Embed Size (px)
Citation preview
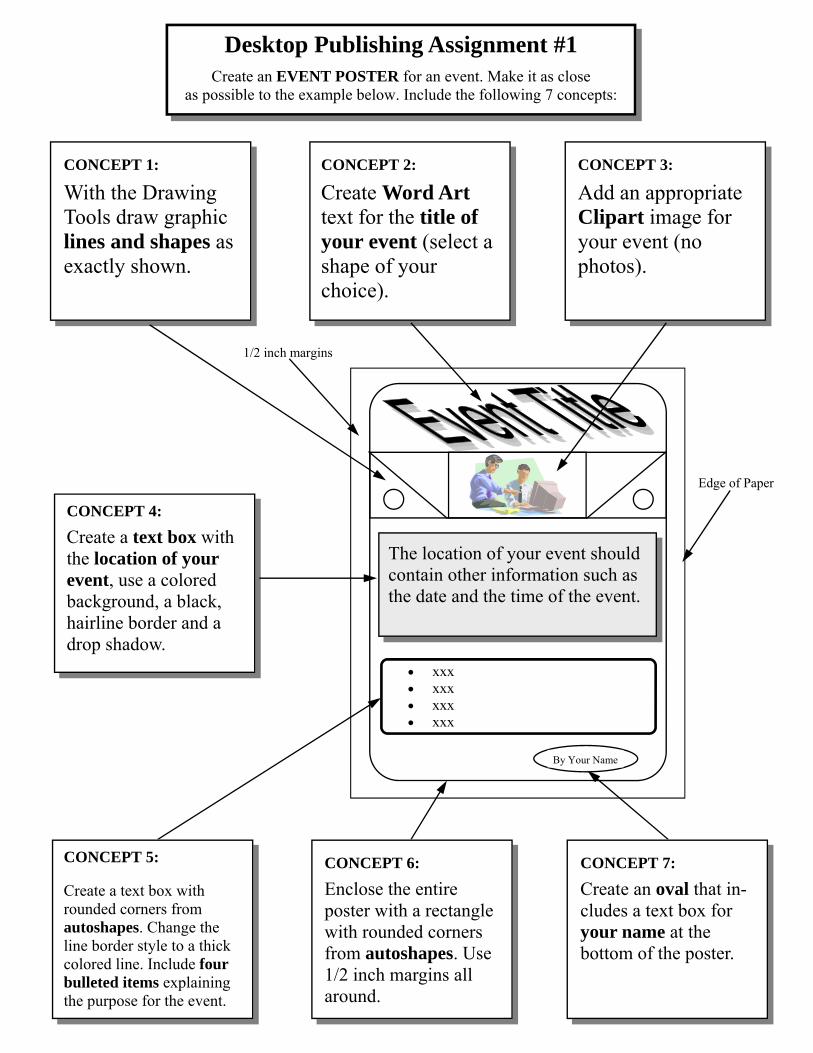
• xxx • xxx • xxx • xxx
By Your Name
Desktop Publishing Assignment #1
Create an EVENT POSTER for an event. Make it as close as possible to the example below. Include the following 7 concepts:
CONCEPT 1:
With the Drawing Tools draw graphic lines and shapes as exactly shown.
CONCEPT 2:
Create Word Art text for the title of your event (select a shape of your choice).
CONCEPT 3:
Add an appropriate Clipart image for your event (no photos).
CONCEPT 4:
Create a text box with the location of your event, use a colored background, a black, hairline border and a drop shadow.
CONCEPT 5: Create a text box with rounded corners from autoshapes. Change the line border style to a thick colored line. Include four bulleted items explaining the purpose for the event.
CONCEPT 6:
Enclose the entire poster with a rectangle with rounded corners from autoshapes. Use 1/2 inch margins all around.
CONCEPT 7:
Create an oval that in-cludes a text box for your name at the bottom of the poster.
The location of your event should contain other information such as the date and the time of the event.
Edge of Paper
1/2 inch margins
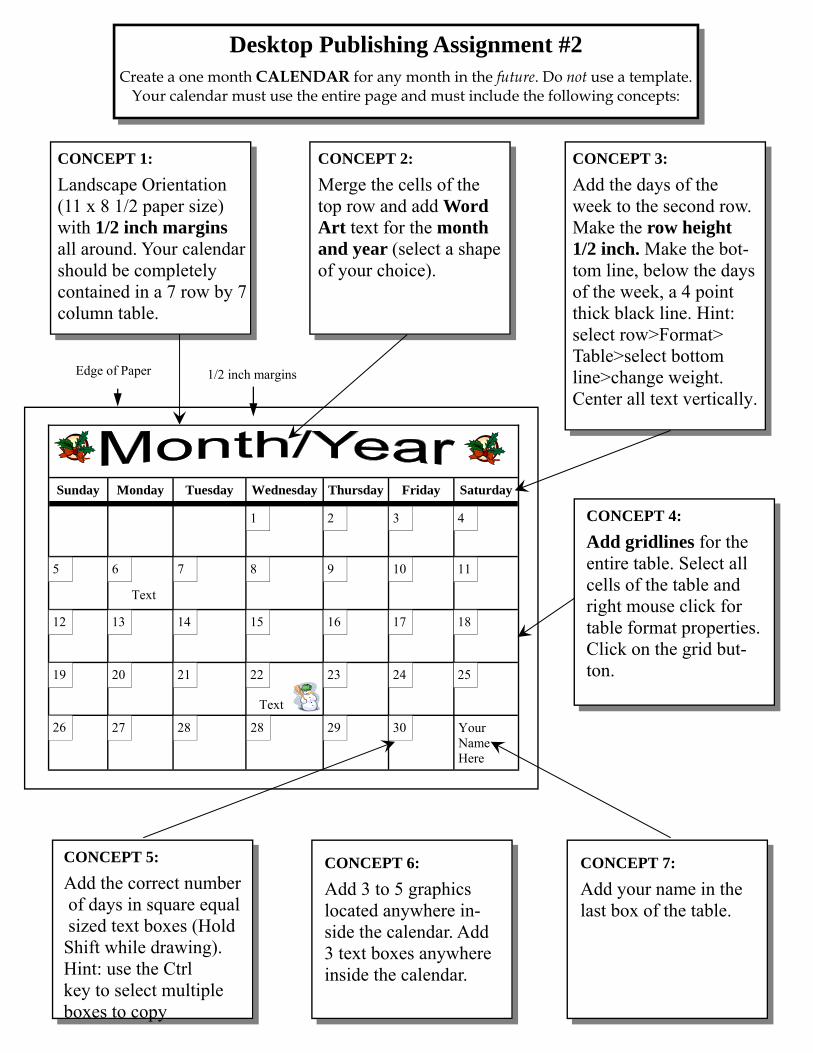
Desktop Publishing Assignment #2
Create a one month CALENDAR for any month in the future. Do not use a template. Your calendar must use the entire page and must include the following concepts:
Sunday Monday Tuesday Wednesday Thursday Friday Saturday
Your Name Here
Text
Text
1 4 3 2
18 17 16 15 14 13 12
5 6 7 8 11 10 9
19 22 20 21 25 24 23
28 28 27 26 29 30
Edge of Paper 1/2 inch margins
CONCEPT 1:
Landscape Orientation (11 x 8 1/2 paper size) with 1/2 inch margins all around. Your calendar should be completely contained in a 7 row by 7 column table.
CONCEPT 2:
Merge the cells of the top row and add Word Art text for the month and year (select a shape of your choice).
CONCEPT 3:
Add the days of the week to the second row. Make the row height 1/2 inch. Make the bot-tom line, below the days of the week, a 4 point thick black line. Hint: select row>Format> Table>select bottom line>change weight. Center all text vertically.
CONCEPT 5:
Add the correct number of days in square equal sized text boxes (Hold Shift while drawing).Hint: use the Ctrlkey to select multiple boxes to copy
CONCEPT 6:
Add 3 to 5 graphics located anywhere in-side the calendar. Add 3 text boxes anywhere inside the calendar.
CONCEPT 7:
Add your name in the last box of the table.
CONCEPT 4:
Add gridlines for the entire table. Select all cells of the table and right mouse click for table format properties. Click on the grid but-ton.
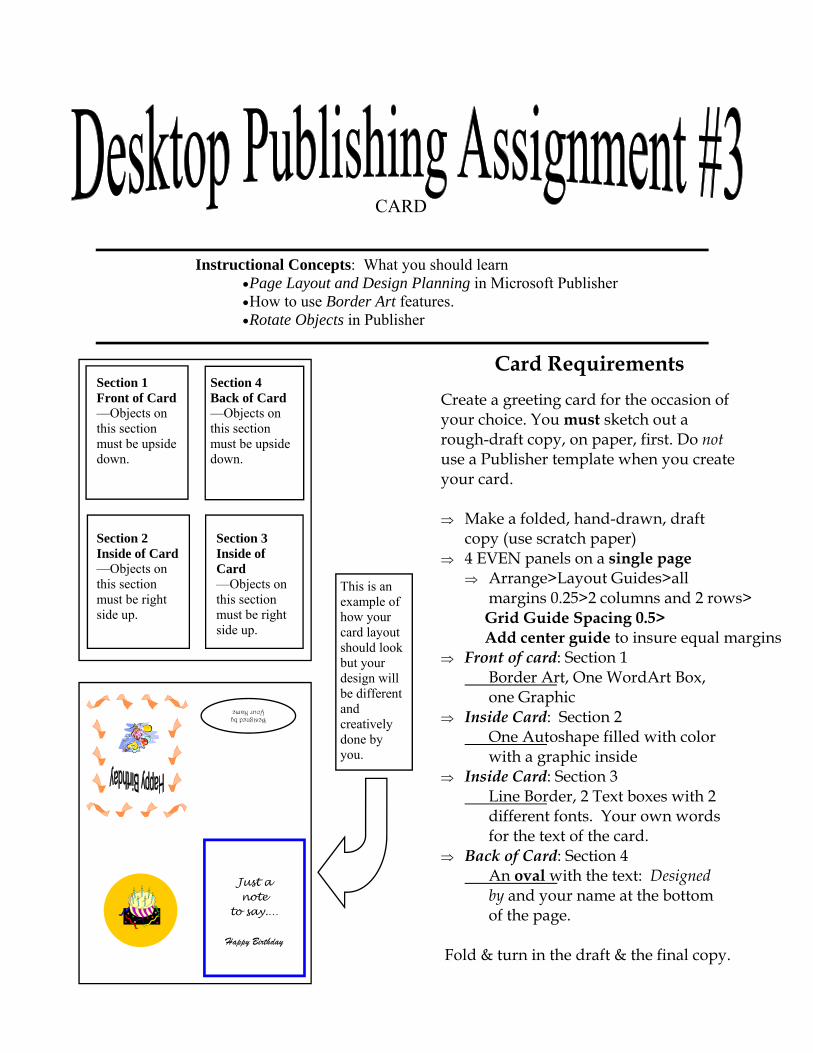
Card Requirements
Create a greeting card for the occasion of your choice. You must sketch out a rough-draft copy, on paper, first. Do not use a Publisher template when you create your card. ⇒ Make a folded, hand-drawn, draft
copy (use scratch paper) ⇒ 4 EVEN panels on a single page
⇒ Arrange>Layout Guides>all margins 0.25>2 columns and 2 rows>
Grid Guide Spacing 0.5> Add center guide to insure equal margins
⇒ Front of card: Section 1 Border Art, One WordArt Box, one Graphic ⇒ Inside Card: Section 2 One Autoshape filled with color with a graphic inside ⇒ Inside Card: Section 3 Line Border, 2 Text boxes with 2 different fonts. Your own words for the text of the card. ⇒ Back of Card: Section 4 An oval with the text: Designed by and your name at the bottom of the page. Fold & turn in the draft & the final copy.
Instructional Concepts: What you should learn •Page Layout and Design Planning in Microsoft Publisher •How to use Border Art features. •Rotate Objects in Publisher
CARD
This is an example of how your card layout should look but your design will be different and creatively done by you.
Designed by Your Name
Just a note
to say.…
Happy Birthday
Section 2 Inside of Card —Objects on this section must be right side up.
Section 3 Inside of Card —Objects on this section must be right side up.
Section 4 Back of Card —Objects on this section must be upside down.
Section 1 Front of Card —Objects on this section must be upside down.
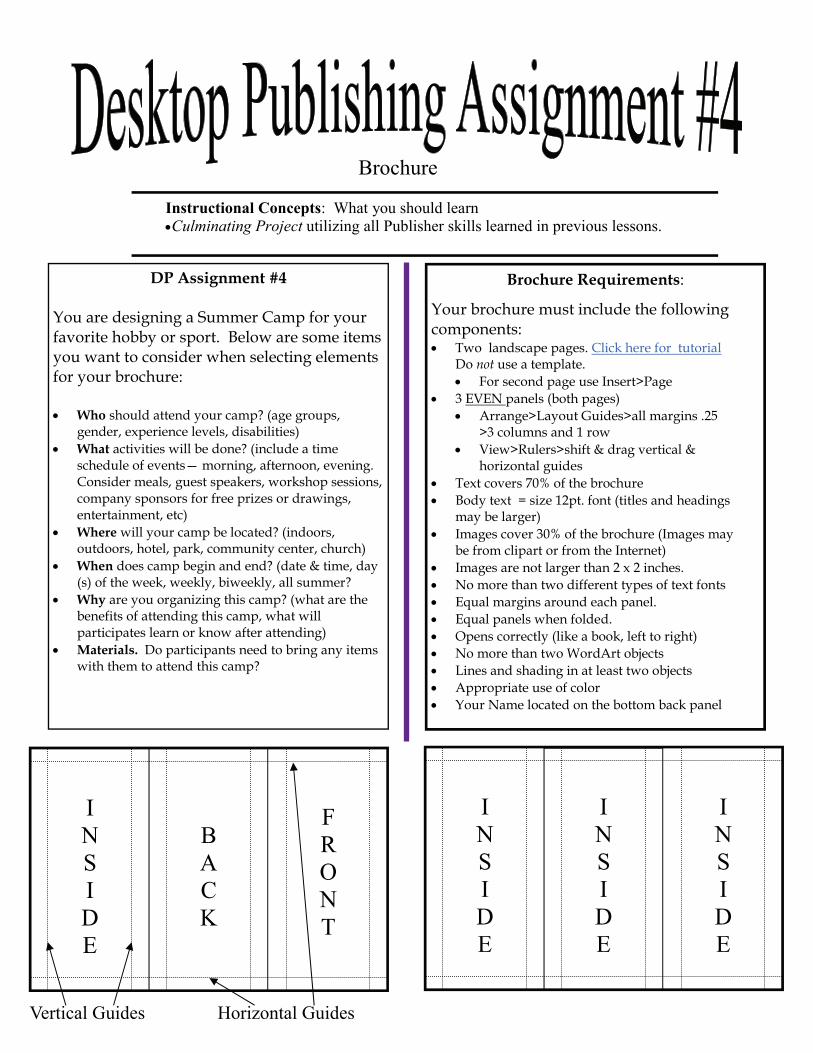
DP Assignment #4 You are designing a Summer Camp for your favorite hobby or sport. Below are some items you want to consider when selecting elements for your brochure: • Who should attend your camp? (age groups,
gender, experience levels, disabilities) • What activities will be done? (include a time
schedule of events— morning, afternoon, evening. Consider meals, guest speakers, workshop sessions, company sponsors for free prizes or drawings, entertainment, etc)
• Where will your camp be located? (indoors, outdoors, hotel, park, community center, church)
• When does camp begin and end? (date & time, day(s) of the week, weekly, biweekly, all summer?
• Why are you organizing this camp? (what are the benefits of attending this camp, what will participates learn or know after attending)
• Materials. Do participants need to bring any items with them to attend this camp?
Brochure
Instructional Concepts: What you should learn •Culminating Project utilizing all Publisher skills learned in previous lessons.
I N S I D E
Brochure Requirements:
Your brochure must include the following components: • Two landscape pages. Click here for tutorial
Do not use a template. • For second page use Insert>Page
• 3 EVEN panels (both pages) • Arrange>Layout Guides>all margins .25
>3 columns and 1 row • View>Rulers>shift & drag vertical &
horizontal guides • Text covers 70% of the brochure • Body text = size 12pt. font (titles and headings
may be larger) • Images cover 30% of the brochure (Images may
be from clipart or from the Internet) • Images are not larger than 2 x 2 inches. • No more than two different types of text fonts • Equal margins around each panel. • Equal panels when folded. • Opens correctly (like a book, left to right) • No more than two WordArt objects • Lines and shading in at least two objects • Appropriate use of color • Your Name located on the bottom back panel
B A C K
F R O N T
I N S I D E
I N S I D E
I N S I D E
Vertical Guides Horizontal Guides


![Desktop Publishing [Written]](https://img.pdfslide.us/doc/110x75/55cf9d52550346d033ad1fe8/desktop-publishing-written.jpg)