Embed Size (px)
DESCRIPTION
Required reading for aspiring pixel artists.
Citation preview
Designing ArcadeComputer Game
Graphics
Ari Feldman
Wordware Publishing, Inc.
Library of Congress Cataloging-in-Publication Data
Feldman, Ari.Designing arcade computer game graphics / by Ari Feldman.
p. cm.ISBN 1-55622-755-8 (pb)
1. Computer graphics. 2. Computer games. I. Title.T385.F447 2000794.8'166--dc21 00-047319
CIP
© 2001, Wordware Publishing, Inc.
All Rights Reserved
2320 Los Rios BoulevardPlano, Texas 75074
No part of this book may be reproduced in any form or byany means without permission in writing from
Wordware Publishing, Inc.
Printed in the United States of America
ISBN 1-55622-755-810 9 8 7 6 5 4 3 2 10010
Product names mentioned are used for identification purposes only and may be trademarks of their respective companies.
All inquiries for volume purchases of this book should be addressed to Wordware Publishing, Inc., at the aboveaddress. Telephone inquiries may be made by calling:
(972) 423-0090

Dedication
This book is dedicated to my friends Dina Willensky, Stephanie Worley, Jennifer
Higbee, Faye Horwitz, Sonya Donaldson, Karen Wasserman, and Howard
Offenhutter, and to my parents, Dr. Bernard Feldman and Gail Feldman. These
people stood by me during this project, always offering me encouragement and
support when I needed it most. Thanks everyone!
I would also like to dedicate this book to my eclectic CD collection, for without
the soothing sounds from the likes of Lush, Ride, The Clash, The English Beat,
and The Creation this book would have never been completed.
iii

Contents
Foreword . . . . . . . . . . . . . . . . . . . . . . . . . . . . . . . . . . . . . . . . . xviAcknowledgments . . . . . . . . . . . . . . . . . . . . . . . . . . . . . . . . . . . xviiiIntroduction . . . . . . . . . . . . . . . . . . . . . . . . . . . . . . . . . . . . . . . xix
Chapter 1 Arcade Games and Computer Arcade Game Platforms . . . . 1What’s an Arcade Game? . . . . . . . . . . . . . . . . . . . . . . . . . . . . . . . . . 2
Arcade Game Sub-Genres . . . . . . . . . . . . . . . . . . . . . . . . . . . . . 2Maze/Chase Games . . . . . . . . . . . . . . . . . . . . . . . . . . . . . . 2Pong Games . . . . . . . . . . . . . . . . . . . . . . . . . . . . . . . . . . 3Shooters . . . . . . . . . . . . . . . . . . . . . . . . . . . . . . . . . . . . 5Puzzlers . . . . . . . . . . . . . . . . . . . . . . . . . . . . . . . . . . . . 6Platformers . . . . . . . . . . . . . . . . . . . . . . . . . . . . . . . . . . 7
This Book and Arcade Games . . . . . . . . . . . . . . . . . . . . . . . . . . . 9Computer Arcade Game Platforms . . . . . . . . . . . . . . . . . . . . . . . . . . . . 9
DOS . . . . . . . . . . . . . . . . . . . . . . . . . . . . . . . . . . . . . . . . . 10Windows . . . . . . . . . . . . . . . . . . . . . . . . . . . . . . . . . . . . . . 10Macintosh . . . . . . . . . . . . . . . . . . . . . . . . . . . . . . . . . . . . . 12Linux . . . . . . . . . . . . . . . . . . . . . . . . . . . . . . . . . . . . . . . . 12Java . . . . . . . . . . . . . . . . . . . . . . . . . . . . . . . . . . . . . . . . . 12Video Game Consoles . . . . . . . . . . . . . . . . . . . . . . . . . . . . . . . 13
Chapter 2 Designing for Different Display Modes . . . . . . . . . . . . 17A Summary of Video Hardware Standards . . . . . . . . . . . . . . . . . . . . . . . 18
Color Graphics Adapter (CGA) . . . . . . . . . . . . . . . . . . . . . . . . . . 18Enhanced Graphics Adapter (EGA). . . . . . . . . . . . . . . . . . . . . . . . 18Video Graphics Adapter (VGA) . . . . . . . . . . . . . . . . . . . . . . . . . . 19Multicolor Graphics Array (MCGA) . . . . . . . . . . . . . . . . . . . . . . . 19Super Video Graphics Adapter (SVGA). . . . . . . . . . . . . . . . . . . . . . 20
Display Modes . . . . . . . . . . . . . . . . . . . . . . . . . . . . . . . . . . . . . . 20Screen Resolution . . . . . . . . . . . . . . . . . . . . . . . . . . . . . . . . . 20
Why It’s Important. . . . . . . . . . . . . . . . . . . . . . . . . . . . . . 21Screen Resolution Issues . . . . . . . . . . . . . . . . . . . . . . . . . . 24What You Can Do . . . . . . . . . . . . . . . . . . . . . . . . . . . . . . 27
Aspect Ratio . . . . . . . . . . . . . . . . . . . . . . . . . . . . . . . . . . . . 28Why It’s Important. . . . . . . . . . . . . . . . . . . . . . . . . . . . . . 28Aspect Ratio Issues . . . . . . . . . . . . . . . . . . . . . . . . . . . . . 30What You Can Do . . . . . . . . . . . . . . . . . . . . . . . . . . . . . . 32
Refresh Rate . . . . . . . . . . . . . . . . . . . . . . . . . . . . . . . . . . . . 32
v
Why It’s Important. . . . . . . . . . . . . . . . . . . . . . . . . . . . . . 32Refresh Rate Issues . . . . . . . . . . . . . . . . . . . . . . . . . . . . . 32What You Can Do . . . . . . . . . . . . . . . . . . . . . . . . . . . . . . 34
Color Capability . . . . . . . . . . . . . . . . . . . . . . . . . . . . . . . . . . 35Why It’s Important. . . . . . . . . . . . . . . . . . . . . . . . . . . . . . 36Color Capability Issues . . . . . . . . . . . . . . . . . . . . . . . . . . . 38What You Can Do . . . . . . . . . . . . . . . . . . . . . . . . . . . . . . 39
Gamma Level . . . . . . . . . . . . . . . . . . . . . . . . . . . . . . . . . . . 40Why It’s Important. . . . . . . . . . . . . . . . . . . . . . . . . . . . . . 40Gamma Level Issues . . . . . . . . . . . . . . . . . . . . . . . . . . . . 40What You Can Do . . . . . . . . . . . . . . . . . . . . . . . . . . . . . . 42
Choosing Display Modes to Design For . . . . . . . . . . . . . . . . . . . . . . . . 42Screen Performance . . . . . . . . . . . . . . . . . . . . . . . . . . . . . . . . 43Image Clarity . . . . . . . . . . . . . . . . . . . . . . . . . . . . . . . . . . . . 45Color Capability . . . . . . . . . . . . . . . . . . . . . . . . . . . . . . . . . . 45System Compatibility . . . . . . . . . . . . . . . . . . . . . . . . . . . . . . . 45Audience Hardware Capabilities . . . . . . . . . . . . . . . . . . . . . . . . . 45Programming Support . . . . . . . . . . . . . . . . . . . . . . . . . . . . . . . 46Graphics Production Time. . . . . . . . . . . . . . . . . . . . . . . . . . . . . 47Display Mode Selection Matrix . . . . . . . . . . . . . . . . . . . . . . . . . . 47Comprehensive Comparison of Display Mode Attributes . . . . . . . . . . . . 48Specific Display Mode Recommendations . . . . . . . . . . . . . . . . . . . . 50Display Mode and Arcade Game Sub-Genre Recommendations . . . . . . . . 51
Arcade Game Type Recommendation Explanations . . . . . . . . . . . . 51Rules for Display Mode Selection. . . . . . . . . . . . . . . . . . . . . . . . . 52
Chapter 3 Image Compression and Graphic File Formats . . . . . . . . 55Image Compression . . . . . . . . . . . . . . . . . . . . . . . . . . . . . . . . . . . 56
Lossless Compression . . . . . . . . . . . . . . . . . . . . . . . . . . . . . . . 57RLE Compression . . . . . . . . . . . . . . . . . . . . . . . . . . . . . . 57Packbits Compression . . . . . . . . . . . . . . . . . . . . . . . . . . . . 58LZ77 Compression. . . . . . . . . . . . . . . . . . . . . . . . . . . . . . 58LZW Compression . . . . . . . . . . . . . . . . . . . . . . . . . . . . . . 58
Lossy Compression . . . . . . . . . . . . . . . . . . . . . . . . . . . . . . . . 59Color Reduction . . . . . . . . . . . . . . . . . . . . . . . . . . . . . . . 59JPEG . . . . . . . . . . . . . . . . . . . . . . . . . . . . . . . . . . . . . 60
Essential Graphic File Formats . . . . . . . . . . . . . . . . . . . . . . . . . . . . . 61BMP (Bitmap) . . . . . . . . . . . . . . . . . . . . . . . . . . . . . . . . . . . 61GIF (Graphics Interchange Format) . . . . . . . . . . . . . . . . . . . . . . . 62IFF (Interchange File Format) . . . . . . . . . . . . . . . . . . . . . . . . . . 64PCX . . . . . . . . . . . . . . . . . . . . . . . . . . . . . . . . . . . . . . . . . 65PICT (Picture) . . . . . . . . . . . . . . . . . . . . . . . . . . . . . . . . . . . 66
Important Graphic File Formats. . . . . . . . . . . . . . . . . . . . . . . . . . . . . 67FLIC . . . . . . . . . . . . . . . . . . . . . . . . . . . . . . . . . . . . . . . . 67JPEG (Joint Photographic Experts Group) . . . . . . . . . . . . . . . . . . . . 68PNG. . . . . . . . . . . . . . . . . . . . . . . . . . . . . . . . . . . . . . . . . 69PSD (Photoshop). . . . . . . . . . . . . . . . . . . . . . . . . . . . . . . . . . 70
vi
Contents
PSP (Paint Shop Pro) . . . . . . . . . . . . . . . . . . . . . . . . . . . . . . . 71TGA (Targa) . . . . . . . . . . . . . . . . . . . . . . . . . . . . . . . . . . . . 72TIFF (Tagged Image File Format) . . . . . . . . . . . . . . . . . . . . . . . . 72XPM (X PixMap) . . . . . . . . . . . . . . . . . . . . . . . . . . . . . . . . . . 73
File Format Suitability for Arcade Game Graphics . . . . . . . . . . . . . . . . . . . 74File Format Compression Savings . . . . . . . . . . . . . . . . . . . . . . . . 77
Caveats for Working with Graphic File Formats . . . . . . . . . . . . . . . . . . . . 79File Corruption. . . . . . . . . . . . . . . . . . . . . . . . . . . . . . . . . . . 79Incompatible Versions . . . . . . . . . . . . . . . . . . . . . . . . . . . . . . . 80
Graphic File Format Recommendations . . . . . . . . . . . . . . . . . . . . . . . . 81Graphics Applications . . . . . . . . . . . . . . . . . . . . . . . . . . . . . . . 81Development Environment . . . . . . . . . . . . . . . . . . . . . . . . . . . . 81Artwork Type. . . . . . . . . . . . . . . . . . . . . . . . . . . . . . . . . . . . 82Operating System and Platform. . . . . . . . . . . . . . . . . . . . . . . . . . 82
Chapter 4 Files and File Management . . . . . . . . . . . . . . . . . . 85File Naming Conventions . . . . . . . . . . . . . . . . . . . . . . . . . . . . . . . . 86
DOS and Windows 3.1 File Naming Rules . . . . . . . . . . . . . . . . . . . . 86Windows 95, 98, NT 4.0, and 2000 File Naming Rules . . . . . . . . . . . . . 87Macintosh File Naming Rules . . . . . . . . . . . . . . . . . . . . . . . . . . . 87Linux File Naming Rules . . . . . . . . . . . . . . . . . . . . . . . . . . . . . 88General File Naming Guidelines . . . . . . . . . . . . . . . . . . . . . . . . . 88A Sample File Naming Scheme . . . . . . . . . . . . . . . . . . . . . . . . . . 89Managing and Organizing Directories . . . . . . . . . . . . . . . . . . . . . . 91
Exchanging Files Across Platforms . . . . . . . . . . . . . . . . . . . . . . . . . . . 92Disk Compatibility . . . . . . . . . . . . . . . . . . . . . . . . . . . . . . . . . 93
Macintosh Disk Compatibility with Different Platforms. . . . . . . . . . 93Linux Disk Compatibility with Different Platforms . . . . . . . . . . . . 94DOS Disk Compatibility with Different Platforms . . . . . . . . . . . . . 94Windows Disk Compatibility with Different Platforms . . . . . . . . . . 94
File Compatibility . . . . . . . . . . . . . . . . . . . . . . . . . . . . . . . . . 95File Format Conversion Issues . . . . . . . . . . . . . . . . . . . . . . . 95File Naming Across Platforms . . . . . . . . . . . . . . . . . . . . . . . 96Compressed Files . . . . . . . . . . . . . . . . . . . . . . . . . . . . . . 97
File Backups . . . . . . . . . . . . . . . . . . . . . . . . . . . . . . . . . . . . . . . 98Importance . . . . . . . . . . . . . . . . . . . . . . . . . . . . . . . . . . . . . 99Change . . . . . . . . . . . . . . . . . . . . . . . . . . . . . . . . . . . . . . . 99Device Capacity and Performance . . . . . . . . . . . . . . . . . . . . . . . . 100Cost . . . . . . . . . . . . . . . . . . . . . . . . . . . . . . . . . . . . . . . . 100Portability . . . . . . . . . . . . . . . . . . . . . . . . . . . . . . . . . . . . . 100Reliability . . . . . . . . . . . . . . . . . . . . . . . . . . . . . . . . . . . . . 100Security . . . . . . . . . . . . . . . . . . . . . . . . . . . . . . . . . . . . . . 100
Backup Media . . . . . . . . . . . . . . . . . . . . . . . . . . . . . . . . . . . . . . 101Floppy Disk Drives . . . . . . . . . . . . . . . . . . . . . . . . . . . . . . . . 101Zip Drives . . . . . . . . . . . . . . . . . . . . . . . . . . . . . . . . . . . . . 102CD-R/CD-RW Drives. . . . . . . . . . . . . . . . . . . . . . . . . . . . . . . 103Internet-Based Backup Systems . . . . . . . . . . . . . . . . . . . . . . . . 104
Contents
vii
File Backup Strategies . . . . . . . . . . . . . . . . . . . . . . . . . . . . . . . . . 106A Final Word about File Backups . . . . . . . . . . . . . . . . . . . . . . . . . . . 107Version Control . . . . . . . . . . . . . . . . . . . . . . . . . . . . . . . . . . . . . 108
How Version Control Can Help . . . . . . . . . . . . . . . . . . . . . . . . . 108Go Back in Time . . . . . . . . . . . . . . . . . . . . . . . . . . . . . . 108Compare Revisions . . . . . . . . . . . . . . . . . . . . . . . . . . . . . 108Preserve Content Safely . . . . . . . . . . . . . . . . . . . . . . . . . . 109Lock Files . . . . . . . . . . . . . . . . . . . . . . . . . . . . . . . . . . 109
Implementing Version Control. . . . . . . . . . . . . . . . . . . . . . . . . . 109A Final Word about Version Control Systems. . . . . . . . . . . . . . . . . . 110
Basic Asset Management. . . . . . . . . . . . . . . . . . . . . . . . . . . . . . . . 110Do You Really Need an Asset Management System? . . . . . . . . . . . . . 111Choosing an Asset Management System . . . . . . . . . . . . . . . . . . . . 111
Database Driven . . . . . . . . . . . . . . . . . . . . . . . . . . . . . . 111Thumbnail Support . . . . . . . . . . . . . . . . . . . . . . . . . . . . . 111Asset Keywords . . . . . . . . . . . . . . . . . . . . . . . . . . . . . . 112Large Catalog Capacity. . . . . . . . . . . . . . . . . . . . . . . . . . . 112Multiple Image Catalogs . . . . . . . . . . . . . . . . . . . . . . . . . . 112Low Cost . . . . . . . . . . . . . . . . . . . . . . . . . . . . . . . . . . 112
Chapter 5 Evaluating Graphics Creation Tools . . . . . . . . . . . . . 113Graphics Creation Tool Categories . . . . . . . . . . . . . . . . . . . . . . . . . . 114
Painting Programs . . . . . . . . . . . . . . . . . . . . . . . . . . . . . . . . 114Screen Capture Utilities . . . . . . . . . . . . . . . . . . . . . . . . . . . . . 116Image Viewers/Converters . . . . . . . . . . . . . . . . . . . . . . . . . . . 116Palette Tools . . . . . . . . . . . . . . . . . . . . . . . . . . . . . . . . . . . 116
Evaluating Graphics Tools and Essential Features . . . . . . . . . . . . . . . . . . 117Essential Painting Program Features . . . . . . . . . . . . . . . . . . . . . . 117
Brush Tools . . . . . . . . . . . . . . . . . . . . . . . . . . . . . . . . . 118Shape Tools . . . . . . . . . . . . . . . . . . . . . . . . . . . . . . . . . 120Block Tools . . . . . . . . . . . . . . . . . . . . . . . . . . . . . . . . . 125Navigation Tools . . . . . . . . . . . . . . . . . . . . . . . . . . . . . . 128Color Tools . . . . . . . . . . . . . . . . . . . . . . . . . . . . . . . . . 130Image Processing Tools . . . . . . . . . . . . . . . . . . . . . . . . . . 132Special Effects Tools . . . . . . . . . . . . . . . . . . . . . . . . . . . . 135Other Tools . . . . . . . . . . . . . . . . . . . . . . . . . . . . . . . . . 137Miscellaneous Features . . . . . . . . . . . . . . . . . . . . . . . . . . 142
Essential Screen Capture Utility Features . . . . . . . . . . . . . . . . . . . 148Capture Flexibility . . . . . . . . . . . . . . . . . . . . . . . . . . . . . 148Common File Format Support . . . . . . . . . . . . . . . . . . . . . . . 149Ease of Use . . . . . . . . . . . . . . . . . . . . . . . . . . . . . . . . . 149
Essential Image Viewer/Converter Features . . . . . . . . . . . . . . . . . . 150Extensive Graphic File Format Support. . . . . . . . . . . . . . . . . . 151Good Interface . . . . . . . . . . . . . . . . . . . . . . . . . . . . . . . 151Batch Conversions . . . . . . . . . . . . . . . . . . . . . . . . . . . . . 151Image Catalogs . . . . . . . . . . . . . . . . . . . . . . . . . . . . . . . 151Special Operations . . . . . . . . . . . . . . . . . . . . . . . . . . . . . 152
viii
Contents
Essential Palette Tool Features . . . . . . . . . . . . . . . . . . . . . . . . . 153Color Palette Editing . . . . . . . . . . . . . . . . . . . . . . . . . . . . 153Color Palette Extraction from Bitmaps . . . . . . . . . . . . . . . . . . 153Palette Construction from Input Files. . . . . . . . . . . . . . . . . . . 153Common File Format Support . . . . . . . . . . . . . . . . . . . . . . . 154
Chapter 6 Essential Graphics Tools . . . . . . . . . . . . . . . . . . . 155Criteria for My Recommendations. . . . . . . . . . . . . . . . . . . . . . . . . . . 156
Interface and Ease of Use . . . . . . . . . . . . . . . . . . . . . . . . . . . . 156Performance and Stability . . . . . . . . . . . . . . . . . . . . . . . . . . . . 156Compatibility . . . . . . . . . . . . . . . . . . . . . . . . . . . . . . . . . . . 157Unique or Special Features . . . . . . . . . . . . . . . . . . . . . . . . . . . 157Availability and Support . . . . . . . . . . . . . . . . . . . . . . . . . . . . . 157Cost . . . . . . . . . . . . . . . . . . . . . . . . . . . . . . . . . . . . . . . . 158Gripes . . . . . . . . . . . . . . . . . . . . . . . . . . . . . . . . . . . . . . . 158
Recommended DOS Painting Programs . . . . . . . . . . . . . . . . . . . . . . . . 159Deluxe Paint IIe . . . . . . . . . . . . . . . . . . . . . . . . . . . . . . . . . 159GrafX2 . . . . . . . . . . . . . . . . . . . . . . . . . . . . . . . . . . . . . . . 163Improces . . . . . . . . . . . . . . . . . . . . . . . . . . . . . . . . . . . . . 167NeoPaint. . . . . . . . . . . . . . . . . . . . . . . . . . . . . . . . . . . . . . 171Other Useful DOS Painting Programs. . . . . . . . . . . . . . . . . . . . . . 176
Recommended Windows Painting Programs . . . . . . . . . . . . . . . . . . . . . 176NeoPaint for Windows . . . . . . . . . . . . . . . . . . . . . . . . . . . . . . 176Paint Shop Pro . . . . . . . . . . . . . . . . . . . . . . . . . . . . . . . . . . 181Pro Motion . . . . . . . . . . . . . . . . . . . . . . . . . . . . . . . . . . . . 186Other Useful Windows Painting Programs . . . . . . . . . . . . . . . . . . . 189
Recommended DOS Screen Capture Utilities . . . . . . . . . . . . . . . . . . . . 190Screen Thief . . . . . . . . . . . . . . . . . . . . . . . . . . . . . . . . . . . 190
Recommended Windows Screen Capture Utilities . . . . . . . . . . . . . . . . . . 192HyperSnapDX. . . . . . . . . . . . . . . . . . . . . . . . . . . . . . . . . . . 192SnagIt Pro . . . . . . . . . . . . . . . . . . . . . . . . . . . . . . . . . . . . . 195
Recommended DOS Image Viewers/Converters . . . . . . . . . . . . . . . . . . . 197SEA . . . . . . . . . . . . . . . . . . . . . . . . . . . . . . . . . . . . . . . . 197Other Useful DOS Image Viewers/Converters . . . . . . . . . . . . . . . . . 198
Recommended Windows Image Viewers/Converters . . . . . . . . . . . . . . . . 199IrfanView . . . . . . . . . . . . . . . . . . . . . . . . . . . . . . . . . . . . . 199XNView . . . . . . . . . . . . . . . . . . . . . . . . . . . . . . . . . . . . . . 201Other Useful Windows Image Viewers/Converters . . . . . . . . . . . . . . 203
Recommended Palette Tools . . . . . . . . . . . . . . . . . . . . . . . . . . . . . . 204Opal . . . . . . . . . . . . . . . . . . . . . . . . . . . . . . . . . . . . . . . . 204PalMerge . . . . . . . . . . . . . . . . . . . . . . . . . . . . . . . . . . . . . 205
Other Useful Graphics Utilities . . . . . . . . . . . . . . . . . . . . . . . . . . . . 207MkExpl 3.0 . . . . . . . . . . . . . . . . . . . . . . . . . . . . . . . . . . . . 208Universe 1.6 . . . . . . . . . . . . . . . . . . . . . . . . . . . . . . . . . . . 208
Chapter 7 Color and Arcade Game Graphics. . . . . . . . . . . . . . 209Basic Color Theory . . . . . . . . . . . . . . . . . . . . . . . . . . . . . . . . . . . 210
Contents
ix
Color Mixing . . . . . . . . . . . . . . . . . . . . . . . . . . . . . . . . . . . . . . 211Additive Color Mixing . . . . . . . . . . . . . . . . . . . . . . . . . . . . . . 213Subtractive Color Mixing . . . . . . . . . . . . . . . . . . . . . . . . . . . . 213Color Temperature . . . . . . . . . . . . . . . . . . . . . . . . . . . . . . . . 213
The Language and Meaning of Color . . . . . . . . . . . . . . . . . . . . . . . . . 214The Cross-Cultural Meaning of Color . . . . . . . . . . . . . . . . . . . . . . 217Color and Mood . . . . . . . . . . . . . . . . . . . . . . . . . . . . . . . . . . 216
Color Perception Issues . . . . . . . . . . . . . . . . . . . . . . . . . . . . . . . . 217Age and Color Perception . . . . . . . . . . . . . . . . . . . . . . . . . . . . 218Gender and Color Perception . . . . . . . . . . . . . . . . . . . . . . . . . . 219
Other Important Color Concepts . . . . . . . . . . . . . . . . . . . . . . . . . . . 220Shade . . . . . . . . . . . . . . . . . . . . . . . . . . . . . . . . . . . . . . . 220Tint . . . . . . . . . . . . . . . . . . . . . . . . . . . . . . . . . . . . . . . . 220Contrast . . . . . . . . . . . . . . . . . . . . . . . . . . . . . . . . . . . . . . 221Luminance . . . . . . . . . . . . . . . . . . . . . . . . . . . . . . . . . . . . 221
Smoothing Objects with Color . . . . . . . . . . . . . . . . . . . . . . . . . . . . . 222Volume, Light, and Shadow. . . . . . . . . . . . . . . . . . . . . . . . . . . . . . . 223
Basic Rules of Light and Shadow . . . . . . . . . . . . . . . . . . . . . . . . 224Accurately Representing Volume with Color . . . . . . . . . . . . . . . . . . 226Rules for Gradient Use . . . . . . . . . . . . . . . . . . . . . . . . . . . . . . 227
Transparency, Translucency, and Opacity . . . . . . . . . . . . . . . . . . . . . . . 230Bounding Colors . . . . . . . . . . . . . . . . . . . . . . . . . . . . . . . . . . . . 232
Bounding Color Rules . . . . . . . . . . . . . . . . . . . . . . . . . . . . . . 233Color and Arcade Game Design Styles . . . . . . . . . . . . . . . . . . . . . . . . 234
Cartoon . . . . . . . . . . . . . . . . . . . . . . . . . . . . . . . . . . . . . . 234Retro. . . . . . . . . . . . . . . . . . . . . . . . . . . . . . . . . . . . . . . . 235Realistic . . . . . . . . . . . . . . . . . . . . . . . . . . . . . . . . . . . . . . 236
General Rules for Using Color in Arcade Games . . . . . . . . . . . . . . . . . . . 238Color Visibility and Usability . . . . . . . . . . . . . . . . . . . . . . . . . . 238Color Context and Aesthetics . . . . . . . . . . . . . . . . . . . . . . . . . . 240
Chapter 8 All About Color Palettes . . . . . . . . . . . . . . . . . . . 243Color Space . . . . . . . . . . . . . . . . . . . . . . . . . . . . . . . . . . . . . . . 244Color Palettes . . . . . . . . . . . . . . . . . . . . . . . . . . . . . . . . . . . . . . 246Color Palette Organization . . . . . . . . . . . . . . . . . . . . . . . . . . . . . . . 249Cross-Platform Color Palette Issues . . . . . . . . . . . . . . . . . . . . . . . . . 250System Palettes . . . . . . . . . . . . . . . . . . . . . . . . . . . . . . . . . . . . . 254
DOS System Palette . . . . . . . . . . . . . . . . . . . . . . . . . . . . . . . 254Windows System Palette . . . . . . . . . . . . . . . . . . . . . . . . . . . . . 255Linux System Palette. . . . . . . . . . . . . . . . . . . . . . . . . . . . . . . 256Macintosh System Palette . . . . . . . . . . . . . . . . . . . . . . . . . . . . 256Java System Palette . . . . . . . . . . . . . . . . . . . . . . . . . . . . . . . 257
Platform-Specific Palette Peculiarities . . . . . . . . . . . . . . . . . . . . . . . . 258DOS . . . . . . . . . . . . . . . . . . . . . . . . . . . . . . . . . . . . . . . . 258Windows. . . . . . . . . . . . . . . . . . . . . . . . . . . . . . . . . . . . . . 260Linux . . . . . . . . . . . . . . . . . . . . . . . . . . . . . . . . . . . . . . . 262Macintosh . . . . . . . . . . . . . . . . . . . . . . . . . . . . . . . . . . . . . 264
x
Contents
Java . . . . . . . . . . . . . . . . . . . . . . . . . . . . . . . . . . . . . . . . 265Creating Color Palettes . . . . . . . . . . . . . . . . . . . . . . . . . . . . . . . . . 266
Planning a Color Palette . . . . . . . . . . . . . . . . . . . . . . . . . . . . . 266Game Audience . . . . . . . . . . . . . . . . . . . . . . . . . . . . . . . 267Game Appearance . . . . . . . . . . . . . . . . . . . . . . . . . . . . . 267Game Mood . . . . . . . . . . . . . . . . . . . . . . . . . . . . . . . . . 267Technical Restrictions . . . . . . . . . . . . . . . . . . . . . . . . . . . 268
Implementing Your Color Palette . . . . . . . . . . . . . . . . . . . . . . . . 268Step 1—Defining the Required Color Palette Components . . . . . . . 269Step 2—Deciding on a Color Palette Order . . . . . . . . . . . . . . . . 274Step 3—Adding System Colors . . . . . . . . . . . . . . . . . . . . . . 274Step 4—Selecting Your Colors. . . . . . . . . . . . . . . . . . . . . . . 275Step 5—Defining Your Color Ranges and Gradients . . . . . . . . . . . 279Step 6—Reserving Palette Entries for Programmed Effects . . . . . . 281Step 7—Testing Your Color Palette . . . . . . . . . . . . . . . . . . . . 281Step 8—Saving Your Palette . . . . . . . . . . . . . . . . . . . . . . . . 282
A Color Palette Creation Exercise. . . . . . . . . . . . . . . . . . . . . . . . 282Tips for Creating Effective Color Palettes . . . . . . . . . . . . . . . . . . . . . . 286
Gradient Selection . . . . . . . . . . . . . . . . . . . . . . . . . . . . . . . . 286Programmed Color Effects. . . . . . . . . . . . . . . . . . . . . . . . . . . . 287Transparent Colors . . . . . . . . . . . . . . . . . . . . . . . . . . . . . . . . 287Miscellaneous Color Palette Tips . . . . . . . . . . . . . . . . . . . . . . . . 288
Color Reduction . . . . . . . . . . . . . . . . . . . . . . . . . . . . . . . . . . . . . 288Palette Optimization . . . . . . . . . . . . . . . . . . . . . . . . . . . . . . . 289Dithering . . . . . . . . . . . . . . . . . . . . . . . . . . . . . . . . . . . . . 289Straight Color Remapping . . . . . . . . . . . . . . . . . . . . . . . . . . . . 290
Chapter 9 Arcade Game Animation. . . . . . . . . . . . . . . . . . . 293What is Animation? . . . . . . . . . . . . . . . . . . . . . . . . . . . . . . . . . . . 294Animation Properties and Fundamentals . . . . . . . . . . . . . . . . . . . . . . . 294
Motion Lines . . . . . . . . . . . . . . . . . . . . . . . . . . . . . . . . . . . 294Motion Angles . . . . . . . . . . . . . . . . . . . . . . . . . . . . . . . . . . 296Key-frames . . . . . . . . . . . . . . . . . . . . . . . . . . . . . . . . . . . . 296Weight and Gravity . . . . . . . . . . . . . . . . . . . . . . . . . . . . . . . . 299Flexibility . . . . . . . . . . . . . . . . . . . . . . . . . . . . . . . . . . . . . 300Secondary Actions . . . . . . . . . . . . . . . . . . . . . . . . . . . . . . . . 301Cycles and Loops . . . . . . . . . . . . . . . . . . . . . . . . . . . . . . . . . 301Tempo . . . . . . . . . . . . . . . . . . . . . . . . . . . . . . . . . . . . . . . 302
Sprites . . . . . . . . . . . . . . . . . . . . . . . . . . . . . . . . . . . . . . . . . . 304Sprite Properties . . . . . . . . . . . . . . . . . . . . . . . . . . . . . . . . . 305
Variable Sizes and Shapes . . . . . . . . . . . . . . . . . . . . . . . . . 305Free Range of Movement . . . . . . . . . . . . . . . . . . . . . . . . . 305Separate from Background . . . . . . . . . . . . . . . . . . . . . . . . . 305
Grid Squares . . . . . . . . . . . . . . . . . . . . . . . . . . . . . . . . . . . 306Maintaining Size Consistency . . . . . . . . . . . . . . . . . . . . . . . 307Assisting the Animation Process . . . . . . . . . . . . . . . . . . . . . 307Optimizing Sprites for Implementation in Games . . . . . . . . . . . . 307
Contents
xi
Optimizing Sprites for Screen Performance . . . . . . . . . . . . . . . 307General Rules for Creating Grid Squares . . . . . . . . . . . . . . . . . . . . 310
Core Arcade Game Animation Primitives . . . . . . . . . . . . . . . . . . . . . . . 310Major Arcade Game Animation Primitives . . . . . . . . . . . . . . . . . . . 311
The Cylindrical Primitive . . . . . . . . . . . . . . . . . . . . . . . . . 311The Rotational Primitive . . . . . . . . . . . . . . . . . . . . . . . . . . 314The Disintegration Primitive . . . . . . . . . . . . . . . . . . . . . . . 315The Color Flash Primitive . . . . . . . . . . . . . . . . . . . . . . . . . 318The Scissors Primitive . . . . . . . . . . . . . . . . . . . . . . . . . . . 320The Growing Primitive. . . . . . . . . . . . . . . . . . . . . . . . . . . 322The Shrinking Primitive . . . . . . . . . . . . . . . . . . . . . . . . . . 323
Minor Arcade Game Animation Primitives . . . . . . . . . . . . . . . . . . . 323The Piston Primitive . . . . . . . . . . . . . . . . . . . . . . . . . . . . 324The Squeeze Primitive . . . . . . . . . . . . . . . . . . . . . . . . . . . 324The Swing Primitive . . . . . . . . . . . . . . . . . . . . . . . . . . . . 325The Slide Primitive. . . . . . . . . . . . . . . . . . . . . . . . . . . . . 326The Open/Close Primitive . . . . . . . . . . . . . . . . . . . . . . . . . 327The Bounce Primitive . . . . . . . . . . . . . . . . . . . . . . . . . . . 328The Stomp Primitive . . . . . . . . . . . . . . . . . . . . . . . . . . . . 328
Complex Arcade Game Animation Primitives . . . . . . . . . . . . . . . . . 329The Slinking Primitive . . . . . . . . . . . . . . . . . . . . . . . . . . . 330The Flying Primitive . . . . . . . . . . . . . . . . . . . . . . . . . . . . 331The Walking Primitive . . . . . . . . . . . . . . . . . . . . . . . . . . . 334The Running Primitive (Humans) . . . . . . . . . . . . . . . . . . . . . 339The Running Primitive (Animals) . . . . . . . . . . . . . . . . . . . . . 343The Jumping Primitive . . . . . . . . . . . . . . . . . . . . . . . . . . . 345The Crawling Primitive . . . . . . . . . . . . . . . . . . . . . . . . . . 348
Creating Your Animation Sequences. . . . . . . . . . . . . . . . . . . . . . . . . . 351General Animation Tips . . . . . . . . . . . . . . . . . . . . . . . . . . . . . 352
Animation Usage in Arcade Games . . . . . . . . . . . . . . . . . . . . . . . . . . 354
Chapter 10 Fonts and Arcade Games . . . . . . . . . . . . . . . . . . 357What are Fonts? . . . . . . . . . . . . . . . . . . . . . . . . . . . . . . . . . . . . . 358
Font Characteristics . . . . . . . . . . . . . . . . . . . . . . . . . . . . . . . 358Serifs . . . . . . . . . . . . . . . . . . . . . . . . . . . . . . . . . . . . 358Sans Serifs . . . . . . . . . . . . . . . . . . . . . . . . . . . . . . . . . 359Monospaced. . . . . . . . . . . . . . . . . . . . . . . . . . . . . . . . . 359Proportional. . . . . . . . . . . . . . . . . . . . . . . . . . . . . . . . . 360Bitmapped. . . . . . . . . . . . . . . . . . . . . . . . . . . . . . . . . . 360Scaleable . . . . . . . . . . . . . . . . . . . . . . . . . . . . . . . . . . 361
Font Legibility . . . . . . . . . . . . . . . . . . . . . . . . . . . . . . . . . . 361Face . . . . . . . . . . . . . . . . . . . . . . . . . . . . . . . . . . . . . 362Style . . . . . . . . . . . . . . . . . . . . . . . . . . . . . . . . . . . . . 362Size . . . . . . . . . . . . . . . . . . . . . . . . . . . . . . . . . . . . . 362Aliased . . . . . . . . . . . . . . . . . . . . . . . . . . . . . . . . . . . 364Anti-Aliased. . . . . . . . . . . . . . . . . . . . . . . . . . . . . . . . . 364Color . . . . . . . . . . . . . . . . . . . . . . . . . . . . . . . . . . . . 365
xii
Contents
Weight. . . . . . . . . . . . . . . . . . . . . . . . . . . . . . . . . . . . 366Leading . . . . . . . . . . . . . . . . . . . . . . . . . . . . . . . . . . . 366Kerning . . . . . . . . . . . . . . . . . . . . . . . . . . . . . . . . . . . 366Tracking . . . . . . . . . . . . . . . . . . . . . . . . . . . . . . . . . . . 367
Common Font Formats . . . . . . . . . . . . . . . . . . . . . . . . . . . . . . 367ROM Fonts . . . . . . . . . . . . . . . . . . . . . . . . . . . . . . . . . 367ZSoft Fonts . . . . . . . . . . . . . . . . . . . . . . . . . . . . . . . . . 369GEM Fonts . . . . . . . . . . . . . . . . . . . . . . . . . . . . . . . . . 369Fastgraph Fonts. . . . . . . . . . . . . . . . . . . . . . . . . . . . . . . 370Custom Game Fonts . . . . . . . . . . . . . . . . . . . . . . . . . . . . 371Borland Stroked Fonts . . . . . . . . . . . . . . . . . . . . . . . . . . . 372TrueType Fonts . . . . . . . . . . . . . . . . . . . . . . . . . . . . . . . 373System Fonts . . . . . . . . . . . . . . . . . . . . . . . . . . . . . . . . 373
Platform-Specific Font Support . . . . . . . . . . . . . . . . . . . . . . . . . 374General Rules for Using Fonts in Arcade Games . . . . . . . . . . . . . . . . . . . 375Using Fonts in Arcade Games . . . . . . . . . . . . . . . . . . . . . . . . . . . . . 377
Game Titles . . . . . . . . . . . . . . . . . . . . . . . . . . . . . . . . . . . . 377Body Text . . . . . . . . . . . . . . . . . . . . . . . . . . . . . . . . . . . . . 378Status Indicators . . . . . . . . . . . . . . . . . . . . . . . . . . . . . . . . . 378
Arcade Game Font Recommendations. . . . . . . . . . . . . . . . . . . . . . . . . 379
Chapter 11 Planning Arcade Game Graphics . . . . . . . . . . . . . . 385The Design Plan . . . . . . . . . . . . . . . . . . . . . . . . . . . . . . . . . . . . 386
The Game Summary . . . . . . . . . . . . . . . . . . . . . . . . . . . . . . . 386Game Back Story . . . . . . . . . . . . . . . . . . . . . . . . . . . . . . 387Game Description . . . . . . . . . . . . . . . . . . . . . . . . . . . . . 387Game Object Inventory . . . . . . . . . . . . . . . . . . . . . . . . . . 388Game Functionality Overview . . . . . . . . . . . . . . . . . . . . . . . 388
The Game Action Sequence . . . . . . . . . . . . . . . . . . . . . . . . . . . 389The Game Action Flowchart . . . . . . . . . . . . . . . . . . . . . . . . 389The Screen Summary . . . . . . . . . . . . . . . . . . . . . . . . . . . 391Screen Mock-ups . . . . . . . . . . . . . . . . . . . . . . . . . . . . . . 391
The Graphics Specification. . . . . . . . . . . . . . . . . . . . . . . . . . . . 393Game Creative Statement . . . . . . . . . . . . . . . . . . . . . . . . . 394Artwork Orientation . . . . . . . . . . . . . . . . . . . . . . . . . . . . 394Target Platform . . . . . . . . . . . . . . . . . . . . . . . . . . . . . . . 394Estimated Object Count . . . . . . . . . . . . . . . . . . . . . . . . . . 395Artwork Screen Resolution and Playfield Size . . . . . . . . . . . . . . 395Artwork Color Depth. . . . . . . . . . . . . . . . . . . . . . . . . . . . 396Artwork File Format(s) . . . . . . . . . . . . . . . . . . . . . . . . . . 396Artwork File Naming Scheme . . . . . . . . . . . . . . . . . . . . . . . 397Artwork Color Palette . . . . . . . . . . . . . . . . . . . . . . . . . . . 397Artwork Gamma Level . . . . . . . . . . . . . . . . . . . . . . . . . . . 398Artwork Object Dimensions . . . . . . . . . . . . . . . . . . . . . . . . 398Frames per Object . . . . . . . . . . . . . . . . . . . . . . . . . . . . . 399Object Actions and Facings . . . . . . . . . . . . . . . . . . . . . . . . 399Game Text Font(s) . . . . . . . . . . . . . . . . . . . . . . . . . . . . . 400
xiii
Contents
Miscellaneous Art Direction . . . . . . . . . . . . . . . . . . . . . . . . 400Technical Restrictions and Stipulations . . . . . . . . . . . . . . . . . . . . . 401The Project Schedule. . . . . . . . . . . . . . . . . . . . . . . . . . . . . . . 401The Game Glossary . . . . . . . . . . . . . . . . . . . . . . . . . . . . . . . 402
Chapter 12 Hands-on Arcade Game Project—Fish Dish . . . . . . . . . 405Getting Started . . . . . . . . . . . . . . . . . . . . . . . . . . . . . . . . . . . . . 406The Three Phases of Fish Dish’s Design . . . . . . . . . . . . . . . . . . . . . . . 407Phase I: The Fish Dish Design Analysis. . . . . . . . . . . . . . . . . . . . . . . . 407
Differentiating Game Objects . . . . . . . . . . . . . . . . . . . . . . . . . . 408Size . . . . . . . . . . . . . . . . . . . . . . . . . . . . . . . . . . . . . 408Shape . . . . . . . . . . . . . . . . . . . . . . . . . . . . . . . . . . . . 409Color . . . . . . . . . . . . . . . . . . . . . . . . . . . . . . . . . . . . 410Position . . . . . . . . . . . . . . . . . . . . . . . . . . . . . . . . . . . 411Animation . . . . . . . . . . . . . . . . . . . . . . . . . . . . . . . . . . 412
Choosing a Design Style . . . . . . . . . . . . . . . . . . . . . . . . . . . . . 415Audience and Emotional Appeal . . . . . . . . . . . . . . . . . . . . . . 415Visual Characteristics . . . . . . . . . . . . . . . . . . . . . . . . . . . 416Difficulty of Implementation . . . . . . . . . . . . . . . . . . . . . . . . 417
Characterization . . . . . . . . . . . . . . . . . . . . . . . . . . . . . . . . . 419Online Game Issues . . . . . . . . . . . . . . . . . . . . . . . . . . . . . . . 420
The Available Display Area . . . . . . . . . . . . . . . . . . . . . . . . 420Artwork File Size Issues . . . . . . . . . . . . . . . . . . . . . . . . . . 422Performance . . . . . . . . . . . . . . . . . . . . . . . . . . . . . . . . 425The Color Palette. . . . . . . . . . . . . . . . . . . . . . . . . . . . . . 427
Determining the Order of Element Creation . . . . . . . . . . . . . . . . . . 431Phase II: The Fish Dish Design Plan . . . . . . . . . . . . . . . . . . . . . . . . . 433
The Fish Dish Game Summary . . . . . . . . . . . . . . . . . . . . . . . . . 433Game Back Story . . . . . . . . . . . . . . . . . . . . . . . . . . . . . . 433Game Description/Game Concept . . . . . . . . . . . . . . . . . . . . . 433Game Object Inventory . . . . . . . . . . . . . . . . . . . . . . . . . . 433Game Functionality Overview . . . . . . . . . . . . . . . . . . . . . . . 436
The Game Action Sequence . . . . . . . . . . . . . . . . . . . . . . . . . . . 436The Game Action Flowchart . . . . . . . . . . . . . . . . . . . . . . . . 437The Screen Summary . . . . . . . . . . . . . . . . . . . . . . . . . . . 437
The Fish Dish Graphics Specification . . . . . . . . . . . . . . . . . . . . . . 447Game Creative Statement . . . . . . . . . . . . . . . . . . . . . . . . . 447Artwork Orientation . . . . . . . . . . . . . . . . . . . . . . . . . . . . 448Target Platform . . . . . . . . . . . . . . . . . . . . . . . . . . . . . . . 448Estimated Object Count . . . . . . . . . . . . . . . . . . . . . . . . . . 449Artwork Screen Resolution and Playfield Size . . . . . . . . . . . . . . 449Artwork Color Depth. . . . . . . . . . . . . . . . . . . . . . . . . . . . 449Artwork File Format(s) . . . . . . . . . . . . . . . . . . . . . . . . . . 449Artwork File Naming Scheme . . . . . . . . . . . . . . . . . . . . . . . 449Artwork Color Palette . . . . . . . . . . . . . . . . . . . . . . . . . . . 450Artwork Gamma Level . . . . . . . . . . . . . . . . . . . . . . . . . . . 451Artwork Object Dimensions . . . . . . . . . . . . . . . . . . . . . . . . 451
xiv
Contents
Frames per Object . . . . . . . . . . . . . . . . . . . . . . . . . . . . . 452Object Actions and Facings . . . . . . . . . . . . . . . . . . . . . . . . 453Game Text Font(s) . . . . . . . . . . . . . . . . . . . . . . . . . . . . . 453
Phase III: The Fish Dish Design Execution . . . . . . . . . . . . . . . . . . . . . . 453Artwork Templates . . . . . . . . . . . . . . . . . . . . . . . . . . . . . . . . 454Step-by-Step Game Object Design . . . . . . . . . . . . . . . . . . . . . . . 455
Salmon Fishdie Object Creation . . . . . . . . . . . . . . . . . . . . . . 456Red Devil Object Creation . . . . . . . . . . . . . . . . . . . . . . . . . 461Gold Digger Object Creation. . . . . . . . . . . . . . . . . . . . . . . . 462Green Meanie Object Creation . . . . . . . . . . . . . . . . . . . . . . 463Gray Shark Object Creation . . . . . . . . . . . . . . . . . . . . . . . . 465Blue Angel Object Creation . . . . . . . . . . . . . . . . . . . . . . . . 466Bad Tuna Object Creation . . . . . . . . . . . . . . . . . . . . . . . . . 467Head Hunter Object Creation . . . . . . . . . . . . . . . . . . . . . . . 469Starfish Object Creation . . . . . . . . . . . . . . . . . . . . . . . . . . 470Happy Clam Object Creation. . . . . . . . . . . . . . . . . . . . . . . . 471M.C. Hammerhead Object Creation . . . . . . . . . . . . . . . . . . . . 472Salmon Fishdie Angel Object Creation . . . . . . . . . . . . . . . . . . 473Pause Bubble Object Creation . . . . . . . . . . . . . . . . . . . . . . . 475Shield Bubble Object Creation. . . . . . . . . . . . . . . . . . . . . . . 476Background Screen Creation . . . . . . . . . . . . . . . . . . . . . . . 477
Chapter 13 Miscellaneous Topics and Final Thoughts . . . . . . . . . . 479Game Level Backgrounds . . . . . . . . . . . . . . . . . . . . . . . . . . . . . . . 480Sources of Inspiration. . . . . . . . . . . . . . . . . . . . . . . . . . . . . . . . . . 483Final Comments. . . . . . . . . . . . . . . . . . . . . . . . . . . . . . . . . . . . . 485
Appendix A Artist Interviews . . . . . . . . . . . . . . . . . . . . . . . 487
Appendix B CD-ROM Contents . . . . . . . . . . . . . . . . . . . . . . 499
Index . . . . . . . . . . . . . . . . . . . . . . . . . . . . . . . . . . . . 507
xv
Contents
Foreword
I have always looked at game artwork from a programmer’s point of view. Tome, the game artist was someone you worked around—someone necessary andimportant, but someone who would give you any old thing that looked good tohim and it was up to the programmer to find a way to make it fit into the game.To this end, I have written books and Web pages on the importance of creatingutilities to correct problems introduced by the artist: palette reduction, colormatching, transparency replacement, size adjustments, and so on. It wasn’t thatthe artist was incapable of taking control of those issues, or even that the artisthad no understanding of the technical issues of game development; the problemwas more a matter of communication between the programmer and the artist.The programmer would have a requirement and express it to the artist in tech-nical terms. The artist’s eyes would gloss over; he would nod and smile, andthen pick up his mouse, and do his best to put out a product matching hisunderstanding of the programmer’s needs. Often this resulted in beautiful andenjoyable games. But behind the scenes there would be much frustration, asthe programmer tried to explain and re-explain the technical aspects of gamedevelopment, and the artist would try to explain and re-explain the limits of histools and training.
That scenario has changed in recent years. With the advent of high-color andtrue-color display resolutions, the problems of palettes and color reduction havefaded away. Modern tools give artists the ability to shrink or expand artwork,change the color depth, and add all the subtle nuances that make a game beauti-ful. And the systems modern game players use allow for greater resources tobe expended, which means games can be bigger and use more memory, and art-ists are freed from the optimization constraints of earlier years.
But there is still the problem of technical communication between the program-mer and the artist. It is not enough that an artist be artistically talented. Heneeds to be technically astute enough to be able to communicate in thelanguage of the programmer. Once the programmer and the artist can communi-cate in the same language, many of the problems and frustrations of the pastwill fade away.
xvi
In this book Ari Feldman gently but firmly exposes the artist to the technicalrequirements and jargon used by professionals in the game development field.Rather than assuming the programmer is the only one who needs to know thisstuff, Ari insists the artist take responsibility too. As a programmer, I think thisis an idea for which the time has come. I have seen talented young artists dropout of the field of game development simply because they were overwhelmedby the expectations of the industry. And really, the technology behind computerartwork is not that difficult. All you really need is a resource that explains thecapabilities and limitations to you. I believe Ari has provided such a resourcewith this book.
Ari is a long-time member of the game development community, and hisSpriteLib collection has been popular for years. Recently, I was pleased toco-sponsor a game development contest with GameDev.Net(http://www.gamedev.net), in which programmers were asked to writegames based on the artwork in SpriteLib. I was amazed at the results we got.There were more than two dozen entries, in categories ranging from a simpletable tennis game, to various space shooters, to elaborate side scrolling adven-ture games. There were falling-bricks games, traffic control games, and fightinggames. I couldn’t believe how many ways the same artwork could be reused toproduce such a vast array of delightful games.
So I guess all this proves that if artwork is well designed, you can do manythings with it. And Ari is an expert on how to design arcade game artwork. So ifyou are interested in breaking into computer game development as an artist, itpays to study the wisdom of the masters, and this book is a great place to start.Good luck with your game development career!
Diana Gruber
Foreword
xvii

Acknowledgments
I would like to give my special thanks to Jim Hill for the opportunity, WesBeckwith for the patience, Kellie Henderson and Beth Kohler for their fineediting, and the entire Wordware Publishing staff for their help in putting thisbook together. Without the hard work of these folks, this book would havenever been possible.
I would also like to thank Diana Gruber for writing a wonderful foreword andboth Karl Maritaud and Neil Shepard for sharing their insights with me on thesubject of creating arcade game graphics.
xviii
Introduction
Why This Book?
Arcade games have been captivating game playing audiences of all ages for wellover twenty-five years now. Their popularity practically built a multi-billiondollar industry and their colorful characters and terminology have becomepermanent fixtures in our everyday language and cultural landscape.
Over the years, arcade game development has become big business, attractingan extremely large and loyal following among programmers. To address thatcommunity’s interest in the subject, scores of books and hundreds of magazinearticles have been written on the subjects of arcade game programming anddesign. Yet, inexplicably, next to nothing has appeared about a topic that is justas crucial to the successful implementation of an arcade game: graphics.
Simply put, without good graphics, an arcade game has no soul. Graphics play acentral role in how people perceive and enjoy the arcade game experience. Justimagine how boring a game like Sonic the Hedgehog would be if the adorableSonic was represented on-screen by blocky ASCII characters rather than adynamic, blue hedgehog graphic. Or, consider how much fun Mortal Kombat
would be if characters like Sub-Zero appeared as lifeless stick figures ratherthan as photo-realistic combatants. If arcade game graphics did indeed look likethe ones in these examples, arcade games wouldn’t hold anyone’s interest forvery long, would they?
For far too long, the process of designing and creating the graphics for arcade-style games has been ignored. Quality graphics are as essential to an arcadegame’s development as solid design, addictive game play, and clever program-ming. And that is exactly why I wrote this book. If you are interested inlearning how graphics are designed, created, and implemented in arcade games,then read on.
You are probably wondering why I even bothered to write a book on a “dated”topic such as 2D arcade game graphics design when 3D-style games are all therage, right? Well, actually there are a number of very good reasons for doing so:
1. 2D, or “old school,” arcade game graphics are far from dead—Therise of the Internet as a gaming platform has opened many new applicationsfor arcade-style games. Their simpler graphics and relatively light system
xix
requirements make them ideally suited for this new and exciting mediumand their use will only increase as more people turn to technologies such as
Java�, Flash�, and Shockwave�. For example, ZapSpot, the companywhere I currently work, has dedicated itself to delivering small 2D-basedgames to users via e-mail. And they’re not alone. Many companies aredoing similar things, and 2D graphics and animation techniques are whatmakes this possible.
2. 2D arcade games still sell—Despite the computer gaming industry’s loveaffair with 3D game technologies, the popularity of arcade-style games hasnever really diminished. Rather, it has just taken a temporary back seat toflashier developments. If you doubt this, just look around the store shelvesand software catalogs. Arcade games are as popular as ever. Arcade titles
such as Epic MegaGames’ Jazz Jackrabbit II� and Broderbund’s
Loadrunner II� have dominated the sales charts for some time. In fact,eight of the ten top selling commercial games of 1998 were 2D based.
3. 2D arcade games are enjoying a comeback—The growing popularity ofemulators such as MAME, iNes, and Virtual Gameboy has only served toreinforce the genre’s immortality and has sparked a major resurgence andinterest in arcade-style games.
4. 2D arcade game graphics are relatively easy to create—For the mostpart, arcade game graphics are much easier to design and create than their3D counterparts. Furthermore, the fundamental concepts behind theirdesign and use are also much simpler to teach, making the topic ideallysuited for users of all levels and competencies. If you can move a mouseand draw simple shapes in a standard graphics package, you can learn howto create arcade-style graphics. Most 3D artwork, on the other hand,requires a significant amount of skill and experience to create, somethingthat only a handful of individuals in the game development industry cur-rently possess.
5. 2D arcade game graphics don’t require much time or financial
investment to create—Designing arcade-style graphics can be done witha relatively small investment in terms of hardware, software, and mostimportantly, time. In fact, all of the graphics examples in this book were cre-ated in a matter of hours using software that costs well under $200 and runson any Pentium class PC. In comparison, it often takes an expensive, work-station class machine running software costing thousands of dollars days tocreate most 3D-style game artwork.
So, if issues like time, money, and audience factor into your game making plans,learning how to create arcade-style graphics is still an important skill toacquire.
xx
Introduction
Who is This Book For?
This book is for anyone who is interested in producing arcade-style games.However, for obvious reasons, those of you directly involved in game develop-ment either as a hobby or as a profession really stand to benefit the most fromthe information contained in these pages.
Basically, this book is for you if:
� You’re a hobbyist or part-time game developer with impressive program-ming skills who could not draw game graphics if your life depended on it.
� You’re a hobbyist or part-time game developer who can’t program but isinterested in learning how to design and draw game artwork and animation.
� You’re a game designer who wants to learn all you can about how gamegraphics are made in order to make your games look and play better.
� You’re a multimedia developer interested in improving the look and feel ofyour creations.
As you can see, this book was written to appeal to users of all different back-grounds, skill levels, and experience. Regardless of whether you are a weekendprogrammer or a classically trained artist, you are bound to find this book avaluable introduction, guide, and reference to the world of developing arcadegame graphics.
What Can You Expect to Learn?
In this book you can expect to learn quite a bit, including a number of thingsabout games and graphics that have either never been published before ornever been published in one place. In this book, you will learn about:
� Display Modes—Every video display mode has a number of distinct prop-erties that can affect your artwork. This book teaches you what these areand how to deal with them.
� Color in Arcade Games—Color usage can make or break an arcade game.This book teaches you how to use color to its maximum potential.
� Arcade Game Animation—Animation is what makes arcade games comealive. This book teaches you the fundamental techniques behind arcadegame animation and breaks the process down into easy-to-understandsteps.
� Game Design and Documentation—No game can exist without properplanning and documentation. This book teaches game design from the art-ist’s perspective, including how to plan out your projects and write relateddocumentation.
Introduction
xxi

� Evaluating Tools—The key to creating high-quality artwork lies in thetools that one uses for the job. This book provides comprehensive informa-tion on the best free and low-cost graphics tools available. In addition, itgives you essential information on what to look for when evaluating graph-ics software for your game projects.
� Graphic File Formats and Image Compression—Arcade game graphicscould not exist if it were not for image compression and a handful of versa-tile graphic file formats. This book covers the topic of image compressionand identifies the essential graphic formats used in arcade game graphicsdevelopment.
� File Management—Proper file naming and file maintenance is crucial to asuccessful arcade game. This book provides useful tips on asset naming, filemanagement, version control, and file backup strategies.
� Fonts—Arcade games rely on fonts to display all sorts of textual informa-tion. This book provides a primer on fonts, font characteristics, and the var-ious font formats available.
� Creating Graphics for Actual Arcade Games—Without actual practicalapplication, you can never expect to master the process of creating arcadegame graphics. Therefore, this book provides a comprehensive step-by-stepexample on how to design 2D graphics and animation for a real arcade-stylegame.
For a more specific breakdown of the concepts and techniques covered in thebook, take a look at this chapter-by-chapter breakdown:
Chapter 1: Arcade Games and Computer Arcade Game Platforms
Many people tend to group arcade games as one type of game or another. Thisis incorrect. Arcade games span many types of games. Some share common ele-ments and themes while others don’t. This chapter tries to define exactly whatan arcade game is and summarizes the primary arcade game genres as well ascommon arcade gaming platforms.
Chapter 2: Designing for Different Display Modes
Different computers offer different video display capabilities. These featuresdirectly influence how you eventually create your game graphics. This chapteridentifies the various issues you can face when designing arcade game graphicsin different video modes on different systems and how you can deal with them.
Chapter 3: Image Compression and Graphic File Formats
There are many image formats out there but only a few are actually useful forarcade game development. As such, this chapter provides an overview of imagecompression and discusses the most important graphic image file formats usedin arcade game graphics development.
xxii
Introduction
Chapter 4: Files and File Management
When designing arcade game graphics, the artwork you create becomes anasset as valuable as gold. After all, you put immeasurable time, thought, andsweat into creating them, why not do something to ensure that they are pro-tected? This chapter explains how to treat your image files properly as well assafely. Among the topics covered here are proper file naming schemes, file man-agement, file organization, and file backups.
Chapter 5: Evaluating Graphics Creation Tools
There are scores of programs available with which to design and create arcadegame graphics. The problem is that most of these programs are totally unsuit-able for the task. This chapter identifies the most useful tools as well as whichfeatures to look for when evaluating graphics software.
Chapter 6: Essential Graphics Tools
This chapter includes mini-reviews and exhaustive feature summaries of the 15best programs you can use to design and create your arcade game graphics.
Chapter 7: Color and Arcade Game Graphics
Color is more than just something we see, it’s something that we experience.This being said, you need to fully understand color in order to be able to exploitit and use it to its full potential. This chapter provides an overview of color the-ory and how to effectively use it in your arcade game projects.
Chapter 8: All About Color Palettes
For various reasons, many arcade games are limited in the amounts of colorthey can display. Therefore, you need to choose your colors wisely. This chapterhelps you to understand what color palettes are, how they differ across plat-forms, and how to effectively define your own. From this information you willbe in the position to best determine how to select and efficiently choose colorsfor your game artwork.
Chapter 9: Arcade Game Animation
Animation is central to the arcade game experience. This chapter provides anoverview of the theory behind designing effective arcade game animation. Bybreaking down the most commonly used types of arcade game animationsequences into digestible pieces, you will have the basics of how to reproducevirtually any type of animated effect or action.
Chapter 10: Fonts and Arcade Games
Arcade games need to display text-based information to represent everythingfrom game scores to instructions. Fonts allow us to display this information
xxiii
Introduction
both legibly and in various sizes and styles. This chapter provides a primer onfonts and their effective use in arcade-style games.
Chapter 11: Planning Arcade Game Graphics
It’s unlikely for you to have a successful, not to mention timely and hassle free,game project without a proper plan. This chapter shows you how to plan out anarcade game from an artist’s perspective.
Chapter 12: Hands-On Arcade Game Project—Fish Dish
As the previous 11 chapters mainly covered design theory, procedures, tools,and technical information, this chapter provides a comprehensive tutorial ondesigning the graphics and animation for an actual arcade game.
Chapter 13: Miscellaneous Topics and Final Comments
This final chapter examines the “missing” topics of arcade game graphics suchas the different methods for representing game level backgrounds, sources ofinspiration, and where to go next with the information you have acquired overthe course of the book.
Appendix A: Artist Interviews
Every game artist has different preferences, techniques, and tool preferences.There is no better way to get this information than right from the horse’smouth. Therefore, this section includes two interviews of very talented com-puter graphic artists.
Here, the interview subjects answer some 21 questions about game graphicsdesign in order to help you, the reader, gain better insight on the tools to useand how to approach arcade game graphics design.
Appendix B: CD-ROM Contents
No book on arcade game graphics would be complete without a CD-ROM thatcontains a library of useful tools and support files. This section describes thecontents of the book’s accompanying CD-ROM.
As a special bonus, the CD includes some very special graphics tools and sev-eral free games to give you inspiration for your own projects.
What You Need Before Beginning
I need to stress that this book doesn’t require you to be an artist or even anexperienced programmer for that matter. You aren’t expected to be able to drawor even code. In fact, the only assumptions this book makes are:
xxiv
Introduction

� You have access to a PC-compatible computer running DOS or, preferably, aversion of Windows 95, 98, NT 4.0, or 2000 with an SVGA color monitor.Although this book clearly targets the DOS and Windows platforms, usersof Macintosh and Linux systems shouldn’t despair as many of the concepts,suggestions, and techniques described in this book apply to these systemsas much as they do to the DOS and Windows platforms.
� You need to be at least familiar with graphics tools and have a basic under-standing of how to use them. While you don’t have to be an expert with anyparticular graphics package, you should at least be comfortable aroundthem. This book is a resource, not a software training manual.
� You need to be both willing and eager to apply what you learn from thisbook in your own projects. This being said, you should also be patient.Unless you’re very lucky or just very talented, you can’t possibly expect toachieve professional results from what you learn right away. Designing goodarcade game graphics takes time and experience. Just keep this in mind andeverything will be fine.
About the Author
Ari Feldman is the creative lead at ZapSpot (http://www.zapspot.com)where he is responsible for designing much of the artwork and animation fortheir line of wildly popular games.
Ari has been designing computer game graphics since 1991 and cut his teethcreating the artwork and animation for a number of well-received shareware,commercial, and freeware titles for the Atari ST and Windows platforms. He isalso the creator of SpriteLib, an extremely popular collection of animatedobjects for arcade-style games that counts tens of thousands of usersworldwide.
Before coming to ZapSpot, Ari supervised the development of high-profileinteractive projects for such companies as Columbia House, iVillage, Compaq,Simon & Schuster, GTE, Lehman Brothers, American Express, Gevalia Kaffe,AT&T, and Lucent Technologies.
Should you wish to contact Ari, you can always e-mail him [email protected] or visit him online at http://www.arifeldman.com.
xxv
Introduction

Book Support
The author realizes that despite his best efforts, it isn’t always possible to coverevery aspect of designing arcade game graphics within the confines of a singlebook. Therefore, the author has taken the liberty of building a special Web sitededicated to supporting the readers of this book.
Among other things, this site features additional resources including bookaddendum and errata, and provides a community where interested readers caninteract with each other as well as the author in order to further their knowl-edge on the subjects of arcade game graphics and game design.
Be sure to visit http://www.gamegfx.com and tell your friends about it.
xxvi
Introduction

Chapter 1
Arcade Games andComputer ArcadeGame Platforms
In this chapter, you’ll learn about:
� Arcade game sub-genres
� Pong games
� Maze/chase games
� Shooters
� Puzzlers
� Platformers
� Popular arcade game platforms
1
What’s an Arcade Game?
Defining exactly what a computer arcade game is can be a difficult thing to do
these days, especially when you consider all of the technological advances that
have been made in the gaming industry over the years.
An arcade game can be many things and the arcade genre is simply too broad to
define with one sweeping statement. You see, arcade games can encompass
everything from games with mindless and gratuitous violence to games that
require intricate problem solving techniques. To further cloud the issue, the action
in an arcade game can take place on a single screen or over multiple levels. These
levels can be static or completely dynamic with scrolling occurring in all four
directions. And, so on and so on.…
To make the concept of the arcade game somewhat easier to comprehend, I’ve
identified five arcade game sub-genres that run the gamut of the arcade game
spectrum.
Arcade Game Sub-Genres
� Maze/chase games
� Pong games
� Shooters
� Puzzlers
� Platformers
Maze/Chase Games
Maze/chase games came into their own during the first arcade game explosion of
the early 1980s and eventually would become one of the defining, if not the most
endearing, examples of the various arcade genres.
All maze/chase games possess the same basic characteristics: the player navigates
an on-screen character through a maze of obstacles to achieve a specific goal. In
many instances, this character is being chased by other on-screen characters in an
attempt to prevent them from accomplishing their objective.
Maze/chase games are one of the few types of arcade games that actually empha-
size strategy over the speed of one’s reflexes, although no one can deny that the
latter helps too. Maze/chase games come in many flavors and range from the very
simple with only a few different game elements to very complex ones that include
dozens or even hundreds of different game elements.
It’s interesting to point out that virtually all of the action in the average maze/
chase game occurs within the confines of a single playfield, or game screen. There
2 Chapter 1 / Arcade Games and Computer Arcade Game Platforms
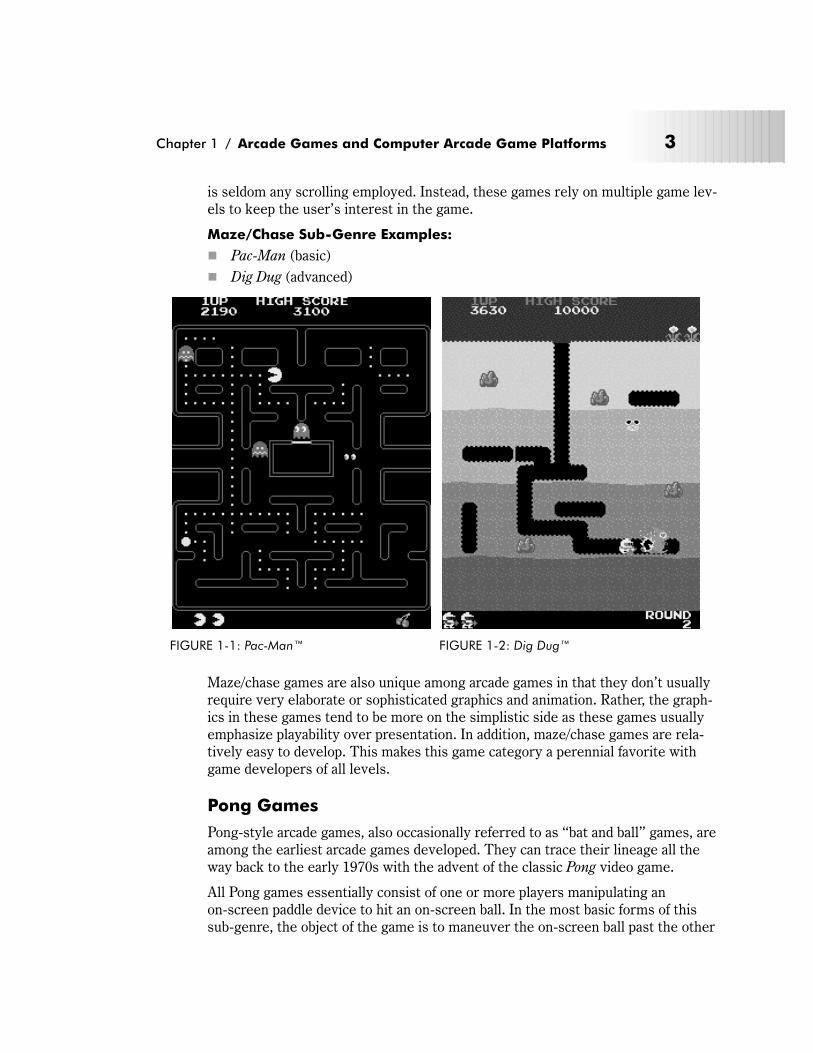
is seldom any scrolling employed. Instead, these games rely on multiple game lev-
els to keep the user’s interest in the game.
Maze/Chase Sub-Genre Examples:
� Pac-Man (basic)
� Dig Dug (advanced)
Maze/chase games are also unique among arcade games in that they don’t usually
require very elaborate or sophisticated graphics and animation. Rather, the graph-
ics in these games tend to be more on the simplistic side as these games usually
emphasize playability over presentation. In addition, maze/chase games are rela-
tively easy to develop. This makes this game category a perennial favorite with
game developers of all levels.
Pong Games
Pong-style arcade games, also occasionally referred to as “bat and ball” games, are
among the earliest arcade games developed. They can trace their lineage all the
way back to the early 1970s with the advent of the classic Pong video game.
All Pong games essentially consist of one or more players manipulating an
on-screen paddle device to hit an on-screen ball. In the most basic forms of this
sub-genre, the object of the game is to maneuver the on-screen ball past the other
Chapter 1 / Arcade Games and Computer Arcade Game Platforms 3
FIGURE 1-1: Pac-Man™ FIGURE 1-2: Dig Dug™
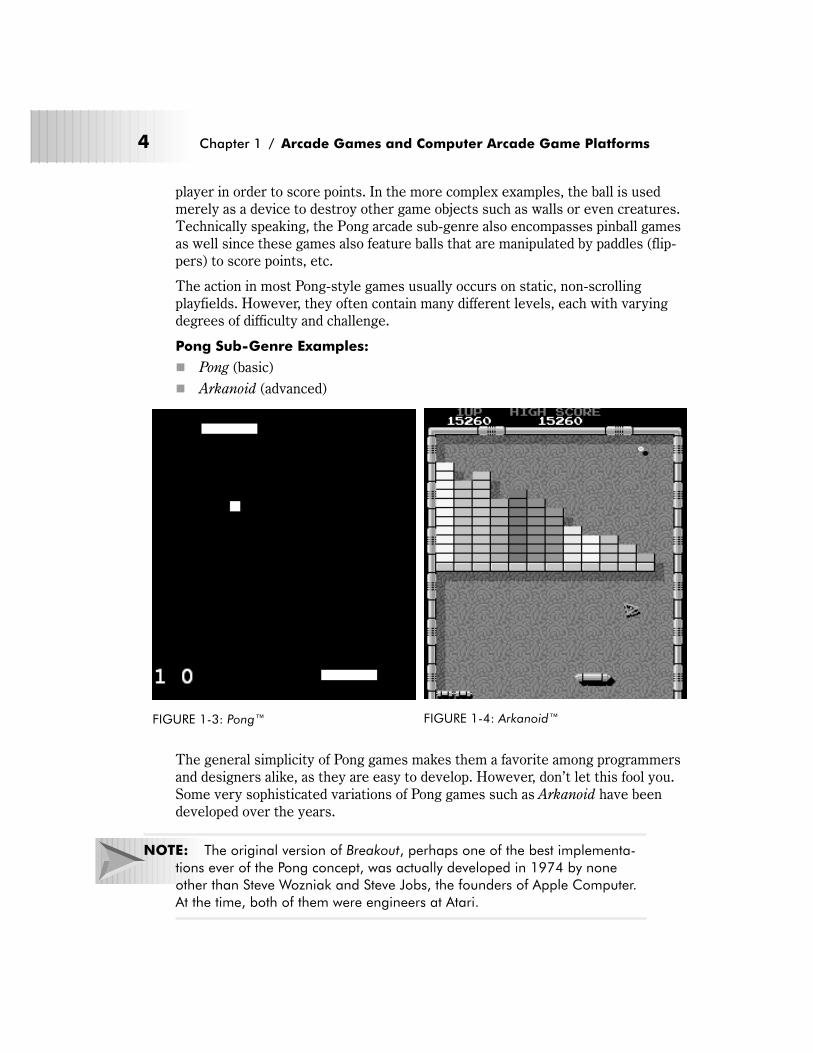
player in order to score points. In the more complex examples, the ball is used
merely as a device to destroy other game objects such as walls or even creatures.
Technically speaking, the Pong arcade sub-genre also encompasses pinball games
as well since these games also feature balls that are manipulated by paddles (flip-
pers) to score points, etc.
The action in most Pong-style games usually occurs on static, non-scrolling
playfields. However, they often contain many different levels, each with varying
degrees of difficulty and challenge.
Pong Sub-Genre Examples:
� Pong (basic)
� Arkanoid (advanced)
The general simplicity of Pong games makes them a favorite among programmers
and designers alike, as they are easy to develop. However, don’t let this fool you.
Some very sophisticated variations of Pong games such as Arkanoid have been
developed over the years.
NOTE: The original version of Breakout, perhaps one of the best implementa-
tions ever of the Pong concept, was actually developed in 1974 by none
other than Steve Wozniak and Steve Jobs, the founders of Apple Computer.
At the time, both of them were engineers at Atari.
4 Chapter 1 / Arcade Games and Computer Arcade Game Platforms
FIGURE 1-3: Pong™ FIGURE 1-4: Arkanoid™

Shooters
Arcade game shooters, or “shoot-em-ups” as they’re commonly called, started to
appear not long after the first Pong games and remained a dominant force in
arcade games from the mid-1980s through the early 1990s.
Shooters are perhaps the broadest of all of the arcade game sub-genres as there
have been so many variations developed over the years. Despite this, all shooters
share a common theme: one or more players control an on-screen character or
object that moves across the screen. This object acts as an aggressor or defender
against a horde of on-screen opponents. The goals of the shooter are typically
solved through violent action that involves blasting away adversaries before they
destroy the player-controlled character. Of all the arcade game sub-genres men-
tioned here, shooters are the most likely to have no central objective. Rather, the
player simply shoots and destroys other on-screen objects for the sake of doing so
or simply to score points. As such, shooters tend to emphasize one’s coordination
and reflexes over cognitive ability. As with Pong games, there are huge differences
in how this activity is implemented.
Shooters also come in two main flavors: static and scrolling.
Static shooters are limited to the player moving within a fixed area of the screen
and firing at an aggressor. Scrolling shooters are offshoots of the static shooter
sub-genre. However, unlike static shooters, they free the player from the con-
straint of moving within a fixed operational area by providing the ability to scroll
the playfield in one or more directions. Most scrolling shooters feature two- or
four-way screen scrolling which enables the game to feature larger, more sophisti-
cated on-screen objects and game levels.
Shooters, as a general rule, always feature multiple game levels. In this context,
these levels are often referred to as “waves.”
Shooter Sub-Genre Examples:
� Berserk (static)
� 1943 (scrolling)
Chapter 1 / Arcade Games and Computer Arcade Game Platforms 5
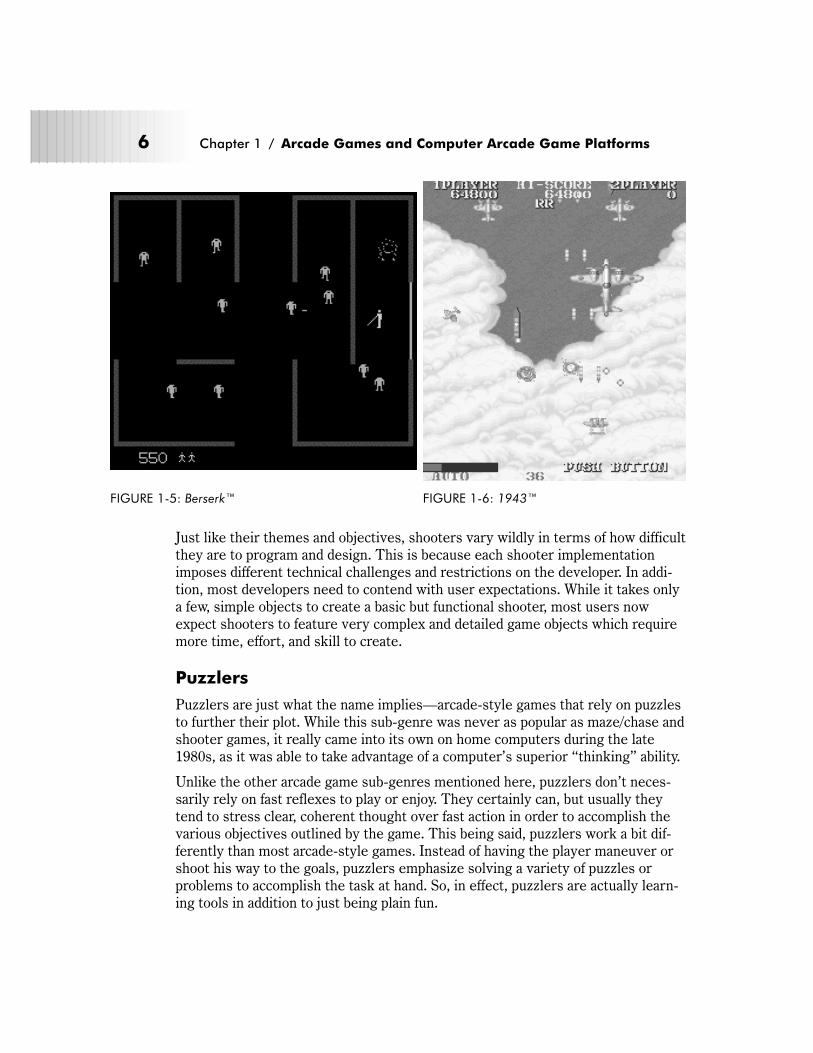
Just like their themes and objectives, shooters vary wildly in terms of how difficult
they are to program and design. This is because each shooter implementation
imposes different technical challenges and restrictions on the developer. In addi-
tion, most developers need to contend with user expectations. While it takes only
a few, simple objects to create a basic but functional shooter, most users now
expect shooters to feature very complex and detailed game objects which require
more time, effort, and skill to create.
Puzzlers
Puzzlers are just what the name implies—arcade-style games that rely on puzzles
to further their plot. While this sub-genre was never as popular as maze/chase and
shooter games, it really came into its own on home computers during the late
1980s, as it was able to take advantage of a computer’s superior “thinking” ability.
Unlike the other arcade game sub-genres mentioned here, puzzlers don’t neces-
sarily rely on fast reflexes to play or enjoy. They certainly can, but usually they
tend to stress clear, coherent thought over fast action in order to accomplish the
various objectives outlined by the game. This being said, puzzlers work a bit dif-
ferently than most arcade-style games. Instead of having the player maneuver or
shoot his way to the goals, puzzlers emphasize solving a variety of puzzles or
problems to accomplish the task at hand. So, in effect, puzzlers are actually learn-
ing tools in addition to just being plain fun.
6 Chapter 1 / Arcade Games and Computer Arcade Game Platforms
FIGURE 1-5: Berserk™ FIGURE 1-6: 1943™
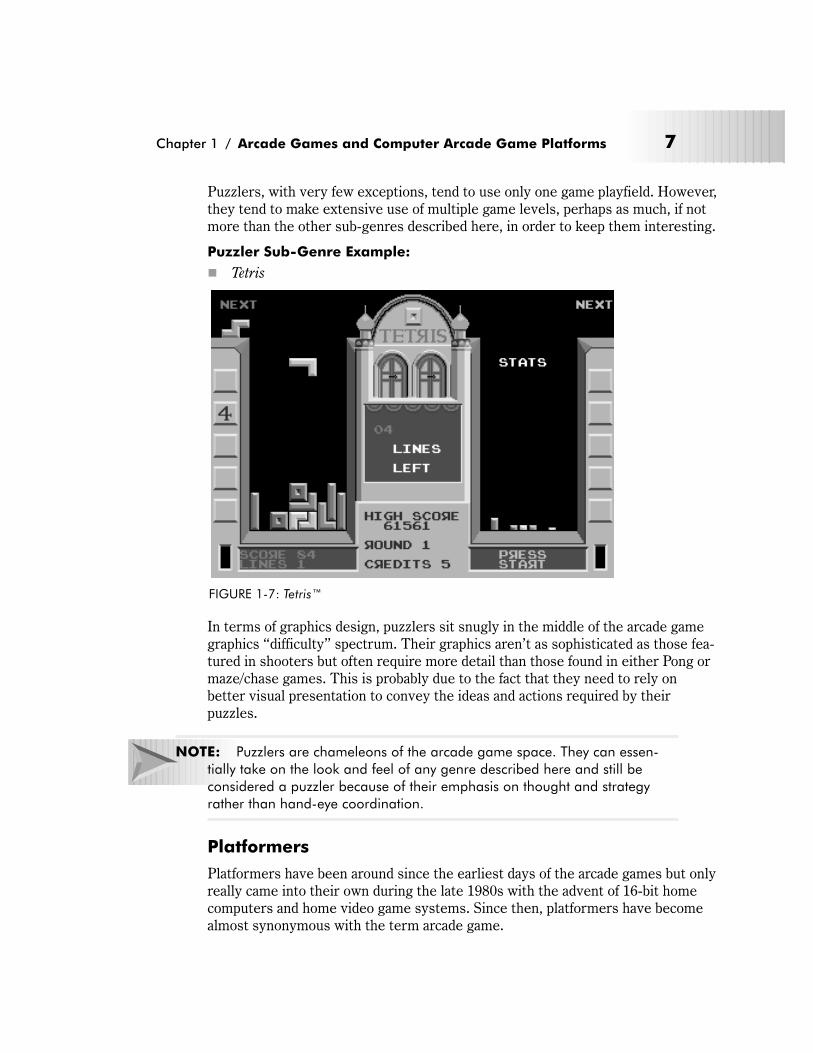
Puzzlers, with very few exceptions, tend to use only one game playfield. However,
they tend to make extensive use of multiple game levels, perhaps as much, if not
more than the other sub-genres described here, in order to keep them interesting.
Puzzler Sub-Genre Example:
� Tetris
In terms of graphics design, puzzlers sit snugly in the middle of the arcade game
graphics “difficulty” spectrum. Their graphics aren’t as sophisticated as those fea-
tured in shooters but often require more detail than those found in either Pong or
maze/chase games. This is probably due to the fact that they need to rely on
better visual presentation to convey the ideas and actions required by their
puzzles.
NOTE: Puzzlers are chameleons of the arcade game space. They can essen-
tially take on the look and feel of any genre described here and still be
considered a puzzler because of their emphasis on thought and strategy
rather than hand-eye coordination.
Platformers
Platformers have been around since the earliest days of the arcade games but only
really came into their own during the late 1980s with the advent of 16-bit home
computers and home video game systems. Since then, platformers have become
almost synonymous with the term arcade game.
Chapter 1 / Arcade Games and Computer Arcade Game Platforms 7
FIGURE 1-7: Tetris™
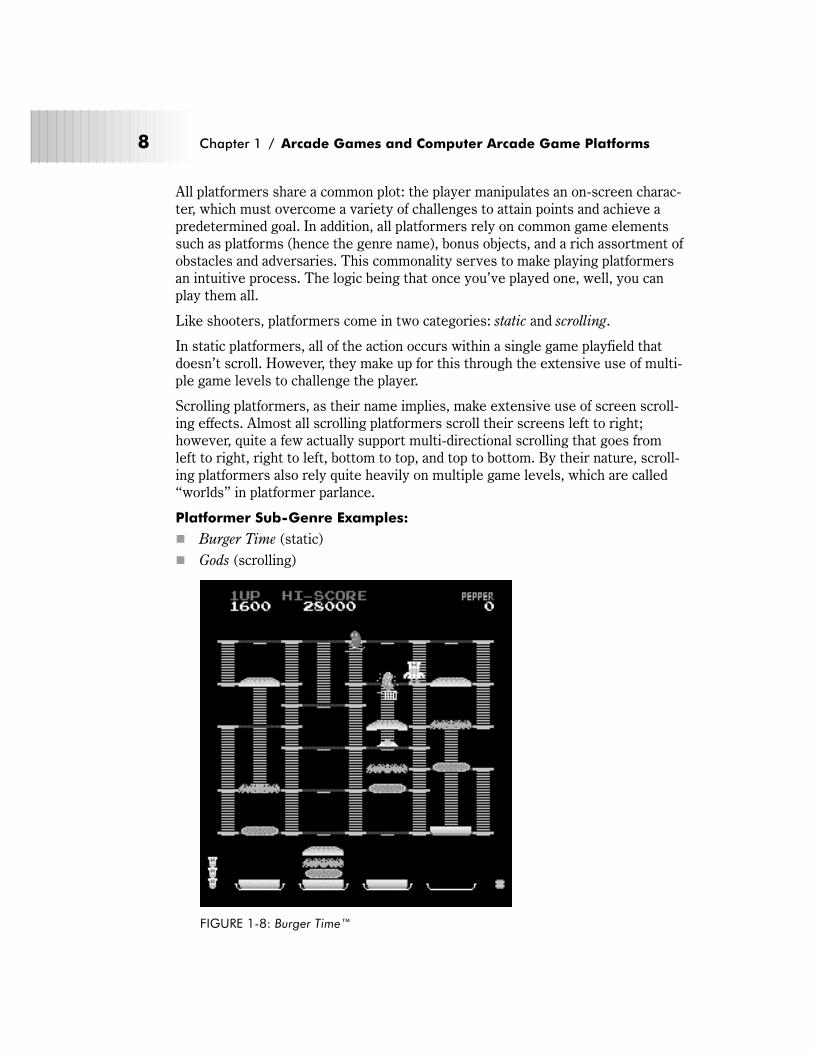
All platformers share a common plot: the player manipulates an on-screen charac-
ter, which must overcome a variety of challenges to attain points and achieve a
predetermined goal. In addition, all platformers rely on common game elements
such as platforms (hence the genre name), bonus objects, and a rich assortment of
obstacles and adversaries. This commonality serves to make playing platformers
an intuitive process. The logic being that once you’ve played one, well, you can
play them all.
Like shooters, platformers come in two categories: static and scrolling.
In static platformers, all of the action occurs within a single game playfield that
doesn’t scroll. However, they make up for this through the extensive use of multi-
ple game levels to challenge the player.
Scrolling platformers, as their name implies, make extensive use of screen scroll-
ing effects. Almost all scrolling platformers scroll their screens left to right;
however, quite a few actually support multi-directional scrolling that goes from
left to right, right to left, bottom to top, and top to bottom. By their nature, scroll-
ing platformers also rely quite heavily on multiple game levels, which are called
“worlds” in platformer parlance.
Platformer Sub-Genre Examples:
� Burger Time (static)
� Gods (scrolling)
8 Chapter 1 / Arcade Games and Computer Arcade Game Platforms
FIGURE 1-8: Burger Time™
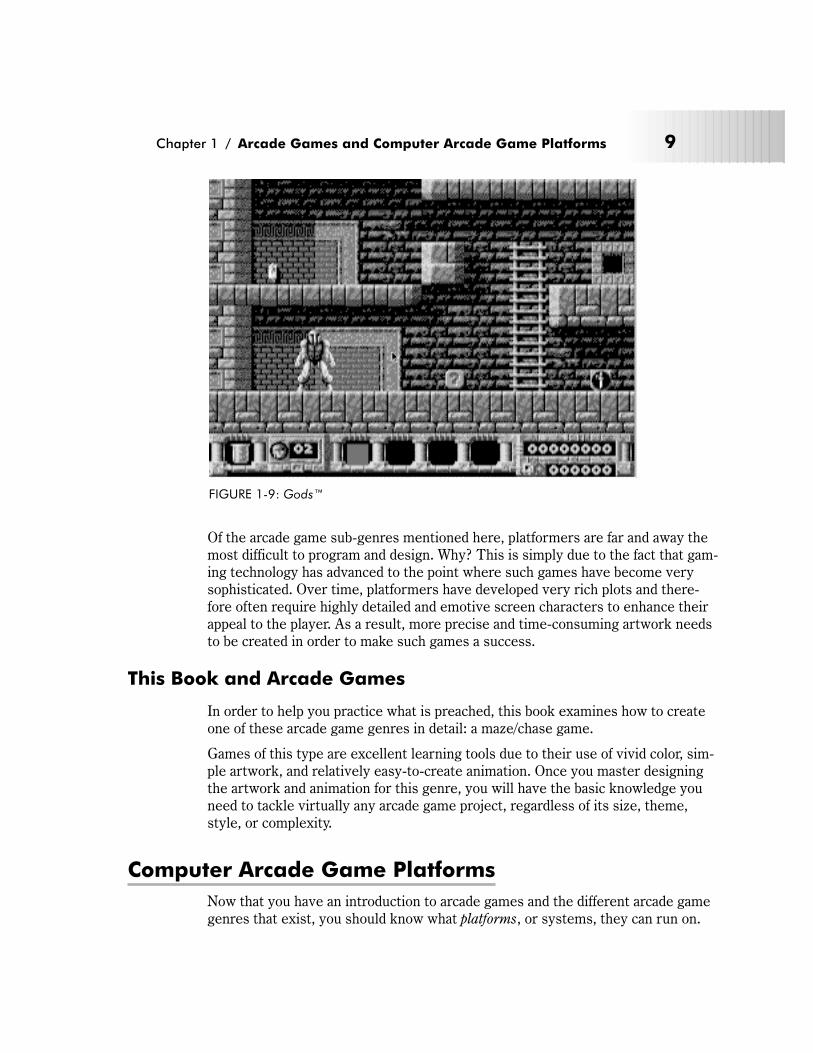
Of the arcade game sub-genres mentioned here, platformers are far and away the
most difficult to program and design. Why? This is simply due to the fact that gam-
ing technology has advanced to the point where such games have become very
sophisticated. Over time, platformers have developed very rich plots and there-
fore often require highly detailed and emotive screen characters to enhance their
appeal to the player. As a result, more precise and time-consuming artwork needs
to be created in order to make such games a success.
This Book and Arcade Games
In order to help you practice what is preached, this book examines how to create
one of these arcade game genres in detail: a maze/chase game.
Games of this type are excellent learning tools due to their use of vivid color, sim-
ple artwork, and relatively easy-to-create animation. Once you master designing
the artwork and animation for this genre, you will have the basic knowledge you
need to tackle virtually any arcade game project, regardless of its size, theme,
style, or complexity.
Computer Arcade Game Platforms
Now that you have an introduction to arcade games and the different arcade game
genres that exist, you should know what platforms, or systems, they can run on.
Chapter 1 / Arcade Games and Computer Arcade Game Platforms 9
FIGURE 1-9: Gods™
There are many computer arcade platforms available but only a few of them are
actually viable options these days. These platforms are:
� DOS
� Windows®
� Macintosh™
� Linux
� Java™
� Video game consoles
DOS
DOS (which includes MS-DOS� , PC-DOS� , and 100% clones such as
DR-DOS� ) used to be the dominant platform for arcade games running on per-
sonal computers from the mid-1980s up until the mid-1990s. However, its days as
the premier arcade game platform are fading fast. Although a number of hobbyists
and small publishers still make games for DOS, very few commercial program-
mers actually do. This is mainly due to the increasing influence of Windows in
game development circles and Microsoft’s declining support for the DOS platform
as a whole.
DOS is a 16-bit operating system. This makes it slower in many computing tasks
compared to today’s modern 32-bit (and soon 64-bit) operating systems. Despite
this, DOS still enjoys healthy support from game developers and gaming enthusi-
asts alike. For one thing, DOS’s ability to access the PC’s graphics hardware
directly gives arcade games the speed and performance that they require for fast
action and smooth animation. Second, there’s a tremendous wealth of DOS-related
game development tools and reference materials floating around. In fact, some of
the best arcade game development tools and graphics packages are completely
DOS based. Third, DOS is relatively simple to program when compared to other
platforms such as Windows. This makes it a good choice for beginners interested
in learning how to design, program, and create artwork for arcade games. Finally,
DOS is also backwardly compatible with the tens of millions of Windows 3.1, 95,
and 98 systems installed around the world, ensuring that there will be an audience
for DOS games for some time to come.
Windows
Microsoft’s Windows operating system is by far the most dominant computing
platform at this time. It’s also the current “gold standard” of arcade game plat-
forms. The vast majority of today’s game releases are made specifically for the
Windows platform. In addition to running over a hundred million machines world-
wide, the most recent implementations of Windows utilize DirectX� technology,
10 Chapter 1 / Arcade Games and Computer Arcade Game Platforms
which makes high-performance arcade gaming experiences finally possible on that
platform.
There are several variations of Windows that exist, including:
� Windows 3.1
� Windows 95
� Windows 98
� Windows NT
� Windows 2000
Each version addresses different market segments and offers different features.
Windows 3.1 is an older, 16-bit version of Windows that’s really little more than a
fancy GUI (graphical user interface) shell that runs over a DOS core. Yet, despite
its lack of technical sophistication, Windows 3.1 helped make Windows a popular
operating system with consumers around the world. Even so, Windows 3.1 never
really caught on as an arcade game platform due to its relatively poor graphics
performance. A fair number of people still use Windows 3.1, but like DOS, its user
base is shrinking rapidly.
Windows 95 was the long-awaited, 32-bit rewrite of Windows 3.1 that was
released in 1995. It successfully married the Windows interface with the power
and performance demanded by modern arcade games. Windows 95 is by far the
most popular version of Windows and virtually all arcade games and game devel-
opment tools are made to run under it.
Windows 98 was released in 1998 as an enhancement to Windows 95. It improved
on Windows 95’s gaming features and added integrated DirectX support, which
makes for even better arcade game performance.
Windows NT was developed in parallel with Windows 3.1 but was designed from
the start as a 32-bit, business-grade operating system. After years of following a
different development path, Microsoft finally gave NT a Windows 95-like interface
and repackaged it as Windows NT 4.0. NT 4.0 was the first version of that operat-
ing system to appeal to both consumers and businesses. Although NT looks and
acts like the other versions of Windows, it’s different enough internally to ensure
that not all Windows games will run on it.
Windows 2000 is the new kid on the Windows block. At the time of this writing, it
has just been released. Despite its interesting name, it’s basically just an
enhanced version of Windows NT with a few additional features and enhance-
ments, particularly in the area of multimedia. Although Windows 2000 is
specifically targeted to business users, there’s little doubt that it will run its share
of Windows-based arcade games as well.
If you want to develop games for a living or create graphics for them, you’ll proba-
bly do it on a Windows-based machine. Virtually all of the latest graphics and game
Chapter 1 / Arcade Games and Computer Arcade Game Platforms 11
development tools are available for the Windows platform and that’s not likely to
change in the foreseeable future.
Macintosh
First introduced in 1984, the Macintosh changed the way we interacted with com-
puters by allowing us to perform routine operations with windows, icons, and a
click of the mouse. Since that time, there have been many permutations of the
Macintosh produced and it developed an incredibly loyal and passionate following
among its users.
For a time, particularly during the late 1980s, the Macintosh was actually a very
popular gaming platform. However, as Apple’s fortunes changed during the early
to mid-1990s, the Macintosh’s market share dropped significantly and game devel-
opers abandoned the platform in droves. However, with Apple’s recent
resurgence, this downward trend has finally reversed and the Macintosh is once
again becoming a viable arcade gaming platform. Even so, the Macintosh pales in
comparison to Windows in terms of the number of installed machines, the selec-
tion of development tools, available hardware extras, and games being released.
This being said, you can still develop some impressive games and game graphics
on the Macintosh platform, but you’ll have many more options and alternatives
available to you on the Windows platform.
Linux
Linux is a free, UNIX variant that has become an increasingly popular alternative
to Windows and the Macintosh operating systems due to its low cost, superior
performance, and legendary reliability. As one of the fastest growing platforms in
the marketplace, it’s not surprising that there’s been a flurry of recent Linux-
oriented game development activity. In fact, a number of popular Windows and
Macintosh games have already been ported over to the Linux platform. If the pace
of innovation and development continues, there is little doubt that Linux will
become an important arcade game platform capable of giving any system a run for
its money.
Java
Unlike the other platforms mentioned here, Java isn’t really an operating system
or hardware system (although Java versions of both do exist) per se, but rather a
programming language developed by Sun Microsystems. Programs, once written
in Java, can theoretically run on any Java-enabled system in a consistent manner,
including arcade games.
12 Chapter 1 / Arcade Games and Computer Arcade Game Platforms
There are three things that make Java an important arcade game platform: a large
audience, strong graphics support, and universal compatibility. Java enjoys an
extremely large installed user base. Essentially, anyone with a modern Web
browser can run and play Java-based games. This ensures developers the widest
possible audience and provides them with plenty of incentive to develop games. In
addition, recent incarnations of Java provide support for a whole slew of graphics
features that make it well suited as a game platform. Finally, as Java can run on
almost any computer system or device, it’s possible to play the same game
whether you’re using a Windows, Macintosh, or UNIX system.
The only limitation that Java faces as a gaming platform is slow performance. At
this time, Java’s speed still doesn’t match that of traditional computer program-
ming languages such as C++. However, Java is more than capable of providing
most types of arcade games with acceptable performance. And, as time goes by, its
performance will only improve. When this finally happens, Java will be the arcade
game platform to watch.
Video Game Consoles
Video game consoles have been around since the late 1970s with the introduction
of the first home versions of Pong. They became entrenched in consumer con-
sciousness during the early 1980s when home video consoles like the Atari 2600,
Intellivision, and Colecovision came on to the scene. Then, once the arcade game
industry crashed in 1983, they vanished almost as quickly as they came. It wasn’t
until the late 1980s with the introduction of a new generation of home video game
consoles by companies such as Sega and Nintendo that they once again captivated
arcade game players everywhere.
Currently, there are several video game console models that stand out as popular
arcade game platforms. These include:
� Nintendo Gameboy�� Sega Genesis�� Super Nintendo�� Sony Playstation�� Nintendo 64�� Sega Dreamcast�
The Nintendo Gameboy is an 8-bit, hand-held gaming system. Many of its games
mimic the earlier Nintendo Entertainment System in terms of look, feel, and per-
formance. This platform is well suited for scrolling platform games and puzzlers
but little else due to its small screen size and relatively puny processing power.
The Sega Genesis is a 16-bit video game system that was state of the art when it
was introduced back in 1989. Although it’s somewhat dated compared to today’s
Chapter 1 / Arcade Games and Computer Arcade Game Platforms 13
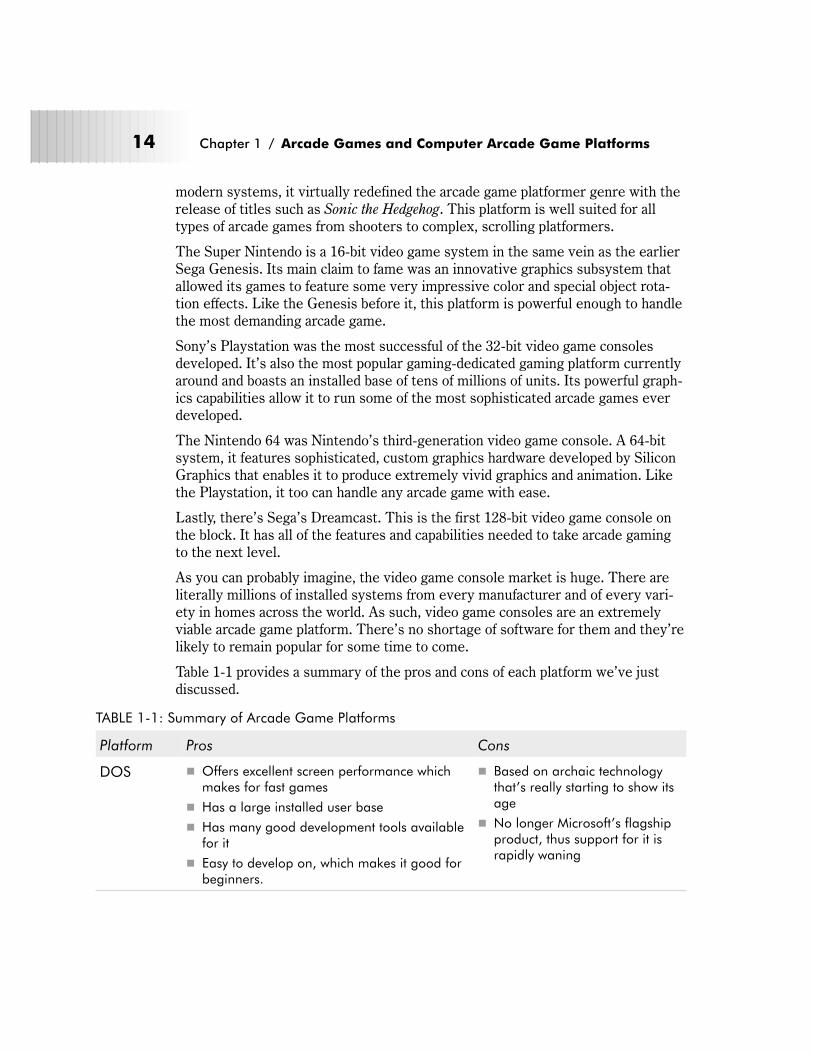
modern systems, it virtually redefined the arcade game platformer genre with the
release of titles such as Sonic the Hedgehog. This platform is well suited for all
types of arcade games from shooters to complex, scrolling platformers.
The Super Nintendo is a 16-bit video game system in the same vein as the earlier
Sega Genesis. Its main claim to fame was an innovative graphics subsystem that
allowed its games to feature some very impressive color and special object rota-
tion effects. Like the Genesis before it, this platform is powerful enough to handle
the most demanding arcade game.
Sony’s Playstation was the most successful of the 32-bit video game consoles
developed. It’s also the most popular gaming-dedicated gaming platform currently
around and boasts an installed base of tens of millions of units. Its powerful graph-
ics capabilities allow it to run some of the most sophisticated arcade games ever
developed.
The Nintendo 64 was Nintendo’s third-generation video game console. A 64-bit
system, it features sophisticated, custom graphics hardware developed by Silicon
Graphics that enables it to produce extremely vivid graphics and animation. Like
the Playstation, it too can handle any arcade game with ease.
Lastly, there’s Sega’s Dreamcast. This is the first 128-bit video game console on
the block. It has all of the features and capabilities needed to take arcade gaming
to the next level.
As you can probably imagine, the video game console market is huge. There are
literally millions of installed systems from every manufacturer and of every vari-
ety in homes across the world. As such, video game consoles are an extremely
viable arcade game platform. There’s no shortage of software for them and they’re
likely to remain popular for some time to come.
Table 1-1 provides a summary of the pros and cons of each platform we’ve just
discussed.
TABLE 1-1: Summary of Arcade Game Platforms
Platform Pros Cons
DOS � Offers excellent screen performance whichmakes for fast games
� Has a large installed user base
� Has many good development tools availablefor it
� Easy to develop on, which makes it good forbeginners.
� Based on archaic technologythat’s really starting to show itsage
� No longer Microsoft’s flagshipproduct, thus support for it israpidly waning
14 Chapter 1 / Arcade Games and Computer Arcade Game Platforms
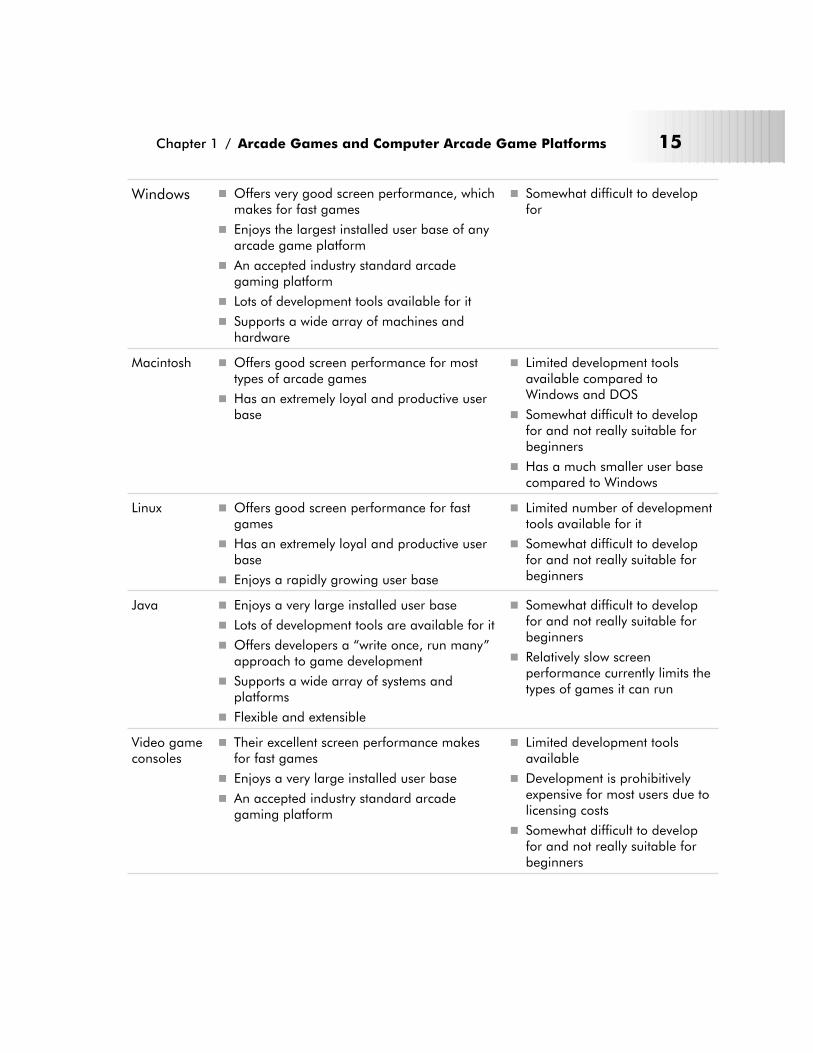
Windows � Offers very good screen performance, whichmakes for fast games
� Enjoys the largest installed user base of anyarcade game platform
� An accepted industry standard arcadegaming platform
� Lots of development tools available for it
� Supports a wide array of machines andhardware
� Somewhat difficult to developfor
Macintosh � Offers good screen performance for mosttypes of arcade games
� Has an extremely loyal and productive userbase
� Limited development toolsavailable compared toWindows and DOS
� Somewhat difficult to developfor and not really suitable forbeginners
� Has a much smaller user basecompared to Windows
Linux � Offers good screen performance for fastgames
� Has an extremely loyal and productive userbase
� Enjoys a rapidly growing user base
� Limited number of developmenttools available for it
� Somewhat difficult to developfor and not really suitable forbeginners
Java � Enjoys a very large installed user base
� Lots of development tools are available for it
� Offers developers a “write once, run many”approach to game development
� Supports a wide array of systems andplatforms
� Flexible and extensible
� Somewhat difficult to developfor and not really suitable forbeginners
� Relatively slow screenperformance currently limits thetypes of games it can run
Video gameconsoles
� Their excellent screen performance makesfor fast games
� Enjoys a very large installed user base
� An accepted industry standard arcadegaming platform
� Limited development toolsavailable
� Development is prohibitivelyexpensive for most users due tolicensing costs
� Somewhat difficult to developfor and not really suitable forbeginners
Chapter 1 / Arcade Games and Computer Arcade Game Platforms 15
Chapter 2
Designing forDifferent DisplayModes
In this chapter, you’ll learn about:
� Video hardware standards
� Display modes
� Screen resolutions
� Aspect ratios
� Refresh rates
� Color capabilities
� Gamma levels
� Choosing display modes to design for
� Specific display mode recommendations
� Rules for display mode selection
17
A Summary of Video Hardware Standards
The purpose of this section is to summarize the historical significance of the vari-
ous video hardware standards that have emerged since the advent of the personal
computer in the early 1980s. These standards include:
� Color graphics adapter (CGA)
� Enhanced graphics adapter (EGA)
� Video graphics adapter (VGA)
� Multicolor graphics array (MCGA)
� Super video graphics adapter (SVGA)
Color Graphics Adapter (CGA)
The CGA was one of the first video hardware standards to appear on the market.
IBM introduced it in 1981 as a display option for their then fledgling line of per-
sonal computers. The CGA standard enabled graphics to be created in color (a
major coup at the time) and offered three different levels of graphics resolution:
low, medium, and high.
Although technically primitive by today’s standards, the CGA was an important
milestone in the annals of graphics development. It not only introduced color
graphics to the PC-compatible world, but it also helped establish the 320x200-line
video mode as an industry screen resolution which was adapted by scores of other
systems like the Commodore 64, Amiga, Atari ST, Apple IIGS, and a number of
home video game systems.
Virtually all PC graphics systems are backwardly compatible with the CGA stan-
dard. This means that they can use software specifically written for any of its
video modes. However, it’s important to point out that the CGA hasn’t been sup-
ported by commercial arcade games since the late 1980s and is widely considered
to be obsolete.
NOTE: Only DOS continues to support the CGA standard and even that sup-
port is limited to running old software.
Enhanced Graphics Adapter (EGA)
IBM introduced the EGA as a replacement for the CGA standard in 1984. The
EGA’s hardware could emulate the CGA video modes as well as use its own,
improved graphics capabilities.
As with the CGA, the EGA’s days as a graphics standard were relatively short-
lived. The EGA was eclipsed by more powerful graphics standards by the late
18 Chapter 2 / Designing for Different Display Modes
1980s. The EGA’s main contribution to the evolution of arcade games was the fact
that it was very popular among PC game programmers due to its ability to display
vibrant color (for that time) and support smooth animation via page flipping. In
fact, such PC arcade game classics as Duke Nukem made their debut on
EGA-compatible hardware.
NOTE: Only DOS and Windows 3.1 continue to support the EGA.
Video Graphics Adapter (VGA)
IBM introduced the VGA in 1987 for use in its higher-end PS/2 systems and as a
replacement for the EGA standard. The VGA raised the bar of PC graphics capa-
bilities—not only in terms of graphics resolution but also in its ability to display
vivid color. The VGA was the first widely adopted video standard to provide sup-
port for analog color monitors, which allowed thousands of colors to be displayed
instead of the 16 that were commonplace.
The VGA standard became very popular with game developers due to its ability to
display many distinct shades of color on-screen at once. Virtually all arcade games
written today are still designed with VGA compatibility in mind.
Although now somewhat dated in terms of features, the VGA standard represents
the minimum display capabilities offered by any modern computer system.
NOTE: DOS, Windows 95/98/NT/2000, Linux, and Macintosh systems all sup-
port some version of the VGA standard.
Multicolor Graphics Array (MCGA)
The MCGA was a reduced-function version of IBM’s VGA hardware standard. It
first appeared in 1987 with IBM’s introduction of its low-end Model 25 and Model
30 PS/2 computer line.
All MCGA display modes are 100% compatible with those supported by the VGA
standard. As a result, MCGA-equipped systems can play almost all of the same
games one can with a VGA-equipped system.
NOTE: Only DOS and Windows 3.1 continue to support the MCGA standard.
Windows 95/98/NT/2000, Linux, and Macintosh systems do not.
Chapter 2 / Designing for Different Display Modes 19
Super Video Graphics Adapter (SVGA)
The SVGA evolved during the early 1990s as a means of taming the market chaos
that occurred when different hardware manufacturers attempted to improve on
the VGA’s core technology without following a common hardware standard.
Video hardware that adheres to the SVGA standard supports additional graphics
resolutions as well as the ability to display thousands and millions of colors. At the
same time, it is fully backward compatible with all software written for the VGA,
EGA, and CGA display standards.
Since its introduction, the SVGA has taken arcade games to a new level by allow-
ing them to support higher resolutions and more colors that users demand, and it
remains the current display standard across all computer platforms.
NOTE: DOS, Windows 95/98/NT/2000, Linux, and Macintosh systems support
all elements of the SVGA standard.
Display Modes
Display modes, or video modes, define how graphic images appear on a given
machine. Each video hardware standard supports different display mode capabili-
ties. Meanwhile, every display mode has a number of unique characteristics
associated with it. These characteristics determine everything from screen width
to the number of colors that can be displayed at a time.
As a designer, it’s important to get to know these characteristics and understand
how they can influence the artwork you create. Specifically, you should concern
yourself with these issues:
� Screen resolution
� Aspect ratio
� Refresh rate
� Color capability
� Gamma level
Screen Resolution
As you probably already know, all computer-generated images are composed of
pixels, which are the smallest graphic elements that you can manipulate. Screen
resolution measures the actual number, or the density of pixels per a horizontal
and vertical screen line.
The basic law of screen resolution is this: the higher the screen resolution, the
greater the amount of graphic detail and information that can be displayed, as
20 Chapter 2 / Designing for Different Display Modes
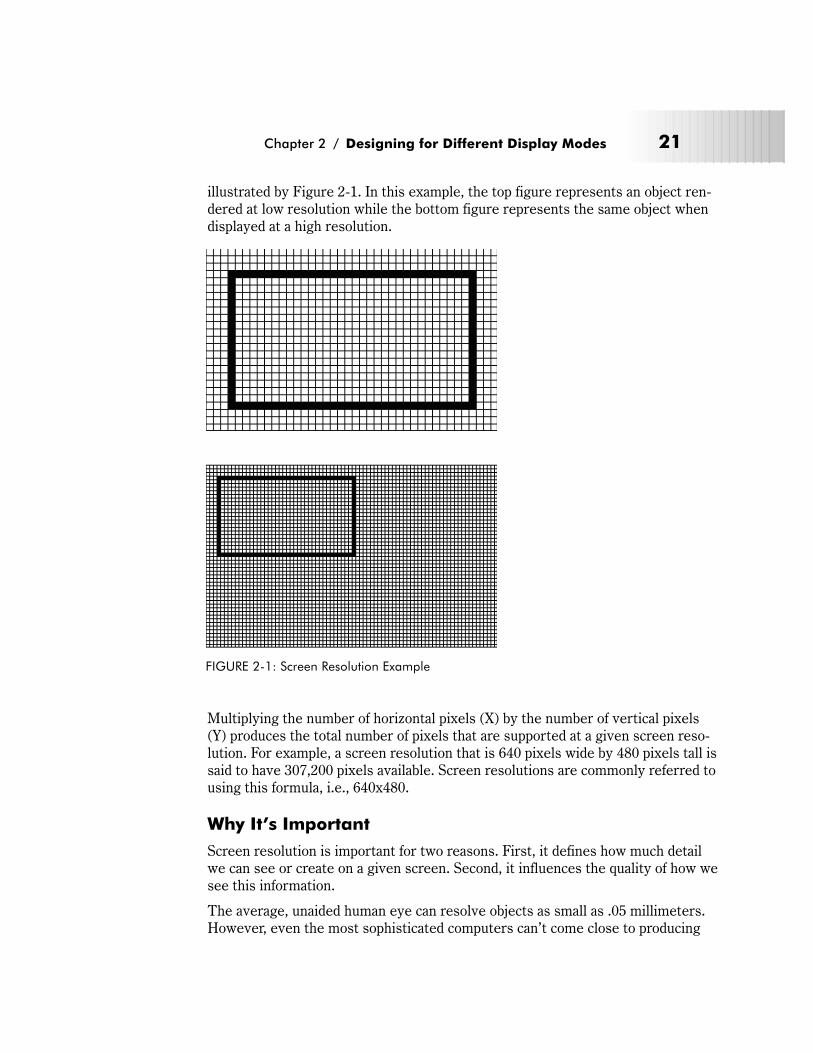
illustrated by Figure 2-1. In this example, the top figure represents an object ren-
dered at low resolution while the bottom figure represents the same object when
displayed at a high resolution.
Multiplying the number of horizontal pixels (X) by the number of vertical pixels
(Y) produces the total number of pixels that are supported at a given screen reso-
lution. For example, a screen resolution that is 640 pixels wide by 480 pixels tall is
said to have 307,200 pixels available. Screen resolutions are commonly referred to
using this formula, i.e., 640x480.
Why It’s Important
Screen resolution is important for two reasons. First, it defines how much detail
we can see or create on a given screen. Second, it influences the quality of how we
see this information.
The average, unaided human eye can resolve objects as small as .05 millimeters.
However, even the most sophisticated computers can’t come close to producing
Chapter 2 / Designing for Different Display Modes 21
FIGURE 2-1: Screen Resolution Example
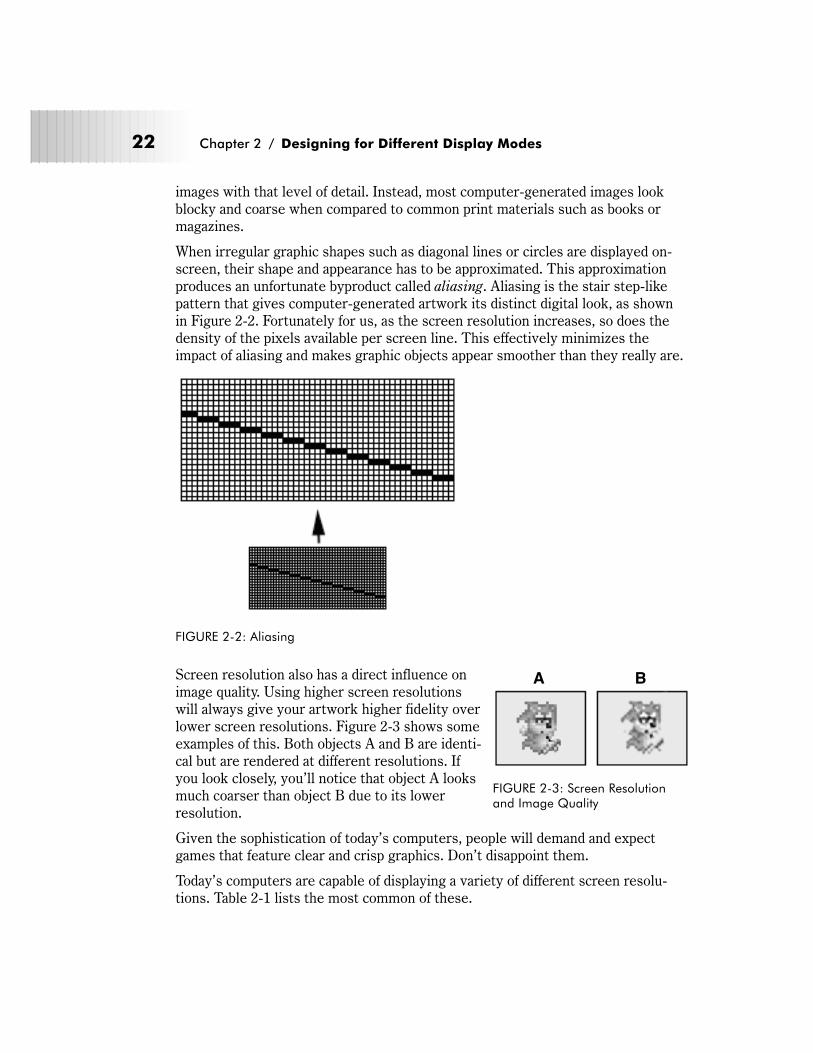
images with that level of detail. Instead, most computer-generated images look
blocky and coarse when compared to common print materials such as books or
magazines.
When irregular graphic shapes such as diagonal lines or circles are displayed on-
screen, their shape and appearance has to be approximated. This approximation
produces an unfortunate byproduct called aliasing. Aliasing is the stair step-like
pattern that gives computer-generated artwork its distinct digital look, as shown
in Figure 2-2. Fortunately for us, as the screen resolution increases, so does the
density of the pixels available per screen line. This effectively minimizes the
impact of aliasing and makes graphic objects appear smoother than they really are.
Screen resolution also has a direct influence on
image quality. Using higher screen resolutions
will always give your artwork higher fidelity over
lower screen resolutions. Figure 2-3 shows some
examples of this. Both objects A and B are identi-
cal but are rendered at different resolutions. If
you look closely, you’ll notice that object A looks
much coarser than object B due to its lower
resolution.
Given the sophistication of today’s computers, people will demand and expect
games that feature clear and crisp graphics. Don’t disappoint them.
Today’s computers are capable of displaying a variety of different screen resolu-
tions. Table 2-1 lists the most common of these.
22 Chapter 2 / Designing for Different Display Modes
FIGURE 2-2: Aliasing
A B
FIGURE 2-3: Screen Resolutionand Image Quality
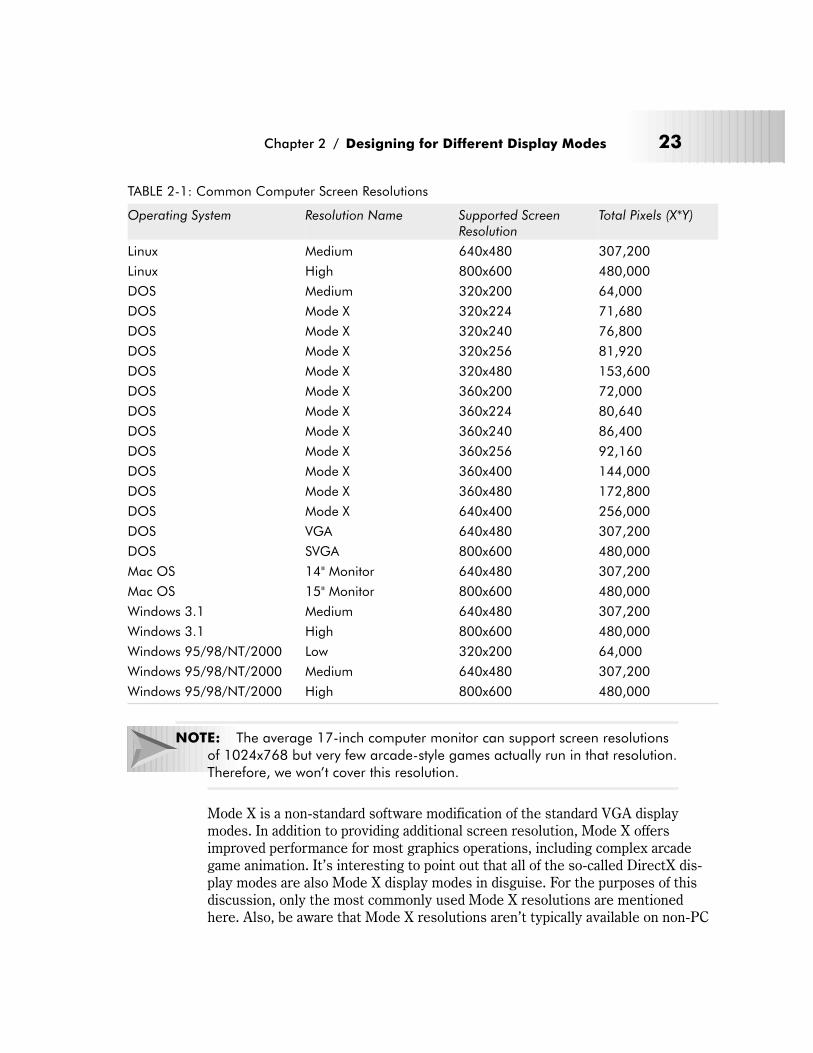
TABLE 2-1: Common Computer Screen Resolutions
Operating System Resolution Name Supported ScreenResolution
Total Pixels (X*Y)
Linux Medium 640x480 307,200
Linux High 800x600 480,000
DOS Medium 320x200 64,000
DOS Mode X 320x224 71,680
DOS Mode X 320x240 76,800
DOS Mode X 320x256 81,920
DOS Mode X 320x480 153,600
DOS Mode X 360x200 72,000
DOS Mode X 360x224 80,640
DOS Mode X 360x240 86,400
DOS Mode X 360x256 92,160
DOS Mode X 360x400 144,000
DOS Mode X 360x480 172,800
DOS Mode X 640x400 256,000
DOS VGA 640x480 307,200
DOS SVGA 800x600 480,000
Mac OS 14" Monitor 640x480 307,200
Mac OS 15" Monitor 800x600 480,000
Windows 3.1 Medium 640x480 307,200
Windows 3.1 High 800x600 480,000
Windows 95/98/NT/2000 Low 320x200 64,000
Windows 95/98/NT/2000 Medium 640x480 307,200
Windows 95/98/NT/2000 High 800x600 480,000
NOTE: The average 17-inch computer monitor can support screen resolutions
of 1024x768 but very few arcade-style games actually run in that resolution.
Therefore, we won’t cover this resolution.
Mode X is a non-standard software modification of the standard VGA display
modes. In addition to providing additional screen resolution, Mode X offers
improved performance for most graphics operations, including complex arcade
game animation. It’s interesting to point out that all of the so-called DirectX dis-
play modes are also Mode X display modes in disguise. For the purposes of this
discussion, only the most commonly used Mode X resolutions are mentioned
here. Also, be aware that Mode X resolutions aren’t typically available on non-PC
Chapter 2 / Designing for Different Display Modes 23
hardware (i.e., the Macintosh) because of differences in video hardware
architecture.
Screen Resolution Issues
Failing to take screen resolution into account while designing your arcade game
graphics can have disastrous results. Here are three important issues to consider
when dealing with screen resolution:
� Graphics production time
� DPI differences
� Platform compatibility
Graphics Production Time
Even experienced designers find that creating high-quality game art takes lots of
time, precision, and patience to do well. As such, it’s not a process that takes
kindly to being rushed. Once you get into a project, you’ll often find that it can
take you hours or even days to make a particular graphic object look just the way
you want it.
This being said, it’s important to understand how screen resolution can influence
the time it takes you to create your game artwork. These influences include screen
real estate, subject matter, and comfort level.
Screen Real Estate
The higher the screen resolution, the more on-screen “real estate” there is for
you to contend with. For example, if you were designing in a relatively low screen
resolution like 320x200, you would be working with 64,000 pixels. However, if you
were designing in a 640x480 resolution, you would be working with 307,000 pix-
els, and so on. That’s a huge increase in on-screen area, 4.8 times more to be
exact. This extra screen area means that there’s more screen space to fill in with
your objects. This in itself can negatively impact how long it takes you to create
your graphics.
Subject Matter
The subject matter of your artwork can also make a big difference on how long the
graphics creation process takes. For example, very simple artwork, such as those
composed of simple shapes, probably won’t be affected by screen resolution very
much. However, very complex artwork that features intricate shapes and patterns
might be affected, as such artwork tends to be more susceptible to visual anoma-
lies that higher screen resolutions can reveal.
Comfort Level
Finally, your comfort level with designing at different screen resolutions can be a
big factor on how long it takes you to create graphics for a given project. For
24 Chapter 2 / Designing for Different Display Modes

example, an artist comfortable with designing at one resolution may not feel com-
fortable designing artwork at another. This is because most graphic artists tend to
learn how to create game graphics at a specific resolution and, over time, adjust
their drawing styles to match the particular quirks and eccentricities exhibited by
that resolution. As a result, many artists aren’t able to easily adapt to a different
screen resolution without a significant amount of retraining and practice. For
example, if you’re used to drawing your artwork at a resolution of 320x200 and
suddenly have to work at a resolution of 640x480 for a project, you may be in for a
rude awakening. You’ll quickly discover that the pixel size and orientation of this
screen resolution has totally changed, potentially throwing you off and slowing
you down.
In any case, be sure to consider these issues thoroughly before you tackle a pro-
ject and make sure you set aside enough time to handle any such contingency. You
have been warned!
DPI Differences
Screen resolution is also sometimes specified as DPI, or dots per inch. DPI is
important to consider because it influences how different images display at vari-
ous screen resolutions and monitor sizes. For example, an image created at a
resolution of 640x480 on a 15-inch monitor will appear larger when shown on a
Chapter 2 / Designing for Different Display Modes 25
320 x 240 Resolution
640 x 480 Resolution
800 x 600 Resolution
FIGURE 2-4: Comparison of Different Screen Resolution Sizes
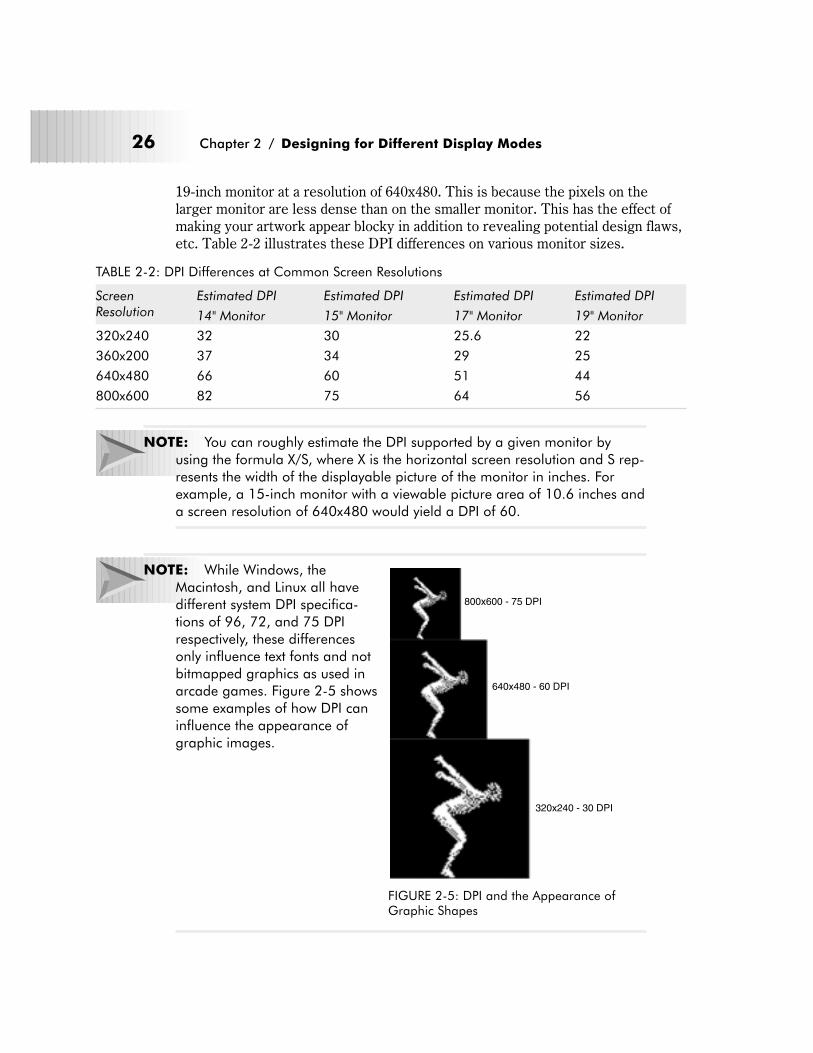
19-inch monitor at a resolution of 640x480. This is because the pixels on the
larger monitor are less dense than on the smaller monitor. This has the effect of
making your artwork appear blocky in addition to revealing potential design flaws,
etc. Table 2-2 illustrates these DPI differences on various monitor sizes.
TABLE 2-2: DPI Differences at Common Screen Resolutions
ScreenResolution
Estimated DPI
14" Monitor
Estimated DPI
15" Monitor
Estimated DPI
17" Monitor
Estimated DPI
19" Monitor
320x240 32 30 25.6 22
360x200 37 34 29 25
640x480 66 60 51 44
800x600 82 75 64 56
NOTE: You can roughly estimate the DPI supported by a given monitor by
using the formula X/S, where X is the horizontal screen resolution and S rep-
resents the width of the displayable picture of the monitor in inches. For
example, a 15-inch monitor with a viewable picture area of 10.6 inches and
a screen resolution of 640x480 would yield a DPI of 60.
NOTE: While Windows, the
Macintosh, and Linux all have
different system DPI specifica-
tions of 96, 72, and 75 DPI
respectively, these differences
only influence text fonts and not
bitmapped graphics as used in
arcade games. Figure 2-5 shows
some examples of how DPI can
influence the appearance of
graphic images.
26 Chapter 2 / Designing for Different Display Modes
800x600 - 75 DPI
640x480 - 60 DPI
320x240 - 30 DPI
FIGURE 2-5: DPI and the Appearance ofGraphic Shapes
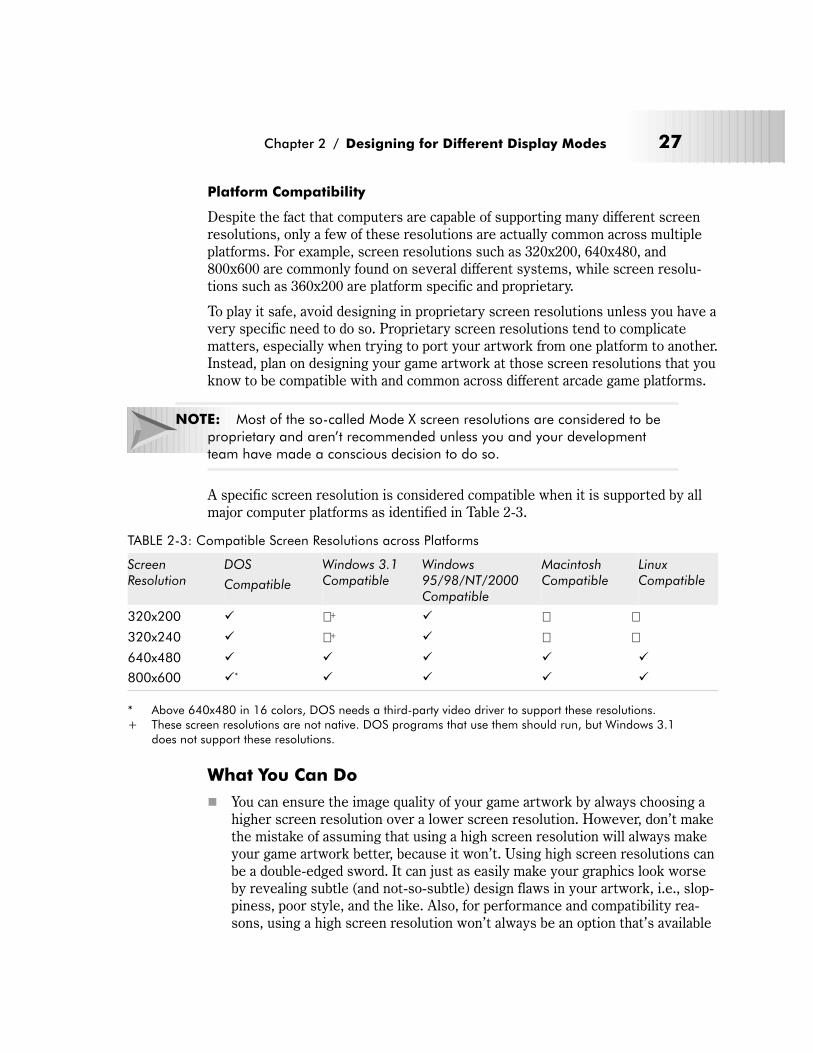
Platform Compatibility
Despite the fact that computers are capable of supporting many different screen
resolutions, only a few of these resolutions are actually common across multiple
platforms. For example, screen resolutions such as 320x200, 640x480, and
800x600 are commonly found on several different systems, while screen resolu-
tions such as 360x200 are platform specific and proprietary.
To play it safe, avoid designing in proprietary screen resolutions unless you have a
very specific need to do so. Proprietary screen resolutions tend to complicate
matters, especially when trying to port your artwork from one platform to another.
Instead, plan on designing your game artwork at those screen resolutions that you
know to be compatible with and common across different arcade game platforms.
NOTE: Most of the so-called Mode X screen resolutions are considered to be
proprietary and aren’t recommended unless you and your development
team have made a conscious decision to do so.
A specific screen resolution is considered compatible when it is supported by all
major computer platforms as identified in Table 2-3.
TABLE 2-3: Compatible Screen Resolutions across Platforms
ScreenResolution
DOS
Compatible
Windows 3.1Compatible
Windows95/98/NT/2000Compatible
MacintoshCompatible
LinuxCompatible
320x200 � � + � � �320x240 � � + � � �640x480 � � � � �
800x600 �* � � � �
* Above 640x480 in 16 colors, DOS needs a third-party video driver to support these resolutions.+ These screen resolutions are not native. DOS programs that use them should run, but Windows 3.1
does not support these resolutions.
What You Can Do
� You can ensure the image quality of your game artwork by always choosing a
higher screen resolution over a lower screen resolution. However, don’t make
the mistake of assuming that using a high screen resolution will always make
your game artwork better, because it won’t. Using high screen resolutions can
be a double-edged sword. It can just as easily make your graphics look worse
by revealing subtle (and not-so-subtle) design flaws in your artwork, i.e., slop-
piness, poor style, and the like. Also, for performance and compatibility rea-
sons, using a high screen resolution won’t always be an option that’s available
Chapter 2 / Designing for Different Display Modes 27

to you. Fortunately, it happens that many games can work well at lower
screen resolutions as well. Refer to Table 2-11 to see some examples of this.
� You can actually speed up the graphics creation time for most game projects
by cheating. For example, if your game doesn’t require very high-resolution
objects, consider creating your graphics using a lower screen resolution
instead, i.e., use 320x240 instead of 640x480 or 640x480 instead of 800x600,
etc. If the lack of image quality concerns you, don’t let it worry you too much.
You can often make up for the lack of overall resolution by strategically using
color. Color, as we’ll see later in Chapters 7 and 8, has the unique ability of
being able to simulate resolution through clever shading. What’s more, there
are many instances where fast animation or certain game styles (i.e., “retro”)
can minimize the impact of not having very highly detailed graphic objects
present. This is because most users psychologically won’t perceive the lack of
detail once they become engrossed in the game’s action.
� Unfortunately, you can’t control how different monitors handle DPI at different
screen sizes, as there is simply too much variation possible. However, you
might be able to anticipate how some systems will render your artwork by
testing your artwork at different screen sizes prior to incorporating it into a
game. This way, you might be able to make some changes that will minimize
the flaws and defects that might be exposed in your artwork on different sized
monitor screens.
� To avoid graphics compatibility and porting problems between major arcade
game platforms such as the PC or Macintosh, always try to design your art-
work using a commonly supported screen resolution. For example, 640x480 is
compatible with Windows, Linux, and Macintosh machines, while 320x200 is
largely compatible with DOS, Windows, and many dedicated video game con-
soles (i.e., Super Nintendo, etc.).
Aspect Ratio
An important, but little known fact is that most popular screen resolutions are
horizontally oriented and actually appear rectangular when displayed, and not
square. Therefore, they are said to have an aspect ratio, or the ratio of horizontal
pixels to vertical pixels, of 4:3. In other words, the images on these screens are
1.33 times wider than they are tall. We refer to this measurement as the horizontal
aspect ratio of an image.
Why It’s Important
Aspect ratio is important because it helps to ensure that geometric shapes such as
circles, curves, and diagonal lines are displayed on the screen correctly. In order
to achieve this, however, some screen resolutions, such as those with 4:3 aspect
ratios, actually change the shape of their pixels from rectangles to squares. Doing
28 Chapter 2 / Designing for Different Display Modes
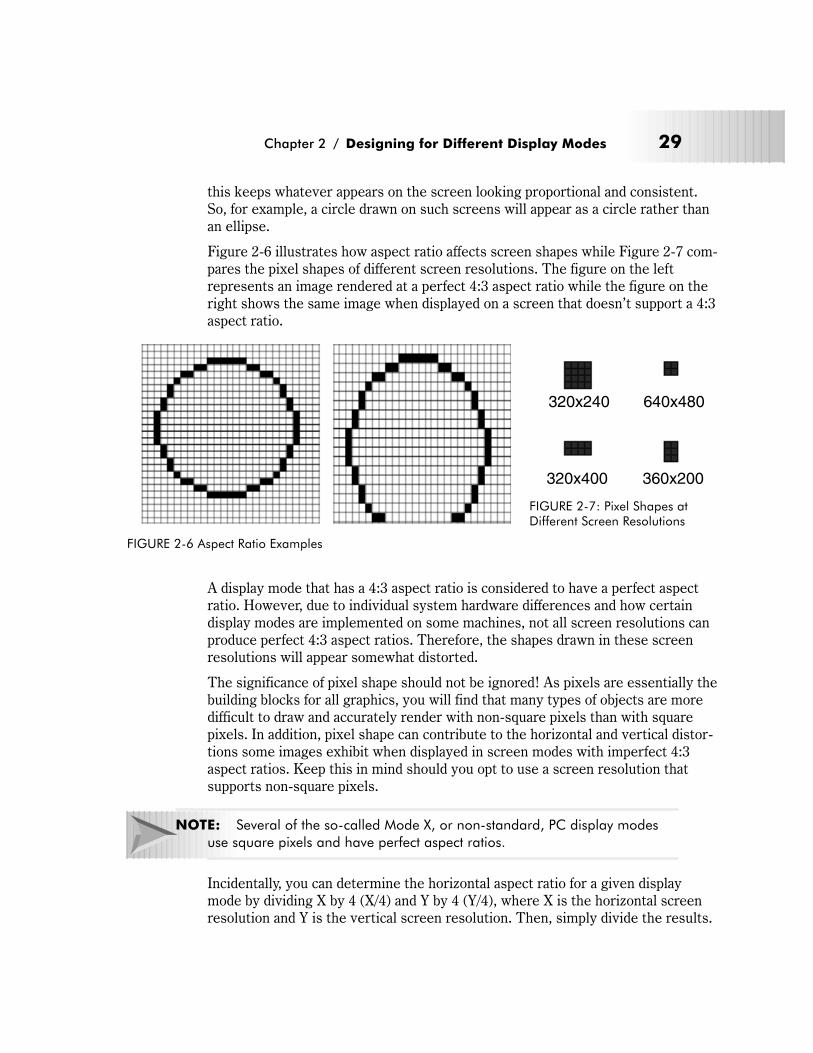
this keeps whatever appears on the screen looking proportional and consistent.
So, for example, a circle drawn on such screens will appear as a circle rather than
an ellipse.
Figure 2-6 illustrates how aspect ratio affects screen shapes while Figure 2-7 com-
pares the pixel shapes of different screen resolutions. The figure on the left
represents an image rendered at a perfect 4:3 aspect ratio while the figure on the
right shows the same image when displayed on a screen that doesn’t support a 4:3
aspect ratio.
A display mode that has a 4:3 aspect ratio is considered to have a perfect aspect
ratio. However, due to individual system hardware differences and how certain
display modes are implemented on some machines, not all screen resolutions can
produce perfect 4:3 aspect ratios. Therefore, the shapes drawn in these screen
resolutions will appear somewhat distorted.
The significance of pixel shape should not be ignored! As pixels are essentially the
building blocks for all graphics, you will find that many types of objects are more
difficult to draw and accurately render with non-square pixels than with square
pixels. In addition, pixel shape can contribute to the horizontal and vertical distor-
tions some images exhibit when displayed in screen modes with imperfect 4:3
aspect ratios. Keep this in mind should you opt to use a screen resolution that
supports non-square pixels.
NOTE: Several of the so-called Mode X, or non-standard, PC display modes
use square pixels and have perfect aspect ratios.
Incidentally, you can determine the horizontal aspect ratio for a given display
mode by dividing X by 4 (X/4) and Y by 4 (Y/4), where X is the horizontal screen
resolution and Y is the vertical screen resolution. Then, simply divide the results.
Chapter 2 / Designing for Different Display Modes 29
FIGURE 2-6 Aspect Ratio Examples
320x240
320x400 360x200
640x480
FIGURE 2-7: Pixel Shapes atDifferent Screen Resolutions

For example, to determine the aspect ratio for a screen resolution 800x600 you
would apply this formula as follows: 800/4 = 200 and 600/4 = 150. Dividing 200 by
150 yields 1.33 or a perfect 4:3 aspect ratio.
NOTE: Programmers sometimes equate the perfect 4:3 aspect ratio to a value
of 1.0. According to this scale, those display modes that have aspect ratios
that are more than 4:3 or less than 4:3 are considered to be greater than
1.0 and less than 1.0, respectively.
Table 2-4 shows some of the more common aspect ratios supported by different
display modes (both Mode X and the standard, compatible modes).
TABLE 2-4: Common Display Mode Aspect Ratios
ScreenResolution
HorizontalAspect Ratio
Square Pixels Display Mode Type
320x200 1.6 � Mode X
320x224 1.42 � Mode X
320x240 1.33 � Mode X, Compatible
320x256 1.25 � Mode X
320x400 .80 � Mode X
320x480 .66 � Mode X
360x200 1.8 � Mode X
360x224 1.6 � Mode X
360x240 1.5 � Mode X
360x256 1.4 � Mode X
360x400 .90 � Mode X
360x480 .75 � Mode X
640x400 1.6 � Mode X
640x480 1.33 � Compatible
800x600 1.33 � Compatible
Aspect Ratio Issues
If you’ve ever wondered why the shape and orientation of identical graphic images
sometimes appear differently across systems, you can pretty much bet that aspect
ratio is the reason. When a screen’s aspect ratio is out of whack, so too will be
everything else on the screen.
As such, you’re likely to encounter these two problems related to aspect ratio
when designing arcade game artwork for different display modes:
30 Chapter 2 / Designing for Different Display Modes
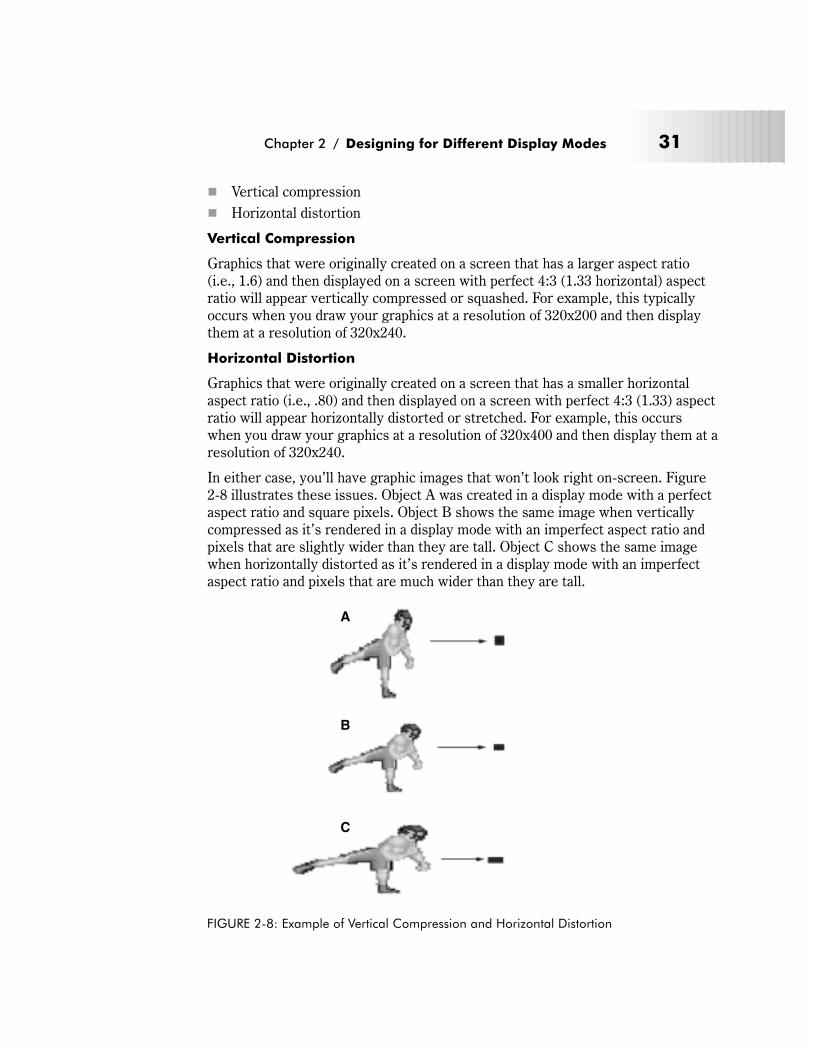
� Vertical compression
� Horizontal distortion
Vertical Compression
Graphics that were originally created on a screen that has a larger aspect ratio
(i.e., 1.6) and then displayed on a screen with perfect 4:3 (1.33 horizontal) aspect
ratio will appear vertically compressed or squashed. For example, this typically
occurs when you draw your graphics at a resolution of 320x200 and then display
them at a resolution of 320x240.
Horizontal Distortion
Graphics that were originally created on a screen that has a smaller horizontal
aspect ratio (i.e., .80) and then displayed on a screen with perfect 4:3 (1.33) aspect
ratio will appear horizontally distorted or stretched. For example, this occurs
when you draw your graphics at a resolution of 320x400 and then display them at a
resolution of 320x240.
In either case, you’ll have graphic images that won’t look right on-screen. Figure
2-8 illustrates these issues. Object A was created in a display mode with a perfect
aspect ratio and square pixels. Object B shows the same image when vertically
compressed as it’s rendered in a display mode with an imperfect aspect ratio and
pixels that are slightly wider than they are tall. Object C shows the same image
when horizontally distorted as it’s rendered in a display mode with an imperfect
aspect ratio and pixels that are much wider than they are tall.
Chapter 2 / Designing for Different Display Modes 31
A
B
C
FIGURE 2-8: Example of Vertical Compression and Horizontal Distortion
What You Can Do
� You can minimize the impact of screen aspect ratio on your artwork by design-
ing your graphics as closely as possible to the target resolution of your game.
For our purposes, the target resolution refers to the resolution that the game
will actually run in. For example, if you already know ahead of time (and you
usually will) that the artwork for the DOS game you’re working on will run in
a resolution of 320x240, design your graphics at a screen resolution of
320x240 and not at 320x224 or 320x200, etc. This is just common sense.
� You can reduce aspect ratio distortion by avoiding designing your artwork in
display modes that have horizontal aspect ratios that are less than 1.33. Such
display modes have problems correctly displaying and maintaining the propor-
tions of rectangular objects such as sprites and background tiles. If, for some
reason, you must design for these display modes, try to use them for title and
menu screens or for situations where proportion doesn’t matter.
� Never try to save time by trying to adjust the aspect ratio of your artwork
after the fact. By this I mean, don’t draw your graphics in a resolution of
320x224 and then try to resize them down to match a screen resolution with a
different aspect ratio, such as 320x200. The end results just won’t look very
good.
Refresh Rate
The refresh rate, also known as the frame rate, is a number that measures how fast
the electron gun in a computer monitor’s CRT (cathode-ray tube) paints an image
from the top of the screen to the bottom. Refresh rates are measured in hertz (Hz),
or cycles per second. For example, a display mode with a refresh rate of 60Hz
repaints the display 60 times per second.
Why It’s Important
The refresh rate affects how comfortable (or uncomfortable) it is to look at an
image on a given screen. Obviously, you are more likely to be productive when
you are comfortable than when you are not.
Refresh Rate Issues
� User Fatigue
User Fatigue
Regarding game graphics design, the refresh rate is important to mention for one
reason only: user fatigue.
32 Chapter 2 / Designing for Different Display Modes
If the refresh rate of the display is too slow, the phosphors that compose the image
will fade before the CRT can repaint them. This premature fading creates a phe-
nomenon called flicker. Among other things, flicker can induce eyestrain and even
headaches if you’re exposed to it over a prolonged period of time.
Since creating game artwork and animation requires you to spend a significant
amount of time in front of the computer screen, this isn’t an ideal situation. Fortu-
nately, you can minimize the effects of flicker by simply upping the screen’s
refresh rate. That’s because higher refresh rates produce much less flicker.
VESA (http://www.vesa.org), an association of computer manufacturers that
sets standards in the computer industry, recommends that users set their refresh
rates to at least 85Hz because eyestrain and related discomfort can be drastically
reduced at this level. Incidentally, this is a change from their old recommendation
that had previously established 72Hz as the minimum satisfactory refresh rate.
Refresh rates are dependent on two factors: the capabilities of the computer’s
video hardware and the capabilities of the monitor. Therefore, not all systems or
platforms will support the same refresh rate at the same resolution. In general,
however, most new monitors come equipped to handle refresh rates of at least
72Hz and more than a few are capable of supporting refresh rates of 85Hz or more
as well.
Table 2-5 shows some refresh rates that are typically supported at different dis-
play modes.
TABLE 2-5: Common Refresh Rates
Display Mode Common Refresh Rate(s)
320x200 60Hz, 70Hz, 72Hz, 75Hz, 85Hz
320x224 60Hz
320x240 60Hz
320x400 60Hz, 70Hz
360x200 60Hz, 72Hz
360x240 60Hz
360x400 60Hz, 72Hz
360x480 60Hz
640x400 60Hz, 70Hz, 72Hz
640x480 60Hz, 72Hz, 75Hz, 85Hz, 120Hz
800x600 56Hz, 60Hz, 72Hz, 75Hz, 85Hz, 95Hz, 100Hz, 110Hz, 120Hz
Chapter 2 / Designing for Different Display Modes 33
NOTE: Refresh rates are sometimes influenced by external factors like electrical
current. For example, it was common for home computers during the 1980s
to have their screens refresh their contents at 60Hz in the United States but
at 50Hz in Europe due to electrical differences between the two regions.
Table 2-6 shows some examples of different refresh rates and their impact on eye-
strain after about three hours of continuous use.
TABLE 2-6: Refresh Rates and Impact on Eyestrain
Refresh Rate Likelihood of Eyestrain Comments
< 60Hz Very High Usually seen only on older computers.
60Hz-67Hz High Common refresh rate supported by many low-endcomputer monitors and televisions. The defaultWindows, DOS, Linux, and Macintosh refresh rates.
72Hz-75Hz Moderate Supported by most low-end computer monitors andvideo cards. Very common.
85Hz Low Supported by most midrange computer monitors andvideo cards. Increasingly common.
> 95Hz Very Low Supported only by high-end computer monitors andvideo cards. Still somewhat uncommon.
What You Can Do
To fight user fatigue, follow these suggestions:
� Don’t design your graphics on a screen that supports less than a 72Hz refresh
rate, especially on larger monitors (i.e., those above 17") as they’re more
prone to flicker problems than smaller monitors. Although 72Hz isn’t as good
as 85Hz, it’s still a lot better than 60Hz. Of course, if your computer supports
refresh rates of 85Hz or above, then take advantage of it. Your eyes will thank
you.
� As it turns out, many operating systems default to lower refresh rates (i.e.,
60Hz) even though they’re capable of supporting much higher ones. For exam-
ple, Windows always defaults to 60Hz even if your system can support more.
However, this situation can usually be corrected by simply adjusting your sys-
tem’s display configuration, i.e., the Display Properties applet under the Win-
dows Control Panel or the Monitors & Sound control panel on the Macintosh.
� It’s been scientifically proven that taking frequent breaks can reduce user
fatigue. So, for every hour spent staring at a flickering CRT screen, try to
spend at least 5-10 minutes looking away from the screen. Close and rest your
eyes or simply focus on something else such as what’s out your window.
34 Chapter 2 / Designing for Different Display Modes
NOTE: DOS systems can’t usually adjust their refresh rates unless a third-party
utility is used, such as SciTech software’s Display Doctor or the free
UniRefresh utility that is included on the book’s accompanying CD-ROM.
See Appendix B for more information.
Table 2-7 shows the default refresh rates of the different computer platforms.
TABLE 2-7: Default System Refresh Rates
Platform Default Refresh Rate
DOS 60Hz
Windows 60Hz
Macintosh 67Hz
Linux 60Hz or 67Hz*
* Depends on whether Linux is running on Intel or Macintosh hardware.
� Only use a high-quality computer monitor when designing your artwork since
it’s more likely to be able to handle the higher refresh rates you’ll require than
a cheaper, less capable monitor.
Color Capability
Everything around us is composed of color, including what we see on the com-
puter screen. Arcade games, whether they’re running on PCs or dedicated video
game consoles, are capable of using and displaying an astounding range of colors.
In fact, many people consider color use to be one of the most appealing aspects of
arcade style games.
All computers understand color as a combination of three primary colors: red (R),
green (G), and blue (B), or RGB. These combinations can be manipulated to create
any of the millions of colors available in the color spectrum. The average com-
puter display is capable of generating an almost unlimited number of colors.
However, under most circumstances, it usually can’t show them all at once. As it
happens, the actual number of colors that can be displayed at any given time is
dependent on the specific hardware capabilities of the system. For example, some
machines can display hundreds, thousands, or even millions of simultaneous col-
ors while others can only display a few. In order to compensate for this, the
computer scientists developed the concept of the color palette. Color palettes are
collections of colors from which one or more colors can be selected. Two types of
color palettes exist: physical palettes and logical palettes.
Physical color palettes (also referred to as hardware palettes) contain all of the
possible color values that can be generated by a computer’s graphics hardware. In
many cases, this can be as many as 16,777,216 colors, if not more. Logical palettes
Chapter 2 / Designing for Different Display Modes 35
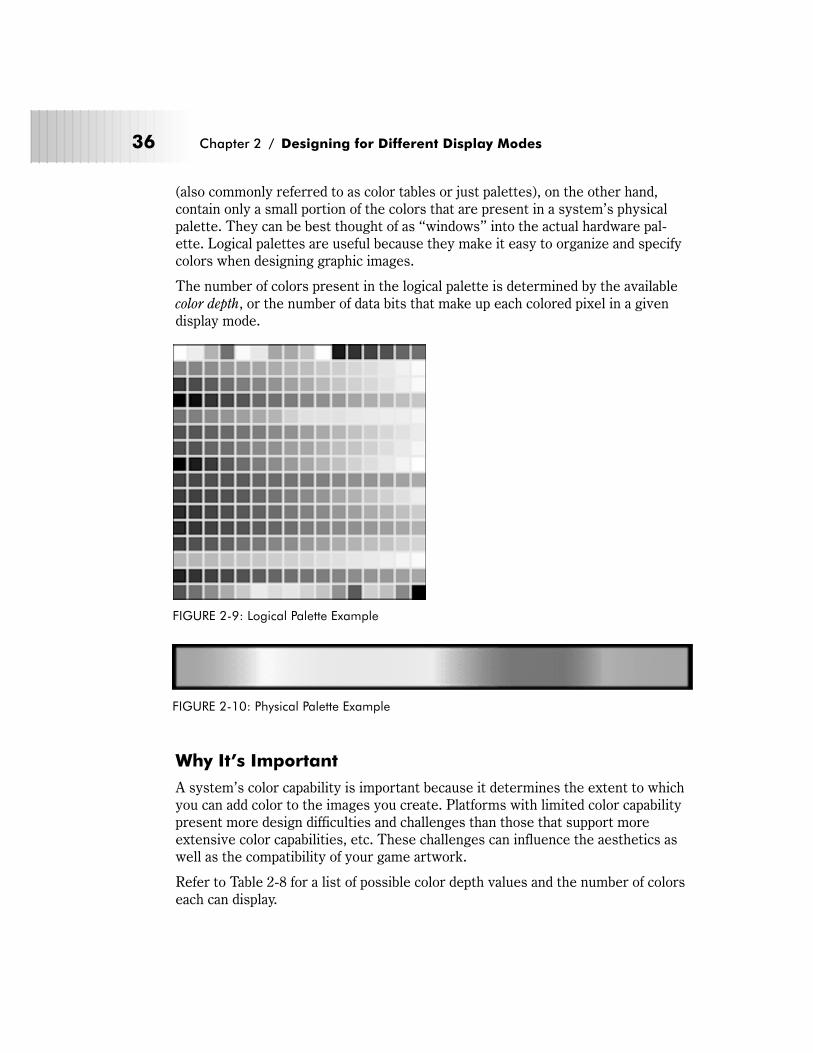
(also commonly referred to as color tables or just palettes), on the other hand,
contain only a small portion of the colors that are present in a system’s physical
palette. They can be best thought of as “windows” into the actual hardware pal-
ette. Logical palettes are useful because they make it easy to organize and specify
colors when designing graphic images.
The number of colors present in the logical palette is determined by the available
color depth, or the number of data bits that make up each colored pixel in a given
display mode.
Why It’s Important
A system’s color capability is important because it determines the extent to which
you can add color to the images you create. Platforms with limited color capability
present more design difficulties and challenges than those that support more
extensive color capabilities, etc. These challenges can influence the aesthetics as
well as the compatibility of your game artwork.
Refer to Table 2-8 for a list of possible color depth values and the number of colors
each can display.
36 Chapter 2 / Designing for Different Display Modes
FIGURE 2-9: Logical Palette Example
FIGURE 2-10: Physical Palette Example
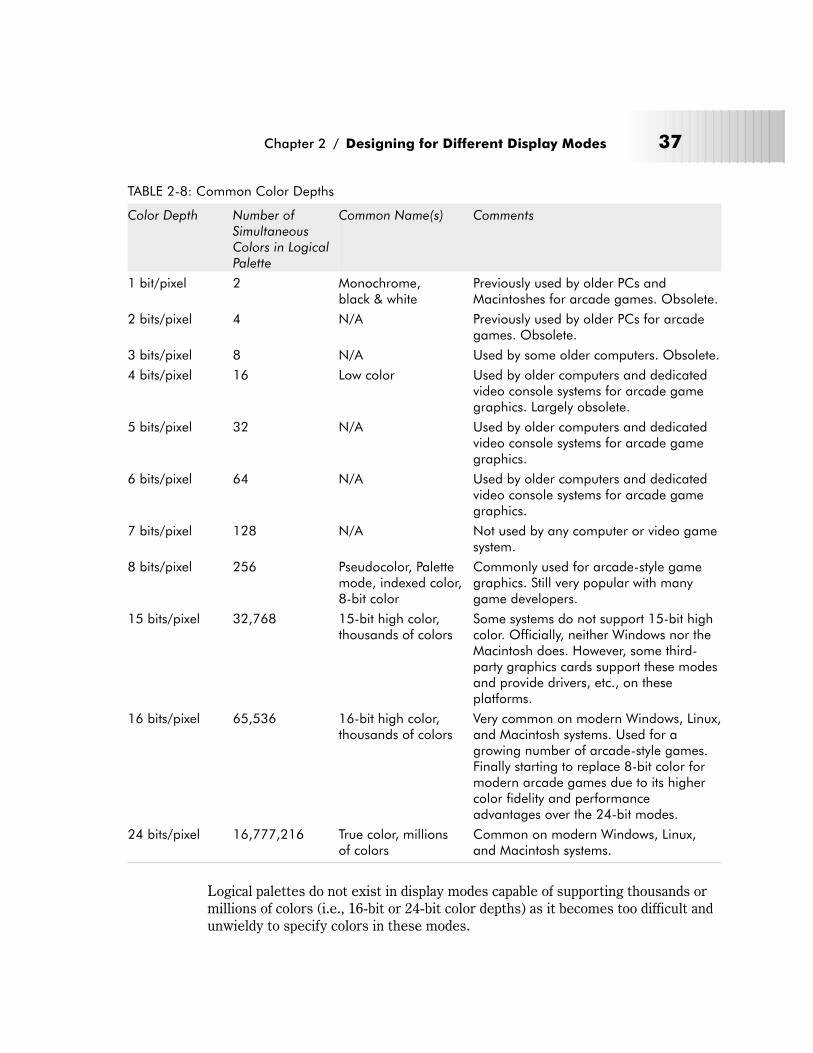
TABLE 2-8: Common Color Depths
Color Depth Number ofSimultaneousColors in LogicalPalette
Common Name(s) Comments
1 bit/pixel 2 Monochrome,black & white
Previously used by older PCs andMacintoshes for arcade games. Obsolete.
2 bits/pixel 4 N/A Previously used by older PCs for arcadegames. Obsolete.
3 bits/pixel 8 N/A Used by some older computers. Obsolete.
4 bits/pixel 16 Low color Used by older computers and dedicatedvideo console systems for arcade gamegraphics. Largely obsolete.
5 bits/pixel 32 N/A Used by older computers and dedicatedvideo console systems for arcade gamegraphics.
6 bits/pixel 64 N/A Used by older computers and dedicatedvideo console systems for arcade gamegraphics.
7 bits/pixel 128 N/A Not used by any computer or video gamesystem.
8 bits/pixel 256 Pseudocolor, Palettemode, indexed color,8-bit color
Commonly used for arcade-style gamegraphics. Still very popular with manygame developers.
15 bits/pixel 32,768 15-bit high color,thousands of colors
Some systems do not support 15-bit highcolor. Officially, neither Windows nor theMacintosh does. However, some third-party graphics cards support these modesand provide drivers, etc., on theseplatforms.
16 bits/pixel 65,536 16-bit high color,thousands of colors
Very common on modern Windows, Linux,and Macintosh systems. Used for agrowing number of arcade-style games.Finally starting to replace 8-bit color formodern arcade games due to its highercolor fidelity and performanceadvantages over the 24-bit modes.
24 bits/pixel 16,777,216 True color, millionsof colors
Common on modern Windows, Linux,and Macintosh systems.
Logical palettes do not exist in display modes capable of supporting thousands or
millions of colors (i.e., 16-bit or 24-bit color depths) as it becomes too difficult and
unwieldy to specify colors in these modes.
Chapter 2 / Designing for Different Display Modes 37
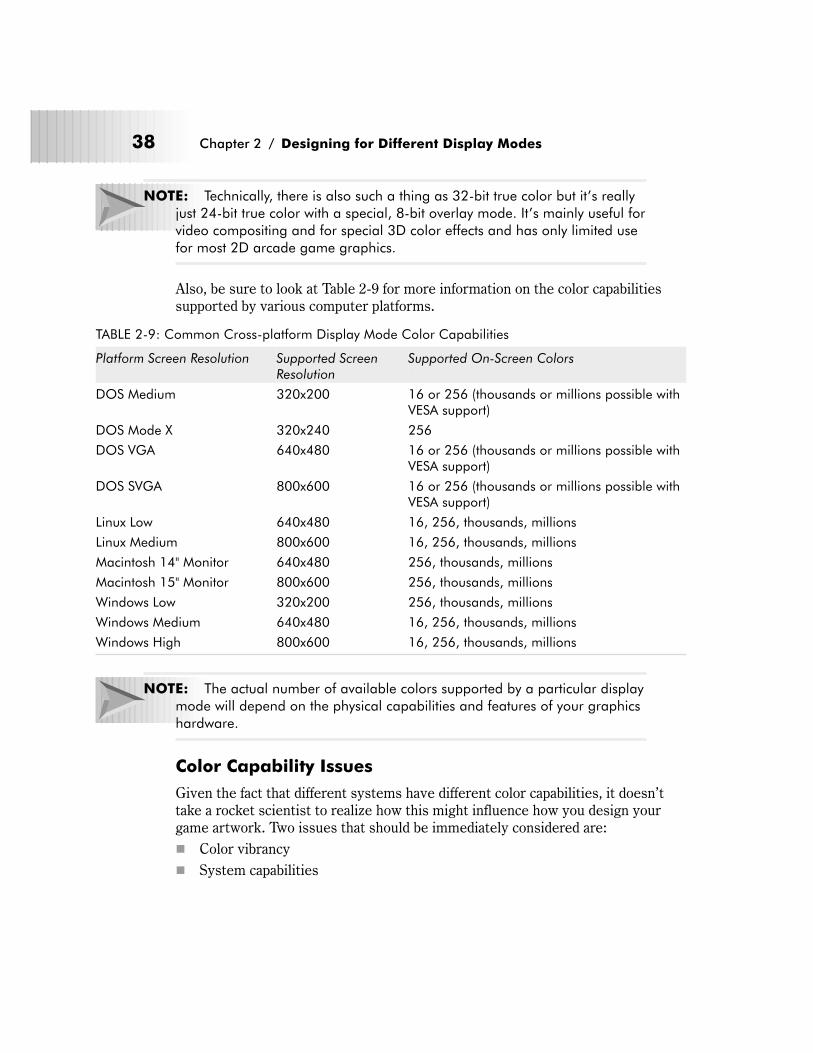
NOTE: Technically, there is also such a thing as 32-bit true color but it’s really
just 24-bit true color with a special, 8-bit overlay mode. It’s mainly useful for
video compositing and for special 3D color effects and has only limited use
for most 2D arcade game graphics.
Also, be sure to look at Table 2-9 for more information on the color capabilities
supported by various computer platforms.
TABLE 2-9: Common Cross-platform Display Mode Color Capabilities
Platform Screen Resolution Supported ScreenResolution
Supported On-Screen Colors
DOS Medium 320x200 16 or 256 (thousands or millions possible withVESA support)
DOS Mode X 320x240 256
DOS VGA 640x480 16 or 256 (thousands or millions possible withVESA support)
DOS SVGA 800x600 16 or 256 (thousands or millions possible withVESA support)
Linux Low 640x480 16, 256, thousands, millions
Linux Medium 800x600 16, 256, thousands, millions
Macintosh 14" Monitor 640x480 256, thousands, millions
Macintosh 15" Monitor 800x600 256, thousands, millions
Windows Low 320x200 256, thousands, millions
Windows Medium 640x480 16, 256, thousands, millions
Windows High 800x600 16, 256, thousands, millions
NOTE: The actual number of available colors supported by a particular display
mode will depend on the physical capabilities and features of your graphics
hardware.
Color Capability Issues
Given the fact that different systems have different color capabilities, it doesn’t
take a rocket scientist to realize how this might influence how you design your
game artwork. Two issues that should be immediately considered are:
� Color vibrancy
� System capabilities
38 Chapter 2 / Designing for Different Display Modes
Color Vibrancy
In general, you’ll find that images and games that display their graphics using
thousands or millions of colors will look noticeably more vibrant and realistic than
those that only use a few dozen or a few hundred colors. This is because these
extra colors can make objects seem smoother and more defined due to the larger
number of shades that are available.
Meanwhile, objects that are rendered using fewer colors will seem coarser and
washed out in comparison. On such systems, you’ll also need to spend a lot more
of your time planning out the colors you’ll want to use. In addition, you’ll have to
learn to make compromises between those objects that you want to render faith-
fully and those you don’t. For example, you’ll probably want to apply more color
for the game’s main character than for background images, etc.
For these reasons, it’s advantageous to have more colors at your disposal to
design with.
System Capabilities
Unfortunately, basic realities in the form of platform limitations prevent us from
always being able to take advantage of such color-rich display modes. This is
because a system’s color capability is entirely dependent on the hardware it’s run-
ning on. If the video hardware you’re designing on or for doesn’t support high or
true color display modes, you’re out of luck. Just as you can’t get blood from a
stone, you can’t get high color from a system that can’t physically support it.
What You Can Do
If you’re not able to use a high color display mode in your game, you’ll have to
make the most of the situation. Here are a few ideas on how:
� You can simulate the presence of more color in an image through clever color
selection and special shading tricks. As it turns out, certain color combina-
tions, when used properly, can take advantage of how the average user per-
ceives color so that less color can actually seem like more. We’ll explore the
issues of user color perception and color selection in more detail in Chapters 7
and 8.
� You can use a technique called dithering to simulate the presence of color.
Dithering works by blending patterns of two colors to produce a third color
much like you would when mixing paint. Through the careful blending of dif-
ferent colors and patterns, you can generate hundreds of additional shades.
For example, a display mode that supports only 16 colors can usually generate
up to 256 shades through dithering. Meanwhile, a screen with 256 colors can
typically generate 65,536 shades and so on. Dithering is commonly used by
systems to display images that contain more colors than they normally could
display. For more information on dithering, consult Chapter 8.
Chapter 2 / Designing for Different Display Modes 39
� You can use high screen resolutions to trick the user into focusing more on
the detail and composition of the image rather than its actual color. Images
that are exquisitely detailed tend to minimize the need for color. Granted, this
technique won’t work for every situation, but it does work from time to time.
� You can take advantage of the fact that once a user starts playing a game, he or
she tends to focus more on the game’s action than on the specific details of the
game’s objects. This is especially true for most arcade games where fast
action forces the user to keep his eyes trained on only small areas of the
screen at any one time. This happens because most game objects usually
move too fast for the player’s eyes to be able to discern more than just passing
details of object forms and shapes, etc.
Gamma Level
Gamma level is a measurement that describes the relationship between the color
input from the computer’s video hardware and how bright it appears on the moni-
tor. The gamma level takes into account several elements of a system, including
the tolerances of the CRT, that generate the picture in a computer monitor or TV
and the overall color capabilities of the system.
A system’s gamma level is usually indicated as a value on a scale between 1.0 and
3.0. As you move the scale towards a gamma level of 1.0, the colors on the screen
appear lighter. Conversely, as you move the scale towards a gamma level of 3.0,
the colors on the screen become darker.
Why It’s Important
Gamma level is important because of how it can influence the appearance of your
graphics images in different situation. For example, a properly set gamma level
will produce true, realistic looking colors with good reproduction of the light, mid-
dle, and dark tones. An improperly adjusted gamma level won’t.
Some systems, such as the Apple Macintosh and Silicon Graphics workstations,
come with a properly tuned gamma level right out of the box. However, most
DOS- and Windows-based PCs do not and will often need to adjust their gamma
levels in order to correctly display color on the screen.
Gamma Level Issues
When designing your game graphics, you need to consider issues such as:
� Color accuracy
� Platform-specific gamma differences
40 Chapter 2 / Designing for Different Display Modes

Color Accuracy
Gamma level can directly affect an image’s color accuracy, its overall ability to
accurately reproduce color information on the screen. Consider, for example, an
identical image of a solider shown on two systems with different gamma level set-
tings. On one system, the soldier’s uniform may appear correctly as khaki while
on the other it may show up as brown. As you can appreciate, this issue presents a
serious challenge to game graphics designers because they’re never really able to
determine how the colors they choose will look on different platforms unless they
actually test them.
NOTE: Windows 3.1 is much worse at handling gamma levels than any of the
other versions of Windows. Whenever possible, avoid creating your graphics
on Windows 3.1. DOS also has no inherent ability to adjust its gamma
level. Therefore, graphics designed in the DOS environment will definitely
appear different (usually darker) than they will on another platform.
Platform-Specific Gamma Differences
Due to system gamma level differences, images will always appear much darker
when viewed on a PC than they will on a Macintosh. This is because most PCs
have gamma levels between 2.2 and 2.5 while all Macintoshes have a built-in
gamma level setting of 1.8. In comparison, gamma levels on most video game con-
soles will usually be around 2.5, as they tend to use televisions rather than
monitors for their displays. This is because virtually all televisions have a fixed
gamma level of around 2.5.
The issue becomes even more complicated when you consider that gamma levels
can vary even among machines on the same platform! For example, two Windows
PCs might have their gamma levels set differently even if they use identical hard-
ware and software.
Table 2-10 illustrates these system-specific gamma differences.
TABLE 2-10: Common Platform Screen Gamma Levels
Platform ApproximateGamma Level
Built-in GammaCorrection
DOS 2.2-2.5 �Linux 1.8 or 2.2* �Macintosh 1.8 �
Windows 2.2-2.5 �
* Depends on whether Linux runs on Intel or Macintosh hardware.
Chapter 2 / Designing for Different Display Modes 41
NOTE: The gamma levels mentioned in Table 2-10 are approximated because
every system varies to some extent based on hardware quality and individ-
ual user adjustments.
What You Can Do
Unfortunately, there isn’t too much you can do about rectifying this situation until
the various computer hardware manufacturers standardize on a gamma level
(there are actually proposals on the table that recommend the standard gamma
level to be 2.2). In the interim, you can try:
� Using an image-processing program to manually adjust the gamma level for
each platform on which you want to display your graphics. For example, if you
created your artwork on a system with a gamma of 2.2 and you wanted to
maintain the same gamma level on a machine with a gamma level of 1.8, you
could use such a program to make this change. Fortunately, this is easy to do
and a number of popular graphics programs provide this capability.
� Adding a gamma correction feature to your game. Such a mechanism will allow
the user to manually adjust the gamma levels on their machines to suit their
particular tastes and preferences. For example, if the game appears too dark,
this option can be used to adjust the colors to something lighter and vice
versa. Such options are now becoming standard features on today’s modern
computer games in order to compensate for platform specific gamma
differences.
� Calibrating your computer’s monitor using color-calibration software. Such
software is usually bundled with your system. While this won’t guarantee that
the color in your artwork will display consistently across different platforms, it
can help to ensure the colors you use in your images are at least created accu-
rately in the first place.
It is not possible to compensate for gamma levels if you don’t know your current
gamma level setting. However, you can determine your system’s current gamma
level by displaying the image available on the book’s accompanying CD-ROM in
the GAMMA directory.
Choosing Display Modes to Design For
Every display mode has its own particular advantages and disadvantages. Deciding
which display mode to design for isn’t always an easy choice to make and it
shouldn’t be taken lightly. You need to weigh several important issues, including:
� Screen performance
� Image clarity
� Color capability
42 Chapter 2 / Designing for Different Display Modes
� System compatibility
� Audience hardware capabilities
� Programming support
� Graphics production time
Screen Performance
When it comes to fast-action arcade games, the issue of screen performance is
still far and away the most important consideration when evaluating a display
mode. While display modes with higher resolution and color capabilities will defi-
nitely enhance the quality of your artwork, they will almost always do so at the
expense of drawing speed. This is due to the fact that higher screen resolutions
and color modes will consume more of your system’s resources (i.e., CPU time,
RAM, and disk space) than lower resolutions and color modes will. There’s simply
more information for the computer to process, store, and manipulate, and hence,
more raw computing power is needed to generate the display. As a result, higher
resolution and higher color display modes will always display graphics somewhat
slower than their lower resolution and color counterparts. So, while your images
may look better when rendered in high resolutions and color display modes, other
crucial items like playability may ultimately suffer in return for the improvement
in aesthetic quality.
Therefore, when considering designing for any display mode you must factor in its
performance. Consult with your developers to find the answer to the question:
“Will using this particular display mode slow down the game?” If the answer is
“yes,” you might want to consider finding an alternative display mode.
There are several factors that can influence a particular display mode’s screen
performance. They include:
� Memory architecture
� Large screen objects
� High color displays
� Screen scrolling
� Programming
Certain display modes, namely the non-standard Mode X ones, offer program-
mers, and hence games, better performance than more traditional display modes
due to their unique memory architecture. Therefore, using such screen modes can
often give your games a needed speed boost, especially when performing complex
animation.
Games that feature particularly large screen objects exacerbate the problem. This
is due to the fact that larger screen objects take longer to draw and animate than
Chapter 2 / Designing for Different Display Modes 43

smaller ones. Display modes that feature high resolutions and high color depths
are particularly prone to this issue.
Games that display their graphics using lots of color (16-bit or above) can slow the
screen display considerably. This is because such display modes require anywhere
from two to four times more memory to be manipulated by the computer than
those that use 16 or 256 colors. Avoid using such display modes unless they’re
absolutely necessary and make sure the target platform for your game is fast
enough to handle the extra work required.
NOTE: This situation is especially true when it comes to DOS games since
many DOS programming environments do not provide optimum video per-
formance without resorting to custom display drivers and/or low-level access
to the video hardware. It was also an important consideration with Windows
3.1 and 95 games until recently. Nowadays, most systems ship with very fast
video hardware and the drivers for these devices are often pre-optimized for
16-bit color display modes rather than the 8-bit modes. Nevertheless, this is
still an issue to think carefully about.
Screen scrolling, especially horizontal scrolling, can cause arcade games to experi-
ence major performance problems. This is because the computer must buffer and
then move several copies of the current screen in order to produce these effects.
While most video hardware is already set up to perform vertically oriented screen
scrolling, horizontal scrolling is a different matter altogether. It typically requires
special programming which consumes even more of the system’s resources.
Screen resolution and color depth can also impact screen-scrolling performance.
Higher color, high resolution screens need more memory and CPU time to store
and scroll the screen than lower color, lower resolution screens do.
Finally, how a game is programmed can have a significant impact on screen perfor-
mance. While this is usually out of your control, as the game designer/artist, it’s
important for you to understand how a game is being written. You should know
about any restrictions that the game’s code imposes way ahead of time in order to
avoid any problems later on.
For example, say the game’s sprite engine requires that all sprites be 32 pixels
wide. If you didn’t find this out before you started drawing, you can easily wind up
with hundreds of graphic objects that can’t be used. So, if you’re not sure about
the details, ask someone! Close communication with the game’s programmer(s) is
key to preventing this and other mishaps during the course of the project. This
way, you can do whatever you can in order to ensure that the graphics you create
are properly optimized prior to their inclusion in the game.
44 Chapter 2 / Designing for Different Display Modes
Image Clarity
Image clarity is a subjective measurement that looks at the display mode’s ability
to show images with sufficient detail and definition. Screen resolution influences
image clarity by allowing more information to be placed on the screen.
As a designer, you need to weigh the benefits that the different display modes
offer you in terms of image clarity with that of the other factors mentioned here,
particularly graphics production time and screen performance.
Color Capability
As discussed, an arcade game’s color capabilities play an important role in the
user’s positive perception of the game. This being said, it’s advantageous for us to
use as much color as possible in our game artwork.
When possible, you should design your artwork in high color (16-bit and above)
display modes, as they will give you the most freedom with regard to your color
selections and the type of color effects you can create. However, low color (8-bit)
display modes tend be the most practical choice for the widest range of arcade
style games. They offer distinct performance (for the most part) and compatibility
advantages over their higher color brethren. Therefore, you should carefully
weigh your potential gains with your potential losses when choosing a display
mode strictly on its color capability.
System Compatibility
Despite Windows’ dominance in the market, designers should not underestimate
compatibility with other systems and computer platforms when designing their
artwork. This is particularly true with regard to the Macintosh and Linux plat-
forms as they support similar if not identical graphics capabilities and represent a
sizeable audience to boot.
By designing your artwork using cross-platform compatible display modes (i.e.,
non-proprietary), you have the opportunity to port your artwork to other plat-
forms with a minimum of fuss and hassle.
Audience Hardware Capabilities
The actual hardware capabilities of your intended target audience can also be a
determining factor regarding which display modes you choose. Many users have
video hardware that supports certain screen resolution and color depths. Not all
video hardware will support every display mode or display mode feature. This is
usually due to limited available video memory. Video memory is used to hold the
screen image. The amount of memory required to generate the image depends
Chapter 2 / Designing for Different Display Modes 45
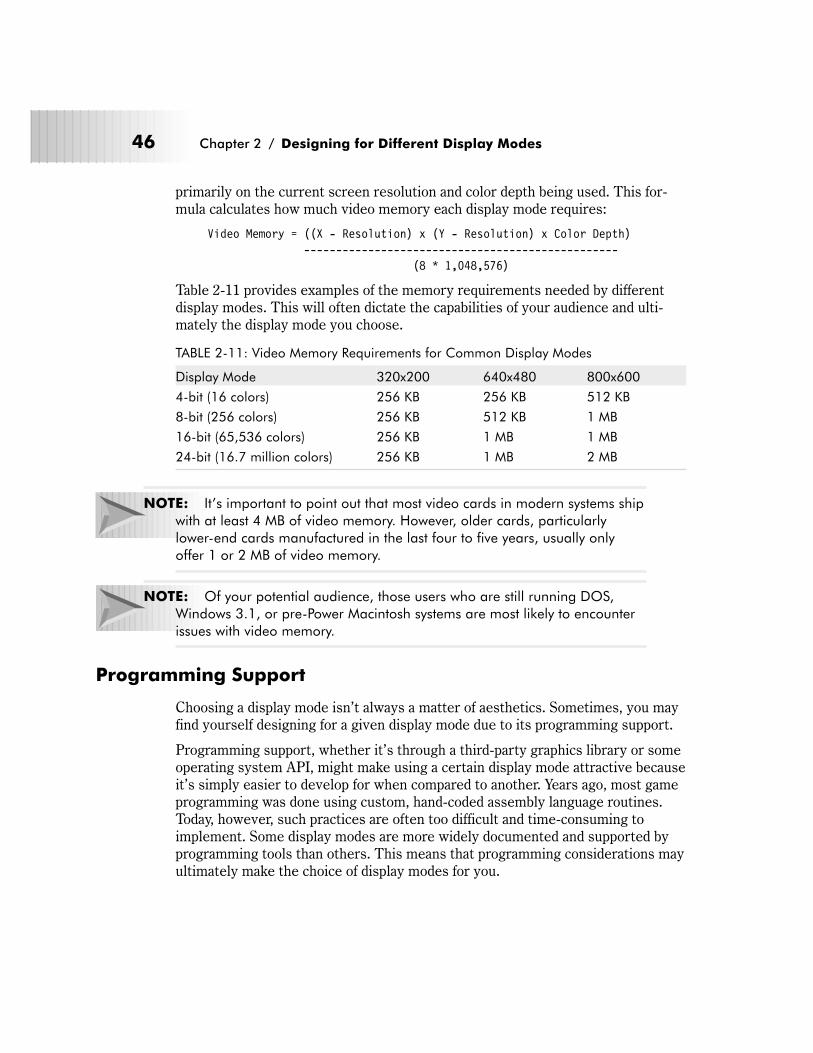
primarily on the current screen resolution and color depth being used. This for-
mula calculates how much video memory each display mode requires:
Video Memory = ((X - Resolution) x (Y - Resolution) x Color Depth)
-------------------------------------------------
(8 * 1,048,576)
Table 2-11 provides examples of the memory requirements needed by different
display modes. This will often dictate the capabilities of your audience and ulti-
mately the display mode you choose.
TABLE 2-11: Video Memory Requirements for Common Display Modes
Display Mode 320x200 640x480 800x600
4-bit (16 colors) 256 KB 256 KB 512 KB
8-bit (256 colors) 256 KB 512 KB 1 MB
16-bit (65,536 colors) 256 KB 1 MB 1 MB
24-bit (16.7 million colors) 256 KB 1 MB 2 MB
NOTE: It’s important to point out that most video cards in modern systems ship
with at least 4 MB of video memory. However, older cards, particularly
lower-end cards manufactured in the last four to five years, usually only
offer 1 or 2 MB of video memory.
NOTE: Of your potential audience, those users who are still running DOS,
Windows 3.1, or pre-Power Macintosh systems are most likely to encounter
issues with video memory.
Programming Support
Choosing a display mode isn’t always a matter of aesthetics. Sometimes, you may
find yourself designing for a given display mode due to its programming support.
Programming support, whether it’s through a third-party graphics library or some
operating system API, might make using a certain display mode attractive because
it’s simply easier to develop for when compared to another. Years ago, most game
programming was done using custom, hand-coded assembly language routines.
Today, however, such practices are often too difficult and time-consuming to
implement. Some display modes are more widely documented and supported by
programming tools than others. This means that programming considerations may
ultimately make the choice of display modes for you.
46 Chapter 2 / Designing for Different Display Modes
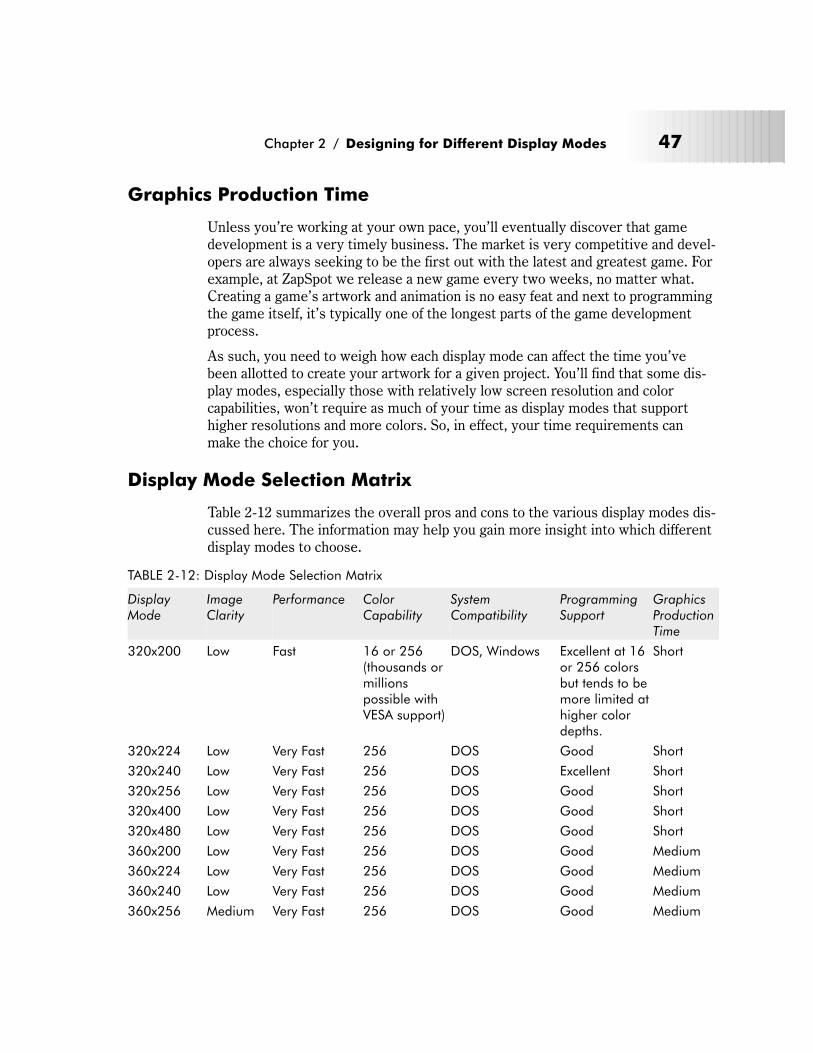
Graphics Production Time
Unless you’re working at your own pace, you’ll eventually discover that game
development is a very timely business. The market is very competitive and devel-
opers are always seeking to be the first out with the latest and greatest game. For
example, at ZapSpot we release a new game every two weeks, no matter what.
Creating a game’s artwork and animation is no easy feat and next to programming
the game itself, it’s typically one of the longest parts of the game development
process.
As such, you need to weigh how each display mode can affect the time you’ve
been allotted to create your artwork for a given project. You’ll find that some dis-
play modes, especially those with relatively low screen resolution and color
capabilities, won’t require as much of your time as display modes that support
higher resolutions and more colors. So, in effect, your time requirements can
make the choice for you.
Display Mode Selection Matrix
Table 2-12 summarizes the overall pros and cons to the various display modes dis-
cussed here. The information may help you gain more insight into which different
display modes to choose.
TABLE 2-12: Display Mode Selection Matrix
DisplayMode
ImageClarity
Performance ColorCapability
SystemCompatibility
ProgrammingSupport
GraphicsProductionTime
320x200 Low Fast 16 or 256(thousands ormillionspossible withVESA support)
DOS, Windows Excellent at 16or 256 colorsbut tends to bemore limited athigher colordepths.
Short
320x224 Low Very Fast 256 DOS Good Short
320x240 Low Very Fast 256 DOS Excellent Short
320x256 Low Very Fast 256 DOS Good Short
320x400 Low Very Fast 256 DOS Good Short
320x480 Low Very Fast 256 DOS Good Short
360x200 Low Very Fast 256 DOS Good Medium
360x224 Low Very Fast 256 DOS Good Medium
360x240 Low Very Fast 256 DOS Good Medium
360x256 Medium Very Fast 256 DOS Good Medium
Chapter 2 / Designing for Different Display Modes 47
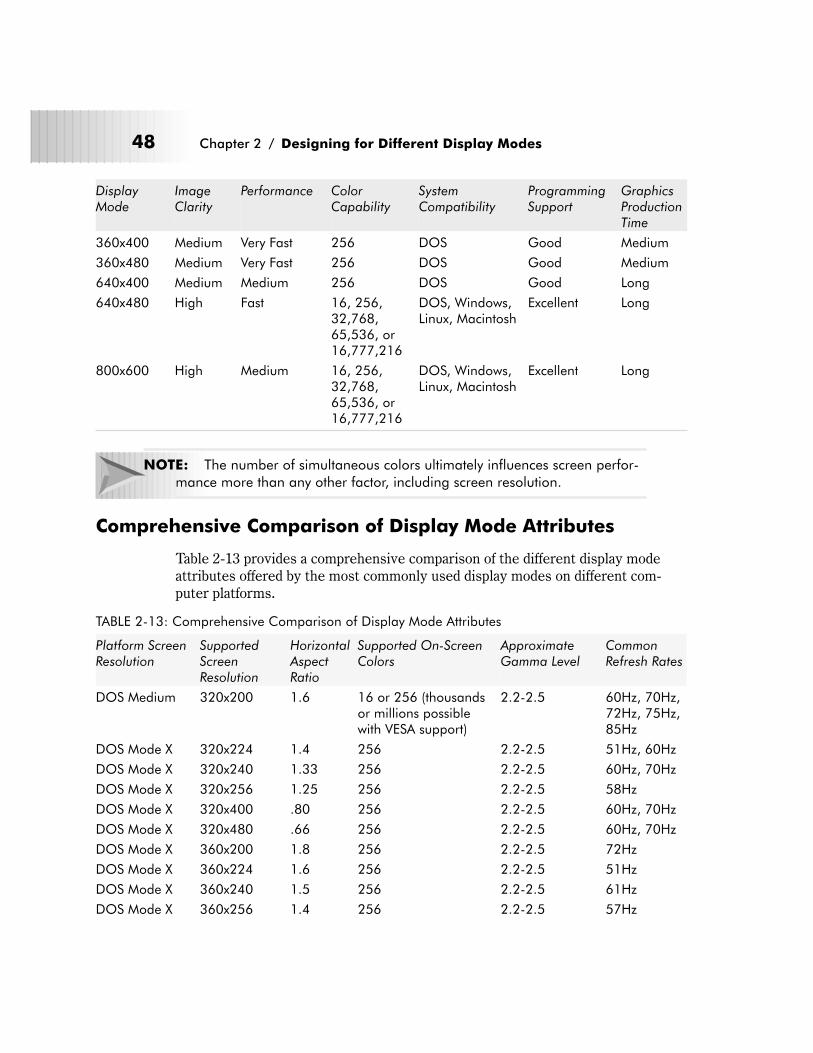
DisplayMode
ImageClarity
Performance ColorCapability
SystemCompatibility
ProgrammingSupport
GraphicsProductionTime
360x400 Medium Very Fast 256 DOS Good Medium
360x480 Medium Very Fast 256 DOS Good Medium
640x400 Medium Medium 256 DOS Good Long
640x480 High Fast 16, 256,32,768,65,536, or16,777,216
DOS, Windows,Linux, Macintosh
Excellent Long
800x600 High Medium 16, 256,32,768,65,536, or16,777,216
DOS, Windows,Linux, Macintosh
Excellent Long
NOTE: The number of simultaneous colors ultimately influences screen perfor-
mance more than any other factor, including screen resolution.
Comprehensive Comparison of Display Mode Attributes
Table 2-13 provides a comprehensive comparison of the different display mode
attributes offered by the most commonly used display modes on different com-
puter platforms.
TABLE 2-13: Comprehensive Comparison of Display Mode Attributes
Platform ScreenResolution
SupportedScreenResolution
HorizontalAspectRatio
Supported On-ScreenColors
ApproximateGamma Level
CommonRefresh Rates
DOS Medium 320x200 1.6 16 or 256 (thousandsor millions possiblewith VESA support)
2.2-2.5 60Hz, 70Hz,72Hz, 75Hz,85Hz
DOS Mode X 320x224 1.4 256 2.2-2.5 51Hz, 60Hz
DOS Mode X 320x240 1.33 256 2.2-2.5 60Hz, 70Hz
DOS Mode X 320x256 1.25 256 2.2-2.5 58Hz
DOS Mode X 320x400 .80 256 2.2-2.5 60Hz, 70Hz
DOS Mode X 320x480 .66 256 2.2-2.5 60Hz, 70Hz
DOS Mode X 360x200 1.8 256 2.2-2.5 72Hz
DOS Mode X 360x224 1.6 256 2.2-2.5 51Hz
DOS Mode X 360x240 1.5 256 2.2-2.5 61Hz
DOS Mode X 360x256 1.4 256 2.2-2.5 57Hz
48 Chapter 2 / Designing for Different Display Modes
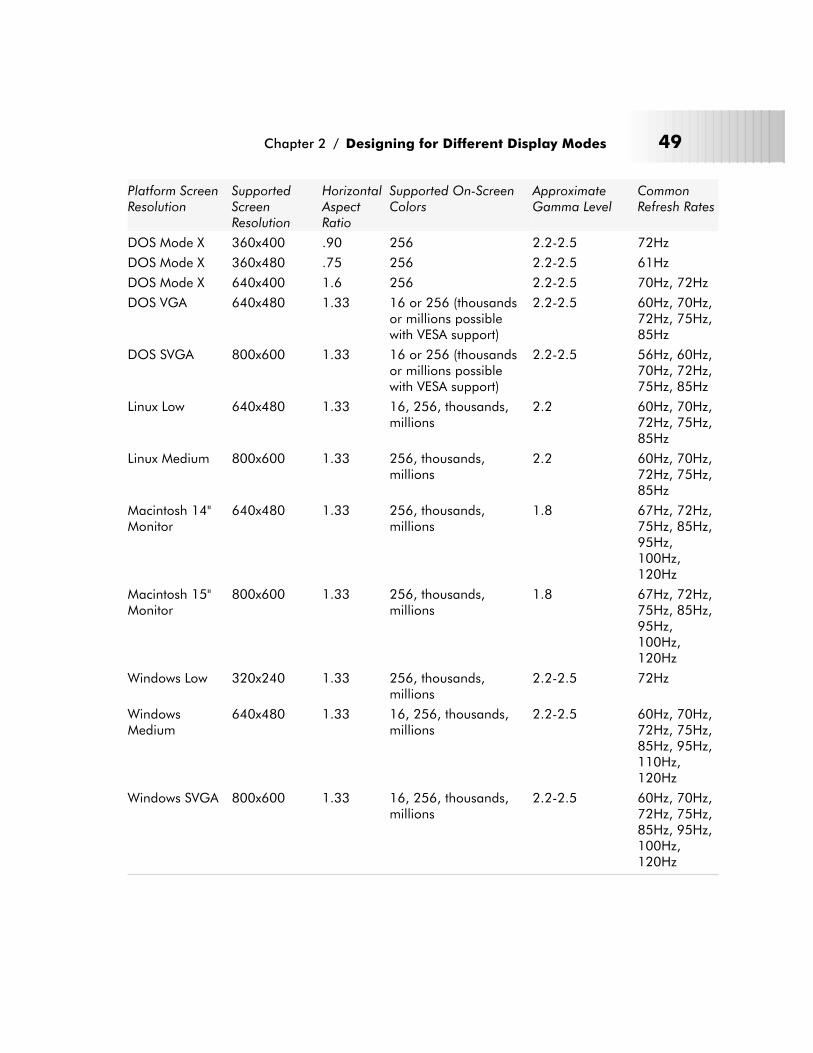
Platform ScreenResolution
SupportedScreenResolution
HorizontalAspectRatio
Supported On-ScreenColors
ApproximateGamma Level
CommonRefresh Rates
DOS Mode X 360x400 .90 256 2.2-2.5 72Hz
DOS Mode X 360x480 .75 256 2.2-2.5 61Hz
DOS Mode X 640x400 1.6 256 2.2-2.5 70Hz, 72Hz
DOS VGA 640x480 1.33 16 or 256 (thousandsor millions possiblewith VESA support)
2.2-2.5 60Hz, 70Hz,72Hz, 75Hz,85Hz
DOS SVGA 800x600 1.33 16 or 256 (thousandsor millions possiblewith VESA support)
2.2-2.5 56Hz, 60Hz,70Hz, 72Hz,75Hz, 85Hz
Linux Low 640x480 1.33 16, 256, thousands,millions
2.2 60Hz, 70Hz,72Hz, 75Hz,85Hz
Linux Medium 800x600 1.33 256, thousands,millions
2.2 60Hz, 70Hz,72Hz, 75Hz,85Hz
Macintosh 14"Monitor
640x480 1.33 256, thousands,millions
1.8 67Hz, 72Hz,75Hz, 85Hz,95Hz,100Hz,120Hz
Macintosh 15"Monitor
800x600 1.33 256, thousands,millions
1.8 67Hz, 72Hz,75Hz, 85Hz,95Hz,100Hz,120Hz
Windows Low 320x240 1.33 256, thousands,millions
2.2-2.5 72Hz
WindowsMedium
640x480 1.33 16, 256, thousands,millions
2.2-2.5 60Hz, 70Hz,72Hz, 75Hz,85Hz, 95Hz,110Hz,120Hz
Windows SVGA 800x600 1.33 16, 256, thousands,millions
2.2-2.5 60Hz, 70Hz,72Hz, 75Hz,85Hz, 95Hz,100Hz,120Hz
Chapter 2 / Designing for Different Display Modes 49
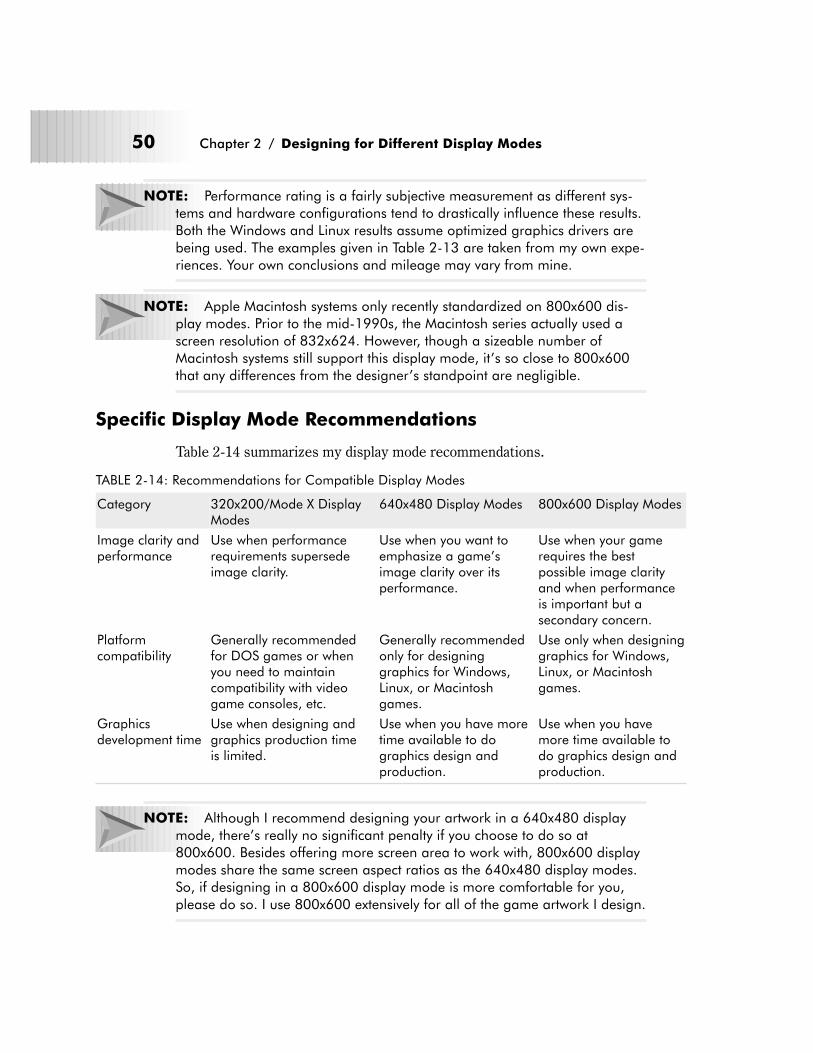
NOTE: Performance rating is a fairly subjective measurement as different sys-
tems and hardware configurations tend to drastically influence these results.
Both the Windows and Linux results assume optimized graphics drivers are
being used. The examples given in Table 2-13 are taken from my own expe-
riences. Your own conclusions and mileage may vary from mine.
NOTE: Apple Macintosh systems only recently standardized on 800x600 dis-
play modes. Prior to the mid-1990s, the Macintosh series actually used a
screen resolution of 832x624. However, though a sizeable number of
Macintosh systems still support this display mode, it’s so close to 800x600
that any differences from the designer’s standpoint are negligible.
Specific Display Mode Recommendations
Table 2-14 summarizes my display mode recommendations.
TABLE 2-14: Recommendations for Compatible Display Modes
Category 320x200/Mode X DisplayModes
640x480 Display Modes 800x600 Display Modes
Image clarity andperformance
Use when performancerequirements supersedeimage clarity.
Use when you want toemphasize a game’simage clarity over itsperformance.
Use when your gamerequires the bestpossible image clarityand when performanceis important but asecondary concern.
Platformcompatibility
Generally recommendedfor DOS games or whenyou need to maintaincompatibility with videogame consoles, etc.
Generally recommendedonly for designinggraphics for Windows,Linux, or Macintoshgames.
Use only when designinggraphics for Windows,Linux, or Macintoshgames.
Graphicsdevelopment time
Use when designing andgraphics production timeis limited.
Use when you have moretime available to dographics design andproduction.
Use when you havemore time available todo graphics design andproduction.
NOTE: Although I recommend designing your artwork in a 640x480 display
mode, there’s really no significant penalty if you choose to do so at
800x600. Besides offering more screen area to work with, 800x600 display
modes share the same screen aspect ratios as the 640x480 display modes.
So, if designing in a 800x600 display mode is more comfortable for you,
please do so. I use 800x600 extensively for all of the game artwork I design.
50 Chapter 2 / Designing for Different Display Modes
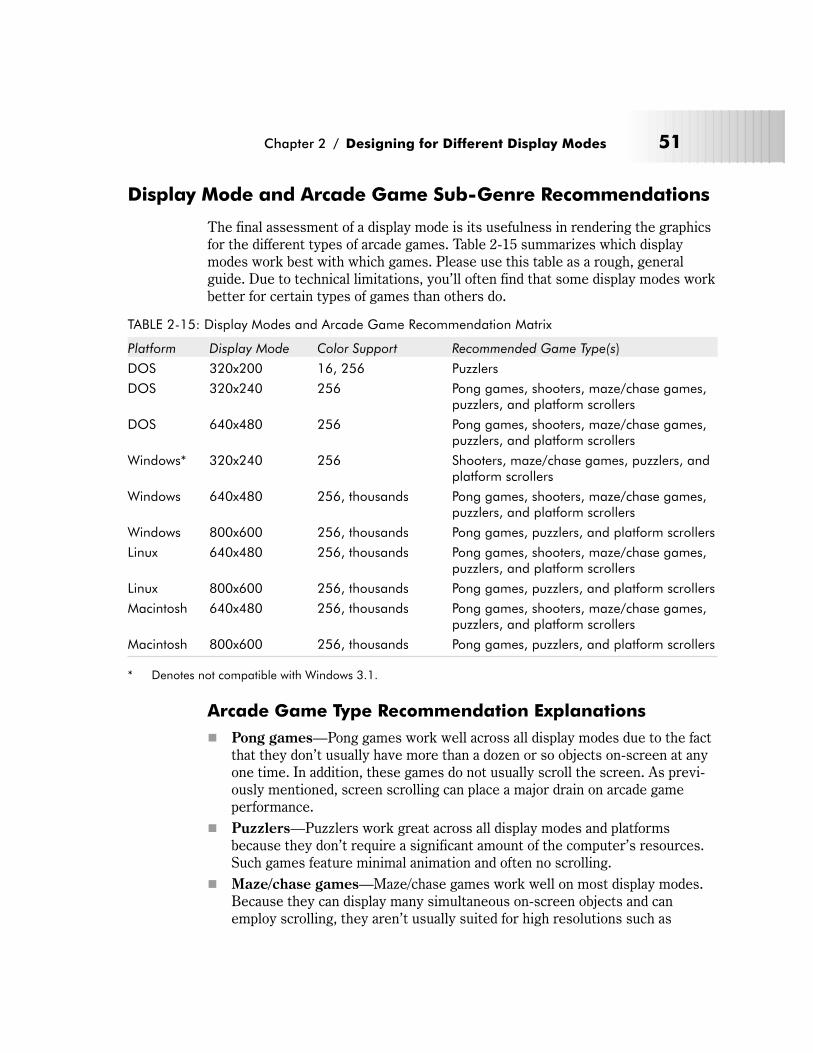
Display Mode and Arcade Game Sub-Genre Recommendations
The final assessment of a display mode is its usefulness in rendering the graphics
for the different types of arcade games. Table 2-15 summarizes which display
modes work best with which games. Please use this table as a rough, general
guide. Due to technical limitations, you’ll often find that some display modes work
better for certain types of games than others do.
TABLE 2-15: Display Modes and Arcade Game Recommendation Matrix
Platform Display Mode Color Support Recommended Game Type(s)
DOS 320x200 16, 256 Puzzlers
DOS 320x240 256 Pong games, shooters, maze/chase games,puzzlers, and platform scrollers
DOS 640x480 256 Pong games, shooters, maze/chase games,puzzlers, and platform scrollers
Windows* 320x240 256 Shooters, maze/chase games, puzzlers, andplatform scrollers
Windows 640x480 256, thousands Pong games, shooters, maze/chase games,puzzlers, and platform scrollers
Windows 800x600 256, thousands Pong games, puzzlers, and platform scrollers
Linux 640x480 256, thousands Pong games, shooters, maze/chase games,puzzlers, and platform scrollers
Linux 800x600 256, thousands Pong games, puzzlers, and platform scrollers
Macintosh 640x480 256, thousands Pong games, shooters, maze/chase games,puzzlers, and platform scrollers
Macintosh 800x600 256, thousands Pong games, puzzlers, and platform scrollers
* Denotes not compatible with Windows 3.1.
Arcade Game Type Recommendation Explanations
� Pong games—Pong games work well across all display modes due to the fact
that they don’t usually have more than a dozen or so objects on-screen at any
one time. In addition, these games do not usually scroll the screen. As previ-
ously mentioned, screen scrolling can place a major drain on arcade game
performance.
� Puzzlers—Puzzlers work great across all display modes and platforms
because they don’t require a significant amount of the computer’s resources.
Such games feature minimal animation and often no scrolling.
� Maze/chase games—Maze/chase games work well on most display modes.
Because they can display many simultaneous on-screen objects and can
employ scrolling, they aren’t usually suited for high resolutions such as
Chapter 2 / Designing for Different Display Modes 51
800x600 and above. However, they are pretty safe for most other resolutions
with few, if any, performance related problems.
� Shooters—Like maze/chase games, shooters work well on most display
modes. However, as they tend to make extensive use of screen scrolling and
can display dozens, if not hundreds, of on-screen objects, they shouldn’t be
used on resolutions above 640x480 except on fast machines.
� Platform scrollers—Platform scrollers are the most sophisticated and
resource-intensive of all arcade-style games. They make extensive use of hor-
izontal (and often vertical) scrolling and often display large, complex objects
and backgrounds. As a result, they are largely unsuitable for display modes
with resolutions above 640x480 except on relatively fast machines.
Rules for Display Mode Selection
As you have seen, choosing a display mode for which to design your artwork and
animation can be a difficult and often complex process. There are many issues to
consider and weigh. To help make the selection process somewhat easier, try fol-
lowing these rules:
� Check with your programmer—Always check with your programmer or
programming team. When it comes to technical matters, whether you’re talk-
ing about the development environment, platform capabilities, or program-
ming tools, the programmer usually knows best. Make sure that you discuss
your thoughts on the matter with them and get their input before you start
drawing anything. As they’re the ones who will have to make your graphics
actually work in a game, they’re in the best position to tell you what can and
can’t be done in a given display mode as well as disclose any other related
technical issues you may face. When in doubt about some technical issue,
never guess or make assumptions. Play it safe and consult a programmer.
� Consider the target platform(s)—Always consider the capabilities of the
target platform for your game. Different systems have different capabilities.
You need to look at these and determine if the target platform can handle what
you have in mind. When in doubt, go for the lowest common denominator. For
example, although 16- and 24-bit color is supported by a large number of com-
puters, all machines support 256 colors. If you’re not sure about what percent-
age of your audience has hardware capable of supporting more than 256 colors,
then stick with 256 colors.
� Factor in your color requirements—Take a good look at the color require-
ments of your game and the particular color capabilities of each display mode
that is available to you. Be sure to evaluate issues such as whether or not a
given display mode can effectively support the number of colors your game is
likely to need. When in doubt, go for the next highest display mode. For
52 Chapter 2 / Designing for Different Display Modes
example, if you’re designing an arcade game and think that you’ll need to use
more than 256 colors, go for a display mode that supports 65,536.
� Factor in your image quality requirements—Each arcade game has differ-
ent resolution requirements. Some require the maximum detail possible while
others can get away with a relatively low screen resolution. Therefore, you
need to evaluate the specific resolution needs of your game and determine the
most suitable display mode from that. You should also carefully examine the
aspect ratio of each display mode. Will designing your graphics in a display
mode with unusual aspect ratios create any problems for you? If so, consider
using a different display mode. When in doubt, choose a screen resolution that
is common across several platforms (as described in Table 2-3) as one or more
of these will provide adequate image fidelity, cross-platform compatibility, and
reasonable screen performance.
Chapter 2 / Designing for Different Display Modes 53
Chapter 3
Image Compressionand Graphic FileFormats
In this chapter, you’ll learn about:
� Common image compression schemes
� Essential graphic file formats
� Important graphic file formats
� File format suitability for arcade game graphics
� Caveats for working with graphic files
� Specific graphic file format recommendations
55
Image Compression
Graphic images can consume a lot of disk space, particularly when they’re saved
at high screen resolutions and/or color depths. To see what I mean, let’s calculate
the file size required by images saved at common screen resolutions and color
depths by applying this simple formula:
H x V x C
File Size (KB) = --------------
8 x 1024
H represents the number of horizontal pixels
V represents the number of vertical pixels
C represents the color depth
TABLE 3-1: Examples of Different Graphic Image File Sizes
Screen Resolution Color Depth File Size (in KB)
320x200 4 bits/pixel 32
320x200 8 bits/pixel 64
320x240 8 bits/pixel 75
640x480 4 bits/pixel 150
640x480 8 bits/pixel 300
640x480 16 bits/pixel 600
640x480 24 bits/pixel 900
800x600 8 bits/pixel 468.75
800x600 16 bits/pixel 937.5
800x600 24 bits/pixel 1406.25
As you can see from Table 3-1, graphics files, particularly those at higher screen
resolutions and color depths, can grow to be quite large. When designing arcade
game graphics, you can easily wind up with dozens, if not hundreds, of such files.
Even with today’s multi-gigabyte hard drives, storing them can consume a fair
amount of disk space. What’s more, large graphics files tend to be more difficult to
work with than smaller ones as they take longer to load, save, and manipulate than
their smaller counterparts. Need to put a bunch on a floppy? Forget about it. Want
to e-mail one to a friend in New Zealand? Don’t even bother unless you both have
access to ISDN, DSL, or cable modems.
To make more efficient use of available disk space, most graphics files are com-
pressed. Compression makes use of complex mathematical equations to
dramatically reduce the sizes of images. There are several methods of image com-
pression available, however, they all tend to fall into two broad categories: lossless
compression and lossy compression.
56 Chapter 3 / Image Compression and Graphic File Formats
Lossless Compression
Lossless compression technologies involve no data loss. The original information
of each file is stored intact and can be completely recovered from its compressed
state at the time it is decompressed or extracted. Lossless compression is usually
implemented using one of two different methods: statistical or dictionary-based.
The statistical method uses a three-step process to do its dirty work. First it reads
in a single byte of data. Next, it calculates the probability of that byte’s appearance
in the data. Finally, it encodes the byte by replacing it with a symbolic token that
acts as a kind of shorthand version of the data. When the data is later decoded, the
symbol is replaced with the original byte. The statistical method can achieve very
high compression levels if the data contains many repeating values.
The dictionary-based method uses a somewhat different concept. It reads in sev-
eral bytes of data and looks for groups of symbols that appear in a dictionary. If a
match is found, a pointer into the dictionary is made. The more matches found in
the image data, the higher the level of compression that can be achieved.
Lossless compression is important to us because it maintains the integrity, or the
quality, of the file’s information.
There are several lossless compression algorithms commonly used on graphic
images. These include:
� RLE compression
� Packbits compression
� LZ77 compression
� LZW compression
RLE Compression
Run-length encoding, or RLE, compression works on images by analyzing their
graphic data sequentially from left to right and top to bottom. It compares the
value of each byte of information with the value of the previous byte. Each new
data value is recorded into a “packet” of two bytes where the first byte contains
the number of times the value is repeated, and the second packet contains the
actual value. The bytes in the packet are known as the “run count” and “run
value,” respectively.
In situations where a graphic image contains many repeat values, the compression
ratio will be very high. For example, if every byte in a 1000-byte image was identi-
cal, its size could be reduced to 20 bytes, giving it a 50:1 compression ratio. An
image with lots of different values won’t compress very well, and in some cases
can actually become larger than the original. For example, if all bytes in an image
Chapter 3 / Image Compression and Graphic File Formats 57
are different from each other, the image’s size will double, because two bytes are
used to store each byte in the image.
RLE compression exists in several forms, all of which work essentially the same
way but differ somewhat in terms of efficiency. Because it works well for most
types of images, RLE is the most common lossless image compression technology
and is used by such popular graphics formats as PCX and BMP.
Packbits Compression
Packbits is considered an RLE compression scheme because it also looks for
“runs,” or repeated values, and calculates their number, or overall “length.” The
repeated bytes it finds are then “packed” together, hence the name. Compared to
RLE, images that use packbits typically offer superior compression rates. Yet
despite this, packbits compression is used by only a few file formats, namely by
LBM and TGA.
LZ77 Compression
LZ77 (Lempel, Ziv, 77) compression was developed in 1977. It works by keeping
track of the last n bytes of the data seen, and when it encounters a data sequence
that has already been analyzed, it records its position along with the length of the
sequence.
LZ77 is used as the primary compression scheme for the PNG image format. In
addition, all popular file compression schemes, such as ARJ, LHA, ZIP, and ZOO,
are based on the LZ77 algorithm.
LZW Compression
The LZW (Lempel, Ziv, Welsh) compression scheme does its work by looking for
patterns of data and assigning codes to them. It works best on images with large
areas of solid colors. Images that contain many different colors and patterns aren’t
very good candidates for this type of compression.
LZW is a “dictionary-based” compression technology. Its “dictionary” includes a
special table that contains a code for each possible value contained in an image.
For example, if the LZW compression is used on an 8-bit image, the LZW dictio-
nary will be initialized with codes for up to 256 possible values. As the image data
is read, new values are added to the table as each unique pattern of data is found.
LZW dictionaries aren’t actually saved along with the compressed data. Instead,
the dictionary is reconstructed as part of the image decompression process.
LZW is most often associated with GIF (Graphics Interchange Format) image
files. However, it is used for other types of graphics files, including TIFF (Tagged
58 Chapter 3 / Image Compression and Graphic File Formats
Image File Format), and the basic technology serves as the foundation for many of
the ZIP file compression algorithms.
Lossy Compression
Lossy compression techniques all involve some sort of information loss. Data that
is compressed using a lossy compression scheme usually can’t be restored back to
its original, uncompressed state. However, in exchange for this inaccurate recon-
struction, lossy compression is capable of achieving very high compression rates.
NOTE: When using a lossy compression scheme, repeatedly saving an image
will cause that image’s quality to degrade.
There are two lossy compression methods in general use. These are:
� Color reduction
� JPEG
Color Reduction
Color reduction is a special process that allows you to create files with fewer col-
ors than contained in the original image. For example, you can reduce a 24-bit
(with millions of colors) image down to an 8-bit (256 colors) one. The end result
will produce a new file that is substantially smaller than the original, as indicated
by Table 3-1. Whenever you reduce the number of colors in an image, there is
always some image information that is lost.
There are a couple of color reduction techniques in use. The most basic form is
called remapping. This simply means that when an image is color reduced, the
resulting image will have the best color reproduction possible. Every pixel con-
tained in it will be replaced with colors available in the new palette. Unfortunately,
the results from remapping are usually less than satisfactory.
The other color reduction process is called color dithering. Color dithering works
much like mixing two shades of paint to produce a third color. Instead of mixing
paint, however, it blends patterns of different colors to simulate the presence of
colors not in the current palette. As a result, color dithering can usually produce
better results than remapping, especially when reducing an image from 256 colors
down to 16. Most graphics programs support both methods of color reduction,
although the resulting image quality varies widely between them.
The primary advantage of color reduction is that it’s relatively fast and usually
produces good results on most types of images. Color reduction is almost always
used in conjunction with one of the lossless compression techniques to reduce
Chapter 3 / Image Compression and Graphic File Formats 59

image file size even further. Both color reduction and dithering are discussed in
more detail in Chapter 8.
JPEG
JPEG is a lossy compression technique that is used for compressing photo-realis-
tic images with millions of colors in them. For more information on JPEG and how
it works, see the JPEG entry under the Important Graphic File Formats section of
this chapter.
Figure 3-1 compares the two compression schemes. Notice the artifacting exhib-
ited by lossy compression compared to lossless compression.
60 Chapter 3 / Image Compression and Graphic File Formats
Lossless Compression
Lossy Compression
FIGURE 3-1: Lossless vs. Lossy Compression Comparison
Essential Graphic File Formats
Computers use file formats to negotiate the exchange of information between dif-
ferent applications and systems. Graphics are no different in this regard. Once you
spend time designing game artwork, you’ll want to save what you create for future
editing or display. Many graphics editors offer several choices of file formats to
save your pictures in. However, only a few are actually useful to arcade game
graphics designers. I’ve taken the liberty of identifying and describing them here.
BMP (Bitmap)
Native Platform(s): Windows 3.1, 95, 98, NT 4.0, and 2000
File Extension(s): .BMP, .bmp
BMP is the standard graphics format used by the various incarnations of
Microsoft’s Windows operating systems (i.e., Windows 3.1, 95, 98, and NT). The
BMP format comes in two flavors, RGB and RLE.
The BMP RGB format, as its name implies, saves images as RGB data (red,
green, blue) which is a representation of what’s actually generated on the com-
puter’s display. This allows you to accurately save and exchange images with
thousands or millions of colors in them. The RGB format doesn’t support image
compression.
The BMP RLE format stores image data using one of the RLE compression
schemes. Unlike the BMP RGB format, this allows you to take advantage of com-
pression and substantially reduce the overall size of your graphic images. Besides
compression, the main difference between the BMP RGB and BMP RLE formats
is that the BMP RLE format is limited to saving images with a maximum of 256
colors.
The Windows BMP format is definitely one of the best choices when it comes to
saving your game graphics, especially on the Windows platform. This is simply
due to the fact that virtually every Windows graphics package can read and write
BMP files. In addition, the BMP format enjoys a good level of cross-platform com-
patibility, as Apple QuickTime (versions 2.0 and better) and most major Macintosh
graphics packages have the ability to read and write both BMP format variations.
NOTE: Although BMP is the standard Windows graphics file format, some Win-
dows graphics programs still don’t support RLE flavored BMP files. To avoid
any unpleasant compatibility problems down the road, make sure all of the
graphics software you use works with BMP RLE files. Otherwise, just to be
safe, always save your files in the BMP RGB format.
Chapter 3 / Image Compression and Graphic File Formats 61
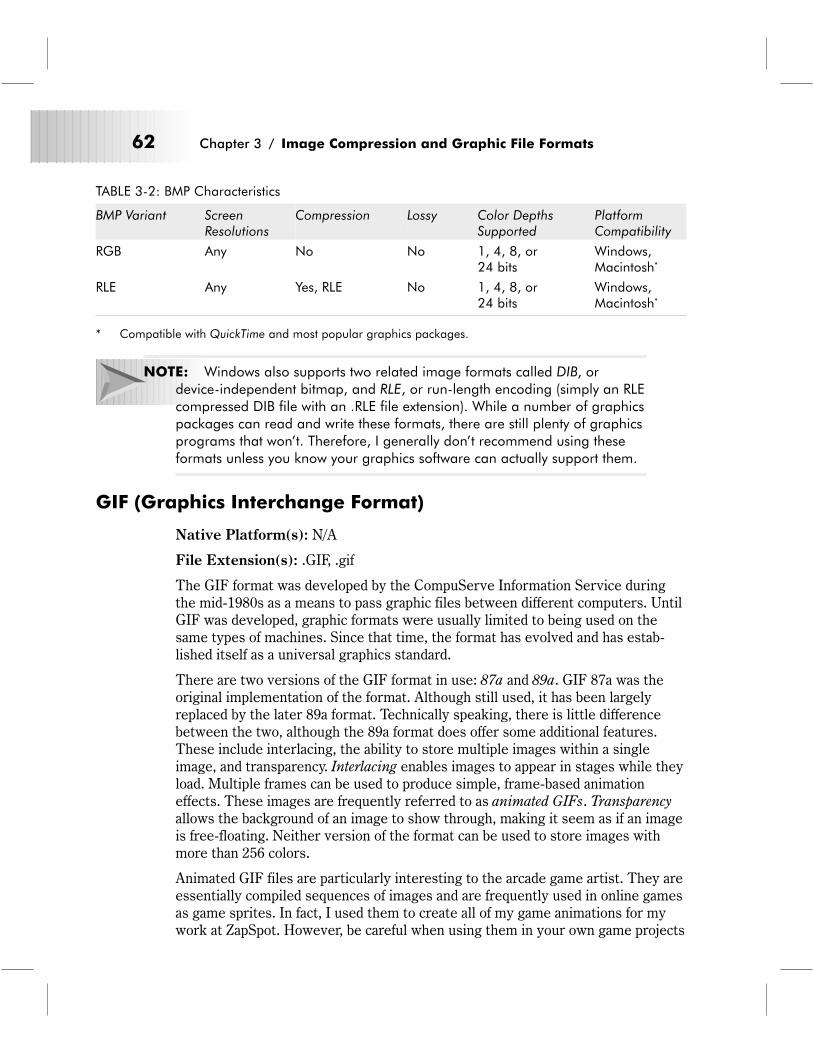
TABLE 3-2: BMP Characteristics
BMP Variant ScreenResolutions
Compression Lossy Color DepthsSupported
PlatformCompatibility
RGB Any No No 1, 4, 8, or24 bits
Windows,Macintosh*
RLE Any Yes, RLE No 1, 4, 8, or24 bits
Windows,Macintosh*
* Compatible with QuickTime and most popular graphics packages.
NOTE: Windows also supports two related image formats called DIB, or
device-independent bitmap, and RLE, or run-length encoding (simply an RLE
compressed DIB file with an .RLE file extension). While a number of graphics
packages can read and write these formats, there are still plenty of graphics
programs that won’t. Therefore, I generally don’t recommend using these
formats unless you know your graphics software can actually support them.
GIF (Graphics Interchange Format)
Native Platform(s): N/A
File Extension(s): .GIF, .gif
The GIF format was developed by the CompuServe Information Service during
the mid-1980s as a means to pass graphic files between different computers. Until
GIF was developed, graphic formats were usually limited to being used on the
same types of machines. Since that time, the format has evolved and has estab-
lished itself as a universal graphics standard.
There are two versions of the GIF format in use: 87a and 89a. GIF 87a was the
original implementation of the format. Although still used, it has been largely
replaced by the later 89a format. Technically speaking, there is little difference
between the two, although the 89a format does offer some additional features.
These include interlacing, the ability to store multiple images within a single
image, and transparency. Interlacing enables images to appear in stages while they
load. Multiple frames can be used to produce simple, frame-based animation
effects. These images are frequently referred to as animated GIFs. Transparency
allows the background of an image to show through, making it seem as if an image
is free-floating. Neither version of the format can be used to store images with
more than 256 colors.
Animated GIF files are particularly interesting to the arcade game artist. They are
essentially compiled sequences of images and are frequently used in online games
as game sprites. In fact, I used them to create all of my game animations for my
work at ZapSpot. However, be careful when using them in your own game projects
62 Chapter 3 / Image Compression and Graphic File Formats
because once you create an animated GIF image, it’s very difficult to extract the
individual frames of such animations for additional editing and manipulation.
Therefore, animated GIFs can best be thought of as a non-reusable image format.
NOTE: While both versions of the format are widely used, some older graphics
programs don’t know how to deal with GIF 89a files. Therefore, if you opt to
store your images in the GIF format, always try to save your images as GIF
87a to ensure maximum compatibility with different applications and
platforms.
By definition, files stored in the GIF format are always compressed. Yet, unlike
most of the other formats described here, they utilize the LZW compression
scheme. This puts them at a slight advantage over other formats as images com-
pressed using LZW generally offer better compression ratios, especially when
used on images that contain large areas of similar colors.
The GIF format has seen widespread use on the Internet and World Wide Web
where it has become the graphics format of choice. Yet, surprisingly, it hasn’t seen
much use in game development, despite being perfectly suited for the role. Due to
its near universal popularity, virtually all graphics packages support the GIF for-
mat. In fact, it’s probably one of the safest and reliable methods for exchanging
graphics between different computers and operating systems.
One potential problem with using GIF files to store your game graphics is how
some graphics programs will optimize the color palette. While this has no adverse
effect on how the image actually appears on-screen, it can cause problems when
you try to edit the file later as the image colors won’t be arranged in exactly the
same order as when you first created the file. What’s more, due to the optimiza-
tion, many of the colors of the image’s original color palette will actually be
removed. This situation is particularly true of graphics packages that emphasize
GIF use for the World Wide Web. Make sure your software doesn’t do this by test-
ing it with non-critical files before you start using the GIF format to store your
important artwork. To be safe, consider saving your images as GIF only once they
are finalized or simply use a different file format to store your images altogether.
NOTE: Since 1994, there have been major legal issues involved with the LZW
compression scheme used by the GIF format. The Unisys Corporation owns
the patents to the technology and now requires any vendor which develops
software that uses the GIF format to acquire an expensive license. This situa-
tion may serve to reduce the popularity of GIF in future generations of
graphics software.
Chapter 3 / Image Compression and Graphic File Formats 63
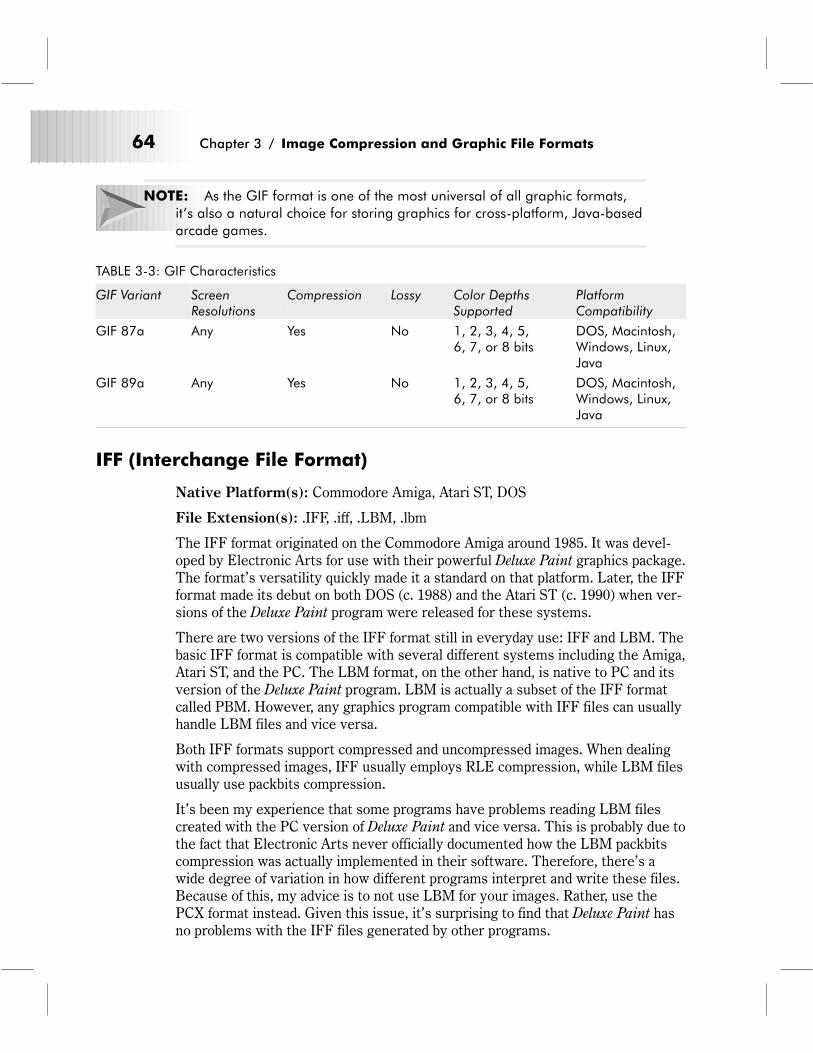
NOTE: As the GIF format is one of the most universal of all graphic formats,
it’s also a natural choice for storing graphics for cross-platform, Java-based
arcade games.
TABLE 3-3: GIF Characteristics
GIF Variant ScreenResolutions
Compression Lossy Color DepthsSupported
PlatformCompatibility
GIF 87a Any Yes No 1, 2, 3, 4, 5,6, 7, or 8 bits
DOS, Macintosh,Windows, Linux,Java
GIF 89a Any Yes No 1, 2, 3, 4, 5,6, 7, or 8 bits
DOS, Macintosh,Windows, Linux,Java
IFF (Interchange File Format)
Native Platform(s): Commodore Amiga, Atari ST, DOS
File Extension(s): .IFF, .iff, .LBM, .lbm
The IFF format originated on the Commodore Amiga around 1985. It was devel-
oped by Electronic Arts for use with their powerful Deluxe Paint graphics package.
The format’s versatility quickly made it a standard on that platform. Later, the IFF
format made its debut on both DOS (c. 1988) and the Atari ST (c. 1990) when ver-
sions of the Deluxe Paint program were released for these systems.
There are two versions of the IFF format still in everyday use: IFF and LBM. The
basic IFF format is compatible with several different systems including the Amiga,
Atari ST, and the PC. The LBM format, on the other hand, is native to PC and its
version of the Deluxe Paint program. LBM is actually a subset of the IFF format
called PBM. However, any graphics program compatible with IFF files can usually
handle LBM files and vice versa.
Both IFF formats support compressed and uncompressed images. When dealing
with compressed images, IFF usually employs RLE compression, while LBM files
usually use packbits compression.
It’s been my experience that some programs have problems reading LBM files
created with the PC version of Deluxe Paint and vice versa. This is probably due to
the fact that Electronic Arts never officially documented how the LBM packbits
compression was actually implemented in their software. Therefore, there’s a
wide degree of variation in how different programs interpret and write these files.
Because of this, my advice is to not use LBM for your images. Rather, use the
PCX format instead. Given this issue, it’s surprising to find that Deluxe Paint has
no problems with the IFF files generated by other programs.
64 Chapter 3 / Image Compression and Graphic File Formats
TABLE 3-4: IFF Characteristics
IFF Variant ScreenResolutions
Compression Lossy Color DepthsSupported
PlatformCompatibility
IFF Any Yes, RLE No 1, 4, 5, 6, 8,or 24 bits
Atari ST, Amiga,DOS, Windows*,Macintosh*
LBM Any Yes, packbits No 1, 4, or 8 bits DOS
* Denotes limited compatibility, usually obtained through graphic conversion software.
PCX
Native Platform(s): DOS
File Extension(s): .PCX, .pcx
The PCX format has been around for a long time. ZSoft developed it in the
mid-1980s for its popular PC Paintbrush. Because of its longevity, PCX is almost
as ubiquitous as the GIF format and is even more widely supported. Even so, PCX
is most at home on DOS systems where over the years it has established itself as
the de facto graphics standard for that platform.
The PCX format is quite flexible and can store images with color depths of 1, 2, 4,
8, and even 24 bits. PCX files also use an RLE compression scheme, which makes
PCX the recommended file format for any DOS related game and graphics devel-
opment. However, because BMP is the Windows standard graphics format, I
suggest that you use BMP instead of PCX when working with Windows applica-
tions if you have a choice. At this time, PCX enjoys only limited support on the
Macintosh platform. Although most of the major Macintosh graphics packages can
read and write the format, QuickTime doesn’t currently support it, thus limiting
its overall compatibility on that platform.
NOTE: Several versions of the PCX graphics format (i.e., version 1, 3, and 5)
actually exist. However, versions below 5 are seriously outdated and do not
support color depths greater than 4 bits. Therefore, I have opted not to dis-
cuss them here.
Even with the PCX format’s widespread popularity, it’s far from perfect. While the
format is well documented, it isn’t always well implemented. I’ve observed vari-
ous discrepancies with how different programs interpret and display PCX files.
Despite this issue, PCX is a good alternative to BMP, especially when working
with programs or development environments that don’t support the BMP format.
Chapter 3 / Image Compression and Graphic File Formats 65
PCX can actually be considered an unofficial Windows graphics format because it’s
supported by the MS Paint application bundled with every version of Windows
since version 3.1. Incidentally, MS Paint is actually a stripped-down version of the
PC Paintbrush program.
TABLE 3-5: PCX Characteristics
PCX Variant ScreenResolutions
Compression Lossy Color DepthsSupported
PlatformCompatibility
Version 5 Any Yes, RLE No 1, 2, 4, 8, or24 bits
DOS, Windows,Macintosh*
* Denotes limited compatibility, usually obtained through graphic conversion software.
PICT (Picture)
Native Platform(s): Apple Macintosh
File Extension(s): .PICT, .pict, .PCT, .pct
Apple developed the PICT file format way back in 1984, when it introduced the
original Macintosh computer. PICT is the standard graphics format used by
Macintosh computers. Because the format is internal to the Macintosh’s operating
system, it can be assumed that all Macintosh graphics programs can read and/or
write legally generated PICT files without any problems.
There have been two major versions of the PICT format introduced, PICT 1 and
PICT 2. PICT 1 was the original version of the format. It supported images that
contained up to eight colors and has long been considered obsolete. PICT 2 was
introduced several years after PICT 1. It’s the current version of the format and is
capable of supporting images that contain as many as 16,777,216 colors. A few
minor variations of the format exist, however, these are largely proprietary to cer-
tain applications and are rarely used otherwise.
The PICT format is interesting in that it’s capable of storing both vector and
bitmap data within the same file. However, the vast majority of the images saved
in the PICT format are actually just straight bitmaps. As with most of the formats
described here, PICT utilizes a form of RLE compression in order to keep images
reasonably small and compact when stored on disk.
NOTE: If a Macintosh user has QuickTime 2.0 or better installed on his or her
machine, it’s possible to save PICT files using whatever compression library
QuickTime supports, including JPEG.
66 Chapter 3 / Image Compression and Graphic File Formats
NOTE: PICT files are viewable through the Windows desktop if there’s a ver-
sion of QuickTime 2.5 or better installed.
TABLE 3-6: PICT Characteristics
PICT Variant ScreenResolutions
Compression Lossy Color DepthsSupported
PlatformCompatibility
PICT 2 Any Yes, RLE orQuickTime
No 1, 4, 8, 24,or 32 bits+
Macintosh,Windows*
* Denotes limited compatibility, usually obtained through graphic conversion software. The Windowsversion of QuickTime allows them to be viewable, however.
+ A color depth of 32 bits is actually 24 bits with an 8-bit alpha channel used to store transparencyinformation.
Important Graphic File Formats
The graphic file formats mentioned in this part of the chapter impose some sort of
limitation on your artwork, either in terms of overall system/application compati-
bility or image quality. This does not mean they are useless, however. They all
have some use or potential use in game graphics development and it’s more than
likely that you’ll come across one or more of them in your projects.
FLIC
Native Platform(s): DOS
File Extension(s): .FLI, .fli, .FLC, .flc
Programmer Jim Kent (author of Autodesk Animator for DOS and Aegis Animator
for the Atari ST) developed the original FLIC file format in 1993 as an attempt to
create a standard animation playback format. Since that time, the format has seen
widespread use by DOS game developers.
There are two variations of the FLIC format in use: FLI and FLIC. FLI files are
the older of the two and are limited to animations with a 320x200 resolution. The
later and more common FLIC format supports several additional features and
extensions. Animations in both versions are limited to a maximum of 4,000
frames.
All FLIC files are capable of displaying up to 256 colors per frame of animation and
can utilize a variety of compression algorithms including RLE and packbits.
The FLIC format was a widely used predecessor of the Windows AVI movie for-
mat and is still commonly used in game development circles. However, as an
animation format, FLIC files are best suited for large animations such as those
Chapter 3 / Image Compression and Graphic File Formats 67
featured in game title sequences or cut scenes. For smaller animations, other for-
mats such as animated GIFs are a better choice.
NOTE: FLI files limit their color values to VGA 0-63 levels or a maximum of 64
shades per color. The FLIC format was later modified to accommodate
SVGA 0-255 color values or a maximum of 256 shades per color. Please
refer to Chapter 9 for more information on the specific implications of these
differences.
TABLE 3-7: FLI/FLIC Characteristics
FLIC Variant ScreenResolutions
Compression Lossy Color DepthsSupported
PlatformCompatibility
FLI Limited to amaximum of320x200
Yes, RLE No 8 bit (color) DOS, Windows*
FLIC 320x200,640x480,800x600
Yes, RLE,packbits
No 8 bit (color) or16+ or 24 bit+
DOS, Windows*
* Denotes limited compatibility, usually obtained through graphic conversion software.+ Not part of the official file format but supported by extended variations of the format.
JPEG (Joint Photographic Experts Group)
Native Platform(s): N/A
File Extension(s): .JPG, .jpg
JPEG is an image compression mechanism and not a file format in itself. There are
actually several classes of JPEG compression but the most popular is known as
JFIF. However, in everyday use, the terms JPEG and JFIF are synonymous.
JPEG uses a lossy compression scheme that is designed to take advantage of the
limitations of the human eye. Any image detail that is not visually perceived by
the eye is lost when stored as a JPEG. As a result, JPEG is capable of providing
images with incredible compression ratios, usually anywhere between 5:1 and
15:1. JPEG is also unique among the compression techniques mentioned here
because it allows you to trade off image quality to gain more compression. The
higher the level of compression, the lower the quality of the image and vice versa.
The most common side effect of using JPEG compression is that images often dis-
play noticeable artifacting and blurring. JPEG works best on highly detailed
images, such as photographs, as these types of images have more content to lose.
Also, any image that uses JPEG compression is automatically promoted to 24-bit
color depth, even if it was originally created at a lower color depth.
68 Chapter 3 / Image Compression and Graphic File Formats

In addition to JFIF, there are two other variations of JPEG compression, progres-
sive JFIF and lossless JFIF. Progressive JFIF (also called progressive JPEG)
stores an image in overlapping layers. When a progressive JFIF image loads, it
displays its content in stages. Each layer appears gradually until the whole image
is rendered. This makes progressive JFIF useful for displaying large images in sit-
uations where bandwidth might be low, i.e., over the Internet or on slow
computers. Lossless JFIF stores images without using lossy compression. There-
fore, images stored this way do not suffer from the visual problems traditionally
associated with JPEG compression. Yet, at the same time, lossless JFIF images
also don’t enjoy the high image compression rates offered by standard JFIF.
Using JPEG compression for arcade game graphics is generally not a good idea.
First, it’s lousy for artwork that contains sharp details (which are commonly found
in sprites and menu screens) since the colors of different objects tend to bleed
into each other. Second, it promotes all images to 24 bit regardless of their original
color depth, making them useless for palette-based images. And, finally, images
stored as JPEGs can’t be resaved without further degrading their image quality.
This makes it nearly impossible to edit them without destroying the integrity of
the original image.
TABLE 3-8: JPEG Characteristics
JPEG Variant ScreenResolutions
Compression Lossy Color DepthsSupported
PlatformCompatibility
JFIF Any Yes, JPEG Yes 8 bit (grayscale)or 24 bits
DOS, Macintosh,Windows, Linux,Java
Progressive JFIF Any Yes, JPEG Yes 8 bit (grayscale)or 24 bits
DOS, Macintosh,Windows, Linux,Java
Lossless JFIF Any No No 8 bit (grayscale)or 24 bits
DOS, Macintosh,Windows, Linux,Java
PNG
Native Platform(s): N/A
File Extension(s): .PNG, .png
The PNG format evolved out of the ashes of the 1994 Unisys patent dispute over
the LZW compression used in the GIF format when Thomas Boutell (along with
others) developed the PNG format specification as an alternative and eventual
replacement for the GIF format. Although until recently support for PNG has been
slow in coming, it’s now on the verge of becoming a new standard as more and
more graphics tools are being updated to support it.
Chapter 3 / Image Compression and Graphic File Formats 69
Like GIF files, PNG files support interlacing and transparency information (up to
254 levels). However, the PNG format also introduces several improvements over
GIF and the other file formats mentioned here. These include built-in gamma cor-
rection, support for 8-bit color, 8-bit grayscale, true color images, and built-in file
integrity checking. PNG’s internal gamma correction ensures that graphic images
saved as PNG files will retain a consistent gamma level regardless of the platform
on which they’re displayed. Its ability to store both 8-bit and 24-bit images makes
it extremely useful for game-oriented graphics. Finally, its built-in file integrity
checking will help minimize problems with file corruption and the like.
The PNG format uses the LZ77 compression algorithm that gives it better com-
pression ratios than many of the other file formats discussed here.
TABLE 3-9: PNG Characteristics
PNG Variant ScreenResolutions
Compression Lossy Color DepthsSupported
PlatformCompatibility
PNG Any Yes, ZIP No 8-bit color, 8-bitgrayscale, or24 bits
DOS, Macintosh,Windows, Linux,Java
PSD (Photoshop)
Native Platform(s): Macintosh, Windows 3.1, 95, 98, NT 4.0, and 2000
File Extension(s): .PSD, .psd
The PSD format is the native file format used by Adobe’s Photoshop program. It
can store images with up to 24-bit color, and the current version supports features
such as layers and transparency. PSD files can be either uncompressed or com-
pressed using RLE compression.
Although Photoshop enjoys an extremely large following among Web, multimedia,
and game developers worldwide, it’s also an expensive program. This fact means
that few low-end graphics packages are currently compatible with the PSD format.
Therefore, unless you have specific need to use it, it is recommended that you
avoid saving your images in PSD format.
70 Chapter 3 / Image Compression and Graphic File Formats
TABLE 3-10: PSD Characteristics
PSD Variant ScreenResolutions
Compression Lossy Color DepthsSupported
PlatformCompatibility
PSD 5.0 Any Yes, RLE No 8 or 24 bits Macintosh,Windows
PSD 3.0 Any Yes, RLE No 8 or 24 bits Macintosh,Windows, Linux+
PSD 2.0/2.5 Any Yes, RLE No 8 or 24 bits Macintosh*,Windows*
* Denotes limited compatibility, usually obtained through graphic conversion software.+ Linux systems can read PSD files when using the free GIMP image editor software that is
frequently bundled with many Linux installations.
NOTE: Most of the applications outside of Photoshop that support the PSD file
format are only compatible with the older, PSD 2.0/2.5 variations. PSD ver-
sions below 2.5 don’t support layers or transparency information. Also, PSD
5.0 files store text as editable layers. This information might be lost when
loading such files into older versions of Photoshop or other applications.
Keep these issues in mind when exchanging files with applications that claim
PSD compatibility.
PSP (Paint Shop Pro)
Native Platform(s): Windows 3.1, 95, 98, NT 4.0, and 2000
File Extension(s): .PSP, .psp
PSP is the native file format of Jasc’s popular Paint Shop Pro program. As with
most of the file formats described here, the PSP format can store graphics images
at a variety of color depths, including 24-bit color.
The PSP format can also store images in either compressed or uncompressed
form. Compressed PSP images use either RLE or LZ77 (a variation of LZW) com-
pression schemes. Version 5 of the PSP format introduced the ability to store
Photoshop-like layer and transparency information with images as well.
Although Paint Shop Pro enjoys a sizeable following among many Windows users,
few other graphics programs are actually compatible with the PSP format. There-
fore, it’s not recommended that you save your images as PSP files unless you
intend to work exclusively with that program.
Chapter 3 / Image Compression and Graphic File Formats 71
TABLE 3-11: PSP Characteristics
PSP Variant ScreenResolutions
Compression Lossy Color DepthsSupported
PlatformCompatibility
PSP 3.0/4.0 Any Yes, RLE or LZ77 No 8 or 24 bits Windows*
PSP 5.0/6.0 Any Yes, RLE or LZ77 No 8 or 24 bits Windows*
* Denotes limited compatibility, usually obtained through graphic conversion software.
NOTE: Older versions of Paintshop Pro aren’t fully compatible with the newer
versions of the PSP format.
TGA (Targa)
Native Platform(s): N/A
File Extension(s): .TGA, .tga
Truevision, Inc. (now Pinnacle) originally developed the Targa format in 1985 to
use with its line of professional video capture products. However, since that time,
the TGA format has seen many refinements and considerable use as an output for-
mat for many high-end painting and 3D programs.
TGA files can contain 8, 16, 24, or 32 bits of color information per pixel and can
store images using a number of compression schemes including RLE and LZW.
Although a technically solid graphics format, TGA’s lack of support among many
lower-end graphics applications makes it difficult to recommend for your graphics
projects.
TABLE 3-12: TGA Characteristics
TGA Variant ScreenResolutions
Compression Lossy Color DepthsSupported
PlatformCompatibility
N/A Any No No 8, 16, 24, or32 bits
DOS, Macintosh*,Windows*
N/A Any Yes, RLE, packbits,and LZW
No 8, 16, 24, or32 bits
DOS, Macintosh*,Windows*
* Denotes limited compatibility, usually obtained through graphic conversion software.
TIFF (Tagged Image File Format)
The Tagged Image File Format, or TIFF as it is commonly known, was designed
with the intention of becoming the standard graphics file format. As such, it was
engineered from the start to handle virtually any contingency that one might
encounter. This provides TIFF files with the flexibility to support monochrome
72 Chapter 3 / Image Compression and Graphic File Formats
and color images as well as several methods of compression including packbits
and LZW.
Despite the good intentions of TIFF’s designers, the format’s flexibility has actu-
ally encouraged application developers to develop variations of the format that
don’t entirely stick to the published format specification. As a result, no single
application can now claim universal TIFF compatibility and there will always be
some version of the format that will cause problems with different graphics
software.
Although TIFF is capable of storing almost any kind of graphic image, it’s most
commonly associated with multi-megabyte high-resolution scanned images.
TABLE 3-13: TIFF Characteristics
TIFF Variant ScreenResolutions
Compression Lossy Color DepthsSupported
PlatformCompatibility
TIFF Any Yes, LZW,packbits
No 2, 4, 8, 16,or 24 bits
DOS, Macintosh,Windows, Linux,Java
XPM (X PixMap)
Native Platform(s): UNIX, Linux
File Extension(s): .XPM, .xpm
XPM is the de facto graphics standard for the X Window system running on UNIX
and Linux computers. They are generated by a variety of applications including
Xpaint and GIMP. XPM files can contain monochrome and color images. They are
most frequently used to store icon data for X Window systems.
Unlike the other formats described in this chapter, XPM files do not use compres-
sion. Instead, images are saved as ASCII, C language source files. While this
makes them versatile and easy to transmit through e-mail, images stored in the
XPM format tend to be extremely large when compared to other graphic file
formats.
Unfortunately, very few graphics packages outside the UNIX and Linux platforms
can correctly handle XPM format files. This makes them difficult to exchange
between other platforms.
TABLE 3-14: XPM Characteristics
XPM Variant ScreenResolutions
Compression Lossy Color DepthsSupported
PlatformCompatibility
XPM Any No No 2, 4, 8, 16,or 24 bits
Linux, UNIX
Chapter 3 / Image Compression and Graphic File Formats 73
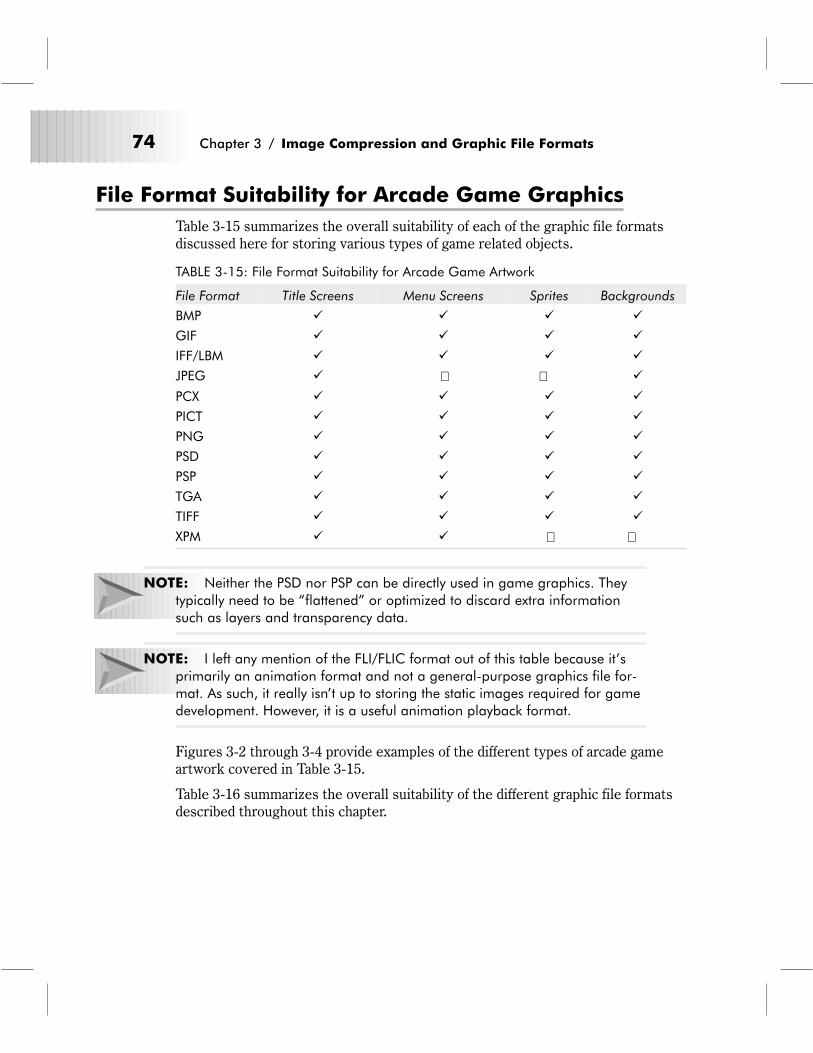
File Format Suitability for Arcade Game Graphics
Table 3-15 summarizes the overall suitability of each of the graphic file formats
discussed here for storing various types of game related objects.
TABLE 3-15: File Format Suitability for Arcade Game Artwork
File Format Title Screens Menu Screens Sprites Backgrounds
BMP � � � �
GIF � � � �
IFF/LBM � � � �
JPEG � � � �
PCX � � � �
PICT � � � �
PNG � � � �
PSD � � � �
PSP � � � �
TGA � � � �
TIFF � � � �
XPM � � � �
NOTE: Neither the PSD nor PSP can be directly used in game graphics. They
typically need to be “flattened” or optimized to discard extra information
such as layers and transparency data.
NOTE: I left any mention of the FLI/FLIC format out of this table because it’s
primarily an animation format and not a general-purpose graphics file for-
mat. As such, it really isn’t up to storing the static images required for game
development. However, it is a useful animation playback format.
Figures 3-2 through 3-4 provide examples of the different types of arcade game
artwork covered in Table 3-15.
Table 3-16 summarizes the overall suitability of the different graphic file formats
described throughout this chapter.
74 Chapter 3 / Image Compression and Graphic File Formats
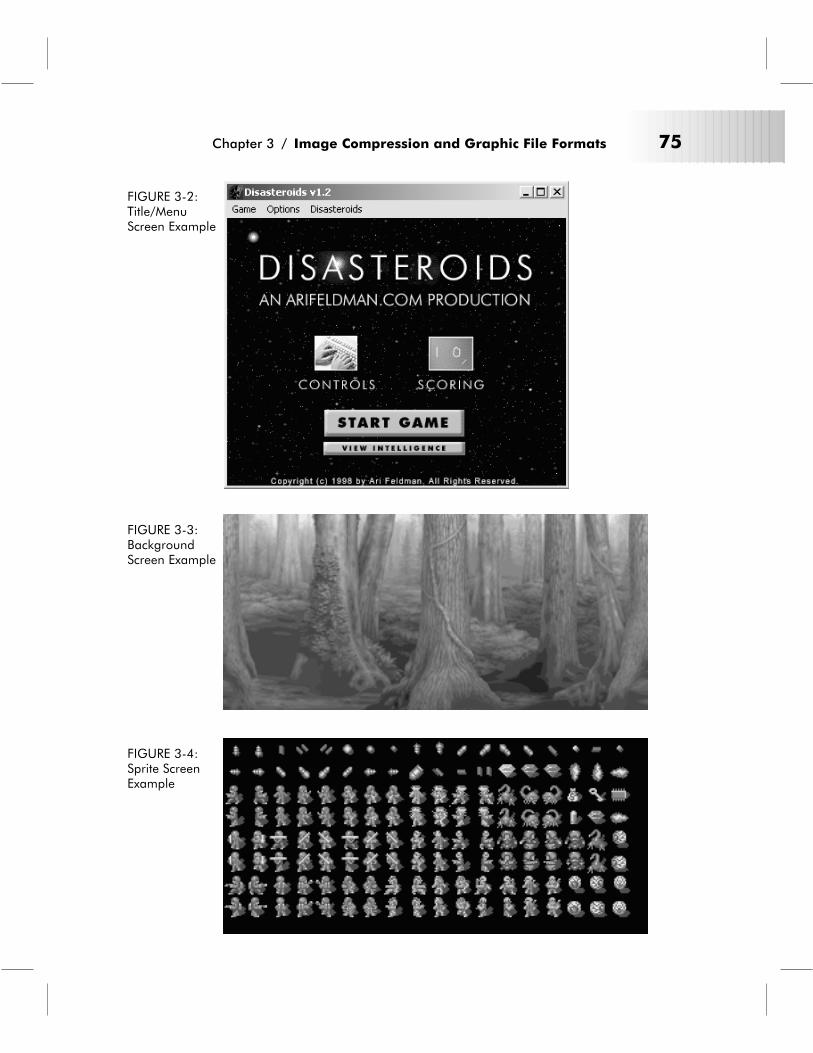
Chapter 3 / Image Compression and Graphic File Formats 75
FIGURE 3-2:Title/MenuScreen Example
FIGURE 3-3:BackgroundScreen Example
FIGURE 3-4:Sprite ScreenExample

TABLE 3-16: File Format Suitability Comments
File Format Comments
BMP � The standard graphics file format for all versions of Windows.
� A good choice for exchanging graphics files between Windows and theMacintosh (provided that a version of QuickTime is installed on the Macintosh).
� Not recommended for use with DOS, as very few DOS applications can read orwrite this format.
FLI/FLIC � The best overall animation file format to use with DOS systems.
� Can be used with Windows as long as you’re sure your software is compatiblewith it. Fortunately, a fair number of Windows graphics packages are.
� Definitely not recommended for the Macintosh due to extremely limitedcompatibility with software on that platform.
GIF � The safest overall graphics format for reliably exchanging files between DOS,Windows, Macintosh, and Java.
� The best overall graphics format for storing game objects for Java-basedgames.
IFF/LBM � The best format to exchange graphics files between the Amiga, Atari ST, andDOS systems should you need to.
� Generally not recommended for use on Windows unless you commonly workwith programs that you know support it.
� Has very limited support on the Macintosh and is not recommended for use onthat platform.
JPEG � Offers extremely high image compression rates; however, there’s a trade-offbetween image quality and the level of compression.
� Offers excellent compression for photographic images but generally not forgame-oriented artwork.
� Potentially useful for game title screens if they contain photo-realistic details.
PCX � The best overall graphics format to use with DOS systems. Widely consideredthe de facto DOS graphics standard.
� Not recommended for use with Windows unless you commonly work withprograms that you know support it. However, it’s the best format to use if youcommonly find yourself exchanging files between the Windows and DOSplatforms.
� Has relatively limited support on the Macintosh and is not recommended foruse on that platform except to exchange files with DOS systems.
PICT � The standard graphics format on the Macintosh platform. As such, compatibilityis assumed to be universal between Macintosh graphics applications.
� Not recommended for use with DOS, as very few DOS graphics programs arecompatible with it.
� Has very limited use on Windows systems except to exchange graphics files withMacintosh systems.
76 Chapter 3 / Image Compression and Graphic File Formats
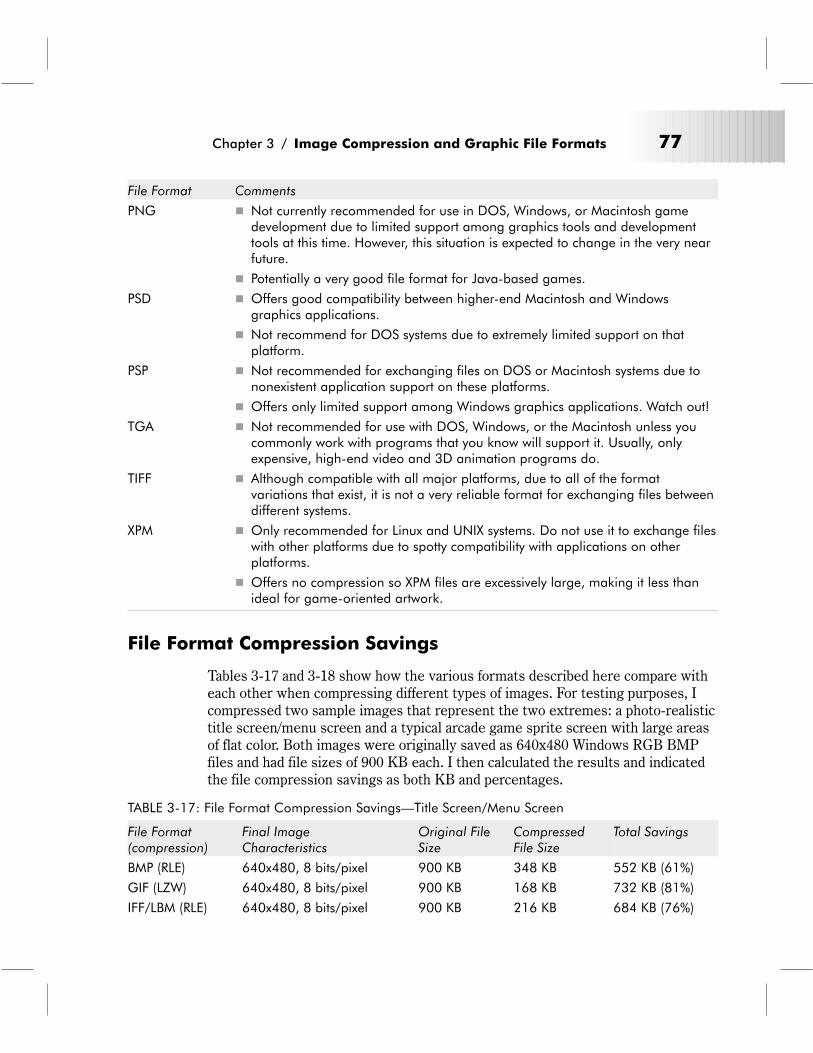
File Format Comments
PNG � Not currently recommended for use in DOS, Windows, or Macintosh gamedevelopment due to limited support among graphics tools and developmenttools at this time. However, this situation is expected to change in the very nearfuture.
� Potentially a very good file format for Java-based games.
PSD � Offers good compatibility between higher-end Macintosh and Windowsgraphics applications.
� Not recommend for DOS systems due to extremely limited support on thatplatform.
PSP � Not recommended for exchanging files on DOS or Macintosh systems due tononexistent application support on these platforms.
� Offers only limited support among Windows graphics applications. Watch out!
TGA � Not recommended for use with DOS, Windows, or the Macintosh unless youcommonly work with programs that you know will support it. Usually, onlyexpensive, high-end video and 3D animation programs do.
TIFF � Although compatible with all major platforms, due to all of the formatvariations that exist, it is not a very reliable format for exchanging files betweendifferent systems.
XPM � Only recommended for Linux and UNIX systems. Do not use it to exchange fileswith other platforms due to spotty compatibility with applications on otherplatforms.
� Offers no compression so XPM files are excessively large, making it less thanideal for game-oriented artwork.
File Format Compression Savings
Tables 3-17 and 3-18 show how the various formats described here compare with
each other when compressing different types of images. For testing purposes, I
compressed two sample images that represent the two extremes: a photo-realistic
title screen/menu screen and a typical arcade game sprite screen with large areas
of flat color. Both images were originally saved as 640x480 Windows RGB BMP
files and had file sizes of 900 KB each. I then calculated the results and indicated
the file compression savings as both KB and percentages.
TABLE 3-17: File Format Compression Savings—Title Screen/Menu Screen
File Format(compression)
Final ImageCharacteristics
Original FileSize
CompressedFile Size
Total Savings
BMP (RLE) 640x480, 8 bits/pixel 900 KB 348 KB 552 KB (61%)
GIF (LZW) 640x480, 8 bits/pixel 900 KB 168 KB 732 KB (81%)
IFF/LBM (RLE) 640x480, 8 bits/pixel 900 KB 216 KB 684 KB (76%)
Chapter 3 / Image Compression and Graphic File Formats 77
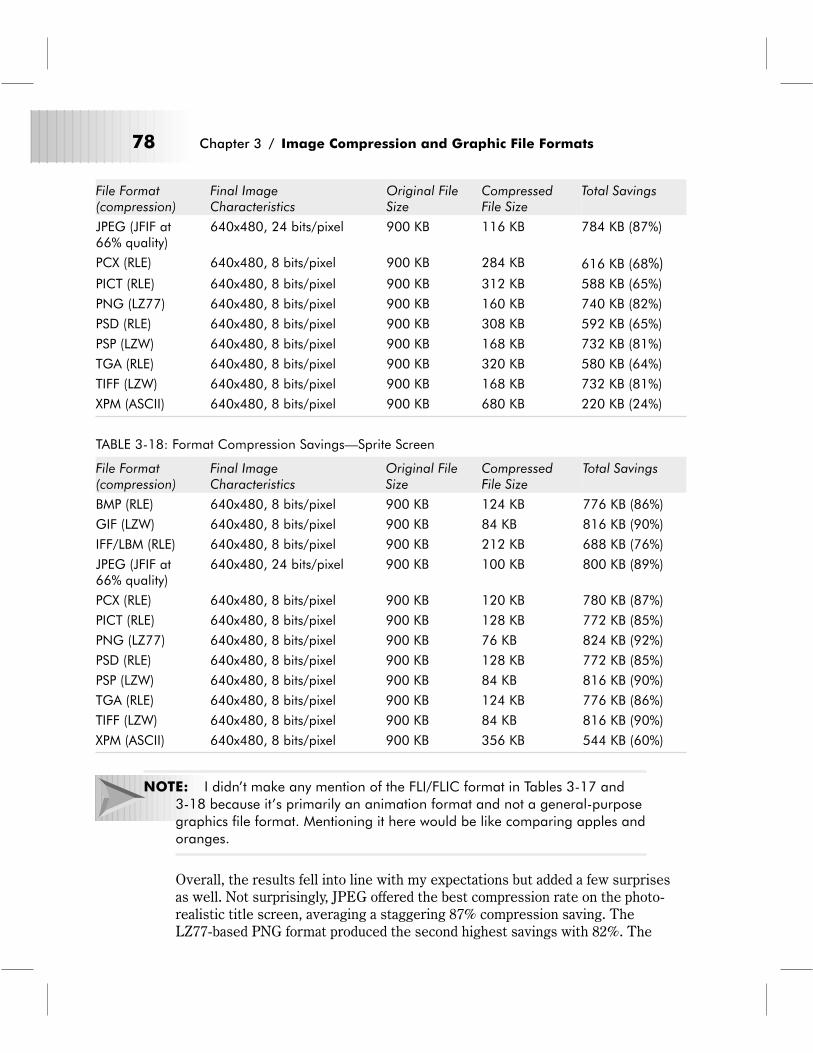
File Format(compression)
Final ImageCharacteristics
Original FileSize
CompressedFile Size
Total Savings
JPEG (JFIF at66% quality)
640x480, 24 bits/pixel 900 KB 116 KB 784 KB (87%)
PCX (RLE) 640x480, 8 bits/pixel 900 KB 284 KB 616 KB (68%)
PICT (RLE) 640x480, 8 bits/pixel 900 KB 312 KB 588 KB (65%)
PNG (LZ77) 640x480, 8 bits/pixel 900 KB 160 KB 740 KB (82%)
PSD (RLE) 640x480, 8 bits/pixel 900 KB 308 KB 592 KB (65%)
PSP (LZW) 640x480, 8 bits/pixel 900 KB 168 KB 732 KB (81%)
TGA (RLE) 640x480, 8 bits/pixel 900 KB 320 KB 580 KB (64%)
TIFF (LZW) 640x480, 8 bits/pixel 900 KB 168 KB 732 KB (81%)
XPM (ASCII) 640x480, 8 bits/pixel 900 KB 680 KB 220 KB (24%)
TABLE 3-18: Format Compression Savings—Sprite Screen
File Format(compression)
Final ImageCharacteristics
Original FileSize
CompressedFile Size
Total Savings
BMP (RLE) 640x480, 8 bits/pixel 900 KB 124 KB 776 KB (86%)
GIF (LZW) 640x480, 8 bits/pixel 900 KB 84 KB 816 KB (90%)
IFF/LBM (RLE) 640x480, 8 bits/pixel 900 KB 212 KB 688 KB (76%)
JPEG (JFIF at66% quality)
640x480, 24 bits/pixel 900 KB 100 KB 800 KB (89%)
PCX (RLE) 640x480, 8 bits/pixel 900 KB 120 KB 780 KB (87%)
PICT (RLE) 640x480, 8 bits/pixel 900 KB 128 KB 772 KB (85%)
PNG (LZ77) 640x480, 8 bits/pixel 900 KB 76 KB 824 KB (92%)
PSD (RLE) 640x480, 8 bits/pixel 900 KB 128 KB 772 KB (85%)
PSP (LZW) 640x480, 8 bits/pixel 900 KB 84 KB 816 KB (90%)
TGA (RLE) 640x480, 8 bits/pixel 900 KB 124 KB 776 KB (86%)
TIFF (LZW) 640x480, 8 bits/pixel 900 KB 84 KB 816 KB (90%)
XPM (ASCII) 640x480, 8 bits/pixel 900 KB 356 KB 544 KB (60%)
NOTE: I didn’t make any mention of the FLI/FLIC format in Tables 3-17 and
3-18 because it’s primarily an animation format and not a general-purpose
graphics file format. Mentioning it here would be like comparing apples and
oranges.
Overall, the results fell into line with my expectations but added a few surprises
as well. Not surprisingly, JPEG offered the best compression rate on the photo-
realistic title screen, averaging a staggering 87% compression saving. The
LZ77-based PNG format produced the second highest savings with 82%. The
78 Chapter 3 / Image Compression and Graphic File Formats
LZW-based file formats such as GIF, PSP, and TIFF followed close behind, aver-
aging 81%. Meanwhile, RLE-based file formats such as BMP, IFF, PICT, PCX,
PSD, and TGA all pulled up the rear, averaging only a 66.5% reduction in file size.
What was interesting was the fact that the LZW compression schemes yielded
identical savings while the RLE compression schemes seemed to vary quite a bit
in the savings they offered.
However, the results were a lot closer when it came to dealing with the flat color
sprite screen. Here, the PNG format yielded the highest compression rate at 92%.
GIF, PSP, TGA, and TIFF followed right behind, averaging 90%. And this time, the
other formats weren’t too far apart, averaging 84%. This time, JPEG produced a
file with an 89% compression saving, but the image’s quality was dramatically and
negatively affected.
NOTE: Different graphics software will produce different results. This is
because some programs offer better file compression logic than others do.
As a result, your compression savings may very well differ from my findings.
Despite these impressive numbers, don’t fall into the trap of using a particular
graphic file format just because it offers a great compression rate. A file format is
only as good as the program that can read it. Unless you have special or unusual
needs, you should always consider a file format’s compatibility with different sys-
tems and applications over its ability to compress files.
Caveats for Working with Graphic File Formats
Although we use them every day and they have proven a reliable mechanism for
exchanging data between machines, graphics files are still imperfect. Things can
sometimes go wrong. The two most common problems are:
� File corruption
� Incompatible versions
File Corruption
Compression schemes do their work by essentially scrambling and rearranging
the contents of a file. The vast majority of the time they work well and the com-
pressed file decompresses without any problems or glitches. However, every now
and then, you may come across a file that gets corrupted while being compressed
and/or saved.
File corruption can rear its ugly head for any number of reasons. For instance,
there might be a bug in how a certain program implemented a particular file-
Chapter 3 / Image Compression and Graphic File Formats 79
compression routine or a system crash might have caused the file save process to
abort before all of the pertinent information was written to disk.
Therefore, in order to minimize the likelihood of this happening in the future, I
recommend that you always save at least two versions of every important graph-
ics file you create. Also, avoid making changes to important files while in an
unstable environment. In other words, don’t continue to work on your file if your
system or graphics program is about to crash. You’re only asking for problems. In
addition, I strongly suggest that you follow the advice I give in Chapter 4 and reg-
ularly back up your files.
Incompatible Versions
A number of the file formats mentioned here can be used across different com-
puter platforms with little or no additional manipulation. However, occasionally
you will encounter a graphics file that should import correctly into a certain pro-
gram and just doesn’t. Often, the file isn’t corrupt, but rather, you’ve discovered
an unpleasant side effect of progress: incompatible file format versions.
Yes, that’s right. As software packages evolve and improve, they often introduce
new file formats and don’t always retain 100% backward compatibility with older
versions of their file formats. The problem is compounded by the fact that many
third-party software vendors are slow to update their software to reflect these
changes. As a result, it’s entirely possible for you to save your files in a particular
version of a file format that one program supports and another doesn’t!
The best and easiest way to cope with this problem is to simply pay attention
when saving or exporting your images. Often, the software you’re using will pro-
vide one or more save options. Among other things, these options will allow you
to determine the version that your file is saved as. In addition, most graphics pro-
grams will inform you when you’ve chosen an outdated or obscure version of a file
format that might cause compatibility problems with other software. Heed its
advice.
Just to drill the point home, here are some examples of common graphic file for-
mats that might cause you grief and some solutions on how to deal with them:
� BMP—Always save using the RGB subformat. This ensures universal com-
patibility with different applications, as RLE compression isn’t supported by
all BMP-compatible software.
� GIF—Choose 87a as it is supported by all GIF-compatible software, especially
when using older software.
� IFF/LBM—Always save the file as compressed (RLE or packbits). Some pro-
grams will allow you to save uncompressed IFF/LBM files but many programs
aren’t compatible with them.
80 Chapter 3 / Image Compression and Graphic File Formats
� PCX—Always choose version 5 unless you plan to use your files with
14-year-old software or want to lose most of your artwork’s color information!
� PSD—Choose version 2.0 or 2.5 if you’re not using layers.
� TIFF—Always choose uncompressed or LZW. Also, be sure to indicate the
appropriate byte order, Intel or Motorola, in order to suit the target platform for
the file. Doing both of these things can greatly reduce the compatibility issues
associated with this particular file format.
Graphic File Format Recommendations
Unfortunately, I can’t recommend one all-inclusive file format simply because
everyone has his or her own unique requirements. Therefore, in order for you to
determine the best file format(s) to use, you should look closely at such game
development related issues as:
� Graphics applications
� Development environment
� Artwork type
� Operating systems and platform
Graphics Applications
The graphics applications you use can have a major influence on which format you
ultimately select. Ask yourself these simple questions: What file formats are the
graphics programs I use compatible with? Can they read or write files in the for-
mats I need? What programs will I eventually use? Weigh your answers and
choose a file format accordingly.
NOTE: Don’t decide these issues solely on compatibility with your preferred
graphics applications. As you’ll see in Chapter 4, there’s an entire class of
image conversion software that can convert graphics files from one format
to another. In fact, to make things easier for you, I’ve included some of the
better programs of this type on the book’s accompanying CD-ROM. You
can find more information by referencing Appendix B of this book.
Development Environment
Your development environment can also have a significant influence on which for-
mat you eventually decide to go with. For example, your favorite C graphics
library might only work with PCX files while another might work with all popular
file formats. The last thing you want is a hard drive of image files that won’t work
with your favorite development tools. Therefore, you need to find out what file
Chapter 3 / Image Compression and Graphic File Formats 81
format restrictions your particular development environment places on you and
then select the appropriate format.
Generally speaking, I’ve found that:
� Multimedia authoring tools such as Macromedia’s Director and the Clickteam’s
The Games Factory tend to offer the best built-in support for graphic file
formats.
� Visual programming languages such as Delphi and Visual Basic tend to offer
support for different graphic formats via third-party controls, components, and
DLLs. However, they will typically also support at least one or more common
graphic formats internally as well.
� Character-oriented languages such as C, Assembler, and Pascal tend to offer
the poorest native support and often need one or more external graphics
libraries to provide the appropriate compatibility with the different file formats
discussed in this chapter.
Artwork Type
The type of artwork you’re designing can also play an important role in the selec-
tion process. As you saw in Tables 3-15 and 3-16, certain file formats work better
on some types of graphics files than others. You need to take this into account and
consider your available options accordingly. For example, if you’re designing game
sprites, you’ll definitely want to use a lossless compression format rather than a
lossy one so you can preserve the original integrity of your artwork. Similarly, if
you are working with photo-realistic artwork, a file format that offers good com-
pression and that better supports 24-bit images may be the way to go.
Operating System and Platform
The need to remain compatible with different computer platforms and operating
systems also impacts your decision. For example, if you’re trying to port the game
you’re working on to the Macintosh, then PICT might be a good solution. Alterna-
tively, if you need to maintain compatibility with your favorite DOS graphics
editor, BMP might not be the best choice. Ultimately, the choice is an easy one to
make as long as you think about your needs and requirements logically and then
weigh your options carefully. Refer to Table 3-19 for suggestions on which file for-
mats to use on which platforms.
82 Chapter 3 / Image Compression and Graphic File Formats
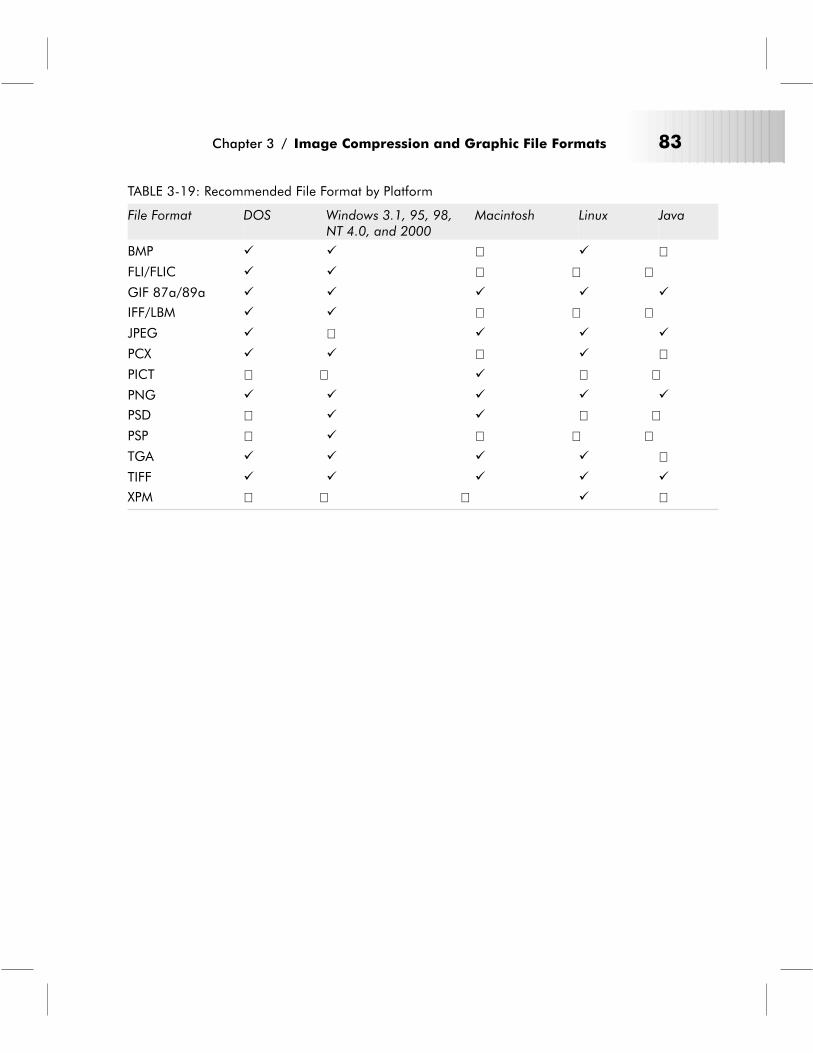
TABLE 3-19: Recommended File Format by Platform
File Format DOS Windows 3.1, 95, 98,NT 4.0, and 2000
Macintosh Linux Java
BMP � � � � �FLI/FLIC � � � � �GIF 87a/89a � � � � �
IFF/LBM � � � � �JPEG � � � � �
PCX � � � � �PICT � � � � �PNG � � � � �
PSD � � � � �PSP � � � � �TGA � � � � �TIFF � � � � �
XPM � � � � �
Chapter 3 / Image Compression and Graphic File Formats 83

Chapter 4
Files and FileManagement
In this chapter, you’ll learn about:
� File naming conventions
� Exchanging files across platforms
� File backups and file backup strategies
� Version control
� Basic asset management
85
This chapter discusses several important but often-ignored topics of game graph-ics development: how to name, exchange, back up, maintain, and manage the filesyou create. Without understanding these issues and why they’re necessary, yourprojects will suffer. However, if you take the time to appreciate them and applywhat you learn here into your daily routine, your projects will go smoother andfaster, and the work that you produce will be of higher quality. Sound good? Great,then read on.
File Naming Conventions
Once you determine the best graphic file format to store your game graphics in,you should start thinking about how to actually name the files you create. If youdon’t do this, you’ll soon find yourself with lots of files on your hard drive andabsolutely no idea of what they are or what they contain. Establishing a good filenaming convention early on in your projects is a good practice and will definitelysave you time and frustration later on.
However, before you start naming all of your files a certain way, you should makesure that you fully understand the various limitations imposed by your particularoperating system as well as any operating system with which you’re likely toexchange files. Unfortunately, DOS, Windows 95/98/NT/2000, Linux, and theMacintosh all have somewhat different rules for how they go about naming files.You need to know what these differences are if you plan on working with andexchanging files between these platforms.
DOS and Windows 3.1 File Naming Rules
� Both DOS and Windows 3.1 use what is known as an “8.3” file namingscheme. This includes eight alphanumeric characters, a dot, and then threemore characters to hold the file’s extension. This gives you a grand total ofeleven characters to use for filenames or folders, which in the grand schemeof things isn’t a whole lot.
� DOS and Windows 3.1 filenames aren’t case sensitive; this means that file-names can be either upper- or lowercase.
� Filenames and directories can’t include blank spaces or characters such as / \ :* ? < > . or |. All other characters available on your keyboard are legal forfilenames, however.
� Neither DOS nor Windows 3.1 require you to include a file extension. How-ever, it’s a generally a good idea to do so since many applications on these sys-tems use the file extension in order to identify what a file is.
86 Chapter 4 / Files and File Management
Windows 95, 98, NT 4.0, and 2000 File Naming Rules
� Windows 95, 98, NT 4.0, and 2000 are all much more flexible than DOS orWindows 3.1 and can support filenames of up to 256 characters.
� Like their older relatives, you can’t use characters such as / \ : * ? < > | or .in your filenames or folder names.
� Unlike DOS or earlier versions of Windows, spaces are okay to use.
� File extensions are also optional on these systems, but again, it’s a good ideato include them because many Windows applications use this information todetermine what different files are.
� Like DOS and Windows 3.1, the newer versions of Windows aren’t case sensi-tive. For example, a filename like arcade game graphics.bmp is a perfectlylegal filename under Windows 95, 98, NT 4.0, and 2000.
NOTE: Neither DOS nor Windows 3.1 like the longer filenames used by thenewer Microsoft operating systems. They will read files created by these sys-tems with no problem, but their filenames will be truncated after the seventhcharacter just before the file extension. For example, the Windows 95 file-name spaceship1999.bmp will appear as spacesh~1.bmp under DOS.Long filenames will display normally when using the DOS console on Win-dows 95, 98, NT 4.0, or 2000, however.
Macintosh File Naming Rules
� All Macintosh computers allow filenames and folder names to be up to 31characters long.
� You can also use any character or combination of characters except for thecolon (:).
� As with DOS and Windows, character case doesn’t matter.
� Macintosh files don’t require you to use file extensions. Unlike DOS or Win-dows, Macintosh applications don’t rely on a file’s extension to tell what it is.Rather, they use what is known as a creator code to identify different types offiles and associate them with the applications they should work with. Everyapplication on the Macintosh assigns files their own unique creator code. Thisallows you to do things such as launch the application that generated the fileby simply double-clicking on its filename.
NOTE: When exchanging files and PC formatted disks with Macintosh comput-ers running Mac OS 8.1 or lower, please be aware that Windows 95, 98,NT 4.0, and 2000 long filenames won’t be preserved. These versions of theMac OS will automatically truncate the filenames to adhere to the old, 8.3
Chapter 4 / Files and File Management 87
naming standards. Mac OS 8.5 and above don’t have this problem, how-ever, and these systems will, in fact, preserve Windows long filenames.
Linux File Naming Rules
� Filenames and directories under Linux can be between 1 and 256 characterslong.
� The following characters are legal for Linux filenames: a..z, A..Z, 0..9, _. Thefollowing characters have special meaning to Linux and really shouldn’t beused in filenames or directories: < > ' " * { } [ ] ( ) ^ ! \ | & $ ? ~.
� Spaces aren’t illegal in Linux filenames and directories, but they’re not recom-mended. Use underscore (_) characters instead of spaces whenever possible.
� Do not start any file or directory name with a period (.), as this tells Linux tomake it hidden from the system.
� Unlike the other platforms mentioned here, filenames are case sensitive underLinux. Therefore, Linux sees the files stars.gif and Stars.gif as two dis-tinct files.
General File Naming Guidelines
The next step is to define the basic rules that identify the different files you cre-ate. Given that most of the graphics you design will have a specific function withina game, I suggest naming your files according to these basic guidelines:
� Name your files logically—This is a no-brainer. Always give your files logi-cal, intelligent names in order to avoid any unnecessary confusion. For exam-ple, call the file that contains the spaceship sprites for level 5 of your gamespaceships.bmp and not ships.bmp.
NOTE: This might cause compatibility problems with DOS systems so skip thisstep on this platform as necessary.
� Consult with others—Always check with your fellow developers and pro-grammers when developing a file naming convention before starting a project.This will save you all time and grief later on should anyone involved have spe-cific preferences, expectations, or needs regarding how graphic files should benamed.
� Be descriptive—Try to be as descriptive as possible in naming your files butdon’t go overboard. For example, name the file that contains the alien space-ships for level 1 of your game alien_spaceships_01.bmp. Keep the file-name restrictions of each platform in mind when naming your files. If you
88 Chapter 4 / Files and File Management
intend to use multiple files of related images, you should number themsequentially, i.e., 00-99. When you run out of digits, use the letters AAthrough ZZ. For example, AA, AB, etc.
� Use file extensions—In addition to helping DOS, Windows, and Linux sys-tems identify which program a particular file belongs to, file extensions alsoallow you to perform many powerful file manipulations on these systems. Forexample, you can decide to delete files that have a .PCX extension by typingdel *.PCX or quickly copy all files to another drive that have a .BMP extensionby typing copy C:\DATA *.BMP D:\BACK.
� Adhere to the 8.3 naming scheme—If cross-platform compatibility withDOS and Windows 3.1 systems is a concern, remember to restrict your file-names and directory names to the 8.3 naming rules described earlier in thissection. Doing this will keep your filenames consistent even when used on dif-ferent platforms.
� Don’t use spaces—I suggest using underscore characters (_) in place ofspaces even though the Macintosh and the current versions of Windows allowthem in filenames. Doing this will give you more flexibility when performingfile searches and wildcard file manipulations. It also allows you to maintainconsistent filename compatibility with DOS and other operating systemsincluding Linux.
� Be consistent—Once you establish a file naming scheme, stick to it. If youdon’t you’re only asking for trouble as you’ll soon experience problems find-ing, tracking, and maintaining your files.
� Provide documentation—You should always document your file namingscheme and distribute it to everyone who works with your files. The wholepoint of establishing your own file naming convention is wasted if you don’ttake the time to write out and define what your naming system actuallymeans! Doing so will also avoid confusion regarding a given file’s contents,especially when working with other people as part of a development team.
A Sample File Naming Scheme
This section provides an example of how you might opt to name your files in yourown game projects.
The sample file naming scheme uses this format:
type-description-size.extension
Type:
This part of the filename indicates the type, or class, of file to which the imagebelongs. Please refer to Table 4-1 for a complete description of the possible imagetype prefixes.
Chapter 4 / Files and File Management 89
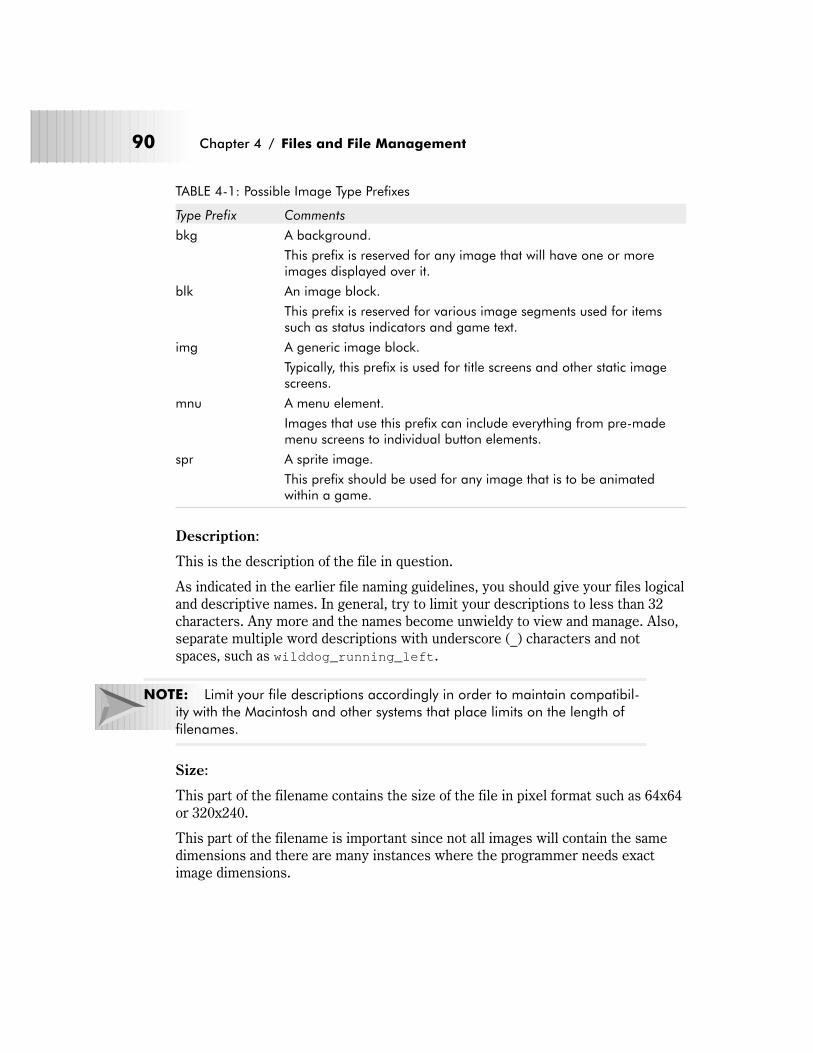
TABLE 4-1: Possible Image Type Prefixes
Type Prefix Comments
bkg A background.
This prefix is reserved for any image that will have one or moreimages displayed over it.
blk An image block.
This prefix is reserved for various image segments used for itemssuch as status indicators and game text.
img A generic image block.
Typically, this prefix is used for title screens and other static imagescreens.
mnu A menu element.
Images that use this prefix can include everything from pre-mademenu screens to individual button elements.
spr A sprite image.
This prefix should be used for any image that is to be animatedwithin a game.
Description:
This is the description of the file in question.
As indicated in the earlier file naming guidelines, you should give your files logicaland descriptive names. In general, try to limit your descriptions to less than 32characters. Any more and the names become unwieldy to view and manage. Also,separate multiple word descriptions with underscore (_) characters and notspaces, such as wilddog_running_left.
NOTE: Limit your file descriptions accordingly in order to maintain compatibil-ity with the Macintosh and other systems that place limits on the length offilenames.
Size:
This part of the filename contains the size of the file in pixel format such as 64x64or 320x240.
This part of the filename is important since not all images will contain the samedimensions and there are many instances where the programmer needs exactimage dimensions.
90 Chapter 4 / Files and File Management
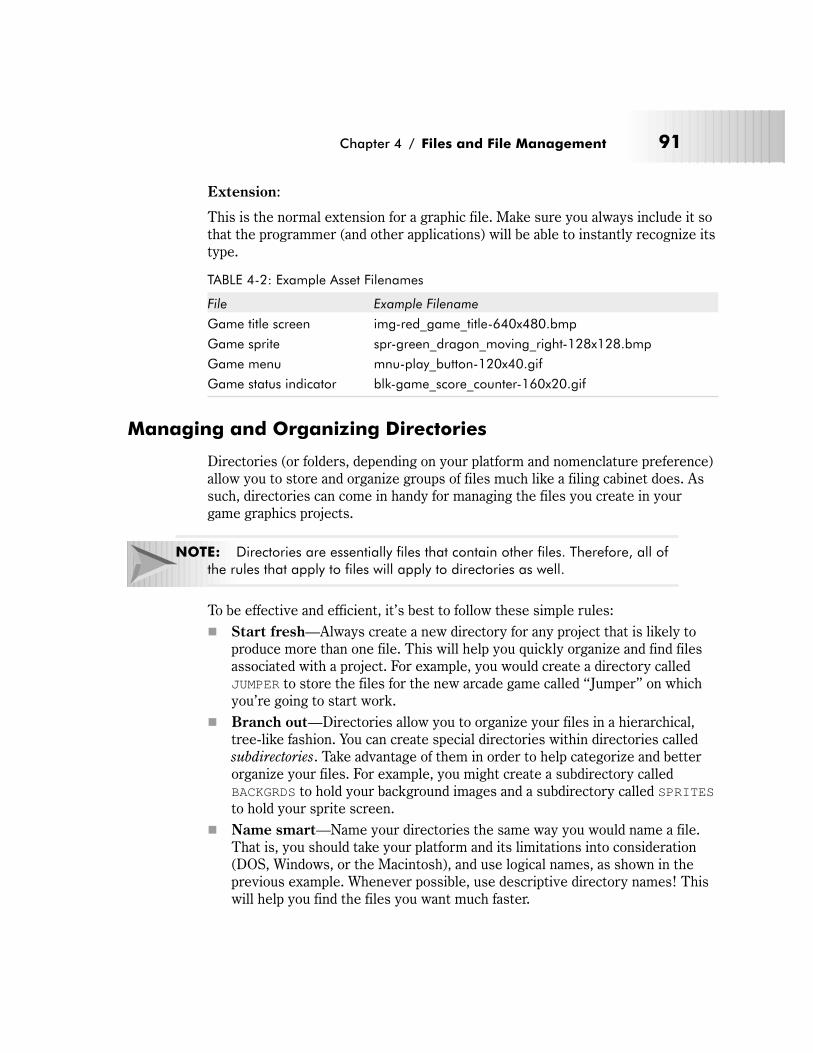
Extension:
This is the normal extension for a graphic file. Make sure you always include it sothat the programmer (and other applications) will be able to instantly recognize itstype.
TABLE 4-2: Example Asset Filenames
File Example Filename
Game title screen img-red_game_title-640x480.bmp
Game sprite spr-green_dragon_moving_right-128x128.bmp
Game menu mnu-play_button-120x40.gif
Game status indicator blk-game_score_counter-160x20.gif
Managing and Organizing Directories
Directories (or folders, depending on your platform and nomenclature preference)allow you to store and organize groups of files much like a filing cabinet does. Assuch, directories can come in handy for managing the files you create in yourgame graphics projects.
NOTE: Directories are essentially files that contain other files. Therefore, all ofthe rules that apply to files will apply to directories as well.
To be effective and efficient, it’s best to follow these simple rules:
� Start fresh—Always create a new directory for any project that is likely toproduce more than one file. This will help you quickly organize and find filesassociated with a project. For example, you would create a directory calledJUMPER to store the files for the new arcade game called “Jumper” on whichyou’re going to start work.
� Branch out—Directories allow you to organize your files in a hierarchical,tree-like fashion. You can create special directories within directories calledsubdirectories. Take advantage of them in order to help categorize and betterorganize your files. For example, you might create a subdirectory calledBACKGRDS to hold your background images and a subdirectory called SPRITESto hold your sprite screen.
� Name smart—Name your directories the same way you would name a file.That is, you should take your platform and its limitations into consideration(DOS, Windows, or the Macintosh), and use logical names, as shown in theprevious example. Whenever possible, use descriptive directory names! Thiswill help you find the files you want much faster.
Chapter 4 / Files and File Management 91

Figure 4-1 shows an example of what your directories might look like in an actualproject.
Exchanging Files Across Platforms
In a world where upwards of 90% of computers are running some version of DOSor Windows, exchanging files between different platforms is a lot easier than itused to be. However, it’s still not a given, particularly with regard to non-PC sys-tems such as the Macintosh or Linux. This being said, there are two basic levelsof cross-platform compatibility that you should be worried about. These are:
� Disk compatibility
� File compatibility
92 Chapter 4 / Files and File Management
PROJECTS (Main Project Directory-top of directory tree)
(Main directory for Jumper game project)
(Subdirectory to store Jumper sprites)
level1.bmp
level1.bmp
level2.bmp
level2.bmp
level3.bmp
level3.bmp
JUMPER
SPRI TES
BACKGRDS
TI TLE
MENUSCRS
FIGURE 4-1: Example Game Project Directory
Disk Compatibility
Mechanically speaking, there is really no different between how disks, be it afloppy, Zip, or CD-ROM, work across different platforms. Regardless of architec-ture, most computers manufactured since the late 1980s pretty much all use thesame components, technology, and hardware. However, there’s a huge differencebetween platforms in how information is recorded and stored. These differencesbecome obvious whenever you try to exchange disks between different systemsusing their native formats. Without compatibility standards, such operations areusually doomed to failure.
Fortunately, there’s one way to ensure almost universal disk compatibility: stan-dardization! By this I mean that you should standardize on a single disk format forall of your disks. For obvious reasons, this standard disk format should be theDOS (FAT) format.
Macintosh Disk Compatibility with Different Platforms
� Format all floppies using the “DOS 1.4 MB” option from the Finder’s EraseDisk command. This creates a 100% compatible DOS disk.
� All Macintoshes can read and write to PC formatted floppies without problemsas long as the File Exchange system extension is installed and enabled. If itisn’t, the Macintosh will report errors that the floppy is unreadable.
� Format all Zip disks using the Iomega Tools utility as it allows you to createDOS readable, removable disks. Unlike floppy disks, the Macintosh can’tdirectly format DOS-compatible disks without using special software.
� All Macintoshes can read and write to PC formatted Zip disks without prob-lems as long as the File Exchange system extension is installed and enabled. Ifit isn’t, the Macintosh will report errors that the Zip disk is unreadable.
� Using CD-R mastering software such as Adaptec’s Toast, burn a CD using theISO 9660 format with Joliet extensions. Joliet enables you to create CDs thatare readable on DOS, Linux, and Windows machines while preserving theappropriate filename length for each platform. Be sure to limit your filenamesto 31 characters, however, as the Mac OS doesn’t support filenames that arelonger.
� All Macintoshes can read PC and Linux formatted CD-ROMs provided thatForeign File Access, ISO 9660 File Access, and High Sierra File Access areenabled.
Chapter 4 / Files and File Management 93
Linux Disk Compatibility with Different Platforms
� Use the free Mtools suite of utilities or a similar utility. Mtools allows Linuxusers to format PC-compatible floppies as well as read, write, and manipulateDOS files.
� Most versions of Linux can mount IS0-9660 (DOS) and ISO-9660 (Windows95/98/NT/2000) CD-ROMs.
� There are also various free utilities available that allow Linux users to readand write files to DOS formatted Zip disks as well.
DOS Disk Compatibility with Different Platforms
� DOS can format floppy disks readable by all systems as long as you stay awayfrom extended formats. This means stick to the plain vanilla 1.4 MB disk for-mat created by most DOS formatting utilities.
� DOS can’t normally read Macintosh formatted floppy disks, removable disks,or CD-ROMs. However, using a utility such as MacSee by REEVEsoft, Inc.will enable DOS users to access most Macintosh formatted media.
Windows Disk Compatibility with Different Platforms
� Windows can format disks readable by all systems as long as you stay awayfrom extended formats. This means stick to the plain vanilla 1.4 MB disk for-mat and don’t use extended disk formats, such as DMF, if you plan onexchanging your disks with other platforms.
� Windows can format DOS-compliant Zip disks using the standard Iomega Tools
that ships with these drives.
� Using software such as Adaptec’s EasyCD Creator, all versions of Windowsother than version 3.1 can burn ISO-9660 (DOS, Linux, and Macintosh read-able) and ISO-9660 Joliet format (long filename CDs readable by Linux andMacintosh systems) CDs.
� Windows machines can’t normally read Macintosh formatted floppy disks,removable disks, or CD-ROMs. However, using such utilities as TransMac byAcute Systems will enable them to access files stored on most types ofMacintosh media.
NOTE: Evaluation copies of both MacSee and TransMac are included on thebook’s accompanying CD-ROM. Please refer to Appendix B for more infor-mation on these programs.
94 Chapter 4 / Files and File Management
File Compatibility
When it comes to transferring files between different platforms, files fall into twodistinct categories: those that require some sort of conversion and those thatdon’t. Let’s tackle the ones that don’t require conversion first.
File Format Conversion Issues
One of the nice things about the abundance of software in the marketplace is thefact that there have emerged some informal standards in terms of compatibilitybetween graphics applications and the files they create. This section summarizes:
� BMP files—The BMP format is common enough that most non-Windowsapplications will support them as an input format with little or no problems.This is especially true on the Macintosh when QuickTime is installed. BothDOS and Linux offer more limited application support for the format but willwork with it.
� GIF files—GIF files are accepted by virtually all major graphics applicationsas an input format and their content displays correctly whether you’re onDOS, Windows, a Macintosh, or even a Linux box. For the time being, they areyour best cross-platform file format choice.
� JPEG files—Like GIF files, JPEG files are accepted by virtually all majorgraphics applications as an input format and their content displays correctlywhether you’re on DOS, Windows, a Macintosh, or even a Linux box. Justrecall the discussion in Chapter 3 on JPEG’s limitations before using themextensively.
� PCX files—PCX files have been around a long time and have thereforeearned a place as the de facto standard on many platforms. DOS applicationshave the most extensive PCX support and there are an ample number of pro-grams on the Windows platform that are compatible with this format as well.The same does not hold true for the Macintosh and Linux platforms, however.
� PNG files—PNG is still a relatively new file format. However, it will soonhave the same level of support across all platforms that GIF currently enjoys.Until then, try to be somewhat circumspect regarding its use until all graphicsapplications and programming tools are updated to be compatible with it.
� PSD files—Photoshop files generated by one platform can be read by another(i.e., Windows to Macintosh and vice versa) as long as the target machine hasa version of Photoshop that’s compatible with the original file.
� TIFF files—TIFF files are very similar between systems like the Macintoshand Windows. However, they’re not completely identical. There’s a subtle dif-ference in how they’re saved that prevents them from being read directly oneither platform without taking special precautions. So, if you plan to use TIFFfiles on other platforms, make sure you save them with the correct byte order.
Chapter 4 / Files and File Management 95
This is because there’s a specific byte order for both Windows and theMacintosh and neither platform is compatible with the other.
Aside from these exceptions, using all other graphic file formats across platformsis a crapshoot. Most of the other formats mentioned in Chapter 3 are either pro-prietary to a specific piece of software or only have limited support from graphicsapplications on different platforms.
File Naming Across Platforms
As discussed earlier in this chapter, each platform has different file naming stan-dards. Table 4-3 highlights how you would handle this issue while moving filesacross different platforms:
TABLE 4-3: An Overview of How to Handle Filenames Across Platforms
Source Platform Destination Platform Comments
Linux DOS/Windows 3.1 N/A
Linux Windows 95/98/NT/2000 N/A
Linux Macintosh N/A
Macintosh DOS/Windows 3.1 If you know you’ll be moving files over to DOSahead of time, cover your bases by limitingyour filenames to the DOS 8.3 convention.Otherwise, DOS will mangle your filenames.
If you’re using Macintosh formatted media,a utility such as MacSee will allowDOS/Windows 3.1 users to read theMacintosh files and convert them into theproper filename length.
Macintosh Windows 95/98/NT/2000 These versions of Windows can handle theMacintosh file length but will need a programsuch as TransMac to read Macintoshformatted media. If the source media is PCcompatible, then there’s no conversionnecessary.
Macintosh Linux N/A
DOS/Windows 3.1 Windows 95/98/NT/2000 Don’t do a thing. These versions of Windowsare fully backward compatible with DOS andWindows 3.1.
DOS/Windows 3.1 Macintosh Don’t do a thing. The Macintosh with FileExchange enabled is fully compatible.
DOS/Windows 3.1 Linux Don’t do a thing. With a utility such as Mtools,Linux is fully compatible.
96 Chapter 4 / Files and File Management
Source Platform Destination Platform Comments
Windows95/98/NT/2000
DOS/Windows 3.1 If you know you’ll be moving files over to DOSahead of time, cover your bases by limitingyour filenames to the DOS 8.3 convention.Otherwise, DOS will mangle your filenames.
Windows95/98/NT/2000
Macintosh Limit your filenames to 31 characters. Otherthan that, the Macintosh with File Exchangeenabled is fully compatible.
Windows95/98/NT/2000
Linux With the proper tools installed on the Linuxend, Linux is fully compatible.
Compressed Files
One last issue to consider is that of compressed files. Compressed files areextremely useful for efficiently exchanging files between platforms. Unfortunately,there exist a number of different compression formats, and each platform has itsown means of dealing with them.
Table 4-4 provides information on these file compression formats.
TABLE 4-4: Common File Compression Formats
Platform File Format(s) File Extension Comments
Linux gzip .gz Gzip is the standard file compression formatused on UNIX type systems.
Almost all Zip-compatible compressionprograms can read and write gzip files.
Macintosh Stuffit .sit Stuffit is the standard Macintosh filecompression format.
Support for it is scarce on the Windows andDOS platforms. However, Aladdin System’sStuffit Expander can read them.
DOS/Windows3.1
Zip, ARJ, RAR,or LZH
.zip, .arj, .rar,
.lzh, .lhaOf the formats listed here, Zip is the mostcommon. The Zip format is a de factostandard and any properly created Zip fileshould be readable on any platform with theappropriate reader.
The ARJ and RAR formats are common andtend to be popular in Europe.
Chapter 4 / Files and File Management 97
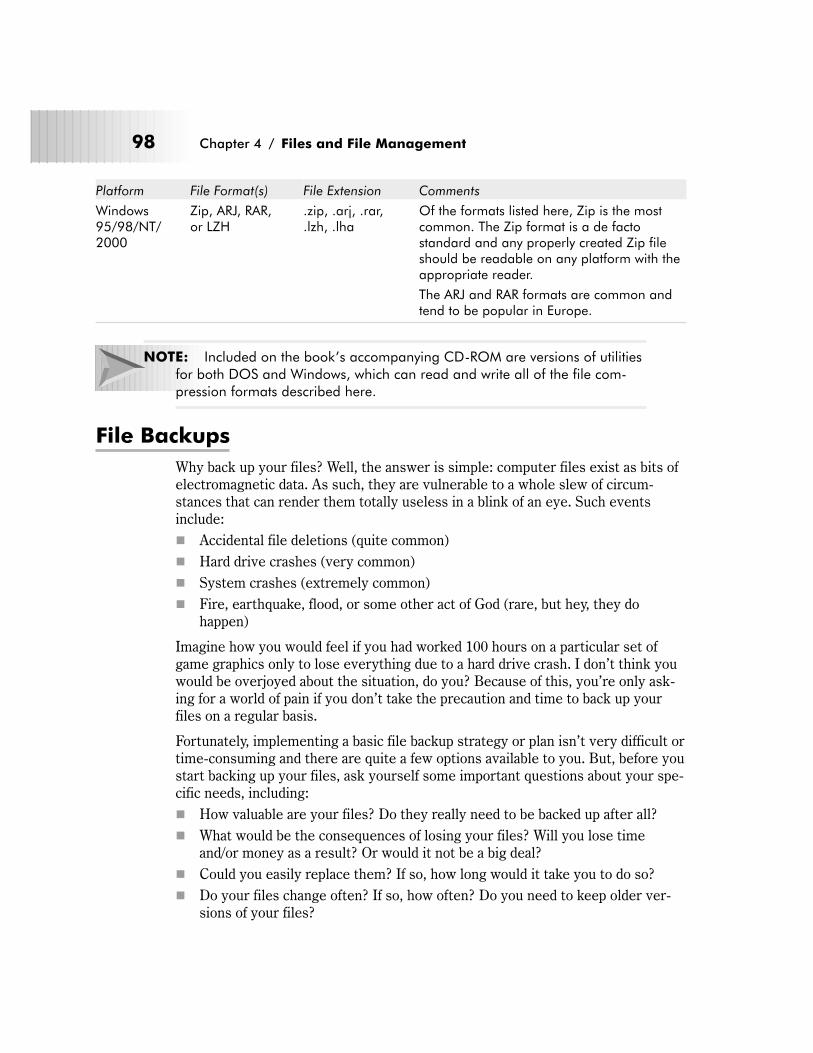
Platform File Format(s) File Extension Comments
Windows95/98/NT/2000
Zip, ARJ, RAR,or LZH
.zip, .arj, .rar,
.lzh, .lhaOf the formats listed here, Zip is the mostcommon. The Zip format is a de factostandard and any properly created Zip fileshould be readable on any platform with theappropriate reader.
The ARJ and RAR formats are common andtend to be popular in Europe.
NOTE: Included on the book’s accompanying CD-ROM are versions of utilitiesfor both DOS and Windows, which can read and write all of the file com-pression formats described here.
File Backups
Why back up your files? Well, the answer is simple: computer files exist as bits ofelectromagnetic data. As such, they are vulnerable to a whole slew of circum-stances that can render them totally useless in a blink of an eye. Such eventsinclude:
� Accidental file deletions (quite common)
� Hard drive crashes (very common)
� System crashes (extremely common)
� Fire, earthquake, flood, or some other act of God (rare, but hey, they dohappen)
Imagine how you would feel if you had worked 100 hours on a particular set ofgame graphics only to lose everything due to a hard drive crash. I don’t think youwould be overjoyed about the situation, do you? Because of this, you’re only ask-ing for a world of pain if you don’t take the precaution and time to back up yourfiles on a regular basis.
Fortunately, implementing a basic file backup strategy or plan isn’t very difficult ortime-consuming and there are quite a few options available to you. But, before youstart backing up your files, ask yourself some important questions about your spe-cific needs, including:
� How valuable are your files? Do they really need to be backed up after all?
� What would be the consequences of losing your files? Will you lose timeand/or money as a result? Or would it not be a big deal?
� Could you easily replace them? If so, how long would it take you to do so?
� Do your files change often? If so, how often? Do you need to keep older ver-sions of your files?
98 Chapter 4 / Files and File Management

� Are your files very large?
� Do your files need to be secured? Do you need to protect them from unautho-rized access or duplication?
� Do you need to transport or distribute your backed-up files to alternatelocations?
� Once backed up, how important is the immediate access to them?
Your answers will dictate the solution that’s right for you. In a nutshell, you cangroup these file backup solutions into seven categories:
� Importance
� Change
� Device capacity and performance
� Cost
� Portability
� Reliability
� Security
Backup strategies are based on a combination of these categories, and you shoulddevelop a backup strategy that regularly takes these issues into consideration.
Importance
Your files are important to you, aren’t they? After all, during the average gameproject, you’ll probably wind up spending hours, days, or even weeks creating andtweaking them to get them looking just right. This being said, you probablywouldn’t want anything to happen to them, right? Therefore, any backup strategyyou adopt should take into account the potential cost to you in terms of the timeand money that you’d need to invest should you need to replace lost files. This initself should encourage you to back up your files at least every day.
Change
How often your files change figures quite prominently in any backup strategy.Files that change frequently are more prone to corruption and loss than files thatdo not. To make matters more complicated, these files always seem to be yourmost important ones! Your strategy should include a plan on how to handle them,such as backing up files that change frequently to ensure that a recent copy of allfiles exists at all times.
Chapter 4 / Files and File Management 99
Device Capacity and Performance
Different backup technologies offer different levels of storage capacity and perfor-mance. Some systems are capable of copying and storing many files very quicklywhile others are only capable of copying a few files relatively slowly. Furthermore,some backup devices might not be available for your particular system. Therefore,your backup strategy must consider your particular hardware setup and operatingsystem, as well as personal needs. For example, you may find that certain backuptechnologies aren’t available for your computer. In addition, you may discover thatyour particular need for backup files is very limited and you don’t have to resort tousing a sophisticated backup solution.
Cost
Your backup strategy must weigh your financial situation with that of the impor-tance of your files. Faster, higher capacity, and more full-featured backup devicestend to be much more expensive than slower, more limited backup devices. Also,your time is valuable and making backups takes time. You need to evaluatewhether your files are worth the cost of what you could be doing with your time inlieu of making backups.
Portability
The portability of different file backup media and devices can also influence thestrategy you choose to implement. For instance, in situations where files must becirculated within your office or sent to another location, you will probably want touse a backup device to physically transport your media. You should also choose abackup device that uses media which is compatible with other devices commonlyfound and used in the environments you regularly access.
Reliability
Different backup devices also offer different levels of reliability. Some backupmedia is more prone to sporadic corruption than other media. You should take thisinto account before committing to a solution in order to avoid any nasty surprises.After all, you don’t want to go through all of the trouble of backing up your filesonly to find them ruined by backup media that has gone bad, do you?
Security
You should consider the security of your files to be of paramount importance inimplementing any backup strategy. The whole point of backing up your files in thefirst place is to keep them safe. This means that your backups should be protected
100 Chapter 4 / Files and File Management

against traumatic events such as theft, fire, and the like. Along the same lines,your backups should also be secure from prying eyes and unauthorized use andaccess. The last thing you want is for someone to steal your intellectual property.Implementing proper security in your file backups can go a long way in preventingthis from happening.
Backup Media
This section will describe some of the more common file backup technologies incommon use.
� Floppy disk drives
� Zip drives
� CD-R/CD-RW drive
� Internet-based backup systems
Floppy Disk Drives
Contrary to popular opinion, there’s still plenty of life left in the venerable floppydisk and they offer a number of advantages when it comes to backing up smallfiles, including:
� They’re sturdy—Despite their name, floppy disks are fairly rigid and able tostand significant abuse before failing. This keeps your files reasonably safe.
� They’re cheap—Floppy disks only cost pennies when purchased in bulk,making them the most inexpensive of all of your backup options.
� They’re portable—The 3.5" floppy disk is small enough to fit in one’s shirtpocket. This makes it easy to transport files using the “sneaker net” acrossthe office or across one’s home.
� They’re compatible—PC formatted floppy disks are readable and compatiblewith DOS, Windows, and Macintosh platforms. However, the same is not truethe other way around. Macintosh formatted floppies are not compatible withDOS or Windows systems without using special software.
� They’re ubiquitous—With the exception of newer Macintosh models such asthe iMac and G3/G4 series, 3.5" floppy disks are installed in and compatiblewith virtually every PC manufactured since the early 1990s. In fact, there areprobably hundreds of millions of installed floppy drives, which virtually assureits ubiquity. This alone makes them a good, inexpensive choice for occasionalbackup duty.
These points being made, floppy disks have their share of faults, including:
� They have limited storage capacity—With average capacities in the neigh-borhood of 1.4 MB, they only have enough space to handle one or two
Chapter 4 / Files and File Management 101

640x480, 24-bit images or about eight to ten, RLE compressed 640x480, 8-bitimages. This fact keeps them relegated to all but the smallest backup jobs.
� They’re slow—Floppy drives are notoriously slow, usually offering only about64 KB/sec of sustained transfer rate in even the best of conditions. Frequently,the host system’s OS slows floppy access even more. This makes themunsuitable for fast, frequent file backups.
� They offer poor security—Floppy disks are prone to theft and the files con-tained on them are easily copied. This makes them a poor choice if data secu-rity is important to you.
NOTE: I have decided not to mention the so-called LS-120 “Super Disk” tech-nology in this discussion because it is not a widely popular storage format atthis time.
Zip Drives
Iomega’s Zip disk drive is known as the “super floppy” for good reason. This ver-satile storage medium offers many advantages, including:
� Large installed base—Since its introduction in 1994, the Zip drive is secondonly to the floppy disk in terms of installed numbers. There are tens of mil-lions of Zip-compatible drives and several times that number of Zip disks inuse around the world. These numbers ensure that you’re not going to back upyour files to a dead medium.
� Respectable storage capacity—Unlike floppy disks, Zip disks can storeapproximately 100 MB of data, which is equivalent to over 70 floppy disks!What’s more, newer Zip models support disks that can store as much as 250MB of data. Even at the 100 MB capacity, the average Zip disk can store adozen or more full-color 24-bit files or hundreds of RLE compressed, 8-bitgraphics files. This is enough for most purposes.
� Cross-platform compatibility—Zip drives and media can be used on Win-dows, Macintosh, and Linux machines. Macintosh systems can read bothnatively formatted Zip disks and PC formatted Zip disks. However, like floppydisks, Windows machines can’t read Macintosh formatted Zip disks withoutusing special software such as TransMac. Despite this, Zip disks are verycross-platform friendly.
As with their floppy cousins, Zip drives aren’t perfect either. Their problemsinclude such things as:
� Reliability problems—Although I’ve personally never experienced problemswith them, there are plenty of users who have. There are some known qualitycontrol issues with certain Zip drives that can cause one to either damage orlose their data in certain situations. Therefore, if the integrity of your data is
102 Chapter 4 / Files and File Management
very important to you, you might want to look elsewhere for a more robustbackup solution.
� Performance issues—Zip drives come in many flavors, including SCSI, USB,and parallel compatible models. Zip drives operate similar to floppy drives andaren’t speed demons to begin with. How you interface the Zip drive to yoursystem will have a significant influence on how fast a Zip drive will copy yourfiles. In general, SCSI-based Zip drives are the fastest, followed closely byUSB drives, and, finally, parallel drives. If backup speed is an issue with youand you have a slow Zip drive, it may not be the backup solution for you.
� Expensive media—Zip media is significantly more expensive than floppydisk media or even CD-R media. Prices have not gone down substantially overthe years, making the cost per megabyte on the high side of available backupstorage options. This is certainly something to consider, especially if you’reprice conscious.
� Poor security—As with floppy disks, Zip disks are prone to theft and the filescontained on them are also easily copied. This makes them a poor choice ifdata security is important to you.
CD-R/CD-RW Drives
CD-R/CD-RW drives are recordable versions of the compact disc. At one time,CD-R (compact disc-recordable) and CD-RW (compact disc-rewritable) driveswere out of reach for the average person. However, with the massive price dropsof recent years, this is no longer the case. Compared to floppy or Zip disks, CDtechnology offers some incredible advantages such as:
� Massive storage capacity—Even in today’s world of multi-gigabyte harddrives, the CD’s 650 megabyte capacity is still nothing to scoff at. You canpotentially store hundreds of full-color, 24-bit, 640x480 images on a CD orthousands of RLE compressed, 8-bit color, 640x480 screens. There’s plenty ofroom for either and then some.
� Reliability—Compact discs store data digitally and not magnetically. There-fore, unlike magnetic media such as floppy disks or Zip disks, CDs aren’tprone to the same hazards. This means files stored on CDs will usually lastmuch longer than files stored on magnetic media. In fact, this data can oftenlast for years, rather than weeks or months, without any noticeable problemsor degradation.
� Inexpensive media—CD-R media ranks just next to floppy disks in terms ofprice. Simply put, CD-R media is very inexpensive. This makes it a goodchoice for making numerous backups of important files. The same does nothold true for CD-RW media, however, as it’s still on the high side.
� High degree of portability—CD-R media (not CD-RW) can be read in practi-cally any CD-ROM drive currently in use as long as they are formatted in the
Chapter 4 / Files and File Management 103
ISO-9660 standard. As virtually all systems manufactured since the early1990s come with CD-ROM drives, this makes CD-R media almost as ubiqui-tous as the floppy disk.
Of course, CD-R and CD-RW drives do have their share of disadvantages,including:
� Write once medium—CD-R drives can only write contents onto a CD onetime. After that time, the disc may no longer be recorded on. While CD-RWdrives do offer the ability to write to discs multiple times, they generally can’twrite to discs at a file by file level. This makes them useless for backing upfrequently changed files.
� Slow performance—Most CD-ROM drives operate at a maximum of only300-600 KB/sec. While much faster than either floppy disk or Zip drives, thisspeed still pales in comparison to the average hard drive. What’s worse, sincemost CD-R and CD-RW drives don’t yet operate at the packet level, you mustwrite the contents of the whole CD at once. And, if you’re backing up severalhundred megabytes of files, this can turn into a quite lengthy process.
� Limited compatibility—CD-R and CD-RW media is incompatible with manyolder CD-ROM drives. What’s more, CD-RW discs aren’t as cross-platformfriendly as, say, the average floppy or Zip disk is. If a CD-R isn’t written usingthe cross-platform ISO-9660 format, one could encounter compatibility prob-lems between DOS, Windows, and Macintosh systems. Again, most Macintoshsystems can usually read the contents of PC formatted CDs but the same isnot true the other way around.
� Poor security—CD-R and CR-RW media is difficult to copy-protect. Thismeans that their contents are easily open to unauthorized access. This makesthem a poor choice if data security is important to you.
NOTE: Contrary to popular belief, CD-R/CD-RW media does not last forever.The longevity of recordable CDs depends strictly on the quality of the mediaused. Therefore, I strongly recommend perusing the official CD-R FAQpages at http://www.fadden.com/cdrfaq/ for more information.
Internet-Based Backup Systems
The concept of an Internet-based file backup system is a relatively new and excit-ing one. It offers users such advantages as:
� Strong security—Unlike any of the other backup devices mentioned so far,files that are backed up via the Internet are less prone to physical damage, i.e.,theft, fire, etc., because they are actually stored at one or more remote facili-ties. This makes Internet file backups an interesting and potentially moresecure alternative then some of the other devices discussed here.
104 Chapter 4 / Files and File Management
� Encryption—Most Internet-based file backup systems can take advantage ofexisting and established Internet-based security and encryption protocols.This gives your files an extra measure of security by keeping them safe fromunauthorized access or use. On the other hand, most floppy, Zip, andCD-R/CD-RW devices can’t provide this without special software or tricks.
� Convenience—Anyone with an Internet connection and a Web browser canuse an Internet backup system. Furthermore, you can access such backup sys-tems from school, work, or even the comfort of your home. If you need to backup files frequently, this could be a viable solution for you.
� Universal compatibility—Because they run off the Internet, such backupschemes don’t require expensive hardware or complex software. You can usesuch systems independent of the platform that originally created the files.
Like the other backup technologies mentioned here, Internet-based backup sys-tems have a number of disadvantages, including:
� Slow file transfer speed—Unless you have a very fast Internet connectionsuch as a T-1, DSL, or cable modem, Internet-based file backups can betedious and slow. Because of this, you might not want to use this as your pri-mary backup system, especially if speed is important to you.
� Limited storage capacity—Internet backup schemes tend to be limited instorage capacity. Although different services vary, most seem to limit you tobetween 10 and 100 megabytes of file storage. In comparison, CDs and Zipdisks offer this and more.
� Cost—Some Internet file backup systems are free; however, most of themcost between $30 and $50 per month. So, unless you have specific needs, youmay find other backup technologies cheaper in the longer run, especially ifyou’re on a budget.
NOTE: I have had good experiences with both FreeDrive(htttp://www.freedrive.com) and iBackup(http://www.ibackup.org). Accounts for these Internet backup servicesare either free or low-cost and you can store between 50 and 200 mega-bytes of information per account. That’s quite a deal considering the extrasecurity and peace of mind these services provide.
NOTE: I decided not to mention tape backup devices in this discussion becausetape is largely a sequential backup medium. In other words, with tape youwill usually be forced to back up everything at once rather than just a fewfiles. Tape drives are also not very common in most homes and small officeenvironments, which makes them less attractive, especially if exchangingfiles with other people is important to you.
Chapter 4 / Files and File Management 105
File Backup Strategies
Everyone will have their own tastes and preferences when it comes to backing uptheir files. And, that’s fine. I don’t want to suggest something that will cramp any-one’s style. However, if you consider your files important, you will adapt somesort of backup system right away.
To minimize data loss and computer downtime when a hard disk crash or com-puter failure occurs, you should follow these rules when backing up your data:
� Daily Basis
Without fail, back up your important files on a daily basis. As files change con-stantly, the loss of even one day’s worth of files can be devastating.
Perform a backup of all of the files and directories that have changed since you lastworked on them. This can be done manually, but please be aware that modernoperating systems and graphics applications tend to modify many files simulta-neously. Therefore, you can’t always be assured that you’ll have accurate filebackups if you perform the backup procedure manually. Instead, consider investingin software that performs what is known as an incremental backup. Incrementalbackups select all the files that have changed since the previous backups by con-sulting the archive date in a file’s directory entry. When the backup is completed,the archive information is then updated to indicate which files have been backedup. Doing this allows files to be ignored the next time a backup is performedunless they have been modified or changed, thus saving you time.
I also suggest backing up your files immediately before turning off your computerfor the day/night. Just be aware that this can take a while.
NOTE: Some backup programs can automatically back up your files based ona predetermined schedule. Be sure to look into it as this can be a real timesaver.
� Monthly Basis
As your time allows, try to back up your entire system at least once a month. Thisshould be in addition to your daily file backup regimen.
Perform a full backup of your hard disk. Again, this can be done manually, but isn’trecommended. You’re better off using specialized backup software that will ensurethat all files are properly copied. The backup software will also ensure that futurebackups go faster and more efficiently since it will be able to track the history ofchanges to your files and drives. Once you have successfully backed up the con-tents of your hard drive, place these backups in a safe place.
106 Chapter 4 / Files and File Management
Weekends or lunchtime are particularly good times to perform this fun task, as afull system backup can take anywhere from 30 minutes to several hours depend-ing on the size of your hard drive and number of files involved.
NOTE: You are encouraged to make frequent backups of your backups! Likeanything else, even backups can go bad. Plan for this and you’ll thank melater, especially after you experience your first system crash and attempt torestore your files with a corrupted backup copy. To keep your backups safe,always store them in a cool, dry, and static free environment. This is espe-cially true for magnetic media, as the information on them tends to expandwhen exposed to hot temperatures. Static electricity can also blank mostmagnetic media in seconds, so keep your backups away from anything thatcan accidentally generate a static charge as well.
A Final Word about File Backups
Try to maintain at least two sets of backups made using the incremental backupprocedure and rotate these sets in order to be prepared for a system crash or asimilar computer disaster. Doing this ensures that your file backups are alwaysstable and fresh in case the worst should happen.
For purposes of illustration, here’s a rundown of my own backup strategy:
� I save all of my files every 10-15 minutes. This minimizes the possibility oflosing any changes if my machine crashes or the power suddenly cuts out.
� At the end of every work session, meaning at least once a day, I back up mycurrent work files to a fresh Zip disk.
� Before I go to bed, I always make a Zip-compressed archive of my currentwork files and upload them to one of my http://www.ibackup.org orhttp://www.freedrive.com Internet storage accounts. Doing this givesme an extra level of security as it provides me with a second set of backupsthat is off premises in case my Zip disk becomes corrupted or damaged. Fur-thermore, I can use this system as a means of archiving and tracking olderversions of my files in case I ruin my originals.
� Every two weeks I make backups of my Zip disk to ensure that I always have agood backup copy to restore from.
� Once I complete a major project, I burn a CD-R using high quality media. Thisgives me a reliable and largely indestructible master set of files.
Chapter 4 / Files and File Management 107
NOTE: To get your backup strategy off to a good start, I’ve made arrange-ments to include the full-featured shareware version of Fileback PC, apowerful, low-cost backup utility, on the book’s accompanying CD-ROM.Refer to Appendix B for additional details on this program.
Version Control
Version control is a system by which you can record and track the history of yourfiles. This allows you to go back to an older version of your file at any time, and tomonitor what was changed, when it was changed, and by whom.
Traditionally, version control has been most at home with programmers who needto keep track of constantly changing source files. However, everyone involvedwith managing ever-changing files can benefit, especially those who design com-puter game artwork.
How Version Control Can Help
You can use a version control system to:
� Go back in time
� Compare revisions
� Preserve content safely
� Lock files
Go Back in Time
With a version control system, you can go back in time and retrieve virtually anyversion of your graphic files at any time. Under version control, every change to afile is saved and marked as a revision. Every revision has unique identifying infor-mation saved with it, allowing you to restore files that have changed two, three,ten, or even a hundred times. This allows you to restore “good” versions of yourfiles in case you recently made changes with them and weren’t too pleased withthe results.
Compare Revisions
Using a version control system, you can easily see what was changed between anytwo versions of a given file. This is very useful for studying how your files havechanged over time, for better or for worse.
108 Chapter 4 / Files and File Management
Preserve Content Safely
A version control system allows you to preserve the content of any file you create.Your work is never lost no matter how badly you mangled an image because apristine, or “safe,” version of it is always available. This alone makes such a sys-tem useful given the frequency that changes and, ultimately, mistakes are made togame artwork.
Lock Files
In a multi-user environment, a version control system can also lock files and pre-vent two users from modifying (and ruining) the same file. You can also keep tabson who makes changes to your files and when. This lets you take control of yourfiles and prevents them from being damaged accidentally by other people.
Granted, using a version control system isn’t for everyone and they do have theirdisadvantages, including:
� Complexity—Most version control systems tend to be very difficult to learndue to their overall complexity and wealth of esoteric features and options.This in itself can turn potential users off to such a system. To make mattersworse, very few version control systems run under Windows, making themeven more difficult to operate and configure.
� They’re cumbersome to use—Similarly, version control systems can be dif-ficult to use. Some people won’t like them because they place too manyrestrictions on their workflow, while others won’t like them because they slowdown or interfere with the creative process.
� They’re pricey—Some version control systems can be expensive to buy andimplement. That generally makes them unattractive to folks on a tight budget.
Implementing Version Control
Implementing version control can be as simple as installing a version controlsystem on your computer and checking your files into it. However, it’s also possi-ble to use a “poor man’s” implementation as well, especially if you don’t want togo to the trouble of working with such a system. To do this, simply append a ver-sion number at the end of your files. For example, to distinguish between version1 and version 2 of the file sky.bmp, you’d name the file sky.bmp.1 andsky.bmp.2, etc. This technique will work fine for Macintosh systems and allversions of Windows except 3.1. It also won’t work for DOS as it can cause someapplications to choke since they’re expecting a standard, three-character fileextension, not to mention an eight-character filename. Still, this system will workas long as you adhere to it.
Chapter 4 / Files and File Management 109
A Final Word about Version Control Systems
For small projects involving few files, I probably wouldn’t recommend employing aversion control system. It’s just too much trouble and fuss. However, as your pro-jects get larger, more complex, and start to involve more people, you may want touse one. Version control systems work best in these scenarios, as their revisiontracking and file locking features really go a long way in avoiding catastrophe.
NOTE: To help introduce you to version control, I’ve included a copy ofCS-RCS, a full-featured Windows based version control system on the book’saccompanying CD-ROM. Check Appendix B for more information.
Basic Asset Management
What exactly is asset management? In a nutshell, asset management at its simplestlevel is a process by which one can organize their graphic images. As you begintaking on larger and larger game projects, it will quickly become evident that yourgraphic files will soon become hard to manage. Even the most well organized per-son may eventually encounter difficulty finding specific images as the imagesaccumulate. Just as one would employ a filing system for their important docu-ments, one also needs a filing system for their collection of graphic files. This iswhere a dedicated asset management system comes in. With one, you’ll be able tofind even your most obscure files quickly and easily.
The advantages of using a dedicated asset management system versus simplylumping all of your files together are many. First, with a dedicated asset manage-ment system, you can generate a database of all of your images. This makes yourfiles easier to manage and track as you add or remove files from your overallimage collection. Second, an asset management system will allow you to associatecomments and notes with each image. This allows you to provide details on eachfile in your collection. For example, you could make a note to yourself about a spe-cific file’s use in a game or special issues about its palette. Third, a dedicated assetmanagement system will allow you to generate thumbnails of all of your images soyou can easily visually browse through your image collection to make sure thatyou find the file you’re interested in. In addition, asset management systems canrecord other crucial information about your files such as their creation date, modi-fication date, and physical dimensions. You can’t even come close to doing any ofthese things using directory naming schemes and frankly, I wouldn’t even try.
110 Chapter 4 / Files and File Management

Do You Really Need an Asset Management System?
Okay, an asset management system sounds great but do you really need one?Well, that really depends on your particular situation. If you’re confident that yourgame projects will seldom grow beyond a handful of files, say, a dozen or so, thenno, you probably don’t. For that small amount of files an asset management systemwould just be overkill and probably doesn’t make sense. However, if you start see-ing a trend where your game projects routinely generate dozens or even hundredsof graphic files, an asset management system may be just what the doctorordered.
Choosing an Asset Management System
As one can expect, asset management systems come in all shapes and sizes aswell as price ranges. The most sophisticated implementations utilize networkbased client-server architecture and can easily handle several hundreds of thou-sands of assets. As our needs tend to be a bit more modest that that, we can getaway with a much more rudimentary system.
For our purposes, I’ve identified several features that an asset management sys-tem should have:
� Database driven
� Thumbnail support
� Asset keywords
� Large catalog capacity
� Multiple image catalogs
� Low cost
Database Driven
The asset management system should support a method of adding all of your filesinto a database. This makes tracking and managing your graphic files a breeze,especially once your image collection starts to contract and expand. Don’t use anyasset management system that doesn’t offer this feature because it’s so useful toyour asset management strategy.
Thumbnail Support
The asset manager should allow you to browse the contents of your image collec-tion via thumbnails, or smaller versions of your original images. Thumbnails canmake it easy to quickly pick out specific images from your collection as opposed tomanually hunting for files. Don’t use any asset management system that doesn’toffer this feature because it can be such a time saver.
Chapter 4 / Files and File Management 111
Asset Keywords
The asset manager should allow you to add notes, comments, keywords, or anyother written data to your image collection. This feature enables you to quicklysearch for images that meet one or more criteria. For example, you could use it toquickly locate all images in your collection that contain the phrase “spaceships”and that are 320x200 pixels in size. Although this isn’t required to make yourasset management system useful, it’s definitely a nice feature to have and is guar-anteed to save you countless time on larger game projects.
Large Catalog Capacity
The asset manager should be able to handle image catalogs of at least 1,000 dis-tinct files. This should give you more than enough room to manage assets foreven the largest of game projects. This isn’t a requirement, but again, it’s anotherfeature that’s nice to have. After all, if your asset manager runs out of room in itsdatabase, the whole point of using an asset management system in the first placebecomes moot, right?
Multiple Image Catalogs
Any asset management system you employ should be able to work with separateimage databases for each of your game projects. As you take on more projects,you’ll find this feature handy as you try to leverage images you created for olderprojects for use with your new ones, etc. Such a feature also makes managing yourassets that much easier.
Low Cost
This goes without saying! Although asset management is important, it shouldn’tbe too expensive. Many of us are on budgets and don’t need the “firepower”offered by many of the high-end asset management solutions. Look for somethingthat meets or comes close to meeting most of the features here for the lowestprice and you’ll be in good shape.
One product that comes to mind is Extensis Portfolio. I like Portfolio because inaddition to providing all of the features mentioned here and more, it’s cross-platform (runs on Windows 95, 98, and NT 4.0, and the Macintosh). It also costsless than $100.
NOTE: For your convenience, there is a 30-day trial version of this program onthe book’s accompanying CD-ROM. Please refer to Appendix B for moreinformation.
112 Chapter 4 / Files and File Management
Chapter 5
Evaluating GraphicsCreation Tools
In this chapter, you’ll learn about:
� Graphics creation tool categories
� Evaluating painting programs
� Evaluating capture utilities
� Evaluating viewers/converters
� Evaluating palette tools
113
Graphics programs can provide the arcade game graphics artist with a variety of
powerful, creative tools. It’s no secret that having access to the right tools can
save you time, make you more productive, and improve the overall quality of your
artwork.
In order to find the right tool, you first need to know what features are the most
important. And that’s exactly what you can expect to learn in this chapter.
Graphics Creation Tool Categories
There are really four types of graphics programs that are useful for designing art-
work and animation for arcade-style games. These categories include:
� Painting programs
� Screen capture utilities
� Image viewers/converters
� Palette tools
Painting Programs
Painting programs are akin to word processors for graphic images. They are pro-
grams that enable you to create graphics from scratch or manipulate pre-existing
images. All painting programs provide a basic set of tools to draw shapes such as
lines, rectangles, and ellipses. In addition to these tools, they also provide the abil-
ity to add text, change color definitions, and perform various other enhancements
to images.
Painting programs are the primary tools for the arcade game graphics artist. The
more sophisticated painting programs are known as image editors. The difference
between image editors and painting programs isn’t always that clear cut, but in
general, image editors are more specialized at working with high-resolution
images, such as scanned photographs, whereas painting programs are more spe-
cialized at creating original artwork.
There are essentially two types of painting programs available: palette based (8-bit)
and true color (24-bit).
Although both types of programs are largely similar to each other in terms of
operation and general feature sets, there are some important differences worth
mentioning:
� Color support—True color painting programs typically offer much better
color support than palette-based programs. Palette-based painting programs
are limited to working with images that contain a maximum of 256 colors,
while true color painting programs can work with images that can contain up
to 16.7 million colors.
114 Chapter 5 / Evaluating Graphics Creation Tools
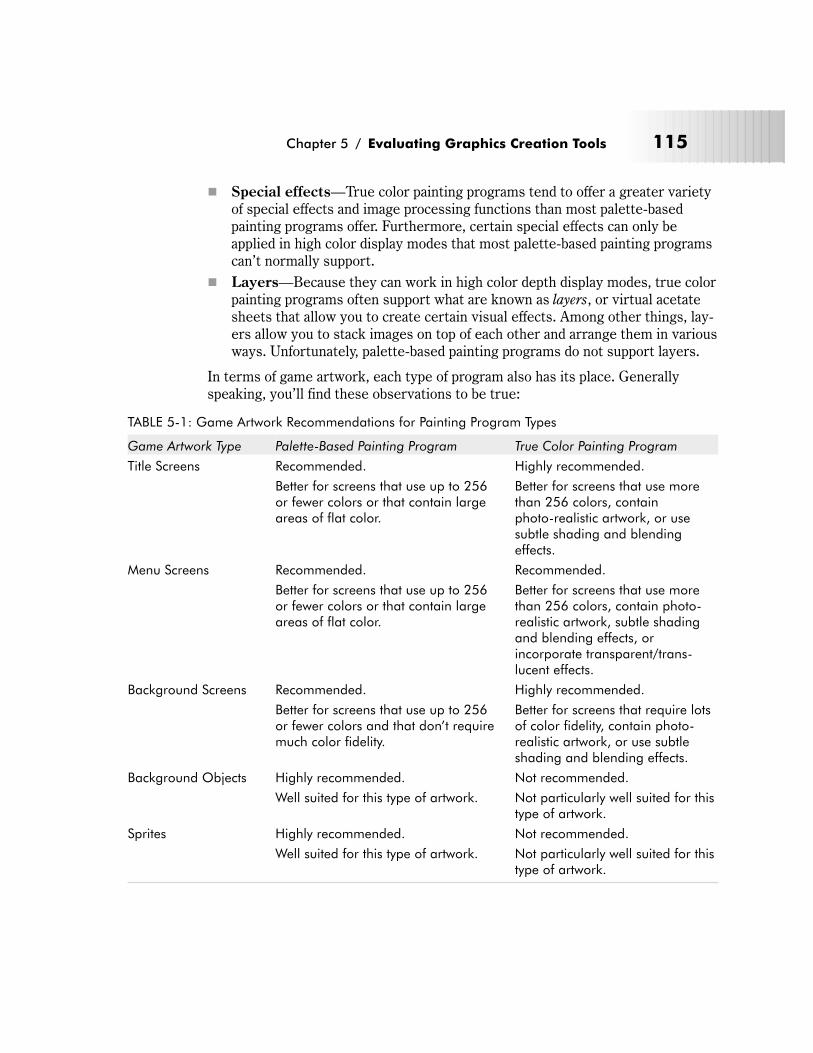
� Special effects—True color painting programs tend to offer a greater variety
of special effects and image processing functions than most palette-based
painting programs offer. Furthermore, certain special effects can only be
applied in high color display modes that most palette-based painting programs
can’t normally support.
� Layers—Because they can work in high color depth display modes, true color
painting programs often support what are known as layers, or virtual acetate
sheets that allow you to create certain visual effects. Among other things, lay-
ers allow you to stack images on top of each other and arrange them in various
ways. Unfortunately, palette-based painting programs do not support layers.
In terms of game artwork, each type of program also has its place. Generally
speaking, you’ll find these observations to be true:
TABLE 5-1: Game Artwork Recommendations for Painting Program Types
Game Artwork Type Palette-Based Painting Program True Color Painting Program
Title Screens Recommended.
Better for screens that use up to 256or fewer colors or that contain largeareas of flat color.
Highly recommended.
Better for screens that use morethan 256 colors, containphoto-realistic artwork, or usesubtle shading and blendingeffects.
Menu Screens Recommended.
Better for screens that use up to 256or fewer colors or that contain largeareas of flat color.
Recommended.
Better for screens that use morethan 256 colors, contain photo-realistic artwork, subtle shadingand blending effects, orincorporate transparent/trans-lucent effects.
Background Screens Recommended.
Better for screens that use up to 256or fewer colors and that don’t requiremuch color fidelity.
Highly recommended.
Better for screens that require lotsof color fidelity, contain photo-realistic artwork, or use subtleshading and blending effects.
Background Objects Highly recommended.
Well suited for this type of artwork.
Not recommended.
Not particularly well suited for thistype of artwork.
Sprites Highly recommended.
Well suited for this type of artwork.
Not recommended.
Not particularly well suited for thistype of artwork.
Chapter 5 / Evaluating Graphics Creation Tools 115
Examples of painting programs include GrafX2 (palette based) and Paint Shop Pro
(true color).
NOTE: There also exists a subclass of palette-based painting programs called
sprite editors. Sprite editors are specially optimized for creating and animat-
ing game sprites. However, because traditional painting programs offer
most of the same functionality, they have largely fallen out of favor with
game developers. The few times you do see them still being used are as part
of programming or multimedia-authoring environments.
Screen Capture Utilities
Screen capture utilities are programs that allow you to take “snapshots” of what-
ever is currently displayed on the screen. You can use such programs to capture
the contents of the entire screen, specific windows, or just certain portions. Some
of them will even let you capture sequences of events such as moving your mouse
across the screen.
Screen capture utilities can really come in handy when you need to “borrow” cer-
tain elements from your favorite arcade game in order to see how something was
drawn.
Examples of screen capture utilities include such programs as HyperSnapDX and
SnagIt.
Image Viewers/Converters
Image viewers/converters are a class of programs that allow you to view and con-
vert graphic images from one file format to another. With them, you can convert
even the most obscure graphic file formats into something your painting program
can use. This is especially important since most painting programs aren’t capable
of reading or writing every file format you’re likely to encounter.
In addition to converting between different file formats, most image viewers/con-
verters also allow you to apply special effects to images including resolution
changes and color depth reductions.
Examples of image viewers/converters include such programs as SEA and
XNView.
Palette Tools
Palette tools are special programs that allow you to construct and modify custom
color palettes for use with your game artwork. Among other things, these
116 Chapter 5 / Evaluating Graphics Creation Tools
programs can be used to build cross-platform color palettes and extract color pal-
ette definitions from existing images.
And, although palette tools aren’t really needed if your painting program has all of
the necessary color tools, they are useful for certain situations and are worth
keeping around.
Examples of palette utilities are programs like Opal and PalMerge.
Evaluating Graphics Tools and Essential Features
Graphics programs are only as good as the tools they offer. As such, this section
examines the most important tools needed for game graphics creation.
For your convenience, I have taken the liberty of organizing these according to
their function, and where applicable I have made specific recommendations on
what features a given tool should support.
Essential Painting Program Features
Painting programs offer designers a wealth of interesting and powerful tools with
which to create their artwork. However, it is important to point out that only a few
of them are actually useful to game graphics designers. Designing arcade game
artwork is a very specialized skill and so are the tools we require.
This being said, it is the purpose of this section to identify and discuss which tools
you should be concerned with when considering whether or not to use a particular
painting program.
The tools to be discussed fall into several categories and include:
� Brush tools
� Shape tools
� Block tools
� Navigation tools
� Color tools
� Image processing tools
� Special effects tools
� Other tools
NOTE: This section comprises the largest part of the chapter for the simple rea-
son that painting programs are your primary graphics creation tools.
Chapter 5 / Evaluating Graphics Creation Tools 117
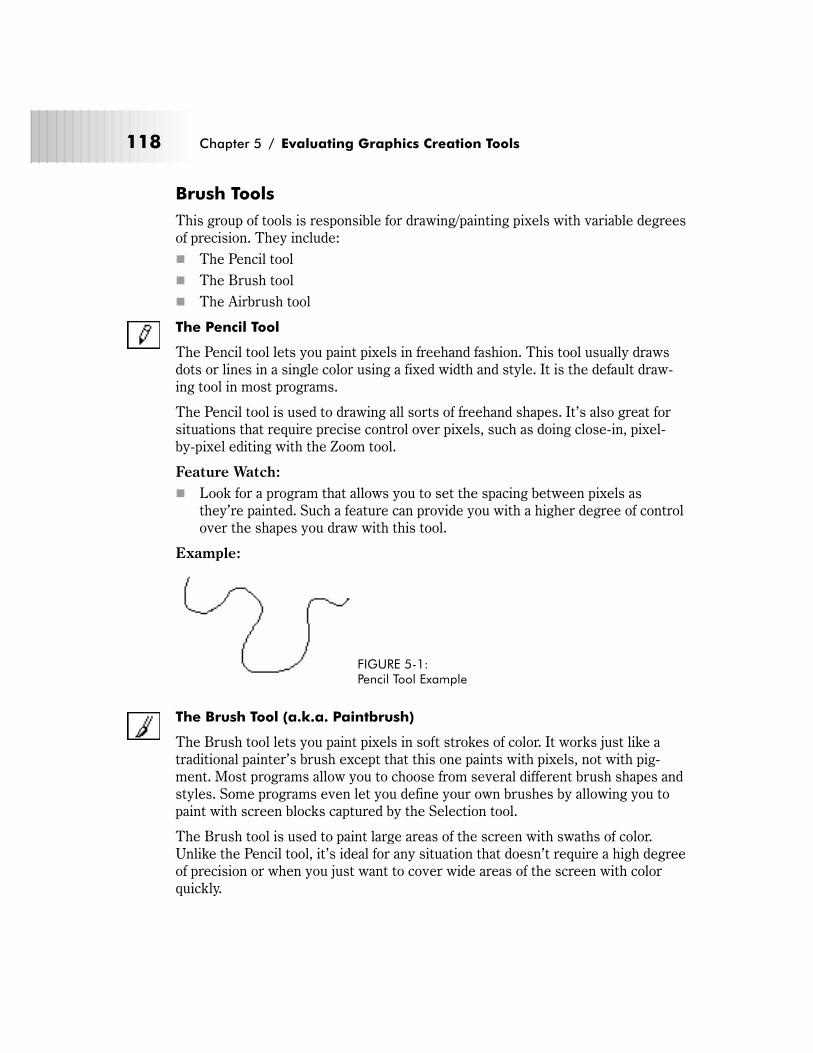
Brush Tools
This group of tools is responsible for drawing/painting pixels with variable degrees
of precision. They include:
� The Pencil tool
� The Brush tool
� The Airbrush tool
The Pencil Tool
The Pencil tool lets you paint pixels in freehand fashion. This tool usually draws
dots or lines in a single color using a fixed width and style. It is the default draw-
ing tool in most programs.
The Pencil tool is used to drawing all sorts of freehand shapes. It’s also great for
situations that require precise control over pixels, such as doing close-in, pixel-
by-pixel editing with the Zoom tool.
Feature Watch:
� Look for a program that allows you to set the spacing between pixels as
they’re painted. Such a feature can provide you with a higher degree of control
over the shapes you draw with this tool.
Example:
The Brush Tool (a.k.a. Paintbrush)
The Brush tool lets you paint pixels in soft strokes of color. It works just like a
traditional painter’s brush except that this one paints with pixels, not with pig-
ment. Most programs allow you to choose from several different brush shapes and
styles. Some programs even let you define your own brushes by allowing you to
paint with screen blocks captured by the Selection tool.
The Brush tool is used to paint large areas of the screen with swaths of color.
Unlike the Pencil tool, it’s ideal for any situation that doesn’t require a high degree
of precision or when you just want to cover wide areas of the screen with color
quickly.
118 Chapter 5 / Evaluating Graphics Creation Tools
FIGURE 5-1:Pencil Tool Example
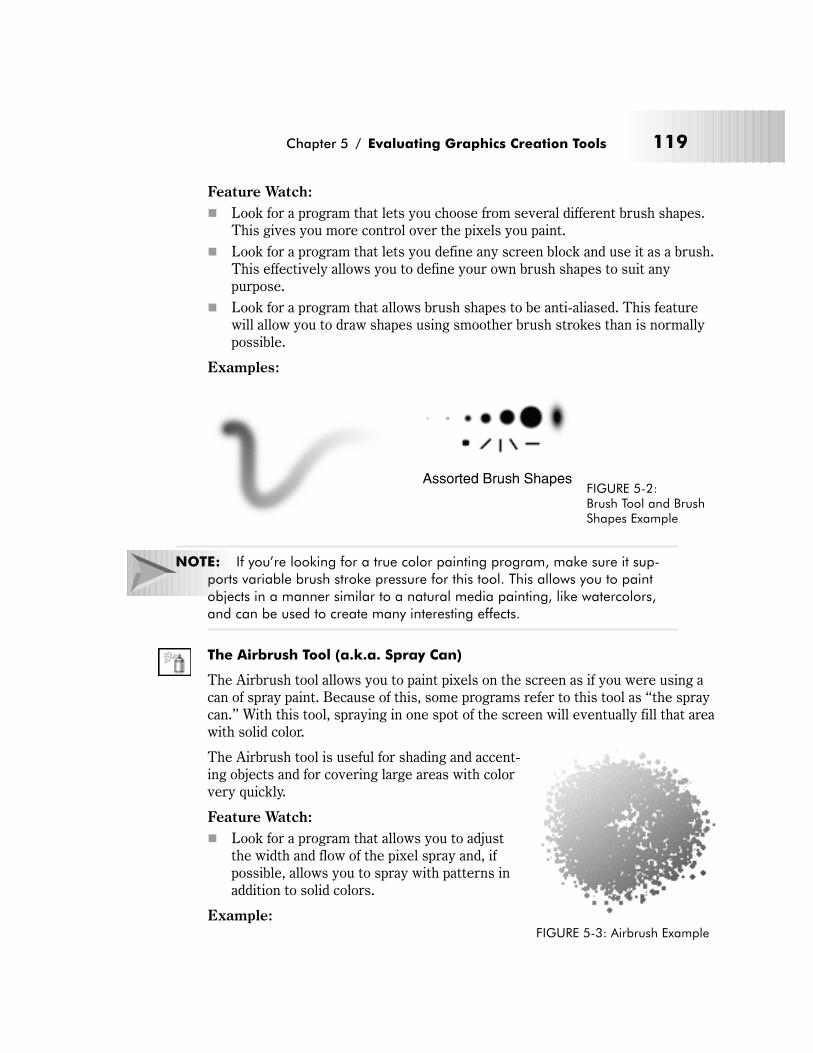
Feature Watch:
� Look for a program that lets you choose from several different brush shapes.
This gives you more control over the pixels you paint.
� Look for a program that lets you define any screen block and use it as a brush.
This effectively allows you to define your own brush shapes to suit any
purpose.
� Look for a program that allows brush shapes to be anti-aliased. This feature
will allow you to draw shapes using smoother brush strokes than is normally
possible.
Examples:
NOTE: If you’re looking for a true color painting program, make sure it sup-
ports variable brush stroke pressure for this tool. This allows you to paint
objects in a manner similar to a natural media painting, like watercolors,
and can be used to create many interesting effects.
The Airbrush Tool (a.k.a. Spray Can)
The Airbrush tool allows you to paint pixels on the screen as if you were using a
can of spray paint. Because of this, some programs refer to this tool as “the spray
can.” With this tool, spraying in one spot of the screen will eventually fill that area
with solid color.
The Airbrush tool is useful for shading and accent-
ing objects and for covering large areas with color
very quickly.
Feature Watch:
� Look for a program that allows you to adjust
the width and flow of the pixel spray and, if
possible, allows you to spray with patterns in
addition to solid colors.
Example:
Chapter 5 / Evaluating Graphics Creation Tools 119
Assorted Brush ShapesFIGURE 5-2:Brush Tool and BrushShapes Example
FIGURE 5-3: Airbrush Example

Shape Tools
This group of tools is responsible for drawing different types of basic geometric
shapes from lines to rectangles. They include:
� The Line tool
� The Curve tool
� The Rectangle tool
� The Ellipse tool
� The Polygon tool
� The Fill tool
The Line Tool
The Line tool is used to draw straight lines at any angle. This tool usually draws
lines in a single color using a variable width and style.
Both straight and diagonal lines are useful for creating objects with precise
surfaces.
Feature Watch:
� Look for a program that allows you to draw connected lines with this tool.
Sometimes this functionality is provided as a separate tool and sometimes it’s
included as part of the basic Line tool feature set.
� Virtually all lines created with this tool have square ends. If possible, look for
a program that allows you to select rounded or arrow line ends in addition to
square ends. This allows you to use this tool to label objects, etc.
� Look for programs that allow any lines you draw to be anti-aliased. This fea-
ture will allow you to draw smoother lines, which is especially useful for diag-
onal lines.
Example:
120 Chapter 5 / Evaluating Graphics Creation Tools
FIGURE 5-4: Line Example
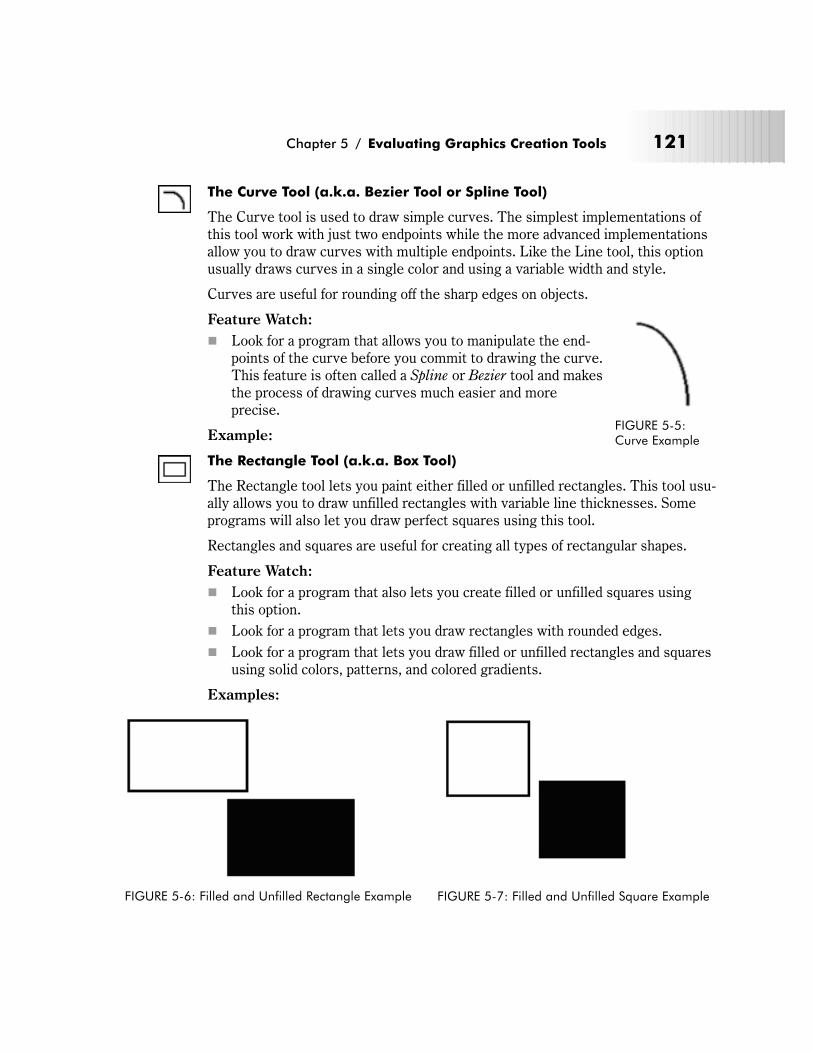
The Curve Tool (a.k.a. Bezier Tool or Spline Tool)
The Curve tool is used to draw simple curves. The simplest implementations of
this tool work with just two endpoints while the more advanced implementations
allow you to draw curves with multiple endpoints. Like the Line tool, this option
usually draws curves in a single color and using a variable width and style.
Curves are useful for rounding off the sharp edges on objects.
Feature Watch:
� Look for a program that allows you to manipulate the end-
points of the curve before you commit to drawing the curve.
This feature is often called a Spline or Bezier tool and makes
the process of drawing curves much easier and more
precise.
Example:
The Rectangle Tool (a.k.a. Box Tool)
The Rectangle tool lets you paint either filled or unfilled rectangles. This tool usu-
ally allows you to draw unfilled rectangles with variable line thicknesses. Some
programs will also let you draw perfect squares using this tool.
Rectangles and squares are useful for creating all types of rectangular shapes.
Feature Watch:
� Look for a program that also lets you create filled or unfilled squares using
this option.
� Look for a program that lets you draw rectangles with rounded edges.
� Look for a program that lets you draw filled or unfilled rectangles and squares
using solid colors, patterns, and colored gradients.
Examples:
Chapter 5 / Evaluating Graphics Creation Tools 121
FIGURE 5-5:Curve Example
FIGURE 5-6: Filled and Unfilled Rectangle Example FIGURE 5-7: Filled and Unfilled Square Example
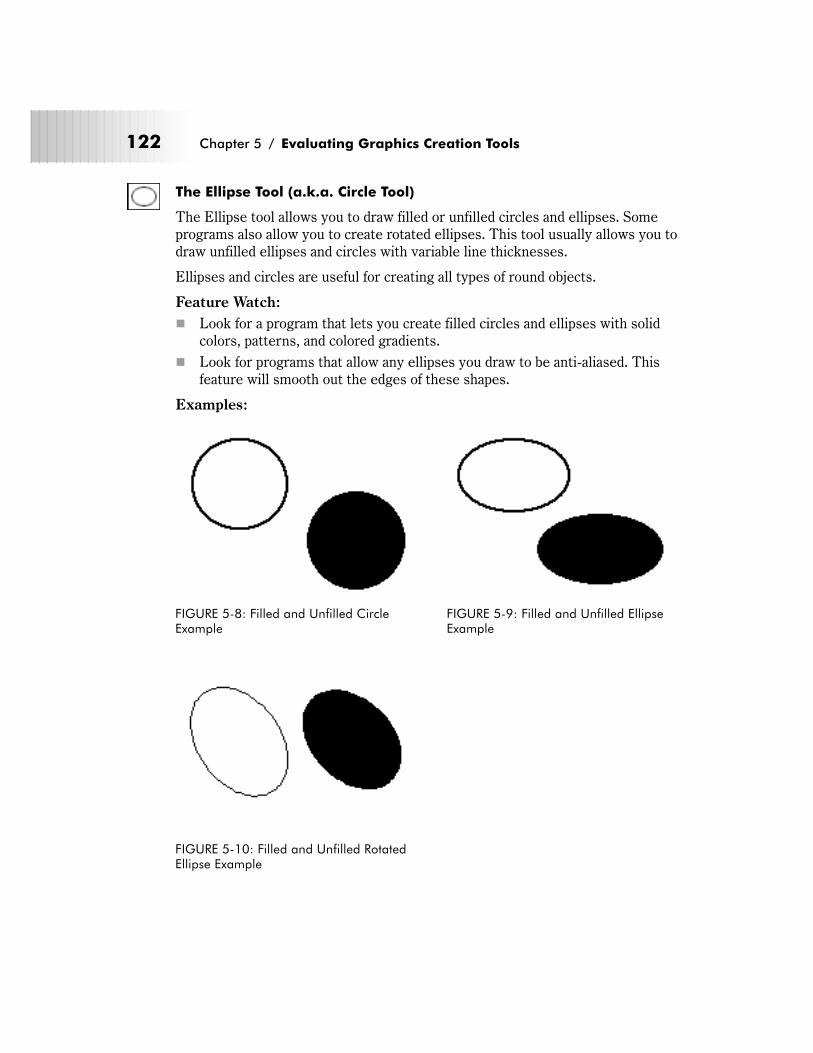
The Ellipse Tool (a.k.a. Circle Tool)
The Ellipse tool allows you to draw filled or unfilled circles and ellipses. Some
programs also allow you to create rotated ellipses. This tool usually allows you to
draw unfilled ellipses and circles with variable line thicknesses.
Ellipses and circles are useful for creating all types of round objects.
Feature Watch:
� Look for a program that lets you create filled circles and ellipses with solid
colors, patterns, and colored gradients.
� Look for programs that allow any ellipses you draw to be anti-aliased. This
feature will smooth out the edges of these shapes.
Examples:
122 Chapter 5 / Evaluating Graphics Creation Tools
FIGURE 5-8: Filled and Unfilled CircleExample
FIGURE 5-9: Filled and Unfilled EllipseExample
FIGURE 5-10: Filled and Unfilled RotatedEllipse Example
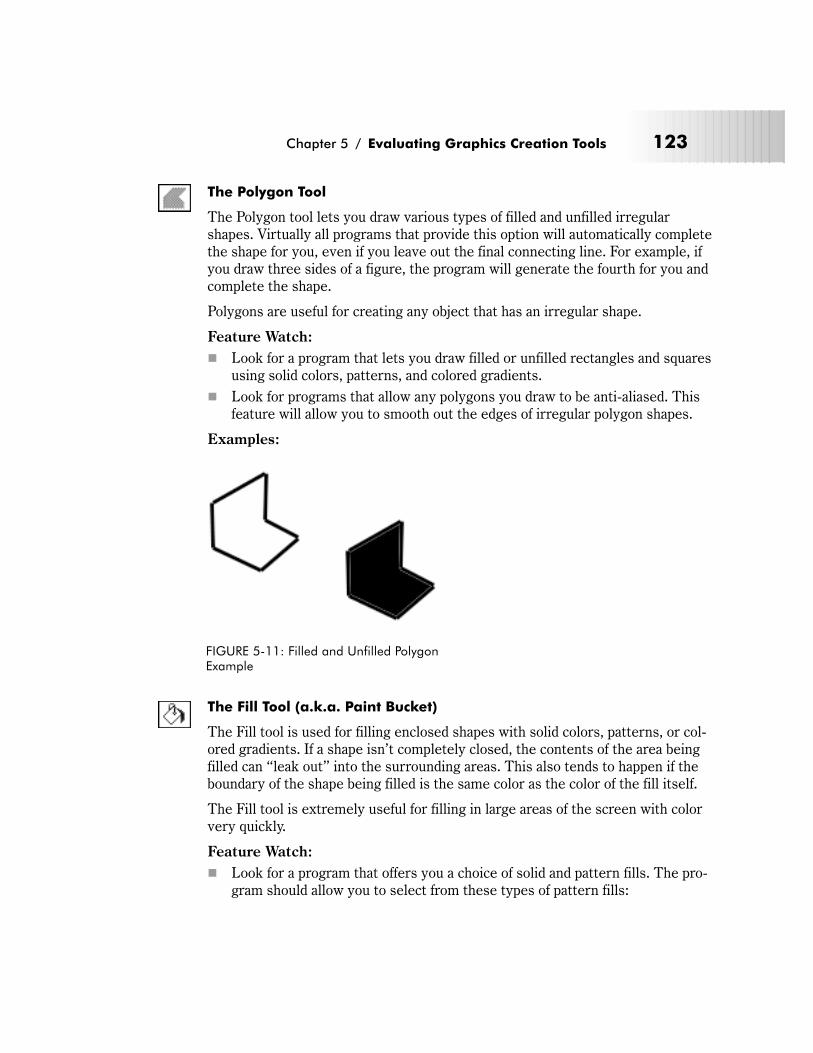
The Polygon Tool
The Polygon tool lets you draw various types of filled and unfilled irregular
shapes. Virtually all programs that provide this option will automatically complete
the shape for you, even if you leave out the final connecting line. For example, if
you draw three sides of a figure, the program will generate the fourth for you and
complete the shape.
Polygons are useful for creating any object that has an irregular shape.
Feature Watch:
� Look for a program that lets you draw filled or unfilled rectangles and squares
using solid colors, patterns, and colored gradients.
� Look for programs that allow any polygons you draw to be anti-aliased. This
feature will allow you to smooth out the edges of irregular polygon shapes.
Examples:
The Fill Tool (a.k.a. Paint Bucket)
The Fill tool is used for filling enclosed shapes with solid colors, patterns, or col-
ored gradients. If a shape isn’t completely closed, the contents of the area being
filled can “leak out” into the surrounding areas. This also tends to happen if the
boundary of the shape being filled is the same color as the color of the fill itself.
The Fill tool is extremely useful for filling in large areas of the screen with color
very quickly.
Feature Watch:
� Look for a program that offers you a choice of solid and pattern fills. The pro-
gram should allow you to select from these types of pattern fills:
Chapter 5 / Evaluating Graphics Creation Tools 123
FIGURE 5-11: Filled and Unfilled PolygonExample
� Dithered patterns—These are patterns of closely grouped dots. In dis-
play modes with few colors available, using dithered patterns can simulate
the presence of additional colors.
� Crosshatched patterns—These are patterns formed by using various
combinations of horizontal, vertical, and diagonal lines.
� Textured patterns—These are patterns formed by using various tex-
tures or full-color image clippings. Textures can come from virtually any
graphic source including photo-realistic images and line drawings.
NOTE: Most programs will let you edit existing fill patterns as well as let you
create your own from scratch.
� Look for a program that also supports color gradient fills. A color gradient is a
series of colors that gradually fade from light to dark. When evaluating this
feature in a painting program be sure to look for these gradient fill options:
� Linear fills—Fills in an area using a linear color gradient. Straight fills
may be vertically, horizontally, or diagonally oriented. Many programs
allow you to control the exact angle of the fill while others predefine them
for you.
� Radial fills—Fills in an area using a circular color gradient. These fills
produce a pronounced and rounded, 3D-like effect. To further enhance this
feature, many programs allow you to control the exact angle of how the fill
is applied.
� Contoured fills—Works in a similar fashion to the Radial fill effect; how-
ever, contoured fills take into account the actual shape of the object being
filled. Contoured fills tend to produce beveled 3D-like effects. To further
enhance this feature, many programs allow you to control the exact angle
of how the fill is applied.
NOTE: Some programs offer the ability to roughen the quality of the fill. This is
useful for certain types of visual effects such as creating textures.
NOTE: Gradient fills are very useful for creating many types of special graphic
effects. If a particular program doesn’t provide a gradient fill option, find
another that does.
124 Chapter 5 / Evaluating Graphics Creation Tools
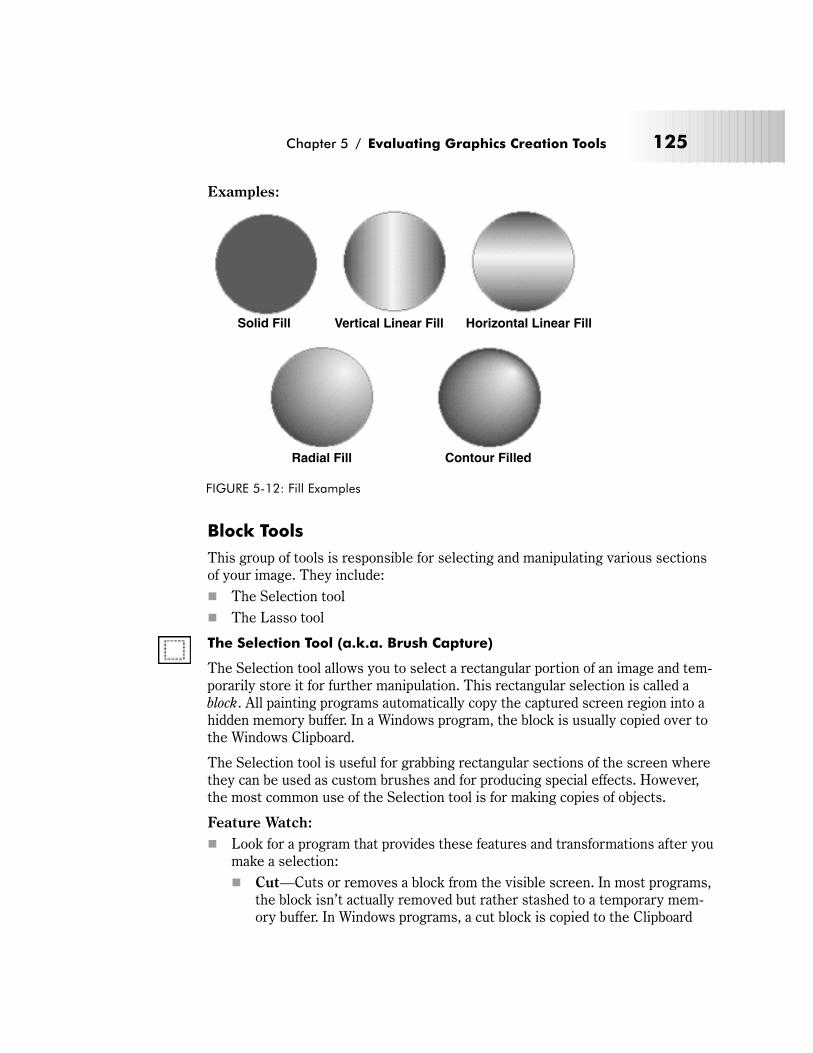
Examples:
Block Tools
This group of tools is responsible for selecting and manipulating various sections
of your image. They include:
� The Selection tool
� The Lasso tool
The Selection Tool (a.k.a. Brush Capture)
The Selection tool allows you to select a rectangular portion of an image and tem-
porarily store it for further manipulation. This rectangular selection is called a
block. All painting programs automatically copy the captured screen region into a
hidden memory buffer. In a Windows program, the block is usually copied over to
the Windows Clipboard.
The Selection tool is useful for grabbing rectangular sections of the screen where
they can be used as custom brushes and for producing special effects. However,
the most common use of the Selection tool is for making copies of objects.
Feature Watch:
� Look for a program that provides these features and transformations after you
make a selection:
� Cut—Cuts or removes a block from the visible screen. In most programs,
the block isn’t actually removed but rather stashed to a temporary mem-
ory buffer. In Windows programs, a cut block is copied to the Clipboard
Chapter 5 / Evaluating Graphics Creation Tools 125
Solid Fill Vertical Linear Fill Horizontal Linear Fill
Radial Fill Contour Filled
FIGURE 5-12: Fill Examples
where it can usually be pasted back on the screen. The contents of the
buffer or Clipboard are replaced with new image data each time you cut a
new selection.
� Copy—Copies or duplicates a block to the visible screen. Many programs
will move the copied block to a temporary buffer while Windows programs
will copy the block to the Clipboard. Once a block has been copied, it can
usually be pasted back on the screen. The contents of the buffer or Clip-
board are replaced with new image data each time you copy a new
selection.
� Paste—Pastes a block that has been previously cut or copied to a buffer or
the Clipboard back on the screen. Since the contents of the buffer or the
Clipboard aren’t erased until a new selection has been cut or copied, you
may paste blocks to your heart’s content. Some programs allow you to
control how a block is pasted back on the screen. There are several
options available but look specifically for a program that allows you to
paste blocks opaquely and transparently. Blocks pasted opaquely will over-
write the background image with their contents. Meanwhile, blocks pasted
transparently will allow the background image to show through certain
parts of the block.
NOTE: Cut, Copy, and Paste functions are considered to be standard features
in any painting program and are indispensable to the graphics artist. Don’t
use a program if it doesn’t support at least some of these features.
� Resize—Resizes (stretches or shrinks) a block. Many programs allow you
to interactively control the size of the block with the mouse while others
force you to manually type values into a dialog box to resize the block.
Some programs also break out these options into separate Stretch and
Shrink operations.
� Rotate—Rotates a block along a given axis. Some programs allow you to
interactively rotate a block through all 360 degrees using the mouse while
other programs only allow blocks to be rotated at 90-degree intervals
using menu commands.
� Bend—Bends a block from its center to the left, right, top, or bottom.
Most of the programs that provide this feature will allow you to interac-
tively control the bending with the mouse.
� Shear—Skews or stretches a block from a specified anchor point. Many of
the programs that offer this feature will allow blocks to be interactively
sheared to the left, right, top, and bottom using the mouse.
� Half—Reduces a block by half along its horizontal and vertical axes. This
is similar to the Resize option except the block reduction is done
126 Chapter 5 / Evaluating Graphics Creation Tools
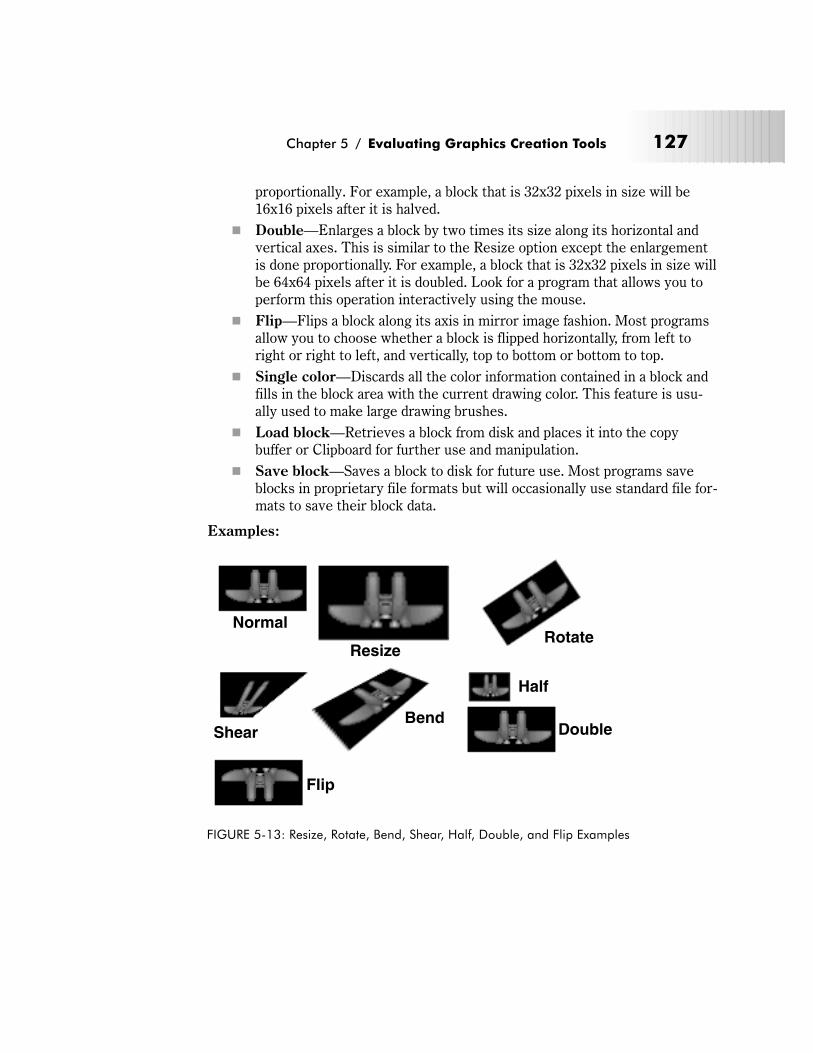
proportionally. For example, a block that is 32x32 pixels in size will be
16x16 pixels after it is halved.
� Double—Enlarges a block by two times its size along its horizontal and
vertical axes. This is similar to the Resize option except the enlargement
is done proportionally. For example, a block that is 32x32 pixels in size will
be 64x64 pixels after it is doubled. Look for a program that allows you to
perform this operation interactively using the mouse.
� Flip—Flips a block along its axis in mirror image fashion. Most programs
allow you to choose whether a block is flipped horizontally, from left to
right or right to left, and vertically, top to bottom or bottom to top.
� Single color—Discards all the color information contained in a block and
fills in the block area with the current drawing color. This feature is usu-
ally used to make large drawing brushes.
� Load block—Retrieves a block from disk and places it into the copy
buffer or Clipboard for further use and manipulation.
� Save block—Saves a block to disk for future use. Most programs save
blocks in proprietary file formats but will occasionally use standard file for-
mats to save their block data.
Examples:
Chapter 5 / Evaluating Graphics Creation Tools 127
Normal
ResizeRotate
Half
DoubleBend
Shear
Flip
FIGURE 5-13: Resize, Rotate, Bend, Shear, Half, Double, and Flip Examples
NOTE: There’s one major difference between how the Selection tool works in
DOS and Windows painting programs. Windows programs typically support
what are known as active selection tools. This means that once you make a
selection, the selection is preserved until it’s manually deselected or disabled
by another program operation. DOS-based painting programs typically
don’t offer this capability. Active selections are far more flexible for manipu-
lating image blocks as they allow for you to perform successive
manipulations without having to continually reselect it.
The Lasso Tool (a.k.a. Block Carve or Freehand Selection Tool)
The Lasso tool allows you to select an irregular portion of an image and tempo-
rarily store it for further manipulation. Despite the fact that the selection appears
to be non-rectangular, it is still referred to as a block. All painting programs auto-
matically copy the captured screen region into a hidden memory buffer. In a
Windows program, the block is usually copied to the Clipboard.
The Lasso tool is useful for grabbing non-rectangular sections of the screen. For
example, you can use this tool to trace the outline of a circle or another complex
shape and then copy it, cut it, paste it, or even paint with it.
Feature Watch:
� All programs that support the Lasso tool can usually apply the same block
transformations supported by the Selection tool.
� Make sure the program supports a Lasso tool that can make transparent image
selections. These are selections where the background shows through the
foreground. It can enable you to produce some interesting visual effects as
well as give you more control over the items you are selecting and
manipulating.
NOTE: Lasso tools under Windows are often active as defined under the Selec-
tion tool description.
Navigation Tools
This group of tools lets you easily navigate across different sections of your
image. They include:
� The Zoom tool
� The Navigator tool
The Zoom Tool (a.k.a. Magnifying Glass or Fatbits)
The Zoom tool lets you magnify any area of an image.
128 Chapter 5 / Evaluating Graphics Creation Tools
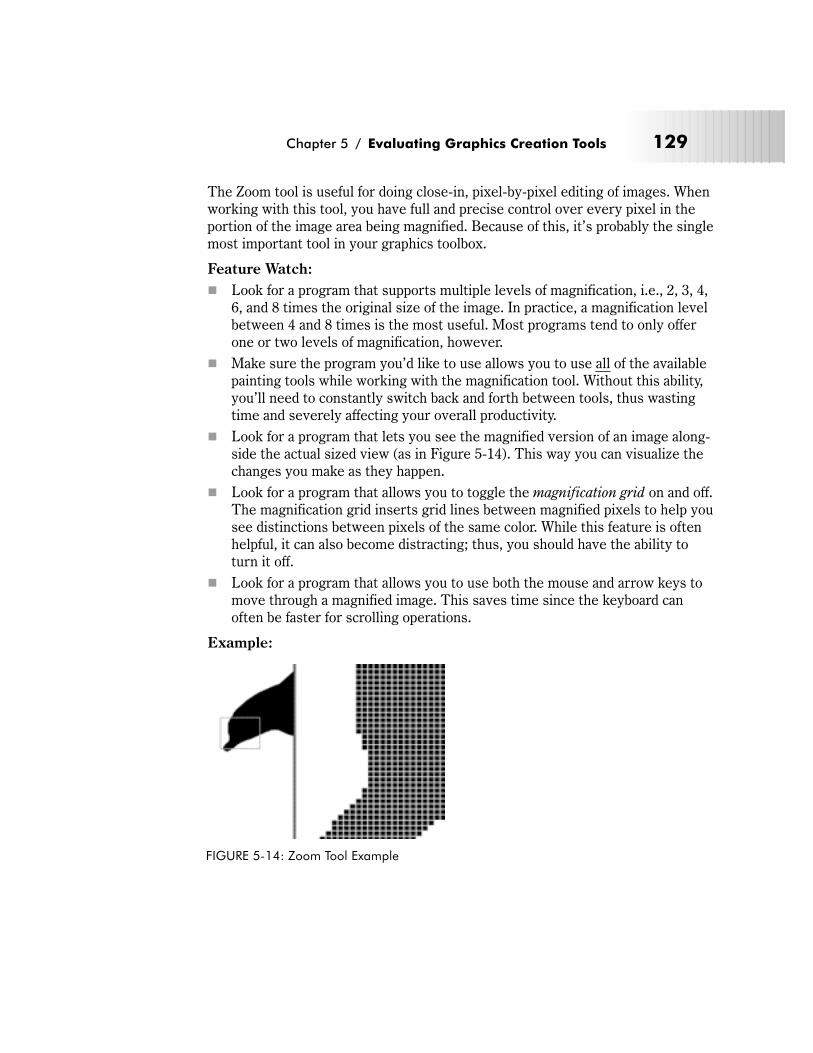
The Zoom tool is useful for doing close-in, pixel-by-pixel editing of images. When
working with this tool, you have full and precise control over every pixel in the
portion of the image area being magnified. Because of this, it’s probably the single
most important tool in your graphics toolbox.
Feature Watch:
� Look for a program that supports multiple levels of magnification, i.e., 2, 3, 4,
6, and 8 times the original size of the image. In practice, a magnification level
between 4 and 8 times is the most useful. Most programs tend to only offer
one or two levels of magnification, however.
� Make sure the program you’d like to use allows you to use all of the available
painting tools while working with the magnification tool. Without this ability,
you’ll need to constantly switch back and forth between tools, thus wasting
time and severely affecting your overall productivity.
� Look for a program that lets you see the magnified version of an image along-
side the actual sized view (as in Figure 5-14). This way you can visualize the
changes you make as they happen.
� Look for a program that allows you to toggle the magnification grid on and off.
The magnification grid inserts grid lines between magnified pixels to help you
see distinctions between pixels of the same color. While this feature is often
helpful, it can also become distracting; thus, you should have the ability to
turn it off.
� Look for a program that allows you to use both the mouse and arrow keys to
move through a magnified image. This saves time since the keyboard can
often be faster for scrolling operations.
Example:
Chapter 5 / Evaluating Graphics Creation Tools 129
FIGURE 5-14: Zoom Tool Example

The Navigator Tool (a.k.a. Grabbing Hand Tool)
The Navigator tool lets you access different sections of the image you’re currently
working on. This tool is useful for moving around and viewing different sections of
an image while drawing.
Feature Watch:
� Look for a program that allows you to visually select the area you want to
access. Typically, most programs can show a small preview of the entire
screen and then use a small, movable window to zero in on the area of the
screen that you want to see.
Color Tools
This group of tools lets you control, define, and modify the color information con-
tained in your image. They include:
� The Eye Dropper tool
� The Palette Selector tool
The Eye Dropper Tool (a.k.a. Pipette Tool)
The Eye Dropper tool allows you to obtain color information from any pixel within
an image.
The Eye Dropper tool can be used to quickly change the current painting color by
simply clicking on any pixel within an image. For example, if the current drawing
color is set to red, you can move the Eye Dropper tool over to a part of the image
that contains green and then change the painting color to green.
The main use of the Eye Dropper is to quickly swap drawing colors without forc-
ing you to fumble around your painting program’s color palette.
Feature Watch:
� None. The Eye Dropper tool functions the same in almost every painting pro-
gram available.
NOTE: Since this tool is such a time saver, don’t consider using any painting
program that doesn’t include one.
The Palette Selector tool (a.k.a. Palette Tool)
The Palette Selector tool allows you to create and modify color combinations for
use in your color palette. The number of colors available to you will depend on
your current display mode settings and the capabilities of your system. Most pro-
grams will allow you to specify color selections using either the RGB (red-green-
blue) color model or the HSV (hue-saturation-value) color model.
130 Chapter 5 / Evaluating Graphics Creation Tools
The Palette Selector tool gives you full control over the colors used in your
images. With this tool you can define and redefine both color palettes and color
gradients.
NOTE: There is a major difference between how color values are specified
between DOS and Windows systems. See Chapter 8 for more information
on these differences.
Feature Watch:
� Look for a program that supports these features:
� Spread—Creates a gradient, or a color spread, between two different col-
ors in the current color palette. Most programs let you define a starting
color and an ending color for the gradient. The Spread function will then
generate all of the color shades that fit between these two colors. For
example, to create a gradient that contains only grays, you would make the
starting color black and the ending color white or vice versa. The Spread
function would then compute all of the intermediate shades of gray that fit
between black and white. The smoothness of the transition between the
colors depends on the number of color entries that separate the start and
ending colors you select. More colors between them produce smoother
gradients while fewer colors produce coarser gradients. This function is
also sometimes referred to as a color ramp. This function is primarily used
for grouping colors with similar shades together in the color palette.
� Copy—Copies the value of one color in your color palette to another posi-
tion in the color palette. This function is useful for making quick adjust-
ments to your palette.
� Swap—Swaps, or exchanges, the positions of two different colors in your
palette. This function is useful for rearranging individual colors in your
color palette.
� Gradient—Works much like the Swap function but is specifically used to
create and manage color gradients used by the Fill tool described earlier in
this chapter. Some programs will limit you to gradients of only 16 shades
while others will let you use the entire palette for a gradient.
� Load—Retrieves a saved color palette from disk. Look for a program that
lets you load color palettes saved in the Microsoft Palette (.PAL) format.
� Save—Saves the contents of the current color palette to disk for later
use. Look for a program that lets you save your palette data in the
Microsoft Palette (.PAL) format, as this will make your color palette defini-
tions compatible with many other programs.
� Undo—Erases any changes or additions you might have made to the cur-
rent color palette.
Chapter 5 / Evaluating Graphics Creation Tools 131
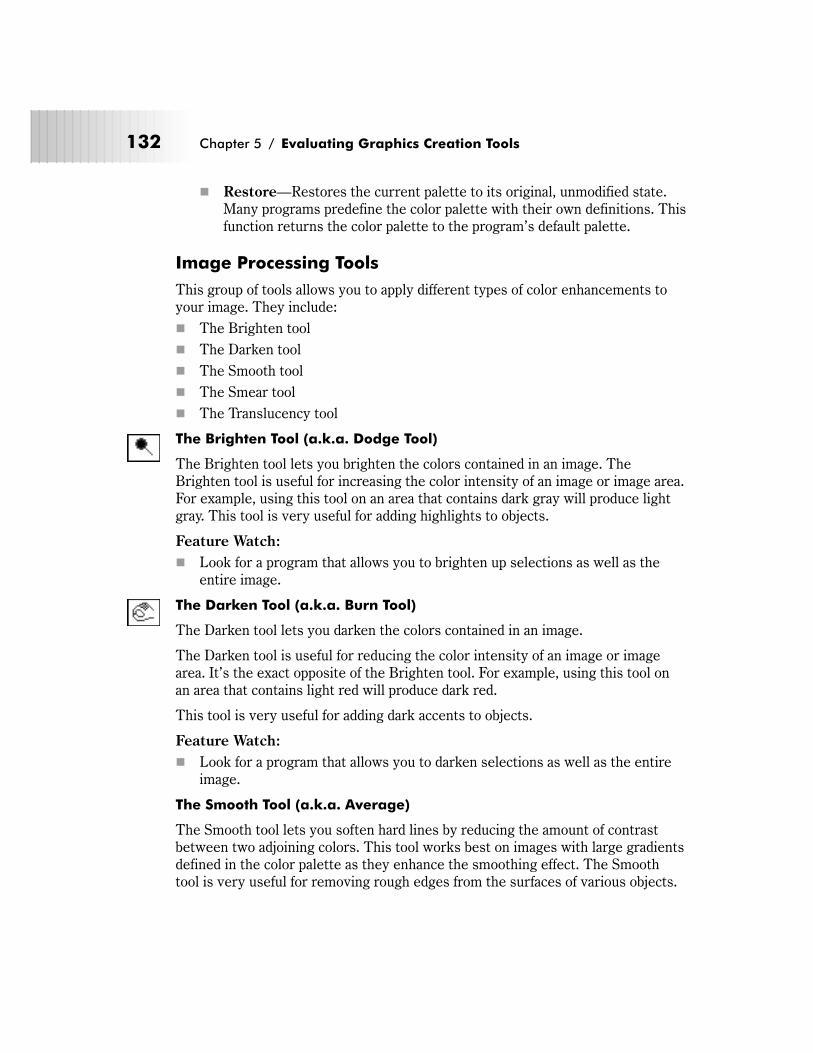
� Restore—Restores the current palette to its original, unmodified state.
Many programs predefine the color palette with their own definitions. This
function returns the color palette to the program’s default palette.
Image Processing Tools
This group of tools allows you to apply different types of color enhancements to
your image. They include:
� The Brighten tool
� The Darken tool
� The Smooth tool
� The Smear tool
� The Translucency tool
The Brighten Tool (a.k.a. Dodge Tool)
The Brighten tool lets you brighten the colors contained in an image. The
Brighten tool is useful for increasing the color intensity of an image or image area.
For example, using this tool on an area that contains dark gray will produce light
gray. This tool is very useful for adding highlights to objects.
Feature Watch:
� Look for a program that allows you to brighten up selections as well as the
entire image.
The Darken Tool (a.k.a. Burn Tool)
The Darken tool lets you darken the colors contained in an image.
The Darken tool is useful for reducing the color intensity of an image or image
area. It’s the exact opposite of the Brighten tool. For example, using this tool on
an area that contains light red will produce dark red.
This tool is very useful for adding dark accents to objects.
Feature Watch:
� Look for a program that allows you to darken selections as well as the entire
image.
The Smooth Tool (a.k.a. Average)
The Smooth tool lets you soften hard lines by reducing the amount of contrast
between two adjoining colors. This tool works best on images with large gradients
defined in the color palette as they enhance the smoothing effect. The Smooth
tool is very useful for removing rough edges from the surfaces of various objects.
132 Chapter 5 / Evaluating Graphics Creation Tools
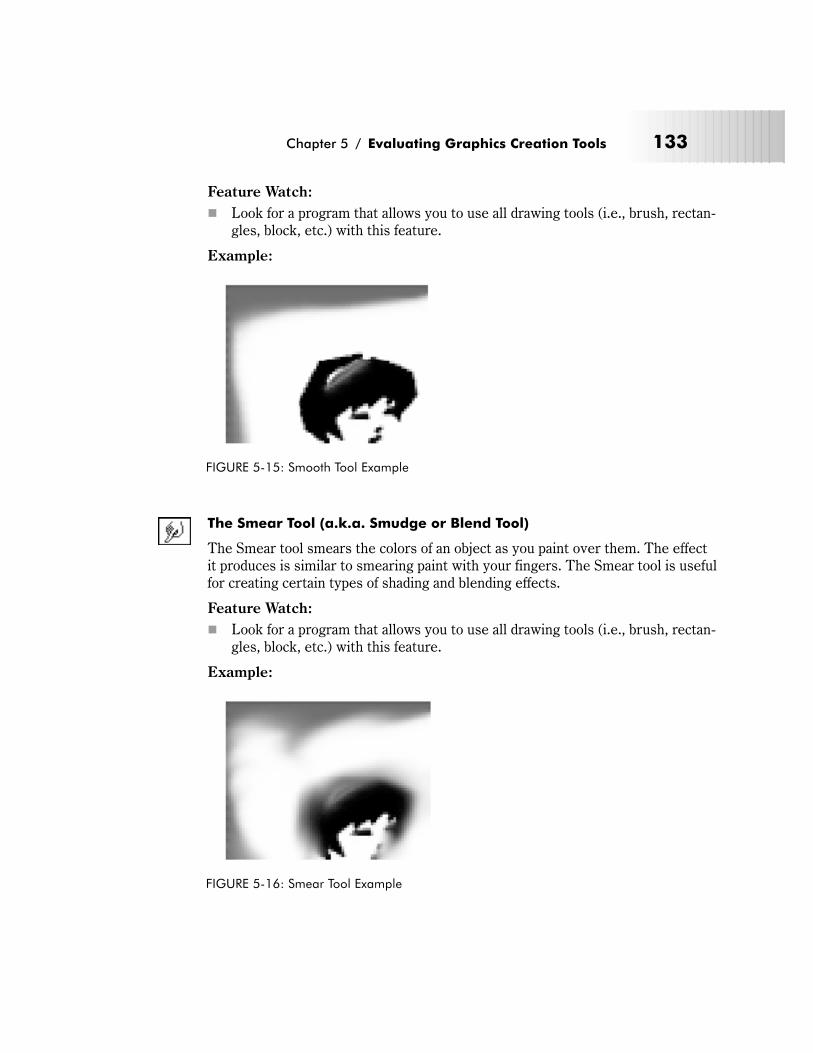
Feature Watch:
� Look for a program that allows you to use all drawing tools (i.e., brush, rectan-
gles, block, etc.) with this feature.
Example:
The Smear Tool (a.k.a. Smudge or Blend Tool)
The Smear tool smears the colors of an object as you paint over them. The effect
it produces is similar to smearing paint with your fingers. The Smear tool is useful
for creating certain types of shading and blending effects.
Feature Watch:
� Look for a program that allows you to use all drawing tools (i.e., brush, rectan-
gles, block, etc.) with this feature.
Example:
Chapter 5 / Evaluating Graphics Creation Tools 133
FIGURE 5-15: Smooth Tool Example
FIGURE 5-16: Smear Tool Example
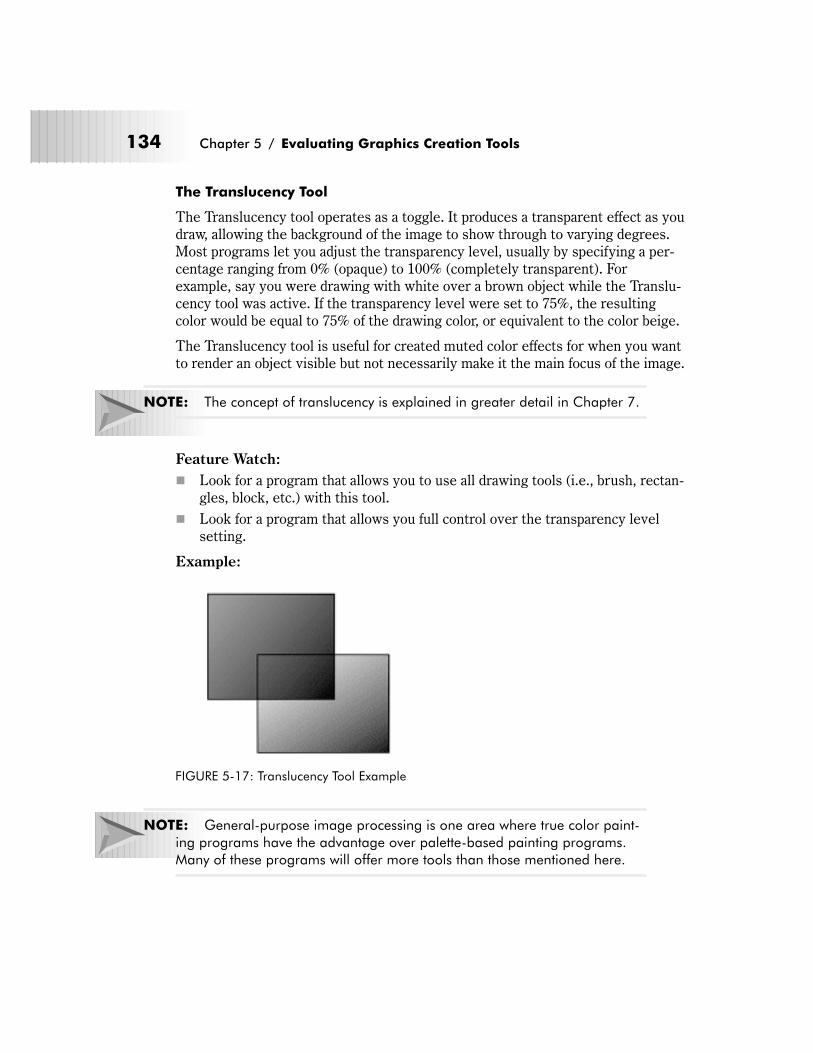
The Translucency Tool
The Translucency tool operates as a toggle. It produces a transparent effect as you
draw, allowing the background of the image to show through to varying degrees.
Most programs let you adjust the transparency level, usually by specifying a per-
centage ranging from 0% (opaque) to 100% (completely transparent). For
example, say you were drawing with white over a brown object while the Translu-
cency tool was active. If the transparency level were set to 75%, the resulting
color would be equal to 75% of the drawing color, or equivalent to the color beige.
The Translucency tool is useful for created muted color effects for when you want
to render an object visible but not necessarily make it the main focus of the image.
NOTE: The concept of translucency is explained in greater detail in Chapter 7.
Feature Watch:
� Look for a program that allows you to use all drawing tools (i.e., brush, rectan-
gles, block, etc.) with this tool.
� Look for a program that allows you full control over the transparency level
setting.
Example:
NOTE: General-purpose image processing is one area where true color paint-
ing programs have the advantage over palette-based painting programs.
Many of these programs will offer more tools than those mentioned here.
134 Chapter 5 / Evaluating Graphics Creation Tools
FIGURE 5-17: Translucency Tool Example
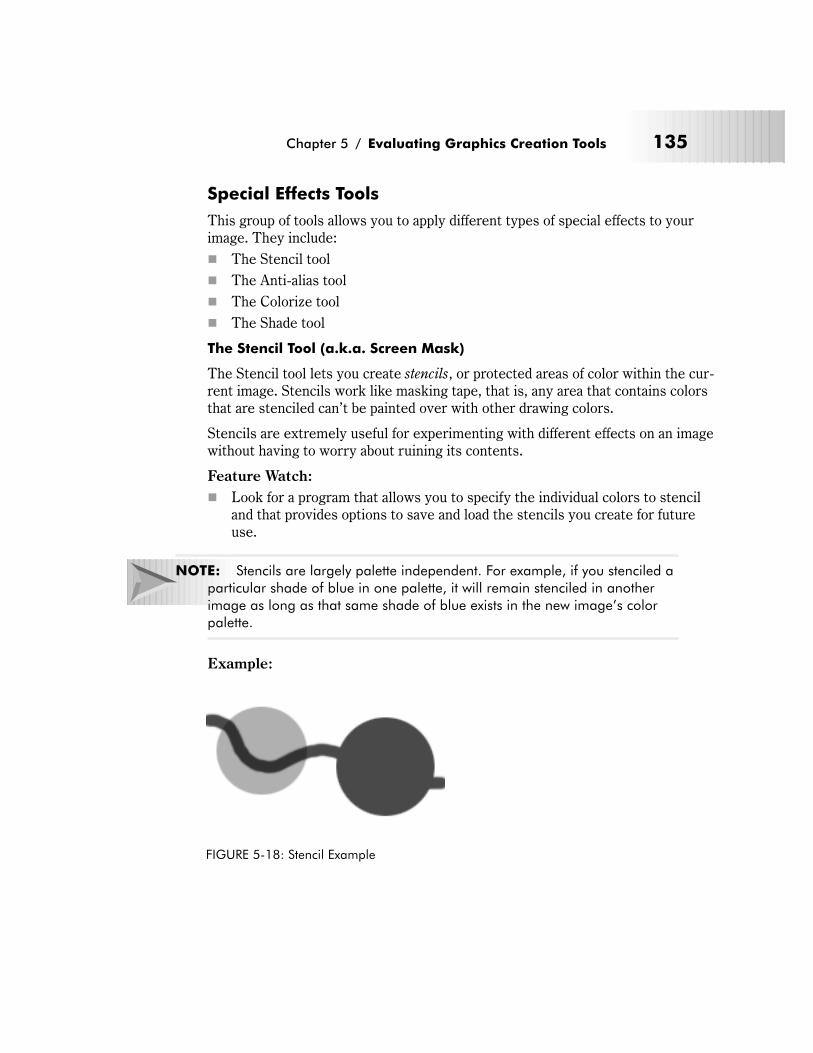
Special Effects Tools
This group of tools allows you to apply different types of special effects to your
image. They include:
� The Stencil tool
� The Anti-alias tool
� The Colorize tool
� The Shade tool
The Stencil Tool (a.k.a. Screen Mask)
The Stencil tool lets you create stencils, or protected areas of color within the cur-
rent image. Stencils work like masking tape, that is, any area that contains colors
that are stenciled can’t be painted over with other drawing colors.
Stencils are extremely useful for experimenting with different effects on an image
without having to worry about ruining its contents.
Feature Watch:
� Look for a program that allows you to specify the individual colors to stencil
and that provides options to save and load the stencils you create for future
use.
NOTE: Stencils are largely palette independent. For example, if you stenciled a
particular shade of blue in one palette, it will remain stenciled in another
image as long as that same shade of blue exists in the new image’s color
palette.
Example:
Chapter 5 / Evaluating Graphics Creation Tools 135
FIGURE 5-18: Stencil Example
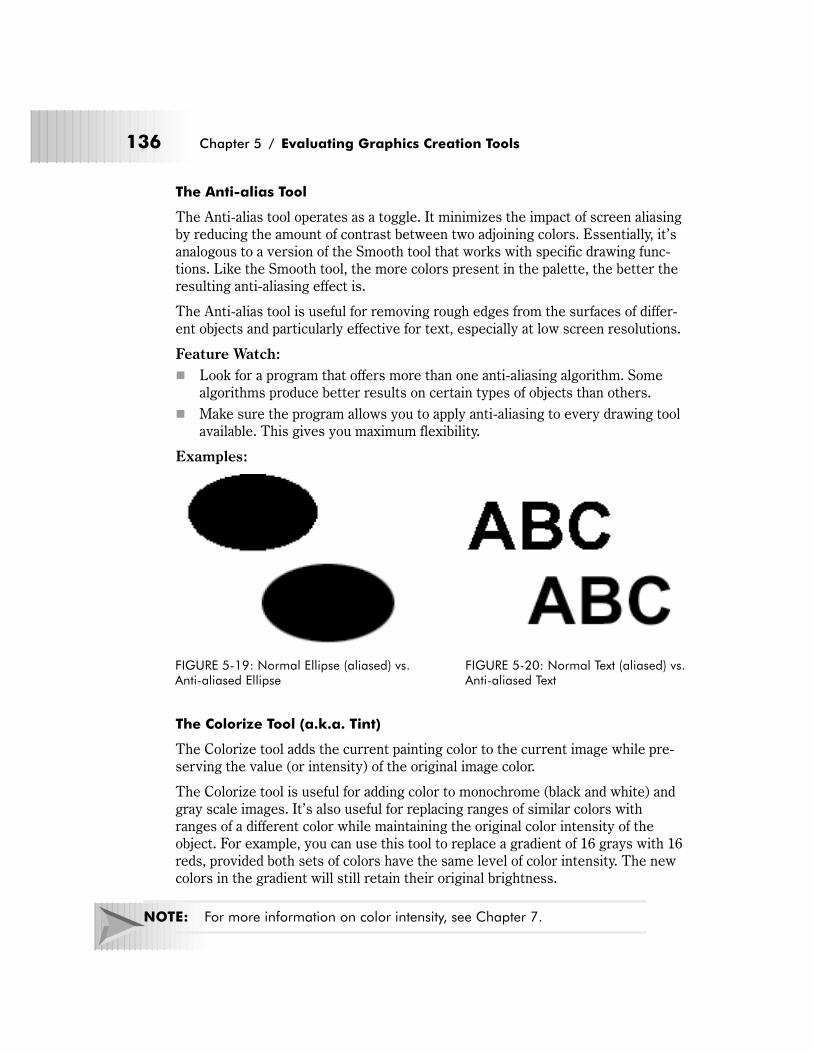
The Anti-alias Tool
The Anti-alias tool operates as a toggle. It minimizes the impact of screen aliasing
by reducing the amount of contrast between two adjoining colors. Essentially, it’s
analogous to a version of the Smooth tool that works with specific drawing func-
tions. Like the Smooth tool, the more colors present in the palette, the better the
resulting anti-aliasing effect is.
The Anti-alias tool is useful for removing rough edges from the surfaces of differ-
ent objects and particularly effective for text, especially at low screen resolutions.
Feature Watch:
� Look for a program that offers more than one anti-aliasing algorithm. Some
algorithms produce better results on certain types of objects than others.
� Make sure the program allows you to apply anti-aliasing to every drawing tool
available. This gives you maximum flexibility.
Examples:
The Colorize Tool (a.k.a. Tint)
The Colorize tool adds the current painting color to the current image while pre-
serving the value (or intensity) of the original image color.
The Colorize tool is useful for adding color to monochrome (black and white) and
gray scale images. It’s also useful for replacing ranges of similar colors with
ranges of a different color while maintaining the original color intensity of the
object. For example, you can use this tool to replace a gradient of 16 grays with 16
reds, provided both sets of colors have the same level of color intensity. The new
colors in the gradient will still retain their original brightness.
NOTE: For more information on color intensity, see Chapter 7.
136 Chapter 5 / Evaluating Graphics Creation Tools
FIGURE 5-19: Normal Ellipse (aliased) vs.Anti-aliased Ellipse
FIGURE 5-20: Normal Text (aliased) vs.Anti-aliased Text
NOTE: This tool can be a real time saver when it comes to recoloring objects
very quickly. For example, with this tool, you can change the green color
scheme of a tank object to brown without affecting the object’s overall
appearance.
Feature Watch:
� Look for a program that allows you to colorize image blocks as well as the
whole image.
� Look for a program that allows you to use all drawing tools (i.e., brush, rectan-
gles, block, etc.) with this feature.
The Shade Tool
The Shade tool is used to create subtle shading effects within your images. It
works by progressively sampling and darkening the current color. The Shade tool
is especially useful for adding shading to large screen objects such as title screen
logos or background scenery.
Feature Watch:
� Look for a program that allows you to use the Shade tool with any size brush
for maximum control.
NOTE: The Shade tool works best when there are many similar colors defined
in your palette; otherwise, the impact of the shading effect is lost. Some pro-
grams also only support shading effects when gray or white is selected as
the current painting color.
Other Tools
This group of tools enables you to correct mistakes, erase entire images, create
precise drawings, and easily apply text to your image. They include:
� The Grid tool
� The Eraser tool
� The Clear tool
� The Undo tool
� The Text tool
The Grid Tool
The Grid tool modifies the behavior of the different drawing tools. When acti-
vated, the Grid tool applies an invisible grid to the image area. All tools are then
constrained to draw only within the coordinates specified by the grid.
Chapter 5 / Evaluating Graphics Creation Tools 137
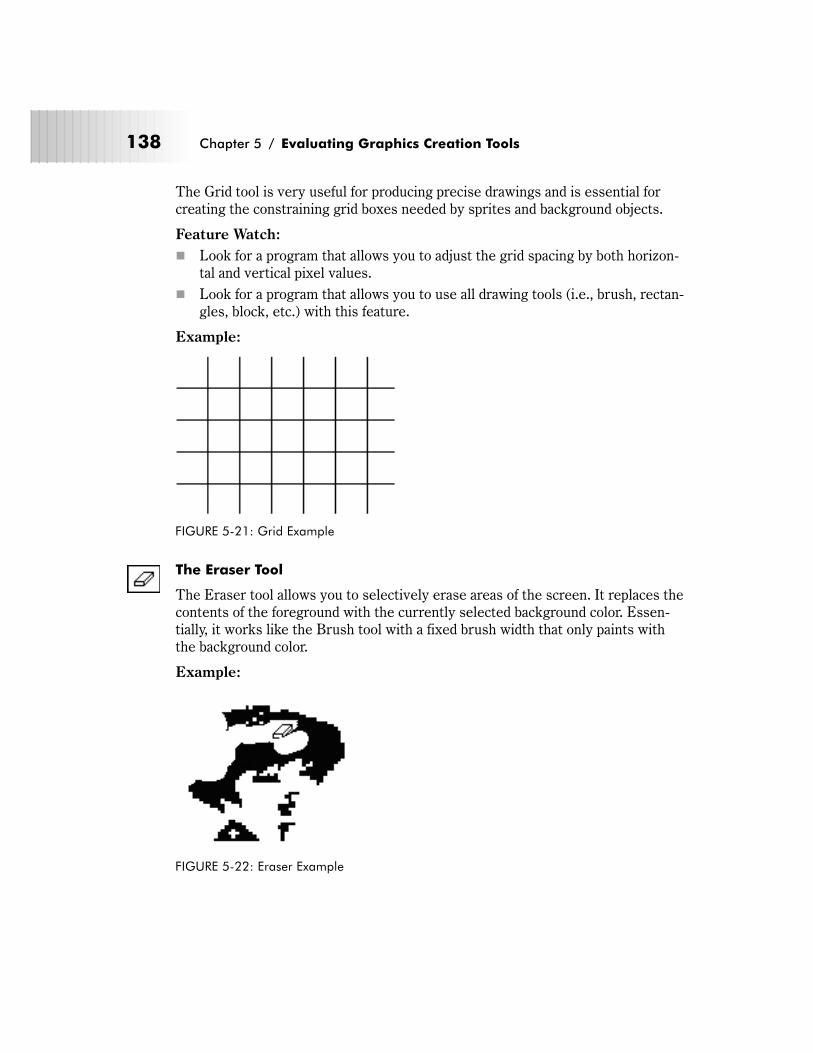
The Grid tool is very useful for producing precise drawings and is essential for
creating the constraining grid boxes needed by sprites and background objects.
Feature Watch:
� Look for a program that allows you to adjust the grid spacing by both horizon-
tal and vertical pixel values.
� Look for a program that allows you to use all drawing tools (i.e., brush, rectan-
gles, block, etc.) with this feature.
Example:
The Eraser Tool
The Eraser tool allows you to selectively erase areas of the screen. It replaces the
contents of the foreground with the currently selected background color. Essen-
tially, it works like the Brush tool with a fixed brush width that only paints with
the background color.
Example:
138 Chapter 5 / Evaluating Graphics Creation Tools
FIGURE 5-21: Grid Example
FIGURE 5-22: Eraser Example
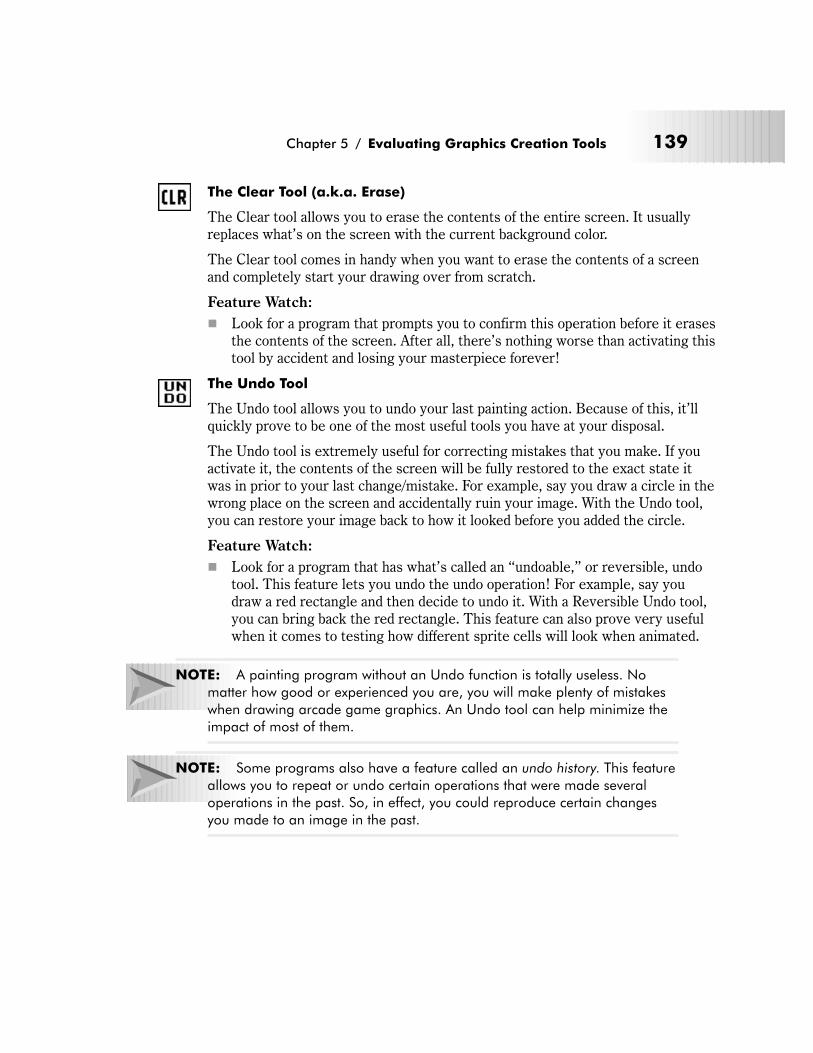
The Clear Tool (a.k.a. Erase)
The Clear tool allows you to erase the contents of the entire screen. It usually
replaces what’s on the screen with the current background color.
The Clear tool comes in handy when you want to erase the contents of a screen
and completely start your drawing over from scratch.
Feature Watch:
� Look for a program that prompts you to confirm this operation before it erases
the contents of the screen. After all, there’s nothing worse than activating this
tool by accident and losing your masterpiece forever!
The Undo Tool
The Undo tool allows you to undo your last painting action. Because of this, it’ll
quickly prove to be one of the most useful tools you have at your disposal.
The Undo tool is extremely useful for correcting mistakes that you make. If you
activate it, the contents of the screen will be fully restored to the exact state it
was in prior to your last change/mistake. For example, say you draw a circle in the
wrong place on the screen and accidentally ruin your image. With the Undo tool,
you can restore your image back to how it looked before you added the circle.
Feature Watch:
� Look for a program that has what’s called an “undoable,” or reversible, undo
tool. This feature lets you undo the undo operation! For example, say you
draw a red rectangle and then decide to undo it. With a Reversible Undo tool,
you can bring back the red rectangle. This feature can also prove very useful
when it comes to testing how different sprite cells will look when animated.
NOTE: A painting program without an Undo function is totally useless. No
matter how good or experienced you are, you will make plenty of mistakes
when drawing arcade game graphics. An Undo tool can help minimize the
impact of most of them.
NOTE: Some programs also have a feature called an undo history. This feature
allows you to repeat or undo certain operations that were made several
operations in the past. So, in effect, you could reproduce certain changes
you made to an image in the past.
Chapter 5 / Evaluating Graphics Creation Tools 139
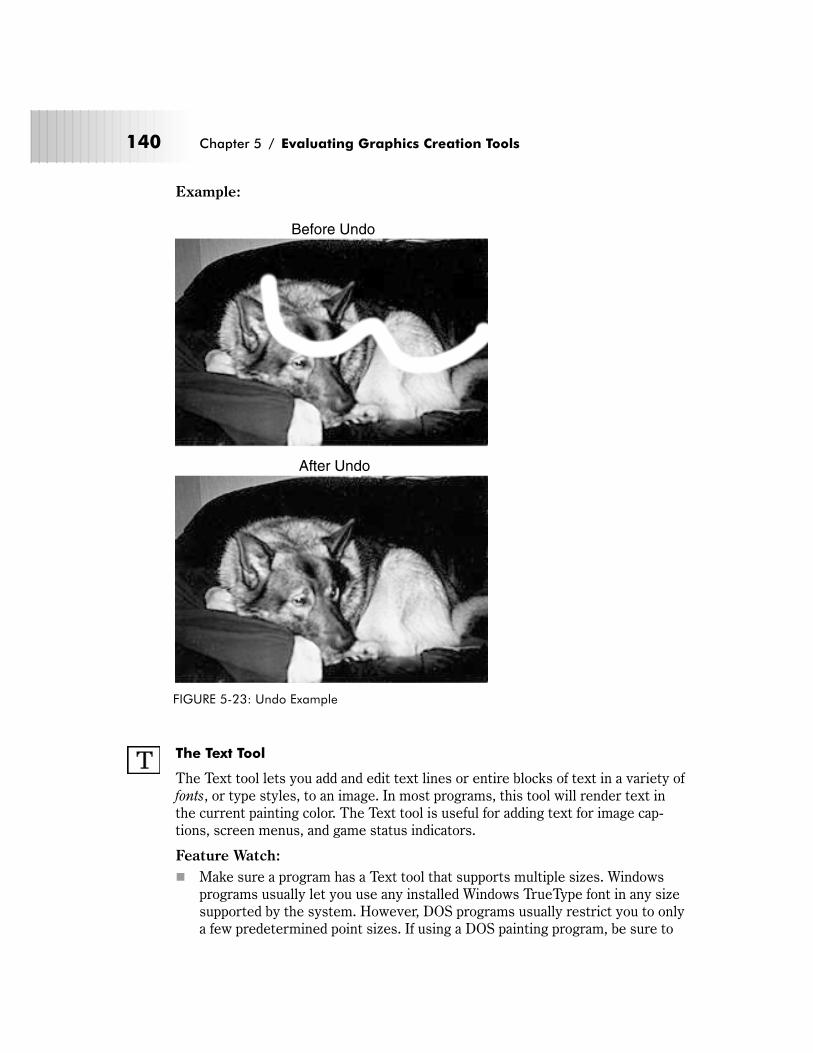
Example:
The Text Tool
The Text tool lets you add and edit text lines or entire blocks of text in a variety of
fonts, or type styles, to an image. In most programs, this tool will render text in
the current painting color. The Text tool is useful for adding text for image cap-
tions, screen menus, and game status indicators.
Feature Watch:
� Make sure a program has a Text tool that supports multiple sizes. Windows
programs usually let you use any installed Windows TrueType font in any size
supported by the system. However, DOS programs usually restrict you to only
a few predetermined point sizes. If using a DOS painting program, be sure to
140 Chapter 5 / Evaluating Graphics Creation Tools
Before Undo
After Undo
FIGURE 5-23: Undo Example
look for a program that allows you to select text from 8-point, 16-point,
24-point, 36-point, and 48-point, if possible.
� If using a DOS painting program, make sure it supports GEM or ZSoft font for-
mats as there are large numbers of these fonts available.
� Look for a Text tool that supports bold, italic, and underline styled text in
addition to normal text.
� If possible, look for a program that allows you to control or adjust text attrib-
utes such as:
� Leading—Leading is a measurement of the vertical space between lines
of characters. Leading can be used to adjust the balance and legibility of
text on the screen. Lines with too little leading can seem cramped and
crowded, while lines with too much leading can seem too open. Many
game designers fail to take leading into account when they place text on
the screen. Poor leading can make information difficult to read and find.
� Kerning—Kerning is a method of reducing the space allotted to one or
both sides of a character to make it fit more comfortably between its
neighbors. Kerning is frequently used to improve the legibility of text.
� Tracking—Tracking is a measurement of the overall letter spacing over a
line. Adjusting the tracking of a line can also improve its legibility.
� Weight—A font’s weight is a measurement of the vertical thickness of the
individual characters in a font. Font weight is specified according to sev-
eral grades: extra-light, light, book, medium, bold, extra bold, and black.
Fonts get darker and heavier in appearance as their weight increases. Be
aware that not all fonts support all of these weights.
� Look for a Text tool that lets you place text anywhere on the screen and
doesn’t restrict you to character boundaries. Some older software, especially
DOS programs, tend to do this.
� Look for a Text tool that supports both proportional and monospaced fonts. In
fonts that are proportional, each character is given only as much horizontal
space as it needs. For example, in a proportional font the letter “I” doesn’t
take up as much spaces as the letter “W.” Proportional fonts are very popular
for text-heavy applications because their characters are easy to distinguish
from each other. Meanwhile, monospaced fonts are commonly used for dis-
playing information that must line up on-screen in a particular way, such as
source code or a game’s high score table. However, they are not very good for
displaying large amounts of connected text, which is commonly found in game
help screens and on-screen instructions. This is because each character in a
monospaced font is surrounded by a fixed amount of white space which makes
their appearance seem uneven.
Chapter 5 / Evaluating Graphics Creation Tools 141
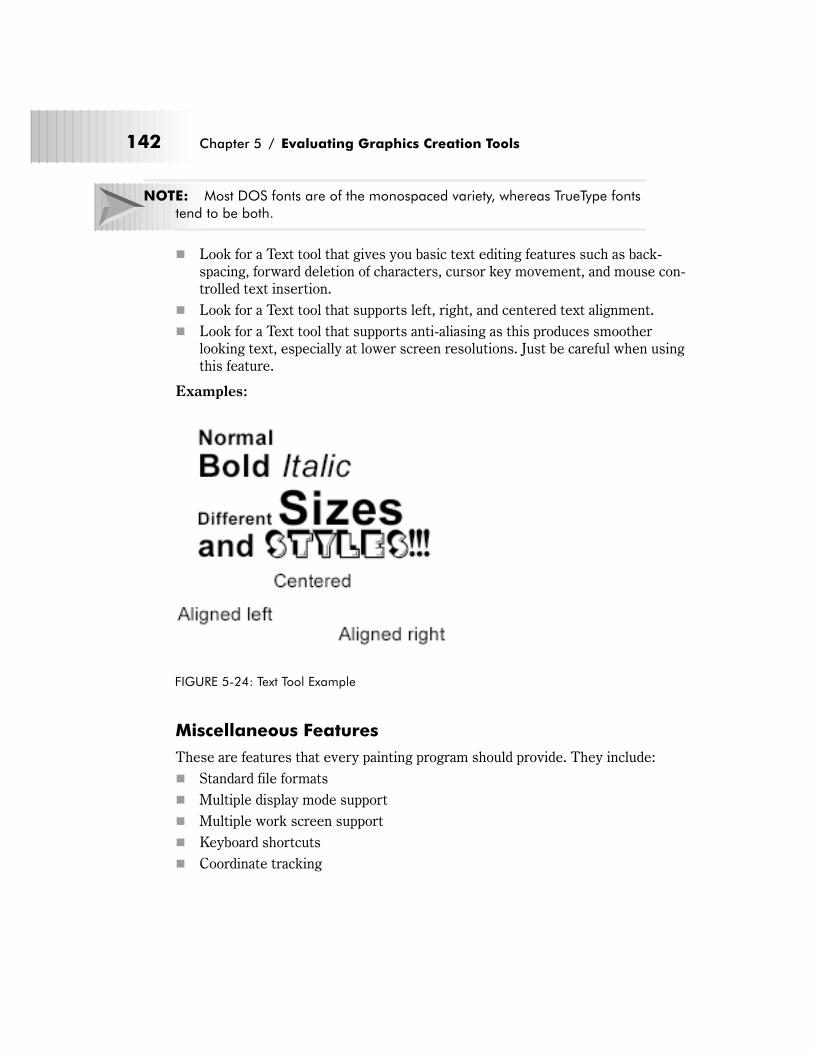
NOTE: Most DOS fonts are of the monospaced variety, whereas TrueType fonts
tend to be both.
� Look for a Text tool that gives you basic text editing features such as back-
spacing, forward deletion of characters, cursor key movement, and mouse con-
trolled text insertion.
� Look for a Text tool that supports left, right, and centered text alignment.
� Look for a Text tool that supports anti-aliasing as this produces smoother
looking text, especially at lower screen resolutions. Just be careful when using
this feature.
Examples:
Miscellaneous Features
These are features that every painting program should provide. They include:
� Standard file formats
� Multiple display mode support
� Multiple work screen support
� Keyboard shortcuts
� Coordinate tracking
142 Chapter 5 / Evaluating Graphics Creation Tools
FIGURE 5-24: Text Tool Example
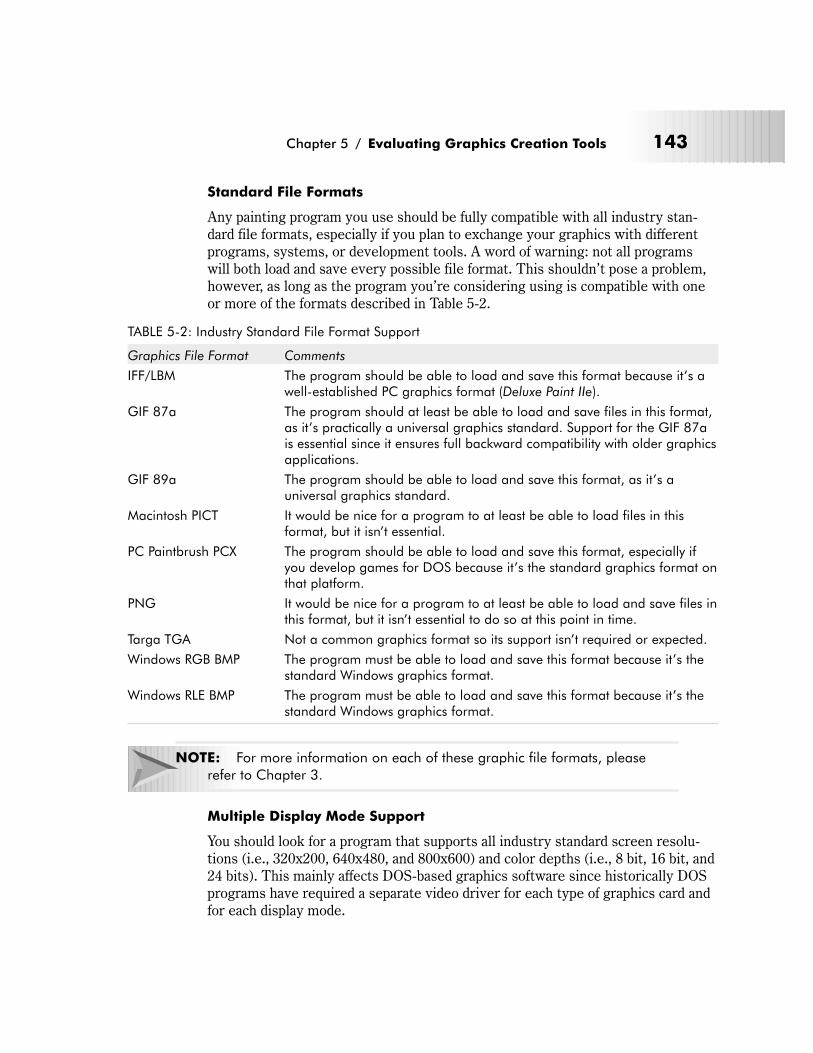
Standard File Formats
Any painting program you use should be fully compatible with all industry stan-
dard file formats, especially if you plan to exchange your graphics with different
programs, systems, or development tools. A word of warning: not all programs
will both load and save every possible file format. This shouldn’t pose a problem,
however, as long as the program you’re considering using is compatible with one
or more of the formats described in Table 5-2.
TABLE 5-2: Industry Standard File Format Support
Graphics File Format Comments
IFF/LBM The program should be able to load and save this format because it’s awell-established PC graphics format (Deluxe Paint IIe).
GIF 87a The program should at least be able to load and save files in this format,as it’s practically a universal graphics standard. Support for the GIF 87ais essential since it ensures full backward compatibility with older graphicsapplications.
GIF 89a The program should be able to load and save this format, as it’s auniversal graphics standard.
Macintosh PICT It would be nice for a program to at least be able to load files in thisformat, but it isn’t essential.
PC Paintbrush PCX The program should be able to load and save this format, especially ifyou develop games for DOS because it’s the standard graphics format onthat platform.
PNG It would be nice for a program to at least be able to load and save files inthis format, but it isn’t essential to do so at this point in time.
Targa TGA Not a common graphics format so its support isn’t required or expected.
Windows RGB BMP The program must be able to load and save this format because it’s thestandard Windows graphics format.
Windows RLE BMP The program must be able to load and save this format because it’s thestandard Windows graphics format.
NOTE: For more information on each of these graphic file formats, please
refer to Chapter 3.
Multiple Display Mode Support
You should look for a program that supports all industry standard screen resolu-
tions (i.e., 320x200, 640x480, and 800x600) and color depths (i.e., 8 bit, 16 bit, and
24 bits). This mainly affects DOS-based graphics software since historically DOS
programs have required a separate video driver for each type of graphics card and
for each display mode.
Chapter 5 / Evaluating Graphics Creation Tools 143
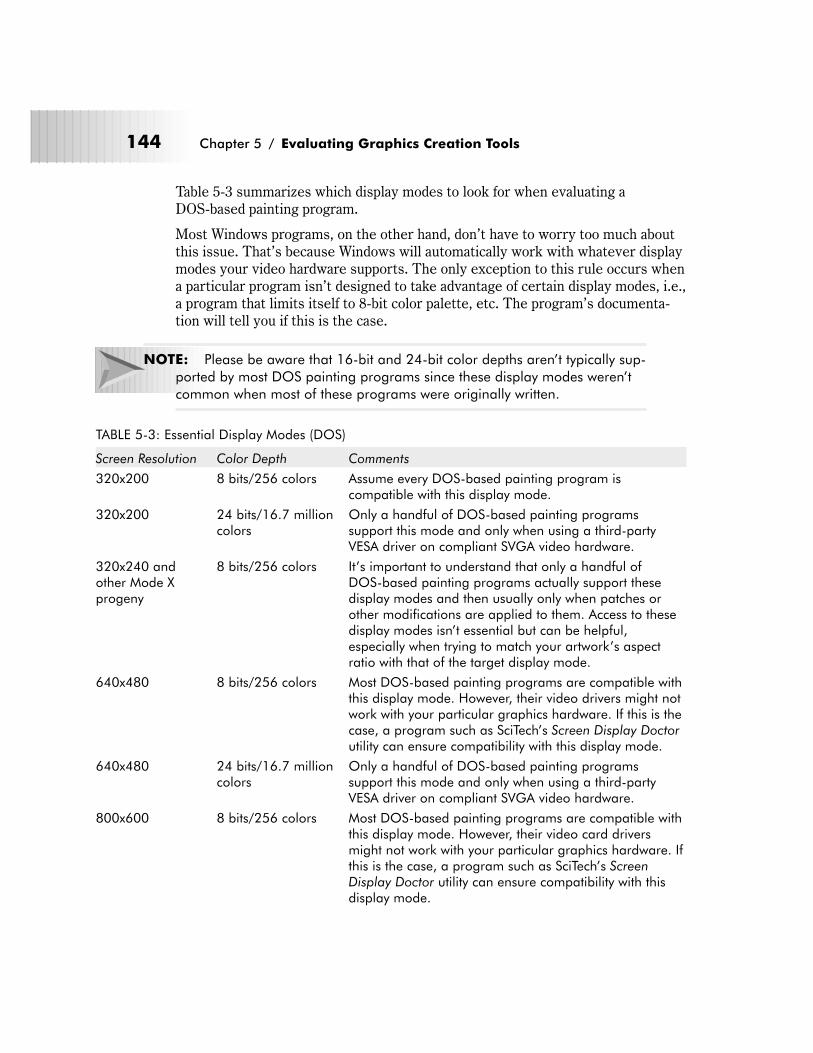
Table 5-3 summarizes which display modes to look for when evaluating a
DOS-based painting program.
Most Windows programs, on the other hand, don’t have to worry too much about
this issue. That’s because Windows will automatically work with whatever display
modes your video hardware supports. The only exception to this rule occurs when
a particular program isn’t designed to take advantage of certain display modes, i.e.,
a program that limits itself to 8-bit color palette, etc. The program’s documenta-
tion will tell you if this is the case.
NOTE: Please be aware that 16-bit and 24-bit color depths aren’t typically sup-
ported by most DOS painting programs since these display modes weren’t
common when most of these programs were originally written.
TABLE 5-3: Essential Display Modes (DOS)
Screen Resolution Color Depth Comments
320x200 8 bits/256 colors Assume every DOS-based painting program iscompatible with this display mode.
320x200 24 bits/16.7 millioncolors
Only a handful of DOS-based painting programssupport this mode and only when using a third-partyVESA driver on compliant SVGA video hardware.
320x240 andother Mode Xprogeny
8 bits/256 colors It’s important to understand that only a handful ofDOS-based painting programs actually support thesedisplay modes and then usually only when patches orother modifications are applied to them. Access to thesedisplay modes isn’t essential but can be helpful,especially when trying to match your artwork’s aspectratio with that of the target display mode.
640x480 8 bits/256 colors Most DOS-based painting programs are compatible withthis display mode. However, their video drivers might notwork with your particular graphics hardware. If this is thecase, a program such as SciTech’s Screen Display Doctorutility can ensure compatibility with this display mode.
640x480 24 bits/16.7 millioncolors
Only a handful of DOS-based painting programssupport this mode and only when using a third-partyVESA driver on compliant SVGA video hardware.
800x600 8 bits/256 colors Most DOS-based painting programs are compatible withthis display mode. However, their video card driversmight not work with your particular graphics hardware. Ifthis is the case, a program such as SciTech’s ScreenDisplay Doctor utility can ensure compatibility with thisdisplay mode.
144 Chapter 5 / Evaluating Graphics Creation Tools
Screen Resolution Color Depth Comments
800x600 Only a handful of DOS-based painting programssupport this mode and only when using a third-partyVESA driver on compliant SVGA video hardware.
NOTE: Some programs, particularly those available for Windows, allow you to
define screen windows of various sizes, but all programs are still restricted to
working within one of the screen resolutions referred to in this table.
Multiple Work Screen Support
The best painting programs provide spare screens for you to work with. For exam-
ple, you can use one screen to experiment with different types of effects and the
other to actually hold the final results. Or imagine how useful it would be to have
multiple screens available to store different images and copy objects between
them. In such cases, having access to work with multiple screens can really be
useful.
Windows-based painting programs usually let you open as many new screen win-
dows as free memory will allow. However, because DOS is particularly bad at
managing memory, this feature is far less common under DOS than it is under
Windows. In fact, you’ll be lucky to find a DOS painting program that lets you
access more than two screens at a time. These programs do exist, but they’re
very rare. In any case, make sure that any painting program you’re considering,
whether it runs under DOS or Windows, allows you to open up multiple work
screens.
Keyboard Shortcuts
In any program, keyboard shortcuts are likely to save you time, especially when
dealing with repetitive tasks. Well, painting programs can benefit from keyboard
shortcuts as much as any application, if not more. Therefore, make sure that any
program you’re considering, whether it runs under DOS or Windows, offers plenty
of keyboard shortcuts.
Table 5-4 lists all of the common operations that should have keyboard shortcuts
associated with them. Look for these in any program that you evaluate.
Chapter 5 / Evaluating Graphics Creation Tools 145
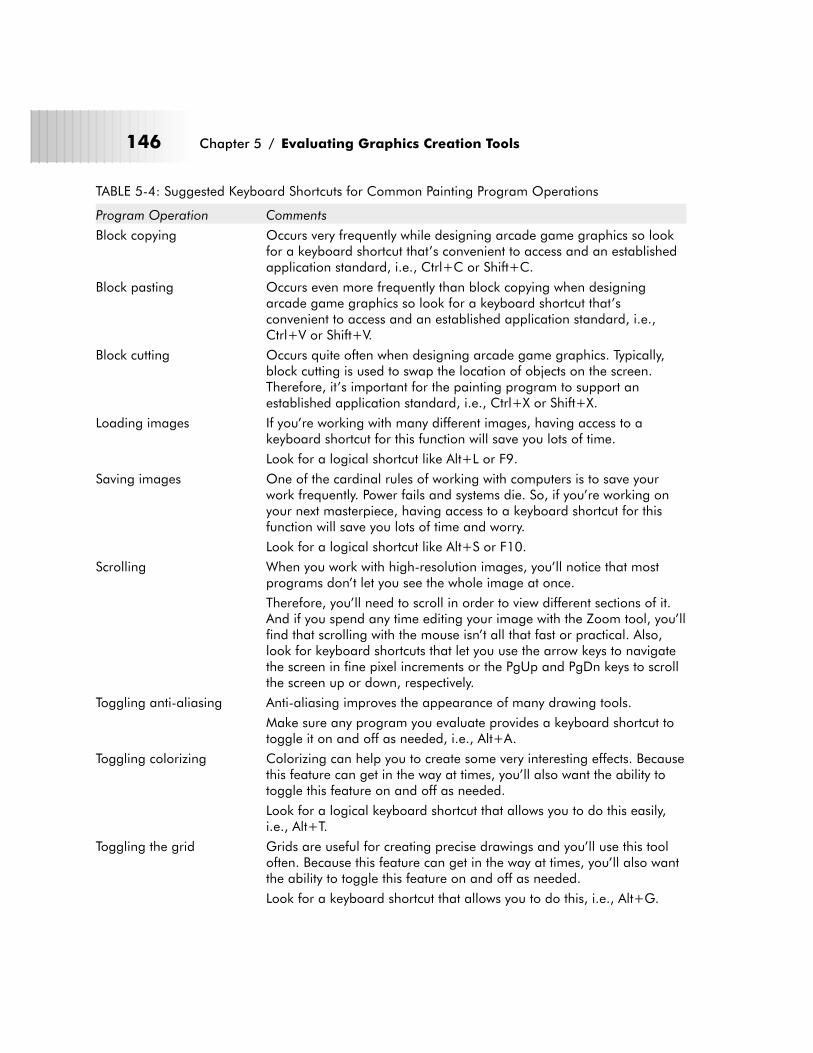
TABLE 5-4: Suggested Keyboard Shortcuts for Common Painting Program Operations
Program Operation Comments
Block copying Occurs very frequently while designing arcade game graphics so lookfor a keyboard shortcut that’s convenient to access and an establishedapplication standard, i.e., Ctrl+C or Shift+C.
Block pasting Occurs even more frequently than block copying when designingarcade game graphics so look for a keyboard shortcut that’sconvenient to access and an established application standard, i.e.,Ctrl+V or Shift+V.
Block cutting Occurs quite often when designing arcade game graphics. Typically,block cutting is used to swap the location of objects on the screen.Therefore, it’s important for the painting program to support anestablished application standard, i.e., Ctrl+X or Shift+X.
Loading images If you’re working with many different images, having access to akeyboard shortcut for this function will save you lots of time.
Look for a logical shortcut like Alt+L or F9.
Saving images One of the cardinal rules of working with computers is to save yourwork frequently. Power fails and systems die. So, if you’re working onyour next masterpiece, having access to a keyboard shortcut for thisfunction will save you lots of time and worry.
Look for a logical shortcut like Alt+S or F10.
Scrolling When you work with high-resolution images, you’ll notice that mostprograms don’t let you see the whole image at once.
Therefore, you’ll need to scroll in order to view different sections of it.And if you spend any time editing your image with the Zoom tool, you’llfind that scrolling with the mouse isn’t all that fast or practical. Also,look for keyboard shortcuts that let you use the arrow keys to navigatethe screen in fine pixel increments or the PgUp and PgDn keys to scrollthe screen up or down, respectively.
Toggling anti-aliasing Anti-aliasing improves the appearance of many drawing tools.
Make sure any program you evaluate provides a keyboard shortcut totoggle it on and off as needed, i.e., Alt+A.
Toggling colorizing Colorizing can help you to create some very interesting effects. Becausethis feature can get in the way at times, you’ll also want the ability totoggle this feature on and off as needed.
Look for a logical keyboard shortcut that allows you to do this easily,i.e., Alt+T.
Toggling the grid Grids are useful for creating precise drawings and you’ll use this tooloften. Because this feature can get in the way at times, you’ll also wantthe ability to toggle this feature on and off as needed.
Look for a keyboard shortcut that allows you to do this, i.e., Alt+G.
146 Chapter 5 / Evaluating Graphics Creation Tools

Program Operation Comments
Toggling the stencil The ability to “mask off” different areas or colors on the screen canprove to be invaluable, especially when you want to experiment withoutrisking your work. Because this feature can get in the way at times,you’ll also want the ability to toggle this feature on and off as needed.Look for a keyboard shortcut that allows you to do this, i.e., Alt+M.
Undoing The Undo tool is probably your single most powerful drawing tool andyou’ll wind up using it quite a bit.
Therefore, look for a logical keyboard shortcut for this tool such asCtrl+Z or Alt+U.
Zooming Once you get serious about creating arcade game graphics, you’llspend most of your time editing images using the Zoom tool. As aresult, you’ll definitely want the ability to quickly access this tool. You’llalso want a program to allow you to scroll while “zoomed.”
Look for simple and logical keyboard shortcuts like Alt+Z or Z toactivate your painting program’s Zoom Tool.
Coordinate Tracking
When activated, this option displays the X and Y coordinates for any pixel on the
screen. This feature is useful for recording the starting and ending points of
graphic objects and comes in handy when you need to measure the horizontal and
vertical dimensions of a particular object.
NOTE: This option is not the same as a ruler and shouldn’t be used as or con-
fused with one.
Example:
NOTE: Be sure to look closely at Chapter 6 for specific reviews and recommen-
dations of painting programs that support most if not all of the features and
tools described here.
Chapter 5 / Evaluating Graphics Creation Tools 147
FIGURE 5-25: Coordinate Tracking
Essential Screen Capture Utility Features
All screen capture programs are not alike. However, all of these programs share a
common set of core features. This section of the chapter examines the features
that a screen capture utility must have to be useful:
� Capture flexibility
� Common file format support
� Ease of use
Capture Flexibility
Any screen capture utility needs to offer several methods for capturing a given
screen. Years ago, Windows wasn’t very popular and it was sufficient for such pro-
grams just to capture the entire contents of the screen. However, this is no longer
the case. Today’s screen capture utilities now have to be more flexible in order to
work effectively with today’s DOS and Windows systems. Therefore, any screen
capture utility worth its salt should support the following image capture features:
� Full screen capture
� Active window capture
� Region capture
� DOS screen capture
� DirectX capture
Full Screen Capture
This feature allows you to capture or save the contents of the entire display
screen regardless of the current color depth or screen resolution.
Active Window Capture
This feature allows you to capture the contents of the currently active window
while ignoring the contents of the rest of the display screen. It should be able to
capture the contents of the active windows regardless of color depth or resolution.
This is probably the single most important screen capture option, since most Win-
dows-based games run within a single screen window.
Region Capture
This feature allows you to capture any user-defined screen region and isn’t specif-
ically limited to capturing certain windows or predefined areas of the current
screen. When this feature is available, the screen capture utility usually provides
some sort of mechanism for selecting the region to be captured.
148 Chapter 5 / Evaluating Graphics Creation Tools
This feature can be a time saver, particularly when you’re interested in capturing a
specific portion of a screen and don’t want to take the extra step of capturing a
screen and editing it in another program.
DOS Screen Capture
This feature allows you to capture the contents of a DOS screen or console win-
dow and is extremely useful for capturing old DOS game and application screens.
NOTE: Not all programs provide this feature and even those that do aren’t
always able to capture every DOS game screen due to various technical
issues.
DirectX Capture
This feature allows you to capture the screens of games that use Windows’
DirectX technology. Because DirectX uses special tricks, most ordinary screen
capture programs will fail when attempting to capture such screens. This feature
is extremely important given the fact that most new Windows games use DirectX
and their screens are difficult, if not impossible, to accurately capture otherwise.
Common File Format Support
As you’ll often need to manipulate the images you capture, it’s imperative that the
screen capture utility allows you to save captures in one or more industry stan-
dard file formats. Refer to Table 5-2 and Chapter 3 for more information on these
file formats.
Ease of Use
Like any good graphics tool, a screen capture utility should be easy to use. Ease of
use is important to consider since the last thing you want is a tool that is difficult
to use and wastes your time rather than saves it. Therefore, make sure to look for
a screen capture utility that supports such features as:
� Keyboard shortcuts
� Capture undo
� Automatic color palette correction
� Clipboard access
� Crop feature
Keyboard Shortcuts
Keyboard shortcuts are essential for capturing fast-action game screens or for cap-
turing the screens of programs that don’t rely on the mouse for input (i.e., DOS or
joystick-driven games).
Chapter 5 / Evaluating Graphics Creation Tools 149
Make sure that the screen capture utility provides this option and allows you to
redefine the shortcut keys for maximum flexibility.
Capture Undo
This feature allows you to undo the most recent screen capture. As the process of
making screen captures is highly error prone, make sure this particular feature is
available.
Automatic Color Palette Correction
This feature automatically accounts for and corrects any color palette “flashing”
that might occur when many different programs are running at once in an 8-bit
display mode.
This feature is needed because in display modes with 256 colors or less, Windows
dynamically shifts the palette to whatever values are defined by the currently
active window. Occasionally, this activity can introduce some unwanted color dis-
tortion into the captured screen, i.e., colors are jumbled.
Clipboard Access
This feature enables the program to directly copy the captured screen over to the
Clipboard.
This makes it possible to access the screen capture in other Windows software
without having to save it to disk first. It also makes it possible to import screen
captures into software that may have no direct file import support.
Crop Feature
This means that the screen capture utility provides an option to crop, or trim, the
captured image.
Cropping can be useful for cutting out extraneous portions from a capture before
you save it to disk. Most screen capture utilities offer this feature, but some don’t,
so be aware of this.
NOTE: Be sure to look closely at Chapter 6 for specific reviews and recommen-
dations of screen capture utilities that support most if not all of the features
and tools described here.
Essential Image Viewer/Converter Features
To be useful, an image viewer/converter program needs to be able to read and
write many different graphics formats and support many different display modes.
Therefore, you should look for a program with features such as:
150 Chapter 5 / Evaluating Graphics Creation Tools
� Extensive graphic file format support
� Good interface
� Batch conversions
� Image catalogs
� Special operations
Extensive Graphic File Format Support
A good image viewer/converter program acts as a translator between many dispa-
rate graphic file formats. The best programs will support as many as 120 file
formats. At the very least, it should support the file formats described in Table 5-2
and in Chapter 3. Make sure any software you evaluate does support these. If not,
consider using another program as there are many from which to choose.
Good Interface
In order to be effective, an image viewer/conversion utility needs to have a good
interface. This means that its commands and options should be visible and intu-
itive to use. Your time is precious and the last thing you want to do is waste it
trying to figure out how to use a program.
Batch Conversions
One of the most important features of any image viewer/converter is its ability to
convert large batches of files from one format to another at one time. For example,
using the image viewer/converter program’s batch conversion feature you can
perform operations such as automatically converting all of your PCX format
images to the Windows BMP RLE format in one fell swoop.
In any case, make sure that any image viewer/converter program you’re looking at
can do these kinds of file operations because sooner or later you’ll have a need for
something like this. When evaluating this feature, consider the program’s speed.
Programs that can process files faster are at an obvious advantage over slower
programs, especially when you’re dealing with dozens or even hundreds of files at
once.
Image Catalogs
Many image viewer/converter programs are capable of generating mini-catalogs of
your images. These catalogs usually contain small graphic thumbnails of your
images, which can make it easier for you to manage and maintain your image col-
lection. Therefore, look for a program that provides such a feature.
Chapter 5 / Evaluating Graphics Creation Tools 151
Special Operations
Image viewer/converter programs are also capable of performing a number of spe-
cial and unusual operations on your graphics files including:
� Color reduction
� Color promotion
� Image scaling
Color Reduction
Color reduction is a process used to compress the size of image files by removing
certain amounts of color information from an image. Typically, color reduction
involves reducing 24-bit images down to 8-bit images or 8-bit images down to 64,
32, or 16 colors, etc. A number of image viewer/converter programs are capable of
performing color reduction operations.
Whenever possible, look for color reduction that supports:
� Palette remapping—This is the ability to map a specific color palette to an
image. This feature is important because different palettes can provide better
color reduction results.
� Dithering—Dithering is a process that allows images to simulate the pres-
ence of colors that don’t actually exist in an image. Clever dithering can make
a color reduced image almost indistinguishable from the original source image.
Therefore, make sure this option is provided.
Image viewer/converters vary wildly in their ability to perform color reduction.
Some do exceptional jobs on most types of images while some don’t. Because this
class of programs does so many different things, it’s important that you don’t
judge a program solely by how well it performs this particular function.
Most image viewer/converter programs can perform this operation on individual
images as well as in batch.
Color Promotion
Color promotion is the opposite of color reduction. It enables you to promote, or
convert an image from a lower color depth to a higher color depth. For example,
using color promotion, you could bring a 16-color image up to 256 colors or an
8-bit image to 24-bit.
Most image viewer/converter programs can perform this operation on individual
images as well as in batch.
Image Scaling
This function allows you to scale an image from one size to another. For example,
you can reduce the size of an image from 640x480 down to 320x240 or scale it
upward.
152 Chapter 5 / Evaluating Graphics Creation Tools
Most image viewer/converter programs can perform this operation on individual
images as well as in batch.
Essential Palette Tool Features
A good palette tool will provide such features as:
� Color palette editing
� Color palette extraction from bitmaps
� Palette construction from input files
� Common file format support
Color Palette Editing
This tool allows you to create and edit color palettes in much the same way you
would when using a painting program.
In addition to providing the usual functions to copy colors and create color gradi-
ents, this tool should allow you to load and save color palettes. There are two
common palette file standards: Jasc PAL and Microsoft PAL. Both are well sup-
ported by painting programs. However, if you have a choice in the matter, you’re
better off using the Microsoft format as it’s slightly more popular than the Jasc
variety.
NOTE: All of the palette tools I’ve seen are for Windows only; therefore, this
function only supports the RGB 0-255 color range.
Color Palette Extraction from Bitmaps
This tool allows you to generate color palettes from individual image files. For
example, you can extract the color palette used by a screen capture from your
favorite game and then edit it.
Most programs that offer this function allow you to extract color palettes from
Windows BMP files. However, some will also support other file formats such as
.PCX and .GIF, thus saving you the extra step of converting images to the BMP
format.
Palette Construction from Input Files
This tool allows you to build color palettes by incorporating colors from one or
more images. For example, you can create custom color palettes by using colors
from three of your favorite game screens with this tool.
Chapter 5 / Evaluating Graphics Creation Tools 153

Common File Format Support
Make sure the palette tool can import files using one or more of the industry stan-
dard file formats. Refer to both Table 5-2 and Chapter 3 for more information on
these file formats.
154 Chapter 5 / Evaluating Graphics Creation Tools
Chapter 6
Essential GraphicsTools
In this chapter, you’ll learn about:
� Recommended painting programs
� Recommended screen capture utilities
� Recommended image viewers/converters
� Recommended palette tools
� Other useful graphics utilities
155
Criteria for My Recommendations
After spending countless hours scouring Internet software download sites, auctionsites, and flea markets for graphics software that can handle the tricky business ofcreating arcade game graphics, I managed to find a number of tools that had all ormost of the features outlined in Chapter 5.
In order to make the “cut,” each program had to pass a rigorous evaluation pro-cess. Among the criteria examined were:
� Interface and ease of use
� Performance and stability
� Compatibility
� Unique or special features
� Availability and support
� Cost
� Gripes
Interface and Ease of Use
This looks at the overall quality of the program’s interface. It considers such fac-tors as the layout of the drawing area, the intuitiveness and placement of tools,and its consistency. These criteria are very important. A program with a poorlydesigned interface tends to be more difficult to use and can make you less produc-tive than a program that has a well-designed interface.
Ease of use examines how easy the program is to use. Creating game artwork ischallenging enough without forcing you to struggle with learning how to use yetanother piece of software. Since everyone approaches arcade game graphicsdesign with different levels of experience, it’s crucial for a painting program toaddress the needs of both beginners and advanced users alike. This means itshould have features that are friendly to new users without being overly obtrusiveto experienced users.
Performance and Stability
Performance looks at how well a particular painting program runs on different sys-tems. A program may provide every feature under the sun but if it doesn’t run fastor smoothly on your computer, it really isn’t worth using. For a program to betruly useful, it needs to be able to run well on both lower-end (i.e., 386, 486) andhigher-end (i.e., Pentium, Pentium II, etc.) computer hardware at an acceptablelevel of performance.
156 Chapter 6 / Essential Graphics Tools
Stability considers how prone the particular application is to errors and crashes.Some programs are bug-ridden and can crash your entire system while others arealmost legendary in their ability to keep on working in a reliable fashion no matterwhat you throw at them. For obvious reasons, stable programs are preferable tounstable ones, not only because they’re less likely to crash but also becausethey’re less likely to take your artwork with them!
Compatibility
This criterion examines whether or not a program is compatible with standard,commonly available hardware and operating systems. A particular program mightbe loaded with features, have a great interface, and be fast, but if it doesn’t run onyour system, then all of its advantages are lost.
For testing compatibility, I used two different computer systems. At the low end, Iused a generic PC compatible with a 133Mhz Pentium processor, 64 MB of RAM,and a 2 MB S3 Trio64 video card that ran Windows 95 OSR2. Meanwhile, at thehigh end, I used a 300Mhz Pentium II, Compaq PC with 192 MB of RAM, and an 8MB Matrox Millenium video card that ran Windows NT 4.0 with SP 4.
NOTE: Since I ran my initial tests, Windows 2000 was released. Although Ihave managed to test some of the software mentioned here under this newoperating system, I have not been able to test everything. As a result, I onlymention compatibility with Windows 2000 on a case-by-case basis.
Unique or Special Features
This criterion looks at any extra or special features that a particular programmight have. These features aren’t essential to do graphics work but are certainlynice to have. However, I figured that I’d mention them anyway, especially sincethere may be a time when you find that you need to use one. The more the mer-rier, I always say.
Availability and Support
Availability looks at the program’s availability in the marketplace and how easy itis to find and acquire a (legal) copy. Obviously, the more difficult it is to obtain aparticular program, the less likely it is for you to be able to use it. I gave specialpreference to those programs that were easily found on the Internet since it offersus more immediacy when it comes to obtaining software.
Similarly, if a program isn’t well supported or frequently updated, the chances arethat the program bugs won’t be fixed on a timely basis and its functionality won’tbe extended to meet your requirements down the road.
Chapter 6 / Essential Graphics Tools 157
Cost
Cost considers the price of the software in question. I felt this was important tomention since many of us, including yours truly, are on tight budgets!
There’s a wealth of powerful graphics software out there and contrary to popularperceptions, most of it is free or modestly priced. Therefore, unless you’re des-perate, have special needs, or like to waste money, there’s really no reason tospend a lot of money for a good piece of graphics software.
In general, I only considered and evaluated programs that cost under $200 US.Most of them cost much less and quite a large number were free altogether. Theissue of cost was, in fact, the only reason I didn’t recommend Adobe’s excellentPhotoshop program in this book. As powerful and feature-rich as this program is, itjust costs too much, especially if creating arcade games is a hobby rather than alivelihood.
NOTE: As this is a book with several months of production time, it’s impossibleto record the most accurate prices for the products reviewed in this chapter.As a result, you should always visit the appropriate vendor’s Web site to getthe latest pricing information.
Gripes
In addition to the other criteria mentioned here, I include my personal gripes witheach program under a separate heading. This section also includes a list of fea-tures and/or program options that aren’t supported but should be.
Finally, the programs themselves were categorized as follows:
� Recommended DOS painting programs
� Recommended Windows painting programs
� Recommended DOS screen capture utilities
� Recommended Windows screen capture utilities
� Recommended DOS image viewers/converters
� Recommended Windows image viewers/converters
� Recommended palette tools
NOTE: For clarification on what each of these different categories are, pleaseconsult Chapter 5.
158 Chapter 6 / Essential Graphics Tools
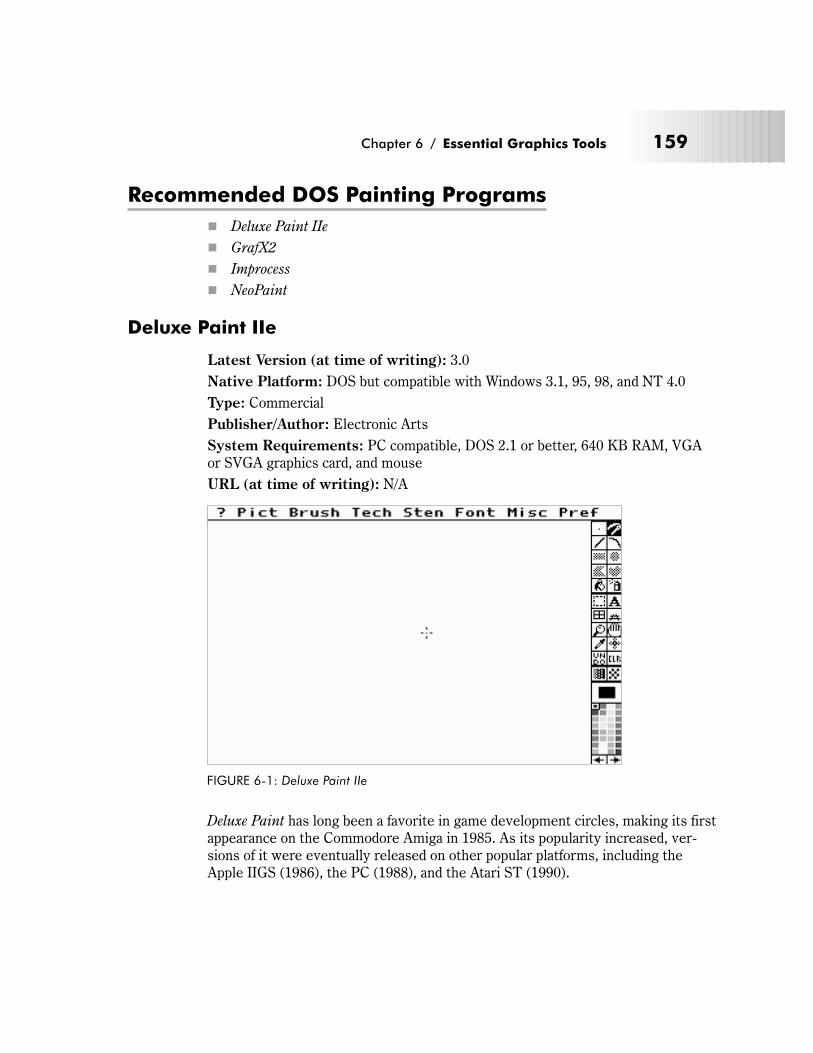
Recommended DOS Painting Programs
� Deluxe Paint IIe
� GrafX2
� Improcess
� NeoPaint
Deluxe Paint IIe
Latest Version (at time of writing): 3.0
Native Platform: DOS but compatible with Windows 3.1, 95, 98, and NT 4.0
Type: Commercial
Publisher/Author: Electronic Arts
System Requirements: PC compatible, DOS 2.1 or better, 640 KB RAM, VGAor SVGA graphics card, and mouse
URL (at time of writing): N/A
Deluxe Paint has long been a favorite in game development circles, making its firstappearance on the Commodore Amiga in 1985. As its popularity increased, ver-sions of it were eventually released on other popular platforms, including theApple IIGS (1986), the PC (1988), and the Atari ST (1990).
Chapter 6 / Essential Graphics Tools 159
FIGURE 6-1: Deluxe Paint IIe
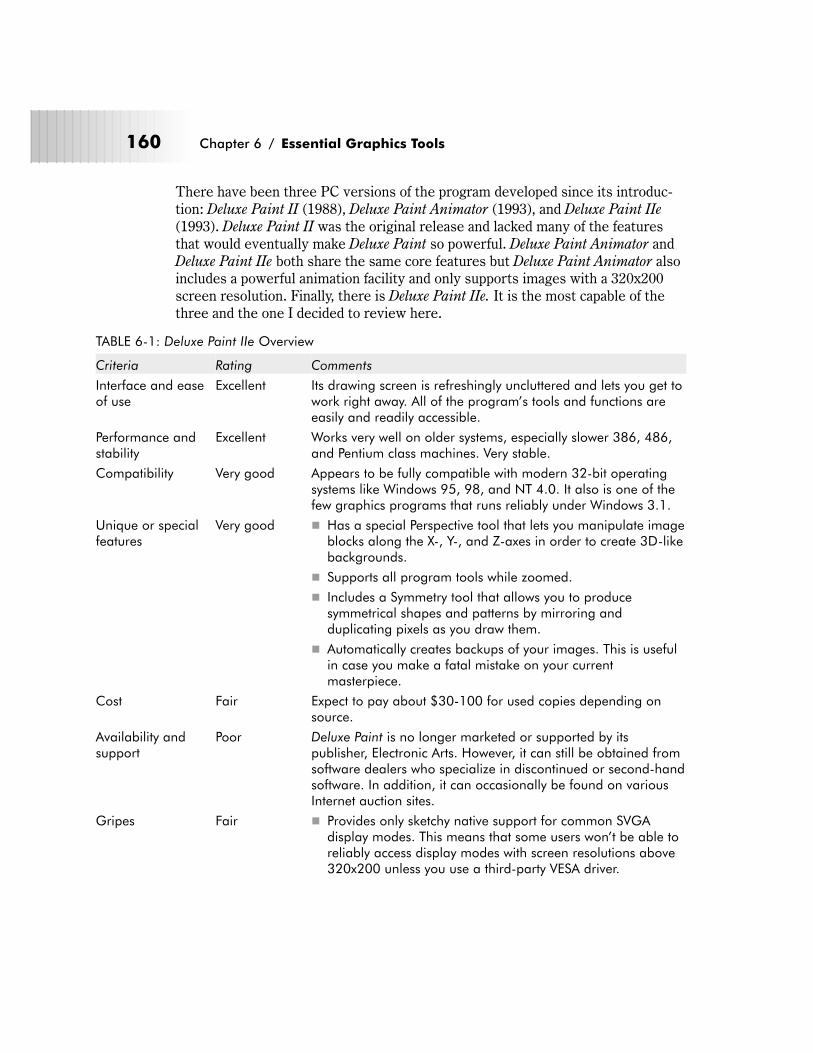
There have been three PC versions of the program developed since its introduc-tion: Deluxe Paint II (1988), Deluxe Paint Animator (1993), and Deluxe Paint IIe
(1993). Deluxe Paint II was the original release and lacked many of the featuresthat would eventually make Deluxe Paint so powerful. Deluxe Paint Animator andDeluxe Paint IIe both share the same core features but Deluxe Paint Animator alsoincludes a powerful animation facility and only supports images with a 320x200screen resolution. Finally, there is Deluxe Paint IIe. It is the most capable of thethree and the one I decided to review here.
TABLE 6-1: Deluxe Paint IIe Overview
Criteria Rating Comments
Interface and easeof use
Excellent Its drawing screen is refreshingly uncluttered and lets you get towork right away. All of the program’s tools and functions areeasily and readily accessible.
Performance andstability
Excellent Works very well on older systems, especially slower 386, 486,and Pentium class machines. Very stable.
Compatibility Very good Appears to be fully compatible with modern 32-bit operatingsystems like Windows 95, 98, and NT 4.0. It also is one of thefew graphics programs that runs reliably under Windows 3.1.
Unique or specialfeatures
Very good � Has a special Perspective tool that lets you manipulate imageblocks along the X-, Y-, and Z-axes in order to create 3D-likebackgrounds.
� Supports all program tools while zoomed.
� Includes a Symmetry tool that allows you to producesymmetrical shapes and patterns by mirroring andduplicating pixels as you draw them.
� Automatically creates backups of your images. This is usefulin case you make a fatal mistake on your currentmasterpiece.
Cost Fair Expect to pay about $30-100 for used copies depending onsource.
Availability andsupport
Poor Deluxe Paint is no longer marketed or supported by itspublisher, Electronic Arts. However, it can still be obtained fromsoftware dealers who specialize in discontinued or second-handsoftware. In addition, it can occasionally be found on variousInternet auction sites.
Gripes Fair � Provides only sketchy native support for common SVGAdisplay modes. This means that some users won’t be able toreliably access display modes with screen resolutions above320x200 unless you use a third-party VESA driver.
160 Chapter 6 / Essential Graphics Tools
Criteria Rating Comments
� Only provides users with two drawing screens. This limitsyour ability to work on multiple images at once and copyelements between them.
� Only supports the PCX and LBM file formats.
� Uses a proprietary text font format for its Text tool. As aresult, it’s impossible to add new fonts to the program andthe included fonts lack significant variation in style comparedto what’s available with TrueType fonts.
TABLE 6-2: Deluxe Paint Feature Summary
Drawing Tools and Effects Supported Comments
The Pencil tool � Not implemented. However, its Brush tool offerssomething similar.
The Brush tool � Supports multiple brush widths.
The Airbrush tool � Allows you to control the size and flow of the spray.
The Line tool � Can also produce connected line segments andcontrol the width of the line.
The Curve tool � Can produce two types of curves: simple and onewith multiple endpoints.
The Rectangle tool � Can produce both filled and unfilled rectangles aswell as squares. Supports gradient fills for this tool.
The Ellipse tool � Can produce filled and unfilled ellipses as well asrotated ellipses. Supports gradient fills for this tool.
The Polygon tool � Can produce both filled and unfilled polygon shapes.Supports gradient fills for this tool.
The Fill tool � Can fill in areas with solid colors, patterns, andgradient fills. Allows you to fill in objects usingstraight, shaped, ridged, radial, and contouredgradients.
The Selection tool � Can perform cut, copy, and paste operations. Inaddition, it also supports block resizing, rotation,bending, shearing, halving, doubling, flipping, andconverting objects into single colors, as well as theloading and saving of blocks.
The Lasso tool � Offers the same features as the Selection tool. TheLasso tool always operates on blocks transparently.
The Zoom tool � Can magnify screen sections up to 2, 3, 4, 6, and 8times their original size. Allows you to use allavailable tools while in magnification mode.
The Navigator tool � Allows you to view the entire screen and scrollaround the entire image.
Chapter 6 / Essential Graphics Tools 161
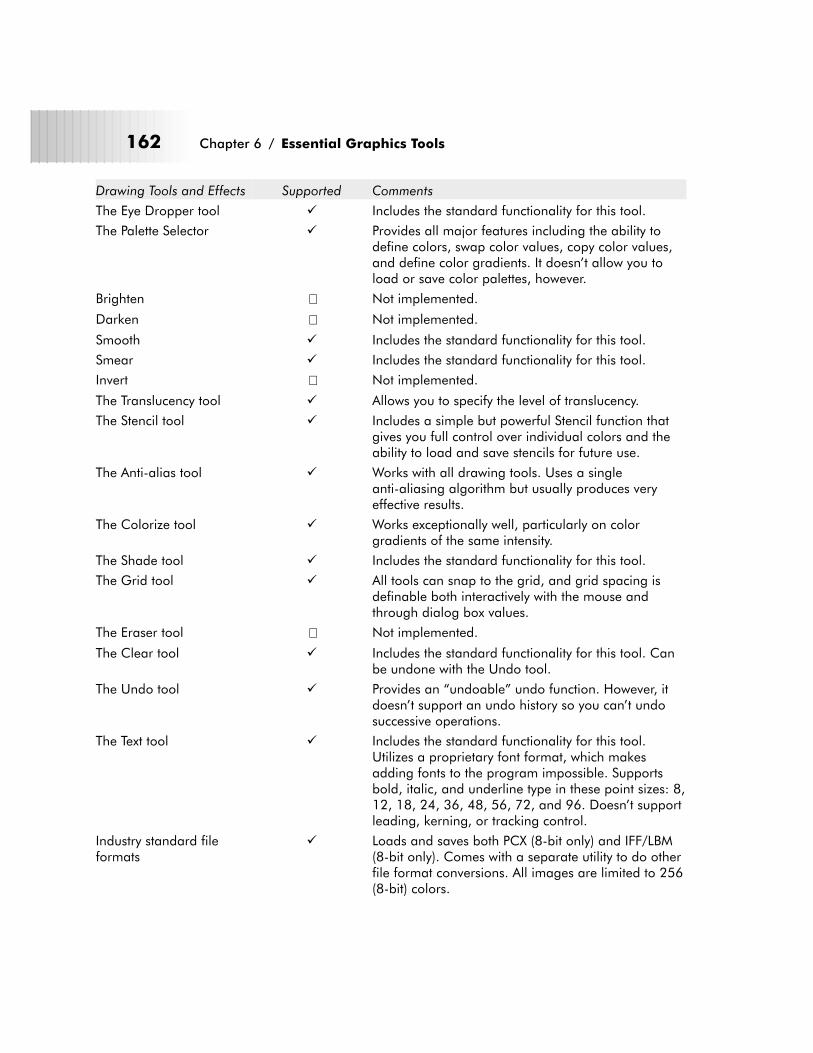
Drawing Tools and Effects Supported Comments
The Eye Dropper tool � Includes the standard functionality for this tool.
The Palette Selector � Provides all major features including the ability todefine colors, swap color values, copy color values,and define color gradients. It doesn’t allow you toload or save color palettes, however.
Brighten � Not implemented.
Darken � Not implemented.
Smooth � Includes the standard functionality for this tool.
Smear � Includes the standard functionality for this tool.
Invert � Not implemented.
The Translucency tool � Allows you to specify the level of translucency.
The Stencil tool � Includes a simple but powerful Stencil function thatgives you full control over individual colors and theability to load and save stencils for future use.
The Anti-alias tool � Works with all drawing tools. Uses a singleanti-aliasing algorithm but usually produces veryeffective results.
The Colorize tool � Works exceptionally well, particularly on colorgradients of the same intensity.
The Shade tool � Includes the standard functionality for this tool.
The Grid tool � All tools can snap to the grid, and grid spacing isdefinable both interactively with the mouse andthrough dialog box values.
The Eraser tool � Not implemented.
The Clear tool � Includes the standard functionality for this tool. Canbe undone with the Undo tool.
The Undo tool � Provides an “undoable” undo function. However, itdoesn’t support an undo history so you can’t undosuccessive operations.
The Text tool � Includes the standard functionality for this tool.Utilizes a proprietary font format, which makesadding fonts to the program impossible. Supportsbold, italic, and underline type in these point sizes: 8,12, 18, 24, 36, 48, 56, 72, and 96. Doesn’t supportleading, kerning, or tracking control.
Industry standard fileformats
� Loads and saves both PCX (8-bit only) and IFF/LBM(8-bit only). Comes with a separate utility to do otherfile format conversions. All images are limited to 256(8-bit) colors.
162 Chapter 6 / Essential Graphics Tools
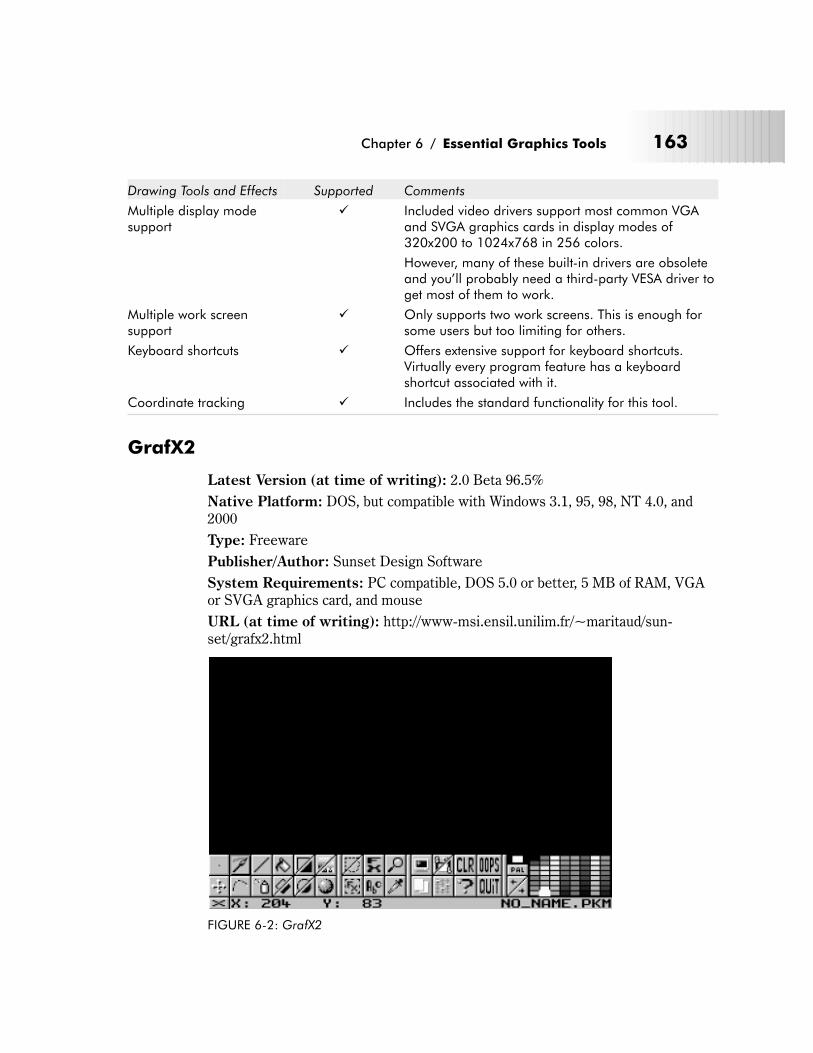
Drawing Tools and Effects Supported Comments
Multiple display modesupport
� Included video drivers support most common VGAand SVGA graphics cards in display modes of320x200 to 1024x768 in 256 colors.
However, many of these built-in drivers are obsoleteand you’ll probably need a third-party VESA driver toget most of them to work.
Multiple work screensupport
� Only supports two work screens. This is enough forsome users but too limiting for others.
Keyboard shortcuts � Offers extensive support for keyboard shortcuts.Virtually every program feature has a keyboardshortcut associated with it.
Coordinate tracking � Includes the standard functionality for this tool.
GrafX2
Latest Version (at time of writing): 2.0 Beta 96.5%
Native Platform: DOS, but compatible with Windows 3.1, 95, 98, NT 4.0, and2000
Type: Freeware
Publisher/Author: Sunset Design Software
System Requirements: PC compatible, DOS 5.0 or better, 5 MB of RAM, VGAor SVGA graphics card, and mouse
URL (at time of writing): http://www-msi.ensil.unilim.fr/~maritaud/sun-set/grafx2.html
Chapter 6 / Essential Graphics Tools 163
FIGURE 6-2: GrafX2
Two members of a French demo-coding group developed GrafX2 back in 1996.Their unique perspective as both talented programmers and artists enabled themto produce one of the most exciting and original painting programs to appear onthe PC platform in many years. While GrafX2 is new to me, it apparently has beena favorite among European demo group artists for some time.
If it’s ever completed and developed to its potential, it stands to surpass evenDeluxe Paint IIe as the leader in PC-based painting software.
TABLE 6-3: GrafX2 Overview
Criteria Rating Comments
Interface and easeof use
Excellent Its drawing screen is clear and uncluttered so you’ll be ableto start drawing immediately. All of GrafX2’s tools are easyto find and are well positioned within the tool bar. Makesgood use of keyboard shortcuts.
Performance andstability
Excellent GrafX2 accesses the computer’s graphics hardware directlyso it runs at exceptional speed, even on slower systems,without requiring lots of memory. However, it experiencessome stability issues that will lead it to crash in certainsituations.
Compatibility Very good Works very well with Windows 95, 98, NT 4.0, and 2000,making it the perfect complement to your Windows gamedevelopment efforts. Unfortunately, this great program isn’tcompatible with systems running Windows 3.1.
Unique or specialfeatures
Good � Provides a tiling function that lets you easily create tiledgraphics. This feature is useful for testing backgroundimages, etc.
� Can reduce colors in images, i.e., reduce a 128-colorimage to 64 colors with good results.
� Supports all program tools while zoomed.
� Can be optionally configured to create backups of yourimages. This is useful should you make a fatal mistakewhen working on your current masterpiece.
Cost Excellent Free.
Availability andsupport
Good Free for all to download although it’s not that easy to find.The program is also still under development, but so far, ithas been well supported by its authors.
164 Chapter 6 / Essential Graphics Tools
Criteria Rating Comments
Gripes Fair � Doesn’t allow you to create rectangles with filled colorgradients.
� Doesn’t have a Text tool. Therefore, there’s no easy wayto add text to an image with this program.
� Doesn’t yet allow you to apply special effects to the wholepicture at once and certain block functions such asfree-rotate and block distort aren’t yet implemented.
� Doesn’t provide an Anti-alias or a true Colorize function.
TABLE 6-4: GrafX2 Feature Summary
Drawing Tools and Effects Supported Comments
The Pencil tool � Not implemented. However, its Brush tool offerssomething similar.
The Brush tool � Also supports multiple brush widths.
The Airbrush tool � Allows you to control the size and flow of the spray.
The Line tool � Can produce both connected line segments andcontinuous line segments.
The Curve tool � Can produce two types of curves: simple and onewith multiple endpoints.
The Rectangle tool � Can produce both filled and unfilled rectangles. Youcan’t draw squares with it. Doesn’t allow you tocreate rectangles with gradient fills.
The Ellipse tool � Only allows you to draw circles but lets you createcircles with gradient fills.
The Polygon tool � Can produce both filled and unfilled polygon shapes.Doesn’t support gradient fills.
The Fill tool � Can fill in areas with solid colors, patterns, andgradient fills. Only allows you to use radial gradientfills but allows you to define the angle of the fill.
The Selection tool � Can perform cut, copy, and paste operations. Inaddition, this program also supports block resizing,rotation (limited to 90- and 180-degree increments),and flipping.
The Lasso tool � Provides the same basic features as the Selectiontool. The Lasso tool always operates on blockstransparently.
The Zoom tool � Can magnify screen sections up 2, 3, 4, 6, 8, 12, 14,16, 18, and 20 times their original size. Also allowsyou to use all tools while in magnification mode.
Chapter 6 / Essential Graphics Tools 165
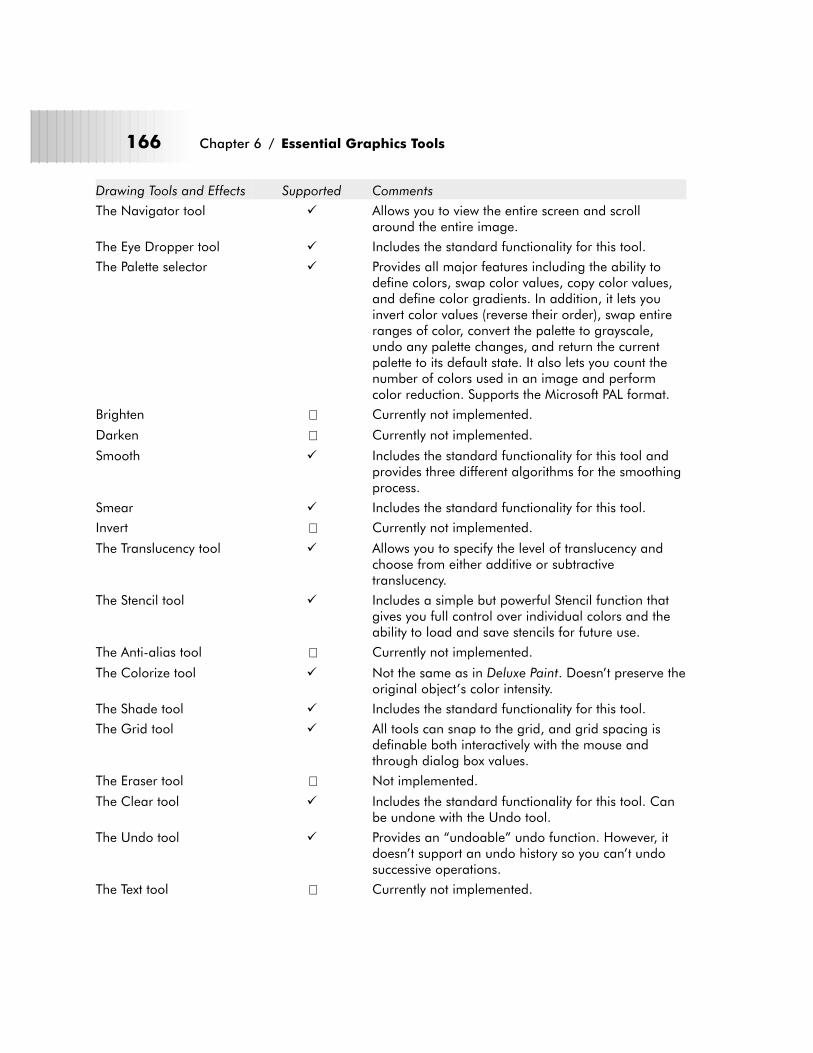
Drawing Tools and Effects Supported Comments
The Navigator tool � Allows you to view the entire screen and scrollaround the entire image.
The Eye Dropper tool � Includes the standard functionality for this tool.
The Palette selector � Provides all major features including the ability todefine colors, swap color values, copy color values,and define color gradients. In addition, it lets youinvert color values (reverse their order), swap entireranges of color, convert the palette to grayscale,undo any palette changes, and return the currentpalette to its default state. It also lets you count thenumber of colors used in an image and performcolor reduction. Supports the Microsoft PAL format.
Brighten � Currently not implemented.
Darken � Currently not implemented.
Smooth � Includes the standard functionality for this tool andprovides three different algorithms for the smoothingprocess.
Smear � Includes the standard functionality for this tool.
Invert � Currently not implemented.
The Translucency tool � Allows you to specify the level of translucency andchoose from either additive or subtractivetranslucency.
The Stencil tool � Includes a simple but powerful Stencil function thatgives you full control over individual colors and theability to load and save stencils for future use.
The Anti-alias tool � Currently not implemented.
The Colorize tool � Not the same as in Deluxe Paint. Doesn’t preserve theoriginal object’s color intensity.
The Shade tool � Includes the standard functionality for this tool.
The Grid tool � All tools can snap to the grid, and grid spacing isdefinable both interactively with the mouse andthrough dialog box values.
The Eraser tool � Not implemented.
The Clear tool � Includes the standard functionality for this tool. Canbe undone with the Undo tool.
The Undo tool � Provides an “undoable” undo function. However, itdoesn’t support an undo history so you can’t undosuccessive operations.
The Text tool � Currently not implemented.
166 Chapter 6 / Essential Graphics Tools
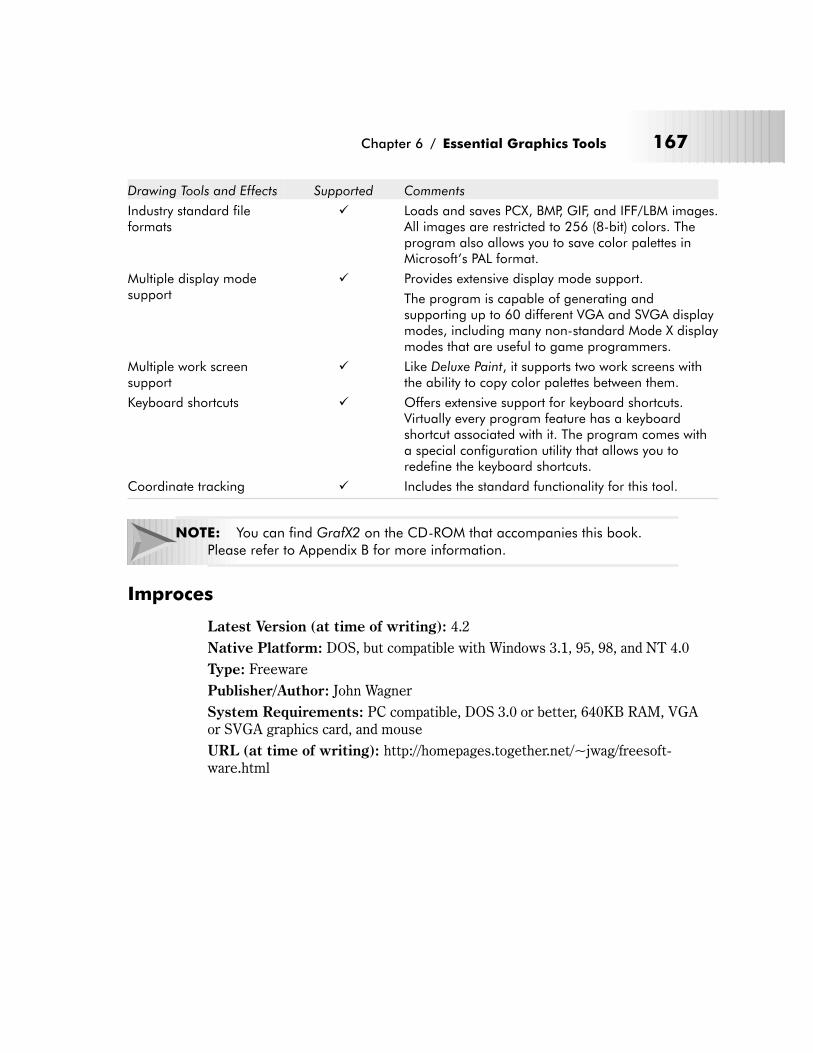
Drawing Tools and Effects Supported Comments
Industry standard fileformats
� Loads and saves PCX, BMP, GIF, and IFF/LBM images.All images are restricted to 256 (8-bit) colors. Theprogram also allows you to save color palettes inMicrosoft’s PAL format.
Multiple display modesupport
� Provides extensive display mode support.
The program is capable of generating andsupporting up to 60 different VGA and SVGA displaymodes, including many non-standard Mode X displaymodes that are useful to game programmers.
Multiple work screensupport
� Like Deluxe Paint, it supports two work screens withthe ability to copy color palettes between them.
Keyboard shortcuts � Offers extensive support for keyboard shortcuts.Virtually every program feature has a keyboardshortcut associated with it. The program comes witha special configuration utility that allows you toredefine the keyboard shortcuts.
Coordinate tracking � Includes the standard functionality for this tool.
NOTE: You can find GrafX2 on the CD-ROM that accompanies this book.Please refer to Appendix B for more information.
Improces
Latest Version (at time of writing): 4.2
Native Platform: DOS, but compatible with Windows 3.1, 95, 98, and NT 4.0
Type: Freeware
Publisher/Author: John Wagner
System Requirements: PC compatible, DOS 3.0 or better, 640KB RAM, VGAor SVGA graphics card, and mouse
URL (at time of writing): http://homepages.together.net/~jwag/freesoft-ware.html
Chapter 6 / Essential Graphics Tools 167

Improces is a program that you’ll either love or hate. It’s been around for years andhas so many features that it’s often hard to classify it as strictly a paintingprogram.
Programmer John Wagner created Improces in 1991 in order to fully exploit thepower of the PC’s impressive VGA graphics capabilities. In many ways, he suc-ceeded. As a graphics package, Improces straddles many different areas within thegraphics field; it’s part painting program, part image editor, and part image pro-cessing program.
Unfortunately, while these multiple personalities make Improces a very powerfulprogram, they also contribute to its well-deserved reputation for being cumber-some and difficult to use.
TABLE 6-5: Improces Overview
Criteria Rating Comments
Interface and easeof use
Poor Not very easy to use overall. Many of the program’s featuresaren’t very intuitive or easy to use.
Performance andstability
Excellent Runs smoothly on slow PC systems (i.e., 286 and 386systems). Users with faster systems will find the program’sperformance proportionally faster.
Appeared to be very stable on all systems tested.
Compatibility Very good Works quite well under Windows 3.1, 95, 98, and NT 4.0. Italso appears to be compatible with most VGA and SVGAcards, although your actual experience may vary dependingon your particular hardware setup.
168 Chapter 6 / Essential Graphics Tools
FIGURE 6-3: Improces
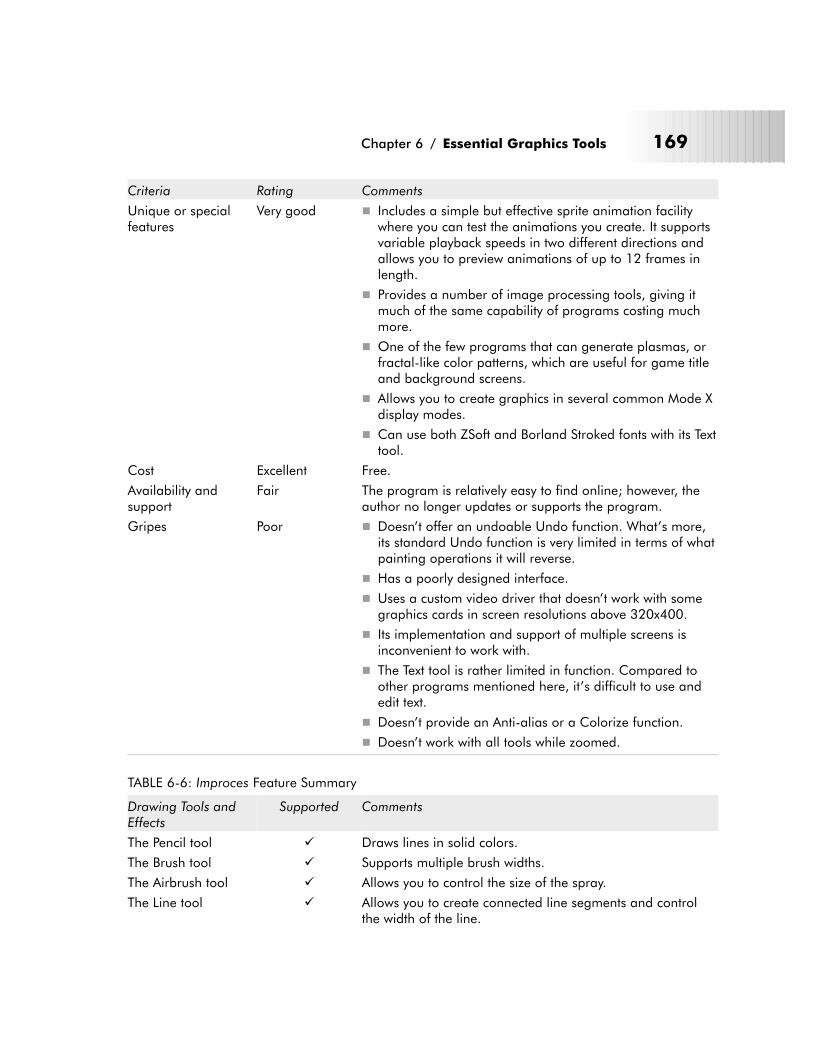
Criteria Rating Comments
Unique or specialfeatures
Very good � Includes a simple but effective sprite animation facilitywhere you can test the animations you create. It supportsvariable playback speeds in two different directions andallows you to preview animations of up to 12 frames inlength.
� Provides a number of image processing tools, giving itmuch of the same capability of programs costing muchmore.
� One of the few programs that can generate plasmas, orfractal-like color patterns, which are useful for game titleand background screens.
� Allows you to create graphics in several common Mode Xdisplay modes.
� Can use both ZSoft and Borland Stroked fonts with its Texttool.
Cost Excellent Free.
Availability andsupport
Fair The program is relatively easy to find online; however, theauthor no longer updates or supports the program.
Gripes Poor � Doesn’t offer an undoable Undo function. What’s more,its standard Undo function is very limited in terms of whatpainting operations it will reverse.
� Has a poorly designed interface.
� Uses a custom video driver that doesn’t work with somegraphics cards in screen resolutions above 320x400.
� Its implementation and support of multiple screens isinconvenient to work with.
� The Text tool is rather limited in function. Compared toother programs mentioned here, it’s difficult to use andedit text.
� Doesn’t provide an Anti-alias or a Colorize function.
� Doesn’t work with all tools while zoomed.
TABLE 6-6: Improces Feature Summary
Drawing Tools andEffects
Supported Comments
The Pencil tool � Draws lines in solid colors.
The Brush tool � Supports multiple brush widths.
The Airbrush tool � Allows you to control the size of the spray.
The Line tool � Allows you to create connected line segments and controlthe width of the line.
Chapter 6 / Essential Graphics Tools 169
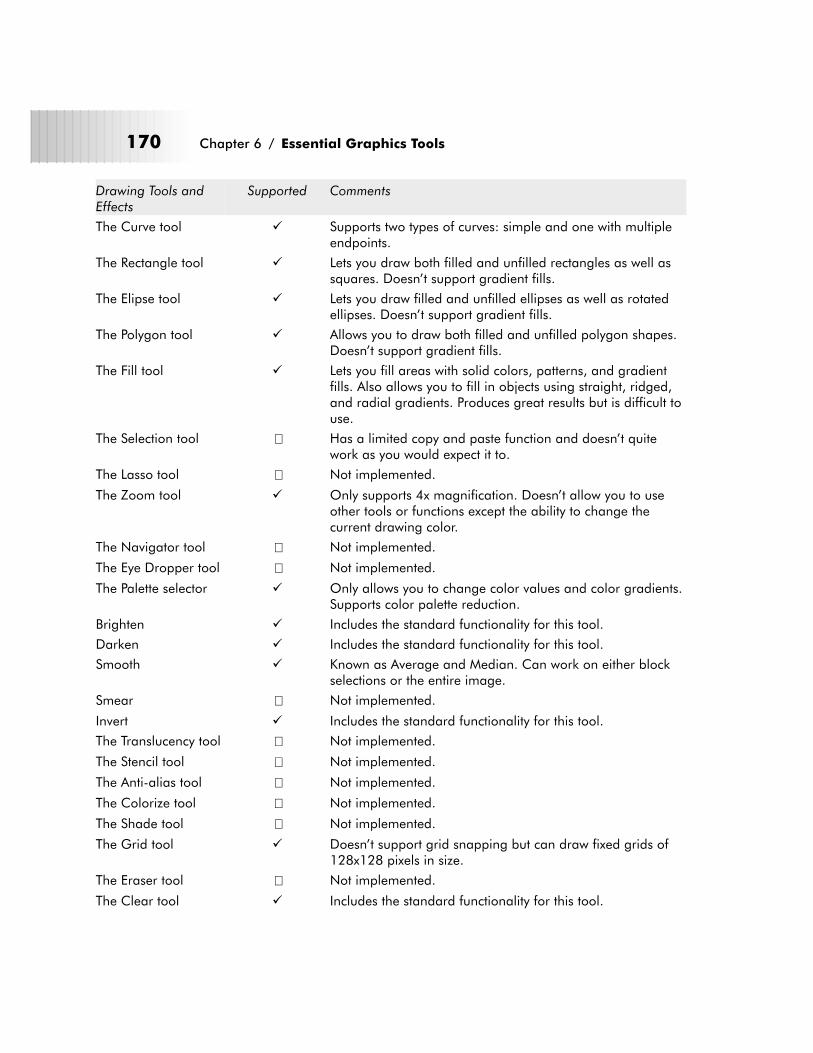
Drawing Tools andEffects
Supported Comments
The Curve tool � Supports two types of curves: simple and one with multipleendpoints.
The Rectangle tool � Lets you draw both filled and unfilled rectangles as well assquares. Doesn’t support gradient fills.
The Elipse tool � Lets you draw filled and unfilled ellipses as well as rotatedellipses. Doesn’t support gradient fills.
The Polygon tool � Allows you to draw both filled and unfilled polygon shapes.Doesn’t support gradient fills.
The Fill tool � Lets you fill areas with solid colors, patterns, and gradientfills. Also allows you to fill in objects using straight, ridged,and radial gradients. Produces great results but is difficult touse.
The Selection tool � Has a limited copy and paste function and doesn’t quitework as you would expect it to.
The Lasso tool � Not implemented.
The Zoom tool � Only supports 4x magnification. Doesn’t allow you to useother tools or functions except the ability to change thecurrent drawing color.
The Navigator tool � Not implemented.
The Eye Dropper tool � Not implemented.
The Palette selector � Only allows you to change color values and color gradients.Supports color palette reduction.
Brighten � Includes the standard functionality for this tool.
Darken � Includes the standard functionality for this tool.
Smooth � Known as Average and Median. Can work on either blockselections or the entire image.
Smear � Not implemented.
Invert � Includes the standard functionality for this tool.
The Translucency tool � Not implemented.
The Stencil tool � Not implemented.
The Anti-alias tool � Not implemented.
The Colorize tool � Not implemented.
The Shade tool � Not implemented.
The Grid tool � Doesn’t support grid snapping but can draw fixed grids of128x128 pixels in size.
The Eraser tool � Not implemented.
The Clear tool � Includes the standard functionality for this tool.
170 Chapter 6 / Essential Graphics Tools
Drawing Tools andEffects
Supported Comments
The Undo tool � Very limited. Only works after certain operations and doesn’tsupport an undoable Undo.
The Text tool � Supports both ZSoft bitmapped fonts and Borland Strokedfonts. Only provides limited text editing capabilities. Doesn’tsupport leading, kerning, or tracking control.
Industry standard fileformats
� Can load PCX, GIF 87a, and TGA files. Can save files inPCX, GIF 87a, and TGA formats as well.
Multiple display modesupport
� Supports most common display modes and Mode X screenresolutions at a maximum of 256 colors.
Multiple screensupport
� Supports multiple work screens but implements them in aweird way. As a result, using multiple screens isn’t as fast orconvenient as with other packages described here.
Keyboard shortcuts � Supports only limited keyboard shortcuts.
Coordinate tracking � Not implemented.
NOTE: You can find Improces on the CD-ROM that accompanies this book.Please refer to Appendix B for more information.
NeoPaint
Latest Version (at time of writing): 3.2d
Native Platform: DOS, but compatible with Windows 3.1, 95, 98, and NT 4.0
Type: Shareware
Publisher/Author: NeoSoft, Inc.
System Requirements: PC compatible, DOS 3.1 or better, 640 KB RAM, VGAor SVGA graphics card, and mouse
URL (at time of writing): http://www.neosoftware.com/np.html
Chapter 6 / Essential Graphics Tools 171
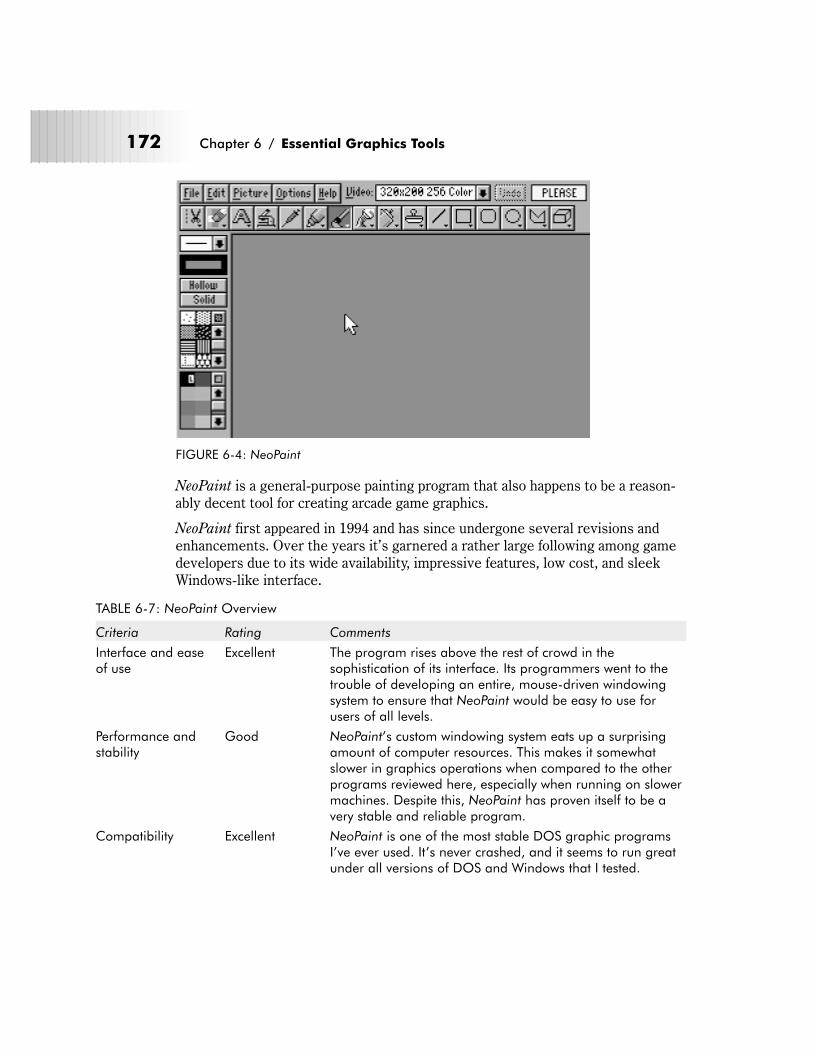
NeoPaint is a general-purpose painting program that also happens to be a reason-ably decent tool for creating arcade game graphics.
NeoPaint first appeared in 1994 and has since undergone several revisions andenhancements. Over the years it’s garnered a rather large following among gamedevelopers due to its wide availability, impressive features, low cost, and sleekWindows-like interface.
TABLE 6-7: NeoPaint Overview
Criteria Rating Comments
Interface and easeof use
Excellent The program rises above the rest of crowd in thesophistication of its interface. Its programmers went to thetrouble of developing an entire, mouse-driven windowingsystem to ensure that NeoPaint would be easy to use forusers of all levels.
Performance andstability
Good NeoPaint’s custom windowing system eats up a surprisingamount of computer resources. This makes it somewhatslower in graphics operations when compared to the otherprograms reviewed here, especially when running on slowermachines. Despite this, NeoPaint has proven itself to be avery stable and reliable program.
Compatibility Excellent NeoPaint is one of the most stable DOS graphic programsI’ve ever used. It’s never crashed, and it seems to run greatunder all versions of DOS and Windows that I tested.
172 Chapter 6 / Essential Graphics Tools
FIGURE 6-4: NeoPaint
Criteria Rating Comments
Unique or specialfeatures
Excellent � Does a great job of managing multiple work screens. Youcan easily create and manage dozens of screenssimultaneously without problems.
� Unique among DOS-based graphics packages in that itsupports display modes from 320x200 to 1024x768 andcolor depths of 4, 8, 16, and 24 bits, provided you havecompatible display hardware.
� Adding text with NeoPaint is very easy thanks to itsWindows-like font selection dialog and sophisticated texteditor. It even allows you to import small text files!
� Supports a wide array of popular graphics formats,including Windows BMP.
� Provides a large number of image processing functionsand special effects.
� Provides good support and compatibility with most VGAand SVGA cards.
� Includes (as an external program) a DOS screen captureutility.
Cost Excellent $45 (US)
Availability andsupport
Good Easily found online and well supported. However, it probablywon’t be upgraded given the recent release of the Windowsversion of the program.
Gripes Fair � Doesn’t provide an undoable Undo function.
� Many of its various filters and special effects are slow,particularly on older machines.
� Doesn’t allow you to use all of its drawing tools whenusing the Zoom tool.
� Offers a limited gradient fill capability. All of its gradientfill angles are predefined.
� Handles image blocks in a cumbersome fashion. It takesseveral steps to perform the same action that otherprograms can perform in one.
� Selecting palette colors is a somewhat tedious process.
� Doesn’t provide an Anti-alias or a Colorize function.
Chapter 6 / Essential Graphics Tools 173
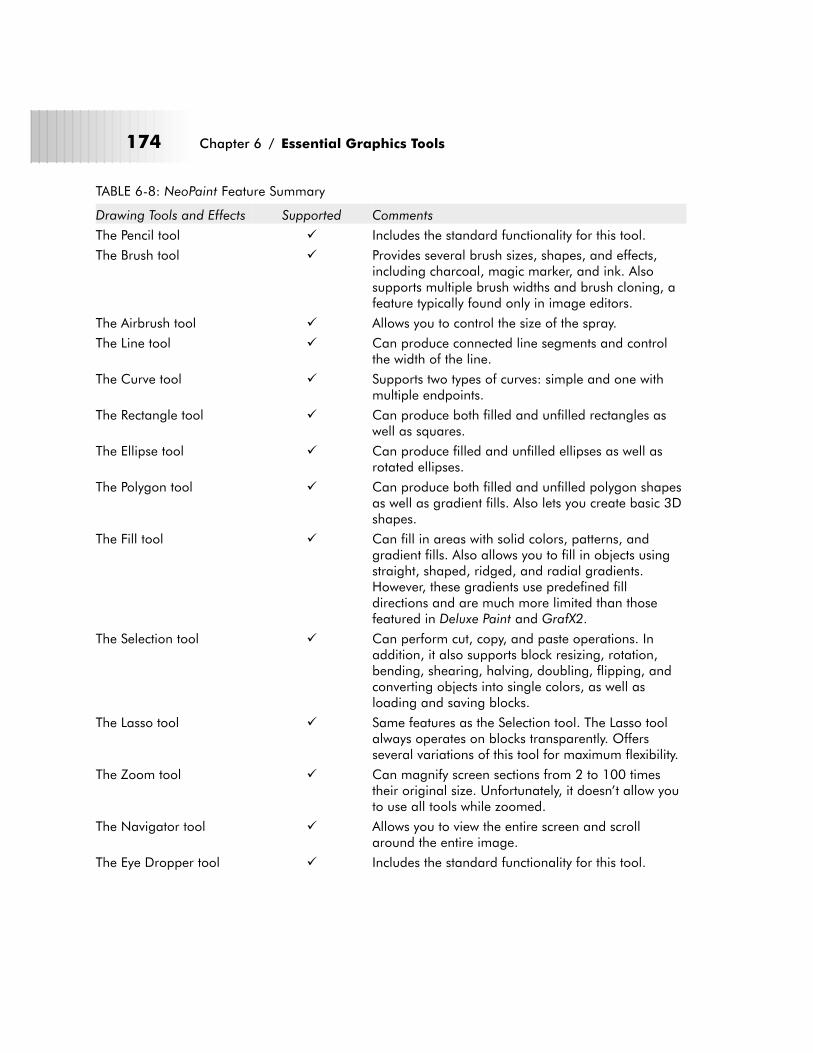
TABLE 6-8: NeoPaint Feature Summary
Drawing Tools and Effects Supported Comments
The Pencil tool � Includes the standard functionality for this tool.
The Brush tool � Provides several brush sizes, shapes, and effects,including charcoal, magic marker, and ink. Alsosupports multiple brush widths and brush cloning, afeature typically found only in image editors.
The Airbrush tool � Allows you to control the size of the spray.
The Line tool � Can produce connected line segments and controlthe width of the line.
The Curve tool � Supports two types of curves: simple and one withmultiple endpoints.
The Rectangle tool � Can produce both filled and unfilled rectangles aswell as squares.
The Ellipse tool � Can produce filled and unfilled ellipses as well asrotated ellipses.
The Polygon tool � Can produce both filled and unfilled polygon shapesas well as gradient fills. Also lets you create basic 3Dshapes.
The Fill tool � Can fill in areas with solid colors, patterns, andgradient fills. Also allows you to fill in objects usingstraight, shaped, ridged, and radial gradients.However, these gradients use predefined filldirections and are much more limited than thosefeatured in Deluxe Paint and GrafX2.
The Selection tool � Can perform cut, copy, and paste operations. Inaddition, it also supports block resizing, rotation,bending, shearing, halving, doubling, flipping, andconverting objects into single colors, as well asloading and saving blocks.
The Lasso tool � Same features as the Selection tool. The Lasso toolalways operates on blocks transparently. Offersseveral variations of this tool for maximum flexibility.
The Zoom tool � Can magnify screen sections from 2 to 100 timestheir original size. Unfortunately, it doesn’t allow youto use all tools while zoomed.
The Navigator tool � Allows you to view the entire screen and scrollaround the entire image.
The Eye Dropper tool � Includes the standard functionality for this tool.
174 Chapter 6 / Essential Graphics Tools
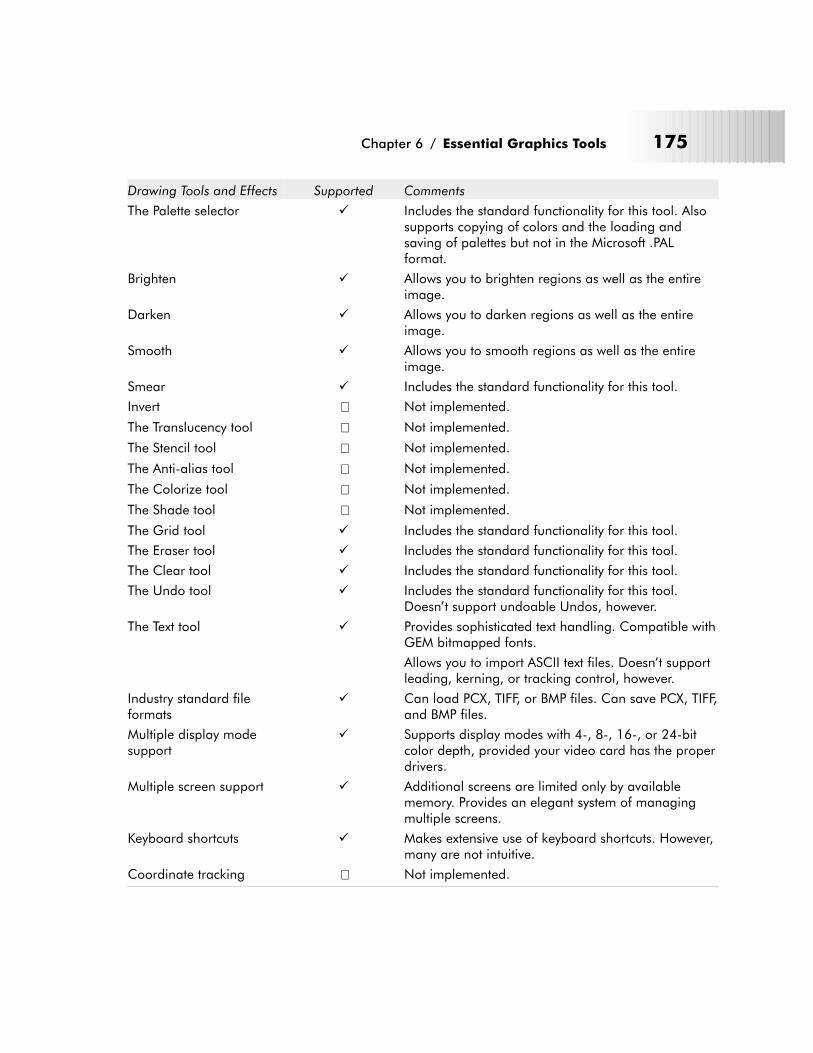
Drawing Tools and Effects Supported Comments
The Palette selector � Includes the standard functionality for this tool. Alsosupports copying of colors and the loading andsaving of palettes but not in the Microsoft .PALformat.
Brighten � Allows you to brighten regions as well as the entireimage.
Darken � Allows you to darken regions as well as the entireimage.
Smooth � Allows you to smooth regions as well as the entireimage.
Smear � Includes the standard functionality for this tool.
Invert � Not implemented.
The Translucency tool � Not implemented.
The Stencil tool � Not implemented.
The Anti-alias tool � Not implemented.
The Colorize tool � Not implemented.
The Shade tool � Not implemented.
The Grid tool � Includes the standard functionality for this tool.
The Eraser tool � Includes the standard functionality for this tool.
The Clear tool � Includes the standard functionality for this tool.
The Undo tool � Includes the standard functionality for this tool.Doesn’t support undoable Undos, however.
The Text tool � Provides sophisticated text handling. Compatible withGEM bitmapped fonts.
Allows you to import ASCII text files. Doesn’t supportleading, kerning, or tracking control, however.
Industry standard fileformats
� Can load PCX, TIFF, or BMP files. Can save PCX, TIFF,and BMP files.
Multiple display modesupport
� Supports display modes with 4-, 8-, 16-, or 24-bitcolor depth, provided your video card has the properdrivers.
Multiple screen support � Additional screens are limited only by availablememory. Provides an elegant system of managingmultiple screens.
Keyboard shortcuts � Makes extensive use of keyboard shortcuts. However,many are not intuitive.
Coordinate tracking � Not implemented.
Chapter 6 / Essential Graphics Tools 175
NOTE: You can find a trial version of NeoPaint on the CD-ROM included in thisbook. Please refer to Appendix B for more information.
Other Useful DOS Painting Programs
There were a number of DOS-based painting programs that met most of myreview criteria but ultimately weren’t recommended for various reasons. Never-theless, they are mentioned here and include such programs as:
� DN Paint—A free painting program with some extremely powerful tools andfeatures. It looks like a promising addition to your creative toolbox if you canget it to run on your system!
� VGA Paint 386—A free Deluxe Paint clone that shares much of the original’spowerful functionality.
NOTE: Some or all of these programs are included on the book’s accompany-ing CD-ROM. Refer to Appendix B for additional details.
Recommended Windows Painting Programs
� NeoPaint for Windows
� Paint Shop Pro
� Pro Motion
NeoPaint for Windows
Latest Version (at time of writing): 4b
Native Platform: Windows 95, 98, NT 4.0, and 2000
Type: Shareware
Publisher/Author: NeoSoft, Inc.
System Requirements: PC compatible, Windows 95, 98, or NT 4.0, and anSVGA graphics card
URL (at time of writing): http://www.neosoftware.com/npw.html
176 Chapter 6 / Essential Graphics Tools
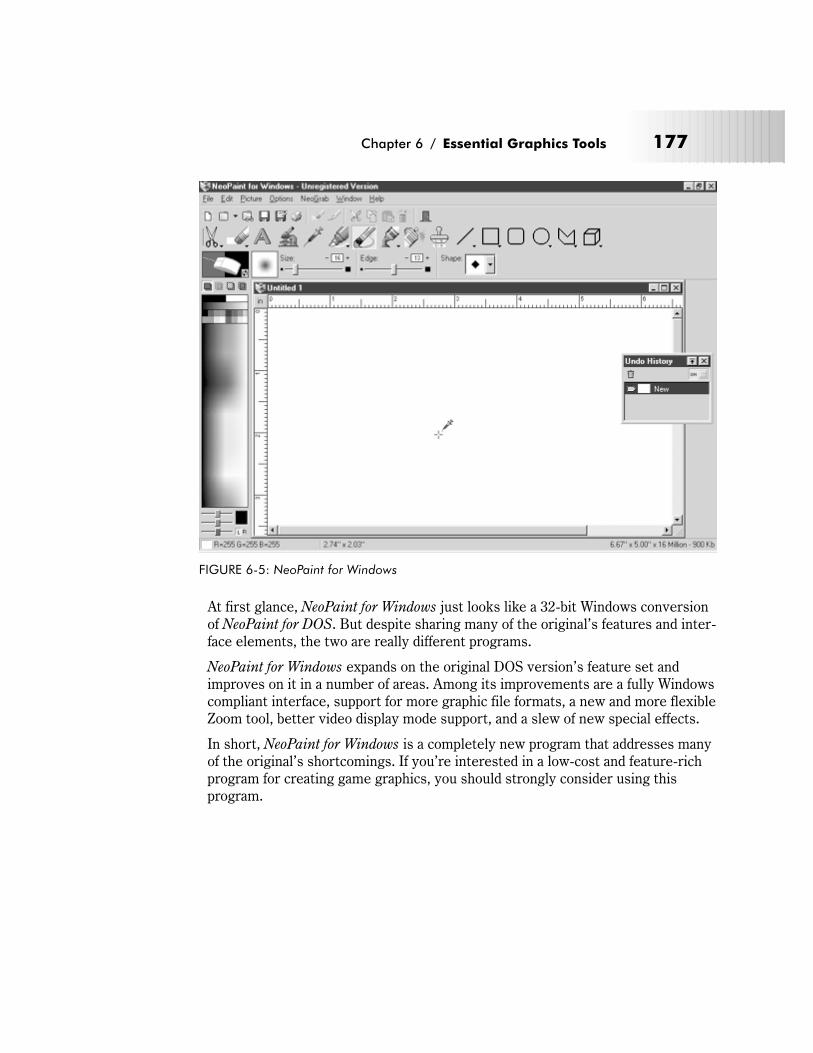
At first glance, NeoPaint for Windows just looks like a 32-bit Windows conversionof NeoPaint for DOS. But despite sharing many of the original’s features and inter-face elements, the two are really different programs.
NeoPaint for Windows expands on the original DOS version’s feature set andimproves on it in a number of areas. Among its improvements are a fully Windowscompliant interface, support for more graphic file formats, a new and more flexibleZoom tool, better video display mode support, and a slew of new special effects.
In short, NeoPaint for Windows is a completely new program that addresses manyof the original’s shortcomings. If you’re interested in a low-cost and feature-richprogram for creating game graphics, you should strongly consider using thisprogram.
Chapter 6 / Essential Graphics Tools 177
FIGURE 6-5: NeoPaint for Windows
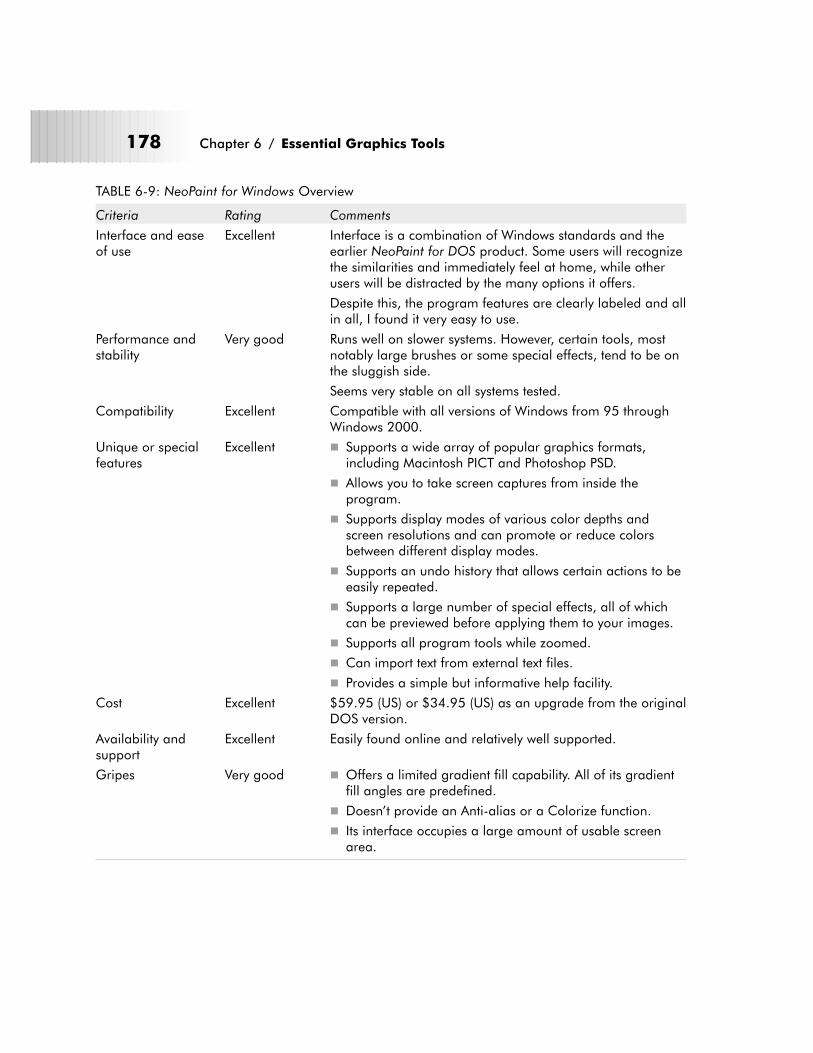
TABLE 6-9: NeoPaint for Windows Overview
Criteria Rating Comments
Interface and easeof use
Excellent Interface is a combination of Windows standards and theearlier NeoPaint for DOS product. Some users will recognizethe similarities and immediately feel at home, while otherusers will be distracted by the many options it offers.
Despite this, the program features are clearly labeled and allin all, I found it very easy to use.
Performance andstability
Very good Runs well on slower systems. However, certain tools, mostnotably large brushes or some special effects, tend to be onthe sluggish side.
Seems very stable on all systems tested.
Compatibility Excellent Compatible with all versions of Windows from 95 throughWindows 2000.
Unique or specialfeatures
Excellent � Supports a wide array of popular graphics formats,including Macintosh PICT and Photoshop PSD.
� Allows you to take screen captures from inside theprogram.
� Supports display modes of various color depths andscreen resolutions and can promote or reduce colorsbetween different display modes.
� Supports an undo history that allows certain actions to beeasily repeated.
� Supports a large number of special effects, all of whichcan be previewed before applying them to your images.
� Supports all program tools while zoomed.
� Can import text from external text files.
� Provides a simple but informative help facility.
Cost Excellent $59.95 (US) or $34.95 (US) as an upgrade from the originalDOS version.
Availability andsupport
Excellent Easily found online and relatively well supported.
Gripes Very good � Offers a limited gradient fill capability. All of its gradientfill angles are predefined.
� Doesn’t provide an Anti-alias or a Colorize function.
� Its interface occupies a large amount of usable screenarea.
178 Chapter 6 / Essential Graphics Tools
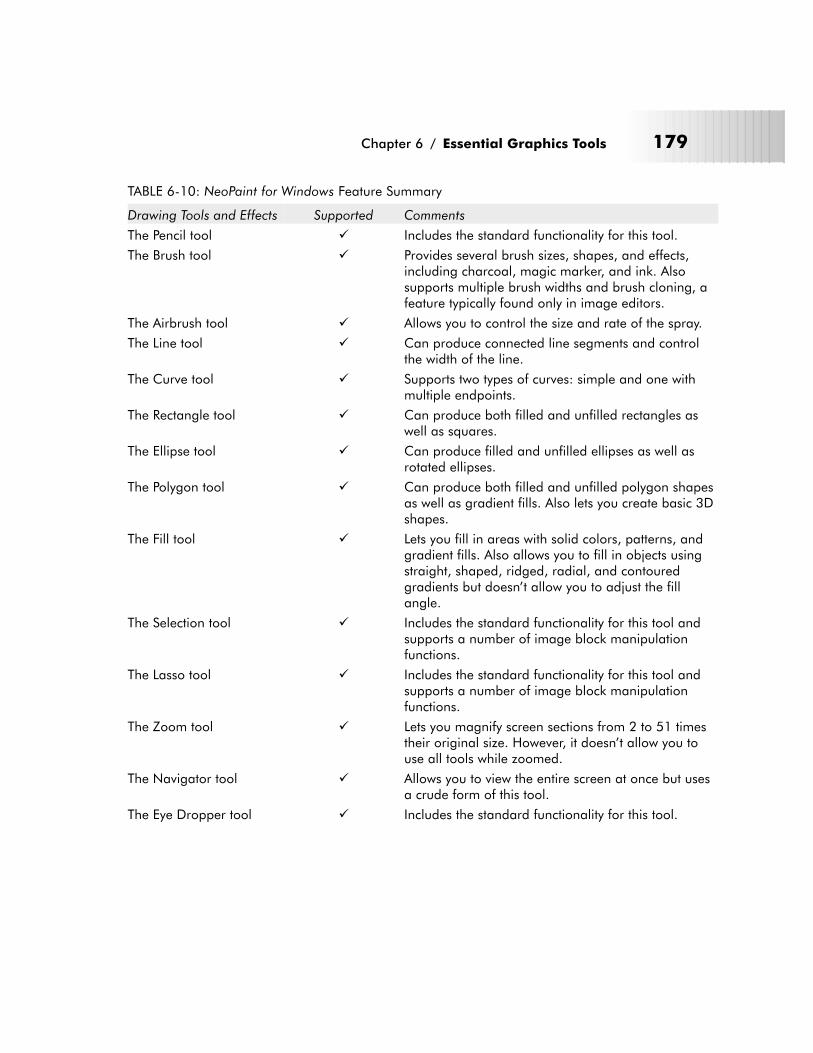
TABLE 6-10: NeoPaint for Windows Feature Summary
Drawing Tools and Effects Supported Comments
The Pencil tool � Includes the standard functionality for this tool.
The Brush tool � Provides several brush sizes, shapes, and effects,including charcoal, magic marker, and ink. Alsosupports multiple brush widths and brush cloning, afeature typically found only in image editors.
The Airbrush tool � Allows you to control the size and rate of the spray.
The Line tool � Can produce connected line segments and controlthe width of the line.
The Curve tool � Supports two types of curves: simple and one withmultiple endpoints.
The Rectangle tool � Can produce both filled and unfilled rectangles aswell as squares.
The Ellipse tool � Can produce filled and unfilled ellipses as well asrotated ellipses.
The Polygon tool � Can produce both filled and unfilled polygon shapesas well as gradient fills. Also lets you create basic 3Dshapes.
The Fill tool � Lets you fill in areas with solid colors, patterns, andgradient fills. Also allows you to fill in objects usingstraight, shaped, ridged, radial, and contouredgradients but doesn’t allow you to adjust the fillangle.
The Selection tool � Includes the standard functionality for this tool andsupports a number of image block manipulationfunctions.
The Lasso tool � Includes the standard functionality for this tool andsupports a number of image block manipulationfunctions.
The Zoom tool � Lets you magnify screen sections from 2 to 51 timestheir original size. However, it doesn’t allow you touse all tools while zoomed.
The Navigator tool � Allows you to view the entire screen at once but usesa crude form of this tool.
The Eye Dropper tool � Includes the standard functionality for this tool.
Chapter 6 / Essential Graphics Tools 179
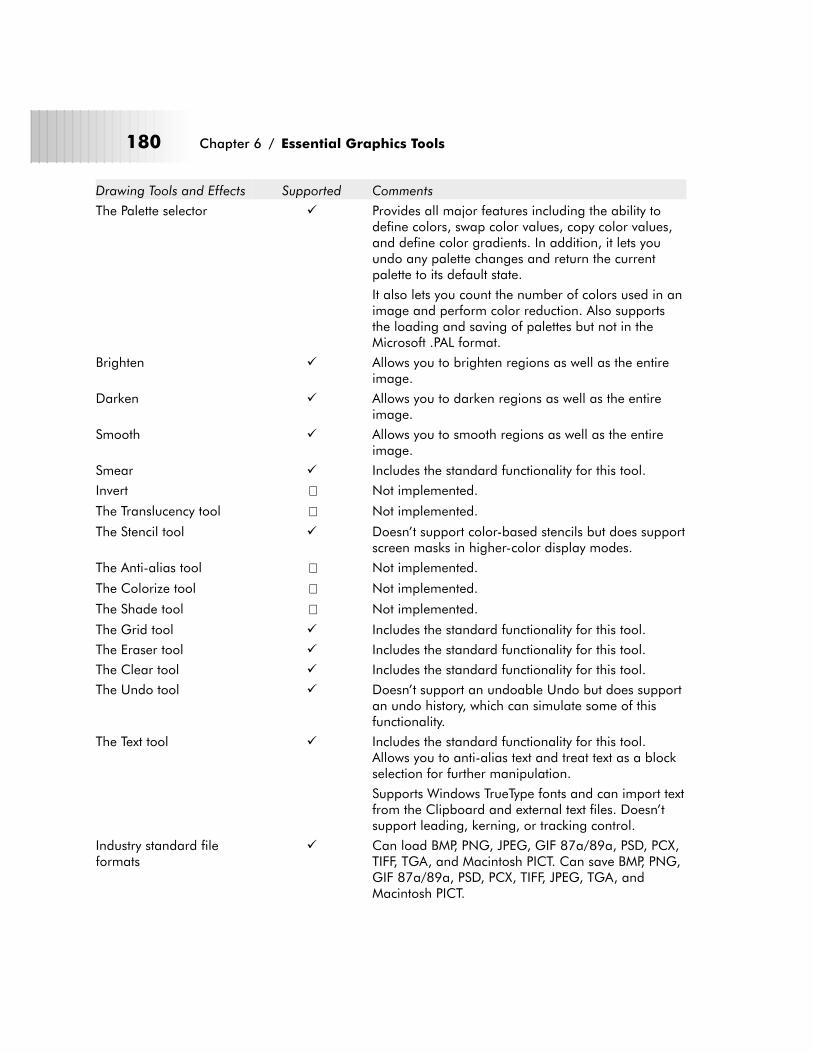
Drawing Tools and Effects Supported Comments
The Palette selector � Provides all major features including the ability todefine colors, swap color values, copy color values,and define color gradients. In addition, it lets youundo any palette changes and return the currentpalette to its default state.
It also lets you count the number of colors used in animage and perform color reduction. Also supportsthe loading and saving of palettes but not in theMicrosoft .PAL format.
Brighten � Allows you to brighten regions as well as the entireimage.
Darken � Allows you to darken regions as well as the entireimage.
Smooth � Allows you to smooth regions as well as the entireimage.
Smear � Includes the standard functionality for this tool.
Invert � Not implemented.
The Translucency tool � Not implemented.
The Stencil tool � Doesn’t support color-based stencils but does supportscreen masks in higher-color display modes.
The Anti-alias tool � Not implemented.
The Colorize tool � Not implemented.
The Shade tool � Not implemented.
The Grid tool � Includes the standard functionality for this tool.
The Eraser tool � Includes the standard functionality for this tool.
The Clear tool � Includes the standard functionality for this tool.
The Undo tool � Doesn’t support an undoable Undo but does supportan undo history, which can simulate some of thisfunctionality.
The Text tool � Includes the standard functionality for this tool.Allows you to anti-alias text and treat text as a blockselection for further manipulation.
Supports Windows TrueType fonts and can import textfrom the Clipboard and external text files. Doesn’tsupport leading, kerning, or tracking control.
Industry standard fileformats
� Can load BMP, PNG, JPEG, GIF 87a/89a, PSD, PCX,TIFF, TGA, and Macintosh PICT. Can save BMP, PNG,GIF 87a/89a, PSD, PCX, TIFF, JPEG, TGA, andMacintosh PICT.
180 Chapter 6 / Essential Graphics Tools
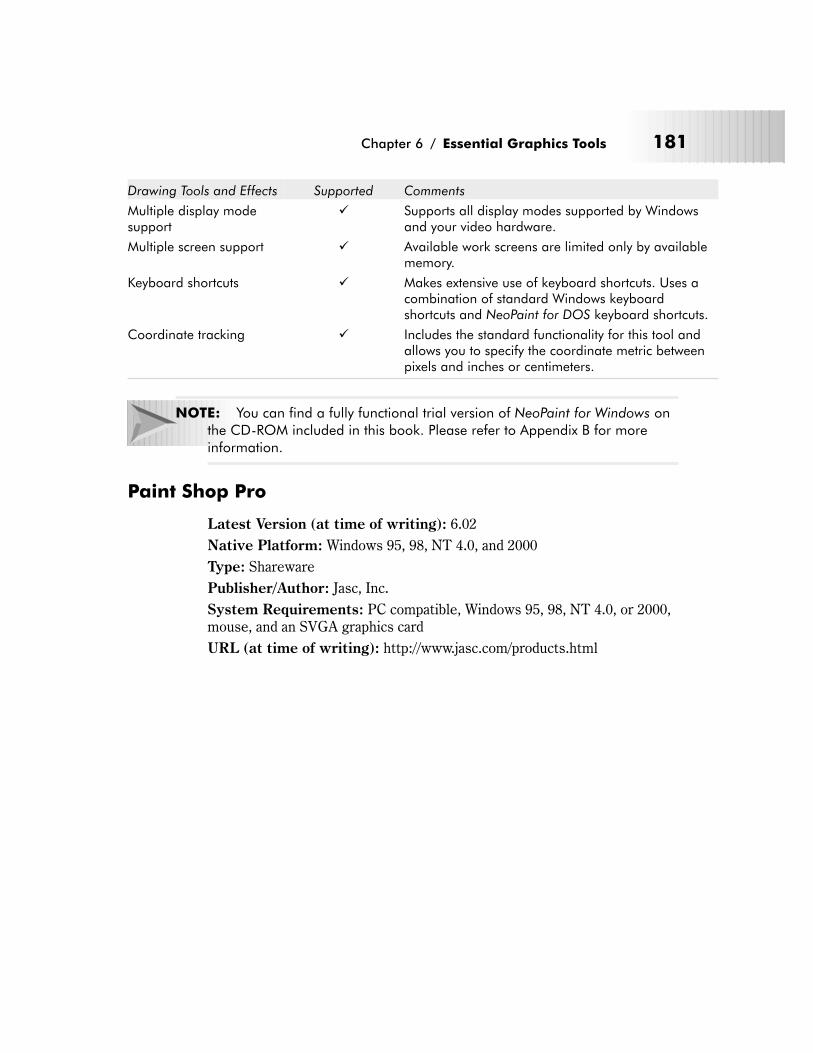
Drawing Tools and Effects Supported Comments
Multiple display modesupport
� Supports all display modes supported by Windowsand your video hardware.
Multiple screen support � Available work screens are limited only by availablememory.
Keyboard shortcuts � Makes extensive use of keyboard shortcuts. Uses acombination of standard Windows keyboardshortcuts and NeoPaint for DOS keyboard shortcuts.
Coordinate tracking � Includes the standard functionality for this tool andallows you to specify the coordinate metric betweenpixels and inches or centimeters.
NOTE: You can find a fully functional trial version of NeoPaint for Windows onthe CD-ROM included in this book. Please refer to Appendix B for moreinformation.
Paint Shop Pro
Latest Version (at time of writing): 6.02
Native Platform: Windows 95, 98, NT 4.0, and 2000
Type: Shareware
Publisher/Author: Jasc, Inc.
System Requirements: PC compatible, Windows 95, 98, NT 4.0, or 2000,mouse, and an SVGA graphics card
URL (at time of writing): http://www.jasc.com/products.html
Chapter 6 / Essential Graphics Tools 181
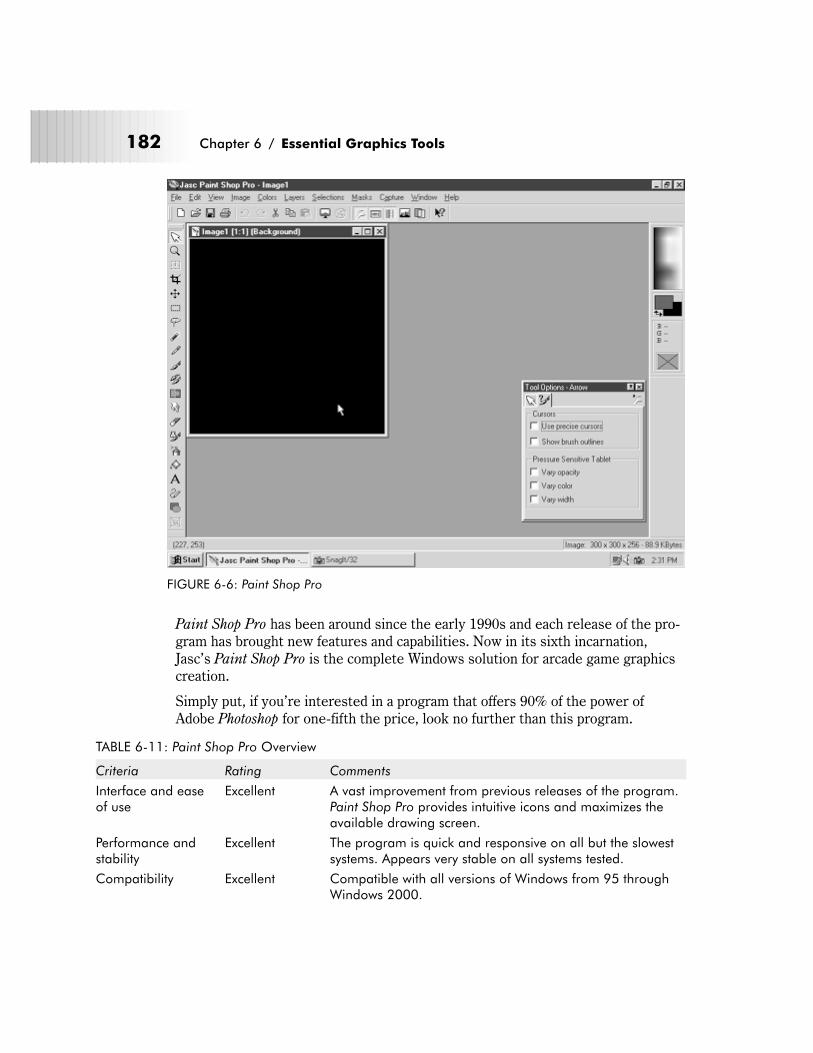
Paint Shop Pro has been around since the early 1990s and each release of the pro-gram has brought new features and capabilities. Now in its sixth incarnation,Jasc’s Paint Shop Pro is the complete Windows solution for arcade game graphicscreation.
Simply put, if you’re interested in a program that offers 90% of the power ofAdobe Photoshop for one-fifth the price, look no further than this program.
TABLE 6-11: Paint Shop Pro Overview
Criteria Rating Comments
Interface and easeof use
Excellent A vast improvement from previous releases of the program.Paint Shop Pro provides intuitive icons and maximizes theavailable drawing screen.
Performance andstability
Excellent The program is quick and responsive on all but the slowestsystems. Appears very stable on all systems tested.
Compatibility Excellent Compatible with all versions of Windows from 95 throughWindows 2000.
182 Chapter 6 / Essential Graphics Tools
FIGURE 6-6: Paint Shop Pro
Criteria Rating Comments
Unique or specialfeatures
Excellent � Supports a wide array of popular graphic formats,including Macintosh PICT and Photoshop PSD.
� Supports layers.
� Compatible with most Adobe Photoshop plug-ins. Thisallows it to support a whole host of powerful third-partyspecial effects filters and export file formats, thus greatlyexpanding the power of the program.
� Supports a large number of predefined special effectsand allows you to preview them before applying them toyour image.
� Supports the drawing of vectorized geometric shapes. Thisallows shapes to be easily resized and manipulatedwithout resolution-specific distortion.
� Allows you to take screen captures from within theprogram.
� Provides a command history that allows you to repeat orundo sequences of past program operations.
� Supports display modes of various color depths andscreen resolutions and can promote or reduce colorsbetween different display modes.
� Can perform batch image conversion, thus, the programcan effectively serve as an image viewer/converterprogram.
� Can perform gamma correction on images.
� Can browse your hard drive for images and make imagecatalogs from them.
� Comes bundled with a powerful animation utility.
� Supports all program tools while zoomed.
� Provides an excellent online help facility.
Cost Very good $99 (US) download or $109 (US) for CD version.
Availability andsupport
Excellent Easily found online and very well supported. Frequentlyupdated by an established company.
Gripes Very good � Offers a limited gradient fill capability. All of its gradientfill angles are predefined.
� Tool option dialogs can be a bit annoying.
� Large program that uses a lot of RAM and disk space.
Chapter 6 / Essential Graphics Tools 183
TABLE 6-12: Paint Shop Pro Feature Summary
Drawing Tools and Effects Supported Comments
The Pencil tool � Includes the standard functionality for this tool.
The Brush tool � Provides several brush sizes, shapes, and effects,including charcoal, magic marker, and ink. Alsosupports multiple brush widths and brush cloning, afeature typically found only in image editors.
The Airbrush tool � Also allows you to control the size and rate of thespray.
The Line tool � Can produce connected line segments and controlthe width of the line.
The Curve tool � Supports two types of curves: simple and one withmultiple endpoints.
The Rectangle tool � Can produce both filled and unfilled rectangles aswell as squares.
The Ellipse tool � Can produce filled and unfilled ellipses as well asrotated ellipses.
The Polygon tool � Can produce both filled and unfilled polygon shapesas well as gradient fills. Also lets you create basic 3Dshapes.
The Fill tool � Lets you fill in areas with solid colors, patterns, andgradient fills. Also allows you to fill in objects usingstraight, shaped, ridged, radial, and contouredgradients but doesn’t allow you to adjust the fillangle.
The Selection tool � Includes the standard functionality for this tool andsupports a number of image block manipulationfunctions.
The Lasso tool � Includes the standard functionality for this tool andsupports a number of image block manipulationfunctions.
The Zoom tool � Lets you magnify screen sections from 2 to 32 timestheir original size. Allows access to all tools whilezoomed.
The Navigator tool � Includes the standard functionality for this tool.
The Eye Dropper tool � Includes the standard functionality for this tool.
The Palette Selector tool � Includes the standard functionality for this tool.Supports the Microsoft PAL format.
Brighten � Allows you to brighten regions as well as the entireimage.
Darken � Allows you to darken regions as well as the entireimage.
184 Chapter 6 / Essential Graphics Tools
Drawing Tools and Effects Supported Comments
Smooth � Allows you to smooth regions as well as the entireimage.
Smear � Includes the standard functionality for this tool.
Invert � Not implemented but can be simulated via one of itsspecial effect options.
The Translucency tool � Not implemented but can be simulated with layers.
The Stencil tool � Doesn’t support color-based stencils but does supportscreen masks in higher color display modes.
The Anti-alias tool � Not implemented.
The Colorize tool � Doesn’t work the same way it does in Deluxe Paint orother programs mentioned here as it’s onlysupported in block operation and not as atoggle/modifier as with other painting programs.
The Shade tool � Not implemented.
The Grid tool � Supports variable sized grids but offers no“snap-to-grid” function.
The Eraser tool � Includes the standard functionality for this tool.
The Clear tool � Includes the standard functionality for this tool.
The Undo tool � Includes the standard functionality for this tool.Doesn’t support an undoable Undo but does supportan undo history.
The Text tool � Includes the standard functionality for this tool.Allows you to anti-alias text and treat text as a blockselection for further manipulation. Supports WindowsTrueType fonts. Includes the ability to adjust kerningand leading.
Industry standard fileformats
� Can load BMP, PNG, JPEG, GIF 87a/89a, IFF/LBM,PSP, PSD, PCX, TIFF, TGA, and Macintosh PICT. Cansave BMP, PNG, GIF 87a/89a, PSP, PSD, PCX, JPEG,IFF/LBM, TIFF, TGA, and Macintosh PICT. Theaccompanying animation utility can also export FLICfiles.
Multiple display modesupport
� Supports all display modes supported by Windowsand your video hardware.
Multiple screen support � Available work screens are limited only by availablememory.
Keyboard shortcuts � Makes extensive use of keyboard shortcuts.
Coordinate tracking � Includes the standard functionality for this tool.
Chapter 6 / Essential Graphics Tools 185
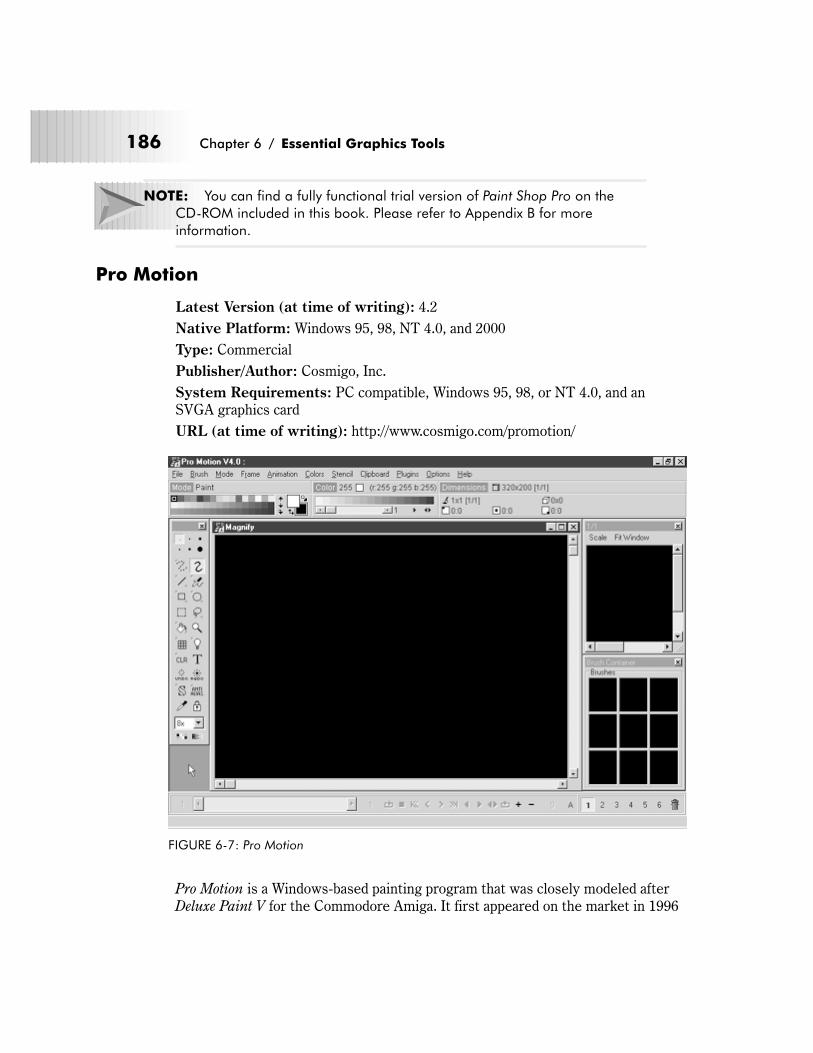
NOTE: You can find a fully functional trial version of Paint Shop Pro on theCD-ROM included in this book. Please refer to Appendix B for moreinformation.
Pro Motion
Latest Version (at time of writing): 4.2
Native Platform: Windows 95, 98, NT 4.0, and 2000
Type: Commercial
Publisher/Author: Cosmigo, Inc.
System Requirements: PC compatible, Windows 95, 98, or NT 4.0, and anSVGA graphics card
URL (at time of writing): http://www.cosmigo.com/promotion/
Pro Motion is a Windows-based painting program that was closely modeled afterDeluxe Paint V for the Commodore Amiga. It first appeared on the market in 1996
186 Chapter 6 / Essential Graphics Tools
FIGURE 6-7: Pro Motion
and has earned a good reputation as a game graphics creation tool with both hob-byists and professional game developers alike.
If you’re serious about designing arcade game graphics, definitely get Pro Motion.
TABLE 6-13: Pro Motion Overview
Criteria Rating Comments
Interface and easeof use
Excellent Interface is very intuitive. Screen is relatively uncluttered.Most options have icons associated with them and all workas expected.
Performance andstability
Excellent Runs well on even the slowest of machines. Faster machineswill enjoy even better performance.
Noticeably stable on the systems tested.
Compatibility Very good Fully compatible with all 32-bit versions of Windows fromWindows 95 through Windows 2000.
Unique or specialfeatures
Excellent � Provides all of Deluxe Paint’s painting tools andfunctionality.
� Includes a sophisticated, built-in animation tool.
� Supports multiple levels of undoable undos.
� Supports all program tools while zoomed.
� Supports all popular file formats.
� Supports plug-ins, which can extend the functionality ofthe program even further.
� Provides a simple but effective help facility.
Cost Very good $58 (US) e-mail version or $74 (US) for the program on CD.
Availability andsupport
Excellent Easily found online and very well supported by its author.Updated frequently and updates are free.
Gripes Very good � Anti-alias function isn’t as robust as some of the otherprograms mentioned here, particularly when dealing withtext.
� Only supports six work screens.
� Handles Windows Clipboard access in a non-standardway.
TABLE 6-14: Pro Motion Feature Summary
Drawing Tools and Effects Supported Comments
The Pencil tool � Not implemented. However, its Brush tool offerssomething similar.
The Brush tool � Also supports multiple brush widths.
The Airbrush tool � Allows you to control the size of the spray.
Chapter 6 / Essential Graphics Tools 187
Drawing Tools and Effects Supported Comments
The Line tool � Also allows you to created connected line segmentsand control the width of the line.
The Curve tool � Supports two types of curves: simple and one withmultiple endpoints.
The Rectangle tool � Lets you draw both filled and unfilled rectangles aswell as squares.
The Ellipse tool � Lets you draw filled and unfilled ellipses.
The Polygon tool � Allows you to draw both filled and unfilled polygonshapes.
The Fill tool � Lets you fill in areas with solid colors, patterns, andgradient fills. Also allows you to fill in objects usingstraight, shaped, ridged, radial, and contouredgradients with full control over the fill angle.
The Selection tool � In addition to the standard functions such as cut,copy, and paste, this program supports blockresizing, rotation, bending, shearing, halving,doubling, flipping, and converting objects into singlecolors, as well as loading and saving blocks.
The Lasso tool � Same features as the Selection tool.
The Zoom tool � Lets you magnify screen sections from 2 to 32 timestheir original size. Also allows you to use all toolswhile in magnification mode.
The Navigator tool � Allows you to view the entire screen at once but usesa crude form of this tool.
The Eye Dropper tool � Includes the standard functionality for this tool.
The Palette Selector tool � Provides all major features including the ability todefine colors, swap color values, copy color values,and define color gradients. It even allows you to loadand save color palettes in the Microsoft .PAL format.
Brighten � Includes the standard functionality for this tool.
Darken � Includes the standard functionality for this tool.
Smooth � Includes the standard functionality for this tool.
Smear � Includes the standard functionality for this tool.
Invert � Includes the standard functionality for this tool.
The Translucency tool � Allows you to specify the level of translucency.
The Stencil tool � Includes a powerful Stencil function that gives you fullcontrol over individual colors and the ability to loadand save stencils for future use.
The Anti-alias tool � Provides two algorithms of anti-aliasing for differentsituations and works with all drawing tools.
188 Chapter 6 / Essential Graphics Tools

Drawing Tools and Effects Supported Comments
The Colorize tool � Works exceptionally well, particularly on colorgradients of the same intensity.
The Shade tool � Includes the standard functionality for this tool.
The Grid tool � Includes the standard functionality for this tool.
The Eraser tool � Not implemented.
The Clear tool � Includes the standard functionality for this tool.
The Undo tool � Supports an undoable Undo and can even redoactions up to several levels.
The Text tool � Supports full text editing capabilities and compatiblewith Windows TrueType fonts. Doesn’t supportleading, kerning, or tracking control.
Industry standard fileformats
� Reads and writes BMP, GIF 87a, IFF/LBM, and PCXfiles.
Its animation tool can also import and export files inthe FLIC format.
Multiple display modesupport
� Limited to 8-bit (256 color) display modes in allstandard Windows screen resolutions.
Multiple screen support � Only supports a maximum of six work screensregardless of available memory.
Keyboard shortcuts � Makes extensive use of keyboard shortcuts. Many ofthese are logically assigned and some even mirrorshortcuts used by Deluxe Paint.
Coordinate tracking � Includes the standard functionality for this tool.
NOTE: You can find a feature-disabled demonstration version of Pro Motion onthe CD-ROM included with this book. Please refer to Appendix B for moreinformation.
Other Useful Windows Painting Programs
There were a number of Windows-based painting programs that met most of myreview criteria but ultimately weren’t recommended for various reasons. Never-theless, they are mentioned here.
� ArtGem—An interesting true color painting program. Although a capable pro-gram, its strange interface makes me prefer other programs.
� ChaosFX—A feature-rich image editing program. The program is technicallyvery impressive but very expensive when compared to most of the other pro-grams reviewed in this section of the chapter.
Chapter 6 / Essential Graphics Tools 189
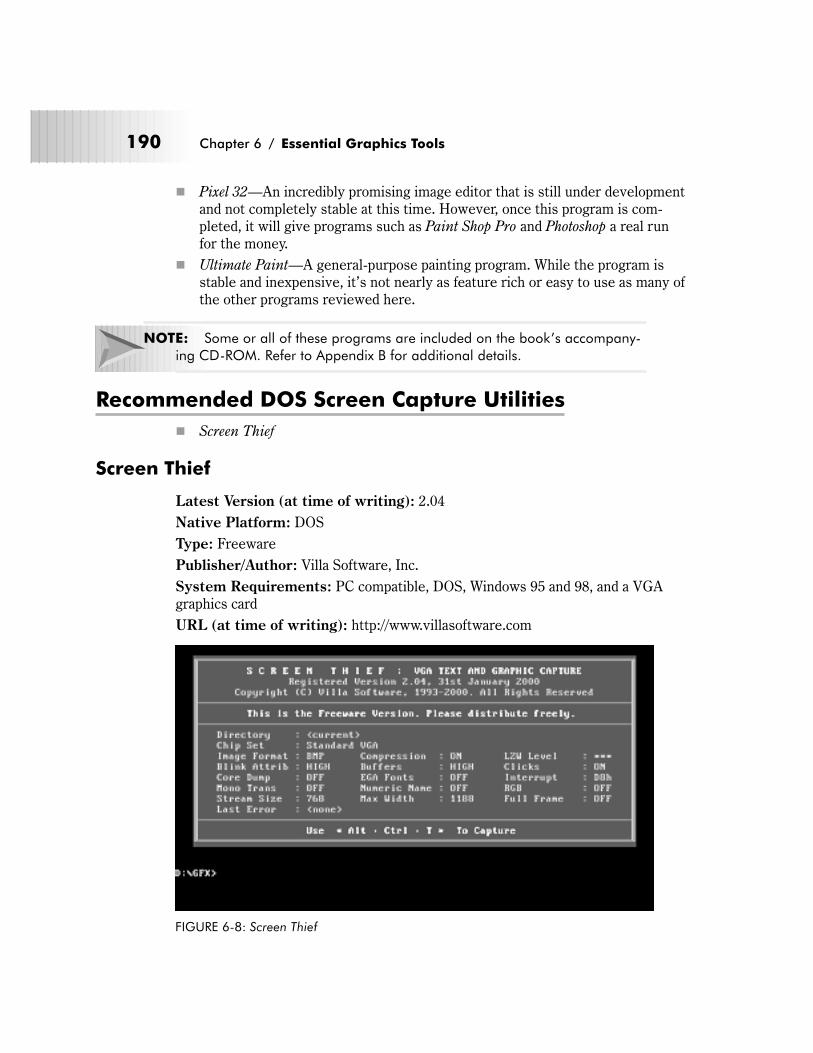
� Pixel 32—An incredibly promising image editor that is still under developmentand not completely stable at this time. However, once this program is com-pleted, it will give programs such as Paint Shop Pro and Photoshop a real runfor the money.
� Ultimate Paint—A general-purpose painting program. While the program isstable and inexpensive, it’s not nearly as feature rich or easy to use as many ofthe other programs reviewed here.
NOTE: Some or all of these programs are included on the book’s accompany-ing CD-ROM. Refer to Appendix B for additional details.
Recommended DOS Screen Capture Utilities
� Screen Thief
Screen Thief
Latest Version (at time of writing): 2.04
Native Platform: DOS
Type: Freeware
Publisher/Author: Villa Software, Inc.
System Requirements: PC compatible, DOS, Windows 95 and 98, and a VGAgraphics card
URL (at time of writing): http://www.villasoftware.com
190 Chapter 6 / Essential Graphics Tools
FIGURE 6-8: Screen Thief
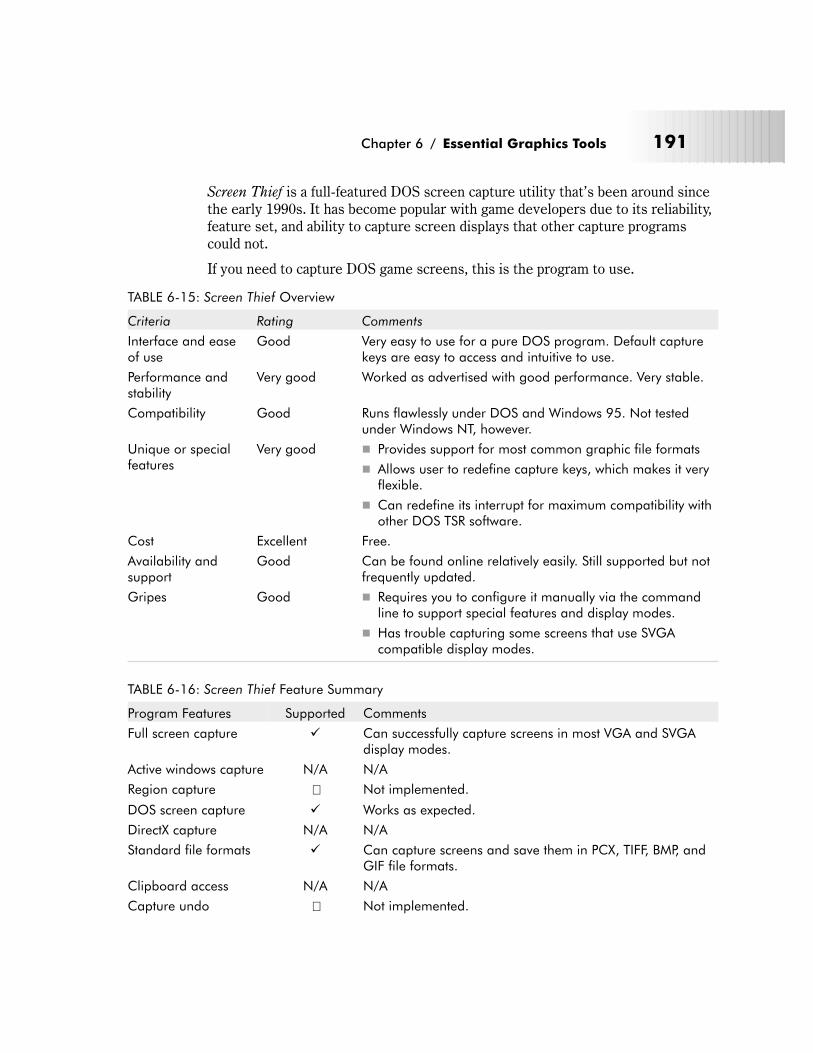
Screen Thief is a full-featured DOS screen capture utility that’s been around sincethe early 1990s. It has become popular with game developers due to its reliability,feature set, and ability to capture screen displays that other capture programscould not.
If you need to capture DOS game screens, this is the program to use.
TABLE 6-15: Screen Thief Overview
Criteria Rating Comments
Interface and easeof use
Good Very easy to use for a pure DOS program. Default capturekeys are easy to access and intuitive to use.
Performance andstability
Very good Worked as advertised with good performance. Very stable.
Compatibility Good Runs flawlessly under DOS and Windows 95. Not testedunder Windows NT, however.
Unique or specialfeatures
Very good � Provides support for most common graphic file formats
� Allows user to redefine capture keys, which makes it veryflexible.
� Can redefine its interrupt for maximum compatibility withother DOS TSR software.
Cost Excellent Free.
Availability andsupport
Good Can be found online relatively easily. Still supported but notfrequently updated.
Gripes Good � Requires you to configure it manually via the commandline to support special features and display modes.
� Has trouble capturing some screens that use SVGAcompatible display modes.
TABLE 6-16: Screen Thief Feature Summary
Program Features Supported Comments
Full screen capture � Can successfully capture screens in most VGA and SVGAdisplay modes.
Active windows capture N/A N/A
Region capture � Not implemented.
DOS screen capture � Works as expected.
DirectX capture N/A N/A
Standard file formats � Can capture screens and save them in PCX, TIFF, BMP, andGIF file formats.
Clipboard access N/A N/A
Capture undo � Not implemented.
Chapter 6 / Essential Graphics Tools 191
Program Features Supported Comments
Automatic palettecorrection
N/A N/A
Image cropping � Not implemented.
NOTE: You can find a copy of Screen Thief on the CD-ROM that accompaniesthis book. Please refer to Appendix B for more information.
Recommended Windows Screen Capture Utilities
� HyperSnapDX
� Snagit
HyperSnapDX
Latest Version (at time of writing): 3.55
Native Platform: Windows 95, 98, NT 4.0, and 2000
Type: Shareware
Publisher/Author: Hyperionics
System Requirements: PC compatible, DOS, Windows 95, 98, NT 4.0, or 2000,and an SVGA graphics card
URL (at time of writing): http://www.hypersnap-dx.com/hsdx/
192 Chapter 6 / Essential Graphics Tools
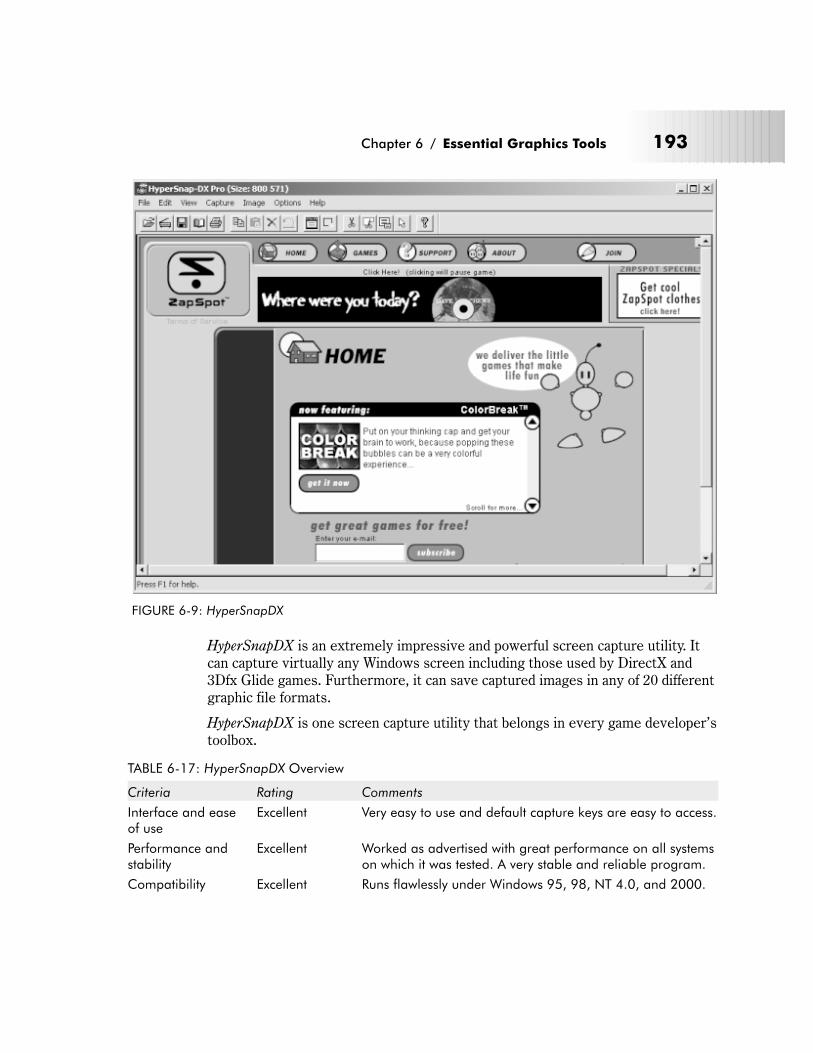
HyperSnapDX is an extremely impressive and powerful screen capture utility. Itcan capture virtually any Windows screen including those used by DirectX and3Dfx Glide games. Furthermore, it can save captured images in any of 20 differentgraphic file formats.
HyperSnapDX is one screen capture utility that belongs in every game developer’stoolbox.
TABLE 6-17: HyperSnapDX Overview
Criteria Rating Comments
Interface and easeof use
Excellent Very easy to use and default capture keys are easy to access.
Performance andstability
Excellent Worked as advertised with great performance on all systemson which it was tested. A very stable and reliable program.
Compatibility Excellent Runs flawlessly under Windows 95, 98, NT 4.0, and 2000.
Chapter 6 / Essential Graphics Tools 193
FIGURE 6-9: HyperSnapDX
Criteria Rating Comments
Unique or specialfeatures
Excellent � Supports over 20 common graphic file formats includingPSD.
� Allows user to redefine capture keys, which makes it veryflexible.
� Can capture DirectX and 3Dfx Glide game screens.
� Can capture the entire scrolling contents of a screenwindow.
� Supports many common image manipulation functionssuch as resizing and changing color depth and resolution.
Cost Excellent $25 (US)
Availability andsupport
Excellent Easily found online, well supported, and frequently updatedand enhanced.
Gripes Very good � Doesn’t capture DOS screens.
TABLE 6-18: HyperSnapDX Feature Summary
Program Features Supported Comments
Full screen capture � Allows you to capture any Windows-compatible displaymode supported by your system.
Active windows capture � Works as expected.
Region capture � Works as expected. Supports coordinate tracking in order tohelp you make more precise region captures.
DOS screen capture � Not implemented.
DirectX capture � Works as expected.
Standard file formats � Can capture screens and save them in PCX, TIFF, BMP, PSD,GIF, PNG, and a number of other file formats.
Clipboard access � Works as expected.
Capture undo � Works as expected.
Automatic palettecorrection
� Works as expected.
Image cropping � Works as expected. Provides handy guides that enable youto crop images with pixel-point precision.
NOTE: You can find a fully functional trial version of HyperSnapDX on theCD-ROM that accompanies this book. Please refer to Appendix B for moreinformation.
194 Chapter 6 / Essential Graphics Tools

SnagIt Pro
Latest Version (at time of writing): 5.01
Native Platform: Windows 95, 98, and NT 4.0
Type: Shareware
Publisher/Author: TechSmith, Inc.
System Requirements: PC compatible, DOS, Windows 95, 98, NT 4.0, or 2000,and an SVGA graphics card
URL (at time of writing): http://www.techsmith.com/products/snagit/
SnagIt has been around in one form or another since 1990, and like a fine wine, itonly gets better with age. This screen capture utility offers a number of powerfuland unique screen capture features, including the ability to capture and recordscreen activity as highly compressed video files. In addition, it’s one of the fewWindows screen capture utilities that is able to capture full-size DOS screens.
TABLE 6-19: SnagIt Overview
Criteria Rating Comments
Interface and easeof use
Excellent Very easy to use and default capture keys are easy to access.
Performance andstability
Excellent Worked as advertised with great performance on all systemstested on. A very stable and reliable program.
Compatibility Excellent Runs flawlessly under Windows 95, 98, NT 4.0, and 2000.
Chapter 6 / Essential Graphics Tools 195
FIGURE 6-10: SnagIt

Criteria Rating Comments
Unique or specialfeatures
Excellent � Supports all common graphic file formats.
� Allows user to redefine capture keys, which makes it veryflexible.
� Can capture DOS screens.
� Can capture screens and save them as Windows AVIvideos.
� Can capture the entire scrolling contents of a window.
� Supports many common image manipulation functionssuch as resizing and changing color depth and resolution.
Cost Excellent $39.95 (US)
Availability andsupport
Excellent Easily found online, well supported, and frequently updatedand enhanced.
Gripes Very good � Doesn’t allow DirectX screen captures.
TABLE 6-20: SnagIt Feature Summary
Program Features Supported Comments
Full screen capture � Allows you to capture any Windows-compatible displaymode supported by your system.
Active windows capture � Works as expected.
Region capture � Works as expected. Supports coordinate tracking in order tohelp you make more precise region captures.
DOS screen capture � Can capture most DOS screens, even when running a fullDOS session.
DirectX capture � Not implemented.
Standard file formats � Can capture screens and save them in PCX, TIFF, BMP, GIF,PNG, and a number of other file formats.
Clipboard access � Works as expected.
Capture undo � Works as expected.
Automatic palettecorrection
� Works as expected.
Image cropping � Works as expected.
NOTE: You can find a fully functional trial version of SnagIt on the CD-ROMthat accompanies this book. Please refer to Appendix B for moreinformation.
196 Chapter 6 / Essential Graphics Tools
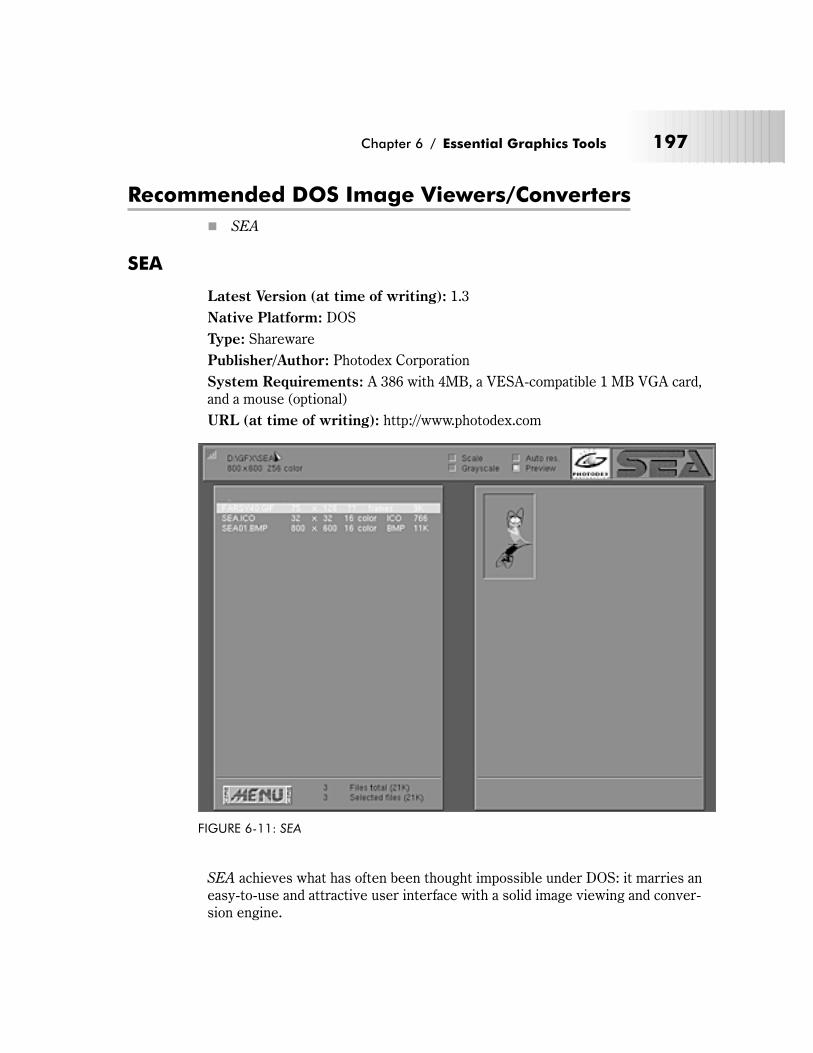
Recommended DOS Image Viewers/Converters
� SEA
SEA
Latest Version (at time of writing): 1.3
Native Platform: DOS
Type: Shareware
Publisher/Author: Photodex Corporation
System Requirements: A 386 with 4MB, a VESA-compatible 1 MB VGA card,and a mouse (optional)
URL (at time of writing): http://www.photodex.com
SEA achieves what has often been thought impossible under DOS: it marries aneasy-to-use and attractive user interface with a solid image viewing and conver-sion engine.
Chapter 6 / Essential Graphics Tools 197
FIGURE 6-11: SEA
If you’re a DOS user, this is the image viewer/converter program to have.
TABLE 6-21: SEA Overview
Criteria Rating Comments
Interface and easeof use
Excellent The best of any DOS-based graphics program of its type.Menu commands are clearly labeled and intuitive, making iteasy to use.
Performance andstability
Excellent Runs very well on all tested systems. Fastest of all of the DOSimage viewers I’ve used. Appears to be very stable andreliable.
Compatibility Very good Runs on DOS and Windows 95 and 98. Will not run onWindows NT 4.0, however.
Unique or specialfeatures
Good � Supports command line driven image viewing andconversion.
� One of the few DOS-based image viewers to support PSDfiles.
� Supports all SVGA display modes with the appropriateVESA drivers installed.
Cost Very good $29.95 (US)
Availability andsupport
Good Easily obtainable and reasonably well supported. Updatedoccasionally.
Gripes Good � Should support more graphic file formats.
TABLE 6-22: SEA Feature Summary
Program Features Supported Comments
Extensive graphics fileformat support
� Supports all standard image formats such as GIF, JPEG,PNG, TIFF, PCX, PSD, IFF/LBM, and TGA.
Good interface � Excellent interface. A real joy to use.
Batch conversions � Works as expected but not as efficient or elegant as some ofthe other programs described here.
Image catalogs � Works as expected.
Special operations � Performs many special operations including image resizing,color reduction, and gamma correction.
Other Useful DOS Image Viewers/Converters
There were a number of DOS-based image viewers/converters that met most ofmy review criteria but weren’t reviewed here for various reasons. Nevertheless, Iwill mention them here as you may find them useful. These are:
198 Chapter 6 / Essential Graphics Tools
� Display—A free image viewing and conversion utility that provides many fea-tures and options. Its only drawbacks are its large memory requirements andcomplex user interface.
� Graphics Workshop for DOS—A very reliable, shareware image viewing andconversion utility. This program was written by Steven William Rimmer, oneof the leading authorities on graphic file formats.
� Nview—A DOS version of XNView (which is described in the next section)that utilizes the same image viewing/conversion engine. Unfortunately, therewere compatibility problems that prevented it from running properly on mytest system.
NOTE: Some or all of these programs are included on the book’s accompany-ing CD-ROM. Refer to Appendix B for additional details.
Recommended Windows Image Viewers/Converters
� IrfanView
� XNView
IrfanView
Latest Version (at time of writing): 3.17
Native Platform: Windows 95, 98, and NT 4.0
Type: Freeware
Publisher/Author: Irfan Skiljan
System Requirements: PC compatible, Windows 95, 98, NT 4.0, or 2000, and anSVGA graphics card
URL (at time of writing): http://stud1.tuwien.ac.at/~e9227474
Chapter 6 / Essential Graphics Tools 199
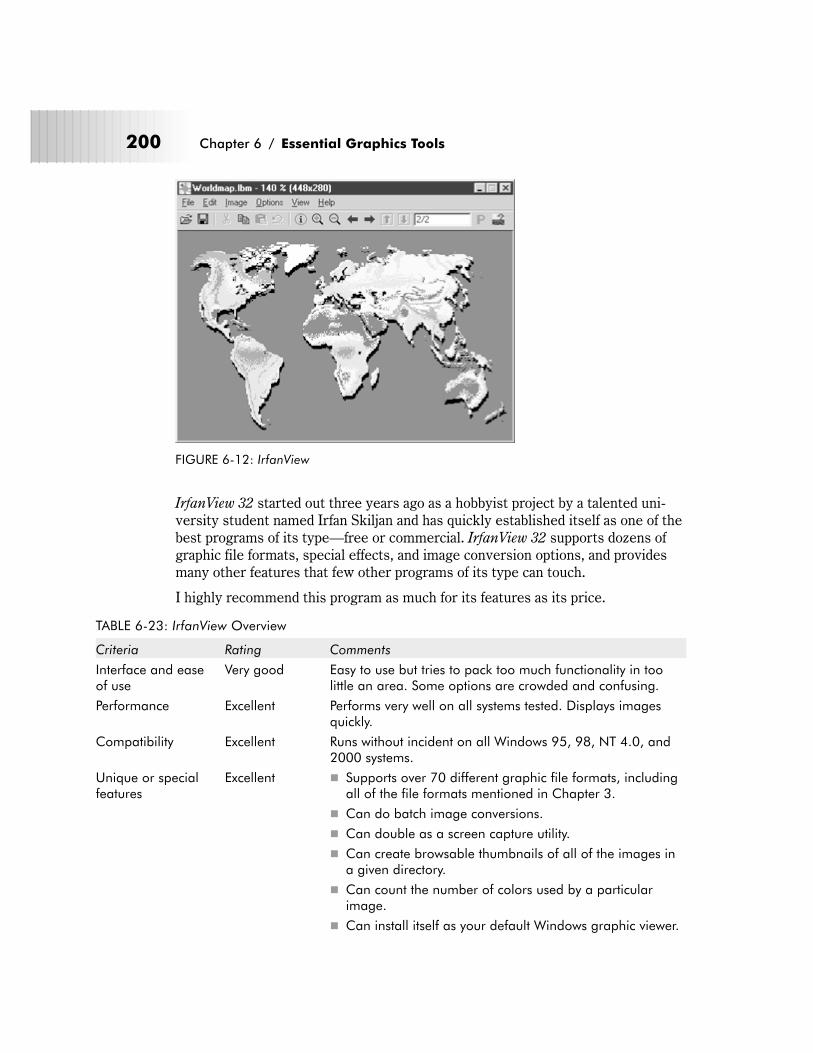
IrfanView 32 started out three years ago as a hobbyist project by a talented uni-versity student named Irfan Skiljan and has quickly established itself as one of thebest programs of its type—free or commercial. IrfanView 32 supports dozens ofgraphic file formats, special effects, and image conversion options, and providesmany other features that few other programs of its type can touch.
I highly recommend this program as much for its features as its price.
TABLE 6-23: IrfanView Overview
Criteria Rating Comments
Interface and easeof use
Very good Easy to use but tries to pack too much functionality in toolittle an area. Some options are crowded and confusing.
Performance Excellent Performs very well on all systems tested. Displays imagesquickly.
Compatibility Excellent Runs without incident on all Windows 95, 98, NT 4.0, and2000 systems.
Unique or specialfeatures
Excellent � Supports over 70 different graphic file formats, includingall of the file formats mentioned in Chapter 3.
� Can do batch image conversions.
� Can double as a screen capture utility.
� Can create browsable thumbnails of all of the images ina given directory.
� Can count the number of colors used by a particularimage.
� Can install itself as your default Windows graphic viewer.
200 Chapter 6 / Essential Graphics Tools
FIGURE 6-12: IrfanView
Criteria Rating Comments
Cost Excellent Free.
Availability andsupport
Excellent Easy to obtain and well supported. Updated frequently.
Gripes Very good � Tries to do a bit too much for a program of its type. Thismeans that many of its menu options are cluttered.
TABLE 6-24: IrfanView Feature Summary
Program Features Supported Comments
Extensive graphics fileformat support
� Compatible with all common graphic file formats and thensome.
Good interface � Interface is relatively easy to use.
Batch conversions � Works as expected. Performs conversion actions quickly.
Image catalogs � Works as expected.
Special operations � Can perform color depth reduction and promotion, imagescaling, and a variety of other useful image processingeffects.
NOTE: You can find a copy of IrfanView on the CD-ROM that accompanies thisbook. Please refer to Appendix B for more information.
XNView
Latest Version (at time of writing): 1.12
Native Platform: Windows 95, 98, NT 4.0, and 2000
Type: Freeware
Publisher/Author: Pierre Gougelet
System Requirements: PC compatible, Windows 95, 98, NT 4.0, or 2000, and anSVGA graphics card
URL (at time of writing): http://perso.wanadoo.fr/pierre.g/
Chapter 6 / Essential Graphics Tools 201
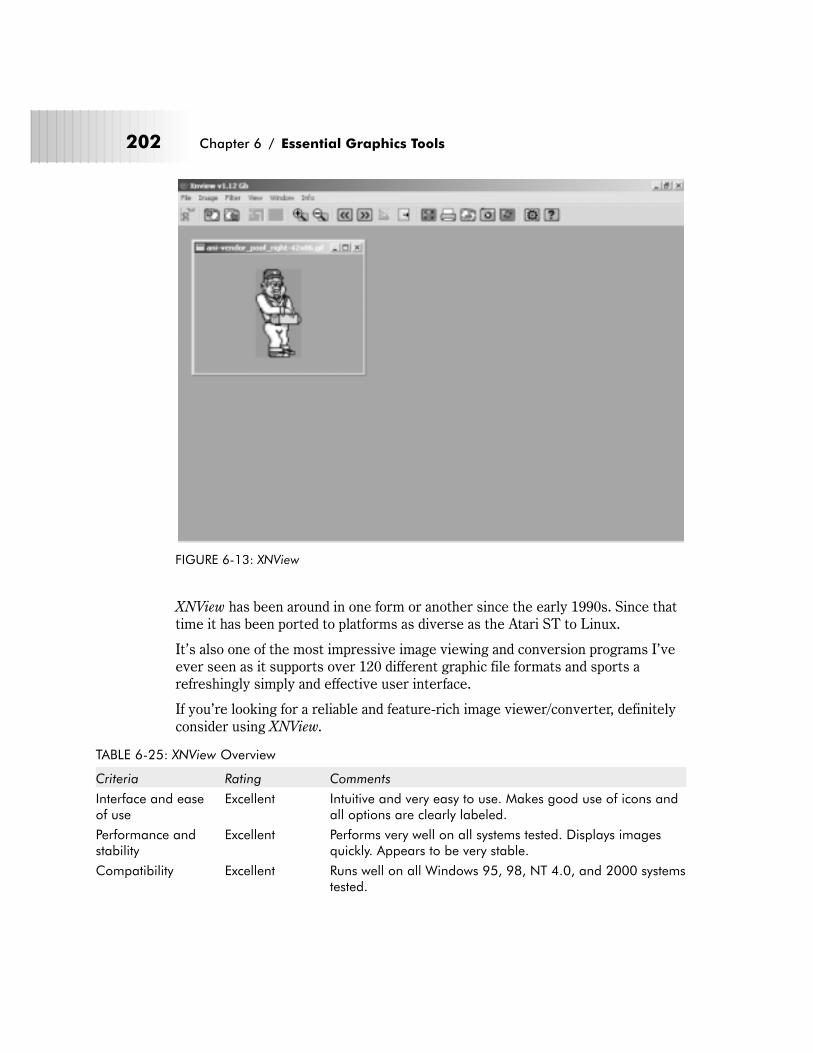
XNView has been around in one form or another since the early 1990s. Since thattime it has been ported to platforms as diverse as the Atari ST to Linux.
It’s also one of the most impressive image viewing and conversion programs I’veever seen as it supports over 120 different graphic file formats and sports arefreshingly simply and effective user interface.
If you’re looking for a reliable and feature-rich image viewer/converter, definitelyconsider using XNView.
TABLE 6-25: XNView Overview
Criteria Rating Comments
Interface and easeof use
Excellent Intuitive and very easy to use. Makes good use of icons andall options are clearly labeled.
Performance andstability
Excellent Performs very well on all systems tested. Displays imagesquickly. Appears to be very stable.
Compatibility Excellent Runs well on all Windows 95, 98, NT 4.0, and 2000 systemstested.
202 Chapter 6 / Essential Graphics Tools
FIGURE 6-13: XNView
Criteria Rating Comments
Unique or specialfeatures
Excellent � Supports over 120 different graphic file formats, includingall of the file formats mentioned in Chapter 3.
� Can do batch image conversions while applying specialeffects.
� Can double as a screen capture utility when needed.
� Can create browsable thumbnails of all of the images ina given directory.
� Can count the number of colors used by a particularimage.
� Can install itself as your default Windows graphic viewer.
Cost Excellent Free.
Availability andsupport
Excellent Easy to obtain and well supported. Updated occasionally.
Gripes Excellent None.
TABLE 6-26: XNView Feature Summary
Program Features Supported Comments
Extensive graphics fileformat support
� Compatible with all common graphic file formats and thensome.
Good interface � Interface is very easy to use.
Batch conversions � Very flexible.
Image catalogs � Works as expected.
Special operations � Can perform color depth reduction and promotion, imagescaling, and a variety of sophisticated image processingeffects. Can even apply these operations to images as itconverts them from one format to another.
NOTE: You can find a copy of XNView on the CD-ROM that accompanies thisbook. Please refer to Appendix B for more information.
Other Useful Windows Image Viewers/Converters
There were a number of Windows-based image viewers/converters that met mostof my review criteria but weren’t reviewed here for various reasons. Neverthe-less, I will mention them here as you may find them useful. These programsinclude:
� CompuPic—A commercial image viewing and conversion utility. Providesmany useful features and has an excellent user interface.
Chapter 6 / Essential Graphics Tools 203
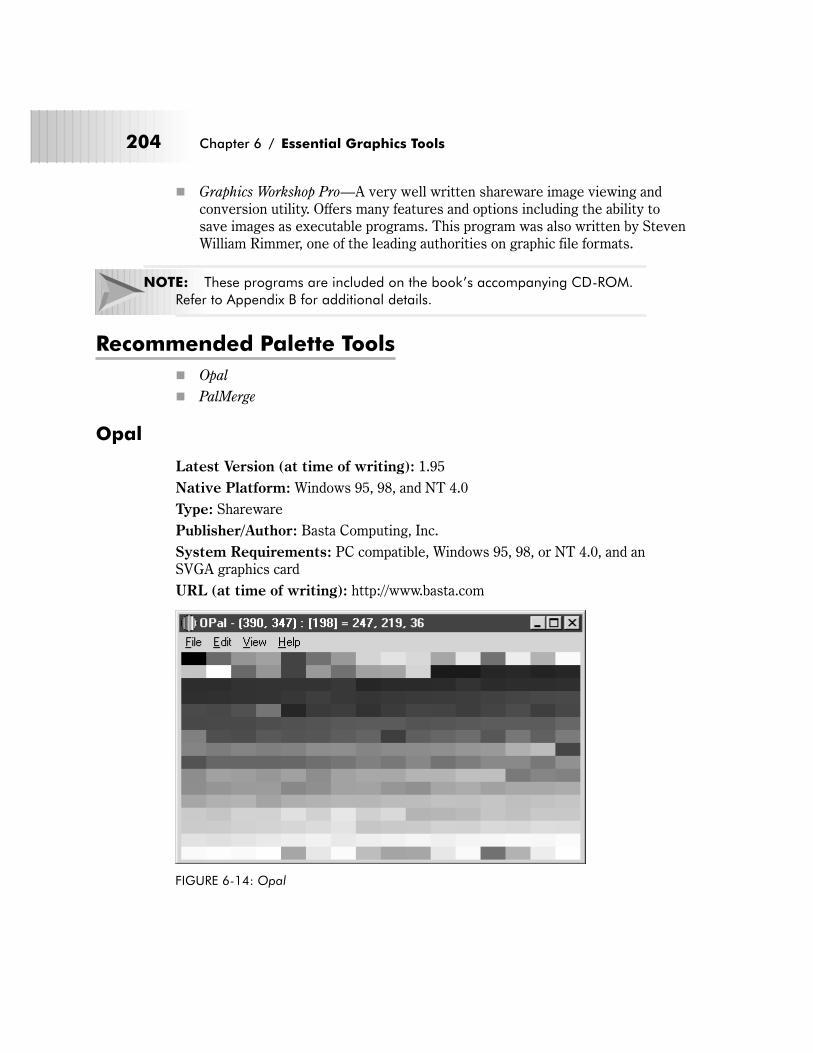
� Graphics Workshop Pro—A very well written shareware image viewing andconversion utility. Offers many features and options including the ability tosave images as executable programs. This program was also written by StevenWilliam Rimmer, one of the leading authorities on graphic file formats.
NOTE: These programs are included on the book’s accompanying CD-ROM.Refer to Appendix B for additional details.
Recommended Palette Tools
� Opal
� PalMerge
Opal
Latest Version (at time of writing): 1.95
Native Platform: Windows 95, 98, and NT 4.0
Type: Shareware
Publisher/Author: Basta Computing, Inc.
System Requirements: PC compatible, Windows 95, 98, or NT 4.0, and anSVGA graphics card
URL (at time of writing): http://www.basta.com
204 Chapter 6 / Essential Graphics Tools
FIGURE 6-14: Opal
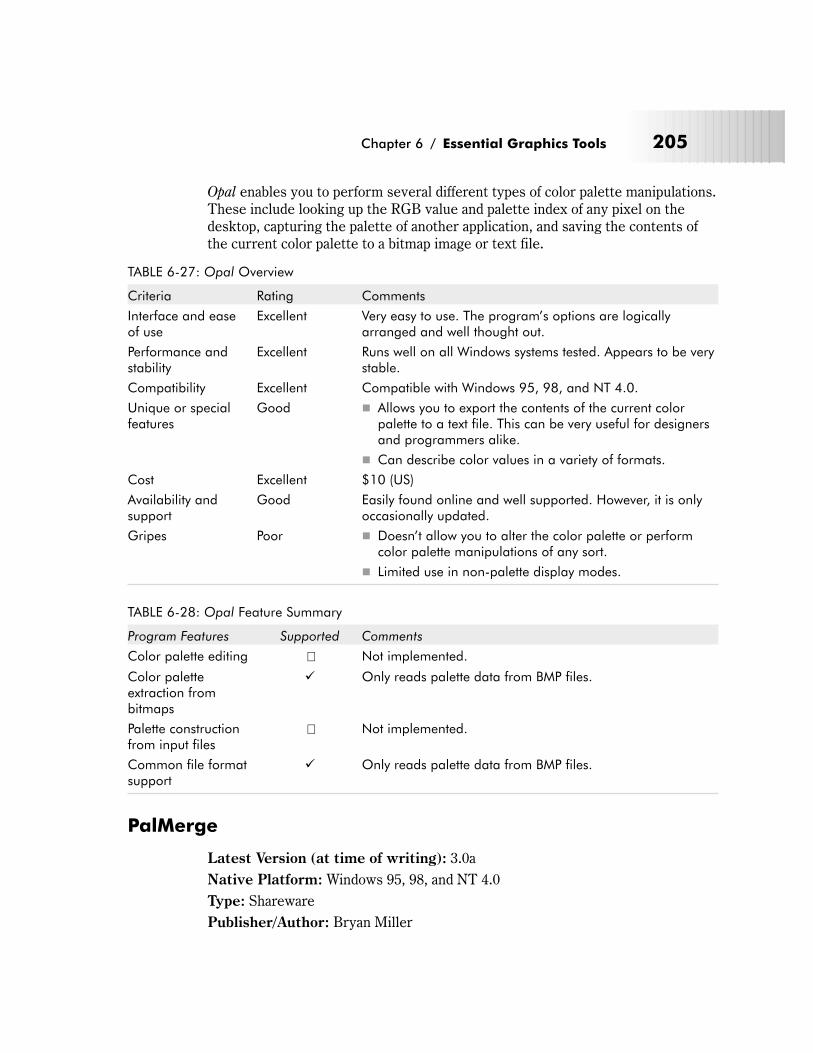
Opal enables you to perform several different types of color palette manipulations.These include looking up the RGB value and palette index of any pixel on thedesktop, capturing the palette of another application, and saving the contents ofthe current color palette to a bitmap image or text file.
TABLE 6-27: Opal Overview
Criteria Rating Comments
Interface and easeof use
Excellent Very easy to use. The program’s options are logicallyarranged and well thought out.
Performance andstability
Excellent Runs well on all Windows systems tested. Appears to be verystable.
Compatibility Excellent Compatible with Windows 95, 98, and NT 4.0.
Unique or specialfeatures
Good � Allows you to export the contents of the current colorpalette to a text file. This can be very useful for designersand programmers alike.
� Can describe color values in a variety of formats.
Cost Excellent $10 (US)
Availability andsupport
Good Easily found online and well supported. However, it is onlyoccasionally updated.
Gripes Poor � Doesn’t allow you to alter the color palette or performcolor palette manipulations of any sort.
� Limited use in non-palette display modes.
TABLE 6-28: Opal Feature Summary
Program Features Supported Comments
Color palette editing � Not implemented.
Color paletteextraction frombitmaps
� Only reads palette data from BMP files.
Palette constructionfrom input files
� Not implemented.
Common file formatsupport
� Only reads palette data from BMP files.
PalMerge
Latest Version (at time of writing): 3.0a
Native Platform: Windows 95, 98, and NT 4.0
Type: Shareware
Publisher/Author: Bryan Miller
Chapter 6 / Essential Graphics Tools 205
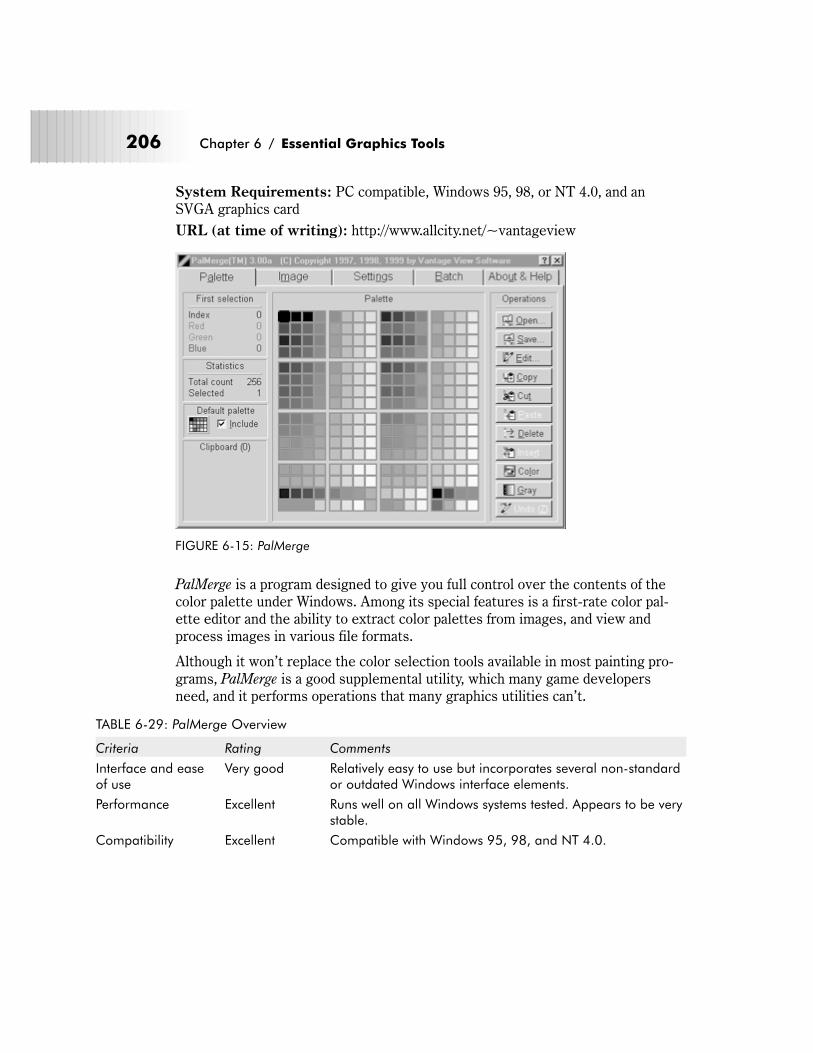
System Requirements: PC compatible, Windows 95, 98, or NT 4.0, and anSVGA graphics card
URL (at time of writing): http://www.allcity.net/~vantageview
PalMerge is a program designed to give you full control over the contents of thecolor palette under Windows. Among its special features is a first-rate color pal-ette editor and the ability to extract color palettes from images, and view andprocess images in various file formats.
Although it won’t replace the color selection tools available in most painting pro-grams, PalMerge is a good supplemental utility, which many game developersneed, and it performs operations that many graphics utilities can’t.
TABLE 6-29: PalMerge Overview
Criteria Rating Comments
Interface and easeof use
Very good Relatively easy to use but incorporates several non-standardor outdated Windows interface elements.
Performance Excellent Runs well on all Windows systems tested. Appears to be verystable.
Compatibility Excellent Compatible with Windows 95, 98, and NT 4.0.
206 Chapter 6 / Essential Graphics Tools
FIGURE 6-15: PalMerge
Criteria Rating Comments
Unique or specialfeatures
Excellent � Can merge the contents of several palettes into one.
� Can add Windows reserved colors to the palette.
� Can perform color reduction and palette remappingoperations on individual images or in batch.
� Comes with a number of predefined color palettes toexperiment with.
� Can export palette data in the Microsoft .PAL format.
Cost Very good $17 (US)
Availability andsupport
Excellent Easily obtainable online. Supported but not updated veryoften.
Gripes Good � Tries to do too much in one program. It’s very good atpalette manipulation but less so as an image viewer orconversion utility.
TABLE 6-30: PalMerge Feature Summary
Program Features Supported Comments
Color palette editing � Works as expected. Uses Windows’ palette editor but doessupport impressive color copying and pasting abilities.
Color paletteextraction frombitmaps
� Works as expected. Can extract palettes from BMP and savethem in Microsoft .PAL format.
Palette constructionfrom input files
� Works as expected.
Common file formatsupport
� Supports all standard file formats including .bmp.
NOTE: These programs, as well as several DOS palette tools, are included onthe book’s accompanying CD-ROM. Refer to Appendix B for additionaldetails.
Other Useful Graphics Utilities
Besides the programs discussed here, the accompanying CD-ROM includes anumber of other useful graphics programs and utilities. Of these, two programsreally stand out as useful additions to any arcade game developer/designer’screative toolbox. These programs are:
� MkExpl 3.0 by Lennart Steinke
� Universe v1.6 by Diard Software
Chapter 6 / Essential Graphics Tools 207
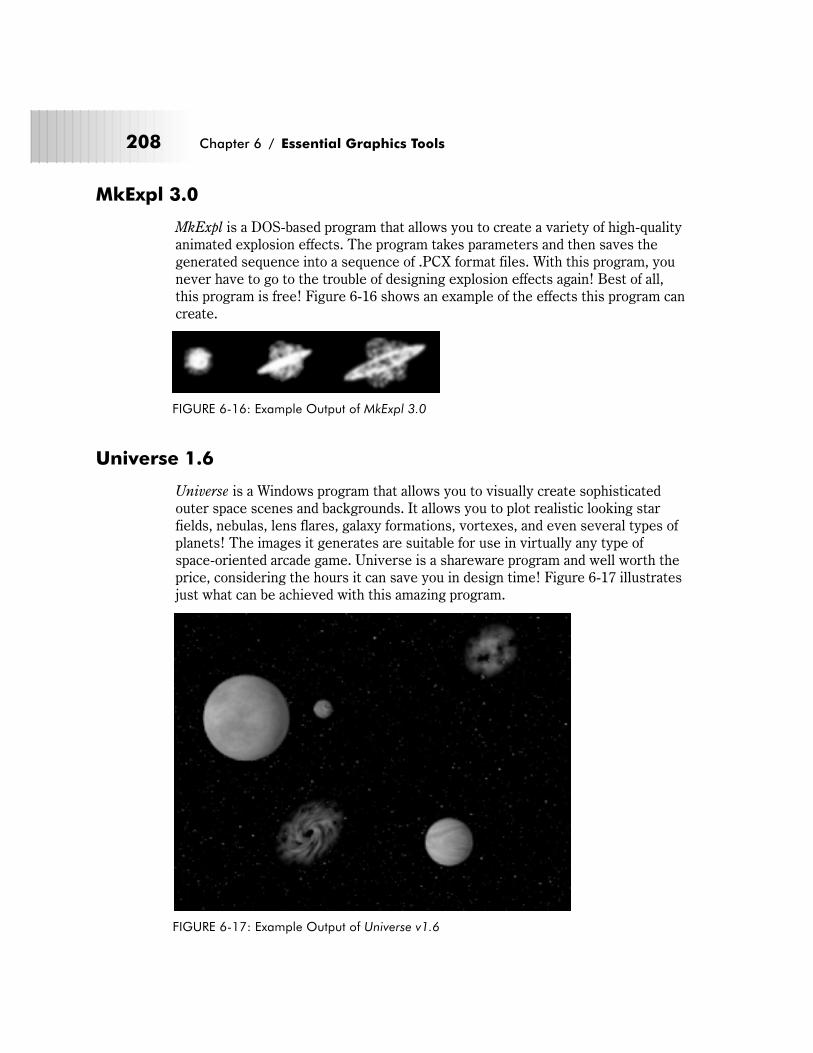
MkExpl 3.0
MkExpl is a DOS-based program that allows you to create a variety of high-qualityanimated explosion effects. The program takes parameters and then saves thegenerated sequence into a sequence of .PCX format files. With this program, younever have to go to the trouble of designing explosion effects again! Best of all,this program is free! Figure 6-16 shows an example of the effects this program cancreate.
Universe 1.6
Universe is a Windows program that allows you to visually create sophisticatedouter space scenes and backgrounds. It allows you to plot realistic looking starfields, nebulas, lens flares, galaxy formations, vortexes, and even several types ofplanets! The images it generates are suitable for use in virtually any type ofspace-oriented arcade game. Universe is a shareware program and well worth theprice, considering the hours it can save you in design time! Figure 6-17 illustratesjust what can be achieved with this amazing program.
208 Chapter 6 / Essential Graphics Tools
FIGURE 6-16: Example Output of MkExpl 3.0
FIGURE 6-17: Example Output of Universe v1.6
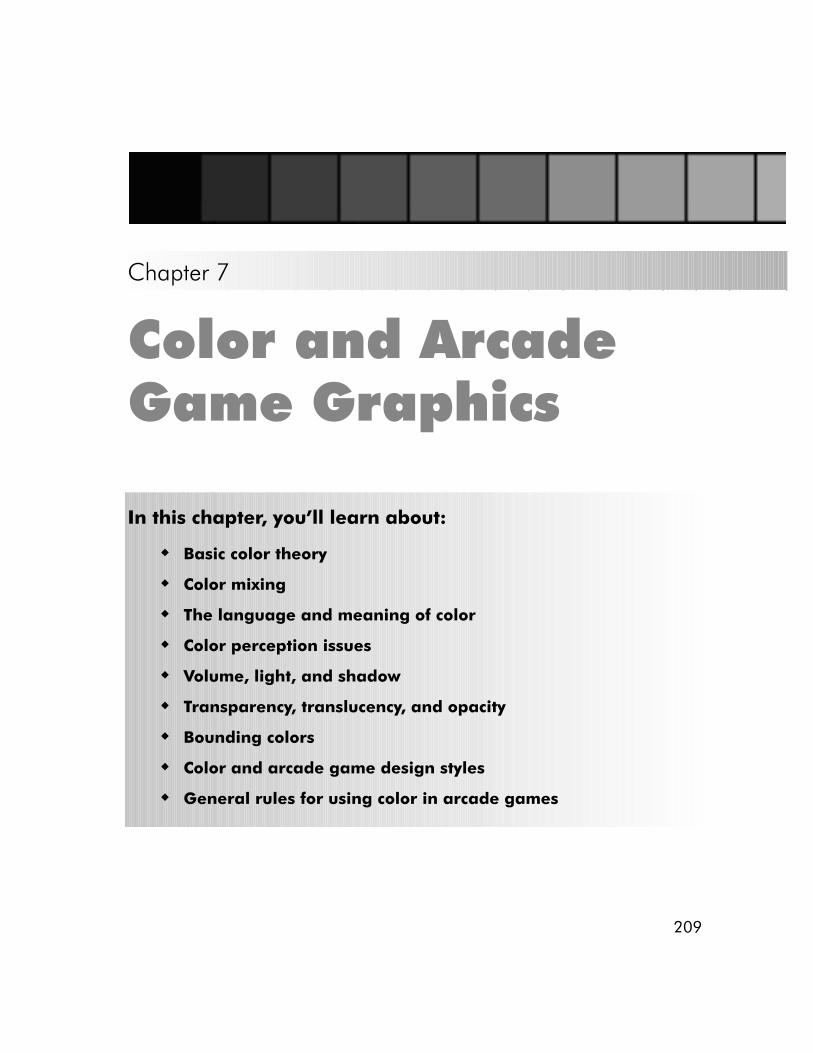
Chapter 7
Color and ArcadeGame Graphics
In this chapter, you’ll learn about:
� Basic color theory
� Color mixing
� The language and meaning of color
� Color perception issues
� Volume, light, and shadow
� Transparency, translucency, and opacity
� Bounding colors
� Color and arcade game design styles
� General rules for using color in arcade games
209
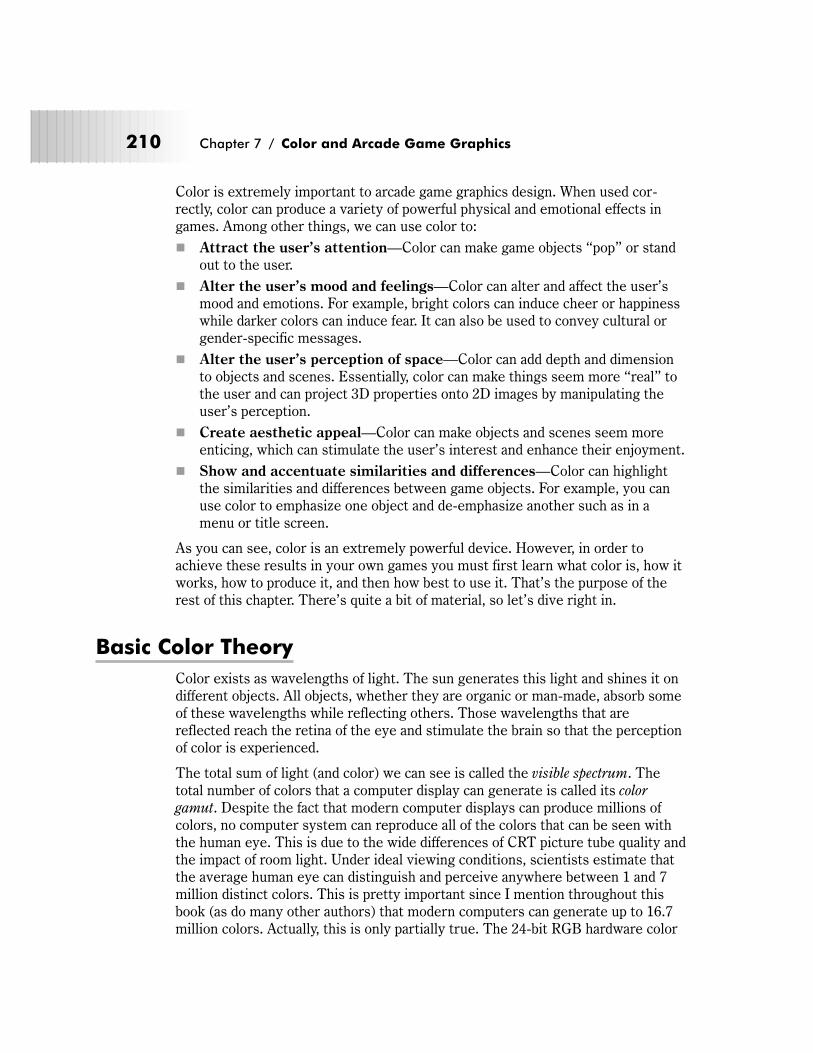
Color is extremely important to arcade game graphics design. When used cor-
rectly, color can produce a variety of powerful physical and emotional effects in
games. Among other things, we can use color to:
� Attract the user’s attention—Color can make game objects “pop” or stand
out to the user.
� Alter the user’s mood and feelings—Color can alter and affect the user’s
mood and emotions. For example, bright colors can induce cheer or happiness
while darker colors can induce fear. It can also be used to convey cultural or
gender-specific messages.
� Alter the user’s perception of space—Color can add depth and dimension
to objects and scenes. Essentially, color can make things seem more “real” to
the user and can project 3D properties onto 2D images by manipulating the
user’s perception.
� Create aesthetic appeal—Color can make objects and scenes seem more
enticing, which can stimulate the user’s interest and enhance their enjoyment.
� Show and accentuate similarities and differences—Color can highlight
the similarities and differences between game objects. For example, you can
use color to emphasize one object and de-emphasize another such as in a
menu or title screen.
As you can see, color is an extremely powerful device. However, in order to
achieve these results in your own games you must first learn what color is, how it
works, how to produce it, and then how best to use it. That’s the purpose of the
rest of this chapter. There’s quite a bit of material, so let’s dive right in.
Basic Color Theory
Color exists as wavelengths of light. The sun generates this light and shines it on
different objects. All objects, whether they are organic or man-made, absorb some
of these wavelengths while reflecting others. Those wavelengths that are
reflected reach the retina of the eye and stimulate the brain so that the perception
of color is experienced.
The total sum of light (and color) we can see is called the visible spectrum. The
total number of colors that a computer display can generate is called its color
gamut. Despite the fact that modern computer displays can produce millions of
colors, no computer system can reproduce all of the colors that can be seen with
the human eye. This is due to the wide differences of CRT picture tube quality and
the impact of room light. Under ideal viewing conditions, scientists estimate that
the average human eye can distinguish and perceive anywhere between 1 and 7
million distinct colors. This is pretty important since I mention throughout this
book (as do many other authors) that modern computers can generate up to 16.7
million colors. Actually, this is only partially true. The 24-bit RGB hardware color
210 Chapter 7 / Color and Arcade Game Graphics
palette creates 16.7 million machine states but these do not necessarily correspond
to 16.7 million unique colors. The average human eye just can’t perceive that
many colors.
In addition to the concept of color there is the element of tone. Tone measures the
lightness or darkness of an image and is subjective in relationship to the other col-
ors that are present in an image. Tone gives color its depth and form. It provides
objects with shape and definition as the tonal range of an image runs from light to
dark and vice versa. Tone is analogous to a color gradient described elsewhere in
these pages. Tone has simple rules: the larger the tonal range, the higher the
image quality. Meanwhile, the smaller the tonal range, the lower the image quality.
Images with poor tone appear flat and washed out, while images with good tone
look smooth and vibrant. High color modes tend to exhibit strong tonal ranges,
while low color modes exhibit weak tonal ranges.
But wait, there’s more! Every color also has three basic properties: hue, satura-
tion, and value.
Hue is the color being described or produced, such as yellow, black, green, etc.
Hue is also known as the local color of an object as it will look as expected when
viewed close up but can appear quite differently when viewed from a distance. For
example, a particular shade of green might appear bluish if you move far away
from the computer’s display.
Saturation, also called intensity or brightness, is the strength or weakness exhib-
ited by a given color. In other words, saturation measures the “purity” of a color.
On computer displays, saturation is typically specified as a percentage of light.
Highly saturated colors display more brilliance, while less saturated colors display
more dullness. For example, 100% black would produce a vivid black, while 50%
black would produce a shade of gray.
Value simply measures the degree of lightness or darkness, also known as the
tonal range of a particular hue.
NOTE: Like RGB, hue-saturation-value, or HSV, is yet another method of select-
ing computer color. It will be described in more detail in Chapter 8.
Color Mixing
At the heart of color theory, whether it’s computer generated or not, is the color
wheel. Think of the color wheel as a circle that contains different colors waiting to
be blended together to produce other colors.
Chapter 7 / Color and Arcade Game Graphics 211
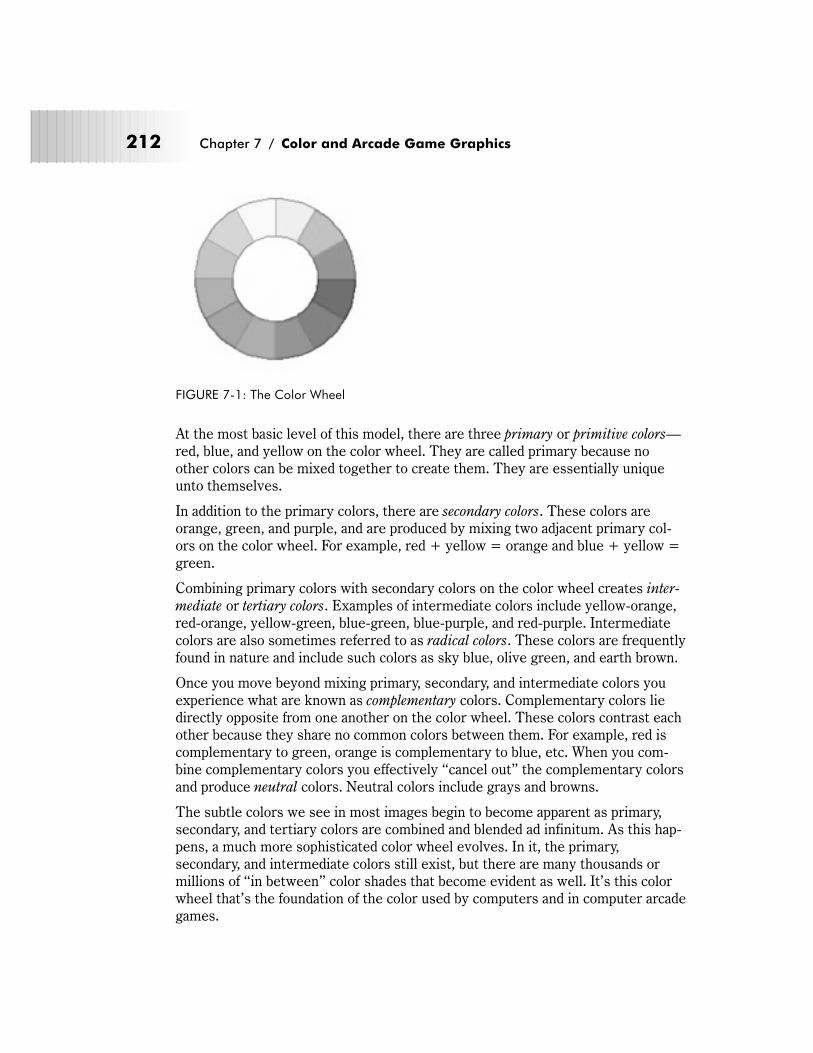
At the most basic level of this model, there are three primary or primitive colors—
red, blue, and yellow on the color wheel. They are called primary because no
other colors can be mixed together to create them. They are essentially unique
unto themselves.
In addition to the primary colors, there are secondary colors. These colors are
orange, green, and purple, and are produced by mixing two adjacent primary col-
ors on the color wheel. For example, red + yellow = orange and blue + yellow =
green.
Combining primary colors with secondary colors on the color wheel creates inter-
mediate or tertiary colors. Examples of intermediate colors include yellow-orange,
red-orange, yellow-green, blue-green, blue-purple, and red-purple. Intermediate
colors are also sometimes referred to as radical colors. These colors are frequently
found in nature and include such colors as sky blue, olive green, and earth brown.
Once you move beyond mixing primary, secondary, and intermediate colors you
experience what are known as complementary colors. Complementary colors lie
directly opposite from one another on the color wheel. These colors contrast each
other because they share no common colors between them. For example, red is
complementary to green, orange is complementary to blue, etc. When you com-
bine complementary colors you effectively “cancel out” the complementary colors
and produce neutral colors. Neutral colors include grays and browns.
The subtle colors we see in most images begin to become apparent as primary,
secondary, and tertiary colors are combined and blended ad infinitum. As this hap-
pens, a much more sophisticated color wheel evolves. In it, the primary,
secondary, and intermediate colors still exist, but there are many thousands or
millions of “in between” color shades that become evident as well. It’s this color
wheel that’s the foundation of the color used by computers and in computer arcade
games.
212 Chapter 7 / Color and Arcade Game Graphics
FIGURE 7-1: The Color Wheel
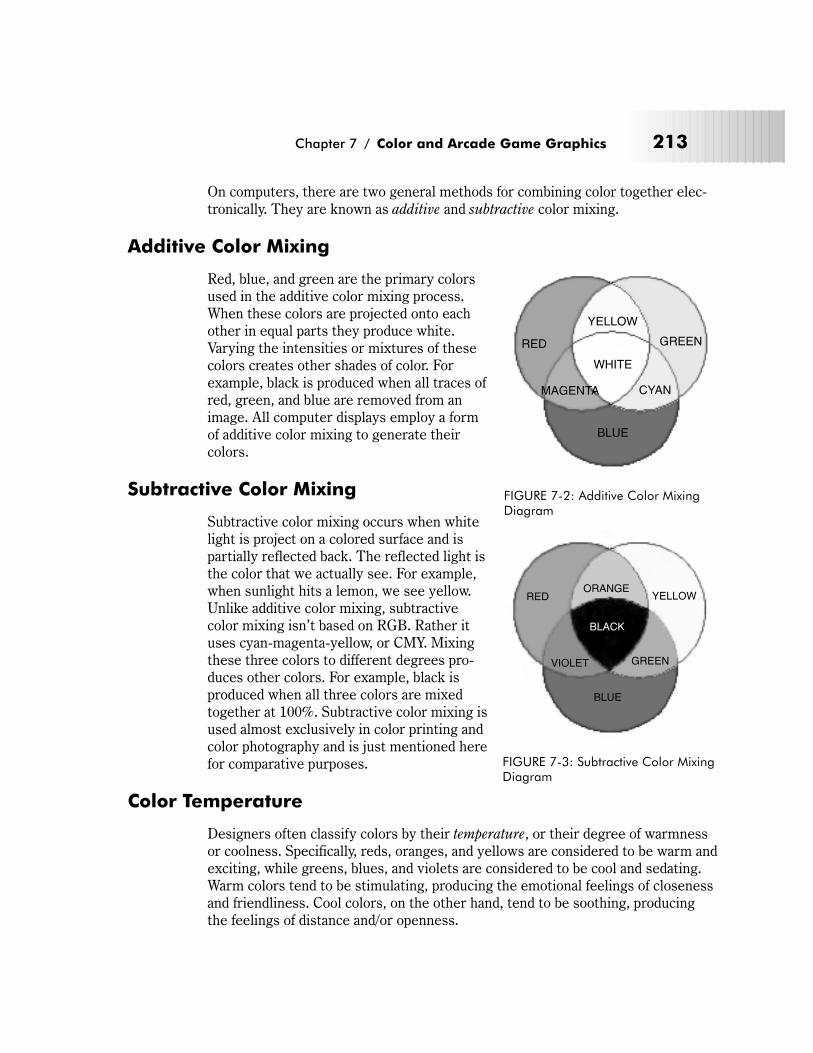
On computers, there are two general methods for combining color together elec-
tronically. They are known as additive and subtractive color mixing.
Additive Color Mixing
Red, blue, and green are the primary colors
used in the additive color mixing process.
When these colors are projected onto each
other in equal parts they produce white.
Varying the intensities or mixtures of these
colors creates other shades of color. For
example, black is produced when all traces of
red, green, and blue are removed from an
image. All computer displays employ a form
of additive color mixing to generate their
colors.
Subtractive Color Mixing
Subtractive color mixing occurs when white
light is project on a colored surface and is
partially reflected back. The reflected light is
the color that we actually see. For example,
when sunlight hits a lemon, we see yellow.
Unlike additive color mixing, subtractive
color mixing isn’t based on RGB. Rather it
uses cyan-magenta-yellow, or CMY. Mixing
these three colors to different degrees pro-
duces other colors. For example, black is
produced when all three colors are mixed
together at 100%. Subtractive color mixing is
used almost exclusively in color printing and
color photography and is just mentioned here
for comparative purposes.
Color Temperature
Designers often classify colors by their temperature, or their degree of warmness
or coolness. Specifically, reds, oranges, and yellows are considered to be warm and
exciting, while greens, blues, and violets are considered to be cool and sedating.
Warm colors tend to be stimulating, producing the emotional feelings of closeness
and friendliness. Cool colors, on the other hand, tend to be soothing, producing
the feelings of distance and/or openness.
Chapter 7 / Color and Arcade Game Graphics 213
YELLOW
WHITE
GREENRED
CYANMAGENTA
BLUE
FIGURE 7-2: Additive Color MixingDiagram
RED
BLACK
ORANGEYELLOW
GREENVIOLET
BLUE
FIGURE 7-3: Subtractive Color MixingDiagram
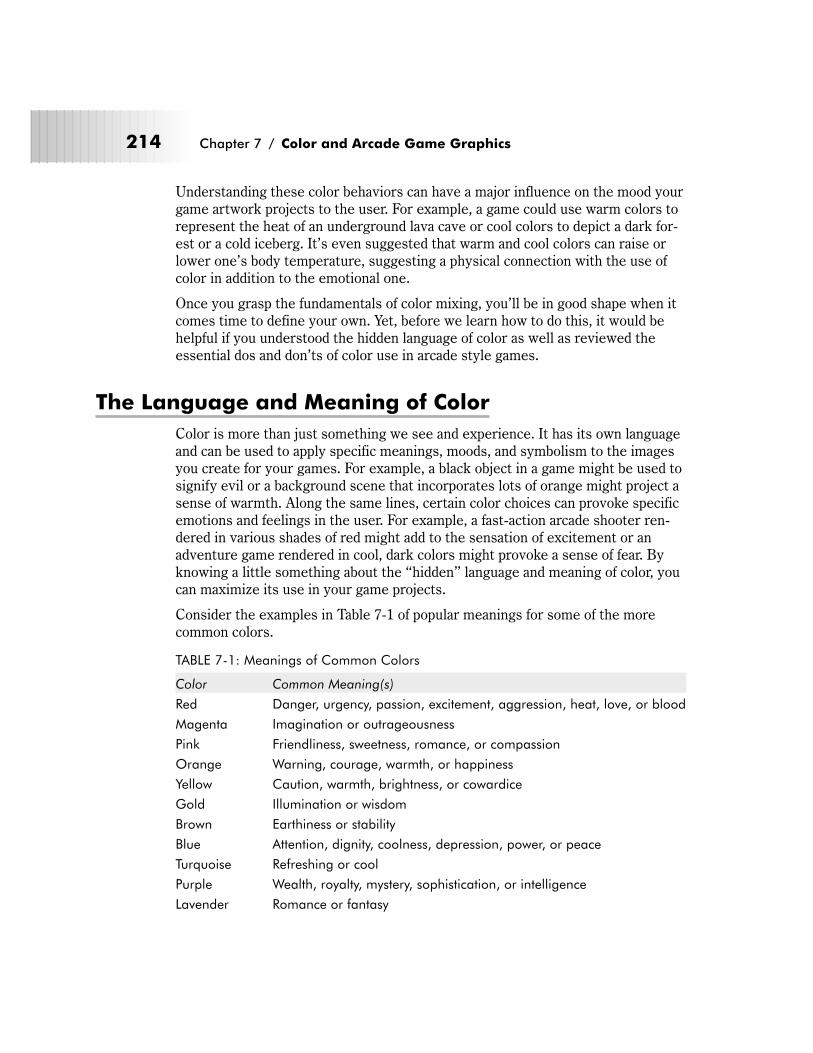
Understanding these color behaviors can have a major influence on the mood your
game artwork projects to the user. For example, a game could use warm colors to
represent the heat of an underground lava cave or cool colors to depict a dark for-
est or a cold iceberg. It’s even suggested that warm and cool colors can raise or
lower one’s body temperature, suggesting a physical connection with the use of
color in addition to the emotional one.
Once you grasp the fundamentals of color mixing, you’ll be in good shape when it
comes time to define your own. Yet, before we learn how to do this, it would be
helpful if you understood the hidden language of color as well as reviewed the
essential dos and don’ts of color use in arcade style games.
The Language and Meaning of Color
Color is more than just something we see and experience. It has its own language
and can be used to apply specific meanings, moods, and symbolism to the images
you create for your games. For example, a black object in a game might be used to
signify evil or a background scene that incorporates lots of orange might project a
sense of warmth. Along the same lines, certain color choices can provoke specific
emotions and feelings in the user. For example, a fast-action arcade shooter ren-
dered in various shades of red might add to the sensation of excitement or an
adventure game rendered in cool, dark colors might provoke a sense of fear. By
knowing a little something about the “hidden” language and meaning of color, you
can maximize its use in your game projects.
Consider the examples in Table 7-1 of popular meanings for some of the more
common colors.
TABLE 7-1: Meanings of Common Colors
Color Common Meaning(s)
Red Danger, urgency, passion, excitement, aggression, heat, love, or blood
Magenta Imagination or outrageousness
Pink Friendliness, sweetness, romance, or compassion
Orange Warning, courage, warmth, or happiness
Yellow Caution, warmth, brightness, or cowardice
Gold Illumination or wisdom
Brown Earthiness or stability
Blue Attention, dignity, coolness, depression, power, or peace
Turquoise Refreshing or cool
Purple Wealth, royalty, mystery, sophistication, or intelligence
Lavender Romance or fantasy
214 Chapter 7 / Color and Arcade Game Graphics
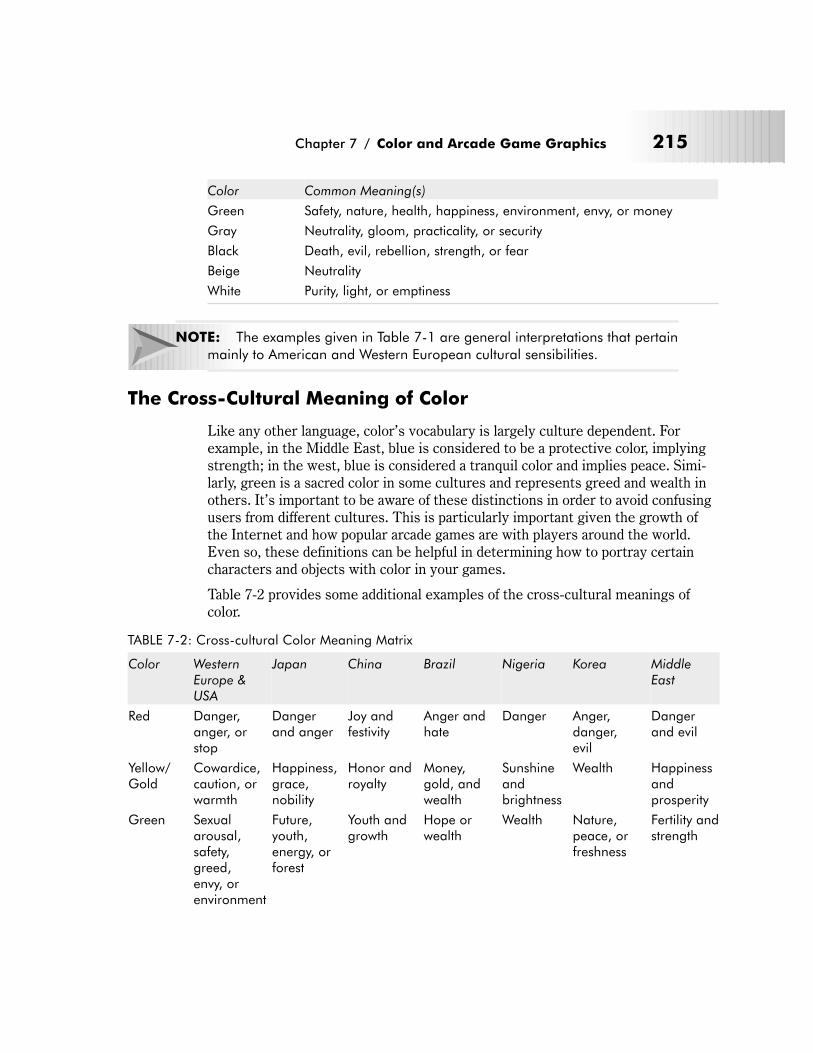
Color Common Meaning(s)
Green Safety, nature, health, happiness, environment, envy, or money
Gray Neutrality, gloom, practicality, or security
Black Death, evil, rebellion, strength, or fear
Beige Neutrality
White Purity, light, or emptiness
NOTE: The examples given in Table 7-1 are general interpretations that pertain
mainly to American and Western European cultural sensibilities.
The Cross-Cultural Meaning of Color
Like any other language, color’s vocabulary is largely culture dependent. For
example, in the Middle East, blue is considered to be a protective color, implying
strength; in the west, blue is considered a tranquil color and implies peace. Simi-
larly, green is a sacred color in some cultures and represents greed and wealth in
others. It’s important to be aware of these distinctions in order to avoid confusing
users from different cultures. This is particularly important given the growth of
the Internet and how popular arcade games are with players around the world.
Even so, these definitions can be helpful in determining how to portray certain
characters and objects with color in your games.
Table 7-2 provides some additional examples of the cross-cultural meanings of
color.
TABLE 7-2: Cross-cultural Color Meaning Matrix
Color WesternEurope &USA
Japan China Brazil Nigeria Korea MiddleEast
Red Danger,anger, orstop
Dangerand anger
Joy andfestivity
Anger andhate
Danger Anger,danger,evil
Dangerand evil
Yellow/Gold
Cowardice,caution, orwarmth
Happiness,grace,nobility
Honor androyalty
Money,gold, andwealth
Sunshineandbrightness
Wealth Happinessandprosperity
Green Sexualarousal,safety,greed,envy, orenvironment
Future,youth,energy, orforest
Youth andgrowth
Hope orwealth
Wealth Nature,peace, orfreshness
Fertility andstrength
Chapter 7 / Color and Arcade Game Graphics 215
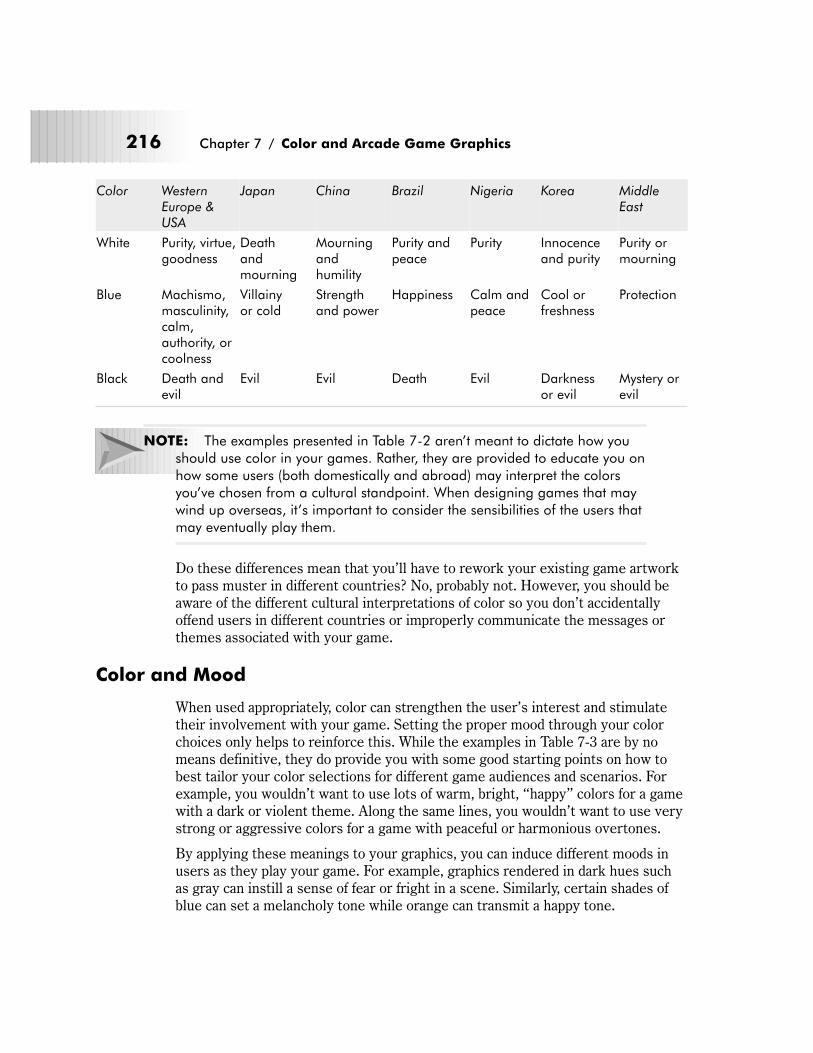
Color WesternEurope &USA
Japan China Brazil Nigeria Korea MiddleEast
White Purity, virtue,goodness
Deathandmourning
Mourningandhumility
Purity andpeace
Purity Innocenceand purity
Purity ormourning
Blue Machismo,masculinity,calm,authority, orcoolness
Villainyor cold
Strengthand power
Happiness Calm andpeace
Cool orfreshness
Protection
Black Death andevil
Evil Evil Death Evil Darknessor evil
Mystery orevil
NOTE: The examples presented in Table 7-2 aren’t meant to dictate how you
should use color in your games. Rather, they are provided to educate you on
how some users (both domestically and abroad) may interpret the colors
you’ve chosen from a cultural standpoint. When designing games that may
wind up overseas, it’s important to consider the sensibilities of the users that
may eventually play them.
Do these differences mean that you’ll have to rework your existing game artwork
to pass muster in different countries? No, probably not. However, you should be
aware of the different cultural interpretations of color so you don’t accidentally
offend users in different countries or improperly communicate the messages or
themes associated with your game.
Color and Mood
When used appropriately, color can strengthen the user’s interest and stimulate
their involvement with your game. Setting the proper mood through your color
choices only helps to reinforce this. While the examples in Table 7-3 are by no
means definitive, they do provide you with some good starting points on how to
best tailor your color selections for different game audiences and scenarios. For
example, you wouldn’t want to use lots of warm, bright, “happy” colors for a game
with a dark or violent theme. Along the same lines, you wouldn’t want to use very
strong or aggressive colors for a game with peaceful or harmonious overtones.
By applying these meanings to your graphics, you can induce different moods in
users as they play your game. For example, graphics rendered in dark hues such
as gray can instill a sense of fear or fright in a scene. Similarly, certain shades of
blue can set a melancholy tone while orange can transmit a happy tone.
216 Chapter 7 / Color and Arcade Game Graphics

Please refer to Table 7-3 for some examples of when and where to use certain col-
ors to create specific moods and emotions in your games.
TABLE 7-3: Game Mood Color Usage Matrix
Desired Mood Recommended Game Type Suggested ForegroundColor Combinations
SuggestedBackground ColorCombinations
Happy, upbeat,cheery
Maze/chase games, puzzlers,platformers, and educationalgames for young children
Oranges Reds and yellows
Sadness, gloom,despair
Shooters and platformers Grays Blues
Harmony, peace,wisdom
Educational games White Blue and gold
Evil, doom, death Shooters and platformers Blues Grays
Mystery, adventure,fantasy
Maze/chase games, puzzlers,platformers, and educationalgames for young children
Purples Lavender,magentas, pinks,and gold
Purity, romance,sweetness
Maze/chase games, puzzlers,platformers, and educationalgames for young children
Pinks Whites, reds, andlavender
Nature, stability,earthiness
Shooters and platformers Greens Grays and browns
Technology, futuristic Maze/chase games, puzzlers,and platformers
Grays and blues Purple and gold
Excitement, anger,power
Maze/chase games, puzzlers,and platformers
Reds Blues and oranges
NOTE: For our purposes, foreground colors refer to the colors used for fore-
ground screen objects such as sprites and bonus/pick-up items. Background
colors refer to background tiles, scenes, and framing elements. As indicated
in Table 7-3, these color choices are just suggestions. Your individual tastes
and the type of game will actually dictate the colors you use. Even so, I
thought it might be helpful to give you a sense of how certain colors can
project certain moods, feelings, and emotions to the user.
Color Perception Issues
As one might expect, everyone perceives color somewhat differently. In some
cases, these differences in perception are due to one’s upbringing or cultural envi-
ronment. However, in most cases, biological and physical factors are responsible
Chapter 7 / Color and Arcade Game Graphics 217
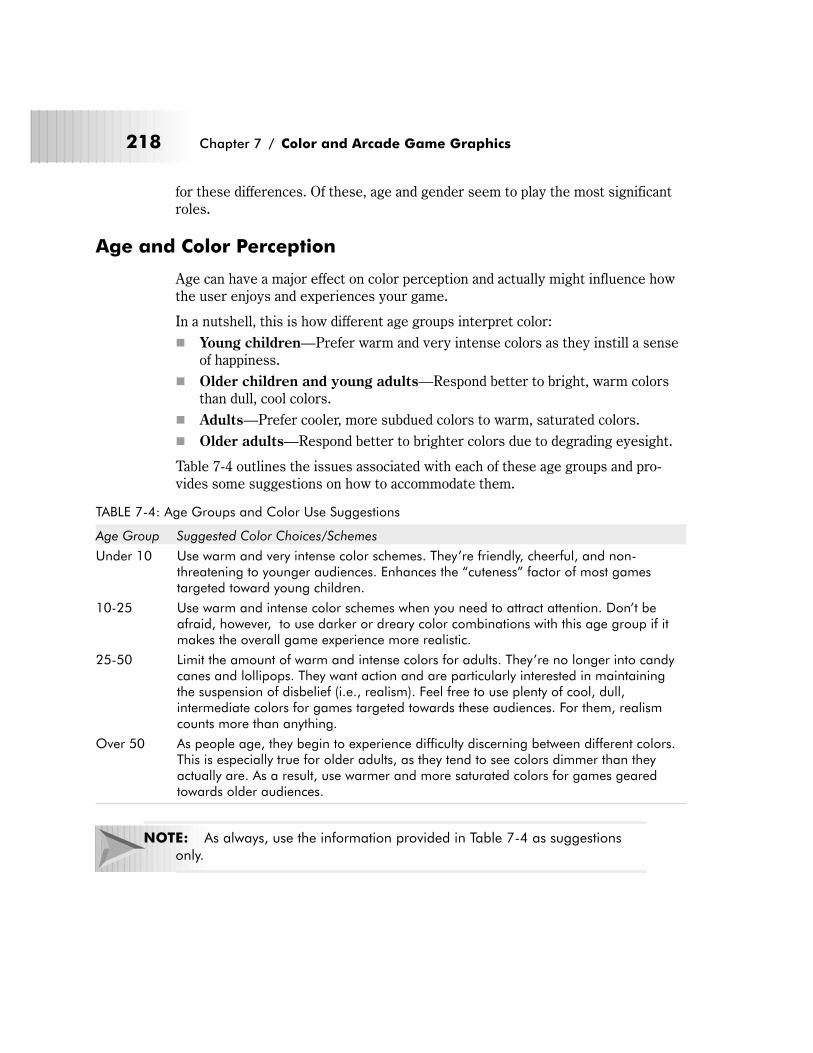
for these differences. Of these, age and gender seem to play the most significant
roles.
Age and Color Perception
Age can have a major effect on color perception and actually might influence how
the user enjoys and experiences your game.
In a nutshell, this is how different age groups interpret color:
� Young children—Prefer warm and very intense colors as they instill a sense
of happiness.
� Older children and young adults—Respond better to bright, warm colors
than dull, cool colors.
� Adults—Prefer cooler, more subdued colors to warm, saturated colors.
� Older adults—Respond better to brighter colors due to degrading eyesight.
Table 7-4 outlines the issues associated with each of these age groups and pro-
vides some suggestions on how to accommodate them.
TABLE 7-4: Age Groups and Color Use Suggestions
Age Group Suggested Color Choices/Schemes
Under 10 Use warm and very intense color schemes. They’re friendly, cheerful, and non-threatening to younger audiences. Enhances the “cuteness” factor of most gamestargeted toward young children.
10-25 Use warm and intense color schemes when you need to attract attention. Don’t beafraid, however, to use darker or dreary color combinations with this age group if itmakes the overall game experience more realistic.
25-50 Limit the amount of warm and intense colors for adults. They’re no longer into candycanes and lollipops. They want action and are particularly interested in maintainingthe suspension of disbelief (i.e., realism). Feel free to use plenty of cool, dull,intermediate colors for games targeted towards these audiences. For them, realismcounts more than anything.
Over 50 As people age, they begin to experience difficulty discerning between different colors.This is especially true for older adults, as they tend to see colors dimmer than theyactually are. As a result, use warmer and more saturated colors for games gearedtowards older audiences.
NOTE: As always, use the information provided in Table 7-4 as suggestions
only.
218 Chapter 7 / Color and Arcade Game Graphics
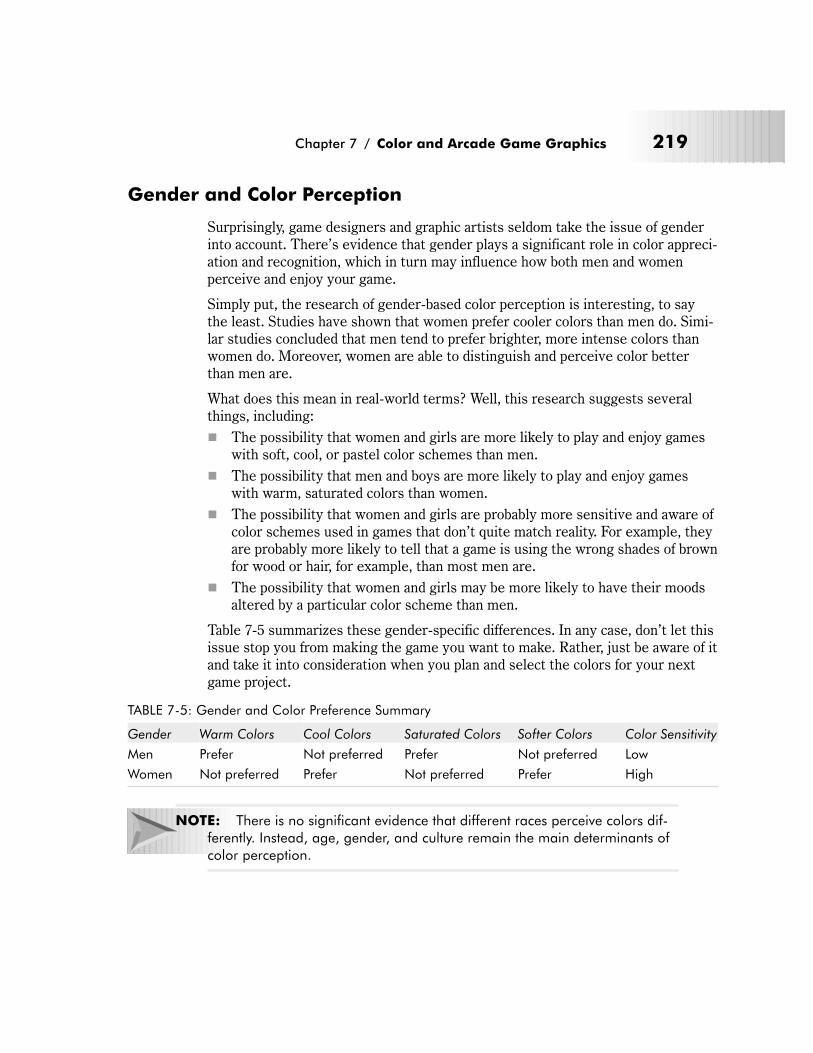
Gender and Color Perception
Surprisingly, game designers and graphic artists seldom take the issue of gender
into account. There’s evidence that gender plays a significant role in color appreci-
ation and recognition, which in turn may influence how both men and women
perceive and enjoy your game.
Simply put, the research of gender-based color perception is interesting, to say
the least. Studies have shown that women prefer cooler colors than men do. Simi-
lar studies concluded that men tend to prefer brighter, more intense colors than
women do. Moreover, women are able to distinguish and perceive color better
than men are.
What does this mean in real-world terms? Well, this research suggests several
things, including:
� The possibility that women and girls are more likely to play and enjoy games
with soft, cool, or pastel color schemes than men.
� The possibility that men and boys are more likely to play and enjoy games
with warm, saturated colors than women.
� The possibility that women and girls are probably more sensitive and aware of
color schemes used in games that don’t quite match reality. For example, they
are probably more likely to tell that a game is using the wrong shades of brown
for wood or hair, for example, than most men are.
� The possibility that women and girls may be more likely to have their moods
altered by a particular color scheme than men.
Table 7-5 summarizes these gender-specific differences. In any case, don’t let this
issue stop you from making the game you want to make. Rather, just be aware of it
and take it into consideration when you plan and select the colors for your next
game project.
TABLE 7-5: Gender and Color Preference Summary
Gender Warm Colors Cool Colors Saturated Colors Softer Colors Color Sensitivity
Men Prefer Not preferred Prefer Not preferred Low
Women Not preferred Prefer Not preferred Prefer High
NOTE: There is no significant evidence that different races perceive colors dif-
ferently. Instead, age, gender, and culture remain the main determinants of
color perception.
Chapter 7 / Color and Arcade Game Graphics 219
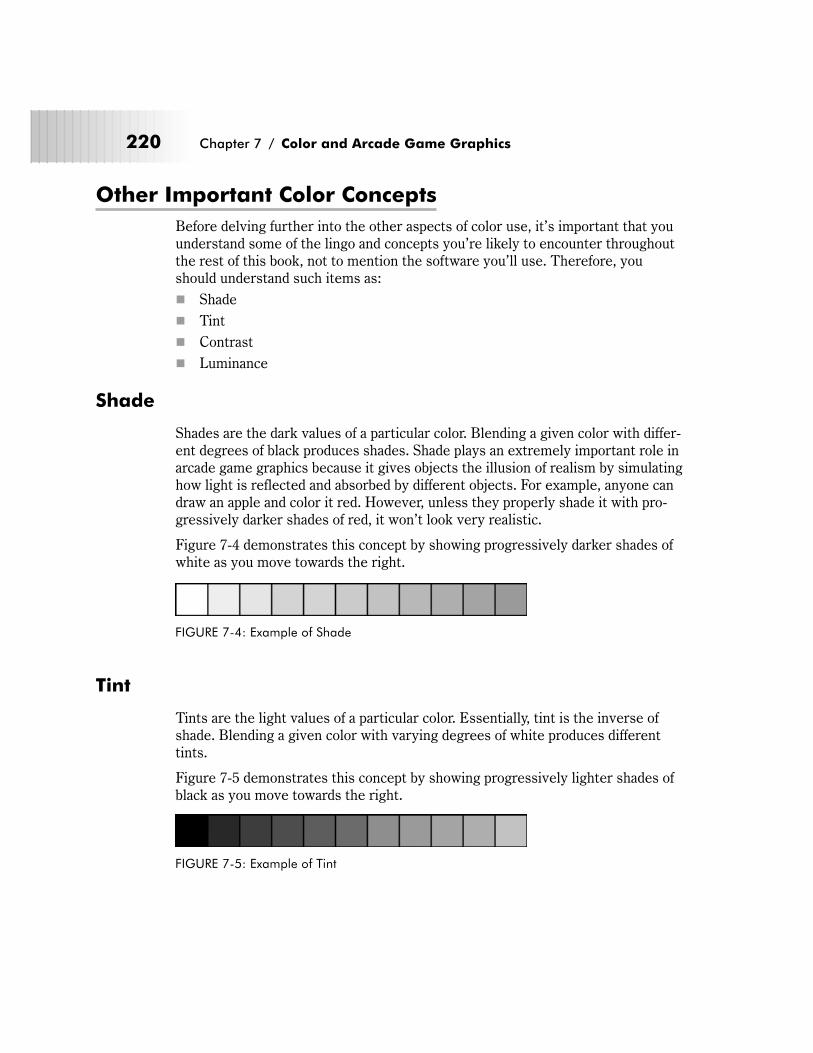
Other Important Color Concepts
Before delving further into the other aspects of color use, it’s important that you
understand some of the lingo and concepts you’re likely to encounter throughout
the rest of this book, not to mention the software you’ll use. Therefore, you
should understand such items as:
� Shade
� Tint
� Contrast
� Luminance
Shade
Shades are the dark values of a particular color. Blending a given color with differ-
ent degrees of black produces shades. Shade plays an extremely important role in
arcade game graphics because it gives objects the illusion of realism by simulating
how light is reflected and absorbed by different objects. For example, anyone can
draw an apple and color it red. However, unless they properly shade it with pro-
gressively darker shades of red, it won’t look very realistic.
Figure 7-4 demonstrates this concept by showing progressively darker shades of
white as you move towards the right.
Tint
Tints are the light values of a particular color. Essentially, tint is the inverse of
shade. Blending a given color with varying degrees of white produces different
tints.
Figure 7-5 demonstrates this concept by showing progressively lighter shades of
black as you move towards the right.
220 Chapter 7 / Color and Arcade Game Graphics
FIGURE 7-4: Example of Shade
FIGURE 7-5: Example of Tint
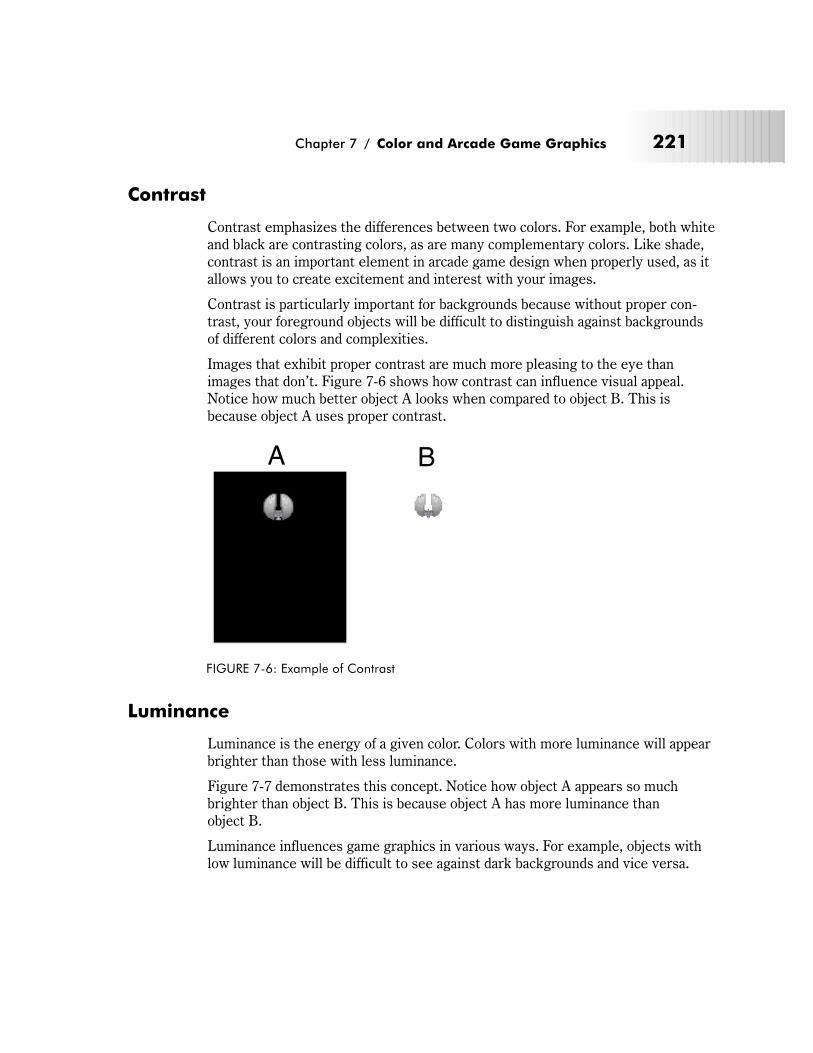
Contrast
Contrast emphasizes the differences between two colors. For example, both white
and black are contrasting colors, as are many complementary colors. Like shade,
contrast is an important element in arcade game design when properly used, as it
allows you to create excitement and interest with your images.
Contrast is particularly important for backgrounds because without proper con-
trast, your foreground objects will be difficult to distinguish against backgrounds
of different colors and complexities.
Images that exhibit proper contrast are much more pleasing to the eye than
images that don’t. Figure 7-6 shows how contrast can influence visual appeal.
Notice how much better object A looks when compared to object B. This is
because object A uses proper contrast.
Luminance
Luminance is the energy of a given color. Colors with more luminance will appear
brighter than those with less luminance.
Figure 7-7 demonstrates this concept. Notice how object A appears so much
brighter than object B. This is because object A has more luminance than
object B.
Luminance influences game graphics in various ways. For example, objects with
low luminance will be difficult to see against dark backgrounds and vice versa.
Chapter 7 / Color and Arcade Game Graphics 221
A B
FIGURE 7-6: Example of Contrast
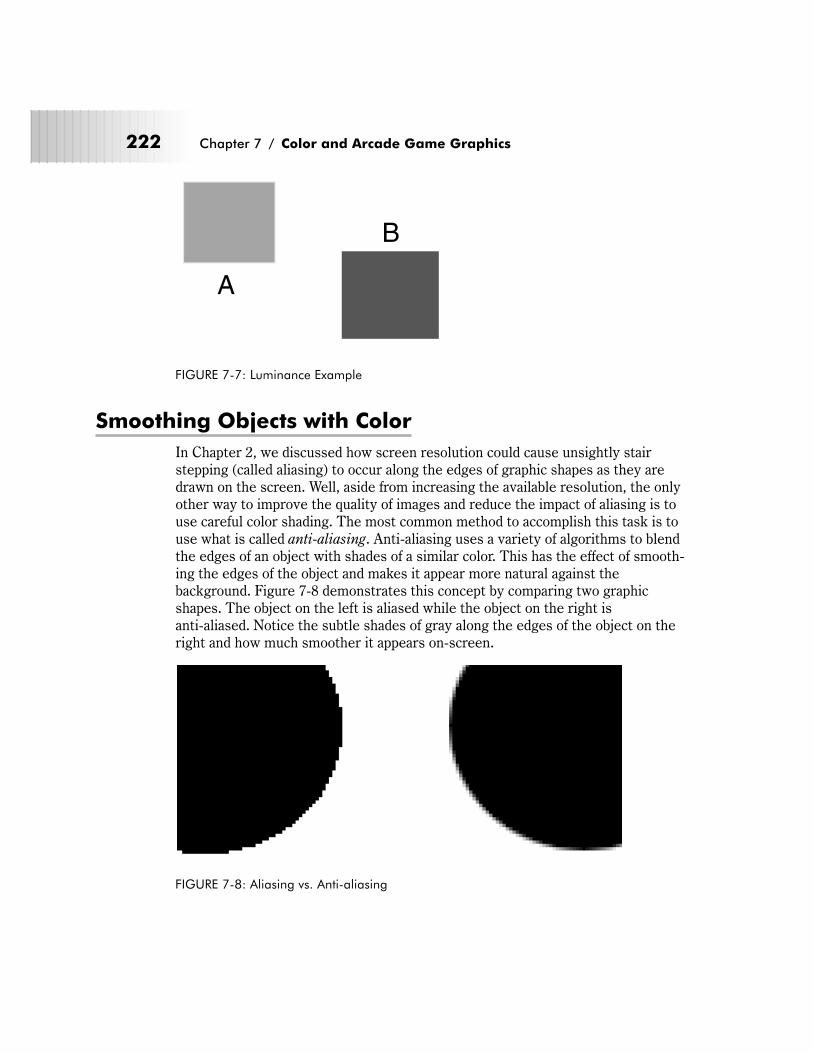
Smoothing Objects with Color
In Chapter 2, we discussed how screen resolution could cause unsightly stair
stepping (called aliasing) to occur along the edges of graphic shapes as they are
drawn on the screen. Well, aside from increasing the available resolution, the only
other way to improve the quality of images and reduce the impact of aliasing is to
use careful color shading. The most common method to accomplish this task is to
use what is called anti-aliasing. Anti-aliasing uses a variety of algorithms to blend
the edges of an object with shades of a similar color. This has the effect of smooth-
ing the edges of the object and makes it appear more natural against the
background. Figure 7-8 demonstrates this concept by comparing two graphic
shapes. The object on the left is aliased while the object on the right is
anti-aliased. Notice the subtle shades of gray along the edges of the object on the
right and how much smoother it appears on-screen.
222 Chapter 7 / Color and Arcade Game Graphics
A
B
FIGURE 7-7: Luminance Example
FIGURE 7-8: Aliasing vs. Anti-aliasing
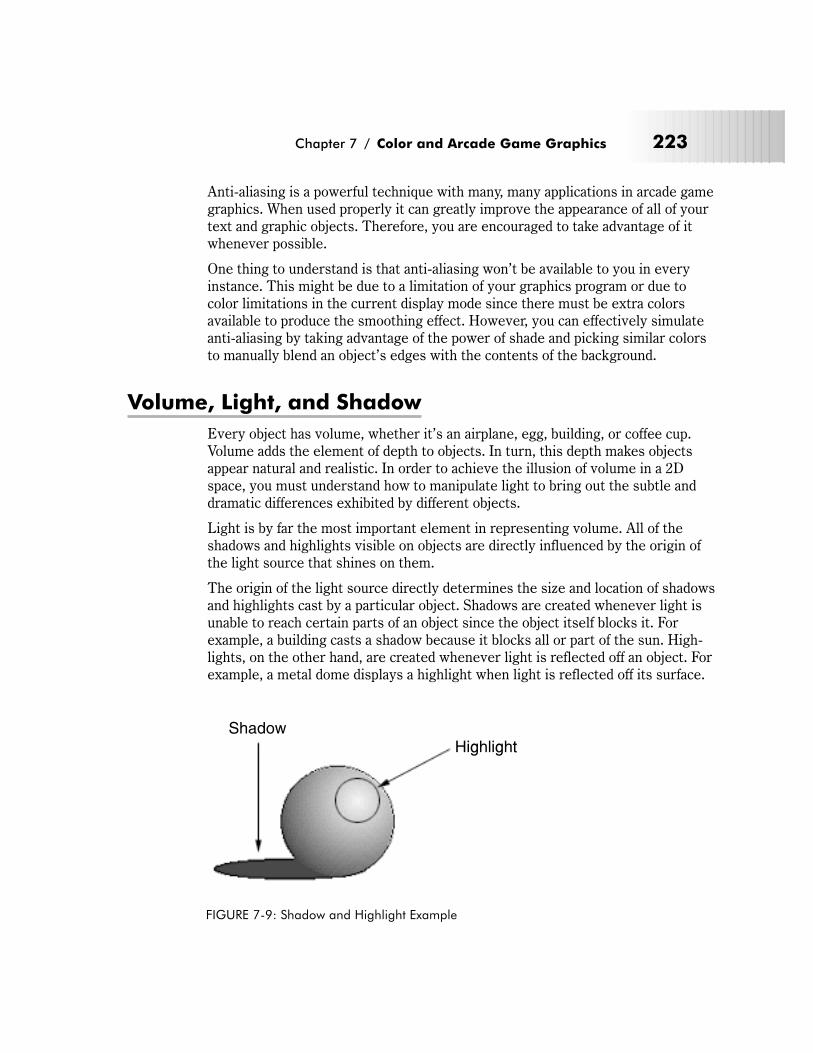
Anti-aliasing is a powerful technique with many, many applications in arcade game
graphics. When used properly it can greatly improve the appearance of all of your
text and graphic objects. Therefore, you are encouraged to take advantage of it
whenever possible.
One thing to understand is that anti-aliasing won’t be available to you in every
instance. This might be due to a limitation of your graphics program or due to
color limitations in the current display mode since there must be extra colors
available to produce the smoothing effect. However, you can effectively simulate
anti-aliasing by taking advantage of the power of shade and picking similar colors
to manually blend an object’s edges with the contents of the background.
Volume, Light, and Shadow
Every object has volume, whether it’s an airplane, egg, building, or coffee cup.
Volume adds the element of depth to objects. In turn, this depth makes objects
appear natural and realistic. In order to achieve the illusion of volume in a 2D
space, you must understand how to manipulate light to bring out the subtle and
dramatic differences exhibited by different objects.
Light is by far the most important element in representing volume. All of the
shadows and highlights visible on objects are directly influenced by the origin of
the light source that shines on them.
The origin of the light source directly determines the size and location of shadows
and highlights cast by a particular object. Shadows are created whenever light is
unable to reach certain parts of an object since the object itself blocks it. For
example, a building casts a shadow because it blocks all or part of the sun. High-
lights, on the other hand, are created whenever light is reflected off an object. For
example, a metal dome displays a highlight when light is reflected off its surface.
Chapter 7 / Color and Arcade Game Graphics 223
ShadowHighlight
FIGURE 7-9: Shadow and Highlight Example
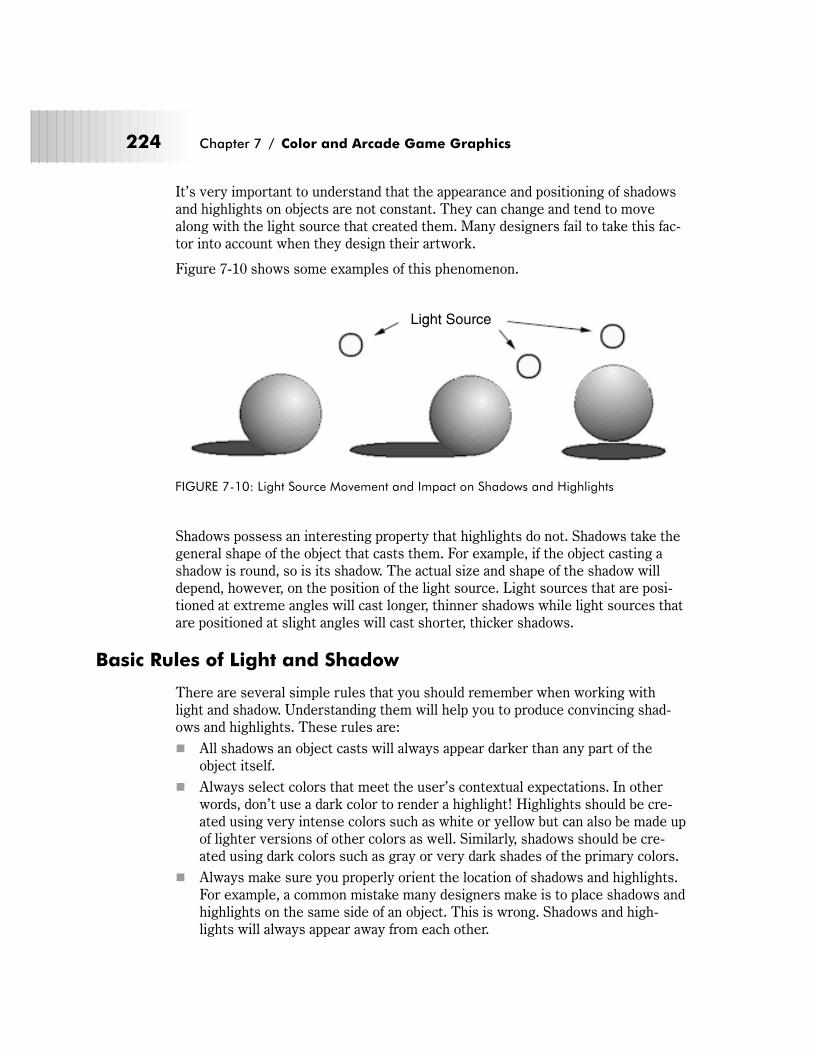
It’s very important to understand that the appearance and positioning of shadows
and highlights on objects are not constant. They can change and tend to move
along with the light source that created them. Many designers fail to take this fac-
tor into account when they design their artwork.
Figure 7-10 shows some examples of this phenomenon.
Shadows possess an interesting property that highlights do not. Shadows take the
general shape of the object that casts them. For example, if the object casting a
shadow is round, so is its shadow. The actual size and shape of the shadow will
depend, however, on the position of the light source. Light sources that are posi-
tioned at extreme angles will cast longer, thinner shadows while light sources that
are positioned at slight angles will cast shorter, thicker shadows.
Basic Rules of Light and Shadow
There are several simple rules that you should remember when working with
light and shadow. Understanding them will help you to produce convincing shad-
ows and highlights. These rules are:
� All shadows an object casts will always appear darker than any part of the
object itself.
� Always select colors that meet the user’s contextual expectations. In other
words, don’t use a dark color to render a highlight! Highlights should be cre-
ated using very intense colors such as white or yellow but can also be made up
of lighter versions of other colors as well. Similarly, shadows should be cre-
ated using dark colors such as gray or very dark shades of the primary colors.
� Always make sure you properly orient the location of shadows and highlights.
For example, a common mistake many designers make is to place shadows and
highlights on the same side of an object. This is wrong. Shadows and high-
lights will always appear away from each other.
224 Chapter 7 / Color and Arcade Game Graphics
Light Source
FIGURE 7-10: Light Source Movement and Impact on Shadows and Highlights
� The closer the light source, the brighter the highlight on an object. This
means that you should draw the highlight with a larger radius and with more
intensity to properly reflect the proximity of the light’s reflection.
� Don’t use unrelated shades to render shadows! For example, if you opt to cre-
ate a shadow using shades of gray, stick with it. Don’t suddenly introduce
blues, reds, or other colors. This will simply ruin the effect.
� Objects with rounded and/or smooth surfaces tend to cast softer, more subtle
shadows, i.e., lighter shadows.
� Objects with sharp and/or distinct edges tend to cast harder and more distinct
shadows, i.e., darker shadows.
� Shadows and highlights must always be used together. One cannot be present
without the other; otherwise, you’ll break the rules of light and shadow and
ruin the element of realism they can provide.
� The length of a shadow varies depending on the angle of the light source.
Steeper angles produce shorter shadows. For example, if light reflects in front
or above an object, a short shadow will result. Conversely, slight angles pro-
duce relatively long shadows. Be careful, however. If the angle of the light
source is too slight, the illusion of depth can be ruined because the resulting
shadow will be too long.
� Try to limit how you describe shadows and highlights by using a maximum of
four to eight shades of a given color. Using any less reduces the effectiveness
of the illusion while using any more is simply overkill.
Table 7-6 contains some examples of good colors to use for shadows and
highlights.
TABLE 7-6: Useful Shadow and Highlight Colors
Shadow Colors Highlight Color
Black* White
Dark gray* Light gray
Medium gray* Yellow
Dark blue Light yellow
Very dark green See Note
Very dark red See Note
NOTE: Colors marked with an asterisk (*) denote realistic shadow colors. Other
colors can be used to render shadow effects but with diminished realism.
Highlight colors work somewhat differently as they always use white or yel-
low to represent the area where the reflection of light is the most intense.
Chapter 7 / Color and Arcade Game Graphics 225
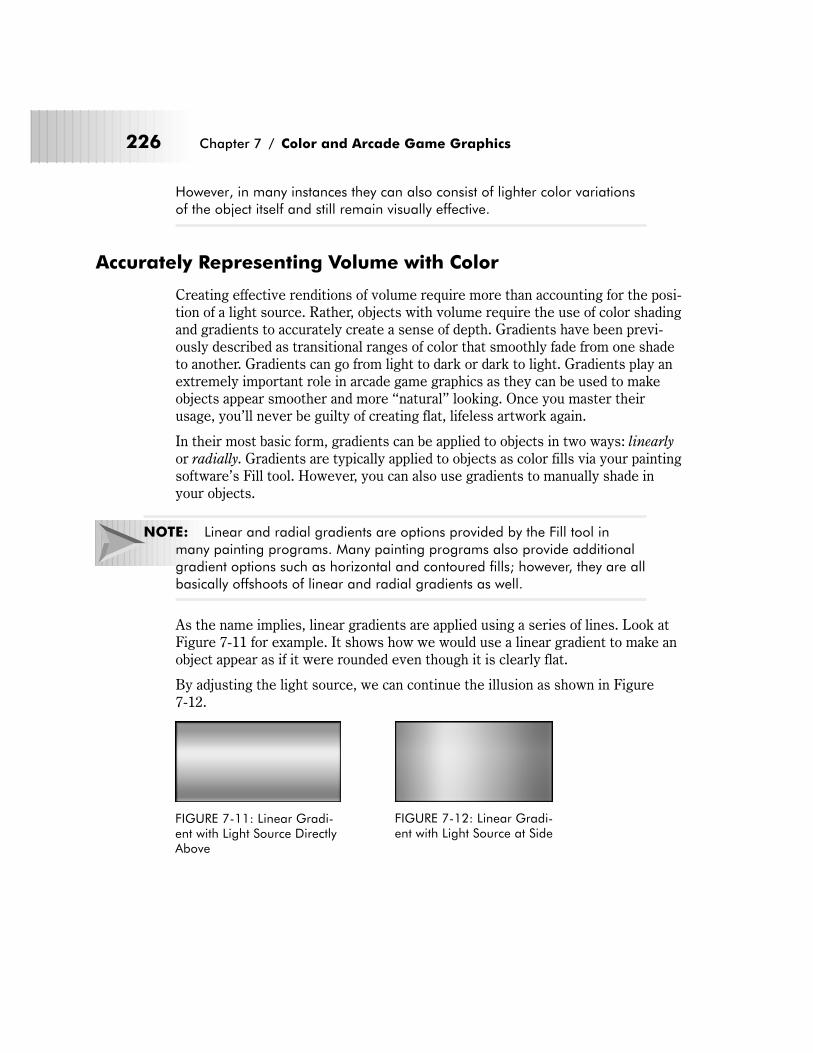
However, in many instances they can also consist of lighter color variations
of the object itself and still remain visually effective.
Accurately Representing Volume with Color
Creating effective renditions of volume require more than accounting for the posi-
tion of a light source. Rather, objects with volume require the use of color shading
and gradients to accurately create a sense of depth. Gradients have been previ-
ously described as transitional ranges of color that smoothly fade from one shade
to another. Gradients can go from light to dark or dark to light. Gradients play an
extremely important role in arcade game graphics as they can be used to make
objects appear smoother and more “natural” looking. Once you master their
usage, you’ll never be guilty of creating flat, lifeless artwork again.
In their most basic form, gradients can be applied to objects in two ways: linearly
or radially. Gradients are typically applied to objects as color fills via your painting
software’s Fill tool. However, you can also use gradients to manually shade in
your objects.
NOTE: Linear and radial gradients are options provided by the Fill tool in
many painting programs. Many painting programs also provide additional
gradient options such as horizontal and contoured fills; however, they are all
basically offshoots of linear and radial gradients as well.
As the name implies, linear gradients are applied using a series of lines. Look at
Figure 7-11 for example. It shows how we would use a linear gradient to make an
object appear as if it were rounded even though it is clearly flat.
By adjusting the light source, we can continue the illusion as shown in Figure
7-12.
226 Chapter 7 / Color and Arcade Game Graphics
FIGURE 7-11: Linear Gradi-ent with Light Source DirectlyAbove
FIGURE 7-12: Linear Gradi-ent with Light Source at Side
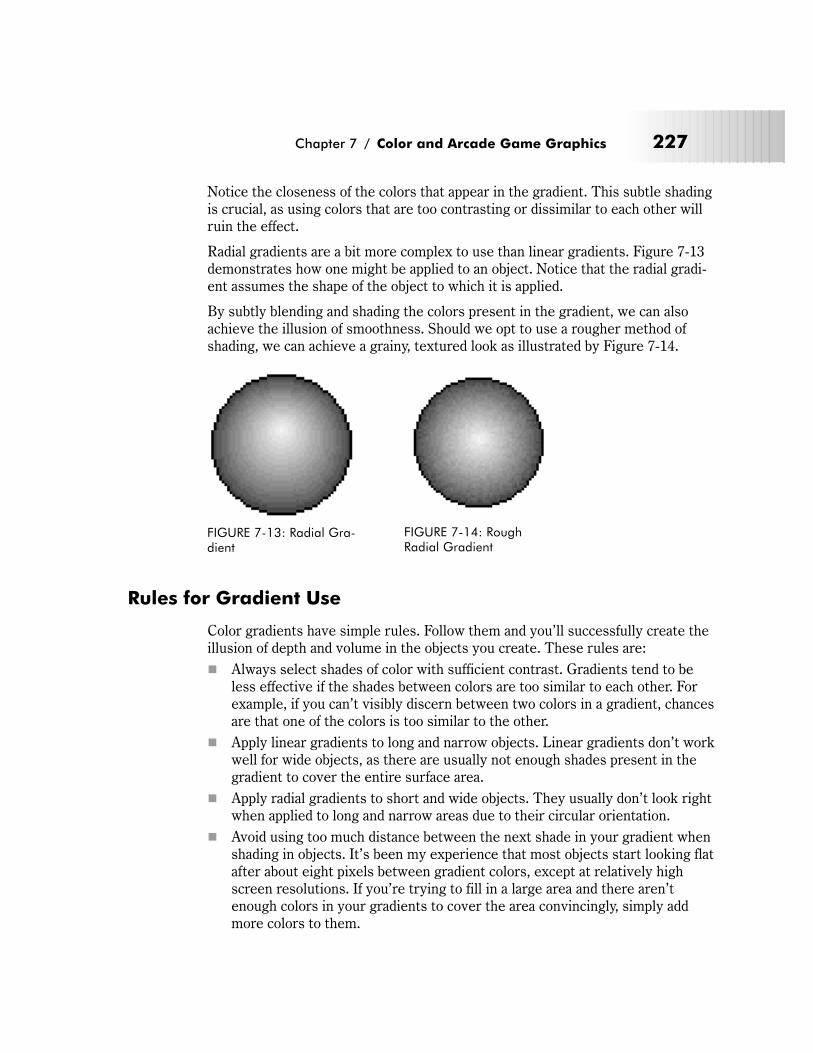
Notice the closeness of the colors that appear in the gradient. This subtle shading
is crucial, as using colors that are too contrasting or dissimilar to each other will
ruin the effect.
Radial gradients are a bit more complex to use than linear gradients. Figure 7-13
demonstrates how one might be applied to an object. Notice that the radial gradi-
ent assumes the shape of the object to which it is applied.
By subtly blending and shading the colors present in the gradient, we can also
achieve the illusion of smoothness. Should we opt to use a rougher method of
shading, we can achieve a grainy, textured look as illustrated by Figure 7-14.
Rules for Gradient Use
Color gradients have simple rules. Follow them and you’ll successfully create the
illusion of depth and volume in the objects you create. These rules are:
� Always select shades of color with sufficient contrast. Gradients tend to be
less effective if the shades between colors are too similar to each other. For
example, if you can’t visibly discern between two colors in a gradient, chances
are that one of the colors is too similar to the other.
� Apply linear gradients to long and narrow objects. Linear gradients don’t work
well for wide objects, as there are usually not enough shades present in the
gradient to cover the entire surface area.
� Apply radial gradients to short and wide objects. They usually don’t look right
when applied to long and narrow areas due to their circular orientation.
� Avoid using too much distance between the next shade in your gradient when
shading in objects. It’s been my experience that most objects start looking flat
after about eight pixels between gradient colors, except at relatively high
screen resolutions. If you’re trying to fill in a large area and there aren’t
enough colors in your gradients to cover the area convincingly, simply add
more colors to them.
Chapter 7 / Color and Arcade Game Graphics 227
FIGURE 7-13: Radial Gra-dient
FIGURE 7-14: RoughRadial Gradient
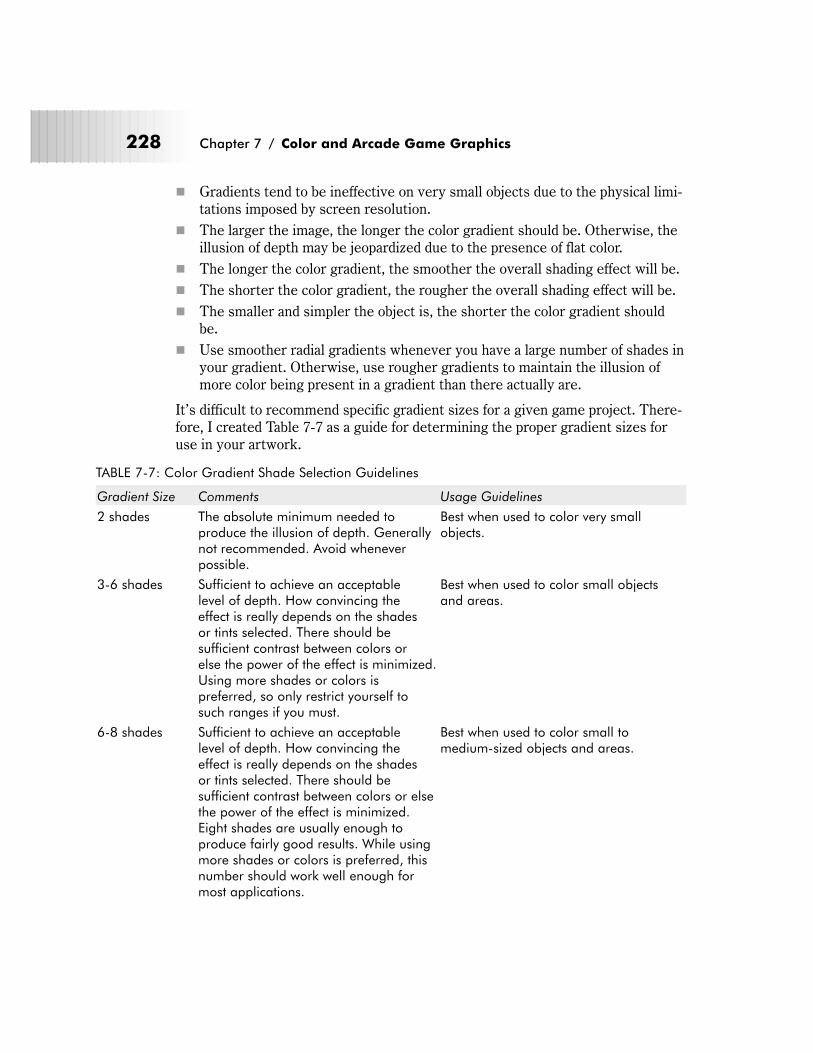
� Gradients tend to be ineffective on very small objects due to the physical limi-
tations imposed by screen resolution.
� The larger the image, the longer the color gradient should be. Otherwise, the
illusion of depth may be jeopardized due to the presence of flat color.
� The longer the color gradient, the smoother the overall shading effect will be.
� The shorter the color gradient, the rougher the overall shading effect will be.
� The smaller and simpler the object is, the shorter the color gradient should
be.
� Use smoother radial gradients whenever you have a large number of shades in
your gradient. Otherwise, use rougher gradients to maintain the illusion of
more color being present in a gradient than there actually are.
It’s difficult to recommend specific gradient sizes for a given game project. There-
fore, I created Table 7-7 as a guide for determining the proper gradient sizes for
use in your artwork.
TABLE 7-7: Color Gradient Shade Selection Guidelines
Gradient Size Comments Usage Guidelines
2 shades The absolute minimum needed toproduce the illusion of depth. Generallynot recommended. Avoid wheneverpossible.
Best when used to color very smallobjects.
3-6 shades Sufficient to achieve an acceptablelevel of depth. How convincing theeffect is really depends on the shadesor tints selected. There should besufficient contrast between colors orelse the power of the effect is minimized.Using more shades or colors ispreferred, so only restrict yourself tosuch ranges if you must.
Best when used to color small objectsand areas.
6-8 shades Sufficient to achieve an acceptablelevel of depth. How convincing theeffect is really depends on the shadesor tints selected. There should besufficient contrast between colors or elsethe power of the effect is minimized.Eight shades are usually enough toproduce fairly good results. While usingmore shades or colors is preferred, thisnumber should work well enough formost applications.
Best when used to color small tomedium-sized objects and areas.
228 Chapter 7 / Color and Arcade Game Graphics
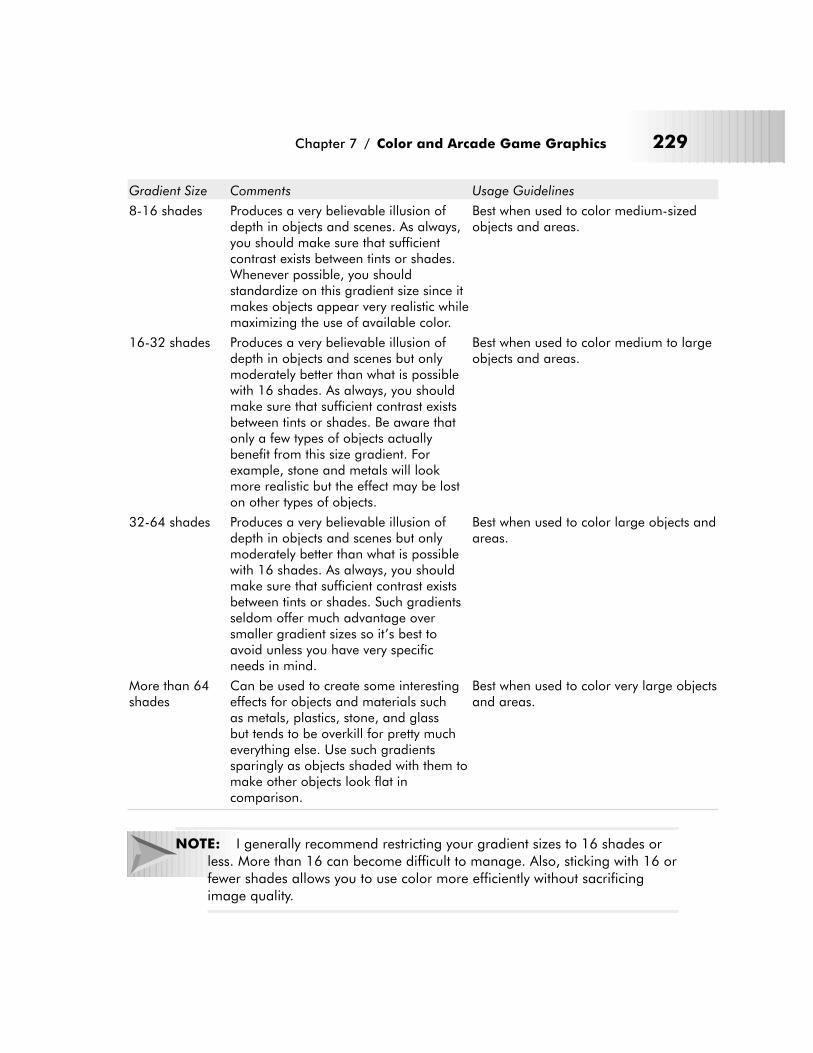
Gradient Size Comments Usage Guidelines
8-16 shades Produces a very believable illusion ofdepth in objects and scenes. As always,you should make sure that sufficientcontrast exists between tints or shades.Whenever possible, you shouldstandardize on this gradient size since itmakes objects appear very realistic whilemaximizing the use of available color.
Best when used to color medium-sizedobjects and areas.
16-32 shades Produces a very believable illusion ofdepth in objects and scenes but onlymoderately better than what is possiblewith 16 shades. As always, you shouldmake sure that sufficient contrast existsbetween tints or shades. Be aware thatonly a few types of objects actuallybenefit from this size gradient. Forexample, stone and metals will lookmore realistic but the effect may be loston other types of objects.
Best when used to color medium to largeobjects and areas.
32-64 shades Produces a very believable illusion ofdepth in objects and scenes but onlymoderately better than what is possiblewith 16 shades. As always, you shouldmake sure that sufficient contrast existsbetween tints or shades. Such gradientsseldom offer much advantage oversmaller gradient sizes so it’s best toavoid unless you have very specificneeds in mind.
Best when used to color large objects andareas.
More than 64shades
Can be used to create some interestingeffects for objects and materials suchas metals, plastics, stone, and glassbut tends to be overkill for pretty mucheverything else. Use such gradientssparingly as objects shaded with them tomake other objects look flat incomparison.
Best when used to color very large objectsand areas.
NOTE: I generally recommend restricting your gradient sizes to 16 shades or
less. More than 16 can become difficult to manage. Also, sticking with 16 or
fewer shades allows you to use color more efficiently without sacrificing
image quality.
Chapter 7 / Color and Arcade Game Graphics 229
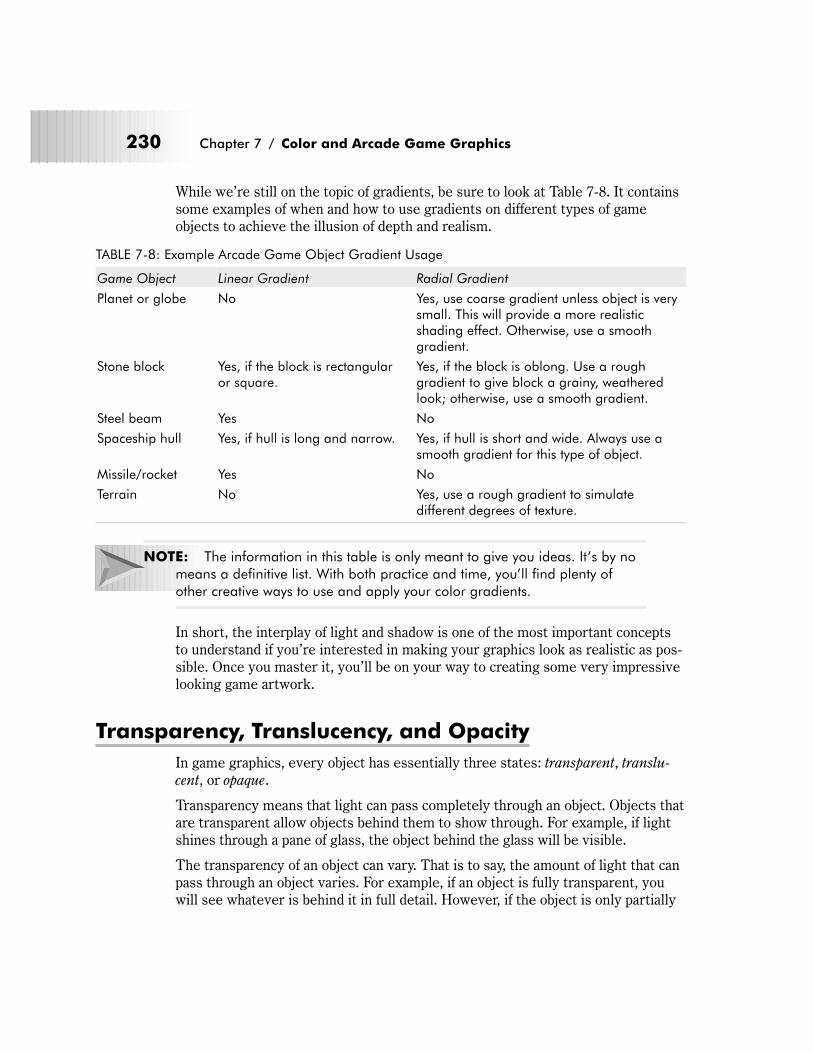
While we’re still on the topic of gradients, be sure to look at Table 7-8. It contains
some examples of when and how to use gradients on different types of game
objects to achieve the illusion of depth and realism.
TABLE 7-8: Example Arcade Game Object Gradient Usage
Game Object Linear Gradient Radial Gradient
Planet or globe No Yes, use coarse gradient unless object is verysmall. This will provide a more realisticshading effect. Otherwise, use a smoothgradient.
Stone block Yes, if the block is rectangularor square.
Yes, if the block is oblong. Use a roughgradient to give block a grainy, weatheredlook; otherwise, use a smooth gradient.
Steel beam Yes No
Spaceship hull Yes, if hull is long and narrow. Yes, if hull is short and wide. Always use asmooth gradient for this type of object.
Missile/rocket Yes No
Terrain No Yes, use a rough gradient to simulatedifferent degrees of texture.
NOTE: The information in this table is only meant to give you ideas. It’s by no
means a definitive list. With both practice and time, you’ll find plenty of
other creative ways to use and apply your color gradients.
In short, the interplay of light and shadow is one of the most important concepts
to understand if you’re interested in making your graphics look as realistic as pos-
sible. Once you master it, you’ll be on your way to creating some very impressive
looking game artwork.
Transparency, Translucency, and Opacity
In game graphics, every object has essentially three states: transparent, translu-
cent, or opaque.
Transparency means that light can pass completely through an object. Objects that
are transparent allow objects behind them to show through. For example, if light
shines through a pane of glass, the object behind the glass will be visible.
The transparency of an object can vary. That is to say, the amount of light that can
pass through an object varies. For example, if an object is fully transparent, you
will see whatever is behind it in full detail. However, if the object is only partially
230 Chapter 7 / Color and Arcade Game Graphics
transparent, you will only see faint details of the background object, usually with
some tint inherited from the foreground object’s color.
Partial transparency is also commonly referred to as translucency. Translucent
means that light can partially pass through an object, yet objects that are translu-
cent allow the colors of objects behind them to show through. For example, if light
shines through a sheet of blue cellophane, the object behind the cellophane will be
partially visible and inherit the blue tint of the cellophane.
Every object has a different level of transparency. As shown in Table 7-9, crystal-
line and otherwise clear objects such as water, ice, and glass tend to have the
most transparency, while objects that are dense such as stone, earth, and metal
tend to have the least.
TABLE 7-9: Examples of Different Object Transparency
Object Type Transparency Percentage Estimated Transparency Level
Clear glass, water,or cellophane
100% Fully transparent
Clear ice 75% Translucent
Tinted glass orcellophane
50-75% Translucent
Fog 0-50% Translucent
Metal, earth, orstone
0%-fully opaque Opaque (not transparent)
Transparency and translucency are difficult to achieve in games that use 8-bit
(256-color) display modes. Instead, most transparent and translucent effects are
produced in 16-bit or 24-bit display modes by using a special technique called
alpha blending. Alpha blending is a method of simulating transparency and translu-
cency by changing the color of the foreground object’s pixels (the source) based
on the background object’s pixels (the destination). The two color values of both
the source and the destination are then blended together using a specified level of
transparency. For example, applying transparency to a red block on a white back-
ground will produce a shade of light red or pink.
Opacity is the opposite of transparency. Opaque objects will not let light pass
through them. For our purposes, opaque objects are solid and retain their original
color and shading. You will not be able to see any object placed behind an opaque
object like you can with a transparent or translucent object.
By default, all of the objects we draw are assumed to be opaque. Because we will
be dealing with a 2D space, transparency will only have a limited value for most of
the arcade style game graphics we create. Still, taking transparency into account
can produce some interesting effects such as overlaid text and status indicators.
Using transparency properly can enhance the realism of your artwork. For
Chapter 7 / Color and Arcade Game Graphics 231
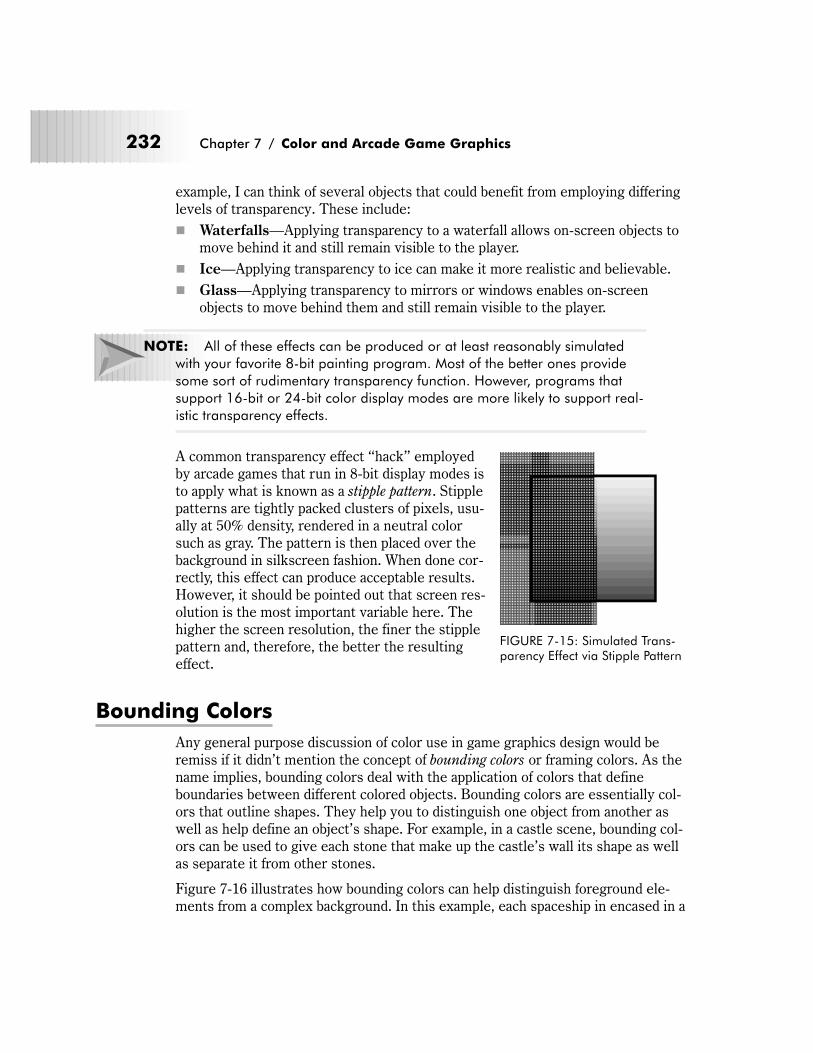
example, I can think of several objects that could benefit from employing differing
levels of transparency. These include:
� Waterfalls—Applying transparency to a waterfall allows on-screen objects to
move behind it and still remain visible to the player.
� Ice—Applying transparency to ice can make it more realistic and believable.
� Glass—Applying transparency to mirrors or windows enables on-screen
objects to move behind them and still remain visible to the player.
NOTE: All of these effects can be produced or at least reasonably simulated
with your favorite 8-bit painting program. Most of the better ones provide
some sort of rudimentary transparency function. However, programs that
support 16-bit or 24-bit color display modes are more likely to support real-
istic transparency effects.
A common transparency effect “hack” employed
by arcade games that run in 8-bit display modes is
to apply what is known as a stipple pattern. Stipple
patterns are tightly packed clusters of pixels, usu-
ally at 50% density, rendered in a neutral color
such as gray. The pattern is then placed over the
background in silkscreen fashion. When done cor-
rectly, this effect can produce acceptable results.
However, it should be pointed out that screen res-
olution is the most important variable here. The
higher the screen resolution, the finer the stipple
pattern and, therefore, the better the resulting
effect.
Bounding Colors
Any general purpose discussion of color use in game graphics design would be
remiss if it didn’t mention the concept of bounding colors or framing colors. As the
name implies, bounding colors deal with the application of colors that define
boundaries between different colored objects. Bounding colors are essentially col-
ors that outline shapes. They help you to distinguish one object from another as
well as help define an object’s shape. For example, in a castle scene, bounding col-
ors can be used to give each stone that make up the castle’s wall its shape as well
as separate it from other stones.
Figure 7-16 illustrates how bounding colors can help distinguish foreground ele-
ments from a complex background. In this example, each spaceship in encased in a
232 Chapter 7 / Color and Arcade Game Graphics
FIGURE 7-15: Simulated Trans-parency Effect via Stipple Pattern
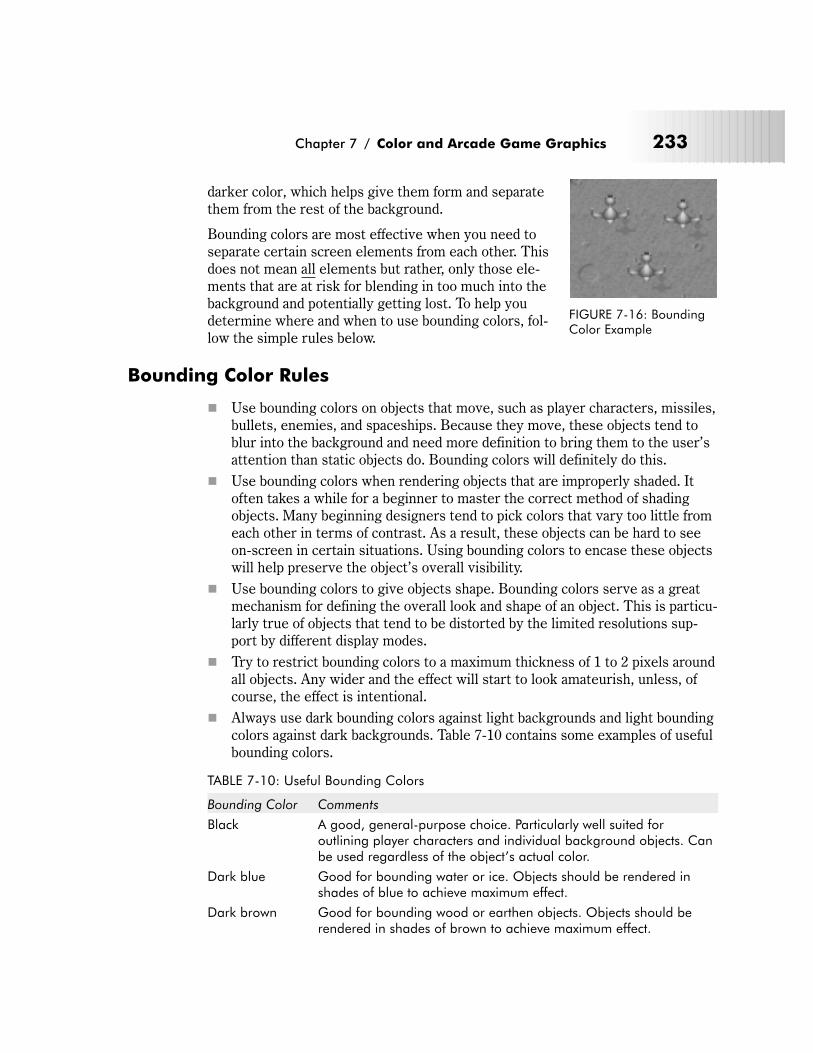
darker color, which helps give them form and separate
them from the rest of the background.
Bounding colors are most effective when you need to
separate certain screen elements from each other. This
does not mean all elements but rather, only those ele-
ments that are at risk for blending in too much into the
background and potentially getting lost. To help you
determine where and when to use bounding colors, fol-
low the simple rules below.
Bounding Color Rules
� Use bounding colors on objects that move, such as player characters, missiles,
bullets, enemies, and spaceships. Because they move, these objects tend to
blur into the background and need more definition to bring them to the user’s
attention than static objects do. Bounding colors will definitely do this.
� Use bounding colors when rendering objects that are improperly shaded. It
often takes a while for a beginner to master the correct method of shading
objects. Many beginning designers tend to pick colors that vary too little from
each other in terms of contrast. As a result, these objects can be hard to see
on-screen in certain situations. Using bounding colors to encase these objects
will help preserve the object’s overall visibility.
� Use bounding colors to give objects shape. Bounding colors serve as a great
mechanism for defining the overall look and shape of an object. This is particu-
larly true of objects that tend to be distorted by the limited resolutions sup-
port by different display modes.
� Try to restrict bounding colors to a maximum thickness of 1 to 2 pixels around
all objects. Any wider and the effect will start to look amateurish, unless, of
course, the effect is intentional.
� Always use dark bounding colors against light backgrounds and light bounding
colors against dark backgrounds. Table 7-10 contains some examples of useful
bounding colors.
TABLE 7-10: Useful Bounding Colors
Bounding Color Comments
Black A good, general-purpose choice. Particularly well suited foroutlining player characters and individual background objects. Canbe used regardless of the object’s actual color.
Dark blue Good for bounding water or ice. Objects should be rendered inshades of blue to achieve maximum effect.
Dark brown Good for bounding wood or earthen objects. Objects should berendered in shades of brown to achieve maximum effect.
Chapter 7 / Color and Arcade Game Graphics 233
FIGURE 7-16: BoundingColor Example
Bounding Color Comments
Dark green Good for bounding trees, grass, flowers, or jewels. Objects shouldbe rendered in shades of green to achieve maximum effect.
Dark gray Good for bounding stone, projectiles, beams, or metallic objects.Objects should be rendered in shades of gray to achieve maximumeffect.
Dark red Good for bounding objects such as jewels, bullets, fire, or blood.Objects should be rendered in some shade of red, orange, oryellow to achieve maximum effect.
White A good, general-purpose color for bounding all sorts of objectsagainst dark backgrounds.
Yellow A good, general-purpose color for bounding all sorts of objectsagainst dark backgrounds.
NOTE: Which color you actually choose will, of course, depend on the color of
the object you’re attempting to outline.
Color and Arcade Game Design Styles
Every arcade game has its own unique look or visual design style associated with
it. This style determines if the game mirrors fantasy or reality. Color plays a major
role in defining the characteristics of each design style and ultimately influences
how your game will appear to the player.
Despite the large number of arcade games they all fall into any one of three basic
design styles:
� Cartoon
� Retro
� Realistic
Cartoon
Cartoon-style arcade games tend to mimic the general look and feel of popular
television cartoons. Because the graphics in such games contain flat, basic shapes,
they often make liberal use of bright and simple colors, such as reds, oranges, and
yellows.
They also make considerable use of intermediate colors with lots of shade in order
to give objects and scenes the illusion of depth. For example, a cartoon-style
dragon character might have bright red polka dots, but its skin could be smoothly
shaded with subtle gradients of green.
234 Chapter 7 / Color and Arcade Game Graphics
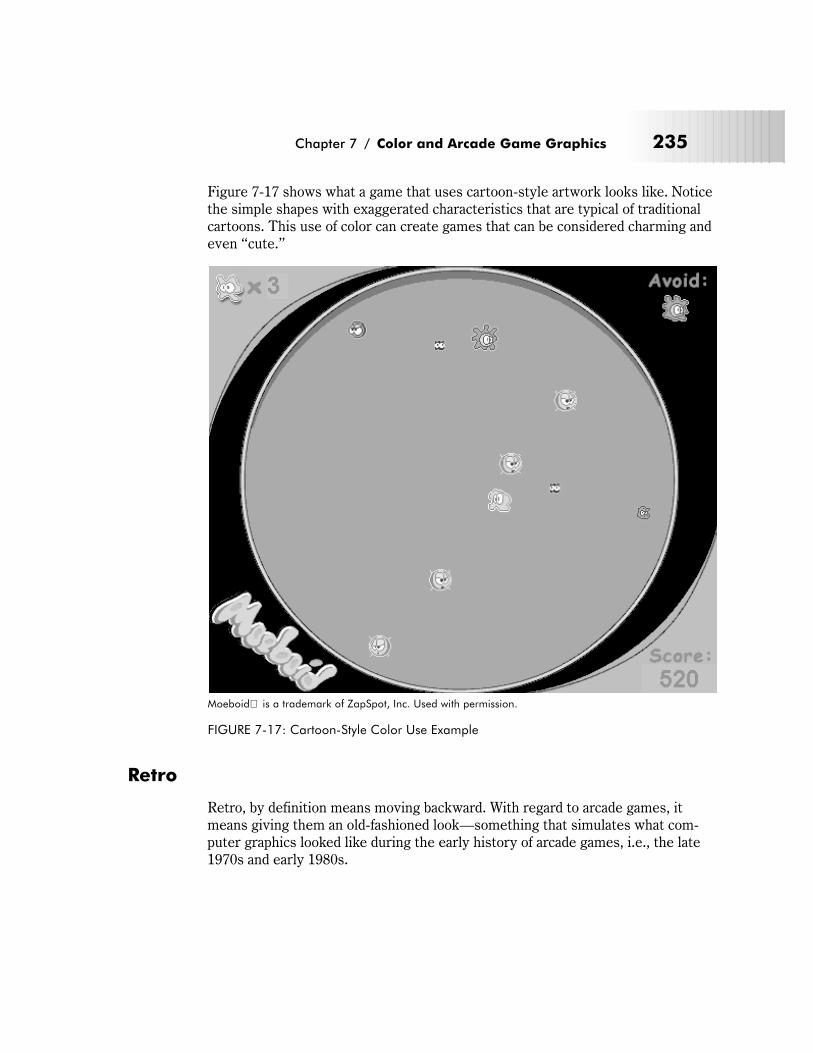
Figure 7-17 shows what a game that uses cartoon-style artwork looks like. Notice
the simple shapes with exaggerated characteristics that are typical of traditional
cartoons. This use of color can create games that can be considered charming and
even “cute.”
Retro
Retro, by definition means moving backward. With regard to arcade games, it
means giving them an old-fashioned look—something that simulates what com-
puter graphics looked like during the early history of arcade games, i.e., the late
1970s and early 1980s.
Chapter 7 / Color and Arcade Game Graphics 235
Moeboid� is a trademark of ZapSpot, Inc. Used with permission.
FIGURE 7-17: Cartoon-Style Color Use Example

Therefore, it’s not uncommon for these games to have spartan, minimalist art-
work that utilizes simple, blocky shapes. For such artwork, it’s best to use flat
colors such as medium red, blue, or green as they will help to reinforce the “old
school” look you’re trying to achieve.
Figure 7-18 illustrates a retro-style game. Notice the crude, blocky, and largely
colorless appearance of the artwork. Whether the effect is intentional or not, it
definitely gives the game pictured the feel of an earlier period.
Realistic
Maintaining the illusion of realism is one of a game artist’s most difficult chal-
lenges. Realistic-style arcade games must always use colors that render objects
and scenes convincingly without ever altering the user’s suspension of disbelief.
As long as you use common sense with your color choices, you should never have
a problem. For example, you don’t want to make tree trunks purple or the sky
brown in a sunny nature scene. It simply won’t fly with the user.
When designing realistic images, avoid the bright, simple colors used by the car-
toon and retro styles and instead go for complex color schemes that mimic nature
as closely as possible. This means picking subtle, intermediate shades that have
sufficient contrast between them.
236 Chapter 7 / Color and Arcade Game Graphics
Jumpman™
FIGURE 7-18: Retro-Style Color Use Example
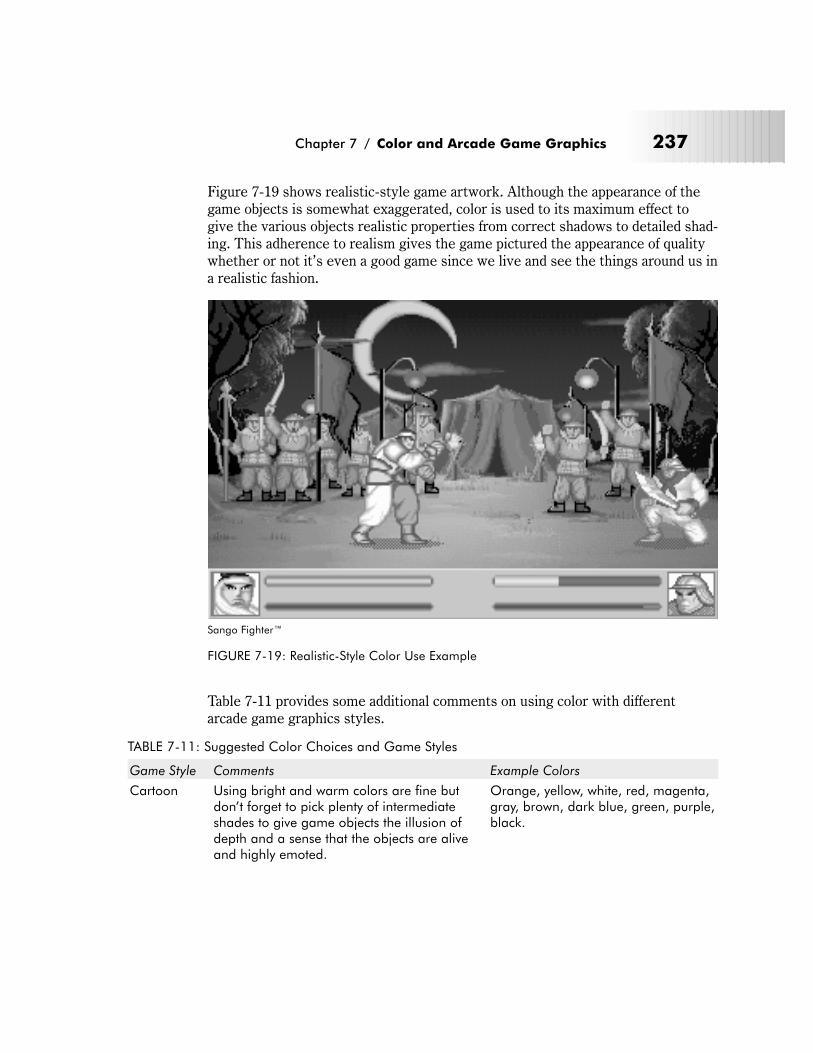
Figure 7-19 shows realistic-style game artwork. Although the appearance of the
game objects is somewhat exaggerated, color is used to its maximum effect to
give the various objects realistic properties from correct shadows to detailed shad-
ing. This adherence to realism gives the game pictured the appearance of quality
whether or not it’s even a good game since we live and see the things around us in
a realistic fashion.
Table 7-11 provides some additional comments on using color with different
arcade game graphics styles.
TABLE 7-11: Suggested Color Choices and Game Styles
Game Style Comments Example Colors
Cartoon Using bright and warm colors are fine butdon’t forget to pick plenty of intermediateshades to give game objects the illusion ofdepth and a sense that the objects are aliveand highly emoted.
Orange, yellow, white, red, magenta,gray, brown, dark blue, green, purple,black.
Chapter 7 / Color and Arcade Game Graphics 237
Sango Fighter™
FIGURE 7-19: Realistic-Style Color Use Example
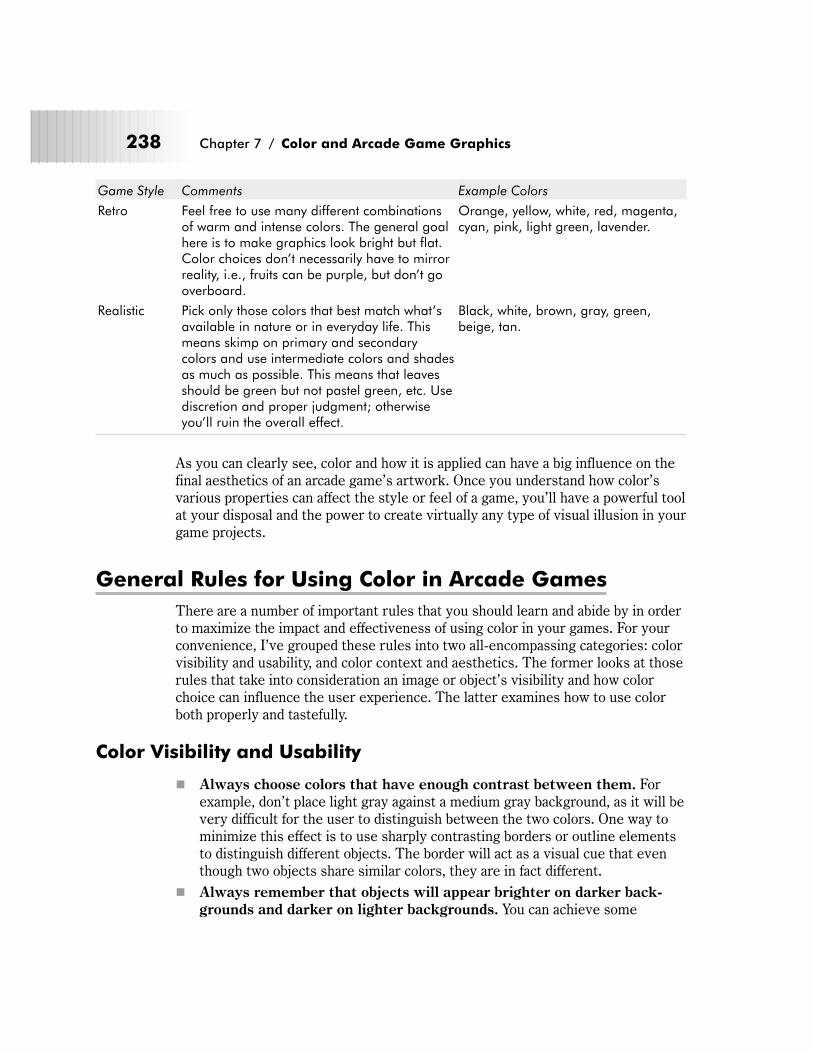
Game Style Comments Example Colors
Retro Feel free to use many different combinationsof warm and intense colors. The general goalhere is to make graphics look bright but flat.Color choices don’t necessarily have to mirrorreality, i.e., fruits can be purple, but don’t gooverboard.
Orange, yellow, white, red, magenta,cyan, pink, light green, lavender.
Realistic Pick only those colors that best match what’savailable in nature or in everyday life. Thismeans skimp on primary and secondarycolors and use intermediate colors and shadesas much as possible. This means that leavesshould be green but not pastel green, etc. Usediscretion and proper judgment; otherwiseyou’ll ruin the overall effect.
Black, white, brown, gray, green,beige, tan.
As you can clearly see, color and how it is applied can have a big influence on the
final aesthetics of an arcade game’s artwork. Once you understand how color’s
various properties can affect the style or feel of a game, you’ll have a powerful tool
at your disposal and the power to create virtually any type of visual illusion in your
game projects.
General Rules for Using Color in Arcade Games
There are a number of important rules that you should learn and abide by in order
to maximize the impact and effectiveness of using color in your games. For your
convenience, I’ve grouped these rules into two all-encompassing categories: color
visibility and usability, and color context and aesthetics. The former looks at those
rules that take into consideration an image or object’s visibility and how color
choice can influence the user experience. The latter examines how to use color
both properly and tastefully.
Color Visibility and Usability
� Always choose colors that have enough contrast between them. For
example, don’t place light gray against a medium gray background, as it will be
very difficult for the user to distinguish between the two colors. One way to
minimize this effect is to use sharply contrasting borders or outline elements
to distinguish different objects. The border will act as a visual cue that even
though two objects share similar colors, they are in fact different.
� Always remember that objects will appear brighter on darker back-
grounds and darker on lighter backgrounds. You can achieve some
238 Chapter 7 / Color and Arcade Game Graphics

interesting effects, particularly on background objects, by understanding this
phenomenon.
� As objects get smaller, their colors become less visible and distinct.
When this happens, darker colors, such as blue, become blacker while bright
colors, such as yellow, become whiter. Keep this in mind when designing par-
ticularly small objects, as certain color details will become lost as a result of
this effect.
� Avoid using very intense or saturated colors over large areas or
objects. While using very intense colors can make objects “pop” on the
screen, using such colors over large areas tends to induce eyestrain and
fatigue in many users. However, if you must use them, please limit yourself to
using them on small objects or localized areas within your artwork. Alterna-
tively, you can use neutral colors for the same areas, as they tend to be kinder
on the eyes.
� Warmer colors will always appear larger on-screen than cooler colors.
For example, objects rendered in red will appear larger than those that are
rendered in green. In some cases, this can alter the user’s perception of size
and break the element of realism that color provides.
� Don’t use shades that offer little difference in intensity. Such colors tend
to be less visible to users and thus less effective. For example, under most
lighting conditions, users won’t notice the subtle difference between a slightly
lighter or darker shade of the same color. Most computer monitors make this
effect even worse. Therefore, always make sure that there’s a visible and dis-
tinct difference between two shades of the same color.
� Don’t use sharply contrasting colors over large, equally sized areas of
the screen, i.e., for background or framing elements. For example, don’t
use large bands of colors such as red and green. Many users tend to find such
combinations annoying over time and users who are annoyed are less likely to
play or enjoy your game.
� Always try to design with a particular color scheme in mind. The eye
automatically recognizes objects that employ similar colors as being related.
This makes it easier for the user to navigate around a game screen. For exam-
ple, if a game uses too many different color schemes, it could potentially dis-
orient the user and make it difficult for them to find out who they are on the
screen, etc.
� Whenever possible, use black or dark blue as your main background
color. This is because objects displayed against these dark colors tend to
stand out more, making them easier to see than if placed against a neutral or
light-colored background.
� Understand how a system’s gamma level can influence the correct dis-
play of color. For example, you don’t want to have the user mistake the shade
of brown you selected for a flesh tone as orange. Refer to Chapter 2 for more
Chapter 7 / Color and Arcade Game Graphics 239
information on system gamma differences and what, if anything, you can do
about them.
� Understand how room lighting can influence the display of your color
choices. For example, a color viewed in a room with fluorescent light will
appear significantly different from the same color viewed in a room using
incandescent light or even sunlight for that matter. As it stands, fluorescent
light adds tints of green to color while incandescent light adds tints of red.
Unfortunately, much of this is unavoidable since there’s no way for you to pre-
dict the individual lighting arrangements of every user. However, knowing
about what happens can at least allow you to plan some contingencies to mini-
mize this effect.
� Pure blue should be avoided for small foreground objects. This is
because blue is relatively difficult for the eyes to see. Blue is an excellent
choice for backgrounds, however. For example, a dark blue field representing
water or the sky makes for a great background in many types of arcade games
since most shades of blue exhibit strong contrast.
� Use warm colors against cool backgrounds and vice versa. This is
because warm colors tend to stand out more against cool backgrounds. For
example, a yellow sun will be very noticeable against a sky blue background.
Color Context and Aesthetics
� Don’t use color for color’s sake or without a specific plan or color
scheme in mind. The lack of a specific color scheme will show in your
designs. Most people do not appreciate haphazard color use because it breaks
the illusion of reality that proper color use gives you. After all, you’re design-
ing effective arcade graphics and not a Jackson Pollock painting!
� Use tertiary colors . . . a lot. Tertiary colors, i.e., natural colors like earthy
brown, add more realism to an object. In addition, they tend to translate across
cultures better than other types of colors.
� Don’t use too much color in an image. Believe it or not, using too much
color diminishes the realism that color can provide. When you use too much
color in an image, it will appear to the user as if you’re trying too hard. Color
use should appear deliberate but at the same time seem natural. Users will
pick up on objects that just don’t seem to “look right.”
� Don’t forget to take into account the influence that color has over the
user’s mood and emotions. Color has the ability to engage and interest
users at a level seldom achieved by the other elements of design. Failing to
properly use color to affect emotion is simply wasting a major opportunity to
further enhance the user experience.
� Make liberal use of contrasting colors. Contrasting colors go well together
and make graphic objects appear to be more interesting. Feel free to
240 Chapter 7 / Color and Arcade Game Graphics
experiment with different contrasting color combinations but don’t go crazy,
as too many contrasting colors can ruin an image.
� Make sure you understand the cultural connotations of the colors you
use. For example, in western societies, black is usually used to depict villains
but in some Asian nations, white has the same exact purpose. Refer to Table
7-2 for more examples of cross-cultural interpretations of color.
� Make sure you understand how age and gender can influence the
user’s perception of your color choices. Colors are perceived and inter-
preted quite differently between genders and age groups. Look at Tables 7-4
and 7-5, respectively for more information.
� Use color where it belongs and where the user expects it to be. In other
words, don’t go against established conventions of color use. For example,
avoid using cool colors to render fire and heat or warm colors to render water
or ice. This undermines the realism effect that color affords us. It’s one thing
if you break this rule intentionally, i.e., to simulate the effect of LSD, but it’s
another to do so accidentally. Most users won’t appreciate the deviation from
conventional norms.
� Use complementary colors when you want to create a sense of har-
mony within an image or between different objects. Complementary col-
ors go well together and, more importantly, appear that way to the user.
� Use cooler colors when designing artwork for games that are intended
for adults. Adults seem to respond better to dimmer and cooler colors than
do children.
� Use varied colors as much as possible. Using too much of one class of
color, i.e., warm, cool, intense, or dull, can ruin the impact of your artwork.
For example, using colors that are exclusively light or pastel-like can make
images seem dull and lifeless. Meanwhile, working entirely in bright primaries
can make your artwork look too basic and simplistic. Therefore, try to vary
your color use as much as possible.
� Use very warm and saturated colors when designing artwork for
games that are intended for young children. Children tend to respond
better to bolder and brighter colors than do adults. These colors are easy to
see and emotionally compatible.
NOTE: These rules are by no means exhaustive nor are they written in stone.
They’re only meant to serve as guidelines for how to start using color cor-
rectly and effectively in your games.
Chapter 7 / Color and Arcade Game Graphics 241
Chapter 8
All About Color
Palettes
In this chapter, you’ll learn about:
� Color spaces
� Color palettes
� Color palette organization
� Cross-platform color palette issues
� System palettes
� Platform specific palette peculiarities
� Planning color palettes
� Creating color palettes
� Color palette effects
� Tips for creating effective color palettes
� Color reduction
243
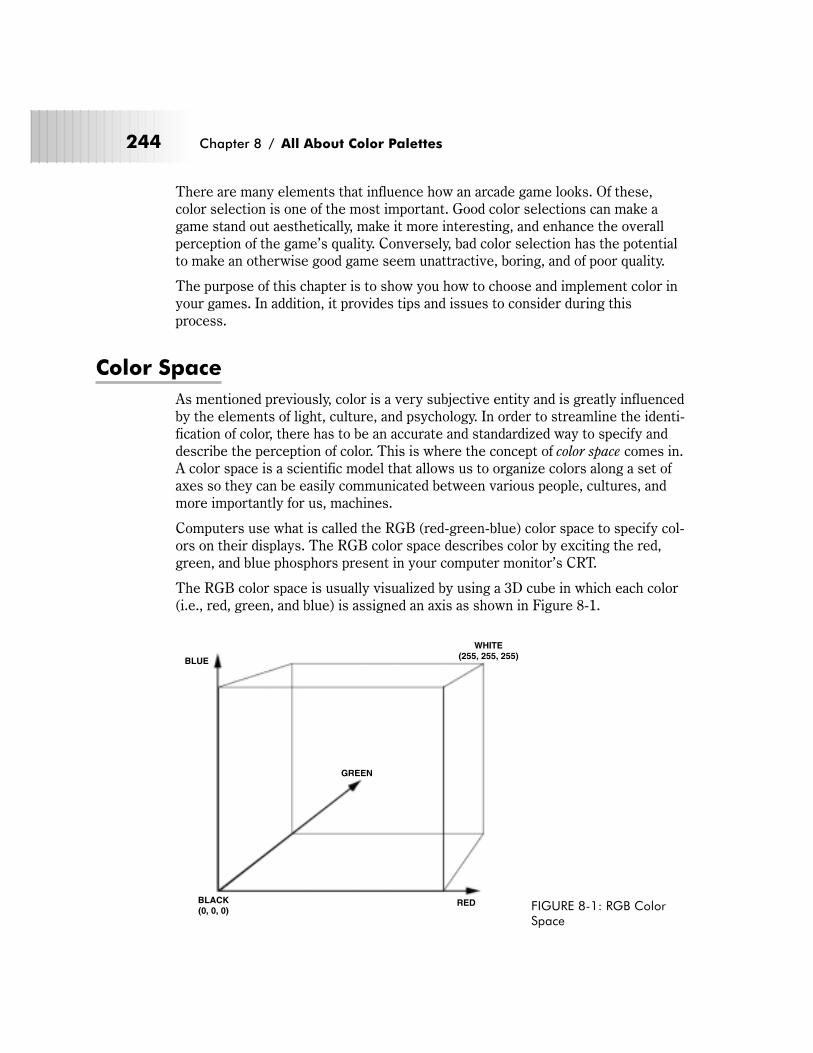
There are many elements that influence how an arcade game looks. Of these,
color selection is one of the most important. Good color selections can make a
game stand out aesthetically, make it more interesting, and enhance the overall
perception of the game’s quality. Conversely, bad color selection has the potential
to make an otherwise good game seem unattractive, boring, and of poor quality.
The purpose of this chapter is to show you how to choose and implement color in
your games. In addition, it provides tips and issues to consider during this
process.
Color Space
As mentioned previously, color is a very subjective entity and is greatly influenced
by the elements of light, culture, and psychology. In order to streamline the identi-
fication of color, there has to be an accurate and standardized way to specify and
describe the perception of color. This is where the concept of color space comes in.
A color space is a scientific model that allows us to organize colors along a set of
axes so they can be easily communicated between various people, cultures, and
more importantly for us, machines.
Computers use what is called the RGB (red-green-blue) color space to specify col-
ors on their displays. The RGB color space describes color by exciting the red,
green, and blue phosphors present in your computer monitor’s CRT.
The RGB color space is usually visualized by using a 3D cube in which each color
(i.e., red, green, and blue) is assigned an axis as shown in Figure 8-1.
244 Chapter 8 / All About Color Palettes
BLUE
WHITE(255, 255, 255)
BLACK(0, 0, 0)
RED
GREEN
FIGURE 8-1: RGB ColorSpace
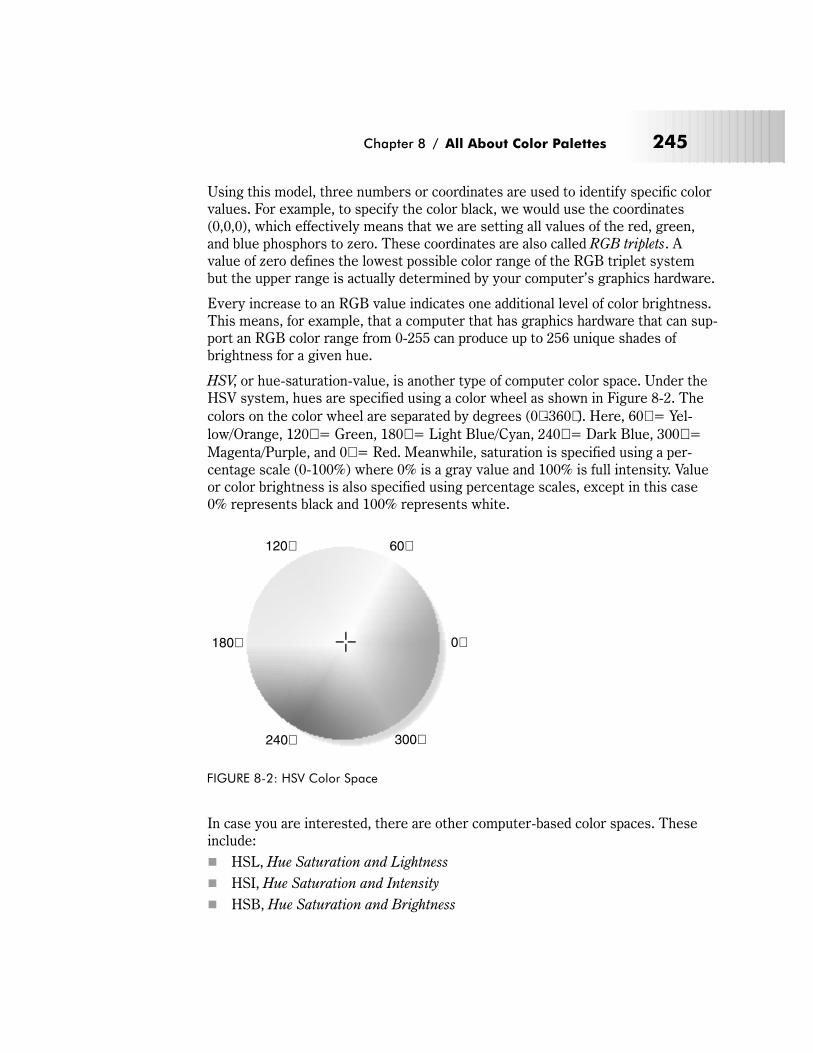
Using this model, three numbers or coordinates are used to identify specific color
values. For example, to specify the color black, we would use the coordinates
(0,0,0), which effectively means that we are setting all values of the red, green,
and blue phosphors to zero. These coordinates are also called RGB triplets. A
value of zero defines the lowest possible color range of the RGB triplet system
but the upper range is actually determined by your computer’s graphics hardware.
Every increase to an RGB value indicates one additional level of color brightness.
This means, for example, that a computer that has graphics hardware that can sup-
port an RGB color range from 0-255 can produce up to 256 unique shades of
brightness for a given hue.
HSV, or hue-saturation-value, is another type of computer color space. Under the
HSV system, hues are specified using a color wheel as shown in Figure 8-2. The
colors on the color wheel are separated by degrees (0� -360� ). Here, 60� = Yel-
low/Orange, 120� = Green, 180� = Light Blue/Cyan, 240� = Dark Blue, 300� =
Magenta/Purple, and 0� = Red. Meanwhile, saturation is specified using a per-
centage scale (0-100%) where 0% is a gray value and 100% is full intensity. Value
or color brightness is also specified using percentage scales, except in this case
0% represents black and 100% represents white.
In case you are interested, there are other computer-based color spaces. These
include:
� HSL, Hue Saturation and Lightness
� HSI, Hue Saturation and Intensity
� HSB, Hue Saturation and Brightness
Chapter 8 / All About Color Palettes 245
120� 60�
180� 0�
240� 300�
FIGURE 8-2: HSV Color Space
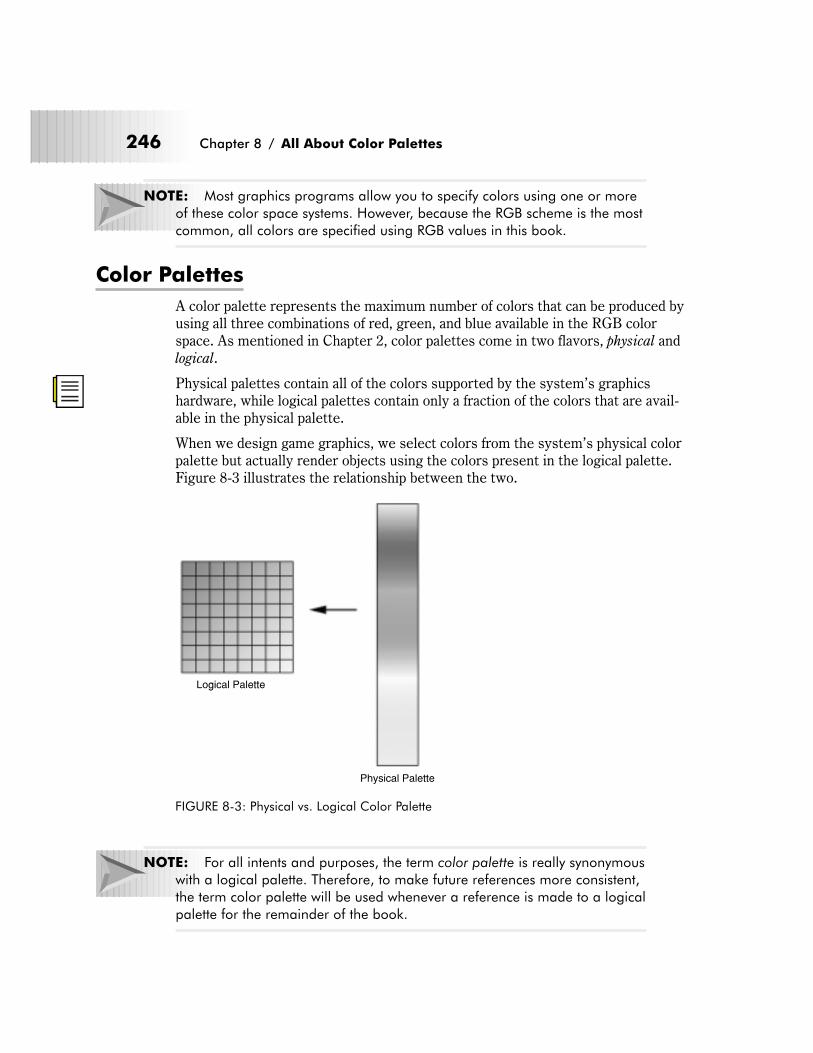
NOTE: Most graphics programs allow you to specify colors using one or more
of these color space systems. However, because the RGB scheme is the most
common, all colors are specified using RGB values in this book.
Color Palettes
A color palette represents the maximum number of colors that can be produced by
using all three combinations of red, green, and blue available in the RGB color
space. As mentioned in Chapter 2, color palettes come in two flavors, physical and
logical.
Physical palettes contain all of the colors supported by the system’s graphics
hardware, while logical palettes contain only a fraction of the colors that are avail-
able in the physical palette.
When we design game graphics, we select colors from the system’s physical color
palette but actually render objects using the colors present in the logical palette.
Figure 8-3 illustrates the relationship between the two.
NOTE: For all intents and purposes, the term color palette is really synonymous
with a logical palette. Therefore, to make future references more consistent,
the term color palette will be used whenever a reference is made to a logical
palette for the remainder of the book.
246 Chapter 8 / All About Color Palettes
Logical Palette
Physical Palette
FIGURE 8-3: Physical vs. Logical Color Palette
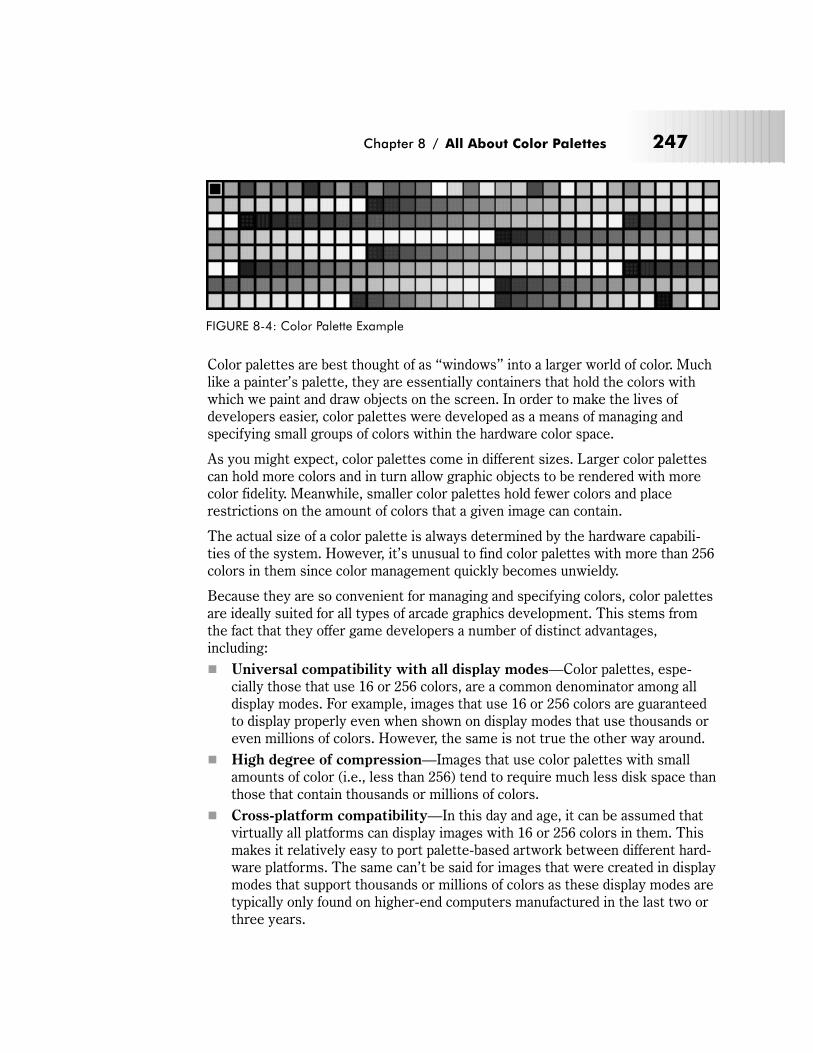
Color palettes are best thought of as “windows” into a larger world of color. Much
like a painter’s palette, they are essentially containers that hold the colors with
which we paint and draw objects on the screen. In order to make the lives of
developers easier, color palettes were developed as a means of managing and
specifying small groups of colors within the hardware color space.
As you might expect, color palettes come in different sizes. Larger color palettes
can hold more colors and in turn allow graphic objects to be rendered with more
color fidelity. Meanwhile, smaller color palettes hold fewer colors and place
restrictions on the amount of colors that a given image can contain.
The actual size of a color palette is always determined by the hardware capabili-
ties of the system. However, it’s unusual to find color palettes with more than 256
colors in them since color management quickly becomes unwieldy.
Because they are so convenient for managing and specifying colors, color palettes
are ideally suited for all types of arcade graphics development. This stems from
the fact that they offer game developers a number of distinct advantages,
including:
� Universal compatibility with all display modes—Color palettes, espe-
cially those that use 16 or 256 colors, are a common denominator among all
display modes. For example, images that use 16 or 256 colors are guaranteed
to display properly even when shown on display modes that use thousands or
even millions of colors. However, the same is not true the other way around.
� High degree of compression—Images that use color palettes with small
amounts of color (i.e., less than 256) tend to require much less disk space than
those that contain thousands or millions of colors.
� Cross-platform compatibility—In this day and age, it can be assumed that
virtually all platforms can display images with 16 or 256 colors in them. This
makes it relatively easy to port palette-based artwork between different hard-
ware platforms. The same can’t be said for images that were created in display
modes that support thousands or millions of colors as these display modes are
typically only found on higher-end computers manufactured in the last two or
three years.
Chapter 8 / All About Color Palettes 247
FIGURE 8-4: Color Palette Example
� Ease of manipulation—Color palettes are relatively easy to manage and
manipulate from both a creative and technical perspective. This isn’t true for
display modes that use thousands or millions of colors, since direct color
access in these modes tends to be much more cumbersome.
� Good color rendition—Color palettes can provide a sufficient level of color
fidelity for most arcade style games. This makes them useful for rendering
most types of objects and images that are often featured in these types of
games.
� Support for special effects—Color palettes can support powerful special
effects such as color cycling and color fades. These effects aren’t easily
achieved in display modes with thousands or millions of colors without special
programming tricks.
NOTE: All of the programs described in Chapter 6 provide the ability to easily
manipulate color palettes.
Table 8-1 outlines some common color palette sizes supported by different com-
puter platforms:
TABLE 8-1: Color Palette Sizes by Platform
Platform Color Palette Size Comments
DOS 16 or 256 The actual display mode determines the number of availablecolors in the color palette.
Sixteen colors are typically used in older EGA and MCGAdisplay modes. Although these display modes are backwardcompatible with most modern graphics cards, very few gamesare written specifically for 16 colors anymore. Virtually all DOSgames created since 1991 are written for display modescapable of displaying 256 colors in their color palette.
Linux 16 or 256 The actual display mode determines the number of availablecolors in the color palette.
Sixteen colors are typically used in older VGA display modes.Sixteen colors are usually the minimum requirement under thevarious Linux desktop managers. Most Linux-based games use256 colors or more.
Macintosh 256 Sixteen-color palettes were quite common on color Macintoshsystems until the advent of the PowerMac series in 1994. At thattime, game developers were encouraged to use the 256-colorpalette and the 16-color palette was deprecated.
248 Chapter 8 / All About Color Palettes
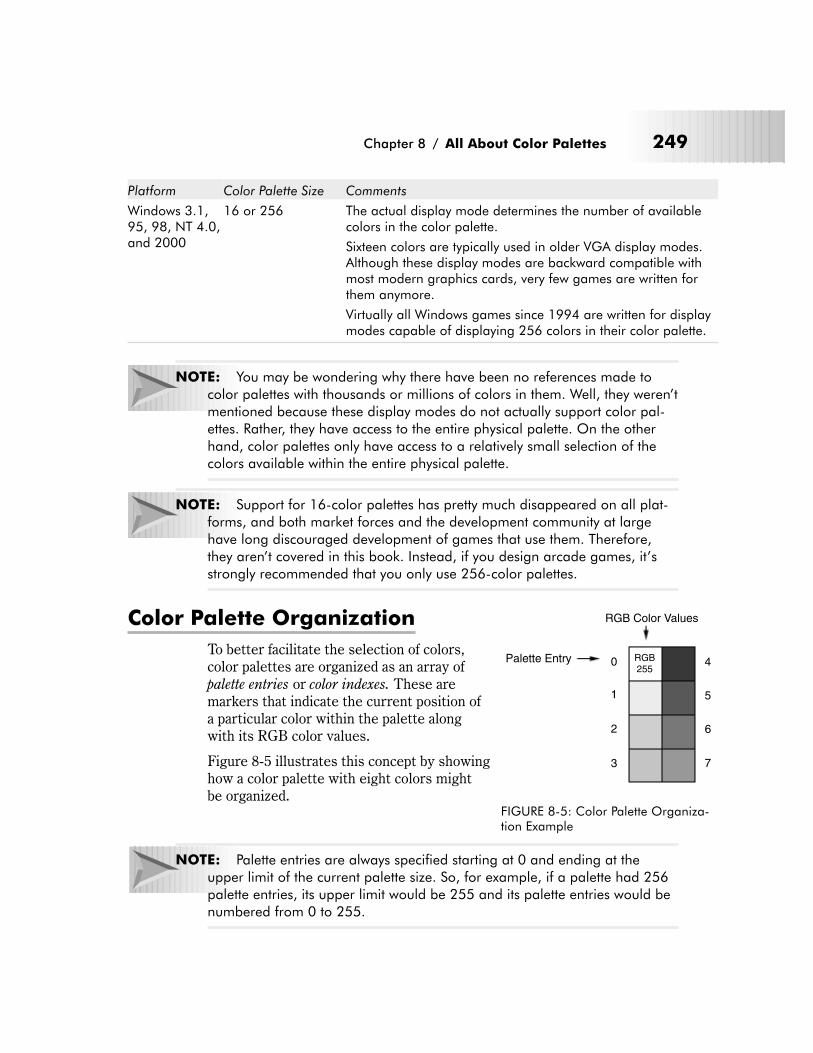
Platform Color Palette Size Comments
Windows 3.1,95, 98, NT 4.0,and 2000
16 or 256 The actual display mode determines the number of availablecolors in the color palette.
Sixteen colors are typically used in older VGA display modes.Although these display modes are backward compatible withmost modern graphics cards, very few games are written forthem anymore.
Virtually all Windows games since 1994 are written for displaymodes capable of displaying 256 colors in their color palette.
NOTE: You may be wondering why there have been no references made to
color palettes with thousands or millions of colors in them. Well, they weren’t
mentioned because these display modes do not actually support color pal-
ettes. Rather, they have access to the entire physical palette. On the other
hand, color palettes only have access to a relatively small selection of the
colors available within the entire physical palette.
NOTE: Support for 16-color palettes has pretty much disappeared on all plat-
forms, and both market forces and the development community at large
have long discouraged development of games that use them. Therefore,
they aren’t covered in this book. Instead, if you design arcade games, it’s
strongly recommended that you only use 256-color palettes.
Color Palette Organization
To better facilitate the selection of colors,
color palettes are organized as an array of
palette entries or color indexes. These are
markers that indicate the current position of
a particular color within the palette along
with its RGB color values.
Figure 8-5 illustrates this concept by showing
how a color palette with eight colors might
be organized.
NOTE: Palette entries are always specified starting at 0 and ending at the
upper limit of the current palette size. So, for example, if a palette had 256
palette entries, its upper limit would be 255 and its palette entries would be
numbered from 0 to 255.
Chapter 8 / All About Color Palettes 249
RGB Color Values
Palette Entry RGB255
0
1
2
3
4
5
6
7
FIGURE 8-5: Color Palette Organiza-tion Example
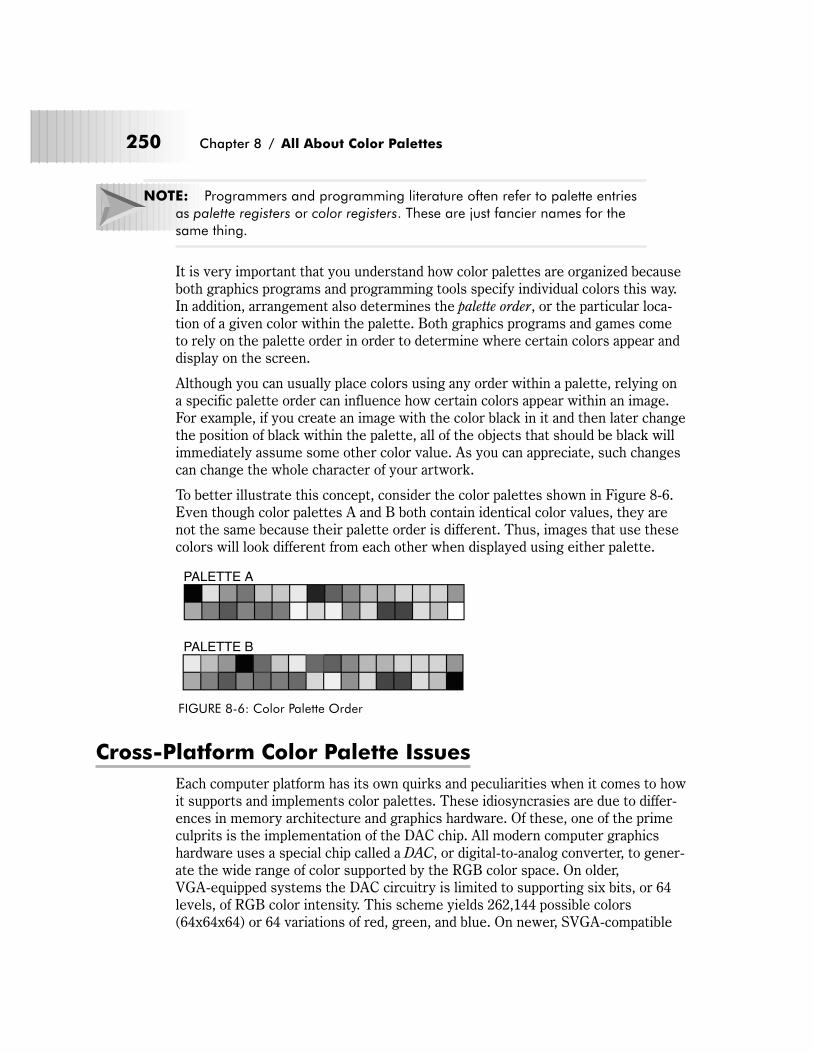
NOTE: Programmers and programming literature often refer to palette entries
as palette registers or color registers. These are just fancier names for the
same thing.
It is very important that you understand how color palettes are organized because
both graphics programs and programming tools specify individual colors this way.
In addition, arrangement also determines the palette order, or the particular loca-
tion of a given color within the palette. Both graphics programs and games come
to rely on the palette order in order to determine where certain colors appear and
display on the screen.
Although you can usually place colors using any order within a palette, relying on
a specific palette order can influence how certain colors appear within an image.
For example, if you create an image with the color black in it and then later change
the position of black within the palette, all of the objects that should be black will
immediately assume some other color value. As you can appreciate, such changes
can change the whole character of your artwork.
To better illustrate this concept, consider the color palettes shown in Figure 8-6.
Even though color palettes A and B both contain identical color values, they are
not the same because their palette order is different. Thus, images that use these
colors will look different from each other when displayed using either palette.
Cross-Platform Color Palette Issues
Each computer platform has its own quirks and peculiarities when it comes to how
it supports and implements color palettes. These idiosyncrasies are due to differ-
ences in memory architecture and graphics hardware. Of these, one of the prime
culprits is the implementation of the DAC chip. All modern computer graphics
hardware uses a special chip called a DAC, or digital-to-analog converter, to gener-
ate the wide range of color supported by the RGB color space. On older,
VGA-equipped systems the DAC circuitry is limited to supporting six bits, or 64
levels, of RGB color intensity. This scheme yields 262,144 possible colors
(64x64x64) or 64 variations of red, green, and blue. On newer, SVGA-compatible
250 Chapter 8 / All About Color Palettes
PALETTE A
PALETTE B
FIGURE 8-6: Color Palette Order
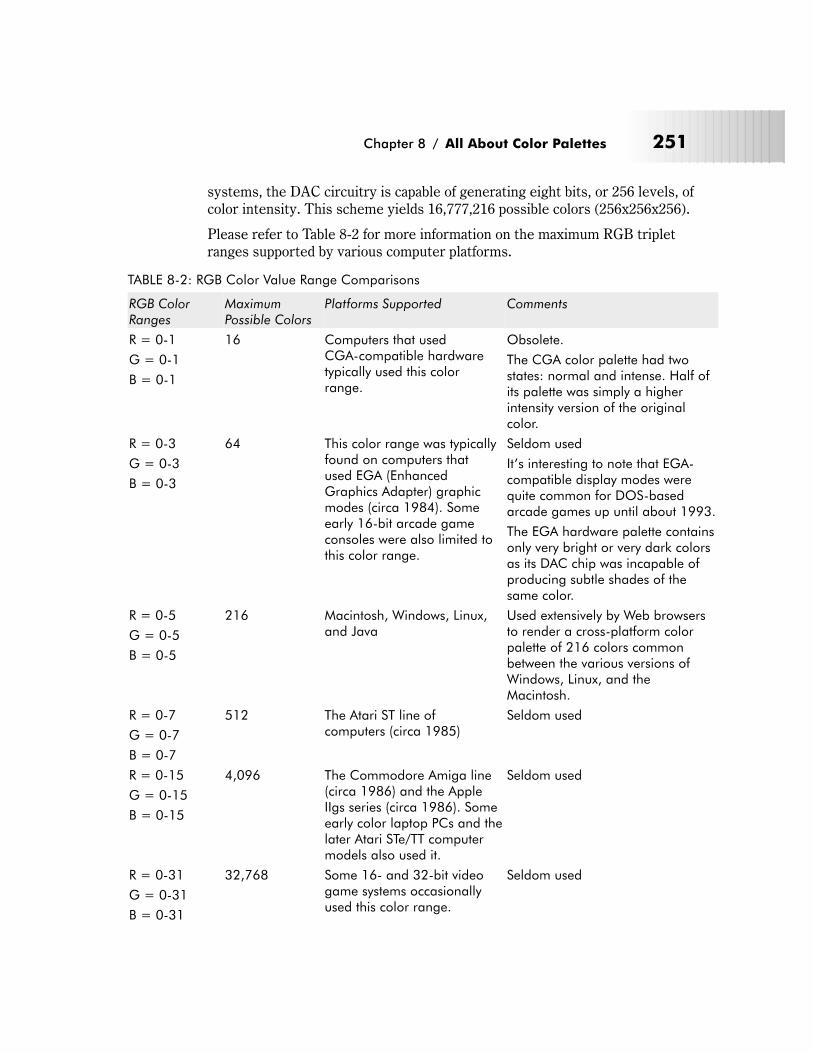
systems, the DAC circuitry is capable of generating eight bits, or 256 levels, of
color intensity. This scheme yields 16,777,216 possible colors (256x256x256).
Please refer to Table 8-2 for more information on the maximum RGB triplet
ranges supported by various computer platforms.
TABLE 8-2: RGB Color Value Range Comparisons
RGB ColorRanges
MaximumPossible Colors
Platforms Supported Comments
R = 0-1
G = 0-1
B = 0-1
16 Computers that usedCGA-compatible hardwaretypically used this colorrange.
Obsolete.
The CGA color palette had twostates: normal and intense. Half ofits palette was simply a higherintensity version of the originalcolor.
R = 0-3
G = 0-3
B = 0-3
64 This color range was typicallyfound on computers thatused EGA (EnhancedGraphics Adapter) graphicmodes (circa 1984). Someearly 16-bit arcade gameconsoles were also limited tothis color range.
Seldom used
It’s interesting to note that EGA-compatible display modes werequite common for DOS-basedarcade games up until about 1993.
The EGA hardware palette containsonly very bright or very dark colorsas its DAC chip was incapable ofproducing subtle shades of thesame color.
R = 0-5
G = 0-5
B = 0-5
216 Macintosh, Windows, Linux,and Java
Used extensively by Web browsersto render a cross-platform colorpalette of 216 colors commonbetween the various versions ofWindows, Linux, and theMacintosh.
R = 0-7
G = 0-7
B = 0-7
512 The Atari ST line ofcomputers (circa 1985)
Seldom used
R = 0-15
G = 0-15
B = 0-15
4,096 The Commodore Amiga line(circa 1986) and the AppleIIgs series (circa 1986). Someearly color laptop PCs and thelater Atari STe/TT computermodels also used it.
Seldom used
R = 0-31
G = 0-31
B = 0-31
32,768 Some 16- and 32-bit videogame systems occasionallyused this color range.
Seldom used
Chapter 8 / All About Color Palettes 251
RGB ColorRanges
MaximumPossible Colors
Platforms Supported Comments
R = 0-63
G = 0-63
B = 0-63
262,144 DOS systems that use MCGAand VGA display hardware.
Older versions of Windowsusing VGA hardware.
The lamented Atari Falcon030 multimedia PC also usedthis color range.
Very common but rapidly becomingobsolete.
All VGA-compatible graphics cardsuse this color range since thetechnology was introduced in1987. Virtually all games that rununder DOS are limited to this colorrange as DOS has trouble “seeing”larger RGB color spaces withoutspecial software.
R = 0-255
G = 0-255
B = 0-255
16,777,216 DOS with SVGA videohardware, Linux, theMacintosh, and all versionsof Windows.
Very common and the currentindustry standard.
The first popular computer to usethis color range was the MacintoshII of 1987 vintage. Since that time ithas become standard for allMacintosh models. However, itdidn’t start becoming common onPCs until the introduction of SVGA-compatible graphics boards andWindows 3.1 in 1992.
It can be safely assumed that allPCs shipped since 1996 cansupport this color range.
The RGB color ranges supported by both VGA- and SVGA-compatible systems
differ from each other only in terms of the color intensities they support. For
example, an image created on a system that only supports 64 shades per color will
appear slightly darker on a system that supports 256 shades per color. However,
the basic color integrity will stay the same, i.e., brown still is brown regardless of
whether the color was produced on a system using a 6-bit DAC or an 8-bit DAC.
To compensate for this effect, most graphics software automatically converts the
color intensity levels of an image to suit the color capabilities of the currently
active graphics chipset.
NOTE: Because of this fact, colors will be specified using a 0-255 RGB color
range.
It’s interesting to point out that Windows, Macintosh, and Linux systems inter-
nally support the 8-bit DAC range, whether SVGA hardware is available or not.
252 Chapter 8 / All About Color Palettes
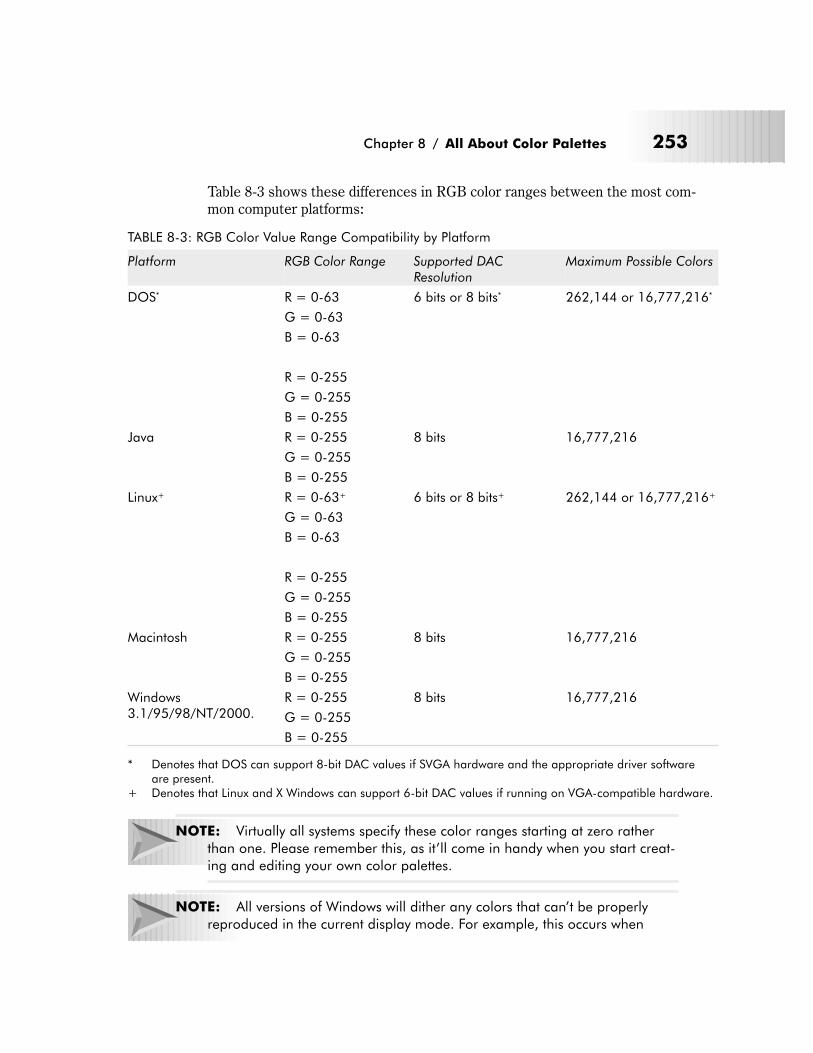
Table 8-3 shows these differences in RGB color ranges between the most com-
mon computer platforms:
TABLE 8-3: RGB Color Value Range Compatibility by Platform
Platform RGB Color Range Supported DACResolution
Maximum Possible Colors
DOS* R = 0-63
G = 0-63
B = 0-63
R = 0-255
G = 0-255
B = 0-255
6 bits or 8 bits* 262,144 or 16,777,216*
Java R = 0-255
G = 0-255
B = 0-255
8 bits 16,777,216
Linux+ R = 0-63+
G = 0-63
B = 0-63
R = 0-255
G = 0-255
B = 0-255
6 bits or 8 bits+ 262,144 or 16,777,216+
Macintosh R = 0-255
G = 0-255
B = 0-255
8 bits 16,777,216
Windows3.1/95/98/NT/2000.
R = 0-255
G = 0-255
B = 0-255
8 bits 16,777,216
* Denotes that DOS can support 8-bit DAC values if SVGA hardware and the appropriate driver softwareare present.
+ Denotes that Linux and X Windows can support 6-bit DAC values if running on VGA-compatible hardware.
NOTE: Virtually all systems specify these color ranges starting at zero rather
than one. Please remember this, as it’ll come in handy when you start creat-
ing and editing your own color palettes.
NOTE: All versions of Windows will dither any colors that can’t be properly
reproduced in the current display mode. For example, this occurs when
Chapter 8 / All About Color Palettes 253
you’re specifying RGB values within the 0-255 color range on older hard-
ware that’s only capable of RGB color ranges of 0-63.
Even with all of this color capability, the average person cannot discern all of the
possible colors contained within the RGB space or physical color palette. So, while
it’s theoretically possible for some platforms to support as many as 16.7 million
different RGB values, the likelihood of the average person being able to distin-
guish between shade 14,056,922 and shade 14,056,923 is practically nil.
System Palettes
All computer platforms in common use have predefined 16- and 256-color pal-
ettes. These palettes are better known as system palettes. A system palette is the
default color scheme that is activated whenever you first turn on or reboot a
computer.
Overall, the system palettes across the different computer platforms tend to share
much of the same color choices and arrangements. In addition, they all seem to
use similar collections of complementary colors. This section describes the imple-
mentation of system palettes across the major computer platforms.
DOS System Palette
DOS doesn’t have its own system palette per se; rather, it just uses the default
color definitions found in the VGA and SVGA hardware’s BIOS (basic input/output
system) ROM.
The developers who selected and programmed the colors used in the VGA/SVGA
palette may have been good engineers but they were definitely lousy designers.
By and large, the VGA/SVGA system palette is totally useless for doing any seri-
ous graphics work. Here’s a synopsis of why:
� One hundred and fifty-two of the 256 colors present in the VGA/SVGA palette
lack significant intensity. They are all dark or dim shades and lack sufficient
contrast to use them to shade in most types of objects.
� Seventy-two of the 256 colors present in the VGA/SVGA palette are merely
rehashes of primary and secondary colors. None of them are particularly good
color choices and few have any practical application in arcade game graphics
design.
� With the exception of the first 32 palette entries, which do provide some use-
ful shades of gray, there’s not sufficient utility or variation in the colors
provided.
254 Chapter 8 / All About Color Palettes
� All but the first 16 palette entries have color ranges that are too small to pro-
duce accurate shading and gradient effects needed to properly render most
game objects.
As you can probably gather, the color palette definitions of the DOS system pal-
ette are largely unsuitable for serious game graphics work. Therefore, it is
strongly recommended that you always take the time to redefine the color palette
when working under DOS for game projects.
NOTE: If you’re interested in seeing the RGB values for these palettes, they can
be found on the book’s accompanying CD-ROM under the PALETTESdirectory in the files labeled DOS16.PAL and DOS256.PAL. These files are in
the Microsoft .PAL format and are compatible with Paintshop Pro and other
programs.
Windows System Palette
All versions of Windows from version 3.1 through Windows 2000 share a common
system palette. This palette appears the same regardless of the particular graphics
hardware that is installed on the machine on which Windows is running.
NOTE: The Windows 256-color system palette is only available on SVGA hard-
ware as the standard. The VGA hardware specification only provides 16
colors at the 640x480 screen resolution required by Windows. However, for
all purposes, the Windows 16-color palette is identical to the DOS 16-color
system palette.
Like the DOS 256-color system palette, the Windows 256-color system palette is
also poorly designed and it’s useful mainly for coloring icons and other GUI screen
elements. Here are some of the problems that have been found with it:
� There aren’t enough shades of gray present in the palette to realistically
depict stone or metallic elements.
� There are too many saturated shades of primary colors (i.e., red, green, and
blue) and not enough intermediate or tertiary colors provided. This effectively
limits the types of objects this palette can convincingly render.
� The color ranges provided are too small to produce accurate shading and gra-
dient effects.
� Related colors aren’t arranged in an accessible order within the palette. This
makes the palette very difficult to use in actual projects.
Chapter 8 / All About Color Palettes 255
Due to these limitations, I strongly recommend not using the Windows 256-color
system palette in your game artwork. It’s simply too limiting and restrictive for
creating serious game artwork.
NOTE: The only exception to this might be when you’re creating artwork or
icons for a Windows game that needs to be backward compatible with Win-
dows running on VGA hardware (i.e., 16 colors). In this situation, you must
limit yourself to the first 16 palette entries of the Windows 256-color system
palette.
NOTE: If you’re interested in seeing the RGB values for this palette, they can be
found on the book’s accompanying CD-ROM under the PALETTES directory
in the file labeled WIN256.PAL.
Linux System Palette
Unlike the other platforms mentioned here, Linux doesn’t have an official system
palette; rather, it uses whatever color definitions users have defined under their
particular desktop manager.
Macintosh System Palette
The Macintosh system palette is interesting in that it shares many of the proper-
ties and color arrangements of both the VGA/SVGA (DOS) and Windows 256-
color system palettes. Every Macintosh system released since 1990 supports this
palette when using an 8-bit color display mode.
Because it shares so much in common with the other system palettes described
here, the Macintosh system palette also shares many of the same limitations.
Here’s a list of them:
� There are too many saturated shades of primary colors (i.e., red, green, and
blue) and not enough intermediate or tertiary colors. This effectively limits
the types of objects this palette can convincingly render.
� With the exception of the 16 grays in the palette, the Macintosh system pal-
ette doesn’t provide color ranges large enough to produce realistic-looking
shading and gradients.
� Related colors aren’t arranged in an easily accessible order within the palette.
This makes the palette inconvenient to use in an actual project.
� The Macintosh system palette positions and arranges its colors very differ-
ently from how Windows does. This means you won’t be able to easily convert
images between these palettes without using an image viewer/converter pro-
gram that supports color remapping.
256 Chapter 8 / All About Color Palettes
Again, because of these limitations, I recommend not using the Macintosh system
palette for your game artwork. You’ll get much better results with a custom color.
NOTE: If you’re interested in seeing the RGB values for this palette, they can be
found on the book’s accompanying CD-ROM under the PALETTES directory
in the file labeled MAC256.PAL.
Java System Palette
As a cross-platform development environment, Java-based arcade games need to
display their graphics consistently as much as they have to play consistently on
different systems. To facilitate this, Java uses what is called the non-dithering
216-color palette, which is commonly referred to as the Netscape palette.
This palette contains a set of colors that won’t dither when displayed inside a
browser window regardless of whether it’s running on a Macintosh or Windows
machine. This fact alone makes this palette useful for cross-platform game pro-
jects whether they’re written in Java or another development tool.
The Java system palette also borrows many color definitions from other system
palettes, namely those from Windows and the Macintosh. Therefore, it too suffers
from many of the same issues, including:
� There are too many saturated shades of primary colors (i.e., red, green, and
blue) and not enough intermediate or tertiary colors. This effectively limits
the type of objects this palette can convincingly render. However, at the same
time, these bright colors are actually quite useful in some instances, particu-
larly for creating simple, flat artwork that is commonly seen in many
retro-style arcade games, such as Donkey Kong or Bubble Bobble.
� There are only six shades of any one color. This isn’t enough to produce the
realistic-looking shading and gradients required by hyper-realistic artwork.
� Related colors aren’t arranged in an accessible order within the palette. This
makes the palette inconvenient to use in an actual project.
NOTE: If you’re interested in seeing the RGB values for this palette, they can be
found on the book’s accompanying CD-ROM under the PALETTES directory
in the file labeled NETSCAPE216.PAL.
NOTE: Despite its shortcomings, we frequently use the Java/Netscape palette
when creating the artwork and animation for ZapSpot’s games due to the
palettes’ special, cross-platform color properties. Examples of where the
palette really shines can be found in the games BullyFrog™ and FenceOut™.
Chapter 8 / All About Color Palettes 257

Generally speaking, games that use system palettes tend to look sloppy and
unprofessional. Using these palettes might have been acceptable during the 1980s
but certainly not anymore. With the color capabilities of today’s computers, there
is simply no excuse not to take advantage of a custom color palette unless you
have a very specialized need, such as developing cross-platform or online games.
Game developers who don’t take full advantage of custom color palettes are just
being lazy.
Platform-Specific Palette Peculiarities
This section describes system-specific issues with using color palettes on differ-
ent computer platforms.
DOS
Table 8-4 shows the various color palettes supported under DOS-based systems.
TABLE 8-4: Color Palettes Supported under DOS
Display Mode Color PaletteSize
Video HardwareStandard(s)
Comments
320x200 4 CGA, EGA, MCGA,VGA, SVGA
Obsolete.
Retained only for backward compatibilitywith ancient game and graphics software.
No longer has any use in arcade gamegraphics.
320x200 16 EGA, MCGA, VGA,SVGA
Seldom used anymore but was once quitepopular with developers such as Id andApogee during the late 1980s and early1990s.
Has only limited use in arcade gamegraphics.
320x200 256 MCGA, VGA, SVGA Supported by all arcade games since thelate 1980s.
Commonly used and popular with gamedevelopers.
Has limited use in arcade game graphicswhen compared to Mode X.
258 Chapter 8 / All About Color Palettes
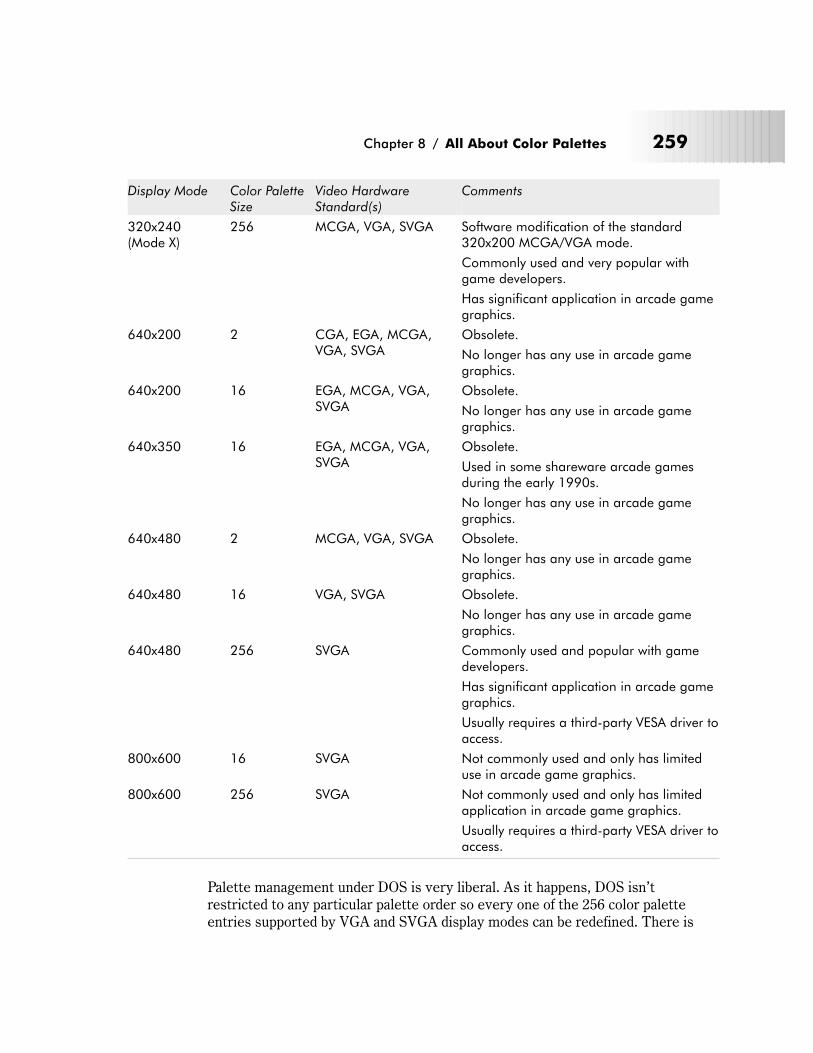
Display Mode Color PaletteSize
Video HardwareStandard(s)
Comments
320x240(Mode X)
256 MCGA, VGA, SVGA Software modification of the standard320x200 MCGA/VGA mode.
Commonly used and very popular withgame developers.
Has significant application in arcade gamegraphics.
640x200 2 CGA, EGA, MCGA,VGA, SVGA
Obsolete.
No longer has any use in arcade gamegraphics.
640x200 16 EGA, MCGA, VGA,SVGA
Obsolete.
No longer has any use in arcade gamegraphics.
640x350 16 EGA, MCGA, VGA,SVGA
Obsolete.
Used in some shareware arcade gamesduring the early 1990s.
No longer has any use in arcade gamegraphics.
640x480 2 MCGA, VGA, SVGA Obsolete.
No longer has any use in arcade gamegraphics.
640x480 16 VGA, SVGA Obsolete.
No longer has any use in arcade gamegraphics.
640x480 256 SVGA Commonly used and popular with gamedevelopers.
Has significant application in arcade gamegraphics.
Usually requires a third-party VESA driver toaccess.
800x600 16 SVGA Not commonly used and only has limiteduse in arcade game graphics.
800x600 256 SVGA Not commonly used and only has limitedapplication in arcade game graphics.
Usually requires a third-party VESA driver toaccess.
Palette management under DOS is very liberal. As it happens, DOS isn’t
restricted to any particular palette order so every one of the 256 color palette
entries supported by VGA and SVGA display modes can be redefined. There is
Chapter 8 / All About Color Palettes 259
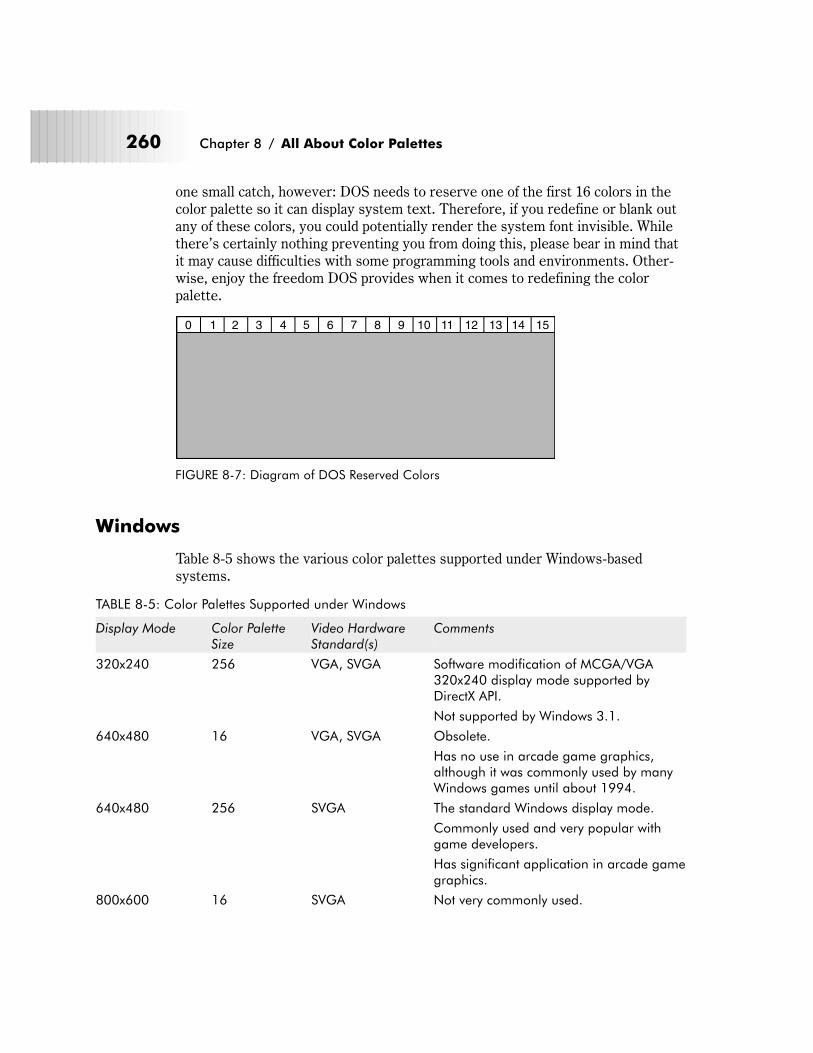
one small catch, however: DOS needs to reserve one of the first 16 colors in the
color palette so it can display system text. Therefore, if you redefine or blank out
any of these colors, you could potentially render the system font invisible. While
there’s certainly nothing preventing you from doing this, please bear in mind that
it may cause difficulties with some programming tools and environments. Other-
wise, enjoy the freedom DOS provides when it comes to redefining the color
palette.
Windows
Table 8-5 shows the various color palettes supported under Windows-based
systems.
TABLE 8-5: Color Palettes Supported under Windows
Display Mode Color PaletteSize
Video HardwareStandard(s)
Comments
320x240 256 VGA, SVGA Software modification of MCGA/VGA320x240 display mode supported byDirectX API.
Not supported by Windows 3.1.
640x480 16 VGA, SVGA Obsolete.
Has no use in arcade game graphics,although it was commonly used by manyWindows games until about 1994.
640x480 256 SVGA The standard Windows display mode.
Commonly used and very popular withgame developers.
Has significant application in arcade gamegraphics.
800x600 16 SVGA Not very commonly used.
260 Chapter 8 / All About Color Palettes
0 1 2 3 4 5 6 7 8 9 10 11 12 13 14 15
FIGURE 8-7: Diagram of DOS Reserved Colors

Display Mode Color PaletteSize
Video HardwareStandard(s)
Comments
800x600 256 SVGA A standard Windows display mode.
Not as popular as 640x480 with gamedevelopers but starting to become muchmore common in games.
All versions of Microsoft Windows reserve 20 palette entries for various system
purposes such as coloring icons, dialog boxes, and the mouse pointer. Therefore,
you shouldn’t redefine these colors.
Because of this, only 236 of 256 colors available in the palette can be user-defined.
To further complicate matters, Windows does not reserve these colors in one con-
tiguous block; rather, it reserves the first 10 palette entries (entries 0-9) and the
last 10 palette entries (entries 246-255) for its own use.
Sixteen of these “reserved” colors are actually composed of standard VGA
16-color palette colors while the remaining four colors are those found in the
SVGA 256-color palette. Figure 8-8 shows the organization of the so-called
“off-limit” colors under Windows.
TABLE 8-6: Windows Reserved Colors
PaletteEntry
Red Value Green Value Blue Value Color Name
0 0 0 0 Black
1 128 0 0 Dark red
2 0 128 0 Dark green
3 128 128 0 Brown
4 0 0 128 Dark blue
5 128 0 128 Dark magenta
6 0 128 128 Dark cyan
Chapter 8 / All About Color Palettes 261
0 1 2 3 4 5 6 7 8 9
246 247 248 249 250 251 252 253 254 255
FIGURE 8-8: Diagram of Windows Reserved Colors
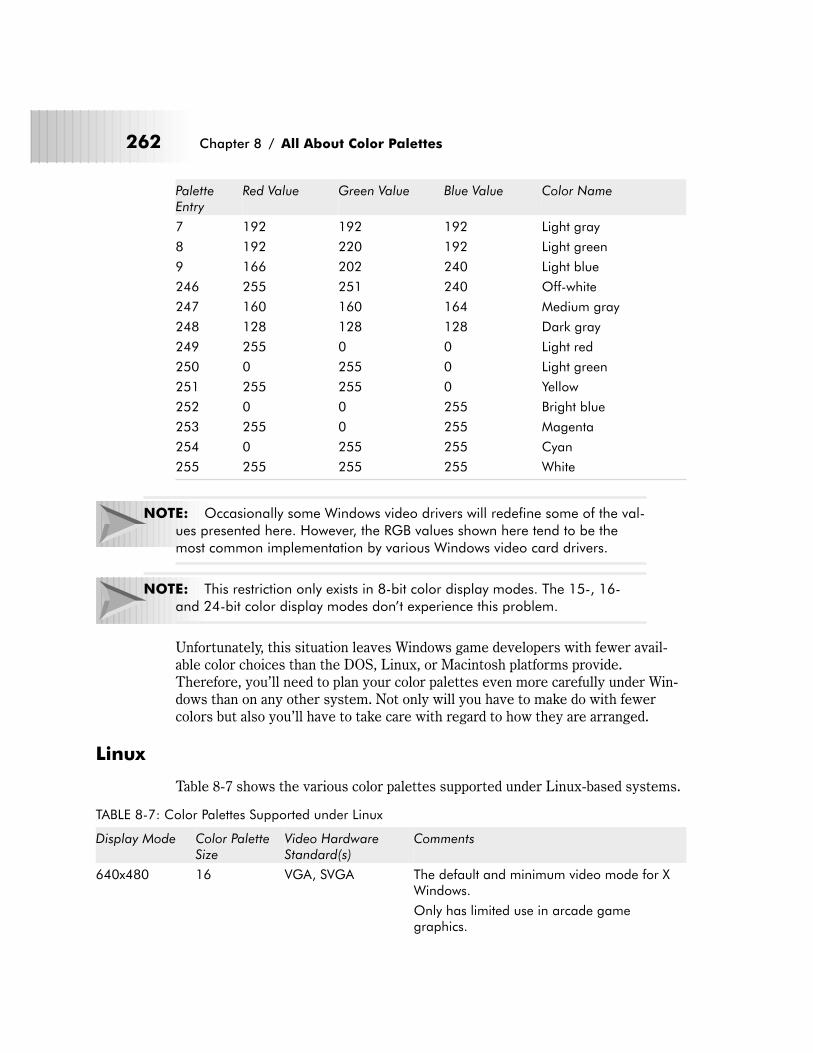
PaletteEntry
Red Value Green Value Blue Value Color Name
7 192 192 192 Light gray
8 192 220 192 Light green
9 166 202 240 Light blue
246 255 251 240 Off-white
247 160 160 164 Medium gray
248 128 128 128 Dark gray
249 255 0 0 Light red
250 0 255 0 Light green
251 255 255 0 Yellow
252 0 0 255 Bright blue
253 255 0 255 Magenta
254 0 255 255 Cyan
255 255 255 255 White
NOTE: Occasionally some Windows video drivers will redefine some of the val-
ues presented here. However, the RGB values shown here tend to be the
most common implementation by various Windows video card drivers.
NOTE: This restriction only exists in 8-bit color display modes. The 15-, 16-
and 24-bit color display modes don’t experience this problem.
Unfortunately, this situation leaves Windows game developers with fewer avail-
able color choices than the DOS, Linux, or Macintosh platforms provide.
Therefore, you’ll need to plan your color palettes even more carefully under Win-
dows than on any other system. Not only will you have to make do with fewer
colors but also you’ll have to take care with regard to how they are arranged.
Linux
Table 8-7 shows the various color palettes supported under Linux-based systems.
TABLE 8-7: Color Palettes Supported under Linux
Display Mode Color PaletteSize
Video HardwareStandard(s)
Comments
640x480 16 VGA, SVGA The default and minimum video mode for XWindows.
Only has limited use in arcade gamegraphics.
262 Chapter 8 / All About Color Palettes
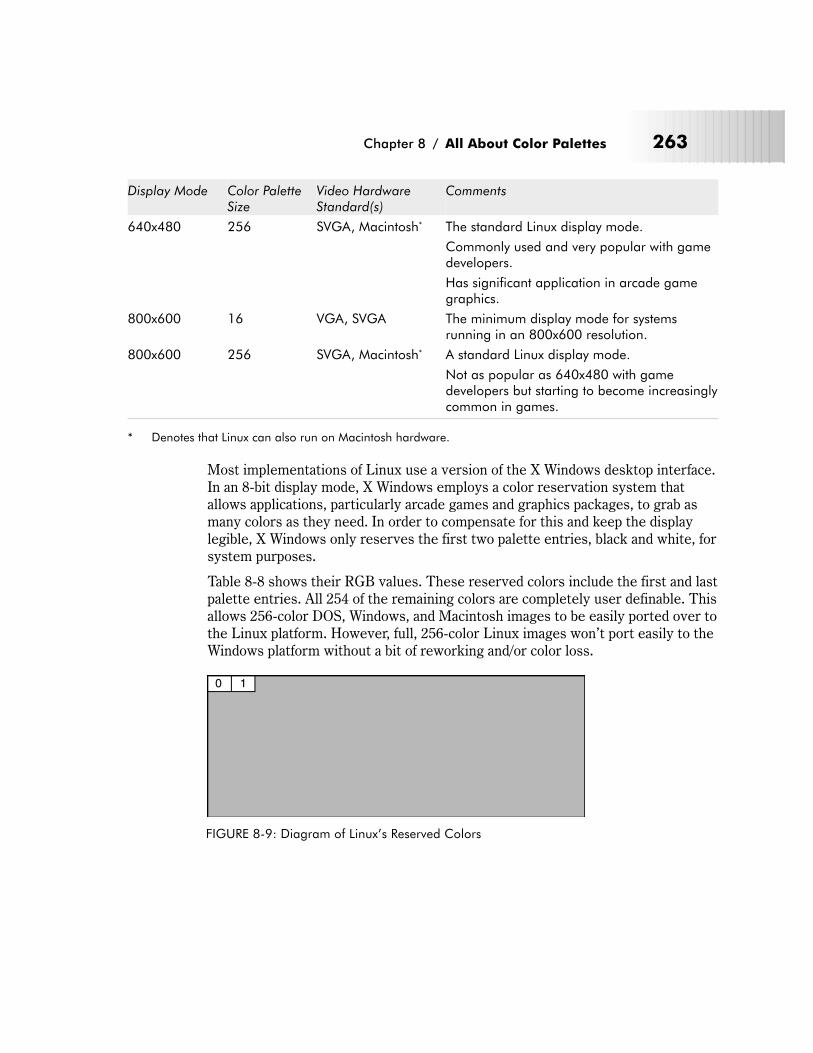
Display Mode Color PaletteSize
Video HardwareStandard(s)
Comments
640x480 256 SVGA, Macintosh* The standard Linux display mode.
Commonly used and very popular with gamedevelopers.
Has significant application in arcade gamegraphics.
800x600 16 VGA, SVGA The minimum display mode for systemsrunning in an 800x600 resolution.
800x600 256 SVGA, Macintosh* A standard Linux display mode.
Not as popular as 640x480 with gamedevelopers but starting to become increasinglycommon in games.
* Denotes that Linux can also run on Macintosh hardware.
Most implementations of Linux use a version of the X Windows desktop interface.
In an 8-bit display mode, X Windows employs a color reservation system that
allows applications, particularly arcade games and graphics packages, to grab as
many colors as they need. In order to compensate for this and keep the display
legible, X Windows only reserves the first two palette entries, black and white, for
system purposes.
Table 8-8 shows their RGB values. These reserved colors include the first and last
palette entries. All 254 of the remaining colors are completely user definable. This
allows 256-color DOS, Windows, and Macintosh images to be easily ported over to
the Linux platform. However, full, 256-color Linux images won’t port easily to the
Windows platform without a bit of reworking and/or color loss.
Chapter 8 / All About Color Palettes 263
0 1
FIGURE 8-9: Diagram of Linux’s Reserved Colors
TABLE 8-8: Linux Reserved Colors
Palette Entry Red Value Green Value Blue Value Color Name
0 0 0 0 Black
1 255 255 255 White
Macintosh
Table 8-9 shows the various color palettes supported under Macintosh-based
systems.
TABLE 8-9: Color Palettes Supported by the Macintosh
Display Mode Color PaletteSize
Comments
640x480 16 Obsolete.
Previously was the standard Macintosh display mode.
No longer has any use in arcade game graphics, although itwas used by many early Macintosh games until about 1994.
640x480 256 The standard Macintosh display mode.
Commonly used and very popular with game developers.
Has significant application in arcade game graphics.
800x600 256 A standard Macintosh display mode.
Not as popular as 640x480 with game developers but startingto become more and more common in games.
The fact that the Macintosh’s early operating systems only supported black and
white means that only two palette entries are reserved by the system—black and
white.
Table 8-10 shows their RGB values. These reserved colors include the first and
last palette entries. All 254 remaining colors are completely user definable. This
allows 256-color DOS images to be easily ported to the Macintosh. Unfortunately,
256-color Macintosh images won’t port easily to the Windows platform without a
bit of reworking and/or color loss.
264 Chapter 8 / All About Color Palettes
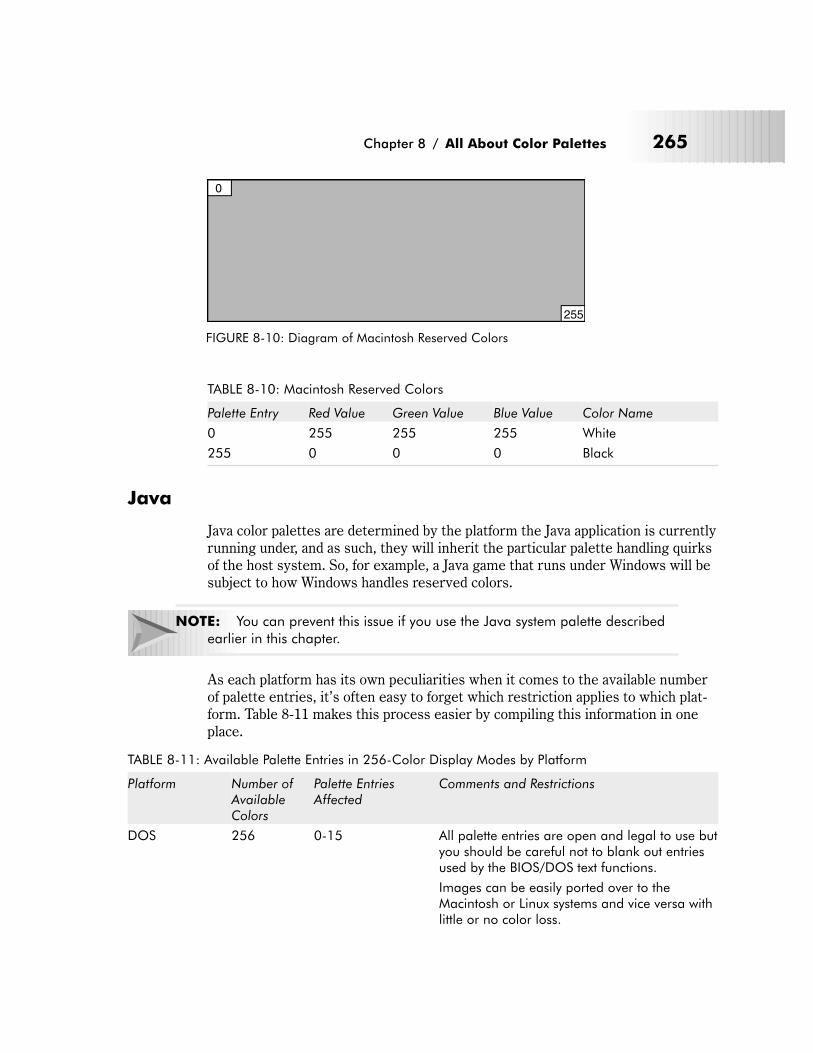
TABLE 8-10: Macintosh Reserved Colors
Palette Entry Red Value Green Value Blue Value Color Name
0 255 255 255 White
255 0 0 0 Black
Java
Java color palettes are determined by the platform the Java application is currently
running under, and as such, they will inherit the particular palette handling quirks
of the host system. So, for example, a Java game that runs under Windows will be
subject to how Windows handles reserved colors.
NOTE: You can prevent this issue if you use the Java system palette described
earlier in this chapter.
As each platform has its own peculiarities when it comes to the available number
of palette entries, it’s often easy to forget which restriction applies to which plat-
form. Table 8-11 makes this process easier by compiling this information in one
place.
TABLE 8-11: Available Palette Entries in 256-Color Display Modes by Platform
Platform Number ofAvailableColors
Palette EntriesAffected
Comments and Restrictions
DOS 256 0-15 All palette entries are open and legal to use butyou should be careful not to blank out entriesused by the BIOS/DOS text functions.
Images can be easily ported over to theMacintosh or Linux systems and vice versa withlittle or no color loss.
Chapter 8 / All About Color Palettes 265
0
255
FIGURE 8-10: Diagram of Macintosh Reserved Colors
Platform Number ofAvailableColors
Palette EntriesAffected
Comments and Restrictions
Windows 3.1,95, 98, NT 4.0,and 2000
236 0-9, 246-255 20 colors are reserved for system functions andshould not be changed. The first 10 and last 10palette entries are essentially off limits to yourpalette.
Images can be ported to other platforms withlittle or no color loss but the same does nothold true for images being ported to Windows.Because Windows supports fewer displayablecolors, there will be some color loss whenmoving full-color Macintosh, Linux, and DOSimages over to it.
Linux 254 0 and 255 All but two palette entries are free for use. Thefirst and last palette entries are reserved forsystem use and should not be changed.
Images can be ported from DOS, Windows,and the Macintosh platforms with little or nocolor loss.
Macintosh 254 0 and 255 All but two palette entries are free for use. Thefirst and last palette entries are reserved forsystem use and should not be changed.
Images can be ported from DOS, Linux, andWindows platforms with little or no color loss.
Creating Color Palettes
There’s more to creating a color palette than just picking pretty or interesting col-
ors. Creating an effective color palette actually involves careful planning and
implementation. Let’s look at the planning aspect first.
Planning a Color Palette
The planning phase happens before you actually define any RGB values and it
examines such issues as:
� Game audience
� Game appearance
� Game mood
� Technical restrictions
266 Chapter 8 / All About Color Palettes
Game Audience
This looks at who will actually be playing your game. Some things to consider
when evaluating your game’s audience include age, gender, and geographic/cul-
tural influences of the game’s potential players. Therefore, when analyzing the
game audience, ask yourself such questions as:
� Is the game targeted towards younger players?
� Is the game targeted towards older players?
� What gender is your game targeted towards?
� Will the game be distributed or marketed overseas or made available for
download over the Internet?
Remember that both older and younger users will perceive and react to color
schemes differently. Younger audiences will prefer games that have palettes with
warmer colors, while older audiences will prefer games with cooler colors.
The same holds true for genders. Be sure to consider this when designing your
game’s graphics.
Finally, if you’re planning to distribute your game overseas or over the Internet,
make sure you address any potential cross-cultural color issues that may affect
your users.
Game Appearance
This determines the aesthetics of your game. Things to consider here are the
desired look and feel you’re interested in creating and the degree of realism asso-
ciated with it. Therefore, as part of this analysis, ask yourself such questions as:
� What look or style are you trying to achieve?
� What colors will you need to produce that particular look?
� How long will your color gradients be?
The “style” you choose for your game can have a significant influence over your
palette definitions. Generally, games with realistic design styles tend to emphasize
palettes with more intermediate shades while games with retro or cartoon design
styles tend to favor palettes with more intense primary colors in them.
Smoother shading is achieved by using longer gradients, so be prepared to reserve
sufficient room in your palette if this is something you want to accomplish.
Game Mood
This examines the feelings and symbolism that you’re trying to convey in your
game. Things to consider when looking at this issue are the types of emotions that
Chapter 8 / All About Color Palettes 267
you’re attempting to provoke in the player. Ask yourself this question: What mood
and emotions are you trying to project to the user?
Remember the discussion in Chapter 7 about the impact that color can have on the
user’s mood and emotion. While you can always choose to ignore this factor with-
out seriously affecting the quality of your game, why not take advantage of it? By
selecting mood-enhancing colors, you can seize the user’s emotions and get them
fully immersed in your game.
Technical Restrictions
There are a number of technical issues that all games face. Of all of the items dis-
cussed so far, this is one of the most complex and frustrating issues to deal with
when designing game graphics.
Technical issues can encompass everything from system-specific color capabilities
to any special color effects you might want to create. Therefore, when looking at
this issue, ask yourself these questions:
� Will the entire game share the same palette or will certain palettes be
assigned to specific game levels?
� Will you use separate palettes for menu and title screens?
� What platforms will the game support—DOS? Windows? Linux? Macintosh?
Many games, regardless of their type, contain different levels. Each level can offer
the user new and interesting challenges. One of the easiest ways of distinguishing
between game levels is to introduce different color schemes. In many cases, this
can be done without having to define a brand new palette. However, in some
instances it will.
While 256 colors can provide you with many possible color choices, there will be
instances where even this many colors can seem restrictive. Because of this, you
need to make sure you have completely thought out how your game will handle
implementing these level-based color schemes.
The same issue holds true for title and menu screens as well. In addition, let’s not
forget all of those annoying platform-specific palette differences!
NOTE: If you’re unsure about any technical issue raised here, remember to ask
your programmer! He or she should be able to fill in any of these gaps for
you.
Implementing Your Color Palette
Once you have planned your palette, you will be ready to define its RGB color val-
ues and implement it. To do this, you’ll need to use the Palette Selection tool that
268 Chapter 8 / All About Color Palettes
is specific to your particular painting program. Every program described in Chap-
ter 5 allows you to define your own custom color palettes; however, they all differ
somewhat in terms of features and ease of use.
Defining color palettes can be a tricky and tedious process. However, once you
grasp the fundamentals, this process will eventually become easier. As with any-
thing else discussed in this book, practice makes perfect.
It is best to break down the process of defining a color palette into several distinct
steps. Doing this not only makes the process easier to manage, but it also allows
you to back up in case you made a mistake. These steps include:
1. Defining the required color palette components
2. Deciding on a color palette order
3. Adding system colors
4. Selecting your colors
5. Defining your color ranges and gradients
6. Reserving palette entries for programmed effects
7. Testing your color palette
8. Saving your palette
Step 1—Defining the Required Color Palette Components
Each color palette should be broken down into several components. These compo-
nents include elements such as:
� System colors
� Background color
� Transparent color
� Color ranges/gradients
� Special effect colors
System Colors
As previously mentioned, these are the colors that are reserved by the system for
various housekeeping purposes, i.e., coloring windows and icons. Therefore,
include them in every palette you define in order to prevent any unpleasant color
distortions from occurring during the course of your game.
Background Color
You’ll use this color for the background for your game artwork screens. There
should only be one background color defined. Make sure that whatever color you
choose has sufficient contrast. Very dark backgrounds such as black, dark gray, or
dark blue provide excellent contrast when displayed against lighter colors.
Chapter 8 / All About Color Palettes 269
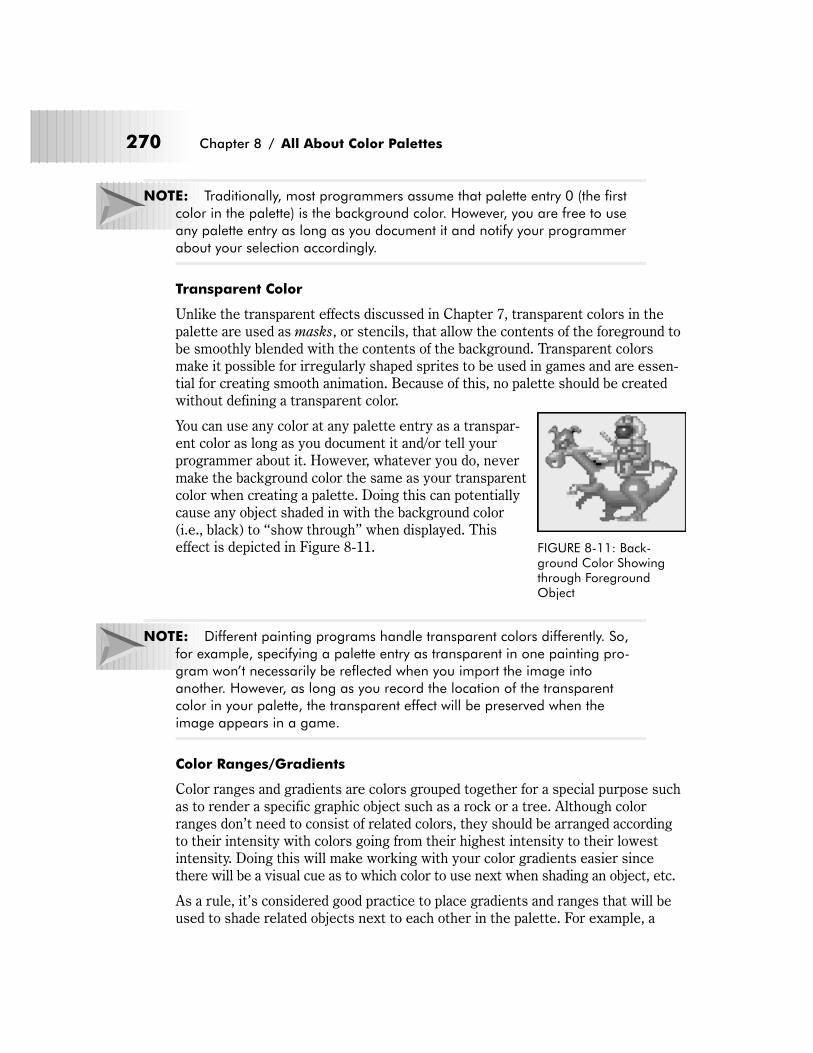
NOTE: Traditionally, most programmers assume that palette entry 0 (the first
color in the palette) is the background color. However, you are free to use
any palette entry as long as you document it and notify your programmer
about your selection accordingly.
Transparent Color
Unlike the transparent effects discussed in Chapter 7, transparent colors in the
palette are used as masks, or stencils, that allow the contents of the foreground to
be smoothly blended with the contents of the background. Transparent colors
make it possible for irregularly shaped sprites to be used in games and are essen-
tial for creating smooth animation. Because of this, no palette should be created
without defining a transparent color.
You can use any color at any palette entry as a transpar-
ent color as long as you document it and/or tell your
programmer about it. However, whatever you do, never
make the background color the same as your transparent
color when creating a palette. Doing this can potentially
cause any object shaded in with the background color
(i.e., black) to “show through” when displayed. This
effect is depicted in Figure 8-11.
NOTE: Different painting programs handle transparent colors differently. So,
for example, specifying a palette entry as transparent in one painting pro-
gram won’t necessarily be reflected when you import the image into
another. However, as long as you record the location of the transparent
color in your palette, the transparent effect will be preserved when the
image appears in a game.
Color Ranges/Gradients
Color ranges and gradients are colors grouped together for a special purpose such
as to render a specific graphic object such as a rock or a tree. Although color
ranges don’t need to consist of related colors, they should be arranged according
to their intensity with colors going from their highest intensity to their lowest
intensity. Doing this will make working with your color gradients easier since
there will be a visual cue as to which color to use next when shading an object, etc.
As a rule, it’s considered good practice to place gradients and ranges that will be
used to shade related objects next to each other in the palette. For example, a
270 Chapter 8 / All About Color Palettes
FIGURE 8-11: Back-ground Color Showingthrough ForegroundObject
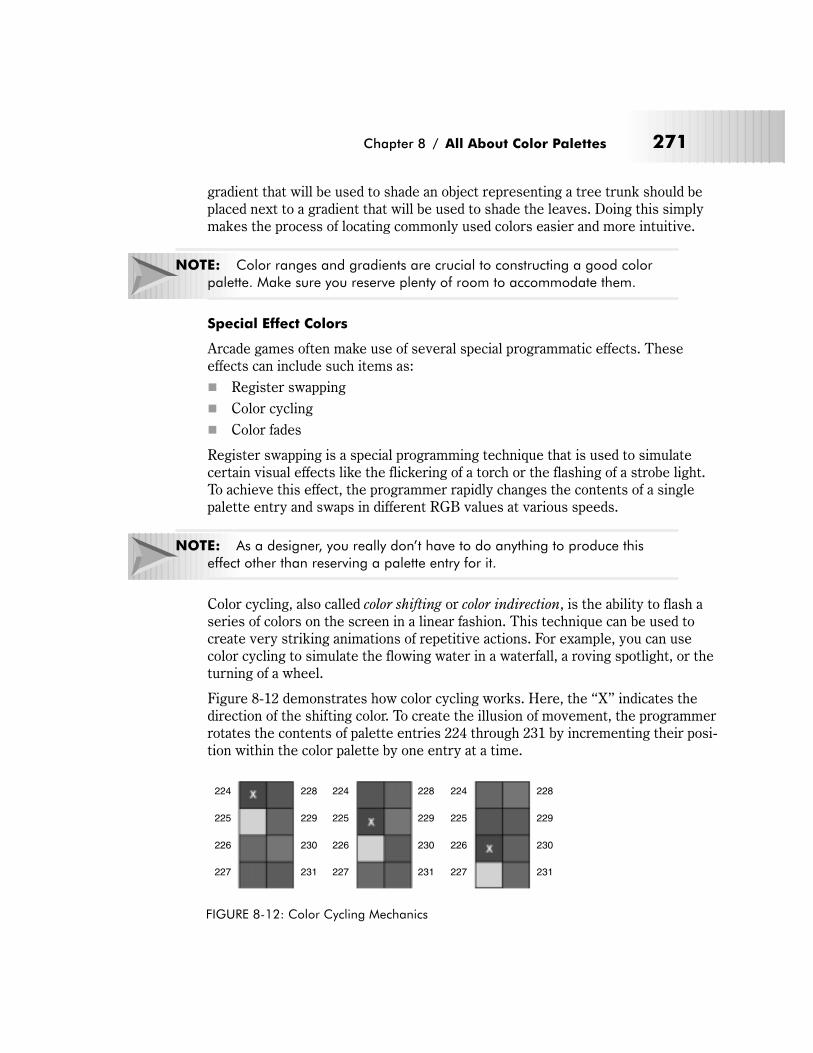
gradient that will be used to shade an object representing a tree trunk should be
placed next to a gradient that will be used to shade the leaves. Doing this simply
makes the process of locating commonly used colors easier and more intuitive.
NOTE: Color ranges and gradients are crucial to constructing a good color
palette. Make sure you reserve plenty of room to accommodate them.
Special Effect Colors
Arcade games often make use of several special programmatic effects. These
effects can include such items as:
� Register swapping
� Color cycling
� Color fades
Register swapping is a special programming technique that is used to simulate
certain visual effects like the flickering of a torch or the flashing of a strobe light.
To achieve this effect, the programmer rapidly changes the contents of a single
palette entry and swaps in different RGB values at various speeds.
NOTE: As a designer, you really don’t have to do anything to produce this
effect other than reserving a palette entry for it.
Color cycling, also called color shifting or color indirection, is the ability to flash a
series of colors on the screen in a linear fashion. This technique can be used to
create very striking animations of repetitive actions. For example, you can use
color cycling to simulate the flowing water in a waterfall, a roving spotlight, or the
turning of a wheel.
Figure 8-12 demonstrates how color cycling works. Here, the “X” indicates the
direction of the shifting color. To create the illusion of movement, the programmer
rotates the contents of palette entries 224 through 231 by incrementing their posi-
tion within the color palette by one entry at a time.
Chapter 8 / All About Color Palettes 271
224 224
225 225225
226 226226
227 227227
228 228 228
229 229 229
230 230 230
231 231 231
224
FIGURE 8-12: Color Cycling Mechanics
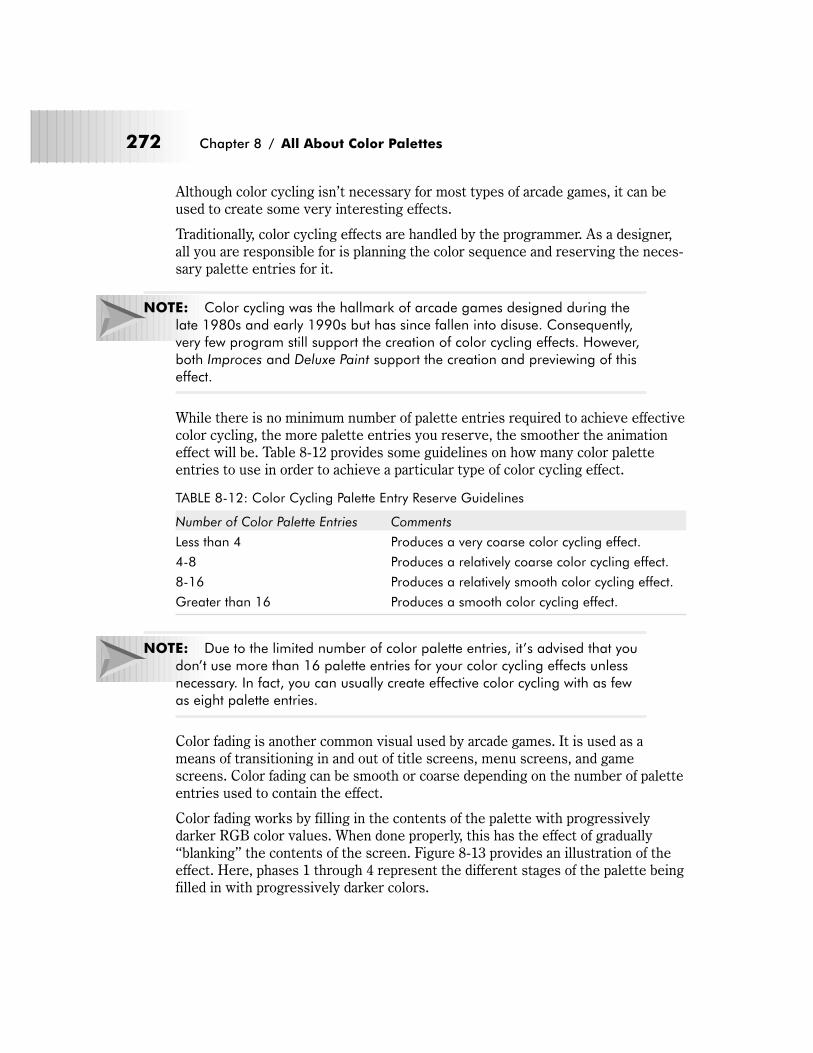
Although color cycling isn’t necessary for most types of arcade games, it can be
used to create some very interesting effects.
Traditionally, color cycling effects are handled by the programmer. As a designer,
all you are responsible for is planning the color sequence and reserving the neces-
sary palette entries for it.
NOTE: Color cycling was the hallmark of arcade games designed during the
late 1980s and early 1990s but has since fallen into disuse. Consequently,
very few program still support the creation of color cycling effects. However,
both Improces and Deluxe Paint support the creation and previewing of this
effect.
While there is no minimum number of palette entries required to achieve effective
color cycling, the more palette entries you reserve, the smoother the animation
effect will be. Table 8-12 provides some guidelines on how many color palette
entries to use in order to achieve a particular type of color cycling effect.
TABLE 8-12: Color Cycling Palette Entry Reserve Guidelines
Number of Color Palette Entries Comments
Less than 4 Produces a very coarse color cycling effect.
4-8 Produces a relatively coarse color cycling effect.
8-16 Produces a relatively smooth color cycling effect.
Greater than 16 Produces a smooth color cycling effect.
NOTE: Due to the limited number of color palette entries, it’s advised that you
don’t use more than 16 palette entries for your color cycling effects unless
necessary. In fact, you can usually create effective color cycling with as few
as eight palette entries.
Color fading is another common visual used by arcade games. It is used as a
means of transitioning in and out of title screens, menu screens, and game
screens. Color fading can be smooth or coarse depending on the number of palette
entries used to contain the effect.
Color fading works by filling in the contents of the palette with progressively
darker RGB color values. When done properly, this has the effect of gradually
“blanking” the contents of the screen. Figure 8-13 provides an illustration of the
effect. Here, phases 1 through 4 represent the different stages of the palette being
filled in with progressively darker colors.
272 Chapter 8 / All About Color Palettes
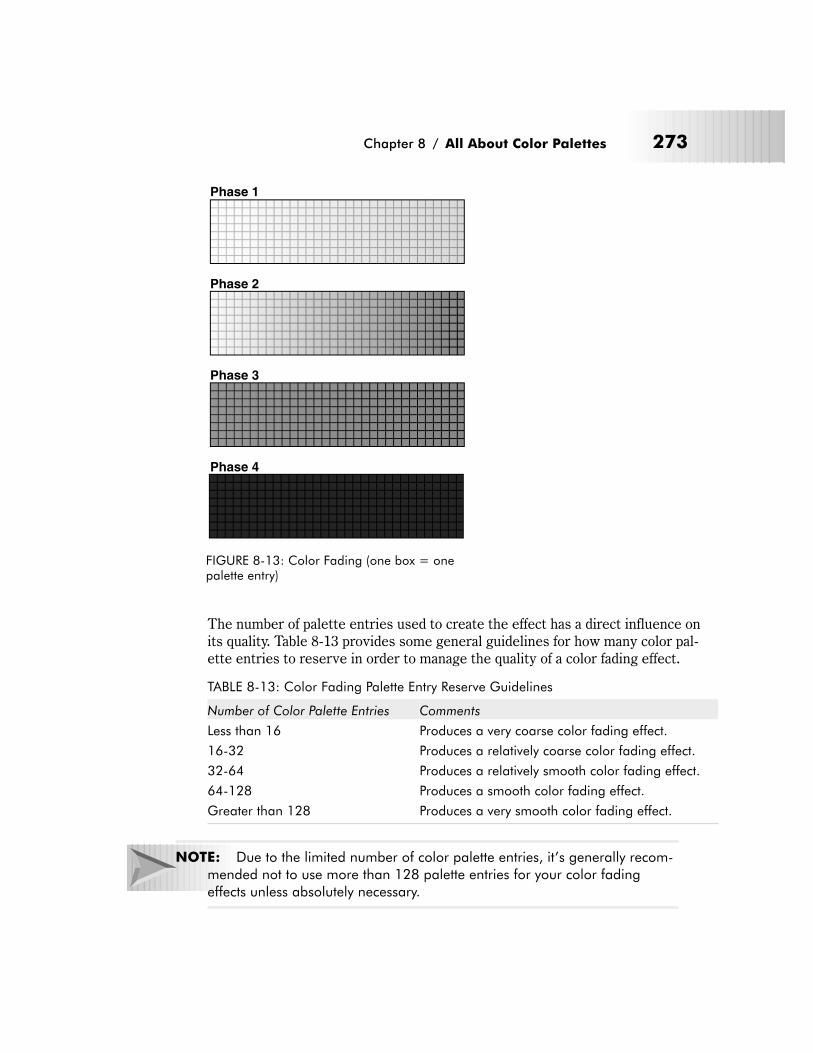
The number of palette entries used to create the effect has a direct influence on
its quality. Table 8-13 provides some general guidelines for how many color pal-
ette entries to reserve in order to manage the quality of a color fading effect.
TABLE 8-13: Color Fading Palette Entry Reserve Guidelines
Number of Color Palette Entries Comments
Less than 16 Produces a very coarse color fading effect.
16-32 Produces a relatively coarse color fading effect.
32-64 Produces a relatively smooth color fading effect.
64-128 Produces a smooth color fading effect.
Greater than 128 Produces a very smooth color fading effect.
NOTE: Due to the limited number of color palette entries, it’s generally recom-
mended not to use more than 128 palette entries for your color fading
effects unless absolutely necessary.
Chapter 8 / All About Color Palettes 273
Phase 1
Phase 2
Phase 3
Phase 4
FIGURE 8-13: Color Fading (one box = onepalette entry)
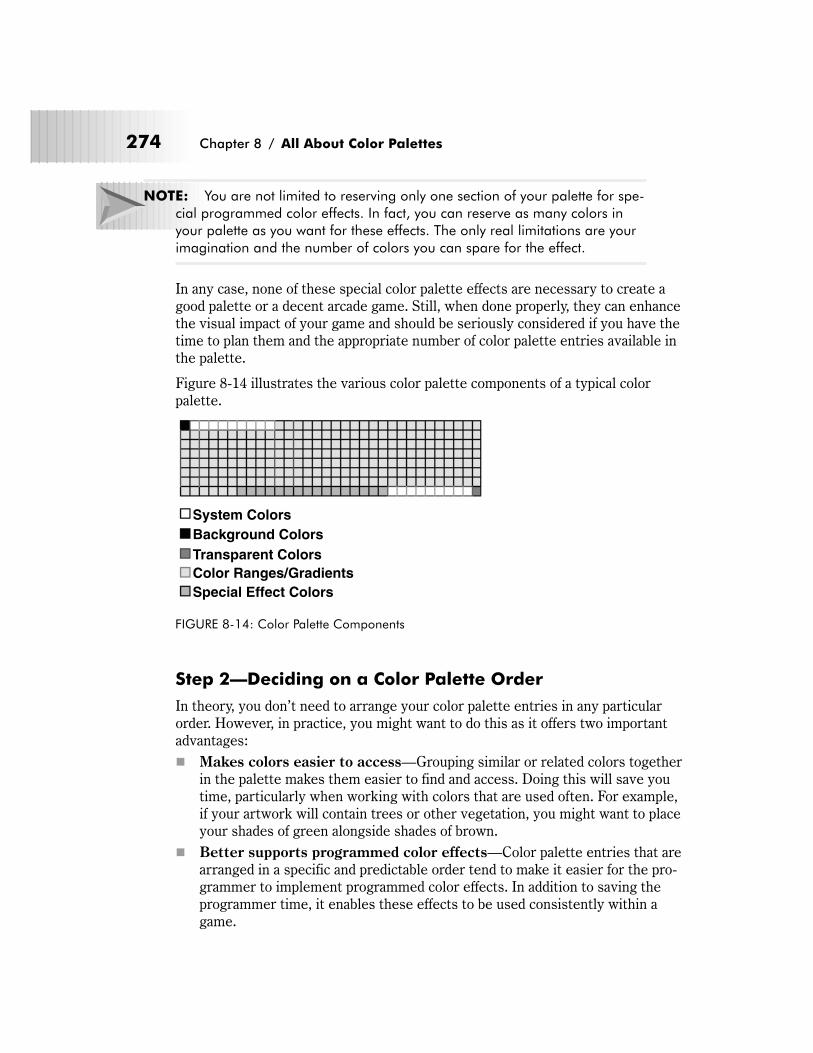
NOTE: You are not limited to reserving only one section of your palette for spe-
cial programmed color effects. In fact, you can reserve as many colors in
your palette as you want for these effects. The only real limitations are your
imagination and the number of colors you can spare for the effect.
In any case, none of these special color palette effects are necessary to create a
good palette or a decent arcade game. Still, when done properly, they can enhance
the visual impact of your game and should be seriously considered if you have the
time to plan them and the appropriate number of color palette entries available in
the palette.
Figure 8-14 illustrates the various color palette components of a typical color
palette.
Step 2—Deciding on a Color Palette Order
In theory, you don’t need to arrange your color palette entries in any particular
order. However, in practice, you might want to do this as it offers two important
advantages:
� Makes colors easier to access—Grouping similar or related colors together
in the palette makes them easier to find and access. Doing this will save you
time, particularly when working with colors that are used often. For example,
if your artwork will contain trees or other vegetation, you might want to place
your shades of green alongside shades of brown.
� Better supports programmed color effects—Color palette entries that are
arranged in a specific and predictable order tend to make it easier for the pro-
grammer to implement programmed color effects. In addition to saving the
programmer time, it enables these effects to be used consistently within a
game.
274 Chapter 8 / All About Color Palettes
System Colors
Background Colors
Transparent Colors
Color Ranges/Gradients
Special Effect Colors
FIGURE 8-14: Color Palette Components
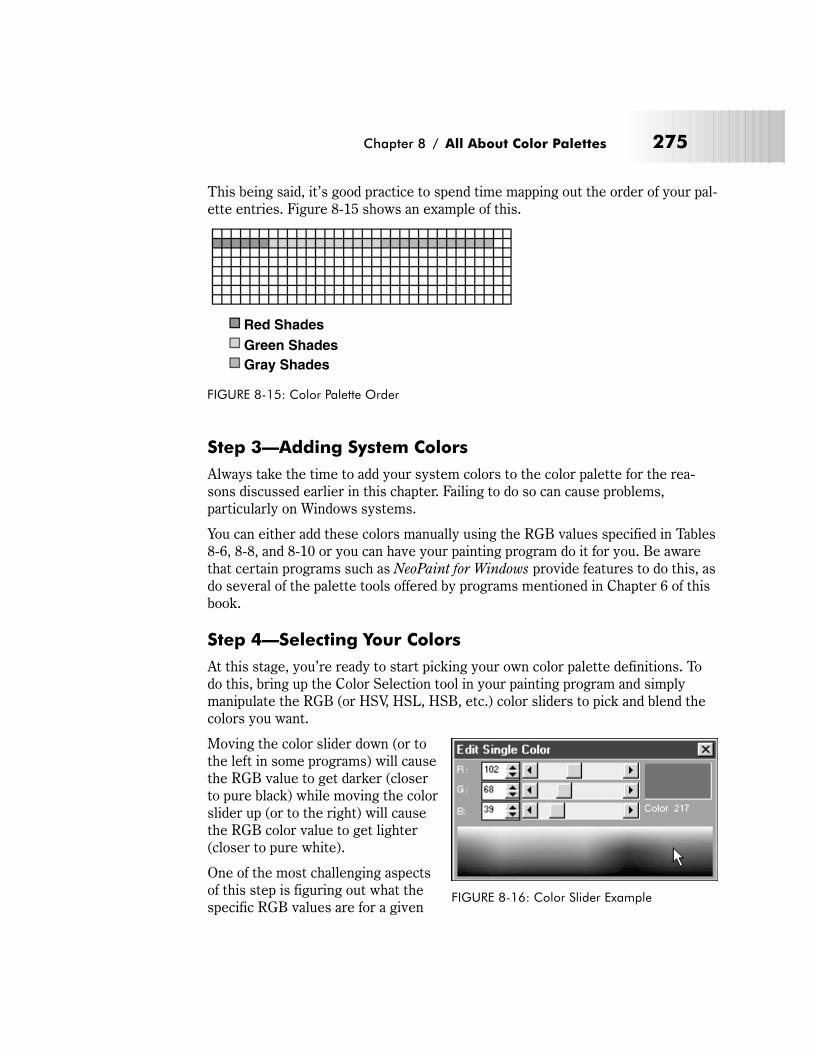
This being said, it’s good practice to spend time mapping out the order of your pal-
ette entries. Figure 8-15 shows an example of this.
Step 3—Adding System Colors
Always take the time to add your system colors to the color palette for the rea-
sons discussed earlier in this chapter. Failing to do so can cause problems,
particularly on Windows systems.
You can either add these colors manually using the RGB values specified in Tables
8-6, 8-8, and 8-10 or you can have your painting program do it for you. Be aware
that certain programs such as NeoPaint for Windows provide features to do this, as
do several of the palette tools offered by programs mentioned in Chapter 6 of this
book.
Step 4—Selecting Your Colors
At this stage, you’re ready to start picking your own color palette definitions. To
do this, bring up the Color Selection tool in your painting program and simply
manipulate the RGB (or HSV, HSL, HSB, etc.) color sliders to pick and blend the
colors you want.
Moving the color slider down (or to
the left in some programs) will cause
the RGB value to get darker (closer
to pure black) while moving the color
slider up (or to the right) will cause
the RGB color value to get lighter
(closer to pure white).
One of the most challenging aspects
of this step is figuring out what the
specific RGB values are for a given
Chapter 8 / All About Color Palettes 275
Red Shades
Green Shades
Gray Shades
FIGURE 8-15: Color Palette Order
FIGURE 8-16: Color Slider Example

color, particularly for the so-called “real-world” colors that we see and experience
every day.
Want to know what color army green is? Or what the RGB color values for a flesh
tone might be? Well, look no further. To help jumpstart the color selection pro-
cess, Table 8-14 includes a list of several dozen “starter” colors.
TABLE 8-14: Starter Colors
Color Name RGB Color Values
(Windows, Linux, Macintosh, and Java)
Aqua 51 255 204
Army Green 128 128 0
Avocado 153 153 0
Banana 227 207 87
Bauhaus Gray 66 66 66
Black 0 0 0
Blue-Green 0 153 102
Boot Leather 160 68 0
Brick 204 102 51
Bright Blue 0 102 255
Bright Gray 192 192 192
Bright Green 0 204 51
Brown 232 168 144
Burgundy 153 0 51
Cadet Blue 96 156 152
Carrot 237 145 33
Castle Stone 41 41 41
Chartreuse 204 255 0
Cobalt 61 89 171
Coral 255 127 80
Crimson 204 0 51
Dark Blue 0 0 153
Dark Brown 104 52 0
Dark Gray 22 22 22
Dark Green 51 102 51
Dark Periwinkle 102 102 255
Dark Purplish Blue 102 0 204
Deep Purple 128 0 128
Deli Mustard 255 204 102
276 Chapter 8 / All About Color Palettes

Color Name RGB Color Values
(Windows, Linux, Macintosh, and Java)
Dull Green 102 255 153
Eggshell 252 230 201
Fire Brick 165 0 33
Flesh 255 204 153
Florida Gator Orange 255 102 0
Fuscia 255 0 255
Gold 204 204 51
Golden Brown 153 102 0
Grass 51 153 102
Gray 128 128 128
Gray-Blue 0 102 153
Grayish Brown 152 140 104
Grayish Purple 153 153 204
Green 0 128 0
Gun Metal 150 150 150
Hot Pink 255 102 204
Indigo 8 46 84
Ivory 255 255 240
Khaki 240 230 140
Lavender 153 102 204
Light Beige 144 132 112
Light Blue #1 51 153 255
Light Blue #2 0 204 255
Light Brown 136 96 88
Light Gold 204 204 102
Light Gray 178 178 178
Light Orange 255 153 0
Light Plum 204 153 204
Light Rose 255 153 204
Light Yellow 255 255 102
Lilac 204 153 255
Lime 0 255 0
Linen 250 240 230
Maroon 128 0 0
Medium Blue 0 51 204
Chapter 8 / All About Color Palettes 277

Color Name RGB Color Values
(Windows, Linux, Macintosh, and Java)
Medium Gray 85 85 85
Medium Green 0 153 0
Melon 227 168 105
Milk Chocolate 144 52 40
Mint 189 252 201
Navy Blue 0 0 128
Ocean Blue 56 176 192
Off White 227 227 227
Olive Drab 107 142 35
Periwinkle #1 153 0 255
Periwinkle #2 102 51 255
Pink 255 124 128
Pumpkin 255 153 51
Purple #1 102 51 204
Purple #2 102 51 153
Raspberry 135 38 87
Red 255 0 0
Red-Orange 204 51 0
Royal Blue 0 0 255
Royal Purple 102 0 153
Rust 112 0 0
Saddle Brown 112 76 48
Salmon 255 102 102
Sandy Brown 120 0 0
Sea Green 153 204 153
Sienna 204 102 0
Sky Blue #1 128 218 225
Sky Blue #2 0 220 255
Snow 255 250 250
Steel 102 102 102
Sun Yellow 255 255 0
Tan 204 204 153
Taupe 160 144 128
Teal 0 128 128
Tomato Soup 255 102 51
278 Chapter 8 / All About Color Palettes
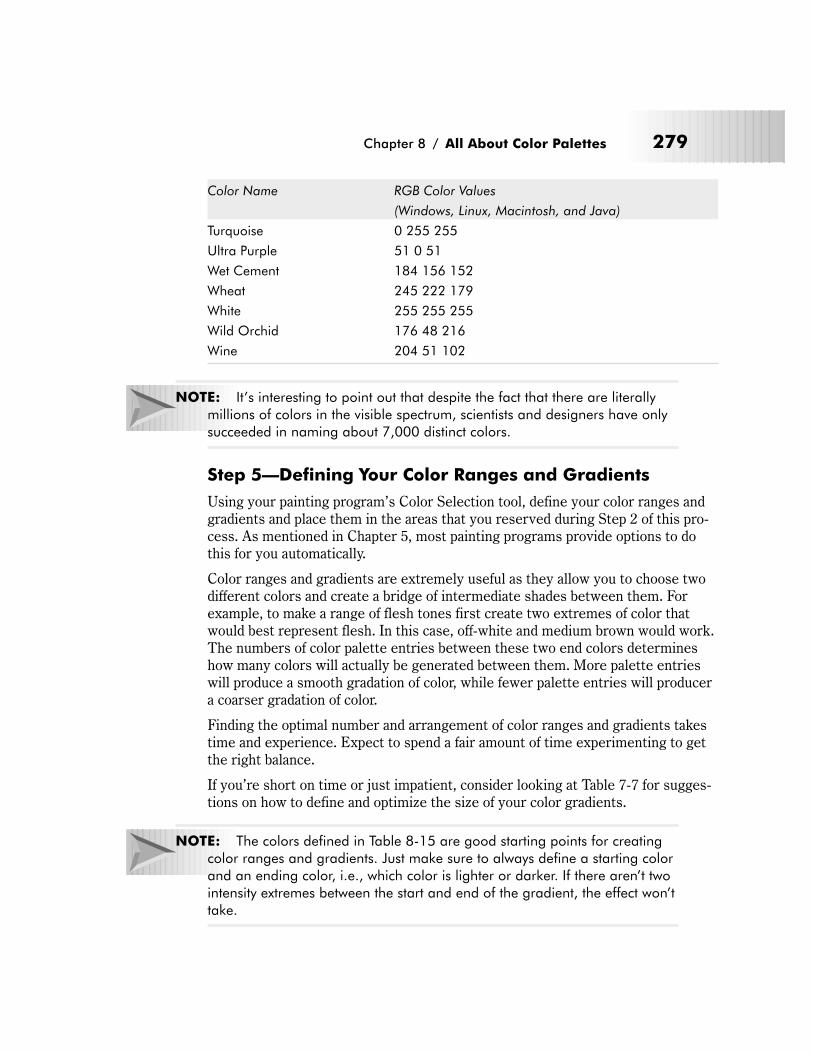
Color Name RGB Color Values
(Windows, Linux, Macintosh, and Java)
Turquoise 0 255 255
Ultra Purple 51 0 51
Wet Cement 184 156 152
Wheat 245 222 179
White 255 255 255
Wild Orchid 176 48 216
Wine 204 51 102
NOTE: It’s interesting to point out that despite the fact that there are literally
millions of colors in the visible spectrum, scientists and designers have only
succeeded in naming about 7,000 distinct colors.
Step 5—Defining Your Color Ranges and Gradients
Using your painting program’s Color Selection tool, define your color ranges and
gradients and place them in the areas that you reserved during Step 2 of this pro-
cess. As mentioned in Chapter 5, most painting programs provide options to do
this for you automatically.
Color ranges and gradients are extremely useful as they allow you to choose two
different colors and create a bridge of intermediate shades between them. For
example, to make a range of flesh tones first create two extremes of color that
would best represent flesh. In this case, off-white and medium brown would work.
The numbers of color palette entries between these two end colors determines
how many colors will actually be generated between them. More palette entries
will produce a smooth gradation of color, while fewer palette entries will producer
a coarser gradation of color.
Finding the optimal number and arrangement of color ranges and gradients takes
time and experience. Expect to spend a fair amount of time experimenting to get
the right balance.
If you’re short on time or just impatient, consider looking at Table 7-7 for sugges-
tions on how to define and optimize the size of your color gradients.
NOTE: The colors defined in Table 8-15 are good starting points for creating
color ranges and gradients. Just make sure to always define a starting color
and an ending color, i.e., which color is lighter or darker. If there aren’t two
intensity extremes between the start and end of the gradient, the effect won’t
take.
Chapter 8 / All About Color Palettes 279
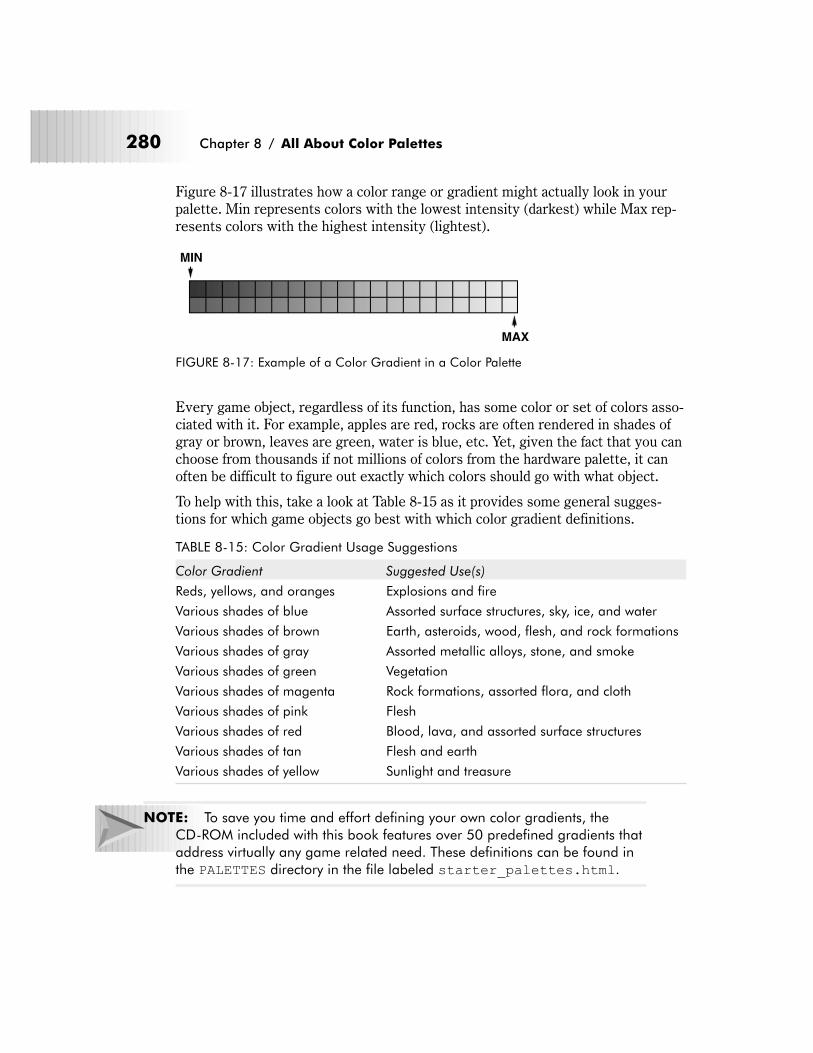
Figure 8-17 illustrates how a color range or gradient might actually look in your
palette. Min represents colors with the lowest intensity (darkest) while Max rep-
resents colors with the highest intensity (lightest).
Every game object, regardless of its function, has some color or set of colors asso-
ciated with it. For example, apples are red, rocks are often rendered in shades of
gray or brown, leaves are green, water is blue, etc. Yet, given the fact that you can
choose from thousands if not millions of colors from the hardware palette, it can
often be difficult to figure out exactly which colors should go with what object.
To help with this, take a look at Table 8-15 as it provides some general sugges-
tions for which game objects go best with which color gradient definitions.
TABLE 8-15: Color Gradient Usage Suggestions
Color Gradient Suggested Use(s)
Reds, yellows, and oranges Explosions and fire
Various shades of blue Assorted surface structures, sky, ice, and water
Various shades of brown Earth, asteroids, wood, flesh, and rock formations
Various shades of gray Assorted metallic alloys, stone, and smoke
Various shades of green Vegetation
Various shades of magenta Rock formations, assorted flora, and cloth
Various shades of pink Flesh
Various shades of red Blood, lava, and assorted surface structures
Various shades of tan Flesh and earth
Various shades of yellow Sunlight and treasure
NOTE: To save you time and effort defining your own color gradients, the
CD-ROM included with this book features over 50 predefined gradients that
address virtually any game related need. These definitions can be found in
the PALETTES directory in the file labeled starter_palettes.html.
280 Chapter 8 / All About Color Palettes
MIN
MAX
FIGURE 8-17: Example of a Color Gradient in a Color Palette
Step 6—Reserving Palette Entries for Programmed Effects
If you plan to take advantage of any special programmatic effects such as color
cycling or palette fades, this is the point in the palette definition process when you
would reserve palette entries for them. The reason this comes up so late in the
process is two-fold:
� As programmed effects are not central to your game artwork, your main draw-
ing colors have priority in your palette.
� Programmed effects are often removed from the game at the last minute for
various reasons. By adding them last, you can easily reclaim the palette
entries they occupied with a minimum of fuss should they be removed later on
in the game development cycle.
Step 7—Testing Your Color Palette
After you define your system colors, individual colors, and color gradients, you
should always test out your palette before using it in a game. This is an extremely
important step since what looks good in your Palette Selection tool won’t always
look good when in actual use. To see if your palette actually passes muster, try
one or more of these procedures:
� The contrast test
� The light/dark test
� The gradient test
The Contrast Test
This particular test evaluates the contrasting qualities of the colors in your pal-
ette. As mentioned in Chapter 7, colors without sufficient contrast undermine
many of the advantages that color can offer your game.
To determine this, draw some simple shapes on the screen using your current pal-
ette definitions, then see how they contrast with each other. Do they look okay? If
not, something is wrong with your palette; you’ll need to redefine the problematic
colors and test your palette again until they do.
The Light/Dark Test
This test evaluates the relative lightness or darkness of the colors you have cho-
sen for your palette.
To perform this test, alternate drawing several test objects against both dark and
light backgrounds and see how things look. Do the colors seem too dark? Do they
appear to be too light? If so, fix the offending color values in your palette and test
again.
Chapter 8 / All About Color Palettes 281
The Gradient Test
This test examines how well the colors you’ve selected blend together. This is
important since colors that don’t blend well also don’t shade well.
To perform this test, create some shapes and fill them with color gradients. Next,
take a close look at how the colors within these shapes blend and ask yourself
questions like these:
� Are your gradients large enough for the level of shading you want to achieve
in your artwork?
� Are they too coarse?
� Is there enough contrast between gradient colors or are they too similar?
If you discover a problem here, go back in your palette and tweak your color selec-
tions until the problems you identify in this test vanish completely.
In short, it always pays to play around with your color palette and look for poten-
tial problems that might crop up before you start using it in your artwork. Believe
me, it’s far better to discover a potential problem with the contents or organiza-
tion of your palette now rather than later when you’re in the middle of a major
project. By that point, it might be too late to start making wholesale changes to
your palette.
Step 8—Saving Your Palette
When you are satisfied with how your palette looks, it’s time to save your palette
to disk. Whenever possible, try to save your palette in the Microsoft .PAL format,
as this will help make your color palette definitions portable across different
graphics applications and development environments.
NOTE: Please be aware that several programs mentioned in Chapter 6 and
included on the book’s CD-ROM save palettes as .PAL files. However, some
of these are actually saved in proprietary formats and not in the Microsoft-
compatible .PAL. format. Always make sure that you save your palettes in
the correct .PAL format, especially if you want to be able to share your color
palettes with different programs.
A Color Palette Creation Exercise
This section will quickly review the basics of actually defining a color palette. For
this example, we’ll use Pro Motion, an excellent Windows-compatible painting pro-
gram that is described in more detail in Chapter 6. Pro Motion was selected for
this exercise because of its powerful color palette manipulation features.
282 Chapter 8 / All About Color Palettes
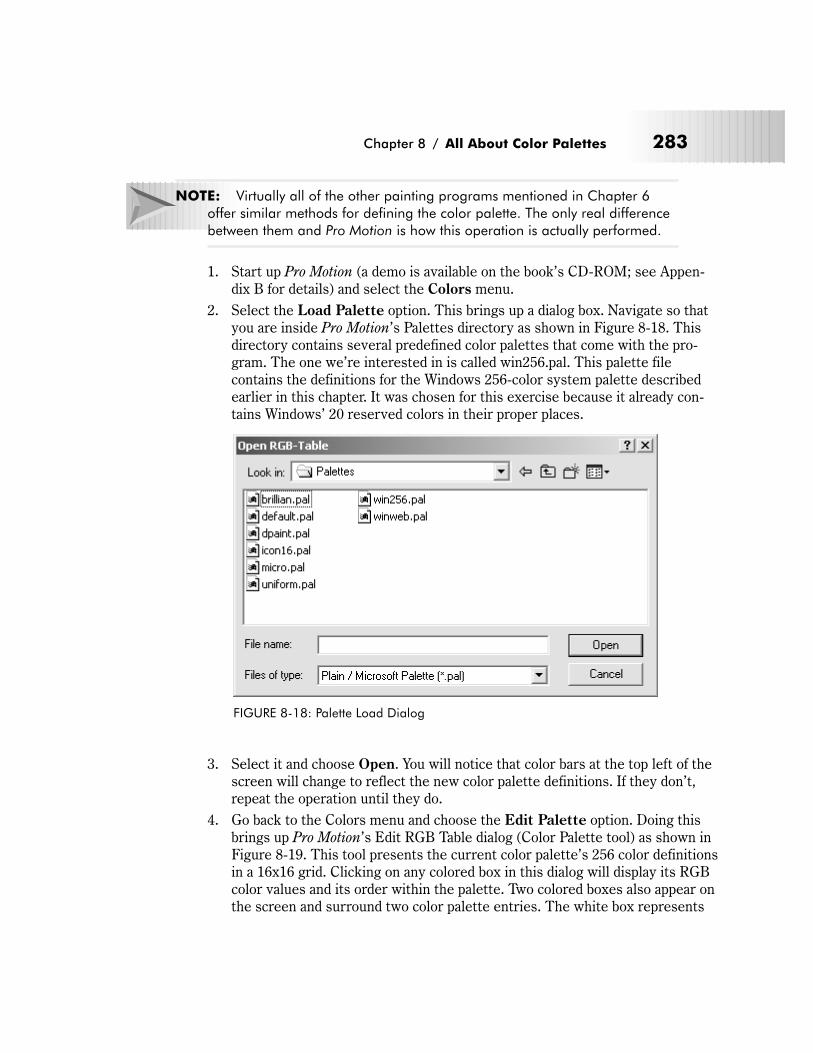
NOTE: Virtually all of the other painting programs mentioned in Chapter 6
offer similar methods for defining the color palette. The only real difference
between them and Pro Motion is how this operation is actually performed.
1. Start up Pro Motion (a demo is available on the book’s CD-ROM; see Appen-
dix B for details) and select the Colors menu.
2. Select the Load Palette option. This brings up a dialog box. Navigate so that
you are inside Pro Motion’s Palettes directory as shown in Figure 8-18. This
directory contains several predefined color palettes that come with the pro-
gram. The one we’re interested in is called win256.pal. This palette file
contains the definitions for the Windows 256-color system palette described
earlier in this chapter. It was chosen for this exercise because it already con-
tains Windows’ 20 reserved colors in their proper places.
3. Select it and choose Open. You will notice that color bars at the top left of the
screen will change to reflect the new color palette definitions. If they don’t,
repeat the operation until they do.
4. Go back to the Colors menu and choose the Edit Palette option. Doing this
brings up Pro Motion’s Edit RGB Table dialog (Color Palette tool) as shown in
Figure 8-19. This tool presents the current color palette’s 256 color definitions
in a 16x16 grid. Clicking on any colored box in this dialog will display its RGB
color values and its order within the palette. Two colored boxes also appear on
the screen and surround two color palette entries. The white box represents
Chapter 8 / All About Color Palettes 283
FIGURE 8-18: Palette Load Dialog
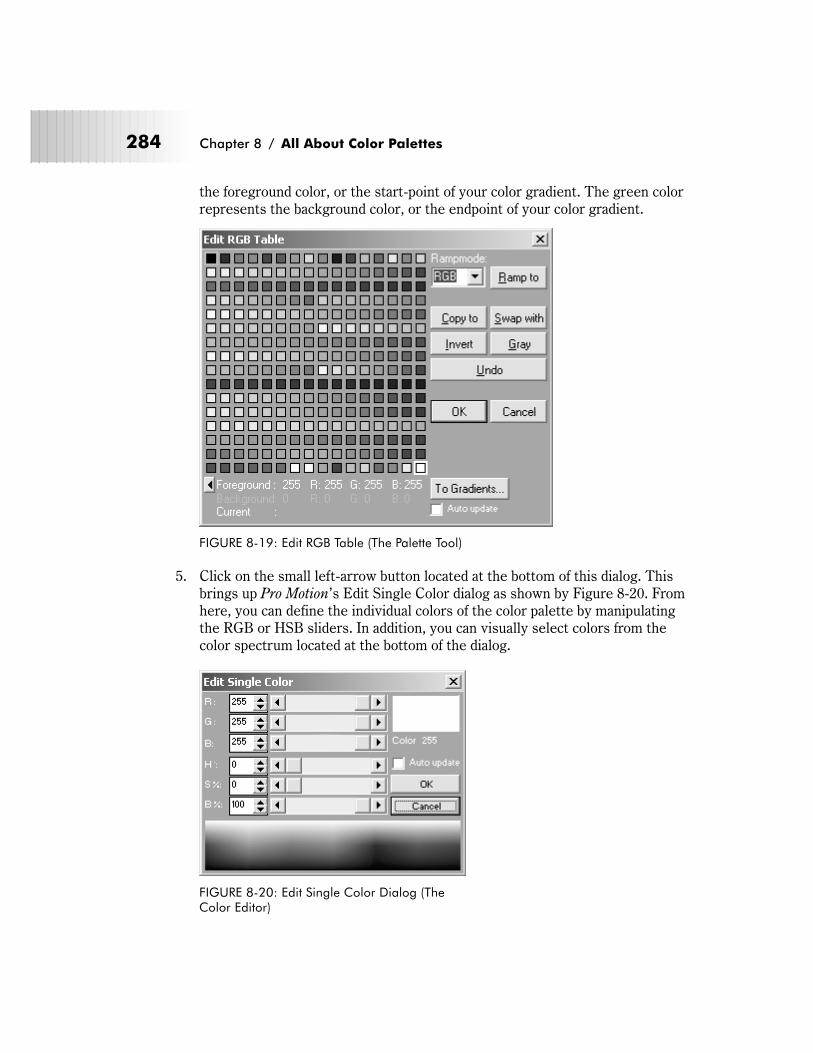
the foreground color, or the start-point of your color gradient. The green color
represents the background color, or the endpoint of your color gradient.
5. Click on the small left-arrow button located at the bottom of this dialog. This
brings up Pro Motion’s Edit Single Color dialog as shown by Figure 8-20. From
here, you can define the individual colors of the color palette by manipulating
the RGB or HSB sliders. In addition, you can visually select colors from the
color spectrum located at the bottom of the dialog.
284 Chapter 8 / All About Color Palettes
FIGURE 8-19: Edit RGB Table (The Palette Tool)
FIGURE 8-20: Edit Single Color Dialog (TheColor Editor)
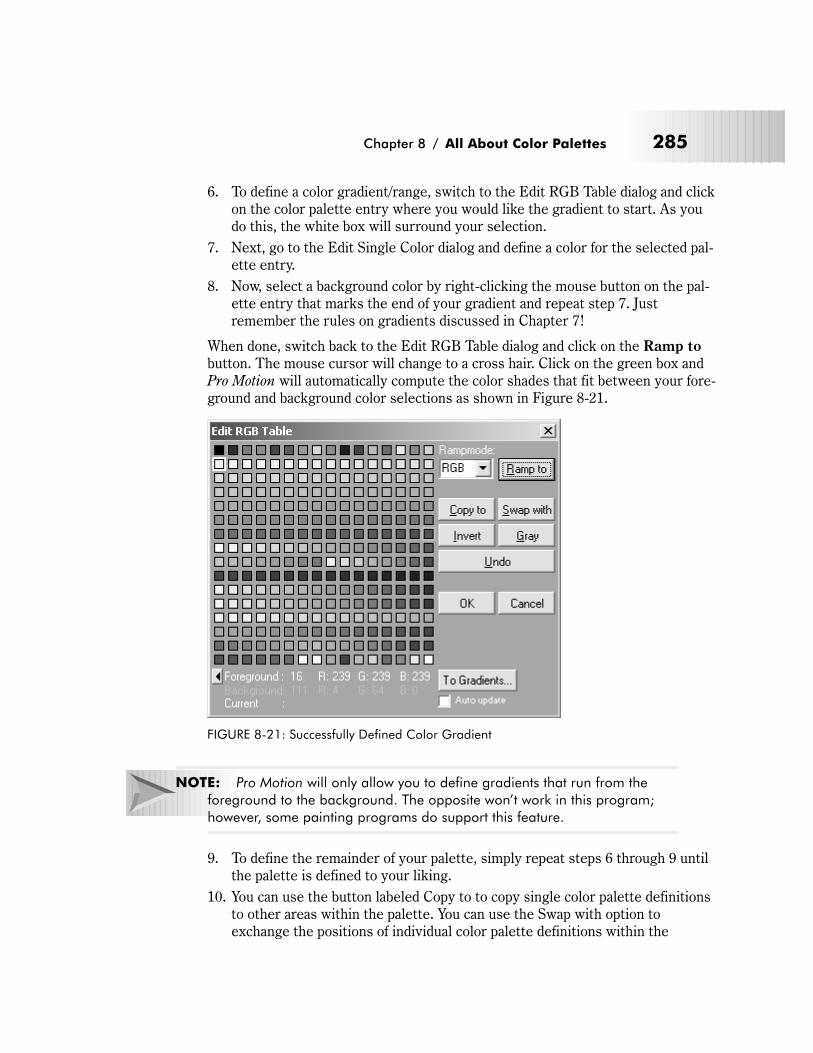
6. To define a color gradient/range, switch to the Edit RGB Table dialog and click
on the color palette entry where you would like the gradient to start. As you
do this, the white box will surround your selection.
7. Next, go to the Edit Single Color dialog and define a color for the selected pal-
ette entry.
8. Now, select a background color by right-clicking the mouse button on the pal-
ette entry that marks the end of your gradient and repeat step 7. Just
remember the rules on gradients discussed in Chapter 7!
When done, switch back to the Edit RGB Table dialog and click on the Ramp to
button. The mouse cursor will change to a cross hair. Click on the green box and
Pro Motion will automatically compute the color shades that fit between your fore-
ground and background color selections as shown in Figure 8-21.
NOTE: Pro Motion will only allow you to define gradients that run from the
foreground to the background. The opposite won’t work in this program;
however, some painting programs do support this feature.
9. To define the remainder of your palette, simply repeat steps 6 through 9 until
the palette is defined to your liking.
10. You can use the button labeled Copy to to copy single color palette definitions
to other areas within the palette. You can use the Swap with option to
exchange the positions of individual color palette definitions within the
Chapter 8 / All About Color Palettes 285
FIGURE 8-21: Successfully Defined Color Gradient
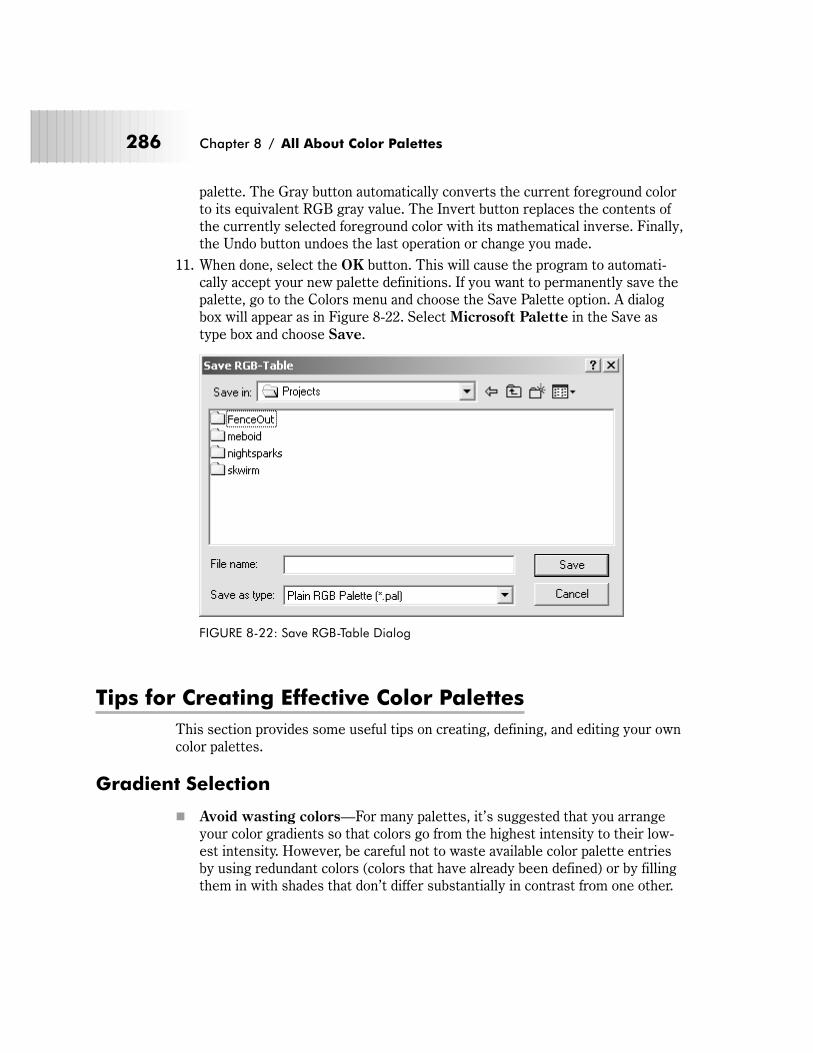
palette. The Gray button automatically converts the current foreground color
to its equivalent RGB gray value. The Invert button replaces the contents of
the currently selected foreground color with its mathematical inverse. Finally,
the Undo button undoes the last operation or change you made.
11. When done, select the OK button. This will cause the program to automati-
cally accept your new palette definitions. If you want to permanently save the
palette, go to the Colors menu and choose the Save Palette option. A dialog
box will appear as in Figure 8-22. Select Microsoft Palette in the Save as
type box and choose Save.
Tips for Creating Effective Color Palettes
This section provides some useful tips on creating, defining, and editing your own
color palettes.
Gradient Selection
� Avoid wasting colors—For many palettes, it’s suggested that you arrange
your color gradients so that colors go from the highest intensity to their low-
est intensity. However, be careful not to waste available color palette entries
by using redundant colors (colors that have already been defined) or by filling
them in with shades that don’t differ substantially in contrast from one other.
286 Chapter 8 / All About Color Palettes
FIGURE 8-22: Save RGB-Table Dialog
� Build gradients with consistent intensity and saturation—Gradients that
feature consistent intensities and saturations tend to be more flexible than
gradients that do not. In addition to keeping your color selections uniform,
doing this allows the contents of these gradients to be easily colorized. The
Colorize function was discussed in Chapter 6.
� Conserve colors intelligently—Remember that you don’t always have to
use very long color gradients (ones that go from minimum to maximum color
intensity) for your palettes. Instead, you can use any gradient length as long as
it contains enough shades so that you can render objects that maintain the illu-
sion of realism. Doing this will help you conserve colors in your palette for
other purposes.
� Make logical color selections—Your color selections should closely mirror
the user’s expectations. In other words, you don’t want to select colors that
seem out of context. For example, water should be a shade of blue and not
purple. Trees should have brown trunks and not red, etc. Doing this will
enhance the character of your artwork and maintain the suspension of
disbelief.
Programmed Color Effects
� Place palette entries adjacently—In order to work, programmed effects
such as color fades and color cycling require that color palette entries be
placed adjacently.
� Test your color cycling—Whenever possible, test any color cycling effects
that you create prior to handing them off to the programmer. You can do this
by previewing them with any program that supports color cycling so that you
can discover any potential problems with your implementation sooner rather
than later.
� Be conservative—Don’t be greedy. Remember that you will need plenty of
colors to render your main game objects so don’t reserve too many color pal-
ette entries for special effects at the expense of your normal drawing colors.
As I said earlier, drawing colors should always have priority in your palette.
Transparent Colors
� Use two blacks—As black is commonly used as both a background and trans-
parent color, it’s a good idea to reserve a second shade of black (RGB: 0,0,0)
somewhere else in your palette. This way, you can use black as much as you
want in your artwork without having to worry about the contents of the back-
ground showing through your foreground objects.
Chapter 8 / All About Color Palettes 287
Miscellaneous Color Palette Tips
� Borrow color palettes from other games—If you have trouble coming up
with your own color palette definitions, or are like me and just plain lazy, you
can always borrow color palettes from other games. To do this, simply use one
of the screen capture utilities described in Chapter 6 and capture a game
screen that interests you. Next, use a palette tool (also described in Chapter
6) to extract the contents of the image’s palette. Doing this can give you
excellent insight on how to use color in your games in addition to saving pre-
cious time.
� Use a scanner to obtain “difficult” colors and shades—Certain colors,
such as those used for flesh tones, can be very difficult to accurately repro-
duce manually when defining a color palette. One of the best ways to deter-
mine which colors to use is to let the computer determine the color values for
you. You can do this by scanning in a photograph from virtually any magazine
into your favorite image editor or painting program and then copy the RGB
values it uses to represent areas of flesh into your palette.
� Try to leave sufficient space at the end of your palette—You are bound
to define color ranges and gradients that don’t fit the feel of your artwork as
the game evolves. Because of this, you should always leave room at the end of
your palette for additional or “replacement” gradients that you can use
instead. Doing this will reduce the possibility of you having to scrap any art-
work rendered with your existing color palette.
Color Reduction
There will come a time in creating arcade game graphics when you will need to
either reduce the amount of colors contained in an image or remap the contents of
one palette with the contents of another. Often, you will have to do both.
Color reduction is the process used whenever you need to take an image you made
in a high color display mode and want to use it in a display mode that only sup-
ports 256 colors (i.e., 8-bit).
Palette remapping is a subset of the color reduction process. It’s used when you
need to convert an image that was made using colors from one palette and incor-
porate this image into a different palette. Even if some or all of the colors are the
same between the two color palettes, their different palette orders prevent the
image from displaying correctly when it is converted over to the new color
scheme.
Fortunately, most of the programs mentioned in Chapter 6 can perform color
reduction on images; however, their results vary wildly depending on the images
used and the options selected.
288 Chapter 8 / All About Color Palettes
There are essentially three color reduction methods. These are:
� Palette optimization
� Dithering
� Straight color remapping
Palette Optimization
This color reduction method uses several different algorithms that analyze the
contents of both images (the original the new image). It then looks for similarities
between the colors contained in both images and weighs them accordingly. The
more colors that match in both images, the better the results.
NOTE: There are great disparities between the various palette optimization
algorithms in common use. Some work better on certain types of images
while some work better on others, etc. In the end, your best bet is to
experiment.
Dithering
As mentioned in Chapter 2, dithering is a technique for simulating colors that are
missing from an image’s palette. By blending pixels of two or more palette colors,
a third color can effectively be simulated. In many ways, dithering is very similar
to mixing paint and in the proper circumstances, dithering can produce excellent
results.
The main drawback to dithering is this: if the unavailable colors differ too much
from the originals, the dithering will produce images that look spotty, grainy, and
coarse, especially when compared to the original image. See Figures 8-23 and
8-24. Like palette optimization, dithering works best on images that have similar
colors in them.
Dithering is frequently used when designing complicated shades for display on
screens that do not support large color palettes (i.e., 16-color) and in the hands of
a skilled artist, can be used to create fairly convincing and attractive artwork. In
this situation, dithering can effectively simulate hundreds of additional shades and
colors, making it particularly useful when creating artwork destined for online use
(i.e., the Web).
Chapter 8 / All About Color Palettes 289

NOTE: Dithering is often combined with palette optimization to produce better
results, especially when dealing with reducing 24-bit images down to 8-bit
color, etc.
Straight Color Remapping
This technique simply does a one-for-one swap of colors between the original
image and the target. While this technique is very fast, the results are often less
than stellar. This is because straight color remapping works best on images that
have similar numbers of colors in them. Figure 8-25 shows the results of color
remapping. Compare it to the original image as seen in Figure 8-23 and you will
290 Chapter 8 / All About Color Palettes
FIGURE 8-23: Original Image
FIGURE 8-24: Dithered Image
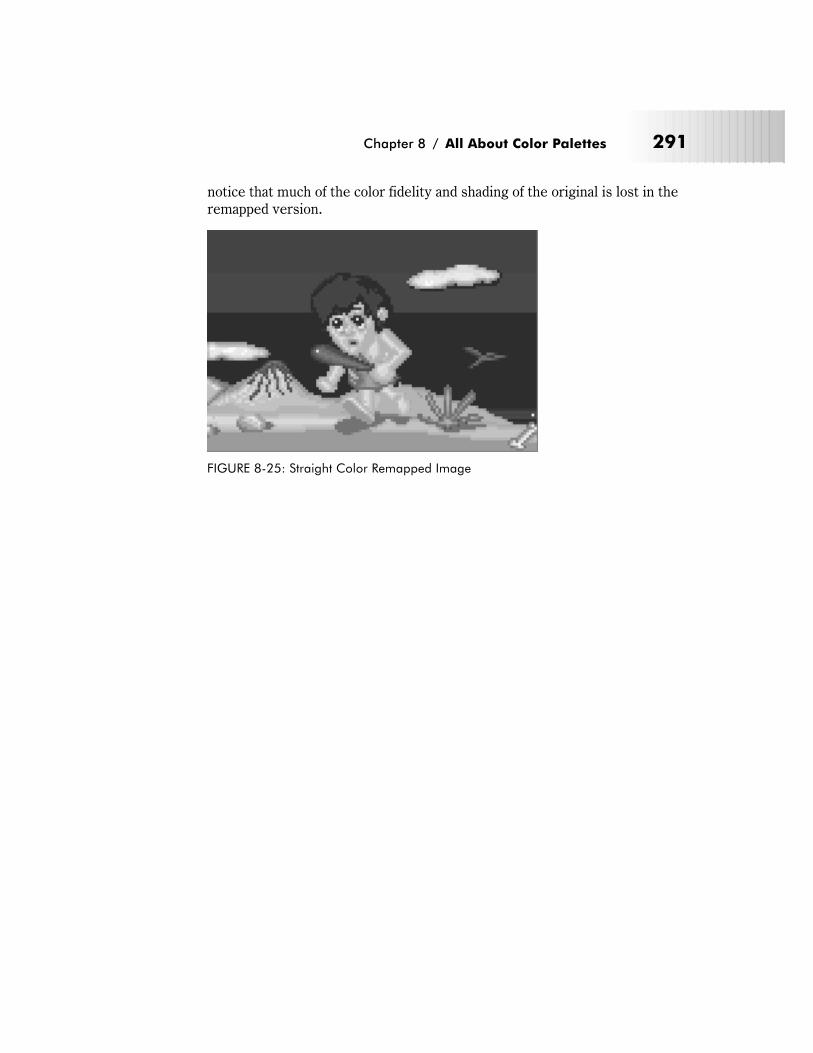
notice that much of the color fidelity and shading of the original is lost in the
remapped version.
Chapter 8 / All About Color Palettes 291
FIGURE 8-25: Straight Color Remapped Image
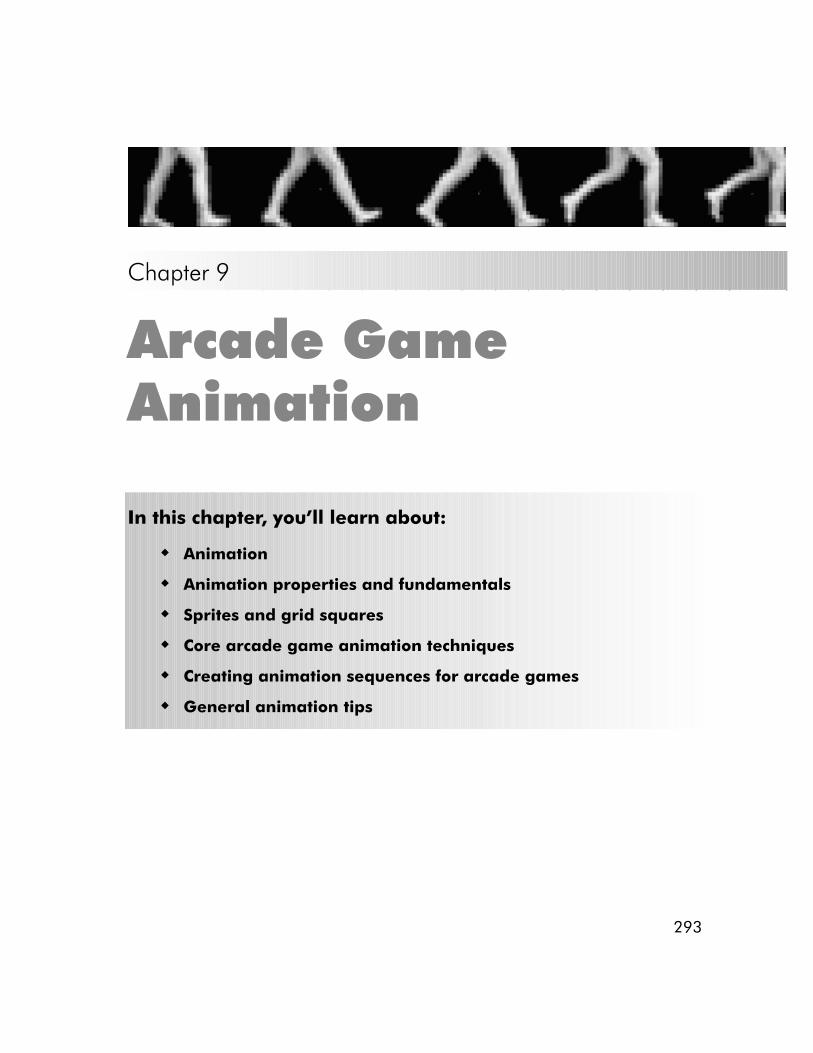
Chapter 9
Arcade Game
Animation
In this chapter, you’ll learn about:
� Animation
� Animation properties and fundamentals
� Sprites and grid squares
� Core arcade game animation techniques
� Creating animation sequences for arcade games
� General animation tips
293

What is Animation?
Animation is the process that produces the illusion of movement. It works by dis-
playing two or more image fragments called frames (also commonly referred to as
cells). When these frames are displayed in rapid succession with subtle changes
made to their content, our eyes register these changes as movement.
Animation is not a mystical art. Rather, it’s a well-established process that com-
bines the aesthetics of design with real-world physics in order to breathe life into
what are otherwise static objects and scenes. This chapter will introduce the fun-
damental concepts behind animation to you so that you can create and implement
animation in your own arcade game projects.
Animation Properties and Fundamentals
To be able to create effective animation, you must learn how to divide the ele-
ments of motion into their basic components. This means breaking them down
into a sequence of easy-to-follow frames. However, before you can do this, you
must first learn and master two things: the art of observation and the characteris-
tics of basic motion.
The secret behind creating great animation lies in keen observation and the ability
to focus on the subtle details of how different objects move. Every object exhibits
certain peculiarities as it moves. Some of these idiosyncrasies are slight while
others are more pronounced. As such, there are several characteristics of motion
that you should be aware of before attempting to animate an object. These charac-
teristics include such things as:
� Motion lines
� Motion angles
� Key-frames and in-betweens
� Weight and gravity
� Flexibility
� Secondary actions
� Cycles and loops
� Tempo
Motion Lines
A motion line (sometimes referred to as a natural path) is an invisible line created
by an object as it performs a series of sequential movements.
294 Chapter 9 / Arcade Game Animation
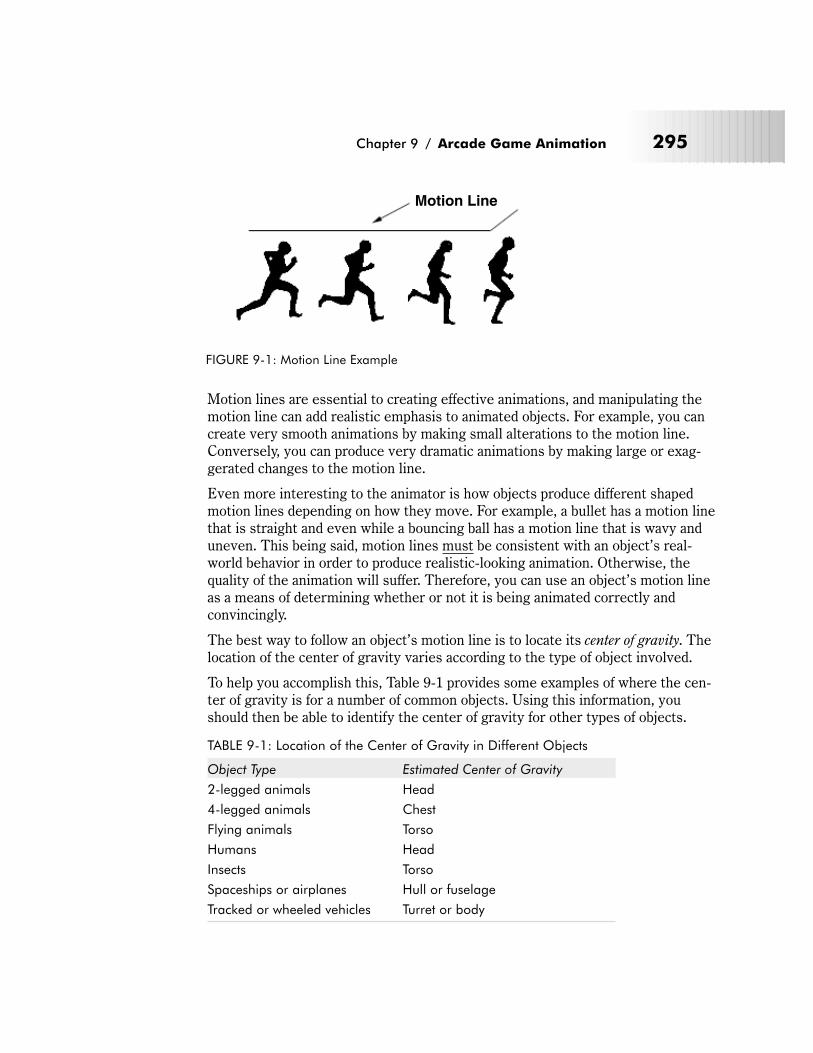
Motion lines are essential to creating effective animations, and manipulating the
motion line can add realistic emphasis to animated objects. For example, you can
create very smooth animations by making small alterations to the motion line.
Conversely, you can produce very dramatic animations by making large or exag-
gerated changes to the motion line.
Even more interesting to the animator is how objects produce different shaped
motion lines depending on how they move. For example, a bullet has a motion line
that is straight and even while a bouncing ball has a motion line that is wavy and
uneven. This being said, motion lines must be consistent with an object’s real-
world behavior in order to produce realistic-looking animation. Otherwise, the
quality of the animation will suffer. Therefore, you can use an object’s motion line
as a means of determining whether or not it is being animated correctly and
convincingly.
The best way to follow an object’s motion line is to locate its center of gravity. The
location of the center of gravity varies according to the type of object involved.
To help you accomplish this, Table 9-1 provides some examples of where the cen-
ter of gravity is for a number of common objects. Using this information, you
should then be able to identify the center of gravity for other types of objects.
TABLE 9-1: Location of the Center of Gravity in Different Objects
Object Type Estimated Center of Gravity
2-legged animals Head
4-legged animals Chest
Flying animals Torso
Humans Head
Insects Torso
Spaceships or airplanes Hull or fuselage
Tracked or wheeled vehicles Turret or body
Chapter 9 / Arcade Game Animation 295
Motion Line
FIGURE 9-1: Motion Line Example
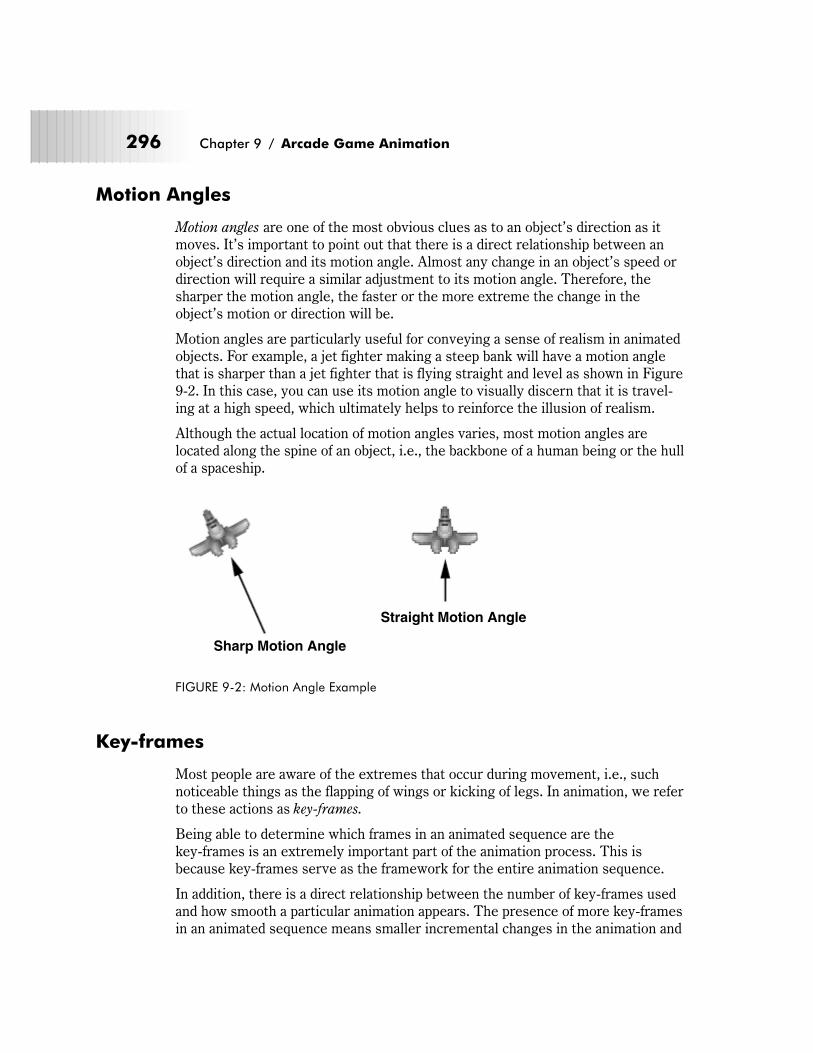
Motion Angles
Motion angles are one of the most obvious clues as to an object’s direction as it
moves. It’s important to point out that there is a direct relationship between an
object’s direction and its motion angle. Almost any change in an object’s speed or
direction will require a similar adjustment to its motion angle. Therefore, the
sharper the motion angle, the faster or the more extreme the change in the
object’s motion or direction will be.
Motion angles are particularly useful for conveying a sense of realism in animated
objects. For example, a jet fighter making a steep bank will have a motion angle
that is sharper than a jet fighter that is flying straight and level as shown in Figure
9-2. In this case, you can use its motion angle to visually discern that it is travel-
ing at a high speed, which ultimately helps to reinforce the illusion of realism.
Although the actual location of motion angles varies, most motion angles are
located along the spine of an object, i.e., the backbone of a human being or the hull
of a spaceship.
Key-frames
Most people are aware of the extremes that occur during movement, i.e., such
noticeable things as the flapping of wings or kicking of legs. In animation, we refer
to these actions as key-frames.
Being able to determine which frames in an animated sequence are the
key-frames is an extremely important part of the animation process. This is
because key-frames serve as the framework for the entire animation sequence.
In addition, there is a direct relationship between the number of key-frames used
and how smooth a particular animation appears. The presence of more key-frames
in an animated sequence means smaller incremental changes in the animation and
296 Chapter 9 / Arcade Game Animation
Sharp Motion Angle
Straight Motion Angle
FIGURE 9-2: Motion Angle Example
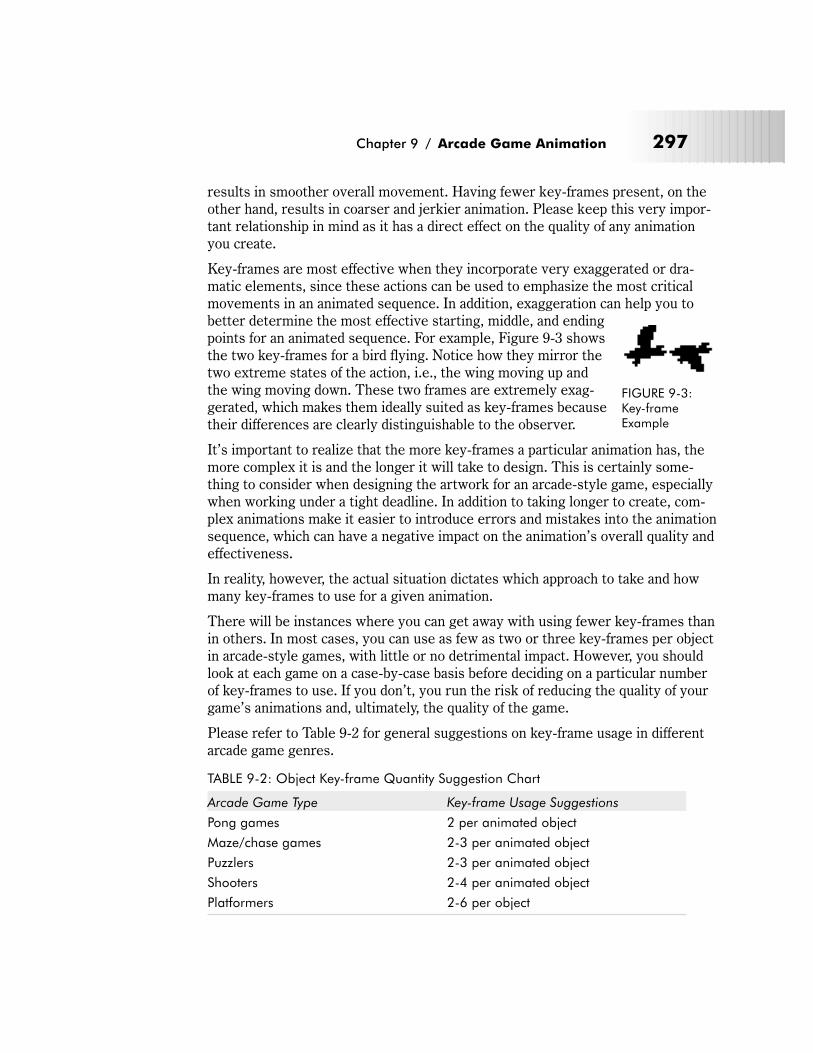
results in smoother overall movement. Having fewer key-frames present, on the
other hand, results in coarser and jerkier animation. Please keep this very impor-
tant relationship in mind as it has a direct effect on the quality of any animation
you create.
Key-frames are most effective when they incorporate very exaggerated or dra-
matic elements, since these actions can be used to emphasize the most critical
movements in an animated sequence. In addition, exaggeration can help you to
better determine the most effective starting, middle, and ending
points for an animated sequence. For example, Figure 9-3 shows
the two key-frames for a bird flying. Notice how they mirror the
two extreme states of the action, i.e., the wing moving up and
the wing moving down. These two frames are extremely exag-
gerated, which makes them ideally suited as key-frames because
their differences are clearly distinguishable to the observer.
It’s important to realize that the more key-frames a particular animation has, the
more complex it is and the longer it will take to design. This is certainly some-
thing to consider when designing the artwork for an arcade-style game, especially
when working under a tight deadline. In addition to taking longer to create, com-
plex animations make it easier to introduce errors and mistakes into the animation
sequence, which can have a negative impact on the animation’s overall quality and
effectiveness.
In reality, however, the actual situation dictates which approach to take and how
many key-frames to use for a given animation.
There will be instances where you can get away with using fewer key-frames than
in others. In most cases, you can use as few as two or three key-frames per object
in arcade-style games, with little or no detrimental impact. However, you should
look at each game on a case-by-case basis before deciding on a particular number
of key-frames to use. If you don’t, you run the risk of reducing the quality of your
game’s animations and, ultimately, the quality of the game.
Please refer to Table 9-2 for general suggestions on key-frame usage in different
arcade game genres.
TABLE 9-2: Object Key-frame Quantity Suggestion Chart
Arcade Game Type Key-frame Usage Suggestions
Pong games 2 per animated object
Maze/chase games 2-3 per animated object
Puzzlers 2-3 per animated object
Shooters 2-4 per animated object
Platformers 2-6 per object
Chapter 9 / Arcade Game Animation 297
FIGURE 9-3:Key-frameExample
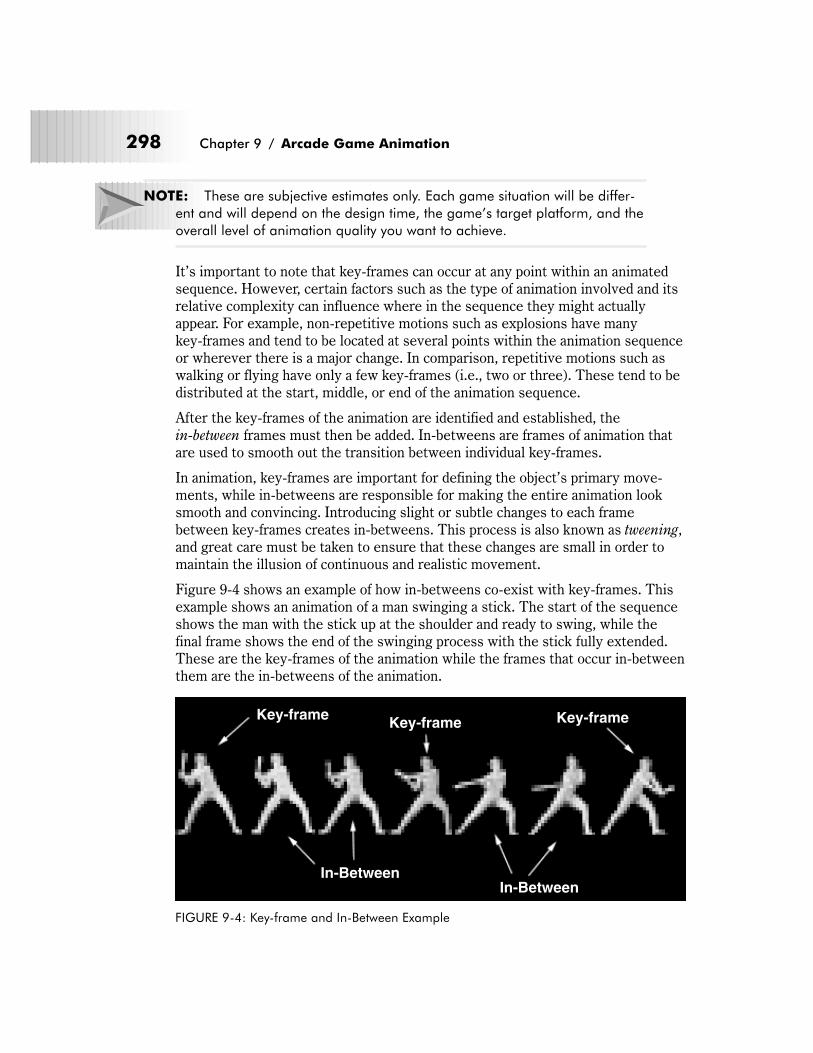
NOTE: These are subjective estimates only. Each game situation will be differ-
ent and will depend on the design time, the game’s target platform, and the
overall level of animation quality you want to achieve.
It’s important to note that key-frames can occur at any point within an animated
sequence. However, certain factors such as the type of animation involved and its
relative complexity can influence where in the sequence they might actually
appear. For example, non-repetitive motions such as explosions have many
key-frames and tend to be located at several points within the animation sequence
or wherever there is a major change. In comparison, repetitive motions such as
walking or flying have only a few key-frames (i.e., two or three). These tend to be
distributed at the start, middle, or end of the animation sequence.
After the key-frames of the animation are identified and established, the
in-between frames must then be added. In-betweens are frames of animation that
are used to smooth out the transition between individual key-frames.
In animation, key-frames are important for defining the object’s primary move-
ments, while in-betweens are responsible for making the entire animation look
smooth and convincing. Introducing slight or subtle changes to each frame
between key-frames creates in-betweens. This process is also known as tweening,
and great care must be taken to ensure that these changes are small in order to
maintain the illusion of continuous and realistic movement.
Figure 9-4 shows an example of how in-betweens co-exist with key-frames. This
example shows an animation of a man swinging a stick. The start of the sequence
shows the man with the stick up at the shoulder and ready to swing, while the
final frame shows the end of the swinging process with the stick fully extended.
These are the key-frames of the animation while the frames that occur in-between
them are the in-betweens of the animation.
298 Chapter 9 / Arcade Game Animation
Key-frameKey-frame Key-frame
In-BetweenIn-Between
FIGURE 9-4: Key-frame and In-Between Example
Creating in-betweens is one of the most tedious and time-consuming aspects of
designing arcade game animation. Fortunately, most painting programs allow you
to easily duplicate existing frames so that each in-between doesn’t have to be
re-created entirely from scratch. In traditional animation, the process of duplicat-
ing an existing frame of animation to create a new one is called onion skinning.
Determining the number of frames necessary for creating a particular type of ani-
mated movement takes time and experience to figure out. To help you on your
way, Table 9-3 lists the number of frames required to produce a variety of different
animation effects. Use these as a general guide if the issue is ever in question in
your own game projects.
TABLE 9-3: Common Frame Animation Frame Requirements
Object Minimum # of Frames Maximum # of Frames
4-legged animal running 4 16
Animal biting 2 5
Crawling 2 12
Explosions 5 16
Falling 3 5
Flying 2 12
Jumping 2 10
Kicking 2 6
Punching 2 6
Rotating/spinning 4 16
Running 2 12
Swinging (an object) 2 8
Throwing (an object) 2 6
Vehicle flying 2 4
Vehicle moving 2 8
Walking 2 12
Weight and Gravity
If you intend to create realistic-looking game animations, you must consider how
the elements of weight and gravity can affect your work. When designing anima-
tion, you must remember that real-world physics should always apply to the
sequences that you create. One of the most important of these influences is that of
weight. Weight affects speed. So, for example, the larger the object, the heavier it
is and the slower it is likely to move.
Chapter 9 / Arcade Game Animation 299

In addition to influencing the speed at which objects travel, weight can also affect
how easily an object can move. For example, think about how fast a racecar moves
in comparison to a battle tank. The tank will plod across the ground whereas the
racecar will quickly skim across it. This is because the racecar weighs less.
Then there’s the issue of gravity. Gravity also influences the motion of objects. In
the real world, gravity will exert more force (resistance) against heavier or denser
objects than it will against lighter ones. To see how this works, consider how
quickly a bomb falls from the sky when compared to a feather, or how a rock
bounces off the ground in comparison to a rubber ball. Remember that people
aren’t always easily fooled. Believe me, they are well aware of such things and
failing to account for these behaviors in your animations can have a negative
impact on how they are perceived in a game.
Incidentally, the principles of weight and gravity can be applied to virtually any
animated object. Therefore, the more attention you pay to them, the more realistic
your animations can be.
Flexibility
Flexibility is essential to producing convincing and fluid animation, particularly
when depicting complex, jointed objects such as animals, insects, and human
beings. Animations without proper flexibility can appear stiff and rigid, which for
these types of objects is a less than desirable effect.
The key to adding flexibility to your animations is careful planning coupled with
careful observation of how different objects behave when they move. Whenever
you animate a jointed object, you must always determine which parts of the object
(i.e., arms, legs, etc.) lead the movement and which ones follow it. It’s very impor-
tant to realize that not all body parts actually move at the same time on all objects.
For example, consider how a swordsman might slash with his sword. The swords-
man leads with his legs first to gain a solid footing and then follows through with
his arm to complete the cutting motion. In animation, this flow of movement is
called the range of motion.
When attempting to incorporate flexibility into an animation you must take care to
account for the limits of anatomy. That is to say, never attempt to unrealistically
extend the available range of motion that a given object has. Don’t depict objects
moving in ways that aren’t possible in the real world. Examples of this might
include, but aren’t limited to, such things as bending a joint backward or in a posi-
tion that is not normally possible for one to make.
300 Chapter 9 / Arcade Game Animation
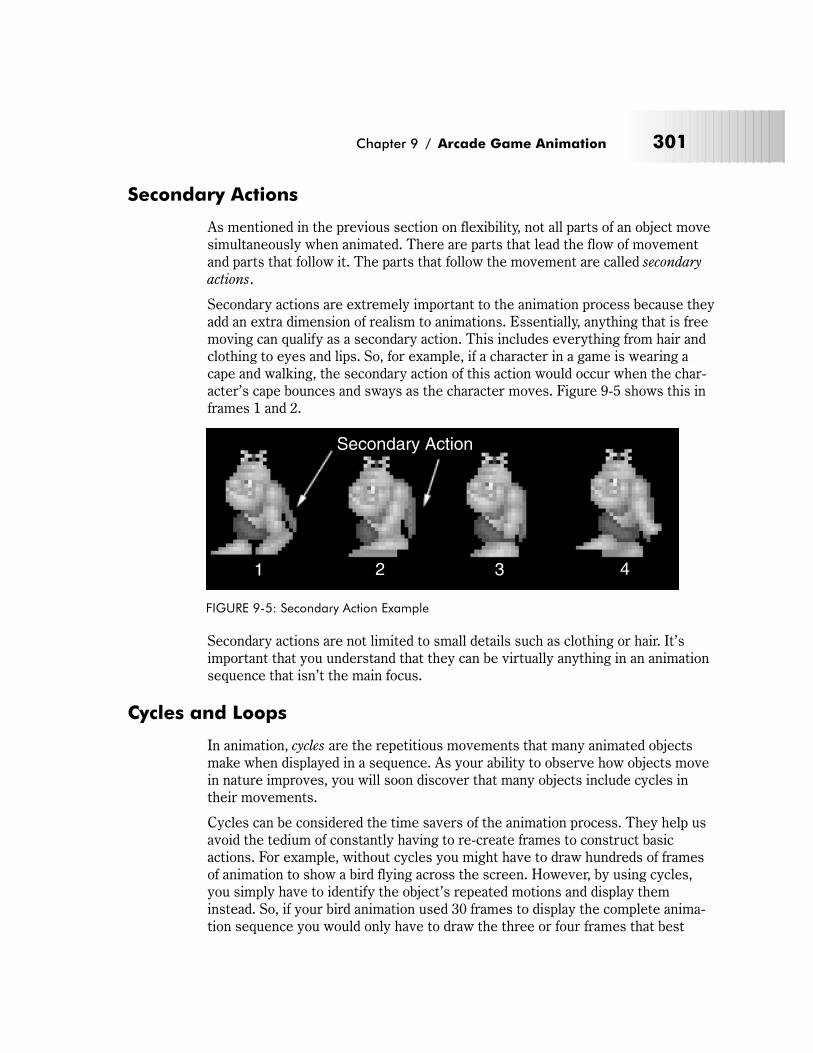
Secondary Actions
As mentioned in the previous section on flexibility, not all parts of an object move
simultaneously when animated. There are parts that lead the flow of movement
and parts that follow it. The parts that follow the movement are called secondary
actions.
Secondary actions are extremely important to the animation process because they
add an extra dimension of realism to animations. Essentially, anything that is free
moving can qualify as a secondary action. This includes everything from hair and
clothing to eyes and lips. So, for example, if a character in a game is wearing a
cape and walking, the secondary action of this action would occur when the char-
acter’s cape bounces and sways as the character moves. Figure 9-5 shows this in
frames 1 and 2.
Secondary actions are not limited to small details such as clothing or hair. It’s
important that you understand that they can be virtually anything in an animation
sequence that isn’t the main focus.
Cycles and Loops
In animation, cycles are the repetitious movements that many animated objects
make when displayed in a sequence. As your ability to observe how objects move
in nature improves, you will soon discover that many objects include cycles in
their movements.
Cycles can be considered the time savers of the animation process. They help us
avoid the tedium of constantly having to re-create frames to construct basic
actions. For example, without cycles you might have to draw hundreds of frames
of animation to show a bird flying across the screen. However, by using cycles,
you simply have to identify the object’s repeated motions and display them
instead. So, if your bird animation used 30 frames to display the complete anima-
tion sequence you would only have to draw the three or four frames that best
Chapter 9 / Arcade Game Animation 301
Secondary Action
1 2 3 4
FIGURE 9-5: Secondary Action Example
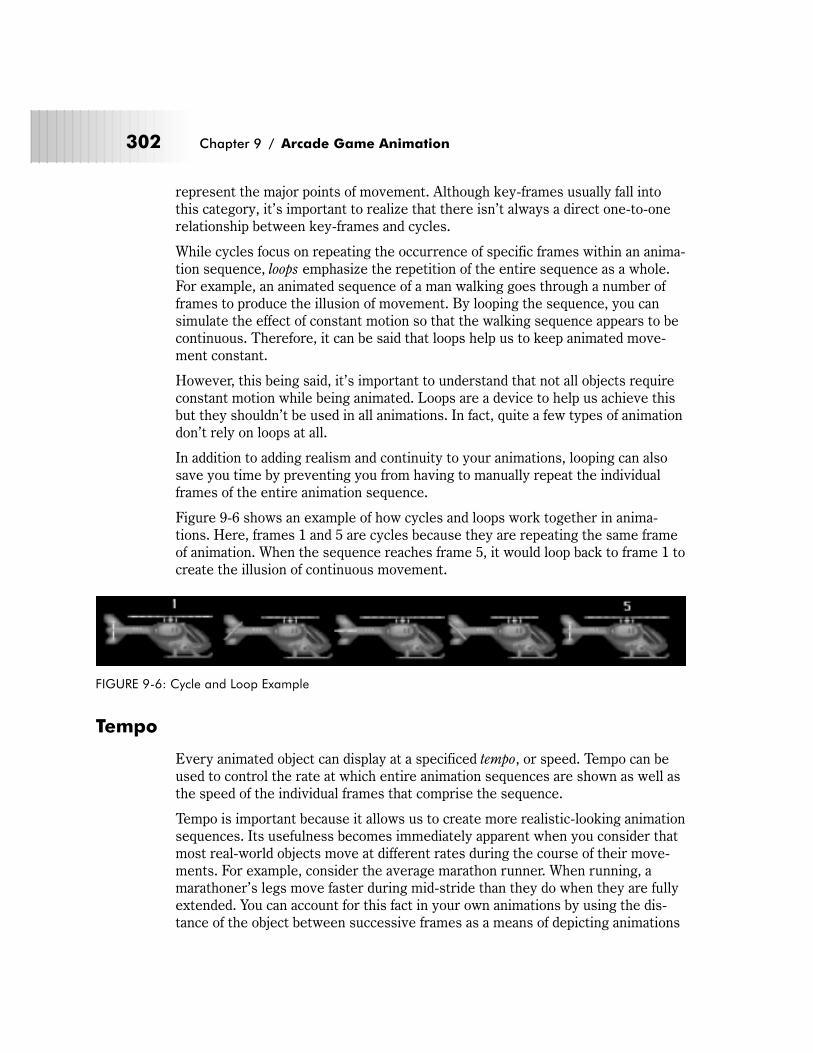
represent the major points of movement. Although key-frames usually fall into
this category, it’s important to realize that there isn’t always a direct one-to-one
relationship between key-frames and cycles.
While cycles focus on repeating the occurrence of specific frames within an anima-
tion sequence, loops emphasize the repetition of the entire sequence as a whole.
For example, an animated sequence of a man walking goes through a number of
frames to produce the illusion of movement. By looping the sequence, you can
simulate the effect of constant motion so that the walking sequence appears to be
continuous. Therefore, it can be said that loops help us to keep animated move-
ment constant.
However, this being said, it’s important to understand that not all objects require
constant motion while being animated. Loops are a device to help us achieve this
but they shouldn’t be used in all animations. In fact, quite a few types of animation
don’t rely on loops at all.
In addition to adding realism and continuity to your animations, looping can also
save you time by preventing you from having to manually repeat the individual
frames of the entire animation sequence.
Figure 9-6 shows an example of how cycles and loops work together in anima-
tions. Here, frames 1 and 5 are cycles because they are repeating the same frame
of animation. When the sequence reaches frame 5, it would loop back to frame 1 to
create the illusion of continuous movement.
Tempo
Every animated object can display at a specificed tempo, or speed. Tempo can be
used to control the rate at which entire animation sequences are shown as well as
the speed of the individual frames that comprise the sequence.
Tempo is important because it allows us to create more realistic-looking animation
sequences. Its usefulness becomes immediately apparent when you consider that
most real-world objects move at different rates during the course of their move-
ments. For example, consider the average marathon runner. When running, a
marathoner’s legs move faster during mid-stride than they do when they are fully
extended. You can account for this fact in your own animations by using the dis-
tance of the object between successive frames as a means of depicting animations
302 Chapter 9 / Arcade Game Animation
FIGURE 9-6: Cycle and Loop Example
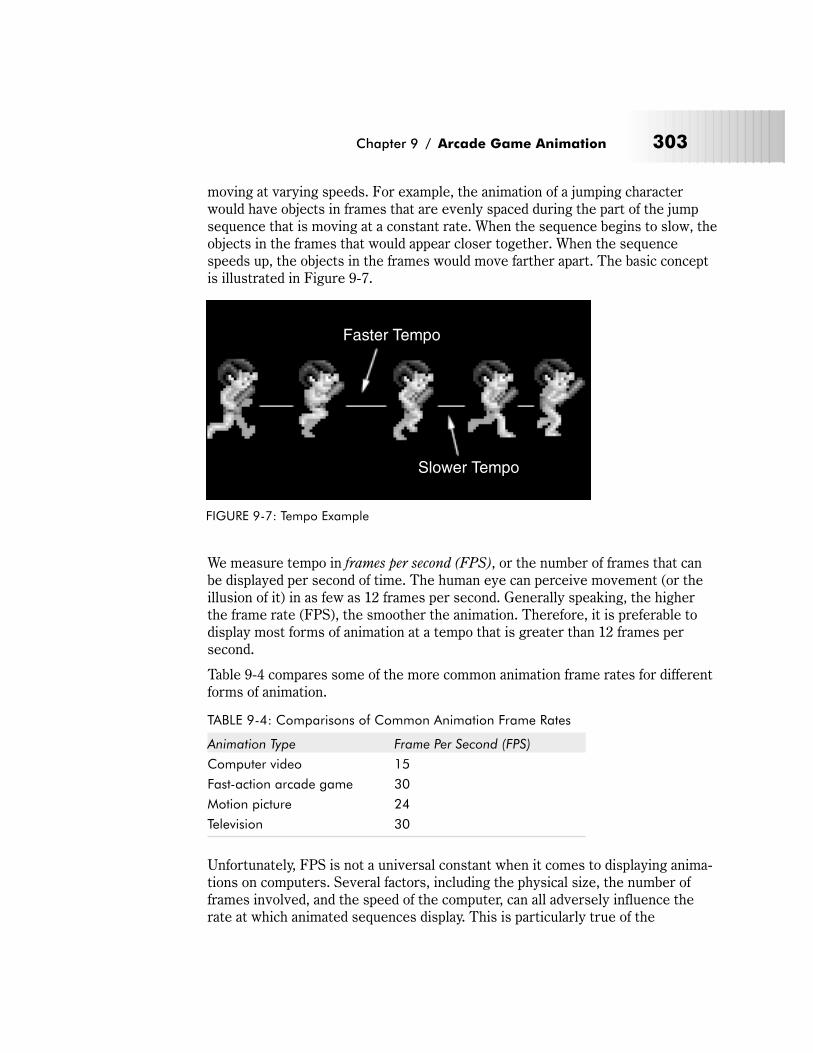
moving at varying speeds. For example, the animation of a jumping character
would have objects in frames that are evenly spaced during the part of the jump
sequence that is moving at a constant rate. When the sequence begins to slow, the
objects in the frames that would appear closer together. When the sequence
speeds up, the objects in the frames would move farther apart. The basic concept
is illustrated in Figure 9-7.
We measure tempo in frames per second (FPS), or the number of frames that can
be displayed per second of time. The human eye can perceive movement (or the
illusion of it) in as few as 12 frames per second. Generally speaking, the higher
the frame rate (FPS), the smoother the animation. Therefore, it is preferable to
display most forms of animation at a tempo that is greater than 12 frames per
second.
Table 9-4 compares some of the more common animation frame rates for different
forms of animation.
TABLE 9-4: Comparisons of Common Animation Frame Rates
Animation Type Frame Per Second (FPS)
Computer video 15
Fast-action arcade game 30
Motion picture 24
Television 30
Unfortunately, FPS is not a universal constant when it comes to displaying anima-
tions on computers. Several factors, including the physical size, the number of
frames involved, and the speed of the computer, can all adversely influence the
rate at which animated sequences display. This is particularly true of the
Chapter 9 / Arcade Game Animation 303
Faster Tempo
Slower Tempo
FIGURE 9-7: Tempo Example
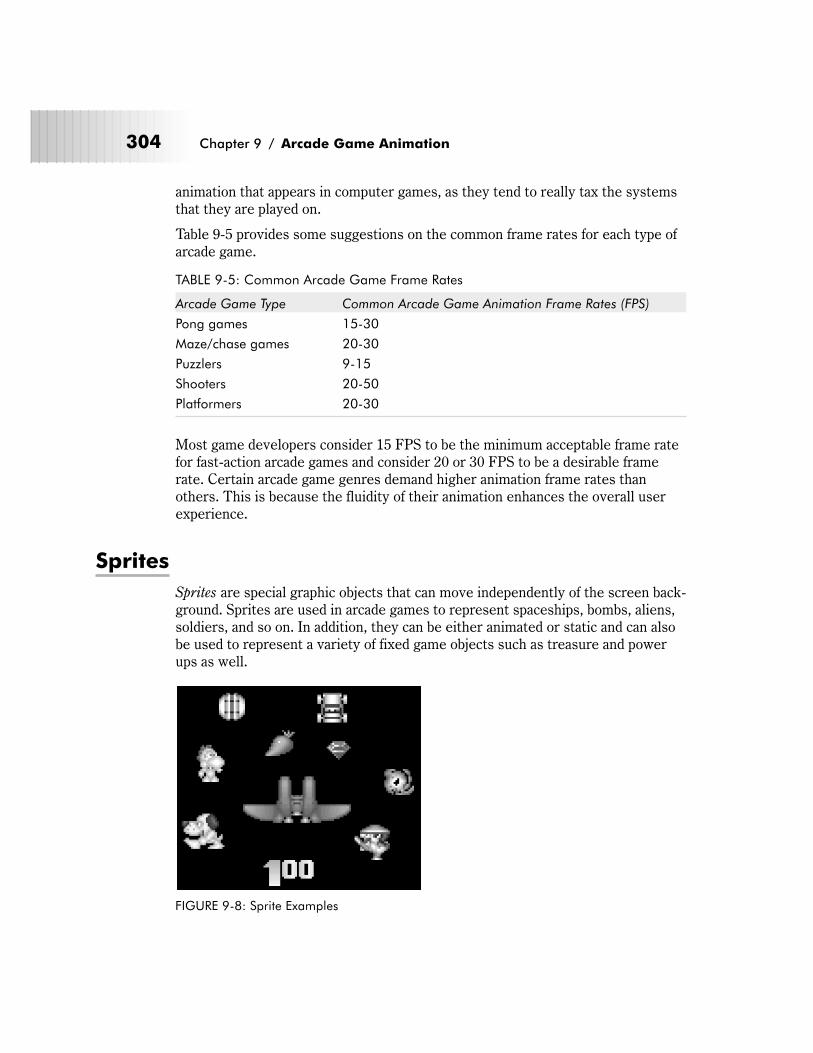
animation that appears in computer games, as they tend to really tax the systems
that they are played on.
Table 9-5 provides some suggestions on the common frame rates for each type of
arcade game.
TABLE 9-5: Common Arcade Game Frame Rates
Arcade Game Type Common Arcade Game Animation Frame Rates (FPS)
Pong games 15-30
Maze/chase games 20-30
Puzzlers 9-15
Shooters 20-50
Platformers 20-30
Most game developers consider 15 FPS to be the minimum acceptable frame rate
for fast-action arcade games and consider 20 or 30 FPS to be a desirable frame
rate. Certain arcade game genres demand higher animation frame rates than
others. This is because the fluidity of their animation enhances the overall user
experience.
Sprites
Sprites are special graphic objects that can move independently of the screen back-
ground. Sprites are used in arcade games to represent spaceships, bombs, aliens,
soldiers, and so on. In addition, they can be either animated or static and can also
be used to represent a variety of fixed game objects such as treasure and power
ups as well.
304 Chapter 9 / Arcade Game Animation
FIGURE 9-8: Sprite Examples

Sprite Properties
Sprites are used extensively by arcade games and have a number of interesting
and distinct properties, including:
� Variable sizes and shapes
� Free range of movement
� Separate from background
Variable Sizes and Shapes
For the most part, sprites have no limits to either their size or shape. This being
said, sprites can have rectangular, square, or even irregular shapes—it really
doesn’t matter. This versatility makes sprites useful for depicting virtually any
type of object an arcade game may require. Sprites can also be of any size and they
can change their size to respond to specific game events or actions as needed.
Free Range of Movement
Unlike other types of animated objects, sprites can move freely about the screen.
This means that they are not restricted to displaying at specific areas of the
screen. This characteristic makes sprite animations very effective in representing
all types of moving game objects.
Separate from Background
Sprites exist as separate entities from the background of the screen. Sprites also
support transparency, which, if you recall our discussion on transparency in Chap-
ters 7 and 8, allows the background of an object to show through the foreground.
This feature makes sprites particularly useful when used in games that have com-
plex background screens since the contents of the background can be preserved as
the sprite moves over it.
NOTE: Practically any graphic object can be used as a sprite. As a result,
sprites can be created using most of the painting programs mentioned in
Chapter 6.
Despite their unique advantages, sprites are among the most challenging aspects
of creating arcade game graphics. This is because designing most sprites involves
a complex two-step process. First, the sprite must be created just as any other
graphic image. However, unlike most graphic objects, sprites tend to face more
restrictions in terms of their size and use of color, which can complicate their
design and increase the time required to create them. Then, after doing all of that
Chapter 9 / Arcade Game Animation 305
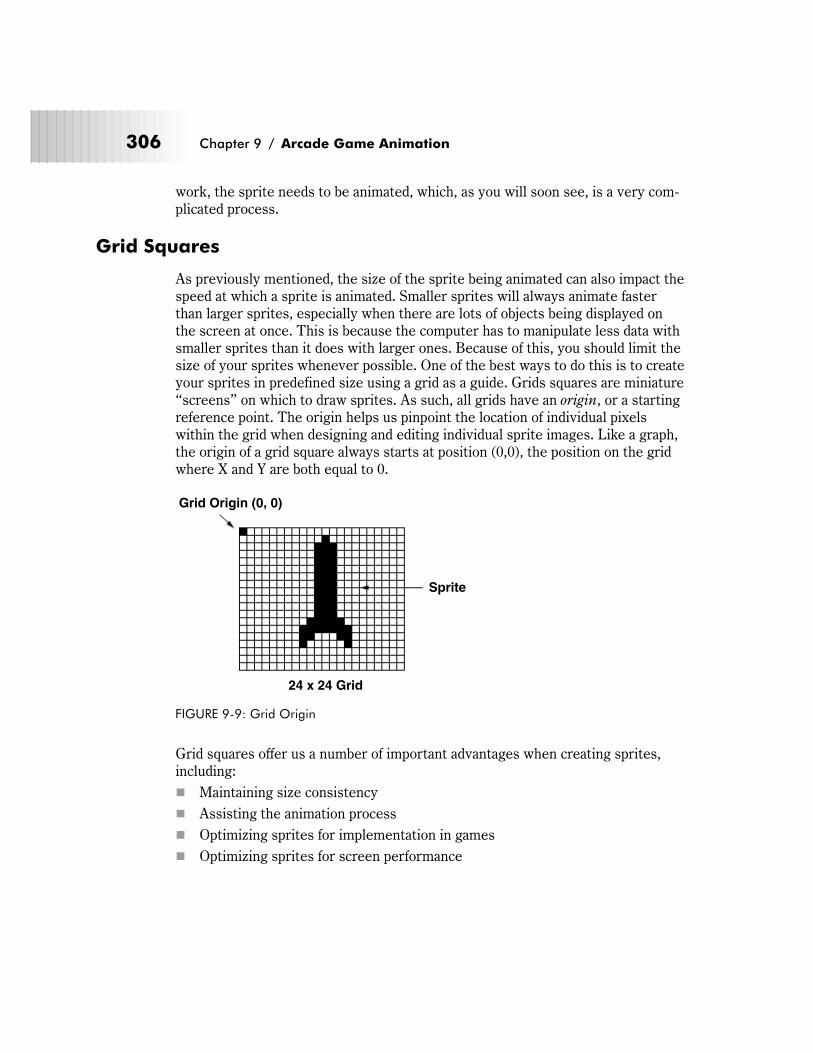
work, the sprite needs to be animated, which, as you will soon see, is a very com-
plicated process.
Grid Squares
As previously mentioned, the size of the sprite being animated can also impact the
speed at which a sprite is animated. Smaller sprites will always animate faster
than larger sprites, especially when there are lots of objects being displayed on
the screen at once. This is because the computer has to manipulate less data with
smaller sprites than it does with larger ones. Because of this, you should limit the
size of your sprites whenever possible. One of the best ways to do this is to create
your sprites in predefined size using a grid as a guide. Grids squares are miniature
“screens” on which to draw sprites. As such, all grids have an origin, or a starting
reference point. The origin helps us pinpoint the location of individual pixels
within the grid when designing and editing individual sprite images. Like a graph,
the origin of a grid square always starts at position (0,0), the position on the grid
where X and Y are both equal to 0.
Grid squares offer us a number of important advantages when creating sprites,
including:
� Maintaining size consistency
� Assisting the animation process
� Optimizing sprites for implementation in games
� Optimizing sprites for screen performance
306 Chapter 9 / Arcade Game Animation
Grid Origin (0, 0)
Sprite
24 x 24 Grid
FIGURE 9-9: Grid Origin
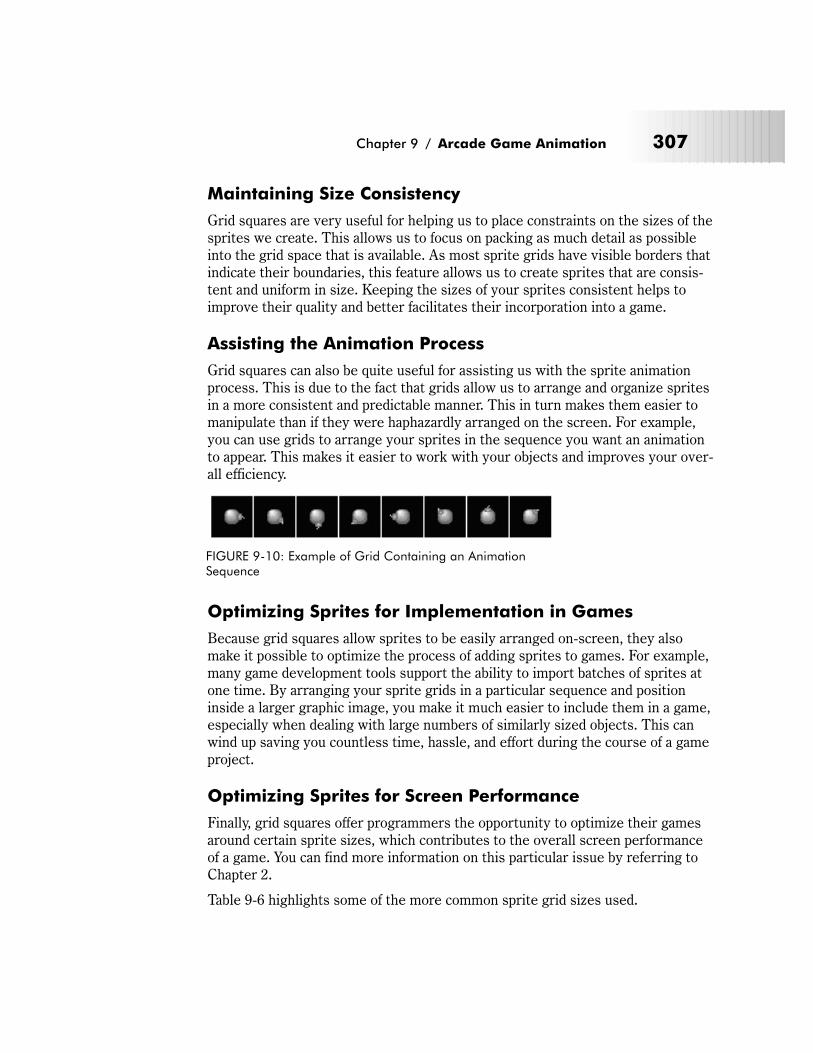
Maintaining Size Consistency
Grid squares are very useful for helping us to place constraints on the sizes of the
sprites we create. This allows us to focus on packing as much detail as possible
into the grid space that is available. As most sprite grids have visible borders that
indicate their boundaries, this feature allows us to create sprites that are consis-
tent and uniform in size. Keeping the sizes of your sprites consistent helps to
improve their quality and better facilitates their incorporation into a game.
Assisting the Animation Process
Grid squares can also be quite useful for assisting us with the sprite animation
process. This is due to the fact that grids allow us to arrange and organize sprites
in a more consistent and predictable manner. This in turn makes them easier to
manipulate than if they were haphazardly arranged on the screen. For example,
you can use grids to arrange your sprites in the sequence you want an animation
to appear. This makes it easier to work with your objects and improves your over-
all efficiency.
Optimizing Sprites for Implementation in Games
Because grid squares allow sprites to be easily arranged on-screen, they also
make it possible to optimize the process of adding sprites to games. For example,
many game development tools support the ability to import batches of sprites at
one time. By arranging your sprite grids in a particular sequence and position
inside a larger graphic image, you make it much easier to include them in a game,
especially when dealing with large numbers of similarly sized objects. This can
wind up saving you countless time, hassle, and effort during the course of a game
project.
Optimizing Sprites for Screen Performance
Finally, grid squares offer programmers the opportunity to optimize their games
around certain sprite sizes, which contributes to the overall screen performance
of a game. You can find more information on this particular issue by referring to
Chapter 2.
Table 9-6 highlights some of the more common sprite grid sizes used.
Chapter 9 / Arcade Game Animation 307
FIGURE 9-10: Example of Grid Containing an AnimationSequence
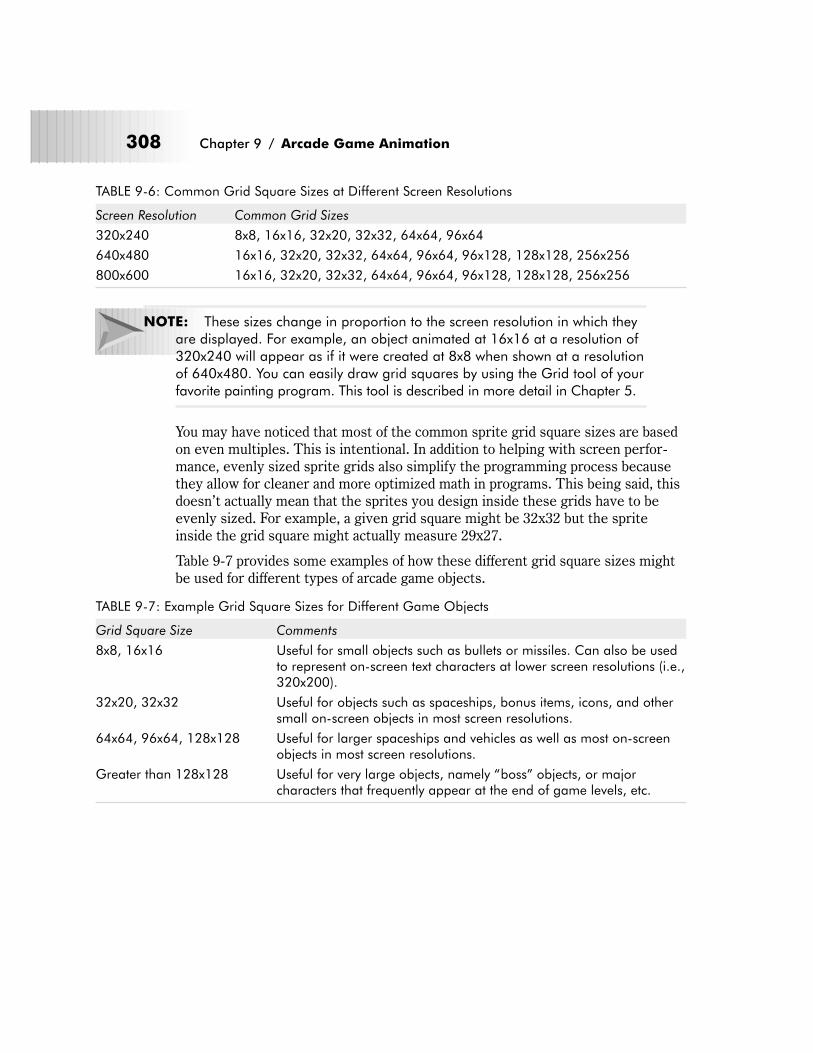
TABLE 9-6: Common Grid Square Sizes at Different Screen Resolutions
Screen Resolution Common Grid Sizes
320x240 8x8, 16x16, 32x20, 32x32, 64x64, 96x64
640x480 16x16, 32x20, 32x32, 64x64, 96x64, 96x128, 128x128, 256x256
800x600 16x16, 32x20, 32x32, 64x64, 96x64, 96x128, 128x128, 256x256
NOTE: These sizes change in proportion to the screen resolution in which they
are displayed. For example, an object animated at 16x16 at a resolution of
320x240 will appear as if it were created at 8x8 when shown at a resolution
of 640x480. You can easily draw grid squares by using the Grid tool of your
favorite painting program. This tool is described in more detail in Chapter 5.
You may have noticed that most of the common sprite grid square sizes are based
on even multiples. This is intentional. In addition to helping with screen perfor-
mance, evenly sized sprite grids also simplify the programming process because
they allow for cleaner and more optimized math in programs. This being said, this
doesn’t actually mean that the sprites you design inside these grids have to be
evenly sized. For example, a given grid square might be 32x32 but the sprite
inside the grid square might actually measure 29x27.
Table 9-7 provides some examples of how these different grid square sizes might
be used for different types of arcade game objects.
TABLE 9-7: Example Grid Square Sizes for Different Game Objects
Grid Square Size Comments
8x8, 16x16 Useful for small objects such as bullets or missiles. Can also be usedto represent on-screen text characters at lower screen resolutions (i.e.,320x200).
32x20, 32x32 Useful for objects such as spaceships, bonus items, icons, and othersmall on-screen objects in most screen resolutions.
64x64, 96x64, 128x128 Useful for larger spaceships and vehicles as well as most on-screenobjects in most screen resolutions.
Greater than 128x128 Useful for very large objects, namely “boss” objects, or majorcharacters that frequently appear at the end of game levels, etc.
308 Chapter 9 / Arcade Game Animation
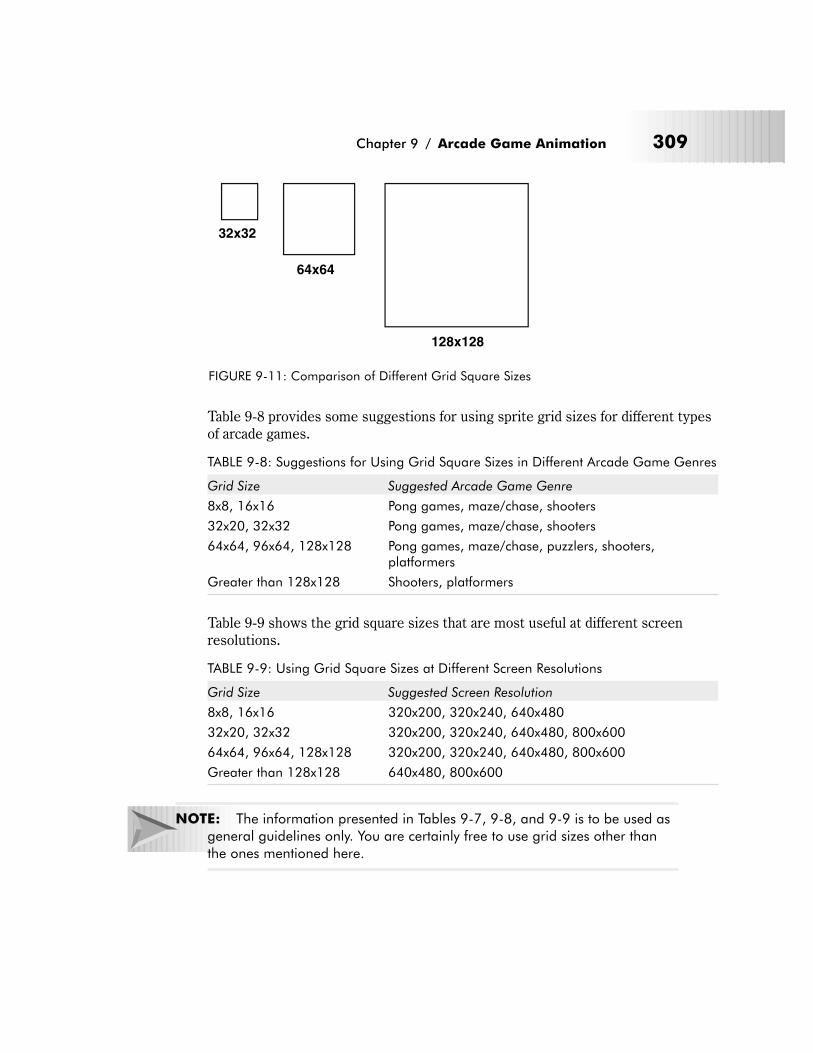
Table 9-8 provides some suggestions for using sprite grid sizes for different types
of arcade games.
TABLE 9-8: Suggestions for Using Grid Square Sizes in Different Arcade Game Genres
Grid Size Suggested Arcade Game Genre
8x8, 16x16 Pong games, maze/chase, shooters
32x20, 32x32 Pong games, maze/chase, shooters
64x64, 96x64, 128x128 Pong games, maze/chase, puzzlers, shooters,platformers
Greater than 128x128 Shooters, platformers
Table 9-9 shows the grid square sizes that are most useful at different screen
resolutions.
TABLE 9-9: Using Grid Square Sizes at Different Screen Resolutions
Grid Size Suggested Screen Resolution
8x8, 16x16 320x200, 320x240, 640x480
32x20, 32x32 320x200, 320x240, 640x480, 800x600
64x64, 96x64, 128x128 320x200, 320x240, 640x480, 800x600
Greater than 128x128 640x480, 800x600
NOTE: The information presented in Tables 9-7, 9-8, and 9-9 is to be used as
general guidelines only. You are certainly free to use grid sizes other than
the ones mentioned here.
Chapter 9 / Arcade Game Animation 309
32x32
64x64
128x128
FIGURE 9-11: Comparison of Different Grid Square Sizes
General Rules for Creating Grid Squares
There are a few items to consider before going to the trouble of designing your
artwork using a specific grid square size. These issues include:
� Programmer requirements—In order to maximize screen performance,
some games use sprites that are hard-coded to certain sizes. Therefore, never
choose a particular grid square size to create your sprites without first con-
sulting with your programmer! Otherwise, you’re likely to create sprites that
are incompatible with the game’s animation code and will probably have to
redo a large portion of your work.
� Grid square size in relation to other objects—During your initial graphics
work, you may find that you need to make certain game objects larger or
smaller to better fit the overall look and feel of the game. Therefore, always
test the grid square size you choose before using it for all of your sprites. To
do this, simply create a few key objects using the selected grid square size and
see how they fit together. Place the objects side by side and in relation to the
rest of the items in your game, i.e., backgrounds, status indicators, etc. After a
few quick tests, it should become clear whether or not a particular grid square
size will work for your game. Taking this extra step can save you a lot of extra
time and effort later on.
� Proper grid square scaling—It helps if you use grid squares that are divisi-
ble by a power of two. Doing this has several advantages. First, it allows your
sprites to be compatible with all common screen resolutions. Second, it facili-
tates their placement on the screen, as all common screen resolutions are also
divisible by a power of two. Third and finally, doing this allows you to scale
your sprites up or down to other sizes as the need arises with minimal loss in
quality.
One last word about sprite grid sizes: be very careful when creating them! When
the programmer specifies a grid size of 32x32, find out if the 32x32 dimensions
include the grid border or just the contents of the grid cell. This detail is often
overlooked and can result in game objects that do not fit together properly, such as
background tiles.
Therefore, to be safe, always make your grids one pixel larger than what is speci-
fied in both the X- and Y-axes. For example, when tasked with making objects that
are 40x40 in size, create a grid that is 41x41, as this will account for the grid’s
border.
Core Arcade Game Animation Primitives
Animated objects are at the heart of every arcade-style game. They represent the
stylistic sequences that comprise everything from on-screen characters that walk,
310 Chapter 9 / Arcade Game Animation

run, and jump to spaceships and special effects such as flashes and explosions. It’s
these objects that ultimately make arcade games engaging and appealing to those
who play them. Yet, despite all of the outward differences each arcade game
exhibits in terms of their looks, the animations that give them unique character all
share a common set of primitives, or techniques of producing animated sequences.
This is a little-known fact but an extremely important one. Once you understand
how these arcade animation primitives work, you will have an important insight
into how arcade game animations are designed and created.
The purpose of this section is to highlight these core animation primitives and
explain both how they work and how to use them effectively in your own arcade-
style game projects.
For the purposes of this book, these key animation primitives can be grouped into
three general categories. These categories include:
� Major arcade game animation primitives
� Minor arcade game animation primitives
� Complex arcade game animation primitives
Major Arcade Game Animation Primitives
This category includes seven of the most basic animation primitives that are used
in nearly every arcade game. The techniques described here are relatively simple
in nature and are applicable to both character and mechanical objects of all types.
They include:
� The cylindrical primitive
� The rotational primitive
� The disintegration primitive
� The color flash primitive
� The scissors primitive
� The growing primitive
� The shrinking primitive
The Cylindrical Primitive
This primitive is used in arcade games to represent the spinning motion of round,
cylindrical objects. Although this doesn’t sound like much, you’d be surprised. In
arcade games, these objects can be used to represent a diverse and extensive
range of elements including ship’s hulls, buildings, missiles, robots, and even car
wheels.
The cylindrical technique is among the easiest animation techniques to master
because unlike most forms of animation, it doesn’t require any dramatic changes
Chapter 9 / Arcade Game Animation 311
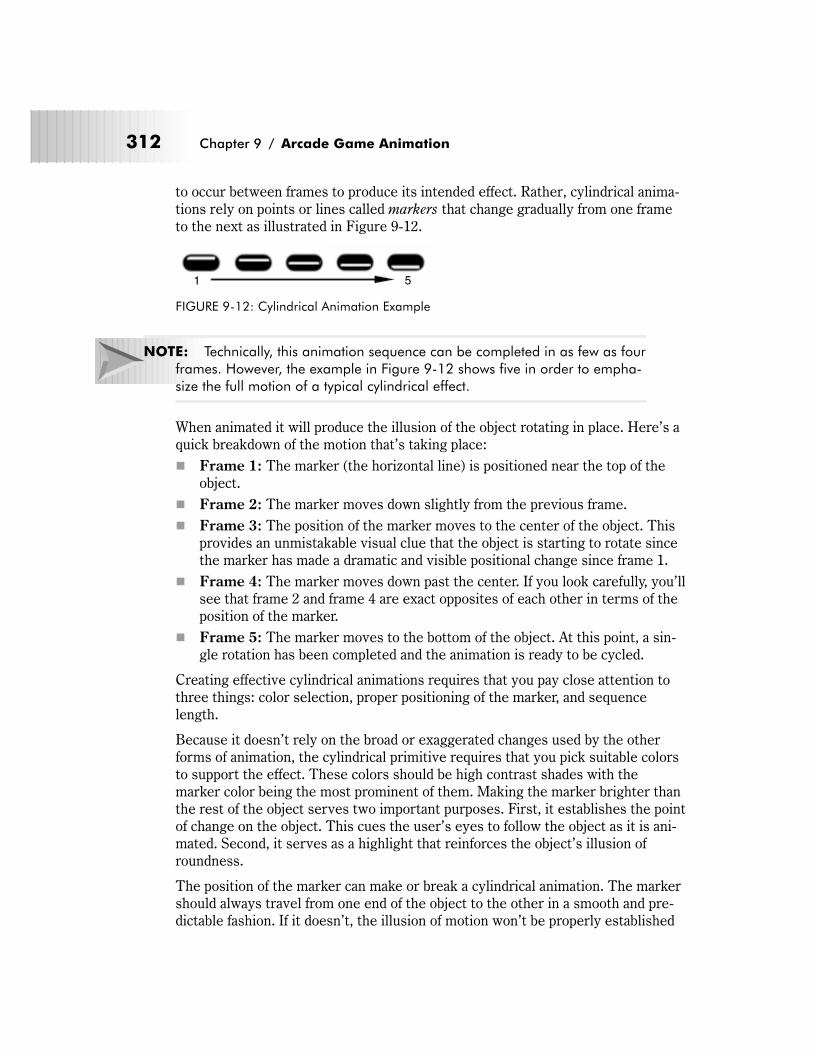
to occur between frames to produce its intended effect. Rather, cylindrical anima-
tions rely on points or lines called markers that change gradually from one frame
to the next as illustrated in Figure 9-12.
NOTE: Technically, this animation sequence can be completed in as few as four
frames. However, the example in Figure 9-12 shows five in order to empha-
size the full motion of a typical cylindrical effect.
When animated it will produce the illusion of the object rotating in place. Here’s a
quick breakdown of the motion that’s taking place:
� Frame 1: The marker (the horizontal line) is positioned near the top of the
object.
� Frame 2: The marker moves down slightly from the previous frame.
� Frame 3: The position of the marker moves to the center of the object. This
provides an unmistakable visual clue that the object is starting to rotate since
the marker has made a dramatic and visible positional change since frame 1.
� Frame 4: The marker moves down past the center. If you look carefully, you’ll
see that frame 2 and frame 4 are exact opposites of each other in terms of the
position of the marker.
� Frame 5: The marker moves to the bottom of the object. At this point, a sin-
gle rotation has been completed and the animation is ready to be cycled.
Creating effective cylindrical animations requires that you pay close attention to
three things: color selection, proper positioning of the marker, and sequence
length.
Because it doesn’t rely on the broad or exaggerated changes used by the other
forms of animation, the cylindrical primitive requires that you pick suitable colors
to support the effect. These colors should be high contrast shades with the
marker color being the most prominent of them. Making the marker brighter than
the rest of the object serves two important purposes. First, it establishes the point
of change on the object. This cues the user’s eyes to follow the object as it is ani-
mated. Second, it serves as a highlight that reinforces the object’s illusion of
roundness.
The position of the marker can make or break a cylindrical animation. The marker
should always travel from one end of the object to the other in a smooth and pre-
dictable fashion. If it doesn’t, the illusion of motion won’t be properly established
312 Chapter 9 / Arcade Game Animation
1 5
FIGURE 9-12: Cylindrical Animation Example
and the animation will fail. To ensure that the marker is always positioned cor-
rectly, move it in gradual increments as this will give you more control over its
progression along the surface of the object and give you the opportunity to correct
it during the design process. The correct positioning of the marker is one of the
more difficult aspects of creating this type of animation. To help give you a better
sense of how to do this, look at a real-world object such as a large coin. Turn the
coin on its side and roll it in your fingers. Notice how the light moves along the
edge of the coin. Move the marker in the same fashion and the animation will pro-
duce the desired result.
The effectiveness of cylindrical animations is also greatly influenced by the num-
ber of frames used to create the effect. To ensure that the animation is successful,
plan on rendering the cylindrical animation using between three and ten frames.
In my experience, seven works best, but more can be used without drawing out
the effect too much. Never use less than three frames to represent any cylindrical
animation since there won’t be enough frames available to adequately show the
flow of movement.
TABLE 9-10: Cylindrical Primitive Animation Property Summary
Animation Property Comments
Motion lines Cylindrical animations should never have an uneven(non-linear) motion path. Cylindrical animations always havestraight motion lines.
Motion angles Motion angles are always straight.
Key-frames and in-betweens Three to four key-frames with up to three in-betweens producethe smoothest and most effective cylindrical animationsequences.
Weight and gravity These properties may influence the speed at which a cylindricalobject rotates if it’s large or heavy.
Flexibility Does not apply and has no effect.
Secondary actions Has no effect as all parts of the object move at the same timeduring cylindrical animations.
Cycles and loops Cycles are used extensively in cylindrical rotation sequences. Allcylindrical animations loop; otherwise, the effect won’t seemcontinuous.
Tempo Used extensively to adjust the speed at which the cylindricalaction occurs. Be careful not to move objects too quickly whenperforming cylindrical animations. Doing so has a tendency toruin the effect.
Chapter 9 / Arcade Game Animation 313
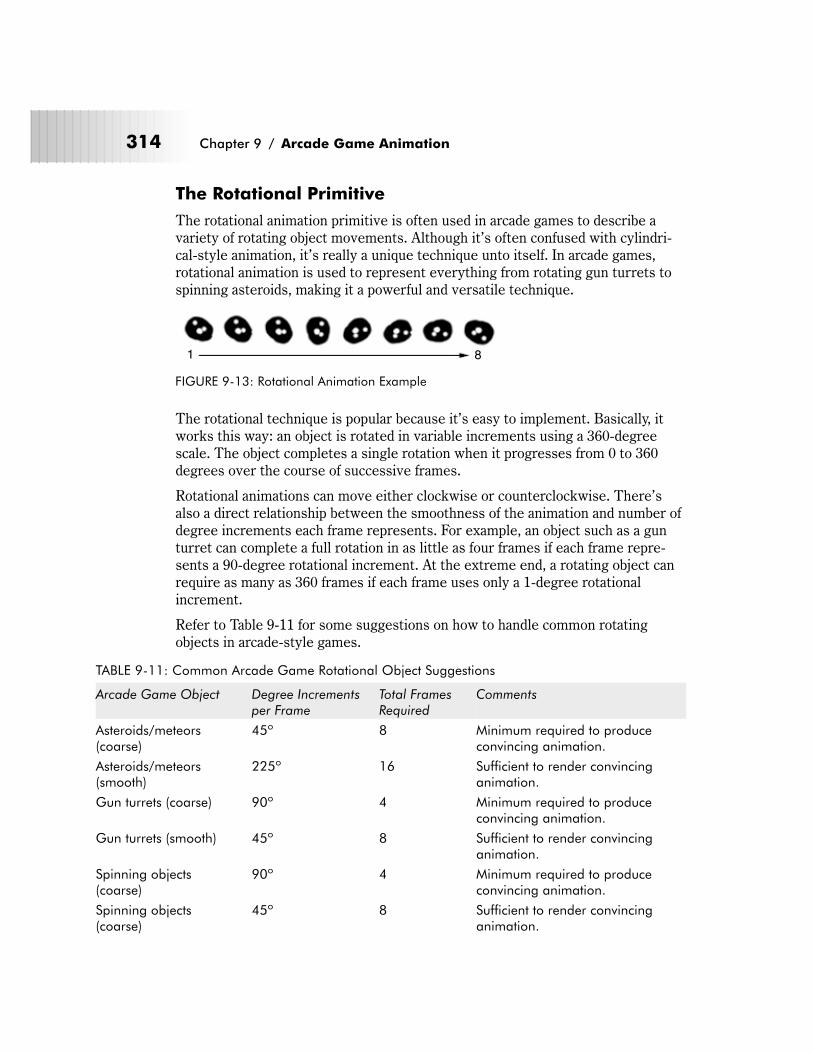
The Rotational Primitive
The rotational animation primitive is often used in arcade games to describe a
variety of rotating object movements. Although it’s often confused with cylindri-
cal-style animation, it’s really a unique technique unto itself. In arcade games,
rotational animation is used to represent everything from rotating gun turrets to
spinning asteroids, making it a powerful and versatile technique.
The rotational technique is popular because it’s easy to implement. Basically, it
works this way: an object is rotated in variable increments using a 360-degree
scale. The object completes a single rotation when it progresses from 0 to 360
degrees over the course of successive frames.
Rotational animations can move either clockwise or counterclockwise. There’s
also a direct relationship between the smoothness of the animation and number of
degree increments each frame represents. For example, an object such as a gun
turret can complete a full rotation in as little as four frames if each frame repre-
sents a 90-degree rotational increment. At the extreme end, a rotating object can
require as many as 360 frames if each frame uses only a 1-degree rotational
increment.
Refer to Table 9-11 for some suggestions on how to handle common rotating
objects in arcade-style games.
TABLE 9-11: Common Arcade Game Rotational Object Suggestions
Arcade Game Object Degree Incrementsper Frame
Total FramesRequired
Comments
Asteroids/meteors(coarse)
45º 8 Minimum required to produceconvincing animation.
Asteroids/meteors(smooth)
225º 16 Sufficient to render convincinganimation.
Gun turrets (coarse) 90º 4 Minimum required to produceconvincing animation.
Gun turrets (smooth) 45º 8 Sufficient to render convincinganimation.
Spinning objects(coarse)
90º 4 Minimum required to produceconvincing animation.
Spinning objects(coarse)
45º 8 Sufficient to render convincinganimation.
314 Chapter 9 / Arcade Game Animation
1 8
FIGURE 9-13: Rotational Animation Example
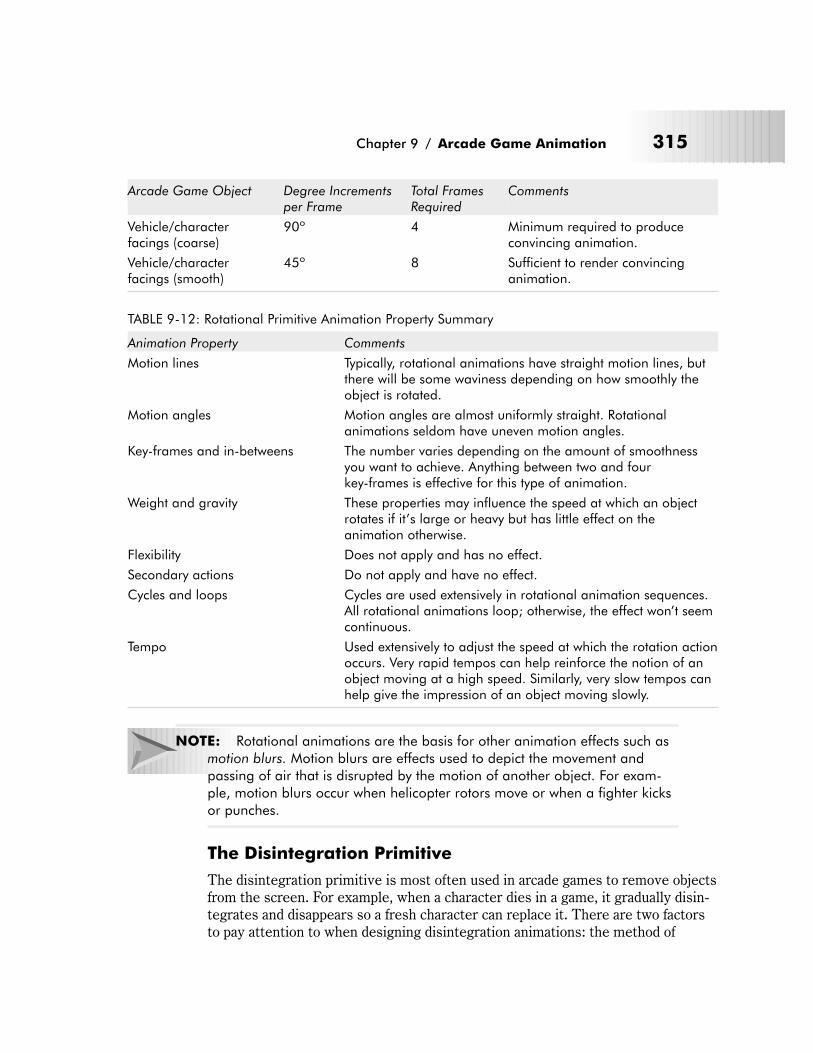
Arcade Game Object Degree Incrementsper Frame
Total FramesRequired
Comments
Vehicle/characterfacings (coarse)
90º 4 Minimum required to produceconvincing animation.
Vehicle/characterfacings (smooth)
45º 8 Sufficient to render convincinganimation.
TABLE 9-12: Rotational Primitive Animation Property Summary
Animation Property Comments
Motion lines Typically, rotational animations have straight motion lines, butthere will be some waviness depending on how smoothly theobject is rotated.
Motion angles Motion angles are almost uniformly straight. Rotationalanimations seldom have uneven motion angles.
Key-frames and in-betweens The number varies depending on the amount of smoothnessyou want to achieve. Anything between two and fourkey-frames is effective for this type of animation.
Weight and gravity These properties may influence the speed at which an objectrotates if it’s large or heavy but has little effect on theanimation otherwise.
Flexibility Does not apply and has no effect.
Secondary actions Do not apply and have no effect.
Cycles and loops Cycles are used extensively in rotational animation sequences.All rotational animations loop; otherwise, the effect won’t seemcontinuous.
Tempo Used extensively to adjust the speed at which the rotation actionoccurs. Very rapid tempos can help reinforce the notion of anobject moving at a high speed. Similarly, very slow tempos canhelp give the impression of an object moving slowly.
NOTE: Rotational animations are the basis for other animation effects such as
motion blurs. Motion blurs are effects used to depict the movement and
passing of air that is disrupted by the motion of another object. For exam-
ple, motion blurs occur when helicopter rotors move or when a fighter kicks
or punches.
The Disintegration Primitive
The disintegration primitive is most often used in arcade games to remove objects
from the screen. For example, when a character dies in a game, it gradually disin-
tegrates and disappears so a fresh character can replace it. There are two factors
to pay attention to when designing disintegration animations: the method of
Chapter 9 / Arcade Game Animation 315
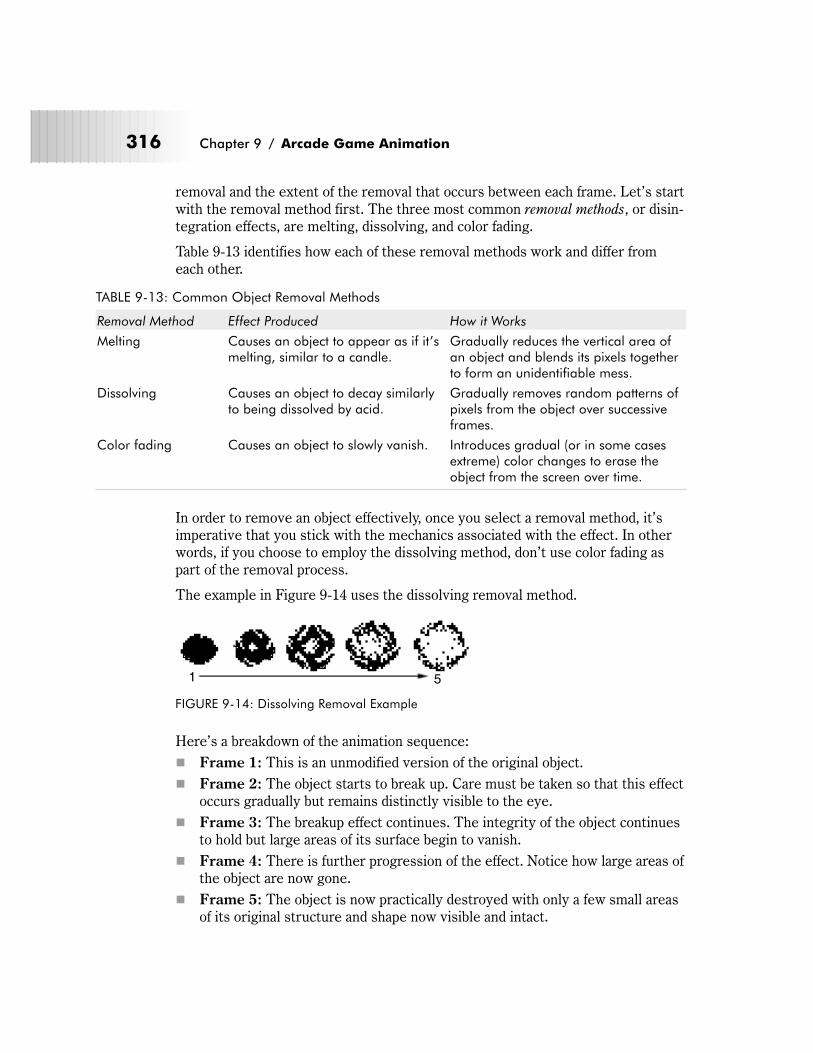
removal and the extent of the removal that occurs between each frame. Let’s start
with the removal method first. The three most common removal methods, or disin-
tegration effects, are melting, dissolving, and color fading.
Table 9-13 identifies how each of these removal methods work and differ from
each other.
TABLE 9-13: Common Object Removal Methods
Removal Method Effect Produced How it Works
Melting Causes an object to appear as if it’smelting, similar to a candle.
Gradually reduces the vertical area ofan object and blends its pixels togetherto form an unidentifiable mess.
Dissolving Causes an object to decay similarlyto being dissolved by acid.
Gradually removes random patterns ofpixels from the object over successiveframes.
Color fading Causes an object to slowly vanish. Introduces gradual (or in some casesextreme) color changes to erase theobject from the screen over time.
In order to remove an object effectively, once you select a removal method, it’s
imperative that you stick with the mechanics associated with the effect. In other
words, if you choose to employ the dissolving method, don’t use color fading as
part of the removal process.
The example in Figure 9-14 uses the dissolving removal method.
Here’s a breakdown of the animation sequence:
� Frame 1: This is an unmodified version of the original object.
� Frame 2: The object starts to break up. Care must be taken so that this effect
occurs gradually but remains distinctly visible to the eye.
� Frame 3: The breakup effect continues. The integrity of the object continues
to hold but large areas of its surface begin to vanish.
� Frame 4: There is further progression of the effect. Notice how large areas of
the object are now gone.
� Frame 5: The object is now practically destroyed with only a few small areas
of its original structure and shape now visible and intact.
316 Chapter 9 / Arcade Game Animation
1 5
FIGURE 9-14: Dissolving Removal Example
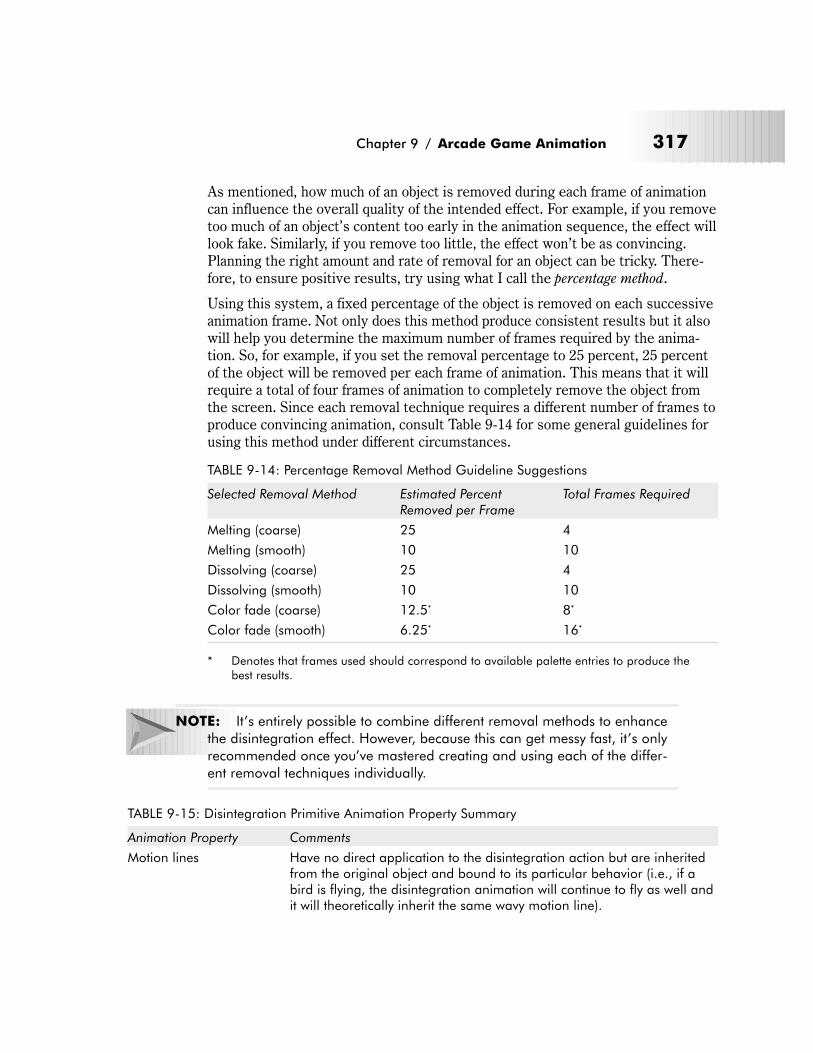
As mentioned, how much of an object is removed during each frame of animation
can influence the overall quality of the intended effect. For example, if you remove
too much of an object’s content too early in the animation sequence, the effect will
look fake. Similarly, if you remove too little, the effect won’t be as convincing.
Planning the right amount and rate of removal for an object can be tricky. There-
fore, to ensure positive results, try using what I call the percentage method.
Using this system, a fixed percentage of the object is removed on each successive
animation frame. Not only does this method produce consistent results but it also
will help you determine the maximum number of frames required by the anima-
tion. So, for example, if you set the removal percentage to 25 percent, 25 percent
of the object will be removed per each frame of animation. This means that it will
require a total of four frames of animation to completely remove the object from
the screen. Since each removal technique requires a different number of frames to
produce convincing animation, consult Table 9-14 for some general guidelines for
using this method under different circumstances.
TABLE 9-14: Percentage Removal Method Guideline Suggestions
Selected Removal Method Estimated PercentRemoved per Frame
Total Frames Required
Melting (coarse) 25 4
Melting (smooth) 10 10
Dissolving (coarse) 25 4
Dissolving (smooth) 10 10
Color fade (coarse) 12.5* 8*
Color fade (smooth) 6.25* 16*
* Denotes that frames used should correspond to available palette entries to produce thebest results.
NOTE: It’s entirely possible to combine different removal methods to enhance
the disintegration effect. However, because this can get messy fast, it’s only
recommended once you’ve mastered creating and using each of the differ-
ent removal techniques individually.
TABLE 9-15: Disintegration Primitive Animation Property Summary
Animation Property Comments
Motion lines Have no direct application to the disintegration action but are inheritedfrom the original object and bound to its particular behavior (i.e., if abird is flying, the disintegration animation will continue to fly as well andit will theoretically inherit the same wavy motion line).
Chapter 9 / Arcade Game Animation 317
Animation Property Comments
Motion angles Have no direct application to the disintegration action but are inheritedfrom the original object and bound to its behavior.
Key-frames andin-betweens
Application varies. Depends on the desired smoothness of thedisintegration action. Refer to Table 9-14 for more information.
Weight and gravity Have no direct application to the disintegration action but are inheritedfrom the original object and bound to its behavior.
Flexibility Does not apply and has no effect.
Secondary actions Have no direct application to the disintegration action but are inheritedfrom the original object and bound to its behavior.
Cycles and loops Rarely used since the purpose of disintegration animations is to removean object from the screen in a graceful manner. Therefore, suchsequences only move once and never cycle or loop.
Tempo Used extensively to adjust the speed at which the disintegration actionoccurs. Correct tempo is a major factor in the success or failure of mostdisintegration-style animations. When in doubt, move your objects faster.Slow tempos, particularly when displaying explosion animations, canruin the illusion produced by the effect.
The Color Flash Primitive
Color flashes are commonly used in arcade games to produce a flashing effect on
or behind an object such as the sparkling of a jewel, the flicker of a torch, the flash
of a light, or the pulse of a rocket motor. Color flashes work by applying a subtle
(or dramatic) color change between each frame of the animation. This color
change is usually limited to a fixed area within each frame and can range anywhere
from a single pixel in size to an intricate, multipixel pattern. Regardless, when
done properly, the color flash technique can produce an extremely effective “quick
and dirty” effect that requires minimal time to create but adds a powerful sense of
realism and character to a scene.
This being said, creating an effective color flash effect relies on four distinct fac-
tors: proper color selection, the size of the flash used, the number of frames
involved, and the position of the flash on the object itself. In most situations, color
flashes require you to use intense, contrasting colors. For example, to use a color
flash to simulate a rocket exhaust at the back of a spaceship’s engine, you should
use shades of red with distinct contrast such as bright red, medium red, and dark
red. When animated, these colors will exhibit the visible distinctions that will
make the effect easier to see in the context of the overall object and game screen.
The size or radius of the color flash can also have a big effect on how convincing
the effect looks when used on an object. A color flash that is too small will appear
too subtle on-screen, whereas a color flash that is too large can ruin the effect and
jeopardize the integrity of the object itself. For the best results, try to find a place
318 Chapter 9 / Arcade Game Animation
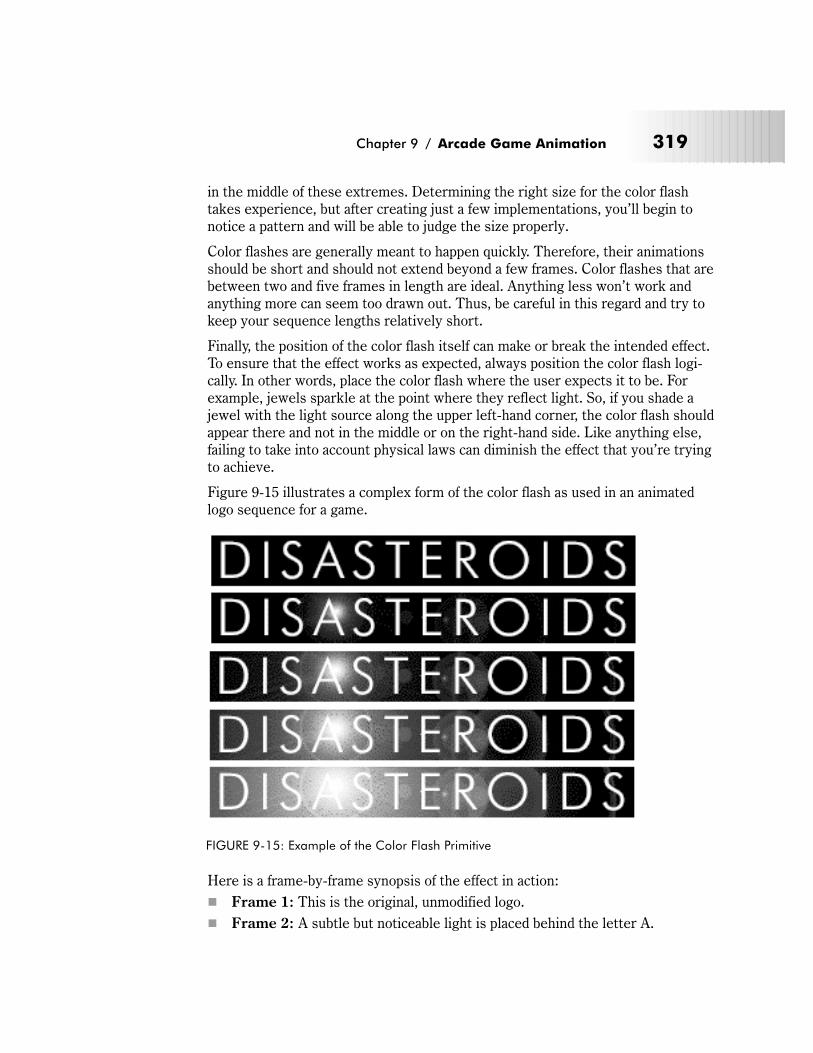
in the middle of these extremes. Determining the right size for the color flash
takes experience, but after creating just a few implementations, you’ll begin to
notice a pattern and will be able to judge the size properly.
Color flashes are generally meant to happen quickly. Therefore, their animations
should be short and should not extend beyond a few frames. Color flashes that are
between two and five frames in length are ideal. Anything less won’t work and
anything more can seem too drawn out. Thus, be careful in this regard and try to
keep your sequence lengths relatively short.
Finally, the position of the color flash itself can make or break the intended effect.
To ensure that the effect works as expected, always position the color flash logi-
cally. In other words, place the color flash where the user expects it to be. For
example, jewels sparkle at the point where they reflect light. So, if you shade a
jewel with the light source along the upper left-hand corner, the color flash should
appear there and not in the middle or on the right-hand side. Like anything else,
failing to take into account physical laws can diminish the effect that you’re trying
to achieve.
Figure 9-15 illustrates a complex form of the color flash as used in an animated
logo sequence for a game.
Here is a frame-by-frame synopsis of the effect in action:
� Frame 1: This is the original, unmodified logo.
� Frame 2: A subtle but noticeable light is placed behind the letter A.
Chapter 9 / Arcade Game Animation 319
FIGURE 9-15: Example of the Color Flash Primitive
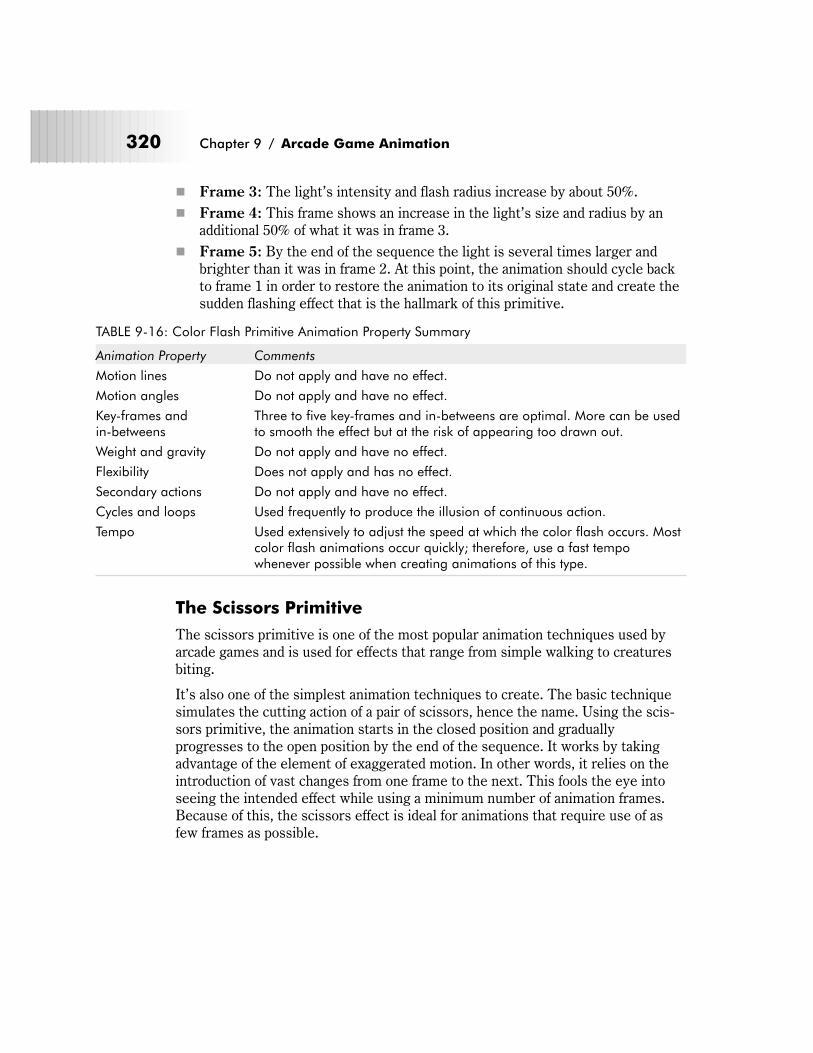
� Frame 3: The light’s intensity and flash radius increase by about 50%.
� Frame 4: This frame shows an increase in the light’s size and radius by an
additional 50% of what it was in frame 3.
� Frame 5: By the end of the sequence the light is several times larger and
brighter than it was in frame 2. At this point, the animation should cycle back
to frame 1 in order to restore the animation to its original state and create the
sudden flashing effect that is the hallmark of this primitive.
TABLE 9-16: Color Flash Primitive Animation Property Summary
Animation Property Comments
Motion lines Do not apply and have no effect.
Motion angles Do not apply and have no effect.
Key-frames andin-betweens
Three to five key-frames and in-betweens are optimal. More can be usedto smooth the effect but at the risk of appearing too drawn out.
Weight and gravity Do not apply and have no effect.
Flexibility Does not apply and has no effect.
Secondary actions Do not apply and have no effect.
Cycles and loops Used frequently to produce the illusion of continuous action.
Tempo Used extensively to adjust the speed at which the color flash occurs. Mostcolor flash animations occur quickly; therefore, use a fast tempowhenever possible when creating animations of this type.
The Scissors Primitive
The scissors primitive is one of the most popular animation techniques used by
arcade games and is used for effects that range from simple walking to creatures
biting.
It’s also one of the simplest animation techniques to create. The basic technique
simulates the cutting action of a pair of scissors, hence the name. Using the scis-
sors primitive, the animation starts in the closed position and gradually
progresses to the open position by the end of the sequence. It works by taking
advantage of the element of exaggerated motion. In other words, it relies on the
introduction of vast changes from one frame to the next. This fools the eye into
seeing the intended effect while using a minimum number of animation frames.
Because of this, the scissors effect is ideal for animations that require use of as
few frames as possible.
320 Chapter 9 / Arcade Game Animation
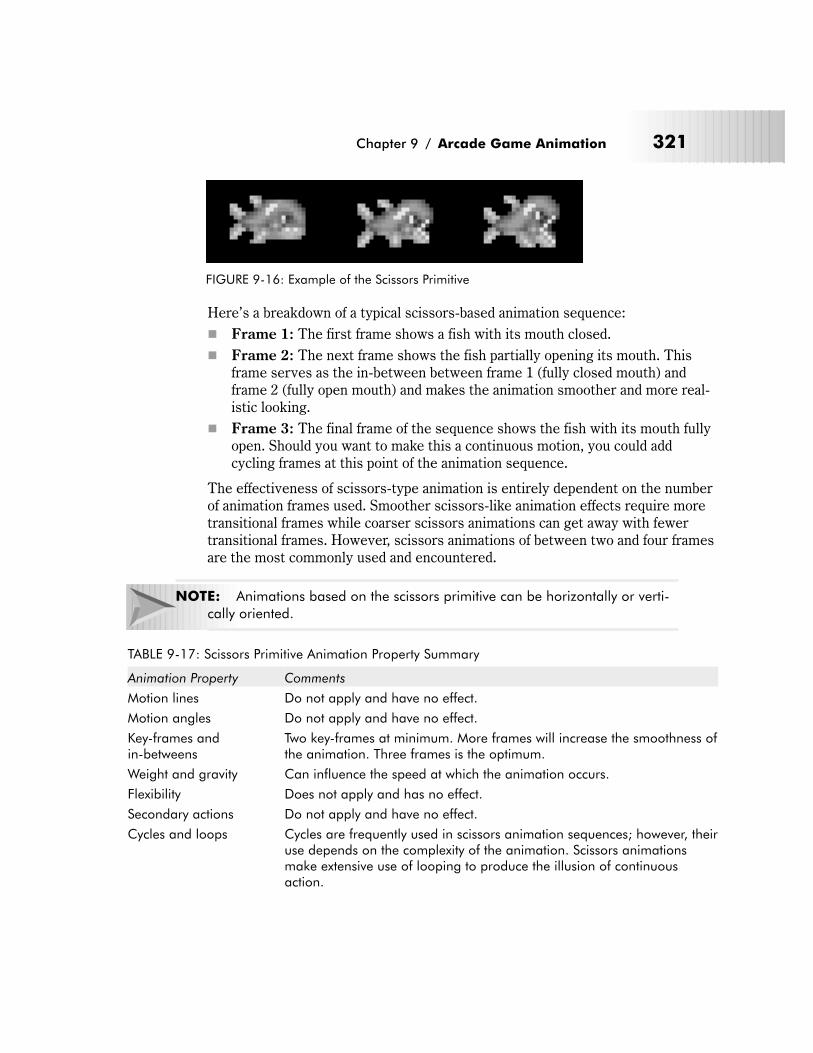
Here’s a breakdown of a typical scissors-based animation sequence:
� Frame 1: The first frame shows a fish with its mouth closed.
� Frame 2: The next frame shows the fish partially opening its mouth. This
frame serves as the in-between between frame 1 (fully closed mouth) and
frame 2 (fully open mouth) and makes the animation smoother and more real-
istic looking.
� Frame 3: The final frame of the sequence shows the fish with its mouth fully
open. Should you want to make this a continuous motion, you could add
cycling frames at this point of the animation sequence.
The effectiveness of scissors-type animation is entirely dependent on the number
of animation frames used. Smoother scissors-like animation effects require more
transitional frames while coarser scissors animations can get away with fewer
transitional frames. However, scissors animations of between two and four frames
are the most commonly used and encountered.
NOTE: Animations based on the scissors primitive can be horizontally or verti-
cally oriented.
TABLE 9-17: Scissors Primitive Animation Property Summary
Animation Property Comments
Motion lines Do not apply and have no effect.
Motion angles Do not apply and have no effect.
Key-frames andin-betweens
Two key-frames at minimum. More frames will increase the smoothness ofthe animation. Three frames is the optimum.
Weight and gravity Can influence the speed at which the animation occurs.
Flexibility Does not apply and has no effect.
Secondary actions Do not apply and have no effect.
Cycles and loops Cycles are frequently used in scissors animation sequences; however, theiruse depends on the complexity of the animation. Scissors animationsmake extensive use of looping to produce the illusion of continuousaction.
Chapter 9 / Arcade Game Animation 321
FIGURE 9-16: Example of the Scissors Primitive
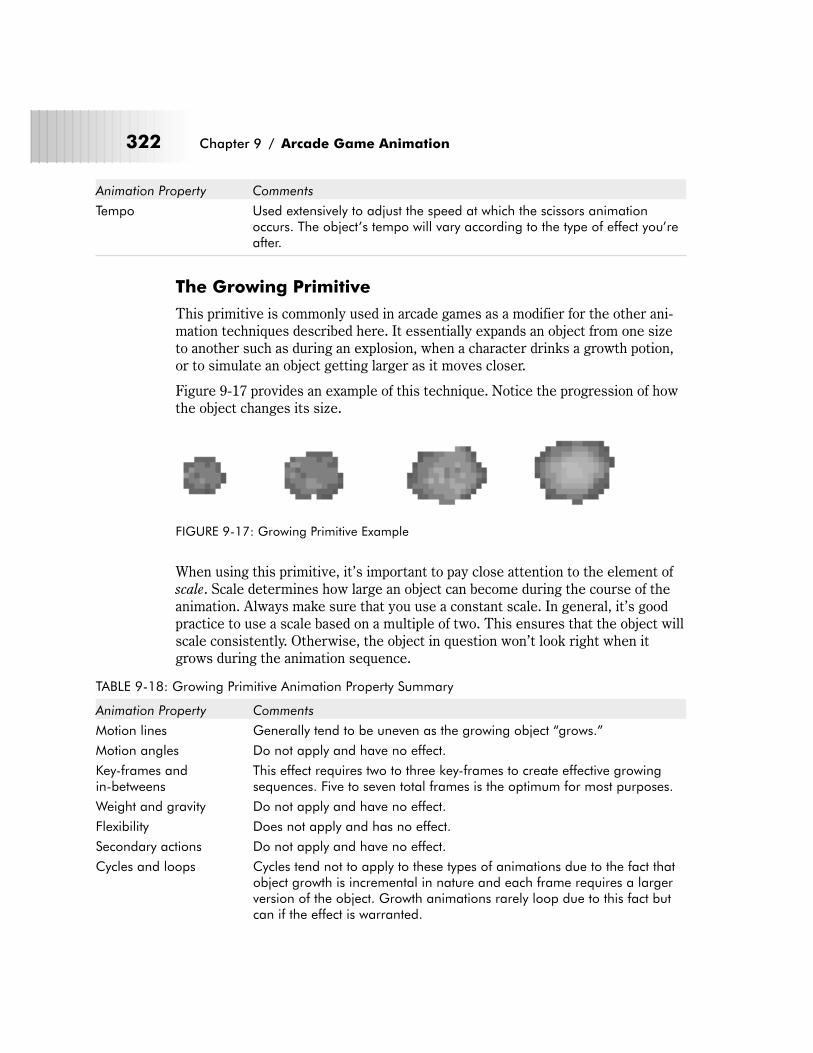
Animation Property Comments
Tempo Used extensively to adjust the speed at which the scissors animationoccurs. The object’s tempo will vary according to the type of effect you’reafter.
The Growing Primitive
This primitive is commonly used in arcade games as a modifier for the other ani-
mation techniques described here. It essentially expands an object from one size
to another such as during an explosion, when a character drinks a growth potion,
or to simulate an object getting larger as it moves closer.
Figure 9-17 provides an example of this technique. Notice the progression of how
the object changes its size.
When using this primitive, it’s important to pay close attention to the element of
scale. Scale determines how large an object can become during the course of the
animation. Always make sure that you use a constant scale. In general, it’s good
practice to use a scale based on a multiple of two. This ensures that the object will
scale consistently. Otherwise, the object in question won’t look right when it
grows during the animation sequence.
TABLE 9-18: Growing Primitive Animation Property Summary
Animation Property Comments
Motion lines Generally tend to be uneven as the growing object “grows.”
Motion angles Do not apply and have no effect.
Key-frames andin-betweens
This effect requires two to three key-frames to create effective growingsequences. Five to seven total frames is the optimum for most purposes.
Weight and gravity Do not apply and have no effect.
Flexibility Does not apply and has no effect.
Secondary actions Do not apply and have no effect.
Cycles and loops Cycles tend not to apply to these types of animations due to the fact thatobject growth is incremental in nature and each frame requires a largerversion of the object. Growth animations rarely loop due to this fact butcan if the effect is warranted.
322 Chapter 9 / Arcade Game Animation
FIGURE 9-17: Growing Primitive Example
Animation Property Comments
Tempo Used extensively to adjust the speed at which the growing effecttranspires. The object’s tempo will vary according to the effect you’reafter.
The Shrinking Primitive
This is the opposite of the growing primitive. It, too, is a commonly used modifier
for the other animation techniques described here. It essentially contracts an
object from one size to another such as during an explosion, when a character
drinks a shrinking potion, or to simulate an object getting smaller as it moves
away from view.
When it comes to the element of scale, what applies to the growing primitive
applies to the shrinking primitive as well.
TABLE 9-19: Shrinking Primitive Animation Property Summary
Animation Property Comments
Motion lines Generally tend to be uneven as the growing object “shrinks.”
Motion angles Do not apply and have no effect.
Key-frames andin-betweens
Two key-frames is the minimum. More frames create smoother shrinkingsequences. Five to seven frames is the optimum for most purposes.
Weight and gravity Do not apply and have no effect.
Flexibility Does not apply and has no effect.
Secondary actions Do not apply and have no effect.
Cycles and loops Cycles tend not to apply to these types of animations due to the fact thatobject shrinking is incremental in nature and each frame requires asmaller version of the object. Shrinking animations rarely loop due to thisfact but can if the effect is warranted.
Tempo Used extensively to adjust the speed at which the shrinking effecttranspires. The object’s tempo will vary according to the type of effectyou’re after.
Minor Arcade Game Animation Primitives
This set of animation primitives is used in many types of arcade-style games but
appears far less often than those described in the major animation primitives cate-
gory. These techniques are applicable to both character and mechanical objects.
They include:
� The piston primitive
� The squeeze primitive
� The swing primitive
Chapter 9 / Arcade Game Animation 323
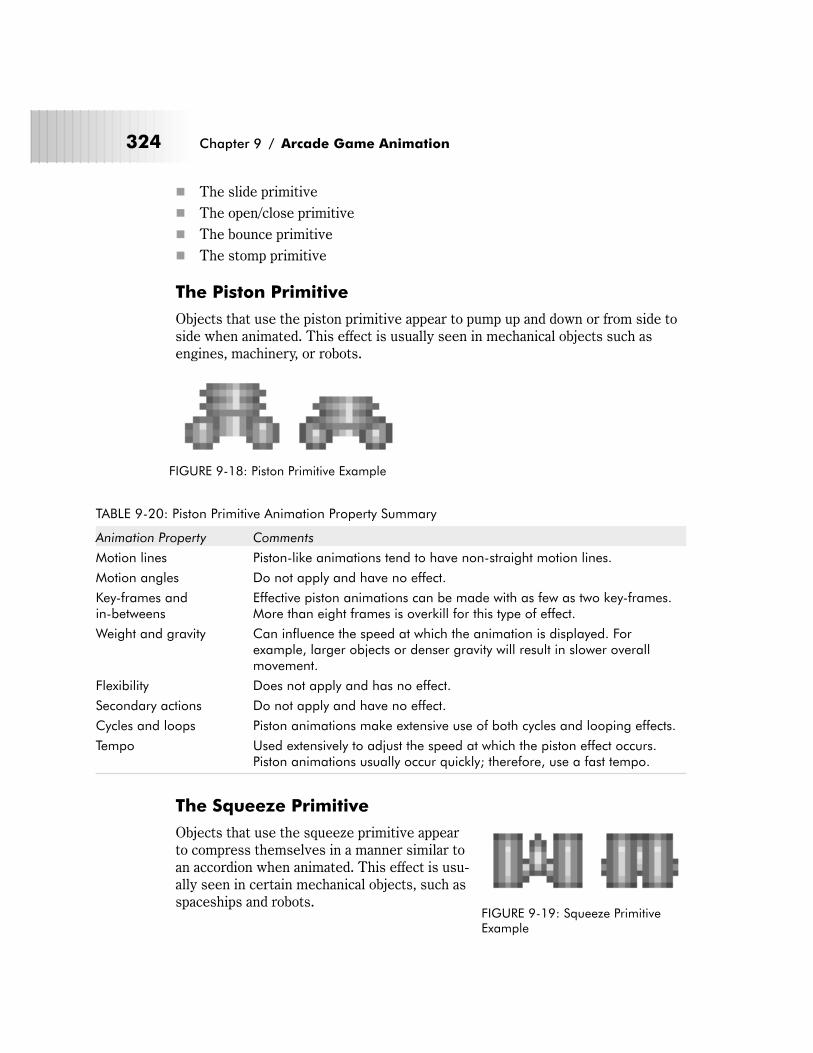
� The slide primitive
� The open/close primitive
� The bounce primitive
� The stomp primitive
The Piston Primitive
Objects that use the piston primitive appear to pump up and down or from side to
side when animated. This effect is usually seen in mechanical objects such as
engines, machinery, or robots.
TABLE 9-20: Piston Primitive Animation Property Summary
Animation Property Comments
Motion lines Piston-like animations tend to have non-straight motion lines.
Motion angles Do not apply and have no effect.
Key-frames andin-betweens
Effective piston animations can be made with as few as two key-frames.More than eight frames is overkill for this type of effect.
Weight and gravity Can influence the speed at which the animation is displayed. Forexample, larger objects or denser gravity will result in slower overallmovement.
Flexibility Does not apply and has no effect.
Secondary actions Do not apply and have no effect.
Cycles and loops Piston animations make extensive use of both cycles and looping effects.
Tempo Used extensively to adjust the speed at which the piston effect occurs.Piston animations usually occur quickly; therefore, use a fast tempo.
The Squeeze Primitive
Objects that use the squeeze primitive appear
to compress themselves in a manner similar to
an accordion when animated. This effect is usu-
ally seen in certain mechanical objects, such as
spaceships and robots.
324 Chapter 9 / Arcade Game Animation
FIGURE 9-18: Piston Primitive Example
FIGURE 9-19: Squeeze PrimitiveExample
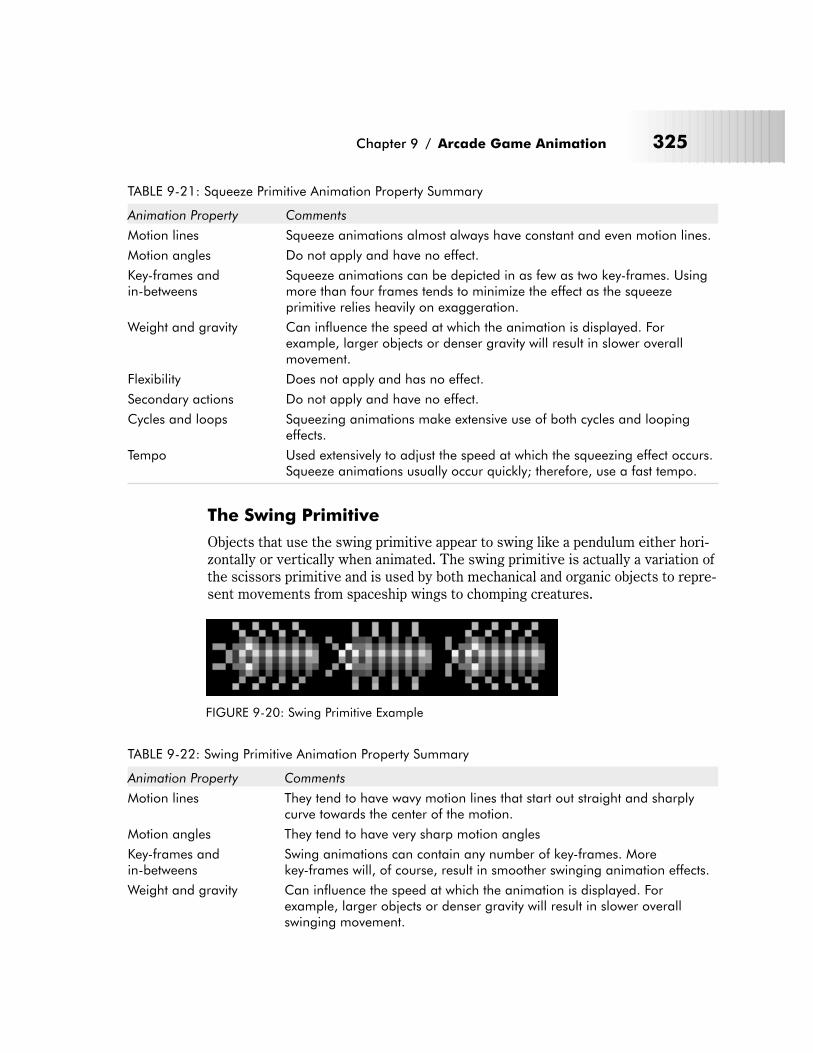
TABLE 9-21: Squeeze Primitive Animation Property Summary
Animation Property Comments
Motion lines Squeeze animations almost always have constant and even motion lines.
Motion angles Do not apply and have no effect.
Key-frames andin-betweens
Squeeze animations can be depicted in as few as two key-frames. Usingmore than four frames tends to minimize the effect as the squeezeprimitive relies heavily on exaggeration.
Weight and gravity Can influence the speed at which the animation is displayed. Forexample, larger objects or denser gravity will result in slower overallmovement.
Flexibility Does not apply and has no effect.
Secondary actions Do not apply and have no effect.
Cycles and loops Squeezing animations make extensive use of both cycles and loopingeffects.
Tempo Used extensively to adjust the speed at which the squeezing effect occurs.Squeeze animations usually occur quickly; therefore, use a fast tempo.
The Swing Primitive
Objects that use the swing primitive appear to swing like a pendulum either hori-
zontally or vertically when animated. The swing primitive is actually a variation of
the scissors primitive and is used by both mechanical and organic objects to repre-
sent movements from spaceship wings to chomping creatures.
TABLE 9-22: Swing Primitive Animation Property Summary
Animation Property Comments
Motion lines They tend to have wavy motion lines that start out straight and sharplycurve towards the center of the motion.
Motion angles They tend to have very sharp motion angles
Key-frames andin-betweens
Swing animations can contain any number of key-frames. Morekey-frames will, of course, result in smoother swinging animation effects.
Weight and gravity Can influence the speed at which the animation is displayed. Forexample, larger objects or denser gravity will result in slower overallswinging movement.
Chapter 9 / Arcade Game Animation 325
FIGURE 9-20: Swing Primitive Example
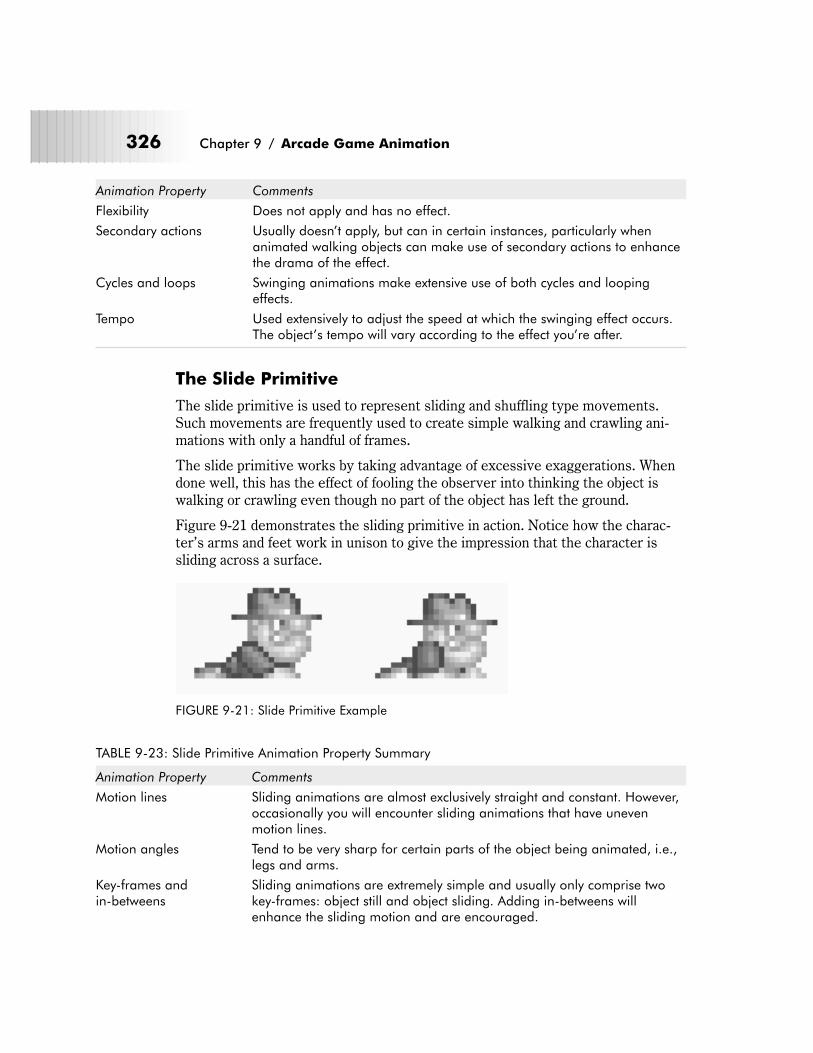
Animation Property Comments
Flexibility Does not apply and has no effect.
Secondary actions Usually doesn’t apply, but can in certain instances, particularly whenanimated walking objects can make use of secondary actions to enhancethe drama of the effect.
Cycles and loops Swinging animations make extensive use of both cycles and loopingeffects.
Tempo Used extensively to adjust the speed at which the swinging effect occurs.The object’s tempo will vary according to the effect you’re after.
The Slide Primitive
The slide primitive is used to represent sliding and shuffling type movements.
Such movements are frequently used to create simple walking and crawling ani-
mations with only a handful of frames.
The slide primitive works by taking advantage of excessive exaggerations. When
done well, this has the effect of fooling the observer into thinking the object is
walking or crawling even though no part of the object has left the ground.
Figure 9-21 demonstrates the sliding primitive in action. Notice how the charac-
ter’s arms and feet work in unison to give the impression that the character is
sliding across a surface.
TABLE 9-23: Slide Primitive Animation Property Summary
Animation Property Comments
Motion lines Sliding animations are almost exclusively straight and constant. However,occasionally you will encounter sliding animations that have unevenmotion lines.
Motion angles Tend to be very sharp for certain parts of the object being animated, i.e.,legs and arms.
Key-frames andin-betweens
Sliding animations are extremely simple and usually only comprise twokey-frames: object still and object sliding. Adding in-betweens willenhance the sliding motion and are encouraged.
326 Chapter 9 / Arcade Game Animation
FIGURE 9-21: Slide Primitive Example
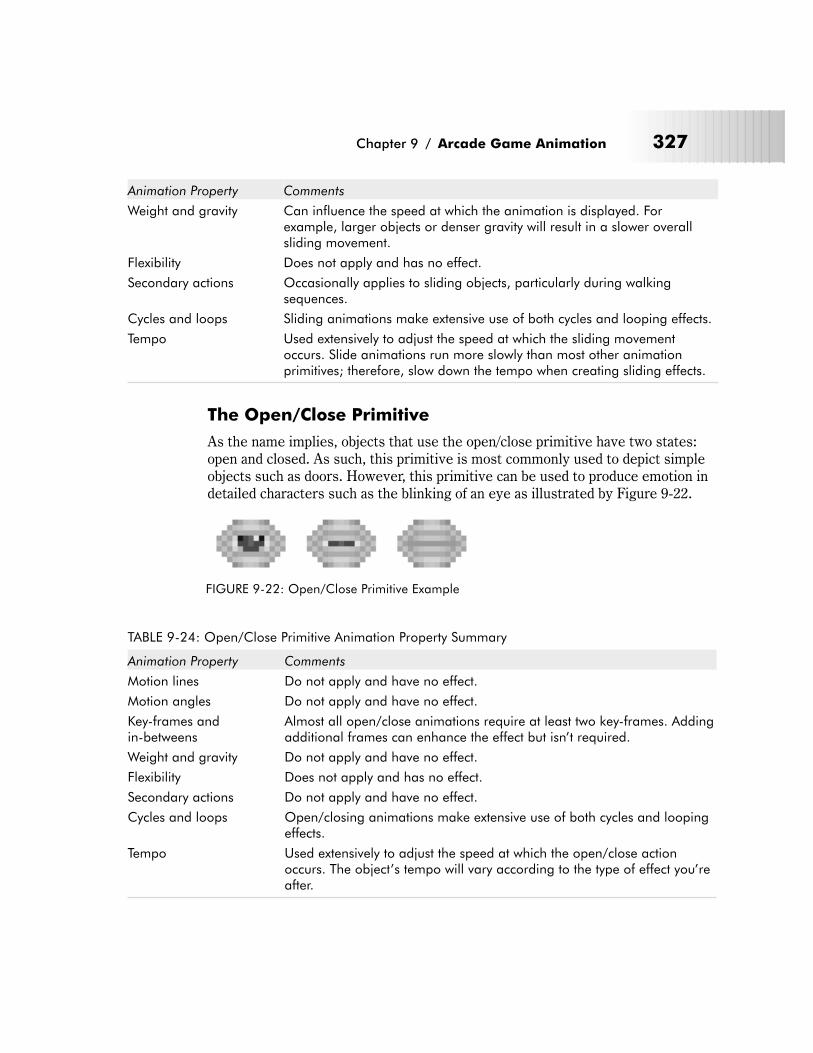
Animation Property Comments
Weight and gravity Can influence the speed at which the animation is displayed. Forexample, larger objects or denser gravity will result in a slower overallsliding movement.
Flexibility Does not apply and has no effect.
Secondary actions Occasionally applies to sliding objects, particularly during walkingsequences.
Cycles and loops Sliding animations make extensive use of both cycles and looping effects.
Tempo Used extensively to adjust the speed at which the sliding movementoccurs. Slide animations run more slowly than most other animationprimitives; therefore, slow down the tempo when creating sliding effects.
The Open/Close Primitive
As the name implies, objects that use the open/close primitive have two states:
open and closed. As such, this primitive is most commonly used to depict simple
objects such as doors. However, this primitive can be used to produce emotion in
detailed characters such as the blinking of an eye as illustrated by Figure 9-22.
TABLE 9-24: Open/Close Primitive Animation Property Summary
Animation Property Comments
Motion lines Do not apply and have no effect.
Motion angles Do not apply and have no effect.
Key-frames andin-betweens
Almost all open/close animations require at least two key-frames. Addingadditional frames can enhance the effect but isn’t required.
Weight and gravity Do not apply and have no effect.
Flexibility Does not apply and has no effect.
Secondary actions Do not apply and have no effect.
Cycles and loops Open/closing animations make extensive use of both cycles and loopingeffects.
Tempo Used extensively to adjust the speed at which the open/close actionoccurs. The object’s tempo will vary according to the type of effect you’reafter.
Chapter 9 / Arcade Game Animation 327
FIGURE 9-22: Open/Close Primitive Example
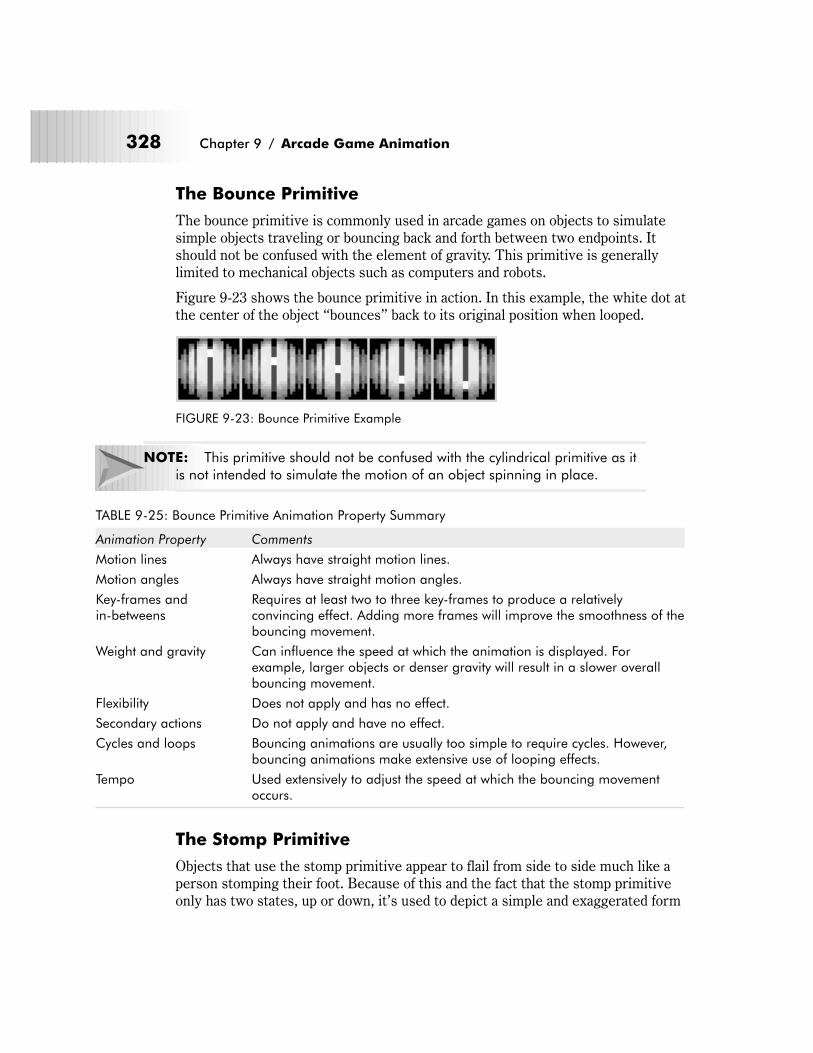
The Bounce Primitive
The bounce primitive is commonly used in arcade games on objects to simulate
simple objects traveling or bouncing back and forth between two endpoints. It
should not be confused with the element of gravity. This primitive is generally
limited to mechanical objects such as computers and robots.
Figure 9-23 shows the bounce primitive in action. In this example, the white dot at
the center of the object “bounces” back to its original position when looped.
NOTE: This primitive should not be confused with the cylindrical primitive as it
is not intended to simulate the motion of an object spinning in place.
TABLE 9-25: Bounce Primitive Animation Property Summary
Animation Property Comments
Motion lines Always have straight motion lines.
Motion angles Always have straight motion angles.
Key-frames andin-betweens
Requires at least two to three key-frames to produce a relativelyconvincing effect. Adding more frames will improve the smoothness of thebouncing movement.
Weight and gravity Can influence the speed at which the animation is displayed. Forexample, larger objects or denser gravity will result in a slower overallbouncing movement.
Flexibility Does not apply and has no effect.
Secondary actions Do not apply and have no effect.
Cycles and loops Bouncing animations are usually too simple to require cycles. However,bouncing animations make extensive use of looping effects.
Tempo Used extensively to adjust the speed at which the bouncing movementoccurs.
The Stomp Primitive
Objects that use the stomp primitive appear to flail from side to side much like a
person stomping their foot. Because of this and the fact that the stomp primitive
only has two states, up or down, it’s used to depict a simple and exaggerated form
328 Chapter 9 / Arcade Game Animation
FIGURE 9-23: Bounce Primitive Example
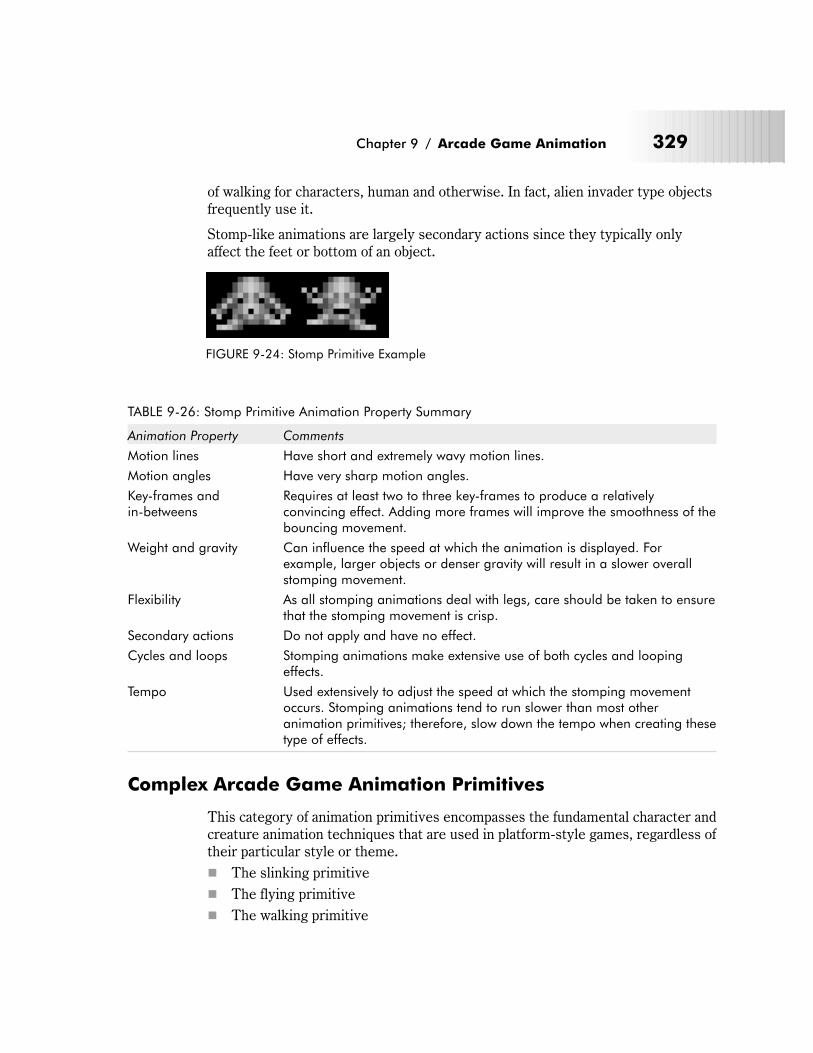
of walking for characters, human and otherwise. In fact, alien invader type objects
frequently use it.
Stomp-like animations are largely secondary actions since they typically only
affect the feet or bottom of an object.
TABLE 9-26: Stomp Primitive Animation Property Summary
Animation Property Comments
Motion lines Have short and extremely wavy motion lines.
Motion angles Have very sharp motion angles.
Key-frames andin-betweens
Requires at least two to three key-frames to produce a relativelyconvincing effect. Adding more frames will improve the smoothness of thebouncing movement.
Weight and gravity Can influence the speed at which the animation is displayed. Forexample, larger objects or denser gravity will result in a slower overallstomping movement.
Flexibility As all stomping animations deal with legs, care should be taken to ensurethat the stomping movement is crisp.
Secondary actions Do not apply and have no effect.
Cycles and loops Stomping animations make extensive use of both cycles and loopingeffects.
Tempo Used extensively to adjust the speed at which the stomping movementoccurs. Stomping animations tend to run slower than most otheranimation primitives; therefore, slow down the tempo when creating thesetype of effects.
Complex Arcade Game Animation Primitives
This category of animation primitives encompasses the fundamental character and
creature animation techniques that are used in platform-style games, regardless of
their particular style or theme.
� The slinking primitive
� The flying primitive
� The walking primitive
Chapter 9 / Arcade Game Animation 329
FIGURE 9-24: Stomp Primitive Example
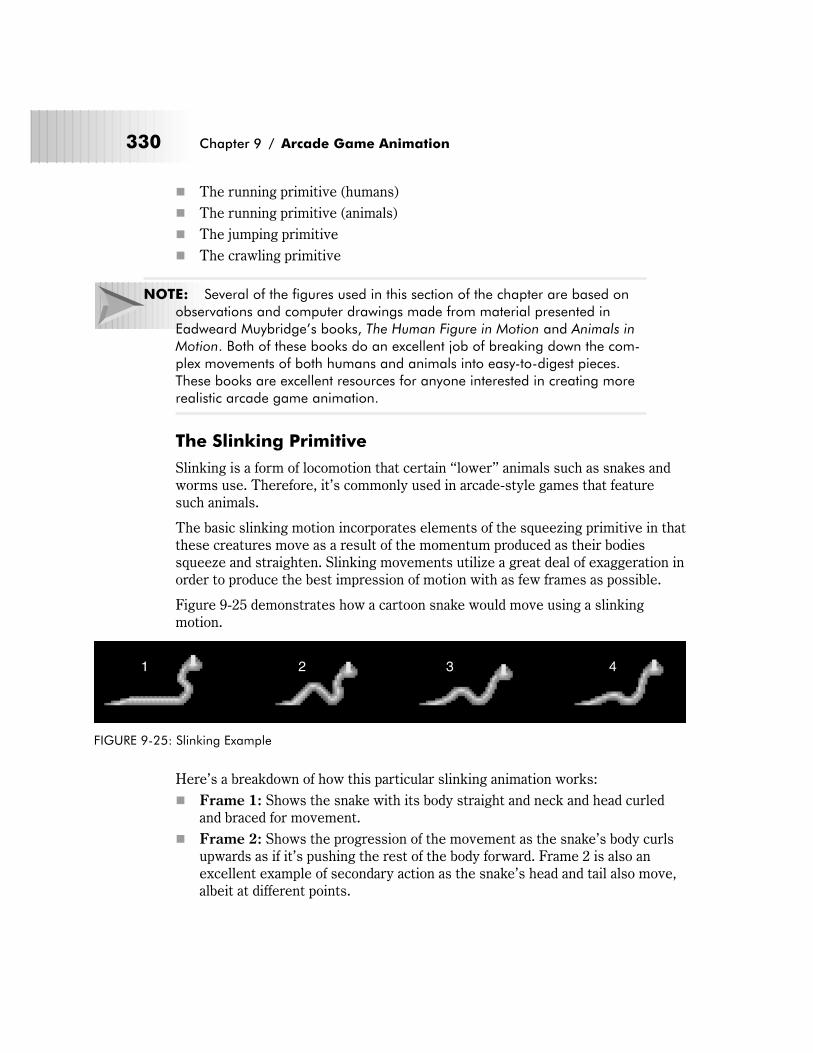
� The running primitive (humans)
� The running primitive (animals)
� The jumping primitive
� The crawling primitive
NOTE: Several of the figures used in this section of the chapter are based on
observations and computer drawings made from material presented in
Eadweard Muybridge’s books, The Human Figure in Motion and Animals in
Motion. Both of these books do an excellent job of breaking down the com-
plex movements of both humans and animals into easy-to-digest pieces.
These books are excellent resources for anyone interested in creating more
realistic arcade game animation.
The Slinking Primitive
Slinking is a form of locomotion that certain “lower” animals such as snakes and
worms use. Therefore, it’s commonly used in arcade-style games that feature
such animals.
The basic slinking motion incorporates elements of the squeezing primitive in that
these creatures move as a result of the momentum produced as their bodies
squeeze and straighten. Slinking movements utilize a great deal of exaggeration in
order to produce the best impression of motion with as few frames as possible.
Figure 9-25 demonstrates how a cartoon snake would move using a slinking
motion.
Here’s a breakdown of how this particular slinking animation works:
� Frame 1: Shows the snake with its body straight and neck and head curled
and braced for movement.
� Frame 2: Shows the progression of the movement as the snake’s body curls
upwards as if it’s pushing the rest of the body forward. Frame 2 is also an
excellent example of secondary action as the snake’s head and tail also move,
albeit at different points.
330 Chapter 9 / Arcade Game Animation
1 2 3 4
FIGURE 9-25: Slinking Example
� Frame 3: Here we see the snake’s body beginning to flatten. At the same
time, the snake’s head and neck lurch forward. This further reinforces the
notion that the snake is moving by the sheer force of momentum.
� Frame 4: Here, the snake’s body is nearly completely flat and its head and
neck are in a similar position to how they were originally in frame 1. At this
point, you would cycle the animation to continue the flow of movement.
TABLE 9-27: Slinking Primitive Animation Property Summary
Animation Property Comments
Motion lines Always have slightly wavy motion lines.
Motion angles Always have straight motion angles.
Key-frames andin-betweens
All four frames qualify as key-frames when using this type of primitive. Ofcourse, smoother animation can be achieved by adding correspondingin-betweens for each key-frame used.
Weight and gravity Can influence the speed at which the animation is displayed. Forexample, larger objects or denser gravity will result in a slower overallslinking movement.
Flexibility Although snakes, worms, and snails don’t have joints or backbones, youshould pay attention to flexibility when applying slinking movements, asthese will enhance the naturalness of the movement.
Secondary actions Secondary actions occur very frequently in slinking animations. Pay closeattention to heads and tails in addition to the main part of the object’sbody as it moves.
Cycles and loops Depending on their complexity, slinking animation sequences can makeuse of cycles. However, all slinking motions require loops to provide theillusion of continuous movement.
Tempo Used extensively to adjust the speed at which the slinking movementoccurs. Slinking animations run slower than most other animationprimitives; therefore, slow down the tempo when creating slinking effects.
The Flying Primitive
Animating the motion of birds and insects can be a fairly complex business that
requires a lot of time and study on how creatures fly in order to do properly. Birds,
and all flying creatures for that matter, move their wings from the down position to
the up position and vice versa. This motion is then repeated, or cycled, to com-
plete the sequence. It takes flying creatures several steps to transition the
movement of their wings from these states.
Under most circumstances, it can take as many as 12 frames to create a realistic
flying animation. However, by breaking the basic flying motion into its most exag-
gerated components, you can extract the key-frames and produce effective, if not
somewhat less realistic, flying animations in as few as five frames.
Chapter 9 / Arcade Game Animation 331
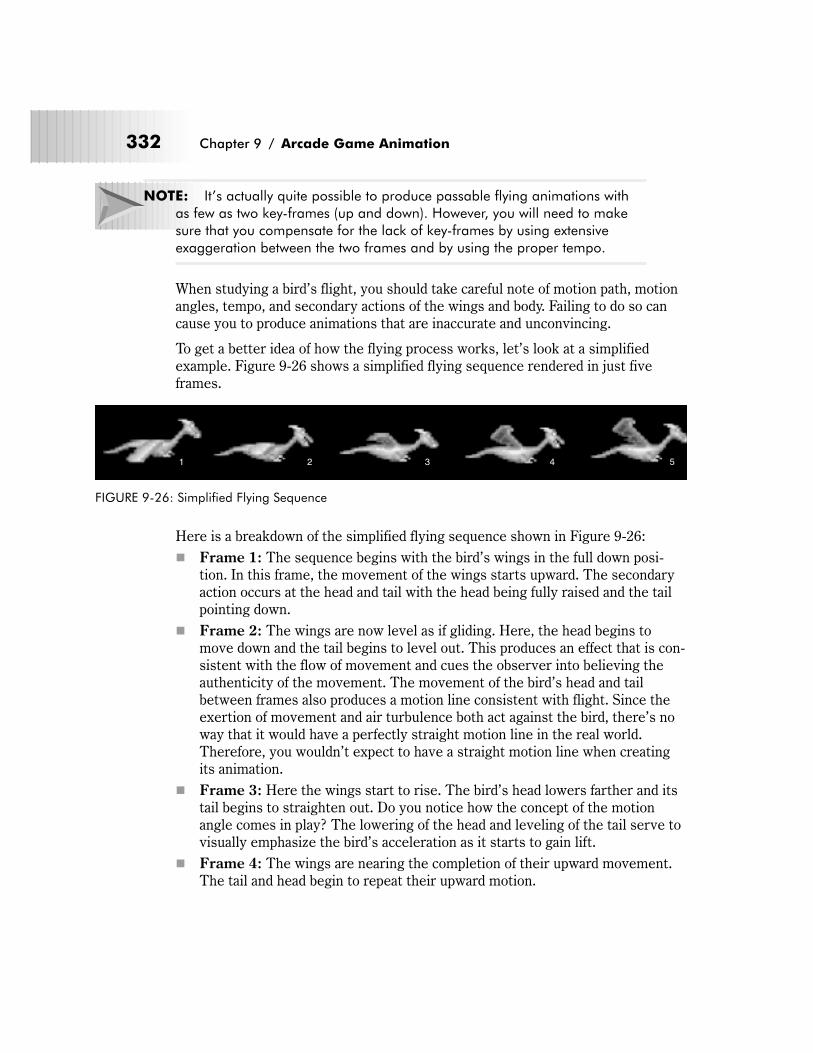
NOTE: It’s actually quite possible to produce passable flying animations with
as few as two key-frames (up and down). However, you will need to make
sure that you compensate for the lack of key-frames by using extensive
exaggeration between the two frames and by using the proper tempo.
When studying a bird’s flight, you should take careful note of motion path, motion
angles, tempo, and secondary actions of the wings and body. Failing to do so can
cause you to produce animations that are inaccurate and unconvincing.
To get a better idea of how the flying process works, let’s look at a simplified
example. Figure 9-26 shows a simplified flying sequence rendered in just five
frames.
Here is a breakdown of the simplified flying sequence shown in Figure 9-26:
� Frame 1: The sequence begins with the bird’s wings in the full down posi-
tion. In this frame, the movement of the wings starts upward. The secondary
action occurs at the head and tail with the head being fully raised and the tail
pointing down.
� Frame 2: The wings are now level as if gliding. Here, the head begins to
move down and the tail begins to level out. This produces an effect that is con-
sistent with the flow of movement and cues the observer into believing the
authenticity of the movement. The movement of the bird’s head and tail
between frames also produces a motion line consistent with flight. Since the
exertion of movement and air turbulence both act against the bird, there’s no
way that it would have a perfectly straight motion line in the real world.
Therefore, you wouldn’t expect to have a straight motion line when creating
its animation.
� Frame 3: Here the wings start to rise. The bird’s head lowers farther and its
tail begins to straighten out. Do you notice how the concept of the motion
angle comes in play? The lowering of the head and leveling of the tail serve to
visually emphasize the bird’s acceleration as it starts to gain lift.
� Frame 4: The wings are nearing the completion of their upward movement.
The tail and head begin to repeat their upward motion.
332 Chapter 9 / Arcade Game Animation
1 2 3 4 5
FIGURE 9-26: Simplified Flying Sequence

� Frame 5: The wings are now in a full upright position. At this stage, you
could cycle the animation in reverse to restart the sequence and keep the
sense of motion constant.
NOTE: You can start simplified flying animation sequences in either the up or
the down state. It doesn’t really matter as long as there is a beginning and
an ending to the sequence.
Figure 9-27 represents a complex flying sequence. This is an exact frame-by-
frame breakdown of how a bird really flies. If you compare it with Figure 9-26,
you’ll probably notice a number of similarities between the key-frames, the shape
of the motion path, and the motion angles. For the most part, Figure 9-27 is identi-
cal to Figure 9-26 but it has seven more frames, or in-betweens, added in order to
produce a smoother-looking animation sequence.
Here’s a breakdown of the complex flying sequence shown in Figure 9-26:
� Frame 1: The first frame starts with the bird’s wings in the down position.
� Frame 2: This frame has the bird’s wing and body slowing rising upwards.
� Frame 3: The third frame shows the bird’s wing and body leveling out as if
it’s gliding.
� Frame 4: This frame shows the bird’s tail drooping down and head and wings
rising.
� Frame 5: Here, the bird’s wings reach their uppermost point while its tail
continues to move down. Notice how the first five frames show the uneven-
ness of the bird’s motion path.
� Frame 6: The bird’s wings slowly move downwards. Its tail has now reached
its lowest position in order to aid lift.
� Frames 7 and 8: These frames show the bird’s wings moving down even
farther.
� Frame 9: In this frame, the bird’s body, tail, and wings are completely straight
and level. Here, the bird’s motion line also begins to straighten.
� Frame 10: The wings continue their downward progression.
� Frames 11 and 12: The wings once again complete their downward move-
ment until they are fully extended. At this point, you could add cycles to keep
the flow of motion constant.
Chapter 9 / Arcade Game Animation 333
12 3 4 5 6 7 8 9 10 11 12
FIGURE 9-27: Complex Flying Sequence
As mentioned, it’s very important not to neglect tempo when creating flying ani-
mations. Different birds fly at different speeds. For example, insects and
hummingbirds tend to flap their wings at very high speeds, whereas most birds
tend to flap their wings more slowly.
You should also remember to consider the effects of weight and gravity of the fly-
ing creature. For example, smaller birds and insects will tend to have very uneven
motion lines because they flutter as they fly, but larger birds don’t.
TABLE 9-28: Flying Primitive Animation Property Summary
Animation Property Comments
Motion lines Always have wavy motion lines. Certain objects, namely complex bird andbutterfly animation sequences, will have very wavy motion lines.
Motion angles Always have straight motion angles.
Key-frames andin-betweens
Requires at least two key-frames. More frames will result in smootherflying sequences. In Figure 9-26, frames 1, 3, and 5 are key-frames whilein Figure 9-27, frames 1, 5, 7, 9, and 12 are key-frames.
Weight and gravity Can influence the speed at which the animation is displayed. Forexample, larger objects or denser gravity will result in a slower overallflying movement.
Flexibility Flexibility should be emphasized around certain object parts such as thehead, neck, and wings.
Secondary actions Secondary actions occur very frequently in flying animations. Pay closeattention to heads and tails in addition to the main part of the object’sbody as it moves.
Cycles and loops Cycles are used extensively in all flying animation sequences. All flyinganimations make use of loops to provide the illusion of continuous andrealistic flight.
Tempo Used extensively to adjust the speed at which the flying movement occurs.Different animals fly at different speeds. For example, insects move theirwings faster than birds. Along the same lines, smaller birds tend to movetheir wings faster than larger birds. Make sure you account for this andapply tempo properly.
NOTE: There is a direct relationship between the number of frames present in
a flying animation sequence and the speed at which it moves. Slowly mov-
ing objects will require more frames than faster moving objects due to the
way our eyes discern movement.
The Walking Primitive
Walking is used in almost every type of arcade game that involves humanoid char-
acters and is particularly important for platform games. Unfortunately, walking is
334 Chapter 9 / Arcade Game Animation
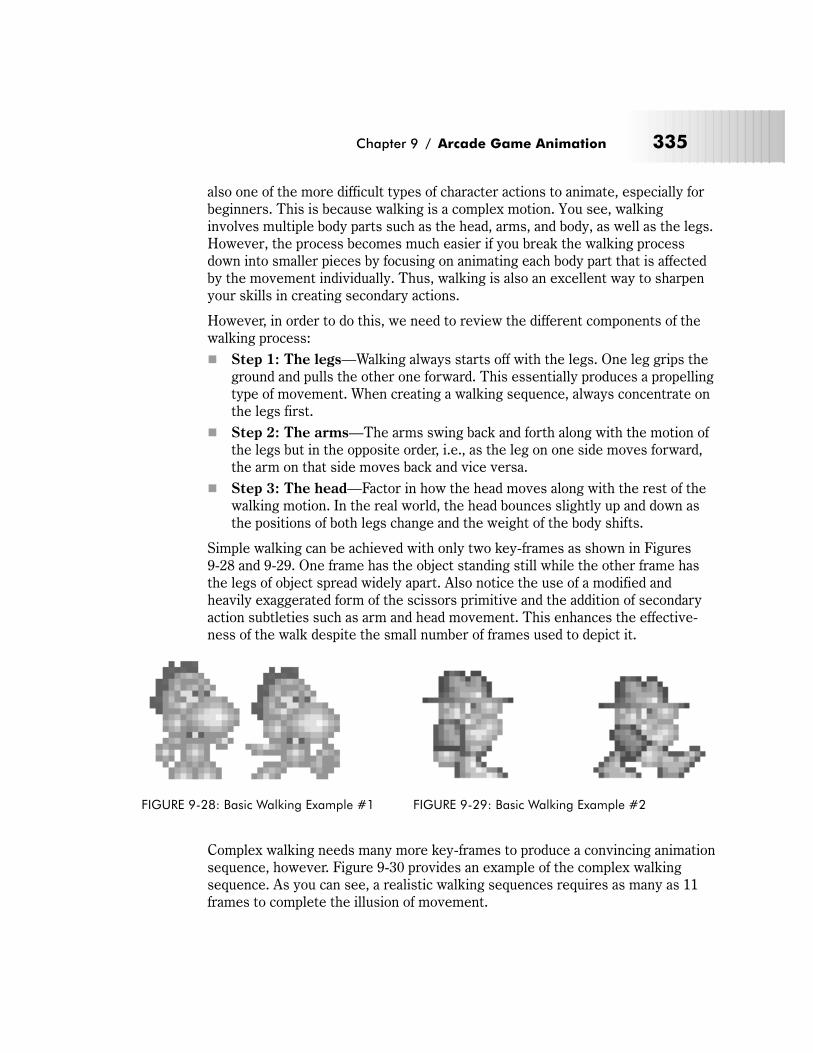
also one of the more difficult types of character actions to animate, especially for
beginners. This is because walking is a complex motion. You see, walking
involves multiple body parts such as the head, arms, and body, as well as the legs.
However, the process becomes much easier if you break the walking process
down into smaller pieces by focusing on animating each body part that is affected
by the movement individually. Thus, walking is also an excellent way to sharpen
your skills in creating secondary actions.
However, in order to do this, we need to review the different components of the
walking process:
� Step 1: The legs—Walking always starts off with the legs. One leg grips the
ground and pulls the other one forward. This essentially produces a propelling
type of movement. When creating a walking sequence, always concentrate on
the legs first.
� Step 2: The arms—The arms swing back and forth along with the motion of
the legs but in the opposite order, i.e., as the leg on one side moves forward,
the arm on that side moves back and vice versa.
� Step 3: The head—Factor in how the head moves along with the rest of the
walking motion. In the real world, the head bounces slightly up and down as
the positions of both legs change and the weight of the body shifts.
Simple walking can be achieved with only two key-frames as shown in Figures
9-28 and 9-29. One frame has the object standing still while the other frame has
the legs of object spread widely apart. Also notice the use of a modified and
heavily exaggerated form of the scissors primitive and the addition of secondary
action subtleties such as arm and head movement. This enhances the effective-
ness of the walk despite the small number of frames used to depict it.
Complex walking needs many more key-frames to produce a convincing animation
sequence, however. Figure 9-30 provides an example of the complex walking
sequence. As you can see, a realistic walking sequences requires as many as 11
frames to complete the illusion of movement.
Chapter 9 / Arcade Game Animation 335
FIGURE 9-28: Basic Walking Example #1 FIGURE 9-29: Basic Walking Example #2
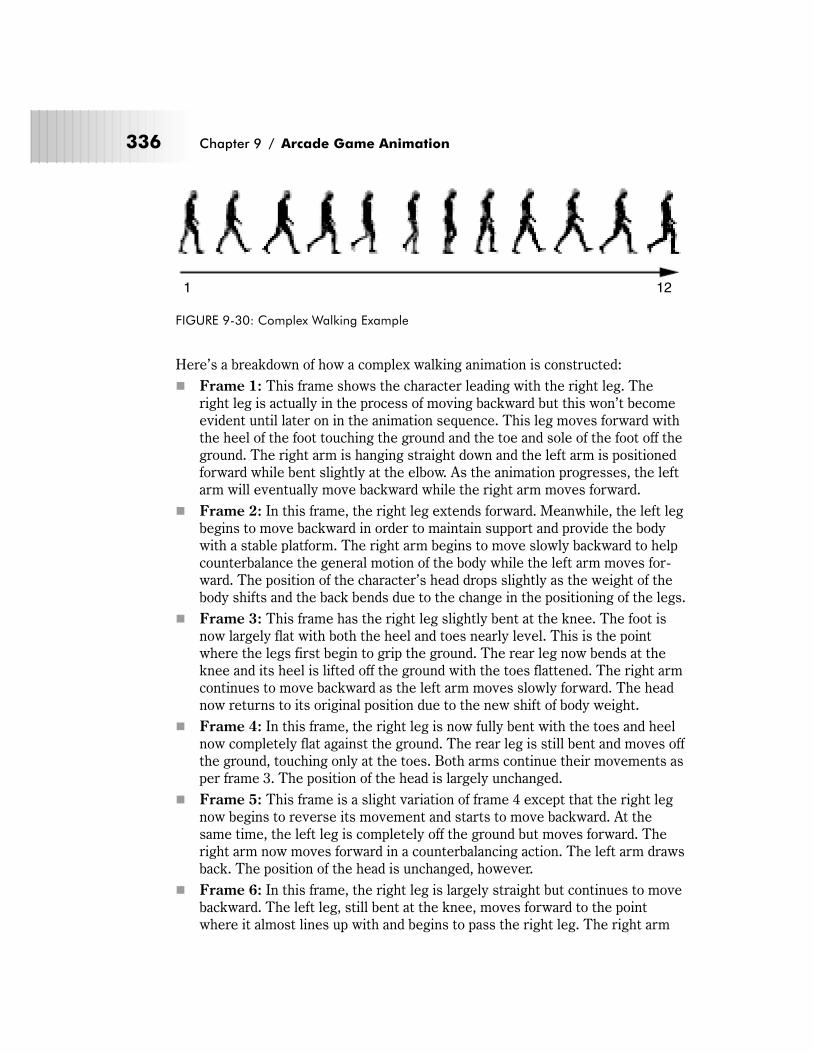
Here’s a breakdown of how a complex walking animation is constructed:
� Frame 1: This frame shows the character leading with the right leg. The
right leg is actually in the process of moving backward but this won’t become
evident until later on in the animation sequence. This leg moves forward with
the heel of the foot touching the ground and the toe and sole of the foot off the
ground. The right arm is hanging straight down and the left arm is positioned
forward while bent slightly at the elbow. As the animation progresses, the left
arm will eventually move backward while the right arm moves forward.
� Frame 2: In this frame, the right leg extends forward. Meanwhile, the left leg
begins to move backward in order to maintain support and provide the body
with a stable platform. The right arm begins to move slowly backward to help
counterbalance the general motion of the body while the left arm moves for-
ward. The position of the character’s head drops slightly as the weight of the
body shifts and the back bends due to the change in the positioning of the legs.
� Frame 3: This frame has the right leg slightly bent at the knee. The foot is
now largely flat with both the heel and toes nearly level. This is the point
where the legs first begin to grip the ground. The rear leg now bends at the
knee and its heel is lifted off the ground with the toes flattened. The right arm
continues to move backward as the left arm moves slowly forward. The head
now returns to its original position due to the new shift of body weight.
� Frame 4: In this frame, the right leg is now fully bent with the toes and heel
now completely flat against the ground. The rear leg is still bent and moves off
the ground, touching only at the toes. Both arms continue their movements as
per frame 3. The position of the head is largely unchanged.
� Frame 5: This frame is a slight variation of frame 4 except that the right leg
now begins to reverse its movement and starts to move backward. At the
same time, the left leg is completely off the ground but moves forward. The
right arm now moves forward in a counterbalancing action. The left arm draws
back. The position of the head is unchanged, however.
� Frame 6: In this frame, the right leg is largely straight but continues to move
backward. The left leg, still bent at the knee, moves forward to the point
where it almost lines up with and begins to pass the right leg. The right arm
336 Chapter 9 / Arcade Game Animation
1 12
FIGURE 9-30: Complex Walking Example
moves forward slightly while the left arm moves back slightly. The position of
the head drops once again due to the shift in body weight.
� Frame 7: This frame demonstrates what is known as the passing position of
the walk sequence. This is when one leg passes the position of the other leg.
In this frame, the right leg is almost completely straight. Because of this, the
character’s back straightens and the head returns to its normal positioning. At
the same time, the left leg passes in front of the right leg, although it’s still
bent and slightly off the ground. The right arm continues forward while the
left arm continues backward.
� Frame 8: This frame shows the right leg starting to move backward slightly
while the left leg continues to move forward. The right arm is now fully in
front of the character’s torso while the left arm is moving backward in small
increments. The position of the head is unchanged from the previous frame.
� Frame 9: In this frame, the right leg is moving backward with the heel off the
ground and is only stabilized at the foot by the toes. The left leg is nearing the
completion of its forward movement. The right arm is nearing completion of
its forward motion while the left arm continues its slow backward movement.
The head is slightly dropped from the previous frame.
� Frame 10: This frame demonstrates the heel to toe part of the walk stride. In
this frame, both legs are at their maximum distance from each other. In addi-
tion, only the toe of the foot stabilizes the right leg. The left leg has completed
its forward movement. The right arm has completed its forward motion while
the left arm has completed its movement backward. The head’s position
remains stable and largely unchanged.
� Frame 11: This frame shows the right foot positioned back. The left leg has
locked out and the left foot lies flat against the ground. The right arm begins
to reverse its movement and move backward. The left arm starts to reverse
its motion and move forward. The head’s position dips slightly due to the
shifting in weight across the body.
� Frame 12: This is the final segment of the animation sequence. The right
foot now begins its sweep forward while the left leg begins its sweep back-
ward. The right arm continues to move backward while the left arm moves
forward. The head returns to its normal position. You can create a very fluid
walking sequence by cycling back to the first frame of the animation and then
looping it.
Of all of the actions described in this section of the chapter, it’s the legs that are
the most difficult to visualize and animate. Therefore, use Figures 9-31 and 9-32
as “cheats” to help you break down this complex movement.
Chapter 9 / Arcade Game Animation 337
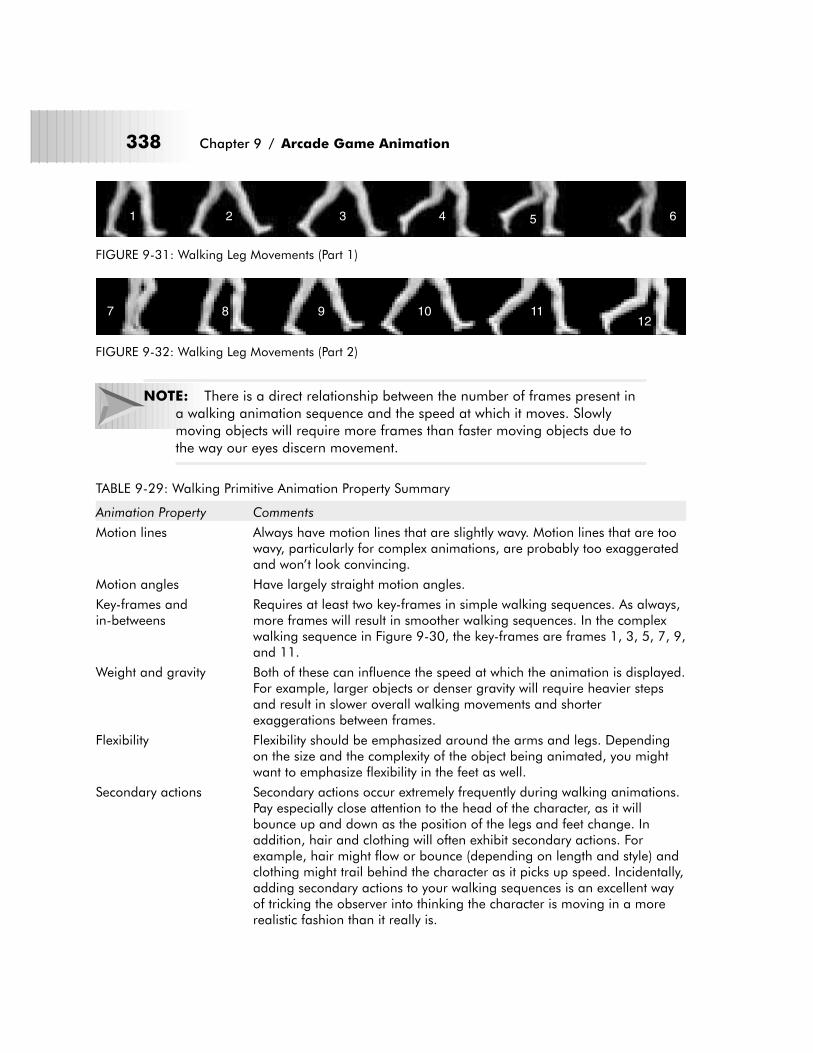
NOTE: There is a direct relationship between the number of frames present in
a walking animation sequence and the speed at which it moves. Slowly
moving objects will require more frames than faster moving objects due to
the way our eyes discern movement.
TABLE 9-29: Walking Primitive Animation Property Summary
Animation Property Comments
Motion lines Always have motion lines that are slightly wavy. Motion lines that are toowavy, particularly for complex animations, are probably too exaggeratedand won’t look convincing.
Motion angles Have largely straight motion angles.
Key-frames andin-betweens
Requires at least two key-frames in simple walking sequences. As always,more frames will result in smoother walking sequences. In the complexwalking sequence in Figure 9-30, the key-frames are frames 1, 3, 5, 7, 9,and 11.
Weight and gravity Both of these can influence the speed at which the animation is displayed.For example, larger objects or denser gravity will require heavier stepsand result in slower overall walking movements and shorterexaggerations between frames.
Flexibility Flexibility should be emphasized around the arms and legs. Dependingon the size and the complexity of the object being animated, you mightwant to emphasize flexibility in the feet as well.
Secondary actions Secondary actions occur extremely frequently during walking animations.Pay especially close attention to the head of the character, as it willbounce up and down as the position of the legs and feet change. Inaddition, hair and clothing will often exhibit secondary actions. Forexample, hair might flow or bounce (depending on length and style) andclothing might trail behind the character as it picks up speed. Incidentally,adding secondary actions to your walking sequences is an excellent wayof tricking the observer into thinking the character is moving in a morerealistic fashion than it really is.
338 Chapter 9 / Arcade Game Animation
1 2 3 4 5 6
FIGURE 9-31: Walking Leg Movements (Part 1)
7 8 9 10 1112
FIGURE 9-32: Walking Leg Movements (Part 2)
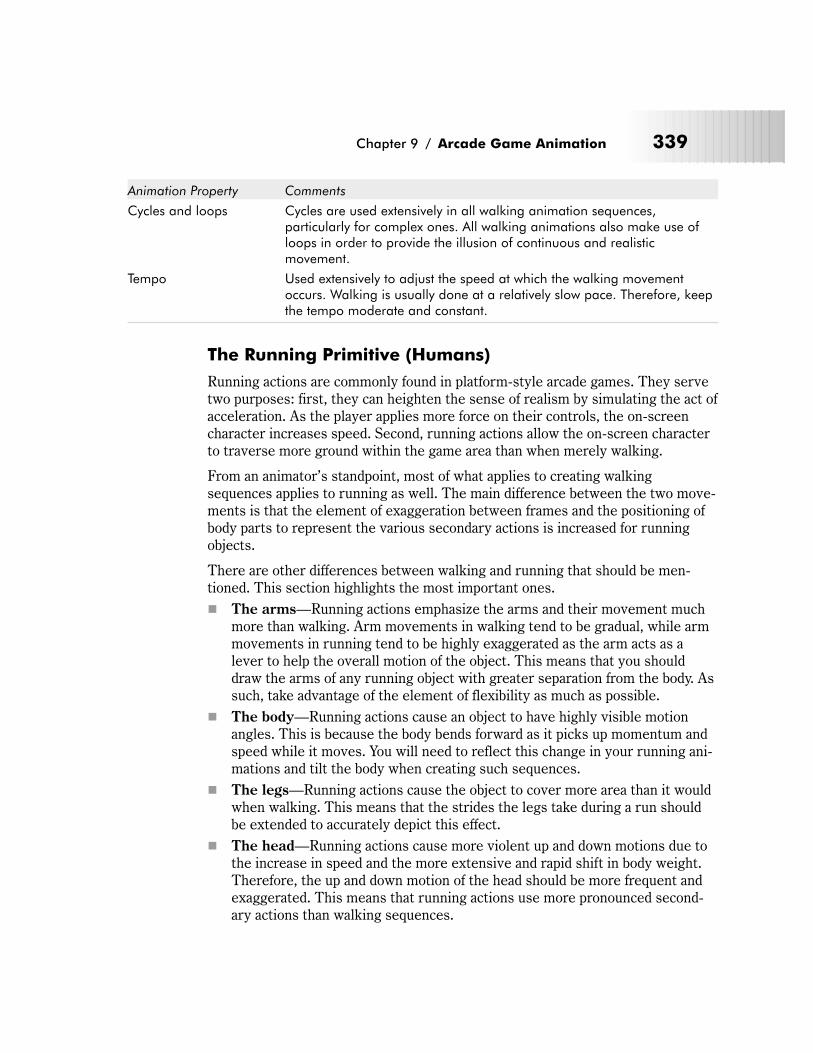
Animation Property Comments
Cycles and loops Cycles are used extensively in all walking animation sequences,particularly for complex ones. All walking animations also make use ofloops in order to provide the illusion of continuous and realisticmovement.
Tempo Used extensively to adjust the speed at which the walking movementoccurs. Walking is usually done at a relatively slow pace. Therefore, keepthe tempo moderate and constant.
The Running Primitive (Humans)
Running actions are commonly found in platform-style arcade games. They serve
two purposes: first, they can heighten the sense of realism by simulating the act of
acceleration. As the player applies more force on their controls, the on-screen
character increases speed. Second, running actions allow the on-screen character
to traverse more ground within the game area than when merely walking.
From an animator’s standpoint, most of what applies to creating walking
sequences applies to running as well. The main difference between the two move-
ments is that the element of exaggeration between frames and the positioning of
body parts to represent the various secondary actions is increased for running
objects.
There are other differences between walking and running that should be men-
tioned. This section highlights the most important ones.
� The arms—Running actions emphasize the arms and their movement much
more than walking. Arm movements in walking tend to be gradual, while arm
movements in running tend to be highly exaggerated as the arm acts as a
lever to help the overall motion of the object. This means that you should
draw the arms of any running object with greater separation from the body. As
such, take advantage of the element of flexibility as much as possible.
� The body—Running actions cause an object to have highly visible motion
angles. This is because the body bends forward as it picks up momentum and
speed while it moves. You will need to reflect this change in your running ani-
mations and tilt the body when creating such sequences.
� The legs—Running actions cause the object to cover more area than it would
when walking. This means that the strides the legs take during a run should
be extended to accurately depict this effect.
� The head—Running actions cause more violent up and down motions due to
the increase in speed and the more extensive and rapid shift in body weight.
Therefore, the up and down motion of the head should be more frequent and
exaggerated. This means that running actions use more pronounced second-
ary actions than walking sequences.
Chapter 9 / Arcade Game Animation 339
Figure 9-33 provides an example of a complex running sequence. As you can see,
a realistic running sequence requires as many as 12 frames to complete the illu-
sion of movement.
Here’s a frame-by-frame synopsis of a typical, complex running action:
� Frame 1: The animation sequence starts with both legs off the ground with
the right leg back and the left leg forward. Both legs are bent at the knees
with the right leg partially bent and left leg fully bent. The right arm is for-
ward with a 45-degree upward bend. The left arm has a 45-degree downward
bend. The character’s back is slightly arched forward and head is bent slightly
forward.
� Frame 2: This frame shows both legs off the ground, although much closer to
the ground than in frame 1. Both legs are still bent at the knees. This time,
however, the right leg is bent back at a 90-degree angle. The right arm is now
bent at an 85-degree angle as it travels downward and back. Meanwhile, the
left arm lunges slowly forward. The character’s back is still arched and the
head has dropped down a bit more.
� Frame 3: In this frame, the right leg, now fully extended back begins the pro-
cess of moving forward. The left leg is now very close to the ground. The
right arm moves downward and the left arm moves forward. The character’s
head and back are hunched over as the character picks up speed.
� Frame 4: This frame demonstrates the contact position of the running move-
ment, or the first point at which the runner’s feet touch the ground. In this
frame, the left foot touches the ground while the right leg, although still bent,
is rapidly moving forward. The right arm is bent and quickly moving backward
while the left arm is bent and moving forward. The position of the head and
back are largely unchanged from the previous frame.
� Frame 5: This part of the animation sequence demonstrates the push-off posi-
tion of the running movement or the point at which the runner’s feet leave the
ground in order to gain momentum in the stride. In this frame, the left leg pre-
pares to leave the ground once again as it starts to push off the ground with
the left foot. Meanwhile, the right leg enters the passing position with the left
leg and lunges forward. The right arm is now at an almost complete
180-degree bend, as it swings backward. The left arm pushes forward and has
a 45-degree bend. Both the head and back begin to straighten.
340 Chapter 9 / Arcade Game Animation
1 12
FIGURE 9-33: Running Primitive Example (Humans)
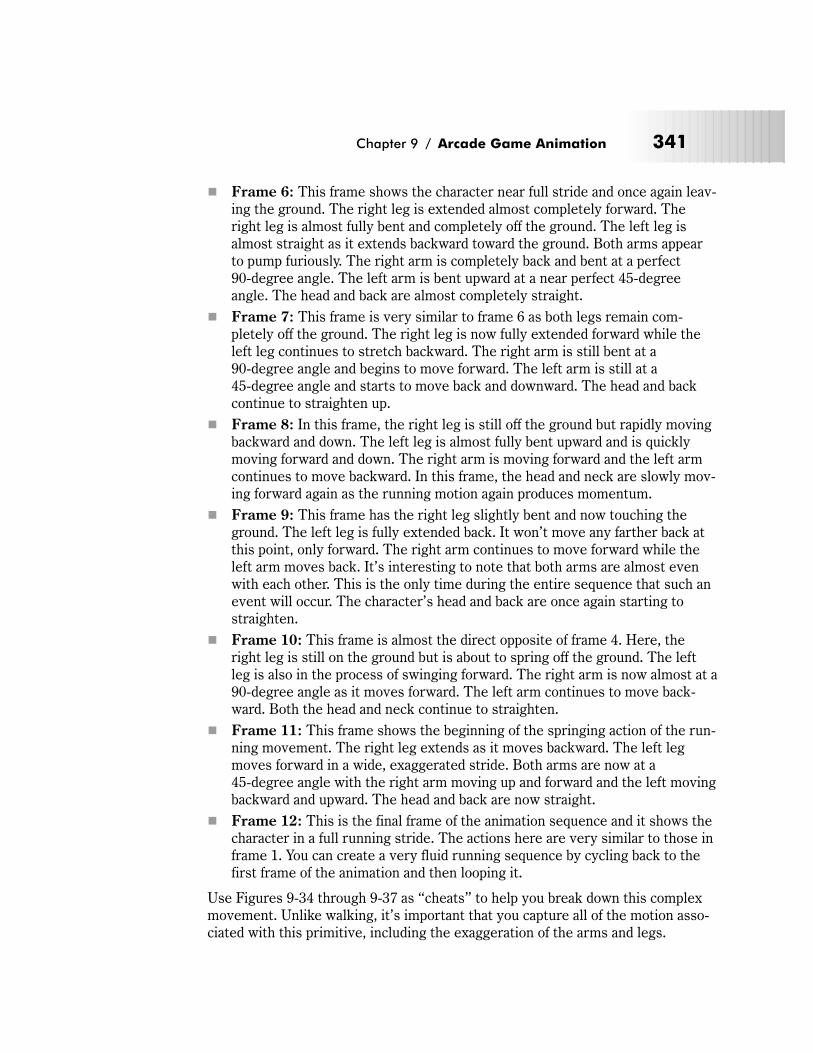
� Frame 6: This frame shows the character near full stride and once again leav-
ing the ground. The right leg is extended almost completely forward. The
right leg is almost fully bent and completely off the ground. The left leg is
almost straight as it extends backward toward the ground. Both arms appear
to pump furiously. The right arm is completely back and bent at a perfect
90-degree angle. The left arm is bent upward at a near perfect 45-degree
angle. The head and back are almost completely straight.
� Frame 7: This frame is very similar to frame 6 as both legs remain com-
pletely off the ground. The right leg is now fully extended forward while the
left leg continues to stretch backward. The right arm is still bent at a
90-degree angle and begins to move forward. The left arm is still at a
45-degree angle and starts to move back and downward. The head and back
continue to straighten up.
� Frame 8: In this frame, the right leg is still off the ground but rapidly moving
backward and down. The left leg is almost fully bent upward and is quickly
moving forward and down. The right arm is moving forward and the left arm
continues to move backward. In this frame, the head and neck are slowly mov-
ing forward again as the running motion again produces momentum.
� Frame 9: This frame has the right leg slightly bent and now touching the
ground. The left leg is fully extended back. It won’t move any farther back at
this point, only forward. The right arm continues to move forward while the
left arm moves back. It’s interesting to note that both arms are almost even
with each other. This is the only time during the entire sequence that such an
event will occur. The character’s head and back are once again starting to
straighten.
� Frame 10: This frame is almost the direct opposite of frame 4. Here, the
right leg is still on the ground but is about to spring off the ground. The left
leg is also in the process of swinging forward. The right arm is now almost at a
90-degree angle as it moves forward. The left arm continues to move back-
ward. Both the head and neck continue to straighten.
� Frame 11: This frame shows the beginning of the springing action of the run-
ning movement. The right leg extends as it moves backward. The left leg
moves forward in a wide, exaggerated stride. Both arms are now at a
45-degree angle with the right arm moving up and forward and the left moving
backward and upward. The head and back are now straight.
� Frame 12: This is the final frame of the animation sequence and it shows the
character in a full running stride. The actions here are very similar to those in
frame 1. You can create a very fluid running sequence by cycling back to the
first frame of the animation and then looping it.
Use Figures 9-34 through 9-37 as “cheats” to help you break down this complex
movement. Unlike walking, it’s important that you capture all of the motion asso-
ciated with this primitive, including the exaggeration of the arms and legs.
Chapter 9 / Arcade Game Animation 341
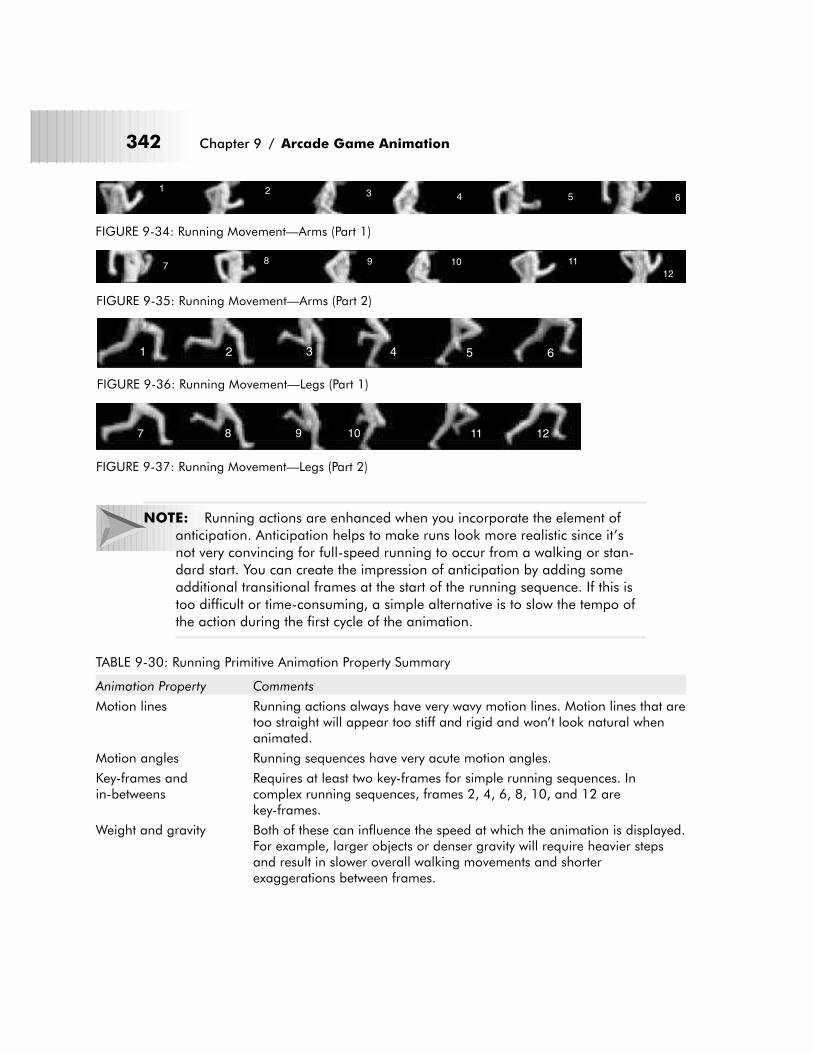
NOTE: Running actions are enhanced when you incorporate the element of
anticipation. Anticipation helps to make runs look more realistic since it’s
not very convincing for full-speed running to occur from a walking or stan-
dard start. You can create the impression of anticipation by adding some
additional transitional frames at the start of the running sequence. If this is
too difficult or time-consuming, a simple alternative is to slow the tempo of
the action during the first cycle of the animation.
TABLE 9-30: Running Primitive Animation Property Summary
Animation Property Comments
Motion lines Running actions always have very wavy motion lines. Motion lines that aretoo straight will appear too stiff and rigid and won’t look natural whenanimated.
Motion angles Running sequences have very acute motion angles.
Key-frames andin-betweens
Requires at least two key-frames for simple running sequences. Incomplex running sequences, frames 2, 4, 6, 8, 10, and 12 arekey-frames.
Weight and gravity Both of these can influence the speed at which the animation is displayed.For example, larger objects or denser gravity will require heavier stepsand result in slower overall walking movements and shorterexaggerations between frames.
342 Chapter 9 / Arcade Game Animation
1 2 3 4 5 6
FIGURE 9-34: Running Movement—Arms (Part 1)
78 9 10 11
12
FIGURE 9-35: Running Movement—Arms (Part 2)
1 2 3 4 5 6
FIGURE 9-36: Running Movement—Legs (Part 1)
7 8 9 10 11 12
FIGURE 9-37: Running Movement—Legs (Part 2)
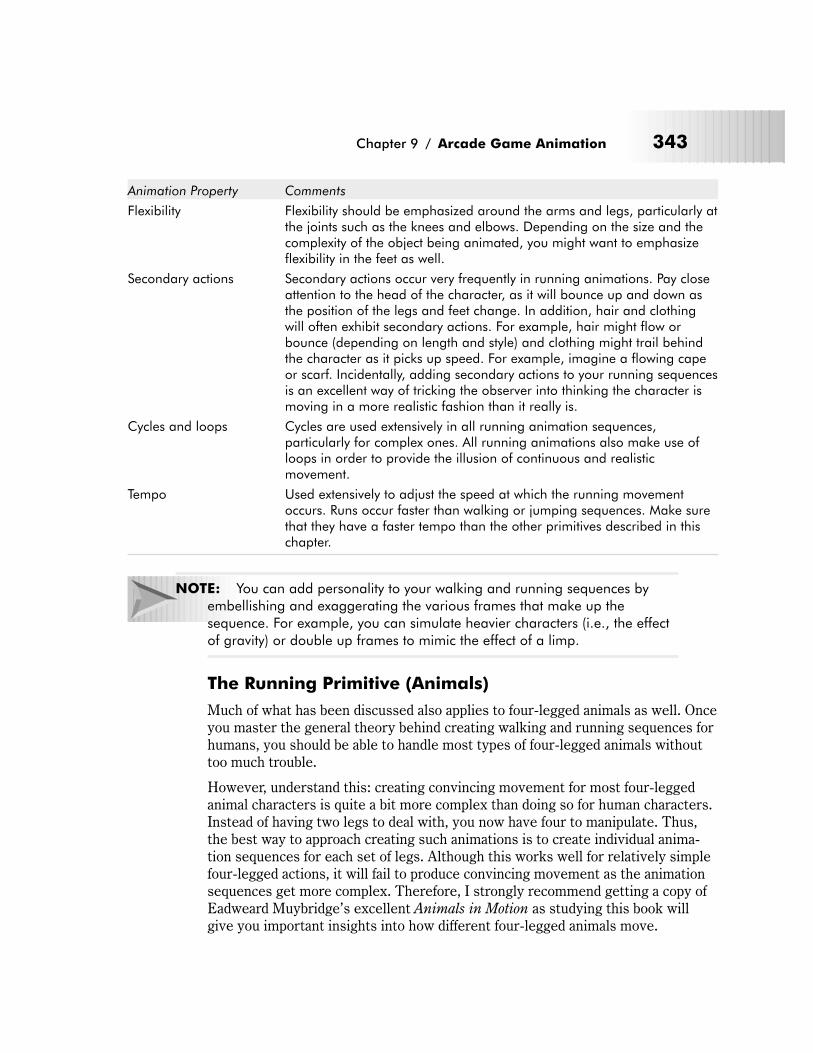
Animation Property Comments
Flexibility Flexibility should be emphasized around the arms and legs, particularly atthe joints such as the knees and elbows. Depending on the size and thecomplexity of the object being animated, you might want to emphasizeflexibility in the feet as well.
Secondary actions Secondary actions occur very frequently in running animations. Pay closeattention to the head of the character, as it will bounce up and down asthe position of the legs and feet change. In addition, hair and clothingwill often exhibit secondary actions. For example, hair might flow orbounce (depending on length and style) and clothing might trail behindthe character as it picks up speed. For example, imagine a flowing capeor scarf. Incidentally, adding secondary actions to your running sequencesis an excellent way of tricking the observer into thinking the character ismoving in a more realistic fashion than it really is.
Cycles and loops Cycles are used extensively in all running animation sequences,particularly for complex ones. All running animations also make use ofloops in order to provide the illusion of continuous and realisticmovement.
Tempo Used extensively to adjust the speed at which the running movementoccurs. Runs occur faster than walking or jumping sequences. Make surethat they have a faster tempo than the other primitives described in thischapter.
NOTE: You can add personality to your walking and running sequences by
embellishing and exaggerating the various frames that make up the
sequence. For example, you can simulate heavier characters (i.e., the effect
of gravity) or double up frames to mimic the effect of a limp.
The Running Primitive (Animals)
Much of what has been discussed also applies to four-legged animals as well. Once
you master the general theory behind creating walking and running sequences for
humans, you should be able to handle most types of four-legged animals without
too much trouble.
However, understand this: creating convincing movement for most four-legged
animal characters is quite a bit more complex than doing so for human characters.
Instead of having two legs to deal with, you now have four to manipulate. Thus,
the best way to approach creating such animations is to create individual anima-
tion sequences for each set of legs. Although this works well for relatively simple
four-legged actions, it will fail to produce convincing movement as the animation
sequences get more complex. Therefore, I strongly recommend getting a copy of
Eadweard Muybridge’s excellent Animals in Motion as studying this book will
give you important insights into how different four-legged animals move.
Chapter 9 / Arcade Game Animation 343
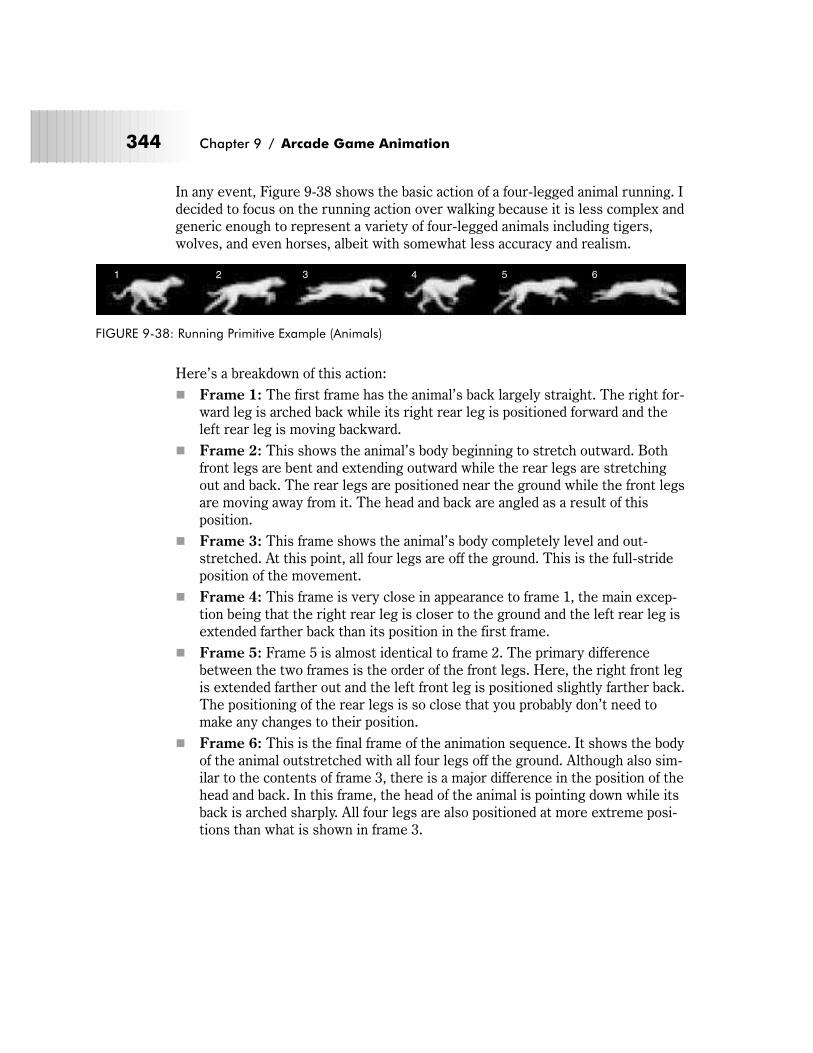
In any event, Figure 9-38 shows the basic action of a four-legged animal running. I
decided to focus on the running action over walking because it is less complex and
generic enough to represent a variety of four-legged animals including tigers,
wolves, and even horses, albeit with somewhat less accuracy and realism.
Here’s a breakdown of this action:
� Frame 1: The first frame has the animal’s back largely straight. The right for-
ward leg is arched back while its right rear leg is positioned forward and the
left rear leg is moving backward.
� Frame 2: This shows the animal’s body beginning to stretch outward. Both
front legs are bent and extending outward while the rear legs are stretching
out and back. The rear legs are positioned near the ground while the front legs
are moving away from it. The head and back are angled as a result of this
position.
� Frame 3: This frame shows the animal’s body completely level and out-
stretched. At this point, all four legs are off the ground. This is the full-stride
position of the movement.
� Frame 4: This frame is very close in appearance to frame 1, the main excep-
tion being that the right rear leg is closer to the ground and the left rear leg is
extended farther back than its position in the first frame.
� Frame 5: Frame 5 is almost identical to frame 2. The primary difference
between the two frames is the order of the front legs. Here, the right front leg
is extended farther out and the left front leg is positioned slightly farther back.
The positioning of the rear legs is so close that you probably don’t need to
make any changes to their position.
� Frame 6: This is the final frame of the animation sequence. It shows the body
of the animal outstretched with all four legs off the ground. Although also sim-
ilar to the contents of frame 3, there is a major difference in the position of the
head and back. In this frame, the head of the animal is pointing down while its
back is arched sharply. All four legs are also positioned at more extreme posi-
tions than what is shown in frame 3.
344 Chapter 9 / Arcade Game Animation
1 2 3 4 5 6
FIGURE 9-38: Running Primitive Example (Animals)
TABLE 9-31: Running Primitive Animation Property Summary
Animation Property Comments
Motion lines Running actions always have very wavy motion lines. Motion lines that aretoo straight will appear too stiff and rigid and won’t look natural whenanimated.
Motion angles Running sequences have very acute motion angles.
Key-frames andin-betweens
Requires at least two key-frames for simple running sequences. Incomplex running sequences, frames 1, 3, and 5 are key-frames.
Weight and gravity Both of these can influence the speed at which the animation is displayed.For example, larger objects or denser gravity will require heavier stepsand result in slower overall walking movements and shorterexaggerations between frames.
Flexibility Flexibility should be emphasized around the joints. Depending on the sizeand the complexity of the object being animated, you might want toemphasize flexibility in the feet as well.
Secondary actions Secondary actions occur very frequently in animal running animations.Pay especially close attention to the head and tail of the animal.Animating these can greatly enhance and improve the realism of thesequence.
Cycles and loops Cycles are used extensively in all running animation sequences,particularly for complex ones. All animal running animations also makeuse of loops in order to provide the illusion of continuous and realisticmovement.
Tempo Animals move at very fast speeds when running. Therefore, make sureyou use an appropriately paced tempo to accurately represent this action.
The Jumping Primitive
Jumps are used in platform-style arcade games to help the on-screen character
cover large sections of the game area in a single bound. They are also used to
jump over obstacles and dodge other objects such as missiles and bullets.
There are many types of jumps but the most popular one is known as the standing
jump. In this type of jump, the character jumps from a standing position. The
jumping process has four parts: the stand, the bend, the leap, and the landing.
The stand is where the character begins the jumping sequence. The bend is
where the character gains the strength and the position to make the jump. The
leap is the actual jump itself. Finally, the landing is where the jump ends.
NOTE: Generally speaking, standing jumps have a shorter and more constant
length than running jumps.
Chapter 9 / Arcade Game Animation 345
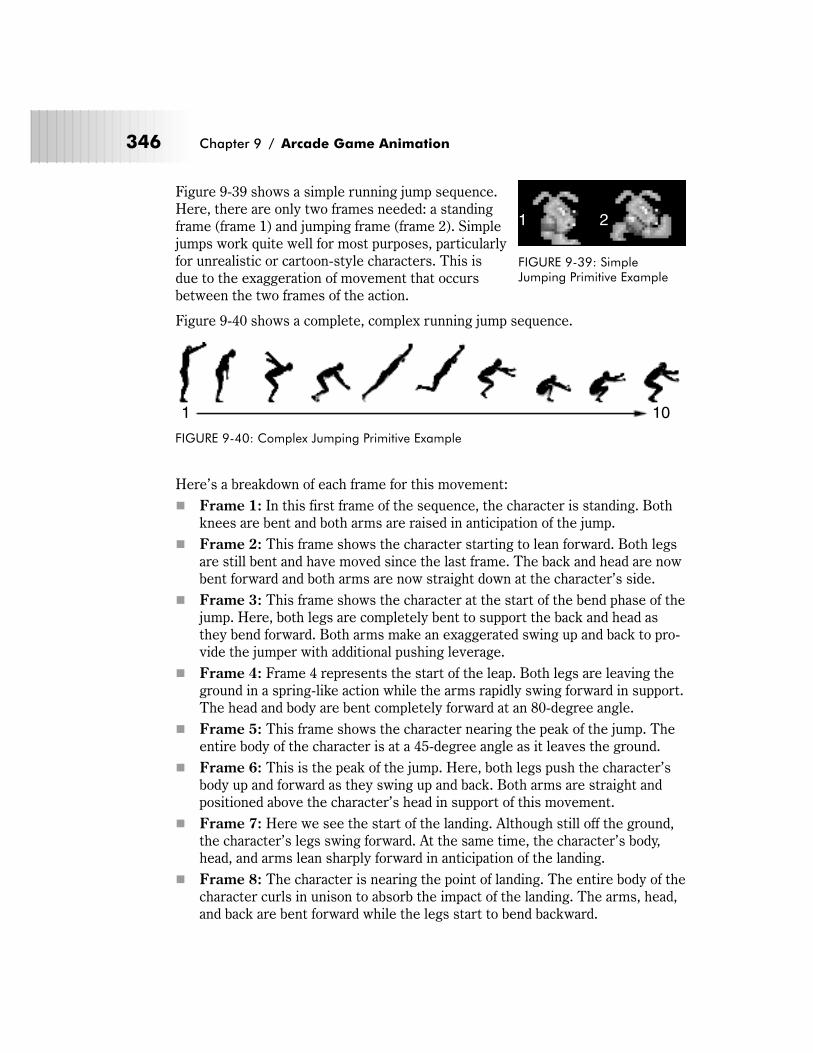
Figure 9-39 shows a simple running jump sequence.
Here, there are only two frames needed: a standing
frame (frame 1) and jumping frame (frame 2). Simple
jumps work quite well for most purposes, particularly
for unrealistic or cartoon-style characters. This is
due to the exaggeration of movement that occurs
between the two frames of the action.
Figure 9-40 shows a complete, complex running jump sequence.
Here’s a breakdown of each frame for this movement:
� Frame 1: In this first frame of the sequence, the character is standing. Both
knees are bent and both arms are raised in anticipation of the jump.
� Frame 2: This frame shows the character starting to lean forward. Both legs
are still bent and have moved since the last frame. The back and head are now
bent forward and both arms are now straight down at the character’s side.
� Frame 3: This frame shows the character at the start of the bend phase of the
jump. Here, both legs are completely bent to support the back and head as
they bend forward. Both arms make an exaggerated swing up and back to pro-
vide the jumper with additional pushing leverage.
� Frame 4: Frame 4 represents the start of the leap. Both legs are leaving the
ground in a spring-like action while the arms rapidly swing forward in support.
The head and body are bent completely forward at an 80-degree angle.
� Frame 5: This frame shows the character nearing the peak of the jump. The
entire body of the character is at a 45-degree angle as it leaves the ground.
� Frame 6: This is the peak of the jump. Here, both legs push the character’s
body up and forward as they swing up and back. Both arms are straight and
positioned above the character’s head in support of this movement.
� Frame 7: Here we see the start of the landing. Although still off the ground,
the character’s legs swing forward. At the same time, the character’s body,
head, and arms lean sharply forward in anticipation of the landing.
� Frame 8: The character is nearing the point of landing. The entire body of the
character curls in unison to absorb the impact of the landing. The arms, head,
and back are bent forward while the legs start to bend backward.
346 Chapter 9 / Arcade Game Animation
1 2
FIGURE 9-39: SimpleJumping Primitive Example
1 10
FIGURE 9-40: Complex Jumping Primitive Example
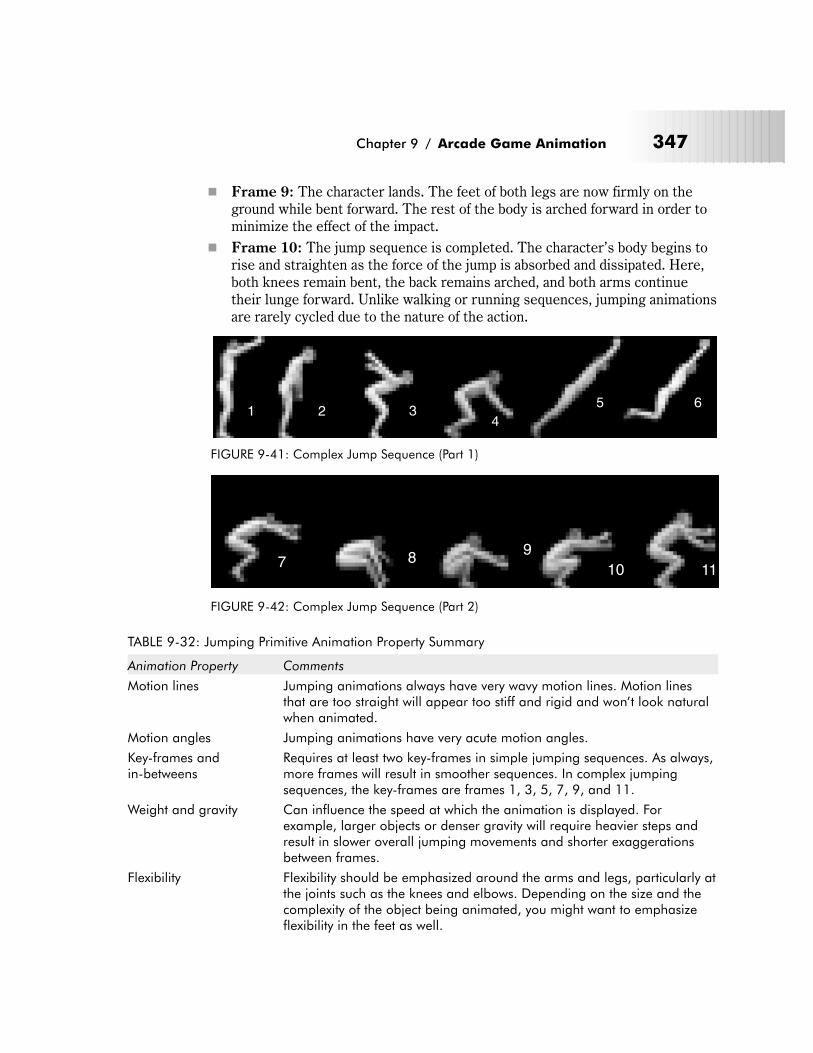
� Frame 9: The character lands. The feet of both legs are now firmly on the
ground while bent forward. The rest of the body is arched forward in order to
minimize the effect of the impact.
� Frame 10: The jump sequence is completed. The character’s body begins to
rise and straighten as the force of the jump is absorbed and dissipated. Here,
both knees remain bent, the back remains arched, and both arms continue
their lunge forward. Unlike walking or running sequences, jumping animations
are rarely cycled due to the nature of the action.
TABLE 9-32: Jumping Primitive Animation Property Summary
Animation Property Comments
Motion lines Jumping animations always have very wavy motion lines. Motion linesthat are too straight will appear too stiff and rigid and won’t look naturalwhen animated.
Motion angles Jumping animations have very acute motion angles.
Key-frames andin-betweens
Requires at least two key-frames in simple jumping sequences. As always,more frames will result in smoother sequences. In complex jumpingsequences, the key-frames are frames 1, 3, 5, 7, 9, and 11.
Weight and gravity Can influence the speed at which the animation is displayed. Forexample, larger objects or denser gravity will require heavier steps andresult in slower overall jumping movements and shorter exaggerationsbetween frames.
Flexibility Flexibility should be emphasized around the arms and legs, particularly atthe joints such as the knees and elbows. Depending on the size and thecomplexity of the object being animated, you might want to emphasizeflexibility in the feet as well.
Chapter 9 / Arcade Game Animation 347
1 2 34
5 6
FIGURE 9-41: Complex Jump Sequence (Part 1)
7 89
10 11
FIGURE 9-42: Complex Jump Sequence (Part 2)
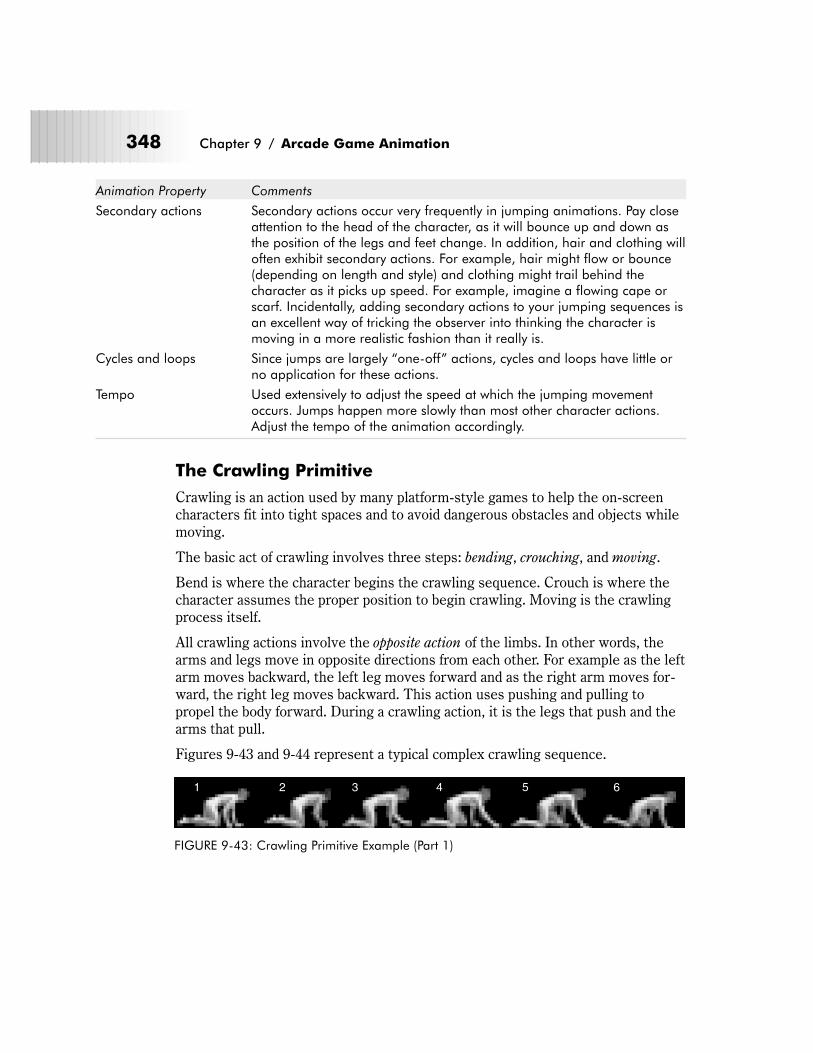
Animation Property Comments
Secondary actions Secondary actions occur very frequently in jumping animations. Pay closeattention to the head of the character, as it will bounce up and down asthe position of the legs and feet change. In addition, hair and clothing willoften exhibit secondary actions. For example, hair might flow or bounce(depending on length and style) and clothing might trail behind thecharacter as it picks up speed. For example, imagine a flowing cape orscarf. Incidentally, adding secondary actions to your jumping sequences isan excellent way of tricking the observer into thinking the character ismoving in a more realistic fashion than it really is.
Cycles and loops Since jumps are largely “one-off” actions, cycles and loops have little orno application for these actions.
Tempo Used extensively to adjust the speed at which the jumping movementoccurs. Jumps happen more slowly than most other character actions.Adjust the tempo of the animation accordingly.
The Crawling Primitive
Crawling is an action used by many platform-style games to help the on-screen
characters fit into tight spaces and to avoid dangerous obstacles and objects while
moving.
The basic act of crawling involves three steps: bending, crouching, and moving.
Bend is where the character begins the crawling sequence. Crouch is where the
character assumes the proper position to begin crawling. Moving is the crawling
process itself.
All crawling actions involve the opposite action of the limbs. In other words, the
arms and legs move in opposite directions from each other. For example as the left
arm moves backward, the left leg moves forward and as the right arm moves for-
ward, the right leg moves backward. This action uses pushing and pulling to
propel the body forward. During a crawling action, it is the legs that push and the
arms that pull.
Figures 9-43 and 9-44 represent a typical complex crawling sequence.
348 Chapter 9 / Arcade Game Animation
1 2 3 4 5 6
FIGURE 9-43: Crawling Primitive Example (Part 1)
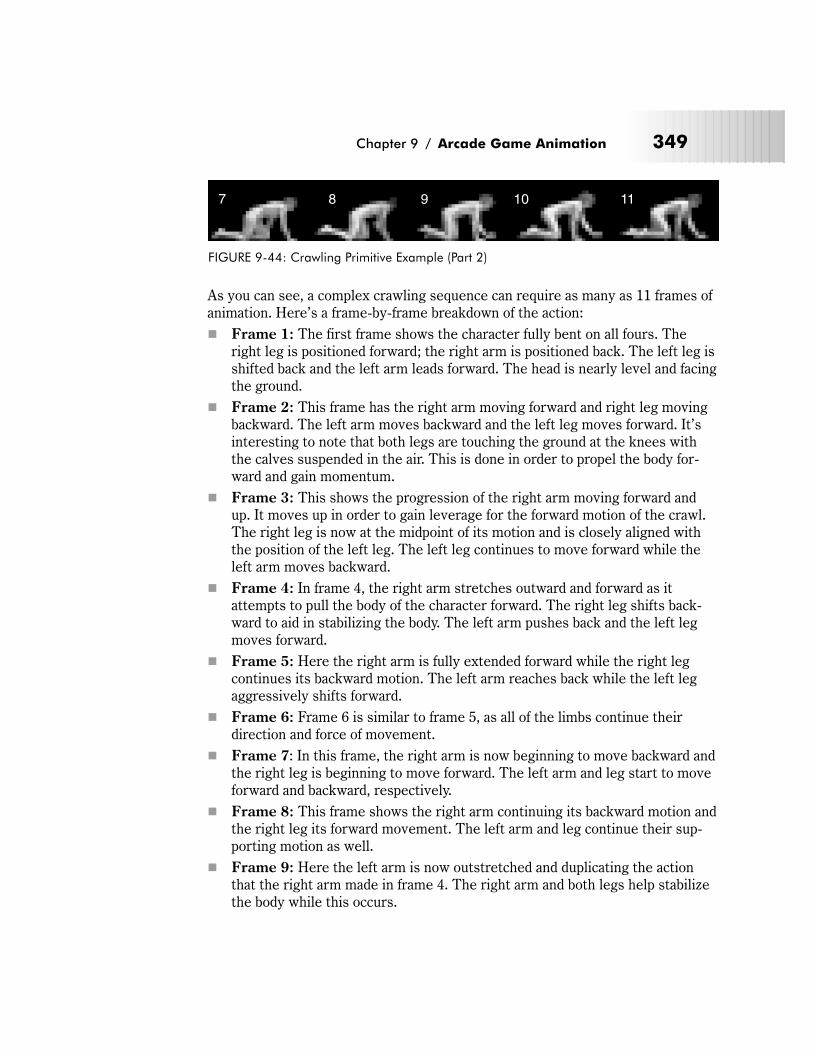
As you can see, a complex crawling sequence can require as many as 11 frames of
animation. Here’s a frame-by-frame breakdown of the action:
� Frame 1: The first frame shows the character fully bent on all fours. The
right leg is positioned forward; the right arm is positioned back. The left leg is
shifted back and the left arm leads forward. The head is nearly level and facing
the ground.
� Frame 2: This frame has the right arm moving forward and right leg moving
backward. The left arm moves backward and the left leg moves forward. It’s
interesting to note that both legs are touching the ground at the knees with
the calves suspended in the air. This is done in order to propel the body for-
ward and gain momentum.
� Frame 3: This shows the progression of the right arm moving forward and
up. It moves up in order to gain leverage for the forward motion of the crawl.
The right leg is now at the midpoint of its motion and is closely aligned with
the position of the left leg. The left leg continues to move forward while the
left arm moves backward.
� Frame 4: In frame 4, the right arm stretches outward and forward as it
attempts to pull the body of the character forward. The right leg shifts back-
ward to aid in stabilizing the body. The left arm pushes back and the left leg
moves forward.
� Frame 5: Here the right arm is fully extended forward while the right leg
continues its backward motion. The left arm reaches back while the left leg
aggressively shifts forward.
� Frame 6: Frame 6 is similar to frame 5, as all of the limbs continue their
direction and force of movement.
� Frame 7: In this frame, the right arm is now beginning to move backward and
the right leg is beginning to move forward. The left arm and leg start to move
forward and backward, respectively.
� Frame 8: This frame shows the right arm continuing its backward motion and
the right leg its forward movement. The left arm and leg continue their sup-
porting motion as well.
� Frame 9: Here the left arm is now outstretched and duplicating the action
that the right arm made in frame 4. The right arm and both legs help stabilize
the body while this occurs.
Chapter 9 / Arcade Game Animation 349
7 8 9 10 11
FIGURE 9-44: Crawling Primitive Example (Part 2)
� Frame 10: This frame has the right arm slowly moving back while the right
leg thrusts forward. The left arm is now nearly fully extended, as it
approaches the ground. The left leg continues to shift backward.
� Frame 11: This frame shows the right arm moving back and coming close to
the right leg as it moves forward. The left arm is now completely extended
and touching the ground. The left leg continues to shift backward. At this
point, the animation would cycle back to frame 1 to complete the sequence
and the continuous flow of motion.
NOTE: In most situations, you can also create simple, two-framed crawling
actions. However, such animations require heavily exaggerated movements
between frames and ample delineation between different parts of the figure
in order to convince the observer that movement is actually occurring.
TABLE 9-33: Crawling Primitive Animation Property Summary
Animation Property Comments
Motion lines Crawling animations have an almost constant motion line. This is due inlarge part to the fact that the head and back rarely change positionduring the course of the crawling motion.
Motion angles Crawling actions have relatively mild motion angles.
Key-frames andin-betweens
Requires at least two key-frames in simple crawling sequences as shownin Figure 9-21. As always, the presence of more frames will result insmoother crawling sequences. In complex crawling sequences, thekey-frames are frames 1, 3, 5, 7, 9, and 11.
Weight and gravity Can influence the speed at which the animation is displayed. Forexample, larger objects or denser gravity will require heavier steps andresult in a slower overall crawling motion and a shorter exaggerationbetween frames.
Flexibility Flexibility should be emphasized around the arms and legs, particularly atthe joints such as the knees and elbows. Flexibility should be added to thehands and feet as they tend to bend slightly as they grip the ground insupport of the crawling movement.
Secondary actions Secondary actions can occur during crawling actions but they tend to bevery subtle in nature and more often than not can be ignored.
Cycles and loops Crawling actions make extensive use of cycles and loops to complete theillusion of movement.
Tempo Used extensively to adjust the speed at which the crawling action occurs.Crawling occurs very slowly in comparison to most other forms ofcharacter movement. Adjust the tempo of the animation accordingly.
350 Chapter 9 / Arcade Game Animation
NOTE: Undoubtedly, you can probably identify a number of other animation
primitives that are found in arcade games and are not described here.
However, most are probably variations of the ones identified in this chapter.
Master these primitives and the rest will come easily to you.
Creating Your Animation Sequences
As you can see, creating animations, even simple ones, involves a lot of time,
planning, and attention to detail. However, the process can be simplified some-
what if you follow these nine steps:
1. Conceptualize—Before you start designing, always have a clear idea of what
you want to animate and how it will look. This will save you time and effort
since you can only really start the animation process once you have a clear
idea of what needs to be done.
2. Decide on object behavior—After determining the object’s look, you need
to determine whether or not the object will be animated continuously (using
cycles) or is a “one-off” and only animated once (no looping). Objects can have
elements of both, however, so you need to decide on this before you start cre-
ating animation. Changing this behavior can complicate matters later on in the
project.
3. Choose a grid size—The next step in the process is to choose a predefined
grid size to contain and constrain the object that you are designing. Be sure to
copy a number of grid squares to give yourself plenty of room to test and
experiment with the animation sequences you create.
4. Design the key-frames—When you’re finally ready to start designing, begin
by drawing the motion extremes or key-frames needed for the object
sequence. To save time and effort, just use simple shapes to represent the
main actions of the object. For example, use stick figures if creating character
animation or basic geometric shapes (i.e., circles, squares, triangles, etc.) if
it’s something else.
5. Estimate the in-betweens—Make an estimate of the number of
in-betweens you think you will need to complete the sequence. Before you do
this, remember that slower moving animations require more frames than
faster moving animations. Be conservative when doing this. It’s actually easier
to add additional transition frames to a sequence than it is to remove them.
6. Create object motion lines—When done, trace the motion line and motion
angles for the sequence. Use your painting program’s Line tool to do this. It
can always be erased later on. Before continuing, make sure that the proper-
ties of the motion line and motion angles are consistent with the type of object
being animated. If not, make the appropriate adjustments to the sequence and
Chapter 9 / Arcade Game Animation 351
position the individual frames until the object starts to conform to these
norms.
7. Apply secondary actions and animation enhancements—Add any sec-
ondary actions that might be needed, and if applicable check to see if the
object exhibits sufficient flexibility. This is also a good time to add any addi-
tional “character” to your object(s). In other words, feel free to embellish the
movement so it looks both convincing and enticing at the same time.
8. Test each movement—Don’t forget to test every animation you create. The
easiest way to do this is to use your painting program’s Copy tool and copy
one grid square to another and then apply an undoable undo. This temporarily
combines two frames and then flips between them to produce a quick ani-
mated effect. For longer, more complex animations, see if your painting
program offers an animation tool so that you can see the entire animation in
context and at different tempos. A few of the ones mentioned in Chapter 6
actually do. In any case, be on the lookout for flaws in how the object moves
and how the object appears. Often, you will catch minor mistakes such as dis-
colored pixels or missing pixels, or even major mistakes such as improper
movement (i.e., not enough exaggeration, too fast, etc.) at this stage of the
process. Make corrections to the sequence as needed and do them before
handing off your work to the programmer. It’s recommended that you do at
least two such tests for complex animations, while one test can suffice for less
sophisticated objects.
9. Repeat—Repeat the previous eight steps to create all of the animations
required by your game.
It’s important to point out that different people have different opinions on how to
go about this process. Some, like myself, prefer to create highly detailed figures
and then animate them, while others prefer to work from rough items first.
How you choose to proceed really boils down to a matter of time, efficiency, and
personal taste. When in doubt, particularly when you’re first starting out, I recom-
mend that you work from rough shapes. Later, when you’re more experienced and
comfortable with creating animation, you can work from more detailed object
images.
General Animation Tips
� Remember the relationship between frames and animation smooth-
ness—This relationship is one of the most important aspects of animation. In
order to achieve the illusion of smooth motion, you need to use many frames.
If design time or file size limits ever become an issue, you can always com-
pensate by using fewer animation frames. Doing this produces a higher FPS,
which can have the effect of making objects appear to move smoother than
they actually are.
352 Chapter 9 / Arcade Game Animation

� Always account for color—Color can affect animations the same way it does
other types of graphics. Always make sure that you choose suitable colors
when creating your animations. Primary actions and secondary actions should
be rendered in colors that make them easy to see. Otherwise, the effective-
ness of the animation can be compromised. For more information on proper
arcade game color usage and selection, refer to Chapters 7 and 8.
� Use tempo wisely—Tempo, if used properly, is your friend. If used incor-
rectly, it is your enemy. Use tempo to pace your animations. Your animations
should never appear to move too fast or too slowly, as this will be perceived as
unrealistic and distracting. Try to mimic nature. Study the speed at which dif-
ferent types of objects move in different situations. After a while, applying the
correct tempo to your animated sequences will become second nature.
� Try to individualize your objects—Adding unique and individualized
touches to your objects has the effect of making them seem real to the
observer. Therefore, every distinct object you create and animate should have
some sort of unique “personality” that distinguishes it from the other objects
on the screen. One of the easiest ways to do this is to apply different degrees
of exaggeration and embellishment (i.e., secondary actions) to each object.
� Keep it simple—Adding unnecessary complexity can ruin an animation
sequence as it opens up the possibility of introducing flaws and other types of
errors into it. To avoid doing this, keep your animations simple as much as
possible. Therefore, stick with using established animation primitives and
minimal frames unless the object requires more subtle effects. In other words,
don’t do any more work than you have to!
� Use exaggerated elements—As an animation device, exaggeration adds
realism and depth to animations. Therefore, use it as much as possible. Exag-
geration is especially important when working with short animation
sequences as they have fewer frames available to them in order to create
effective and convincing motion.
� Constantly observe—Successful animation requires the careful study of the
objects around you. Study how different things move. Study books on anima-
tion such as those by Eadweard Muybridge in addition to studying how the
animation featured in your favorite arcade games was created. Studying these
sources will give you useful insights into animation techniques and will enable
you to create better and more accurate animations.
In any case, don’t get discouraged if the animation process doesn’t go smoothly for
you the first few times you try. Like most things, creating effective animations
takes time and experience. Start off by working on simple animation sequences
first. After you’re comfortable with the basic animation process and are satisfied
with the results, move on to animating more sophisticated subjects.
Chapter 9 / Arcade Game Animation 353
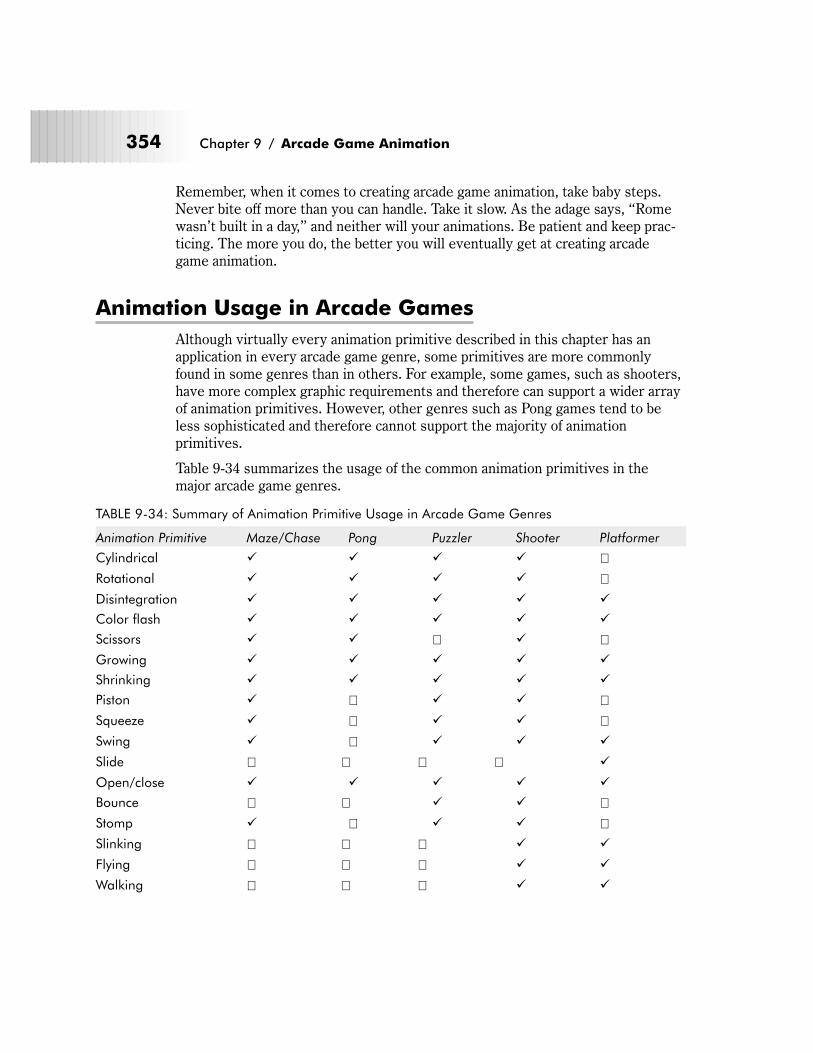
Remember, when it comes to creating arcade game animation, take baby steps.
Never bite off more than you can handle. Take it slow. As the adage says, “Rome
wasn’t built in a day,” and neither will your animations. Be patient and keep prac-
ticing. The more you do, the better you will eventually get at creating arcade
game animation.
Animation Usage in Arcade Games
Although virtually every animation primitive described in this chapter has an
application in every arcade game genre, some primitives are more commonly
found in some genres than in others. For example, some games, such as shooters,
have more complex graphic requirements and therefore can support a wider array
of animation primitives. However, other genres such as Pong games tend to be
less sophisticated and therefore cannot support the majority of animation
primitives.
Table 9-34 summarizes the usage of the common animation primitives in the
major arcade game genres.
TABLE 9-34: Summary of Animation Primitive Usage in Arcade Game Genres
Animation Primitive Maze/Chase Pong Puzzler Shooter Platformer
Cylindrical � � � � �Rotational � � � � �Disintegration � � � � �
Color flash � � � � �
Scissors � � � � �Growing � � � � �
Shrinking � � � � �
Piston � � � � �Squeeze � � � � �Swing � � � � �
Slide � � � � �
Open/close � � � � �
Bounce � � � � �Stomp � � � � �Slinking � � � � �
Flying � � � � �
Walking � � � � �
354 Chapter 9 / Arcade Game Animation
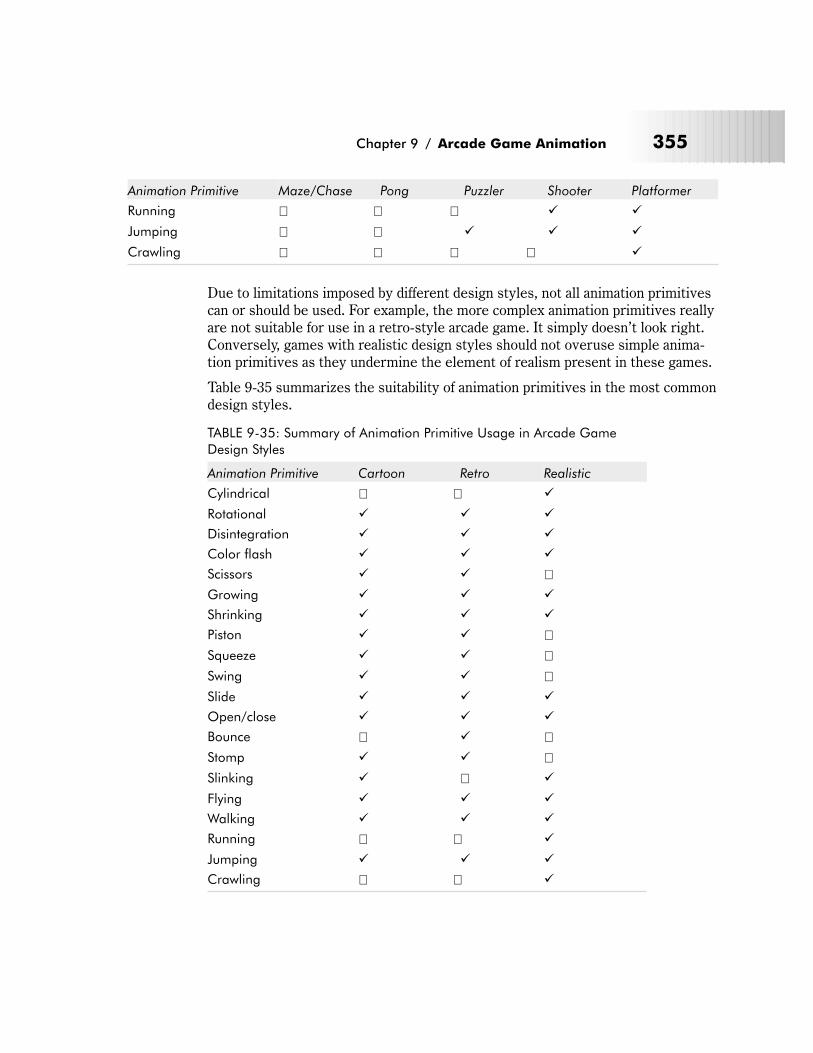
Animation Primitive Maze/Chase Pong Puzzler Shooter Platformer
Running � � � � �
Jumping � � � � �
Crawling � � � � �
Due to limitations imposed by different design styles, not all animation primitives
can or should be used. For example, the more complex animation primitives really
are not suitable for use in a retro-style arcade game. It simply doesn’t look right.
Conversely, games with realistic design styles should not overuse simple anima-
tion primitives as they undermine the element of realism present in these games.
Table 9-35 summarizes the suitability of animation primitives in the most common
design styles.
TABLE 9-35: Summary of Animation Primitive Usage in Arcade Game
Design Styles
Animation Primitive Cartoon Retro Realistic
Cylindrical � � �
Rotational � � �
Disintegration � � �
Color flash � � �
Scissors � � �Growing � � �
Shrinking � � �
Piston � � �Squeeze � � �Swing � � �Slide � � �
Open/close � � �
Bounce � � �Stomp � � �Slinking � � �
Flying � � �
Walking � � �
Running � � �
Jumping � � �
Crawling � � �
Chapter 9 / Arcade Game Animation 355

NOTE: The information presented in Tables 9-34 and 9-35 are general sug-
gestions only. Every arcade game project is unique and can define its own
rules for the use of animation primitives.
356 Chapter 9 / Arcade Game Animation
Chapter 10
Fonts and Arcade
Games
In this chapter, you’ll learn about:
� Fonts
� Font characteristics
� Font legibility
� Common font formats
� Platform-specific font support
� General rules for using fonts in arcade games
� Using fonts in arcade games
357
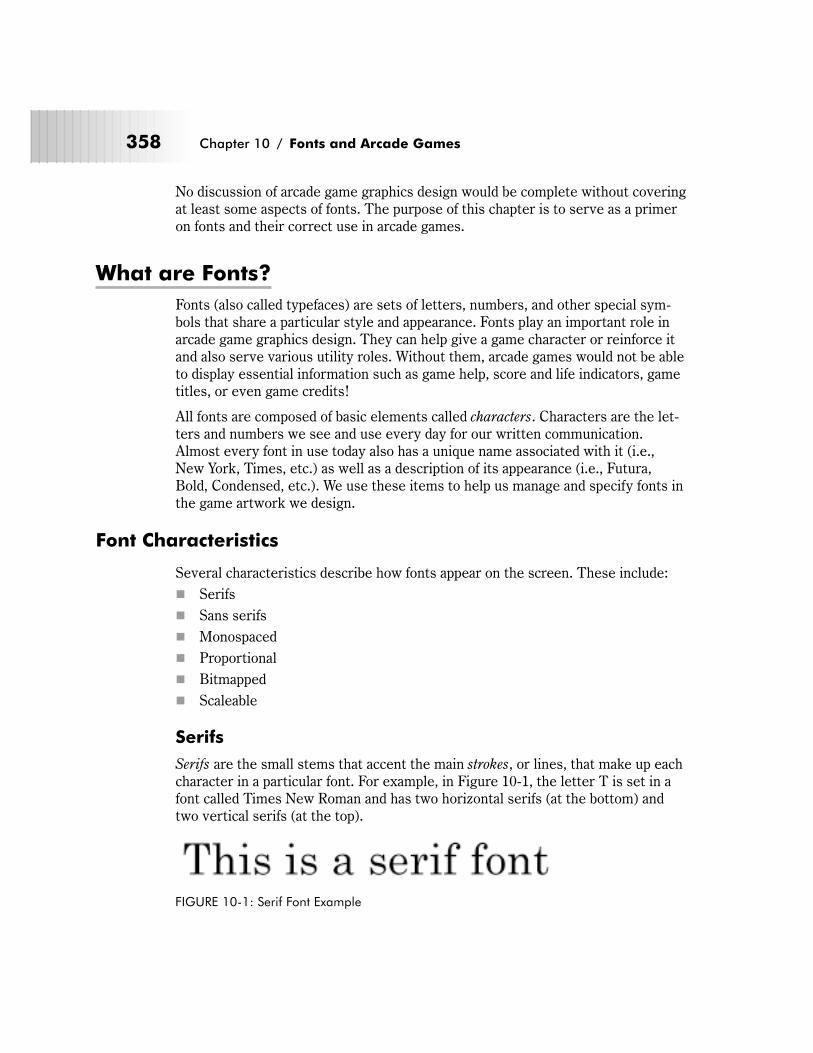
No discussion of arcade game graphics design would be complete without covering
at least some aspects of fonts. The purpose of this chapter is to serve as a primer
on fonts and their correct use in arcade games.
What are Fonts?
Fonts (also called typefaces) are sets of letters, numbers, and other special sym-
bols that share a particular style and appearance. Fonts play an important role in
arcade game graphics design. They can help give a game character or reinforce it
and also serve various utility roles. Without them, arcade games would not be able
to display essential information such as game help, score and life indicators, game
titles, or even game credits!
All fonts are composed of basic elements called characters. Characters are the let-
ters and numbers we see and use every day for our written communication.
Almost every font in use today also has a unique name associated with it (i.e.,
New York, Times, etc.) as well as a description of its appearance (i.e., Futura,
Bold, Condensed, etc.). We use these items to help us manage and specify fonts in
the game artwork we design.
Font Characteristics
Several characteristics describe how fonts appear on the screen. These include:
� Serifs
� Sans serifs
� Monospaced
� Proportional
� Bitmapped
� Scaleable
Serifs
Serifs are the small stems that accent the main strokes, or lines, that make up each
character in a particular font. For example, in Figure 10-1, the letter T is set in a
font called Times New Roman and has two horizontal serifs (at the bottom) and
two vertical serifs (at the top).
358 Chapter 10 / Fonts and Arcade Games
FIGURE 10-1: Serif Font Example
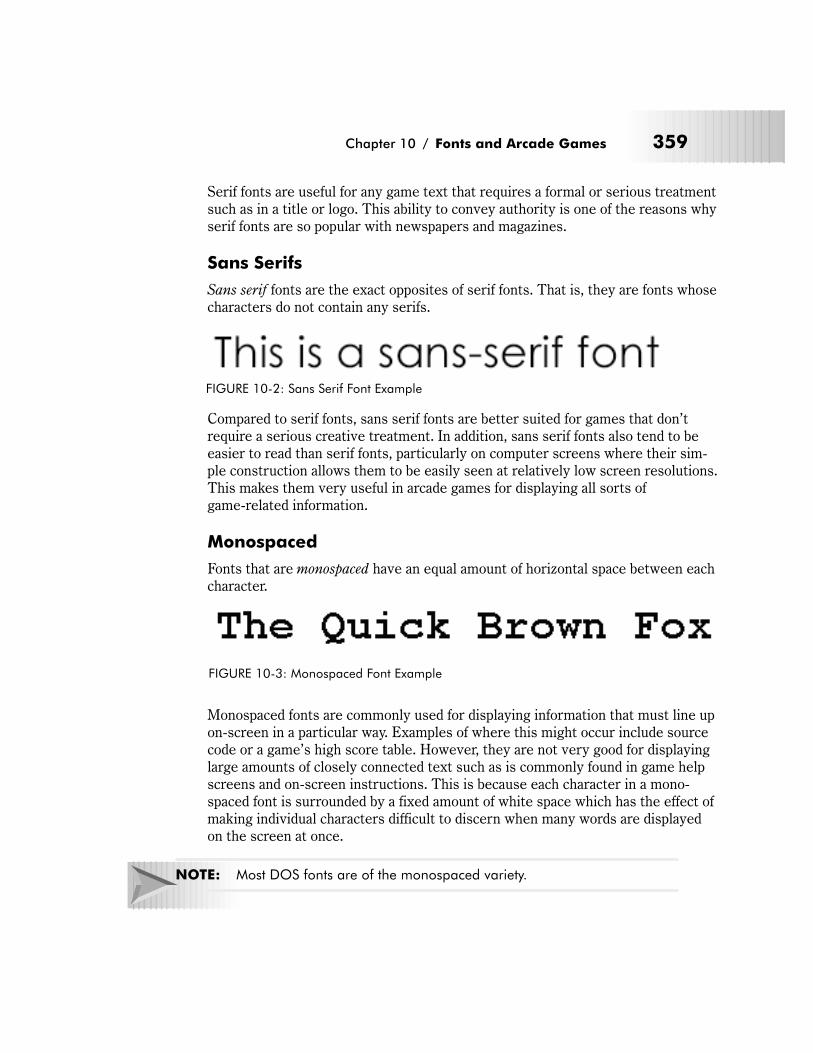
Serif fonts are useful for any game text that requires a formal or serious treatment
such as in a title or logo. This ability to convey authority is one of the reasons why
serif fonts are so popular with newspapers and magazines.
Sans Serifs
Sans serif fonts are the exact opposites of serif fonts. That is, they are fonts whose
characters do not contain any serifs.
Compared to serif fonts, sans serif fonts are better suited for games that don’t
require a serious creative treatment. In addition, sans serif fonts also tend to be
easier to read than serif fonts, particularly on computer screens where their sim-
ple construction allows them to be easily seen at relatively low screen resolutions.
This makes them very useful in arcade games for displaying all sorts of
game-related information.
Monospaced
Fonts that are monospaced have an equal amount of horizontal space between each
character.
Monospaced fonts are commonly used for displaying information that must line up
on-screen in a particular way. Examples of where this might occur include source
code or a game’s high score table. However, they are not very good for displaying
large amounts of closely connected text such as is commonly found in game help
screens and on-screen instructions. This is because each character in a mono-
spaced font is surrounded by a fixed amount of white space which has the effect of
making individual characters difficult to discern when many words are displayed
on the screen at once.
NOTE: Most DOS fonts are of the monospaced variety.
Chapter 10 / Fonts and Arcade Games 359
FIGURE 10-2: Sans Serif Font Example
FIGURE 10-3: Monospaced Font Example
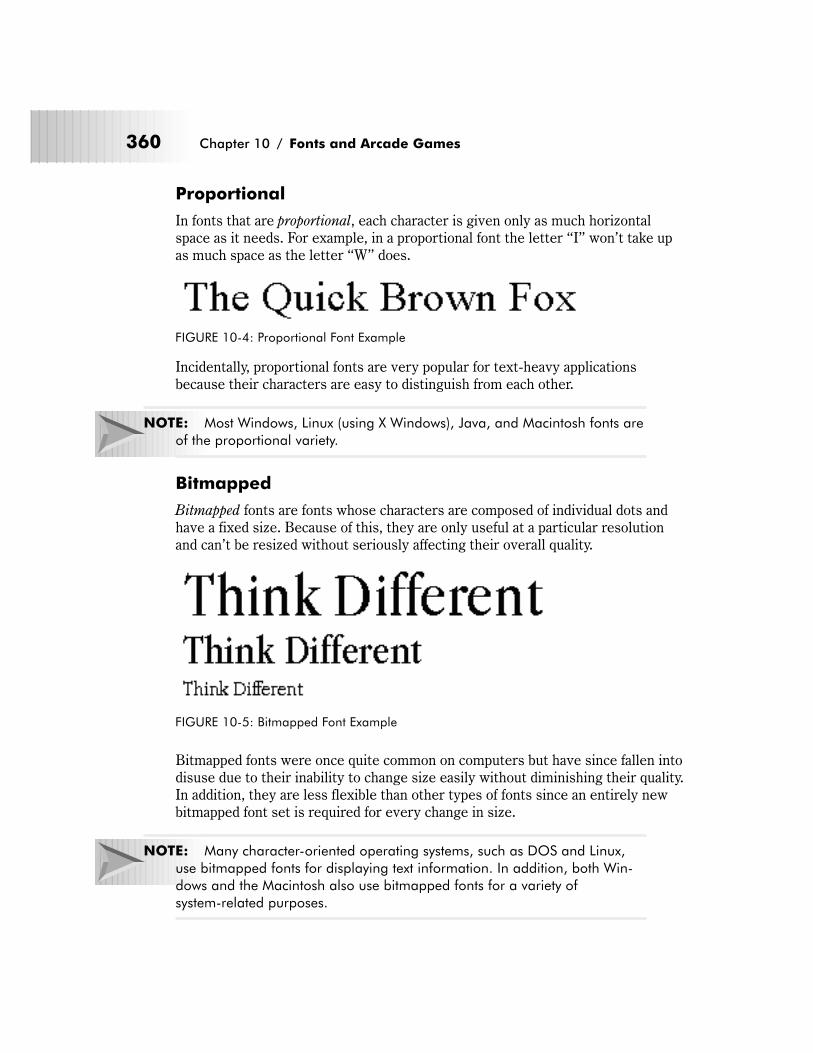
Proportional
In fonts that are proportional, each character is given only as much horizontal
space as it needs. For example, in a proportional font the letter “I” won’t take up
as much space as the letter “W” does.
Incidentally, proportional fonts are very popular for text-heavy applications
because their characters are easy to distinguish from each other.
NOTE: Most Windows, Linux (using X Windows), Java, and Macintosh fonts are
of the proportional variety.
Bitmapped
Bitmapped fonts are fonts whose characters are composed of individual dots and
have a fixed size. Because of this, they are only useful at a particular resolution
and can’t be resized without seriously affecting their overall quality.
Bitmapped fonts were once quite common on computers but have since fallen into
disuse due to their inability to change size easily without diminishing their quality.
In addition, they are less flexible than other types of fonts since an entirely new
bitmapped font set is required for every change in size.
NOTE: Many character-oriented operating systems, such as DOS and Linux,
use bitmapped fonts for displaying text information. In addition, both Win-
dows and the Macintosh also use bitmapped fonts for a variety of
system-related purposes.
360 Chapter 10 / Fonts and Arcade Games
FIGURE 10-4: Proportional Font Example
FIGURE 10-5: Bitmapped Font Example
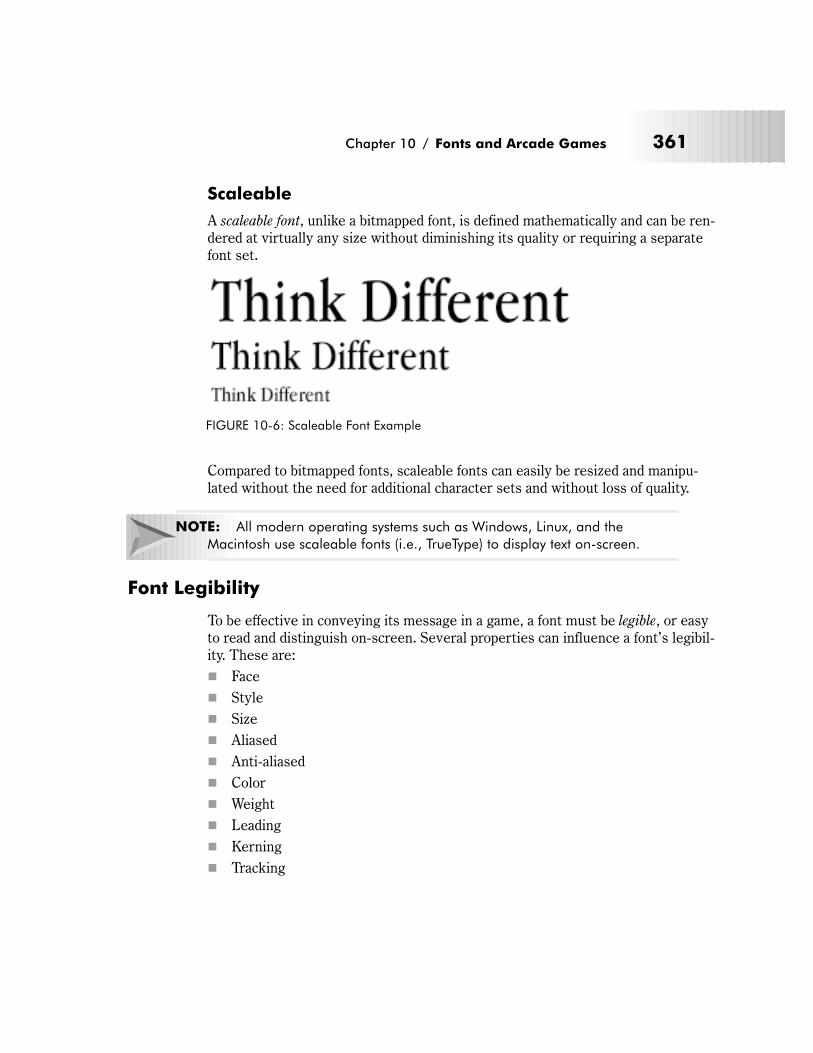
Scaleable
A scaleable font, unlike a bitmapped font, is defined mathematically and can be ren-
dered at virtually any size without diminishing its quality or requiring a separate
font set.
Compared to bitmapped fonts, scaleable fonts can easily be resized and manipu-
lated without the need for additional character sets and without loss of quality.
NOTE: All modern operating systems such as Windows, Linux, and the
Macintosh use scaleable fonts (i.e., TrueType) to display text on-screen.
Font Legibility
To be effective in conveying its message in a game, a font must be legible, or easy
to read and distinguish on-screen. Several properties can influence a font’s legibil-
ity. These are:
� Face
� Style
� Size
� Aliased
� Anti-aliased
� Color
� Weight
� Leading
� Kerning
� Tracking
Chapter 10 / Fonts and Arcade Games 361
FIGURE 10-6: Scaleable Font Example
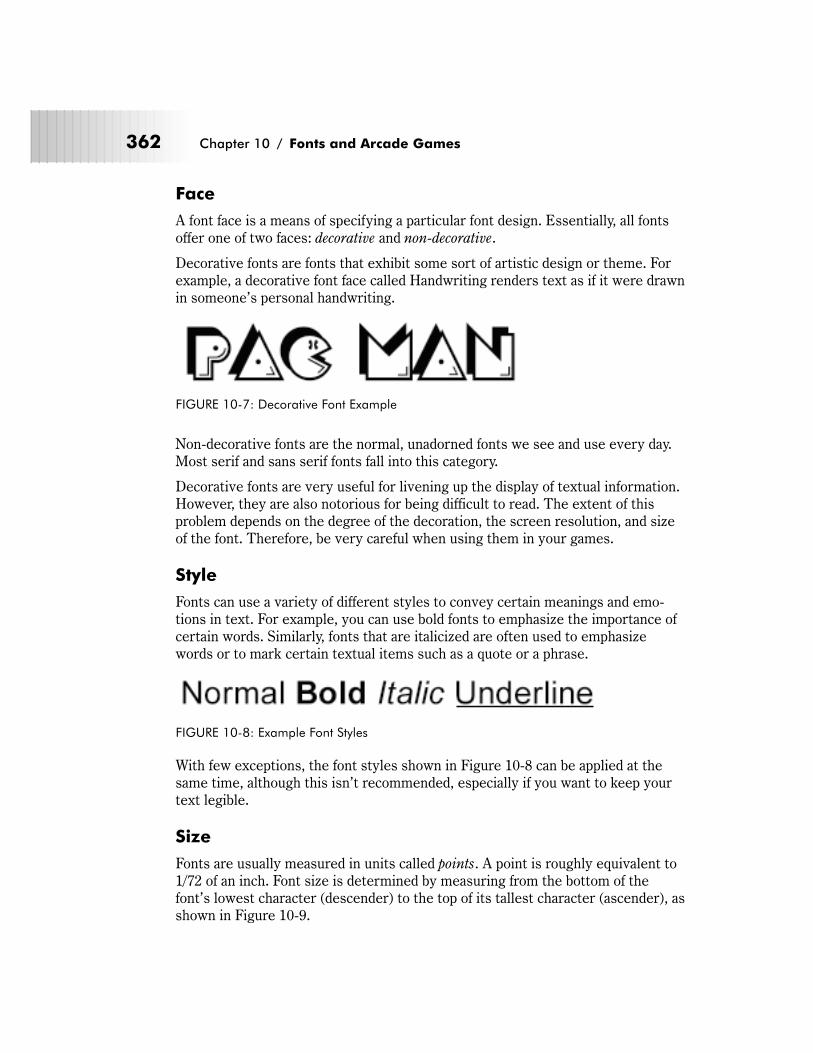
Face
A font face is a means of specifying a particular font design. Essentially, all fonts
offer one of two faces: decorative and non-decorative.
Decorative fonts are fonts that exhibit some sort of artistic design or theme. For
example, a decorative font face called Handwriting renders text as if it were drawn
in someone’s personal handwriting.
Non-decorative fonts are the normal, unadorned fonts we see and use every day.
Most serif and sans serif fonts fall into this category.
Decorative fonts are very useful for livening up the display of textual information.
However, they are also notorious for being difficult to read. The extent of this
problem depends on the degree of the decoration, the screen resolution, and size
of the font. Therefore, be very careful when using them in your games.
Style
Fonts can use a variety of different styles to convey certain meanings and emo-
tions in text. For example, you can use bold fonts to emphasize the importance of
certain words. Similarly, fonts that are italicized are often used to emphasize
words or to mark certain textual items such as a quote or a phrase.
With few exceptions, the font styles shown in Figure 10-8 can be applied at the
same time, although this isn’t recommended, especially if you want to keep your
text legible.
Size
Fonts are usually measured in units called points. A point is roughly equivalent to
1/72 of an inch. Font size is determined by measuring from the bottom of the
font’s lowest character (descender) to the top of its tallest character (ascender), as
shown in Figure 10-9.
362 Chapter 10 / Fonts and Arcade Games
FIGURE 10-7: Decorative Font Example
FIGURE 10-8: Example Font Styles
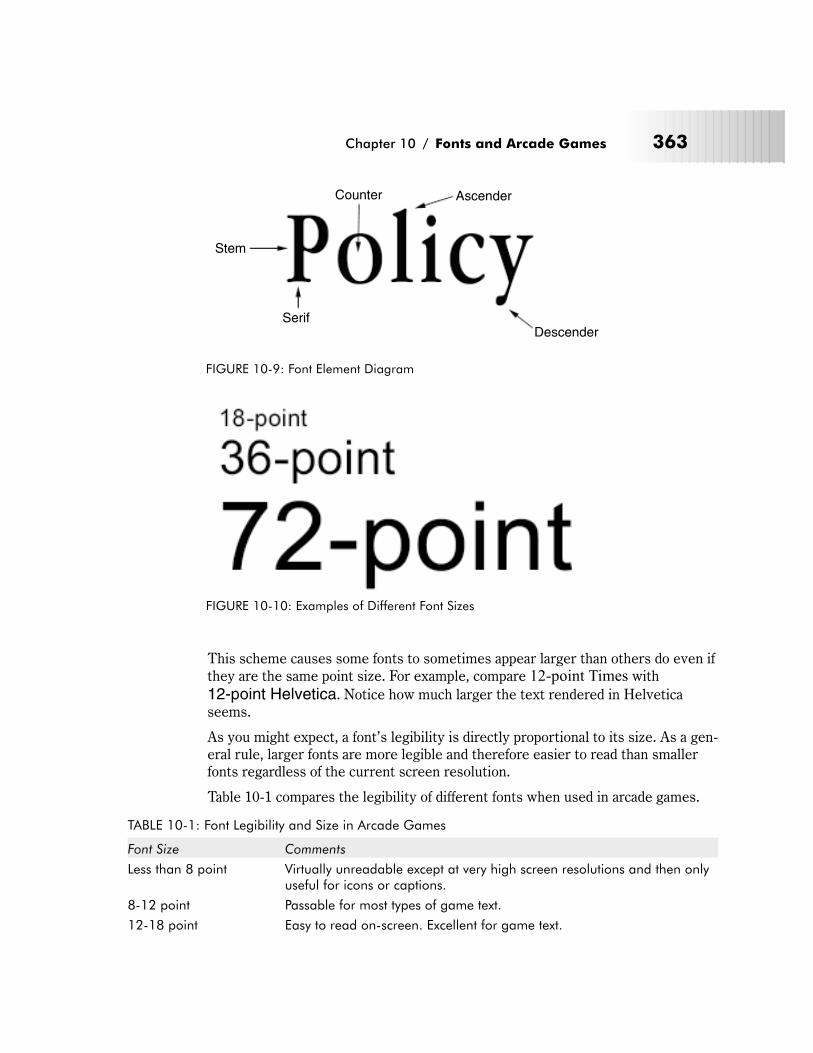
This scheme causes some fonts to sometimes appear larger than others do even if
they are the same point size. For example, compare 12-point Times with
12-point Helvetica. Notice how much larger the text rendered in Helvetica
seems.
As you might expect, a font’s legibility is directly proportional to its size. As a gen-
eral rule, larger fonts are more legible and therefore easier to read than smaller
fonts regardless of the current screen resolution.
Table 10-1 compares the legibility of different fonts when used in arcade games.
TABLE 10-1: Font Legibility and Size in Arcade Games
Font Size Comments
Less than 8 point Virtually unreadable except at very high screen resolutions and then onlyuseful for icons or captions.
8-12 point Passable for most types of game text.
12-18 point Easy to read on-screen. Excellent for game text.
Chapter 10 / Fonts and Arcade Games 363
Counter Ascender
Stem
SerifDescender
FIGURE 10-9: Font Element Diagram
FIGURE 10-10: Examples of Different Font Sizes
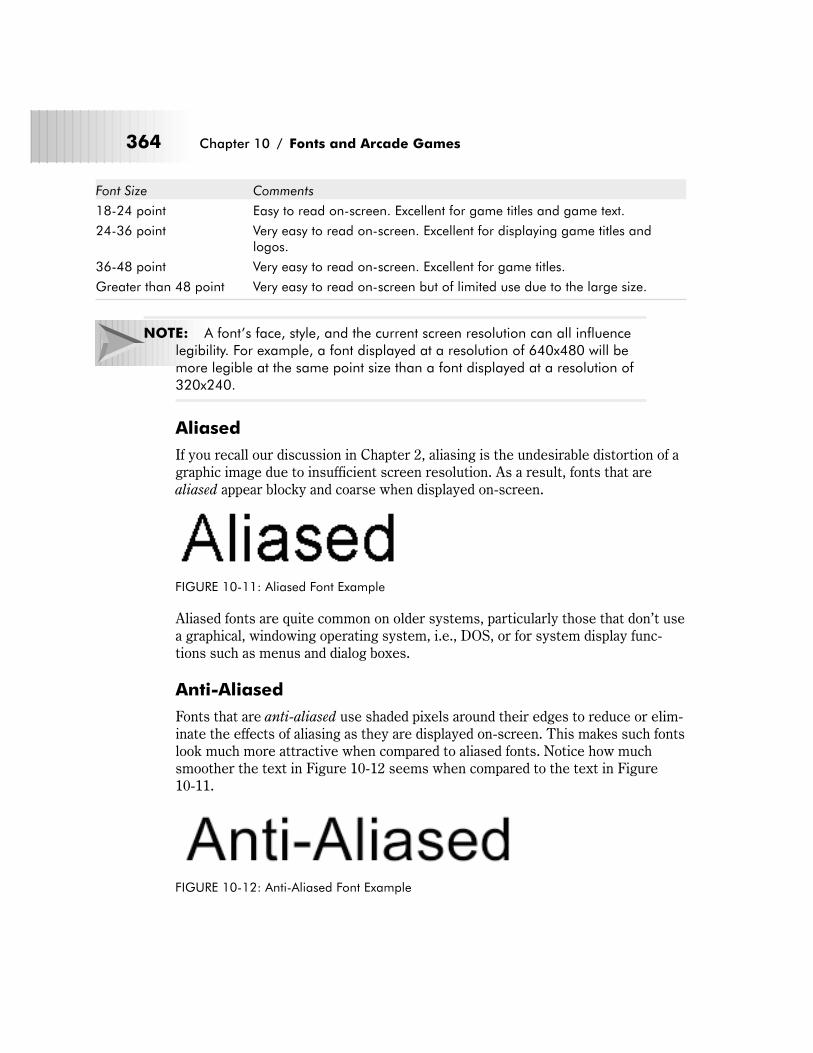
Font Size Comments
18-24 point Easy to read on-screen. Excellent for game titles and game text.
24-36 point Very easy to read on-screen. Excellent for displaying game titles andlogos.
36-48 point Very easy to read on-screen. Excellent for game titles.
Greater than 48 point Very easy to read on-screen but of limited use due to the large size.
NOTE: A font’s face, style, and the current screen resolution can all influence
legibility. For example, a font displayed at a resolution of 640x480 will be
more legible at the same point size than a font displayed at a resolution of
320x240.
Aliased
If you recall our discussion in Chapter 2, aliasing is the undesirable distortion of a
graphic image due to insufficient screen resolution. As a result, fonts that are
aliased appear blocky and coarse when displayed on-screen.
Aliased fonts are quite common on older systems, particularly those that don’t use
a graphical, windowing operating system, i.e., DOS, or for system display func-
tions such as menus and dialog boxes.
Anti-Aliased
Fonts that are anti-aliased use shaded pixels around their edges to reduce or elim-
inate the effects of aliasing as they are displayed on-screen. This makes such fonts
look much more attractive when compared to aliased fonts. Notice how much
smoother the text in Figure 10-12 seems when compared to the text in Figure
10-11.
364 Chapter 10 / Fonts and Arcade Games
FIGURE 10-11: Aliased Font Example
FIGURE 10-12: Anti-Aliased Font Example
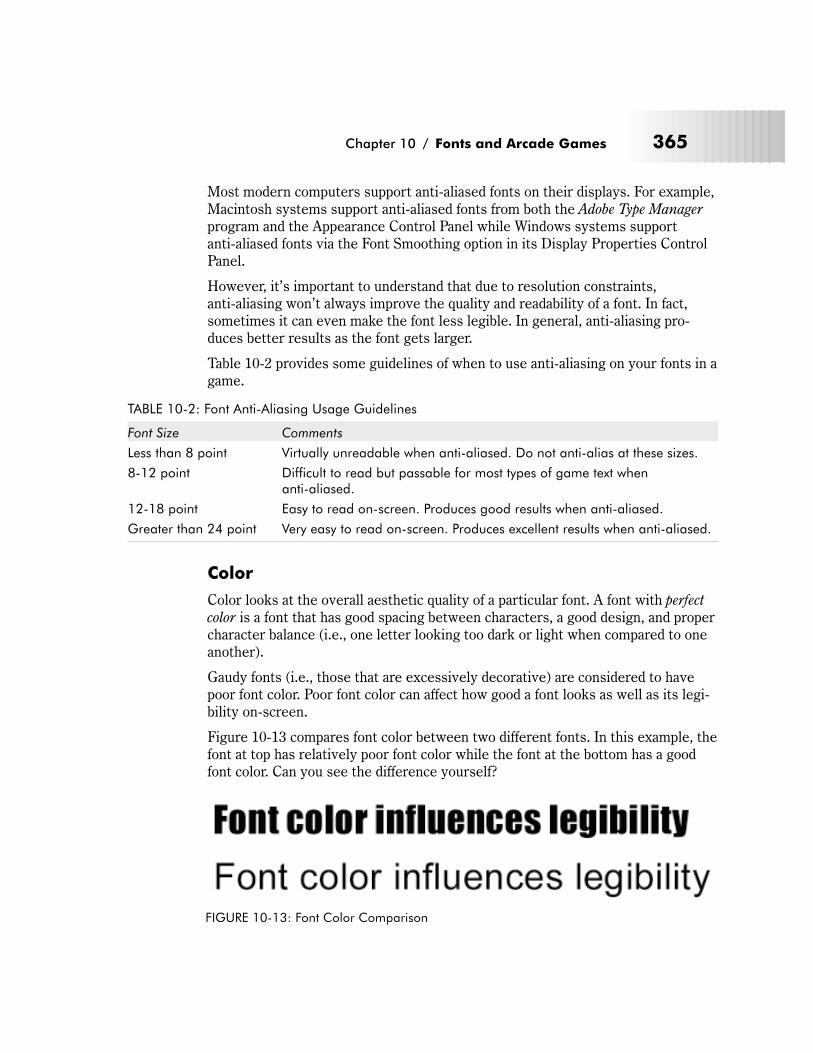
Most modern computers support anti-aliased fonts on their displays. For example,
Macintosh systems support anti-aliased fonts from both the Adobe Type Manager
program and the Appearance Control Panel while Windows systems support
anti-aliased fonts via the Font Smoothing option in its Display Properties Control
Panel.
However, it’s important to understand that due to resolution constraints,
anti-aliasing won’t always improve the quality and readability of a font. In fact,
sometimes it can even make the font less legible. In general, anti-aliasing pro-
duces better results as the font gets larger.
Table 10-2 provides some guidelines of when to use anti-aliasing on your fonts in a
game.
TABLE 10-2: Font Anti-Aliasing Usage Guidelines
Font Size Comments
Less than 8 point Virtually unreadable when anti-aliased. Do not anti-alias at these sizes.
8-12 point Difficult to read but passable for most types of game text whenanti-aliased.
12-18 point Easy to read on-screen. Produces good results when anti-aliased.
Greater than 24 point Very easy to read on-screen. Produces excellent results when anti-aliased.
Color
Color looks at the overall aesthetic quality of a particular font. A font with perfect
color is a font that has good spacing between characters, a good design, and proper
character balance (i.e., one letter looking too dark or light when compared to one
another).
Gaudy fonts (i.e., those that are excessively decorative) are considered to have
poor font color. Poor font color can affect how good a font looks as well as its legi-
bility on-screen.
Figure 10-13 compares font color between two different fonts. In this example, the
font at top has relatively poor font color while the font at the bottom has a good
font color. Can you see the difference yourself?
Chapter 10 / Fonts and Arcade Games 365
FIGURE 10-13: Font Color Comparison

Weight
A font’s weight is a measurement of the vertical thickness of the
individual characters in a font. Font weight is specified and
determined according to several grades. These include
extra-light, light, book, medium, bold, extra bold, and black.
Fonts get darker and heavier in appearance as their weight
increases. It is important to point out that not all fonts support
all of these different weights.
Leading
Leading is a measurement of the vertical space between lines of characters.
Leading can be used to adjust the color of lines of text. Lines with too little lead-
ing can appear cramped and crowded, while lines with too much leading can
appear too loose and open.
Unfortunately, many game designers fail to take leading into
account when they place text on the screen. Poor leading can
make text difficult to find and read when displaying important
game-related information.
Figure 10-15 shows an example of how leading can affect the
color of a line of text. In this example, Lines 1 and 2 have too
little leading while Lines 3 and 4 are just right.
NOTE: Many bitmapped system fonts also have poor font leading
characteristics.
Kerning
Kerning is a method of reducing the space allotted to one or both sides of a charac-
ter to make it fit more comfortably between its neighbors. Kerning is frequently
used to adjust and improve the color of a partic-
ular font.
Figure 10-16 shows an example of how kerning
alters character spacing and the appearance of
text.
366 Chapter 10 / Fonts and Arcade Games
FIGURE 10-14:Font WeightExample
FIGURE 10-15:Leading Example
FIGURE 10-16: Kerning Example
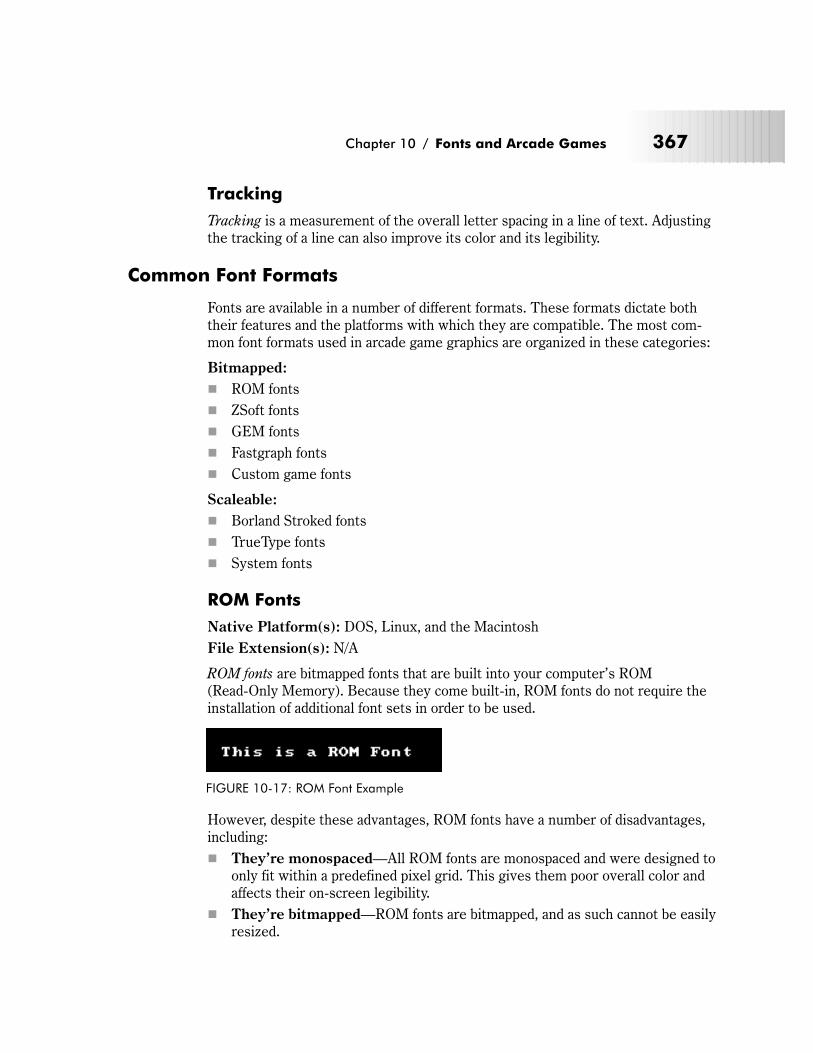
Tracking
Tracking is a measurement of the overall letter spacing in a line of text. Adjusting
the tracking of a line can also improve its color and its legibility.
Common Font Formats
Fonts are available in a number of different formats. These formats dictate both
their features and the platforms with which they are compatible. The most com-
mon font formats used in arcade game graphics are organized in these categories:
Bitmapped:
� ROM fonts
� ZSoft fonts
� GEM fonts
� Fastgraph fonts
� Custom game fonts
Scaleable:
� Borland Stroked fonts
� TrueType fonts
� System fonts
ROM Fonts
Native Platform(s): DOS, Linux, and the Macintosh
File Extension(s): N/A
ROM fonts are bitmapped fonts that are built into your computer’s ROM
(Read-Only Memory). Because they come built-in, ROM fonts do not require the
installation of additional font sets in order to be used.
However, despite these advantages, ROM fonts have a number of disadvantages,
including:
� They’re monospaced—All ROM fonts are monospaced and were designed to
only fit within a predefined pixel grid. This gives them poor overall color and
affects their on-screen legibility.
� They’re bitmapped—ROM fonts are bitmapped, and as such cannot be easily
resized.
Chapter 10 / Fonts and Arcade Games 367
FIGURE 10-17: ROM Font Example
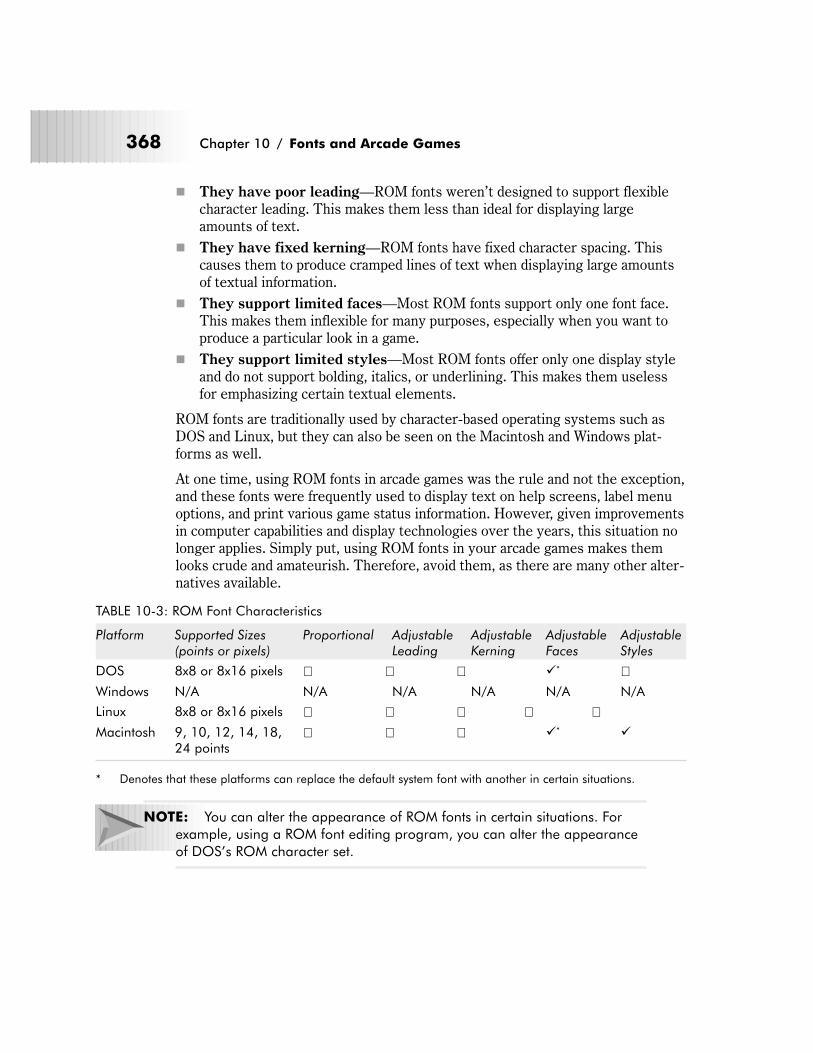
� They have poor leading—ROM fonts weren’t designed to support flexible
character leading. This makes them less than ideal for displaying large
amounts of text.
� They have fixed kerning—ROM fonts have fixed character spacing. This
causes them to produce cramped lines of text when displaying large amounts
of textual information.
� They support limited faces—Most ROM fonts support only one font face.
This makes them inflexible for many purposes, especially when you want to
produce a particular look in a game.
� They support limited styles—Most ROM fonts offer only one display style
and do not support bolding, italics, or underlining. This makes them useless
for emphasizing certain textual elements.
ROM fonts are traditionally used by character-based operating systems such as
DOS and Linux, but they can also be seen on the Macintosh and Windows plat-
forms as well.
At one time, using ROM fonts in arcade games was the rule and not the exception,
and these fonts were frequently used to display text on help screens, label menu
options, and print various game status information. However, given improvements
in computer capabilities and display technologies over the years, this situation no
longer applies. Simply put, using ROM fonts in your arcade games makes them
looks crude and amateurish. Therefore, avoid them, as there are many other alter-
natives available.
TABLE 10-3: ROM Font Characteristics
Platform Supported Sizes(points or pixels)
Proportional AdjustableLeading
AdjustableKerning
AdjustableFaces
AdjustableStyles
DOS 8x8 or 8x16 pixels � � � �* �Windows N/A N/A N/A N/A N/A N/A
Linux 8x8 or 8x16 pixels � � � � �Macintosh 9, 10, 12, 14, 18,
24 points� � � �* �
* Denotes that these platforms can replace the default system font with another in certain situations.
NOTE: You can alter the appearance of ROM fonts in certain situations. For
example, using a ROM font editing program, you can alter the appearance
of DOS’s ROM character set.
368 Chapter 10 / Fonts and Arcade Games
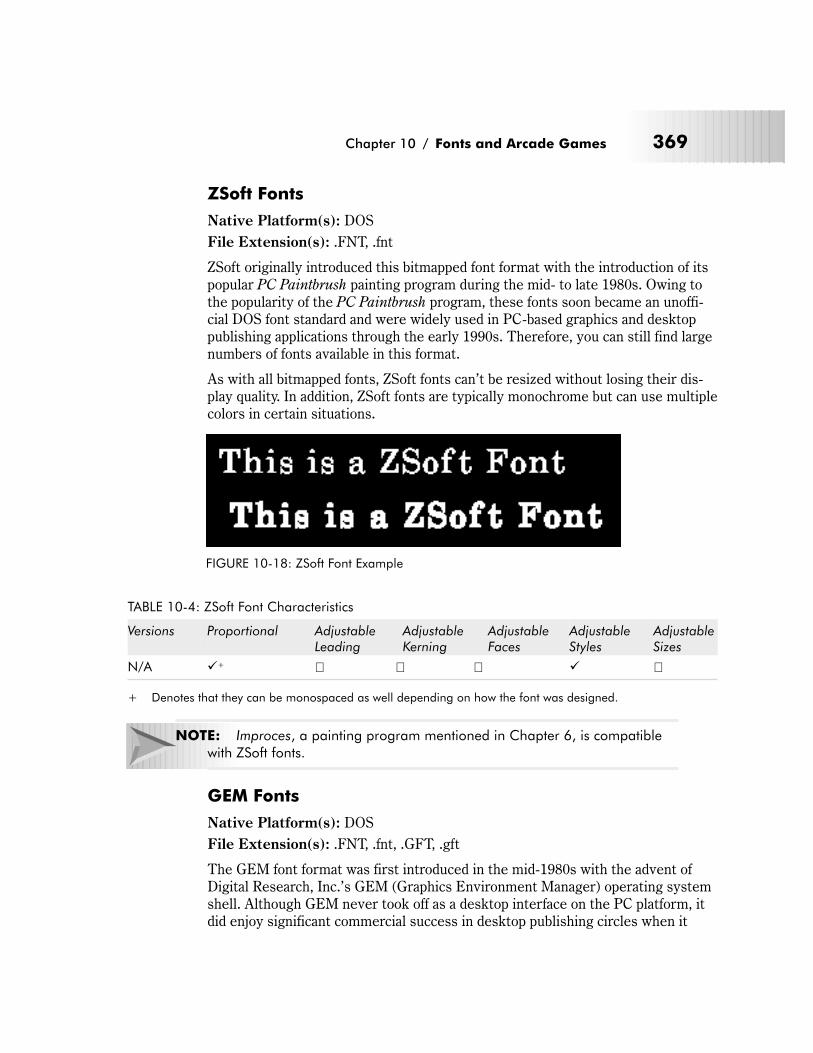
ZSoft Fonts
Native Platform(s): DOS
File Extension(s): .FNT, .fnt
ZSoft originally introduced this bitmapped font format with the introduction of its
popular PC Paintbrush painting program during the mid- to late 1980s. Owing to
the popularity of the PC Paintbrush program, these fonts soon became an unoffi-
cial DOS font standard and were widely used in PC-based graphics and desktop
publishing applications through the early 1990s. Therefore, you can still find large
numbers of fonts available in this format.
As with all bitmapped fonts, ZSoft fonts can’t be resized without losing their dis-
play quality. In addition, ZSoft fonts are typically monochrome but can use multiple
colors in certain situations.
TABLE 10-4: ZSoft Font Characteristics
Versions Proportional AdjustableLeading
AdjustableKerning
AdjustableFaces
AdjustableStyles
AdjustableSizes
N/A �+ � � � � �
+ Denotes that they can be monospaced as well depending on how the font was designed.
NOTE: Improces, a painting program mentioned in Chapter 6, is compatible
with ZSoft fonts.
GEM Fonts
Native Platform(s): DOS
File Extension(s): .FNT, .fnt, .GFT, .gft
The GEM font format was first introduced in the mid-1980s with the advent of
Digital Research, Inc.’s GEM (Graphics Environment Manager) operating system
shell. Although GEM never took off as a desktop interface on the PC platform, it
did enjoy significant commercial success in desktop publishing circles when it
Chapter 10 / Fonts and Arcade Games 369
FIGURE 10-18: ZSoft Font Example
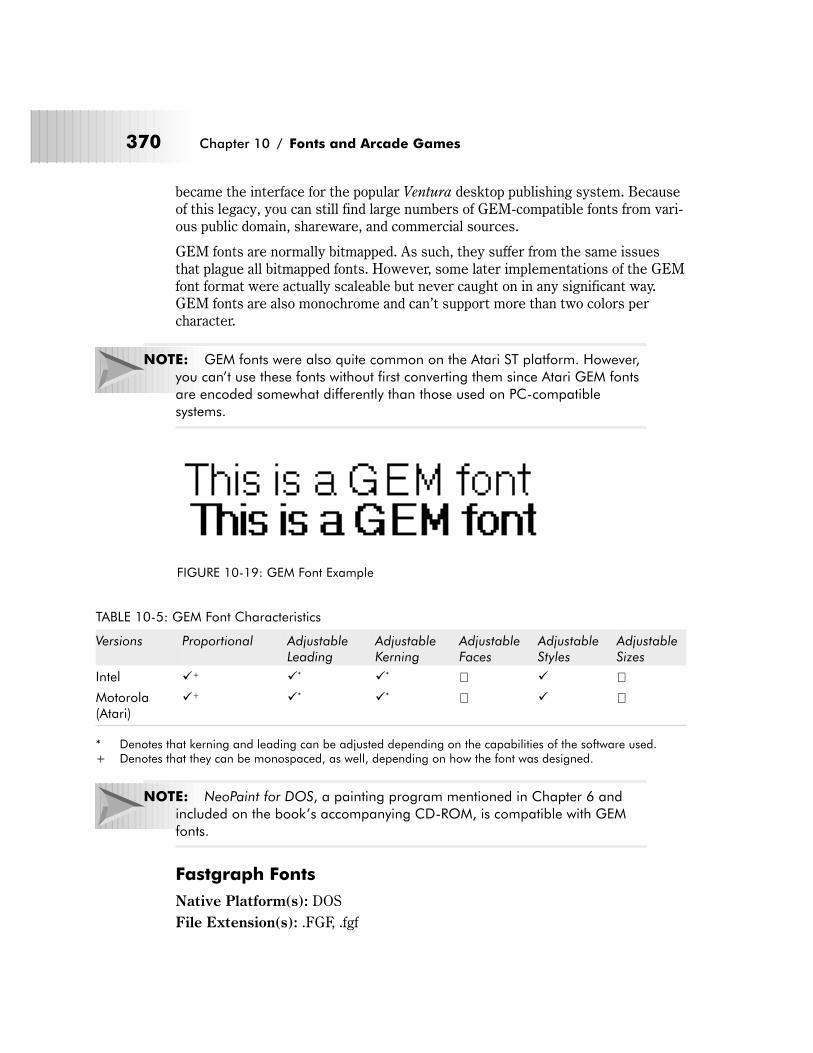
became the interface for the popular Ventura desktop publishing system. Because
of this legacy, you can still find large numbers of GEM-compatible fonts from vari-
ous public domain, shareware, and commercial sources.
GEM fonts are normally bitmapped. As such, they suffer from the same issues
that plague all bitmapped fonts. However, some later implementations of the GEM
font format were actually scaleable but never caught on in any significant way.
GEM fonts are also monochrome and can’t support more than two colors per
character.
NOTE: GEM fonts were also quite common on the Atari ST platform. However,
you can’t use these fonts without first converting them since Atari GEM fonts
are encoded somewhat differently than those used on PC-compatible
systems.
TABLE 10-5: GEM Font Characteristics
Versions Proportional AdjustableLeading
AdjustableKerning
AdjustableFaces
AdjustableStyles
AdjustableSizes
Intel �+ �* �* � � �Motorola(Atari)
�+ �* �* � � �
* Denotes that kerning and leading can be adjusted depending on the capabilities of the software used.+ Denotes that they can be monospaced, as well, depending on how the font was designed.
NOTE: NeoPaint for DOS, a painting program mentioned in Chapter 6 and
included on the book’s accompanying CD-ROM, is compatible with GEM
fonts.
Fastgraph Fonts
Native Platform(s): DOS
File Extension(s): .FGF, .fgf
370 Chapter 10 / Fonts and Arcade Games
FIGURE 10-19: GEM Font Example
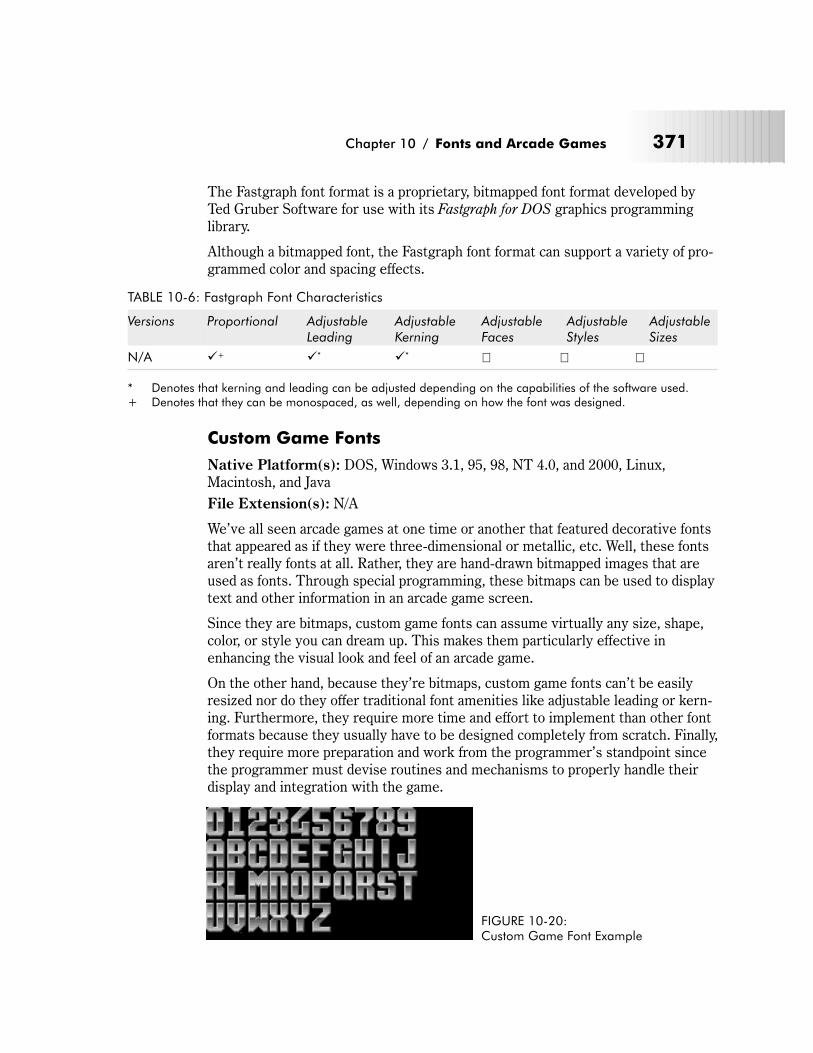
The Fastgraph font format is a proprietary, bitmapped font format developed by
Ted Gruber Software for use with its Fastgraph for DOS graphics programming
library.
Although a bitmapped font, the Fastgraph font format can support a variety of pro-
grammed color and spacing effects.
TABLE 10-6: Fastgraph Font Characteristics
Versions Proportional AdjustableLeading
AdjustableKerning
AdjustableFaces
AdjustableStyles
AdjustableSizes
N/A �+ �* �* � � �
* Denotes that kerning and leading can be adjusted depending on the capabilities of the software used.+ Denotes that they can be monospaced, as well, depending on how the font was designed.
Custom Game Fonts
Native Platform(s): DOS, Windows 3.1, 95, 98, NT 4.0, and 2000, Linux,
Macintosh, and Java
File Extension(s): N/A
We’ve all seen arcade games at one time or another that featured decorative fonts
that appeared as if they were three-dimensional or metallic, etc. Well, these fonts
aren’t really fonts at all. Rather, they are hand-drawn bitmapped images that are
used as fonts. Through special programming, these bitmaps can be used to display
text and other information in an arcade game screen.
Since they are bitmaps, custom game fonts can assume virtually any size, shape,
color, or style you can dream up. This makes them particularly effective in
enhancing the visual look and feel of an arcade game.
On the other hand, because they’re bitmaps, custom game fonts can’t be easily
resized nor do they offer traditional font amenities like adjustable leading or kern-
ing. Furthermore, they require more time and effort to implement than other font
formats because they usually have to be designed completely from scratch. Finally,
they require more preparation and work from the programmer’s standpoint since
the programmer must devise routines and mechanisms to properly handle their
display and integration with the game.
Chapter 10 / Fonts and Arcade Games 371
FIGURE 10-20:Custom Game Font Example

TABLE 10-7: Custom Bitmap Font Characteristics
Versions Proportional AdjustableLeading
AdjustableKerning
AdjustableFaces
AdjustableStyles
AdjustableSizes
N/A � � � � � �
NOTE: Custom bitmapped font sizes tend to be specified in pixels rather than
points.
NOTE: You can create custom game fonts with any painting program or image
editor mentioned in Chapter 6.
Borland Stroked Fonts
Native Platform(s): DOS
File Extension(s): .CHR, .chr
This scaleable font format made its debut with Borland’s Turbo Pascal program-
ming language during the late 1980s. A monochrome-only font format, Borland
Stroked fonts remained in use through the mid-1990s until the advent of the
Windows platform, which abandoned this technology in favor of other scaleable
font technologies like TrueType.
TABLE 10-8: Borland Stroked Font Characteristics
Versions Proportional AdjustableLeading
AdjustableKerning
AdjustableFaces
AdjustableStyles
AdjustableSizes
N/A �* �* �* � � �
* Denotes that kerning and leading can be adjusted depending on the capabilities of the software used.
NOTE: Improces, a painting program mentioned in Chapter 6, is compatible
with Borland Stroked fonts.
372 Chapter 10 / Fonts and Arcade Games
FIGURE 10-21: Borland Stroked Font Example
TrueType Fonts
Native Platform(s): Windows 3.1, 95, 98, NT 4.0, and 2000, Linux, Macintosh,
and Java
File Extension(s): .TTF, .ttf
Apple originally developed the TrueType font format in 1990 as a means of chal-
lenging Adobe (once the leading font developer and technology supplier) in the hot
desktop publishing market. The technology made its debut on the Macintosh plat-
form and the technology was later supplied to Microsoft, which in 1991 introduced
TrueType on the PC with the release of Windows 3.1.
TrueType fonts are inherently scaleable. Therefore, they enjoy all of the advan-
tages that this provides, including the ability to scale text to any size without the
loss of quality. As designed, TrueType fonts are monochromatic. This allows them
to be used for printing as well as for screen display.
TrueType fonts are the standard font formats for both Windows and Macintosh
systems and virtually all graphics programs on these platforms support them.
Until recently, TrueType fonts weren’t compatible with Linux but recent imple-
mentations of that operating system have made their use possible on that platform
as well.
Despite their popularity, you can’t transfer TrueType fonts from one platform to
another without first converting them. This is due to platform-specific font-encod-
ing differences. Fortunately, this is relatively easy to do with the proper software.
TABLE 10-9: TrueType Font Characteristics
Versions Proportional AdjustableLeading
AdjustableKerning
AdjustableFaces
AdjustableStyles
AdjustableSizes
Windows �+ �* �* � � �
Macintosh �+ �* �* � � �
* Denotes that kerning and leading can be adjusted depending on the capabilities of the software used.+ Denotes that they can be monospaced, as well, depending on how the font was designed.
System Fonts
Native Platform(s): DOS, Windows 3.1, 95, 98, NT 4.0, and 2000, Linux,
Macintosh, and Java
File Extension(s): N/A
System fonts are those fonts that come bundled with a particular operating system
or computer platform. They don’t come built-in like ROM fonts are but are the
default fonts supported by a particular system.
Chapter 10 / Fonts and Arcade Games 373
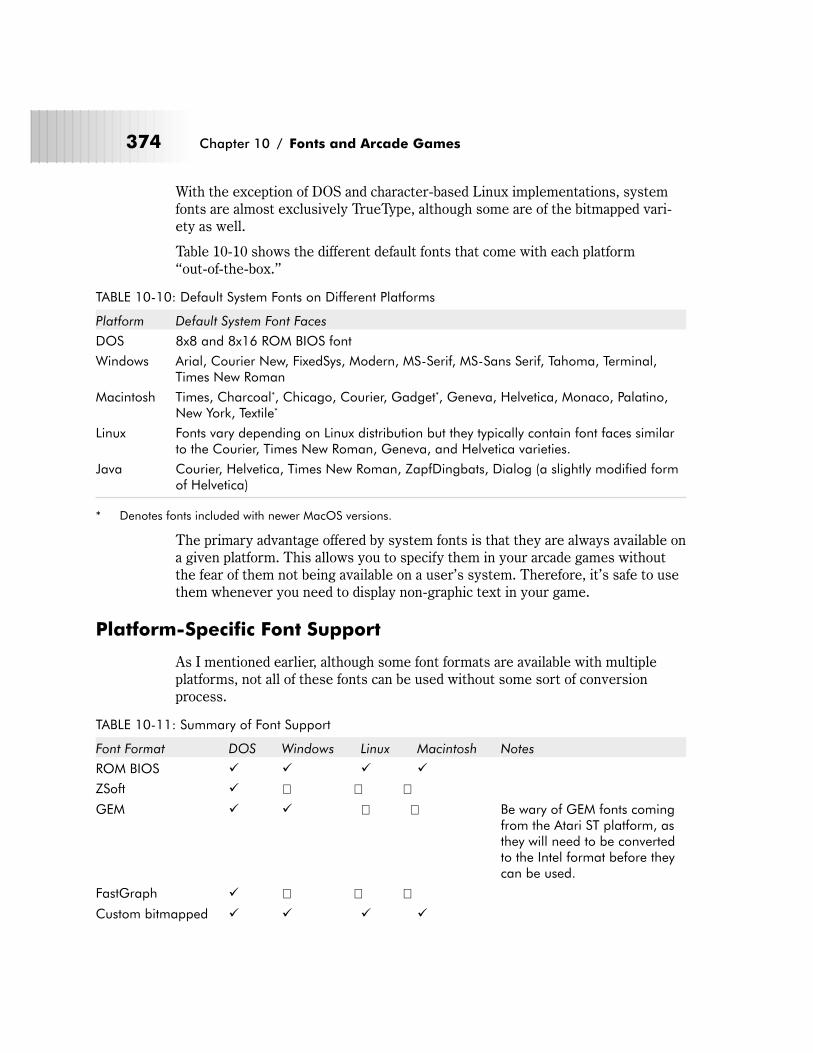
With the exception of DOS and character-based Linux implementations, system
fonts are almost exclusively TrueType, although some are of the bitmapped vari-
ety as well.
Table 10-10 shows the different default fonts that come with each platform
“out-of-the-box.”
TABLE 10-10: Default System Fonts on Different Platforms
Platform Default System Font Faces
DOS 8x8 and 8x16 ROM BIOS font
Windows Arial, Courier New, FixedSys, Modern, MS-Serif, MS-Sans Serif, Tahoma, Terminal,Times New Roman
Macintosh Times, Charcoal*, Chicago, Courier, Gadget*, Geneva, Helvetica, Monaco, Palatino,New York, Textile*
Linux Fonts vary depending on Linux distribution but they typically contain font faces similarto the Courier, Times New Roman, Geneva, and Helvetica varieties.
Java Courier, Helvetica, Times New Roman, ZapfDingbats, Dialog (a slightly modified formof Helvetica)
* Denotes fonts included with newer MacOS versions.
The primary advantage offered by system fonts is that they are always available on
a given platform. This allows you to specify them in your arcade games without
the fear of them not being available on a user’s system. Therefore, it’s safe to use
them whenever you need to display non-graphic text in your game.
Platform-Specific Font Support
As I mentioned earlier, although some font formats are available with multiple
platforms, not all of these fonts can be used without some sort of conversion
process.
TABLE 10-11: Summary of Font Support
Font Format DOS Windows Linux Macintosh Notes
ROM BIOS � � � �
ZSoft � � � �GEM � � � � Be wary of GEM fonts coming
from the Atari ST platform, asthey will need to be convertedto the Intel format before theycan be used.
FastGraph � � � �Custom bitmapped � � � �
374 Chapter 10 / Fonts and Arcade Games
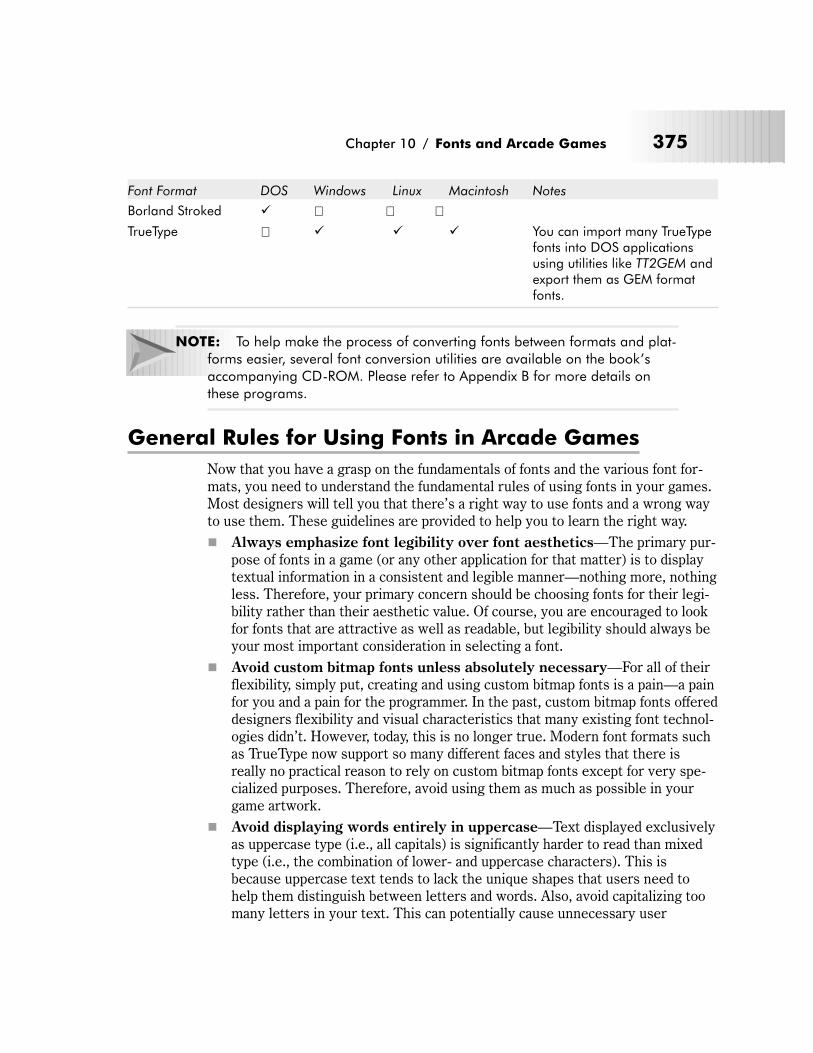
Font Format DOS Windows Linux Macintosh Notes
Borland Stroked � � � �TrueType � � � � You can import many TrueType
fonts into DOS applicationsusing utilities like TT2GEM andexport them as GEM formatfonts.
NOTE: To help make the process of converting fonts between formats and plat-
forms easier, several font conversion utilities are available on the book’s
accompanying CD-ROM. Please refer to Appendix B for more details on
these programs.
General Rules for Using Fonts in Arcade Games
Now that you have a grasp on the fundamentals of fonts and the various font for-
mats, you need to understand the fundamental rules of using fonts in your games.
Most designers will tell you that there’s a right way to use fonts and a wrong way
to use them. These guidelines are provided to help you to learn the right way.
� Always emphasize font legibility over font aesthetics—The primary pur-
pose of fonts in a game (or any other application for that matter) is to display
textual information in a consistent and legible manner—nothing more, nothing
less. Therefore, your primary concern should be choosing fonts for their legi-
bility rather than their aesthetic value. Of course, you are encouraged to look
for fonts that are attractive as well as readable, but legibility should always be
your most important consideration in selecting a font.
� Avoid custom bitmap fonts unless absolutely necessary—For all of their
flexibility, simply put, creating and using custom bitmap fonts is a pain—a pain
for you and a pain for the programmer. In the past, custom bitmap fonts offered
designers flexibility and visual characteristics that many existing font technol-
ogies didn’t. However, today, this is no longer true. Modern font formats such
as TrueType now support so many different faces and styles that there is
really no practical reason to rely on custom bitmap fonts except for very spe-
cialized purposes. Therefore, avoid using them as much as possible in your
game artwork.
� Avoid displaying words entirely in uppercase—Text displayed exclusively
as uppercase type (i.e., all capitals) is significantly harder to read than mixed
type (i.e., the combination of lower- and uppercase characters). This is
because uppercase text tends to lack the unique shapes that users need to
help them distinguish between letters and words. Also, avoid capitalizing too
many letters in your text. This can potentially cause unnecessary user
Chapter 10 / Fonts and Arcade Games 375
confusion. When in doubt, only capitalize the first letter in each line of text
and the first letter of proper nouns such as the names of people, places, or
things.
� Avoid overly decorative fonts for body text—Overly decorative fonts can
be difficult to read on-screen for the same reasons that most serif fonts are.
Also, be careful when using them for any text less than 16 points in size.
� Avoid overusing bold fonts—Bolding text is used to give a word or phrase
emphasis. However, bold fonts tend to be difficult to read when used over
large amounts of copy. This is due to the fact that bolded fonts have thicker
strokes than normal text. This additional stroke thickness, particularly at
lower screen resolutions, can dramatically affect the amount of space that’s
available inside letters like “o,” “e,” “d,” and “g.” Users depend on these
spaces to recognize words. As this intra-letter spacing gets smaller, the text
can become harder and harder to recognize.
� Avoid overusing italic fonts—Italics are meant to provide words and
phrases with a “soft” emphasis. However, italic text, when used in large
amounts, can disrupt how a user reads information presented on the screen.
Under normal circumstances, italics confuse the reader and slows down the
pace at which they can decipher text. This explains why italics are effective
for emphasizing certain words or phrases. Yet, when used in large amounts,
this characteristic of italics can also make text more difficult to read and the
information you’re trying to convey more difficult to remember.
� Avoid overusing underlined fonts—Underlining is commonly used inter-
changeably with italics in order to emphasize certain words or phrases in a
subtle manner. Unfortunately, underlining doesn’t always translate very well
to the computer screen due to the limitation of available screen resolution. In
addition, when used on blocks of text with tight leading, underlining can dras-
tically affect legibility. Therefore, use underlining sparingly or, better yet, not
at all.
� Avoid using anti-aliased fonts for small text—Anti-aliased fonts are very
effective for displaying large text items, but due to resolution limitations they
do not produce very readable text at very small text sizes. See Table 10-2 for
more details.
� Make use of kerning and tracking as much as possible—Letter and line
spacing can have a significant impact in the effectiveness of your message,
especially when rendered on-screen where you have to contend with limited
screen resolution. Kerning tends to become more important as font size
increases. To minimize legibility issues, keep kerning narrower at large font
sizes and wider at small font sizes. Similarly, tracking can make text look too
cramped at small font sizes and too open at large font sizes. Adjust it to suit
your circumstances.
376 Chapter 10 / Fonts and Arcade Games
� Pay attention to line spacing—Line spacing, or leading, can be a very effec-
tive aid in drawing the user’s eye from word to word. Very narrow line spacing
can cause the user to return to the same line of text. Meanwhile, line spacing
that is too wide can slow the user down and force them to look for the start of
the next line of text. Although line spacing will vary according to the font style
and size you choose, a good rule of thumb is to add two to four points between
the lowest descender and highest ascender of a given line of text. So, for
example, if you’re using a 12-point font, set the leading to 14.
� Use centered text carefully—Centered text can be very effective for focus-
ing the user’s attention on certain text elements such as titles and headlines.
However, if used too much or used improperly, centered text can have a detri-
mental effect on text readability. In addition, when used too much in a game,
centered text can appear amateurish to the player.
� Use sans serif fonts for game text—Sans serif fonts are inherently easier
to read on-screen than text that uses serif fonts. This is because the individual
character serifs can blend together due to screen resolution limitations. Serif
fonts are fine to use for headlines and the like because such text usually tends
to be large and well spaced.
� Use sans serif fonts for casual text—Due to the simple construction of
their characters, sans serif fonts are ideally suited for presenting a casual,
laid-back feeling on-screen. Use them for any text that doesn’t require an
authoritative air.
� Use serif fonts for elegant or serious text—Serif fonts are best used for
text that requires a sense of elegance.
Using Fonts in Arcade Games
Fonts, when properly used, can liven up and enhance an arcade game’s graphics in
addition to their primary role of displaying important game-related information. In
arcade games, fonts are usually relegated to these three areas:
� Game titles
� Body text
� Status indicators
Game Titles
Game titles consist of any words or phrases used to describe and label information
displayed on a given game screen.
For our purposes, any text greater than 16 points in size can be considered a game
title. Game titles are usually between one and six words in length.
Chapter 10 / Fonts and Arcade Games 377
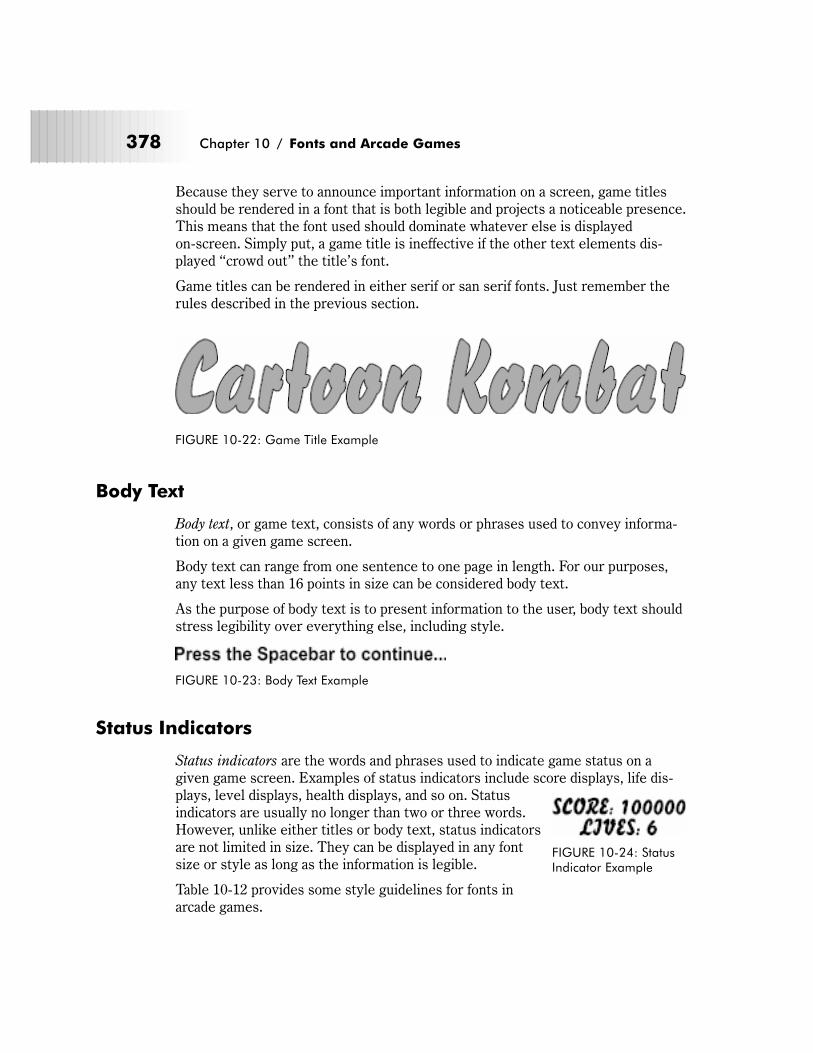
Because they serve to announce important information on a screen, game titles
should be rendered in a font that is both legible and projects a noticeable presence.
This means that the font used should dominate whatever else is displayed
on-screen. Simply put, a game title is ineffective if the other text elements dis-
played “crowd out” the title’s font.
Game titles can be rendered in either serif or san serif fonts. Just remember the
rules described in the previous section.
Body Text
Body text, or game text, consists of any words or phrases used to convey informa-
tion on a given game screen.
Body text can range from one sentence to one page in length. For our purposes,
any text less than 16 points in size can be considered body text.
As the purpose of body text is to present information to the user, body text should
stress legibility over everything else, including style.
Status Indicators
Status indicators are the words and phrases used to indicate game status on a
given game screen. Examples of status indicators include score displays, life dis-
plays, level displays, health displays, and so on. Status
indicators are usually no longer than two or three words.
However, unlike either titles or body text, status indicators
are not limited in size. They can be displayed in any font
size or style as long as the information is legible.
Table 10-12 provides some style guidelines for fonts in
arcade games.
378 Chapter 10 / Fonts and Arcade Games
FIGURE 10-22: Game Title Example
FIGURE 10-23: Body Text Example
FIGURE 10-24: StatusIndicator Example

TABLE 10-12: Arcade Game Font Style Guide
ArcadeGame Text
Bold Italic Size Proportional Monospaced Face Anti-aliased
Game titles � � Greaterthan 16points
� � Decorative �
Body text � � Less than16 points
� � Non-decorative*
�
Statusindicators
� � Any size � � Non-decorative*
�
* Depends on the legibility of the font being used.
� Game titles—Title text may be bolded or italicized because their size tends
to minimize the issue of screen resolution. Title text works best when it is
displayed using proportional and anti-aliased fonts.
� Body text—Body text shouldn’t be bolded or italicized due to screen resolu-
tion limitations. Although body text can be proportional, monospaced fonts
offer the best legibility for most types of body text, especially when lots of text
is involved. It’s also not a good idea to anti-alias body text as legibility may be
affected. When in doubt, refer to Table 10-1 and experiment with the values
shown there.
� Status indicators—Status indicators have very few stylistic restrictions on
them. Pretty much anything can go as long as legibility isn’t compromised by
the font face and style used.
Arcade Game Font Recommendations
Every font format has its place in arcade game graphics design. Use the informa-
tion presented in Tables 10-13 and 10-14 to help determine which font formats
and font styles to use in your own game projects.
TABLE 10-13: Font Format Game Font Recommendations
Font Format Game Titles Body Text Status Indicators
ROM BIOS � � �
ZSoft � � �
GEM � � �
Fastgraph � � �
Custom Bitmapped � � �
Borland Stroked � � �TrueType � � �
Chapter 10 / Fonts and Arcade Games 379

� ROM fonts—These fonts are excellent for body text but are virtually useless
for title text. Although they can be used for status indicators, this isn’t recom-
mended due to their overall inflexibility with regard to sizing and style.
� ZSoft fonts—As a bitmapped font, ZSoft fonts work well for all arcade game
text applications. Just be aware of their limitations with regard to size, spac-
ing, and quality (anti-aliasing).
� GEM fonts—GEM fonts also work well for all arcade text purposes. How-
ever, like ZSoft fonts, they tend to be limited in terms of size, spacing, and
quality.
� Fastgraph fonts—Fastgraph fonts are useful for all arcade game text pur-
poses. They suffer the same problems as ZSoft and GEM fonts but offer more
flexibility due to their ability to control their spacing via software.
� Custom bitmapped—Custom bitmapped fonts can be used for any arcade
game text application. They can be especially effective for titles. Just make
sure that the fonts used are legible. However, be aware that the widespread
availability of Windows and Macintosh TrueType fonts often negates their
usefulness.
� Borland Stroked fonts—These fonts are useful for title text but not much
else. Despite being scaleable, their quality and legibility is usually lacking at
all but the largest sizes.
� TrueType fonts—TrueType fonts are the most flexible of all of the font for-
mats mentioned here. They can be used to render any game text and should
be used over the other font formats whenever possible.
Table 10-14 provides a list of recommended TrueType fonts to use in your game
projects. The fonts listed here are available from a variety of sources. Some are
commercial, some are pre-installed on most systems, but most are from freeware
or shareware sources. In addition, the Internet offers one of the best selections of
fonts. The supporting Web site for this book, http://www.gamegfx.com has a
listing of some of the best sites for downloading fonts.
NOTE: Check on the legality of any font you download from the Internet. As it
happens, many commercial fonts are repacked as being free or shareware
when they are not.
380 Chapter 10 / Fonts and Arcade Games
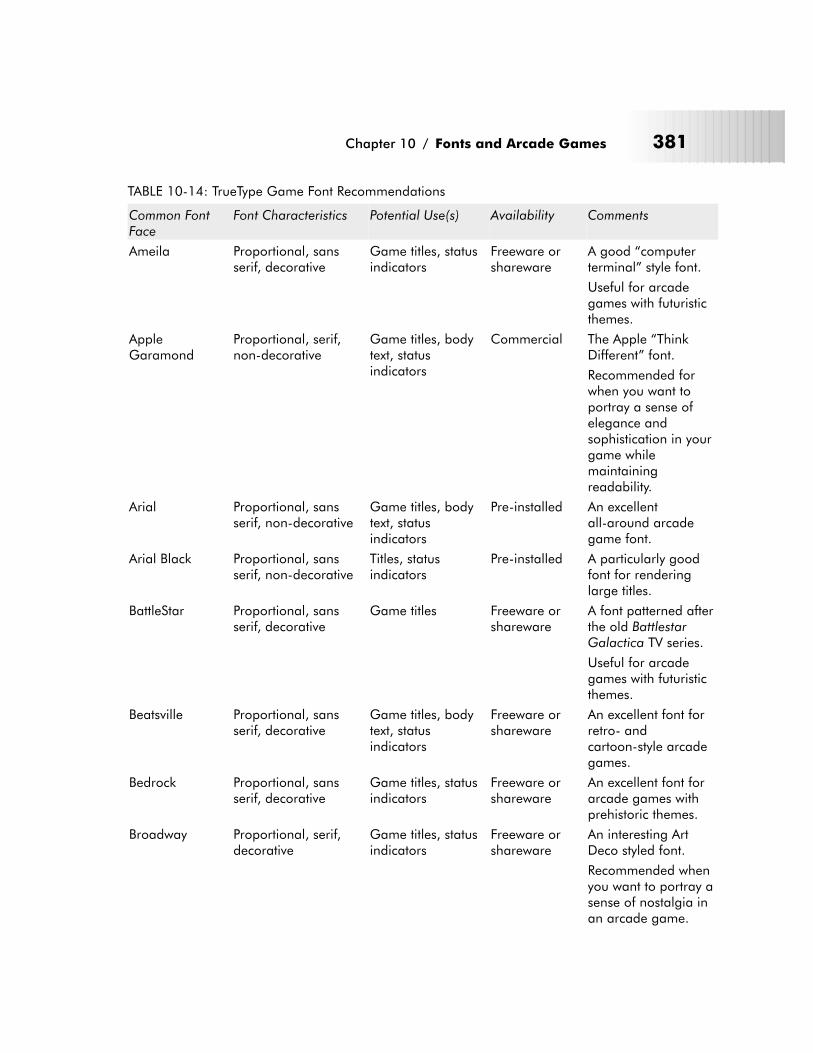
TABLE 10-14: TrueType Game Font Recommendations
Common FontFace
Font Characteristics Potential Use(s) Availability Comments
Ameila Proportional, sansserif, decorative
Game titles, statusindicators
Freeware orshareware
A good “computerterminal” style font.
Useful for arcadegames with futuristicthemes.
AppleGaramond
Proportional, serif,non-decorative
Game titles, bodytext, statusindicators
Commercial The Apple “ThinkDifferent” font.
Recommended forwhen you want toportray a sense ofelegance andsophistication in yourgame whilemaintainingreadability.
Arial Proportional, sansserif, non-decorative
Game titles, bodytext, statusindicators
Pre-installed An excellentall-around arcadegame font.
Arial Black Proportional, sansserif, non-decorative
Titles, statusindicators
Pre-installed A particularly goodfont for renderinglarge titles.
BattleStar Proportional, sansserif, decorative
Game titles Freeware orshareware
A font patterned afterthe old BattlestarGalactica TV series.
Useful for arcadegames with futuristicthemes.
Beatsville Proportional, sansserif, decorative
Game titles, bodytext, statusindicators
Freeware orshareware
An excellent font forretro- andcartoon-style arcadegames.
Bedrock Proportional, sansserif, decorative
Game titles, statusindicators
Freeware orshareware
An excellent font forarcade games withprehistoric themes.
Broadway Proportional, serif,decorative
Game titles, statusindicators
Freeware orshareware
An interesting ArtDeco styled font.
Recommended whenyou want to portray asense of nostalgia inan arcade game.
Chapter 10 / Fonts and Arcade Games 381
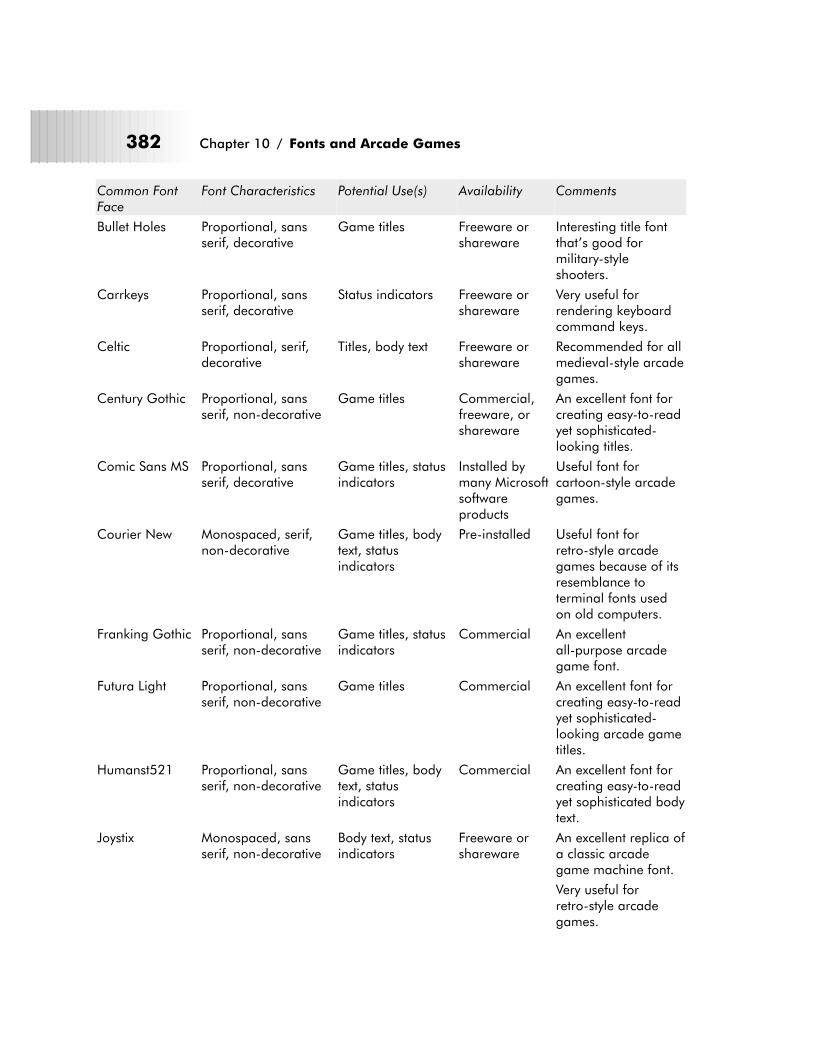
Common FontFace
Font Characteristics Potential Use(s) Availability Comments
Bullet Holes Proportional, sansserif, decorative
Game titles Freeware orshareware
Interesting title fontthat’s good formilitary-styleshooters.
Carrkeys Proportional, sansserif, decorative
Status indicators Freeware orshareware
Very useful forrendering keyboardcommand keys.
Celtic Proportional, serif,decorative
Titles, body text Freeware orshareware
Recommended for allmedieval-style arcadegames.
Century Gothic Proportional, sansserif, non-decorative
Game titles Commercial,freeware, orshareware
An excellent font forcreating easy-to-readyet sophisticated-looking titles.
Comic Sans MS Proportional, sansserif, decorative
Game titles, statusindicators
Installed bymany Microsoftsoftwareproducts
Useful font forcartoon-style arcadegames.
Courier New Monospaced, serif,non-decorative
Game titles, bodytext, statusindicators
Pre-installed Useful font forretro-style arcadegames because of itsresemblance toterminal fonts usedon old computers.
Franking Gothic Proportional, sansserif, non-decorative
Game titles, statusindicators
Commercial An excellentall-purpose arcadegame font.
Futura Light Proportional, sansserif, non-decorative
Game titles Commercial An excellent font forcreating easy-to-readyet sophisticated-looking arcade gametitles.
Humanst521 Proportional, sansserif, non-decorative
Game titles, bodytext, statusindicators
Commercial An excellent font forcreating easy-to-readyet sophisticated bodytext.
Joystix Monospaced, sansserif, non-decorative
Body text, statusindicators
Freeware orshareware
An excellent replica ofa classic arcadegame machine font.
Very useful forretro-style arcadegames.
382 Chapter 10 / Fonts and Arcade Games
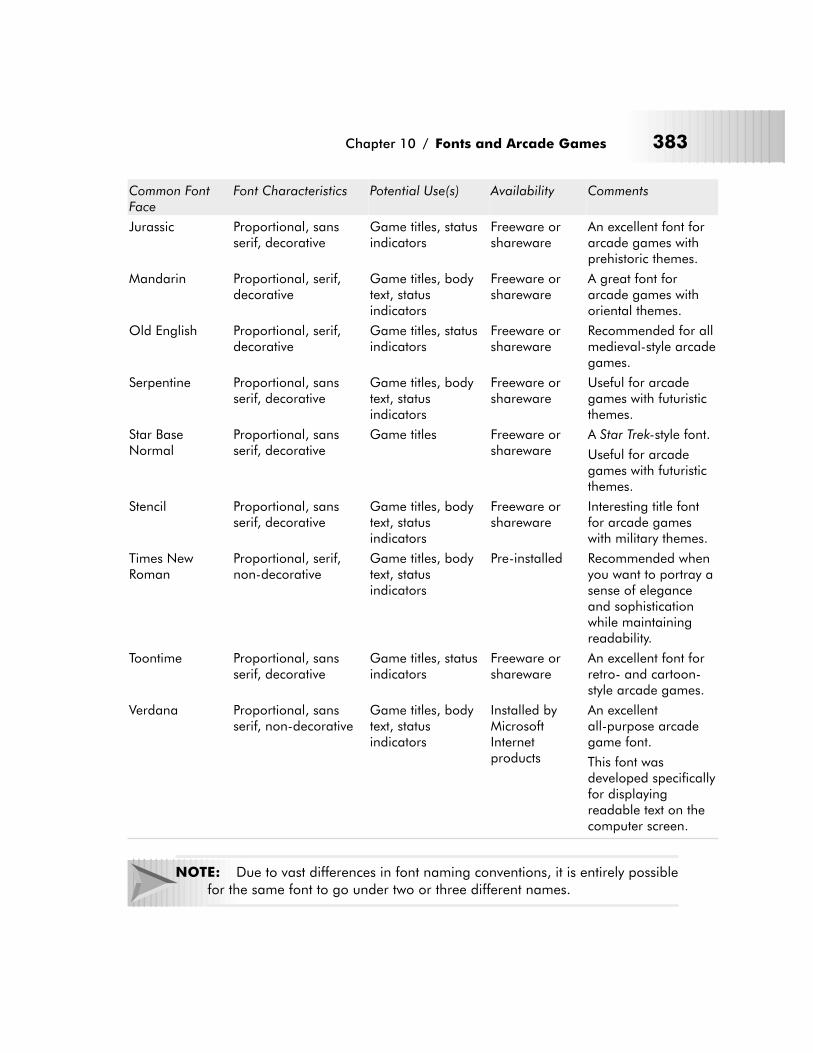
Common FontFace
Font Characteristics Potential Use(s) Availability Comments
Jurassic Proportional, sansserif, decorative
Game titles, statusindicators
Freeware orshareware
An excellent font forarcade games withprehistoric themes.
Mandarin Proportional, serif,decorative
Game titles, bodytext, statusindicators
Freeware orshareware
A great font forarcade games withoriental themes.
Old English Proportional, serif,decorative
Game titles, statusindicators
Freeware orshareware
Recommended for allmedieval-style arcadegames.
Serpentine Proportional, sansserif, decorative
Game titles, bodytext, statusindicators
Freeware orshareware
Useful for arcadegames with futuristicthemes.
Star BaseNormal
Proportional, sansserif, decorative
Game titles Freeware orshareware
A Star Trek-style font.
Useful for arcadegames with futuristicthemes.
Stencil Proportional, sansserif, decorative
Game titles, bodytext, statusindicators
Freeware orshareware
Interesting title fontfor arcade gameswith military themes.
Times NewRoman
Proportional, serif,non-decorative
Game titles, bodytext, statusindicators
Pre-installed Recommended whenyou want to portray asense of eleganceand sophisticationwhile maintainingreadability.
Toontime Proportional, sansserif, decorative
Game titles, statusindicators
Freeware orshareware
An excellent font forretro- and cartoon-style arcade games.
Verdana Proportional, sansserif, non-decorative
Game titles, bodytext, statusindicators
Installed byMicrosoftInternetproducts
An excellentall-purpose arcadegame font.
This font wasdeveloped specificallyfor displayingreadable text on thecomputer screen.
NOTE: Due to vast differences in font naming conventions, it is entirely possible
for the same font to go under two or three different names.
Chapter 10 / Fonts and Arcade Games 383

NOTE: The book’s accompanying CD-ROM contains a number of useful
freeware and shareware fonts, including several of the fonts described in
Table 10-14.
384 Chapter 10 / Fonts and Arcade Games

Chapter 11
Planning ArcadeGame Graphics
In this chapter, you’ll learn about:
� Planning your arcade game graphics
� The game summary
� The game action sequence
� The graphics specification
� Technical restrictions
� The game glossary
385
Behind every successful arcade game project stands a well-crafted plan. This
being said, before you plot even a single pixel, you should take the time to plan out
every aspect of your game’s artwork from its appearance to how the individual
elements and objects will interact with each other when displayed on-screen. Sim-
ply put, creating a detailed plan at the start of each new game project will save you
time and effort, reduce mistakes, and improve the overall quality of the artwork
that you create.
The Design Plan
Let’s take a look at the design plan, or the document that details and records all of
the creative-related issues that are associated with your game. An effective and
well-written design plan will include most, if not all, of these elements:
� Game summary
� Game action sequence
� Graphics specification
� Technical restrictions and stipulations
� Project schedule
� Game glossary
Before continuing, it’s important to realize that the extent to which you adhere to
these elements in your own game design plans really depends on the size and
sophistication of the game project at hand. Larger games should include all of
these items, while smaller games can omit one or more of these steps. Use your
best judgment here, especially if time is an issue. There’s no reason to craft a
full-blown design plan for a really simple game. At the same time, however, you’re
only hurting yourself if you skimp on these details for a big game project.
NOTE: The purpose of this chapter is to point you and/or your development
team in the right direction regarding how you want the game to look and
work—nothing more. The last thing I want to do is dictate how something
must be done. After all, what works for me might not work for you.
The Game Summary (required)
The game summary provides a general overview of the game in question. The
purpose of this part of the design plan is to get you thinking about the look of the
game as early as possible in the design process. Since the game summary serves
as the foundation of your design plan, it should be comprehensive but not overly
detailed; use the other sections of the design plan to really get into specifics and
fill in any gaps that might develop.
386 Chapter 11 / Planning Arcade Game Graphics
It should include these elements:
� Game back story
� Game description
� Game object inventory
� Game functionality overview
Game Back Story (optional)
This section provides the basic background story for your game.
Generally speaking, the back story doesn’t have any direct influence on the game
except to make it seem more interesting to the player; therefore, you can leave it
out if you want.
In terms of size, it can be as descriptive or as vague as you want. It’s really up to
you.
Example:
The year is 2299 and you’ve just arrived to assist in the asteroidsweeping operation along the frontier.
You volunteered for this duty in the hopes of avoiding long-term militaryservice on some alien-infested world. You thought it would be easy. Wellbuddy, it looks like you were wrong…
Game Description (required)
The purpose of this section is to summarize and explain the overall theme, func-
tion, and mechanics of your game. This section is required because without a
game description, no one will have any idea what your game is about!
Try to limit the length of this section unless there’s a particular need to go into
more detail. One or two short paragraphs should be sufficient.
Example:
Disasteroids is an “asteroids”-style arcade game in which the playermaneuvers a small spaceship through a dangerous planetary asteroid field.The player scores points by shooting at and destroying these asteroids. Atthe same time, the player must avoid dense bands of roving asteroids,fast-moving asteroid fragments, and other perils including belligerentalien spaceships and mines.
The asteroids that appear are all randomly generated; however, each gamelevel assigns a specific number of asteroids to be destroyed called aquota. After all of the asteroids on a given level are eliminated, theplayer is automatically transported to the next one.
Chapter 11 / Planning Arcade Game Graphics 387
Game Object Inventory (required)
This section is used to list and describe all of the game’s objects from background
images to text elements. Each object description should include pertinent infor-
mation on object properties such as size and color, as well as any associated
actions or movements. Doing this not only helps you get a better sense of the
game’s objects, but should help anyone else involved with the project as well.
The object inventory list should be as thorough as possible, but you should try to
keep the individual object descriptions brief. Two or three sentences per object
should be more than enough at this stage. Later, once you have a better sense of
the various game elements, you can add more.
Examples:
� Player Ship—A round, metallic spacecraft that is controlled by theplayer. The player’s ship is equipped with a blaster cannon that shootsvarious types of energy projectiles and it can move in all eightdirections.
� Arian Magnetic Mine—A small, metallic, slow-moving object that driftsrandomly across the game screen. It will be completely vaporized whenit collides with another object (except another mine).
NOTE: You may also find it helpful to include rough sketches of the different
game objects mentioned here. You can place them on a separate page or
simply draw them alongside each object’s entry. Doing this can help you
and other development team members to get a better handle on what
you’re thinking regarding the objects you’re designing. It might also help
eliminate any dead-end artwork, or art that doesn’t quite fit the feel of the
game, before things go too far.
Game Functionality Overview (required)
The purpose of this section is to define the game’s desired functionality. It should
consist of a simple, bulleted list.
Example:
� Runs on any Pentium-based PC running Windows 95, 98, or NT 4.0.
� Offers 10 increasingly difficult levels of play.
� Includes a special arcade “Classic” mode with eight levels of play.
� Battle four types of asteroids, alien spacecraft, minelayers, andmines.
� Obtain weapon power ups and extra lives.
388 Chapter 11 / Planning Arcade Game Graphics
The Game Action Sequence (required)
The game action sequence is essentially a storyboard that details the various
screens needed to play the game, the order in which they appear, and the various
attributes and actions associated with them. All arcade games include two types of
game screens: functional screens and play screens.
Functional screens are screens that contain game-related information, control, and
configuration options. This includes title/introductory screens, menu/option
screens, transitional/cut-scene screens, help screens, credits screens, and game
over screens.
Play screens are any screens where game activity occurs; in other words, they are
the actual game levels.
The game flow sequence consists of three parts:
� The game action flowchart
� The screen summary
� Screen mock-ups
The Game Action Flowchart (required)
This is a diagram that illustrates the basic flow of action within the game. It can
range from something as crude as a piece of loose-leaf paper with hand-drawn flow
diagrams to something very sophisticated that was produced with a professional-
quality flowcharting package. Either is fine as long as they include information
about the various paths of action that can occur in the game.
NOTE: Whenever possible, use flowcharting software to create these diagrams.
Such programs allow you to make changes easily and will give you flexibility
when it comes to printing and sharing the information with others. To help
you with this, I’ve included a trial copy of WizFlow flowcharting software on
the book’s accompanying CD-ROM. See Appendix B for more information
on this program.
Chapter 11 / Planning Arcade Game Graphics 389
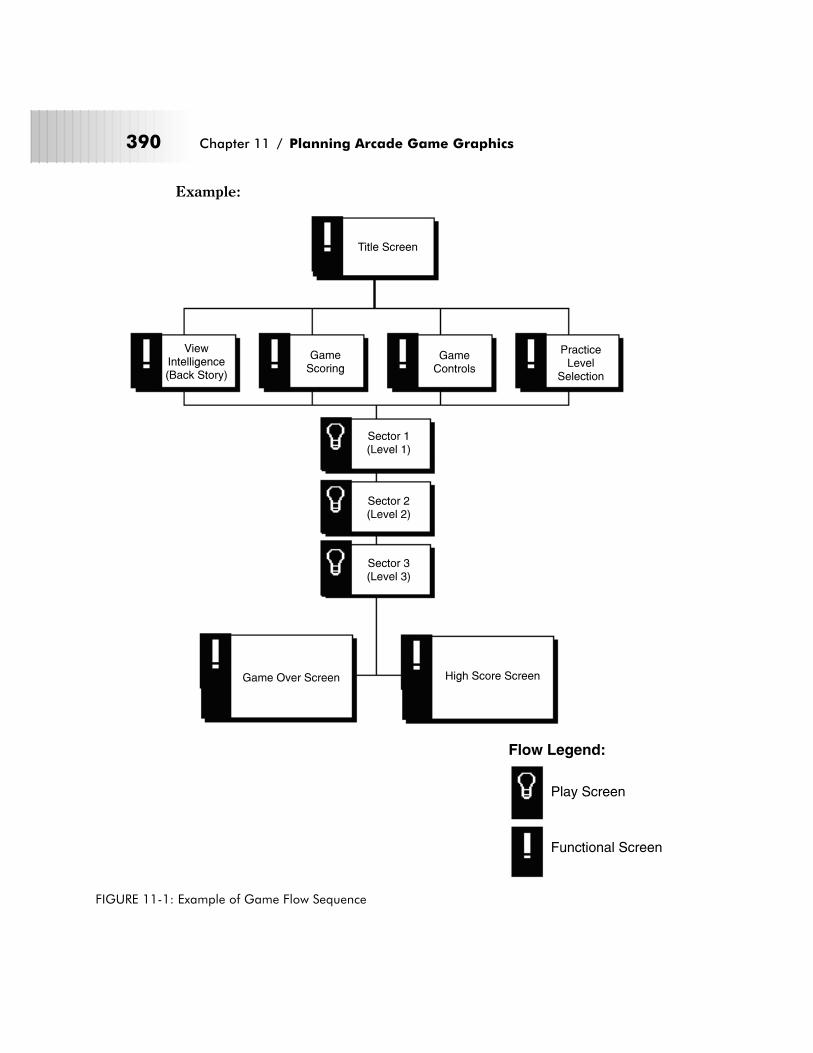
Example:
390 Chapter 11 / Planning Arcade Game Graphics
Title Screen
ViewIntelligence(Back Story)
GameScoring
GameControls
PracticeLevel
Selection
Sector 1(Level 1)
Sector 2(Level 2)
Sector 3(Level 3)
Game Over Screen High Score Screen
Flow Legend:
Play Screen
Functional Screen
FIGURE 11-1: Example of Game Flow Sequence
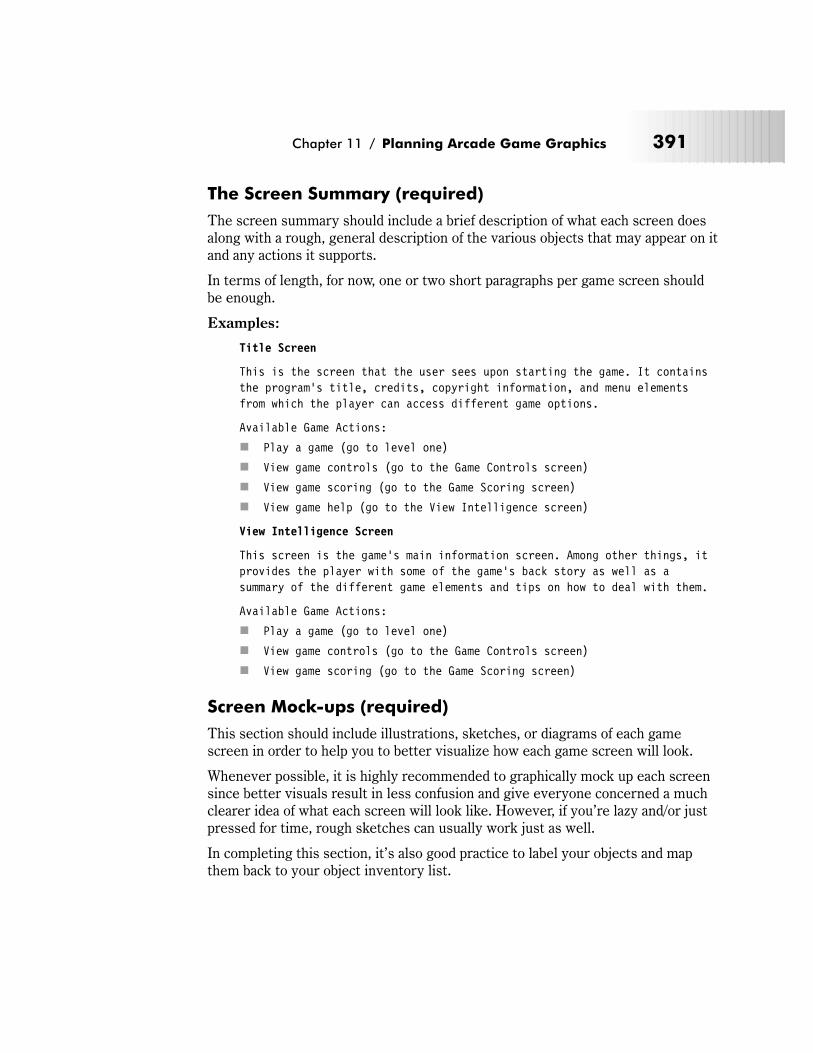
The Screen Summary (required)
The screen summary should include a brief description of what each screen does
along with a rough, general description of the various objects that may appear on it
and any actions it supports.
In terms of length, for now, one or two short paragraphs per game screen should
be enough.
Examples:
Title Screen
This is the screen that the user sees upon starting the game. It containsthe program’s title, credits, copyright information, and menu elementsfrom which the player can access different game options.
Available Game Actions:
� Play a game (go to level one)
� View game controls (go to the Game Controls screen)
� View game scoring (go to the Game Scoring screen)
� View game help (go to the View Intelligence screen)
View Intelligence Screen
This screen is the game’s main information screen. Among other things, itprovides the player with some of the game’s back story as well as asummary of the different game elements and tips on how to deal with them.
Available Game Actions:
� Play a game (go to level one)
� View game controls (go to the Game Controls screen)
� View game scoring (go to the Game Scoring screen)
Screen Mock-ups (required)
This section should include illustrations, sketches, or diagrams of each game
screen in order to help you to better visualize how each game screen will look.
Whenever possible, it is highly recommended to graphically mock up each screen
since better visuals result in less confusion and give everyone concerned a much
clearer idea of what each screen will look like. However, if you’re lazy and/or just
pressed for time, rough sketches can usually work just as well.
In completing this section, it’s also good practice to label your objects and map
them back to your object inventory list.
Chapter 11 / Planning Arcade Game Graphics 391
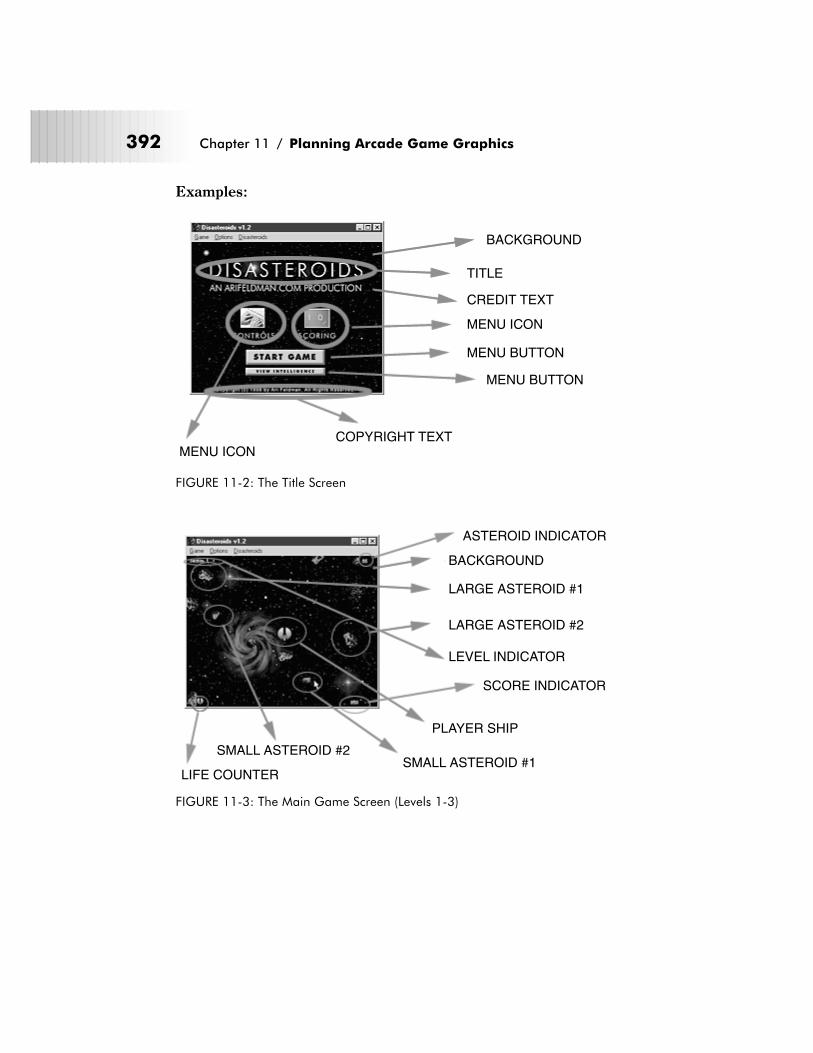
Examples:
392 Chapter 11 / Planning Arcade Game Graphics
BACKGROUND
TITLE
CREDIT TEXT
COPYRIGHT TEXT
MENU ICON
MENU ICON
MENU BUTTON
MENU BUTTON
FIGURE 11-2: The Title Screen
BACKGROUND
ASTEROID INDICATOR
LARGE ASTEROID #1
SMALL ASTEROID #1SMALL ASTEROID #2
PLAYER SHIP
LIFE COUNTER
LARGE ASTEROID #2
LEVEL INDICATOR
SCORE INDICATOR
FIGURE 11-3: The Main Game Screen (Levels 1-3)
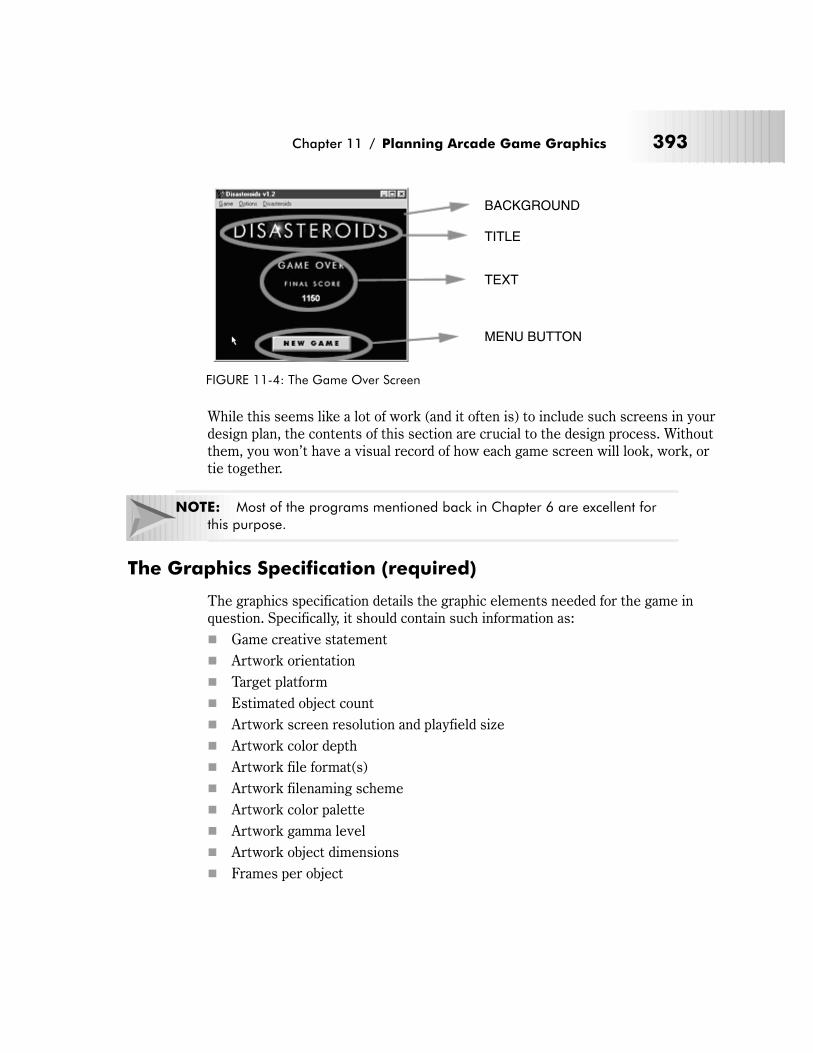
While this seems like a lot of work (and it often is) to include such screens in your
design plan, the contents of this section are crucial to the design process. Without
them, you won’t have a visual record of how each game screen will look, work, or
tie together.
NOTE: Most of the programs mentioned back in Chapter 6 are excellent for
this purpose.
The Graphics Specification (required)
The graphics specification details the graphic elements needed for the game in
question. Specifically, it should contain such information as:
� Game creative statement
� Artwork orientation
� Target platform
� Estimated object count
� Artwork screen resolution and playfield size
� Artwork color depth
� Artwork file format(s)
� Artwork filenaming scheme
� Artwork color palette
� Artwork gamma level
� Artwork object dimensions
� Frames per object
Chapter 11 / Planning Arcade Game Graphics 393
BACKGROUND
TITLE
TEXT
MENU BUTTON
FIGURE 11-4: The Game Over Screen
� Object actions and facings
� Game text font(s)
� Miscellaneous art direction
For obvious reasons, the graphics specification section is the largest and most
important part of your design plan. Not only will you rely on it, but so too will the
other members of the development team. Therefore, it’s crucial that you make
this area as detailed as possible in order to avoid any misunderstandings between
team members and to ensure that you get the results you want.
Game Creative Statement (required)
This is a creative statement that describes the overall style, feeling, and personal-
ity expected of the artwork (i.e., realistic, cartoon-like, happy, gloomy, dark,
serious, etc.). The statement should be concise yet sufficiently descriptive to get
the point across. Two to three sentences should be more than adequate for this
purpose.
Example:
The artwork in Disasteroids will be hyper-realistic in style. All objectswill appear as detailed as possible and will be rendered using colors thatsupport this effect to the fullest.
Artwork Orientation (required)
This section describes the physical orientation and perspective of the artwork
(i.e., above-view, profile-view, etc.). All that is necessary is a brief, one- or two-
sentence statement.
Example:
Disasteroids will employ an above-view perspective. In other words, allgame objects will be rendered as if the light source is shining directlyabove them.
NOTE: It might help to include a few simple sketches of objects rendered in the
described orientation in order to illustrate the concept.
Target Platform (required)
This section simply describes the intended target platform of the game. It’s
important to include this information since it can influence the RGB values
selected for the palette as well as the file formats used to store the associated
game artwork.
394 Chapter 11 / Planning Arcade Game Graphics
NOTE: It’s also necessary to mention the target platform just in case this infor-
mation wasn’t originally included in the design plan’s game summary
section.
Example:
Disasteroids is intended to run on all Windows 95, 98, and NT 4.0 systems.
Estimated Object Count (required)
This section provides an estimated count of the overall number of graphical
objects (sprites and backgrounds) that will need to be designed and created for the
game. The object must match the game object inventory described earlier in the
design plan.
NOTE: Since the game is still in the planning stage, the object count is not
definitive. You may find yourself adding or removing game objects as your
design plan evolves.
Example:
It’s estimated that Disasteroids will require a total of 35 differentgraphic objects to be designed and produced.
Artwork Screen Resolution and Playfield Size (required)
This section details the recommended or desired screen resolution in which to
create the game’s artwork (i.e., 320x240, 640x480, etc.) and the size of the game’s
play area.
NOTE: This information should only be included here after an initial consulta-
tion with a programmer. This is due to potential technical issues that might
crop up when using a particular screen resolution.
NOTE: The playfield size usually only applies to systems that using a window-
ing operating system. Therefore, it wouldn’t be defined for a game that’s
intended to run on DOS. It can also be left blank if you indicate that the
game will run fullscreen, i.e., DirectX 640x480 fullscreen, etc.
Example:
All of the artwork in Disasteroids will be created in a screen resolutionof 640x480.
Chapter 11 / Planning Arcade Game Graphics 395
Disasteroids will use a screen window that is 400x380 in size. This willremain constant for ALL game screens, regardless of their type.
Artwork Color Depth (required)
This section describes the color depth that the game’s artwork will be created in
(i.e., 16 colors, 256 colors, thousands of colors, etc.). Among other things, the
information provided here will help the programmer determine whether or not
certain special color effects are possible.
NOTE: This information should only be included here after an initial consulta-
tion with a programmer. This is due to potential technical issues that might
crop up when using a particular color depth.
Example:
All of the artwork in Disasteroids will be designed in 256 colors (8-bitcolor).
Artwork File Format(s) (required)
This section details the preferred or acceptable file format(s) to store all of the
artwork in (i.e., BMP, PCX, etc.).
This information should only be included here after an initial consultation with a
programmer. This is done to avoid any potential technical issues that might crop
up when using a particular file format.
Try to provide as much information here as possible, including listing any
subformats of the selected graphics format. Including this information helps to flag
any potential compatibility problems with your software.
NOTE: Be sure to be explicit in mentioning the selected graphics file format for
each type of artwork screen you use. For example, you might choose to
store your sprite screens in the BMP format but use TGA for your title
screens.
Example:
All of the artwork in Disasteroids will be stored using 8-bit, RLE formatWindows BMP files.
396 Chapter 11 / Planning Arcade Game Graphics

Artwork File Naming Scheme (required)
This section details the file naming convention that you intend to use for your art-
work. You should break out the naming scheme for all game object types
separately. For more information on this issue, refer to Chapter 4.
Example:
Sprites:
� ani_player.bmp (main player)
� ani_alien.bmp (alien objects)
� ani_asteroids.bmp (asteroid objects)
� ani_effects.bmp (explosions, shots, and missile objects)
� ani_assorted.bmp (miscellaneous game objects such as title screen ani-mations, etc.)
Backgrounds:
� bkg_level1.bmp (level one background)
� bkg_level2.bmp (level two background)
� bkg_level3.bmp (level three background)
Other:
� mnu_buttons.bmp (buttons for menu and help screens)
� mnu_assorted.bmp (miscellaneous menu screen objects)
Artwork Color Palette (required)
This section describes the preferred color palette(s) to be used in the game. This
information should include a complete list of RGB values, the transparent color
value, and any reserved or off-limit palette entries. You may also opt to include
palette format information if the programmer requires you to supply the color pal-
ette in a separate file.
NOTE: Be sure to provide all palette definitions using this format: paletteentry: RGB value. For the transparent color and the off-limit/reserved
colors, you only need to provide the palette entries affected.
Example:
Color Palette Definitions:
Index: R, G, B0: 0, 0, 01: 128, 0, 02: 0, 128, 03: 128, 128, 0
Chapter 11 / Planning Arcade Game Graphics 397

4: 0, 0, 1285: 128, 0, 1286: 0, 128, 1287: 192, 192, 1928: 192, 220, 1929: 166, 202, 240
10: 255, 219, 011: 219, 167, 012: 183, 127, 713: 147, 87, 714: 111, 59, 715: 75, 35, 716: 255, 11, 15. . . .. . . .
Transparent Color: Index 254 (RGB: 0,0,0)
Off-Limit or Restricted Colors:
None aside from the normal 20 Windows reserved system colors.
Other:
� There are no palette entries reserved for color cycling.
� Palettes will also be supplied as Microsoft .PAL files.
Artwork Gamma Level (required)
This section lists the gamma level at which the graphics will be created.
NOTE: This information can be important, especially if the artwork is created
on a different platform than the game’s target system, i.e., you design the
graphics on a Macintosh while the game is slated to run on Windows.
Chapter 2 provides more information on estimating the gamma level for your par-
ticular system or platform.
Example:
The graphics for Disasteroids will be designed on a Windows PC using agamma level setting of 2.2.
Artwork Object Dimensions (required)
This section lists the maximum and/or recommended pixel dimensions (grid
square size) for all sprites and background images.
398 Chapter 11 / Planning Arcade Game Graphics
NOTE: This information should only be included here after an initial consulta-
tion with a programmer. This is due to potential technical issues that might
crop up when dealing with certain development tools that might require
game objects to be created in certain sizes.
Examples:
� Sprite Grid Square Dimensions: 64x64
� Background Image Dimensions: 400x380
Frames per Object (required)
This section details the number of frames of animation required for each game
object. It’s important to record this information in order to estimate how long it
might take you to create the artwork for a given game. This information also helps
you determine how smooth or coarse the individual animations for each object will
be.
Refer to Chapter 9 for more information on animation frames.
Examples:
� Player Sprite: moving (2) - Total Frames: 2
� Asteroid Sprite: moving (8) - Total Frames: 8
� Explosion Sprite: exploding (13) - Total Frames: 13
� Warp Signature Sprite: warping (8) - Total Frames: 8
Object Actions and Facings (required)
This section describes all of the potential actions that each game object (sprite)
will perform in the game (i.e., walking, running, shooting). As part of this informa-
tion, you should include the number of facings that each game object requires (i.e.,
left, right, top, bottom). It’s important to record this information in order to esti-
mate how long it might take you to create the artwork for a given game.
NOTE: Try to be as detailed as possible with regard to this section and be sure
to include the total number of actions for your records.
Example:
� Player Sprite: moving (8) - left, right, upper-left, lower-left, up,down, upper-right, lower-right
Chapter 11 / Planning Arcade Game Graphics 399
NOTE: You may find it helpful to indicate how each object facing maps to a
specific game control. For example, you can include a sketch of a mouse
movement, keyboard press, or joystick movement that produces each object
facing.
Game Text Font(s) (optional)
This section describes the preferred font and text style to be used in the game (if
applicable). Most games default to the currently active system font (i.e., 8x8, 8x16
if DOS or TrueType if Windows or the Macintosh, etc.). This information applies
to both the fonts used for housekeeping tasks such as displaying the game’s score
and the font style that appears on the game’s title and menu screens.
Always make sure you provide the exact font names for each font you use. Doing
this will help minimize confusion during implementation.
Also, make distinctions between what should be rendered in graphic text (i.e.,
bitmapped font) and what should be rendered in system text. There’s a huge dif-
ference in quality between the two and system text is usually not something that
you can change since it’s under program control.
Finally, be sure to include the X and Y pixel dimensions for each custom
bitmapped font you intend to use as well as a list of all of the characters this font
includes.
Examples:
� Houskeeping Font: Disasteroids will use 10-point, aliased Arial for allgame screen indicators such as level and score.
� Menu Screen Font: Disasteroids will use 18- and 24-point, anti-aliasedFutura for all graphic text.
� Title Screen Font: Disasteroids will use 12-point, anti-aliased Futurafor all graphic text.
� Custom Bitmapped Font: 16x16 - includes A-Z, a-z, 0-9, and !$+-.,?()=:
Miscellaneous Art Direction (optional)
This section includes any additional art direction that was left out in the previous
design plan sections.
NOTE: Due to the importance of the graphics specification section of the
design plan, don’t proceed any further if any required information is miss-
ing. Even missing a detail as small as the number of frames in animation
required per sprite can throw a big wrench into the works of a game project.
Also, never guess or make assumptions about any item mentioned here
400 Chapter 11 / Planning Arcade Game Graphics
since you might guess wrong. If a certain piece of information is missing,
track it down before proceeding. It may lengthen the design process but it
helps reduce the likelihood of problems during the project. It is better to be
safe than sorry!
Technical Restrictions and Stipulations (optional)
This section of your design plan discusses any technical restrictions imposed by
the game and/or the development environment.
For example, this section might mention fixed sprite size limits or color use
restrictions that have the potential to adversely impact how you create and imple-
ment your artwork. It’s very important that this information be obtained and
detailed as early in the project as possible before you start drawing your graphics!
This is necessary because you don’t want to create extra work for yourself in case
some technical issue crops up that renders your artwork useless for the project.
Typically, the programmer would convey such information during the start of the
project; therefore be sure you discuss any potential caveats with him or her if
you’re not actually coding the game yourself.
NOTE: This section is optional because there may not be any technical restric-
tions that apply to your particular game project.
Example:
In order to maximize screen performance on slower systems, no object inDisasteroids should be larger than 128x128 pixels in size.
The Project Schedule (optional)
Most game projects, including those that are done in one’s spare time, have some
sort of schedule associated with them. A schedule helps to introduce the element
of order into what is often a chaotic process. Without a schedule that establishes
firm milestones, or special project-related deadlines, your game project could
potentially drag on forever. To prevent this, use a schedule to help you impose
deadlines for yourself as well as for other members of your development team. A
game graphics schedule might include such items as:
� The estimated start date for the project.
� An estimated date for presenting the initial game artwork to the game’s pro-
grammer(s).
� An estimate for how long it will take to revise the artwork as per program-
mer/other team member feedback.
Chapter 11 / Planning Arcade Game Graphics 401
� An estimated date for delivering revised artwork to the game’s program-
mer(s).
� An estimate for how long it will take to complete the remaining game artwork.
� The estimated end date for delivering the final artwork to the game’s pro-
grammer(s).
As a game graphics designer, it’s important to define milestones for the project
early on in the process in order to establish good work habits and to facilitate the
delivery of a timely game. Also, be sure to establish realistic milestones by giving
yourself sufficient time to complete the designated task, as there’s no sense hav-
ing a deadline if you can’t meet it.
You should always base your schedule milestones on realistic estimates. This
means if you think it will take you at least two weeks to create the artwork and
animation for a particular game, don’t say you can do it in one week. Often, your
estimates will be wrong, especially when working on your first few projects.
Therefore, the best advice I can give you here is to overestimate. That means, if
you think you can complete a project in two weeks, give yourself three weeks.
This will give you some slack time in case you run into some unforeseen snags
(and you will) while working on a project.
Schedules are an invaluable resource for medium to large scale game projects and
are best created using a tool that allows easy revisions and modifications. For our
purposes, any spreadsheet program or text editor should be enough to create and
manage your schedule. However, if you’re interested in a more scaleable and
robust solution, then I recommend using professional project management/sched-
ule software such as Microsoft Project or IMSI’s Turbo Project series.
In closing, remember that schedules are just estimates. This means that they can
be adjusted. Don’t be afraid to do so as long as you inform the other members of
your development team about changes in the schedule so that they can make
adjustments on their end. Hopefully, you won’t make many adjustments as the
original schedule you created was done with achievable deadlines. Still, at least
you have the option to do so.
NOTE: This section is optional, especially if you develop games strictly for your
own pleasure. However, even then you might want to use one anyway since
it might give you the incentive to actually finish a project for a change!
The Game Glossary (optional)
The purpose of the game glossary is to tie up any remaining loose ends by defin-
ing the terms and vocabulary introduced in the design plan. Essentially, it serves
as the development team’s “rosetta stone” as it allows all team members to get on
402 Chapter 11 / Planning Arcade Game Graphics

the same page regarding the terminology used for all of the game’s characters,
objects, and events.
It’s generally considered good practice to include a glossary at the end of each
section if you introduce a lot of unique terms. This will help to minimize any con-
fusion over terminology that carries over into other sections of the design plan.
However, as design plans vary, feel free to place the glossary section where you
best think it should go. The end of the design plan will suffice for most game
projects.
Chapter 11 / Planning Arcade Game Graphics 403

Chapter 12
Hands-on ArcadeGame Project—Fish
Dish
In this chapter, you’ll learn about:
� Planning an actual game project
� Designing an online arcade game
� Designing simple sprites
� Designing simple backgrounds
� Designing simple title screens
405
For much of the last 11 chapters, this book has focused almost exclusively on thetheory, tools, and technology behind creating arcade-style game graphics. Now itis time to take what you have learned up to this point and apply it to a real gameproject. Therefore, in this chapter, we will actually conceive, spec, and design theartwork and animation for a maze/chase game called Fish Dish.
Fish Dish is an arcade game in which you control a small fish that must eat otherfish to grow while at the same time avoiding becoming the meal of a larger fish.
The simple nature of this game makes it the perfect platform for discussing a vari-ety of important game design topics, including:
� Basic online game design
� Establishing an artwork style
� Optimal color selection and usage
� Understanding graphics orientation
� Game character design
� Title and background screen design
Getting Started
Before proceeding with the Fish Dish tutorial, please be aware that this chaptermakes extensive use of previously discussed concepts. Therefore it is suggestedthat you familiarize yourself with topics such as color theory, covered in Chapter 7,color palettes, covered in Chapter 8, sprites and animation, covered in Chapter 9,and planning, covered in Chapter 11.
Moreover, this chapter also assumes that you are comfortable with the graphicscreation tools discussed in Chapter 5. Specifically, this chapter assumes that youfully understand how and, more importantly, when to use:
� The Pencil tool
� The Brush tool
� The Line tool
� The Smear tool
� The Fill tool
� The Zoom tool
� The Selection tool (including Cut, Copy, Paste, and Flip operations)
� The Lasso tool (including Cut, Copy, Paste, and Flip operations)
� The Color Selection tool
� The Eye Dropper tool
406 Chapter 12 / Hands-on Arcade Game Project—Fish Dish
NOTE: This tutorial was designed to be application agnostic. In other words,
all of the tips, tools, and techniques described in this chapter should work
regardless of the actual graphics software being used.
The Three Phases of Fish Dish’s Design
To make it easier to follow, the Fish Dish design tutorial is divided into threephases. These are:
� Phase I: The design analysis—During this phase, we examine the game’sconcept, identify important design and technical issues, and discuss how toarrive at a suitable design plan. The purpose of this phase is to develop a solidapproach to the game’s design and gain a better understanding of the overallissues and problems that might occur over the course of the game’s graphicdevelopment.
� Phase II: The design plan—During this phase, we document and organizeall of the game’s various components. The purpose of this phase is create amaster document that will serve as a reference and road map for the rest ofthe graphic design process.
� Phase III: The design execution—During this phase, we actually imple-ment the game’s artwork and animation according to the principles and speci-fications laid out by the previous two phases. This is the most involved sectionof the tutorial and where you get to see how the various elements in a gameare created and fit together.
All three phases are interdependent and as such, no single phase can really existor occur without the others. Skipping one or more of these phases may shortenthe design time required by a game but does so only at the risk of introducing anumber of problems in the process.
Phase I: The Fish Dish Design Analysis
The purpose of the Fish Dish design analysis is to identify the most importantissues that can negatively impact the successful design and implementation of thegame. As such, there are several design issues to consider and resolve. Theseinclude:
� Differentiating game objects
� Choosing a design style
� Characterization
� Online game issues
� Determining the order of element creation
Chapter 12 / Hands-on Arcade Game Project—Fish Dish 407
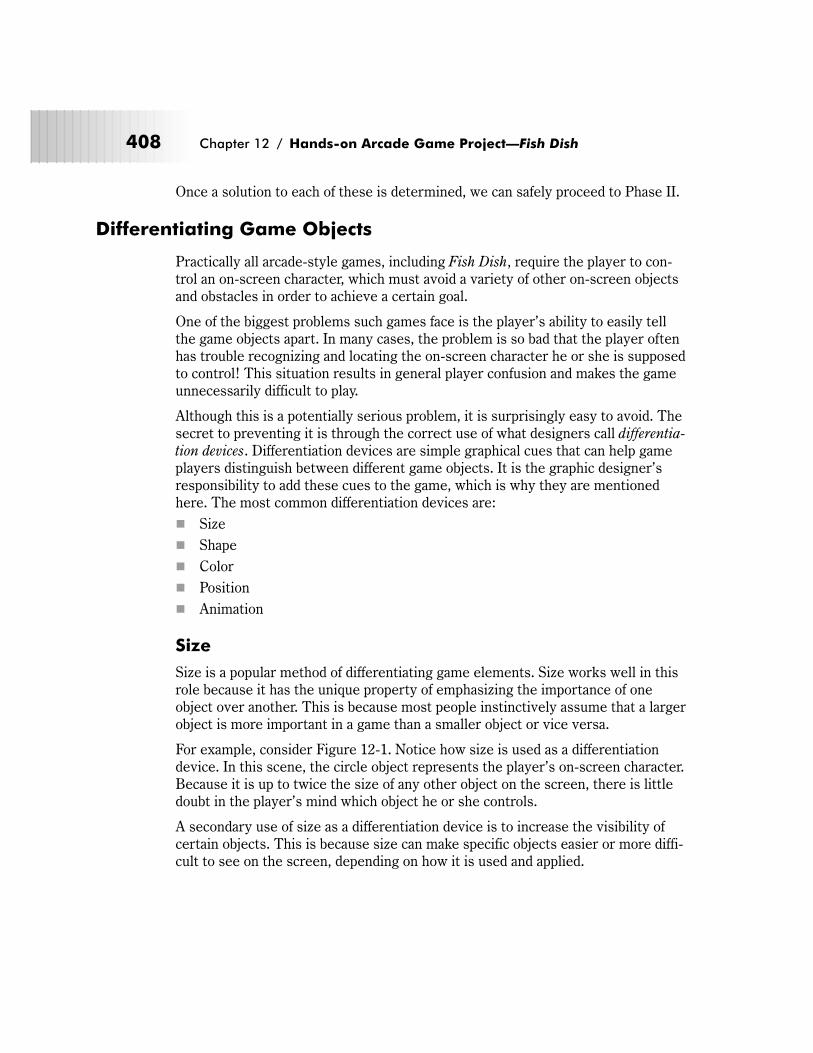
Once a solution to each of these is determined, we can safely proceed to Phase II.
Differentiating Game Objects
Practically all arcade-style games, including Fish Dish, require the player to con-trol an on-screen character, which must avoid a variety of other on-screen objectsand obstacles in order to achieve a certain goal.
One of the biggest problems such games face is the player’s ability to easily tellthe game objects apart. In many cases, the problem is so bad that the player oftenhas trouble recognizing and locating the on-screen character he or she is supposedto control! This situation results in general player confusion and makes the gameunnecessarily difficult to play.
Although this is a potentially serious problem, it is surprisingly easy to avoid. Thesecret to preventing it is through the correct use of what designers call differentia-
tion devices. Differentiation devices are simple graphical cues that can help gameplayers distinguish between different game objects. It is the graphic designer’sresponsibility to add these cues to the game, which is why they are mentionedhere. The most common differentiation devices are:
� Size
� Shape
� Color
� Position
� Animation
Size
Size is a popular method of differentiating game elements. Size works well in thisrole because it has the unique property of emphasizing the importance of oneobject over another. This is because most people instinctively assume that a largerobject is more important in a game than a smaller object or vice versa.
For example, consider Figure 12-1. Notice how size is used as a differentiationdevice. In this scene, the circle object represents the player’s on-screen character.Because it is up to twice the size of any other object on the screen, there is littledoubt in the player’s mind which object he or she controls.
A secondary use of size as a differentiation device is to increase the visibility ofcertain objects. This is because size can make specific objects easier or more diffi-cult to see on the screen, depending on how it is used and applied.
408 Chapter 12 / Hands-on Arcade Game Project—Fish Dish
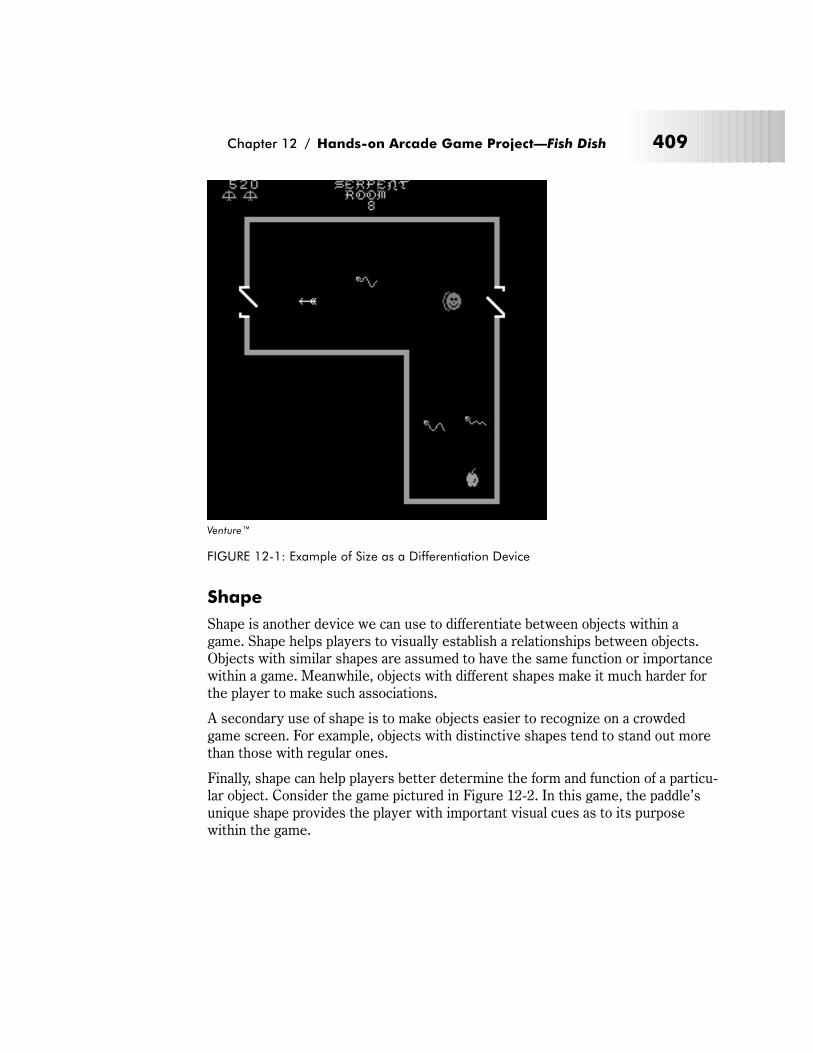
Shape
Shape is another device we can use to differentiate between objects within agame. Shape helps players to visually establish a relationships between objects.Objects with similar shapes are assumed to have the same function or importancewithin a game. Meanwhile, objects with different shapes make it much harder forthe player to make such associations.
A secondary use of shape is to make objects easier to recognize on a crowdedgame screen. For example, objects with distinctive shapes tend to stand out morethan those with regular ones.
Finally, shape can help players better determine the form and function of a particu-lar object. Consider the game pictured in Figure 12-2. In this game, the paddle’sunique shape provides the player with important visual cues as to its purposewithin the game.
Chapter 12 / Hands-on Arcade Game Project—Fish Dish 409
Venture™
FIGURE 12-1: Example of Size as a Differentiation Device
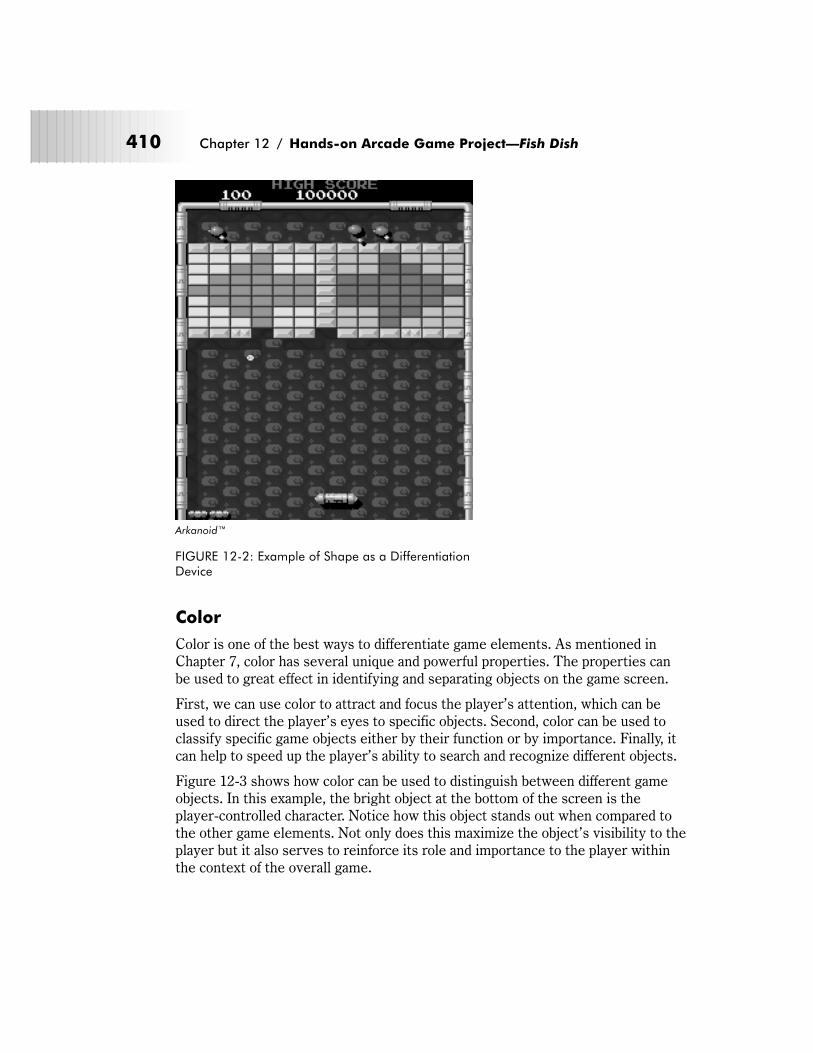
Color
Color is one of the best ways to differentiate game elements. As mentioned inChapter 7, color has several unique and powerful properties. The properties canbe used to great effect in identifying and separating objects on the game screen.
First, we can use color to attract and focus the player’s attention, which can beused to direct the player’s eyes to specific objects. Second, color can be used toclassify specific game objects either by their function or by importance. Finally, itcan help to speed up the player’s ability to search and recognize different objects.
Figure 12-3 shows how color can be used to distinguish between different gameobjects. In this example, the bright object at the bottom of the screen is theplayer-controlled character. Notice how this object stands out when compared tothe other game elements. Not only does this maximize the object’s visibility to theplayer but it also serves to reinforce its role and importance to the player withinthe context of the overall game.
410 Chapter 12 / Hands-on Arcade Game Project—Fish Dish
Arkanoid™
FIGURE 12-2: Example of Shape as a DifferentiationDevice
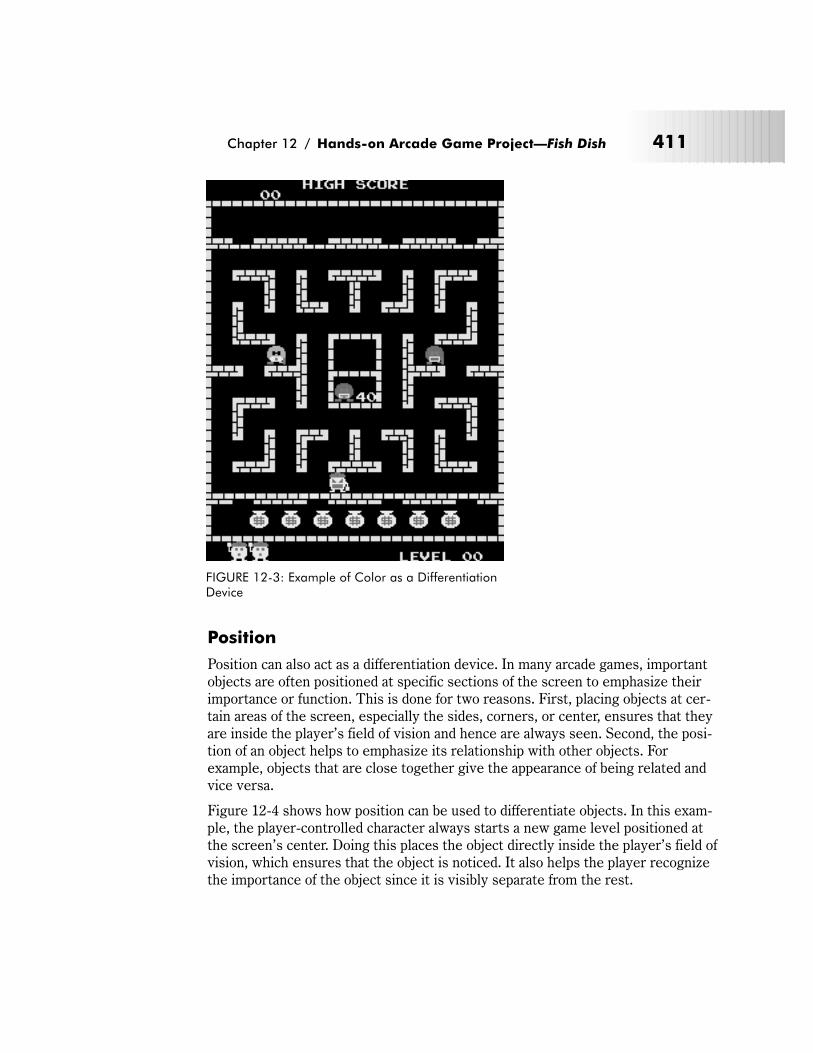
Position
Position can also act as a differentiation device. In many arcade games, importantobjects are often positioned at specific sections of the screen to emphasize theirimportance or function. This is done for two reasons. First, placing objects at cer-tain areas of the screen, especially the sides, corners, or center, ensures that theyare inside the player’s field of vision and hence are always seen. Second, the posi-tion of an object helps to emphasize its relationship with other objects. Forexample, objects that are close together give the appearance of being related andvice versa.
Figure 12-4 shows how position can be used to differentiate objects. In this exam-ple, the player-controlled character always starts a new game level positioned atthe screen’s center. Doing this places the object directly inside the player’s field ofvision, which ensures that the object is noticed. It also helps the player recognizethe importance of the object since it is visibly separate from the rest.
Chapter 12 / Hands-on Arcade Game Project—Fish Dish 411
FIGURE 12-3: Example of Color as a DifferentiationDevice
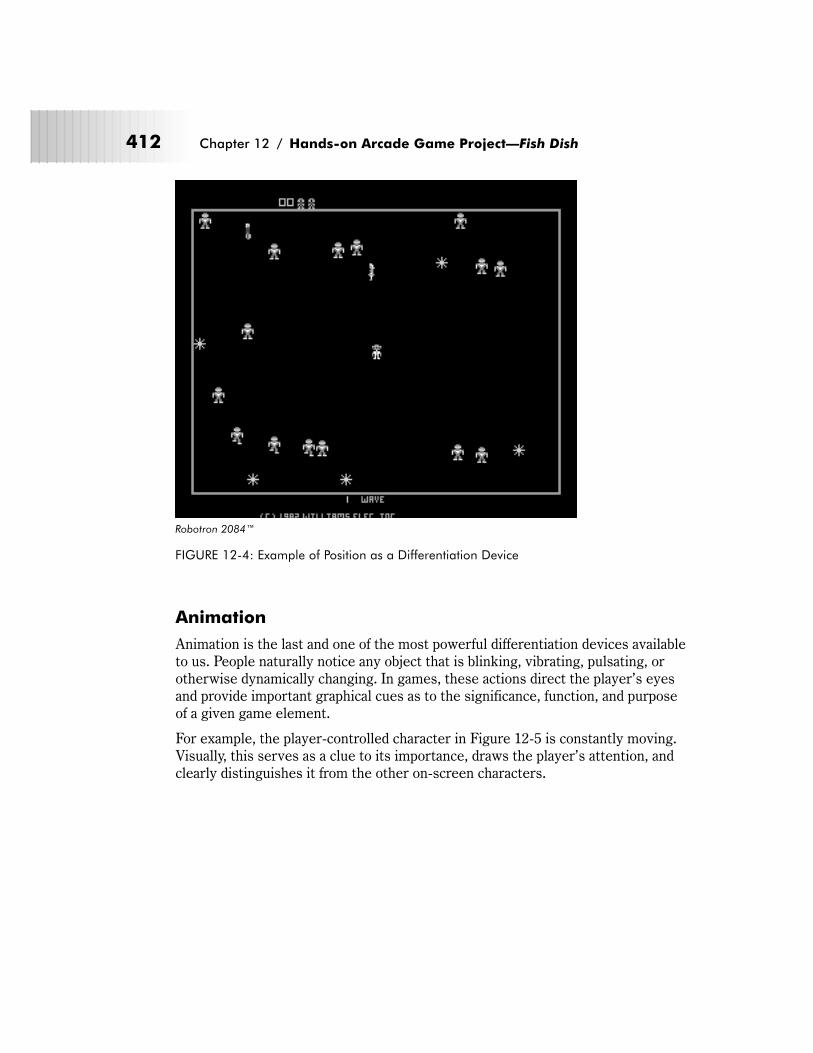
Animation
Animation is the last and one of the most powerful differentiation devices availableto us. People naturally notice any object that is blinking, vibrating, pulsating, orotherwise dynamically changing. In games, these actions direct the player’s eyesand provide important graphical cues as to the significance, function, and purposeof a given game element.
For example, the player-controlled character in Figure 12-5 is constantly moving.Visually, this serves as a clue to its importance, draws the player’s attention, andclearly distinguishes it from the other on-screen characters.
412 Chapter 12 / Hands-on Arcade Game Project—Fish Dish
Robotron 2084™
FIGURE 12-4: Example of Position as a Differentiation Device
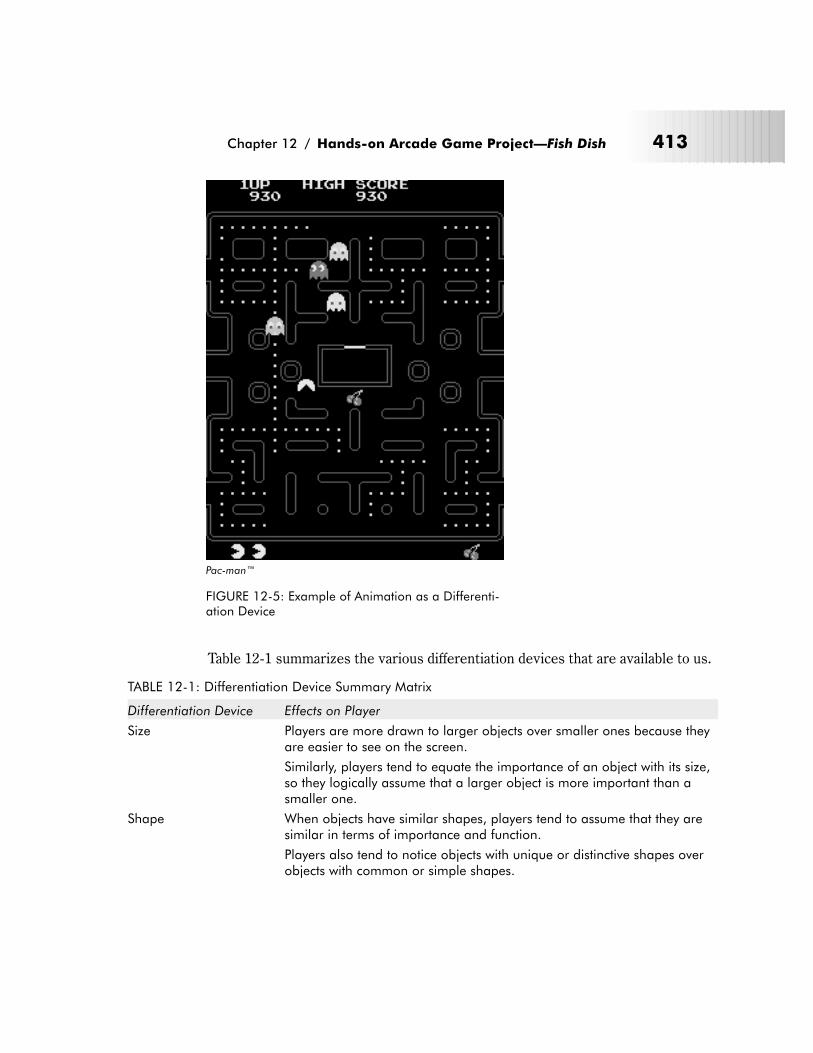
Table 12-1 summarizes the various differentiation devices that are available to us.
TABLE 12-1: Differentiation Device Summary Matrix
Differentiation Device Effects on Player
Size Players are more drawn to larger objects over smaller ones because theyare easier to see on the screen.
Similarly, players tend to equate the importance of an object with its size,so they logically assume that a larger object is more important than asmaller one.
Shape When objects have similar shapes, players tend to assume that they aresimilar in terms of importance and function.
Players also tend to notice objects with unique or distinctive shapes overobjects with common or simple shapes.
Chapter 12 / Hands-on Arcade Game Project—Fish Dish 413
Pac-man™
FIGURE 12-5: Example of Animation as a Differenti-ation Device
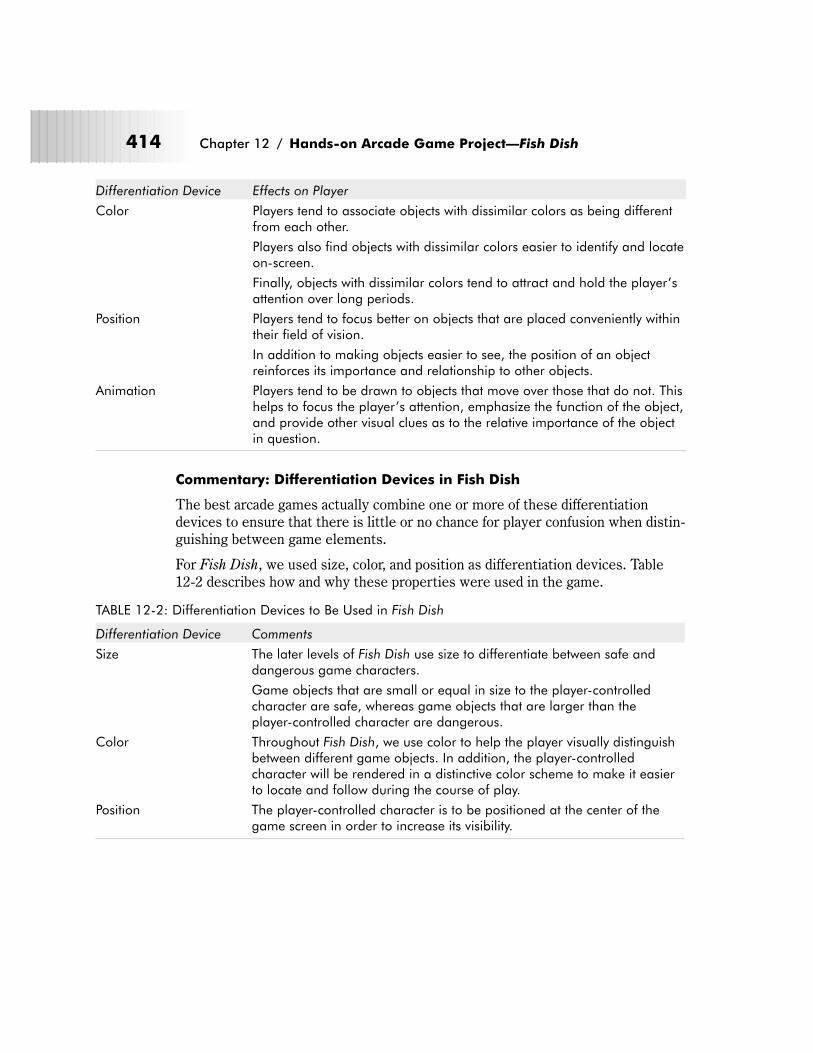
Differentiation Device Effects on Player
Color Players tend to associate objects with dissimilar colors as being differentfrom each other.
Players also find objects with dissimilar colors easier to identify and locateon-screen.
Finally, objects with dissimilar colors tend to attract and hold the player’sattention over long periods.
Position Players tend to focus better on objects that are placed conveniently withintheir field of vision.
In addition to making objects easier to see, the position of an objectreinforces its importance and relationship to other objects.
Animation Players tend to be drawn to objects that move over those that do not. Thishelps to focus the player’s attention, emphasize the function of the object,and provide other visual clues as to the relative importance of the objectin question.
Commentary: Differentiation Devices in Fish Dish
The best arcade games actually combine one or more of these differentiationdevices to ensure that there is little or no chance for player confusion when distin-guishing between game elements.
For Fish Dish, we used size, color, and position as differentiation devices. Table12-2 describes how and why these properties were used in the game.
TABLE 12-2: Differentiation Devices to Be Used in Fish Dish
Differentiation Device Comments
Size The later levels of Fish Dish use size to differentiate between safe anddangerous game characters.
Game objects that are small or equal in size to the player-controlledcharacter are safe, whereas game objects that are larger than theplayer-controlled character are dangerous.
Color Throughout Fish Dish, we use color to help the player visually distinguishbetween different game objects. In addition, the player-controlledcharacter will be rendered in a distinctive color scheme to make it easierto locate and follow during the course of play.
Position The player-controlled character is to be positioned at the center of thegame screen in order to increase its visibility.
414 Chapter 12 / Hands-on Arcade Game Project—Fish Dish
Choosing a Design Style
Most dictionaries define style as “a combination of distinctive features of artisticexpression or execution characterizing a particular group, school, or era.”Although Chapter 7 briefly touched on the concept of design style as it pertains tocolor use, this chapter will examine design style as it relates to the actual appear-ance of your artwork.
A design style is one of the most powerful tools at your disposal. It helps you todefine the appearance, theme, and audience for your game. In addition, it givesyour artwork life and conveys a range of emotions from fear to nostalgia in theplayer, which ultimately reinforces their interest.
This being said, the process of choosing a design style for your game artwork isnot something to be taken lightly. The design style you choose can have a dra-matic effect on the visual aspects of your artwork from the size and shape yougive your objects to the colors you use. Furthermore, once selected, a designstyle must be consistently carried through and applied to all of your game’sgraphic elements; otherwise you risk undermining its power.
To help you determine which design style to use for your game project, this sec-tion of the chapter examines three of the most important stylistic factors:
� Audience and emotional appeal
� Visual characteristics
� Difficulty of implementation
Audience and Emotional Appeal
It is very important to realize that a game is just an idea until you define its style.As you may recall from Chapter 8, all arcade games generally fall into one of threedesign styles: cartoon, retro, and realistic. There are others but these tend to bevariations of the three types mentioned. Each design style can give your game adifferent look and feel depending on the audience segment you are trying to reachand the general theme of the game. For example, are you trying to rekindle child-hood memories with your game? If so, then consider designing your artwork usinga retro style. Do you want to make your game funny? If so, then consider using acartoon design style.
Tables 12-3 and 12-4 classify the three main design styles according to these facts.Such information is useful when trying to match up a game’s design with a partic-ular demographic group and game theme.
Chapter 12 / Hands-on Arcade Game Project—Fish Dish 415
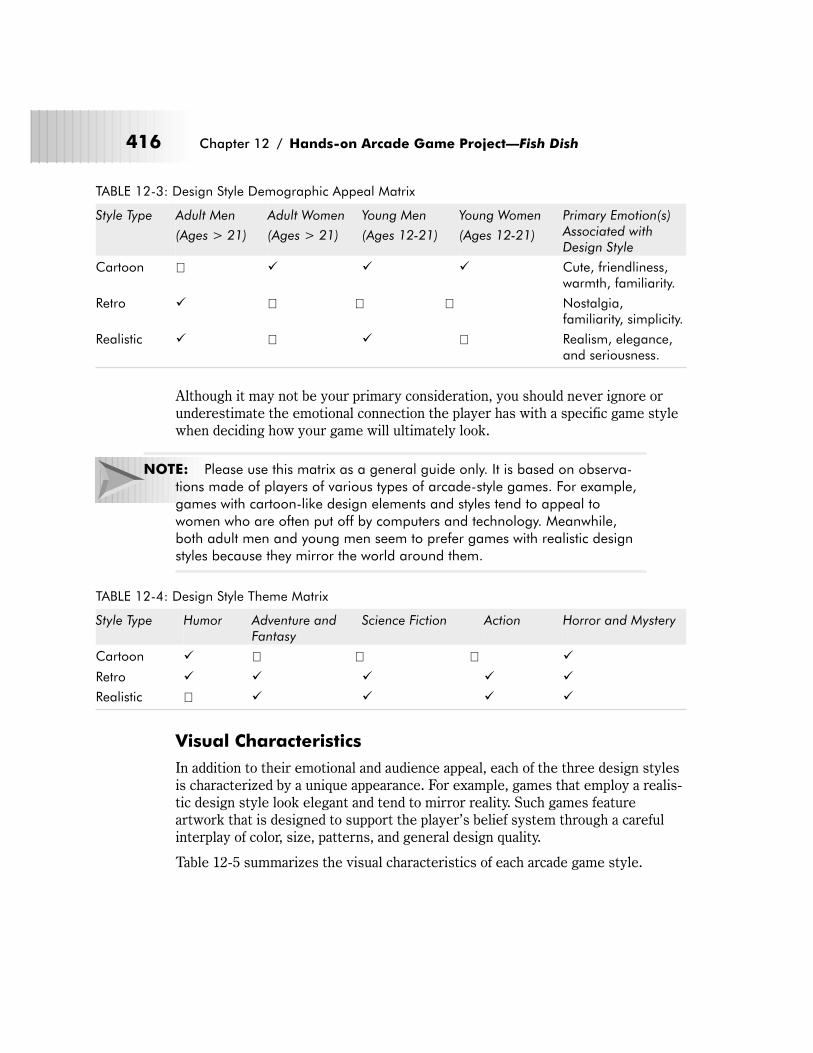
TABLE 12-3: Design Style Demographic Appeal Matrix
Style Type Adult Men
(Ages > 21)
Adult Women
(Ages > 21)
Young Men
(Ages 12-21)
Young Women
(Ages 12-21)
Primary Emotion(s)Associated withDesign Style
Cartoon � � � � Cute, friendliness,warmth, familiarity.
Retro � � � � Nostalgia,familiarity, simplicity.
Realistic � � � � Realism, elegance,and seriousness.
Although it may not be your primary consideration, you should never ignore orunderestimate the emotional connection the player has with a specific game stylewhen deciding how your game will ultimately look.
NOTE: Please use this matrix as a general guide only. It is based on observa-
tions made of players of various types of arcade-style games. For example,
games with cartoon-like design elements and styles tend to appeal to
women who are often put off by computers and technology. Meanwhile,
both adult men and young men seem to prefer games with realistic design
styles because they mirror the world around them.
TABLE 12-4: Design Style Theme Matrix
Style Type Humor Adventure andFantasy
Science Fiction Action Horror and Mystery
Cartoon � � � � �
Retro � � � � �
Realistic � � � � �
Visual Characteristics
In addition to their emotional and audience appeal, each of the three design stylesis characterized by a unique appearance. For example, games that employ a realis-tic design style look elegant and tend to mirror reality. Such games featureartwork that is designed to support the player’s belief system through a carefulinterplay of color, size, patterns, and general design quality.
Table 12-5 summarizes the visual characteristics of each arcade game style.
416 Chapter 12 / Hands-on Arcade Game Project—Fish Dish
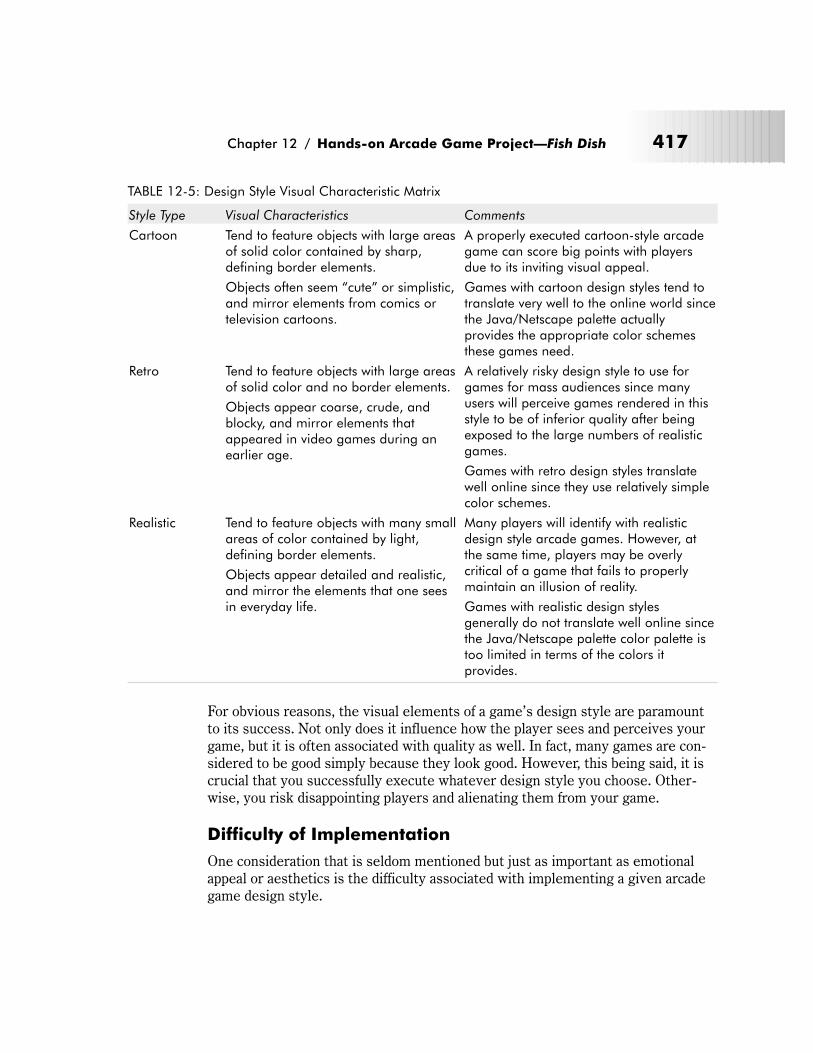
TABLE 12-5: Design Style Visual Characteristic Matrix
Style Type Visual Characteristics Comments
Cartoon Tend to feature objects with large areasof solid color contained by sharp,defining border elements.
Objects often seem “cute” or simplistic,and mirror elements from comics ortelevision cartoons.
A properly executed cartoon-style arcadegame can score big points with playersdue to its inviting visual appeal.
Games with cartoon design styles tend totranslate very well to the online world sincethe Java/Netscape palette actuallyprovides the appropriate color schemesthese games need.
Retro Tend to feature objects with large areasof solid color and no border elements.
Objects appear coarse, crude, andblocky, and mirror elements thatappeared in video games during anearlier age.
A relatively risky design style to use forgames for mass audiences since manyusers will perceive games rendered in thisstyle to be of inferior quality after beingexposed to the large numbers of realisticgames.
Games with retro design styles translatewell online since they use relatively simplecolor schemes.
Realistic Tend to feature objects with many smallareas of color contained by light,defining border elements.
Objects appear detailed and realistic,and mirror the elements that one seesin everyday life.
Many players will identify with realisticdesign style arcade games. However, atthe same time, players may be overlycritical of a game that fails to properlymaintain an illusion of reality.
Games with realistic design stylesgenerally do not translate well online sincethe Java/Netscape palette color palette istoo limited in terms of the colors itprovides.
For obvious reasons, the visual elements of a game’s design style are paramountto its success. Not only does it influence how the player sees and perceives yourgame, but it is often associated with quality as well. In fact, many games are con-sidered to be good simply because they look good. However, this being said, it iscrucial that you successfully execute whatever design style you choose. Other-wise, you risk disappointing players and alienating them from your game.
Difficulty of Implementation
One consideration that is seldom mentioned but just as important as emotionalappeal or aesthetics is the difficulty associated with implementing a given arcadegame design style.
Chapter 12 / Hands-on Arcade Game Project—Fish Dish 417
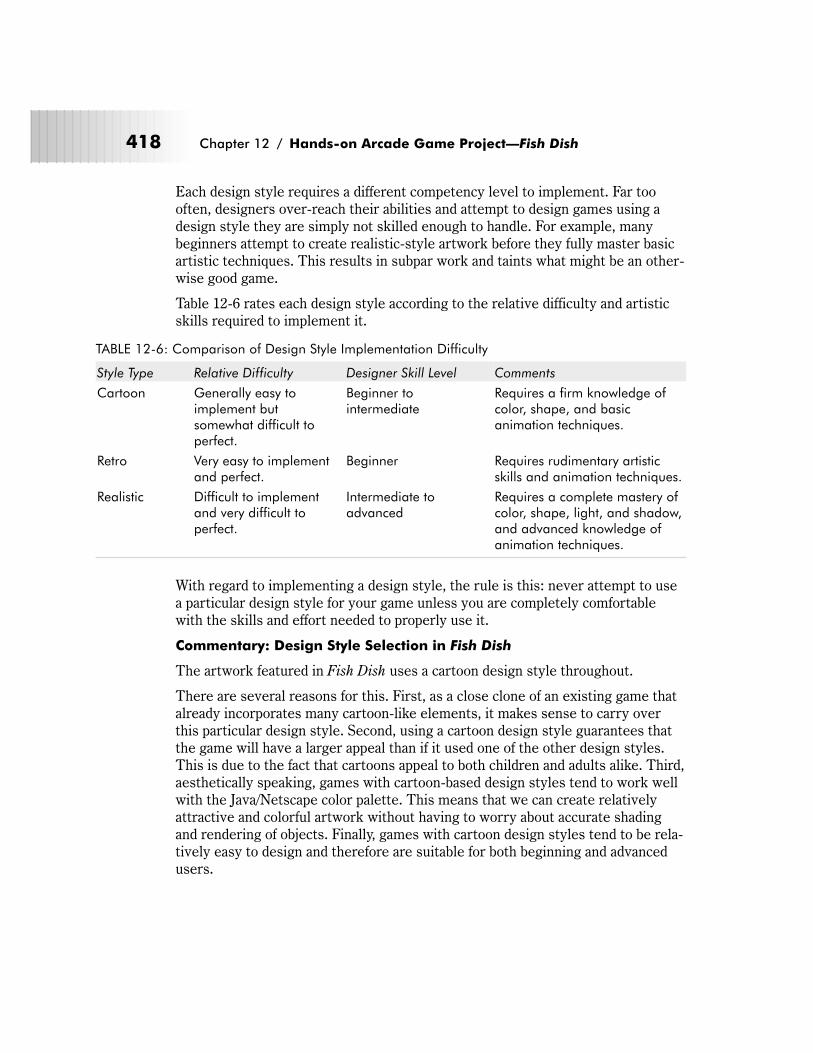
Each design style requires a different competency level to implement. Far toooften, designers over-reach their abilities and attempt to design games using adesign style they are simply not skilled enough to handle. For example, manybeginners attempt to create realistic-style artwork before they fully master basicartistic techniques. This results in subpar work and taints what might be an other-wise good game.
Table 12-6 rates each design style according to the relative difficulty and artisticskills required to implement it.
TABLE 12-6: Comparison of Design Style Implementation Difficulty
Style Type Relative Difficulty Designer Skill Level Comments
Cartoon Generally easy toimplement butsomewhat difficult toperfect.
Beginner tointermediate
Requires a firm knowledge ofcolor, shape, and basicanimation techniques.
Retro Very easy to implementand perfect.
Beginner Requires rudimentary artisticskills and animation techniques.
Realistic Difficult to implementand very difficult toperfect.
Intermediate toadvanced
Requires a complete mastery ofcolor, shape, light, and shadow,and advanced knowledge ofanimation techniques.
With regard to implementing a design style, the rule is this: never attempt to usea particular design style for your game unless you are completely comfortablewith the skills and effort needed to properly use it.
Commentary: Design Style Selection in Fish Dish
The artwork featured in Fish Dish uses a cartoon design style throughout.
There are several reasons for this. First, as a close clone of an existing game thatalready incorporates many cartoon-like elements, it makes sense to carry overthis particular design style. Second, using a cartoon design style guarantees thatthe game will have a larger appeal than if it used one of the other design styles.This is due to the fact that cartoons appeal to both children and adults alike. Third,aesthetically speaking, games with cartoon-based design styles tend to work wellwith the Java/Netscape color palette. This means that we can create relativelyattractive and colorful artwork without having to worry about accurate shadingand rendering of objects. Finally, games with cartoon design styles tend to be rela-tively easy to design and therefore are suitable for both beginning and advancedusers.
418 Chapter 12 / Hands-on Arcade Game Project—Fish Dish
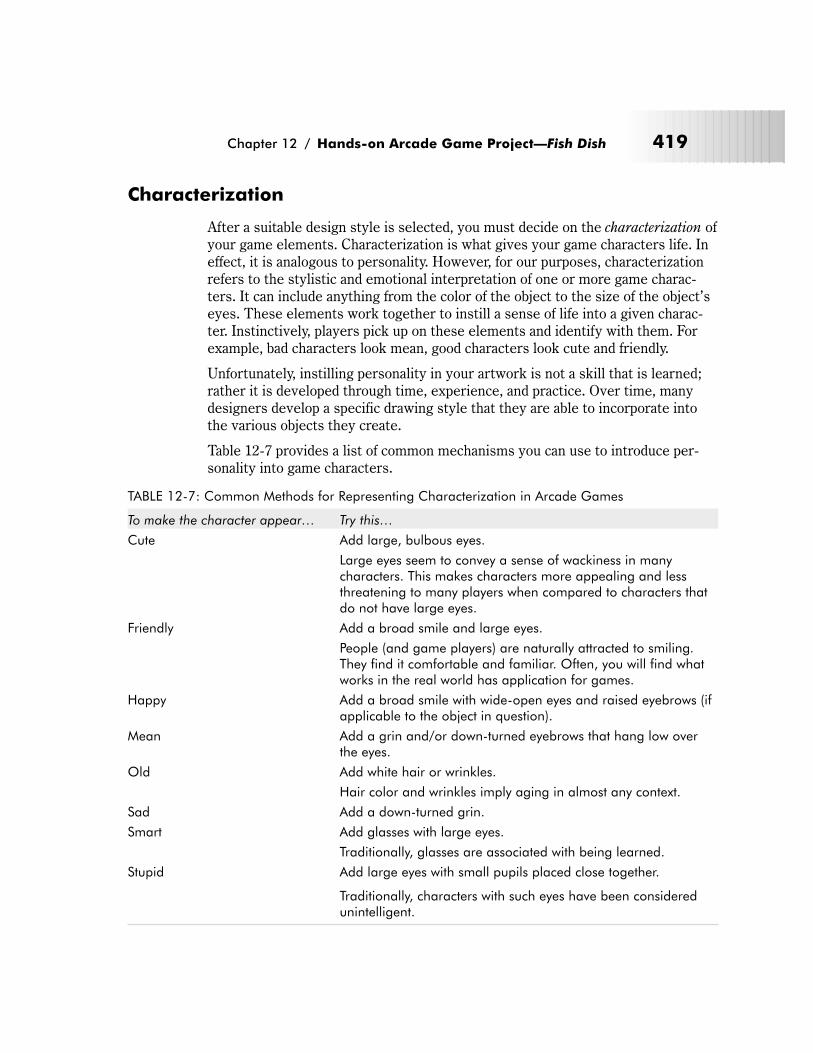
Characterization
After a suitable design style is selected, you must decide on the characterization ofyour game elements. Characterization is what gives your game characters life. Ineffect, it is analogous to personality. However, for our purposes, characterizationrefers to the stylistic and emotional interpretation of one or more game charac-ters. It can include anything from the color of the object to the size of the object’seyes. These elements work together to instill a sense of life into a given charac-ter. Instinctively, players pick up on these elements and identify with them. Forexample, bad characters look mean, good characters look cute and friendly.
Unfortunately, instilling personality in your artwork is not a skill that is learned;rather it is developed through time, experience, and practice. Over time, manydesigners develop a specific drawing style that they are able to incorporate intothe various objects they create.
Table 12-7 provides a list of common mechanisms you can use to introduce per-sonality into game characters.
TABLE 12-7: Common Methods for Representing Characterization in Arcade Games
To make the character appear… Try this…
Cute Add large, bulbous eyes.
Large eyes seem to convey a sense of wackiness in manycharacters. This makes characters more appealing and lessthreatening to many players when compared to characters thatdo not have large eyes.
Friendly Add a broad smile and large eyes.
People (and game players) are naturally attracted to smiling.They find it comfortable and familiar. Often, you will find whatworks in the real world has application for games.
Happy Add a broad smile with wide-open eyes and raised eyebrows (ifapplicable to the object in question).
Mean Add a grin and/or down-turned eyebrows that hang low overthe eyes.
Old Add white hair or wrinkles.
Hair color and wrinkles imply aging in almost any context.
Sad Add a down-turned grin.
Smart Add glasses with large eyes.
Traditionally, glasses are associated with being learned.
Stupid Add large eyes with small pupils placed close together.
Traditionally, characters with such eyes have been consideredunintelligent.
Chapter 12 / Hands-on Arcade Game Project—Fish Dish 419
Other personality traits can be added by simply studying those things around you.You would be surprised at how much video game characters tend to use real-lifeexpressions.
It is important to realize that characterization is not just limited to expressions.The color you give certain game objects plays an important part in the player’sinterpretation and understanding of a game object characterization. Color could beused to enhance an object’s characterization, for example, a red devil or a blackknight. Chapter 7 covers this topic at length. Please refer to it when deciding onthe characterization for your game.
Commentary: Characterization in Fish Dish
Fish Dish uses characterization extensively. All of the game’s objects exhibit itthrough a variety of visual means. For example, to make a particular game objectlook stupid, it was given large eyes and a blank expression. This cues the playerinto the fact that that character is not considered very bright.
Similarly, color is used extensively to reinforce the characterization of Fish Dish’scharacters. For example, the main character is a salmon and is pink. Another char-acter is green and has a mean temperament.
Online Game Issues
Online games, compared to the average offline arcade game, require a bit morework and planning to design. Specifically, you must examine and address suchissues as:
� The available display area
� Artwork file size issues
� Performance
� The color palette
The Available Display Area
Virtually all online games are played from inside a Web browser. Due to significantdifferences in how most browsers handle the display of content, most onlinegames cannot count on being able to take advantage of the entire screen area thatis available at a given screen resolution. For example, a browser running at ascreen resolution of 800x600 does not translate into the full 800x600 resolutionbeing available to the online game running inside of it. Often, there will be asmuch as 50% less screen area available to an online game at any screenresolution.
Having less usable display area available means that your game’s objects, titlescreens, and background screens have to be smaller than if they were appearing in
420 Chapter 12 / Hands-on Arcade Game Project—Fish Dish
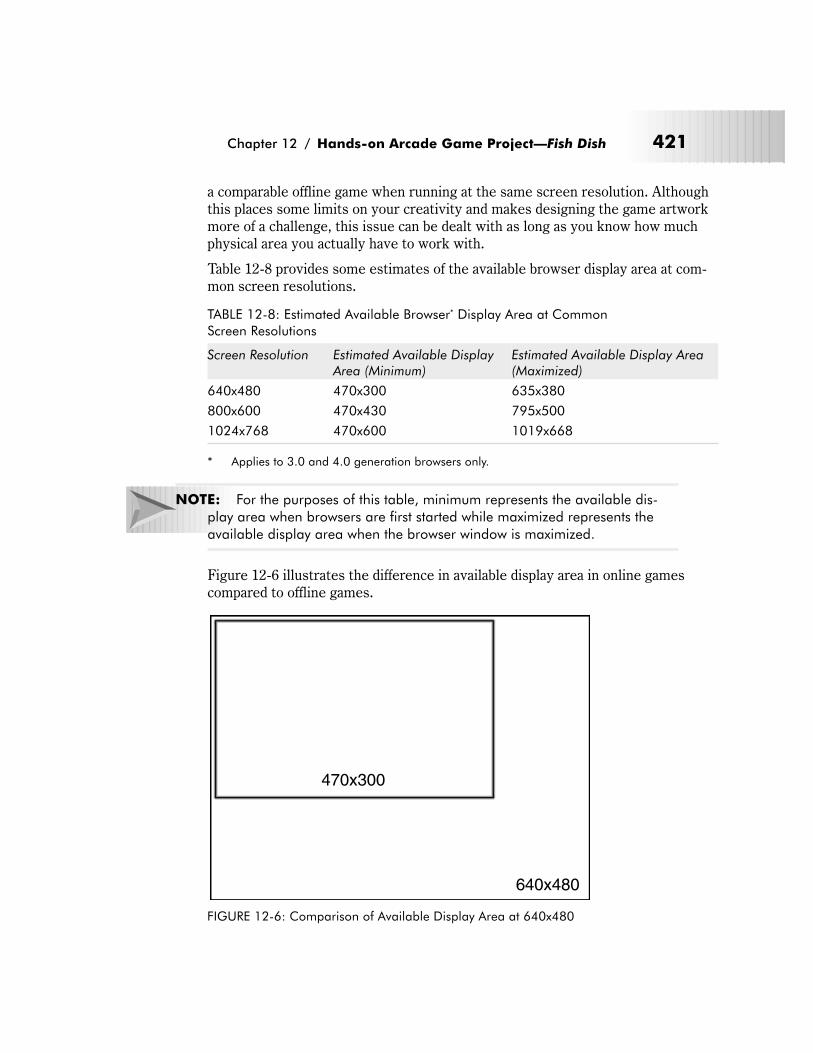
a comparable offline game when running at the same screen resolution. Althoughthis places some limits on your creativity and makes designing the game artworkmore of a challenge, this issue can be dealt with as long as you know how muchphysical area you actually have to work with.
Table 12-8 provides some estimates of the available browser display area at com-mon screen resolutions.
TABLE 12-8: Estimated Available Browser* Display Area at Common
Screen Resolutions
Screen Resolution Estimated Available DisplayArea (Minimum)
Estimated Available Display Area(Maximized)
640x480 470x300 635x380
800x600 470x430 795x500
1024x768 470x600 1019x668
* Applies to 3.0 and 4.0 generation browsers only.
NOTE: For the purposes of this table, minimum represents the available dis-
play area when browsers are first started while maximized represents the
available display area when the browser window is maximized.
Figure 12-6 illustrates the difference in available display area in online gamescompared to offline games.
Chapter 12 / Hands-on Arcade Game Project—Fish Dish 421
470x300
640x480
FIGURE 12-6: Comparison of Available Display Area at 640x480
In order to ensure that your online game is viewable by as many people as possi-ble, it is strongly recommended that you always design your game’s play areaaround the smallest available display area. According to Table 12-8, this meansrestricting your game screens to a maximum size of 470x300.
Commentary: Display Area Issues in Fish Dish
Because of the previously mentioned issue, all game screens in Fish Dish arerestricted to a maximum size of 470x300 to ensure that they are viewable by thelargest possible audience on all platforms.
Artwork File Size Issues
Despite rapid advances in communication technologies, most people do not havevery fast Internet access, especially outside the United States. In fact, the vastmajority of users are still connecting to the Internet with 33.6 Kbps and 56 Kbpsmodems. Therefore, online game developers face a nasty dilemma: they have tocreate games that are compelling enough to attract players, yet small enough toaccess and play through relatively slow Internet connections.
Unfortunately, this is not always easy to do. For one thing, arcade-style gamestend to be very graphic intensive. This makes for larger, more complex programssince next to digital sound, graphic images are the most expensive component ofan arcade game in terms of program size and disk space used. Second, there is theissue of the user/player’s experience. With a typical online game weighing in at200-300 KB in size, it can take most players over a minute to download and play it.The fact is that we live in an impatient world. Studies have shown that the longera person has to wait for the computer to perform an action the more likely he is tobecome distracted. Therefore, it is in our best interest to do what we can toreduce the size of the game and shorten the player’s wait before he can startplaying.
Fortunately, we have some tricks up our sleeve. As it turns out, one of the bestways to reduce the size of online games is to use image compression since creat-ing smaller graphic files ultimately means creating smaller games. Although thereare several compressed graphic file formats available, only three are of any use foronline games. These are:
� GIF
� JPEG
� PNG
Of these, GIF is the best all-around choice due to its solid compression ratios andalmost universal application compatibility.
Once you have selected a compressed file format, you should try to keep everypiece of game-related artwork down to reasonable file sizes. Table 12-9 provides
422 Chapter 12 / Hands-on Arcade Game Project—Fish Dish

some loose guidelines for specific limits to set for common game graphicelements.
TABLE 12-9: Online Arcade Game Artwork File Size Guidelines
Artwork Type Suggested Maximum File Size (in KB)
Background Screen < 25*
Menu Button/Element < 1*
Single Animated Sprite < 2.5*
Single Static Sprite < 1.5
Status Indicator < 8*
Title/Menu Screen < 18*
* Actual results may vary depending on the compression scheme used and theartwork involved.
As noted, the numbers in this table will vary depending on the artwork and theimage compression scheme used. This is because different compression schemesonly work well on certain types of images. Table 12-10 summarizes these issues.
TABLE 12-10: Image Compression Issues and Usage Recommendations
Compression Scheme Issues Recommendations
LZW (GIF) Works best on images that containsimple shapes and large areas of solidcolor. Images that contain largenumbers of colors and complex patternsdo not compress nearly as well.
Especially optimized for smaller objectsthat cannot afford to lose any detail.
Best when used on cartoon- orretro-styled artwork.
LZ77 (PNG) Generally similar to LZW. Best when used on cartoon- orretro-styled artwork.
JPEG (JPEG) Works best on images that containcomplex shapes and patterns.
Especially optimized for relatively largeobjects that can afford to lose detail.
Only use on photographic orhyper-realistically styled artwork.
Ultimately, such issues can affect the stylistic appearance of your artwork. Forexample, you may have to choose to design your artwork using a cartoon styleinstead of a realistic style in order to maximize the file compression savingsoffered by a particular compression scheme.
As a rule, you should limit your online game’s artwork to a maximum of 25% ofthe game’s total file size and often you will want to limit them to less. Therefore,if the game’s final size is 300 KB, no more than 75 KB of it should be artwork. If it
Chapter 12 / Hands-on Arcade Game Project—Fish Dish 423
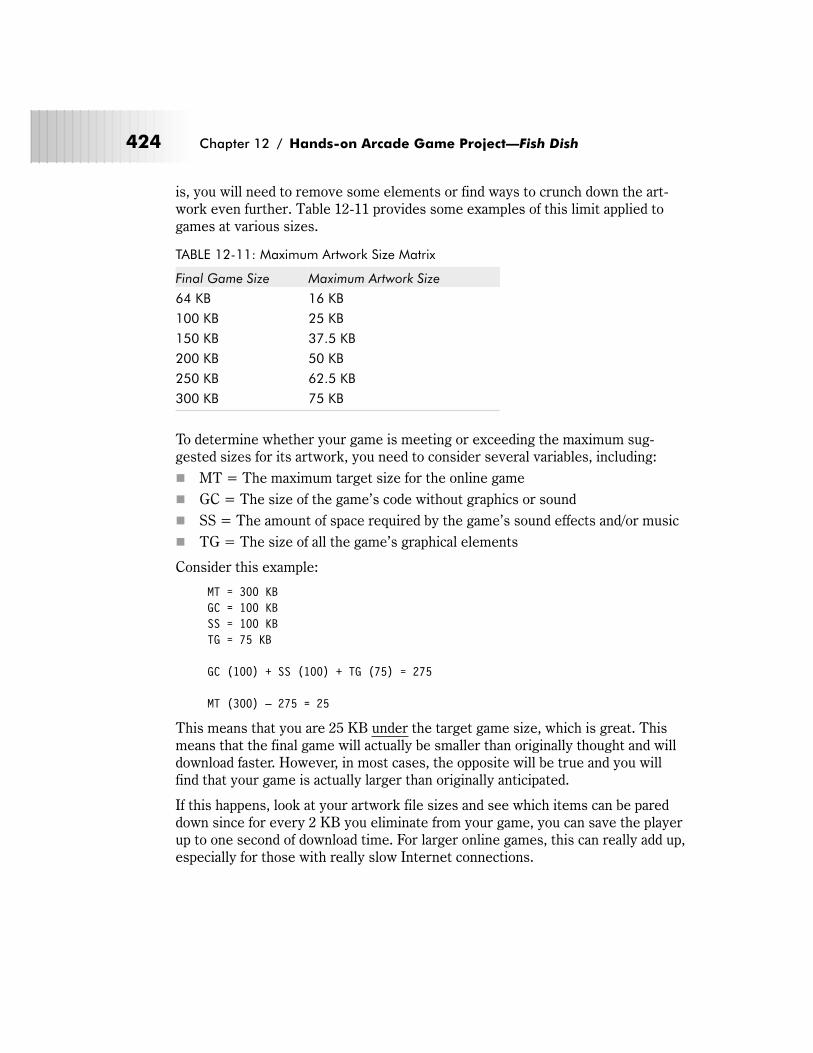
is, you will need to remove some elements or find ways to crunch down the art-work even further. Table 12-11 provides some examples of this limit applied togames at various sizes.
TABLE 12-11: Maximum Artwork Size Matrix
Final Game Size Maximum Artwork Size
64 KB 16 KB
100 KB 25 KB
150 KB 37.5 KB
200 KB 50 KB
250 KB 62.5 KB
300 KB 75 KB
To determine whether your game is meeting or exceeding the maximum sug-gested sizes for its artwork, you need to consider several variables, including:
� MT = The maximum target size for the online game
� GC = The size of the game’s code without graphics or sound
� SS = The amount of space required by the game’s sound effects and/or music
� TG = The size of all the game’s graphical elements
Consider this example:
MT = 300 KB
GC = 100 KB
SS = 100 KB
TG = 75 KB
GC (100) + SS (100) + TG (75) = 275
MT (300) – 275 = 25
This means that you are 25 KB under the target game size, which is great. Thismeans that the final game will actually be smaller than originally thought and willdownload faster. However, in most cases, the opposite will be true and you willfind that your game is actually larger than originally anticipated.
If this happens, look at your artwork file sizes and see which items can be pareddown since for every 2 KB you eliminate from your game, you can save the playerup to one second of download time. For larger online games, this can really add up,especially for those with really slow Internet connections.
424 Chapter 12 / Hands-on Arcade Game Project—Fish Dish
Commentary: File Format Issues in Fish Dish
Fish Dish uses the GIF format to store its artwork because it provides good imagecompression and widespread compatibility with different programming languages,graphics tools, and computer platforms.
GIF is also a good choice for other reasons. As it happens, GIF compressionworks particularly well on images that contain large areas of solid color. Cartoon-style artwork usually falls into this category. Consequently, we enjoyed significantcompression savings by using this file format.
Performance
Performance, or how fast and smooth a game plays, affects an online game muchmore than it would an offline game. The primary reason for this is due to howonline games are written.
Practically all online arcade games are written using either Java or Shockwave. Webriefly discussed Java in Chapter 1 but not Shockwave. For those of you not famil-iar with it, Shockwave is a compression engine for games created with Macromedia
Director, a powerful, multimedia authoring tool. The Shockwave engine com-presses Director applications so that they can be efficiently used on the Web.
Java and Shockwave are popular with online game developers for three reasons.First, games created with them can reach a very large audience because Javacomes built into many Web browsers while the Shockwave player comes bundledwith many computer systems. Second, they are portable across multiple plat-forms. With the appropriate support (a Virtual Machine in the case of Java or aspecial player in case of Shockwave) installed Java and Director/Shockwave contentwill run consistently regardless of the system it is running on. Finally, they pro-vide programmers with many features that greatly speed up the developmentprocess. This means games can usually be developed much faster using thesetools than with more traditional programming languages.
However, all of this flexibility comes with a price—speed. You see, both Java andShockwave are highly abstracted development environments. This means that theyexecute commands through multiple layers instead of accessing the computer’shardware and operating system directly, which in turn limits performance. Forexample, in order for a Java game to move an on-screen object, it must sendinstructions to a corresponding Java function that performs this action. In turn,the Java function must then be translated into the appropriate Windows,Macintosh, or Linux operating system call and so on. In contrast, using a tradi-tional programming language like C or C++ only requires one such translationrather than several to perform the same task. Therefore, games written usingeither of these technologies do not offer anywhere near the same level of perfor-mance as their offline counterparts.
Chapter 12 / Hands-on Arcade Game Project—Fish Dish 425

To make matters even worse, games written in Java usually store their artwork asseparate files. For games with many different objects, this additional overhead canfurther degrade performance. However, due to the way they are compressed,Shockwave games do not have this problem.
Table 12-12 compares the performance of Java and Shockwave.
TABLE 12-12: Comparison of Online Game Development Tool Performance
Online ProgrammingEnvironment
Screen Performance Rating Other Issues
Java Mediocre to good.
Depends on the game type, thecomplexity of the animation, andthe number of objects.
Overall, performance depends onthe version of Java and theimplementation of the Java VirtualMachine.
Game-related artwork is usuallyexternal to the game and is loadedwhen the game first runs, which cancause a noticeable delay.
Director/Shockwave Mediocre to good.
Depends on the game type, thecomplexity of the animation, andthe number of objects.
Performance is tied to the speed ofthe player’s machine and the versionof the Shockwave player being used.
Game-related artwork is usuallyinternal to the game program and isloaded when the game first runs. Theresulting performance penalty tendsto be less than for Java becausemost, if not all, game artwork comesembedded in the game itself.
From a design perspective, there are several ways to enhance an online game’sperformance. These are:
� Reducing the number of on-screen objects—Fewer game objects meansfewer items for the game to track, move, and manipulate. Limiting the numberof game objects can help to speed up a game’s performance.
� Using simpler animation—Simple animations (only a few frames) are farless resource intensive than complex animations (many frames). Using lesssophisticated animations can improve game performance.
� Reducing the size of on-screen objects—Smaller sprites and game objectsrequire less computing time to display, track, and move than larger sprites andgame objects. Therefore, restricting the size of your game’s objects can trans-late directly into faster overall performance.
426 Chapter 12 / Hands-on Arcade Game Project—Fish Dish
� Eliminating or minimizing background activity—Background activitysuch as scrolling is a huge drain on a computer’s resources. Removing sucheffects from your online game can go a long way in improving its performance.
Commentary: Performance Issues in Fish Dish
Fish Dish can be implemented using Java, Shockwave, or any other programminglanguage for that matter. However, to ensure optimal performance regardless ofthe technology used, Fish Dish was designed with these considerations in mind:
� Simple animation—The need to keep game activity moving at a reasonablepace means that Fish Dish will use very simple animation. Specifically, Fish
Dish uses the open/close and swing animation primitives, and several of thegame’s objects do not use animation at all. In addition, all game objects arelimited to only a few animation frames each.
� Static background screens—The backgrounds used in Fish Dish are staticin order to minimize non-essential animation and improve the game’s overallperformance.
� Object size—Most of Fish Dish’s game objects are small to medium in size.This was done to take advantage of the fact that smaller objects animate fasterthan larger ones.
These design modifications were made after a careful evaluation of Fish Dish’svarious components so that we could maximize performance without dramaticallydiminishing the overall quality of the game.
Good performance is important to any arcade game, but you should never sacrificethe integrity of the game just to see a performance benefit. Rather, you shouldcarefully weigh what is to be gained by removing or reducing the graphical ele-ments of your game and what is to be lost. For example, although all of the designmodifications to be implemented will contribute to Fish Dish’s performance, noneof them actually detracts from the game as a whole. In other words, these changescan be made and Fish Dish will still be a good game. Therefore, only make designchanges if they benefit the game without ruining the player’s experience.
The Color Palette
All online arcade games use a common color palette known as the Java/Netscapepalette. First described in Chapter 8, this palette has the ability to display artworkcreated with it on multiple platforms without color loss or dithering when in an8-bit display mode. Although this property makes it very useful for online games,it has its share of issues to contend with, including:
� Color availability—Most color palettes give us 256 different colors to choosefrom and use. However, for various technical reasons, the Java/Netscape pal-ette only gives us 216 usable colors. This leaves us with fewer available colorchoices and can (at times) place restrictions on our creativity.
Chapter 12 / Hands-on Arcade Game Project—Fish Dish 427

� Poor color variation—As explained in Chapter 8, this palette has two majorshortcomings with the colors it provides. First, there are too many saturatedshades of primary colors and very few intermediate or tertiary colors. Second,there are only six shades of any one color available. This makes it useless forgames that require artwork with complex shading.
� Poor color harmony—The colors contained in the Java/Netscape paletteexhibit poor color harmony. This means that they do not work well togetherand give us few useful color combinations to use in our artwork.
Indeed, these issues definitely make using this palette in a game a challenge.However, one of the signs of a good designer is being able to determine how tobest utilize the colors available. The key to doing this is by identifying which colorcombinations work well together and the most suitable styles of artwork to usewith the palette in question.
It takes time and experience to really determine which colors work well with eachother for a given palette. This is especially true when creating artwork for onlinegames using the Java/Netscape palette. As it happens, there are only about 16 use-ful color combinations supported by this palette.
Shown in Table 12-13, these color combinations have been identified though trialby working on numerous game projects. They all provide sufficient diversity toallow you to render many different types of objects without being overly repeti-tious or boring. While other color combinations are indeed possible using thispalette, they usually produce color combinations that are too bright, too dark, ordo not provide sufficient contrast to make them effective in a game.
TABLE 12-13: Effective Color Combinations for Use in Online Games
Color Combination Colors (RGB Values)
Combo 1 Dark Red: 153 0 0
Maroon: 204 51 51
Light Red: 255 102 102
Pink: 255 153 153
Combo 2 Light Brown: 204 102 0
Dark Tan: 204 153 0
Sand: 255 204 51
Pure White: 255 255 255
Combo 3 Dark Brown: 102 51 0
Medium Brown: 204 102 0
Light Tan: 255 153 0
428 Chapter 12 / Hands-on Arcade Game Project—Fish Dish
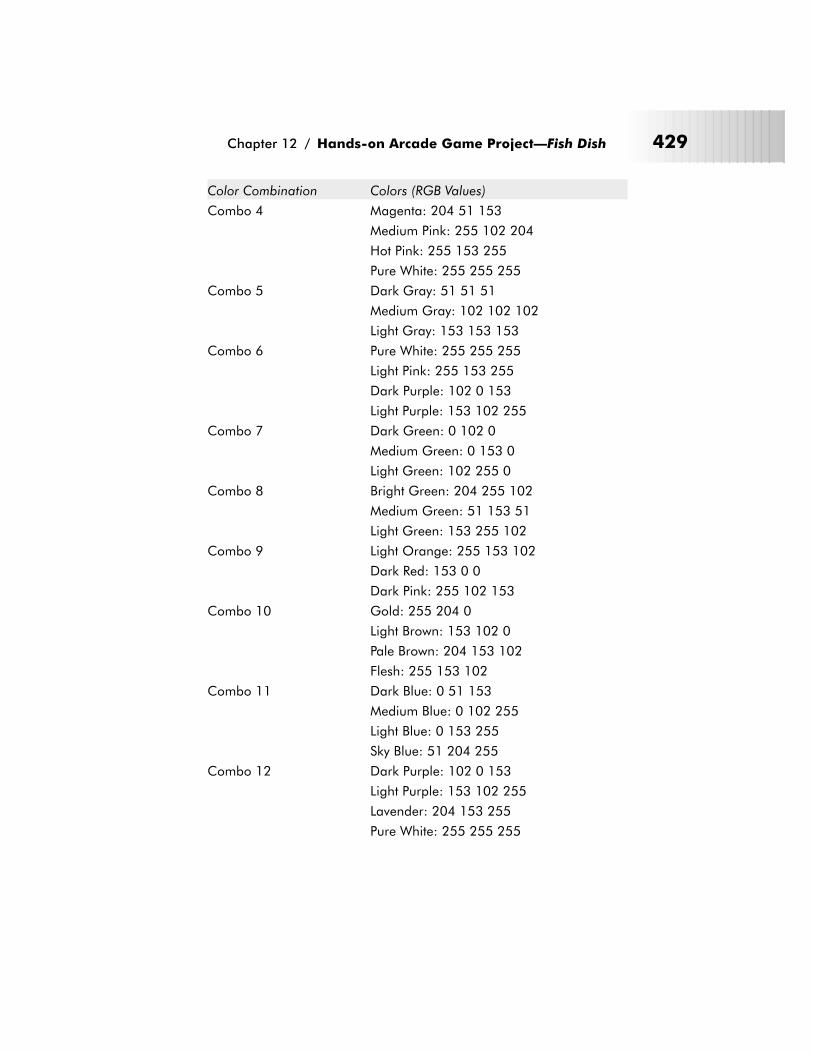
Color Combination Colors (RGB Values)
Combo 4 Magenta: 204 51 153
Medium Pink: 255 102 204
Hot Pink: 255 153 255
Pure White: 255 255 255
Combo 5 Dark Gray: 51 51 51
Medium Gray: 102 102 102
Light Gray: 153 153 153
Combo 6 Pure White: 255 255 255
Light Pink: 255 153 255
Dark Purple: 102 0 153
Light Purple: 153 102 255
Combo 7 Dark Green: 0 102 0
Medium Green: 0 153 0
Light Green: 102 255 0
Combo 8 Bright Green: 204 255 102
Medium Green: 51 153 51
Light Green: 153 255 102
Combo 9 Light Orange: 255 153 102
Dark Red: 153 0 0
Dark Pink: 255 102 153
Combo 10 Gold: 255 204 0
Light Brown: 153 102 0
Pale Brown: 204 153 102
Flesh: 255 153 102
Combo 11 Dark Blue: 0 51 153
Medium Blue: 0 102 255
Light Blue: 0 153 255
Sky Blue: 51 204 255
Combo 12 Dark Purple: 102 0 153
Light Purple: 153 102 255
Lavender: 204 153 255
Pure White: 255 255 255
Chapter 12 / Hands-on Arcade Game Project—Fish Dish 429

Color Combination Colors (RGB Values)
Combo 13 Dark Green: 0 102 0
Medium Green: 51 153 51
Light Green: 102 204 102
Bright Green: 153 255 153
Very Light Green: 204 255 204
Combo 14 Dark Olive: 102 102 51
Medium Olive: 153 153 102
Light Olive: 204 204 153
Very Light Olive: 255 255 204
Pure White: 255 255 255
Combo 15 Dark Magenta: 102 51 102
Medium Magenta: 153 102 153
Light Magenta: 204 153 204
Very Light Magenta: 255 204 255
Pure White: 255 255 255
Combo 16 Dark Cyan: 51 102 102
Medium Cyan: 102 153 153
Cyan: 102 204 204
Light Cyan: 153 255 255
Very Light Cyan: 204 255 255
The lack of more than six shades for any one color and the overabundance of pri-mary colors in the Java/Netscape palette make it largely unsuitable for creatingcertain types of images. Instead, it is strongly recommended to only use this pal-ette to create retro- or cartoon-style artwork. Coming to this realization will saveyou time and effort later.
Usually, the palette’s suitability can be determined by examining the colors atyour disposal. Specifically, look for essential “indicators” or factors that can nega-tively affect your creativity as:
� Available shades and tints—As mentioned in Chapters 7 and 8, a palettewith too few shades and tints per unique color prevents it from being used toeffectively render realistic objects.
� Available color types—Many objects, particularly realistic ones, requireintermediate and neutral colors. A palette with too few of these types of colorseffectively rules it out for rendering realistic or complex objects.
� Available color intensity—A palette with an abundance of highly saturatedcolors makes it largely unsuitable for rendering realistic or detailed objects.Similarly, a palette with too little intensity can have the same effect.
430 Chapter 12 / Hands-on Arcade Game Project—Fish Dish
In addition, other factors can influence a palette’s suitability, including:
� Contextual requirements—These are the color requirements of theobject(s) in question, i.e., green sky vs. blue sky, etc. You may have no choicebut to use certain colors because the context of the situation demands theiruse. This should be one of your most important considerations, especiallywhen trying to mimic real-world characters and objects in your game artwork.A palette is worth considering as long as it meets your contextualrequirements.
� Aesthetic requirements—These consider issues like which colors look bestagainst certain backgrounds and with other objects. This is essentially thecolor harmony of the palette. If the palette provides your game objects withsufficient coverage, then the palette is worth considering.
On the positive side, the Java/Netscape palette can produce some very attractivegame artwork when used properly. This means sticking to the color combinationsdescribed in Table 12-13 and only using them to create cartoon- or retro-style art-work. Because of this, the artwork in Fish Dish does not use a realistic designstyle.
Commentary: The Color Palette in Fish Dish
As an online game, we really had no choice but to use the Java/Netscape palettefor Fish Dish. However, despite the palette’s obvious disadvantages, the colors init more than meet our contextual and aesthetic color requirements. This meansthat it will do the trick.
Determining the Order of Element Creation
One of the challenges of designing arcade game graphics is figuring out exactlywhat to do first. Do you design the game’s characters and animation first? Do youcreate the backgrounds before the title screen? As you can probably appreciate,these are important questions, especially when you consider the fact that you maybe under a deadline and only have a limited amount of time to create everythingfor your game.
There are a number of factors to consider in determining which part of your gameproject to tackle first. These include such things as:
� The quantity of objects—For obvious reasons, the number of objects in agame can have a big effect on whether you choose to work on this part of thegame’s artwork first. This is simply due to the fact that more objects will takemore time to design.
� The design style—Certain design styles require more design effort than oth-ers. For example, games with realistic artwork are more complex than thosewith retro artwork, and so on.
Chapter 12 / Hands-on Arcade Game Project—Fish Dish 431
� The type of artwork—Some artwork is simply more difficult and time-con-suming to design than others. For example, animated objects will usually takemore time to create than static objects.
� The color palette—The color palette used can significantly affect how long ittakes to create a piece of game artwork. For example, some palettes imposespecific limitations on the number or types of colors you can use. This willforce you to spend more time coming up with workarounds.
Given these factors and issues, it is suggested that you approach creating yourgame objects in this order:
1. Game sprites
2. Game backgrounds
3. Game titles and menu elements
Game sprites and any animated objects should be created first because they tendto be the most complex as well as the most numerous parts of your game. There-fore, you’re bound to spend the most time creating them. The sooner you getthem done and out of the way, the better off you are.
Game backgrounds can be very complex but rarely as much as sprites. Also, theretend to be fewer of them so they should not take you nearly as long to design andcreate.
Finally, always create your title screen and menu screen elements last. This isbecause they are considered game icing. That is, they are embellishments to thegame and not central to it. Your game sprites and backgrounds are far more impor-tant. Far too many designers make the mistake of focusing on these elements firstwhen they should really be creating them last.
NOTE: If you are working with other designers, some of these steps can be
done at the same time. For example, you can have one artist focus on creat-
ing the title screen while another focuses on designing the backgrounds.
This is typically how larger, commercial game projects are done as this
arrangement maximizes resources and productivity. However, the order of
element creation presented here will work for pretty much any solo game
project.
Commentary: The Order of Element Creation in Fish Dish
Fish Dish is sufficiently complex enough that it requires the bulk of the designtime to be used creating the game’s various game sprites. The backgrounds arevery simple, and therefore only minimal time will be allocated to them. In addi-tion, they will be done after the main game objects have been completed. The titlescreen, because it is an embellishment, will also be done last.
432 Chapter 12 / Hands-on Arcade Game Project—Fish Dish
Phase II: The Fish Dish Design Plan
This section of the chapter documents the various technical details associatedwith designing the artwork and animation for Fish Dish’s game objects andelements.
The Fish Dish Game Summary
As discussed back in Chapter 11, it is the purpose of the game summary in ourdesign plan to help us flesh out the overall creative appearance of our game (inthis case, Fish Dish). In addition, this is the place where we define and establishsuch crucial game elements as the characters that we will need to eventuallydesign.
Game Back Story
Poor Salmon Fishdie has just hatched and is very hungry. All alone in the deepblue ocean, Salmon must rely on his speed and wits to snag a meal and grow bigand fat. Unfortunately, life in the wild isn’t easy because the ocean is a toughplace. Salmon must constantly be vigilant and watch out for bigger, more powerfulfish and even worse—sharks! Can you help Salmon fill his belly without him fillingsomeone else’s?
Game Description/Game Concept
Fish Dish is a humorous online, maze/chase version of Darwin’s “survival of thefittest” theory. In it, the player controls an on-screen character in the form of asmall fish named Salmon Fishdie. The player must maneuver Salmon so that hecan gobble up any fish that are smaller or equal in size to Salmon while avoidinglarger, predatory fish that periodically appear. The more fish that Sal eats, thelarger he grows. Unfortunately, for Salmon, his predators grow as well, making itprogressively more dangerous for Salmon to survive.
The goal of Fish Dish is very simple: the player scores points by eating other fish.When the player exhausts all of Salmon’s lives, the game ends.
Game Object Inventory
As designed, Fish Dish includes a number of different game objects. This group ofobjects contains the game’s core game characters. Core game characters are gameobjects central to the theme or plot of the game and usually include theplayer-controlled character as well as the computer-controlled enemies. In Fish
Dish, these objects include:
� Salmon Fishdie—The player-controlled character. Salmon starts the game asa small, round fish with two large eyes on the same side of his face. Salmon’s
Chapter 12 / Hands-on Arcade Game Project—Fish Dish 433

main ambition in life is to eat. As such, he travels the ocean looking for fish toeat that are smaller or equal to him in size while avoiding bigger and meanerfish. The more Salmon eats, the more he grows. In fact, Salmon can grow upto 7x his original size. However, even at his largest size, Salmon manages toretain the boyish good looks he had when he was a small fry. In other words,he looks more or less the same as he did at the start of the game. The playercontrols Salmon with the arrow keys and can move Salmon in four possibledirections—up, down, left, and right. To help make Salmon easier for theplayer to spot in a sea of fish, he is colored pink. In addition, he is the only fishin the game that moves both his fins and mouth as he swims.
� Salmon Fishdie Angel—This divine, winged fish appears whenever Salmon“gives up the ghost” and becomes another fish’s meal. Salmon is inherentlygood so he gets to go upstairs to that big ocean in the sky and swap his fins fora pair of wings.
� Bad Tuna—A potential predator or meal, depending on Salmon’s size at thetime of contact. Bad Tuna are a particularly tasty species of tuna that areknown for their voracious appetites for Salmon. Bad Tuna are easily identifiedby their purple and lavender color scheme and large fins. Unlike other fish,Bad Tuna never swim alone.
� Blue Angels—A species of uncanny beauty, and like many of the fishdescribed here, they are both a threat and meal to good ol’ Salmon. BlueAngels are triangular in shape and blue in color. Despite having large eyes fortheir size, Blue Angels are virtually blind, making them easy prey for a hun-gry, ever-growing Salmon.
� Gold Diggers—A small species of fish known for their brownish-gold coloringand tendency to feed at the bottom of the sea. Gold Diggers are very fond ofsmaller Salmon but the feeling is not mutual; Salmon hates the taste of GoldDiggers. However, if hungry, Salmon considers Gold Diggers to be excellentsources of protein, vitamins, and minerals and will eat them if given thechance.
� Gray Sharks—A small and notoriously cowardly species of Shark. GraySharks are sharks only in name, as they tend to startle easily. Although theyoften prey on young Salmon, Salmon just as often preys on them. Despitetheir meek demeanor, Gray Sharks freely roam the ocean and rely on theirgreat speed to avoid danger.
� Green Meanies—Another potential predator and meal of Salmon’s. Plentifuland hearty, Green Meanies are one of Salmon’s favorite dishes. When notbeing hunted, Green Meanies are one of smaller Salmon’s greatest threats.Green Meanies are small, green, and round and are easy to spot no matterhow many fish are in the sea. Green Meanies prefer to swim in the upperreaches of the ocean, near the surface where the water is warm.
434 Chapter 12 / Hands-on Arcade Game Project—Fish Dish
� Happy Clams—A species of giant clams that are occasionally found on theocean bottom. Although immobile, Happy Clams are impervious to attack dueto their hard outer shell.
� Head Hunter Fish—A scourge of the sea, Head Hunter Fish are feared farand wide for their razor-sharp teeth and even nastier composure. HeadHunters love to eat Salmon, especially if he’s big and fat. Head Hunter Fishare big, round, and tan in color. They can be found in all parts of the ocean andalways hunt alone.
� M.C. Hammerhead—The oversized bully of Salmon’s underwater neighbor-hood. M.C. Hammerhead is a giant Hammerhead Shark who knows no fearand who will eat any fish he comes across. A skilled hunter, M.C. alwaysappears when you least expect him to. Gray in color like most sharks, M.C.’ssize is equaled only by his obsession for Salmon.
� Red Devils—One of the smallest fish in the ocean and Salmon’s easiest meal.Dark red in color, Red Devils are a small and stupid species of fish that wan-ders the ocean aimlessly. No one knows why or how they got such a horriblename but to Salmon they are simply known as “dinner.”
� Starfish—Starfish are frequently found at the bottom of the ocean, alone andin pairs. When hungry, they float up to the surface in the hopes of finding food.A lazy species, they only eat what fish they run into. Unfortunately forSalmon, they would prefer to eat him over other types of fish.
In addition to these core objects, several items in Fish Dish can alter or enhancethe abilities of the player. These objects are often referred to as pickups. In Fish
Dish, the pickups include:
� Bubbles—Bubbles are transparent spheres that appear in various sizes andemanate from the ocean depths. Although they usually contain pockets of air,on rare occasions, some bubbles actually contain magical items that Salmoncan use to his advantage in his quest to eat.
� Pause Bubbles—Pause Bubbles are special bubbles that contain the power tostop time for exactly three seconds. During this time, Salmon is the only fishin the ocean that can move. All other fish are stopped dead in their tracksregardless of their size or speed. Pause Bubbles make it very easy for Salmonto pig out and eat without worrying about being eaten. In some cases, they canalso help get Salmon out of a tight spot. Pause Bubbles look like ordinary bub-bles with miniature stoplights in them.
� Shield Bubbles—Shield Bubbles are special bubbles that contain the powerto make Salmon invincible to bigger fish for exactly five seconds. During thistime, Salmon cannot be eaten. Any fish that tries will simply bounce offSalmon, frustrated and hungry. Shield Bubbles are useful for protectingSalmon when he is small so that he can freely eat without having to worry
Chapter 12 / Hands-on Arcade Game Project—Fish Dish 435
about becoming someone else’s snack. Shield Bubbles look like normal bub-bles except for a small shield icon inside of them.
Every game also has a few supporting objects that include everything from statusindicators to title screens. In Fish Dish, these items are:
� Title Screen—A title screen that features a Fish Dish logo and a simple,game difficulty menu. The game’s logo is located at the top of the screen andconsists of a drawing of a fish skeleton while the game title is in thick, pink,cartoon-like lettering. The difficulty menu consists of three small buttons thatresemble check boxes. The check boxes are labeled Easy, Medium, and Hard,respectively. The menu itself is positioned at the bottom of the screen.
� Level 1 Background—This is the background screen for all levels of thegame. This screen consists of two parts: a light blue field and a dark brownfield. The light blue field occupies the upper 85% of the screen and representsthe ocean while the dark brown field that occupies the remaining 15% of thescreen represents a seabed. The seabed itself consists of rocky and craggymounds of earth rendered in various shades of brown.
� Level 2 Background—Same as in Level 1, except the game difficulty wouldincrease.
� Level 3 Background—Same as in Levels 1 and 2, except the game difficultywould increase.
Game Functionality Overview
Fish Dish was originally conceived to be an online game. As such, it can be imple-mented using any existing programming technology and can run on virtually allplatforms from Windows to the Macintosh. It is also perfectly feasible to use Fish
Dish’s artwork for an offline game as well.
As designed, Fish Dish supports these features:
� Runs on any Windows 95, 98, NT, or 2000, Linux, or Macintosh computercapable of running Java or Shockwave (if implemented as an online-only game).
� Allows the player to oppose ten different creatures, each with a unique lookand behavior.
� Allows the player to obtain temporary advantages with two pickup objects.
The Game Action Sequence
The game action sequence was also described in Chapter 11. In case you’ve for-gotten, the purpose of this section of the design plan is to chart or “map out” theflow of action throughout Fish Dish. It is through this section that we gain anunderstanding of what game elements will be needed to be designed and how andwhere they will be used.
436 Chapter 12 / Hands-on Arcade Game Project—Fish Dish
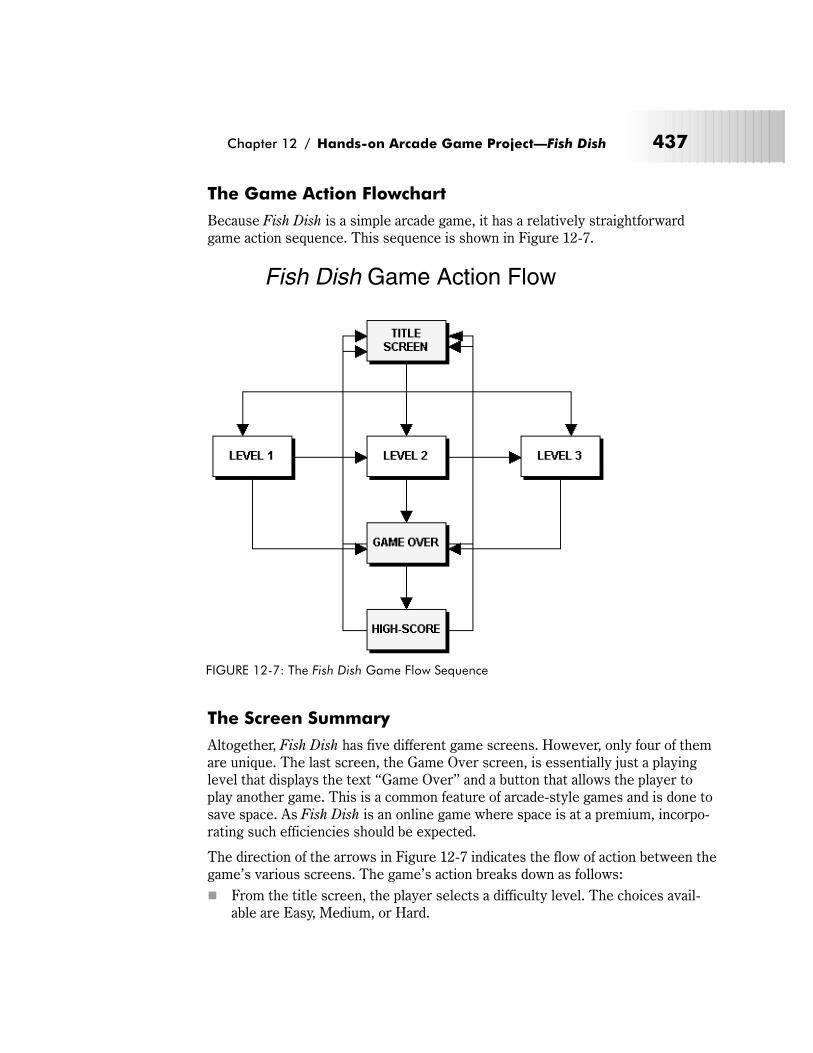
The Game Action Flowchart
Because Fish Dish is a simple arcade game, it has a relatively straightforwardgame action sequence. This sequence is shown in Figure 12-7.
The Screen Summary
Altogether, Fish Dish has five different game screens. However, only four of themare unique. The last screen, the Game Over screen, is essentially just a playinglevel that displays the text “Game Over” and a button that allows the player toplay another game. This is a common feature of arcade-style games and is done tosave space. As Fish Dish is an online game where space is at a premium, incorpo-rating such efficiencies should be expected.
The direction of the arrows in Figure 12-7 indicates the flow of action between thegame’s various screens. The game’s action breaks down as follows:
� From the title screen, the player selects a difficulty level. The choices avail-able are Easy, Medium, or Hard.
Chapter 12 / Hands-on Arcade Game Project—Fish Dish 437
Fish Dish Game Action Flow
FIGURE 12-7: The Fish Dish Game Flow Sequence
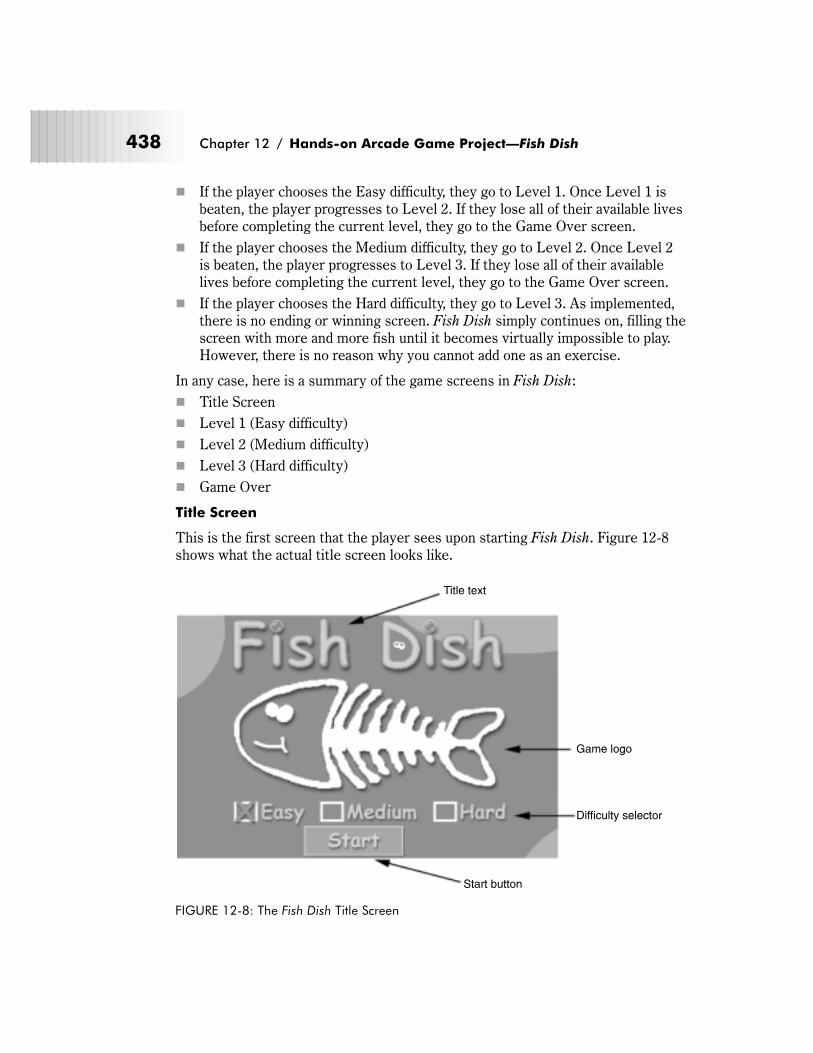
� If the player chooses the Easy difficulty, they go to Level 1. Once Level 1 isbeaten, the player progresses to Level 2. If they lose all of their available livesbefore completing the current level, they go to the Game Over screen.
� If the player chooses the Medium difficulty, they go to Level 2. Once Level 2is beaten, the player progresses to Level 3. If they lose all of their availablelives before completing the current level, they go to the Game Over screen.
� If the player chooses the Hard difficulty, they go to Level 3. As implemented,there is no ending or winning screen. Fish Dish simply continues on, filling thescreen with more and more fish until it becomes virtually impossible to play.However, there is no reason why you cannot add one as an exercise.
In any case, here is a summary of the game screens in Fish Dish:
� Title Screen
� Level 1 (Easy difficulty)
� Level 2 (Medium difficulty)
� Level 3 (Hard difficulty)
� Game Over
Title Screen
This is the first screen that the player sees upon starting Fish Dish. Figure 12-8shows what the actual title screen looks like.
438 Chapter 12 / Hands-on Arcade Game Project—Fish Dish
Title text
Game logo
Difficulty selector
Start button
FIGURE 12-8: The Fish Dish Title Screen
In most games, this screen contains the program’s title, logo, credits, and/or anyrelated copyright information. It is here where the player can control the difficultyof the game as well as begin a new game. This is true regardless of whether thegame is online, offline, maze/chase, or another type of arcade game.
In Fish Dish, the title screen contains four different elements. These are:
� The title text
� The game logo
� The difficulty selector
� The Start button
The title text is simply the game’s name represented graphically. Most games,regardless of their type, use some sort of stylized title that ties back into thegame’s theme or plot. In Fish Dish, the title text is rendered using bright colorsand includes elements from the game (such as bubbles and cartoon-style eyes).Not only do these elements give the title text character, but they help furtherreinforce their relationship to the game’s plot.
The game logo is a graphical element that represents the theme or plot of thegame in question. Many games feature logos that somehow tie into the game byusing characters or items that are featured in the game. Other games use moreabstract elements that are not in the actual game but still manage to tie into itnonetheless. Fish Dish falls into the latter category. The logo element consists of acartoon-style fishbone. This was done to emphasize the general theme of thegame, i.e., eating other fish and surviving. Several other concepts could have beenexecuted in its place and would probably have the same effect, including putting afish on a plate so that it would tie in with the game’s name. Yet, to keep the exam-ple simple while effective in illustrating the point, only the fishbone motif wasused here.
The difficulty selector is a menu that allows the player to determine the game’sdifficulty setting. The vast majority of arcade-style games usually place suchmenus on a separate screen; however, in order to maximize space and for the sakeof illustration, it was placed on the title screen in Fish Dish.
As implemented, the difficulty selector consists of three check boxes in which theplayer merely has to click on one of them to choose a setting. Although othermechanisms could just as easily have been used, check boxes are probably thebest choice. This is because they offer the player affordances, or subtle designcharacteristics that convey the correct use of an object. Therefore, people under-stand their purpose and know to click on them. As a rule, regardless of the type ofgame involved, always try to give the player as many affordances as possible.
The final item on the title screen is the Start button. This is a simple rectanglethat the player clicks on to begin the actual game. Like the difficulty selector, theStart button contains such affordances as a drop shadow, a unique shape, and
Chapter 12 / Hands-on Arcade Game Project—Fish Dish 439

position on the screen so that players have no problem understanding the button’spurpose within the game.
NOTE: We will examine the construction of Fish Dish’s title screen later in this
chapter.
Level Screens (Easy, Medium, and Hard)
These are the actual game screens where all of Fish Dish’s activity occurs. Figure12-9 shows an example of what a typical Fish Dish game level looks like.
In most arcade games, the average level screen consists of a simple playfield alongwith any relevant scoring information, level information, and the current count ofthe player’s available lives or chances.
In addition to hosting all of the game’s action, each game level offers the playernew game experiences. These experiences can range from introducing visual ele-ments such as new characters or backgrounds to increasing the difficulty over theprevious level.
Despite this possibility, every game level usually shares elements and objects incommon. In the case of Fish Dish, there are four basic elements that neverchange, regardless of what challenges a new level brings. These items includethe:
� Score indicator
440 Chapter 12 / Hands-on Arcade Game Project—Fish Dish
Score indicator
Lives indicator
Game character
Background
FIGURE 12-9: Example of a Fish Dish Game Level Screen
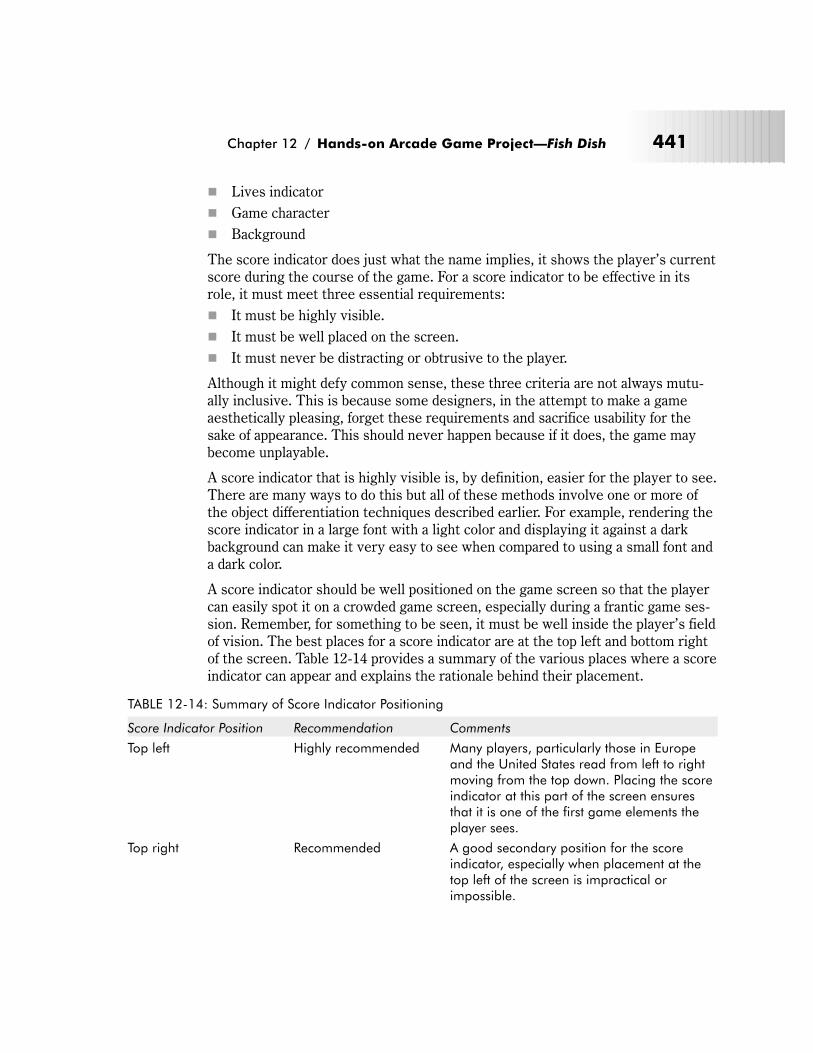
� Lives indicator
� Game character
� Background
The score indicator does just what the name implies, it shows the player’s currentscore during the course of the game. For a score indicator to be effective in itsrole, it must meet three essential requirements:
� It must be highly visible.
� It must be well placed on the screen.
� It must never be distracting or obtrusive to the player.
Although it might defy common sense, these three criteria are not always mutu-ally inclusive. This is because some designers, in the attempt to make a gameaesthetically pleasing, forget these requirements and sacrifice usability for thesake of appearance. This should never happen because if it does, the game maybecome unplayable.
A score indicator that is highly visible is, by definition, easier for the player to see.There are many ways to do this but all of these methods involve one or more ofthe object differentiation techniques described earlier. For example, rendering thescore indicator in a large font with a light color and displaying it against a darkbackground can make it very easy to see when compared to using a small font anda dark color.
A score indicator should be well positioned on the game screen so that the playercan easily spot it on a crowded game screen, especially during a frantic game ses-sion. Remember, for something to be seen, it must be well inside the player’s fieldof vision. The best places for a score indicator are at the top left and bottom rightof the screen. Table 12-14 provides a summary of the various places where a scoreindicator can appear and explains the rationale behind their placement.
TABLE 12-14: Summary of Score Indicator Positioning
Score Indicator Position Recommendation Comments
Top left Highly recommended Many players, particularly those in Europeand the United States read from left to rightmoving from the top down. Placing the scoreindicator at this part of the screen ensuresthat it is one of the first game elements theplayer sees.
Top right Recommended A good secondary position for the scoreindicator, especially when placement at thetop left of the screen is impractical orimpossible.
Chapter 12 / Hands-on Arcade Game Project—Fish Dish 441

Score Indicator Position Recommendation Comments
Middle Not recommended Never place the score indicator (or anyindicator for that matter) in the middle of thescreen. Placing the score indicator here notonly makes it difficult to see but can cause apotential conflict with the game’s otherobjects.
Bottom left Recommended but withreservations
An acceptable position but not preferredsince this locates the score indicator outsideof comfortable viewing.
Bottom right Highly recommended An excellent position for the score indicatorbecause it is the last thing the player sees onthe screen. This provides the player with animportant visual clue as to the score’s relativeimportance on the screen.
The third requirement of a good score indicator is to not be obtrusive or distract-ing to the player. In effect, this requirement directly relates to the previous two inthat the score indicator’s object differentiation methods and placement on thescreen can become distracting if done improperly. As long as the first two require-ments are addressed properly, the score indicator will never appear obtrusive tothe player.
In Fish Dish, the score indicator meets all of these requirements. It uses a darkcolor that is rendered in a unique but readable font, and is positioned at the top leftof the game screen. All of these factors ensure that the score remains highly visi-ble to the player without being distracting or disruptive.
The purpose of the lives indicator is to show the player how many lives orchances they have at any point during a game. It is interesting to note that muchof the same logic that applies to score indicators applies to lives indicators as well,with one significant addition: presentation. Traditionally, lives indicators inarcade-style games are iconic in nature. That is to say, they use small graphicelements, usually in the form of a smaller version of the main player-controlledcharacter, to display the number of lives a player has left. In most cases, thisdevice works well, as players are able to associate the icon with their on-screencharacter. However, in others it does not, especially when this icon runs the riskof confusing the player. For example, if a game uses a small spaceship for its livesindicator and then displays several small spaceships on the game screen, it standsto reason that some players will mistake their lives indicator for another gameobject. While this situation is usually not fatal, it is considered bad design. No sta-tus indicator (i.e., score indicator, lives indicator, etc.) should ever favor form overfunction. In other words, they should always work better than they look. One of
442 Chapter 12 / Hands-on Arcade Game Project—Fish Dish
the best ways to do this is to simply use text to represent the actual number ofplayer lives that remain.
It was for this very reason that Fish Dish takes a hybrid approach. It combines anicon of a small fish (Salmon) with a numeric counter as shown in Figure 12-9. Thisallows the lives indicator to look good while minimizing the potential for playerconfusion. In addition, placing the lives indicator in Fish Dish close to the scoreindicator tells the player that it is a status device and not an active game objectthey can manipulate or interact with.
Game characters are the graphical objects controlled by both the player and thecomputer. They usually consist of animated sprites that can interact with a varietyof on-screen elements. As such, they are the focal point for all of the game’saction. Due to their importance, all game characters must meet three essentialrequirements:
� They must be easily differentiated from each other.
� Their function or purpose within a game must be visually obvious.
� They must be consistent with the game’s chosen design style across all levels.
The fact that game characters should be easily differentiated from each othershould go without saying. Without a means for the player to distinguish between agame’s different game objects, game play would be nonexistent. Game charactersshould always be designed using the various differentiation devices in mind.Whether you design your characters using differences in color, size, shape, or ani-mation does not matter as long as the differences are sufficient for the player totell objects apart.
Fish Dish uses several differentiation devices to ensure that its game charactersare uniquely identifiable to the player. This gives the game more variety andvisual appeal, and reduces the potential for player confusion.
One of the greatest challenges we face as designers is to convincingly rendersmall grids of pixels as recognizable, real-world objects. For example, does theplayer recognize the graphic we made as a doorway? To make matters worse, dueto a variety of resolution, size, and color restrictions that various platformsimpose, it can become very difficult to accurately represent certain objects. Forexample, does the graphic we made actually look like a door? This in turn makes itvery difficult for the average player to understand the context of how an object isused within a game. For example, does the player know that they can use the doorto exit the current level? So lies our dilemma. It is our job to make it as easy aspossible for the player to understand what is going on in a game at all times. Thisextends to how objects look and work. Therefore, you should maximize yourefforts to always make sure that any game objects or characters you design for agame leave some clue as to their role in the game. There are a number of ways todo this. One of the easiest and most useful techniques is to simply carry over as
Chapter 12 / Hands-on Arcade Game Project—Fish Dish 443

much of the real-world object’s shape and color as possible within your particularsize and color constraints. For example, if an apple is red in the real world, makesure that it is red in your game and shaped like an apple. Usually, such clues areenough to help the player make the connection as to what the object is.
Fish Dish addresses this issue by using this technique. All of its game charactersare recognizable as fish so the player immediately has some understanding ofwhat they are and how they fit into the context of the game.
It is essential that the game characters you design be consistent across thegame’s various screens and levels. In particular, this means the design style youchose should be reflected in all of the game’s objects and not change. For example,if you design your game characters using a cartoon-like design style, make surethat all of the game’s objects appear this way. The importance of consistencyshould not be underestimated. Simply put, players will associate the lack of con-sistency in your game and its characters with poor quality and bad design.Therefore, always strive to maintain whatever design convention you establishthroughout your game.
Fish Dish follows this rule to a tee. Every game character that appears in it isdrawn in the same design style using the same color shading techniques. Thisgives the game a coherent and professional look compared to a game that does notfollow this requirement as closely.
Backgrounds are the actual playing area where all of the game’s action occurs.Backgrounds can come in many styles and can range from the absurdly simple tothe amazingly complex. Regardless of this, in order to be effective all arcade gamebackgrounds must follow these three rules:
� Backgrounds must provide sufficient contrast so that foreground elementsstand out.
� Backgrounds must stylistically fit in with the foreground element used.
� Backgrounds must be designed with efficiency and flexibility in mind.
To be aesthetically pleasing, all game background screens must provide amplecontrast. As already mentioned, contrast makes graphic elements stand outagainst a colored or complex background. Backgrounds that fail to provide suffi-cient contrast can potentially destroy the player’s experience by making thegame’s artwork difficult to see and interact with. For example, a game with darkforeground elements should have a light background screen and vice versa. Inaddition, backgrounds that provide good contrast can improve the appearance andperceived quality of a game’s artwork. The key to determining whether or not agiven background screen has sufficient contrast can be done via the light/dark testfirst mentioned in Chapter 8.
444 Chapter 12 / Hands-on Arcade Game Project—Fish Dish
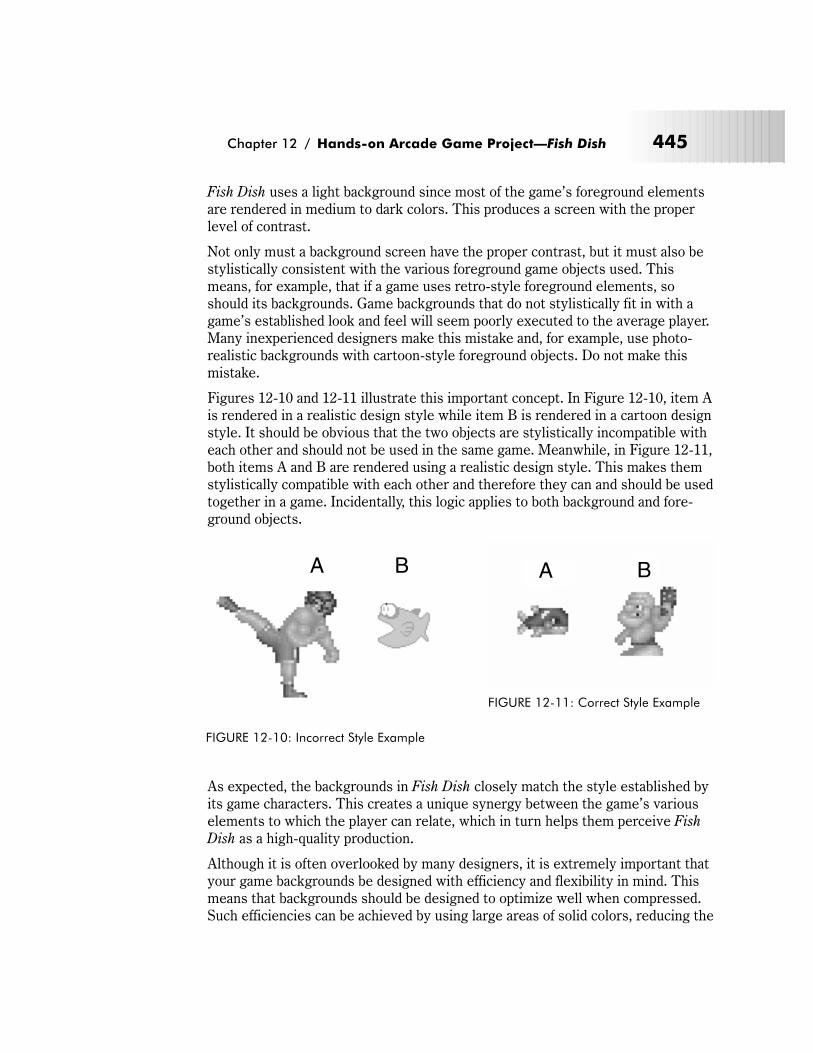
Fish Dish uses a light background since most of the game’s foreground elementsare rendered in medium to dark colors. This produces a screen with the properlevel of contrast.
Not only must a background screen have the proper contrast, but it must also bestylistically consistent with the various foreground game objects used. Thismeans, for example, that if a game uses retro-style foreground elements, soshould its backgrounds. Game backgrounds that do not stylistically fit in with agame’s established look and feel will seem poorly executed to the average player.Many inexperienced designers make this mistake and, for example, use photo-realistic backgrounds with cartoon-style foreground objects. Do not make thismistake.
Figures 12-10 and 12-11 illustrate this important concept. In Figure 12-10, item Ais rendered in a realistic design style while item B is rendered in a cartoon designstyle. It should be obvious that the two objects are stylistically incompatible witheach other and should not be used in the same game. Meanwhile, in Figure 12-11,both items A and B are rendered using a realistic design style. This makes themstylistically compatible with each other and therefore they can and should be usedtogether in a game. Incidentally, this logic applies to both background and fore-ground objects.
As expected, the backgrounds in Fish Dish closely match the style established byits game characters. This creates a unique synergy between the game’s variouselements to which the player can relate, which in turn helps them perceive Fish
Dish as a high-quality production.
Although it is often overlooked by many designers, it is extremely important thatyour game backgrounds be designed with efficiency and flexibility in mind. Thismeans that backgrounds should be designed to optimize well when compressed.Such efficiencies can be achieved by using large areas of solid colors, reducing the
Chapter 12 / Hands-on Arcade Game Project—Fish Dish 445
A B
FIGURE 12-10: Incorrect Style Example
A B
FIGURE 12-11: Correct Style Example
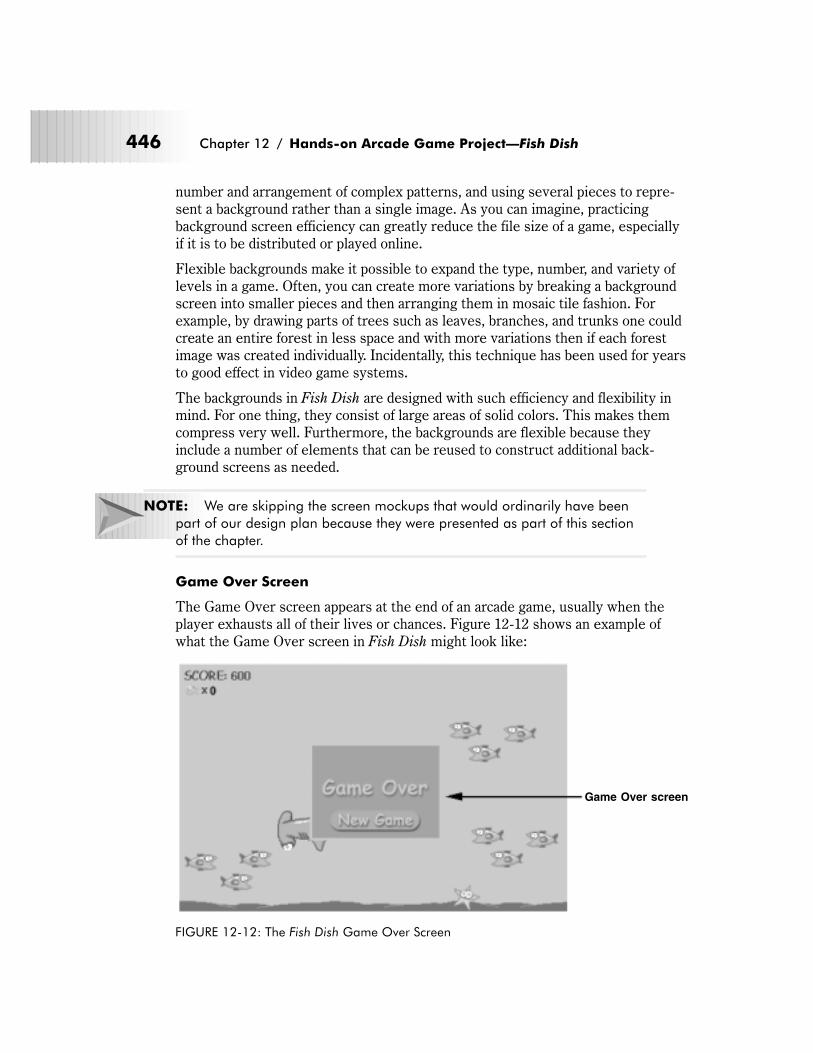
number and arrangement of complex patterns, and using several pieces to repre-sent a background rather than a single image. As you can imagine, practicingbackground screen efficiency can greatly reduce the file size of a game, especiallyif it is to be distributed or played online.
Flexible backgrounds make it possible to expand the type, number, and variety oflevels in a game. Often, you can create more variations by breaking a backgroundscreen into smaller pieces and then arranging them in mosaic tile fashion. Forexample, by drawing parts of trees such as leaves, branches, and trunks one couldcreate an entire forest in less space and with more variations then if each forestimage was created individually. Incidentally, this technique has been used for yearsto good effect in video game systems.
The backgrounds in Fish Dish are designed with such efficiency and flexibility inmind. For one thing, they consist of large areas of solid colors. This makes themcompress very well. Furthermore, the backgrounds are flexible because theyinclude a number of elements that can be reused to construct additional back-ground screens as needed.
NOTE: We are skipping the screen mockups that would ordinarily have been
part of our design plan because they were presented as part of this section
of the chapter.
Game Over Screen
The Game Over screen appears at the end of an arcade game, usually when theplayer exhausts all of their lives or chances. Figure 12-12 shows an example ofwhat the Game Over screen in Fish Dish might look like:
446 Chapter 12 / Hands-on Arcade Game Project—Fish Dish
Game Over screen
FIGURE 12-12: The Fish Dish Game Over Screen
Some arcade games make the Game Over screen into a fancy affair and includeadditional artwork or animation that ties into the game’s plot in order to tell theplayer that they lost.
The vast majority of arcade games do not need to go this far. In fact, one can getaway with a Game Over screen that just displays a message that says “GameOver.” However, in order to be truly effective, any Game Over screen shouldreally meet two requirements:
� The Game Over message should be obvious and visible.
� The Game Over screen should provide a means of letting the player start anew game.
Nothing is more confusing and frustrating for a player than to not know when agame is actually over. Sure, we might assume that the lives indicator would cuethem to this fact, but as designers, we cannot always make such assumptions.Therefore, we must always let the player know that the game is over. Knock themover the head with the message so that there can be no doubt in the player’s mind.This can be done in several ways, such as using large text, certain color combina-tions, animation, certain placements, or even sound. As long as you catch theirattention with the game’s Game Over message, there will be no doubt in theplayer’s mind that the game is indeed over.
Players hate it when a game ends and they have no obvious mechanism for start-ing a new game. Why not make it easy for them and provide a way for them toimmediately play again? The easiest and most obvious way to do this is to simplyinclude a Play Again or New Game button on your game’s Game Over screen.This will save the player frustration and encourage them to keep playing yourgame.
Fish Dish meets both of these requirements. First, it includes a Game Over dialog.This is simply a graphical box that displays a “Game Over” message positioned atthe center of the screen so there can be no doubt in the player’s mind that thegame has actually ended. In addition, it includes a large button that is labeled“New Game” so the player has an easy method for playing again.
The Fish Dish Graphics Specification
The next several pages contain the graphics specification for Fish Dish.
Game Creative Statement
Creatively speaking, Fish Dish artwork is drawn using a cartoon design style. Inaddition, bright colors were used to further highlight the light-hearted and come-dic nature of the game.
Chapter 12 / Hands-on Arcade Game Project—Fish Dish 447
Artwork Orientation
The artwork in Fish Dish is rendered using a profile orientation, i.e., the objectsappear as if viewed from the side.
Arcade game graphics can be oriented in one of three ways: from the side (profile),from above (top-view), or in simulated 3D space (isometric). Figure 12-13 illus-trates these orientations.
An arcade game should only use the profile or top-view orientations for their art-work. Although they can produce some very striking visual effects, isometricorientations tend to work best for non-arcade type games such as RPG (role-play-ing games) and simulations.
In addition, you should only use one orientation for your artwork at any one time,as no orientation scheme is complementary with another. For example, it wouldlook very strange for an arcade shooter that uses a profile orientation to suddenlyintroduce objects that use a top-view orientation and vice versa. Therefore, deter-mine which orientation to use and stick to it for the duration of the project.
Target Platform
As mentioned in several places in this chapter, Fish Dish is designed as an onlinegame capable of running on virtually any 32-bit Windows, Linux, or Macintoshmachine with the appropriate language support (i.e., Java or Shockwave). However,it is not limited to this and can be easily adapted to an offline format with minimalchanges.
448 Chapter 12 / Hands-on Arcade Game Project—Fish Dish
Profile Top-View Isometric
FIGURE 12-13: Object Orientation Examples
Estimated Object Count
In all, there are about 27 different objects in Fish Dish, including all variations ofSalmon Fishdie and the various supporting elements (i.e., title and backgroundscreens).
NOTE: The graphics for Fish Dish were designed to be extensible enough to
allow virtually anyone to extend the basic graphics set to include additional
objects not described in the game object inventory.
Artwork Screen Resolution and Playfield Size
All of Fish Dish’s graphics were designed in a 640x480 screen resolution. Becausethe artwork was conceived with online play in mind, the active game area of Fish
Dish was implemented using dimensions of 470 pixels wide by 300 pixels high.See our discussion of online game considerations earlier in this chapter.
Artwork Color Depth
All of Fish Dish’s graphics were designed for use in an 8-bit (256-color) displaymode. This allows them to be used on a variety of different systems whether theysupport high color display modes or not. It also enables Fish Dish to take advan-tage of color cycling and other effects that palette-based display modes supportshould they be implemented by the game’s programmer(s).
Refer to Chapter 2 for more information on the subject of color depth and Chapter8 for more information on the topic of palettes and color cycling.
Artwork File Format(s)
All of Fish Dish’s artwork is stored using GIF 89a files. This makes its graphicsassets compatible with the widest range of graphics programs and developmenttools, especially if its artwork is incorporated into an online game.
Artwork File Naming Scheme
The graphic assets in Fish Dish use a file naming scheme that is very similar tothe example described in Chapter 4 of this book. Be aware that all of the game’sassets were named so that they would be compatible with both Windows andMacintosh systems (i.e., maximum of 31 characters with file extensions).
Here is a breakdown of the suggested file naming scheme for Fish Dish:
Chapter 12 / Hands-on Arcade Game Project—Fish Dish 449
NOTE: The object dimensions used for these filenames are for demonstration
purposes only.
Backgrounds:
� bkg-level1-470x300.gif—Background screen for level 1
� bkg-level2-470x300.gif—Background screen for level 2
� bkg-level3-470x300.gif—Background screen for level 3
Title Screen:
� img-titlescreen-470x300.gif—Completed title screen
Sprites:
� spr-sal-470x300.gif—Sprite animations for Salmon
� spr-badfish-470x300.gif—Sprite animations for the other fish
Supporting and Miscellaneous Elements:
� mnu-easybutton_unsel-131x38.gif—The unchecked button for the easy diffi-culty setting
� mnu-easybutton_sel-131x38.gif—The checked button for the easy difficultysetting
� mnu-medbutton_unsel-131x38.gif—The unchecked button for the medium dif-ficulty setting
� mnu-medbutton_sel-131x38.gif—The checked button for the medium diffi-culty setting
� mnu-hardbutton_unsel-131x38.gif—The unchecked button for the hard diffi-culty setting
� mnu-hardbutton_sel-131x38.gif—The checked button for the hard difficultysetting
� mnu-startbutton-123x38.gif—The game Start button
� img-fishdish_title-346x72.gif—The game title text
� img-fishfish_logo-346x148.gif—The game logo
� img-title-back-470x300.gif—The title screen background pattern
� img-gameover-160x118.gif—The Game Over dialog box
Artwork Color Palette
The Fish Dish color palette uses the Java/Netscape system palette. This color pal-ette was then modified to include the 20 Windows reserved colors described inChapter 8. Doing this allows the artwork in Fish Dish to be used as both an onlineand offline arcade game.
450 Chapter 12 / Hands-on Arcade Game Project—Fish Dish
The palette is supplied in the Microsoft .PAL format. The file is calledfishdish.pal.
The transparent color for this palette is index (palette entry) 0 which is also RGB:0,0,0 or black.
The actual RGB values for the color palette can be found on the book’s accompa-nying CD-ROM. Please see Appendix B for additional details.
Artwork Gamma Level
Fish Dish uses a 2.2 gamma level since its artwork was designed on a Windowssystem. However, because the Java/Netscape color palette contains color defini-tions that are the same across Windows and the Macintosh, gamma-related issuesdo not have a significant impact.
Artwork Object Dimensions
Fish Dish uses several different grid sizes to contain its various objects and ele-ments. All of the main game characters use sprite grids that range in size from16x16 to 40x40. This was done to support the “growing” effect of the game’s maincharacter. In addition, several of the larger objects use sprite grids up to 148x72pixels in size.
These sizes were selected because they maximize the amount of object detail thatcan be displayed while remaining relatively efficient in terms of their screen per-formance and file size.
In any case, here is a breakdown of the sprite grid sizes of the different objects inFish Dish:
Salmon Fishdie:
� 16x16, 20x20, 24x24, 28x28, 32x32, 36x36, 40x40
Salmon Angel:
� 16x16
Bad Tuna:
� 36x36
Blue Angels:
� 32x32
Gold Diggers:
� 20x20
Gray Sharks:
� 28x28
Chapter 12 / Hands-on Arcade Game Project—Fish Dish 451

Green Meanies:
� 24x24
Happy Clams:
� 66x30
Head Hunter Fish:
� 40x40
M.C. Hammerhead:
� 148x72
Red Devils:
� 16x16
Starfish:
� 36x36
Bubbles and Pickups (All):
� 24x24
Frames per Object
Due to its simplicity, most of Fish Dish’s objects are animated using minor anima-tion techniques like the swing and open/close primitives. This results inanimations that use a relatively small number of total frames.
Here is a breakdown of the different game objects:
NOTE: Only objects that require animation are included in this list.
� Salmon Fishdie: Moving—5 frames (x7) sizes = 35 frames total
� Salmon Angel: Flying—3 frames (x1) size = 3 frames total
� Bad Tuna: Moving—5 frames (x1) size = 5 frames total
� Blue Angels: Moving—5 frames (x1) size = 2 frames total
� Gold Diggers: Moving—5 frames (x1) size = 2 frames total
� Gray Sharks: Moving—5 frames (x1) size = 2 frames total
� Green Meanies: Moving—5 frames (x1) size = 2 frames total
� Happy Clams: Moving—1 frame (x1) size = 1 frames total
� Head Hunter Fish: Moving—5 frames (x1) size = 5 frames total
� M.C. Hammerhead: Moving—1 frame (x1) size = 1 frame total
� Red Devils: Moving—1 frame (x1) size = 1 frame total
452 Chapter 12 / Hands-on Arcade Game Project—Fish Dish
� Starfish: Moving—1 frame (x1) size = 1 frame total
Object Actions and Facings
This section lists the actions and directional facings for the key game objects.
NOTE: Only objects that require animation are included in this list.
� Salmon Fishdie: Moving—2 directions (left and right)
� Salmon Angel: Flying—1 direction (up)
� Bad Tuna: Moving—2 directions (left and right)
� Blue Angels: Moving—2 directions (left and right)
� Gold Diggers: Moving—2 directions (left and right)
� Gray Sharks: Moving—2 directions (left and right)
� Green Meanies: Moving—2 directions (left and right)
� Happy Clams: Moving—2 directions (left and right)
� Head Hunter Fish: Moving—2 directions (left and right)
� M.C. Hammerhead: Moving—2 directions (left and right)
� Red Devils: Moving—2 directions (left and right)
� Starfish: Moving—2 directions (left and right)
Game Text Font(s)
Fish Dish does not display a significant amount of textual information on itsscreens. However, it does use one font:
� MS Comic Sans—This font appears throughout Fish Dish. It is used exten-sively on the title screen where it appears in the game title text, difficultyselector, and Start button. It is also used in both the score and lives indicators.Finally, it appears in the Game Over dialog. This font was chosen because ithas a distinctive appearance that is reminiscent of the type that is used in car-toons and comics. It was thought that this characteristic would blend in per-fectly with the rest of Fish Dish given its humorous plot and engagingcartoon-like elements.
Phase III: The Fish Dish Design Execution
This part of the chapter focuses on how the various objects in Fish Dish weredesigned and created.
Chapter 12 / Hands-on Arcade Game Project—Fish Dish 453
Artwork Templates
The fastest and most efficient way to create artwork for an arcade game is totemplatize, or systematically develop a process for constructing each game ele-ment. Doing this allows you to break your artwork into a series of simple andconsistently repeatable steps, which reduces the possibility for making mistakeswhile helping you maintain a good level of control over image quality.
Although not every game project lends itself to such a system, most do. In Fish
Dish, two sets of templates were used, a design template which guided the cre-ation of the game artwork and an animation template which guided thedevelopment of the related object animation.
Table 12-15 shows the basic components of the Fish Dish design template.
TABLE 12-15: The General Fish Dish Design Template
Step # Procedure Description and Purpose
1 Create the general objectshape
The basic shape of the object is created, usually from apaper sketch or a simple pixel-by-pixel drawing.
2 Establish object coloring The object begins to be filled in with a base color and thebasic boundaries of the different parts of the object begin tobecome visible.
3 Add expressive and otherfunctional elements
This is where the various expressive elements such as theeyes, eyebrows, and teeth are created as well as wherefunctional design elements such as the fins are added.
4 Shade and complete The object is completely colored and shaded and the finaldetailing is added.
Using this scheme, the average game object in Fish Dish can be completed in justfour steps. A few objects even require just three.
Once the game object is completed, it must be animated. To simplify this process,we have devised an animation template for use in Fish Dish. Table 12-16 showsthe basic components of the Fish Dish animation template.
TABLE 12-16: The General Fish Dish Animation Template
Step # Procedure Description and Purpose
1 Draw starting movement The starting key-frame of the animation (usually a swing oropen/close primitive) is created.
2 Draw the ending movement The ending key-frame of the animation (usually a swing oropen/close primitive) is created. All animated objects in FishDish use two to three frames of animation and noin-betweens in order to keep the animation sequences verysimple.
454 Chapter 12 / Hands-on Arcade Game Project—Fish Dish
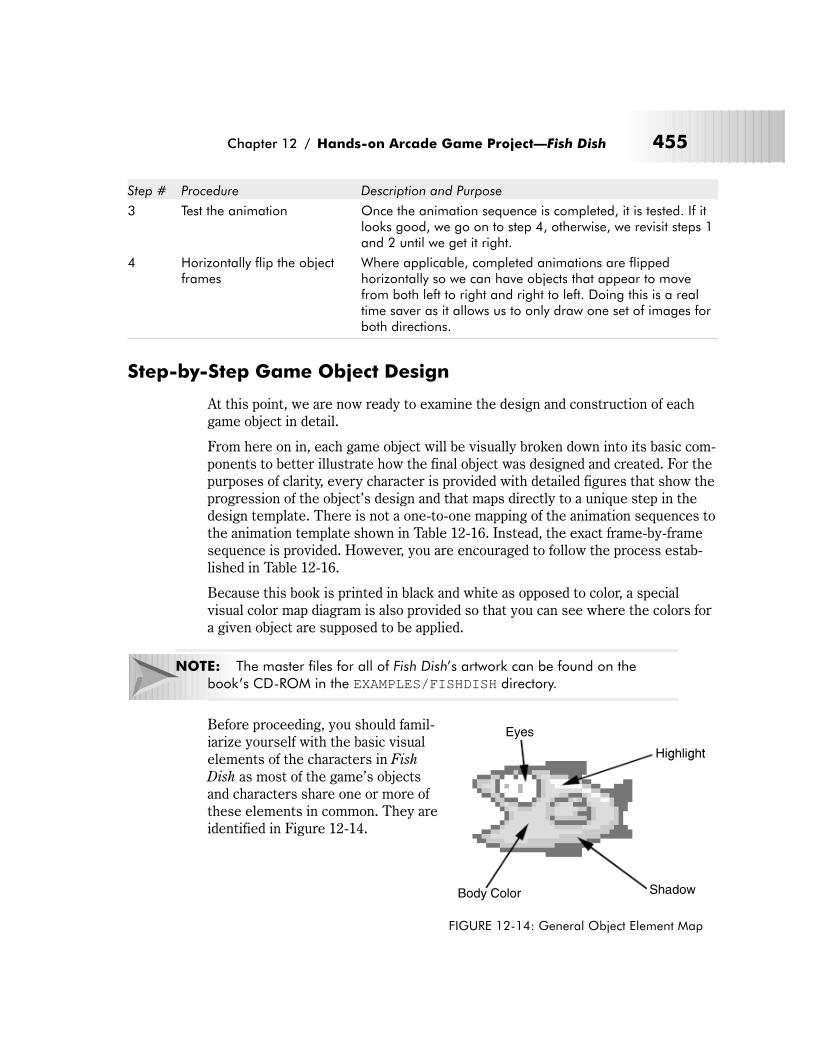
Step # Procedure Description and Purpose
3 Test the animation Once the animation sequence is completed, it is tested. If itlooks good, we go on to step 4, otherwise, we revisit steps 1and 2 until we get it right.
4 Horizontally flip the objectframes
Where applicable, completed animations are flippedhorizontally so we can have objects that appear to movefrom both left to right and right to left. Doing this is a realtime saver as it allows us to only draw one set of images forboth directions.
Step-by-Step Game Object Design
At this point, we are now ready to examine the design and construction of eachgame object in detail.
From here on in, each game object will be visually broken down into its basic com-ponents to better illustrate how the final object was designed and created. For thepurposes of clarity, every character is provided with detailed figures that show theprogression of the object’s design and that maps directly to a unique step in thedesign template. There is not a one-to-one mapping of the animation sequences tothe animation template shown in Table 12-16. Instead, the exact frame-by-framesequence is provided. However, you are encouraged to follow the process estab-lished in Table 12-16.
Because this book is printed in black and white as opposed to color, a specialvisual color map diagram is also provided so that you can see where the colors fora given object are supposed to be applied.
NOTE: The master files for all of Fish Dish’s artwork can be found on the
book’s CD-ROM in the EXAMPLES/FISHDISH directory.
Before proceeding, you should famil-iarize yourself with the basic visualelements of the characters in Fish
Dish as most of the game’s objectsand characters share one or more ofthese elements in common. They areidentified in Figure 12-14.
Chapter 12 / Hands-on Arcade Game Project—Fish Dish 455
Eyes
Highlight
Body Color Shadow
FIGURE 12-14: General Object Element Map
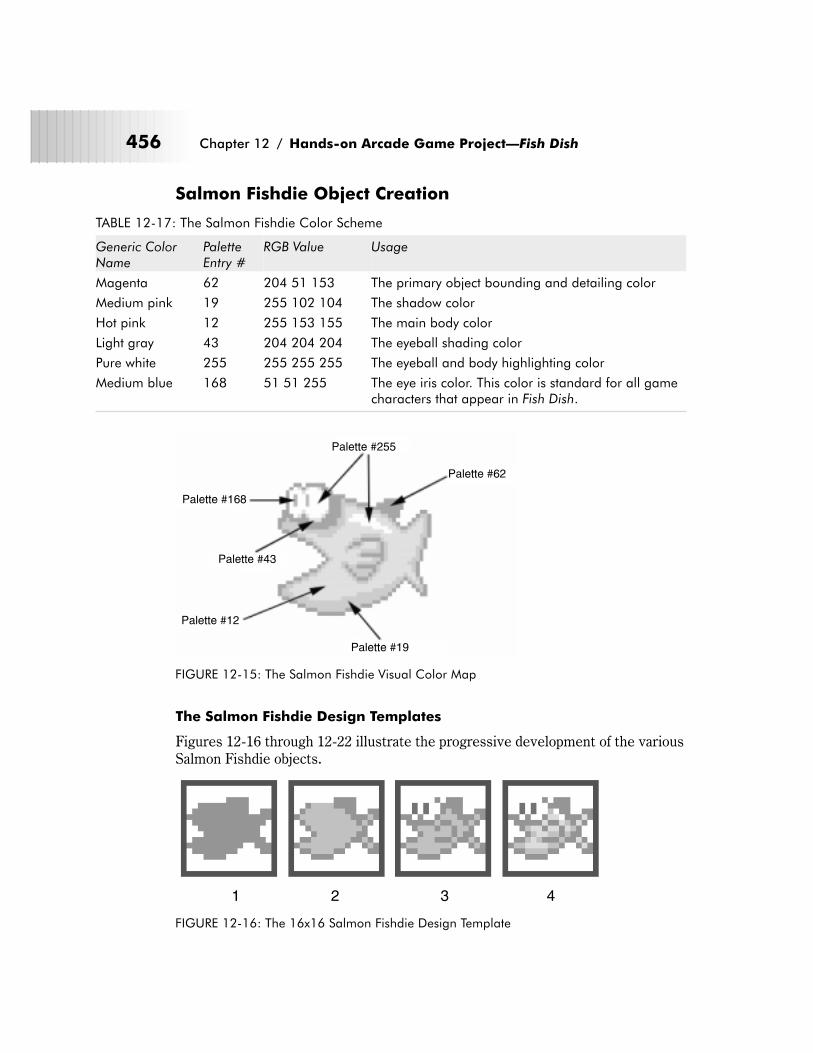
Salmon Fishdie Object Creation
TABLE 12-17: The Salmon Fishdie Color Scheme
Generic ColorName
PaletteEntry #
RGB Value Usage
Magenta 62 204 51 153 The primary object bounding and detailing color
Medium pink 19 255 102 104 The shadow color
Hot pink 12 255 153 155 The main body color
Light gray 43 204 204 204 The eyeball shading color
Pure white 255 255 255 255 The eyeball and body highlighting color
Medium blue 168 51 51 255 The eye iris color. This color is standard for all gamecharacters that appear in Fish Dish.
The Salmon Fishdie Design Templates
Figures 12-16 through 12-22 illustrate the progressive development of the variousSalmon Fishdie objects.
456 Chapter 12 / Hands-on Arcade Game Project—Fish Dish
Palette #168
Palette #43
Palette #12
Palette #19
Palette #62
Palette #255
FIGURE 12-15: The Salmon Fishdie Visual Color Map
1 2 3 4
FIGURE 12-16: The 16x16 Salmon Fishdie Design Template
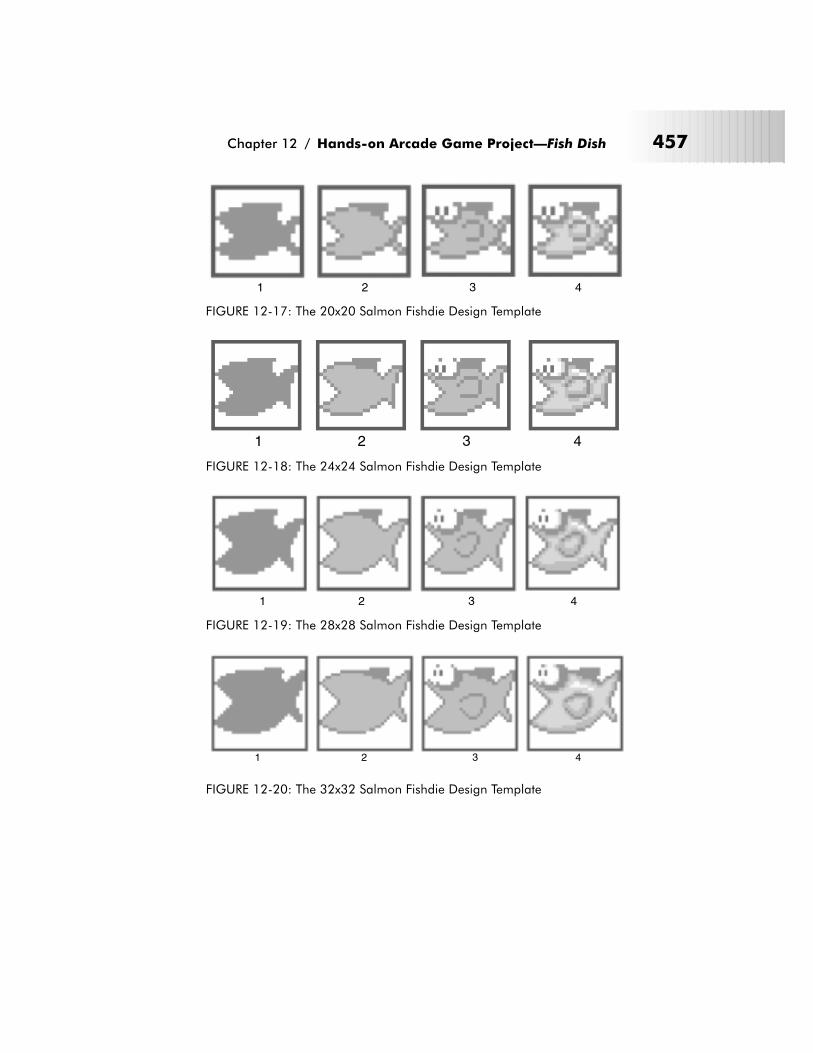
Chapter 12 / Hands-on Arcade Game Project—Fish Dish 457
1 2 3 4
FIGURE 12-17: The 20x20 Salmon Fishdie Design Template
1 2 3 4
FIGURE 12-18: The 24x24 Salmon Fishdie Design Template
1 2 3 4
FIGURE 12-19: The 28x28 Salmon Fishdie Design Template
1 2 3 4
FIGURE 12-20: The 32x32 Salmon Fishdie Design Template
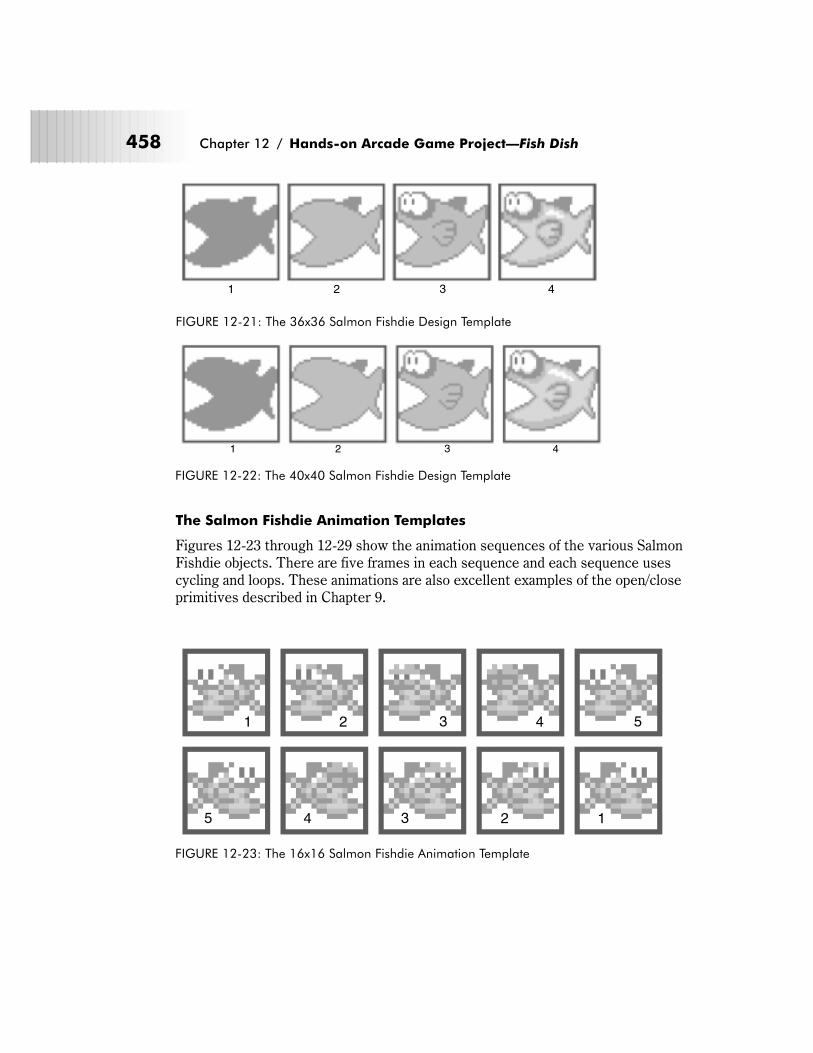
The Salmon Fishdie Animation Templates
Figures 12-23 through 12-29 show the animation sequences of the various SalmonFishdie objects. There are five frames in each sequence and each sequence usescycling and loops. These animations are also excellent examples of the open/closeprimitives described in Chapter 9.
458 Chapter 12 / Hands-on Arcade Game Project—Fish Dish
1 2 3 4
FIGURE 12-21: The 36x36 Salmon Fishdie Design Template
1 2 3 4
FIGURE 12-22: The 40x40 Salmon Fishdie Design Template
1 2 3 4 5
12345
FIGURE 12-23: The 16x16 Salmon Fishdie Animation Template
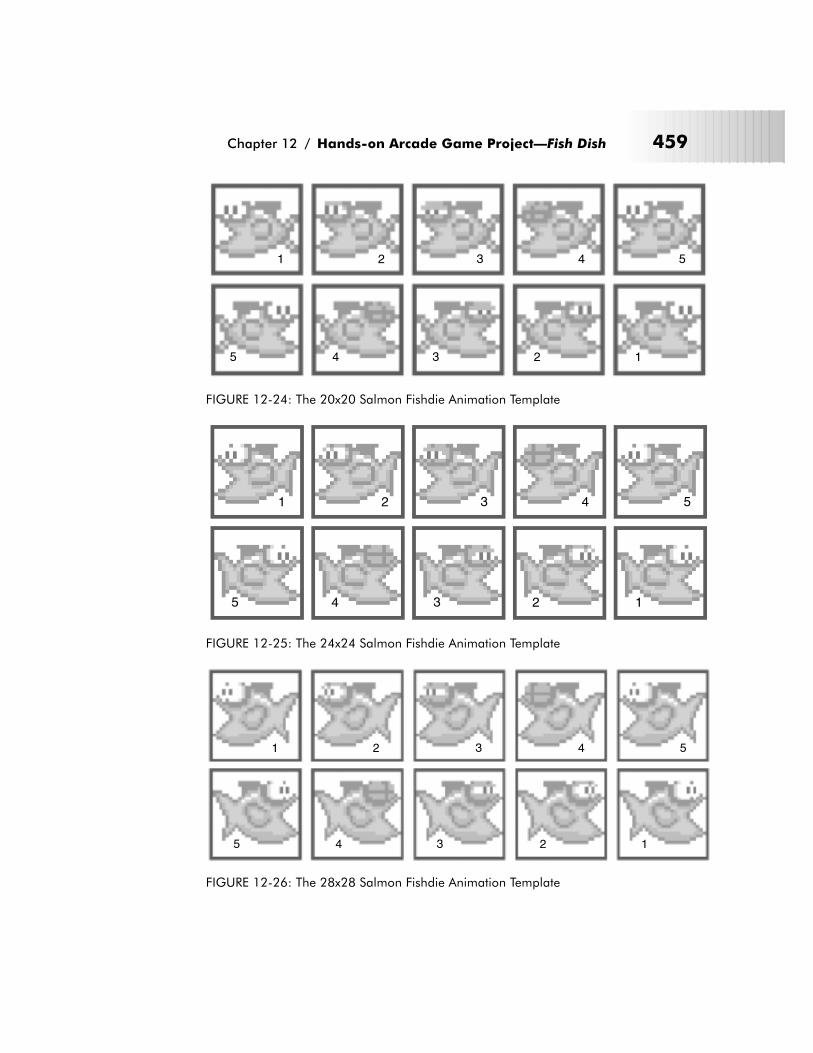
Chapter 12 / Hands-on Arcade Game Project—Fish Dish 459
1 2 3 4 5
12345
FIGURE 12-24: The 20x20 Salmon Fishdie Animation Template
1 2 3 4 5
12345
FIGURE 12-25: The 24x24 Salmon Fishdie Animation Template
1 2 3 4 5
12345
FIGURE 12-26: The 28x28 Salmon Fishdie Animation Template
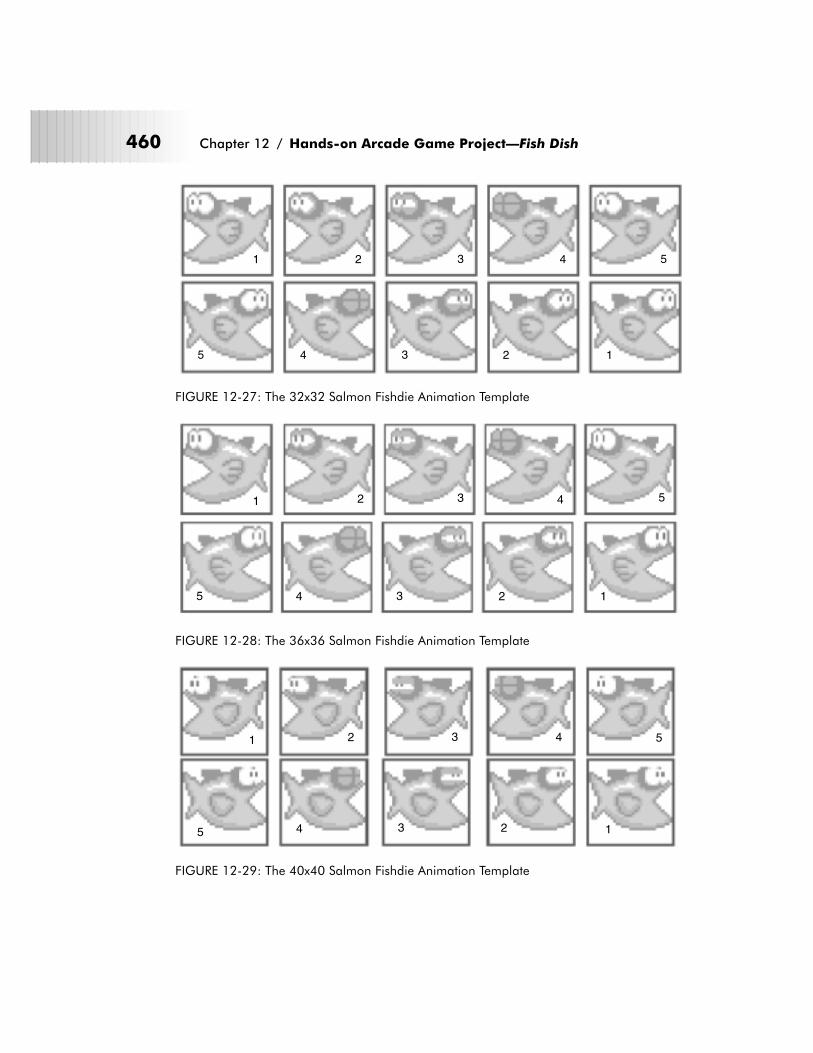
460 Chapter 12 / Hands-on Arcade Game Project—Fish Dish
1 2 3 4 5
12345
FIGURE 12-27: The 32x32 Salmon Fishdie Animation Template
1 2 3 4 5
12345
FIGURE 12-28: The 36x36 Salmon Fishdie Animation Template
1 2 3 4 5
12345
FIGURE 12-29: The 40x40 Salmon Fishdie Animation Template
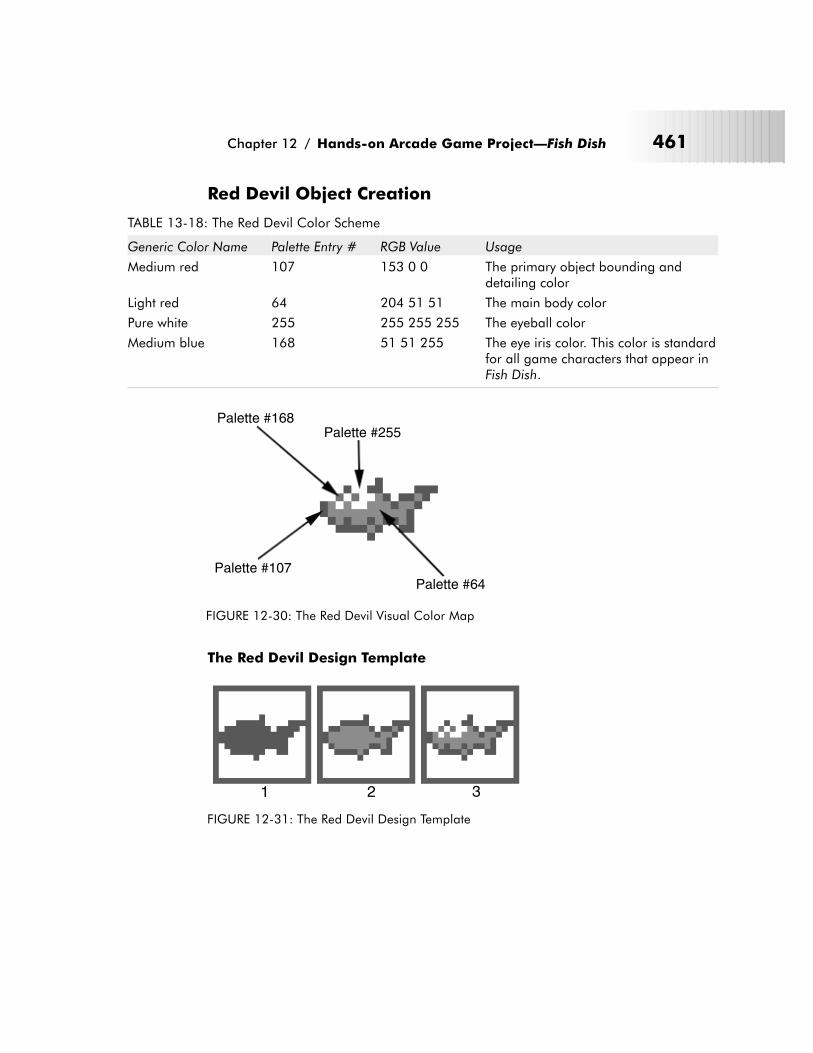
Red Devil Object Creation
TABLE 13-18: The Red Devil Color Scheme
Generic Color Name Palette Entry # RGB Value Usage
Medium red 107 153 0 0 The primary object bounding anddetailing color
Light red 64 204 51 51 The main body color
Pure white 255 255 255 255 The eyeball color
Medium blue 168 51 51 255 The eye iris color. This color is standardfor all game characters that appear inFish Dish.
The Red Devil Design Template
Chapter 12 / Hands-on Arcade Game Project—Fish Dish 461
Palette #168Palette #255
Palette #107Palette #64
FIGURE 12-30: The Red Devil Visual Color Map
1 2 3
FIGURE 12-31: The Red Devil Design Template
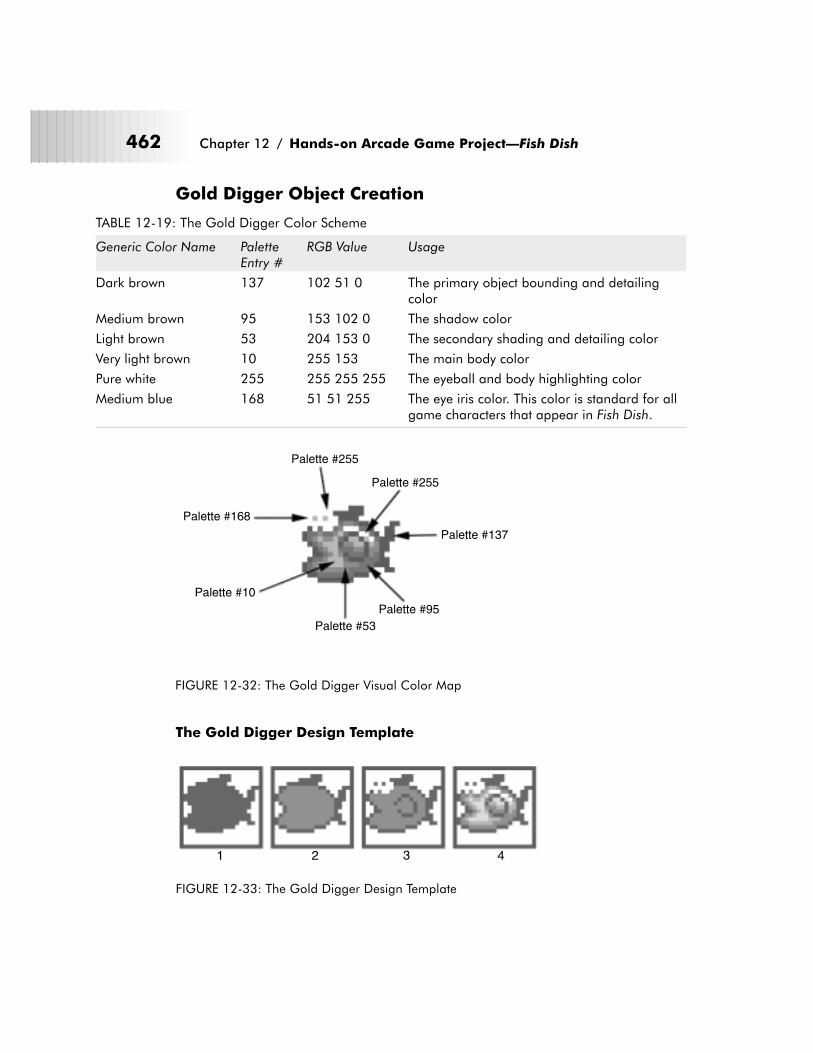
Gold Digger Object Creation
TABLE 12-19: The Gold Digger Color Scheme
Generic Color Name PaletteEntry #
RGB Value Usage
Dark brown 137 102 51 0 The primary object bounding and detailingcolor
Medium brown 95 153 102 0 The shadow color
Light brown 53 204 153 0 The secondary shading and detailing color
Very light brown 10 255 153 The main body color
Pure white 255 255 255 255 The eyeball and body highlighting color
Medium blue 168 51 51 255 The eye iris color. This color is standard for allgame characters that appear in Fish Dish.
The Gold Digger Design Template
462 Chapter 12 / Hands-on Arcade Game Project—Fish Dish
Palette #168
Palette #255
Palette #255
Palette #137
Palette #10
Palette #53
Palette #95
FIGURE 12-32: The Gold Digger Visual Color Map
1 2 3 4
FIGURE 12-33: The Gold Digger Design Template
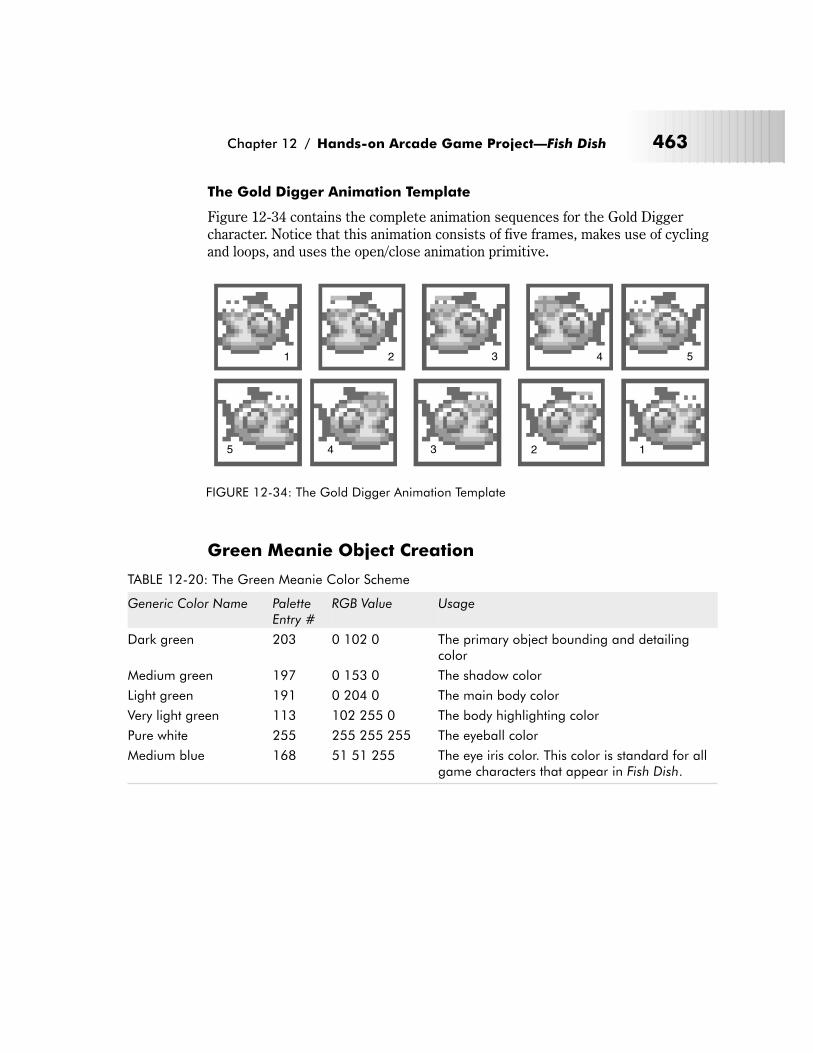
The Gold Digger Animation Template
Figure 12-34 contains the complete animation sequences for the Gold Diggercharacter. Notice that this animation consists of five frames, makes use of cyclingand loops, and uses the open/close animation primitive.
Green Meanie Object Creation
TABLE 12-20: The Green Meanie Color Scheme
Generic Color Name PaletteEntry #
RGB Value Usage
Dark green 203 0 102 0 The primary object bounding and detailingcolor
Medium green 197 0 153 0 The shadow color
Light green 191 0 204 0 The main body color
Very light green 113 102 255 0 The body highlighting color
Pure white 255 255 255 255 The eyeball color
Medium blue 168 51 51 255 The eye iris color. This color is standard for allgame characters that appear in Fish Dish.
Chapter 12 / Hands-on Arcade Game Project—Fish Dish 463
1 2 3 4 5
12345
FIGURE 12-34: The Gold Digger Animation Template
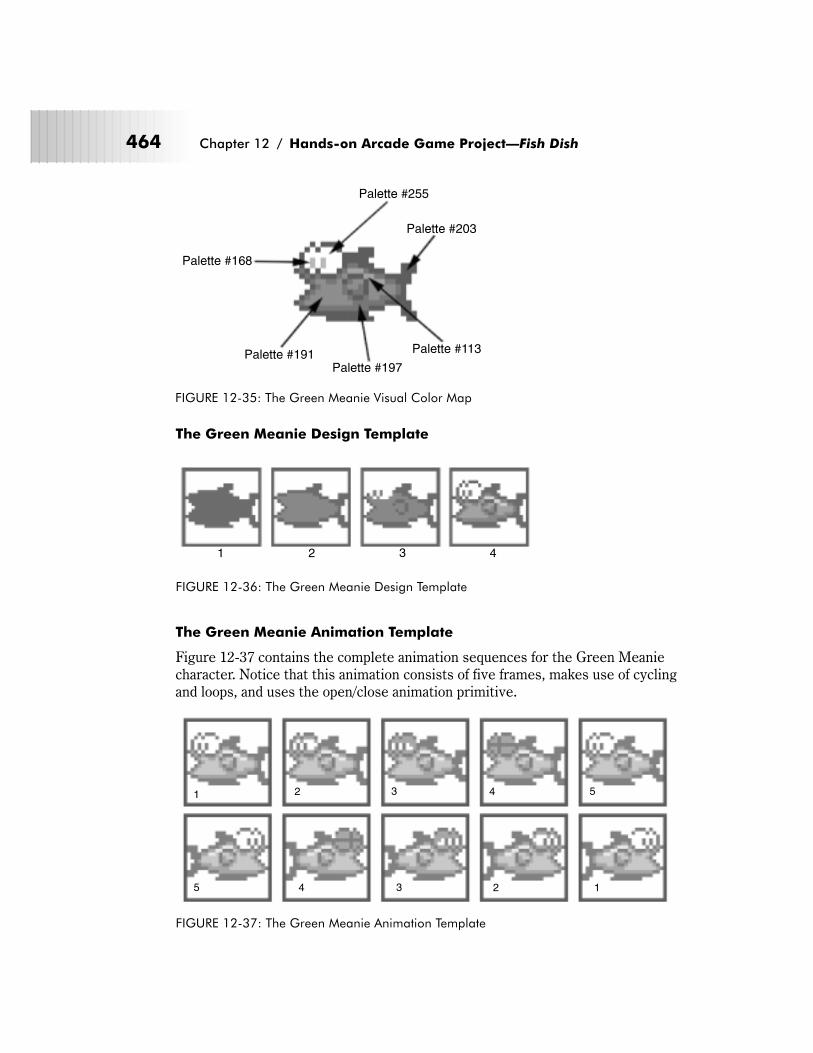
The Green Meanie Design Template
The Green Meanie Animation Template
Figure 12-37 contains the complete animation sequences for the Green Meaniecharacter. Notice that this animation consists of five frames, makes use of cyclingand loops, and uses the open/close animation primitive.
464 Chapter 12 / Hands-on Arcade Game Project—Fish Dish
Palette #168
Palette #255
Palette #203
Palette #113
Palette #197Palette #191
FIGURE 12-35: The Green Meanie Visual Color Map
1 2 3 4
FIGURE 12-36: The Green Meanie Design Template
1 2 3 4 5
12345
FIGURE 12-37: The Green Meanie Animation Template
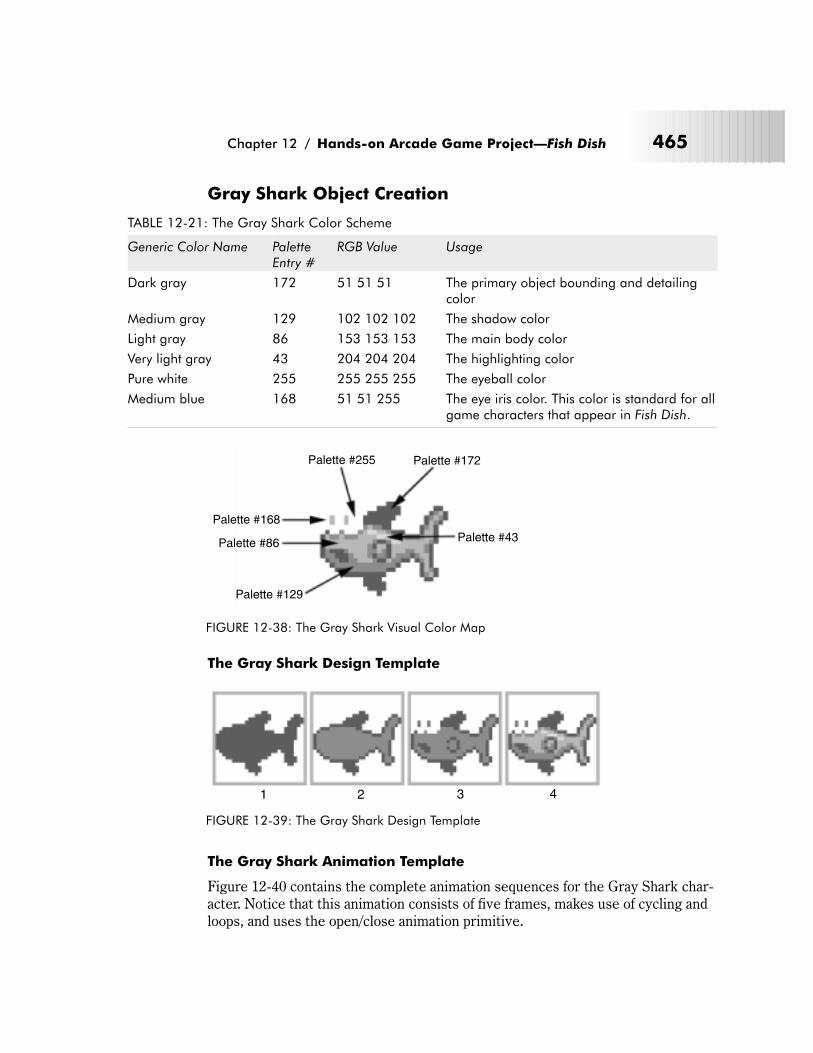
Gray Shark Object Creation
TABLE 12-21: The Gray Shark Color Scheme
Generic Color Name PaletteEntry #
RGB Value Usage
Dark gray 172 51 51 51 The primary object bounding and detailingcolor
Medium gray 129 102 102 102 The shadow color
Light gray 86 153 153 153 The main body color
Very light gray 43 204 204 204 The highlighting color
Pure white 255 255 255 255 The eyeball color
Medium blue 168 51 51 255 The eye iris color. This color is standard for allgame characters that appear in Fish Dish.
The Gray Shark Design Template
The Gray Shark Animation Template
Figure 12-40 contains the complete animation sequences for the Gray Shark char-acter. Notice that this animation consists of five frames, makes use of cycling andloops, and uses the open/close animation primitive.
Chapter 12 / Hands-on Arcade Game Project—Fish Dish 465
Palette #168
Palette #255 Palette #172
Palette #43
Palette #129
Palette #86
FIGURE 12-38: The Gray Shark Visual Color Map
1 2 3 4
FIGURE 12-39: The Gray Shark Design Template
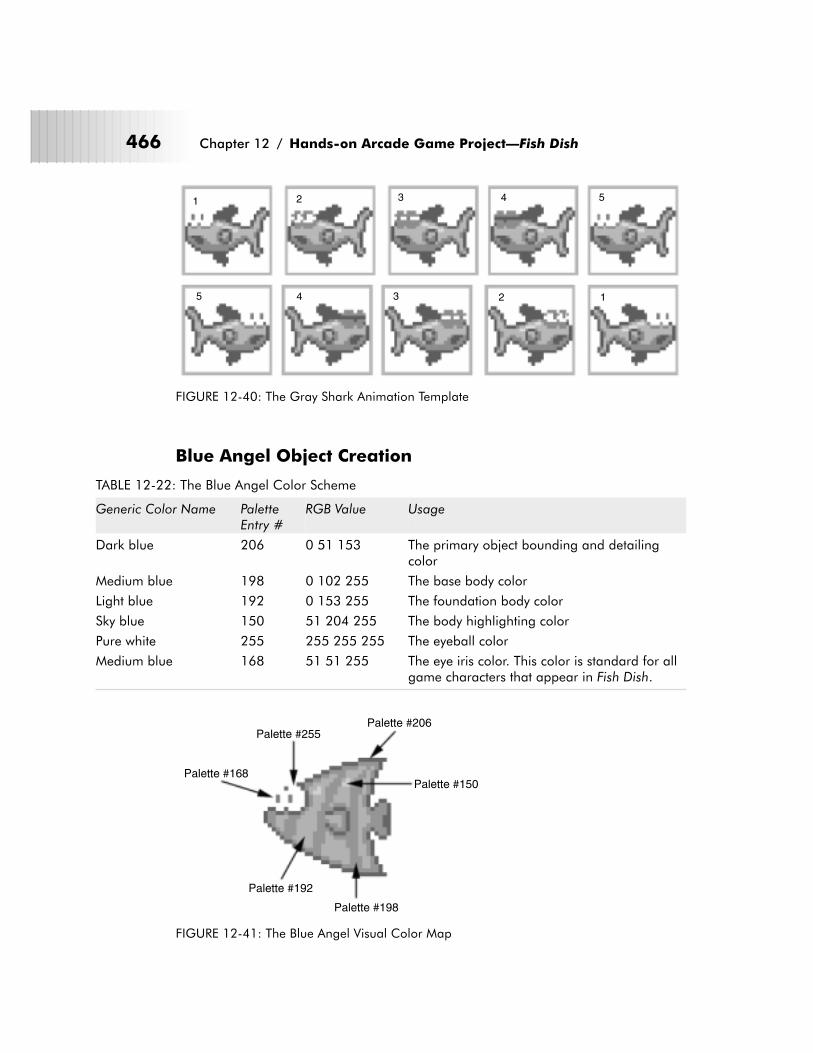
Blue Angel Object Creation
TABLE 12-22: The Blue Angel Color Scheme
Generic Color Name PaletteEntry #
RGB Value Usage
Dark blue 206 0 51 153 The primary object bounding and detailingcolor
Medium blue 198 0 102 255 The base body color
Light blue 192 0 153 255 The foundation body color
Sky blue 150 51 204 255 The body highlighting color
Pure white 255 255 255 255 The eyeball color
Medium blue 168 51 51 255 The eye iris color. This color is standard for allgame characters that appear in Fish Dish.
466 Chapter 12 / Hands-on Arcade Game Project—Fish Dish
1 2 3 4 5
12345
FIGURE 12-40: The Gray Shark Animation Template
Palette #168
Palette #255
Palette #192
Palette #198
Palette #206
Palette #150
FIGURE 12-41: The Blue Angel Visual Color Map
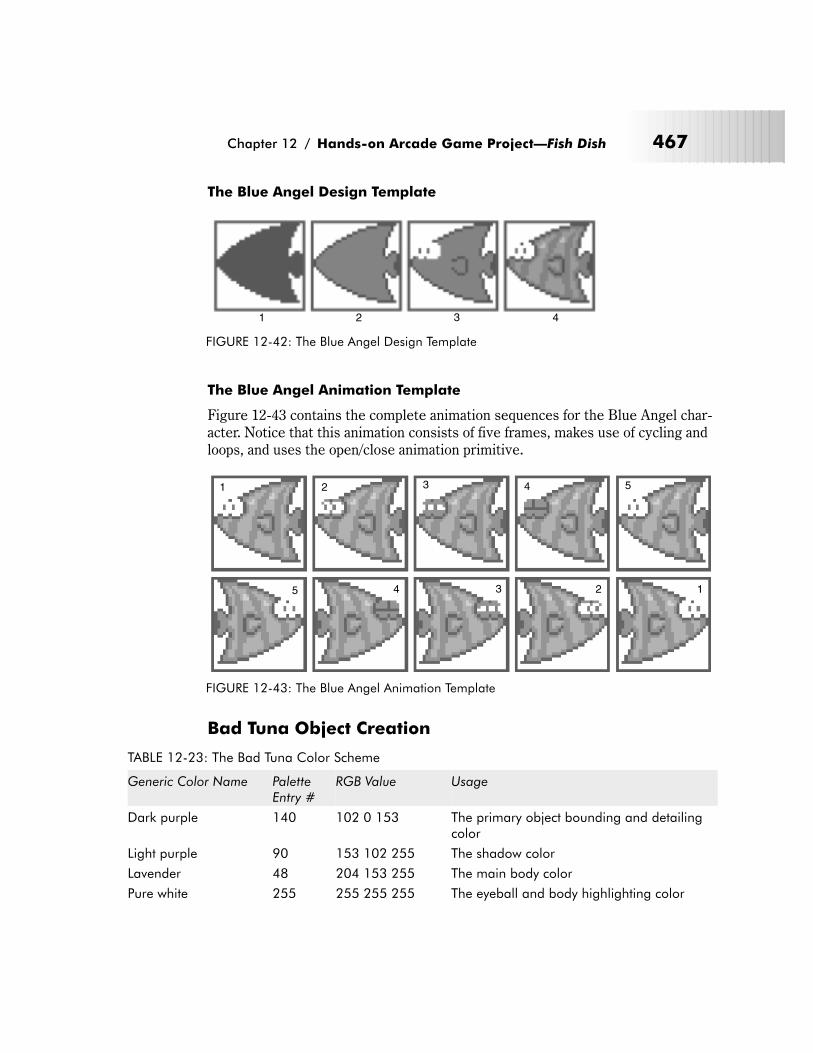
The Blue Angel Design Template
The Blue Angel Animation Template
Figure 12-43 contains the complete animation sequences for the Blue Angel char-acter. Notice that this animation consists of five frames, makes use of cycling andloops, and uses the open/close animation primitive.
Bad Tuna Object Creation
TABLE 12-23: The Bad Tuna Color Scheme
Generic Color Name PaletteEntry #
RGB Value Usage
Dark purple 140 102 0 153 The primary object bounding and detailingcolor
Light purple 90 153 102 255 The shadow color
Lavender 48 204 153 255 The main body color
Pure white 255 255 255 255 The eyeball and body highlighting color
Chapter 12 / Hands-on Arcade Game Project—Fish Dish 467
1 2 3 4
FIGURE 12-42: The Blue Angel Design Template
1 2 3 4 5
12345
FIGURE 12-43: The Blue Angel Animation Template
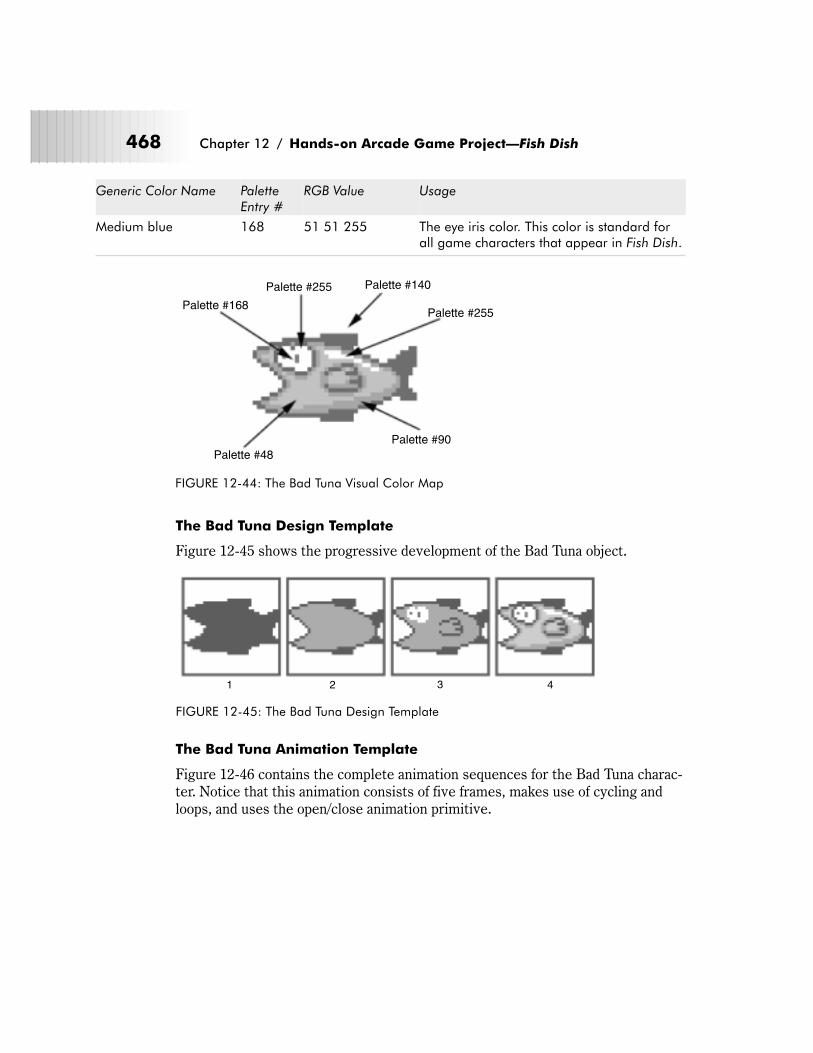
Generic Color Name PaletteEntry #
RGB Value Usage
Medium blue 168 51 51 255 The eye iris color. This color is standard forall game characters that appear in Fish Dish.
The Bad Tuna Design Template
Figure 12-45 shows the progressive development of the Bad Tuna object.
The Bad Tuna Animation Template
Figure 12-46 contains the complete animation sequences for the Bad Tuna charac-ter. Notice that this animation consists of five frames, makes use of cycling andloops, and uses the open/close animation primitive.
468 Chapter 12 / Hands-on Arcade Game Project—Fish Dish
Palette #168
Palette #255
Palette #255
Palette #140
Palette #48
Palette #90
FIGURE 12-44: The Bad Tuna Visual Color Map
1 2 3 4
FIGURE 12-45: The Bad Tuna Design Template
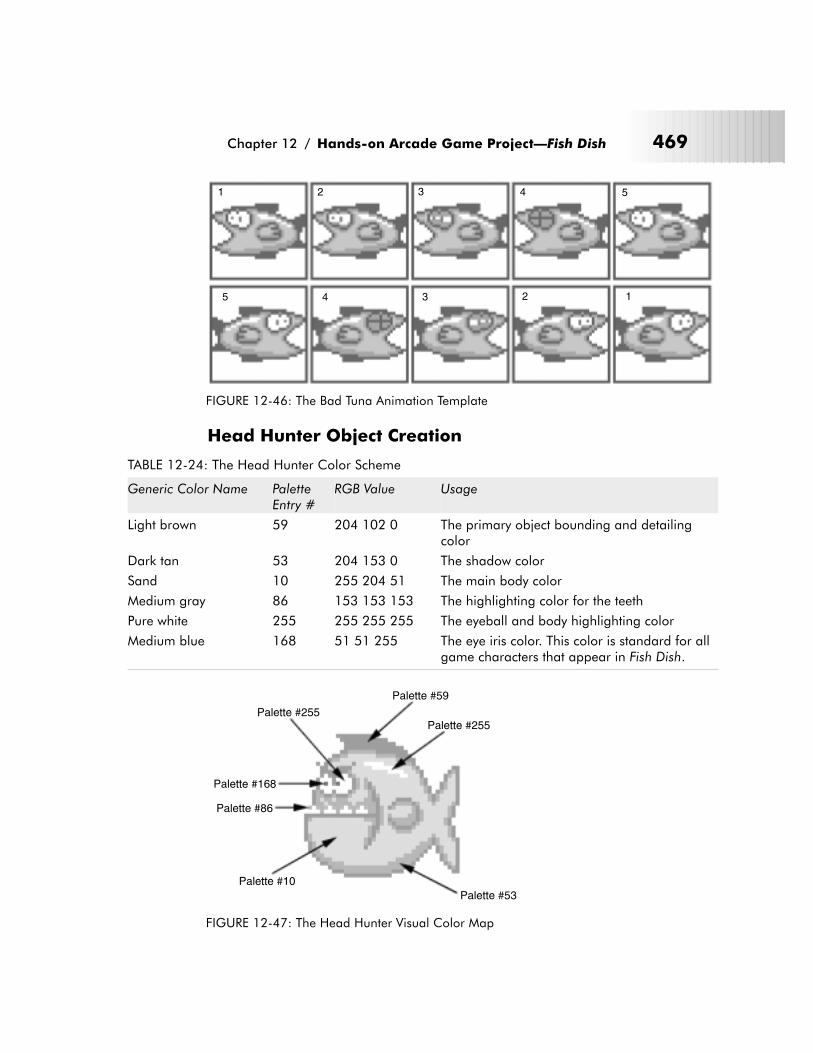
Head Hunter Object Creation
TABLE 12-24: The Head Hunter Color Scheme
Generic Color Name PaletteEntry #
RGB Value Usage
Light brown 59 204 102 0 The primary object bounding and detailingcolor
Dark tan 53 204 153 0 The shadow color
Sand 10 255 204 51 The main body color
Medium gray 86 153 153 153 The highlighting color for the teeth
Pure white 255 255 255 255 The eyeball and body highlighting color
Medium blue 168 51 51 255 The eye iris color. This color is standard for allgame characters that appear in Fish Dish.
Chapter 12 / Hands-on Arcade Game Project—Fish Dish 469
1 2 3 4 5
12345
FIGURE 12-46: The Bad Tuna Animation Template
Palette #168
Palette #255Palette #255
Palette #10
Palette #86
Palette #59
Palette #53
FIGURE 12-47: The Head Hunter Visual Color Map
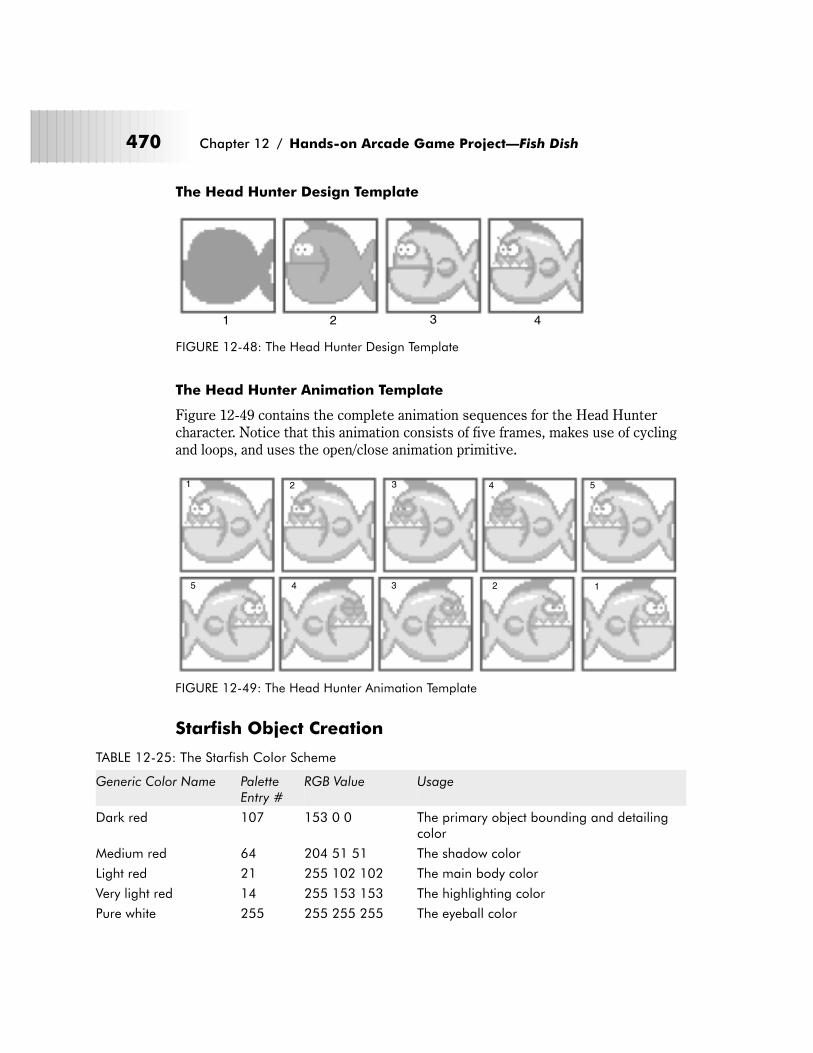
The Head Hunter Design Template
The Head Hunter Animation Template
Figure 12-49 contains the complete animation sequences for the Head Huntercharacter. Notice that this animation consists of five frames, makes use of cyclingand loops, and uses the open/close animation primitive.
Starfish Object Creation
TABLE 12-25: The Starfish Color Scheme
Generic Color Name PaletteEntry #
RGB Value Usage
Dark red 107 153 0 0 The primary object bounding and detailingcolor
Medium red 64 204 51 51 The shadow color
Light red 21 255 102 102 The main body color
Very light red 14 255 153 153 The highlighting color
Pure white 255 255 255 255 The eyeball color
470 Chapter 12 / Hands-on Arcade Game Project—Fish Dish
1 2 3 4
FIGURE 12-48: The Head Hunter Design Template
1 2 3 4 5
12345
FIGURE 12-49: The Head Hunter Animation Template
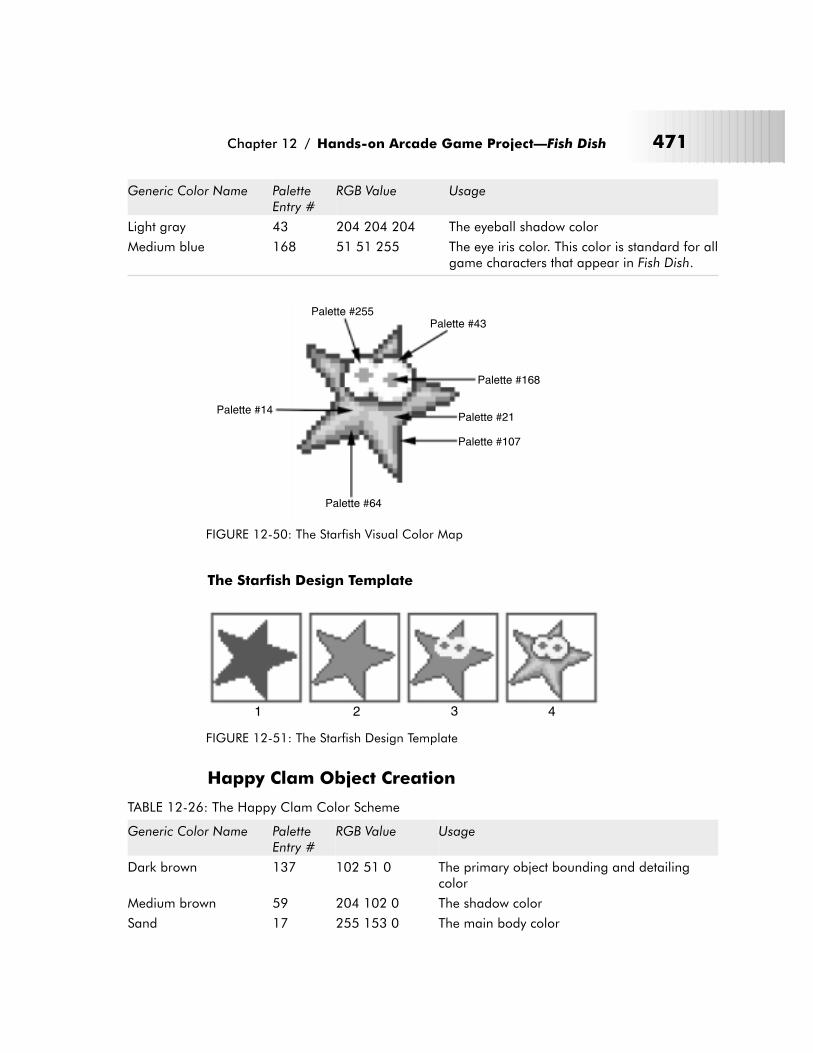
Generic Color Name PaletteEntry #
RGB Value Usage
Light gray 43 204 204 204 The eyeball shadow color
Medium blue 168 51 51 255 The eye iris color. This color is standard for allgame characters that appear in Fish Dish.
The Starfish Design Template
Happy Clam Object Creation
TABLE 12-26: The Happy Clam Color Scheme
Generic Color Name PaletteEntry #
RGB Value Usage
Dark brown 137 102 51 0 The primary object bounding and detailingcolor
Medium brown 59 204 102 0 The shadow color
Sand 17 255 153 0 The main body color
Chapter 12 / Hands-on Arcade Game Project—Fish Dish 471
Palette #168
Palette #255
Palette #14
Palette #43
Palette #21
Palette #107
Palette #64
FIGURE 12-50: The Starfish Visual Color Map
1 2 3 4
FIGURE 12-51: The Starfish Design Template
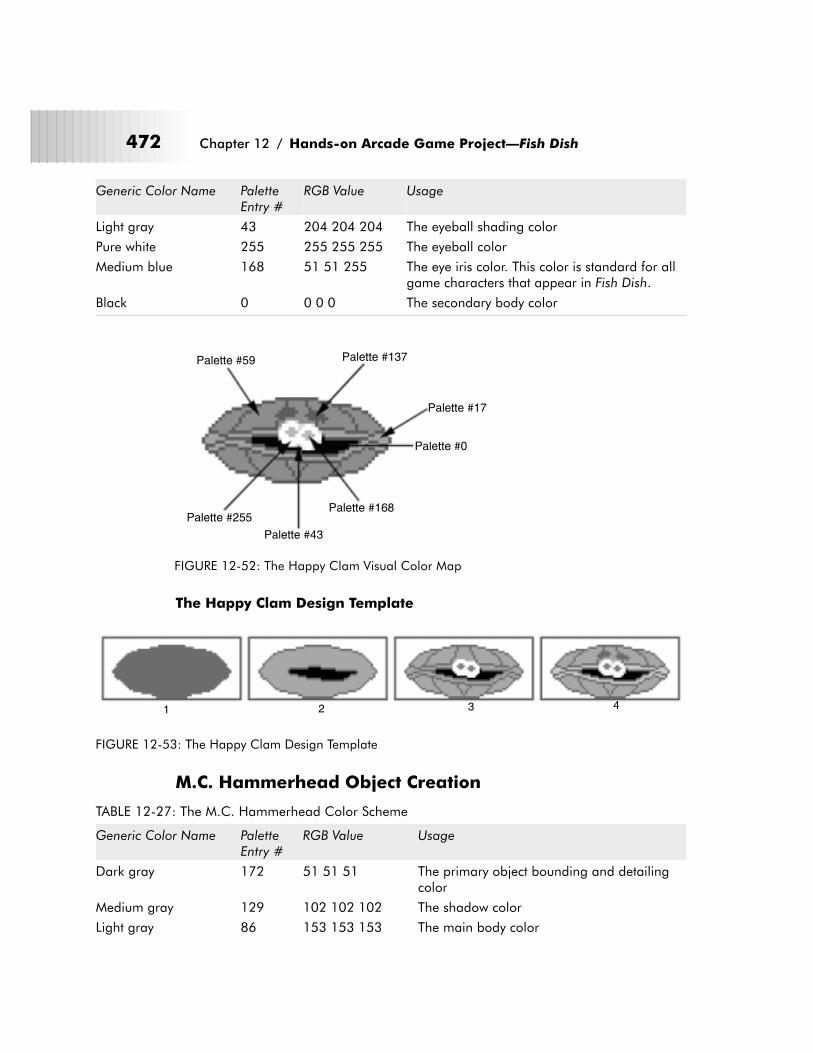
Generic Color Name PaletteEntry #
RGB Value Usage
Light gray 43 204 204 204 The eyeball shading color
Pure white 255 255 255 255 The eyeball color
Medium blue 168 51 51 255 The eye iris color. This color is standard for allgame characters that appear in Fish Dish.
Black 0 0 0 0 The secondary body color
The Happy Clam Design Template
M.C. Hammerhead Object Creation
TABLE 12-27: The M.C. Hammerhead Color Scheme
Generic Color Name PaletteEntry #
RGB Value Usage
Dark gray 172 51 51 51 The primary object bounding and detailingcolor
Medium gray 129 102 102 102 The shadow color
Light gray 86 153 153 153 The main body color
472 Chapter 12 / Hands-on Arcade Game Project—Fish Dish
Palette #168Palette #255
Palette #0
Palette #137
Palette #17
Palette #43
Palette #59
FIGURE 12-52: The Happy Clam Visual Color Map
1 2 3 4
FIGURE 12-53: The Happy Clam Design Template
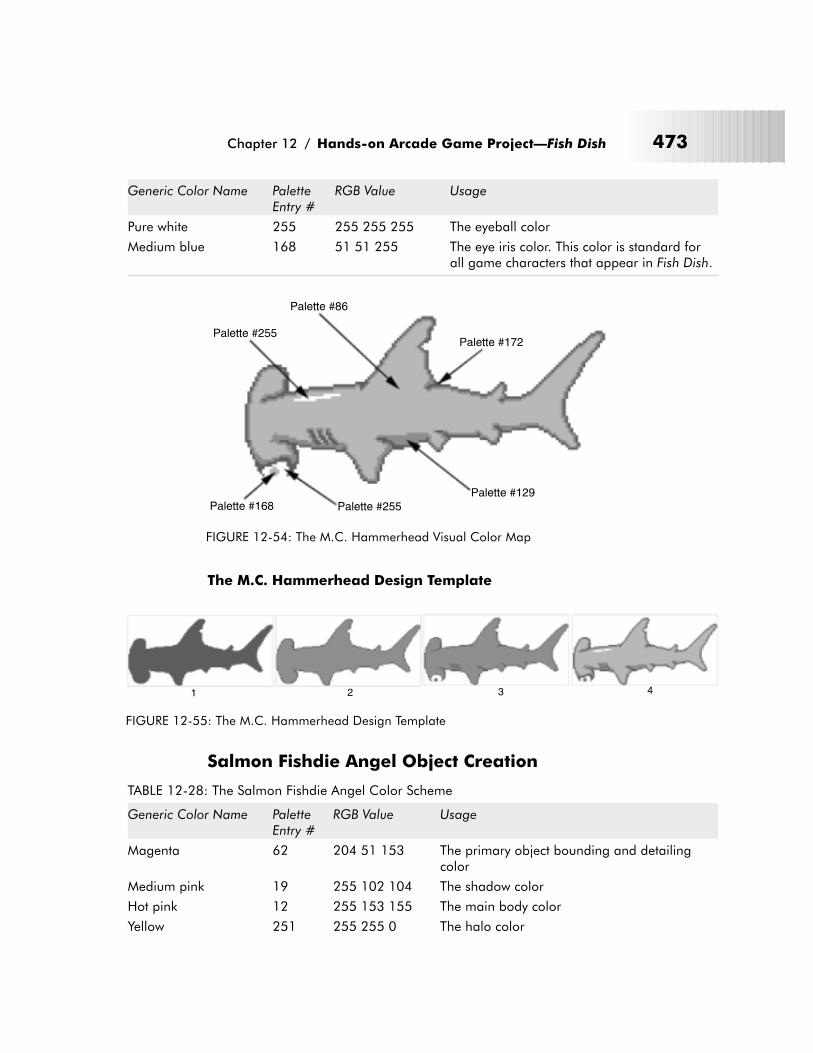
Generic Color Name PaletteEntry #
RGB Value Usage
Pure white 255 255 255 255 The eyeball color
Medium blue 168 51 51 255 The eye iris color. This color is standard forall game characters that appear in Fish Dish.
The M.C. Hammerhead Design Template
Salmon Fishdie Angel Object Creation
TABLE 12-28: The Salmon Fishdie Angel Color Scheme
Generic Color Name PaletteEntry #
RGB Value Usage
Magenta 62 204 51 153 The primary object bounding and detailingcolor
Medium pink 19 255 102 104 The shadow color
Hot pink 12 255 153 155 The main body color
Yellow 251 255 255 0 The halo color
Chapter 12 / Hands-on Arcade Game Project—Fish Dish 473
Palette #168Palette #129
Palette #255
Palette #255
Palette #172
Palette #86
FIGURE 12-54: The M.C. Hammerhead Visual Color Map
1 2 3 4
FIGURE 12-55: The M.C. Hammerhead Design Template
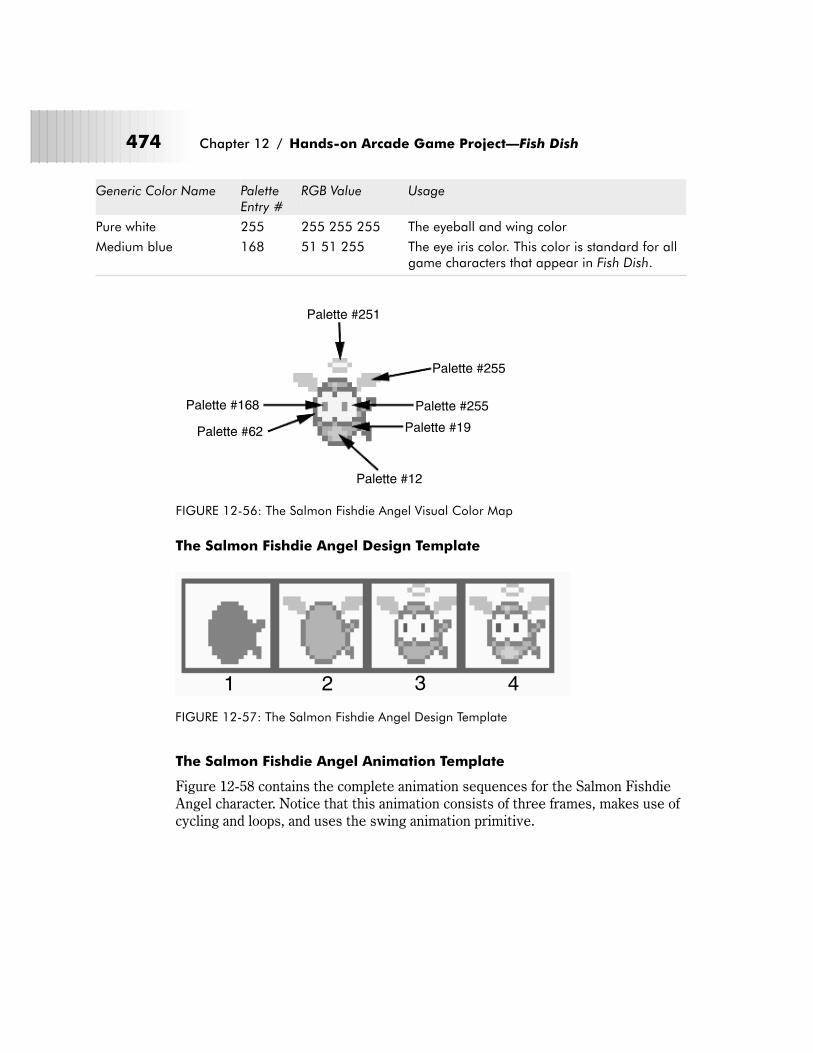
Generic Color Name PaletteEntry #
RGB Value Usage
Pure white 255 255 255 255 The eyeball and wing color
Medium blue 168 51 51 255 The eye iris color. This color is standard for allgame characters that appear in Fish Dish.
The Salmon Fishdie Angel Design Template
The Salmon Fishdie Angel Animation Template
Figure 12-58 contains the complete animation sequences for the Salmon FishdieAngel character. Notice that this animation consists of three frames, makes use ofcycling and loops, and uses the swing animation primitive.
474 Chapter 12 / Hands-on Arcade Game Project—Fish Dish
Palette #168
Palette #255
Palette #251
Palette #255
Palette #12
Palette #19Palette #62
FIGURE 12-56: The Salmon Fishdie Angel Visual Color Map
1 2 3 4
FIGURE 12-57: The Salmon Fishdie Angel Design Template
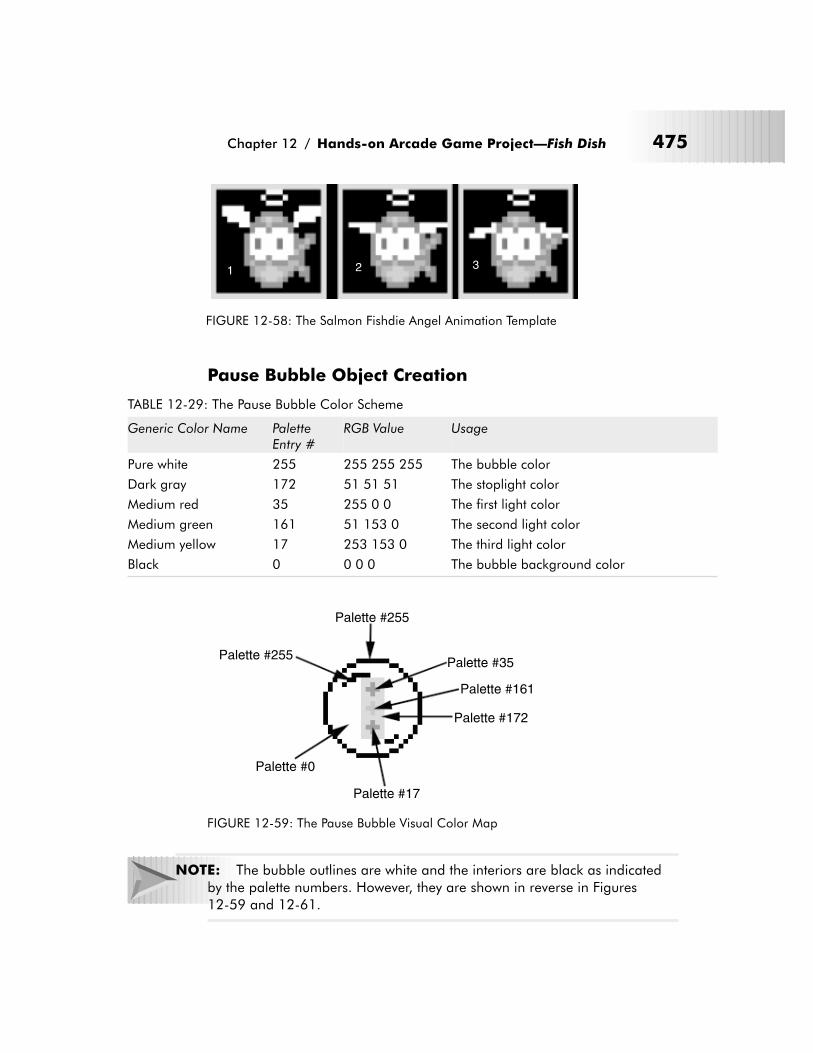
Pause Bubble Object Creation
TABLE 12-29: The Pause Bubble Color Scheme
Generic Color Name PaletteEntry #
RGB Value Usage
Pure white 255 255 255 255 The bubble color
Dark gray 172 51 51 51 The stoplight color
Medium red 35 255 0 0 The first light color
Medium green 161 51 153 0 The second light color
Medium yellow 17 253 153 0 The third light color
Black 0 0 0 0 The bubble background color
NOTE: The bubble outlines are white and the interiors are black as indicated
by the palette numbers. However, they are shown in reverse in Figures
12-59 and 12-61.
Chapter 12 / Hands-on Arcade Game Project—Fish Dish 475
1 2 3
FIGURE 12-58: The Salmon Fishdie Angel Animation Template
Palette #172
Palette #255
Palette #255
Palette #0
Palette #17
Palette #161
Palette #35
FIGURE 12-59: The Pause Bubble Visual Color Map

The Pause Bubble Design Template
Shield Bubble Object Creation
TABLE 12-30: The Shield Bubble Color Scheme
Generic Color Name PaletteEntry #
RGB Value Usage
Pure white 255 255 255 255 The bubble color
Light gray 43 51 51 51 The outer shield color
Medium blue 207 255 0 0 The first inner shield color
Light blue 198 51 153 0 The second inner shield color
Black 0 0 0 0 The bubble background color
476 Chapter 12 / Hands-on Arcade Game Project—Fish Dish
1 2 3 4
FIGURE 12-60: The Pause Bubble Design Template
Palette #207
Palette #43
Palette #255
Palette #255
Palette #0Palette #198
FIGURE 12-61: The Shield Bubble Visual Color Map
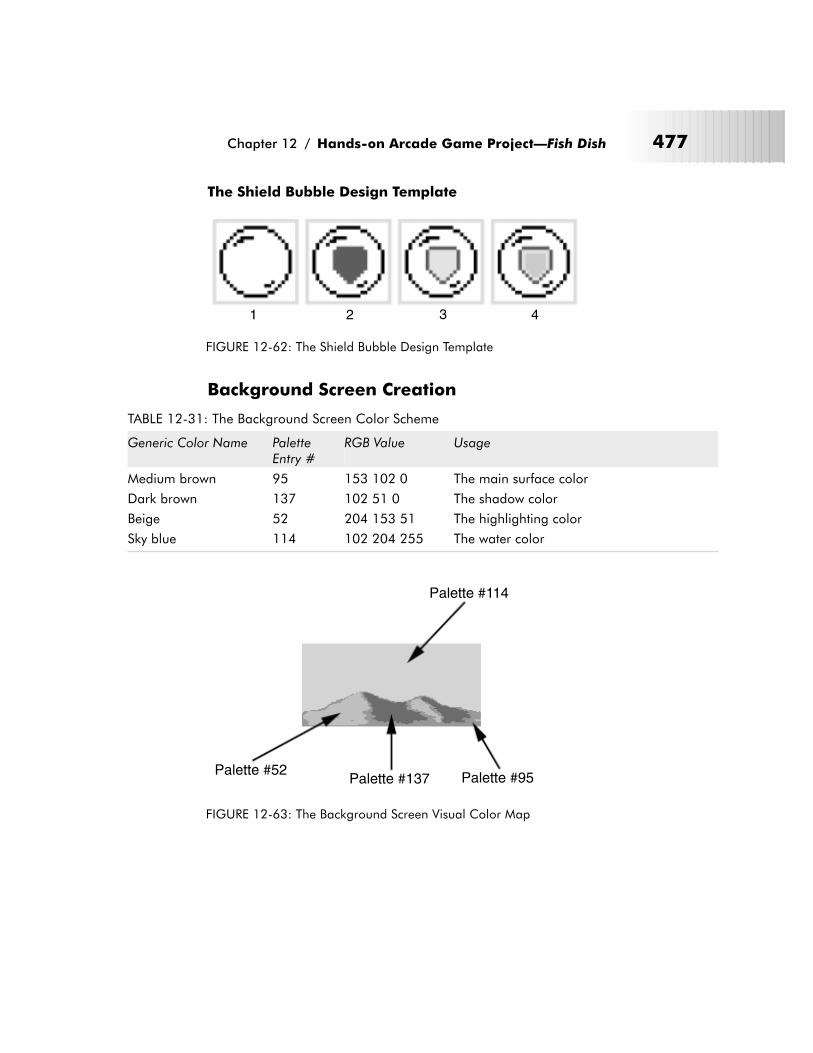
The Shield Bubble Design Template
Background Screen Creation
TABLE 12-31: The Background Screen Color Scheme
Generic Color Name PaletteEntry #
RGB Value Usage
Medium brown 95 153 102 0 The main surface color
Dark brown 137 102 51 0 The shadow color
Beige 52 204 153 51 The highlighting color
Sky blue 114 102 204 255 The water color
Chapter 12 / Hands-on Arcade Game Project—Fish Dish 477
1 2 3 4
FIGURE 12-62: The Shield Bubble Design Template
Palette #137
Palette #114
Palette #52Palette #95
FIGURE 12-63: The Background Screen Visual Color Map
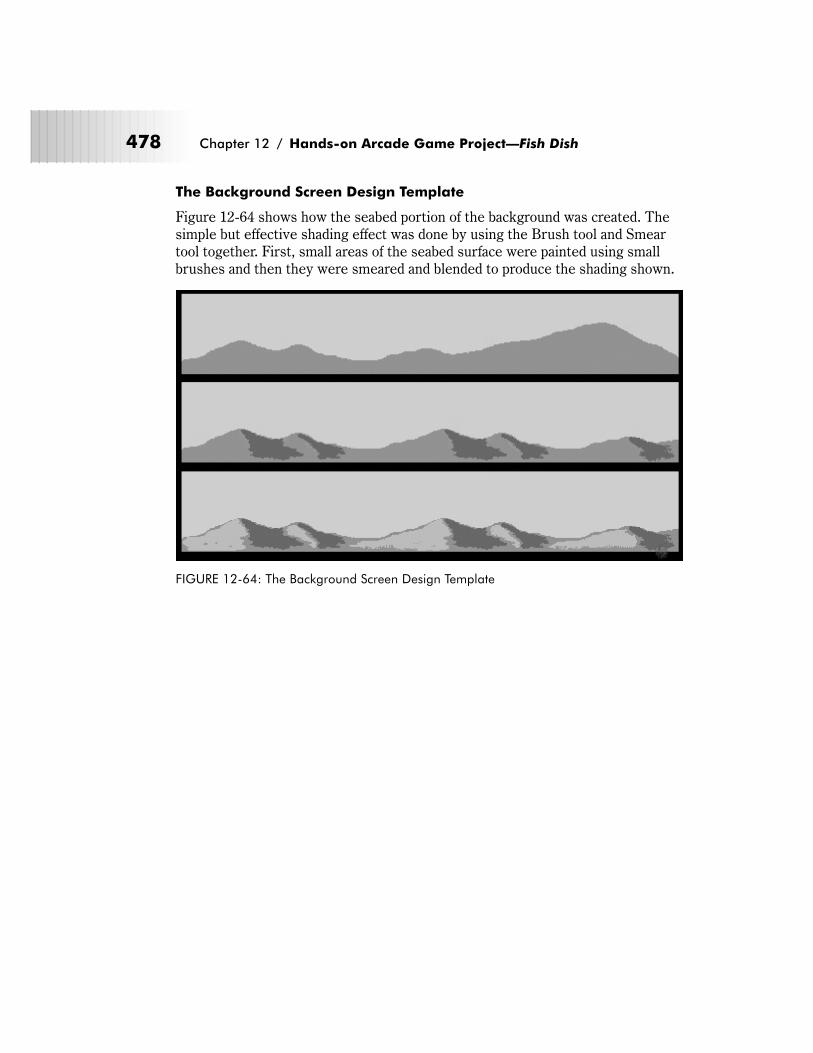
The Background Screen Design Template
Figure 12-64 shows how the seabed portion of the background was created. Thesimple but effective shading effect was done by using the Brush tool and Smeartool together. First, small areas of the seabed surface were painted using smallbrushes and then they were smeared and blended to produce the shading shown.
478 Chapter 12 / Hands-on Arcade Game Project—Fish Dish
FIGURE 12-64: The Background Screen Design Template
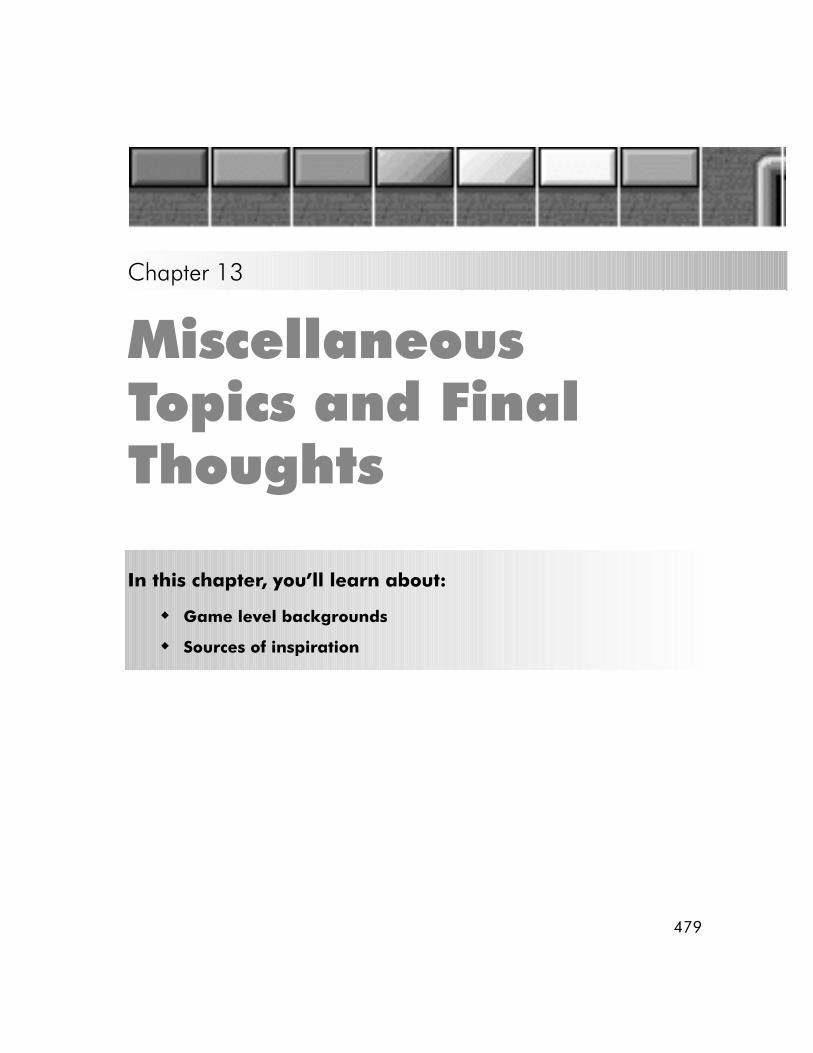
Chapter 13
MiscellaneousTopics and FinalThoughts
In this chapter, you’ll learn about:
� Game level backgrounds
� Sources of inspiration
479
Game Level Backgrounds
As mentioned back in Chapter 1, most types of arcade games can support multiple
game levels or screens. Game levels are rendered in one of two ways: using
full-size backgrounds and using background tiles.
Full-size backgrounds are just what their name implies—full-size graphic screens.
Full-size backgrounds are completely self-contained images that include all of the
graphical elements required to effectively represent a game level. We used a
full-size background for Fish Dish, the game described in the previous chapter.
Background tiles are small modular graphic elements that represent a variety of
different game elements. They can be arranged in a mosaic tile-like fashion to dis-
play a unique game level.
Full-size backgrounds are popular with game developers because they are rela-
tively easy to design and integrate into a game. However, they are also
notoriously inefficient. Full-size backgrounds tend to dramatically increase the
overall size of the game, even with compression. The problem is compounded as
the game grows in size. The more game levels, the larger the game. For example,
say the average full-size background screen consumes 10 KB of space. For a five-
level game this increases the size of the game by 50 K (10 x 5), which is accept-
able. Yet, for a game with 100 levels, the game will increase by over 1,000 KB (10
x 100), which is not acceptable.
Background tiles, on the other hand, offer game developers a powerful alternative
to the limitations imposed by full-size background screens. Because they consist
of small graphic pieces, they take up far less space and memory than full-size
background screens. In addition, their modularity makes them very flexible as
many background tiles can be reused to represent a variety of different game lev-
els and scenes.
Table 13-1 summarizes and compares both arcade game background techniques.
TABLE 13-1: Comparison of Full-Size Backgrounds and Background Tiles
Game Level BackgroundTechnique
Advantages Disadvantages
Full-size backgrounds � Easy to design and create.
� Easy to integrate into a game.
� Can consume large amounts ofmemory and disk space makingtheir use prohibitive for anythingbut small games.
480 Chapter 13 / Miscellaneous Topics and Final Thoughts
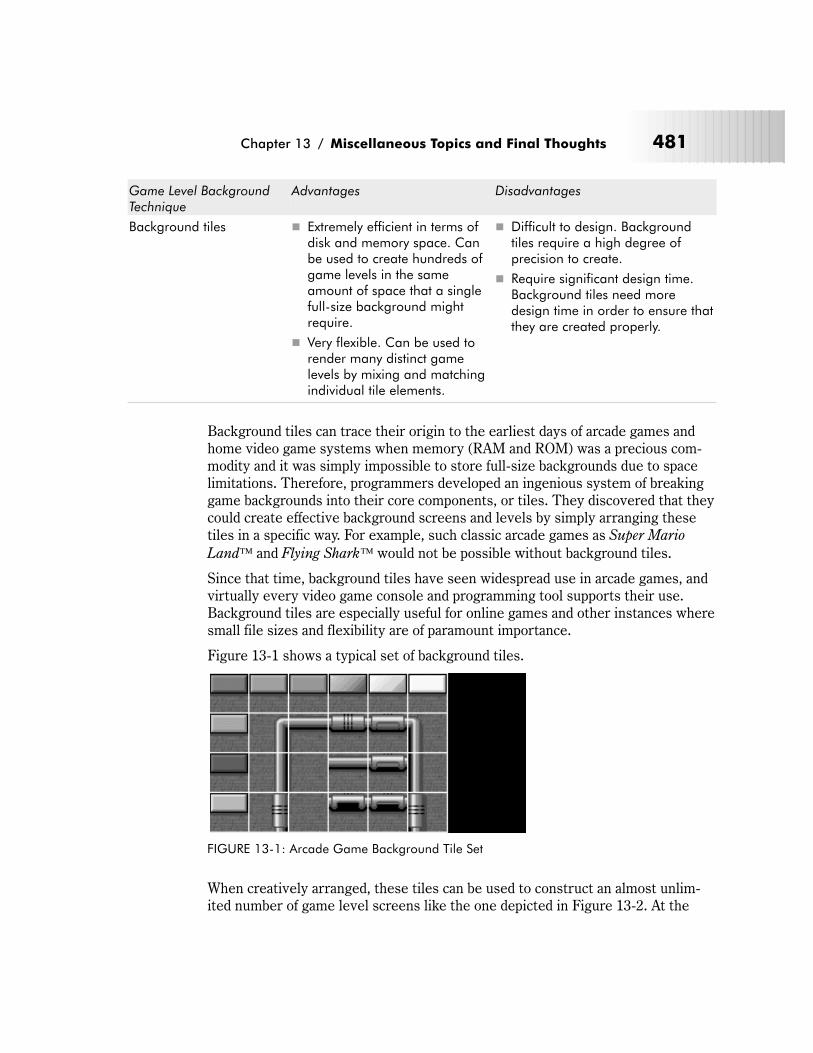
Game Level BackgroundTechnique
Advantages Disadvantages
Background tiles � Extremely efficient in terms ofdisk and memory space. Canbe used to create hundreds ofgame levels in the sameamount of space that a singlefull-size background mightrequire.
� Very flexible. Can be used torender many distinct gamelevels by mixing and matchingindividual tile elements.
� Difficult to design. Backgroundtiles require a high degree ofprecision to create.
� Require significant design time.Background tiles need moredesign time in order to ensure thatthey are created properly.
Background tiles can trace their origin to the earliest days of arcade games and
home video game systems when memory (RAM and ROM) was a precious com-
modity and it was simply impossible to store full-size backgrounds due to space
limitations. Therefore, programmers developed an ingenious system of breaking
game backgrounds into their core components, or tiles. They discovered that they
could create effective background screens and levels by simply arranging these
tiles in a specific way. For example, such classic arcade games as Super Mario
Land� and Flying Shark� would not be possible without background tiles.
Since that time, background tiles have seen widespread use in arcade games, and
virtually every video game console and programming tool supports their use.
Background tiles are especially useful for online games and other instances where
small file sizes and flexibility are of paramount importance.
Figure 13-1 shows a typical set of background tiles.
When creatively arranged, these tiles can be used to construct an almost unlim-
ited number of game level screens like the one depicted in Figure 13-2. At the
Chapter 13 / Miscellaneous Topics and Final Thoughts 481
FIGURE 13-1: Arcade Game Background Tile Set
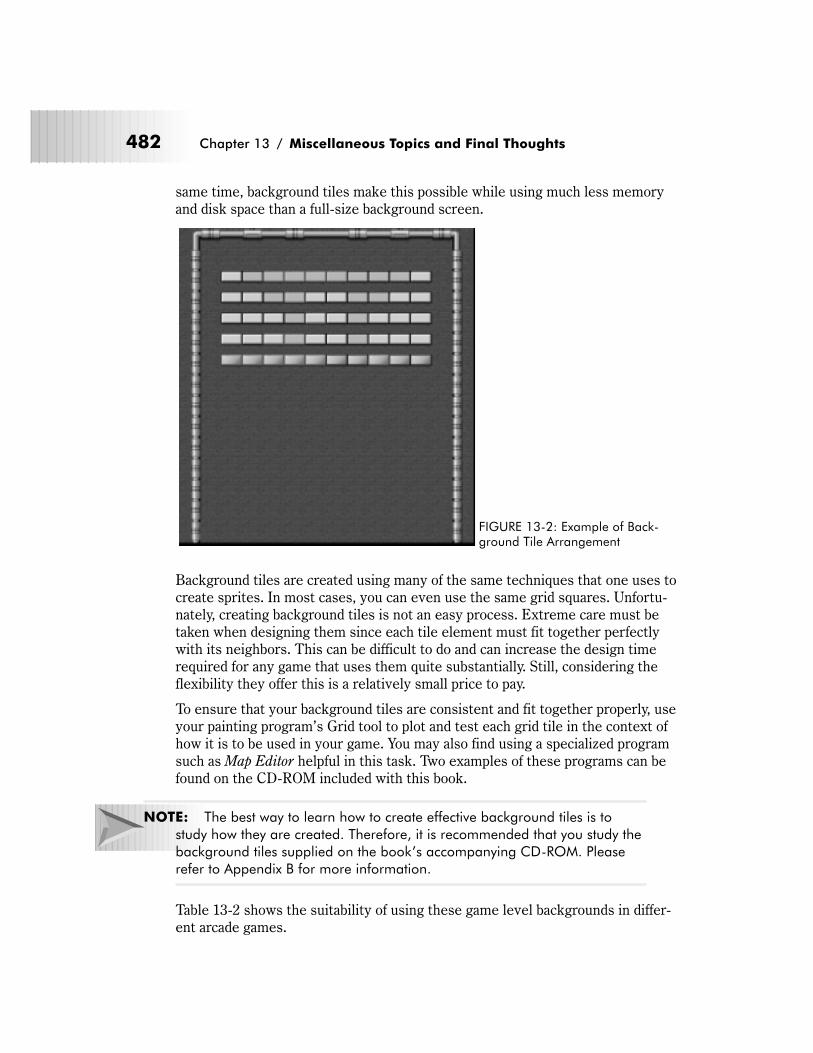
same time, background tiles make this possible while using much less memory
and disk space than a full-size background screen.
Background tiles are created using many of the same techniques that one uses to
create sprites. In most cases, you can even use the same grid squares. Unfortu-
nately, creating background tiles is not an easy process. Extreme care must be
taken when designing them since each tile element must fit together perfectly
with its neighbors. This can be difficult to do and can increase the design time
required for any game that uses them quite substantially. Still, considering the
flexibility they offer this is a relatively small price to pay.
To ensure that your background tiles are consistent and fit together properly, use
your painting program’s Grid tool to plot and test each grid tile in the context of
how it is to be used in your game. You may also find using a specialized program
such as Map Editor helpful in this task. Two examples of these programs can be
found on the CD-ROM included with this book.
NOTE: The best way to learn how to create effective background tiles is to
study how they are created. Therefore, it is recommended that you study the
background tiles supplied on the book’s accompanying CD-ROM. Please
refer to Appendix B for more information.
Table 13-2 shows the suitability of using these game level backgrounds in differ-
ent arcade games.
482 Chapter 13 / Miscellaneous Topics and Final Thoughts
FIGURE 13-2: Example of Back-ground Tile Arrangement
TABLE 13-2: Summary of Game Level Backgrounds in Arcade Games
Arcade GameSub-genre
Full-sizeBackgrounds
BackgroundTiles
Comments
Maze/chase � � Background tiles are recommended formaze/chase games with more than fiveunique game levels.
Pong games � � Background tiles should always be used inPong games.
Puzzlers � � Puzzlers with more than ten unique levelsshould use background tiles instead offull-size background screens.
Shooters � � Background tiles are recommended forshooter games with more than five uniquegame levels.
Platformers � � Background tiles should always be used inplatformers.
It is extremely important that you understand that all of the same rules that apply
to other game elements will also apply to game level backgrounds. This includes
color selection, resolution limitations, and design styles.
Sources of Inspiration
Over the course of this book, we have talked a great deal about the techniques and
potential problems that can occur when creating arcade game graphics. However,
almost nothing has been said about sources of inspiration that you can study in
order to improve your skills.
By far, the best sources of inspiration for a burgeoning arcade game artist are the
classic arcade games such as Pac-Man�, Galaxian�, and the like. Studying these
games is akin to an art student studying the great Renaissance masters. These
games and their designers were the pioneers of an industry. Their designers faced
many unknowns and developed numerous techniques for dealing with them. They
developed methods for rendering character shapes and styles, as well as animat-
ing them. You can learn a great deal about every aspect of arcade game graphics by
taking a long, hard look at how the “early” video game masters created the vari-
ous elements in these games.
Classic arcade games should be analyzed in four major areas: color use, design style,
animation technique, and usability. By studying how classic arcade games
addressed these areas, you can gain extremely valuable knowledge for your own
arcade game projects. In some cases, you can discover what not to do, while in
Chapter 13 / Miscellaneous Topics and Final Thoughts 483
others you may pick up a useful technique or two. In any case, you should ask
yourself these questions:
� Color use—How many colors are used? What is the color palette? How effec-
tively do they use color? How do they handle light and shadow? Are any spe-
cial color effects used (i.e., color cycling, dithering)?
� Design style—What design style do they employ? Is this design style ren-
dered convincingly and appropriately?
� Animation techniques—What animation primitives are used? How effective
are the animations?
� Usability—Are the different game objects well differentiated? How intuitive
are the menu screens? How legible are the scoring, lives, and level indicators?
How readable is the on-screen text and game-related messages?
Table 13-3 provides some examples of classic arcade games to analyze and study.
TABLE 13-3: Recommended Classic Arcade Games to Study
Arcade Game Sub-genre Classic Arcade Game
Maze/chase Tank Force�, Pac Man�, Pengo�
Pong games Arkanoid�Puzzlers Tetris�, Klax�
Shooters R-Type�, Raiden�, Robotron 2084�
Platformers Sonic the Hedgehog�, Super Mario Land�,
Megaman�, Burgertime�
Until recently, many classic arcade games were not commonly available. However,
today’s powerful personal computers have spurred a generation of arcade game
emulators. These emulators make it possible to run long-forgotten but classic
arcade games. For the best in arcade game emulation, check out MAME at
http://www.mame.org. MAME is available for virtually every computer plat-
form including DOS, Windows, the Macintosh, and Linux systems.
While you’re at it, you should also look at classic PC-based arcade games, as their
designers also had to contend with many limitations over the years. A good source
for locating these games is Moby Games at http://www.mobygames.com.
484 Chapter 13 / Miscellaneous Topics and Final Thoughts
Final Comments
Don’t consider this part of the book the end, but rather the beginning. The past 12
chapters have introduced you to the wonderful world of arcade game graphics. You
have learned how to design for different display modes, how to use and apply
color, how to evaluate tools, how animation works, and how to design the artwork
and animation for an actual arcade game. Yet despite this, this book only scratched
the surface of the topic. There is still much for you to learn and you can only learn
by doing. Hopefully, this book will be successful enough to justify future editions
that will expand and elaborate on the topics and concepts discussed here. Finally,
before leaving, please consider this simple but practical advice:
� Practice constantly, as this is the only way to gain experience and sharpen
your skills. Remember the adage, Practice makes perfect.
� Be patient! It takes time to develop and refine your skills.
� Don’t be afraid to experiment with the techniques discussed in the book and in
other sources.
� Don’t be afraid to borrow elements (i.e., colors, style, poses, etc.) from the
work of others but never steal someone else’s artwork. Copying may be the
highest form of flattery, but passing off someone else’s designs as your own is
just plain theft.
� Don’t be afraid to innovate or to develop your own style and techniques. Doing
this will make your work stand out and become uniquely yours.
With that being said, I wish you good luck in your future arcade game endeavors!
Ari Feldman, 2000
Chapter 13 / Miscellaneous Topics and Final Thoughts 485
Appendix A
Artist Interviews
I feel that this book wouldn’t be complete without getting other computer art-
ists’ perspectives on game art and computer graphics design in general.
For this section, I’ve been fortunate to speak to two very talented individuals. I
asked each artist a series of questions divided into three parts: personal, design,
and technical. The personal questions probe into the artist’s background and
experience in game and computer artwork. The design-oriented questions
examine the artist’s feelings and approach towards arcade game graphics design
and 2D-computer artwork in general. The technical questions explore the art-
ist’s opinions on different software and tools.
Karl Maritaud (nickname: X-Man)
The first person I interviewed was Karl Maritaud. Karl is a part-time demo
graphician, or graphic artist, who specializes in creating artwork for the PC
demo scene in France. He has also dabbled quite a bit in computer game
graphics design, and is an extremely talented artist as shown by Figures A-1
and A-2.
487
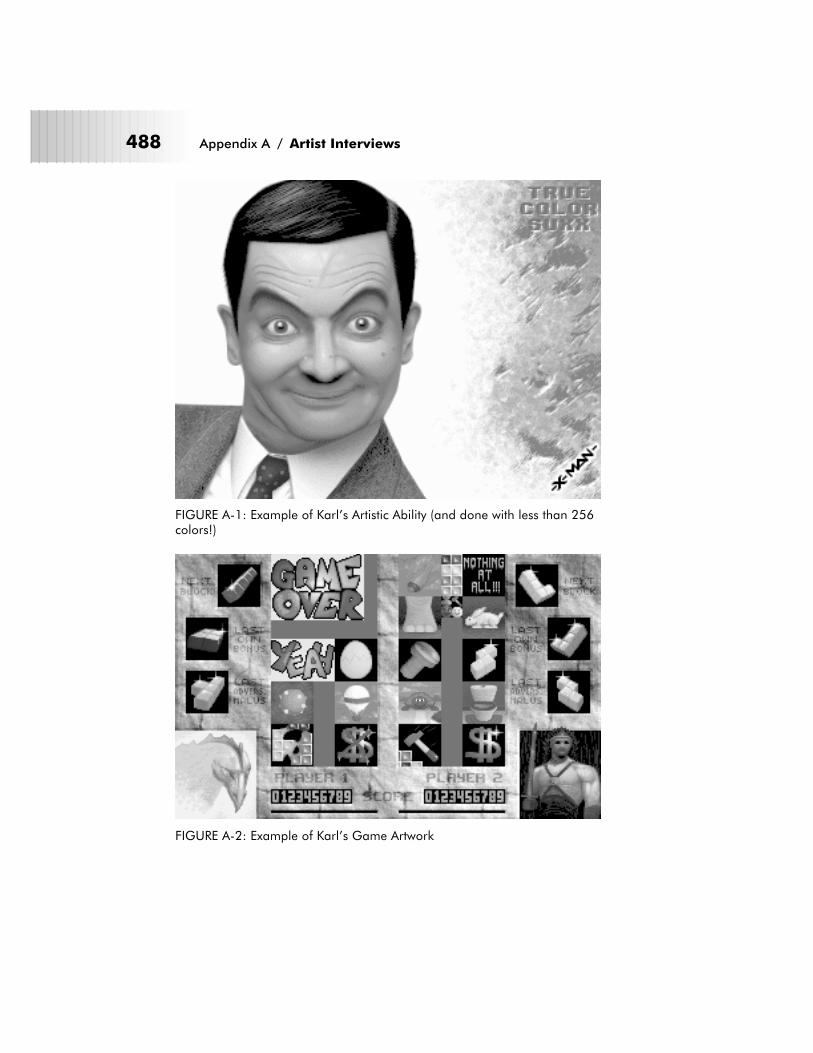
488 Appendix A / Artist Interviews
FIGURE A-1: Example of Karl’s Artistic Ability (and done with less than 256colors!)
FIGURE A-2: Example of Karl’s Game Artwork
Personal Questions
1. What is your background and how did you get started in computer
artwork?
I’m currently a computer scientist who is doing a Ph.D. thesis in image syn-
thesis. So, you can see that my passion for pixels has influenced my studies.
This interest in computer graphics started when I got my first paint program
on my first computer. It was The OCP Art Studio on an Amstrad CPC 6128.
2. How long have you been creating computer artwork?
Since the day mentioned above. I’ve been doing it for about 11 or 12 years
now. But it became “serious” when I got involved in the “demo scene” five
years ago.
3. Do you think 2D artwork is dead or does it have a future given the
interest in 3D graphics?
Well, it’s true that 3D has invaded the computer graphics domain. But 2D
skills are still needed to draw textures and retouch rendered scenes, etc. Any-
way, even if 2D artwork really died, I’d continue to draw in 2D, because I like
it! I don’t live from my pictures; it’s just for my pleasure, so I don’t really care
about what is the standard in game companies.
All I can say is that I loooooove the low-res 2D landscapes in the game Simon
the Sorcerer, and I really cannot imagine them in 3D.
4. What’s your favorite platform for creating computer artwork—Mac,
PC, Amiga, Falcon, etc.?
The PC, definitely.
Design Questions
1. How do you approach a project? Is there a certain procedure you fol-
low? Do you just start drawing or do you take the time to plan your
artwork out?
It’s really variable. For some pictures, I know exactly what I want to draw
before starting (especially when I just want to copy from a model). Sometimes,
I start from a model but then I decide to add things that I didn’t think of in the
beginning. And sometimes, I make a whole picture without knowing what it
will exactly look like at the end; just from an idea that become clearer or can
totally change while I’m drawing. It’s like writing a book. You’ve got the main
idea that makes you start to write, and then your imagination finds ways to
link and enhance these ideas.
Appendix A / Artist Interviews 489
2. What inspires you creatively?
Everything. Photography, sci-fi, heroic fantasy, movies. . . But anyway, I’ve got
to be more creative. In the “demo scene,” we use the label “no copy” when a
picture was built from imagination. I mostly used to draw copies or half-copies,
but now I want to be able to stamp the “no copy” label on my pictures.
3. What’s your favorite type of computer artwork? Do you like doing
stills for demos better or do you prefer doing game-oriented artwork?
Well, I’ve done graphics for a few little non-commercial games and I’ve also
worked on a bigger project that was unfortunately aborted. It was interesting,
but I prefer drawing for my pleasure, because I don’t have to fear whether the
result will be good or bad. When I am more confident in my skills, maybe I’ll
start to enjoy drawing for commercial projects.
4. What’s the best way to develop your overall artistic techniques?
Looking at others’ work! One has much to learn from others. It’s very inter-
esting to try to figure out how your favorite computer graphics artists draw.
By trying to do like someone else, you can find new techniques, even different
from the one you originally tried to copy. Another very interesting way is to
read tutorials from others. There are plenty of them on the Web.
5. How do you approach different types of artwork? In other words, how
would you approach doing a demo screen versus sprite artwork for a
game, etc.?
The only difference for me is freedom. For a demo screen, the only restraints
are your imagination and your talent (and the competition rules, but they are
not very restrictive, except for “old-school” competitions). But for a game,
you have to respect its overall mood. But the techniques, for me, are about the
same. I have something to draw, so I draw it. Actually, I’m quite attached to
details, so a picture is kind of a huge set of sprites that must all be drawn with
precision.
6. What’s the most difficult part of designing game graphics?
From my experience in this domain, I’d say that the most difficult thing is to
define the global aspect of the game, and to keep close to it. The best is when
you can hardly tell who drew what. You know, when several artists work on a
game, they must try to adapt their style to others’ and that is not easy.
Technical Questions
1. What are your favorite painting tools/image editors for 8-bit artwork
and why? What’s your favorite true color image editor and why?
For 8-bit drawing, my favorite program is GrafX2. Why? Well. . . because I’m
one of its two creators! But more seriously, because it does almost all that I
want for 8-bit artwork. And what has not been done yet will be, if we find time
490 Appendix A / Artist Interviews
and motivation. Another reason is simply because there are not many good
8-bit paint programs on PC, and then I objectively think that GrafX2 is one of
the best, if not the best. It’s really user friendly once you become familiar to
the keyboard shortcuts.
For true color, my favorite one is Photoshop 5. The word “photo” in its name
does not mean that you can’t draw with. It’s really powerful and I seldom use
more than 10% of its power. There are many other programs for true color
painting, but Photoshop does all that I want, and it does it well.
2. What are the most important features for a drawing tool to have and
why?
Well, it really depends if it is for 8-bit or true color drawing. For 8-bit, a good
program requires, in my opinion, the following features: the basic tools: free-
hand drawing, lines, polygons, rectangles, circles, flood-fill, etc.; the basic
effects: shade (change to the next color in a color range), smooth (blur),
colorize, etc., and the possibility to control which colors must be used when
the effect looks for the nearest color in the palette to the one it has computed;
and the possibility to arrange your palette as you wish: for example, allowing
the user to insert a color into a gradient without shifting the correspondence
between the colors in the palette and the pixels in the image.
For true color, I need the basic tools: the same as for 8-bit and a few others
that were effects in 8-bit programs like blur and smudge; effects: darken,
lighten, colorize; filters: the most basic ones and the “HSB noise” from Eye
Candy; layers; and color adjustments (gamma, contrast, and color balance).
I could do with less, but I have greatly needed all the mentioned features at
least once.
3. What other graphics tools (i.e., image viewers, converters, etc.) do you
use and why?
Viewers: ACDSee for fast viewing, SEA for full-screen viewing true color pic-
tures, and GrafX2 for full-screen viewing 8-bit pictures.
Converters: I rarely convert images, but when I do, I use either Photoshop or
Paint Shop Pro.
4. Do you have a specific file format preference (i.e., .PCX, .BMP, etc.)
and why?
GIF for 8-bit images, and PNG or TGA for true color. These are for artwork, of
course, because JPEG is good enough for the rest. But I couldn’t use lossy
compression for images drawn with a computer; that’s out of the question.
5. How do you go about defining your color palettes?
I define the main color gradients and a few others that are close to the first
ones. The main gradients will be used for the main shapes of the image, and
the others will “break” the main gradients because images with only one color
Appendix A / Artist Interviews 491

gradient per shape are really ugly. In my opinion, a good picture requires color
variations.
6. What are some of the issues to watch out for and consider when con-
structing a color palette?
There shouldn’t be any important problems if the palette editors were perfect.
In most paint programs, it is not possible to move colors in the palette without
destroying the picture. This is not a problem in GrafX2 thanks to its X-swap
option. This option allows the user to insert colors in a gradient, to delete
unused colors without letting “holes” in the palette, etc.
On the other hand, GrafX2 does not offer yet all the interesting features from
most true color programs where you can adjust colors, contrast, gamma cor-
rection, or simply edit them in the hue-saturation-brightness color space.
Now, apart from the limitations of the palette editor, it is better not to use all
the 256 colors in the beginning because you might need extra colors later. For
example, if you had a rather pink face to draw and want to anti-alias the neck
with a green pullover (just an example), you’ll first define pink gradients
(more than one!) and green gradients. But you’ll also need a few colors
between green and pink for anti-aliasing. And you can’t define these colors
while you haven’t (more or less roughly) drawn the neck and the pullover.
7. What is your favorite screen resolution to draw in and why?
In 8-bit, my favorite resolution is 320x240. It’s a low resolution because
pixeling requires a lot of work in order to get a good picture. And it’s got
square pixels.
In true color, I don’t really have a favorite resolution because you don’t work
on each pixel separately. But I generally draw 640x480 or 800x600 pictures.
And, since most true color picture editors work in a windowed environment, I
think it’s interesting to speak about the chosen resolution. I personally config-
ured Windows in 1152x864 because it’s the biggest resolution supported by
my monitor that offers square pixels. Indeed, 1280x1024 has an aspect ratio of
5/4 instead of the standard 4/3 for monitors.
You can contact Karl directly via email at [email protected] or by
visiting his Web site at http://www-msi.ensil.unilim.fr/~maritaud.
Neil Shepard (nickname: The Neil)
Neil Shepard is an experienced arcade game artist from the United Kingdom. To
date, he has created the artwork and animation for over a dozen well-received
arcade games. Figures A-3 and A-4 demonstrate Neil’s impressive work.
492 Appendix A / Artist Interviews
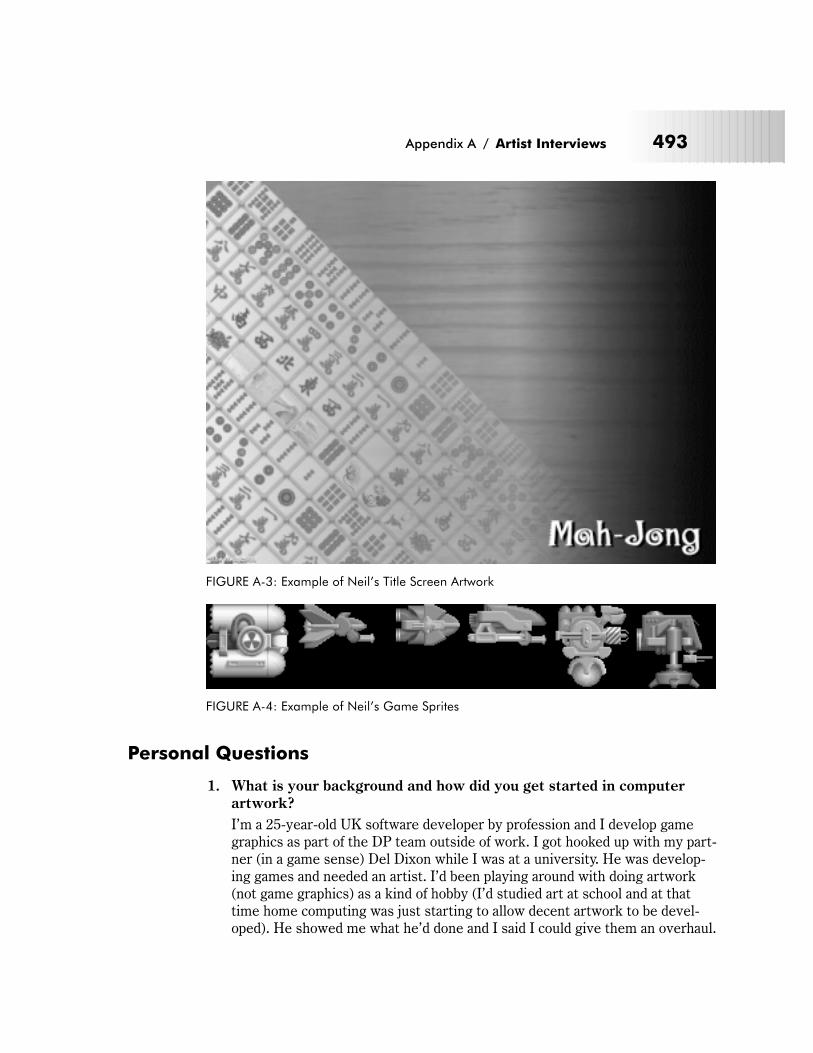
Personal Questions
1. What is your background and how did you get started in computer
artwork?
I’m a 25-year-old UK software developer by profession and I develop game
graphics as part of the DP team outside of work. I got hooked up with my part-
ner (in a game sense) Del Dixon while I was at a university. He was develop-
ing games and needed an artist. I’d been playing around with doing artwork
(not game graphics) as a kind of hobby (I’d studied art at school and at that
time home computing was just starting to allow decent artwork to be devel-
oped). He showed me what he’d done and I said I could give them an overhaul.
Appendix A / Artist Interviews 493
FIGURE A-3: Example of Neil’s Title Screen Artwork
FIGURE A-4: Example of Neil’s Game Sprites
Apparently, I did a good job, and we’ve been working together on games for
about five or six years now. So, now I develop graphics for the team in my
spare time and work as a Delphi developer during the day. This allows me to
understand hardware, pixels, color depths, etc., but I can also bring my art
experience to the programming side of things.
2. How long have you been creating computer artwork?
Game graphics for about five or six years and computer artwork in general for
maybe six or seven. As for anything that I’d actually be prepared to release
into the public domain then maybe one or two years.
3. Do you think 2D artwork is dead or does it have a future given the
interest in 3D graphics?
Three-dimensional graphics are great and all the rage right now but 2D graph-
ics do have their place. Three-dimensional graphics are only really going to
work when you create a 3D environment for the player to operate in. As soon
as you jump to 2D environments then you’re going to have to bring an ele-
ment of 2D into the equation. There are also practical considerations—maybe
you could create everything in 3D Studio (for example), but actually manually
drawing your graphics gives you an extra level of control.
4. What’s your favorite platform for creating computer artwork—Mac,
PC, Amiga, Falcon, etc.?
I originally started way back in the dim distant past using a BBC B, then
jumped up to the Acorn A3000. Finally, I moved over to the PC and everything
I’ve ever done for games and release has been on the PC. Of course, if anyone
wants to lose a Silicon Graphics machine in my direction, then I’m sure I could
find space on my desk.
Design Questions
1. How do you approach a project? Is there a certain procedure you
follow? Do you just start drawing or do you take the time to plan your
artwork out?
I never just jump into artwork. If you jump into drawing straight away or
before the whole thing is agreed upon then you’ll hit problems and end up hav-
ing to do an awful lot of work. Personally I’ll try to get the theme for an entire
set of graphics before I start thinking about specifics. This can often dictate
how the rest of the graphics are going to go (e.g., if a game requires realistic
graphics, then characters like cats wearing denim jackets and giant boots are
generally out). Another thing that I try to insist on is having a complete list of
the graphics needed before I get started. Not only does this give you a better
idea of time scale, but it’s easier to work out that if sprite A is thing X then
sprite B can be thing Y.
494 Appendix A / Artist Interviews
I’m very much a sketch artist. I make page after page of sketches and let ideas
work their way through my head for a few days before I start creating anything
on the machine. General artwork in itself is difficult but in game graphics
there is the added problem of making graphics that have to be modular (e.g.,
pipes), functional (e.g., lifts, ladders), etc. Certain game styles really do create
nightmares—isometric games, games where there is an element of sprites
being overlaid, etc.
2. What inspires you creatively?
Life! It might sound a bit glib but we do live a world full of ideas. Personally
I’m a sci-fi and film fan so I simply take all that I see and use bits and pieces all
over the place. It sometimes takes one thought to lead to another, sometimes
it can take days of getting nothing and then suddenly get inspired by the most
unlikely things.
3. What’s your favorite type of computer artwork? Do you like doing
stills for demos better or do you prefer doing game-oriented artwork?
Each brings its own rewards. Game graphics really give me a buzz when it all
comes together and the various aspects all fit in, but on the other hand static
screen artwork looks fabulous and when done properly can have such impact.
If push came to shove then I would have to go for static artwork (even though
I do create 90% of mine in 3D Studio).
4. What’s the best way to develop your overall artistic techniques?
Practice, study other people’s work, and keep things simple. I don’t mean rip
their work off, but see how they light things, how they shade things—Do
sprites look better with a black/dark surround? Do they look better
anti-aliased? etc. In the field of animation then, watch how real people/things
move and try to incorporate that into your animations. They’ll look more real-
istic and natural if you do.
5. How do you approach different types of artwork? In other words, how
would you approach doing a demo screen versus sprite artwork for a
game, etc.?
Designing a sprite means a lot more work basically. I tend to think about how
the sprite is going to move, how it’s going to interact with other graphics, etc.
A screen, on the other hand, is totally static (obviously) but you can make it
far more dramatic, light it more stylistically, etc.
6. What’s the most difficult part of designing game graphics?
For actual type of graphics it would have to be animation, closely followed by
modular graphics. The biggest pain, however, is coming up with an idea and
then being able to apply that idea to all of the various elements. This can often
be very difficult.
Appendix A / Artist Interviews 495
7. Do you have any pointers or tips on creating sprites and backgrounds
for games?
As with everything it all depends on what you’re trying to create but there are
several things that I always keep in mind:
The graphics are what generally sell your game to the user (game play is
important but the graphics are what are going to grab people’s attention in the
first place) so make them bright, colorful, and eye-catching.
Keep things simple to start with when it comes to sprites and animation—you
can always add extra bits and pieces later.
When it comes to backdrops, try to tone them down; otherwise, they’ll over-
power the foreground graphics and it’ll be difficult to see things.
Pick a style and stick to it throughout your game. Don’t have a mixture of
styles (e.g., all rotoscoped, all cute, all photo-realistic) as it’ll look messy. If it
all flows together then it will look slicker and more professional.
Think about your animations—do they have to cycle? How do they get on and
off the screen? (If you can make them appear and then disappear, then they’ll
look far better than if they just suddenly pop up, do their thing, and then van-
ish).
When you’re developing cartoon-style graphics, emphasize everything—make
colors brighter, movements more exaggerated, etc. It’ll add impact and make
the whole thing look that little bit more dynamic.
Sprite edges can be tricky. Think about what the sprite is going to be displayed
on top of. If it’s a generally dark background then try to anti-alias them (by
hand, sadly) slightly to a dark color (they’ll look far more integrated if you do).
When you animate objects, think about how they move in the real world. Don’t
go overboard (or get weighed down), but try to take things like gravity, inertia,
etc., into consideration when you animate your object.
Again with animation, never jump straight in and create final frames. Create a
skeleton (stick) version, get that moving correctly, then add the body. Once
this version is fine, you can then add the actual colors, shading, etc. If the
basic movement is wrong, then you’ve got a lot of work ahead of you trying to
fix it.
Technical Questions
1. What are your favorite painting tools/image editors for 8-bit artwork
and why? What’s your favorite true color image editor and why?
I used to be a big fan of Neopaint (for DOS) but it’s showing its age now and
I’ve now switched to JASC’s Paint Shop Pro for the majority of both 8- and
24-bit editing. Neopaint had the great advantage of being able to quickly access
the palette but was let down by a general lack of features. PSP has the fea-
496 Appendix A / Artist Interviews
tures but not quite as quick access to the palette. It swings and roundabouts as
to which one I use but Neopaint is becoming too long in the tooth (and won’t
work under Windows NT anyway). When it comes to things like splash and
About screens, though, I leave 2D land and usually go straight for 3D Studio.
Yes, it’s big, a bit scary (to the novice anyway), and causes all sorts of head-
aches when you start thinking about meshes, objects, etc., but it speeds the
development process up incredibly (and you can always touch the stuff up in
PSP anyway).
2. What are the most important features for a drawing tool to have and
why?
Definitely the ability to operate on a pixel level and have the ability to switch
anti-aliasing and other features off. Working with 2D graphics always means
that you’re going to want to work at the most primitive level (it offers the best
control) and that means getting your hands dirty and playing around with pix-
els in some shape or form. I’m not saying that anti-aliasing, etc., have no
place, as they most certainly do (especially as graphics are getting just too big
to do completely manually nowadays), but for the basics of animation, they are
just something to confuse the matter.
After that, it would be the ability to be able to work directly with palettes
(switching between tools and colors really quickly is nice too).
3. What other graphics tools (i.e., image viewers, converters, etc.) do you
use and why?
I’m also a programmer and have put together a package of my own [Author:
Tiny Animation Studio, included on the book’s accompanying CD-ROM].
Basically this does a load of the normally mundane and downright difficult
tasks like merging, etc. If I find something that I can’t do anywhere else (i.e.,
without spending cash) I just work out the steps involved and write a new
function for that. Occasionally I’ll go back to using Microsoft’s Paint but
usually only when I’m working out the basics of animation. It gives you quick
access to the palette as well as pixel editing. As I said though, it’s used only at
the very start of an animation (after that it goes into PSP). For testing anima-
tions I use another application that I’ve developed myself (Tiny Animation
Studio—TAS, available from my Web site).
4. Do you have a specific file format preference (i.e., .PCX, .BMP, etc.)
and why?
Personally I prefer PCX for eight bit images and BMP for 24 bit. Both are
non-lossy (try saving 24-bit images in JPEG and you’ll see your artwork disin-
tegrate after a while). As to why I use them . . . PCX is pretty small, offers
fairly good compression, and, most importantly, is easy to understand if you
ever need to play around with the file in code. BMP may be large and wasteful
of space but again it’s very easy to use in code (I use Delphi and that has
explicit support for BMP). I could use BMP for both, but by storing 8-bit as
Appendix A / Artist Interviews 497

PCX, and 24-bit as BMP, I can easily see which graphics are ready to be incor-
porated into a game (PCX), and which are development versions (BMP).
5. How do you go about defining your color palettes?
It’s not something that I do very often. I’ve found that over time you become
accustomed to just one palette that has a good spread of colors (and any shade
that’s missing can be achieved by dithering). Not only does it have a good
spread of colors but it also allows you to be able to jump to colors within the
palette almost without thinking. Being able to do this really speeds things up.
In short, go for the most comprehensive range of colors possible—it’ll make
life so much easier.
6. What are some of the issues to watch out for and consider when con-
structing a color palette?
Make sure you have a good range of colors! Try to have the right number of
greens, blues, reds, and, most importantly grays. As I said, you tend to come
up with a standard palette that you keep going back to. It might need a little
tweaking now and then, but generally it covers all possibilities.
7. What is your favorite screen resolution to draw in and why?
At work I use 1024x768 but at home, 800x600. Both are at 24-bit color depth
though. Anything bigger and you start to lose small sprites. It’s also easier to
see how they’ll look on a user’s machine if you use something similar to what
the standard user uses.
You can contact Neil directly via email at [email protected] or by
visiting his Web site at http://www.dodgyposse.home.dhs.org/dodgyposse/.
498 Appendix A / Artist Interviews
Appendix B
CD-ROM Contents
In addition to containing some very useful information, this book comes with aCD packed with great programs and examples that will serve you well on yourown arcade game projects.
This CD contains over 128 MB of software and graphic examples organized intothe following categories:
� EXAMPLES—A variety of sample arcade game graphics and backgroundsto study, edit, and use freely in your own arcade game projects.
� FONTS—A large selection of high-quality TrueType fonts to use in yourgames.
� FUN—Play these complimentary games when you need to take a break.
� GAMEDEV—A nice selection of tools and libraries that can be used tomake arcade games.
� GAMMA—Files to help you determine and set your gamma level.
� GFXTOOLS—A comprehensive selection of the best low-cost and freegraphics tools available anywhere.
� GRIDS—Several predefined sprite grid templates to use for your arcadegame projects.
� MISC—Several utilities that will help you manage your files.
� PALETTES—A selection of sample color palettes to use and experimentwith in your own game projects.
NOTE: Several of the programs included on this CD are shareware andcommercial programs. If you find any of them useful, you are encour-aged to register for them or buy them.
499
Individual Directory Contents
This section briefly describes the contents of each directory.
EXAMPLES
� ARINOID—The complete graphic images for Arinoid, a sophisticatedPong-style arcade game.
� COMPLEX—A set of sophisticated frame-by-frame animation templates thatcan be used in your own game projects.
� FISHDISH—The complete graphic images for Fish Dish, the hands-onarcade game project described in Chapter 12.
� MAZECHASE—Contains images suitable for use in an infinite variety ofmaze/chase games.
� PLATFORM—Contains images useful for creating all sorts of platformgames.
� SHOOTER—Contains images that can be used for any number of shootergames.
NOTE: There is enough variety in the provided artwork to keep one occupiedfor quite some time, and that’s not counting the fact that many can bemixed and matched to form entirely new sprite sets.
NOTE: All of the images contained in this directory are free to use in your owngames as long as you include this phrase somewhere in the program ordocumentation: “portions of this artwork are copyright � 2000 by AriFeldman.”
FONTS
There are two directories here—one for Windows and one for DOS. The Windowsdirectory contains the following:
� ARMY—Fonts useful for military-style arcade games.
� CARTOON—Fonts useful for arcade games with cartoon-like design styles.
� DISPLAY—Fonts optimized for displaying large amounts of textualinformation.
� FANTASY—A variety of fantasy-oriented fonts.
� MISC—Several decorative fonts.
� SCIFI—A variety of science fiction-oriented fonts.
� SYMBOLS—Several symbolic font sets.
500 Appendix B / CD-ROM Contents
� TITLE—Fonts suitable for title screens.
� VIDGAME—Fonts modeled after video games.
� WORLD—Several international style fonts.
The DOS directory contains a file called npfnts01.zip, which contains an assort-ment of GEM fonts compatible with NeoPaint for DOS.
NOTE: Most of the fonts included in this directory are free, but some are share-ware. Please refer to each file for information on copyrights and anyrestrictions on their use.
FUN
� BullyFrog.exe—A great example of an arcade puzzler game.
� disasteroids.zip—A great example of an arcade shooter.
� FenceOut.exe—A great example of a maze/chase game.
GAMEDEV
TABLE B-1: DEVTOOL Directory
Filename DOS Windows Description
all3932.zip � � The Allegro graphics library. A free programminglibrary oriented to developing DOS-based arcadegames.
fgl404a.zip � � FastGraph for DOS (part A). A graphicsprogramming library useful for making DOS-basedarcade games.
fgl404b.zip � � FastGraph for DOS (part B). A graphicsprogramming library useful for making DOS-basedarcade games.
as30.exe � � AniSprite. A graphics programming library usefulfor making Windows-based arcade games.
DXC.zip � � DX-Creator. A game-oriented developmentenvironment.
fglw600.zip � � FastGraph for Windows. A graphics programminglibrary useful for making Windows-based arcadegames.
fgw60doc.zip � � The documentation for FastGraph for Windows.
GFShw16.exe � � The Games Factory. A visually oriented gamecreation tool (16-bit version).
GFShw32.exe � � The Games Factory. A visually oriented gamecreation tool (32-bit version).
Appendix B / CD-ROM Contents 501
TABLE B-2: SPRITE Directory
Filename DOS Windows Description
autograb.zip � � Autograb. A utility to automatically grab batches ofsprites from an image.
isd31.zip � � Icons & Sprites Designer. A sprite and icon editor.
Ixe130.zip � � IXE. A sprite precompiler.
scat160.zip � � SCAT. A utility to cut sprites from images.
sprget11a.zip � � SPRiteGET. Another utility for extracting sprites fromimages.
!sprite.exe � � Sprite. A sprite animation utility.
dpdl_tas.zip � � The Tiny Animation Studio. A sprite animationutility.
spredit.zip � � SpriteEditor. A sprite animation utility.
tileit_v1.zip � � Tile It. A utility for cutting images into smallerpieces.
Wspr32.zip � � WSPR32. A sprite animation utility that supportsJava.
TABLE B-3: TILEEDIT Directory
Filename DOS Windows Description
MapMaker.zip � � MapMaker. A utility for plotting background tilelayouts.
mm51demo.zip � � Mapmaker. A utility for plotting background tilelayouts.
GAMMA
� findgamma.gif—Use this image to determine your current gamma level.
� setgamma.gif—Use this image to help adjust your gamma level.
GFXTOOLS
TABLE B-4: ASSETMGR Directory
Filename DOS Windows Description
Portfolio411US.exe � � Extensis Portfolio. An asset managementprogram.
502 Appendix B / CD-ROM Contents
TABLE B-5: CAPTURE Directory
Filename DOS Windows Description
St204f.zip � � Screen Thief. A screen capture utility.
Ezepro45.exe � � EZ Capture Pro. A screen capture utility.
HySnapP.exe � � HyperSnap DX. A screen capture utility.
snagt436.zip � � SnagIt. A screen capture utility.
TABLE B-6: FONTUTIL Directory
Filename DOS Windows Description
vgafed30.zip � � FONT EDITOR. A font editor for ROM fonts.
crossfnt.zip � � CrossFont. Converts TrueType fonts between theMacintosh and PC platforms.
fgfedit.zip � � FastGraph Font Editor. A font editor for FastGraphprogramming library.
font2bmp.zip � � Font2bmp. A utility that converts TrueType fonts into.BMP files.
ttgem.zip � � TT2Gem. A utility that converts TrueType fonts intoGEM fonts.
TABLE B-7: MISC Directory
Filename DOS Windows Description
MkExpl.zip � � MkExpl. A utility that generates explosion effects.
pcxred.zip � � Mercury PCX Reducer. A utility for scaling .PCXfiles.
squash10.zip � � WSQUASH. A specialized file compression utility for.BMP files.
Apr.zip � � PicturesToExe. Converts one or more graphic filesinto standalone EXE files.
univ162.zip � � Universe. A utility that allows you to visuallycompose space-oriented artwork.
TABLE B-8: PAINT Directory
Filename DOS Windows Description
dnpaint.zip � � DN Paint. A DOS-based painting program.
gfx2b965.zip � � GrafX2. A DOS-based painting program.
improc42.zip � � Improces. A DOS-based painting and imageprocessing program.
Appendix B / CD-ROM Contents 503
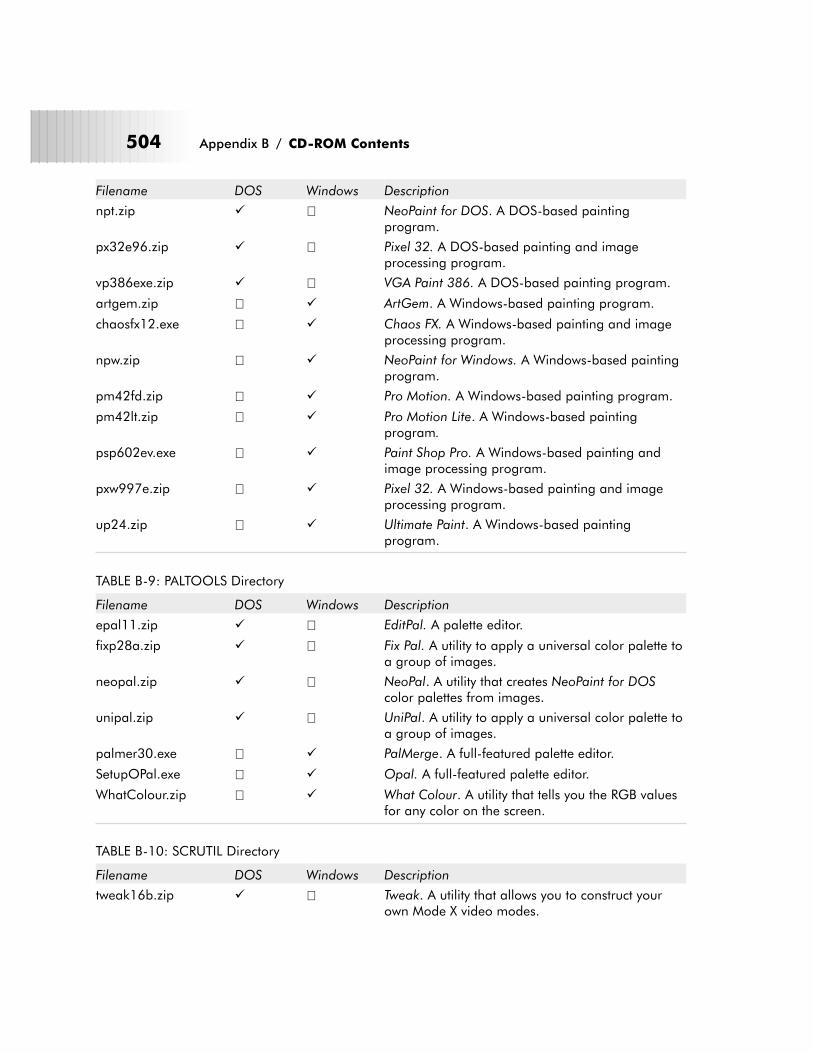
Filename DOS Windows Description
npt.zip � � NeoPaint for DOS. A DOS-based paintingprogram.
px32e96.zip � � Pixel 32. A DOS-based painting and imageprocessing program.
vp386exe.zip � � VGA Paint 386. A DOS-based painting program.
artgem.zip � � ArtGem. A Windows-based painting program.
chaosfx12.exe � � Chaos FX. A Windows-based painting and imageprocessing program.
npw.zip � � NeoPaint for Windows. A Windows-based paintingprogram.
pm42fd.zip � � Pro Motion. A Windows-based painting program.
pm42lt.zip � � Pro Motion Lite. A Windows-based paintingprogram.
psp602ev.exe � � Paint Shop Pro. A Windows-based painting andimage processing program.
pxw997e.zip � � Pixel 32. A Windows-based painting and imageprocessing program.
up24.zip � � Ultimate Paint. A Windows-based paintingprogram.
TABLE B-9: PALTOOLS Directory
Filename DOS Windows Description
epal11.zip � � EditPal. A palette editor.
fixp28a.zip � � Fix Pal. A utility to apply a universal color palette toa group of images.
neopal.zip � � NeoPal. A utility that creates NeoPaint for DOScolor palettes from images.
unipal.zip � � UniPal. A utility to apply a universal color palette toa group of images.
palmer30.exe � � PalMerge. A full-featured palette editor.
SetupOPal.exe � � Opal. A full-featured palette editor.
WhatColour.zip � � What Colour. A utility that tells you the RGB valuesfor any color on the screen.
TABLE B-10: SCRUTIL Directory
Filename DOS Windows Description
tweak16b.zip � � Tweak. A utility that allows you to construct yourown Mode X video modes.
504 Appendix B / CD-ROM Contents
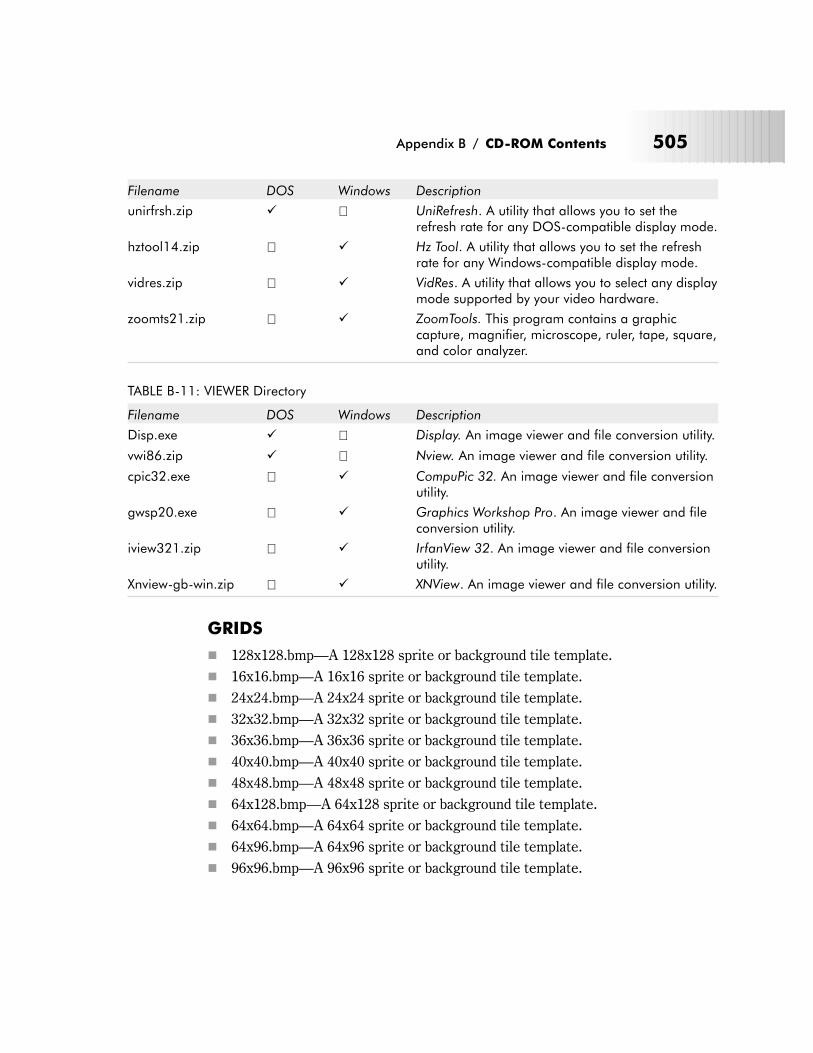
Filename DOS Windows Description
unirfrsh.zip � � UniRefresh. A utility that allows you to set therefresh rate for any DOS-compatible display mode.
hztool14.zip � � Hz Tool. A utility that allows you to set the refreshrate for any Windows-compatible display mode.
vidres.zip � � VidRes. A utility that allows you to select any displaymode supported by your video hardware.
zoomts21.zip � � ZoomTools. This program contains a graphiccapture, magnifier, microscope, ruler, tape, square,and color analyzer.
TABLE B-11: VIEWER Directory
Filename DOS Windows Description
Disp.exe � � Display. An image viewer and file conversion utility.
vwi86.zip � � Nview. An image viewer and file conversion utility.
cpic32.exe � � CompuPic 32. An image viewer and file conversionutility.
gwsp20.exe � � Graphics Workshop Pro. An image viewer and fileconversion utility.
iview321.zip � � IrfanView 32. An image viewer and file conversionutility.
Xnview-gb-win.zip � � XNView. An image viewer and file conversion utility.
GRIDS
� 128x128.bmp—A 128x128 sprite or background tile template.
� 16x16.bmp—A 16x16 sprite or background tile template.
� 24x24.bmp—A 24x24 sprite or background tile template.
� 32x32.bmp—A 32x32 sprite or background tile template.
� 36x36.bmp—A 36x36 sprite or background tile template.
� 40x40.bmp—A 40x40 sprite or background tile template.
� 48x48.bmp—A 48x48 sprite or background tile template.
� 64x128.bmp—A 64x128 sprite or background tile template.
� 64x64.bmp—A 64x64 sprite or background tile template.
� 64x96.bmp—A 64x96 sprite or background tile template.
� 96x96.bmp—A 96x96 sprite or background tile template.
Appendix B / CD-ROM Contents 505
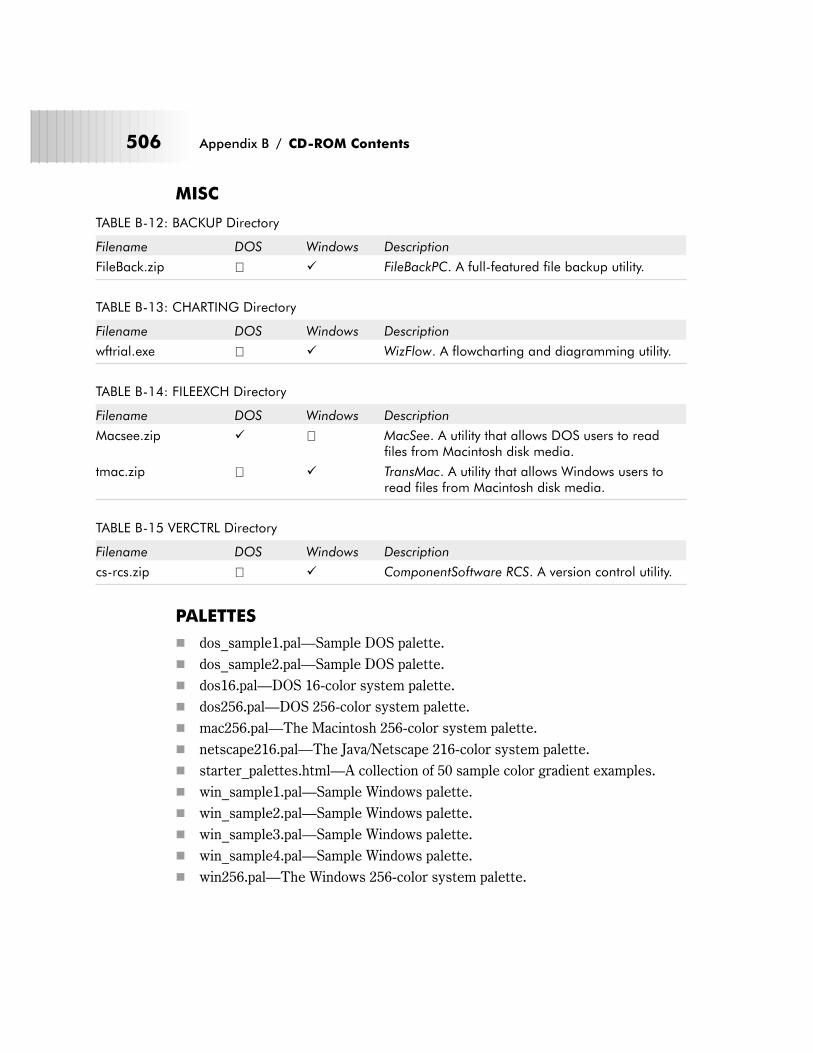
MISC
TABLE B-12: BACKUP Directory
Filename DOS Windows Description
FileBack.zip � � FileBackPC. A full-featured file backup utility.
TABLE B-13: CHARTING Directory
Filename DOS Windows Description
wftrial.exe � � WizFlow. A flowcharting and diagramming utility.
TABLE B-14: FILEEXCH Directory
Filename DOS Windows Description
Macsee.zip � � MacSee. A utility that allows DOS users to readfiles from Macintosh disk media.
tmac.zip � � TransMac. A utility that allows Windows users toread files from Macintosh disk media.
TABLE B-15 VERCTRL Directory
Filename DOS Windows Description
cs-rcs.zip � � ComponentSoftware RCS. A version control utility.
PALETTES
� dos_sample1.pal—Sample DOS palette.
� dos_sample2.pal—Sample DOS palette.
� dos16.pal—DOS 16-color system palette.
� dos256.pal—DOS 256-color system palette.
� mac256.pal—The Macintosh 256-color system palette.
� netscape216.pal—The Java/Netscape 216-color system palette.
� starter_palettes.html—A collection of 50 sample color gradient examples.
� win_sample1.pal—Sample Windows palette.
� win_sample2.pal—Sample Windows palette.
� win_sample3.pal—Sample Windows palette.
� win_sample4.pal—Sample Windows palette.
� win256.pal—The Windows 256-color system palette.
506 Appendix B / CD-ROM Contents
Index
128-bit, 14
16-bit, 10-11
32-bit, 11
32-bit true color, 38
64-bit, 14
8-bit, 13
Aaction flowchart, 389-390
active window capture, 148
additive color mixing, 213
aesthetic requirements, 431
affordances, 439
age and color perception, 218
Airbrush tool, 119
aliased fonts, 364
aliasing, 22
alpha blending, 231
animated GIF, 62
animation, 294
as differentiation device, 412-413
frame requirements, 299
primitives, 311
properties and fundamentals, 294
template, 454-455
tips, 352-354
usage in arcade games, 354-356
animation sequences, creating, 351-352
Anti-alias tool, 136
anti-aliased fonts, 364-365
anti-aliasing, 146, 222-223
Apple Macintosh, see Macintosh
arcade game platforms, 9-14
comparing, 14-15
arcade games, 2
art direction, 400-401
artifacting, 68
artwork
color depth, 396
color palette, 397-398
file formats, 396
file naming scheme, 397
gamma level, 398
object dimensions, 398-399
orientation, 394
screen resolution and playfield size,
395-396
templates, 454-455
aspect ratio, 28-30
aspect ratios, common, 30
asset management, 110-111
choosing system, 111-112
Atari ST, 67
automatic color palette correction, 150
Average, 132-133
Bback story, 387
background color, 269-270
background tiles, 480-483
backgrounds, 444-446
backup media, 101-105
backup strategy, 106-107
backups, 98-101
batch conversions, 151
Bend, 126
Bezier tool, 121
bitmapped fonts, 360
Blend tool, 133
block, 125
Block Carve tool, 128
block copying, 146
block cutting, 146
block pasting, 146
507

block tools, 125-128
BMP files, 95
BMP format, 61-62, 80
BMP RGB, 61
BMP RLE, 61
body text, 378-379
Borland Stroked fonts, 372
bounce primitive, 328
bounding colors, 232-233
using, 233-234
Box tool, 121
Brighten tool, 132
brightness, 211
Brush Capture, 125
Brush tool, 118-119
brush tools, 118-119
Burn tool, 132
Ccapture flexibility, 148-149
capture undo, 150
cartoon design style, 234-235
CD-R/CD-RW drives, 103-104
cells, 294
center of gravity, 295
CGA, 18
characterization, 419-420
Circle tool, 122
Clear tool, 139
clipboard access, 150
color, 210
accuracy, 41
and arcade game design styles, 234-238
and mood, 216-217
as differentiation device, 410
context and aesthetics, 240-241
cycling, 271-272
depth, 36
dithering, 59
fading, 272-273
gamut, 210
indexes, 249
meaning of, 214-216
mixing, 211-214
perception issues, 217-219
promotion, 152
ramp, 131
reduction, 59-60, 152, 288
scheme, 254
space, 244-246
temperature, 213-214
theory, 210-211
tools, 130-132
using in arcade games, 238-241
using to represent volume, 226-227
vibrancy, 39
visibility and usability, 238-240
wheel, 211-212
color capabilities, 45
common, 38
color depths, common, 37
color flash primitive, 318-320
color gradients, 124, 227-228
selecting, 228-229
Color Graphics Adapter, see CGA
color palette components, defining, 269-274
color palette order, deciding on, 274-275
color palettes, 35, 246-249, see also palette
advantages of, 247-248
and cross-platform issues, 250-254
and online games, 427-431
and platform issues, 258-266
creating, 266-282
editing, 153
exercise, 282-286
extraction, 153
implementing, 268-282
organization of, 249-250
planning, 266-268
saving, 282
testing, 281-282
tips for creating, 286-288
color ranges/gradients, 270-271
defining, 279-280
suggested, 280
Colorize tool, 136-137
colorizing, 146
colors,
common, 276-279
selecting, 275-276
comfort level, 24-25
Commodore Amiga, 64
compatibility issues, 80-81
complementary colors, 212
508
Index
compression, 56-60
savings, 77-79
compression formats, 422-423
common, 97-98
contextual requirements, 431
contoured fills, 124
contrast, 221
contrast test, 281
coordinate tracking, 147
Copy, 126, 131
core game characters, 433
crawling primitive, 348
crop feature, 150
crosshatched patterns, 124
CRT, 32
Curve tool, 121
Cut, 125
cycles, 301-302
cylindrical primitive, 311-313
DDAC chip, 250
Darken tool, 132
decorative fonts, 362
Deluxe Paint IIe, 159-163
description, 387
design plan, 386
design style, choosing, 415-418
design template, 454
device capacity and performance, 100
device-independent bitmap, see DIB
DIB, 62
differentiation devices, 408, 413-414
directories, managing, 91-92
DirectX, 10, 23
DirectX capture, 149
disintegration primitive, 315-318
disk compatibility, 93-94
display area issues, 420-422
display mode and game genre
recommendations, 51
display mode attributes, comparing, 48-49
display mode recommendations, 50
display mode support, 143-144
display modes, 20
choosing, 42-43, 52-53
comparing, 47-48
dithered patterns, 124
dithering, 39, 152, 289-290
Dodge tool, 132
DOS, 10, 258
and color palettes, 258-260
disk compatibility, 94
display modes, 144-145
file naming rules, 86
image viewers/converters, 197-199
painting programs, 159, 176
screen capture, 149
screen capture utilities, 190
system palette, 254-255
Double, 127
DPI, 25-26
DR-DOS, 10
Dreamcast, 14
Eease of use features, 149-150
EGA, 18-19
elements, determining order of creation,
431-432
Ellipse tool, 122
Enhanced Graphics Adapter, see EGA
Erase tool, 139
Eraser tool, 138
example game, see Fish Dish
Eye Dropper tool, 130
Fface, 362
Fastgraph fonts, 370-371
Fatbits, 128-129
file backup strategies, 106-107
file backups, 98-101
file compatibility, 95-98
file corruption, 79-80
file format
compression savings, 77-79
conversion issues, 95-96
incompatibility, 80-81
recommendations, 81-83
suitability, 74-77
support, 151, 154
file formats, 61-73
standard, 143
509
Index

file naming
across platforms, 96-97
conventions, 86-89
file naming scheme, sample, 89-91
file size issues, 422-425
files, exchanging, 92-98
Fill tool, 123-125
fills, 124-125
Fish Dish
design analysis, 407-432
design execution, 453-478
design plan, 433-453
step-by-step object design, 455-478
flexibility, 300
FLI format, 68
FLIC format, 67-68
flicker, 33
Flip, 127
floppy disk drives, 101-102
flow of movement, 300
flying primitive, 331-334
font
characteristics, 358-361
color, 365
formats, 367-374
legibility, 361-367
size, 362
font support, platform-specific, 374-375
fonts, 358
custom, 371-372
recommendations for using, 379-383
using, 375-379
FPS, 303-304
frame rate, 303
frames, 394
frames per object, 399
framing colors, see bounding colors
Freehand Selection tool, 128
full screen capture, 148
full-size backgrounds, 480, 483
functionality overview, 388
Ggame
action sequence, 389-393
appearance, 267
audience, 267
characters, 443
creative statement, 394
genres, 2
glossary, 402-403
level backgrounds, 480-483
mood, 267-268
summary, 386-388
text fonts, 400
titles, 377-379
gamma level, 40
gamma levels, common, 41
GEM fonts, 369-370
gender and color perception, 219
GIF 87a, 62
GIF 89a, 62
GIF files, 95
GIF format, 62-64, 80, 422
grabbing hand, 130
Gradient, 131
gradient selection, 286-287
gradient test, 282
gradients, using, 227-230
GrafX2, 163-167
graphics production time, 24, 47
graphics specification, 393-401
graphics utilities, 207
gravity, 299-300
grid, 146
grid squares, 306
advantages of using, 306-307
using, 308-310
Grid tool, 137-138
growing primitive, 322-323
Gzip, 97
HHalf, 126
hardware capabilities, 45-46
hardware palette, 35
hertz, 32
horizontal aspect ratio, 28-30
horizontal distortion, 31
HSB, 245
HSI, 245
HSL, 245
HSV, 245
hue, 211
510
Index
HyperSnapDX, 192-194
IIFF format, 64-65
IFF/LBM, 80
image
catalogs, 151
clarity, 45
compression, see compression
editors, 114
processing tools, 132-134
scaling, 152
image viewers/converters, 116
features of, 150-153
images,
loading, 146
saving, 246
Improces, 167-171
in-betweens, 298-299
incompatibility, 80-81
intensity, 211
interface, 151
interlacing, 62
intermediate colors, 212
Internet-based backup systems, 104-105
IrfanView, 199-201
JJava, 12-13, 265
and color palettes, 265-266
system palette, 257
JPEG, 60, 68-69
JPEG files, 95
jumping primitive, 345-348
Kkerning, 141, 366
keyboard shortcuts, 145-147, 149-150
key-frames, 296-299
LLasso tool, 128
layers, 115
LBM, 64
leading, 141, 366
light, 223-226
light/dark test, 281
Line tool, 120
linear fills, 124
Linux, 12, 262
and color palettes, 262-264
disk compatibility, 94
file naming rules, 88
system palette, 256
lives indicator, 442-443
Load block, 127
logical palette, 35-36, 246
loops, 301-302
lossless compression, 57
lossy compression, 59
luminance, 221-222
LZ77 compression, 58
LZW compression, 58-59
MMacintosh, 12, 264
and color palettes, 264-265
disk compatibility, 93
file naming rules, 87-88
system palette, 256-257
magnification levels, 129
Magnifying Glass, 128-129
MAME, 484
masks, 270
maze/chase games, 2-3
MCGA, 19
MkExpl 3.0, 208
Mode X, 23, 27, 29
monospaced fonts, 141, 359
mood, setting with color, 216-217
motion,
angles, 296
blurs, 315
characteristics of, 294
lines, 294-295
MS-DOS, 10
Multicolor Graphics Array, see MCGA
multiple work screen support, 145
Muybridge, Eadweard, 330
Nnatural path, 294
navigation tools, 128-130
Navigator tool, 130
511
Index
NeoPaint, 171-176
NeoPaint for Windows, 176-181
Netscape palette, 257
Nintendo Gameboy, 13
non-decorative fonts, 362
Oobject actions and facings, 399
object count, estimating, 395
object inventory, 388
objects,
differentiating, 408
smoothing with color, 222-223
online game issues, 420
opacity, 231-232
Opal, 204-205
open/close primitive, 327
orientation, 448
Ppackbits compression, 58
Paint Bucket, 123-125
Paint Shop Pro, 181-186, see also PSP format
Paintbrush, 118-119
painting programs, 114-116
features of, 117-147
palette-based painting programs, 115
palette entries, 249, 397
reserving, 281
palette, see also color palettes
optimization, 289
order, 250
remapping, 152, 288, see also remapping
Palette Selector tool, 130-132
Palette tool, 130-132
palette tools, 116-117, 204
features of, 153-154
PalMerge, 205-207
Paste, 126
PBM, 64
PC-DOS, 10
PCX files, 95
PCX format, 65-66, 81
Pencil tool, 118
perfect color, 365
performance, 425-427
physical palette, 35, 246
pickups, 435
PICT format, 66-67
Pipette tool, 130
piston primitive, 324
pixels, 20
platform compatibility, 27
platform scrollers, 52
platformers, 7-9
platforms, 9-10
Playstation, 14
PNG files, 95
PNG format, 69-70
Polygon tool, 123
Pong games, 3-4
portability, 100
position, 411-412
primary colors, 212
primitive colors, 212
primitives, types of, 311
Pro Motion, 186-189
programmed color effects, 287
programming support, 46
project schedule, 401-402
proportional fonts, 141, 360
PSD files, 95
PSD format, 70-71, 81
PSP format, 71-72
puzzlers, 6-7
QQuickTime, 66
Rradial fills, 124
radical colors, 212
range of motion, 300
realistic design style, 236-237
Rectangle tool, 121
refresh rate, 32
refresh rates, common, 33
region capture, 148-149
register swapping, 271
reliability, 100
remapping, 59, 290-291
removal methods, 316-317
Resize, 126
Restore, 132
512
Index
retro design style, 235-236
RGB color ranges, 251-253
RGB color space, 244
RLE compression, 57-58
ROM fonts, 367-368
Rotate, 126
rotational primitive, 314-315
running primitive (animals), 343-345
running primitive (humans), 339-343
Ssans serif fonts, 359
saturation, 211
Save, 131
Save block, 127
scale, 322
scaleable fonts, 361
scissors primitive, 320-322
score indicator, 441-442
screen
mask, 135
mockups, 391-393
performance, 43-44
real estate, 24
resolution, 20-21
summary, 391
screen capture utilities, 116
features of, 148-150
screen resolutions, common, 23
Screen Thief, 190-192
scrolling, 146
SEA, 197-198
secondary actions, 301
secondary colors, 212
security, 100-101
Sega Genesis, 13-14
Selection tool, 125-128
serif fonts, 358-359
shade, 220
Shade tool, 137
shadows, 224-226
shape, 409-410
shape tools, 120-125
Shear, 126
shooters, 5-6
shrinking primitive, 323
Single color, 127
size, 362-364, 408-409
slide primitive, 326-327
slinking primitive, 330-331
Smear tool, 133
Smooth tool, 132-133
Smudge tool, 133
SnagIt Pro, 195-196
special effect colors, 271-274
special effects tools, 135-137
speed, 302-304
Spline tool, 121
Spray Can, 119
Spread, 131
sprite editors, 116
sprite properties, 305
sprites, 304-306
squeeze primitive, 324-325
status indicators, 378-379
Stencil tool, 135
stencils, 135, 147
stipple pattern, 232
stomp primitive, 328-329
Stuffit, 97
style, 362, 415
subtractive color mixing, 213
Super Nintendo, 14
Super Video Graphics Adapter, see SVGA
SVGA, 20
Swap, 131
swing primitive, 325-326
Symmetry tool, 160
system colors, 269
adding, 275
system compatibility, 45
system fonts, 373-374
system palettes, 254-258
Ttarget platform, 394-395
technical restrictions, 268, 401
tempo, 302-304
tertiary colors, 212
Text tool, 140-142
textured patterns, 124
TGA format, 72
TIFF files, 95-96
TIFF format, 72-73, 81
513
Index
tint, 220
Tint tool, 136-137
tone, 211
tracking, 141, 367
translucency, 231
Translucency tool, 134
transparency, 62, 230-231
transparent colors, 270, 287
true color painting programs, 115
TrueType fonts, 373
UUndo, 131
Undo tool, 139-140
undoing, 147
Universe 1.6, 208
user fatigue, 32-33
Vvalue, 211
version control, 108-109
implementing, 109-110
vertical compression, 31
VESA, 33
VGA, 19
video game consoles, 13-14
Video Graphics Adapter, see VGA
video hardware standards, 18
video memory requirements, 46
video modes, 20
visible spectrum, 210
volume, 223
representing with color, 226-227
Wwalking primitive, 334-339
Web browser, 420
weight, 141, 299-300, 366
Windows, 10-12, 260
and color palettes, 260-262
disk compatibility, 94
file naming rules, 86-87
image viewers/converters, 199, 203-204
painting programs, 176, 189-190
screen capture utilities, 192
system palette, 255-256
versions, 11
Windows BMP format, 61
XXNView, 201-203
XPM format, 73
ZZapSpot, xxii
Zip drives, 102-103
Zoom tool, 128-129
zooming, 147
ZSoft, 65
ZSoft fonts, 369
514
Index
Fastgraph� is a programmer’s graphics library designed to give the programmer
the tools he needs to display graphic images in a Windows or DOS environ-
ment. With Fastgraph you can initialize a program in the video environment of
your choice, display a graphic image, and then move graphics for animation
effects. In addition, you can use Fastgraph to display graphic primitives and
shapes, establish 2D and 3D coordinate systems, and render scenes based on
polygons. For a complete description of Fastgraph, visit our Web site at
http://www.fastgraph.com.
Fastgraph�
Used by programming professionals since 1987 and still the best way to
do graphics programming.
Use the coupon below to get a discount on any Fastgraph product.
10% Off Any Fastgraph� Product
Ted Gruber Software, Inc. email: [email protected]. Box 13408 http://www.fastgraph.comLas Vegas, NV 89112(702) 735-1980
Offer Expires December 31, 2001. Not good with any other promotional offer.

ZapSpot Wants You!
You haven’t seen sunlight in three days . . . your body can no longer maintain
homeostasis . . . you wake up and try to pass parameters to your alarm clock . . .
you’re not having fun. Fun??? In computer science???
Yes, FUN! ZapSpot is building a top-notch software development team to bring
entertainment to the masses. Think of it—we’ll pay you to brighten someone’s
day! You still have time to get in on the ground floor of a startup.
Our three founders put in more than 20 combined years at Microsoft before the
DOF (Department of Fun) sued them for having Too Much Fun and split them
off. Now we want to give you the opportunity to make decisions that will affect
the future of our company. Sound crazy??? No. Fun!
So, if you know C++ really, really well and you are interested in checking out
New York City’s fabled Silicon Alley, we’ll be eagerly awaiting your resume at
For more information on ZapSpot and the games we create, check us out at
http://www.zapspot.com.
About the CD
The CD-ROM that accompanies this book contains a selection of shareware,
freeware, and commercial programs and examples to help you design your own
arcade game projects. These are arranged in the following directories:
� Examples—Sample arcade game graphics and backgrounds
� Fonts—TrueType fonts
� Fun—ZapSpot games
� Gamedev—Tools and libraries for creating arcade games
� Gamma—Files for determining and setting your system gamma level
� Gfxtools—Graphics tools
� Grids—Predefined sprite grid templates
� Misc—File management utilities
� Palettes—Sample color palettes
For more information about the contents of these directories, see Appendix B.
A shareware evaluation copy of WinZip is provided for extracting the contents
of the archives.
You can copy the files to your hard drive (be sure to turn the read-only flag off)
or use them from the CD.
NOTE: Opening the CD package makes this book nonreturnable.

CD/Source Code Usage License Agreement
Please read the following CD/Source Code usage license agreement before opening the CD
and using the contents therein:
1. By opening the accompanying software package, you are indicating that you have readand agree to be bound by all terms and conditions of this CD/Source Code usage licenseagreement.
2. The compilation of code and utilities contained on the CD and in the book are copy-righted and protected by both U.S. copyright law and international copyright treaties, andis owned by Wordware Publishing, Inc. Individual source code, example programs, helpfiles, freeware, shareware, utilities, and evaluation packages, including their copyrights,are owned by the respective authors.
3. No part of the enclosed CD or this book, including all source code, help files, shareware,freeware, utilities, example programs, or evaluation programs, may be made available ona public forum (such as a World Wide Web page, FTP site, bulletin board, or Internetnews group) without the express written permission of Wordware Publishing, Inc. or theauthor of the respective source code, help files, shareware, freeware, utilities, exampleprograms, or evaluation programs.
4. You may not decompile, reverse engineer, disassemble, create a derivative work, or oth-erwise use the enclosed programs, help files, freeware, shareware, utilities, or evaluationprograms except as stated in this agreement.
5. The software, contained on the CD and/or as source code in this book, is sold withoutwarranty of any kind. Wordware Publishing, Inc. and the authors specifically disclaim allother warranties, express or implied, including but not limited to implied warranties ofmerchantability and fitness for a particular purpose with respect to defects in the disk,the program, source code, sample files, help files, freeware, shareware, utilities, and eval-uation programs contained therein, and/or the techniques described in the book andimplemented in the example programs. In no event shall Wordware Publishing, Inc., itsdealers, its distributors, or the authors be liable or held responsible for any loss of profitor any other alleged or actual private or commercial damage, including but not limited tospecial, incidental, consequential, or other damages.
6. One (1) copy of the CD or any source code therein may be created for backup purposes.The CD and all accompanying source code, sample files, help files, freeware, shareware,utilities, and evaluation programs may be copied to your hard drive. With the exception offreeware and shareware programs, at no time can any part of the contents of this CDreside on more than one computer at one time. The contents of the CD can be copied toanother computer, as long as the contents of the CD contained on the original computerare deleted.
7. You may not include any part of the CD contents, including all source code, example pro-grams, shareware, freeware, help files, utilities, or evaluation programs in anycompilation of source code, utilities, help files, example programs, freeware, shareware,or evaluation programs on any media, including but not limited to CD, disk, or Internetdistribution, without the express written permission of Wordware Publishing, Inc. or theowner of the individual source code, utilities, help files, example programs, freeware,shareware, or evaluation programs.
8. You may use the source code, techniques, and example programs in your own commer-cial or private applications unless otherwise noted by additional usage agreements asfound on the CD.