Embed Size (px)
Citation preview
Choose page languageBrazilian PortugueseJapaneseRussianSimplified Chinese
NetBeans IDENetBeans PlatformPluginsDocs & SupportCommunityPartners
HOME / Docs & Support
Designing a Swing GUI in NetBeans IDE
This tutorial guides you through the process of creating the graphical user interface (GUI) for an application called ContactEditorusing the NetBeans IDE GUI Builder. In the process you will layout a GUI front-end that enables you to view and edit contactinformation of individuals included in an employee database.
In this tutorial you will learn how to: use the GUI Builder Interface, create a GUI Container, add, resize, and align components,adjust component anchoring, set component auto-resizing behavior, edit component properties.
This tutorial takes about 30 minutes to complete.
Contents
Getting StartedCreating a ProjectCreating a JFrame Container
Getting Familiar with the GUI BuilderKey Concepts
Free DesignAutomatic Component Positioning (Snapping)Visual Feedback
First Things FirstAdding Components: The BasicsAdding Individual Components to the FormAdding Multiple Components to the FormInserting Components
Moving ForwardComponent AlignmentBaseline Alignment
Reviewing What We've LearnedAdding, Aligning, and AnchoringComponent SizingIndentation
Making the Final AdjustmentsPreviewing Your GUIDeploying GUI ApplicationsSee Also
To complete this tutorial, you need the following software and resources.
Software or Resource Version Required
NetBeans IDE version 6.9, 7.0, 7.1, or 7.2
Java Development Kit (JDK) version 6 or 7
Getting Started
The IDE's GUI Builder makes it possible to build professional-looking GUIs without an intimate understanding of layout managers.You can lay out your forms by simply placing components where you want them.
For descriptions of the GUI Builder's visual feedback, you can use the GUI Builder Visual Feedback Legend.
Creating a Project
Because all Java development in the IDE takes place within projects, we first need to create a new ContactEditor projectwithin which to store sources and other project files. An IDE project is a group of Java source files plus its associatedmeta data, including project-specific properties files, an Ant build script that controls the build and run settings, and aproject.xml file that maps Ant targets to IDE commands. While Java applications often consist of several IDE projects, forthe purposes of this tutorial, we will build a simple application which is stored entirely in a single project.
Training
Java ProgrammingLanguage
Support
Oracle DevelopmentTools Support Offeringfor NetBeans IDE
Documentation
General JavaDevelopmentExternal Tools andServicesJava GUI ApplicationsJava EE & Java WebDevelopmentWeb Services ApplicationsNetBeans Platform (RCP)and Module DevelopmentPHP ApplicationsC/C++ ApplicationsMobile Applications
Sample ApplicationsDemos and Screencasts
More
FAQsContributeDocumentation!Docs for Earlier Releases
Designing a Swing GUI in NetBeans IDE - Tutorial http://netbeans.org/kb/docs/java/quickstart-gui.html
1 จาก 14 27/12/2555 19:35
To create a new ContactEditor application project:
Choose File > New Project. Alternately, you can click the New Project icon in the IDE toolbar.1.In the Categories pane, select the Java node and in the Projects pane, choose Java Application. ClickNext.
2.
Enter ContactEditor in the Project Name field and specify the project location.3.Leave the Use Dedicated Folder for Storing Libraries checkbox unselected.4.Ensure that the Set as Main Project checkbox is selected and clear the Create Main Class field.5.Click Finish.
The IDE creates the ContactEditor folder on your system in the designated location. This folder containsall of the project's associated files, including its Ant script, folders for storing sources and tests, and afolder for project-specific metadata. To view the project structure, use the IDE's Files window.
6.
Creating a JFrame Container
After creating the new application, you may have noticed that the Source Packages folder in the Projects windowcontains an empty <default package> node. To proceed with building our interface, we need to create a Java containerwithin which we will place the other required GUI components. In this step we'll create a container using the JFrame
component and place the container in a new package.
To add a JFrame container:
In the Projects window, right-click the ContactEditor node and choose New > JFrame Form.Alternatively, you can find a JFrame form by choosing New > Other > Swing GUI Forms > JFrameForm.
1.
Enter ContactEditorUI as the Class Name.2.Enter my.contacteditor as the package.3.Click Finish.
The IDE creates the ContactEditorUI form and the ContactEditorUI class within the ContactEditorUI.java
application and opens the ContactEditorUI form in the GUI Builder. Notice that the my.contacteditor packagereplaces the default package.
4.
top
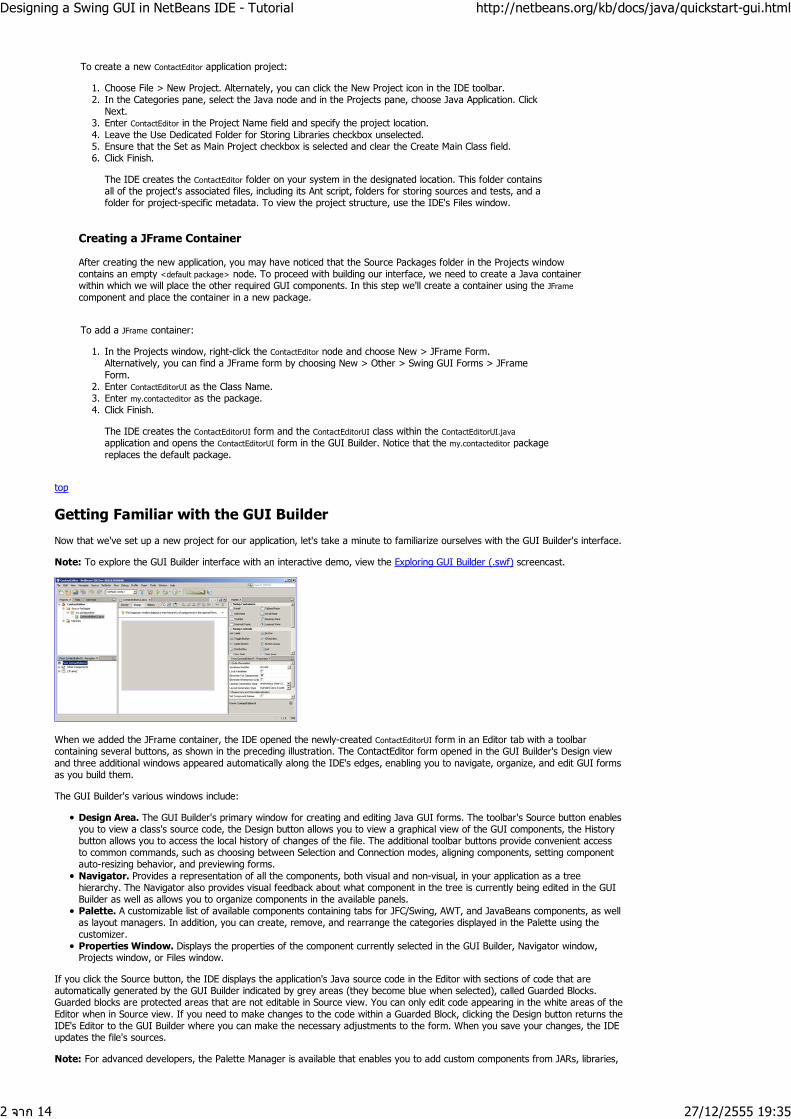
Getting Familiar with the GUI Builder
Now that we've set up a new project for our application, let's take a minute to familiarize ourselves with the GUI Builder's interface.
Note: To explore the GUI Builder interface with an interactive demo, view the Exploring GUI Builder (.swf) screencast.
When we added the JFrame container, the IDE opened the newly-created ContactEditorUI form in an Editor tab with a toolbarcontaining several buttons, as shown in the preceding illustration. The ContactEditor form opened in the GUI Builder's Design viewand three additional windows appeared automatically along the IDE's edges, enabling you to navigate, organize, and edit GUI formsas you build them.
The GUI Builder's various windows include:
Design Area. The GUI Builder's primary window for creating and editing Java GUI forms. The toolbar's Source button enablesyou to view a class's source code, the Design button allows you to view a graphical view of the GUI components, the Historybutton allows you to access the local history of changes of the file. The additional toolbar buttons provide convenient accessto common commands, such as choosing between Selection and Connection modes, aligning components, setting componentauto-resizing behavior, and previewing forms.Navigator. Provides a representation of all the components, both visual and non-visual, in your application as a treehierarchy. The Navigator also provides visual feedback about what component in the tree is currently being edited in the GUIBuilder as well as allows you to organize components in the available panels.Palette. A customizable list of available components containing tabs for JFC/Swing, AWT, and JavaBeans components, as wellas layout managers. In addition, you can create, remove, and rearrange the categories displayed in the Palette using thecustomizer.Properties Window. Displays the properties of the component currently selected in the GUI Builder, Navigator window,Projects window, or Files window.
If you click the Source button, the IDE displays the application's Java source code in the Editor with sections of code that areautomatically generated by the GUI Builder indicated by grey areas (they become blue when selected), called Guarded Blocks.Guarded blocks are protected areas that are not editable in Source view. You can only edit code appearing in the white areas of theEditor when in Source view. If you need to make changes to the code within a Guarded Block, clicking the Design button returns theIDE's Editor to the GUI Builder where you can make the necessary adjustments to the form. When you save your changes, the IDEupdates the file's sources.
Note: For advanced developers, the Palette Manager is available that enables you to add custom components from JARs, libraries,
Designing a Swing GUI in NetBeans IDE - Tutorial http://netbeans.org/kb/docs/java/quickstart-gui.html
2 จาก 14 27/12/2555 19:35
or other projects to the Palette. To add custom components through the Palette Manager, choose Tools > Palette > Swing/AWTComponents.
top
Key Concepts
The IDE's GUI Builder solves the core problem of Java GUI creation by streamlining the workflow of creating graphical interfaces,freeing developers from the complexities of Swing layout managers. It does this by extending the current NetBeans IDE GUI Builderto support a straightforward "Free Design" paradigm with simple layout rules that are easy to understand and use. As you lay outyour form, the GUI Builder provides visual guidelines suggesting optimal spacing and alignment of components. In the background,the GUI Builder translates your design decisions into a functional UI that is implemented using the new GroupLayout layoutmanager and other Swing constructs. Because it uses a dynamic layout model, GUI's built with the GUI Builder behave as youwould expect at runtime, adjusting to accommodate any changes you make without altering the defined relationships betweencomponents. Whenever you resize the form, switch locales, or specify a different look and feel, your GUI automatically adjusts torespect the target look and feel's insets and offsets.
Free Design
In the IDE's GUI Builder, you can build your forms by simply putting components where you want them as though youwere using absolute positioning. The GUI Builder figures out which layout attributes are required and then generates thecode for you automatically. You need not concern yourself with insets, anchors, fills, and so forth.
Automatic Component Positioning (Snapping)
As you add components to a form, the GUI Builder provides visual feedback that assists in positioning components basedon your operating system's look and feel. The GUI Builder provides helpful inline hints and other visual feedbackregarding where components should be placed on your form, automatically snapping components into position alongguidelines. It makes these suggestions based on the positions of the components that have already been placed in theform, while allowing the padding to remain flexible such that different target look and feels render properly at runtime.
Visual Feedback
The GUI Builder also provides visual feedback regarding component anchoring and chaining relationships. Theseindicators enable you to quickly identify the various positioning relationships and component pinning behavior that affectthe way your GUI will both appear and behave at runtime. This speeds the GUI design process, enabling you to quicklycreate professional-looking visual interfaces that work.
top
First Things First
Now that you have familiarized yourself with the GUI builder's interface, it's time to begin developing the UI of our ContactEditorapplication. In this section we'll take a look at using the IDE's Palette to add the various GUI components that we need to our form.
Thanks to the IDE's Free Design paradigm, you no longer have to struggle with layout managers to control the size and position ofthe components within your containers. All you need to do is drag and drop the components you need to your GUI form as shownin the illustrations that follow.
Note: Refer to the Adding individual and multiple components (.swf) screencast for an interactive demo on the sectionbelow.
Adding Components: The Basics
Though the IDE's GUI Builder simplifies the process of creating Java GUIs, it is often helpful to sketch out the way youwant your interface to look before beginning to lay it out. Many interface designers consider this a "best practice"technique, however, for the purposes of this tutorial you can simply peek at how our completed form should look byjumping ahead to the Previewing your GUI section.
Since we've already added a JFrame as our form's top-level container, the next step is to add a couple of JPanels whichwill enable us to cluster the components of our UI using titled borders. Refer to the following illustrations and notice theIDE's "drag and drop" behavior when accomplishing this.
To add a JPanel:
In the Palette window, select the Panel component from the Swing Containers category by clicking andreleasing the mouse button.
1.
Move the cursor to the upper left corner of the form in the GUI Builder. When the component islocated near the container's top and left edges, horizontal and vertical alignment guidelines appearindicating the preferred margins. Click in the form to place the JPanel in this location.
The JPanel component appears in the ContactEditorUI form with orange highlighting signifying that it isselected. After releasing the mouse button, small indicators appear to show the component's anchoringrelationships and a corresponding JPanel node is displayed in the Navigator window, as shown in thefollowing illustration.
2.
Designing a Swing GUI in NetBeans IDE - Tutorial http://netbeans.org/kb/docs/java/quickstart-gui.html
3 จาก 14 27/12/2555 19:35
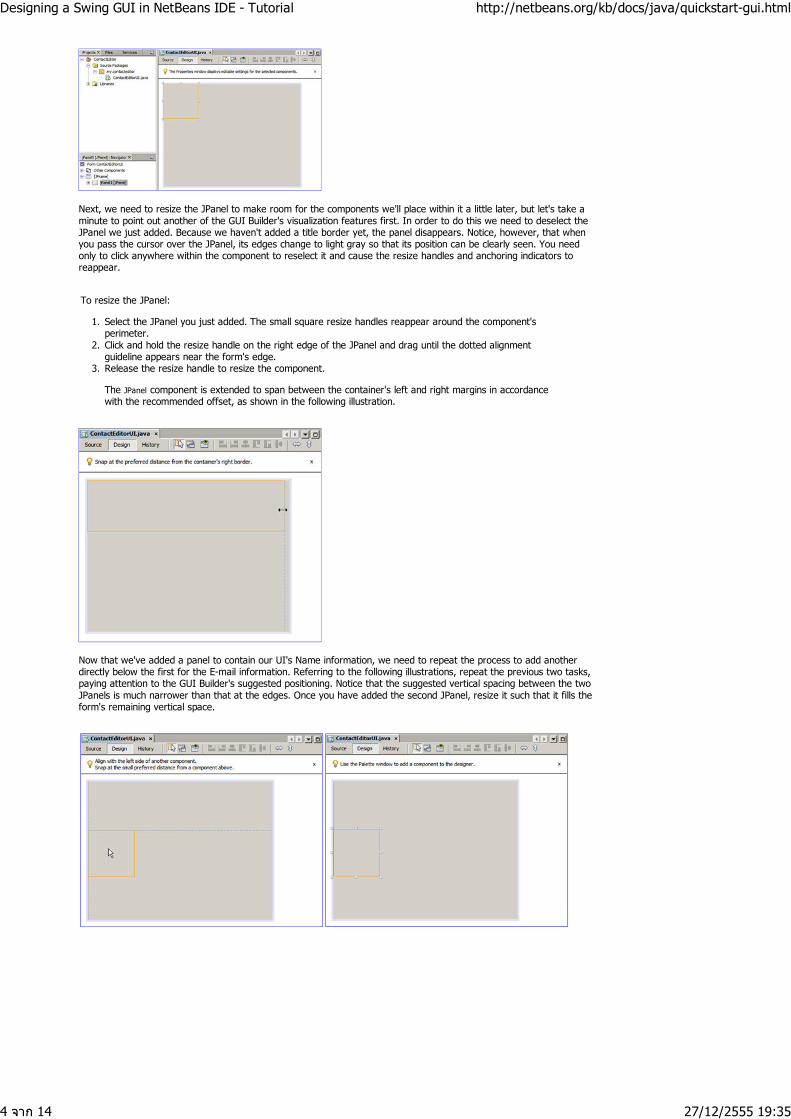
Next, we need to resize the JPanel to make room for the components we'll place within it a little later, but let's take aminute to point out another of the GUI Builder's visualization features first. In order to do this we need to deselect theJPanel we just added. Because we haven't added a title border yet, the panel disappears. Notice, however, that whenyou pass the cursor over the JPanel, its edges change to light gray so that its position can be clearly seen. You needonly to click anywhere within the component to reselect it and cause the resize handles and anchoring indicators toreappear.
To resize the JPanel:
Select the JPanel you just added. The small square resize handles reappear around the component'sperimeter.
1.
Click and hold the resize handle on the right edge of the JPanel and drag until the dotted alignmentguideline appears near the form's edge.
2.
Release the resize handle to resize the component.
The JPanel component is extended to span between the container's left and right margins in accordancewith the recommended offset, as shown in the following illustration.
3.
Now that we've added a panel to contain our UI's Name information, we need to repeat the process to add anotherdirectly below the first for the E-mail information. Referring to the following illustrations, repeat the previous two tasks,paying attention to the GUI Builder's suggested positioning. Notice that the suggested vertical spacing between the twoJPanels is much narrower than that at the edges. Once you have added the second JPanel, resize it such that it fills theform's remaining vertical space.
Designing a Swing GUI in NetBeans IDE - Tutorial http://netbeans.org/kb/docs/java/quickstart-gui.html
4 จาก 14 27/12/2555 19:35
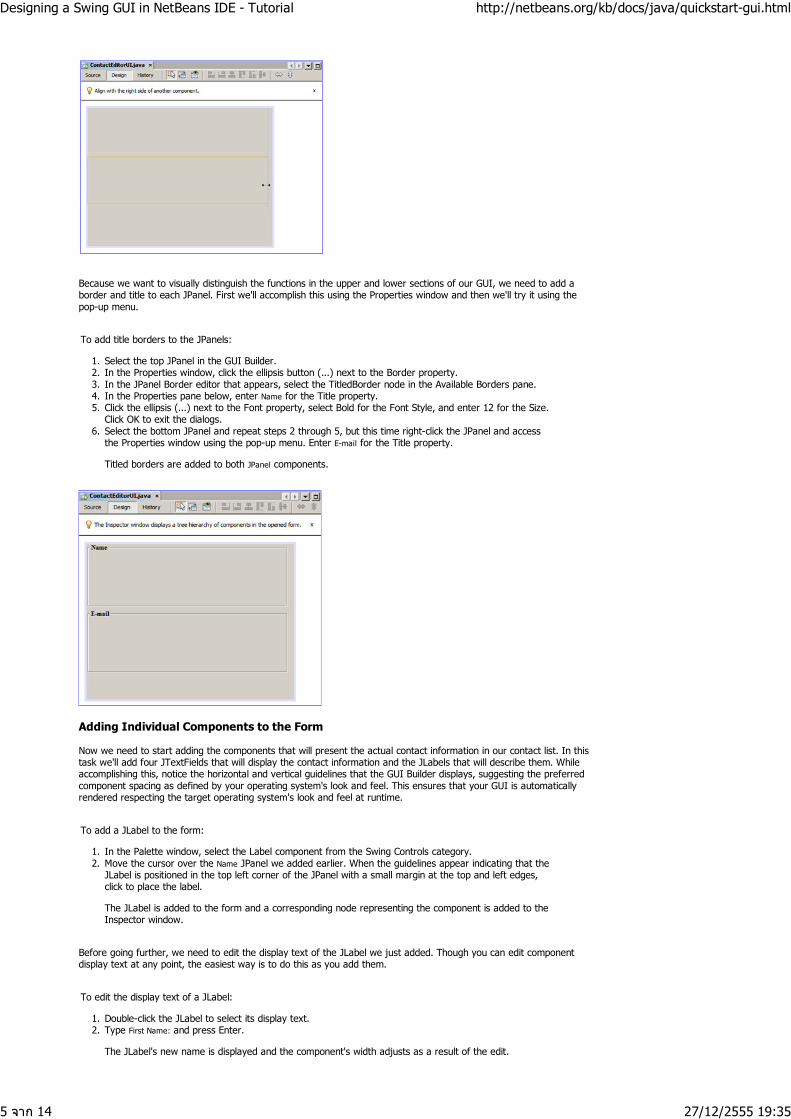
Because we want to visually distinguish the functions in the upper and lower sections of our GUI, we need to add aborder and title to each JPanel. First we'll accomplish this using the Properties window and then we'll try it using thepop-up menu.
To add title borders to the JPanels:
Select the top JPanel in the GUI Builder.1.In the Properties window, click the ellipsis button (...) next to the Border property.2.In the JPanel Border editor that appears, select the TitledBorder node in the Available Borders pane.3.In the Properties pane below, enter Name for the Title property.4.Click the ellipsis (...) next to the Font property, select Bold for the Font Style, and enter 12 for the Size.Click OK to exit the dialogs.
5.
Select the bottom JPanel and repeat steps 2 through 5, but this time right-click the JPanel and accessthe Properties window using the pop-up menu. Enter E-mail for the Title property.
Titled borders are added to both JPanel components.
6.
Adding Individual Components to the Form
Now we need to start adding the components that will present the actual contact information in our contact list. In thistask we'll add four JTextFields that will display the contact information and the JLabels that will describe them. Whileaccomplishing this, notice the horizontal and vertical guidelines that the GUI Builder displays, suggesting the preferredcomponent spacing as defined by your operating system's look and feel. This ensures that your GUI is automaticallyrendered respecting the target operating system's look and feel at runtime.
To add a JLabel to the form:
In the Palette window, select the Label component from the Swing Controls category.1.Move the cursor over the Name JPanel we added earlier. When the guidelines appear indicating that theJLabel is positioned in the top left corner of the JPanel with a small margin at the top and left edges,click to place the label.
The JLabel is added to the form and a corresponding node representing the component is added to theInspector window.
2.
Before going further, we need to edit the display text of the JLabel we just added. Though you can edit componentdisplay text at any point, the easiest way is to do this as you add them.
To edit the display text of a JLabel:
Double-click the JLabel to select its display text.1.Type First Name: and press Enter.
The JLabel's new name is displayed and the component's width adjusts as a result of the edit.
2.
Designing a Swing GUI in NetBeans IDE - Tutorial http://netbeans.org/kb/docs/java/quickstart-gui.html
5 จาก 14 27/12/2555 19:35
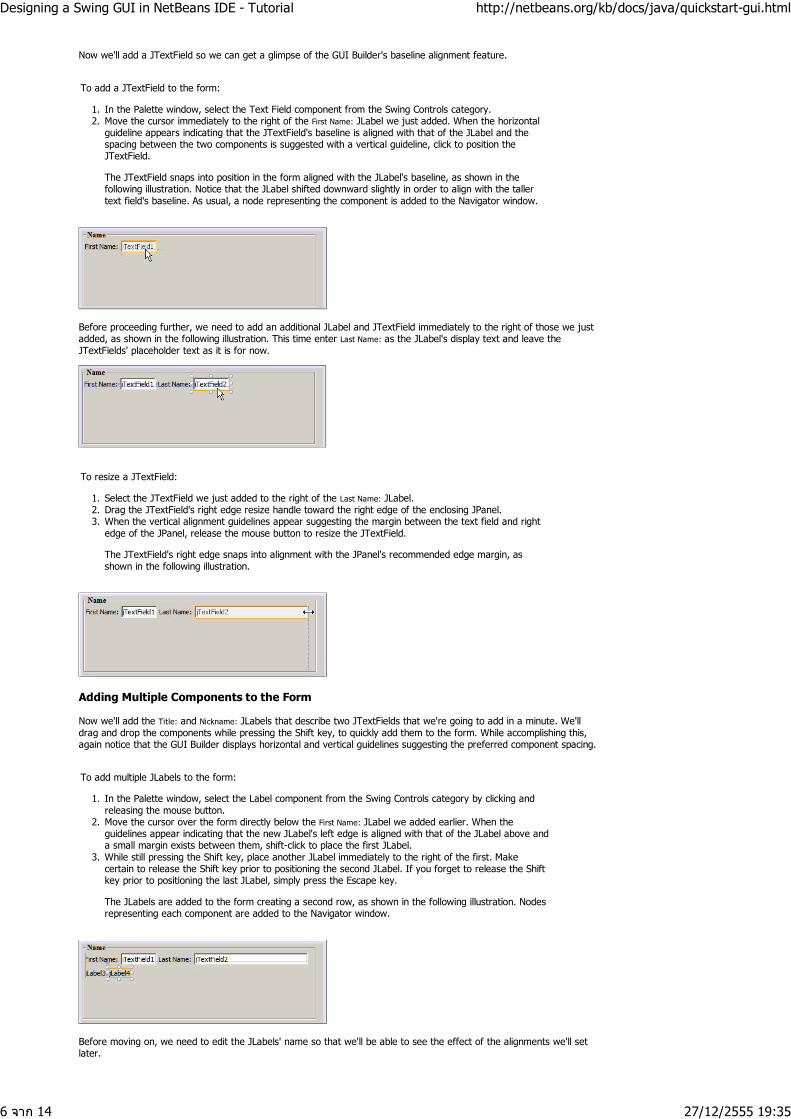
Now we'll add a JTextField so we can get a glimpse of the GUI Builder's baseline alignment feature.
To add a JTextField to the form:
In the Palette window, select the Text Field component from the Swing Controls category.1.Move the cursor immediately to the right of the First Name: JLabel we just added. When the horizontalguideline appears indicating that the JTextField's baseline is aligned with that of the JLabel and thespacing between the two components is suggested with a vertical guideline, click to position theJTextField.
The JTextField snaps into position in the form aligned with the JLabel's baseline, as shown in thefollowing illustration. Notice that the JLabel shifted downward slightly in order to align with the tallertext field's baseline. As usual, a node representing the component is added to the Navigator window.
2.
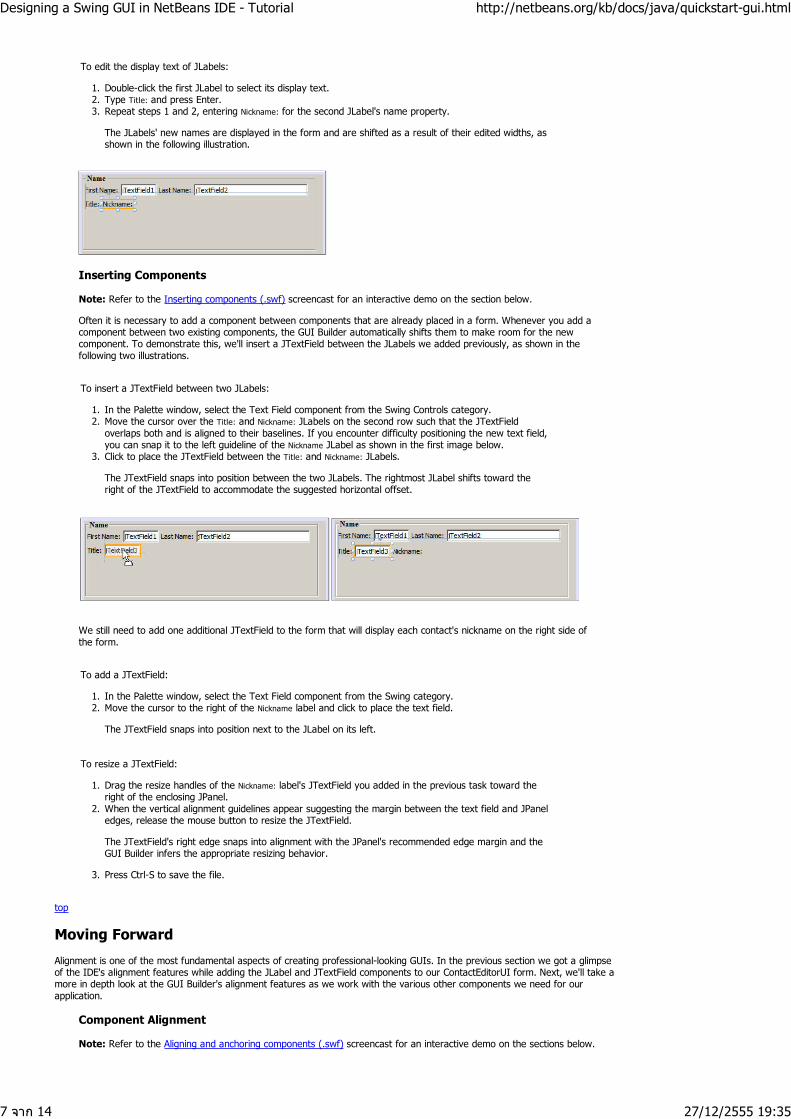
Before proceeding further, we need to add an additional JLabel and JTextField immediately to the right of those we justadded, as shown in the following illustration. This time enter Last Name: as the JLabel's display text and leave theJTextFields' placeholder text as it is for now.
To resize a JTextField:
Select the JTextField we just added to the right of the Last Name: JLabel.1.Drag the JTextField's right edge resize handle toward the right edge of the enclosing JPanel.2.When the vertical alignment guidelines appear suggesting the margin between the text field and rightedge of the JPanel, release the mouse button to resize the JTextField.
The JTextField's right edge snaps into alignment with the JPanel's recommended edge margin, asshown in the following illustration.
3.
Adding Multiple Components to the Form
Now we'll add the Title: and Nickname: JLabels that describe two JTextFields that we're going to add in a minute. We'lldrag and drop the components while pressing the Shift key, to quickly add them to the form. While accomplishing this,again notice that the GUI Builder displays horizontal and vertical guidelines suggesting the preferred component spacing.
To add multiple JLabels to the form:
In the Palette window, select the Label component from the Swing Controls category by clicking andreleasing the mouse button.
1.
Move the cursor over the form directly below the First Name: JLabel we added earlier. When theguidelines appear indicating that the new JLabel's left edge is aligned with that of the JLabel above anda small margin exists between them, shift-click to place the first JLabel.
2.
While still pressing the Shift key, place another JLabel immediately to the right of the first. Makecertain to release the Shift key prior to positioning the second JLabel. If you forget to release the Shiftkey prior to positioning the last JLabel, simply press the Escape key.
The JLabels are added to the form creating a second row, as shown in the following illustration. Nodesrepresenting each component are added to the Navigator window.
3.
Before moving on, we need to edit the JLabels' name so that we'll be able to see the effect of the alignments we'll setlater.
Designing a Swing GUI in NetBeans IDE - Tutorial http://netbeans.org/kb/docs/java/quickstart-gui.html
6 จาก 14 27/12/2555 19:35
To edit the display text of JLabels:
Double-click the first JLabel to select its display text.1.Type Title: and press Enter.2.Repeat steps 1 and 2, entering Nickname: for the second JLabel's name property.
The JLabels' new names are displayed in the form and are shifted as a result of their edited widths, asshown in the following illustration.
3.
Inserting Components
Note: Refer to the Inserting components (.swf) screencast for an interactive demo on the section below.
Often it is necessary to add a component between components that are already placed in a form. Whenever you add acomponent between two existing components, the GUI Builder automatically shifts them to make room for the newcomponent. To demonstrate this, we'll insert a JTextField between the JLabels we added previously, as shown in thefollowing two illustrations.
To insert a JTextField between two JLabels:
In the Palette window, select the Text Field component from the Swing Controls category.1.Move the cursor over the Title: and Nickname: JLabels on the second row such that the JTextFieldoverlaps both and is aligned to their baselines. If you encounter difficulty positioning the new text field,you can snap it to the left guideline of the Nickname JLabel as shown in the first image below.
2.
Click to place the JTextField between the Title: and Nickname: JLabels.
The JTextField snaps into position between the two JLabels. The rightmost JLabel shifts toward theright of the JTextField to accommodate the suggested horizontal offset.
3.
We still need to add one additional JTextField to the form that will display each contact's nickname on the right side ofthe form.
To add a JTextField:
In the Palette window, select the Text Field component from the Swing category.1.Move the cursor to the right of the Nickname label and click to place the text field.
The JTextField snaps into position next to the JLabel on its left.
2.
To resize a JTextField:
Drag the resize handles of the Nickname: label's JTextField you added in the previous task toward theright of the enclosing JPanel.
1.
When the vertical alignment guidelines appear suggesting the margin between the text field and JPaneledges, release the mouse button to resize the JTextField.
The JTextField's right edge snaps into alignment with the JPanel's recommended edge margin and theGUI Builder infers the appropriate resizing behavior.
2.
Press Ctrl-S to save the file.3.
top
Moving Forward
Alignment is one of the most fundamental aspects of creating professional-looking GUIs. In the previous section we got a glimpseof the IDE's alignment features while adding the JLabel and JTextField components to our ContactEditorUI form. Next, we'll take amore in depth look at the GUI Builder's alignment features as we work with the various other components we need for ourapplication.
Component Alignment
Note: Refer to the Aligning and anchoring components (.swf) screencast for an interactive demo on the sections below.
Designing a Swing GUI in NetBeans IDE - Tutorial http://netbeans.org/kb/docs/java/quickstart-gui.html
7 จาก 14 27/12/2555 19:35
Every time you add a component to a form, the GUI Builder effectively aligns them, as evidenced by the alignmentguidelines that appear. It is sometimes necessary, however, to specify different relationships between groups ofcomponents as well. Earlier we added four JLabels that we need for our ContactEditor GUI, but we didn't align them.Now we'll align the two columns of JLabels so that their right edges line up.
To align components:
Hold down the Ctrl key and click to select the First Name: and Title: JLabels on the left side of the form.1.Click the Align Right in Column button ( ) in the toolbar. Alternately, you can right-click either one andchoose Align > Right in Column from the pop-up menu.
2.
Repeat this for the Last Name: and Nickname: JLabels as well.
The JLabels' positions shift such that the right edges of their display text are aligned. The anchoringrelationships are updated, indicating that the components have been grouped.
3.
Before we're finished with the JTextFields we added earlier, we need to make sure that the two JTextFields we insertedbetween the JLabels are set to resize correctly. Unlike the two JTextFields that we stretched to the right edge of ourform, inserted components' resizeability behavior isn't automatically set.
To set component resizeability behavior:
Control-click the two inserted JTextField components to select them in the GUI Builder.1.With both JTextFields selected, right-click either one of them and choose Auto Resizing > Horizontalfrom the pop-up menu.
The JTextFields are set to resize horizontally at runtime. The alignment guidelines and anchoringindicators are updated, providing visual feedback of the component relationships.
2.
To set components to be the same size:
Control-click all four of the JTextFields in the form to select them.1.With the JTextFields selected, right-click any one of them and choose Set Same Size > Same Widthfrom the pop-up menu.
The JTextFields are all set to the same width and indicators are added to the top edge of each,providing visual feedback of the component relationships.
2.
Now we need to add another JLabel describing the JComboBox that will enable users to select the format of theinformation our ContactEditor application will display.
To align a JLabel to a component group:
In the Palette window, select the Label component from the Swing category.1.Move the cursor below the First Name and Title JLabels on the left side of the JPanel. When the guidelineappears indicating that the new JLabel's right edge is aligned with the right edges of the componentgroup above (the two JLabels), click to position the component.
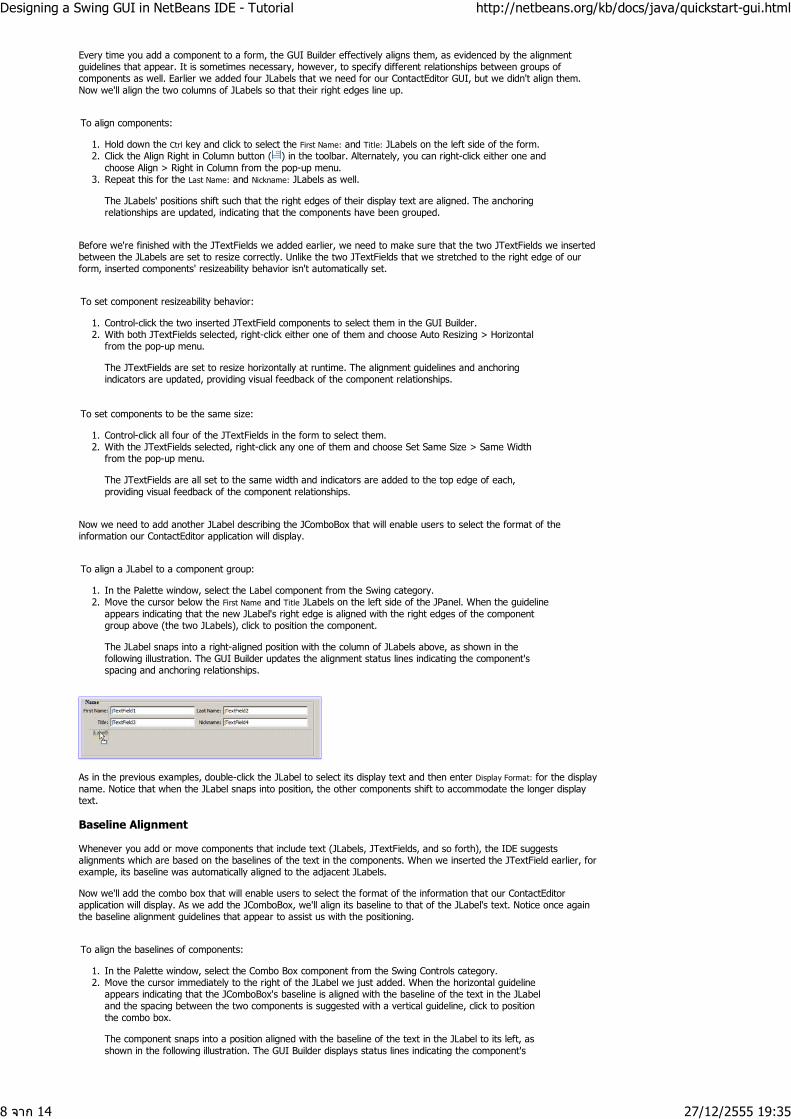
The JLabel snaps into a right-aligned position with the column of JLabels above, as shown in thefollowing illustration. The GUI Builder updates the alignment status lines indicating the component'sspacing and anchoring relationships.
2.
As in the previous examples, double-click the JLabel to select its display text and then enter Display Format: for the displayname. Notice that when the JLabel snaps into position, the other components shift to accommodate the longer displaytext.
Baseline Alignment
Whenever you add or move components that include text (JLabels, JTextFields, and so forth), the IDE suggestsalignments which are based on the baselines of the text in the components. When we inserted the JTextField earlier, forexample, its baseline was automatically aligned to the adjacent JLabels.
Now we'll add the combo box that will enable users to select the format of the information that our ContactEditorapplication will display. As we add the JComboBox, we'll align its baseline to that of the JLabel's text. Notice once againthe baseline alignment guidelines that appear to assist us with the positioning.
To align the baselines of components:
In the Palette window, select the Combo Box component from the Swing Controls category.1.Move the cursor immediately to the right of the JLabel we just added. When the horizontal guidelineappears indicating that the JComboBox's baseline is aligned with the baseline of the text in the JLabeland the spacing between the two components is suggested with a vertical guideline, click to positionthe combo box.
The component snaps into a position aligned with the baseline of the text in the JLabel to its left, asshown in the following illustration. The GUI Builder displays status lines indicating the component's
2.
Designing a Swing GUI in NetBeans IDE - Tutorial http://netbeans.org/kb/docs/java/quickstart-gui.html
8 จาก 14 27/12/2555 19:35
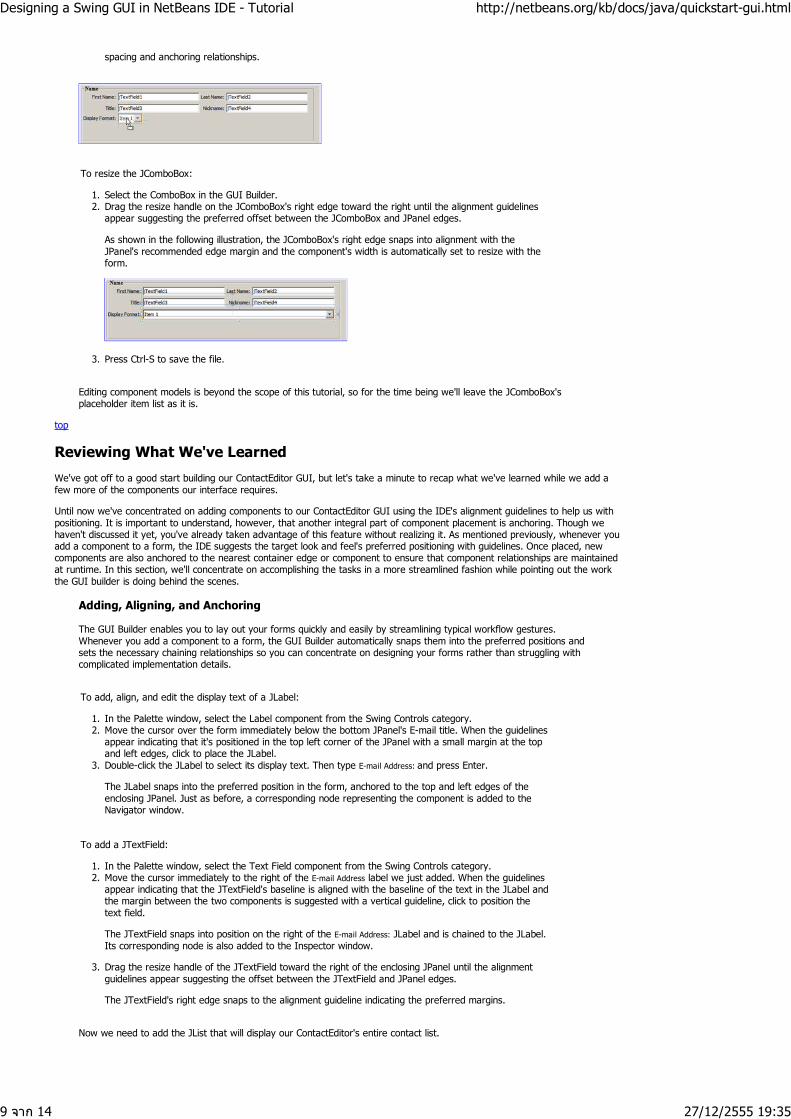
spacing and anchoring relationships.
To resize the JComboBox:
Select the ComboBox in the GUI Builder.1.Drag the resize handle on the JComboBox's right edge toward the right until the alignment guidelinesappear suggesting the preferred offset between the JComboBox and JPanel edges.
As shown in the following illustration, the JComboBox's right edge snaps into alignment with theJPanel's recommended edge margin and the component's width is automatically set to resize with theform.
2.
Press Ctrl-S to save the file.3.
Editing component models is beyond the scope of this tutorial, so for the time being we'll leave the JComboBox'splaceholder item list as it is.
top
Reviewing What We've Learned
We've got off to a good start building our ContactEditor GUI, but let's take a minute to recap what we've learned while we add afew more of the components our interface requires.
Until now we've concentrated on adding components to our ContactEditor GUI using the IDE's alignment guidelines to help us withpositioning. It is important to understand, however, that another integral part of component placement is anchoring. Though wehaven't discussed it yet, you've already taken advantage of this feature without realizing it. As mentioned previously, whenever youadd a component to a form, the IDE suggests the target look and feel's preferred positioning with guidelines. Once placed, newcomponents are also anchored to the nearest container edge or component to ensure that component relationships are maintainedat runtime. In this section, we'll concentrate on accomplishing the tasks in a more streamlined fashion while pointing out the workthe GUI builder is doing behind the scenes.
Adding, Aligning, and Anchoring
The GUI Builder enables you to lay out your forms quickly and easily by streamlining typical workflow gestures.Whenever you add a component to a form, the GUI Builder automatically snaps them into the preferred positions andsets the necessary chaining relationships so you can concentrate on designing your forms rather than struggling withcomplicated implementation details.
To add, align, and edit the display text of a JLabel:
In the Palette window, select the Label component from the Swing Controls category.1.Move the cursor over the form immediately below the bottom JPanel's E-mail title. When the guidelinesappear indicating that it's positioned in the top left corner of the JPanel with a small margin at the topand left edges, click to place the JLabel.
2.
Double-click the JLabel to select its display text. Then type E-mail Address: and press Enter.
The JLabel snaps into the preferred position in the form, anchored to the top and left edges of theenclosing JPanel. Just as before, a corresponding node representing the component is added to theNavigator window.
3.
To add a JTextField:
In the Palette window, select the Text Field component from the Swing Controls category.1.Move the cursor immediately to the right of the E-mail Address label we just added. When the guidelinesappear indicating that the JTextField's baseline is aligned with the baseline of the text in the JLabel andthe margin between the two components is suggested with a vertical guideline, click to position thetext field.
The JTextField snaps into position on the right of the E-mail Address: JLabel and is chained to the JLabel.Its corresponding node is also added to the Inspector window.
2.
Drag the resize handle of the JTextField toward the right of the enclosing JPanel until the alignmentguidelines appear suggesting the offset between the JTextField and JPanel edges.
The JTextField's right edge snaps to the alignment guideline indicating the preferred margins.
3.
Now we need to add the JList that will display our ContactEditor's entire contact list.
Designing a Swing GUI in NetBeans IDE - Tutorial http://netbeans.org/kb/docs/java/quickstart-gui.html
9 จาก 14 27/12/2555 19:35
To add and resize a JList:
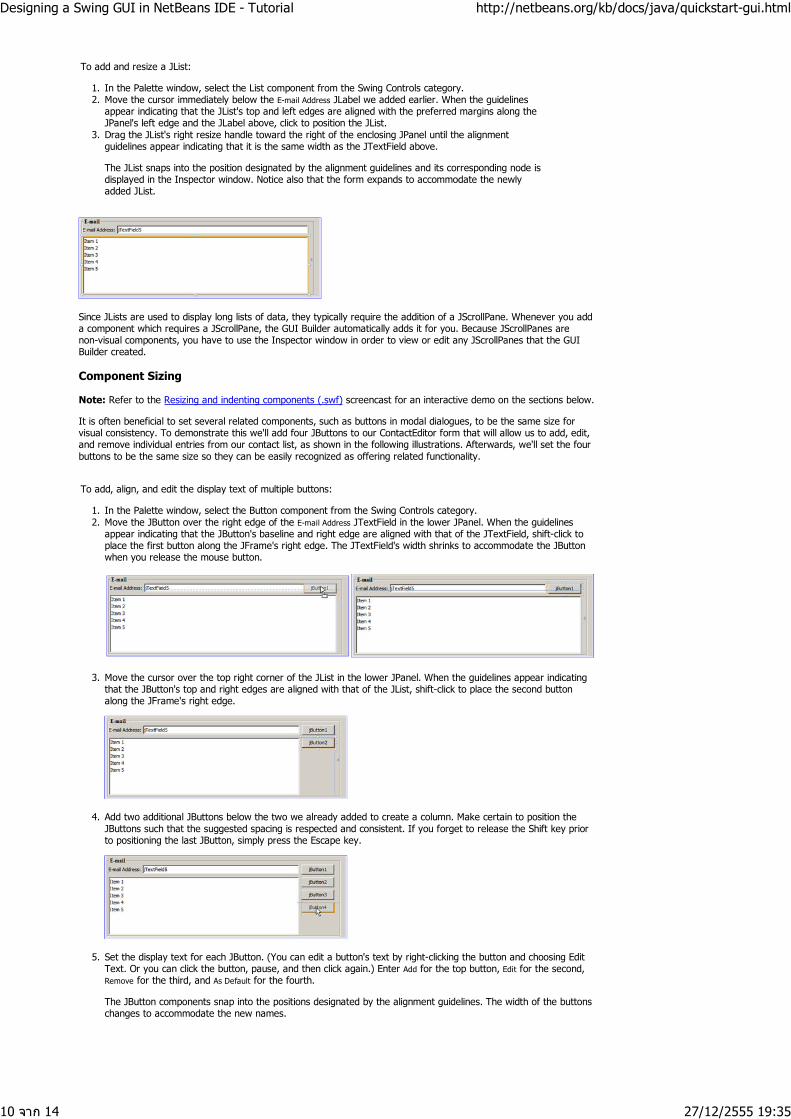
In the Palette window, select the List component from the Swing Controls category.1.Move the cursor immediately below the E-mail Address JLabel we added earlier. When the guidelinesappear indicating that the JList's top and left edges are aligned with the preferred margins along theJPanel's left edge and the JLabel above, click to position the JList.
2.
Drag the JList's right resize handle toward the right of the enclosing JPanel until the alignmentguidelines appear indicating that it is the same width as the JTextField above.
The JList snaps into the position designated by the alignment guidelines and its corresponding node isdisplayed in the Inspector window. Notice also that the form expands to accommodate the newlyadded JList.
3.
Since JLists are used to display long lists of data, they typically require the addition of a JScrollPane. Whenever you adda component which requires a JScrollPane, the GUI Builder automatically adds it for you. Because JScrollPanes arenon-visual components, you have to use the Inspector window in order to view or edit any JScrollPanes that the GUIBuilder created.
Component Sizing
Note: Refer to the Resizing and indenting components (.swf) screencast for an interactive demo on the sections below.
It is often beneficial to set several related components, such as buttons in modal dialogues, to be the same size forvisual consistency. To demonstrate this we'll add four JButtons to our ContactEditor form that will allow us to add, edit,and remove individual entries from our contact list, as shown in the following illustrations. Afterwards, we'll set the fourbuttons to be the same size so they can be easily recognized as offering related functionality.
To add, align, and edit the display text of multiple buttons:
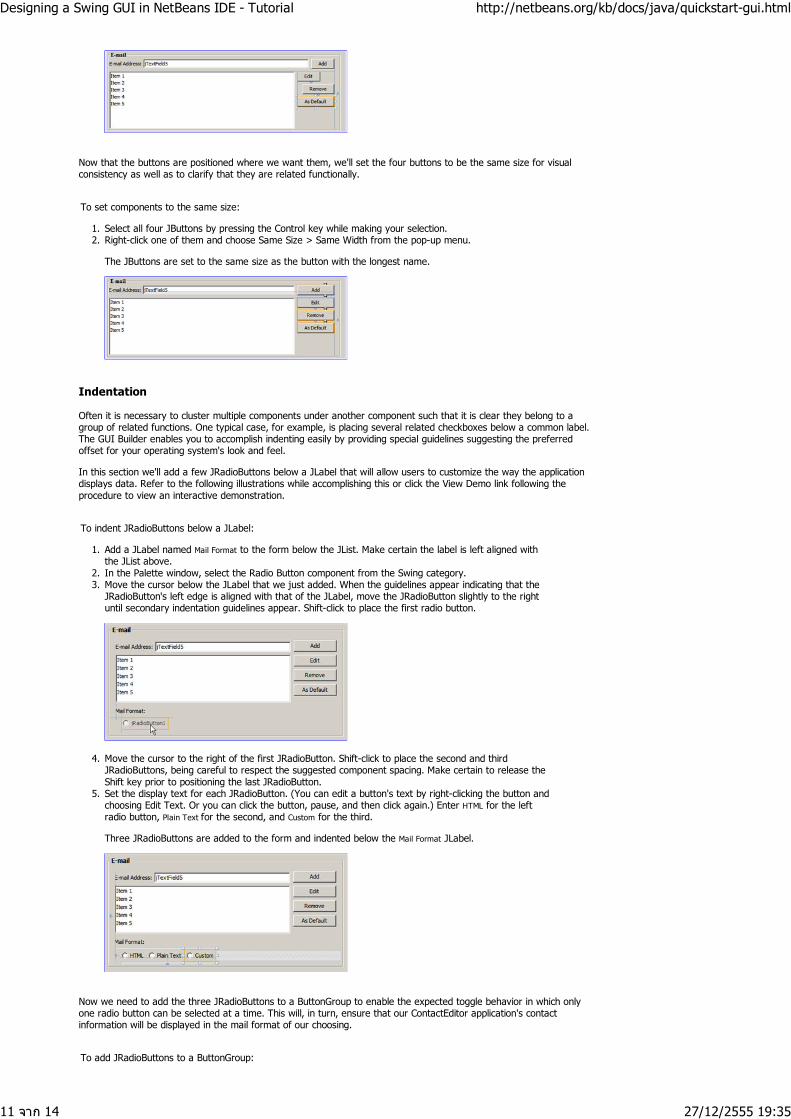
In the Palette window, select the Button component from the Swing Controls category.1.Move the JButton over the right edge of the E-mail Address JTextField in the lower JPanel. When the guidelinesappear indicating that the JButton's baseline and right edge are aligned with that of the JTextField, shift-click toplace the first button along the JFrame's right edge. The JTextField's width shrinks to accommodate the JButtonwhen you release the mouse button.
2.
Move the cursor over the top right corner of the JList in the lower JPanel. When the guidelines appear indicatingthat the JButton's top and right edges are aligned with that of the JList, shift-click to place the second buttonalong the JFrame's right edge.
3.
Add two additional JButtons below the two we already added to create a column. Make certain to position theJButtons such that the suggested spacing is respected and consistent. If you forget to release the Shift key priorto positioning the last JButton, simply press the Escape key.
4.
Set the display text for each JButton. (You can edit a button's text by right-clicking the button and choosing EditText. Or you can click the button, pause, and then click again.) Enter Add for the top button, Edit for the second,Remove for the third, and As Default for the fourth.
The JButton components snap into the positions designated by the alignment guidelines. The width of the buttonschanges to accommodate the new names.
5.
Designing a Swing GUI in NetBeans IDE - Tutorial http://netbeans.org/kb/docs/java/quickstart-gui.html
10 จาก 14 27/12/2555 19:35
Now that the buttons are positioned where we want them, we'll set the four buttons to be the same size for visualconsistency as well as to clarify that they are related functionally.
To set components to the same size:
Select all four JButtons by pressing the Control key while making your selection.1.Right-click one of them and choose Same Size > Same Width from the pop-up menu.
The JButtons are set to the same size as the button with the longest name.
2.
Indentation
Often it is necessary to cluster multiple components under another component such that it is clear they belong to agroup of related functions. One typical case, for example, is placing several related checkboxes below a common label.The GUI Builder enables you to accomplish indenting easily by providing special guidelines suggesting the preferredoffset for your operating system's look and feel.
In this section we'll add a few JRadioButtons below a JLabel that will allow users to customize the way the applicationdisplays data. Refer to the following illustrations while accomplishing this or click the View Demo link following theprocedure to view an interactive demonstration.
To indent JRadioButtons below a JLabel:
Add a JLabel named Mail Format to the form below the JList. Make certain the label is left aligned withthe JList above.
1.
In the Palette window, select the Radio Button component from the Swing category.2.Move the cursor below the JLabel that we just added. When the guidelines appear indicating that theJRadioButton's left edge is aligned with that of the JLabel, move the JRadioButton slightly to the rightuntil secondary indentation guidelines appear. Shift-click to place the first radio button.
3.
Move the cursor to the right of the first JRadioButton. Shift-click to place the second and thirdJRadioButtons, being careful to respect the suggested component spacing. Make certain to release theShift key prior to positioning the last JRadioButton.
4.
Set the display text for each JRadioButton. (You can edit a button's text by right-clicking the button andchoosing Edit Text. Or you can click the button, pause, and then click again.) Enter HTML for the leftradio button, Plain Text for the second, and Custom for the third.
Three JRadioButtons are added to the form and indented below the Mail Format JLabel.
5.
Now we need to add the three JRadioButtons to a ButtonGroup to enable the expected toggle behavior in which onlyone radio button can be selected at a time. This will, in turn, ensure that our ContactEditor application's contactinformation will be displayed in the mail format of our choosing.
To add JRadioButtons to a ButtonGroup:
Designing a Swing GUI in NetBeans IDE - Tutorial http://netbeans.org/kb/docs/java/quickstart-gui.html
11 จาก 14 27/12/2555 19:35
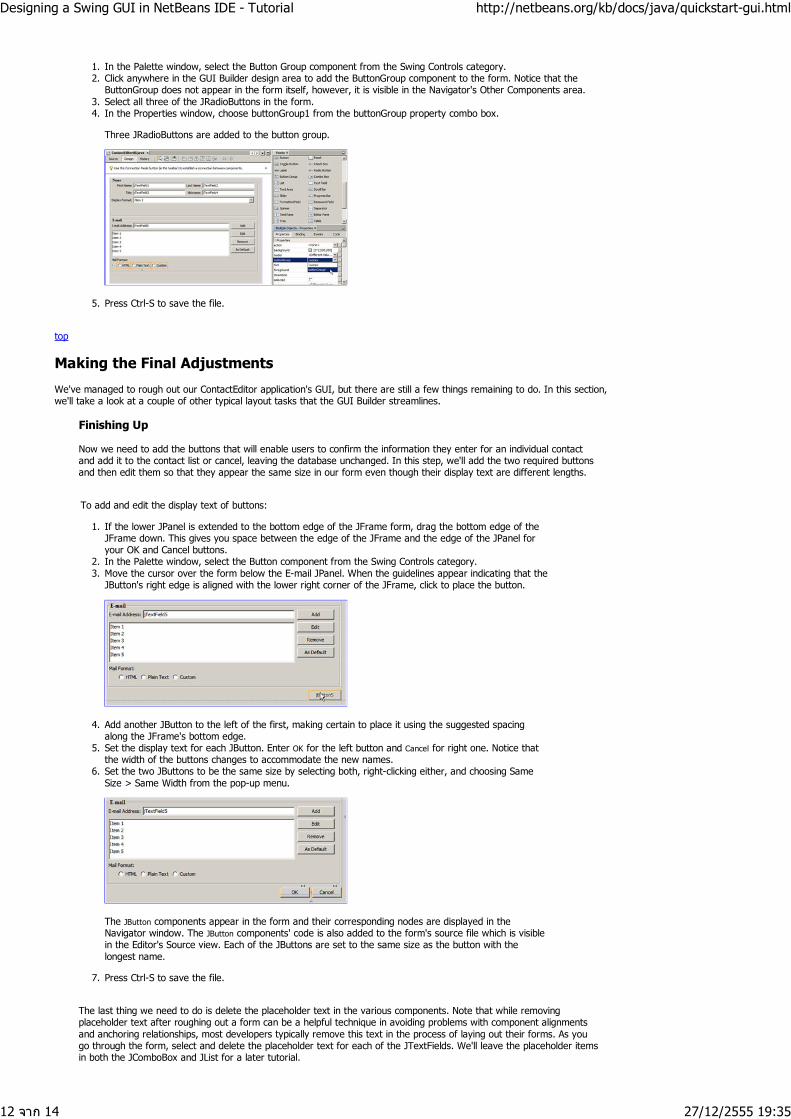
In the Palette window, select the Button Group component from the Swing Controls category.1.Click anywhere in the GUI Builder design area to add the ButtonGroup component to the form. Notice that theButtonGroup does not appear in the form itself, however, it is visible in the Navigator's Other Components area.
2.
Select all three of the JRadioButtons in the form.3.In the Properties window, choose buttonGroup1 from the buttonGroup property combo box.
Three JRadioButtons are added to the button group.
4.
Press Ctrl-S to save the file.5.
top
Making the Final Adjustments
We've managed to rough out our ContactEditor application's GUI, but there are still a few things remaining to do. In this section,we'll take a look at a couple of other typical layout tasks that the GUI Builder streamlines.
Finishing Up
Now we need to add the buttons that will enable users to confirm the information they enter for an individual contactand add it to the contact list or cancel, leaving the database unchanged. In this step, we'll add the two required buttonsand then edit them so that they appear the same size in our form even though their display text are different lengths.
To add and edit the display text of buttons:
If the lower JPanel is extended to the bottom edge of the JFrame form, drag the bottom edge of theJFrame down. This gives you space between the edge of the JFrame and the edge of the JPanel foryour OK and Cancel buttons.
1.
In the Palette window, select the Button component from the Swing Controls category.2.Move the cursor over the form below the E-mail JPanel. When the guidelines appear indicating that theJButton's right edge is aligned with the lower right corner of the JFrame, click to place the button.
3.
Add another JButton to the left of the first, making certain to place it using the suggested spacingalong the JFrame's bottom edge.
4.
Set the display text for each JButton. Enter OK for the left button and Cancel for right one. Notice thatthe width of the buttons changes to accommodate the new names.
5.
Set the two JButtons to be the same size by selecting both, right-clicking either, and choosing SameSize > Same Width from the pop-up menu.
The JButton components appear in the form and their corresponding nodes are displayed in theNavigator window. The JButton components' code is also added to the form's source file which is visiblein the Editor's Source view. Each of the JButtons are set to the same size as the button with thelongest name.
6.
Press Ctrl-S to save the file.7.
The last thing we need to do is delete the placeholder text in the various components. Note that while removingplaceholder text after roughing out a form can be a helpful technique in avoiding problems with component alignmentsand anchoring relationships, most developers typically remove this text in the process of laying out their forms. As yougo through the form, select and delete the placeholder text for each of the JTextFields. We'll leave the placeholder itemsin both the JComboBox and JList for a later tutorial.
Designing a Swing GUI in NetBeans IDE - Tutorial http://netbeans.org/kb/docs/java/quickstart-gui.html
12 จาก 14 27/12/2555 19:35
top
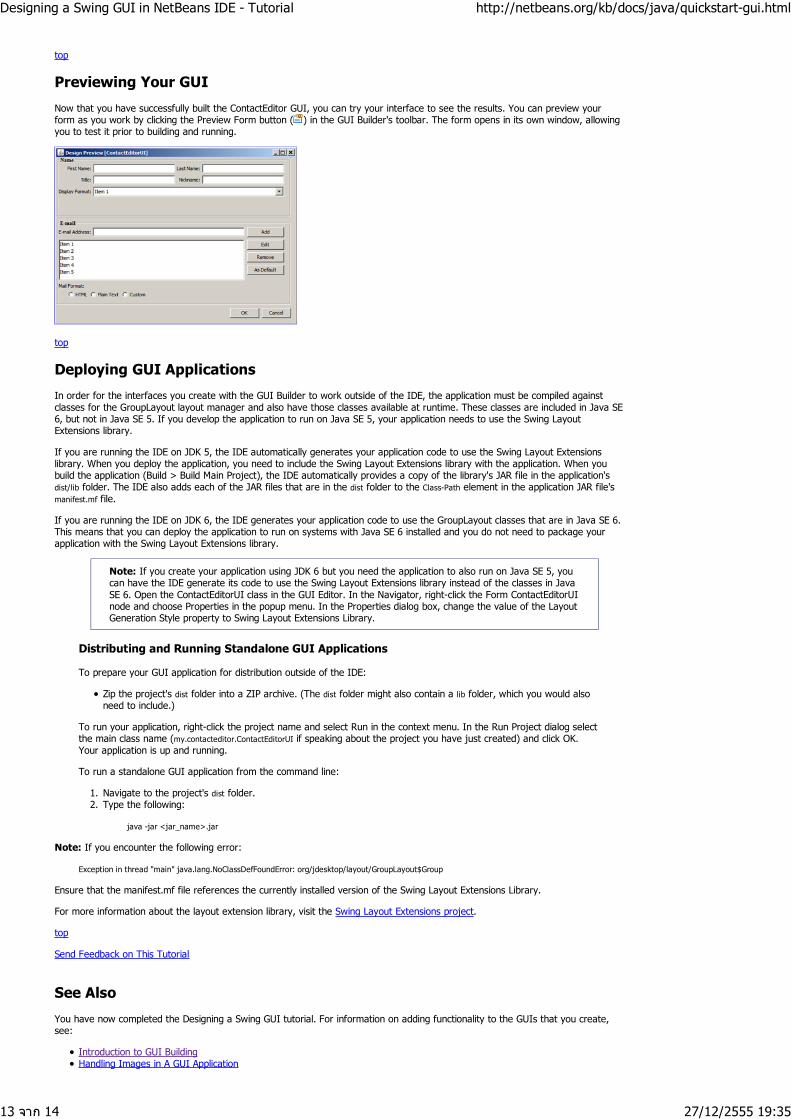
Previewing Your GUI
Now that you have successfully built the ContactEditor GUI, you can try your interface to see the results. You can preview yourform as you work by clicking the Preview Form button ( ) in the GUI Builder's toolbar. The form opens in its own window, allowingyou to test it prior to building and running.
top
Deploying GUI Applications
In order for the interfaces you create with the GUI Builder to work outside of the IDE, the application must be compiled againstclasses for the GroupLayout layout manager and also have those classes available at runtime. These classes are included in Java SE6, but not in Java SE 5. If you develop the application to run on Java SE 5, your application needs to use the Swing LayoutExtensions library.
If you are running the IDE on JDK 5, the IDE automatically generates your application code to use the Swing Layout Extensionslibrary. When you deploy the application, you need to include the Swing Layout Extensions library with the application. When youbuild the application (Build > Build Main Project), the IDE automatically provides a copy of the library's JAR file in the application'sdist/lib folder. The IDE also adds each of the JAR files that are in the dist folder to the Class-Path element in the application JAR file'smanifest.mf file.
If you are running the IDE on JDK 6, the IDE generates your application code to use the GroupLayout classes that are in Java SE 6.This means that you can deploy the application to run on systems with Java SE 6 installed and you do not need to package yourapplication with the Swing Layout Extensions library.
Note: If you create your application using JDK 6 but you need the application to also run on Java SE 5, youcan have the IDE generate its code to use the Swing Layout Extensions library instead of the classes in JavaSE 6. Open the ContactEditorUI class in the GUI Editor. In the Navigator, right-click the Form ContactEditorUInode and choose Properties in the popup menu. In the Properties dialog box, change the value of the LayoutGeneration Style property to Swing Layout Extensions Library.
Distributing and Running Standalone GUI Applications
To prepare your GUI application for distribution outside of the IDE:
Zip the project's dist folder into a ZIP archive. (The dist folder might also contain a lib folder, which you would alsoneed to include.)
To run your application, right-click the project name and select Run in the context menu. In the Run Project dialog selectthe main class name (my.contacteditor.ContactEditorUI if speaking about the project you have just created) and click OK.Your application is up and running.
To run a standalone GUI application from the command line:
Navigate to the project's dist folder.1.Type the following:
java -jar <jar_name>.jar
2.
Note: If you encounter the following error:
Exception in thread "main" java.lang.NoClassDefFoundError: org/jdesktop/layout/GroupLayout$Group
Ensure that the manifest.mf file references the currently installed version of the Swing Layout Extensions Library.
For more information about the layout extension library, visit the Swing Layout Extensions project.
top
Send Feedback on This Tutorial
See Also
You have now completed the Designing a Swing GUI tutorial. For information on adding functionality to the GUIs that you create,see:
Introduction to GUI BuildingHandling Images in A GUI Application
Designing a Swing GUI in NetBeans IDE - Tutorial http://netbeans.org/kb/docs/java/quickstart-gui.html
13 จาก 14 27/12/2555 19:35
GUI Builder FAQJava GUI Applications Learning Trail
top
SiteMapAbout UsContactLegal & Licences
By use of this website, you agree to the NetBeans Policies and Terms of Use. © 2012, Oracle Corporation and/or its affiliates. Sponsored by
Designing a Swing GUI in NetBeans IDE - Tutorial http://netbeans.org/kb/docs/java/quickstart-gui.html
14 จาก 14 27/12/2555 19:35