Embed Size (px)
Citation preview
Designed, Engineered & Manufactured by: VoiceGate Corporation 550 Alden Road, Unit 112 Markham, Ontario Canada L3R 6A8 Sales Phone: (800) 668-2387/(905) 513-1403 Technical Support: Phone: (800) 250-2929/(905) 513-1403
While every effort has been made to ensure this document’s accuracy, VoiceGate Corporation is not responsible or liable for content errors.
TollGuard Call Accounting Manual
Contents
Section Page Getting Started
Hardware Installation………………..……………………………..1 System Requirements…………...………………...…………...……1
Software programming……………………………………..….…1-2 Trouble Shooting………………….…………….…………………..3
Administration
Login Options……………………………………………………….4 Programming
Tools Reports…………………………………………………..7-20 Tasks…………………………………………………...17-11
Refresh Information…………….…………….……………………………21
Real Time Call Chart………………………….………22-23 Area City Codes Update…….…………………………….23 POST……………….……………………………………....23 HOBIC Port……….…………………………….……...….23 Alarms Alarm ………………………………..…….…...24-28 Special Alarms PBX Alarm……………………… 29 View PBX Alarms…………………30 Extension Alarms…….…………...30
View Extension Alarms……...……31 Call Analysis Phone Number……………………………….…….31 Trunk ………………….…………………..……….32 Extension……………….…………………………..32 User Account Code…….…………………………..33
Client account Code…….…………………………34 External Database……………………….…………..…….……....35 Create DSN File Open Connection Define Database Fields
1

View Log Info………….…………….…………………………………………..36
Active Extension….……………….………………….…....36 Database Active/Inactive Data……..….……………….…….37 Compact/Repair………….………………….….….37
Setup Phone System ……………………………….……..……………38-42 User Administrator……………………….………..…………..43-46 Company………………………………….……………..…….…...47 Company Info…………………….………….….……...48-51 Department/Section/Extension….………….…………52-54 Clients…………………………….………….…….………54 Voice Mail User…………………………………….……...55
Lists Extension list ………………………..…………………….56
Message list………………………….…….………………57 Phone List……………………………..……………….58-59 Schedule List ………………………….……….………60-63
Holiday List…………………………….…..……………..64 Area/Rate Area…………………………………….…………………66 Group of Areas…………………….……………………..67 Rate Setup………………………………………..……68-69
Rate Compare………………………………..………..….70 Phone/Caller Name List Rates…………..…………...70-71
Help
Call Accounting Help………………………..…………………...72 Help Index………………………………..…………………….…72 About…………………………………..………….……………….72 While every effort has been made to ensure this document’s accuracy, VoiceGate Corporation is not responsible or liable for content errors.
2
Getting Started
To configure the Call Accounting system the administrator needs to perform the following:
Hardware Installation
Check for an available SMDR (Simplified Message Detail Recording) port on phone system. (Additional hardware and software from the phone system manufacturer may be required)
Check for an available COM (RS-232) Port on the Call Accounting System.
Connect a RS-232 cable from the SMDR port on phone system to the COM (RS-
232) port on the call accounting computer. The RS-232 cable should not exceed 15 feet otherwise errors may occur with the information. (Refer to the phone system manual or contact the manufacturer for the SMDR set up and pin configurations).
System Requirements (Minimum) Intel Pentium IV (or compatible) 600 Mhz or higher processor 256 MB of Ram 5 Gig of available hard drive space DVD or CD-Rom drive Sound card and speakers (optional, for error messages) Windows NT SP 6, 2000 Professional or XP Professional Modem (internal or external) & PcAnywhere 9.2 or 10.5 for XP Pro. If the call accounting program is running in the same computer with third party programs ensure that each program has the appropriate memory, hard drive space and processing power available. VoiceGate Corporation does not recommend running the application in this manner.
Software Programming The first thing to do is to login as VOICEGATECORP the user name is in capital. The default password is set to *99*99. The VOICEGATECORP user name will only come up once when the software in logged in for the first time. After logging in select Add New User under Setup/User Administration and enter a password for the Administrator then press the Save button. Anytime a User/Administrator logs in after this a valid User Name and Password must be entered. Other users could be added and their permissions set also. The Administrator by default has complete access to the system.
3
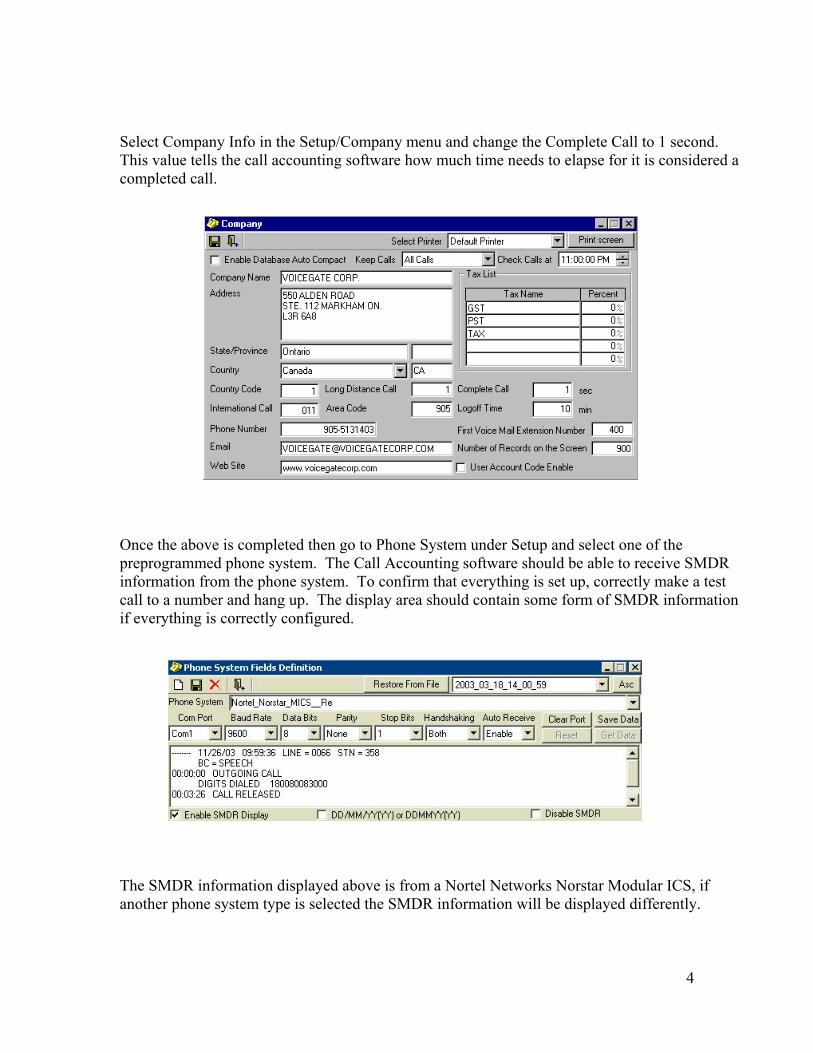
Select Company Info in the Setup/Company menu and change the Complete Call to 1 second. This value tells the call accounting software how much time needs to elapse for it is considered a completed call.
Once the above is completed then go to Phone System under Setup and select one of the preprogrammed phone system. The Call Accounting software should be able to receive SMDR information from the phone system. To confirm that everything is set up, correctly make a test call to a number and hang up. The display area should contain some form of SMDR information if everything is correctly configured.
The SMDR information displayed above is from a Nortel Networks Norstar Modular ICS, if another phone system type is selected the SMDR information will be displayed differently.
4
Troubleshooting:
If you are not receiving SMDR information from the phone system, then terminate the
Call Accounting software and use HyperTerminal to see if SMDR information is being sent from the phone system.
HyperTerminal is a communication program supplied by Microsoft with their operating
system.
The following items may restrict the SMDR information: The serial cable between the phone system and the call accounting computer is not
properly connected or not the correct type (Null or Straight). The serial port is not programmed correctly in the phone systems programming. The Com port in the SMDR computer may not be activated. The Com port selected in the call accounting software may not be correct. The Baud Rate, Parity, Data Bit and Stop Bit are not programmed correctly in the Call
Accounting phone system programming section or the phone system may not be correct. The distance between the phone system and the Call Accounting unit should not exceed
15 feet. Consult the appropriate phone system manual for longer lengths.
Consult the telephone system manual, or contact the PBX manufacturer with problems regarding sending SMDR.
If the phone system that you are connecting to is not listed contact VoiceGate
Corporation. Before calling connect a phone line to the modem and check that Pc Anywhere is configured and running.
Pc Anywhere is a commercially made communications program that allows a computer to be operated remotely.
Once the SMDR information is working the rest of the Call Accounting software can be completed by following the remainder of the manual.
5
Administration
Login Options
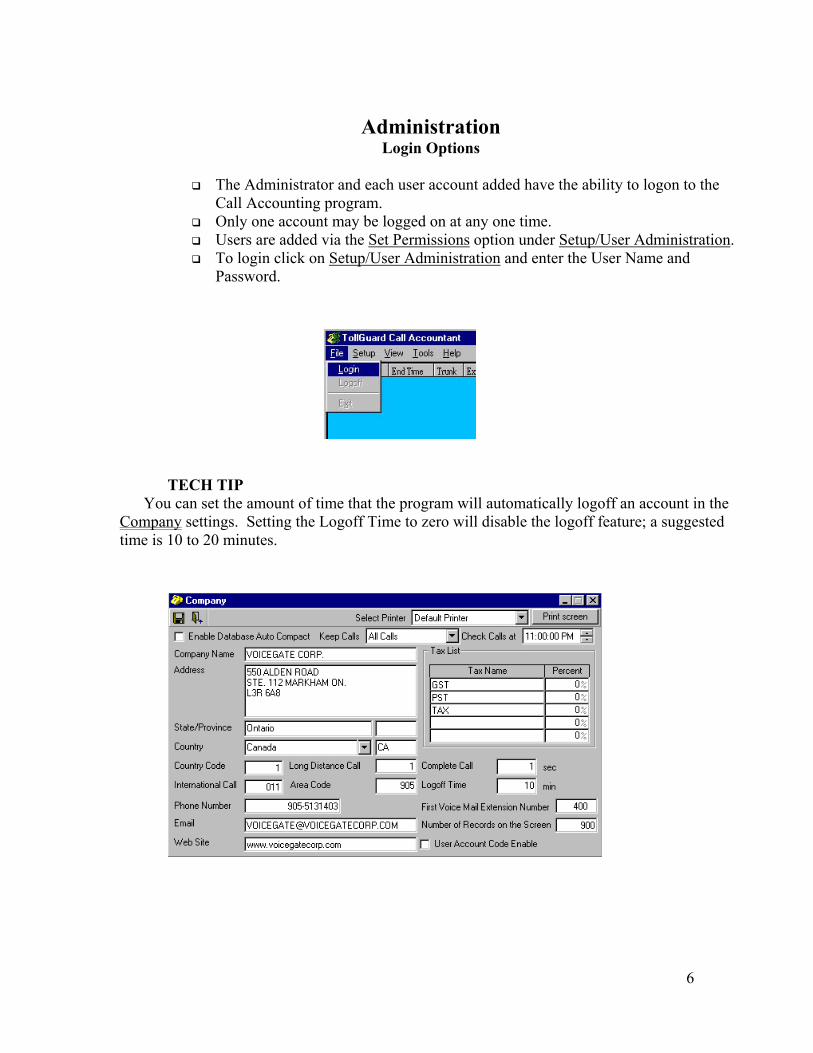
The Administrator and each user account added have the ability to logon to the Call Accounting program.
Only one account may be logged on at any one time. Users are added via the Set Permissions option under Setup/User Administration. To login click on Setup/User Administration and enter the User Name and
Password.
TECH TIP
You can set the amount of time that the program will automatically logoff an account in the Company settings. Setting the Logoff Time to zero will disable the logoff feature; a suggested time is 10 to 20 minutes.
6
Programming
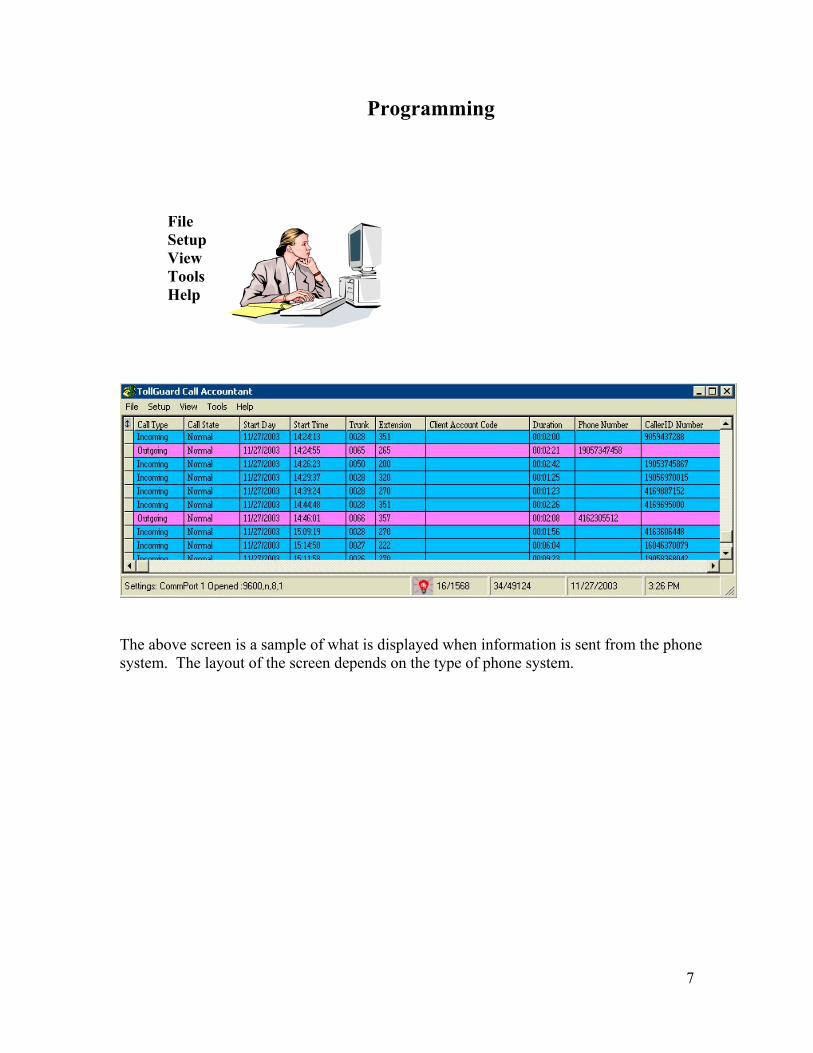
File Setup View Tools Help
The above screen is a sample of what is displayed when information is sent from the phone system. The layout of the screen depends on the type of phone system.
7
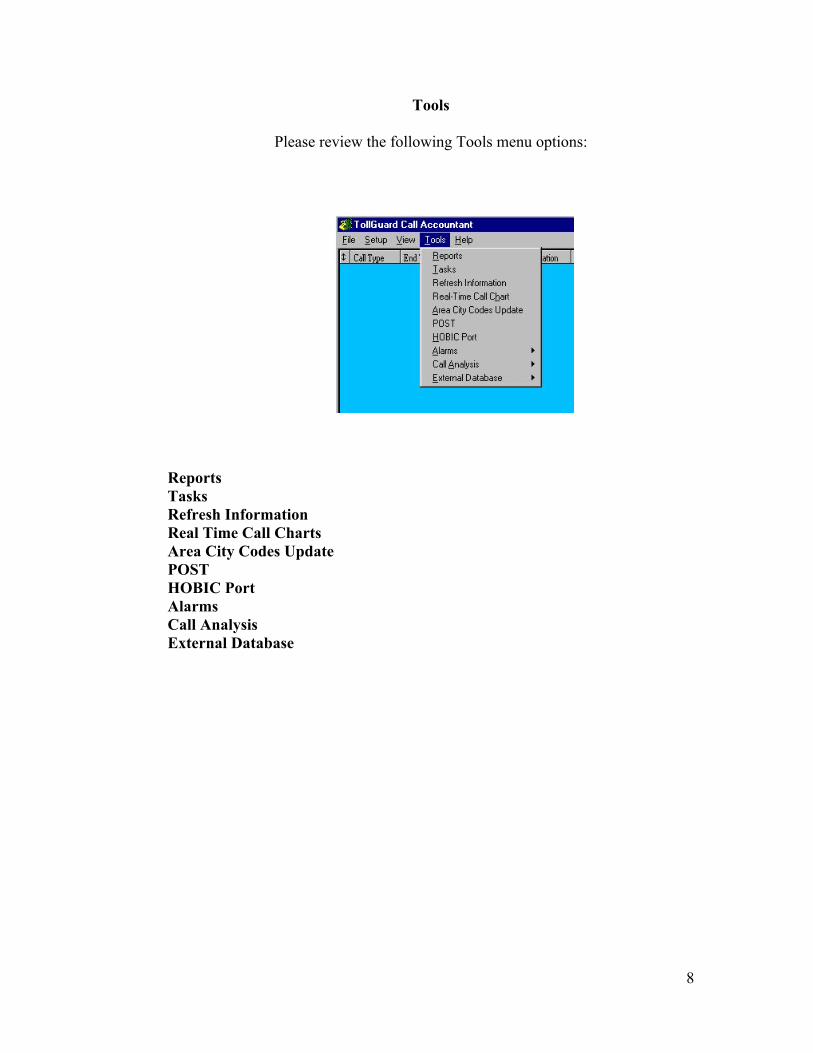
Tools
Please review the following Tools menu options:
Reports Tasks
Refresh Information Real Time Call Charts Area City Codes Update
POST HOBIC Port Alarms Call Analysis
External Database
8
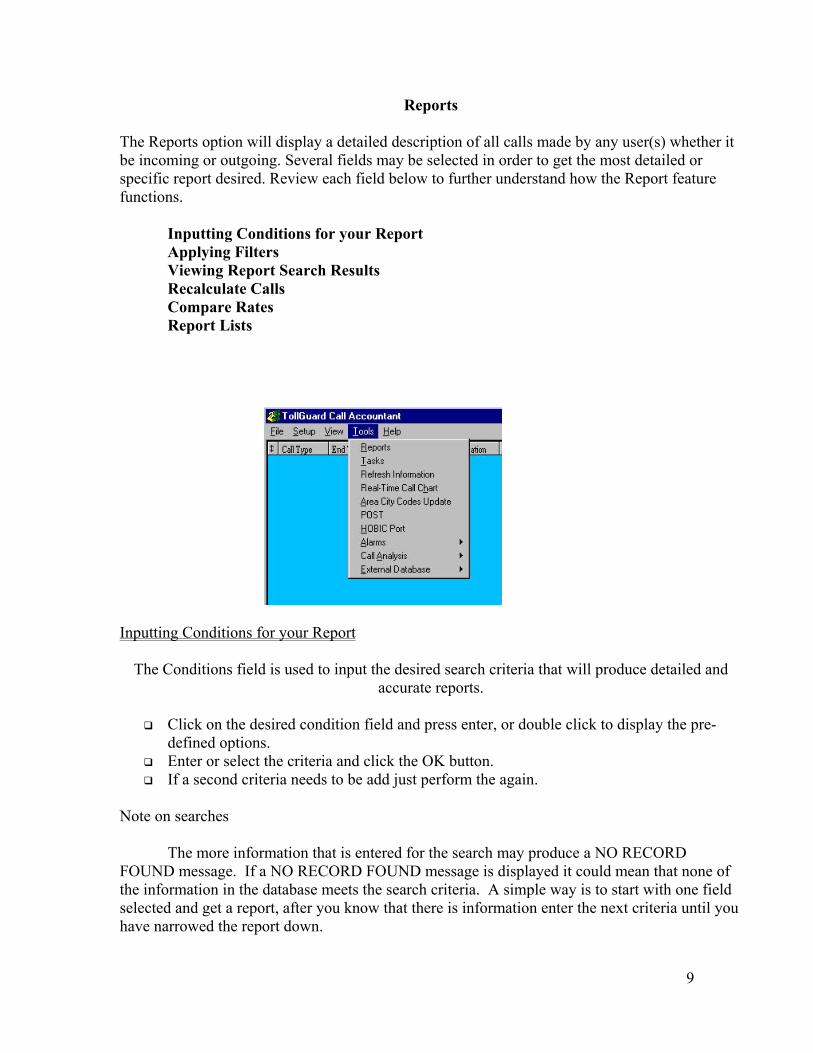
Reports
The Reports option will display a detailed description of all calls made by any user(s) whether it be incoming or outgoing. Several fields may be selected in order to get the most detailed or specific report desired. Review each field below to further understand how the Report feature functions.
Inputting Conditions for your Report Applying Filters Viewing Report Search Results Recalculate Calls Compare Rates Report Lists
Inputting Conditions for your Report
The Conditions field is used to input the desired search criteria that will produce detailed and accurate reports.
Click on the desired condition field and press enter, or double click to display the pre-
defined options. Enter or select the criteria and click the OK button. If a second criteria needs to be add just perform the again.
Note on searches
The more information that is entered for the search may produce a NO RECORD FOUND message. If a NO RECORD FOUND message is displayed it could mean that none of the information in the database meets the search criteria. A simple way is to start with one field selected and get a report, after you know that there is information enter the next criteria until you have narrowed the report down.
9
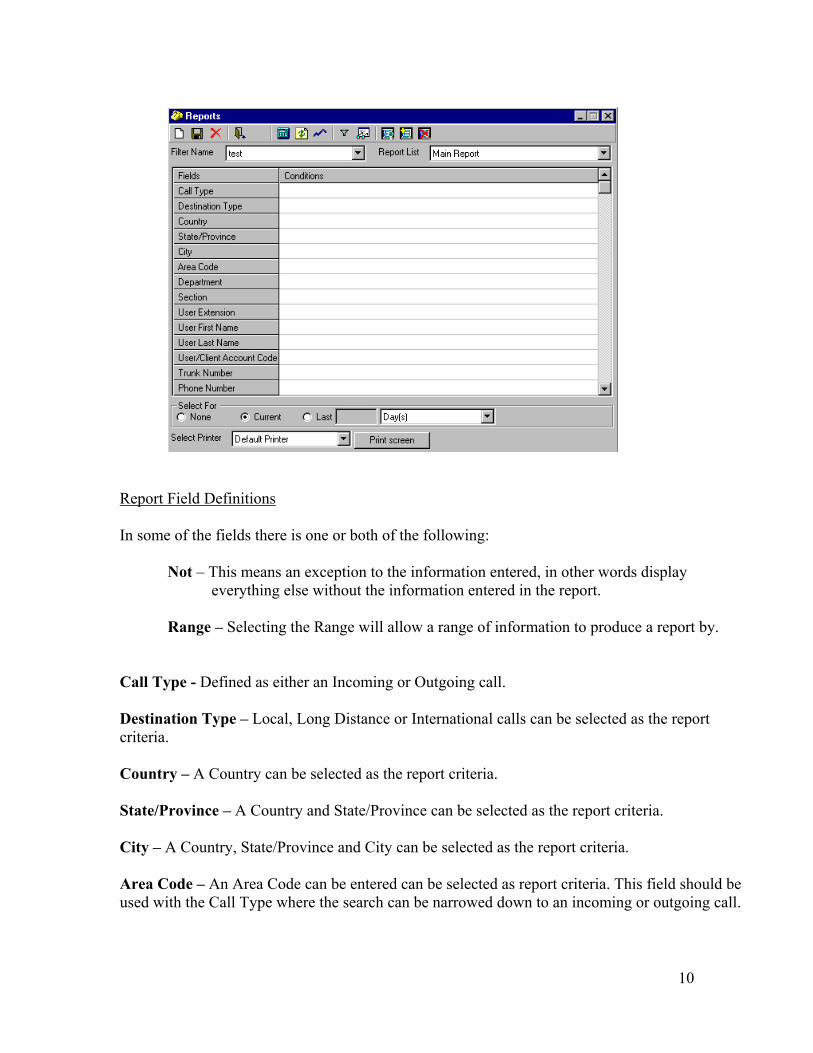
Report Field Definitions In some of the fields there is one or both of the following:
Not – This means an exception to the information entered, in other words display everything else without the information entered in the report.
Range – Selecting the Range will allow a range of information to produce a report by. Call Type - Defined as either an Incoming or Outgoing call. Destination Type – Local, Long Distance or International calls can be selected as the report criteria.
Country – A Country can be selected as the report criteria. State/Province – A Country and State/Province can be selected as the report criteria. City – A Country, State/Province and City can be selected as the report criteria. Area Code – An Area Code can be entered can be selected as report criteria. This field should be used with the Call Type where the search can be narrowed down to an incoming or outgoing call.
10
Department – A Department name can be selected as the report criteria. The names that are shown are the ones entered in the Setup – Company - Department/Section/Extension. Section – A Section is defined as a group or groups under a department. The names that are shown are the ones entered in the Setup – Company - Department/Section/Extension. User Extension – A single or a range of extensions can be entered as the report criteria. User First Name – The first name can be selected from the list as the report criteria. User Last Name – The last name can be selected from the list as the report criteria. User/Client Account Code – Account Code is defined as the number used by an employee or user on a call to charge back to a client for the call or charge a Department/Section for the call. When the Account code field is displayed the list that shows first are the User Account Codes, to show the Client Account Codes only click or check the box marked Client Account Code. The account code field can have a combination of user and client account codes. Trunk Number – Defined as the equipment in the phone system that was used to receive the incoming or make the outgoing call. Phone Number – Defined as the phone number dialed out. The Caller ID Number - Defined as the phone number that the telephone company sent for the originating caller. If a number is entered and the Caller ID Number is not checked then the report will only display outgoing calls only. When the Caller ID Number is checked then the report will display incoming calls. The Phone Number field can have a combination of Phone Number and Caller ID Number. Transfer Extension - Defined as the extension that transferred the call to the extension that completed the call. Duration/Ringing Time – Duration is defined as the amount of time that the call took to complete. To produce a report the exact duration time or a range can be entered. The Ringing time is defined as the amount of time the call was ringing at an extension before it was answered. Total Payment – Defined as the total amount for each call. The report can be a range or an exception. Start Day - Defined as the start date of the call from the phone system. To produce a report a single or range of start dates can be entered. Start Time - Defined as the start time of the call from the phone system. To produce a report a single or range of start time can be entered.
11
Select For The Select For section allows a person to quickly get a report with minimal search criteria entered. None – When None is selected the program does not use the Select For section. Current – When Current is selected the program will search for information based on the selected criteria below. Day(s) – The software will perform a search on the current date along with the other fields selected above. Week(s) Mon to Fri - The software will perform a search on the current week from Monday to Friday along with the other fields selected above. Week(s) - The software will perform a search on the current week from Sunday to Saturday along with the other fields selected above. Month(s) - The software will perform a search on the current month along with the other fields selected above. Year(s) - The software will perform a search on the current year along with the other fields selected above. Last - When Last is selected the program will search for information based on the selected criteria below. Day(s) - The software will perform a search on the last date (yesterday) along with the other fields selected above. Week(s) Mon to Fri/ Week(s) - The software will perform a search on the last week (previous n weeks) from Sunday to Saturday along with the other fields selected above. Month(s) - The software will perform a search on the last month (previous n month) along with the other fields selected above. Year(s) - The software will perform a search on the last year (previous n month) along with the other fields selected above. Note: In Week(s) Mon to Fri/ Week(s), Month(s) and Year(s) a value “n” can be entered for the program to search for information prior to the current date.
12
Tips on producing a report: If all the fields are blank when a report is generated then all the information in the database is considered a match. When entering the search criteria it is better to enter as little information to get the most amount of information. To get a report for an extension just enter the extension number in the User Extension field and leave the other fields empty. The report will show all the information that has been collected from day one to present. To get a report of activities for an extension on a specific day, just enter the extension number in the User Extension field and the date in the Start Day. The report will show all the information that has been collected as of the date and extension number entered. To get a report on all the calls to or from a phone number perform the following: Enter the whole or partial phone number in the Phone Number field, if the Caller ID Number is not checked then the report will only show outgoing calls only. If the Caller ID Number is checked off then the report will show all the incoming call received. Examples of acceptable formats in the Phone Number field:
705* - This example will monitor for 705 only at the beginning of the phone number for an outgoing call. The follow numbers will be detected.
705-456-1235 905-513-7055 or 416-427-0545 will not be detected.
1705* - This example will monitor for 1705 only at the beginning of the phone number for either an incoming or outgoing call. The follow number will be detected.
1-705-456-1235
*705* - This example will monitor for 705 anywhere in the phone number for either an incoming or outgoing call. The follow numbers will be detected.
1-705-456-1235, 1-706-457-0569
??705* - This example will monitor for 705 only if it starts at the third location of the phone number for either a incoming or outgoing call. The follow number will be detected.
1-970-556-1235, 1-270-577-8989
13
1705???1403 - This example will monitor for 1705???1403 in the phone number for outgoing call. The follow numbers will be detected.
1-705-555-1403, 1-705-456-1403, 1-705-984-1403 * - The * (star) can be used at the beginning, end or both. When the * is inserted
at the beginning, end or both this tells the software to monitor for any matches within the phone number and ignore any characters before or after the *.
? - The ? symbol can be used in the alarm monitor as a wild character. For each ?
symbol used this represents a character in the phone number.
14
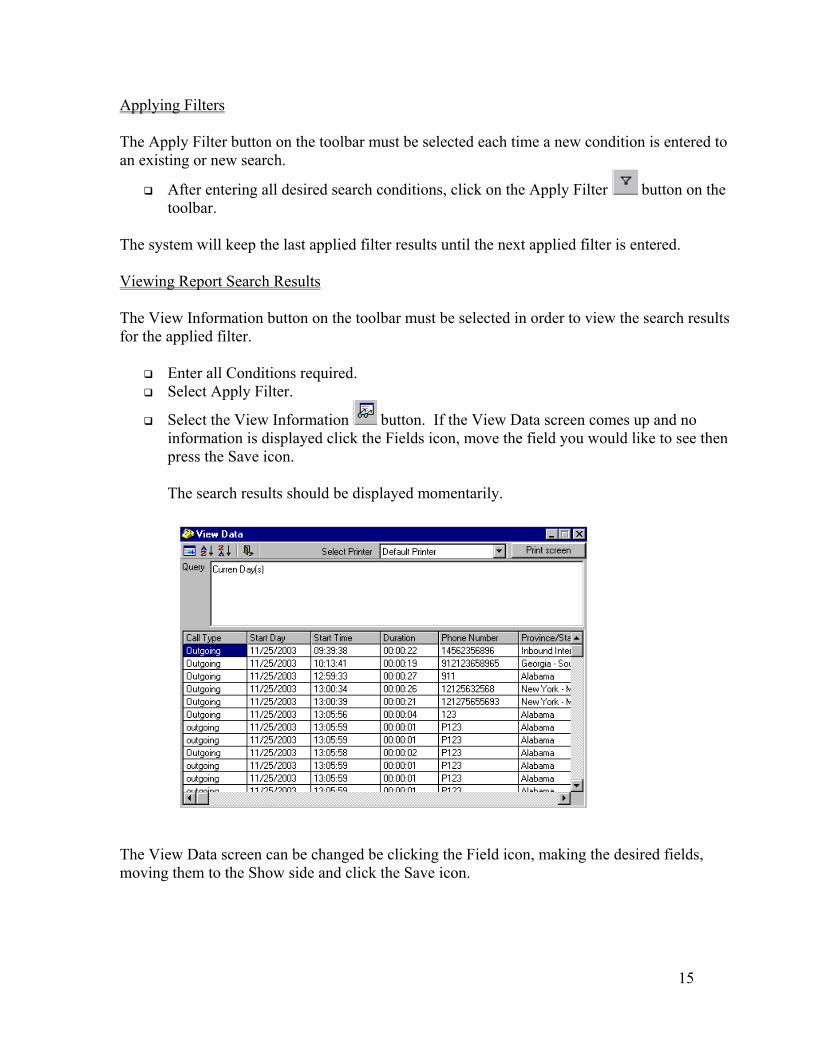
Applying Filters The Apply Filter button on the toolbar must be selected each time a new condition is entered to an existing or new search.
After entering all desired search conditions, click on the Apply Filter button on the toolbar.
The system will keep the last applied filter results until the next applied filter is entered. Viewing Report Search Results The View Information button on the toolbar must be selected in order to view the search results for the applied filter.
Enter all Conditions required. Select Apply Filter.
Select the View Information button. If the View Data screen comes up and no information is displayed click the Fields icon, move the field you would like to see then press the Save icon.
The search results should be displayed momentarily.
The View Data screen can be changed be clicking the Field icon, making the desired fields, moving them to the Show side and click the Save icon.
15
Recalculate Calls
The Recalculate Calls option allows the system administrator to view a specific report using a different rate.
Activate the Reports option in the Tools menu. Enter all conditions required. Click on the Apply Filter button. Do not close the Reports window. Select the Rate option in the Area/Rate menu. Manually change the selected rate value without changing the rate name. Save the changes.
From the Reports window, click on Recalculate Calls . Click on the Apply Filter button. Click on the View Information button.
The call costs should now be re-calculated using the new rate.
When a recalculate is done with a new rate the software will only apply the new rate to the selected records.
16

Compare Rates
The Compare Rates option on the toolbar is used to display the calculated difference in cost according to the rates selected.
Click on the Setup/Area/Rate option from the main TollGuard screen toolbar and select
Rate Compare. Move the rates you wish to compare from the display window on the left to the compare
window on the right. Click on save and then exit. Return back to the reports screen and configure a report by doing the following:
Enter all Conditions required. Select Apply Filter.
Click on the Compare Rates button on the toolbar. The compared rates should appear with headings that specify: the number dialed, the duration of the call, the rates that are being compared and the difference in cost.
17
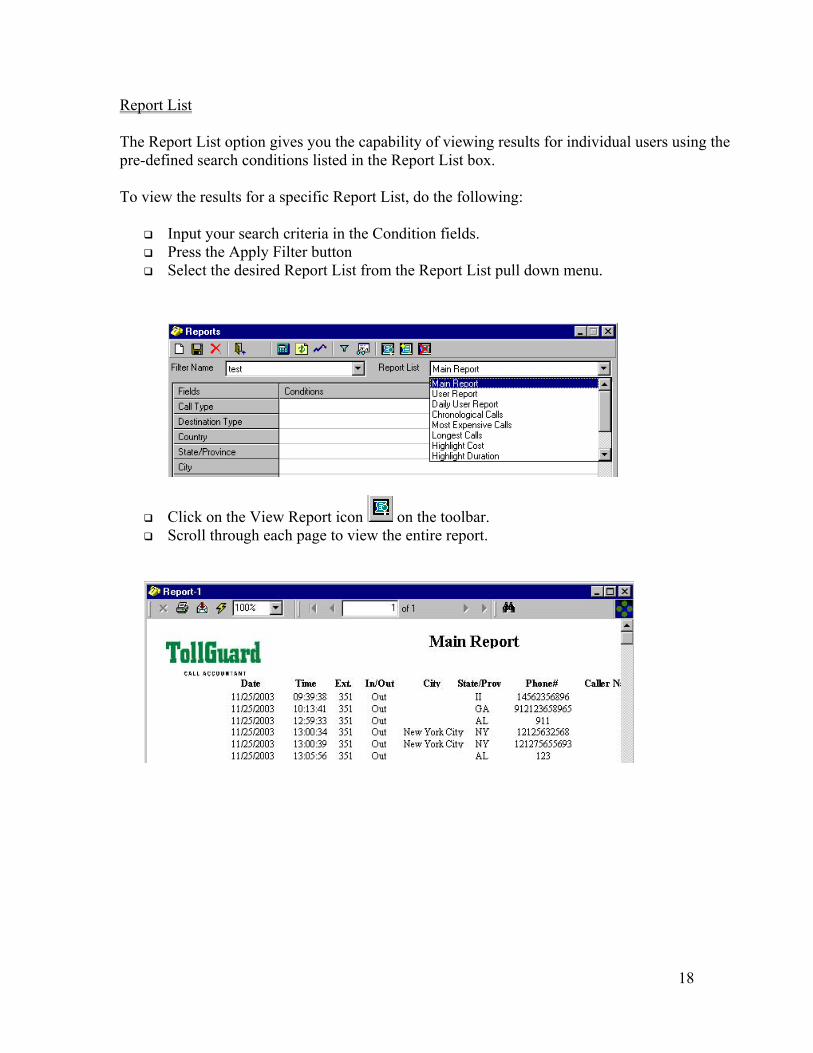
Report List
The Report List option gives you the capability of viewing results for individual users using the pre-defined search conditions listed in the Report List box. To view the results for a specific Report List, do the following:
Input your search criteria in the Condition fields. Press the Apply Filter button Select the desired Report List from the Report List pull down menu.
Click on the View Report icon on the toolbar. Scroll through each page to view the entire report.
18
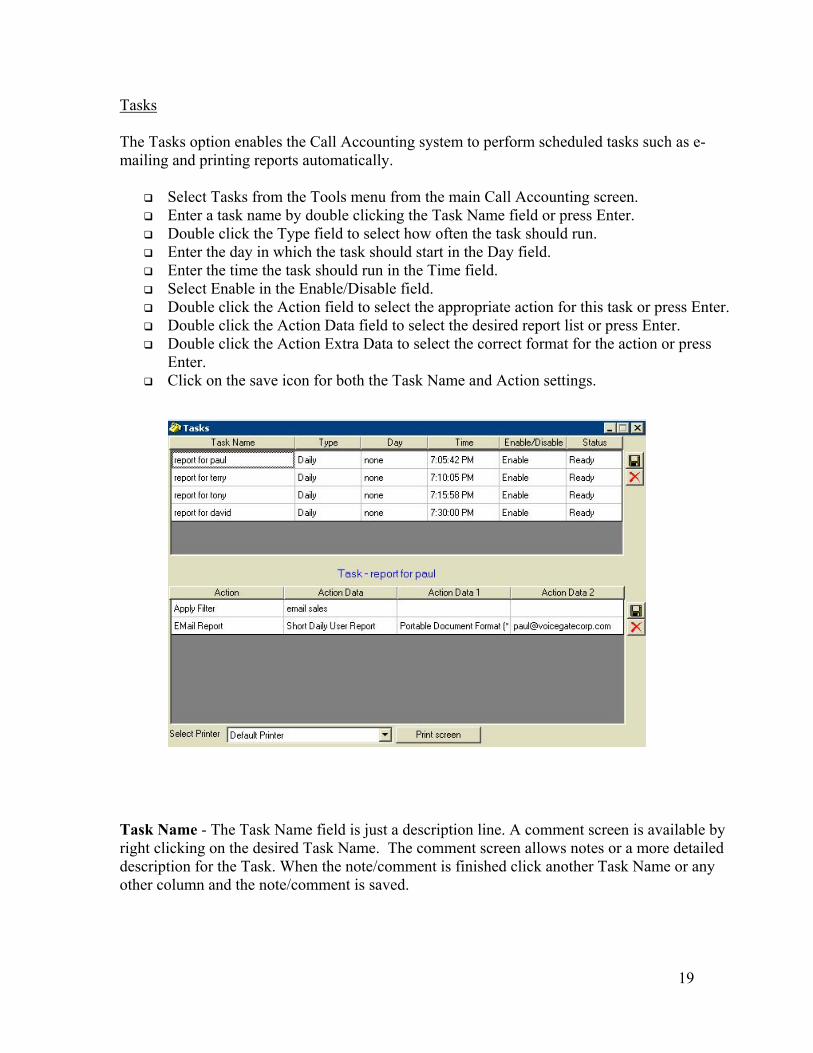
Tasks
The Tasks option enables the Call Accounting system to perform scheduled tasks such as e-mailing and printing reports automatically.
Select Tasks from the Tools menu from the main Call Accounting screen. Enter a task name by double clicking the Task Name field or press Enter. Double click the Type field to select how often the task should run. Enter the day in which the task should start in the Day field. Enter the time the task should run in the Time field. Select Enable in the Enable/Disable field. Double click the Action field to select the appropriate action for this task or press Enter. Double click the Action Data field to select the desired report list or press Enter. Double click the Action Extra Data to select the correct format for the action or press
Enter. Click on the save icon for both the Task Name and Action settings.
Task Name - The Task Name field is just a description line. A comment screen is available by right clicking on the desired Task Name. The comment screen allows notes or a more detailed description for the Task. When the note/comment is finished click another Task Name or any other column and the note/comment is saved.
19
Type - The Type field allows the administrator to define the when to perform the task desired. The following can be selected: Date - Task will be performed at selected date. Daily - Task will be performed every day (Monday to Sunday). Weekly - Task will be performed on a specific day of the week for each week. Monthly - Task will be performed on the same day of each month for each month. 1st Quarter - Task will be performed on the first or last day of the 1st Quarter. 2nd Quarter - Task will be performed on the first or last day of the 2nd Quarter. 3rd Quarter - Task will be performed on the first or last day of the 3rd Quarter. 4th Quarter - Task will be performed on the first or last day of the 4th Quarter. 1st Half - Task will be performed on the first or last day of the 1st Half of the year. 2nd Half - Task will be performed on the first or last day of the 2nd Half of the year. Year - Task will be performed on the first or last day of the year. Explanation of the above If Date is selected in the Type field than a date can be selected from the pull down calendar and a time can be selected in the Time field. If Daily is selected in the Type field than a time can be selected in the Time field. If Weekly is selected in the Type field than a day of the week can be selected from the pull down screen in the Day field and a time can be selected in the Time field. If Monthly is selected in the Type field than a number from one to thirty one can be entered (1 to 31). A number can be selected for the day the Task is to be performed in the Day field along with a time in the Time field. If 1st Quarter is selected in the Type field than either the first or last day of the 1st Quarter can be selected in the Day field along with a time in the Time field. If 2nd Quarter is selected in the Type field than either the first or last day of the 2nd Quarter can be selected in the Day field along with a time in the Time field. If 3rd Quarter is selected in the Type field than either the first or last day of the 3rd Quarter can be selected in the Day field along with a time in the Time field. If 4th Quarter is selected in the Type field than either the first or last day of the 4th Quarter can be selected in the Day field along with a time in the Time field. If 1st Half is selected in the Type field than either the first or last day of the 1st Half of the year can be selected in the Day field along with a time in the Time field. If 2nd Half is selected in the Type field than either the first or last day of the 2nd Half of the year can be selected in the Day field along with a time in the Time field.
20
If Year is selected in the Type field than either the first or last day of the of the year can be selected in the Day field along with a time in the Time field. Day - The Day field allows the administrator to define the date if Date is selected in the Type field. Time - The Time field allows the administrator to define the time the Task is to be performed at in the Type and Date field. Enable/Disable - This field allow the administrator to turn on or off the Task. Status - The Status field just shows if the software has performed the Task or not. If the Task has been performed the Status field will show Done, if the Task was unable to be performed the Status would show Incomplete this simply means that the Task was not Saved and the Status field will show Ready if the Task is ready to be performed. Action - The Action Field allows the administrator to select one of the following: Apply Filters Print Report Email Report Save Report Action Data - The Action Data field allow the administrator to select one of the following: For Apply Filters Select User defined Filters. For Print Report, Email Report or Save Report Select one of the pre-built or user Reports.
Main Report User report Daily Report Chronological Calls Most Expensive Calls Longest Calls Highlight Calls Highlight Duration Department Section Daily Account Main Report Client Main Report
21
Action Data 1 - The Action Data 1 field allow the administrator to select one of the following: for Print Report select print output. Default Printer Procomm Plus 32 Fax Acrobat PDFWriter The list of print devices available is dependant on what is configured in Windows NT 4.0 or Windows 2000 Professional Printer Setting. for Email Report select a file formats that the attachment is to be sent out as. Text (*.txt) Portable Document Format Word for Windows (*.txt) Rich Text Format (*.doc) Character-Separated Value Comma-Separated Value Tab-Separated Text (*.ttx) Tab-Separated Value (*.tsv) Paginated Text (*.txt) Data Interchange Format Crystal Report (*.rpt) Crystal Report 7.0 (*.rpt) Report Definition (*.txt) Excel 5.0 (*.xls) Excel 5.0 (Extended) (*.xls) Excel 7.0 (*.xls) Excel 7.0 (Extended) (*.xls) Excel 8.0 (*.xls) Excel 8.0 (Extended) (*.xls) HTML 3.2 (*.html) HTML 4.0 (DHTML) (*.html) Lotus 1-2-3 (*.wk1) Lotus 1-2-3 (*.wk2) Lotus 1-2-3 (*.wk3) Lotus 1-2-3 (*.wks) Record Style (no Columns) Record Style (with Columns) XML Format (*.xml) Action Data 2 - The Action Data 2 field allow the administrator to enter an E-Mail address if EMail is selected in the Action field.
22
Refresh Information
The Refresh Information allows the administrator press one button to update the database. The Refresh Information button should be used whenever the information in the Department, Section or Extension has been changed. The refresh option is presented to the administrator when the changes are saved but if the option is not done at that time the option can be done later using this button. When a report is generated after information in Department, Section or Extension is changed and prior to a Refresh been completed the report will display the old information. Real Time Call Chart
The Chart option in the Tools menu displays the real time totals for incoming, outgoing,
duration, and cost of all calls processed by your phone system.
Select Chart in the Tools menu. The Calls chart displays incoming calls in blue and outgoing calls in red. Call totals are showed in violet.
The above color code also represents the cost and duration values.
The date field allows the administrator/user to view a previous date statistics. To view
another dates statistics click the down arrow in the date field and the current month will show up, to select another month click the arrow for the previous month or the arrow for the next
23
month. Once the month is located click the day of the report, after the selection the system will display the information on the screen. To view the other information on that date click the Call, Cost, Duration, Hold or Ringing Time heading and the information will be displayed.
24
Area City Codes Update
This section is used to update the City code, City name, State/Province and Area code information that the call accounting software uses to generate the costs and reports. Updates are sent out periodically to customers that have an annual service agreement in effect.
Select the Area City Codes Update option in the Tools menu.
When the Area City Codes Update is selected, the software will ask if you want to proceed; if
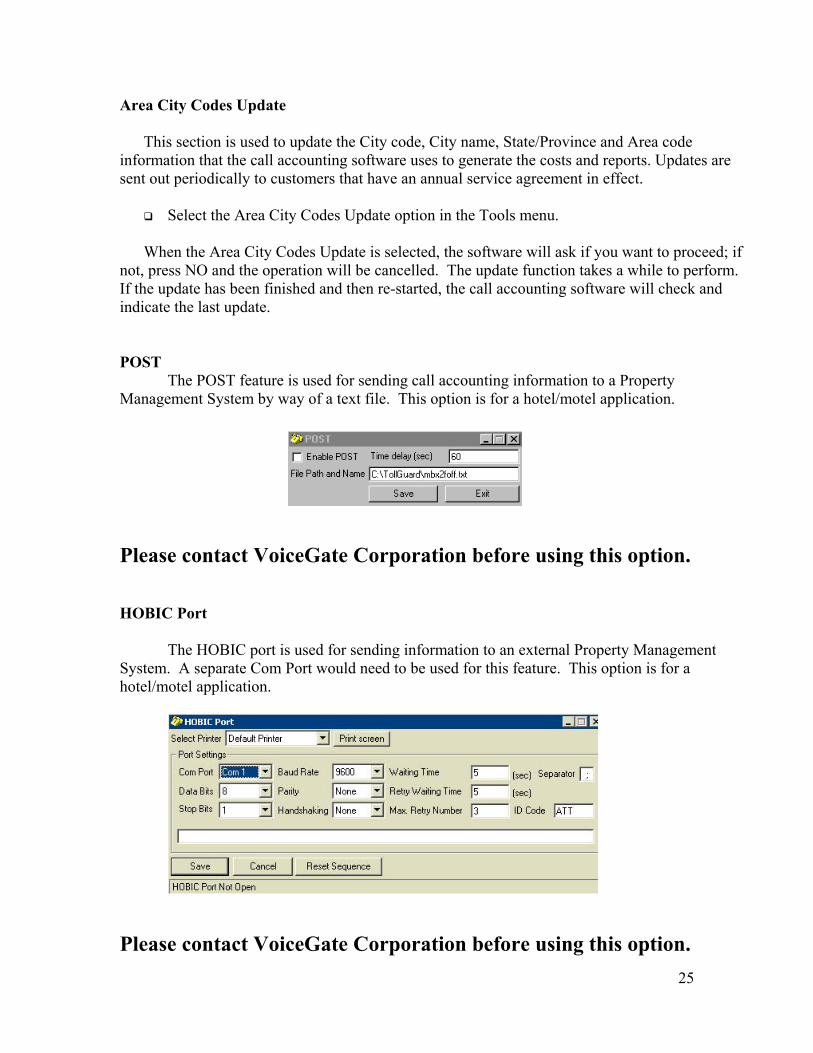
not, press NO and the operation will be cancelled. The update function takes a while to perform. If the update has been finished and then re-started, the call accounting software will check and indicate the last update. POST The POST feature is used for sending call accounting information to a Property Management System by way of a text file. This option is for a hotel/motel application.
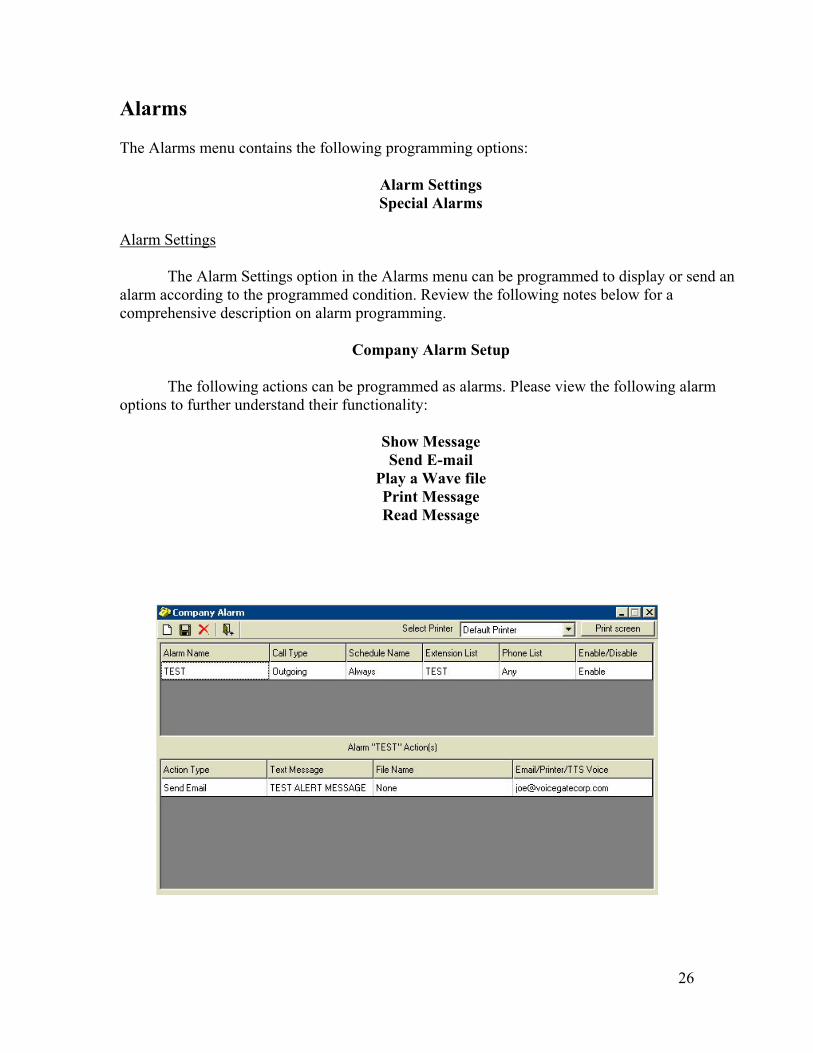
Please contact VoiceGate Corporation before using this option. HOBIC Port The HOBIC port is used for sending information to an external Property Management System. A separate Com Port would need to be used for this feature. This option is for a hotel/motel application.
Please contact VoiceGate Corporation before using this option. 25
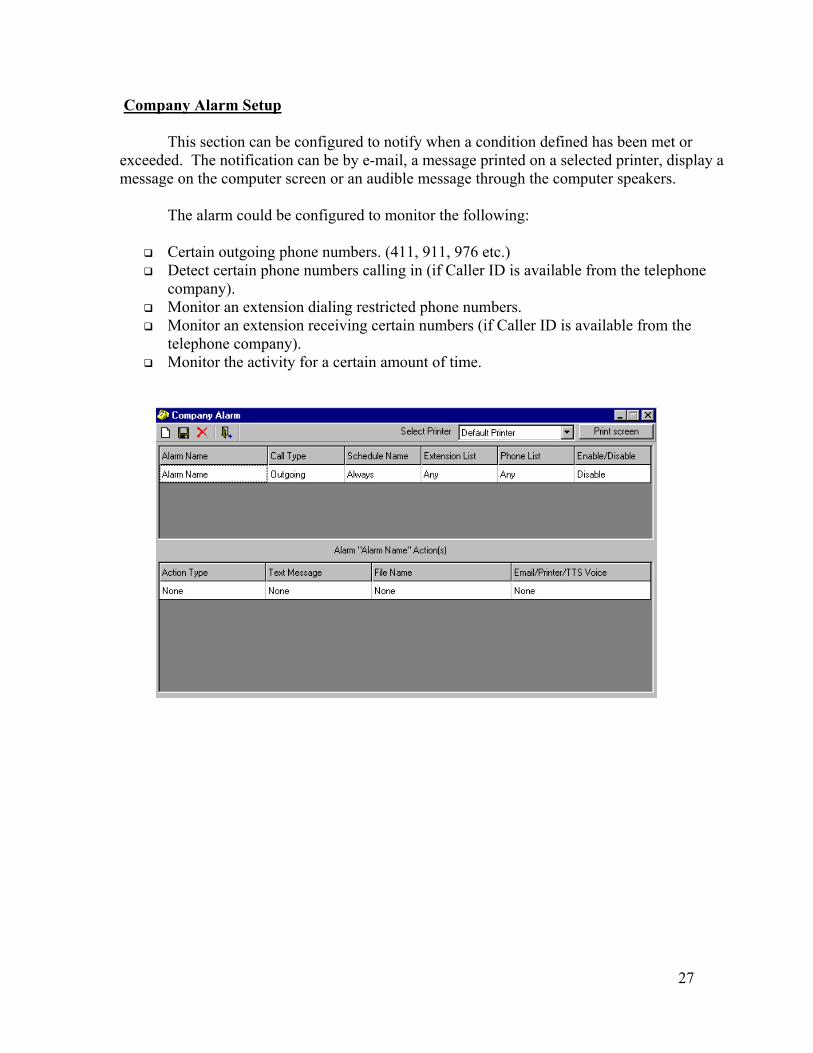
Alarms The Alarms menu contains the following programming options:
Alarm Settings Special Alarms
Alarm Settings
The Alarm Settings option in the Alarms menu can be programmed to display or send an alarm according to the programmed condition. Review the following notes below for a comprehensive description on alarm programming.
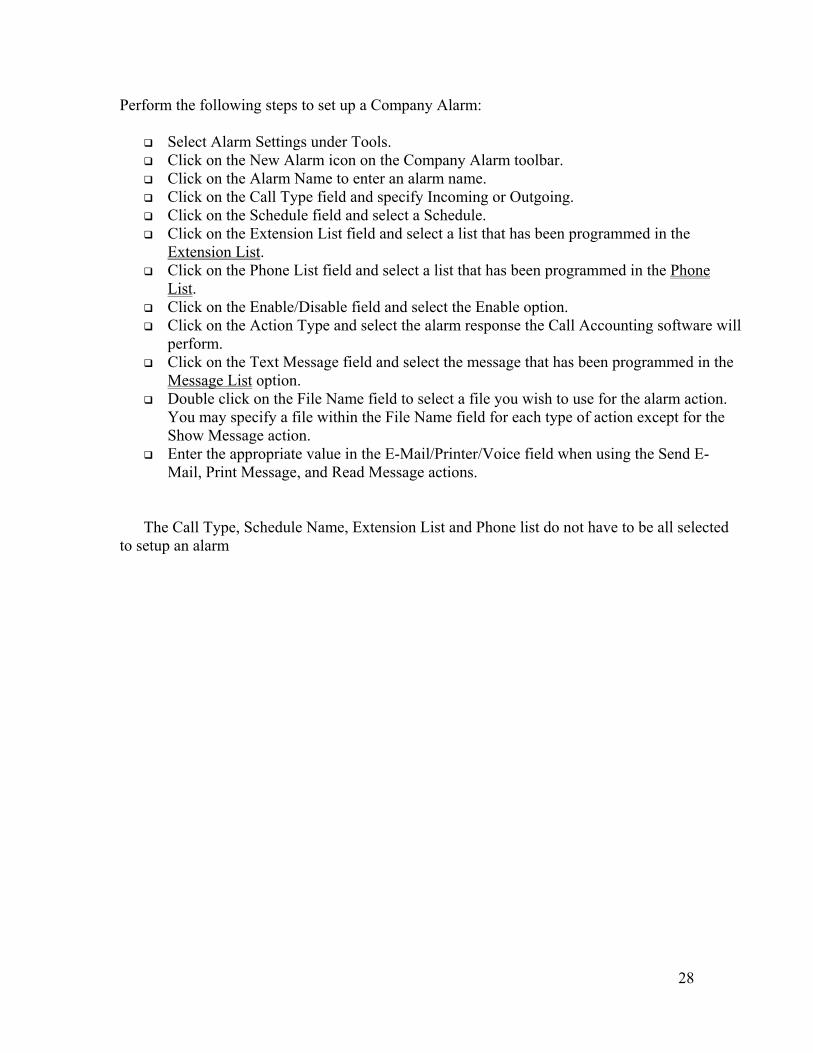
Company Alarm Setup
The following actions can be programmed as alarms. Please view the following alarm
options to further understand their functionality:
Show Message Send E-mail
Play a Wave file Print Message Read Message
26
Company Alarm Setup This section can be configured to notify when a condition defined has been met or
exceeded. The notification can be by e-mail, a message printed on a selected printer, display a message on the computer screen or an audible message through the computer speakers. The alarm could be configured to monitor the following:
Certain outgoing phone numbers. (411, 911, 976 etc.) Detect certain phone numbers calling in (if Caller ID is available from the telephone
company). Monitor an extension dialing restricted phone numbers. Monitor an extension receiving certain numbers (if Caller ID is available from the
telephone company). Monitor the activity for a certain amount of time.
27
Perform the following steps to set up a Company Alarm: Select Alarm Settings under Tools. Click on the New Alarm icon on the Company Alarm toolbar. Click on the Alarm Name to enter an alarm name. Click on the Call Type field and specify Incoming or Outgoing. Click on the Schedule field and select a Schedule. Click on the Extension List field and select a list that has been programmed in the
Extension List. Click on the Phone List field and select a list that has been programmed in the Phone
List. Click on the Enable/Disable field and select the Enable option. Click on the Action Type and select the alarm response the Call Accounting software will
perform. Click on the Text Message field and select the message that has been programmed in the
Message List option. Double click on the File Name field to select a file you wish to use for the alarm action.
You may specify a file within the File Name field for each type of action except for the Show Message action.
Enter the appropriate value in the E-Mail/Printer/Voice field when using the Send E-Mail, Print Message, and Read Message actions.
The Call Type, Schedule Name, Extension List and Phone list do not have to be all selected to setup an alarm
28
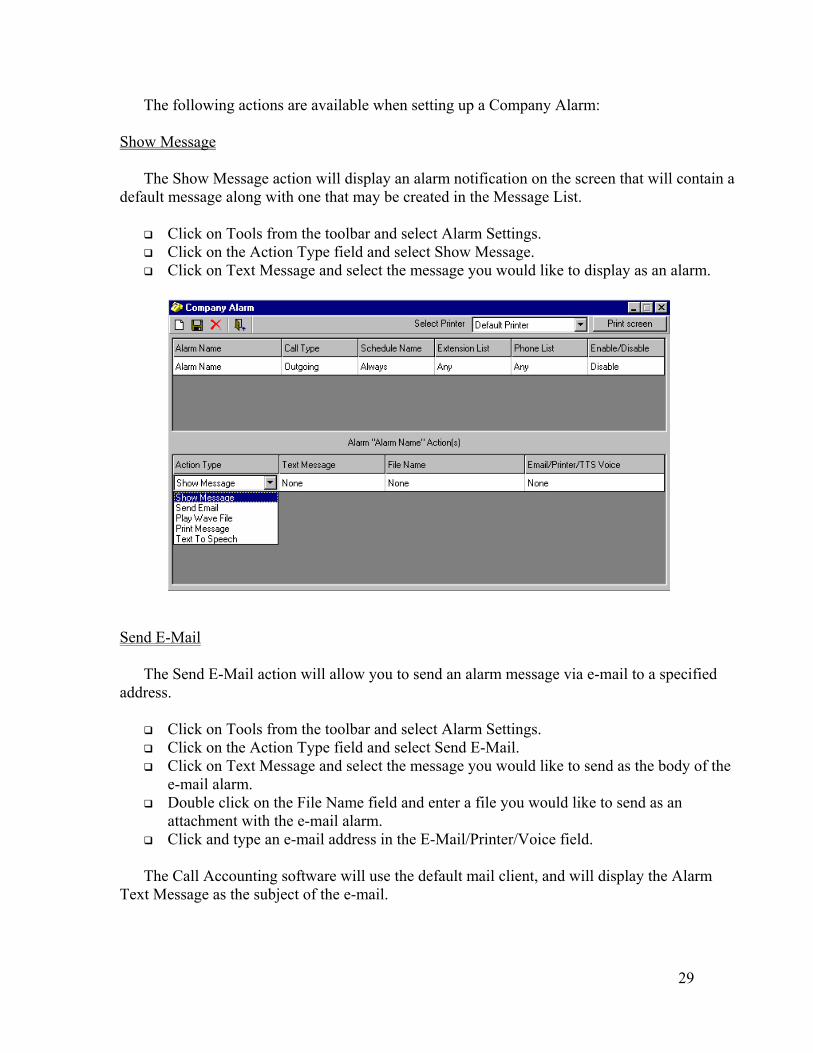
The following actions are available when setting up a Company Alarm: Show Message
The Show Message action will display an alarm notification on the screen that will contain a
default message along with one that may be created in the Message List.
Click on Tools from the toolbar and select Alarm Settings. Click on the Action Type field and select Show Message. Click on Text Message and select the message you would like to display as an alarm.
Send E-Mail
The Send E-Mail action will allow you to send an alarm message via e-mail to a specified address.
Click on Tools from the toolbar and select Alarm Settings. Click on the Action Type field and select Send E-Mail. Click on Text Message and select the message you would like to send as the body of the
e-mail alarm. Double click on the File Name field and enter a file you would like to send as an
attachment with the e-mail alarm. Click and type an e-mail address in the E-Mail/Printer/Voice field.
The Call Accounting software will use the default mail client, and will display the Alarm
Text Message as the subject of the e-mail.
29
Play Wave File
The Play Wave file action will play the selected sound file in the File Name field via the
installed sound card instead of displaying an alarm message on the desktop.
Click on Tools from the toolbar and select Alarm Settings. Click on the Action Type field and select Play Wave File. Double click on the File Name field and select a wave file that will play as an alarm.
Print Message
The Print Message action will print the alarm report to the default, or any other installed
printer.
Click on Tools from the toolbar and select Alarm Settings. Click on the Action Type field and select Print Message. Click on Text Message and select the message that will be printed. Double click on the File Name field and enter a file that will be printed as part of the
alarm. Click and select the appropriate printer that will be used to print the alarm.
Read Message
The Read Message action will convert a text message to speech and place the converted file
into the specified user’s mailbox.
Click on Tools from the toolbar and select Alarm Settings. Click on the Action Type field and select Read Message. Click on Text Message and select the message that will be converted to speech. Double click on the File Name field and enter a file that may also be converted and
deposited to a user’s mailbox. Select the user from the E-Mail/Printer/Voice field that will receive the converted speech
files.
30
Special Alarms
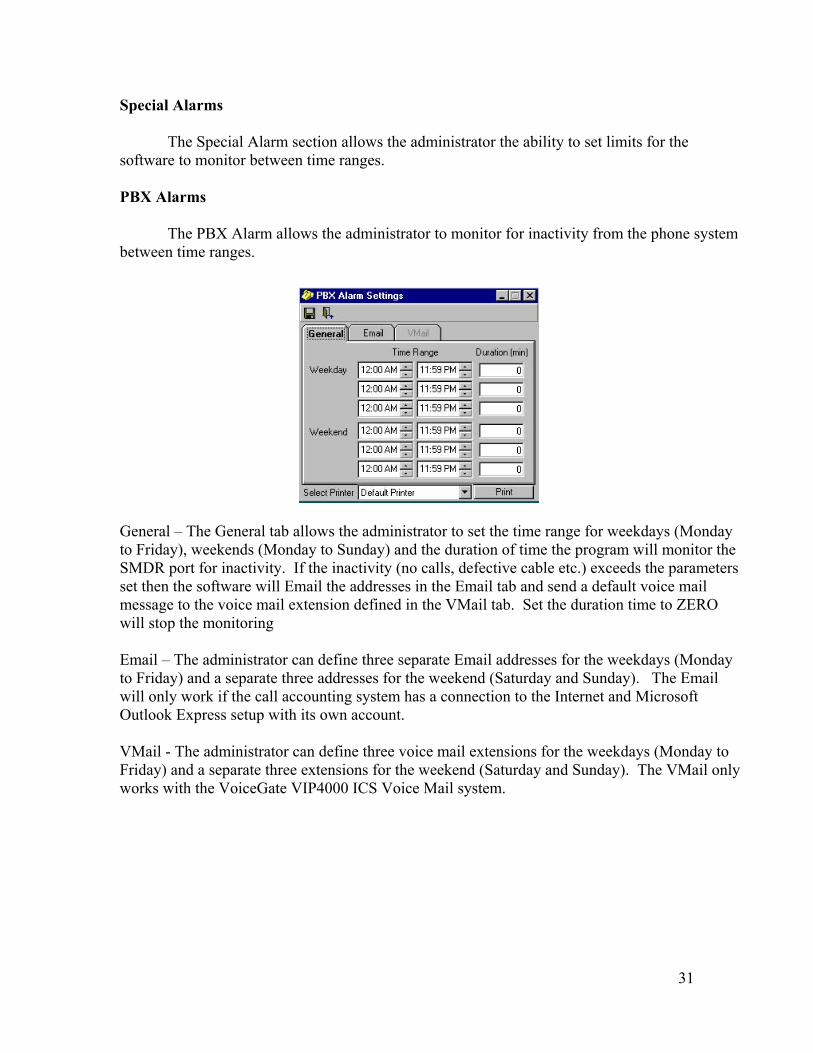
The Special Alarm section allows the administrator the ability to set limits for the software to monitor between time ranges. PBX Alarms The PBX Alarm allows the administrator to monitor for inactivity from the phone system between time ranges.
General – The General tab allows the administrator to set the time range for weekdays (Monday to Friday), weekends (Monday to Sunday) and the duration of time the program will monitor the SMDR port for inactivity. If the inactivity (no calls, defective cable etc.) exceeds the parameters set then the software will Email the addresses in the Email tab and send a default voice mail message to the voice mail extension defined in the VMail tab. Set the duration time to ZERO will stop the monitoring Email – The administrator can define three separate Email addresses for the weekdays (Monday to Friday) and a separate three addresses for the weekend (Saturday and Sunday). The Email will only work if the call accounting system has a connection to the Internet and Microsoft Outlook Express setup with its own account. VMail - The administrator can define three voice mail extensions for the weekdays (Monday to Friday) and a separate three extensions for the weekend (Saturday and Sunday). The VMail only works with the VoiceGate VIP4000 ICS Voice Mail system.
31
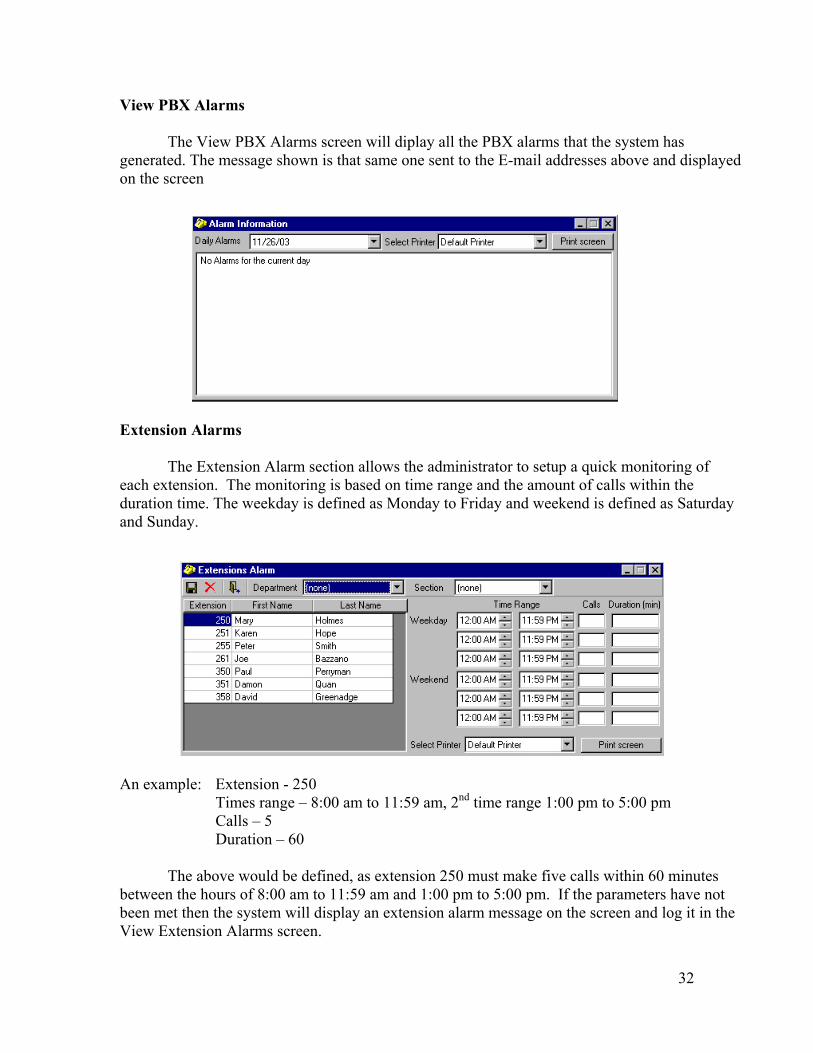
View PBX Alarms
The View PBX Alarms screen will diplay all the PBX alarms that the system has generated. The message shown is that same one sent to the E-mail addresses above and displayed on the screen
Extension Alarms
The Extension Alarm section allows the administrator to setup a quick monitoring of
each extension. The monitoring is based on time range and the amount of calls within the duration time. The weekday is defined as Monday to Friday and weekend is defined as Saturday and Sunday.
An example: Extension - 250
Times range – 8:00 am to 11:59 am, 2nd time range 1:00 pm to 5:00 pm Calls – 5 Duration – 60
The above would be defined, as extension 250 must make five calls within 60 minutes between the hours of 8:00 am to 11:59 am and 1:00 pm to 5:00 pm. If the parameters have not been met then the system will display an extension alarm message on the screen and log it in the View Extension Alarms screen.
32
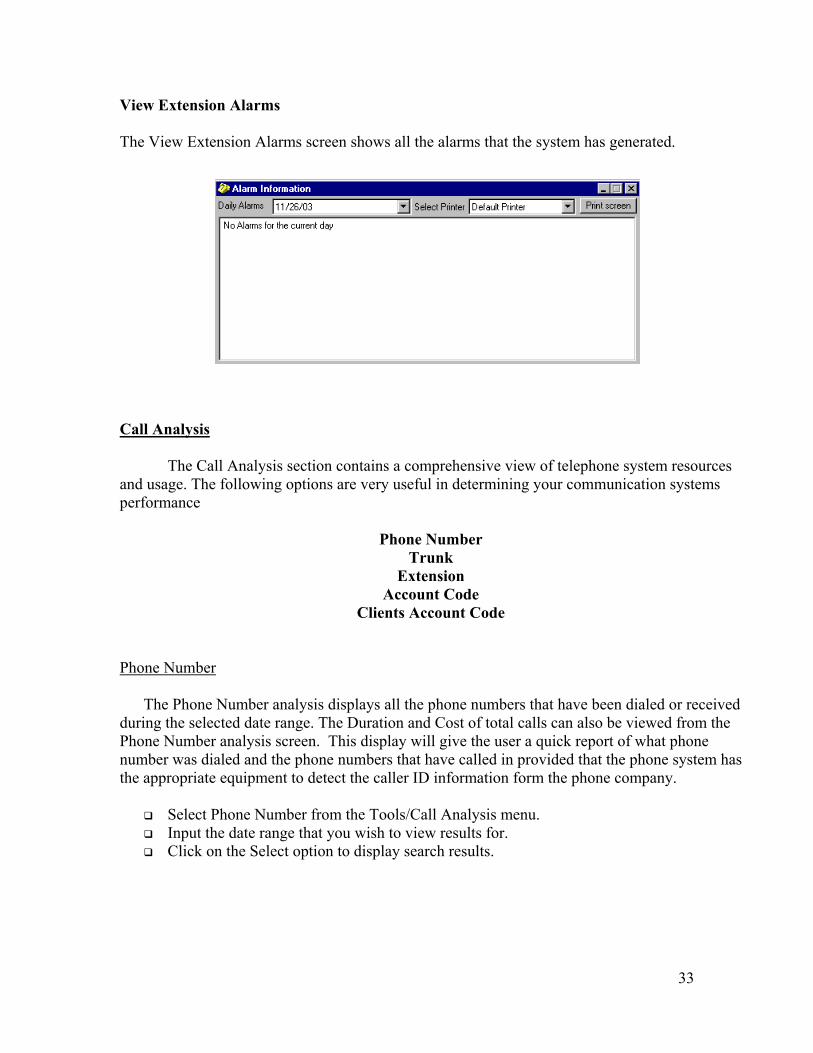
View Extension Alarms The View Extension Alarms screen shows all the alarms that the system has generated.
Call Analysis
The Call Analysis section contains a comprehensive view of telephone system resources and usage. The following options are very useful in determining your communication systems performance
Phone Number Trunk
Extension Account Code
Clients Account Code Phone Number
The Phone Number analysis displays all the phone numbers that have been dialed or received during the selected date range. The Duration and Cost of total calls can also be viewed from the Phone Number analysis screen. This display will give the user a quick report of what phone number was dialed and the phone numbers that have called in provided that the phone system has the appropriate equipment to detect the caller ID information form the phone company.
Select Phone Number from the Tools/Call Analysis menu. Input the date range that you wish to view results for. Click on the Select option to display search results.
33
Trunk
The Trunks section uses the date range option to display the amount of time in minutes a particular trunk has been used for incoming, outgoing and total calls.
Select Trunks from the Tools/Call Analysis menu. Input a date range to search for trunk data. Click on the Select to display the search results.
Extension
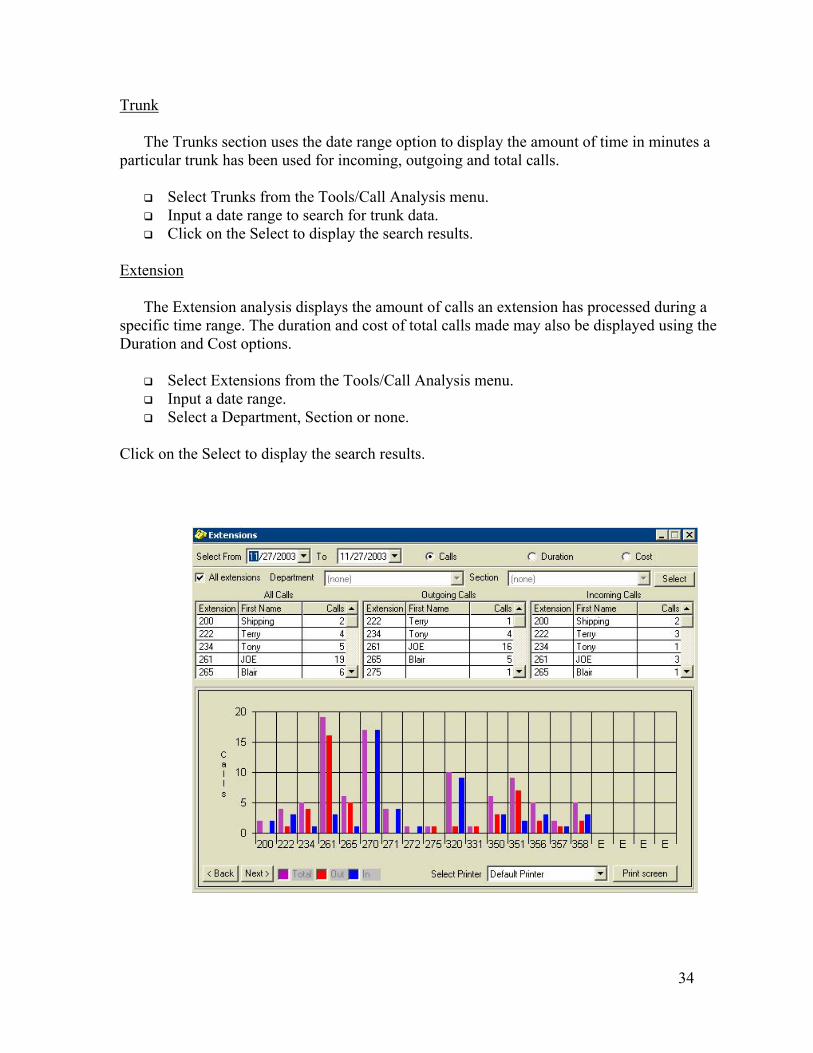
The Extension analysis displays the amount of calls an extension has processed during a
specific time range. The duration and cost of total calls made may also be displayed using the Duration and Cost options.
Select Extensions from the Tools/Call Analysis menu. Input a date range. Select a Department, Section or none.
Click on the Select to display the search results.
34
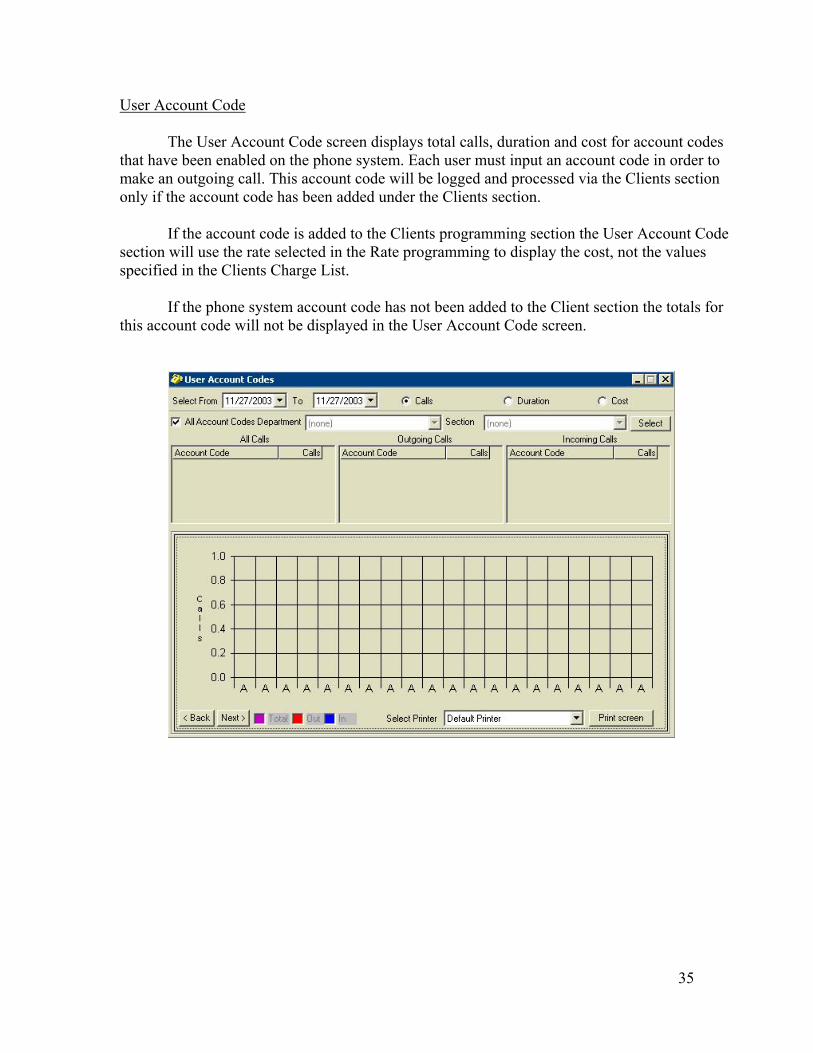
User Account Code
The User Account Code screen displays total calls, duration and cost for account codes that have been enabled on the phone system. Each user must input an account code in order to make an outgoing call. This account code will be logged and processed via the Clients section only if the account code has been added under the Clients section.
If the account code is added to the Clients programming section the User Account Code section will use the rate selected in the Rate programming to display the cost, not the values specified in the Clients Charge List.
If the phone system account code has not been added to the Client section the totals for this account code will not be displayed in the User Account Code screen.
35
Client Account Code
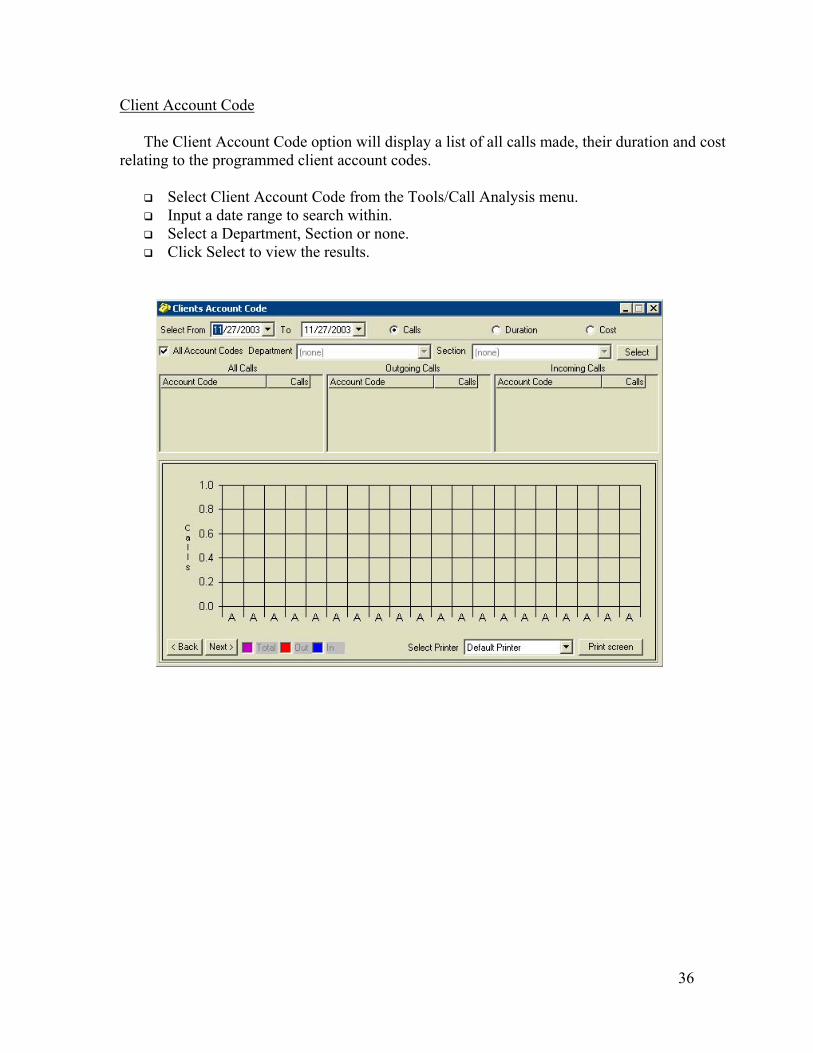
The Client Account Code option will display a list of all calls made, their duration and cost relating to the programmed client account codes.
Select Client Account Code from the Tools/Call Analysis menu. Input a date range to search within. Select a Department, Section or none. Click Select to view the results.
36
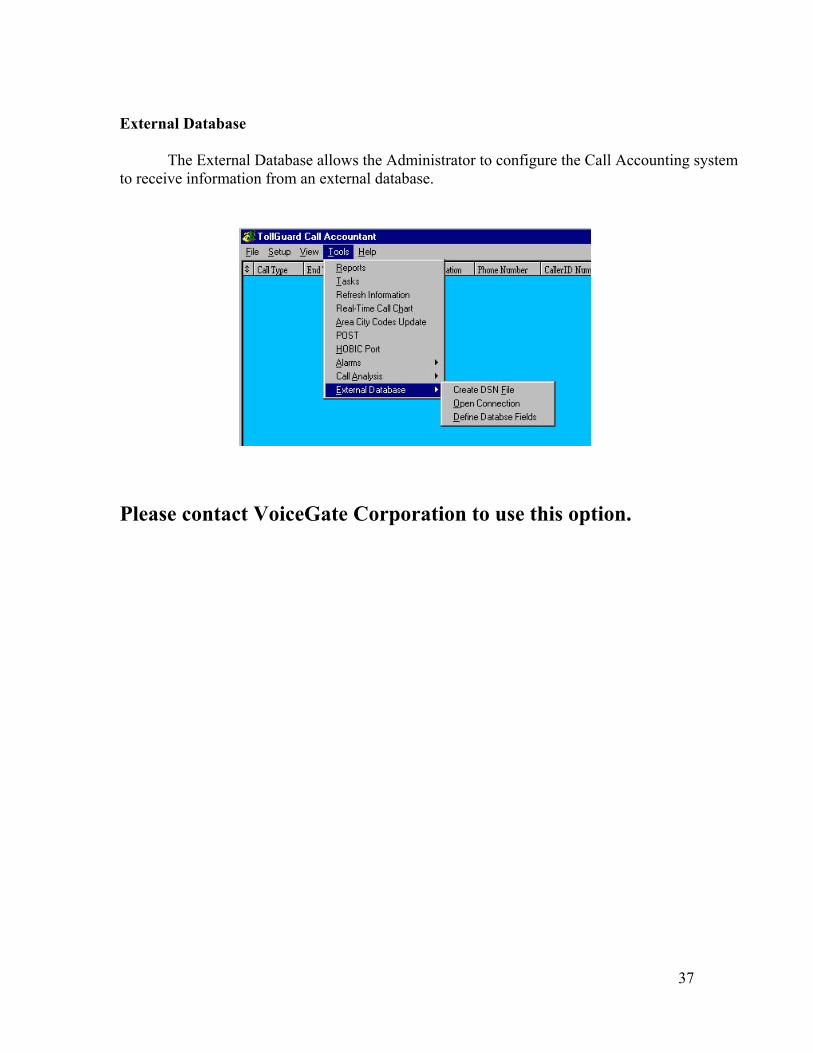
External Database The External Database allows the Administrator to configure the Call Accounting system to receive information from an external database.
Please contact VoiceGate Corporation to use this option.
37
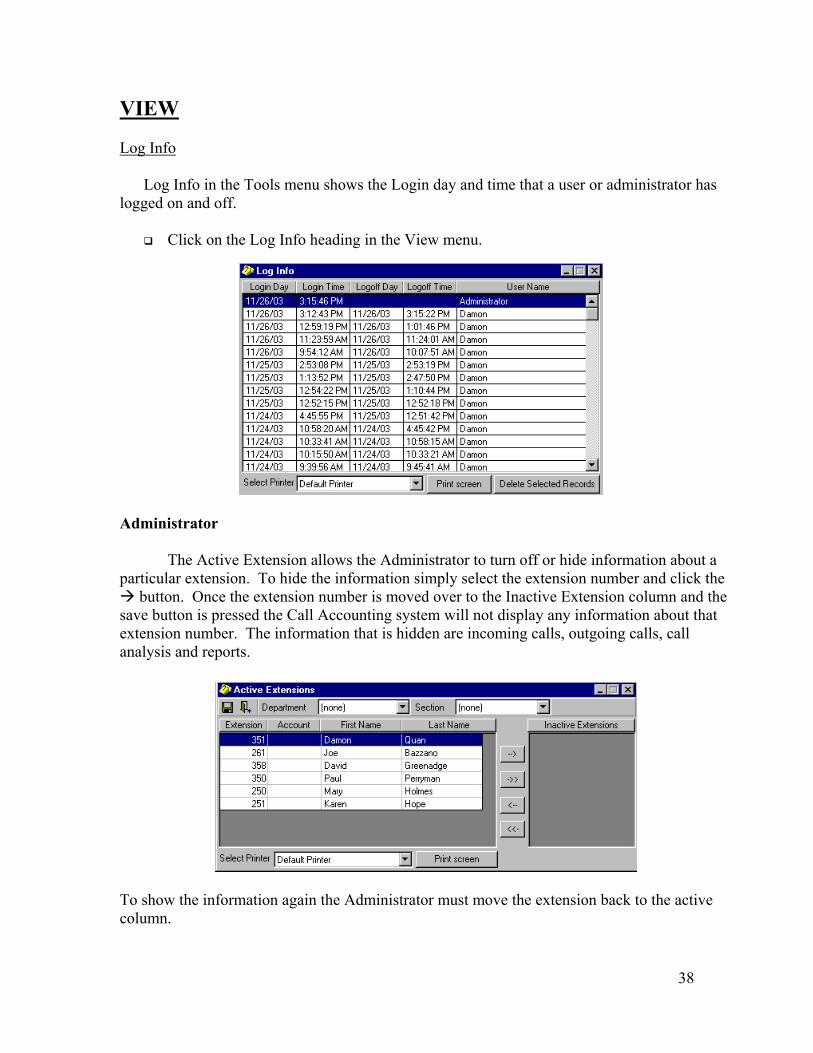
VIEW Log Info
Log Info in the Tools menu shows the Login day and time that a user or administrator has
logged on and off.
Click on the Log Info heading in the View menu.
Administrator The Active Extension allows the Administrator to turn off or hide information about a particular extension. To hide the information simply select the extension number and click the
button. Once the extension number is moved over to the Inactive Extension column and the save button is pressed the Call Accounting system will not display any information about that extension number. The information that is hidden are incoming calls, outgoing calls, call analysis and reports.
To show the information again the Administrator must move the extension back to the active column.
38
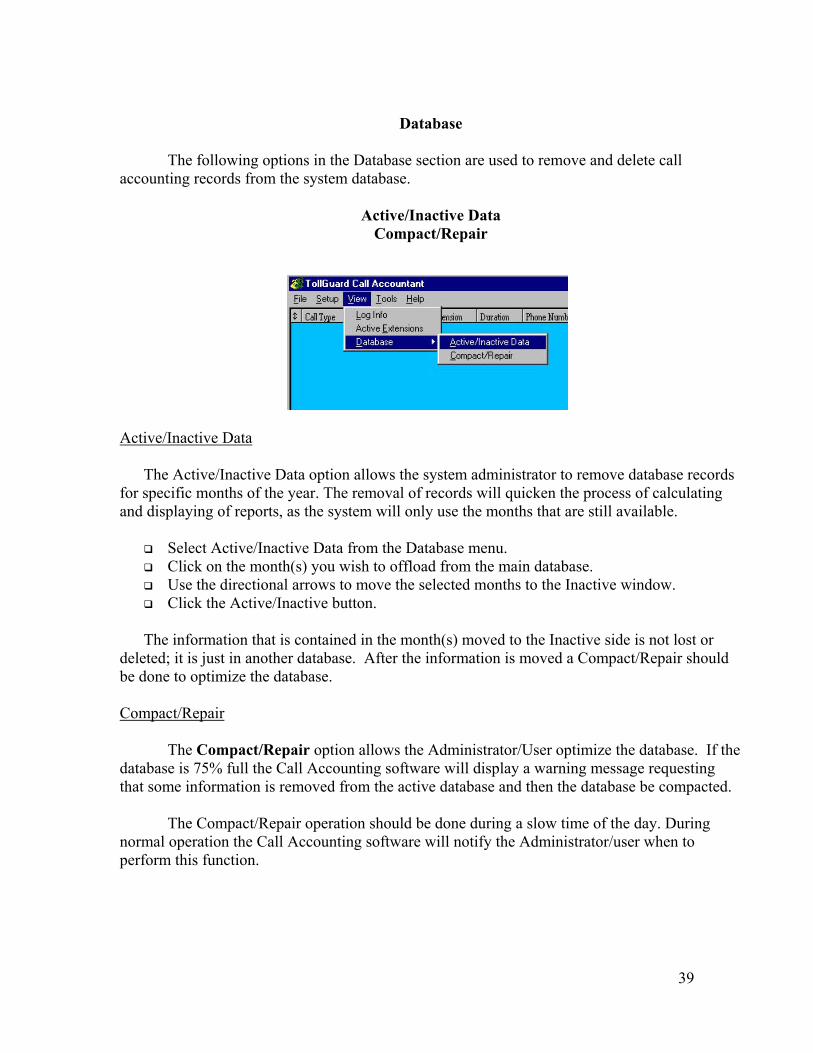
Database
The following options in the Database section are used to remove and delete call
accounting records from the system database.
Active/Inactive Data Compact/Repair
Active/Inactive Data
The Active/Inactive Data option allows the system administrator to remove database records
for specific months of the year. The removal of records will quicken the process of calculating and displaying of reports, as the system will only use the months that are still available.
Select Active/Inactive Data from the Database menu. Click on the month(s) you wish to offload from the main database. Use the directional arrows to move the selected months to the Inactive window. Click the Active/Inactive button.
The information that is contained in the month(s) moved to the Inactive side is not lost or
deleted; it is just in another database. After the information is moved a Compact/Repair should be done to optimize the database. Compact/Repair
The Compact/Repair option allows the Administrator/User optimize the database. If the database is 75% full the Call Accounting software will display a warning message requesting that some information is removed from the active database and then the database be compacted.
The Compact/Repair operation should be done during a slow time of the day. During normal operation the Call Accounting software will notify the Administrator/user when to perform this function.
39
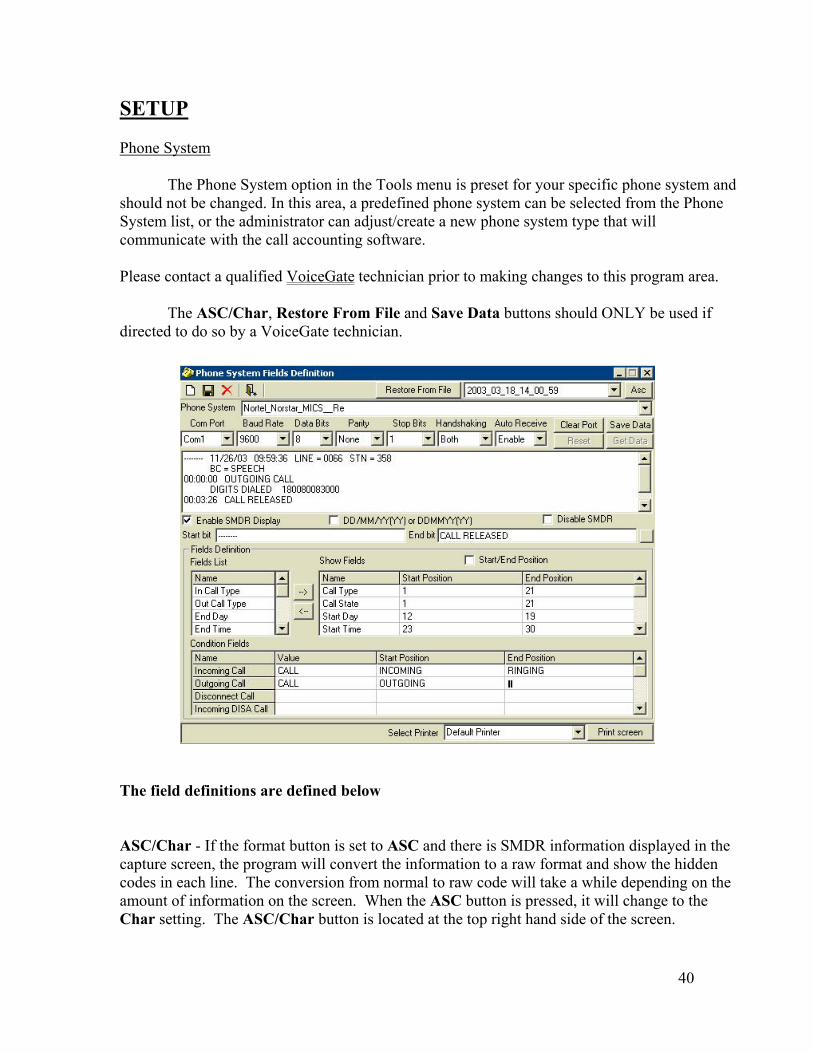
SETUP Phone System
The Phone System option in the Tools menu is preset for your specific phone system and
should not be changed. In this area, a predefined phone system can be selected from the Phone System list, or the administrator can adjust/create a new phone system type that will communicate with the call accounting software. Please contact a qualified VoiceGate technician prior to making changes to this program area.
The ASC/Char, Restore From File and Save Data buttons should ONLY be used if
directed to do so by a VoiceGate technician.
The field definitions are defined below ASC/Char - If the format button is set to ASC and there is SMDR information displayed in the capture screen, the program will convert the information to a raw format and show the hidden codes in each line. The conversion from normal to raw code will take a while depending on the amount of information on the screen. When the ASC button is pressed, it will change to the Char setting. The ASC/Char button is located at the top right hand side of the screen.
40
If the format button is set to Char and raw information is being displayed on the screen the program will convert the raw information back to normal and hide the raw codes. When the Char button is pressed, it will convert to ASC. Restore From File - The Restore From File option is used to restore the value from the database for a listed phone system. After pressing the Restore From File button, press the Save icon to use those values. Clear Port - The Clear Port will clear the information in the Com Port buffer, the information displayed on the screen is not cleared. Save Data - The Save Data button is used to save the information in the display screen for technical support purposes. Information about incoming/outgoing calls are saved to a file that VoiceGate technical support can use to help in setting up a non listed phone system. The information is saved and given a file name in the following format. 2003_12_07_14_10_59.phd The above example translates to December 07, 2003 2:10:59 PM Each time the Save Data button is pressed a new file is generated.
Comm. Port – From the drop down menu, select the Communication Port on the computer where the SMDR cable is connected. Default value is Com 1.
Baud Rate - From the drop down menu, select the Baud Rate speed that the computer needs to communicate with the phone system. Default value is 2400.
Data Bits - From the drop down menu, select the Data Bits setting for the phone system. Default value is 8 (eight). Parity - From the drop down menu, select the Parity setting for the phone system. Default value is None.
Stop Bits - From the drop down menu, select the Stop Bits setting for the phone system. Default value is 1 (one). Hand Shaking - From the drop down menu, select the Hand Shaking method setting for the phone system. Default value is None. Auto Receive - When this field is Enabled, the software continues to collect information from the phone system SMDR port. If the field is Disabled, the software ceases to collect and display information from the phone system. The last string of information obtained will stay on the screen. The SMDR information displayed can be used by the installer to set up the call accounting software for a phone system not predefined.
41
Reset - The Reset button becomes active only when the Auto Receive function is DISABLED. The Reset button is used to tell the call accounting software to use the changed communication values to clear/erase the information in the buffer. Use the GetData button to view the results for the changed values. If no information is seen after pressing the GetData button, do the following:
Change the communication values again, then press Reset. Make another test call and press GetData. Follow this sequence until the communication values are correct. Once the values are correct, press the SAVE icon.
GetData - The GetData button is used in conjunction with the Reset function. This function will retrieve the information in the buffer and display it on the screen.
Start bit - The Start bit field is defined by the administrator, as the first bit of information the phone system will send when a call is completed. The information in this field is always sent to indicate the start of a new call.
End bit - The End bit field is defined by the administrator as the last bit of information the phone system will send when a call is completed. The information in this field is always sent to indicate the end of a call.
Enable SMDR Display - The Enable SMDR Display field if selected, will display the SMDR information from the phone system in the diagnostic screen above this field. If this field is not selected, then the SMDR information will not be displayed in the diagnostic screen. DD/MM/YY or DDMMYY – This field would be activated if the phone system sends the date in this format. The default format is MM/DD/YY or MMDDYY.
Stop Extract Information - The Stop Extract Information field will show the SMDR information on the display screen but will not display call information on the main call accounting screen. The database will also not be updated. This field is used in conjunction with the Stop Retrieving information field to set up the call accounting software if it is not available from the phone system list. Start/End Position - The Start/End Position option allows the installer to click on the first character in the display screen and drag the cursor to the last character so that the software can calculate the start and length positions of the field automatically. The length and the starting numbers can also be entered manually.
42
Field List Definitions
Some of the fields below are phone system dependent. Field List - The Field List field shows the available column headings that can be selected for a phone system. The options are as follow:
ID Call Type - Defined as the Caller ID information sent from the telephone company. In Call Type - Defined as an incoming call by the phone system
Out Call Type - Defined as an outgoing call by the phone system.
Start Day - Defined as the start date of the call from the phone system.
Start Time - Defined as the start time of the call from the phone system.
Second Extension - Defined as the second extension number that talked to the caller.
Account Code - Defined as the customer account number that the user wishes the call to be charged to.
Verified Account Code - Defined as an alternate code that an extension could use.
Client Account Code - Defined as a Client Account Code that the extension is using for this call. CallerID Name - Defined as the Name of the originating caller from the telephone company. DNIS Name - Defined as the DNIS Name of the originating caller from the phone company. ANI Number - Defined as the ANI Number of the originating caller from the phone company. Call Type - Defined as either an incoming or outgoing call. End Day - Defined as the date the call was terminated. End Time - Defined as the time the call was terminated
Trunk - Defined as the trunk or telephone line that the incoming or outgoing caller used.
Extension - Defined as the extension number that was connected with the incoming call. Duration - Defined as the duration or length of the call.
Phone Number - Defined as the telephone number that was dialed for an outgoing call.
43
Caller ID Number - Defined as the phone number that the telephone company sent for the originating caller.
Transfer Extension - Defined as the extension that transferred the call to the extension that completed the call. Other1 - Defined as a user definable field for a value not listed above. Other2 - Defined as a user definable field for a value not listed above. Other3 - Defined as a user definable field for a value not listed above. Other4 - Defined as a user definable field for a value not listed above. Other5 - Defined as a user definable field for a value not listed above.
Show Fields - The Show Fields area lists the columns that have been selected to display call information on the main call accounting screen.
To select a field, do the following: Choose the fields from the Field List area and use the directional arrow button to move
the field to the Show Fields area. Input the Start and End position on the display screen.
Condition Fields definitions. Incoming Call - Defined as the value used to distinguish an incoming call. Outgoing Call - Defined as the value used to distinguish an outgoing call. Disconnect Call - Defined as the code the phone system sends to indicate a disconnected call. Incoming DISA Call - Defined as the value used to distinguish an incoming Direct Inward System Access call. Outgoing DISA Call - Defined as the value used to distinguish an outgoing Direct Inward System Access call. Call Forwarding Call - Defined as the value used to distinguish a Call Forwarded call. Remote Modem Call - Defined as the value used to distinguish a Remote Modem call. Caller ID Call - Defined as the value used to distinguish an incoming Caller ID call. DISA/ANI Call - Defined as the value used to distinguish an incoming DISA/ANI call.
44
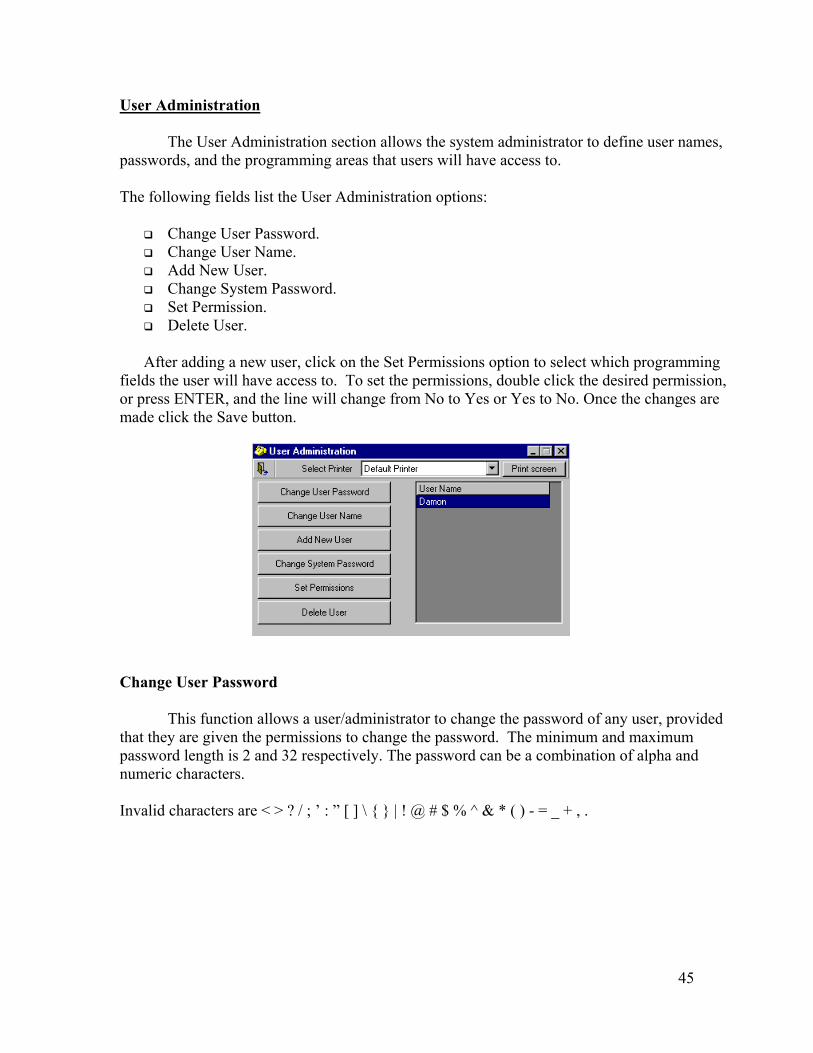
User Administration
The User Administration section allows the system administrator to define user names, passwords, and the programming areas that users will have access to.
The following fields list the User Administration options:
Change User Password. Change User Name. Add New User. Change System Password. Set Permission. Delete User.
After adding a new user, click on the Set Permissions option to select which programming
fields the user will have access to. To set the permissions, double click the desired permission, or press ENTER, and the line will change from No to Yes or Yes to No. Once the changes are made click the Save button.
Change User Password
This function allows a user/administrator to change the password of any user, provided that they are given the permissions to change the password. The minimum and maximum password length is 2 and 32 respectively. The password can be a combination of alpha and numeric characters. Invalid characters are < > ? / ; ’ : ” [ ] \ { } | ! @ # $ % ^ & * ( ) - = _ + , .
45
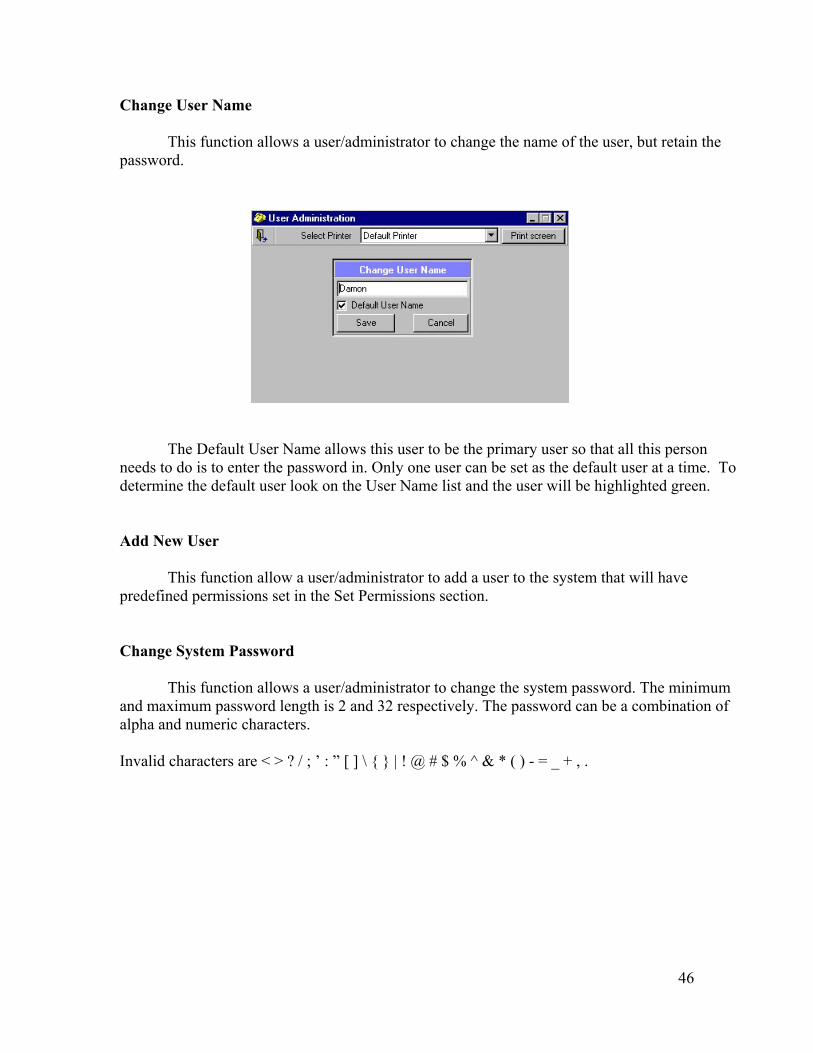
Change User Name
This function allows a user/administrator to change the name of the user, but retain the password.
The Default User Name allows this user to be the primary user so that all this person needs to do is to enter the password in. Only one user can be set as the default user at a time. To determine the default user look on the User Name list and the user will be highlighted green. Add New User
This function allow a user/administrator to add a user to the system that will have predefined permissions set in the Set Permissions section. Change System Password
This function allows a user/administrator to change the system password. The minimum
and maximum password length is 2 and 32 respectively. The password can be a combination of alpha and numeric characters. Invalid characters are < > ? / ; ’ : ” [ ] \ { } | ! @ # $ % ^ & * ( ) - = _ + , .
46
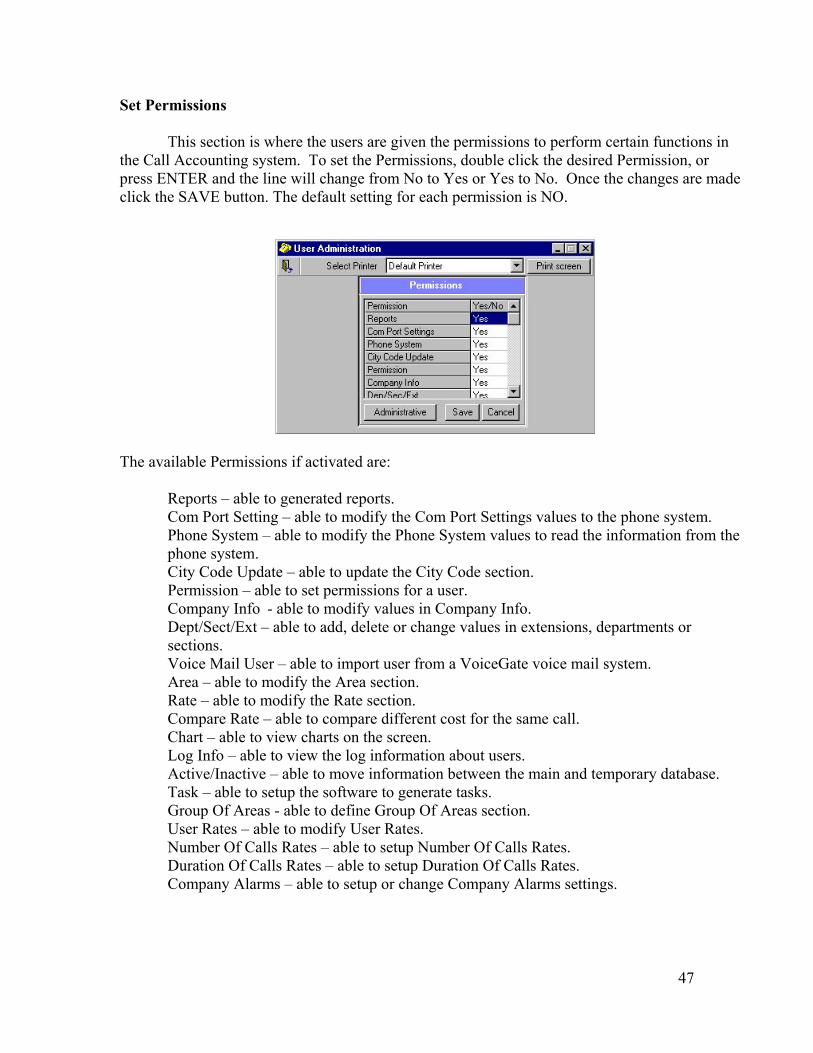
Set Permissions This section is where the users are given the permissions to perform certain functions in
the Call Accounting system. To set the Permissions, double click the desired Permission, or press ENTER and the line will change from No to Yes or Yes to No. Once the changes are made click the SAVE button. The default setting for each permission is NO.
The available Permissions if activated are:
Reports – able to generated reports. Com Port Setting – able to modify the Com Port Settings values to the phone system.
Phone System – able to modify the Phone System values to read the information from the phone system.
City Code Update – able to update the City Code section. Permission – able to set permissions for a user.
Company Info - able to modify values in Company Info. Dept/Sect/Ext – able to add, delete or change values in extensions, departments or sections.
Voice Mail User – able to import user from a VoiceGate voice mail system. Area – able to modify the Area section. Rate – able to modify the Rate section. Compare Rate – able to compare different cost for the same call. Chart – able to view charts on the screen.
Log Info – able to view the log information about users. Active/Inactive – able to move information between the main and temporary database. Task – able to setup the software to generate tasks. Group Of Areas - able to define Group Of Areas section. User Rates – able to modify User Rates. Number Of Calls Rates – able to setup Number Of Calls Rates. Duration Of Calls Rates – able to setup Duration Of Calls Rates. Company Alarms – able to setup or change Company Alarms settings.
47
Delete Unlock Records – able to Delete Unlock Records. Delete Inactive Records – able to Delete Inactive Records. Extension List – able to add change or delete extensions. Message List – able to create, change or delete error messages. Phone List - able to create, change or delete a phone number. Schedule List - able to create, change or delete a schedule list. Holiday List - able to create, change or delete a holiday list. Clients – able to setup a client. Phone Number – able to view phone number activity information. Trunk – able to view trunk activity information on the screen. Extension - able to view extension activity information on the screen. PBX Alarms – able to define the PBX alarm values. Extension Alarms - able to view extension alarms on the screen. Account Alarms - able to view account alarms on the screen. View PBX Alarms – able to view PBX alarms on the screen. View Extension Alarms – able to view extension alarms on the screen. Account Code – able to add change or delete account codes. Client Account Code – able to setup a client account code. Active Extension – able to turn an activate or deactivate an extension. Caller Rate – able to setup caller rates. Create DSN File – able to setup and create a DSN file for PMS. Open Connection – able to setup a connection for PMS operations. Define Database Fields – able to setup the database fields to communicate with another database. HOBIC Port – able to setup a Com port to communicate with a PMS.
PMS means Property Management Software Delete User
This function allows a user/administrator to delete a user from the list. When any of the
functions above are changed the user/administrator must have the appropriate permissions set to YES.
48
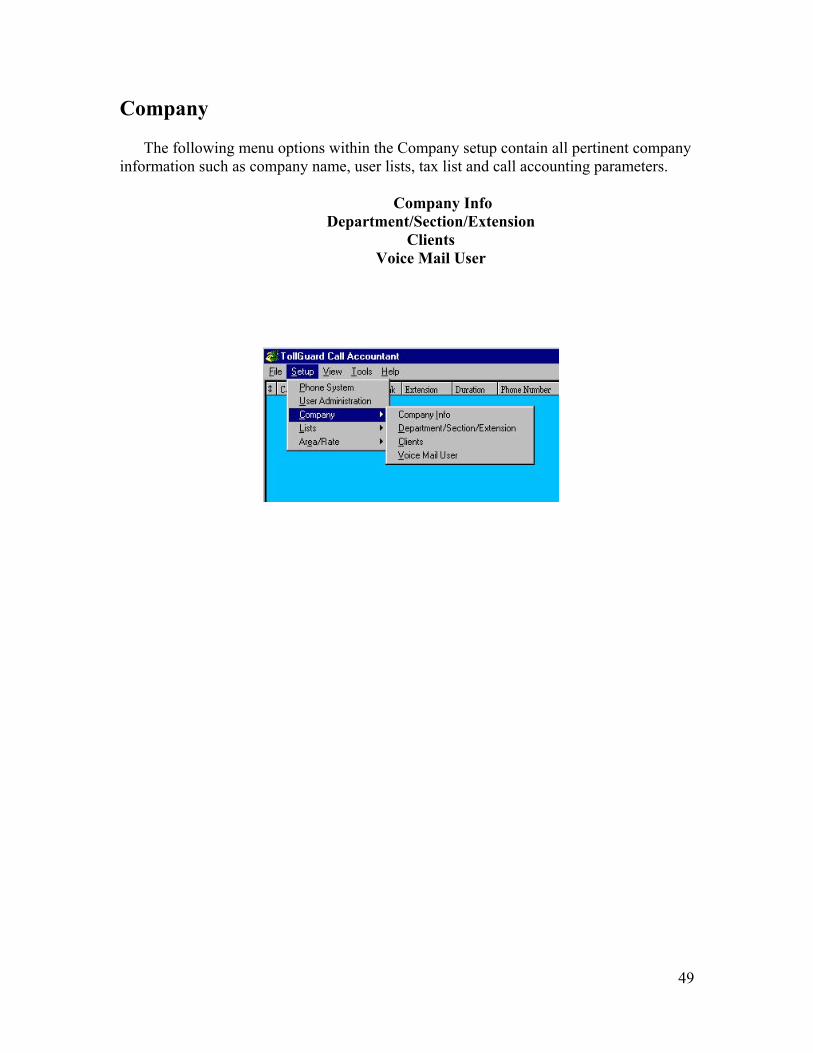
Company
The following menu options within the Company setup contain all pertinent company information such as company name, user lists, tax list and call accounting parameters.
Company Info
Department/Section/Extension Clients
Voice Mail User
49
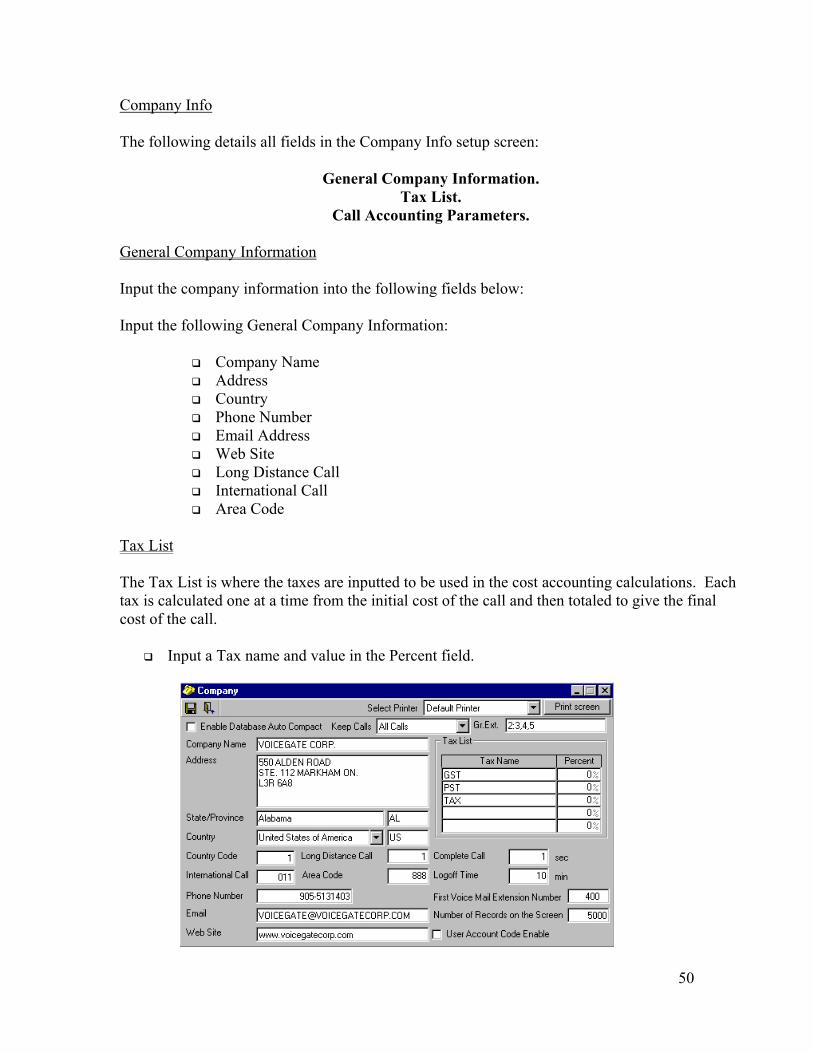
Company Info The following details all fields in the Company Info setup screen:
General Company Information.
Tax List. Call Accounting Parameters.
General Company Information Input the company information into the following fields below: Input the following General Company Information:
Company Name Address Country Phone Number Email Address Web Site Long Distance Call International Call Area Code
Tax List The Tax List is where the taxes are inputted to be used in the cost accounting calculations. Each tax is calculated one at a time from the initial cost of the call and then totaled to give the final cost of the call.
Input a Tax name and value in the Percent field.
50
Call Accounting Parameters
The following settings directly relate to how the call accounting software processes and displays calls:
Enable Database Auto Compact Keep Calls
Gr.Ext. Complete Call Logoff Time
Number of Records on the Screen User Account Code Enable
First VM Extension # Enable Database Auto Compact The Enable Database Auto Compact if activated will monitor the database (SMDR information collected) and if it exceeds a preprogrammed size the program will optimize the database, in other words the database will be defragged. Keep Calls The Keep Calls will delete record from the database automatically on the first day of the following month at 12:01 AM if a selection is made other than All Calls. The default setting is All Calls. The following can be selected:
All Calls, Last 3 Months, Last 6 Months, Last 9 Months or Last 12 Months The following is a guideline to setting this field:
Calls under 1,000 calls per day - All Calls or 12 months 2,000 to 3,000 calls per day - 6 or 9 months 4,000 to 5,000 calls per day - 3 or 6 months
If the information needs to be retained longer go to Active/Inactive under View/Database and move the information to the inactive database.
51
Gr. Ext. The Gr.Ext. (Group Extension) allows the system to receive call accounting information from phone systems that use different extension numbers on the same set for Intercom function. All the extension numbers must be activated for the program to keep track of the information. The following are examples: 2:3,4,5,6 If the primary intercom number is 230 then the secondary numbers would be 330, 430, 530 and 630. Another example is 245is the primary and the secondary would be 345, 445, 545 and 645.
22:44,11,12,55 If the primary intercom is 2201 then the secondary numbers would be 4401, 1101, 1201 and 5501. Another example is 2260 is the primary and the secondary would be 4460, 1160, 1260 and 5560. Complete Call
The Complete Call field specifies the amount of time the call accounting software will constitute a phone call to be complete and valid. If a call is terminated before the time set the software considers it an incomplete call and shows it on the screen as a incoming or outgoing in lower case. For example:
If the Complete Call is set to 1 second, the call accounting software will wait 1 second
before logging call data and applying the cost analysis procedures.
Logoff Time
The Logoff Time indicates how long before an active, logged on administrator or user will be automatically logged off.
Once the Logoff Time has expired, the administrator or user must log back in to resume any program or data checks. If information was changed but not saved at the time of the logoff the software will display a screen asking to save the information for as many sections that have been modified. Entering a zero “0” value will disable this option. A suggested value would be 10 to 20 minutes.
52
Number of Records on the Screen
The Number of Records on the Screen shows how many incoming and outgoing calls will be displayed on the main VoiceGate TollGuard Call Accounting screen.
The maximum amount of records that can be displayed is 5000.
If the TollGuard Call Accounting software was shut down and restarted the information
displayed on the screen does not show back. The information is stored in a database and any new information is displayed.
User Account Code Enable
This option forces the System Administrator to enter an account code for each user
during extension programming in the Department/Section/Extension section. If this option is not activated then an account code will not be requested for the extension entered.
The User Account Code Enable option is disabled as a default.
First VM Extension #
The First VM Extension # must be define so that the program can keep track of all the voice mail extension traffic if a VoiceGate Voice Mail system is running. If the TollGuard Call Accounting software is running as a stand-alone unit than the First VM Extension # field does not have to be entered. When the TollGuard Call Accounting system is used with a third party voice mail system and the port need to be monitored than the extension numbers must be entered and activated just like a regular extension.
53
Department/Section/Extension
The Department/Section/Extension option allows you to manually input users’ extensions, departments, or sections that they belong to.
Select Department/Section/Extension from the Company toolbar heading. Click on the Add New User icon and add all user extensions along with their information. Select the Sections option and add all appropriate sections. Select the Departments option and add all required departments. Click the Save icon to save all changes made.
The Area Group values are set up in the Group of Areas section.
Note:
Before the Call Accounting software will start displaying the collected information about the extension it must be ACTIVATED. To activate an extension perform the following:
Select the extension using the mouse. Press the “ESC” key. Press the “SPACE” bar. The extension box will turn GREEN. Press the SAVE key
When the extension is GREEN the Call Accounting software will start displaying information about it on incoming and outgoing calls. The Out./Inc. Call Rate work in conjunction with the Phone/Caller Name List Rate under Setup/Area Rate. The Area Group works in conjunction with the Area under Setup/Area Rate.
54
The field in Department/Section/Extension have the following character values: Extension - 5 Section Name - 50 Account Code - 20 Department Manager First Name - 20 First Name - 20 Department Manager Last Name - 20 Last Name - 20 Section Manager First Name - 20 Department Name - 20 Section Manager Last Name - 20
55
Client
This section would be used if an organization charges calls back to the customer. The Clients section is a programmable area where individual client accounts may be administered and calculated using specific rates for each call made involving the client. An Account Code for a particular customer is inputted at the start of every outgoing call and during each incoming call. A detailed report may be generated showing all call and cost data for the Account Number(s) created. Some phone systems do not support an account code.
To add a new client perform the following steps:
Select Clients from the Setup/Company heading. Click on the Add New icon. Enter an Account Code. (Maximum 8 digits) Input a First Name, Last Name and all other customer information. Insert any Details that will better describe the customer account. Enter the Base Rate/Min value in the Charge List. Add an additional percentage value that will be taken from the Base Rate and used to
calculate the total cost. Click on the Save icon.
The Account Calls window displays the date, time, duration, phone number, caller name id
and the total cost according to the Charge List settings. The violet colored rows indicate outgoing calls and the blue colored rows indicate incoming calls.
56
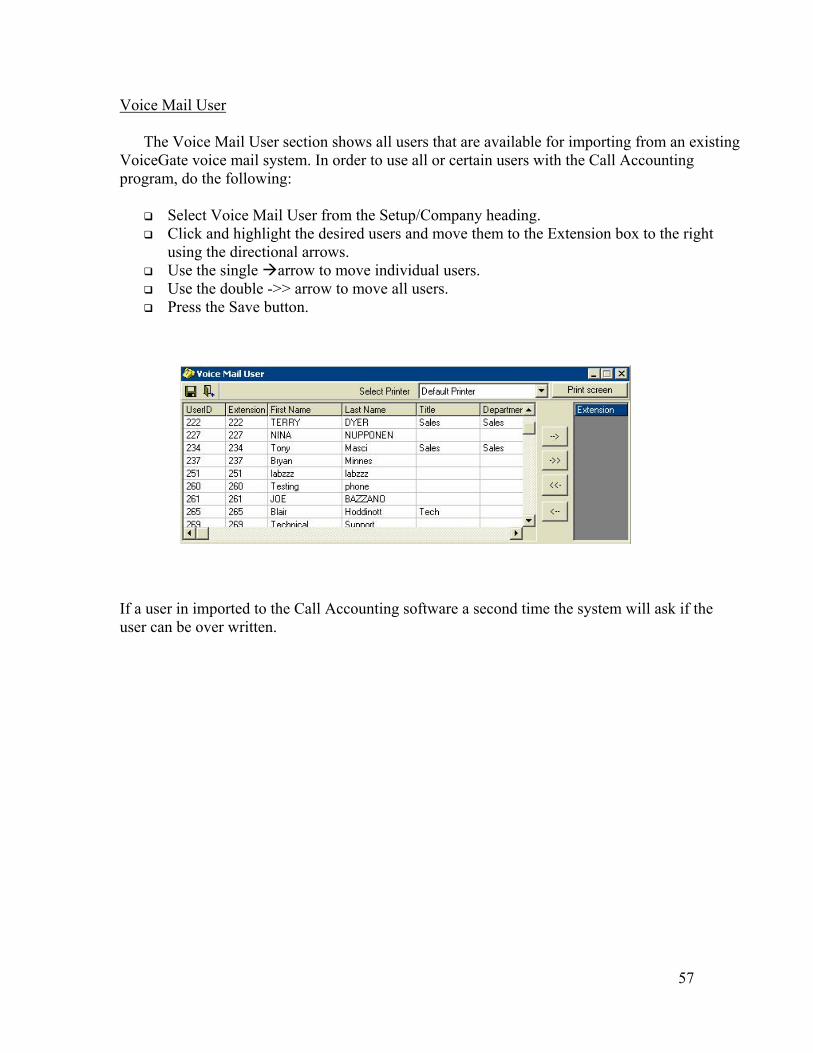
Voice Mail User
The Voice Mail User section shows all users that are available for importing from an existing VoiceGate voice mail system. In order to use all or certain users with the Call Accounting program, do the following:
Select Voice Mail User from the Setup/Company heading. Click and highlight the desired users and move them to the Extension box to the right
using the directional arrows. Use the single arrow to move individual users. Use the double ->> arrow to move all users. Press the Save button.
If a user in imported to the Call Accounting software a second time the system will ask if the user can be over written.
57
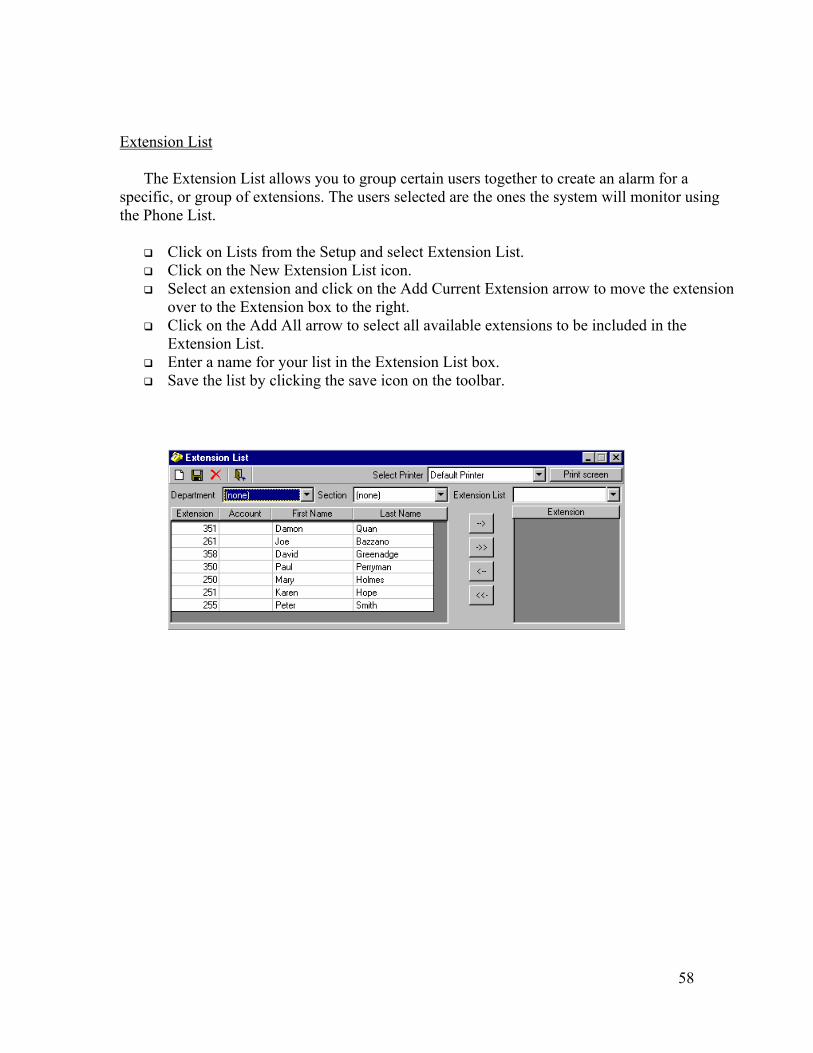
Extension List
The Extension List allows you to group certain users together to create an alarm for a specific, or group of extensions. The users selected are the ones the system will monitor using the Phone List.
Click on Lists from the Setup and select Extension List. Click on the New Extension List icon. Select an extension and click on the Add Current Extension arrow to move the extension
over to the Extension box to the right. Click on the Add All arrow to select all available extensions to be included in the
Extension List. Enter a name for your list in the Extension List box. Save the list by clicking the save icon on the toolbar.
58
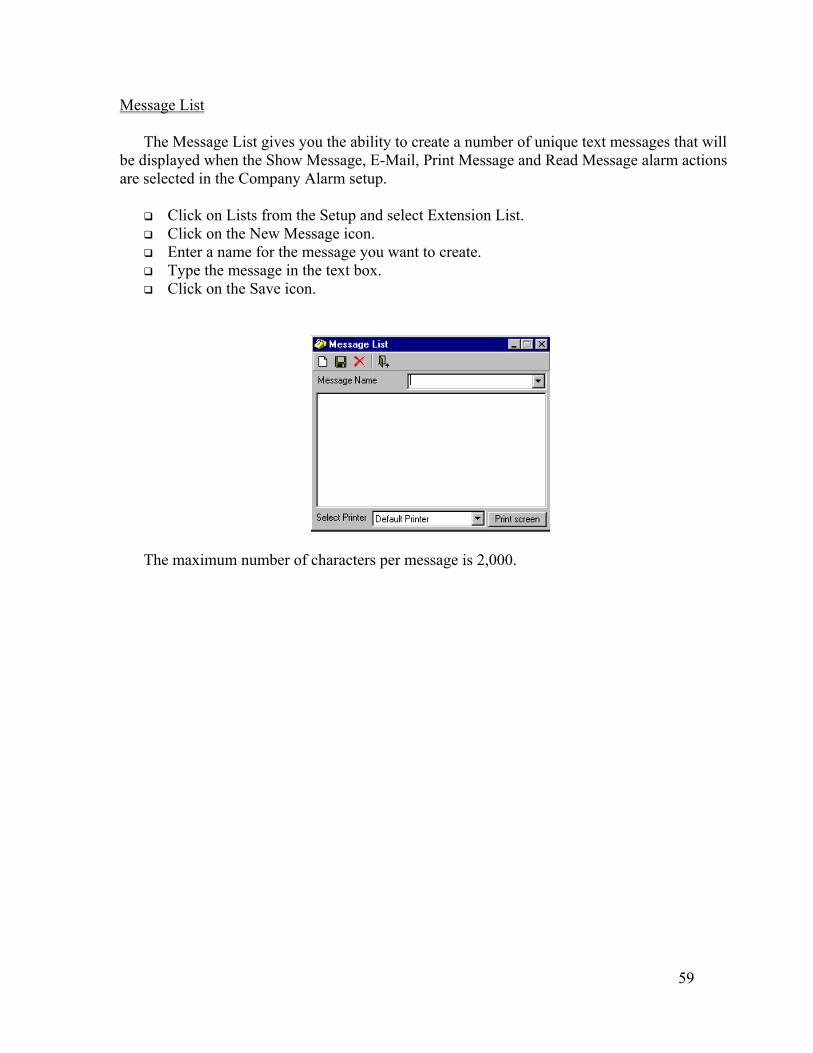
Message List
The Message List gives you the ability to create a number of unique text messages that will be displayed when the Show Message, E-Mail, Print Message and Read Message alarm actions are selected in the Company Alarm setup.
Click on Lists from the Setup and select Extension List. Click on the New Message icon. Enter a name for the message you want to create. Type the message in the text box. Click on the Save icon.
The maximum number of characters per message is 2,000.
59
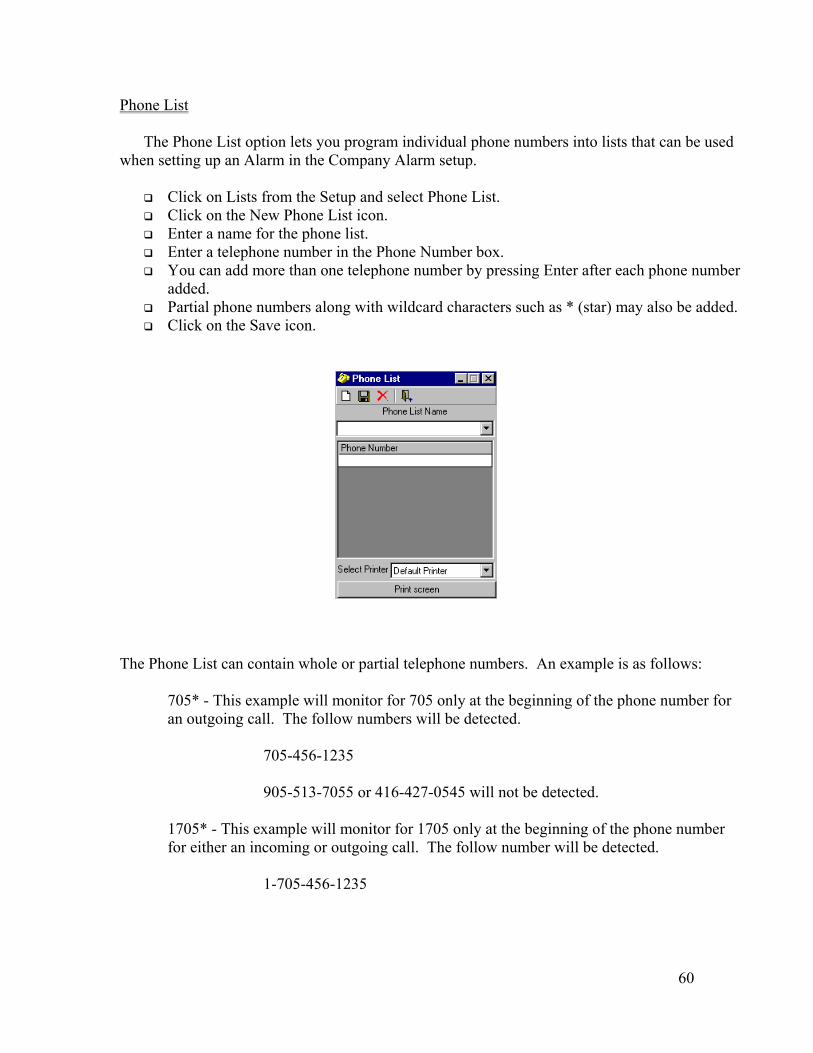
Phone List
The Phone List option lets you program individual phone numbers into lists that can be used when setting up an Alarm in the Company Alarm setup.
Click on Lists from the Setup and select Phone List. Click on the New Phone List icon. Enter a name for the phone list. Enter a telephone number in the Phone Number box. You can add more than one telephone number by pressing Enter after each phone number
added. Partial phone numbers along with wildcard characters such as * (star) may also be added. Click on the Save icon.
The Phone List can contain whole or partial telephone numbers. An example is as follows:
705* - This example will monitor for 705 only at the beginning of the phone number for an outgoing call. The follow numbers will be detected.
705-456-1235 905-513-7055 or 416-427-0545 will not be detected.
1705* - This example will monitor for 1705 only at the beginning of the phone number for either an incoming or outgoing call. The follow number will be detected.
1-705-456-1235
60
*705* - This example will monitor for 705 anywhere in the phone number for either an incoming or outgoing call. The follow numbers will be detected. 1-705-456-1235, 1-706-457-0569 ??705* - This example will monitor for 705 only if it starts at the third location of the phone number for either a incoming or outgoing call. The follow number will be detected. 1-970-556-1235, 1-270-577-8989 1705???1403 - This example will monitor for 1705???1403 in the phone number for outgoing call. The follow numbers will be detected. 1-705-555-1403, 1-705-456-1403, 1-705-984-1403 * - The * (star) can be used at the beginning, end or both when the * is inserted at the beginning,
end or both this tells the software to monitor for any matches within the phone number and ignore any characters before or after the *.
? - The ? symbol can be used in the alarm monitor as a wild character. For each ? used this represents a character in the phone number.
61
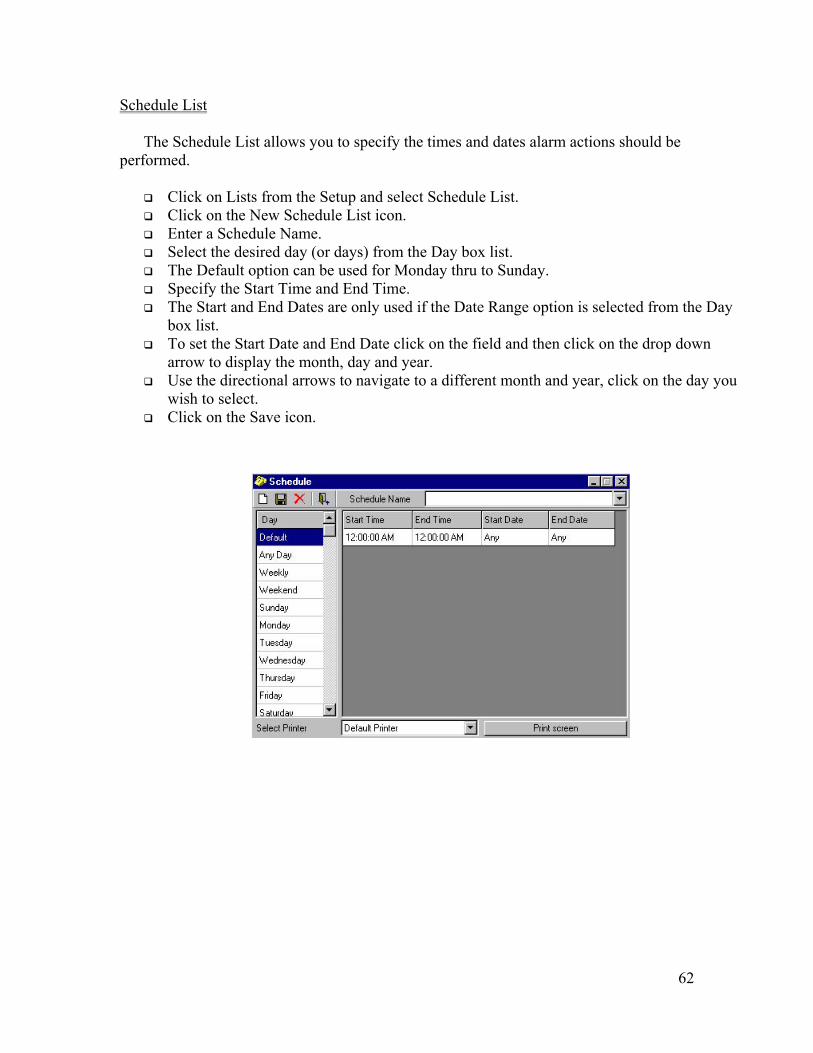
Schedule List
The Schedule List allows you to specify the times and dates alarm actions should be performed.
Click on Lists from the Setup and select Schedule List. Click on the New Schedule List icon. Enter a Schedule Name. Select the desired day (or days) from the Day box list. The Default option can be used for Monday thru to Sunday. Specify the Start Time and End Time. The Start and End Dates are only used if the Date Range option is selected from the Day
box list. To set the Start Date and End Date click on the field and then click on the drop down
arrow to display the month, day and year. Use the directional arrows to navigate to a different month and year, click on the day you
wish to select. Click on the Save icon.
62
Day - This area is where the administrator defines the day/s the alarm function monitors for. The selections are as follows: Default - If the Default field is selected the Start time and, End time can be defined only. The Default field has a priority of 7, which means the software will try to determine if it falls within the parameters defined when it fails the previous priority from Any Week Day. The Default field is defined as Monday to Sunday inclusive. Any Week Day - If the Any Week Day field is selected the Start time and, End time can be defined only. The Any Week Day field has a priority of 6 which means the software will try to determine if it falls within the parameters defined when it fails the previous priority from Weekend. The Any Week Day field is defined as Monday to Sunday inclusive. Week Day - If the Week Day field is selected the Start time and, End time can be defined only. The Week Day field has a priority of 6 which means the software will try to determine if it falls within the parameters defined when it fails the previous priority from Weekend. The Week day field is defined as Monday to Friday inclusive. Weekend - If the Weekend field is selected the Start time and, End time can be defined only. The Weekend field has a priority of 5 which means the software will try to determine if it falls within the parameters defined when it fails the previous priority from Monday to Sunday. The Weekend field is defined as Saturday and Sunday. Sunday - If the Sunday field is selected the Start time and, End time can be defined only. The Sunday field has a priority of 4, which means the software will try to determine if it falls within the parameters defined when it fails the previous priority from Holiday. Monday - If the Monday field is selected the Start time and, End time can be defined only. The Monday field has a priority of 4, which means the software will try to determine if it falls within the parameters defined when it fails the previous priority from Holiday. Tuesday - If the Tuesday field is selected the Start time and, End time can be defined only. The Tuesday field has a priority of 4, which means the software will try to determine if it falls within the parameters defined when it fails the previous priority from Holiday.
63
Wednesday - If the Wednesday field is selected the Start time and, End time can be defined only. The Wednesday field has a priority of 4, which means the software will try to determine if it falls within the parameters defined when it fails the previous priority from Holiday. Thursday - If the Thursday field is selected the Start time and, End time can be defined only. The Thursday field has a priority of 4, which means the software will try to determine if it falls within the parameters defined when it fails the previous priority from Holiday. Friday - If the Friday field is selected the Start time and, End time can be defined only. The Friday field has a priority of 4, which means the software will try to determine if it falls within the parameters defined when it fails the previous priority from Holiday. Saturday - If the Saturday field is selected the Start time and, End time can be defined only. The Saturday field has a priority of 4, which means the software will try to determine if it falls within the parameters defined when it fails the previous priority from Holiday. Holiday - If the Holiday field is selected the Start time and, End time can be defined only. The Holiday field has a priority of 3 which means the software will try to determine if it falls within the parameters defined when it fails the previous priority in the user defined holiday list. Priority 2 comes into effect when the administrator defines holidays in the Holiday List Date Range - If the Date Range is selected the Start time, End time, Start Date and End date can be defined. The Date Range has a priority of 1 which means the software will take each call that is receives and determine if it falls within the parameters defined. Holiday - If the Holiday field is selected the Start time and, End time can be defined only. The Holiday field has a priority of 3 which means the software will try to determine if it falls within the parameters defined when it fails the previous priority in the user defined holiday list. Priority 2 comes into effect when the administrator defines holidays in the Holiday List
64
Start Time - This is defined as the start time of the alarm monitoring. When this field is clicked it will highlight and allow the administrator to use the up and down arrows to define the Start Time. End Time - This is defined as the end time of the alarm monitoring. When this field is clicked it will highlight and allow the administrator to use the up and down arrows to define the End Time.
Example one: 7:00 am to 8:45pm Start Time End Time 7:00:00 am 8:45:00 pm Example two: 7:00 pm to 6:30 am Start Time End Time 7:00:00 pm 11:59:59 pm 12:00:00 am 6:30:00 am Start Date - This is defined as the starting date of the alarm monitoring. When this field is clicked it will highlight and allow the administrator to use the down arrow to select the date from the calendar for the Start Date. The Start Date is ONLY available in DATE RANGE. End Date - This is defined as the ending date of the alarm monitoring. When this field is clicked it will highlight and allow the administrator to use the down arrow to select the date from the calendar for the End Date. The End Date is ONLY available in DATE RANGE.
65
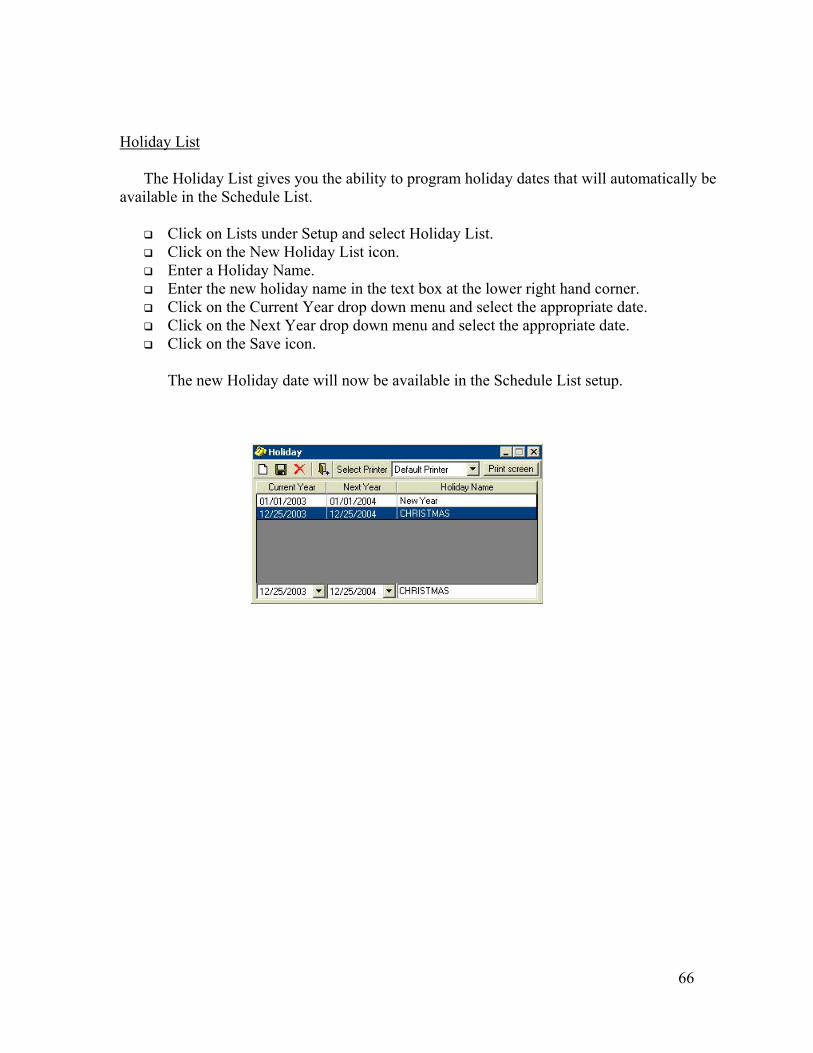
Holiday List
The Holiday List gives you the ability to program holiday dates that will automatically be
available in the Schedule List.
Click on Lists under Setup and select Holiday List. Click on the New Holiday List icon. Enter a Holiday Name. Enter the new holiday name in the text box at the lower right hand corner. Click on the Current Year drop down menu and select the appropriate date. Click on the Next Year drop down menu and select the appropriate date. Click on the Save icon.
The new Holiday date will now be available in the Schedule List setup.
66

Area/Rate
The Area/Rate section is used to program the rates for calculating the cost of the calls and to charge customers according to the rate, area, and area code values inputted.
Area
Group of Areas Rate
Rate Compare
67
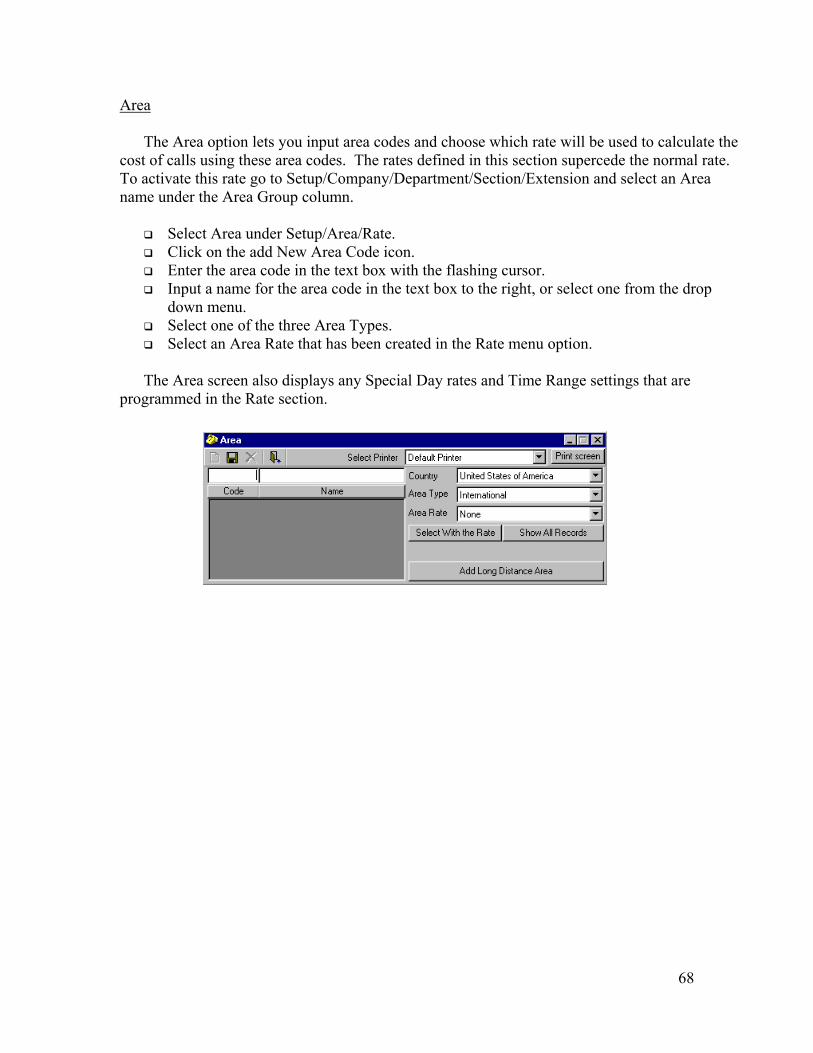
Area
The Area option lets you input area codes and choose which rate will be used to calculate the cost of calls using these area codes. The rates defined in this section supercede the normal rate. To activate this rate go to Setup/Company/Department/Section/Extension and select an Area name under the Area Group column.
Select Area under Setup/Area/Rate. Click on the add New Area Code icon. Enter the area code in the text box with the flashing cursor. Input a name for the area code in the text box to the right, or select one from the drop
down menu. Select one of the three Area Types. Select an Area Rate that has been created in the Rate menu option.
The Area screen also displays any Special Day rates and Time Range settings that are
programmed in the Rate section.
68

Group of Areas
The Group of Areas permits the system administrator to set a fixed rate for selected areas that will supersede the value specified in the Rate programming. This option is primarily used to allocate a group of areas to individual or multiple users, at a fixed rate.
Click on the New Group icon. Input a Group Name. Select and move the preferred areas to the display window on the right using the
directional arrows. Choose a rate from the Group Rate field. All calls within the selected areas will be
calculated with this group rate. Save any changes. From the Company menu, select the Departments, Sections and Extensions option. Scroll across to the Area Group field. Select an Area Group name for one or more users. Save any changes.
69
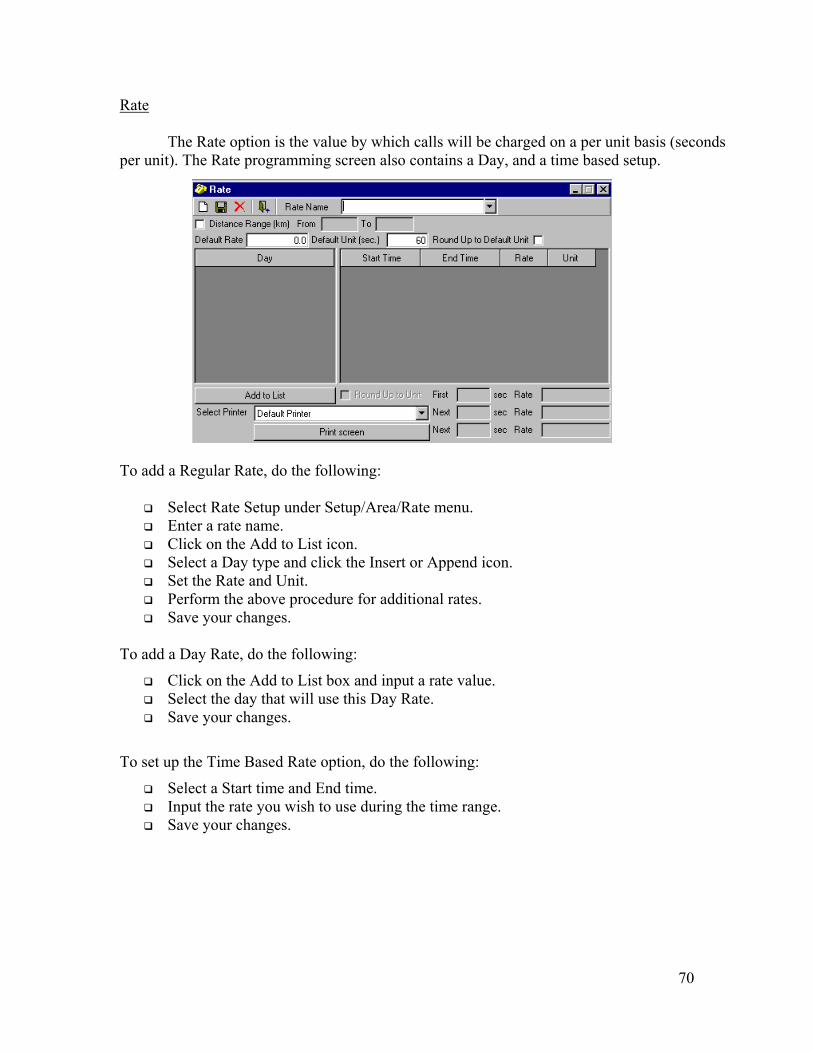
Rate
The Rate option is the value by which calls will be charged on a per unit basis (seconds per unit). The Rate programming screen also contains a Day, and a time based setup.
To add a Regular Rate, do the following:
Select Rate Setup under Setup/Area/Rate menu. Enter a rate name. Click on the Add to List icon. Select a Day type and click the Insert or Append icon. Set the Rate and Unit. Perform the above procedure for additional rates. Save your changes.
To add a Day Rate, do the following:
Click on the Add to List box and input a rate value. Select the day that will use this Day Rate. Save your changes.
To set up the Time Based Rate option, do the following:
Select a Start time and End time. Input the rate you wish to use during the time range. Save your changes.
70
To set up a one-time charge for local calls, do the following: Enter LOCAL for the Rate Name. Input the desired rate (.25) for local calls in Default Rate. Enter 0 (zero) for the Default Unit. Save the Rate. Go to Area in Setup/Area/Rate. Select the name for local rates in Area Rate. Select LOCAL in Area Type. Enter 000 (zeros) for the Code. Enter Local for the Name. Save your changes.
71
Rate Compare
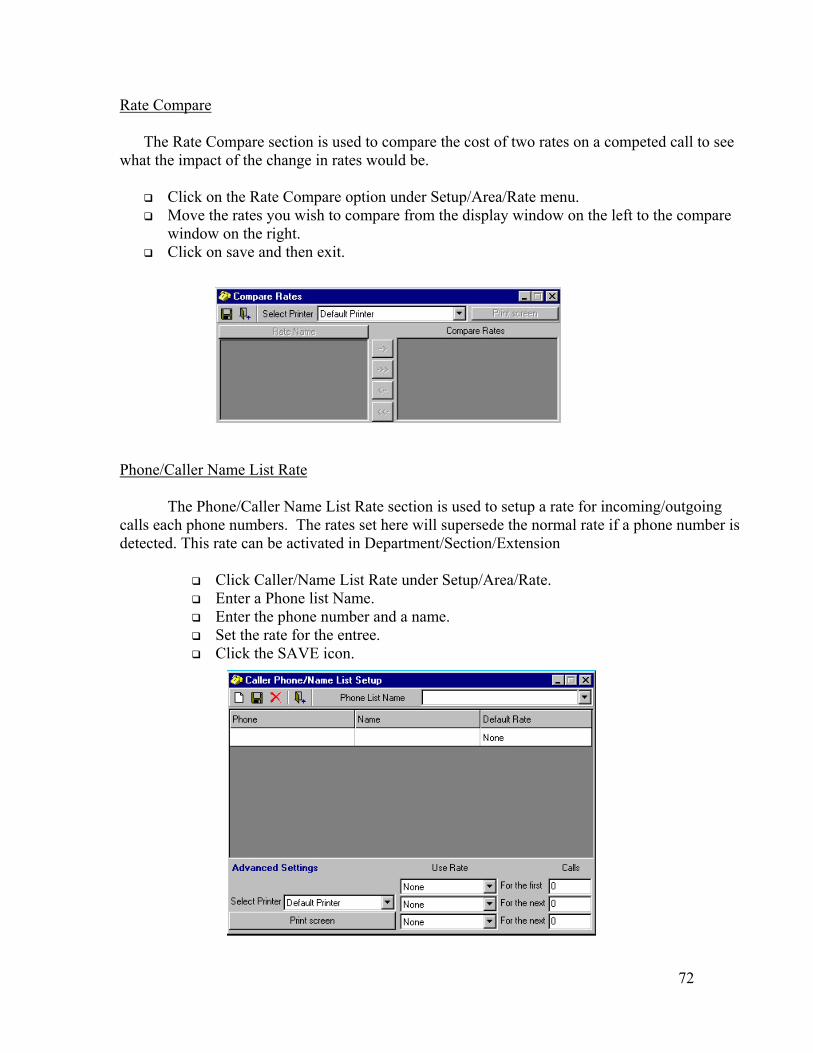
The Rate Compare section is used to compare the cost of two rates on a competed call to see what the impact of the change in rates would be.
Click on the Rate Compare option under Setup/Area/Rate menu. Move the rates you wish to compare from the display window on the left to the compare
window on the right. Click on save and then exit.
Phone/Caller Name List Rate
The Phone/Caller Name List Rate section is used to setup a rate for incoming/outgoing calls each phone numbers. The rates set here will supersede the normal rate if a phone number is detected. This rate can be activated in Department/Section/Extension
Click Caller/Name List Rate under Setup/Area/Rate. Enter a Phone list Name. Enter the phone number and a name. Set the rate for the entree. Click the SAVE icon.
72
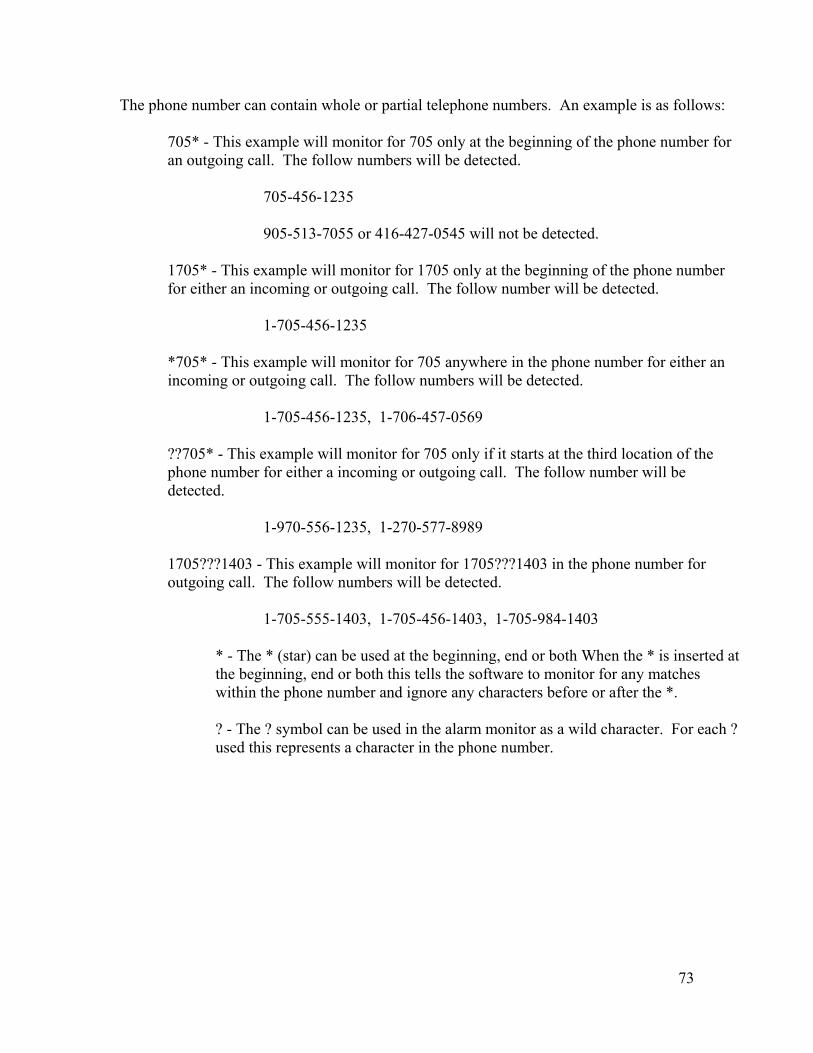
The phone number can contain whole or partial telephone numbers. An example is as follows:
705* - This example will monitor for 705 only at the beginning of the phone number for an outgoing call. The follow numbers will be detected.
705-456-1235 905-513-7055 or 416-427-0545 will not be detected.
1705* - This example will monitor for 1705 only at the beginning of the phone number for either an incoming or outgoing call. The follow number will be detected.
1-705-456-1235
*705* - This example will monitor for 705 anywhere in the phone number for either an incoming or outgoing call. The follow numbers will be detected.
1-705-456-1235, 1-706-457-0569
??705* - This example will monitor for 705 only if it starts at the third location of the phone number for either a incoming or outgoing call. The follow number will be detected.
1-970-556-1235, 1-270-577-8989
1705???1403 - This example will monitor for 1705???1403 in the phone number for outgoing call. The follow numbers will be detected.
1-705-555-1403, 1-705-456-1403, 1-705-984-1403 * - The * (star) can be used at the beginning, end or both When the * is inserted at
the beginning, end or both this tells the software to monitor for any matches within the phone number and ignore any characters before or after the *.
? - The ? symbol can be used in the alarm monitor as a wild character. For each ?
used this represents a character in the phone number.
73
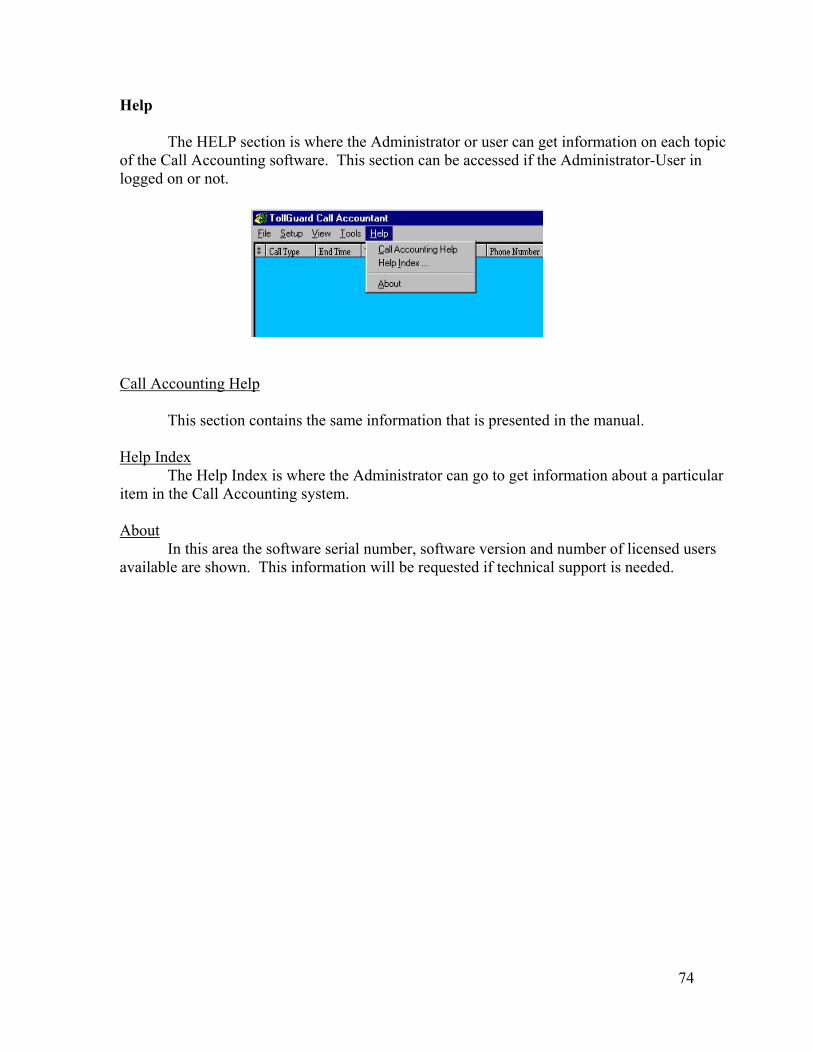
74
Help The HELP section is where the Administrator or user can get information on each topic of the Call Accounting software. This section can be accessed if the Administrator-User in logged on or not.
Call Accounting Help This section contains the same information that is presented in the manual. Help Index The Help Index is where the Administrator can go to get information about a particular item in the Call Accounting system. About In this area the software serial number, software version and number of licensed users available are shown. This information will be requested if technical support is needed.