Embed Size (px)
Citation preview
Project Number. GFP1405
DESIGN PATTERN GENERATOR FOR PYTHON
A Major Qualifying Project Report:
submitted to the faculty of the
WORCESTER POLYTECHNIC INSTITUTE
in partial fulfillment of the requirements for the
Degree of Bachelor of Science
by:
___________________________
Robert Mullins
___________________________
Alfred Scott
Date: April 25, 2015
Approved:
______________________________
Professor Gary F. Pollice, Major Advisor
This report represents the work of WPI undergraduate students submitted to the faculty as evidence of
completion of a degree requirement. WPI routinely publishes these reports on its website without editorial
or peer review. For more information about the projects program at WPI, please see
http://www.wpi.edu/academics/ugradstudies/project-learning.html

i
Abstract
Design patterns are important techniques that programmers can use to solve
common problems and make their code more robust. The goal of this project is to provide
a tool that supports inserting design patterns into existing code. We manipulate abstract
syntax trees to achieve this goal. We created a graphical user interface that lets users
generate different design patterns. We provide instructions on how to extend our program
by adding more design patterns.
ii
Acknowledgements
We would like to thank Gary Pollice, our project advisor. He provided us with the
idea for our project as well as invaluable insight on to how to approach the many
problems we faced.
iii
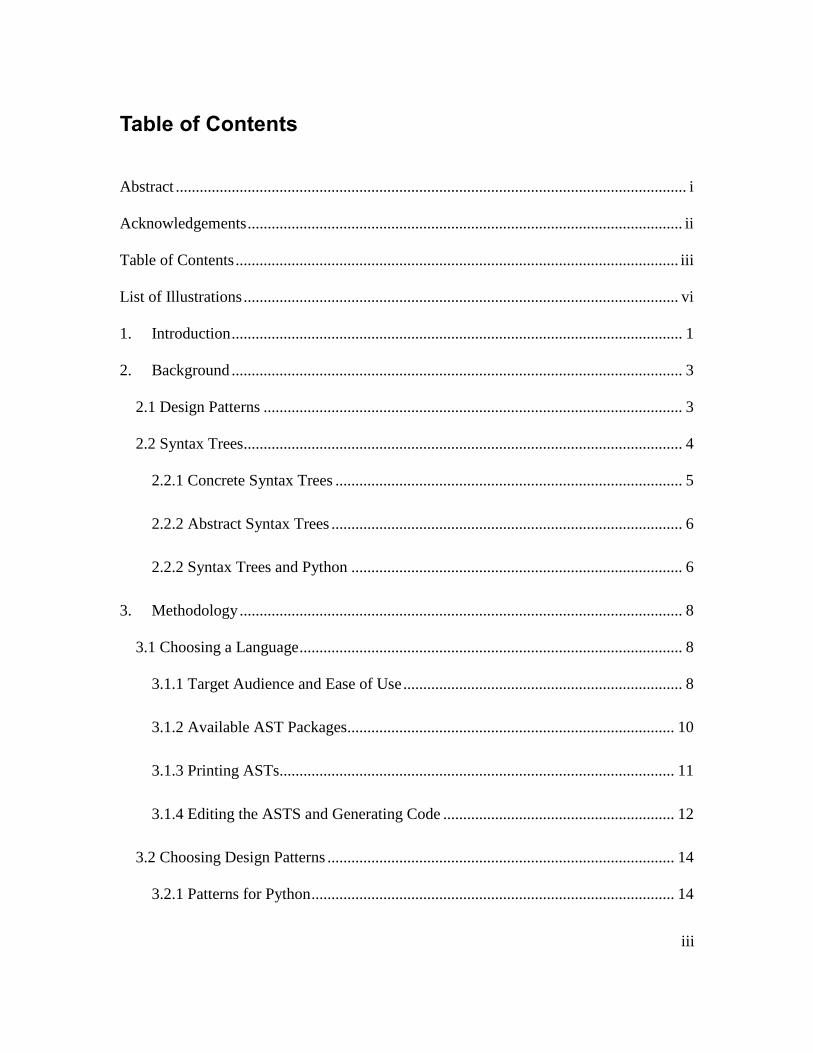
Table of Contents
Abstract ................................................................................................................................ i
Acknowledgements ............................................................................................................. ii
Table of Contents ............................................................................................................... iii
List of Illustrations ............................................................................................................. vi
1. Introduction ................................................................................................................. 1
2. Background ................................................................................................................. 3
2.1 Design Patterns ......................................................................................................... 3
2.2 Syntax Trees.............................................................................................................. 4
2.2.1 Concrete Syntax Trees ....................................................................................... 5
2.2.2 Abstract Syntax Trees ........................................................................................ 6
2.2.2 Syntax Trees and Python ................................................................................... 6
3. Methodology ............................................................................................................... 8
3.1 Choosing a Language ................................................................................................ 8
3.1.1 Target Audience and Ease of Use ...................................................................... 8
3.1.2 Available AST Packages.................................................................................. 10
3.1.3 Printing ASTs................................................................................................... 11
3.1.4 Editing the ASTS and Generating Code .......................................................... 12
3.2 Choosing Design Patterns ....................................................................................... 14
3.2.1 Patterns for Python ........................................................................................... 14
iv
3.2.2 Patterns for Beginners ...................................................................................... 15
3.2.3 Pattern Structure............................................................................................... 16
3.3 Class Adapter Pattern Implementation ................................................................... 18
3.3.1 Importance of the Class Adapter Pattern ......................................................... 19
3.3.2 Class Adapter Pattern Structure ....................................................................... 20
3.3.3 Class Adapter Pattern Generation .................................................................... 21
3.4 Observer Pattern Implementation ........................................................................... 23
3.4.1 Importance of the Observer Pattern ................................................................. 24
3.4.2 Observer Pattern Structure ............................................................................... 25
3.4.3 Observer Pattern Generation ............................................................................ 26
3.5 Factory Pattern Implementation .............................................................................. 32
3.5.1 Importance of the Factory Pattern .................................................................... 33
3.5.2 Factory Pattern Structure ................................................................................. 33
3.5.3 Factory generation ........................................................................................... 34
3.6 Class Decorator Pattern Implementation ................................................................ 36
3.6.1 Importance of the Class Decorator Pattern ...................................................... 37
3.6.2 Class Decorator Structure ................................................................................ 38
3.6.3 Class Decorator Generation ............................................................................. 40
3.7 Comment Preservation ............................................................................................ 45
3.8 Graphical User Interface ......................................................................................... 46
v
4. Results and Analysis ................................................................................................. 47
5. Future Work and Conclusion .................................................................................... 48
5.1 Conclusion .............................................................................................................. 49
Appendices ........................................................................................................................ 50
Appendix A – User Guide: Generating a Pattern .......................................................... 50
Appendix B – User Guide: Expanding Our Program ................................................... 51
References ......................................................................................................................... 54
vi
List of Illustrations
Figure 1- Concrete Syntax Tree Example ........................................................................... 5
Figure 2 - Abstract Syntax Tree Example........................................................................... 6
Figure 3 - C and Python Code Comparison ........................................................................ 9
Figure 4 - Example Python Class...................................................................................... 10
Figure 5 - Example AST Printed With Meta .................................................................... 11
Figure 6 - Printing an AST................................................................................................ 12
Figure 7 - AST Transformer Function .............................................................................. 13
Figure 8 - Modified AST Example ................................................................................... 14
Figure 9 - Example Classes with Unknown Context ........................................................ 16
Figure 10 - Modified Classes ............................................................................................ 16
Figure 11- Façade Pattern Structure ................................................................................. 17
Figure 12 - Class Adapter Structure.................................................................................. 20
Figure 13 - Example Target and Adaptee Classes ............................................................ 21
Figure 14 - Example Class Adapter .................................................................................. 22
Figure 15 - Example Class Adapter with Method Call ..................................................... 23
Figure 16 - Observer Pattern Structure ............................................................................. 25
Figure 17- Example Subject and Observer Classes .......................................................... 27
Figure 18 - Generated Observer File: generatedObserver.py ........................................... 28
Figure 19 - Modified File for Observer Pattern ................................................................ 31
Figure 20 - Using the Observer Pattern ............................................................................ 32
Figure 21 - Factory Pattern Structure................................................................................ 33
vii
Figure 22 - Example Interface .......................................................................................... 34
Figure 23 - Modified Class with Abstract Factory ........................................................... 36
Figure 24 - Decorator Structure ........................................................................................ 38
Figure 25 - Function Decorator Example ......................................................................... 39
Figure 26 - Function Declaration Printout ........................................................................ 39
Figure 27 - Example Class ................................................................................................ 40
Figure 28 - Partially Constructed Class Decorator ........................................................... 41
Figure 29 - Generated __getattribute__ Method ............................................................... 42
Figure 30 - Decorator Pathway Part A .............................................................................. 43
Figure 31 - Decorator Pathway Part B .............................................................................. 43
Figure 32 - Complete Class Decorator.............................................................................. 44
1
1. Introduction
A design pattern is a proven solution for a general problem. By utilizing design
patterns, one’s code often becomes more organized, readable, and expandable [19]. For
these reasons, it is import for programmers to structure their code with design patterns in
mind. Our goal is to design a tool that allows for the insertion of design patterns into
existing code for the purpose of teaching good coding practices. Due to the fact that
design patterns can only be applied under certain conditions, our tool also has the side
effect of educating the programmer as to when patterns can be used.
Our project required us to select a suitable implementation language and an
appropriate set of patterns to implement. Python is a popular programming language for
beginners due to its readable syntax and ease of use [22]. The patterns we selected were
ones that work well with Python, are useful for beginners to know, and have a standard
structure regardless of code context. We decided to implement the class adapter,
observer, abstract factory, and class decorator design patterns.
Our method of generating patterns utilized abstract syntax trees generated by
Python. An abstract syntax tree (AST) is a tree representation of the abstract syntactic
structure of source code. Each node of this tree can be anything from a main function to a
single string. With the help of standard and third party libraries, we were able
successfully apply design patterns to existing code. We designed a graphical user
interface that allows the user to select a file, a design pattern, and the classes or methods
to apply the pattern to. We also created a guide for how a user could add their own design
pattern to our program. Future work includes more comprehensive error checking for
design pattern generation and working to preserve all comments and whitespace.
2
This paper is organized in the following way. Section 2 discusses design patterns
and syntax trees for the purpose of understanding the motivation of our project. Section 3
discusses our process for picking a language and set of design patterns to work with, and
how we manipulated syntax trees to incorporate patterns into existing code. Section 4
discusses the general results of our project. Section 5 identifies areas of future work.
3
2. Background
Our program deals with the modification of existing code to implement design
patterns. To fully understand the motivation for our project, it is important to recognize
why design patterns are regarded as important tools for programmers. Additionally, our
means of modifying existing code was to modify generated abstract syntax trees. An
explanation as to how these structures work and can be modified is given.
2.1 Design Patterns
Design patterns are proven solution for a general problem [19]. In computer
science, many problems occur frequently but in different forms or contexts. Once a
solution for a problem is found, it can be modified to apply to other similar problems.
Design patterns are the most effective and widely used of these solutions.
Design patterns are abstract in nature. On the concept of abstract patterns applied
to building design, Christopher Alexander stated that "...each pattern describes a problem
which occurs over and over again in our environment, and then describes the core of the
solution to that problem, in such a way that you can use this solution a million times over,
without ever doing it the same way twice" [3]. This same logic applies to design patterns
in an object oriented coding context. One could use a single design pattern under many
different contexts, but its basic structure and approach to solving the problem will remain
the same.
The concept of reusable and flexible code is something that beginner
programmers do not often grasp naturally. An experienced programmer can design code
from the ground up with future changes in mind. “A designer who is familiar with such
4
patterns can apply them immediately to design problems without having to rediscover
them” [3]. Once a programmer has encountered a problem and solved it, he or she will
recall that solution the next time a similar problem occurs. Eventually, an experienced
programmer will have an idea as to what kinds of problems will lay ahead based on the
requirements of their project. His or her code will be structured so that it can easily
incorporate their pre-designed solution for the predicted obstacles. However, it is
impossible to predict all challenges one will face whilst working on a project. For this
reason, it is important to have your code remain flexible so that unforeseen future
problems can be addressed.
Design patterns help the programmer communicate intent. Many patterns are
easily recognizable; their relatively standardized structure can help future developers
understand existing projects. “In the object oriented world, design patterns tell us how, in
the context of a certain problem, we should structure the classes and objects. They do not
translate directly into the solution; rather have to be adapted to suit the problem context.”
[2]. Design patterns provide abstract solutions to recurring problems, so if someone can
identify a pattern in a project, they can also discern the problem it is trying to solve,
which is a major step toward understanding the project as a whole.
2.2 Syntax Trees
A syntax tree is a tree representation of the structure of a program’s source code.
Syntax trees are generated by the parser during the compilation process before output
code can be produced [24, 25]. In a syntax tree, each node represents a hierarchal piece of
the code structure located in the source. For example, a function definition is a node
which contains a series of child nodes for each of its expressions. These expressions may
5
be arithmetic operations, variable declarations, function calls, or other code bodies. There
are two types of syntax trees: parse trees, or concrete syntax trees (CSTs) and abstract
syntax trees (ASTs). The parsers of certain compilers create ASTs directly, while others
create a CST from which an AST is derived [1].
2.2.1 Concrete Syntax Trees
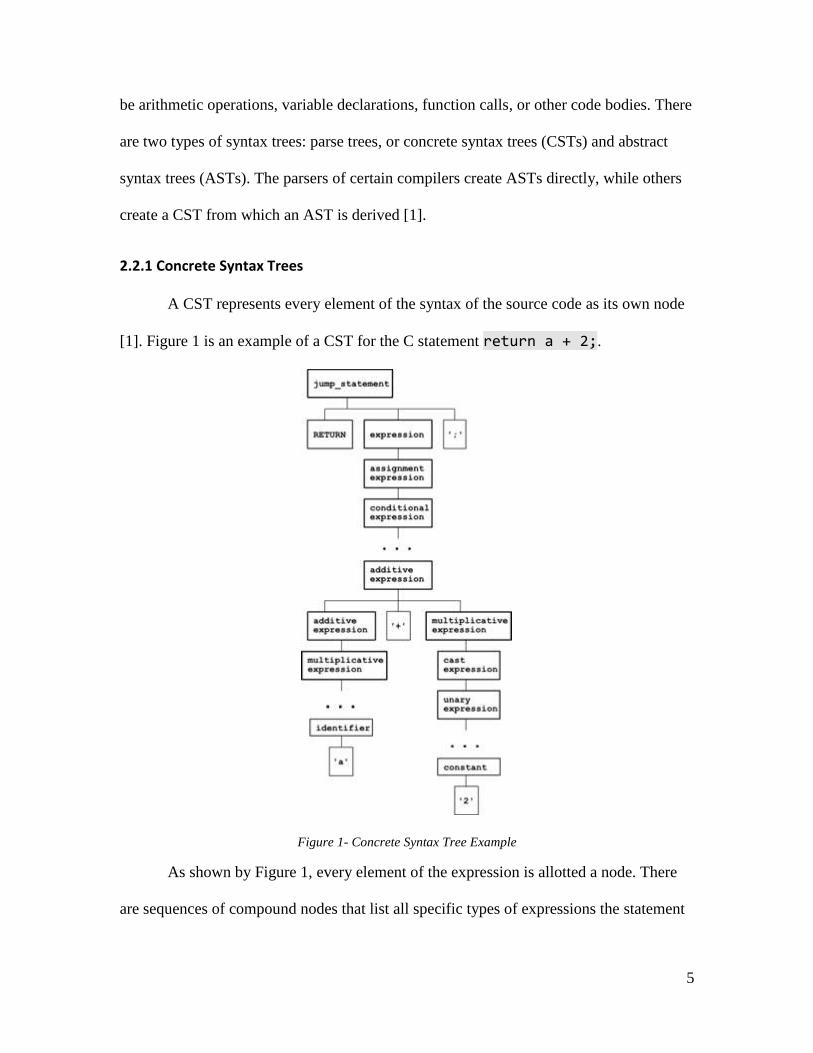
A CST represents every element of the syntax of the source code as its own node
[1]. Figure 1 is an example of a CST for the C statement return a + 2;.
Figure 1- Concrete Syntax Tree Example
As shown by Figure 1, every element of the expression is allotted a node. There
are sequences of compound nodes that list all specific types of expressions the statement

6
is. This formal representation describes every detail of the syntax that the parser detected.
However, such detail is often not needed, making CSTs more difficult to work with [1].
2.2.2 Abstract Syntax Trees
An AST “is a tree representation of the abstract syntactic structure of source
code” [2]. The nodes provide a semantic representation of the code, but with abstract
syntax. This means that certain syntactic nodes, such as terminating semicolons, are not
present as singular nodes but instead are encompassed by the expression nodes. Figure 2
shows an AST representation of the same statement used for the CST in Figure 1.
Figure 2 - Abstract Syntax Tree Example
ASTs are a more compact version of CSTs in that they eliminate nodes with no
semantic meaning. For example, Figure 2 shows that sequence of expression nodes
present in the CST in Figure 1 are now simply represented as a single BinaryOp node
[1]. This leads to a smaller, more readable tree. However, the exact syntax derivation of
the statement is lost in this process, thus making the tree an abstract representation.
2.2.2 Syntax Trees and Python
The Python interpreter creates an AST as part of its compilation process. The
source code is first tokenized by the lexer and then sent to the parser, which creates a
parse tree. An AST is then created from this parse tree, which is then sent to the bytecode
generator and eventually the bytecode interpreter [24, 26]. The tools for generating the
7
ASTs, manipulating ASTs, and compiling ASTs into bytecode are included within the
free Python ast and compile modules [25]. In the methodology section of this paper we
discuss the process of modifying an AST and then converting it back into source code.

8
3. Methodology
This section of the paper discusses our process of picking a language in which to
write our program, picking design patterns to implement, and modifying ASTs for the
purpose of adding patterns to existing code.
3.1 Choosing a Language
The language we decided to write our program in was Python. This decision was
made based on many factors: our target audience, ease of use, and our available tools.
3.1.1 Target Audience and Ease of Use
The goal of our project is to design a resource for new programmers that provides
an easy way to implement design patterns into existing code. Therefore, it was important
that we write our program to operate on a language that is often used by beginners.
Python is one of the more popular introductory languages. It is listed as one of the top
languages that is being used by computer science departments in university starter
courses [33].
Python’s popularity is attributed to its ease of use due to its readable syntax [22].
Newer programmers can easily grasp the language’s grammar as it often uses English
words opposed to symbols to represent logic and expressions.
9
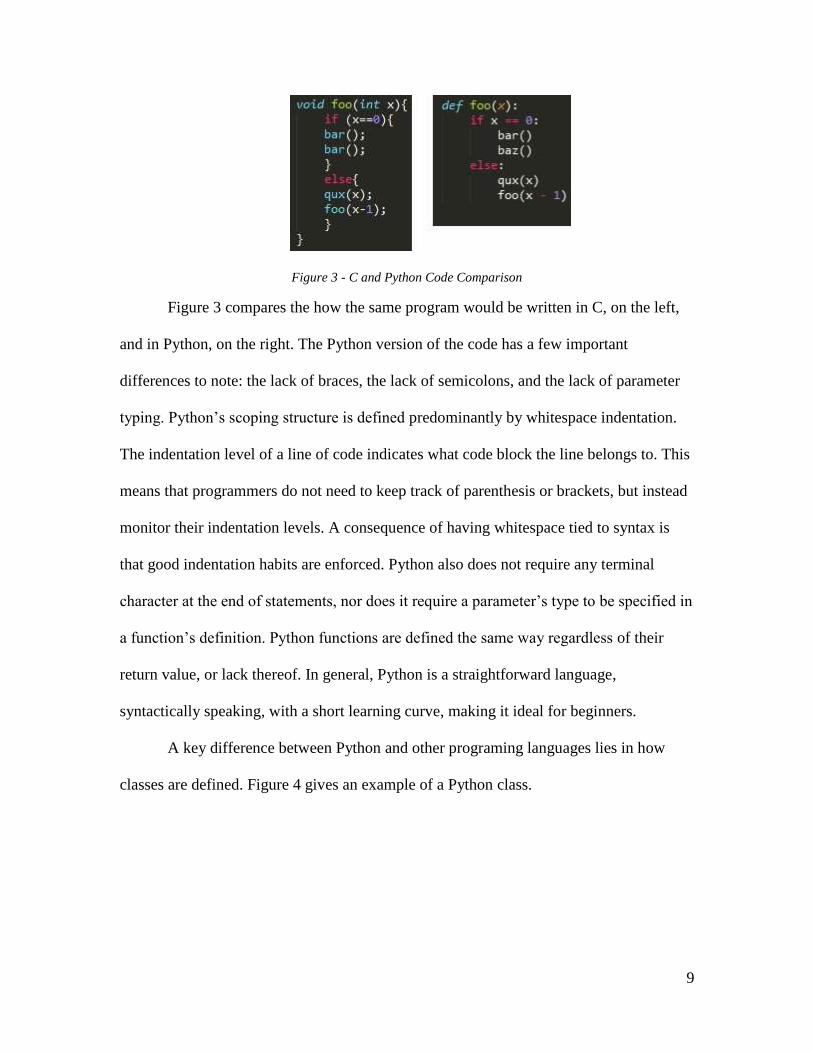
Figure 3 - C and Python Code Comparison
Figure 3 compares the how the same program would be written in C, on the left,
and in Python, on the right. The Python version of the code has a few important
differences to note: the lack of braces, the lack of semicolons, and the lack of parameter
typing. Python’s scoping structure is defined predominantly by whitespace indentation.
The indentation level of a line of code indicates what code block the line belongs to. This
means that programmers do not need to keep track of parenthesis or brackets, but instead
monitor their indentation levels. A consequence of having whitespace tied to syntax is
that good indentation habits are enforced. Python also does not require any terminal
character at the end of statements, nor does it require a parameter’s type to be specified in
a function’s definition. Python functions are defined the same way regardless of their
return value, or lack thereof. In general, Python is a straightforward language,
syntactically speaking, with a short learning curve, making it ideal for beginners.
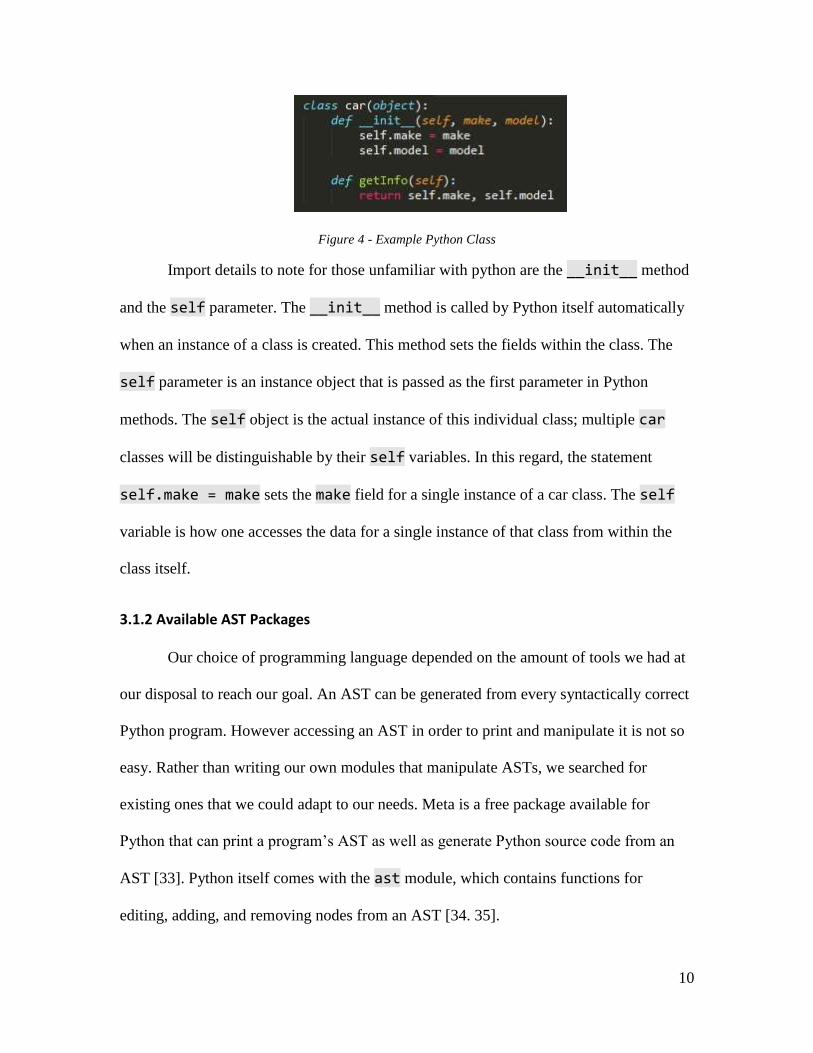
A key difference between Python and other programing languages lies in how
classes are defined. Figure 4 gives an example of a Python class.
10
Figure 4 - Example Python Class
Import details to note for those unfamiliar with python are the __init__ method
and the self parameter. The __init__ method is called by Python itself automatically
when an instance of a class is created. This method sets the fields within the class. The
self parameter is an instance object that is passed as the first parameter in Python
methods. The self object is the actual instance of this individual class; multiple car
classes will be distinguishable by their self variables. In this regard, the statement
self.make = make sets the make field for a single instance of a car class. The self
variable is how one accesses the data for a single instance of that class from within the
class itself.
3.1.2 Available AST Packages
Our choice of programming language depended on the amount of tools we had at
our disposal to reach our goal. An AST can be generated from every syntactically correct
Python program. However accessing an AST in order to print and manipulate it is not so
easy. Rather than writing our own modules that manipulate ASTs, we searched for
existing ones that we could adapt to our needs. Meta is a free package available for
Python that can print a program’s AST as well as generate Python source code from an
AST [33]. Python itself comes with the ast module, which contains functions for
editing, adding, and removing nodes from an AST [34. 35].
11
3.1.3 Printing ASTs
The Meta package allows for the printing of ASTs. The output shows the tree
structure in the form of nodes. When working with an AST in Python, each node is set up
as if it were an object, having fields and values which denote the structure of the
statement or code block it represents. Meta prints out the tree of these objects exactly
how they would be used by the Python ast module, but properly indented so that it is
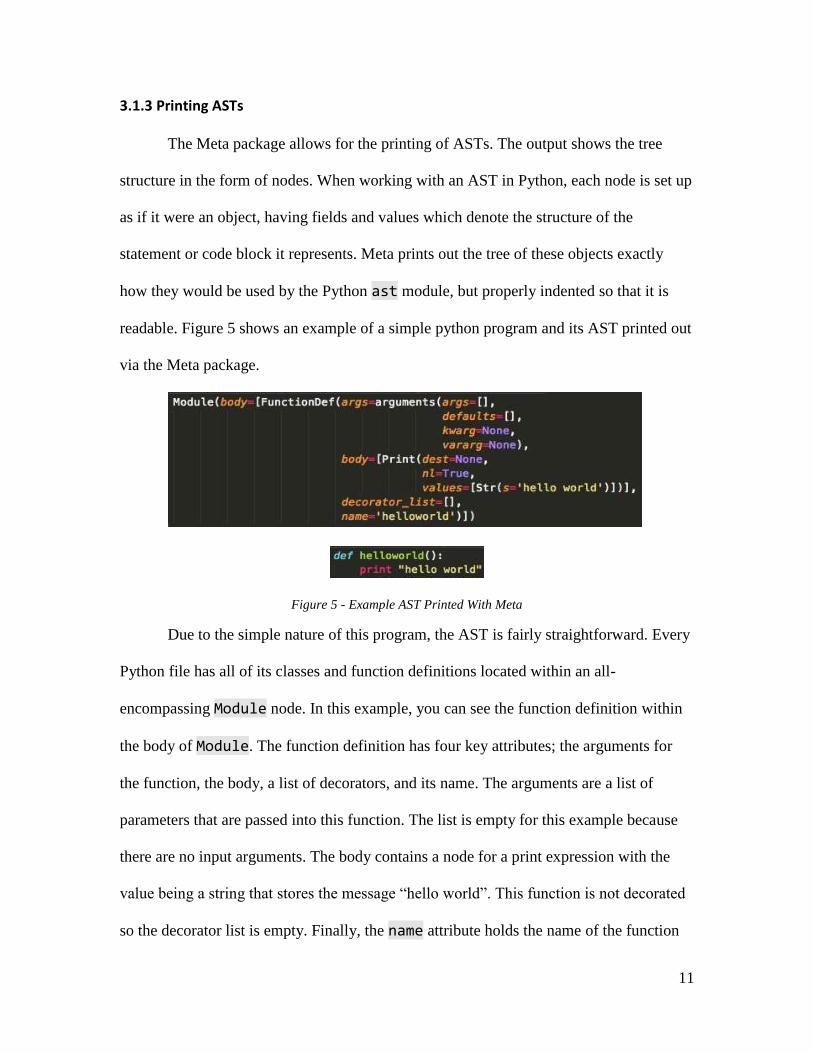
readable. Figure 5 shows an example of a simple python program and its AST printed out
via the Meta package.
Figure 5 - Example AST Printed With Meta
Due to the simple nature of this program, the AST is fairly straightforward. Every
Python file has all of its classes and function definitions located within an all-
encompassing Module node. In this example, you can see the function definition within
the body of Module. The function definition has four key attributes; the arguments for
the function, the body, a list of decorators, and its name. The arguments are a list of
parameters that are passed into this function. The list is empty for this example because
there are no input arguments. The body contains a node for a print expression with the
value being a string that stores the message “hello world”. This function is not decorated
so the decorator list is empty. Finally, the name attribute holds the name of the function
12
.
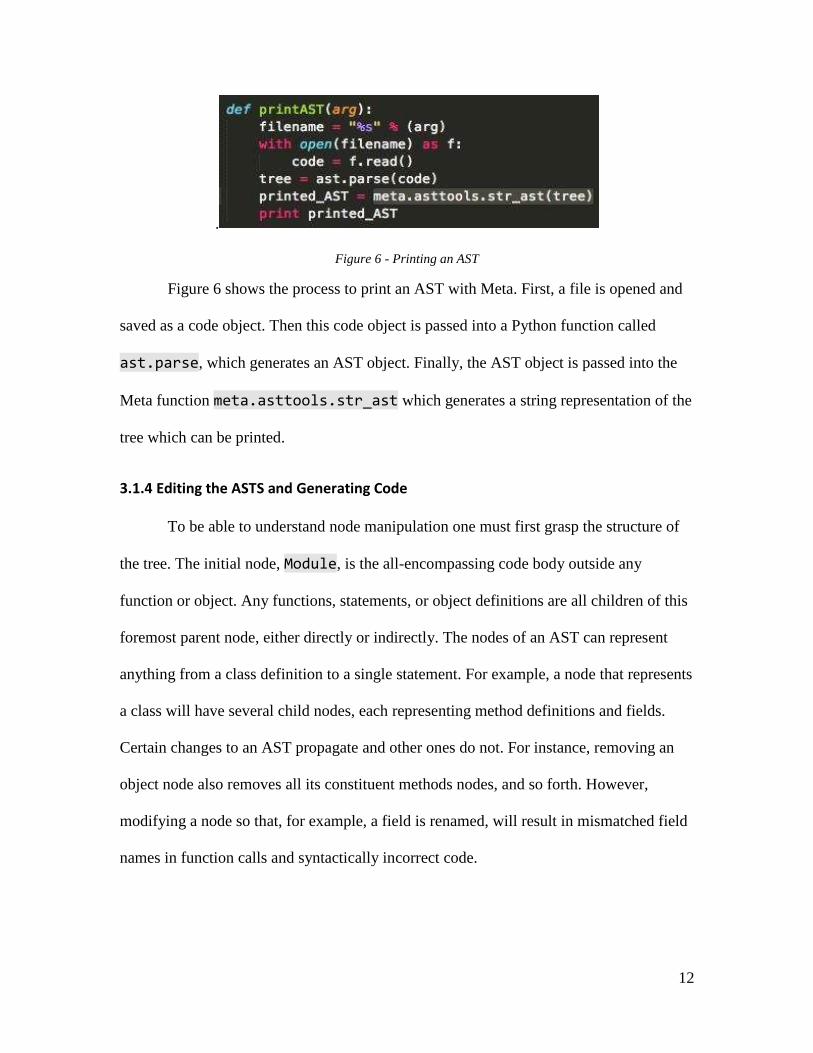
Figure 6 - Printing an AST
Figure 6 shows the process to print an AST with Meta. First, a file is opened and
saved as a code object. Then this code object is passed into a Python function called
ast.parse, which generates an AST object. Finally, the AST object is passed into the
Meta function meta.asttools.str_ast which generates a string representation of the
tree which can be printed.
3.1.4 Editing the ASTS and Generating Code
To be able to understand node manipulation one must first grasp the structure of
the tree. The initial node, Module, is the all-encompassing code body outside any
function or object. Any functions, statements, or object definitions are all children of this
foremost parent node, either directly or indirectly. The nodes of an AST can represent
anything from a class definition to a single statement. For example, a node that represents
a class will have several child nodes, each representing method definitions and fields.
Certain changes to an AST propagate and other ones do not. For instance, removing an
object node also removes all its constituent methods nodes, and so forth. However,
modifying a node so that, for example, a field is renamed, will result in mismatched field
names in function calls and syntactically incorrect code.
13
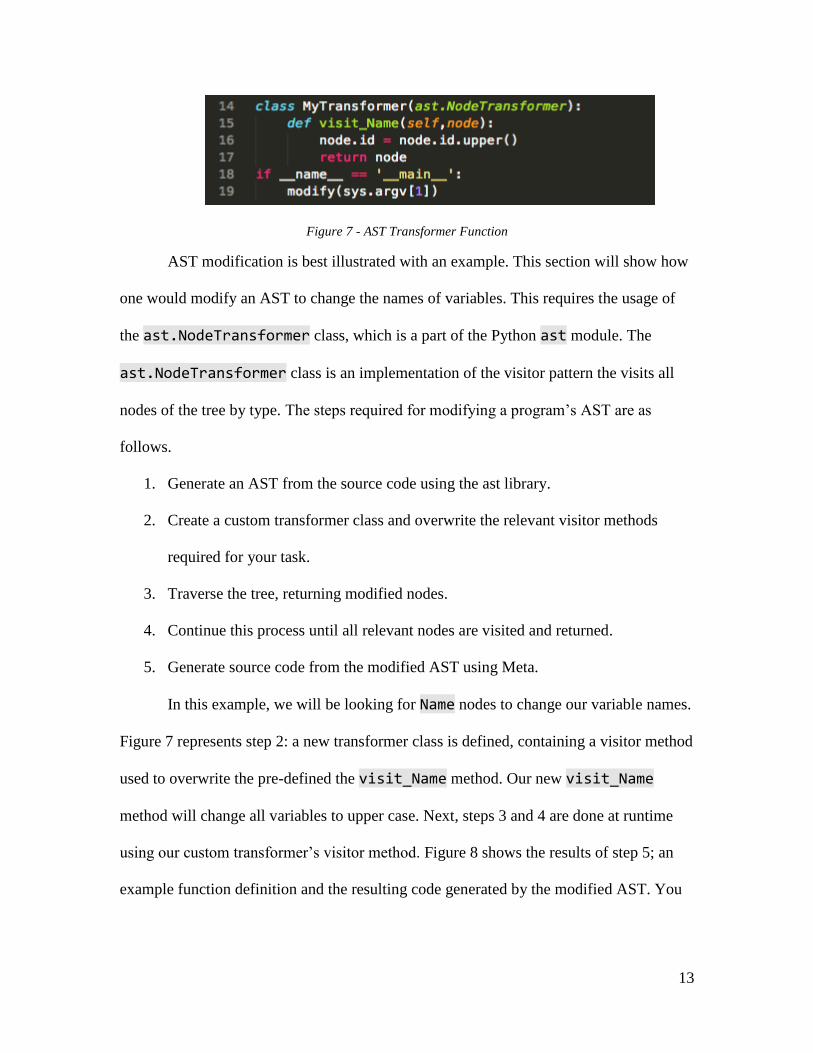
Figure 7 - AST Transformer Function
AST modification is best illustrated with an example. This section will show how
one would modify an AST to change the names of variables. This requires the usage of
the ast.NodeTransformer class, which is a part of the Python ast module. The
ast.NodeTransformer class is an implementation of the visitor pattern the visits all
nodes of the tree by type. The steps required for modifying a program’s AST are as
follows.
1. Generate an AST from the source code using the ast library.
2. Create a custom transformer class and overwrite the relevant visitor methods
required for your task.
3. Traverse the tree, returning modified nodes.
4. Continue this process until all relevant nodes are visited and returned.
5. Generate source code from the modified AST using Meta.
In this example, we will be looking for Name nodes to change our variable names.
Figure 7 represents step 2: a new transformer class is defined, containing a visitor method
used to overwrite the pre-defined the visit_Name method. Our new visit_Name
method will change all variables to upper case. Next, steps 3 and 4 are done at runtime
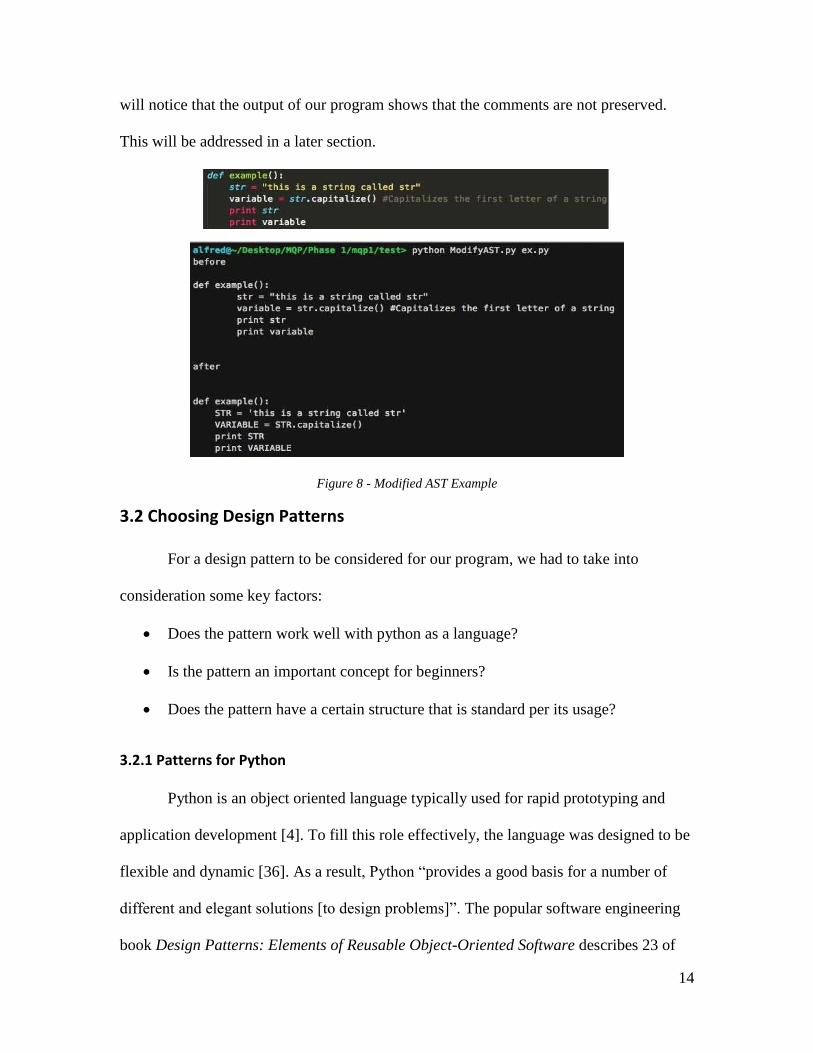
using our custom transformer’s visitor method. Figure 8 shows the results of step 5; an
example function definition and the resulting code generated by the modified AST. You
14
will notice that the output of our program shows that the comments are not preserved.
This will be addressed in a later section.
Figure 8 - Modified AST Example
3.2 Choosing Design Patterns
For a design pattern to be considered for our program, we had to take into
consideration some key factors:
Does the pattern work well with python as a language?
Is the pattern an important concept for beginners?
Does the pattern have a certain structure that is standard per its usage?
3.2.1 Patterns for Python
Python is an object oriented language typically used for rapid prototyping and
application development [4]. To fill this role effectively, the language was designed to be
flexible and dynamic [36]. As a result, Python “provides a good basis for a number of
different and elegant solutions [to design problems]”. The popular software engineering
book Design Patterns: Elements of Reusable Object-Oriented Software describes 23 of
15
the most widely used design patterns [3, 37, 38]. These patterns are called the Gang of
Four (GoF) design patterns, referring to the four authors of the book. The Gang of Four
patterns sometimes assume language traits that are absent from Python, however “it is not
impossible to build pattern implementations that work like their GoF counterparts” [36].
While the resulting Python pattern implementations might have some non-typical
features, they will still have the same functionality and recognizability.
Certain design patterns exist that lose their usefulness in Python. As a dynamic,
high level language, Python eases the load on the programmer by managing memory,
pointers, and determining types at runtime. A consequence of this is that Python
programs have less need for bookkeeping patterns meant to manage those programming
aspects [38]. Additionally, certain patterns such as the iterator and function decorator are
not required to be constructed manually as they are built into Python, [37].
3.2.2 Patterns for Beginners
Beginner programmers need to understand the basics of good software design
[23]. Using design patterns gives one exposure to proven techniques that utilize important
software engineering concepts. Design patterns also give beginner and experienced
programmers a common language in which to communicate [4]. The most well
documented patterns are the most beneficial for a new programmer to learn. Doing so
allows one to immediately be able to participate in a multitude of design discussions
based around proposed patterns as solutions to a problem. The Gang of Four patterns are
the most widely known and documented patterns, so they are the most ideal for beginners
to learn about.

16
3.2.3 Pattern Structure
A key issue that a program such as ours faces is the lack of context as to what the
input code is trying to accomplish. We have no way of knowing what the functionality of
certain classes are, as there is no way to explicitly derive the real world purpose of the
input bodies of code. Design patterns “do not translate directly into the solution; rather
have to be adapted to suit the problem context” [4].
For our program to be useful, we need to be able to implement a design pattern
without knowing what the bodies of our generated classes or functions will be. For this
reason, the only design patterns that we can implement are ones that have constant
structures not entirely dependent on their per-program application.
Figure 9 - Example Classes with Unknown Context
Figure 10 - Modified Classes
For example, a design pattern might always have a certain dependency between
classes “A” and “B”, shown in Figure 9. The pattern might also require a third class, “C”,
that has a relatively standard structure whenever that design pattern is implemented.
Therefore, even though our program does not have any context as to what classes “A”
and “B” have inside them or what purpose they serve, we can still implement the pattern
17
by adding in the dependency between “A” and “B” as well as generating the structure of
“C”. These changes are shown in Figure 10.
In other cases, new functions might be added. These functions might require
access to fields that are supplied by a particular class. We can use the AST to get those
fields from the class and make those the parameters of the generated function, as well as
building the function definition and creating an empty code body. While any code bodies
we create may be blank, we still have supplied the user with the skeletal structure of the
requested design. They can now see how the pattern is structured, which can help them to
understand how it works.
A new programmer can learn from a skeletal structure of a design pattern.
Showing required functions, classes, and class dependencies helps one to visualize the
pattern and potentially be able to recreate it in the future. This way, our program does not
do all the work for the programmer; they still are tasked with adding the correct
functionality to the code bodies. Our tool is not a way to get around having to think about
patterns, but more of a shortcut to understanding them.
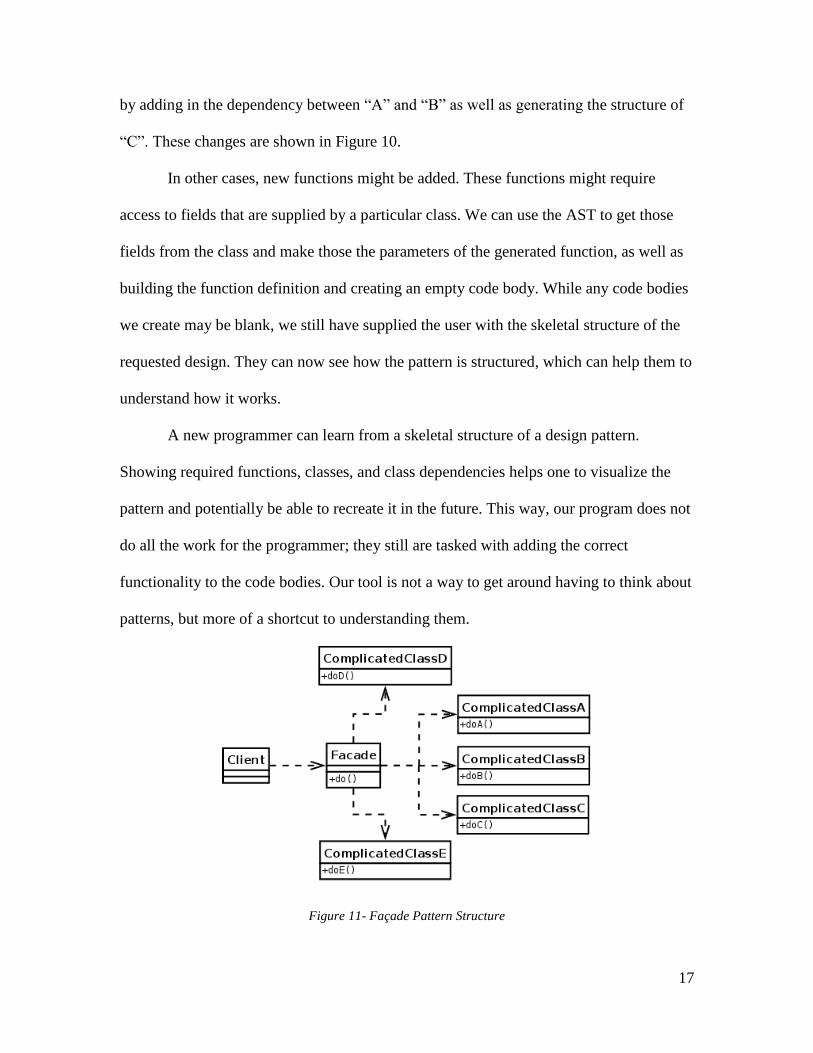
Figure 11- Façade Pattern Structure
18
Certain design patterns by their very nature are too program-dependent for our
program to generate a meaningful amount of their structure. Take for example the façade
pattern, whose purpose is to provide a version of an interface that is simplified for a
chosen functionality [4]. The structure of a façade is simply a class that has methods
defined for chosen purposes, which are often a series of method calls to existing and
more complicated interfaces. A situation that would warrant the use of the façade pattern
would be one where a user has many tests they would like to run at once. These tests
involve several different method calls and initialization phases. The statements could be
placed within one function definition that only needs to be called once; a façade. If our
program attempted to create the facade pattern in this scenario, all it can do is simply
generate an empty function definition, which is not clearly a façade at first glance. Our
program does not have the same level of understanding of the program as the user, thus is
cannot emulate the majority of the façade pattern’s structure. Design patterns such as this
have too much of their structure dependent on the program they are being applied to for
them to be adequately generated by our program.
3.3 Class Adapter Pattern Implementation
The first pattern we implemented was the class adapter pattern. This pattern
satisfies all of the requirements for it to work with our program; it works well with
Python as a language, is a useful pattern for newer programmers to learn, and has a
context-free structure that can be mostly recreated via AST manipulation. There are two
types of adapter patterns: the object adapter pattern and the class adapter pattern. The
object adapter pattern uses encapsulation to wrap a target interface, while a class adapter

19
uses multiple inheritance to fuse the functionality of two classes into one. Our program
generates object class adapters as they are considered more useful for Python [6].
The class adapter pattern is designed let the interface of an existing class to be
used by another interface [5]. This is accomplished through the addition of an adapter
class that implements the existing class’s interface while correctly calling the
corresponding methods from the secondary interface. The class adapter pattern works for
Python in that the language is object oriented and can utilize interface-like classes. In
Python, interfaces can be represented in the form of “abstract” classes, which have
methods defined but without bodies [6]. The abstract nature of these classes is faked in
that they are concrete classes that are intended to never be instantiated and instead dictate
the structure of their subclasses. These “abstract” classes essentially function as interfaces
and therefore fulfill their role in the pattern. True abstract classes exist in Python via the
Abstract Base Class module but are not needed to implement the class adapter pattern
[31].
3.3.1 Importance of the Class Adapter Pattern
Having the ability to add to a project without modifying existing code is
necessary for a program’s extensibility. When code needs to be changed, all other places
in the program that rely on its previous structure also have to adapt to this change, often
leading to bugs, client frustration, and wasted time. The class adapter pattern works to
avoid these issues by encapsulating existing code for the purpose of adding additional
functionality. A class adapter replicates the methods defined in a target interface but
without modifying the interface itself. Beginner programmers armed with the knowledge
of adapters can now start reusing old code for new purposes without having to modify it.
20
This power, coupled with the class adapter’s relatively simple design and concept, makes
it an excellent pattern for introductory programmers to know.
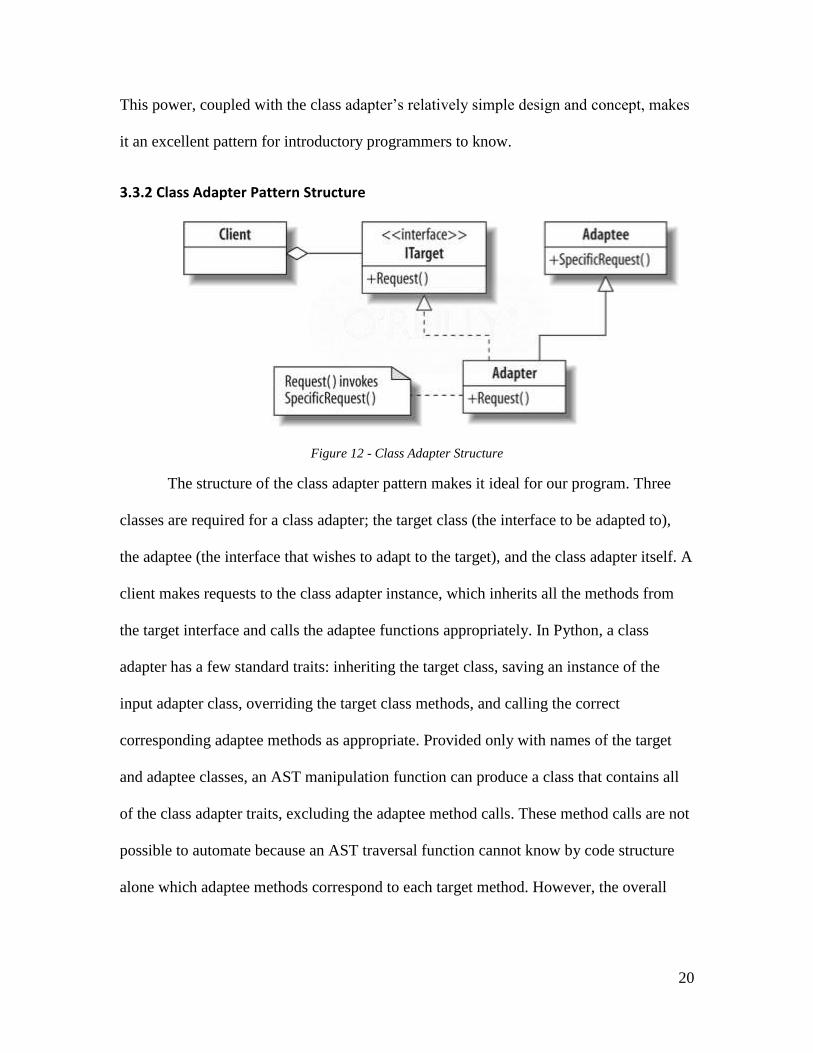
3.3.2 Class Adapter Pattern Structure
Figure 12 - Class Adapter Structure
The structure of the class adapter pattern makes it ideal for our program. Three
classes are required for a class adapter; the target class (the interface to be adapted to),
the adaptee (the interface that wishes to adapt to the target), and the class adapter itself. A
client makes requests to the class adapter instance, which inherits all the methods from
the target interface and calls the adaptee functions appropriately. In Python, a class
adapter has a few standard traits: inheriting the target class, saving an instance of the
input adapter class, overriding the target class methods, and calling the correct
corresponding adaptee methods as appropriate. Provided only with names of the target
and adaptee classes, an AST manipulation function can produce a class that contains all
of the class adapter traits, excluding the adaptee method calls. These method calls are not
possible to automate because an AST traversal function cannot know by code structure
alone which adaptee methods correspond to each target method. However, the overall
21
structure of the adapter can be generated, leaving TODO stubs where method calls are
required.
3.3.3 Class Adapter Pattern Generation
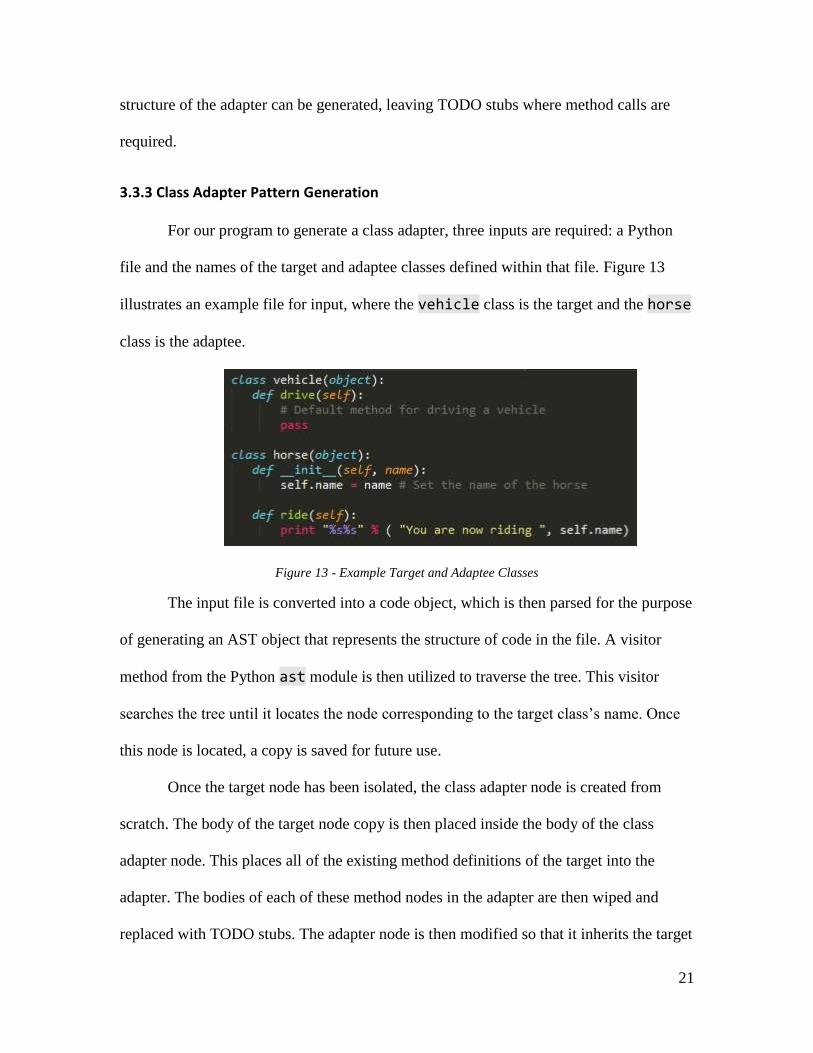
For our program to generate a class adapter, three inputs are required: a Python
file and the names of the target and adaptee classes defined within that file. Figure 13
illustrates an example file for input, where the vehicle class is the target and the horse
class is the adaptee.
Figure 13 - Example Target and Adaptee Classes
The input file is converted into a code object, which is then parsed for the purpose
of generating an AST object that represents the structure of code in the file. A visitor
method from the Python ast module is then utilized to traverse the tree. This visitor
searches the tree until it locates the node corresponding to the target class’s name. Once
this node is located, a copy is saved for future use.
Once the target node has been isolated, the class adapter node is created from
scratch. The body of the target node copy is then placed inside the body of the class
adapter node. This places all of the existing method definitions of the target into the
adapter. The bodies of each of these method nodes in the adapter are then wiped and
replaced with TODO stubs. The adapter node is then modified so that it inherits the target
22
class. An __init__ method node is then added to the class adapter node. The body of
this node contains an expression that saves an instance of an input class within the object.
A __getattr__ method node is also added to the class adapter node. The
__getattr__ method is a ‘magic’ method used by the Python interpreter when an
object lookup on an unknown attribute is called [32]. This addition allows the adapter to
pass any adaptee functions not defined within the adapter itself along to the adaptee.
Finally, the name of the adapter node is set to “adapteeTargetAdapter”. In this example,
the name will be “horseVehicleAdapter”.
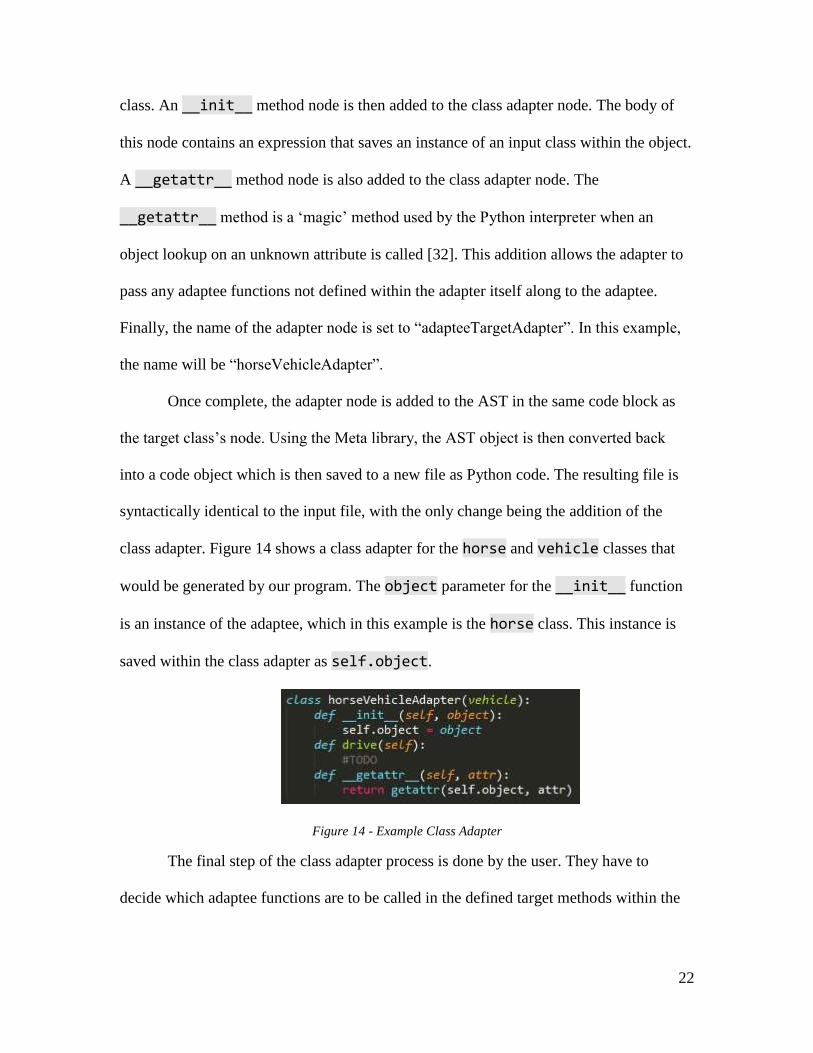
Once complete, the adapter node is added to the AST in the same code block as
the target class’s node. Using the Meta library, the AST object is then converted back
into a code object which is then saved to a new file as Python code. The resulting file is
syntactically identical to the input file, with the only change being the addition of the
class adapter. Figure 14 shows a class adapter for the horse and vehicle classes that
would be generated by our program. The object parameter for the __init__ function
is an instance of the adaptee, which in this example is the horse class. This instance is
saved within the class adapter as self.object.
Figure 14 - Example Class Adapter
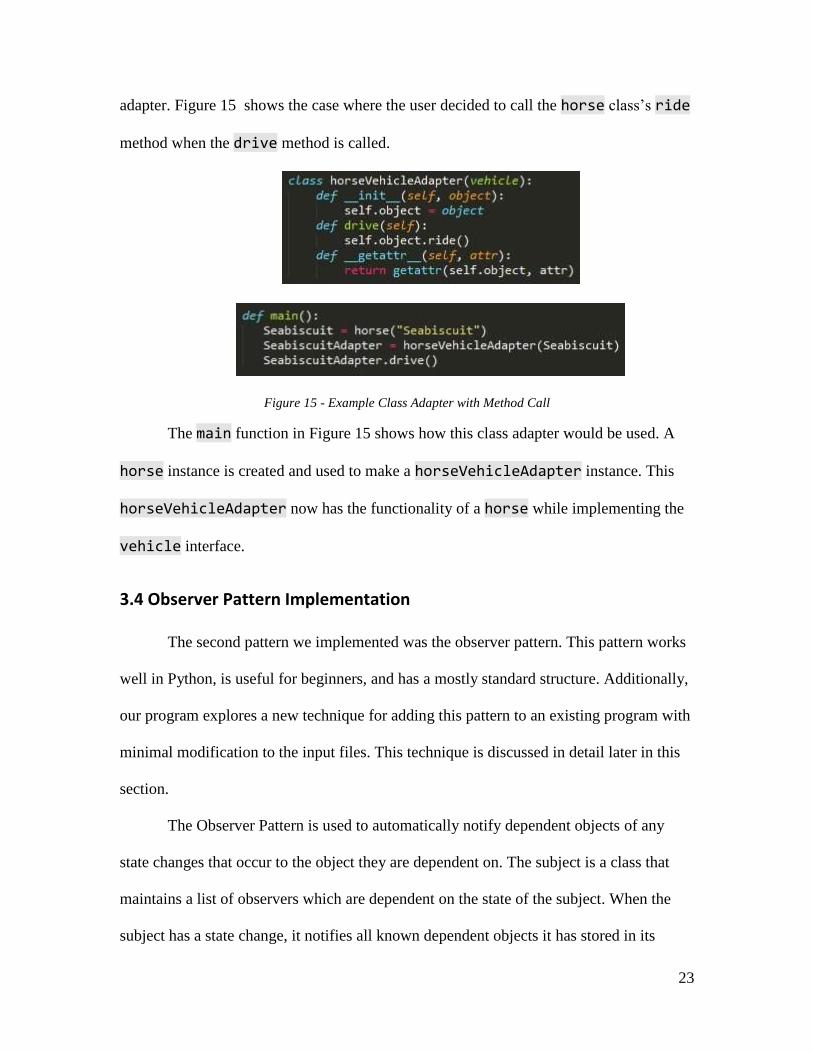
The final step of the class adapter process is done by the user. They have to
decide which adaptee functions are to be called in the defined target methods within the
23
adapter. Figure 15 shows the case where the user decided to call the horse class’s ride
method when the drive method is called.
Figure 15 - Example Class Adapter with Method Call
The main function in Figure 15 shows how this class adapter would be used. A
horse instance is created and used to make a horseVehicleAdapter instance. This
horseVehicleAdapter now has the functionality of a horse while implementing the
vehicle interface.
3.4 Observer Pattern Implementation
The second pattern we implemented was the observer pattern. This pattern works
well in Python, is useful for beginners, and has a mostly standard structure. Additionally,
our program explores a new technique for adding this pattern to an existing program with
minimal modification to the input files. This technique is discussed in detail later in this
section.
The Observer Pattern is used to automatically notify dependent objects of any
state changes that occur to the object they are dependent on. The subject is a class that
maintains a list of observers which are dependent on the state of the subject. When the
subject has a state change, it notifies all known dependent objects it has stored in its
24
observers list via a notification function. Each dependent class has a notify function
within itself that gets called whenever the subject notifies it of a state change [8]. Python
projects are often object based, so the observer pattern’s ability to automatically inform
multiple objects of a subject's change in state is relevant to the language.
3.4.1 Importance of the Observer Pattern
Properly maintaining the states of objects is an important concept in object
oriented programming. When an event occurs in a program and a state of a class instance
changes, all objects dependent on that instance must be notified. The challenge in doing
this involves maintaining these dependences without tightly coupling the related objects.
In software engineering, coupling is how closely two classes rely on each other [10].
Decoupling two objects means to limit their interaction, and is often considered the most
pragmatic way to approach object oriented design. Tight coupling between two objects
inhibits change; if one object is modified, all those tightly coupled to it may need to be
modified as well [11]. The observer pattern is useful to know because it maintains
consistency between dependent objects while avoiding tight coupling [10]. The subject
does not need to know any information about its observers; all it does is add them to its
list observers and notify them of a state change via a uniform notification function. New
programmers can gain useful insight as to how a program can update all dependent
classes while keeping them loosely coupled through the use of the observer pattern.
25
3.4.2 Observer Pattern Structure
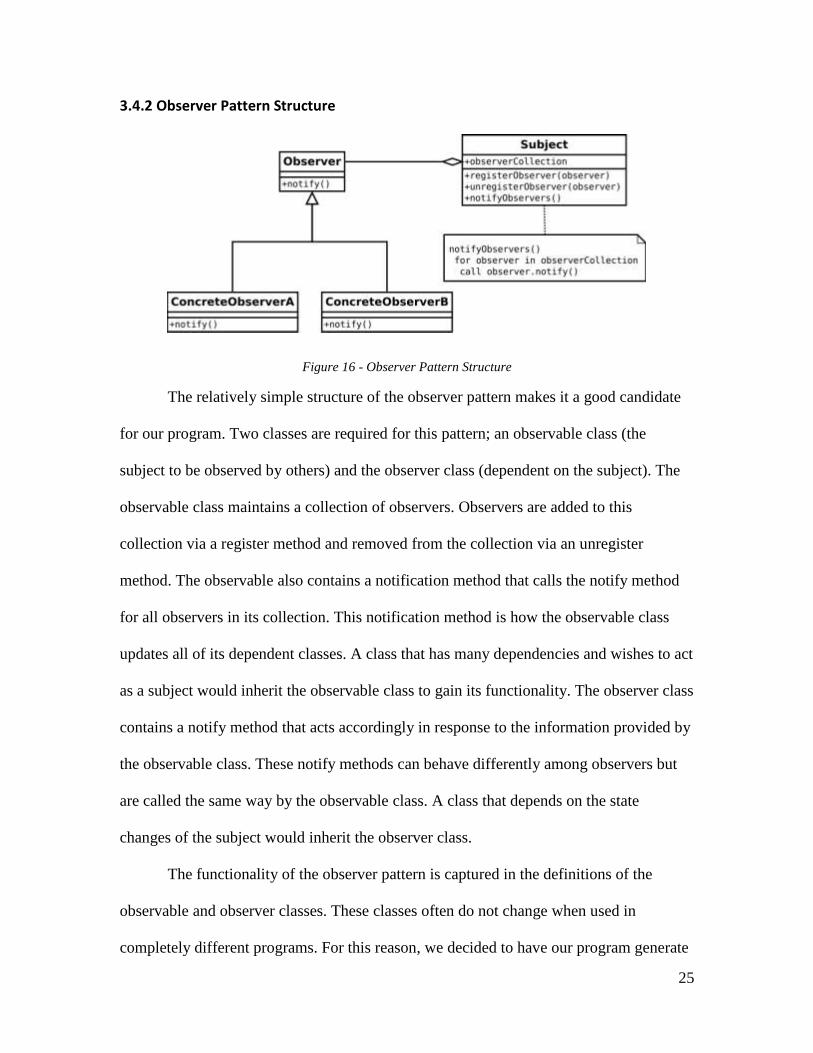
Figure 16 - Observer Pattern Structure
The relatively simple structure of the observer pattern makes it a good candidate
for our program. Two classes are required for this pattern; an observable class (the
subject to be observed by others) and the observer class (dependent on the subject). The
observable class maintains a collection of observers. Observers are added to this
collection via a register method and removed from the collection via an unregister
method. The observable also contains a notification method that calls the notify method
for all observers in its collection. This notification method is how the observable class
updates all of its dependent classes. A class that has many dependencies and wishes to act
as a subject would inherit the observable class to gain its functionality. The observer class
contains a notify method that acts accordingly in response to the information provided by
the observable class. These notify methods can behave differently among observers but
are called the same way by the observable class. A class that depends on the state
changes of the subject would inherit the observer class.
The functionality of the observer pattern is captured in the definitions of the
observable and observer classes. These classes often do not change when used in
completely different programs. For this reason, we decided to have our program generate
26
these class definitions in a separate, standard file. When a user submits a file to have the
observer pattern applied to, two files are generated: a completely new file that contains
the observer pattern class definitions, and a slightly modified version of their input file
that imports the newly generated file and uses it appropriately. With this method of
approach, the input file is modified as little as possible while still employing the observer
pattern.
3.4.3 Observer Pattern Generation
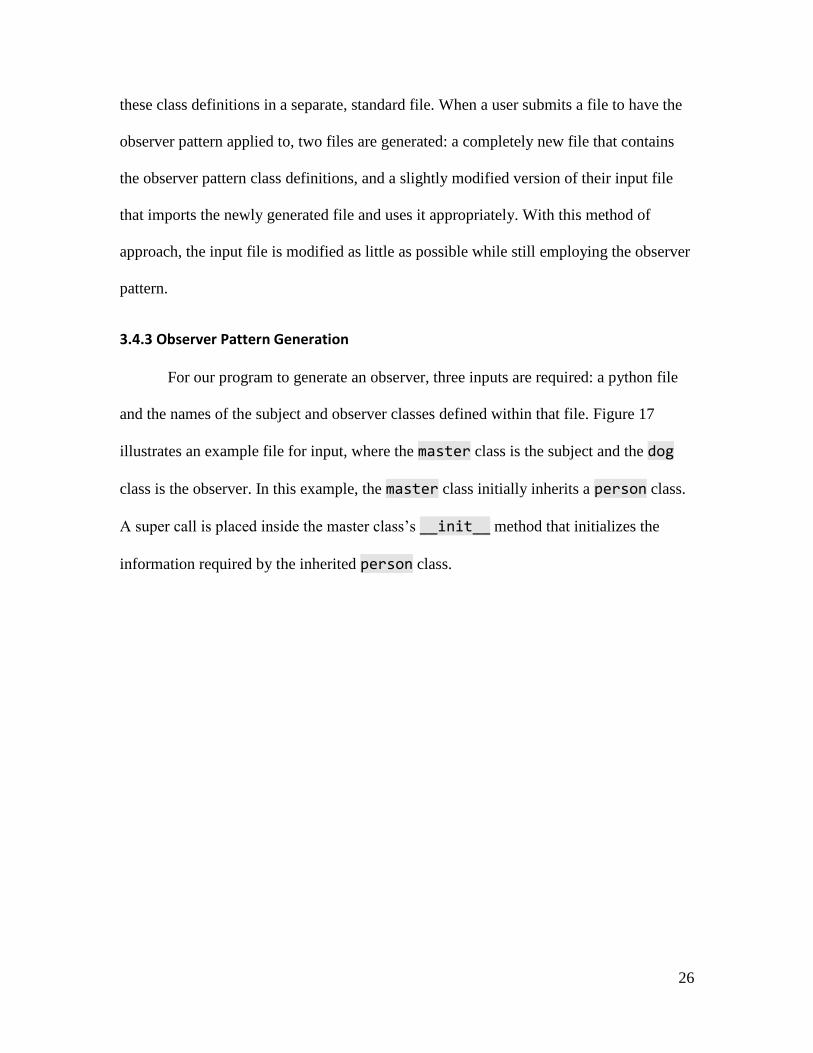
For our program to generate an observer, three inputs are required: a python file
and the names of the subject and observer classes defined within that file. Figure 17
illustrates an example file for input, where the master class is the subject and the dog
class is the observer. In this example, the master class initially inherits a person class.
A super call is placed inside the master class’s __init__ method that initializes the
information required by the inherited person class.
27
Figure 17- Example Subject and Observer Classes
The first step of the observer pattern generation process is to create a file that has
the class definitions for the observable and observer classes. Our program has an AST
representation of these class definitions saved within it. Source code is generated from
this AST and written to a file called “generatedObserver.py”. If that file already exists,
the previous version is overwritten. Figure 18 shows the contents of the generated file.
28
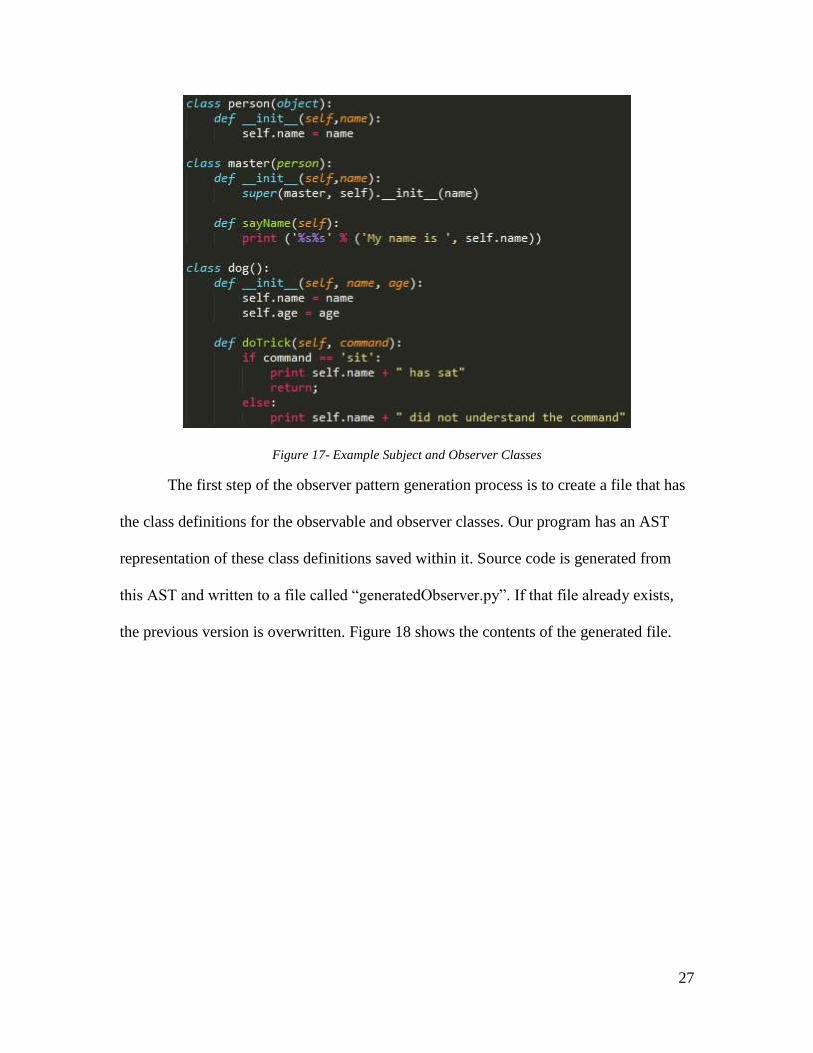
Figure 18 - Generated Observer File: generatedObserver.py
There are three classes defined within this file; the Observable class, the
Observer class, and the metaClass class. The Observable class acts as the subject. It
has methods defined that add, remove, and notify observers in its observer list. The
Observer class has a notify function that by default prints out the input arguments
received when the observable notifies its observers. This functionality can be changed or
overwritten. The third and most mysterious class is the metaClass. To grasp the logic
and purpose of this class, one must first understand multiple inheritance initializations in
Python.
Figure 17 shows, the master class inherits the person class. Our program
intends to have master also inherit the Observable class. In Python, multiple
29
inheritance is acceptable, but at a price [14]. If any of the inherited classes required
initialization (a call to their __init__ method), then Python’s super method is
required. In our example, both of the classes master inherits would require their own
initialization; person wishes to set the name field and Observable wishes to create an
observers list. The expression super(master, self).__init__(name) inside the
master class effectively is calling the __init__ method defined within the person
class. Without this super call, master instances would not have their name property
set, and calls to the sayName method would yield an error. Complications start to arise
when multiple inherited classes require initialization. The expression super(master,
self).__init__(name) only initializes one of the inherited classes. To initialize both
classes, a chain of super calls each initializing the next class is required. This process can
get cumbersome and is best avoided [16].
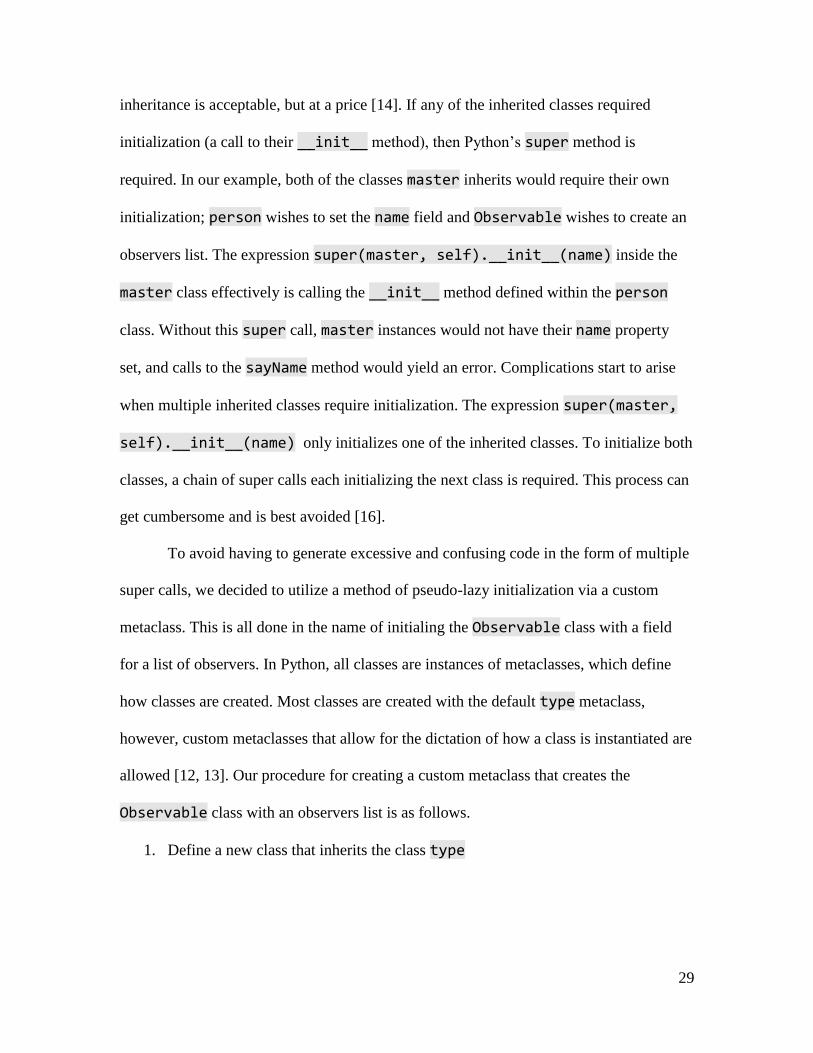
To avoid having to generate excessive and confusing code in the form of multiple
super calls, we decided to utilize a method of pseudo-lazy initialization via a custom
metaclass. This is all done in the name of initialing the Observable class with a field
for a list of observers. In Python, all classes are instances of metaclasses, which define
how classes are created. Most classes are created with the default type metaclass,
however, custom metaclasses that allow for the dictation of how a class is instantiated are
allowed [12, 13]. Our procedure for creating a custom metaclass that creates the
Observable class with an observers list is as follows.
1. Define a new class that inherits the class type
30
2. Place the __metaclass = metaClass expression within the class to be created
via our custom metaclass. The metaClass component is the name of our custom
metaclass.
3. Add a List method is to metaClass which will enable an observers list to be
added to the Observable class. List is a class method, which means it takes in
a class structure as an argument in the form of cls, opposed to an instance of a
class in the form of self [18]. List takes in the Observable class and calls the
getattr method to determine if the input class has the _observers attribute. If
it does not, the attribute is added to the input class as an empty list.
4. Decorate List with a property descriptor. A descriptor is “an object attribute with
‘binding behavior’, one whose attribute access has been overridden by methods in
the descriptor protocol” [15]. Placing the @property tag above the List method
definition essentially means that the List method is now an accessible property of
the custom metaclass.
5. Place the expression Observable.List within the class that will be inheriting
Observable. This calls the List method added to the Observable class by our
custom metaclass, creating an observers list.
Once the file containing the Observable, Observer, and metaClass classes
has been generated, the next step it to edit the input code to accept this new file. This
process is as follows.
1. Parse the input source code into a code object, which is then used to generate an
AST object.
31
2. Traverse the tree via a node visitor, searching for the nodes that define the input
classes denoted as the subject and the observer.
3. Modify the subject node so that it now inherits the Observable class and has the
expression Observable.List within its __init__ method. Now when this
initialization method is call, the Observable class has an observer list created
without requiring a call to its __init__ method, thus avoiding the super chain
issue.
4. Modify the observer node so that it now inherits the Observer class
5. Add an expression that imports the Observable and Observer classes defined
in the generated file
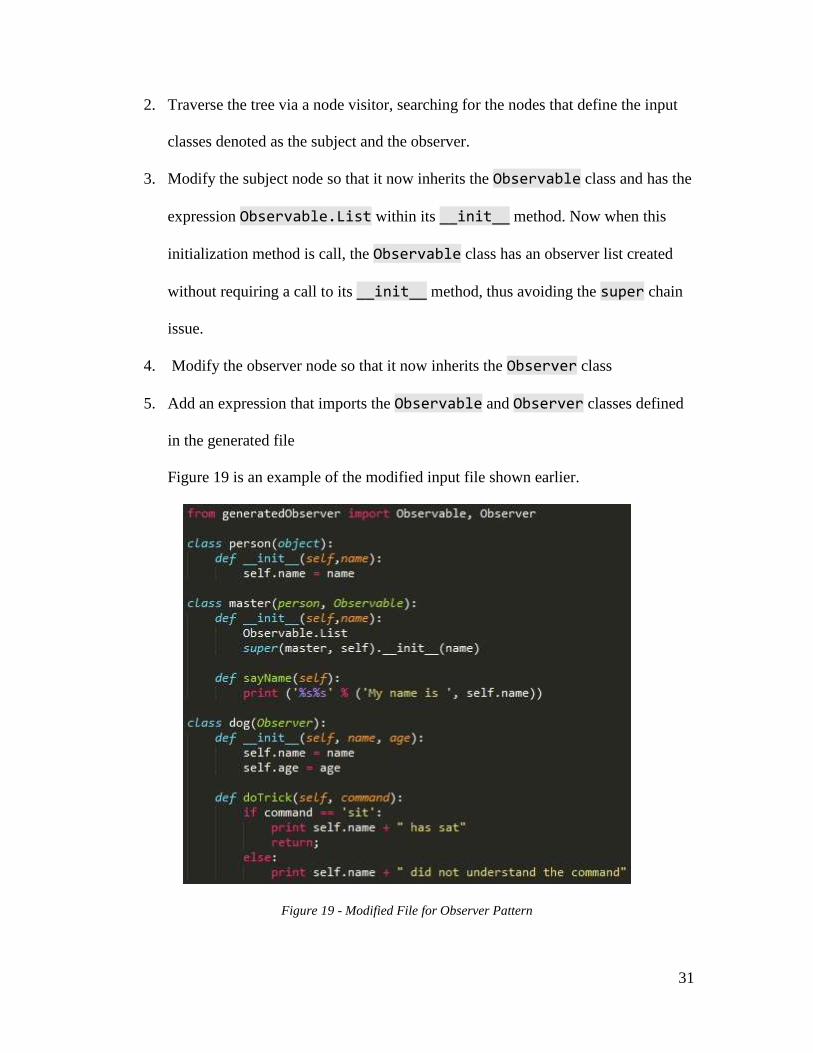
Figure 19 is an example of the modified input file shown earlier.
Figure 19 - Modified File for Observer Pattern
32
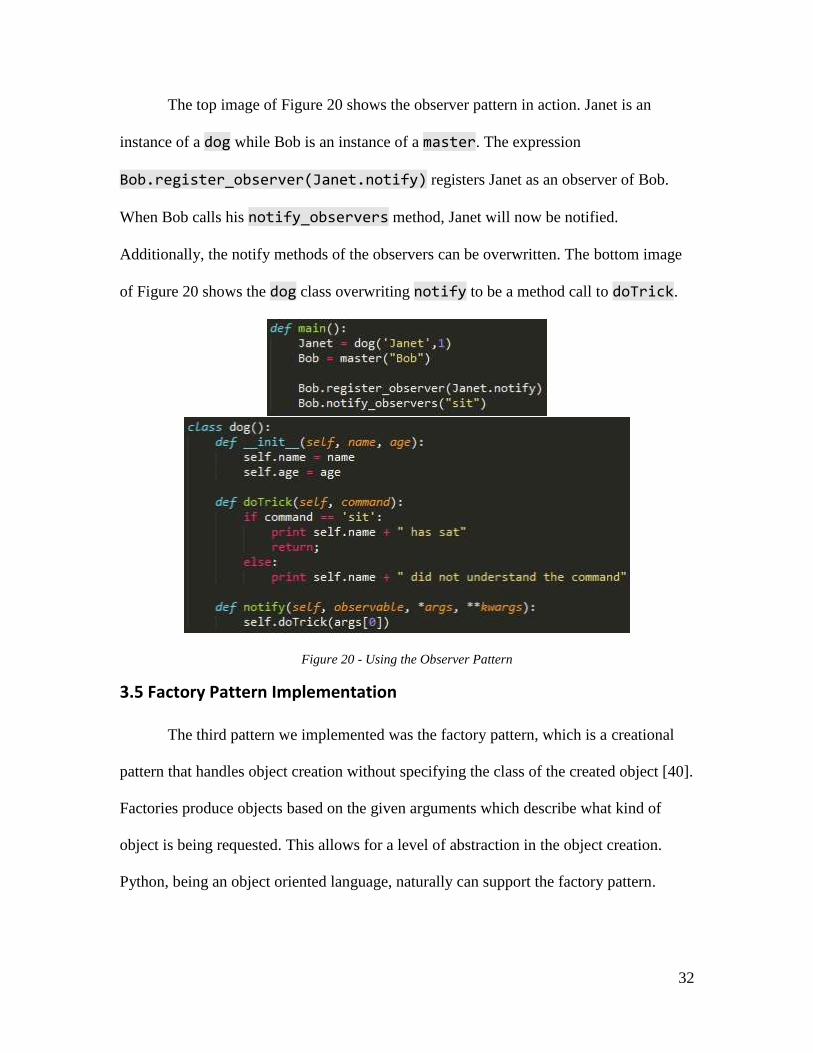
The top image of Figure 20 shows the observer pattern in action. Janet is an
instance of a dog while Bob is an instance of a master. The expression
Bob.register_observer(Janet.notify) registers Janet as an observer of Bob.
When Bob calls his notify_observers method, Janet will now be notified.
Additionally, the notify methods of the observers can be overwritten. The bottom image
of Figure 20 shows the dog class overwriting notify to be a method call to doTrick.
Figure 20 - Using the Observer Pattern
3.5 Factory Pattern Implementation
The third pattern we implemented was the factory pattern, which is a creational
pattern that handles object creation without specifying the class of the created object [40].
Factories produce objects based on the given arguments which describe what kind of
object is being requested. This allows for a level of abstraction in the object creation.
Python, being an object oriented language, naturally can support the factory pattern.
33
3.5.1 Importance of the Factory Pattern
Factories allow for the type of desired object instance to be decided at runtime
[41]. This functionality is useful in the situation where a “system needs to be independent
from the way the products it works with are created.” Independent creation methods
allow for a program to group and compare the different options for creating objects more
effectively. Depending on the input arguments, an object instantiation request can
interpreted and passed to its appropriate creation method. This system is also receptive to
new creation methods. Relying too heavily on built in creation methods that return a
single version of an object every time can make your code less flexibly. Factories help
newer programmers to understand how a level of abstraction can be beneficial for object
creation in programs.
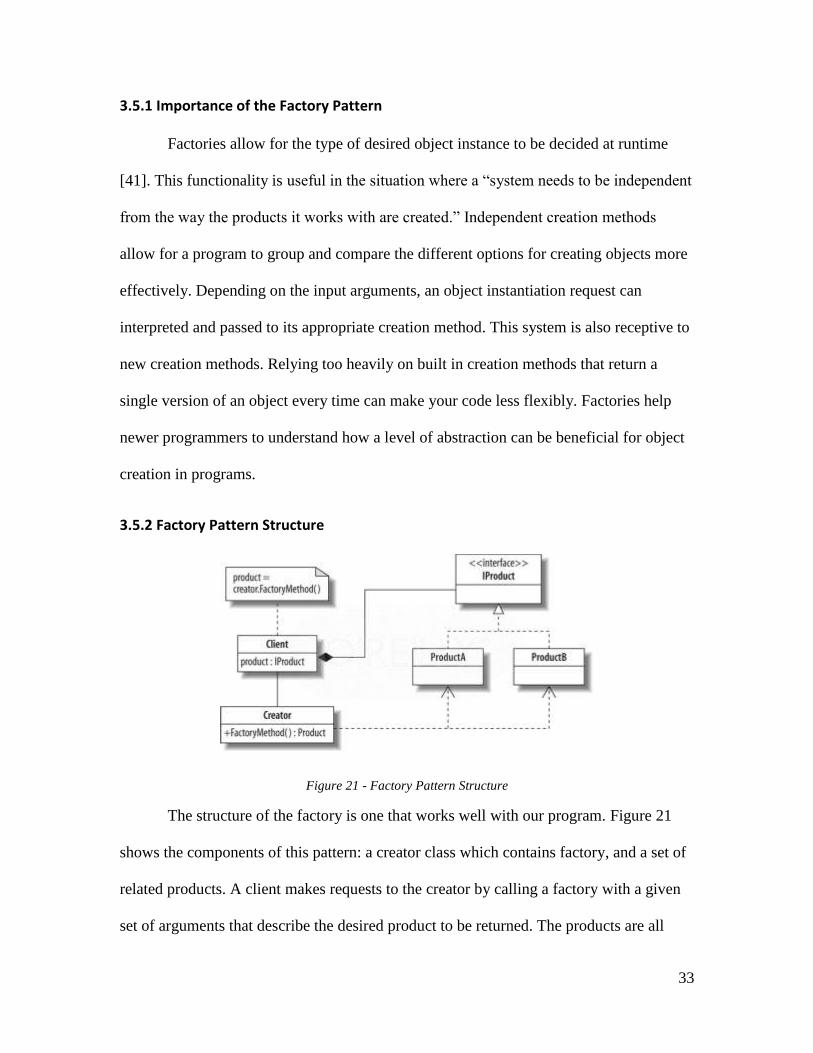
3.5.2 Factory Pattern Structure
Figure 21 - Factory Pattern Structure
The structure of the factory is one that works well with our program. Figure 21
shows the components of this pattern: a creator class which contains factory, and a set of
related products. A client makes requests to the creator by calling a factory with a given
set of arguments that describe the desired product to be returned. The products are all
34
related, and may inherit a common interface. The client does not know or care which type
of product is returned, they simply want a correct instance of an object that matches their
input specifications. In Python, factories have a general structure that consists of a class
that serves as the creator which contains internal factory methods design to return related
objects. An AST manipulation function can detect all classes that inherit from a specified
interface, generate simple factory methods for these classes, and then place those
factories into a creator class. The logic that determines which factories are called under
different conditions is up to the user to determine.
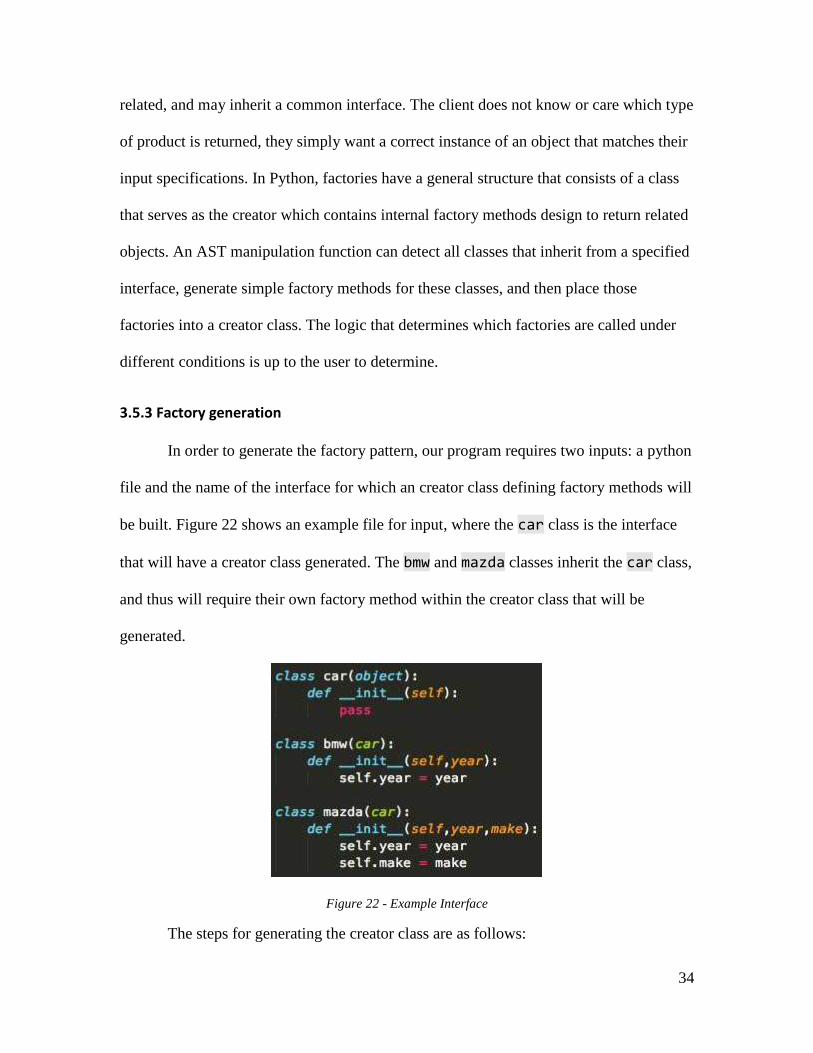
3.5.3 Factory generation
In order to generate the factory pattern, our program requires two inputs: a python
file and the name of the interface for which an creator class defining factory methods will
be built. Figure 22 shows an example file for input, where the car class is the interface
that will have a creator class generated. The bmw and mazda classes inherit the car class,
and thus will require their own factory method within the creator class that will be
generated.
Figure 22 - Example Interface
The steps for generating the creator class are as follows:
35
1. The input file is converted into a code object, which is then converted into an
AST object.
2. A visitor method traverses the AST searching for all class nodes that inherit the
given interface.
3. Once a match is found, the arguments for that class node’s __init__ method are
converted into an array and stored in a dictionary structure, with the key being the
name of the class. This is done so that each of the classes and their required
initialization arguments can be accessed later.
4. A new class node is created and placed on the AST.
5. Factory methods for each of the class nodes located in step 3 are then created as
methods within the creator.
6. The arguments for each of the factories are retrieved from the dictionary by using
the name of their respective class node as the key.
By default, the factory methods simply return an instance of the corresponding
class. Each of these factory methods is labeled as a @classmethod, and list cls as their
first argument. This means that an instance of creator class is will not be required for the
individual factory methods to be called. The cls argument is different than the typical
self argument in that cls passes the structure of the class to the method, not an instance
of it.
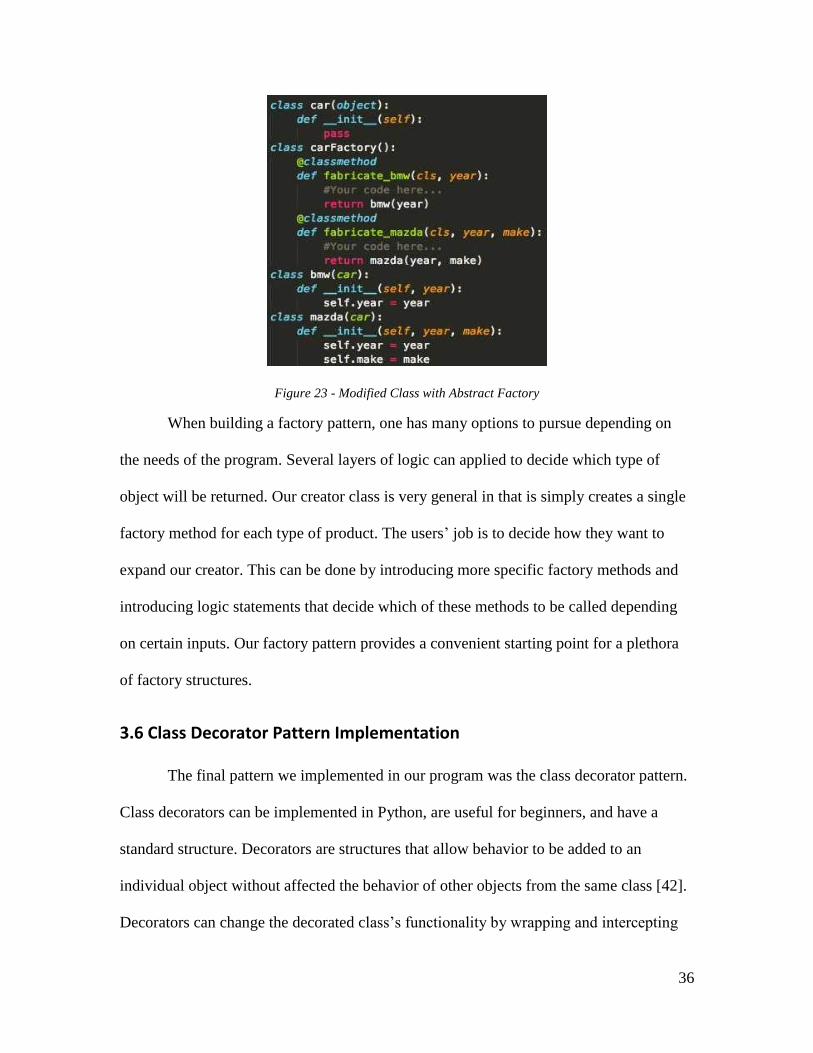
The creator node is now complete. The modified AST is converted back to source
code which is then saved to a new file. Figure 23 shows the class from Figure 22, now
modified to incorporate the factory pattern.
36
Figure 23 - Modified Class with Abstract Factory
When building a factory pattern, one has many options to pursue depending on
the needs of the program. Several layers of logic can applied to decide which type of
object will be returned. Our creator class is very general in that is simply creates a single
factory method for each type of product. The users’ job is to decide how they want to
expand our creator. This can be done by introducing more specific factory methods and
introducing logic statements that decide which of these methods to be called depending
on certain inputs. Our factory pattern provides a convenient starting point for a plethora
of factory structures.
3.6 Class Decorator Pattern Implementation
The final pattern we implemented in our program was the class decorator pattern.
Class decorators can be implemented in Python, are useful for beginners, and have a
standard structure. Decorators are structures that allow behavior to be added to an
individual object without affected the behavior of other objects from the same class [42].
Decorators can change the decorated class’s functionality by wrapping and intercepting
37
actions the decorated class’s methods. This can be done statically or at runtime.
Decorated instances of the same class are all independent. Function decorators are built
into Python; their usage and purpose in the class decorator pattern is discussed later in
this section.
3.6.1 Importance of the Class Decorator Pattern
Maintaining the structure of a pre-existing project while still being able to expand
its functionality is an important concept. In many cases, the classes being used in a
project are imported from other inaccessible files or are tightly coupled with other design
components. Knowing how to make seemingly rigid code flexible in order to incorporate
new changes is very important. Decorators provide a means to add functionality to
existing functions or classes without requiring their modification. By using a decorator,
pre-existing structures can be wrapped and interpreted differently. Decorators also allow
for runtime changes; based on how an object is instantiated or a method is called,
different results can be returned. The ability to maintain prior code structure while
implementing new changes is an important concept for programmers to grasp, making
decorators a useful pattern for beginners.
38
3.6.2 Class Decorator Structure
Figure 24 - Decorator Structure
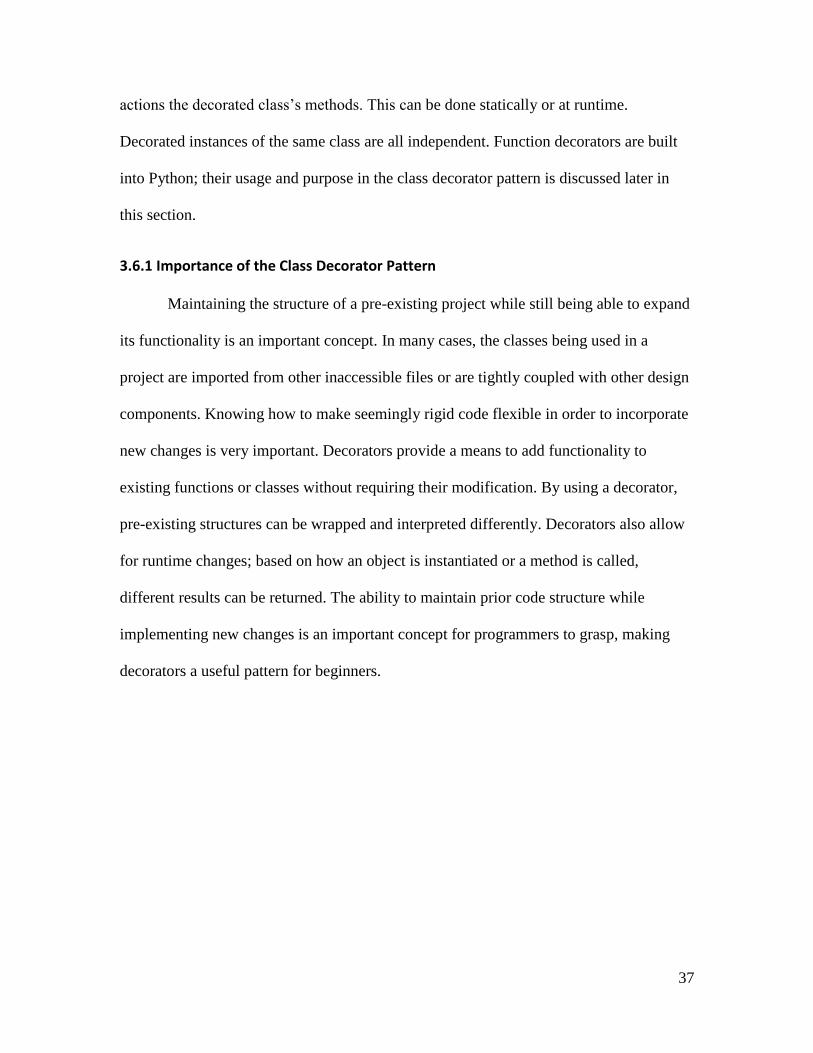
The decorator pattern has a standard structure that works well for our program.
There are four key classes in this pattern; a component, a decorator, and instances of
both. The component is a class that will be decorated. The decorator wraps the
component within itself and redirects all component methods calls to it. The concrete
instance of the decorator overrides the component methods that require modification [42].
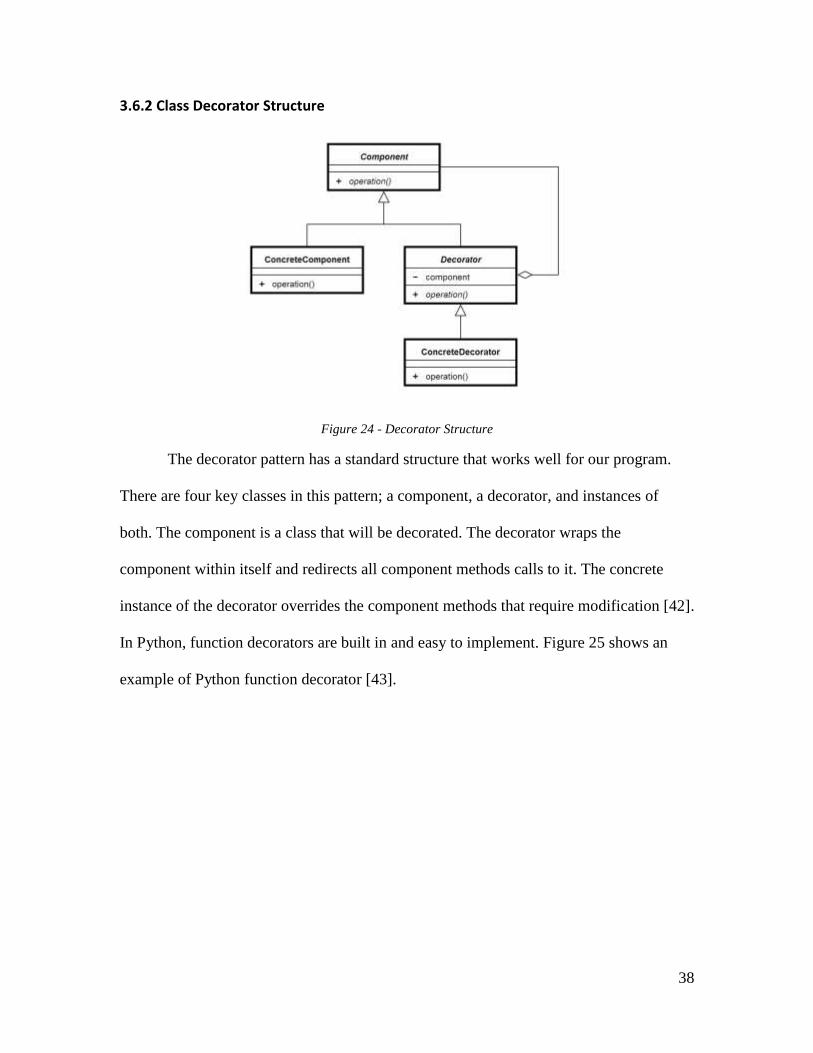
In Python, function decorators are built in and easy to implement. Figure 25 shows an
example of Python function decorator [43].
39
Figure 25 - Function Decorator Example
The built in decorators in Python are declared by placing the name of the
decorator preceded by the ‘@’ symbol above the component it is decorating. In the above
example, the aFunction function is being decorated by the myDecorator class. When
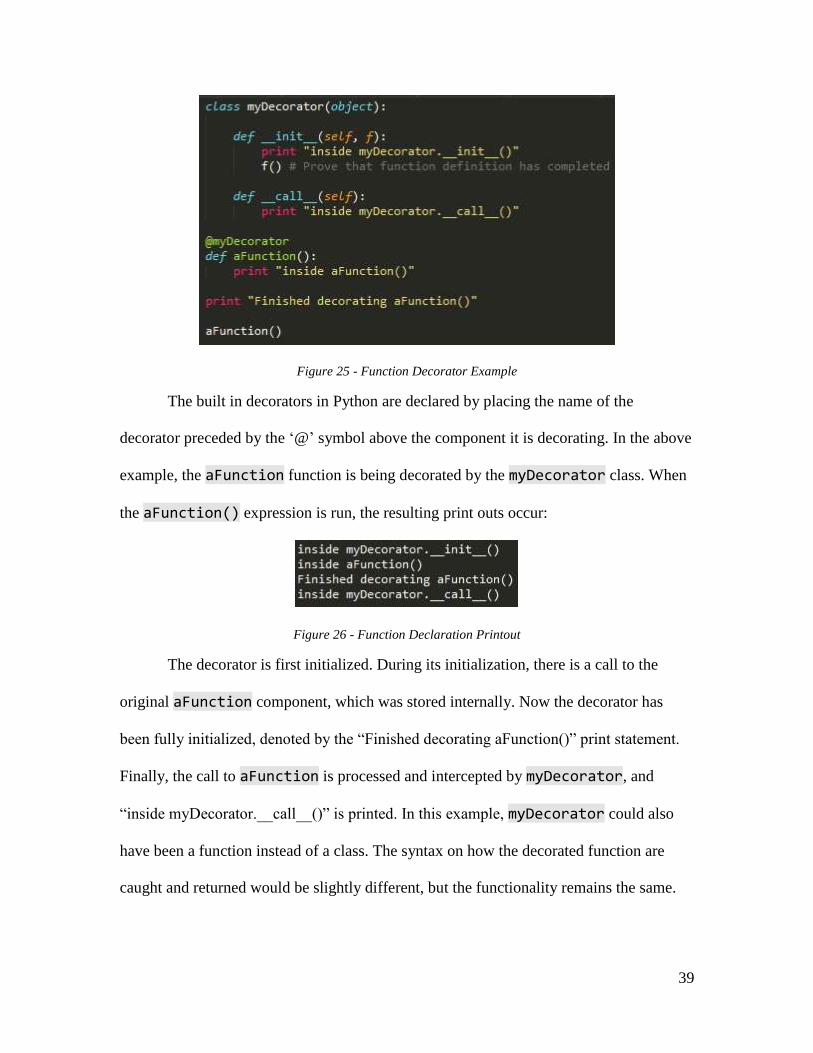
the aFunction() expression is run, the resulting print outs occur:
Figure 26 - Function Declaration Printout
The decorator is first initialized. During its initialization, there is a call to the
original aFunction component, which was stored internally. Now the decorator has
been fully initialized, denoted by the “Finished decorating aFunction()” print statement.
Finally, the call to aFunction is processed and intercepted by myDecorator, and
“inside myDecorator.__call__()” is printed. In this example, myDecorator could also
have been a function instead of a class. The syntax on how the decorated function are
caught and returned would be slightly different, but the functionality remains the same.
40
The built in function decorators in Python can be used to build a similarly
functioning and structured class decorator. A class rebuilder can be used to return a
modified component class that has decorated methods. The code blocks that determine
the logic that determines when decorators are called as well as the functionality of those
decorators are isolated, meaning the class decorator structure can be generated by our
program.
3.6.3 Class Decorator Generation
Figure 27 - Example Class
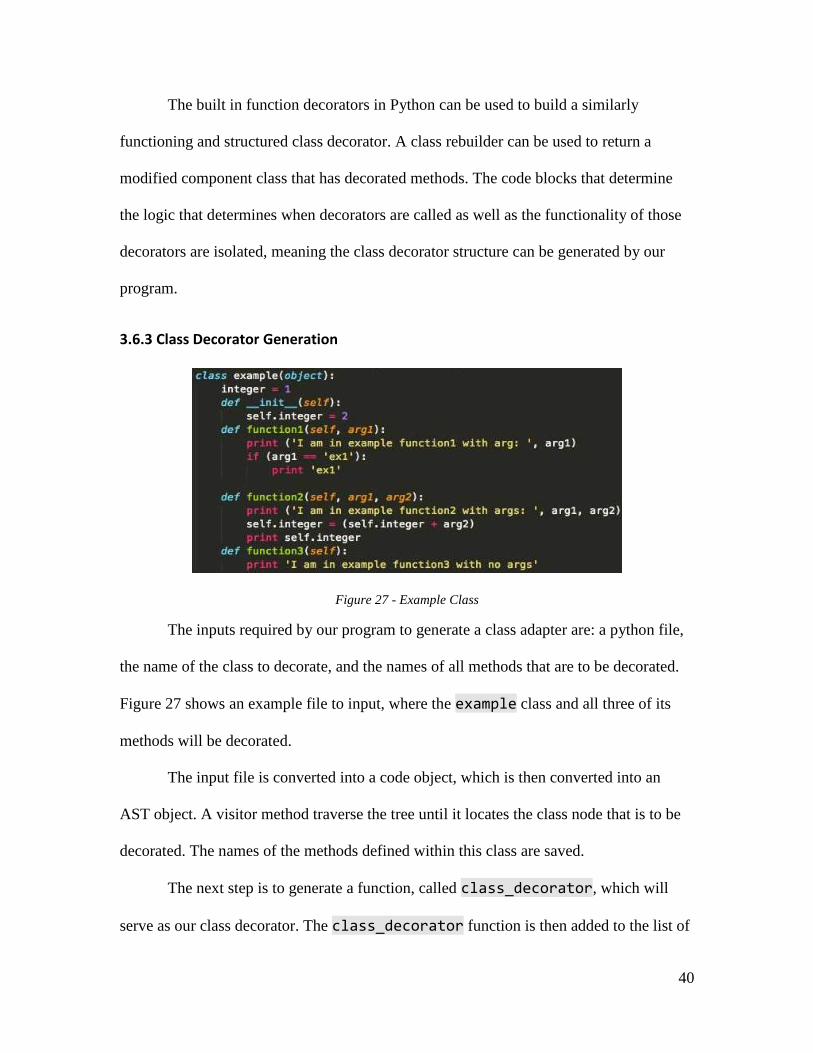
The inputs required by our program to generate a class adapter are: a python file,
the name of the class to decorate, and the names of all methods that are to be decorated.
Figure 27 shows an example file to input, where the example class and all three of its
methods will be decorated.
The input file is converted into a code object, which is then converted into an
AST object. A visitor method traverse the tree until it locates the class node that is to be
decorated. The names of the methods defined within this class are saved.
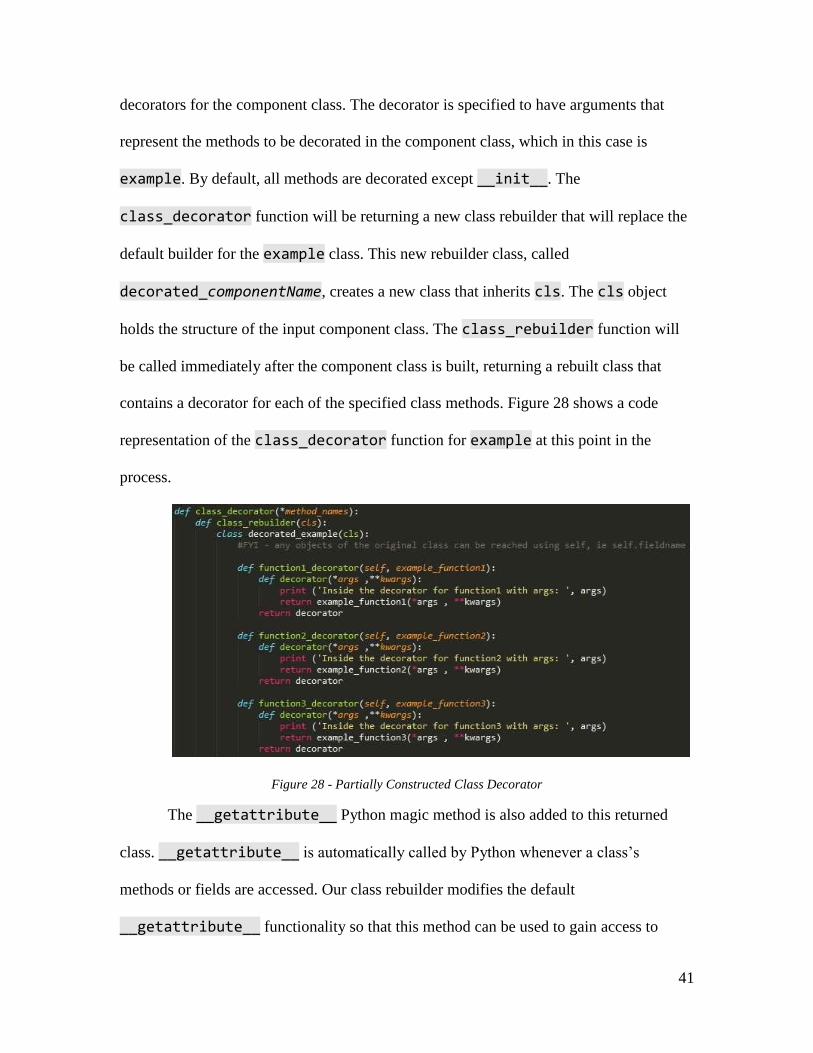
The next step is to generate a function, called class_decorator, which will
serve as our class decorator. The class_decorator function is then added to the list of
41
decorators for the component class. The decorator is specified to have arguments that
represent the methods to be decorated in the component class, which in this case is
example. By default, all methods are decorated except __init__. The
class_decorator function will be returning a new class rebuilder that will replace the
default builder for the example class. This new rebuilder class, called
decorated_componentName, creates a new class that inherits cls. The cls object
holds the structure of the input component class. The class_rebuilder function will
be called immediately after the component class is built, returning a rebuilt class that
contains a decorator for each of the specified class methods. Figure 28 shows a code
representation of the class_decorator function for example at this point in the
process.
Figure 28 - Partially Constructed Class Decorator
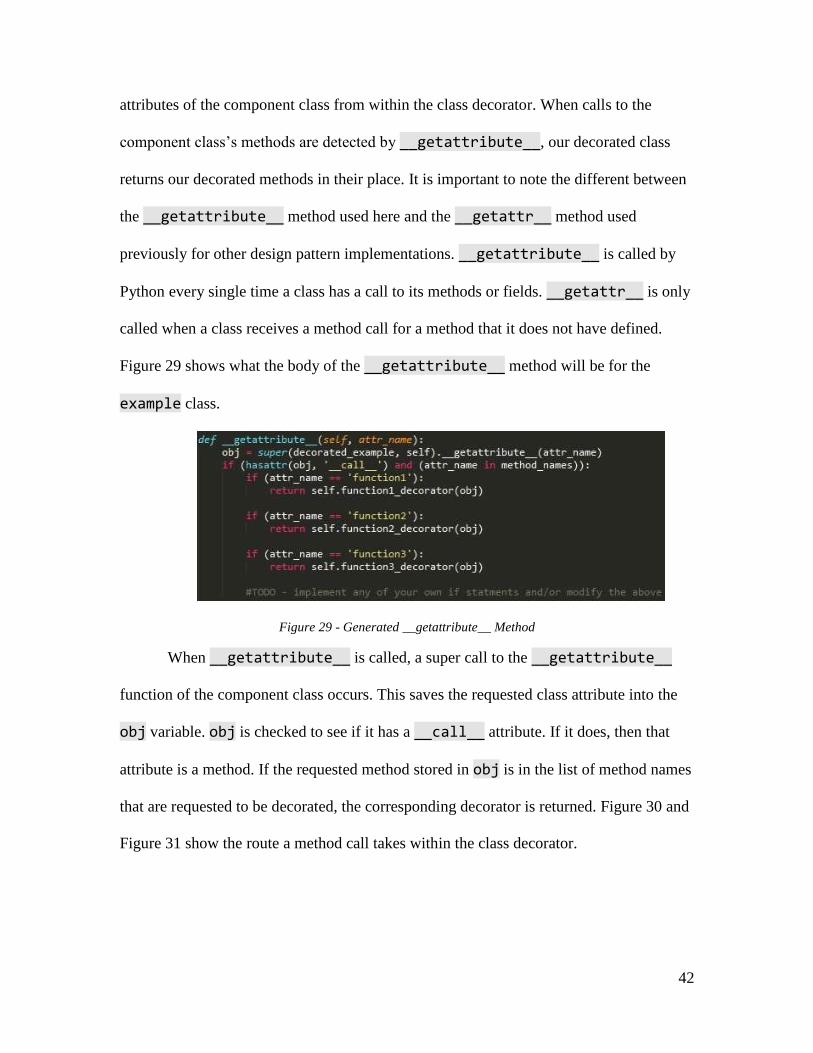
The __getattribute__ Python magic method is also added to this returned
class. __getattribute__ is automatically called by Python whenever a class’s
methods or fields are accessed. Our class rebuilder modifies the default
__getattribute__ functionality so that this method can be used to gain access to
42
attributes of the component class from within the class decorator. When calls to the
component class’s methods are detected by __getattribute__, our decorated class
returns our decorated methods in their place. It is important to note the different between
the __getattribute__ method used here and the __getattr__ method used
previously for other design pattern implementations. __getattribute__ is called by
Python every single time a class has a call to its methods or fields. __getattr__ is only
called when a class receives a method call for a method that it does not have defined.
Figure 29 shows what the body of the __getattribute__ method will be for the
example class.
Figure 29 - Generated __getattribute__ Method
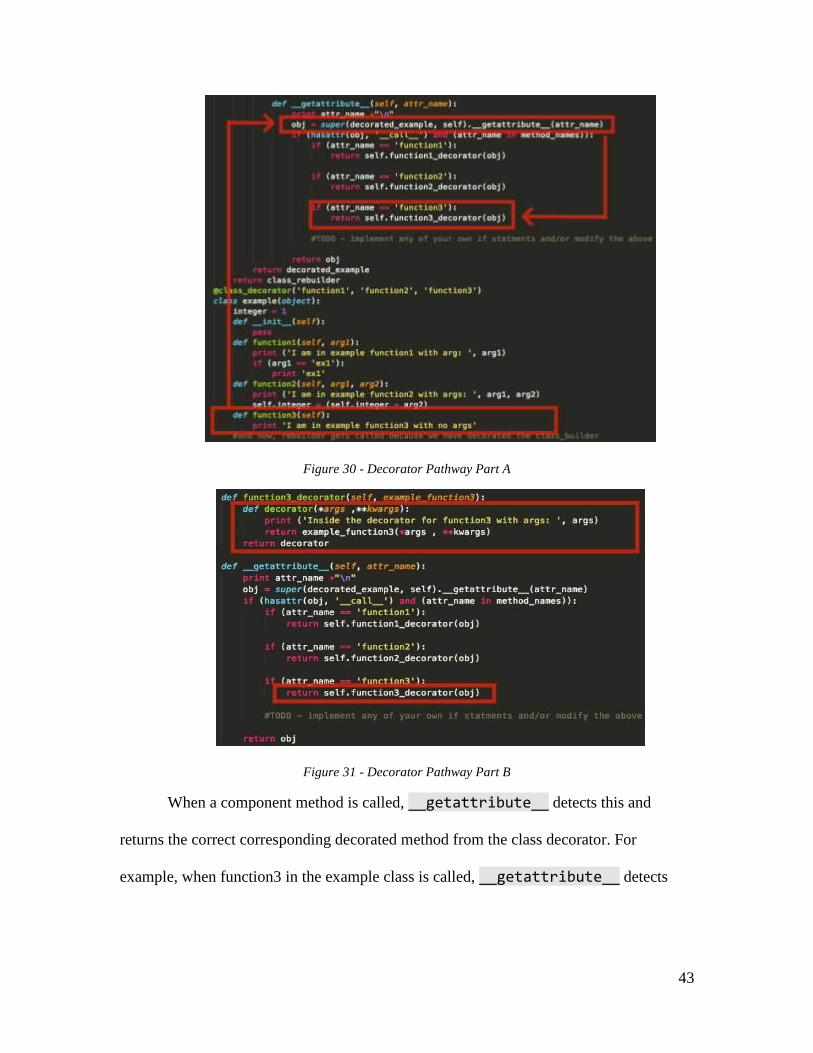
When __getattribute__ is called, a super call to the __getattribute__
function of the component class occurs. This saves the requested class attribute into the
obj variable. obj is checked to see if it has a __call__ attribute. If it does, then that
attribute is a method. If the requested method stored in obj is in the list of method names
that are requested to be decorated, the corresponding decorator is returned. Figure 30 and
Figure 31 show the route a method call takes within the class decorator.
43
Figure 30 - Decorator Pathway Part A
Figure 31 - Decorator Pathway Part B
When a component method is called, __getattribute__ detects this and
returns the correct corresponding decorated method from the class decorator. For
example, when function3 in the example class is called, __getattribute__ detects
44
that a method lookup has occurred for a decorated method, and a call to
function3_decorator is returned.
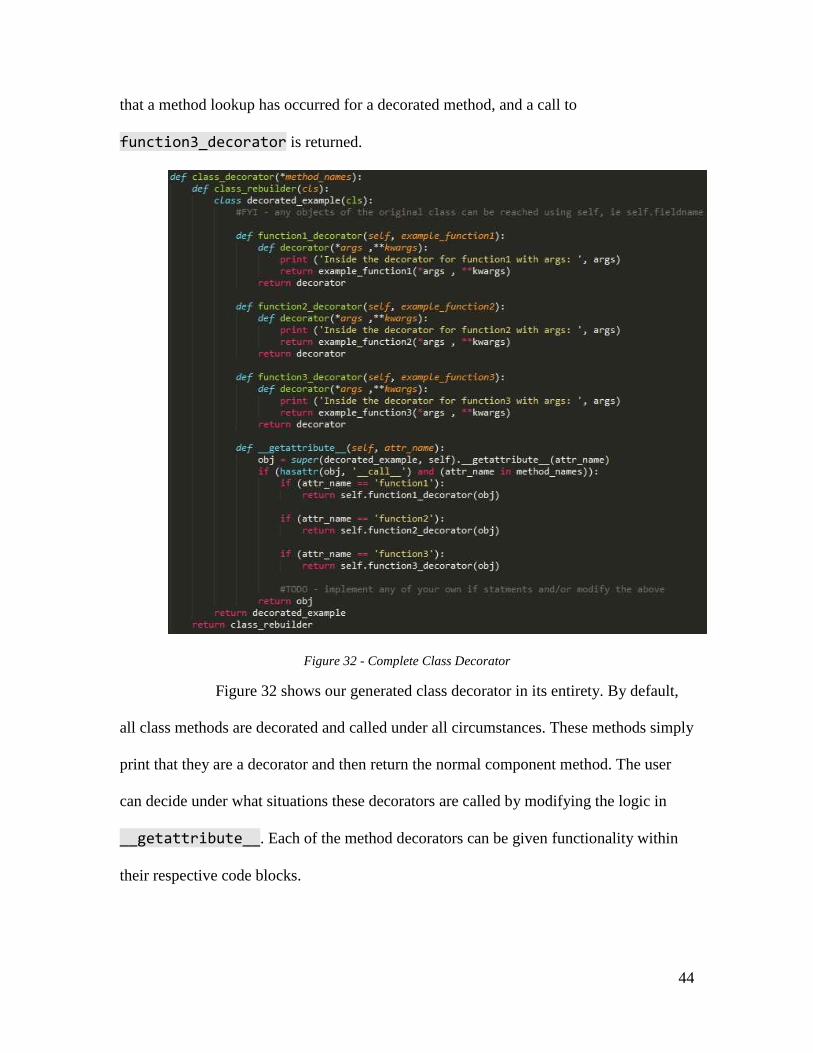
Figure 32 - Complete Class Decorator
Figure 32 shows our generated class decorator in its entirety. By default,
all class methods are decorated and called under all circumstances. These methods simply
print that they are a decorator and then return the normal component method. The user
can decide under what situations these decorators are called by modifying the logic in
__getattribute__. Each of the method decorators can be given functionality within
their respective code blocks.
45
3.7 Comment Preservation
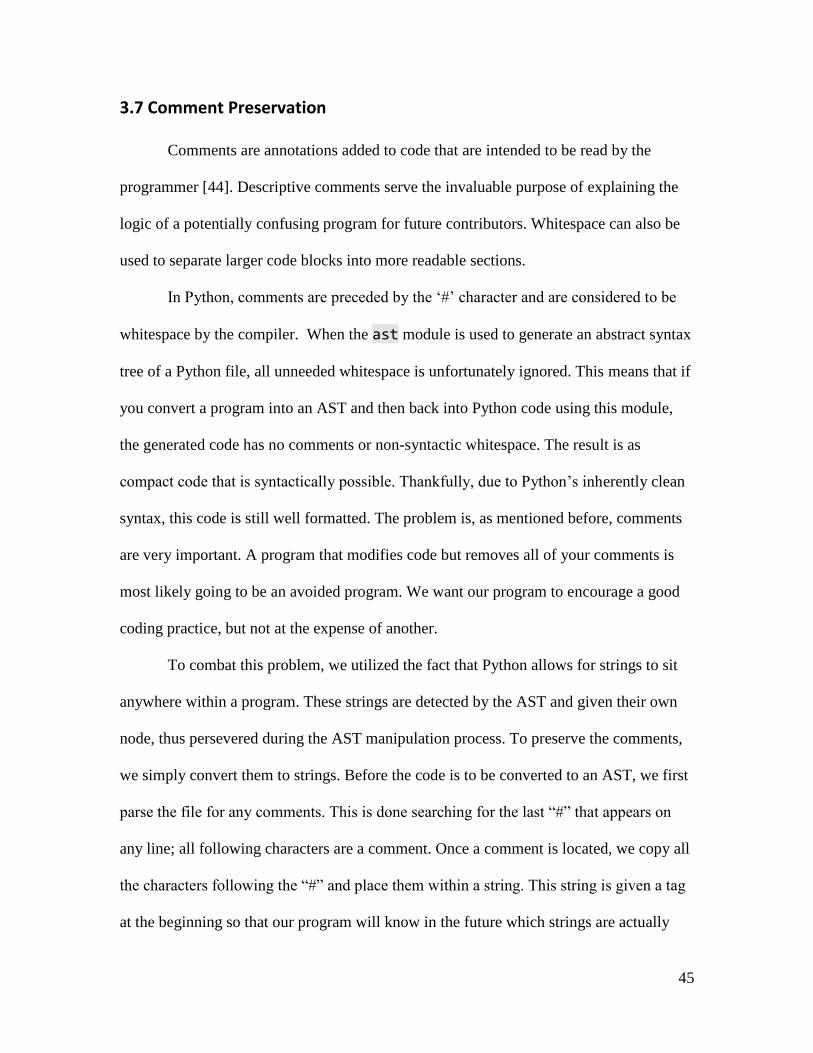
Comments are annotations added to code that are intended to be read by the
programmer [44]. Descriptive comments serve the invaluable purpose of explaining the
logic of a potentially confusing program for future contributors. Whitespace can also be
used to separate larger code blocks into more readable sections.
In Python, comments are preceded by the ‘#’ character and are considered to be
whitespace by the compiler. When the ast module is used to generate an abstract syntax
tree of a Python file, all unneeded whitespace is unfortunately ignored. This means that if
you convert a program into an AST and then back into Python code using this module,
the generated code has no comments or non-syntactic whitespace. The result is as
compact code that is syntactically possible. Thankfully, due to Python’s inherently clean
syntax, this code is still well formatted. The problem is, as mentioned before, comments
are very important. A program that modifies code but removes all of your comments is
most likely going to be an avoided program. We want our program to encourage a good
coding practice, but not at the expense of another.
To combat this problem, we utilized the fact that Python allows for strings to sit
anywhere within a program. These strings are detected by the AST and given their own
node, thus persevered during the AST manipulation process. To preserve the comments,
we simply convert them to strings. Before the code is to be converted to an AST, we first
parse the file for any comments. This is done searching for the last “#” that appears on
any line; all following characters are a comment. Once a comment is located, we copy all
the characters following the “#” and place them within a string. This string is given a tag
at the beginning so that our program will know in the future which strings are actually
46
comments. This tag varies depending on whether or not the comment was in-line. Once
all comments are converted to strings, the AST manipulation can take place. When the
new Python code has been generated, we parse the file as a string and search for any of
our comment tags. Once a tag is found, the text including and following the “#” character
is plucked from the string and placed back as a comment. If the tag denotes it as an in-
line comment, it is placed at the end of the following line. Once the parsing is complete,
all comments are back in their rightful place. This process works but has some drawbacks
which will be discussed in a later section.
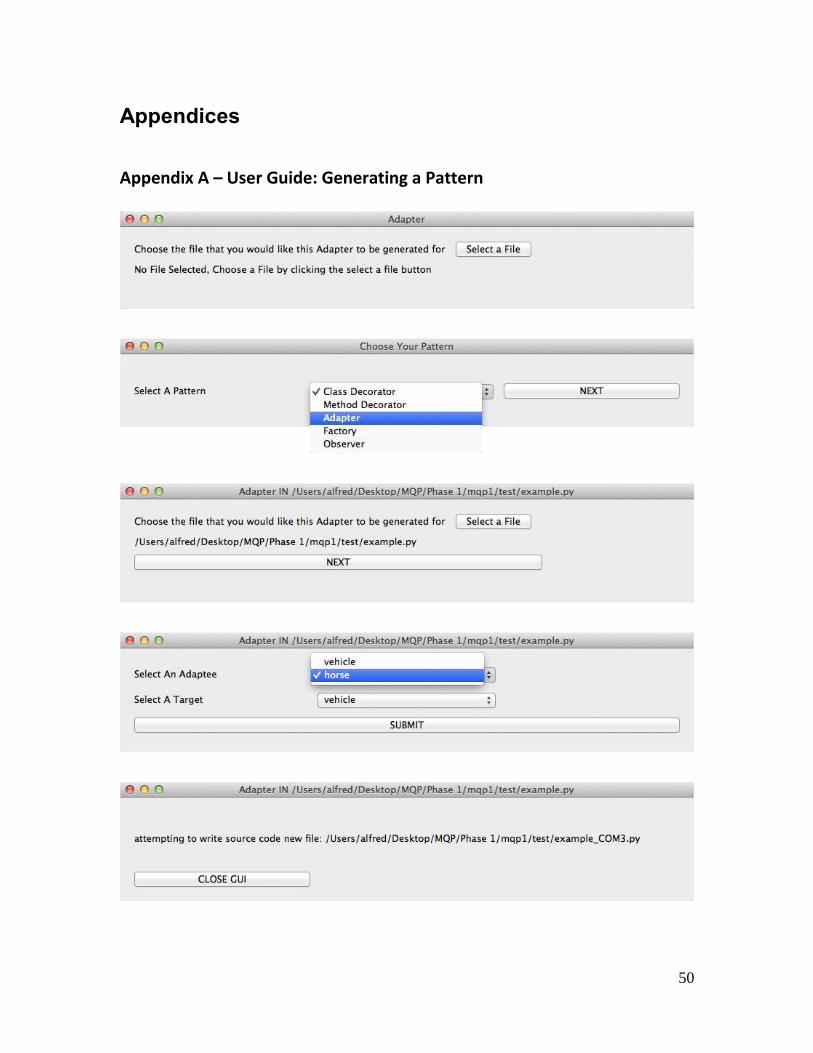
3.8 Graphical User Interface
We designed a simple graphical user interface (GUI) prototype for our program.
This GUI first takes in a file that the user would like to add a design pattern to. The user
then selects which pattern they want. An AST is then generated from their input file and
is searched for any classes or methods that could be used as arguments for our pattern
insertion function. These options are piped into a series of drop downs. The user selects
which options they would like for their pattern. A file is then generated that has their
modified code in the same directory as their input file. Screenshots of our GUI are
located in Appendix A.
47
4. Results and Analysis
At the start of this project we set out to prove that generating design patterns
through manipulation of ASTs was possible. Our intent was to generate three or more
design patterns and place them into existing python code. We accomplished this goal by
designing a program that can generate four design patterns: the class adapter, observer,
factory, and class decorator. The patterns we generate are the proof that creating a tool
for generating patterns with AST manipulation is possible. The file “generate.py” which
contains all the logic for our code generation consisted of 1149 lines, including all
documentation and whitespace. 783 of those lines are actual functional code. The file
consists of 17 standalone function definitions, and 14 node visitors and transformers.
Our project has a few issues. First, the secondary file that our observer pattern
generates gets placed in the same directory as “generate.py”, not the input file. If the
input file is not located in the same directory as “generate.py”, our observer pattern will
yield errors. Second, the Meta module and comment preservation techniques we used
have some bugs; these are discussed in more detail in the future work section.
48
5. Future Work and Conclusion
Our project has many avenues in which it can be expanded. Our comment
preservation method was mostly successful but imperfect. If a comment exists on the
same line as a multiline string, our comment tokenizer gets tripped up and fails to
preserve the comment correctly during AST manipulation. Additionally, our solution
only attempts to preserve comments and does not address the problem of unneeded
whitespace being ignored by the AST. Two solutions exist to fix these problems:
Write a more complete comment and whitespace tokenizer
Purchase proprietary software
Proprietary software exists that claims to successfully preserve all comments and
whitespace. If a product version of our program were to be released, utilizing third party
software for comment preservation would be worthwhile solution.
An additional problem we encountered was that the Meta package we used for
deconstruction of syntax trees to create syntactically correct code was not bug free. For
example, we found Meta could not generate correct code for the following kinds of
expressions: print statements containing multiple comma separated arguments, multiline
strings, and usage of the format function. Other invalid expressions that did we did not
come upon may also be present. Three solutions exist to address these problems:
Modify the Meta package to handle the problem expressions
Write a new syntax tree code generator package
Purchase proprietary software
Another area where our project could be expanded is in the amount of options our
design patterns have. For instance, it would be possible to ask the user which method
49
calls they would like placed in their adapters. Our observer could ask the user if they
would like to override the default notify function. A larger variety of factory methods
could be generated inside our factory pattern. Our class decorator could provide more
logic options for when decorator methods get called.
The final issue to be address with our project is its graphical user interface.
Currently, our GUI is very basic. This could be expanded to include more options for the
user, such as specifying method calls to be placed inside of certain code blocks. Help
sections could also be included to give a detailed explanation as to what each pattern is,
what it requires, and problem it aims to solve.
5.1 Conclusion
This project was a successful proof of concept in that generation of design
patterns in existing code is possible through manipulation of its abstract syntax tree.
Research was performed on the usefulness of design patterns and the structure of syntax
trees. Python was decided to be the most appropriate programing language for design
pattern generation for the purpose of reaching newer programmers. A set of criteria were
constructed for selecting the most appropriate design patterns to generate. We were able
to design a program that can generate the structure of the class adapter, observer, factory,
and class decorator design patterns. A graphical user interface prototype was developed.
A user guide on how to generate patterns as well as expand our program with more
design patterns was developed.
50
Appendices
Appendix A – User Guide: Generating a Pattern
51
Appendix B – User Guide: Expanding Our Program
This section discusses the steps required to expand our program through the
addition of more design patterns. The steps are as following:
1. Select an appropriate pattern
2. Produce code for an abstract version of your pattern structure
3. Determine what is required for your pattern to be fully functional
4. Write node transformer and visitor functions that modify an AST to incorporate
your pattern
5. Utilize our helper functions to correctly generate and modify a program’s AST by
using your custom node transformer
Step one of the process involves selecting an appropriate pattern for our program.
As outlined in our methodology, for a pattern to work in our program it should make
sense for Python as a language, be useful for beginners, and have a standard structure
where program specific expressions are isolated.
Step two is to produce an abstract version of the structure of your pattern. This is
best done by replicating a UML diagram of your pattern in as simple of terms as possible.
This will allow you to proceed to step three by helping you visualize what parts of your
pattern can be generated based on information available from a program’s AST, and
which parts cannot.
Step three is to analyze your patterns structure. Make note of the structural
properties that are always present, as these will be the key parts of the pattern that can be
recreated via AST manipulation. Attempt to rework the structure of your pattern so that it
isolates code blocks where program specific expressions will be located. Do so in a
52
manner that still preserves the overall structure of the pattern so as not to impede its
recognizability. Use the resulting structure to determine what input arguments would be
required to fill in the blanks of your structure. These arguments can be anything from
class to function names.
Step four is to write node transformer and visitor functions that will modify an
AST to incorporate the refined pattern structure you created during the previous steps.
Your node visitor will walk the AST, and any node it returns will be replaced by the node
transformer. After the AST has been modified, it is important to call the function
ast.fix_missing_locations(node), where “node” is the most recently added or
modified node. This allows your node to sit correctly within the AST. For an in-depth
explanation about the structure of ASTs in Python as well as a rundown on node
transformers and visitors, visit http://greentreesnakes.readthedocs.org/en/latest/.
Step five is to set up the process for generating an AST, modifying it with your
custom node transformer and visitor, and finally generating code. To add your new
pattern, create a new function that receives a filename and any other necessary inputs for
your pattern as arguments. Inside this new function, call the
openAndParse(filename) method, which will create an AST of the code located at
the filename that is ready to be modified and that has all comments replaced as strings.
Next, call your note transformer and visitor functions accordingly. Once you are done
modifying the AST, call the function writeToSource(AST, filename) which will
write out the AST as source code to a file with the same name as the filename input
argument.
Sample code is show below that shows an implementation of this process.
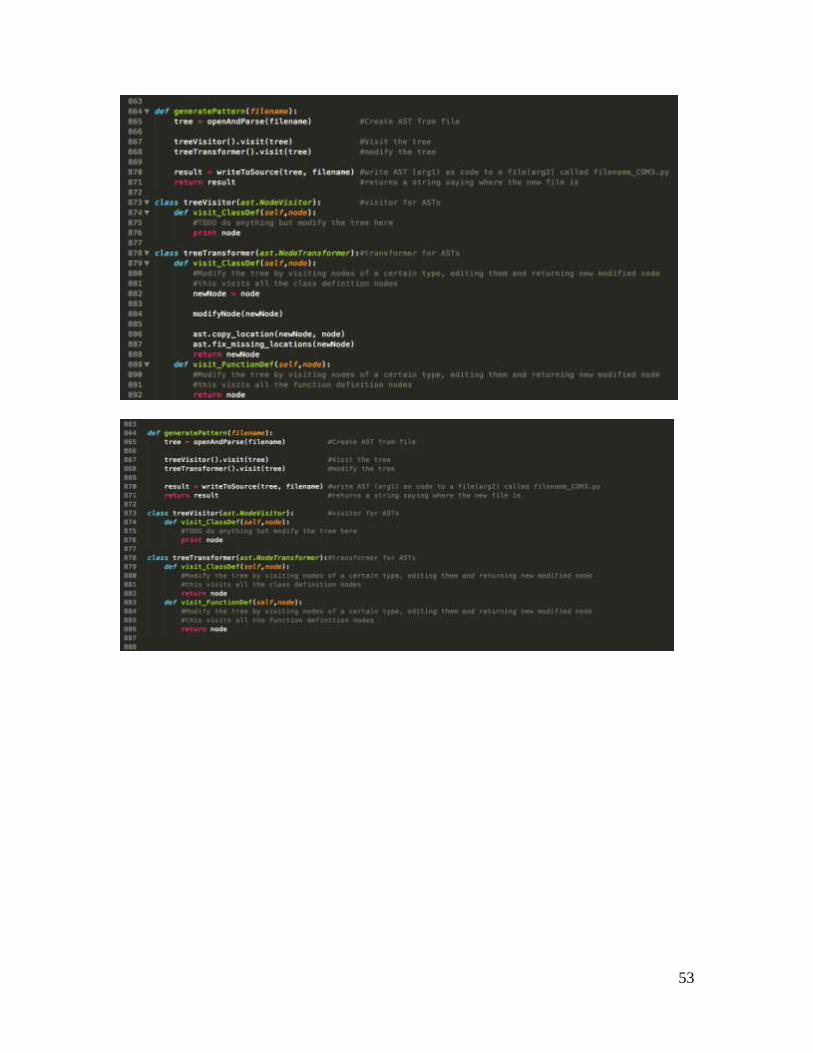
53

54
References
[1] Bendersky, Eli. “Abstract vs. Concrete Syntax Trees.” Eli Bendersky’s Website,
TheGreenPlace, 16 Feb. 2009. Web. 25 Apr. 2015.
<http://eli.thegreenplace.net/2009/02/16/abstract-vs-concrete-syntax-trees>.
[2] Wikipedia contributors. "Abstract syntax tree." Wikipedia, The Free Encyclopedia.
Wikipedia, The Free Encyclopedia, 24 Apr. 2015. Web. 27 Apr. 2015.
<http://en.wikipedia.org/wiki/Abstract_syntax_tree>.
[3] Erich Gamma, Richard Helm, Ralph Johnson, and John Vlissides. Design
Patterns: Elements of Reusable Object-Oriented Software. Addison-Wesley
Longman Publishing Co., Inc., Boston, MA, USA. 1995.
[4] Verma, Rahul and Chetan Giridhar. Design Patterns in Python: A learner’s approach
to understand design patterns via Python programming language. Testing
Persepctive, 2011.
[5] Wikipedia contributors. "Adapter pattern." Wikipedia, The Free Encyclopedia.
Wikipedia, The Free Encyclopedia, 4 Apr. 2015. Web. 27 Apr. 2015.
<http://en.wikipedia.org/wiki/Adapter_pattern>.
[6] Ginstrom, Ryan. “The Adapter Pattern in Python.” The GITS Blog. n.p. 29 Mar.
2009. Web. 25 Apr. 2015. <http://ginstrom.com/scribbles/2009/03/27/the-
adapter-pattern-in-python/>.
[7] The Python Software Foundation. "Modules." Python Documentation. n.d. Web. 25
Apr. 2015. <https://docs.python.org/2/tutorial/modules.html>.
[8] Wikipedia contributors. "Observer pattern." Wikipedia, The Free Encyclopedia.
Wikipedia, The Free Encyclopedia, 26 Apr. 2015. Web. 27 Apr. 2015.
<http://en.wikipedia.org/wiki/Observer_pattern>.
[9] "Observer Pattern." Object Oriented Design. Web. 26 Apr. 2015.
<http://www.oodesign.com/observer-pattern.html>.
[10] While. “Decoupling, the Observer Pattern and a little Java’s Mystery.” My
Developed World. My Developed World. 25 Mar. 2013. Web. 25 Apr. 2015.
<https://mydevelopedworld.wordpress.com/2013/03/25/decoupling-the-observer-
pattern-and-a-javas-mistery/>.
[11] Colburn, Timothy and Gary Shute. “Decoupling as a Fundamental Value of
Computer Science.” Mind & Machines 259 (2011): 241. Web. 25 Apr. 2015.
<http://www.d.umn.edu/~tcolburn/papers/Decoupling.pdf>.
[12] “What is a metaclass in Python?” Stack Overflow. n.p. 19 Sep. 2008.
<http://stackoverflow.com/questions/100003/what-is-a-metaclass-in-python>.
55
[13] “Python Programming/MetaClasses.” Wikibooks. 15 May. 2014.
<http://en.wikibooks.org/wiki/Python_Programming/Metaclasses>.
[14] “Calling parent class __init__ with multiple inheritance, what’s the right way?”
Stack Overflow. n.p. 5 Mar. 2012.
<http://stackoverflow.com/questions/9575409/calling-parent-class-init-with-
multiple-inheritance-whats-the-right-way>.
[15] The Python Software Foundation. "Descriptor HowTo Guide." Python
Documentation. n.d. Web. 25 Apr. 2015.
<https://docs.python.org/2/howto/descriptor.html>.
[16] Knight, Jame. “Python’s Super is nifty, but you can’t use it.” Fuhm. n.p. n.d. Web.
26 Apr. 2015. <https://fuhm.net/super-harmful/>
[17] “What is the ‘cls’ variable used in Python classes?” Stack Overflow. n.p. 6 Jan.
2011. <http://stackoverflow.com/questions/4613000/what-is-the-cls-variable-
used-in-python-classes>.
[18] The Python Software Foundation. "Built-in Functions." Python Documentation. n.d.
Web. 25 Apr. 2015.
<https://docs.python.org/2/library/functions.html#classmethod>.
[19] Bishop, Judith. C# 3.0 Design Patterns. O’Reilly Media. 2007. Print.
<https://msdn.microsoft.com/en-us/library/orm-9780596527730-01-04.aspx.>
[20] Wikipedia contributors. "Software design pattern." Wikipedia, The Free
Encyclopedia. Wikipedia, The Free Encyclopedia, 19 Apr. 2015. Web. 27 Apr.
2015. <http://en.wikipedia.org/wiki/Software_design_pattern#cite_note-5>.
[21] “How important are Design Patterns really?” Stack Overflow. n.p. 10 Jun. 2009.
<http://stackoverflow.com/questions/978489/how-important-are-design-patterns-
really>.
[22] Zelle, John. “Python as a First Language.” n.p. n.d. Web. 25 Apr. 2015.
<http://mcsp.wartburg.edu/zelle/python/python-first.html>.
[23] Joshi, Bipin. “Overview of Design Patterns for Beginners.” Developer. n.p. 23 Apr.
2014. Web. 23 Apr. 2015. <http://www.developer.com/design/overview-of-
design-patterns-for-beginners.html>.
[24] Schreiner, Axel. “PyPy: A Python Implementation written in Python” n.p. n.d. Web.
25 Apr. 2015. Lecture. <http://www.cs.rit.edu/~ats/lp-2005-2/p/PyPy.pdf>.
[25] The Python Software Foundation. "Access Python parse trees." Python
Documentation. n.d. Web. 25 Apr. 2015.
<https://docs.python.org/2/library/parser.html>.
56
[26] Ferg, Stephen. “Notes on How Parsers and Compilers Work.” Parsingintro. n.p. 15
Oct. 2007. Web. 26 Apr. 2015.
<http://parsingintro.sourceforge.net/#contents_item_8.1>.
[27] Crosta, Dan. "Exploring Python Code Objects." Late.am. 26 March 2012 . Web. 25
Apr. 2015. <http://late.am/post/2012/03/26/exploring-python-code-objects.html>.
[28] “What is a Python code object?” Stack Overflow. n.p. 12 Apr. 2011.
<http://stackoverflow.com/questions/4613000/what-is-the-cls-variable-used-in-
python-classes>
[29] Lee, Thomas. Python Compiler Internals, n.d. n.p. Web. 25 Apr.
<http://tomlee.co/wp-content/uploads/2012/11/108_python-language-
internals.pdf>
[30] Guo, Philip. "Python Is Now the Most Popular Introductory Teaching Language at
Top U.S. Universities." Communications of the ACM. 7 July 2014. Web. 25 Apr.
2015. <http://cacm.acm.org/blogs/blog-cacm/176450-python-is-now-the-most-
popular-introductory-teaching-language-at-top-us-universities/fulltext>.
[31] The Python Software Foundation. "Abstract Base Classes." Python Documantatoin.
n.d. Web. 25 Apr. 2015. <https://docs.python.org/2/library/abc.html>.
[32] Kettlerx, Rafe. "A Guide to Python's Magic Methods." Rafekettler.com. 2012. Web.
25 Apr. 2015. <http://www.rafekettler.com/magicmethods.html>.
[33] Ross-Ross, Sean. "Meta API." Meta 0.4.1 Documentation. n.d. Web. 25 Apr. 2015.
<http://meta.readthedocs.org/en/latest/api/index.html>.
[34] The Python Software Foundation. "Abstract Syntax Trees." Python Documentation.
n.d. Web. 25 Apr. 2015. <https://docs.python.org/2/library/ast.html>.
[35] Kluyver, Thomas. "Green Tree Snakes - the Missing Python AST Docs." Read the
Docs. 2012. Web. 25 Apr. 2015.
<https://greentreesnakes.readthedocs.org/en/latest/>.
[36] Savikko, Vespe. "Design Patterns in Python." Python. Software Systems Laboratory
Tampere University of Technology. Web. 25 Apr. 2015.
<http://legacy.python.org/workshops/1997-10/proceedings/savikko.html>.
[37] Ginstrom, Ryan. “Six GoF design patterns, Python style” The GITS Blog. n.p.
October 8th, 2007. Web. 25 Apr. 2015
<http://ginstrom.com/scribbles/2007/10/08/design-patterns-python-style/>
[38] Carr, Richard. "Gang of Four Design Patterns." Black Wasp. 22 Aug. 2009. Web. 25
Apr. 2015. <http://www.blackwasp.co.uk/GofPatterns.aspx>.
[39] Norvig , Peter. "Design Patterns in Dynamic Programming". Slides from
presentation at Object World ‘96 , 5 May 1996.
57
[40] Sukesh, Marla. "Factory Method Pattern vs. Abstract Factory Pattern." CodeProject.
28 June 2014. Web. 25 Apr. 2015.
<http://www.codeproject.com/Articles/716413/Factory-Method-Pattern-vs-
Abstract-Factory-Pattern>.
[41] "Factory Method Pattern." Object Oriented Design. n.d. Web. 26 Apr. 2015.
< http://www.oodesign.com/factory-method-pattern.html >.
[42] Wikipedia contributors. "Decorator pattern." Wikipedia, The Free Encyclopedia.
Wikipedia, The Free Encyclopedia, 19 Apr. 2015. Web. 27 Apr. 2015.
<http://en.wikipedia.org/wiki/Decorator_pattern>.
[43] Eckel, Bruce. "Decorators vs. the Decorator Pattern." Decorators I: Introduction to
Python Decorators. 8 Oct. 2008. Web. 25 Apr. 2015.
<https://www.artima.com/weblogs/viewpost.jsp?thread=240808>.
[44] Chae, Sam. Students Guide to Computer Science C. IUniverse, 2001. Print.