Embed Size (px)
Citation preview

Design Options in Production Modeling
HRUG Monthly Meeting
Presented by Donald Franklin & Steve Wilkerson
August 10, 2011
Structural Engineering

Before we begin...Please set your cell phones to silent or vibrate.
Food and refreshments generously provided by:
Thanks for your attendanceThanks for your attendance
and participation!

Introductions
Steve Wilkerson, PhD, P.E. Associate Vice PresidentAssociate Vice President Director of Technology Implementation Haynes Whaley Associates, Inc. [email protected] e e e so @ ay es a ey co
Ph.D. in Structural Engineering from Rice University, 2005Registered Professional Engineer in the State of TexasMember ASCE, AISC, SEAoT, and SIAM

Introductions
Donald Franklin, AIA BIM/CAD Production ManagerBIM/CAD Production Manager Associate WHR Architects, Inc. [email protected] a @ a c ec s co
Texas A&M Aggie (Bach. Env. Design, M. Architecture) Registered Architect (TX) Autodesk Revit Architecture 2010 Certified Professional

Key Topics
• Intended use of "Design Options"Intended use of Design Options
• "Design Options" TerminologyDesign Options Terminology
• Procedures for implementing "Design Options"Procedures for implementing Design Options
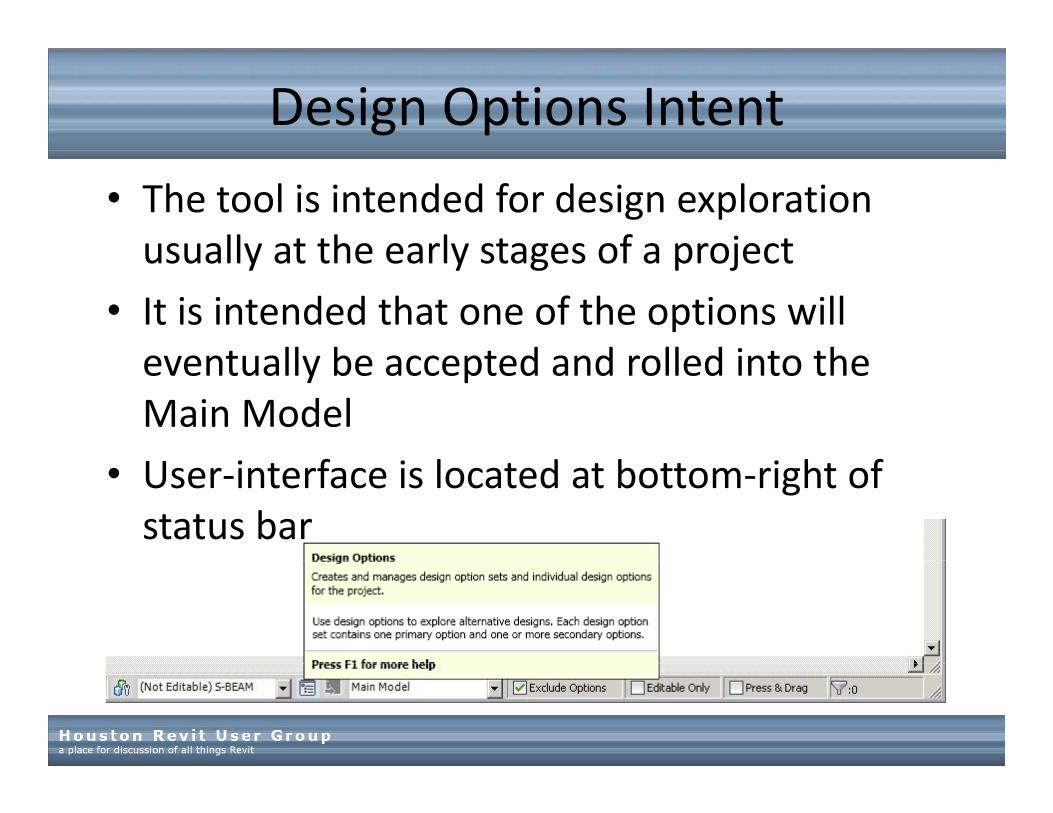
Design Options Intent
• The tool is intended for design exploration usually at the early stages of a projectusually at the early stages of a project
• It is intended that one of the options will e ent all be accepted and rolled into theeventually be accepted and rolled into the Main Model
• User‐interface is located at bottom‐right of status bar

Design Options Terminology
• Main Model – any part of your Revit design that has no variation under consideration (no options)( p )
• Option Set – Each work area or portion of a project to which you will consider design variations
• Option – a discreet design variation you wish to consider in your project
• Primary – the option that you or your client favors AutomaticallyPrimary the option that you or your client favors. Automatically displays in all project views unless a visibility override is applied
• Secondary – an alternate option
• Active – the option you are currently editing

Design Options Procedure
• Create an Option Set with two or more options
• Add geometry to each Option Seteach Option Set

Design Options Procedure (cont.)
• Create views with Design Option overrides applied to present your schemes
• Upon approval of your client, make an option primary, then accept the primary

Troubleshooting Design Options
• LevelsCertain Elements are not supported in Design Options:
• Levels • Grids • Most view‐specific elements like
tags, detail components, etc. • You cannot add an insert (e.g. a Door
or a Window, structural framing, etc.) , g, )to an option without also adding its host
• Adding a host element to an optionAdding a host element to an option will also automatically add all inserts on that host as well
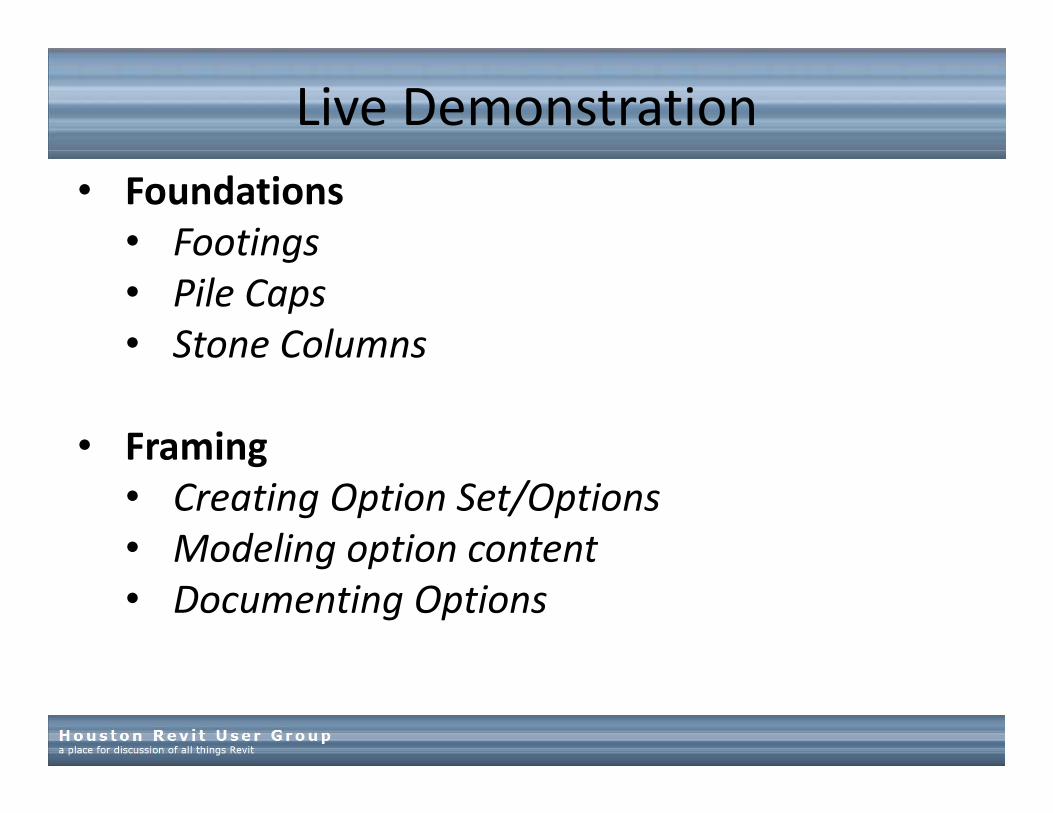
Live Demonstration• Foundations• FootingsFootings• Pile Caps• Stone ColumnsStone Columns
• FramingFraming • Creating Option Set/Options• Modeling option contentModeling option content• Documenting Options

Design Options ‐ TipsExclude Options
Wh diti th M i M d l R it t f l ti• When editing the Main Model, Revit prevents you from selecting elements in a Design Option. Similarly, when editing a Design Option, Revit prevents you from selecting elements in the Main Model. However, you can explicitly allow these functions.
• Checkbox on the Status Bar‐ When editing in the Main Model:
‐ When editing in a Design Option:

Design Options > Add to SetMoving elements from Main Model to a Design Option
Fi t it h t M i M d l• First, switch to Main Model. • Select the desired building element(s) already in the model. • Activate the Manage tab and click Add to Set.
• Choose one or more Option Setsh th l t( ) h ld i twhere the element(s) should exist
then click OK.

Design Options ‐ Changing OptionsMoving elements from one Design Option to a different option• Open a view containing the Source Design Option elements.
S l t th d i d l t( ) d Ct l X (C t)• Select the desired element(s) and press Ctrl+X (Cut). • Activate the Manage tab and select the Target Design Option
to which you want to add the elements.
• Activate Modify > Clipboard > P t (Ali d t S Pl )Paste (Aligned to Same Place)
• Manage tab > Design Optionspanel, and select Main Model.

Design Options and Linked FilesVisibility Graphics > Revit Links• You can control the display of Design Options existing in links.
• Use Visibility Graphics > Revit Links.
• Select the appropriate link and set the Display Settingas Customas Custom.
I th D i O ti t b• In the Design Options tab select the Design Optionfor each Design Option Set.

Design Options and WallsWall Joins and Cleanups• The cleanup of walls in the Main Model and walls in the Primary
D i O ti k th if th ll ll i th M iDesign Option works the same as if the walls were all in the Main Model.
• Incorrect wall joins can occur between walls in the Main Modeland Secondary Design Options.
• Solution: Move the applicable wall(s) from the Main Model into the same Secondary Design Option as the other wall(s).
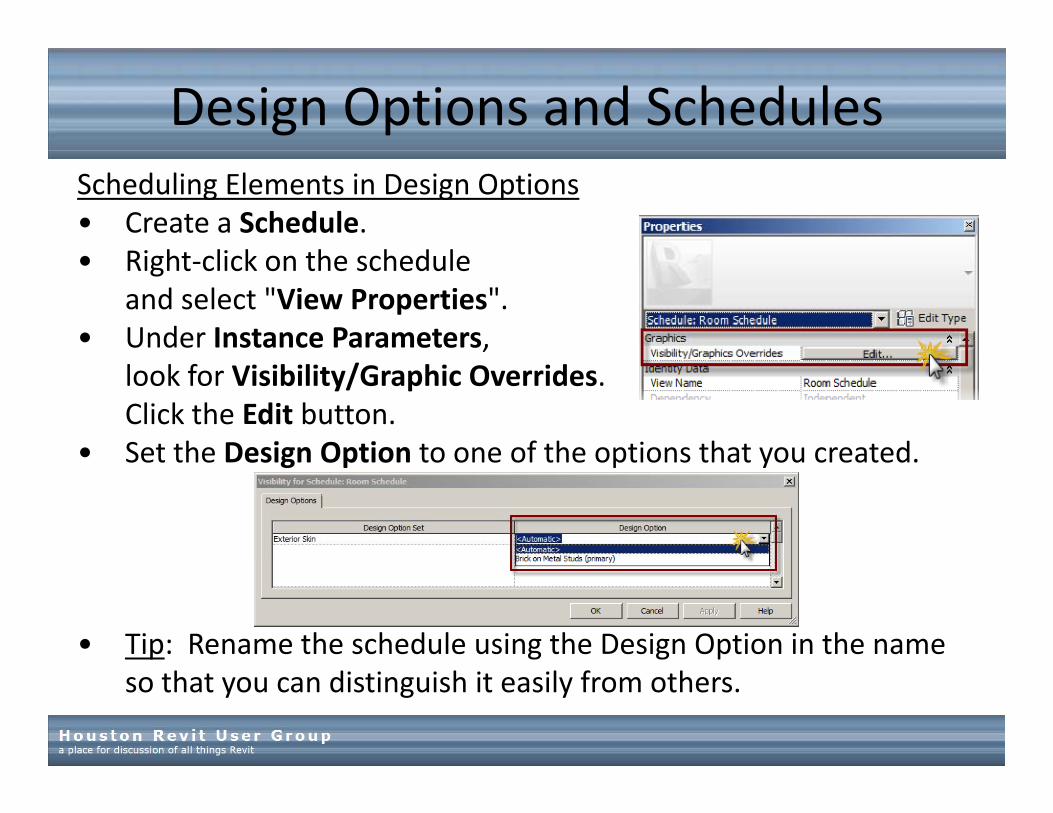
Design Options and SchedulesScheduling Elements in Design Options• Create a Schedule.
Ri ht li k th h d l• Right‐click on the schedule and select "View Properties".
• Under Instance Parameters, look for Visibility/Graphic Overrides. Click the Edit button.
• Set the Design Option to one of the options that you created Set the Design Option to one of the options that you created.
• Tip: Rename the schedule using the Design Option in the name so that you can distinguish it easily from others.

Design Options and ConstraintsError: Constraints are not satisfied
• It may not be obvious if an element is pinned inside a Design Option If Exclude Options is checked you cannot select theOption. If Exclude Options is checked, you cannot select the element to see the pin icon.
• For example if a wall was pinned, then constrained to another ll t id th D i O ti h t th llwall outside the Design Option, when you go to move the wall
you may receive the warning. • Un‐check Exclude Options, select the element inside the other
Design Option to see if it is pinned, and un‐pin if needed.

Design Options and ConstraintsError: Element must be i M i M d lin Main Model[Main Model could be another Design Option name]
• Typically occurs when constraints exist between elements in a Design Option and the Main Model. So when you attempt to
l t i th M i M d l th bmove an element in the Main Model, the error occurs because a constrained element is attempting to move in a Design Option.
• Expand the error and make note of the constraint Element ID(s). • Use Manage > Select by ID and enter the Element ID(s), then
delete the constraint (not the element). • You should now be able to move the element in theMain Model You should now be able to move the element in the Main Model.

Design Options and PhasingCombining Design Options with Phasing• You can use both Design Options and Phasing together.
F l Ph i t i th ll i d• For example, you can use Phasing to assign the walls, windows, roofs, etc., in the existing building to an Existing Phase. Then you can set up Design Options to show one scheme where the existing building remains as‐is, and a different scheme containing building modifications.

Live Demonstration
• Exterior Envelope Exterior Envelope
• Interior Design Interior Design

Quick AnnouncementsQuick Announcements
Resources
Houston Area R it U GRevit User Group
http://www.harug.org/
http://hrug.wordpress.com/p // g p /

ResourcesAutodesk Blogshttp://usa.autodesk.com/adsk/servlet/index?siteID=123112&id=4805213http://insidethefactory typepad com/http://insidethefactory.typepad.com/http://bimandbeam.typepad.com/http://inside‐the‐system.typepad.com/http://revitclinic.typepad.com/p // e c c ypepad co /http://thesustainabledesigntoolbox.typepad.com/http://doddsandends.typepad.com/blog/http://thebuildingcoder.typepad.com/http://bimapps.typepad.com/http://labs.blogs.com/its_alive_in_the_lab/
Autodesk University (various sessions) http://au.autodesk.com/
http://au.autodesk.com/?nd=class&session_id=705( l b )(AU2007, AB214‐1P, Paul Aubin)

AUGI Wish Listswww.AUGI.com
The Autodesk User Group International (AUGI) Wish List Ballots Are Open!
Revit Architecture: (http://forums.augi.com/forumdisplay.php?f=856) Revit Structure: (http://forums.augi.com/forumdisplay.php?f=1196) Revit MEP: (http://forums augi com/forumdisplay php?f 1192)Revit MEP: (http://forums.augi.com/forumdisplay.php?f=1192)
In order to vote on Revit Wishes you must be an AUGI Member.It’s FREE to join: http://www augi com/account/registerIt s FREE to join: http://www.augi.com/account/register

Coming Soon...
September 14, 2011September 14, 2011
• Topic ??? Topic ???
Watch forWatch for a survey coming soon!coming soon!

QUESTIONS andand
COMMENTS
This concludes today's HOUSTON AREA REVIT USER GROUP
presentationpresentation
Thanks for attending!Thanks for attending!