Embed Size (px)
Citation preview

DESIGN AND DETAILING FOR QUALITY
IN ARCHITECTURAL COMPONENTS
6.1 TIMBER DOORS 6.2 CABINETS AND OTHER COMPONENTS
6.0

6.0 DESIGN AND DETAILING FOR QUALITY IN ARCHITECTURAL COMPONENTS 6.1 TIMBER DOORS
74
Door is an essential element in buildings. Some door designs and detailing inherently lend itself to good quality outcome. This section illustrates some such examples which can be considered to improve workmanship quality.
6.1.1 Pocket door system
Pocket door (also called slide and hide) system is now widely used in residential projects. The sliding door panel is hidden within the hollow section between walls and operated on a track and roller system fixed at the top of the door panel (Fig. 6.1). This system enhances spaciousness in the unit, as the sliding door is hidden from view when it is open.
However, in most cases it is not feasible to provide tracks at the bottom of the door panel as this is fixed on the floor and may cause inconvenience to users e.g. tripping or creating a barrier. Dirt and dust can also accumulate inside the track and this needs to be cleaned periodically. Most designs therefore specify the track to be installed at the top only.
In such designs, the door panels are typically about 2.1m high and the whole panel hangs from the top track. When the doors are in closed position and butt against each other, any misalignment can be noticed easily due to uneven butt gap and different levels of the adjoining panels (Fig 6.2).
Fig. 6.2 - When door is closed and butt against each other, any misalignment is easily noticed.
Fig. 6.1 - A pocket door system hung on top track enhances spaciousness in a unit.
6.0 DESIGN AND DETAILING FOR QUALITY IN ARCHITECTURAL COMPONENTS6.1 TIMBER DOORS
75
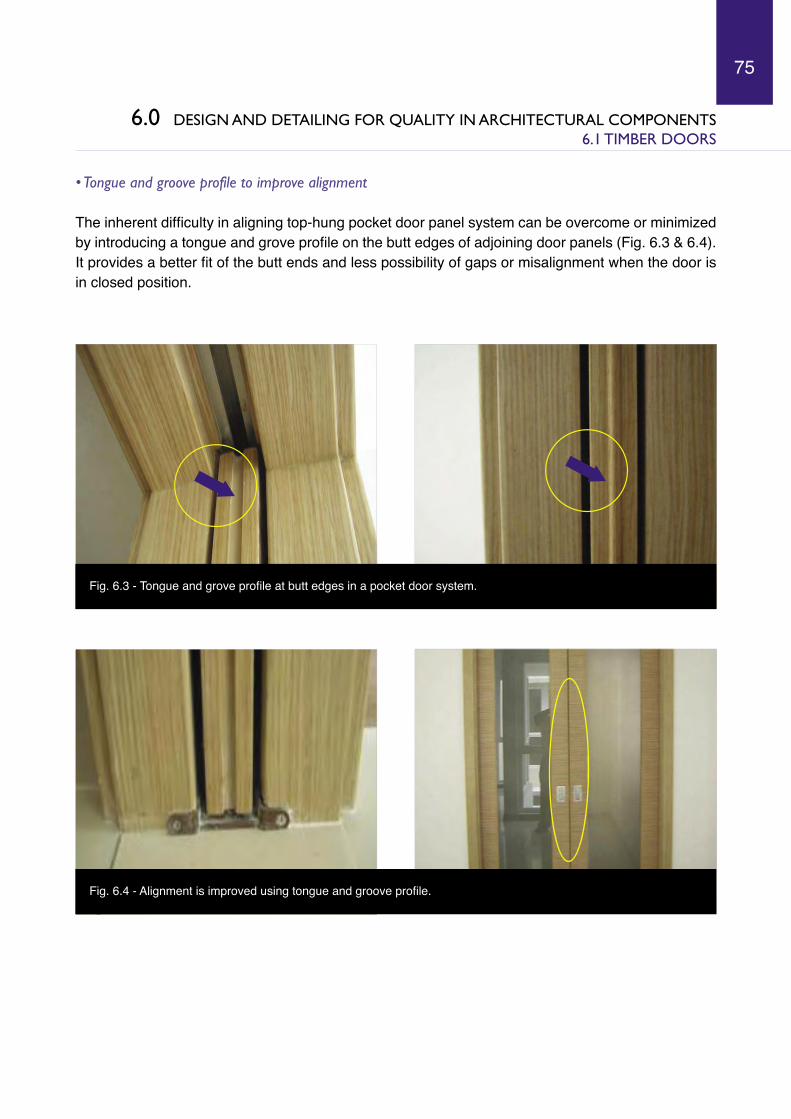
Fig. 6.3 - Tongue and grove profile at butt edges in a pocket door system.
• Tongue and groove profile to improve alignment
The inherent difficulty in aligning top-hung pocket door panel system can be overcome or minimized by introducing a tongue and grove profile on the butt edges of adjoining door panels (Fig. 6.3 & 6.4). It provides a better fit of the butt ends and less possibility of gaps or misalignment when the door is in closed position.
Fig. 6.4 - Alignment is improved using tongue and groove profile.

6.0 DESIGN AND DETAILING FOR QUALITY IN ARCHITECTURAL COMPONENTS 6.1 TIMBER DOORS
76
6.1.2 Sub-frame door system
In conventional construction, door main frames are fastened directly to masonry works. Major architectural works like flooring and skirting are carried out after the frame installation. These subsequent activities can cause damage to the door frames. In addition, where the flooring adjoins the frame, it has to be cut to follow the frame’s profile. This usually requires skill and more time to complete. If the flooring comprises high density material e.g. granite flooring, etc. this task will be more difficult to execute.
Fig. 6.5 - Traditional main frame system: Flooring material laid after installation of door frame needs to be cut to suit door frame profile.
To get round this challenge, a sub-frame system which is widely used in private residential projects but less so in public housing and commercial buildings, can be employed. A door sub-frame is first built into the wall construction and the main frame is installed at a later stage i.e. after completion of the major wet trades. This reduces the risk of damage by other trades during construction. The other advantages of such a system are:
• The main frames are less likely to shrink and warp since it is not directly in contact with any masonry structures. • The floor finish below the frame can be installed more easily. It need not be cut to suit the door frame’s profile since the frame is installed after the floor finishing works.
Fig. 6.7- Main frame installed after completion of floor finish. A neat joint is achieved below the door frame.
Fig. 6.6 - Door sub-frames installed before main frames: Adjoining floor installation need not be cut to door frame profile.

6.0 DESIGN AND DETAILING FOR QUALITY IN ARCHITECTURAL COMPONENTS6.1 TIMBER DOORS
77
6.1.3 Rebate door with lift-off hinges
Rebate doors with lift-off hinges are gaining widespread use in private residential projects. The door panel has a rebate profile that aligns with the door frame (Fig. 6.8). Furthermore, a PVC gasket is provided in between the frame and panel to make the gap less noticeable and aid in smooth functioning of the door when closing.
Fig. 6.9 - Better alignment consistency between door frame and panel.
Fig. 6.8- A rebated door panel.
Fig. 6.10 - A PVC gasket makes door gap less noticeable and aids smooth operation.

6.0 DESIGN AND DETAILING FOR QUALITY IN ARCHITECTURAL COMPONENTS 6.1 TIMBER DOORS
78
The lift-up hinges system allows the door, together with the hinges, to be fabricated off site and slotted into place after the finishing trades have been completed. (Fig. 6.11)
Material damage on door is often a recurring non-compliance in CONQUAS assessments and frequent item of complaint by home owners during hand over. This is largely due to damage caused by other trades during construction, which can be minimized if the door panel is installed at the last stage. This lift-up hinges system allows installation of door panels at a very late stage of construction. Furthermore, the installation process is simple, quick and can be carried out without affecting other activities.
Fig. 6.11 - Lift-up hinge allows door panels to be installed late in construction. This reduces damage on doors by other trades.
Fig.6.12 - % Defects distribution for doors for private residential buildings.
Accessories defects (3.5%)
Alignment & evenness (23.6%)
Joints & gaps (30.8%)
Material & damages (32.8%)
Functionality (1.8%)
6.1.4 Common quality issues in doors and its causesThe following data from CONQUAS assessments from 2005 -2007 highlight the key quality concerns in door construction viz. material and damages, joints and gaps, and alignment and evenness (Fig.6.12).

6.0 DESIGN AND DETAILING FOR QUALITY IN ARCHITECTURAL COMPONENTS6.1 TIMBER DOORS
79
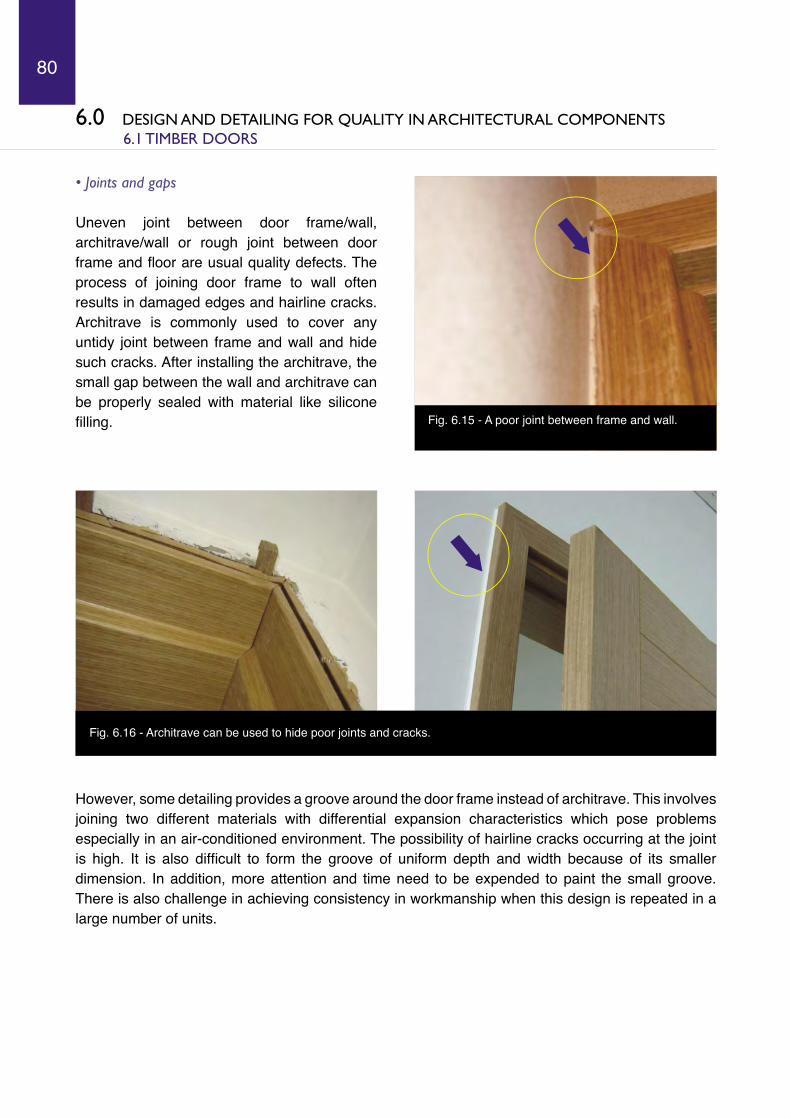
• Alignment
Inconsistent alignment between a frame and a door panel is usually the result of warpage and twisting in the panel or frame. This could be due to inherent characteristics of the timber material used and its tendency to warp/twist is more likely when longer lengths of panel or frame are used. In such cases, the panel will not be aligned exactly with the frame, making it more noticeable. To minimize such defects, it is important to use materials that are properly treated and protected from moisture ingress and provision of better detail and profile on door panels.
Fig. 6.14 - Warpage and twist in door panel is easily noticeable in standard door design.
• Material and damages
Damages on doors are mostly caused by other trade activities. This is due to the interfacing of activities in traditional construction. To prevent this, door panels should be installed at later stage of construction and properly protected with suitable materials. A method like lift-up hinges door will help and expedite the installation process at later stage of construction without affecting other sequence of works.
Fig. 6.13 - Dent, damage and nail-hole: Common damages on door panels.
6.0 DESIGN AND DETAILING FOR QUALITY IN ARCHITECTURAL COMPONENTS 6.1 TIMBER DOORS
80

6.0 DESIGN AND DETAILING FOR QUALITY IN ARCHITECTURAL COMPONENTS6.1 TIMBER DOORS
81

6.0 DESIGN AND DETAILING FOR QUALITY IN ARCHITECTURAL COMPONENTS 6.2 CABINETS AND OTHER COMPONENTS
82
The typical components in a residential project include wardrobe, kitchen and vanity cabinets, shoe rack, wash basin, shower screen and water closet (W.C.). This section highlights and compares the advantages in using preassembled (modular) system components over components that are cut and assembled on site. It also highlights how the selection of materials, accessories and its installation impacts the quality of the component. There are many types of finishes available for use in cabinets. The common finishes include: • Veneer• Melamine• Laminate• Polykem• Vinyl
These finishing materials can be installed on-site by manual labour or integrated into the component by machines in the factory. The following highlights the challenges in ensuring quality of the finished component when installation is carried on-site.
6.2.1 Challenges in on-site cutting, lamination and installation
• Reliance on workers’ skill
The quality of the component finishes is dependent largely on the skill of the labour employed. The more experienced and competent worker will produce better quality workmanship. However in mass production e.g. in a large project where the same component is replicated, it may not be possible to ensure all workmen possess the same level of skill. Therefore the quality outcome may not be consistent since many workmen are deployed. As a result, the following workmanship issues are likely to surface due to lack of or variances in skill level:
• Imprecise cutting• Air bubbles in lamination fixing • Uneven lap or mitre joints.
Fig. 6.19 - On-site cutting relies on labour skill.
Fig. 6.20 - On-site lamination of carcass: Possible air bubble and blister defects.
Fig. 6.21 - Poor jointing at turning in manual installation.

6.0 DESIGN AND DETAILING FOR QUALITY IN ARCHITECTURAL COMPONENTS6.2 CABINETS AND OTHER COMPONENTS
83
• Working space constraints
Very often, the installation work has to be carried out in narrow or confined spaces. The confined space is not a favourable environment for the workman to carry out fine or precision work. This may be compounded where there are many trade activities in the same area. In such situations, lower quality workmanship and productivity are often the result.
• Site environment
If the site environment is dusty or polluted, it may affect on-site lamination process. There is possibility of de-bonding, blistering and the finish surface may not be sufficiently smooth. At the same time, it is also necessary to take precautions during installation to avoid damage to other ‘sensitive’ finishing trades like natural stone or timber flooring.
• Handling and storage
Materials can be easily damaged if they are not properly stored and protected against dust or wet and damp conditions. For certain products, improper storage and insufficient ventilation may affect the moisture content of the material leading to warpage and twist.
Fig. 6.24 - Damage caused by improper storage and other trades
• Layout and specifications
The more complicated the layout e.g. more turns, corners, odd shapes, etc. more care and in-depth planning is required before producing shop drawings. The installer should be capable of reading, interpreting and executing the designs according to the specifications. A proper cutting schedule needs to be prepared and adequate skill is required to assemble the works to minimize wastage during on–site installation.
Fig. 6.22 - A typical on-site installation environment.
Fig. 6.23 - Turns and odd shapes: Need more attention.

6.0 DESIGN AND DETAILING FOR QUALITY IN ARCHITECTURAL COMPONENTS 6.2 CABINETS AND OTHER COMPONENTS
84
6.2.2 Advantages of factory assembled components
• Smooth joints and finish
Factory assembled components generally have consistent joints and smooth finish especially in critical areas like rounded edges and mitre joints. The factory environment with good quality control results in better and more consistent component quality compared to on-site fabrication and assembly.
Fig. 6.25 - Joints at turns are smooth and precise in factory assembled cabinets.
• Less manpower on site
The factory environment favours producing components with good dimensional accuracy. The carcass and door panels are produced in standard sizes and no further alteration, trimming or alignment adjustment is required. Therefore, the components can be installed on site faster and with less manpower.
Fig. 6.26 - Less installers required when using pre-assembled components.

6.0 DESIGN AND DETAILING FOR QUALITY IN ARCHITECTURAL COMPONENTS6.2 CABINETS AND OTHER COMPONENTS
85
Fig. 6.27 - Pre-assembled modular kitchen cabinet system generally gives good finish, quality and dimensional accuracy.

6.0 DESIGN AND DETAILING FOR QUALITY IN ARCHITECTURAL COMPONENTS 6.2 CABINETS AND OTHER COMPONENTS
86
Fig. 6.29 - A PVC strip introduced in the gap results in consistent and neat finish.
6.2.3 Examples of component design and detailing for quality
To maximize the benefits of using factory assembled components, it is necessary to pay attention to design and detailing when installing the components on site. The following examples show how such benefits can be maximized.
• Using strips on joint between cabinet and wall
The traditional way of mounting a cabinet on a wall is by drilling and plugging. The small gap between cabinet and wall is then filled with silicone material. If the quality of silicone used is inferior, it will deteriorate and discolour with time. The jointing consistency will also depend on the skill of the applicator. If the gap between wall and component is too wide or inconsistent, the operation becomes more difficult. Very often this results in a joint that is not neat and aesthetically pleasing.
To overcome this, a PVC / rubber strip insert is placed at the joint instead of silicone infill in some modular system cabinets. It results in a neat, simple and consistent joint.
Fig. 6.28 - Gap between wall and component sealed by silicone material applied manually.
• Additional hinges and magnetic catches for taller doors
In hinged swing cabinet doors where the door height is taller than usual e.g. 2.5m, it is good to provide additional hinges and magnetic catches to hold the heavier door panels in place. This prevents sagging and the door panel is held in position and aligned with the door frame. In addition, if there is any minor warping on the panels, the appropriate catch system makes it less noticeable. Fig. 6.30 - A small warp becomes more noticeable
in taller door panels.

6.0 DESIGN AND DETAILING FOR QUALITY IN ARCHITECTURAL COMPONENTS6.2 CABINETS AND OTHER COMPONENTS
87
Fig. 6.31 - Additional magnetic catches help to hold the door in position for taller panels.
• Cushion in-lay for carcass
Some cabinet systems come with rubber/PVC in-lay on the carcass inner face. This has a cushioning effect preventing the door panel from hitting the carcass surface and reducing noise. It also prevents surface damage to the panel and the carcass resulting from repeated use. The gap between the panel and carcass is also neat and consistent.
Fig. 6.32 - Door panel hitting directly on carcass creates noise and may cause damage.
Fig. 6.33 - Provision of in-lay to carcass cushions against noise and prevents damage.
Fig. 6.34 - Gap between door panel and carcass is consistent and neat with in-lay.
6.0 DESIGN AND DETAILING FOR QUALITY IN ARCHITECTURAL COMPONENTS 6.2 CABINETS AND OTHER COMPONENTS
88
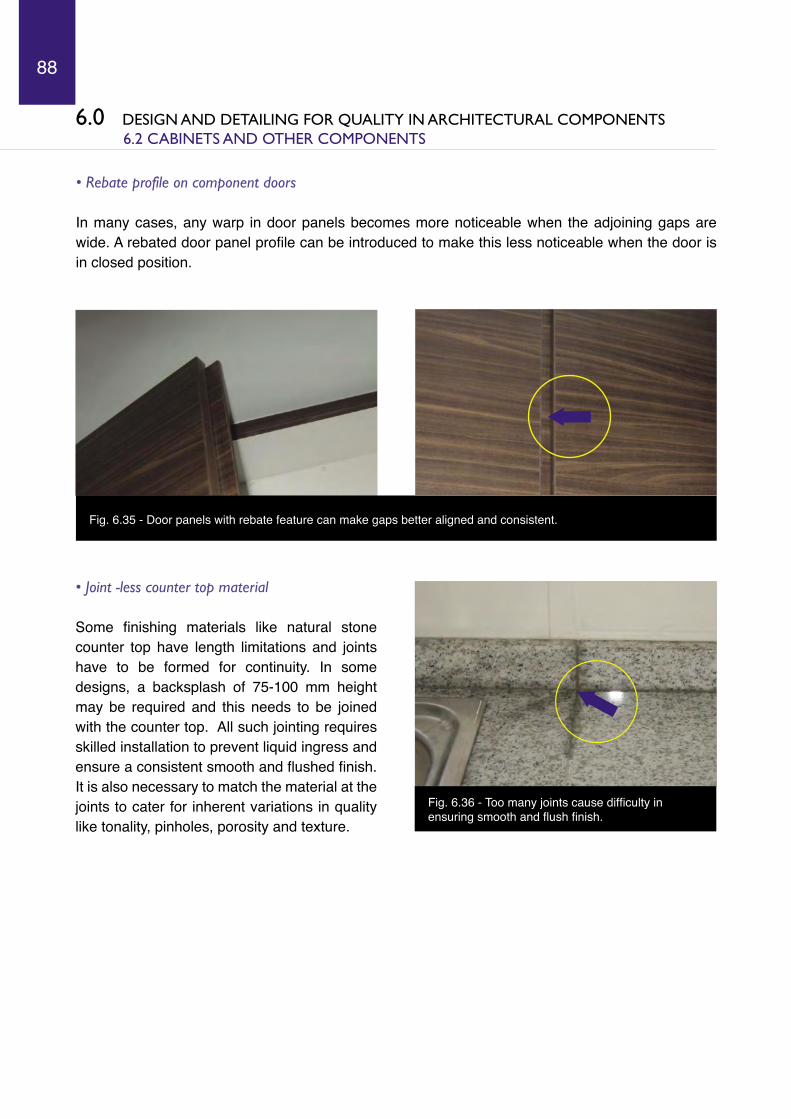
• Rebate profile on component doors
In many cases, any warp in door panels becomes more noticeable when the adjoining gaps are wide. A rebated door panel profile can be introduced to make this less noticeable when the door is in closed position.
Fig. 6.35 - Door panels with rebate feature can make gaps better aligned and consistent.
• Joint -less counter top material
Some finishing materials like natural stone counter top have length limitations and joints have to be formed for continuity. In some designs, a backsplash of 75-100 mm height may be required and this needs to be joined with the counter top. All such jointing requires skilled installation to prevent liquid ingress and ensure a consistent smooth and flushed finish. It is also necessary to match the material at the joints to cater for inherent variations in quality like tonality, pinholes, porosity and texture.
Fig. 6.36 - Too many joints cause difficulty in ensuring smooth and flush finish.

6.0 DESIGN AND DETAILING FOR QUALITY IN ARCHITECTURAL COMPONENTS6.2 CABINETS AND OTHER COMPONENTS
89
To minimize such problems, some acrylic polymer materials that are suitable for counter tops and which come in long sizes together with backsplash can be used. The homogenous material generally has good resistance to liquid ingress and can be polished if there are any minor scratches on the surface. Less jointing is required and it gives a better quality finish appearance.
Fig. 6.38 - Fewer joints facilitate easy installation and better quality finish.
Fig. 6.37 - Long counter top with integrated backsplash: No on-site joint required.
• Integrated components for less joints
Wash basins are usually fixed to a vanity counter using a bracket system. The joints between the basin and counter top are then sealed with silicone material to prevent water ingress. Some projects eliminate this sealing process by using factory made integrated counter top with built-in basin and sink as a single component. This reduces site work and results in a uniform and quality finish.
Fig. 6.40 - Integrated kitchen top, back - splash and sink.
Fig. 6.39 - Integrated vanity counter and washbasin.
To reap the benefits of high productivity and quality by using pre-assembled components, careful planning is required at the design stage. The plinths, kerbs, room dimensions and other spaces should be constructed accurately to suit the components. Once the components are fabricated, it would not be possible to alter or modify dimensions and sizes to suit changes in site conditions without additional time, cost and impact on quality.