Embed Size (px)
Citation preview
Deployment Guide
Single Sign On for Office 365 with NetScaler Unified GatewayDeployment Guide
This deployment guide focuses on defining the process for enabling Single Sign On into
Microsoft Office 365 with Citrix NetScaler Unified Gateway
Deployment Guide Single Sign On for Office 365 with NetScaler
citrix.com 2
Table of Contents
Table of Contents 2
Introduction 3
Configuration Details 4
NetScaler features to be enabled 4
Solution description 5
Part 1: Configure the NetScaler 5
5
8
Configuring LDAP domain authentication
Configure the SAML IDP Policy and Profile
Configure your UG Virtual Server 10
Part 2: Configure Office 365 11
Confirm Microsoft Office 365 Portal Settings 11
Signing Certificate 12
Setup Federation Settings for Windows Azure AD 12
Office 365 PowerShell Commands 13
Revert back to Managed Authentication 15
Validate the Configuration 15
Troubleshooting 16
The NetScaler receives the authentication request from Office 365 16
Messages indicating successful authentication and extraction of parameters 16
Messages verifying SAML transaction and sending of SAML assertion 17
SAML UserID Issues 19
Additional Resources 20
Conclusion 21
Deployment Guide Single Sign On for Office 365 with NetScaler
citrix.com 3
Citrix NetScaler Unified Gateway provides users with secure remote access to business applications deployed in the data center or a cloud across a range of devices including laptops, desktops, thin clients, tablets and smart phones. It provides a consolidated infrastructure, simplifies IT and reduces TCO of the data center infrastructure.
Microsoft Office 365 is a suite of cloud-based productivity and
collaboration applications provided by Microsoft on a subscription
basis. It includes Microsoft’s popular server-based applications such as
Exchange, SharePoint, Office and Skype for Business. The apps are
widely used by SMBs and enterprise customers alike to enable their
business without significant capital investments.
Introduction
This guide focuses on enabling Microsoft Office 365 single sign on with Citrix NetScaler Unified Gateway.
Deployment Guide Single Sign On for Office 365 with NetScaler
citrix.com 4
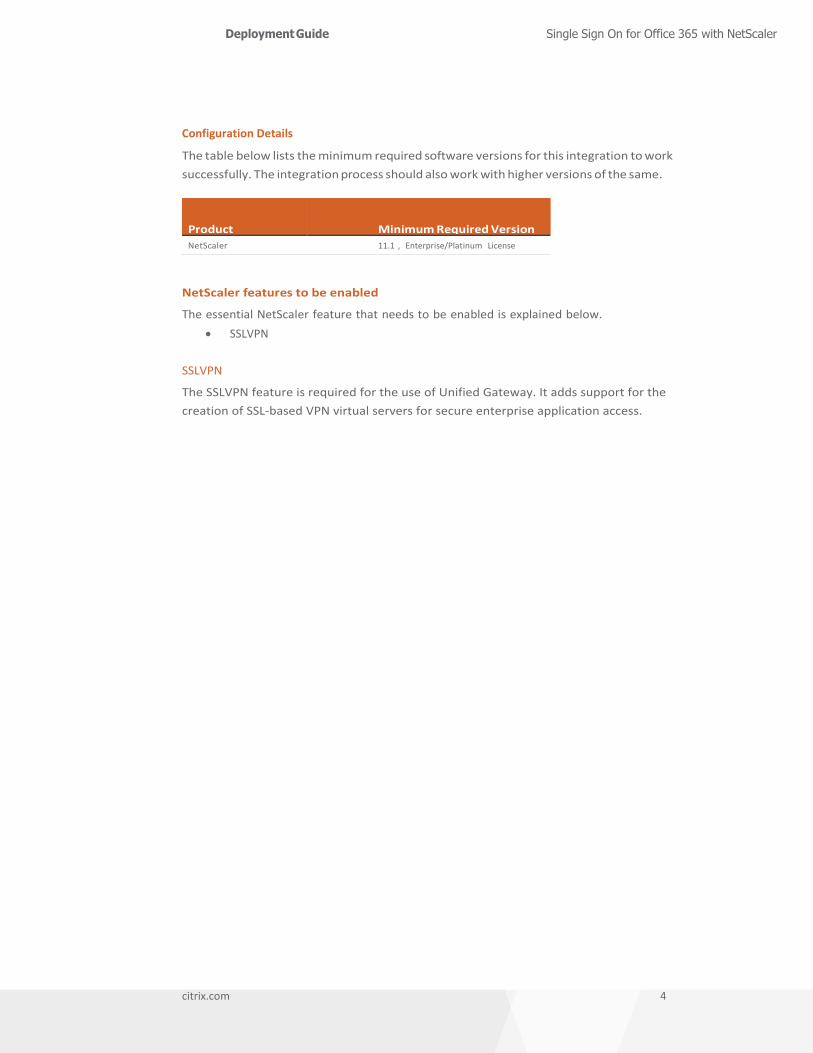
Configuration Details
The table below lists the minimum required software versions for this integration to work
successfully. The integration process should also work with higher versions of the same.
Product Minimum Required Version
NetScaler 11.1 , Enterprise/Platinum License
NetScaler features to be enabled
The essential NetScaler feature that needs to be enabled is explained below.
SSLVPN
SSLVPN
The SSLVPN feature is required for the use of Unified Gateway. It adds support for thecreation of SSL-based VPN virtual servers for secure enterprise application access.
Deployment Guide Single Sign On for Office 365 with NetScaler
citrix.com 5
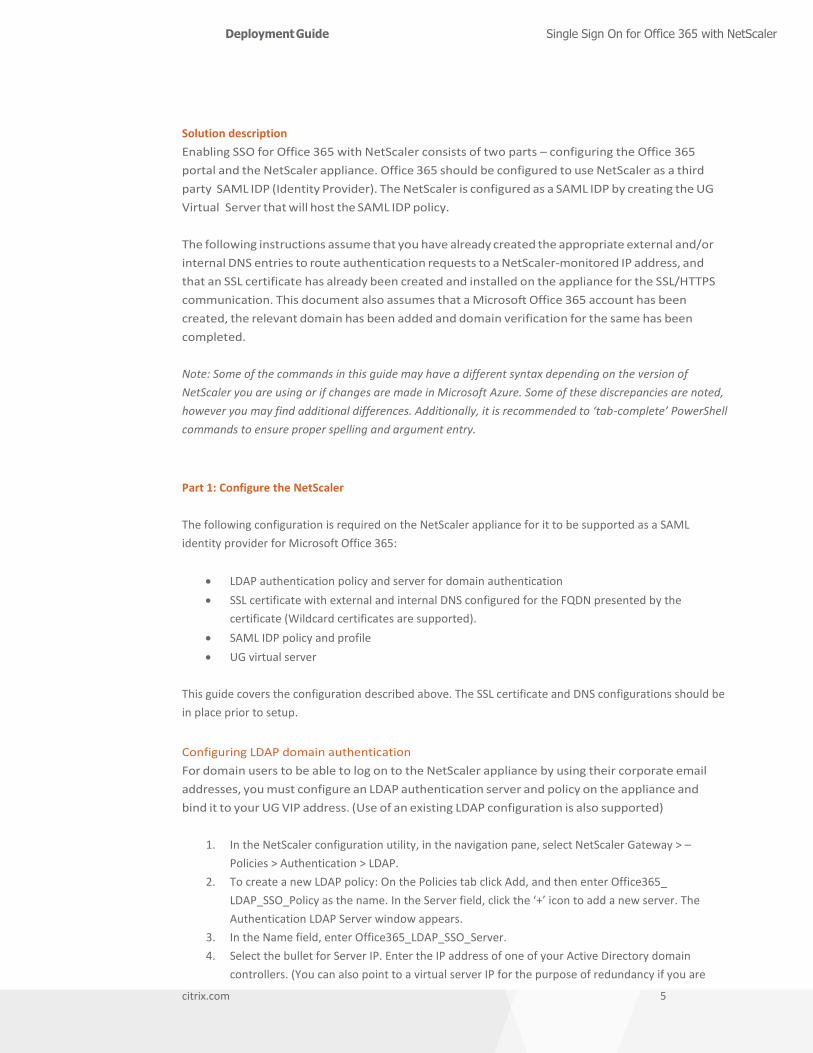
Solution description
Enabling SSO for Office 365 with NetScaler consists of two parts – configuring the Office 365
portal and the NetScaler appliance. Office 365 should be configured to use NetScaler as a third
party SAML IDP (Identity Provider). The NetScaler is configured as a SAML IDP by creating the UG
Virtual Server that will host the SAML IDP policy.
The following instructions assume that you have already created the appropriate external and/or
internal DNS entries to route authentication requests to a NetScaler-monitored IP address, and
that an SSL certificate has already been created and installed on the appliance for the SSL/HTTPS
communication. This document also assumes that a Microsoft Office 365 account has been
created, the relevant domain has been added and domain verification for the same has been
completed.
Note: Some of the commands in this guide may have a different syntax depending on the version of
NetScaler you are using or if changes are made in Microsoft Azure. Some of these discrepancies are noted,
however you may find additional differences. Additionally, it is recommended to ‘tab-complete’ PowerShell
commands to ensure proper spelling and argument entry.
Part 1: Configure the NetScaler
The following configuration is required on the NetScaler appliance for it to be supported as a SAML
identity provider for Microsoft Office 365:
LDAP authentication policy and server for domain authentication
SSL certificate with external and internal DNS configured for the FQDN presented by the
certificate (Wildcard certificates are supported).
SAML IDP policy and profile
UG virtual server
This guide covers the configuration described above. The SSL certificate and DNS configurations should be
in place prior to setup.
Configuring LDAP domain authentication
For domain users to be able to log on to the NetScaler appliance by using their corporate email
addresses, you must configure an LDAP authentication server and policy on the appliance and
bind it to your UG VIP address. (Use of an existing LDAP configuration is also supported)
1. In the NetScaler configuration utility, in the navigation pane, select NetScaler Gateway > – Policies > Authentication > LDAP.
2. To create a new LDAP policy: On the Policies tab click Add, and then enter Office365_
LDAP_SSO_Policy as the name. In the Server field, click the ‘+’ icon to add a new server. The
Authentication LDAP Server window appears.
3. In the Name field, enter Office365_LDAP_SSO_Server.
4. Select the bullet for Server IP. Enter the IP address of one of your Active Directory domain
controllers. (You can also point to a virtual server IP for the purpose of redundancy if you are
Deployment Guide Single Sign On for Office 365 with NetScaler
citrix.com 6
load balancing domain controllers)
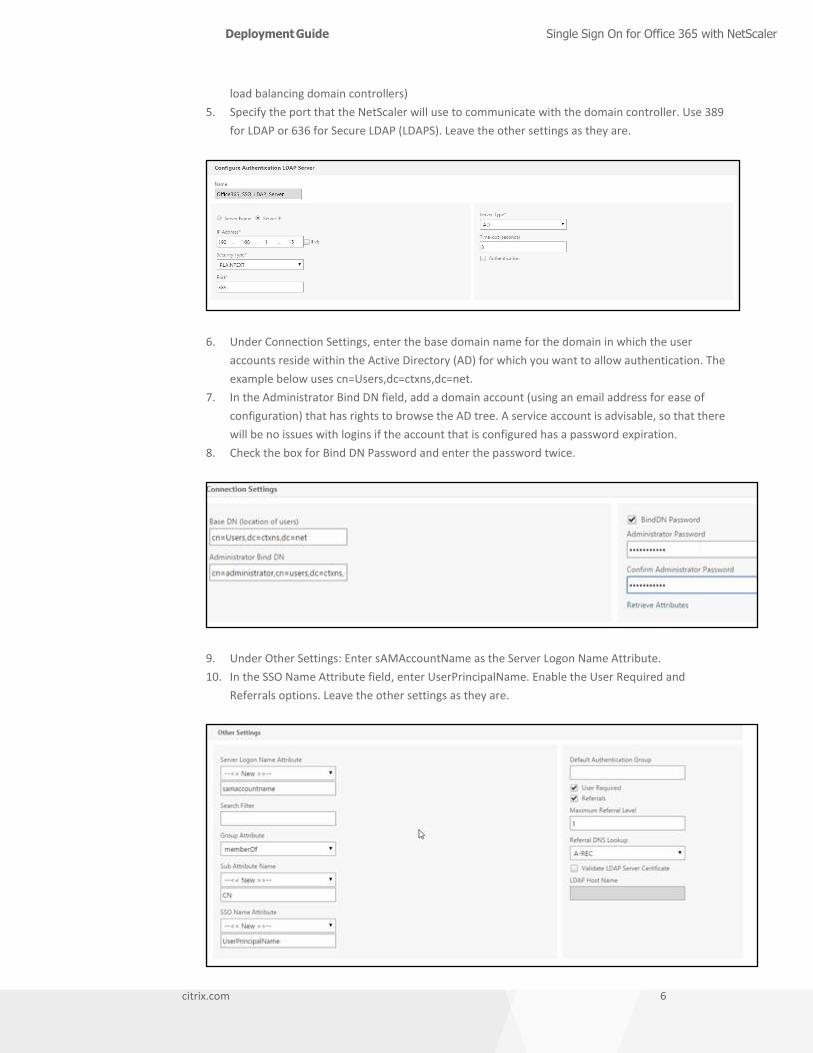
5. Specify the port that the NetScaler will use to communicate with the domain controller. Use 389
for LDAP or 636 for Secure LDAP (LDAPS). Leave the other settings as they are.
6. Under Connection Settings, enter the base domain name for the domain in which the user
accounts reside within the Active Directory (AD) for which you want to allow authentication. The
example below uses cn=Users,dc=ctxns,dc=net.
7. In the Administrator Bind DN field, add a domain account (using an email address for ease of
configuration) that has rights to browse the AD tree. A service account is advisable, so that there
will be no issues with logins if the account that is configured has a password expiration.
8. Check the box for Bind DN Password and enter the password twice.
9. Under Other Settings: Enter sAMAccountName as the Server Logon Name Attribute.
10. In the SSO Name Attribute field, enter UserPrincipalName. Enable the User Required and
Referrals options. Leave the other settings as they are.

Deployment Guide Single Sign On for Office 365 with NetScaler
citrix.com 7
11. Click on More at the bottom of the screen, then add mail as Attribute 1 and objectGUID as
Attribute 2 in the Attribute Fields section. Leave Nested Group Extraction in the Disabled state
(we are not going to be using this option for this deployment)
12. Click the Create button to complete the LDAP server settings.
13. For the LDAP Policy Configuration, select the newly created LDAP server from the Server drop-
down list, and in the Expression field type ns_true.
14. Click the Create button to complete the LDAP Policy and Server configuration.
Deployment Guide Single Sign On for Office 365 with NetScaler
citrix.com 8
Configure the SAML IDP Policy and Profile
For your users to receive the SAML token for logging on to Microsoft Office 365, you must configure a
SAML IDP policy and profile, and bind them to the UG virtual server where users’ credentials are sent.
Use the following procedure:
1. Open the NetScaler Configuration Utility and navigate to NetScaler Gateway > Policies > Authentication > SAML IDP
2. On the Policies Tab, select the Add button.
3. In the Create Authentication SAML IDP Policy Window, provide a name for your policy (for
example – Office365_SSO_Policy).
4. To the right of the Action field, click the ‘+’ icon to add a new action or profile.
5. Provide a name (for example, Office365_SSO_Profile).
6. In the Assertion Consumer Service URL field, enter https://login.microsoftonline.com/login.srf
7. Leave the SP Certificate Name blank.
8. In the IDP Certificate Name field, browse to the certificate installed on the NetScaler that is will be used to secure your UG authentication Virtual Server.
9. In the Issuer Name field enter the public FQDN of your UG vServer: https://auth.yourCompany.com/saml/login
10. Set the Encryption Algorithm to AES256 and leave the Service Provider ID field blank.
a. Note: The encryption field is not available in later builds of the NetScaler
11. Set both the Signature and Digest algorithms to SHA-1.
12. Set the SAML Binding to POST.
Deployment Guide Single Sign On for Office 365 with NetScaler
citrix.com 9
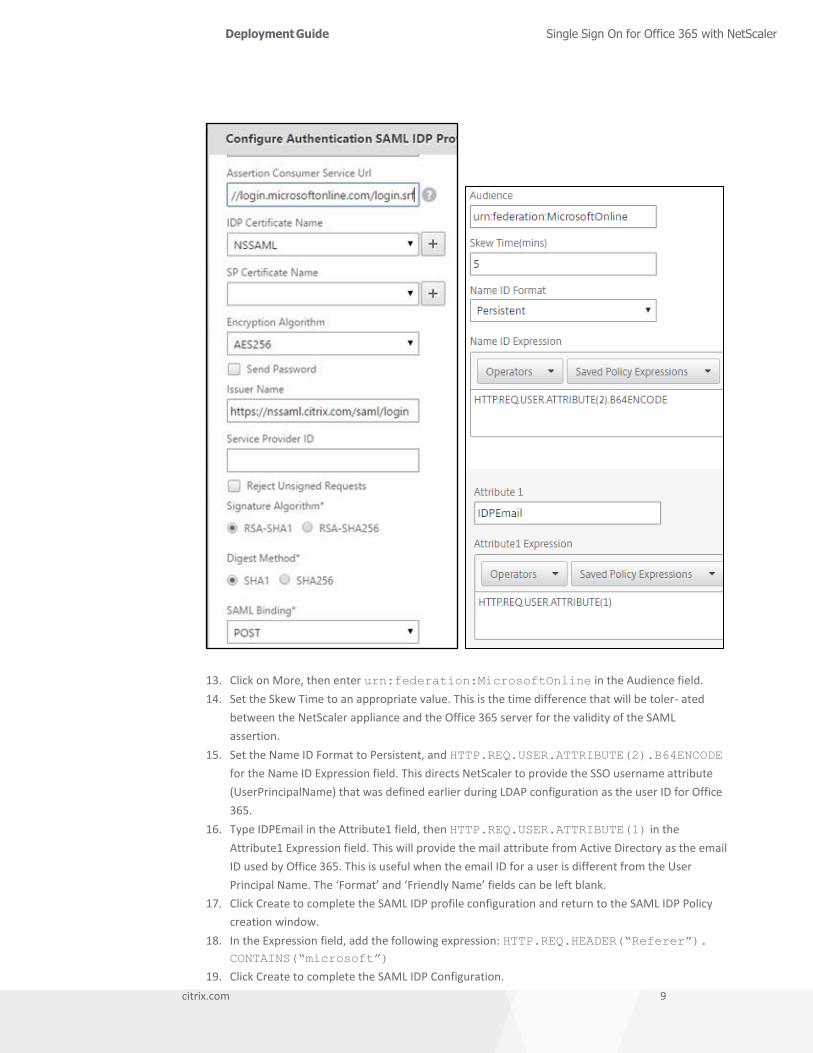
13. Click on More, then enter urn:federation:MicrosoftOnline in the Audience field.
14. Set the Skew Time to an appropriate value. This is the time difference that will be toler- ated
between the NetScaler appliance and the Office 365 server for the validity of the SAML
assertion.
15. Set the Name ID Format to Persistent, and HTTP.REQ.USER.ATTRIBUTE(2).B64ENCODE
for the Name ID Expression field. This directs NetScaler to provide the SSO username attribute
(UserPrincipalName) that was defined earlier during LDAP configuration as the user ID for Office
365.
16. Type IDPEmail in the Attribute1 field, then HTTP.REQ.USER.ATTRIBUTE(1) in the
Attribute1 Expression field. This will provide the mail attribute from Active Directory as the email
ID used by Office 365. This is useful when the email ID for a user is different from the User
Principal Name. The ‘Format’ and ‘Friendly Name’ fields can be left blank.
17. Click Create to complete the SAML IDP profile configuration and return to the SAML IDP Policy
creation window.
18. In the Expression field, add the following expression: HTTP.REQ.HEADER(“Referer”).
CONTAINS(“microsoft”)
19. Click Create to complete the SAML IDP Configuration.
Deployment Guide Single Sign On for Office 365 with NetScaler
citrix.com 10
To Configure your Unified Gateway (UG) Virtual Server
1. Select the Unified Gateway option in the Integrate with Citrix Products section on the
navigation panel to initiate the Unified Gateway Configuration Wizard.2. First, provide an appropriate name , IP address and port for the UG virtual server.
3. In the next step, provide a server certificate (if it is already present on the NetScaler) or
install a new certificate that will be used as the server certificate for the UG virtual server.
4. Next, define the authentication mechanism to be used for the UG Virtual Server.
Note: In the Wizard, only the most common authentication mechanisms are configured. Select Active Directory/LDAP and add the LDAP server configured earlier.
5. Set the Portal Theme to Default (or a theme of your choice) and click on Continue.
6. In the Applications section, select the pencil shaped icon on the top right, then the plus-
shaped icon to add a new application. Select Web Application, then provide the ACS (Assertion Consumer Service) URL provided in the NetScaler SAML IDP policy earlier with an appropriate name.
7. Click on Done once the application has been added.
8. To add the SAML IDP policy to the Unified Gateway, navigate to the VPN Virtual Server
listing (NetScaler Gateway>Virtual Servers) to find the virtual server created using the wizard (named UG_VPN_<UG vserver name>). Choose the option for editing the virtual server, then add the SAML IDP policy created earlier in the Advanced Authentication section.
Deployment Guide Single Sign On for Office 365 with NetScaler
citrix.com 11
Part 2: Configure Office 365
Once the NetScaler configuration is completed, move on to make the configuration changes to Office 365.
Note: Screenshots may differ as Microsoft Azure is a continually evolving platform.
Confirm Microsoft Office 365 Portal Settings
1. In a web browser, log in to your Office 365 administration portal at
https://login.microsoftonline.com using an account with administrative rights.
2. Confirm that the domain that is in use by your company for Office 365 has been verified by
navigating to Domains in the left hand navigation bar
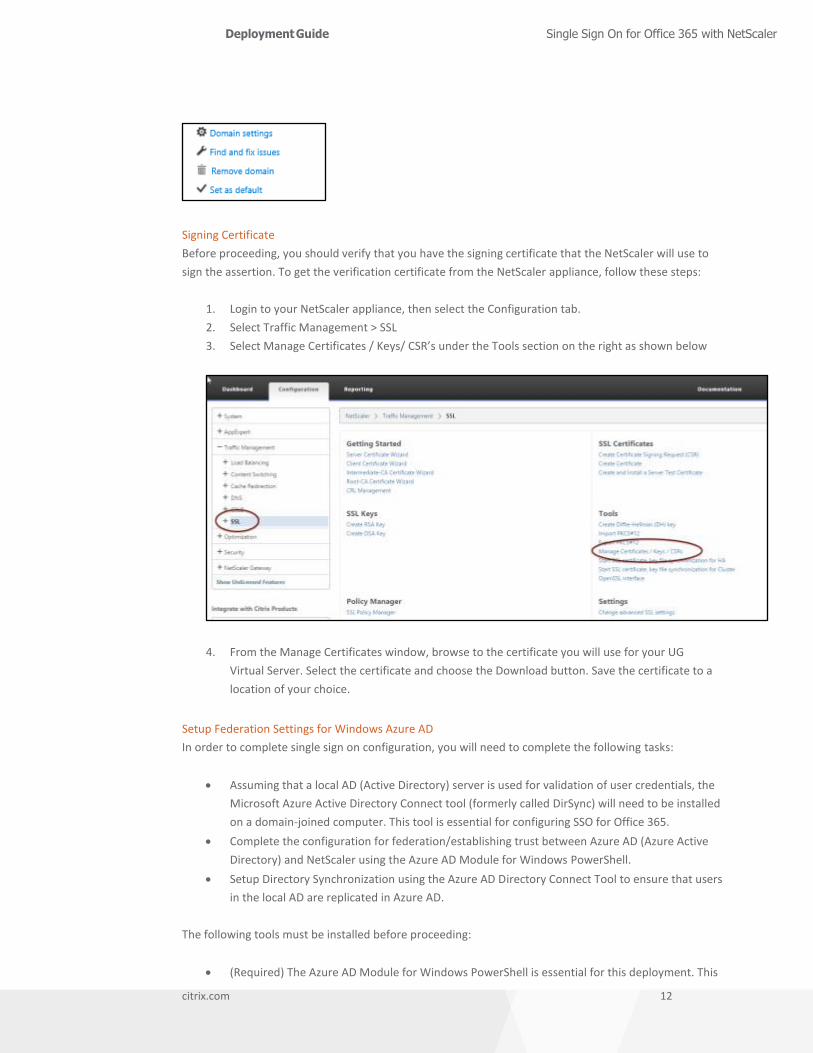
3. Select the Domain Settings options in the Manage Domains section shown on the right after
selecting the appropriate domain in the list – noting the default domain.
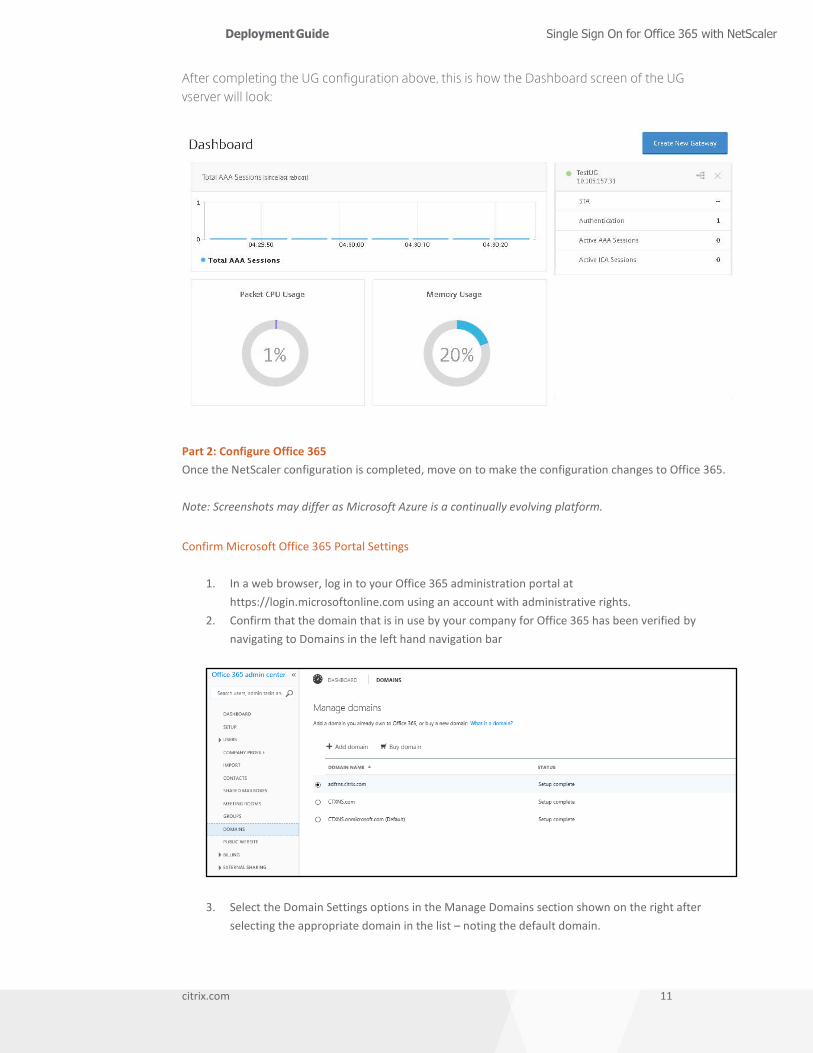
After completing the UG configuration above, this is how the Dashboard screen of the UG vserver will look:
Deployment Guide Single Sign On for Office 365 with NetScaler
citrix.com 12
Signing Certificate
Before proceeding, you should verify that you have the signing certificate that the NetScaler will use to
sign the assertion. To get the verification certificate from the NetScaler appliance, follow these steps:
1. Login to your NetScaler appliance, then select the Configuration tab.
2. Select Traffic Management > SSL
3. Select Manage Certificates / Keys/ CSR’s under the Tools section on the right as shown below
4. From the Manage Certificates window, browse to the certificate you will use for your UG Virtual Server. Select the certificate and choose the Download button. Save the certificate to a location of your choice.
Setup Federation Settings for Windows Azure AD
In order to complete single sign on configuration, you will need to complete the following tasks:
Assuming that a local AD (Active Directory) server is used for validation of user credentials, the
Microsoft Azure Active Directory Connect tool (formerly called DirSync) will need to be installed
on a domain-joined computer. This tool is essential for configuring SSO for Office 365.
Complete the configuration for federation/establishing trust between Azure AD (Azure Active
Directory) and NetScaler using the Azure AD Module for Windows PowerShell.
Setup Directory Synchronization using the Azure AD Directory Connect Tool to ensure that users
in the local AD are replicated in Azure AD.
The following tools must be installed before proceeding:
(Required) The Azure AD Module for Windows PowerShell is essential for this deployment. This
Deployment Guide Single Sign On for Office 365 with NetScaler
citrix.com 13
module enables cmdlets to be run that complete the Azure AD administrative and configuration
tasks for this deployment.
o More information is available from Microsoft here: https://technet.microsoft.com/en-
us/library/dn975125.aspx
o The PowerShell module can be downloaded here:
http://go.microsoft.com/fwlink/p/?linkid=236297
o Note: Support for the 32-bit version of this tool has ended
(Optional) Windows Azure AD Connect enables synchronization of directories between Azure AD
and the local Active Directory. This tool simplifies user account setup in Office 365, eliminating
the need to add them individually. For more information on directory synchronization using
Azure AD Connect, refer to https://azure.microsoft.com/en-in/documentation/articles/active-
directory-aadconnect/
o Note: Azure AD Connect is an optional installation, and this integration can be
completed without it. However, in this instance you will need to ensure that the Azure
AD tenant for your Office 365 account has all user accounts corresponding to the ones
in your Active Directory (the user account login should be the same as the UPN for the
user accounts in the local Active Directory) – see the troubleshooting section at the end
of this document regarding the ImmutableID field in AzureAD
Office 365 PowerShell Commands
These commands are executed in the PowerShell after completing the Azure AD Directory Module
installation. <your domain name> here refers to the domain name that your accounts are bound to – for
example, for a user UPN (User Principal Name) of [email protected], <your domain name> will be
“company.com.”
1. Connect-MSolService will prompt for user credentials, provide an Office 365 administrative
user’s credentials.
PS C:\Windows\system32> Connect-MsolService
Note: Steps 2 and 3 are necessary only if your domain has not already been added to Office 365. If it is
already setup, you may skip to step 4. If the domain you are planning to use is already the default domain
in Azure, it cannot be converted to federated authentication. For example, if ‘company.com’ is the desired
domain and is currently set to default, it is recommended to make the ‘company.onmicrosoft.com’ domain
the default – otherwise a new default will be needed to take over the ‘default’ role.
2. (Optional) Convert another domain than the target domain to default:
PS C:\Windows\System32> Set-MsolDomain –Name company.onmicrosoft.com
–IsDefault:$true
a. (Optional) Create a new domain to make default if one does not already exist. Ensure
that the domain name matches with an existing public DNS record.
PS C:\Windows\system32> New-MsolDomain –name adfsns.citrix.com
3. (Optional) Get the DNS record information for the new domain with the following
command:
Deployment Guide Single Sign On for Office 365 with NetScaler
citrix.com 14
PS C:\Windows\system32> Get-MsolDomainVerificationDns –DomainName
<your domain name>
PS C:\Windows\system32> Confirm-MsolDomain –DomainName <your domain
name>
4. Provide a public certificate that will be used in SAML Signing. This is the certificate that was downloaded from the NetScaler device and bound to the UG vserver.
a. Note: Open the certificate file prior to moving on to the next step – if the file contains
the private key, it should be removed – only the certificate is needed.
PS C:\Users\administrator> $cert = New-Object
System.Security.Cryptography.X509Certificates.X509Certificate2(“<
path to certificate, for example: C:\NS-IDP-Cert.cer>”)
PS C:\Users\administrator> $certData =
[system.convert]::tobase64string($cert.rawdata)
5. Create variables and assign domain name and federation brand name. The domain variable
should match the domain name you are federating.
PS C:\Users\administrator> $dom = “<your domain name>”
PS C:\Users\administrator> $fedBrandName = “<company brand name, for
example: Citrix India>”
6. Provide the URL for the SAML IdP (Identity Provider), in this case the FQDN (fully qualified domain name) for the UG vserver that the SAML policies on the NetScaler appliance will be bound to.
a. Note: In the case of NetScaler Gateway acting as a SAML IDP the URL will be
https://<NS Gateway domain name>/saml/login
b. Note: In the case of AAATM, the SAML IDP URL will be https://<aaavserver domain
name>/saml/login.
c. Note: The ECP protocol URL has been set to the same value as the URI as there is no
unique URL for ECP support
PS C:\Users\administrator> $url = “https://<aaavserver domain
name>/cgi/tmlogout”
PS C:\Users\administrator> $uri = “https://<aaavserver domain
name>/saml/login”
PS C:\Users\administrator> $ecpUrl = “https://<aaavserver domain
name>/saml/login”
7. (Optional) If the domain being used has already been federated (for example, with ADFS), it
needs to be converted to a standard domain before it can be used for federated authentication
with NetScaler. Use the following command to convert it to a standard domain before setting
new authentication parameters.
PS C:\Users\administrator> Convert-MsolDomainToStandard –DomainName
<your domain name> -SkipUserConversion: $true –PasswordFile
C:\userpasswords.txt
Note: The userpasswords.txt file can be any path on the local hard drive; this command will dump all
Deployment Guide Single Sign On for Office 365 with NetScaler
citrix.com 15
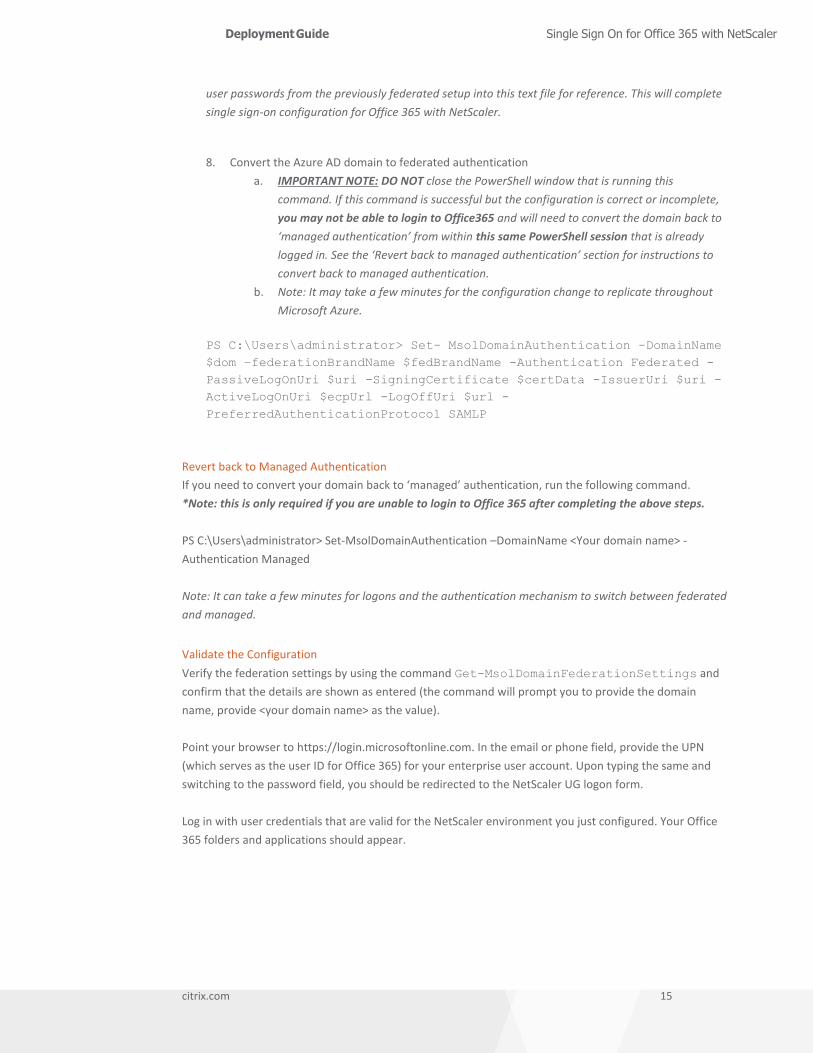
user passwords from the previously federated setup into this text file for reference. This will complete
single sign-on configuration for Office 365 with NetScaler.
8. Convert the Azure AD domain to federated authentication
a. IMPORTANT NOTE: DO NOT close the PowerShell window that is running this
command. If this command is successful but the configuration is correct or incomplete,
you may not be able to login to Office365 and will need to convert the domain back to
‘managed authentication’ from within this same PowerShell session that is already
logged in. See the ‘Revert back to managed authentication’ section for instructions to
convert back to managed authentication.
b. Note: It may take a few minutes for the configuration change to replicate throughout
Microsoft Azure.
PS C:\Users\administrator> Set- MsolDomainAuthentication -DomainName
$dom –federationBrandName $fedBrandName -Authentication Federated -
PassiveLogOnUri $uri -SigningCertificate $certData -IssuerUri $uri -
ActiveLogOnUri $ecpUrl -LogOffUri $url -
PreferredAuthenticationProtocol SAMLP
Revert back to Managed Authentication
If you need to convert your domain back to ‘managed’ authentication, run the following command.
*Note: this is only required if you are unable to login to Office 365 after completing the above steps.
PS C:\Users\administrator> Set-MsolDomainAuthentication –DomainName <Your domain name> -
Authentication Managed
Note: It can take a few minutes for logons and the authentication mechanism to switch between federated
and managed.
Validate the Configuration
Verify the federation settings by using the command Get-MsolDomainFederationSettings and
confirm that the details are shown as entered (the command will prompt you to provide the domain
name, provide <your domain name> as the value).
Point your browser to https://login.microsoftonline.com. In the email or phone field, provide the UPN
(which serves as the user ID for Office 365) for your enterprise user account. Upon typing the same and
switching to the password field, you should be redirected to the NetScaler UG logon form.
Log in with user credentials that are valid for the NetScaler environment you just configured. Your Office
365 folders and applications should appear.
Deployment Guide Single Sign On for Office 365 with NetScaler
citrix.com 16
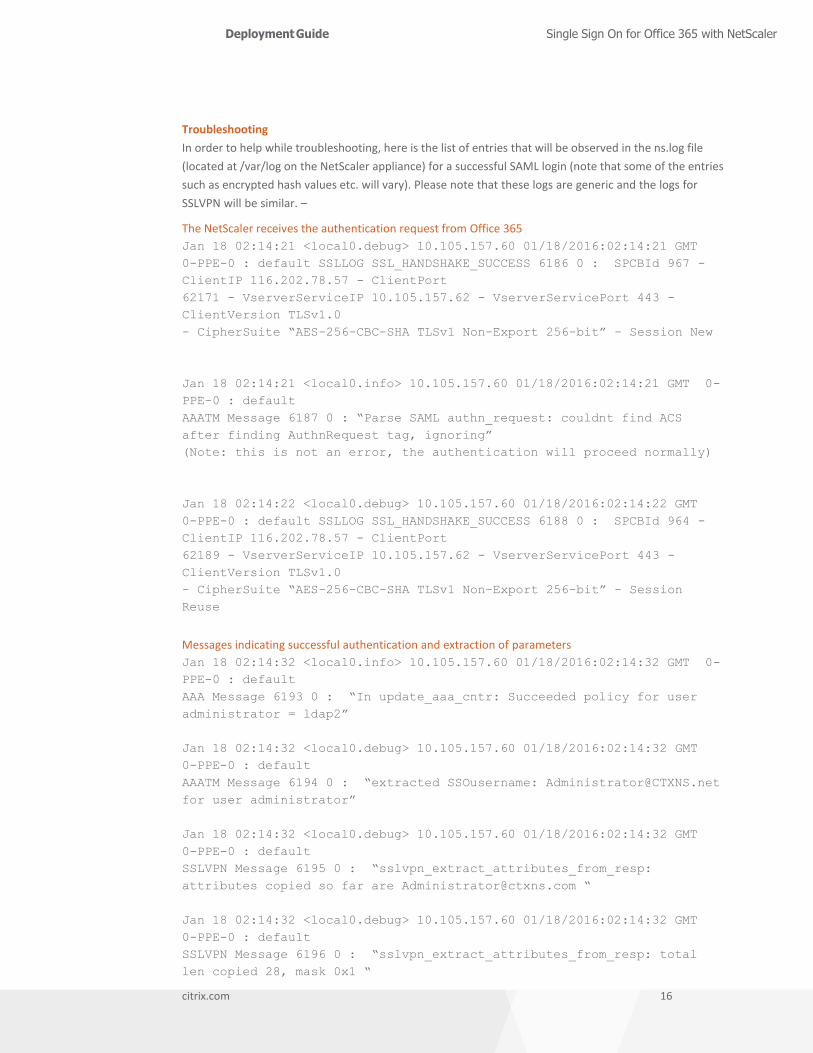
Troubleshooting
In order to help while troubleshooting, here is the list of entries that will be observed in the ns.log file
(located at /var/log on the NetScaler appliance) for a successful SAML login (note that some of the entries
such as encrypted hash values etc. will vary). Please note that these logs are generic and the logs for SSLVPN will be similar. –
The NetScaler receives the authentication request from Office 365
Jan 18 02:14:21 <local0.debug> 10.105.157.60 01/18/2016:02:14:21 GMT
0-PPE-0 : default SSLLOG SSL_HANDSHAKE_SUCCESS 6186 0 : SPCBId 967 -
ClientIP 116.202.78.57 - ClientPort
62171 - VserverServiceIP 10.105.157.62 - VserverServicePort 443 -
ClientVersion TLSv1.0
- CipherSuite “AES-256-CBC-SHA TLSv1 Non-Export 256-bit” - Session New
Jan 18 02:14:21 <local0.info> 10.105.157.60 01/18/2016:02:14:21 GMT 0-
PPE-0 : default
AAATM Message 6187 0 : “Parse SAML authn_request: couldnt find ACS
after finding AuthnRequest tag, ignoring”
(Note: this is not an error, the authentication will proceed normally)
Jan 18 02:14:22 <local0.debug> 10.105.157.60 01/18/2016:02:14:22 GMT
0-PPE-0 : default SSLLOG SSL_HANDSHAKE_SUCCESS 6188 0 : SPCBId 964 -
ClientIP 116.202.78.57 - ClientPort
62189 - VserverServiceIP 10.105.157.62 - VserverServicePort 443 -
ClientVersion TLSv1.0
- CipherSuite “AES-256-CBC-SHA TLSv1 Non-Export 256-bit” - Session
Reuse
Messages indicating successful authentication and extraction of parameters
Jan 18 02:14:32 <local0.info> 10.105.157.60 01/18/2016:02:14:32 GMT 0-
PPE-0 : default
AAA Message 6193 0 : “In update_aaa_cntr: Succeeded policy for user
administrator = ldap2”
Jan 18 02:14:32 <local0.debug> 10.105.157.60 01/18/2016:02:14:32 GMT
0-PPE-0 : default
AAATM Message 6194 0 : “extracted SSOusername: [email protected]
for user administrator”
Jan 18 02:14:32 <local0.debug> 10.105.157.60 01/18/2016:02:14:32 GMT
0-PPE-0 : default
SSLVPN Message 6195 0 : “sslvpn_extract_attributes_from_resp:
attributes copied so far are [email protected] “
Jan 18 02:14:32 <local0.debug> 10.105.157.60 01/18/2016:02:14:32 GMT
0-PPE-0 : default
SSLVPN Message 6196 0 : “sslvpn_extract_attributes_from_resp: total
len copied 28, mask 0x1 “
Deployment Guide Single Sign On for Office 365 with NetScaler
citrix.com 17
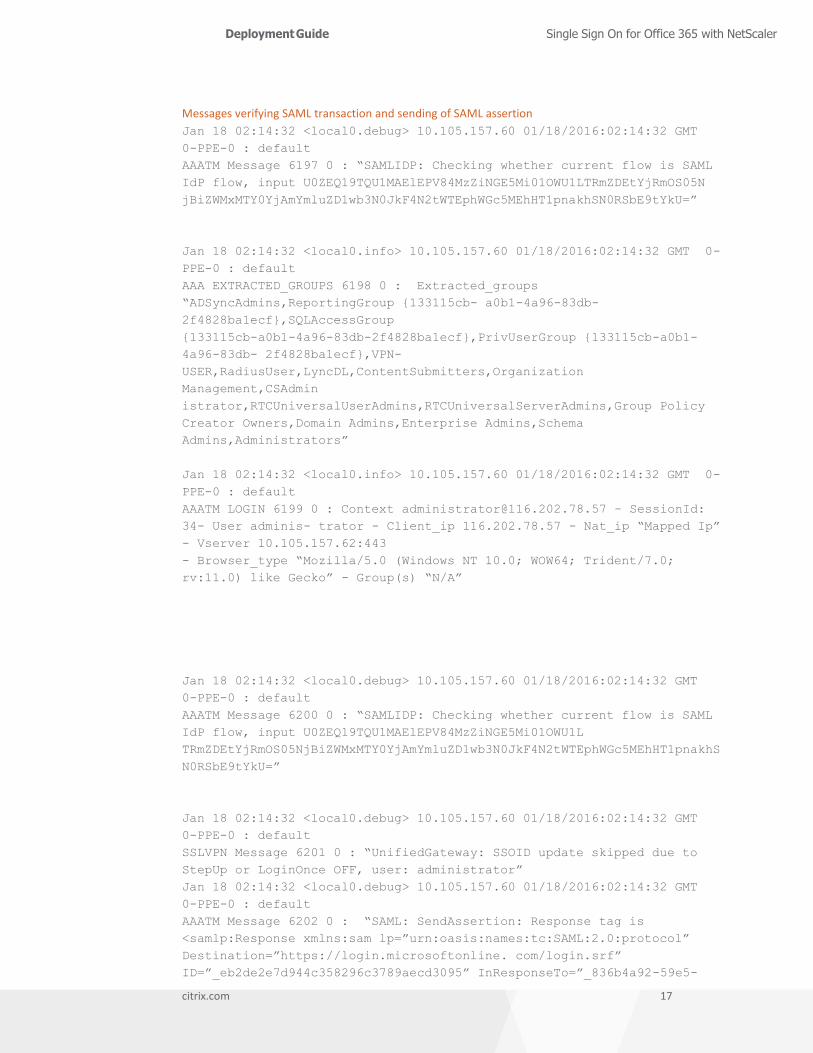
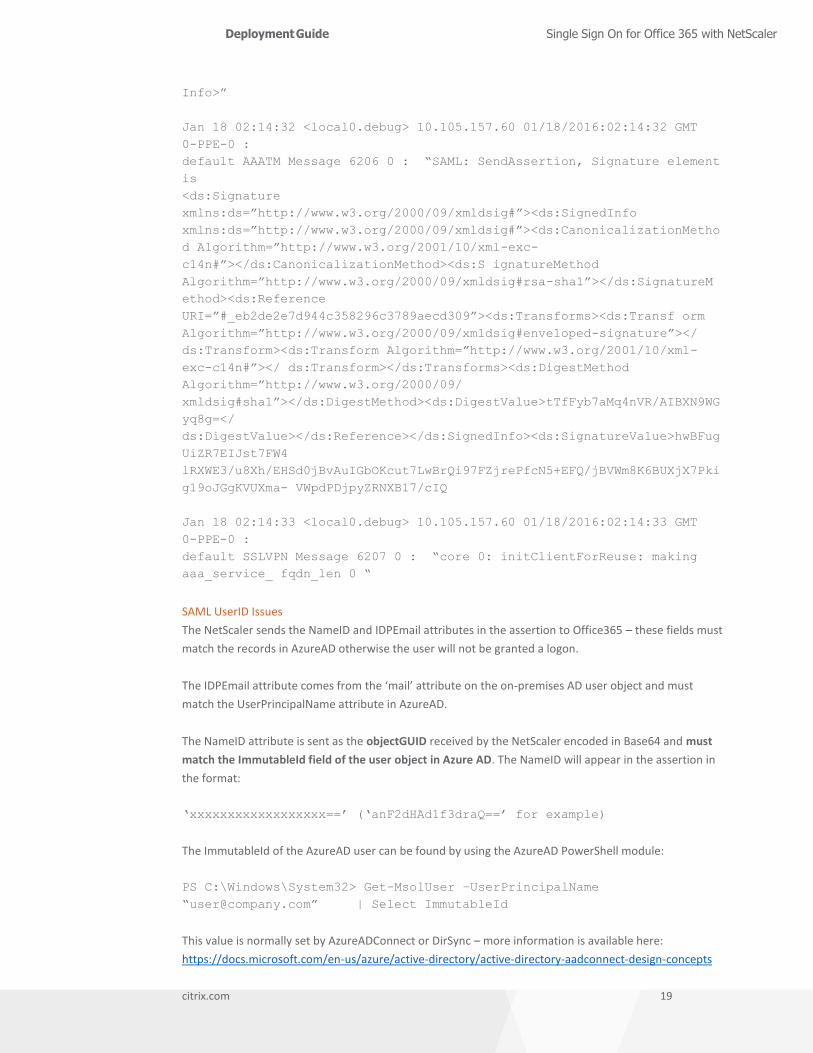
Messages verifying SAML transaction and sending of SAML assertion
Jan 18 02:14:32 <local0.debug> 10.105.157.60 01/18/2016:02:14:32 GMT
0-PPE-0 : default
AAATM Message 6197 0 : “SAMLIDP: Checking whether current flow is SAML
IdP flow, input U0ZEQ19TQU1MAElEPV84MzZiNGE5Mi01OWU1LTRmZDEtYjRmOS05N
jBiZWMxMTY0YjAmYmluZD1wb3N0JkF4N2tWTEphWGc5MEhHT1pnakhSN0RSbE9tYkU=”
Jan 18 02:14:32 <local0.info> 10.105.157.60 01/18/2016:02:14:32 GMT 0-
PPE-0 : default
AAA EXTRACTED_GROUPS 6198 0 : Extracted_groups
“ADSyncAdmins,ReportingGroup {133115cb- a0b1-4a96-83db-
2f4828ba1ecf},SQLAccessGroup
{133115cb-a0b1-4a96-83db-2f4828ba1ecf},PrivUserGroup {133115cb-a0b1-
4a96-83db- 2f4828ba1ecf},VPN-
USER,RadiusUser,LyncDL,ContentSubmitters,Organization
Management,CSAdmin
istrator,RTCUniversalUserAdmins,RTCUniversalServerAdmins,Group Policy
Creator Owners,Domain Admins,Enterprise Admins,Schema
Admins,Administrators”
Jan 18 02:14:32 <local0.info> 10.105.157.60 01/18/2016:02:14:32 GMT 0-
PPE-0 : default
AAATM LOGIN 6199 0 : Context [email protected] - SessionId:
34- User adminis- trator - Client_ip 116.202.78.57 - Nat_ip “Mapped Ip”
- Vserver 10.105.157.62:443
- Browser_type “Mozilla/5.0 (Windows NT 10.0; WOW64; Trident/7.0;
rv:11.0) like Gecko” - Group(s) “N/A”
Jan 18 02:14:32 <local0.debug> 10.105.157.60 01/18/2016:02:14:32 GMT
0-PPE-0 : default
AAATM Message 6200 0 : “SAMLIDP: Checking whether current flow is SAML
IdP flow, input U0ZEQ19TQU1MAElEPV84MzZiNGE5Mi01OWU1L
TRmZDEtYjRmOS05NjBiZWMxMTY0YjAmYmluZD1wb3N0JkF4N2tWTEphWGc5MEhHT1pnakhS
N0RSbE9tYkU=”
Jan 18 02:14:32 <local0.debug> 10.105.157.60 01/18/2016:02:14:32 GMT
0-PPE-0 : default
SSLVPN Message 6201 0 : “UnifiedGateway: SSOID update skipped due to
StepUp or LoginOnce OFF, user: administrator”
Jan 18 02:14:32 <local0.debug> 10.105.157.60 01/18/2016:02:14:32 GMT
0-PPE-0 : default
AAATM Message 6202 0 : “SAML: SendAssertion: Response tag is
<samlp:Response xmlns:sam lp=”urn:oasis:names:tc:SAML:2.0:protocol”
Destination=”https://login.microsoftonline. com/login.srf”
ID=”_eb2de2e7d944c358296c3789aecd3095” InResponseTo=”_836b4a92-59e5-
Deployment Guide Single Sign On for Office 365 with NetScaler
citrix.com 18
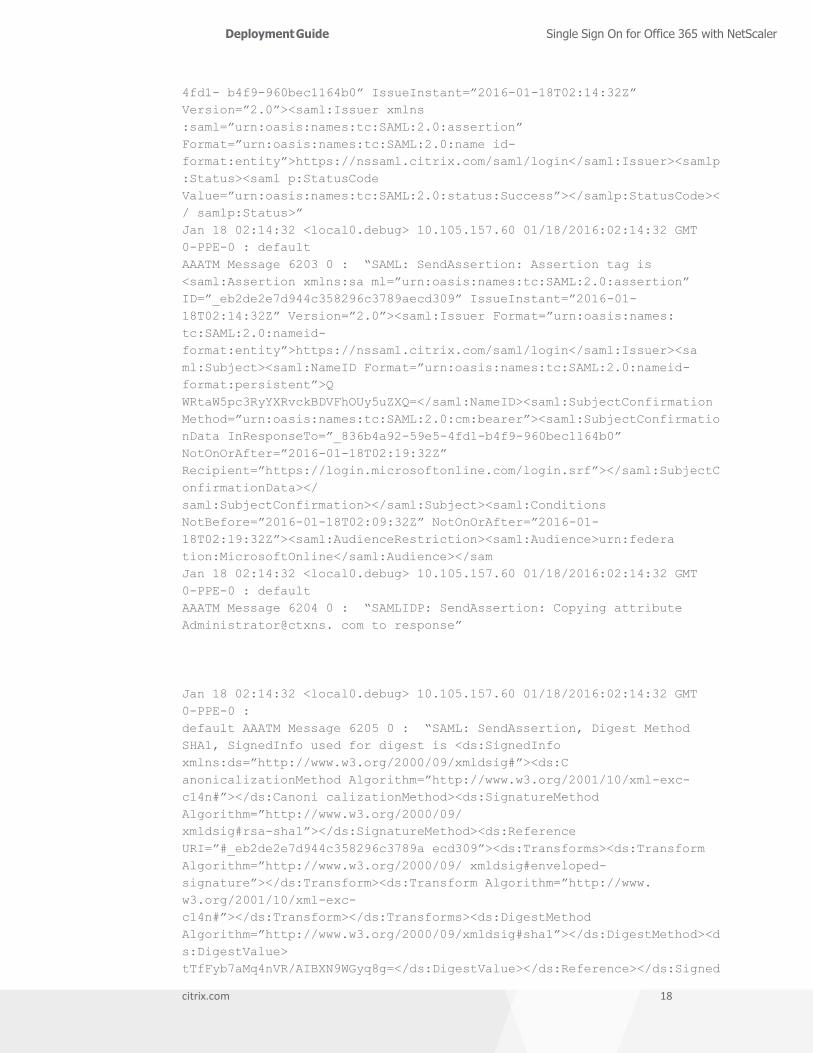
4fd1- b4f9-960bec1164b0” IssueInstant=”2016-01-18T02:14:32Z”
Version=”2.0”><saml:Issuer xmlns
:saml=”urn:oasis:names:tc:SAML:2.0:assertion”
Format=”urn:oasis:names:tc:SAML:2.0:name id-
format:entity”>https://nssaml.citrix.com/saml/login</saml:Issuer><samlp
:Status><saml p:StatusCode
Value=”urn:oasis:names:tc:SAML:2.0:status:Success”></samlp:StatusCode><
/ samlp:Status>”
Jan 18 02:14:32 <local0.debug> 10.105.157.60 01/18/2016:02:14:32 GMT
0-PPE-0 : default
AAATM Message 6203 0 : “SAML: SendAssertion: Assertion tag is
<saml:Assertion xmlns:sa ml=”urn:oasis:names:tc:SAML:2.0:assertion”
ID=”_eb2de2e7d944c358296c3789aecd309” IssueInstant=”2016-01-
18T02:14:32Z” Version=”2.0”><saml:Issuer Format=”urn:oasis:names:
tc:SAML:2.0:nameid-
format:entity”>https://nssaml.citrix.com/saml/login</saml:Issuer><sa
ml:Subject><saml:NameID Format=”urn:oasis:names:tc:SAML:2.0:nameid-
format:persistent”>Q
WRtaW5pc3RyYXRvckBDVFhOUy5uZXQ=</saml:NameID><saml:SubjectConfirmation
Method=”urn:oasis:names:tc:SAML:2.0:cm:bearer”><saml:SubjectConfirmatio
nData InResponseTo=”_836b4a92-59e5-4fd1-b4f9-960bec1164b0”
NotOnOrAfter=”2016-01-18T02:19:32Z”
Recipient=”https://login.microsoftonline.com/login.srf”></saml:SubjectC
onfirmationData></
saml:SubjectConfirmation></saml:Subject><saml:Conditions
NotBefore=”2016-01-18T02:09:32Z” NotOnOrAfter=”2016-01-
18T02:19:32Z”><saml:AudienceRestriction><saml:Audience>urn:federa
tion:MicrosoftOnline</saml:Audience></sam
Jan 18 02:14:32 <local0.debug> 10.105.157.60 01/18/2016:02:14:32 GMT
0-PPE-0 : default
AAATM Message 6204 0 : “SAMLIDP: SendAssertion: Copying attribute
Administrator@ctxns. com to response”
Jan 18 02:14:32 <local0.debug> 10.105.157.60 01/18/2016:02:14:32 GMT
0-PPE-0 :
default AAATM Message 6205 0 : “SAML: SendAssertion, Digest Method
SHA1, SignedInfo used for digest is <ds:SignedInfo
xmlns:ds=”http://www.w3.org/2000/09/xmldsig#”><ds:C
anonicalizationMethod Algorithm=”http://www.w3.org/2001/10/xml-exc-
c14n#”></ds:Canoni calizationMethod><ds:SignatureMethod
Algorithm=”http://www.w3.org/2000/09/
xmldsig#rsa-sha1”></ds:SignatureMethod><ds:Reference
URI=”#_eb2de2e7d944c358296c3789a ecd309”><ds:Transforms><ds:Transform
Algorithm=”http://www.w3.org/2000/09/ xmldsig#enveloped-
signature”></ds:Transform><ds:Transform Algorithm=”http://www.
w3.org/2001/10/xml-exc-
c14n#”></ds:Transform></ds:Transforms><ds:DigestMethod
Algorithm=”http://www.w3.org/2000/09/xmldsig#sha1”></ds:DigestMethod><d
s:DigestValue>
tTfFyb7aMq4nVR/AIBXN9WGyq8g=</ds:DigestValue></ds:Reference></ds:Signed
Deployment Guide Single Sign On for Office 365 with NetScaler
citrix.com 19
Info>”
Jan 18 02:14:32 <local0.debug> 10.105.157.60 01/18/2016:02:14:32 GMT
0-PPE-0 :
default AAATM Message 6206 0 : “SAML: SendAssertion, Signature element
is
<ds:Signature
xmlns:ds=”http://www.w3.org/2000/09/xmldsig#”><ds:SignedInfo
xmlns:ds=”http://www.w3.org/2000/09/xmldsig#”><ds:CanonicalizationMetho
d Algorithm=”http://www.w3.org/2001/10/xml-exc-
c14n#”></ds:CanonicalizationMethod><ds:S ignatureMethod
Algorithm=”http://www.w3.org/2000/09/xmldsig#rsa-sha1”></ds:SignatureM
ethod><ds:Reference
URI=”#_eb2de2e7d944c358296c3789aecd309”><ds:Transforms><ds:Transf orm
Algorithm=”http://www.w3.org/2000/09/xmldsig#enveloped-signature”></
ds:Transform><ds:Transform Algorithm=”http://www.w3.org/2001/10/xml-
exc-c14n#”></ ds:Transform></ds:Transforms><ds:DigestMethod
Algorithm=”http://www.w3.org/2000/09/
xmldsig#sha1”></ds:DigestMethod><ds:DigestValue>tTfFyb7aMq4nVR/AIBXN9WG
yq8g=</
ds:DigestValue></ds:Reference></ds:SignedInfo><ds:SignatureValue>hwBFug
UiZR7EIJst7FW4
lRXWE3/u8Xh/EHSd0jBvAuIGbOKcut7LwBrQi97FZjrePfcN5+EFQ/jBVWm8K6BUXjX7Pki
g19oJGgKVUXma- VWpdPDjpyZRNXB17/cIQ
Jan 18 02:14:33 <local0.debug> 10.105.157.60 01/18/2016:02:14:33 GMT
0-PPE-0 :
default SSLVPN Message 6207 0 : “core 0: initClientForReuse: making
aaa_service_ fqdn_len 0 “
SAML UserID Issues
The NetScaler sends the NameID and IDPEmail attributes in the assertion to Office365 – these fields must
match the records in AzureAD otherwise the user will not be granted a logon.
The IDPEmail attribute comes from the ‘mail’ attribute on the on-premises AD user object and must
match the UserPrincipalName attribute in AzureAD.
The NameID attribute is sent as the objectGUID received by the NetScaler encoded in Base64 and must
match the ImmutableId field of the user object in Azure AD. The NameID will appear in the assertion in
the format:
‘xxxxxxxxxxxxxxxxxx==’ (‘anF2dHAd1f3draQ==’ for example)
The ImmutableId of the AzureAD user can be found by using the AzureAD PowerShell module:
PS C:\Windows\System32> Get-MsolUser –UserPrincipalName
“[email protected]” | Select ImmutableId
This value is normally set by AzureADConnect or DirSync – more information is available here:
https://docs.microsoft.com/en-us/azure/active-directory/active-directory-aadconnect-design-concepts
Deployment Guide Single Sign On for Office 365 with NetScaler
citrix.com 20
Additional Resources
Microsoft lists the generic required configuration for SAML 2.0 compliant identity providers to function
effectively with Office 365 at https://msdn.microsoft.com/enus/library/azure/dn641269.aspx

Deployment Guide Single Sign On for Office 365 with NetScaler
citrix.com 21
Conclusion
NetScaler Unified Gateway provides a secure and seamless experience with Office 365 by enabling
single sign-on into Office 365 accounts, avoiding the need for users to remember multiple passwords
and user IDs, while reducing the administrative overhead involved in maintaining these deployments.
Corporate Headquarters
Fort Lauderdale, FL, USA
Silicon Valley Headquarters
Santa Clara, CA, USA
EMEA Headquarters
Schaffhausen, Switzerland
India Development Center
Bangalore, India
Online Division Headquarters
Santa Barbara, CA, USA
Pacific Headquarters
Hong Kong, China
Latin America Headquarters
Coral Gables, FL, USA
UK Development Center
Chalfont, United Kingdom
About Citrix
Citrix (NASDAQ: CTXS) is leading the transition to software-defining the workplace, uniting virtualization, mobility
management, networking and SaaS solutions to enable new ways for businesses and people to work better. Citrix
solutions power business mobility through secure, mobile workspaces that provide people with instant access to apps,
desktops, data and communications on any device, over any network and cloud. With annual revenue in 2014 of $3.14
billion, Citrix solutions are in use at more than 330,000 organizations and by over 100 million users globally. Learn more
at www.citrix.com.
Copyright © 2016 Citrix Systems, Inc. All rights reserved. Citrix and NetScaler are trademarks of Citrix Systems, Inc.
and/or one of its subsidiaries, and may be registered in the U.S. and other countries. Other product and company
names mentioned herein may be trademarks of their respective companies.