Embed Size (px)
Citation preview
© 2017 Infoblox Inc. All rights reserved. Installing and Configuring Devstack Newton for Infoblox Integration Page 1 of 38
DEPLOYMENT GUIDE
Installing and Configuring Devstack Newton for Infoblox Integration
© 2017 Infoblox Inc. All rights reserved. Installing and Configuring Devstack Newton for Infoblox Integration Page 2 of 38
Contents
Introduction ....................................................................................................................................... 3
Prerequisites ..................................................................................................................................... 3
Port Group Creation in vCenter Server ...................................................................................... 3
Architectural Diagram ....................................................................................................................... 5
Setup creation and configuration ...................................................................................................... 6
Setup details .............................................................................................................................. 6
Grid Master and Members ......................................................................................................... 6
Deploying Grid Master ......................................................................................................... 6
Deploying Grid Members ..................................................................................................... 7
Enabling DNS, DHCP, NTP Services .................................................................................. 8
Creating infoblox.com forward zone .................................................................................... 8
pfSense ...................................................................................................................................... 9
Ubuntu server ........................................................................................................................... 12
Windows ................................................................................................................................... 14
Configuring the Grid........................................................................................................................ 15
Configuring cloud user permissions ......................................................................................... 15
Installing Devstack .......................................................................................................................... 17
Post-installation verification...................................................................................................... 19
Grid Configuration Changes to work with Devstack ....................................................................... 20
Configuring Extensible Attributes in the Grid Master ............................................................... 20
Adding an authoritative zone for external.com......................................................................... 23
Adding IPv4 reverse mapping zone for external.com .............................................................. 24
Adding IPv6 reverse mapping zone for external.com .............................................................. 25
Devstack Use Cases ...................................................................................................................... 26
Creating overlapping IP addresses across Tenants in Devstack ............................................ 26
Creating Tenants and Networks ........................................................................................ 26
Creating Instances with the same internal IP address across different tenants ...................... 31
Creating Instances ............................................................................................................. 31
Verifying the network creation and hostnames in NIOS .................................................... 32
Cross-Instance communication using the floating IP Addresses ............................................. 33
Creating Routers................................................................................................................ 33
Associating the Floating IP ................................................................................................ 35
Verifying the floating IP creation in NIOS .......................................................................... 36
Deploying Devstack on a Physical Machine ................................................................................... 38
© 2017 Infoblox Inc. All rights reserved. Installing and Configuring Devstack Newton for Infoblox Integration Page 3 of 38
Introduction
Devstack is basically an opinionated script to create an OpenStack environment. It can also be used to
demonstrate starting/running OpenStack services and provide examples of using them from a command line.
Infoblox Devstack Plugin offers the following benefits:
• Automatic creation of DNS and DHCP Fixed Address records when new host instances are created.
• Automatic reclamation of IP addresses and DNS names from decommissioned instances.
• A single centralized view of all IPAM, DNS, and DHCP data for the DevStack environment, along with
VMware, Microsoft, and other cloud and physical environments.
• Full visibility into IP Addresses, DNS, and DHCP record creation/deletion and DHCP lease history for
auditing, compliance tracking and reporting.
• Ability to use Infoblox Grid Members to serve DNS and DHCP services to Virtual Machines in individual
Devstack Tenants.
• Support for non-overlapping and overlapping IP address spaces, including fixed IP addresses in private
and shared networks, and floating IP addresses in external/public networks.
This deployment guide will walk you through configuring Devstack (Newton release) with Infoblox Plugin.
Prerequisites
This guide assumes that Devstack installation would be performed on a virtual infrastructure based on VMware
vSphere 6.5.
Port Group Creation in vCenter Server
This deployment guide leverages Distributed virtual switch (DVS) for Devstack networking.
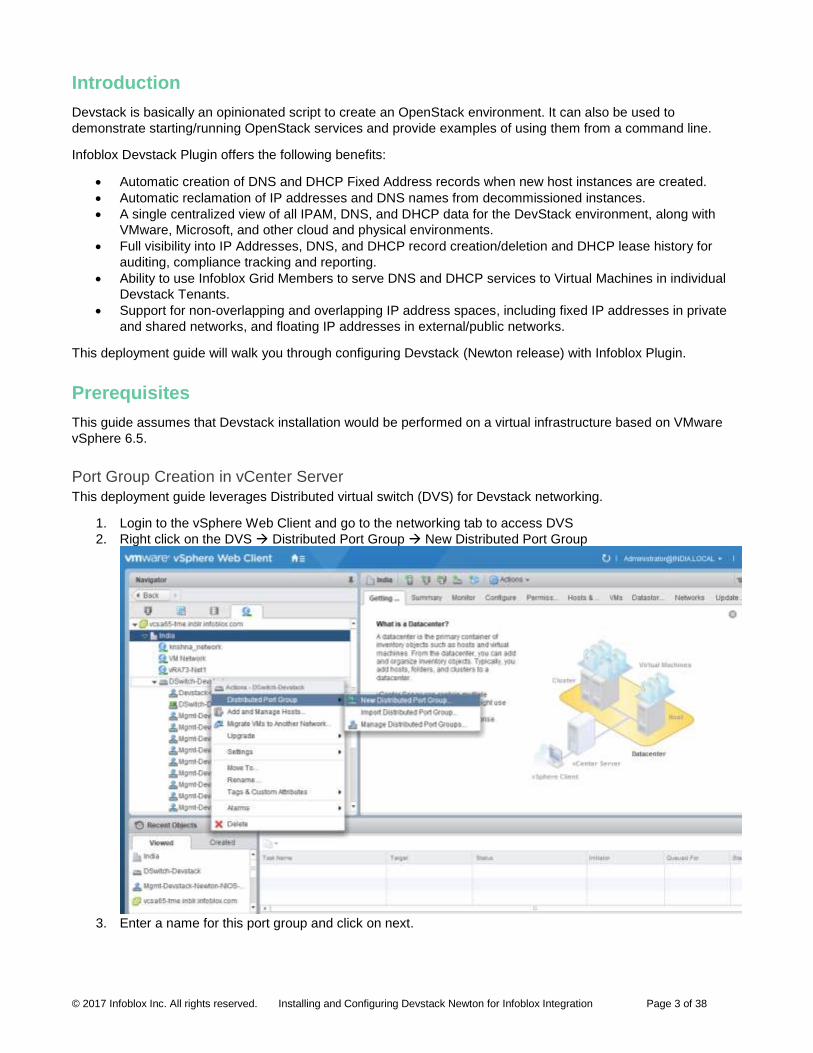
1. Login to the vSphere Web Client and go to the networking tab to access DVS
2. Right click on the DVS Distributed Port Group New Distributed Port Group
3. Enter a name for this port group and click on next.
© 2017 Infoblox Inc. All rights reserved. Installing and Configuring Devstack Newton for Infoblox Integration Page 4 of 38
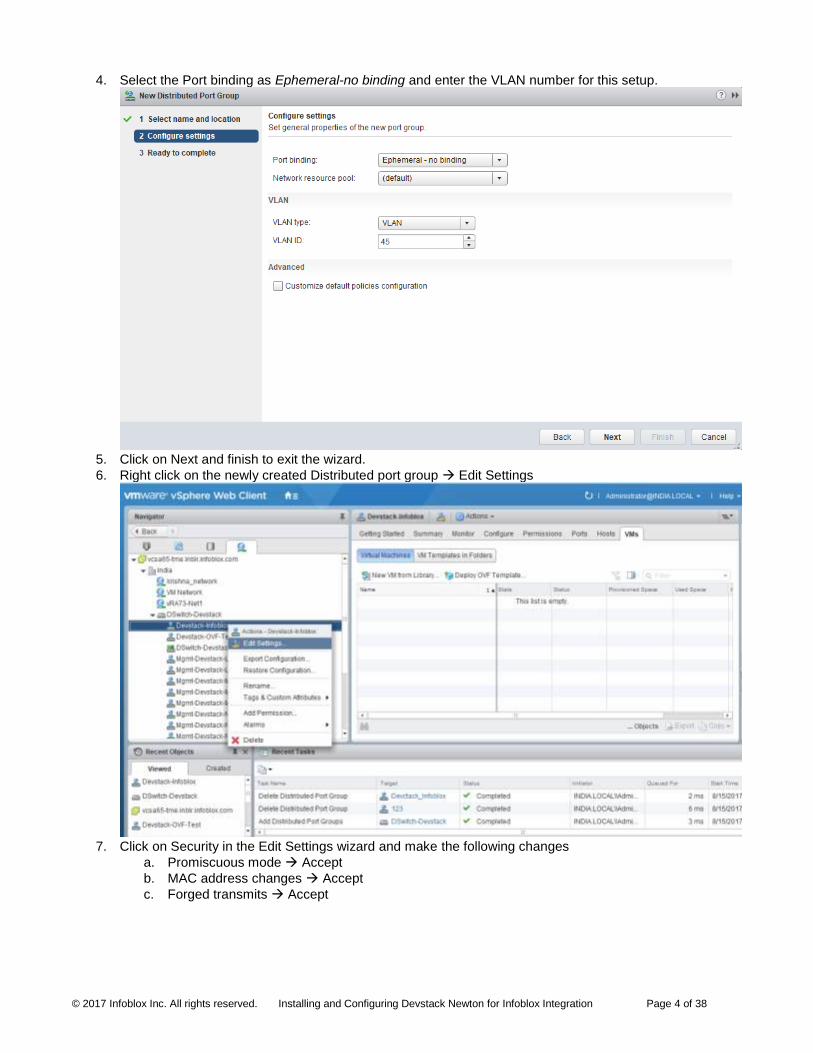
4. Select the Port binding as Ephemeral-no binding and enter the VLAN number for this setup.
5. Click on Next and finish to exit the wizard.
6. Right click on the newly created Distributed port group Edit Settings
7. Click on Security in the Edit Settings wizard and make the following changes
a. Promiscuous mode Accept
b. MAC address changes Accept
c. Forged transmits Accept
© 2017 Infoblox Inc. All rights reserved. Installing and Configuring Devstack Newton for Infoblox Integration Page 5 of 38
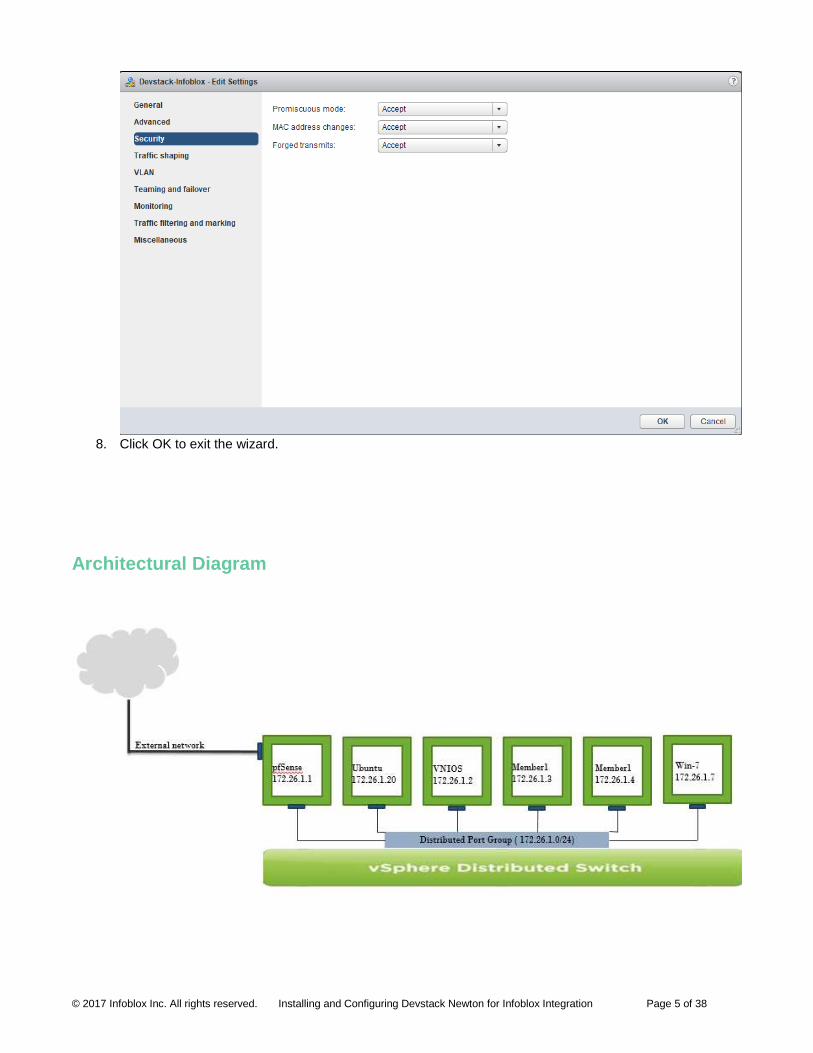
8. Click OK to exit the wizard.
Architectural Diagram
© 2017 Infoblox Inc. All rights reserved. Installing and Configuring Devstack Newton for Infoblox Integration Page 6 of 38
Setup creation and configuration
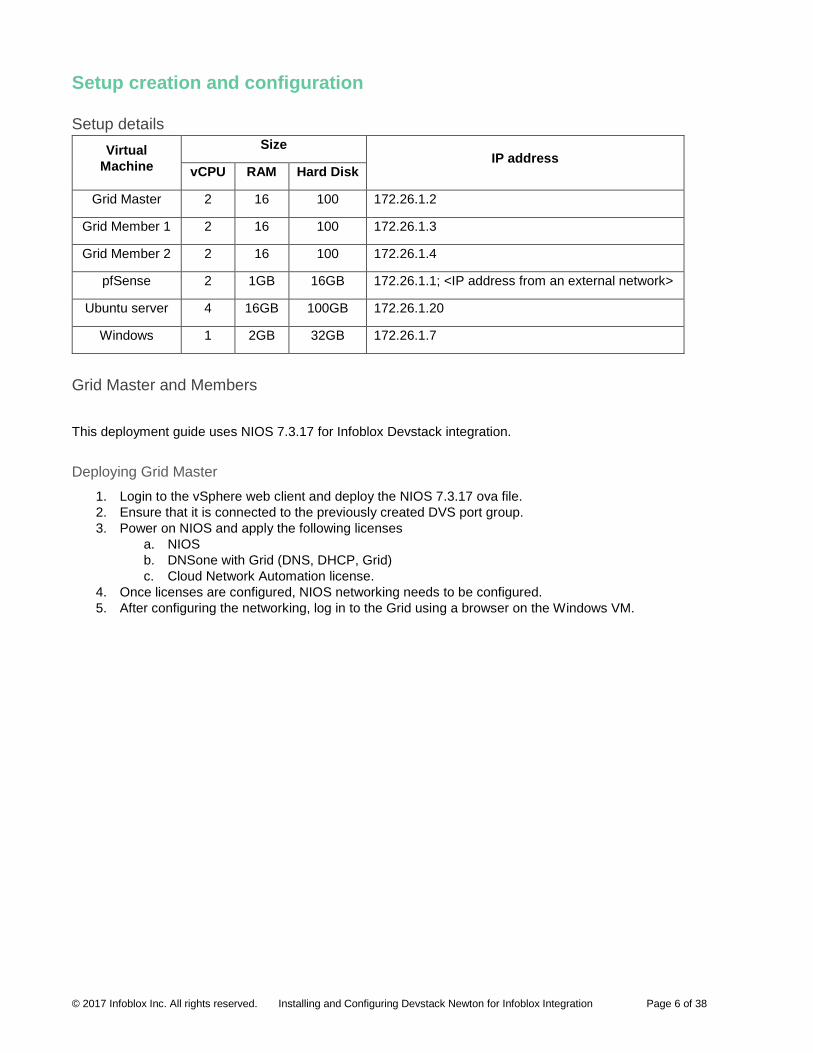
Setup details
Virtual
Machine
Size IP address
vCPU RAM Hard Disk
Grid Master 2 16 100 172.26.1.2
Grid Member 1 2 16 100 172.26.1.3
Grid Member 2 2 16 100 172.26.1.4
pfSense 2 1GB 16GB 172.26.1.1; <IP address from an external network>
Ubuntu server 4 16GB 100GB 172.26.1.20
Windows 1 2GB 32GB 172.26.1.7
Grid Master and Members
This deployment guide uses NIOS 7.3.17 for Infoblox Devstack integration.
Deploying Grid Master
1. Login to the vSphere web client and deploy the NIOS 7.3.17 ova file.
2. Ensure that it is connected to the previously created DVS port group.
3. Power on NIOS and apply the following licenses
a. NIOS
b. DNSone with Grid (DNS, DHCP, Grid)
c. Cloud Network Automation license.
4. Once licenses are configured, NIOS networking needs to be configured.
5. After configuring the networking, log in to the Grid using a browser on the Windows VM.

© 2017 Infoblox Inc. All rights reserved. Installing and Configuring Devstack Newton for Infoblox Integration Page 7 of 38
6. Configure this NIOS instance as grid master
7. Change the Host Name to nios.infoblox.com and leave the other options as default.
Deploying Grid Members
Note: You can only have as many tenants as the number of grid members you have. For example, if you are
planning to create 2 tenants in Devstack, you must have 2 members added to the grid master.
1. Go to the GridMembers Add and then enter the details of Grid members which you will be adding.
2. Login to the vSphere web client and deploy 2 NIOS 7.3.17as members
3. Apply NIOS and DNSone with Grid (DNS, DHCP, Grid) licenses to both the members.
4. Configure the networking for both members and add them to the Infoblox Grid.
© 2017 Infoblox Inc. All rights reserved. Installing and Configuring Devstack Newton for Infoblox Integration Page 8 of 38
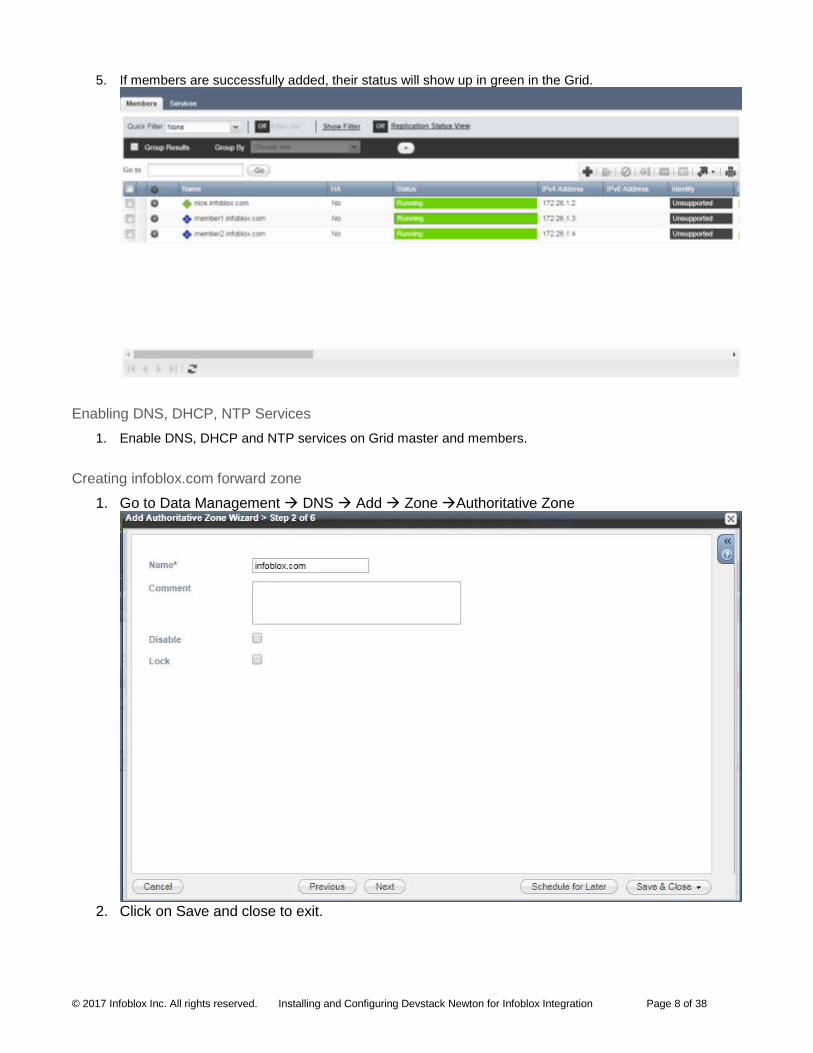
5. If members are successfully added, their status will show up in green in the Grid.
Enabling DNS, DHCP, NTP Services
1. Enable DNS, DHCP and NTP services on Grid master and members.
Creating infoblox.com forward zone
1. Go to Data Management DNS Add Zone Authoritative Zone
2. Click on Save and close to exit.
© 2017 Infoblox Inc. All rights reserved. Installing and Configuring Devstack Newton for Infoblox Integration Page 9 of 38
pfSense
pfSense is an open source firewall/router computer distribution based on FreeBSD. It can be installed on a
physical computer or a virtual machine.
This deployment guide uses pfsense for NATing. It is configured with two network interfaces: eth0 and eth1
• eth0 is connected to the external network.
• eth1 is connected to the internal network. This acts like a gateway for the internal network to access
external network.
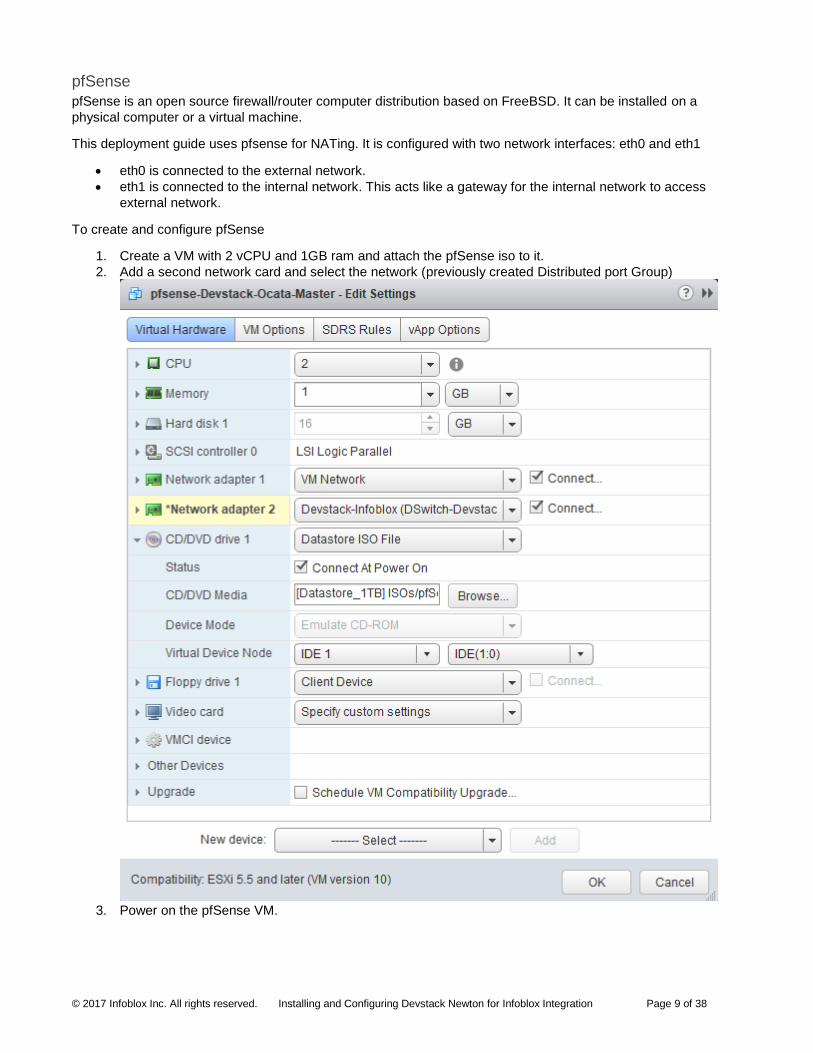
To create and configure pfSense
1. Create a VM with 2 vCPU and 1GB ram and attach the pfSense iso to it.
2. Add a second network card and select the network (previously created Distributed port Group)
3. Power on the pfSense VM.
© 2017 Infoblox Inc. All rights reserved. Installing and Configuring Devstack Newton for Infoblox Integration Page 10 of 38
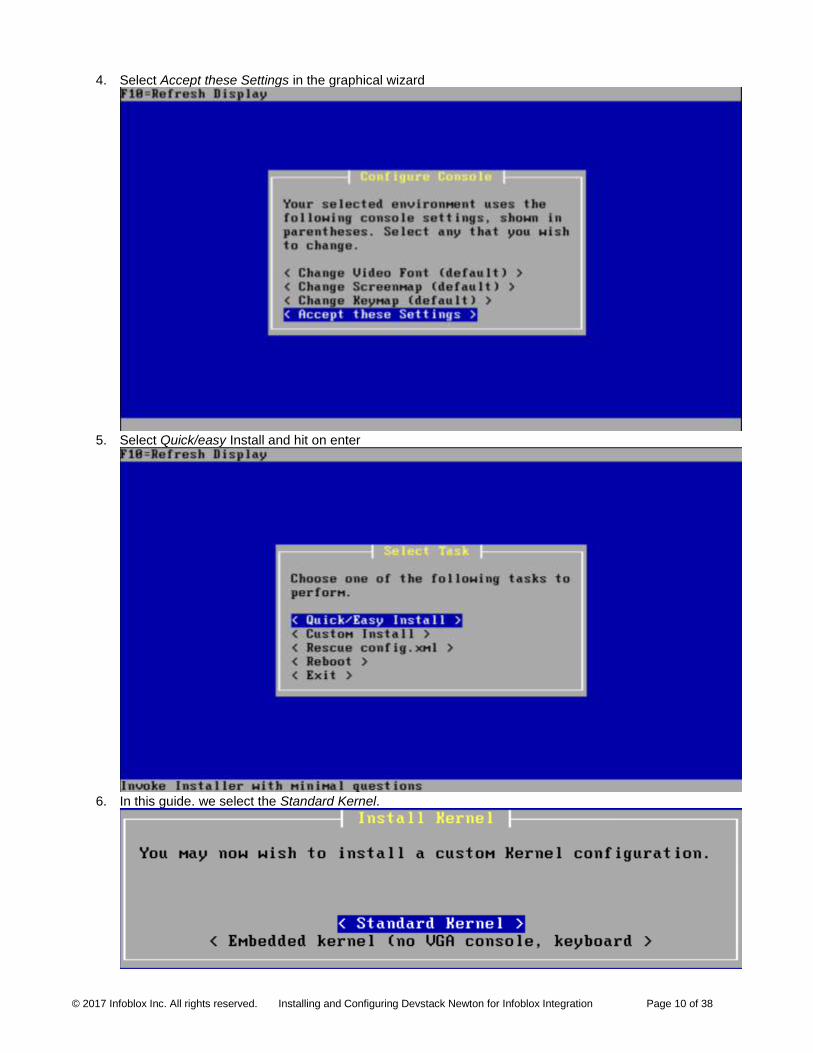
4. Select Accept these Settings in the graphical wizard
5. Select Quick/easy Install and hit on enter
6. In this guide. we select the Standard Kernel.

© 2017 Infoblox Inc. All rights reserved. Installing and Configuring Devstack Newton for Infoblox Integration Page 11 of 38
7. Reboot the machine to finalize the installation.
8. Post reboot, you are required to assign IP addresses to both the network interfaces. Note that pfsense
calls the interfaces em0 and em1.
9. Type 2 for assigning IP addresses to the interfaces in the command prompt
10. Type 1 for assigning the external interface (WAN). Once configured go back to the main menu and select
the option Set Interfaces IP addresses by typing no. 2 and configure the internal IP address(LAN) by
selecting 2.
© 2017 Infoblox Inc. All rights reserved. Installing and Configuring Devstack Newton for Infoblox Integration Page 12 of 38
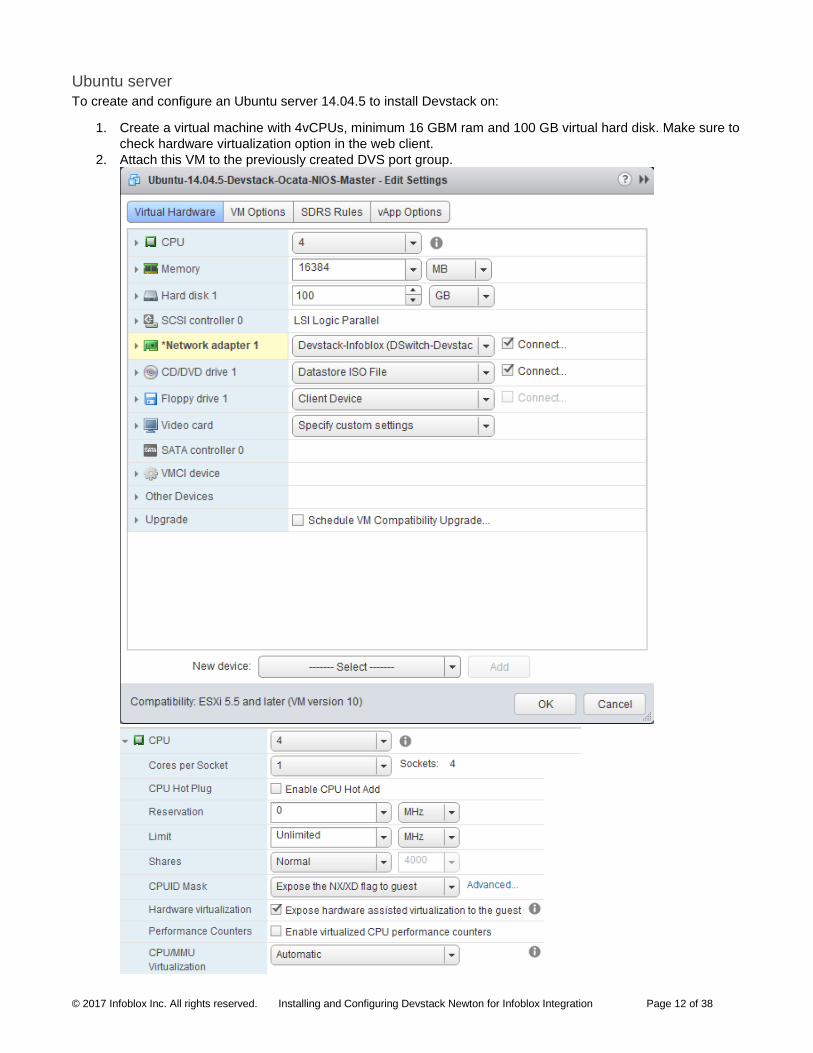
Ubuntu server
To create and configure an Ubuntu server 14.04.5 to install Devstack on:
1. Create a virtual machine with 4vCPUs, minimum 16 GBM ram and 100 GB virtual hard disk. Make sure to
check hardware virtualization option in the web client.
2. Attach this VM to the previously created DVS port group.
© 2017 Infoblox Inc. All rights reserved. Installing and Configuring Devstack Newton for Infoblox Integration Page 13 of 38
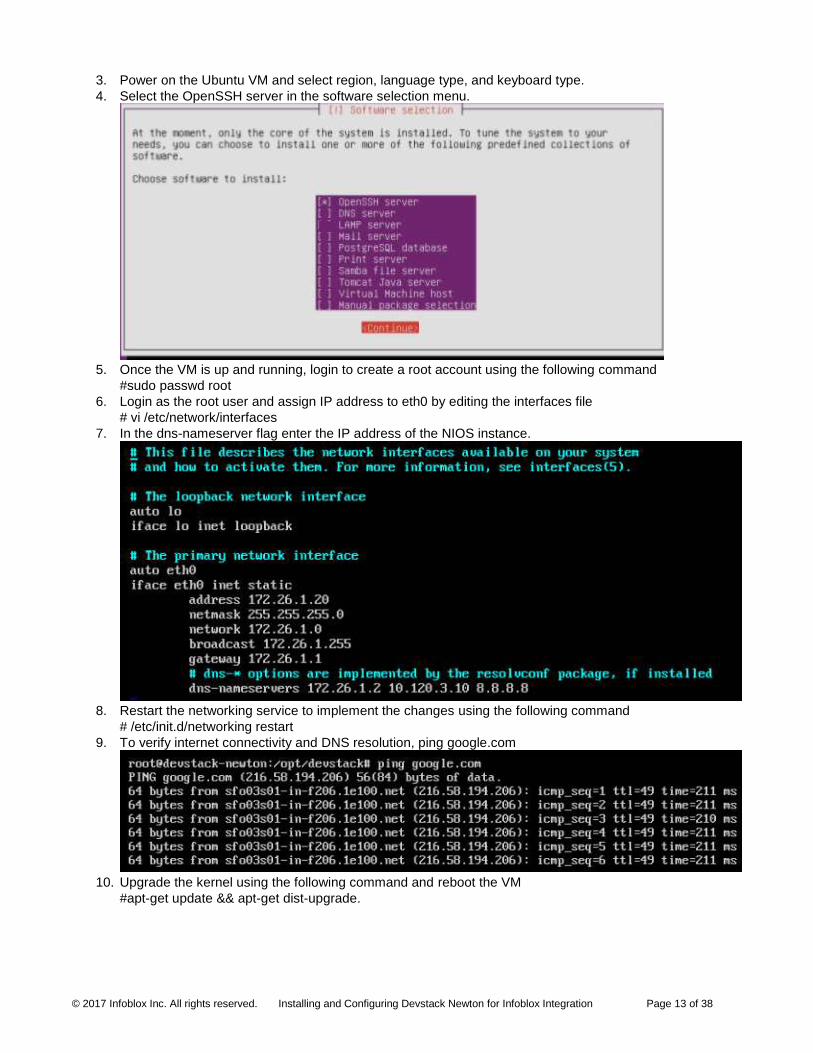
3. Power on the Ubuntu VM and select region, language type, and keyboard type.
4. Select the OpenSSH server in the software selection menu.
5. Once the VM is up and running, login to create a root account using the following command
#sudo passwd root
6. Login as the root user and assign IP address to eth0 by editing the interfaces file
# vi /etc/network/interfaces
7. In the dns-nameserver flag enter the IP address of the NIOS instance.
8. Restart the networking service to implement the changes using the following command
# /etc/init.d/networking restart
9. To verify internet connectivity and DNS resolution, ping google.com
10. Upgrade the kernel using the following command and reboot the VM
#apt-get update && apt-get dist-upgrade.
© 2017 Infoblox Inc. All rights reserved. Installing and Configuring Devstack Newton for Infoblox Integration Page 14 of 38
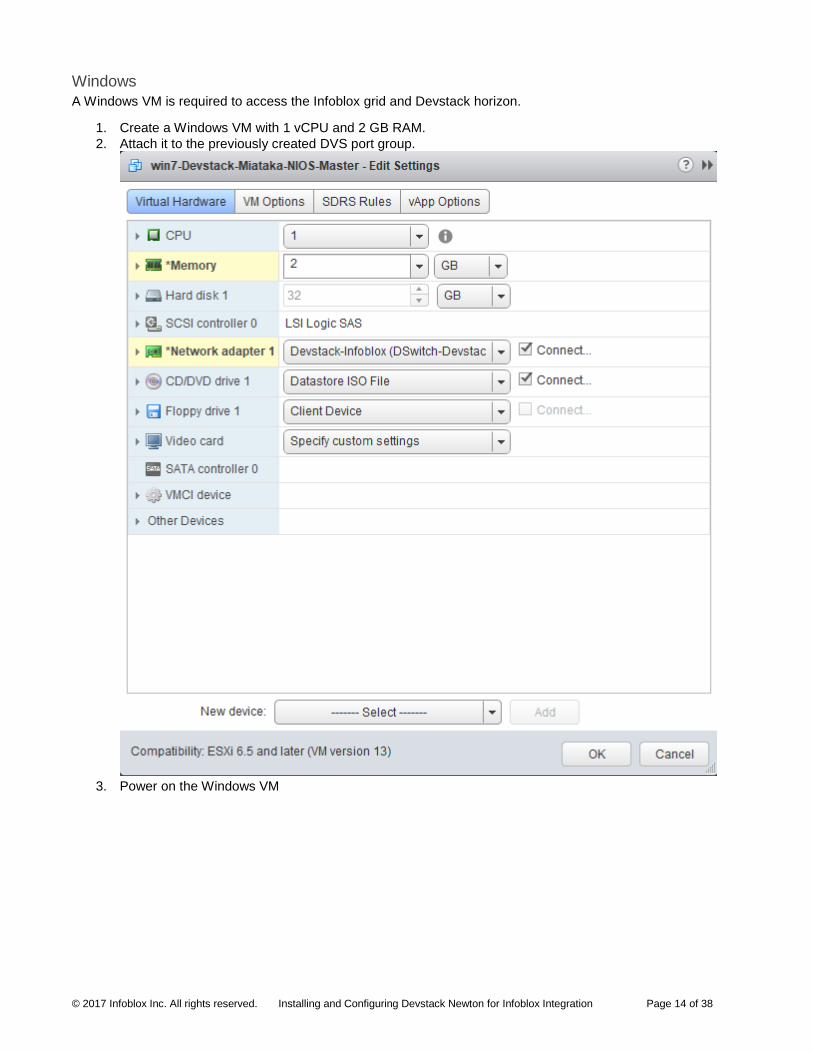
Windows
A Windows VM is required to access the Infoblox grid and Devstack horizon.
1. Create a Windows VM with 1 vCPU and 2 GB RAM.
2. Attach it to the previously created DVS port group.
3. Power on the Windows VM
© 2017 Infoblox Inc. All rights reserved. Installing and Configuring Devstack Newton for Infoblox Integration Page 15 of 38
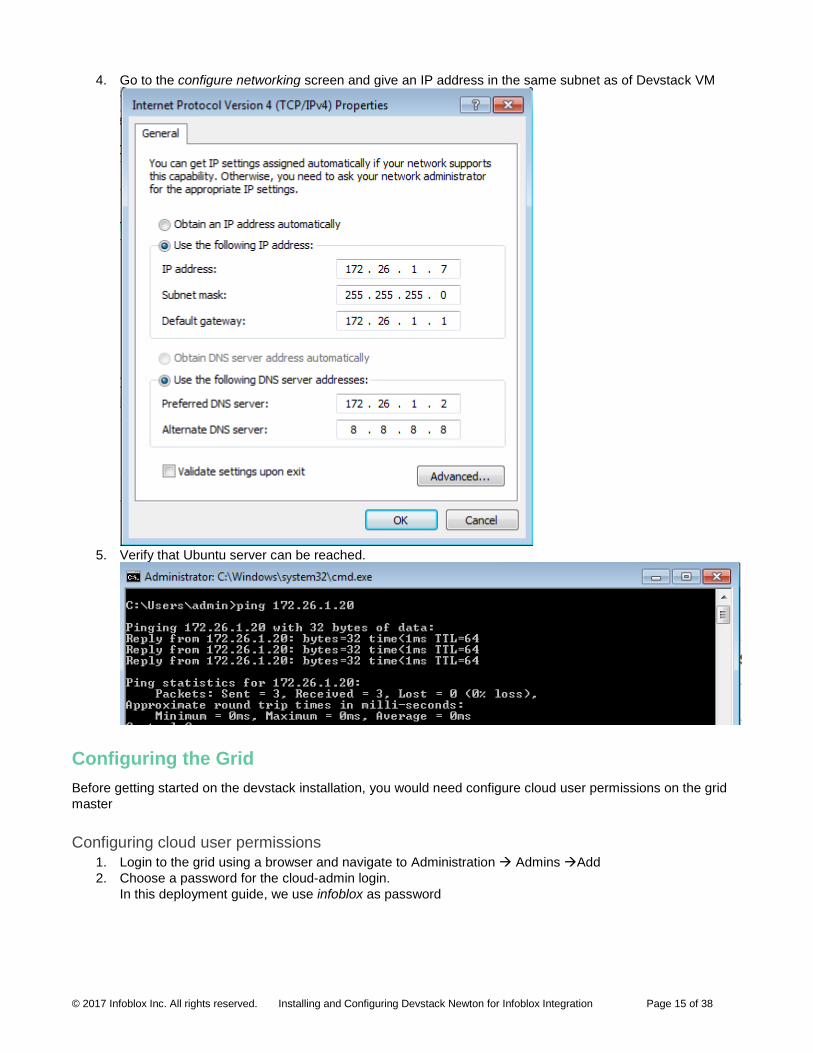
4. Go to the configure networking screen and give an IP address in the same subnet as of Devstack VM
5. Verify that Ubuntu server can be reached.
Configuring the Grid
Before getting started on the devstack installation, you would need configure cloud user permissions on the grid
master
Configuring cloud user permissions
1. Login to the grid using a browser and navigate to Administration Admins Add
2. Choose a password for the cloud-admin login.
In this deployment guide, we use infoblox as password
© 2017 Infoblox Inc. All rights reserved. Installing and Configuring Devstack Newton for Infoblox Integration Page 16 of 38
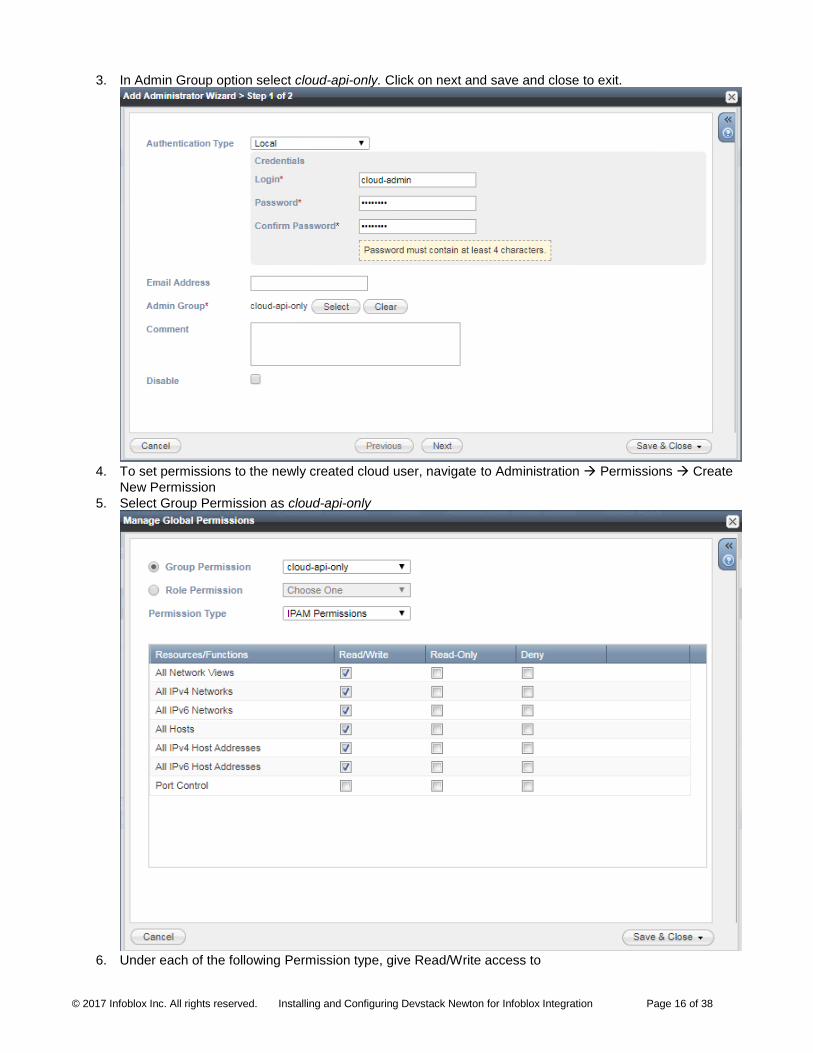
3. In Admin Group option select cloud-api-only. Click on next and save and close to exit.
4. To set permissions to the newly created cloud user, navigate to Administration Permissions Create
New Permission
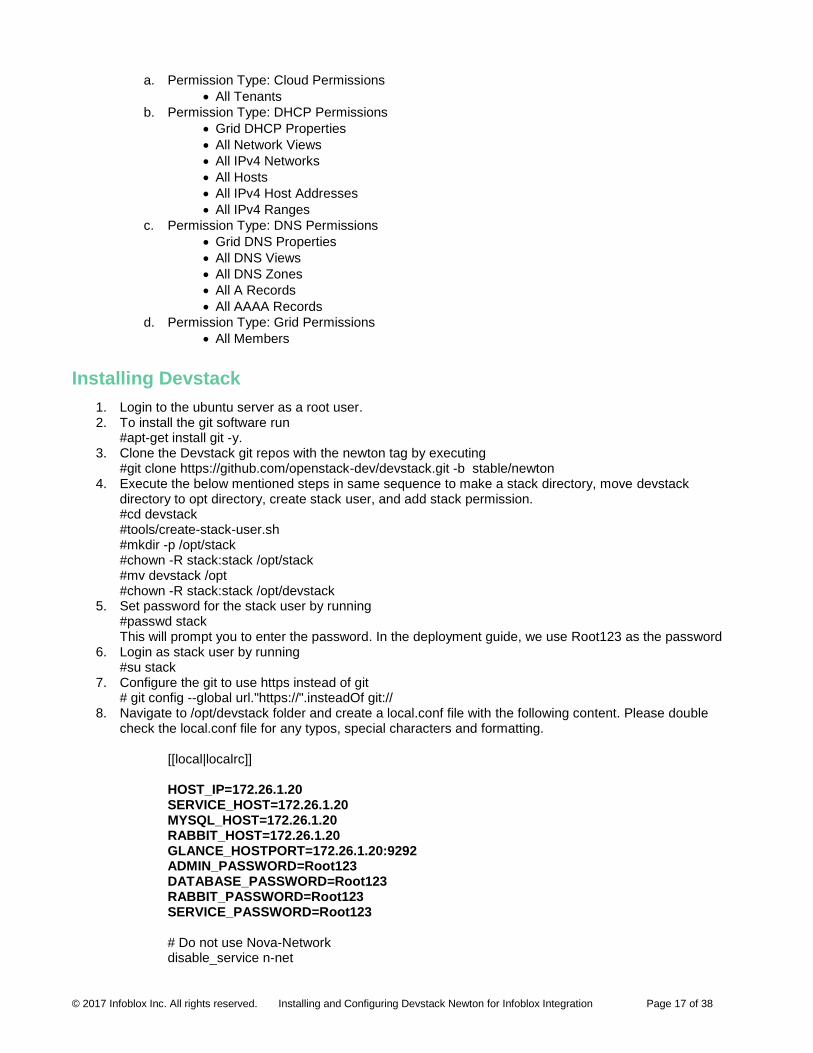
5. Select Group Permission as cloud-api-only
6. Under each of the following Permission type, give Read/Write access to
© 2017 Infoblox Inc. All rights reserved. Installing and Configuring Devstack Newton for Infoblox Integration Page 17 of 38
a. Permission Type: Cloud Permissions
• All Tenants
b. Permission Type: DHCP Permissions
• Grid DHCP Properties
• All Network Views
• All IPv4 Networks
• All Hosts
• All IPv4 Host Addresses
• All IPv4 Ranges
c. Permission Type: DNS Permissions
• Grid DNS Properties
• All DNS Views
• All DNS Zones
• All A Records
• All AAAA Records
d. Permission Type: Grid Permissions
• All Members
Installing Devstack
1. Login to the ubuntu server as a root user. 2. To install the git software run
#apt-get install git -y. 3. Clone the Devstack git repos with the newton tag by executing
#git clone https://github.com/openstack-dev/devstack.git -b stable/newton 4. Execute the below mentioned steps in same sequence to make a stack directory, move devstack
directory to opt directory, create stack user, and add stack permission. #cd devstack #tools/create-stack-user.sh #mkdir -p /opt/stack #chown -R stack:stack /opt/stack #mv devstack /opt #chown -R stack:stack /opt/devstack
5. Set password for the stack user by running #passwd stack This will prompt you to enter the password. In the deployment guide, we use Root123 as the password
6. Login as stack user by running #su stack
7. Configure the git to use https instead of git # git config --global url."https://".insteadOf git://
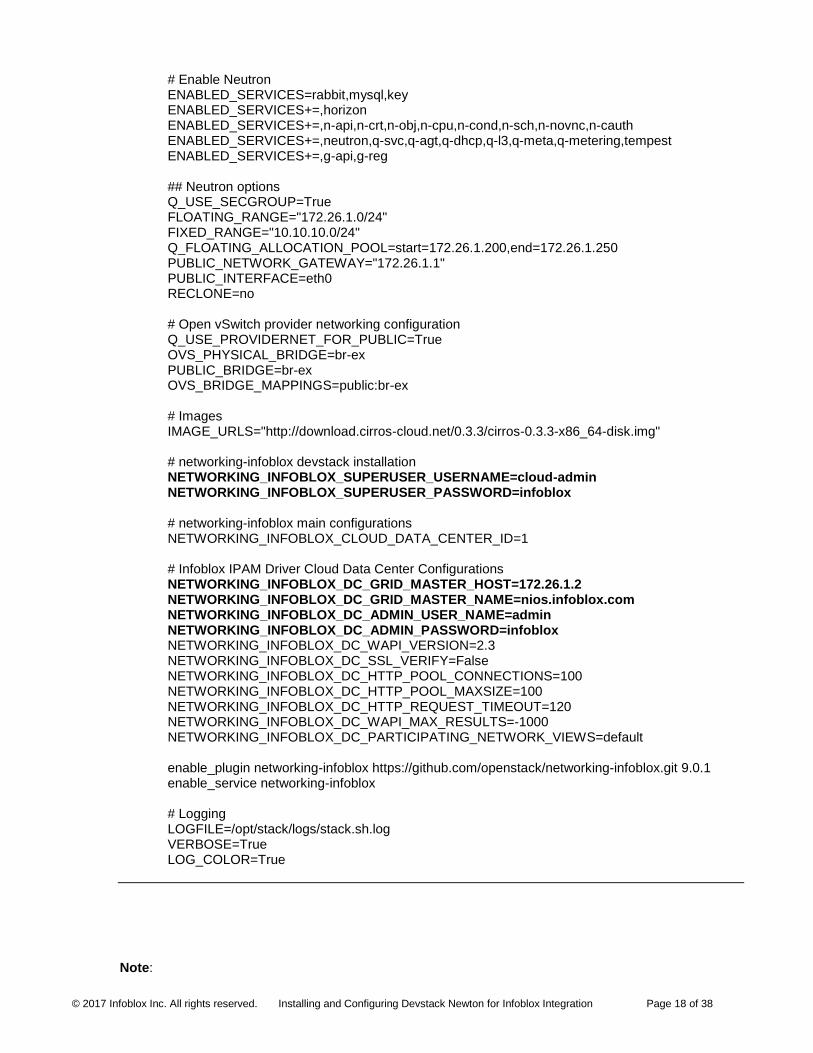
8. Navigate to /opt/devstack folder and create a local.conf file with the following content. Please double check the local.conf file for any typos, special characters and formatting.
[[local|localrc]]
HOST_IP=172.26.1.20 SERVICE_HOST=172.26.1.20 MYSQL_HOST=172.26.1.20 RABBIT_HOST=172.26.1.20 GLANCE_HOSTPORT=172.26.1.20:9292 ADMIN_PASSWORD=Root123 DATABASE_PASSWORD=Root123 RABBIT_PASSWORD=Root123 SERVICE_PASSWORD=Root123
# Do not use Nova-Network disable_service n-net
© 2017 Infoblox Inc. All rights reserved. Installing and Configuring Devstack Newton for Infoblox Integration Page 18 of 38
# Enable Neutron ENABLED_SERVICES=rabbit,mysql,key ENABLED_SERVICES+=,horizon ENABLED_SERVICES+=,n-api,n-crt,n-obj,n-cpu,n-cond,n-sch,n-novnc,n-cauth ENABLED_SERVICES+=,neutron,q-svc,q-agt,q-dhcp,q-l3,q-meta,q-metering,tempest ENABLED_SERVICES+=,g-api,g-reg
## Neutron options Q_USE_SECGROUP=True FLOATING_RANGE="172.26.1.0/24" FIXED_RANGE="10.10.10.0/24" Q_FLOATING_ALLOCATION_POOL=start=172.26.1.200,end=172.26.1.250 PUBLIC_NETWORK_GATEWAY="172.26.1.1" PUBLIC_INTERFACE=eth0 RECLONE=no
# Open vSwitch provider networking configuration Q_USE_PROVIDERNET_FOR_PUBLIC=True OVS_PHYSICAL_BRIDGE=br-ex PUBLIC_BRIDGE=br-ex OVS_BRIDGE_MAPPINGS=public:br-ex
# Images IMAGE_URLS="http://download.cirros-cloud.net/0.3.3/cirros-0.3.3-x86_64-disk.img"
# networking-infoblox devstack installation NETWORKING_INFOBLOX_SUPERUSER_USERNAME=cloud-admin NETWORKING_INFOBLOX_SUPERUSER_PASSWORD=infoblox
# networking-infoblox main configurations NETWORKING_INFOBLOX_CLOUD_DATA_CENTER_ID=1
# Infoblox IPAM Driver Cloud Data Center Configurations NETWORKING_INFOBLOX_DC_GRID_MASTER_HOST=172.26.1.2 NETWORKING_INFOBLOX_DC_GRID_MASTER_NAME=nios.infoblox.com NETWORKING_INFOBLOX_DC_ADMIN_USER_NAME=admin NETWORKING_INFOBLOX_DC_ADMIN_PASSWORD=infoblox NETWORKING_INFOBLOX_DC_WAPI_VERSION=2.3 NETWORKING_INFOBLOX_DC_SSL_VERIFY=False NETWORKING_INFOBLOX_DC_HTTP_POOL_CONNECTIONS=100 NETWORKING_INFOBLOX_DC_HTTP_POOL_MAXSIZE=100 NETWORKING_INFOBLOX_DC_HTTP_REQUEST_TIMEOUT=120 NETWORKING_INFOBLOX_DC_WAPI_MAX_RESULTS=-1000 NETWORKING_INFOBLOX_DC_PARTICIPATING_NETWORK_VIEWS=default
enable_plugin networking-infoblox https://github.com/openstack/networking-infoblox.git 9.0.1 enable_service networking-infoblox
# Logging LOGFILE=/opt/stack/logs/stack.sh.log VERBOSE=True LOG_COLOR=True
Note:
© 2017 Infoblox Inc. All rights reserved. Installing and Configuring Devstack Newton for Infoblox Integration Page 19 of 38
• You will have to substitute the fields highlighted in bold with values relevant to your lab.
• This guide assumes that 172.26.1.0/24 will be the external network (which has internet connectivity). In case you wish to use a different network please make changes to the following flags FLOATING_RANGE="172.26.1.0/24" FIXED_RANGE="10.10.10.0/24" Q_FLOATING_ALLOCATION_POOL=start=172.26.1.200,end=172.26.1.250 PUBLIC_NETWORK_GATEWAY="172.26.1.1" PUBLIC_INTERFACE=eth0
• If you are using NIOS 8.x, set NETWORKING_INFOBLOX_DC_WAPI_VERSION=2.5
• If you are using NIOS 7.x. , set NETWORKING_INFOBLOX_DC_WAPI_VERSION=2.3
9. As a stack user run ./stack.sh in the /opt/devstack directory Note: The script will take approximately 30-35 minutes to install Devstack. Once Devstack is installed, it will give you a summary of installation along with horizon URL and password.
10. Login to the Windows VM and launch the horizon dashboard from browser by entering devstack_ip_address/dashboard.
Post-installation verification
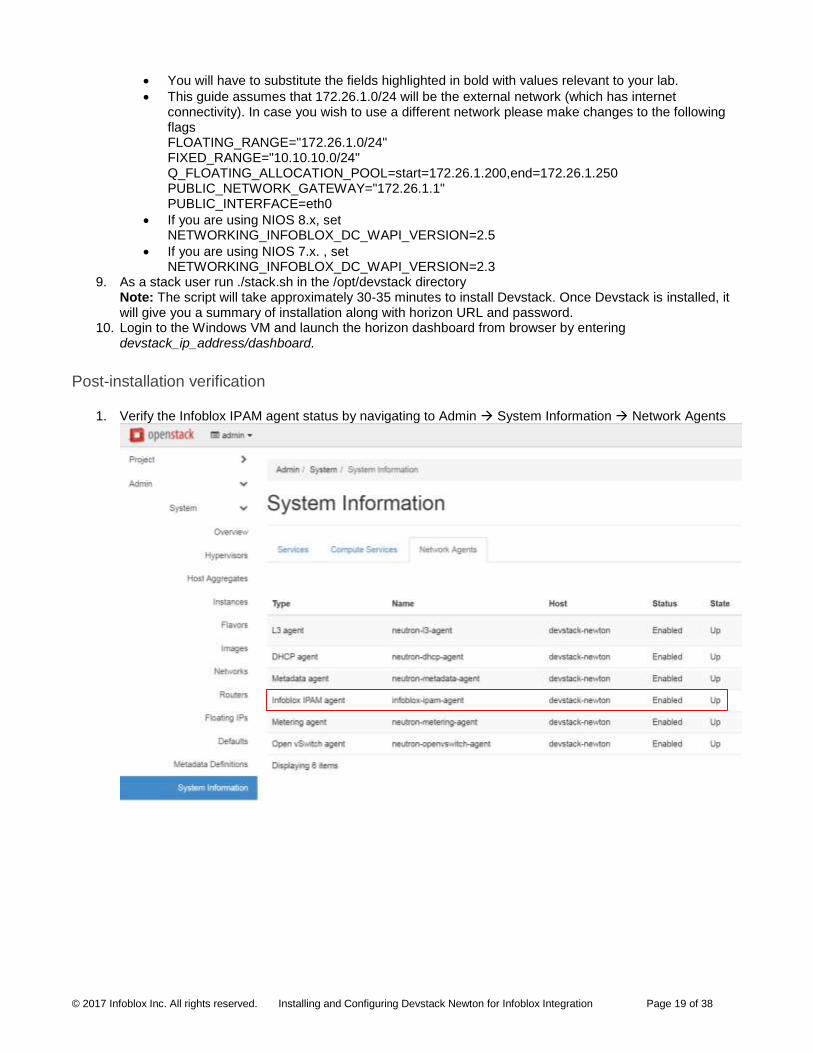
1. Verify the Infoblox IPAM agent status by navigating to Admin System Information Network Agents
© 2017 Infoblox Inc. All rights reserved. Installing and Configuring Devstack Newton for Infoblox Integration Page 20 of 38
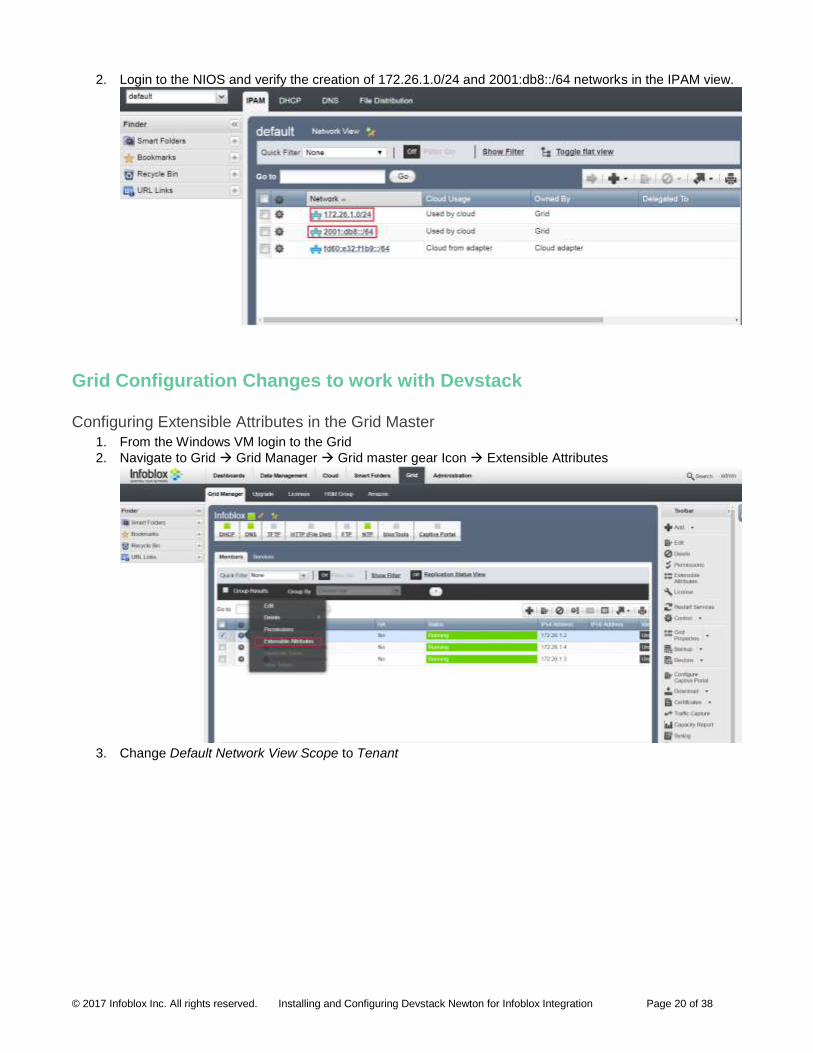
2. Login to the NIOS and verify the creation of 172.26.1.0/24 and 2001:db8::/64 networks in the IPAM view.
Grid Configuration Changes to work with Devstack
Configuring Extensible Attributes in the Grid Master
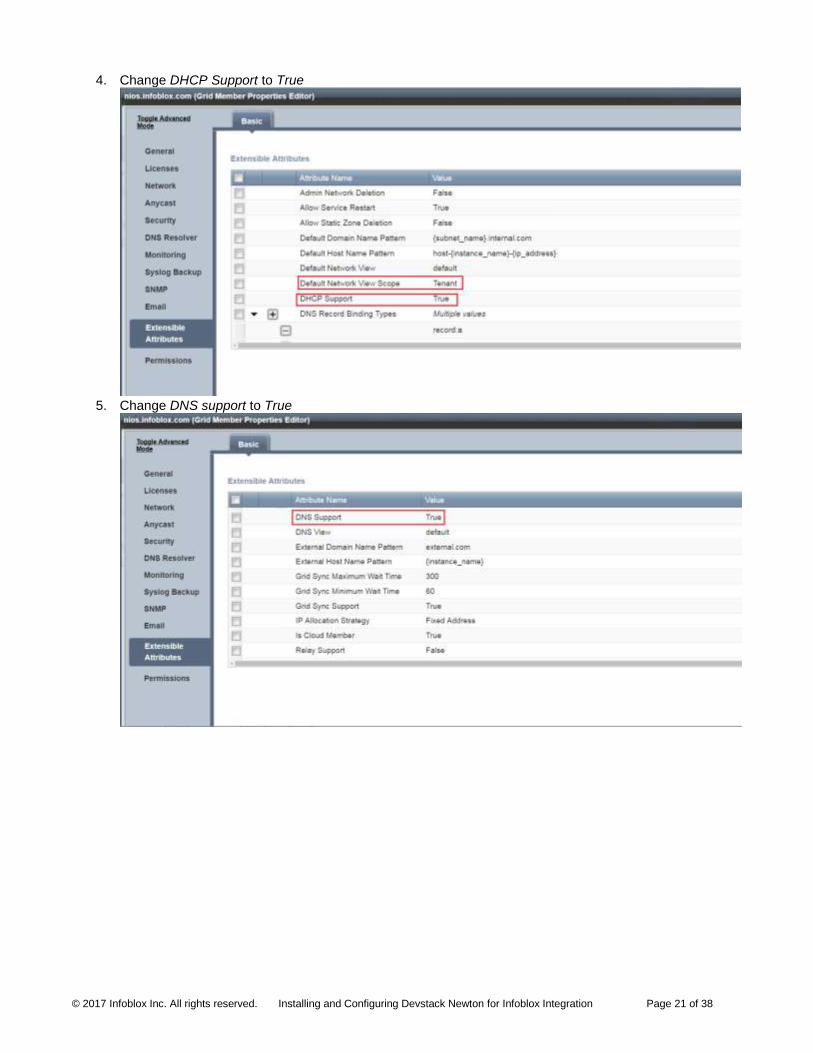
1. From the Windows VM login to the Grid
2. Navigate to Grid Grid Manager Grid master gear Icon Extensible Attributes
3. Change Default Network View Scope to Tenant
© 2017 Infoblox Inc. All rights reserved. Installing and Configuring Devstack Newton for Infoblox Integration Page 21 of 38
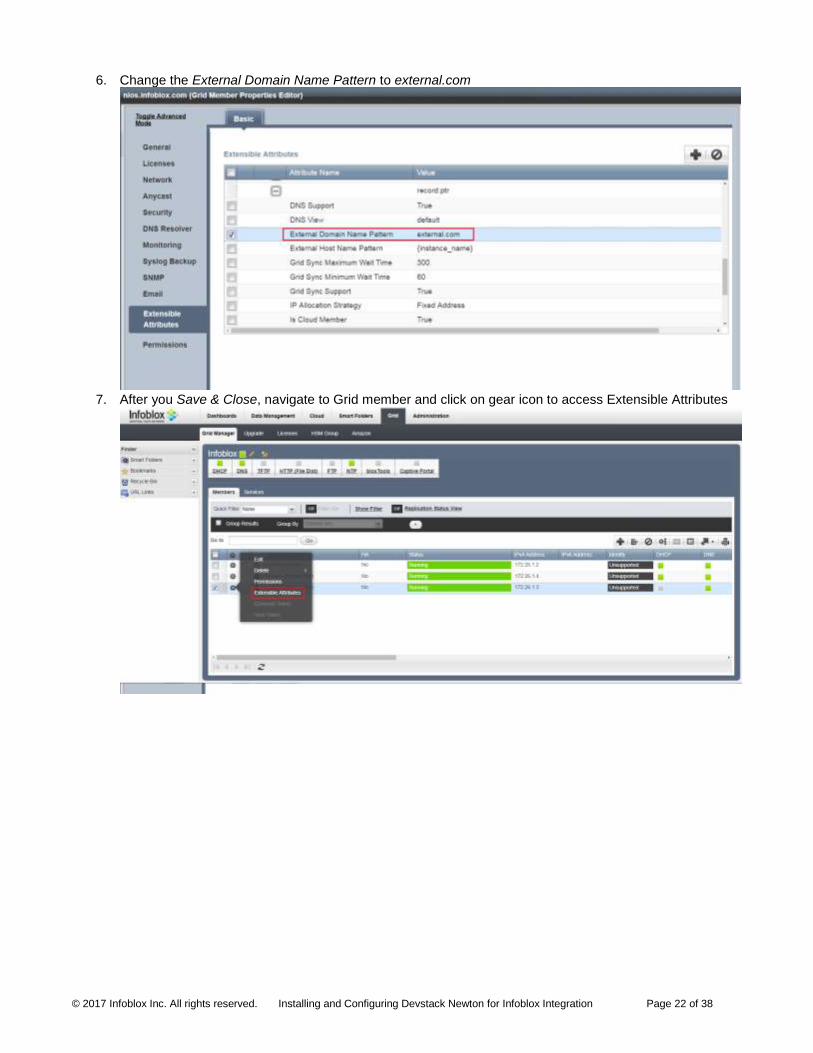
4. Change DHCP Support to True
5. Change DNS support to True
© 2017 Infoblox Inc. All rights reserved. Installing and Configuring Devstack Newton for Infoblox Integration Page 22 of 38
6. Change the External Domain Name Pattern to external.com
7. After you Save & Close, navigate to Grid member and click on gear icon to access Extensible Attributes

© 2017 Infoblox Inc. All rights reserved. Installing and Configuring Devstack Newton for Infoblox Integration Page 23 of 38
8. Click on and add Is Cloud Member to the attribute name and change the value to True
Adding an authoritative zone for external.com
1. Add an authoritative forward-mapping zone for external.com
© 2017 Infoblox Inc. All rights reserved. Installing and Configuring Devstack Newton for Infoblox Integration Page 24 of 38
2. Select the name server which will host this zone.
3. Click on Save & Close to exit
Adding IPv4 reverse mapping zone for external.com
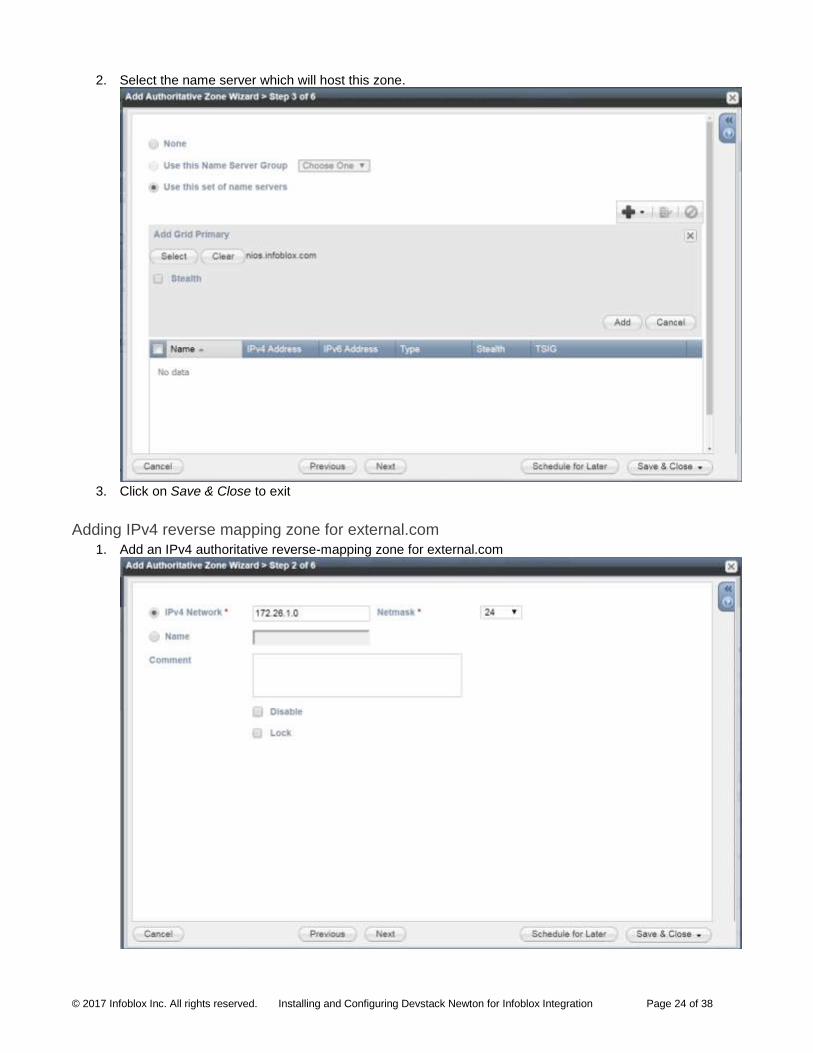
1. Add an IPv4 authoritative reverse-mapping zone for external.com
© 2017 Infoblox Inc. All rights reserved. Installing and Configuring Devstack Newton for Infoblox Integration Page 25 of 38
2. Select the name server which will host this zone.
3. Click on Save & Close to exit
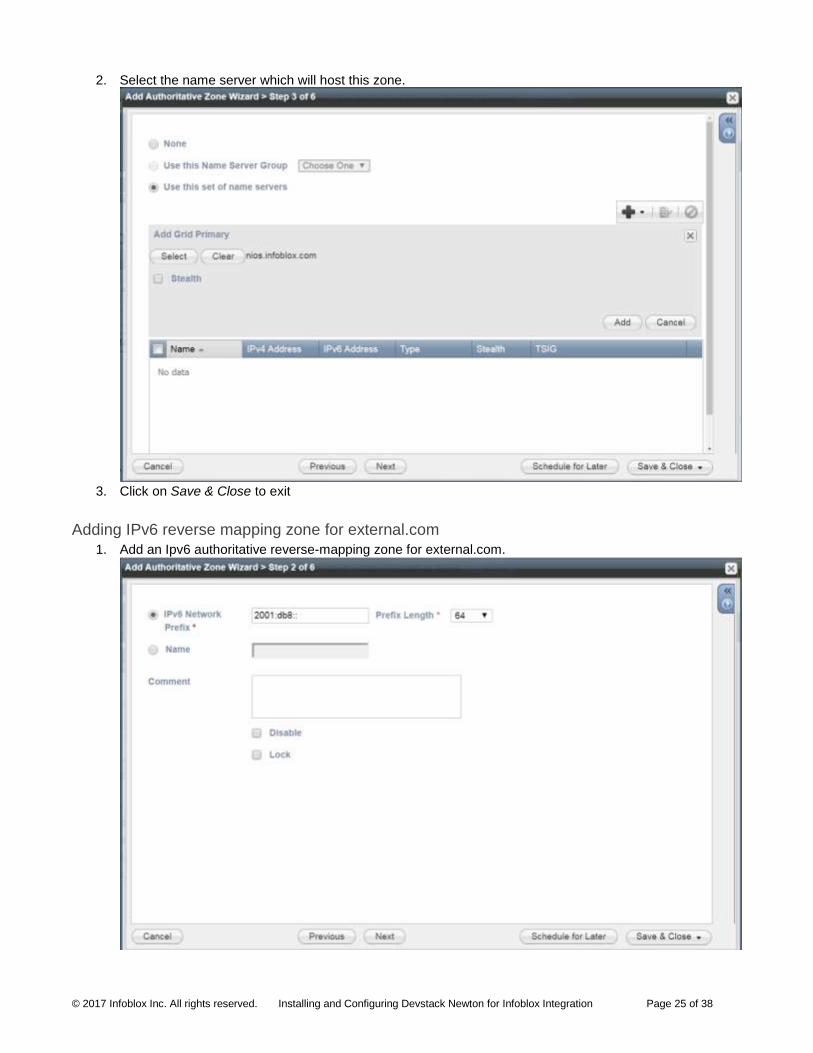
Adding IPv6 reverse mapping zone for external.com
1. Add an Ipv6 authoritative reverse-mapping zone for external.com.
© 2017 Infoblox Inc. All rights reserved. Installing and Configuring Devstack Newton for Infoblox Integration Page 26 of 38
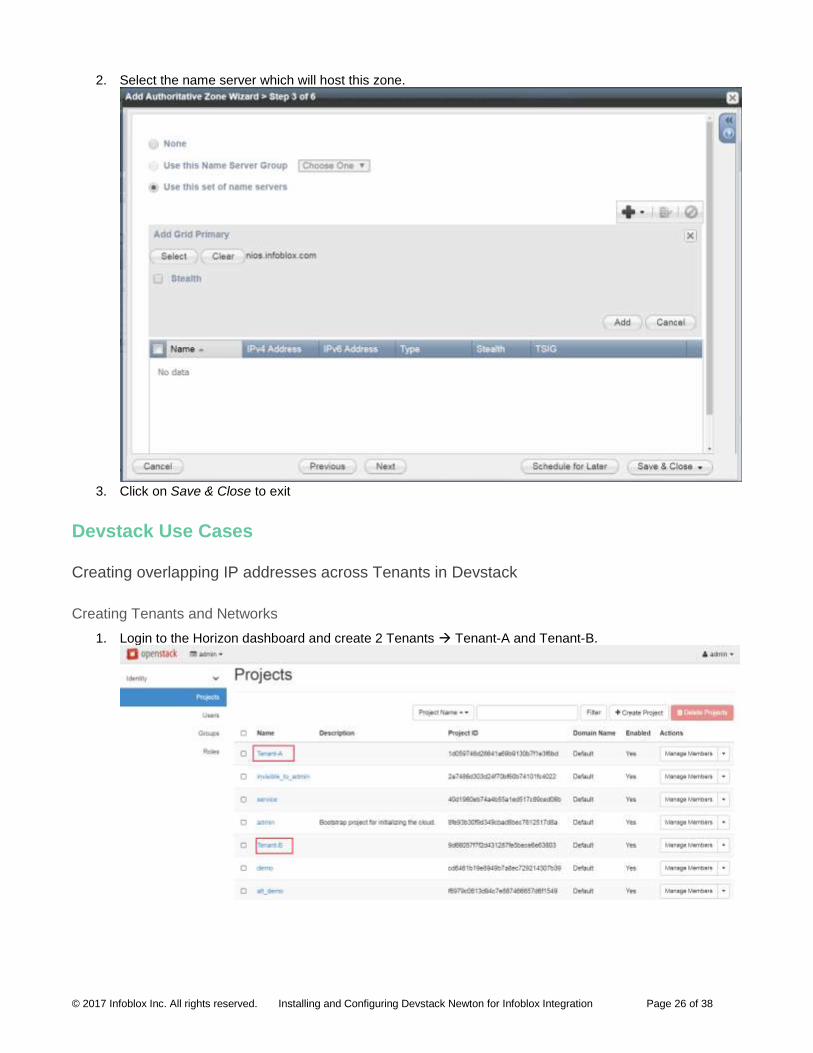
2. Select the name server which will host this zone.
3. Click on Save & Close to exit
Devstack Use Cases
Creating overlapping IP addresses across Tenants in Devstack
Creating Tenants and Networks
1. Login to the Horizon dashboard and create 2 Tenants Tenant-A and Tenant-B.
© 2017 Infoblox Inc. All rights reserved. Installing and Configuring Devstack Newton for Infoblox Integration Page 27 of 38
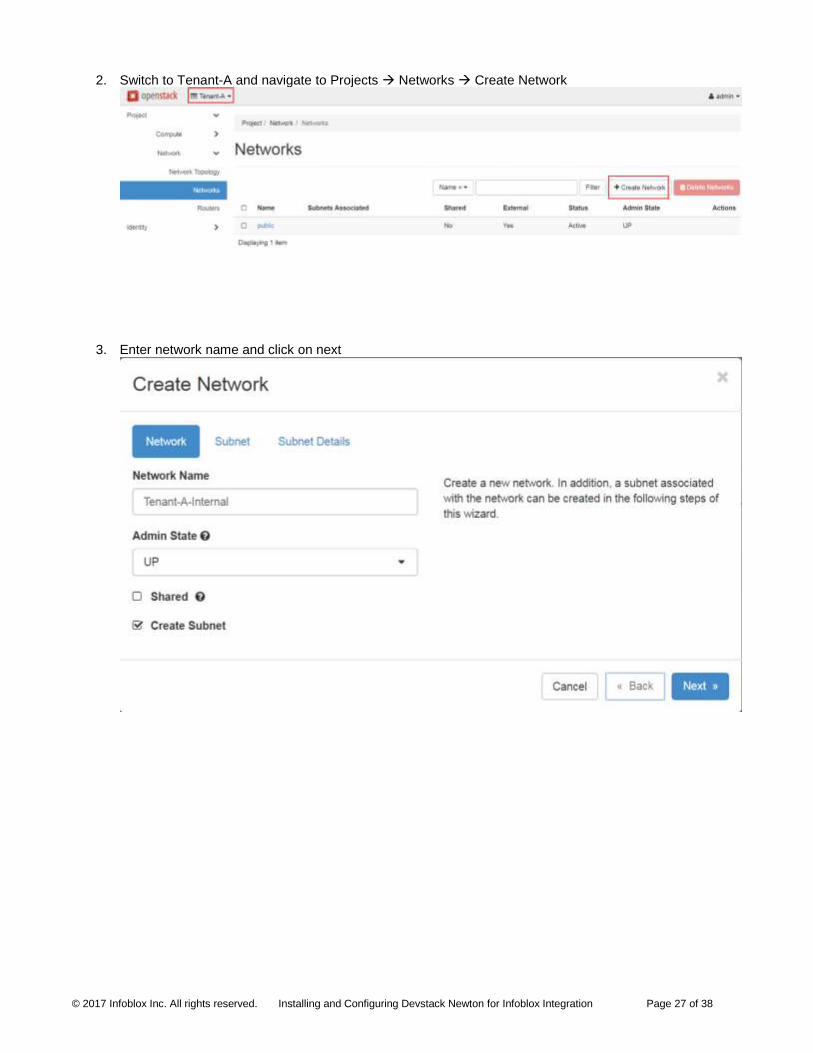
2. Switch to Tenant-A and navigate to Projects Networks Create Network
3. Enter network name and click on next
© 2017 Infoblox Inc. All rights reserved. Installing and Configuring Devstack Newton for Infoblox Integration Page 28 of 38
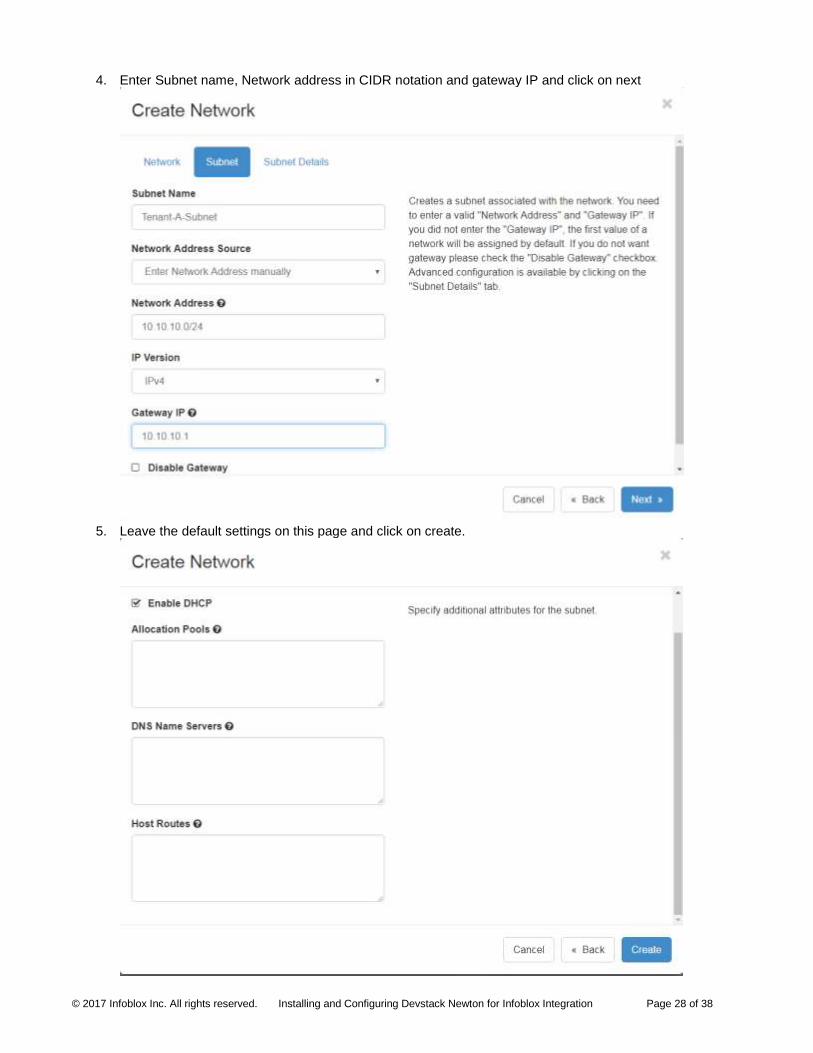
4. Enter Subnet name, Network address in CIDR notation and gateway IP and click on next
5. Leave the default settings on this page and click on create.
© 2017 Infoblox Inc. All rights reserved. Installing and Configuring Devstack Newton for Infoblox Integration Page 29 of 38
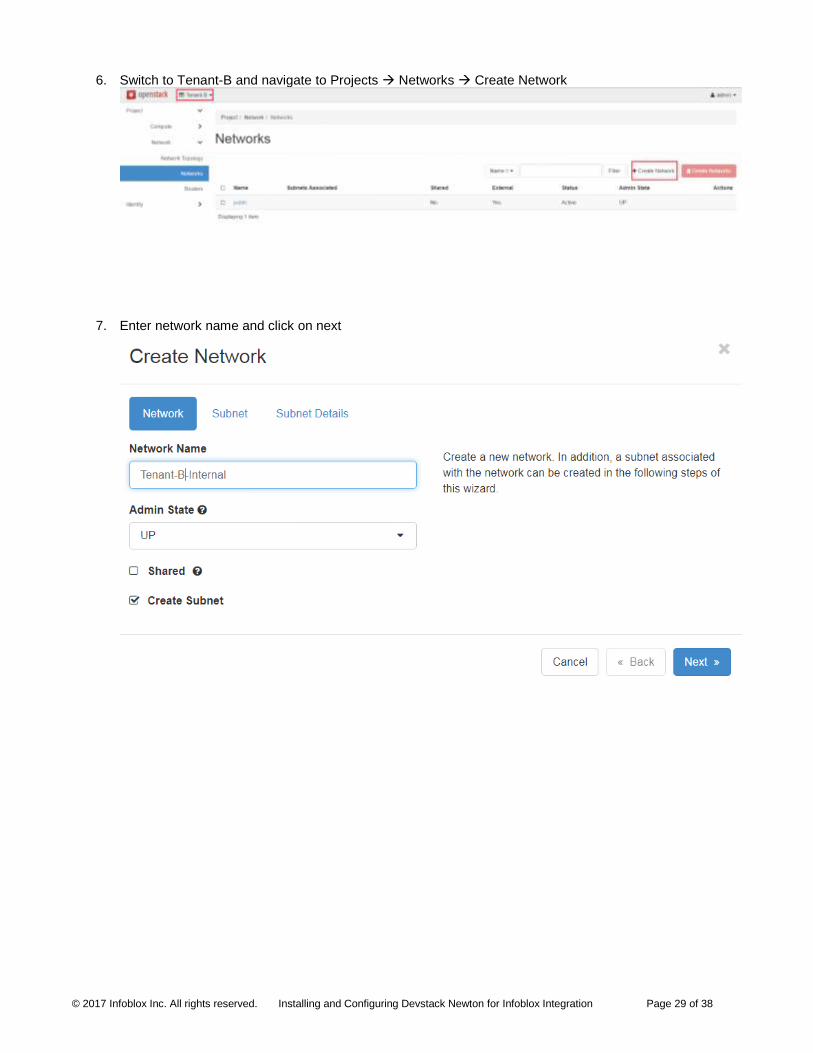
6. Switch to Tenant-B and navigate to Projects Networks Create Network
7. Enter network name and click on next
© 2017 Infoblox Inc. All rights reserved. Installing and Configuring Devstack Newton for Infoblox Integration Page 30 of 38
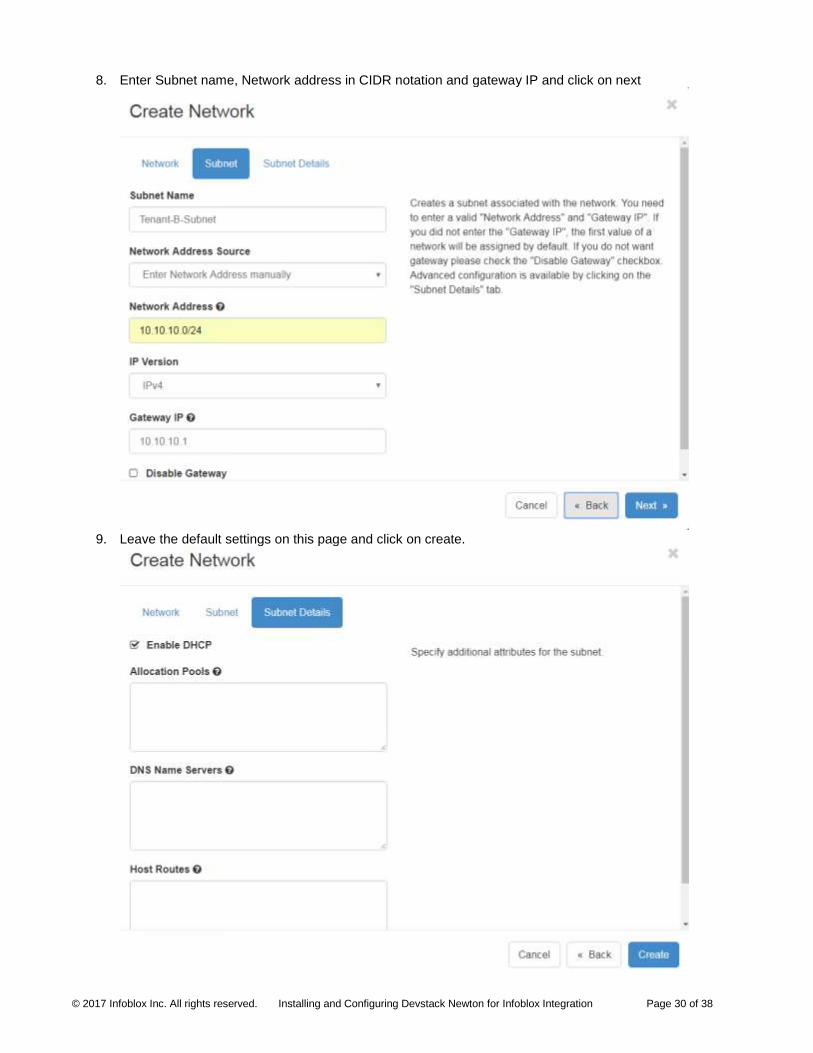
8. Enter Subnet name, Network address in CIDR notation and gateway IP and click on next
9. Leave the default settings on this page and click on create.

© 2017 Infoblox Inc. All rights reserved. Installing and Configuring Devstack Newton for Infoblox Integration Page 31 of 38
Creating Instances with the same internal IP address across different tenants
Creating Instances
1. Login to Tenant-A and launch an instance and associate it to Tenant-A-Internal network.
2. Login to Tenant-B and launch an instance and associate it to the Tenant-B-Internal network
© 2017 Infoblox Inc. All rights reserved. Installing and Configuring Devstack Newton for Infoblox Integration Page 32 of 38
Verifying the network creation and hostnames in NIOS
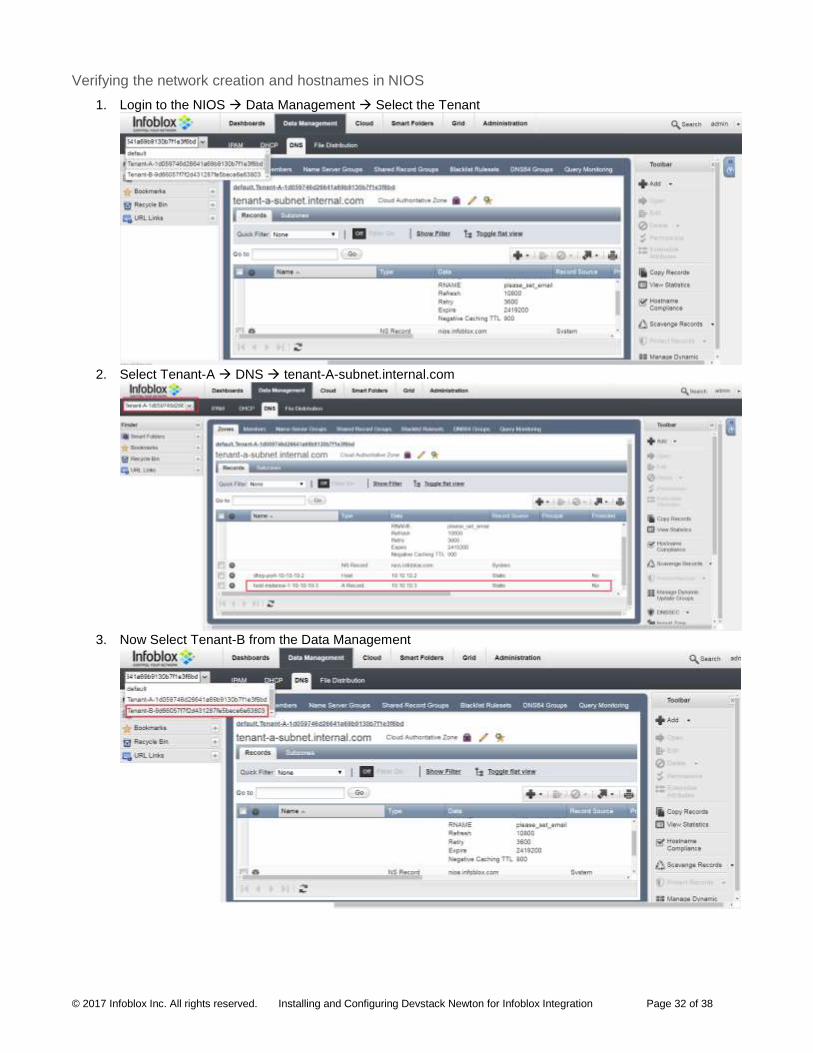
1. Login to the NIOS Data Management Select the Tenant
2. Select Tenant-A DNS tenant-A-subnet.internal.com
3. Now Select Tenant-B from the Data Management
© 2017 Infoblox Inc. All rights reserved. Installing and Configuring Devstack Newton for Infoblox Integration Page 33 of 38
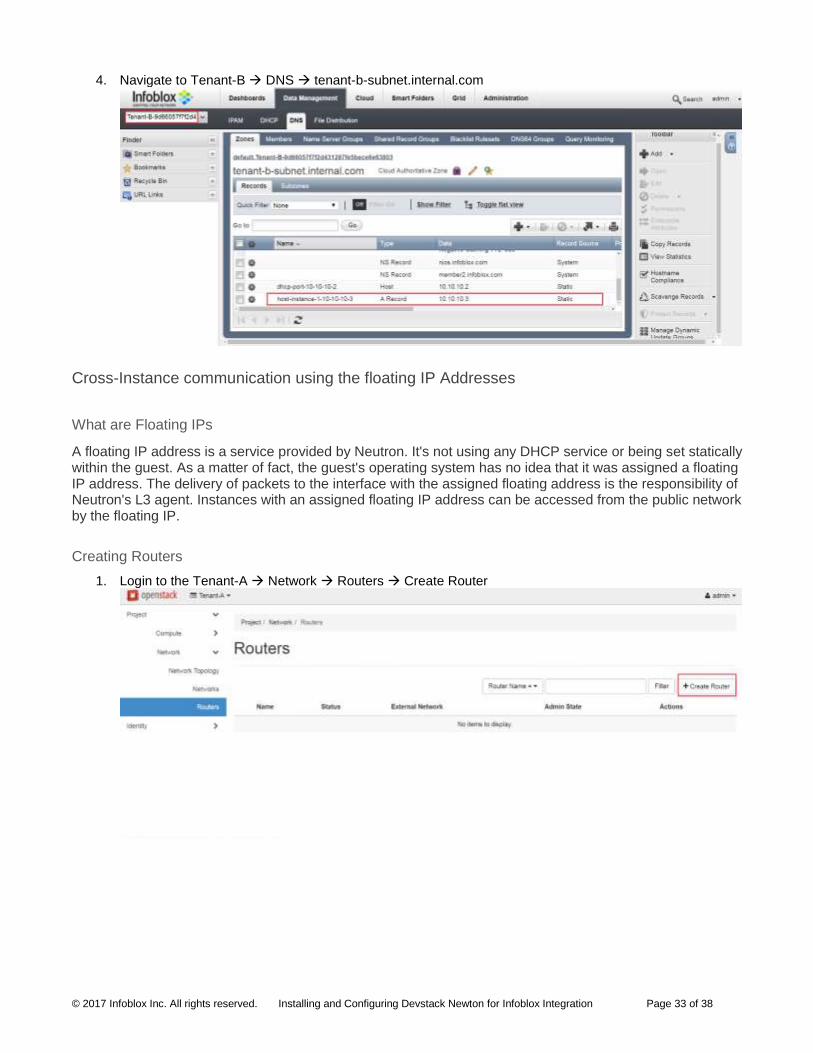
4. Navigate to Tenant-B DNS tenant-b-subnet.internal.com
Cross-Instance communication using the floating IP Addresses
What are Floating IPs
A floating IP address is a service provided by Neutron. It's not using any DHCP service or being set statically within the guest. As a matter of fact, the guest's operating system has no idea that it was assigned a floating IP address. The delivery of packets to the interface with the assigned floating address is the responsibility of Neutron's L3 agent. Instances with an assigned floating IP address can be accessed from the public network by the floating IP.
Creating Routers
1. Login to the Tenant-A Network Routers Create Router
© 2017 Infoblox Inc. All rights reserved. Installing and Configuring Devstack Newton for Infoblox Integration Page 34 of 38
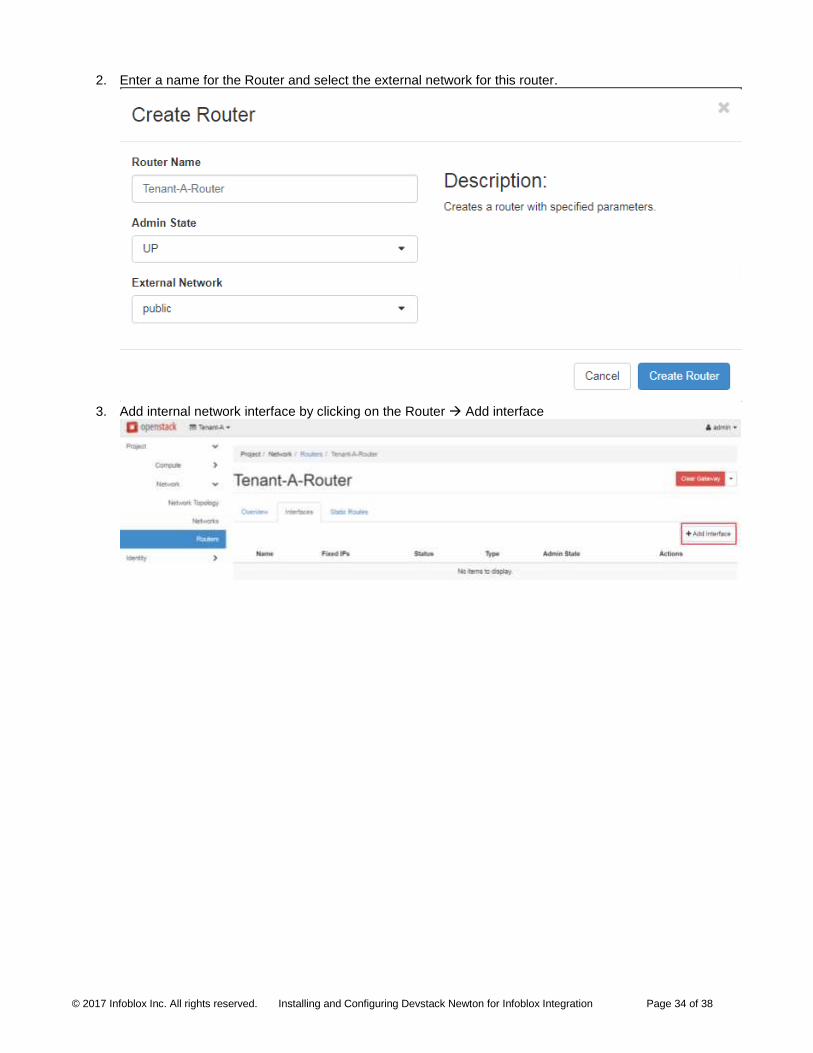
2. Enter a name for the Router and select the external network for this router.
3. Add internal network interface by clicking on the Router Add interface
© 2017 Infoblox Inc. All rights reserved. Installing and Configuring Devstack Newton for Infoblox Integration Page 35 of 38
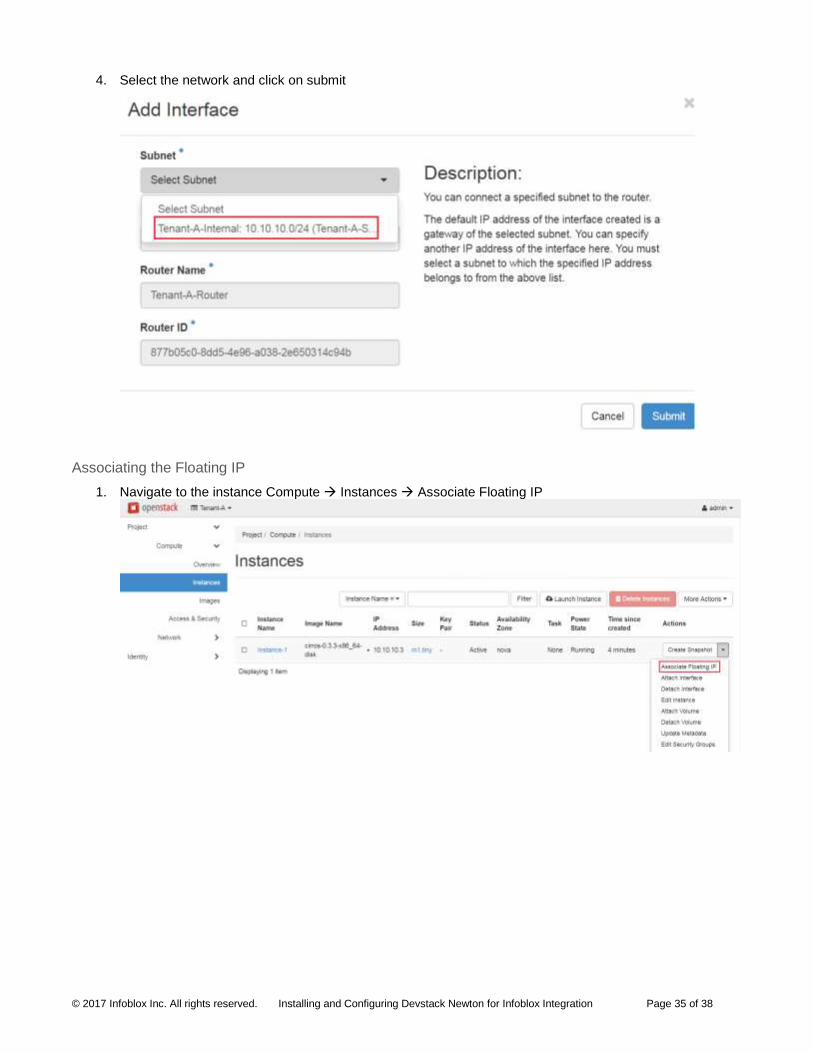
4. Select the network and click on submit
Associating the Floating IP
1. Navigate to the instance Compute Instances Associate Floating IP
© 2017 Infoblox Inc. All rights reserved. Installing and Configuring Devstack Newton for Infoblox Integration Page 36 of 38
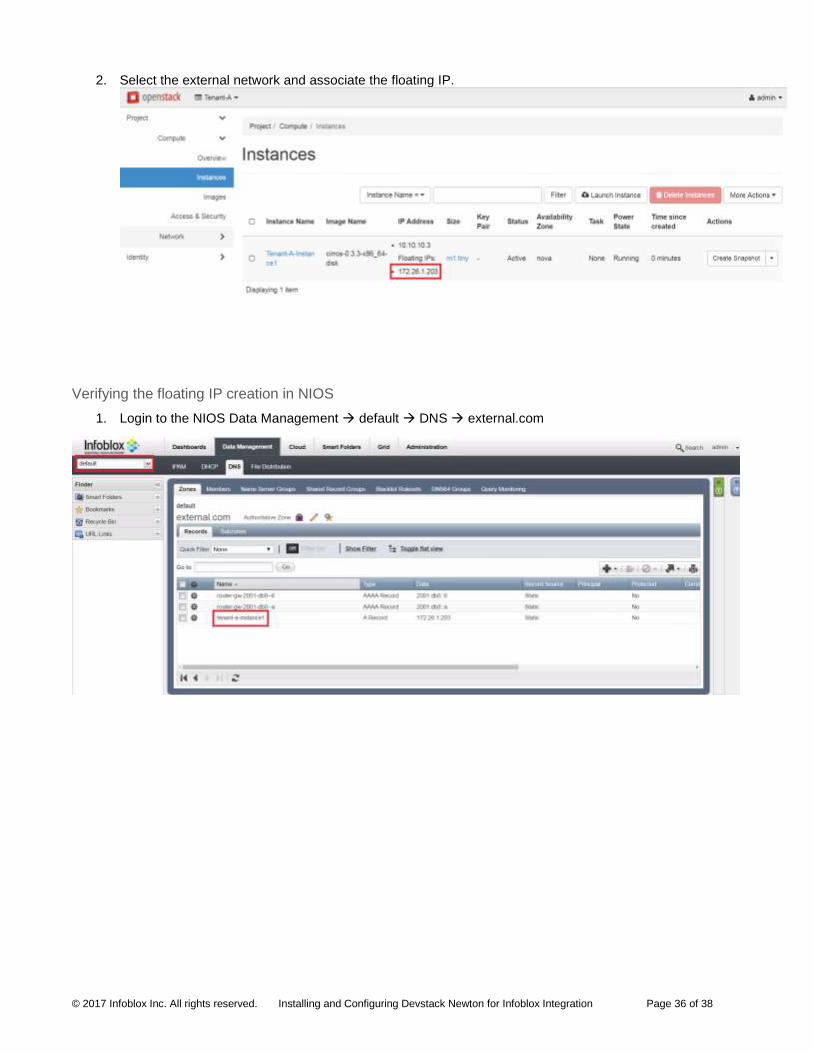
2. Select the external network and associate the floating IP.
Verifying the floating IP creation in NIOS
1. Login to the NIOS Data Management default DNS external.com
© 2017 Infoblox Inc. All rights reserved. Installing and Configuring Devstack Newton for Infoblox Integration Page 37 of 38
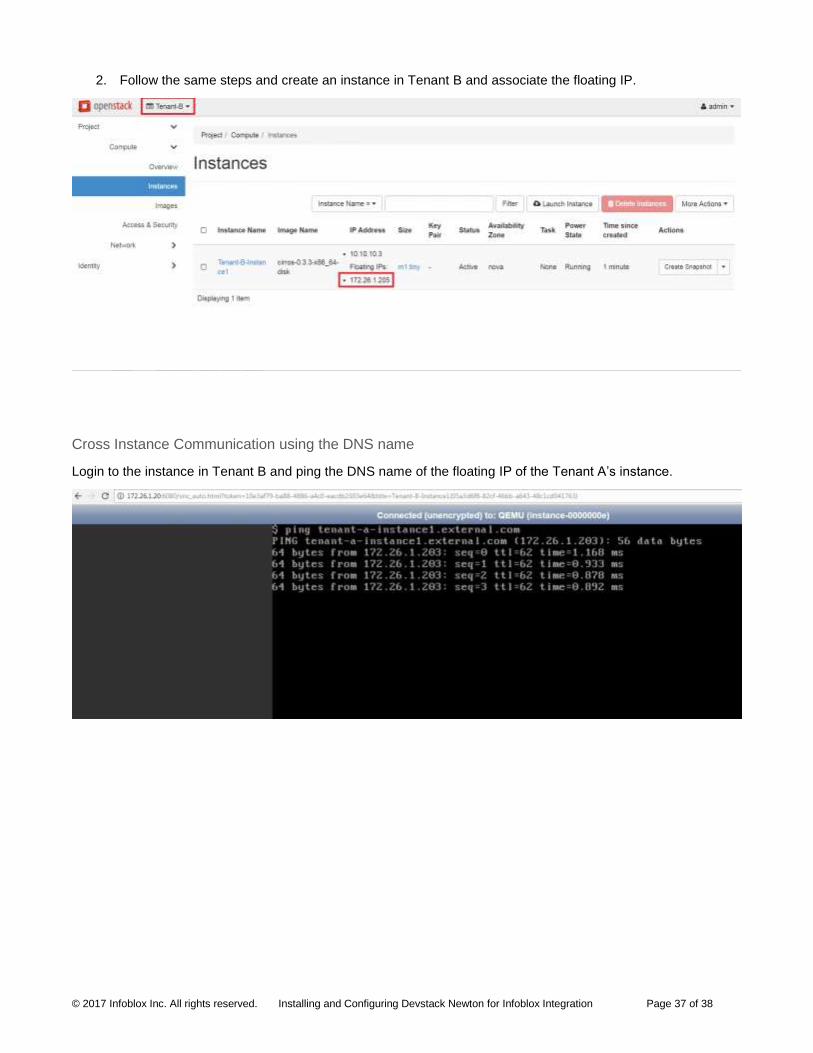
2. Follow the same steps and create an instance in Tenant B and associate the floating IP.
Cross Instance Communication using the DNS name
Login to the instance in Tenant B and ping the DNS name of the floating IP of the Tenant A’s instance.
© 2017 Infoblox Inc. All rights reserved. Installing and Configuring Devstack Newton for Infoblox Integration Page 38 of 38
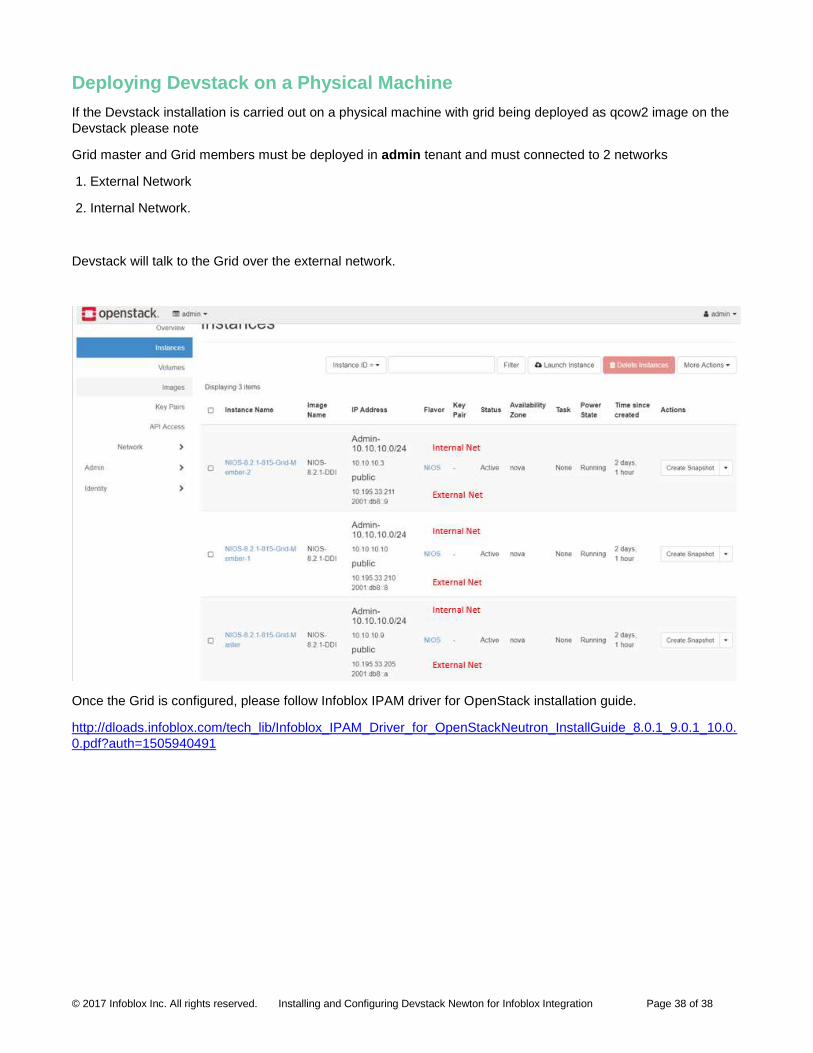
Deploying Devstack on a Physical Machine
If the Devstack installation is carried out on a physical machine with grid being deployed as qcow2 image on the
Devstack please note
Grid master and Grid members must be deployed in admin tenant and must connected to 2 networks
1. External Network
2. Internal Network.
Devstack will talk to the Grid over the external network.
Once the Grid is configured, please follow Infoblox IPAM driver for OpenStack installation guide.
http://dloads.infoblox.com/tech_lib/Infoblox_IPAM_Driver_for_OpenStackNeutron_InstallGuide_8.0.1_9.0.1_10.0.
0.pdf?auth=1505940491