Embed Size (px)
Citation preview
+
DEPLOYMENT GUIDE FOR BIG-IP ORCHESTRATION ON RED HAT OPENSTACK PLATFORM VERSION 10
F5 OpenStack Private Cloud Solution Package
January 2018
i
DEPLOYMENT GUIDEF5 OpenStack Private Cloud Solution Package
+
Contents
IntroductionOpenStack for cloud . . . . . . . . . . . . . . . . . . . . . . . . . . . . . . . . . . . . . . . . . . . . . . . . . . . . . . . . . . . . . . . 1Planning an OpenStack architecture . . . . . . . . . . . . . . . . . . . . . . . . . . . . . . . . . . . . . . . . . . . . . . . . . . 1Seamless migration to the cloud . . . . . . . . . . . . . . . . . . . . . . . . . . . . . . . . . . . . . . . . . . . . . . . . . . . . . . 1
F5 Private Cloud Solution Package for OpenStackTesting the solution . . . . . . . . . . . . . . . . . . . . . . . . . . . . . . . . . . . . . . . . . . . . . . . . . . . . . . . . . . . . . . . . 2
Use Case: Migrating Workloads to OpenStack Private Cloud . . . . . . . . . . . . . . . . . . . . . . . . . . . . . . . . . . 2Implementing BIG-IP Local Traffic Manager . . . . . . . . . . . . . . . . . . . . . . . . . . . . . . . . . . . . . . . . . . . . . . . . 3Understanding Red Hat Openstack Platform . . . . . . . . . . . . . . . . . . . . . . . . . . . . . . . . . . . . . . . . . . . . . . . 5
Install Red Hat OpenStack Platform 101. Installing RHEL . . . . . . . . . . . . . . . . . . . . . . . . . . . . . . . . . . . . . . . . . . . . . . . . . . . . . . . . . . . . . . . . . . . . . . 52. Register and update UnderCloud . . . . . . . . . . . . . . . . . . . . . . . . . . . . . . . . . . . . . . . . . . . . . . . . . . . . . . 63. Plan your Overcloud installation . . . . . . . . . . . . . . . . . . . . . . . . . . . . . . . . . . . . . . . . . . . . . . . . . . . . . . . 74. Install the Undercloud . . . . . . . . . . . . . . . . . . . . . . . . . . . . . . . . . . . . . . . . . . . . . . . . . . . . . . . . . . . . . . . 95. Configure and create the overcloud . . . . . . . . . . . . . . . . . . . . . . . . . . . . . . . . . . . . . . . . . . . . . . . . . . . 10Undercloud: LBaaS . . . . . . . . . . . . . . . . . . . . . . . . . . . . . . . . . . . . . . . . . . . . . . . . . . . . . . . . . . . . . . . . . . . 13Overcloud: BIG-IP VE in a tenant . . . . . . . . . . . . . . . . . . . . . . . . . . . . . . . . . . . . . . . . . . . . . . . . . . . . . . . . 14
Creating flavors in OpenStack . . . . . . . . . . . . . . . . . . . . . . . . . . . . . . . . . . . . . . . . . . . . . . . . . . . . . . . 14Creating images in OpenStack . . . . . . . . . . . . . . . . . . . . . . . . . . . . . . . . . . . . . . . . . . . . . . . . . . . . . . 16Create Instances in OpenStack . . . . . . . . . . . . . . . . . . . . . . . . . . . . . . . . . . . . . . . . . . . . . . . . . . . . . . 18
Orchestrating BIG-IP VE using Heat Templates . . . . . . . . . . . . . . . . . . . . . . . . . . . . . . . . . . . . . . . . . . . . . 21F5-Supported Heat templates . . . . . . . . . . . . . . . . . . . . . . . . . . . . . . . . . . . . . . . . . . . . . . . . . . . . . . . 21Launching Stacks . . . . . . . . . . . . . . . . . . . . . . . . . . . . . . . . . . . . . . . . . . . . . . . . . . . . . . . . . . . . . . . . 22
Customizing OpenStack LBaaSv2 Using Enhanced Services Definitions . . . . . . . . . . . . . . . . . . . . . . . . . 25Create an Enhanced Service Definition . . . . . . . . . . . . . . . . . . . . . . . . . . . . . . . . . . . . . . . . . . . . . . . . 25Using ESDs . . . . . . . . . . . . . . . . . . . . . . . . . . . . . . . . . . . . . . . . . . . . . . . . . . . . . . . . . . . . . . . . . . . . . 26
Deployment Guide Use Cases . . . . . . . . . . . . . . . . . . . . . . . . . . . . . . . . . . . . . . . . . . . . . . . . . . . . . . . . . 27
Summary . . . . . . . . . . . . . . . . . . . . . . . . . . . . . . . . . . . . . . . . . . . . . . . . . . . . . . . . . . . . . . . . . . . . . . . . . . . . 30
1
DEPLOYMENT GUIDEF5 OpenStack Private Cloud Solution Package
IntroductionIn today’s software-defined economy, businesses have to move faster than their competition. Speed and agility are
critical to keeping up with competitive demands for new applications, as well as maintaining existing infrastructure.
IT organizations must respond aggressively to meet business needs—and the private cloud can be a primary tool to
achieve this objective. It’s not surprising, then, that organizations are accelerating their journey to the cloud.
OpenStack for cloud
Many software developers are turning to the OpenStack platform for cloud computing. Its open APIs, flexible
architecture, and large commercial ecosystem help organizations compete in a completely new paradigm of software
development. OpenStack is rapidly becoming the dominant cloud platform for delivering Infrastructure as a Service
(IaaS). As OpenStack-powered clouds increasingly host mission-critical production applications, advanced application
delivery services for layers 4–7 are becoming essential. Enterprise customers are now deploying new applications with
these services, and expect them to be available when they transition to a cloud-based architecture.
Planning an OpenStack architecture
F5 is the leading supplier of advanced application delivery services across data center, public, private, and hybrid
clouds, including those powered by OpenStack. F5 partnered with Red Hat to help customers accelerate OpenStack
deployments. OpenStack and F5 application delivery services and platforms combine to bring production-grade services
to OpenStack-hosted applications .
F5 application delivery services can be accessed in two ways within OpenStack: through Neutron Load Balancing as a
Service v2.0 (LBaaSv2), and F5’s OpenStack orchestration (HEAT). With the combination of OpenStack, F5, and Red
Hat, organizations can transition from traditional data centers to private cloud faster and more efficiently.
Red Hat OpenStack Platform provides the foundation to build a private or public Infrastructure-as-a-Service (IaaS) cloud
on top of Red Hat Enterprise Linux. It offers a highly scalable, fault-tolerant platform for the development of cloud-
enabled workloads. Red Hat OpenStack Platform is packaged so that available physical hardware can be turned into a
private, public, or hybrid cloud platform.
Seamless migration to the cloud
The F5 private cloud solution package for OpenStack offers agile application services, delivered by NetOps in an
automated and continuous integration environment without compromising corporate security or reliability standards. The
solution package enables efficient collaboration between DevOps/application owners and NetOps, while reducing the
proliferation of shadow IT. Seamless app migration—from development to production clouds—and consistent delivery of
application services facilitates infrastructure-as-code initiatives .
The solution package also offers simplified private cloud rollout and operational confidence with tested and certified
solutions, backed by enterprise-grade support. It provides joint certification and testing with Red Hat to orchestrate F5®
BIG-IP® Application Delivery Controllers (ADCs) with OpenStack Networking services.
2
DEPLOYMENT GUIDEF5 OpenStack Private Cloud Solution Package
F5 Private Cloud Solution Package for OpenStackThe F5 private cloud solution package for OpenStack represents validated solutions and use cases based on customer
requirements utilizing BIG-IP ADC and OpenStack integrations . F5’s OpenStack LBaaSv2 integration provides under-
the-cloud L4–L7 services for OpenStack Networking tenants . F5’s OpenStack orchestration templates provide over-the-
cloud, orchestration (NFV) with BIG-IP Virtual Edition version 13 ADC clusters, and F5 iApps® templating for application
services deployment. OpenStack installations are highly configurable, and vary greatly. New OpenStack versions are
released every six months, creating the continuous need for testing and validation of our solutions. Red Hat OpenStack
Platform 10 extends private cloud support for up to five years.
The OpenStack private cloud package documented in this deployment guide introduces enhanced use cases with
L7 capabilities using Enhanced Service Definitions (ESD). BIG-IP local traffic management has many load balancing
configurations that don’t have direct implementation in the OpenStack LBaaSv2 specification. While it’s easy to
customize BIG-IP LTM settings using profiles, policies, and F5 iRules® scripting language, LBaaSv2 doesn’t provide a
way to apply these to BIG-IP LTM. Now, Enhanced Service Definitions (ESDs) allow you to apply BIG-IP LTM profiles,
policies, and iRules to OpenStack load balancers. The F5 solution validates this use case based on tests utilizing the
OpenStack integration. These tests have been validated and certified by Red Hat, and published as part of F5 open
source solutions. This enables our customers and their partners to easily deploy the F5 private cloud solution for
OpenStack .
Testing the solution
OpenStack installations are highly configurable and vary greatly. New OpenStack versions are released every six
months, creating the need for continuous testing and validation of our solutions. This F5 solution package for the
OpenStack private cloud was tested with a series of OpenStack cloud deployments and Tempest tests suites while
using Red Hat OpenStack Platform 10, an OpenStack distribution. Red Hat, which maintains and supports the
OpenStack Platform, has its own test suite for LBaaSv2 certifications. F5 maintains its LBaaSv2 certification with Red
Hat as part of its partnership . Red Hat also provides input and validates use case tests for private clouds against the
company’s own OpenStack Platform cloud deployments . The successful completion of this test with Red Hat OpenStack
Platform version 10 forms the basis of a documented and validated solution supported by both F5 and Red Hat. See
Red Hat’s Customer Portal for more information on LBaaS v2.0 official support certification .
Use Case: Migrating Workloads to OpenStack Private CloudAs applications migrate from traditional architectures to the private cloud, F5 ADCs can help ease the transition. For the
many existing applications currently using F5 ADCs, application policies, and iRules, business logic can be maintained
in the migration to the cloud. For other applications, the presence of BIG-IP virtual edition ADCs offers a dynamic pivot
for services as they are chained and refactored into new architectures. The first use case focuses on migrating existing
workloads to an OpenStack private cloud. This migration is based on tested deployments of Red Hat OpenStack
Platform v10 with F5 LBaaSv2 services—utilizing BIG-IP i5800 ADC devices and deployment of a BIG-IP VE instance
within an OpenStack tenant. Validation and certification were performed at the F5 Labs in San Jose, California, in
partnership with Red Hat. Additional information regarding the Red Hat OpenStack Platform can be found in the Red
Hat OpenStack Platform documentation; F5 has extensive documentation for its OpenStack solutions, in addition to the
open source code on GitHub . Details on the F5 iSeries are provided on f5 .com .
3
DEPLOYMENT GUIDEF5 OpenStack Private Cloud Solution Package
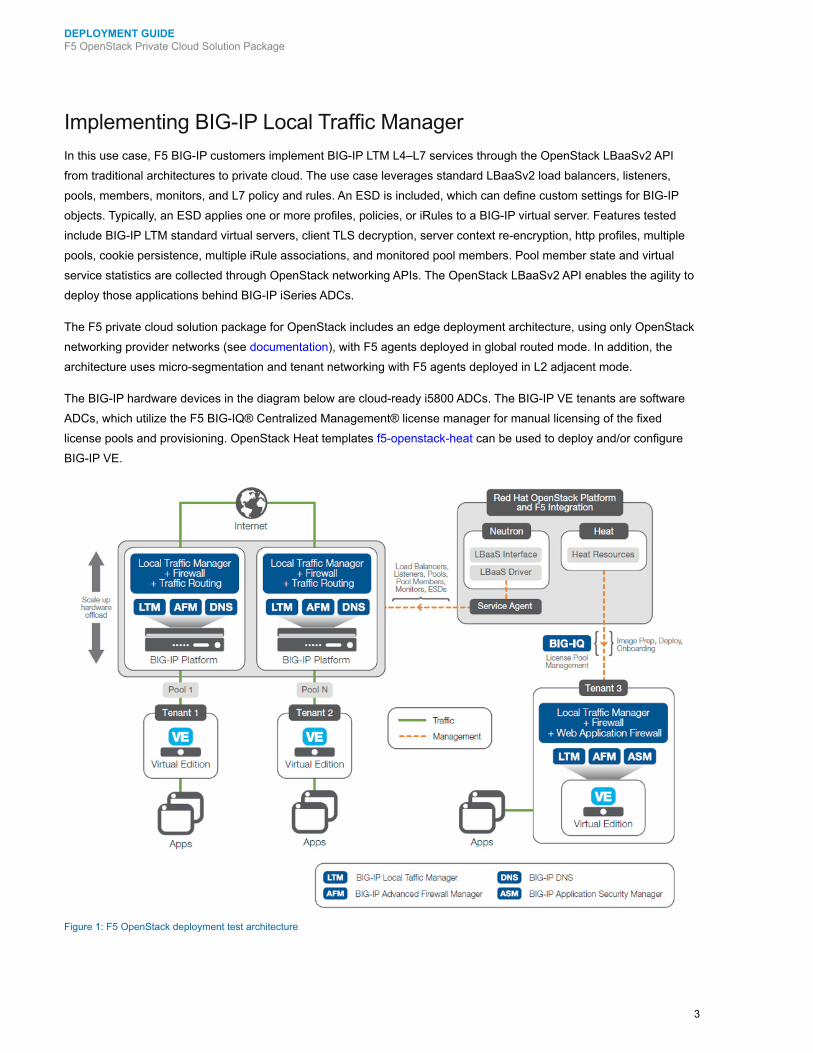
Implementing BIG-IP Local Traffic ManagerIn this use case, F5 BIG-IP customers implement BIG-IP LTM L4–L7 services through the OpenStack LBaaSv2 API
from traditional architectures to private cloud. The use case leverages standard LBaaSv2 load balancers, listeners,
pools, members, monitors, and L7 policy and rules. An ESD is included, which can define custom settings for BIG-IP
objects. Typically, an ESD applies one or more profiles, policies, or iRules to a BIG-IP virtual server. Features tested
include BIG-IP LTM standard virtual servers, client TLS decryption, server context re-encryption, http profiles, multiple
pools, cookie persistence, multiple iRule associations, and monitored pool members. Pool member state and virtual
service statistics are collected through OpenStack networking APIs. The OpenStack LBaaSv2 API enables the agility to
deploy those applications behind BIG-IP iSeries ADCs.
The F5 private cloud solution package for OpenStack includes an edge deployment architecture, using only OpenStack
networking provider networks (see documentation), with F5 agents deployed in global routed mode. In addition, the
architecture uses micro-segmentation and tenant networking with F5 agents deployed in L2 adjacent mode.
The BIG-IP hardware devices in the diagram below are cloud-ready i5800 ADCs. The BIG-IP VE tenants are software
ADCs, which utilize the F5 BIG-IQ® Centralized Management® license manager for manual licensing of the fixed
license pools and provisioning . OpenStack Heat templates f5-openstack-heat can be used to deploy and/or configure
BIG-IP VE .
Figure 1: F5 OpenStack deployment test architecture
4
DEPLOYMENT GUIDEF5 OpenStack Private Cloud Solution Package
In the diagram, F5 OpenStack HOT (Heat Orchestration Templates) are used to onboard a BIG-IP virtual edition with the
OpenStack agent startup script. These templates employ similar pattern as OpenStack TripleO wherein the common/
reusable templates and components such as software configs and scripts are referenced by parent templates. When
creating a stack, you only need to specify the parent template as the template param, and Heat engine automatically
takes care of the dependencies. Tables 1 and 2 show the F5 components and build of material included in the private
cloud solution package for OpenStack .
Solution Package Medium SizeF5 iSeries i5800 x 2
iSeries SW Modules LTM, DNS, AFM
Virtual Edition – 200M 8
Virtual Edition – 25M 8
Virtual Edition Software Modules LTM, ASM, AFM
Orchestration Heat
3rd Party Solution Certification Red Hat OpenStack Platform (OSP) version 10
Professional Services 40 Hour Engagement
Support Premium Support
Customer Documentation• Solution Architecture
• Deployments Guide
Table 1: F5 Private Cloud Solution Packages for OpenStack: iSeries + VE + SW Solution-Engineered, Tested, and Certified
Components of Offering Quantity Detail
Components of Offering Quantity DetailI5800 Better i5800 x 2 Provides desired network packaging of LTM, DNS and AFM
200M “App Services” VE 8 (2 pools of 4 VEs) Provides desired tenant packaging of LTM + ASM +AFM, this packaging is only available within the Private Cloud Offering
25M “App Services” VE 8 Provides desired tenant packaging of LTM + ASM +AFM, this packaging is only available within the Private Cloud Offering
BIG-IQ VE “S” 2Included free as part of offering - BIG-IQ VE License Manager is needed for the VE licensing . The full Centralized Management is not needed .
Premium Support For all the above
Professional Services 40 hours
40 Hours of professional services covering BIP-IP VE orchestration using supported HOT and ESD templates . Configuration of undercloud and overcloud is out-of-scope and would require a SOW.
Table 2: Private Cloud Solution Package for OpenStack: i5800M Build of Material
This deployment guide is an update, demonstrating BIG-IP orchestration and L7 capabilities. OpenStack version 9 guide
can be found here .
5
DEPLOYMENT GUIDEF5 OpenStack Private Cloud Solution Package
Understanding Red Hat OpenStack PlatformRed Hat OpenStack Platform delivers an integrated foundation to create, deploy, and scale a secure and reliable public
or private OpenStack cloud. Red Hat OpenStack Platform is packaged so that available physical hardware can be
turned into a private, public, or hybrid cloud platform that includes:
• Fully distributed object storage
• Persistent block-level storage
• Virtual machine provisioning engine and image storage
• Authentication and authorization mechanisms
• Integrated networking
• Web browser-based interface accessible to users and administrators
The Red Hat OpenStack Platform IaaS cloud is implemented by a collection of interacting services that control its
computing, storage, and networking resources. The cloud is managed using a web-based interface which allows
administrators to control, provision, and automate OpenStack resources. Additionally, the OpenStack infrastructure is
facilitated through an extensive API, which is also available to end users of the cloud.
Install Red Hat OpenStack Platform 10The following 5 steps are required to get started with Red Hat OpenStack Platform . Its highly recommended to read all
the documentation prior to starting the installation of OpenStack Platform version 10. We have provided some notes
from our testing and validation that will help accelerate your OpenStack deployment .
1 . Installing RHELPerform a minimal installation for RHEL 7 on a physical system . See getting started for Red Hat Enterprise Linux 7 for
more details .
Note: The undercloud system hosting the director provides provisioning and management for all nodes in the overcloud .
Make sure you follow the undercloud RHEL requirements for Red Hat Enterprise Linux 7.3. In our environment the
undercloud was installed on a VMware ESXi virtualized platform. When the undercloud is a virtual machine running on
VMware ESXi following the required resolution or overcloud nodes fail to get DHCP IP .
• When the Undercloud is hosted on an ESXi Virtual Machine, forged transmit has to be set to Accept, so ESXi
does not compare source and effective MAC addresses .
• This setting allows DHCP offers to reach the deployment nodes during Ironic bare metal deployment operations
• Configure these settings on the virtual switch that the Undercloud VM is connected to in the switch security
settings .
6
DEPLOYMENT GUIDEF5 OpenStack Private Cloud Solution Package
• Here is the settings menu
Figure 2: VMware Properties from virtual switch
• The director installation process requires a non-root user to execute commands. Use the following commands to
create the user named stack and set a password: [root@director ~]# useradd stack [root@director ~]# passwd stack # specify a password Disable password requirements for this user when using sudo: [root@director ~]# echo “stack ALL=(root) NOPASSWD:ALL” | tee -a /etc/sudoers.d/stack [root@director ~]# chmod 0440 /etc/sudoers.d/stack Switch to the new stack user: [root@director ~]# su - stack [stack@director ~]$
• The director uses system images and Heat templates to create the overcloud environment. To keep these files
organized, we recommend creating directories for images and templates: $ mkdir ~/images$ mkdir ~/templates
• The director requires a fully qualified domain name for its installation and configuration process. This means you
may need to set the hostname of your director’s host. Check the hostname of your host: $ hostname # Checks the base hostname$ hostname -f # Checks the long hostname (FQDN)
2 . Register and update UnderCloudRegister the Undercloud system via Red Hat Subscription Management and confirm that an OpenStack subscription is
attached .
$ sudo subscription-manager register $ sudo subscription-manager list --available --all --matches=”*OpenStack*”note the pool id of the subscription that includes the openstack subscription.$ sudo subscription-manager attach –pool=<poolID noted above>
Disable all default repositories, and then enable the required Red Hat Enterprise Linux repositories
$ sudo subscription-manager repos --disable=*$ sudo subscription-manager repos --enable=rhel-7-server-rpms -- enable=rhel-7-server-extras-rpms --enable=rhel-7-server-rh-common-rpms -- enable=rhel-ha-for-rhel-7-server-rpms --enable=rhel-7-server-openstack-10- rpms
Perform an update on your system to make sure you have the latest base system packages:
$ sudo yum update -y $ sudo reboot
7
DEPLOYMENT GUIDEF5 OpenStack Private Cloud Solution Package
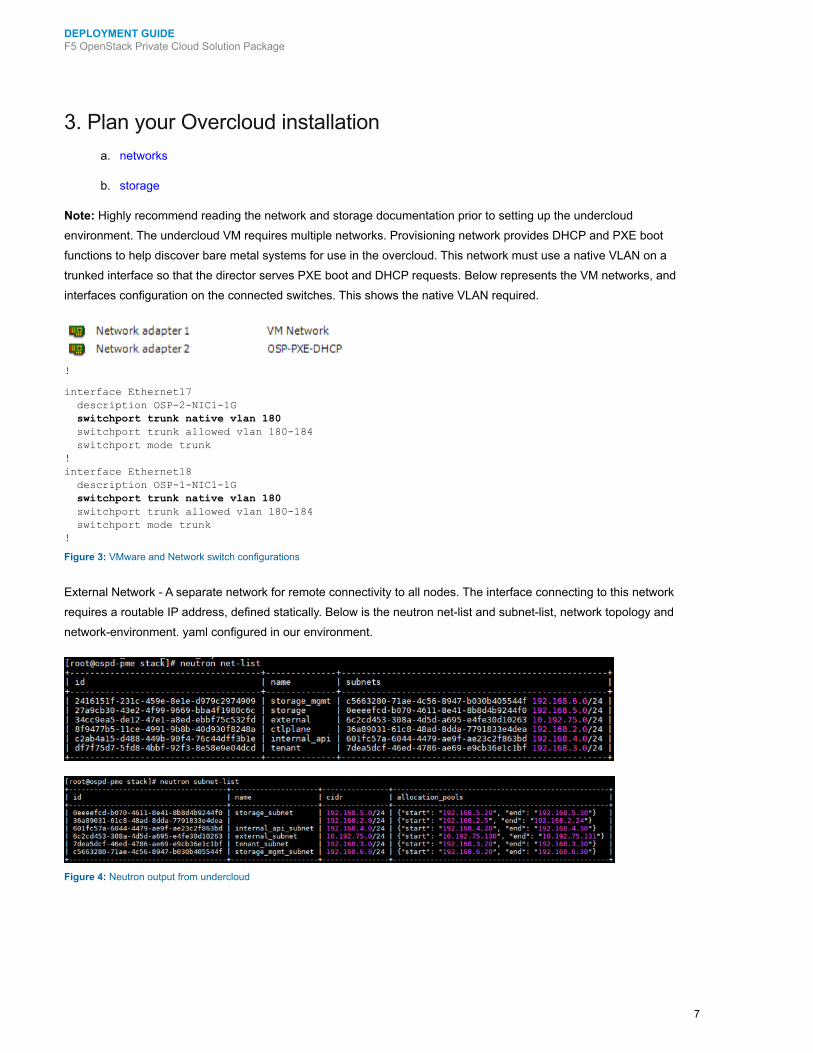
3 . Plan your Overcloud installationa . networks
b. storage
Note: Highly recommend reading the network and storage documentation prior to setting up the undercloud
environment. The undercloud VM requires multiple networks. Provisioning network provides DHCP and PXE boot
functions to help discover bare metal systems for use in the overcloud. This network must use a native VLAN on a
trunked interface so that the director serves PXE boot and DHCP requests. Below represents the VM networks, and
interfaces configuration on the connected switches. This shows the native VLAN required.
!
interface Ethernet17 description OSP-2-NIC1-1G switchport trunk native vlan 180 switchport trunk allowed vlan 180-184 switchport mode trunk!interface Ethernet18 description OSP-1-NIC1-1G switchport trunk native vlan 180 switchport trunk allowed vlan 180-184 switchport mode trunk!
Figure 3: VMware and Network switch configurations
External Network - A separate network for remote connectivity to all nodes. The interface connecting to this network
requires a routable IP address, defined statically. Below is the neutron net-list and subnet-list, network topology and
network-environment. yaml configured in our environment.
Figure 4: Neutron output from undercloud
8
DEPLOYMENT GUIDEF5 OpenStack Private Cloud Solution Package
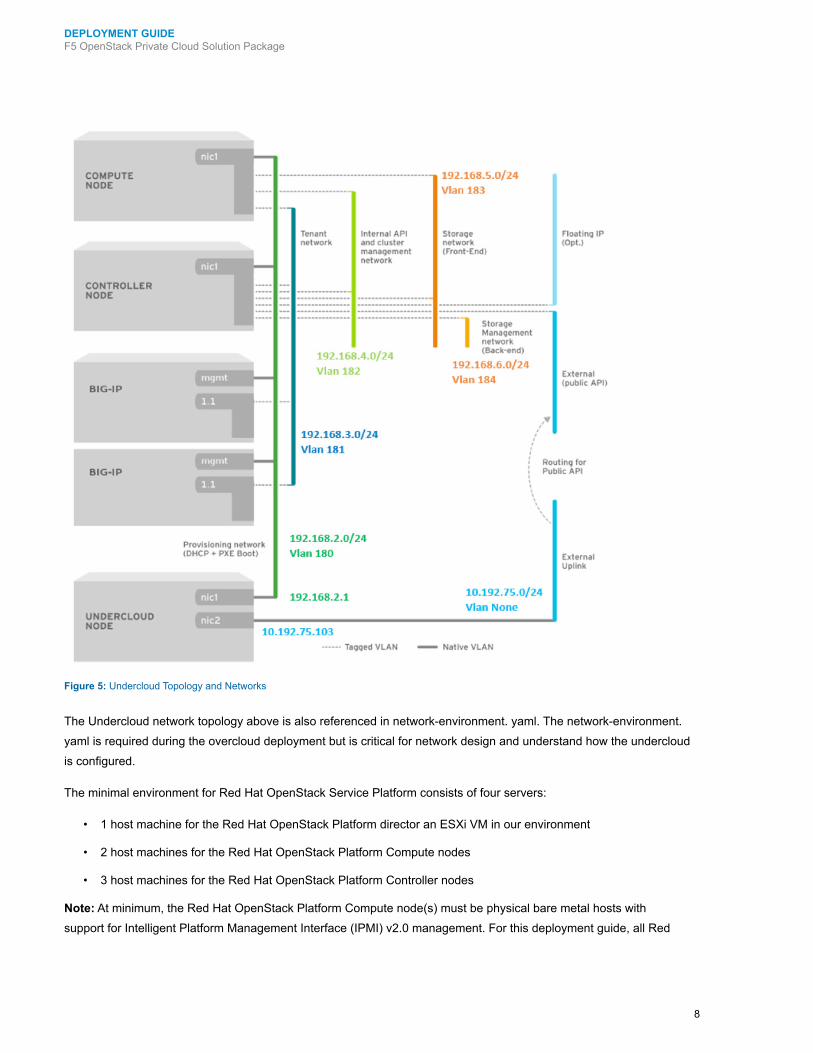
Figure 5: Undercloud Topology and Networks
The Undercloud network topology above is also referenced in network-environment. yaml. The network-environment.
yaml is required during the overcloud deployment but is critical for network design and understand how the undercloud
is configured.
The minimal environment for Red Hat OpenStack Service Platform consists of four servers:
• 1 host machine for the Red Hat OpenStack Platform director an ESXi VM in our environment
• 2 host machines for the Red Hat OpenStack Platform Compute nodes
• 3 host machines for the Red Hat OpenStack Platform Controller nodes
Note: At minimum, the Red Hat OpenStack Platform Compute node(s) must be physical bare metal hosts with
support for Intelligent Platform Management Interface (IPMI) v2.0 management. For this deployment guide, all Red
9
DEPLOYMENT GUIDEF5 OpenStack Private Cloud Solution Package
Hat OpenStack Controller and Compute nodes are physical bare metal hosts with IPMI controlled by the Red Hat
OpenStack Platform Undercloud node (also known as the Director node) .
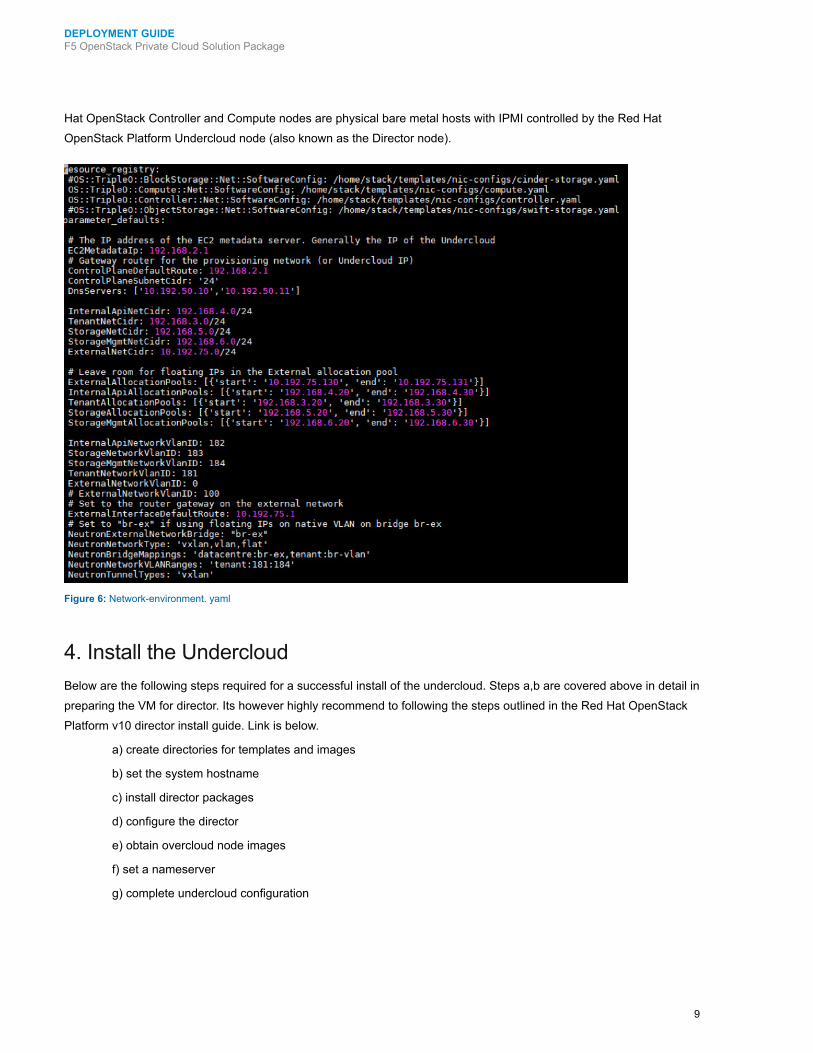
Figure 6: Network-environment . yaml
4 . Install the UndercloudBelow are the following steps required for a successful install of the undercloud. Steps a,b are covered above in detail in
preparing the VM for director . Its however highly recommend to following the steps outlined in the Red Hat OpenStack
Platform v10 director install guide. Link is below.
a) create directories for templates and images
b) set the system hostname
c) install director packages
d) configure the director
e) obtain overcloud node images
f) set a nameserver
g) complete undercloud configuration
10
DEPLOYMENT GUIDEF5 OpenStack Private Cloud Solution Package
Note: The instructions provided here contain information originally published in the Red Hat OpenStack Platform
Undercloud Installation and Usage guide: Installing the Undercloud. Again If installing the Undercloud on VMware ESXi,
see https://access.redhat.com/solutions/1980283
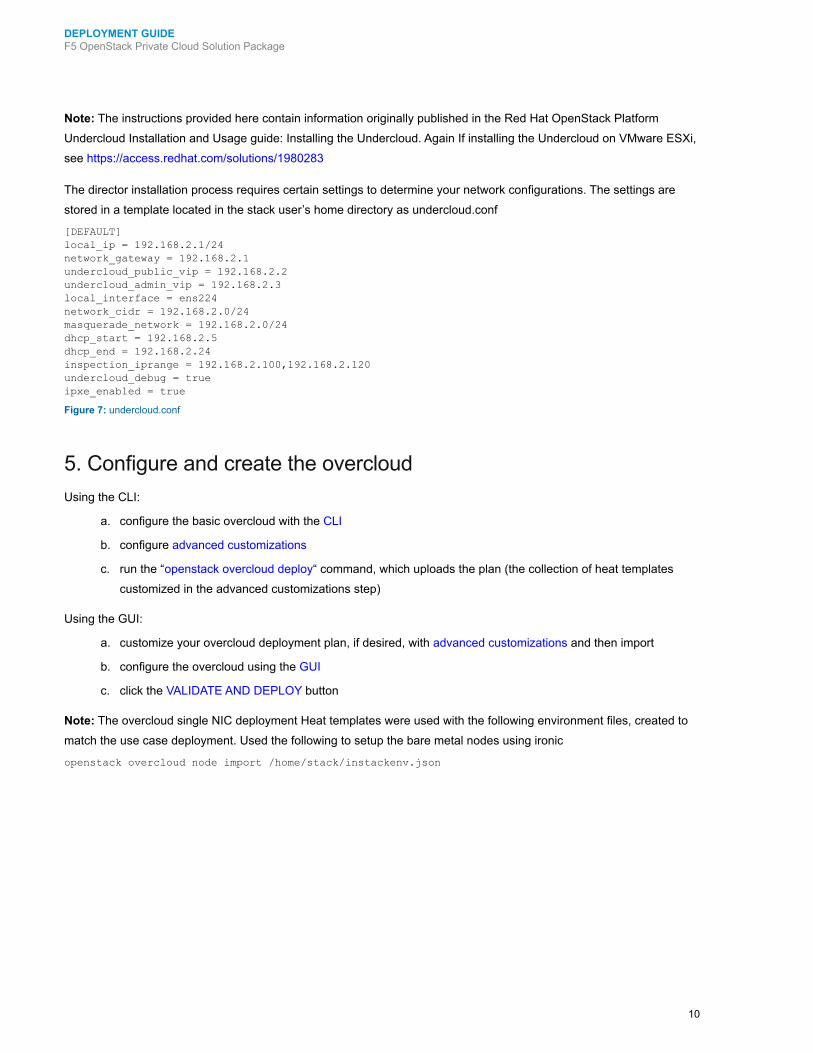
The director installation process requires certain settings to determine your network configurations. The settings are
stored in a template located in the stack user’s home directory as undercloud .conf
[DEFAULT]local_ip = 192.168.2.1/24network_gateway = 192.168.2.1undercloud_public_vip = 192.168.2.2undercloud_admin_vip = 192.168.2.3local_interface = ens224network_cidr = 192.168.2.0/24masquerade_network = 192.168.2.0/24dhcp_start = 192.168.2.5dhcp_end = 192.168.2.24inspection_iprange = 192.168.2.100,192.168.2.120undercloud_debug = trueipxe_enabled = true
Figure 7: undercloud .conf
5. Configure and create the overcloudUsing the CLI:
a . configure the basic overcloud with the CLI
b. configure advanced customizations
c . run the “openstack overcloud deploy“ command, which uploads the plan (the collection of heat templates
customized in the advanced customizations step)
Using the GUI:
a . customize your overcloud deployment plan, if desired, with advanced customizations and then import
b. configure the overcloud using the GUI
c . click the VALIDATE AND DEPLOY button
Note: The overcloud single NIC deployment Heat templates were used with the following environment files, created to
match the use case deployment. Used the following to setup the bare metal nodes using ironic
openstack overcloud node import /home/stack/instackenv.json
11
DEPLOYMENT GUIDEF5 OpenStack Private Cloud Solution Package
Figure 8: instrackenv.json
openstack overcloud node introspect --all --provide
openstack baremetal node set --property capabilities=’profile:compute,boot_option:local’ compute1
openstack baremetal node set --property capabilities=’profile:control,boot_option:local’ controller
openstack flavor set --property “cpu_arch”=”x86_64” --property “capabilities:boot_option”=”local” --property “capabilities:profile”=”compute” compute
openstack flavor set --property “cpu_arch”=”x86_64” --property “capabilities:boot_option”=”local” --property “capabilities:profile”=”control” control
Figure 9: Viewing baremetal node list using ironic
12
DEPLOYMENT GUIDEF5 OpenStack Private Cloud Solution Package
Figure 10: ironic node showing the setting for the controller
Note: Ironic will display the last errors when overcloud node introspect was done. From the diagram, we had received
an error status as it looks like IPMI calls failed talking to the Dell iDRAC here. Upon seeing these errors, we were able
to make modifications and resolve the issues. See Debugging Bare Metal: Practical Tips and Tricks for help debugging
bare metal issues.
13
DEPLOYMENT GUIDEF5 OpenStack Private Cloud Solution Package
Figure 11: ironic node showing the setting for the compute nodes
Used the following command to install the overcloud
openstack overcloud deploy --templates \-e /usr/share/openstack-tripleo-heat-templates/environments/network-isolation.yaml \ -e /home/stack/templates/network-environment.yaml \ -e /home/stack/templates/storage-environment.yaml \ -e /home/stack/templates/global-defaults.yaml \ -e /home/stack/templates/service-net-map.yaml \ --compute-flavor compute \ --control-flavor control
Undercloud: LBaaSLoad Balancing As-A Service (LBaaS) is a community standard around providing Load Balancing as a standardized
service within OpenStack. The current version LBaaS v2, provides basic L4-7 capabilities. F5 can be deployed in two
ways in an OpenStack environment. The two methods are a undercloud or overcloud deployment. It is possible to
14
DEPLOYMENT GUIDEF5 OpenStack Private Cloud Solution Package
use one or both of these methodologies when deploying F5 and OpenStack. These next chapters we will cover both
methods . Undercloud commonly refers to a deployment where the BIP-IP device (physical or virtual) is outside of the
OpenStack environment. Typically, this is done with physical hardware to provide a multi-tenant and used with LBaaS.
Overcloud refers to a deployment where a BIG-IP Virtual Edition (VE) is provisioned within a tenant network as a virtual
machine within OpenStack Nova . In this scenario the BIG-IP is in similar topology to the other tenant virtual machines .
When deploying in overcloud OpenStack HEAT templates (automation templates) are commonly used to deploy
the BIG-IP device. You can manage the BIG-IP device through traditional, HEAT templates and/or other automation
templates .
The decision to use one method or both will depend on your requirements. An undercloud deployment using LBaaS is
well suite to providing basic services that can be provided in a multi-tenant manner. Overcloud is well suited to providing
access to features in a multi-tenant manner . Overcloud is well suited to providing access to features and functions that
many not be exposed via LBaaS or provide per-tenant services. This deployment will cover both methods.
1 . BIG-IP VE in an overcloud deployment using HEAT templates for orchestration
2 . BIG-IP using advanced extended service definitions deployed in the undercloud using LBaaS.
Overcloud: BIG-IP VE in a tenantIn OpenStack language, an Instance is a virtual machine such as the BIG-IP VE. It boots from an operating system
image, and it is configured with a certain amount of CPU, RAM and disk space, amongst other parameters such as
networking interfaces. The goal is to provide configuration and optimization options that will help you achieve the
required performance, reliability and security that you need for your BIP-IP VEs. Some of the optimizations can be done
inside a guest regardless of what has the OpenStack Cloud Administrator. However, more advanced options require
prior enablement and, possibly, special host capabilities. In this chapter we will explore these advanced options require
using HEAT Templates. More information about this subject can be found on the Red Hat Documentation Portal and its
comprehensive guide on OpenStack Image Service. Similarly, the upstream OpenStack documentation has some extra
guidelines available .
Creating flavors in OpenStack
In OpenStack, a flavor defines the compute, memory, and storage capacity of a virtual machine, also known as an
instance. As an administrative user, you can create, edit, and delete flavors. As of Newton, there are no default flavors.
BIG-IP Virtual Edition (VE) images come in different sizes and supports different Nova flavors. Use the table below to
determine the correct “f5 flavor” for your image
15
DEPLOYMENT GUIDEF5 OpenStack Private Cloud Solution Package
Figure 12: F5 Nova flavors
You can create new flavors using the Dashboard or via the CLI. Again, by default, only admin users can create Nova
flavors
Create a new flavor using the dashboard. Select Admin, Flavors and Create Flavor tab
Add the required fields to create the new flavors.
Figure 13: Creating new flavor
16
DEPLOYMENT GUIDEF5 OpenStack Private Cloud Solution Package
Another option to create flavors is using the CLI. Below is the syntax and also the flavor created for the deployment
guide . See OpenStack Horizon - Manage flavors for more information .
$ openstack flavor create FLAVOR_NAME --id FLAVOR_ID --ram RAM_IN_MB --disk ROOT_DISK_IN_GB --vcpus NUMBER_OF_VCPUSnova flavor-create --is-public true m1.tiny auto 512 1 1nova flavor-create --is-public true m1.small auto 2048 20 1nova flavor-create --is-public true m1.medium auto 4096 40 2nova flavor-create --is-public true m1.large auto 8192 80 4nova flavor-create --is-public true m1.xlarge auto 16384 160 8nova flavor-create --is-public true m1.bigip.1SLOT auto 2048 8 1 nova flavor-create --is-public true m1.bigip.LTM.small auto 4096 40 2nova flavor-create --is-public true m1.bigip.LTM.medium auto 8192 40 4nova flavor-create --is-public true m1.bigip.ALL.large auto 8192 160 4nova flavor-create --is-public true m1.bigip.ALL.xlarge auto 16384 160 8nova flavor-create --is-public true m1.bigiq.small auto 4096 160 2nova flavor-create --is-public true m1.bigiq.medium auto 8192 160 4
For more detail information regarding BIG-IP VE images sizes review the following article K14946 . Below is a list of
flavors created.
Figure 14: Dashboard showing available Flavors
Creating images in OpenStack
OpenStack storage configuration is an implementation choice by the Cloud Administrator, often not fully visible to
the tenant. Storage configuration may also change over the time without explicit notification by the Administrator, as
capacity changes with different specs. When creating a new instance on OpenStack, it is based on a Glance image. The
two most prevalent and recommended image formats are QCOW2 and RAW. QCOW2 images.
Create a new image using the dashboard. Select Admin, Images and Create Image tab
17
DEPLOYMENT GUIDEF5 OpenStack Private Cloud Solution Package
Add the required fields to create the new Image.
Figure 15: Creating new BIG-IP VE Image
You can upload images through the CLI using the openstack image create command . The openstack image create
command provides mechanisms to list and delete images, set and delete image metadata, and create images of a
running instance or snapshot and backup types. Use the openstack image list command and openstack image show
command to view all the images created .
18
DEPLOYMENT GUIDEF5 OpenStack Private Cloud Solution Package
Figure 16: Show all OpenStack images
Figure 17: Show all OpenStack images
To create an image, use OpenStack image create as shown below
openstack image create --file BIGIP-13.0.0.2.0.1671.LTM.qcow2 --disk-format qcow2 --container-format bare BIGIP-13.0.0.2.0.1671.LTM
Create Instances in OpenStack
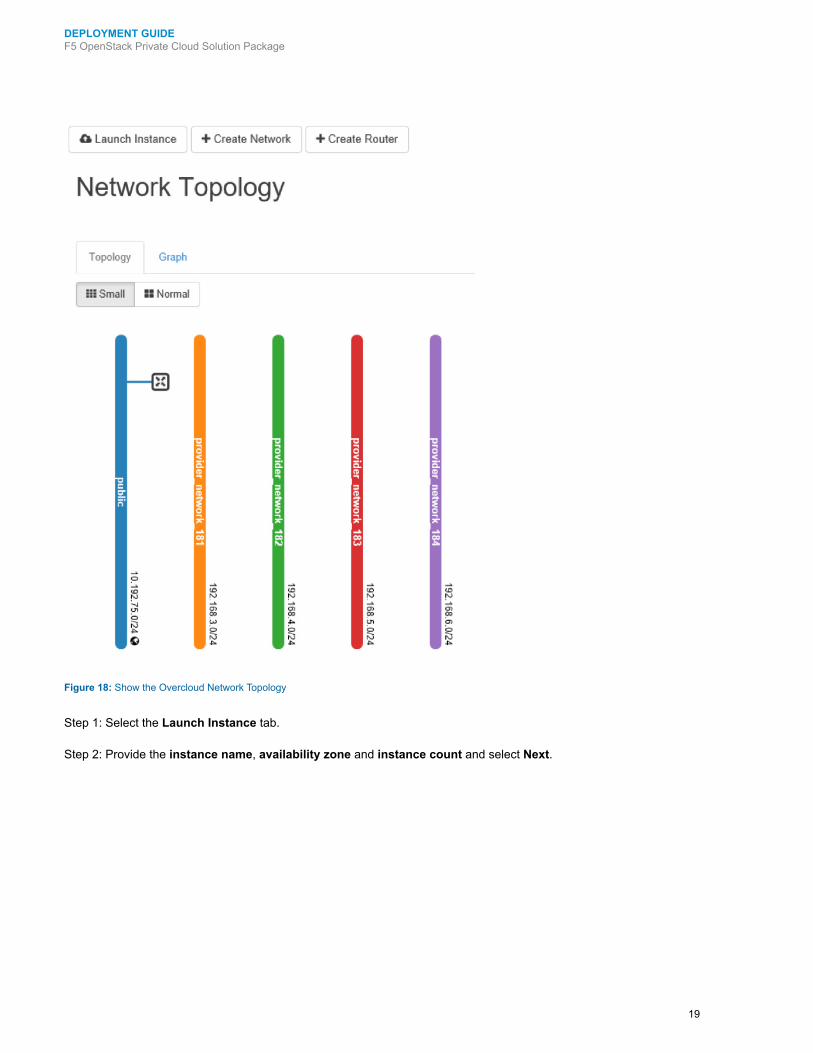
This next section covers how to create the BIG-IP VE Instance manually. Prior to creating your Overcloud Instances
you must make sure the VM has the correct tenants configured. Select the Project and Network tap to view the Network
Topology. You will notice from the Network Topology diagram below the networks were created during the Overcloud
install using the network-environment. Yaml file. You can also create, and new Instance from the Network Topology page
as shown below.
19
DEPLOYMENT GUIDEF5 OpenStack Private Cloud Solution Package
Figure 18: Show the Overcloud Network Topology
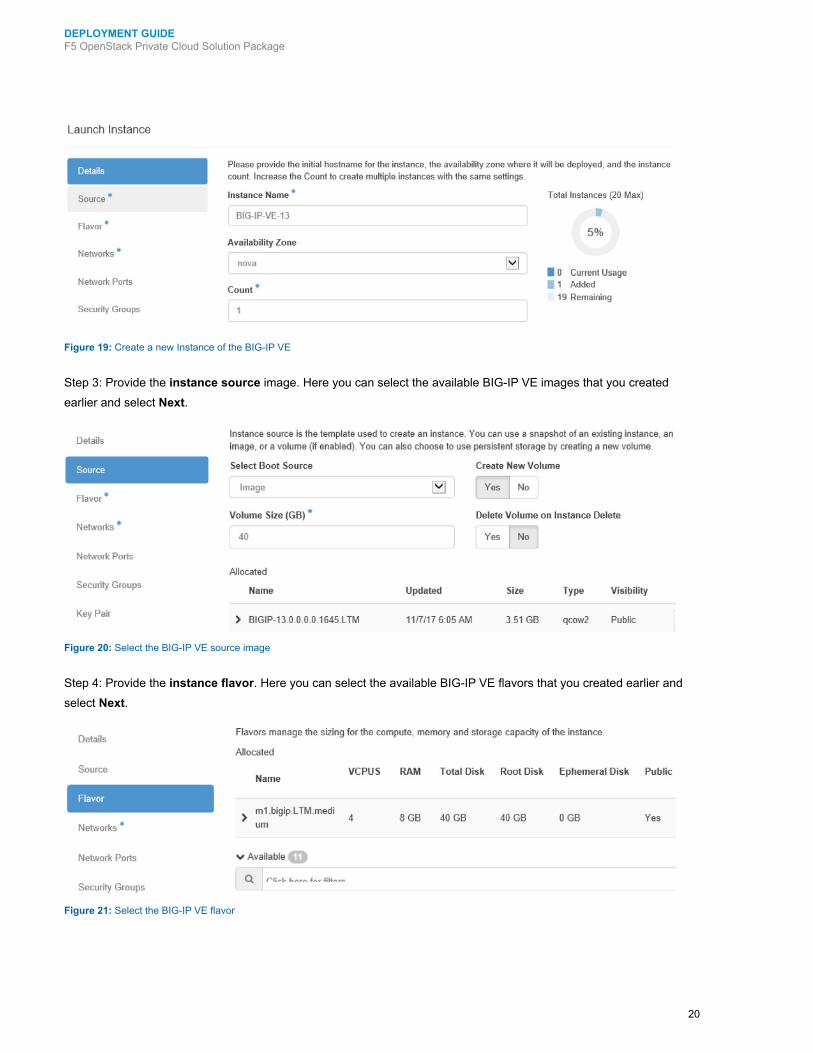
Step 1: Select the Launch Instance tab.
Step 2: Provide the instance name, availability zone and instance count and select Next .
20
DEPLOYMENT GUIDEF5 OpenStack Private Cloud Solution Package
Figure 19: Create a new Instance of the BIG-IP VE
Step 3: Provide the instance source image. Here you can select the available BIG-IP VE images that you created
earlier and select Next .
Figure 20: Select the BIG-IP VE source image
Step 4: Provide the instance flavor. Here you can select the available BIG-IP VE flavors that you created earlier and
select Next .
Figure 21: Select the BIG-IP VE flavor
21
DEPLOYMENT GUIDEF5 OpenStack Private Cloud Solution Package
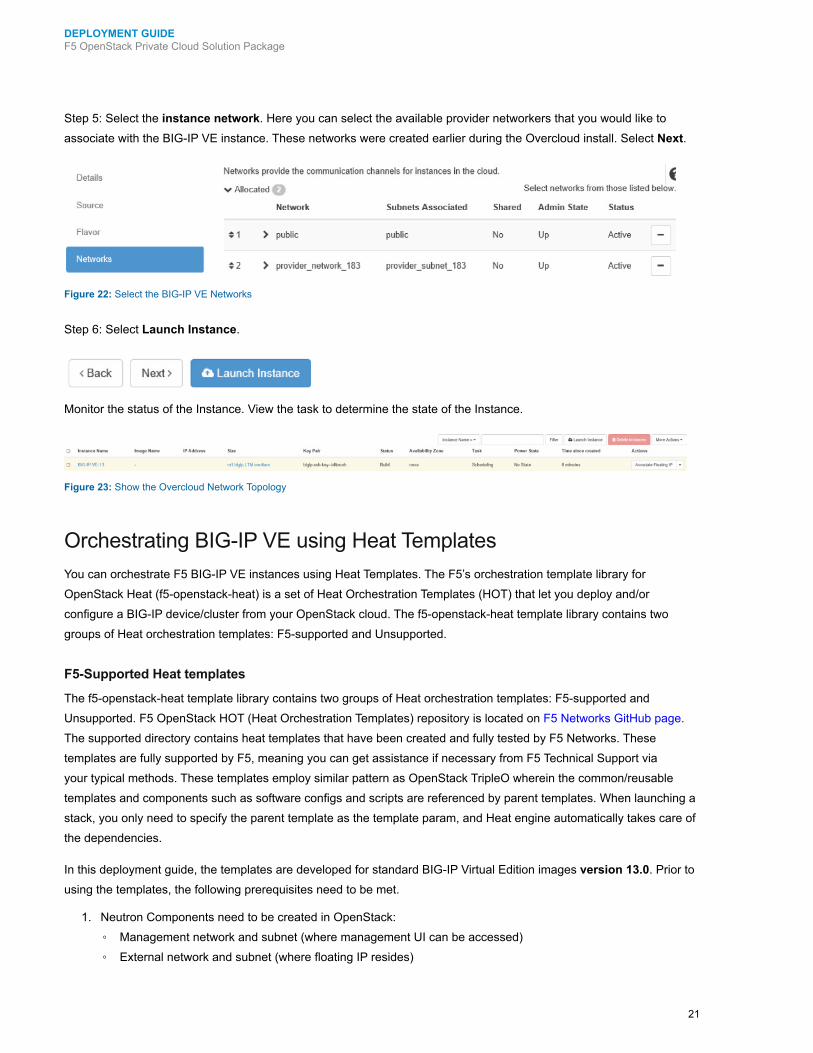
Step 5: Select the instance network. Here you can select the available provider networkers that you would like to
associate with the BIG-IP VE instance . These networks were created earlier during the Overcloud install . Select Next .
Figure 22: Select the BIG-IP VE Networks
Step 6: Select Launch Instance .
Monitor the status of the Instance . View the task to determine the state of the Instance .
Figure 23: Show the Overcloud Network Topology
Orchestrating BIG-IP VE using Heat TemplatesYou can orchestrate F5 BIG-IP VE instances using Heat Templates. The F5’s orchestration template library for
OpenStack Heat (f5-openstack-heat) is a set of Heat Orchestration Templates (HOT) that let you deploy and/or
configure a BIG-IP device/cluster from your OpenStack cloud. The f5-openstack-heat template library contains two
groups of Heat orchestration templates: F5-supported and Unsupported.
F5-Supported Heat templates
The f5-openstack-heat template library contains two groups of Heat orchestration templates: F5-supported and
Unsupported . F5 OpenStack HOT (Heat Orchestration Templates) repository is located on F5 Networks GitHub page .
The supported directory contains heat templates that have been created and fully tested by F5 Networks. These
templates are fully supported by F5, meaning you can get assistance if necessary from F5 Technical Support via
your typical methods. These templates employ similar pattern as OpenStack TripleO wherein the common/reusable
templates and components such as software configs and scripts are referenced by parent templates. When launching a
stack, you only need to specify the parent template as the template param, and Heat engine automatically takes care of
the dependencies .
In this deployment guide, the templates are developed for standard BIG-IP Virtual Edition images version 13.0 . Prior to
using the templates, the following prerequisites need to be met.
1 . Neutron Components need to be created in OpenStack:
◦ Management network and subnet (where management UI can be accessed)
◦ External network and subnet (where floating IP resides)
22
DEPLOYMENT GUIDEF5 OpenStack Private Cloud Solution Package
◦ Additional network(s) and subnet(s) (e.g. Data Subnet)
◦ Corresponding router(s) configuration
2 . Nova Components:
◦ Key pair for SSH access to BIG-IP VE
3 . Heat Components:
◦ f5-openstack-heat-plugins is optional . It is only needed if you need to reference a custom resource type that
does not exist in the resource_registry section of the environment file.
4 . Glance Components:
◦ BIG-IP Virtual Edition Image Version 13.0 added to Images. The image file must be in QCOW2 format and
can be any size (ALL, LTM, or LTM_1SLOT).
The f5-openstack-hot / supported / templates / allows cluster/2nic and standalone BIG-IP VE deployment methods.
Standalone supports a single or multiple NIC . This deployment guide uses a Heat Orchestration Template to launch a
nNIC (multi NIC) deployment of a BIG-IP VE in an Openstack Private Cloud. In a nNIC implementation, one interface
is for management and data-plane traffic from the Internet, and the user-provided NIC count determines the number of
additional NICs. The standalone heat orchestration template incorporates existing networks defined in Neutron.
Launching Stacks
1 . Ensure the prerequisites are configured in your environment. Prerequisites and Configuration Notes.
2 . Clone this repository or manually download the contents (zip/tar). As the templates use nested stacks and
referenced components, we recommend you retain the project structure as-is for ease of deployment. If any of
the files changed location, make sure that the corresponding paths are updated in the environment files.
3 . Locate and update the environment file (_env.yaml) with the appropriate parameter values. Note that some
default values are used if no value is specified for an optional parameter.
4 . Launch the stack using the OpenStack CLI with a command using the following syntax:
CLI Syntax
openstack stack create <stackname> -t <path-to-template> -e <path-to-env>
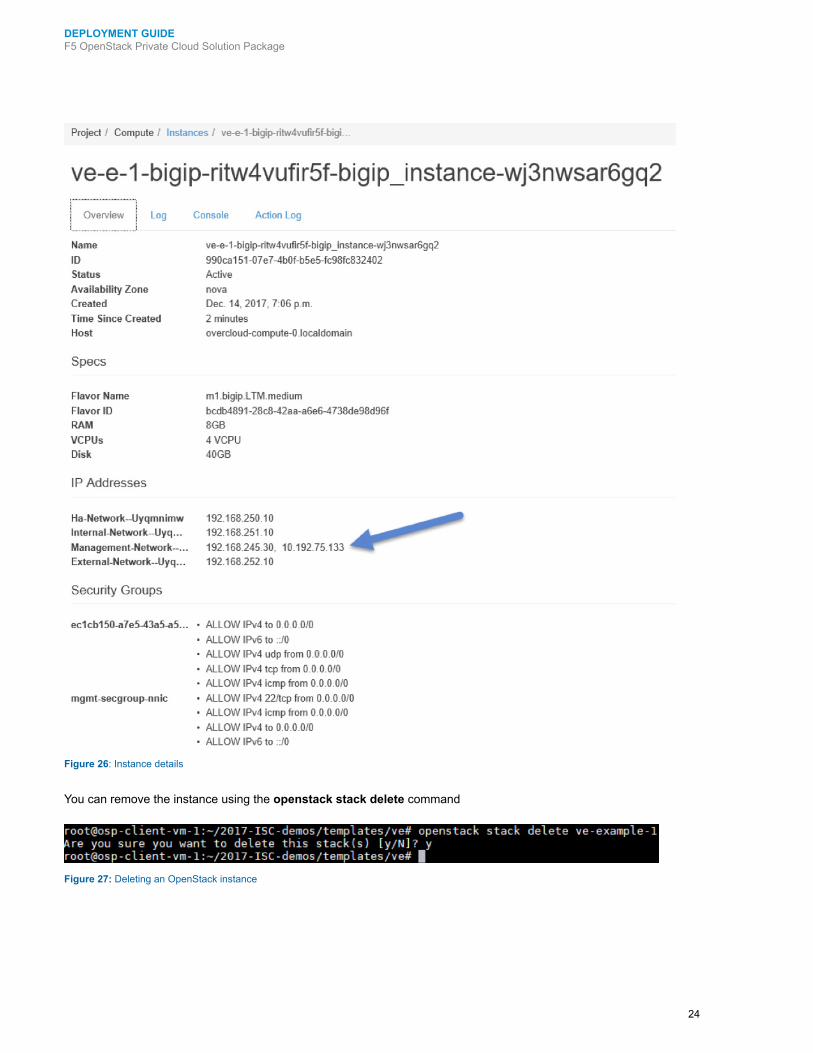
If you select the Instance you will get all the information required for the BIG-IP VE such state, what Overcloud host, VM
sizing, IP addresses etc. You can also access the BIG-IP VE console through Horizon dashboard.
Reviewing the environment file (_env.yaml). While this template has been created by F5 Networks, it is in the
experimental directory and therefore has not completed full testing and is subject to change. F5 Networks does not
offer technical support for templates in the experimental directory. For supported templates, see the templates in the
supported directory .
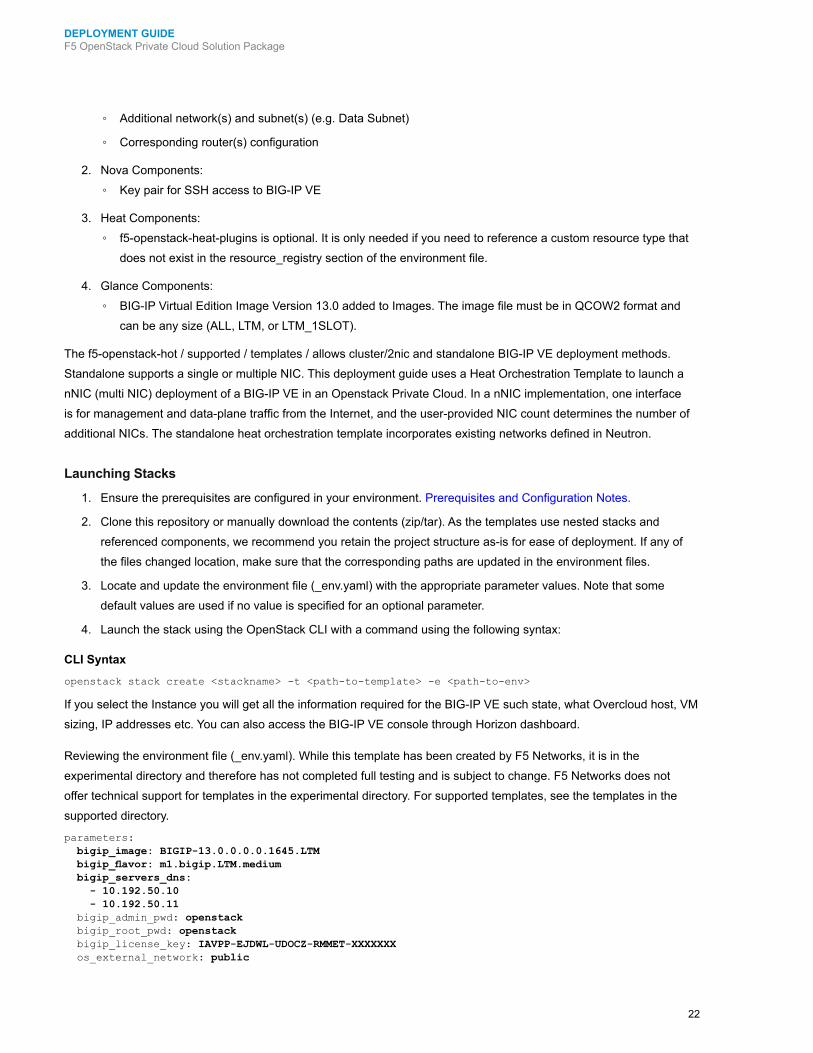
parameters: bigip_image: BIGIP-13.0.0.0.0.1645.LTM bigip_flavor: m1.bigip.LTM.medium bigip_servers_dns: - 10.192.50.10 - 10.192.50.11 bigip_admin_pwd: openstack bigip_root_pwd: openstack bigip_license_key: IAVPP-EJDWL-UDOCZ-RMMET-XXXXXXX os_external_network: public
23
DEPLOYMENT GUIDEF5 OpenStack Private Cloud Solution Package
resource_registry: F5::BigIP::NNICInstance: ../f5-openstack-hot/experimental/templates/standalone/nnic/f5_bigip_standalone_n_nic.yaml F5::BigIP::OverrideDefaultConfig: ../f5-openstack-hot/experimental/configs/override_default_config.yaml F5::BigIP::OnboardingLibs: ../f5-openstack-hot/experimental/configs/onboarding_libs.yaml F5::BigIP::OnboardingScripts: ../f5-openstack-hot/experimental/configs/onboarding_scripts.yaml F5::BigIP::OnboardNetworkConfigIndexed: ../f5-openstack-hot/experimental/configs/onboarding_network_config_indexed.yaml F5::BigIP::ManagementSecurityGroup: ../f5-openstack-hot/experimental/security_groups/bigip_mgmt_security_group.yaml F5::BigIP::CustomSecurityGroup: ../f5-openstack-hot/experimental/security_groups/bigip_custom_security_group.yaml F5::BigIP::NeutronPort: ../f5-openstack-hot/experimental/networks/bigip_neutron_port.yaml F5::BigIP::NNicHandler: ../f5-openstack-hot/experimental/networks/bigip_nnic_handler.yaml F5::BigIP::RunOnboardNetworkConfigs: ../f5-openstack-hot/experimental/configs/run_onboard_network_configs.yaml
We encourage you to use our Slack channel for discussion and assistance on F5 Cloud templates . This channel is
typically monitored Monday-Friday 9-5 PST by F5 employees who will offer best-effort support.
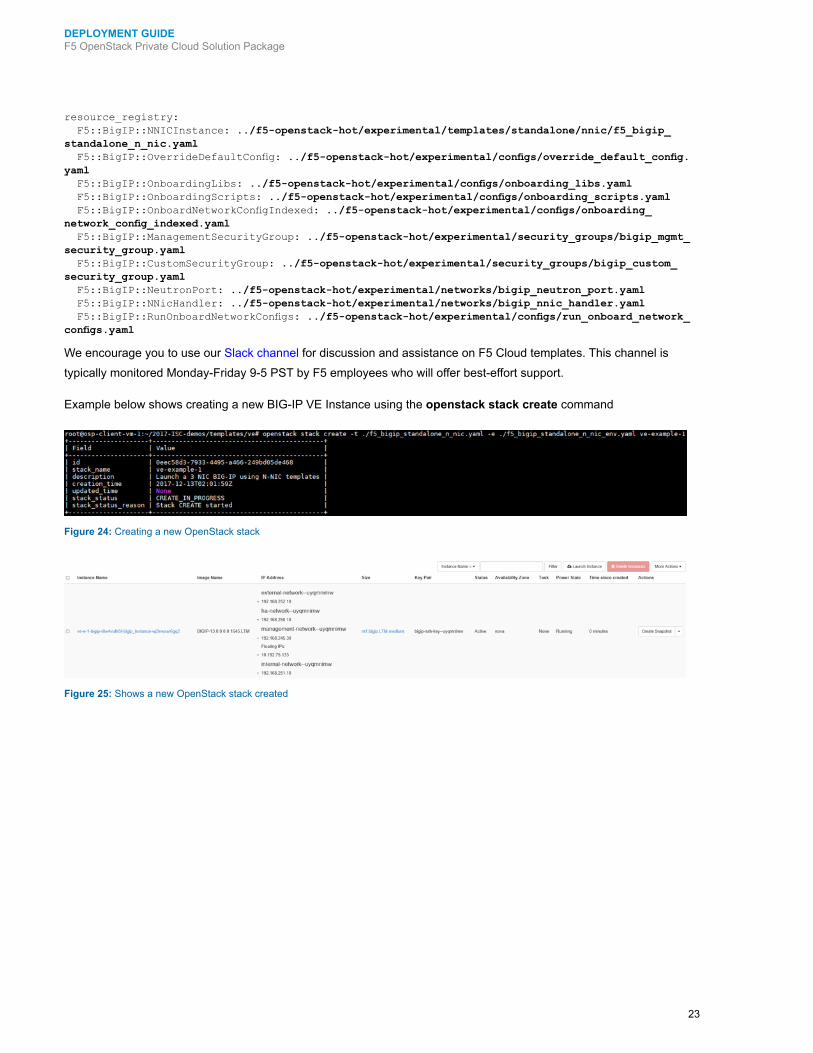
Example below shows creating a new BIG-IP VE Instance using the openstack stack create command
Figure 24: Creating a new OpenStack stack
Figure 25: Shows a new OpenStack stack created
24
DEPLOYMENT GUIDEF5 OpenStack Private Cloud Solution Package
Figure 26: Instance details
You can remove the instance using the openstack stack delete command
Figure 27: Deleting an OpenStack instance
25
DEPLOYMENT GUIDEF5 OpenStack Private Cloud Solution Package
Customizing OpenStack LBaaSv2 Using Enhanced Services DefinitionsF5’s BIG-IP system has many load balancing configurations that don’t have direct implementation in the OpenStack
LBaaSv2 specification. While it’s easy to customize BIG-IP local traffic management settings using profiles, policies,
and iRules, LBaaSv2 doesn’t provide a way to apply these to BIG-IP virtual servers. You can use the F5 Agent for
OpenStack Neutron to deploy Enhanced Service Definitions (ESDs), allowing you to add BIG-IP profiles, policies, and
iRules to OpenStack load balancers
How ESDs Work
An ESD is a set of tags and values that define custom settings for BIG-IP objects. Typically, an ESD applies one or more
profiles, policies, or iRules to a BIG-IP virtual server. The F5 agent reads all ESD JSON files located in /etc/neutron/services/f5/esd/ on startup .
The F5 agent applies ESDs to BIG-IP virtual servers using LBaaSv2 L7 policy operations. When you create an LBaaSv2
L7 policy object (neutron lbaas-l7policy-create), the Agent checks the policy name against the names of all available
ESDs. If it finds a match, the Agent applies the ESD to the BIG-IP virtual server associated with the policy. If the
Agent doesn’t find a matching ESD, it creates a standard L7 policy. Essentially, the F5 agent supersedes the standard
LBaaSv2 behavior, translating neutron lbaas-l7policy-create mypolicy into “apply the ESD named mypolicy to the
BIG-IP system .”
You can define multiple ESDs—each containing a set of predefined tags and values—in a single JSON file. The Agent
validates each tag and discards any that are invalid. ESDs remain fixed in the Agent’s memory until you restart the
Agent service. When you apply multiple L7 policies, each subsequent ESD overwrites the virtual server settings defined
by previous ESDs.
Note: F5 recommends defining all of the settings you want to apply for a specific application in a single ESD. If you
define multiple ESDs, each should apply to one (1) specific application. Deleting an L7 policy that matches an ESD
removes all the settings defined by that ESD from the virtual server. If you apply multiple ESD policies to the virtual
server, removing one ESD L7 policy will not affect the settings defined by the remaining ESD policies.
Create an Enhanced Service Definition
Enhanced Service Definitions (ESDs) must be valid JSON. To apply multiple ESDs to a single application, define them
all in a single file. Create as many individual ESDs as you need for your applications. Each ESD must have a unique
name to avoid conflicts; if you give multiple ESDs the same name, the Agent will implement one of them (method of
selection is not defined). The following link provided details on the enhanced service definition supported tags that
define the policies you want the F5 agent to apply to the BIG-IP. Neutron will apply L7 content policies before any
LBaaS policies included in ESDs .
26
DEPLOYMENT GUIDEF5 OpenStack Private Cloud Solution Package
ESD files have this general format:
{ “<ESD name>”: { “<tag name>”: “<tag value>”, “<tag name>”: “<tag value>”, … }, … }
An example ESD file, demo.json, shows the desired BIG-IP virtual server configurations in valid JSON. The agent
package includes an example ESD file, demo.json. You can amend this example file – and save it with a unique name
– to create ESDs for your applications .
{ “esd_demo_1”: { “lbaas_ctcp”:”tcp-mobile-optimized”, “lbaas_stcp”:”tcp-lan-optimized”, “lbaas_cssl_profile”:”clientssl”, “lbaas_sssl_profile”:”serverssl”, “lbaas_irule”: [“_sys_https_redirect”], “lbaas_policy”: [“demo_policy”], “lbaas_persist”: “hash”, “lbaas_fallback_persist”: “source_addr” }, “esd_demo_2”: { “lbaas_irule”: [ “_sys_https_redirect”,“_sys_APM_ExchangeSupport_helper” ] } }
1 . The ESD file is a valid JSON format. Any invalid JSON file will be ignored.
2 . The tag name is valid .
3 . The tag value is correctly defined: a single string (for most tags), or a comma delimited list using JSON [] notation
(only for lbaas_irule and lbaas_policy tags).
4 . The tag value (profile, policy, or iRule) exists in the Common partition. Keep these rules in mind:
a . Any profile, policy, or iRule used in an ESD must be created in the Common partition.
b. Any profile, policy, or iRule must be pre-configured on your BIG-IP before re-starting the F5 LBaaSv2 agent.
Any tag that does not pass the validation steps above will be ignored. An ESD that contains a mix of valid and invalid
tags will still be used, but only valid tags will be applied.
Using ESDs
Follow this workflow for using ESDs.
1 . Configure all desired profiles, policies, and iRules on your BIG-IP .
2 . Create an ESD in a JSON file located in /etc/neutron/services/f5/esd/.
3 . Restart the F5 OpenStack agent .
UBUNTU - service f5-oslbaasv2-agent restart
4 . Create a Neutron load balancer with a listener (and pool, members, monitor).
5 . Create a Neutron L7 policy object with a name parameter that matches your ESD name.
27
DEPLOYMENT GUIDEF5 OpenStack Private Cloud Solution Package
You apply an ESD to a virtual server using L7 policy objects in LBaaSv2. Using the Neutron CLI, you can create an L7
policy like this:
$ neutron lbaas-l7policy-create --listener <name or ID> --name <ESD name> --action <action>
The action parameter is ignored, but must be included for Neutron to accept the command.
Deployment Guide Use Cases Helpful hints
1 . Use a JSON lint application to validate your ESD files before you deploy them.
2 . Restart the F5 agent every time you add or modify ESD files.
3 . Use a unique name for each ESD you define. ESD names are case-sensitive.
4 . Configure all profiles, policies, and/or iRules in the /Common partition on your BIG-IP before deploying your ESD.
5 . Remember that ESDs overwrite existing settings.
6 . When using iRules and policies, remember to define any iRule priority within the iRule itself.
7 . If you have DEBUG logging enabled, check the Agent log for statements reporting on tag validity.
Here is an ESD which does provider defined TLS offload and has compliance and security based iRules
root@osp-client-vm-1:~/2017-ISC-demos/scripts# cat enterprise_10302017.json{“dmzmobile”: { “lbaas_ctcp”: “tcp-mobile-optimized”, “lbaas_stcp”: “tcp-lan-optimized”, “lbaas_cssl_profile”: “clientssl-secure”, “lbaas_irule”: [“server_header_scrub”,”cve-2017-5638”,”cve-2015-1635”,”cve-2013-0156”], “lbaas_policy”: [“dmz”], “lbaas_persist”: “cookie”, “lbaas_fallback_persist”: “source_addr” },
Since we are doing TLS offload its change the declarative yaml template for the service to listen in TCP port 443 and
not TCP port 80
root@osp-client-vm-1:~/2017-ISC-demos/templates/esd# cat lbaas_env.yaml---parameters: app_image: webserver app_flavor: m1.medium app_port: 80 lb_port: 443 lb_type: HTTP lb_method: LEAST_CONNECTIONS lb_monitor: PING lb_pool_member_count: 3 external_network: 8b000a01-a864-4a12-9e98-bf89002f82c9
resource_registry: LBaaS::AppServerInstance: app_server.yaml
28
DEPLOYMENT GUIDEF5 OpenStack Private Cloud Solution Package
We add the ESD by declaring a standard OpenStack LBaaSv2 l7 policy resource with the same name of the ESD
root@osp-client-vm-1:~/2017-ISC-demos/templates/esd# cat lbaas_with_esd.yaml---
esd: type: OS::Neutron::LBaaS::L7Policy properties: name: dmzmobile description: add corporate Internet mobile application ADC policies listener: {get_resource: listener} action: REJECT
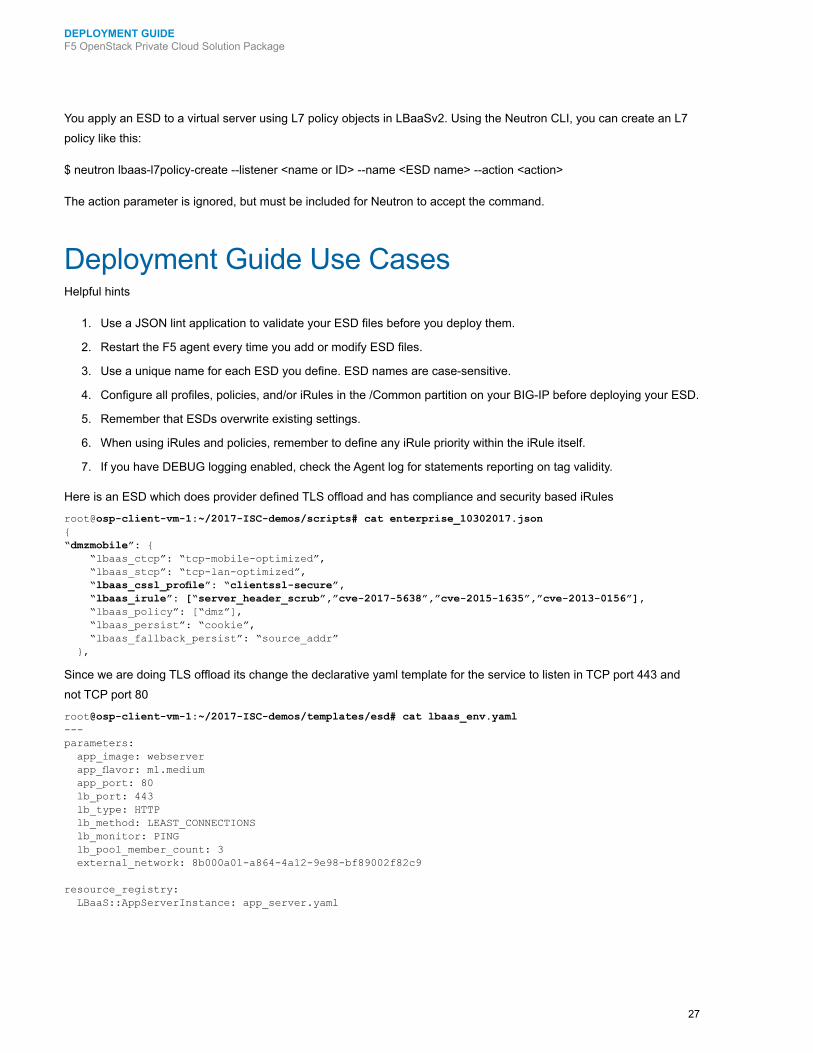
Simply deploy the service and you get an LBaaSv3 virtual service with all the goodness of our provider defined ESD
Figure 28: Creating a new stack with ESD
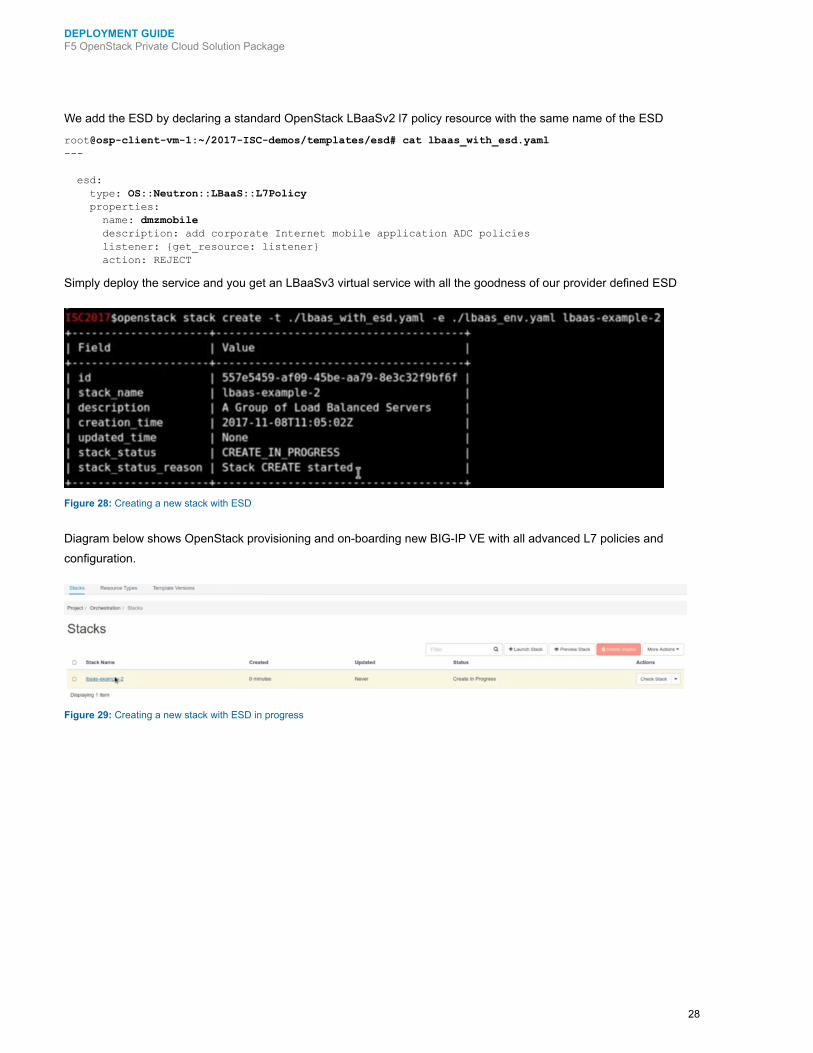
Diagram below shows OpenStack provisioning and on-boarding new BIG-IP VE with all advanced L7 policies and
configuration.
Figure 29: Creating a new stack with ESD in progress
29
DEPLOYMENT GUIDEF5 OpenStack Private Cloud Solution Package
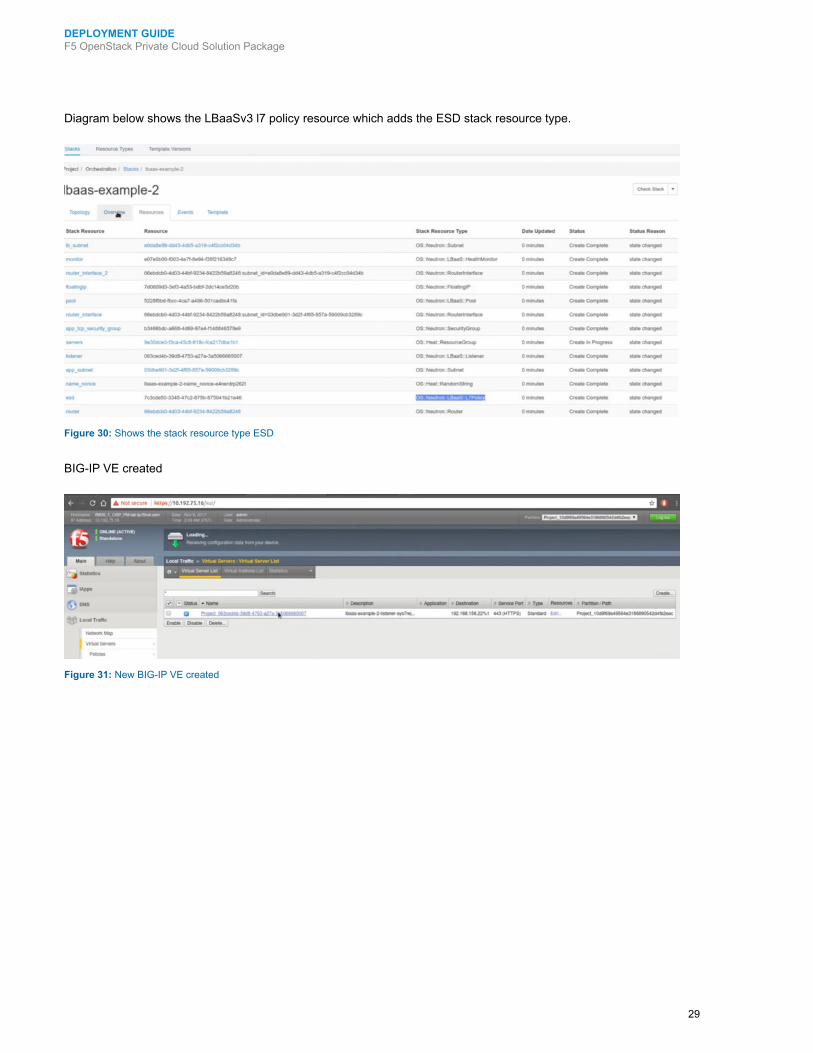
Diagram below shows the LBaaSv3 l7 policy resource which adds the ESD stack resource type.
Figure 30: Shows the stack resource type ESD
BIG-IP VE created
Figure 31: New BIG-IP VE created
30
DEPLOYMENT GUIDEF5 OpenStack Private Cloud Solution Package
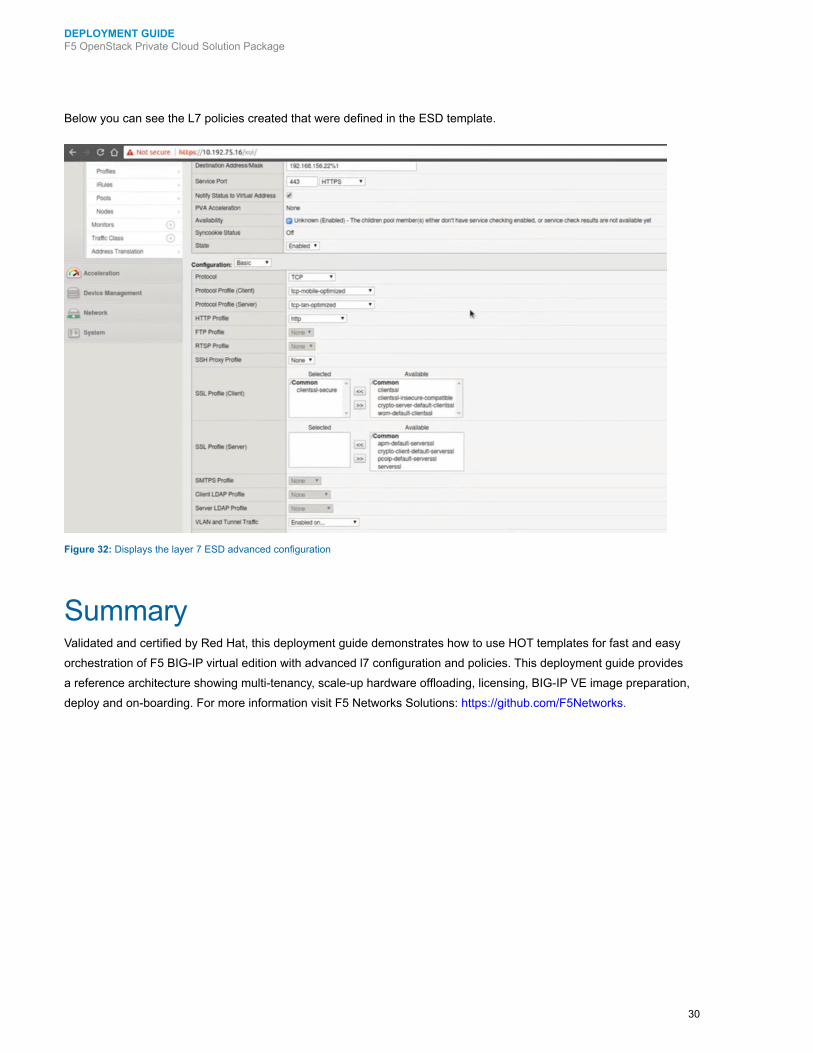
Below you can see the L7 policies created that were defined in the ESD template.
Figure 32: Displays the layer 7 ESD advanced configuration
SummaryValidated and certified by Red Hat, this deployment guide demonstrates how to use HOT templates for fast and easy
orchestration of F5 BIG-IP virtual edition with advanced l7 configuration and policies. This deployment guide provides
a reference architecture showing multi-tenancy, scale-up hardware offloading, licensing, BIG-IP VE image preparation,
deploy and on-boarding. For more information visit F5 Networks Solutions: https://github.com/F5Networks.
DEPLOYMENT GUIDEF5 OpenStack Private Cloud Solution Package
©2018 F5 Networks, Inc. All rights reserved. F5, F5 Networks, and the F5 logo are trademarks of F5 Networks, Inc. in the U.S. and in certain other countries. Other F5 trademarks are identi ed at f5.com. Any other products, services, or company names referenced herein may be trademarks of their respective owners with no endorsement or af liation, express or implied, claimed by F5. 0218
About F5 F5 mitigates online identity theft by preventing phishing, malware, and pharming attacks in real time with advanced
encryption and identification mechanisms. F5 products and services complement your existing anti-fraud technologies,
improving your protection against malicious activity and providing an encompassing defense mechanism . F5 security
products are customizable, so you can address your exact needs.
F5 enables financial organizations working online to gain control over areas that were once virtually unreachable and
indefensible, and to neutralize local threats found on customers’ personal computers, without requiring the installation of
software on the end user side. The transparent solution installs seamlessly on your websites, so it doesn’t alter the user
experience in any way.
F5’s one-of-a-kind solution has proven its exceptional effectiveness in large number of financial institutions around the
world, helping them protect their brand and reputation, and to avoid significant economic damage.
Rounding out its offering, F5 provides professional services and advanced research capabilities in the field of
cybercrime including malware, Trojans, viruses, and more.