Embed Size (px)
Citation preview

Deploying Oracle Database 11g R2
on Red Hat Enterprise Linux 6
Best Practices
Roger Lopez, Sr. Software Engineer
RHCE
Version 1.3
August 2013

1801 Varsity Drive™Raleigh NC 27606-2072 USAPhone: +1 919 754 3700Phone: 888 733 4281Fax: +1 919 754 3701PO Box 13588Research Triangle Park NC 27709 USA
Linux is a registered trademark of Linus Torvalds. Red Hat, Red Hat Enterprise Linux and the Red Hat "Shadowman" logo are registered trademarks of Red Hat, Inc. in the United States and other countries.
Oracle and Java are registered trademarks of Oracle.
Intel, the Intel logo and Xeon are registered trademarks of Intel Corporation or its subsidiaries in the United States and other countries.
All other trademarks referenced herein are the property of their respective owners.
© 2013 by Red Hat, Inc. This material may be distributed only subject to the terms and conditions set forth in the Open Publication License, V1.0 or later (the latest version is presently available at http://www.opencontent.org/openpub/).
The information contained herein is subject to change without notice. Red Hat, Inc. shall not be liable for technical or editorial errors or omissions contained herein.
Distribution of modified versions of this document is prohibited without the explicit permission of Red Hat Inc.
Distribution of this work or derivative of this work in any standard (paper) book form for commercial purposes is prohibited unless prior permission is obtained from Red Hat Inc.
The GPG fingerprint of the [email protected] key is:CA 20 86 86 2B D6 9D FC 65 F6 EC C4 21 91 80 CD DB 42 A6 0E
www.redhat.com ii [email protected]

Comments and FeedbackIn the spirit of open source, we invite anyone to provide feedback and comments on any reference architectures. Although we review our papers internally, sometimes issues or typographical errors are encountered. Feedback allows us to not only improve the quality of the papers we produce, but allowsthe reader to provide their thoughts on potential improvements and topic expansion to the papers.
Feedback on the papers can be provided by emailing [email protected]. Please refer to the title within the email.
Staying In TouchJoin us on some of the popular social media sites where we keep our audience informed on new reference architectures as well as offer related information on things we find interesting.
Like us on Facebook:
https://www.facebook.com/rhrefarch
Follow us on Twitter:
https://twitter.com/RedHatRefArch
Plus us on Google+:
https://plus.google.com/u/0/b/114152126783830728030/
Accessing Reference Architectures
There are two ways to access Red Hat reference architectures:
• The Red Hat customer portal at http://access.redhat.com using a customer login
• The Red Hat resource library at http://www.redhat.com/resourcelibrary/reference-architectures/
[email protected] iii www.redhat.com

Table of Contents1 Executive Summary......................................................................................... 1
2 Reference Architecture Environment................................................................ 2
2.1 Reference Architecture Overview...................................................................................... 2
2.2 Network Topology.............................................................................................................. 3
2.3 Hardware Details............................................................................................................... 4
2.4 File System Layout & Disk Space Details........................................................................ 5
2.5 Storage Layout.................................................................................................................. 6
2.6 Swap Space..................................................................................................................... 6
2.7 Security: Firewall Settings................................................................................................ 7
2.8 Security: SELinux.............................................................................................................. 7
3 Reference Architecture Configuration Details................................................... 8
3.1 Setting OS Hostname........................................................................................................ 8
3.2 Network Configuration....................................................................................................... 8
3.2.1 Configuring /etc/resolv.conf file.................................................................................... 93.2.2 Public Network Configuration...................................................................................... 93.2.3 NTP Configuration..................................................................................................... 11
3.3 OS Configuration............................................................................................................. 12
3.3.1 Accessing the RHN Repository................................................................................. 123.3.2 Oracle Database 11g Release 2 (11.2.0.3) Package Requirements........................ 123.3.3 Configuring Security-Enhanced Linux (SELinux)...................................................... 143.3.4 Configuring Firewall Settings..................................................................................... 143.3.5 Setting Virtual Memory.............................................................................................. 153.3.6 Setting Shared Memory............................................................................................. 163.3.7 Setting Semaphores.................................................................................................. 173.3.8 Ephemeral Network Ports.......................................................................................... 183.3.9 Optimizing Network Settings...................................................................................... 183.3.10 Increasing synchronous I/O Requests..................................................................... 193.3.11 Increasing File Handles........................................................................................... 193.3.12 User Accounts & Groups......................................................................................... 203.3.13 Setting Shell Limits for the Grid and Oracle User.................................................... 21
3.4 Storage Configuration..................................................................................................... 23
3.4.1 Setting up DM-Multipath............................................................................................ 233.4.2 Partitioning Device Mapper Shared Disks................................................................. 26
www.redhat.com iv [email protected]

3.4.3 Configuring Oracle ASM Disks.................................................................................. 273.4.3.1 Oracle ASMLib Alternative: Configuring Udev Rules........................................... 273.4.3.2 Configuring Oracle ASMLib.................................................................................. 28
3.4.4 Optimizing Database Storage using Automatic System Tuning................................ 32
4 Oracle 11gR2 Configuration........................................................................... 34
4.1.1 Installing Oracle Grid Infrastructure (Required for ASM)........................................... 344.1.2 Installing Oracle 11g R2 Database Software............................................................ 384.1.3 Creating ASM Diskgroups via the ASM Configuration Assistant (ASMCA)............... 434.1.4 Creating a Database using Database Configuration Assistant (DBCA).................... 454.1.5 Enabling HugePages................................................................................................. 50
5 Logging into the Oracle Database 11g Release 2 (11.2.0.3)......................... 53
6 Conclusion...................................................................................................... 54
Appendix A: Revision History........................................................................... 55
Appendix B: Contributors ................................................................................ 56
Appendix C: DM Multipath Configuration File................................................... 57
Appendix D: Iptables Configuration File........................................................... 59
Appendix E: Huge Pages Script....................................................................... 60
Appendix F: Oracle Database Package Requirements Text File...................... 61
Appendix G: Kernel Parameters....................................................................... 62
Appendix H: Limits Configuration File (Limits.conf).......................................... 63
Appendix I: 99-oracle-asmdevices.rules........................................................... 64
Appendix J: Sample Kickstart File.................................................................... 65
Appendix K: Configuration Files....................................................................... 66
Appendix L: Troubleshooting ORA-* Errors...................................................... 67
Appendix M: References.................................................................................. 71
[email protected] v www.redhat.com

1 Executive SummaryIT organizations face challenges of optimizing Oracle database environments to keep up with the ever increasing workload demands and evolving security risks. This reference architectureprovides a step-by-step deployment procedure with the latest best practices to install and configure an Oracle Database 11g Release (11.2.0.3) with Oracle Automatic Storage Management (ASM). It is suited for system, storage, and database administrators deploying Oracle Database 11g Release 2 (11.2.0.3) on Red Hat Enterprise Linux 6. It is intended to provide a Red Hat | Oracle reference architecture that focuses on the following tasks:
• Deploying Oracle Grid Infrastructure 11g R2 (11.2.0.3)
• Deploying Oracle Database 11g R2 (11.2.0.3) with shared SAN disks
• Using Oracle ASM disks with udev rules or with Oracle ASMLib
• Securing the Oracle Database 11gR2 environment with SELinux
[email protected] 1 www.redhat.com

2 Reference Architecture EnvironmentThis section focuses on the components used during the deployment of Oracle Database 11gRelease 2 (11.2.0.3) with Oracle Automatic Storage Management (ASM) on Red Hat Enterprise Linux 6 x86_64 in this reference architecture.
2.1 Reference Architecture OverviewA pictorial representation of the environment used in this reference architecture is shown inFigure 1: Reference Architecture Overview.
www.redhat.com 2 [email protected]
Figure 1: Reference Architecture
Overview

2.2 Network TopologyThe network topology used in this reference architecture consists of two public switches with a link aggregation that connect the two switches together (Public Switch A and Public Switch B), creating a single logical switch. Ethernet device em1 on the server connects to Public Switch A, while Ethernet device em2 on the server connects to Public Switch B. Ethernet devices em1 and em2 are bonded together as a bond device, bond0, providing high availability for the network traffic. Figure 2.2.1: Network Topology shows the pictorial representation of the two public switches connecting to the server, while Figure 2.2.2: Ethernet Bonding shows the bonding of Ethernet device em1 and em2 as part of the bond0 device.
[email protected] 3 www.redhat.com
Figure 2.2.1: Network Topology
Figure 2.2.2: Ethernet Bonding

2.3 Hardware DetailsThe following are the minimum hardware requirements to properly install Oracle Database 11g Release 2 (11.2.0.3) on a x86_64 system:
• Minimum of 1 GB of RAM for the installation of both Oracle Grid Infrastructure and Oracle Database, however 2 GB of memory or more is recommended
• Minimum of 1 Network Interface Card (NIC), however 2 NICs are recommended for high availability (HA) as used in the reference architecture
• Red Hat Enterprise Linux 6.x Server x86_64 with kernel 2.6.32-71 or higher
• Console access that supports 1024 x 768 resolution to ensure correct display of Oracle's Universal Installer (OUI).
Table 2.3.1: Server Details specifies the hardware for the server used within this reference architecture. This hardware meets the minimum requirements for properly installing Oracle Database 11g Release 2 (11.2.0.3) on a x86_64 system.
Server Hardware Specifications
Oracle 11g R2 Standalone Server(db-oracle-node1)[1 x HP ProLiant DL370 G6 Server]
Red Hat Enterprise Linux 6.4kernel 2.6.32-358.el6.x86_64
2 Socket, 8 Core (16 cores)Intel(R) Xeon(R) CPU W5580 @ 3.20 GHz
48 GB of memory, DDR3 4096 MB @ 1333MHz DIMMs
2 x NetXen NX3031 1/10-Gigabit NetworkInterface Cards (NICs) for public network
1 x Qlogic ISP2532 8GB Fibre Channel DualPort HBA
Table 2.3.1: Server Details
Table 2.3.2: Switch Details specifies the Fibre Channel and Ethernet switches used within this reference architecture.
Switch Hardware
2 x Brocade Silkworm Fibre Switches
2 x HP ProCurve Gigabit Switches
Table 2.3.2: Switch Details
www.redhat.com 4 [email protected]

Table 2.3.3: Storage Details specifies the storage used for storing Oracle data files within this reference architecture.
Storage Hardware Specifications
HP StorageWorks MSA2324fc DualController Array
24 x 146 GB 15K SAS Hard disks
Table 2.3.3: Storage Details
2.4 File System Layout & Disk Space DetailsThe following are the minimum disk space requirements for properly installing Oracle Database 11g Release 2 (11.2.0.3) software based upon this reference architecture.
Software Disk Space
Oracle Grid Infrastructure Home 5.5 GB
Oracle Database Home Enterprise Edition(includes software files and data files)
8.9 GB
/tmp 1 GB
Table 2.4.1:Disk Space Requirements
NOTE: The actual amount of disk space consumed for Oracle Grid Infrastructure Home and Oracle Database Home Enterprise Edition may vary.
Table 2.4.2: File System Layout specifies the file system layout for the server used within this reference architecture. This layout ensures the disk space requirements to properly installthe Oracle Grid Infrastructure and Oracle Database software for Oracle Database 11g Release 2 (11.2.0.3) within the /u01 partition.
File System Layout Disk Space Size
/ 15 GB
/dev/shm 24 GB
/boot 248 MB
/home 8 GB
/tmp 4 GB
/u01 50 GB
/usr 5 GB
/var 8 GB
Table 2.4.2: File System Layout
While the size of the Oracle data files varies for each solution, the following are the Oracle
[email protected] 5 www.redhat.com

data file sizes used for this reference architecture.
Volume Volume Size
Oracle Database Volume 1 (db1) 100 GB
Oracle Database Volume 2 (db2) 100 GB
Fast Recovery Area (fra) 200 GB
Oracle Redo Log Volume (redo) 10 GB
Table 2.4.3: Oracle Data File Sizes for Reference Architecture
2.5 Storage Layout
Table 2.5.1: Storage Disk Layout for Reference Architecture shows the storage disk layout for each volume.
VirtualDiskgroup
Name
VolumeName
Volume Size RAID GroupType
HarddriveCount
HotSpares
Available
Size ofVirtualDisk
vd01 db1 100 GB Raid 1/0 8 1 586 GB
vd02 db2 100 GB Raid 1/0 8 1 586 GB
vd03 fra 200 GB Raid 5 5 0 586 GB
vd04 redo 10 GB Raid 1 2 0 146 GB
Table 2.5.1: Storage Disk Layout for Reference Architecture
2.6 Swap SpaceSwap space is determined by the amount of RAM found within the system. The following table displays the swap space recommendation. This reference architecture allocates 16 GB of RAM for swap space.
RAM Swap Space
2.5 GB up to 16 GB Equal to the size of RAM
Greater than 16 GB 16 GB of RAM
Table 2.6.1: Recommended Swap Space
NOTE: When calculating swap space, ensure not to include RAM assigned for hugepages. More information on hugepages can be found in Section 4.1.5 Enabling HugePages
www.redhat.com 6 [email protected]

2.7 Security: Firewall SettingsTable 2.7.1: Firewall Settings lists the enabled ports within this reference architecture.
Port Protocol Description
22 TCP Secure Shell (SSH)
80 TCP Hypertext Transfer Protocol (HTTP)
443 TCP Hypertext Transfer Protocol overSSL/TLS (HTTPS)
1521 TCP Oracle Transparent NetworkSubstrate (TNS) Listener default
port
1158 TCP Oracle Enterprise Manager 11gdefault port
Table 2.7.1: Firewall Settings
2.8 Security: SELinuxOracle 11g Release 2 version 11.2.0.3 and later support SELinux. All systems in this reference architecture run with SELinux enabled and set to enforcing mode. Table 2.8.1: SELinux Packages lists the required SELinux packages. The version 3.7.19-202 is available within the downloadable tar from Appendix K Configuration Files
Package Version
selinux-policy 3.7.19-211
selinux-policy-targeted 3.7.19-211
Table 2.8.1: SELinux Packages
[email protected] 7 www.redhat.com

3 Reference Architecture Configuration DetailsThis reference architecture focuses on the deployment of Oracle Database 11g Release 2 (11.2.0.3) with Oracle Automatic Storage Management (ASM) on Red Hat Enterprise Linux 6 x86_64. The configuration is intended to provide a comprehensive Red Hat | Oracle solution. The key solution components covered within this reference architecture consists of:
• Red Hat Enterprise Linux 6 Update 4
• Oracle Grid Infrastructure 11g Release 2 (11.2.0.3)
• Oracle Database 11g Release 2 (11.2.0.3)
• Security-Enhanced Linux (SELinux)
• Device Mapper Multipathing
• udev Rules
• Oracle ASMLib
3.1 Setting OS HostnameA unique host name is required for the installation of Oracle Database 11g Release 2 (11.2.0.3) The host name within this reference architecture is: db-oracle-node1. To set the host name, please follow the instructions below.
Set the host name via the use of the hostname command. An example of setting db-oracle-node1 host name is shown below.# hostname db-oracle-node1.cloud.lab.eng.bos.redhat.com
Edit the /etc/sysconfig/network file's host name variable with the host name provided above. An example of the /etc/sysconfig/network file on db-oracle-node1 can be seen below.
# cat /etc/sysconfig/network NETWORKING=yes HOSTNAME=db-oracle-node1.cloud.lab.eng.bos.redhat.com NOZEROCONF=yes
3.2 Network Configuration The network configuration section focuses on the proper creation of a bonded network interface, ensures the NetworkManager is disabled, and configures the /etc/resolv.conf file. The bonded network interface provides an Oracle environment with high availability in case ofa network interface failure.
www.redhat.com 8 [email protected]

3.2.1 Configuring /etc/resolv.conf fileVia the man pages of resolv.conf, “The resolver is a set of routines in the C library that provide access to the Internet Domain Name System (DNS). The resolver configuration file contains information that is read by the resolver routines the first time they are invoked by a process. The file is designed to be human readable and contains a list of keywords with values that provide various types of resolver information.” The /etc/resolv.conf file for this reference architecture consists of two configuration options: nameserver and search. The search option is used to search for a host name part of a particular domain. The nameserver option is the IP address of the name server the system (db-oracle-node1) should query. If more than one nameserver is listed, the resolver library queries them in order. An example of the /etc/resolv.conf file used on the reference architecture can be seen below.
cat /etc/resolv.conf search cloud.lab.eng.bos.redhat.com nameserver 10.16.143.247 nameserver 10.16.143.248 nameserver 10.16.255.2
For more information, please visit the man pages of the resolv.conf file via the command:
# man resolv.conf
3.2.2 Public Network ConfigurationThe public network configuration consists of two network interfaces bonded together to provide high availability. The example below shows how to bond physical interfaces em1 and em2 with a bond device labeled bond0. If NetworkManager is installed, ensure it is disabled.
Check the status of NetworkManager:
# chkconfig –-list | grep NetworkManagerNetworkManager 0:off 1:off 2:off 3:off 4:off 5:off 6:off
Disable NetworkManager:
# service NetworkManager stop# chkconfig NetworkManager off
As the root user, execute the following command which creates a file named bonding.conf within the /etc/modprobe.d/ directory needed to create a bonded device for multiple network interfaces. The bonding.conf file is also part of Appendix K Configuration Files
# echo "alias bond0 bonding" > /etc/modprobe.d/bonding.conf
[email protected] 9 www.redhat.com
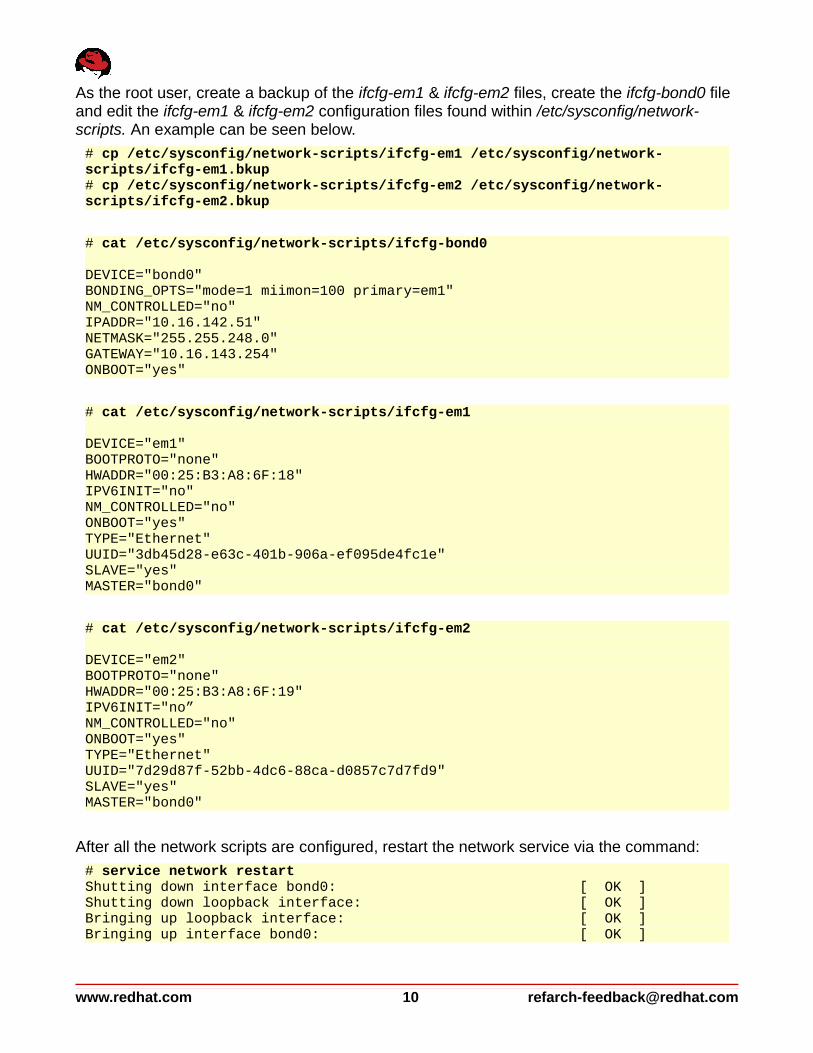
As the root user, create a backup of the ifcfg-em1 & ifcfg-em2 files, create the ifcfg-bond0 file and edit the ifcfg-em1 & ifcfg-em2 configuration files found within /etc/sysconfig/network-scripts. An example can be seen below.
# cp /etc/sysconfig/network-scripts/ifcfg-em1 /etc/sysconfig/network-scripts/ifcfg-em1.bkup# cp /etc/sysconfig/network-scripts/ifcfg-em2 /etc/sysconfig/network-scripts/ifcfg-em2.bkup
# cat /etc/sysconfig/network-scripts/ifcfg-bond0
DEVICE="bond0" BONDING_OPTS="mode=1 miimon=100 primary=em1" NM_CONTROLLED="no" IPADDR="10.16.142.51" NETMASK="255.255.248.0" GATEWAY="10.16.143.254" ONBOOT="yes"
# cat /etc/sysconfig/network-scripts/ifcfg-em1
DEVICE="em1" BOOTPROTO="none" HWADDR="00:25:B3:A8:6F:18" IPV6INIT="no" NM_CONTROLLED="no" ONBOOT="yes" TYPE="Ethernet" UUID="3db45d28-e63c-401b-906a-ef095de4fc1e" SLAVE="yes" MASTER="bond0"
# cat /etc/sysconfig/network-scripts/ifcfg-em2
DEVICE="em2" BOOTPROTO="none"HWADDR="00:25:B3:A8:6F:19"IPV6INIT="no”NM_CONTROLLED="no"ONBOOT="yes"TYPE="Ethernet" UUID="7d29d87f-52bb-4dc6-88ca-d0857c7d7fd9"SLAVE="yes" MASTER="bond0"
After all the network scripts are configured, restart the network service via the command:
# service network restartShutting down interface bond0: [ OK ] Shutting down loopback interface: [ OK ] Bringing up loopback interface: [ OK ] Bringing up interface bond0: [ OK ]
www.redhat.com 10 [email protected]

3.2.3 NTP ConfigurationThe ntpd program is an operating system daemon which sets and maintains the system timeof day in synchronism with Internet standard time servers1. The ntpd program operates by exchanging messages with one or more configured servers at designated poll intervals1.
To configure the ntpd daemon, follow the instructions below.
1. Edit the /etc/ntp.conf file with a text editor such as vi.
# vi /etc/ntp.conf2. Locate the following public server pool section, and modify to include the appropriate
NTP servers. For the purposes of this reference architecture, only one NTP server is used, but 3 is recommended. The iburst option was added to speed up the time in which it takes to properly sync with the NTP servers.
# Use public servers from the pool.ntp.org project. # Please consider joining the pool (http://www.pool.ntp.org/join.html). server 10.16.255.2 iburst
3. Save all the changes within the /etc/ntp.conf file
4. Restart the ntpd daemon via the command:
# service ntpd restartShutting down ntpd: [FAILED] Starting ntpd: [ OK ] NOTE: Shutting down ntpd daemon provides a status of 'FAILED' if the ntpd daemonis currently off.
5. Ensure that the ntpd daemon is started when the system is booted.
# chkconfig ntpd on
1 ntpd – Network Time Protocol (NTP) daemon man page – man ntpd (8)
[email protected] 11 www.redhat.com

3.3 OS Configuration
3.3.1 Accessing the RHN RepositoryInstructions on how to register a system and manage subscriptions on Red Hat Enterprise Linux 6 can be found within the Red Hat Linux 6 Deployment Guide documentation2.
The following table shows the required channels via the Red Hat Network for the installation of Oracle.
Channel Source
rhel-x86_64-server-6 RHN Classic
rhel-x86_64-server-supplementary-6 RHN Classic
Table 3.3.1.1: Required Channels
NOTE: The rhel-x86_64-server-supplementary-6 channel is a requirement for the implementation of Oracle ASMLib found in Section 3.4.3.2 Configuring Oracle ASMLib. However, Oracle ASMLib is not required for the use of Oracle ASM disks. This reference architecture features both methods of implementation within Section 3.4.3.1 Oracle ASMLib Alternative: Configuring Udev Rules and Section 3.4.3.2 Configuring Oracle ASMLib
3.3.2 Oracle Database 11g Release 2 (11.2.0.3) Package RequirementsA specific set of packages is required to properly deploy Oracle Database 11g Release 2 (11.2.0.3) on Red Hat Enterprise Linux 6 (x86_64). The number of installed packages required varies depending on whether a default or minimal installation of Red Hat Enterprise Linux 6 (x86_64) is performed. For the purposes of this reference architecture, a minimal RedHat Enterprise Linux 6 installation is performed to reduce the number of installed packages. Asample kickstart file as been provided within Appendix K Configuration Files. Red Hat Enterprise Linux 6 installation required group packages:
Required Group Packages
@Base
@Core
Table 3.3.2.1: Group Packages
2 Red Hat Enterprise Linux 6 Deployment Guide, https://access.redhat.com/site/documentation/en-US/Red_Hat_Enterprise_Linux/6/html-single/Deployment_Guide/index.html#entitlements
www.redhat.com 12 [email protected]

Oracle Grid Infrastructure 11.2 and Oracle Database 11.2 required x86_64 RPM packages3:
Required Packages
cloog-ppl libXxf86misc
compat-libcap1 libXxf86vm
compat-libstdc++-33 libaio-devel
cpp libdmx
gcc libstdc++-devel
gcc-c++ mpfr
glibc-devel make
glibc-headers ppl
kernel-headers xorg-x11-utils
libXmu xorg-x11-xauth
libXt libXv
ksh libXxf86dga
Table 3.3.2.2: Required Packages
After the installation of Red Hat Enterprise Linux 6 is completed, create a file, req-rpm.txt, thatcontains the name of each RPM package listed above on a separate line. For simplicity, this req-rpm.txt file is included in Appendix F Oracle Database Package Requirements Text File.
Use the yum package manager to install the packages and any of their dependencies with thefollowing command:
# yum install `awk '{print $1}' ./req-rpm.txt`
A minimum installation of Red Hat Enterprise Linux 6 does not install the X Window System server package, but only the required X11 client libraries. In order to run the Oracle Universal Installer (OUI), a system with the X Window System server package installed is required. Via a system with X Window System installed, SSH into the Oracle Database server with the Y option to ensure trusted X11 forwarding is set. The command is as follows:
# ssh -Y 10.16.142.51
Alternatively, if a system with the X Window System server package is unavailable, install the X Window System server package directly on the Oracle Database Server.
# yum groupinstall "X Window System"
3 Linux OS Installation with Reduced Set of Packages for Running Oracle Database Server [ID 728346.1]
[email protected] 13 www.redhat.com

3.3.3 Configuring SecurityEnhanced Linux (SELinux)SELinux is an implementation of a mandatory access control (MAC) mechanism developed by the National Security Agency (NSA). The purpose of SELinux is to apply rules on files and processes based on defined policies. When policies are appropriately defined, a system running SELinux enhances application security by determining if an action from a particular process should be granted thus protecting against vulnerabilities within a system. The implementation of Red Hat Enterprise Linux 6 enables SELinux by default and appropriately sets it to the default setting of ENFORCING. It is highly recommended that SELinux be kept in ENFORCING mode when running Oracle Database 11g Release 2 (11.2.0.3).
Verify that SELinux is running and set to ENFORCING:
As the root user,
# getenforceEnforcing
If the system is running in PERMISSIVE or DISABLED mode, modify the /etc/sysconfig/selinux file and set SELinux to enforcing as shown below.
SELINUX=enforcing
The modification of the /etc/sysconfig/selinux file takes effect after a reboot. To change the setting of SELinux immediately without a reboot, run the following command:
# setenforce 1
For more information on Security-Enhanced Linux, please visit the Red Hat Enterprise Linux 6Security-Enhanced Linux User Guide
3.3.4 Configuring Firewall SettingsFirewall access and restrictions play a critical role in securing your Oracle Database 11g Release 2 (11.2.0.3) environment. It is recommended that the firewall settings be configured to permit access to the Oracle Database network ports only from authorized database or database-management clients. For example, in order to allow access to a specific database client with an IP address of 10.16.142.54 to make requests to the database server via SQL*Net using Oracle's TNS (Transparent Network Substrate) Listener (default port of 1521),the following firewall rule must be added to the iptables configuration file found at /etc/sysconfig/iptables.
-A INPUT -m state --state NEW -m tcp -p tcp -s 10.16.142.54 --dport 1521 -j ACCEPT
Likewise, if this particular database client with an IP address of 10.16.142.54 required access to the web-based Oracle Enterprise Manager 11g that uses the default port of 1158, the following firewall rule must be added to the iptables configuration file found at /etc/sysconfig/iptables.
www.redhat.com 14 [email protected]

-A INPUT -m state --state NEW -m tcp -p tcp -s 10.16.142.54 --dport 1158 -j ACCEPT
Once the rules have been modified within the /etc/sysconfig/iptables, run the following command to activate:
# service iptables restartiptables: Flushing firewall rules: [ OK ] iptables: Setting chains to policy ACCEPT: nat mangle filte[ OK ] iptables: Unloading modules: [ OK ] iptables: Applying firewall rules: [ OK ]
NOTE: A full listing of all the firewall settings within the /etc/sysconfig/iptables file for this reference architecture can be found at Appendix D Iptables Configuration File.
3.3.5 Setting Virtual MemoryTuning virtual memory requires the modification of five kernel parameters that affect the rate at which virtual memory is used within Oracle databases. It is important to note the recommended values are to be used as a starting point when setting virtual memory. A brief description4 and recommended settings for the virtual memory parameters, as well as, the definition of dirty data are described below.
SWAPPINESS4 - A value from 0 to 100 which controls the degree to which the system swaps. A
high value prioritizes system performance, aggressively swapping processes out of physical memory when they are not active. A low value prioritizes interactivity and avoids swapping processes out of physical memory for as long as possible, which decreases response latency.The default value is 60. The Oracle recommended value is 0.
DIRTY DATA – Dirty data is data that has been modified and held in the page cache for performance benefits. Once the data is flushed to disk, the data is clean.
DIRTY_RATIO5 – Contains, as a percentage of total system memory, the number of pages at
which a process which is generating disk writes will itself start writing out dirty data. The default value is 20. The recommended value is 80.
DIRTY_BACKGROUND_RATIO5 – Contains, as a percentage of total system memory, the number of
pages at which the background write back daemon will start writing out dirty data. The Oracle recommended value is 3.
DIRTY_EXPIRE_CENTISECS5 - Defines when dirty in-memory data is old enough to be eligible for
writeout. The default value is 3000, expressed in hundredths of a second. The Oracle recommended value is 500.
DIRTY_WRITEBACK_CENTISECS5 - Defines the interval of when writes of dirty in-memory data are
written out to disk. The default value is 500, expressed in hundredths of a second. The Oraclerecommended value is 100.
4 RHEL6 Kernel Documentation - /usr/share/doc/kernel-doc-2.6.32/Documentation/sysctl/vm.txt5 RHEL6 Kernel Documentation - /usr/share/doc/kernel-doc-2.6.32/Documentation/sysctl/vm.txt
[email protected] 15 www.redhat.com
Prior to making any changes to the /etc/sysctl.conf ensure to create a backup as follows:
# cp /etc/sysctl.conf /etc/sysctl.conf.bkup
The following is a snippet from the /etc/sysctl.conf file with the five virtual memory parametersset with the recommended settings:
vm.swappiness = 0vm.dirty_background_ratio = 3vm.dirty_ratio = 80vm.dirty_expire_centisecs = 500vm.dirty_writeback_centisecs = 100
For the changes take effect immediately, run the following command:
# sysctl -p
NOTE: A full listing of all the kernel parameters modified within the /etc/sysctl.conf file can be found at Appendix G Kernel Parameters.
3.3.6 Setting Shared MemoryShared memory allows processes to communicate with each other by placing regions of memory into memory segments. In the case of Oracle, shared memory segments are used by the System Global Area (SGA) to store incoming data and control information. The size of Oracle's SGA impacts the amount of shared memory pages and shared memory segments to be set within a system. By default, Red Hat Enterprise Linux 6 provides a large amount of shared memory pages and segments, however, the appropriate allocation for a system depends on the amount of RAM within the system.
In order to allocate the appropriate amount of shared memory pages and shared memory segments for a system running an Oracle database, the kernel parameters SHMALL, SHMMAX, andSHMMNI must be set.
SHMALL – is the maximum total amount of shared memory pages
SHMMAX – is the maximum size in bytes of a single shared memory segment
SHMMNI – is the maximum total amount of shared memory segments
The first step in determining the maximum amount of shared memory pages (SHMALL) in a system is to determine the system's page size in bytes. The following command can be used to obtain the system page size.
# getconf PAGE_SIZE4096
Once the page size is captured, calculate SHMALL as follows:
TOTAL RAM IN BYTES / PAGE_SIZE
For example, on a system with 48 GB of memory the SHMALL calculation would look as follows:
www.redhat.com 16 [email protected]

# echo “48 * 1024^3 / 4096” | bc12582912
The calculation of SHMMAX, is as follows:
HALF OF TOTAL RAM IN BYTES
For example, on a system with 48 GB of memory the SHMMAX calculation would look as follows:
# echo “48 * 1024^3 / 2” | bc25769803776
As for SHMMNI, Oracle recommends the value of SHMMNI to be set to 4096.
NOTE: If the current value found within /etc/sysctl.conf for any parameter is higher than the value calculated for SHMMAX and SHMALL, do not change the value found within the /etc/sysctl.conf file.
Since the values of SHMMAX and SHMALL calculated are smaller then the values already set, no changes are made within /etc/sysctl.conf. Snippet of the /etc/sysctl.conf file:
kernel.shmmax = 68719476736kernel.shmall = 4294967296 kernel.shmmni = 4096
In order for the changes take effect immediately, run the following command:
# sysctl -p
NOTE: A full listing of all the kernel parameters modified within the /etc/sysctl.conf file can be found at Appendix G Kernel Parameters.
3.3.7 Setting SemaphoresRed Hat Enterprise Linux 6 provides semaphores for synchronization of information between processes. The kernel parameter sem is composed of four parameters:
SEMMSL – is defined as the maximum number of semaphores per semaphore set
SEMMNI – is defined as the maximum number of semaphore sets for the entire system
SEMMNS – is defined as the total number of semaphores for the entire system
NOTE: SEMMNS is calculated by SEMMSL * SEMMNI
SEMOPM – is defined as the total number of semaphore operations performed per semop system call.
The following line is required within the /etc/sysctl.conf file to provide sufficient semaphores for Oracle:
kernel.sem = 250 32000 100 128
In order for the changes take effect immediately, run the following command:
[email protected] 17 www.redhat.com
# sysctl -p
NOTE: A full listing of all the kernel parameters modified within the /etc/sysctl.conf file can be found at Appendix G Kernel Parameters.
3.3.8 Ephemeral Network PortsOracle recommends that the ephemeral default port range be set starting at 9000 to 65500. This ensures that all well known ports, ports used by Oracle and other applications are avoided. To set the ephemeral port range, modify the /etc/sysctl.conf file and add the followingline:
net.ipv4.ip_local_port_range = 9000 65500
In order for the changes take effect immediately, run the following command:
# sysctl -p
NOTE: A full listing of all the kernel parameters modified within the /etc/sysctl.conf file can be found at Appendix G Kernel Parameters.
3.3.9 Optimizing Network SettingsOptimizing the network settings for the default and maximum buffers for the application sockets in Oracle Database 11g Release 2 (11.2.0.3) is done by setting static sizes to RMEM and WMEM. The RMEM parameter represents the receive buffer size, while the WMEM represents the send buffer size. The recommended values by Oracle are modified within the /etc/sysct.conf file.
net.core.rmem_default = 262144 net.core.rmem_max = 4194304 net.core.wmem_default = 262144 net.core.wmem_max = 1048576
In order to make the changes take effect immediately, run the following command:
# sysctl -p
NOTE: A full listing of all the kernel parameters modified within the /etc/sysctl.conf file can be found at Appendix G Kernel Parameters.
www.redhat.com 18 [email protected]

3.3.10 Increasing synchronous I/O RequestsThe kernel parameter FS.AIO-MAX-NR sets the maximum number of on current asynchronous I/O requests. Oracle recommends setting the value to 1048576. In order to add FS-AIO-MAX-NR to 1048576, modify the /etc/sysctl.conf file as follows:
fs.aio-max-nr = 1048576
In order for the changes take effect immediately, run the following command:
# sysctl -pNOTE: A full listing of all the kernel parameters modified within the /etc/sysctl.conf file can be found at Appendix G Kernel Parameters.
3.3.11 Increasing File HandlesNOTE: Oracle ASMLib does not open file descriptors for each device, but instead opens one file descriptor per Oracle process. This reference architecture features both methods of implementation within Section 3.4.3.1 Oracle ASMLib Alternative: Configuring Udev Rules and Section 3.4.3.2 Configuring Oracle ASMLib. However, during the installation of Oracle Database 11g Release 2 (11.2.0.3) the FS.FILE-MAX kernel parameter must be set to at least 6815744.
The kernel parameter FS.FILE-MAX sets the maximum number of open file handles assigned to the Red Hat Enterprise Linux 6 operating system. Oracle recommends that for each Oracle database instance found within a system, allocate 512*PROCESSSES in addition to the openfile handles already assigned to the Red Hat Enterprise Linux 6 operating system. PROCESSES within a database instance refers to the maximum number of processes that can be concurrently connected to the Oracle database by the oracle user. The default value for PROCESSES is 150 for Oracle Database 11g Release 2 (11.2.0.3). To properly calculate the FS.FILE-MAX for a system, first identify the current FS.FILE-MAX allocated to the system via the following command:
# cat /proc/sys/fs/file-max32768
Next, add all the PROCESSES together from each Oracle database instance found within thesystem and multiple by 512 as seen in the following command.
# echo “512 * 150” | bc76800
NOTE: To determine the current PROCESSES value, log into the Oracle database instance and run the following command below. Since no Oracle database has yet been created within this reference architecture, the default value of 150 PROCESSES is used.
[email protected] 19 www.redhat.com

Finally, add the current FS.FILE-MAX value with the new value found from multiplying 512*PROCESSES to attain the new FS.FILE-MAX value.
# echo “32768 + 76800” | bc109568
While the value of the FS.FILE-MAX parameter varies upon your environment, this reference architecture sets the value at 6815744. Oracle recommends a value no smaller than 6815744. Due to the calculation in the above example equating to 109568, the minimum Oracle recommended value was used. In order to add FS.FILE-MAX to 6815744, modify the /etc/sysctl.conf file as follows:
fs.file-max = 6815744
In order for the changes take effect immediately, run the following command:
# sysctl -p
NOTE: It is recommended to revisit the FS.FILE-MAX value if the PROCESSES value is increased for the Oracle database instance.
NOTE: A full listing of all the kernel parameters modified within the /etc/sysctl.conf file can be found at Appendix G Kernel Parameters.
3.3.12 User Accounts & GroupsPrior to the installation of Oracle Database 11g Release 2 (11.2.0.3), Oracle recommends thecreation of a GRID user for the Oracle Grid Infrastructure and an ORACLE user for the Oracle Database software installed on the system. For the purposes of this reference architecture, the Oracle Database software owner is the user ORACLE and the Oracle Grid Infrastructure for a standalone server software owner is the user GRID. Each user is designated different groupsto handle specific roles based on the software installed. However, the creation of separate users requires that both the ORACLE user and the GRID user have a common primary group, the Oracle central inventory group (OINSTALL).
The following are the recommended system groups created for the installation of the Oracle Database and part of the oracle user.
OSDBA group (DBA) – determines OS user accounts with DBA privileges
OSOPER group (OPER) – an optional group created to assign limited DBA privileges (SYSOPER priviledge) to particular OS user accounts
The following are the recommended system groups created for the installation of the Oracle Grid Infrastructure and part of the GRID user
OSDBA group (ASMDBA) – provides administrative access to Oracle ASM instances
OSASM group (ASMADMIN) – provides administrative access for storage files via the SYSASM priviledge
OSOPER group (ASMOPER) – an optional group created to assign limited DBA privileges with regards to ASM to particular OS user accounts
www.redhat.com 20 [email protected]

As the root user, create the following user accounts, groups, and group assignments using a consistent UID and GID assignments across your organization:
# groupadd --gid 54321 oinstall# groupadd --gid 54322 dba# groupadd --gid 54323 asmdba# groupadd --gid 54324 asmoper# groupadd --gid 54325 asmadmin# groupadd --gid 54326 oper
# useradd --uid 54321 --gid oinstall --groups dba,oper,asmdba,asmoper oracle# passwd oracle
# useradd --uid 54322 --gid oinstall --groups dba,asmadmin,asmdba,asmoper grid# passwd grid
Verify the GRID and ORACLE user correctly display the appropriate primary and supplementary groups via the commands:
# id oracleuid=54321(oracle) gid=54321(oinstall) groups=54321(oinstall),54322(dba),54323(asmdba),54324(asmoper),54326(oper)
# id griduid=54322(grid) gid=54321(oinstall) groups=54321(oinstall),54322(dba),54323(asmdba),54324(asmoper),54325(asmadmin)
3.3.13 Setting Shell Limits for the Grid and Oracle UserOracle recommends the following settings for the soft and hard limits for the number of open file descriptors (nofile), number of processes (nproc), and size of the stack segment (stack) allowed by each user respectively. The purpose of setting these limits is to prevent a system wide crash that could be caused if an application, such as Oracle, were allowed to exhaust allof the OS resources under an extremely heavy workload.
Prior to modifying the /etc/security/limits.conf create a backup as follows:
# cp /etc/security/limits.conf /etc/security/limits.conf.bkup
[email protected] 21 www.redhat.com

Within the /etc/security/limits.conf file, add the following soft and hard limits for the oracle and grid user:
oracle soft nproc 2047 oracle hard nproc 16384 oracle soft nofile 1024 oracle hard nofile 65536 oracle soft stack 10240 oracle hard stack 32768 grid soft nproc 2047 grid hard nproc 16384 grid soft nofile 1024 grid hard nofile 65536 grid soft stack 10240 grid hard stack 32768
.
NOTE: Modifications made to the limits.conf file take effect immediately. However, please ensure that any previously logged in oracle or grid user sessions (if any) are logged out and logged back in for the changes to take effect.
Once the modifications of the limits.conf are set, enable the Pluggable Authentication Module (PAM) labeled pam_limits.so within /etc/pam.d/login. The pam_limits.so module limits the resources on login sessions
As the root user, create a backup of /etc/pam.d/login
# cp /etc/pam.d/login /etc/pam.d/login.bkup
As the root user, add the following line within the /etc/pam.d/login file
session required pam_limits.so
As the root user, create a shell script labeled oracle-grid.sh within /etc/profile.d/ to create the appropriate ulimits for the oracle and grid user. The contents of the oracle-grid.sh script can be seen below.
#Setting the appropriate ulimits for oracle and grid user if [ $USER = "oracle" ]; then if [ $SHELL = "/bin/ksh" ]; then ulimit -u 16384 ulimit -n 65536 else ulimit -u 16384 -n 65536 fi fi
if [ $USER = "grid" ]; then if [ $SHELL = "/bin/ksh" ]; then ulimit -u 16384 ulimit -n 65536 else ulimit -u 16384 -n 65536 fi fi
www.redhat.com 22 [email protected]

NOTE: While the ulimit values can be set directly within the /etc/profile file, it is recommendedto create a custom shell script within /etc/profile.d instead. The oracle-grid.sh script can be downloaded from the Appendix K Configuration Files
As oracle and grid user, verify the ULIMIT values by running the following command:
# ulimit -acore file size (blocks, -c) 0 data seg size (kbytes, -d) unlimited scheduling priority (-e) 0 file size (blocks, -f) unlimited pending signals (-i) 385878 max locked memory (kbytes, -l) 14854144 max memory size (kbytes, -m) unlimited open files (-n) 65536 pipe size (512 bytes, -p) 8 POSIX message queues (bytes, -q) 819200 real-time priority (-r) 0 stack size (kbytes, -s) 10240 cpu time (seconds, -t) unlimited max user processes (-u) 16384 virtual memory (kbytes, -v) unlimited file locks (-x) unlimited
3.4 Storage ConfigurationThe following storage configuration section describes the best practices for setting up device mapper multipath, the use of udev rules or Oracle ASMLib for ASM disk management, and the use of the tuned package for optimal performance.
3.4.1 Setting up DMMultipathDevice mapper multipath provides the ability to aggregate multiple I/O paths to a newly created device mapper path to achieve high availability, I/O load balancing, and persistent naming. The following procedures provide the best practices to installing and configuring device mapper multipath devices.
NOTE: Ensure Oracle database volumes are accessible via the operating system prior to continuing with the section below.
1. As the root user, install the device-mapper-multipath package using the yum package manager.
# yum install device-mapper-multipath
2. Copy the multipath.conf file found within /usr/share/doc/device-mapper-multipath-0.4.9/to /etc/
# cp /usr/share/doc/device-mapper-multipath-0.4.9/multipath.conf /etc/
[email protected] 23 www.redhat.com

3. Capture the scsi id of the local disk(s) on the system.
# scsi_id --whitelisted --replace-whitespace –-device=/dev/sda3600508b1001030353434363646301200
4. Uncomment and modify the blacklist section within the /etc/multipath.conf file to includethe scsi id of the local disk on the system. Once complete, save the changes made to the multipath.conf file.
blacklist { wwid 3600508b1001030353434363646301200 devnode "^(ram|raw|loop|fd|md|dm-|sr|scd|st)[0-9]*" devnode "^hd[a-z]" }
5. Start the multipath daemon.
# service multipathd startStarting multipathd daemon: [ OK ]
6. Enable the multipath daemon to ensure it is started upon boot time.
# chkconfig multipathd on
7. Identify the dm- device, size, and WWID of each device mapper volume for Oracle data disks and recovery disks. In this example, volume mpathb is identified via the following command:
# multipath -ll
Figure 3.4.1.1: Multipath Device (mpathb) properly identifies the current multipath alias name, size, WWID, and dm device. This information is required for the application of a custom alias to each volume as shown in step 9.
www.redhat.com 24 [email protected]
Figure 3.4.1.1: Multipath Device (mpathb)

8. Uncomment the defaults section found within the /etc/multipath.conf file.
defaults { udev_dir /dev polling_interval 10 path_selector "round-robin 0" path_grouping_policy multibus getuid_callout "/lib/udev/scsi_id --whitelisted --device=/dev/%n" prio alua path_checker readsector0 rr_min_io 100 max_fds 8192 rr_weight priorities failback immediate no_path_retry fail user_friendly_names yes }
9. Uncomment the multipath section found within the /etc/multipath.conf file and create an alias for each device mapper volume in order to enable persistent naming of those volumes. Once complete, save the changes made to the multipath.conf file. The outputshould resemble the example below. For reference, refer the Oracle data volumes created for this reference architecture as seen on Table 2.4.3: Oracle Data File Sizes for Reference Architecture.
multipaths { multipath { wwid 3600c0ff000d7e7a899d8515101000000 alias db1 } multipath { wwid 3600c0ff000dabfe5a7d8515101000000 alias db2 } multipath { wwid 3600c0ff000d7e7a8dbd8515101000000 alias fra } multipath { wwid 3600c0ff000dabfe5f4d8515101000000 alias redo } }
[email protected] 25 www.redhat.com

10.Restart the device mapper multipath daemon.
# service multipathd restartok Stopping multipathd daemon: [ OK ] Starting multipathd daemon: [ OK ]
11.Verify the device mapper paths and aliases are displayed properly. Below is an example of one device mapper device labeled fra.
# multipath -llfra (3600c0ff000d7e7a89e85ac5101000000) dm-10 HP,MSA2324fc size=186G features='1 queue_if_no_path' hwhandler='0' wp=rw |-+- policy='round-robin 0' prio=130 status=active | |- 3:0:0:3 sdd 8:48 active ready running | |- 3:0:1:3 sdh 8:112 active ready running | |- 4:0:0:3 sdt 65:48 active ready running | `- 4:0:1:3 sdx 65:112 active ready running `-+- policy='round-robin 0' prio=10 status=enabled |- 3:0:2:3 sdl 8:176 active ready running |- 3:0:3:3 sdp 8:240 active ready running |- 4:0:2:3 sdab 65:176 active ready running `- 4:0:3:3 sdaf 65:240 active ready running
3.4.2 Partitioning Device Mapper Shared DisksPartitioning of the device mapper shared disks is only required when using Oracle ASMLib. For the simplification of ensuring to meet all requirements, this reference architecture creates a partition for each device mapper volume. For each device mapper volume, create a partitionusing parted. An example is shown below.
# parted /dev/mapper/db1 mklabel gpt mkpart primary "1 -1"Information: You may need to update /etc/fstab.
Once the partition is created, a newly created device mapper device is created as db1p1.
# ls -l /dev/mapper/db1p1 lrwxrwxrwx. 1 root root 8 Apr 16 15:15 /dev/mapper/db1p1 -> ../dm-11
NOTE: A newly created partition requires the alias name followed by p1 such as db1p1 seen above. If p1 is missing, please run the following command to add the partition mappings to the device mapper disks.
# kpartx -a /dev/mapper/db1
www.redhat.com 26 [email protected]

3.4.3 Configuring Oracle ASM DisksThe configuration of Oracle ASM requires the use of either udev rules or Oracle's ASMLib. It is important to note that Oracle's ASMLib is not a requirement for the use of Oracle ASM disks. The reasoning behind providing an Oracle ASMLib alternative is due to udev rules not requiring additional kernel modules, unlike Oracle ASMLib that requires a kernel module labeled kmod-oracleasm and proprietary user space utilities to properly function. This section focuses on the implementation best practices of using Red Hat's native udev rules to setup the appropriate permissions for each device mapper disk, as well as, the best practices for Oracle's ASMLib. This reference architecture documents both methods of implementation, however, only one method can be applied for a given solution.
3.4.3.1 Oracle ASMLib Alternative: Configuring Udev RulesNOTE: If following the steps in this section, please ignore Section 3.4.3.2 Configuring Oracle ASMLib
The configuration of Oracle ASM requires the use of either udev rules or Oracle's ASMLib. This section, focuses on the best practices of using Red Hat's native udev rules to setup the appropriate permissions for each device mapper disk.
1. As the root user, identify the Device Mapper Universally Unique IDentifier (DM_UUID) for each device mapper volume. The example below shows the DM_UID for the partitions of the volumes labeled db1,db2,fra, and redo.
# for i in db1p1 db2p1 frap1 redop1; do printf "%s %s\n" "$i" "$(udevadm info --query=all --name=/dev/mapper/$i | grep -i dm_uuid)"; done db1p1 E: DM_UUID=part1-mpath-3600c0ff000d7e7a899d8515101000000 db2p1 E: DM_UUID=part1-mpath-3600c0ff000dabfe5a7d8515101000000 frap1 E: DM_UUID=part1-mpath-3600c0ff000d7e7a8dbd8515101000000 redop1 E: DM_UUID=part1-mpath-3600c0ff000dabfe5f4d8515101000000
2. Create a file labeled 99-oracle-asmdevices.rules within /etc/udev/rules.d/
3. Within 99-oracle-asmdevices.rules file, create rules for each device similar to the example below:
KERNEL=="dm-*",ENV{DM_UUID}=="part1-mpath-3600c0ff000dabfe5f4d8515101000000",OWNER="grid",GROUP="asmadmin",MODE="0660" To understand the rule above, it can be read as follows:
If any dm- device matches the DM_UUID of part1-mpath-3600c0ff000dabfe5f4d8515101000000, assign to that dm- device to be owned by the grid user and part of the asmadmin group with the permission mode set to 0660.
4. Save the file labeled 99-oracle-asmdevices.rules
[email protected] 27 www.redhat.com

5. Locate the dm- device for each Oracle related partition. An example to find the dm- device for each partition is to run the following command:
# for i in db1p1 db2p1 frap1 redop1; do printf “%s %s\n” “$i” “$(ls -ll /dev/mapper/$i)”; donedb1p1 lrwxrwxrwx. 1 root root 8 May 20 20:39 /dev/mapper/db1p1 -> ../dm-11db2p1 lrwxrwxrwx. 1 root root 8 May 20 20:39 /dev/mapper/db1p1 -> ../dm-12frap1 lrwxrwxrwx. 1 root root 8 May 20 20:39 /dev/mapper/db1p1 -> ../dm-13redop1 lrwxrwxrwx. 1 root root 8 May 20 20:39 /dev/mapper/db1p1 -> ../dm-14
6. Apply and test the rules created within the 99-oracle-asmdevices.rules by running a udevadm test on each device.
# udevadm test /sys/block/dm-11[ ... Output Abbreviated ... ]udevadm_test: DM_NAME=db1p1 udevadm_test: DM_UUID=part1-mpath-3600c0ff000d7e7a86485ac5101000000 udevadm_test: DM_SUSPENDED=0 udevadm_test: DEVLINKS=/dev/mapper/db1p1 /dev/disk/by-id/dm-name-db1p1 /dev/disk/by-id/dm-uuid-part1-mpath-3600c0ff000d7e7a86485ac5101000000 /dev/block/253:11 udevadm_test: ID_FS_TYPE=oracleasm
7. Confirm the device has the desired permissions
# ls -lh /dev/dm-11brw-rw----. 1 grid asmadmin 253, 11 Jun 6 20:59 /dev/dm-11
NOTE: For simplicity, this 99-oracle-asmdevices.rules file is included in Appendix I99-oracle-asmdevices.rules
3.4.3.2 Configuring Oracle ASMLibNOTE: If Section 3.4.3.1 Oracle ASMLib Alternative: Configuring Udev Rules has been configured, ignore this section and continue to Section 3.4.4 Optimizing Database Storage using Automatic System Tuning
In order to configure Oracle ASMLib the following components are required: kmod-oracleasm, oracleasm-support, and oracleasmlib
The ASMLib kernel module package (kmod-oracleasm) is provided for Red Hat customers via the Supplementary Channel on Red Hat Network (RHN). In order to properly install and configure ASMLib the following procedures must be followed.
As the root user,
1. Enable the Red Hat Enterprise Linux 6 Supplementary repository on RHN6.
2. Download the ASMLib library package (oracleasmlib)
# wget http://download.oracle.com/otn_software/asmlib/oracleasmlib-2.0.4-1.el6.x86_64.rpm
6 Enabling the Supplementary Repository Knowledge Base Article, https://access.redhat.com/knowledge/articles/58637
www.redhat.com 28 [email protected]

3. Download the ASMLib utilites package (oracleasm-support)
# wget http://public-yum.oracle.com/repo/OracleLinux/OL6/latest/x86_64/oracleasm-support-2.1.8-1.el6.x86_64.rpm
4. Install the ASMLib kernel module package (kmod-oracleasm) using the following command:
# yum install kmod-oracleasm
5. Install the ASMLib library package (oracleasmlib) using the following command:
# yum install oracleasmlib-2.0.4-1.el6.x86_64.rpm
6. Install the ASMLib utilities package (oracleasm-support) using the following command:
# yum install oracleasm-support-2.1.8-1.el6.x86_64.rpm
7. Configure ASMLib using the following command:
# /usr/sbin/oracleasm configure -iConfiguring the Oracle ASM library driver.
This will configure the on-boot properties of the Oracle ASM library driver. The following questions will determine whether the driver is loaded on boot and what permissions it will have. The current values will be shown in brackets ('[]'). Hitting <ENTER> without typing an answer will keep that current value. Ctrl-C will abort.
Default user to own the driver interface []: gridDefault group to own the driver interface []: asmadminStart Oracle ASM library driver on boot (y/n) [ n ]: yScan for Oracle ASM disks on boot (y/n) [y]: y Writing Oracle ASM library driver configuration: done
8. Within /etc/sysconfig/oracleasm, set the ORACLEASM_SCANORDER and ORACLEASM_SCANEXCLUDE parameters as follows:
# ORACLEASM_SCANORDER: Matching patterns to order disk scanning ORACLEASM_SCANORDER="dm"
# ORACLEASM_SCANEXCLUDE: Matching patterns to exclude disks from scan ORACLEASM_SCANEXCLUDE="sda"
NOTE: The ORACLEASM_SCANORDER set to dm ensures that when oracleasm scans disks, it is appropriately scanning devices known by the kernel. The ORACLEASM_SCANEXCLUDE set to sda is ensuring that local disk sda is to be ignored by ASMLib.
[email protected] 29 www.redhat.com
9. Prior to creating disks with oracleasm, ensure the SELinux policy files version 3.7.19-211 is downloaded from Appendix K Configuration Files . This ensure that oracleasm properly runs with SELinux enabled and avoids any SELinux errors7. Enablethe SELinux policy and modules as follows:
• Download a copy of the selinux-policy-3.7.19-211.el6.noarch.rpm and selinux-policy-targeted-3.7.19-211.el6.noarch.rpm from Appendix K
• Update the selinux-policy via the following commands:
# rpm -Uvh selinux-policy-3.7.19-211.el6.noarch.rpm selinux-policy-targeted-3.7.19-211.el6.noarch.rpm Preparing... #####################################[100%]1:selinux-policy #####################################[ 50%]2:selinux-policytargeted#####################################[100%]
7 oracleasm createdisk fails with Selinux enabled [ID 1430947.1]
www.redhat.com 30 [email protected]

10.Run the following oracleasm command to ensure that oracleasm is enabled.
# /etc/init.d/oracleasm enable Writing Oracle ASM library driver configuration: done Initializing the Oracle ASMLib driver: [ OK ] Scanning the system for Oracle ASMLib disks: [ OK ]
11.Run the following oracleasm command to create and label all Oracle related volumes as an ASM disk. The example below creates an ASM disk labeled DATA1 for the following /dev/mapper/db1p1 partition.
# /usr/sbin/oracleasm createdisk DATA1 /dev/mapper/db1p1Writing disk header: done Instantiating disk: done
NOTE: It is highly recommended to have all Oracle related disks to be included within Oracle ASM.
12.Verify all the Oracle ASM disks created are listed.
# /usr/sbin/oracleasm listdisksDATA1 DATA2 FRA1 REDO1
13. If no disks are listed or if any disks are missing, run the following command to rescan the ASM disks.
# /usr/sbin/oracleasm scandisksReloading disk partitions: done Cleaning any stale ASM disks... Scanning system for ASM disks...
NOTE: If the issue persists after a rescan of the Oracle ASM disks, a reboot of the system might be required via the command:
# shutdown -r now
[email protected] 31 www.redhat.com

3.4.4 Optimizing Database Storage using Automatic System TuningThe tuned package in Red Hat Enterprise Linux 6 is recommended for automatically tuning the system for common workloads via the use of profiles. Each profile is tailored for different workload scenarios such as: enterprise storage, power savings, and high network throughput.It is recommended to enable the enterprise storage profile for Oracle databases workload environments. Table 3.4.4.1: Default vs Enterprise-Storage Profile provides details of the enterprise-storage profile attributes that are adjusted versus the defaults found within the RedHat Enterprise Linux 6 distribution.
Tuned Parameters Default Enterprise-Storage
I/O Elevator CFQ deadline
CPU governor OnDemand performance
kernel.sched_min_granularity_ns
4ms 10ms
kernel.sched_wake_up_granularity_ns
4ms 15ms
Disk read-ahead 1x 4x
vm.dirty_ratio 20% 40%
File-system barrier on off
Table 3.4.4.1: Default vs Enterprise-Storage Profile
The following procedures provide the steps that are required to install, enable, and select the enterprise-storage profile.
1. Install the tuned package via the yum package manager.
# yum install tuned
2. Enable tuned to ensure it is started upon boot time.
# chkconfig tuned on
3. Start the tuned service
# service tuned start
4. Select the enterprise-storage profile
# tuned-adm profile enterprise-storage
www.redhat.com 32 [email protected]

NOTE: If at any point in time a revert to the original settings are required, the following command can be run:
# service tuned stop
To make the change to revert to the original settings permanent across reboots, run the following command:
# chkconfig tuned off
[email protected] 33 www.redhat.com

4 Oracle 11gR2 Configuration4.1.1 Installing Oracle Grid Infrastructure (Required for ASM)The installation of the Oracle Grid Infrastructure for Oracle Database 11g Release 2 (11.2.0.3) is required for the use of Oracle ASM. Prior to the installation of the Oracle Grid Infrastructure, ensure the following prerequisites from the following sections have been met:
• Reference Architecture Environment
• Reference Architecture Configuration Details
NOTE: The reference architecture uses the /u01/app/grid as the grid base. The owner is set to grid and the group is set to oinstall. Run the following commands to create the grid base directory and set the appropriate permissions:
As the root user,
# mkdir --parents /u01/app/grid# chown --recursive grid.oinstall /u01/
1. Download the Oracle Grid Infrastructure software8 from the My Oracle Support site.
2. As the grid user, create a temporary directory within /u01/app/grid/grid-software to store the Oracle Grid Software gunzip file, move the Oracle Grid Software gunzip file tothe /u01/app/grid/grid-software location, ensure the Oracle Grid Software gunzip has the proper permissions and unpack its contents.
As the grid user,
# mkdir /u01/app/grid/grid-software# mv p10404530_112030_Linux-x86-64_3of7.zip /u01/app/grid/grid-software
As the root user,
# chown grid.oinstall p10404530_112030_Linux-x86-64_3of7.zip
As the grid user,
# cd /u01/app/grid/grid-software# unzip p10404530_112030_Linux-x86-64_3of7.zip
3. As the grid user, locate the Oracle Grid Infrastructure software and modify the file labeled cvu_config to ensure the Oracle Universal Installer (OUI) performs the correct prerequisite checks for Red Hat Enterprise Linux 6.
• Edit the cvu_config file as follows:
# sed -i 's/CV_ASSUME_DISTID=OEL4/CV_ASSUME_DISTID=OEL6/' /u01/app/grid/grid-software/grid/stage/cvu/cv/admin/cvu_config
4. As the grid user, start the OUI via the command:
8 Patch 10404530: 11.2.0.3.0 PATCH SET FOR ORACLE DATABASE SERVER, via http://support.oracle.com
www.redhat.com 34 [email protected]

# /u01/app/grid/grid-software/grid/runInstaller
NOTE: Ensure to SSH with the -Y option as the grid user from the client server, otherwise the following error will occur.
# /u01/app/grid/grid-software/grid/runInstaller Starting Oracle Universal Installer...
Checking Temp space: must be greater than 120 MB. Actual 3690 MB Passed Checking swap space: must be greater than 150 MB. Actual 20479 MB Passed Checking monitor: must be configured to display at least 256 colors
>>> Could not execute auto check for display colors using command /usr/bin/xdpyinfo. Check if the DISPLAY variable is set. Failed <<<<
Some requirement checks failed. You must fulfill these requirements before continuing with the installation,
Continue? (y/n) [n] n
5. Within the Download Software Updates window, select the option to either enter the MyOracle Support credentials to download latest software updates or select Skip software updates. This reference architecture selected Skip software updates and click Next.
6. Within the Installation Option window, select Configure Oracle Grid Infrastructure for a Standalone Server and click Next.
7. Within the Product Languages window, select the appropriate language, and click Next.
8. Within the Create ASM Disk Group window, provide the following:
• a Disk Group Name, i.e. DATA
• Redundancy Level
◦ EXTERNAL – redundancy provided by the storage system RAID, and not by Oracle ASM.
◦ NORMAL – provides two-way mirroring by Oracle ASM, thus provided two copies of every data extent.
◦ HIGH – provides three-way mirroring by Oracle ASM thus enduring the loss of two ASM disks within different failure groups.
• Disks to be assigned to the Disk Group, i.e. /dev/mapper/db1p1, /dev/mapper/db2p1
NOTE: This reference architecture uses NORMAL REDUNDANCY.
[email protected] 35 www.redhat.com

To display the appropriate candidate disks, click on the Change Discovery Path button and enter as the Disk Discovery Path one of the following:
• For Device Mapper devices, type:
/dev/mapper/*
• For Oracle ASMLib marked disks, type:
/dev/oracleasm/disks/*
9. Click Next once complete within the Create ASM Disk Group window
10.Within the ASM Password window, specify the password for the SYS and ASMSNMP user accounts.
www.redhat.com 36 [email protected]
Figure 4.1.1.1: ASM Disk Group Window

11.Within the Operating System Groups window, select the appropriate OS groups. The values as created and assigned within this reference architecture are as follows:
• Oracle ASM DBA Group – ASMDBA
• Oracle ASM Operator Group – ASMOPER
• Oracle ASM Administrator Group – ASMADMIN
12.Within the Installation Location window, specify the appropriate Oracle base and software locations. The values set by this reference architecture are as follows:
• ORACLE BASE - /u01/app/grid
• SOFTWARE LOCATION - /u01/app/grid/product/11.2.0/grid
13.Within the Create Inventory window, specify the inventory directory. The values set by this reference architecture are as follows:
• Inventory Directory - /u01/app/oraInventory
14. Within the Prerequisite Checks window, review the status and ensure there are no errors prior to continuing the installation. For failures with a status set to Fixable, selectthe Fix & Check Again button. The execution of the Fix & Check Again button provides a runfixup.sh script provided by the OUI. As root, run the runfixup.sh and click on the Check Again button once the runfixup.sh has finished.
15. Within the Summary window, review all the information provided, and select Install to start the installation.
16. Once the installation completes, execute the scripts within the 'Execute Configuration scripts' window. As the root user, run the following:
# /u01/app/oraInventory/orainstRoot.shChanging permissions of /u01/app/oraInventory. Adding read,write permissions for group. Removing read,write,execute permissions for world. Changing groupname of /u01/app/oraInventory to oinstall. The execution of the script is complete. # /u01/app/grid/product/11.2.0/grid/root.shPerforming root user operation for Oracle 11g
The following environment variables are set as: ORACLE_OWNER= grid ORACLE_HOME= /u01/app/grid/product/11.2.0/grid
Enter the full pathname of the local bin directory: [/usr/local/bin]:/usr/local/bin Copying dbhome to /usr/local/bin ... Copying oraenv to /usr/local/bin ... Copying coraenv to /usr/local/bin ...
[ ... Abbreviated Ouputput ... ]Successfully configured Oracle Grid Infrastructure for a Standalone Server
[email protected] 37 www.redhat.com

17.Click OK within the Execute Configuration scripts window.
18.Within the Finish window, click Close.
4.1.2 Installing Oracle 11g R2 Database SoftwarePrior to the installation of the Oracle Database 11g Release 2 (11.2.0.3), ensure the following prerequisites from the following sections have been met:
• Reference Architecture Environment
• Reference Architecture Configuration Details
NOTE: The reference architecture uses the /u01/app/oracle as the Oracle base. The owner is set to oracle and the group is set to oinstall. Run the following commands to create the oracle base directory set the appropriate permissions:
As the root user,
# mkdir /u01/app/oracle# chown --recursive oracle.oinstall /u01/app/oracle
1. Download the Oracle Database software9 from the My Oracle Support site.
2. As the oracle user, create a temporary directory within /u01/app/oracle/oracle-software to store the Oracle Database Software gunzip files, move the Oracle Database software gunzip files to the /u01/app/oracle/oracle-software location, ensure the OracleDatabase software gunzip has the proper permissions and unpack its contents.
As the oracle user,
# mkdir /u01/app/oracle/oracle-software# mv p10404530_112030_Linux-x86-64_1of7.zip p10404530_112030_Linux-x86-64_2of7.zip /u01/app/oracle/oracle-software/
As the root user,
# chown oracle.oinstall /path/to/p10404530_112030_Linux-x86-64_1of7.zip# chown oracle.oinstall /path/to/p10404530_112030_Linux-x86-64_2of7.zip
As the oracle user,
# cd /u01/app/oracle/oracle-software# unzip p10404530_112030_Linux-x86-64_1of7.zip# unzip p10404530_112030_Linux-x86-64_2of7.zip
3. As the oracle user, locate the Oracle Database software and modify the file labeled cvu_config to ensure the Oracle Universal Installer (OUI) performs the correct prerequisite checks for Red Hat Enterprise Linux 6.
4. Edit the cvu_config file as follows:
sed -i 's/CV_ASSUME_DISTID=OEL4/CV_ASSUME_DISTID=OEL6/' /u01/app/oracle/oracle-software/database/stage/cvu/cv/admin/cvu_config
9 Patch 10404530: 11.2.0.3.0 PATCH SET FOR ORACLE DATABASE SERVER, via http://support.oracle.com
www.redhat.com 38 [email protected]

5. As the oracle user, start the OUI via the command:
# /u01/app/oracle/oracle-software/database/runInstaller
NOTE: Ensure to SSH with the -Y option as the oracle user from the client server, otherwise the following error will occur.
# /u01/app/oracle/oracle-software/database/runInstallerStarting Oracle Universal Installer...
Checking Temp space: must be greater than 120 MB. Actual 3461 MB Passed Checking swap space: must be greater than 150 MB. Actual 20479 MB Passed X11 connection rejected because of wrong authentication. X11 connection rejected because of wrong authentication. Checking monitor: must be configured to display at least 256 colors
>>> Could not execute auto check for display colors using command /usr/bin/xdpyinfo. Check if the DISPLAY variable is set. Failed <<<<
Some requirement checks failed. You must fulfill these requirements before continuing with the installation,
Continue? (y/n) [n] n
6. Within the Configure Security Updates window, provide the My Oracle Support email address for the latest security issues information, otherwise uncheck the I wish to receive security updates via My Oracle Support and click Next.
7. Within the Download Software Updates window, provide the My Oracle Support credentials to download the latest security updates, otherwise select the Skip software updates radio button. This reference architecture selected Skip software updates. Click Next.
[email protected] 39 www.redhat.com

8. Within the Installation Option window, select Install database software only and click Next.
www.redhat.com 40 [email protected]
Figure 4.1.2.1: Installation Option Window

9. Within the Grid Installation Options, select Single Instance database installation as the type of database installation being performed.
10.Within the Product Languages window, select the appropriate language for the installation.
11.Within the Database Edition window, select the appropriate database edition and click Next. For the purposes of this reference architecture, Enterprise Edition is the edition ofchoice.
12.Within the Installation Location window, select the appropriate Oracle base and software location and click Next. For the purposes of this reference architecture, the following are set as:
• ORACLE BASE - /u01/app/oracle
• SOFTWARE LOCATION - /u01/app/oracle/product/11.2.0/dbhome_1
[email protected] 41 www.redhat.com
Figure 4.1.2.2:Grid Installation Options Window

13.Within the Operating System Groups window, select the appropriate OS groups and click Next. For the purposes of this reference architecture, the following are set as:
• Database Administrator Group – DBA
• Database Operator Group – OPER
14.Within the Prerequisite Checks window, review the status and ensure there are no errors prior to continuing the installation. For failures with a status set to Fixable, selectthe Fix & Check Again button. The execution of the Fix & Check Again button provides a runfixup.sh script provided by the OUI. As root, run the runfixup.sh and click on the Check Again button once the runfixup.sh has finished.
15. Within the Summary window, review all the information provided, and select Install to start the installation.
16. Once the installation completes, execute the scripts within the Execute Configuration scripts window. As the root user, run the following:
# /u01/app/oracle/product/11.2.0/dbhome_1/root.shPerforming root user operation for Oracle 11g
The following environment variables are set as: ORACLE_OWNER= oracle ORACLE_HOME= /u01/app/oracle/product/11.2.0/dbhome_1
Enter the full pathname of the local bin directory: [/usr/local/bin]: /usr/local/bin The contents of "dbhome" have not changed. No need to overwrite. The contents of "oraenv" have not changed. No need to overwrite. The contents of "coraenv" have not changed. No need to overwrite.
Entries will be added to the /etc/oratab file as needed by Database Configuration Assistant when a database is created Finished running generic part of root script. Now product-specific root actions will be performed. Finished product-specific root actions.
17.Click OK within the Execute Configuration scripts window.
18.Within the Finish window, click Close.
NOTE: In the example above, /u01/app/oracle/product/11.2.0/dbhome_1 is the Oracle home directory.
www.redhat.com 42 [email protected]

4.1.3 Creating ASM Diskgroups via the ASM Configuration Assistant (ASMCA)Prior to the creation of an Oracle database, create the Fast Recovery Area and Redo Logs Oracle ASM diskgroups via Oracle's ASM Configuration Assistant (ASMCA).
1. As the grid user, start asmca via the following command:
# /u01/app/grid/product/11.2.0/grid/bin/asmca
NOTE: In the example above, /u01/app/grid/product/11.2.0/grid is the grid home directory.
2. Via the asmca application, select the Disk Groups tab and click Create.
[email protected] 43 www.redhat.com
Figure 4.1.3.1: ASMCA DiskGroup Tab

3. Within the Create Disk Group window, provide the following:
• A name for the disk group, i.e. FRADG
• Redundancy level for the disk group, i.e. External Redundancy
• Selection of the disks to be added to the disk group, i.e. /dev/mapper/frap1
NOTE: To display the appropriate eligible disks, click on the Change Discovery Path button and enter as the 'Disk Discovery Path' one of the following:
• For Device Mapper devices, type:
/dev/mapper/*
• For Oracle ASMLib marked disks, type:
/dev/oracleasm/disks/*
www.redhat.com 44 [email protected]
Figure 4.1.3.2: ASMCA DiskGroup Creation Window

Click the OK button once the steps above are complete.
4. Repeat steps 2 and 3 to configure both a disk group for the Fast Recovery Area (FRA) and the redo logs. NOTE: Separation of redo logs into a separate Oracle ASM disk group is optional, but recommended.
5. Once all disk groups are created, click the Exit buttonfrom the main ASM ConfigurationAssistant window. Click yes, when asked to confirm quitting the application.
4.1.4 Creating a Database using Database Configuration Assistant (DBCA)When creating an Oracle database, the recommended method is the usage of the DBCA utility. The following section describes the step-by-step to create a custom database.
1. As the oracle user, run the dbca utility via the command:
# /u01/app/oracle/product/11.2.0/dbhome_1/bin/dbca
NOTE: In the example above, /u01/app/oracle/product/11.2.0/dbhome_1 is the Oracle home directory.
2. Within the Welcome window, click Next.
3. Within the Operations window, select Create a Database radio button and click Next.
4. Within the Database Template window, select Custom Database radio button and click Next.
5. Within the Database Identification window, set a global database name and Oracle System Identifier (SID), i.e. oracledb and click Next.
6. Within the Management Options window, configure Enterprise Manager and enable daily disk backup to recovery area (optional), and click Next.
7. Within the Database Credentials window, provide the administrative passwords for each username and click Next.
[email protected] 45 www.redhat.com

8. Within the Database File Locations window, select the appropriate storage type and storage location. For the purposes of this reference architecture the following selections were made:
• Storage Type – Automatic Storage Management (ASM)
• Storage Locations – Use Oracle-Managed Files
◦ Database Area: +DATA
www.redhat.com 46 [email protected]
Figure 4.1.4.1: Database File Locations Window

9. Select the Multiplex Redo Logs and Control Files button and within the Multiplex Redo Logs and Control Files window, add the Redo Logs diskgroup, i.e. +REDODG and clickOK, then click Next.
10. Within the ASM Credentials window, specify a ASMSNMP password and click OK.
[email protected] 47 www.redhat.com
Figure 4.1.4.2: Multiplex Redo Logs and Control Files Window

11.Within the Recovery Configuration window, select the recovery options appropriate for the database. The selections for this reference architecture enable the Fast Recovery Area (FRA) and Archiving. The FRA location and size as seen below and click Next.
• FRA – +FRADG
• FRA Size – 190680 Megabytes (total size of FRA)
NOTE: It is recommended, to modify the values above based on the database's recovery requirements. For more information, visit My Oracle Support Doc ID [305648.1] – “What is Flash Recovery Area and how to configure it?”.
12.Within the Database Content window, select the components to be configured for the database and click Next. The selections for this reference architecture were the defaultsettings.
www.redhat.com 48 [email protected]
Figure 4.1.4.3: Recovery Configuration Window

13.Within the Initialization Parameters window, select Custom and enter the appropriate values for the SGA and PGA size and click Next. It is recommended that the Memory Management be set as Automatic Shared Memory Management. The values set for the reference architecture with regards to SGA and PGA are the following:
• SGA – 14475 Megabytes
• PGA – 4825 Megabytes
NOTE: It is recommended to modify the values above based on the database's SGA and PGA requirements.
14. Within the Database Storage window, click Next.
15. Within the Creation Options window, ensure the Create Database box is checked and click Finish.
16. Within the Confirmation window, review the database configuration summary, and clickOK to start the database creation.
[email protected] 49 www.redhat.com
Figure 4.1.4.4: Initialization Parameters Window

4.1.5 Enabling HugePagesRed Hat Enterprise Linux 6, by default, uses transparent huge pages also known as anonymous huge pages. Transparent Huge Pages (THP) are implemented within Red Hat Enterprise Linux 6 to improve memory management by removing many of the difficulties of manually managing huge pages by dynamically allocating huge pages as needed. Unlike static huge pages, no additional configuration is needed to use them. Huge pages can boost application performance by increasing the chance a program will have quick access to a memory page. Unlike traditional huge pages, transparent huge pages can be swapped out (as smaller 4kB pages) when virtual memory clean up is required.
Unfortunately, Oracle Databases do not take advantage of transparent huge pages for interprocess communication. In fact, My Oracle Support [ID 1557478.1]10 states to disable THP due to unexpected performance issues or delays when THP is found to be enabled. To reap the benefit of huge pages for an Oracle database, it is required to allocate static huge pages and disable THP. Due to the complexity of properly configuring huge pages, it is recommended to copy the bash shell script found within Appendix E Huge Pages Script andrun the script once the database is up and running. The reasoning behind allocating huge pages once the database is up and running is to provide a proper number of pages to handle the running shared memory segments. The steps are as follows:
1. Copy the bash script found within Appendix E Huge Pages Script and save it as huge_pages_settings.sh
2. As the root user, ensure the huge_pages_settings.sh is executable by running the following command:
# chmod +x huge_pages_settings.sh
3. As the root user, execute the huge_pages_settings.sh script as follows:
# ./huge_pages_settings.shRecommended setting within the kernel boot command line: hugepages = <value>Recommended setting within /etc/security/limits.conf: oracle soft memlock <value>Recommended setting within /etc/security/limits.conf: oracle hard memlock <value>
4. Add the number of hugepages provided by the huge_pages_settings.sh script to the kernel boot command line within the /etc/grub.conf and disable transparent huge pages persistently across reboots as follows:
title Red Hat Enterprise Linux (2.6.32-358.el6.x86_64) root (hd0,0) kernel /vmlinuz-2.6.32-358.el6.x86_64 ro root=/dev/mapper/myvg-rootrd_NO_LUKS LANG=en_US.UTF-8 rd_NO_MD SYSFONT=latarcyrheb-sun16 crashkernel=auto rd_NO_DM rd_LVM_LV=myvg/root KEYBOARDTYPE=pc KEYTABLE=us rd_LVM_LV=myvg/swap rhgb quiet hugepages=<value-provided-by-script> transparent_hugepage=never initrd /initramfs-2.6.32-358.el6.x86_64.img
10 ALERT: Disable Transparent HugePages on SLES11,RHEL6,OEL6 and UEK2 Kernels (DOC ID: 1557478.1)
www.redhat.com 50 [email protected]

NOTE: Allocating the number of huge pages within the kernel boot command line is the most reliable method due to memory not yet becoming fragmented.11
5. Add the oracle soft and hard limits with regards to memlock within /etc/security/limits.conf as follows:
oracle soft memlock <value-provided-by-script>oracle hard memlock <value-provided-by-script>
6. The tuned package automatically enables THP upon start of the tuned services. This includes during boot time. Due to this, one must set the following THP_ENABLE line within /etc/tune-profiles/functions to be set as /dev/null. From:
THP_ENABLE=”/sys/kernel/mm/redhat_transparent_hugepage/enabled”To:
THP_ENABLE=”/dev/null”Within the /etc/tune-profiles/functions file, disable transparent huge pages by running the following sed command:
# sed -i 's/THP_ENABLE=\"\/sys\/kernel\/mm\/redhat_transparent_hugepage\/enabled/THP_ENABLE=\"\/dev\/null/g' /etc/tune-profiles/functions
NOTE: Failure to change the /etc/tune-profiles/functions THP_ENABLE variable to /dev/null results in transparent huge pages forever being set to always. For more information refer to Red Hat Article: Disabling transparent hugepages (THP) on Red Hat Enterprise Linux 6 is not taking effect.12
7. Reboot the system to ensure the hugepages setting takes effect properly.
8. Verify the total number of huge pages on the system with the following command:
# cat /proc/meminfo | grep -i hugepages_totalHugePages_Total: <value-provided-by-script>
9. Verify the current status of the transparent huge pages is set to NEVER via the following command:
# cat /sys/kernel/mm/transparent_hugepage/enabledalways [never]
11 https://www.kernel.org/doc/Documentation/vm/hugetlbpage.txt12 https://access.redhat.com/site/solutions/422283
[email protected] 51 www.redhat.com

NOTE: Starting with Oracle Database version 11.2.0.2, the initialization parameter “USE_LARGE_PAGES” was introduced to allocate huge pages on a per database use case. The default value for Oracle Database 11.2.0.2 is true, while for Oracle Databases running 11.2.0.3 or higher it is set to auto. For more information on the parameter and its value refer to My Oracle Support13.
NOTE: Huge pages is not compatible with Automatic Memory Management (AMM).
13 USE_LARGE_PAGES To Enable HugePages In 11.2 [ID 1392497.1]
www.redhat.com 52 [email protected]

5 Logging into the Oracle Database 11g Release 2 (11.2.0.3)This section focuses on ensuring once the Oracle Database 11g Release 2 (11.2.0.3) deployment is complete, one can successfully log into the Oracle database. The following steps provide the details.
As the oracle user,
1. Set the environment variable for ORACLE_HOME with the location of your Oracle Database 11g Release 2 (11.2.0.3) home. This reference architecture sets ORACLE_HOME to /u01/app/oracle/product/11.2.0/dbhome_1
# export ORACLE_HOME=/u01/app/oracle/product/11.2.0/dbhome_1# echo $ORACLE_HOME/u01/app/oracle/product/11.2.0/dbhome_1
NOTE: There is a bug within Oracle Database 11g Release 2 (11.2.0.3) that requires that the export of ORACLE_HOME not include a trailing forward slash (/).
2. Set the Oracle System ID (ORACLE_SID) used to identify the database.
# export ORACLE_SID=db# echo $ORACLE_SIDdb
3. Invoke the sqlplus binary to log into the Oracle instance as a sysdba.
# $ORACLE_HOME/bin/sqlplus / as sysdba;SQL*Plus: Release 11.2.0.3.0 Production on Wed Jun 5 13:55:05 2013
Copyright (c) 1982, 2011, Oracle. All rights reserved.
Connected to: Oracle Database 11g Enterprise Edition Release 11.2.0.3.0 - 64bit Production With the Partitioning, Automatic Storage Management, OLAP, Data Mining and Real Application Testing options
[email protected] 53 www.redhat.com

6 ConclusionRed Hat solutions with Oracle Database 11g Release 2 (11.2.0.3) on Red Hat Enterprise Linux 6 are created to simplify and optimize the deployment process, provide the latest best practices, and protect Oracle Database environments with the use of SELinux. The steps and procedures provide system and storage administrators the blueprint required to create a Red Hat | Oracle solution.
For any questions or concerns, please email [email protected] and ensure to visit the Red Hat Reference Architecture page at http://www.redhat.com/resourcelibrary/reference-architectures/ to find out about all of our RedHat solution offerings.
www.redhat.com 54 [email protected]

Appendix A: Revision History
Revision 1.3 Friday, August 16, 2013 Roger Lopez
• Created a new OS Hostname section• Created a new /etc/resolv.conf config section • Added a MOS article note to DBCA section with regards to Flash Recovery Area• Altered how to disable THP due to tuned• fs.file-max is required for both udev and Oracle ASMLib during Oracle Installation. • Changed instructions within Section 3.4.3.2 Configuring Oracle ASMLib, now that
oracleasm.pp is no longer required• Fixed typos
Revision 1.2 Friday July 26, 2013 Roger Lopez
• Added styling to certain text & fixed typos• Added steps to Section 3.3.3.1 Oracle ASMLib Alternative: Configuring Udev Rules• Modified steps to Section 4.1.5 Enabling HugePages that refer to disabling THP &
setting the number of huge pages via the kernel boot command line.
Revision 1.1 Monday July 8, 2013 Roger Lopez
• Fixed numbering & alignment of Table of Contents• Section 2.5, changed label from “Spare Count” to “Hot Spares Available” • Section 2.7, expanded each port and provided a brief description• Section 3.1, Added the bonding.conf file within /etc/modprobe.d/• Section 3.2.5, Provided the definition of dirty data• Section 3.2.13, Added /etc/profile.d/oracle-grid.sh shell script for user ulimits• Added Appendix J Sample Kickstart File• Added Appendix L Troubleshooting ORA-* Errors
Revision 1.0 Monday June 24, 2013 Roger Lopez
Initial Release
[email protected] 55 www.redhat.com
Appendix B: Contributors 1. Dan Walsh, technical review of SELinux oracleasm.pp module
2. Scott Collier, content review and technical review of Oracle deployment procedures
3. John Herr, content review
4. Aleksandr Brezhnev, content review and technical review of Oracle deployment procedures
5. Yan Fisher, content review
6. John Boero, content review
www.redhat.com 56 [email protected]

Appendix C: DM Multipath Configuration File# This is a basic configuration file with some examples, for device mapper# multipath.# For a complete list of the default configuration values, see# /usr/share/doc/device-mapper-multipath-0.4.9/multipath.conf.defaults# For a list of configuration options with descriptions, see# /usr/share/doc/device-mapper-multipath-0.4.9/multipath.conf.annotated## REMEMBER: After updating multipath.conf, you must run## service multipathd reload## for the changes to take effect in multipathd
## By default, devices with vendor = "IBM" and product = "S/390.*" are## blacklisted. To enable mulitpathing on these devies, uncomment the## following lines.#blacklist_exceptions {# device {# vendor "IBM"# product "S/390.*"# }#}
## Use user friendly names, instead of using WWIDs as names.defaults { user_friendly_names yes}#### Here is an example of how to configure some standard options.###defaults { udev_dir /dev polling_interval 10 path_selector "round-robin 0" path_grouping_policy multibus getuid_callout "/lib/udev/scsi_id --whitelisted --device=/dev/%n" prio alua path_checker readsector0 rr_min_io 100 max_fds 8192 rr_weight priorities failback immediate no_path_retry fail user_friendly_names yes}#### The wwid line in the following blacklist section is shown as an example
[email protected] 57 www.redhat.com

## of how to blacklist devices by wwid. The 2 devnode lines are the## compiled in default blacklist. If you want to blacklist entire types## of devices, such as all scsi devices, you should use a devnode line.## However, if you want to blacklist specific devices, you should use## a wwid line. Since there is no guarantee that a specific device will## not change names on reboot (from /dev/sda to /dev/sdb for example)## devnode lines are not recommended for blacklisting specific devices.##blacklist { wwid 3600508b1001030353434363646301200 devnode "^(ram|raw|loop|fd|md|dm-|sr|scd|st)[0-9]*" devnode "^hd[a-z]"}multipaths { multipath { wwid 3600c0ff000d7e7a899d8515101000000 alias db1 } multipath { wwid 3600c0ff000dabfe5a7d8515101000000 alias db2 } multipath { wwid 3600c0ff000d7e7a8dbd8515101000000 alias fra } multipath { wwid 3600c0ff000dabfe5f4d8515101000000 alias redo }}#devices {# device {# vendor "COMPAQ "# product "HSV110 (C)COMPAQ"# path_grouping_policy multibus# getuid_callout "/lib/udev/scsi_id --whitelisted --device=/dev/%n"# path_checker readsector0# path_selector "round-robin 0"# hardware_handler "0"# failback 15# rr_weight priorities# no_path_retry queue# }# device {# vendor "COMPAQ "# product "MSA1000 "# path_grouping_policy multibus# }#}
www.redhat.com 58 [email protected]

Appendix D: Iptables Configuration File# Generated by iptables-save v1.4.7 on Thu May 2 17:24:00 2013 *filter :INPUT ACCEPT [0:0] :FORWARD ACCEPT [0:0] :OUTPUT ACCEPT [6747137:1773545794] -A INPUT -m state --state RELATED,ESTABLISHED -j ACCEPT -A INPUT -p icmp -j ACCEPT -A INPUT -i lo -j ACCEPT -A INPUT -p tcp -m state --state NEW -m tcp --dport 22 -j ACCEPT -A INPUT -p tcp -m state --state NEW -m tcp --dport 80 -j ACCEPT -A INPUT -p tcp -m state --state NEW -m tcp --dport 443 -j ACCEPT -A INPUT -p tcp -m state --state NEW -m tcp --dport 443 -j ACCEPT -A INPUT -p tcp -m state --state NEW -m tcp -s 10.16.142.54 --dport 1521 -j ACCEPT -A INPUT -p tcp -m state --state NEW -m tcp -s 10.16.142.54 --dport 1158 -j ACCEPT -A INPUT -j REJECT --reject-with icmp-host-prohibited -A FORWARD -j REJECT --reject-with icmp-host-prohibited COMMIT # Completed on Thu May 2 17:24:00 2013
[email protected] 59 www.redhat.com

Appendix E: Huge Pages ScriptThe following huge pages script is from Tuning Red Hat Enterprise Linux For Oracle & Oracle RAC by Scott Crot, Sr. Consultant, Red Hat14 and modified to include the values Oracle's soft and hard memlock.
#!/bin/bash KERN=`uname -r | awk -F. '{ printf("%d.%d\n",$1,$2); }'` # Find out the HugePage size HPG_SZ=`grep Hugepagesize /proc/meminfo | awk '{print $2}'` # Start from 1 pages to be on the safe side and guarantee 1 free HugePage NUM_PG=1 # Cumulative number of pages required to handle the running shared memory segments for SEG_BYTES in `ipcs -m | awk '{print $5}' | grep "[0-9][0-9]*"` do MIN_PG=`echo "$SEG_BYTES/($HPG_SZ*1024)" | bc -q` if [ $MIN_PG -gt 0 ]; then NUM_PG=`echo "$NUM_PG+$MIN_PG+1" | bc -q` fi done # Finish with results case $KERN in '2.4') HUGETLB_POOL=`echo "$NUM_PG*$HPG_SZ/1024" | bc -q`; echo "Recommended setting: vm.hugetlb_pool = $HUGETLB_POOL" ;; '2.6') MEM_LOCK=`echo "$NUM_PG*$HPG_SZ" | bc -q`; echo "Recommended setting within the kernel boot command line: hugepages = $NUM_PG" echo "Recommended setting within /etc/security/limits.conf: oracle soft memlock $MEM_LOCK" echo "Recommended setting within /etc/security/limits.conf: oracle hard memlock $MEM_LOCK" ;; *) echo "Unrecognized kernel version $KERN. Exiting." ;; esac
14 Tuning Red Hat Enterprise Linux For Oracle & Oracle RAC by Scott Crot, Sr. Consultant, Red Hat, http://www.redhat.com/promo/summit/2010/presentations/summit/decoding-the-code/fri/scott-945-tuning/summit_jbw_2010_presentation.pdf
www.redhat.com 60 [email protected]

Appendix F: Oracle Database Package Requirements Text Filecloog-ppl compat-libcap1 compat-libstdc++-33 cpp gcc gcc-c++ glibc-devel glibc-headers kernel-headers ksh libXmu libXt libXv libXxf86dga libXxf86misc libXxf86vm libaio-devel libdmx libstdc++-devel mpfr make ppl xorg-x11-utils xorg-x11-xauth
[email protected] 61 www.redhat.com

Appendix G: Kernel Parametersvm.swappiness = 0vm.dirty_background_ratio = 3vm.dirty_ratio = 80vm.dirty_expire_centisecs = 500vm.dirty_writeback_centisecs = 100kernel.shmmax = 68719476736 kernel.shmall = 4294967296 kernel.shmmni = 4096 kernel.sem = 250 32000 100 128 # fs.file-max needs to be set to at least 6815744 for Oracle Installation.fs.file-max = 6815744 fs.aio-max-nr = 1048576 net.ipv4.ip_local_port_range = 9000 65500 net.core.rmem_default = 262144 net.core.rmem_max = 4194304 net.core.wmem_default = 262144 net.core.wmem_max = 1048576
www.redhat.com 62 [email protected]

Appendix H: Limits Configuration File (Limits.conf)oracle soft nproc 2047 oracle hard nproc 16384 oracle soft nofile 1024 oracle hard nofile 65536 oracle soft stack 10240 oracle hard stack 32768 oracle soft memlock <value-provided-by-script>oracle hard memlock <value-provided-by-script>
grid soft nproc 2047 grid hard nproc 16384 grid soft nofile 1024 grid hard nofile 65536 grid soft stack 10240 grid hard stack 32768 # End of file
[email protected] 63 www.redhat.com

Appendix I: 99-oracle-asmdevices.rulesKERNEL=="dm-*",ENV{DM_UUID}=="<enter-value-according-to-your-environment>",OWNER="grid",GROUP="asmadmin",MODE="0660" KERNEL=="dm-*",ENV{DM_UUID}=="<enter-value-according-to-your-environment>",OWNER="grid",GROUP="asmadmin",MODE="0660" KERNEL=="dm-*",ENV{DM_UUID}=="<enter-value-according-to-your-environment>",OWNER="grid",GROUP="asmadmin",MODE="0660" KERNEL=="dm-*",ENV{DM_UUID}=="<enter-value-according-to-your-environment>",OWNER="grid",GROUP="asmadmin",MODE="0660"
www.redhat.com 64 [email protected]
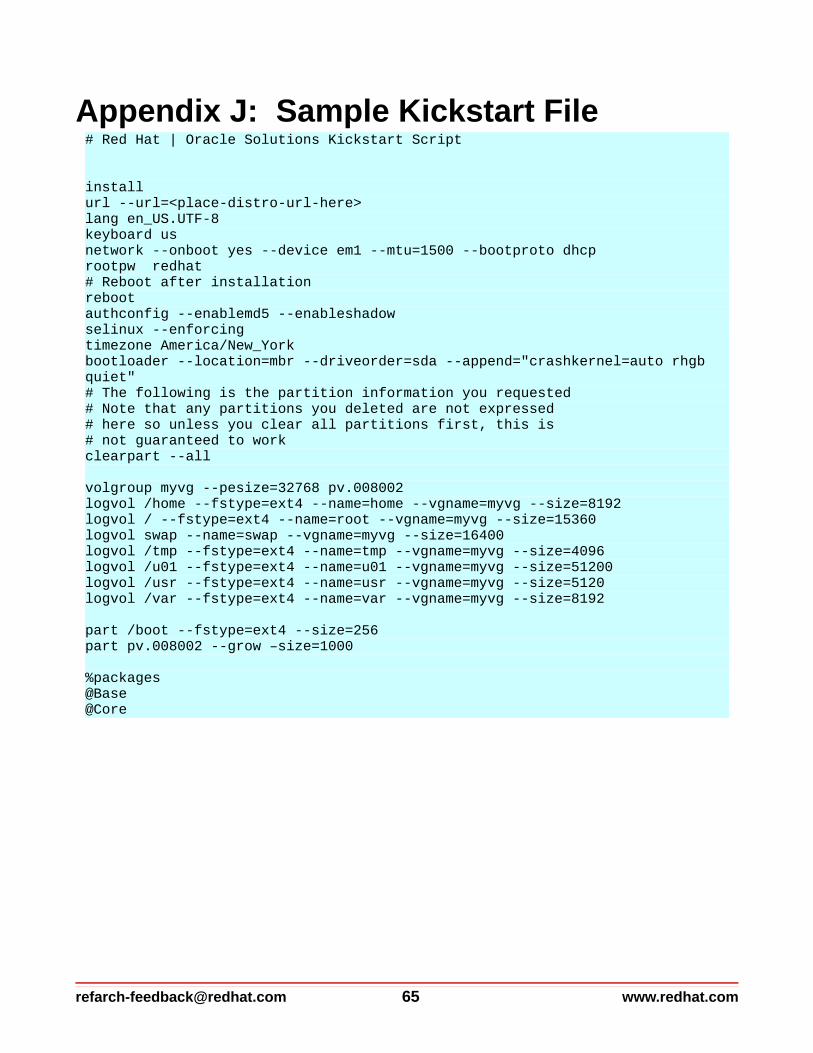
Appendix J: Sample Kickstart File# Red Hat | Oracle Solutions Kickstart Script
install url --url=<place-distro-url-here>lang en_US.UTF-8 keyboard us network --onboot yes --device em1 --mtu=1500 --bootproto dhcp rootpw redhat# Reboot after installation reboot authconfig --enablemd5 --enableshadow selinux --enforcing timezone America/New_York bootloader --location=mbr --driveorder=sda --append="crashkernel=auto rhgb quiet" # The following is the partition information you requested # Note that any partitions you deleted are not expressed # here so unless you clear all partitions first, this is # not guaranteed to work clearpart --all
volgroup myvg --pesize=32768 pv.008002 logvol /home --fstype=ext4 --name=home --vgname=myvg --size=8192 logvol / --fstype=ext4 --name=root --vgname=myvg --size=15360 logvol swap --name=swap --vgname=myvg --size=16400 logvol /tmp --fstype=ext4 --name=tmp --vgname=myvg --size=4096 logvol /u01 --fstype=ext4 --name=u01 --vgname=myvg --size=51200 logvol /usr --fstype=ext4 --name=usr --vgname=myvg --size=5120 logvol /var --fstype=ext4 --name=var --vgname=myvg --size=8192
part /boot --fstype=ext4 --size=256 part pv.008002 --grow –size=1000
%packages @Base @Core
[email protected] 65 www.redhat.com

Appendix K: Configuration FilesAll configuration files can be downloaded from the Red Hat customer portal15. A listing of all the files and a brief description can be seen on the Table 6.1: Configuration Files. Some of the configuration files require input with the proper information pertaining to your environment.
Files Description
req-rpm.txt The required RPMs to deploy Oracle.
huge_page_settings.sh Script that provides the proper hugepagevalues to set.
multipath.conf Device Mapper Multipath configuration file.
sysctl.conf Configuration file for the kernel parameters
limits.conf Configuration file to set limits for a user.
selinux-policy Version: 3.7.19-211. This version ensuresthat oracleasm works properly with SELinux
enabled.
selinux-policy-targeted Version: 3.7.19-211. This version ensuresthat oracleasm works properly with SELinux
enabled.
99-oracle-asmdevices.rules Udev configuration file for Oracle ASM disks
iptables iptables configuration
bonding.conf /etc/modprobe.d/ bonding configuration file
oracle-grid.sh Shell script used to set user limits
sample-ks.cfg Sample Kickstart File
CHANGELOG Listing of the latest changes made to the.tar.gz file
Table 6.1: Configuration Files
15 https://access.redhat.com/site/node/395013/40/1
www.redhat.com 66 [email protected]

Appendix L: Troubleshooting ORA-* ErrorsThis section focuses on using the command line tool, Automatic Diagnostic Repository Command Interpreter (ADRCI), to troubleshoot Oracle database related errors. ADRCI was introduced in Oracle Database 11g in order to help users diagnose errors within their Oracle database environments and provide health reports if an issue should arise. The following example shows how one could troubleshoot an Oracle database instance error using the ADRCI tool.
NOTE: The following steps are intended to produce an ORA-07445 error that can be troubleshooted using the ADRCI tool. Do not attempt on a Oracle Database Production environment. The following is for demonstration purposes only and intended only to show howto troubleshoot ORA-* related errors using the ADRCI tool.
1. In order to create an ORA-07445 error, an essential Oracle process will be killed via the following commands:
# ps -A --format pid,args | grep ora_dbrm | grep -v grep27121 ora_dbrm_db# kill -SEGV 27121
2. Export the ORACLE_HOME via the command:
# export ORACLE_HOME=/u01/app/oracle/product/11.2.0/dbhome_13. Start the ADRCI command tool via the command:
# $ORACLE_HOME/bin/adrci
ADRCI: Release 11.2.0.3.0 - Production on Mon Jul 1 19:42:58 2013
Copyright (c) 1982, 2011, Oracle and/or its affiliates. All rights reserved.
ADR base = "/u01/app/oracle" adrci>
4. At the ADRCI prompt, show Oracle Home's available via the command:
adcri> show homeADR Homes: diag/rdbms/db/db NOTE: If more than one Oracle Home is available, one must specify a particular Oracle Database Home. An example on how to set to a particular Oracle Database Home is as follows:
adcri> set home diag/rdbms/db/db5. At the ADRCI prompt, run the following command to see the last 50 entries in the alert
log:
adrci> show alert -tail -f[ ... Output Abbreviated ... ]Exception [type: SIGSEGV, unknown code] [ADDR:0xD43100006BE0] [PC:0x3D6CCEAFCA, semtimedop()+10] [exception issued by pid: 27616, uid: 54321] [flags: 0x0, count: 1] Errors in file /u01/app/oracle/diag/rdbms/db/db/trace/db_dbrm_27121.trc (incident=24057):
[email protected] 67 www.redhat.com

ORA-07445: exception encountered: core dump [semtimedop()+10] [SIGSEGV] [ADDR:0xD43100006BE0] [PC:0x3D6CCEAFCA] [unknown code] [] Incident details in: /u01/app/oracle/diag/rdbms/db/db/incident/incdir_24057/db_dbrm_27121_i24057.trc Use ADRCI or Support Workbench to package the incident. See Note 411.1 at My Oracle Support for error and packaging details.
NOTE: In this particular case, we are looking for an ORA-07445 within the alert log as seen above. However, this step is just to confirm what is seen in the future ADRCI steps. To exit the alert log, CTRL+C.
6. Within the ADRCI, there are two key terms to be aware of, problem and incident. An incident is a particular time when a problem occurred. For example, it is possible for anOracle process to crash at different times with the same ORA-07445. The multiple occurences of the crash are incidents, while the problem is still the ORA-07445 error. In order to view the problem, the following ADRCI command needs to be run.
adrci> show problemADR Home = /u01/app/oracle/diag/rdbms/db/db: *************************************************************************PROBLEM_ID PROBLEM_KEY LAST_INCIDENT LASTINC_TIME -------------------------------------------------------------------------1 ORA 7445 [semtimedop()+10] 24057 2013-07-01 19:51:42.408000-04:00
7. In order to view how many incidents, the following ADRCI command needs to be run. In this example, I only have one incident in which the ORA-07445 problem occurred.
adrci> show incidentADR Home = /u01/app/oracle/diag/rdbms/db/db: *************************************************************************INCIDENT_ID PROBLEM_KEY CREATE_TIME -------------------------------------------------------------------------24057 ORA 7445 [semtimedop()+10] 2013-07-01 19:51:42.408000 -04:001 rows fetched
8. In order to view the incident in more detail, run the following command:
adrci> show incident -mode detail -p “incident_id=24057”ADR Home = /u01/app/oracle/diag/rdbms/db/db: *************************************************************************
********************************************************** INCIDENT INFO RECORD 1 ********************************************************** INCIDENT_ID 24057 STATUS ready CREATE_TIME 2013-07-01 19:51:42.408000 -04:00 PROBLEM_ID 1 CLOSE_TIME <NULL> FLOOD_CONTROLLED none ERROR_FACILITY ORA ERROR_NUMBER 7445
www.redhat.com 68 [email protected]

ERROR_ARG1 semtimedop()+10 ERROR_ARG2 SIGSEGV ERROR_ARG3 ADDR:0xD43100006BE0 [ ... Output Abbreviated ... ] OWNER_ID 1 INCIDENT_FILE /u01/app/oracle/diag/rdbms/db/db/trace/db_dbrm_27121.trc OWNER_ID 1 INCIDENT_FILE /u01/app/oracle/diag/rdbms/db/db/incident/incdir_24057/db_dbrm_27121_i24057.trc 1 rows fetched NOTE: The two parameters of importance here are the PROBLEM_ID and INCIDENT_FILE.
9. When looking at the incident in further detail, the following incident file can be examined further via the following command:
adrci> show trace /u01/app/oracle/diag/rdbms/db/db/incident/incdir_24057/db_dbrm_27121_i24057.trc /u01/app/oracle/diag/rdbms/db/db/incident/incdir_24057/db_dbrm_27121_i24057.trc ---------------------------------------------------------- ---------------LEVEL PAYLOAD ------------------------------------------------------------------------- Dump file /u01/app/oracle/diag/rdbms/db/db/incident/incdir_24057/db_dbrm_27121_i24057.trc Oracle Database 11g Enterprise Edition Release 11.2.0.3.0 – 64bit Production With the Partitioning, Automatic Storage Management, OLAP, Data Mining and Real Application Testing options ORACLE_HOME = /u01/app/oracle/product/11.2.0/dbhome_1 System name: Linux Node name: db-oracle-node1.cloud.lab.eng.bos.redhat.com Release: 2.6.32-358.el6.x86_64 Version: #1 SMP Tue Jan 29 11:47:41 EST 2013 Machine: x86_64 Instance name: db Redo thread mounted by this instance: 1 Oracle process number: 7 Unix process pid: 27121, image: ?
*** 2013-07-01 19:51:42.411 *** SESSION ID:(113.1) 2013-07-01 19:51:42.411 *** CLIENT ID:() 2013-07-01 19:51:42.411 *** SERVICE NAME:(SYS$BACKGROUND) 2013-07-01 19:51:42.411 *** MODULE NAME:() 2013-07-01 19:51:42.411 *** ACTION NAME:() 2013-07-01 19:51:42.411
Dump continued from file: /u01/app/oracle/diag/rdbms/db/db/trace/db_dbrm_27121.trc 1> ***** Error Stack ***** ORA-07445: exception encountered: core dump [semtimedop()+10] [SIGSEGV]
[email protected] 69 www.redhat.com

[ADDR:0xD43100006BE0] [PC:0x3D6CCEAFCA] [unknown code] [] 1< ***** Error Stack ***** 1> ***** Dump for incident 24057 (ORA 7445 [semtimedop()+10]) ***** 2> ***** Beginning of Customized Incident Dump(s) ***** Exception [type: SIGSEGV, unknown code] [ADDR:0xD43100006BE0] [PC:0x3D6CCEAFCA, semtimedop()+10] [exception issued by pid: 27616, uid: 54321] [ ... Output Abbreviated ... ]
10. While this concludes how to examine trace files that pertain to a particular ORA error using ADRCI; if the issue cannot be solved by the end user, the ADRCI provides the Incident Packaging Service (IPS) tool to ZIP the necessary trace files based on the problem. It can then be sent to support for further debugging. To create the appropriate ZIP file, use the following commands:
adrci> ips create package problem 1 correlate allCreated package 1 based on problem id 1, correlation level all
NOTE: Problem 1 is the Problem_ID found step 6.
adrci> ips generate package 1 in “/home/oracle”Generated package 1 in file
/home/oracle/ORA7445se_20130701212832_COM_1.zip, mode complete
NOTE: Package 1 is the package ID captured from the ips create output command.
For more information about ADRCI, please visit the http://docs.oracle.com/cd/E11882_01/server.112/e25494/diag001.htm
www.redhat.com 70 [email protected]

Appendix M: ReferencesTECH: Unix Semaphores and Shared Memory Explained [ID 15566.1]http://docs.oracle.com/cd/E11882_01/install.112/e24321/pre_install.htm
Oracle Grid Infrastructure, Oracle Documentationhttp://docs.oracle.com/cd/E18248_01/doc/install.112/e16763/oraclerestart.htm#CHDFDAIG
Tuning Red Hat Enterprise Linux For Oracle & Oracle RAC by Scott Crot, Sr. Consultant, Red Hathttp://www.redhat.com/promo/summit/2010/presentations/summit/decoding-the-code/fri/scott-945-tuning/summit_jbw_2010_presentation.pdf
Linux OS Installation with Reduced Set of Packages for Running Oracle Database Server [ID 728346.1]https://support.oracle.com/epmos/faces/DocumentDisplay?_afrLoop=290805959329203&id=728346.1&_adf.ctrl-state=13886txzey_67
Installing 11.2.0.3 32-bit (x86) or 64-bit (x86-64) on RHEL6 Reports That Packages "elfutils-libelf-devel-0.97" and "pdksh-5.2.14" are missing (PRVF-7532) [ID 1454982.1]https://support.oracle.com/epmos/faces/ui/km/SearchDocDisplay.jspx?returnToSrId=&_afrLoop=290981302886992&srnum=&type=DOCUMENT&id=1454982.1&displayIndex=3&_afrWindowMode=0&_adf.ctrl-state=13886txzey_154
USE_LARGE_PAGES To Enable HugePages In 11.2 [ID 1392497.1]https://support.oracle.com/epmos/faces/Dashboard?_adf.ctrl-state=nvtwimbst_252
Large Pages Information in the Alert Log [ID 1392543.1]https://support.oracle.com/epmos/faces/ui/km/SearchDocDisplay.jspx?_adf.ctrl-state=nvtwimbst_226
Tuning Virtual Memoryhttps://access.redhat.com/site/documentation/en-US/Red_Hat_Enterprise_Linux/6/html/Performance_Tuning_Guide/s-memory-tunables.html
Maximum SHMMAX values for Linux x86 and x86-64 [ID 567506.1]https://support.oracle.com/epmos/faces/ui/km/SearchDocDisplay.jspx?_adf.ctrl-state=yp0o5bwk6_4
About the Oracle Database Fault Diagnosability Infrastructurehttp://docs.oracle.com/cd/E11882_01/server.112/e25494/diag001.htm
[email protected] 71 www.redhat.com