Embed Size (px)
Citation preview

An Oracle White Paper
April 2012
Deploying Oracle Data Guard with Oracle Database Appliance

Deploying Oracle Data Guard with Oracle Database Appliance
Table of Contents
Introduction ....................................................................................... 2
Why do I need a standby database environment? ......................... 2
Why Oracle Data Guard? .............................................................. 3
Multiple Benefits of Using Oracle Data Guard .................................... 3
Best Practices for Setup .................................................................... 5
Conclusion ........................................................................................ 7
Appendix A: Example Setup on Oracle Database Appliance ............. 8
Sample Environment ..................................................................... 8
Standby Environment Configuration ............................................ 12
Instantiate Standby Database ...................................................... 15
Post Instantiation Steps ............................................................... 17
Appendix B: Converting Single Instance Databases to Oracle RAC 18
Appendix C: Creating Data Guard Broker Configuration .................. 20
References ...................................................................................... 23

Deploying Oracle Data Guard with Oracle Database Appliance
2
Introduction
Oracle Database Appliance is a pre-built, pre-tuned, and ready-to-use clustered database
system that includes servers, storage, networking, and software. Oracle has optimized it to
make it easy to deploy, operate, and manage. It is a complete and ideal database platform for
small and medium sized implementations and incorporates robust, time-tested Oracle
technologies, including the world leading Oracle Database, Oracle Real Application Clusters
(RAC), Oracle Clusterware, and Oracle Automatic Storage Management. By integrating
hardware and software, Oracle Database Appliance eliminates the complexities inherent in
non-integrated, manually assembled solutions, reducing deployment time from weeks or
months to just a few hours, while preventing configuration and setup errors that often result in
sub-optimal, hard-to-manage database environments.
Why do I need a standby database environment?
While the Oracle Database Appliance is a highly available system in itself, a standby database
environment can provide protection against planned and unplanned downtime as well as
against data loss in case the primary database environment becomes unavailable. With the
use of proper technology, it is also possible keep the standby database synchronized with the
primary database, thereby providing almost transparent continued database operations even in
the face of problems ranging from user errors to system failures, to disasters. A standby
database has therefore always been a key to high availability and protection for any important
production system.
Oracle recommends using a separate, dedicated Oracle Database Appliance system to host
the standby database for one or more mission critical production databases running on the
primary Oracle Database Appliance system.
Figure 1 Oracle Data Guard Setup Using Two Oracle Database Appliances

Deploying Oracle Data Guard with Oracle Database Appliance
3
Why Oracle Data Guard?
Oracle Data Guard is the recommended disaster recovery solution to protect databases
residing on Oracle Database Appliance against database or cluster failures, corruptions,
disasters, and user errors resulting in “sick” or down database. The tight integration of Oracle
Data Guard with Oracle Database provides a unique level of data protection that is impossible
to achieve with any other solution. Oracle Data Guard is available to customers as part of
Oracle Database Enterprise Edition. It is easy to deploy and provides the management,
monitoring, and automation software to create and maintain one or more synchronized copies
(standby databases). Oracle Data Guard helps maintain database availability easily when the
production database system becomes unavailable due to any reason and also helps minimize
downtime during planned maintenance activities by shifting the application workload to the
standby environment.
Multiple Benefits of Using Oracle Data Guard
With the use of Oracle Data Guard, the standby database environment does not need to be idle, dark
capacity. The standby database can instead actively serve many useful purposes. There are several
benefits of implementing the standby database using Oracle Data Guard. These numerous benefits
greatly increase the overall return on effort and investment.
• Migration to Oracle Database Appliance – Oracle Data Guard enables an easy approach for
migration to Oracle Database Appliance. You can simply create a Physical Standby database on a
Oracle Database Appliance and switchover from the old environment to the new environment. This
includes migration across certain platforms as well. For example, to migrate your databases currently
running on Windows to Oracle Database Appliance, a Linux platform, you may simply setup Oracle
Data Guard between the two environments and switchover. This approach to platform migration
provides the flexibility to switchback, if for any reason you choose to do so after testing. Refer to My
Oracle Support (MOS) note 413484.1, Data Guard Support for Heterogeneous Primary and Physical
Standbys in Same Data Guard Configuration, for more information about platform migration using
Data Guard.
Oracle Data Guard also allows you to migrate across database versions using a transient logical
standby database.
• Disaster Recovery – Oracle Data Guard physical standby database provides an ideal solution for
disaster protection. Disaster scenarios vary from burst water or steam pipes, fire, hurricanes,
vandalism, to earthquakes, floods, and terrorism. Oracle Data Guard maintains a block-for-block
copy of the production database. In the event the primary environment becomes unavailable due to

Deploying Oracle Data Guard with Oracle Database Appliance
4
any reason, the standby environment can be quickly activated to maintain continued database
availability.
• High Availability – The standby database can also be useful in maintaining availability during
planned and unplanned outages, such as configuration changes, hardware replacements, etc. as well
as during data corruptions, failures resulting from human errors, and other unexpected system
failures.
• Database Rolling Upgrades – The standby database minimizes downtime when certain patches
are applied and changes are made to the primary Oracle Database Appliance. Patches or other
maintenance is applied first at the standby database, validated, and then production is switched to
the standby database. The only downtime for the databases is the short period of time required to
change roles between primary and standby. Please refer to My Oracle Support (MOS) note
1265700.1, Oracle Patch Assurance - Data Guard Standby-First Patch Apply, for more information.
• Offloading Workload and Activities – The standby environment does not have to be idle. It can
be actively used to maximize the overall return on investment. With a physical standby database in
place, several key activities can be offloaded to the standby environment.
o Read-Only Queries – Using Oracle Active Data Guard option, the standby
database can be open for query workload while being in the standby mode and
accepting updates from the primary database. In many cases, this can help offload a
significant part of the production workload to the standby database environment,
thereby increasing the overall capacity of the system.
o Backups – Because the physical standby database is a block-for-block copy of the
primary database, database backups can be completely offloaded to the standby
environment and these backups can be transparently used to restore and recover the
primary database in the event of a failure or database loss. Note that if Oracle Active
Data Guard is licensed, then fast incremental backups can be run at the standby
database, further adding to the appeal of offloading backups to the standby database.
o Block Repair – One of the other benefits of the physical standby database is the
ability that it provides to automatically recover from block corruption scenarios. In a
primary/standby configuration a corrupt block can be automatically repaired and this
operation can be completely transparent. This feature is also a part of the Oracle
Active Data Guard option.
• Snapshot Standby – The snapshot standby database is an updatable standby database that provides
full data protection for the primary database. It continues to receive redo data from the primary but
the apply process is halted while the standby database is open for read/write for test. When testing is
complete, a single command reverts the standby database back to its original state, discarding the
changes made while it was open read-write and applying the accumulated redo logs to make it
current with the primary database.

Deploying Oracle Data Guard with Oracle Database Appliance
5
Best Practices for Setup
This section describes some of the important best practices for setting up Oracle Data Guard on
Oracle Database Appliance. For a complete list of general Oracle Data Guard best practices, which
also apply to the Oracle Database Appliance environment, please refer to Chapter 8, Configuring
Oracle Data Guard, of the Oracle® Database High Availability Best Practices Guide 11g Release 2
(11.2).
• Match the primary and standby database configuration -- In order to maintain consistent
service levels and to use the primary and standby databases transparently, it is important to match
the resources, setup, and configuration of the two systems as much as possible. Significant
differences between the primary and standby database configuration can result in sub-optimal
performance and unpredictable behavior when role transitions occur. Specifically, the following
recommendations are made:
o Run Primary and Standby Database on Separate Oracle Database Appliances -
- It is recommended that the primary and the standby databases run on separate
Oracle Database Appliance units. Thus, while the primary database is deployed on
one Oracle Database Appliance unit, the standby database should be deployed on a
separate Oracle Database Appliance, preferably located in a geographically distant
location.
o Run Primary and Standby Database in Same Configuration -- Three different
database configurations are supported on Oracle Database Appliance; Oracle RAC
database, Oracle RAC One, and Single Instance Enterprise Edition database. The
standby database should also be of the same configuration type as the primary
database. Thus, if the primary database is configured as a cluster database (Oracle
RAC), then the standby database should also be configured as a cluster database
(Oracle RAC).
o Size Primary and Standby Instances Similar to Each Other -- The instances on
the primary and standby databases should be configured similar to each other in
terms of database parameter settings. This helps avoid any unpredictability when the
database switch roles.
o Pre-configure Primary and Standby Databases for Role Transition – The
primary and standby databases should be configured so that during role transitions,
primary to standby and vice versa, minimal changes are required and necessary. Thus
all the database features implemented on the primary database should be configured
on the standby database in advance.
• Configure Flashback Database on both Primary and Standby Databases -- The Flashback
Database feature enables rapid role transitions and reduces the effort required to re-establish
database roles after a transition. As a best practice, Flashback Database should be configured on
both the primary and the standby database. However, if Flashback is only used for the purposes of

Deploying Oracle Data Guard with Oracle Database Appliance
6
re-instating the Data Guard configuration, it is a best practice to reduce the flashback retention
target from the default of 24 hours to 2 hours.
• Use Dedicated Network for Standby Traffic -- Oracle Database Appliance comes pre-built with
multiple redundant network interfaces. If required, a separate network path can be created for the
standby traffic to minimize any performance impact on the user and application related workload.
Note that since Oracle Data Guard needs to transport only the changes made to the primary
database from the primary database to the standby database, it does not impose any unnecessary
requirements on the network than is needed. Therefore, many deployments of Oracle Data Guard
may not require a separate network path to be established for redo log transport between primary
and standby. However, some high volume applications may require a separate network path for redo
log transport. Oracle Database Appliance provides three additional network interfaces on each
server node, including a 10 GbE interface, besides the public 1 GbE interface to configure such a
network. Please refer to MOS note 1451810.1 for additional details on configuring a dedicated
network for disaster recovery purposes on Oracle Database Appliance.
• Consider Offloading Certain Workloads to Standby -- Oracle Recovery Manager (RMAN) works
transparently across the primary and standby databases. The standby database should be leveraged to
offload backups from the primary database environment. The Oracle Active Data Guard
configuration allows for offloading the query workload to the standby environment. Additionally,
the standby database can also enable transparent block corruption repair.
• Consider Utilizing Oracle Active Data Guard – Oracle Active Data Guard allows the standby
database to be open for read-only operations while managed recovery (redo transmission and
application on the standby) is concurrently active. This can help distribute the workload from the
primary environment to the standby database, increasing the return on investment in the standby
database. Note that with Oracle Active Data Guard, it is also possible to use fast incremental
backups on the standby database. The fast incremental backups could reduce backup windows from
hours to minutes.
• Review Oracle Maximum Availability Architecture (MAA) Best practices for Oracle
Database -- Depending on the deployment and usage of the Data Guard environment, you may
find the following additional best practices for Oracle Data Guard useful.
a. Client Failover Best Practices for Data Guard 11g Release 2
b. Active Data Guard Best Practices
c. Role Transition Best Practices
d. Maximum Availability Architecture (MAA) White Paper: Preventing, Detecting, and Repairing
Block Corruption: Oracle Database 11g
The Maximum Availability Architecture (MAA) Best Practices for Oracle Database are available at
http://www.oracle.com/technetwork/database/features/availability/oracle-
database-maa-best-practices-155386.html

Deploying Oracle Data Guard with Oracle Database Appliance
7
Conclusion
Oracle Data Guard when used with Oracle Database Appliance enables you to deploy an effective
disaster recovery protection strategy right from the time of initial deployment. The physical standby
configuration process outlined in this white paper is simple and can be completed without any
downtime incurred on the primary database. Most of the standby creation steps are automated using
tools such as Oracle Appliance Manager, Database Configuration Assistance (DBCA), RMAN, and
Oracle Data Guard. The automation removes the chances of errors and improper configuration. The
creation of the primary and standby databases can be performed at the time of initial primary database
deployment.

Deploying Oracle Data Guard with Oracle Database Appliance
8
Appendix A: Example Setup on Oracle Database Appliance
Sample Environment
The following section describes the primary and standby database environment topologies used in the
subsequent Data Guard setup example using Oracle Database Appliance.
Figure 2 Configuration Topology of Oracle RAC on Oracle Database Appliance
TABLE 1. EXAMPLE ORACLE DATABASE NAMING CONVENTIONS
PRIMARY ORACLE DATABASE APPLIANCE STANDBY ORACLE DATABASE APPLIANCE
APPLIANCE NAME appliance#1 appliance#2
HOST NAMES slcac456 slcac457 slcac458 slcac459
CLUSTER NAME CLUSTER1 CLUSTER2
DATABASE NAME pdb sdb
INSTANCE NAME pdb1 pdb2 sdb1 sdb2
SCAN NAME AND IPS slcac456-scan (10.1.27.2, 10.1.27.3) slcac458-scan (10.1.27.4, 10.1.27.5)
GRID INFRASTRUCTURE
SOFTWARE INSTALLATION
/u01/app/11.2.0.3/grid /u01/app/11.2.0.3/grid
ORACLE DATABASE SOFTWARE
INSTALLATION
/u01/app/oracle/product/11.2.0.3/db_home1 /u01/app/oracle/product/11.2.0.3/db_home1
ARCHIVELOG MODE Yes Yes
FORCE LOGGING MODE Yes Yes

Deploying Oracle Data Guard with Oracle Database Appliance
9
1. Create Standby Redo Logs
Oracle recommends that a standby redo log be created on the primary database in a Data Guard
configuration so that it is immediately ready to receive redo data following a switch-over to the
standby role.
Create Standby Redo Logs (SRL) on the primary database. Each thread of the standby redo log
must have at least one more redo log group than the corresponding thread of the online redo log.
$> sqlplus / as sysdba
SQL> alter database add standby logfile thread 1 group 7 size
1024M, group 8 size 1024M, group 9 size 1024M, group 10 size
1024M;
SQL> alter database add standby logfile thread 2 group 11
size 1024M, group 12 size 1024M, group 13 size 1024M, group
14 size 1024M;
To check the number of online redo logs & their sizes, use the following query.
SQL> select group#, thread#, bytes from v$log;
Note that the size of the standby redo logs should match the size of the redo logs. The standby
redo logs have to be created on the REDO disk group.
To validate the size of each log file and number of log groups in the standby redo log, use the
following query.
SQL> select group#, thread#, bytes from v$standby_log;
2. Enable archivelog mode on primary database
Verify that the primary database is running in ARCHIVELOG mode.
SQL> archive log list
If the primary database is not running in ARCHIVELOG mode then enable ARCHIVELOG
mode.
Shutdown both instances on Oracle Database Appliance.
$ srvctl stop database –d pdb
SQL> startup mount exclusive;
SQL> alter database archivelog;
SQL> shutdown immediate;
$ srvctl start database –d pdb

Deploying Oracle Data Guard with Oracle Database Appliance
10
3. Enable FORCE LOGGING mode.
Verify that FORCE LOGGING is enabled. If FORCE LOGGING is not enabled on the primary
database, then enable it.
SQL> select force_logging from v$database;
SQL> alter database force logging;
4. Configure Flashback Database feature
Although using the Flashback Database feature is optional, for faster re-instatement of the old
primary database after a failover, it is recommended to use the Flashback Database feature of the
Oracle databases. Thus, if you do a failover to the standby, and the old primary can be repaired,
you do not have to rebuild it but simply flashback and let Oracle Data Guard resynchronize from
that point onwards.
Check if the primary database has Flashback Database enabled and if required then enable it.
SQL> select flashback_on from v$database;
SQL> alter database flashback on;
Note that enabling Flashback Database will require additional space consumption in the Fast
Recovery Area (FRA). The space used by flashback logs can be controlled by setting the
parameter DB_FLASHBACK_RETENTION_TARGET to a desired value in minutes.
SQL> alter system set DB_FLASHBACK_RETENTION_TARGET=120
scope=both sid='*';
5. Enable Standby File Management
When the primary database adds or drops a datafile, the corresponding action should also be
automatically taken on the standby database. This operation can be automated by enabling standby
file management.
SQL> alter system set STANDBY_FILE_MANAGEMENT=AUTO scope=both
sid='*';
6. Enable Remote Privileged Login
Ensure that each instance of the primary database is configured with remote login password file.
Note that the Oracle Database Appliance deploys the databases with this setting. The initialization
parameter REMOTE_LOGIN_PASSWORDFILE must be set to exclusive. If this parameter
needs to be modified as below, it requires an instance restart for it to take effect.
$ sqlplus / as sysdba
SQL> show parameter remote_login_passwordfile

Deploying Oracle Data Guard with Oracle Database Appliance
11
SQL> alter system set remote_login_passwordfile='exclusive'
scope=spfile sid='*';
7. Setup Redo Transport Service
The Oracle Data Guard redo transport mechanism uses Oracle Net connections to send the redo
between the databases. Redo transport is enabled by setting the LOG_ARCHIVE_DEST_n
parameter. For example, the following setup enables logging shipping and uses the LGWR in
asynchronous mode.
SQL> alter system set log_archive_dest_2='SERVICE=sdb LGWR
ASYNC REGISTER VALID_FOR=(online_logfile,primary_role)
REOPEN=60 DB_UNIQUE_NAME=sdb' scope=both sid='*';
8. Setup Fetch Archive Log Server
When the database is in standby role and the primary is unable to send any missing log files, then
the standby database can use the FAL_SERVER setting to pull those missing log files. The
FAL_SERVER parameter is uses the Oracle Net service name.
SQL> alter system set FAL_SERVER=sdb scope=both sid='*';
SQL> alter system set remote_login_passwordfile=exclusive
scope=spfile;

Deploying Oracle Data Guard with Oracle Database Appliance
12
Standby Environment Configuration
This section describes the steps that must be executed on the standby database.
1. Setup TNS Entries
Oracle Net Service Names must be configured to enable redo transportation across the databases.
Update tnsnames.ora file for primary database with TNS alias entries for the standby database.
Note that in the Oracle Database Appliance, the tnsnames.ora file is located in network/admin
directory of the Oracle database home.
PDB =
(DESCRIPTION =
(ADDRESS = (PROTOCOL = TCP) (HOST = slcac456-scan)
(PORT = 1521))
(CONNECT_DATA = (SERVER = DEDICATED) (SERVICE_NAME =
pdb)))
SDB =
(DESCRIPTION =
(ADDRESS = (PROTOCOL = TCP) (HOST = slcac458-scan)
(PORT = 1521))
(CONNECT_DATA = (SERVER = DEDICATED) (SERVICE_NAME =
sdb)))
2. Create Static Listener Configuration
As the grid user, create a static listener service on the standby database for Recovery Manager
(RMAN) connection during instantiation. Note that the listener home is in the Grid Infrastructure
home (/u01/app/11.2.0.3/grid/network/admin)
SID_LIST_LISTENER =
(SID_LIST = (SID_DESC = (GLOBAL_DBNAME = sdb)
(ORACLE_HOME =
/u01/app/oracle/product/11.2.0.3/dbhome_1)(SID_NAME = sdb))
3. Restart Listener

Deploying Oracle Data Guard with Oracle Database Appliance
13
After changes to the listener are made, it must be restarted.
$> srvctl stop listener
$> srvctl start listener
4. Create Initial Standby Parameter File
Create a parameter file, pfile, ($ORACLE_HOME/dbs/initsdb.ora) in the standby database. For
example:
SQL> CREATE PFILE = 'initsdb.ora' FROM SPFILE;
5. Create Password File
During the RMAN duplication process, the auxiliary instance needs to be accessed with remote
authentication that requires the creation of the password file.
$> orapwd
file=/u01/app/oracle/product/11.2.0.3/dbhome_1/dbs/orapwsdb
password=<primary sysdba passwd>
6. Create Audit Directory
Create audit file destination directory on the standby database.
$ mkdir –p /u01/app/oracle/admin/sdb/adump
7. Startup Standby Instance
Startup the standby database instance on first standby host in the NOMOUNT state to prepare
for instantiation.
$> export ORACLE_SID=sdb
$> sqlplus / as sysdba
SQL> startup nomount
8. Validate Network Setup
At this stage, Oracle Net should be able to resolve the TNS aliases for both the primary and
standby environments from the standby environment.
$ tnsping pdb

Deploying Oracle Data Guard with Oracle Database Appliance
14
$ tnsping sdb
$ sqlplus sys/<password>@//slcac456:1521/pdb as sysdba

Deploying Oracle Data Guard with Oracle Database Appliance
15
Instantiate Standby Database
This section outlines the instantiation of the standby database after the setup on the primary and
standby environments is complete.
1. Duplicate Database
Using the Recovery Manager (RMAN), the standby database can be created with DUPLICATE
DATABASE command. As part of the duplication process, the parameter file, password file,
controlfile, and database files are copied over from the primary instance and setup in the standby
environment.
The appropriate changes required to the parameter settings for standby operation will also need to
be specified during the RMAN command. Once RMAN copies over the primary parameter file,
the provided parameters are changed accordingly.
As the password file is also copied over, the standby database would have the same password as
the primary database and not necessarily as that was created earlier.
$rman
connect target sys/welcome1@//slcac456:1521/pdb
connect auxiliary sys/welcome1@//slcac458:1521/sdb
run {
allocate channel p1 type disk;
allocate channel p2 type disk;
allocate channel p3 type disk;
allocate channel p4 type disk;
allocate auxiliary channel s1 type disk;
duplicate target database for standby from active database
dorecover
spfile
parameter_value_convert='/pdb','/sdb'
set db_unique_name = 'sdb'
set cluster_database = 'false'
set audit_file_dest = '/u01/app/oracle/admin/sdb/adump'
Deploying Oracle Data Guard with Oracle Database Appliance
16
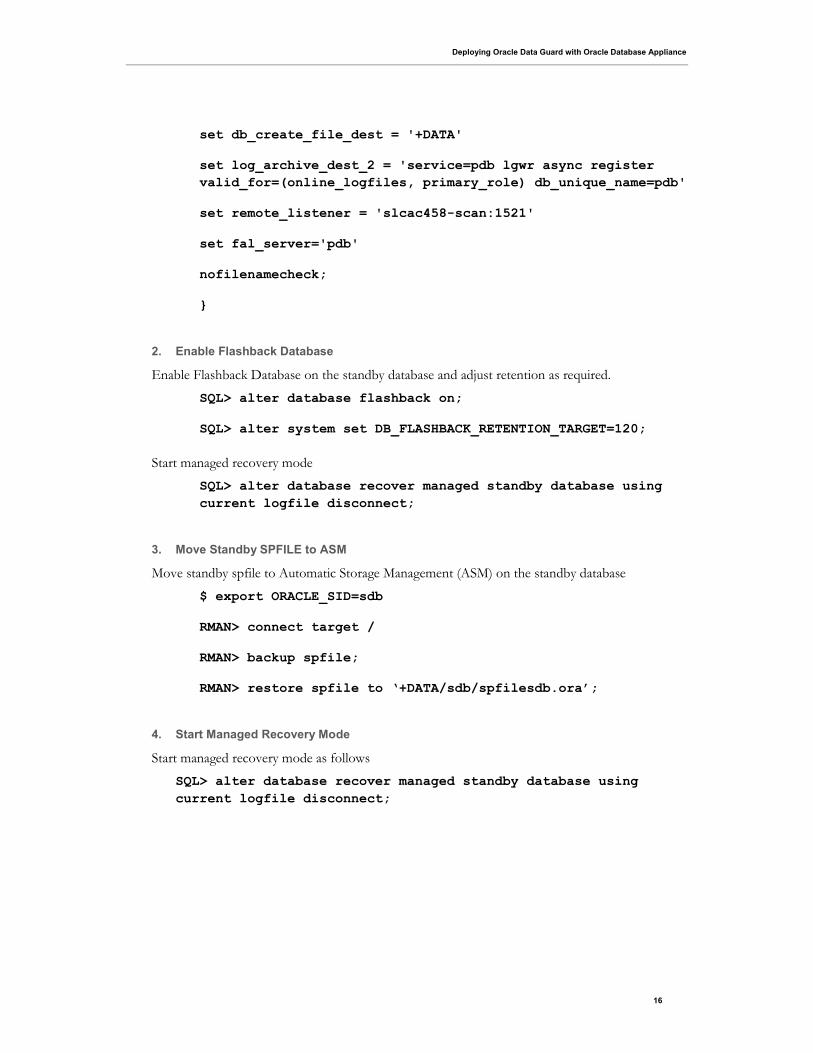
set db_create_file_dest = '+DATA'
set log_archive_dest_2 = 'service=pdb lgwr async register
valid_for=(online_logfiles, primary_role) db_unique_name=pdb'
set remote_listener = 'slcac458-scan:1521'
set fal_server='pdb'
nofilenamecheck;
}
2. Enable Flashback Database
Enable Flashback Database on the standby database and adjust retention as required.
SQL> alter database flashback on;
SQL> alter system set DB_FLASHBACK_RETENTION_TARGET=120;
Start managed recovery mode
SQL> alter database recover managed standby database using
current logfile disconnect;
3. Move Standby SPFILE to ASM
Move standby spfile to Automatic Storage Management (ASM) on the standby database
$ export ORACLE_SID=sdb
RMAN> connect target /
RMAN> backup spfile;
RMAN> restore spfile to ‘+DATA/sdb/spfilesdb.ora’;
4. Start Managed Recovery Mode
Start managed recovery mode as follows
SQL> alter database recover managed standby database using
current logfile disconnect;

Deploying Oracle Data Guard with Oracle Database Appliance
17
Post Instantiation Steps
The following steps are performed after the standby instantiation has been completed.
1. Register standby database with Oracle Clusterware.
Make sure that the ORACLE_HOME environment variable is set correctly. Register the standby
database with Oracle Clusterware as single instance to run from one node of the cluster.
$ srvctl add database –d sdb –o $ORACLE_HOME –p
"+DATA/sdb/spfilesdb.ora" –r physical_standby –s mount -c
SINGLE -x slcac458
2. Convert the standby database to Oracle RAC
This step is optional. At this stage the standby database is configured as a single instance database.
If the primary database was RAC database, the standby database can also be converted into RAC
standby. Appendix B provides information on using the rconfig tool to convert the single instance
database to RAC standby database.
3. Setup Data Guard Broker Configuration
This step is optional. Creating a Data Guard Broker configuration enables easier management of
the entire Data Guard environment as a single entity. It provides management, maintenance and
monitoring capabilities that can be used both locally and remotely. Appendix C provides more
information on setting up Data Guard Broker configuration.
4. Setup Dedicated DR Network
This step is optional. The Redo Transport Services can be configured to use a dedicated network.
A dedicated network channel can help in improving the performance of redo transmission
especially when the application network traffic consumes most of available bandwidth on the
public network. Please refer to MOS note 1451810.1, Configuring Dedicated Disaster Recovery
Network on Oracle Database Appliance, for more information on setting up a dedicated network
channel for Data Guard Redo Transport.
5. Verify Configuration and Setup
On the standby database internal data dictionary views can be used to verify standby database
operations.
$ srvctl config database -d sdb
SQL> select database_role, switchover_status from v$database;
SQL> select thread#, sequence#, applied from v$archived_log
order by sequence#;

Deploying Oracle Data Guard with Oracle Database Appliance
18
Appendix B: Converting Single Instance Databases to Oracle RAC
You can use the rconfig command line utility to convert a single-instance database to an Oracle RAC
database, or to convert it to an Oracle RAC One Node.
To use this feature, complete the following steps:
Create Configuration XML File
A sample of the configuration XML file to be saved as convert.xml is shown below. You may modify
this file as required for your system.
The sample XML files are in $ORACLE_HOME/assistants/rconfig/sampleXML directory.
Note: Set the convert option Convert verify="ONLY" initially to perform a test conversion to ensure
that a conversion can be completed successfully.
<?xml version="1.0" encoding="UTF-8"?> <n:RConfig xmlns:n="http://www.oracle.com/rconfig" xmlns:xsi="http://www.w3.org/2001/XMLSchema-instance" xsi:schemaLocation="http://www.oracle.com/rconfig rconfig.xsd"> <n:ConvertToRAC> <n:Convert verify="YES"> <n:SourceDBHome>/u01/app/oracle/product/11.2.0.3/dbhome_1</n:SourceDBHome> <n:TargetDBHome>/u01/app/oracle/product/11.2.0.3/dbhome_1</n:TargetDBHome> <n:SourceDBInfo SID="sdb"> <n:Credentials> <n:User>sys</n:User> <n:Password>welcome1</n:Password> <n:Role>sysdba</n:Role> </n:Credentials> </n:SourceDBInfo> <n:NodeList> <n:Node name="slcac458"/> <n:Node name="slcac459"/> </n:NodeList> <n:InstancePrefix>sdb</n:InstancePrefix> <n:SharedStorage type="ASM"> <n:TargetDatabaseArea></n:TargetDatabaseArea> <n:TargetFlashRecoveryArea></n:TargetFlashRecoveryArea> </n:SharedStorage> </n:Convert> </n:ConvertToRAC> </n:RConfig>

Deploying Oracle Data Guard with Oracle Database Appliance
19
Run rconfig Tool
When you have completed making changes, save the file. Run the following command on the standby
database. The convert.xml is the name of the XML input file you configured above.
$ rconfig convert.xml
Update Cluster Ready Services Resource
The Cluster Ready Services (CRS) resource must be updated for the converted database.
$ srvctl modify database -d stby -r physical_standby -s mount
Validate Configuration
Validate the configuration of standby database.
$ srvctl config database -d stby

Deploying Oracle Data Guard with Oracle Database Appliance
20
Appendix C: Creating Data Guard Broker Configuration
This section outlines the process of Oracle Data Guard Broker configuration.
Configure listeners for static registration
Configure listeners for static registration of all the instances of primary & standby databases. In the
Oracle Database Appliance, the listeners are running from the Grid Infrastructure home. An example
of static registration for a RAC primary & standby configuration:
On node slcac456:
SID_LIST_LISTENER =
(SID_LIST =
(SID_DESC = (GLOBAL_DBNAME = pdb_DGMGRL)
(ORACLE_HOME =
/u01/app/oracle/product/11.2.0.3/dbhome_1)
(SID_NAME = pdb1)))
On node slcac457:
SID_LIST_LISTENER =
(SID_LIST =
(SID_DESC = (GLOBAL_DBNAME = pdb_DGMGRL)
(ORACLE_HOME = /u01/app/oracle/product/11.2.0.3/dbhome_1)
(SID_NAME = pdb2)))
On node slcac458:
SID_LIST_LISTENER =
(SID_LIST =
(SID_DESC =
(GLOBAL_DBNAME = sdb_DGMGRL)
(ORACLE_HOME = /u01/app/oracle/product/11.2.0.3/dbhome_1)
(SID_NAME = sdb1)))
On node slcac459:

Deploying Oracle Data Guard with Oracle Database Appliance
21
SID_LIST_LISTENER =
(SID_LIST =
(SID_DESC = (GLOBAL_DBNAME = sdb_DGMGRL)
(ORACLE_HOME = /u01/app/oracle/product/11.2.0.3/dbhome_1)
(SID_NAME = sdb2)))
Configure Broker Configuration Files
Configure location of broker configuration files at both primary and standby databases.
On node slcac456:
SQL> ALTER SYSTEM SET DG_BROKER_CONFIG_FILE1='+DATA' SCOPE=BOTH SID='*';
SQL> ALTER SYSTEM SET DG_BROKER_CONFIG_FILE2='+RECO' SCOPE=BOTH SID='*';
On node slcac458:
SQL> ALTER SYSTEM SET DG_BROKER_CONFIG_FILE1='+DATA' SCOPE=BOTH SID='*';
SQL> ALTER SYSTEM SET DG_BROKER_CONFIG_FILE2='+RECO' SCOPE=BOTH SID='*';
Enable Data Guard Broker
Enable Data Guard Broker on both primary and standby databases.
On node slcac456:
SQL> ALTER SYSTEM SET DG_BROKER_START='TRUE' SCOPE=BOTH SID='*';
On node slcac458:
SQL> ALTER SYSTEM SET DG_BROKER_START='TRUE' SCOPE=BOTH SID='*';
Create Broker Configuration
Create the broker configuration on the primary using the DB_UNIQUE_NAME of the primary
database and its corresponding TNS alias.
DGMGRL> connect sys/welcome1;
DGMGRL> CREATE CONFIGURATION 'ODADGConfig' AS
> PRIMARY DATABASE IS 'PDB'

Deploying Oracle Data Guard with Oracle Database Appliance
22
> CONNECT IDENTIFIER is PDB;
Add Standby Database to Data Guard Broker Configuration
Add standby database to the configuration using the DB_UNIQUE_NAME of the standby database.
DGMGRL> ADD DATABASE 'SDB' AS
> CONNECT IDENTIFIER IS SDB;
Enable Configuration
Enable Data Guard Broker configuration as follows.
DGMGRL> enable configuration;
Check configuration
Run the following command to verify the established configuration.
DGMGRL> show configuration;
DGMGRL> show database verbose prim;
DGMGRL> show instance verbose prim1;
DGMGRL> show instance verbose prim2;
DGMGRL> show database verbose stby;
DGMGRL> show instance verbose stby1;
DGMGRL> show instance verbose stby2;

Deploying Oracle Data Guard with Oracle Database Appliance
23
References
1. Oracle Database Appliance Website on OTN
http://www.oracle.com/technetwork/server-storage/engineered-systems/database-appliance/index.html
2. Oracle Real Application Clusters Website on OTN
http://www.oracle.com/technetwork/database/clustering/overview/index.html
3. Oracle Clusterware Website on OTN
http://www.oracle.com/technetwork/database/clusterware/overview/index.html
4. Oracle Data Guard Website on OTN
http://www.oracle.com/technetwork/database/features/availability/dataguardoverview-083155.html
5. Oracle Maximum Availability Architecture
http://www.oracle.com/technetwork/database/features/availability/oracle-database-maa-best-practices-155386.html
6. Oracle Data Guard Concepts and Administration 11g Release 2 (11.2)
http://docs.oracle.com/cd/E11882_01/server.112/e25608/toc.htm
7. My Oracle Support (MOS) Note 1075908.1
https://support.oracle.com/CSP/main/article?cmd=show&type=NOT&id=1075908.1
8. Oracle Database High Availability Website on OTN http://www.oracle.com/technetwork/database/features/availability/index.html
9. Oracle® Database High Availability Best Practices 11g Release 2 (11.2)
http://docs.oracle.com/cd/E11882_01/server.112/e10803.pdf

Deploying Oracle Data Guard with Oracle
Database Appliance
April 2012
Oracle Corporation
World Headquarters
500 Oracle Parkway
Redwood Shores, CA 94065
U.S.A.
Worldwide Inquiries:
Phone: +1.650.506.7000
Fax: +1.650.506.7200
oracle.com
Copyright © 2012, Oracle and/or its affiliates. All rights reserved. This document is provided for information purposes only and the
contents hereof are subject to change without notice. This document is not warranted to be error-free, nor subject to any other
warranties or conditions, whether expressed orally or implied in law, including implied warranties and conditions of merchantability or
fitness for a particular purpose. We specifically disclaim any liability with respect to this document and no contractual obligations are
formed either directly or indirectly by this document. This document may not be reproduced or transmitted in any form or by any
means, electronic or mechanical, for any purpose, without our prior written permission.
Oracle and Java are registered trademarks of Oracle and/or its affiliates. Other names may be trademarks of their respective owners.
Intel and Intel Xeon are trademarks or registered trademarks of Intel Corporation. All SPARC trademarks are used under license and
are trademarks or registered trademarks of SPARC International, Inc. AMD, Opteron, the AMD logo, and the AMD Opteron logo are
trademarks or registered trademarks of Advanced Micro Devices. UNIX is a registered trademark licensed through X/Open
Company, Ltd. 0112