Embed Size (px)
Citation preview
Deploying IBM Security Guardium Multi-Cloud Data Protection on Azure
Technical Note September 2019
Deploying IBM Security Guardium Multi-Cloud Data Protection on Azure
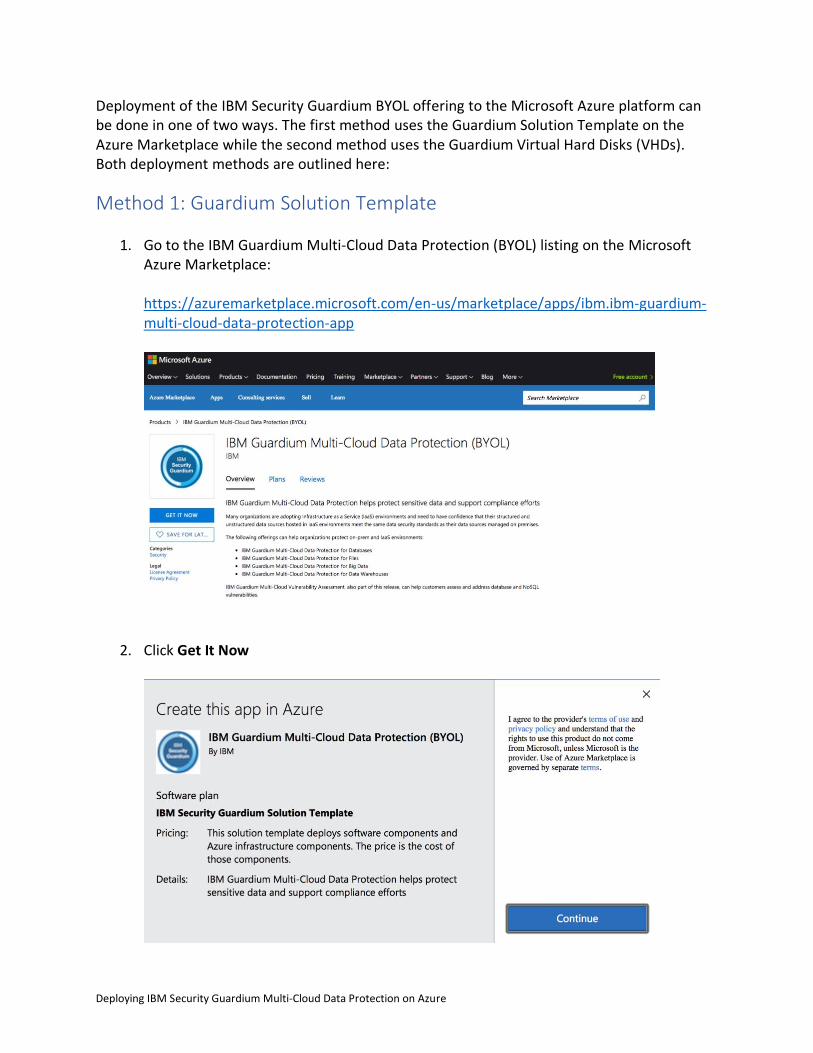
Deployment of the IBM Security Guardium BYOL offering to the Microsoft Azure platform can be done in one of two ways. The first method uses the Guardium Solution Template on the Azure Marketplace while the second method uses the Guardium Virtual Hard Disks (VHDs). Both deployment methods are outlined here:
Method 1: Guardium Solution Template
1. Go to the IBM Guardium Multi-Cloud Data Protection (BYOL) listing on the Microsoft Azure Marketplace: https://azuremarketplace.microsoft.com/en-us/marketplace/apps/ibm.ibm-guardium-multi-cloud-data-protection-app
2. Click Get It Now
Deploying IBM Security Guardium Multi-Cloud Data Protection on Azure
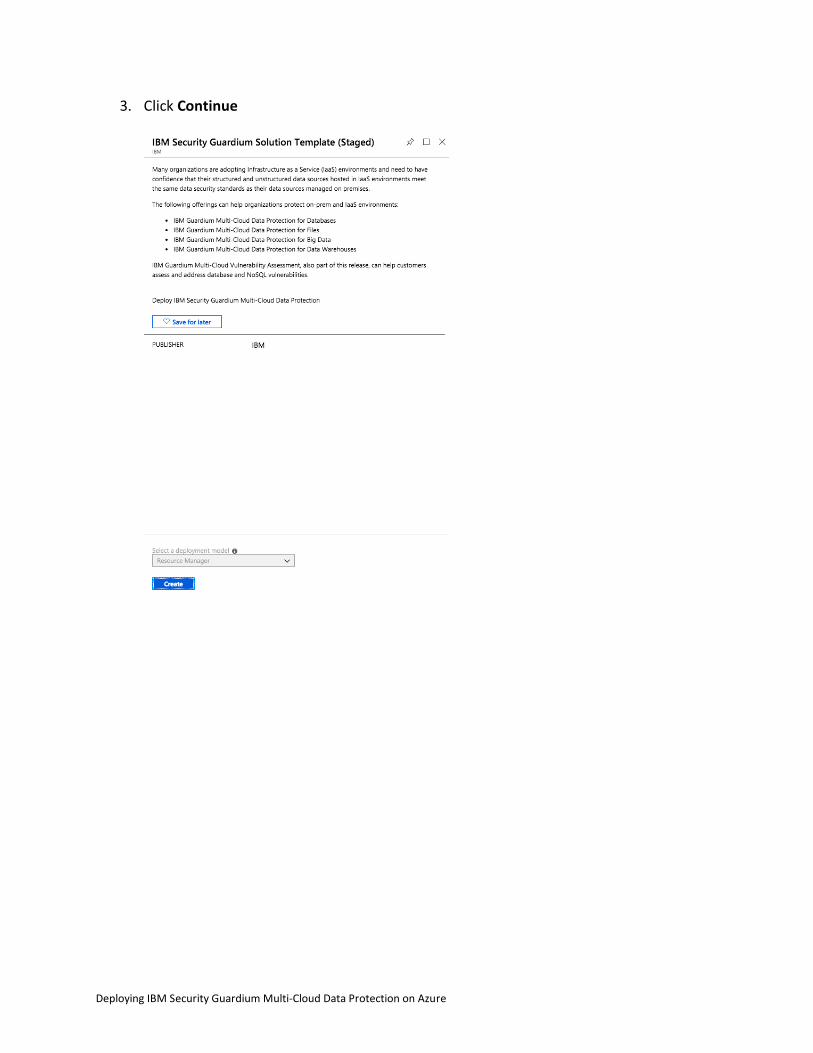
3. Click Continue
Deploying IBM Security Guardium Multi-Cloud Data Protection on Azure
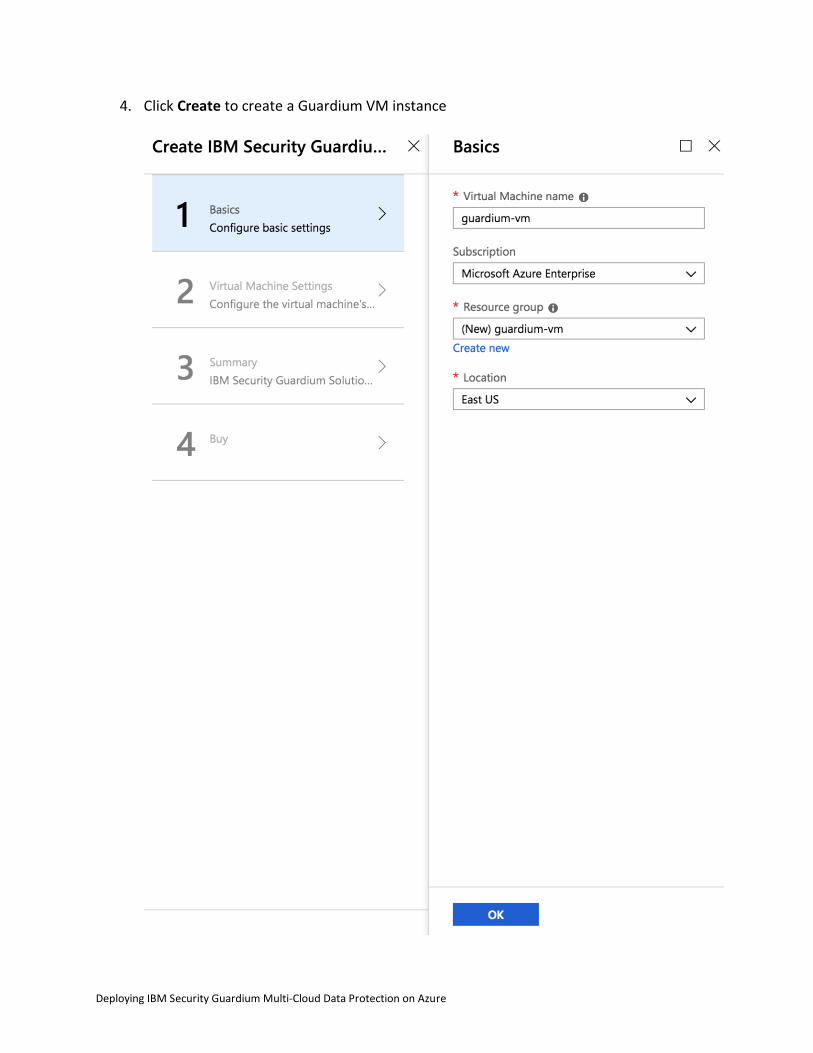
4. Click Create to create a Guardium VM instance
Deploying IBM Security Guardium Multi-Cloud Data Protection on Azure
5. Configure basic settings a. Enter the name of your virtual machine b. Select your subscription c. Create a resource group or select an existing one d. Select the location of the instance deployment
Deploying IBM Security Guardium Multi-Cloud Data Protection on Azure
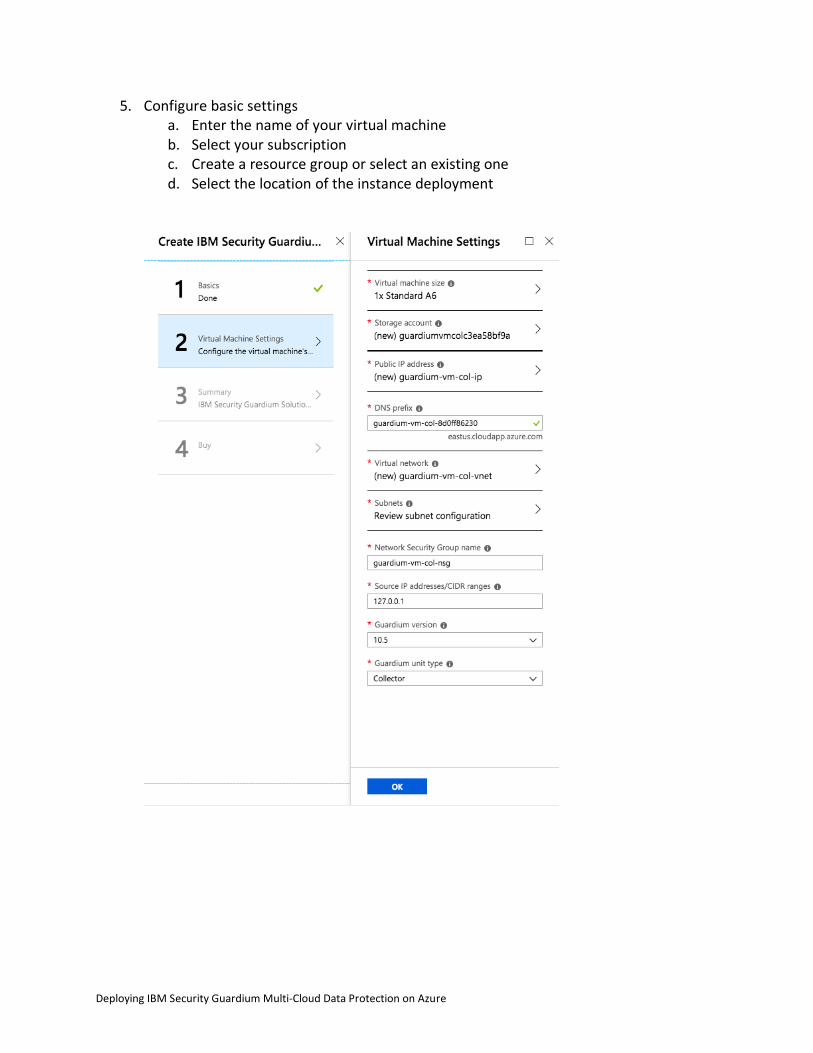
6. Configure Virtual Machine settings a. Select the VM size
Note: Ensure that your VM meets the minimum system requirements. For more information, see http://www.ibm.com/support/docview.wss?uid=ibm10883750
b. Create a storage account or select an existing one c. Specify whether you want to assign a public IP to the instance d. If a public IP is specified, include a DNS prefix e. Create a new virtual network or select an existing one f. Configure a subnet for the virtual network g. Specify a name for the Network Security Group
Note: Ports 22 and 8443 are open by default to allow SSH and UI access h. Set source IP or CIDR ranges to limit access to the VM
Note: this can be modified after deployment if needed by modifying the network security group
i. Select the version of the Guardium instance to deploy j. Select the unit type of the instance to deploy
7. Click Create to deploy the instance 8. After the VM is deployed to Azure, set the private IP address to static
a. In Azure, go to Virtual Machines > Guardium Instance > Networking b. Select the interface name c. Click IP configurations d. Click the name of the IP configuration e. Set the Assignment to Static f. Click Save
9. After the VM is deployed to Azure, set the public IP to static, if applicable a. In Azure, go to Virtual Machines > Guardium Instance > Networking b. Click the public IP c. Click Configuration d. Set the Assignment to Static e. Click Save
Note: The VM can reboot at this stage 10. To open an SSH connection, SSH as user CLI by using the default password: guardium
Note: You are prompted to change your password on first login 11. To connect to the Guardium UI, use the URL https://<ip or hostname>:8443 and login as
user admin or accessmgr by using default password: guardium Note: You are prompted to change your password on first login
Deploying IBM Security Guardium Multi-Cloud Data Protection on Azure
Method 2: Guardium VHDs
Before you proceed with the steps below, install Azure PowerShell 1.0 (or later) and the AzCopy tool. The public VHD URLs included here contain the source container path followed by the name of the VHD. Use the VHDs specific to your region to minimize transfer times. North America: https://guardiumv11imagesuseast.blob.core.windows.net/aggregator/Guardium_v11_Aggregator.vhd https://guardiumv11imagesuseast.blob.core.windows.net/collector/Guardium_v11_Collector.vhd
Europe: https://guardiumv11imageseuwest.blob.core.windows.net/aggregator/Guardium_v11_Aggregator.vhd https://guardiumv11imageseuwest.blob.core.windows.net/collector/Guardium_v11_Collector.vhd
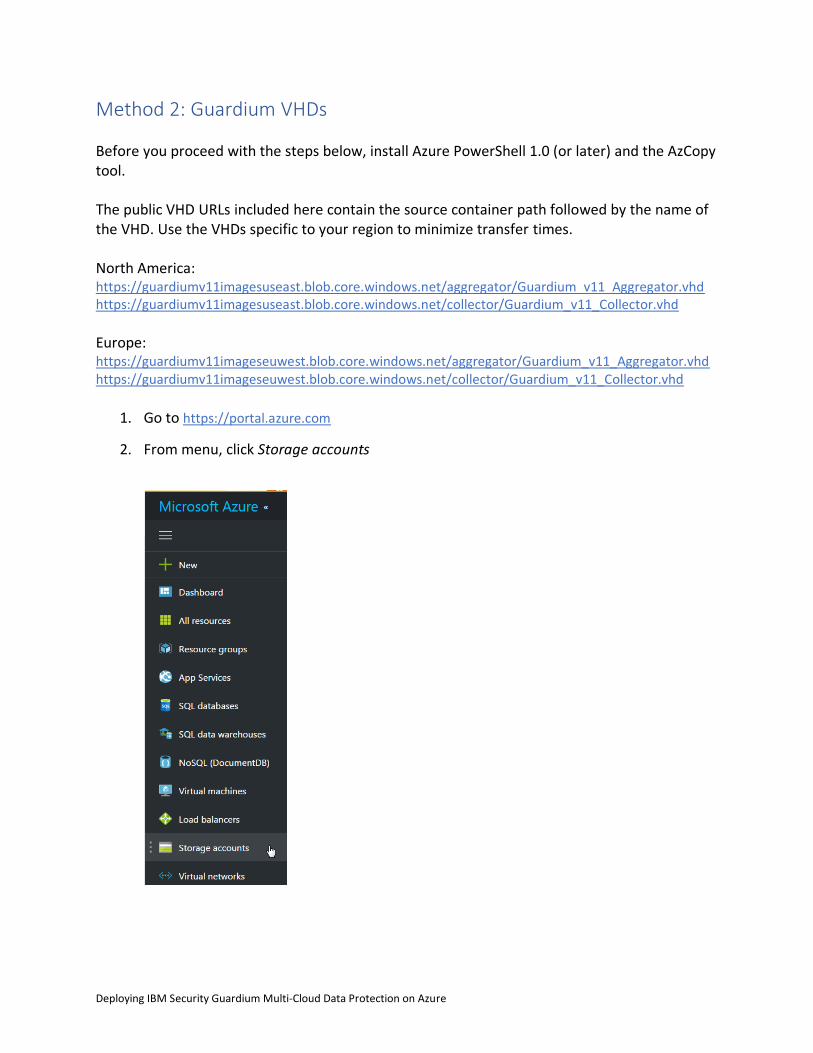
1. Go to https://portal.azure.com
2. From menu, click Storage accounts
Deploying IBM Security Guardium Multi-Cloud Data Protection on Azure
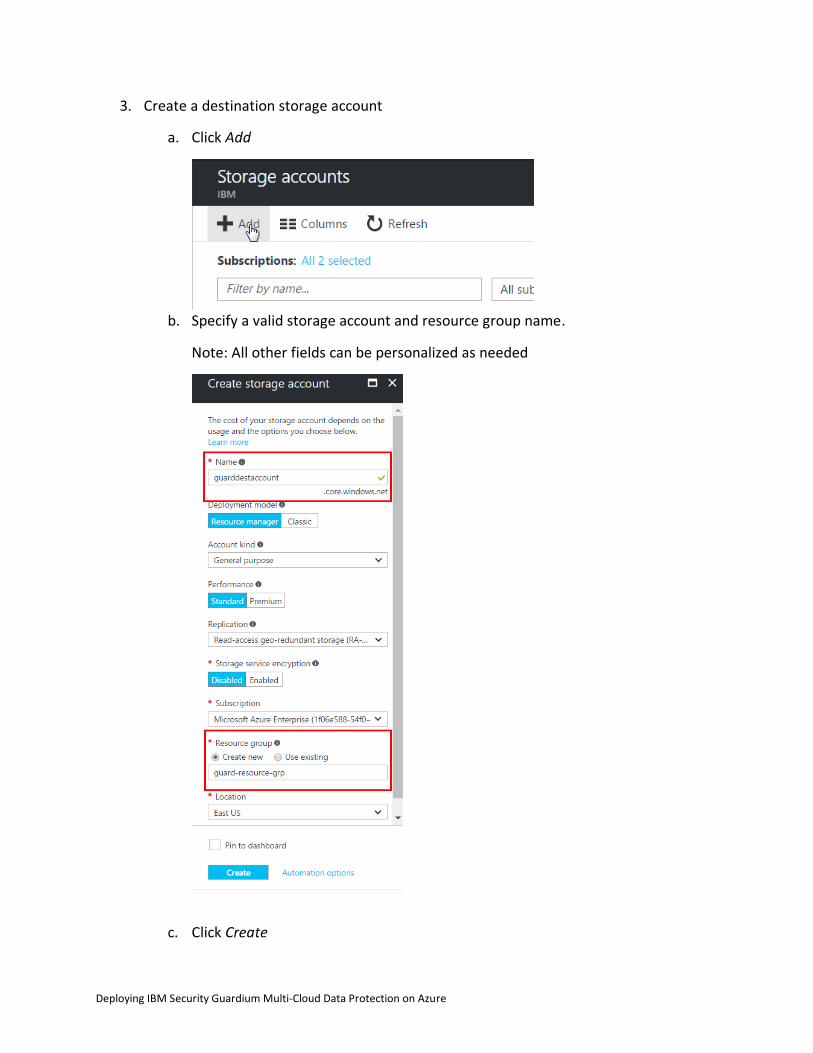
3. Create a destination storage account
a. Click Add
b. Specify a valid storage account and resource group name.
Note: All other fields can be personalized as needed
c. Click Create
Deploying IBM Security Guardium Multi-Cloud Data Protection on Azure
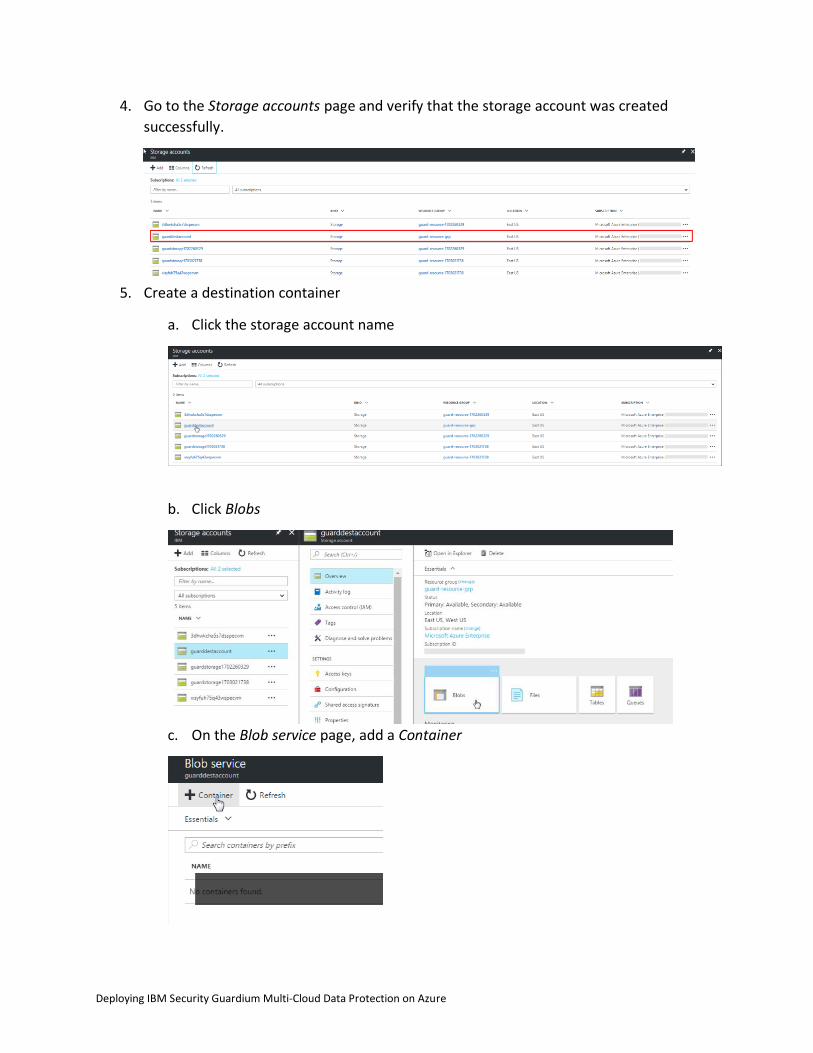
4. Go to the Storage accounts page and verify that the storage account was created
successfully.
5. Create a destination container
a. Click the storage account name
b. Click Blobs
c. On the Blob service page, add a Container
Deploying IBM Security Guardium Multi-Cloud Data Protection on Azure
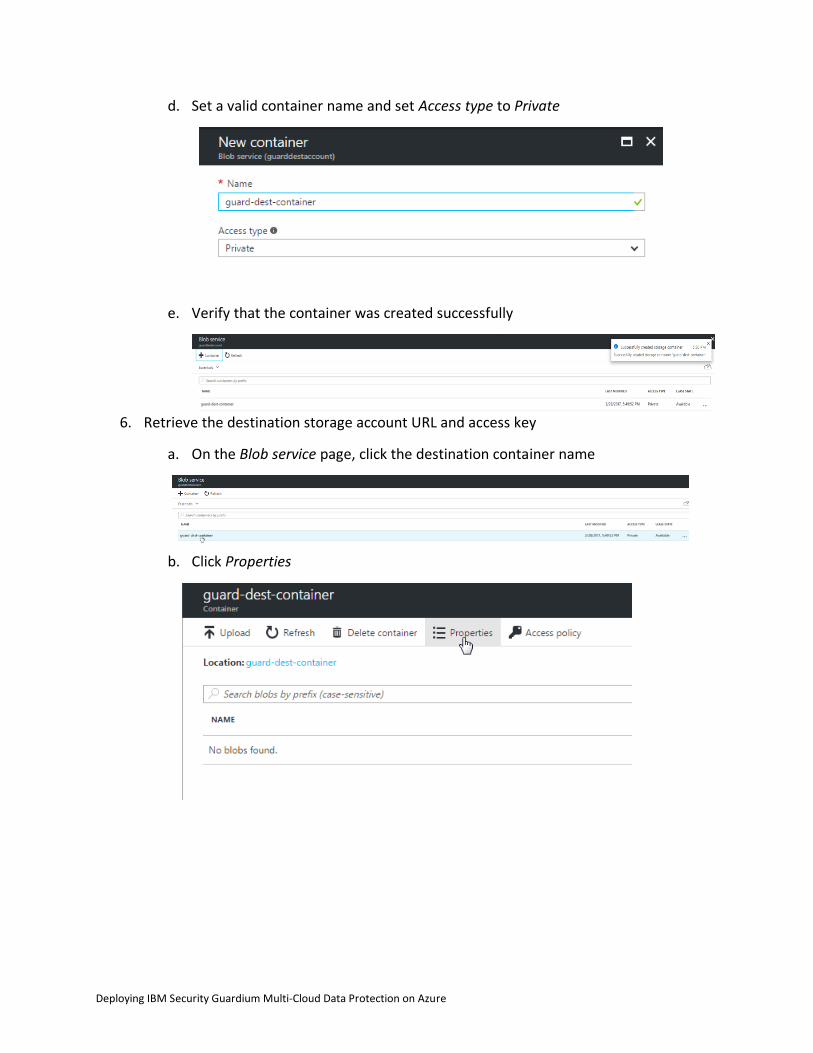
d. Set a valid container name and set Access type to Private
e. Verify that the container was created successfully
6. Retrieve the destination storage account URL and access key
a. On the Blob service page, click the destination container name
b. Click Properties
Deploying IBM Security Guardium Multi-Cloud Data Protection on Azure
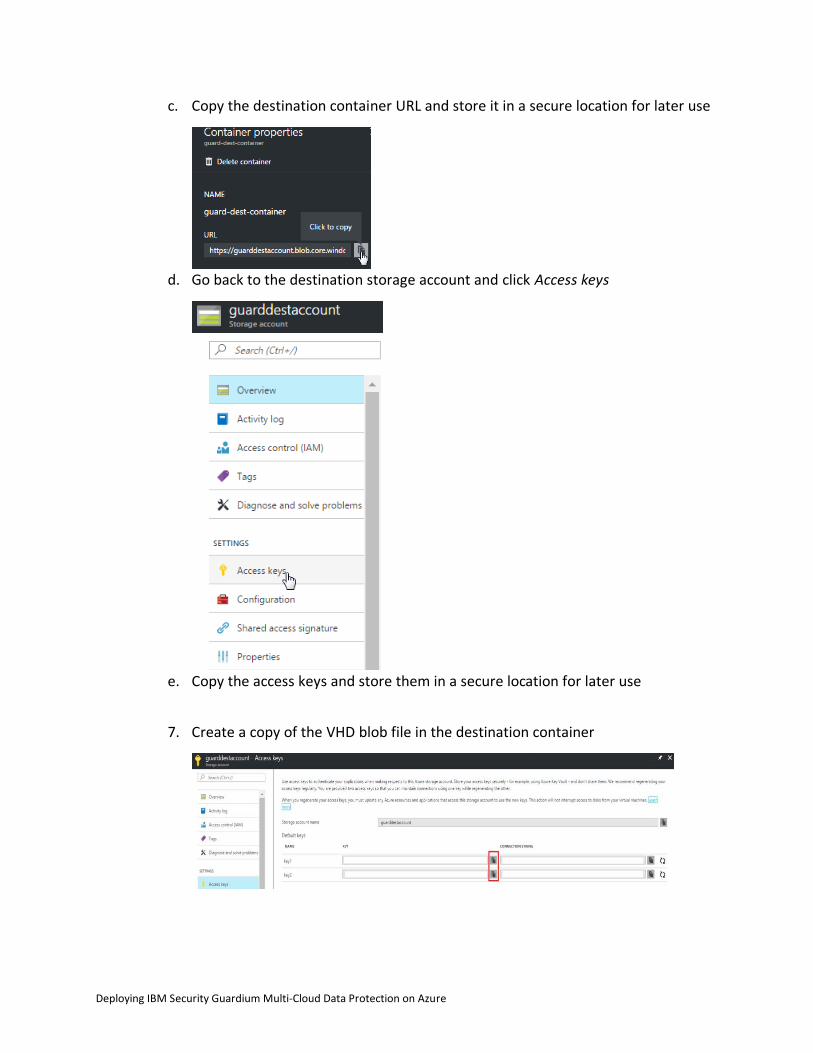
c. Copy the destination container URL and store it in a secure location for later use
d. Go back to the destination storage account and click Access keys
e. Copy the access keys and store them in a secure location for later use
7. Create a copy of the VHD blob file in the destination container
Deploying IBM Security Guardium Multi-Cloud Data Protection on Azure
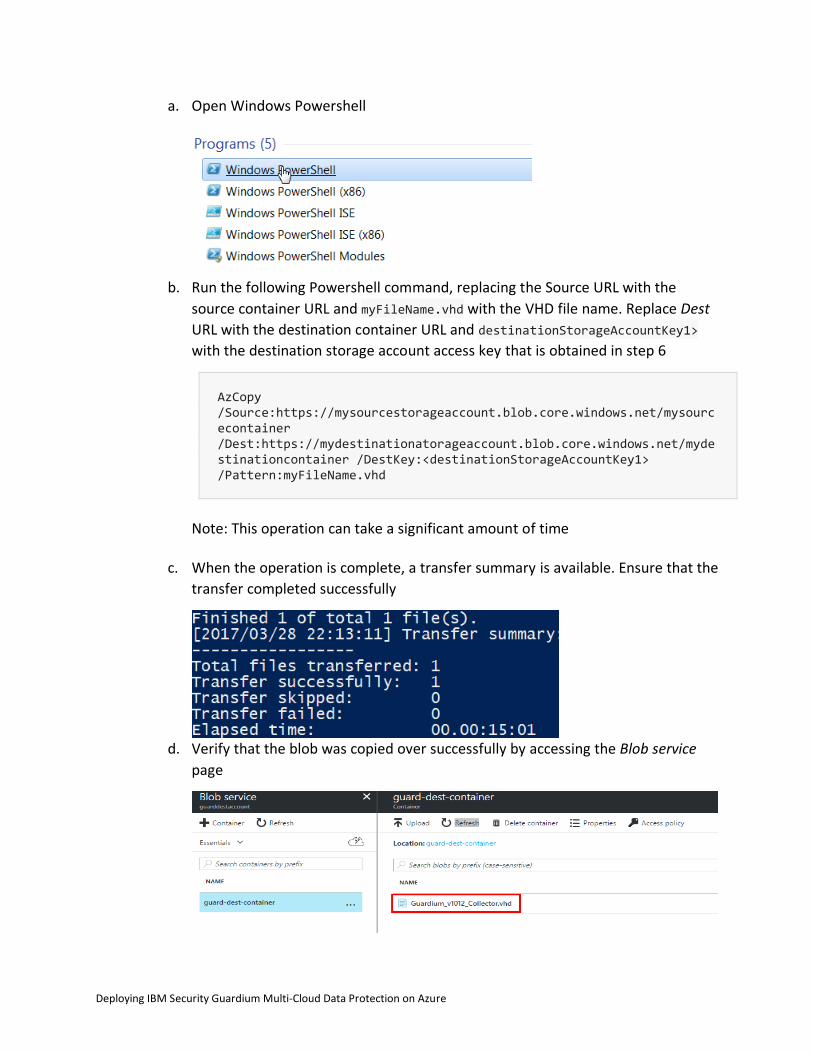
a. Open Windows Powershell
b. Run the following Powershell command, replacing the Source URL with the
source container URL and myFileName.vhd with the VHD file name. Replace Dest
URL with the destination container URL and destinationStorageAccountKey1>
with the destination storage account access key that is obtained in step 6
AzCopy /Source:https://mysourcestorageaccount.blob.core.windows.net/mysourcecontainer /Dest:https://mydestinationatorageaccount.blob.core.windows.net/mydestinationcontainer /DestKey:<destinationStorageAccountKey1> /Pattern:myFileName.vhd
Note: This operation can take a significant amount of time
c. When the operation is complete, a transfer summary is available. Ensure that the
transfer completed successfully
d. Verify that the blob was copied over successfully by accessing the Blob service
page
Deploying IBM Security Guardium Multi-Cloud Data Protection on Azure
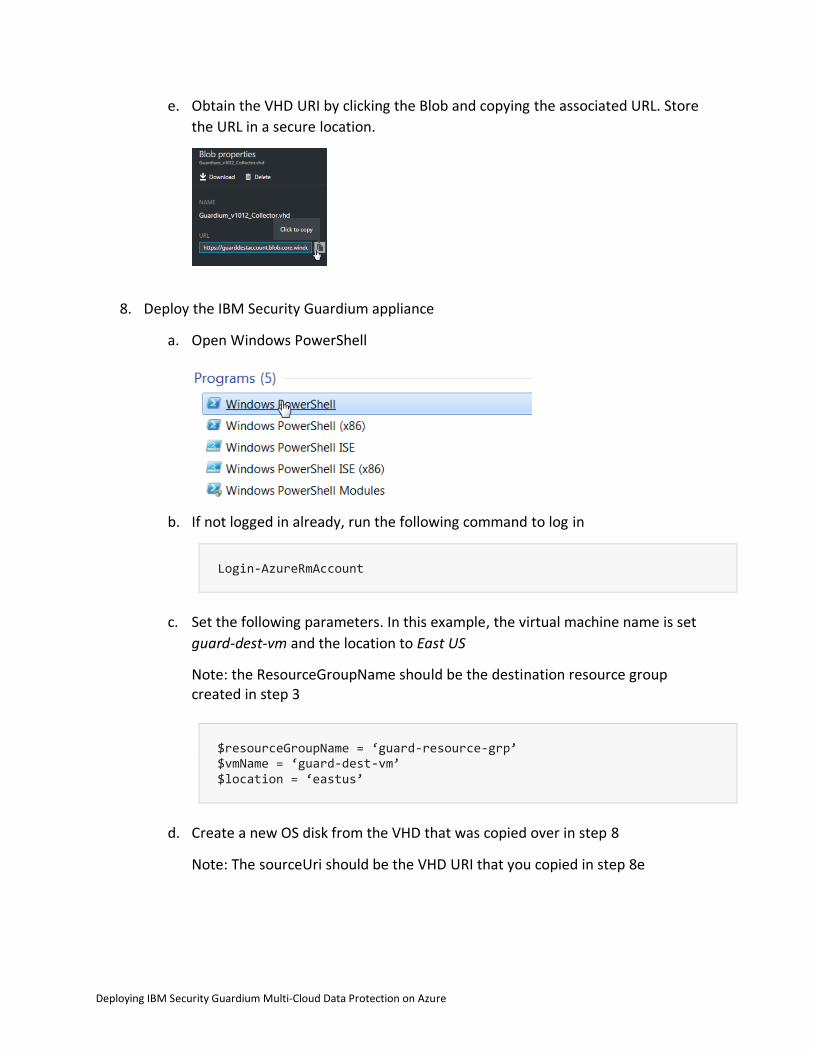
e. Obtain the VHD URI by clicking the Blob and copying the associated URL. Store
the URL in a secure location.
8. Deploy the IBM Security Guardium appliance
a. Open Windows PowerShell
b. If not logged in already, run the following command to log in
Login-AzureRmAccount
c. Set the following parameters. In this example, the virtual machine name is set
guard-dest-vm and the location to East US
Note: the ResourceGroupName should be the destination resource group created in step 3
$resourceGroupName = ‘guard-resource-grp’ $vmName = ‘guard-dest-vm’ $location = ‘eastus’
d. Create a new OS disk from the VHD that was copied over in step 8
Note: The sourceUri should be the VHD URI that you copied in step 8e
Deploying IBM Security Guardium Multi-Cloud Data Protection on Azure
$sourceUri = https://storageaccount.blob.core.windows.net/vhdcontainer/osdisk.vhd $osDiskName = ‘guardosDisk’ $osDisk = New-AzureRmDisk -DiskName $osDiskName -Disk (New-AzureRmDiskConfig -AccountType StandardLRS -Location $location -CreateOption Import -SourceUri $sourceUri) -ResourceGroupName $resourceGroupName
e. Create the subNet.
In this example we create a subnet named guardiumSubNet with subnet address
prefix 10.0.0.0/24
$subnetName = ‘guardiumSubNet’ $singleSubnet = New-AzureRmVirtualNetworkSubnetConfig -Name $subnetName -AddressPrefix 10.0.0.0/24
f. Create the vNet.
In this example we set the virtual network name to be guardiumVnet and the
address prefix for the virtual network to 10.0.0.0/16
$vnetName = ‘guardiumVnet’ $vnet = New-AzureRmVirtualNetwork -Name $vnetName -ResourceGroupName $destinationResourceGroup -Location $location -AddressPrefix 10.0.0.0/16 -Subnet $singleSubnet
g. Create a Network Security Group (NSG) and configure Inbound security rules:
For UI: “tcp:8443” For GIM: “tcp:8444-8446; tcp:8081” For FAM: “tcp:16022-16023” For UNIX S-TAP: “tcp:16016-16018” For Windows S-TAP: “tcp:9500-9501” For Quick Search: “tcp:8983; tcp:9983” For MySQL: “tcp:3306” For a complete list of ports that are used in IBM Security Guardium, refer to the following technote: http://www-01.ibm.com/support/docview.wss?uid=swg21973188
This example sets the NSG name to guardiumNsg, the UI rule to guardiumUIRule, the GIM rule name to guardiumGIMRule, the FAM rule name to guardiumFAMRule, the UNIX S-TAP rule name to guardiumUnixStapRule, the Windows S-TAP rule name to guardiumWindowsStapRule, the Quick Search rule
Deploying IBM Security Guardium Multi-Cloud Data Protection on Azure
name to guardium QuickSearchRule and the MySQL rule name to guardiumMysqlRule. If logging in to the VM by using Remote Desktop Protocol (RDP), a security rule needs to be created that allows RDP access on port 3389. In this example, an RDP rule is defined and is named guardiumRdpRule.
$nsgName = ‘guardiumNsg’ $guardiumUIRule = New-AzureRmNetworkSecurityRuleConfig -Name guardiumUI -Description ‘UI Access’ -Access Allow -Protocol Tcp -Direction Inbound -Priority 100 -SourceAddressPrefix * -SourcePortRange * -DestinationAddressPrefix * -DestinationPortRange 8443 $guardiumGIMRule1 = New-AzureRmNetworkSecurityRuleConfig -Name guardiumGIM1 -Description ‘GIM Access’ -Access Allow -Protocol Tcp -Direction Inbound -Priority 101 -SourceAddressPrefix * -SourcePortRange * -DestinationAddressPrefix * -DestinationPortRange 8444-8446 $guardiumGIMRule2 = New-AzureRmNetworkSecurityRuleConfig -Name guardiumGIM2 -Description ‘GIM Access’ -Access Allow -Protocol Tcp -Direction Inbound -Priority 102 -SourceAddressPrefix * -SourcePortRange * -DestinationAddressPrefix * -DestinationPortRange 8081 $guardiumFAMRule = New-AzureRmNetworkSecurityRuleConfig -Name guardiumFAM -Description ‘FAM Access’ -Access Allow -Protocol Tcp -Direction Inbound -Priority 103 -SourceAddressPrefix * -SourcePortRange * -DestinationAddressPrefix * -DestinationPortRange 16022-16023 $guardiumUnixStapRule = New-AzureRmNetworkSecurityRuleConfig -Name guardiumUnixStap -Description ‘Unix Stap Access’ -Access Allow -Protocol Tcp -Direction Inbound -Priority 104 -SourceAddressPrefix * -SourcePortRange * -DestinationAddressPrefix * -DestinationPortRange 16016-16018 $guardiumWindowsStapRule = New-AzureRmNetworkSecurityRuleConfig -Name guardiumUnixStap -Description ‘Windows Stap Access’ -Access Allow -Protocol Tcp -Direction Inbound -Priority 105 -SourceAddressPrefix * -SourcePortRange * -DestinationAddressPrefix * -DestinationPortRange 9500-9501 $guardiumQuickSearchRule1 = New-AzureRmNetworkSecurityRuleConfig -Name guardiumQuickSearch1 -Description ‘Quick Search Access’ -Access Allow -Protocol Tcp -Direction Inbound -Priority 106 -SourceAddressPrefix * -SourcePortRange * -DestinationAddressPrefix * -DestinationPortRange 8983 $guardiumQuickSearchRule2 = New-AzureRmNetworkSecurityRuleConfig -Name guardiumQuickSearch2
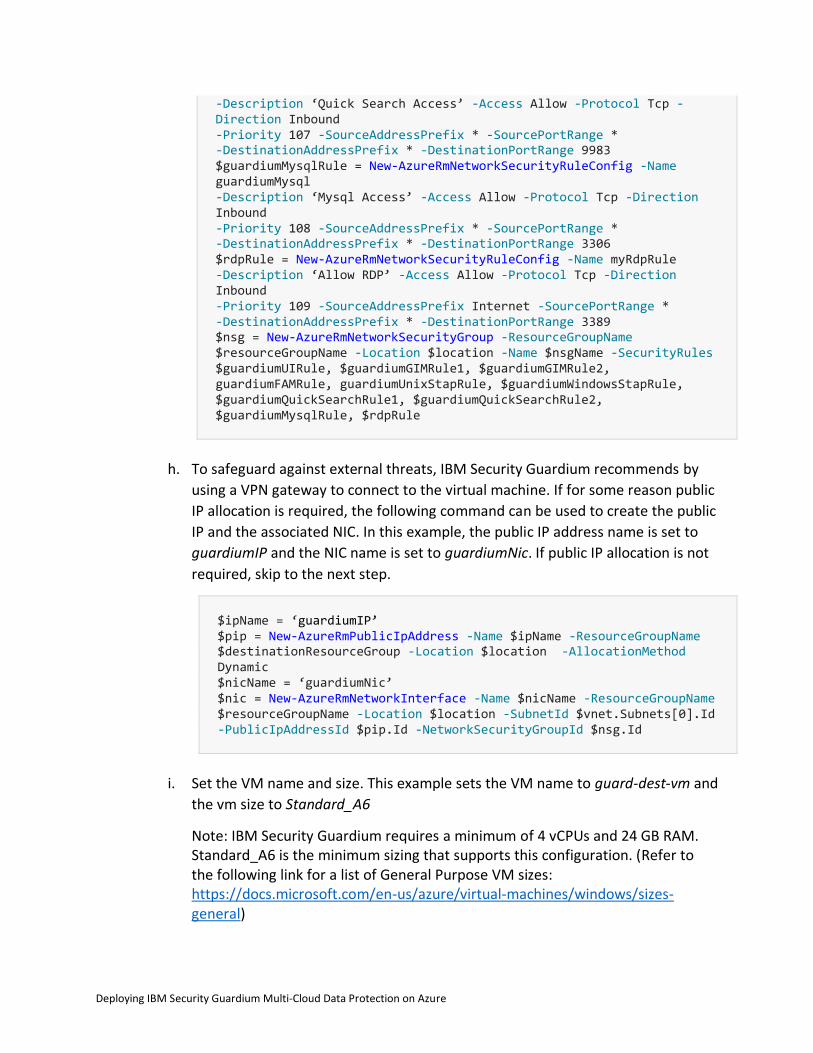
Deploying IBM Security Guardium Multi-Cloud Data Protection on Azure
-Description ‘Quick Search Access’ -Access Allow -Protocol Tcp -Direction Inbound -Priority 107 -SourceAddressPrefix * -SourcePortRange * -DestinationAddressPrefix * -DestinationPortRange 9983 $guardiumMysqlRule = New-AzureRmNetworkSecurityRuleConfig -Name guardiumMysql -Description ‘Mysql Access’ -Access Allow -Protocol Tcp -Direction Inbound -Priority 108 -SourceAddressPrefix * -SourcePortRange * -DestinationAddressPrefix * -DestinationPortRange 3306 $rdpRule = New-AzureRmNetworkSecurityRuleConfig -Name myRdpRule -Description ‘Allow RDP’ -Access Allow -Protocol Tcp -Direction Inbound -Priority 109 -SourceAddressPrefix Internet -SourcePortRange * -DestinationAddressPrefix * -DestinationPortRange 3389 $nsg = New-AzureRmNetworkSecurityGroup -ResourceGroupName $resourceGroupName -Location $location -Name $nsgName -SecurityRules $guardiumUIRule, $guardiumGIMRule1, $guardiumGIMRule2, guardiumFAMRule, guardiumUnixStapRule, $guardiumWindowsStapRule, $guardiumQuickSearchRule1, $guardiumQuickSearchRule2, $guardiumMysqlRule, $rdpRule
h. To safeguard against external threats, IBM Security Guardium recommends by
using a VPN gateway to connect to the virtual machine. If for some reason public
IP allocation is required, the following command can be used to create the public
IP and the associated NIC. In this example, the public IP address name is set to
guardiumIP and the NIC name is set to guardiumNic. If public IP allocation is not
required, skip to the next step.
$ipName = ‘guardiumIP’ $pip = New-AzureRmPublicIpAddress -Name $ipName -ResourceGroupName $destinationResourceGroup -Location $location -AllocationMethod Dynamic $nicName = ‘guardiumNic’ $nic = New-AzureRmNetworkInterface -Name $nicName -ResourceGroupName $resourceGroupName -Location $location -SubnetId $vnet.Subnets[0].Id -PublicIpAddressId $pip.Id -NetworkSecurityGroupId $nsg.Id
i. Set the VM name and size. This example sets the VM name to guard-dest-vm and
the vm size to Standard_A6
Note: IBM Security Guardium requires a minimum of 4 vCPUs and 24 GB RAM. Standard_A6 is the minimum sizing that supports this configuration. (Refer to the following link for a list of General Purpose VM sizes: https://docs.microsoft.com/en-us/azure/virtual-machines/windows/sizes-general)
Deploying IBM Security Guardium Multi-Cloud Data Protection on Azure
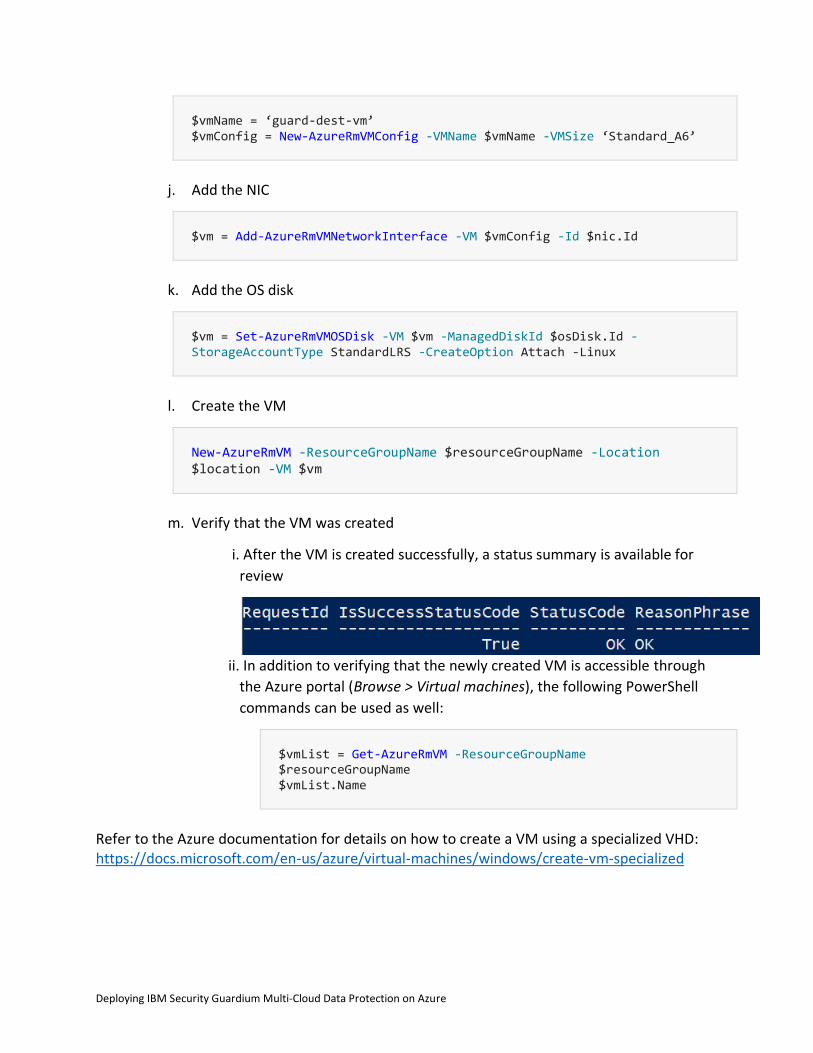
$vmName = ‘guard-dest-vm’ $vmConfig = New-AzureRmVMConfig -VMName $vmName -VMSize ‘Standard_A6’
j. Add the NIC
$vm = Add-AzureRmVMNetworkInterface -VM $vmConfig -Id $nic.Id
k. Add the OS disk
$vm = Set-AzureRmVMOSDisk -VM $vm -ManagedDiskId $osDisk.Id -StorageAccountType StandardLRS -CreateOption Attach -Linux
l. Create the VM
New-AzureRmVM -ResourceGroupName $resourceGroupName -Location $location -VM $vm
m. Verify that the VM was created
i. After the VM is created successfully, a status summary is available for
review
ii. In addition to verifying that the newly created VM is accessible through
the Azure portal (Browse > Virtual machines), the following PowerShell
commands can be used as well:
$vmList = Get-AzureRmVM -ResourceGroupName $resourceGroupName $vmList.Name
Refer to the Azure documentation for details on how to create a VM using a specialized VHD: https://docs.microsoft.com/en-us/azure/virtual-machines/windows/create-vm-specialized
Deploying IBM Security Guardium Multi-Cloud Data Protection on Azure
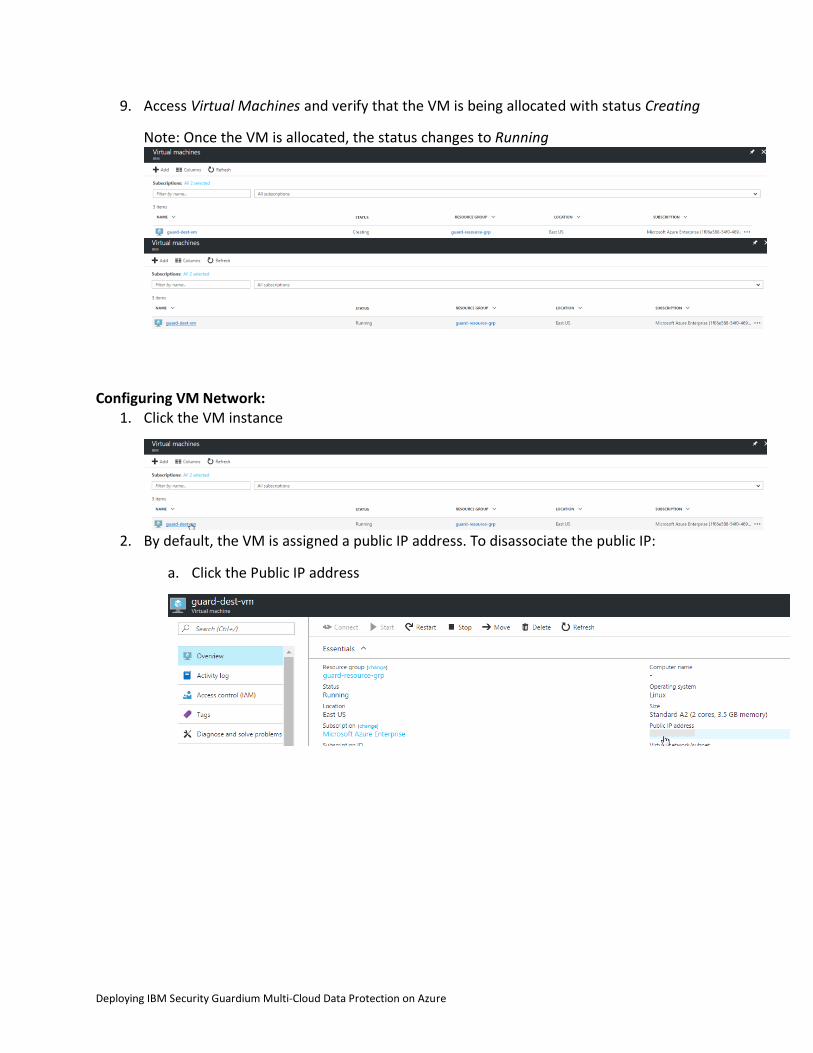
9. Access Virtual Machines and verify that the VM is being allocated with status Creating
Note: Once the VM is allocated, the status changes to Running
Configuring VM Network:
1. Click the VM instance
2. By default, the VM is assigned a public IP address. To disassociate the public IP:
a. Click the Public IP address
Deploying IBM Security Guardium Multi-Cloud Data Protection on Azure
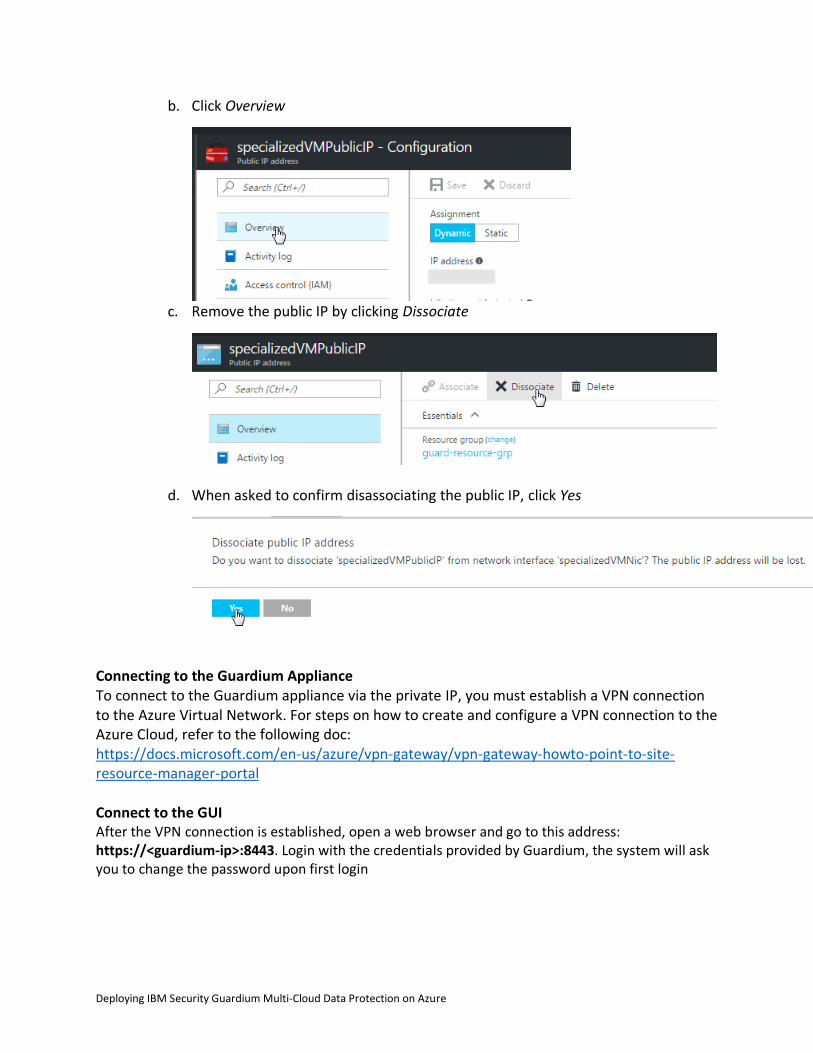
b. Click Overview
c. Remove the public IP by clicking Dissociate
d. When asked to confirm disassociating the public IP, click Yes
Connecting to the Guardium Appliance To connect to the Guardium appliance via the private IP, you must establish a VPN connection to the Azure Virtual Network. For steps on how to create and configure a VPN connection to the Azure Cloud, refer to the following doc: https://docs.microsoft.com/en-us/azure/vpn-gateway/vpn-gateway-howto-point-to-site-resource-manager-portal Connect to the GUI After the VPN connection is established, open a web browser and go to this address: https://<guardium-ip>:8443. Login with the credentials provided by Guardium, the system will ask you to change the password upon first login

Deploying IBM Security Guardium Multi-Cloud Data Protection on Azure
Connect to CLI To connect to the Guardium CLI, ssh (or use Putty) to the Guardium IP and login as user cli. You will be prompted to change the password on first login. Configuring Appliance Network:
1. Select the VM on the Virtual Machines page in the Azure portal
2. Click on the Virtual network/subnet

Deploying IBM Security Guardium Multi-Cloud Data Protection on Azure
3. Make note of the private IP associated with the VM
4. Configure network settings
a. SSH into the appliance using the private ip as CLI user
b. Change your password on first log in
ssh [email protected] IBM Guardium, Command Line Interface (CLI) [email protected] password: Last login: Fri Jan 20 21:12:06 2017 Welcome cli - this is your first login in this system. Your password has expired. Changing password for 'cli'. Enter current password: Enter new password: Re-enter new password:
c. Configure the system IP (use the private ip)
localhost.localdomain> store network interface ip 10.0.0.4 Mar 29 14:12:20 guard-network[19801]: INFO Sanitizing Hosts This change will take effect after the next network restart. ok
d. Configure the netmask
localhost.localdomain> store network interface mask 255.255.255.255 This change will take effect after the next network restart. ok
Deploying IBM Security Guardium Multi-Cloud Data Protection on Azure
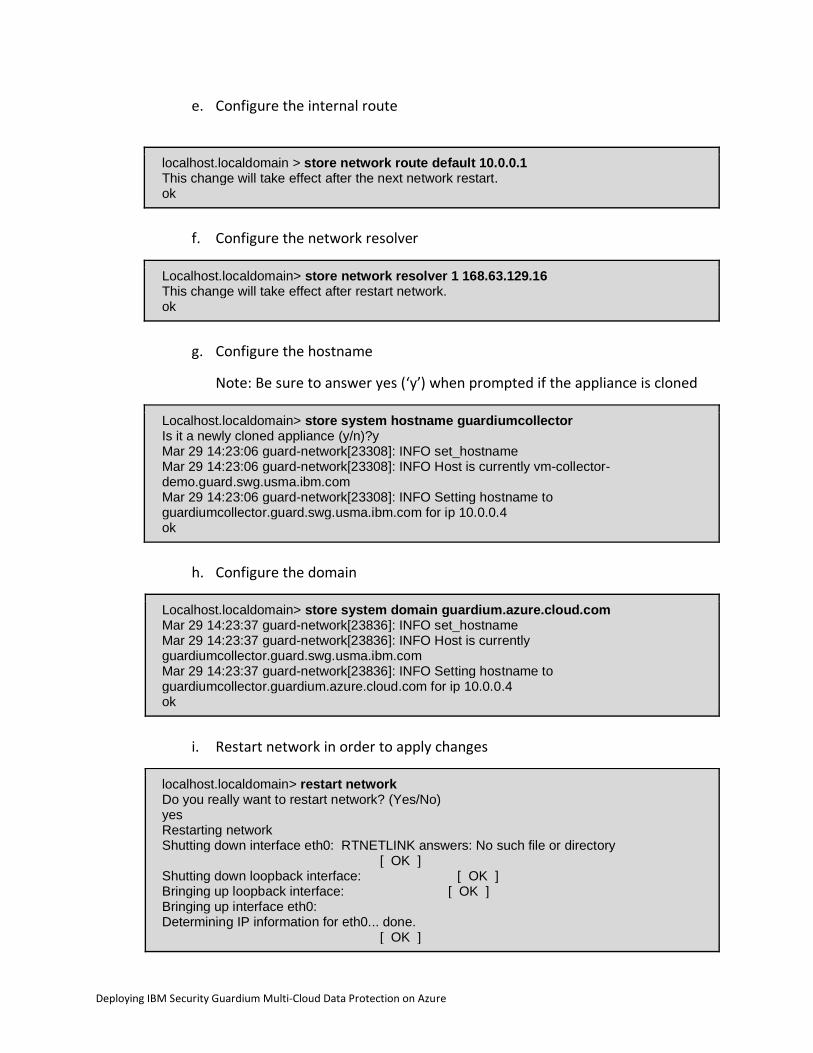
e. Configure the internal route
localhost.localdomain > store network route default 10.0.0.1 This change will take effect after the next network restart. ok
f. Configure the network resolver
Localhost.localdomain> store network resolver 1 168.63.129.16 This change will take effect after restart network. ok
g. Configure the hostname
Note: Be sure to answer yes (‘y’) when prompted if the appliance is cloned
Localhost.localdomain> store system hostname guardiumcollector Is it a newly cloned appliance (y/n)?y Mar 29 14:23:06 guard-network[23308]: INFO set_hostname Mar 29 14:23:06 guard-network[23308]: INFO Host is currently vm-collector-demo.guard.swg.usma.ibm.com Mar 29 14:23:06 guard-network[23308]: INFO Setting hostname to guardiumcollector.guard.swg.usma.ibm.com for ip 10.0.0.4 ok
h. Configure the domain
Localhost.localdomain> store system domain guardium.azure.cloud.com Mar 29 14:23:37 guard-network[23836]: INFO set_hostname Mar 29 14:23:37 guard-network[23836]: INFO Host is currently guardiumcollector.guard.swg.usma.ibm.com Mar 29 14:23:37 guard-network[23836]: INFO Setting hostname to guardiumcollector.guardium.azure.cloud.com for ip 10.0.0.4 ok
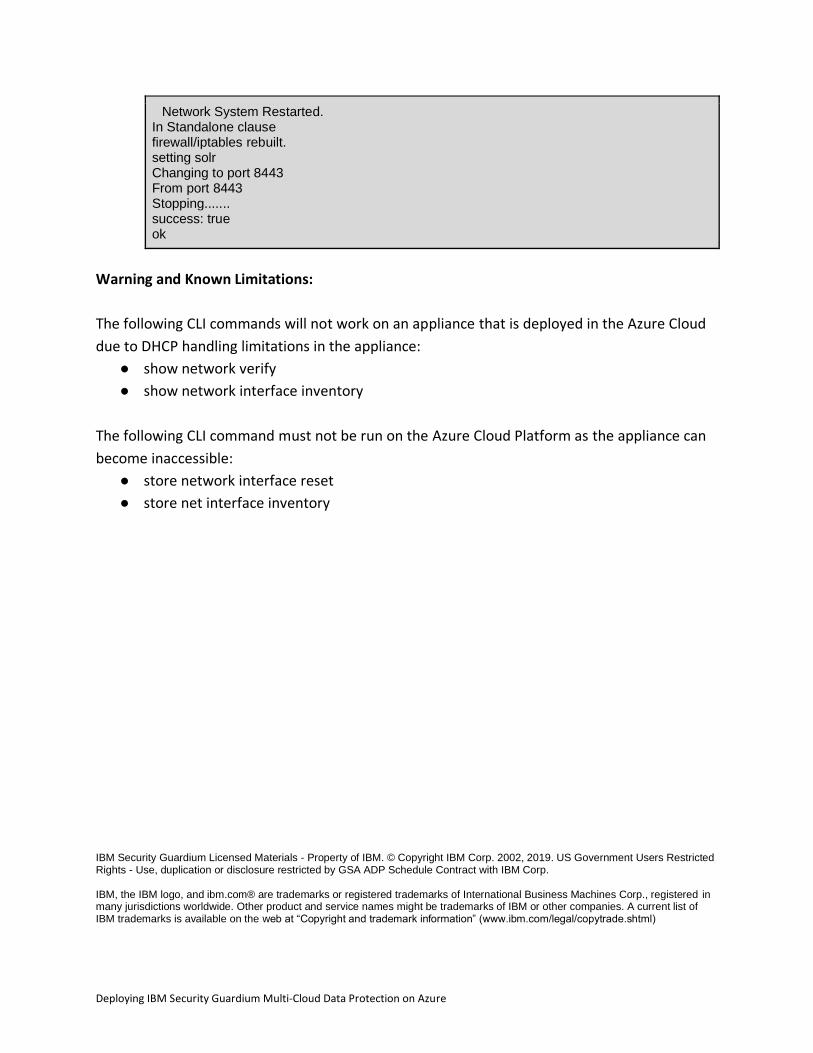
i. Restart network in order to apply changes
localhost.localdomain> restart network Do you really want to restart network? (Yes/No) yes Restarting network Shutting down interface eth0: RTNETLINK answers: No such file or directory [ OK ] Shutting down loopback interface: [ OK ] Bringing up loopback interface: [ OK ] Bringing up interface eth0: Determining IP information for eth0... done. [ OK ]
Deploying IBM Security Guardium Multi-Cloud Data Protection on Azure
Network System Restarted. In Standalone clause firewall/iptables rebuilt. setting solr Changing to port 8443 From port 8443 Stopping....... success: true ok
Warning and Known Limitations:
The following CLI commands will not work on an appliance that is deployed in the Azure Cloud
due to DHCP handling limitations in the appliance:
● show network verify
● show network interface inventory
The following CLI command must not be run on the Azure Cloud Platform as the appliance can
become inaccessible:
● store network interface reset
● store net interface inventory
IBM Security Guardium Licensed Materials - Property of IBM. © Copyright IBM Corp. 2002, 2019. US Government Users Restricted Rights - Use, duplication or disclosure restricted by GSA ADP Schedule Contract with IBM Corp. IBM, the IBM logo, and ibm.com® are trademarks or registered trademarks of International Business Machines Corp., registered in many jurisdictions worldwide. Other product and service names might be trademarks of IBM or other companies. A current list of IBM trademarks is available on the web at “Copyright and trademark information” (www.ibm.com/legal/copytrade.shtml)