Embed Size (px)
Citation preview
Deploying a Ruby on Rails Application with Amazon Web
Services OpsWorks The Idiot’s Guide to Migrating a full stack Rails
Application from Heroku to AWS: A Guide made by an Idiot, for Idiots
by Alex Meyers ([email protected])
Page � of �1 26
Deploying a Ruby on Rails Application with Amazon Web Services OpsWorksThe Idiot’s Guide to Migrating a Full Stack Rails Application from Heroku to AWS: A Guide made by an Idiot, for Idiots
Table of Contents IAM Security Group and User 3 Amazon EC2 Key Pairs 4 AWS OpsWorks Stack 5 Relational Database Service (RDS) 7 Elastic Load Balancer (ELB) 8 Rails Application Layer 10 Relational Database System Layer 12 Test Application Configuration 13 Set-up Application Repository 14 Deploy an Application 15 Generate Secure Sockets Layer (SSL) 17 Generate Secure Sockets Layer (SSL) on GoDaddy 18 Migrate Database from Heroku to RDS 19 Private Github Access 20 Amazon CloudFront 21 Amazon Simple Email Server (SES) 23 Background Processes 24 Server Monitoring 25
Alex Meyers ([email protected]) Page � of �2 26
Deploying a Ruby on Rails Application with Amazon Web Services OpsWorksThe Idiot’s Guide to Migrating a Full Stack Rails Application from Heroku to AWS: A Guide made by an Idiot, for Idiots
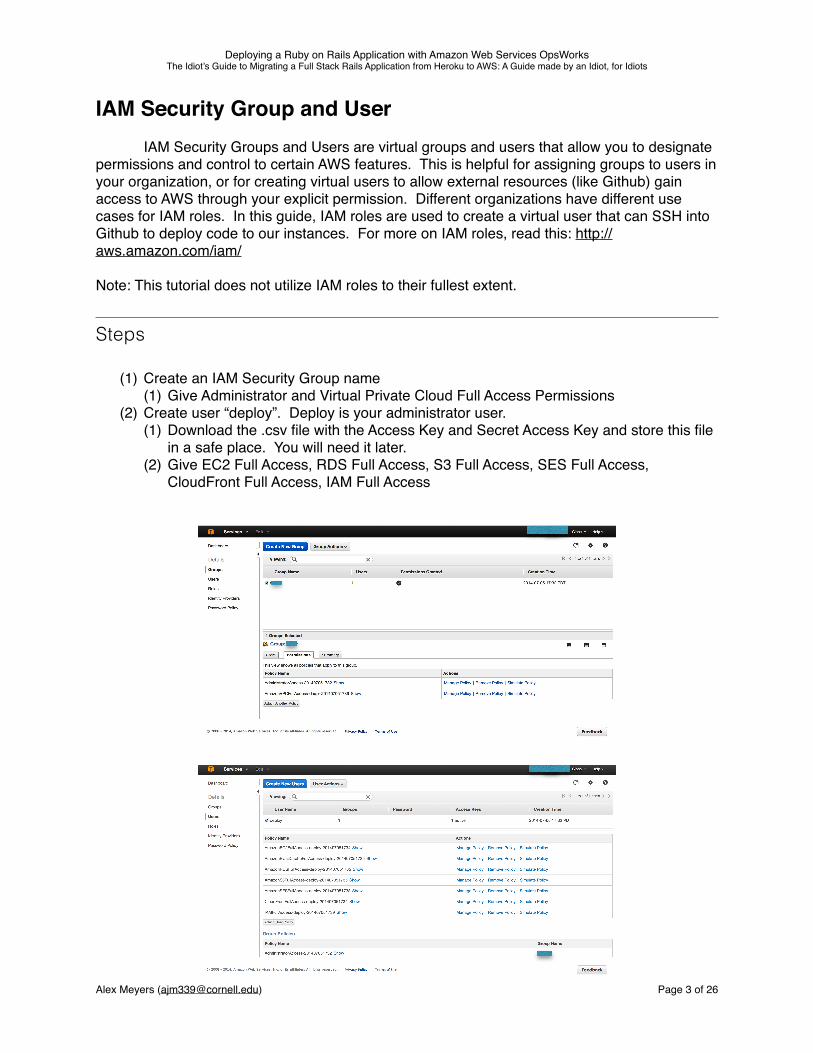
IAM Security Group and UserIAM Security Groups and Users are virtual groups and users that allow you to designate
permissions and control to certain AWS features. This is helpful for assigning groups to users in your organization, or for creating virtual users to allow external resources (like Github) gain access to AWS through your explicit permission. Different organizations have different use cases for IAM roles. In this guide, IAM roles are used to create a virtual user that can SSH into Github to deploy code to our instances. For more on IAM roles, read this: http://aws.amazon.com/iam/
Note: This tutorial does not utilize IAM roles to their fullest extent.
Steps
(1) Create an IAM Security Group name(1) Give Administrator and Virtual Private Cloud Full Access Permissions
(2) Create user “deploy”. Deploy is your administrator user.(1) Download the .csv file with the Access Key and Secret Access Key and store this file
in a safe place. You will need it later.(2) Give EC2 Full Access, RDS Full Access, S3 Full Access, SES Full Access,
CloudFront Full Access, IAM Full Access
Alex Meyers ([email protected]) Page � of �3 26
Deploying a Ruby on Rails Application with Amazon Web Services OpsWorksThe Idiot’s Guide to Migrating a Full Stack Rails Application from Heroku to AWS: A Guide made by an Idiot, for Idiots
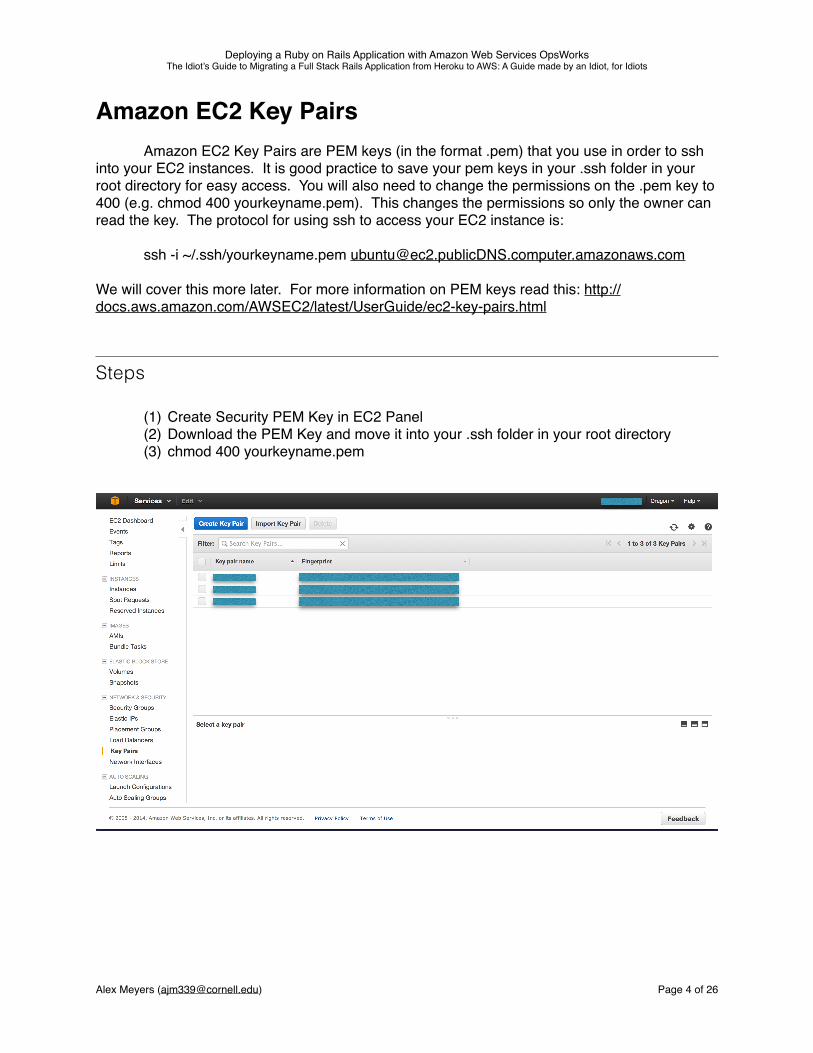
Amazon EC2 Key PairsAmazon EC2 Key Pairs are PEM keys (in the format .pem) that you use in order to ssh
into your EC2 instances. It is good practice to save your pem keys in your .ssh folder in your root directory for easy access. You will also need to change the permissions on the .pem key to 400 (e.g. chmod 400 yourkeyname.pem). This changes the permissions so only the owner can read the key. The protocol for using ssh to access your EC2 instance is:
ssh -i ~/.ssh/yourkeyname.pem [email protected]
We will cover this more later. For more information on PEM keys read this: http://docs.aws.amazon.com/AWSEC2/latest/UserGuide/ec2-key-pairs.html
Steps
(1) Create Security PEM Key in EC2 Panel(2) Download the PEM Key and move it into your .ssh folder in your root directory(3) chmod 400 yourkeyname.pem
Alex Meyers ([email protected]) Page � of �4 26
Deploying a Ruby on Rails Application with Amazon Web Services OpsWorksThe Idiot’s Guide to Migrating a Full Stack Rails Application from Heroku to AWS: A Guide made by an Idiot, for Idiots
AWS OpsWorks StackAWS OpsWorks is a tool that allows you to manage the architecture of your application.
It also makes it easy to deploy your application. OpsWorks allows you to create different layers that define different server roles for your application. Additionally, OpsWorks makes it easy to scale horizontally without any downtime for your application. OpsWorks leverages Chef for the customizable configuration of servers. To learn more about AWS OpsWorks, read this: http://aws.amazon.com/opsworks/ and to learn more about Chef, read this: http://www.getchef.com/chef/
Steps
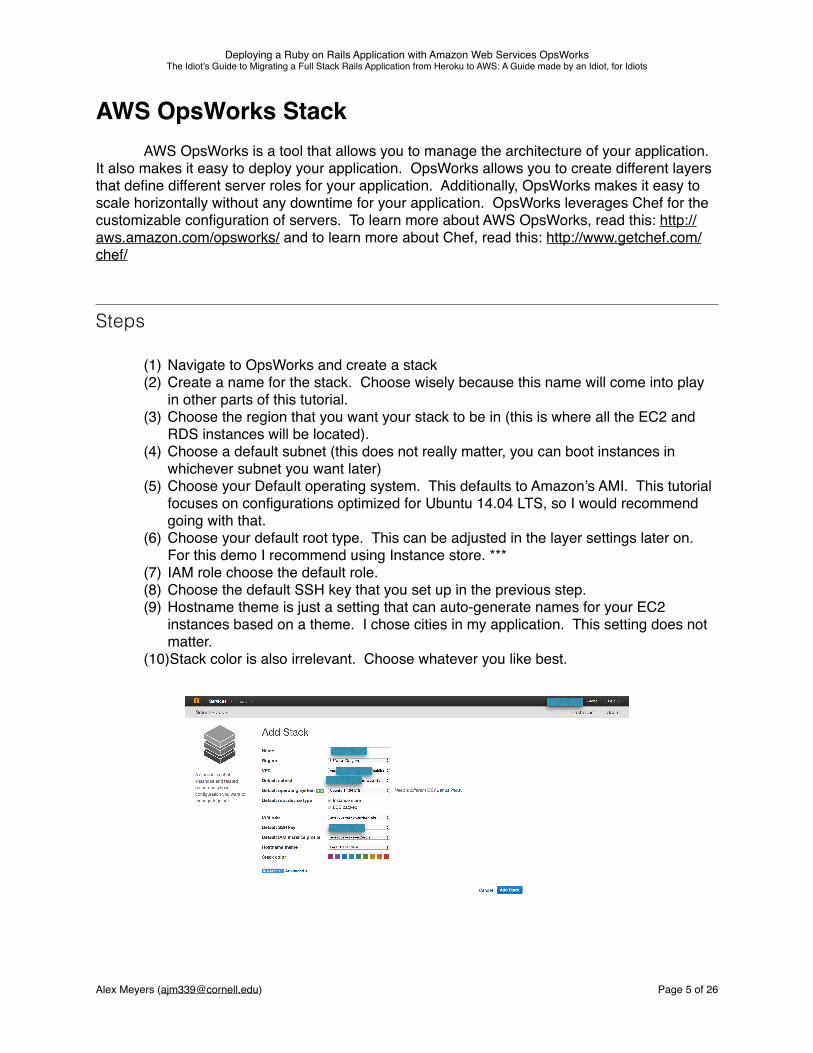
(1) Navigate to OpsWorks and create a stack(2) Create a name for the stack. Choose wisely because this name will come into play
in other parts of this tutorial.(3) Choose the region that you want your stack to be in (this is where all the EC2 and
RDS instances will be located).(4) Choose a default subnet (this does not really matter, you can boot instances in
whichever subnet you want later)(5) Choose your Default operating system. This defaults to Amazon’s AMI. This tutorial
focuses on configurations optimized for Ubuntu 14.04 LTS, so I would recommend going with that.
(6) Choose your default root type. This can be adjusted in the layer settings later on. For this demo I recommend using Instance store. ***
(7) IAM role choose the default role.(8) Choose the default SSH key that you set up in the previous step.(9) Hostname theme is just a setting that can auto-generate names for your EC2
instances based on a theme. I chose cities in my application. This setting does not matter.
(10)Stack color is also irrelevant. Choose whatever you like best.
Alex Meyers ([email protected]) Page � of �5 26
Deploying a Ruby on Rails Application with Amazon Web Services OpsWorksThe Idiot’s Guide to Migrating a Full Stack Rails Application from Heroku to AWS: A Guide made by an Idiot, for Idiots
***Instance store means the hard drive is with the Virtual Private Server (VPS) so if and when you remove that instance, the data on the disk goes with it. EBS is Amazon’s proprietary system that is essentially a virtual hard drive removed from the instance that AWS can move from instance to instance. In other words, if the hardware on the VPS fails, you can transfer the EBS data to another VPS. For my configuration, the EBS does not store a database or any critical data (the database is in an RDS, which I will delve into more later), so I chose Instance store since it is cheaper and ideal for my application. For more information on EBS vs Instance store read this: http://stackoverflow.com/questions/3630506/benefits-of-ebs-vs-instance-store-and-vice-versa
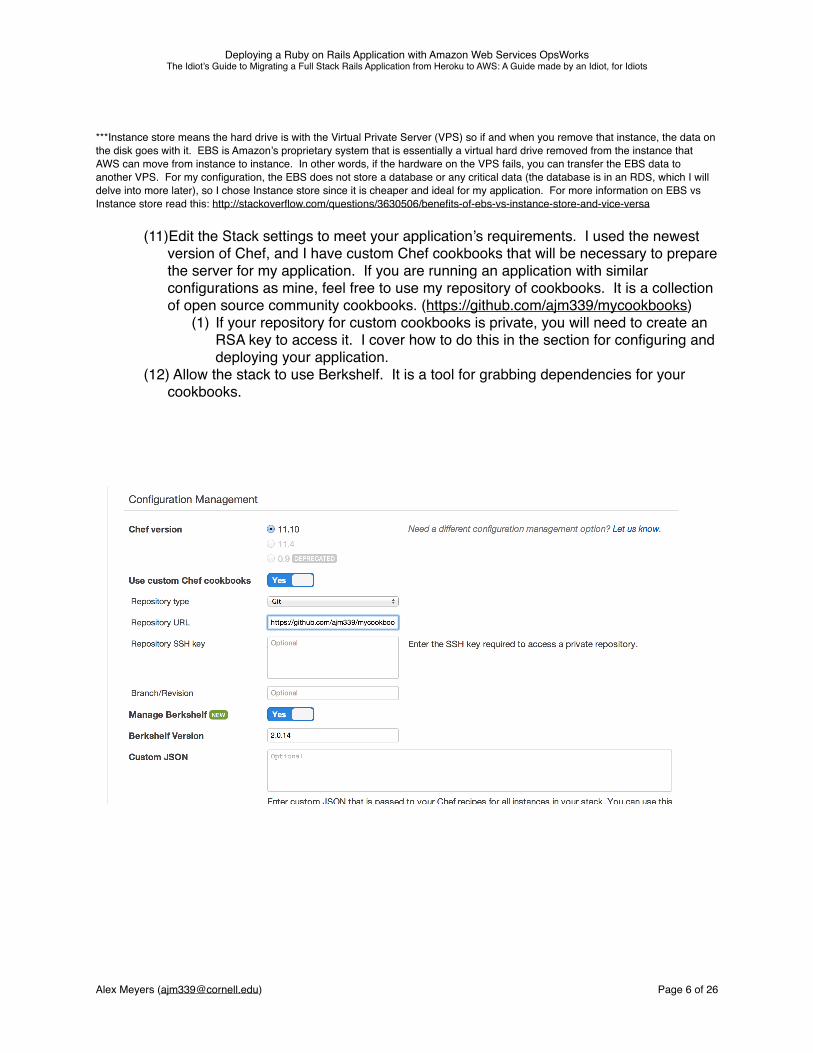
(11)Edit the Stack settings to meet your application’s requirements. I used the newest version of Chef, and I have custom Chef cookbooks that will be necessary to prepare the server for my application. If you are running an application with similar configurations as mine, feel free to use my repository of cookbooks. It is a collection of open source community cookbooks. (https://github.com/ajm339/mycookbooks)
(1) If your repository for custom cookbooks is private, you will need to create an RSA key to access it. I cover how to do this in the section for configuring and deploying your application.
(12) Allow the stack to use Berkshelf. It is a tool for grabbing dependencies for your cookbooks.
Alex Meyers ([email protected]) Page � of �6 26
Deploying a Ruby on Rails Application with Amazon Web Services OpsWorksThe Idiot’s Guide to Migrating a Full Stack Rails Application from Heroku to AWS: A Guide made by an Idiot, for Idiots
Relational Database Service (RDS)RDS is a service optimized for setting up highly scalable databases. They automatically
backup nightly. There is also the option for increased data input/output and slave databases. This is also ideal for setting up a horizontally scalable application. This sample application utilizes a Postgres Database. RDS also support MySQL, Oracle SQL, and Microsoft SQL. For more information read this: http://aws.amazon.com/rds/
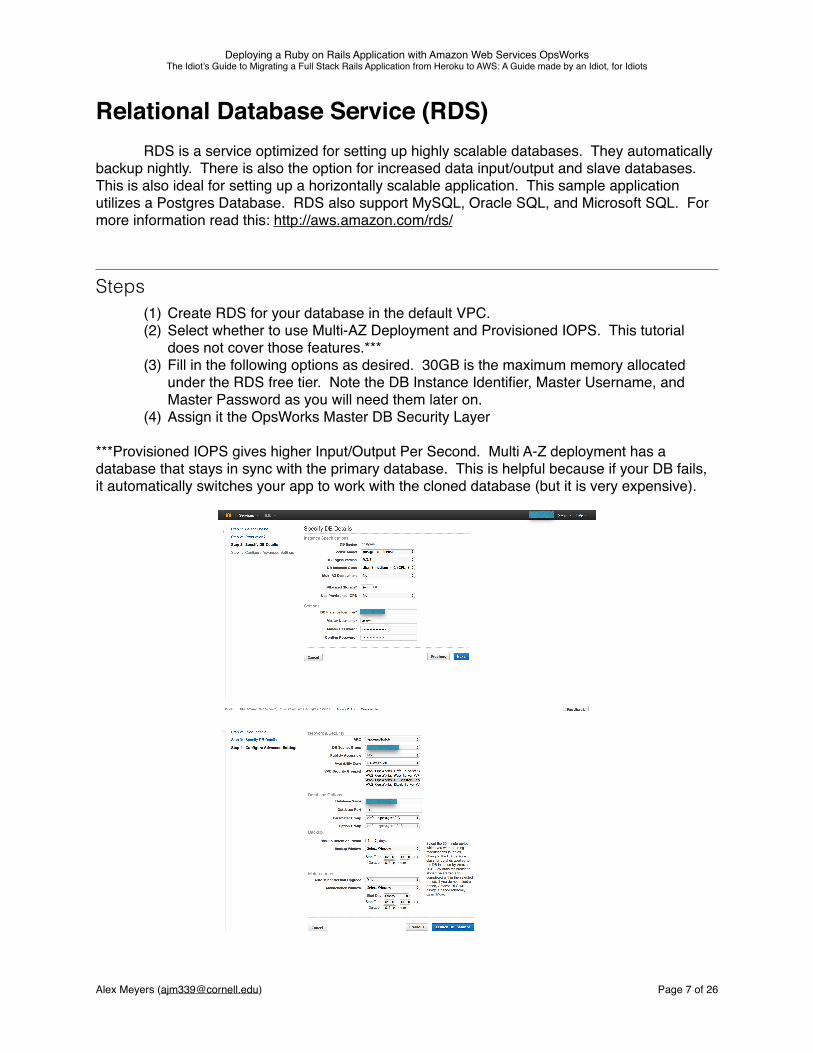
Steps (1) Create RDS for your database in the default VPC.(2) Select whether to use Multi-AZ Deployment and Provisioned IOPS. This tutorial
does not cover those features.***(3) Fill in the following options as desired. 30GB is the maximum memory allocated
under the RDS free tier. Note the DB Instance Identifier, Master Username, and Master Password as you will need them later on.
(4) Assign it the OpsWorks Master DB Security Layer
***Provisioned IOPS gives higher Input/Output Per Second. Multi A-Z deployment has a database that stays in sync with the primary database. This is helpful because if your DB fails, it automatically switches your app to work with the cloned database (but it is very expensive).
Alex Meyers ([email protected]) Page � of �7 26
Deploying a Ruby on Rails Application with Amazon Web Services OpsWorksThe Idiot’s Guide to Migrating a Full Stack Rails Application from Heroku to AWS: A Guide made by an Idiot, for Idiots
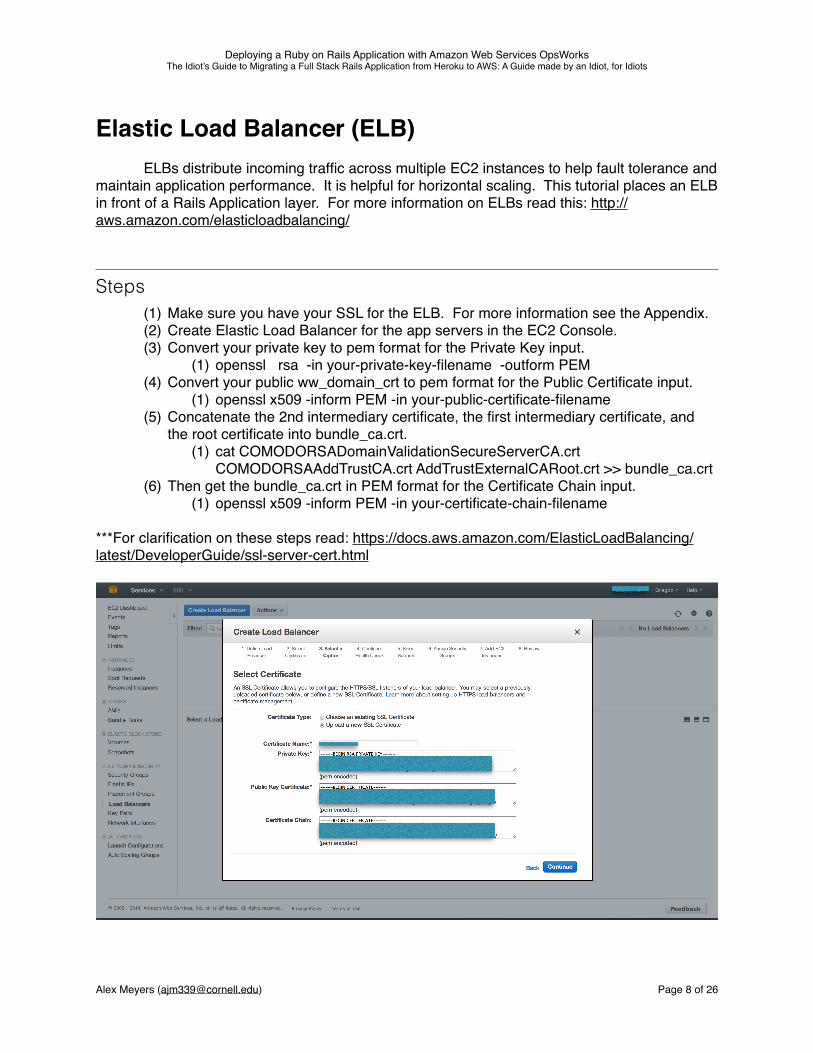
Elastic Load Balancer (ELB)ELBs distribute incoming traffic across multiple EC2 instances to help fault tolerance and
maintain application performance. It is helpful for horizontal scaling. This tutorial places an ELB in front of a Rails Application layer. For more information on ELBs read this: http://aws.amazon.com/elasticloadbalancing/
Steps (1) Make sure you have your SSL for the ELB. For more information see the Appendix.(2) Create Elastic Load Balancer for the app servers in the EC2 Console.(3) Convert your private key to pem format for the Private Key input.
(1) openssl rsa -in your-private-key-filename -outform PEM(4) Convert your public ww_domain_crt to pem format for the Public Certificate input.
(1) openssl x509 -inform PEM -in your-public-certificate-filename(5) Concatenate the 2nd intermediary certificate, the first intermediary certificate, and
the root certificate into bundle_ca.crt.(1) cat COMODORSADomainValidationSecureServerCA.crt
COMODORSAAddTrustCA.crt AddTrustExternalCARoot.crt >> bundle_ca.crt(6) Then get the bundle_ca.crt in PEM format for the Certificate Chain input.
(1) openssl x509 -inform PEM -in your-certificate-chain-filename
***For clarification on these steps read: https://docs.aws.amazon.com/ElasticLoadBalancing/latest/DeveloperGuide/ssl-server-cert.html
Alex Meyers ([email protected]) Page � of �8 26
Deploying a Ruby on Rails Application with Amazon Web Services OpsWorksThe Idiot’s Guide to Migrating a Full Stack Rails Application from Heroku to AWS: A Guide made by an Idiot, for Idiots
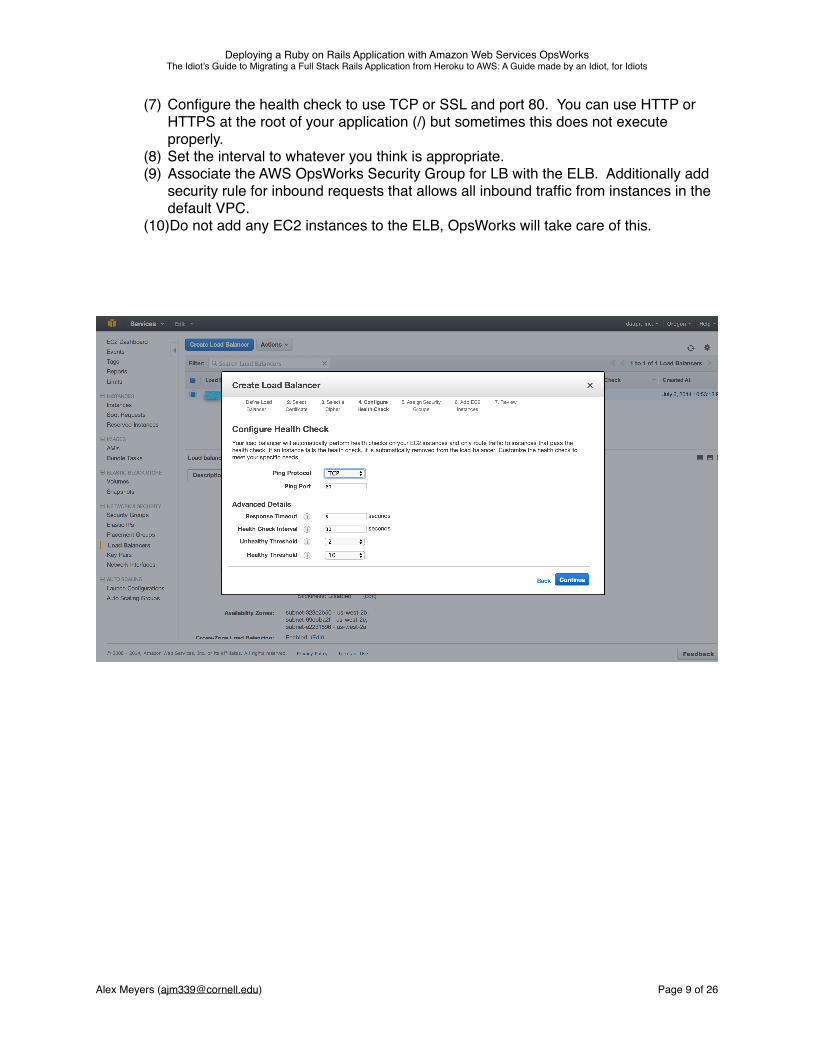
(7) Configure the health check to use TCP or SSL and port 80. You can use HTTP or HTTPS at the root of your application (/) but sometimes this does not execute properly.
(8) Set the interval to whatever you think is appropriate.(9) Associate the AWS OpsWorks Security Group for LB with the ELB. Additionally add
security rule for inbound requests that allows all inbound traffic from instances in the default VPC.
(10)Do not add any EC2 instances to the ELB, OpsWorks will take care of this.
Alex Meyers ([email protected]) Page � of �9 26
Deploying a Ruby on Rails Application with Amazon Web Services OpsWorksThe Idiot’s Guide to Migrating a Full Stack Rails Application from Heroku to AWS: A Guide made by an Idiot, for Idiots
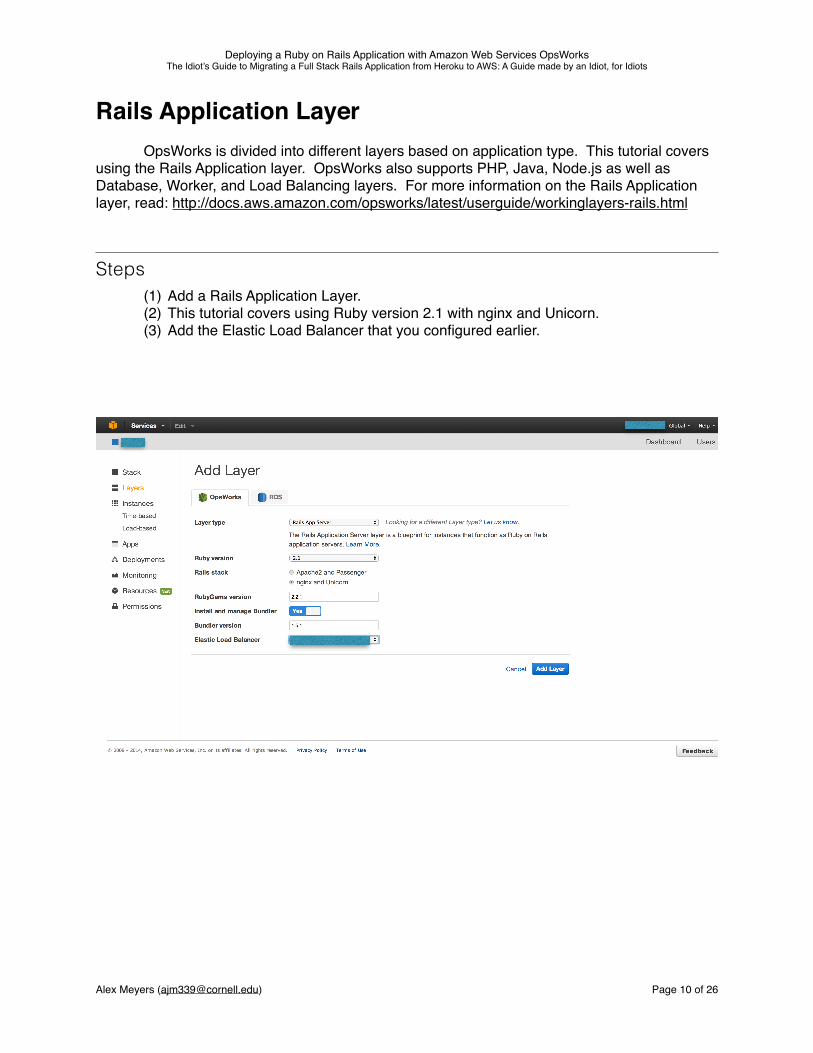
Rails Application LayerOpsWorks is divided into different layers based on application type. This tutorial covers
using the Rails Application layer. OpsWorks also supports PHP, Java, Node.js as well as Database, Worker, and Load Balancing layers. For more information on the Rails Application layer, read: http://docs.aws.amazon.com/opsworks/latest/userguide/workinglayers-rails.html
Steps (1) Add a Rails Application Layer. (2) This tutorial covers using Ruby version 2.1 with nginx and Unicorn. (3) Add the Elastic Load Balancer that you configured earlier.
Alex Meyers ([email protected]) Page � of �10 26
Deploying a Ruby on Rails Application with Amazon Web Services OpsWorksThe Idiot’s Guide to Migrating a Full Stack Rails Application from Heroku to AWS: A Guide made by an Idiot, for Idiots
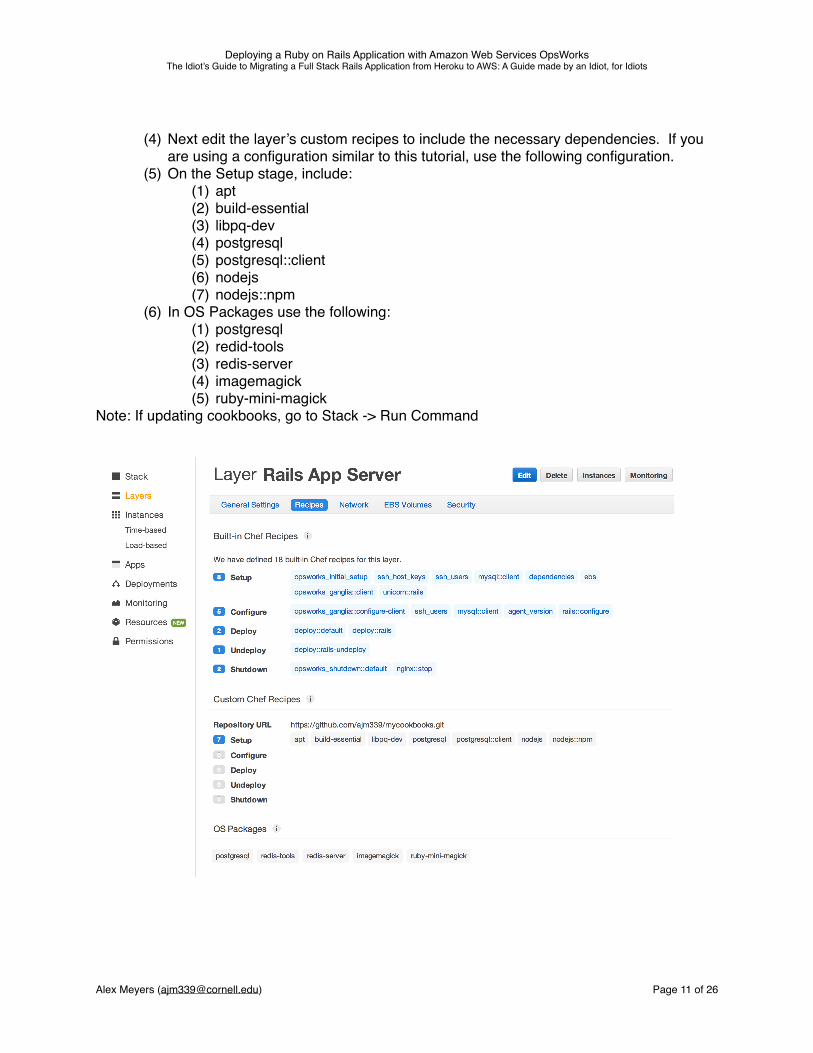
(4) Next edit the layer’s custom recipes to include the necessary dependencies. If you are using a configuration similar to this tutorial, use the following configuration.
(5) On the Setup stage, include:(1) apt(2) build-essential(3) libpq-dev(4) postgresql (5) postgresql::client (6) nodejs (7) nodejs::npm
(6) In OS Packages use the following:(1) postgresql(2) redid-tools(3) redis-server(4) imagemagick(5) ruby-mini-magick
Note: If updating cookbooks, go to Stack -> Run Command
Alex Meyers ([email protected]) Page � of �11 26
Deploying a Ruby on Rails Application with Amazon Web Services OpsWorksThe Idiot’s Guide to Migrating a Full Stack Rails Application from Heroku to AWS: A Guide made by an Idiot, for Idiots
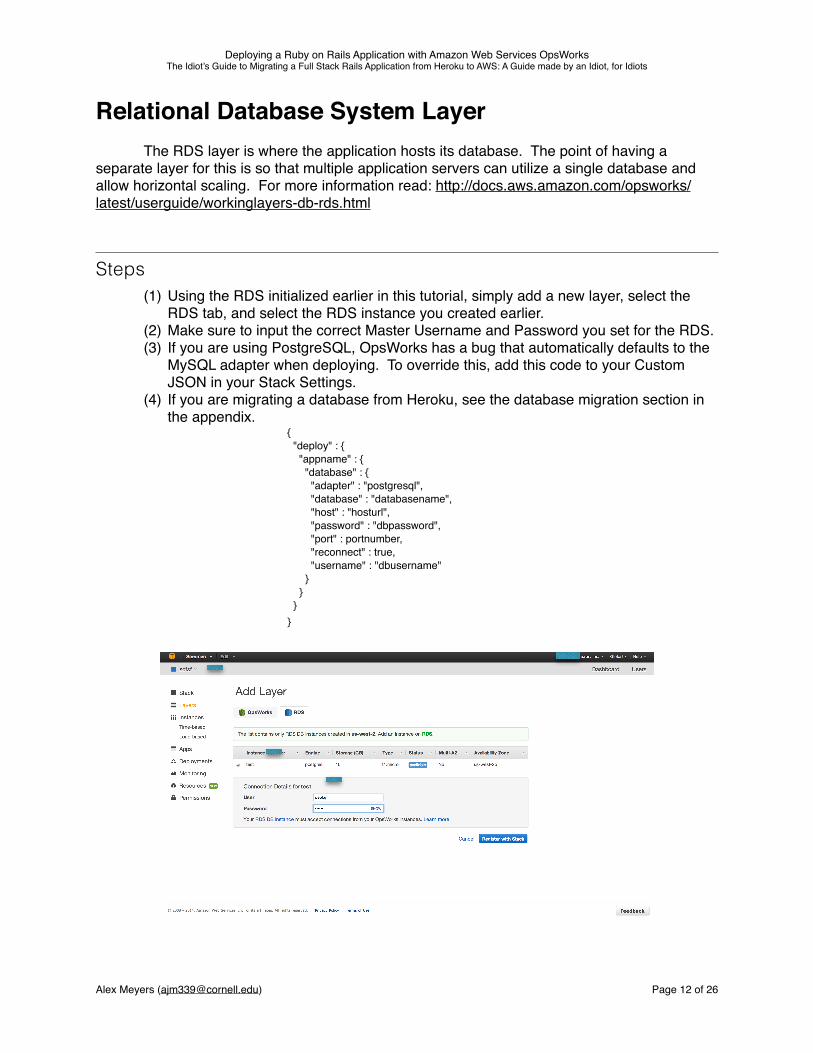
Relational Database System LayerThe RDS layer is where the application hosts its database. The point of having a
separate layer for this is so that multiple application servers can utilize a single database and allow horizontal scaling. For more information read: http://docs.aws.amazon.com/opsworks/latest/userguide/workinglayers-db-rds.html
Steps (1) Using the RDS initialized earlier in this tutorial, simply add a new layer, select the
RDS tab, and select the RDS instance you created earlier. (2) Make sure to input the correct Master Username and Password you set for the RDS.(3) If you are using PostgreSQL, OpsWorks has a bug that automatically defaults to the
MySQL adapter when deploying. To override this, add this code to your Custom JSON in your Stack Settings.
(4) If you are migrating a database from Heroku, see the database migration section in the appendix.
{ "deploy" : { "appname" : { "database" : { "adapter" : "postgresql", "database" : "databasename", "host" : "hosturl", "password" : "dbpassword", "port" : portnumber, "reconnect" : true, "username" : "dbusername" } } }}
Alex Meyers ([email protected]) Page � of �12 26
Deploying a Ruby on Rails Application with Amazon Web Services OpsWorksThe Idiot’s Guide to Migrating a Full Stack Rails Application from Heroku to AWS: A Guide made by an Idiot, for Idiots
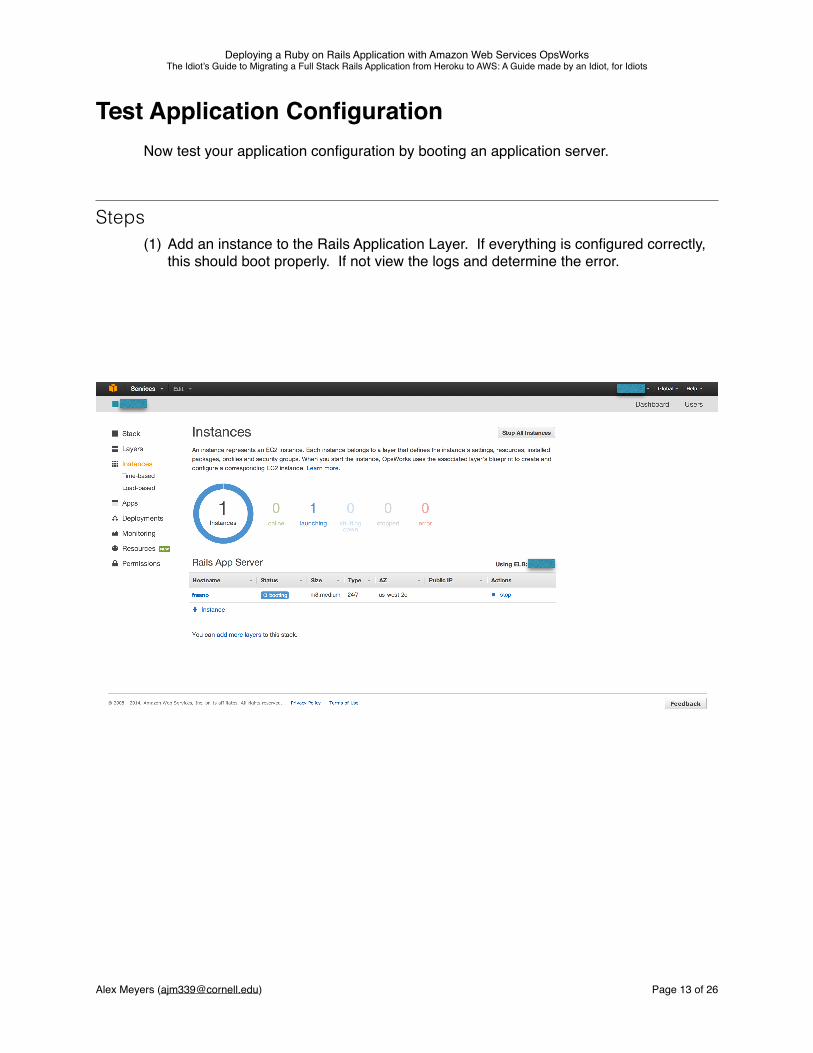
Test Application ConfigurationNow test your application configuration by booting an application server.
Steps (1) Add an instance to the Rails Application Layer. If everything is configured correctly,
this should boot properly. If not view the logs and determine the error.
Alex Meyers ([email protected]) Page � of �13 26
Deploying a Ruby on Rails Application with Amazon Web Services OpsWorksThe Idiot’s Guide to Migrating a Full Stack Rails Application from Heroku to AWS: A Guide made by an Idiot, for Idiots
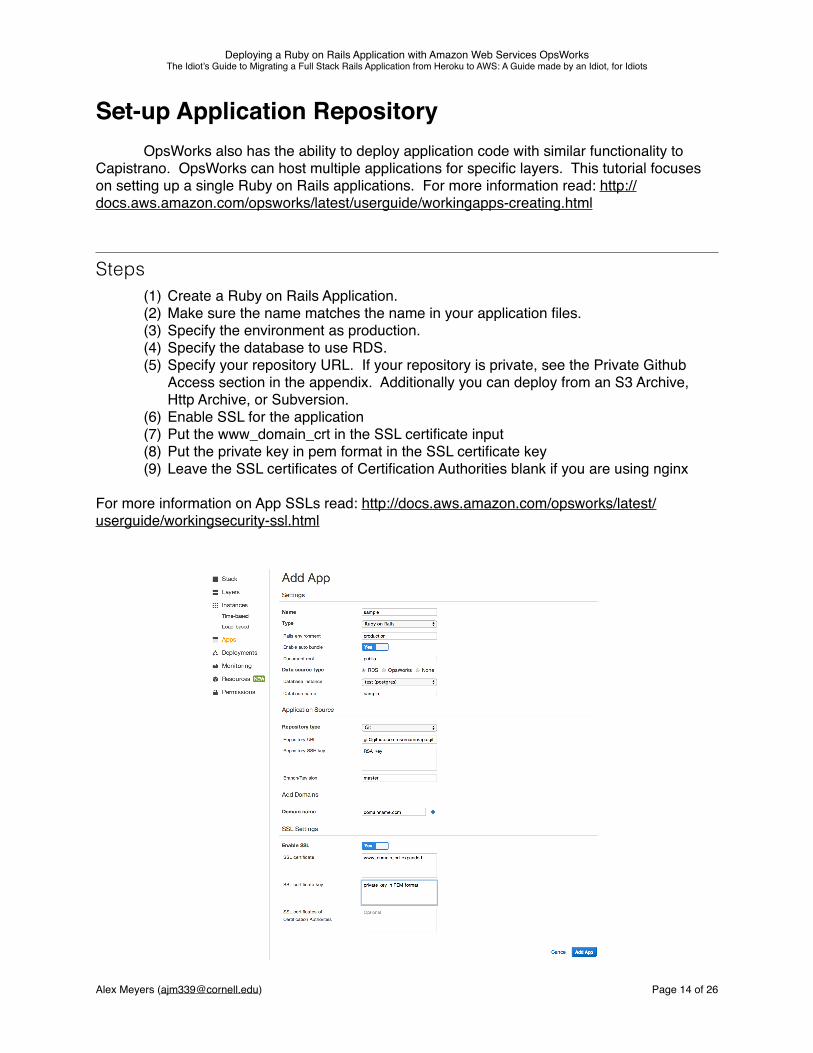
Set-up Application RepositoryOpsWorks also has the ability to deploy application code with similar functionality to
Capistrano. OpsWorks can host multiple applications for specific layers. This tutorial focuses on setting up a single Ruby on Rails applications. For more information read: http://docs.aws.amazon.com/opsworks/latest/userguide/workingapps-creating.html
Steps (1) Create a Ruby on Rails Application. (2) Make sure the name matches the name in your application files.(3) Specify the environment as production.(4) Specify the database to use RDS.(5) Specify your repository URL. If your repository is private, see the Private Github
Access section in the appendix. Additionally you can deploy from an S3 Archive, Http Archive, or Subversion.
(6) Enable SSL for the application(7) Put the www_domain_crt in the SSL certificate input(8) Put the private key in pem format in the SSL certificate key(9) Leave the SSL certificates of Certification Authorities blank if you are using nginx
For more information on App SSLs read: http://docs.aws.amazon.com/opsworks/latest/userguide/workingsecurity-ssl.html
Alex Meyers ([email protected]) Page � of �14 26
Deploying a Ruby on Rails Application with Amazon Web Services OpsWorksThe Idiot’s Guide to Migrating a Full Stack Rails Application from Heroku to AWS: A Guide made by an Idiot, for Idiots
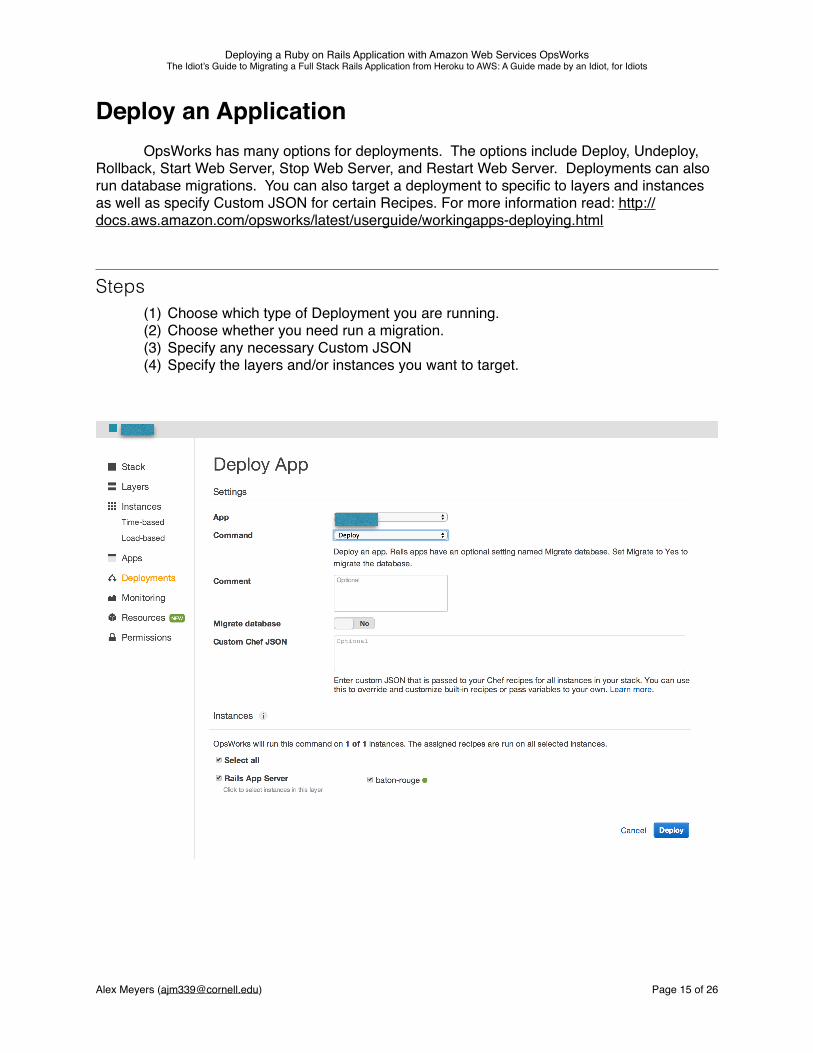
Deploy an ApplicationOpsWorks has many options for deployments. The options include Deploy, Undeploy,
Rollback, Start Web Server, Stop Web Server, and Restart Web Server. Deployments can also run database migrations. You can also target a deployment to specific to layers and instances as well as specify Custom JSON for certain Recipes. For more information read: http://docs.aws.amazon.com/opsworks/latest/userguide/workingapps-deploying.html
Steps (1) Choose which type of Deployment you are running. (2) Choose whether you need run a migration.(3) Specify any necessary Custom JSON(4) Specify the layers and/or instances you want to target.
Alex Meyers ([email protected]) Page � of �15 26

Deploying a Ruby on Rails Application with Amazon Web Services OpsWorksThe Idiot’s Guide to Migrating a Full Stack Rails Application from Heroku to AWS: A Guide made by an Idiot, for Idiots
Appendix
Alex Meyers ([email protected]) Page � of �16 26
Deploying a Ruby on Rails Application with Amazon Web Services OpsWorksThe Idiot’s Guide to Migrating a Full Stack Rails Application from Heroku to AWS: A Guide made by an Idiot, for Idiots
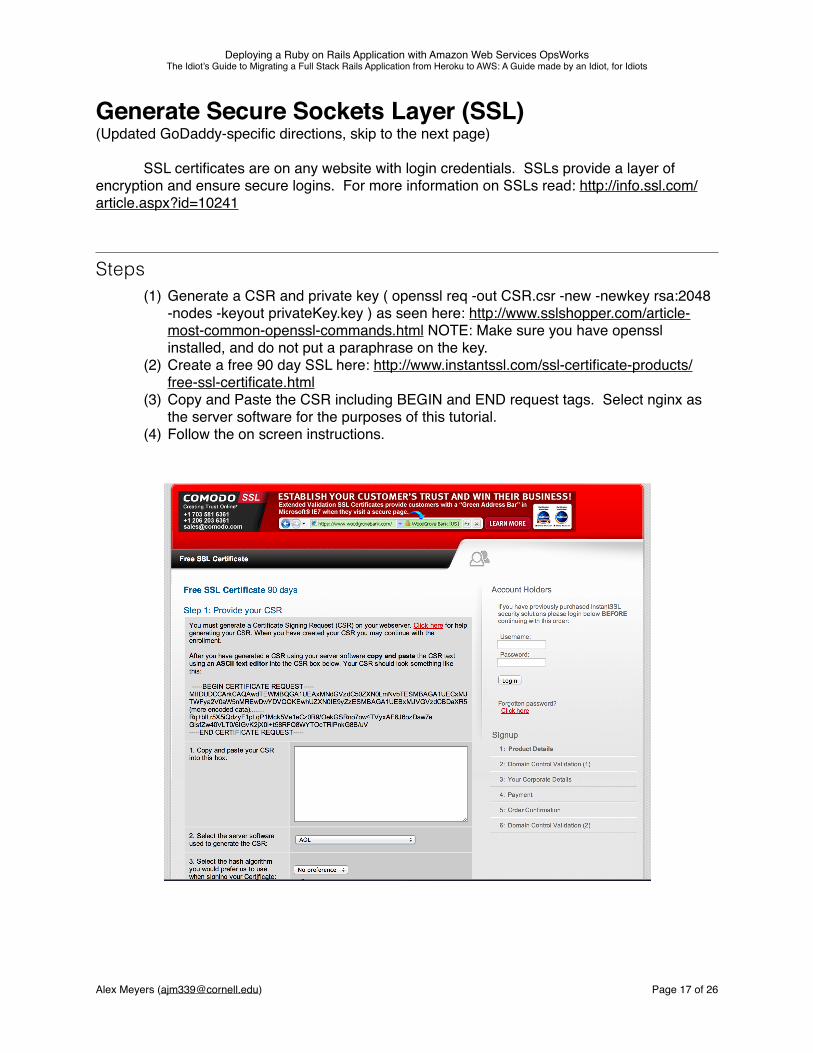
Generate Secure Sockets Layer (SSL)(Updated GoDaddy-specific directions, skip to the next page)
SSL certificates are on any website with login credentials. SSLs provide a layer of encryption and ensure secure logins. For more information on SSLs read: http://info.ssl.com/article.aspx?id=10241
Steps (1) Generate a CSR and private key ( openssl req -out CSR.csr -new -newkey rsa:2048
-nodes -keyout privateKey.key ) as seen here: http://www.sslshopper.com/article-most-common-openssl-commands.html NOTE: Make sure you have openssl installed, and do not put a paraphrase on the key.
(2) Create a free 90 day SSL here: http://www.instantssl.com/ssl-certificate-products/free-ssl-certificate.html
(3) Copy and Paste the CSR including BEGIN and END request tags. Select nginx as the server software for the purposes of this tutorial.
(4) Follow the on screen instructions.
Alex Meyers ([email protected]) Page � of �17 26
Deploying a Ruby on Rails Application with Amazon Web Services OpsWorksThe Idiot’s Guide to Migrating a Full Stack Rails Application from Heroku to AWS: A Guide made by an Idiot, for Idiots
Generate Secure Sockets Layer (SSL) on GoDaddySSL certificates are on any website with login credentials. SSLs provide a layer of
encryption and ensure secure logins. For more information on SSLs read: http://info.ssl.com/article.aspx?id=10241 (
Steps (1) Generate a CSR and private key ( openssl req sha256 -new -newkey rs:2048 -nodes
-keyout your_domain_privateKey.key -out your_domain.csr as seen here: http://pud.com/post/51823819131/getting-godaddy-ssl-certificates-to-work-with NOTE: Make sure you have openssl installed, and do not put a paraphrase on the key.
(2) Copy and paste the CSR into GoDaddy, then download the security certificate for the server type (in this tutorial, select Other)
(3) For Amazon ELB, convert your_domain_privateKey.key to pem format as well as both certificate files downloaded from GoDaddy as seen here: http://stackoverflow.com/questions/4691699/how-to-convert-crt-to-pem
(4) The certificate with the random string in its name is the public key for the ELB (in pem format) and the certificate with “bundle” in its name is the certificate chain for the ELB (in pem format).
Alex Meyers ([email protected]) Page � of �18 26
Deploying a Ruby on Rails Application with Amazon Web Services OpsWorksThe Idiot’s Guide to Migrating a Full Stack Rails Application from Heroku to AWS: A Guide made by an Idiot, for Idiots
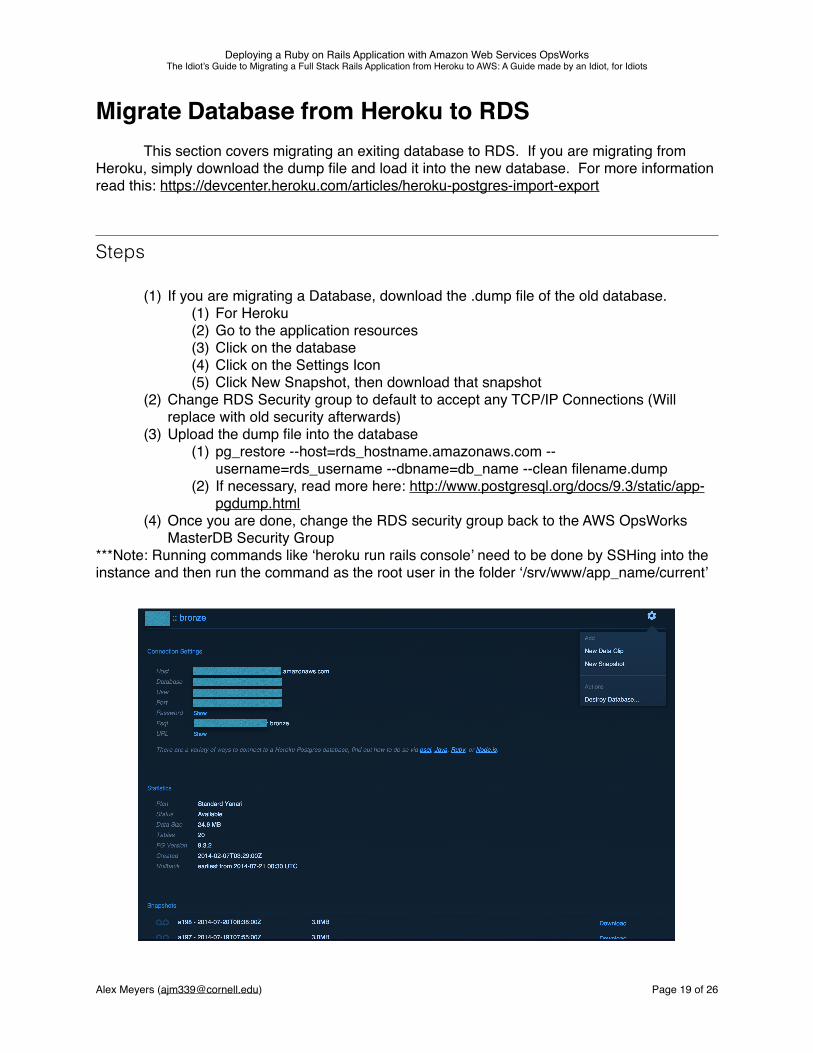
Migrate Database from Heroku to RDSThis section covers migrating an exiting database to RDS. If you are migrating from
Heroku, simply download the dump file and load it into the new database. For more information read this: https://devcenter.heroku.com/articles/heroku-postgres-import-export
Steps
(1) If you are migrating a Database, download the .dump file of the old database. (1) For Heroku(2) Go to the application resources(3) Click on the database(4) Click on the Settings Icon(5) Click New Snapshot, then download that snapshot
(2) Change RDS Security group to default to accept any TCP/IP Connections (Will replace with old security afterwards)
(3) Upload the dump file into the database(1) pg_restore --host=rds_hostname.amazonaws.com --
username=rds_username --dbname=db_name --clean filename.dump(2) If necessary, read more here: http://www.postgresql.org/docs/9.3/static/app-
pgdump.html(4) Once you are done, change the RDS security group back to the AWS OpsWorks
MasterDB Security Group***Note: Running commands like ‘heroku run rails console’ need to be done by SSHing into the instance and then run the command as the root user in the folder ‘/srv/www/app_name/current’
Alex Meyers ([email protected]) Page � of �19 26
Deploying a Ruby on Rails Application with Amazon Web Services OpsWorksThe Idiot’s Guide to Migrating a Full Stack Rails Application from Heroku to AWS: A Guide made by an Idiot, for Idiots
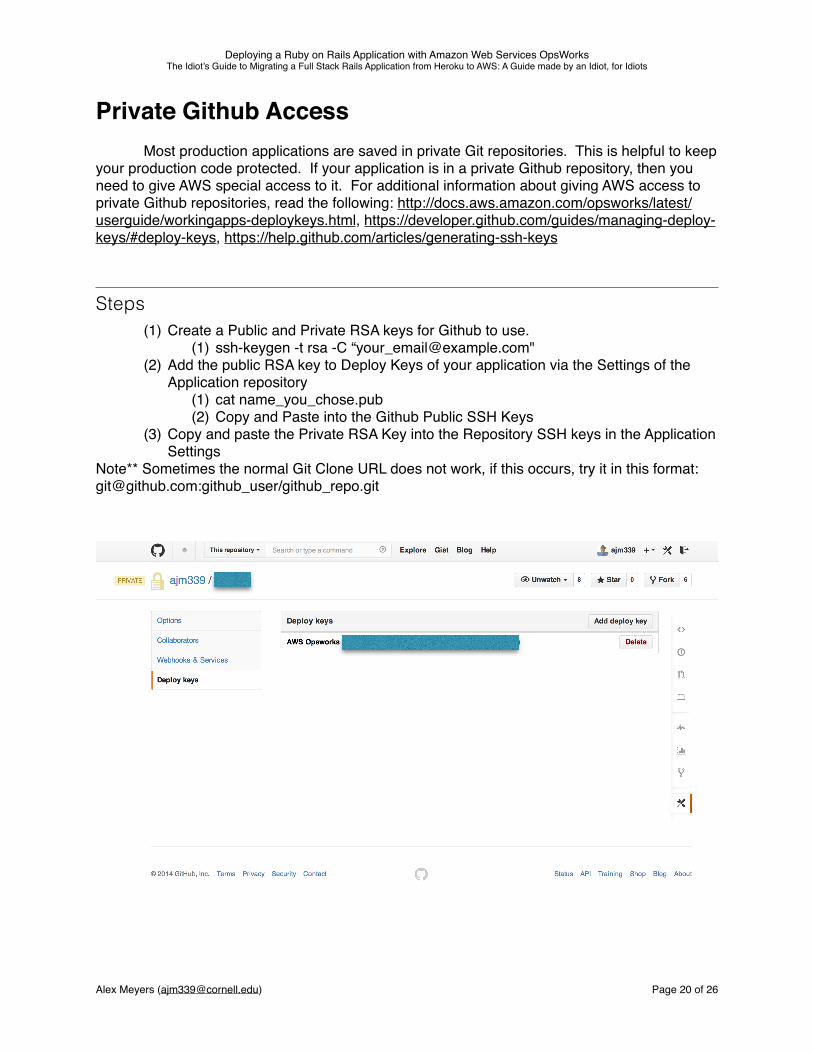
Private Github AccessMost production applications are saved in private Git repositories. This is helpful to keep
your production code protected. If your application is in a private Github repository, then you need to give AWS special access to it. For additional information about giving AWS access to private Github repositories, read the following: http://docs.aws.amazon.com/opsworks/latest/userguide/workingapps-deploykeys.html, https://developer.github.com/guides/managing-deploy-keys/#deploy-keys, https://help.github.com/articles/generating-ssh-keys
Steps (1) Create a Public and Private RSA keys for Github to use.
(1) ssh-keygen -t rsa -C “[email protected]"(2) Add the public RSA key to Deploy Keys of your application via the Settings of the
Application repository(1) cat name_you_chose.pub(2) Copy and Paste into the Github Public SSH Keys
(3) Copy and paste the Private RSA Key into the Repository SSH keys in the Application Settings
Note** Sometimes the normal Git Clone URL does not work, if this occurs, try it in this format: [email protected]:github_user/github_repo.git
Alex Meyers ([email protected]) Page � of �20 26
Deploying a Ruby on Rails Application with Amazon Web Services OpsWorksThe Idiot’s Guide to Migrating a Full Stack Rails Application from Heroku to AWS: A Guide made by an Idiot, for Idiots
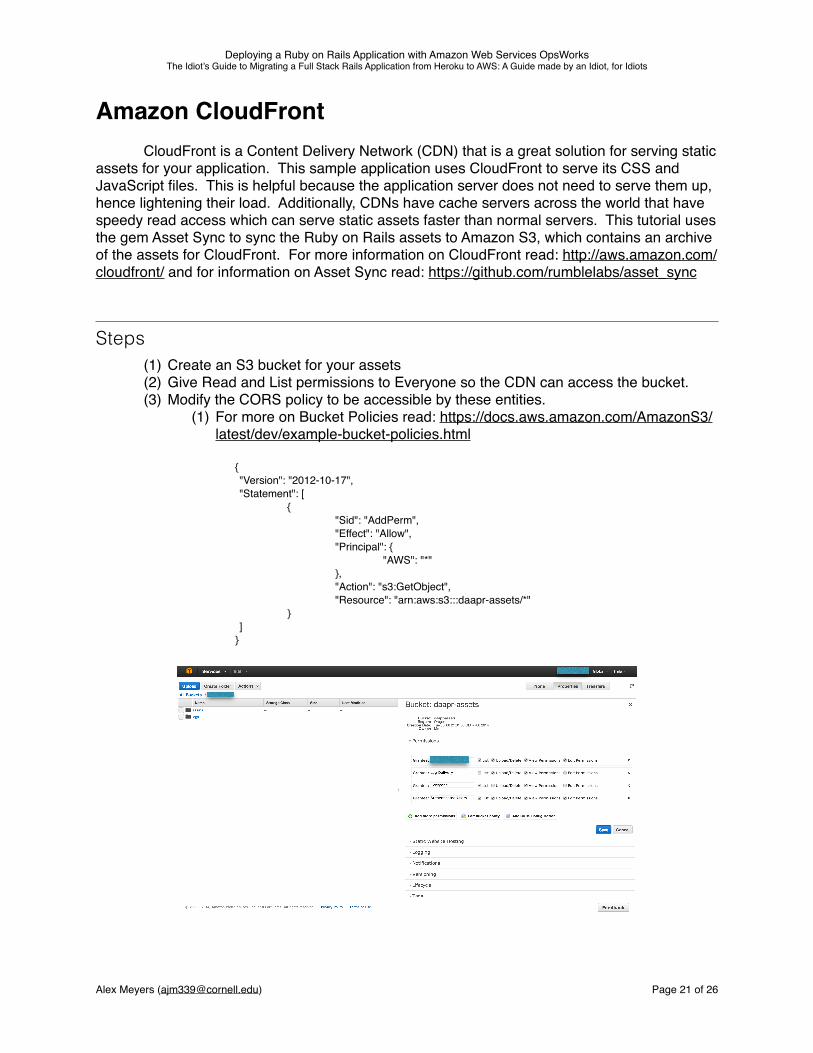
Amazon CloudFrontCloudFront is a Content Delivery Network (CDN) that is a great solution for serving static
assets for your application. This sample application uses CloudFront to serve its CSS and JavaScript files. This is helpful because the application server does not need to serve them up, hence lightening their load. Additionally, CDNs have cache servers across the world that have speedy read access which can serve static assets faster than normal servers. This tutorial uses the gem Asset Sync to sync the Ruby on Rails assets to Amazon S3, which contains an archive of the assets for CloudFront. For more information on CloudFront read: http://aws.amazon.com/cloudfront/ and for information on Asset Sync read: https://github.com/rumblelabs/asset_sync
Steps (1) Create an S3 bucket for your assets(2) Give Read and List permissions to Everyone so the CDN can access the bucket.(3) Modify the CORS policy to be accessible by these entities.
(1) For more on Bucket Policies read: https://docs.aws.amazon.com/AmazonS3/latest/dev/example-bucket-policies.html
{"Version": "2012-10-17","Statement": [
{"Sid": "AddPerm","Effect": "Allow","Principal": {
"AWS": "*"},"Action": "s3:GetObject","Resource": "arn:aws:s3:::daapr-assets/*"
}]
}
Alex Meyers ([email protected]) Page � of �21 26
Deploying a Ruby on Rails Application with Amazon Web Services OpsWorksThe Idiot’s Guide to Migrating a Full Stack Rails Application from Heroku to AWS: A Guide made by an Idiot, for Idiots
(4) Configure CloudFront.(1) Create a Web Distribution with the default settings. Link to the S3 bucket you
created earlier(5) Configure Asset Sync
(1) add ‘gem asset-sync’ to the Gemfile(2) Configure the environment sheet: config/environments/production.rb
(1) Note: make sure to place // in front of the CDN URL, but do not specify http or https.
(3) Create the initializer: config/initializers/asset_sync.rb(4) Create the rake task: lib/tasks/asset_sync.rake
(6) In order to sync assets to S3 run these commands:(1) RAILS_ENV=production bundle exec rake assets:precompile(2) bundle exec rake assets:sync
Alex Meyers ([email protected]) Page � of �22 26
Deploying a Ruby on Rails Application with Amazon Web Services OpsWorksThe Idiot’s Guide to Migrating a Full Stack Rails Application from Heroku to AWS: A Guide made by an Idiot, for Idiots
Amazon Simple Email Server (SES)SES is a great service for helping your applications send automated emails to users.
One is able to use the Rails Model Mailer with SES very easily. For more information read: http://aws.amazon.com/ses/ or more instructions read: http://blogs.sequoiainc.com/blogs/getting-started-quickly-with-amazon-email-sending-service-ses-and-ruby-on-rails
Steps (1) Add some verified email addresses in order to test the mailer.(2) Configure your application’s mailer by following these directions: http://
guides.rubyonrails.org/action_mailer_basics.html (3) Create a mailer user in the SMTP Settings, and download the CSV file with the User
Name and Password for the mailer user.(4) Verify the domain using the on-screen directions to place the proper credentials with
you DNS provider.(5) Place the settings below in your production environment (6) Once you have proven the settings, request Production Access to use live.
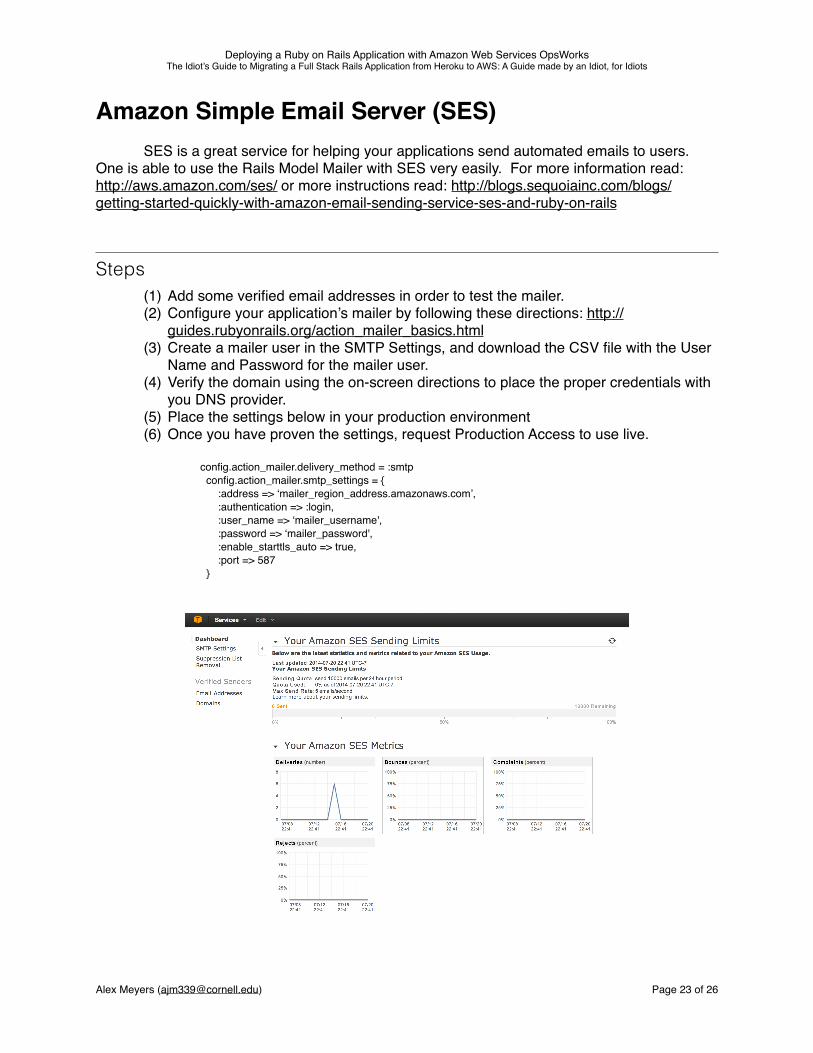
config.action_mailer.delivery_method = :smtp config.action_mailer.smtp_settings = { :address => ‘mailer_region_address.amazonaws.com’, :authentication => :login, :user_name => ‘mailer_username', :password => ‘mailer_password', :enable_starttls_auto => true, :port => 587 }
Alex Meyers ([email protected]) Page � of �23 26
Deploying a Ruby on Rails Application with Amazon Web Services OpsWorksThe Idiot’s Guide to Migrating a Full Stack Rails Application from Heroku to AWS: A Guide made by an Idiot, for Idiots
Background ProcessesMany applications use background processes to handle some of their computations to
maintain application performance. This tutorial leverages Redis and Sidekiq for background processes. This tutorial covered installing the necessary dependencies earlier. Sidekiq and background processes run on the same server as the application servers for easy configuration as well as the ability to For more information on Redis read: http://redis.io/ and Sidekiq read: http://sidekiq.org/ Additional directions: http://zaman.io/running-sidekiq-on-opsworks/
Steps (1) Add the redis-server and redis-tools to allow Redis to run(2) Follow https://github.com/mperham/sidekiq/wiki/Getting-Started to set up Sidekiq(3) Make sure to include imagemagick and ruby-mini-magick for any image resizing (4) Configure the Rails Application to start sidekiq on boot.
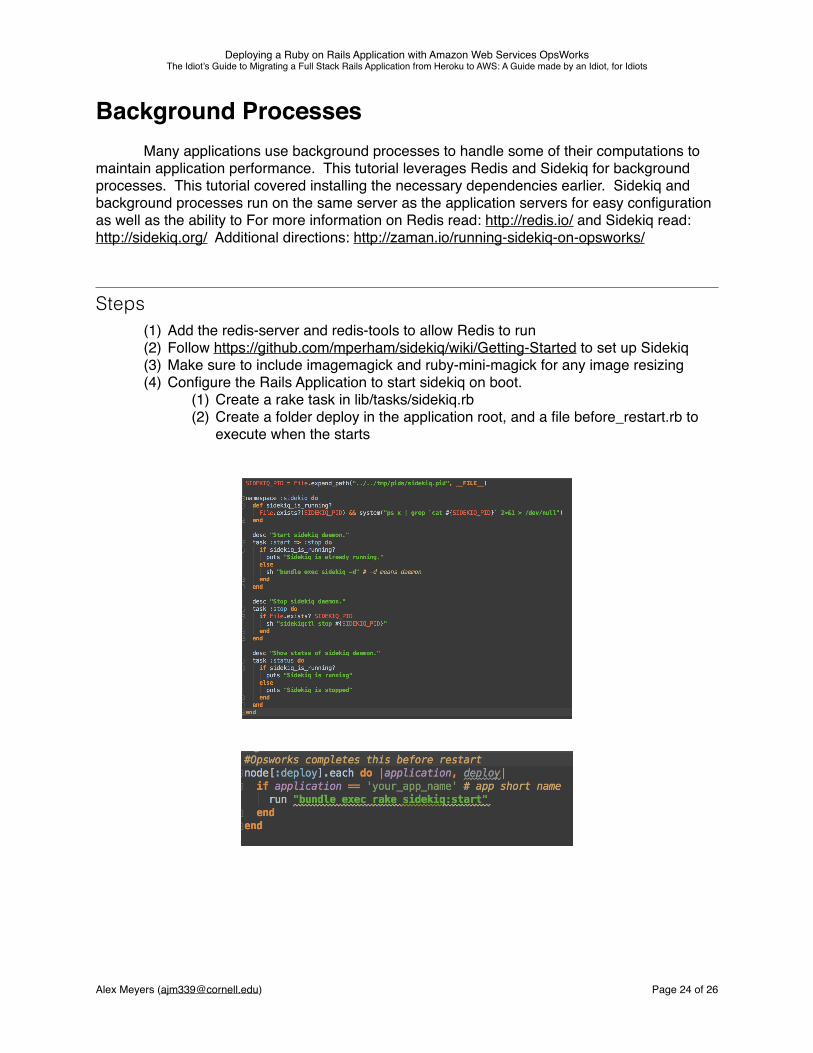
(1) Create a rake task in lib/tasks/sidekiq.rb(2) Create a folder deploy in the application root, and a file before_restart.rb to
execute when the starts
Alex Meyers ([email protected]) Page � of �24 26
Deploying a Ruby on Rails Application with Amazon Web Services OpsWorksThe Idiot’s Guide to Migrating a Full Stack Rails Application from Heroku to AWS: A Guide made by an Idiot, for Idiots
Server MonitoringAll developers [should] have tools in place to monitor their server and application
performance. This section describes how to utilize Logentries and NewRelic to monitor application and server performance. If one wants to monitor application log output and receive warning for performance issues, simply create a Logentries (http://www.logentries.com) account and follow the instructions for inserting the logging information in the application. For overall application performance in a visual graph layout as well as server performance statistics, utilize NewRelic. Simply create an account on NewRelic’s site (http://www.newrelic.com) and follow the instructions for installing it within an application. For monitoring server performance with NewRelic, follow the directions below.
Steps (1) If you are using Ubuntu, you can utilize the newrelic_server_config cookbook that I
wrote in my repository(https://github.com/ajm339/mycookbooks).(2) Create a NewRelic account and click on the Server Tab. (3) Select the platform “Ubuntu or Debian”(4) Skip to Step 3 in the list and copy the license_key (The other steps are built into my
cookbook).(5) Fork your own copy of my cookbook repository.(6) Modify the file newrelic_server_config/recipes/default.rb and replace
‘YOUR_APP_NAME’ with your application’s name that is specified in its configuration as well as the Custom JSON in the Stack Settings.
(7) Your Custom JSON should look like this:{ "deploy" : { "appname" : { "newrelic" : { "server_monitoring" : { "license": “YOUR_NEWRELIC_LICENSE” } } } }}
Note: If you configured your database with RDS earlier, simply stack the “newrelic” section right after the “database” section.
Alex Meyers ([email protected]) Page � of �25 26
Deploying a Ruby on Rails Application with Amazon Web Services OpsWorksThe Idiot’s Guide to Migrating a Full Stack Rails Application from Heroku to AWS: A Guide made by an Idiot, for Idiots
The MIT License (MIT)
Copyright (c) 2015 Alex Meyers
Permission is hereby granted, free of charge, to any person obtaining a copyof this software and associated documentation files (the "Software"), to dealin the Software without restriction, including without limitation the rightsto use, copy, modify, merge, publish, distribute, sublicense, and/or sellcopies of the Software, and to permit persons to whom the Software isfurnished to do so, subject to the following conditions:
The above copyright notice and this permission notice shall be included inall copies or substantial portions of the Software.
THE SOFTWARE IS PROVIDED "AS IS", WITHOUT WARRANTY OF ANY KIND, EXPRESS ORIMPLIED, INCLUDING BUT NOT LIMITED TO THE WARRANTIES OF MERCHANTABILITY,FITNESS FOR A PARTICULAR PURPOSE AND NONINFRINGEMENT. IN NO EVENT SHALL THEAUTHORS OR COPYRIGHT HOLDERS BE LIABLE FOR ANY CLAIM, DAMAGES OR OTHERLIABILITY, WHETHER IN AN ACTION OF CONTRACT, TORT OR OTHERWISE, ARISING FROM,OUT OF OR IN CONNECTION WITH THE SOFTWARE OR THE USE OR OTHER DEALINGS INTHE SOFTWARE.
Alex Meyers ([email protected]) Page � of �26 26


![Ruby on Rails [ Ruby On Rails.ppt ] - [Ruby - [Ruby-Doc.org](https://img.pdfslide.us/doc/110x75/5491e450b479597e6a8b57d5/ruby-on-rails-ruby-on-railsppt-ruby-ruby-docorg-.jpg)