Embed Size (px)
Citation preview

Delta Cast® Wrist Splint
Thumb Spica
Elbow Shell
Sugar Tong/Munster Splint

2
Delta Cast Basics Delta Cast Conformable Polyester Cast Tape is an easy-to-use, fiberglass-free cast tape that produces versatile, lightweight and strong casts. When fabricated as described below, the casts can be cut off with scissors. Cast saws should not be used with this material. Prepare Items: • Bucket of water • Roll(s) of cast tape • Inexpensive bandage scissors (for cutting wet cast tape, sticky back Velcro,
fleece edger, etc) • Cast scissors: 8” Clean Cut™ (for cutting dry cast material only). Take good
care of these! • Zip Stick (cast removal aid/plastic cutting stick) • Terry-Net™ Stockinette • Terry-Net™ adhesive terry cloth/foam padding • Terry-Net™ adhesive felt padding • Terry-Net™ adhesive fleece edger • Sticky back hook Velcro
o The sticky back hook Velcro manufactured by BSN Medical is preferable
• Stretch loop strapping (BSN brand) o The sticky back hook Velcro manufactured by BSN Medical is
preferable o Standard non-stretch strapping can also be used very effectively
• Gloves • Towel • Gown to protect patient and clothing, if necessary Things to Keep in Mind: • Use inexpensive bandage scissors to cut wet cast tape and sticky materials. • Use special, expensive BSN black and gold scissors (8” Clean Cut Scissors) for
cutting dry cast material ONLY. Item number 28230. • BSN 6” Clean Cut Scissors are useful. They have pointed tips so use with care.
Item number 28235. • We occasionally use heavy duty shears to cut the cast AFTER it has been
removed from the patient: Sammons Preston 5599-88-11 Kretzer Heavy Duty Shears.
• Cold water slows curing rate (conversely, warm water speeds curing rate). • Dipping roll of cast tape without squeezing slows curing rate (conversely,
squeezing roll speeds curing rate). There is no need to squeeze the roll after submersion.
• Purple gloves of yore: • Special purple gloves used to be required when using the polyester cast
tape. They are no longer required. Regular gloves found in the clinic can be used.

3
• Explain to patient that the cast may feel warm and a bit tight during application.
• Tension the material as you roll the cast. • Overlap about 50 %. • 1 layer: very flimsy • 2 layers: good rigidity, cut-able • 3 layers: very rigid, hard to cut • 4 layers: totally solid, impossible to cut • Do NOT forget to place the cutting stick (you will do this once and then never
again!). • Use clinical judgment when deciding where to place the extra layers for
reinforcement and rigidity. • For smaller, more delicate splints, you can use a wide (at least 2”) strip of
webbing material instead of the Zip Stick. • Cutting open a Delta Cast splint can be made easier by gently squeezing it
together on either side of the cutting line. This lifts the cast away from the skin and reduces pressure.
• Avoid putting foam where you will be cutting. • Avoid excessive layers of cast material where you will be cutting. Plan ahead. • Use one long piece of sticky back Velcro per strap and heat the adhesive
with heat gun prior to applying to splint. • Strap ends should pull from the middle of the piece of sticky back Velcro.
This reduces pull-off of sticky-back Velcro pieces. • If you apply the sticky back Velcro strips to splint before applying fleece edger,
the edge of the Velcro can be placed under the fleece edger to improve adherence.
• Applying the fleece edger can be tricky. Un-spool a significant length of edger out of the box to make it easier to work with. Peel about 1” of paper backing off and apply to edge of splint. Allow about ½ the width to fit on the outside of the splint and the other ½ will be folded over to fit on the inside of the splint. Peel paper off slowly as you simultaneously apply the edger to the splint. If you peel off all of the paper first, it will curl and stick to itself, creating a mess. Cut the tape where there is still paper attached, otherwise it will stick to the scissors.
• Sometimes skin can be pinched along the splint closure area. Mold a thin strip of 1/16” thermoplastic splint material to the skin in the area where the splint closes. The splint then closes over the thermoplastic piece, functioning like a tongue in a shoe.
• Plan ahead!! • Be creative!! • Wear a protective gown until you are confident in your skills. The resin of the
cast tape does not come out of clothing. • Protect the clothing of the patient. • Use Goo Gone® Painter’s Pal (silver-colored spray bottle) to clean black &
gold scissors. Spray the scissors and leave overnight in a sealed container (it smells a bit). You can also use powerful, industrial adhesive stripper used for
4
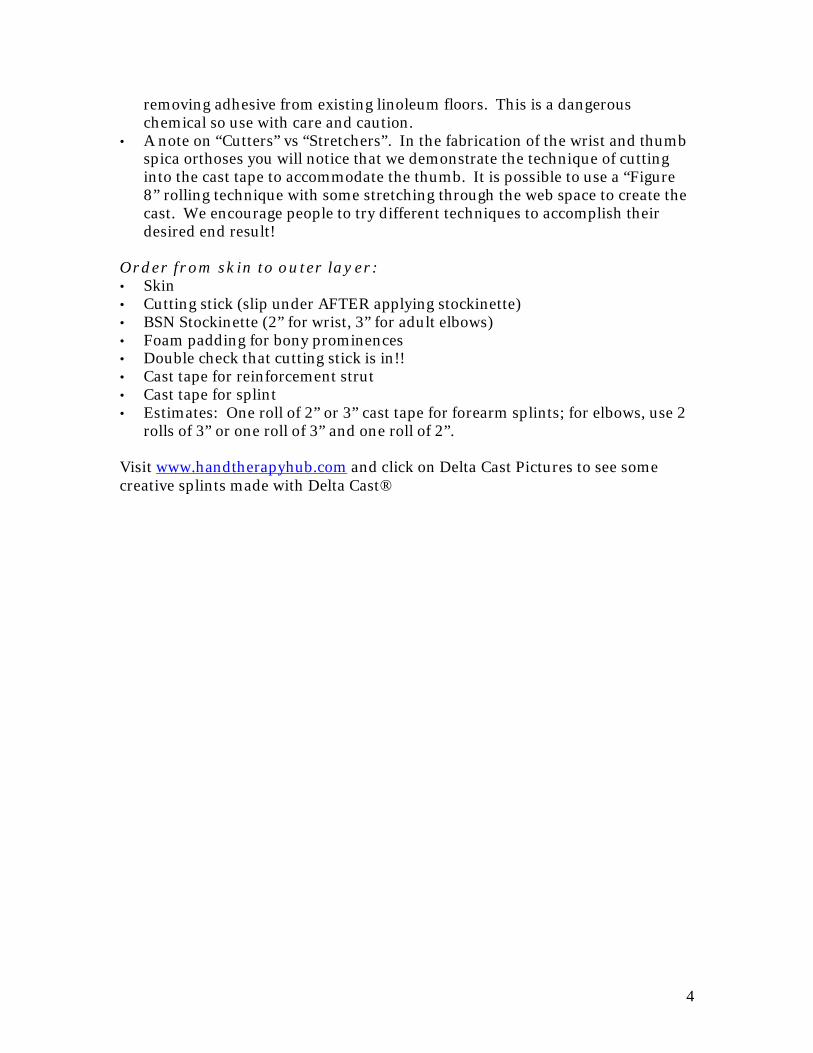
removing adhesive from existing linoleum floors. This is a dangerous chemical so use with care and caution.
• A note on “Cutters” vs “Stretchers”. In the fabrication of the wrist and thumb spica orthoses you will notice that we demonstrate the technique of cutting into the cast tape to accommodate the thumb. It is possible to use a “Figure 8” rolling technique with some stretching through the web space to create the cast. We encourage people to try different techniques to accomplish their desired end result!
Order from skin to outer layer: • Skin • Cutting stick (slip under AFTER applying stockinette) • BSN Stockinette (2” for wrist, 3” for adult elbows) • Foam padding for bony prominences • Double check that cutting stick is in!! • Cast tape for reinforcement strut • Cast tape for splint • Estimates: One roll of 2” or 3” cast tape for forearm splints; for elbows, use 2
rolls of 3” or one roll of 3” and one roll of 2”. Visit www.handtherapyhub.com and click on Delta Cast Pictures to see some creative splints made with Delta Cast®

5
Delta Cast Wrist Splint
1. Slip Surgitube on thumb to protect from resin (optional). 2. Snip a tiny hole in Terry-Net sleeve for thumb. Hole should be no less
than 4” from distal end of sleeve. Sleeve will shorten as it is stretched over arm so cut a generous overall length. (Figure 1)
3. Slip 2” sleeve of Terry-Net on forearm. 4. Piece of foam to ulnar head. (Figure 2) 5. Place Zip Stick through thumb hole along radial border of arm. (Figure 3) 6. Don gloves. 7. Open a roll of 3” BSN Delta Cast Polyester Cast Tape. 8. Cut a 6” piece off the end. Fold in half length-wise. This is your
reinforcing strut for the volar aspect of the wrist splint. (Figure 4) 9. Submerge roll of 3” cast material in water. Do not squeeze. Remove and
gently blot on towel. 10. Begin to roll cast at wrist crease. (Figure 5) 11. Second layer at wrist crease. (Figure 6) 12. Begin first layer of palmar portion. Cut tape to accommodate thumb.
(Figures 7 & 8) 13. Begin second layer of palmar portion. (Figure 9) 14. Complete 2nd layer of palmar portion. Then angle down to begin forearm
portion of cast. (Figure 10) 15. Create forearm portion with 50% overlaps. (Figure 11) 16. Complete forearm portion. Proximal edge should be 2 layers thick.
(Figure 12) 17. Cut tape, discard excess portion of rolled cast tape. 18. Shape splint as desired. 19. Rub surface of material with wet gloves. 20. Allow material to dry and set (about 5 minutes). 21. Remove gloves. 22. Draw shape of splint and cutting line. Use Sharpie® pen. (Figures 13, 14,
15) 23. Using special black and gold scissors, cut along plastic cutting stick.
(Figure 16) 24. Using special black and gold scissors, trim excess off proximal end of
splint, cut along previously drawn lines to create final shape of splint. (Figure 17, 18)
25. Apply fleece edger to cut edges of the splint. (Figures 19, 20) 26. Affix sticky back Velcro strips. (Figure 21) 27. Apply straps. (Figure 22) 28. Completed splint. (Figures 23, 24)

6
Notes: • Keep gloves moist during fabrication. • Add a 1” wide collar of folded regular stockinette material just proximal
to metacarpal heads, under Terry Net sleeve. This will create more room in this area of the splint to increase ease of don/doff. Prominent metacarpal heads can make don/doff difficult.
• Distal opening of splint (at distal palmar crease) should slant obliquely (radial to ulnar). This permits full flexion of II-V at the MCP joints and increases the area of the opening, allowing easier don/doff of splint.

7
Illustrations
Figure 1: Stockinette sleeve, surgitube to protect thumb from resin, cutting stick on radial aspect of the forearm, foam padding on ulnar head
Figure 3 Cutting stick
Figure 2 Foam padding on ulnar head

8
Figure 4 2-layer reinforcing strip
Figure 5 Begin to roll cast
Figure 6 Second layer at wrist crease

9
Figure 7 Begin first layer of palmar portion. Cut into tape to accommodate thumb.
Figure 8 Stretch through webspace
Figure 9 Begin second layer of palmar portion

10
Figure 10 Complete 2nd layer of palmar portion and angle down to forearm area.
Figure 11 Begin forearm portion with 50% overlaps
Figure 12 Complete forearm portion. Cut tape. Discard extra material.

11
Figure 13 Draw shape of splint
Figure 14 Draw guide line along cutting stick
Figure 15 Draw shape of splint

12
Figure 16 Cut cast along cutting stick
Figure 17 Trim excess off proximal edge
Figure 18 Trim along line on distal end of splint

13
Figure 19 Apply fleece edger to cut edges of the splint.
Figure 20
Figure 21 Apply sticky back Velcro pieces. Complete fleece edging.

14
Figure 22 Apply straps
Figure 23 Completed splint
Figure 24 Completed splint

15
Delta Cast Thumb Spica
1. Slip thumb spica stockinette onto hand. (Figure 1) 2. Cut excess thumb length to just shorter than thumb tip. (Figures 1-3) 3. Mark thumb IP joint line volarly and dorsally. (Figures 1-2) 4. Cut into the thumb cuff as shown. (Figure 2) 5. Place plastic Zip Stick on dorsal aspect of forearm. (Figure 3) 6. Foam padding to dorsal thumb and ulnar head. (Figures 2-3) 7. Don gloves. 8. Open a roll of 2” BSN Delta Cast Polyester Cast Tape. 9. Cut an 8” piece off the end. Fold in half . Create a taper at the folded end.
This is your reinforcing strut for the dorsal side of the thumb and radial forearm. (Figures 4-5)
10. Submerge the roll of cast tape in water. Remove and gently blot on towel. Do not squeeze.
11. Begin to roll cast at the level of the carpal tunnel. The tape starts on the ulnar side of the wrist. Complete one loop. Then angle up to the thumb. (Figures 6-8)
12. Cut into the tape from proximal to distal to permit fit through the web space. Circle the thumb once, stopping at the cut that you made in step 4. (Figures 9-10)
13. Fold down the cuff. The leading portion of the tape with slide through the cut in the cuff. You will again need to cut into the tape to allow the second round of the thumb to fit through the web space. (Figure 11) Note: some clinicians prefer to stretch the tape through the web space instead of cutting the tape. This is a personal preference/decision.
14. Complete second round of thumb. 15. Then circle the distal ends of the metacarpals twice. You will again need to
cut into the tape at the web space. (Figures 12-13) 16. Once the thumb and hand are complete, begin spiral down the forearm to
the elbow. Overlap should be about 2/3. (Figure 14) 17. Once you have reached the desired length, cut the tape and discard the
unused portion. Remember that the end of the splint needs to have 2 layers for stability. (Figure 15)
18. Shape splint as desired. 19. Allow material to dry and set. 20. Draw outline of splint with Sharpie®. (Figures 15-16) 21. Using black and gold scissors, cut along the cutting stick. (Figure 17) 22. Using black and gold scissors, trim all edges of the splint to the desired
shape. (Figure 19) 23. Apply fleece edger to the cut edges of the splint. 24. Affix velco strips. 25. Apply strap material 26. Splint is complete.

16
Illustrations
Figure 1. Stockinette, Zip Stick, IP joint line marked volarly, foam padding to thumb and ulnar head
Figures 2 & 3. Cut into cuff of thumb sleeve, foam padding, Zip Stick
Figures 4 & 5. Creation and placement of reinforcing strip

17
Figure 6. Begin roll at ulnar side of wrist. Unroll in direction of the arrow. Complete one loop.
Figures 7 & 8. In next loop, angle up to the thumb, cut into the tape to permit fit through web space
Figures 9 & 10. Circle the thumb. Lay the edges of the cut down on either side of the web space. Cut into tape again to prepare for second pass through web space

18
Figure 11. Before the second loop of the thumb, fold thumb sleeve down over the edge of cast material, permitting the tape to come through the cut that you made in the thumb sleeve. Secure the folded cuff with the second loop of cast material around the thumb
Figure 12. After completing second loop of the thumb, create two loops at the distal metacarpal level. Again, cut into the tape, as shown, to permit fit through web space. Lay the cut edges of the tape (V’s) down on either side of the web space.
Figure 13. Complete second loop around distal metacarpals level, including cut for web space.

19
Figure 15. Cut tape at desired length. Mark distal edge of splint
Figure 14. Continue down forearm, overlapping by about 2/3
Figure 16. Mark cutting line on dorsal aspect of the forearm. Mark distal edge of the splint

20
Figure 17 & 18. Cut along cutting line, over Zip Stick. Remove splint from hand.
Figure 19. Trim to desired shape, place sticky-back, hook Velcro tabs. Fleece edge as described in the wrist splint section.

21
Delta Cast Elbow Shell
1. Gown to protect patient’s clothing. 2. Cut desired length of 3” Terry-Net sleeve. Snip small hole in sleeve for the
thumb. Leave at least 4” between the hole and the end of the sleeve. 3. Use Surgitube thumb sleeve to protect the patient’s thumb from the resin
if desired. 4. Slip sleeve on patient’s arm. 5. Place foam as shown to ulnar head, olecranon, medial/lateral epicondyle.
(Figures 2-4) 6. Place Zip Stick anteriorly as shown. (Figure 2) 7. Open a roll of 3” BSN Delta Cast Polyester Cast Tape. 8. Create a 3-4 layer posterior strut. (Figure 5) 9. Submerge roll of cast material in water. Do not squeeze. Remove and
gently blot on towel. 10. Begin to roll cast at the proximal end. (Figure 6) 11. Overlap about 50%. 12. As you approach the elbow joint (positioned at 90°), be sure to debulk
the cast tape by cutting into it from both sides in the spot where it crossed the cutting stick. If you do not do this, too much cast material will be layered in this area and you will not be able to cut it off. (Figures 7-10)
13. Start a new roll of cast tape when the first one runs out. 14. Once you are past the bend of the elbow, proceed normally with 50%
overlap. (Figure 11) 15. Wrap all the way down to the level of the metacarpal heads, cutting into
the tape as needed to accommodate the thumb (same technique that was used for the wrist splint). (Figures 12-13)
16. When splint is complete, cut tape and discard excess portion of rolled cast tape.
17. Shape splint as desired. 18. Rub surface of material with wet gloves. 19. Allow material to dry and set. 20. Remove gloves. 21. Using a Sharpie® draw shape of splint and cutting line. (Figure 16) 22. Cut along cutting line. (Figures 16-17) 23. Take great care to stay on the cutting stick and be careful at the antecubital
fossa. 24. Remove splint. (Figure 18) 25. Trim distal and proximal edges in same fashion as wrist splint and thumb
spica and shape the anterior opening. We recommend creating a corner at the bend in the elbow (See Finishing Pictures).
26. Place sticky-back Velcro tabs. 27. Apply fleece edger. See special tips in the Illustrations section below. 28. Apply strap straps.

22
Illustrations
Figure 1. Prepare foam pieces for elbow splint. Left to Right: ulnar head, lateral elbow, medial elbow, posterior elbow
Figures 2, 3 & 4. Foam padding at ulnar head, olecranon, medial epicondyle, lateral epicondyle.
Figure 2. Stockinette sleeve with small hole for thumb, Zip Stick placed anteriorly.
23
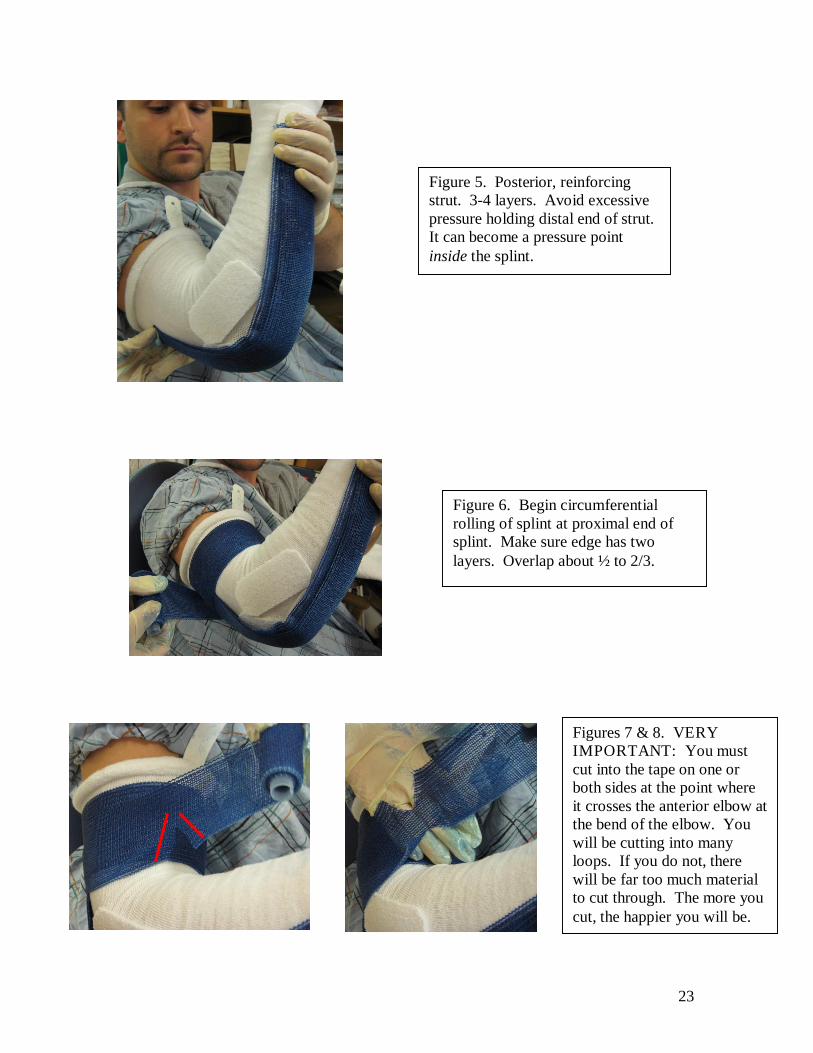
Figure 5. Posterior, reinforcing strut. 3-4 layers. Avoid excessive pressure holding distal end of strut. It can become a pressure point inside the splint.
Figure 6. Begin circumferential rolling of splint at proximal end of splint. Make sure edge has two layers. Overlap about ½ to 2/3.
Figures 7 & 8. VERY IMPORTANT: You must cut into the tape on one or both sides at the point where it crosses the anterior elbow at the bend of the elbow. You will be cutting into many loops. If you do not, there will be far too much material to cut through. The more you cut, the happier you will be.

24
Figures 9 & 10. More views of debulking cuts. Material splays over cutting strip.
Figure 11. Continue rolling in standard fashion toward the hand. Overlapping ½ to 2/3. Avoid too much material over cutting stick!
Figures 12 & 13. Two loops around the metacarpal level of the hand, cutting into the tape to accommodate the web space. This is exactly the same technique as was used for the distal end of the wrist splint.

25
Figures 14 & 15. Cut tape when splint is complete. Discard excess. Shape as needed. Rub entire splint with wet gloves.
Figure 17. Exercise great care at the antecubital fossa.
Figure 16. Draw cutting line with Sharpie and cut splint.

26
Figure 18. Remove splint from patient once cut is complete. Draw preferred shape of splint with a sharpie and cut final shape with black and gold scissors. This is done is exactly the same fashion as the thumb spica and wrist splint.
Figures below: special tips for fleece edging elbow splint. Begin edging at corner formed at the bend in the elbow. Cut into the end of the fleece tape and apply as shown. Continue edging as usual. End at opposite crease and finish with similar fishtail split. Then start edging in the other direction in the same manner. Further reinforce the medial and lateral corners with an extra short piece of edging as shown. Apply sticky-back hook Velcro pieces as usual and apply straps.
Note 90° corner at the medial and lateral aspects at the bend in the elbow. Provides wide opening for don/doff.

27
Delta Cast Sugar Tong/Munster Splint
1. Gown to protect patient’s clothing. 2. Cut desired length of 3” Terry-Net sleeve. Snip small hole in sleeve for
the thumb. Leave at least 4” between the hole and the end of the sleeve. 3. Use Surgitube thumb sleeve to protect the patient’s thumb from the resin
if desired. (Figure 1) 4. Place 4-layer ring of 2” stockinette just proximal to metacarpal heads if
desired. This will loosen the fit of the cast around MCPs and ease don/doff. (Figure 1)
5. Slip stockinette sleeve on patient’s arm. 6. Place foam as shown to ulnar head and distal humerus. (Figures 2 & 3)) 7. Place Zip Stick anteriorly as shown. (Figure 4) 8. Open a roll of 2” BSN Delta Cast Polyester Cast Tape. 9. Create a 2-3 layer strut. (Figure 5) 10. Submerge roll of cast material in water. Do not squeeze. Remove and
gently blot on towel. 11. While patient holds reinforcing strut, create a figure-of-8 (x2) around the
elbow joint, with the cross at the antecubital fossa. (Figure 6) 12. Then begin spiral toward the hand. (Figures 7 & 8) 13. Overlap about 2/3. 14. Start second roll when first roll runs out. This will be a 3” roll of tape.
(Figures 9 & 10) 15. As you approach the hand, cut into the tape to accommodate the thumb
(same technique as used in the wrist splint and the posterior elbow shell). (Figures 11-13)
16. When splint is complete, cut tape and discard excess portion of rolled cast tape. (Figure 14)
17. Shape splint as desired. 18. Rub surface of material with wet gloves. 19. Allow material to dry and set. 20. Remove gloves. 21. Using a Sharpie® draw shape of splint and cutting line. (Figure 15 & 16) 22. Cut along cutting line. (Figure 17) 23. Take great care to stay on the cutting stick and be careful at the antecubital
fossa. 24. Remove splint. (Figure 18) 25. Trim edges of the splint to create final shape. (Figures 19-28) 26. Place sticky-back Velcro tabs. (Figure 29) 27. Apply fleece edger. (Figures 30-35) 28. Apply straps

28
Figure 1. Prepare and protect hand.
Figure 3. Distal humeral foam
Figure 2. Sleeve and foam.
Figure 4. Insert Zip Stick. Mark base of thumb/radiocarpal joint
Figure 5. Place reinforcing strut.
Figure 6. Create 2-layer figure-of-8. Cross at antecubital fossa. See schematic on last page.
Figure 7. Begin spiral toward hand. Overlap 2/3.

29
Figure 8. Continue toward hand. Figure 9. End of first roll of cast tape.
Figure 10. Begin 3” roll. Figure 11. Cut tape to accommodate thumb
Figures 12 & 13. Cutting tape to accommodate thumb.

30
Figure 14. Rolling is done.
Figure 15. Draw outline final splint.
Figure 16. Draw edges of splint. Figure 17. Cut along cutting line and stick.
Figure 18. Cutting is complete. Carefully remove from patient.
Figure 19. Trim and shape.

31
Figures 20-28 (below) Trim and shape splint edges.
Radial Opening
Thumb Opening Metacarpal Head
Opening
Metacarpal Head Opening
Olecranon Opening Final Shape

32
Figure 29. Apply sticky back hook Velcro tabs for straps. Apply to dorsal side.
Figures 30-35 (below) Apply fleece edger.
Olecranon Opening Metacarpal Head Opening

33
Splint is DONE!

34
Schematic of Figure-of-8 at elbow.