Embed Size (px)
Citation preview
Dell Wyse TCX SuiteVersion 7.2— Administrator’s Guide
Notes, cautions, and warnings
NOTE: A NOTE indicates important information that helps you make better use of your product.
CAUTION: A CAUTION indicates either potential damage to hardware or loss of data and tells you how to avoid the problem.
WARNING: A WARNING indicates a potential for property damage, personal injury, or death.
© 2017 – 2018 Dell Inc. or its subsidiaries. All rights reserved. Dell, EMC, and other trademarks are trademarks of Dell Inc. or its subsidiaries. Other trademarks may be trademarks of their respective owners.
2017 - 02
Rev. A02
Contents
1 Introduction....................................................................................................................................................5Technical Support.............................................................................................................................................................. 5New features...................................................................................................................................................................... 5Support information...........................................................................................................................................................6
Supported client environments.................................................................................................................................. 6Supported server OS and TCX 7.3 component details............................................................................................6Supported protocols.................................................................................................................................................... 8Supported browsers.................................................................................................................................................... 8Multimedia support details for RDP 6.0, 7.1, 8.0, 8.1, and 10....................................................................................8Flash support details for flash acceleration and flash redirection.......................................................................... 9TCX 7.3 USB redirection............................................................................................................................................ 10
2 Configuring and Using TCX Flash..................................................................................................................11Configuring the TCX Flash Client Software................................................................................................................... 11Configuring the TCX Flash Server Software.................................................................................................................12Using TCX Flash Parameters in INI Files........................................................................................................................15
3 Configuring and Using TCX Multi-display..................................................................................................... 16Configuring the TCX Multi-display Server Software....................................................................................................16Using TCX multi-display parameters in INI Files............................................................................................................18
4 Configuring and Using TCX Multimedia........................................................................................................ 21Configuring TCX Multimedia Server Software..............................................................................................................21Configuring TCX Multimedia Client Software.............................................................................................................. 23Using TCX Multimedia Software....................................................................................................................................23
Using URL Redirection on Wyse Cloud Clients Running Wyse ThinOS.............................................................. 23Enabling Multicast Support for Windows Media Content.................................................................................... 26
5 Configuring and Using TCX Rich Sound....................................................................................................... 27Configuring TCX Rich Sound Server Software............................................................................................................ 27Configuring the TCX Rich Sound Client Software.......................................................................................................28
6 Configuring and Using TCX USB Virtualizer.................................................................................................29Required Settings for TCX USB Virtualizer Use with Wyse ThinOS......................................................................... 29Secure Device Unlocking for Non-Administrator Users..............................................................................................29Redirecting USB Devices to an Off State Virtual Desktop......................................................................................... 30Allocation of 26 Drive letters per session......................................................................................................................30Configuring TCX USB Virtualizer Server Software..................................................................................................... 30
How to read the device Hardware ID...................................................................................................................... 30Configuring TCX USB Virtualizer Server Software using UI................................................................................ 30Configuring the WAN Acceleration for USB devices............................................................................................. 31Configuring TCX USB Virtualizer Server Software using Active Directory........................................................ 32
Configuring the TCX USB Virtualizer Client Software................................................................................................ 37
Contents 3
Configuring the TCX USB redirection for Smartcards................................................................................................ 38
7 Using TCX Monitor...................................................................................................................................... 39
8 Troubleshooting............................................................................................................................................41Stopping, Starting, and Verifying TCX Suite Services................................................................................................. 41Using Event Viewer for Server Troubleshooting...........................................................................................................41TCX Troubleshooting tips.................................................................................................................................................41Troubleshooting for Smartcards ....................................................................................................................................48
4 Contents
IntroductionDell Wyse TCX Suite is a single software solution that provides the benefits of cloud client computing. The supported environments for Dell Wyse TCX Suite are Microsoft Remote Desktop Services, Citrix XenApp, Citrix XenDesktop, Teradici, and VMware Horizon View. The Collaborative Processing Architecture (CPA) used in Dell Wyse TCX divides the workload between the server and Plug-n-Play USB devices. TCX Suite uses the established software protocols to provide breakthrough multimedia and audio technology for cloud client computing environments.
TCX Suite enables rich flash playback, multiple monitors awareness, rich multimedia playback, high-quality bidirectional audio capabilities, and seamless USB device access for cloud clients.
TCX Suite provides the following features:
• TCX Flash Acceleration and TCX Flash Redirection—Enhances the performance of the Flash video content in a remote computing environment.
• TCX Multidisplay—Provides productivity-enhancing advantages for cloud clients with multiple monitors by using virtual desktops.
• TCX Multimedia—Supports enhanced playback of MPEG, WAV, WMV, H.264, and other multimedia file formats. The software includes both the server and the client components that redirect multimedia processing tasks between the client and server for a rich user experience.
• TCX Rich Sound—Provides bidirectional audio capabilities for virtual desktops and applications and supports sound recording and playback applications. It supports zero-compromise deployment.
• TCX USB Virtualizer—Makes the USB devices attached to thin clients or endpoints visible to the virtual desktops and applications. It removes any dependencies on limited local device drivers for a broad range of USB-based printers, scanners, storage devices, Palmtop, BlackBerry, Pocket PC handhelds, HID devices, Webcams, headsets, iPhone, credit card machines, and smart cards.
• TCX Monitor—Helps you to efficiently identify the system state for proper functioning of USB and Flash Redirection modules.
Topics:
• Technical Support
• New features
• Support information
Technical SupportTo access the technical resources self-service portal, knowledge base, software downloads, registration, warranty extensions/ RMAs, reference manuals, and so on, visit www.dell.com/wyse/support .For Customer Support, visit www.dell.com/support/contents/us/en/19/article/Contact-Information/International-Support-Services/international-contact-center?ref=contactus , and phone numbers for Basic and Pro Support are available at www.dell.com/supportcontacts .
NOTE: Before proceeding, verify if your product has a Dell Service Tag. See www.dell.com/support/contents/us/en/19/article/Product-Support/Dell-Subsidiaries/wyse for more information.
New featuresDell Wyse TCX release supports the following new features:
• Support for Windows 10 LTSB 2016 and Windows 10 RS2 (Client and Server) and Windows Server 2016.
1
Introduction 5
• Support for Latitude 3480 mobile thin client and Latitude 5280 mobile thin client.
Support informationThis section provides information about supported client environments; supported server operating systems, and TCX 7.3 component details; and supported remote desktop protocols.
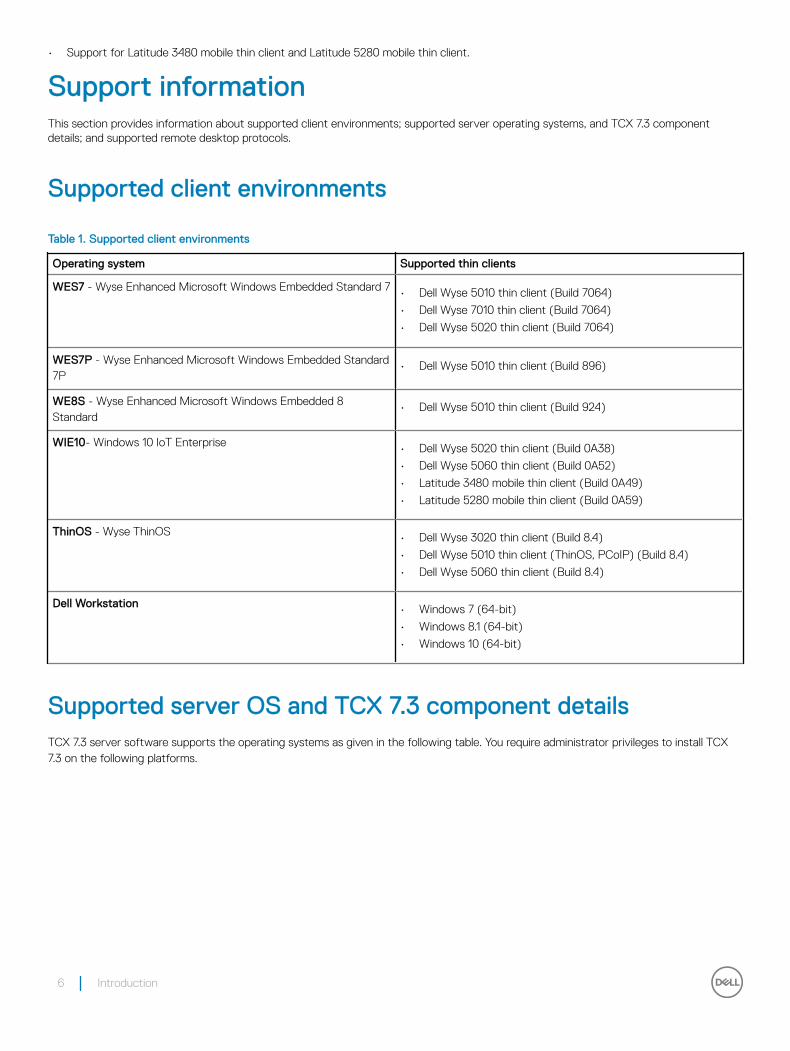
Supported client environments
Table 1. Supported client environments
Operating system Supported thin clients
WES7 - Wyse Enhanced Microsoft Windows Embedded Standard 7 • Dell Wyse 5010 thin client (Build 7064)
• Dell Wyse 7010 thin client (Build 7064)
• Dell Wyse 5020 thin client (Build 7064)
WES7P - Wyse Enhanced Microsoft Windows Embedded Standard 7P
• Dell Wyse 5010 thin client (Build 896)
WE8S - Wyse Enhanced Microsoft Windows Embedded 8 Standard
• Dell Wyse 5010 thin client (Build 924)
WIE10- Windows 10 IoT Enterprise • Dell Wyse 5020 thin client (Build 0A38)
• Dell Wyse 5060 thin client (Build 0A52)
• Latitude 3480 mobile thin client (Build 0A49)
• Latitude 5280 mobile thin client (Build 0A59)
ThinOS - Wyse ThinOS • Dell Wyse 3020 thin client (Build 8.4)
• Dell Wyse 5010 thin client (ThinOS, PCoIP) (Build 8.4)
• Dell Wyse 5060 thin client (Build 8.4)
Dell Workstation • Windows 7 (64-bit)
• Windows 8.1 (64-bit)
• Windows 10 (64-bit)
Supported server OS and TCX 7.3 component detailsTCX 7.3 server software supports the operating systems as given in the following table. You require administrator privileges to install TCX 7.3 on the following platforms.
6 Introduction
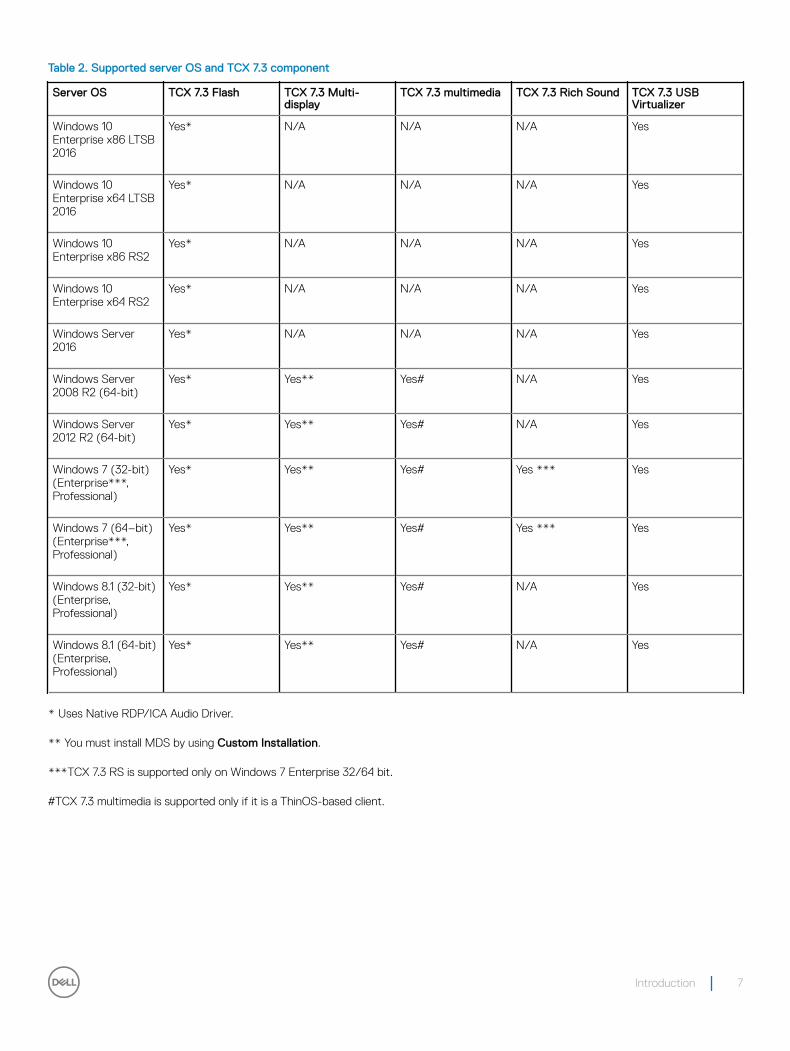
Table 2. Supported server OS and TCX 7.3 component
Server OS TCX 7.3 Flash TCX 7.3 Multi-display
TCX 7.3 multimedia TCX 7.3 Rich Sound TCX 7.3 USB Virtualizer
Windows 10 Enterprise x86 LTSB 2016
Yes* N/A N/A N/A Yes
Windows 10 Enterprise x64 LTSB 2016
Yes* N/A N/A N/A Yes
Windows 10 Enterprise x86 RS2
Yes* N/A N/A N/A Yes
Windows 10 Enterprise x64 RS2
Yes* N/A N/A N/A Yes
Windows Server 2016
Yes* N/A N/A N/A Yes
Windows Server 2008 R2 (64-bit)
Yes* Yes** Yes# N/A Yes
Windows Server 2012 R2 (64-bit)
Yes* Yes** Yes# N/A Yes
Windows 7 (32-bit) (Enterprise***, Professional)
Yes* Yes** Yes# Yes *** Yes
Windows 7 (64–bit) (Enterprise***, Professional)
Yes* Yes** Yes# Yes *** Yes
Windows 8.1 (32-bit) (Enterprise, Professional)
Yes* Yes** Yes# N/A Yes
Windows 8.1 (64-bit) (Enterprise, Professional)
Yes* Yes** Yes# N/A Yes
* Uses Native RDP/ICA Audio Driver.
** You must install MDS by using Custom Installation.
***TCX 7.3 RS is supported only on Windows 7 Enterprise 32/64 bit.
#TCX 7.3 multimedia is supported only if it is a ThinOS-based client.
Introduction 7
NOTE:
• H.264 is supported only over Teradici PCoIP.
• Windows Remote Desktop Connection must be enabled.
• Windows Terminal Services must be installed and enabled.
• Multimedia Redirection is not supported on 64–bit clients.
• Flash Acceleration is not supported on 64–bit clients.
• IE10 and IE11 is not supported for Flash Acceleration.
• Flash Acceleration supports Firefox.
• Flash Redirection is supported on 32–bit browsers.
• Flash Redirection over secure gateway such as, Netscalar is supported on Windows clients but it is not supported on ThinOS and Linux clients.
• TCX 7.3 Session Level Restriction with the supported USB class of devices include HID class, scanner, printer class, COM port, disk drive, smart readers, and WPD.
Supported protocolsTCX 7.3 supports the following remote desktop protocols:
• Remote Desktop Protocol
• ICA with XenDesktop 7.15
• ICA with XenApp 6.5 and 7.15
• VMWare View 7.2 (RDP and PCoIP)
• PCoIP Teradici Client 1.9 and Server 2.6.1
Supported browsersThe following are the supported browsers for TCX 7.3:
• Internet Explorer 32–bit version 11.0.9600.18792
• Mozilla Firefox 32–bit version 55.0.3
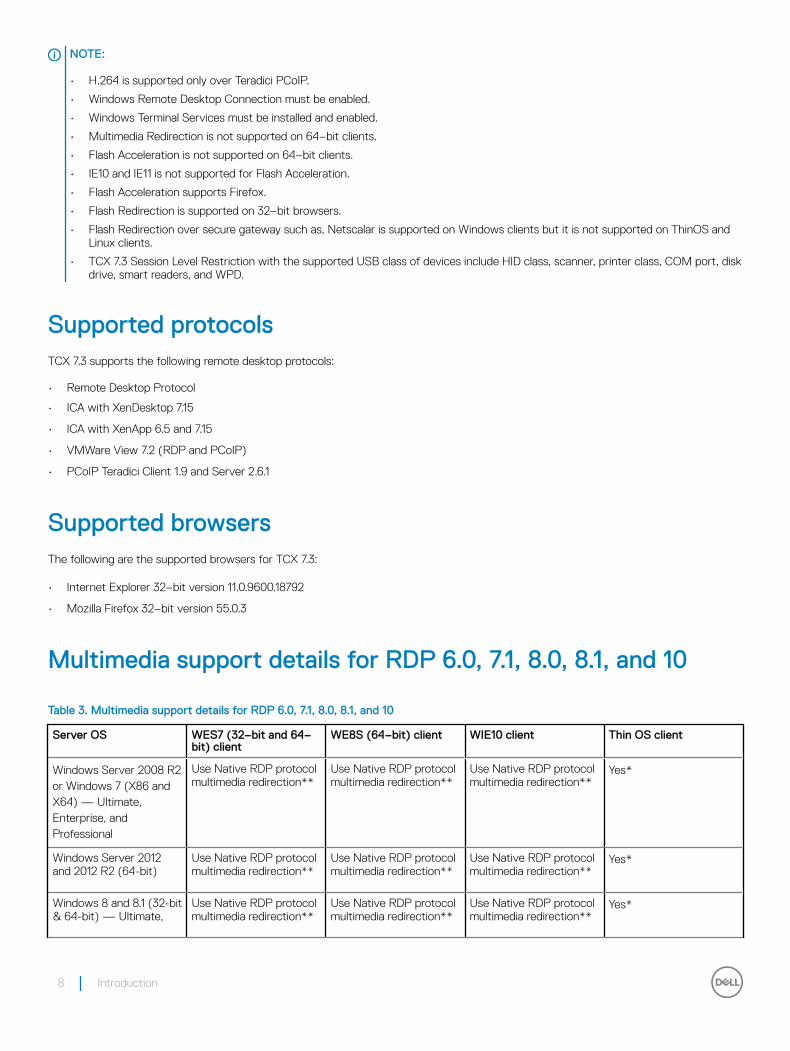
Multimedia support details for RDP 6.0, 7.1, 8.0, 8.1, and 10
Table 3. Multimedia support details for RDP 6.0, 7.1, 8.0, 8.1, and 10
Server OS WES7 (32–bit and 64–bit) client
WE8S (64–bit) client WIE10 client Thin OS client
Windows Server 2008 R2 or Windows 7 (X86 and X64) — Ultimate, Enterprise, and Professional
Use Native RDP protocol multimedia redirection**
Use Native RDP protocol multimedia redirection**
Use Native RDP protocol multimedia redirection**
Yes*
Windows Server 2012 and 2012 R2 (64-bit)
Use Native RDP protocol multimedia redirection**
Use Native RDP protocol multimedia redirection**
Use Native RDP protocol multimedia redirection**
Yes*
Windows 8 and 8.1 (32-bit & 64-bit) — Ultimate,
Use Native RDP protocol multimedia redirection**
Use Native RDP protocol multimedia redirection**
Use Native RDP protocol multimedia redirection**
Yes*
8 Introduction
Server OS WES7 (32–bit and 64–bit) client
WE8S (64–bit) client WIE10 client Thin OS client
Enterprise and Professional
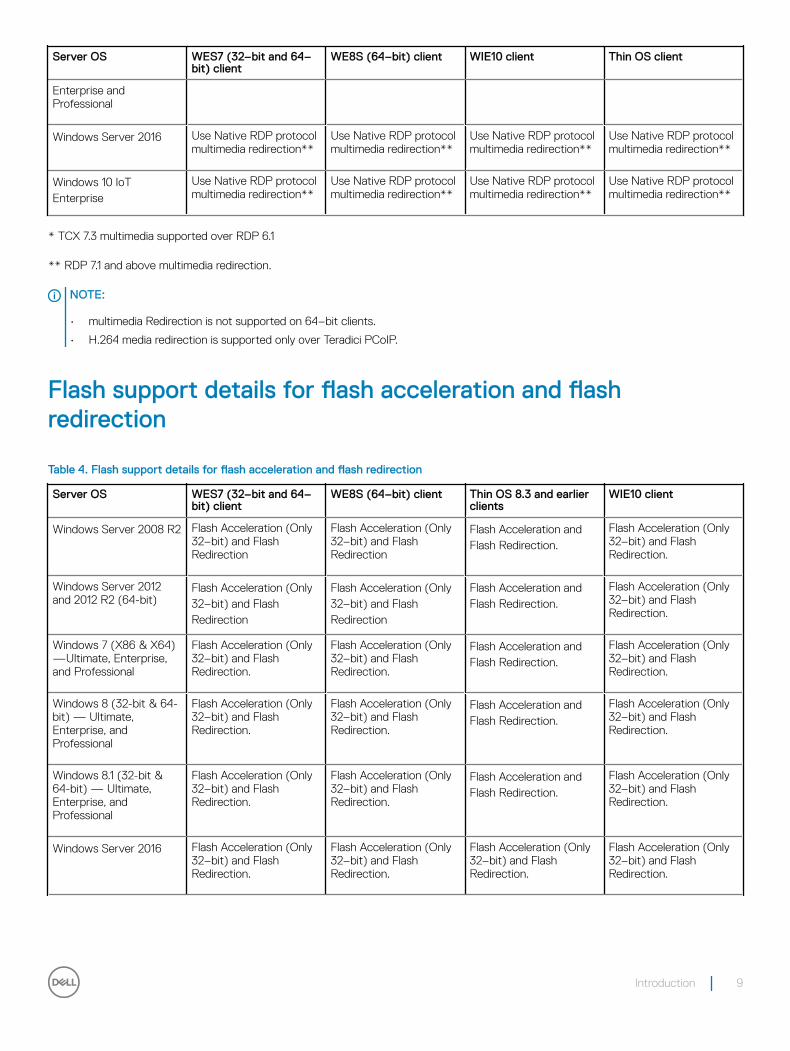
Windows Server 2016 Use Native RDP protocol multimedia redirection**
Use Native RDP protocol multimedia redirection**
Use Native RDP protocol multimedia redirection**
Use Native RDP protocol multimedia redirection**
Windows 10 IoT Enterprise
Use Native RDP protocol multimedia redirection**
Use Native RDP protocol multimedia redirection**
Use Native RDP protocol multimedia redirection**
Use Native RDP protocol multimedia redirection**
* TCX 7.3 multimedia supported over RDP 6.1
** RDP 7.1 and above multimedia redirection.
NOTE:
• multimedia Redirection is not supported on 64–bit clients.
• H.264 media redirection is supported only over Teradici PCoIP.
Flash support details for flash acceleration and flash redirection
Table 4. Flash support details for flash acceleration and flash redirection
Server OS WES7 (32–bit and 64–bit) client
WE8S (64–bit) client Thin OS 8.3 and earlier clients
WIE10 client
Windows Server 2008 R2 Flash Acceleration (Only 32–bit) and Flash Redirection
Flash Acceleration (Only 32–bit) and Flash Redirection
Flash Acceleration and Flash Redirection.
Flash Acceleration (Only 32–bit) and Flash Redirection.
Windows Server 2012 and 2012 R2 (64-bit)
Flash Acceleration (Only 32–bit) and Flash Redirection
Flash Acceleration (Only 32–bit) and Flash Redirection
Flash Acceleration and Flash Redirection.
Flash Acceleration (Only 32–bit) and Flash Redirection.
Windows 7 (X86 & X64) —Ultimate, Enterprise, and Professional
Flash Acceleration (Only 32–bit) and Flash Redirection.
Flash Acceleration (Only 32–bit) and Flash Redirection.
Flash Acceleration and Flash Redirection.
Flash Acceleration (Only 32–bit) and Flash Redirection.
Windows 8 (32-bit & 64-bit) — Ultimate, Enterprise, and Professional
Flash Acceleration (Only 32–bit) and Flash Redirection.
Flash Acceleration (Only 32–bit) and Flash Redirection.
Flash Acceleration and Flash Redirection.
Flash Acceleration (Only 32–bit) and Flash Redirection.
Windows 8.1 (32-bit & 64-bit) — Ultimate, Enterprise, and Professional
Flash Acceleration (Only 32–bit) and Flash Redirection.
Flash Acceleration (Only 32–bit) and Flash Redirection.
Flash Acceleration and Flash Redirection.
Flash Acceleration (Only 32–bit) and Flash Redirection.
Windows Server 2016 Flash Acceleration (Only 32–bit) and Flash Redirection.
Flash Acceleration (Only 32–bit) and Flash Redirection.
Flash Acceleration (Only 32–bit) and Flash Redirection.
Flash Acceleration (Only 32–bit) and Flash Redirection.
Introduction 9
Server OS WES7 (32–bit and 64–bit) client
WE8S (64–bit) client Thin OS 8.3 and earlier clients
WIE10 client
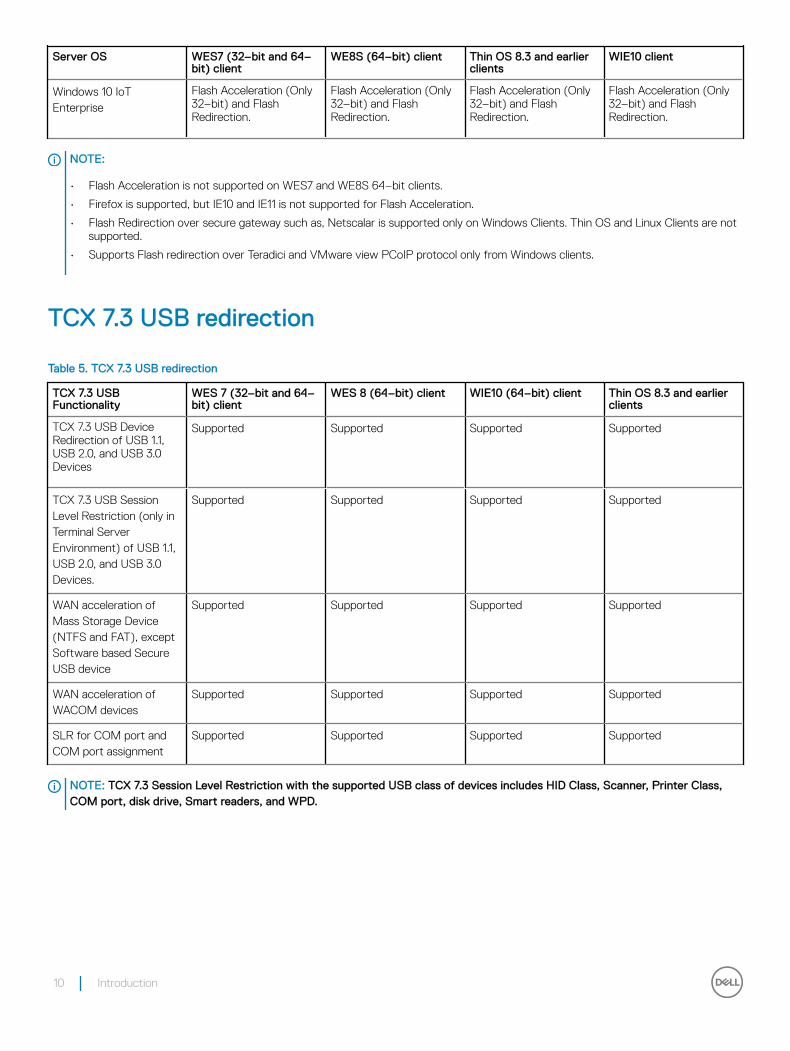
Windows 10 IoT Enterprise
Flash Acceleration (Only 32–bit) and Flash Redirection.
Flash Acceleration (Only 32–bit) and Flash Redirection.
Flash Acceleration (Only 32–bit) and Flash Redirection.
Flash Acceleration (Only 32–bit) and Flash Redirection.
NOTE:
• Flash Acceleration is not supported on WES7 and WE8S 64–bit clients.
• Firefox is supported, but IE10 and IE11 is not supported for Flash Acceleration.
• Flash Redirection over secure gateway such as, Netscalar is supported only on Windows Clients. Thin OS and Linux Clients are not supported.
• Supports Flash redirection over Teradici and VMware view PCoIP protocol only from Windows clients.
TCX 7.3 USB redirection
Table 5. TCX 7.3 USB redirection
TCX 7.3 USB Functionality
WES 7 (32–bit and 64–bit) client
WES 8 (64–bit) client WIE10 (64–bit) client Thin OS 8.3 and earlier clients
TCX 7.3 USB Device Redirection of USB 1.1, USB 2.0, and USB 3.0 Devices
Supported Supported Supported Supported
TCX 7.3 USB Session Level Restriction (only in Terminal Server Environment) of USB 1.1, USB 2.0, and USB 3.0 Devices.
Supported Supported Supported Supported
WAN acceleration of Mass Storage Device (NTFS and FAT), except Software based Secure USB device
Supported Supported Supported Supported
WAN acceleration of WACOM devices
Supported Supported Supported Supported
SLR for COM port and COM port assignment
Supported Supported Supported Supported
NOTE: TCX 7.3 Session Level Restriction with the supported USB class of devices includes HID Class, Scanner, Printer Class, COM port, disk drive, Smart readers, and WPD.
10 Introduction
Configuring and Using TCX Flash
TCX Flash Acceleration and TCX Flash Redirection are two mutually exclusive options supported in TCX Flash to enhance flash experience in a cloud computing environment. TCX Flash Acceleration uses server/datacenter CPU to decode and transcode to a jpeg image for rendering on the client. TCX Flash Acceleration uses the browser supported Adobe flash player at the server/datacenter
TCX Flash Redirection uses the client CPU to decode and render flash. TCX Flash Redirection uses the Adobe flash player plug-in that supports the NPAPI interface on the client. This section provides details on configuring the TCX flash module for improved flash experience while using Microsoft Internet Explorer and Mozilla Firefox in a cloud computing environment.
Supported browsers for Flash Acceleration and Redirection are:
• Microsoft Browser versions IE8 (32-bit) and later.
• Mozilla Firefox browser (32-bit ) version 12 and later.
• TCX supports Flash Redirection for 32-bit applications which uses embedded IE Web Browser to play Flash videos.
Other notable features of TCX Flash include:
• Automatic Discovery of Proxy Server using Proxy Auto-Configuration (PAC) file if the client is not connected to the Internet.
• Automatic fallback to TCX Flash Acceleration except for Applications which embed IE Web Browser if the client does not support TCX Flash Redirection, for ThinOS and Linux clients, or if the client has TCX Flash Version earlier than 5.0, or if the client does not have flash player installed.
• TCX Flash Redirection uses less server CPU cycles.
• TCX Flash Acceleration uses less client CPU cycles.
Topics:
• Configuring the TCX Flash Client Software
• Configuring the TCX Flash Server Software
• Using TCX Flash Parameters in INI Files
Configuring the TCX Flash Client SoftwareAlthough the software is enabled by default, you can further configure the available client settings for optimal performance using the TCX Suite Client Configuration Utility.Before modifying the client configuration, make sure you disable the File Based Write Filter.To configure the TCX Flash client software:
1 Launch the TCX Suite — Client Configuration utility from Start > Programs > Wyse > TCX Suite Client Configuration.
2 Click the General tab and on it click Logging.
The settings are similar to the Server Configuration settings. For details, see Step 3 of Configuring the TCX Flash Server Software.
3 Click the Flash tab of the Client Configuration Utility.
Select any of the following options:
• Proxy - This is the default setting. TCX Flash Client makes no effort to search for proxy server availability. This option helps the TCX Client to obtain the flash content from the web server quickly. If selected, this option and the client is not connected to the Internet, a user will not see flash playback.
• Automatically Detect Settings - TCX Flash Redirection Client will search for a proxy server if it is unable to obtain the flash content from the Web server directly. Discovery of a proxy server is done using a PAC file, so the administrator of the network
2
Configuring and Using TCX Flash 11
must configure the automatic discovery of a proxy server using the pac file method in the network. If this option is selected and the pac file discovery fails, then a user will not see flash playback. This search is a one time process that is for a given session this process will be done only once. Once a proxy server is discovered, the same proxy server will be used until the session is active.
• Use System Proxy Settings - If the administrator of the system has configured a client machine with a proxy setting, this proxy setting will be retrieved by the TCX Flash Redirection Client. If this option is selected and the client does not have a configured proxy setting, then the Flash content will not be fetched if the client is not connected to the Internet.
• Manual Proxy Configuration - If selected, the administrator of the system can input the proxy server and port number of the proxy server (both input fields are required). The input values for HTTP Proxy can be FQDN or IP address only.
Configuring the TCX Flash Server SoftwareAfter you install the TCX Flash component, you must first configure the IE and Firefox to support TCX Flash. To configure the browsers:
• Launch the IE browser, and click Tools > Manage Add-ons and enable the TFR Serve BHO Class option.
• Launch the Firefox browser and click the Add-ons icon to display all available extensions. Click the Enable button for Thin Client Extensions.
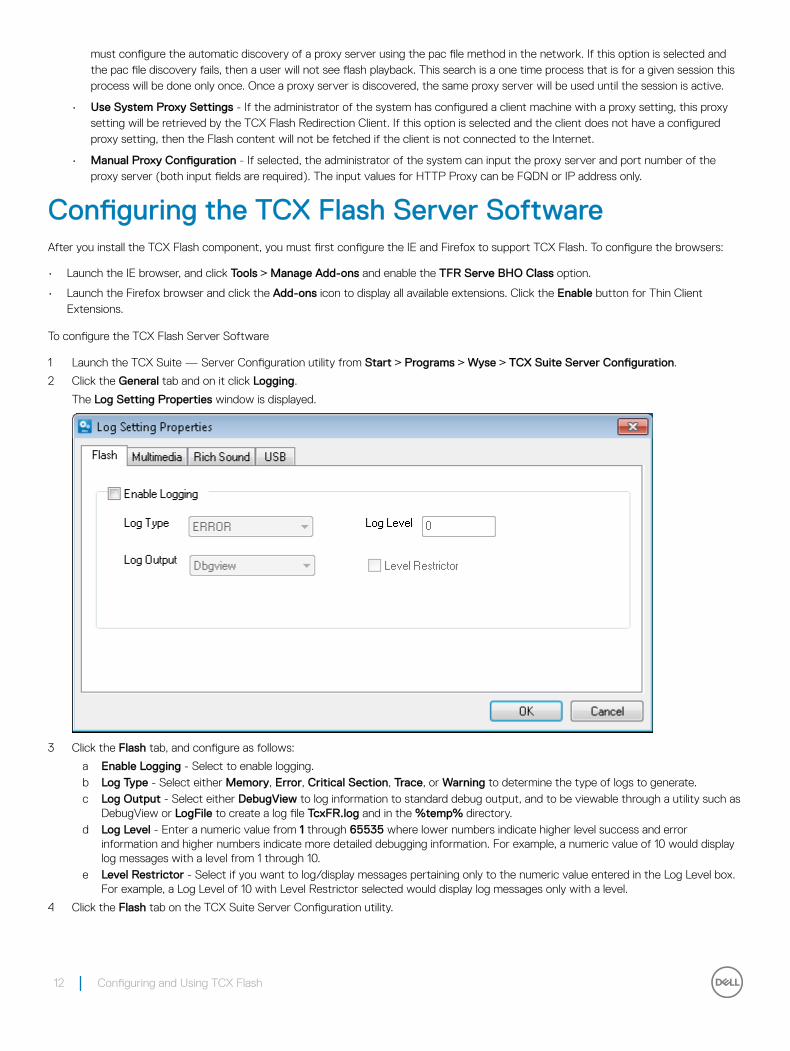
To configure the TCX Flash Server Software
1 Launch the TCX Suite — Server Configuration utility from Start > Programs > Wyse > TCX Suite Server Configuration.
2 Click the General tab and on it click Logging.
The Log Setting Properties window is displayed.
3 Click the Flash tab, and configure as follows:
a Enable Logging - Select to enable logging.b Log Type - Select either Memory, Error, Critical Section, Trace, or Warning to determine the type of logs to generate.c Log Output - Select either DebugView to log information to standard debug output, and to be viewable through a utility such as
DebugView or LogFile to create a log file TcxFR.log and in the %temp% directory.d Log Level - Enter a numeric value from 1 through 65535 where lower numbers indicate higher level success and error
information and higher numbers indicate more detailed debugging information. For example, a numeric value of 10 would display log messages with a level from 1 through 10.
e Level Restrictor - Select if you want to log/display messages pertaining only to the numeric value entered in the Log Level box. For example, a Log Level of 10 with Level Restrictor selected would display log messages only with a level.
4 Click the Flash tab on the TCX Suite Server Configuration utility.
12 Configuring and Using TCX Flash
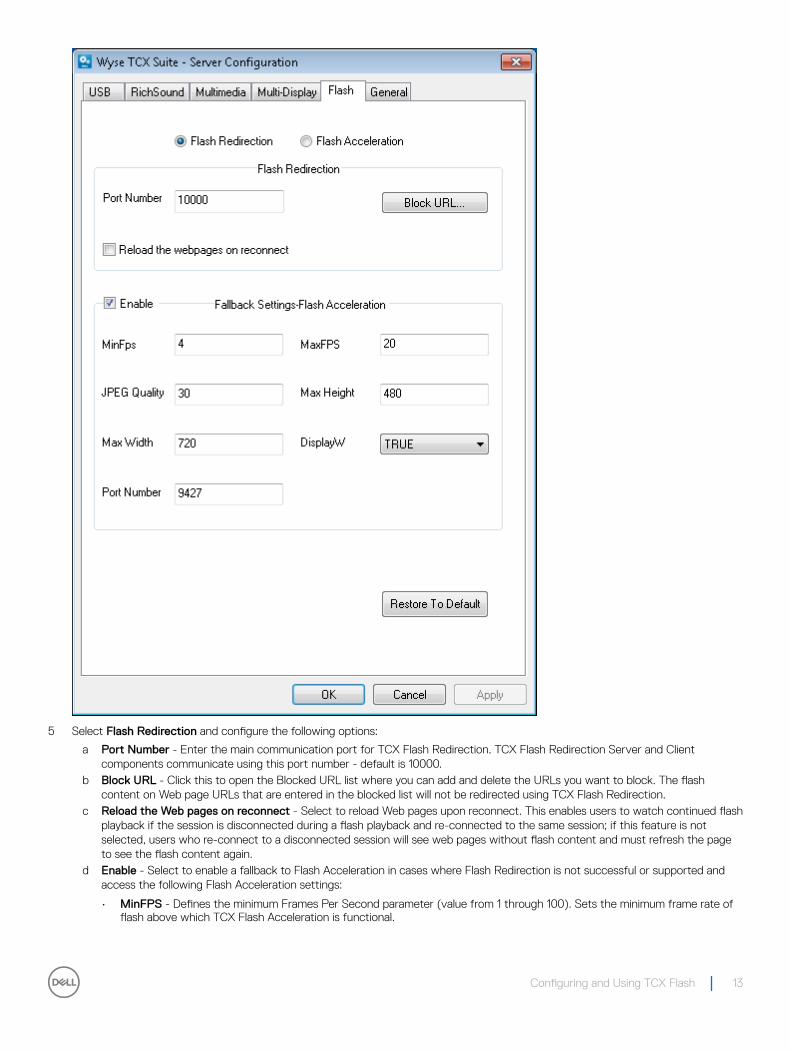
5 Select Flash Redirection and configure the following options:
a Port Number - Enter the main communication port for TCX Flash Redirection. TCX Flash Redirection Server and Client components communicate using this port number - default is 10000.
b Block URL - Click this to open the Blocked URL list where you can add and delete the URLs you want to block. The flash content on Web page URLs that are entered in the blocked list will not be redirected using TCX Flash Redirection.
c Reload the Web pages on reconnect - Select to reload Web pages upon reconnect. This enables users to watch continued flash playback if the session is disconnected during a flash playback and re-connected to the same session; if this feature is not selected, users who re-connect to a disconnected session will see web pages without flash content and must refresh the page to see the flash content again.
d Enable - Select to enable a fallback to Flash Acceleration in cases where Flash Redirection is not successful or supported and access the following Flash Acceleration settings:
• MinFPS - Defines the minimum Frames Per Second parameter (value from 1 through 100). Sets the minimum frame rate of flash above which TCX Flash Acceleration is functional.
Configuring and Using TCX Flash 13
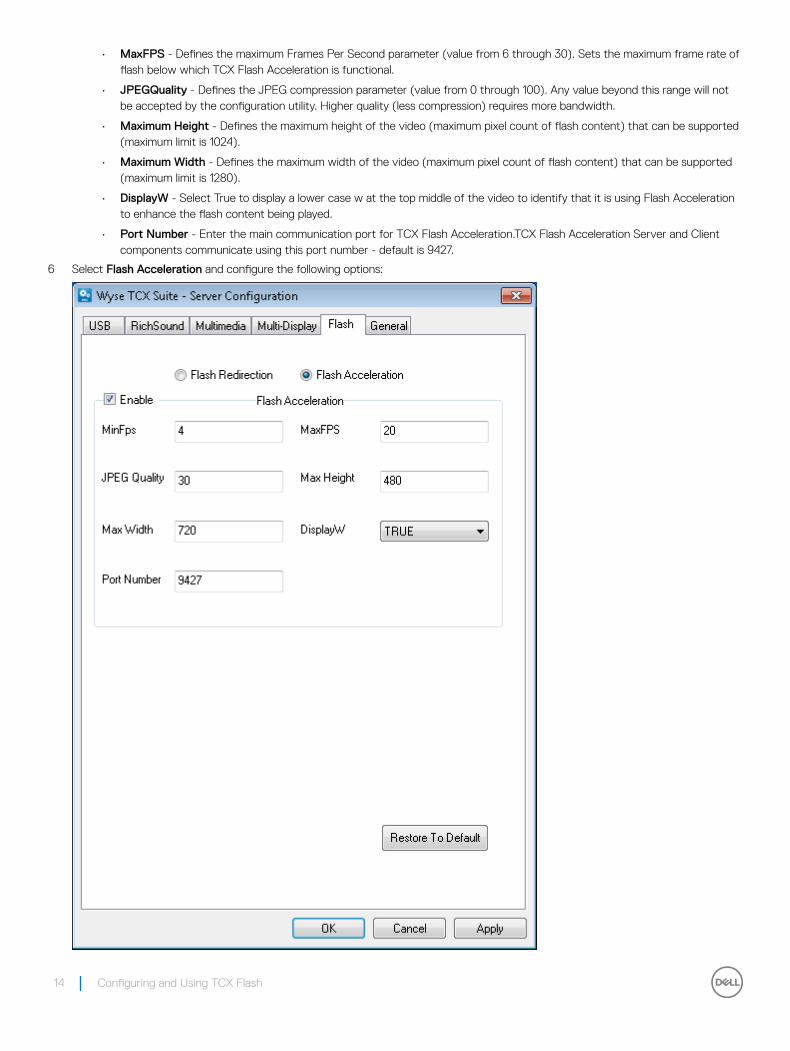
• MaxFPS - Defines the maximum Frames Per Second parameter (value from 6 through 30). Sets the maximum frame rate of flash below which TCX Flash Acceleration is functional.
• JPEGQuality - Defines the JPEG compression parameter (value from 0 through 100). Any value beyond this range will not be accepted by the configuration utility. Higher quality (less compression) requires more bandwidth.
• Maximum Height - Defines the maximum height of the video (maximum pixel count of flash content) that can be supported (maximum limit is 1024).
• Maximum Width - Defines the maximum width of the video (maximum pixel count of flash content) that can be supported (maximum limit is 1280).
• DisplayW - Select True to display a lower case w at the top middle of the video to identify that it is using Flash Acceleration to enhance the flash content being played.
• Port Number - Enter the main communication port for TCX Flash Acceleration.TCX Flash Acceleration Server and Client components communicate using this port number - default is 9427.
6 Select Flash Acceleration and configure the following options:
14 Configuring and Using TCX Flash
The options are similar to the Flash Redirection options. See step 5 for details.
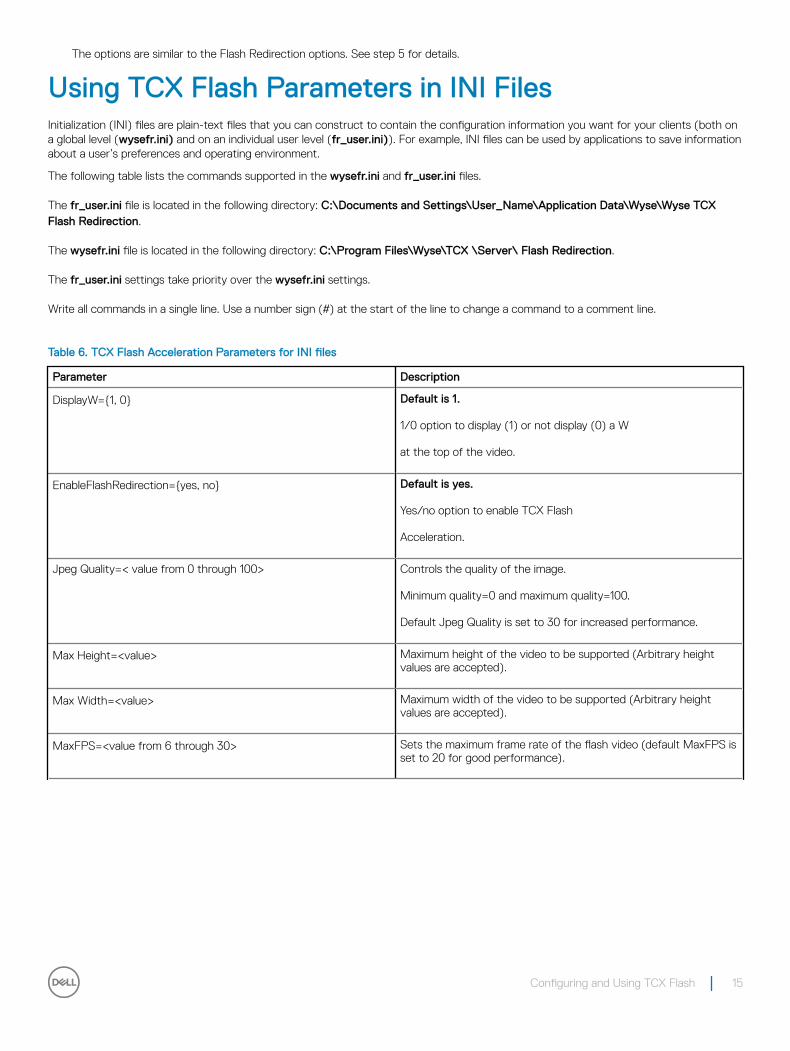
Using TCX Flash Parameters in INI FilesInitialization (INI) files are plain-text files that you can construct to contain the configuration information you want for your clients (both on a global level (wysefr.ini) and on an individual user level (fr_user.ini)). For example, INI files can be used by applications to save information about a user’s preferences and operating environment.
The following table lists the commands supported in the wysefr.ini and fr_user.ini files.
The fr_user.ini file is located in the following directory: C:\Documents and Settings\User_Name\Application Data\Wyse\Wyse TCX Flash Redirection.
The wysefr.ini file is located in the following directory: C:\Program Files\Wyse\TCX \Server\ Flash Redirection.
The fr_user.ini settings take priority over the wysefr.ini settings.
Write all commands in a single line. Use a number sign (#) at the start of the line to change a command to a comment line.
Table 6. TCX Flash Acceleration Parameters for INI files
Parameter Description
DisplayW={1, 0} Default is 1.
1/0 option to display (1) or not display (0) a W
at the top of the video.
EnableFlashRedirection={yes, no} Default is yes.
Yes/no option to enable TCX Flash
Acceleration.
Jpeg Quality=< value from 0 through 100> Controls the quality of the image.
Minimum quality=0 and maximum quality=100.
Default Jpeg Quality is set to 30 for increased performance.
Max Height=<value> Maximum height of the video to be supported (Arbitrary height values are accepted).
Max Width=<value> Maximum width of the video to be supported (Arbitrary height values are accepted).
MaxFPS=<value from 6 through 30> Sets the maximum frame rate of the flash video (default MaxFPS is set to 20 for good performance).
Configuring and Using TCX Flash 15
Configuring and Using TCX Multi-displayThe TCX Multi-display features enables your virtual desktops and applications to use multiple monitors. Using multiple monitors provides productivity enhancing advantages for cloud clients. The notable features of multi-display includes:
• Multi-monitor awareness capability of primary and non-primary monitors with a task bar on the primary monitor of Windows XP Professional and virtual desktops.
• Window maximization on the appropriate monitor.
• Dialog box and message box position control.
• Windows position memory where the feature remembers on which monitor an application window was last closed.
• Advanced monitor layout and application layout.
• If any application is added to an exclusion list, the multi display feature is not applicable.
• Ability to position the Windows Security dialog box and the Windows login screen on the primary monitor without making it span across multiple monitors. This feature is applicable only to Windows XP Professional desktops.
• When TCX Multi-display is running and you maximize an application window or configure for a full screen, the window is maximized or shown as a full screen on the monitor in which it is located. If the window spans across multiple displays, it is maximized only on the monitor that initially displayed the largest area of the window.
• Dialog boxes or popups that do not have a parent window are displayed in the middle of the farthest left or top monitor, which otherwise would be centered around the border between the two monitors.
• Dialog boxes or popups with parent monitors are displayed in the middle of the monitor where the parent window is located.
Topics:
• Configuring the TCX Multi-display Server Software
• Using TCX multi-display parameters in INI Files
Configuring the TCX Multi-display Server SoftwareThe TCX Multi-display service automatically starts along with the other services. You can further configure the available server settings for optimal performance.When you are using multiple monitors, you must set the screen resolution of each monitor to be the same.To configure the TCX Multi-display settings:
1 Launch the TCX Suite — Server Configuration utility from Start > Programs > Wyse > TCX Suite Server Configuration.
2 Click the Multi-Display tab and click the MultiDisplay Settings on this tab to display the Wyse TCX Multi-display options.
3
16 Configuring and Using TCX Multi-display
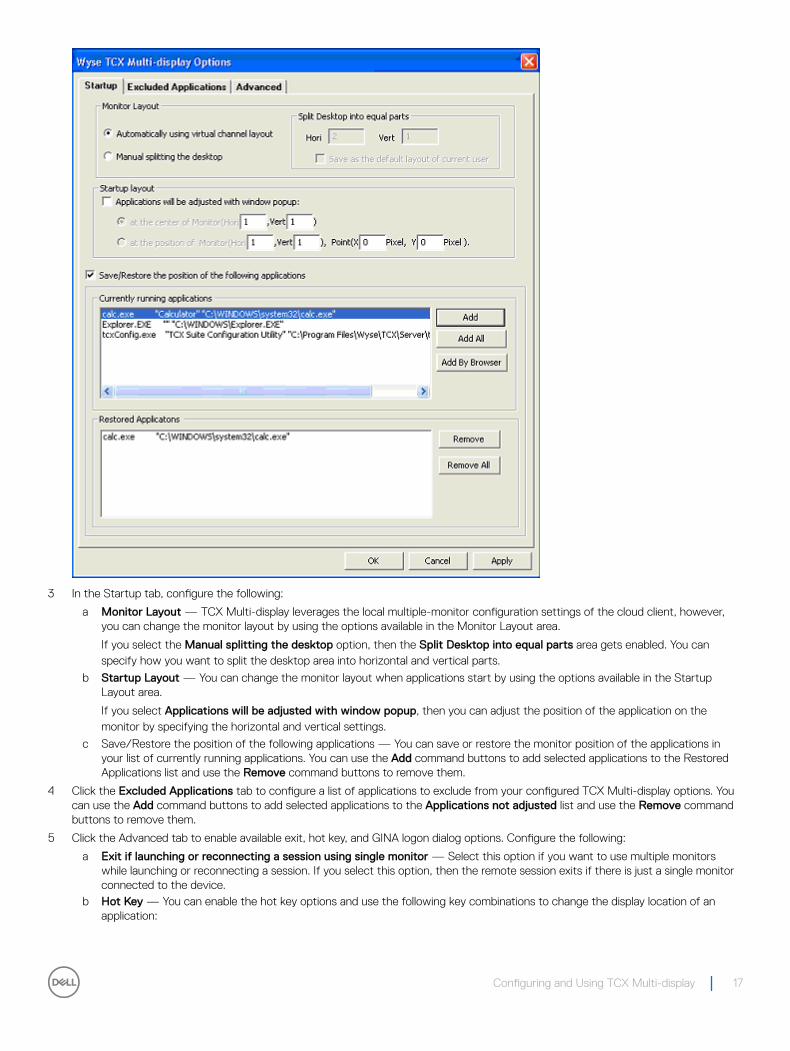
3 In the Startup tab, configure the following:
a Monitor Layout — TCX Multi-display leverages the local multiple-monitor configuration settings of the cloud client, however, you can change the monitor layout by using the options available in the Monitor Layout area.
If you select the Manual splitting the desktop option, then the Split Desktop into equal parts area gets enabled. You can specify how you want to split the desktop area into horizontal and vertical parts.
b Startup Layout — You can change the monitor layout when applications start by using the options available in the Startup Layout area.
If you select Applications will be adjusted with window popup, then you can adjust the position of the application on the monitor by specifying the horizontal and vertical settings.
c Save/Restore the position of the following applications — You can save or restore the monitor position of the applications in your list of currently running applications. You can use the Add command buttons to add selected applications to the Restored Applications list and use the Remove command buttons to remove them.
4 Click the Excluded Applications tab to configure a list of applications to exclude from your configured TCX Multi-display options. You can use the Add command buttons to add selected applications to the Applications not adjusted list and use the Remove command buttons to remove them.
5 Click the Advanced tab to enable available exit, hot key, and GINA logon dialog options. Configure the following:
a Exit if launching or reconnecting a session using single monitor — Select this option if you want to use multiple monitors while launching or reconnecting a session. If you select this option, then the remote session exits if there is just a single monitor connected to the device.
b Hot Key — You can enable the hot key options and use the following key combinations to change the display location of an application:
Configuring and Using TCX Multi-display 17
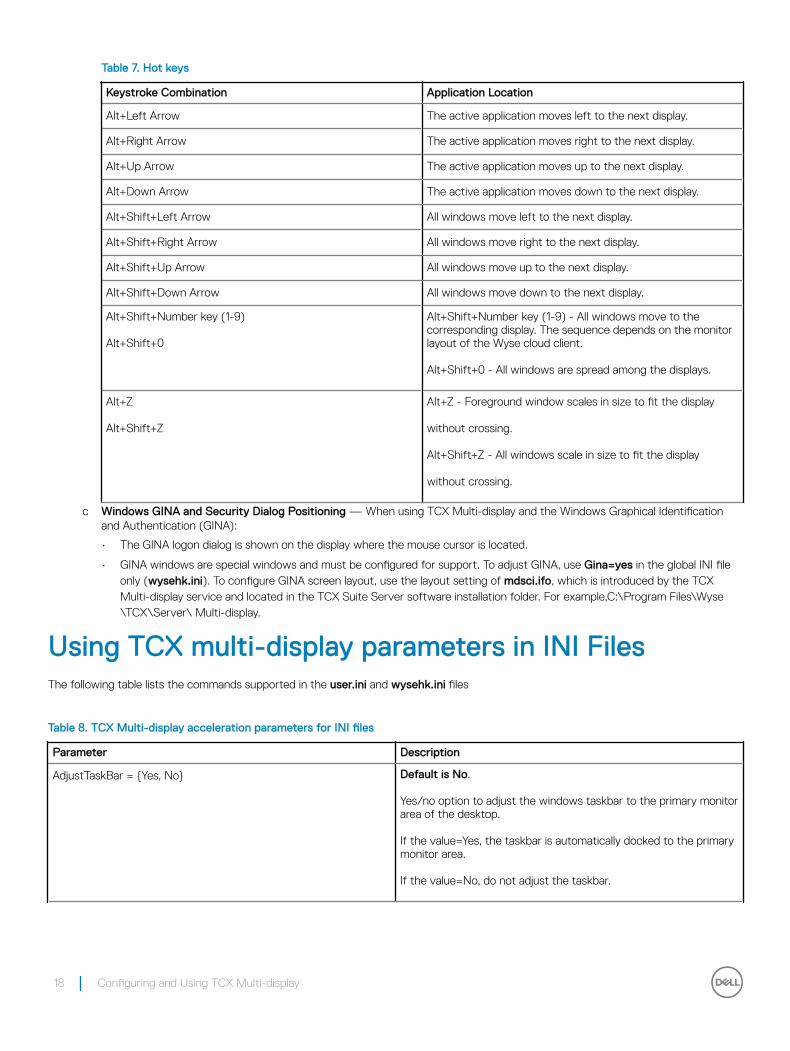
Table 7. Hot keys
Keystroke Combination Application Location
Alt+Left Arrow The active application moves left to the next display.
Alt+Right Arrow The active application moves right to the next display.
Alt+Up Arrow The active application moves up to the next display.
Alt+Down Arrow The active application moves down to the next display.
Alt+Shift+Left Arrow All windows move left to the next display.
Alt+Shift+Right Arrow All windows move right to the next display.
Alt+Shift+Up Arrow All windows move up to the next display.
Alt+Shift+Down Arrow All windows move down to the next display.
Alt+Shift+Number key (1-9)
Alt+Shift+0
Alt+Shift+Number key (1-9) - All windows move to the corresponding display. The sequence depends on the monitor layout of the Wyse cloud client.
Alt+Shift+0 - All windows are spread among the displays.
Alt+Z
Alt+Shift+Z
Alt+Z - Foreground window scales in size to fit the display
without crossing.
Alt+Shift+Z - All windows scale in size to fit the display
without crossing.
c Windows GINA and Security Dialog Positioning — When using TCX Multi-display and the Windows Graphical Identification and Authentication (GINA):
• The GINA logon dialog is shown on the display where the mouse cursor is located.
• GINA windows are special windows and must be configured for support. To adjust GINA, use Gina=yes in the global INI file only (wysehk.ini). To configure GINA screen layout, use the layout setting of mdsci.ifo, which is introduced by the TCX Multi-display service and located in the TCX Suite Server software installation folder. For example,C:\Program Files\Wyse\TCX\Server\ Multi-display.
Using TCX multi-display parameters in INI FilesThe following table lists the commands supported in the user.ini and wysehk.ini files
Table 8. TCX Multi-display acceleration parameters for INI files
Parameter Description
AdjustTaskBar = {Yes, No} Default is No.
Yes/no option to adjust the windows taskbar to the primary monitor area of the desktop.
If the value=Yes, the taskbar is automatically docked to the primary monitor area.
If the value=No, do not adjust the taskbar.
18 Configuring and Using TCX Multi-display
Parameter Description
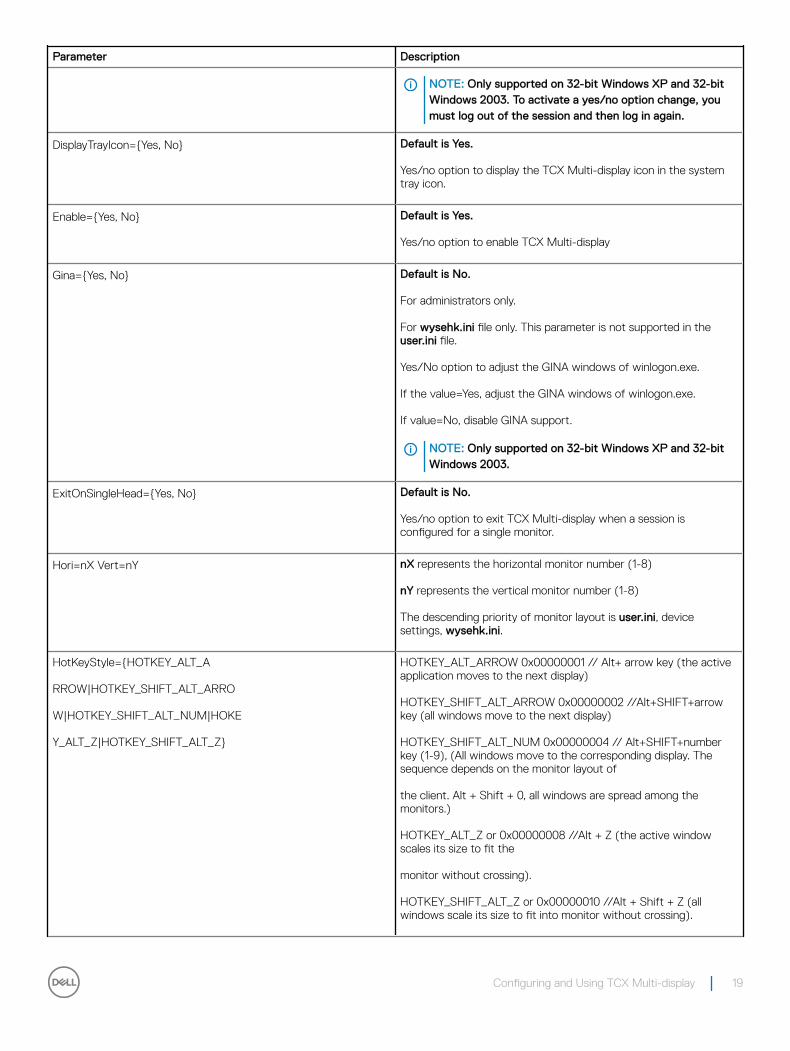
NOTE: Only supported on 32-bit Windows XP and 32-bit Windows 2003. To activate a yes/no option change, you must log out of the session and then log in again.
DisplayTrayIcon={Yes, No} Default is Yes.
Yes/no option to display the TCX Multi-display icon in the system tray icon.
Enable={Yes, No} Default is Yes.
Yes/no option to enable TCX Multi-display
Gina={Yes, No} Default is No.
For administrators only.
For wysehk.ini file only. This parameter is not supported in the user.ini file.
Yes/No option to adjust the GINA windows of winlogon.exe.
If the value=Yes, adjust the GINA windows of winlogon.exe.
If value=No, disable GINA support.
NOTE: Only supported on 32-bit Windows XP and 32-bit Windows 2003.
ExitOnSingleHead={Yes, No} Default is No.
Yes/no option to exit TCX Multi-display when a session is configured for a single monitor.
Hori=nX Vert=nY nX represents the horizontal monitor number (1-8)
nY represents the vertical monitor number (1-8)
The descending priority of monitor layout is user.ini, device settings, wysehk.ini.
HotKeyStyle={HOTKEY_ALT_A
RROW|HOTKEY_SHIFT_ALT_ARRO
W|HOTKEY_SHIFT_ALT_NUM|HOKE
Y_ALT_Z|HOTKEY_SHIFT_ALT_Z}
HOTKEY_ALT_ARROW 0x00000001 // Alt+ arrow key (the active application moves to the next display)
HOTKEY_SHIFT_ALT_ARROW 0x00000002 //Alt+SHIFT+arrow key (all windows move to the next display)
HOTKEY_SHIFT_ALT_NUM 0x00000004 // Alt+SHIFT+number key (1-9), (All windows move to the corresponding display. The sequence depends on the monitor layout of
the client. Alt + Shift + 0, all windows are spread among the monitors.)
HOTKEY_ALT_Z or 0x00000008 //Alt + Z (the active window scales its size to fit the
monitor without crossing).
HOTKEY_SHIFT_ALT_Z or 0x00000010 //Alt + Shift + Z (all windows scale its size to fit into monitor without crossing).
Configuring and Using TCX Multi-display 19
Parameter Description
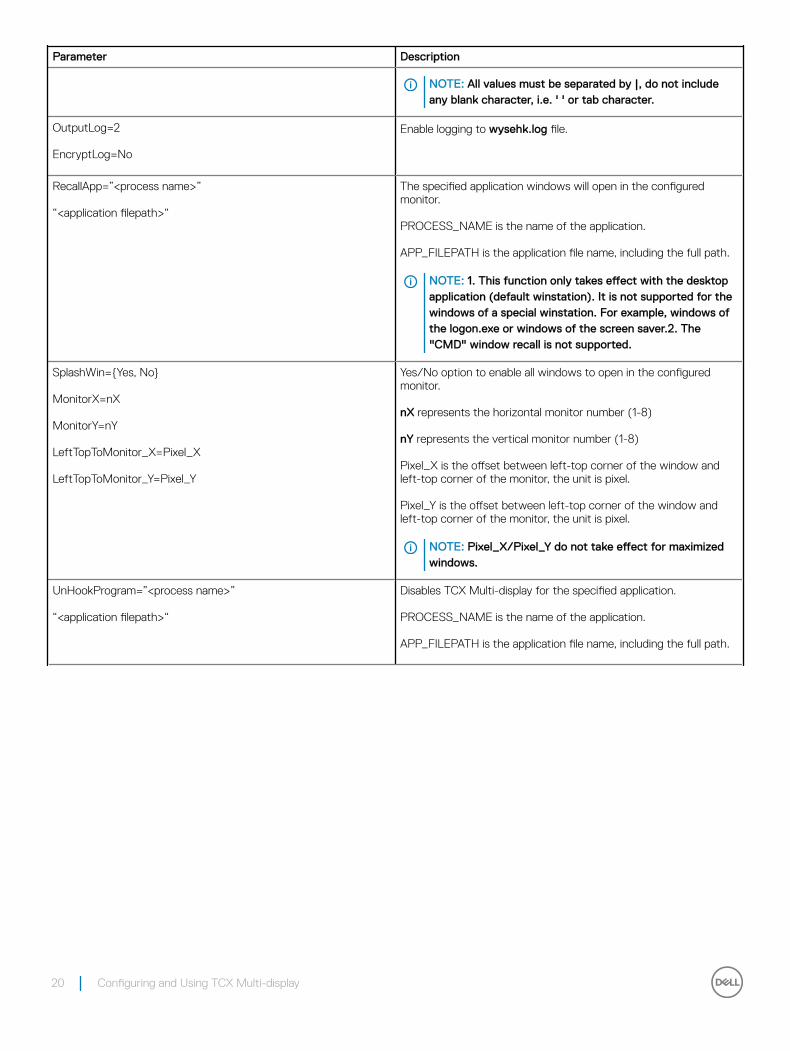
NOTE: All values must be separated by |, do not include any blank character, i.e. ' ' or tab character.
OutputLog=2
EncryptLog=No
Enable logging to wysehk.log file.
RecallApp=”<process name>”
“<application filepath>“
The specified application windows will open in the configured monitor.
PROCESS_NAME is the name of the application.
APP_FILEPATH is the application file name, including the full path.
NOTE: 1. This function only takes effect with the desktop application (default winstation). It is not supported for the windows of a special winstation. For example, windows of the logon.exe or windows of the screen saver.2. The "CMD" window recall is not supported.
SplashWin={Yes, No}
MonitorX=nX
MonitorY=nY
LeftTopToMonitor_X=Pixel_X
LeftTopToMonitor_Y=Pixel_Y
Yes/No option to enable all windows to open in the configured monitor.
nX represents the horizontal monitor number (1-8)
nY represents the vertical monitor number (1-8)
Pixel_X is the offset between left-top corner of the window and left-top corner of the monitor, the unit is pixel.
Pixel_Y is the offset between left-top corner of the window and left-top corner of the monitor, the unit is pixel.
NOTE: Pixel_X/Pixel_Y do not take effect for maximized windows.
UnHookProgram=”<process name>”
“<application filepath>“
Disables TCX Multi-display for the specified application.
PROCESS_NAME is the name of the application.
APP_FILEPATH is the application file name, including the full path.
20 Configuring and Using TCX Multi-display
Configuring and Using TCX MultimediaTCX Multimedia intelligently redirects multimedia processing tasks dynamically between the server and client for a richer user experience.
Notable features of TCX Multimedia include:
• Multi-format awareness capability that includes the following formats
• Unicast — WMV-7, WMV-8, WMV-9.
• Multicast — WMV.
• Media Foundation and Direct Show based media player support. For example, Windows Media Player 11.
• Decoder redirection. Wyse cloud clients with supported multimedia codecs installed support this feature. All media content is transferred to the client for rendering. This feature optimizes the audio-video synchronization experience for the user and improves server scalability.
• Rendering redirection. When decoder redirection is not possible, the media content is encoded in a series of efficiently compressed JPEG images and transferred to the client. This results in significant improvement compared to rendering content using the underlying protocol, such as RDP.
• Playlist playback, network-shared clip playback, URL playback, and Web page embedded playback are supported.
Some important points about TCX Multimedia that are to be noted:
• Network bandwidth required— is generally be the same as the bitrate of the multimedia file being played.
• AVI support— audio support for MP3, WMA, AC3 formats, and video support for MPEG-1, MPEG-2, MPEG-4, part 2 is provided via the availability of corresponding decoders on the connecting cloud client. However, .avi files that contain MPEG4 or H.264 are not redirected on Windows 7 or Windows Server 2008 R2. If client side decoders are not available, the functionality seamlessly falls back to compression of raw video as JPEG images on the server and transmission to client with synchronized audio.
• MPEG-2 support— on Windows XPe clients requires that a client side decoder is installed.
• TCX Multimedia for XenApp— is supported for Wyse cloud clients by clearing the Enable Sound check box on an ICA connection. In order to disable TCX Multimedia for XenApp and use the native RAVE (Speed Screen) technology, check the Enable Sound check-box on an ICA connection.
• Playback of H.264 video— Supported only over Teradici PCoIP Protocol. Requires client side H.264 decoders to be installed before installing TCX on windows client.
Multicast support— requires that the virtual desktop terminal server or XenApp server be in a multicast enabled subnet.
NOTE: Ensure XenDesktop has Sound Preference Off: For TCX Multimedia to work properly on a XenDesktop environment, you must ensure the sound is OFF in the general preferences.
Topics:
• Configuring TCX Multimedia Server Software
• Configuring TCX Multimedia Client Software
• Using TCX Multimedia Software
Configuring TCX Multimedia Server SoftwareAlthough the software is enabled by default (TCX Multimedia Service status in the Services applet of the Windows Administrative Tools displays as Started), you can further configure the available server settings for optimal performance.
4
Configuring and Using TCX Multimedia 21
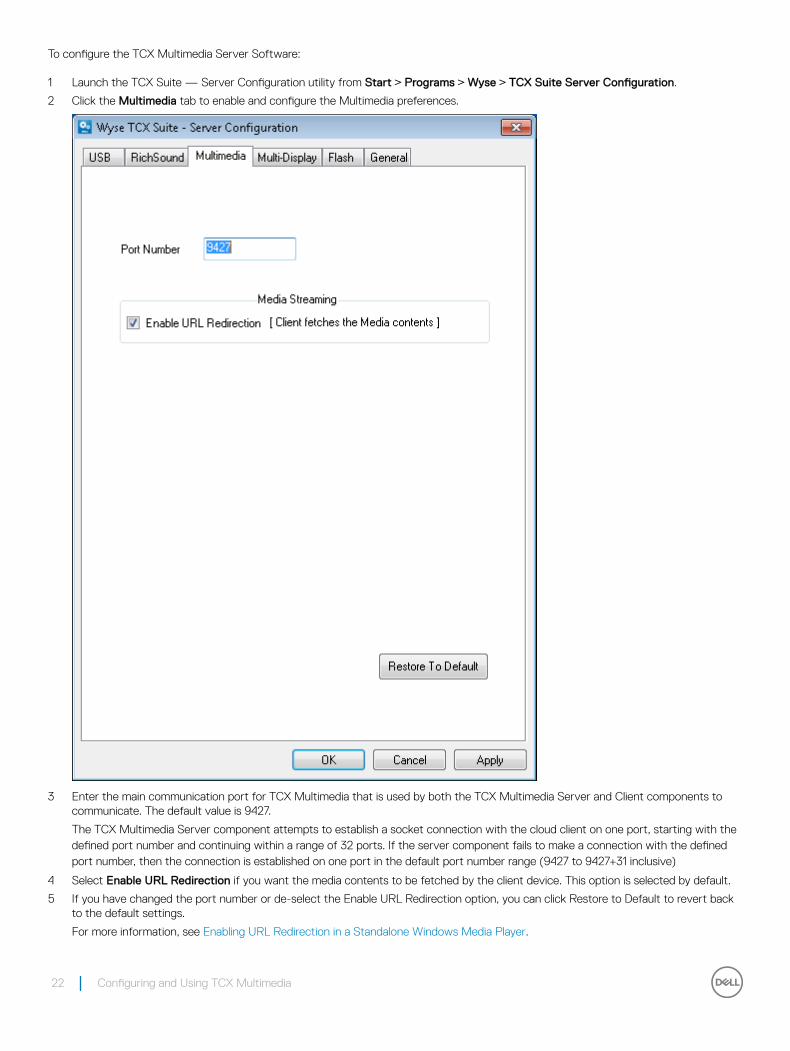
To configure the TCX Multimedia Server Software:
1 Launch the TCX Suite — Server Configuration utility from Start > Programs > Wyse > TCX Suite Server Configuration.
2 Click the Multimedia tab to enable and configure the Multimedia preferences.
3 Enter the main communication port for TCX Multimedia that is used by both the TCX Multimedia Server and Client components to communicate. The default value is 9427.
The TCX Multimedia Server component attempts to establish a socket connection with the cloud client on one port, starting with the defined port number and continuing within a range of 32 ports. If the server component fails to make a connection with the defined port number, then the connection is established on one port in the default port number range (9427 to 9427+31 inclusive)
4 Select Enable URL Redirection if you want the media contents to be fetched by the client device. This option is selected by default.
5 If you have changed the port number or de-select the Enable URL Redirection option, you can click Restore to Default to revert back to the default settings.
For more information, see Enabling URL Redirection in a Standalone Windows Media Player.
22 Configuring and Using TCX Multimedia

6 Click OK to save the configuration.
Configuring TCX Multimedia Client SoftwareBefore modifying the client configuration, make sure you disable the File Based Write Filter.To configure TCX Multimedia Client Software:
1 Launch the TCX Suite — Client Configuration utility from Start > Programs > Wyse > TCX Suite Client Configuration.
2 Click the General tab and on it click Logging.
The settings are similar to the Server Configuration settings. For details, see Step 3 of Configuring the TCX Flash Server Software.
3 Click the Multimedia tab.
4 Select Enable Logging and select the following:
• Log Type — Select either Basic for higher level success and error information, or Advanced for detailed debugging information.
• Log Output — Select Dbgview to generate the log output in a standard debug format, or Logfile to generate the output in a file named tcxmmr.log that is available in user %temp% folder.
5 Click OK to save the settings.
Using TCX Multimedia SoftwareYou can use the TCX Multimedia Software in the following ways:
• Using URL Redirection on Wyse Cloud Clients Running Wyse Thin OS
• Enabling Multicast Support for Windows Media Content
Using URL Redirection on Wyse Cloud Clients Running Wyse ThinOSFor Wyse cloud clients running Wyse ThinOS, URL redirection sends an original URL with multimedia content directly to the cloud client for processing, reducing load on the server and providing increased scalability. There are two types of URL redirection:
• URL Redirection in a standard supported via HTTP/HTTPS/FTP for *.mpg files. This type of redirection does not require any special modifications. The server and cloud client negotiate by default whether to take advantage of URL redirection for these files.
Configuring and Using TCX Multimedia 23

• Custom URL Redirection for a Custom Type URL. For example, qvmc://. This type of redirection requires special changes to the Windows registry on the server. For more information see:
• Supporting Custom URL Redirection
• Supporting Custom Transport Registration
• Enabling URL Redirection in a Standalone Windows Media Player
• Wyse-specific Registry Entries for URL Redirection on Internet Explorer
Supporting Custom URL Redirection
To support custom URL Redirection you must consider the following points
• The server must be a Windows-based machine.When the Windows Media Player attempts to play a URL, the player parses the initial part of the URL and determines the correct source filter to load.
• Windows Media Player does not play all udp:// or rtp:// based links.
• The default udp or rtp filter cannot process links from other hardware or software based streaming servers such as VLC, Minerva, or Darwin.
• To support the playback of standard udp or rtp based streams on Windows Media Player, you can use various third party source filters with different URL primitives. For example, QVMC-based URLs begin with qvmc://, Elecard-based URLs begin elecard_rtsp://. These URLs are designed to play streams from standard streaming servers. When the URL is played, either the QVMC or Elecard source filter is loaded, as needed.
• Wyse cloud clients running Wyse ThinOS support standard rtp and udp protocols for streaming media. However, URL playback is only possible if the Wyse URL Redirection SRC filter can be registered for such protocols.
• To enable URL redirection you must first create specific registry entries that allow the Multimedia server to convert a custom-based URL to an rtp URL and send it to the cloud client for processing.
Supporting Custom Transport Registration
Any custom transport type can be registered with DirectShow. Therefore, whenever a custom URL is found, DirectShow searches for the right source filter based on registry entry and loads it.
A custom registry entry should follow this format:
HKEY_CLASSES_ROOT <protocol> Source Filter = <Source filter CLSID> Extensions <.ext1> = <Source filter CLSID> <.ext2> = <Source filter CLSID>
For more information on registering a custom file type, see Microsoft documentation at: http://msdn2.microsoft.com/en-us/library/ms787558.aspx.
Enabling URL Redirection in a Standalone Windows Media Player
To enable URL redirection:
1 Launch the TCX Suite — Server Configuration utility from Start > Programs > Wyse > TCX Suite Server Configuration.
2 Click the Multimedia tab.
3 Select Enable URL Redirection.
This selection enables the media player to redirect the URL to the client and the client plays the URL. If you clear this option, the server fetches the data and it is passed to the client for decoding and rendering. This setting is applicable for Standalone Windows Media Player only.
24 Configuring and Using TCX Multimedia
Wyse-specific Registry Entries for URL Redirection on Internet Explorer
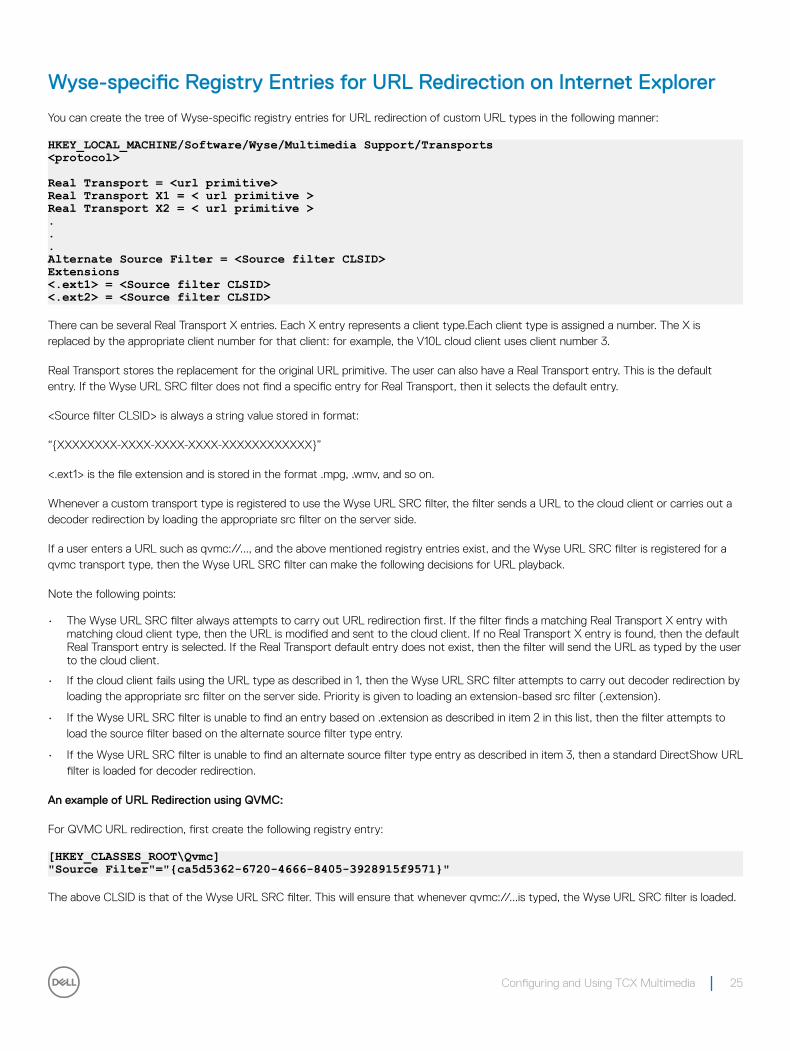
You can create the tree of Wyse-specific registry entries for URL redirection of custom URL types in the following manner:
HKEY_LOCAL_MACHINE/Software/Wyse/Multimedia Support/Transports<protocol>
Real Transport = <url primitive>Real Transport X1 = < url primitive >Real Transport X2 = < url primitive >...Alternate Source Filter = <Source filter CLSID>Extensions<.ext1> = <Source filter CLSID><.ext2> = <Source filter CLSID>
There can be several Real Transport X entries. Each X entry represents a client type.Each client type is assigned a number. The X is replaced by the appropriate client number for that client: for example, the V10L cloud client uses client number 3.
Real Transport stores the replacement for the original URL primitive. The user can also have a Real Transport entry. This is the default entry. If the Wyse URL SRC filter does not find a specific entry for Real Transport, then it selects the default entry.
<Source filter CLSID> is always a string value stored in format:
“{XXXXXXXX-XXXX-XXXX-XXXX-XXXXXXXXXXXX}”
<.ext1> is the file extension and is stored in the format .mpg, .wmv, and so on.
Whenever a custom transport type is registered to use the Wyse URL SRC filter, the filter sends a URL to the cloud client or carries out a decoder redirection by loading the appropriate src filter on the server side.
If a user enters a URL such as qvmc://..., and the above mentioned registry entries exist, and the Wyse URL SRC filter is registered for a qvmc transport type, then the Wyse URL SRC filter can make the following decisions for URL playback.
Note the following points:
• The Wyse URL SRC filter always attempts to carry out URL redirection first. If the filter finds a matching Real Transport X entry with matching cloud client type, then the URL is modified and sent to the cloud client. If no Real Transport X entry is found, then the default Real Transport entry is selected. If the Real Transport default entry does not exist, then the filter will send the URL as typed by the user to the cloud client.
• If the cloud client fails using the URL type as described in 1, then the Wyse URL SRC filter attempts to carry out decoder redirection by loading the appropriate src filter on the server side. Priority is given to loading an extension-based src filter (.extension).
• If the Wyse URL SRC filter is unable to find an entry based on .extension as described in item 2 in this list, then the filter attempts to load the source filter based on the alternate source filter type entry.
• If the Wyse URL SRC filter is unable to find an alternate source filter type entry as described in item 3, then a standard DirectShow URL filter is loaded for decoder redirection.
An example of URL Redirection using QVMC:
For QVMC URL redirection, first create the following registry entry:
[HKEY_CLASSES_ROOT\Qvmc]"Source Filter"="{ca5d5362-6720-4666-8405-3928915f9571}"
The above CLSID is that of the Wyse URL SRC filter. This will ensure that whenever qvmc://...is typed, the Wyse URL SRC filter is loaded.
Configuring and Using TCX Multimedia 25
Next, create the following entries:
[HKEY_LOCAL_MACHINE\Software\Wyse\Multimedia Support\Transports\Qvmc]"Alternate Source Filter"="{AB3499B0-949F-11D4-BAB8-0000863E0FD8}"
"real transport"="udp"
"real transport 3"="qvmc"
[HKEY_LOCAL_MACHINE\Software\Wyse\MultimediaSupport\Transports\Qvmc\Extensions]
As a result of these entries, when a V10L cloud client user enters qvmc://<multicastip>:<portno> as the URL, real transport is used and qvmc is replaced by udp. The URL sent to the
cloud client will be udp:// <multicast ip>:<portno>.
For the V10L cloud client, real transport 3 is selected. The entry is the same as the original URL primitive.
If the cloud client is unable to play the URL and returns ‘false’ to the server, the server attempts a decoder redirection by selecting the CLSID from an Alternate Source Filter entry in the registry. The CLSID mentioned above is the CLSID of the qvmc src filter.
If the user enters a URL such as qvmc://10.150.5.15:2000/Olympic.mpg and URL redirection fails, the Wyse URL SRC filter attempts a decoder redirection based on an Alternate Source Filter entry, since there are no entries under the .../extensions key.
Enabling Multicast Support for Windows Media ContentYou can achieve multicast support for Windows media content in the following ways:
• Using Decoder Redirection
• Using URL Source Redirection
URL redirection reduces the load on the server. The seek function of Windows Media Player is disabled when URL redirection is used.
Using Decoder Redirection
With decoder redirection, the server receives the URL, parses it, extracts the media data,and then sends the media data to the client. The client receives the media data and connects to the appropriate decoder for the media format, and then renders the content. The CPU load is shared between the client and the server. Decoder redirection requires no change to the server registry.
The user can either type the URL of the .nsc file into a browser address window or click the .asx file to start Windows Media Player and view the content. The seek and pause functions of Windows Media Player are disabled when decoder redirection is used.
Using URL Source Redirection
With URL source redirection, the server sends the URL directly to the client, which parses the URL, decodes it based on the media format, and then renders it. No server CPU cycles are used for playback.
TCX Multimedia Redirection supports Windows Media Streaming. It consists of two types of streaming:
• Multicast — For this type, .nsc URL extensions are used. For example, http://<Multicast Server Full Name>/<IP of Multicast Server>/<filename>.nsc.
• Unicast — For this type, the prototype will be MMS. For example, mms:// <Multicast Server Full Name>/.
These two types of URLs will be present inside a container format called .asx. Double-clicking the .asx file will play the respective URL.
26 Configuring and Using TCX Multimedia
Configuring and Using TCX Rich SoundTCX Rich Sound enables the zero-compromise deployment of virtual desktops and applications with the capability of receiving and transmitting high quality audio. It also provides bidirectional audio capabilities for virtual desktops and applications, and supports sound recording and playback applications.
Users can use a USB headset directly attached to a supported cloud client to input and output audio to and from IP soft phone applications such as Cisco IP Communicator, Avaya Softphone, and Elluminate running in a Microsoft Windows XP Pro virtual desktop and Windows 7 Enterprise and Ultimate desktops. With its high quality bidirectional audio capabilities, TCX Rich Sound is qualified for use in LAN deployments.
The following are the notable features of TCX Rich Sound :
• Use any analog headset or supported USB headset attached to Wyse cloud clients, TCX Rich Sound supports Microsoft RDP for use in VDI environments.
• Record and playback using Windows Sound Recorder.
• Audio playback using Windows Media Player and VLC Player.
• Smooth audio playback of You Tube content.
• Support for instant messaging tool like Skype.
Sound Record Quality: TCX Rich Sound best supports sound recorder audio format of PCM 16.000 kHz, 16 Bit, Mono or higher.
Topics:
• Configuring TCX Rich Sound Server Software
• Configuring the TCX Rich Sound Client Software
Configuring TCX Rich Sound Server SoftwareYou can configure the TCX Rich Sound Server software for optimal performance and by default the software is enabled. In the Services applet of the Windows Administrative Tools, TCX Rich Sound Service status is displayed as Started.To configure the settings:
1 To open TCX Suite-Server Configuration dialog box, go to Start > Programs > TCX Suite-Server Configuration > Rich Sound tab
2 Select General tab to display the software versions, set logging preferences and set the main port for server and client communication. To configure General Preference:
a Click the About tab to view the versions of the TCX Suite Server components installed and a link to navigate to the TCX Suite page on the Dell Website.
b Click the Logging box to enable and set logging preferences, and set the main port for server and client information.
3 In the Log Type select:
• Basic: For higher level success and error information.
• Advanced: For detailed debugging information.
4 In the Log Output select:
• DebugView- Here log information will be logged to standard debug output, and can be viewed through a utility such as DebugView.
• LogFile- Also known as RichSound_processid.log and located in the user%temp% folder.
5
Configuring and Using TCX Rich Sound 27

Configuring the TCX Rich Sound Client SoftwareYou can configure the TCX Rich Sound Server software for optimal performance and by default the software is enabled. In the Services applet of the Windows Administrative Tools, TCX Rich Sound Service status is displayed as Started.To configure the settings:
1 To open TCX Suite-Server Configuration dialog box, go to Start > Programs > TCX Suite-Server Configuration
2 Select General tab to display the software versions, set logging preferences and set the main port for server and client communication. To configure General Preference:
a Click the About tab to view the versions of the TCX Suite Server components installed and a link to navigate to the TCX Suite page on the Dell Website.
b Click the Logging box to enable and set logging preferences, and set the main port for server and client information.
3 In the Log Type select:
• Basic: For higher level success and error information.
• Advanced: For detailed debugging information.
4 In the Log Output select:
• DebugView- Here log information will be logged to standard debug output, and can be viewed through a utility such as DebugView.
• LogFile- Also known as RichSound_processid.log and located in the user%temp% folder.
28 Configuring and Using TCX Rich Sound
Configuring and Using TCX USB VirtualizerTCX USB Virtualizer makes the thin client device attached USB devices visible to virtual desktops and applications. The USB Virtualizer removes any compromises on limited local device drivers for a broad range of USB — based printers, scanners, storage devices, Palm, BlackBerry, Pocket PC handhelds, webcams and headsets.
Topics:
• Required Settings for TCX USB Virtualizer Use with Wyse ThinOS
• Secure Device Unlocking for Non-Administrator Users
• Redirecting USB Devices to an Off State Virtual Desktop
• Allocation of 26 Drive letters per session
• Configuring TCX USB Virtualizer Server Software
• Configuring the TCX USB Virtualizer Client Software
• Configuring the TCX USB redirection for Smartcards
Required Settings for TCX USB Virtualizer Use with Wyse ThinOSBefore using TCX USB Virtualizer with ThinOS, be aware of the following:
• Redirecting USB devices through TCX USB Virtualizer
• Granular Control over USB Redirection
Secure Device Unlocking for Non-Administrator UsersTo unlock U3 secure devices from Dell Wyse ThinOS and Windows cloud clients for nonadministrator users, the devices composite interface must be configured as remote to work.
To identify the composite interface:
• A secure U3 device plugged into the client shows the mass storage interface. The user launches the secure application present in the U3 device. It switches to a composite device where an HID class device and mass storage device interface is present. Using USBView, the Vendor ID and Product ID of this composite device can be obtained.
• In Windows, cloud clients use the Vendor ID and Product ID of the composite device to configure the device as remote to work. If, in the case of Wyse ThinOS cloud clients, the syntax to force redirect the device is: Device=VUSB ForceRedirect=VendorID, ProductID, ClassID, Sub Class, Protocol. Input 0 for ClassID, SubClass and Protocol.
You add the following parameter lines to the wnos.ini to redirect the device:
• For Mass Storage Interface, Buffalo U3 secures the device with VendorID = 0x411, ProductID = 0xED add Device = VUSB ForceRedirect = 0x411, 0xED, 0x0, 0x0, 0x0
• For Composite Interface, Buffalo U3 secures the device with VendorID = 0x411, ProductID = 0xEE add Device = VUSB ForceRedirect = 0x411, 0xEE, 0x0, 0x0, 0x0
6
Configuring and Using TCX USB Virtualizer 29
Redirecting USB Devices to an Off State Virtual DesktopXen Off-state virtual machines runs on XenDesktop. In some cases, virtual machines receive client connection events as out of order. To avoid this, whenever a previous event is missed a timeout value is set to wait. The default timeout value is 10 seconds, and can be modified using Windows Registry (regkey).
HKLM\\Software\\Wyse\\TCX\\Server\\USB V irtualizer\\ICAOffstate Wait
Allocation of 26 Drive letters per sessionIn USB Session isolation of mass storage, all the 26 letters are available per sessions.
This feature is supported only in Windows Terminal Server grade OS.
Following are the two scenarios which explains this feature:
• For suppose, a User redirects a mass storage device with only C:\ as system drive. Similarly another User also redirects a mass storage device with C:\ as system drive. Both the users will be able to view the redirected mass storage device as a D:\ in their respective sessions. Henceforth all the 26 Drive letters should be allocated per session, that is, per session will have D:\, E:\ F:\ and so on for the respective redirected devices.
• Redirected Mass Storage device should have a next available drive letter. For example: E:\, F:\, G:\ are used by drive mapping and redirected device should have H:\ in one User session and H:\ in all the User session.
NOTE: When all the 26 drive letters in a session is exhausted, driver letters are allocated as per the default Windows behavior.
Configuring TCX USB Virtualizer Server SoftwareThe TCX USB Virtualizer Server Software can be configured by following ways:
• Configuring TCX USB Virtualizer Server Software using UI.
• Configuring TCX USB Virtualizer Server Software using Active Directory.
How to read the device Hardware IDYou can use Device Manager to determine the VID and PID. To read the device Hardware ID follow the below steps:
1 Connect to the device.
2 Navigate to Device Manager.
3 In the menu option, click view and select Devices by connection from the drop down list.
4 Select WYSE Technology, Inc. Virtual USB Bus.
5 Right click the interested Device and select properties.
6 Click the Details tab and click the Hardware ID’s.
7 Copy the value and enter the same in the Show Contents dialog box.
Configuring TCX USB Virtualizer Server Software using UITCX USB Virtualizer Software is enabled by default, status is displayed as Started in the Services applet of the Windows Administrative Tools. For optimal performance, you can further configure the settings in the TCX Suite Configuration Utility dialog box. To open TCX Suite Configuration Utility dialog box, go to Start > Programs > Wyse > TCX Suite Server Configuration.
1 To configure General USB Preferences:
30 Configuring and Using TCX USB Virtualizer
a In the general tab, click on the About Wyse TCX Suite option to view software version of TCX Suite.
In Information window, the versions of the TCX Suite Server components installed and also a link is provided to navigate to the TCX Suite page in the Dell Support Site.
b In the general tab, click on the Logging option, Logging window is opened.
To set the logging preferences, enable logging and select the following:
• Log Type: Based on the requirements, select the following:
• Basic: Select Basic, for higher level success and error information.
• Advanced: Select Advanced, for more details on debugging information.
• Log Output: Based on the requirements, select the following:
• DebugView: Here log information will be logged to standard debug output, and can be viewed through DebugView utility.
• LogFile: It is named as usbv.log, located in C:\ TCX install folder.
2 To set USB redirection server settings/Configuration: Under the USB tab, you can enable USB redirection preferences for devices and the class of devices available in the device list. Following are the options available to manage your list of devices:
• Add: To add a device or class of devices, click the Add option.
• Edit: To edit the information of a device or class of devices, click Edit in the USB tab, select the checkbox of the device or class of devices. Enter the device or class of device information, and then click Update.
NOTE:
• For an USB device, Vendor ID and Product ID cannot be edited as they are the key items of the database.
• For an USB class, Class cannot be edited.
• To edit the key items of the database, delete the device or device class from the list and then, add the device or device class with the key item information of your choice to the list,
• Remove: To remove a device or class of devices for which redirection is enabled, select the device or class of devices in the list click Remove, and then click OK.
a Port Number settings button: Enter the main port number for TCX USB Redirection. Default port number is 17185.
TCX USB Server and Client components communicate through this port number.
b Allow these devices: Select the check box for the devices or class of devices to enable redirection for that particular device. To allow redirection for all the devices of that particular type for example, printers select class of devices.
Configuring the WAN Acceleration for USB devicesBy default WAN Acceleration for mass storage devices option is enabled under USB tab in TCX server UI.
• WAN Acceleration status for Mass Storage and WACOM devices—you can enable or disable the device WAN Acceleration by selecting or clearing the checkbox.
NOTE: In our lab environment, tests are confirmed that WAN acceleration for Mass Storage is on par with the Drive mapping upto 150ms latency. Performance may vary based on the parameters like no of partitions, and file system.
Add Device Configuration
You must enter the following details:
• Vendor ID
• Product ID
• Class
• Subclass
• Protocol
• Allow this USB Device allows the new device to be redirected, or else it will be blocked from redirection.
• Allow WAN Acceleration is applicable only for Mass Storage and WACOM devices. WACOM devices are accelerated by VID and PID.
• Read-Only is applicable only for Mass Storage Devices. Ready-Only denies Write access to the redirected Mass Storage device.
NOTE: WAN acceleration of Mass Storage is only available in Windows clients.
Configuring and Using TCX USB Virtualizer 31
Edit Device Configuration
To edit the information of a device or class of devices, click Edit in the USB tab, select the check box of the device or class of devices. Enter the device or class of devices information, and then click Update.
Session Level Restriction settings
1 Session level restriction is applicable only for Windows Terminal Server OS starting from Window Server 2008 R2.
2 Session Level Restriction window lists the USB devices based on the Windows class and description.
3 Select the windows USB class Name to enable the session level restriction for that particular device class, if you clear the checkbox the session level restriction for the class of devices will be disabled.
4 Add, Edit, and Remove buttons are provided to add the devices, edit, and remove the selected devices.
Configuration of the COM Port Assignment
The Serial (COM) port devices are exposed to the user application by Port-Name, for example, COM1. The port-name is assigned exclusively to a serial port device and it cannot be used by other serial port devices (even in absence of the owning serial port device) that is, no two serial port devices shall request for the same preferred port number. In TCX USB Virtualizer, the redirected USB Serial (COM) port devices may request for Preferred port name. Also, the multiple redirected USB Serial (COM) devices may request for the same Preferred Port-name (in this case, the Preferred port name is assigned to the device based on the availability - First Come First Served Basis).
It allows you to add the information of COM Port devices. You must enter the following details:
• Name
• Port Number
• Vendor ID
• Product ID
When the SLR for Serial (COM) port devices are enabled, the TCX USB tries to assign the device's Preferred port-name, if available.
Configuring TCX USB Virtualizer Server Software using Active DirectoryIn Dell Wyse TCX, the TCX USB virtualizer server software can be configured using Active directory.
The following location stores the AD template for both 32–bit and 64–bit OS.
• C:\Program Files\Wyse\TCX\Server\USB Virtualizer\Others\AD_Template\TCX_USB_AD.adm in 32bit OS.
• C:\Program Files (x86)\Wyse\TCX\Server\USB Virtualizer\Others\AD_Template\TCX_USB_AD.adm in 64bit OS.
In Active directory, there are two types of configuration:
• Machine Level Configuration.
• User Level Configuration.
Machine Level Configuration
Different types of policies under Machine Level Configuration are listed below:
• Configure Session Level Restriction based on the device class.
• Prevent Session Level Restriction for devices matching any of these device IDs.
• Configure Preferred Port Number for Serial/COM port devices.
32 Configuring and Using TCX USB Virtualizer
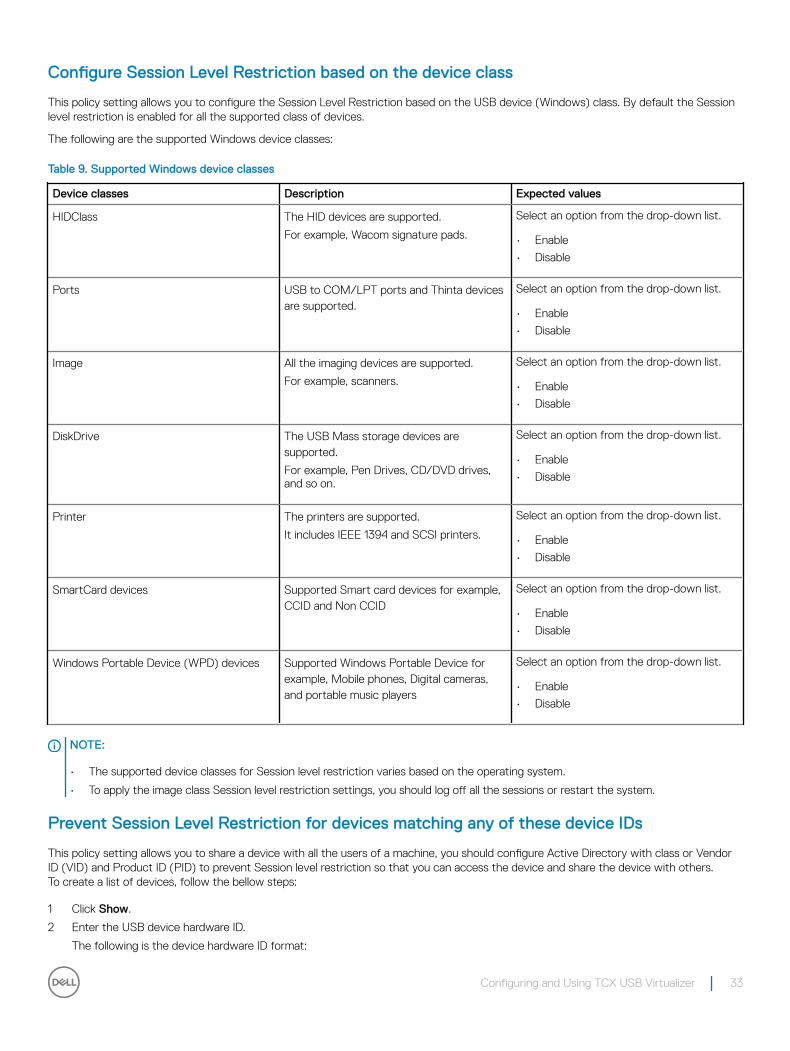
Configure Session Level Restriction based on the device class
This policy setting allows you to configure the Session Level Restriction based on the USB device (Windows) class. By default the Session level restriction is enabled for all the supported class of devices.
The following are the supported Windows device classes:
Table 9. Supported Windows device classes
Device classes Description Expected values
HIDClass The HID devices are supported.
For example, Wacom signature pads.
Select an option from the drop-down list.
• Enable
• Disable
Ports USB to COM/LPT ports and Thinta devices are supported.
Select an option from the drop-down list.
• Enable
• Disable
Image All the imaging devices are supported.
For example, scanners.
Select an option from the drop-down list.
• Enable
• Disable
DiskDrive The USB Mass storage devices are supported.
For example, Pen Drives, CD/DVD drives, and so on.
Select an option from the drop-down list.
• Enable
• Disable
Printer The printers are supported.
It includes IEEE 1394 and SCSI printers.
Select an option from the drop-down list.
• Enable
• Disable
SmartCard devices Supported Smart card devices for example, CCID and Non CCID
Select an option from the drop-down list.
• Enable
• Disable
Windows Portable Device (WPD) devices Supported Windows Portable Device for example, Mobile phones, Digital cameras, and portable music players
Select an option from the drop-down list.
• Enable
• Disable
NOTE:
• The supported device classes for Session level restriction varies based on the operating system.
• To apply the image class Session level restriction settings, you should log off all the sessions or restart the system.
Prevent Session Level Restriction for devices matching any of these device IDs
This policy setting allows you to share a device with all the users of a machine, you should configure Active Directory with class or Vendor ID (VID) and Product ID (PID) to prevent Session level restriction so that you can access the device and share the device with others.To create a list of devices, follow the bellow steps:
1 Click Show.
2 Enter the USB device hardware ID.
The following is the device hardware ID format:
Configuring and Using TCX USB Virtualizer 33
For example, if a device that has the Vendor ID as 0001 and the Product ID as 0164, then enter the value in the following format,
Vid_0001&Pid_0164.
3 Click OK.
If you Enable this policy setting, the session level restriction is disabled for the listed USB devices. The listed devices are available to all the user sessions in the machine.And if you Disable or do not configure this policy setting, the Session level restriction setting based on device class is applied.
You can use Device Manager to determine the VID and PID. To read the device Hardware ID, see How to read the device Hardware ID.
Configure Preferred Port Number for Serial and COM port devices
This policy setting allows you to reserves the COM port number for a device on domain user or domain user group by providing the Vendor ID (VID) and Product ID (PID). The device must be assigned with AD configured port number for any user to redirect that particular device.To create a list of devices, follow the bellow steps:
1 Click Show.
2 Enter the USB device hardware ID.
The following is the device hardware ID format:
For example, if the device hardware ID has Vendor ID as 0123 and the Product ID as 0123 and the preferred port number is 10 decimal ( in hex — 0A), then enter the value in the following format,
Vid_0123&Pid_0123&0A
3 Embed the preferred port number and then click OK.
NOTE: This policy setting is applicable only for the Session Level Restricted (SLR) Serial/COM Port devices.
If you Enable this policy setting, TCX tries to assign the preferred port number (if available) to the mentioned USB Serial/COM port device and if the preferred port number is not available, then the next port number is assigned.
If you Disable or do not configure this policy setting, then the first available port number is assigned to the USB Serial/COM port device.
To get the device Hardware ID, see How to read the device Hardware ID.
After getting the device Hardware ID, embed Vid_0123&Pid_0123 string with COM Port Number for the device it is associated. for example, Vid_0123&Pid_0123&0A, where 0A (hex) is the preferred COM port number.
User Level Configuration
Different types of policies under User Level Configuration are listed below:
• Prevent redirection of USB devices.
• Prevent USB redirection: By USB class, sub-class and protocol.
• Prevent USB Redirection: By device hardware ID.
• All Mass Storage devices: Deny write access (make read-only device).
• Mass Storage devices: Deny write access (make read-only device) by hardware ID.
• All Mass Storage devices: Prohibit WAN Acceleration.
• Mass Storage devices: Prohibit WAN Acceleration by hardware ID.
• Wacom devices: Prohibit WAN Acceleration by hardware ID.
34 Configuring and Using TCX USB Virtualizer

Prevent redirection of USB devices
This policy setting allows you to stop USB redirection for a user. By default all the devices are allowed to redirect to the system. If you want to block a user from redirection, this policy must be configured in AD which prevents the USB Redirection.
If you Enable this policy setting, none of the USB devices will be redirected by Dell WyseTCX USB.
If you Disable or do not configure this policy setting, all the USB devices will be redirected by Dell WyseTCX USB.
Prevent USB redirection
This policy setting allows you to prevent USB devices based on the class for a User. By default all the classes of devices are allowed. If you want to block a user from device redirection identified by class, then configure this policy setting in AD which does not allow the user to redirect the device classes.To create a list of devices, follow the bellow steps:
1 Click Show.
2 Enter the USB device hardware ID.
The following is the device hardware ID format:
For example, if you do not want to allow any of the mass storage devices, then the class/subclass/protocol is 08/06/50 and the following is the device hardware ID format:
USB\Class_08&SubClass_06&Prot_50.
3 Click OK.
If you Enable this policy setting, the devices which matches with this device’s hardware ID (class/subclass/protocol) is not allowed to redirect to the server.
You can use Device Manager to determine the devices’s class/subclass/protocol. To get the device Hardware ID, see How to read the device Hardware ID.
Prevent USB Redirection by device hardware ID
This policy setting allows you to Deny USB devices based on the hardware ID. By default all the devices are allowed to redirect to the server. If you want to block a user from redirection of particular device, then configure this policy setting in AD with vendor ID (VID) and product ID (PID) so that the User should not be able to redirect the devices identified.To create a list of devices, follow the bellow steps:
1 Click Show.
2 Enter the USB device hardware ID.
The following is the device hardware ID format:
For example, if a device that has the Vendor ID as 0001 and the Product ID as 0164, then enter the value in the following format,
Vid_0001&Pid_0164.
3 Click OK.
If you Enable this policy setting, the devices which matches with this device’s hardware ID is not allowed to redirect to the server.
You can use Device Manager to determine the VID and PID. To get the values, see How to read the device Hardware ID.
All Mass Storage devices Deny write access
This policy setting allows read only and denies write access to all the TCX USB redirected mass storage devices based on domain user or domain user group.
The following features are applied when Read-only is configured in AD:
• You can only copy the data from the device.
Configuring and Using TCX USB Virtualizer 35
• You cannot copy the data to the device.
• You cannot perform any device management operations like delete the partition, format, shrink, and so on.
If you Enable this policy setting, the write access is denied for all the TCX USB redirected mass storage devices. For example, pen drives, hard disks, and so on.
If you Disable or do not configure this policy setting, all the TCX USB redirected mass storage devices have the write access.
Mass Storage devices Deny write access by hardware ID
This policy setting allows read only and denies write access to all the TCX USB redirected mass storage devices based on hardware ID.To create a list of devices, follow the bellow steps:
1 Click Show.
2 Enter the USB device hardware ID.
The following is the device hardware ID format:
For example, if a device that has the Vendor ID as 0001 and the Product ID as 0164, then enter the value in the following format,
Vid_0001&Pid_0164.
3 Click OK.
If you Enable this policy setting, the write access is denied to all the TCX USB redirected mass storage devices matching with the device ID.
You can use Device Manager to determine the VID and PID. To get the values, see How to read the device Hardware ID.
All Mass Storage devices to Prohibit WAN Acceleration
This policy setting allows you to prohibit the WAN acceleration for the TCX USB redirected mass storage devices.
If you Enable this policy setting, the WAN acceleration is not allowed for the TCX USB redirected mass storage devices.
If you Disable or do not configure this policy setting, WAN acceleration is enabled for all the TCX USB redirected mass storage devices.
Mass Storage devices to Prohibit WAN Acceleration by hardware ID
This policy setting allows you to prohibit the WAN acceleration for the TCX USB redirected mass storage devices based on hardware ID.To create a list of devices, follow the bellow steps:
1 Click Show
2 Enter the USB device hardware ID.
The following is the device hardware ID format:
For example, if a device that has the Vendor ID as 0001 and the Product ID as 0164, then enter the value in the following format,
Vid_0001&Pid_0164
3 Click OK.
If you Enable this policy setting, the WAN acceleration is not allowed for all the TCX USB redirected devices matching the hardware device ID.
You can use Device Manager to determine the VID and PID. To get the values, see How to read the device Hardware ID.
Wacom devices to Prohibit WAN Acceleration by hardware ID
This policy setting allows you to prohibit the WAN acceleration for the Wacom signature pad devices based on hardware ID.To create a list of devices, follow the bellow steps:
1 Click Show.
2 Enter the USB device hardware ID.
36 Configuring and Using TCX USB Virtualizer
The following is the device hardware ID format:
For example, if a device that has the Vendor ID as 0001 and the Product ID as 0164, then enter the value in the following format,
Vid_0001&Pid_0164.
3 Click OK.
If you Enable this policy setting, the WAN acceleration prohibits for the Wacom signature pad devices matching the device hardware ID.
You can use Device Manager to determine the VID and PID. To get the values, see How to read the device Hardware ID.
Configuring the TCX USB Virtualizer Client SoftwareThe TCX USB Virtualizer Client Software GUI is supported on Dell Wyse Enhanced Microsoft Windows Embedded Standard 2009 WFR2 version 8.01 build or later version.
1 The TCX USB Virtualizer Client software is enabled by default. For optimal performance, you configure the available client settings in the Configuration Utility dialog box.
a To open Wyse TCX Suite - Client Configuration window, go to Start > Programs > Wyse > TCX Suite Client Configurationb After configuring, click OK.
NOTE: Before configuring, disable the File Based Write Filter so that they will persist after a cloud client reboot. Otherwise, the settings changed will not be saved when the cloud client device is shut down or restarted.
2 To configure General Preferences:
a To display the software versions and set logging preferences, click General tabb Click About Wyse TCX Suite tab to get the details of the versions of the TCX Suite Client components installed and a link to
navigate to the TCX Suite page in the Dell website.c To open the Log Setting Properties dialog box, click Logging tab. Select USB tab.d Select the Enable Logging check box.
• Log Type - From the drop - down menu, for higher level success and error information select Basic. For detailed debugging information select Advanced.
• Log Output - From the drop - down menu, select Debug View where log information will be logged to standard debug output. Select LogFile named as usbv.log and located in C:/
3 Add and Configure devices to work in local or remote session : To manage your devices list and to pre-configure device to work in local or remote session, select USB tab.
a Green, Blue and Brown Overlay Dots:
• The color Green signify that the devices are pre configured to work locally. The devices will never be redirected to any server.
• The color Blue signify that the devices are pre configured to work remotely. The device is in a “ready-to-redirect” state when there is no remote session and not available for the local user.
• The color Brown signify that the device will work remotely when available, else work as a local device. The device redirects to a remote session, but always available for the local user when there is no remote session.
b Drag - and - Drop Functionality: To redirect the device to a particular session, you can drag a device from one session to another. When you drag a redirected device which is either pre configured or not configured to the local machine, the device will be in a ready-to-redirect state.
c Right - Click Functionality - To pre - configure a device, right click and select the option. Un select the option to un - configure the device.
d Configure - To view and manage your pre configured devices, open the Preconfigured devices dialog box.
• To add a device, in the Add dialog box, click Add.
• To remove a device, select the name of the device in the list of devices and click Remove.
Configuring and Using TCX USB Virtualizer 37
NOTE:
• View USB Redirection and TCX USB Redirection are mutually exclusive. By default, TCX USB Redirection is selected and will work with RDP/ICA/VMware View RDP. If you want VMware View USB Redirection, you should select the Use VMware View USB Redirection option. For VMware View RDP and PCoIP. machines, reboot for these changes to take effect.
• Devices in a “ready-to-redirect” state are shown in gray and italicized.
• When managing a device, any changes made to the configuration database will be reflected only after the device is detached and reattached.
Configuring the TCX USB redirection for SmartcardsThe smartcard management activities which can be done locally can be achieved after the Smartcard or eToken is redirected to the remote session, few examples of the smartcard management activities are stated below:
• Initialize or Format Smartcard
• Create Base CSP
• Import or Export Certificate
• Change pin/password of eToken/smartcard
• Change Default Containers
• Rename eToken/Smartcard
Protocols Supported
• Microsoft RDP
• Citrix ICA (XenApp and Xendesktop)
• VMware View RDP
NOTE:
• This feature cannot be used for Windows login when device is in Remote mode at the client. In this situation, it can be used only within the session. This is by TCX design.
• In Terminal Server, Smart card devices are not shown in Device Manager when Session level restriction is enabled. When you disable the Session level restriction, device manager should be able to list the devices.
• Session level restriction is supported only from Windows Server 2008 R2 or later.
• Smartcard redirection is supported only from Window 7 or later as a back end (VDI or RDSH).
• Session level restriction does not work on the applications which installs the virtual smart cards.
38 Configuring and Using TCX USB Virtualizer
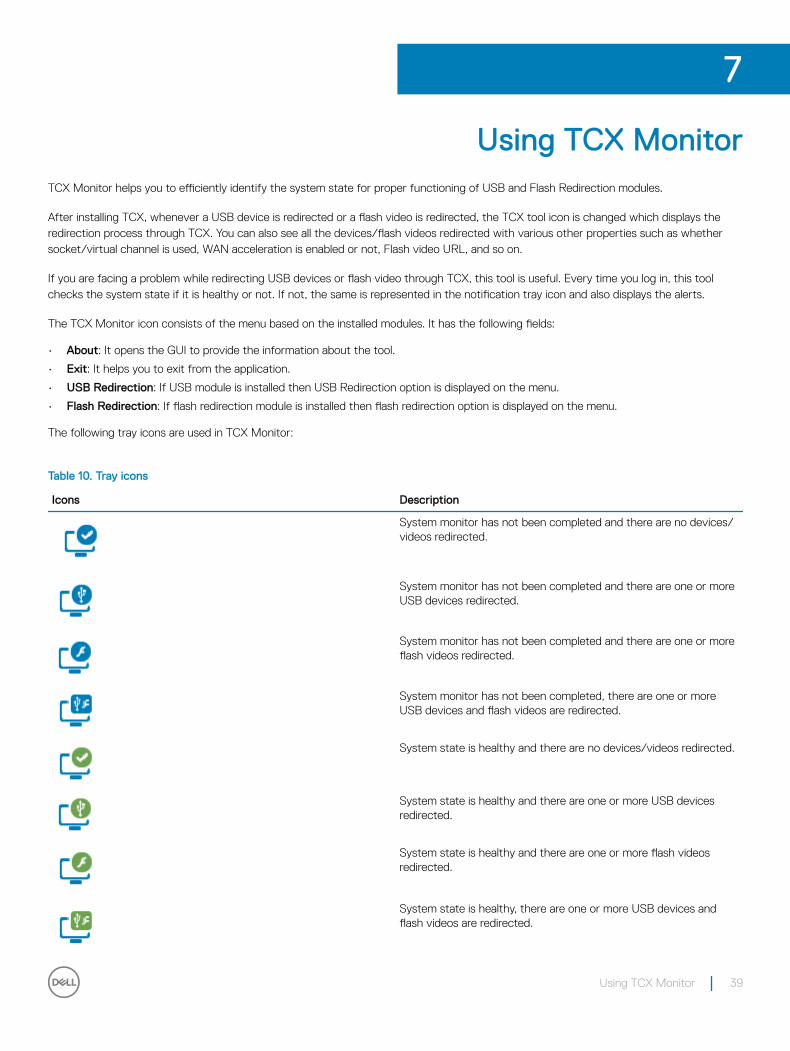
Using TCX MonitorTCX Monitor helps you to efficiently identify the system state for proper functioning of USB and Flash Redirection modules.
After installing TCX, whenever a USB device is redirected or a flash video is redirected, the TCX tool icon is changed which displays the redirection process through TCX. You can also see all the devices/flash videos redirected with various other properties such as whether socket/virtual channel is used, WAN acceleration is enabled or not, Flash video URL, and so on.
If you are facing a problem while redirecting USB devices or flash video through TCX, this tool is useful. Every time you log in, this tool checks the system state if it is healthy or not. If not, the same is represented in the notification tray icon and also displays the alerts.
The TCX Monitor icon consists of the menu based on the installed modules. It has the following fields:
• About: It opens the GUI to provide the information about the tool.
• Exit: It helps you to exit from the application.
• USB Redirection: If USB module is installed then USB Redirection option is displayed on the menu.
• Flash Redirection: If flash redirection module is installed then flash redirection option is displayed on the menu.
The following tray icons are used in TCX Monitor:
Table 10. Tray icons
Icons Description
System monitor has not been completed and there are no devices/videos redirected.
System monitor has not been completed and there are one or more USB devices redirected.
System monitor has not been completed and there are one or more flash videos redirected.
System monitor has not been completed, there are one or more USB devices and flash videos are redirected.
System state is healthy and there are no devices/videos redirected.
System state is healthy and there are one or more USB devices redirected.
System state is healthy and there are one or more flash videos redirected.
System state is healthy, there are one or more USB devices and flash videos are redirected.
7
Using TCX Monitor 39
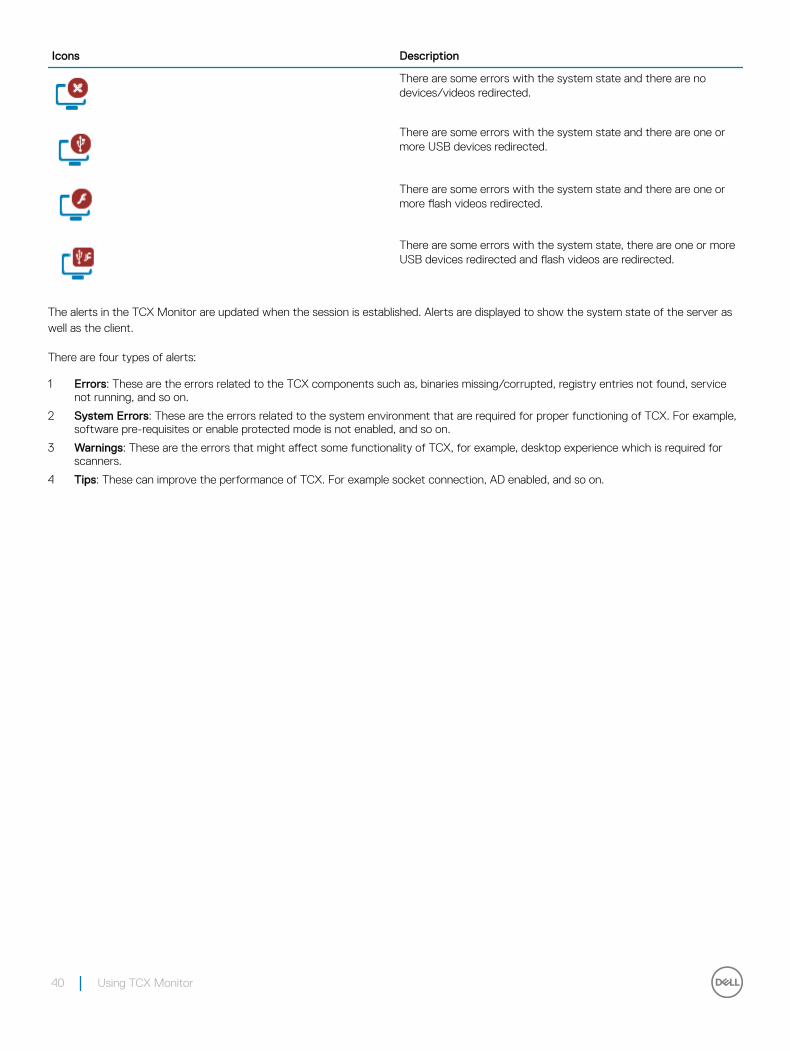
Icons Description
There are some errors with the system state and there are no devices/videos redirected.
There are some errors with the system state and there are one or more USB devices redirected.
There are some errors with the system state and there are one or more flash videos redirected.
There are some errors with the system state, there are one or more USB devices redirected and flash videos are redirected.
The alerts in the TCX Monitor are updated when the session is established. Alerts are displayed to show the system state of the server as well as the client.
There are four types of alerts:
1 Errors: These are the errors related to the TCX components such as, binaries missing/corrupted, registry entries not found, service not running, and so on.
2 System Errors: These are the errors related to the system environment that are required for proper functioning of TCX. For example, software pre-requisites or enable protected mode is not enabled, and so on.
3 Warnings: These are the errors that might affect some functionality of TCX, for example, desktop experience which is required for scanners.
4 Tips: These can improve the performance of TCX. For example socket connection, AD enabled, and so on.
40 Using TCX Monitor

TroubleshootingThis chapter includes:
• Stopping, Starting, and Verifying TCX Suite Services
• Using Event Viewer for Server Troubleshooting
• TCX Troubleshooting tips
Topics:
• Stopping, Starting, and Verifying TCX Suite Services
• Using Event Viewer for Server Troubleshooting
• TCX Troubleshooting tips
• Troubleshooting for Smartcards
Stopping, Starting, and Verifying TCX Suite ServicesAfter the installation is complete, TCX Suite Server software is enabled by default. You can stop and start the USB Virtualizer or TCX Multi-display Service by using the Services applet of the Windows Administrative Tools (right-click the name of the service you want and select Stop or Start). For information on configuring the TCX Suite Server software, refer to:
• Configuring TCX Flash Server Software
• Configuring TCX Multi-display Server Software
• Configuring TCX Multimedia Server Software
• Configuring TCX Rich Sound Server Software
• Configuring TCX USB Virtualizer Server Software
NOTE:
• You can use the Services applet in the Windows Administrative Tools to view the current status of USB Virtualizer and TCX Multi-display Service.
• After modifying a server software component (for example, USB Virtualizer), be sure to restart the service of the component by using the Services applet in the Windows Administrative Tools (for example, right-click the USB Virtualizer and select Restart).
Using Event Viewer for Server TroubleshootingEvent Viewer (in Windows Administrative Tools) maintains logs about program, security, and system events on the server where you installed the TCX Suite Server software. You can use Event Viewer to view and manage the event logs, gather information about hardware and software problems, and monitor Windows security events.
TCX Troubleshooting tipsThis section includes the problem and solutions related to TCX features.
• Troubleshooting tips for TCX 7.3
Problem 1: Flash Video fails to play using TCX FR when the view session is reconnected/logged-in after disconnecting/logging-off the remote session.
8
Troubleshooting 41
Solution: Close and restart the VMware View 6.1 console window and login to the view session and then play FR videos.
Problem 2: When keyboard and mouse are connected through KVM switch, it does not work when device is woken up from sleep mode.
Solution: Connect the keyboard and the mouse directly to the client’s USB ports.
Problem 3: Windows 2008R2 server session hangs when devices are redirected to multiple session from different client terminals by different users.
Solution: Any drive mapping solution from any protocol cannot co-exist with TCX USB redirection, disable drive mapping from the native remote session protocol.
Problem 4: TCX client UI Intermittently shows unknown entry when USB 2.0 removable storage devices are redirected to the remote server session.
Solution: Unplug and re-plug the device.
Problem 5: Client side BSOD occurs with error name IRQL_NOT_LESS_OR_EQUAL when you disconnect and reconnect an USB device.
Solution: Check Quest vWorkspace USB service at the client machine, if it is running STOP the service.
Problem 6: IPhone 6S is not visible in the iTunes after redirecting to the remote session in Windows server OS.
Solution: ITunes are supported only on desktop OS editions and they are not supported on Windows Server editions.
Problem 7: USB devices does not get redirected to the remote Teradici session.
Solution: Teradici USB service needs to be uninstalled for the client to work with TCX USB redirection.
Problem 8: User is not able to scan using twain drivers over ICA session.
Solution: Modify the registry for Citrix Twain hook by setting flag to 0 as below HKLM\Software\WOW6432node\citrix\CtxHook\AppInit_Dlls\TwainHook\Flags=0.
Problem 9: IPhone 6S does not get redirected when connected to USB 2.0 port.
Solution: Connect the iPhone through active USB Hub.
Problem 10: Duplicates entries displayed in Client USB UI when user tries to make device "Always work local" to "Always work Remote" or vice versa.
Solution: Enable the Quick Removal option at disk properties from device manager.
Problem 11: Mass Storage device does not get redirected on launching remote session after logging off and logging in to the remote session.
Solution: Unplug the mass storage device and plug in the device again.
Problem 12: Intermittently mstsc crash observed at the client D90D7_x86.
Solution: Download Update for Microsoft Lync 2013 (KB2956174) and install at the client.
Problem 13: Flash video fails to play after disconnecting and reconnecting over VMWare View RDP session.
Solution: We need to refresh or relaunch the browser in order to play the flash video in IE and Firefox but for Embedded flash application, we need to close and re-launch the application.
42 Troubleshooting
Problem 14: We need to run below mentioned command in command prompt to install Shockwave Flash player in Windows 2016 Datacenter server & reboot the server.
Solution: Shockwave plugin shows you try to play flash file using adobe flash player
Link for the same: https://blogs.technet.microsoft.com/bernhard_frank/2016/11/24/add-flash-player-to-server-2016/
• Troubleshooting tips for USB Virtualizer
Problem 1: Server IP is not displayed on Client UI of windows client
Solution: This problems is due to one of the two reasons:
• When Server-side USB Service is stopped.
• When Client-side USB-dependent binaries are not loaded.
• In Server, Go to Run and type Services.msc command. Service window opens, Start or restart the Wyse technology Inc. USB Virtualizer Service, and log off and log in to the session.
• There is one Windows internal software named Process Explorer. Make Remote Desktop Connection to server, then run Process Explorer software on Client, window is displayed which lists all the running process on client-side. Click the Find option , then click Find Handle or DLL and in Edit Control type usbvc.dll command and click search.
• If it is Microsoft RDP connection, view mstsc.exe in the process column just below the Edit Control. In Handle or Dll column, it displays the path of usbvc.dll
• If it is Citrix ICA Connection, view wfica32.exe in the Process column just below the Edit Control. In Handle or Dll column, it displays the path of usbvc.dll
• If it is VMware View RDP connection, view wswc.exe in the Process column.
• If Usbvc.dll is listed, then there is no problem with dependent binaries, otherwise there is a problem with dependent library. In this situation, Reboot the machine and Reinstall the TCX.
Problem 2: External HDD is not visible in the explorer after disconnecting and reconnecting the device in Win2k12r2 server session over vWorkspace.
Solution:
• The issue is, because the HDD is removed abruptly, the FS cache is not flushed. Hence on next device insertion, the scan-now pop-up comes (at the client). Sometimes until the device is scanned for errors, the volume arrival is not notified.
• If a device has already FS cache inconsistency errors, the device must be scanned for errors, foroptimize for quick removal policy to work without any issues.
Problem 3: Save as message pops up and the remote session is not usable while redirecting USB printer from WE8S client.
Solution:
• In Thin-Client, Click Start > Settings > Printers,
• Right-click and delete the MS-Document-Imaging printer, or at least set it to offline.
• Set all the local printers offline before you connect, or delete it.
• Uninstall all the printer drivers (including Adobe PDF, XPS drivers) at the client side.
Problem 4: Some of the USB Devices are redirected but does not work on server.
Solution: kindly check the supported class of Devices in the Release Notes. Make sure that the device is supported for the redirection. If the Server is Windows Terminal Server operating system then check device driver support in Windows Server catalog on Google.
Problem 5: WACOM devices will redirect to Windows Desktop operating system but does not work with supporting applications. This issue is specifically happens only on Windows 8 and windows 8.1
Solution: Need to create a registry key under
HKLM\SYSTEM\CurrentControlSet\Enum\<HID_Device_instance_path>\Device Parameters
Troubleshooting 43
The HID device instance path can be found using the device manager. Goto Device Manager > Right-click on WACOM Device(It shows as HID-Complaint device) > Property > Details > Device Instance Path. The device instance path must start with HID The sample WACOM device instance path is,HID\Vid_056a&Pid_00a1&Rev_0203\2&b5c2459&0&0000
Create registry value as provided below:
• Value name: SessionSecurityEnabled
• Type: REG_DWORD
• Data: 0
After changing the registry, unplug all the WACOM devices and replug. If it does not help, reboot the machine.
The device instance parameter is unique for every device. That is, if there are two WACOM devices connected/redirected to the server, then there is two unique entries in the registry. And in both the places, SessionSecurityEnabled key must be set. If you do not see any entries in simple.exe(in Win8, 8.1, 2012 or 2012-R2), then the only reason could be absence of this entry.
Problem 6: Scanner Device redirects but does not work on Terminal Server.
Solution: Enable the Desktop Experience feature in Server Role. Once installation is complete, restart the server and then redirect the scanner.
Problem 7: HID Devices connected will not redirect by default.
Solution: In Windows Client, right-click the HID Device Entry and select the Always Work as Remote option.
Problem 8: USB Server service is stopped on Server.
Solution:
a Restart the server.
b If restart does not work, then collect the event log as explained and pass it to technical support.
• Go to Run, enter eventvwr command and click Enter.
• Event Viewer Window displays, in the left pane expand the Windows Logs option.
• Click Application, it displays the events of all the application, in right pane find Action Panel.
• Click Filter Current Log, a Filter Current Log Window displays.
• Select the Critical and Error check box and click OK.
• In Application, you can see bunch of event logs and find any Logs which display USBTCX in source column. If you find any logs click, Even Properties window displays.
• Click the Detail tab and select the Friendly view button. Click Copy and Paste it on notepad and share the detail with Technical Team.
Problem 9: Windows Client UI is showing blank.
Solution:
a Restart the client.
b If restart does not work, then collect the event log as explained and pass it to technical support.
• Go to Run, enter eventvwr command and click Enter.
• Event Viewer Window displays, in the left pane expand the Windows Logs option.
• Click Application, it displays the events of all the application, in right pane you will find Action Panel.
• Click Filter Current Log, a Filter Current Log Window displays.
• Select the Critical and Error check box and click OK.
• In Application, you can see bunch of event logs and find any Logs which display USBTCX in source column. If you find any logs click, Even Properties window displays.
• Click the Detail tab and select the Friendly view button. Click Copy and Paste it on notepad and share the detail with Technical Team.
• Troubleshooting tips for TCX Flash
Problem 1: Some videos are not clipped properly in TCX Flash Redirection for Firefox.
44 Troubleshooting
Solution: Start Firefox browser. Click Alt > Tools > Add-On > Extensions. Thin Client extension 6.1.0.5 exists. Click the Enable button if it is disabled and restart the Firefox.
Problem 2: IE11 is a plugin free browser and it does not load any adobe plugins to play a flash content. It plays through HTML5.
Solution: If you want to load Adobe Flash and experience Flash Redirection, add that particular website into Tools > compatibility View Settings.
Problem 3: TCX Flash is not working in Internet Explorer.
Solution:
a Start Internet Explorer, go to browser settings.
b Click the Manage add-ons option, Manage Add-ons window displays. In the left pane, Add-on Types are listed.
c Click the Toolbar and Extensions option, select All Add-ons, it lists the installed add-ons to the right pane.
d Locate Wyse technology LLC in the list, find TFRServerBHO Class in Name column. Check the status column in the same row, if the status is other than Enabled, click the row.
e In bottom of the window, Click Enable and restart the Internet Explorer.
f Go to internet Settings, click the Advanced tab, under browsing settings select the enable third-party browser extensions check box and restart the browser.
g Check whether Flash ActiveX is installed on Server. It is must for TCX Flash to work on internet Explorer.
Problem 4: Flash Redirection is not working for any browsers.
Solution:
a Open the browser and play some video. If Flash Redirection is not working, make sure that particular video URL is not added to URL Block List.
b Right-click on the video, menu appears make sure that about Adobe Flash Player [version number] is shown in the bottom of the menu. If you find about the HTML5 Player in bottom of the menu, that means its HTML 5 video and Flash Redirection is not supported.
c Check whether client has Flash player plugin. If not then it fallback to the Flash Acceleration provided Flash player is installed on Server.
Problem 5: TCX Flash Acceleration is not working with Firefox in XenDesktop Environment.
Solution: : In order to make Flash Acceleration to work with XenDesktop, downgrade the flash player version from 11.6 to 10.2 or with latest flash player.
Follow the steps:
a Locate to the Flash Folder
• C:\Windows\system32\macromed\Flash for 32-bit OS or
• C:\Windows\sysWOW64\Macromed\Flash for 64-bit OS
b Find the file mms.cfgand open it using notepad.
c Add value ProtectedMode=0 to the end of the file and save it.
d Now open Firefox, Flash Acceleration should work both for the windowed and windowless Flashes.
Problem 6: TCX Flash is not working in Google Chrome browser.
Solution:
a Open Google chrome.
b Enter about:flags in the URL.
c Click Enter.
d In experiments section, findEnable NPAPI Mac windows. If you see Enable option, then click Enable, otherwise you need not do anything.
e Restart the browser, enter about:plugins in the URL and then click Enter. It lists the plugins installed for the browser. Click the +Details option.
Troubleshooting 45
f Under Adobe Flash Player section. Disable the Flash :
• Name: Shockwave Flash
• Description: Shockwave Flash 80.0 r0
• Version: 80.0.0.0
g Restart the browser.
• Troubleshooting tips for Multimedia Redirection
Problem 1: Multimedia Redirection is not working.
Solution:
a From Windows Task Manager on server, select Process and check whether one instance of TCXMedia.exe is running. If there is multiple instance of TCXMedia.exe is running, then kill all instance of TCXMedia.exe, Log off and log in the Server Session. If there is one instance of TcxMedia.exe is running and multimedia redirection is not working, then again log off and log in the session. In Terminal Server Environment, log off and log in.
b Check whether appropriate codec is installed on the server and client.
c Make sure that client has internet connection and the URL is accessible from client.
Problem 2: TCX Multimedia Redirection does not pitch in Windows 8 as server. By default media files play with the ZuneVideoMedia Player which is a Metro Application.
Solution:
a Right-click on the Media file, select the Open With Windows Media Player option. It starts the Windows Media Player and TCX Multimedia Redirection pitches in.
b User can set the Default program to Windows Media Player. Click Control Panel > Programs > Default Programs, and set the default program as Windows Media Player.
Problem 3: Multimedia Redirection is not working in Terminal Servers.
Solution: Check whether Desktop Experience is enabled in Server Role Features. If it is not installed, then install Desktop Experience and reinstall TCX Multimedia.
• Troubleshooting tips for Multi-display
Problem: Sometimes Multi-display functionality does not work and if you try to start Multi-display settings in Server UI, you may find previous pop-up.
Solution:
a Screen resolution of the connected clients may be different, screen resolution of each connected client should be same.
b TCX Multi-display component may not be installed on the client.
c Multi-display services may be stopped. In the Server Session, open Run and enter Services.msc command. Services window displays, Check for Wyse TCX Multi-display Services in the Name column. Make sure that Service is running, start the services if it is stopped.
d If none of the solution works, then restart the server and try again.
• Troubleshooting tips for TCX Rich Sound
Problem: Unable to capture the audio in window sound recorder on server and An audio recording device cannot be found message displays and fails to detect input device connected.
Solution: In windows client, disconnect the Microsoft RDP, In Microsoft RDP, click Local Resources > Remote Audio Setting > Remote Audio Recording , click OK and reconnect to Server.
WTOS also has similar settings like RDP. Go to connection Properties, In RDP Audio Recording, select Record from local and click OK.
List of Event logs in Troubleshooting
Depending on the Event logs you can identify the problems.
46 Troubleshooting
1 GetTSAudioEndpointEnumeratorForSessionReturns error for not supporting the application.
EventLog — Application does not support by Wyse TCX Rich Sound
2 Capture OpenDevice failed – Mic not connected or detected
EventLog — Failed to Open Audio capture Device
3 Capture PrepareDevice failed – Setting Device to usable state called afteropen.
EventLog — Failed to Prepare capture Device.
4 Application Media Format is not supported.
EventLog — Failed GetDeviceCaps of Audio Capture endpoint
5 Failed GetDeviceCaps of Audio Capture endpoint.
EventLog — Failed in Capture Device Closing
6 Failed to initialize Audio endpoint - No start is called for stream.
EventLog — Failed to Initialize AudioEndpoint
7 Check for media Format is supported by TCX Rich Sound for particular device.
EventLog — IsFormatSupported failed with Invalid Device
8 Check whether media format is supported by TCX RS for endpoint
EventLog — IsFormatSupported - unsupported format
9 Speaker Volume level set was invalid
EventLog — Invalid Volume Level
10 TCX Rich Sound returning wrong Speaker Volume level.
EventLog — Invalid Volume Level Set
11 Volume Mixer Failed to Open Mixer – Volume control fails – check traffic controller is running.
EventLog — Open Mixer Failed
12 Initialize mixer failed but successfully opens.
EventLog — Initialize Mixer Failed
13 Notification to Master Volume on Explorer toolbar failed.
EventLog — CVolumeChangeNotifier failed
14 Volume has been changed but failed to notify Explorer toolbar volume.
EventLog — CVolumeChangeNotifier failed to notify
15 Volume notification instance closing failed.
EventLog — Failed to close Notify Volume Handle
16 Render (AudioOut) Open Failed — check speaker or headset.
EventLog — Render OpenDevice Failed
17 Render(Audioout) Device Failed to Prepare – set to Usable state
EventLog — Render PrepareDevice Failed.
18 Render(Audioout) Device Failed to UnPrepare.
Troubleshooting 47
EventLog — Render UnPrepareDevice failed
19 Render(AudioOut) Device Closing Failed — check for WTOS (client logs) on failure.
EventLog — CloseDevice Failed to Render
20 Volume Control interface is Accessable — Query Failed
EventLog — Failed to create Simple Audio Volume Instance
21 Device Enumeration Failed — check devices is detected by session
EventLog — Enumerate endPoints failed
22 Default Device Access Failed — check running on WIN 7 Ent version.
EventLog — Default Audio endpoints failed.
23 Failed to Get Actual device from MMDEVICE.
EventLog — GetDevice — Failed to get original MMDevice
24 Endpoint Volume Interface Failed.
EventLog — Failed to create AudioEndpointVolume
Troubleshooting for Smartcards Problem
On disconnecting or logging off the existing view RDP session and connecting to a different view RDP session smartcard redirection does not work.
Solution
Close the view workspace and then restart the view workspace again for TCX usb redirection to work.
Problem
WTOS client freezes on locking the client, when the smartcard is already redirected.
Solution
Do not use smartcard sign-on to broker, when force redirection is enabled for smartcards.
Problem
Yellow Bang in device manager after the device is redirected to the Target session.
Solution
Install Vendor specific device drivers.
Problem
Device disappears from the client UI on logoff or disconnecting the remote session.
Solution
Remove and Reinsert the device to the USB port.
48 Troubleshooting