Embed Size (px)
Citation preview
book.book Page 1 Thursday, September 2, 2010 2:36 PM
Dell PowerVaultNetwork Attached Storage
(NAS) Systems
Administrator’s Guide
book.book Page 2 Thursday, September 2, 2010 2:36 PM
Notes, Cautions, and Warnings NOTE: A NOTE indicates important information that helps you make better use of
your computer.
CAUTION: A CAUTION indicates potential damage to hardware or loss of data if instructions are not followed.
WARNING: A WARNING indicates a potential for property damage, personal injury, or death.
____________________
Information in this publication is subject to change without notice.© 2010 Dell Inc. All rights reserved.
Reproduction of these materials in any manner whatsoever without the written permission of Dell Inc. is strictly forbidden.
Trademarks used in this text: Dell™, the DELL logo, PowerEdge™, PowerVault™, and OpenManage™ are trademarks of Dell Inc. Microsoft®, Windows®, Windows Server®, and Active Directory® are either trademarks or registered trademarks of Microsoft Corporation in the United States and/or other countries. UNIX® is a registered trademark of UNIX System Laboratories, Inc., a wholly owned subsidiary of Novell, Inc.
Other trademarks and trade names may be used in this publication to refer to either the entities claiming the marks and names or their products. Dell Inc. disclaims any proprietary interest in trademarks and trade names other than its own.
August 2010 Rev. A01
book.book Page 3 Thursday, September 2, 2010 2:36 PM
Contents
1 Overview . . . . . . . . . . . . . . . . . . . . . . . . . . 7
What's in This Release . . . . . . . . . . . . . . . . . . 7
Operating System Editions. . . . . . . . . . . . . . . . . 8
Supported Systems. . . . . . . . . . . . . . . . . . . . . 8
Configurations Pre-Installed on Your System . . . . . . . 8
Roles and Services . . . . . . . . . . . . . . . . . . 8
2 Initial Configuration of Your NAS System . . . . . . . . . . . . . . . . . . 11
Configuring Your Storage System UsingKeyboard, Monitor, and Mouse . . . . . . . . . . . . . 11
3 Configuring Your NAS System . . . . . . . . . 13
Server Manager . . . . . . . . . . . . . . . . . . . . . 13
Roles . . . . . . . . . . . . . . . . . . . . . . . . 14
Diagnostics . . . . . . . . . . . . . . . . . . . . . 14
Configuration . . . . . . . . . . . . . . . . . . . . 14
Storage . . . . . . . . . . . . . . . . . . . . . . . 14
Roles . . . . . . . . . . . . . . . . . . . . . . . . . . . 15
Share and Storage Management. . . . . . . . . . 15
File Server Resource Manager . . . . . . . . . . . 15
Storage Report Management . . . . . . . . . . . 15
Contents 3

book.book Page 4 Thursday, September 2, 2010 2:36 PM
Disk Management. . . . . . . . . . . . . . . . . . 16
Distributed File System Management . . . . . . . 16
Group Diagnostics . . . . . . . . . . . . . . . . . 17
Configuration Tools . . . . . . . . . . . . . . . . . . . 17
Storage . . . . . . . . . . . . . . . . . . . . . . . . . . 17
Windows Server Backup . . . . . . . . . . . . . . 17
4 Managing Your NAS System . . . . . . . . . 19
Dell OpenManage Server Administrator . . . . . . . . 19
Integrated Features . . . . . . . . . . . . . . . . . 19
Remote Desktop for Administration . . . . . . . . . . . 21
Remote Desktop Connection . . . . . . . . . . . . 21
5 Updating Your NAS System . . . . . . . . . . 23
6 Reinstalling the NAS Operating System . . . . . . . . . . . . . . . . . . 25
7 Using Your NAS System . . . . . . . . . . . . . 27
Creating Server Message Block Shares . . . . . . . . 27
NFS Share . . . . . . . . . . . . . . . . . . . . . . . . 28
Identity Mapping . . . . . . . . . . . . . . . . . . 28
Creating the NFS Share . . . . . . . . . . . . . . . 40
Creating Quotas and File Screens . . . . . . . . . . . . 41
Creating a New Volume . . . . . . . . . . . . . . . . . 42
4 Contents
book.book Page 5 Thursday, September 2, 2010 2:36 PM
Managing a Volume . . . . . . . . . . . . . . . . . . . 43
Extending a Volume . . . . . . . . . . . . . . . . . . . 43
Prerequisites . . . . . . . . . . . . . . . . . . . . 43
Shrinking a Volume . . . . . . . . . . . . . . . . . . . 45
Deleting a Volume . . . . . . . . . . . . . . . . . . . . 46
Enabling or Disabling SIS on a Volume . . . . . . . . . 46
Enabling SIS on a Volume . . . . . . . . . . . . . 47
Disabling SIS on a Volume . . . . . . . . . . . . . 47
Enabling Shadow Copies of Shared Folders . . . . . . 47
Enabling and Configuring Shadow Copies of Shared Folders . . . . . . . . . . . . . . 47
Performing Backup of Your Server . . . . . . . . . . . 48
Accessing the Microsoft Windows Server Backup Snap-in . . . . . . . . . . . . . . . 48
Choosing Volumes to Backup . . . . . . . . . . . . . . 48
Choosing a Storage Location . . . . . . . . . . . . . . 49
Contents 5

book.book Page 6 Thursday, September 2, 2010 2:36 PM
6 Contents
book.book Page 7 Thursday, September 2, 2010 2:36 PM
1OverviewDell Network Attached Storage (NAS) systems run the Microsoft Windows Storage Server 2008 operating system, which provides a user interface for:
• Initial system configuration
• Unified storage appliance management
• Simplified setup
• Management of storage and shared folders
Windows Storage Server 2008 is specially tuned to provide optimal performance for NAS. It provides enhancements in share and storage management scenarios, as well as integration of storage appliance management components and functionality.
What's in This ReleaseWindows Storage Server 2008 provides an efficient and unified file management by extending and consolidating the management interface. This includes the following features and functionalities:• File Server Resource Manager (FSRM) provides support for performing
additional administration tasks.
NOTE: FSRM is not available on Windows Storage Server 2008 Basic Edition.
• Share and Storage Management is a snap-in that allows for the provisioning of shares.
• Services for Network File System (NFS) is a feature that enables NFS systems to access files on the NAS system.
NOTE: NFS is not available on Windows Storage Server 2008 Basic Edition.
• Remote Desktop for Administration provides a Windows Server Remote Administration applet that enables browser-based remote access to the management console from non-Microsoft clients.
Overview 7
book.book Page 8 Thursday, September 2, 2010 2:36 PM
• Single Instance Storage (SIS) improves remote management up to 20 volumes per server. It also supports unSIS or removal of SIS from a volume.
NOTE: SIS is not available on Windows Storage Server 2008 Workgroup and Basic Editions.
Operating System Editions• Microsoft Windows Storage Server 2008, Basic Edition, x64
• Microsoft Windows Storage Server 2008, Workgroup Edition, x64
• Microsoft Windows Storage Server 2008, Standard Edition, x64
Supported Systems• Dell PowerVault NX200
• Dell PowerVault NX300
• Dell PowerVault NX3000
• Dell PowerVault NX3100
Configurations Pre-Installed on Your System
Roles and Services• File Services—manages shared folders and allows users access to files on
your system from the network.
• FSRM—allows users to generate reports, configure quotas, and define file screening properties.
• SIS—reduces storage space by consolidating duplicate files on your storage system.
NOTE: SIS is not available on Windows Storage Server 2008 Workgroup and Basic Editions.
• Print Services
• Web Server (IIS)—provides the following features:
– WebRDP—allows systems running Windows or any other operating system to access the system using a web browser.
8 Overview
book.book Page 9 Thursday, September 2, 2010 2:36 PM
– Utility Share—allows you to view system documentation locally or from a remote system using a web browser.
• Remote Desktop
• SNMP Services
• SNMP Service and WMI Provider
• Windows Server Backup—allows backup and recovery of operating system, applications, and data. Backups can be scheduled to run once, daily, and weekly.
• Firewall Ports
NOTE: The Dell PowerVault NAS software automatically opens certain firewall ports on your system. These ports assist in the proper functioning of the NAS system and are checked after every logon and boot operation.
Overview 9

book.book Page 10 Thursday, September 2, 2010 2:36 PM
10 Overview
book.book Page 11 Thursday, September 2, 2010 2:36 PM
2Initial Configuration of Your NAS System
Configuring Your Storage System Using Keyboard, Monitor, and Mouse
1 Connect one end of an Ethernet cable into one of the 10/100/1000 RJ-45 Network Interface Cable (NIC) connectors at the back of your NAS system and the other end to a working Ethernet port.
2 Connect one end of the power cable to the NAS system and the other end to a power source.
3 Connect a keyboard, monitor, and mouse to the NAS system.
4 Press the power button to turn on the NAS system.
5 Log on to the NAS system as administrator. The default password is Stor@ge!.
6 The Dell PowerVault NAS Initial Configuration Wizard guides you with:
a An option for changing the default password.
b Selecting and configuring the back-end storage software, if applicable.
c Selecting and configuring the default system language, if needed.
d Confirming the settings.
e Rebooting the system, if necessary.
7 After reboot, log on to the system using the administrator account.
8 The Server Manager window opens each time an administrator logs on. If Server Manager does not open, you can open it by clicking Start Administrative Tools Server Manager.
Initial Configuration of Your NAS System 11
book.book Page 12 Thursday, September 2, 2010 2:36 PM
Using Server Manager, you can perform the following tasks:
– Initial computer configuration
– Configure networking
– Change computer name
12 Initial Configuration of Your NAS System
book.book Page 13 Thursday, September 2, 2010 2:36 PM
3Configuring Your NAS SystemThe Server Manager console is an expanded Microsoft Management Console (MMC) which contains several configuration and management tools in a single location. It serves as the single pane of management for your storage system.
Server ManagerThe Server Manager main window allows you to view:
• A detailed snapshot of your server's identity information
• Selected security configuration options
• Installed roles and features
The Resources and Support area of the Server Manager main window contains links to the latest documentation and downloads and allows you to participate in feedback programs that help improve future versions of Microsoft Windows Storage Server 2008.
The Server Summary area displays details about your server that are particularly useful during troubleshooting, such as the system's name, network addresses, and the product ID of the operating system running on the system.
From the Server Summary area, you can view and modify network connections, modify system properties, and configure Remote Desktop.
Configuring Your NAS System 13
book.book Page 14 Thursday, September 2, 2010 2:36 PM
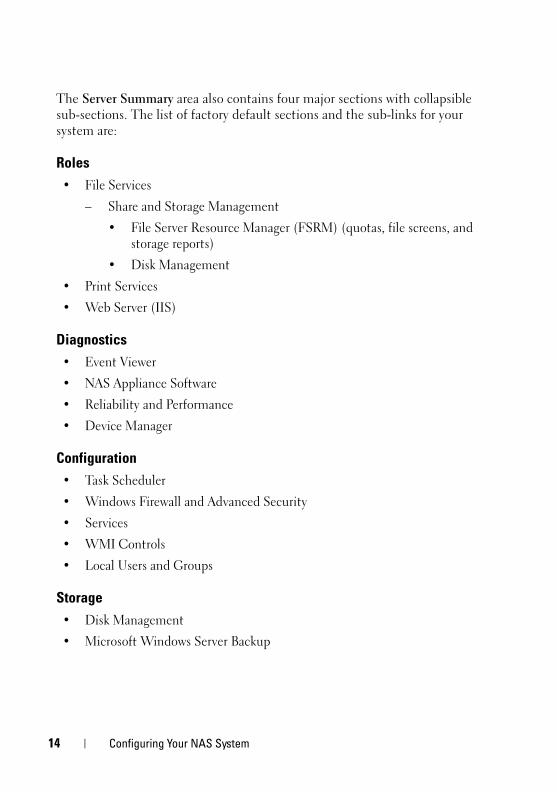
The Server Summary area also contains four major sections with collapsible sub-sections. The list of factory default sections and the sub-links for your system are:
Roles• File Services
– Share and Storage Management
• File Server Resource Manager (FSRM) (quotas, file screens, and storage reports)
• Disk Management
• Print Services
• Web Server (IIS)
Diagnostics• Event Viewer
• NAS Appliance Software
• Reliability and Performance
• Device Manager
Configuration• Task Scheduler
• Windows Firewall and Advanced Security
• Services
• WMI Controls
• Local Users and Groups
Storage• Disk Management
• Microsoft Windows Server Backup
14 Configuring Your NAS System
book.book Page 15 Thursday, September 2, 2010 2:36 PM
RolesThe Roles Summary section lists roles that are installed on the computer. The icon on the left of each role displays the current general operational status of the role.
Click the name of the role in the Roles Summary section to open the home page for that role.
Share and Storage ManagementShare and Storage Management provides a centralized location to manage folders and volumes that are shared on the network:
To create Server Message Block (SMB) shares, see "Creating Server Message Block Shares" on page 27.
To create the NFS shares, see "Creating the NFS Share" on page 40.
NOTE: Volume operations are only available when Virtual Disk Service (VDS) hardware providers are installed on the solution. VDS is not supported on this NAS system.
File Server Resource Manager FSRM is a suite of tools for Windows Storage Server 2008 that allows administrators to understand, control, and manage the quantity and type of data that is stored on their system. By using FSRM, administrators can place quotas on folders and volumes, actively screen files, and generate comprehensive storage reports. This set of advanced instruments not only helps the administrator efficiently monitor existing storage resources, but it also aids in the planning and implementation of future policy changes. See "Creating Quotas and File Screens" on page 41.
Storage Report ManagementThe Storage Reports Management node of the FSRM MMC snap-in allows you to:
• Schedule periodic storage reports to identify trends in disk usage.
• Monitor attempts to save unauthorized files for all users or a selected group of users.
• Generate storage reports instantly.
Configuring Your NAS System 15
book.book Page 16 Thursday, September 2, 2010 2:36 PM
Disk ManagementDisk Management is a system utility for managing hard disks and the volumes or partitions that they contain. Disk Management allows you to initialize disks, create volumes, and format volumes with the FAT, FAT32, or NTFS file systems. It also helps perform most disk-related tasks without restarting the system or interrupting users. Most configuration changes take effect immediately.
The following sections describe additional disk management options in detail:
• Enabling Shadow Copies of Shared Folders
• Creating a New Volume
• Managing a Volume
• Extending a Volume
• Shrinking a Volume
• Deleting a Volume
• Enabling or Disabling SIS on a Volume
Distributed File System ManagementDistributed File System (DFS) is not enabled on your system by default. To enable DFS:
1 Launch Server Manager and click File Services located in the Roles Tree.
2 Locate and click the Add Role Services link.
3 Select DFS and complete the wizard.
Namespaces
DFS namespaces allow you to group shared folders that are located on different servers into one or more logically structured namespaces. Each namespace appears to users as a single shared folder with a series of subfolders. However, the underlying structure of the namespace can consist of numerous shared folders that are located on different servers and in multiple sites.
16 Configuring Your NAS System
book.book Page 17 Thursday, September 2, 2010 2:36 PM
Creating a Namespace
Use the Namespace Wizard to create a namespace.
Click Start ServerManager Roles File Services DFS Management Namespaces. Right-click and select New Namespace.
Replication
DFS Replication is a multiple-master replication engine that can replicate data between multiple servers over limited-bandwidth network connections.
Creating a New Replication Group
Use the Replication wizard to create a new replication group.
Click Start ServerManager Roles File Services DFS Management Replication and then right-click and select New Replication.
NOTE: DFS Replication is not available on Windows Storage Server 2008 Basic Edition.
Group DiagnosticsThe tools in this section assist in diagnosing or notifying issues with your system. For more information about using these tools, right-click Snap-in within Server Manager and click Help.
Configuration ToolsConfiguration tools help the administrator in optimizing certain administrative duties. For more information about using these tools, right-click Snap-in within Server Manager and click Help.
Storage
Windows Server BackupWindows Server Backup is a feature in Windows Server 2008 that provides a set of wizards and tools for you to perform basic backup and recovery tasks for the server it is installed on. This feature has been redesigned and introduces
Configuring Your NAS System 17
book.book Page 18 Thursday, September 2, 2010 2:36 PM
new technology. The previous backup feature (Ntbackup.exe) in earlier versions of Windows is no longer available. See "Performing Backup of Your Server" on page 48 for more information.
18 Configuring Your NAS System
book.book Page 19 Thursday, September 2, 2010 2:36 PM
4Managing Your NAS SystemThe following management tools are pre-installed on your system:
• Dell OpenManage Server Administrator
• Remote Desktop for Administration
Dell OpenManage Server AdministratorDell OpenManage Server Administrator provides a comprehensive, one-to-one system management solution in two ways:
• Integrated web browser-based GUI—through the Server Administrator home page
• Command line interface (CLI)—through the operating system
Server Administrator allows you to manage NAS systems on a network locally and remotely.
Server Administrator provides information about:
• Systems that are operating properly and systems that have problems
• Systems that require updates
• Systems that require remote recovery operations
Integrated Features Server Administrator provides easy-to-use management and administration of local and remote systems through a comprehensive set of integrated management services. Server Administrator resides solely on the managed system and is accessible both locally and remotely from the Server Administrator home page. Server Administrator ensures the security of its management connections through Role-Based Access Control (RBAC), authentication, and industry-standard Secure Sockets Layer (SSL) encryption.
Managing Your NAS System 19
book.book Page 20 Thursday, September 2, 2010 2:36 PM
Server Administrator Home Page
The Server Administrator home page provides a web browser-based system management from the managed node or from a remote host through a LAN, dial-up service, or wireless network. When the NAS system is installed and configured on the managed node, you can perform remote management functions from any system that has a supported web browser and connection. Additionally, the Server Administrator home page provides extensive, context-sensitive online help.
Instrumentation Service
The Instrumentation Service provides rapid access to detailed fault and performance information gathered by industry-standard systems management agents. It also allows remote administration of monitored systems, including shutdown, startup, and security.
Remote Access Service
The Remote Access Service provides a complete remote system management solution for systems equipped with remote access controllers. For more information on the Remote Access Service, see the documentation for Dell Remote Access Controllers on the Dell Support website at support.dell.com/manuals.
Storage Management Service
The Storage Management Service provides storage management information in an integrated graphical view. The Storage Management Service enables you to view the status of local storage attached to a monitored system using PowerEdge Expandable RAID Controller (PERC). Virtual Disks (generally called LUNs) can also be created using this service.
Logs
Server Administrator displays logs of commands issued to or by the system, monitored hardware events, POST events, and system alerts. You can view logs on the home page, print, or save them as reports, and send them by e-mail to a designated service contact.
20 Managing Your NAS System
book.book Page 21 Thursday, September 2, 2010 2:36 PM
Remote Desktop for AdministrationYou can remotely administer a storage appliance by using Remote Desktop for Administration (formerly known as Terminal Services in Remote Administration mode). You can use it to administer a computer from virtually any computer on your network. Based on the terminal services technology, remote desktop for administration is specifically designed for server management.
Remote desktop for administration does not require the purchase of special licenses for client computers that access the server. It is not necessary to install Terminal Server Licensing when using remote desktop for administration.
You can use remote desktop for administration to log on to the server remotely with any of the following features:
• Remote Desktop Connection
• Remote Web Administration
• Microsoft Windows Server Remote Administration Applet
For more information, see Remote Desktop for Administration, which is also available in Windows Server 2008 Help.
NOTE: For secure connections, it is recommended to obtain a certificate for the server and use HTTPS connections to connect to Windows Storage Server 2008.
Remote Desktop ConnectionAdministrators can fully administer computers running Windows Storage Server 2008 from a Windows-based computer by using Remote Desktop Connection. To facilitate access, administrators can create a remote desktop connection and save it to the desktop of the computer that is used for administration.
To create and save a remote desktop connection to Windows Storage Server 2008:
1 Click Start Run. In the Run dialog box, type MSTSC and then click OK.
2 In the Remote Desktop Connection window, type the computer name or IP address of the storage appliance, and then click Options.
3 In the Remote Desktop Connection window, click Save As in the Connection Settings box. The Save As window appears.
Managing Your NAS System 21
book.book Page 22 Thursday, September 2, 2010 2:36 PM
4 In the File name field, type a name for the connection, and leave the extension as .rdp.
5 In the Save-in drop-down menu, select Desktop and click Save.
For more information about configuring your remote desktop connection, click Help in the Remote Desktop Connection window.
22 Managing Your NAS System
book.book Page 23 Thursday, September 2, 2010 2:36 PM
5Updating Your NAS SystemTo update your NAS system with the latest software:
1 Go to the Dell Support website at support.dell.com and download the latest PowerVault NAS appliance software and all Dell Update Packages that correspond to your system.
For example, if you have a PowerVault NX300, download the NAS Appliance Software for NX300 in addition to all Dell Update packages for that system.
2 Double-click the downloaded file and follow the wizard that guides you through the process.
NOTE: The PowerVault NAS Appliance Software only runs on corresponding PowerVault NX systems.
Updating Your NAS System 23

book.book Page 24 Thursday, September 2, 2010 2:36 PM
24 Updating Your NAS System
book.book Page 25 Thursday, September 2, 2010 2:36 PM
6Reinstalling the NAS Operating System
CAUTION: It is recommended that you backup the internal disk drives on your system before reinstalling the NAS Operating System.
1 Insert your Dell PowerVault NAS Operating System Reinstall DVD and shut down the system.
2 Restart your NAS system and boot from the DVD.
NOTE: Your NAS system boots to the DVD by default. You may need to change the boot order if this was modified in the past.
The operating system reinstallation begins and proceeds without any user intervention if no errors are encountered. This process takes around 30–45 minutes to complete. Errors encountered are flagged on the front panel LCD of your device. To resolve issues, see the Dell PowerVault Network Attached Storage (NAS) Systems Troubleshooting Guide on the Dell Support website at support.dell.com/manuals.
3 After the operating system reinstallation is complete, PowerVault NAS Initial Configuration Wizard appears on your desktop.
4 Go to the Dell Support website at support.dell.com and download the latest PowerVault NAS Appliance Software for the NAS system.
For example, if you have a PowerVault NX300, download the NAS Appliance Software for NX300.
5 Copy the NAS Appliance Software package to a USB key, removable media, or network share.
Reinstalling the NAS Operating System 25
book.book Page 26 Thursday, September 2, 2010 2:36 PM
6 The PowerVault NAS Initial Configuration Wizard guides you through the following steps:
• Installing the NAS Appliance software
• Changing the default administrator password
• Installing the back-end storage software (when applicable)
• Selecting and installing the language pack if needed
7 After the PowerVault NAS Initial Configuration Wizard completes, the NAS system reboots to apply the settings.
8 After reboot, log on to the system using the administrator account to launch the Server Manager.
26 Reinstalling the NAS Operating System
book.book Page 27 Thursday, September 2, 2010 2:36 PM
7Using Your NAS System
Creating Server Message Block SharesServer Message Block (SMB) protocol is an access control for Microsoft Windows -based file systems and is implemented by granting permissions to individual users and groups.
To create an SMB share using Server Manager:
1 Click StartProgramsAdministrative Tools Share and Storage Management or, go to Server Manager Roles File Services Share and Storage Management.
2 On the right pane, select Provision Share.
3 Browse and select the volume that you want to enable as an SMB share and run the wizard.
4 Select SMB as the share protocol.
The folder name is displayed as share name followed by the share path.
5 Specify the SMB settings and SMB permissions in the subsequent screens.
Review Settings and Create Share allows you to revise the share settings before you actually create it.
6 After reviewing the share settings, click Create to create the share.
7 Close the confirmation screen.
To modify the properties of an existing share:
1 Select the share from the middle pane of Share and Storage Management.
2 Right-click and select Properties.
3 Select different tabs to change the properties.
The newly-created SMB shared folder can be accessed from a Windows- based client.
Using Your NAS System 27
book.book Page 28 Thursday, September 2, 2010 2:36 PM
NFS ShareNetwork File System (NFS) protocol provides access control (for UNIX-based file systems) and is implemented by granting permissions to specific client systems and groups, using network names.
NOTE: NFS is not available on Windows Storage Server 2008 Basic Edition.
Identity Mapping Before creating the NFS share, the administrator must configure Identity Mapping.
The identity mapping source can be any one of the following:
• Microsoft Active Directory domain name server (Microsoft Windows Server 2003 domain controller or Microsoft Windows Server 2008 domain controller)
• User Name Mapping (UNM) server
• Active Directory Lightweight Directory Services (AD LDS)
Choose the appropriate option from the four available options, perform the actions, and proceed to the configuration steps followed by steps for creating NFS share.
Option 1: Windows 2003 Domain Controller as Identity Mapping SourceGo to the Windows 2003 Domain Controller and install Identity Management for UNIX.
NOTE: You may need the Windows 2003 SP 2 CD/DVD.
If required, insert the Windows 2003 SP 2 CD/DVD and perform the following:
1 Click Add or Remove Programs Add or Remove Windows Components Active Directory Services.
2 Click Details.
3 Select Identity Management for Unix and click Next to complete the installation.
NOTE: Reboot your system after the installation is complete.
28 Using Your NAS System
book.book Page 29 Thursday, September 2, 2010 2:36 PM
Option 2: Windows 2008 Domain Controller as Identity Mapping SourceGo to the Windows 2008 Domain Controller and install Identity Management for Unix using Server Manager Roles Add Role Services.
NOTE: Windows 2008 Domain Controller needs to be rebooted to activate this service.
Configuration Steps
1 Go to NFS client, note down the user name, group name, UID and GID details.
2 Go to the Domain Controller.
3 Open Active Directory Users and Computers, and create the UNIX user name and group.
4 Add the user to the group created in the previous step.
5 Select the newly-created user, go to Properties Unix Attributes. Modify the UID, GID, shell, home directory, and domain details (captured earlier from the NFS client).
6 Select the newly-created group, check the GID (ensure it matches the UNIX GID), modify the UNIX properties, add the members (users that you added in the previous step) and click Apply.
7 Go to PowerVault NAS Windows Storage Server 2008 (NFS) Server.
8 Click StartPrograms Administrative Tools Services for Network File System (NFS).
9 Select Services for NFS, right-click Properties Active Directory domain name as your Identity mapping source, type the Windows 2008 domain name and click Apply.
Option 3: User Name Mapping (UNM) Server as Identity Mapping Source1 On the NAS system, click Start Administrative Tools Services for
Network File System (NFS).
2 In the window that appears, right-click Services for NFS and select Properties.
3 Select User Name Mapping as the Identity mapping source and type the Hostname of your User Name Mapping server in the space provided.
Using Your NAS System 29
book.book Page 30 Thursday, September 2, 2010 2:36 PM
4 Go to the UNM server, copy the password, and group the files you collected in the previous step to a local disk.
5 Go to Add or Remove Programs Add Windows Components Select Other Network File and Print Services.
6 Click Details.
7 Select Microsoft Services for NFS, click Details and select User Name Mapping.
8 Click Next and complete the installation.
NOTE: Reboot your system after the installation is complete.
Configuration Steps
1 Go to the NFS client, obtain the /etc/passwd and /etc/group files and copy them to a USB key.
2 Go to the UNM server and copy the UNIX files from the USB key to a local hard disk. Open Microsoft Services for NFS.
3 Select User Name Mapping and then right-click Properties.
4 Go to UNIX User Source tab and select the Use Password and Group Files option.
5 Click the Browse button, select the password and group files that you had copied in the previous step.
6 Go to the Simple Mapping tab, select the Use simple maps option, and click Apply.
7 Select User Maps, and right-click Create Map.
8 Click List Windows Users and List UNIX Users options. Map the users (select one user at a time) and add to the list. Repeat this step for other listed users.
9 Open Group MapsCreate Maps.
10 List Windows & Unix groups, map them and add to the list.
Open the .maphosts file (C:\Windows\msnfs and C:\Windows\amd64\cmpnents\r2 and look for the .maphosts file) and add the NFS server details (IP 4 address or host name, if DNS exists) and save the file.
30 Using Your NAS System
book.book Page 31 Thursday, September 2, 2010 2:36 PM
Option 4: Active Directory Lightweight Directory Services (AD LDS) as Identity Mapping SourceAD LDS is used for identity mapping on computers that run Windows Server 2008 in an environment where no Active Directory exists to support user mapping.
Before you start AD LDS mapping:
• Determine the users and groups on the UNIX-based computer that must be mapped to users and groups on the Windows-based computer.
• Get the UID and GID for each UNIX user, and the GID for each UNIX group.
• Create a user or group on the Windows-based computer for each UNIX user or group to be mapped.
NOTE: Each UID and GID requires a unique mapping. You cannot use one-to-many or many-to-one mappings.
To configure AD LDS for services for NFS you must:
1 Install the AD LDS server role.
2 Create a new AD LDS instance.
3 Extend the AD LDS schema to support NFS user mapping.
4 Set a default instance name for AD LDS instances.
5 Update the active directory schema.
6 Add user and group account maps from a UNIX-based computer to a Windows-based computer.
7 Authorize appropriate access to the ADS LDS namespace object.
8 Configure the mapping source.
Installing the AD LDS Server Role
To install the AD LDS server role:
1 Click StartAdministrative Tools Server Manager.
2 In the console tree, right-click the Roles node, and then click Add Roles to start the Add Roles Wizard.
3 In the Add Roles Wizard, read the information in the Before You Begin window and then click Next.
Using Your NAS System 31

book.book Page 32 Thursday, September 2, 2010 2:36 PM
NOTE: The Before You Begin window is not displayed if the Skip this page by default check box is selected.
4 On the Select Server Roles window, select the Active Directory Lightweight Directory Services check box, and then click Next.
NOTE: If additional features are required for installing AD LDS, a pop-up window appears. Click Add Required Features to continue, and then click Next.
5 On the Active Directory Lightweight Services window, review the summary information, and then click Next.
6 On the Confirm Installation Selections window, read any informational messages, and then click Install.
7 Review the Installation Results window to verify that the installation succeeded.
8 Click Close to exit the wizard.
The Active Directory Lightweight Directory Services node is created under the Roles node in the console tree.
Creating a New AD LDS Instance
To create a new AD LDS instance:
1 Click Start Administrative Tools Active Directory Lightweight Directory Services Setup Wizard.
2 On the Welcome to the Active Directory Lightweight Directory Services Setup Wizard window, click Next.
3 On the Setup Options window, select a unique instance, and then click Next.
4 On the Instance Name window, type a name for the instance, and then click Next.
NOTE: For this example, you can use nfsadldsinstance as the instance name.
5 On the Ports window, fill in the LDAP port number and SSL port number text boxes, and then click Next.
NOTE: The default LDAP port number is 389 and the default SSL port number is 636.
6 On the Application Directory Partition window, select the Yes, create an application directory partition.
32 Using Your NAS System
book.book Page 33 Thursday, September 2, 2010 2:36 PM
7 In the Partition name text box, use the following format to type a partition name that does not already exist in this instance:
CN=<Partition>,DC=<Computer name>
NOTE: By convention, this string is based on the fully qualified domain name; for example, if the instance name is nfsadldsinstance and the server name is server1, the partition name would be represented as follows: CN=nfsadldsinstance,DC=server1.
8 After typing the partition name, click Next.
9 On the File Locations window, in the Data files and the Data recovery files text boxes, type or browse to the locations where you want to store files associated with AD LDS, and then click Next.
10 On the Service Account Selection window, select Network service account, and then click Next.
NOTE: If the computer is not a member of a domain, a notification message appears. It warns you that this AD LDS instance cannot replicate data with AD LDS instances on other computers while using this service account.
11 Click Yes to continue or No to cancel.
12 On the AD LDS Administrators window, select the currently logged on user: <Username> option, and then click Next.
13 On the Importing LDIF Files window, select the check box for each LDIF file name that you want to import, and then click Next.
NOTE: MS-InetOrgPerson.LDF and MS-User.LDF are required.
14 On the Ready to Install window, under Selections, review the listed selections, and then click Next.
15 Click Finish to exit the wizard.
To verify if an active AD LDS instance exists, start Services.msc. Each AD LDS instance is listed. Add/Remove Programs should also show that AD LDS is present.
Using Your NAS System 33
book.book Page 34 Thursday, September 2, 2010 2:36 PM
Extending the AD LDS Schema to Support NFS User Mapping
To extend the AD LDS schema:
1 Click Start, right-click Command Prompt, and then click Run as administrator to open an elevated command prompt.
2 Navigate to the C:\WINDOWS\ADAM directory, and then type the following command:
ldifde -i -u -f MS-AdamSchemaW2K8.LDF -s localhost:389 -j . -c "cn=Configuration,dc=X" #configurationNamingContext
This command imports the MS-AdamSchemaW2K8.LDF file.
NOTE: This example uses the default LDAP port number 389 for the AD LDS instance. The strings "cn=Configuration,dc=X" and #configurationNamingContext should not be modified.
Setting a Default Instance Name for AD LDS Instances
To manage the AD LDS instance:
1 Click StartAdministrative ToolsADSI Edit to open ADSI Edit.
2 In the console tree, right-click ADSI Edit and then click Connect to.
This opens the Connection Settings dialog box.
a Under Connection Point, select the Select a well known Naming Context option, and then select Configuration from the drop-down menu.
b Under Computer, choose the Select or type a domain or server option, and then type the following in the text box: localhost:389
NOTE: This example uses the default LDAP port number 389. If you specified a different port number in the Active Directory Lightweight Directory Services Setup Wizard, use that value instead.
3 Click OK. ADSI Edit refreshes to display the new connection.
4 In the resulting tree, under the Configuration node, click CN=Configuration, click CN=Sites, click CN=Default-First-Site-Name, click CN=Servers, click CN=server1$ nfsadldsinstance, and then click CN=NTDS Settings.
34 Using Your NAS System
book.book Page 35 Thursday, September 2, 2010 2:36 PM
5 Right-click CN=NTDS Settings, and then click Properties.
6 In the Properties dialog box, click msDs-DefaultNamingContext, and then click Edit.
7 In the String Attribute Editor, in the Value text box, type CN=nfsadldsinstance, dc=server1, and then click OK.
8 Close ADSI Edit.
Updating the Active Directory Schema
To update the Active Directory schema:
1 Click Start, right-click Command Prompt, and then click Run as administrator to open an elevated command prompt.
2 Navigate to the C:\WINDOWS\ADAM directory, and then type the following command:
regsvr32 schmmgmt.dll
This command enables the Active Directory plug-in, schmmgmt.dll.
3 Click Start Run, and type MMC to open the Microsoft Management Console (MMC).
4 On the File menu, click Add/Remove Snap-in.
5 In the Add or Remove Snap-ins dialog box, click Active Directory Schema.
6 Click Add, and then click OK.
7 Right-click the Active Directory Schema node, and then click Change Active Directory Domain Controller to connect to the AD LDS instance that was previously created.
8 In the Change Directory Server dialog box, under Change to, click This Domain Controller or AD LDS instance.
9 In the Name column, replace the placeholder text <Type a Directory Server name[:port] here> with the server and port number (for example, localhost:389).
10 Click OK.
11 Add the gidNumber and uidNumber attributes to the user class as follows:
Using Your NAS System 35
book.book Page 36 Thursday, September 2, 2010 2:36 PM
a Expand the Active Directory Schema node, expand the Classes node, right-click User, and then click Properties.
b In the Properties dialog box, click the Attributes tab.
c Click Add to open the Select Schema Object dialog box.
d Click gidNumber, and then click OK.
e Click Add to open the Select Schema Object dialog box.
f Click uidNumber, and then click OK.
g Click OK.
12 Add the gidNumber attribute to the group class as follows:
a Expand the Active Directory Schema node and the Classes node.
b Right-click Group, and then click Properties.
c In the group Properties dialog box, click the Attributes tab.
d Click Add to open the Select Schema Object dialog box.
e Click gidNumber, and then click OK.
f Click OK.
13 Close the MMC, and then click Save.
Adding User and Group Account Maps from a UNIX-based Computer to a Windows-Based Computer
The following steps are included in this procedure:
• Connecting to the Distinguished Name or Naming Context. Follow this procedure to set a default naming context and create a container to hold your account mappings from UNIX to the Windows operating system.
• Adding User Account Maps. Follow this procedure to create a user-class object in the CN=Users container, to map the uidNumber, gidNumber, and sAMAccountName attributes.
• Adding Group Account Maps. Follow this procedure to create a group-class object in the CN=Users container, to map the gidNumber and sAMAccountName attributes.
36 Using Your NAS System
book.book Page 37 Thursday, September 2, 2010 2:36 PM
Connecting to the Distinguished Name or Naming Context
1 Click StartAdministrative Tools ADSI Edit to open ADSI Edit.
2 In the console tree, right-click ADSI Edit and then click Connect to.
This opens the Connection Settings dialog box.
3 Under Connection Point, select the Select a well known Naming Context option.
4 Click Default naming context from the drop-down menu.
5 Under Computer, select the Select or type a domain or server option, and then type the server name and port number into the text box, separated by a colon (for example, localhost:389).
6 Click OK. ADSI Edit refreshes to display the new connection.
7 In the resulting tree, under the Default naming context node, right-click the partition name, point to New, and then click Object.
NOTE: For this example, under the Default naming context [localhost:389], select the following properties: CN=nfsadldsinstance, DC=server1.
8 In the Create Object dialog box, select the Container class, and then click Next.
9 In the Value text box, type Users, and then click Next.
This value specifies the name of the container object that is used to hold your user account mappings.
10 Click Finish.
Adding User Account Maps
1 In ADSI Edit, expand the Default naming context node, and then expand the partition name.
2 Right-click CN=Users, point to New, and then click Object.
3 In the Create Object dialog box, select the User class, and then click Next.
4 In the Value text box, type the user’s name, and then click Next.
NOTE: The user’s name is not associated with the Windows or Unix user, and can be a random entry.
5 Click the More Attributes button to edit the uidNumber, gidNumber, and sAMAccountName attributes of this user account.
Using Your NAS System 37
book.book Page 38 Thursday, September 2, 2010 2:36 PM
NOTE: The uidNumber and gidNumber represent the UID and GID of the UNIX user who is being mapped, and sAMAccountName must match the name of a local Windows user on the computer that is running Server for NFS. If, after selecting the More Attributes button, the uidNumber and gidNumber do not appear, close and open the ADSI Edit MMC.
6 Click OK.
Adding Group Account Maps
1 In ADSI Edit, expand the Default naming context node, and then expand the partition name.
2 Right-click CN=Users, point to New, and then click Object.
3 In the Create Object dialog box, select the Group class, and then click Next.
4 Ensure that the group object’s name matches the name of the group account for which group account mapping is desired.
5 Set the gidNumber and sAMAccountName attributes for the new group object.
NOTE: The gidNumber is the GID of the UNIX group that is being mapped, and sAMAccountName must match the name of a local group on the Windows-based computer that is running Server for NFS. If, after selecting the More Attributes button, the uidNumber and gidNumber do not appear, close and open the ADSI Edit MMC.
6 Click OK, and then click Finish to exit the wizard.
Authorizing Appropriate Access to the ADS LDS Namespace Object
To connect to the Configuration partition:
1 Click Start, right-click Command Prompt, and then click Run as administrator to open an elevated command prompt.
2 Navigate to the C:\WINDOWS\ADAM directory, and then run the dsacls command to grant the Everyone group read access to the mapping data store as follows:
dsacls "\\server1:389\CN=nfsadldsinstance,dc=server1" /G everyone:GR /I:T
38 Using Your NAS System
book.book Page 39 Thursday, September 2, 2010 2:36 PM
3 Optionally, if you are setting up a shared AD LDS store to allow multiple NFS servers to query the account mapping database, add the mapping data store to the ACL to allow Read permissions for the Anonymous Logon account as follows:
dsacls "\\server1:389\CN=nfsadldsinstance,dc=server1" /G "anonymous logon":GR /I:T
NOTE: You can skip this step if there is no shared access between computers to the mapping data store.
Configuring the Mapping Source
To configure the mapping source:1 Click Start, right-click Command Prompt, and then click Run as
administrator to open an elevated command prompt.2 Run the following command, where <Computer> is the name of the
computer where the AD LDS instance was created, and where <Port> is the port that the AD LDS instance uses:
nfsadmin mapping config adlookup=yes addomain=<Computer>:<Port>
NOTE: For this example, use the following:
nfsadmin mapping config adlookup=yes addomain=server1:389
3 Test the setup by accessing the NFS resources and verifying that the user and group account mappings work as expected.
Debug Notes for NFS Account Mapping Problems
Server for NFS can be made to log account mapping failures to the Windows Event Log service by setting the following registry key:
HKEY_LOCAL_MACHINE\System\CurrentControlSet\Services\nfsserver\Parameters\VerboseMappingFailureLogging INVALID USE OF SYMBOLS REG_DWORD = 1
Using Your NAS System 39
book.book Page 40 Thursday, September 2, 2010 2:36 PM
After you create the key, you must restart Server for NFS.
To restart Server for NFS:
1 Click Start, right-click Command Prompt, and then click Run as administrator to open an elevated command prompt.
2 Run the following command:
nfsadmin server stop && nfsadmin server start
Creating the NFS ShareBefore creating the NFS share, see "NFS Share" on page 28.
After completing the prerequisites and configuration steps, follow the instructions below to create the NFS share.
1 Click StartProgramsAdministrative tools Share and Storage Management, or click Server Manager Roles File Services Share and Storage Management.
2 On the right pane, select Provision Share.
3 Browse and select the volume that you want to enable as an NFS share and follow the wizard.
4 Select NFS as the share protocol.
The folder name is displayed as share name followed by the share path. Specify the NTFS/NFS settings and permissions in the next screens.
NOTE: While creating the share, modify the NTFS settings to add the newly-created group details with specific permissions. (This adds all new users that you included in that group).
5 Before the NFS share is created, Review settings and Create Share allows you to revise the share settings before you actually create it.
6 Click Create to proceed.
7 Close the confirmation screen.
8 Go to NFS client and perform an NFS mount.
NOTE: Only the UNIX user (who was added in the domain user list) has access to the NFS share. If you have enabled Anonymous access for the NFS share, all UNIX users have access to the share.
40 Using Your NAS System
book.book Page 41 Thursday, September 2, 2010 2:36 PM
Creating Quotas and File ScreensYou can either use File Server Resource Manager (FSRM) from Administrative Tools or Share and Storage Management for your Quotas and File Screen operations.
Option 1: Share and Storage Management Wizard
Quotas and File Screens can be created using the Share and Storage Management Wizard while creating an NFS or SMB share.
1 Run the Provision Share wizard, create NFS or SMB share, and run through the wizard.
After the Share Permission screen, the Quota Policy screen is displayed.
2 Select the Apply Quota check box and select an option for Derive properties from this quota template.
3 Click Next to go to the File Screen Policy screen.
4 Select the Apply File Screen check box and select an option for Derive properties from this file screen template.Review settings and Create Share lists the Quota Policy and File Screen Policy details.
5 To make changes, click the Previous button otherwise click Create.
The selected options (NFS/SMB Share, Quota, and File Screen) are created.
Option 2: File Server Resource Manager
1 Click Start Administrative Tools File Server Resource Manager.
2 Click Quota Management to display Quotas and Quota Template.
3 Click Quota, either right-click or use the Create Quota option from the right pane.
4 Follow the wizard, select the path (volume or folder in which you want to create the quota), set your preferred Quota Properties and click Create.
The newly-created quota is displayed in the central pane.
5 Select any of the existing quotas and right-click or use the options in the right pane to change the quota properties.
Using Your NAS System 41
book.book Page 42 Thursday, September 2, 2010 2:36 PM
6 Click File Screening ManagementFile Screens.
7 Either right-click or use Create File Screen option from the right pane.
8 Follow the wizard, select the path (volume or folder in which you want to create the file screen), select your preferred File Screen Properties and click Create.
The newly-created file screen is displayed in the central pane.
9 Select any of the existing file screens and right-click or use the options in right-most panes to change the file screen properties.
Creating a New VolumePerform the following configuration steps.
NOTE: Backup Operator or Administrator is the minimum membership required to perform this configuration.
1 From your NAS system or remote desktop, open disk management, select the Rescan Disks option.
The central pane lists the LUNs of storage located on your NAS system.
NOTE: The default status for the newly-created LUN in Disk management is Unknown and Offline.
2 Select the Disk, right-click, and select the Online option.
Now the disk is seen as Unknown and Not Initialized.
3 Select the Disk, right-click, and select the Initialize Disk option. In the Initialize Disk dialog box, select the disk(s) to initialize.
A pop-up window to select the partition style for the selected disks is displayed with the following options:
a MBR (Master Boot Record)
b GPT (GUID Partition Table)
4 Select a partition style and click OK.
NOTE: The disk is initialized as a basic disk.
5 In the middle pane, select the disk and run the New Simple Volume… wizard.
42 Using Your NAS System
book.book Page 43 Thursday, September 2, 2010 2:36 PM
6 Select the volume size, assign the drive letter, choose the file system type, type in the volume label, select the format option, and complete the volume create operation.
Managing a VolumeDisk Management can be used to manage disks and volumes.
• You can initialize disks, create volumes, and format volumes with the FAT, FAT32, or NTFS file systems using Disk Management.
• Disk Management enables you to perform most disk-related tasks without restarting the system or interrupting users. Most configuration changes take effect immediately.
Extending a VolumeYou can add more space to existing primary partitions and logical drives by extending them into adjacent un-allocated space on the same disk. To extend a basic volume, it must be raw or formatted with the NTFS file system.
PrerequisitesIf you do not have un-allocated space in your disk, use Dell OpenManage Server Administrator to extend your LUN before you extend your volume.
To extend a basic volume using the Windows interface:
1 In Disk Management, right-click the Basic Volume you want to extend.
2 Click Extend Volume….
3 Follow the instructions on your screen. Choose the disk, type in the amount of space and complete the wizard.
To extend a basic volume using CLI:
1 Open a command prompt window and type diskpart.
2 At the DISKPART prompt, type list volume.
3 Make note of the basic volume you want to extend.
4 At the DISKPART prompt:
Using Your NAS System 43
book.book Page 44 Thursday, September 2, 2010 2:36 PM
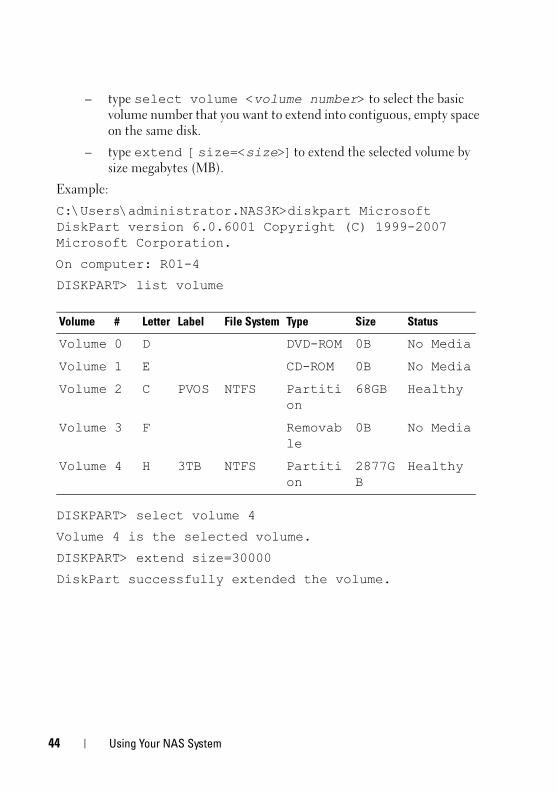
– type select volume <volume number> to select the basic volume number that you want to extend into contiguous, empty space on the same disk.
– type extend [size=<size>]to extend the selected volume by size megabytes (MB).
Example:
C:\Users\administrator.NAS3K>diskpart Microsoft DiskPart version 6.0.6001 Copyright (C) 1999-2007 Microsoft Corporation.
On computer: R01-4
DISKPART> list volume
DISKPART> select volume 4
Volume 4 is the selected volume.
DISKPART> extend size=30000
DiskPart successfully extended the volume.
Volume # Letter Label File System Type Size Status
Volume 0 D DVD-ROM 0B No Media
Volume 1 E CD-ROM 0B No Media
Volume 2 C PVOS NTFS Partition
68GB Healthy
Volume 3 F Removable
0B No Media
Volume 4 H 3TB NTFS Partition
2877GB
Healthy
44 Using Your NAS System
book.book Page 45 Thursday, September 2, 2010 2:36 PM
Shrinking a VolumeYou can decrease the space used by primary partitions and logical drives by shrinking them into adjacent, contiguous space on the same disk. For example, if you discover that you need an additional partition but do not have additional disks, you can shrink the existing partition from the end of the volume to create new un-allocated space that can then be used for a new partition.
For shrinking a volume:
1 In Disk Manager, right-click the Basic Volume you want to shrink.
2 Click Shrink Volume….
3 Follow the instructions on your screen.
NOTE: You can only shrink basic volumes that have no file system or use the NTFS file system.
Additional Considerations
• When you shrink a partition, unmovable files (for example, the page file or the shadow copy storage area) are not automatically relocated and you cannot decrease the allocated space beyond the point where the unmovable files are located.
• If the number of bad clusters detected by dynamic bad-cluster remapping is too high, you cannot shrink the partition. If this occurs, you should consider moving the data and replacing the disk.
• Do not use a block-level copy to transfer the data. The block-level copy also copies the bad sector table and the new disk treats the same sectors as bad even though they are normal.
• You can shrink primary partitions and logical drives on raw partitions (those without a file system) or partitions using the NTFS file system.
Using Your NAS System 45
book.book Page 46 Thursday, September 2, 2010 2:36 PM
Deleting a Volume CAUTION: You must delete all shares and shadow copies from your volume
before deleting it. If a volume is removed before all shares of that volume have been removed, the Server Manager might not display shares correctly.
In Disk Management, right-click the Basic Volume you want to delete and select the Delete Volume… option. Selecting Yes on the confirmation screen deletes the volume.
Additional Information
Some new features of disk management:
• Simpler partition creation—When you right-click a Volume, you can choose whether to create a basic, spanned, or striped partition directly from the menu.
• Disk conversion options—When you add more than four partitions to a basic disk, you are prompted to convert the disk to dynamic or to the GUID Partition Table (GPT) partition style.
• Extend and shrink partitions—You can extend and shrink partitions directly from the Windows interface.
Enabling or Disabling SIS on a VolumeSIS is a solution for managing duplicate files. It helps recover disk space by reducing the amount of redundant data stored on a volume. It identifies identical files and stores only a single copy of the file in the SIS Common Store while replacing duplicate files with link (pointers) to the file in the SIS Common Store.
SIS is enabled or disabled on individual volumes on your storage appliance. When you disable SIS on a volume that is using SIS, the Groveler service is stopped. SIS can also be paused or disabled temporarily by pausing the Groveler service or changing its priority by using the Sisadmin.exe utility.
Membership in the local Administrators group, or equivalent, is the minimum requirement to complete this procedure.
NOTE: SIS is not available on Windows Storage Server 2008 Workgroup and Basic Editions.
46 Using Your NAS System
book.book Page 47 Thursday, September 2, 2010 2:36 PM
Enabling SIS on a Volume1 On the Volumes tab in Share and Storage Management, click the volume
for which you want to enable SIS.
2 In the Actions pane, click Properties.
3 On the Advanced tab, select the Enable SIS on this volume check box and click OK.
Disabling SIS on a Volume1 On the Volumes tab in Share and Storage Management, click the Volume
for which you want to disable SIS.
2 In the Actions pane, click Properties.
3 On the Advanced tab, clear the Enable SIS on this volume check box, and then click OK.
Enabling Shadow Copies of Shared FoldersIf you enable Shadow Copies of Shared Folders on a volume using the default values, tasks are scheduled to create shadow copies at 7:00 A.M. and noon. The default storage area is on the same volume, and its size is 10 percent of the available space.
You can only enable Shadow Copies of Shared Folders on a per-volume basis; you cannot select specific shared folders and files on a volume to be copied or not copied.
NOTE: Creating shadow copies is not a replacement for creating regular backups.
Enabling and Configuring Shadow Copies of Shared Folders
CAUTION: There is a limit of 64 shadow copies per volume. When this limit is reached or when storage area limits are reached, the oldest shadow copy is deleted. When deleted, the shadow copy cannot be retrieved.
1 Open Server Manager Disk Management.2 Right-click the volume and select the Properties tab. Click the Shadow
Copies tab. 3 Click the volume where you want to enable Shadow Copies of Shared
Folders and then click Enable.4 To change the storage location, space allocation, and schedule, click
Settings.
Using Your NAS System 47
book.book Page 48 Thursday, September 2, 2010 2:36 PM
Performing Backup of Your Server
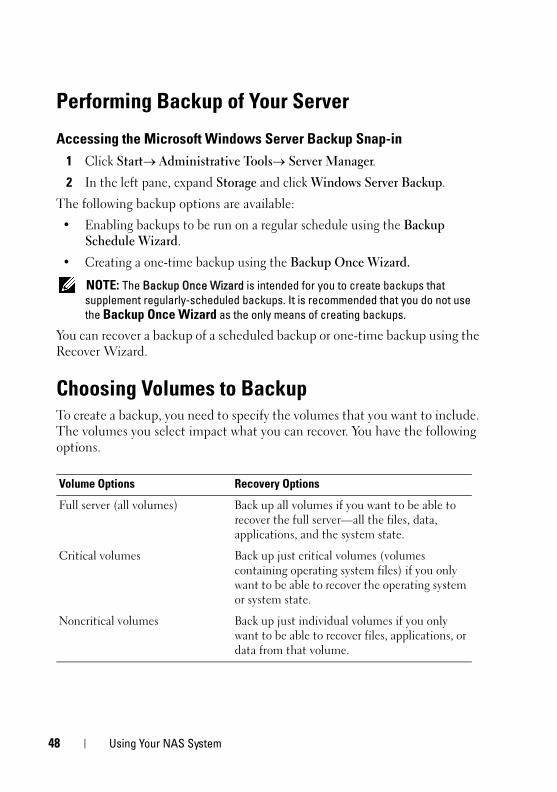
Accessing the Microsoft Windows Server Backup Snap-in1 Click Start Administrative Tools Server Manager.
2 In the left pane, expand Storage and click Windows Server Backup.
The following backup options are available:
• Enabling backups to be run on a regular schedule using the Backup Schedule Wizard.
• Creating a one-time backup using the Backup Once Wizard.
NOTE: The Backup Once Wizard is intended for you to create backups that supplement regularly-scheduled backups. It is recommended that you do not use the Backup Once Wizard as the only means of creating backups.
You can recover a backup of a scheduled backup or one-time backup using the Recover Wizard.
Choosing Volumes to BackupTo create a backup, you need to specify the volumes that you want to include. The volumes you select impact what you can recover. You have the following options.
Volume Options Recovery Options
Full server (all volumes) Back up all volumes if you want to be able to recover the full server—all the files, data, applications, and the system state.
Critical volumes Back up just critical volumes (volumes containing operating system files) if you only want to be able to recover the operating system or system state.
Noncritical volumes Back up just individual volumes if you only want to be able to recover files, applications, or data from that volume.
48 Using Your NAS System
book.book Page 49 Thursday, September 2, 2010 2:36 PM
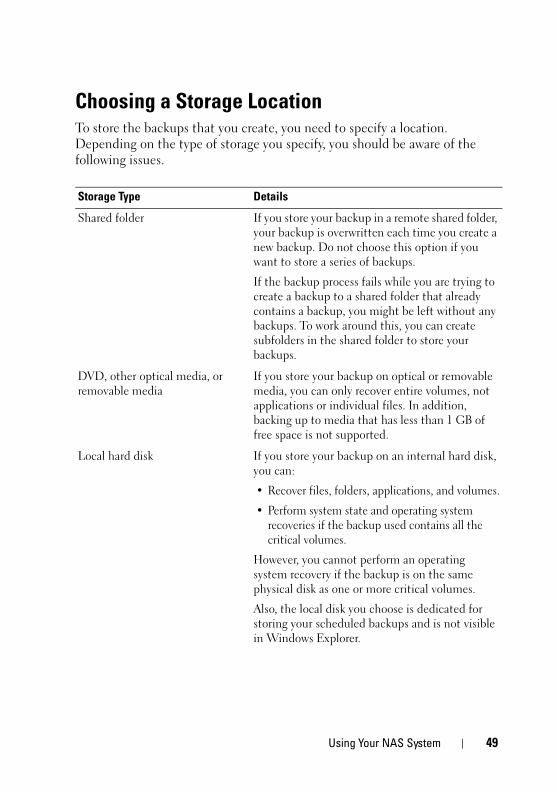
Choosing a Storage LocationTo store the backups that you create, you need to specify a location. Depending on the type of storage you specify, you should be aware of the following issues.
Storage Type Details
Shared folder If you store your backup in a remote shared folder, your backup is overwritten each time you create a new backup. Do not choose this option if you want to store a series of backups.
If the backup process fails while you are trying to create a backup to a shared folder that already contains a backup, you might be left without any backups. To work around this, you can create subfolders in the shared folder to store your backups.
DVD, other optical media, or removable media
If you store your backup on optical or removable media, you can only recover entire volumes, not applications or individual files. In addition, backing up to media that has less than 1 GB of free space is not supported.
Local hard disk If you store your backup on an internal hard disk, you can:
• Recover files, folders, applications, and volumes.
• Perform system state and operating system recoveries if the backup used contains all the critical volumes.
However, you cannot perform an operating system recovery if the backup is on the same physical disk as one or more critical volumes.
Also, the local disk you choose is dedicated for storing your scheduled backups and is not visible in Windows Explorer.
Using Your NAS System 49
book.book Page 50 Thursday, September 2, 2010 2:36 PM
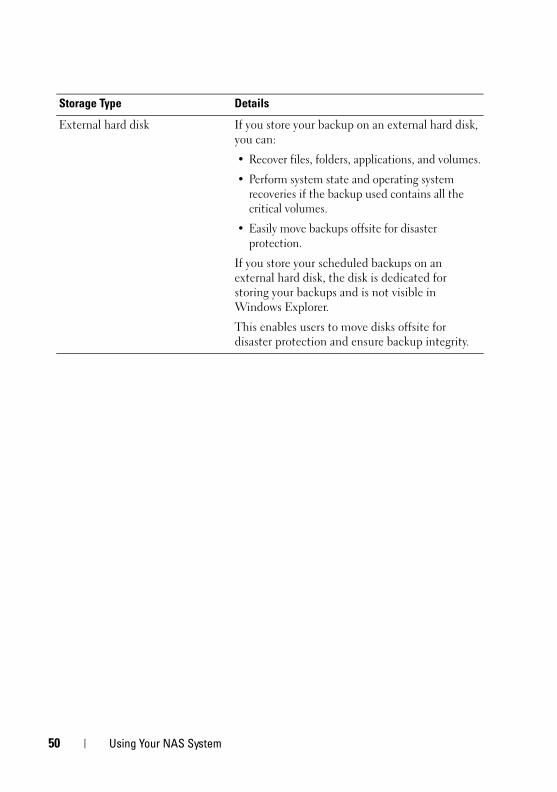
External hard disk If you store your backup on an external hard disk, you can:
• Recover files, folders, applications, and volumes.
• Perform system state and operating system recoveries if the backup used contains all the critical volumes.
• Easily move backups offsite for disaster protection.
If you store your scheduled backups on an external hard disk, the disk is dedicated for storing your backups and is not visible in Windows Explorer.
This enables users to move disks offsite for disaster protection and ensure backup integrity.
Storage Type Details
50 Using Your NAS System