Embed Size (px)
Citation preview

DellTM KM714 Wireless Keyboard and Mouse
Owner's Manual
Information in this document is subject to change without notice. © 2015 Dell Inc. All rights reserved.
Reproduction of these materials in any manner whatsoever without the written permission of Dell Inc. is strictly forbidden. Trademarks used in this text : Dell™ and the DELL logo are trademarks of Dell Inc.; Microsoft® and the Windows start button logo are either trademarks or registered trademarks of Microsoft Corporation in the United States and/or other countries.
Other trademarks and trade names may be used in this document to refer to either the entities claiming the marks and names or their products. Dell Inc. disclaims any proprietary interest in trademarks and trade names other than its own.
2015 - 03 Rev. A01
Restrictions and DisclaimersThe information contained in this document, including all instructions, cautions, and regulatory approvals and certifications, is provided by the supplier and has not been independently verified or tested by Dell. Dell cannot be responsible for damage caused as a result of either following or failing to follow these instructions.
All statements or claims regarding the properties, capabilities, speeds or qualifications of the part referenced in this document are made by the supplier and not by Dell. Dell specifically disclaims knowledge of the accuracy, completeness or substantiation for any such statements. All questions or comments relating to such statements or claims should be directed to the supplier.
Export RegulationsCustomer acknowledges that these Products, which may include technology and software, are subject to the customs and export control laws and regulations of the United States (“U.S.”) and may also be subject to the customs and export laws and regulations of the country in which the Products are manufactured and/or received. Customer agrees to abide by those laws and regulations. Further, under U.S. law, the Products may not be sold, leased or otherwise transferred to restricted end-users or to restricted countries. In addition, the Products may not be sold, leased or otherwise transferred to, or utilized by an end-user engaged in activities related to weapons of mass destruction, including without limitation, activities related to the design, development, production or use of nuclear weapons, materials, or facilities, missiles or the support of missile projects, and chemical or biological weapons.

Setup
Keyboard
Features
Troubleshooting
Specifications
Mouse
Features
Troubleshooting
Specifications
Statutory Information
Warranty
Certifications
Contents

4
Back to Contents Page
System Requirements
NOTE: The USB receiver may be pre-installed on your computer.NOTE: The documents that shipped with the keyboard and mouse may vary based on your region.NOTE: If the Caps Lock indicator does not appear on the screen or eject shortcut key does not function, download the software from www.dell.com/support/KM714
One wireless keyboardOne wireless mouse One USB receiver Two AA batteries for the mouse Two AAA batteries for the keyboard Product documentation
Contents of the Box
Setup
One USB port (for the USB receiver)Microsoft Windows 7/8/10/RT

5
Back to Contents Page
Setting Up Your Dell KM714 Wireless Keyboard and Mouse
3. Connect the USB receiver to the computer.
If your keyboard or mouse is not working, see the Troubleshooting section.
1. Install the two AAA batteries in your keyboard.
2. Install the two AA batteries in your mouse.
AAA

6
Back to Contents Page
Dell Universal Receiver Feature for Windows
Dell Universal Receiver
The Dell Universal Receiver allows up to six Dell Universal compatible wireless devices to be added to the receiver.
Dell Universal Receiver Control Panel
You can add Dell Universal compatible wireless devices to the receiver using Dell Universal Receiver Control Panel.
Installing Dell Universal Receiver Control Panel
To install Dell Universal Control Panel:
1. Turn on the computer.
2. Open the web browser and navigate to www.dell.com/support.
3. Type in the Search bar “dell universal receiver”. Then click Search.
4. Download and install the Dell Universal Receiver software in yoursystem.

7
Back to Contents Page
Using Dell Universal Receiver Control Panel
The receiver and mouse shipped with your system are paired at the factory. Use the Dell Universal Receiver Control Panel to view the connection status of your wireless mouse or pair the mouse with another receiver.
Follow the instructions on the screen to add a device or to remove pairing.

8
Back to Contents Page
1 2 3 4
Top View
Features
1. Multimedia Control Keys2. Optical-drive eject key3. Battery status light – Indicates the status of the
batteries installed on your keyboardsolid white – Appears for about 15 seconds after the
blinking amber – Battery charge is low. Replace thebatteries.

9
Back to Contents Page
Features
Bottom View1 2
1. Power switch2. Battery compartment

10
Back to Contents Page
Function Keys
Mute the sound
Decrease the volume level
Increase the volume level
Play or pause the media
Search (Windows 8 & 10)
+

11
Back to Contents Page
Application Keys
Key Combinations Function
Windows keyWin7 : Open the Start MenuWin8 : Start screen
+ E Open Windows Explorer
+ F Find a document
+ M Minimize all open windows
+ R Display the Run dialog box
+ F1 Display the Help menu
+ TAB Activate the next taskbar button
+ Ctrl + F Open the find computers window
+ Shift + M Undo minimize all windows
+ Pause/Break Open the System Properties window

12
Back to Contents Page
Troubleshooting
Check if the batteries are inserted in the correct orientation.
Check if the keyboard’s power switch is set to “On”.
Remove and reconnect the USB receiver on your computer.
Connect the USB receiver into another USB port on your computer.
Restart your computer.
Remove and reinstall the batteries. The power status light turns on (solid white) for about 15 seconds and then turns off.
If you have problems with your keyboard:

13
Back to Contents Page
Specifications
GeneralModel number Connection type Supported operating systems
Rollover Key mechanism
KM713 2.4 GHz wireless technology Microsoft Windows 8 Microsoft Windows 7Microsoft Windows 10Microsoft Windows RTPseudo N-key rollover capability Scissor
ElectricalOperating voltage 2.05V to 3.2V Battery life Approximately 12 monthsBattery required Two AAA Alkaline
Physical CharacteristicsHeight 21.2mm (± 0.4mm)Length 380.03mm (± 0.7mm) Width 122.21mm (± 0.4mm) Weight 540g (±10g), without batteries
EnvironmentalOperating temperature 0°C to 40°C Storage temperature -40°C to 65°COperating humidity 90% maximum Relative Humidity, non
condensingStorage humidity 95% maximum Relative Humidity, non
condensing
2.4 GHz WirelessRadio transmission Bi-directional communication
(Transceiver)Range Up to 10 meters

14
Back to Contents Page
Features
Top View
1. Left mouse button2. Tilt wheel3. Side button *4. Battery status light
Blinking amber - Battery charge is low. Replace the batteries.
5. Side button *6. Right mouse button
*Both side buttons perform the same function.
15
Back to Contents Page
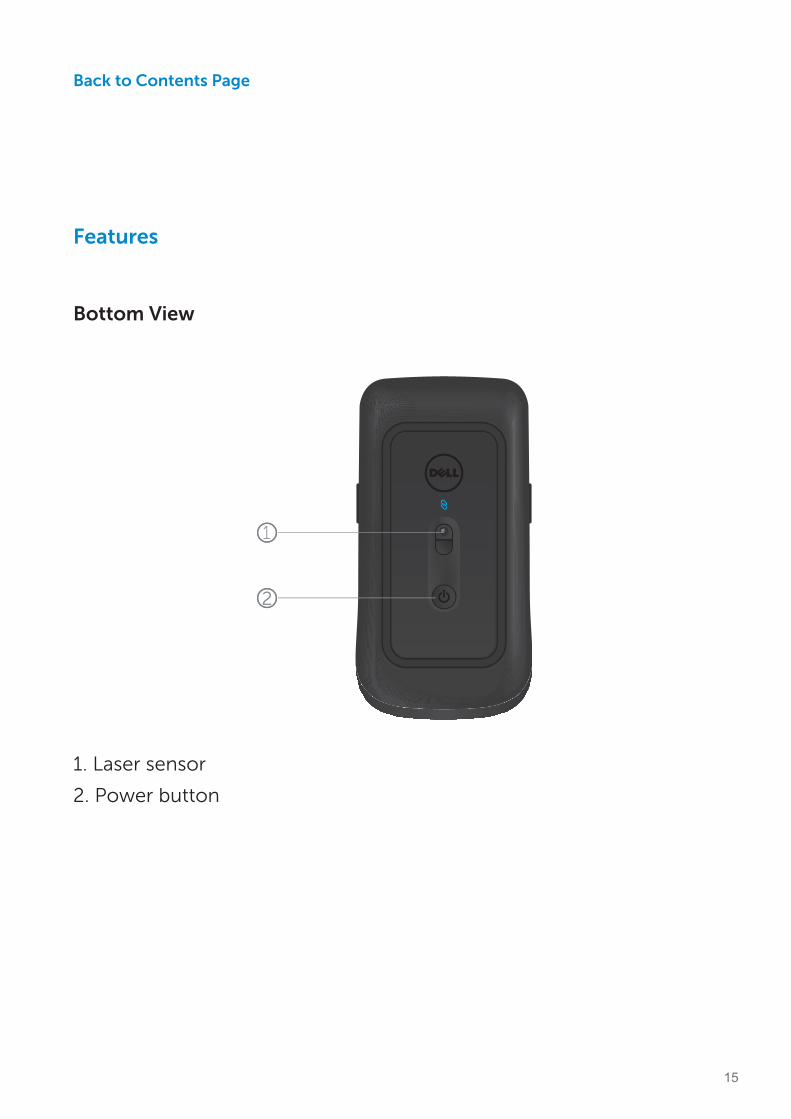
Features
Bottom View
1
2
1. Laser sensor
2. Power button

16
Back to Contents Page
Shortcut Gestures
Windows charmsPress and hold side button,and slide the mouse towards left.
(Windows 8 only)
App switchPress and hold side button,and slide the mouse towards right.
(Windows 8 only)
Scroll and pan 4-way scroll
(Windows 7 , 8 and 10)
Zoom in/outPress and hold side button, and scroll wheel up or down.
(Windows 7 , 8 and 10)
BackPress and hold side button, and tilt wheel towards left.
(Windows 7 , 8 and 10)
ForwardPress and hold side button, and tilt wheel towards right.
(Windows 7, 8 and 10)

17
Back to Contents Page
Increasing the Battery Life of your Mouse
1. Sleep mode: When the mouse has been inactivefor 5 seconds.To wake the mouse: Move, click or scroll the tilt wheel.
2. Deep sleep mode: When the mouse has beeninactive for 5 minutes.To wake the mouse: Move or click.
3. Cut-off mode: When the mouse has been carriedaround or left facing upwards for 5 minutes or when themouse has been inactive for 4 hours.To wake the mouse: Push the power button.
The mouse has three operating modes built in to conserve battery power:

18
Back to Contents Page
Troubleshooting
Check if the batteries are inserted in the correct orientation.
Check if the mouse’s power button light is on.
Remove and reconnect the USB receiver on your computer.
Insert the USB receiver into another USB port onyour computer.
Remove and reinstall the batteries. Check to see if the power button light turns on (solid white).
Restart your computer.
If you have problems with your mouse:
19
Back to Contents Page
Specifications
GeneralModel Number Connection Type Supported Operating Systems
WM514 2.4 GHz wireless technology Microsoft Windows 8 Microsoft Windows 7Microsoft Windows 10 Microsoft Windows RT
ElectricalOperating Voltage 0.95 V to 1.8 V Battery Life Approximately 12 monthsBattery Requirements Two AA Alkaline
Physical CharacteristicsHeight 33.6 ± 0.3 mm Width 58.4 ± 0.3 mm Length 109.9 ± 0.5 mm Weight 67g, without batteries
EnvironmentalOperating Temperature 0°C to 40°C Storage Temperature -40°C to 65°COperating Humidity 90% maximum Relative Humidity, non
condensingStorage Humidity 95% maximum Relative Humidity, non
condensing
2.4 GHz WirelessRadio Transmission Bi-directional communication
(Transceiver)Range Up to 10 meters

20
Back to Contents Page
Limited Warranty and Return Policies
Dell-branded products carry a 1-year limited hardware warranty.
If purchased together with Dell system, it will follow the system warranty.
For U.S. customers:This purchase and your use of this product are subject to Dell’s end user agreement, which you can find at www.dell.com/terms. This document contains a binding arbitration clause.
For European, Middle Eastern and African customers:Dell-branded products that are sold and used are subject to applicable national consumer legal rights, the terms of any retailer sale agreement that you have entered into (which will apply between you and the retailer) and Dell’s end user contract terms. Dell may also provide an additional hardware warranty – full details of the Dell end user contract and warranty terms can be found by going to www.dell.com, selecting your country from the list at the bottom of the “home” page and then clicking the “terms and conditions” link for the end user terms or the “support” link for the warranty terms.
For non-U.S. customers:Dell-branded products that are sold and used are subject to applicable national consumer legal rights, the terms of any retailer sale agreement that you have entered into (which will apply between you and the retailer) and Dell’s warranty terms. Dell may also provide an additional hardware warranty – full details of Dell’s warranty terms can be found by going to www.dell.com, selecting your country from the list at the bottom of the “home” page and then clicking the “terms and conditions” link or the “support” link for the warranty terms.
Warranty

21
Back to Contents Page
Microsoft WHQL LogoThe Dell KM714 Wireless Keyboard and Mouse have passed WHQL logo testing by Microsoft Windows Hardware Quality Labs.
WHQL Logo is a certification scheme operated by Microsoft Windows Hardware Quality Labs. In this case it ensures that hardware is compatible with Microsoft Operating Systems. The keyboard and mouse are qualified through the use ofWHQL test kits and have been included in the Microsoft Hardware Compatibility List.
Certifications