Embed Size (px)
Citation preview

Dell EMC Avamar for IBM DB2Version 18.1
User Guide302-004-679
REV 02
November 2019

Copyright © 2001-2018 Dell Inc. or its subsidiaries. All rights reserved.
Dell believes the information in this publication is accurate as of its publication date. The information is subject to change without notice.
THE INFORMATION IN THIS PUBLICATION IS PROVIDED “AS-IS.” DELL MAKES NO REPRESENTATIONS OR WARRANTIES OF ANY KIND
WITH RESPECT TO THE INFORMATION IN THIS PUBLICATION, AND SPECIFICALLY DISCLAIMS IMPLIED WARRANTIES OF
MERCHANTABILITY OR FITNESS FOR A PARTICULAR PURPOSE. USE, COPYING, AND DISTRIBUTION OF ANY DELL SOFTWARE DESCRIBED
IN THIS PUBLICATION REQUIRES AN APPLICABLE SOFTWARE LICENSE.
Dell Technologies, Dell, EMC, Dell EMC and other trademarks are trademarks of Dell Inc. or its subsidiaries. Other trademarks may be the property
of their respective owners. Published in the USA.
Dell EMCHopkinton, Massachusetts 01748-91031-508-435-1000 In North America 1-866-464-7381www.DellEMC.com
2 Dell EMC Avamar for IBM DB2 User Guide

7
9
11
Introduction 15Architecture...................................................................................................... 16
Data Domain system support................................................................ 16Multiple DB2 versions on a single host.................................................. 17DPF support..........................................................................................17Log files................................................................................................ 17
Backup...............................................................................................................17Backup types........................................................................................ 17Data deduplication optimization............................................................18
Restore and recovery........................................................................................ 18Redirected restores.............................................................................. 19Table space restore and recovery from Avamar Administrator..............19Restore and recovery from the Cloud.................................................. 20
Concurrent backups and restores..................................................................... 20DB2 CLP support.............................................................................................. 20Database Partition Feature (DPF) backup and restore..................................... 20
DPF backup......................................................................................... 20DPF restore and recovery.....................................................................21
DB2 HADR backup and restore..........................................................................21Archived log backup and restore....................................................................... 22Multi-streaming................................................................................................ 22
Installation 23Preparing to install the Avamar Plug-in for DB2................................................24
System requirements........................................................................... 24DB2 server requirements......................................................................24Downloading the software....................................................................24Installing the Avamar file system client................................................ 25
Installing, upgrading, and uninstalling on HP-UX...............................................25Installing the Avamar Plug-in for DB2 on HP-UX..................................25Upgrading the Avamar Plug-in for DB2 on HP-UX............................... 26Uninstalling the Avamar Plug-in for DB2 on HP-UX............................. 26
Installing, upgrading, and uninstalling on IBM AIX............................................. 27Installing the Avamar Plug-in for DB2 on IBM AIX................................ 27Upgrading the Avamar Plug-in for DB2 on IBM AIX..............................27Uninstalling the Avamar Plug-in for DB2 on IBM AIX............................28
Installing, upgrading, and uninstalling on Linux..................................................29Installing the Avamar Plug-in for DB2 on Linux.....................................29Upgrading the Avamar Plug-in for DB2 on Linux.................................. 30Uninstalling the Avamar Plug-in for DB2 on Linux................................ 30
Figures
Tables
Preface
Chapter 1
Chapter 2
CONTENTS
Dell EMC Avamar for IBM DB2 User Guide 3
Installing, upgrading, and uninstalling on Solaris................................................ 31Installing the Avamar Plug-in for DB2 on Solaris................................... 31Upgrading the Avamar Plug-in for DB2 on Solaris................................ 32Uninstalling the Avamar Plug-in for DB2 on Solaris.............................. 33
Installing, upgrading, and uninstalling on Windows............................................34Installing the Avamar Plug-in for DB2 on Windows...............................34Upgrading the Avamar Plug-in for DB2 on Windows............................ 34Uninstalling the Avamar Plug-in for DB2 on Windows.......................... 35
Backup 37Preparing the database for backup................................................................... 38
Configuring automatic backups for DB2 transaction logs.....................38Creating the Avamar Plug-in for DB2 flag file.......................................38Performing offline backups.................................................................. 39Performing online backups...................................................................39
Performing on-demand backups....................................................................... 40Scheduling backups.......................................................................................... 42
Creating a dataset................................................................................42Creating a group.................................................................................. 45Enabling scheduled backups.................................................................46
Monitoring backups.......................................................................................... 46Canceling backups............................................................................................ 47
Restore and Recovery 49Backup naming conventions............................................................................. 50
Backup labels and image names for a database backup........................50Backup labels and image names for log backups...................................51
Restoring DB2 databases to the original location...............................................51Restoring offline backups..................................................................... 51Restoring online backups that include archive logs.............................. 54Restoring online backups that do not include archive logs................... 56Restoring only the archive logs............................................................ 59Recovering a database..........................................................................61
Restoring DB2 databases to a different client...................................................62Setting flags for automatic storage databases..................................... 62Rollforward after a redirected restore to a different host.................... 63Restoring the database to a different client......................................... 63Rolling forward the database................................................................67
Restoring table spaces in a stand-alone DB2 environment................................ 67Recovering retired clients..................................................................................71Disaster recovery.............................................................................................. 73
Recovering the DB2 application........................................................... 73Recovering the DB2 server...................................................................73
Monitoring restores...........................................................................................74Canceling restores............................................................................................ 74
High Availability and Clustering Solutions 75Database Partition Feature (DPF) backup and restore......................................76
Preparing for DPF backups.................................................................. 76Restoring and recovering DPF..............................................................77
DB2 High Availability Disaster Recovery (HADR) backup and recovery............ 86Preparing for HADR backups............................................................... 86Starting and stopping the Avamar client for DB2 HADR and changingHADR roles.......................................................................................... 89
Chapter 3
Chapter 4
Chapter 5
Contents
4 Dell EMC Avamar for IBM DB2 User Guide
HADR backups..................................................................................... 90HADR restore and recovery.................................................................. 91Removing the DB2 HADR client from Microsoft Windows................... 92Removing the DB2 HADR client from UNIX and Linux..........................92
Backup and Restore with DB2 CLP 95Using DB2 CLP for backups and restores......................................................... 96
Backup label and image names............................................................. 97Avamar Plug-in for DB2 flag file configuration..................................... 97Specifying DB2 vendor parameters...................................................... 97Using the Load command with the Copy Yes option.............................98
Backing up databases from the DB2 CLP..........................................................99Example command to back up a database in offline mode.................. 100Example command to back up a database in online mode................... 100Example command to back up a table space in online mode................ 101
Restoring databases and table spaces from the DB2 CLP............................... 102Specifying multiple sessions for a restore from the DB2 CLP............. 102
Performing redirected restores from the DB2 CLP..........................................103Example procedure to restore an instance to a different instance...... 103Example restore that uses an automatically generated script............. 104
Rolling forward the database from the DB2 CLP............................................. 105Restoring backup images from Avamar versions before 7.0.............................105Recovering DB2 with the DB2 CLP................................................................. 105Setting the expiration and retention for backups.............................................106Monitoring CLP-initiated backups and restores............................................... 107Canceling CLP-initiated backups and restores.................................................107DB2 CLP limitations.........................................................................................107
Plug-in Options 109Plug-in options................................................................................................. 110Performance options........................................................................................110Backup options................................................................................................ 110Restore options................................................................................................112Table space restore option............................................................................... 113DB2 vendor parameters....................................................................................114
Troubleshooting 119Troubleshooting installation and configuration problems................................. 120
Installing the Avamar Plug-in for DB2 in the default directory fails..... 120Resolving a network hostname might result in a time-out error.......... 120
Troubleshooting backup problems................................................................... 120Troubleshooting restore problems....................................................................121
Adjusting the base timeline for a log restore........................................121Recover fails if LOGARCHOPT1 is more than 30 characters............... 121Restore fails with a “Failed to initiate the restore operation” error..... 122Restore fails while retrieving snapview and metadata......................... 122Restore fails when search for backup images takes too long.............. 123
Troubleshooting DB2 CLP backup and restore problems................................. 123Adjusting the time gap between DB2 CLP operations......................... 124Backup does not complete in DPF configuration.................................124Cleaning up processes and resources after a DB2 CLP operation....... 124DB2 CLP fails due to time-out in communication response................. 124Recovery of a dropped database fails with error code 30................... 125Using an invalid Avamar Plug-in for DB2 flag file returns an error....... 126
Chapter 6
Appendix A
Appendix B
Contents
Dell EMC Avamar for IBM DB2 User Guide 5

Use of signal handles does not cleanly stop DB2 CLP operations .......126Database configuration for the DB2 load command............................ 126
Specifying backup and restore options as normal text..................................... 127
129Glossary
Contents
6 Dell EMC Avamar for IBM DB2 User Guide

Avamar Plug-in for DB2 configuration............................................................................... 16Manage All Datasets......................................................................................................... 44Backup label and image names..........................................................................................50Backup, Restore, and Manage window..............................................................................52Restore Command Line Options........................................................................................56Restore Command Line Options........................................................................................58Restore Command Line Options........................................................................................60Restore Command Line Options........................................................................................66Select Destination Client...................................................................................................68Restoring table spaces in a DB2 DPF environment............................................................70Select Destination Client...................................................................................................84Setup Avamar for DB2 HADR Database............................................................................ 87Avamar software and DB2 CLP process flow.................................................................... 96Restore Command Line Options...................................................................................... 128
1234567891011121314
FIGURES
Dell EMC Avamar for IBM DB2 User Guide 7

Figures
8 Dell EMC Avamar for IBM DB2 User Guide

Typographical conventions................................................................................................ 12Command to back up a database in offline mode............................................................. 100Command to back up a database in online mode.............................................................. 101Command to back up a table space in online mode...........................................................101Performance options........................................................................................................110Backup plug-in options......................................................................................................111Restore plug-in options.................................................................................................... 112DB2 vendor parameters....................................................................................................114
12345678
TABLES
Dell EMC Avamar for IBM DB2 User Guide 9

Tables
10 Dell EMC Avamar for IBM DB2 User Guide

PREFACE
As part of an effort to improve the product lines, revisions of the software and hardware areperiodically released. Therefore, some functions that are described in this document might not besupported by all versions of the software or hardware currently in use. The product release notesprovide the most up-to-date information on product features.
Contact the technical support professional when a product does not function correctly or does notfunction as described in this document.
Note: This document was accurate at publication time. To find the latest version of thisdocument, go to Online Support (https://support.EMC.com).
Purpose
This guide describes how to install, configure, administer, and use the Avamar Plug-in for IBMDB2.
Audience
The audience for this guide includes DB2 system and database administrators.
Revision history
The following table presents the revision history of this document.
Revision Date Description
02 November 15, 2019 Updates to the browseinstructions in the section"Restoring the database to adifferent client."
01 July 7, 2018 GA release of Avamar 18.1
Related documentation
The following publications provide additional information:
l Avamar Administration Guide
l Avamar and Data Domain System Integration Guide
l Avamar Operational Best Practices Guide
l Avamar Product Security Guide
l Avamar Release Notes
Dell EMC Avamar for IBM DB2 User Guide 11
Special notice conventions used in this document
These conventions are used for special notices.
DANGER Indicates a hazardous situation which, if not avoided, results in death or seriousinjury.
WARNING Indicates a hazardous situation which, if not avoided, could result in death orserious injury.
CAUTION Indicates a hazardous situation which, if not avoided, could result in minor ormoderate injury.
NOTICE Addresses practices that are not related to personal injury.
Note: Presents information that is important, but not hazard-related.
Typographical conventions
These type style conventions are used in this document.
Table 1 Typographical conventions
Bold Used for names of interface elements, such as names of windows,dialog boxes, buttons, fields, tab names, key names, and menu paths(what the user specifically selects or clicks)
Italic Used for full titles of publications that are referenced in text
Monospace Used for:
l System code
l System output, such as an error message or script
l Pathnames, filenames, prompts, and syntax
l Commands and options
Monospace italic Used for variables
Monospace bold Used for user input
[ ] Square brackets enclose optional values
| Vertical bar indicates alternate selections - the bar means “or”
{ } Braces enclose content that the user must specify, such as x or y orz
... Ellipses indicate nonessential information that is omitted from theexample
Where to get help
The Avamar support page provides access to licensing information, product documentation,advisories, and downloads, as well as how-to and troubleshooting information. This informationmay resolve a product issue before contacting Customer Support.
To access the Avamar support page:
1. Go to https://support.EMC.com/products.
2. Type a product name in the Find a Product by Name box.
3. Select the product from the list that appears.
4. Click the arrow next to the Find a Product by Name box.
PREFACE
12 Dell EMC Avamar for IBM DB2 User Guide

5. (Optional) Add the product to the My Products list by clicking Add to My Saved Products inthe upper right corner of the Support by Product page.
Comments and suggestions
Comments and suggestions help to continue to improve the accuracy, organization, and overallquality of the user publications. Send comments and suggestions about this document to [email protected].
Please include the following information:
l Product name and version
l Document name, part number, and revision (for example, 01)
l Page numbers
l Other details to help address documentation issues
PREFACE
Dell EMC Avamar for IBM DB2 User Guide 13

PREFACE
14 Dell EMC Avamar for IBM DB2 User Guide
CHAPTER 1
Introduction
This chapter includes the following topics:
l Architecture...........................................................................................................................16l Backup................................................................................................................................... 17l Restore and recovery.............................................................................................................18l Concurrent backups and restores..........................................................................................20l DB2 CLP support.................................................................................................................. 20l Database Partition Feature (DPF) backup and restore.......................................................... 20l DB2 HADR backup and restore.............................................................................................. 21l Archived log backup and restore........................................................................................... 22l Multi-streaming.....................................................................................................................22
Dell EMC Avamar for IBM DB2 User Guide 15
ArchitectureThe Avamar Plug-in for DB2 provides a complete deduplication backup and recovery solution forIBM DB2 servers. The Avamar Plug-in for DB2 works with the Avamar server, the Avamar client,and the DB2 API to back up DB2 databases and logs.
You can back up DB2 data to and restore DB2 data from an Avamar server or a Data Domainsystem. The Avamar Plug-in for DB2 serves as a backup module and the Avamar server or DataDomain system as a storage device.
The Avamar Plug-in for DB2 supports backups and restores of DB2 single or multiple instanceconfigurations and DB2 configurations that implement DB2 Database Partitioning Feature (DPF).
Each DB2 server host requires the installation of the Avamar Plug-in for DB2 and an Avamar filesystem client. You can back up and restore DB2 databases by using Avamar Administrator or theDB2 Command Line Processor (CLP).
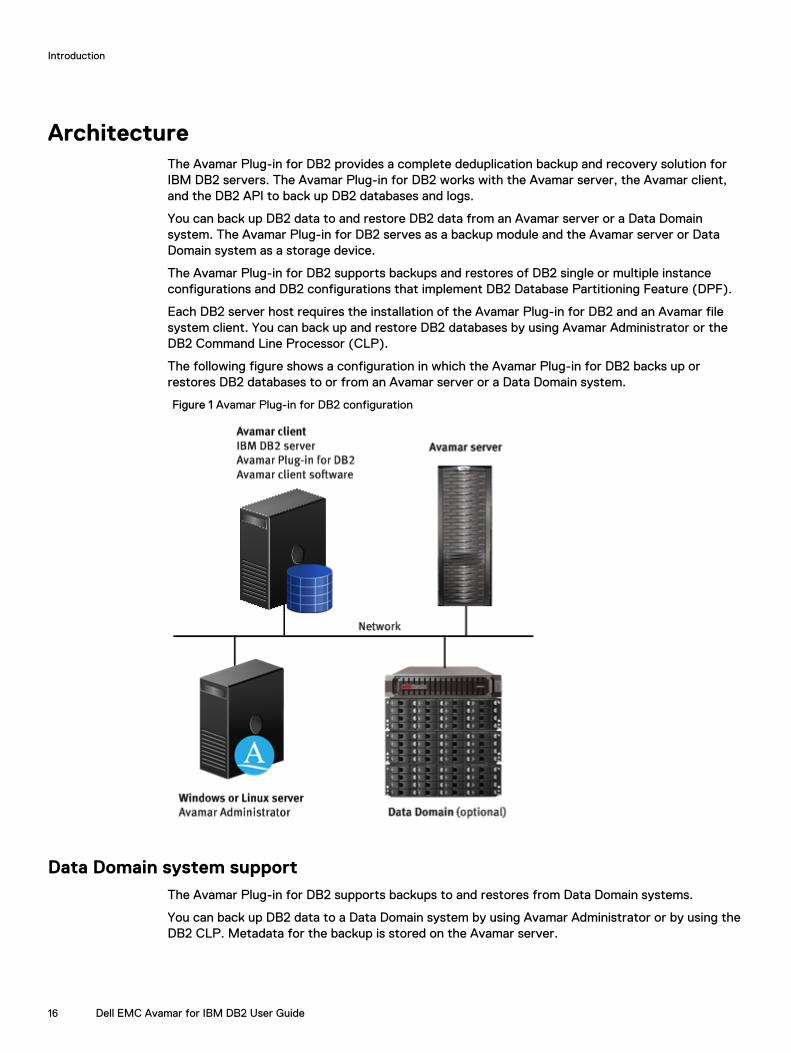
The following figure shows a configuration in which the Avamar Plug-in for DB2 backs up orrestores DB2 databases to or from an Avamar server or a Data Domain system.
Figure 1 Avamar Plug-in for DB2 configuration
Data Domain system supportThe Avamar Plug-in for DB2 supports backups to and restores from Data Domain systems.
You can back up DB2 data to a Data Domain system by using Avamar Administrator or by using theDB2 CLP. Metadata for the backup is stored on the Avamar server.
Introduction
16 Dell EMC Avamar for IBM DB2 User Guide
You can restore backups from a Data Domain system the same way you restore backups from theAvamar server. There are no extra steps. You can follow the same restore procedure whether thedata is located on the Avamar server or on a Data Domain system.
The Avamar and Data Domain System Integration Guide provides more information about configuringData Domain systems for use with Avamar systems.
Multiple DB2 versions on a single hostThe Avamar Plug-in for DB2 supports multiple versions of the DB2 software. For example, theAvamar Plug-in for DB2 can support DB2 10.1 and DB2 9.7 on the same host. The Avamar Plug-infor DB2 also supports multiple DB2 instances within a single DB2 software installation.
DPF supportThe Avamar Plug-in for DB2 supports backups and restores in configurations which use DPF. ADPF configuration allows you to partition a database across multiple servers or within a largeSymmetric Multi-Processor (SMP) server.
The catalog node or partition is where you run the CREATE DATABASE command and where thebackup process runs. All other partitions are called noncatalog nodes or partitions.
Log filesThe Avamar Plug-in for DB2 creates log files during backup and restore operations. These log filesare for debugging purposes.
Backup and restore operations from Avamar Administrator create log files in the install-directory/var/clientlogs directory. Backup and restore operations from the DB2 CLPcreate log files in the directory you specify with the --logfile option in the flag file.
Note: If the --logfile option is not specified in the Avamar Plug-in for DB2 flag file, the logsare generated under the install-dir/var/clientlogs directory.
BackupThe Avamar Plug-in for DB2 allows you to perform backups from Avamar Administrator or from theDB2 Command Line Processor (CLP).
Backup typesThe Avamar Plug-in for DB2 allows you to use Avamar Administrator and the DB2 CLP to performfull and incremental backups.
The Avamar Plug-in for DB2 supports the following types of backups:
l Full backups from Avamar Administrator
l Full, incremental, and delta backups from the DB2 CLP
l Table space backups from the DB2 CLP
l Online backups
You can perform an online backup while the database is active. When using this type ofbackup, users and applications can connect to the database and perform transactions. Onlinebackups can either include or exclude archived logs.
l Offline backups
Introduction
Dell EMC Avamar for IBM DB2 User Guide 17
You can perform an offline backup while the database is inactive. Offline backups do not allowconnections to the database.
l On-demand or scheduled backups from Avamar Administrator.
You can perform either on-demand or scheduled backups while the database is online oroffline.
l Backups of load copy images created by db2 load operations with copy yes option
Data deduplication optimizationThe Avamar Plug-in for DB2 supports the dedup_device option.
The dedup_device option for the db2 backup database command is available in the latestDB2 versions and fixpacks. Refer to the vendor documentation for the availability ofdedup_device option.
The dedup_device option optimizes the format of data that is backed up to a deduplicationdevice. The Avamar Plug-in for DB2 includes support for the dedup_device option for backupsrun from Avamar Administrator or the DB2 CLP.
l From Avamar Administrator, specify the Optimize backup images option.
l From the DB2 CLP, specify the dedup_device option with the db2 backup db command.
Restore and recoveryThe Avamar Plug-in for DB2 supports DB2 database restores from both online and offline backups.
You can restore and recover a database only while the database is offline. You cannot restore andrecover a database that is online with connections. The restore and recovery operationautomatically establishes a connection to the specified database. The connection terminates afterthe restore operation completes.
You can identify whether the backup is an online or offline backup by its backup label name. TheAvamar Plug-in for DB2 uses a naming convention that specifies the type of backup. Backupnaming conventions provide more information.
The Avamar Plug-in for DB2 restores and recovers databases and table spaces. The Avamar Plug-in for DB2 supports the following restore and recovery options from Avamar Administrator:
l Restore and roll forward database
l Restore only
l Restore only archive logs from an online backup
l Recover
The Avamar Plug-in for DB2 includes the following recovery type options:
l End of logs
l Point in Time
l End of Backup
Restore options provides more information about restore and recover options available fromAvamar Administrator.
Introduction
18 Dell EMC Avamar for IBM DB2 User Guide
Redirected restoresThe Avamar Plug-in for DB2 supports redirected restores. A redirected restore enables you torestore a database to a different location on the original client or to a different client altogether.You can restore data from one instance to a different instance.
When you restore a database to a different location, you can only select one database for therestore operation. When performing a redirected restore, the restore target can be the same clientfrom which the backup was originally taken or a different client. A redirected restore to the sameclient creates a clone of the original database. The new database contains the same contents ofthe original database. A redirected restore to a different client requires that the operating systemversion and DB2 version on the target client to be the same version as on the source client.
A non-automatic storage database (ASM) redirected restore that you perform with AvamarAdministrator that sets the table space container pathname to the DB2 defaults. If the databasecontains a user-defined container pathname to a table space, the redirected restore redefines thedefault pathname. This process requires adequate space on the partition.
The Avamar Plug-in for DB2 supports redirected restores of automatic storage table spaces. Toperform redirected restores of automatic storage table spaces requires you to change the storageand database pathnames by passing attributes to the restore operation. Restore and Recovery onpage 49 provides more information about setting attributes to restore automatic storage tablespaces.
You cannot restore automatic storage table spaces and non-automatic storage table spaces in thesame restore operation.
Table space restore and recovery from Avamar AdministratorThe granular recovery feature enables you to restore one or more table spaces from a full databasebackup. During a full database backup from Avamar Administrator, the Avamar Plug-in for DB2runs the db2 list history command, which compiles a list of backed-up table spaces. TheAvamar Plug-in for DB2 then uses this list of table spaces for granular recovery operations.
You can perform a table space restore and recovery while the database is online or offline. Theexception is the SYSCATSPACE table space. You must perform a SYSCATSPACE table spacerestore and recovery while the database is offline.
You must use the DB2 rollforward command to manually roll the table space forward after yourestore a table space from an offline backup or a DPF environment.
An end of backup or point-in-time recovery of a table space leaves the table space in a backuppending state. When a table is in a backup pending state, the database is read-only. You must notmake any modifications to the table space. After performing an end of backup or point-in-timerecovery of a table space, you must perform an online or offline backup to reset the table spacestate.
You can restore a renamed table space by using the renamed_tablespace_list option.
The following restrictions apply to the granular recovery feature:
l The Avamar Plug-in for DB2 does not support the end of logs, point-in-time, or end of backuprecovery types for a table space in a DPF environment.
l DB2 does not support restores of a table space to a database other than the one from whichthe backup was taken. You cannot restore a table space to a different location on the samehost or to a different host.
l The Avamar Plug-in for DB2 does not support restores of dropped table spaces.
Introduction
Dell EMC Avamar for IBM DB2 User Guide 19
Restore and recovery from the CloudFor Elastic Cloud Storage (ECS), when backups are in the Cloud and absent on Active tier, directread from ECS for DB2 enables common restore scenarios by using the plugin restore operationswith DD 6.1 and above. When the user perform restores of backups in the ECS, Avamar plug-in forDB2 transparently restores data from ECS without performing a recall operation first.
For other Cloud providers, a two step process is in place for restoring and recovering data:
l Recall data from the Cloud
l Restore and recover data
Refer to Restore operations for cloud tier in the Avamar Data Domain System Integration Guide formore information.
Concurrent backups and restoresThe Avamar Plug-in for DB2 supports a maximum of six concurrent backups or restore operations.Each backup or restore operation can run multiple data sessions to or from the Avamar server orthe Data Domain system.
All backup images that you create by specifying multiple sessions use a sequence number as anextension. The sequence number identifies the backup piece. After a successful backup, theAvamar Plug-in for DB2 represents all backup pieces from all backup sessions as one backup imageor label.
You can restore backups that you create with multiple sessions in a single restore session. TheAvamar Plug-in for DB2 restores the entire backup image even when you select only one backuppiece. To obtain the best performance during a restore, use the same number of restore sessionsthat you used for the backup.
Multi-streaming on page 22 provides more information about running multiple data sessions.
DB2 CLP supportYou can use the DB2 CLP for backup, restore, recovery, and roll forward operations.
The Avamar Plug-in for DB2 supports the db2 backup, db2 restore, db2 recover, and db2rollforward commands. The plugin also supports db2 load command with copy yes option. Backup and Restore with DB2 CLP on page 95 provides more information.
Database Partition Feature (DPF) backup and restoreThe Avamar Plug-in for DB2 supports backups and restores of DB2 database partitions.
DPF backupThe Avamar Plug-in for DB2 backs up database partitions that are local to the catalog node orremote (found on remote nodes).
To back up database partitions, the Avamar Plug-in for DB2 backup process first connects to thedatabase that you select for backup and runs a query to determine configuration details:
l If the query determines that database partition is local, the backup process continues on theDB2 server.
Introduction
20 Dell EMC Avamar for IBM DB2 User Guide
l If the query determines that the database partition is on a remote node, the Avamar Plug-in forDB2 forwards the backup request to the remote node's host. The host then acts with the DB2backup request at the remote host.
DPF restore and recoveryThe Avamar Plug-in for DB2 supports database partition restores in configurations which use theDPF.
Unlike the backup process, which must run only from the catalog partition, the restore operationruns on each partition:
l To restore partitions from the catalog partition, you perform a restore to the original location.
l To restore partitions from non-catalog partitions, you perform a restore to a different location.
For DPF restore operations from Avamar Administrator, the Avamar Plug-in for DB2 limits theselection of DPF nodes to one node and one database. The limitation of one DPF node at a time ona host also applies to restore operations from the DB2 CLP. DB2 CLP limitations on page 107provides more information.
The rollforward and recovery operations of DPF nodes from either Avamar Administrator or theDB2 CLP must be run in DPF mode and must be run at the catalog node.
DB2 HADR backup and restoreThe Avamar Plug-in for DB2 supports backup and restore of DB2 High Availability DisasterRecovery (HADR) databases by using the Avamar client for DB2 HADR. The Avamar client for DB2HADR is provided as part of the Avamar Plug-in for DB2.
The Avamar client for DB2 HADR is installed along the base Avamar client. The Avamar agent forthe HADR client also runs in parallel with the agent of the base Avamar client. The HADR client isnot tied to any specific client host. At any point in time, the HADR client is only active on theprimary node, and can be moved from one host to another when its role changes.
All operations on the HADR client, including backups, restores and log archiving, require that theDB2 HADR client process (avagent) is active on one of the HADR nodes. All work orders aredirected to this node. Database backup images and archive log files from all HADR nodes arestored under the same common account in Avamar.
The Avamar Plug-in for DB2 includes a utility to configure the Avamar client for DB2 HADR thatperforms the following configuration steps:
l Creates the required directories and installs required files.
l Adjusts scripts and configuration files.
l Creates the service/daemon for HADR avagent client process.
l Registers the common account with the Management Console server.
A deconfiguration utility removes files and stops the HADR avagent client process, but retainslogs and configuration files.
Backups and restores of the file system or stand-alone DB2 databases on the same node shouldnot be performed by the Avamar client for DB2 HADR. These activities must be performed byusing the base Avamar client that is configured and registered during the Avamar client softwareinstallation.
Introduction
Dell EMC Avamar for IBM DB2 User Guide 21
Archived log backup and restoreThe Avamar Plug-in for DB2 supports backups of archived transaction logs, which you can lateruse for rollforward operations.
DB2 transaction logs keep records of database changes. DB2 software provides circular andarchive logging:
l Circular logging supports full offline database backups.
l Archive logging supports online database backups and rollforward recovery.
The IBM DB2 documentation provides more information about circular and archive logging.
You can configure the DB2 server to back up a transaction log as soon as it is archived. During arecovery or rollforward operation, the DB2 server requests the restore of archived logs that arenot available on the system from the Avamar Plug-in for DB2. To skip the overhead process ofsearching for the available saved archived logs, the Avamar file system plug-in can be used torestore missing archived logs before you restore the database. Specify the location of the log fileswhen you perform a database rollforward operation.
Multi-streamingThe Avamar Plug-in for DB2 enables you to use multiple data streams for backups and restores.DB2 supports the use of multiple data streams (or sessions) to back up or restore databaseobjects. You can specify multiple sessions for backups and restores from Avamar Administratorand the DB2 CLP.
The use of multiple data sessions for a backup or restore increases system performance when youback up or restore a large database. However, multi-streaming can place additional demands oncomputer hardware and resources beyond the base requirements for the Avamar Plug-in for DB2.
Introduction
22 Dell EMC Avamar for IBM DB2 User Guide
CHAPTER 2
Installation
This chapter includes the following topics:
l Preparing to install the Avamar Plug-in for DB2.................................................................... 24l Installing, upgrading, and uninstalling on HP-UX................................................................... 25l Installing, upgrading, and uninstalling on IBM AIX.................................................................. 27l Installing, upgrading, and uninstalling on Linux...................................................................... 29l Installing, upgrading, and uninstalling on Solaris.....................................................................31l Installing, upgrading, and uninstalling on Windows................................................................ 34
Dell EMC Avamar for IBM DB2 User Guide 23

Preparing to install the Avamar Plug-in for DB2Review the system requirements for Avamar Plug-in for DB2 to ensure that the environmentmeets these requirements before its installation. Download the Avamar file system client andAvamar Plug-in for DB2 packages from the Avamar server.
System requirementsBefore you install the Avamar Plug-in for DB2, ensure that the environment meets all software andhardware requirements.
Client compatibility requirements are available in the Avamar Compatibility and Interoperability Matrixat http://compatibilityguide.emc.com:8080/CompGuideApp. The requirements in the matrixinclude supported operating systems and application versions. The Avamar file system client andthe Avamar Plug-in for DB2 that you install on the host must be the same version number.
DB2 server requirementsEnsure that the environment meets the DB2 requirements. You must have the operating systemroot privileges on the computer that hosts the DB2 server.
The Avamar server must be operational and accessible to the DB2 server on a network. To verifynetwork connectivity, open a command shell on the DB2 server and type the following command:
ping Avamar_server
where Avamar_server is the network hostname or IP address of the Avamar server.
Downloading the softwareDownload the installation package for the Avamar Plug-in for DB2 from the Avamar server. Thensave the package to a temporary directory.
Procedure
1. Log in to the DB2 server with the necessary privileges for an installation to be performed.
2. Open a web browser and type the following URL:
https://Avamar_server
where Avamar_server is the DNS name or IP address of the Avamar server.
The Avamar Web Restore page appears.
3. Click Downloads.
The Downloads list appears.
4. Click + next to the platform heading for the DB2 server.
5. Click + next to the operating system heading for the DB2 server.
6. Click the link for the Avamar Plug-in for DB2 installation package.
7. Save the Avamar Plug-in for DB2 installation package to a temporary directory.
Installation
24 Dell EMC Avamar for IBM DB2 User Guide
Installing the Avamar file system clientInstall the appropriate Avamar file system client before you install the Avamar Plug-in for DB2.
Procedure
l For HP-UX, IBM AIX, Linux, and Solaris systems, follow the instructions in the Avamar BackupClients User Guide.
l For Windows systems, follow the instructions in the Avamar for Windows Server User Guide.
Installing, upgrading, and uninstalling on HP-UXYou can install, upgrade, and uninstall the Avamar Plug-in for DB2 on HP-UX.
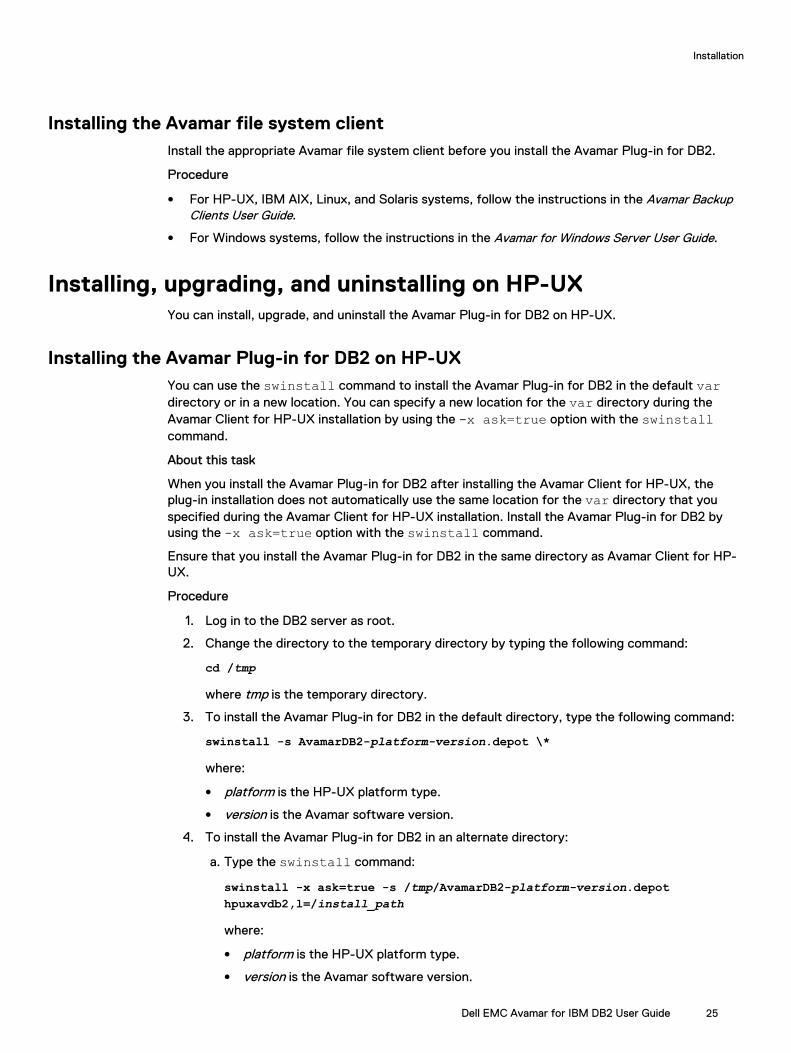
Installing the Avamar Plug-in for DB2 on HP-UXYou can use the swinstall command to install the Avamar Plug-in for DB2 in the default vardirectory or in a new location. You can specify a new location for the var directory during theAvamar Client for HP-UX installation by using the -x ask=true option with the swinstallcommand.
About this task
When you install the Avamar Plug-in for DB2 after installing the Avamar Client for HP-UX, theplug-in installation does not automatically use the same location for the var directory that youspecified during the Avamar Client for HP-UX installation. Install the Avamar Plug-in for DB2 byusing the -x ask=true option with the swinstall command.
Ensure that you install the Avamar Plug-in for DB2 in the same directory as Avamar Client for HP-UX.
Procedure
1. Log in to the DB2 server as root.
2. Change the directory to the temporary directory by typing the following command:
cd /tmp
where tmp is the temporary directory.
3. To install the Avamar Plug-in for DB2 in the default directory, type the following command:
swinstall -s AvamarDB2-platform-version.depot \*
where:
l platform is the HP-UX platform type.
l version is the Avamar software version.
4. To install the Avamar Plug-in for DB2 in an alternate directory:
a. Type the swinstall command:
swinstall -x ask=true -s /tmp/AvamarDB2-platform-version.depothpuxavdb2,l=/install_path
where:
l platform is the HP-UX platform type.
l version is the Avamar software version.
Installation
Dell EMC Avamar for IBM DB2 User Guide 25
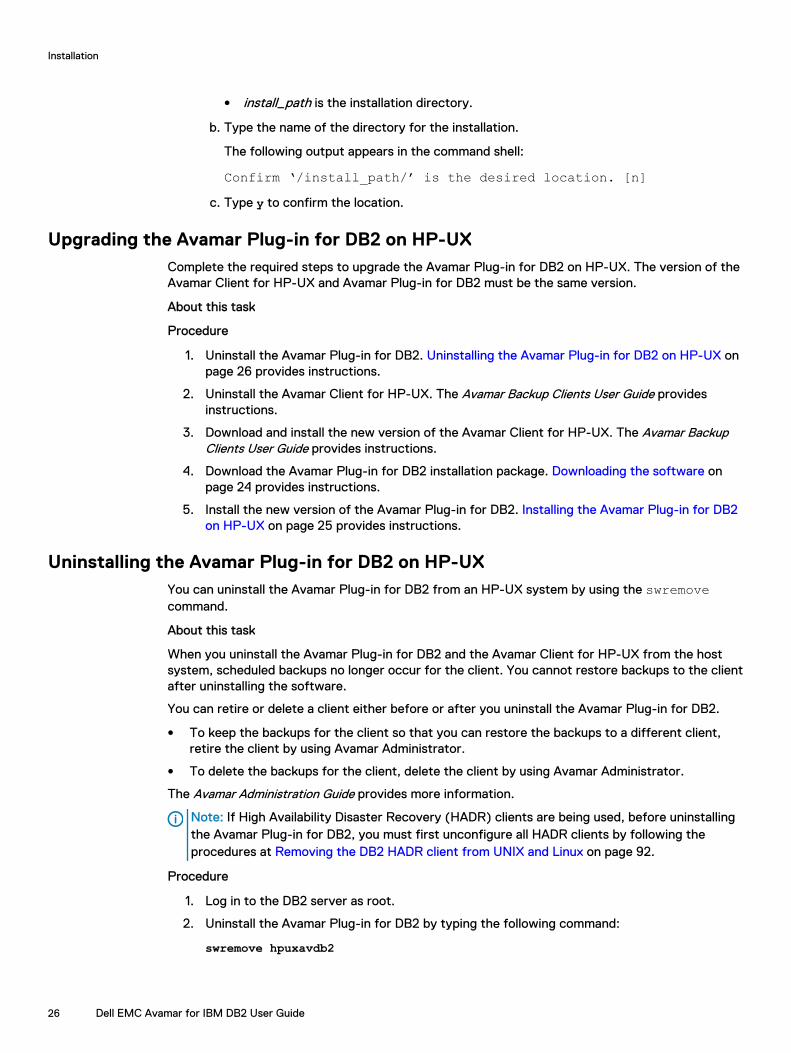
l install_path is the installation directory.
b. Type the name of the directory for the installation.
The following output appears in the command shell:
Confirm ‘/install_path/’ is the desired location. [n]c. Type y to confirm the location.
Upgrading the Avamar Plug-in for DB2 on HP-UXComplete the required steps to upgrade the Avamar Plug-in for DB2 on HP-UX. The version of theAvamar Client for HP-UX and Avamar Plug-in for DB2 must be the same version.
About this task
Procedure
1. Uninstall the Avamar Plug-in for DB2. Uninstalling the Avamar Plug-in for DB2 on HP-UX onpage 26 provides instructions.
2. Uninstall the Avamar Client for HP-UX. The Avamar Backup Clients User Guide providesinstructions.
3. Download and install the new version of the Avamar Client for HP-UX. The Avamar BackupClients User Guide provides instructions.
4. Download the Avamar Plug-in for DB2 installation package. Downloading the software onpage 24 provides instructions.
5. Install the new version of the Avamar Plug-in for DB2. Installing the Avamar Plug-in for DB2on HP-UX on page 25 provides instructions.
Uninstalling the Avamar Plug-in for DB2 on HP-UXYou can uninstall the Avamar Plug-in for DB2 from an HP-UX system by using the swremovecommand.
About this task
When you uninstall the Avamar Plug-in for DB2 and the Avamar Client for HP-UX from the hostsystem, scheduled backups no longer occur for the client. You cannot restore backups to the clientafter uninstalling the software.
You can retire or delete a client either before or after you uninstall the Avamar Plug-in for DB2.
l To keep the backups for the client so that you can restore the backups to a different client,retire the client by using Avamar Administrator.
l To delete the backups for the client, delete the client by using Avamar Administrator.
The Avamar Administration Guide provides more information.
Note: If High Availability Disaster Recovery (HADR) clients are being used, before uninstallingthe Avamar Plug-in for DB2, you must first unconfigure all HADR clients by following theprocedures at Removing the DB2 HADR client from UNIX and Linux on page 92.
Procedure
1. Log in to the DB2 server as root.
2. Uninstall the Avamar Plug-in for DB2 by typing the following command:
swremove hpuxavdb2
Installation
26 Dell EMC Avamar for IBM DB2 User Guide
Installing, upgrading, and uninstalling on IBM AIXYou can install, upgrade, and uninstall the Avamar Plug-in for DB2 on IBM AIX.
Installing the Avamar Plug-in for DB2 on IBM AIXYou can install the Avamar Client for AIX software in either the default installation directory or analternate directory. Use the geninstall command to install the Avamar Plug-in for DB2 in thedefault var directory or use the installp command to install the Avamar Plug-in for DB2 in anew location.
About this task
Ensure that you install the Avamar Plug-in for DB2 in the same directory as Avamar Client for AIX.The installation returns an error if you try to install the Avamar Plug-in for DB2 in the defaultdirectory after installing the Avamar Client for AIX in an alternate directory.
Procedure
1. Log in to the DB2 server as root.
2. Change the directory to the temporary directory by typing the following command:
cd /tmp
where tmp is the temporary install directory.
3. To install the Avamar Plug-in for DB2 in the default directory, type the following command:
geninstall -d AvamarDB2-aix6-ppc64-version.bff all
where version is the Avamar software version.
4. To install the Avamar Plug-in for DB2 in an alternate directory, type the following command:
installp -R /install_path -d AvamarDB2-aix6-ppc64-version.bff all
where:
l install_path is the directory for the installation files.
l version is the Avamar software version.
Upgrading the Avamar Plug-in for DB2 on IBM AIXUse the geninstall command to upgrade the software in the default directory or use theinstallp command to upgrade the software in an alternate directory. Upgrade the Avamar Plug-in for DB2 before upgrading the Avamar Client for AIX. The versions of the Avamar Client for AIXand Avamar Plug-in for DB2 must be the same.
Procedure
1. Download the Avamar Plug-in for DB2 installation package. Downloading the software onpage 24 provides instructions.
2. Log in to the DB2 server as root.
3. Change the directory to the temporary directory by typing the following command:
cd /tmp
where tmp is the temporary install directory.
4. To upgrade the Avamar Plug-in for DB2 in the default directory, type the followingcommand:
Installation
Dell EMC Avamar for IBM DB2 User Guide 27

geninstall -d AvamarDB2-aix6-ppc64-version.bff all
where version is the Avamar software version.
5. To upgrade the Avamar Plug-in for DB2 in an alternate directory, type the followingcommand:
installp -R /install_path -d AvamarDB2-aix6-ppc64-version.bff all
where:
l install_path is the directory for the installation files.
l version is the Avamar software version.
6. Download the Avamar Client for AIX. The Avamar Backup Clients User Guide providesinstructions.
7. To upgrade the Avamar Client for AIX in the default directory, type the following command:
geninstall -d AvamarClient-aix6-ppc-version.bff all
where version is the Avamar software version.
8. To upgrade the Avamar Client for AIX in an alternate installation directory, type thefollowing command:
installp -R /install_path -d AvamarClient-aix6-ppc-version.bff all
where:
l install_path is the directory for the installation files.
l version is the Avamar software version.
Uninstalling the Avamar Plug-in for DB2 on IBM AIXYou can uninstall the Avamar Plug-in for DB2 from an IBM AIX system by using the geninstallor installp command. Use the geninstall command to uninstall the software in the defaultdirectory or use the installp command to uninstall the software in an alternate directory.
About this task
When you uninstall the Avamar Plug-in for DB2 and the Avamar Client for AIX from the hostsystem, scheduled backups no longer occur for the client. You cannot restore backups to the clientafter you uninstall the software.
You can retire or delete a client either before or after you uninstall the Avamar Plug-in for DB2.
l To keep the backups for the client so that you can restore the backups to a different client,retire the client by using Avamar Administrator.
l To delete the backups for the client, delete the client by using Avamar Administrator.
The Avamar Administration Guide provides more information.
Note: If High Availability Disaster Recovery (HADR) clients are being used, before uninstallingthe Avamar Plug-in for DB2, you must first unconfigure all HADR clients by following theprocedures at Removing the DB2 HADR client from UNIX and Linux on page 92.
Procedure
1. Log in to the DB2 server host as root.
2. View all Avamar packages that are installed on the system by typing the following command:
lslpp -l | grep Avamar
The following output appears in the command shell:
Installation
28 Dell EMC Avamar for IBM DB2 User Guide
AvamarClient-aix6-ppc VERSION COMMITTED Avamar client VERSIONAvamarDB2-aix6-ppc64 VERSION COMMITTED Avamar client VERSION
3. To uninstall the Avamar Plug-in for DB2 software in the default directory, type the followingcommand:
geninstall -u AvamarDB2-aix6-ppc64
4. To uninstall the Avamar Plug-in for DB2 software in an alternate directory, type thefollowing command:
installp –R /install_path –u AvamarDB2-aix6-ppc
where install_path is the directory for the installation files.
5. Uninstall the Avamar Client for AIX software by typing the following command:
geninstall -u AvamarClient-aix6-ppc
Installing, upgrading, and uninstalling on LinuxYou can install, upgrade, and uninstall the Avamar Plug-in for DB2 on Linux.
Installing the Avamar Plug-in for DB2 on LinuxYou can install the Avamar Plug-in for DB2 software in either the default installation directory or analternate directory by using the rpm command.
About this task
Ensure that you install the Avamar Plug-in for DB2 in the same directory as the Avamar Client forLinux.
Procedure
1. Log in to the DB2 server as root.
2. Change the directory to the temporary directory by typing the following command:
cd /tmp
where tmp is the temporary install directory.
3. To install the software in the default directory, type the following command:
rpm -ivh AvamarDB2-linux-platform-version.rpm
where:
l platform is the Linux platform type.
l version is the Avamar software version.
4. To install the software in an alternate directory, type the following command:
rpm --relocate /usr/local/avamar=/install_path -ivh AvamarDB2-linux-platform-version.rpm
where:
l install_path is the directory where you installed the Avamar Client for Linux.
Installation
Dell EMC Avamar for IBM DB2 User Guide 29
l platform is the Linux platform type.
l version is the Avamar software version.
Upgrading the Avamar Plug-in for DB2 on LinuxUse the rpm command to upgrade the software in the default directory or the rpm command withthe --relocate option to upgrade the software in an alternate directory. The versions of theAvamar Client for Linux and Avamar Plug-in for DB2 must be the same.
Procedure
1. To upgrade the Avamar Client for Linux, use the instructions in the Avamar Backup ClientsUser Guide.
2. To upgrade the software in the default directory, type the following command:
rpm -Uvh AvamarDB2-linux-platform-version.rpm
where:
l platform is the Linux platform type.
l version is the Avamar software version.
3. To upgrade the software in an alternate directory, type the following command:
rpm -Uvh --relocate /usr/local/avamar=install_path AvamarDB2-linux-platform-version.rpm
where:
l install_path is the directory where you installed the Avamar Client for Linux.
l platform is the Linux platform type.
l version is the Avamar software version.
Uninstalling the Avamar Plug-in for DB2 on LinuxYou can uninstall the Avamar Plug-in for DB2 from a Linux system by using the rpm -e command.
About this task
When you uninstall the Avamar Plug-in for DB2 and the Avamar Client for Linux from the hostsystem, scheduled backups no longer occur for the client. You cannot restore backups to the clientafter you uninstall the software.
You can retire or delete a client either before or after you uninstall the Avamar Plug-in for DB2.
l To keep the backups for the client so that you can restore the backups to a different client,retire the client by using Avamar Administrator.
l To delete the backups for the client, delete the client by using Avamar Administrator.
The Avamar Administration Guide provides more information.
Note: If High Availability Disaster Recovery (HADR) clients are being used, before uninstallingthe Avamar Plug-in for DB2, you must first unconfigure all HADR clients by following theprocedures at Removing the DB2 HADR client from UNIX and Linux on page 92.
Installation
30 Dell EMC Avamar for IBM DB2 User Guide
Procedure
1. Log in to the DB2 server host as root.
2. List the Avamar software that is installed on the system by typing the following command:
rpm -qa | grep Av
A list of Avamar software appears in the command shell:
AvamarClient-versionAvamarDB2-version
3. Uninstall the Avamar Plug-in for DB2 by typing the following command:
rpm -e AvamarDB2-version
where AvamarDB2-version is the Avamar Plug-in for DB2 installation package.
4. Uninstall the Avamar Client for Linux by typing the following command:
rpm -e AvamarClient-version
where AvamarClient-version is the Avamar software installation package.
Installing, upgrading, and uninstalling on SolarisYou can install, upgrade, and uninstall the Avamar Plug-in for DB2 on Solaris.
Installing the Avamar Plug-in for DB2 on SolarisYou can install the Avamar Client for Solaris software by using the pkgadd command.
About this task
Ensure that you install the Avamar Plug-in for DB2 in the same directory as the Avamar Client forSolaris.
Procedure
1. Log in to the DB2 server as root.
2. Change the directory to the temporary directory by typing the following command:
cd /tmp
where tmp is the temporary install directory.
3. Install the software by typing the following command:
pkgadd -d AvamarDB2-solaris10-platform-version.pkg
where platform-version is the platform type and Avamar version number.
The following output appears in the command shell:
The following packages are available:1 AVMRdb2 Avamar Client Plugin for DB2(sparc) 7.2.100-nnnSelect package(s) you wish to process (or 'all' to processall packages). (default: all) [?,??,q]:
4. Type 1 and press Enter.
The following output appears in the command shell:
Processing package instance <AVMRdb2> from</tmp/AvamarDB2-solaris10-sparc-7.2.100-nnn.pkg>
Installation
Dell EMC Avamar for IBM DB2 User Guide 31
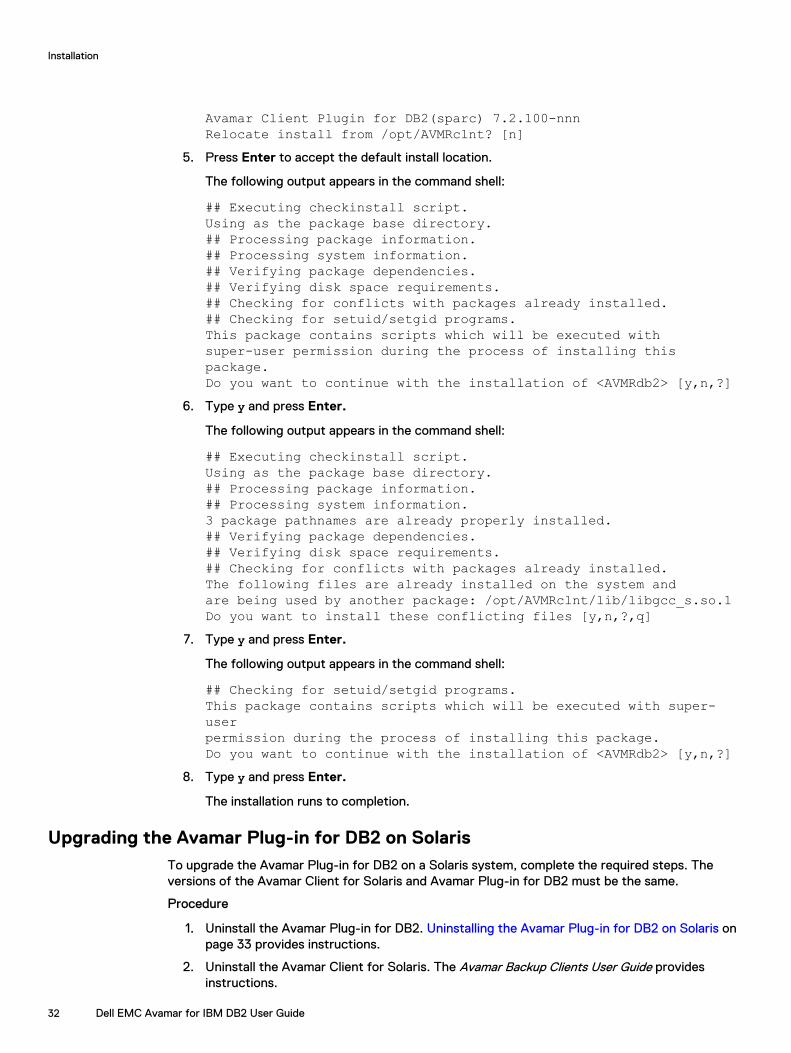
Avamar Client Plugin for DB2(sparc) 7.2.100-nnnRelocate install from /opt/AVMRclnt? [n]
5. Press Enter to accept the default install location.
The following output appears in the command shell:
## Executing checkinstall script.Using as the package base directory.## Processing package information.## Processing system information.## Verifying package dependencies.## Verifying disk space requirements.## Checking for conflicts with packages already installed.## Checking for setuid/setgid programs.This package contains scripts which will be executed withsuper-user permission during the process of installing thispackage.Do you want to continue with the installation of <AVMRdb2> [y,n,?]
6. Type y and press Enter.
The following output appears in the command shell:
## Executing checkinstall script.Using as the package base directory.## Processing package information.## Processing system information.3 package pathnames are already properly installed.## Verifying package dependencies.## Verifying disk space requirements.## Checking for conflicts with packages already installed.The following files are already installed on the system andare being used by another package: /opt/AVMRclnt/lib/libgcc_s.so.1Do you want to install these conflicting files [y,n,?,q]
7. Type y and press Enter.
The following output appears in the command shell:
## Checking for setuid/setgid programs.This package contains scripts which will be executed with super-userpermission during the process of installing this package.Do you want to continue with the installation of <AVMRdb2> [y,n,?]
8. Type y and press Enter.
The installation runs to completion.
Upgrading the Avamar Plug-in for DB2 on SolarisTo upgrade the Avamar Plug-in for DB2 on a Solaris system, complete the required steps. Theversions of the Avamar Client for Solaris and Avamar Plug-in for DB2 must be the same.
Procedure
1. Uninstall the Avamar Plug-in for DB2. Uninstalling the Avamar Plug-in for DB2 on Solaris onpage 33 provides instructions.
2. Uninstall the Avamar Client for Solaris. The Avamar Backup Clients User Guide providesinstructions.
Installation
32 Dell EMC Avamar for IBM DB2 User Guide

3. Download the Avamar Plug-in for DB2 installation package. Downloading the software onpage 24 provides instructions.
4. Download and install the new version of the Avamar Client for Solaris. The Avamar BackupClients User Guide provides instructions.
5. Install the new version of the Avamar Plug-in for DB2. Installing the Avamar Plug-in for DB2on Solaris on page 31 provides instructions.
Uninstalling the Avamar Plug-in for DB2 on SolarisYou can uninstall the Avamar Plug-in for DB2 from a Solaris system by using the pkgrm command.
About this task
When you uninstall the Avamar Plug-in for DB2 and the Avamar Client for Solaris from the hostsystem, scheduled backups no longer occur for the client. You cannot restore backups to the clientafter you uninstall the software.
You can retire or delete a client either before or after you uninstall the Avamar Plug-in for DB2.
l To keep the backups for the client so that you can restore the backups to a different client,retire the client by using Avamar Administrator.
l To delete the backups for the client, delete the client by using Avamar Administrator.
The Avamar Administration Guide provides more information.
Note: If High Availability Disaster Recovery (HADR) clients are being used, before uninstallingthe Avamar Plug-in for DB2, you must first unconfigure all HADR clients by following theprocedures at Removing the DB2 HADR client from UNIX and Linux on page 92.
Procedure
1. Log in to the DB2 server host as root.
2. Display all Avamar packages that are installed on the system by typing the followingcommand:
pkginfo | grep AVMR
Information similar to the following appears in the command shell:
The following packages are currently installed:1 AVMRclnt Avamar Client(sparc) 7.2.100-nnn2 AVMRdb2 Avamar Client Plugin for DB2(sparc) 7.2.100-nnn
3. Note the package names.
4. Uninstall the software by typing the following command:
pkgrm package_name
where package_name is the Avamar plug-in package.
The following output appears in the command shell:
The following package is currently installed:package_nameDo you want to remove this package?
5. Type y and press Enter.
The following output appears in the command shell:
Installation
Dell EMC Avamar for IBM DB2 User Guide 33
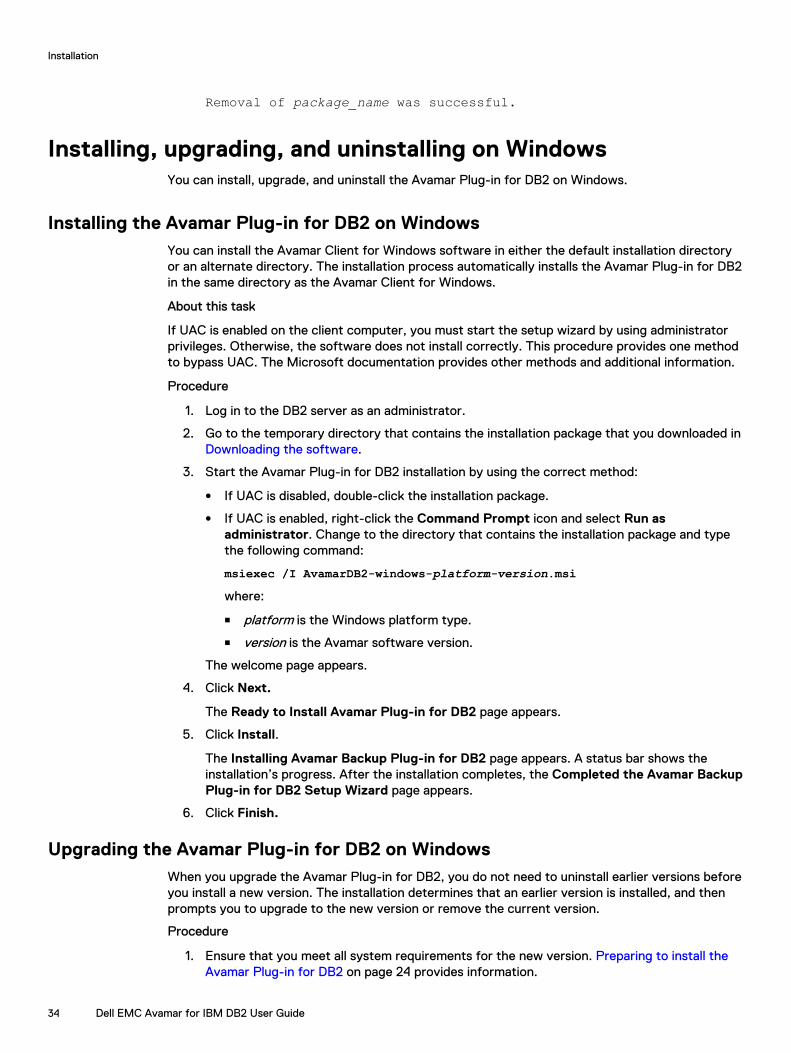
Removal of package_name was successful.
Installing, upgrading, and uninstalling on WindowsYou can install, upgrade, and uninstall the Avamar Plug-in for DB2 on Windows.
Installing the Avamar Plug-in for DB2 on WindowsYou can install the Avamar Client for Windows software in either the default installation directoryor an alternate directory. The installation process automatically installs the Avamar Plug-in for DB2in the same directory as the Avamar Client for Windows.
About this task
If UAC is enabled on the client computer, you must start the setup wizard by using administratorprivileges. Otherwise, the software does not install correctly. This procedure provides one methodto bypass UAC. The Microsoft documentation provides other methods and additional information.
Procedure
1. Log in to the DB2 server as an administrator.
2. Go to the temporary directory that contains the installation package that you downloaded in Downloading the software.
3. Start the Avamar Plug-in for DB2 installation by using the correct method:
l If UAC is disabled, double-click the installation package.
l If UAC is enabled, right-click the Command Prompt icon and select Run asadministrator. Change to the directory that contains the installation package and typethe following command:
msiexec /I AvamarDB2-windows-platform-version.msiwhere:
n platform is the Windows platform type.
n version is the Avamar software version.
The welcome page appears.
4. Click Next.
The Ready to Install Avamar Plug-in for DB2 page appears.
5. Click Install.
The Installing Avamar Backup Plug-in for DB2 page appears. A status bar shows theinstallation’s progress. After the installation completes, the Completed the Avamar BackupPlug-in for DB2 Setup Wizard page appears.
6. Click Finish.
Upgrading the Avamar Plug-in for DB2 on WindowsWhen you upgrade the Avamar Plug-in for DB2, you do not need to uninstall earlier versions beforeyou install a new version. The installation determines that an earlier version is installed, and thenprompts you to upgrade to the new version or remove the current version.
Procedure
1. Ensure that you meet all system requirements for the new version. Preparing to install theAvamar Plug-in for DB2 on page 24 provides information.
Installation
34 Dell EMC Avamar for IBM DB2 User Guide

2. Upgrade the Avamar Client for Windows by running the Windows client installation wizardfor the new version on the client computer. The Avamar for Windows Server User Guideprovides instructions.
3. Upgrade the Avamar Plug-in for DB2 by running the plug-in installation wizard for the newversion on the Windows server. Installing the Avamar Plug-in for DB2 on Windows on page34 provides instructions.
Uninstalling the Avamar Plug-in for DB2 on WindowsWhen you uninstall the Avamar Plug-in for DB2 and the Avamar Client for Windows from the hostsystem, scheduled backups no longer occur for the client. You cannot restore backups to the clientafter you uninstall the software.
About this task
You can retire or delete a client either before or after you uninstall the Avamar Plug-in for DB2.
l To keep the backups for the client so that you can restore the backups to a different client,retire the client by using Avamar Administrator.
l To delete the backups for the client, delete the client by using Avamar Administrator.
The Avamar Administration Guide provides more information.
Note: If High Availability Disaster Recovery (HADR) clients are being used, before uninstallingthe Avamar Plug-in for DB2, you must first unconfigure all HADR clients by following theprocedures at Removing the DB2 HADR client from Microsoft Windows on page 92.
Procedure
1. Uninstall the Avamar Plug-in for DB2 by using Programs and Features.
2. Uninstall the Avamar Client for Windows by using Programs and Features.
Installation
Dell EMC Avamar for IBM DB2 User Guide 35

Installation
36 Dell EMC Avamar for IBM DB2 User Guide
CHAPTER 3
Backup
This chapter includes the following topics:
l Preparing the database for backup........................................................................................38l Performing on-demand backups............................................................................................40l Scheduling backups...............................................................................................................42l Monitoring backups...............................................................................................................46l Canceling backups.................................................................................................................47
Dell EMC Avamar for IBM DB2 User Guide 37

Preparing the database for backupBefore you use the Avamar Plug-in for DB2 to perform backups, you must configure the databaseappropriately.
Configuring automatic backups for DB2 transaction logsYou can configure the DB2 database to enable automatic backups of transaction logs.
About this task
DB2 uses the LOGARCHMETH1 and LOGARCHOPT1 parameters to enable automatic backups of atransaction log as soon as it is archived. DB2 10.1 includes a new parameter, LOGARCHCOMPR1, toenable archive log compression. Leave this parameter set to its default value since Avamarperforms its own compression.
Procedure
1. Create the Avamar Plug-in for DB2 flag file. Creating the Avamar Plug-in for DB2 flag file onpage 38 provides instructions.
2. Configure the database for log backups by typing the following command:
db2 update db cfg for database_name using logarchmeth1VENDOR:vendor_library logarchopt1 @pathname
where:
l database_name is the name of the database to back up.
l vendor_library is the full pathname to the shared library of the Avamar Plug-in for DB2.
l pathname is the absolute pathname to the flag file that you created in step 1.
Creating the Avamar Plug-in for DB2 flag fileBefore you back up a DB2 data, create a flag file. You can choose any name for the flag file. Forexample, avdb2.flg. Specify the Avamar server user credentials and other parameters in the flagfile. To perform log backups, the Avamar Plug-in for DB2 requires you to set Avamar server usercredentials in the flag file.
Procedure
1. Create a text file.
2. Type the required information in the text file. The following file is an example flag file:
--id=user-1@/clients/hostA.avamar.emc--password=obfuscated password--sysdir=c:\Progra~1\avs\etc--dbpartitionnums=0,1,2,3--catnode=0--logfile=e:\avdb2-cli.log--labelnum=256--ddr=true--ddr-index=1--avtar-before-after-days-search=1where:
Backup
38 Dell EMC Avamar for IBM DB2 User Guide
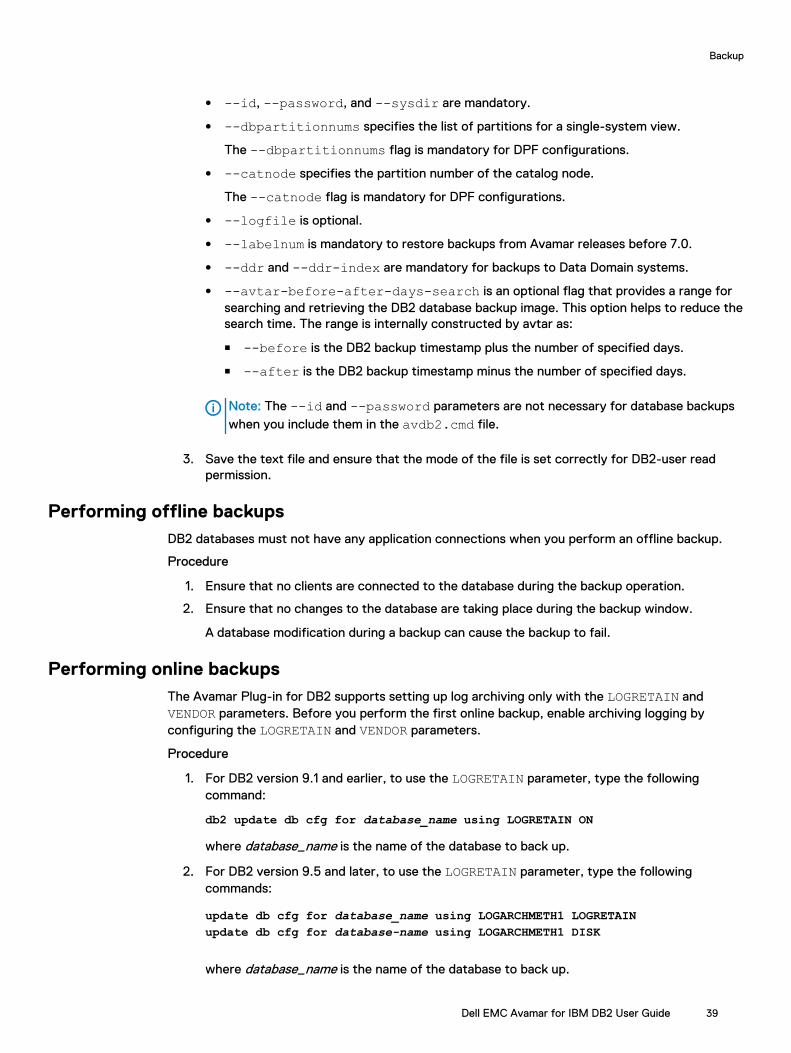
l --id, --password, and --sysdir are mandatory.
l --dbpartitionnums specifies the list of partitions for a single-system view.
The --dbpartitionnums flag is mandatory for DPF configurations.
l --catnode specifies the partition number of the catalog node.
The --catnode flag is mandatory for DPF configurations.
l --logfile is optional.
l --labelnum is mandatory to restore backups from Avamar releases before 7.0.
l --ddr and --ddr-index are mandatory for backups to Data Domain systems.
l --avtar-before-after-days-search is an optional flag that provides a range forsearching and retrieving the DB2 database backup image. This option helps to reduce thesearch time. The range is internally constructed by avtar as:
n --before is the DB2 backup timestamp plus the number of specified days.
n --after is the DB2 backup timestamp minus the number of specified days.
Note: The --id and --password parameters are not necessary for database backupswhen you include them in the avdb2.cmd file.
3. Save the text file and ensure that the mode of the file is set correctly for DB2-user readpermission.
Performing offline backupsDB2 databases must not have any application connections when you perform an offline backup.
Procedure
1. Ensure that no clients are connected to the database during the backup operation.
2. Ensure that no changes to the database are taking place during the backup window.
A database modification during a backup can cause the backup to fail.
Performing online backupsThe Avamar Plug-in for DB2 supports setting up log archiving only with the LOGRETAIN andVENDOR parameters. Before you perform the first online backup, enable archiving logging byconfiguring the LOGRETAIN and VENDOR parameters.
Procedure
1. For DB2 version 9.1 and earlier, to use the LOGRETAIN parameter, type the followingcommand:
db2 update db cfg for database_name using LOGRETAIN ON
where database_name is the name of the database to back up.
2. For DB2 version 9.5 and later, to use the LOGRETAIN parameter, type the followingcommands:
update db cfg for database_name using LOGARCHMETH1 LOGRETAINupdate db cfg for database-name using LOGARCHMETH1 DISK
where database_name is the name of the database to back up.
Backup
Dell EMC Avamar for IBM DB2 User Guide 39
3. To use the VENDOR parameter, use the db2 update db cfg command in Configuringautomatic backups for DB2 transaction logs.
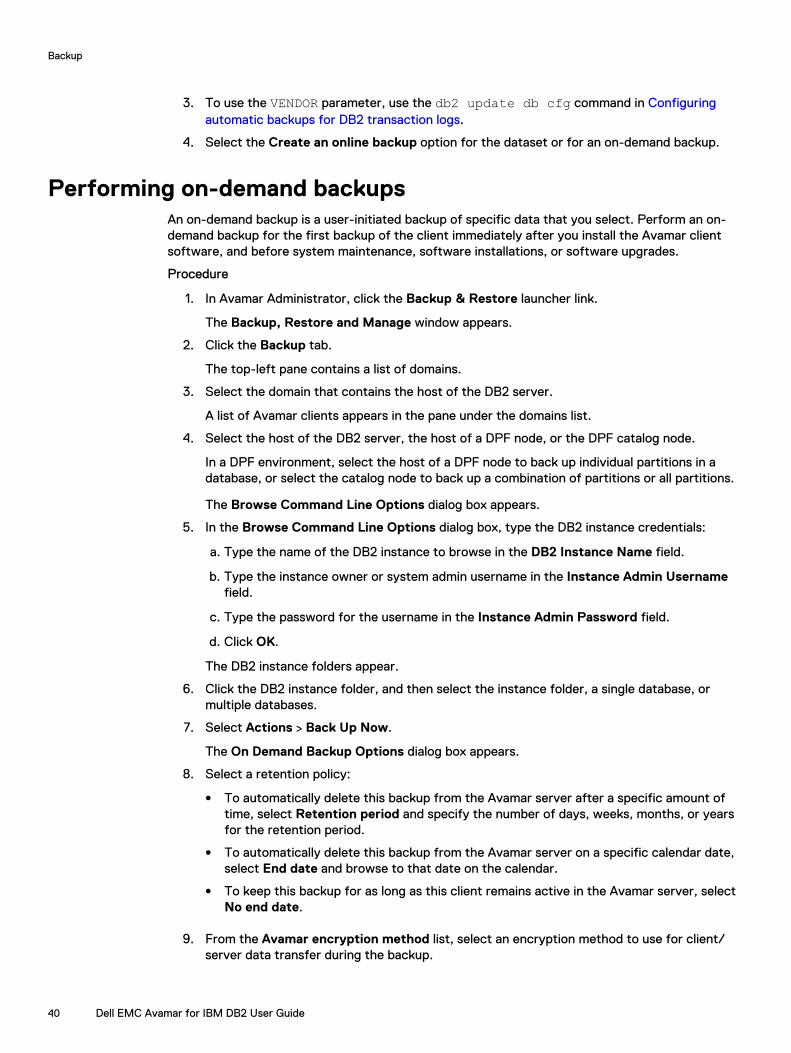
4. Select the Create an online backup option for the dataset or for an on-demand backup.
Performing on-demand backupsAn on-demand backup is a user-initiated backup of specific data that you select. Perform an on-demand backup for the first backup of the client immediately after you install the Avamar clientsoftware, and before system maintenance, software installations, or software upgrades.
Procedure
1. In Avamar Administrator, click the Backup & Restore launcher link.
The Backup, Restore and Manage window appears.
2. Click the Backup tab.
The top-left pane contains a list of domains.
3. Select the domain that contains the host of the DB2 server.
A list of Avamar clients appears in the pane under the domains list.
4. Select the host of the DB2 server, the host of a DPF node, or the DPF catalog node.
In a DPF environment, select the host of a DPF node to back up individual partitions in adatabase, or select the catalog node to back up a combination of partitions or all partitions.
The Browse Command Line Options dialog box appears.
5. In the Browse Command Line Options dialog box, type the DB2 instance credentials:
a. Type the name of the DB2 instance to browse in the DB2 Instance Name field.
b. Type the instance owner or system admin username in the Instance Admin Usernamefield.
c. Type the password for the username in the Instance Admin Password field.
d. Click OK.
The DB2 instance folders appear.
6. Click the DB2 instance folder, and then select the instance folder, a single database, ormultiple databases.
7. Select Actions > Back Up Now.
The On Demand Backup Options dialog box appears.
8. Select a retention policy:
l To automatically delete this backup from the Avamar server after a specific amount oftime, select Retention period and specify the number of days, weeks, months, or yearsfor the retention period.
l To automatically delete this backup from the Avamar server on a specific calendar date,select End date and browse to that date on the calendar.
l To keep this backup for as long as this client remains active in the Avamar server, selectNo end date.
9. From the Avamar encryption method list, select an encryption method to use for client/server data transfer during the backup.
Backup
40 Dell EMC Avamar for IBM DB2 User Guide
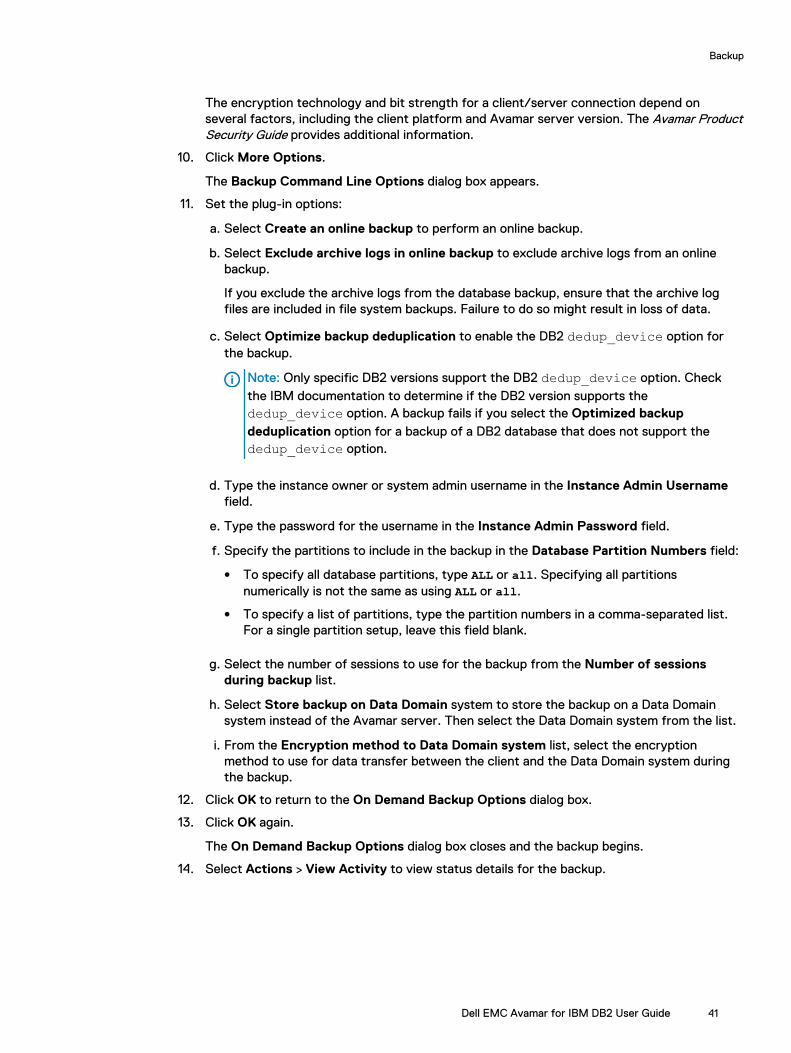
The encryption technology and bit strength for a client/server connection depend onseveral factors, including the client platform and Avamar server version. The Avamar ProductSecurity Guide provides additional information.
10. Click More Options.
The Backup Command Line Options dialog box appears.
11. Set the plug-in options:
a. Select Create an online backup to perform an online backup.
b. Select Exclude archive logs in online backup to exclude archive logs from an onlinebackup.
If you exclude the archive logs from the database backup, ensure that the archive logfiles are included in file system backups. Failure to do so might result in loss of data.
c. Select Optimize backup deduplication to enable the DB2 dedup_device option forthe backup.
Note: Only specific DB2 versions support the DB2 dedup_device option. Checkthe IBM documentation to determine if the DB2 version supports thededup_device option. A backup fails if you select the Optimized backupdeduplication option for a backup of a DB2 database that does not support thededup_device option.
d. Type the instance owner or system admin username in the Instance Admin Usernamefield.
e. Type the password for the username in the Instance Admin Password field.
f. Specify the partitions to include in the backup in the Database Partition Numbers field:
l To specify all database partitions, type ALL or all. Specifying all partitionsnumerically is not the same as using ALL or all.
l To specify a list of partitions, type the partition numbers in a comma-separated list.For a single partition setup, leave this field blank.
g. Select the number of sessions to use for the backup from the Number of sessionsduring backup list.
h. Select Store backup on Data Domain system to store the backup on a Data Domainsystem instead of the Avamar server. Then select the Data Domain system from the list.
i. From the Encryption method to Data Domain system list, select the encryptionmethod to use for data transfer between the client and the Data Domain system duringthe backup.
12. Click OK to return to the On Demand Backup Options dialog box.
13. Click OK again.
The On Demand Backup Options dialog box closes and the backup begins.
14. Select Actions > View Activity to view status details for the backup.
Backup
Dell EMC Avamar for IBM DB2 User Guide 41
Scheduling backupsScheduled backups run automatically to ensure that backups of the DB2 data occur on an ongoingbasis. You can schedule backups to run daily, weekly, or monthly. The scheduled backup caninclude multiple clients or a single server.
Procedure
1. Create a dataset for the backups.
2. Create a group for the backups.
During the group creation process:
a. Assign the new dataset to the new group.
b. Assign a schedule to the new group.
c. Assign a retention policy to the new group.
d. Add one or more clients to the new group.
The Avamar Administration Guide provides more information about groups, group policy,datasets, schedules, and retention policies.
3. Enable scheduling for the group.
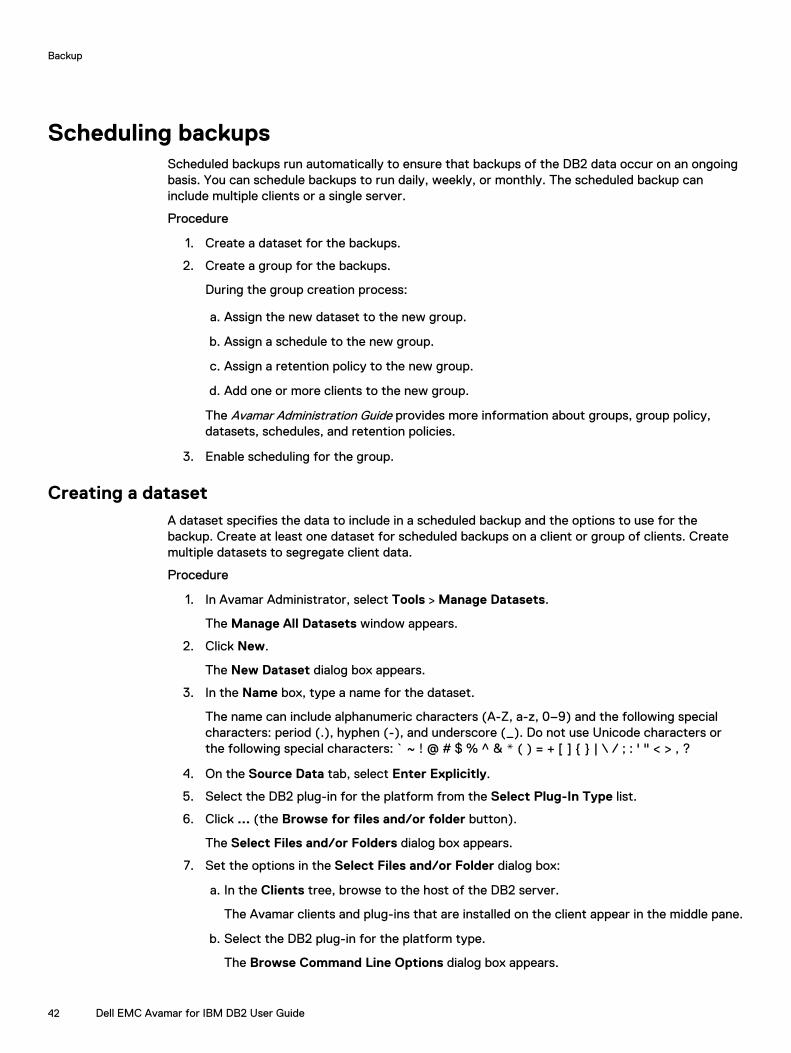
Creating a datasetA dataset specifies the data to include in a scheduled backup and the options to use for thebackup. Create at least one dataset for scheduled backups on a client or group of clients. Createmultiple datasets to segregate client data.
Procedure
1. In Avamar Administrator, select Tools > Manage Datasets.
The Manage All Datasets window appears.
2. Click New.
The New Dataset dialog box appears.
3. In the Name box, type a name for the dataset.
The name can include alphanumeric characters (A-Z, a-z, 0–9) and the following specialcharacters: period (.), hyphen (-), and underscore (_). Do not use Unicode characters orthe following special characters: ` ~ ! @ # $ % ^ & * ( ) = + [ ] { } | \ / ; : ' " < > , ?
4. On the Source Data tab, select Enter Explicitly.
5. Select the DB2 plug-in for the platform from the Select Plug-In Type list.
6. Click ... (the Browse for files and/or folder button).
The Select Files and/or Folders dialog box appears.
7. Set the options in the Select Files and/or Folder dialog box:
a. In the Clients tree, browse to the host of the DB2 server.
The Avamar clients and plug-ins that are installed on the client appear in the middle pane.
b. Select the DB2 plug-in for the platform type.
The Browse Command Line Options dialog box appears.
Backup
42 Dell EMC Avamar for IBM DB2 User Guide
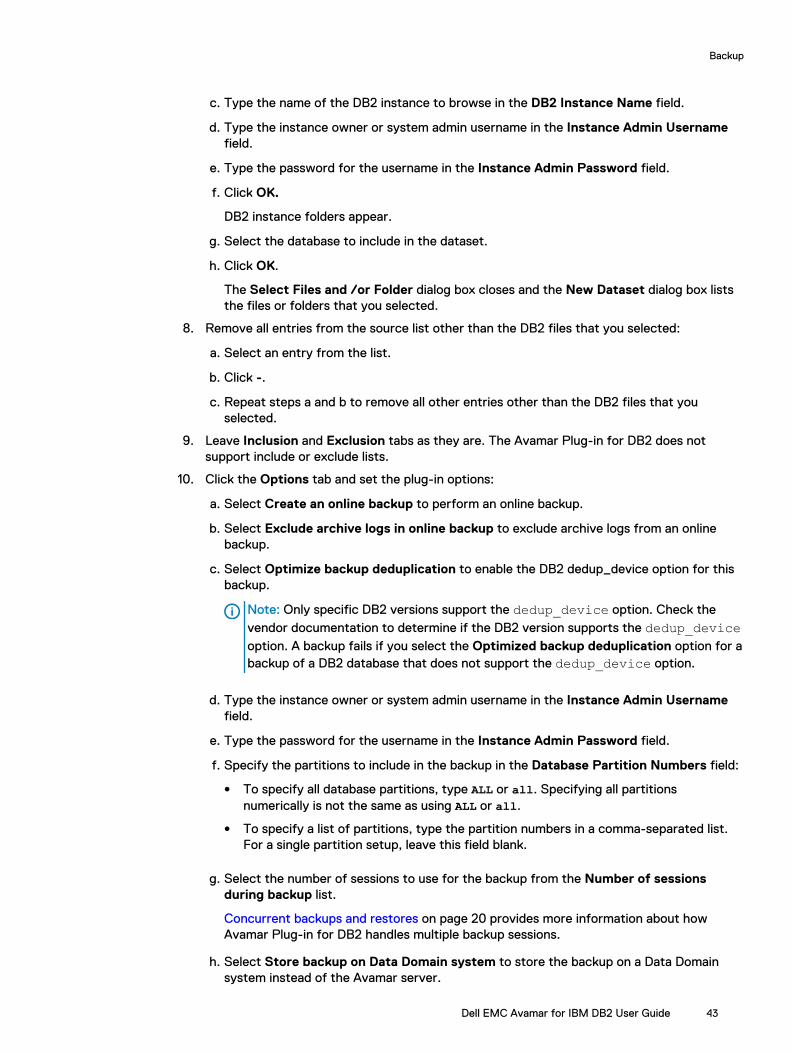
c. Type the name of the DB2 instance to browse in the DB2 Instance Name field.
d. Type the instance owner or system admin username in the Instance Admin Usernamefield.
e. Type the password for the username in the Instance Admin Password field.
f. Click OK.
DB2 instance folders appear.
g. Select the database to include in the dataset.
h. Click OK.
The Select Files and /or Folder dialog box closes and the New Dataset dialog box liststhe files or folders that you selected.
8. Remove all entries from the source list other than the DB2 files that you selected:
a. Select an entry from the list.
b. Click -.
c. Repeat steps a and b to remove all other entries other than the DB2 files that youselected.
9. Leave Inclusion and Exclusion tabs as they are. The Avamar Plug-in for DB2 does notsupport include or exclude lists.
10. Click the Options tab and set the plug-in options:
a. Select Create an online backup to perform an online backup.
b. Select Exclude archive logs in online backup to exclude archive logs from an onlinebackup.
c. Select Optimize backup deduplication to enable the DB2 dedup_device option for thisbackup.
Note: Only specific DB2 versions support the dedup_device option. Check thevendor documentation to determine if the DB2 version supports the dedup_deviceoption. A backup fails if you select the Optimized backup deduplication option for abackup of a DB2 database that does not support the dedup_device option.
d. Type the instance owner or system admin username in the Instance Admin Usernamefield.
e. Type the password for the username in the Instance Admin Password field.
f. Specify the partitions to include in the backup in the Database Partition Numbers field:
l To specify all database partitions, type ALL or all. Specifying all partitionsnumerically is not the same as using ALL or all.
l To specify a list of partitions, type the partition numbers in a comma-separated list.For a single partition setup, leave this field blank.
g. Select the number of sessions to use for the backup from the Number of sessionsduring backup list.
Concurrent backups and restores on page 20 provides more information about howAvamar Plug-in for DB2 handles multiple backup sessions.
h. Select Store backup on Data Domain system to store the backup on a Data Domainsystem instead of the Avamar server.
Backup
Dell EMC Avamar for IBM DB2 User Guide 43
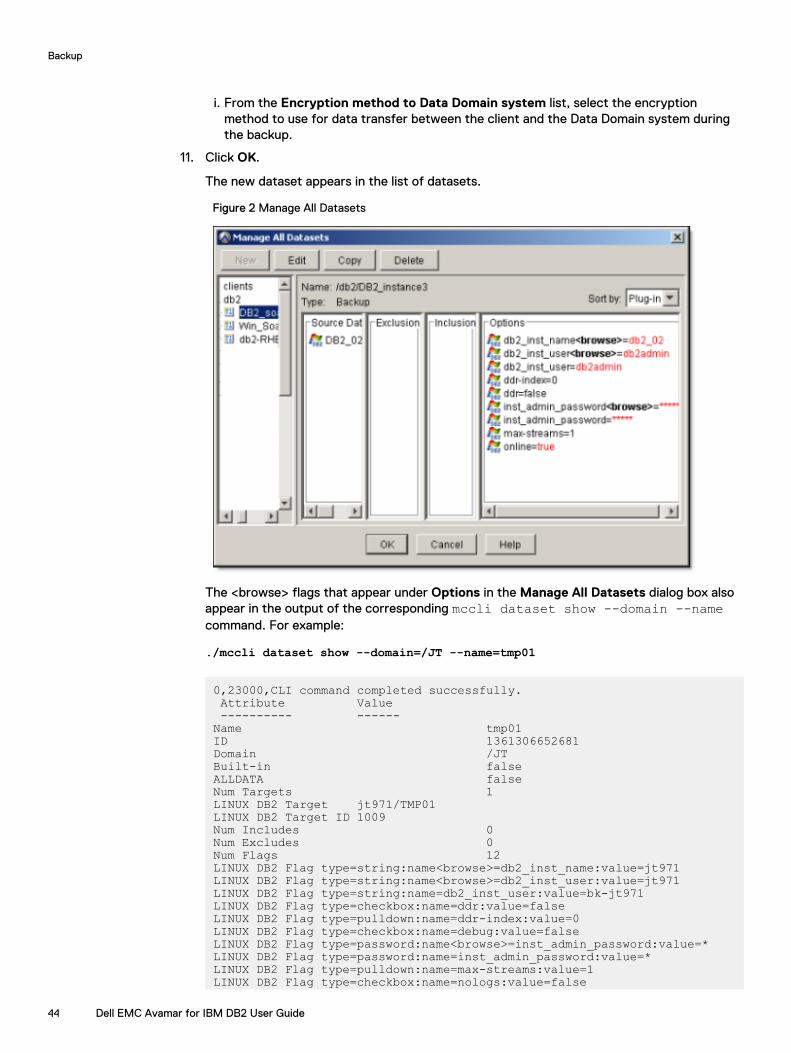
i. From the Encryption method to Data Domain system list, select the encryptionmethod to use for data transfer between the client and the Data Domain system duringthe backup.
11. Click OK.
The new dataset appears in the list of datasets.
Figure 2 Manage All Datasets
The <browse> flags that appear under Options in the Manage All Datasets dialog box alsoappear in the output of the corresponding mccli dataset show --domain --namecommand. For example:
./mccli dataset show --domain=/JT --name=tmp01
0,23000,CLI command completed successfully. Attribute Value ---------- ------Name tmp01 ID 1361306652681Domain /JT Built-in false ALLDATA false Num Targets 1 LINUX DB2 Target jt971/TMP01 LINUX DB2 Target ID 1009Num Includes 0 Num Excludes 0Num Flags 12LINUX DB2 Flag type=string:name<browse>=db2_inst_name:value=jt971LINUX DB2 Flag type=string:name<browse>=db2_inst_user:value=jt971LINUX DB2 Flag type=string:name=db2_inst_user:value=bk-jt971LINUX DB2 Flag type=checkbox:name=ddr:value=false LINUX DB2 Flag type=pulldown:name=ddr-index:value=0LINUX DB2 Flag type=checkbox:name=debug:value=false LINUX DB2 Flag type=password:name<browse>=inst_admin_password:value=* LINUX DB2 Flag type=password:name=inst_admin_password:value=* LINUX DB2 Flag type=pulldown:name=max-streams:value=1 LINUX DB2 Flag type=checkbox:name=nologs:value=false
Backup
44 Dell EMC Avamar for IBM DB2 User Guide
LINUX DB2 Flag type=checkbox:name=online:value=false LINUX DB2 Flag type=checkbox:name=optimize-dedup:value=false Is Link false
Creating a groupWhen you create a group, define the dataset, schedule, and retention policy, which togethercomprise the group policy for scheduled backups of all members of the group. A group mustcontain at least one Avamar client. When the group contains two or more clients, the clients mustbelong to the same Avamar domain. You can override group policy settings at the client level.
About this task
You cannot edit schedules or retention policies when you use the New Group wizard to create agroup. Otherwise, create schedules and retention policies before creating a group. The AvamarAdministration Guide provides information about editing schedule properties and retention policies.
Procedure
1. In Avamar Administrator, click the Policy launcher link.
The Policy window appears.
2. Click the Policy Management tab.
3. Select the Groups tab.
The Policy window displays a table that contains groups for the domain.
4. Select the domain for the DB2 server.
5. Select Actions > Group > New > Backup Group.
The New Group page appears.
6. Type a name for the new group in the Name box.
The name can include alphanumeric characters (A-Z, a-z, 0–9) and the following specialcharacters: period (.), hyphen (-), and underscore (_). Do not use Unicode characters orthe following special characters: ` ~ ! @ # $ % ^ & * ( ) = + [ ] { } | \ / ; : ' "< > , ?
7. Clear the Disabled checkbox to use this group for scheduled client backups.
Selecting the checkbox disables backups for the group.
8. From the Avamar encryption method list, select an encryption method to use for client/server data transfer during the backup.
The encryption technology and bit strength for the client/server connection depend onseveral factors, including the client platform and Avamar server version. The Avamar ProductSecurity Guide provides additional information.
9. (Optional) Select Override Schedule to override the assigned schedule for this group:
l To skip the next scheduled backup, select Skip Next Backup.
l To perform the next scheduled backup one time only, select Run Next Backup Once.
10. Click Next.
The next New Group page appears with dataset information.
11. Select the dataset that you created from the Select an Existing Dataset list, and then clickNext.
The next New Group page appears with schedule information.
12. Select a schedule from the Select an Existing Schedule list, and then click Next.
The next New Group page appears with retention policy information.
Backup
Dell EMC Avamar for IBM DB2 User Guide 45
13. Select a retention policy from the Select an Existing Retention Policy list, and then clickNext.
The final New Group page appears with a list of domains in the Choose Domain pane.
14. Select the domain that contains the DB2 server.
A list of Avamar clients appears in the pane under the Choose Domain pane.
15. Select the checkbox next to the clients to include them in the group. You can select theClient checkbox to include all clients.
The clients that you select appear in the Members pane.
16. (Optional) To remove a client from the group, select the client from the Members list, andthen click the red X.
17. Click Finish.
The New Group wizard closes and the new group appears in the table in the Policy window.
Enabling scheduled backupsScheduled backups occur only for enabled groups. Groups are disabled by default unless you selectthe Enabled checkbox on the first page of the New Group wizard. If you did not enable the groupwhen you created it, use the menu options in the Policy window to enable backups.
Procedure
1. In Avamar Administrator, click the Policy launcher link tab.
The Policy window appears.
2. Click the Policy Management tab.
3. Click the Groups tab.
4. Select the domain for the DB2 server.
5. Select the group that you created.
6. Enable the group, if required by selecting Actions > Group > Disable Group.
Perform this step only if a check mark appears next to the Disable Group menu option.
7. Click Yes to enable this group.
Monitoring backupsYou can monitor backups to ensure that they are completed successfully and troubleshoot issues.The Activity Monitor in Avamar Administrator enables you to view status information for both on-demand and scheduled backups.
Procedure
1. In Avamar Administrator, click the Activity launcher link.
The Activity window appears.
2. Click the Activity Monitor tab.
A list of all activities appears.
3. To filter the results to display only backup activity, select Actions > Filter.
The Filter Activity dialog box appears.
4. Select All Backups from the Type list.
5. Click OK.
Backup
46 Dell EMC Avamar for IBM DB2 User Guide
Canceling backupsYou can cancel a backup any time before it completes. The cancellation might take 5 minutes orlonger. The backup may complete before the cancellation finishes.
Procedure
1. In Avamar Administrator, click the Activity launcher link.
The Activity window appears.
2. Click the Activity Monitor tab.
A list of all activities appears.
3. Select the backup from the list.
4. Select Actions > Cancel Activity.
A confirmation message appears.
5. Click Yes.
Backup
Dell EMC Avamar for IBM DB2 User Guide 47

Backup
48 Dell EMC Avamar for IBM DB2 User Guide
CHAPTER 4
Restore and Recovery
This chapter includes the following topics:
l Backup naming conventions..................................................................................................50l Restoring DB2 databases to the original location................................................................... 51l Restoring DB2 databases to a different client....................................................................... 62l Restoring table spaces in a stand-alone DB2 environment.....................................................67l Recovering retired clients...................................................................................................... 71l Disaster recovery.................................................................................................................. 73l Monitoring restores............................................................................................................... 74l Canceling restores.................................................................................................................74
Dell EMC Avamar for IBM DB2 User Guide 49

Backup naming conventionsThe naming convention that the Avamar Plug-in for DB2 uses is based on the standard namingconvention that DB2 uses.
The Backup, Restore and Manage window in Avamar Administrator displays backup label andbackup image names for backups available to restore. Backup labels appear to the right of thecalendar in the Backups table. Backup image names appear below the Backups table in theContents of Backup table.
The following figure shows the label name and image name for a backup that a user selects forrestore.
Figure 3 Backup label and image names
Backup labels and image names for a database backupBackup labels for database backups contain specific elements. For example, a backup labelcontains an element that shows you whether the CLI or GUI was used to create the backup.
Backup labels for database backups use the following naming convention:
interface-database_status-backup_type
where:
l interface is CLI or GUI.
l database_status is C for an offline database backup and H for an online database backup.
l backup_type is DB2 Database(s) backup or DB2 LOAD_COPY image.
CLI-C-DB2 Databases(s) backup, for example, is the backup label that is selected in Figure3 on page 50.
Backup image names for database backups are specific to the version of DB2. Versions 9.5 and 9.7use the following naming convention:
db_name.DB2_backup_type.instance_name.node_id.catalognode_id.DB2_backup_timestamp.stream_sequence_number
where the value of DB2_backup_type is 0, 3, or 4:
Restore and Recovery
50 Dell EMC Avamar for IBM DB2 User Guide
l 0 represents a full backup of a database.
l 3 represents a backup of a table space.
l 4 represents a backup image the LOAD ... COPY TO command creates.
Backup image names in DB2 10 use a different naming convention. The node_id.catalognode_idformat changes to part_id.
Note: The Avamar image format for DB2 10 is the same as DB2 versions 9.7 and 9.5. The DB210 native format is different than DB2 9.7.
AVAMAR1.0.db2inst1.NODE0000.CATN0000.20121129175842.001, for example, is abackup image name. The 0 (zero) value for DB2_backup_type in this backup image name indicatesthat the image backup is a full backup of a database.
Backup labels and image names for log backupsBackup labels for log backups contain specific elements. A backup label, for example, contains anelement that shows you the sequence number of the log backup.
Backup labels for log backups use the following naming convention:
db_name-chain-number_sequence-number.LOGAVAMAR1-C0000042_S0000038.LOG is an example backup label name for a log backup.
Backup image names for log backups use the following naming convention:
chain-number_sequence-number.LOGC0000042_S0000038.LOG is an example backup image name for a log backup.
The display for the directory structure that contains the log files shows the instance, the database,and the node for the log files.
The backup image name is the same for backups from Avamar Administrator and from the DB2CLP.
Restoring DB2 databases to the original locationYou can restore DB2 databases to the original directory on the original client by using AvamarAdministrator. The Avamar Plug-in for DB2 can restore offline backups, online backups thatinclude archive log, online backups that do not include archive logs, and backups of archive logs.
Restoring offline backupsYou can restore an offline backup to the original directory. A backup label, for example, GUI-C-DB2 Database(s) backup contains a “C” in its name. The “C” indicates that the backup is foran offline database.
Before you begin
Ensure that the DB2 database is inactive. During the restore operation, do not connect to thedatabase.
Procedure
1. In Avamar Administrator, click the Backup & Restore launcher link button.
The Backup, Restore and Manage window appears.
2. Click the Restore tab.
The top-left pane contains a list of domains.
Restore and Recovery
Dell EMC Avamar for IBM DB2 User Guide 51
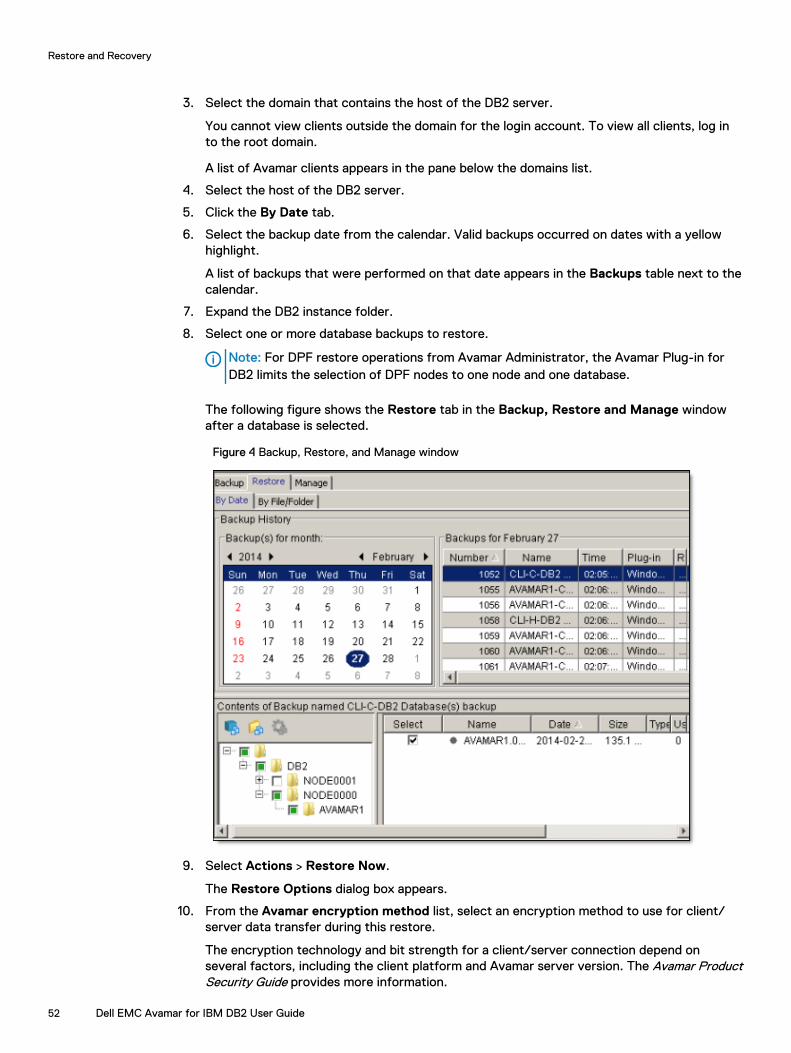
3. Select the domain that contains the host of the DB2 server.
You cannot view clients outside the domain for the login account. To view all clients, log into the root domain.
A list of Avamar clients appears in the pane below the domains list.
4. Select the host of the DB2 server.
5. Click the By Date tab.
6. Select the backup date from the calendar. Valid backups occurred on dates with a yellowhighlight.
A list of backups that were performed on that date appears in the Backups table next to thecalendar.
7. Expand the DB2 instance folder.
8. Select one or more database backups to restore.
Note: For DPF restore operations from Avamar Administrator, the Avamar Plug-in forDB2 limits the selection of DPF nodes to one node and one database.
The following figure shows the Restore tab in the Backup, Restore and Manage windowafter a database is selected.
Figure 4 Backup, Restore, and Manage window
9. Select Actions > Restore Now.
The Restore Options dialog box appears.
10. From the Avamar encryption method list, select an encryption method to use for client/server data transfer during this restore.
The encryption technology and bit strength for a client/server connection depend onseveral factors, including the client platform and Avamar server version. The Avamar ProductSecurity Guide provides more information.
Restore and Recovery
52 Dell EMC Avamar for IBM DB2 User Guide

11. Select Restore everything to its original location.
12. Click More Options.
The Restore Command Line Options dialog box appears.
13. Set the plug-in options:
a. From the Encryption method from Data Domain system list, select the encryptionmethod to use for data transfer between the Data Domain system and the client duringthe restore.
b. Select Restore only.
Note: Leave the Recovery Type panel as is. The Recovery Type options apply onlyto the Restore and roll forward database option and the Recover option.
c. Select the number of sessions to use for the restore from the Number of sessionsduring restore list.
Note: To obtain the best performance during a restore, use the same number ofrestore sessions that you used for the backup.
d. Type the instance owner or system admin username in the Instance Admin Usernamefield.
e. Type the password for the username in the Instance Admin Password field.
f. Leave the Database Partition Numbers field blank. This field only applies to DPFenvironments.
g. Leave the Directory Path to Restore Archive Logs field blank. This field only applies toonline backups that include archive logs.
A restore of an offline backup fails if the Directory Path to Restore Archive Logs fieldcontains a pathname. The error message for this type of failure is similar to the followingmessage:
restore: Invalid option for archive logs. Backup imagedb2inst1/c-AVAMAR1-1-sles10-32-db2-95-dpf does not containarchive logs
h. Leave Database Name field blank. This field only applies to redirected restores.
i. Type the name of the instance in the Instance Name field. This field only applies toredirected restores.
j. If the target database exists and you want to overwrite it, select the Replace existingdatabase checkbox.
k. Click OK to close the Restore Command Line Options dialog box.
14. Click OK to close the Restore Options dialog box.
The following status message appears:
Restore initiated.15. Click OK.
Restore and Recovery
Dell EMC Avamar for IBM DB2 User Guide 53

Restoring online backups that include archive logsYou can restore an online backup that includes archive logs to the original directory by specifyingthe End of logs, Point In Time, or End of Backup recovery types. The End of Backup recoverytype is available only for database backups of DB2 9.5 and later.
Procedure
1. In Avamar Administrator, click the Backup & Restore launcher link button.
The Backup, Restore and Manage window appears.
2. Click the Restore tab.
The top-left pane contains a list of domains.
3. Select the domain that contains the host of the DB2 server.
You cannot view clients outside the domain for the login account. To view all clients, log into the root domain.
A list of Avamar clients appears in the pane below the domains list.
4. Select the host of the DB2 server.
5. Click the By Date tab.
6. Select the backup date from the calendar. Valid backups occurred on dates with a yellowhighlight.
A list of backups that were performed on that date appears in the Backups table next to thecalendar.
7. Select a backup from the Backups table.
The backup contents appear below the Contents of Backup pane.
8. Expand the DB2 instance folder.
9. Select one or more database backups to restore.
10. Select Actions > Restore Now.
The Restore Options dialog box appears.
11. From the Avamar encryption method list, select an encryption method to use for client/server data transfer during this restore.
The encryption technology and bit strength for a client/server connection depend onseveral factors, including the client platform and Avamar server version. The Avamar ProductSecurity Guide provides more information.
12. Select Restore everything to its original location.
13. Click More Options.
The Restore Command Line Options dialog box appears.
14. Set the plug-in options:
a. From the Encryption method from Data Domain system list, select the encryptionmethod to use for data transfer between the Data Domain system and the client duringthe restore.
b. Select Restore and roll forward database.
c. Select a recovery type from the Type of Recovery list:
l End of logs recovers the database by performing a rollforward operation to the endof the logs.
Restore and Recovery
54 Dell EMC Avamar for IBM DB2 User Guide

l Point In Time recovers the database by performing a rollforward operation to aspecific point-in-time. Using the Point In Time recovery type requires you to type adate and time in the Date and Time field. Use the yyyy-mm-dd hh:mm:ss format. Thetime must be in the time zone of the client system.
l End of Backup recovers the database by performing a rollforward operation to theend of the backup. The End of Backup option is valid for DB2 versions 9.5 and later.
d. Select the number of sessions to use for the restore from the Number of sessionsduring restore list.
Note: To obtain the best performance during a restore, use the same number ofrestore sessions that you used for the backup.
e. Type the instance owner or system admin username in the Instance Admin Usernamefield.
f. Type the password for the username in the Instance Admin Password field.
g. Leave the Database Partition Numbers field blank. This field only applies to DPFenvironments.
h. Type the fully qualified pathname of an existing top-level directory in the Directory Pathto Restore Archive Logs field.
The restore operation creates a subdirectory below the directory pathname you specifyand restores the archive logs to this subdirectory.
i. Leave the Database Name field blank. This field only applies to redirected restores.
j. Leave the Instance Name field blank. This field only applies to redirected restores.
k. If the target database exists and you want to overwrite it, select the Replace existingdatabase checkbox.
The following figure shows an example of the Restore Command Line Options dialogbox.
Restore and Recovery
Dell EMC Avamar for IBM DB2 User Guide 55
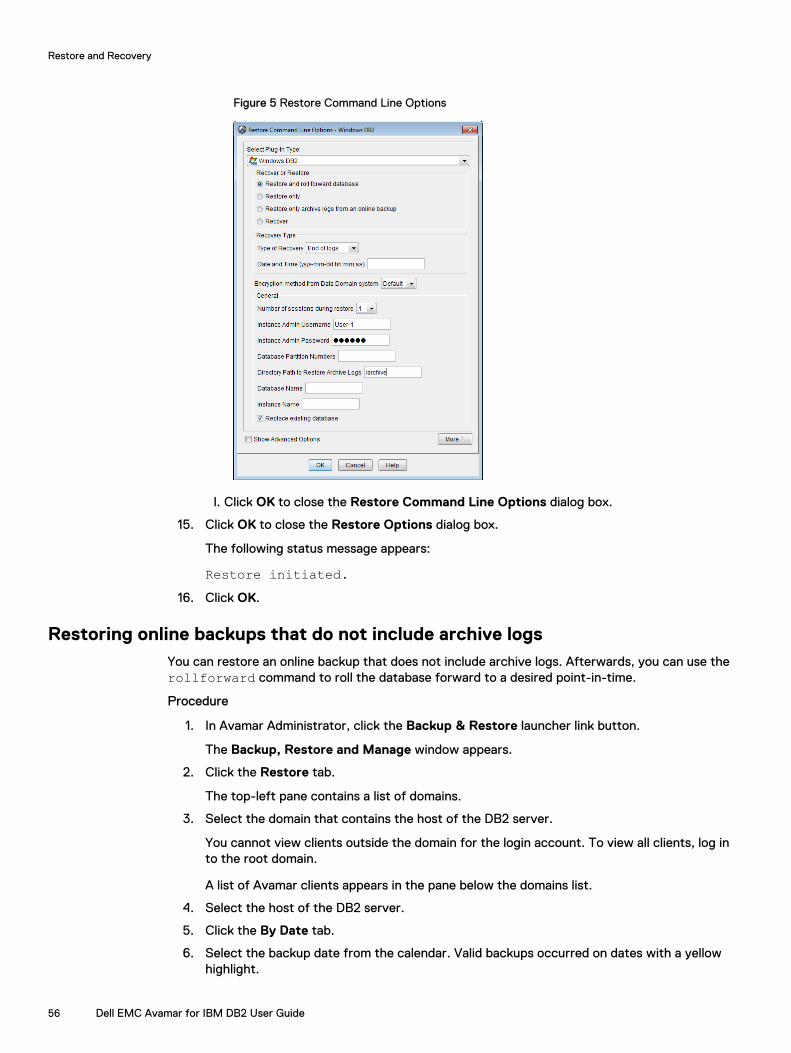
Figure 5 Restore Command Line Options
l. Click OK to close the Restore Command Line Options dialog box.
15. Click OK to close the Restore Options dialog box.
The following status message appears:
Restore initiated.16. Click OK.
Restoring online backups that do not include archive logsYou can restore an online backup that does not include archive logs. Afterwards, you can use therollforward command to roll the database forward to a desired point-in-time.
Procedure
1. In Avamar Administrator, click the Backup & Restore launcher link button.
The Backup, Restore and Manage window appears.
2. Click the Restore tab.
The top-left pane contains a list of domains.
3. Select the domain that contains the host of the DB2 server.
You cannot view clients outside the domain for the login account. To view all clients, log into the root domain.
A list of Avamar clients appears in the pane below the domains list.
4. Select the host of the DB2 server.
5. Click the By Date tab.
6. Select the backup date from the calendar. Valid backups occurred on dates with a yellowhighlight.
Restore and Recovery
56 Dell EMC Avamar for IBM DB2 User Guide
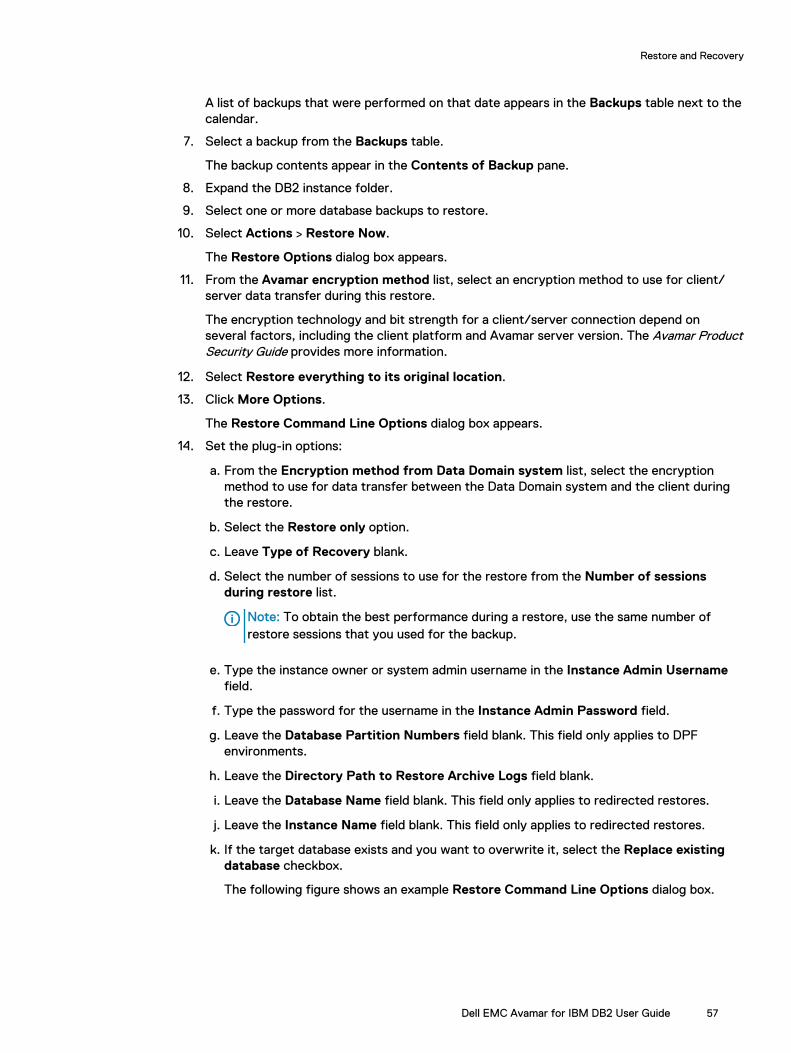
A list of backups that were performed on that date appears in the Backups table next to thecalendar.
7. Select a backup from the Backups table.
The backup contents appear in the Contents of Backup pane.
8. Expand the DB2 instance folder.
9. Select one or more database backups to restore.
10. Select Actions > Restore Now.
The Restore Options dialog box appears.
11. From the Avamar encryption method list, select an encryption method to use for client/server data transfer during this restore.
The encryption technology and bit strength for a client/server connection depend onseveral factors, including the client platform and Avamar server version. The Avamar ProductSecurity Guide provides more information.
12. Select Restore everything to its original location.
13. Click More Options.
The Restore Command Line Options dialog box appears.
14. Set the plug-in options:
a. From the Encryption method from Data Domain system list, select the encryptionmethod to use for data transfer between the Data Domain system and the client duringthe restore.
b. Select the Restore only option.
c. Leave Type of Recovery blank.
d. Select the number of sessions to use for the restore from the Number of sessionsduring restore list.
Note: To obtain the best performance during a restore, use the same number ofrestore sessions that you used for the backup.
e. Type the instance owner or system admin username in the Instance Admin Usernamefield.
f. Type the password for the username in the Instance Admin Password field.
g. Leave the Database Partition Numbers field blank. This field only applies to DPFenvironments.
h. Leave the Directory Path to Restore Archive Logs field blank.
i. Leave the Database Name field blank. This field only applies to redirected restores.
j. Leave the Instance Name field blank. This field only applies to redirected restores.
k. If the target database exists and you want to overwrite it, select the Replace existingdatabase checkbox.
The following figure shows an example Restore Command Line Options dialog box.
Restore and Recovery
Dell EMC Avamar for IBM DB2 User Guide 57
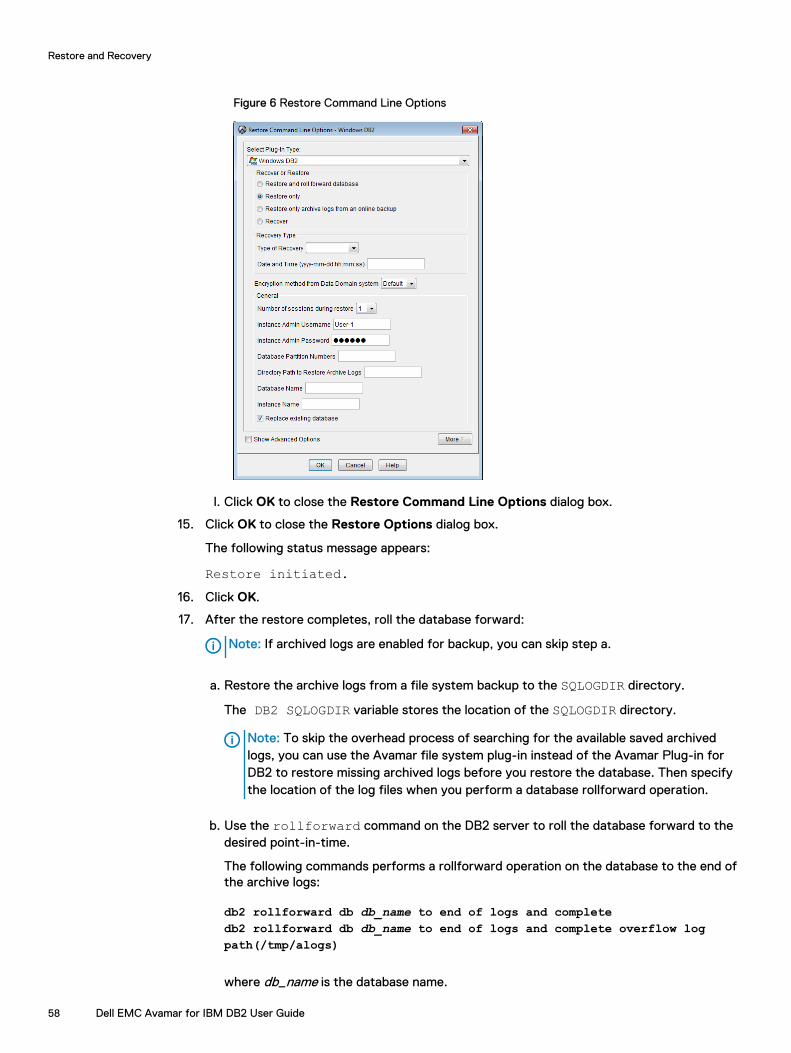
Figure 6 Restore Command Line Options
l. Click OK to close the Restore Command Line Options dialog box.
15. Click OK to close the Restore Options dialog box.
The following status message appears:
Restore initiated.16. Click OK.
17. After the restore completes, roll the database forward:
Note: If archived logs are enabled for backup, you can skip step a.
a. Restore the archive logs from a file system backup to the SQLOGDIR directory.
The DB2 SQLOGDIR variable stores the location of the SQLOGDIR directory.
Note: To skip the overhead process of searching for the available saved archivedlogs, you can use the Avamar file system plug-in instead of the Avamar Plug-in forDB2 to restore missing archived logs before you restore the database. Then specifythe location of the log files when you perform a database rollforward operation.
b. Use the rollforward command on the DB2 server to roll the database forward to thedesired point-in-time.
The following commands performs a rollforward operation on the database to the end ofthe archive logs:
db2 rollforward db db_name to end of logs and completedb2 rollforward db db_name to end of logs and complete overflow logpath(/tmp/alogs)
where db_name is the database name.
Restore and Recovery
58 Dell EMC Avamar for IBM DB2 User Guide

Note: If a database is in a rollforward pending state and you do not run therollforward command, the next Avamar Plug-in for DB2 backup of this databasefails with an error message. The error message recommends that you roll thedatabase forward. You can perform one more restore operation on a database that isin a rollforward pending state.
Restoring only the archive logsYou can restore an online backup that includes only archive logs from an online backup.
Procedure
1. In Avamar Administrator, click the Backup & Restore launcher link button.
The Backup, Restore and Manage window appears.
2. Click the Restore tab.
The top-left pane contains a list of domains.
3. Select the domain that contains the host of the DB2 server.
You cannot view clients outside the domain for the login account. To view all clients, log into the root domain.
A list of Avamar clients appears in the pane below the domains list.
4. Select the host of the DB2 server.
5. Click the By Date tab.
6. Select the backup date from the calendar. Valid backups occurred on dates with a yellowhighlight.
A list of backups that were performed on that date appears in the Backups table next to thecalendar.
7. Select a backup from the Backups table.
The backup contents appear below the Backup History pane.
8. Expand the DB2 instance folder.
9. Select one or more database backups to restore.
10. Select Actions > Restore Now.
The Restore Options dialog box appears.
11. From the Avamar encryption method list, select an encryption method to use for client/server data transfer during this restore.
The encryption technology and bit strength for a client/server connection depend onseveral factors, including the client platform and Avamar server version. The Avamar ProductSecurity Guide provides more information.
12. Select Restore everything to its original location.
13. Click More Options.
The Restore Command Line Options dialog box appears.
14. Set the plug-in options:
a. From the Encryption method from Data Domain system list, select the encryptionmethod to use for data transfer between the Data Domain system and the client duringthe restore.
Restore and Recovery
Dell EMC Avamar for IBM DB2 User Guide 59
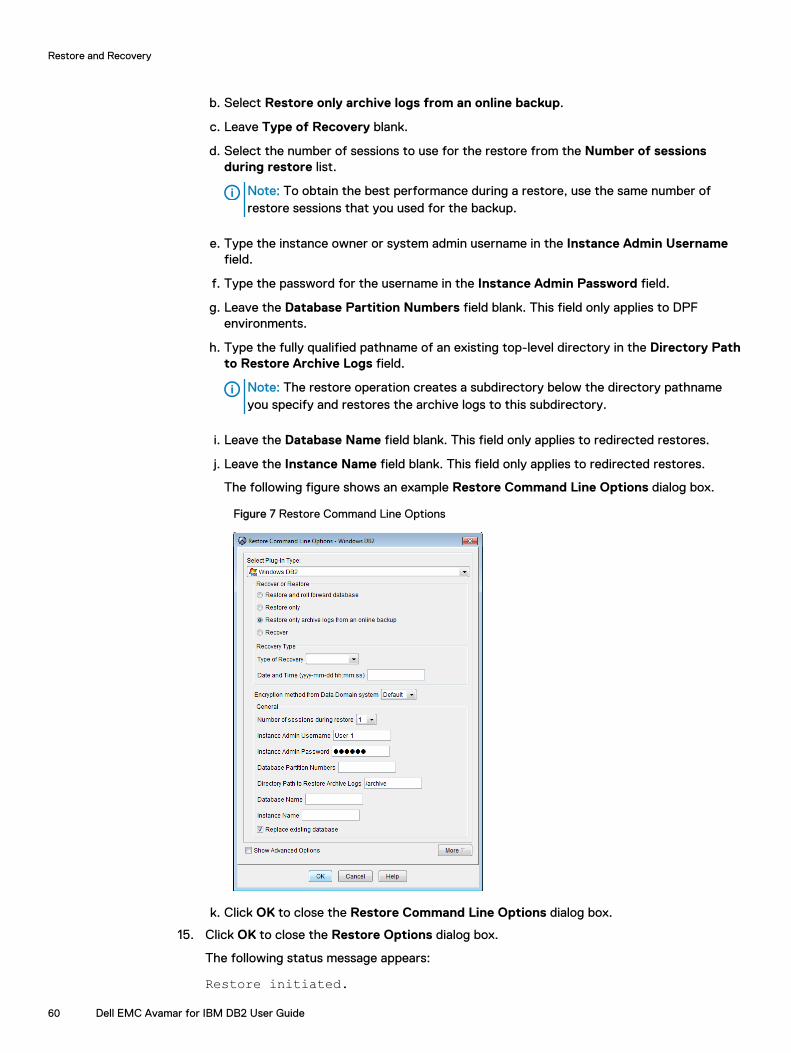
b. Select Restore only archive logs from an online backup.
c. Leave Type of Recovery blank.
d. Select the number of sessions to use for the restore from the Number of sessionsduring restore list.
Note: To obtain the best performance during a restore, use the same number ofrestore sessions that you used for the backup.
e. Type the instance owner or system admin username in the Instance Admin Usernamefield.
f. Type the password for the username in the Instance Admin Password field.
g. Leave the Database Partition Numbers field blank. This field only applies to DPFenvironments.
h. Type the fully qualified pathname of an existing top-level directory in the Directory Pathto Restore Archive Logs field.
Note: The restore operation creates a subdirectory below the directory pathnameyou specify and restores the archive logs to this subdirectory.
i. Leave the Database Name field blank. This field only applies to redirected restores.
j. Leave the Instance Name field blank. This field only applies to redirected restores.
The following figure shows an example Restore Command Line Options dialog box.
Figure 7 Restore Command Line Options
k. Click OK to close the Restore Command Line Options dialog box.
15. Click OK to close the Restore Options dialog box.
The following status message appears:
Restore initiated.
Restore and Recovery
60 Dell EMC Avamar for IBM DB2 User Guide
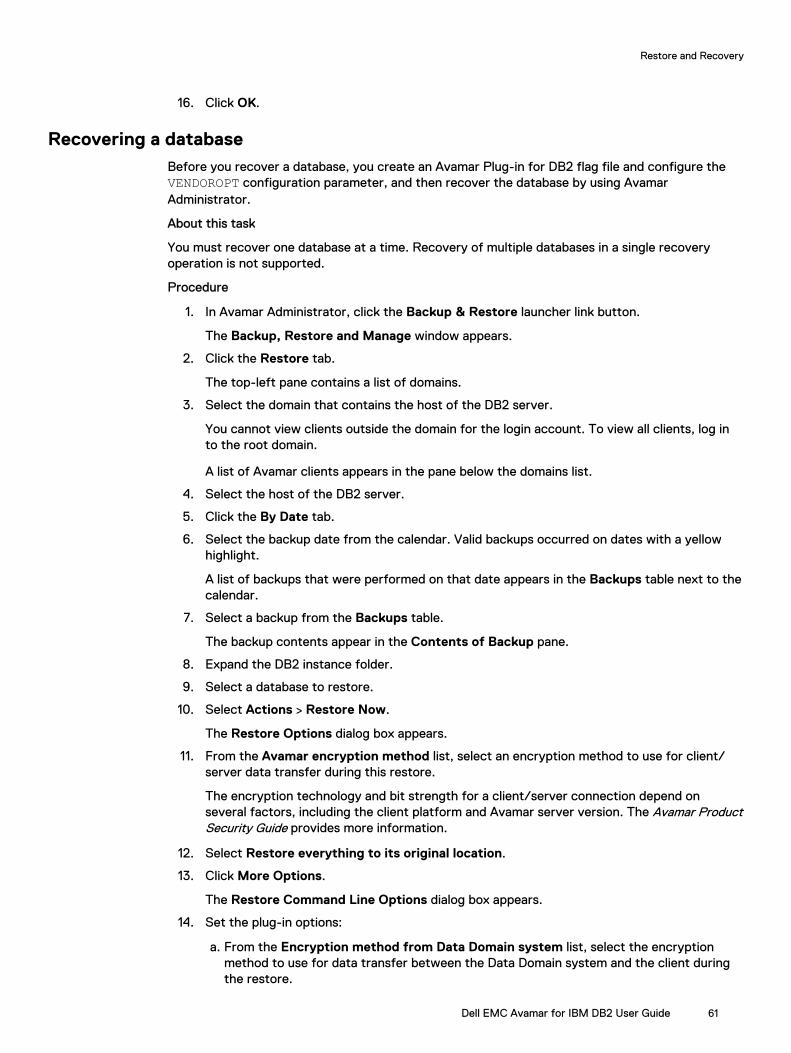
16. Click OK.
Recovering a databaseBefore you recover a database, you create an Avamar Plug-in for DB2 flag file and configure theVENDOROPT configuration parameter, and then recover the database by using AvamarAdministrator.
About this task
You must recover one database at a time. Recovery of multiple databases in a single recoveryoperation is not supported.
Procedure
1. In Avamar Administrator, click the Backup & Restore launcher link button.
The Backup, Restore and Manage window appears.
2. Click the Restore tab.
The top-left pane contains a list of domains.
3. Select the domain that contains the host of the DB2 server.
You cannot view clients outside the domain for the login account. To view all clients, log into the root domain.
A list of Avamar clients appears in the pane below the domains list.
4. Select the host of the DB2 server.
5. Click the By Date tab.
6. Select the backup date from the calendar. Valid backups occurred on dates with a yellowhighlight.
A list of backups that were performed on that date appears in the Backups table next to thecalendar.
7. Select a backup from the Backups table.
The backup contents appear in the Contents of Backup pane.
8. Expand the DB2 instance folder.
9. Select a database to restore.
10. Select Actions > Restore Now.
The Restore Options dialog box appears.
11. From the Avamar encryption method list, select an encryption method to use for client/server data transfer during this restore.
The encryption technology and bit strength for a client/server connection depend onseveral factors, including the client platform and Avamar server version. The Avamar ProductSecurity Guide provides more information.
12. Select Restore everything to its original location.
13. Click More Options.
The Restore Command Line Options dialog box appears.
14. Set the plug-in options:
a. From the Encryption method from Data Domain system list, select the encryptionmethod to use for data transfer between the Data Domain system and the client duringthe restore.
Restore and Recovery
Dell EMC Avamar for IBM DB2 User Guide 61
b. Select the Recover option.
c. Select End of Logs or Point in Time from the Type of Recovery list.
Note: The End of Logs and Point in Time options are valid only for the Recoveroption.
d. Leave the Number of sessions during restore list set to 1.
e. Type the instance owner or system admin username in the Instance Admin Usernamefield.
f. Type the password for the username in the Instance Admin Password field.
g. Leave the Database Partition Numbers field blank.
Note: The Recover option supports only a recovery of a single database at a time.
h. Type the fully qualified pathname of an existing top-level directory in the Directory Pathto Restore Archive Logs field.
The restore operation creates a subdirectory below the directory pathname you specifyand restores the archive logs to this subdirectory.
i. Leave the Database Name field and the Instance Name field blank.
j. If the target database exists and you want to overwrite it, select the Replace existingdatabase checkbox.
k. Click OK to close the Restore Command Line Options dialog box.
15. Click OK to close the Restore Options dialog box.
The following status message appears:
Restore initiated.16. Click OK.
Restoring DB2 databases to a different clientYou can restore DB2 databases, including automatic storage databases, to a client other than theoriginal client by using Avamar Administrator. This type of restore is known as a redirected restore.
Setting flags for automatic storage databases
To perform a redirected restore of an automatic storage database, you must set the asm-restore-set-storagepaths flag, the restore-set-dbpath flag, or both.
l The asm-restore-set-storagepaths flag set to true corresponds to the DB2’s ONpath-list parameter. A comma-separated list of directories that you select appears in theDestination column in the Restore Options dialog box. The ON path-list parameterredefines the storage paths associated with automatic storage databases.
l The restore-set-dbpath flag set to 1 corresponds to the new DBPATH as the first entrythat you specify in a comma-separated list of directories in the Destination column in theRestore Options dialog box. The new storage path list does not use this DBPATH. Therestore-set-dbpath flag is only relevant for automatic storage database restores.
Restore and Recovery
62 Dell EMC Avamar for IBM DB2 User Guide
Rollforward after a redirected restore to a different hostThe Avamar Plug-in for DB2 backup process does not save vendor configuration files during adatabase or log backup. A manual rollforward after a redirected restore requires theseconfiguration files. Otherwise, the rollforward fails because it cannot find the log files.
1. Before you perform a manual rollforward after a redirected restore, ensure that all databasevendor configuration files are available on the target system.Database configuration files include the file with the logarchopt1 parameter setting. Youcan set up these configuration settings for the target database after the redirected restorecompletes.
2. Configure the --logdest-id and --logdest-ap parameters.A manual rollforward after a redirected restore to a different host requires these parameters.Add these parameters to the DB2 flag file. You can also configure the optional parameter, --logdest-account. DB2 vendor parameters on page 114 provides more information aboutthese parameters. Creating the Avamar Plug-in for DB2 flag file on page 38 provides moreinformation about parameters in the flag file.
Note: The use of the --logdest-id, --logdest-ap, and --logdest-accountparameters is specific to an archived log backup of the destination database. An archivedlog backup of the destination database can happen if a rollback occurs when a rollforwardcompletes. These parameters replace the --id, --account, and --ap parameters thatyou set for the source client and use for archived log retrieval during a rollforward.
3. After the rollforward completes, you must remove the --logdest-id, --logdest-ap, and--logdest-account parameters from the DB2 flag file and replace the --id, --account,and --ap parameters. The values for the --id, --account, and --ap parameterscorrespond to the destination client.
4. After a restore or a change to database configuration settings, perform a full database backupto create a new baseline for the database backup and recovery history.
Restoring the database to a different client
Procedure
1. In Avamar Administrator, click the Backup & Restore launcher link button.
The Backup, Restore and Manage window appears.
2. Click the Restore tab.
The top-left pane contains a list of domains.
3. Select the domain that contains the host of the DB2 server.
You cannot view clients outside the domain for the login account. To view all clients, log into the root domain.
A list of Avamar clients appears in the pane below the domains list.
4. Select the host of the DB2 server.
5. Click the By Date tab.
6. Select the backup date from the calendar. Valid backups occurred on dates with a yellowhighlight.
A list of backups that were performed on that date appears in the Backups table next to thecalendar.
Restore and Recovery
Dell EMC Avamar for IBM DB2 User Guide 63
7. Select a backup from the Backups table.
The backup contents appear below the Backup History pane.
8. Expand the DB2 instance folder.
9. Select one or more database backups to restore.
10. Select Actions > Restore Now.
The Restore Options dialog box appears.
11. From the Avamar encryption method list, select an encryption method to use for client/server data transfer during this restore.
The encryption technology and bit strength for a client/server connection depend onseveral factors, including the client platform and Avamar server version. The Avamar ProductSecurity Guide provides more information.
12. Select Restore everything to a different location.
13. On Windows platforms, specify the destination location manually. For example,E:\DATABASE\BACKUPS\.
On other platforms, click Browse.
The Browse for Restore Client dialog box appears.
14. Select the target client from the client tree, and then click OK.
The client name appears in the Restore Destination Client text box.
15. Click Set Destination.
The Set Destination dialog box appears.
16. Type the destination for the restore in the Save Target(s) in Directory field. For an ASMrestore, type a list of directories for storage paths. Separate entries in the list with acomma.
17. Click OK.
The destination appears in the Destination column.
18. Click More Options.
The Restore Command Line Options dialog box appears.
19. Set the plug-in options:
a. From the Encryption method from Data Domain system list, select the encryptionmethod to use for data transfer between the Data Domain system and the client duringthe restore.
b. Select the Restore only option.
c. Leave the Recovery Type panel blank. The Recovery Type options apply only to theRecover option.
d. Select the number of sessions to use for the restore from the Number of sessionsduring restore list.
Note: To obtain the best performance during a restore, use the same number ofrestore sessions that you used for the backup.
e. Type the instance owner or system admin username in the Instance Admin Usernamefield and the instance owner’s password in the Instance Admin Password field.
f. Type the fully qualified pathname of an existing top-level directory in the Directory Pathto Restore Archive Logs field.
Restore and Recovery
64 Dell EMC Avamar for IBM DB2 User Guide
The restore operation creates a subdirectory below the directory pathname you specifyand restores the archive logs to this subdirectory.
g. Type the name of the database in the Database Name field.
h. Type the name of the instance in the Instance Name field.
i. If the target database exists and you want to overwrite it, select the Replace existingdatabase checkbox.
j. (Automatic storage databases only) Click More to display the Enter Attribute and EnterAttribute Value fields.
k. In the Enter Attribute field, type --[avdb2]asm-restore-set-storagepaths.
Note: You must precede the attribute with --[avdb2].
l. In the Enter Attribute Value filed, type true.
m. Click +.
n. In the Enter Attribute field, type --[avdb2]restore-set-dbpath.
o. In the Enter Attribute Value field, type 1.
p. To set NEWLOGPATH, in the Enter Attribute field, type --[avdb2]new-log-path. Inthe Enter Attribute Value field, type the absolute path for log files after restore.
q. In the Enter Attribute Value field, type the absolute path for log files after restore.
The new-log-path flag allows you to specify a string representing the path to be used forlogging after the restore has completed. This flag is optional.
r. Click +.
s. Click OK.
The asm-restore-set-storagepaths and restore-set-dbpath flags appear inthe box below the + and - buttons.
Restore and Recovery
Dell EMC Avamar for IBM DB2 User Guide 65
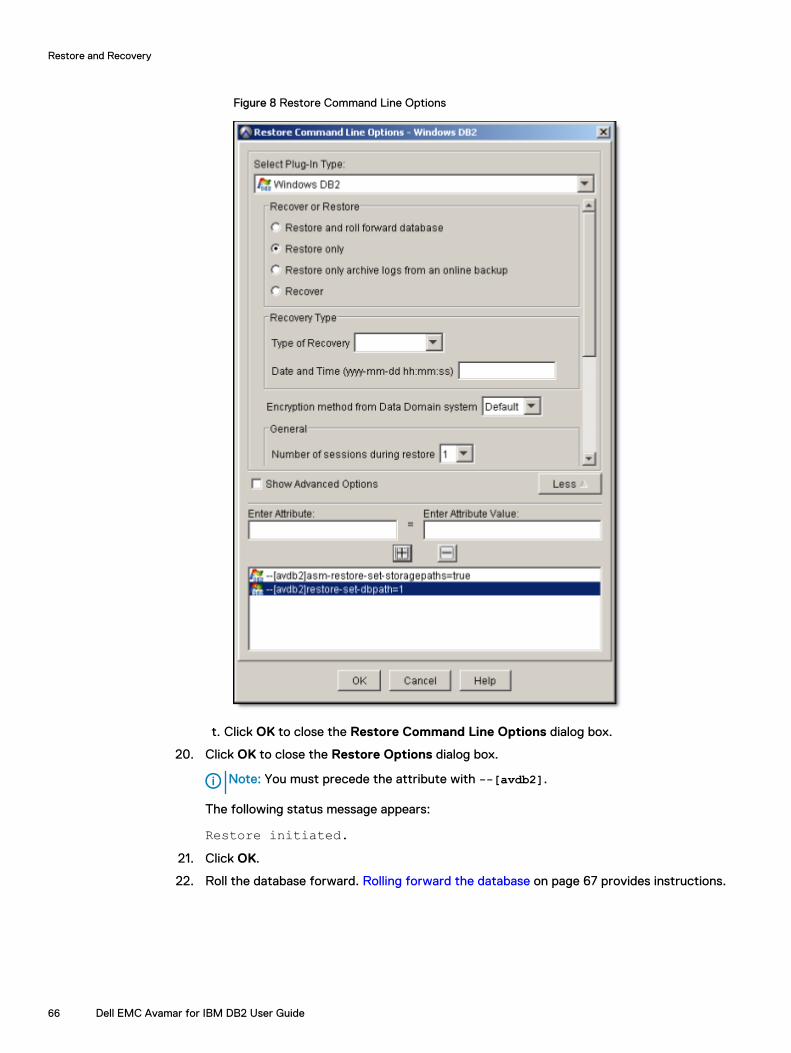
Figure 8 Restore Command Line Options
t. Click OK to close the Restore Command Line Options dialog box.
20. Click OK to close the Restore Options dialog box.
Note: You must precede the attribute with --[avdb2].
The following status message appears:
Restore initiated.21. Click OK.
22. Roll the database forward. Rolling forward the database on page 67 provides instructions.
Restore and Recovery
66 Dell EMC Avamar for IBM DB2 User Guide
Rolling forward the databaseRoll forward the database if you used the Restore only option to restore an online backup. Arollforward operation does not apply to restores of offline backups.
Procedure
l To manually roll forward the database to the desired point-in-time, use the rollforwardcommand on the DB2 server. The following command is an example:
db2 rollforward db db_name to end of logs and completewhere db_name is the database name.
This example command rolls forward the database to the end of the archive logs.
Note: If you do not run the rollforward command, subsequent Avamar Plug-in for DB2backups and restores fail with an error message, which recommends that you roll forwardthe database.
Restoring table spaces in a stand-alone DB2 environmentYou can use Avamar Administrator to restore one or more table spaces from a backup.
About this task
To restore the SYSCATSPACE table space from DB2 version 10.1 or later databases, you mustspecify the tbs-offline-restore-mode=true option in the Enter Attribute and EnterAttribute Value fields. The following procedure includes instructions.
Procedure
1. In Avamar Administrator, click the Backup & Restore launcher link button.
The Backup, Restore and Manage window appears.
2. Click the Restore tab.
The top-left pane contains a list of domains.
3. Select the domain that contains the host of the DB2 server.
You cannot view clients outside the domain for the login account. To view all clients, log into the root domain.
A list of Avamar clients appears in the pane below the domains list.
4. Select the host of the DB2 server.
5. Click the By Date tab.
6. Select the backup date from the calendar. Valid backups occurred on dates with a yellowhighlight.
A list of backups that were performed on that date appears in the Backups table next to thecalendar.
7. Select a full backup from the Backups table.
The backup contents appear in the Contents of Backup pane.
The Browse for Image Restore and Browse for Granular Restore buttons appear abovethe directory tree in the Contents of Backup pane.
8. Select the top-level folder to select the entire plug-in, or select one or more databases forthe granular browse operation.
Restore and Recovery
Dell EMC Avamar for IBM DB2 User Guide 67
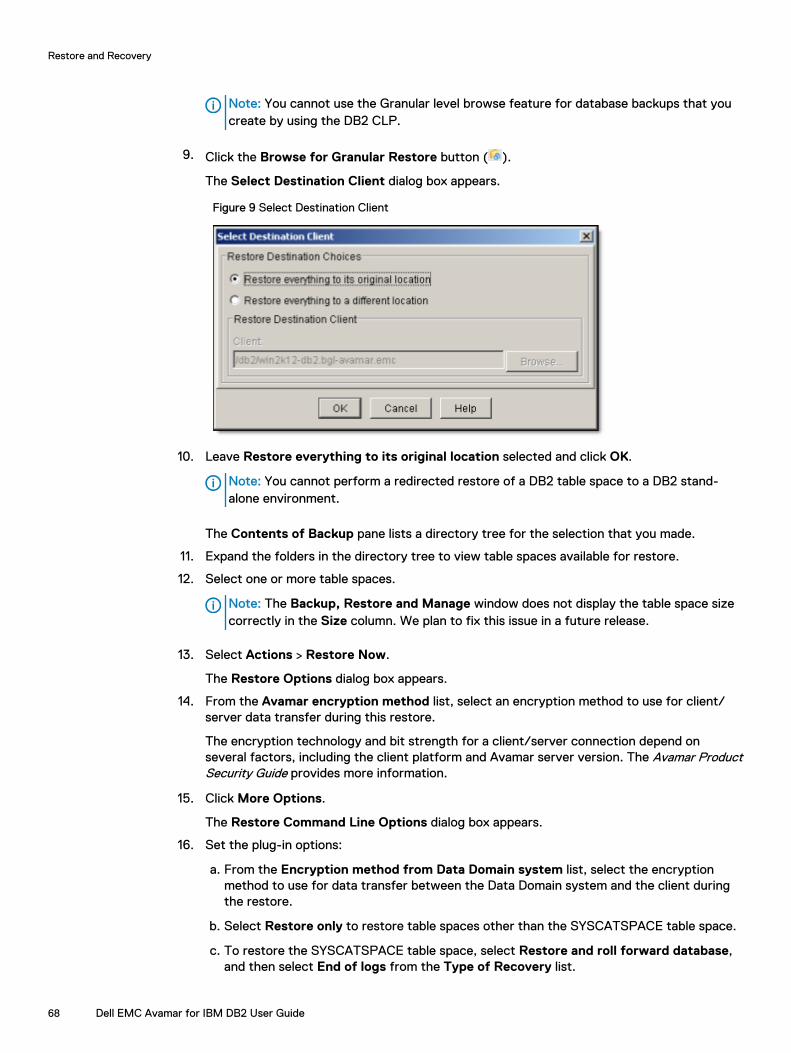
Note: You cannot use the Granular level browse feature for database backups that youcreate by using the DB2 CLP.
9. Click the Browse for Granular Restore button ( ).
The Select Destination Client dialog box appears.
Figure 9 Select Destination Client
10. Leave Restore everything to its original location selected and click OK.
Note: You cannot perform a redirected restore of a DB2 table space to a DB2 stand-alone environment.
The Contents of Backup pane lists a directory tree for the selection that you made.
11. Expand the folders in the directory tree to view table spaces available for restore.
12. Select one or more table spaces.
Note: The Backup, Restore and Manage window does not display the table space sizecorrectly in the Size column. We plan to fix this issue in a future release.
13. Select Actions > Restore Now.
The Restore Options dialog box appears.
14. From the Avamar encryption method list, select an encryption method to use for client/server data transfer during this restore.
The encryption technology and bit strength for a client/server connection depend onseveral factors, including the client platform and Avamar server version. The Avamar ProductSecurity Guide provides more information.
15. Click More Options.
The Restore Command Line Options dialog box appears.
16. Set the plug-in options:
a. From the Encryption method from Data Domain system list, select the encryptionmethod to use for data transfer between the Data Domain system and the client duringthe restore.
b. Select Restore only to restore table spaces other than the SYSCATSPACE table space.
c. To restore the SYSCATSPACE table space, select Restore and roll forward database,and then select End of logs from the Type of Recovery list.
Restore and Recovery
68 Dell EMC Avamar for IBM DB2 User Guide
d. Select the number of sessions to use for the restore from the Number of sessionsduring restore list.
Note: To obtain the best performance during a restore, use the same number ofrestore sessions that you used for the backup.
e. Type the instance owner or system admin username in the Instance Admin Usernamefield.
f. Type the password for the username in the Instance Admin Password field.
g. Leave the Database Partition Numbers field blank.
h. Leave the Directory Path to Restore Archive Logs field blank.
i. Leave the Database Name field blank.
17. (Renamed table spaces only) Complete the following steps to restore renamed table spaces:
a. Click More to display the Enter Attribute and Enter Attribute Value fields.
b. Type --[avdb2]renamed_tablespace_list in the Enter Attribute field.
c. Type the name of the renamed table space in the Enter Attribute Value field.
d. Click +.
The attribute and value appear in the box below the + and - buttons.
Restore and Recovery
Dell EMC Avamar for IBM DB2 User Guide 69
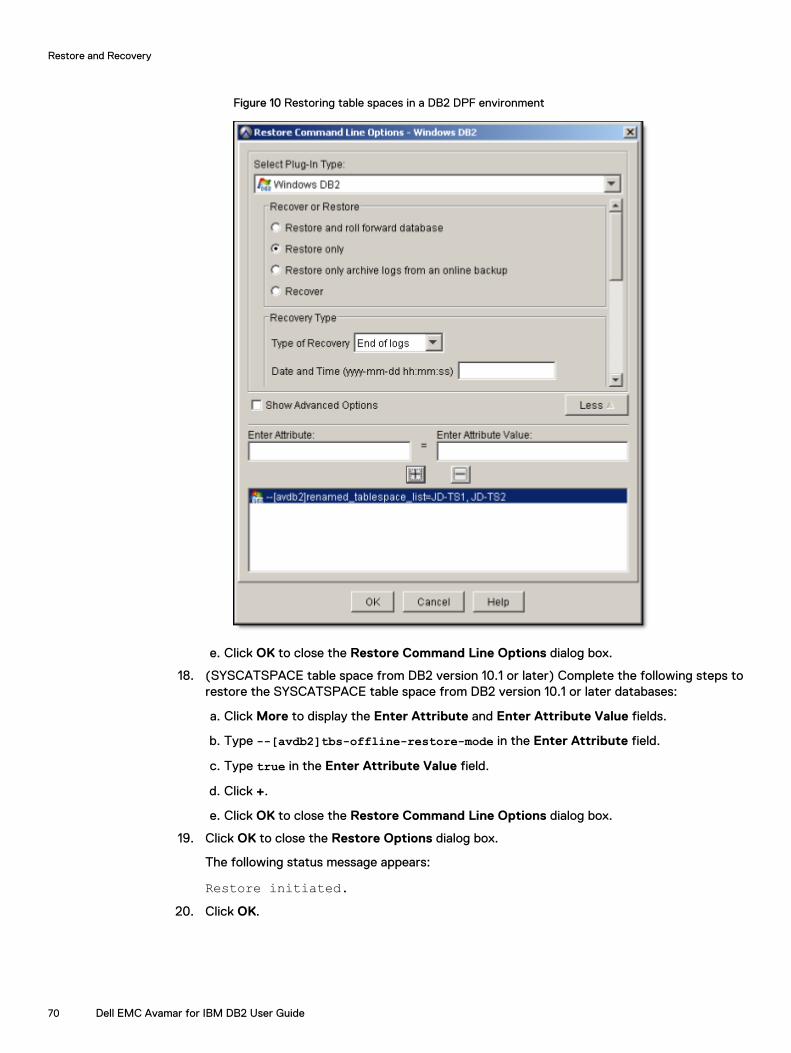
Figure 10 Restoring table spaces in a DB2 DPF environment
e. Click OK to close the Restore Command Line Options dialog box.
18. (SYSCATSPACE table space from DB2 version 10.1 or later) Complete the following steps torestore the SYSCATSPACE table space from DB2 version 10.1 or later databases:
a. Click More to display the Enter Attribute and Enter Attribute Value fields.
b. Type --[avdb2]tbs-offline-restore-mode in the Enter Attribute field.
c. Type true in the Enter Attribute Value field.
d. Click +.
e. Click OK to close the Restore Command Line Options dialog box.
19. Click OK to close the Restore Options dialog box.
The following status message appears:
Restore initiated.20. Click OK.
Restore and Recovery
70 Dell EMC Avamar for IBM DB2 User Guide
Recovering retired clientsThe Avamar system maintains backups for retired clients for the length of time determined by theretention policy. You can restore a backup from a retired client by using Avamar Administrator.
Procedure
1. In Avamar Administrator, click the Backup & Restore launcher link button.
The Backup, Restore and Manage window appears.
2. Click the Restore tab.
The top-left pane contains a list of domains.
3. Click the MC_RETIRED domain.
4. Select the client from the MC_RETIRED domain.
5. Click the By Date tab.
6. Select the backup date from the calendar. Valid backups occurred on dates with a yellowhighlight.
A list of backups that were performed on that date appears in the Backups table next to thecalendar.
7. Select a backup from the Backups table.
The backup contents appear as a list in the Contents of Backup pane.
8. Expand the folders to display the DB2 instance folder.
9. Select the database backup to restore.
10. Select Actions > Restore Now.
The Restore Options dialog box appears.
11. Select the target client from the Browse for Client Destination dialog box.
Note: The target client name has the same name as the MC_RETIRED client name.
The target client name appears in the Restore Destination Client field.
12. Click Set Destination.
The Set Destination dialog box appears.
13. Click Browse.
The Browse for File, Folder, or Directory dialog box appears.
14. Click the DB2 plug-in.
The Browse Command Line Options dialog box appears.
15. Type the DB2 instance credentials:
a. In the DB2 Instance Name field, type the name of the DB2 instance to browse.
b. In the Instance Admin Username, type the instance owner or system admin username.
c. In the Instance Admin Password , type the password for the username.
16. Click OK to close the Set Destination dialog box.
The database instance appears in the Destination column of the Items Marked for Restoretable.
Restore and Recovery
Dell EMC Avamar for IBM DB2 User Guide 71
17. Click More Options.
The Restore Command Line Options dialog box appears.
18. Set the plug-in options:
a. From the Encryption method from Data Domain system list, select the encryptionmethod to use for data transfer between the Data Domain system and the client duringthe restore.
b. Select the Restore and roll forward database option.
Note: Alternately, you can select the Restore only option and perform a manualrollforward operation after the restore completes. To perform a manual rollforwardoperation, use the overflow log path option with the rollforward command,and then recover the database to the end of logs or to a point-in-time. DB2documentation provides more information about the rollforward command.
c. Select one of the following recovery types from the Type of Recovery list:
l End of logs recovers the database by performing a rollforward operation to the endof logs.
l Point In Time recovers the database by performing a rollforward operation to aspecific point-in-time. To use the Point In Time recovery type requires you to type adate and time in the Date and Time field. Use theyyyy-mm-dd hh:mm:ss format. Thetime must be in the time zone of the client system.
l End of Backup recovers the database by performing a rollforward operation to theend of the backup. The End of Backup option is valid for DB2 versions 9.5 and later.
d. Select the number of sessions to use for the restore from the Number of sessionsduring restore list.
Note: To obtain the best performance during a restore, use the same number ofrestore sessions that you used for the backup.
e. Type the instance owner or system admin username in the Instance Admin Usernamefield.
f. Type the password for the username in the Instance Admin Password field.
g. Leave the Database Partition Numbers field blank.
h. Type the fully qualified pathname of an existing top-level directory in the Directory Pathto Restore Archive Logs field.
The restore operation creates a subdirectory below the directory pathname you specifyand restores the archive logs to this subdirectory.
i. Type the name of the database from which the backup was originally taken in theDatabase Name field.
j. Type the name of the DB2 instance in the Instance Name field.
k. If the target database exists and you want to overwrite it, select the Replace existingdatabase checkbox.
l. Click OK to close the Restore Command Line Options dialog box.
19. Click OK to close the Restore Options dialog box.
The following status message appears:
Restore initiated.
Restore and Recovery
72 Dell EMC Avamar for IBM DB2 User Guide
20. Click OK.
Disaster recoveryWith an effective data backup plan in place, you can successfully recover a DB2 server after theloss of the DB2 application or server hardware.
Note: To perform a manual rollforward after you restore the DB2 server and DB2 applications,follow the guidelines in Rollforward after a redirected restore to a different host on page 63.
Recovering the DB2 application
About this task
As long as Avamar components on a DB2 server are intact, you can recover only the DB2application.
Procedure
1. Uninstall the current installation of the DB2 application.
2. Delete all DB2 application files and directories.
3. Install the same version of the DB2 application that was previously installed.
4. Re-create the DB2 instance (UNIX) or DB2 copy (Windows) with the same name that waspreviously used.
5. Restore a full backup of the DB2 database to the original location by completing theappropriate instructions in Restoring DB2 databases to the original location.
Recovering the DB2 server
About this task
In the event of the loss of the DB2 server hardware, you then need a replacement host computer.The DB2 server is restored to the replacement host computer.
Procedure
1. Install the same version and release of the operating system on the replacement computer.
2. Log in to the computer.
3. Configure the computer with the IP address and hostname from the old computer.
4. Install the same version of the DB2 application.
5. Re-create the DB2 instance (UNIX) or DB2 copy (Windows) with the same name that waspreviously used.
Refer to the vendor documentation for instructions.
6. Install and register the Avamar file system client. Installing the Avamar file system client onpage 25 provides instructions.
7. Install the Avamar Plug-in for DB2. Installation on page 23 provides instructions.
Restore and Recovery
Dell EMC Avamar for IBM DB2 User Guide 73
Monitoring restoresYou can monitor restores to ensure a successful completion of restores and troubleshooting ofissues. The Activity Monitor in Avamar Administrator enables you to view status information forrestores.
Procedure
1. In Avamar Administrator, click the Activity launcher link.
The Activity window appears.
2. Click the Activity Monitor tab.
A list of all activities appears.
3. To filter the results to display only restore activity, select Actions > Filter.
The Filter Activity dialog box appears.
4. Select Restore from the Type list.
5. Click OK.
Canceling restoresYou can cancel a restore any time before it completes. The cancellation might take 5 minutes orlonger. The restore may complete before the cancellation finishes.
Procedure
1. In Avamar Administrator, click the Activity launcher link.
The Activity window appears.
2. Click the Activity Monitor tab.
A list of all activities appears.
3. Select the restore from the list.
4. Select Actions > Cancel Activity.
A confirmation message appears.
5. Click Yes.
Restore and Recovery
74 Dell EMC Avamar for IBM DB2 User Guide
CHAPTER 5
High Availability and Clustering Solutions
This chapter includes the following topics:
l Database Partition Feature (DPF) backup and restore.......................................................... 76l DB2 High Availability Disaster Recovery (HADR) backup and recovery.................................86
Dell EMC Avamar for IBM DB2 User Guide 75
Database Partition Feature (DPF) backup and restoreThe Avamar Plug-in for DB2 supports backups and restores of DB2 database partitions.
Preparing for DPF backupsIn a DPF environment, you can back up individual partitions in a database or select the catalognode to back up a combination of partitions or all partitions.
Configuring the backup agent for DPF backupsBefore you back up a DB2 database partition, you must configure the Backup agent service on allWindows systems in the DPF environment to use the domain administrator account.
Procedure
1. From the Windows Start menu, select Run.
The Run dialog box appears.
2. Type services.msc in the Open field.
The Services window appears.
3. Configure the Backup agent service:
a. Right-click Backup agent, and then select Properties.
The Backup agent Properties dialog box appears.
b. Click the Log On tab, and then select This account.
c. Click Browse.
The Select User dialog box appears.
d. Select the domain administrator account, and then click OK.
e. Click OK to close the Backup agent Properties dialog box.
4. In the Services window, right-click Backup agent and select Restart.
DPF backup limitationsYou cannot perform a database partition backup from a non-catalog node. Doing so returns thefollowing error:
Cannot perform multi-partition backup.The catalog node for the database is not present on this server.You cannot back up a node in a multi-partition configuration unless all nodes are online. A multi-partition backup fails if one or more nodes is offline. The backup returns the following errormessages for this type of failure:
2012/4/1-13:14:07.21048 [avdb2ctlplugin_assist] snapup: returnfrom db2 API2012-4-1 18:44:07 avdb2 Error <0000>: snapup: failed to createbackup of database [db2inst1/AVAMAR2]. db2 errcode -11702012-4-1 18:44:07 avdb2 Error <9018>: DB2 returned error -11702012/4/1-13:14:07.21122 [avdb2ctlplugin_assist] retire_manager:force terminate
High Availability and Clustering Solutions
76 Dell EMC Avamar for IBM DB2 User Guide
Restoring and recovering DPFYou can restore DB2 database partitions to the original location or to a different location by usingAvamar Administrator.
Whether you restore the partition to the original location or to a different location depends on thelocation of the partition:
l If the partition is on the catalog partition, restore the partition to the original location. Restoring database partitions to the original location on page 77 provides instructions.
l If the partition is on a non-catalog partition, perform a redirected restore. Restore the partitionto a different location from the viewpoint of the catalog node. Restoring database partitions toa different location on page 79 provides instructions.
Avamar Administrator lists all partition backups under the client that contains the catalog partition.Restore database partitions from the catalog partition only. The Avamar Plug-in for DB2 restoreseach partition backup separately. You cannot restore all partition backups in a single restoreoperation.
Select the Restore only option in the Restore Command Line Options dialog box for all databasepartition restore operations. The Restore and roll forward option is not supported for databasepartition restore operations.
Note: For an ASM redirected restore of a DPF database, pass the ON path-list option from theCLP to change the storage paths. Perform this operation from the catalog node only.Afterwards, the redirected restore continues to restore the non-catalog node without the needto pass the ON path-list option from the CLP. When you pass an ON path-list option during aredirected restore on an ASM non-catalog node, the restore fails.
Restoring database partitions to the original locationRestore the partition to the original location when the partition is located on the catalog partition.
Procedure
1. In Avamar Administrator, click the Backup & Restore launcher link button.
The Backup, Restore and Manage window appears.
2. Click the Restore tab.
The top-left pane contains a list of domains.
3. Select the domain that contains the host of the DB2 server.
You cannot view clients outside the domain for the login account. To view all clients, log into the root domain.
A list of Avamar clients appears in the pane below the domains list.
4. Select the host of the DB2 server.
5. Click the By Date tab.
6. Select the backup date from the calendar. Valid backups occurred on dates with a yellowhighlight.
A list of backups that were performed on that date appears in the Backups table next to thecalendar.
7. Select a backup from the Backups table.
The backup contents appear in the Contents for Backup pane.
8. Expand the DB2 instance folder.
High Availability and Clustering Solutions
Dell EMC Avamar for IBM DB2 User Guide 77
9. Select a partition to restore.
10. Select Actions > Restore Now.
The Restore Options dialog box appears.
11. From the Avamar encryption method list, select an encryption method to use for client/server data transfer during this restore.
The encryption technology and bit strength for a client/server connection depend onseveral factors, including the client platform and Avamar server version. The Avamar ProductSecurity Guide provides more information.
12. Select Restore everything to its original location.
13. Click More Options.
The Restore Command Line Options dialog box appears.
14. Set the plug-in options:
a. From the Encryption method from Data Domain system list, select the encryptionmethod to use for data transfer between the Data Domain system and the client duringthe restore.
b. Select the Restore only option.
Note: The Restore and roll forward database option is not supported for databasepartition restore operations. Restore options on page 112 provides more informationabout restore plug-in options.
c. Leave the Type of Recovery list blank.
d. Select the number of sessions to use for the restore from the Number of sessionsduring restore list.
Note: To obtain the best performance during a restore, use the same number ofrestore sessions that you used for the backup.
e. Type the instance owner or system admin username in the Instance Admin Usernamefield.
f. Type the password for the username in the Instance Admin Password field.
g. Leave the Database Partition Numbers field blank.
h. Type the fully qualified pathname of an existing top-level directory in the Directory Pathto Restore Archive Logs field.
The restore operation creates a subdirectory below the directory pathname you specifyand restores the archive logs to this subdirectory.
i. Leave the Database Name field blank.
j. Leave the Instance Name field blank.
k. If the target database exists and you want to overwrite it, select the Replace existingdatabase checkbox.
l. Click OK to close the Restore Command Line Options dialog box.
15. Click OK to close the Restore Options dialog box.
16. Click OK.
High Availability and Clustering Solutions
78 Dell EMC Avamar for IBM DB2 User Guide
Restoring database partitions to a different locationRestore the partition to a different location when the partition is located on a non-catalogpartition. This type of restore is called a redirected restore.
Procedure
1. In Avamar Administrator, click the Backup & Restore launcher link button.
The Backup, Restore and Manage window appears.
2. Click the Restore tab.
The top-left pane contains a list of domains.
3. Select the domain that contains the host of the DB2 server.
You cannot view clients outside the domain for the login account. To view all clients, log into the root domain.
A list of Avamar clients appears in the pane below the domains list.
4. Select the host of the DB2 server.
5. Click the By Date tab.
6. Select the backup date from the calendar. Valid backups occurred on dates with a yellowhighlight.
A list of backups that were performed on that date appears in the Backups table next to thecalendar.
7. Select a backup from the Backups table.
The backup contents appear in the Contents of Backup pane.
8. Expand the DB2 instance folder.
9. Select a partition to restore.
10. Select Actions > Restore Now.
The Restore Options dialog box appears.
11. From the Avamar encryption method list, select an encryption method to use for client/server data transfer during this restore.
The encryption technology and bit strength for a client/server connection depend onseveral factors, including the client platform and Avamar server version. The Avamar ProductSecurity Guide provides more information.
12. Select Restore everything to a different location.
13. On Windows platforms, specify the destination location manually. For example,E:\DATABASE\BACKUPS\.
On other platforms, click Browse.
The Browse for Restore Client dialog box appears.
14. Select the target client from the client tree, and then click OK.
The client name appears in the Restore Destination Client text box.
15. Click Set Destination.
The Set Destination dialog box appears.
16. Type the destination for the restore in the Save Target(s) in Directory field. For an ASMrestore, type a list of directories for storage paths. Separate entries in the list with acomma.
High Availability and Clustering Solutions
Dell EMC Avamar for IBM DB2 User Guide 79
17. Click OK.
The destination appears in the Destination column.
18. Click More Options.
The Restore Command Line Options dialog box appears.
19. Set the plug-in options:
a. From the Encryption method from Data Domain system list, select the encryptionmethod to use for data transfer between the Data Domain system and the client duringthe restore.
b. Select the Restore only option.
Note: The Restore and roll forward database option is not supported for databasepartition restore operations. Restore options on page 112 provides more informationabout restore plug-in options.
c. Leave Type of Recovery blank.
d. Select the number of sessions to use for the restore from the Number of sessionsduring restore list.
Note: To obtain the best performance during a restore, use the same number ofrestore sessions that you used for the backup.
e. Type the instance owner or system admin username in the Instance Admin Usernamefield.
f. Type the password for the username in the Instance Admin Password field.
g. Leave the Database Partition Numbers field blank.
h. Type the fully qualified pathname of an existing top-level directory in the Directory Pathto Restore Archive Logs field.
The restore operation creates a subdirectory below the directory pathname you specifyand restores the archive logs to this subdirectory.
i. Type the name of the database in the Database Name field.
j. Type the name of the DB2 instance in the Instance Name field.
k. If the target database exists and you want to overwrite it, select the Replace existingdatabase checkbox.
l. Click More to display the Enter Attribute and Enter Attribute Value fields.
20. (ASM database restores only) Type the appropriate attributes and values to direct theAvamar Plug-in for DB2 to use storage redefinition options for ASM database restores:
l To use a value from the Destination field as the storage paths for the new database, setasm-restore-set-storagepaths to true:
--[avdb2]asm-restore-set-storagepaths=true
Note: When you enable ASM mode for a restore, you can specify multiple values inthe Destination field. Separate values for multiple storage paths with commas.
l To use a value from the Destination field as the new target database pathname for thenew database, set restore-set-dbpath to 1:
--[avdb2]restore-set-dbpath=1
High Availability and Clustering Solutions
80 Dell EMC Avamar for IBM DB2 User Guide
Note: The value 1 enables the DBPATH ON option. When the new db_path is the firstpathname listed in the Destination field, the db_path is then not used in the newstorage pathname list. You must set the restore_set-storagepaths flag, therestore-set-dbpath flag, or both flags to enable ASM mode for the restore.
l To use values from the Destination field as the storage paths and theredirect_restore_target_path values for the new target database pathname forthe new database, set both of the following attributes:
--[avdb2]asm-restore-set-storagepaths=true--[avdb2]restore-set-dbpath=1
Note: To comply with DB2 guidelines, call out the ON path-list from only the catalognode. For a catalog node, specify a list of locations for the storage paths in theDestination field. For a non-catalog nodes, specify only a single location in theDestination field with the effective db_path value that you used for restoring thecatalog node.
After you set the options and attributes appear in the box below the + and - buttons.
21. To set NEWLOGPATH: In the Enter Attribute field, type --[avdb2]new-log-path. In theEnter Attribute Value field, type the absolute path for log files after restore.
a. In the Enter Attribute field, type --[avdb2]new-log-path. In the Enter Attribute Valuefield, type the absolute path for log files after restore.
b. In the Enter Attribute Value field, type the absolute path for log files after restore.
The new-log-path flag allows you to specify a string representing the path to be used forlogging after the restore has completed. This flag is optional.
22. Click OK to close the Restore Command Line Options dialog box.
23. Click OK to close the Restore Options dialog box.
The following status message appears:
Restore initiated.24. Click OK.
After you finish
Perform a rollforward operation from the catalog node. Rolling forward the database on page 67provides more information.
Recovering partitionsYou can recover partitions, one at a time, by using Avamar Administrator. Before you perform arecovery operation from Avamar Administrator, create an Avamar Plug-in for DB2 flag file. Therecovery operation requires you to configure the VENDOROPT configuration parameter. The IBMDB2 documentation provides more information about the VENDOROPT parameter.
About this task
Note: You must recover one partition at a time. Recovery of multiple partitions in a singlerecovery operation is not supported.
Procedure
1. In Avamar Administrator, click the Backup & Restore launcher link button.
The Backup, Restore and Manage window appears.
High Availability and Clustering Solutions
Dell EMC Avamar for IBM DB2 User Guide 81
2. Click the Restore tab.
The top-left pane contains a list of domains.
3. Select the domain that contains the host of the DB2 server.
You cannot view clients outside the domain for the login account. To view all clients, log into the root domain.
A list of Avamar clients appears in the pane below the domains list.
4. Select the host of the DB2 server.
5. Click the By Date tab.
6. Select the backup date from the calendar. Valid backups occurred on dates with a yellowhighlight.
A list of backups that were performed on that date appears in the Backups table next to thecalendar.
7. Select a backup from the Backups table.
The backup contents appear in the Contents of Backup pane.
8. Expand the DB2 instance folder.
9. Select a partition to restore.
10. Select Actions > Restore Now.
The Restore Options dialog box appears.
11. From the Avamar encryption method list, select an encryption method to use for client/server data transfer during this restore.
The encryption technology and bit strength for a client/server connection depend onseveral factors, including the client platform and Avamar server version. The Avamar ProductSecurity Guide provides more information.
12. Select Restore everything to its original location.
13. Click More Options.
The Restore Command Line Options dialog box appears.
14. Set the plug-in options:
a. From the Encryption method from Data Domain system list, select the encryptionmethod to use for data transfer between the Data Domain system and the client duringthe restore.
b. Select the Recover option.
c. Select End of Logs or Point in Time from the Type of Recovery list.
Note: The End of Logs and Point in Time options are valid only for the Recoveroption.
d. Leave the Number of sessions during restore list set to 1.
e. Type the instance owner or system admin username in the Instance Admin Usernamefield.
f. Type the password for the username In the Instance Admin Password field.
g. Specify a single partition number in the Database Partition Numbers field.
Note: The Recover option supports only a recovery of a single partition at a time.
High Availability and Clustering Solutions
82 Dell EMC Avamar for IBM DB2 User Guide
h. Type the fully qualified pathname of an existing top-level directory in the Directory Pathto Restore Archive Logs field.
The restore operation creates a subdirectory below the directory pathname you specifyand restores the archive logs to this subdirectory.
i. Leave the Database Name field and the Instance Name field blank.
j. If the target database exists and you want to overwrite it, select the Replace existingdatabase checkbox.
k. Click OK to close the Restore Command Line Options dialog box.
15. Click OK to close the Restore Options dialog box.
The following status message appears:
Restore initiated.16. Click OK.
Restoring table spaces in a DB2 DPF environmentYou can use Avamar Administrator to restore a table space that is not local to the catalog partitionby performing a redirected restore from the catalog node to the target node.
About this task
To restore the SYSCATSPACE table space from DB2 version 10.1 or later databases, you mustspecify the tbs-offline-restore-mode=true option in the Enter Attribute and EnterAttribute Value fields. The following procedure includes instructions.
Note: You cannot specify a recovery type for a table space restore in a DPF environment.
Procedure
1. In Avamar Administrator, click the Backup & Restore launcher link button.
The Backup, Restore and Manage window appears.
2. Click the Restore tab.
The top-left pane contains a list of domains.
3. Select the domain that contains the host of the DB2 server.
You cannot view clients outside the domain for the login account. To view all clients, log into the root domain.
A list of Avamar clients appears in the pane below the domains list.
4. Select the host of the DB2 server.
5. Click the By Date tab.
6. Select the backup date from the calendar. Valid backups occurred on dates with a yellowhighlight.
A list of backups that were performed on that date appears in the Backups table next to thecalendar.
7. Select a full backup from the Backups table.
The backup contents appear in the Contents of Backup pane.
The Browse for Image Restore and Browse for Granular Restore buttons appear abovethe directory tree in the Contents of Backup pane.
8. Select the top-level folder to select the entire plug-in, or select one or more databases forthe granular browse operation.
High Availability and Clustering Solutions
Dell EMC Avamar for IBM DB2 User Guide 83
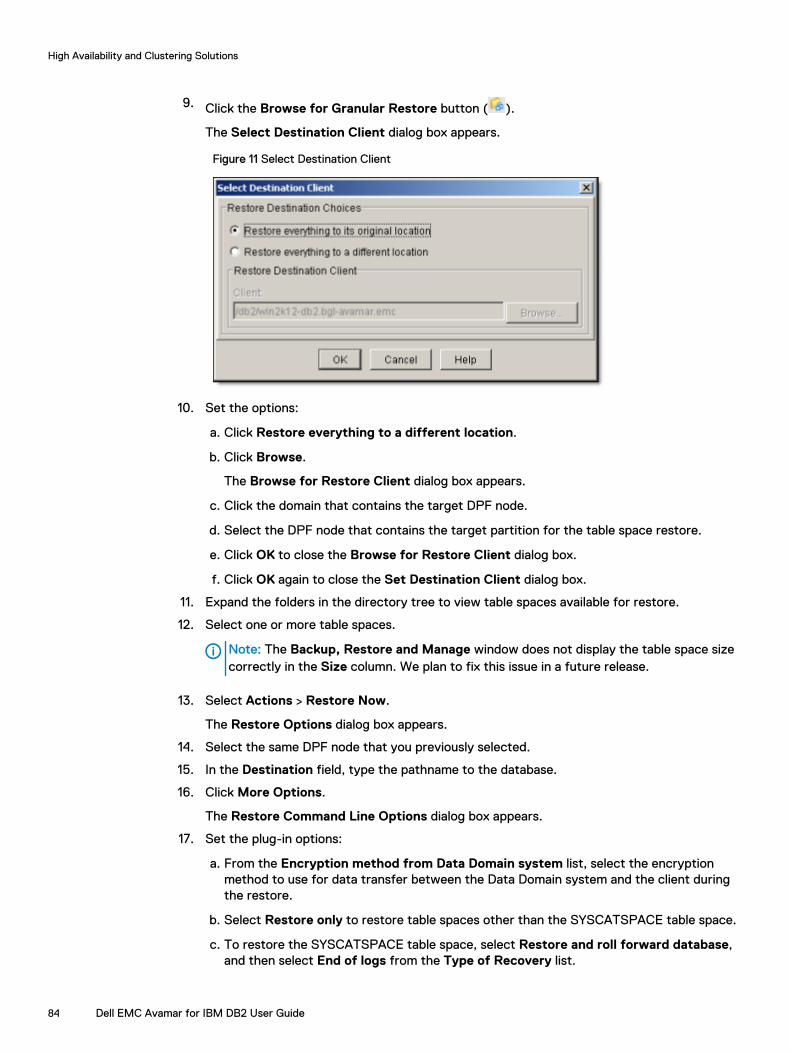
9. Click the Browse for Granular Restore button ( ).
The Select Destination Client dialog box appears.
Figure 11 Select Destination Client
10. Set the options:
a. Click Restore everything to a different location.
b. Click Browse.
The Browse for Restore Client dialog box appears.
c. Click the domain that contains the target DPF node.
d. Select the DPF node that contains the target partition for the table space restore.
e. Click OK to close the Browse for Restore Client dialog box.
f. Click OK again to close the Set Destination Client dialog box.
11. Expand the folders in the directory tree to view table spaces available for restore.
12. Select one or more table spaces.
Note: The Backup, Restore and Manage window does not display the table space sizecorrectly in the Size column. We plan to fix this issue in a future release.
13. Select Actions > Restore Now.
The Restore Options dialog box appears.
14. Select the same DPF node that you previously selected.
15. In the Destination field, type the pathname to the database.
16. Click More Options.
The Restore Command Line Options dialog box appears.
17. Set the plug-in options:
a. From the Encryption method from Data Domain system list, select the encryptionmethod to use for data transfer between the Data Domain system and the client duringthe restore.
b. Select Restore only to restore table spaces other than the SYSCATSPACE table space.
c. To restore the SYSCATSPACE table space, select Restore and roll forward database,and then select End of logs from the Type of Recovery list.
High Availability and Clustering Solutions
84 Dell EMC Avamar for IBM DB2 User Guide
d. Select the number of sessions to use for the restore from the Number of sessionsduring restore list.
Note: To obtain the best performance during a restore, use the same number ofrestore sessions that you used for the backup.
e. Type the instance owner or system admin username in the Instance Admin Usernamefield.
f. Type the password for the username in the Instance Admin Password field.
g. Leave the Database Partition Numbers field blank.
h. Type the fully qualified pathname of an existing top-level directory in the Directory Pathto Restore Archive Logs field.
Note: If the backup for this restore operation is an online backup and you intend torestore archive log files, you must complete the Directory Path to Restore ArchiveLogs field.
The restore operation creates a subdirectory below the directory pathname you specifyand restores the archive logs to this subdirectory.
i. Type the name of the database from which the backup was originally taken in theDatabase Name field.
j. Type the name of the DB2 instance in the Instance Name field.
k. If the target database exists and you want to overwrite it, select the Replace existingdatabase checkbox.
l. (SYSCATSPACE table space from DB2 version 10.1 or later) Complete the followingsteps to restore the SYSCATSPACE table space from DB2 version 10.1 or laterdatabases:
a. Click More to display the Enter Attribute and Enter Attribute Values fields.
b. Type --[avdb2]tbs-offline-restore-mode in the Enter Attribute field.
c. Type true in the Enter Attribute Value field.
d. Click +.
m. Click OK to close the Restore Command Line Options dialog box.
18. Click OK to close the Restore Options dialog box.
The following status message appears:
Restore initiated.19. Click OK.
20. Manually roll the table space forward to the desired point-in-time by using the DB2rollforward command on the DB2 server.
Disaster Recovery of the DB2 server in a DPF environmentFollow this procedure to recover the DB2 server in a DPF environment in the event of a disaster.
Procedure
1. Install the DB2 application on the catalog node and other participating nodes.
2. Re-create the DB2 instance (UNIX) or DB2 copy (Windows) with the same name that waspreviously used.
High Availability and Clustering Solutions
Dell EMC Avamar for IBM DB2 User Guide 85
3. Restore the catalog node backup by performing a restore from the catalog node. Restoringand recovering DPF on page 77 provides more information.
4. Restore all other node backups by performing a redirected restore. Restoring andrecovering DPF on page 77 provides more information.
DB2 High Availability Disaster Recovery (HADR) backup andrecovery
The following sections detail configuration of the Avamar Plug-in for DB2 for the High AvailabilityDisaster Recovery (HADR) feature, as well as backup, recovery, and disaster recovery procedures.
Preparing for HADR backupsTo backup, restore, and roll forward the database in the HADR environment, you must configurethe Avamar client for DB2 HADR as described in the following sections.
Configuring the DB2 HADR client for Microsoft WindowsThis section describes how to configure the Avamar client for DB2 HADR for backups in MicrosoftWindows environments.
About this task
Each node of a DB2 HADR system has to be configured and registered with the same Avamarserver using the same client name before any backup or restore operations can be performed.
Procedure
1. Log in to one of the DB2 HADR nodes where the Avamar client for DB2 HADR should beconfigured.
2. Locate the AvamarHADRConfiguration.exe file that is located in the installpath\bin\ directory. Right-click and select Run as Administrator.
The Setup Avamar for DB2 HADR Database window opens.
High Availability and Clustering Solutions
86 Dell EMC Avamar for IBM DB2 User Guide
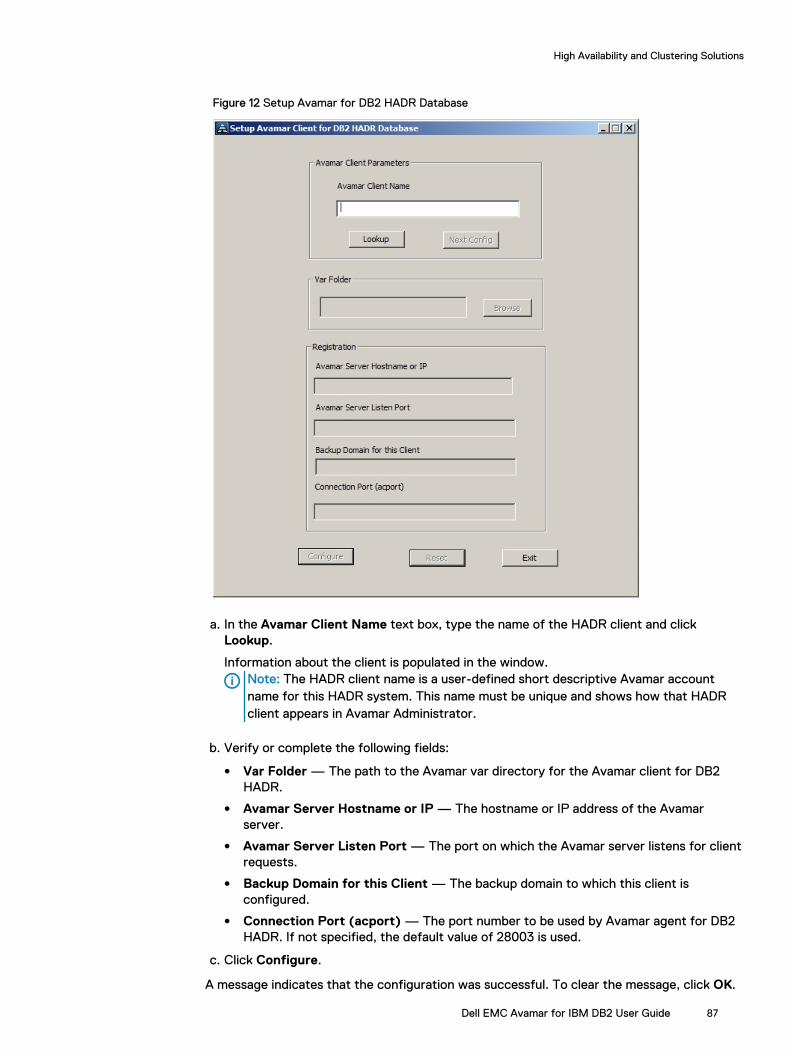
Figure 12 Setup Avamar for DB2 HADR Database
a. In the Avamar Client Name text box, type the name of the HADR client and clickLookup.
Information about the client is populated in the window.Note: The HADR client name is a user-defined short descriptive Avamar accountname for this HADR system. This name must be unique and shows how that HADRclient appears in Avamar Administrator.
b. Verify or complete the following fields:
l Var Folder — The path to the Avamar var directory for the Avamar client for DB2HADR.
l Avamar Server Hostname or IP — The hostname or IP address of the Avamarserver.
l Avamar Server Listen Port — The port on which the Avamar server listens for clientrequests.
l Backup Domain for this Client — The backup domain to which this client isconfigured.
l Connection Port (acport) — The port number to be used by Avamar agent for DB2HADR. If not specified, the default value of 28003 is used.
c. Click Configure.
A message indicates that the configuration was successful. To clear the message, click OK.
High Availability and Clustering Solutions
Dell EMC Avamar for IBM DB2 User Guide 87
3. Repeat the previous steps on all DB2 HADR nodes.
4. Once all HADR nodes have been configured, start the DB2 HADR client agent on the primarynode.
Note: Do not start the DB2 HADR client agent until all HADR nodes have beenconfigured. Starting the DB2 HADR client agent before all nodes have been configuredmay cause failures during the configuration of the other nodes or during backup.
Configuring the DB2 HADR client on UNIX and LinuxThis section describes how to configure the Avamar client for DB2 HADR for backups in UNIX andLinux environments.
Procedure
1. Log in as root to the primary HADR node.
2. Run the hadr_config script from the Avamar bin directory:
/avamar_install_dir/bin/hadr_config [-s MCSAddr] [-d Domain] [-c Client] [-p ACPort] [-n Nodes] [-h]
where:
l avamar_install_dir is the path of the Avamar client for DB2 HADR installation.
l MCSAddr is the IP address or host name of the Avamar server. If this option is notspecified, the script prompts you to enter it.
l Domain is the backup domain to which this client is configured. If this option is notspecified, the script then prompts you to enter it.
l Client is the user-defined short descriptive Avamar account name for this HADR Client.This name is how that HADR system appears in Avamar Administrator. If this option isnot specified, the script then prompts you to enter it.
l ACPort is the port number of the connection port of the DB2 server. If this option is notspecified, the default value of 28003 is used.
l Nodes is a comma-separated list (with no spaces) of the DB2 HADR nodes that thescript should configure. The specified nodes are added to the .HADR_Nodes file, whichis used afterwards for the automatic configuration removal. If this option is not used,only the local node is configured.Notes:
n Remote node configuration requires ssh to be correctly configured on all nodes.
n If the password is requested, provide the root password for the node that is beingconfigured. This action allows the script to configure remote HADR nodes.
n If remote execution as root via ssh cannot be performed, you must configure eachnode separately by running this command locally on all nodes without the -n Nodesoption. All options must be the same when the script is run on each node.
l -h echoes the complete list of supported option for the command.
Results
After configuration is complete, the hadr_config script automatically starts the Avamar clientfor DB2 HADR agent on the current node.
High Availability and Clustering Solutions
88 Dell EMC Avamar for IBM DB2 User Guide
The following is a command line example for running the hadr_config script:
/usr/local/avamar/bin/hadr_config –s AvamarSrvr -n hadr1,hadr2
Starting and stopping the Avamar client for DB2 HADR and changing HADRroles
This section provides procedures for starting and stopping the Avamar client for DB2 HADR andfor changing the client's HADR role.
Starting and stopping HADR requires the sequence of operation to be performed in the order thatis specified in these sections. Takeover requires stopping the DB2 HADR client's agent on theprevious primary node and starting it on the new primary.
Starting the Avamar client for DB2 HADRThis procedure describes how to start the Avamar client for DB2 HADR on Microsoft Windows andUNIX/Linux systems.
Procedure
1. Log in to the node and start HADR as Standby. Refer to the vendor documentation fordetailed DB2 HADR instructions.
2. Start the Avamar client for DB2 HADR agent on the Primary node by doing one of thefollowing:
l On Microsoft Windows, log in to the Primary Node and start the HADR client backupservice:
a. In the Start menu, select All Programs > Administrative Tools > Services.
b. Right-click Avamar Client_name Backup Agent and select Start.
l On UNIX or Linux, log in to the Primary Node as root and start the Avamar client for DB2HADR agent by using the following command:
/avamar_installation_path/db2_hadr/etc/start.sh
where:
n avamar_installation_path is the path to the Avamar client installation.
n db2_hadr is the name of the DB2 HADR client.
3. Start HADR as Primary. Refer to the vendor documentation for detailed DB2 HADRinstructions.
Stopping the Avamar client for DB2 HADRTo stop HADR system, stop HADR on Primary node first, then stop HADR on Standby nodes.
Procedure
1. Log in to the Primary node and stop HADR. Refer to the vendor documentation for detailedDB2 HADR instructions.
2. Stop the Avamar client for DB2 HADR agent on the Primary node by doing one of thefollowing:
High Availability and Clustering Solutions
Dell EMC Avamar for IBM DB2 User Guide 89
l On Microsoft Windows, log in to the Primary node and stop the HADR client backupservice:
a. In the Start menu, select All Programs > Administrative Tools > Services.
b. Right-click Avamar Client_name Backup Agent and select Stop.l On UNIX or Linux, log in to the Primary Node as root and stop the Avamar client for DB2
HADR agent by using the following command:
/avamar_installation_path/db2_hadr/etc/stop.sh
where:
n avamar_installation_path is the path to the Avamar client installation.n db2_hadr is the name of the DB2 HADR client.
Changing HADR rolesThis section describes how to change the HADR Primary node on when using the Avamar client forDB2 HADR.
Procedure
1. Log in to the current Primary node and stop the Avamar client for DB2 HADR as described in Stopping the Avamar client for DB2 HADR on page 89.
2. Log in to the node that becomes the Primary node and start the Avamar client for DB2HADR as described in Starting the Avamar client for DB2 HADR on page 89.
3. Use the db2 takeover command on the node that becomes the new Primary node toperform the takeover. Refer to the vendor documentation for detailed DB2 HADRinstructions.
HADR backupsThis section describes how to perform DB2 HADR backups using the Avamar client for DB2 HADR.
Management Console-initiated on-demand backups of an HADR database are performed the sameway as with the stand-alone databases. Performing on-demand backups on page 40 contains moreinformation. Management Console-initiated on-demand backups require that the Avamar client forDB2 HADR is started on the Primary node. Starting the Avamar client for DB2 HADR on page 89contains more information.
To configure the scheduled backups, replace the base Avamar client with the Avamar client forDB2 HADR by following instructions in Scheduling backups on page 42.
CLP-backups of an HADR database can be performed the same way as on a stand-alone database. Avamar Plug-in for DB2 flag file configuration on page 97 contains details on how to prepare theflag file. The --account option must contain the path to the Avamar client for DB2 HADR, andthe --sysdir option must contain the path to the etc directory of the Avamar client for DB2HADR.
For Microsoft Windows clients, the following options must also be set:
l --vardir must contain the path to the var directory of the Avamar client for DB2 HADRdefined during the HADR client configuration.
l --logfile must contain the path to the logs and the prefix.
For example:
--sysdir=C:\Progra~1\avs\etc--account=/clients/db2_hadr_win
High Availability and Clustering Solutions
90 Dell EMC Avamar for IBM DB2 User Guide

--vardir=C:\Progra~1\avs\var\db2_hadr_win_var\--logfile=C:\Progra~1\avs\var\db2_hadr_win_var\clientlogs\avdb2-log
Note: For Microsoft Windows clients, the etc directory for the HADR client is shared with thebase client. For UNIX and Linux client, the etc directory is created separately from the baseclient.
Archive log backups with DB2 HADRThis section describes issues that are related to archive log backups with the Avamar client forDB2 HADR.
With DB2 HADR, only the Primary database generates archive logs while Standby databases donot. All archive log backups are initiated by DB2 while the Avamar server does not directly initiatelog backups.
To configure the archive log backups, follow instructions in Configuring automatic backups forDB2 transaction logs on page 38. The --account option must contain the path to the Avamarclient for DB2 HADR, and the --sysdir option must contain the path to the etc directory of theAvamar client for DB2 HADR. The logs are stored under the client specified by the --accountoption. For Microsoft Windows clients, the --vardir and --logfile options must also be set,as described in HADR backups on page 90.
HADR restore and recoveryThis section describes how to perform DB2 HADR restores and recovery using the Avamar clientfor DB2 HADR.
Management Console-initiated restore or recovery can be performed in two ways:
l If the HADR client is active on the current node, use the Restore to the original locationoption.
l If the HADR client is active on another HADR node, perform a Redirected database restore tothe base (physical) client.
CLP-initiated restore or recover of HADR database can be performed the same way as for thestand-alone database. The --account option must contain the path to the Avamar client for DB2HADR, and the --sysdir option must contain the path to the etc directory of the Avamar clientfor DB2 HADR. For Microsoft Windows clients, the --vardir and --logfile options must alsobe set.
HADR disaster recoveryThis section describes how to perform DB2 HADR disaster recovery using the Avamar client forDB2 HADR. This procedure must be performed on all HADR nodes.
Procedure
1. Install the same version and release of the operating system and the DB2 application on allservers. Refer to the vendor documentation for instructions.
2. Re-create the DB2 instance (UNIX) or DB2 copy (Windows) with the same name that waspreviously used. Refer to the vendor documentation for instructions.
3. Install and register the Avamar file system client. Installing the Avamar file system client onpage 25 provides instructions.
4. Install the Avamar Plug-in for DB2. Installation on page 23 provides instructions.
5. Create the HADR client for Avamar configuration. Configuring the DB2 HADR client forMicrosoft Windows on page 86 and Configuring the DB2 HADR client on UNIX and Linux onpage 88 provide instructions.
High Availability and Clustering Solutions
Dell EMC Avamar for IBM DB2 User Guide 91

6. Restore the latest good database backup and roll forward to the last good archive log. Restoring DB2 databases to the original location on page 51 provides instructions.
7. Perform a full backup of the database. Preparing the database for backup on page 38provides further information.
8. Configure the second HADR node by repeating the previous steps.
9. Restore the backup that is taken in step 7 on page 92 to the second node. Keep thedatabase in the Rollforward Pending state.
10. If applicable, repeat steps 8 on page 92 and 9 on page 92 on all other HADR nodes.
11. Start HADR on all Standby nodes, then on Primary node. Starting the Avamar client for DB2HADR on page 89provides instructions.
Removing the DB2 HADR client from Microsoft WindowsThis section describes how to remove the Avamar client for DB2 HADR from Microsoft Windowsenvironments.
Procedure
1. Log in to one of the DB2 HADR nodes where the Avamar client for DB2 HADR should beremoved.
2. Locate the AvamarHADRConfiguration.exe file that is found in the installpath\bin\ directory. Right-click and select Run as Administrator.
The Setup Avamar for DB2 HADR Database window opens.
a. In the Avamar Client Name text box, enter the name of the HADR client and clickLookup.
Information about the client is then populated in the window.
b. Click Reset.
A message indicates that the configuration was removed. Click OK. The client agent is alsostopped and the client software is removed.
3. Repeat the previous steps on all DB2 HADR nodes.
Results
This procedure removes files and stops the Avamar Client Backup Agent for HADR, but retainslogs and configuration files.
Removing the DB2 HADR client from UNIX and LinuxThis section describes how to remove the Avamar client for DB2 HADR from UNIX and Linuxenvironments.
Procedure
1. Log in as root to the HADR node that you used for the HADR client configuration.
2. Run the hadr_deconfig script from the Avamar bin directory:
/avamar_install_dir/bin/hadr_deconfig [AccountName]
where:
l avamar_install_dir is the path of the Avamar client for DB2 HADR installation.
High Availability and Clustering Solutions
92 Dell EMC Avamar for IBM DB2 User Guide
l AccountName is the name of the Avamar client for DB2 HADR. If this option is notspecified, the script prompts you to enter it.
Results
The hadr_deconfig script automatically removes the Avamar client for DB2 HADR from allHADR nodes that were configured by using the -n Nodes option with the hadr_config script.If the -n Nodes option was not used to configure multiple nodes, then you will need to run thehadr_deconfig script on each node to remove the Avamar client for DB2 HADR. Configuring theDB2 HADR client on UNIX and Linux on page 88 contains more information about using the -nNodes option with the hadr_config script.The hadr_deconfig script removes files and stops the HADR avagent client process, butretains logs and configuration files.
High Availability and Clustering Solutions
Dell EMC Avamar for IBM DB2 User Guide 93

High Availability and Clustering Solutions
94 Dell EMC Avamar for IBM DB2 User Guide

CHAPTER 6
Backup and Restore with DB2 CLP
This chapter includes the following topics:
l Using DB2 CLP for backups and restores..............................................................................96l Backing up databases from the DB2 CLP.............................................................................. 99l Restoring databases and table spaces from the DB2 CLP....................................................102l Performing redirected restores from the DB2 CLP.............................................................. 103l Rolling forward the database from the DB2 CLP..................................................................105l Restoring backup images from Avamar versions before 7.0................................................. 105l Recovering DB2 with the DB2 CLP...................................................................................... 105l Setting the expiration and retention for backups................................................................. 106l Monitoring CLP-initiated backups and restores................................................................... 107l Canceling CLP-initiated backups and restores..................................................................... 107l DB2 CLP limitations............................................................................................................. 107
Dell EMC Avamar for IBM DB2 User Guide 95
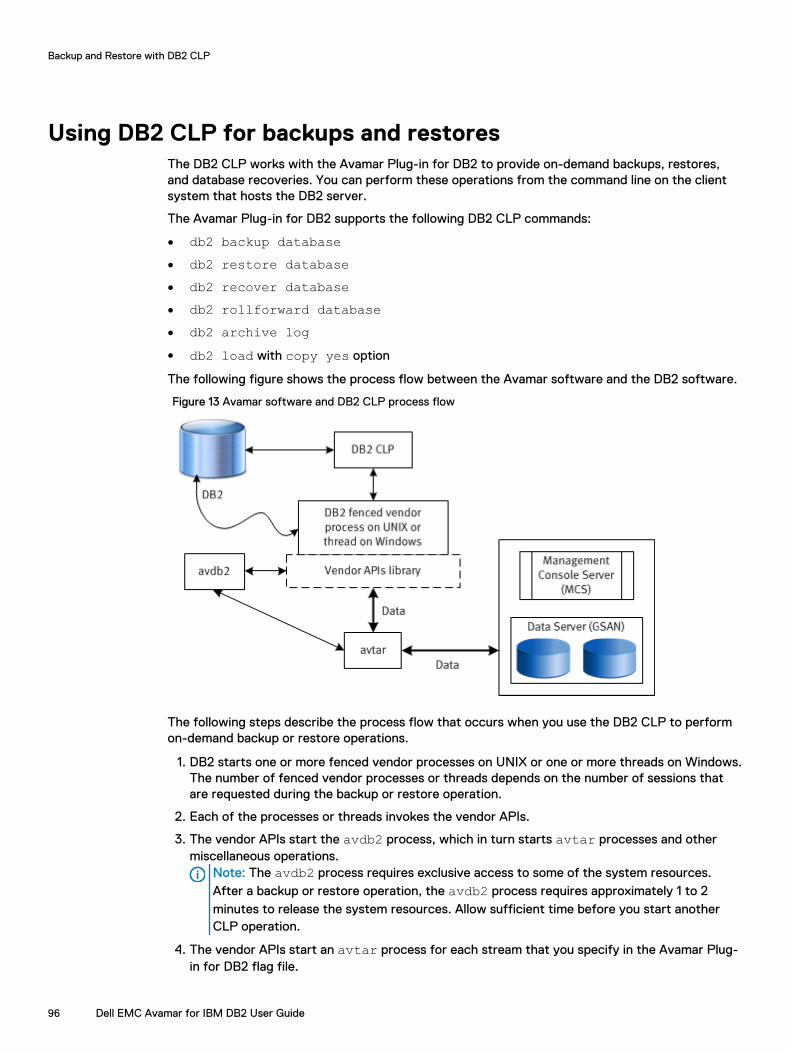
Using DB2 CLP for backups and restoresThe DB2 CLP works with the Avamar Plug-in for DB2 to provide on-demand backups, restores,and database recoveries. You can perform these operations from the command line on the clientsystem that hosts the DB2 server.
The Avamar Plug-in for DB2 supports the following DB2 CLP commands:
l db2 backup databasel db2 restore databasel db2 recover databasel db2 rollforward databasel db2 archive logl db2 load with copy yes option
The following figure shows the process flow between the Avamar software and the DB2 software.
Figure 13 Avamar software and DB2 CLP process flow
The following steps describe the process flow that occurs when you use the DB2 CLP to performon-demand backup or restore operations.
1. DB2 starts one or more fenced vendor processes on UNIX or one or more threads on Windows.The number of fenced vendor processes or threads depends on the number of sessions thatare requested during the backup or restore operation.
2. Each of the processes or threads invokes the vendor APIs.
3. The vendor APIs start the avdb2 process, which in turn starts avtar processes and othermiscellaneous operations.
Note: The avdb2 process requires exclusive access to some of the system resources.After a backup or restore operation, the avdb2 process requires approximately 1 to 2minutes to release the system resources. Allow sufficient time before you start anotherCLP operation.
4. The vendor APIs start an avtar process for each stream that you specify in the Avamar Plug-in for DB2 flag file.
Backup and Restore with DB2 CLP
96 Dell EMC Avamar for IBM DB2 User Guide
a. The DB2 data blocks pass from the vendor APIs to avtar during a backup operation.
b. Vendor APIs read data from avtar during a restore operation.
Note: To obtain the best performance during a restore, use the same number of restoresessions that you used for the backup.
All backup images that you create by specifying multiple sessions use a sequence number as anextension. The sequence number identifies the backup piece.
After a successful backup, the Avamar Plug-in for DB2 represents all backup pieces from allbackup sessions as one backup image or label.
You can restore backups that you create with multiple session in a single restore session. TheAvamar Plug-in for DB2 restores the entire backup image even when you select only onebackup piece.
5. The avtar process stores the data to either the Avamar server or a Data Domain systemdepending on what back-end device you specify.
6. The vendor library communicates a success or failure status to the DB2 server.
Backup label and image namesBackup label names and image names identify the type of backup and whether the backup wascreated from Avamar Plug-in for DB2 or from the command line.
Backup label and image names use the same naming convention whether you create a backup fromAvamar Plug-in for DB2 or from the DB2 CLP. Backup label names include the prefix “CLI” whenyou create a backup by using the db2 backup command. Backup naming conventions on page 50provides more information.
Avamar Plug-in for DB2 flag file configurationBefore you use the DB2 CLP, create an Avamar Plug-in for DB2 flag file. The DB2 CLP requiresyou to configure the configuration parameter for a DB2 recovery operation and configureLOGARCHOPT1 for a DB2 rollforward operation.
Specifying DB2 vendor parameters on page 97 provides information about parameters you canuse with db2 commands.
Specifying DB2 vendor parametersInclude only parameters in the Avamar Plug-in for DB2 flag file that are relevant to the backup orrestore operation.
Remove all parameters from the flag file that are not relevant to the backup or restore operation.The DB2 CLP does not recognize comment symbols, such as the hash symbol (#), when youinclude them in a flag file. For example, the DB2 CLP uses the following parameter despite the #symbol:
#--logfile=/abcDB2 vendor parameters on page 114 provides more information about parameters that you canspecify in the flag file for DB2 CLP backups and restores.
Backup and Restore with DB2 CLP
Dell EMC Avamar for IBM DB2 User Guide 97
Using the Load command with the Copy Yes optionYou can use the db2 load utility to store a copy of data that is loaded with the db2 load utilityto the Avamar server.
About this task
The LOGARCHMETH1, LOGARCHOPT1, and VENDOROPT parameters are required for backing up andrecovering copy images that are created with the Load command.
Procedure
1. Create the Avamar Plug-in for DB2 flag file.
2. Configure the database for backup and recovery of copy images by typing the followingcommands:
db2 update db cfg for database_name using logarchmeth1VENDOR:vendor_library
db2 update db cfg for database_name using logarchopt1 pathname
db2 update db cfg for database_name using vendoropt pathname
where:
l database_name is the name of the database to back up.
l vendor_library is the full pathname to the shared library of the Avamar Plug-in for DB2.
l pathname is the absolute pathname to the flag file that you created.
3. Copy the database being loaded by using the copy yes option and indicating that the copyshould be loaded to the Avamar plug-in:
db2 load from input_file of file_type insert into table_name copy yes loadvendor_library
where:
l input_file is the file, pipe, or device that contains the data being loaded.
l file_type is the format of the data in the input file.
l table_name is the database table into which the data is to be loaded.
l vendor_library is the full pathname to the shared library of the Avamar Plug-in for DB2.
Results
This operation produces archive logs and the copied image with type 4 in the image name. As aresult, the Backup, Restore, and Manage window in the Avamar Administrator will show two newimages: an archive log that contains details of the operation and the location of the image, and theimage itself.
Restoring the LOAD_COPY imageThe LOAD_COPY image cannot be restored alone. It can only be restored during a rollforward orrecover operation. During the log retrieval, when a log contains a reference to a LOAD_COPYimage, DB2 requests the image from the vendor. Then DB2 applies the change to the database andcontinues the rollforward.
Both recover and rollforward operations can be launched from DB2 CLP. The AvamarAdministrator has Recover and Restore and roll forward database options for those operations.
Backup and Restore with DB2 CLP
98 Dell EMC Avamar for IBM DB2 User Guide

Restore options on page 112 contains more information on the database recovery and rollingforward options.
Backing up databases from the DB2 CLPThe DB2 CLP enables you to perform on-demand backups to either the Avamar server or a DataDomain system. Use the DB2 CLP to back up an entire database in offline or online mode, or toback up a single table space from an online database. The IBM website provides more informationabout the DB2 CLP.
Procedure
1. Log in to the Avamar Plug-in for DB2 client with DB2 instance owner’s credentials.
2. Create an Avamar Plug-in for DB2 flag file that includes all necessary parameters for thebackup. Creating the Avamar Plug-in for DB2 flag file on page 38 provides more information.
3. To use a Data Domain system for the backup, add the following parameters to the flag file:
--ddr=true--ddr-index=index_number
where index_number is the identification number of the Data Domain system to use for thebackup. Contact the Avamar administrator to determine the index number of the DataDomain system.
4. To back up data from a DPF node, add the following parameters to the flag file:
--dbpartitionnums=partition_numbers--catnode=catnode_number
where:
l partition_numbers is a list of partitions for a single-system view backup. Separate eachpartition number by a comma.
l catnode_number specifies the partition number of the catalog node.
5. (Optional) To back up data from an HADR node, ensure that the following parameters in theflag file are defined for the Avamar Client for DB2 HADR:
--sysdir=/HADR-Client/etc--account=/clients/account
where:
l HADR-Client is the path to the Avamar client for DB2 HADR.
l clients is the Avamar Domain of the HADR client.
l account is the client name of the HADR configuration.
Additionally, on Windows, add the following parameters to the flag file:
--vardir=HADR-VarDir--logfile=HADR-VarDir\clientlogs\avdb2-log
where HADR-VarDir is the path to the var directory of the HADR client.
Backup and Restore with DB2 CLP
Dell EMC Avamar for IBM DB2 User Guide 99
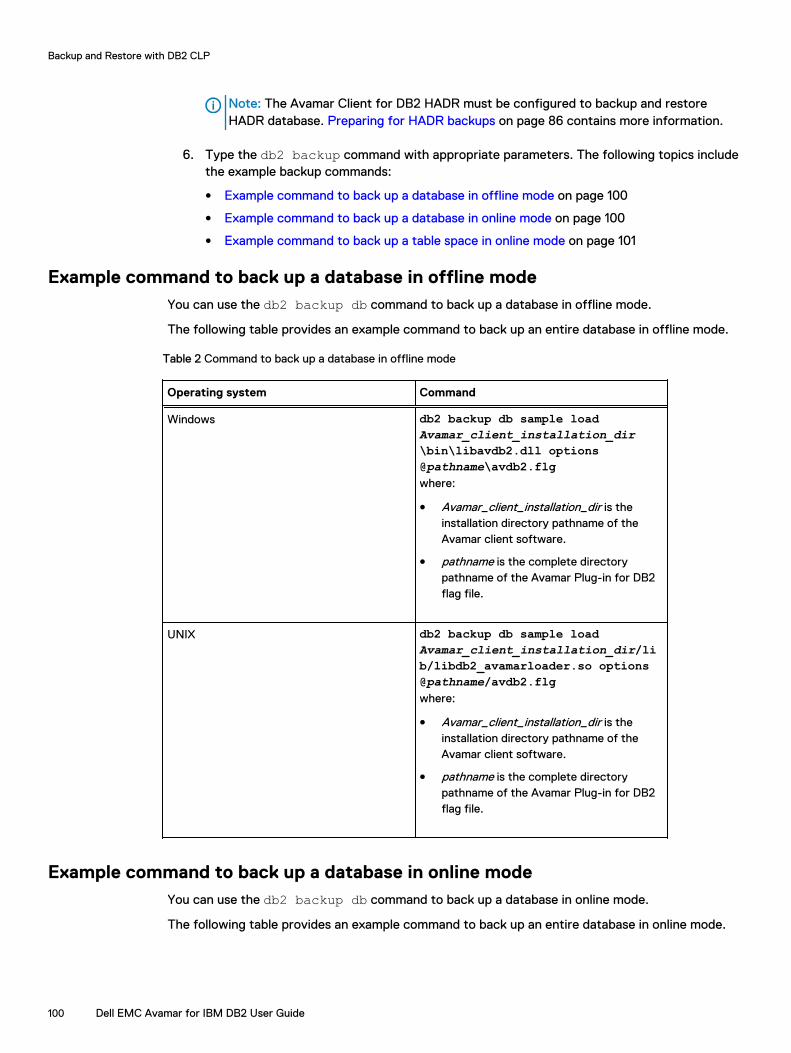
Note: The Avamar Client for DB2 HADR must be configured to backup and restoreHADR database. Preparing for HADR backups on page 86 contains more information.
6. Type the db2 backup command with appropriate parameters. The following topics includethe example backup commands:
l Example command to back up a database in offline mode on page 100
l Example command to back up a database in online mode on page 100
l Example command to back up a table space in online mode on page 101
Example command to back up a database in offline modeYou can use the db2 backup db command to back up a database in offline mode.
The following table provides an example command to back up an entire database in offline mode.
Table 2 Command to back up a database in offline mode
Operating system Command
Windows db2 backup db sample loadAvamar_client_installation_dir\bin\libavdb2.dll options@pathname\avdb2.flgwhere:
l Avamar_client_installation_dir is theinstallation directory pathname of theAvamar client software.
l pathname is the complete directorypathname of the Avamar Plug-in for DB2flag file.
UNIX db2 backup db sample loadAvamar_client_installation_dir/lib/libdb2_avamarloader.so options@pathname/avdb2.flgwhere:
l Avamar_client_installation_dir is theinstallation directory pathname of theAvamar client software.
l pathname is the complete directorypathname of the Avamar Plug-in for DB2flag file.
Example command to back up a database in online modeYou can use the db2 backup db command to back up a database in online mode.
The following table provides an example command to back up an entire database in online mode.
Backup and Restore with DB2 CLP
100 Dell EMC Avamar for IBM DB2 User Guide

Table 3 Command to back up a database in online mode
Operating system Command
Windows db2 backup db sample online loadAvamar_client_installation_dir\bin\libavdb2.dll open 5 sessionsoptions @pathname\avdb2.flgwhere:
l Avamar_client_installation_dir is theinstallation directory pathname of theAvamar client software.
l pathname is the complete directorypathname of the Avamar Plug-in for DB2flag file.
UNIX db2 backup db sample online loadAvamar_client_installation_dir/lib/libdb2_avamarloader.so open 5sessions options @pathname/avdb2.flgwhere:
l Avamar_client_installation_dir is theinstallation directory pathname of theAvamar client software.
l pathname is the complete directorypathname of the Avamar Plug-in for DB2flag file.
Note: The Avamar Plug-in for DB2 supports a maximum of 10 sessions.
Example command to back up a table space in online modeYou can use the db2 backup db command to back up a single table space in online mode.
The following table provides an example command to back up a single table space in online modefrom the sample database. The example command also shows how to use the dedup_deviceoption.
Table 4 Command to back up a table space in online mode
Operating system Command
Windows db2 backup db sampletablespace(TBSPACE1) online loadAvamar_client_installation_dir\bin\libavdb2.dll open 5 sessionsoptions @pathname\avdb2.flgdedup_devicewhere:
Backup and Restore with DB2 CLP
Dell EMC Avamar for IBM DB2 User Guide 101
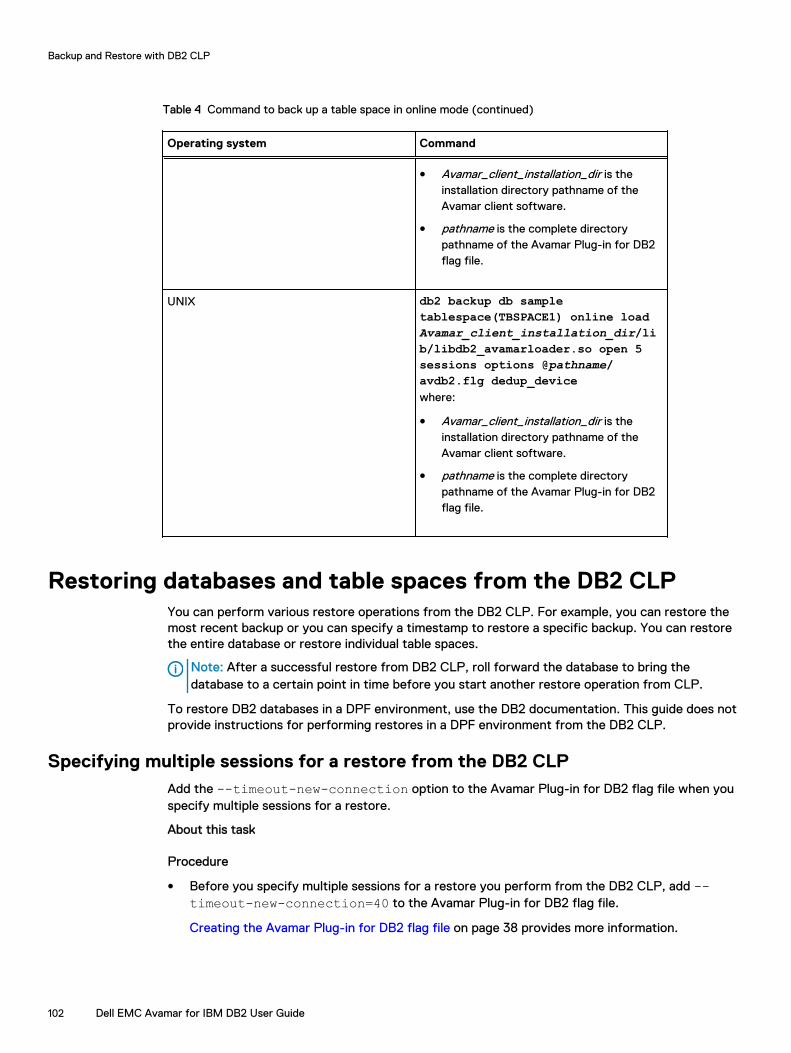
Table 4 Command to back up a table space in online mode (continued)
Operating system Command
l Avamar_client_installation_dir is theinstallation directory pathname of theAvamar client software.
l pathname is the complete directorypathname of the Avamar Plug-in for DB2flag file.
UNIX db2 backup db sampletablespace(TBSPACE1) online loadAvamar_client_installation_dir/lib/libdb2_avamarloader.so open 5sessions options @pathname/avdb2.flg dedup_devicewhere:
l Avamar_client_installation_dir is theinstallation directory pathname of theAvamar client software.
l pathname is the complete directorypathname of the Avamar Plug-in for DB2flag file.
Restoring databases and table spaces from the DB2 CLPYou can perform various restore operations from the DB2 CLP. For example, you can restore themost recent backup or you can specify a timestamp to restore a specific backup. You can restorethe entire database or restore individual table spaces.
Note: After a successful restore from DB2 CLP, roll forward the database to bring thedatabase to a certain point in time before you start another restore operation from CLP.
To restore DB2 databases in a DPF environment, use the DB2 documentation. This guide does notprovide instructions for performing restores in a DPF environment from the DB2 CLP.
Specifying multiple sessions for a restore from the DB2 CLPAdd the --timeout-new-connection option to the Avamar Plug-in for DB2 flag file when youspecify multiple sessions for a restore.
About this task
Procedure
l Before you specify multiple sessions for a restore you perform from the DB2 CLP, add --timeout-new-connection=40 to the Avamar Plug-in for DB2 flag file.
Creating the Avamar Plug-in for DB2 flag file on page 38 provides more information.
Backup and Restore with DB2 CLP
102 Dell EMC Avamar for IBM DB2 User Guide
Note: A restore that specifies multiple session might fail if you do not include --timeout-new-connection=40 in the Avamar Plug-in for DB2 flag file.
Performing redirected restores from the DB2 CLPYou can perform redirected restores from the DB2 CLP. A redirected restore enables you torestore a backup to a target other than the original one. You can restore backups to a differentsystem, instance, or database.
To restore one instance to another instance, include the --db2-source-instance parameter inthe Avamar Plug-in for DB2 flag file. The value of the --db2-source-instance parameter isthe name of the source instance.
Example procedure to restore an instance to a different instanceYou can redirect a restore of an instance to a different instance by using DB2 commands.
Procedure
1. Create the flag file and include the following parameters:
--id=user-1@/clients/hostA.avamar.emc--password=obfuscated password--sysdir=/usr/local/avamar/etc--db2-source-instance=db2inst1--redirected_restore_target=db2inst2
Creating the Avamar Plug-in for DB2 flag file on page 38 provides more information.
2. Attach to the target instance by typing the following command:
db2 attach to db2inst2
3. Set the DB2INSTANCE environment variable to the target instance, db2inst2.
4. Type the appropriate restore command for the system type:
l For Windows, type the following command:
db2 restore db sample load Avamar_client_installation_dir\bin\libavdb2.dll options @pathname\avdb2.flg redirectwhere:
n Avamar_client_installation_dir is the installation directory pathname of the Avamarclient software.
n pathname is the complete directory pathname of the Avamar Plug-in for DB2 flag file.
l For UNIX, type the following command:
db2 restore db sample load Avamar_client_installation_dir/lib/libdb2_avamarloader.so options @pathname/avdb2.flg redirectwhere:
n Avamar_client_installation_dir is the installation directory pathname of the Avamarclient software.
n pathname is the complete directory pathname of the Avamar Plug-in for DB2 flag file.
5. Run the set table space containers command for each table space whosecontainers you want to redefine. The DB2 documentation provides more information.
Backup and Restore with DB2 CLP
Dell EMC Avamar for IBM DB2 User Guide 103
6. After you successfully complete all previous steps, type the following db2 restore dbcommand with the continue option:
db2 restore db sample continue
Example restore that uses an automatically generated scriptYou can redirect a restore of an instance to a different instance by using an automaticallygenerated script. The DB2 documentation provides complete details about performing redirectedrestore to a different DB2 instance.
Procedure
1. Log in as the target instance, db2inst1, and then generate a redirected restore script:
l For Windows, type the following command:
db2 restore db sample load Avamar_client_installation_dir\bin\libavdb2.dll options @pathname\avdb2.flg generate script script_path\my_redirect.clpwhere:
n Avamar_client_installation_dir is the installation directory pathname of the Avamarclient software.
n pathname is the complete directory pathname of the Avamar Plug-in for DB2 flag file.
n script_path is the complete pathname where the script is saved.
l For UNIX, type the following command:
db2 restore db sample load Avamar_client_installation_dir/lib/libdb2_avamarloader.so options @pathname/avdb2.flg generate scriptscript_path/my_redirect.clpwhere:
n Avamar_client_installation_dir is the installation directory pathname of the Avamarclient software.
n pathname is the complete directory pathname of the Avamar Plug-in for DB2 flag file.
n script_path is the complete pathname where the script is saved.
2. Open the script in an editor and define the following parameters:
l ONNote: For Windows operating systems, you must specify a drive letter as the firstentry if the database does not exist and you do not specify the DBPATH ONparameter. If you specify a pathname, the script returns an error.
l DBPATHl NEWLOGPATHl INTOl TAKEN ATl REPLACE EXISTING REDIRECTl WITHOUT ROLLING FORWARD
For example:
ON '/home/db2inst2'INTO sample1
Backup and Restore with DB2 CLP
104 Dell EMC Avamar for IBM DB2 User Guide
where /home/db2inst2 is the home directory of the new instance.Note: If the backup created table spaces, set the set tablespace containersparameter to the appropriate value, if necessary.
3. Change the directory to the script_path directory, and then type the following command:
db2 -tvf my_redirect.clp
Rolling forward the database from the DB2 CLPAfter restoring a tablespace or database, you can roll forward the database to apply the archivedtransaction logs, which bring the data to a certain point in time.
The DB2 software checks the database history to obtain all the information about availablearchived logs, including the storage and method to retrieve the log. Then it requests that theAvamar software checks for log availability. The DB2 rollforward operation does not requireany additional configuration steps to retrieve the logs from the Avamar server.
Note: Due to a DB2 restriction, when the DB2 configuration parameter AUTO_DEL_REC_OBJis turned on, LOGARCHOPTn should be configured with a value of less than 30 character long.This action allows the log pruning to work correctly. DB2 documentation provides moreinformation.
Restoring backup images from Avamar versions before 7.0Backups from the Avamar Plug-in for DB2 before release 7.0 do not include a timestamp in thebackup image name. The naming convention for backup image names changes in release 7.0 toinclude a timestamp.
Backup naming conventions provide more information.
To restore a backup from a release of the Avamar Plug-in for DB2 before 7.0, provide the labelnumber of the backup. Specify the label number by including the --labelnum parameter in theAvamar Plug-in for DB2 flag file.
The following flag file includes the --labelnum parameter, which enables you to restore DB2from a previous version of the Avamar Plug-in for DB2:
--id=user-1@/clients/hostA.avamar.emc--password=obfuscated password--sysdir=/usr/local/avamar/etc--labelnum=136
Recovering DB2 with the DB2 CLPYou can use the db2 recover db command to recover a database in a stand-alone DB2installation.
About this task
The database name in the following commands is a sample.
To run the db2 recover db command by using the plug-in vendor library, set the VENDOROPTparameter to the flag file:
update db cfg for database_name using VENDOROPT @/pathname/avdb2.flgwhere database_name is the name of the database and pathname is the directory that containsthe Avamar Plug-in for DB2 flag file.
Backup and Restore with DB2 CLP
Dell EMC Avamar for IBM DB2 User Guide 105
Procedure
l To recover the database, type the following command:
db2 recover db samplel To recover partition 1 of the database, type the following command:
db2 recover db sample on dbpartitionnum(1)DB2 CLP limitations on page 107 provides more information.
Note: In a DPF environment, the Avamar Plug-in for DB2 supports only single-partitionrecoveries.
l To roll forward the database to the end of backup, and then run a complete operation, typethe following command:
db2 rollforward db sample to end of backup and completel To roll forward the database to the end of logs, and then run a complete operation, type the
following command:
db2 rollforward db sample to end of logs and completel To roll forward the database on all nodes in a DPF environment, type the following command:
db2 rollforward db sample to end of logs on all dbpartitionnumsl To roll forward the database on partitions 1 and 3 to the end of backup, type the following
command:
db2 rollforward db sample to end of backup on dbpartitionnums(1,3)
Setting the expiration and retention for backupsYou can specify the --expires and --retention parameters to set an expiration time for abackup.
About this task
You can specify a timestamp value or a calendar day, month, or year for the --expiresparameter. The Avamar Administration Guide provides more information about the --expires and--retention parameters.
You can manually adjust the expiration time and retention policy after a backup completes by usingthe mccli backup edit command. The Avamar Management Console Command Line Interface(MCCLI) Programmer Guide provides more information.
To ensure that all backup pieces are available for an incremental restore and rollforward operation,set the --expires parameter to the same timestamp for all related backups.
Procedure
l If you should change an expiration date, manually adjust the expiration date for all relatedbackups.
l If you specify a count for the --expires parameter, ensure that all expiration dates for allbackup pieces are synchronized.
Backup and Restore with DB2 CLP
106 Dell EMC Avamar for IBM DB2 User Guide
Monitoring CLP-initiated backups and restoresYou can monitor CLP-initiated backups and restores from the Avamar Administrator to ensure thatthe operations complete successfully and troubleshoot issues.
Monitoring backups on page 46 and Monitoring restores on page 74 contain information aboutusing the Avamar Administrator to monitor backups and restores.
Canceling CLP-initiated backups and restoresYou can cancel CLP-initiated backups and restores from the Avamar Administrator.
Note: Cancelling CLP-initiated operations from the command line (for example, by using Ctrl +C) is not supported.
DB2 CLP limitationsThe Avamar Plug-in for DB2 limits the use of some operations from the DB2 CLP:
l You cannot restore incremental or delta backups that you create from the DB2 CLP by usingAvamar Administrator.
Note: DB2 CLP incremental and delta backup images are not linked. If the base backupexpires, Avamar removes it, which results in data loss. Subsequently, there is no snapviewavailable for all the required pieces. Adjust the expiry so that all required full, incremental,and delta pieces are available for restore.
l The Avamar Plug-in for DB2 supports one restore operation of a partition at a time. Thislimitation applies to restores by using the db2 restore and db2 recover commands.
l The Avamar Plug-in for DB2 does not support the db2 recover db command for droppeddatabases.
Note: To recover a dropped database, use the db2 restore command followed by thedb2 rollforward command. Recovery of a dropped database fails with error code 30on page 125 provides more information.
l You cannot use the Point-in-Time (PIT) recovery type in a DPF environment.
l You cannot recover multiple partitions from the DB2 CLP. A recovery operation can only beperformed on one partition at a time.
l Archived logs must have an appropriate expiry date that corresponds to the backup image.Archived logs are not linked to a backup. Avamar purges backup logs that expire if you restorethe most recent backup in which the archive logs have been deleted due to the expiry date.
Backup and Restore with DB2 CLP
Dell EMC Avamar for IBM DB2 User Guide 107

Backup and Restore with DB2 CLP
108 Dell EMC Avamar for IBM DB2 User Guide
APPENDIX A
Plug-in Options
This appendix includes the following topics:
l Plug-in options..................................................................................................................... 110l Performance options............................................................................................................ 110l Backup options..................................................................................................................... 110l Restore options.................................................................................................................... 112l Table space restore option................................................................................................... 113l DB2 vendor parameters........................................................................................................ 114
Dell EMC Avamar for IBM DB2 User Guide 109
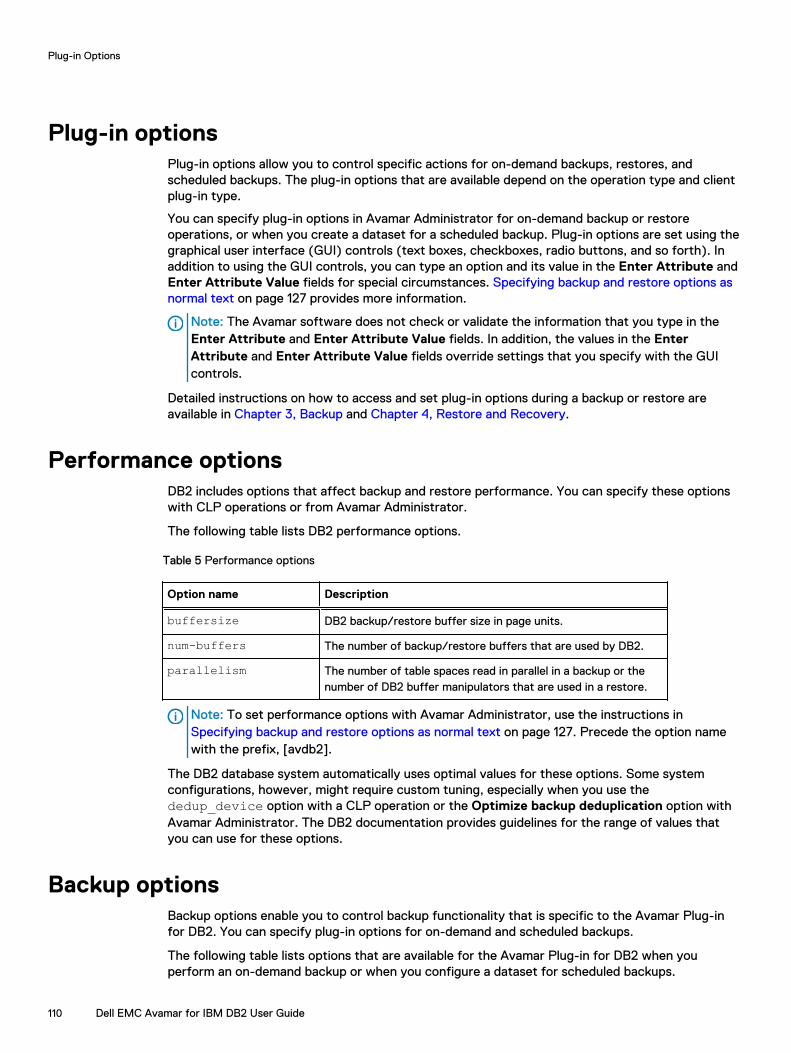
Plug-in optionsPlug-in options allow you to control specific actions for on-demand backups, restores, andscheduled backups. The plug-in options that are available depend on the operation type and clientplug-in type.
You can specify plug-in options in Avamar Administrator for on-demand backup or restoreoperations, or when you create a dataset for a scheduled backup. Plug-in options are set using thegraphical user interface (GUI) controls (text boxes, checkboxes, radio buttons, and so forth). Inaddition to using the GUI controls, you can type an option and its value in the Enter Attribute andEnter Attribute Value fields for special circumstances. Specifying backup and restore options asnormal text on page 127 provides more information.
Note: The Avamar software does not check or validate the information that you type in theEnter Attribute and Enter Attribute Value fields. In addition, the values in the EnterAttribute and Enter Attribute Value fields override settings that you specify with the GUIcontrols.
Detailed instructions on how to access and set plug-in options during a backup or restore areavailable in Chapter 3, Backup and Chapter 4, Restore and Recovery.
Performance optionsDB2 includes options that affect backup and restore performance. You can specify these optionswith CLP operations or from Avamar Administrator.
The following table lists DB2 performance options.
Table 5 Performance options
Option name Description
buffersize DB2 backup/restore buffer size in page units.
num-buffers The number of backup/restore buffers that are used by DB2.
parallelism The number of table spaces read in parallel in a backup or thenumber of DB2 buffer manipulators that are used in a restore.
Note: To set performance options with Avamar Administrator, use the instructions in Specifying backup and restore options as normal text on page 127. Precede the option namewith the prefix, [avdb2].
The DB2 database system automatically uses optimal values for these options. Some systemconfigurations, however, might require custom tuning, especially when you use thededup_device option with a CLP operation or the Optimize backup deduplication option withAvamar Administrator. The DB2 documentation provides guidelines for the range of values thatyou can use for these options.
Backup optionsBackup options enable you to control backup functionality that is specific to the Avamar Plug-infor DB2. You can specify plug-in options for on-demand and scheduled backups.
The following table lists options that are available for the Avamar Plug-in for DB2 when youperform an on-demand backup or when you configure a dataset for scheduled backups.
Plug-in Options
110 Dell EMC Avamar for IBM DB2 User Guide
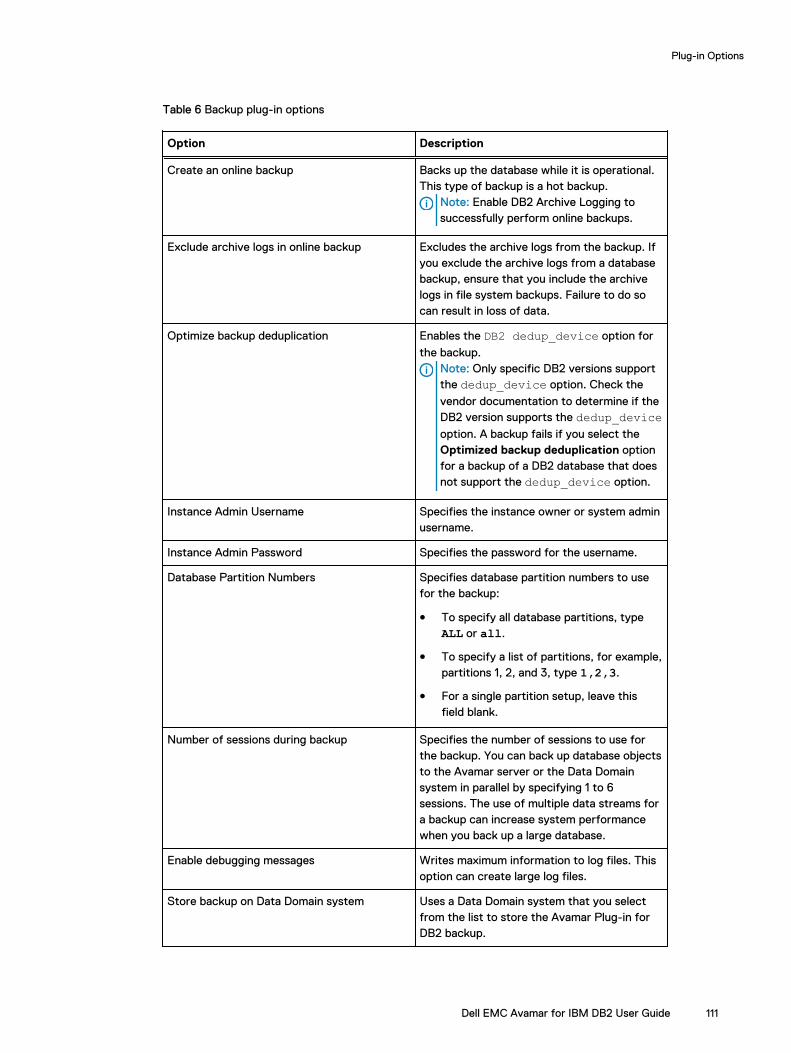
Table 6 Backup plug-in options
Option Description
Create an online backup Backs up the database while it is operational.This type of backup is a hot backup.
Note: Enable DB2 Archive Logging tosuccessfully perform online backups.
Exclude archive logs in online backup Excludes the archive logs from the backup. Ifyou exclude the archive logs from a databasebackup, ensure that you include the archivelogs in file system backups. Failure to do socan result in loss of data.
Optimize backup deduplication Enables the DB2 dedup_device option for
the backup.Note: Only specific DB2 versions supportthe dedup_device option. Check the
vendor documentation to determine if theDB2 version supports the dedup_deviceoption. A backup fails if you select theOptimized backup deduplication optionfor a backup of a DB2 database that doesnot support the dedup_device option.
Instance Admin Username Specifies the instance owner or system adminusername.
Instance Admin Password Specifies the password for the username.
Database Partition Numbers Specifies database partition numbers to usefor the backup:
l To specify all database partitions, typeALL or all.
l To specify a list of partitions, for example,partitions 1, 2, and 3, type 1,2,3.
l For a single partition setup, leave thisfield blank.
Number of sessions during backup Specifies the number of sessions to use forthe backup. You can back up database objectsto the Avamar server or the Data Domainsystem in parallel by specifying 1 to 6sessions. The use of multiple data streams fora backup can increase system performancewhen you back up a large database.
Enable debugging messages Writes maximum information to log files. Thisoption can create large log files.
Store backup on Data Domain system Uses a Data Domain system that you selectfrom the list to store the Avamar Plug-in forDB2 backup.
Plug-in Options
Dell EMC Avamar for IBM DB2 User Guide 111
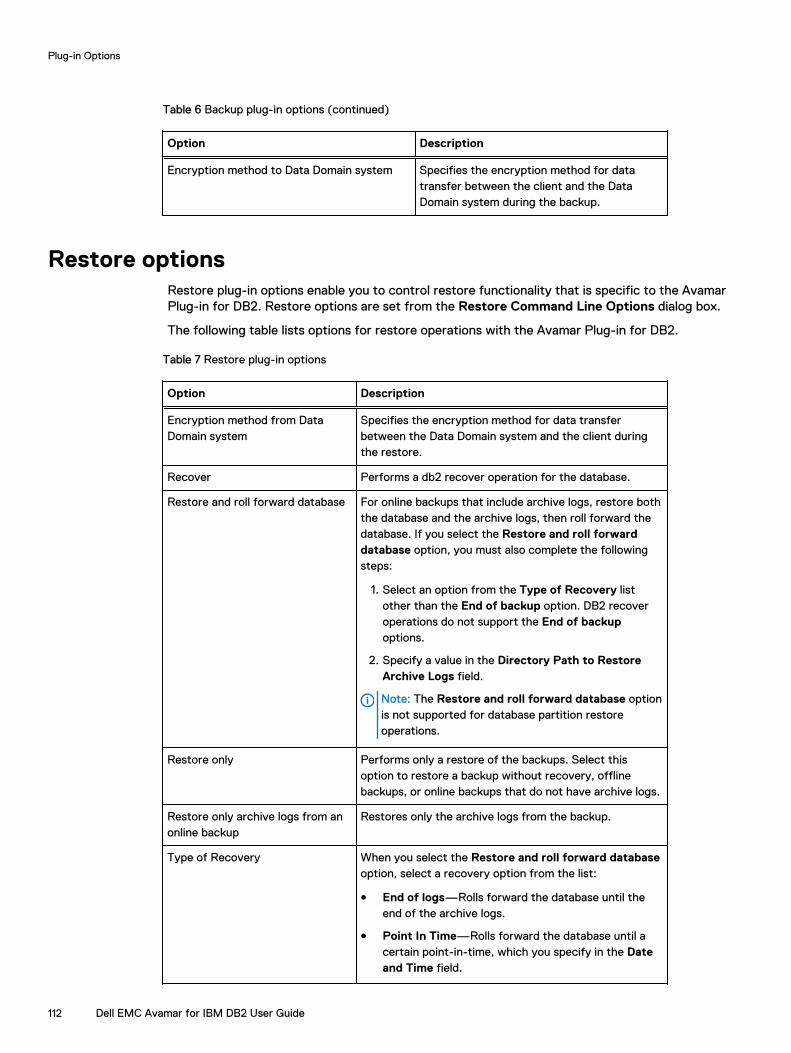
Table 6 Backup plug-in options (continued)
Option Description
Encryption method to Data Domain system Specifies the encryption method for datatransfer between the client and the DataDomain system during the backup.
Restore optionsRestore plug-in options enable you to control restore functionality that is specific to the AvamarPlug-in for DB2. Restore options are set from the Restore Command Line Options dialog box.
The following table lists options for restore operations with the Avamar Plug-in for DB2.
Table 7 Restore plug-in options
Option Description
Encryption method from DataDomain system
Specifies the encryption method for data transferbetween the Data Domain system and the client duringthe restore.
Recover Performs a db2 recover operation for the database.
Restore and roll forward database For online backups that include archive logs, restore boththe database and the archive logs, then roll forward thedatabase. If you select the Restore and roll forwarddatabase option, you must also complete the followingsteps:
1. Select an option from the Type of Recovery listother than the End of backup option. DB2 recoveroperations do not support the End of backupoptions.
2. Specify a value in the Directory Path to RestoreArchive Logs field.
Note: The Restore and roll forward database optionis not supported for database partition restoreoperations.
Restore only Performs only a restore of the backups. Select thisoption to restore a backup without recovery, offlinebackups, or online backups that do not have archive logs.
Restore only archive logs from anonline backup
Restores only the archive logs from the backup.
Type of Recovery When you select the Restore and roll forward databaseoption, select a recovery option from the list:
l End of logs—Rolls forward the database until theend of the archive logs.
l Point In Time—Rolls forward the database until acertain point-in-time, which you specify in the Dateand Time field.
Plug-in Options
112 Dell EMC Avamar for IBM DB2 User Guide
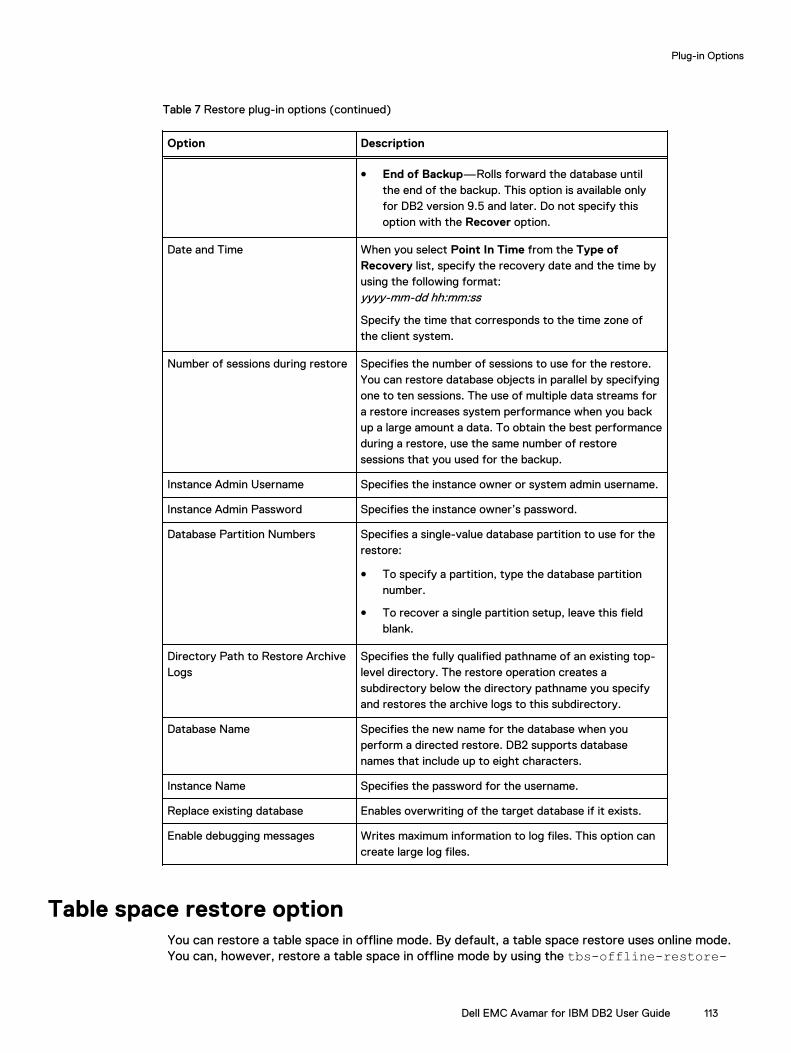
Table 7 Restore plug-in options (continued)
Option Description
l End of Backup—Rolls forward the database untilthe end of the backup. This option is available onlyfor DB2 version 9.5 and later. Do not specify thisoption with the Recover option.
Date and Time When you select Point In Time from the Type ofRecovery list, specify the recovery date and the time byusing the following format:yyyy-mm-dd hh:mm:ss
Specify the time that corresponds to the time zone ofthe client system.
Number of sessions during restore Specifies the number of sessions to use for the restore.You can restore database objects in parallel by specifyingone to ten sessions. The use of multiple data streams fora restore increases system performance when you backup a large amount a data. To obtain the best performanceduring a restore, use the same number of restoresessions that you used for the backup.
Instance Admin Username Specifies the instance owner or system admin username.
Instance Admin Password Specifies the instance owner’s password.
Database Partition Numbers Specifies a single-value database partition to use for therestore:
l To specify a partition, type the database partitionnumber.
l To recover a single partition setup, leave this fieldblank.
Directory Path to Restore ArchiveLogs
Specifies the fully qualified pathname of an existing top-level directory. The restore operation creates asubdirectory below the directory pathname you specifyand restores the archive logs to this subdirectory.
Database Name Specifies the new name for the database when youperform a directed restore. DB2 supports databasenames that include up to eight characters.
Instance Name Specifies the password for the username.
Replace existing database Enables overwriting of the target database if it exists.
Enable debugging messages Writes maximum information to log files. This option cancreate large log files.
Table space restore optionYou can restore a table space in offline mode. By default, a table space restore uses online mode.You can, however, restore a table space in offline mode by using the tbs-offline-restore-
Plug-in Options
Dell EMC Avamar for IBM DB2 User Guide 113
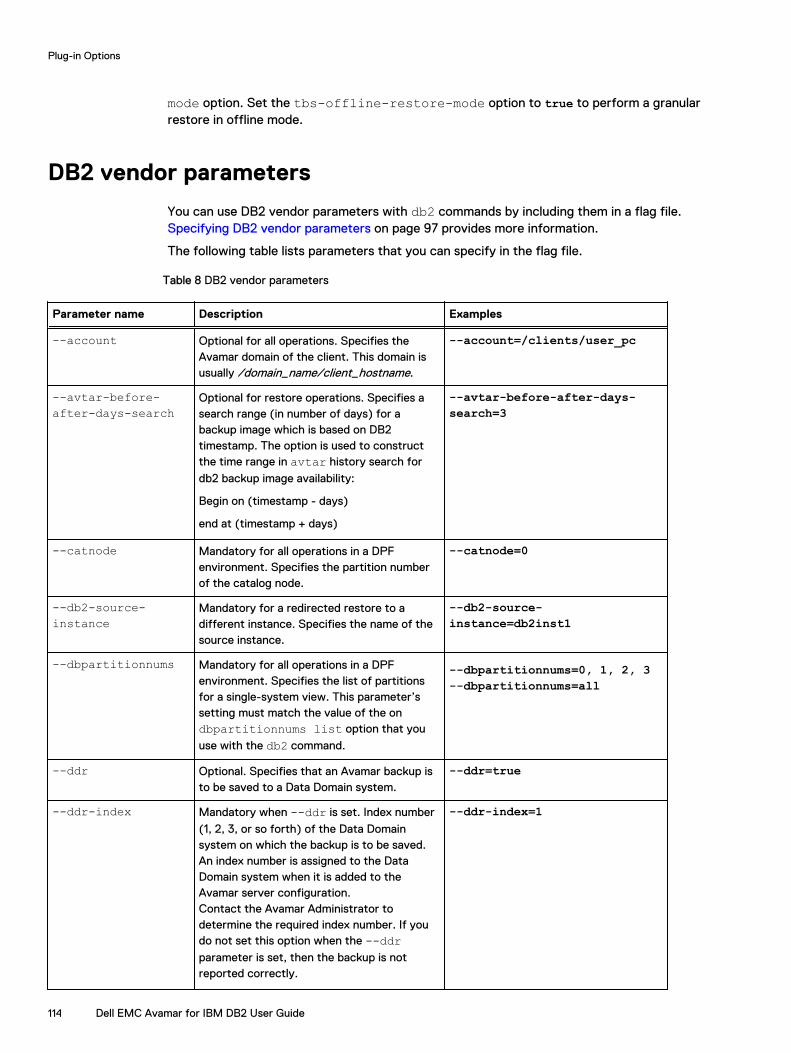
mode option. Set the tbs-offline-restore-mode option to true to perform a granularrestore in offline mode.
DB2 vendor parameters
You can use DB2 vendor parameters with db2 commands by including them in a flag file. Specifying DB2 vendor parameters on page 97 provides more information.
The following table lists parameters that you can specify in the flag file.
Table 8 DB2 vendor parameters
Parameter name Description Examples
--account Optional for all operations. Specifies theAvamar domain of the client. This domain isusually /domain_name/client_hostname.
--account=/clients/user_pc
--avtar-before-after-days-search
Optional for restore operations. Specifies asearch range (in number of days) for abackup image which is based on DB2timestamp. The option is used to constructthe time range in avtar history search for
db2 backup image availability:
Begin on (timestamp - days)
end at (timestamp + days)
--avtar-before-after-days-search=3
--catnode Mandatory for all operations in a DPFenvironment. Specifies the partition numberof the catalog node.
--catnode=0
--db2-source-instance
Mandatory for a redirected restore to adifferent instance. Specifies the name of thesource instance.
--db2-source-instance=db2inst1
--dbpartitionnums Mandatory for all operations in a DPFenvironment. Specifies the list of partitionsfor a single-system view. This parameter’ssetting must match the value of the ondbpartitionnums list option that you
use with the db2 command.
--dbpartitionnums=0, 1, 2, 3--dbpartitionnums=all
--ddr Optional. Specifies that an Avamar backup isto be saved to a Data Domain system.
--ddr=true
--ddr-index Mandatory when --ddr is set. Index number
(1, 2, 3, or so forth) of the Data Domainsystem on which the backup is to be saved.An index number is assigned to the DataDomain system when it is added to theAvamar server configuration.Contact the Avamar Administrator todetermine the required index number. If youdo not set this option when the --ddrparameter is set, then the backup is notreported correctly.
--ddr-index=1
Plug-in Options
114 Dell EMC Avamar for IBM DB2 User Guide
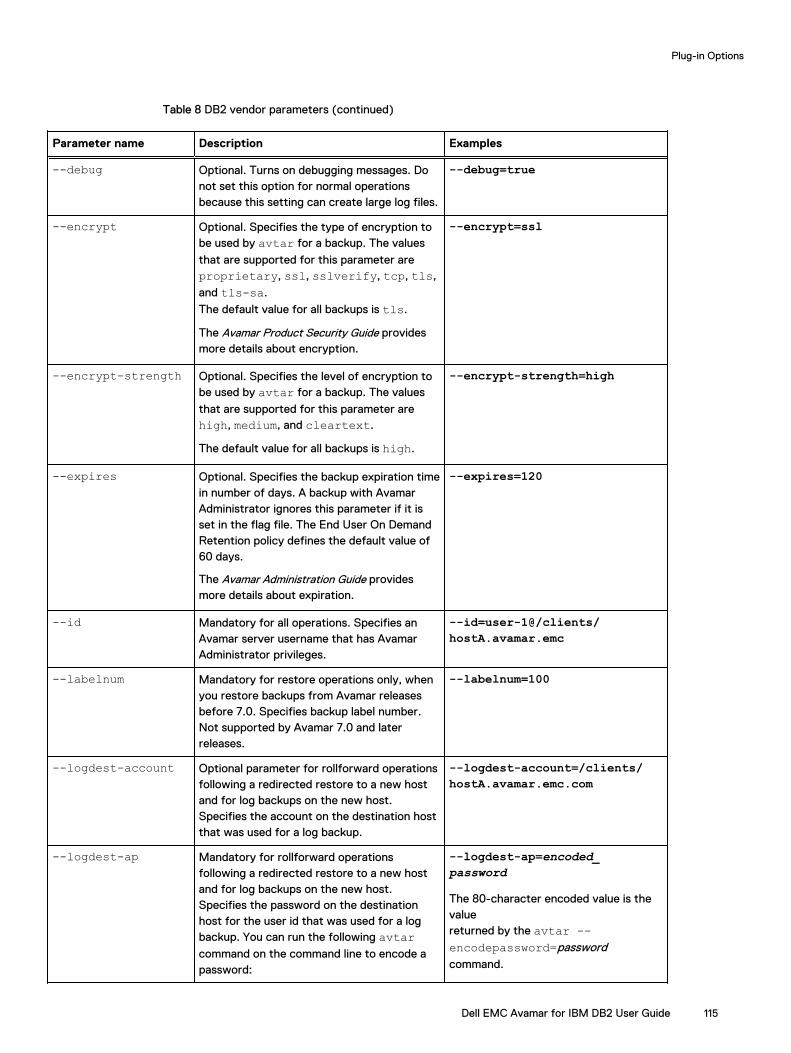
Table 8 DB2 vendor parameters (continued)
Parameter name Description Examples
--debug Optional. Turns on debugging messages. Donot set this option for normal operationsbecause this setting can create large log files.
--debug=true
--encrypt Optional. Specifies the type of encryption tobe used by avtar for a backup. The values
that are supported for this parameter areproprietary, ssl, sslverify, tcp, tls,
and tls-sa.
The default value for all backups is tls.
The Avamar Product Security Guide providesmore details about encryption.
--encrypt=ssl
--encrypt-strength Optional. Specifies the level of encryption tobe used by avtar for a backup. The values
that are supported for this parameter arehigh, medium, and cleartext.
The default value for all backups is high.
--encrypt-strength=high
--expires Optional. Specifies the backup expiration timein number of days. A backup with AvamarAdministrator ignores this parameter if it isset in the flag file. The End User On DemandRetention policy defines the default value of60 days.
The Avamar Administration Guide providesmore details about expiration.
--expires=120
--id Mandatory for all operations. Specifies anAvamar server username that has AvamarAdministrator privileges.
--id=user-1@/clients/hostA.avamar.emc
--labelnum Mandatory for restore operations only, whenyou restore backups from Avamar releasesbefore 7.0. Specifies backup label number.Not supported by Avamar 7.0 and laterreleases.
--labelnum=100
--logdest-account Optional parameter for rollforward operationsfollowing a redirected restore to a new hostand for log backups on the new host.Specifies the account on the destination hostthat was used for a log backup.
--logdest-account=/clients/hostA.avamar.emc.com
--logdest-ap Mandatory for rollforward operationsfollowing a redirected restore to a new hostand for log backups on the new host.Specifies the password on the destinationhost for the user id that was used for a logbackup. You can run the following avtarcommand on the command line to encode apassword:
--logdest-ap=encoded_password
The 80-character encoded value is thevaluereturned by the avtar --encodepassword=passwordcommand.
Plug-in Options
Dell EMC Avamar for IBM DB2 User Guide 115
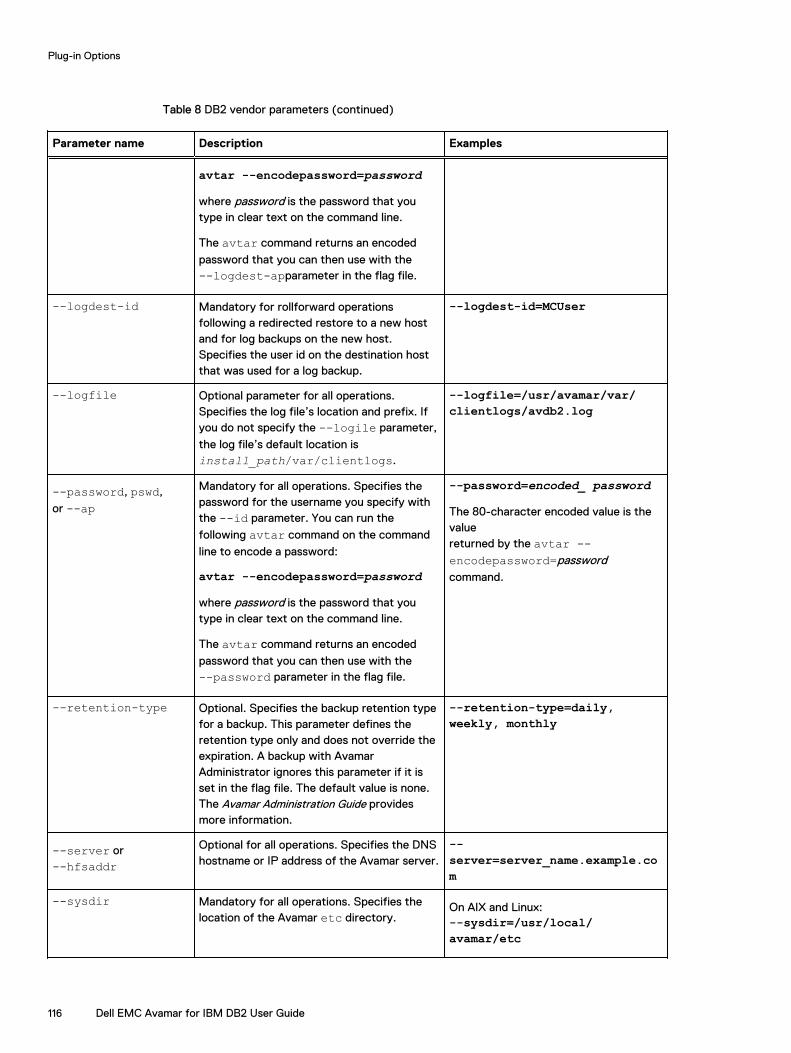
Table 8 DB2 vendor parameters (continued)
Parameter name Description Examples
avtar --encodepassword=password
where password is the password that youtype in clear text on the command line.
The avtar command returns an encoded
password that you can then use with the--logdest-apparameter in the flag file.
--logdest-id Mandatory for rollforward operationsfollowing a redirected restore to a new hostand for log backups on the new host.Specifies the user id on the destination hostthat was used for a log backup.
--logdest-id=MCUser
--logfile Optional parameter for all operations.Specifies the log file’s location and prefix. Ifyou do not specify the --logile parameter,
the log file’s default location isinstall_path/var/clientlogs.
--logfile=/usr/avamar/var/clientlogs/avdb2.log
--password, pswd,
or --apMandatory for all operations. Specifies thepassword for the username you specify withthe --id parameter. You can run the
following avtar command on the command
line to encode a password:
avtar --encodepassword=password
where password is the password that youtype in clear text on the command line.
The avtar command returns an encoded
password that you can then use with the--password parameter in the flag file.
--password=encoded_ password
The 80-character encoded value is thevaluereturned by the avtar --encodepassword=passwordcommand.
--retention-type Optional. Specifies the backup retention typefor a backup. This parameter defines theretention type only and does not override theexpiration. A backup with AvamarAdministrator ignores this parameter if it isset in the flag file. The default value is none.The Avamar Administration Guide providesmore information.
--retention-type=daily,weekly, monthly
--server or--hfsaddr
Optional for all operations. Specifies the DNShostname or IP address of the Avamar server.
--server=server_name.example.com
--sysdir Mandatory for all operations. Specifies thelocation of the Avamar etc directory.
On AIX and Linux:--sysdir=/usr/local/avamar/etc
Plug-in Options
116 Dell EMC Avamar for IBM DB2 User Guide
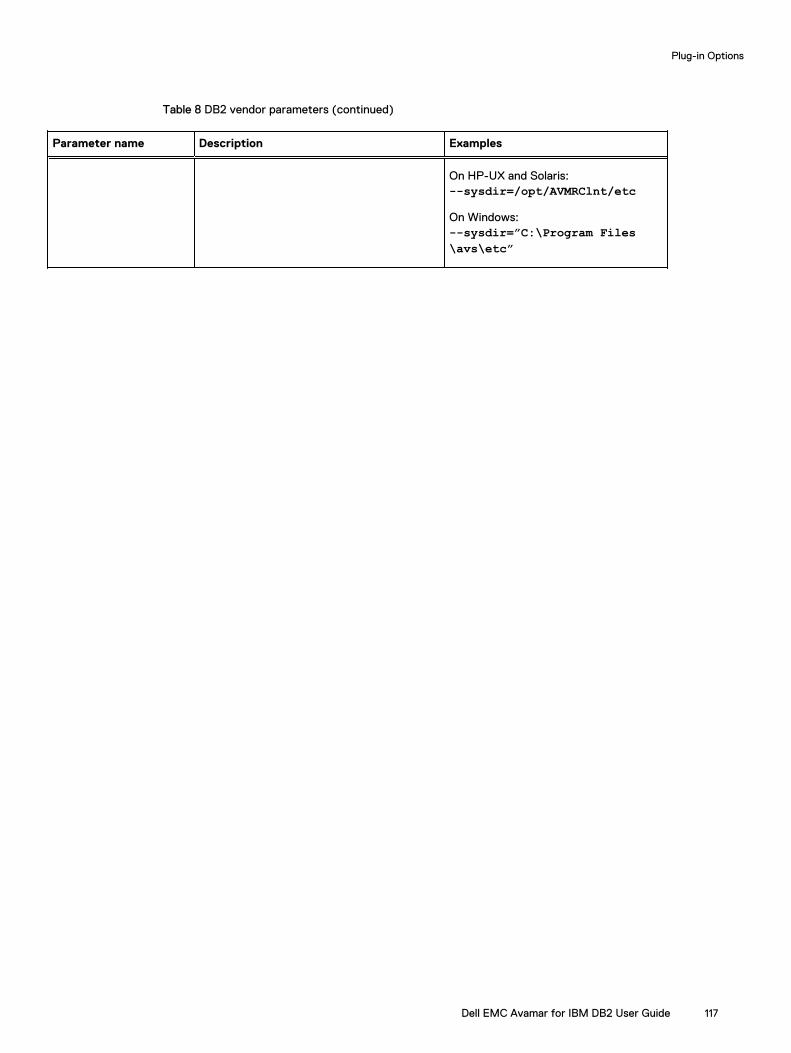
Table 8 DB2 vendor parameters (continued)
Parameter name Description Examples
On HP-UX and Solaris:--sysdir=/opt/AVMRClnt/etc
On Windows:--sysdir=”C:\Program Files\avs\etc”
Plug-in Options
Dell EMC Avamar for IBM DB2 User Guide 117

Plug-in Options
118 Dell EMC Avamar for IBM DB2 User Guide
APPENDIX B
Troubleshooting
This appendix includes the following topics:
l Troubleshooting installation and configuration problems......................................................120l Troubleshooting backup problems........................................................................................120l Troubleshooting restore problems........................................................................................ 121l Troubleshooting DB2 CLP backup and restore problems......................................................123l Specifying backup and restore options as normal text......................................................... 127
Dell EMC Avamar for IBM DB2 User Guide 119
Troubleshooting installation and configuration problemsYou can resolve some installation and configuration problems with the troubleshooting informationin this appendix.
Installing the Avamar Plug-in for DB2 in the default directory failsThe Avamar Plug-in for DB2 must be installed in the same directory as the Avamar client software.Otherwise, the installation fails.
If you install the Avamar Plug-in for DB2 in the default directory on an AIX system, which has theAvamar client software that is installed in a nondefault directory, the installation fails with thefollowing error:
The Avamar Client is located in '/usr/local/INSTALLPATH'.Please re-run the DB2 plugin installer with the '-R /usr/local/INSTALLPATH' flaginstall: Failed while executing the AvamarDB2-aix6-ppc64.pre_i script.To resolve this problem, install the Avamar Plug-in for DB2 in the same directory as the AvamarClient for AIX:
installp -R /install_path -d AvamarDB2-aix6-ppc64-version.bff allwhere:
l install_path is the directory for the installation files.
l version is the Avamar software version.
Resolving a network hostname might result in a time-out errorYou might receive a time-out error while the system tries to resolve the hostname of the clientsystem that runs the DB2 server and Avamar Plug-in for DB2. The Avamar Plug-in for DB2 requiresan unimpeded network connection to the Avamar server.
To establish a communication resource, it is required to have a hostname resolution either throughDNS or by using the /etc/hosts file. A system’s network configuration determines what methodto use for hostname resolution. For example, a system might resolve a hostname by usingthe /etc/hosts file as the last method. In this case, the communication process might appear tobe slow.
Ensure that the hostname resolution configuration is optimal on the host that runs the DB2 serverand Avamar Plug-in for DB2. The documentation for the operation system provides moreinformation about configuring hostname resolution.
Troubleshooting backup problemsYou can resolve some backup problems with the troubleshooting information in this appendix.
Backup fails with error SQL1776N
IBM DB2 does not support the backup of Standby databases in an HADR environment. During thebackup operation, the Avamar Plug-in for DB2 may fail with the following error message:
SQL1776N. The command cannot be issued onan HADR database. Reason code = 1.
Troubleshooting
120 Dell EMC Avamar for IBM DB2 User Guide

To avoid such failures, configure the HADR Client for Avamar on all HADR nodes. Details of theconfiguration are provided in the section Preparing for HADR Backups.
Backup fails at snapview creation stage
When a backup operation fails with the following message, perform the following steps:
avdb2 Error <0000>: Failed to create the snapview. However, the database data has been successfully backed up and is marked as a hidden backup. Restore is available through CLI only. See the plug-in documentation for information about restoring hidden backups.
1. Run a FULL backup.
2. Verify that the backup was successful by using DB2 CLP command:
DB2 LIST HISTORY BACKUP SINCE <DATE> FOR DB <DBNAME>
The message might mean that although you cannot see the backup label in the AvamarAdministrator window, the database data has backed up, but does not display as normal.
3. Record the last and largest sequence number of the timestamp, which is the backup start time.For one backup operation, you might see multiple entries in the result with timestamp+sequence format. For example, timestamp+001, timestamp+002
4. To restore the backup with that specific timestamp, follow the CLP restore procedure.
5. Add the following flag to the restore command:—num-hidden-piecies=XWhere X is the number that you record from the result of DB2 LIST HISTORY for that specifictimestamp.
Troubleshooting restore problemsYou can resolve some restore problems with the troubleshooting information in this appendix.
Adjusting the base timeline for a log restoreDuring a rollforward operation, the Avamar Plug-in for DB2 uses the DB2 history backup time witha fallback of 10 minutes as the default base timeline when searching for the available logs. A 10-minute period might not allow enough search time for archived logs.
If there be an online backup, the default fallback time includes the logs that were archived andsaved before the database image is saved. The amount of fallback time that the search requirescan vary depending on the size of the logs.
The --fallback-mins-search flag impacts the search time for a restore operation of archivedlogs. A database rollforward operation uses this flag when retrieving the archived logs to apply tothe database after the restore and recovery of a database backup image completes.
Use the --fallback-mins-search flag to add more fallback time to the default fallback timeof 10 minutes. You can specify a negative value to fall forward from the default base timeline.
Recover fails if LOGARCHOPT1 is more than 30 charactersA database recovery operation records an entry for the archived log backup in the COMMENTfield of db2 recovery history. This entry is the value of the LOGARCHOPT1 parameter.
The COMMENT field can contain 30 characters. If the value of the LOGARCHOPT1 parameter isgreater than 30 characters, the rollforward operation might fail with an error similar to thefollowing error:
Troubleshooting
Dell EMC Avamar for IBM DB2 User Guide 121
SQL1268N Roll-forward recovery stopped due to error "SQL1042" whileretrieving log file "S0000001.LOG" for database "TEST" on node "0"To work around this issue, ensure that the LOGARCHOPT1 parameter does not exceed 30characters:
1. Configure the LOGARCHOPT1 parameter by using the following command:
db2 update db cfg for database_name using logarchopt1 @pathname
where database_name is the name of the database and pathname is the absolute pathname,which comprises no more than 30 characters.
This step reconfigures the LOGARCHOPT1 parameter.
2. Recover the database. For example:
db2 recover db database_name3. Back up the database after the recover successfully completes. For example:
db2 backup db pathname load/usr/local/avamar/lib/libdb2_avamarloader.so options @pathname
The step ensures that future recovery operations use the new setting for the LOGARCHOPT1parameter.
Restore fails with a “Failed to initiate the restore operation” errorThe default setting of 30 s for the --subprocesstimeoutsecs option might not allow enoughtime for a restore to complete.
A restore operation fails and writes the following error to the log file:
Failed to initiate the restore operationComplete the following steps to resolve this problem:
1. Set the --subprocesstimeoutsecs option and value for the restore operation. Specifyingbackup and restore options as normal text on page 127 provides instructions.
2. Type --[avdb2]subprocesstimeoutsecs in the Enter Attribute field.
3. Type a value from 40 to 60 in the Enter Attribute Value field.
The default value is 30 s.
4. Retry the restore operation.
Restore fails while retrieving snapview and metadataA restore operation from Avamar Administrator might fail when the Avamar Plug-in for DB2retrieves snapview and metadata.
Adjusting the snapupbrowsetimeoutsecs flag
During a restore operation from Avamar Administrator, the Avamar Plug-in for DB2 retrieves thesnapview of the backup. Because the performance and connection speed of the client and theAvamar server vary from system to system, this retrieval process might require a shorter or longerperiod to complete. For a busy system, the retrieval process might require up to 90 s. The --snapupbrowsetimeoutsecs flag, which is set to 30 s by default, determines the time-out valuefor the retrieval of the snapview. If the retrieval of the snapview does not have enough time tocomplete, the restore fails with the following error messages:
2013-01-30 19:28:43 avdb2 Info <6686>: Process 31757(/usr/local/avamar/bin/avtar) for workorder
Troubleshooting
122 Dell EMC Avamar for IBM DB2 User Guide
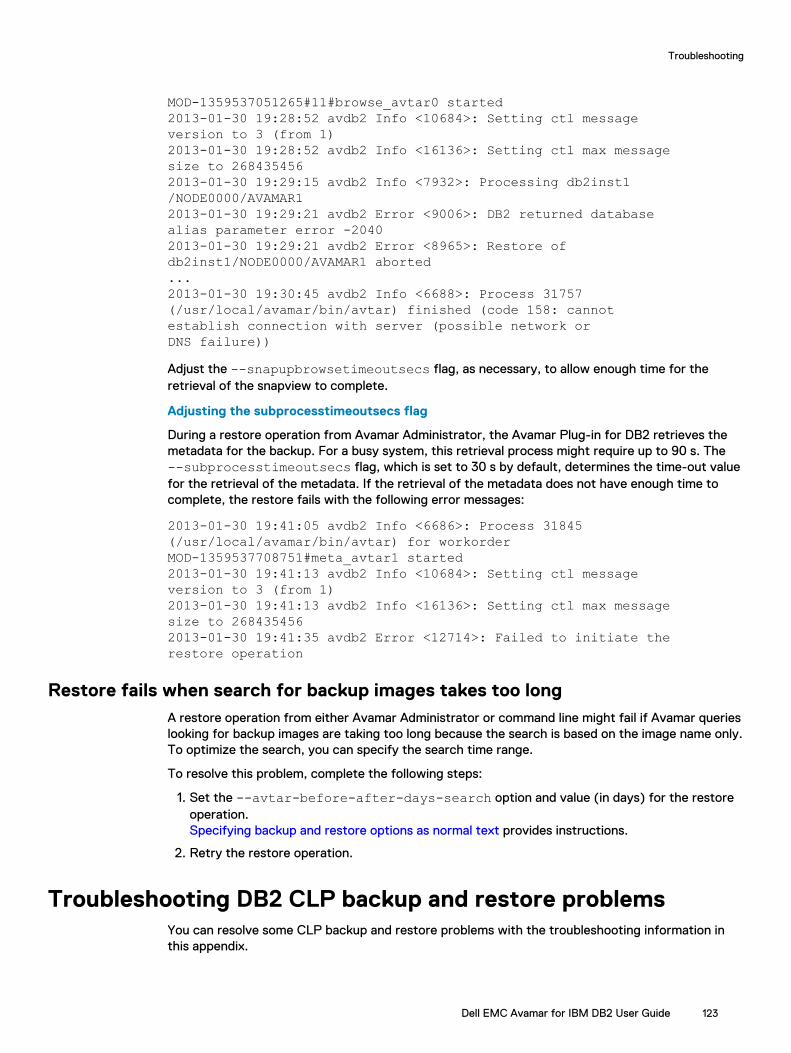
MOD-1359537051265#11#browse_avtar0 started2013-01-30 19:28:52 avdb2 Info <10684>: Setting ctl messageversion to 3 (from 1)2013-01-30 19:28:52 avdb2 Info <16136>: Setting ctl max messagesize to 2684354562013-01-30 19:29:15 avdb2 Info <7932>: Processing db2inst1/NODE0000/AVAMAR12013-01-30 19:29:21 avdb2 Error <9006>: DB2 returned databasealias parameter error -20402013-01-30 19:29:21 avdb2 Error <8965>: Restore ofdb2inst1/NODE0000/AVAMAR1 aborted...2013-01-30 19:30:45 avdb2 Info <6688>: Process 31757(/usr/local/avamar/bin/avtar) finished (code 158: cannotestablish connection with server (possible network orDNS failure))Adjust the --snapupbrowsetimeoutsecs flag, as necessary, to allow enough time for theretrieval of the snapview to complete.
Adjusting the subprocesstimeoutsecs flag
During a restore operation from Avamar Administrator, the Avamar Plug-in for DB2 retrieves themetadata for the backup. For a busy system, this retrieval process might require up to 90 s. The--subprocesstimeoutsecs flag, which is set to 30 s by default, determines the time-out valuefor the retrieval of the metadata. If the retrieval of the metadata does not have enough time tocomplete, the restore fails with the following error messages:
2013-01-30 19:41:05 avdb2 Info <6686>: Process 31845(/usr/local/avamar/bin/avtar) for workorderMOD-1359537708751#meta_avtar1 started2013-01-30 19:41:13 avdb2 Info <10684>: Setting ctl messageversion to 3 (from 1)2013-01-30 19:41:13 avdb2 Info <16136>: Setting ctl max messagesize to 2684354562013-01-30 19:41:35 avdb2 Error <12714>: Failed to initiate therestore operation
Restore fails when search for backup images takes too longA restore operation from either Avamar Administrator or command line might fail if Avamar querieslooking for backup images are taking too long because the search is based on the image name only.To optimize the search, you can specify the search time range.
To resolve this problem, complete the following steps:
1. Set the --avtar-before-after-days-search option and value (in days) for the restoreoperation.Specifying backup and restore options as normal text provides instructions.
2. Retry the restore operation.
Troubleshooting DB2 CLP backup and restore problemsYou can resolve some CLP backup and restore problems with the troubleshooting information inthis appendix.
Troubleshooting
Dell EMC Avamar for IBM DB2 User Guide 123
Adjusting the time gap between DB2 CLP operationsSet --timeout-new-connection option to allow enough time for CLP operations to complete.
After all data is successfully read, written, and processed for a CLP operation, the vendor callsequence completes. After the vendor call completes and the control of the CLP interface returnsto the user, the avdb2 process requires time to shut down and clean up resources before anotherCLP operation can begin. The time gap between CLP operations is approximately 1 to 2 minutes.This time gap can vary, but it must be large enough for the --timeout-new-connectionoption to include the time value.
Backup does not complete in DPF configurationIn a DPF configuration, which uses a SLES system as the Avamar Plug-in for DB2 client system,insufficient RAM on the client system might prevent backups from completing.
A backup in a DPF configuration fails to complete on a SUSE Linux Enterprise Server 11 64-bitsystem.
To work around this issue, use the following command from the DB2 CLP:
db2 backup db dbname on all DBPARTITIONNUMS TO /pathIf the backup command from the CLP does not complete, IBM recommends increasing RAM on theSLES system to 6 GB or more.
Cleaning up processes and resources after a DB2 CLP operationThe 1 to 2 minute period in which the avdb2 process has to terminate and clean up resourcesmight not be enough time before a subsequent CLP operation begins.
The components that a DB2 CLP operation uses typically includes one avdb2 process, allocatedresources such as global named semaphores, and a semaphore-key port file for communicationcontrol management. Regardless of whether the CLP operation completes successfully or fails, theavdb2 process must terminate and the operation must release allocated resources. Otherwise, thevendor plug-in communication and workflow are not synchronized for subsequent CLP operations.
After each CLP operation completes, there is a 1 to 2 minute period to terminate processes andclean up resources. In some instances, you might need to manually clean up the processes andallocated resources.
DB2 CLP fails due to time-out in communication responseAn operation from the DB2 CLP might fail if the communication response between the AvamarPlug-in for DB2 and the vendor times out. The connection and performance speed, or heavy taskloads on the system might cause the timeout.
Adjusting the avdb2-response-time-for-library flag
The --avdb2-response-time-for-library flag, which is set to 200 by default, determinesthe amount of time the vendor library waits for a response from the Avamar Plug-in for DB2. Whenthe amount of time exceeds the time set by the --avdb2-response-time-for-library flag,a timeout occurs. The --avdb2-response-time-for-library flag also determines theamount of time the Avamar Plug-in for DB2 takes to start a DB2 CLP operation.
When the timeout setting is insufficient, vendor-plug-in communication errors might occur. Thefollowing error messages occur while waiting for the Avamar Plug-in for DB2 to start in responseto a backup call:
Troubleshooting
124 Dell EMC Avamar for IBM DB2 User Guide
2012-11-04 22:09:40 Error :File open failed/usr/local/avamar/var/clientlogs/db2inst1-AVAMAR3-backup-sem2012-11-04 22:09:40 Error :Could not get port numberAdjust the --avdb2-response-time-for-library flag, as necessary, to accommodate theperformance and connection speed of the system and the task load on the system.
Adjusting the timeout-new-connection flag
The --timeout-new-connection flag is useful for DB2 CLP database-image and log restoreoperations. By default, the --timeout-new-connection flag is set to 5 seconds for databaseimage operations and 60 seconds for log operations.
The Avamar Plug-in for DB2 terminates when it assumes that there are no more requests orqueries from the vendor library. For a DB2 backup or restore operation, there are multiple queriesand requests from the vendor to the Avamar Plug-in for DB2 process. During a rollforwardoperation, for example, the DB2 software requires some time after it retrieves an archive log toapply the log. After the log is applied, the DB2 software can query for another log. The rollforwardprocess, including the query and retrieval of logs, then continues.
The --timeout-new-connection flag controls the length of time the Avamar Plug-in for DB2waits for new requests or queries from the vendor library until the operation is complete.
During an ongoing operation, when the time gap between the requests or queries exceeds the --time-new-connection value, the following error messages appear:
2013-02-21 10:23:01 Debug :AvLibCommThread::initComm()2013-02-21 10:23:01 Error : Socket connection failed to host[localhost] to port [53275] Error [239]2013-02-21 10:23:01 Debug :initComm thows exception2013-02-21 10:23:01 Debug :AvCommunicator failed with[exception in AvLibCommThread::AvLibCommThread ]Adjust the --timeout-new-connection flag, as necessary, to allow the connection betweenthe Avamar Plug-in for DB2 and vendor library to have enough time to complete the CLPoperation.
Recovery of a dropped database fails with error code 30You cannot use the recover db command to recover a dropped database.
The following recover db command fails to recover a dropped database:
recover db avamar1 to end of logs using history file (/tmp/)The recovery failure returns the following error message:
SQL2079N An error was reported by the shared library"/opt/AVMRclnt/lib/libdb2_avamarloader.so". Return code: "30".The Avamar Plug-in for DB2 does not support the recover db command for dropped databases.
To recover a dropped database, use the restore command, followed by the rollforwardcommand:
1. Set the VENDOROPT parameter to the flag file:update db cfg for database_name using VENDOROPT @/pathname/avdb2.flgwhere:
l database_name is the name of the database.
Troubleshooting
Dell EMC Avamar for IBM DB2 User Guide 125
l pathname is the directory that contains the Avamar Plug-in for DB2 flag file.
2. Restore the database by using the restore command.
3. Perform a rollforward operation.
Using an invalid Avamar Plug-in for DB2 flag file returns an errorAn invalid or missing Avamar Plug-in for DB2 flag file causes backup operations to fail.
A DB2 CLP operation fails with a SQL2062N error message when the Avamar Plug-in for DB2 flagfile is invalid or missing. For example, the following backup operation fails:
db2 backup db cover01 load/usr/local/avamar/lib/libdb2_avamarloader.so options@/tmp/cli_test/wrong_file.cfg
This db2 backup db command returns the following error message:
SQL2062N An error occurred while accessing media"/usr/local/avamar/lib/libdb2_avamarloader.so". Reason code: "115".You can obtain the description of the SQL message ID (SQL2062N) from the DB2 documentationor by using the following command:
db2 ? SQL2062N
Use of signal handles does not cleanly stop DB2 CLP operationsThe Avamar Plug-in for DB2 and vendor do not implement signal handlers. When a CLP operationreceives an interrupt signal from a user or from a DB2 exception, the termination of the operationis not clean.
The avdb2 process can stop responding and resources such as the global named semaphores andthe semaphore-key port file might still be allocated to the CLP operation.
To resolve this issue, you must manually stop the avdb2 process and clean up the allocatedresources. You might also need to restart the database manager.
l The semaphore-key port file is in the Avamar_ install_dir/var/clientlogs directory.
l The semaphore-key-name file name is instance_name-DB_name-operation-sem, whereoperation is backup, restore, or log-restore.
On Linux, global named semaphores are created in a virtual file system and are normally mountedunder /dev/shm with the name format: sem.semaphore-key-name. To avoid such issues,cancel the operation from the Avamar Administrator. Canceling CLP-initiated backups andrestores on page 107 provides details.
Database configuration for the DB2 load commandThe db2 load command with copy yes option might fail with the following messages:
SQL2062N An error occurred whileaccessing media"/usr/local/avamar/lib/libdb2_avamarloader.so". Reasoncode: "115".
Troubleshooting
126 Dell EMC Avamar for IBM DB2 User Guide
An improperly configured DB2 parameter VENDOROPT can cause the error messages. Resolve thisproblem with the following command:
db2 update db cfg for database_name using VENDOROPT pathname
Where database_name is the name of the database to back up and pathname is the absolutepathname to the Avamar Plug-in for DB2 flag file.
Specifying backup and restore options as normal textResolving certain backup or restore problems can require the use of special options that you musttype in the Enter Attribute and Enter Attribute Value fields. These fields are available by clickingthe More button in the Backup Command Line Options or the Restore Command Line Optionsdialog box.
About this task
You can specify options from either the Backup Command Line Options dialog box or theRestore Command Line Options dialog box. Precede an option name that you specify in theEnter Attribute field with the prefix, [avdb2].
Note: The Avamar software does not validate the text that you type in the Enter Attributeand Enter Attribute Value fields. Ensure that you type the options and values correctly.
Procedure
1. From the Backup Command Line Options or the Restore Command Line Options dialogbox, click the More button.
The dialog box expands to display the Enter Attribute and Enter Attribute Value fields.
2. Type the option name in the Enter Attribute field and the value for the option in the EnterAttribute Value field.
3. Click +.
The option and value appear in the area below the Enter Attribute and Enter AttributeValue fields.
4. To add more options for the backup or restore operation, repeat steps 2 and 3.
The following figure shows the dialog box after adding two options.
Troubleshooting
Dell EMC Avamar for IBM DB2 User Guide 127
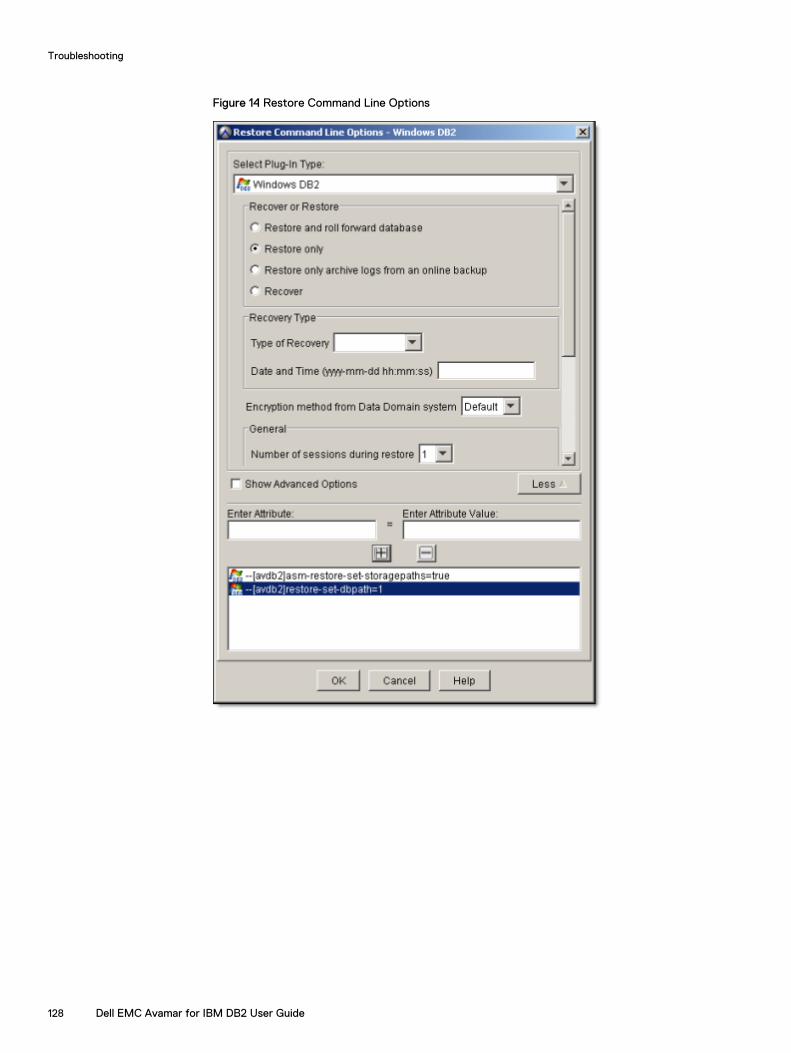
Figure 14 Restore Command Line Options
Troubleshooting
128 Dell EMC Avamar for IBM DB2 User Guide
GLOSSARY
A
activation The process of passing the client ID (CID) back to the client, where it is stored in anencrypted file on the client file system. See also client activation
administrator Person who normally installs, configures, and maintains software on networkcomputers, and who adds users and defines user privileges.
archive logs Files that DB2 uses for rollforward recovery.
Automatic storagemanagement
A DB2 storage feature that enables storage management at the database level. Thedatabase manager is responsible for creating, extending, and adding containers asneeded. The user specifies a group of storage devices for the database manager tocontrol.
avagent The name of the client agent process.
Avamar Administrator A graphical management console software application that is used to remotelyadminister an Avamar system from a supported Windows or Linux client computer.
Avamar client A computer or workstation that runs Avamar software and accesses the Avamar serverover a network connection. Avamar client software comprises a client agent and one ormore plug-ins.
Avamar server The server component of the Avamar client/server system. Avamar server is a fault-tolerant, high-availability system that efficiently stores the backups from all protectedclients. It also provides essential processes and services required for data restores,client access, and remote system administration. Avamar server runs as a distributedapplication across multiple networked storage nodes.
avtar The Avamar process that performs backups and restores.
B
backup A point-in-time copy of client data that can be restored as individual files, selecteddata, or as an entire backup.
browse The process of viewing data that is available for backup on a client computer or restorefrom the Avamar server.
Dell EMC Avamar for IBM DB2 User Guide 129
C
client activation The process of passing the client ID (CID) back to the client, where it is stored in anencrypted file on the client file system. See also activation
client agent A platform-specific software process that runs on the client and communicates withthe Management Console Server (MCS) and with any plug-ins installed on that client.
client registration The process of establishing an identity with the Avamar server. When Avamarrecognizes the client, it assigns a unique client ID (CID), which it passes back to theclient during client activation. See also registration
cold backup A backup performed while the database is offline.
D
database A collection of data arranged for ease and speed of update, search, and retrieval bycomputer software.
database partition An independent part of a partitioned database with its own data, configuration files,indexes, and transaction logs.
Data Domain system Disk-based deduplication appliances and gateways that provide data protection anddisaster recovery (DR) in the enterprise environment.
Data Partition Feature(DPF)
A feature that enables the distribution of a DB2 UDB database across multiple serversin a cluster or on multiple nodes on massively parallel processors (MPP). You candistribute a DB2 database across several database partitions.
dataset A policy that defines a set of files, directories, and file systems for each supportedplatform that are included or excluded in backups across a group of clients. A datasetis a persistent and reusable Avamar policy that can be named and attached to multiplegroups.
DB2 instance An independent environment where you create database objects and run applicationsrun against the database objects.
DD Boost The API that Avamar clients use to access a Data Domain system. The Avamar clientinstallation automatically installs the DD Boost API on the client computer. The Avamarserver installation automatically installs the DD Boost API on the Avamar server.
disaster recovery Recovery from any disruptive situation, such as hardware failure or softwarecorruption, in which ordinary data recovery procedures are not sufficient to restore asystem and its data to normal day-to-day operations. A disaster recovery can be a baremetal recovery.
DNS Domain Name Server. A dynamic and distributed directory service for assigning domainnames to specific IP addresses.
Glossary
130 Dell EMC Avamar for IBM DB2 User Guide
domain A feature in Avamar Administrator that is used to organize large numbers of clients intonamed areas of control and management.
F
file system Software interface used to save, retrieve, and manage files on storage media byproviding directory structures, data transfer methods, and file association.
G
granular recovery An Avamar feature that enables you to restore a part of a backup rather than the entirebackup. The Avamar Plug-in for DB2 enables you to restore table spaces from abackup.
group A level of organization in Avamar Administrator for one or more Avamar clients. Allclients in an Avamar group use the same group policies, which include the dataset,schedule, and retention policy.
group policy The dataset, schedule, and retention policy for all clients in an Avamar group.
H
High Availability DisasterRecovery (HADR)
A high availability DB2 server that can be backed up and recovered using the DB2HADR client for Avamar.
hot backup A backup that you run while users are online and have access to the data that is beingbacked up.
L
LAN Local Area Network.
M
MCS Management console server. The server subsystem that provides centralizedadministration (scheduling, monitoring, and management) for the Avamar server. TheMCS also runs the server-side processes used by Avamar Administrator.
metadata Data about the backup, including information about the original database files, thebackup types, the date and time of the backup, and other information necessary forrestore.
P
plug-in Avamar client software that recognizes a particular kind of data resident on that client.
plug-in options Options that you specify during backup or restore to control backup or restorefunctionality.
Glossary
Dell EMC Avamar for IBM DB2 User Guide 131
policy A set of rules for client backups that can be named and applied to multiple groups.Groups have dataset, schedule, and retention policies.
R
recover To restore data from a backup to a client disk and apply transaction logs to the data tomake it consistent with a specific point-in-time.
redirected restore The process of restoring a backup to a different location than the original locationwhere the backup occurred.
registration The process of establishing an identity with the Avamar server. When Avamarrecognizes the client, it assigns a unique client ID (CID), which it passes back to theclient during client activation. See also client registration
restore An operation that retrieves one or more file systems, directories, files, or data objectsfrom a backup and writes the data to a designated location.
retention The time setting to automatically delete backups on an Avamar server. Retention canbe set to permanent for backups that should not be deleted from an Avamar server.Retention is a persistent and reusable Avamar policy that can be named and attachedto multiple groups.
rollforward The process of updating a database or a table space by applying changes recorded inthe database log files. You perform a rollforward operation after you restore a databasebackup.
S
schedule The ability to control the frequency and the start and end time each day for backups ofclients in a group. A schedule is a persistent and reusable Avamar policy that can benamed and attached to multiple groups.
snapview A list of table spaces that are available for a granular restore. To view a snapview fromAvamar Administrator, select the Browse for Granular Restore button.
T
table spaces Containers within a database that store specific data. DB2 includes five table spaces,which DB2 names according to their usage: catalog, regular, large, system temporary,and user temporary. IBM DB2 documentation provides more information.
transaction logs Files that provide a history of updates that you make to a database. You usetransaction logs to roll back a database to a previous state.
Glossary
132 Dell EMC Avamar for IBM DB2 User Guide

U
User Account Control(UAC)
A Windows feature available in Windows Server 2008 R2 and Windows Vista. UAChelps prevent unauthorized changes to the computer. When functions that couldpotentially affect a computer's operation are made, UAC prompts the user forpermission or for an administrator's password before continuing with the task.
Glossary
Dell EMC Avamar for IBM DB2 User Guide 133

Glossary
134 Dell EMC Avamar for IBM DB2 User Guide