Embed Size (px)
Citation preview
sewmag.co.uk 47
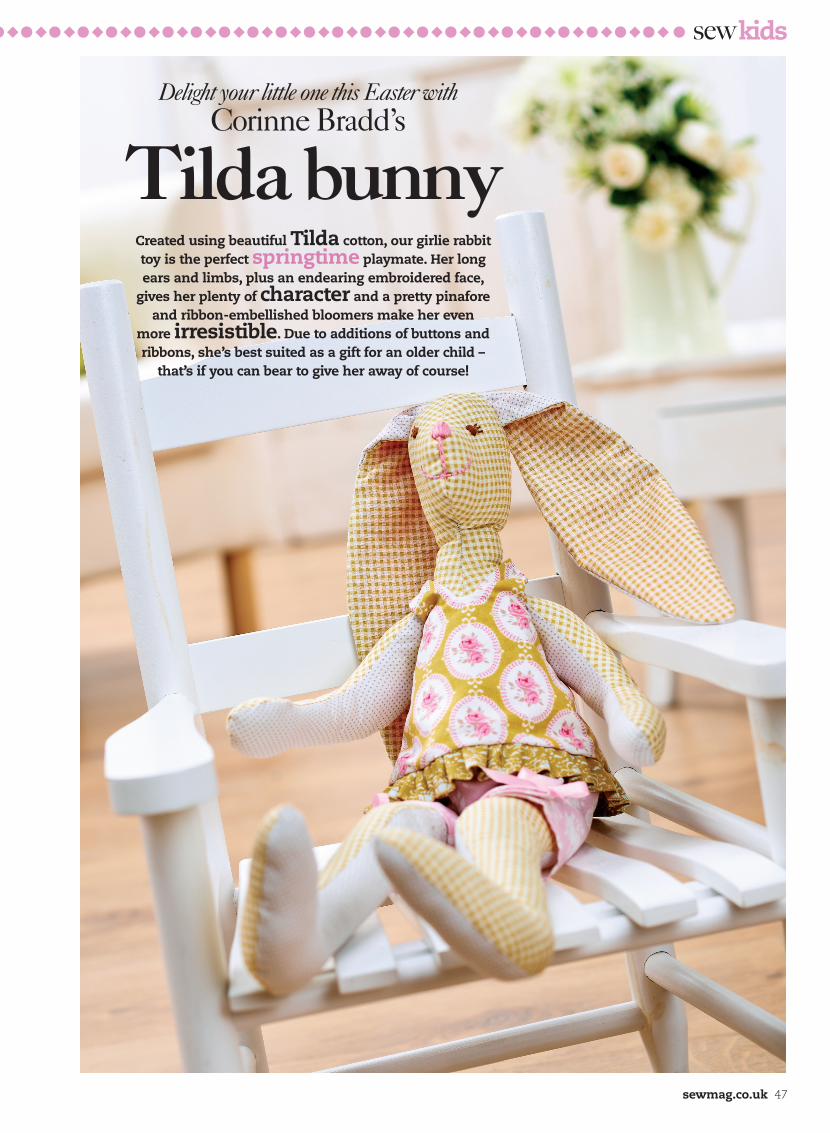
Delight your little one this Easter withCorinne Bradd’s
Tilda bunnyCreated using beautiful Tilda cotton, our girlie rabbittoy is the perfect springtime playmate. Her longears and limbs, plus an endearing embroidered face,
gives her plenty of character and a pretty pinaforeand ribbon-embellished bloomers make her even
more irresistible. Due to additions of buttons andribbons, she’s best suited as a gift for an older child –
that’s if you can bear to give her away of course!
sewkids
easter bunny_Layout 1 01/02/2013 14:40 Page 1
48 sewmag.co.uk
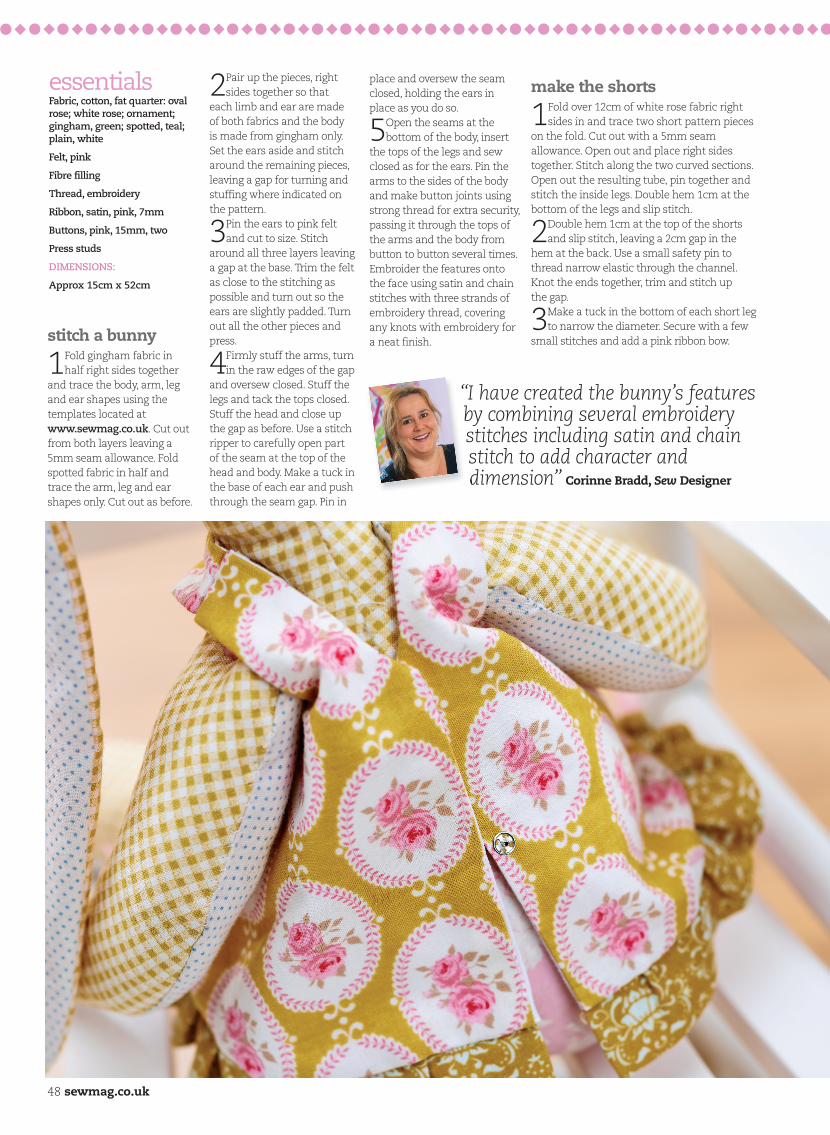
essentialsFabric, cotton, fat quarter: ovalrose; white rose; ornament;gingham, green; spotted, teal;plain, white
Felt, pink
Fibre filling
Thread, embroidery
Ribbon, satin, pink, 7mm
Buttons, pink, 15mm, two
Press studs
DIMENSIONS:
Approx 15cm x 52cm
stitch a bunny
1Fold gingham fabric inhalf right sides together
and trace the body, arm, legand ear shapes using thetemplates located atwww.sewmag.co.uk. Cut outfrom both layers leaving a5mm seam allowance. Foldspotted fabric in half andtrace the arm, leg and earshapes only. Cut out as before.
2Pair up the pieces, rightsides together so that
each limb and ear are made of both fabrics and the body is made from gingham only.Set the ears aside and stitcharound the remaining pieces,leaving a gap for turning andstuffing where indicated on the pattern.
3Pin the ears to pink feltand cut to size. Stitch
around all three layers leavinga gap at the base. Trim the feltas close to the stitching aspossible and turn out so theears are slightly padded. Turnout all the other pieces andpress.
4Firmly stuff the arms, turnin the raw edges of the gap
and oversew closed. Stuff thelegs and tack the tops closed.Stuff the head and close upthe gap as before. Use a stitchripper to carefully open partof the seam at the top of thehead and body. Make a tuck inthe base of each ear and pushthrough the seam gap. Pin in
place and oversew the seamclosed, holding the ears inplace as you do so.
5Open the seams at thebottom of the body, insert
the tops of the legs and sewclosed as for the ears. Pin thearms to the sides of the bodyand make button joints usingstrong thread for extra security,passing it through the tops ofthe arms and the body frombutton to button several times.Embroider the features ontothe face using satin and chainstitches with three strands ofembroidery thread, coveringany knots with embroidery fora neat finish.
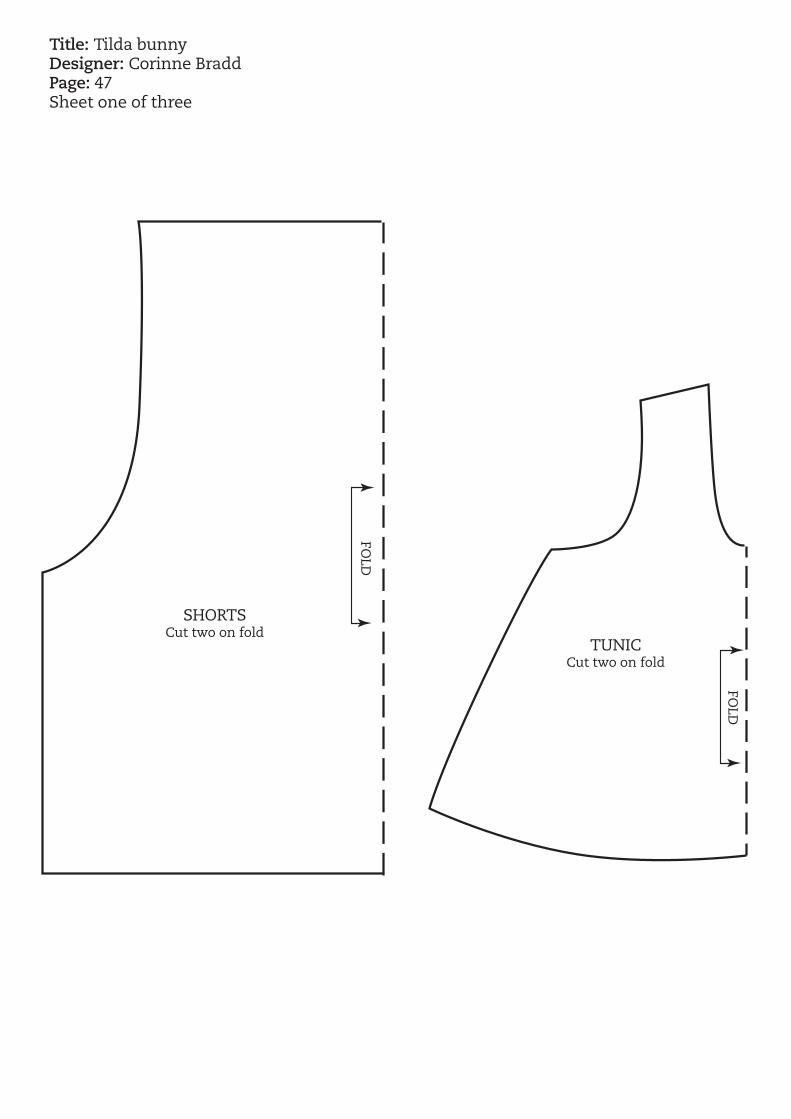
make the shorts
1Fold over 12cm of white rose fabric rightsides in and trace two short pattern pieces
on the fold. Cut out with a 5mm seamallowance. Open out and place right sidestogether. Stitch along the two curved sections.Open out the resulting tube, pin together andstitch the inside legs. Double hem 1cm at thebottom of the legs and slip stitch.
2Double hem 1cm at the top of the shortsand slip stitch, leaving a 2cm gap in the
hem at the back. Use a small safety pin tothread narrow elastic through the channel.Knot the ends together, trim and stitch up the gap.
3Make a tuck in the bottom of each short legto narrow the diameter. Secure with a few
small stitches and add a pink ribbon bow.
“I have created the bunny’s featuresby combining several embroiderystitches including satin and chainstitch to add character anddimension” Corinne Bradd, Sew Designer
easter bunny_Layout 1 01/02/2013 14:40 Page 2
sewkids
Join the world’s busiest online craft community today! www.busymitts.com 49
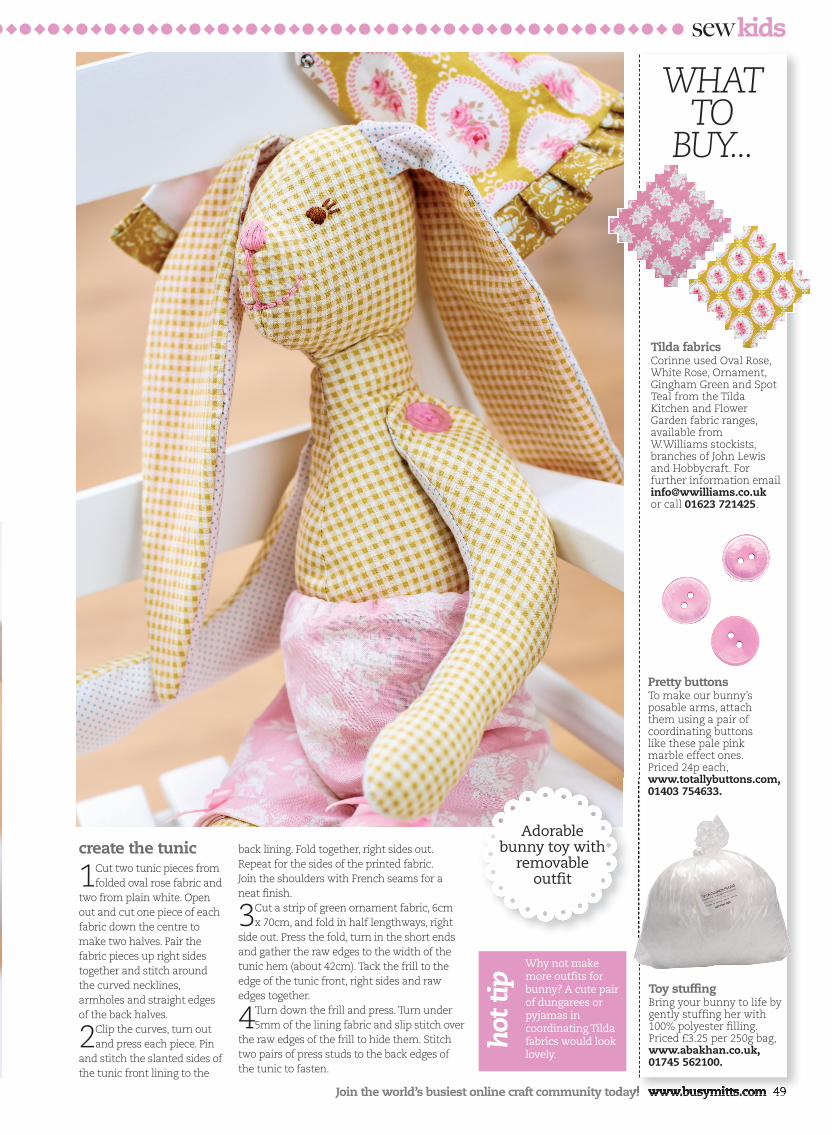
Why not makemore outfits forbunny? A cute pairof dungarees orpyjamas incoordinating Tildafabrics would looklovely.
Pretty buttonsTo make our bunny’sposable arms, attachthem using a pair ofcoordinating buttons like these pale pinkmarble effect ones. Priced 24p each,www.totallybuttons.com,01403 754633.
Toy stuffingBring your bunny to life bygently stuffing her with100% polyester filling.Priced £3.25 per 250g bag,www.abakhan.co.uk,01745 562100.
Adorablebunny toy with
removableoutfit
create the tunic
1Cut two tunic pieces fromfolded oval rose fabric and
two from plain white. Openout and cut one piece of eachfabric down the centre tomake two halves. Pair thefabric pieces up right sidestogether and stitch aroundthe curved necklines,armholes and straight edgesof the back halves.
2Clip the curves, turn outand press each piece. Pin
and stitch the slanted sides ofthe tunic front lining to the
WHATTO
BUY...
Tilda fabricsCorinne used Oval Rose,White Rose, Ornament,Gingham Green and SpotTeal from the TildaKitchen and FlowerGarden fabric ranges,available fromW.Williams stockists,branches of John Lewisand Hobbycraft. Forfurther information [email protected] or call 01623 721425.
back lining. Fold together, right sides out.Repeat for the sides of the printed fabric. Join the shoulders with French seams for a neat finish.
3Cut a strip of green ornament fabric, 6cm x 70cm, and fold in half lengthways, right
side out. Press the fold, turn in the short endsand gather the raw edges to the width of thetunic hem (about 42cm). Tack the frill to theedge of the tunic front, right sides and rawedges together.
4Turn down the frill and press. Turn under5mm of the lining fabric and slip stitch over
the raw edges of the frill to hide them. Stitchtwo pairs of press studs to the back edges ofthe tunic to fasten.
easter bunny_Layout 1 01/02/2013 14:41 Page 3
Title: Tilda bunnyDesigner: Corinne BraddPage: 47Sheet one of three
TUNICCut two on fold
SHORTSCut two on fold
FOLD
FOLD

Button position
B
B
Gap for stuffing
Title: Tilda bunnyDesigner: Corinne BraddPage: 47Sheet two of three
BODYCut two
ARMCut four
LEGCut four

A
A
Gap for stuffing
Gap for stuffing
Gap for turning
Title: Tilda bunnyDesigner: Corinne BraddPage: 47Sheet three of three
EARCut four
BODYCut two