Embed Size (px)
Citation preview
XPLAN FPA Advice Process
Delegate Workbook
Version 3.0 – February 2016
Name..................................................................................................................
FPA Delegate Workbook Feb 2016 V 3 2
Agenda
Day 1 Day 2
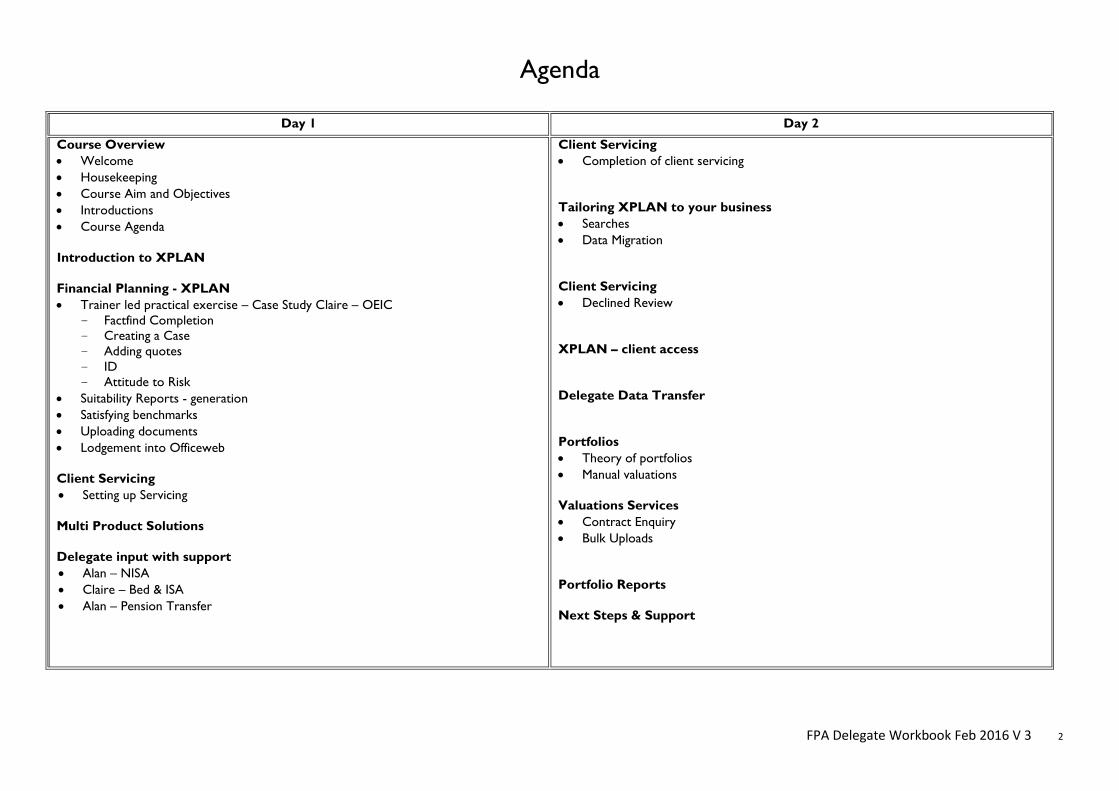
Course Overview • Welcome • Housekeeping • Course Aim and Objectives • Introductions • Course Agenda Introduction to XPLAN Financial Planning - XPLAN • Trainer led practical exercise – Case Study Claire – OEIC
- Factfind Completion - Creating a Case - Adding quotes - ID - Attitude to Risk
• Suitability Reports - generation • Satisfying benchmarks • Uploading documents • Lodgement into Officeweb Client Servicing • Setting up Servicing Multi Product Solutions Delegate input with support • Alan – NISA • Claire – Bed & ISA • Alan – Pension Transfer
Client Servicing • Completion of client servicing
Tailoring XPLAN to your business • Searches • Data Migration Client Servicing • Declined Review XPLAN – client access Delegate Data Transfer Portfolios • Theory of portfolios • Manual valuations Valuations Services • Contract Enquiry • Bulk Uploads
Portfolio Reports Next Steps & Support
FPA Delegate Workbook Feb 2016 V 3 3
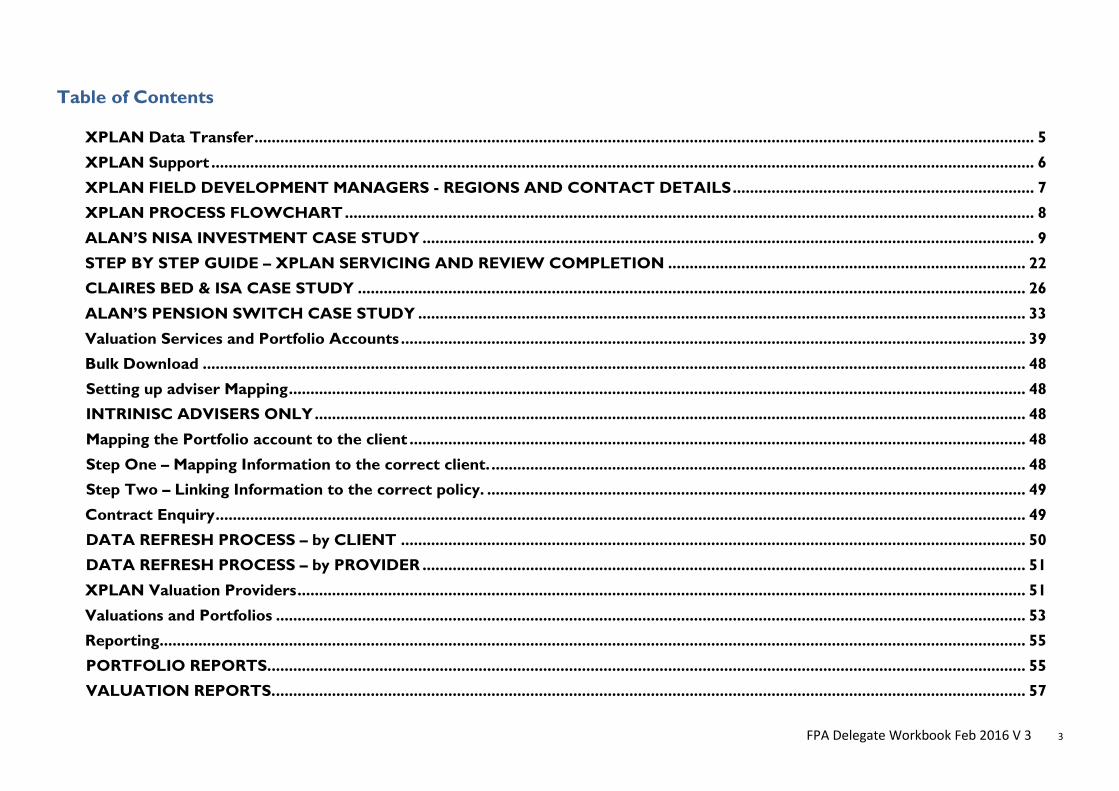
Table of Contents
XPLAN Data Transfer ..................................................................................................................................................................................... 5
XPLAN Support ............................................................................................................................................................................................... 6
XPLAN FIELD DEVELOPMENT MANAGERS - REGIONS AND CONTACT DETAILS ...................................................................... 7 XPLAN PROCESS FLOWCHART ................................................................................................................................................................ 8
ALAN’S NISA INVESTMENT CASE STUDY .............................................................................................................................................. 9
STEP BY STEP GUIDE – XPLAN SERVICING AND REVIEW COMPLETION ................................................................................... 22 CLAIRES BED & ISA CASE STUDY ........................................................................................................................................................... 26
ALAN’S PENSION SWITCH CASE STUDY ............................................................................................................................................. 33
Valuation Services and Portfolio Accounts ................................................................................................................................................. 39 Bulk Download ............................................................................................................................................................................................... 48
Setting up adviser Mapping ........................................................................................................................................................................... 48 INTRINISC ADVISERS ONLY ..................................................................................................................................................................... 48
Mapping the Portfolio account to the client ............................................................................................................................................... 48
Step One – Mapping Information to the correct client. ............................................................................................................................ 48 Step Two – Linking Information to the correct policy. ............................................................................................................................. 49
Contract Enquiry ............................................................................................................................................................................................ 49
DATA REFRESH PROCESS – by CLIENT ................................................................................................................................................. 50 DATA REFRESH PROCESS – by PROVIDER ............................................................................................................................................ 51
XPLAN Valuation Providers ......................................................................................................................................................................... 51
Valuations and Portfolios .............................................................................................................................................................................. 53 Reporting......................................................................................................................................................................................................... 55
PORTFOLIO REPORTS. ............................................................................................................................................................................... 55 VALUATION REPORTS. .............................................................................................................................................................................. 57
FPA Delegate Workbook Feb 2016 V 3 4
Customisation of XPLAN ............................................................................................................................................................................. 59 Emails .............................................................................................................................................................................................................. 59
Setting you own Email details in XPLAN ................................................................................................................................................... 59 Email Signature .............................................................................................................................................................................................. 59
Emailing Individual Clients from XPLAN ................................................................................................................................................... 60
Emailing a Searched group on XPLAN ....................................................................................................................................................... 60 Joint and Multiple Product Solutions ........................................................................................................................................................... 61
XPLAN Training CPD ................................................................................................................................................................................... 71
FPA Delegate Workbook Feb 2016 V 3 5
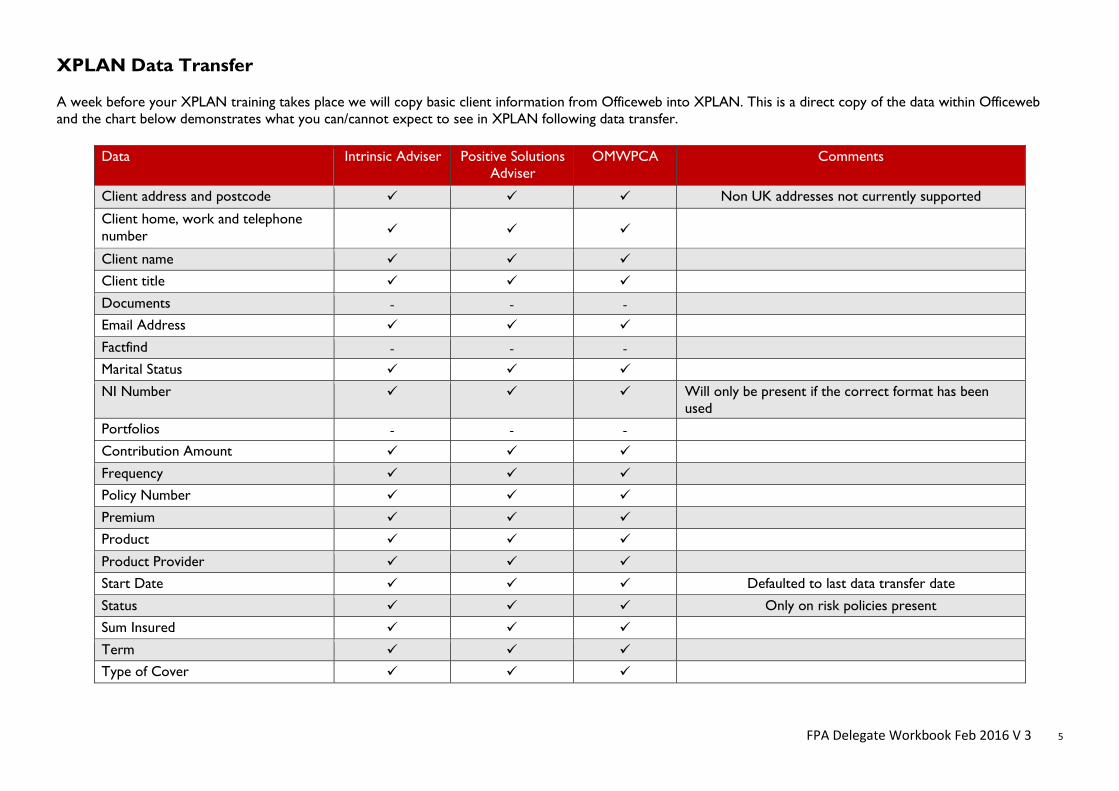
XPLAN Data Transfer A week before your XPLAN training takes place we will copy basic client information from Officeweb into XPLAN. This is a direct copy of the data within Officeweb and the chart below demonstrates what you can/cannot expect to see in XPLAN following data transfer.
Data Intrinsic Adviser Positive Solutions Adviser
OMWPCA Comments
Client address and postcode Non UK addresses not currently supported
Client home, work and telephone number
Client name Client title
Documents - - - Email Address
Factfind - - - Marital Status
NI Number Will only be present if the correct format has been used
Portfolios - - -
Contribution Amount
Frequency Policy Number
Premium Product
Product Provider Start Date Defaulted to last data transfer date
Status Only on risk policies present Sum Insured
Term Type of Cover
FPA Delegate Workbook Feb 2016 V 3 6
Please note you may notice duplication of policies and clients as the data is copied directly from Officeweb in its current form. You may therefore need to carry out a Data Cleansing exercise.
XPLAN Support XPLAN Support is available in a number of ways:- • You can ring the XPLAN Support team on 0191 241 0705 – Monday to Friday from 8.30am to 5.30pm or email [email protected]
• User guides & Video User guides are available within XPLAN as well as the Extranet XPLAN Hub XPLAN – Document Library (Within XPLAN)
Click on Menu Select Document Library Under Categories Select the How to Guides folder In the Document List Select Final Checked
Extranet - XPLAN Hub
In the XPLAN Hub you will find • User Guides • Video User Guides (short videos on focused areas of XPLAN) • XPLAN Training Webinars Intrinsic Advisers can select XPLAN Hub from the left hand menu of the extranet XPLAN Webinars
Webinars are short focused online training sessions which last around 30 – 45 mins. To view what is available and when go to the XPLAN Hub>XPLAN Training Webinars Just before and after we have a new release or enhancement on XPLAN we will invite you by email to join us for a webinar on the new changes. There will be a link from the communication however you will be able to view other up and coming webinars.

FPA Delegate Workbook Feb 2016 V 3 7
XPLAN FIELD DEVELOPMENT MANAGERS - REGIONS AND CONTACT DETAILS
Northern Ireland Adam Harrison [email protected] 07464 673 069
North West Alan Chandler [email protected] 07471 355 364
West Midlands Shaun Nicholls [email protected] 07471 216 779
M4 Corridor Ian Williams [email protected] 07471 226 645
South West Stuart Rutter [email protected] 07471 355 373
Scotland Steven McMahon [email protected] 07900 582 036
North East Jordan Vincent [email protected] 07464 673 400
East Midlands Bruce Soulsbury [email protected] 07471 354 738
London Paul Kenney [email protected] 07464 673 269
South East Paul Forster [email protected] 07464 673 344
FPA Delegate Workbook Feb 2016 V 3 8
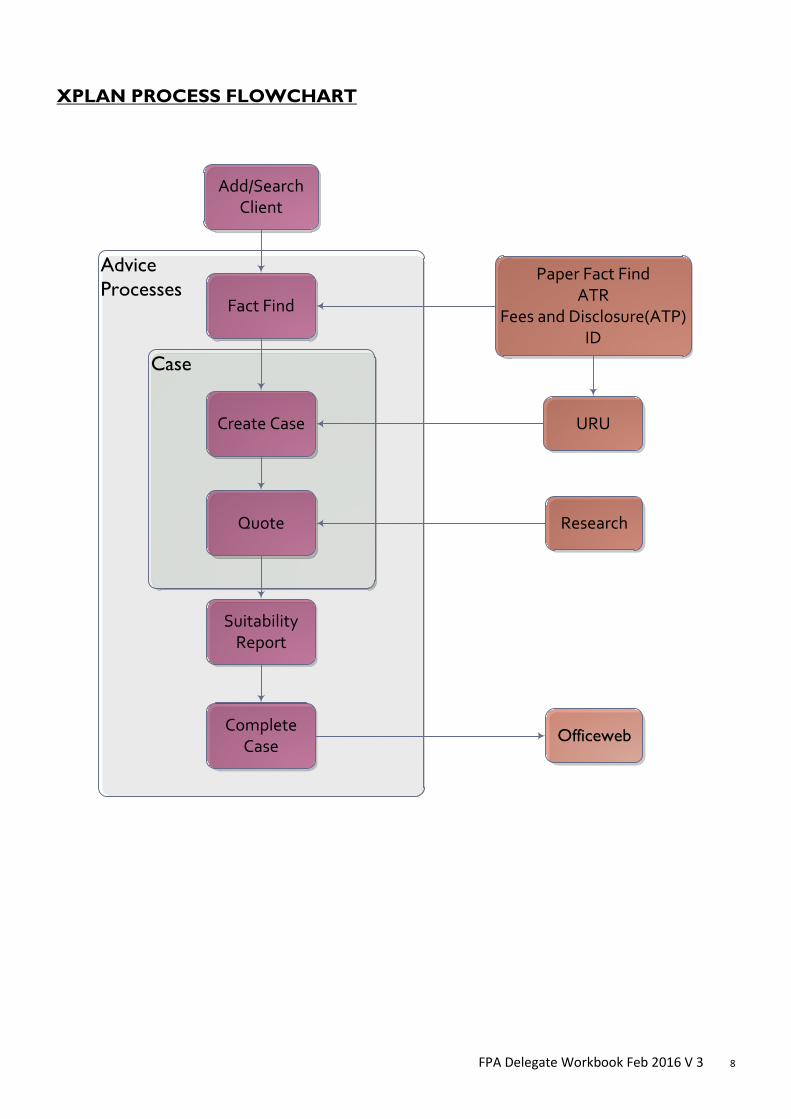
XPLAN PROCESS FLOWCHART
Advice Processes
Case
Add/Search Client
Fact Find
Create Case
Quote
Suitability Report
Complete Case
Paper Fact FindATR
Fees and Disclosure(ATP)ID
URU
Research
Officeweb

FPA Delegate Workbook Feb 2016 V 3 9
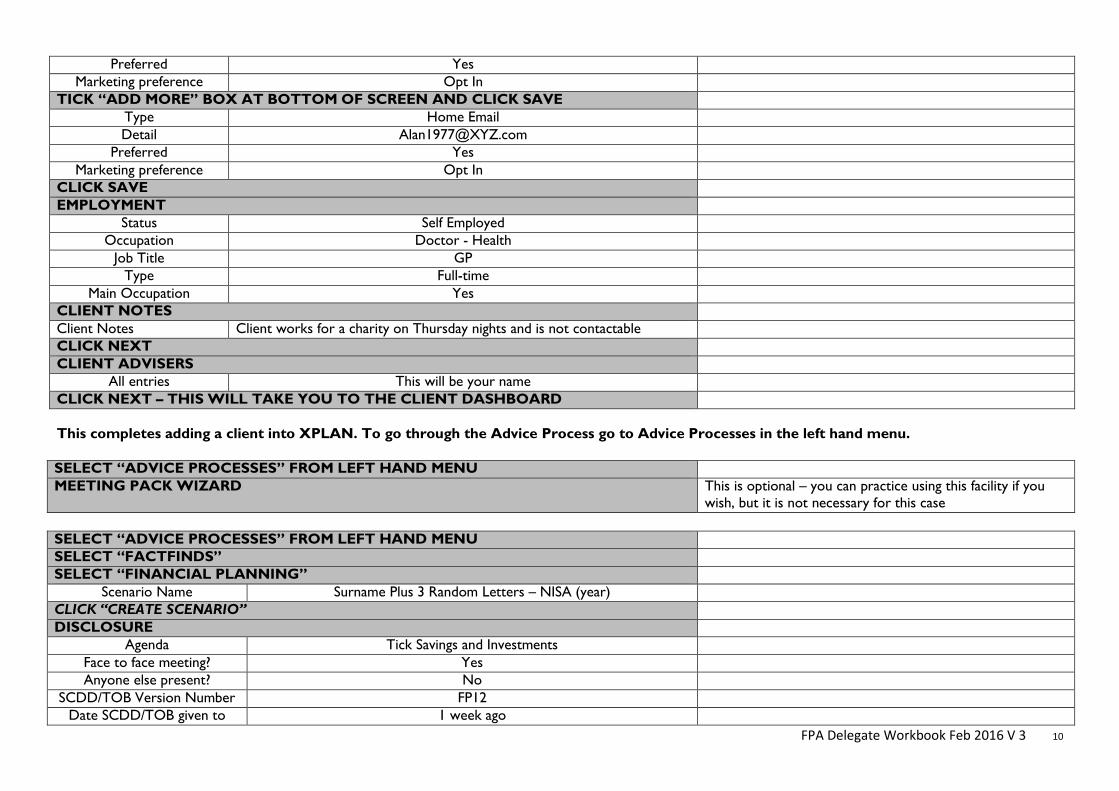
ALAN’S NISA INVESTMENT CASE STUDY Alan is divorced and as part of the settlement has retained the family home together with the associated mortgage. He has a daughter Julia. He has been in a relationship with Claire, your client, and wants to also utilise his NISA allowance for this tax year. He is self-employed and a doctor. CLICK ADD – ADD CLIENT WIZARD – ADD PRIVATE CLIENT Notes DO NOT TICK “CLIENT HAS A PARTNER” CLICK “NEXT” PERSONAL DETAILS – ENTER PERSONAL DETAILS
Title Mr Forename Alan Surname Your Surname plus 3 random letters Gender Male
Date of Birth 21/05/1977 Marital Status Divorced/ Ex-Civil Partner
COMMUNICATION PREFERENCES Email Communication Yes Mail Communication Yes Phone Communication Yes SMS Communication No ADDRESS – CLICK “ADD”
Type Residential Status Owner Occupied
House Name/No. 247 Postcode SN4 2DD
Street Name Street Town Town
County County Country United Kingdom Preferred Yes
Address more than 3 years Yes CLICK SAVE CONTACT DETAILS – CLICK “ADD”
Type Mobile Phone Detail 07967 654321
FPA Delegate Workbook Feb 2016 V 3 10
Preferred Yes Marketing preference Opt In
TICK “ADD MORE” BOX AT BOTTOM OF SCREEN AND CLICK SAVE Type Home Email Detail [email protected]
Preferred Yes Marketing preference Opt In
CLICK SAVE EMPLOYMENT
Status Self Employed Occupation Doctor - Health
Job Title GP Type Full-time
Main Occupation Yes CLIENT NOTES Client Notes Client works for a charity on Thursday nights and is not contactable CLICK NEXT CLIENT ADVISERS
All entries This will be your name CLICK NEXT – THIS WILL TAKE YOU TO THE CLIENT DASHBOARD This completes adding a client into XPLAN. To go through the Advice Process go to Advice Processes in the left hand menu. SELECT “ADVICE PROCESSES” FROM LEFT HAND MENU MEETING PACK WIZARD This is optional – you can practice using this facility if you
wish, but it is not necessary for this case SELECT “ADVICE PROCESSES” FROM LEFT HAND MENU SELECT “FACTFINDS” SELECT “FINANCIAL PLANNING”
Scenario Name Surname Plus 3 Random Letters – NISA (year) CLICK “CREATE SCENARIO” DISCLOSURE
Agenda Tick Savings and Investments Face to face meeting? Yes Anyone else present? No
SCDD/TOB Version Number FP12 Date SCDD/TOB given to 1 week ago
FPA Delegate Workbook Feb 2016 V 3 11
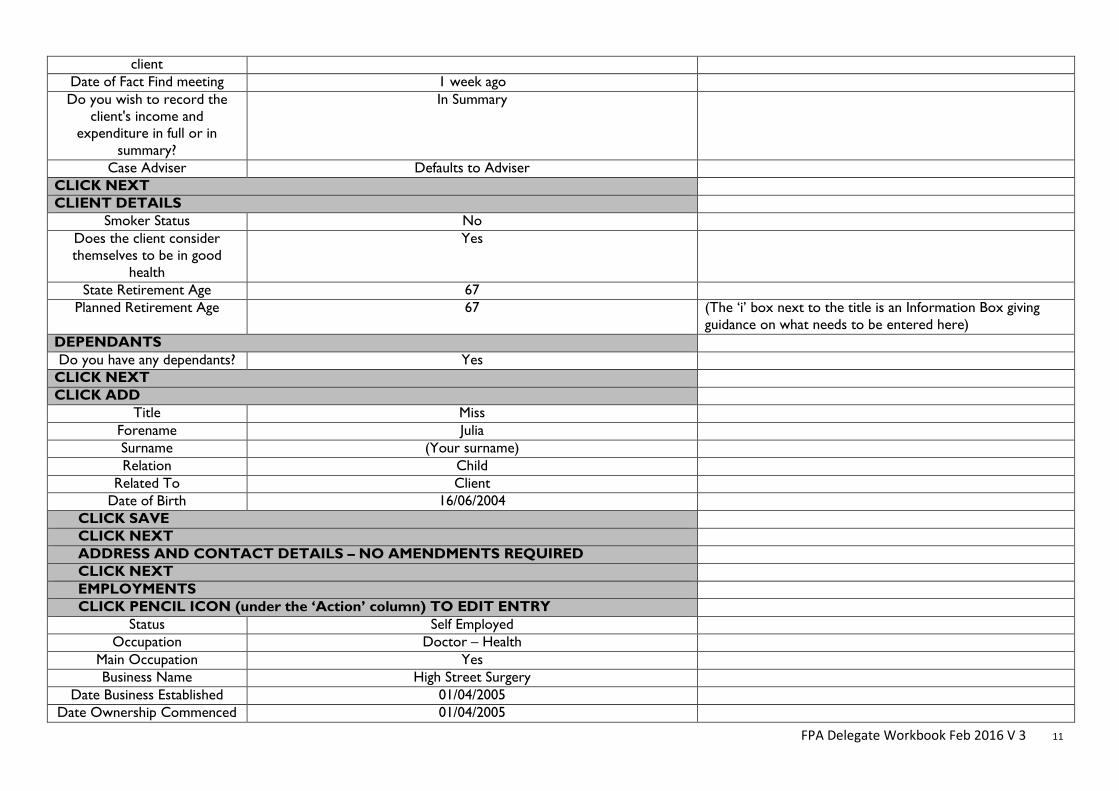
client Date of Fact Find meeting 1 week ago Do you wish to record the
client's income and expenditure in full or in
summary?
In Summary
Case Adviser Defaults to Adviser CLICK NEXT CLIENT DETAILS
Smoker Status No Does the client consider themselves to be in good
health
Yes
State Retirement Age 67 Planned Retirement Age 67 (The ‘i’ box next to the title is an Information Box giving
guidance on what needs to be entered here) DEPENDANTS Do you have any dependants? Yes
CLICK NEXT CLICK ADD
Title Miss Forename Julia Surname (Your surname) Relation Child
Related To Client Date of Birth 16/06/2004
CLICK SAVE CLICK NEXT ADDRESS AND CONTACT DETAILS – NO AMENDMENTS REQUIRED CLICK NEXT EMPLOYMENTS CLICK PENCIL ICON (under the ‘Action’ column) TO EDIT ENTRY
Status Self Employed Occupation Doctor – Health
Main Occupation Yes Business Name High Street Surgery
Date Business Established 01/04/2005 Date Ownership Commenced 01/04/2005
FPA Delegate Workbook Feb 2016 V 3 12
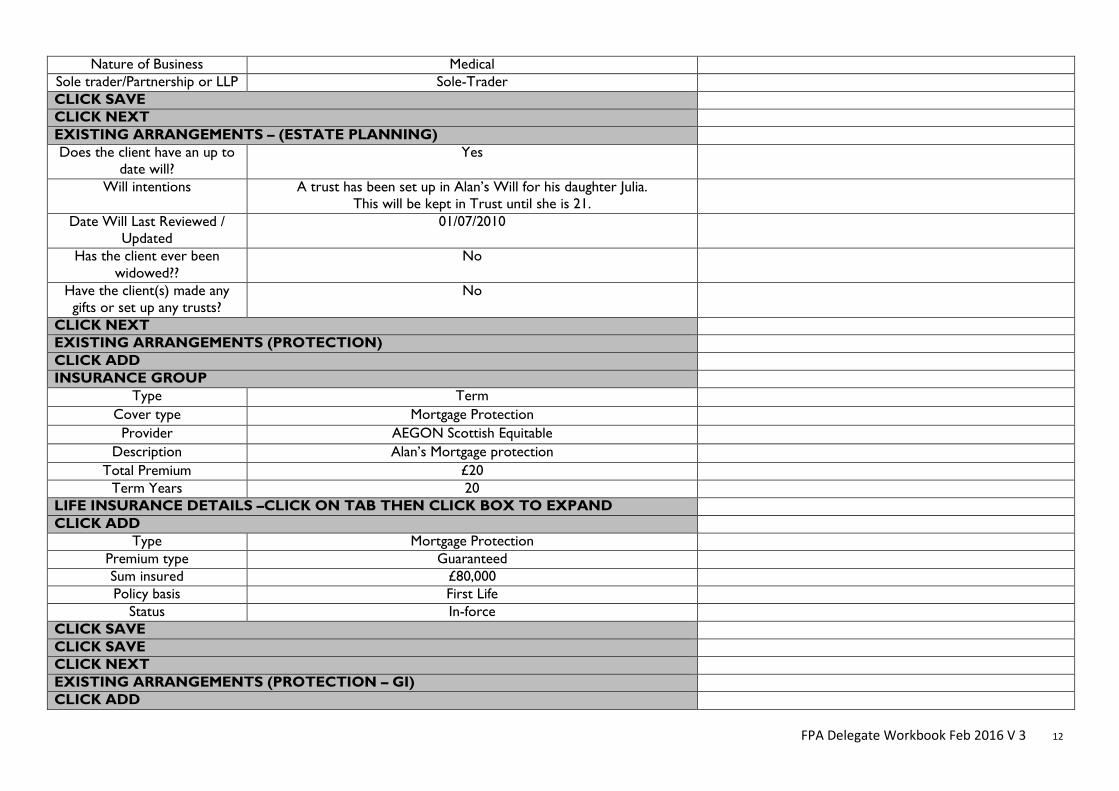
Nature of Business Medical Sole trader/Partnership or LLP Sole-Trader CLICK SAVE CLICK NEXT EXISTING ARRANGEMENTS – (ESTATE PLANNING) Does the client have an up to
date will? Yes
Will intentions A trust has been set up in Alan’s Will for his daughter Julia. This will be kept in Trust until she is 21.
Date Will Last Reviewed / Updated
01/07/2010
Has the client ever been widowed??
No
Have the client(s) made any gifts or set up any trusts?
No
CLICK NEXT EXISTING ARRANGEMENTS (PROTECTION) CLICK ADD INSURANCE GROUP
Type Term Cover type Mortgage Protection
Provider AEGON Scottish Equitable Description Alan’s Mortgage protection
Total Premium £20 Term Years 20
LIFE INSURANCE DETAILS –CLICK ON TAB THEN CLICK BOX TO EXPAND CLICK ADD
Type Mortgage Protection Premium type Guaranteed Sum insured £80,000 Policy basis First Life
Status In-force CLICK SAVE CLICK SAVE CLICK NEXT EXISTING ARRANGEMENTS (PROTECTION – GI) CLICK ADD
FPA Delegate Workbook Feb 2016 V 3 13
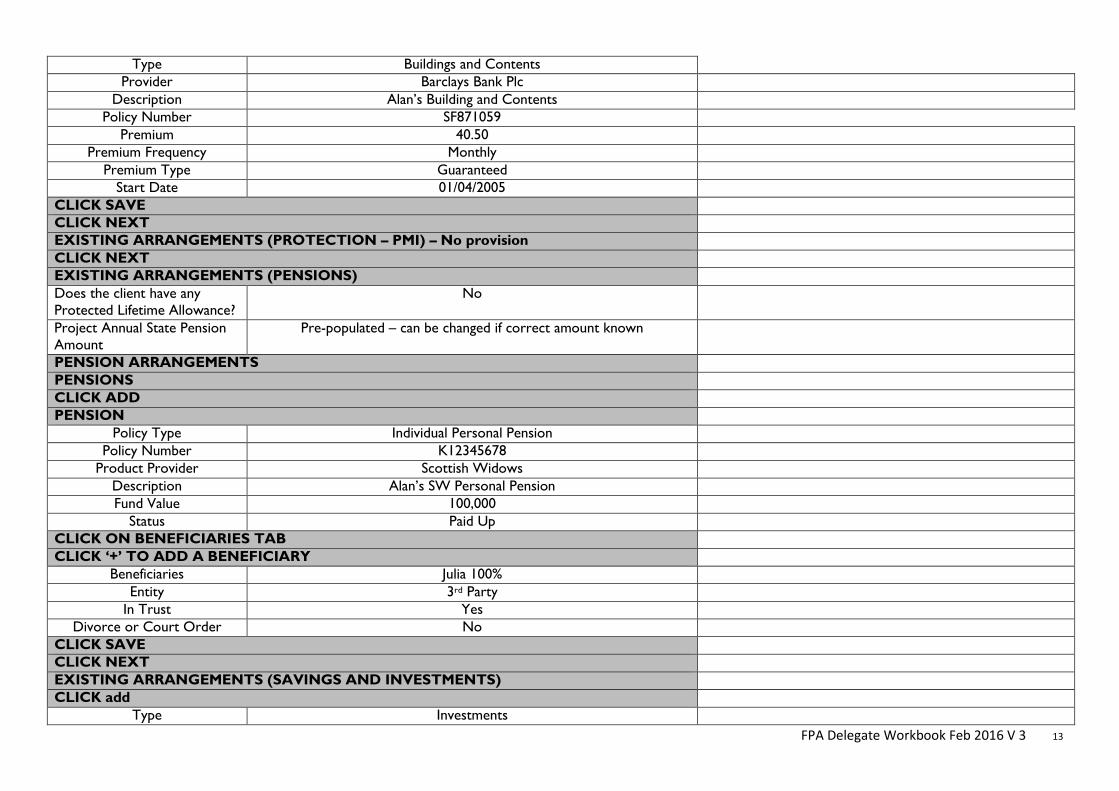
Type Buildings and Contents Provider Barclays Bank Plc
Description Alan’s Building and Contents Policy Number SF871059
Premium 40.50 Premium Frequency Monthly
Premium Type Guaranteed Start Date 01/04/2005
CLICK SAVE CLICK NEXT EXISTING ARRANGEMENTS (PROTECTION – PMI) – No provision CLICK NEXT EXISTING ARRANGEMENTS (PENSIONS) Does the client have any Protected Lifetime Allowance?
No
Project Annual State Pension Amount
Pre-populated – can be changed if correct amount known
PENSION ARRANGEMENTS PENSIONS CLICK ADD PENSION
Policy Type Individual Personal Pension Policy Number K12345678
Product Provider Scottish Widows Description Alan’s SW Personal Pension Fund Value 100,000
Status Paid Up CLICK ON BENEFICIARIES TAB CLICK ‘+’ TO ADD A BENEFICIARY
Beneficiaries Julia 100% Entity 3rd Party
In Trust Yes Divorce or Court Order No
CLICK SAVE CLICK NEXT EXISTING ARRANGEMENTS (SAVINGS AND INVESTMENTS) CLICK add
Type Investments
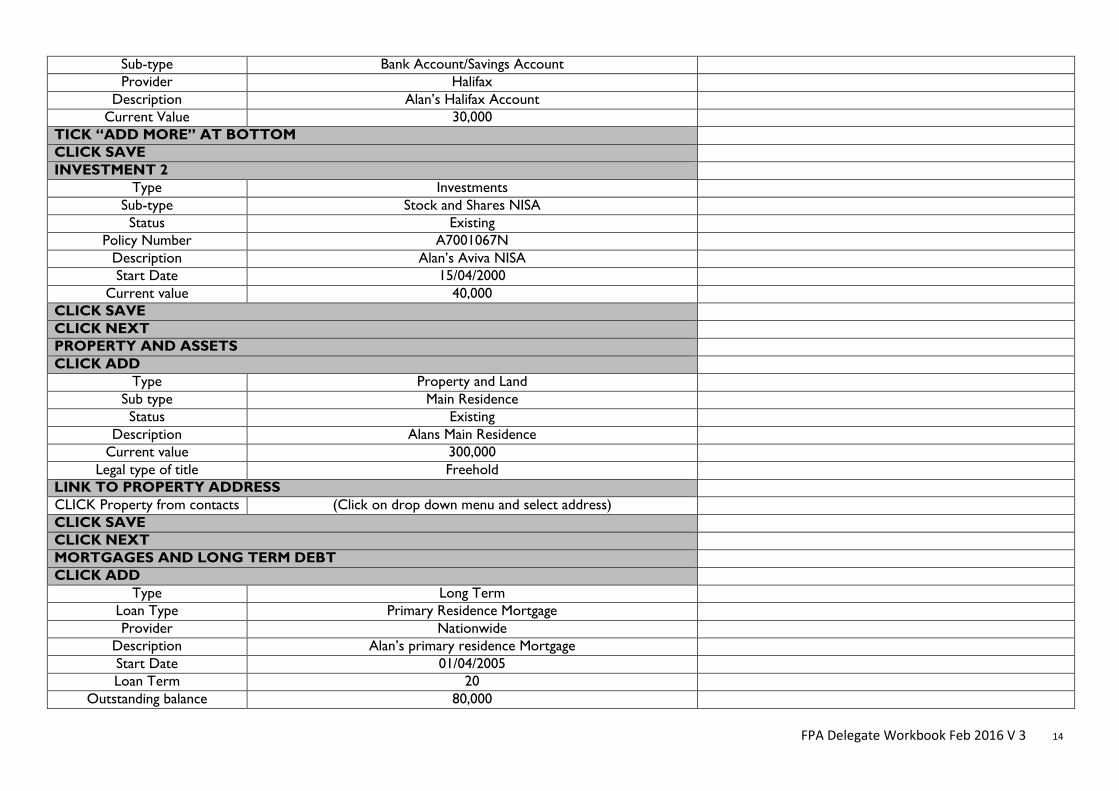
FPA Delegate Workbook Feb 2016 V 3 14
Sub-type Bank Account/Savings Account Provider Halifax
Description Alan’s Halifax Account Current Value 30,000
TICK “ADD MORE” AT BOTTOM CLICK SAVE INVESTMENT 2
Type Investments Sub-type Stock and Shares NISA Status Existing
Policy Number A7001067N Description Alan’s Aviva NISA Start Date 15/04/2000
Current value 40,000 CLICK SAVE CLICK NEXT PROPERTY AND ASSETS CLICK ADD
Type Property and Land Sub type Main Residence Status Existing
Description Alans Main Residence Current value 300,000
Legal type of title Freehold LINK TO PROPERTY ADDRESS CLICK Property from contacts (Click on drop down menu and select address) CLICK SAVE CLICK NEXT MORTGAGES AND LONG TERM DEBT CLICK ADD
Type Long Term Loan Type Primary Residence Mortgage Provider Nationwide
Description Alan’s primary residence Mortgage Start Date 01/04/2005 Loan Term 20
Outstanding balance 80,000
FPA Delegate Workbook Feb 2016 V 3 15
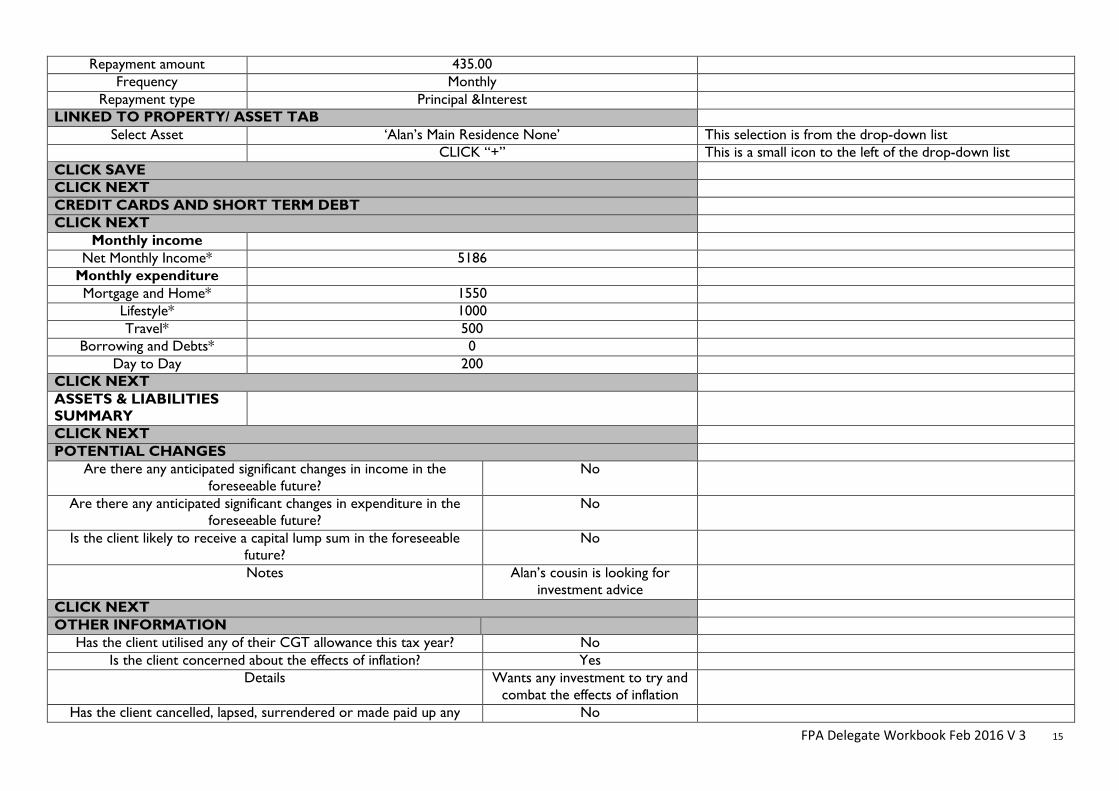
Repayment amount 435.00 Frequency Monthly
Repayment type Principal &Interest LINKED TO PROPERTY/ ASSET TAB
Select Asset ‘Alan’s Main Residence None’ This selection is from the drop-down list CLICK “+” This is a small icon to the left of the drop-down list CLICK SAVE CLICK NEXT CREDIT CARDS AND SHORT TERM DEBT CLICK NEXT
Monthly income Net Monthly Income* 5186
Monthly expenditure Mortgage and Home* 1550
Lifestyle* 1000 Travel* 500
Borrowing and Debts* 0 Day to Day 200
CLICK NEXT ASSETS & LIABILITIES SUMMARY
CLICK NEXT POTENTIAL CHANGES
Are there any anticipated significant changes in income in the foreseeable future?
No
Are there any anticipated significant changes in expenditure in the foreseeable future?
No
Is the client likely to receive a capital lump sum in the foreseeable future?
No
Notes Alan’s cousin is looking for investment advice
CLICK NEXT OTHER INFORMATION
Has the client utilised any of their CGT allowance this tax year? No Is the client concerned about the effects of inflation? Yes
Details Wants any investment to try and combat the effects of inflation
Has the client cancelled, lapsed, surrendered or made paid up any No
FPA Delegate Workbook Feb 2016 V 3 16
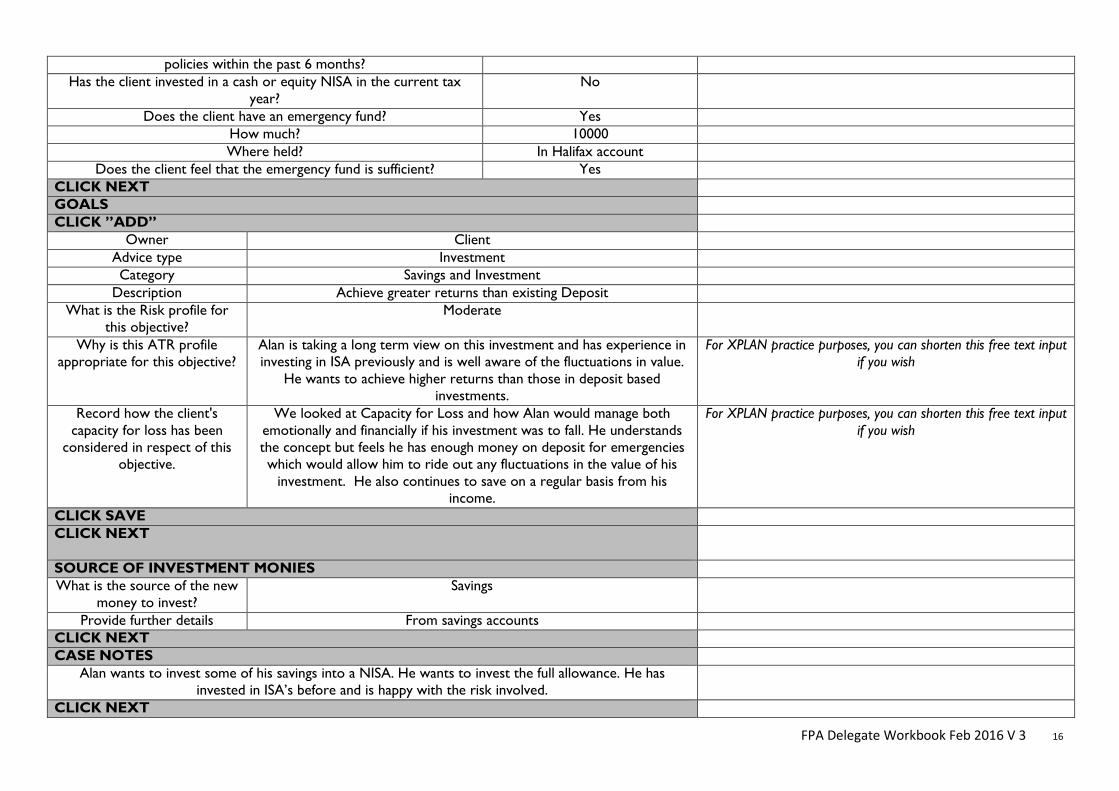
policies within the past 6 months? Has the client invested in a cash or equity NISA in the current tax
year? No
Does the client have an emergency fund? Yes How much? 10000 Where held? In Halifax account
Does the client feel that the emergency fund is sufficient? Yes CLICK NEXT GOALS CLICK ”ADD”
Owner Client Advice type Investment Category Savings and Investment
Description Achieve greater returns than existing Deposit What is the Risk profile for
this objective? Moderate
Why is this ATR profile appropriate for this objective?
Alan is taking a long term view on this investment and has experience in investing in ISA previously and is well aware of the fluctuations in value.
He wants to achieve higher returns than those in deposit based investments.
For XPLAN practice purposes, you can shorten this free text input if you wish
Record how the client's capacity for loss has been
considered in respect of this objective.
We looked at Capacity for Loss and how Alan would manage both emotionally and financially if his investment was to fall. He understands the concept but feels he has enough money on deposit for emergencies which would allow him to ride out any fluctuations in the value of his
investment. He also continues to save on a regular basis from his income.
For XPLAN practice purposes, you can shorten this free text input if you wish
CLICK SAVE CLICK NEXT
SOURCE OF INVESTMENT MONIES What is the source of the new
money to invest? Savings
Provide further details From savings accounts CLICK NEXT CASE NOTES
Alan wants to invest some of his savings into a NISA. He wants to invest the full allowance. He has invested in ISA’s before and is happy with the risk involved.
CLICK NEXT
FPA Delegate Workbook Feb 2016 V 3 17
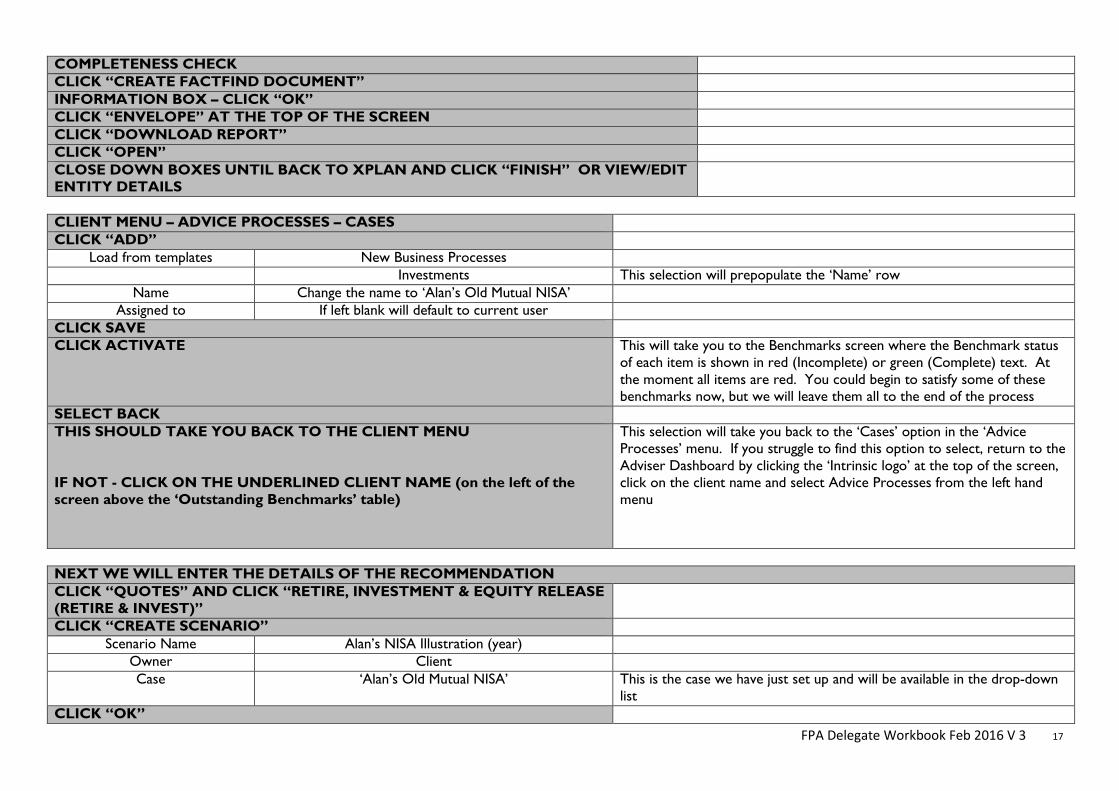
COMPLETENESS CHECK CLICK “CREATE FACTFIND DOCUMENT” INFORMATION BOX – CLICK “OK” CLICK “ENVELOPE” AT THE TOP OF THE SCREEN CLICK “DOWNLOAD REPORT” CLICK “OPEN” CLOSE DOWN BOXES UNTIL BACK TO XPLAN AND CLICK “FINISH” OR VIEW/EDIT ENTITY DETAILS
CLIENT MENU – ADVICE PROCESSES – CASES CLICK “ADD”
Load from templates New Business Processes Investments This selection will prepopulate the ‘Name’ row
Name Change the name to ‘Alan’s Old Mutual NISA’ Assigned to If left blank will default to current user
CLICK SAVE CLICK ACTIVATE This will take you to the Benchmarks screen where the Benchmark status
of each item is shown in red (Incomplete) or green (Complete) text. At the moment all items are red. You could begin to satisfy some of these benchmarks now, but we will leave them all to the end of the process
SELECT BACK THIS SHOULD TAKE YOU BACK TO THE CLIENT MENU IF NOT - CLICK ON THE UNDERLINED CLIENT NAME (on the left of the screen above the ‘Outstanding Benchmarks’ table)
This selection will take you back to the ‘Cases’ option in the ‘Advice Processes’ menu. If you struggle to find this option to select, return to the Adviser Dashboard by clicking the ‘Intrinsic logo’ at the top of the screen, click on the client name and select Advice Processes from the left hand menu
NEXT WE WILL ENTER THE DETAILS OF THE RECOMMENDATION CLICK “QUOTES” AND CLICK “RETIRE, INVESTMENT & EQUITY RELEASE (RETIRE & INVEST)”
CLICK “CREATE SCENARIO” Scenario Name Alan’s NISA Illustration (year)
Owner Client Case ‘Alan’s Old Mutual NISA’ This is the case we have just set up and will be available in the drop-down
list CLICK “OK”
FPA Delegate Workbook Feb 2016 V 3 18
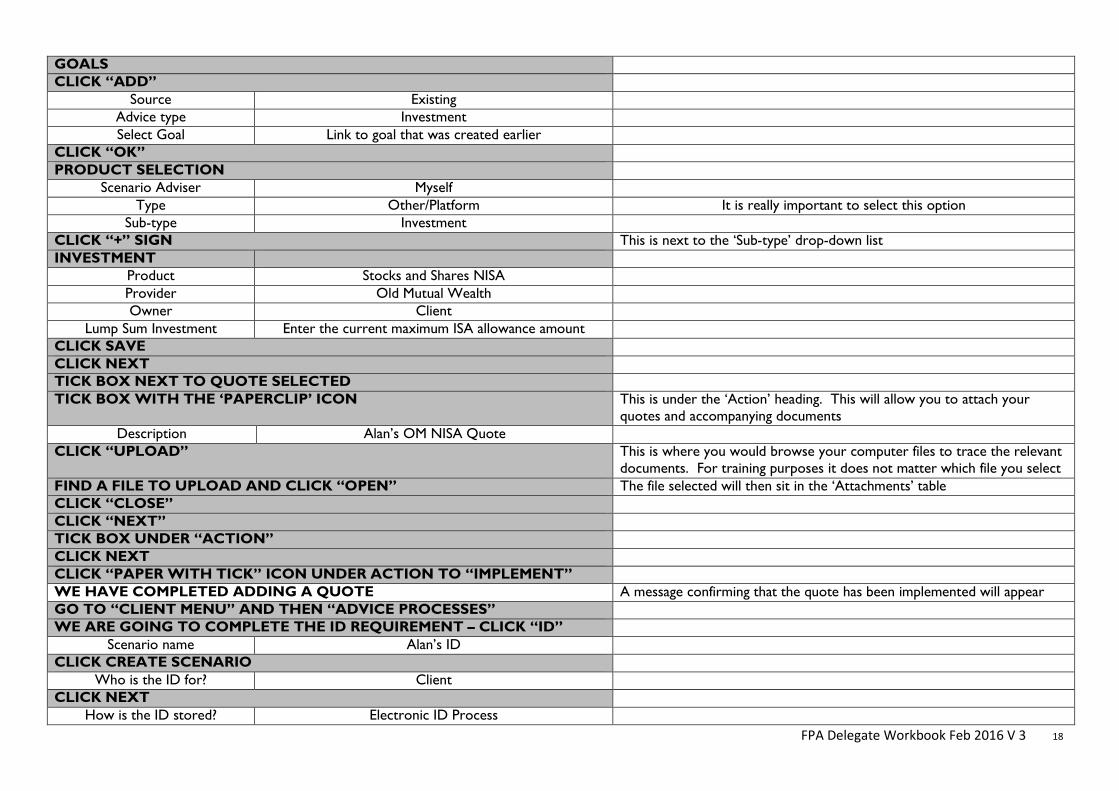
GOALS CLICK “ADD”
Source Existing Advice type Investment Select Goal Link to goal that was created earlier
CLICK “OK” PRODUCT SELECTION
Scenario Adviser Myself Type Other/Platform It is really important to select this option
Sub-type Investment CLICK “+” SIGN This is next to the ‘Sub-type’ drop-down list INVESTMENT
Product Stocks and Shares NISA Provider Old Mutual Wealth Owner Client
Lump Sum Investment Enter the current maximum ISA allowance amount CLICK SAVE CLICK NEXT TICK BOX NEXT TO QUOTE SELECTED TICK BOX WITH THE ‘PAPERCLIP’ ICON This is under the ‘Action’ heading. This will allow you to attach your
quotes and accompanying documents Description Alan’s OM NISA Quote
CLICK “UPLOAD” This is where you would browse your computer files to trace the relevant documents. For training purposes it does not matter which file you select
FIND A FILE TO UPLOAD AND CLICK “OPEN” The file selected will then sit in the ‘Attachments’ table CLICK “CLOSE” CLICK “NEXT” TICK BOX UNDER “ACTION” CLICK NEXT CLICK “PAPER WITH TICK” ICON UNDER ACTION TO “IMPLEMENT” WE HAVE COMPLETED ADDING A QUOTE A message confirming that the quote has been implemented will appear GO TO “CLIENT MENU” AND THEN “ADVICE PROCESSES” WE ARE GOING TO COMPLETE THE ID REQUIREMENT – CLICK “ID”
Scenario name Alan’s ID CLICK CREATE SCENARIO
Who is the ID for? Client CLICK NEXT
How is the ID stored? Electronic ID Process
FPA Delegate Workbook Feb 2016 V 3 19
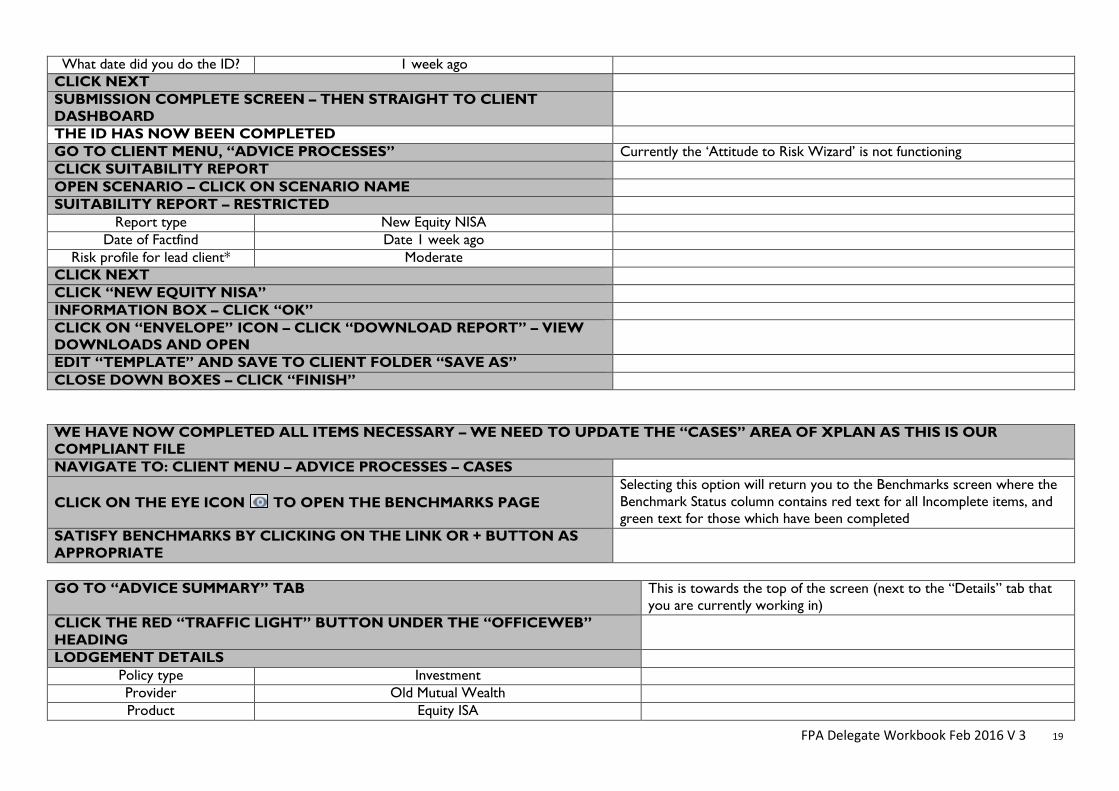
What date did you do the ID? 1 week ago CLICK NEXT SUBMISSION COMPLETE SCREEN – THEN STRAIGHT TO CLIENT DASHBOARD
THE ID HAS NOW BEEN COMPLETED GO TO CLIENT MENU, “ADVICE PROCESSES” Currently the ‘Attitude to Risk Wizard’ is not functioning CLICK SUITABILITY REPORT OPEN SCENARIO – CLICK ON SCENARIO NAME SUITABILITY REPORT – RESTRICTED
Report type New Equity NISA Date of Factfind Date 1 week ago
Risk profile for lead client* Moderate CLICK NEXT CLICK “NEW EQUITY NISA” INFORMATION BOX – CLICK “OK” CLICK ON “ENVELOPE” ICON – CLICK “DOWNLOAD REPORT” – VIEW DOWNLOADS AND OPEN
EDIT “TEMPLATE” AND SAVE TO CLIENT FOLDER “SAVE AS” CLOSE DOWN BOXES – CLICK “FINISH” WE HAVE NOW COMPLETED ALL ITEMS NECESSARY – WE NEED TO UPDATE THE “CASES” AREA OF XPLAN AS THIS IS OUR COMPLIANT FILE NAVIGATE TO: CLIENT MENU – ADVICE PROCESSES – CASES
CLICK ON THE EYE ICON TO OPEN THE BENCHMARKS PAGE Selecting this option will return you to the Benchmarks screen where the Benchmark Status column contains red text for all Incomplete items, and green text for those which have been completed
SATISFY BENCHMARKS BY CLICKING ON THE LINK OR + BUTTON AS APPROPRIATE
GO TO “ADVICE SUMMARY” TAB This is towards the top of the screen (next to the “Details” tab that
you are currently working in) CLICK THE RED “TRAFFIC LIGHT” BUTTON UNDER THE “OFFICEWEB” HEADING
LODGEMENT DETAILS Policy type Investment Provider Old Mutual Wealth Product Equity ISA
FPA Delegate Workbook Feb 2016 V 3 20
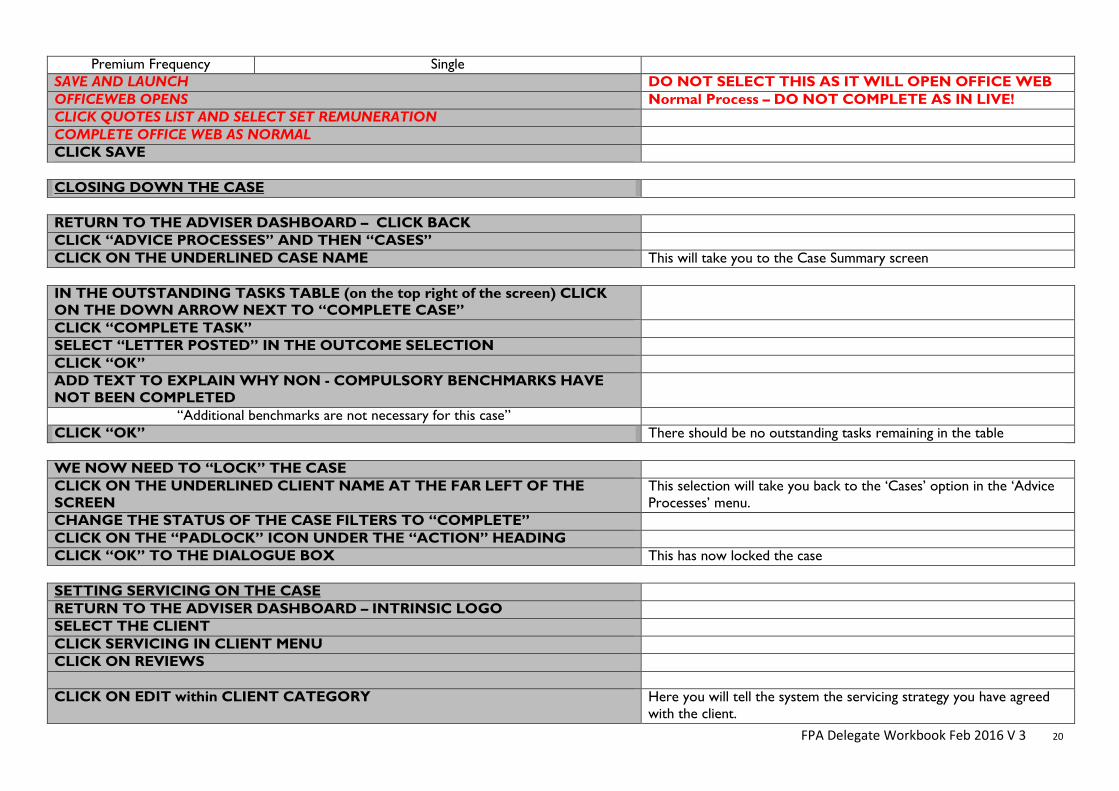
Premium Frequency Single SAVE AND LAUNCH DO NOT SELECT THIS AS IT WILL OPEN OFFICE WEB OFFICEWEB OPENS Normal Process – DO NOT COMPLETE AS IN LIVE! CLICK QUOTES LIST AND SELECT SET REMUNERATION COMPLETE OFFICE WEB AS NORMAL CLICK SAVE CLOSING DOWN THE CASE RETURN TO THE ADVISER DASHBOARD – CLICK BACK CLICK “ADVICE PROCESSES” AND THEN “CASES” CLICK ON THE UNDERLINED CASE NAME This will take you to the Case Summary screen IN THE OUTSTANDING TASKS TABLE (on the top right of the screen) CLICK ON THE DOWN ARROW NEXT TO “COMPLETE CASE”
CLICK “COMPLETE TASK” SELECT “LETTER POSTED” IN THE OUTCOME SELECTION CLICK “OK” ADD TEXT TO EXPLAIN WHY NON - COMPULSORY BENCHMARKS HAVE NOT BEEN COMPLETED
“Additional benchmarks are not necessary for this case” CLICK “OK” There should be no outstanding tasks remaining in the table WE NOW NEED TO “LOCK” THE CASE CLICK ON THE UNDERLINED CLIENT NAME AT THE FAR LEFT OF THE SCREEN
This selection will take you back to the ‘Cases’ option in the ‘Advice Processes’ menu.
CHANGE THE STATUS OF THE CASE FILTERS TO “COMPLETE” CLICK ON THE “PADLOCK” ICON UNDER THE “ACTION” HEADING CLICK “OK” TO THE DIALOGUE BOX This has now locked the case SETTING SERVICING ON THE CASE RETURN TO THE ADVISER DASHBOARD – INTRINSIC LOGO SELECT THE CLIENT CLICK SERVICING IN CLIENT MENU CLICK ON REVIEWS CLICK ON EDIT within CLIENT CATEGORY Here you will tell the system the servicing strategy you have agreed
with the client.
FPA Delegate Workbook Feb 2016 V 3 21
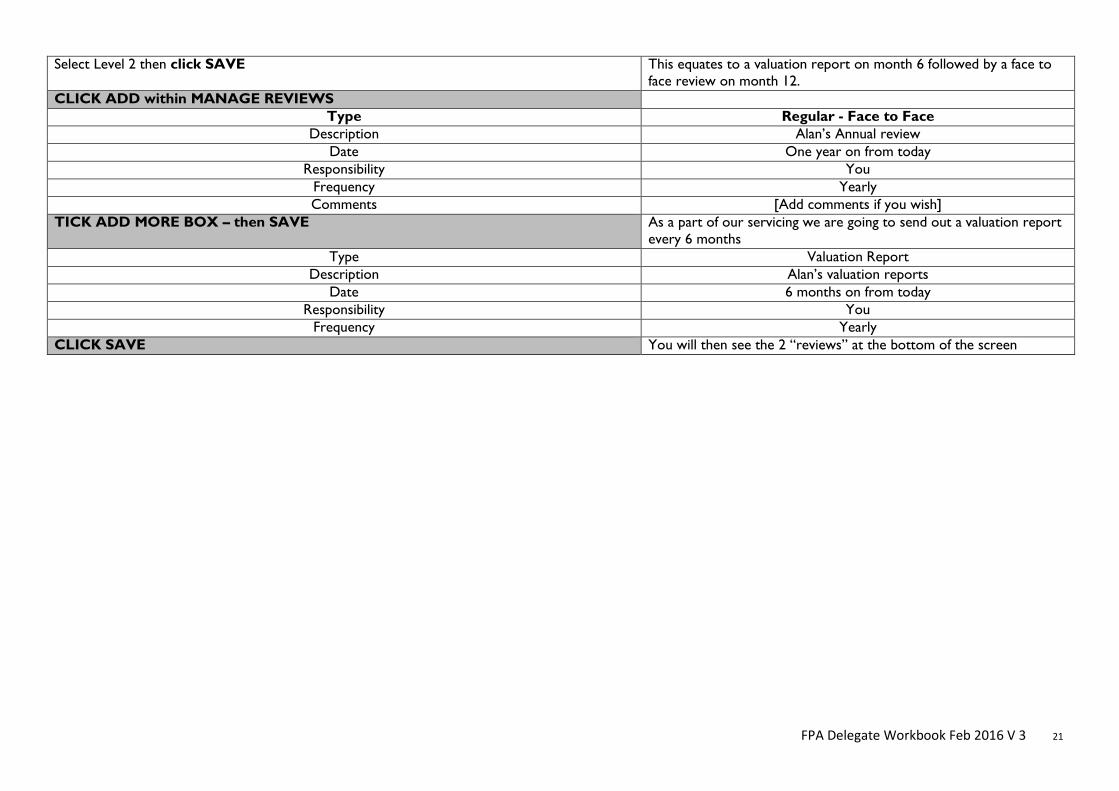
Select Level 2 then click SAVE This equates to a valuation report on month 6 followed by a face to face review on month 12.
CLICK ADD within MANAGE REVIEWS Type Regular - Face to Face
Description Alan’s Annual review Date One year on from today
Responsibility You Frequency Yearly Comments [Add comments if you wish]
TICK ADD MORE BOX – then SAVE As a part of our servicing we are going to send out a valuation report every 6 months
Type Valuation Report Description Alan’s valuation reports
Date 6 months on from today Responsibility You
Frequency Yearly CLICK SAVE You will then see the 2 “reviews” at the bottom of the screen
FPA Delegate Workbook Feb 2016 V 3 22
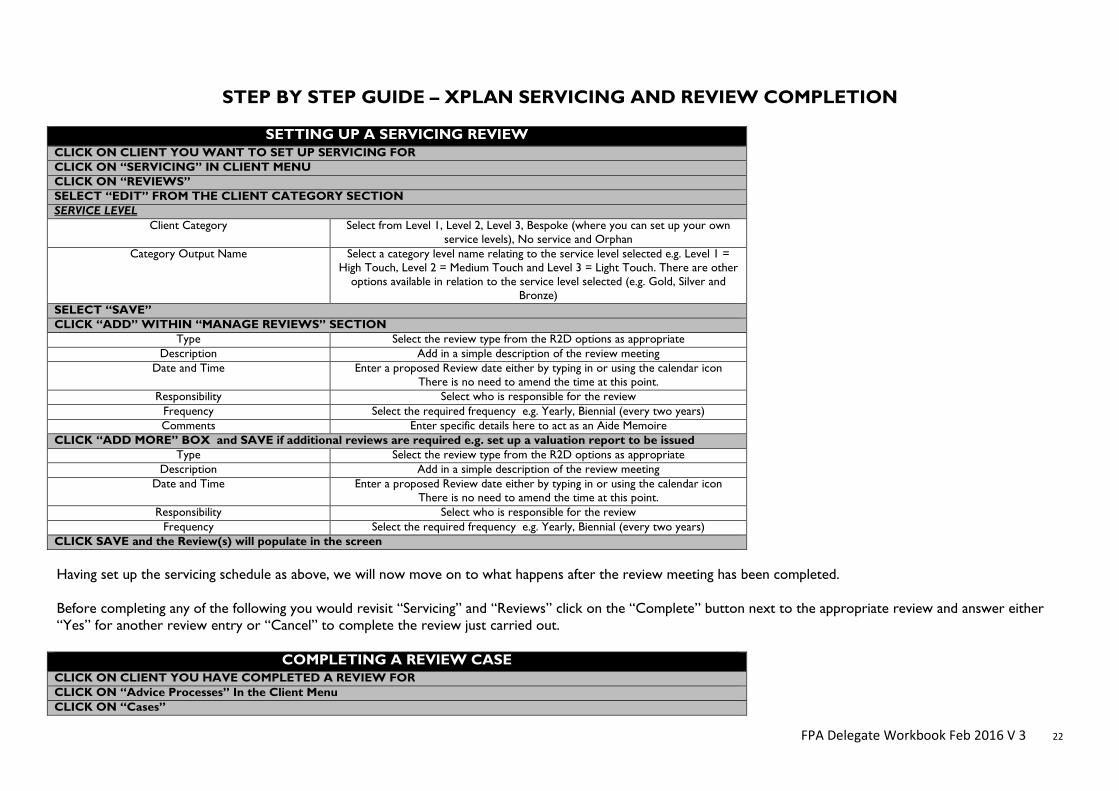
STEP BY STEP GUIDE – XPLAN SERVICING AND REVIEW COMPLETION
SETTING UP A SERVICING REVIEW CLICK ON CLIENT YOU WANT TO SET UP SERVICING FOR CLICK ON “SERVICING” IN CLIENT MENU CLICK ON “REVIEWS” SELECT “EDIT” FROM THE CLIENT CATEGORY SECTION SERVICE LEVEL
Client Category Select from Level 1, Level 2, Level 3, Bespoke (where you can set up your own service levels), No service and Orphan
Category Output Name Select a category level name relating to the service level selected e.g. Level 1 = High Touch, Level 2 = Medium Touch and Level 3 = Light Touch. There are other
options available in relation to the service level selected (e.g. Gold, Silver and Bronze)
SELECT “SAVE” CLICK “ADD” WITHIN “MANAGE REVIEWS” SECTION
Type Select the review type from the R2D options as appropriate Description Add in a simple description of the review meeting
Date and Time Enter a proposed Review date either by typing in or using the calendar icon There is no need to amend the time at this point.
Responsibility Select who is responsible for the review Frequency Select the required frequency e.g. Yearly, Biennial (every two years) Comments Enter specific details here to act as an Aide Memoire
CLICK “ADD MORE” BOX and SAVE if additional reviews are required e.g. set up a valuation report to be issued Type Select the review type from the R2D options as appropriate
Description Add in a simple description of the review meeting Date and Time Enter a proposed Review date either by typing in or using the calendar icon
There is no need to amend the time at this point. Responsibility Select who is responsible for the review
Frequency Select the required frequency e.g. Yearly, Biennial (every two years) CLICK SAVE and the Review(s) will populate in the screen Having set up the servicing schedule as above, we will now move on to what happens after the review meeting has been completed. Before completing any of the following you would revisit “Servicing” and “Reviews” click on the “Complete” button next to the appropriate review and answer either “Yes” for another review entry or “Cancel” to complete the review just carried out.
COMPLETING A REVIEW CASE CLICK ON CLIENT YOU HAVE COMPLETED A REVIEW FOR CLICK ON “Advice Processes” In the Client Menu CLICK ON “Cases”
FPA Delegate Workbook Feb 2016 V 3 23
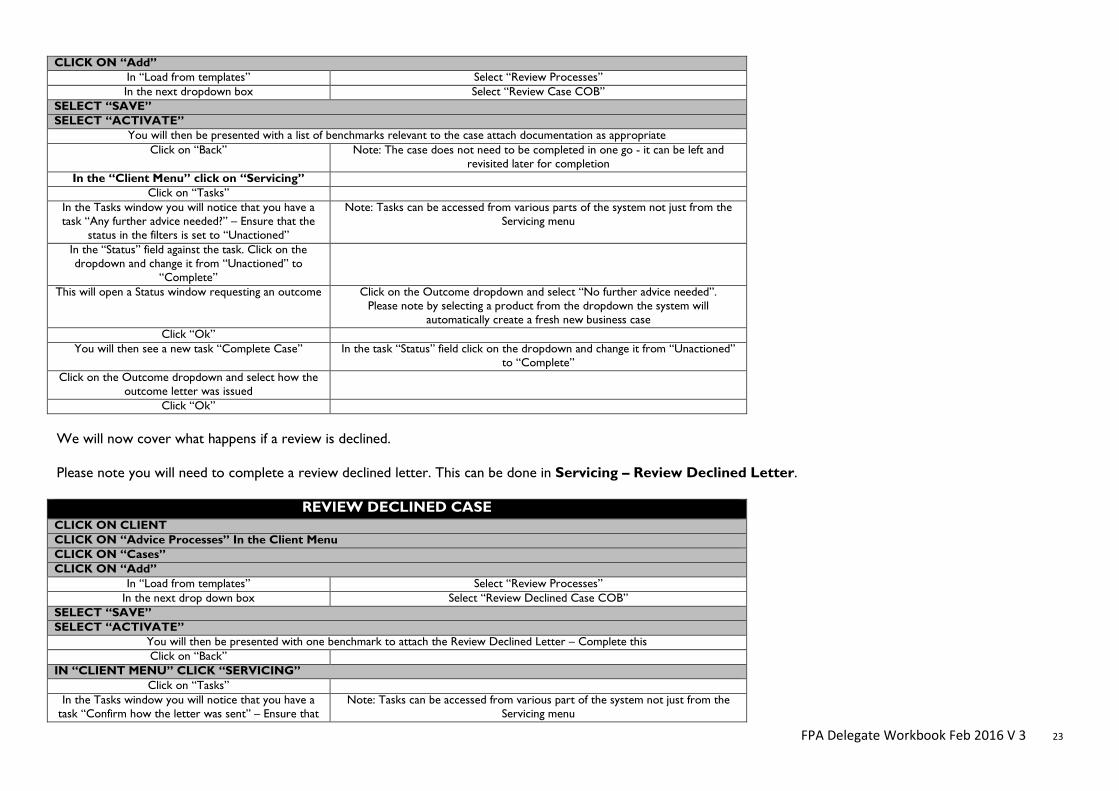
CLICK ON “Add” In “Load from templates” Select “Review Processes” In the next dropdown box Select “Review Case COB”
SELECT “SAVE” SELECT “ACTIVATE”
You will then be presented with a list of benchmarks relevant to the case attach documentation as appropriate Click on “Back” Note: The case does not need to be completed in one go - it can be left and
revisited later for completion In the “Client Menu” click on “Servicing”
Click on “Tasks” In the Tasks window you will notice that you have a task “Any further advice needed?” – Ensure that the
status in the filters is set to “Unactioned”
Note: Tasks can be accessed from various parts of the system not just from the Servicing menu
In the “Status” field against the task. Click on the dropdown and change it from “Unactioned” to
“Complete”
This will open a Status window requesting an outcome Click on the Outcome dropdown and select “No further advice needed”. Please note by selecting a product from the dropdown the system will
automatically create a fresh new business case Click “Ok”
You will then see a new task “Complete Case” In the task “Status” field click on the dropdown and change it from “Unactioned” to “Complete”
Click on the Outcome dropdown and select how the outcome letter was issued
Click “Ok” We will now cover what happens if a review is declined. Please note you will need to complete a review declined letter. This can be done in Servicing – Review Declined Letter.
REVIEW DECLINED CASE CLICK ON CLIENT CLICK ON “Advice Processes” In the Client Menu CLICK ON “Cases” CLICK ON “Add”
In “Load from templates” Select “Review Processes” In the next drop down box Select “Review Declined Case COB”
SELECT “SAVE” SELECT “ACTIVATE”
You will then be presented with one benchmark to attach the Review Declined Letter – Complete this Click on “Back”
IN “CLIENT MENU” CLICK “SERVICING” Click on “Tasks”
In the Tasks window you will notice that you have a task “Confirm how the letter was sent” – Ensure that
Note: Tasks can be accessed from various part of the system not just from the Servicing menu
FPA Delegate Workbook Feb 2016 V 3 24
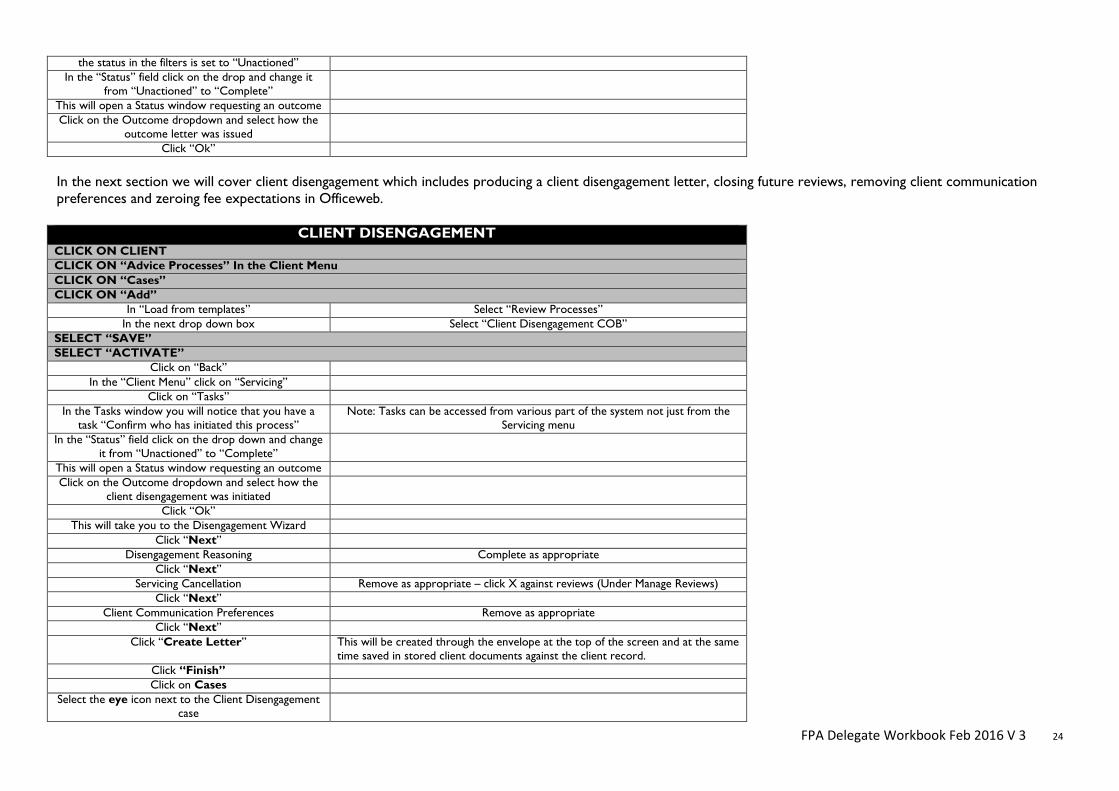
the status in the filters is set to “Unactioned” In the “Status” field click on the drop and change it
from “Unactioned” to “Complete”
This will open a Status window requesting an outcome Click on the Outcome dropdown and select how the
outcome letter was issued
Click “Ok” In the next section we will cover client disengagement which includes producing a client disengagement letter, closing future reviews, removing client communication preferences and zeroing fee expectations in Officeweb.
CLIENT DISENGAGEMENT CLICK ON CLIENT CLICK ON “Advice Processes” In the Client Menu CLICK ON “Cases” CLICK ON “Add”
In “Load from templates” Select “Review Processes” In the next drop down box Select “Client Disengagement COB”
SELECT “SAVE” SELECT “ACTIVATE”
Click on “Back” In the “Client Menu” click on “Servicing”
Click on “Tasks” In the Tasks window you will notice that you have a
task “Confirm who has initiated this process” Note: Tasks can be accessed from various part of the system not just from the
Servicing menu In the “Status” field click on the drop down and change
it from “Unactioned” to “Complete”
This will open a Status window requesting an outcome Click on the Outcome dropdown and select how the
client disengagement was initiated
Click “Ok” This will take you to the Disengagement Wizard
Click “Next” Disengagement Reasoning Complete as appropriate
Click “Next” Servicing Cancellation Remove as appropriate – click X against reviews (Under Manage Reviews)
Click “Next” Client Communication Preferences Remove as appropriate
Click “Next” Click “Create Letter” This will be created through the envelope at the top of the screen and at the same
time saved in stored client documents against the client record. Click “Finish” Click on Cases
Select the eye icon next to the Client Disengagement case
FPA Delegate Workbook Feb 2016 V 3 25
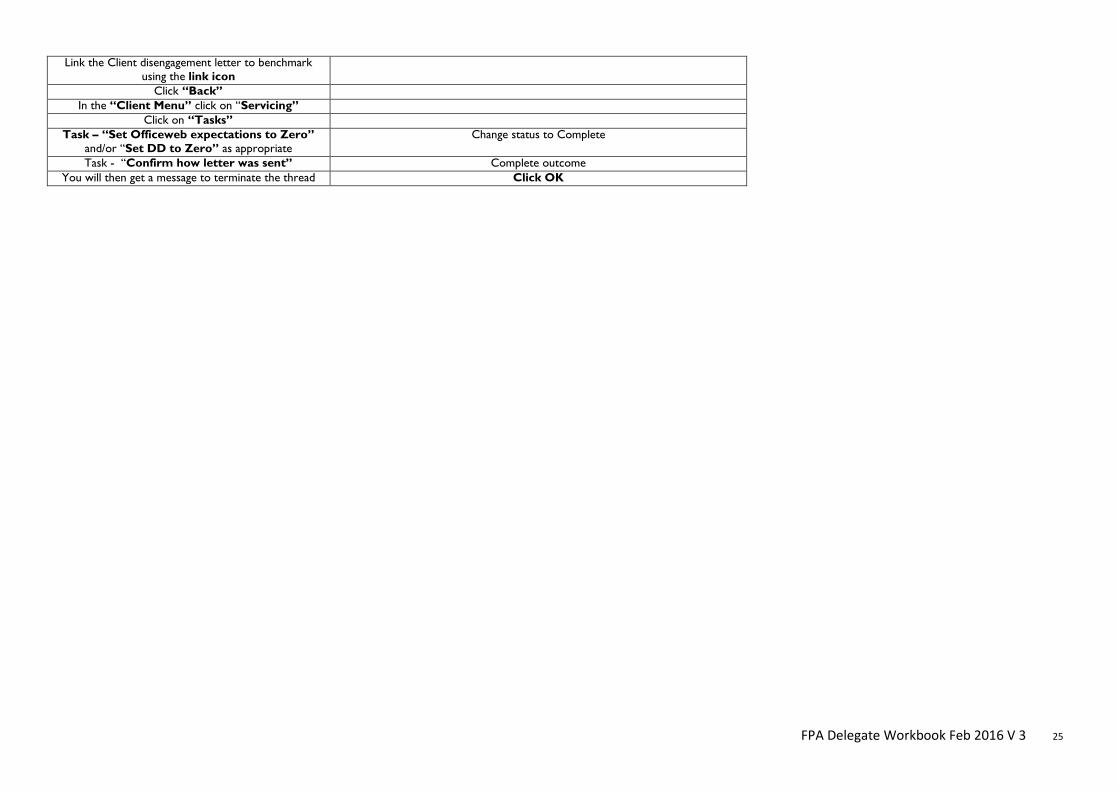
Link the Client disengagement letter to benchmark using the link icon
Click “Back” In the “Client Menu” click on “Servicing”
Click on “Tasks” Task – “Set Officeweb expectations to Zero”
and/or “Set DD to Zero” as appropriate Change status to Complete
Task - “Confirm how letter was sent” Complete outcome You will then get a message to terminate the thread Click OK
FPA Delegate Workbook Feb 2016 V 3 26
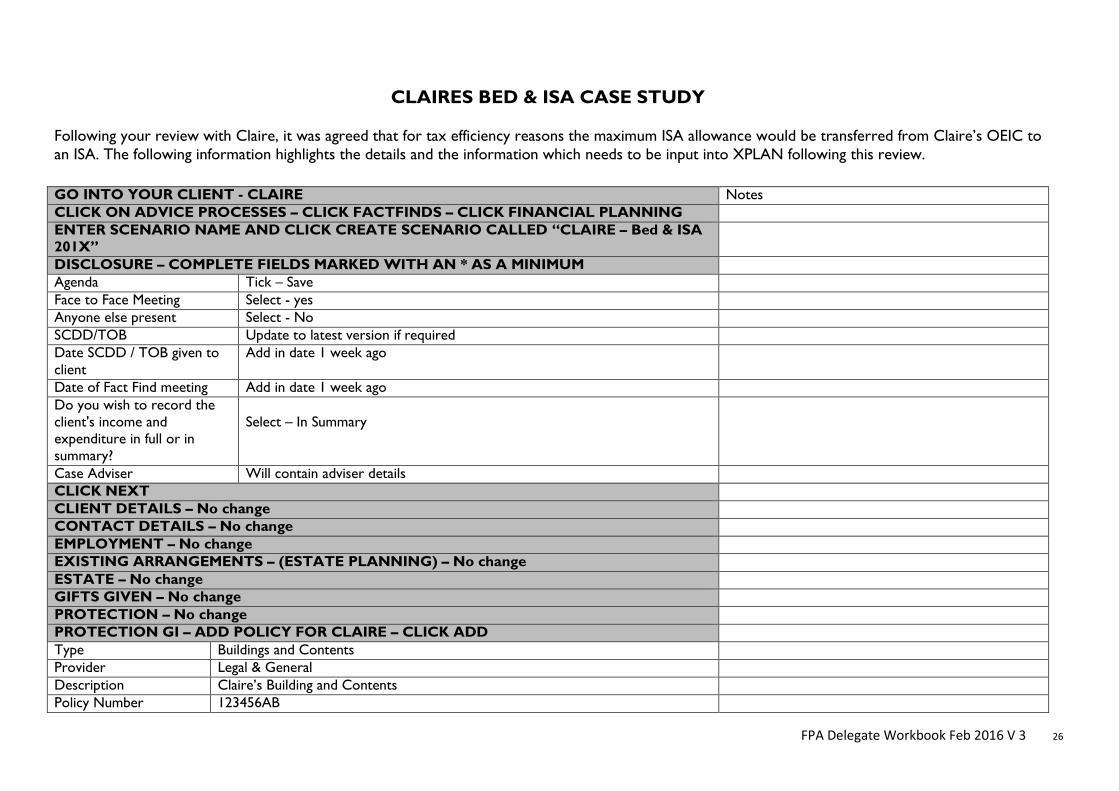
CLAIRES BED & ISA CASE STUDY Following your review with Claire, it was agreed that for tax efficiency reasons the maximum ISA allowance would be transferred from Claire’s OEIC to an ISA. The following information highlights the details and the information which needs to be input into XPLAN following this review.
GO INTO YOUR CLIENT - CLAIRE Notes CLICK ON ADVICE PROCESSES – CLICK FACTFINDS – CLICK FINANCIAL PLANNING ENTER SCENARIO NAME AND CLICK CREATE SCENARIO CALLED “CLAIRE – Bed & ISA 201X”
DISCLOSURE – COMPLETE FIELDS MARKED WITH AN * AS A MINIMUM Agenda Tick – Save Face to Face Meeting Select - yes Anyone else present Select - No SCDD/TOB Update to latest version if required Date SCDD / TOB given to client
Add in date 1 week ago
Date of Fact Find meeting Add in date 1 week ago Do you wish to record the client's income and expenditure in full or in summary?
Select – In Summary
Case Adviser Will contain adviser details CLICK NEXT CLIENT DETAILS – No change CONTACT DETAILS – No change EMPLOYMENT – No change EXISTING ARRANGEMENTS – (ESTATE PLANNING) – No change ESTATE – No change GIFTS GIVEN – No change PROTECTION – No change PROTECTION GI – ADD POLICY FOR CLAIRE – CLICK ADD Type Buildings and Contents Provider Legal & General Description Claire’s Building and Contents Policy Number 123456AB
FPA Delegate Workbook Feb 2016 V 3 27
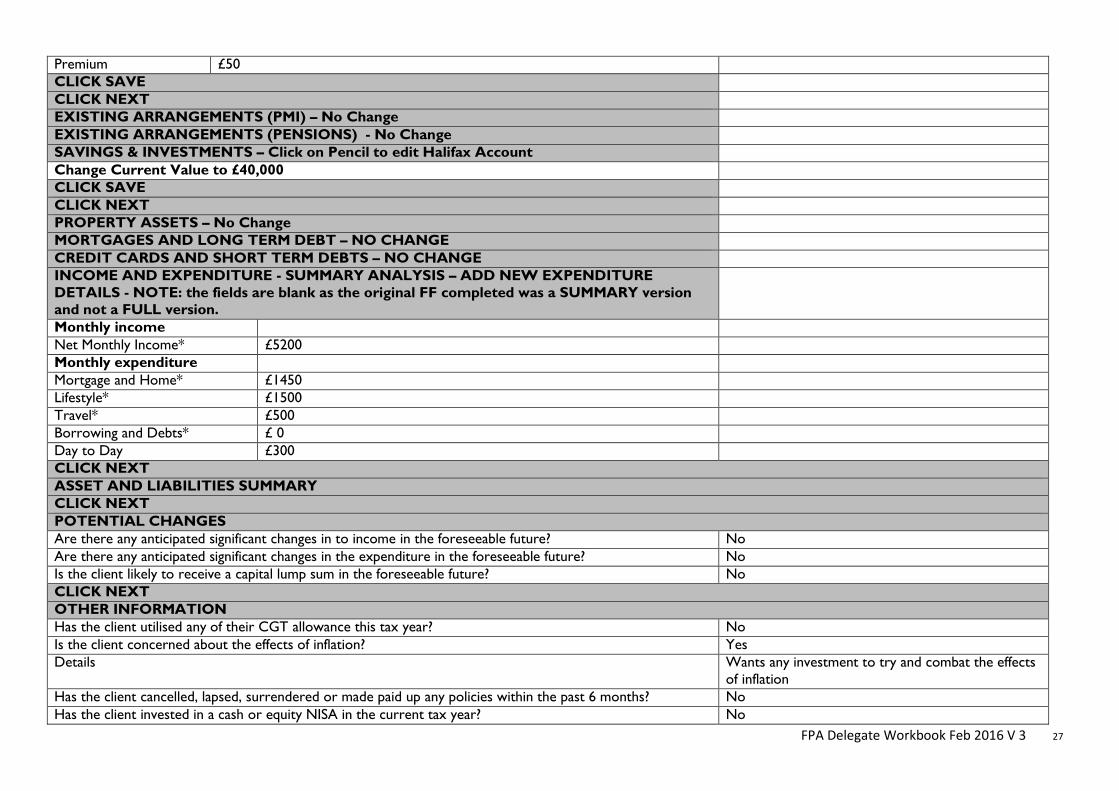
Premium £50 CLICK SAVE CLICK NEXT EXISTING ARRANGEMENTS (PMI) – No Change EXISTING ARRANGEMENTS (PENSIONS) - No Change SAVINGS & INVESTMENTS – Click on Pencil to edit Halifax Account Change Current Value to £40,000 CLICK SAVE CLICK NEXT PROPERTY ASSETS – No Change MORTGAGES AND LONG TERM DEBT – NO CHANGE CREDIT CARDS AND SHORT TERM DEBTS – NO CHANGE INCOME AND EXPENDITURE - SUMMARY ANALYSIS – ADD NEW EXPENDITURE DETAILS - NOTE: the fields are blank as the original FF completed was a SUMMARY version and not a FULL version.
Monthly income Net Monthly Income* £5200 Monthly expenditure Mortgage and Home* £1450 Lifestyle* £1500 Travel* £500 Borrowing and Debts* £ 0 Day to Day £300 CLICK NEXT ASSET AND LIABILITIES SUMMARY CLICK NEXT POTENTIAL CHANGES Are there any anticipated significant changes in to income in the foreseeable future? No Are there any anticipated significant changes in the expenditure in the foreseeable future? No Is the client likely to receive a capital lump sum in the foreseeable future? No CLICK NEXT OTHER INFORMATION Has the client utilised any of their CGT allowance this tax year? No Is the client concerned about the effects of inflation? Yes Details Wants any investment to try and combat the effects
of inflation Has the client cancelled, lapsed, surrendered or made paid up any policies within the past 6 months? No Has the client invested in a cash or equity NISA in the current tax year? No

FPA Delegate Workbook Feb 2016 V 3 28
Does the client have an emergency fund? Yes How Much? £40,000 Where held? In Halifax accounts Does the client feel that the emergency fund is sufficient? Yes CLICK NEXT GOALS ORIGINAL GOAL – INVESTMENT - AMEND DETAILS - CLICK PENCIL Status Partially Fulfilled CLICK SAVE CLICK NEXT SOURCE OF INVESTMENT MONIES What is the source of the new money to invest?
Other
Provide Further Details Bed & ISA from Claire's existing OEIC. CLICK NEXT FACT FIND NOTES – ENTER THE FOLLOWING Explain: this is where you would put soft facts justifying the advice CLICK NEXT COMPLETENESS CHECK – SCREEN FLASHES THROUGH CLICK CREATE FACTFIND DOCUMENT CLICK ENVELOPE IN BLACK BAR AT TOP AND OPEN UP FACTFIND CLOSE DOWN AND CLICK FINISH GO TO ADVICE PROCESSES IN CLIENT MENU CLIENT MENU – ADVICE PROCESSES – CASES CLICK “ADD”
Load from templates Review Business Processes Review Case (COB) This selection will pre-populate the ‘Name’ row
Name Change the name to ‘Claire’s Review 201X’ CLICK SAVE CLICK ACTIVATE This will take you to the Benchmarks screen where the
Benchmark status of each item is shown in red (Incomplete) or green (Complete) text. At the moment all items are red. You could begin to satisfy some of these benchmarks now, but we will leave them all to the end of the process
CLICK BACK We are now going to create a combined review/suitability letter for the Bed & ISA and the review rather than two separate letters.
FPA Delegate Workbook Feb 2016 V 3 29
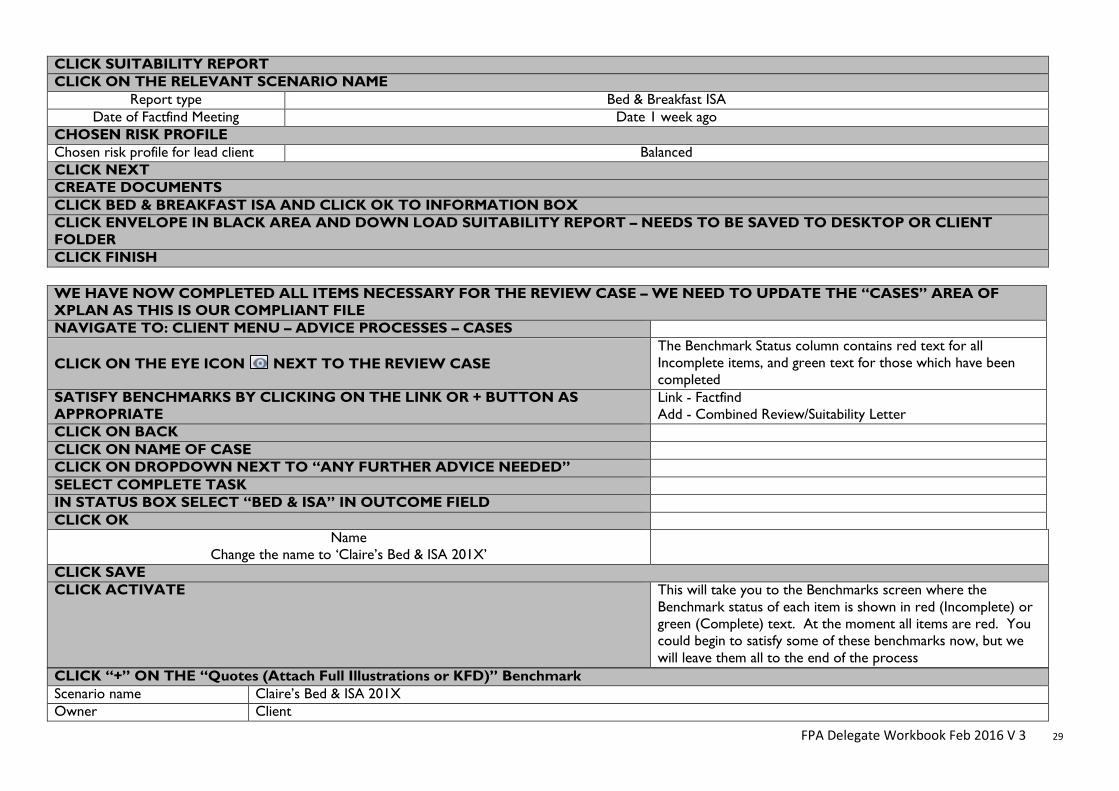
CLICK SUITABILITY REPORT CLICK ON THE RELEVANT SCENARIO NAME
Report type Bed & Breakfast ISA Date of Factfind Meeting Date 1 week ago
CHOSEN RISK PROFILE Chosen risk profile for lead client Balanced CLICK NEXT CREATE DOCUMENTS CLICK BED & BREAKFAST ISA AND CLICK OK TO INFORMATION BOX CLICK ENVELOPE IN BLACK AREA AND DOWN LOAD SUITABILITY REPORT – NEEDS TO BE SAVED TO DESKTOP OR CLIENT FOLDER CLICK FINISH WE HAVE NOW COMPLETED ALL ITEMS NECESSARY FOR THE REVIEW CASE – WE NEED TO UPDATE THE “CASES” AREA OF XPLAN AS THIS IS OUR COMPLIANT FILE NAVIGATE TO: CLIENT MENU – ADVICE PROCESSES – CASES
CLICK ON THE EYE ICON NEXT TO THE REVIEW CASE The Benchmark Status column contains red text for all Incomplete items, and green text for those which have been completed
SATISFY BENCHMARKS BY CLICKING ON THE LINK OR + BUTTON AS APPROPRIATE
Link - Factfind Add - Combined Review/Suitability Letter
CLICK ON BACK CLICK ON NAME OF CASE CLICK ON DROPDOWN NEXT TO “ANY FURTHER ADVICE NEEDED” SELECT COMPLETE TASK IN STATUS BOX SELECT “BED & ISA” IN OUTCOME FIELD CLICK OK
Name Change the name to ‘Claire’s Bed & ISA 201X’
CLICK SAVE CLICK ACTIVATE This will take you to the Benchmarks screen where the
Benchmark status of each item is shown in red (Incomplete) or green (Complete) text. At the moment all items are red. You could begin to satisfy some of these benchmarks now, but we will leave them all to the end of the process
CLICK “+” ON THE “Quotes (Attach Full Illustrations or KFD)” Benchmark Scenario name Claire’s Bed & ISA 201X Owner Client
FPA Delegate Workbook Feb 2016 V 3 30
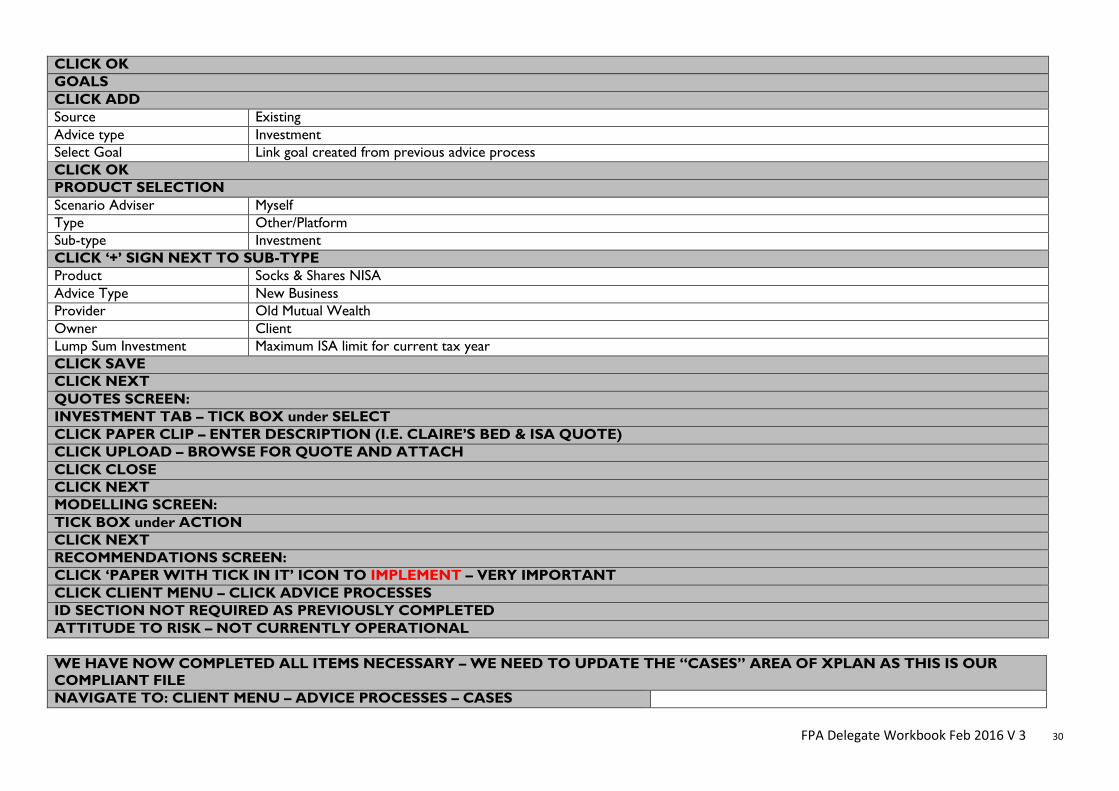
CLICK OK GOALS CLICK ADD Source Existing Advice type Investment Select Goal Link goal created from previous advice process CLICK OK PRODUCT SELECTION Scenario Adviser Myself Type Other/Platform Sub-type Investment CLICK ‘+’ SIGN NEXT TO SUB-TYPE Product Socks & Shares NISA Advice Type New Business Provider Old Mutual Wealth Owner Client Lump Sum Investment Maximum ISA limit for current tax year CLICK SAVE CLICK NEXT QUOTES SCREEN: INVESTMENT TAB – TICK BOX under SELECT CLICK PAPER CLIP – ENTER DESCRIPTION (I.E. CLAIRE’S BED & ISA QUOTE) CLICK UPLOAD – BROWSE FOR QUOTE AND ATTACH CLICK CLOSE CLICK NEXT MODELLING SCREEN: TICK BOX under ACTION CLICK NEXT RECOMMENDATIONS SCREEN: CLICK ‘PAPER WITH TICK IN IT’ ICON TO IMPLEMENT – VERY IMPORTANT CLICK CLIENT MENU – CLICK ADVICE PROCESSES ID SECTION NOT REQUIRED AS PREVIOUSLY COMPLETED ATTITUDE TO RISK – NOT CURRENTLY OPERATIONAL WE HAVE NOW COMPLETED ALL ITEMS NECESSARY – WE NEED TO UPDATE THE “CASES” AREA OF XPLAN AS THIS IS OUR COMPLIANT FILE NAVIGATE TO: CLIENT MENU – ADVICE PROCESSES – CASES

FPA Delegate Workbook Feb 2016 V 3 31
CLICK ON THE EYE ICON TO OPEN THE BENCHMARKS PAGE The Benchmark Status column contains red text for all Incomplete items, and green text for those which have been completed
SATISFY BENCHMARKS BY CLICKING ON THE LINK OR + BUTTON AS APPROPRIATE
GO TO “ADVICE SUMMARY” TAB This is towards the top of the screen (next to the “Details” tab
that you are currently working in) CLICK THE RED “TRAFFIC LIGHT” BUTTON UNDER THE “OFFICEWEB” HEADING
LODGEMENT DETAILS Policy type Investment Provider Old Mutual Wealth Product ISA
Premium Frequency Single CLICK SAVE AND LAUNCH DO NOT SELECT THIS AS IT WILL OPEN
OFFICEWEB OFFICEWEB OPENS Normal Process – DO NOT COMPLETE AS IN LIVE! CLICK QUOTES LIST AND SELECT SET REMUNERATION COMPLETE OFFICE WEB AS NORMAL CLOSING DOWN THE CASE RETURN TO THE ADVISER DASHBOARD – INTRINSIC LOGO SELECT THE CLIENT CLICK “ADVICE PROCESSES” AND THEN “CASES” CLICK ON THE UNDERLINED CASE NAME This will take you to the Case Summary screen IN THE OUTSTANDING TASKS TABLE (on the top right of the screen) CLICK ON THE DOWN ARROW NEXT TO “COMPLETE CASE”
CLICK “COMPLETE TASK” SELECT “LETTER POSTED” IN THE OUTCOME SELECTION CLICK “OK” CLICK “OK” TO TERMINATE THE THREAD WE NOW NEED TO “LOCK” THE CASE CLICK ON THE UNDERLINED CLIENT NAME AT THE FAR LEFT OF THE SCREEN
This selection will take you back to the ‘Cases’ option in the ‘Advice Processes’ menu.
CHANGE THE STATUS OF THE CASE FILTERS TO “COMPLETE”

FPA Delegate Workbook Feb 2016 V 3 32
CLICK ON THE “PADLOCK” ICON UNDER THE “ACTION” HEADING NEXT TO THE RELEVANT CASE
CLICK “OK” TO THE DIALOGUE BOX This has now locked the case
FPA Delegate Workbook Feb 2016 V 3 33
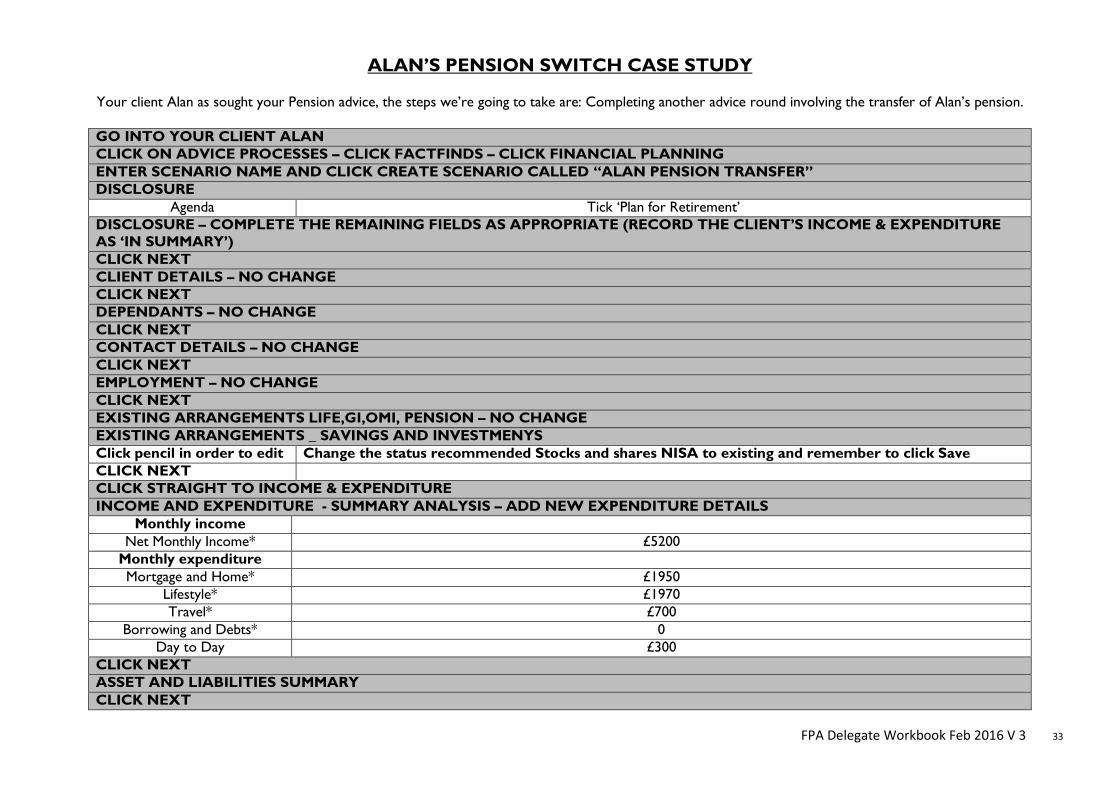
ALAN’S PENSION SWITCH CASE STUDY
Your client Alan as sought your Pension advice, the steps we’re going to take are: Completing another advice round involving the transfer of Alan’s pension.
GO INTO YOUR CLIENT ALAN CLICK ON ADVICE PROCESSES – CLICK FACTFINDS – CLICK FINANCIAL PLANNING ENTER SCENARIO NAME AND CLICK CREATE SCENARIO CALLED “ALAN PENSION TRANSFER” DISCLOSURE
Agenda Tick ‘Plan for Retirement’ DISCLOSURE – COMPLETE THE REMAINING FIELDS AS APPROPRIATE (RECORD THE CLIENT’S INCOME & EXPENDITURE AS ‘IN SUMMARY’) CLICK NEXT CLIENT DETAILS – NO CHANGE CLICK NEXT DEPENDANTS – NO CHANGE CLICK NEXT CONTACT DETAILS – NO CHANGE CLICK NEXT EMPLOYMENT – NO CHANGE CLICK NEXT EXISTING ARRANGEMENTS LIFE,GI,OMI, PENSION – NO CHANGE EXISTING ARRANGEMENTS _ SAVINGS AND INVESTMENYS Click pencil in order to edit Change the status recommended Stocks and shares NISA to existing and remember to click Save CLICK NEXT CLICK STRAIGHT TO INCOME & EXPENDITURE INCOME AND EXPENDITURE - SUMMARY ANALYSIS – ADD NEW EXPENDITURE DETAILS
Monthly income Net Monthly Income* £5200
Monthly expenditure Mortgage and Home* £1950
Lifestyle* £1970 Travel* £700
Borrowing and Debts* 0 Day to Day £300
CLICK NEXT ASSET AND LIABILITIES SUMMARY CLICK NEXT
FPA Delegate Workbook Feb 2016 V 3 34
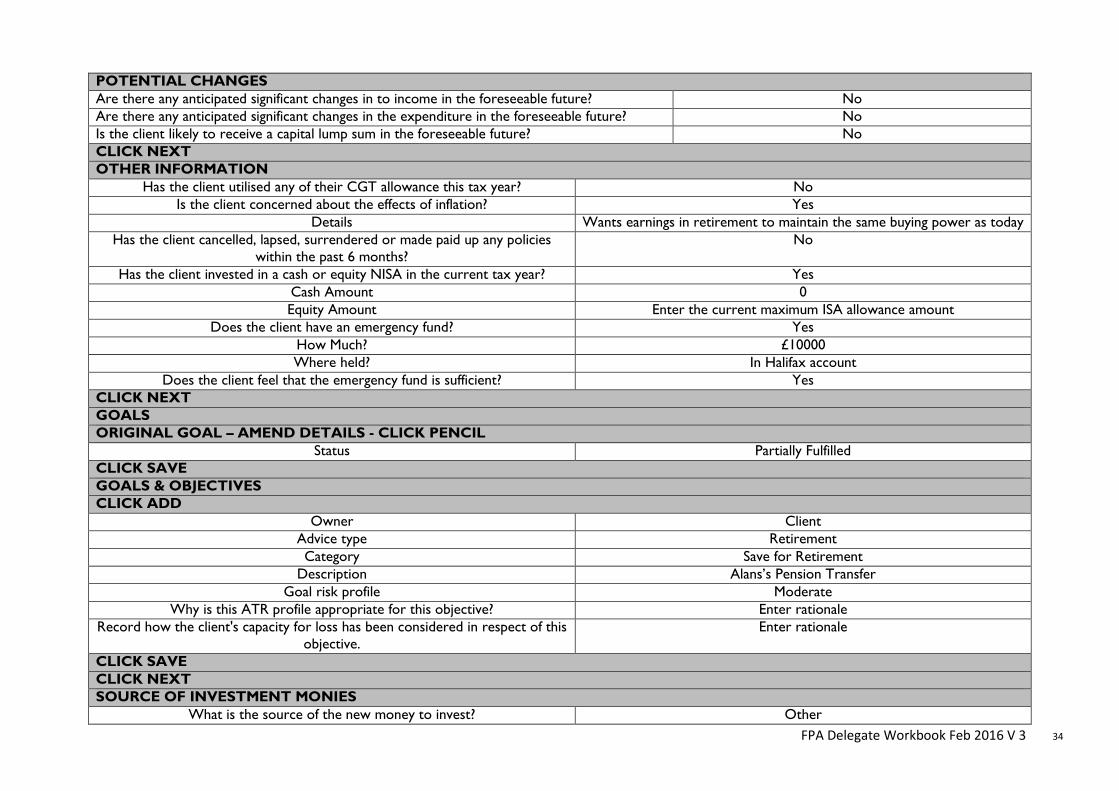
POTENTIAL CHANGES Are there any anticipated significant changes in to income in the foreseeable future? No Are there any anticipated significant changes in the expenditure in the foreseeable future? No Is the client likely to receive a capital lump sum in the foreseeable future? No CLICK NEXT OTHER INFORMATION
Has the client utilised any of their CGT allowance this tax year? No Is the client concerned about the effects of inflation? Yes
Details Wants earnings in retirement to maintain the same buying power as today Has the client cancelled, lapsed, surrendered or made paid up any policies
within the past 6 months? No
Has the client invested in a cash or equity NISA in the current tax year? Yes Cash Amount 0 Equity Amount Enter the current maximum ISA allowance amount
Does the client have an emergency fund? Yes How Much? £10000 Where held? In Halifax account
Does the client feel that the emergency fund is sufficient? Yes CLICK NEXT GOALS ORIGINAL GOAL – AMEND DETAILS - CLICK PENCIL
Status Partially Fulfilled CLICK SAVE GOALS & OBJECTIVES CLICK ADD
Owner Client Advice type Retirement Category Save for Retirement
Description Alans’s Pension Transfer Goal risk profile Moderate
Why is this ATR profile appropriate for this objective? Enter rationale Record how the client's capacity for loss has been considered in respect of this
objective. Enter rationale
CLICK SAVE CLICK NEXT SOURCE OF INVESTMENT MONIES
What is the source of the new money to invest? Other
FPA Delegate Workbook Feb 2016 V 3 35
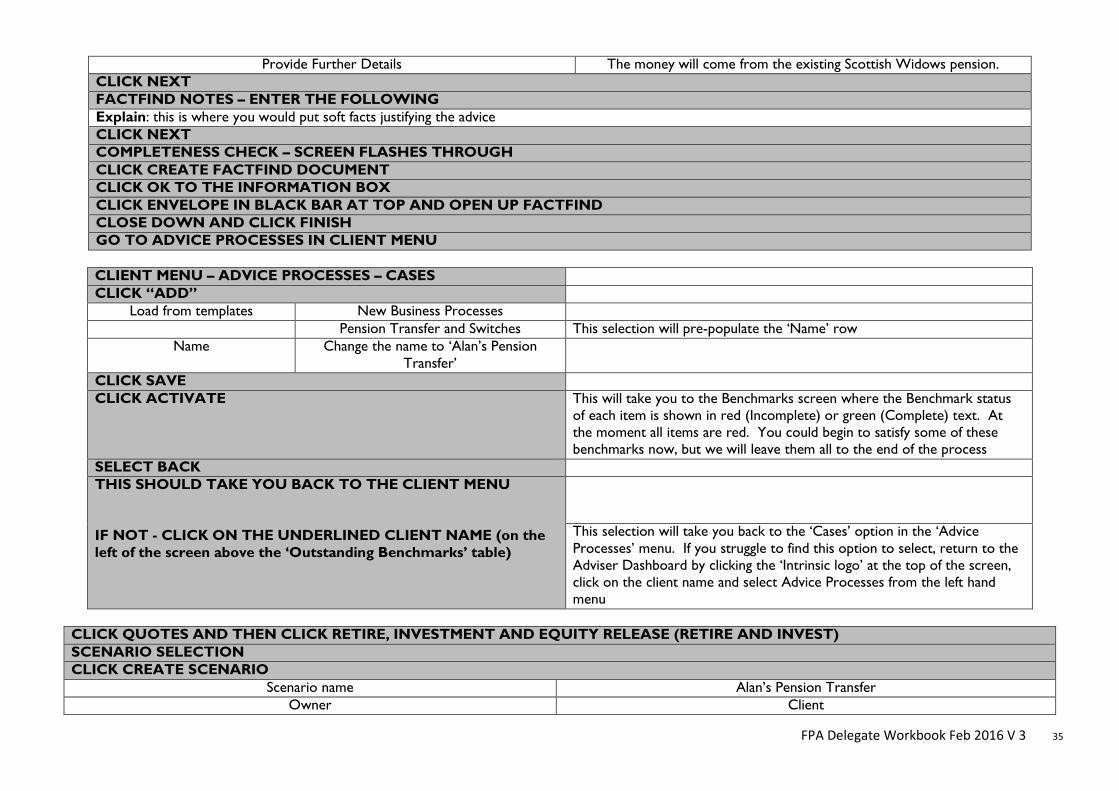
Provide Further Details The money will come from the existing Scottish Widows pension. CLICK NEXT FACTFIND NOTES – ENTER THE FOLLOWING Explain: this is where you would put soft facts justifying the advice CLICK NEXT COMPLETENESS CHECK – SCREEN FLASHES THROUGH CLICK CREATE FACTFIND DOCUMENT CLICK OK TO THE INFORMATION BOX CLICK ENVELOPE IN BLACK BAR AT TOP AND OPEN UP FACTFIND CLOSE DOWN AND CLICK FINISH GO TO ADVICE PROCESSES IN CLIENT MENU
CLIENT MENU – ADVICE PROCESSES – CASES CLICK “ADD”
Load from templates New Business Processes Pension Transfer and Switches This selection will pre-populate the ‘Name’ row
Name Change the name to ‘Alan’s Pension Transfer’
CLICK SAVE CLICK ACTIVATE This will take you to the Benchmarks screen where the Benchmark status
of each item is shown in red (Incomplete) or green (Complete) text. At the moment all items are red. You could begin to satisfy some of these benchmarks now, but we will leave them all to the end of the process
SELECT BACK THIS SHOULD TAKE YOU BACK TO THE CLIENT MENU IF NOT - CLICK ON THE UNDERLINED CLIENT NAME (on the left of the screen above the ‘Outstanding Benchmarks’ table)
This selection will take you back to the ‘Cases’ option in the ‘Advice Processes’ menu. If you struggle to find this option to select, return to the Adviser Dashboard by clicking the ‘Intrinsic logo’ at the top of the screen, click on the client name and select Advice Processes from the left hand menu
CLICK QUOTES AND THEN CLICK RETIRE, INVESTMENT AND EQUITY RELEASE (RETIRE AND INVEST) SCENARIO SELECTION CLICK CREATE SCENARIO
Scenario name Alan’s Pension Transfer Owner Client
FPA Delegate Workbook Feb 2016 V 3 36
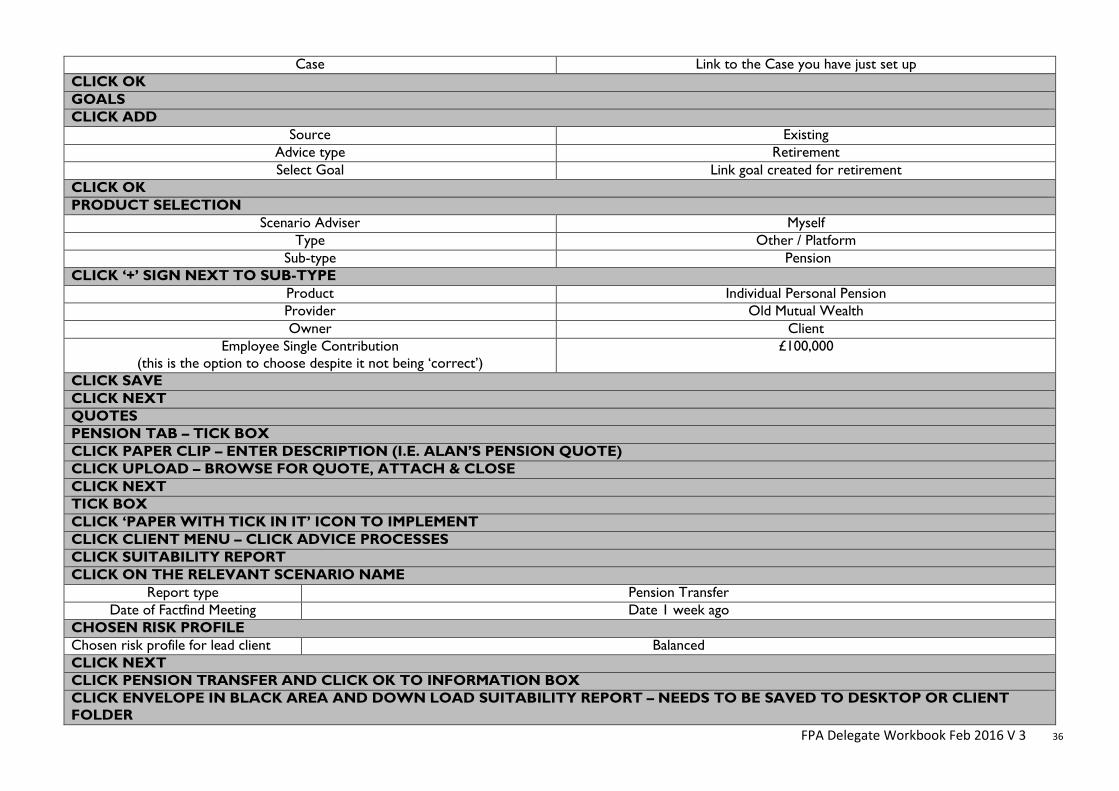
Case Link to the Case you have just set up CLICK OK GOALS CLICK ADD
Source Existing Advice type Retirement Select Goal Link goal created for retirement
CLICK OK PRODUCT SELECTION
Scenario Adviser Myself Type Other / Platform
Sub-type Pension CLICK ‘+’ SIGN NEXT TO SUB-TYPE
Product Individual Personal Pension Provider Old Mutual Wealth Owner Client
Employee Single Contribution (this is the option to choose despite it not being ‘correct’)
£100,000
CLICK SAVE CLICK NEXT QUOTES PENSION TAB – TICK BOX CLICK PAPER CLIP – ENTER DESCRIPTION (I.E. ALAN’S PENSION QUOTE) CLICK UPLOAD – BROWSE FOR QUOTE, ATTACH & CLOSE CLICK NEXT TICK BOX CLICK ‘PAPER WITH TICK IN IT’ ICON TO IMPLEMENT CLICK CLIENT MENU – CLICK ADVICE PROCESSES CLICK SUITABILITY REPORT CLICK ON THE RELEVANT SCENARIO NAME
Report type Pension Transfer Date of Factfind Meeting Date 1 week ago
CHOSEN RISK PROFILE Chosen risk profile for lead client Balanced CLICK NEXT CLICK PENSION TRANSFER AND CLICK OK TO INFORMATION BOX CLICK ENVELOPE IN BLACK AREA AND DOWN LOAD SUITABILITY REPORT – NEEDS TO BE SAVED TO DESKTOP OR CLIENT FOLDER
FPA Delegate Workbook Feb 2016 V 3 37
CLICK FINISH CLICK ADVICE PROCESSES
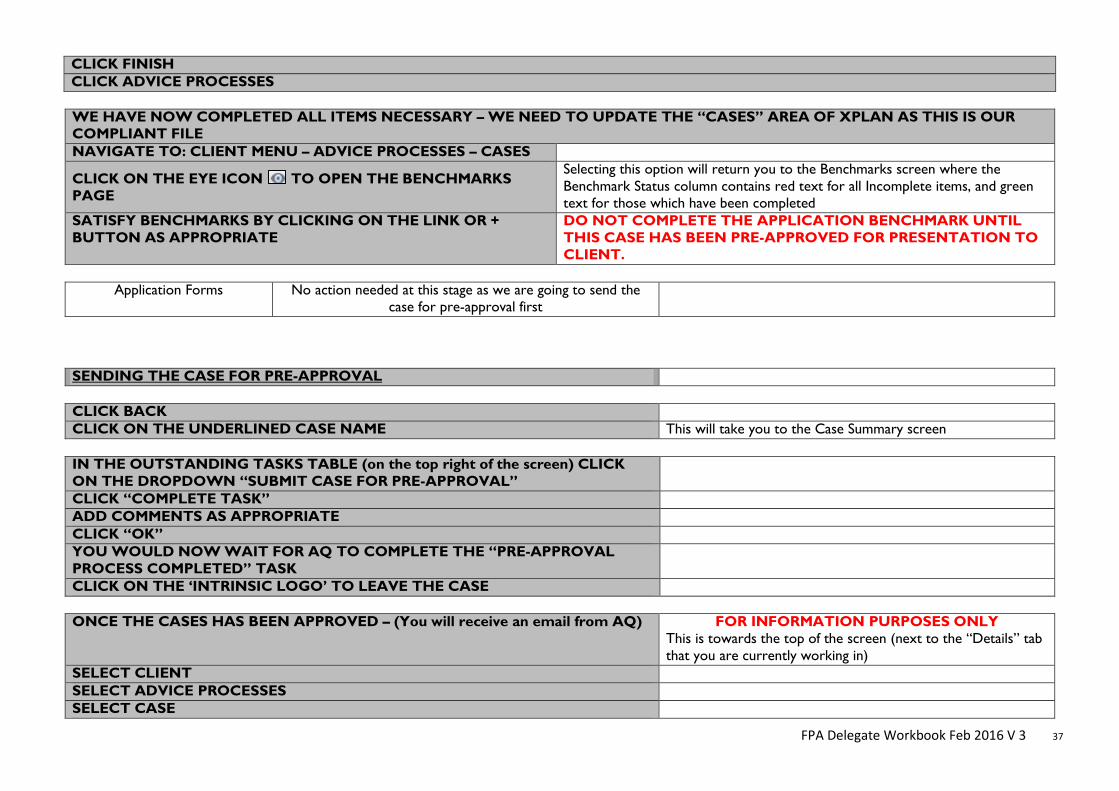
WE HAVE NOW COMPLETED ALL ITEMS NECESSARY – WE NEED TO UPDATE THE “CASES” AREA OF XPLAN AS THIS IS OUR COMPLIANT FILE NAVIGATE TO: CLIENT MENU – ADVICE PROCESSES – CASES
CLICK ON THE EYE ICON TO OPEN THE BENCHMARKS PAGE
Selecting this option will return you to the Benchmarks screen where the Benchmark Status column contains red text for all Incomplete items, and green text for those which have been completed
SATISFY BENCHMARKS BY CLICKING ON THE LINK OR + BUTTON AS APPROPRIATE
DO NOT COMPLETE THE APPLICATION BENCHMARK UNTIL THIS CASE HAS BEEN PRE-APPROVED FOR PRESENTATION TO CLIENT.
Application Forms No action needed at this stage as we are going to send the
case for pre-approval first
SENDING THE CASE FOR PRE-APPROVAL
CLICK BACK CLICK ON THE UNDERLINED CASE NAME This will take you to the Case Summary screen
IN THE OUTSTANDING TASKS TABLE (on the top right of the screen) CLICK ON THE DROPDOWN “SUBMIT CASE FOR PRE-APPROVAL”
CLICK “COMPLETE TASK” ADD COMMENTS AS APPROPRIATE CLICK “OK” YOU WOULD NOW WAIT FOR AQ TO COMPLETE THE “PRE-APPROVAL PROCESS COMPLETED” TASK
CLICK ON THE ‘INTRINSIC LOGO’ TO LEAVE THE CASE
ONCE THE CASES HAS BEEN APPROVED – (You will receive an email from AQ) FOR INFORMATION PURPOSES ONLY This is towards the top of the screen (next to the “Details” tab that you are currently working in)
SELECT CLIENT SELECT ADVICE PROCESSES SELECT CASE
FPA Delegate Workbook Feb 2016 V 3 38
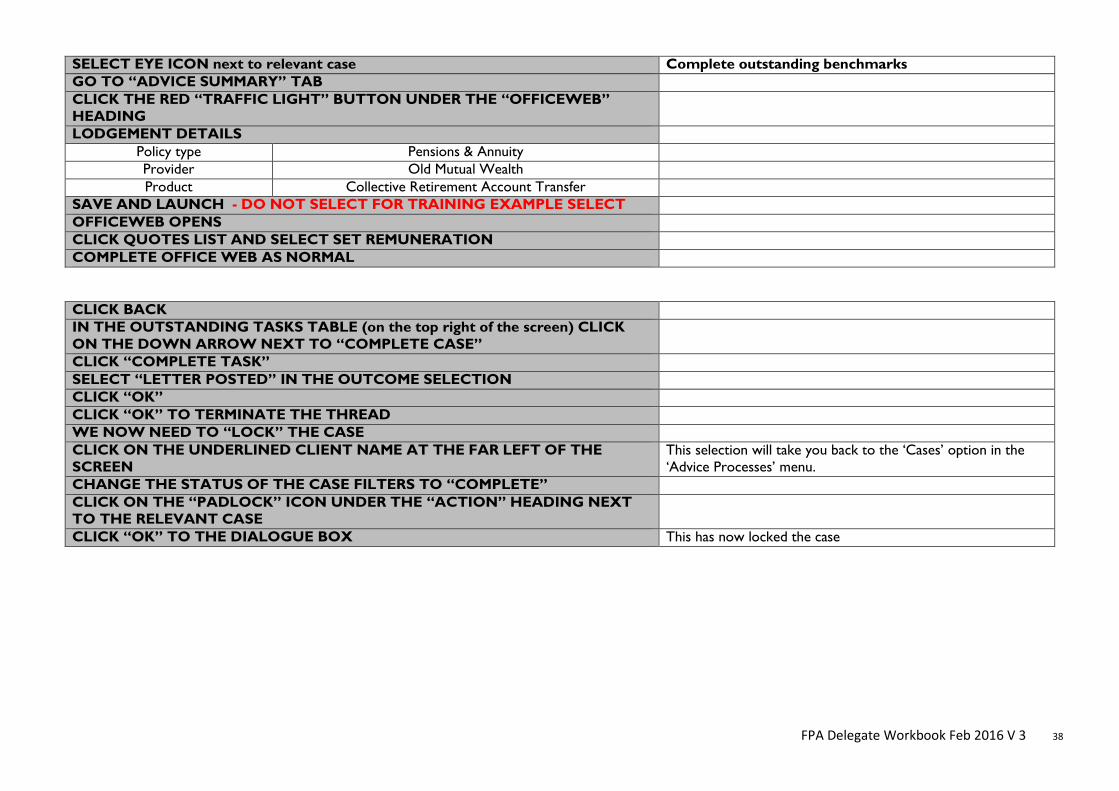
SELECT EYE ICON next to relevant case Complete outstanding benchmarks GO TO “ADVICE SUMMARY” TAB CLICK THE RED “TRAFFIC LIGHT” BUTTON UNDER THE “OFFICEWEB” HEADING
LODGEMENT DETAILS Policy type Pensions & Annuity Provider Old Mutual Wealth Product Collective Retirement Account Transfer
SAVE AND LAUNCH - DO NOT SELECT FOR TRAINING EXAMPLE SELECT OFFICEWEB OPENS CLICK QUOTES LIST AND SELECT SET REMUNERATION COMPLETE OFFICE WEB AS NORMAL
CLICK BACK IN THE OUTSTANDING TASKS TABLE (on the top right of the screen) CLICK ON THE DOWN ARROW NEXT TO “COMPLETE CASE”
CLICK “COMPLETE TASK” SELECT “LETTER POSTED” IN THE OUTCOME SELECTION CLICK “OK” CLICK “OK” TO TERMINATE THE THREAD WE NOW NEED TO “LOCK” THE CASE CLICK ON THE UNDERLINED CLIENT NAME AT THE FAR LEFT OF THE SCREEN
This selection will take you back to the ‘Cases’ option in the ‘Advice Processes’ menu.
CHANGE THE STATUS OF THE CASE FILTERS TO “COMPLETE” CLICK ON THE “PADLOCK” ICON UNDER THE “ACTION” HEADING NEXT TO THE RELEVANT CASE
CLICK “OK” TO THE DIALOGUE BOX This has now locked the case
FPA Delegate Workbook Feb 2016 V 3 39
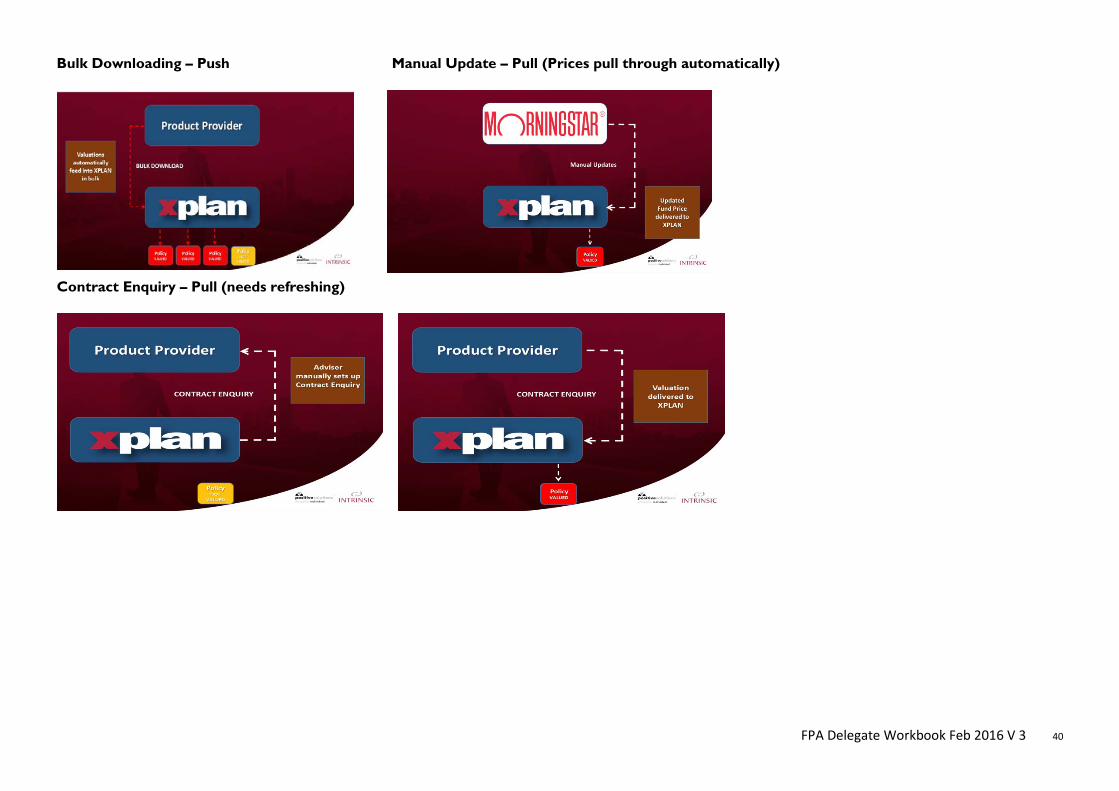
Valuation Services and Portfolio Accounts There are different types of Valuation Services - Bulk Download, Contract Enquiry and Manual updates Think of these in terms of ‘Pushing and Pulling’: • Bulk Downloads - Data is automatically pushed into XPLAN from providers who send down a client specific Portfolio Accounts, which, when linked to the
relevant client’s asset/plan, will value accordingly from that day forward. (Note when you first run Bulk downloads it might take a while to download all
the valuations please be patient).
• Contract Enquiries – here the XPLAN user requests fund values from a provider which are then pulled into a user generated Portfolio Account within
XPLAN which is kept up to date by “refreshing”. Refreshing can be done per client or provider.
• Manual Updates – XPLAN pulls fund prices from Morningstar (Using Fund name or ISIN, SEDOL or MEX codes) into a user generated Portfolio account.
(WARNING this method does not update number of Units on the fund only the fund price. The number of units will have to be manually
adjusted). Fund prices are updated automatically every day.
This guide looks at portfolio accounts (creating them where required, inputting plan information and linking them both together to provide a client Valuation Service). Although this was covered briefly in the first round of training, it is crucial to understanding how this valuation service works.
FPA Delegate Workbook Feb 2016 V 3 40
Bulk Downloading – Push Manual Update – Pull (Prices pull through automatically)
Contract Enquiry – Pull (needs refreshing)

FPA Delegate Workbook Feb 2016 V 3 41
Valuing Assets – an Overview TWO sections of XPLAN are involved in valuing assets:
• One is ‘Portfolios’; and the other is • Client Details>Existing Arrangements.
Both of these headings are within the Client Menu down the left hand side of the screen. Portfolio Accounts A Portfolio Account is a container that holds the fund information which can then be linked to a client’s asset or plan in order to obtain up to date values. This link can be manually unlinked/re-linked to other plans/assets if required. Portfolio Accounts allow for investment holdings to be separated and categorised. Imagine a client has an NISA, two OEICS and two Personal Pensions and each asset has five funds within it. That’s 25 funds in total! Trying to link the asset to the right funds from a list of 25 could be difficult. However, if all those funds were held within their own portfolio account then there’d only be five appropriately named portfolio accounts to link to the five plans. A Bulk downloaded portfolio already comes named by the Provider, a Contract Enquiry portfolio account can be renamed to suit – i.e. Mr Smith’s AVIVA ISA, Mr Smith’s Old Mutual OEIC etc. It’s much easier to link a Portfolio Account to a Plan (asset) than try to link a Plan to a number of individual funds. The example below demonstrates how to add shares/funds manually – remember you would only add shares/funds if the product provider was not available on either bulk download or contract enquiry.

FPA Delegate Workbook Feb 2016 V 3 42
Harold’s Portfolio Account - Case Study
Harold is single and has invested into an NISA and also has some shares with M&S, BP and Tesco’s. You are collating this information and this exercise will guide you through the process for MANUALLY setting up Portfolio Accounts for both the NISA and his Shares.
CLICK ADD – ADD CLIENT WIZARD – ADD PRIVATE CLIENT DO NOT TICK “CLIENT HAS A PARTNER” CLICK “NEXT” PERSONAL DETAILS – ENTER PERSONAL DETAILS
Title Mr Forename Harold Surname Your Surname plus 3 random letters Gender Male
Date of Birth 18/01/1969 Marital Status Single
COMMUNICATION PREFERENCES Email Communication Yes Mail Communication Yes Phone Communication No SMS Communication No ADDRESS – CLICK “ADD”
Type Residential Status Owner Occupied
House Name/No. 2 Postcode EC4V 4GG
Street Name Lambeth Hill Town London
Country United Kingdom Preferred Yes
Address more than 3 years Yes CLICK SAVE CONTACT DETAILS – CLICK “ADD”
Type Home Email Detail [email protected]
Preferred Yes Marketing preference Opt In
CLICK SAVE

FPA Delegate Workbook Feb 2016 V 3 43
EMPLOYMENT Status Employed
Occupation Accountant Job Title Corporate Accountant
Type Full-time Main Occupation Yes
CLIENT NOTES Client Notes NONE CLICK SAVE & EXIT– THIS WILL TAKE YOU TO THE CLIENT MENU
This completes adding this client into XPLAN. To add a Portfolio Account for this client, go to PORTFOLIOS/Portfolios/Position in the left hand client menu. SELECT “PORTFOLIO” FROM LEFT HAND MENU SELECT “PORTFOLIO” SELECT “POSITION” From within Portfolios>Portfolio>Position Click Add:
Click on Account from the options in Add. An Edit Account Details window now opens; we only need to concern ourselves with the box Account Details box that is labelled ‘Account:’
Account: The default wording inside is ‘New Account’ Rename the account to “Harold’s Hargreaves Lansdown NISA Portfolio” NOTE: When linking this portfolio account to the Plan (asset) the user will be presented with a list of available portfolio accounts to select from which will be difficult unless renamed appropriately as part of the process.
Click OK
This will save the Portfolio Account.
The screen will return to Portfolios>Portfolio>Position
In the Filter Option for Holdings Overview area, click on the drop-down labelled ‘Portfolio Account:’ (may show a default statement of ‘View All’) to see that there will be a new portfolio account listed (Harold’s Hargreaves Lansdown NISA Portfolio).
Click on “Harold’s Hargreaves Lansdown NISA Portfolio” to select
Harold’s Hargreaves Lansdown NISA Portfolio is now shown in the Portfolio Account drop-down window. There will be no fund data within the portfolio account. (It is important that you select the right portfolio account to update)
Holding Overview Section Once fund data has been added it will appear in this area.
FPA Delegate Workbook Feb 2016 V 3 44
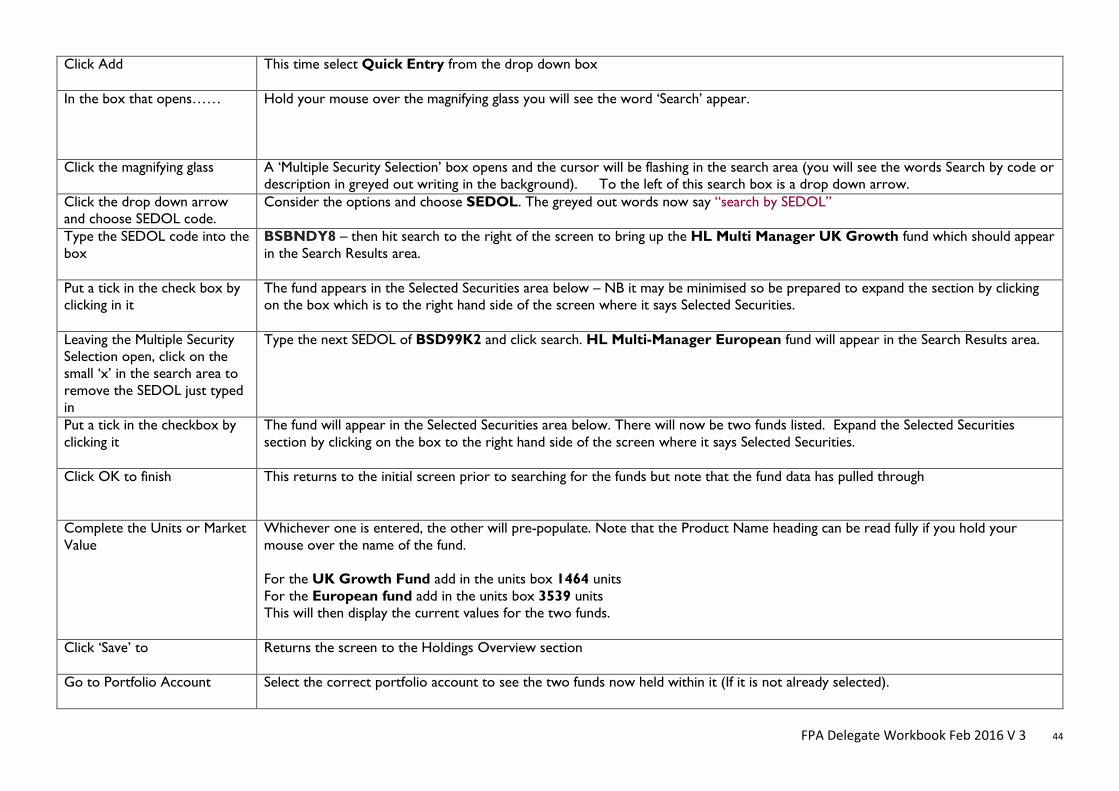
Click Add This time select Quick Entry from the drop down box
In the box that opens…… Hold your mouse over the magnifying glass you will see the word ‘Search’ appear.
Click the magnifying glass
A ‘Multiple Security Selection’ box opens and the cursor will be flashing in the search area (you will see the words Search by code or description in greyed out writing in the background). To the left of this search box is a drop down arrow.
Click the drop down arrow and choose SEDOL code.
Consider the options and choose SEDOL. The greyed out words now say “search by SEDOL”
Type the SEDOL code into the box
BSBNDY8 – then hit search to the right of the screen to bring up the HL Multi Manager UK Growth fund which should appear in the Search Results area.
Put a tick in the check box by clicking in it
The fund appears in the Selected Securities area below – NB it may be minimised so be prepared to expand the section by clicking on the box which is to the right hand side of the screen where it says Selected Securities.
Leaving the Multiple Security Selection open, click on the small ‘x’ in the search area to remove the SEDOL just typed in
Type the next SEDOL of BSD99K2 and click search. HL Multi-Manager European fund will appear in the Search Results area.
Put a tick in the checkbox by clicking it
The fund will appear in the Selected Securities area below. There will now be two funds listed. Expand the Selected Securities section by clicking on the box to the right hand side of the screen where it says Selected Securities.
Click OK to finish This returns to the initial screen prior to searching for the funds but note that the fund data has pulled through
Complete the Units or Market Value
Whichever one is entered, the other will pre-populate. Note that the Product Name heading can be read fully if you hold your mouse over the name of the fund. For the UK Growth Fund add in the units box 1464 units For the European fund add in the units box 3539 units This will then display the current values for the two funds.
Click ‘Save’ to Returns the screen to the Holdings Overview section
Go to Portfolio Account Select the correct portfolio account to see the two funds now held within it (If it is not already selected).
FPA Delegate Workbook Feb 2016 V 3 45
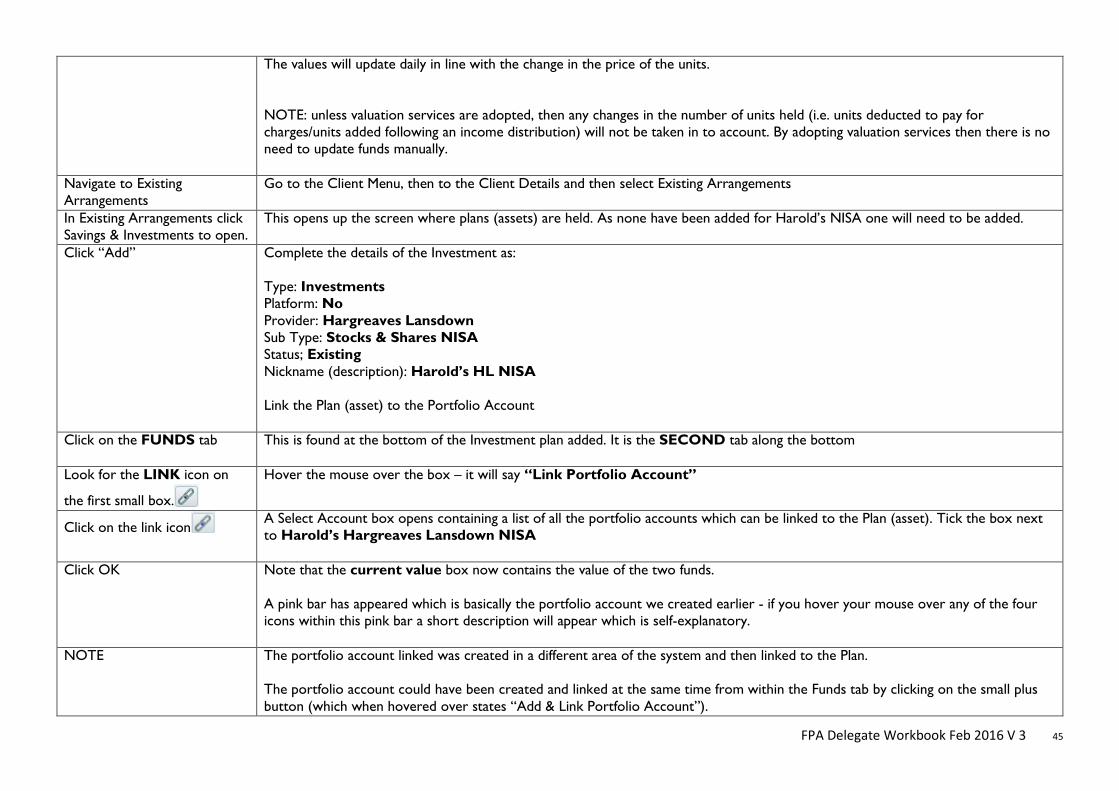
The values will update daily in line with the change in the price of the units. NOTE: unless valuation services are adopted, then any changes in the number of units held (i.e. units deducted to pay for charges/units added following an income distribution) will not be taken in to account. By adopting valuation services then there is no need to update funds manually.
Navigate to Existing Arrangements
Go to the Client Menu, then to the Client Details and then select Existing Arrangements
In Existing Arrangements click Savings & Investments to open.
This opens up the screen where plans (assets) are held. As none have been added for Harold’s NISA one will need to be added.
Click “Add” Complete the details of the Investment as: Type: Investments Platform: No Provider: Hargreaves Lansdown Sub Type: Stocks & Shares NISA Status; Existing Nickname (description): Harold’s HL NISA Link the Plan (asset) to the Portfolio Account
Click on the FUNDS tab This is found at the bottom of the Investment plan added. It is the SECOND tab along the bottom
Look for the LINK icon on
the first small box.
Hover the mouse over the box – it will say “Link Portfolio Account”
Click on the link icon A Select Account box opens containing a list of all the portfolio accounts which can be linked to the Plan (asset). Tick the box next to Harold’s Hargreaves Lansdown NISA
Click OK Note that the current value box now contains the value of the two funds. A pink bar has appeared which is basically the portfolio account we created earlier - if you hover your mouse over any of the four icons within this pink bar a short description will appear which is self-explanatory.
NOTE The portfolio account linked was created in a different area of the system and then linked to the Plan. The portfolio account could have been created and linked at the same time from within the Funds tab by clicking on the small plus button (which when hovered over states “Add & Link Portfolio Account”).
FPA Delegate Workbook Feb 2016 V 3 46
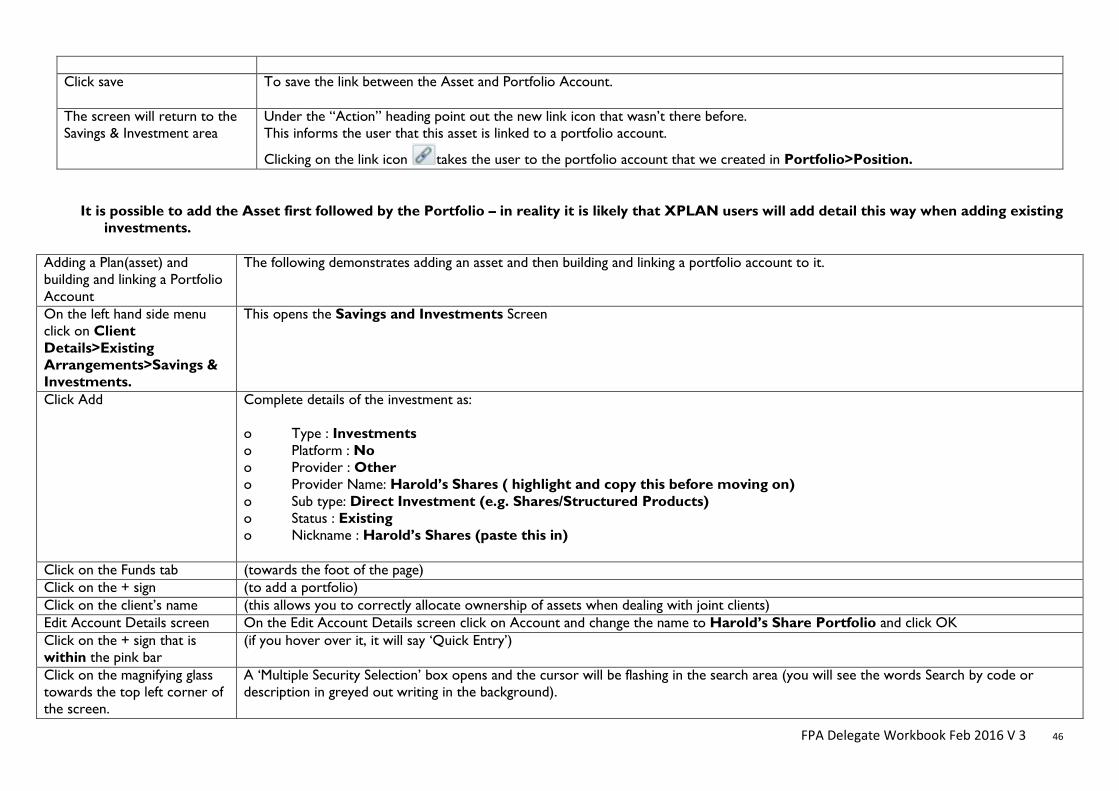
Click save To save the link between the Asset and Portfolio Account.
The screen will return to the Savings & Investment area
Under the “Action” heading point out the new link icon that wasn’t there before. This informs the user that this asset is linked to a portfolio account.
Clicking on the link icon takes the user to the portfolio account that we created in Portfolio>Position. It is possible to add the Asset first followed by the Portfolio – in reality it is likely that XPLAN users will add detail this way when adding existing
investments.
Adding a Plan(asset) and building and linking a Portfolio Account
The following demonstrates adding an asset and then building and linking a portfolio account to it.
On the left hand side menu click on Client Details>Existing Arrangements>Savings & Investments.
This opens the Savings and Investments Screen
Click Add Complete details of the investment as: o Type : Investments o Platform : No o Provider : Other o Provider Name: Harold’s Shares ( highlight and copy this before moving on) o Sub type: Direct Investment (e.g. Shares/Structured Products) o Status : Existing o Nickname : Harold’s Shares (paste this in)
Click on the Funds tab (towards the foot of the page) Click on the + sign (to add a portfolio) Click on the client’s name (this allows you to correctly allocate ownership of assets when dealing with joint clients) Edit Account Details screen On the Edit Account Details screen click on Account and change the name to Harold’s Share Portfolio and click OK Click on the + sign that is within the pink bar
(if you hover over it, it will say ‘Quick Entry’)
Click on the magnifying glass towards the top left corner of the screen.
A ‘Multiple Security Selection’ box opens and the cursor will be flashing in the search area (you will see the words Search by code or description in greyed out writing in the background).
FPA Delegate Workbook Feb 2016 V 3 47
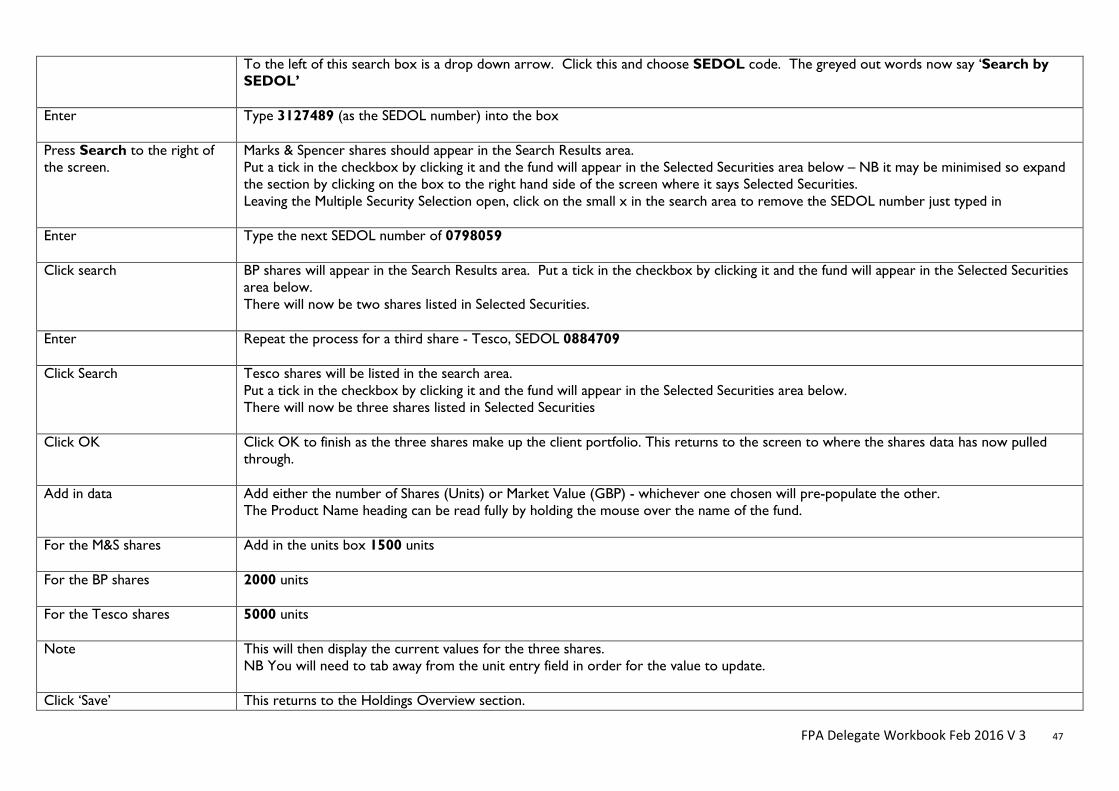
To the left of this search box is a drop down arrow. Click this and choose SEDOL code. The greyed out words now say ‘Search by SEDOL’
Enter Type 3127489 (as the SEDOL number) into the box
Press Search to the right of the screen.
Marks & Spencer shares should appear in the Search Results area. Put a tick in the checkbox by clicking it and the fund will appear in the Selected Securities area below – NB it may be minimised so expand the section by clicking on the box to the right hand side of the screen where it says Selected Securities. Leaving the Multiple Security Selection open, click on the small x in the search area to remove the SEDOL number just typed in
Enter Type the next SEDOL number of 0798059
Click search BP shares will appear in the Search Results area. Put a tick in the checkbox by clicking it and the fund will appear in the Selected Securities area below. There will now be two shares listed in Selected Securities.
Enter Repeat the process for a third share - Tesco, SEDOL 0884709
Click Search Tesco shares will be listed in the search area. Put a tick in the checkbox by clicking it and the fund will appear in the Selected Securities area below. There will now be three shares listed in Selected Securities
Click OK Click OK to finish as the three shares make up the client portfolio. This returns to the screen to where the shares data has now pulled through.
Add in data Add either the number of Shares (Units) or Market Value (GBP) - whichever one chosen will pre-populate the other. The Product Name heading can be read fully by holding the mouse over the name of the fund.
For the M&S shares Add in the units box 1500 units
For the BP shares 2000 units
For the Tesco shares 5000 units
Note
This will then display the current values for the three shares. NB You will need to tab away from the unit entry field in order for the value to update.
Click ‘Save’ This returns to the Holdings Overview section.
FPA Delegate Workbook Feb 2016 V 3 48
Click Save again This returns to the Savings and Investments screen
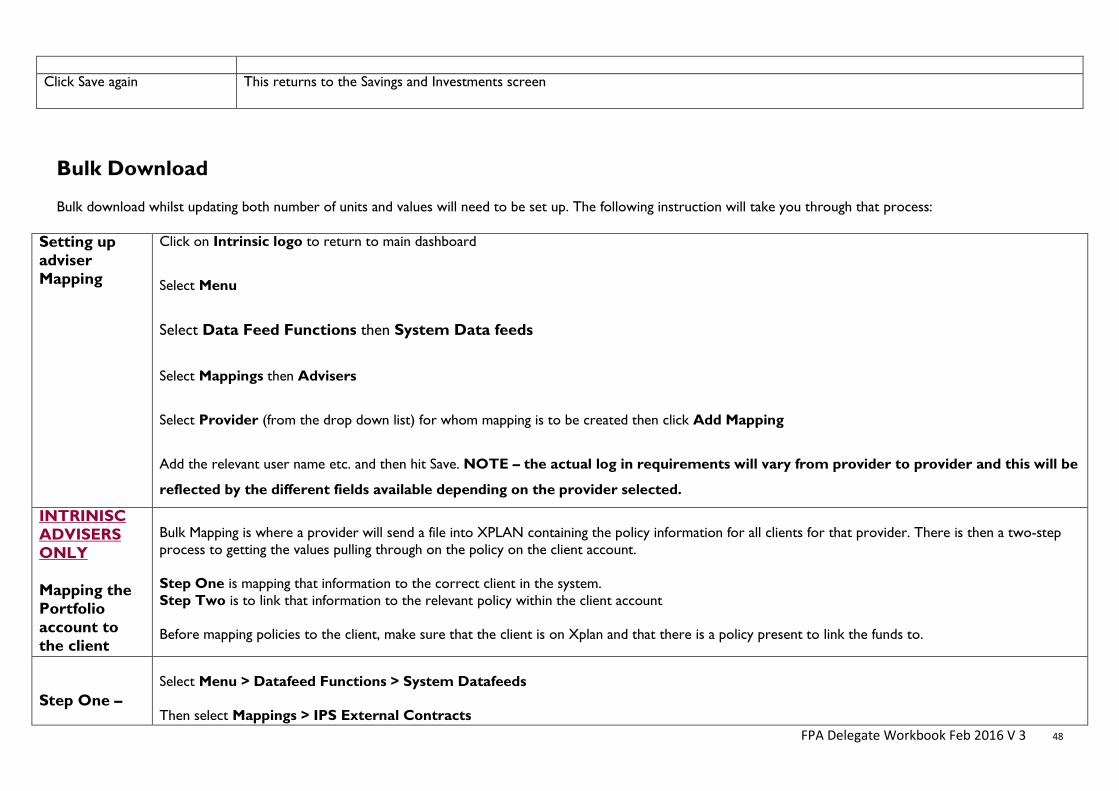
Bulk Download Bulk download whilst updating both number of units and values will need to be set up. The following instruction will take you through that process:
Setting up adviser Mapping
Click on Intrinsic logo to return to main dashboard
Select Menu
Select Data Feed Functions then System Data feeds
Select Mappings then Advisers
Select Provider (from the drop down list) for whom mapping is to be created then click Add Mapping
Add the relevant user name etc. and then hit Save. NOTE – the actual log in requirements will vary from provider to provider and this will be
reflected by the different fields available depending on the provider selected.
INTRINISC ADVISERS ONLY
Mapping the Portfolio account to the client
Bulk Mapping is where a provider will send a file into XPLAN containing the policy information for all clients for that provider. There is then a two-step process to getting the values pulling through on the policy on the client account. Step One is mapping that information to the correct client in the system. Step Two is to link that information to the relevant policy within the client account Before mapping policies to the client, make sure that the client is on Xplan and that there is a policy present to link the funds to.
Step One –
Select Menu > Datafeed Functions > System Datafeeds Then select Mappings > IPS External Contracts

FPA Delegate Workbook Feb 2016 V 3 49
Mapping Information to the correct client.
Search by the name or policy number. Select the provider from the dropdown menu and select the listing option (Unmapped, Mapped or All). If you don’t select a listing option, no list will be returned. Also, don’t select an adviser unless you are only searching for policies that have already been mapped as many unmapped policies will not be linked to an adviser on this screen. This will then list the policy information received from the provider. Next, you tick the box next to the policy you want to map. Then, click on the downward arrow next to the tick box and select MAP. This will then take you through to the Remap An IPS External Account ID screen. This allows you to select the client to map the policy to. Clicking on the magnifying glass will allow you to search for the appropriate client. In the search box type the clients name, starting with the surname, then press enter. DO NOT tick the new client button as this will send the policy to the wrong place. After Selecting the client, click Ok and then click Save in the top right hand corner. This will take you back to the unmapped policies list.
Step Two – Linking Information to the correct policy.
At this time, we have mapped the policy information to the client, but the value hasn’t been linked to the appropriate policy/asset in the system as yet. To do this, you will need to go to the client profile and select Client Details > Existing Arrangements Click on the ‘pencil’ next to the policy. Scroll Down and click on the Funds tab. Then click on the ‘Chain’ to link Account/Funds to the policy. This will then bring a list of policies we have mapped, initially, to the client. Select the correct account and click OK. You will now be able to see the funds and their values under the funds tab. Scroll to the top of the screen and click Save. The ‘Chain’ next to the provider name indicates that the account has been linked to the policy. This will update the Current Value on the right.
Contract Enquiry As with many aspects of XPLAN, there are a number of ways to set up the Contract Enquiry link. The following instructions take you through just one of those methods:
CLICK “INTRINSIC LOGO” to return to Global Dashboard SELECT the relevant client to go to Client Menu
FPA Delegate Workbook Feb 2016 V 3 50
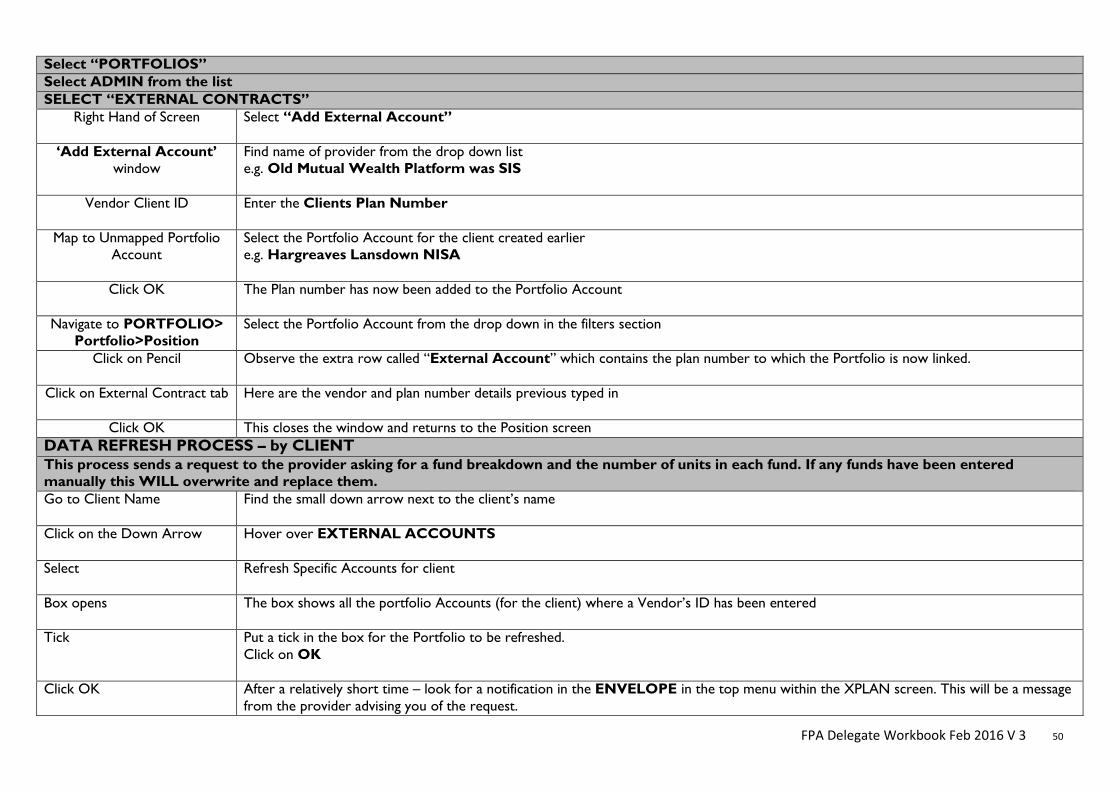
Select “PORTFOLIOS” Select ADMIN from the list SELECT “EXTERNAL CONTRACTS”
Right Hand of Screen Select “Add External Account”
‘Add External Account’ window
Find name of provider from the drop down list e.g. Old Mutual Wealth Platform was SIS
Vendor Client ID Enter the Clients Plan Number
Map to Unmapped Portfolio Account
Select the Portfolio Account for the client created earlier e.g. Hargreaves Lansdown NISA
Click OK The Plan number has now been added to the Portfolio Account
Navigate to PORTFOLIO> Portfolio>Position
Select the Portfolio Account from the drop down in the filters section
Click on Pencil Observe the extra row called “External Account” which contains the plan number to which the Portfolio is now linked.
Click on External Contract tab Here are the vendor and plan number details previous typed in
Click OK This closes the window and returns to the Position screen DATA REFRESH PROCESS – by CLIENT This process sends a request to the provider asking for a fund breakdown and the number of units in each fund. If any funds have been entered manually this WILL overwrite and replace them. Go to Client Name Find the small down arrow next to the client’s name
Click on the Down Arrow Hover over EXTERNAL ACCOUNTS
Select Refresh Specific Accounts for client
Box opens The box shows all the portfolio Accounts (for the client) where a Vendor’s ID has been entered
Tick Put a tick in the box for the Portfolio to be refreshed.
Click on OK
Click OK After a relatively short time – look for a notification in the ENVELOPE in the top menu within the XPLAN screen. This will be a message from the provider advising you of the request.
FPA Delegate Workbook Feb 2016 V 3 51
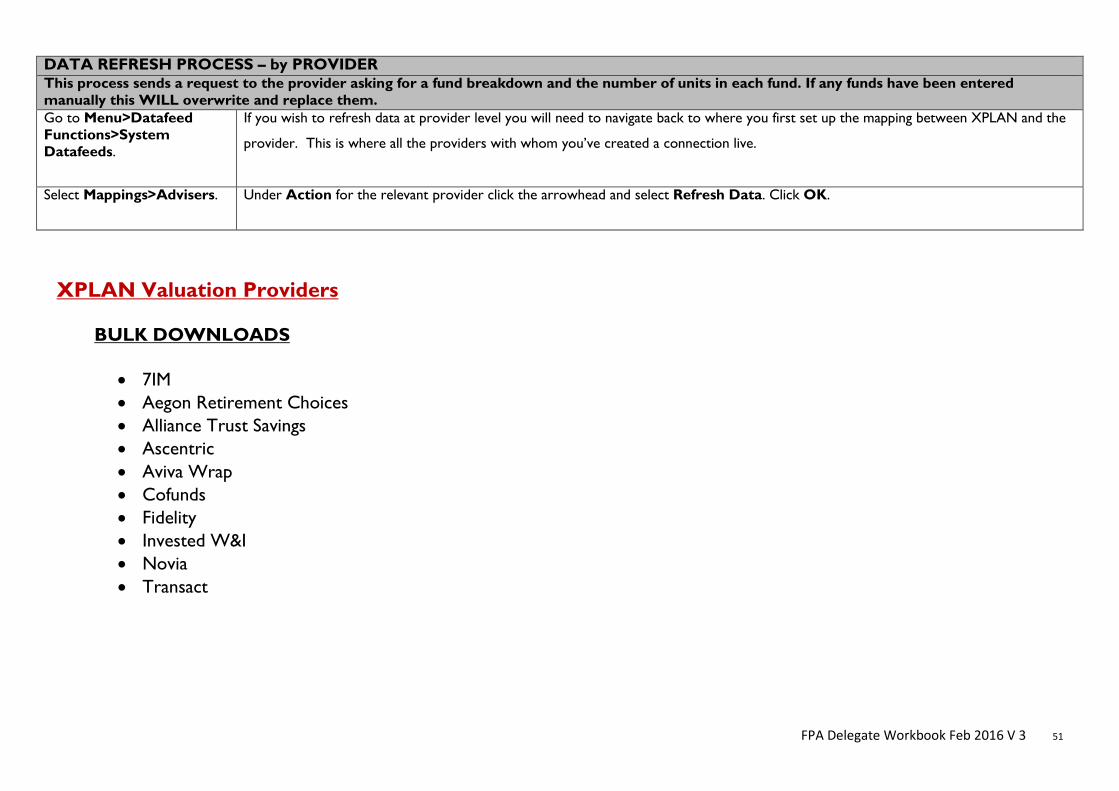
DATA REFRESH PROCESS – by PROVIDER This process sends a request to the provider asking for a fund breakdown and the number of units in each fund. If any funds have been entered manually this WILL overwrite and replace them. Go to Menu>Datafeed Functions>System Datafeeds.
If you wish to refresh data at provider level you will need to navigate back to where you first set up the mapping between XPLAN and the
provider. This is where all the providers with whom you’ve created a connection live.
Select Mappings>Advisers. Under Action for the relevant provider click the arrowhead and select Refresh Data. Click OK.
XPLAN Valuation Providers BULK DOWNLOADS
• 7IM • Aegon Retirement Choices • Alliance Trust Savings • Ascentric • Aviva Wrap • Cofunds • Fidelity • Invested W&I • Novia • Transact
FPA Delegate Workbook Feb 2016 V 3 52
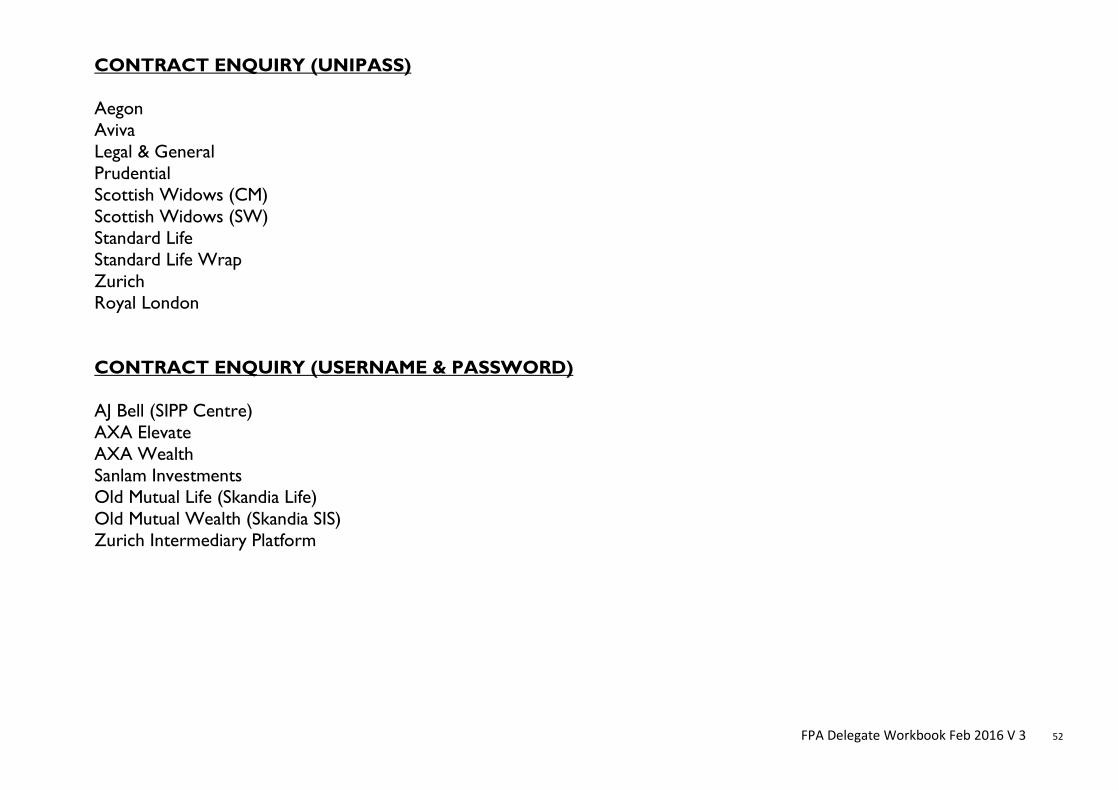
CONTRACT ENQUIRY (UNIPASS) Aegon Aviva Legal & General Prudential Scottish Widows (CM) Scottish Widows (SW) Standard Life Standard Life Wrap Zurich Royal London CONTRACT ENQUIRY (USERNAME & PASSWORD) AJ Bell (SIPP Centre) AXA Elevate AXA Wealth Sanlam Investments Old Mutual Life (Skandia Life) Old Mutual Wealth (Skandia SIS) Zurich Intermediary Platform
FPA Delegate Workbook Feb 2016 V 3 53
Valuations and Portfolios
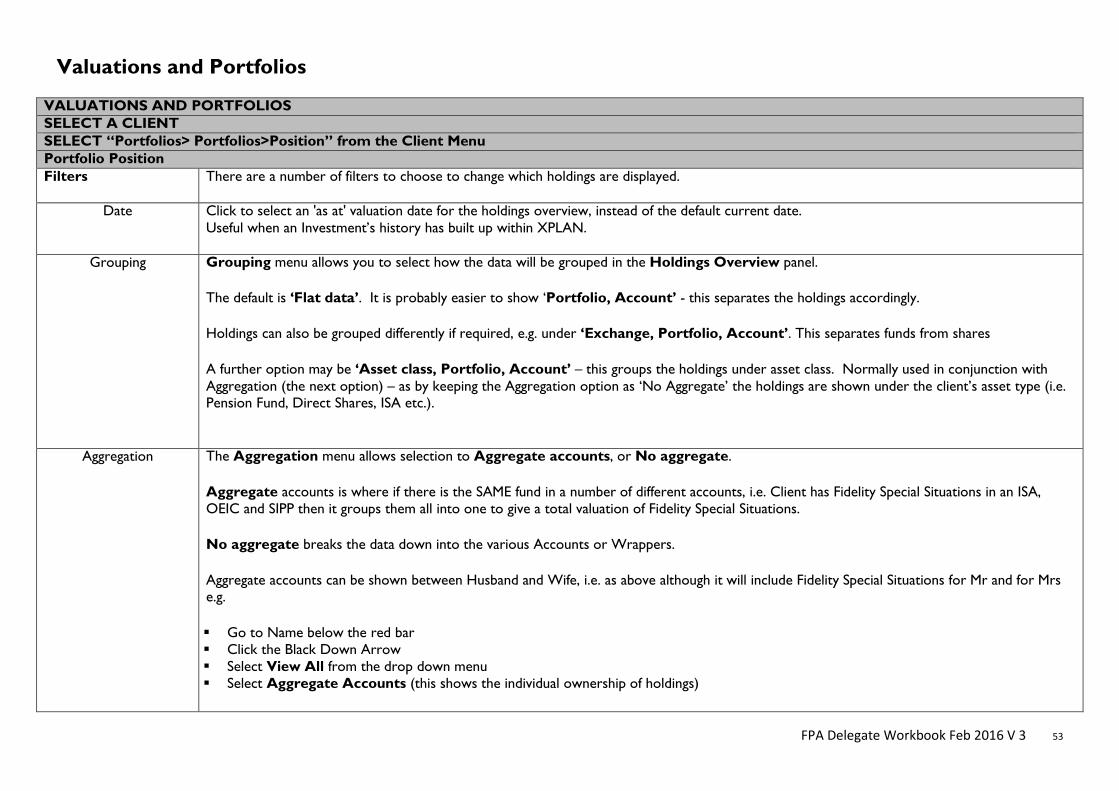
VALUATIONS AND PORTFOLIOS SELECT A CLIENT SELECT “Portfolios> Portfolios>Position” from the Client Menu Portfolio Position Filters There are a number of filters to choose to change which holdings are displayed.
Date Click to select an 'as at' valuation date for the holdings overview, instead of the default current date.
Useful when an Investment’s history has built up within XPLAN.
Grouping Grouping menu allows you to select how the data will be grouped in the Holdings Overview panel.
The default is ‘Flat data’. It is probably easier to show ‘Portfolio, Account’ - this separates the holdings accordingly.
Holdings can also be grouped differently if required, e.g. under ‘Exchange, Portfolio, Account’. This separates funds from shares
A further option may be ‘Asset class, Portfolio, Account’ – this groups the holdings under asset class. Normally used in conjunction with Aggregation (the next option) – as by keeping the Aggregation option as ‘No Aggregate’ the holdings are shown under the client’s asset type (i.e. Pension Fund, Direct Shares, ISA etc.).
Aggregation The Aggregation menu allows selection to Aggregate accounts, or No aggregate.
Aggregate accounts is where if there is the SAME fund in a number of different accounts, i.e. Client has Fidelity Special Situations in an ISA, OEIC and SIPP then it groups them all into one to give a total valuation of Fidelity Special Situations.
No aggregate breaks the data down into the various Accounts or Wrappers.
Aggregate accounts can be shown between Husband and Wife, i.e. as above although it will include Fidelity Special Situations for Mr and for Mrs e.g.
Go to Name below the red bar Click the Black Down Arrow Select View All from the drop down menu Select Aggregate Accounts (this shows the individual ownership of holdings)
FPA Delegate Workbook Feb 2016 V 3 54
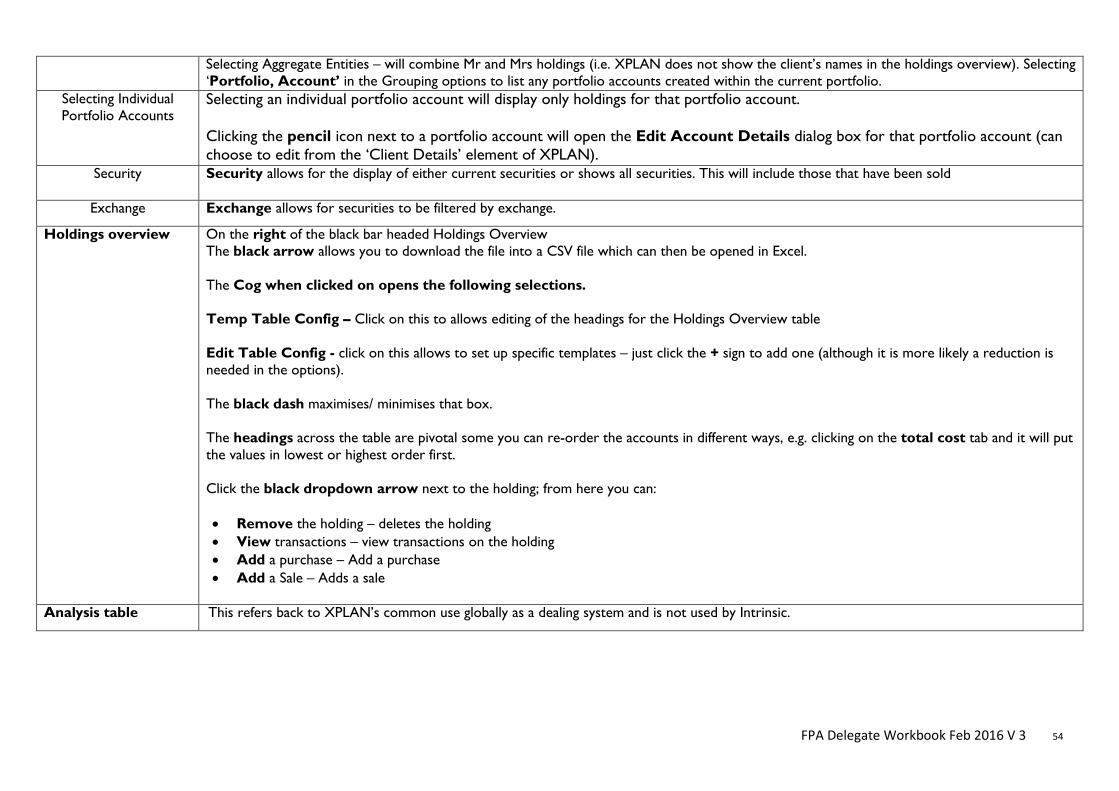
Selecting Aggregate Entities – will combine Mr and Mrs holdings (i.e. XPLAN does not show the client’s names in the holdings overview). Selecting ‘Portfolio, Account’ in the Grouping options to list any portfolio accounts created within the current portfolio.
Selecting Individual Portfolio Accounts
Selecting an individual portfolio account will display only holdings for that portfolio account.
Clicking the pencil icon next to a portfolio account will open the Edit Account Details dialog box for that portfolio account (can choose to edit from the ‘Client Details’ element of XPLAN).
Security Security allows for the display of either current securities or shows all securities. This will include those that have been sold
Exchange Exchange allows for securities to be filtered by exchange.
Holdings overview On the right of the black bar headed Holdings Overview The black arrow allows you to download the file into a CSV file which can then be opened in Excel. The Cog when clicked on opens the following selections. Temp Table Config – Click on this to allows editing of the headings for the Holdings Overview table Edit Table Config - click on this allows to set up specific templates – just click the + sign to add one (although it is more likely a reduction is needed in the options). The black dash maximises/ minimises that box. The headings across the table are pivotal some you can re-order the accounts in different ways, e.g. clicking on the total cost tab and it will put the values in lowest or highest order first. Click the black dropdown arrow next to the holding; from here you can: • Remove the holding – deletes the holding • View transactions – view transactions on the holding • Add a purchase – Add a purchase • Add a Sale – Adds a sale
Analysis table This refers back to XPLAN’s common use globally as a dealing system and is not used by Intrinsic.
FPA Delegate Workbook Feb 2016 V 3 55
Reporting
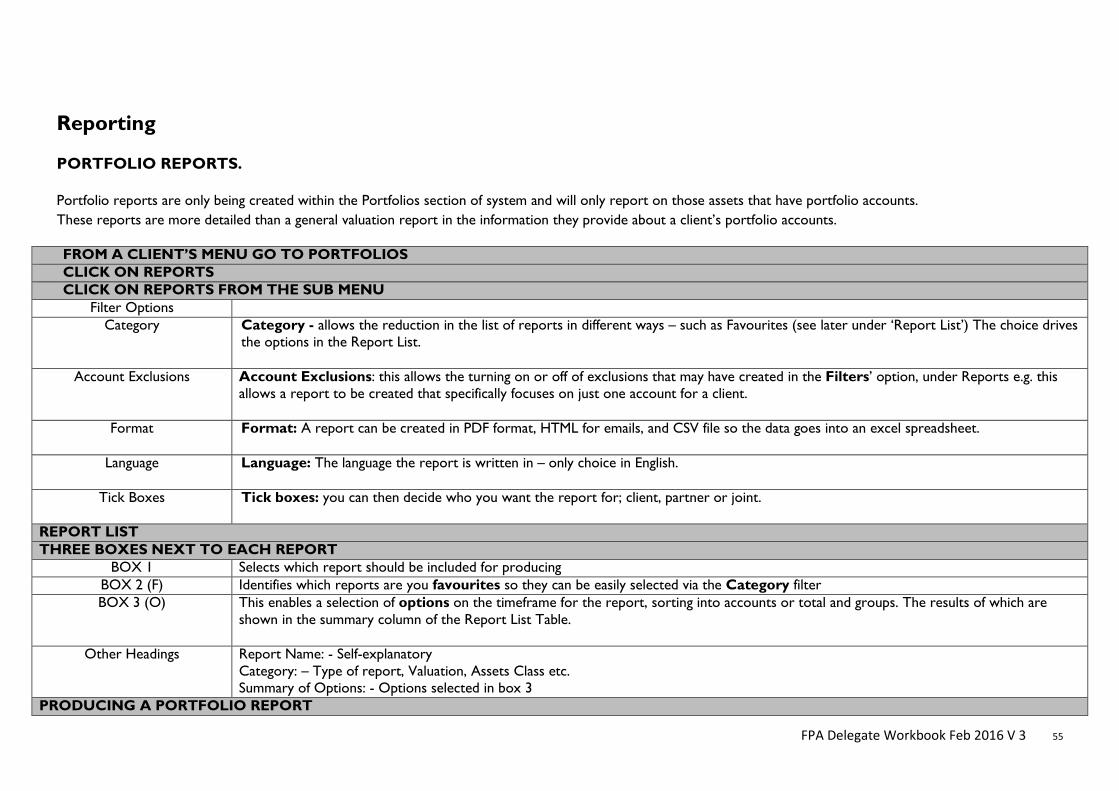
PORTFOLIO REPORTS.
Portfolio reports are only being created within the Portfolios section of system and will only report on those assets that have portfolio accounts. These reports are more detailed than a general valuation report in the information they provide about a client’s portfolio accounts. FROM A CLIENT’S MENU GO TO PORTFOLIOS CLICK ON REPORTS CLICK ON REPORTS FROM THE SUB MENU
Filter Options Category Category - allows the reduction in the list of reports in different ways – such as Favourites (see later under ‘Report List’) The choice drives
the options in the Report List.
Account Exclusions Account Exclusions: this allows the turning on or off of exclusions that may have created in the Filters’ option, under Reports e.g. this allows a report to be created that specifically focuses on just one account for a client.
Format Format: A report can be created in PDF format, HTML for emails, and CSV file so the data goes into an excel spreadsheet.
Language Language: The language the report is written in – only choice in English.
Tick Boxes Tick boxes: you can then decide who you want the report for; client, partner or joint.
REPORT LIST THREE BOXES NEXT TO EACH REPORT
BOX 1 Selects which report should be included for producing BOX 2 (F) Identifies which reports are you favourites so they can be easily selected via the Category filter BOX 3 (O) This enables a selection of options on the timeframe for the report, sorting into accounts or total and groups. The results of which are
shown in the summary column of the Report List Table.
Other Headings Report Name: - Self-explanatory Category: – Type of report, Valuation, Assets Class etc. Summary of Options: - Options selected in box 3
PRODUCING A PORTFOLIO REPORT
FPA Delegate Workbook Feb 2016 V 3 56
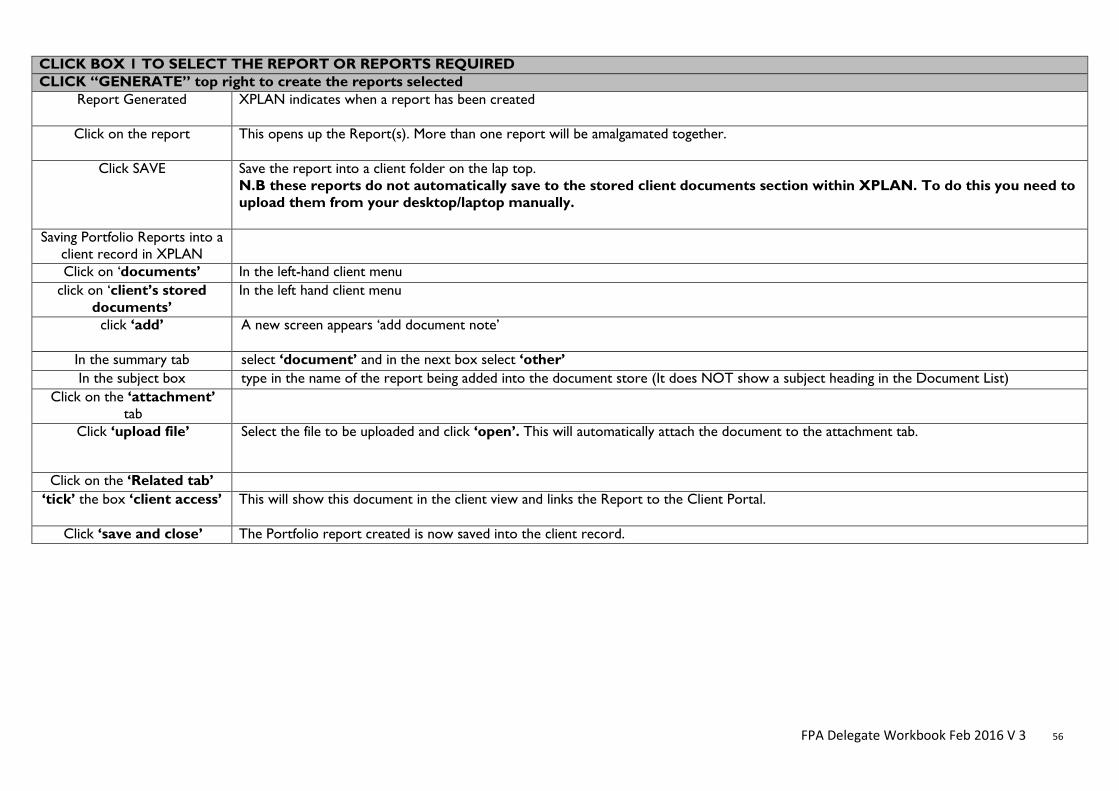
CLICK BOX 1 TO SELECT THE REPORT OR REPORTS REQUIRED CLICK “GENERATE” top right to create the reports selected
Report Generated XPLAN indicates when a report has been created
Click on the report This opens up the Report(s). More than one report will be amalgamated together.
Click SAVE Save the report into a client folder on the lap top. N.B these reports do not automatically save to the stored client documents section within XPLAN. To do this you need to upload them from your desktop/laptop manually.
Saving Portfolio Reports into a client record in XPLAN
Click on ‘documents’ In the left-hand client menu click on ‘client’s stored
documents’ In the left hand client menu
click ‘add’ A new screen appears ‘add document note’
In the summary tab select ‘document’ and in the next box select ‘other’ In the subject box type in the name of the report being added into the document store (It does NOT show a subject heading in the Document List)
Click on the ‘attachment’ tab
Click ‘upload file’ Select the file to be uploaded and click ‘open’. This will automatically attach the document to the attachment tab.
Click on the ‘Related tab’ ‘tick’ the box ‘client access’ This will show this document in the client view and links the Report to the Client Portal.
Click ‘save and close’ The Portfolio report created is now saved into the client record.
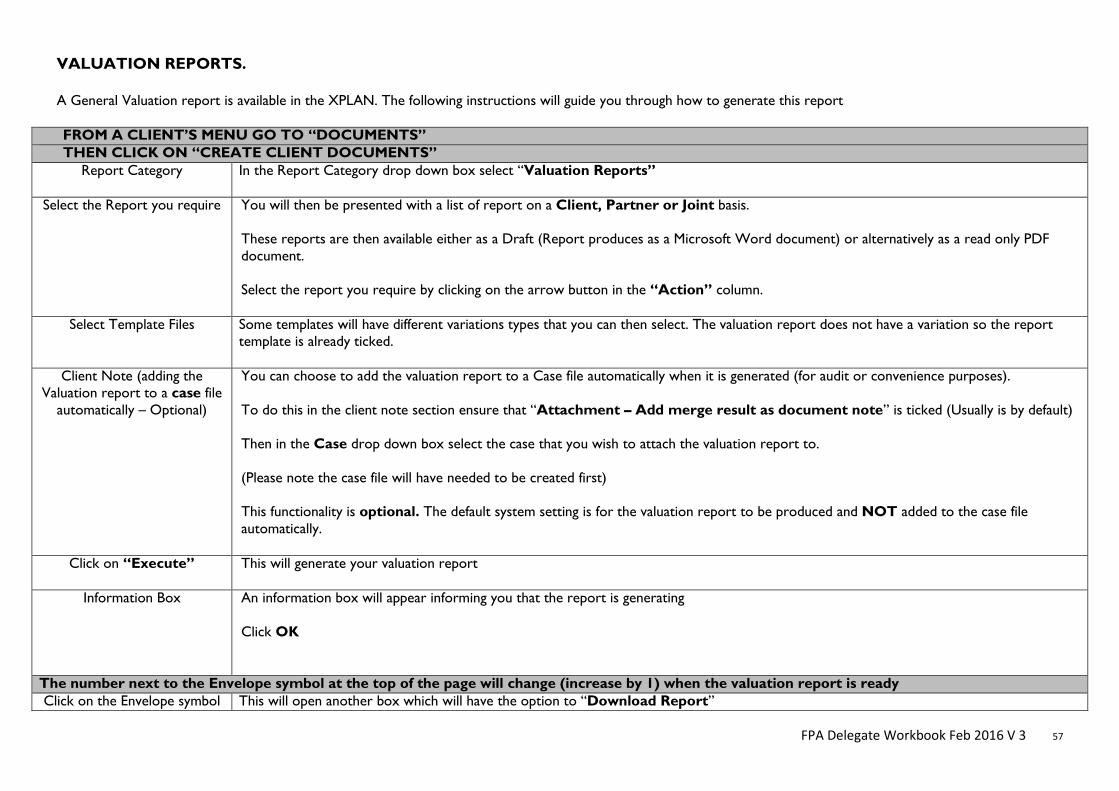
FPA Delegate Workbook Feb 2016 V 3 57
VALUATION REPORTS.
A General Valuation report is available in the XPLAN. The following instructions will guide you through how to generate this report FROM A CLIENT’S MENU GO TO “DOCUMENTS” THEN CLICK ON “CREATE CLIENT DOCUMENTS”
Report Category In the Report Category drop down box select “Valuation Reports”
Select the Report you require You will then be presented with a list of report on a Client, Partner or Joint basis. These reports are then available either as a Draft (Report produces as a Microsoft Word document) or alternatively as a read only PDF document. Select the report you require by clicking on the arrow button in the “Action” column.
Select Template Files Some templates will have different variations types that you can then select. The valuation report does not have a variation so the report template is already ticked.
Client Note (adding the Valuation report to a case file
automatically – Optional)
You can choose to add the valuation report to a Case file automatically when it is generated (for audit or convenience purposes). To do this in the client note section ensure that “Attachment – Add merge result as document note” is ticked (Usually is by default) Then in the Case drop down box select the case that you wish to attach the valuation report to. (Please note the case file will have needed to be created first) This functionality is optional. The default system setting is for the valuation report to be produced and NOT added to the case file automatically.
Click on “Execute” This will generate your valuation report
Information Box An information box will appear informing you that the report is generating Click OK
The number next to the Envelope symbol at the top of the page will change (increase by 1) when the valuation report is ready Click on the Envelope symbol This will open another box which will have the option to “Download Report”
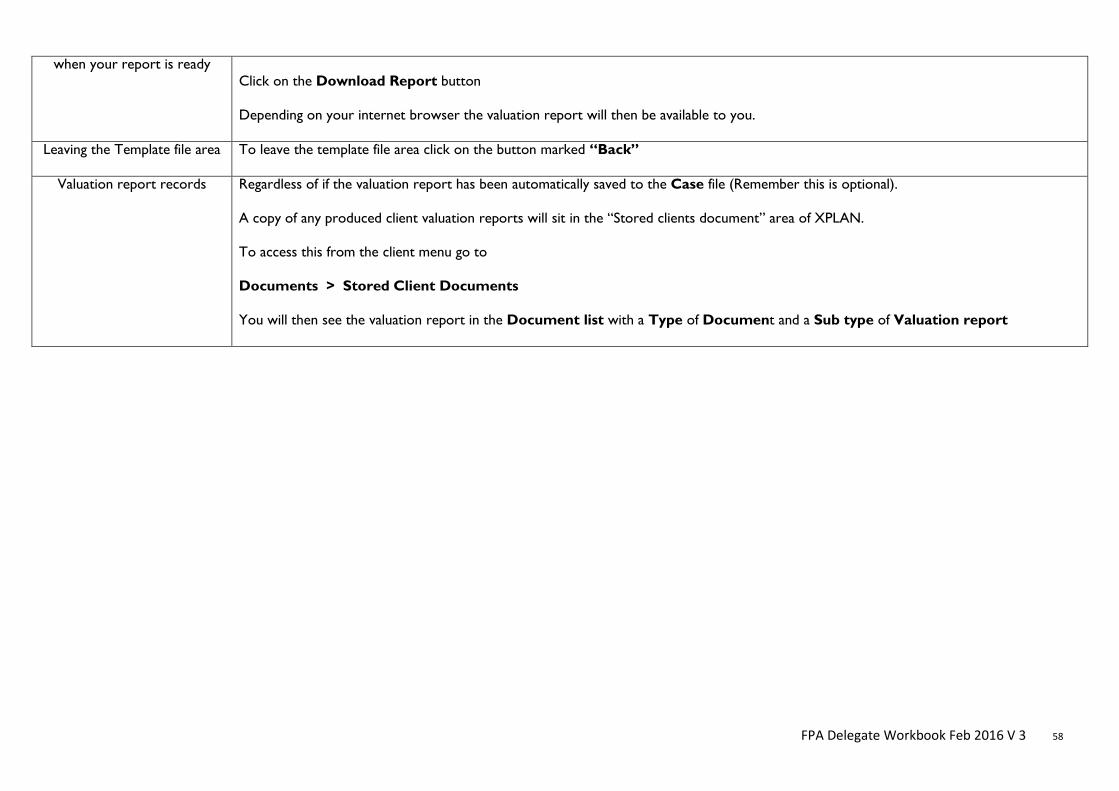
FPA Delegate Workbook Feb 2016 V 3 58
when your report is ready Click on the Download Report button Depending on your internet browser the valuation report will then be available to you.
Leaving the Template file area To leave the template file area click on the button marked “Back”
Valuation report records Regardless of if the valuation report has been automatically saved to the Case file (Remember this is optional). A copy of any produced client valuation reports will sit in the “Stored clients document” area of XPLAN. To access this from the client menu go to Documents > Stored Client Documents You will then see the valuation report in the Document list with a Type of Document and a Sub type of Valuation report
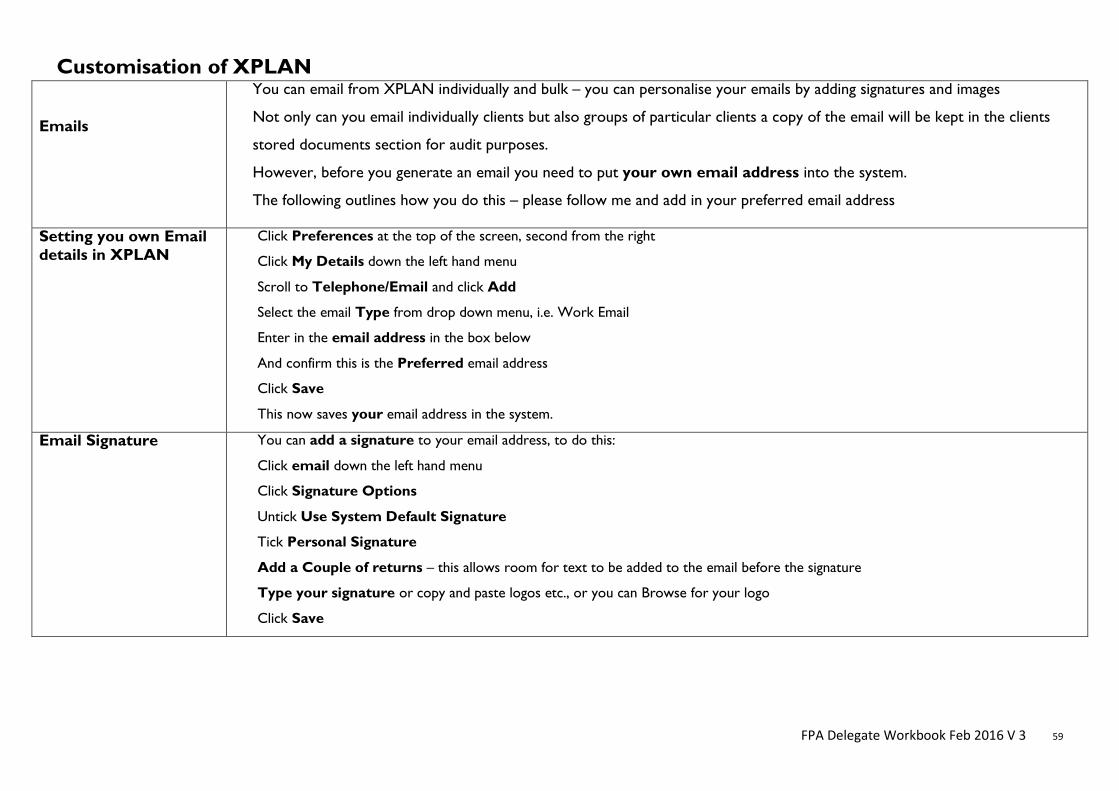
FPA Delegate Workbook Feb 2016 V 3 59
Customisation of XPLAN
Emails
You can email from XPLAN individually and bulk – you can personalise your emails by adding signatures and images
Not only can you email individually clients but also groups of particular clients a copy of the email will be kept in the clients
stored documents section for audit purposes.
However, before you generate an email you need to put your own email address into the system.
The following outlines how you do this – please follow me and add in your preferred email address
Setting you own Email details in XPLAN
Click Preferences at the top of the screen, second from the right
Click My Details down the left hand menu
Scroll to Telephone/Email and click Add
Select the email Type from drop down menu, i.e. Work Email
Enter in the email address in the box below
And confirm this is the Preferred email address
Click Save
This now saves your email address in the system.
Email Signature You can add a signature to your email address, to do this:
Click email down the left hand menu
Click Signature Options
Untick Use System Default Signature
Tick Personal Signature
Add a Couple of returns – this allows room for text to be added to the email before the signature
Type your signature or copy and paste logos etc., or you can Browse for your logo
Click Save
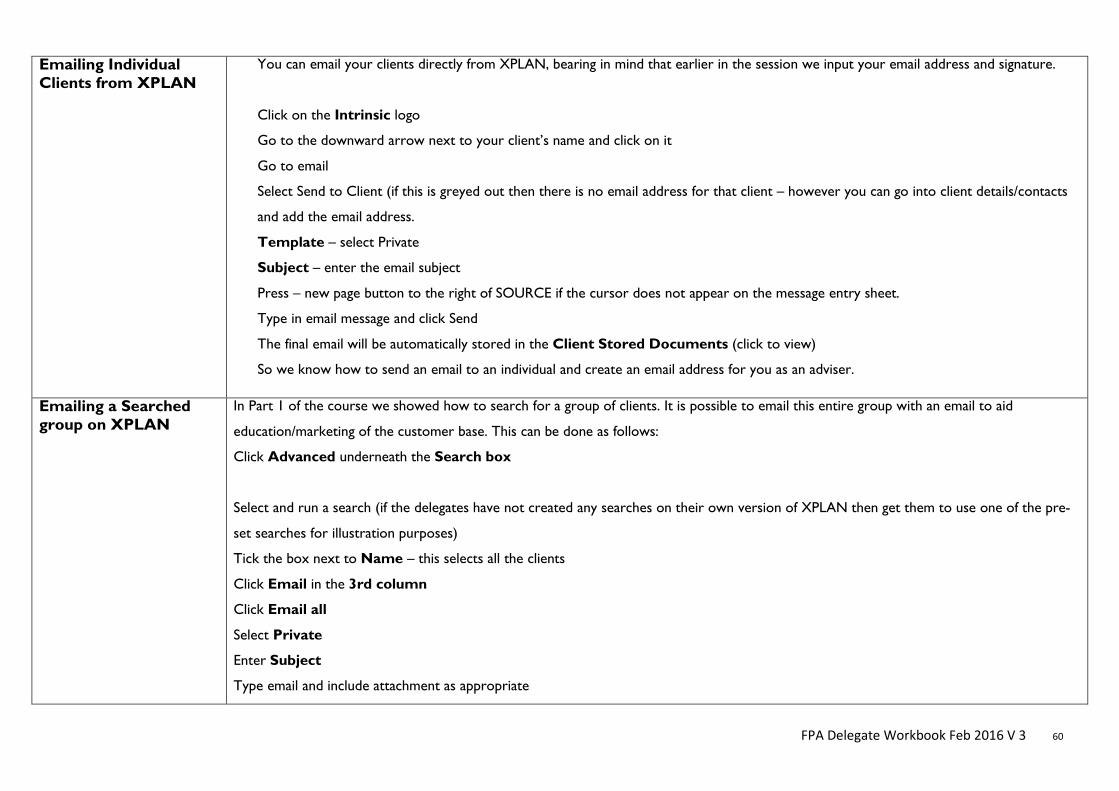
FPA Delegate Workbook Feb 2016 V 3 60
Emailing Individual Clients from XPLAN
You can email your clients directly from XPLAN, bearing in mind that earlier in the session we input your email address and signature.
Click on the Intrinsic logo
Go to the downward arrow next to your client’s name and click on it
Go to email
Select Send to Client (if this is greyed out then there is no email address for that client – however you can go into client details/contacts
and add the email address.
Template – select Private
Subject – enter the email subject
Press – new page button to the right of SOURCE if the cursor does not appear on the message entry sheet.
Type in email message and click Send
The final email will be automatically stored in the Client Stored Documents (click to view)
So we know how to send an email to an individual and create an email address for you as an adviser.
Emailing a Searched group on XPLAN
In Part 1 of the course we showed how to search for a group of clients. It is possible to email this entire group with an email to aid
education/marketing of the customer base. This can be done as follows:
Click Advanced underneath the Search box
Select and run a search (if the delegates have not created any searches on their own version of XPLAN then get them to use one of the pre-
set searches for illustration purposes)
Tick the box next to Name – this selects all the clients
Click Email in the 3rd column
Click Email all
Select Private
Enter Subject
Type email and include attachment as appropriate
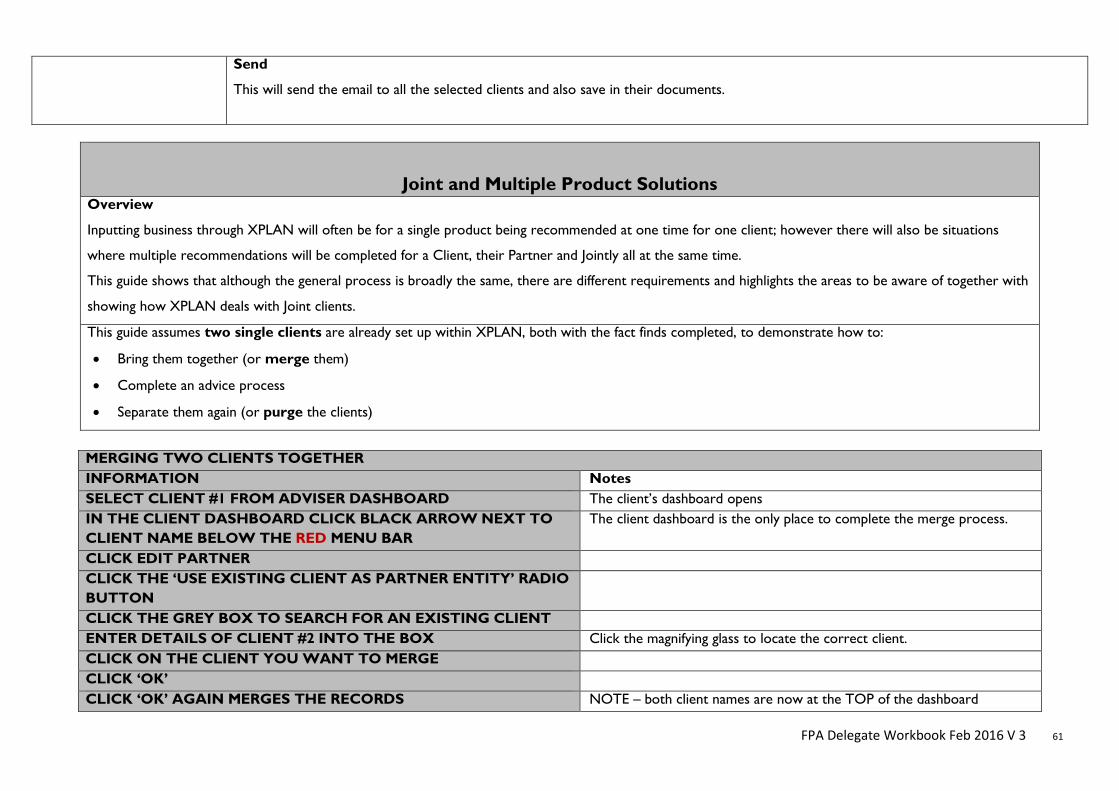
FPA Delegate Workbook Feb 2016 V 3 61
Send
This will send the email to all the selected clients and also save in their documents.
Joint and Multiple Product Solutions Overview
Inputting business through XPLAN will often be for a single product being recommended at one time for one client; however there will also be situations
where multiple recommendations will be completed for a Client, their Partner and Jointly all at the same time.
This guide shows that although the general process is broadly the same, there are different requirements and highlights the areas to be aware of together with
showing how XPLAN deals with Joint clients.
This guide assumes two single clients are already set up within XPLAN, both with the fact finds completed, to demonstrate how to:
• Bring them together (or merge them)
• Complete an advice process
• Separate them again (or purge the clients)
MERGING TWO CLIENTS TOGETHER INFORMATION Notes SELECT CLIENT #1 FROM ADVISER DASHBOARD The client’s dashboard opens IN THE CLIENT DASHBOARD CLICK BLACK ARROW NEXT TO CLIENT NAME BELOW THE RED MENU BAR
The client dashboard is the only place to complete the merge process.
CLICK EDIT PARTNER CLICK THE ‘USE EXISTING CLIENT AS PARTNER ENTITY’ RADIO BUTTON
CLICK THE GREY BOX TO SEARCH FOR AN EXISTING CLIENT ENTER DETAILS OF CLIENT #2 INTO THE BOX Click the magnifying glass to locate the correct client. CLICK ON THE CLIENT YOU WANT TO MERGE CLICK ‘OK’ CLICK ‘OK’ AGAIN MERGES THE RECORDS NOTE – both client names are now at the TOP of the dashboard
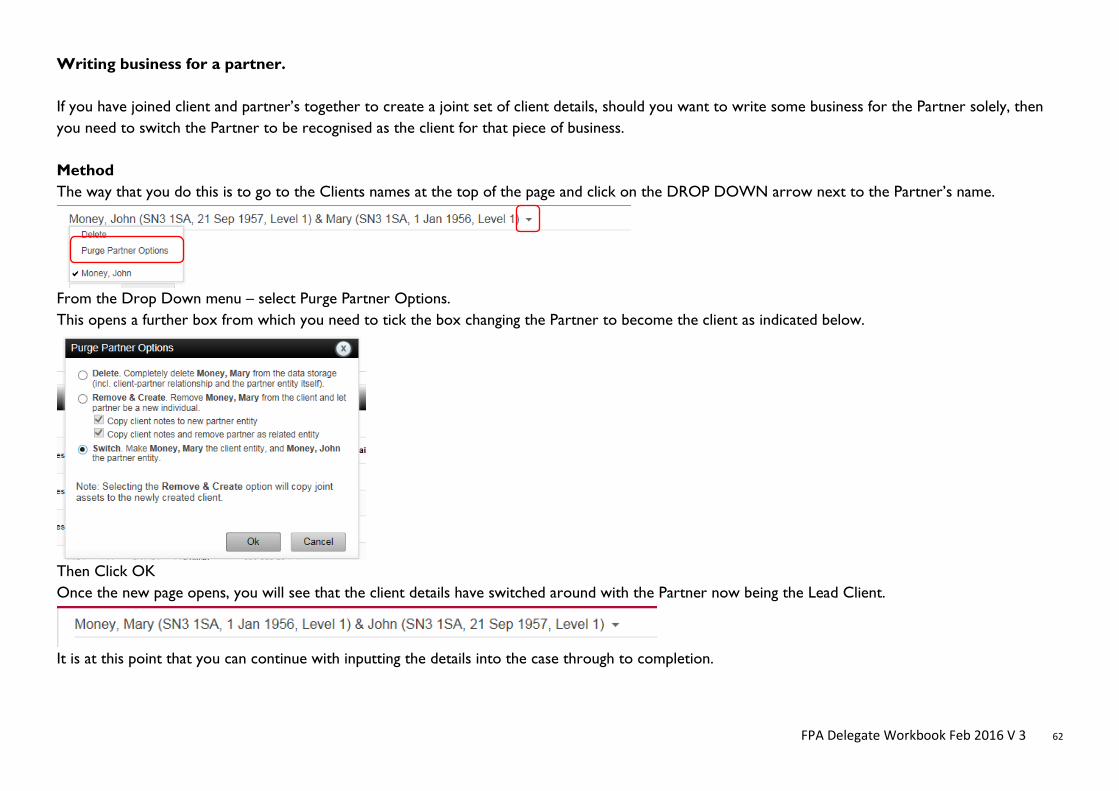
FPA Delegate Workbook Feb 2016 V 3 62
Writing business for a partner. If you have joined client and partner’s together to create a joint set of client details, should you want to write some business for the Partner solely, then you need to switch the Partner to be recognised as the client for that piece of business. Method The way that you do this is to go to the Clients names at the top of the page and click on the DROP DOWN arrow next to the Partner’s name.
From the Drop Down menu – select Purge Partner Options. This opens a further box from which you need to tick the box changing the Partner to become the client as indicated below.
Then Click OK Once the new page opens, you will see that the client details have switched around with the Partner now being the Lead Client.
It is at this point that you can continue with inputting the details into the case through to completion.
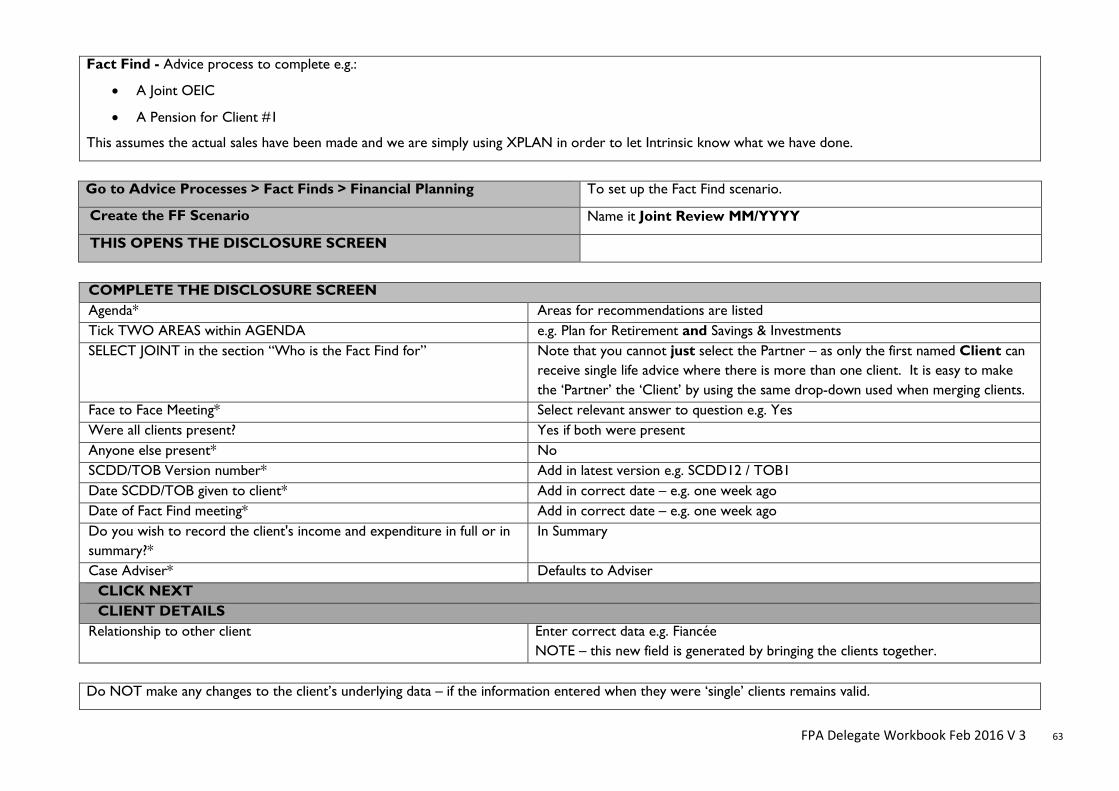
FPA Delegate Workbook Feb 2016 V 3 63
Fact Find - Advice process to complete e.g.:
• A Joint OEIC
• A Pension for Client #1
This assumes the actual sales have been made and we are simply using XPLAN in order to let Intrinsic know what we have done.
Go to Advice Processes > Fact Finds > Financial Planning To set up the Fact Find scenario.
Create the FF Scenario Name it Joint Review MM/YYYY
THIS OPENS THE DISCLOSURE SCREEN
COMPLETE THE DISCLOSURE SCREEN Agenda* Areas for recommendations are listed Tick TWO AREAS within AGENDA e.g. Plan for Retirement and Savings & Investments SELECT JOINT in the section “Who is the Fact Find for” Note that you cannot just select the Partner – as only the first named Client can
receive single life advice where there is more than one client. It is easy to make the ‘Partner’ the ‘Client’ by using the same drop-down used when merging clients.
Face to Face Meeting* Select relevant answer to question e.g. Yes Were all clients present? Yes if both were present Anyone else present* No SCDD/TOB Version number* Add in latest version e.g. SCDD12 / TOB1 Date SCDD/TOB given to client* Add in correct date – e.g. one week ago Date of Fact Find meeting* Add in correct date – e.g. one week ago Do you wish to record the client's income and expenditure in full or in summary?*
In Summary
Case Adviser* Defaults to Adviser CLICK NEXT CLIENT DETAILS
Relationship to other client Enter correct data e.g. Fiancée NOTE – this new field is generated by bringing the clients together.
Do NOT make any changes to the client’s underlying data – if the information entered when they were ‘single’ clients remains valid.
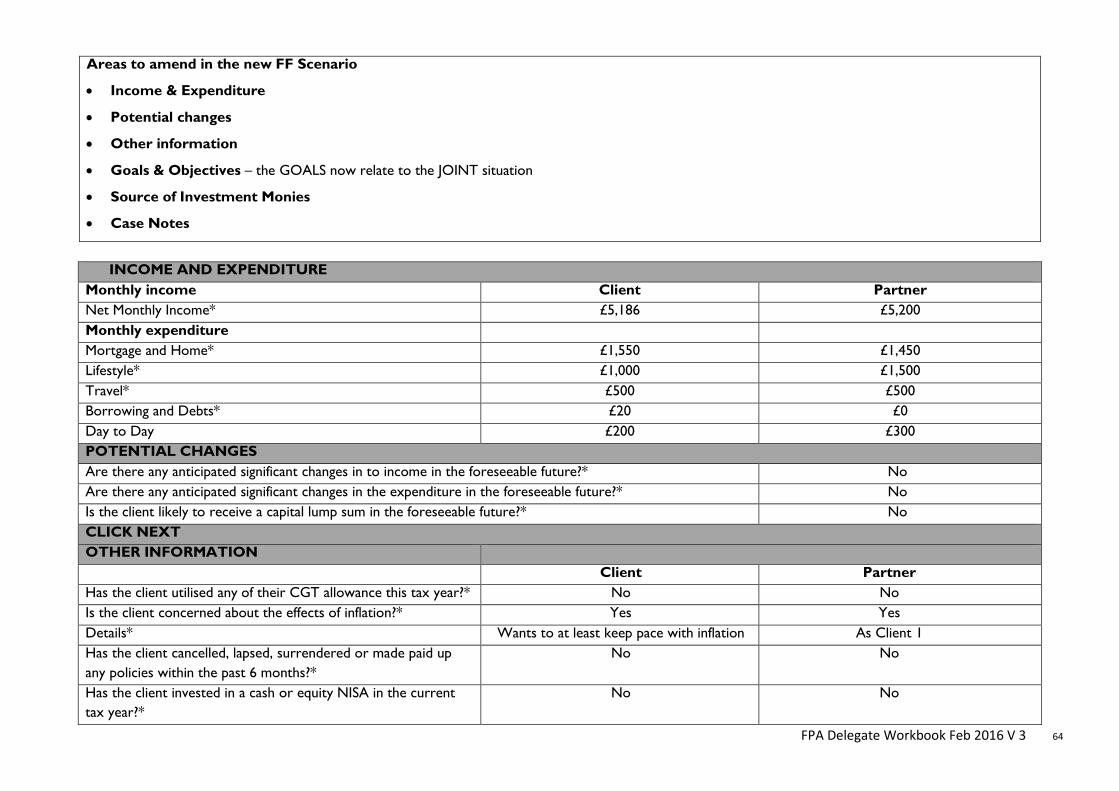
FPA Delegate Workbook Feb 2016 V 3 64
Areas to amend in the new FF Scenario
• Income & Expenditure
• Potential changes
• Other information
• Goals & Objectives – the GOALS now relate to the JOINT situation
• Source of Investment Monies
• Case Notes
INCOME AND EXPENDITURE
Monthly income Client Partner Net Monthly Income* £5,186 £5,200 Monthly expenditure Mortgage and Home* £1,550 £1,450 Lifestyle* £1,000 £1,500 Travel* £500 £500 Borrowing and Debts* £20 £0 Day to Day £200 £300 POTENTIAL CHANGES Are there any anticipated significant changes in to income in the foreseeable future?* No Are there any anticipated significant changes in the expenditure in the foreseeable future?* No Is the client likely to receive a capital lump sum in the foreseeable future?* No CLICK NEXT OTHER INFORMATION Client Partner Has the client utilised any of their CGT allowance this tax year?* No No Is the client concerned about the effects of inflation?* Yes Yes Details* Wants to at least keep pace with inflation As Client 1 Has the client cancelled, lapsed, surrendered or made paid up any policies within the past 6 months?*
No No
Has the client invested in a cash or equity NISA in the current tax year?*
No
No
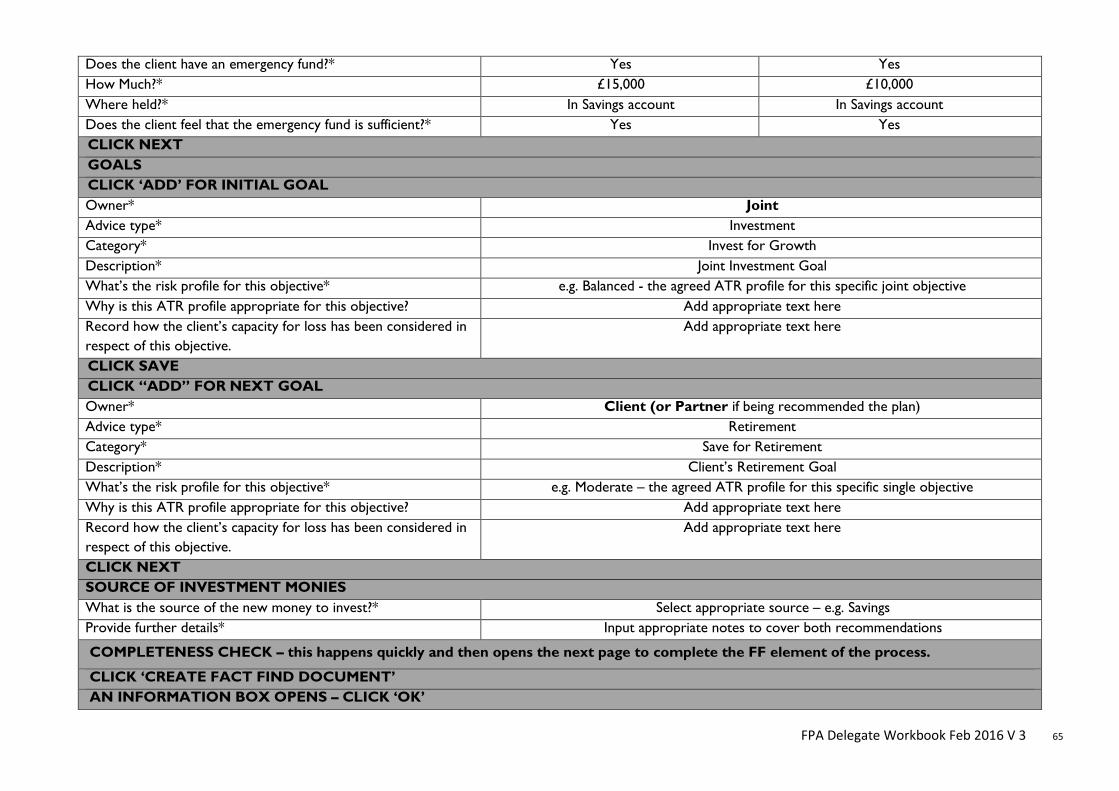
FPA Delegate Workbook Feb 2016 V 3 65
Does the client have an emergency fund?* Yes Yes How Much?* £15,000 £10,000 Where held?* In Savings account In Savings account Does the client feel that the emergency fund is sufficient?* Yes Yes CLICK NEXT GOALS CLICK ‘ADD’ FOR INITIAL GOAL Owner* Joint Advice type* Investment Category* Invest for Growth Description* Joint Investment Goal What’s the risk profile for this objective* e.g. Balanced - the agreed ATR profile for this specific joint objective Why is this ATR profile appropriate for this objective? Add appropriate text here Record how the client’s capacity for loss has been considered in respect of this objective.
Add appropriate text here
CLICK SAVE CLICK “ADD” FOR NEXT GOAL Owner* Client (or Partner if being recommended the plan) Advice type* Retirement Category* Save for Retirement Description* Client’s Retirement Goal What’s the risk profile for this objective* e.g. Moderate – the agreed ATR profile for this specific single objective Why is this ATR profile appropriate for this objective? Add appropriate text here Record how the client’s capacity for loss has been considered in respect of this objective.
Add appropriate text here
CLICK NEXT SOURCE OF INVESTMENT MONIES What is the source of the new money to invest?* Select appropriate source – e.g. Savings Provide further details* Input appropriate notes to cover both recommendations
COMPLETENESS CHECK – this happens quickly and then opens the next page to complete the FF element of the process.
CLICK ‘CREATE FACT FIND DOCUMENT’ AN INFORMATION BOX OPENS – CLICK ‘OK’
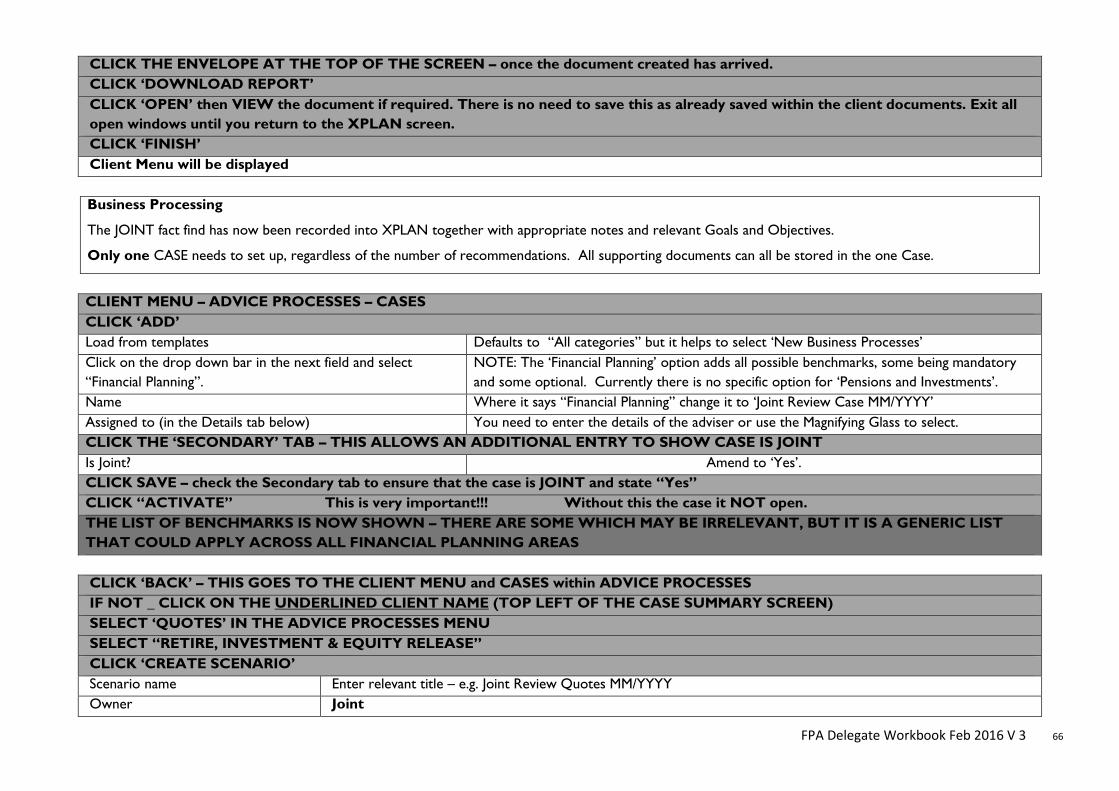
FPA Delegate Workbook Feb 2016 V 3 66
CLICK THE ENVELOPE AT THE TOP OF THE SCREEN – once the document created has arrived. CLICK ‘DOWNLOAD REPORT’ CLICK ‘OPEN’ then VIEW the document if required. There is no need to save this as already saved within the client documents. Exit all open windows until you return to the XPLAN screen. CLICK ‘FINISH’ Client Menu will be displayed
Business Processing
The JOINT fact find has now been recorded into XPLAN together with appropriate notes and relevant Goals and Objectives.
Only one CASE needs to set up, regardless of the number of recommendations. All supporting documents can all be stored in the one Case.
CLIENT MENU – ADVICE PROCESSES – CASES CLICK ‘ADD’ Load from templates Defaults to “All categories” but it helps to select ‘New Business Processes’ Click on the drop down bar in the next field and select “Financial Planning”.
NOTE: The ‘Financial Planning’ option adds all possible benchmarks, some being mandatory and some optional. Currently there is no specific option for ‘Pensions and Investments’.
Name Where it says “Financial Planning” change it to ‘Joint Review Case MM/YYYY’ Assigned to (in the Details tab below) You need to enter the details of the adviser or use the Magnifying Glass to select. CLICK THE ‘SECONDARY’ TAB – THIS ALLOWS AN ADDITIONAL ENTRY TO SHOW CASE IS JOINT Is Joint? Amend to ‘Yes’. CLICK SAVE – check the Secondary tab to ensure that the case is JOINT and state “Yes” CLICK “ACTIVATE” This is very important!!! Without this the case it NOT open. THE LIST OF BENCHMARKS IS NOW SHOWN – THERE ARE SOME WHICH MAY BE IRRELEVANT, BUT IT IS A GENERIC LIST THAT COULD APPLY ACROSS ALL FINANCIAL PLANNING AREAS
CLICK ‘BACK’ – THIS GOES TO THE CLIENT MENU and CASES within ADVICE PROCESSES IF NOT _ CLICK ON THE UNDERLINED CLIENT NAME (TOP LEFT OF THE CASE SUMMARY SCREEN) SELECT ‘QUOTES’ IN THE ADVICE PROCESSES MENU SELECT “RETIRE, INVESTMENT & EQUITY RELEASE” CLICK ‘CREATE SCENARIO’ Scenario name Enter relevant title – e.g. Joint Review Quotes MM/YYYY Owner Joint
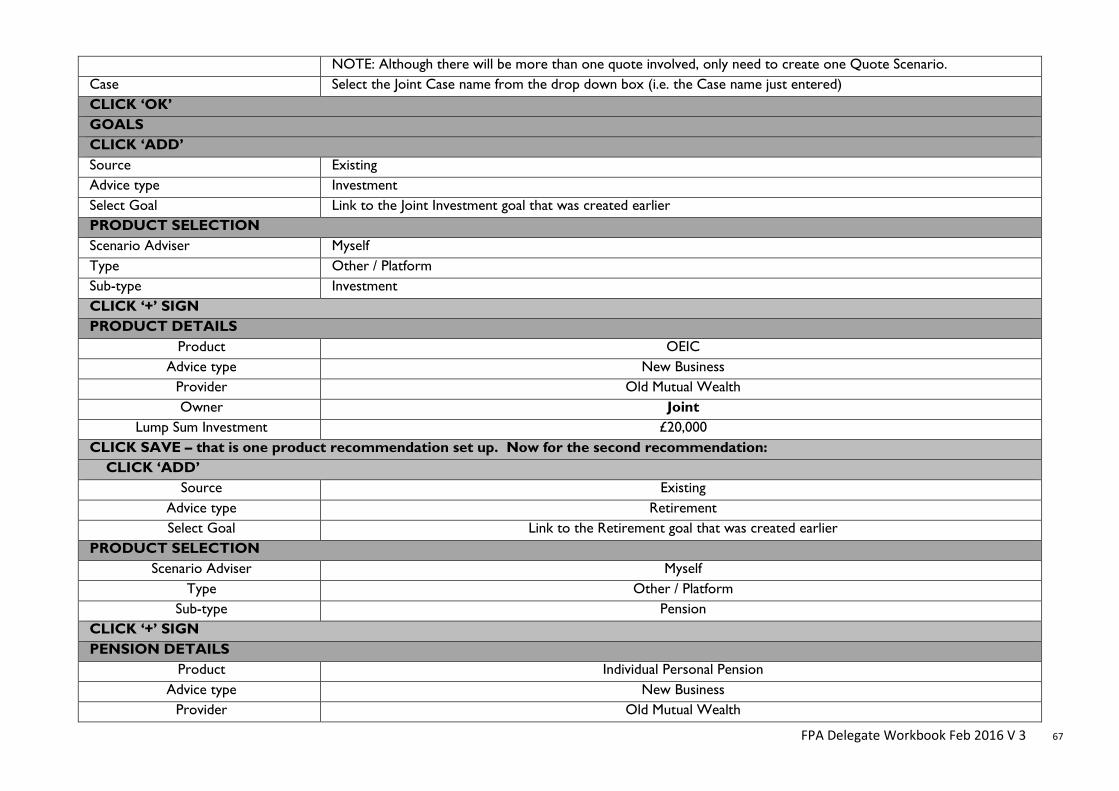
FPA Delegate Workbook Feb 2016 V 3 67
NOTE: Although there will be more than one quote involved, only need to create one Quote Scenario. Case Select the Joint Case name from the drop down box (i.e. the Case name just entered) CLICK ‘OK’ GOALS CLICK ‘ADD’ Source Existing Advice type Investment Select Goal Link to the Joint Investment goal that was created earlier PRODUCT SELECTION Scenario Adviser Myself Type Other / Platform Sub-type Investment CLICK ‘+’ SIGN PRODUCT DETAILS
Product OEIC Advice type New Business
Provider Old Mutual Wealth Owner Joint
Lump Sum Investment £20,000 CLICK SAVE – that is one product recommendation set up. Now for the second recommendation: CLICK ‘ADD’
Source Existing Advice type Retirement Select Goal Link to the Retirement goal that was created earlier
PRODUCT SELECTION Scenario Adviser Myself
Type Other / Platform Sub-type Pension
CLICK ‘+’ SIGN PENSION DETAILS
Product Individual Personal Pension Advice type New Business
Provider Old Mutual Wealth
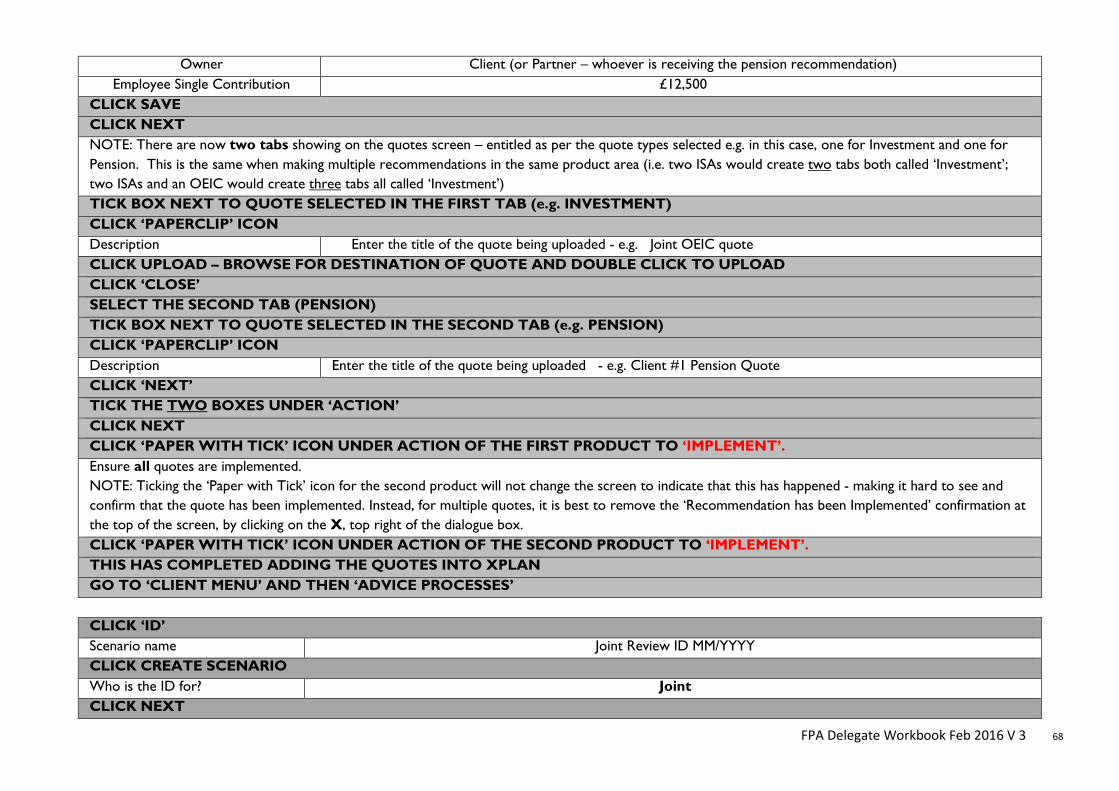
FPA Delegate Workbook Feb 2016 V 3 68
Owner Client (or Partner – whoever is receiving the pension recommendation) Employee Single Contribution £12,500
CLICK SAVE CLICK NEXT NOTE: There are now two tabs showing on the quotes screen – entitled as per the quote types selected e.g. in this case, one for Investment and one for Pension. This is the same when making multiple recommendations in the same product area (i.e. two ISAs would create two tabs both called ‘Investment’; two ISAs and an OEIC would create three tabs all called ‘Investment’) TICK BOX NEXT TO QUOTE SELECTED IN THE FIRST TAB (e.g. INVESTMENT) CLICK ‘PAPERCLIP’ ICON Description Enter the title of the quote being uploaded - e.g. Joint OEIC quote CLICK UPLOAD – BROWSE FOR DESTINATION OF QUOTE AND DOUBLE CLICK TO UPLOAD CLICK ‘CLOSE’ SELECT THE SECOND TAB (PENSION) TICK BOX NEXT TO QUOTE SELECTED IN THE SECOND TAB (e.g. PENSION) CLICK ‘PAPERCLIP’ ICON Description Enter the title of the quote being uploaded - e.g. Client #1 Pension Quote CLICK ‘NEXT’ TICK THE TWO BOXES UNDER ‘ACTION’ CLICK NEXT CLICK ‘PAPER WITH TICK’ ICON UNDER ACTION OF THE FIRST PRODUCT TO ‘IMPLEMENT’. Ensure all quotes are implemented. NOTE: Ticking the ‘Paper with Tick’ icon for the second product will not change the screen to indicate that this has happened - making it hard to see and confirm that the quote has been implemented. Instead, for multiple quotes, it is best to remove the ‘Recommendation has been Implemented’ confirmation at the top of the screen, by clicking on the X, top right of the dialogue box. CLICK ‘PAPER WITH TICK’ ICON UNDER ACTION OF THE SECOND PRODUCT TO ‘IMPLEMENT’. THIS HAS COMPLETED ADDING THE QUOTES INTO XPLAN GO TO ‘CLIENT MENU’ AND THEN ‘ADVICE PROCESSES’
CLICK ‘ID’ Scenario name Joint Review ID MM/YYYY CLICK CREATE SCENARIO Who is the ID for? Joint CLICK NEXT
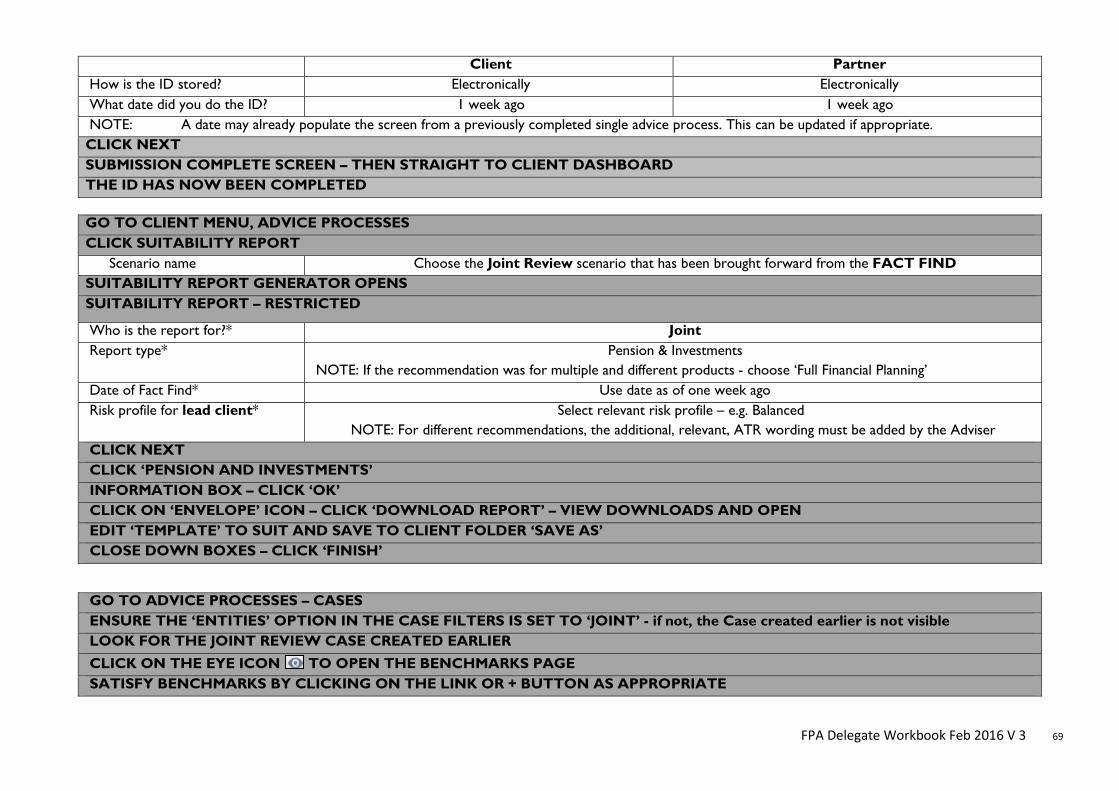
FPA Delegate Workbook Feb 2016 V 3 69
Client Partner How is the ID stored? Electronically Electronically What date did you do the ID? 1 week ago 1 week ago NOTE: A date may already populate the screen from a previously completed single advice process. This can be updated if appropriate.
CLICK NEXT SUBMISSION COMPLETE SCREEN – THEN STRAIGHT TO CLIENT DASHBOARD THE ID HAS NOW BEEN COMPLETED
GO TO CLIENT MENU, ADVICE PROCESSES CLICK SUITABILITY REPORT
Scenario name Choose the Joint Review scenario that has been brought forward from the FACT FIND SUITABILITY REPORT GENERATOR OPENS SUITABILITY REPORT – RESTRICTED
Who is the report for?* Joint Report type* Pension & Investments
NOTE: If the recommendation was for multiple and different products - choose ‘Full Financial Planning’ Date of Fact Find* Use date as of one week ago Risk profile for lead client* Select relevant risk profile – e.g. Balanced
NOTE: For different recommendations, the additional, relevant, ATR wording must be added by the Adviser CLICK NEXT CLICK ‘PENSION AND INVESTMENTS’ INFORMATION BOX – CLICK ‘OK’ CLICK ON ‘ENVELOPE’ ICON – CLICK ‘DOWNLOAD REPORT’ – VIEW DOWNLOADS AND OPEN EDIT ‘TEMPLATE’ TO SUIT AND SAVE TO CLIENT FOLDER ‘SAVE AS’ CLOSE DOWN BOXES – CLICK ‘FINISH’
GO TO ADVICE PROCESSES – CASES ENSURE THE ‘ENTITIES’ OPTION IN THE CASE FILTERS IS SET TO ‘JOINT’ - if not, the Case created earlier is not visible LOOK FOR THE JOINT REVIEW CASE CREATED EARLIER CLICK ON THE EYE ICON TO OPEN THE BENCHMARKS PAGE SATISFY BENCHMARKS BY CLICKING ON THE LINK OR + BUTTON AS APPROPRIATE
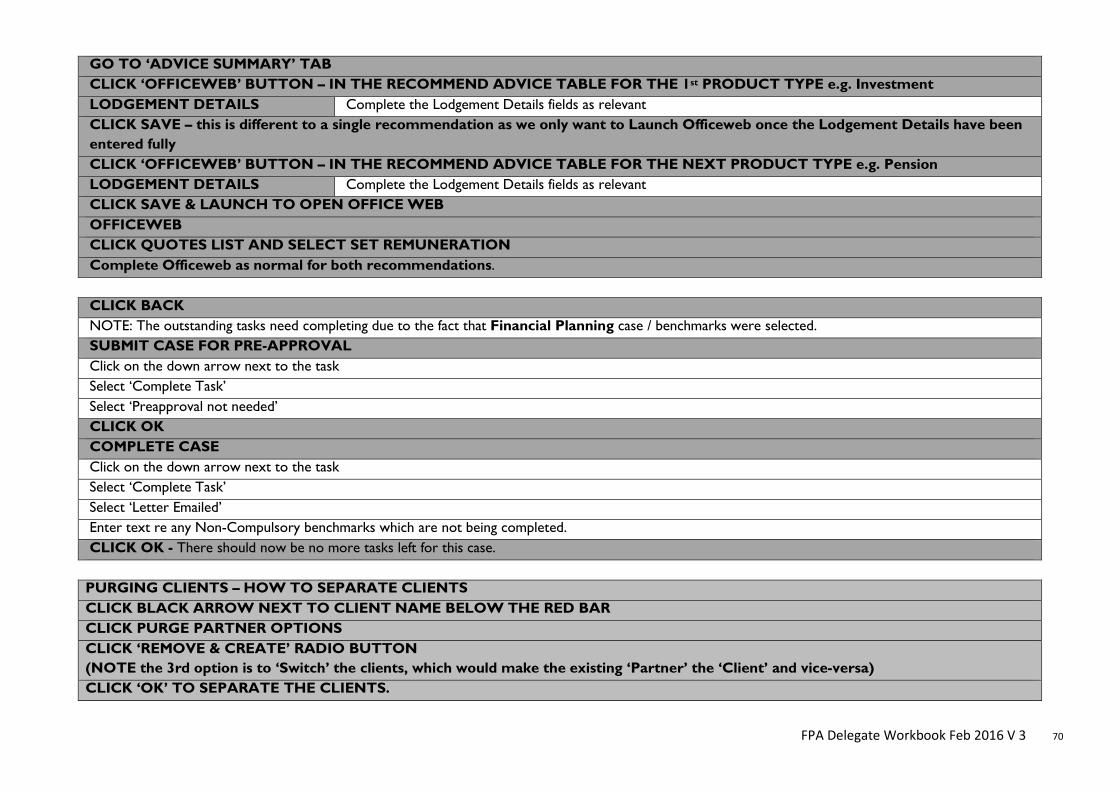
FPA Delegate Workbook Feb 2016 V 3 70
GO TO ‘ADVICE SUMMARY’ TAB CLICK ‘OFFICEWEB’ BUTTON – IN THE RECOMMEND ADVICE TABLE FOR THE 1st PRODUCT TYPE e.g. Investment LODGEMENT DETAILS Complete the Lodgement Details fields as relevant CLICK SAVE – this is different to a single recommendation as we only want to Launch Officeweb once the Lodgement Details have been entered fully CLICK ‘OFFICEWEB’ BUTTON – IN THE RECOMMEND ADVICE TABLE FOR THE NEXT PRODUCT TYPE e.g. Pension LODGEMENT DETAILS Complete the Lodgement Details fields as relevant CLICK SAVE & LAUNCH TO OPEN OFFICE WEB OFFICEWEB CLICK QUOTES LIST AND SELECT SET REMUNERATION Complete Officeweb as normal for both recommendations.
CLICK BACK NOTE: The outstanding tasks need completing due to the fact that Financial Planning case / benchmarks were selected. SUBMIT CASE FOR PRE-APPROVAL Click on the down arrow next to the task Select ‘Complete Task’ Select ‘Preapproval not needed’ CLICK OK COMPLETE CASE Click on the down arrow next to the task Select ‘Complete Task’ Select ‘Letter Emailed’ Enter text re any Non-Compulsory benchmarks which are not being completed. CLICK OK - There should now be no more tasks left for this case.
PURGING CLIENTS – HOW TO SEPARATE CLIENTS CLICK BLACK ARROW NEXT TO CLIENT NAME BELOW THE RED BAR CLICK PURGE PARTNER OPTIONS CLICK ‘REMOVE & CREATE’ RADIO BUTTON (NOTE the 3rd option is to ‘Switch’ the clients, which would make the existing ‘Partner’ the ‘Client’ and vice-versa) CLICK ‘OK’ TO SEPARATE THE CLIENTS.
FPA Delegate Workbook Feb 2016 V 3 71
XPLAN Training CPD Confirm your attendance at the XPLAN Training on …………………………. At ……………………….. As discussed during the course there is content of the training that qualifies for CPD. These elements are listed below:-
- Client Servicing - Client Portal - Valuation Services - Portfolio & Valuation Reports - Cases
Total CPD time is 3 hours. In order to claim your CPD do remember to update your CPD record within the Learning Academy system. You should ensure that you record a full reflective statement of your own individual learning following this training event.
https://www.competentadviser.com/index.asp