Embed Size (px)
Citation preview

DegreeWorksWeb Interface
User Guide
Software Patch DW4.0.5January 22, 2010
What can we help you achieve? HIGHER EDUCATION
Baseline Release DW4.0.0 September 30, 2008

________________________________________________________________________________
SunGard Higher Education 4 Country View Road Malvern, Pennsylvania 19355 United States of America (800) 522 - 4827
Customer Support Center website http://connect.sungardhe.com
Documentation Feedback http://education.sungardhe.com/survey/documentation.html
Distribution Services E-mail address [email protected] SunGard or its subsidiaries in the U.S. and other countries is the owner of numerous marks, including “SunGard,” the SunGard logo, “Banner,” “PowerCAMPUS,” “Advance,” “Luminis,” “UDC,” “Unified Digital Campus,” “TreQ,” and “DegreeWorks.” Other names and marks used in this material are owned by third parties.
© 1995-2009 SunGard. All rights reserved. The unauthorized possession, use, reproduction, distribution, display or disclosure of this material or the information contained herein is prohibited. In preparing and providing this publication, SunGard Higher Education is not rendering legal, accounting, or other similar professional services. SunGard Higher Education makes no claims that an institution's use of this publication or the software for which it is provided will insure compliance with applicable federal or state laws, rules, or regulations. Each organization should seek legal, accounting and other similar professional services from competent providers of the organization’s own choosing.

January 22, 2010 DegreeWorks DW4.0.5 3 User Guide Web Interface
Document Change Log Version Date Change Description DW4.0.5 January 22, 2010 Added drag and drop support for the Student Educational Planner in Firefox 3.5 DW4.0.4 September 14, 2009 Degree source of applicant in student context indicated by *
CourseLink DW4.0.2 March 31, 2009 Exception Management using Banner Workflow
Plan Approval Unenforced Exceptions report
DW4.0.1 December 19, 2008 Requirement blocks created with SEP “Create Block” prefixed with RB Exceptions – Apply Here Exceptions – Remove Course GPA Advice calculator now uses UCX-STU385 Graded Attempted flag
DW4.0.0 September 30, 2008 Update UCX references to reflect new names and naming convention Administrative Change Password functionality SEP functionality added Look & Feel changed for screen shots
7.7.2.D02.P02 March 2008 SEP Setup - UCX-CFG020 PLANNER has new flags 7.7.2.D02 December 14, 2007 Screens updated
SOC Worksheet added 7.7.2.D01A August 17 2007 No Changes 7.7.2.D01 July 15, 2007 Add Batch SEP,
Remove old Student Planner (replaced with SEP) Updated Special Topic Label Tags
7.7.2 June 26, 2007 Re-brand document to SGHE. Updates Reserved Words in Scribe. Added SEP section to On the Web.

January 22, 2010 DegreeWorks DW4.0.5 4 User Guide Web Interface
Table of Contents
Document Change Log ....................................................................................................... 3 Table of Contents ................................................................................................................ 4 DegreeWorks Web Interface ............................................................................................... 6 Introduction.......................................................................................................................... 6
Learning Objectives ........................................................................................................................................6 Logging On ......................................................................................................................................................7
Overview of Web Functions.............................................................................................. 11 Student Context Area....................................................................................................................................11
Processing Degree Audits ................................................................................................ 13 Historic Degree Audit ........................................................................................................ 14 What-If Audits .................................................................................................................... 15 Student Educational Planner............................................................................................ 17
Setup...............................................................................................................................................................18 Setup the UCX-CFG020 PLANNER record. .................................................................................................................18 Setup the UCX-CFG072 table. .....................................................................................................................................20 Setup the Web Planner flag in UCX-STU016 and UCX-STU035..................................................................................21
Web Interface.................................................................................................................................................22 Planner .........................................................................................................................................................................22 Planner Body ................................................................................................................................................................23
What If Planner Audits ..................................................................................................................................25 Calendar mode ..............................................................................................................................................26 General Notes section ..................................................................................................................................27 Classes Completed in Unplanned Terms ...................................................................................................28 New Plan ........................................................................................................................................................29 Loading a pre-defined plan ..........................................................................................................................30 Course Validation..........................................................................................................................................31 Viewing Plans ................................................................................................................................................32 Planned vs Taken..........................................................................................................................................33 Create Block ..................................................................................................................................................34
Setup the UCX-CFG020 PLANNERBLOCK record. .....................................................................................................35 Plan Approval ................................................................................................................................................37 Templates.......................................................................................................................................................39
AKA – pre-defined plans...............................................................................................................................................39 Searching for Templates...............................................................................................................................................39 Selecting a Template ....................................................................................................................................................40 Editing a Template........................................................................................................................................................41
Course Validation..........................................................................................................................................42
Batch Plan Assignment..................................................................................................... 43

January 22, 2010 DegreeWorks DW4.0.5 5 User Guide Web Interface
Look Ahead ........................................................................................................................ 44 Notes................................................................................................................................... 49 Petitions ............................................................................................................................. 51
E-mail Notification - petsend and dwpetjob ...............................................................................................53
Exceptions ......................................................................................................................... 54 Force Complete .............................................................................................................................................58 Substitute.......................................................................................................................................................60 Also Allow ......................................................................................................................................................61 Apply Here .....................................................................................................................................................63 Remove Course .............................................................................................................................................65 Block Header Qualifier Exceptions .............................................................................................................67
GPA Calculators ................................................................................................................ 68 Overview ........................................................................................................................................................68 Specifics.........................................................................................................................................................69
Graduation Calculator inputs ........................................................................................................................................69 Advice Calculator inputs ...............................................................................................................................................71 Term Calculator inputs..................................................................................................................................................73 Who Gets Access? .......................................................................................................................................................75 What UCX Tables are Used?........................................................................................................................................75
Exception Management..................................................................................................... 76 Exception Reports ............................................................................................................. 84 CourseLink......................................................................................................................... 86 Worksheet Reports............................................................................................................ 87
Diagnostics Report .......................................................................................................................................89 Financial Aid Report .....................................................................................................................................92 Graduation Checklist ....................................................................................................................................93 Registrar Report ............................................................................................................................................94 Registration Checklist ................................................................................................................................100 SOC Report ..................................................................................................................................................101 Student Data Report....................................................................................................................................103 Student View................................................................................................................................................104
Admin – Change Password ............................................................................................ 107 Change another user’s password .............................................................................................................107

January 22, 2010 DegreeWorks DW4.0.5 6 User Guide Web Interface
DegreeWorks Web Interface
DegreeWorks Web Interface
Introduction This section provides the basic operational instructions for DegreeWorks on the Web. DegreeWorks can be accessed from any computer with an Internet connection and a web browser. DegreeWorks on the Web is used for processing individual degree audits, What- If scenarios, student planner, addition of notes and exceptions processing. For more detailed information, consult the DegreeWorks Technical documentation, which is available in PDF format and can be downloaded to your PC. The processes used by DegreeWorks on the WEB are listed below as learning objectives:
Learning Objectives After reading this section you will be able to:
• Log onto DegreeWorks from the WEB • Identify the WEB functions available • Process Degree Audits • Review Historic Degree Audits • Process What-If Audits • Use Student Planner • Enter Notes • Use Petitions • Identify Exceptions • Manage Exceptions • Report Exceptions • Deal with links from advice (CourseLink) • Deal with Advice Reports

Logging On Using an Internet browser, enter the URL of the logon page or access the logon page from a link on your college's home page. DegreeWorks can be accessed using Netscape Navigator (versions 4.7 or greater) or Internet Explorer (version 5.0 or greater). SunGard Higher Education recommends the use of Internet Explorer 5.0 or greater or Netscape 6.x or greater when accessing DegreeWorks. To make the connection quick and easy, it is recommended that you create a bookmark for the logon page. Clients using Campus Online (formerly called IRISLink) can access DegreeWorks from their Campus Online homepage.
In order to gain access to DegreeWorks, you must have a valid User ID and Password. Your User ID and Password are alphanumeric values available from your DegreeWorks administrator. Your User ID and Password also determine what permissions you have as a DegreeWorks user. DegreeWorks uses these values to determine which screens you have access to, which functions are available on these screens and what information is displayed. For example, a Student user does not have access to any search functions while a Registrar or Faculty member may have varying degrees of search functionality. Student users will never see the Find Students or the Exceptions buttons. Once you have been validated in the system, you will automatically be taken to the DegreeWorks Introduction page. This page contains brief information about the DegreeWorks functions available. The top of the page contains several buttons. These buttons are Exception Management, Help, Print and Close. These buttons are located at the top right of the Introduction page.
The Close button is only present for Campus Online clients. This button will close the current window and take you back to the Campus Online access point. You can then select a different Campus Online service without having to logon again. If you do not use Campus Online (DegreeWorks stand-alone clients), a Logout button will appear in place of the Close button. The Logout button will close the DegreeWorks window, log you out of DegreeWorks and take you to an exit screen. You can log back in again by following the link on the exit screen. Not all DegreeWorks users will have access to all functions described on this page. The Exceptions and Notes tabs as well as the Exception Management button are not available to student users by default. The Planner can be made available to students in read-only mode. Your DegreeWorks administrator can modify these settings if necessary.
January 22, 2010 DegreeWorks DW4.0.5 7 User Guide Web Interface
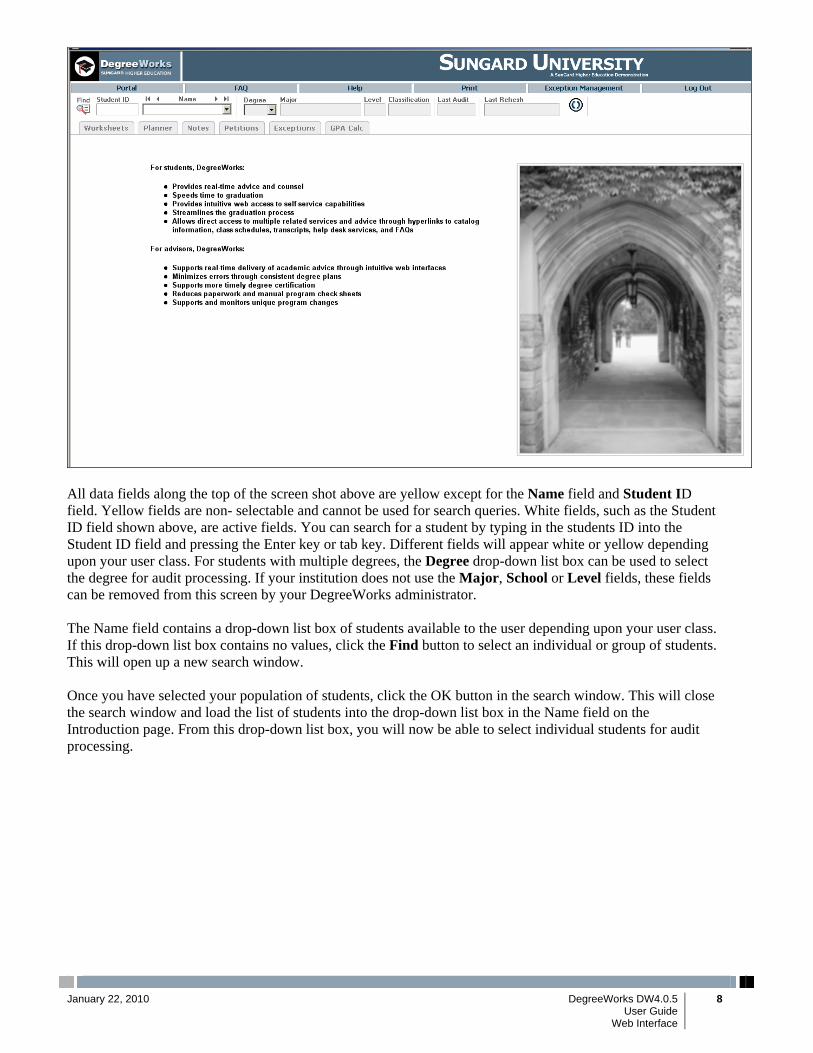
All data fields along the top of the screen shot above are yellow except for the Name field and Student ID field. Yellow fields are non- selectable and cannot be used for search queries. White fields, such as the Student ID field shown above, are active fields. You can search for a student by typing in the students ID into the Student ID field and pressing the Enter key or tab key. Different fields will appear white or yellow depending upon your user class. For students with multiple degrees, the Degree drop-down list box can be used to select the degree for audit processing. If your institution does not use the Major, School or Level fields, these fields can be removed from this screen by your DegreeWorks administrator. The Name field contains a drop-down list box of students available to the user depending upon your user class. If this drop-down list box contains no values, click the Find button to select an individual or group of students. This will open up a new search window. Once you have selected your population of students, click the OK button in the search window. This will close the search window and load the list of students into the drop-down list box in the Name field on the Introduction page. From this drop-down list box, you will now be able to select individual students for audit processing.
January 22, 2010 DegreeWorks DW4.0.5 8 User Guide Web Interface
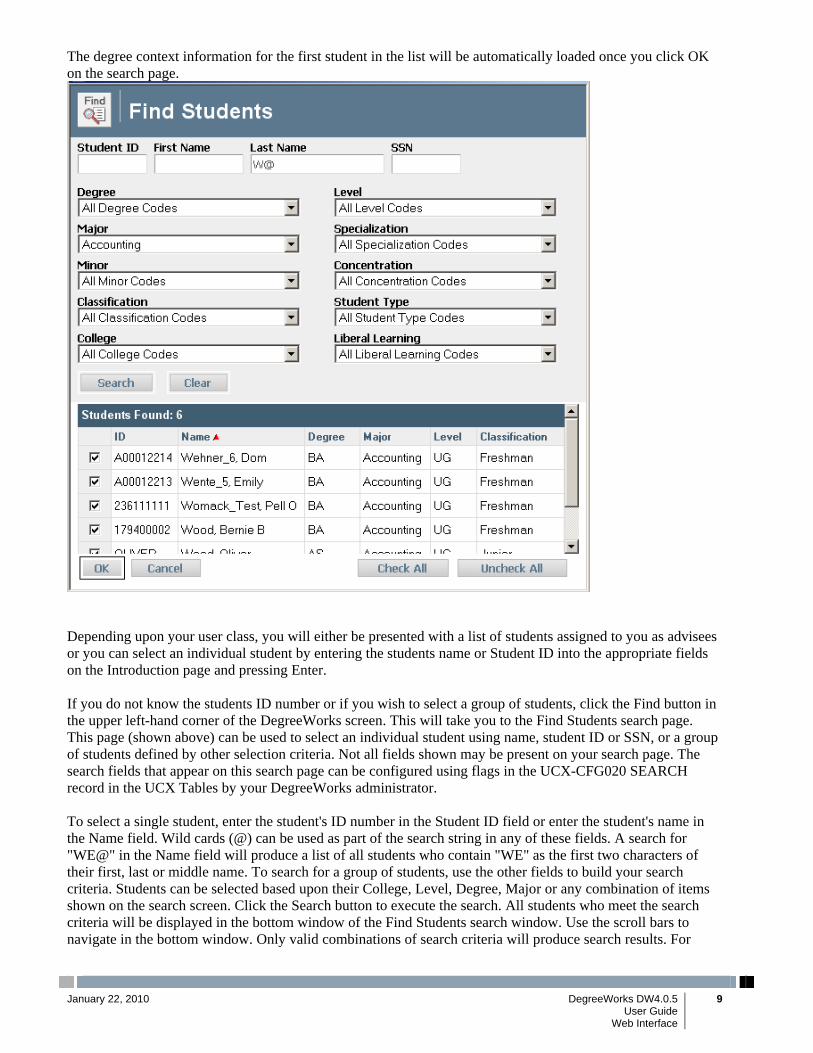
The degree context information for the first student in the list will be automatically loaded once you click OK on the search page.
Depending upon your user class, you will either be presented with a list of students assigned to you as advisees or you can select an individual student by entering the students name or Student ID into the appropriate fields on the Introduction page and pressing Enter. If you do not know the students ID number or if you wish to select a group of students, click the Find button in the upper left-hand corner of the DegreeWorks screen. This will take you to the Find Students search page. This page (shown above) can be used to select an individual student using name, student ID or SSN, or a group of students defined by other selection criteria. Not all fields shown may be present on your search page. The search fields that appear on this search page can be configured using flags in the UCX-CFG020 SEARCH record in the UCX Tables by your DegreeWorks administrator. To select a single student, enter the student's ID number in the Student ID field or enter the student's name in the Name field. Wild cards (@) can be used as part of the search string in any of these fields. A search for "WE@" in the Name field will produce a list of all students who contain "WE" as the first two characters of their first, last or middle name. To search for a group of students, use the other fields to build your search criteria. Students can be selected based upon their College, Level, Degree, Major or any combination of items shown on the search screen. Click the Search button to execute the search. All students who meet the search criteria will be displayed in the bottom window of the Find Students search window. Use the scroll bars to navigate in the bottom window. Only valid combinations of search criteria will produce search results. For
January 22, 2010 DegreeWorks DW4.0.5 9 User Guide Web Interface
January 22, 2010 DegreeWorks DW4.0.5 10 User Guide Web Interface
example, if the Biochemistry major at your institution can only be taken as a Bachelor of Science Degree, then a search for Biochemistry majors pursuing a Bachelor of Arts Degree will not produce any results. Once you have created a list of students who meet your selection criteria, you can sort the list by clicking on any of the field headers in the Students Found window. The red arrow indicates the sort field being applied to the list of students found. The list of students is sorted by name in descending order as a default. To change the sort from descending to ascending order, click the Name field header again. You will see the red arrow to the right change from a down-arrow to an up-arrow indicating that the name field is being sorted in ascending order. Any changes made to the sort criteria are valid only for the list of students found in the preceding search. If you modify the search criteria and execute a new search, the results will be displayed with Name as the default sort field. This sort feature is not available if you are using Netscape 4.x. When you have successfully created your list of students using the Find function and entered the sort order, you can delete students from the list by un-checking the check box to the left of the student. Click OK to close the search window and load the list of students into DegreeWorks. The list of students will load with the same sort characteristics defined on the search page. You may then select any student from the list for degree audit processing. Although it is possible to create a list of students who meet specific selection criteria, DegreeWorks on the Web can only perform degree audits on one student at a time. To perform degree audit and reporting functions on groups of students, use the Transit batch processing application. As mentioned earlier, access to search functions is dependent upon permissions associated with the User ID and Password used during the logon process. These user class permissions can be configured in the UCX Tables and/or in the SHPCFG file. Some institutions may limit advisors to having access only to their list of advisees. In this case, a list of student advisees will appear in the Name drop-down list box on the Introduction page after logon. The list of advisees can contain only current students assigned to the advisor or all students assigned to the advisor depending upon the value specified in the UCX-CFG020 WEBPARAMS active term field. If the active term field on this record is filled in with a valid term value, then only those students with a GOAL_DTL record for the active term specified in this record will be included in the list. If the active term field on this record is set to blanks, then ALL students assigned to the advisor will be included in the list regardless of the term specified on the GOAL_DTL record. The Find button will only bring up your list of advisees. You can remove students from the list returned by removing the check mark next to their ID. If you remove students from your drop-down list box by un-checking the checkbox next to them in the search window, you can refresh your list of students by clicking the Refresh Advisees button located at the bottom of the search window. It is important to keep in mind that if you are allowing your advisors to only see a list of their assigned advisees for the current term, you must update the active term field on the UCX-CFG020 WEBPARAMS record each term. If this record is not updated, your advisors will not be able to see a list of current students and will only be allowed access to students with historic GOAL_DTL records.

Overview of Web Functions
Student Context Area Once a student has been selected either directly on the Introduction page or using the Find Students search page, the student’s information is loaded into the Student Context Area. Then, you can choose the appropriate tab to perform the services you require in DegreeWorks. The information in the student context area can include:
• Student ID: this value can be “masked” based on a UCX-CFG020 WEB setting • Name: if you have multiple students selected, this is a dropdown list of all selected students • Degree: if the student has multiple degrees, this is a dropdown list of all degrees for that student.
Also, if the degree is an applicant degree, the degree code will be followed by an asterisk. (As of DW4.0.4) • Major: the student’s first-sequence major for the chosen degree
(from rad_goaldata_dtl: rad_goal_value where rad_goal_code=’MAJOR’ and rad_goal_seq=1) • Level/School: the student’s level/school (like “Undergraduate”) for the chosen degree • Classification: the student’s classification (like “Sophomore” or “Senior”) for the chosen degree • Last Audit: the date an audit was last processed for the chosen degree • Last Refresh: the date the student’s Student System data was last verified
Each DegreeWorks service can be selected by clicking the appropriate tab. Each tab in turn brings up one or more screens to be used for that function. Different screens will appear depending on the type of service being processed. There are two different Audit functions available in DegreeWorks. The Worksheets tab allows you to run a new audit or review the most recent audit for a student as shown later. Select the desired audit report format from the Format drop-down list box and click the View button to view the most recent audit for that student. To process a new audit for the student, select the desired audit report format and then click the Process New button to run a new audit. The name of the audit report format appears on the top header of the audit report.
January 22, 2010 DegreeWorks DW4.0.5 11 User Guide Web Interface
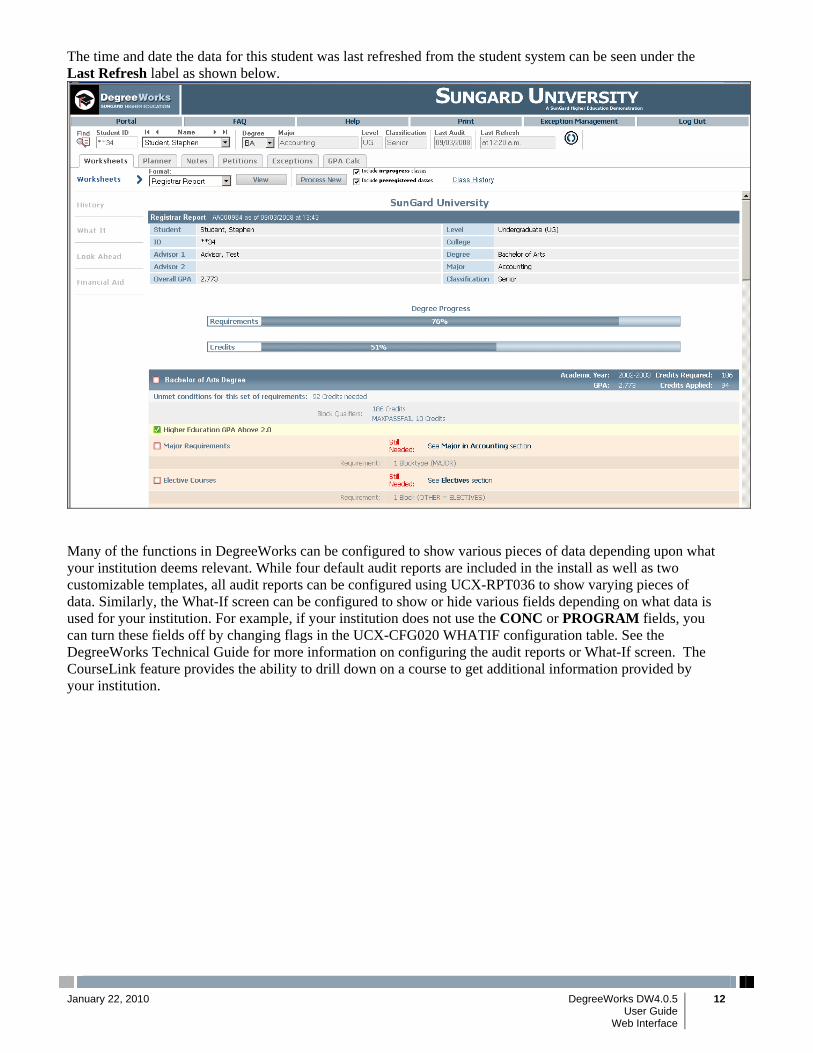
The time and date the data for this student was last refreshed from the student system can be seen under the Last Refresh label as shown below.
Many of the functions in DegreeWorks can be configured to show various pieces of data depending upon what your institution deems relevant. While four default audit reports are included in the install as well as two customizable templates, all audit reports can be configured using UCX-RPT036 to show varying pieces of data. Similarly, the What-If screen can be configured to show or hide various fields depending on what data is used for your institution. For example, if your institution does not use the CONC or PROGRAM fields, you can turn these fields off by changing flags in the UCX-CFG020 WHATIF configuration table. See the DegreeWorks Technical Guide for more information on configuring the audit reports or What-If screen. The CourseLink feature provides the ability to drill down on a course to get additional information provided by your institution.
January 22, 2010 DegreeWorks DW4.0.5 12 User Guide Web Interface

Processing Degree Audits Degree audits are processed using the Worksheets tab. To access this screen, select the student you wish to process. This will automatically take you to the Worksheets screen and the most recent audit for this student will load automatically. The student context information will be displayed in the fields at the top of the window once the student has been selected. This information includes current degree pursuit, major, school, student level and the date the last audit was processed. To process a new audit for the student select the Process New button. To include In-Progress classes or to include pre-registered classes, place a check in the appropriate check box. The Include in-progress classes and Include pre-registered classes check boxes are checked by default. Be sure to select the appropriate audit report format prior to clicking the Process New button.
The nightly batch process checks for data changes for each student and runs a new audit for those students with changed data. The audit you see when the student is loaded will reflect their most recent academic data. However, you may wish to click Process New to run a new audit at any time to reflect changes to requirements or to configuration settings. Once the audit has been processed, the audit report will be displayed in the format selected prior to processing. As mentioned earlier, the audit information displayed depends upon the UCX-RPT036 configuration settings for the audit report format selected.
January 22, 2010 DegreeWorks DW4.0.5 13 User Guide Web Interface
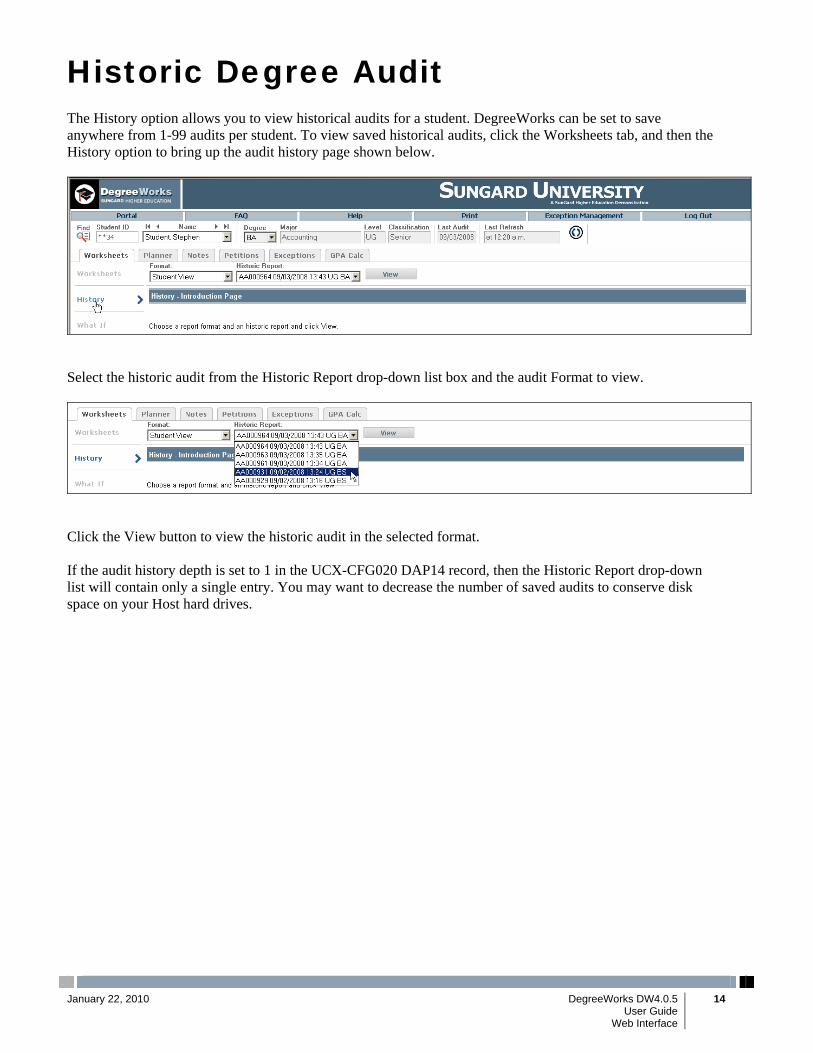
Historic Degree Audit The History option allows you to view historical audits for a student. DegreeWorks can be set to save anywhere from 1-99 audits per student. To view saved historical audits, click the Worksheets tab, and then the History option to bring up the audit history page shown below.
Select the historic audit from the Historic Report drop-down list box and the audit Format to view.
Click the View button to view the historic audit in the selected format. If the audit history depth is set to 1 in the UCX-CFG020 DAP14 record, then the Historic Report drop-down list will contain only a single entry. You may want to decrease the number of saved audits to conserve disk space on your Host hard drives.
January 22, 2010 DegreeWorks DW4.0.5 14 User Guide Web Interface
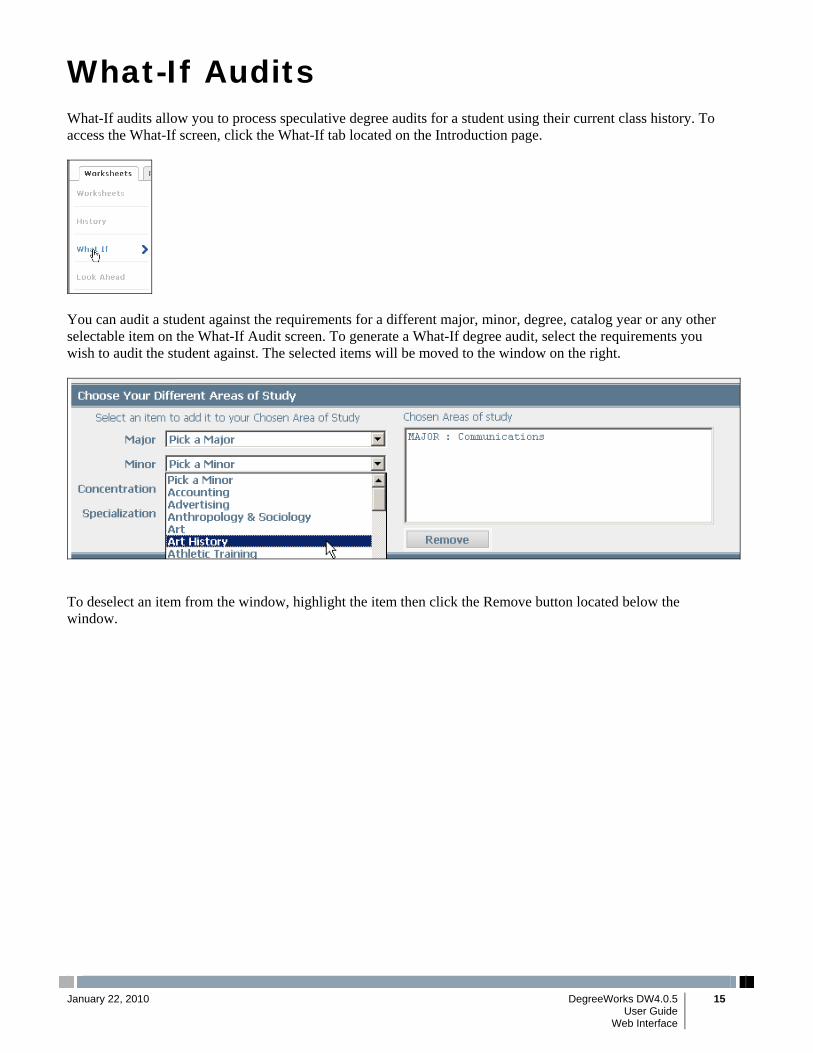
What-If Audits What-If audits allow you to process speculative degree audits for a student using their current class history. To access the What-If screen, click the What-If tab located on the Introduction page.
You can audit a student against the requirements for a different major, minor, degree, catalog year or any other selectable item on the What-If Audit screen. To generate a What-If degree audit, select the requirements you wish to audit the student against. The selected items will be moved to the window on the right.
To deselect an item from the window, highlight the item then click the Remove button located below the window.
January 22, 2010 DegreeWorks DW4.0.5 15 User Guide Web Interface
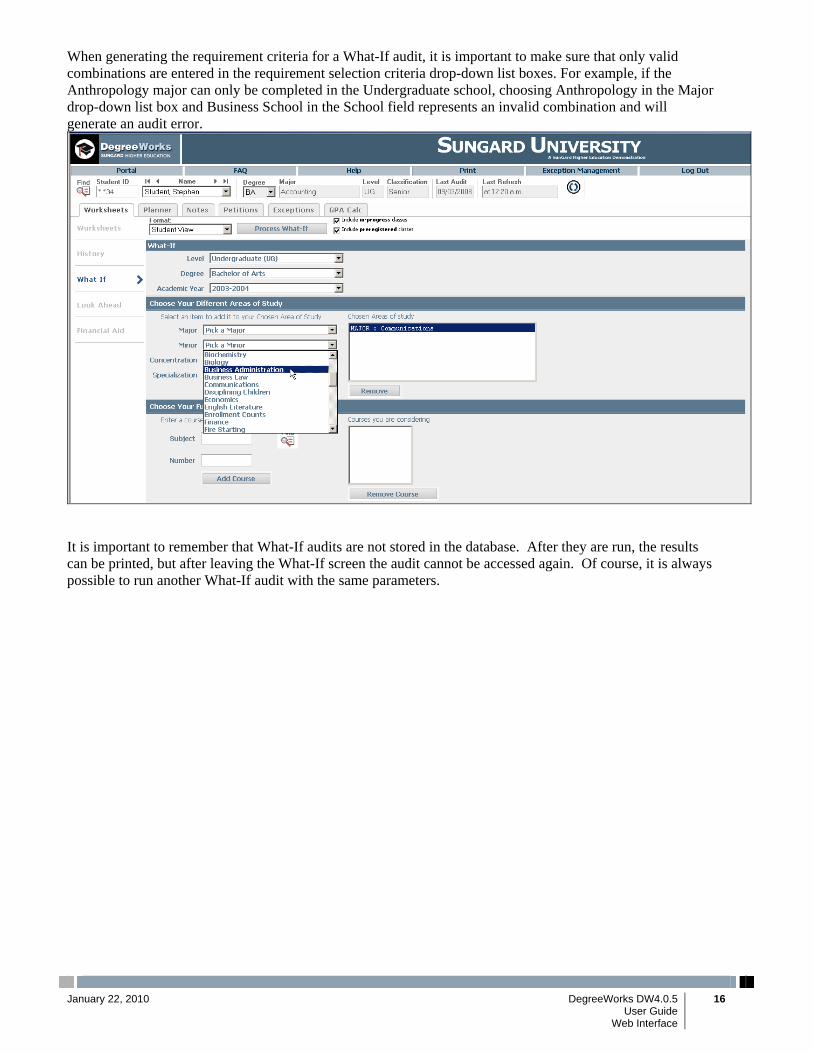
When generating the requirement criteria for a What-If audit, it is important to make sure that only valid combinations are entered in the requirement selection criteria drop-down list boxes. For example, if the Anthropology major can only be completed in the Undergraduate school, choosing Anthropology in the Major drop-down list box and Business School in the School field represents an invalid combination and will generate an audit error.
It is important to remember that What-If audits are not stored in the database. After they are run, the results can be printed, but after leaving the What-If screen the audit cannot be accessed again. Of course, it is always possible to run another What-If audit with the same parameters.
January 22, 2010 DegreeWorks DW4.0.5 16 User Guide Web Interface

Student Educational Planner The Student Educational Planner (SEP) is a tool in DegreeWorks that students and advisors use to create academic plans. Pre-defined plans, or templates for particular programs of study, can be created ahead of time and loaded for student advising. Once a plan is populated it may be modified as needed. The SEP format allows courses from the degree audit to be pulled into the plan with a simple drag-n-drop action.
January 22, 2010 DegreeWorks DW4.0.5 17 User Guide Web Interface
January 22, 2010 DegreeWorks DW4.0.5 18 User Guide Web Interface
Setup Setup the UCX-CFG020 PLANNER record. Planner Name and Planner Type Two views are available in SEP. A plan can be viewed in “Calendar” mode with each year represented as a row of terms; in this mode there is only a single notes field at the bottom of the plan. The plan can also be viewed in “Note” mode where a note field appears next to each term and the terms are presented in one single column – top to bottom. Placing N in Planner Type 1 tells SEP that the Note View should be the default view; placing C in Planner Type 1 will make the Calendar View the default. An appropriate name should be placed in the Planner Name 1 field to match the view in Planner Type 1. You may choose to leave Planner Type 2 blank so that your users only get one view; no option is given. Placing a C or N in Planner Type 2 gives your users an option of views. The Allow changes to past terms field controls plan modifications for historic terms and the current term. Setting this flag to N tells SEP to show historic terms as gray and read-only so that no changes can be made; the student’s active term is also read-only. You may want to prevent users from modifying their plans for historic terms if you plan on running statistical reports on what courses were planned versus those taken. It is strongly recommended that this be set to “N.” The Allow changes current term field works in conjunction with the Allow changes to past term. If Allow changes to past term is set to “Y”, then Allow changes to current term is ignored, because it means that all terms are allowed. If, however, Allow changes to past terms is set to “N”, this flag determines whether the current term (the student’s “Active Term”, as defined on the rad_student_mst.rad_term) is editable. The Show School, Show Degree, Show Major, Show Minor, Show Concentration, Show College, Show Liberal Learning, Show Specialization, Show Program flags are used when searching for templates to pull into a new plan and when searching and saving templates on the Templates tab. If all templates are for an undergraduate school, you may want to hide the school drop-down list. Community colleges without majors may wish to hide the major drop-down list. The Show Completed Classes Default field sets the default for the “Show completed classes” checkbox on the Planner interface. If the Allow changes to past terms field is set to “Y”, then it is strongly recommended that this field be set to “N” so that completed courses are NOT included in the plan.

SureCode – UCX-CFG020 Example
January 22, 2010 DegreeWorks DW4.0.5 19 User Guide Web Interface
January 22, 2010 DegreeWorks DW4.0.5 20 User Guide Web Interface
Setup the UCX-CFG072 table. UCX-CFG072 Overview: 1. UCX-CFG072 controls which courses may be saved in specified terms in SEP plans. 2. You may not create registration records for more than one or two future terms but this table allows you to
indicate your best guess at when courses will be offered. 3. Courses that are offered every term do not need a record in UCX-CFG072; the absence of a UCX-CFG072
record means a course is allowed in any term. 4. Validation against the course-mst will occur if no UCX-CFG072 record is found; only courses offered by
the institution are allowed in plans. 5. Some course offerings are known only one term in advance; such courses may not be appropriate for
UCX-CFG072. 6. Since users may not be allowed to modify courses in historic terms and their active term validation is only
performed on courses for future terms. UCX-CFG072 Details: 1. The key into UCX-CFG072 is the discipline + course number – no spaces; eg, MATH123, PE101,
ART106. 2. Up to 16 terms may be specified for each course. 3. Wildcards and the negation operator (!) may be used instead of a specific term value. 4. A Message to User may be entered to tell the user when a course can or can’t be planned. 5. Leaving Message to User blank results in a generic message to the user; eg, “Not offered in this term”. 6. A match made to any of the terms values passes the validation. Term value guide Term value Meaning @ Any term @03 Any term ending in “03” 2008@ Any term starting with 2008 200803 This specific term !@03 Any term but those ending in “03” !200803 Any term but this specific term !@ Not valid in any term Renumbered courses You may specify !@ as the term value. This could be useful for course number changes. If HIST 106 has been renumbered to HIST 123 you may want to create a HIST106 entry in UCX-CFG072, specify !@ as Term 1, and create a Message to User of “HIST 106 is now offered as HIST 123”. Users entering HIST 106 in their plan will be told exactly what to do when they attempt to save. Skipping validation If a course is found on a plan with a hyphen as the first character, then the validation check will be skipped. For example, if the user enters “-BIOL 109” no validation will be performed in UCX-CFG072 or against the course-mst. This allows you to store a course even if it is really not allowed in that term or not offered at your institution. Any statistical reporting you do against the planner data will be skewed if a lot of plans are stored with this character imbedded as it is stored in the database with the hyphen in front of the discipline. Updating UCX-CFG072 each year/term Table UCX-CFG072 should be updated with each new term. Since validation is not performed on historic terms you can clean out old term values and insert new ones as course offerings change.
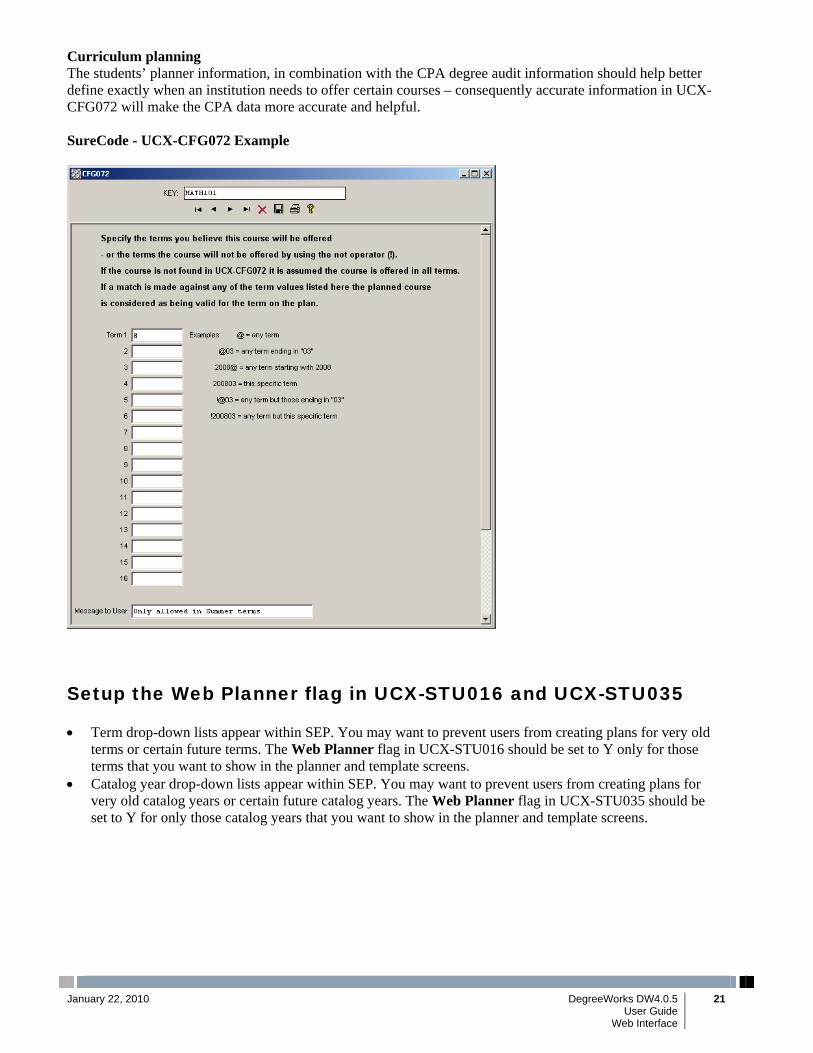
Curriculum planning The students’ planner information, in combination with the CPA degree audit information should help better define exactly when an institution needs to offer certain courses – consequently accurate information in UCX-CFG072 will make the CPA data more accurate and helpful. SureCode - UCX-CFG072 Example
Setup the Web Planner flag in UCX-STU016 and UCX-STU035 • Term drop-down lists appear within SEP. You may want to prevent users from creating plans for very old
terms or certain future terms. The Web Planner flag in UCX-STU016 should be set to Y only for those terms that you want to show in the planner and template screens.
• Catalog year drop-down lists appear within SEP. You may want to prevent users from creating plans for very old catalog years or certain future catalog years. The Web Planner flag in UCX-STU035 should be set to Y for only those catalog years that you want to show in the planner and template screens.
January 22, 2010 DegreeWorks DW4.0.5 21 User Guide Web Interface

Web Interface Planner
• Access to the Planner tab for SEP is given by the SDSEP key. • You may use SHPCFG to restrict access to this service as you wish. • Users with the SDSEPMOD key are allowed to both Edit and View plans. • Users with only the SDSEP key, not the SDSEPMOD key, cannot Edit plans.
PLANNER CONTROLS Plan list
• The plan number and description for each of the student’s list of plans are shown • An entry for “Add New Plan” allows the creation of a new plan • Active and inactive plans appear • Plans appear in order by plan number
Mode options
• Notes mode – terms are listed top to bottom with notes for each term (see UCX-CFG020 PLANNER) • Calendar mode – each “year” of terms is a row (see UCX-CFG020 PLANNER) • Planned vs Taken – compare planned courses to those actually taken by the student
Show completed classes
• For past terms and current term allows classes taken to be shown instead of those planned • Default behavior is based on the UCX-CFG020 PLANNER “Show Completed Classes Default” • If checked, it will not allow modification of past terms. This guards against saving completed courses
into Planned terms. Edit vs View
• Edit allows users to modify the plan • View gives a report that is good for printing • Planned vs Taken assumes View even if not selected
January 22, 2010 DegreeWorks DW4.0.5 22 User Guide Web Interface
January 22, 2010 DegreeWorks DW4.0.5 23 User Guide Web Interface
Planner Body Planner Edit
1. Degree Audit appears in the left frame 2. Plan appears in the right frame 3. The left and right frames can be resized by dragging the gray separating bar 4. Historic terms are shown in gray (disabled) based on the UCX-CFG020 PLANNER flag. 5. Classes taken and their grades are shown for completed terms based on the Show completed classes
checkbox 6. Courses from the audit can be dropped into a plan using drag-n-drop 7. When a class is dropped into the plan the credits for the course will show in the box to the right of the
course (only available in Internet Explorer and Firefox 3.5). 8. If a user types a course into the plan clicking Save Plan will populate the credits field. 9. If it is a variable credit course the user may change the credits to the high or low value based on what
is in the catalog; the user will get an error if the credits value entered is invalid. 10. A total number of credits appears beneath each term and a plan total of credits appears at the bottom of
the plan. Both sets of total credits are updated as the user makes changes. 11. Users with the SDPLNAUD key are shown the Process Audit button and checkboxes appear next to
each term 12. When a new audit is run classes from the plan appear in the audit in blue with a term value of
PLANNED; the credits from the plan are used in the audit. 13. Plan buttons appear in the bottom right
a. Save Plan – saves contents of plan b. Reload Form – start over c. Save As… - save the data as a new plan d. Delete Plan – delete this current plan – confirmation message appears e. Process New – runs a new audit with planned courses applied to rules f. Check All Terms – check the boxes for all future terms to be included in a new audit g. Uncheck All – uncheck all boxes for all future terms
14. Description field is used to distinguish one plan from another if the student has multiple plans 15. Academic Year field is also helpful if the student has multiple plans but also useful for reporting
purposes 16. The Active checkbox can be used to deactivate a plan (put it on hold); also useful for reporting
purposes 17. Clicking Print in the top-right of the plan frame prints just the plan frame

January 22, 2010 DegreeWorks DW4.0.5 24 User Guide Web Interface
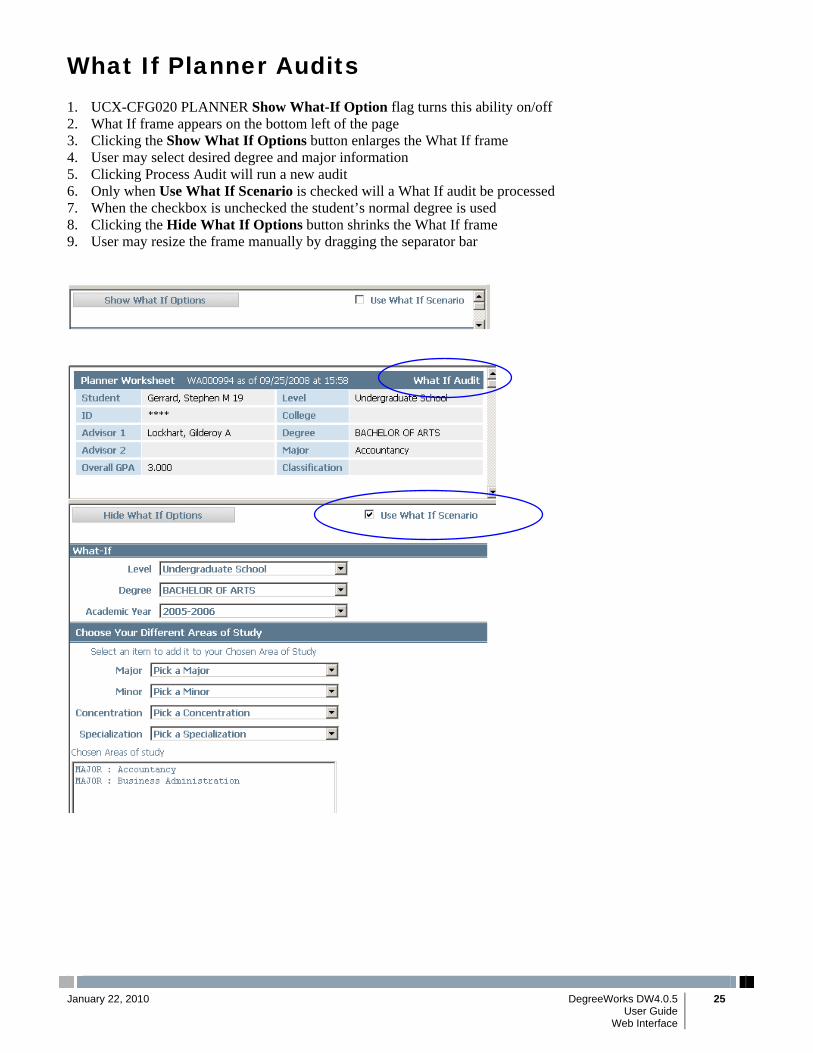
What If Planner Audits 1. UCX-CFG020 PLANNER Show What-If Option flag turns this ability on/off 2. What If frame appears on the bottom left of the page 3. Clicking the Show What If Options button enlarges the What If frame 4. User may select desired degree and major information 5. Clicking Process Audit will run a new audit 6. Only when Use What If Scenario is checked will a What If audit be processed 7. When the checkbox is unchecked the student’s normal degree is used 8. Clicking the Hide What If Options button shrinks the What If frame 9. User may resize the frame manually by dragging the separator bar
January 22, 2010 DegreeWorks DW4.0.5 25 User Guide Web Interface

Calendar mode • Terms are arranged in rows by year • A single notes box appears at the bottom of the plan
January 22, 2010 DegreeWorks DW4.0.5 26 User Guide Web Interface

General Notes section A general notes section appears at the bottom of the plan
January 22, 2010 DegreeWorks DW4.0.5 27 User Guide Web Interface

Classes Completed in Unplanned Terms 1. When the Show completed classes box is checked, the classes already taken will replace those that were
planned for historic terms. 2. Classes taken not fitting into any term specified on the plan appear in a section at the bottom of the plan 3. Classes appear organized by term along with their final grade 4. Transfer classes will also appear in a section at the bottom of the plan; no transfer classes will ever appear
in the plan itself.
January 22, 2010 DegreeWorks DW4.0.5 28 User Guide Web Interface
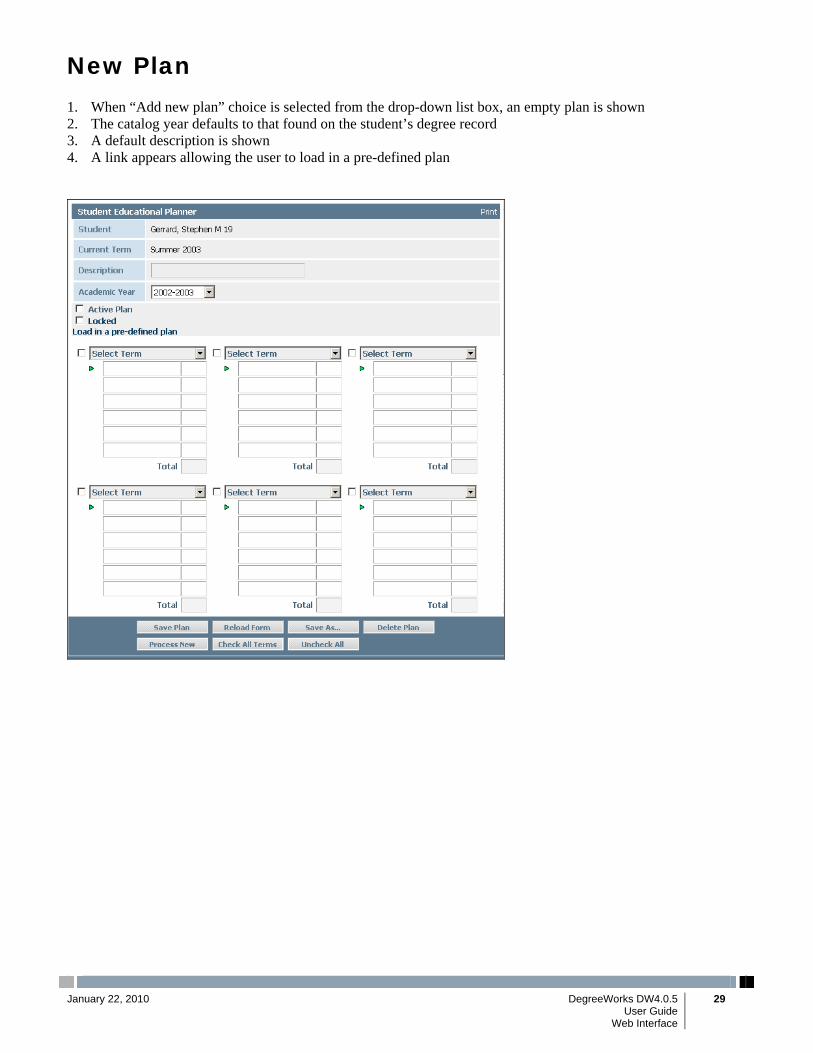
New Plan 1. When “Add new plan” choice is selected from the drop-down list box, an empty plan is shown 2. The catalog year defaults to that found on the student’s degree record 3. A default description is shown 4. A link appears allowing the user to load in a pre-defined plan
January 22, 2010 DegreeWorks DW4.0.5 29 User Guide Web Interface

Loading a pre-defined plan 1. Clicking Load in a pre-defined plan opens a search window 2. The School, Degree, Major and Catalog Year default to the values found on the student’s degree record 3. Clear All may be used to clear all fields 4. The UCX-CFG020 PLANNER flags control whether School, Degree, Major, Minor, Concentration,
College, Liberal Learning, Specialization, and Program appear 5. Clicking Search queries the dap-template-mst records using the search values 6. The search results are shown in the bottom half of the page 7. Choosing a pre-defined plan and clicking Load into my plan populates the template into the student’s new
plan 8. After the window closes the template is populated into the student’s new plan 9. The user must click Save Planner to save the new plan
January 22, 2010 DegreeWorks DW4.0.5 30 User Guide Web Interface
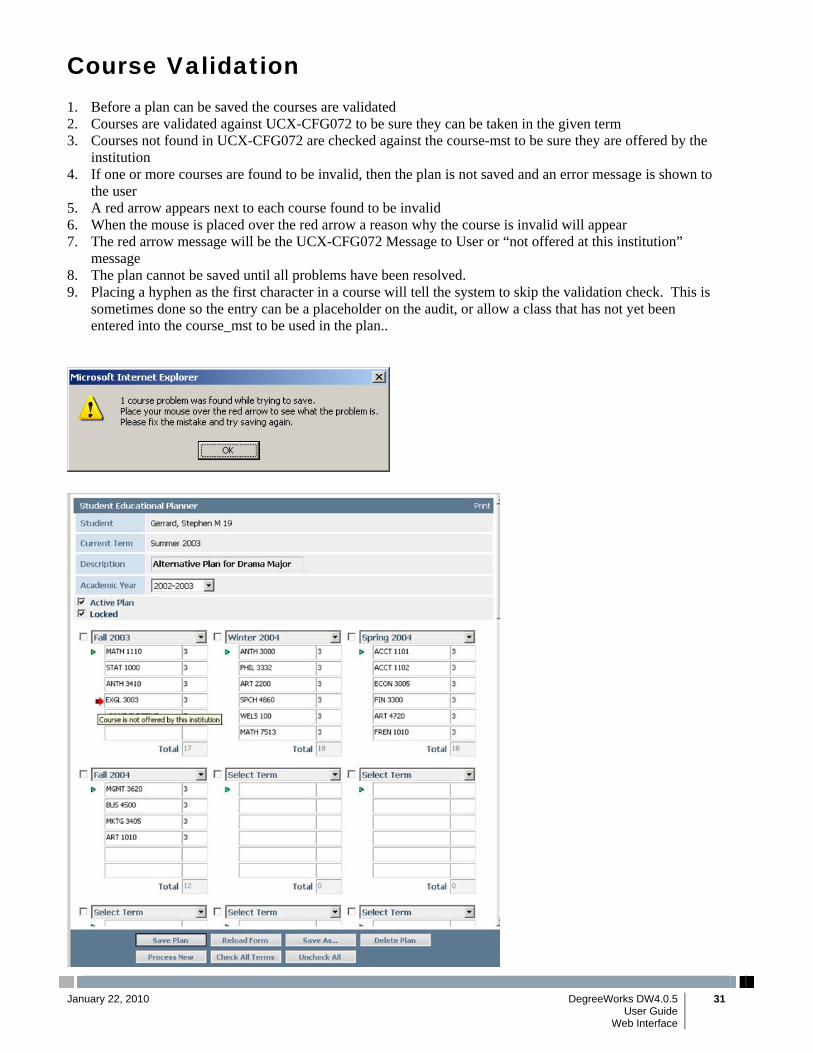
Course Validation 1. Before a plan can be saved the courses are validated 2. Courses are validated against UCX-CFG072 to be sure they can be taken in the given term 3. Courses not found in UCX-CFG072 are checked against the course-mst to be sure they are offered by the
institution 4. If one or more courses are found to be invalid, then the plan is not saved and an error message is shown to
the user 5. A red arrow appears next to each course found to be invalid 6. When the mouse is placed over the red arrow a reason why the course is invalid will appear 7. The red arrow message will be the UCX-CFG072 Message to User or “not offered at this institution”
message 8. The plan cannot be saved until all problems have been resolved. 9. Placing a hyphen as the first character in a course will tell the system to skip the validation check. This is
sometimes done so the entry can be a placeholder on the audit, or allow a class that has not yet been entered into the course_mst to be used in the plan..
January 22, 2010 DegreeWorks DW4.0.5 31 User Guide Web Interface

Viewing Plans 1. Clicking on the View radio button produces a report that is better for printing 2. Users that do not have permission to edit plans will be given this view option only 3. As with editing, Calendar mode and Notes mode are supported Notes mode
Calendar mode
January 22, 2010 DegreeWorks DW4.0.5 32 User Guide Web Interface
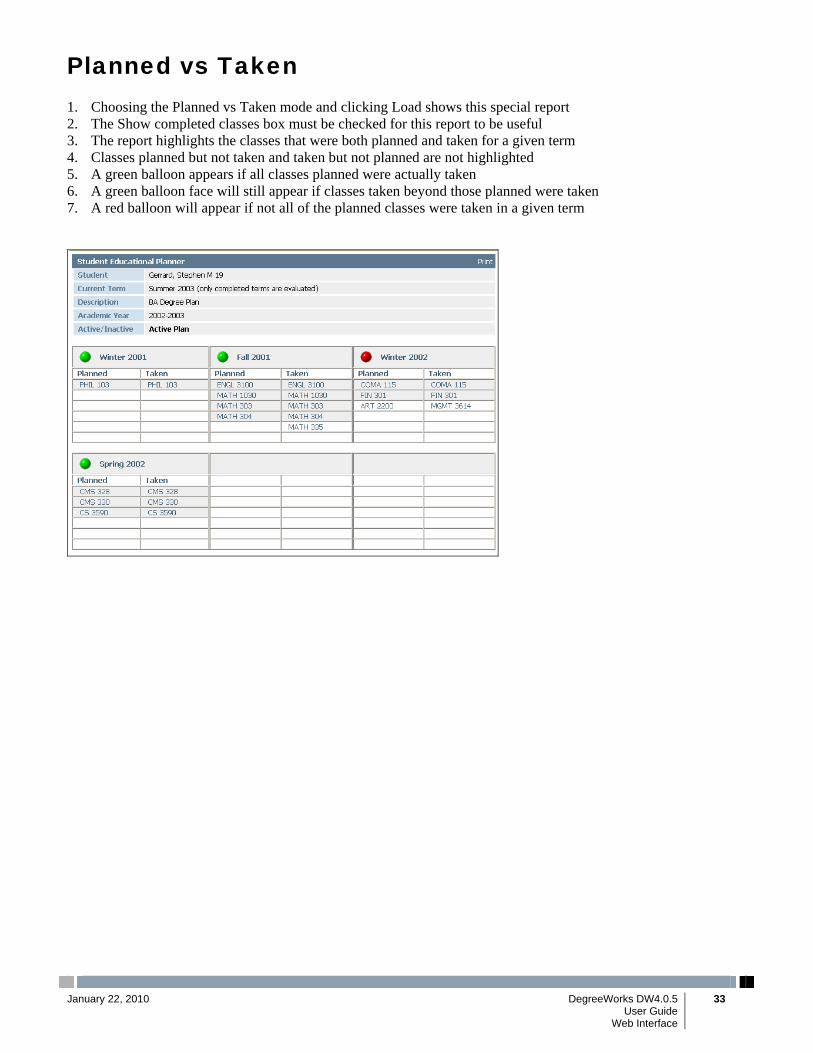
Planned vs Taken 1. Choosing the Planned vs Taken mode and clicking Load shows this special report 2. The Show completed classes box must be checked for this report to be useful 3. The report highlights the classes that were both planned and taken for a given term 4. Classes planned but not taken and taken but not planned are not highlighted 5. A green balloon appears if all classes planned were actually taken 6. A green balloon face will still appear if classes taken beyond those planned were taken 7. A red balloon will appear if not all of the planned classes were taken in a given term
January 22, 2010 DegreeWorks DW4.0.5 33 User Guide Web Interface

January 22, 2010 DegreeWorks DW4.0.5 34 User Guide Web Interface
Create Block The Create Block button is used to generate a requirement block from the educational plan. This is most useful when the degree requirements are decided upon on a student-by-student basis as is the case in many graduate programs. It eliminates the need to build individualized blocks from within Srcibe itself. The Create Block button will only appear when the user has the SDPLNREQ key assigned (and only when the Process Audit button is also present) Clicking Create Block will save the plan and then generate an OTHER=PLAN (where “PLAN” is defined in CFG020 PLANNERBLOCK) requirement block with one rule for each class listed in the plan. In addition, the student’s ID is added as a secondary tag to the OTHER=PLAN block so that many OTHER=PLAN blocks may exist. For an MBA degree, for example, you would create a DEGREE=MBA block in Scribe and then call in the OTHER=PLAN block:
1 Block (OTHER=PLAN) Label “Educational Plan requirements”;
When a new audit is run the correct OTHER=PLAN block with the specific student ID as the secondary tag will be pulled into the audit. Other notes: If the plan is altered the user may simply click Create Block again to regenerate the block overwriting what was previously saved. Any hyphenated items found in the plan (such as “-Math elective” or “-Language requirement”) appear in the block as a RuleIncomplete rule as they are not real classes that can be taken. The catalog year saved on the plan is used as the start and stop catalog years saved on the block. Once a block is created Scribe may be used to make alterations to it. If Create Block is used to regenerate the block after Scribe changes have been made the user will be asked if they really wish to overwrite the changes made in Scribe and the Create Block modifications would prevail.. Blocks created using this option have a block ID that begins with "RB" instead of "RA". When using dapblockunload/dapblockload, these "RB" blocks are ignored. So if you are moving requirement blocks from one environment to another, these "RB" blocks are not considered. (As of DW4.0.1)

Setup the UCX-CFG020 PLANNERBLOCK record.
OTHER Block Title This title is saved on the OTHER block on the dap-req-mst. If this setting is left blank the description from the plan is used as the block title. OTHER Block Name When the OTHER block is saved this is the value that is used. Normally this is set to PLAN or PLANNER or something simple. In Scribe you could then simply search for all OTHER=PLAN blocks created from the planner. Note, the student’s ID is saved as a secondary tag on the block so Scribe should return many OTHER=PLAN blocks for all the students who had blocks created from their plan. Subset Label Prefix When the Create Subsets for Terms flag is Y this text is used as the prefix on the subset label. The term literal is added to the end of this text. For example, if this text is “Classes planned for” the resulting label will be “Classes planned for Spring 2009” Create Subsets for Terms When this flag is set to Y a subset is created for each term. When set to N, no subsets are created and each class in the plan will simply be created as a rule without grouping of course rules. Use Classes in Rules The course rules can be created as a class or as a credits rule. When this flag is N the credits from the planner for the class are used. For example, if the planner contains HIST 213 for 4 credits a rule like this will be created:
4 Credits in HIST 213 When the flag is Y a rule like this will be created
1 Class in HIST 213
January 22, 2010 DegreeWorks DW4.0.5 35 User Guide Web Interface
January 22, 2010 DegreeWorks DW4.0.5 36 User Guide Web Interface
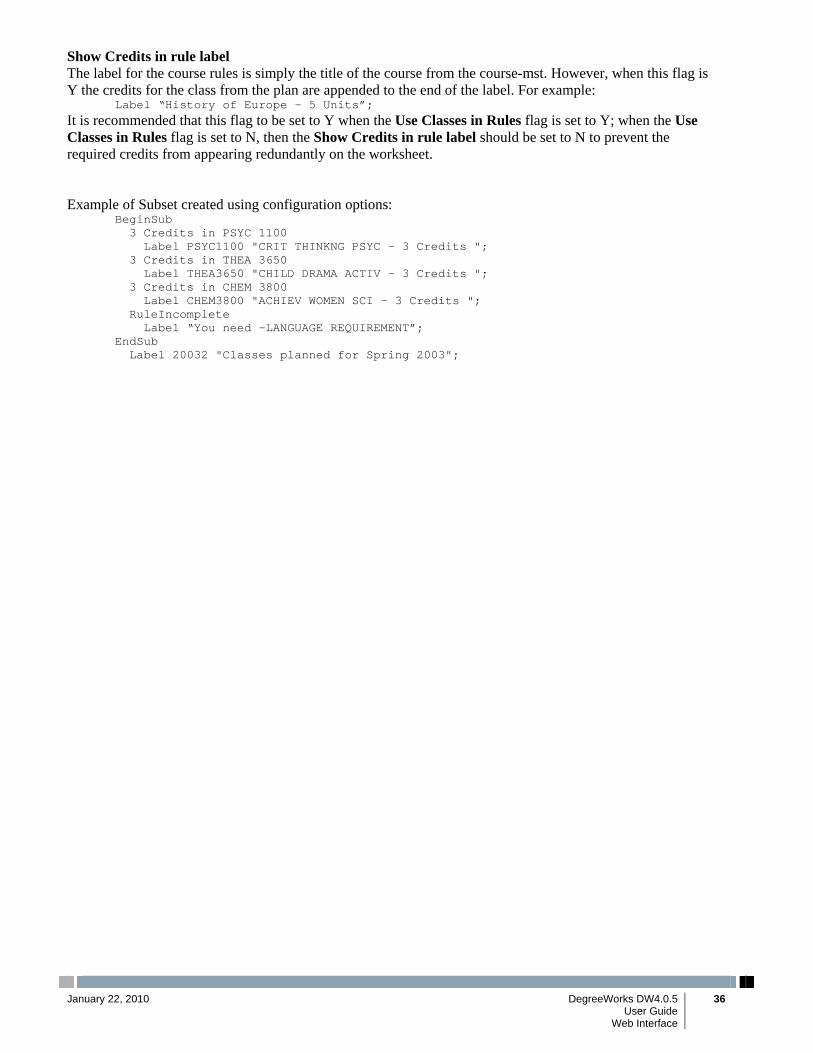
Show Credits in rule label The label for the course rules is simply the title of the course from the course-mst. However, when this flag is Y the credits for the class from the plan are appended to the end of the label. For example:
Label “History of Europe – 5 Units”; It is recommended that this flag to be set to Y when the Use Classes in Rules flag is set to Y; when the Use Classes in Rules flag is set to N, then the Show Credits in rule label should be set to N to prevent the required credits from appearing redundantly on the worksheet. Example of Subset created using configuration options:
BeginSub 3 Credits in PSYC 1100 Label PSYC1100 "CRIT THINKNG PSYC - 3 Credits "; 3 Credits in THEA 3650 Label THEA3650 "CHILD DRAMA ACTIV - 3 Credits "; 3 Credits in CHEM 3800 Label CHEM3800 "ACHIEV WOMEN SCI - 3 Credits "; RuleIncomplete Label “You need –LANGUAGE REQUIREMENT”; EndSub Label 20032 "Classes planned for Spring 2003";
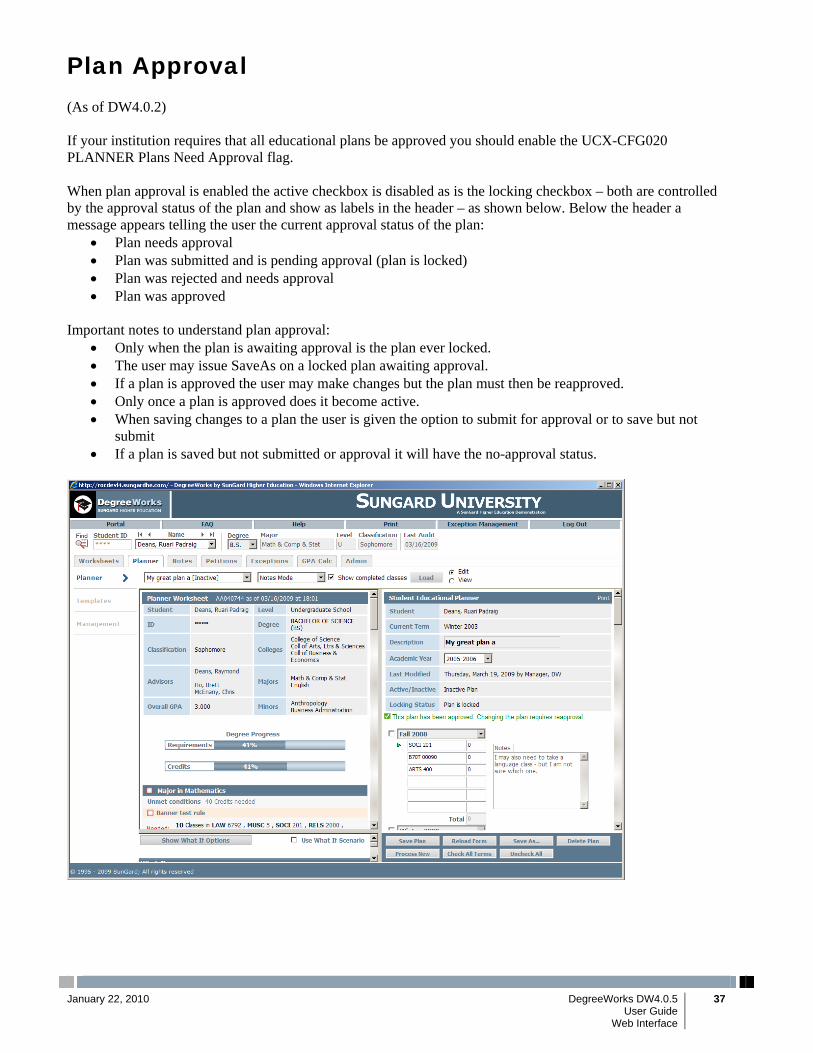
Plan Approval (As of DW4.0.2) If your institution requires that all educational plans be approved you should enable the UCX-CFG020 PLANNER Plans Need Approval flag. When plan approval is enabled the active checkbox is disabled as is the locking checkbox – both are controlled by the approval status of the plan and show as labels in the header – as shown below. Below the header a message appears telling the user the current approval status of the plan:
• Plan needs approval • Plan was submitted and is pending approval (plan is locked) • Plan was rejected and needs approval • Plan was approved
Important notes to understand plan approval:
• Only when the plan is awaiting approval is the plan ever locked. • The user may issue SaveAs on a locked plan awaiting approval. • If a plan is approved the user may make changes but the plan must then be reapproved. • Only once a plan is approved does it become active. • When saving changes to a plan the user is given the option to submit for approval or to save but not
submit • If a plan is saved but not submitted or approval it will have the no-approval status.
January 22, 2010 DegreeWorks DW4.0.5 37 User Guide Web Interface
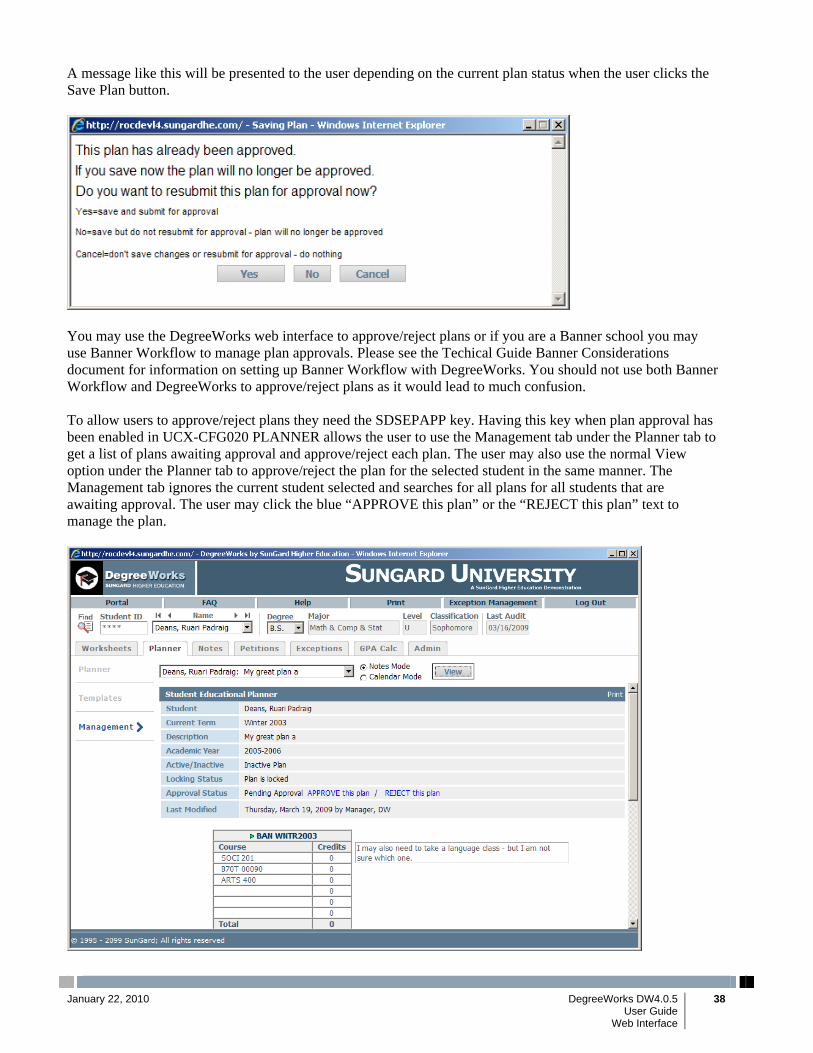
A message like this will be presented to the user depending on the current plan status when the user clicks the Save Plan button.
You may use the DegreeWorks web interface to approve/reject plans or if you are a Banner school you may use Banner Workflow to manage plan approvals. Please see the Techical Guide Banner Considerations document for information on setting up Banner Workflow with DegreeWorks. You should not use both Banner Workflow and DegreeWorks to approve/reject plans as it would lead to much confusion. To allow users to approve/reject plans they need the SDSEPAPP key. Having this key when plan approval has been enabled in UCX-CFG020 PLANNER allows the user to use the Management tab under the Planner tab to get a list of plans awaiting approval and approve/reject each plan. The user may also use the normal View option under the Planner tab to approve/reject the plan for the selected student in the same manner. The Management tab ignores the current student selected and searches for all plans for all students that are awaiting approval. The user may click the blue “APPROVE this plan” or the “REJECT this plan” text to manage the plan.
January 22, 2010 DegreeWorks DW4.0.5 38 User Guide Web Interface

Templates AKA – pre-defined plans 1. Access to the Templates tab is given by the SDTMP key. 2. SDTMP is part of the SRNREG group – registrar users get access by default 3. You may use SHPCFG to restrict access to this service as you wish. Searching for Templates 1. School, Degree, Major, Minor, Concentration, College, Liberal Learning, Specialization, Program, and
Catalog Year should help you narrow your search 2. You can also find Active, Inactive or both types of templates 3. If you know the ID of the specific template you may enter it also 4. Entering “12” in the ID field is sufficient, the value will change to T0000012 automatically
January 22, 2010 DegreeWorks DW4.0.5 39 User Guide Web Interface
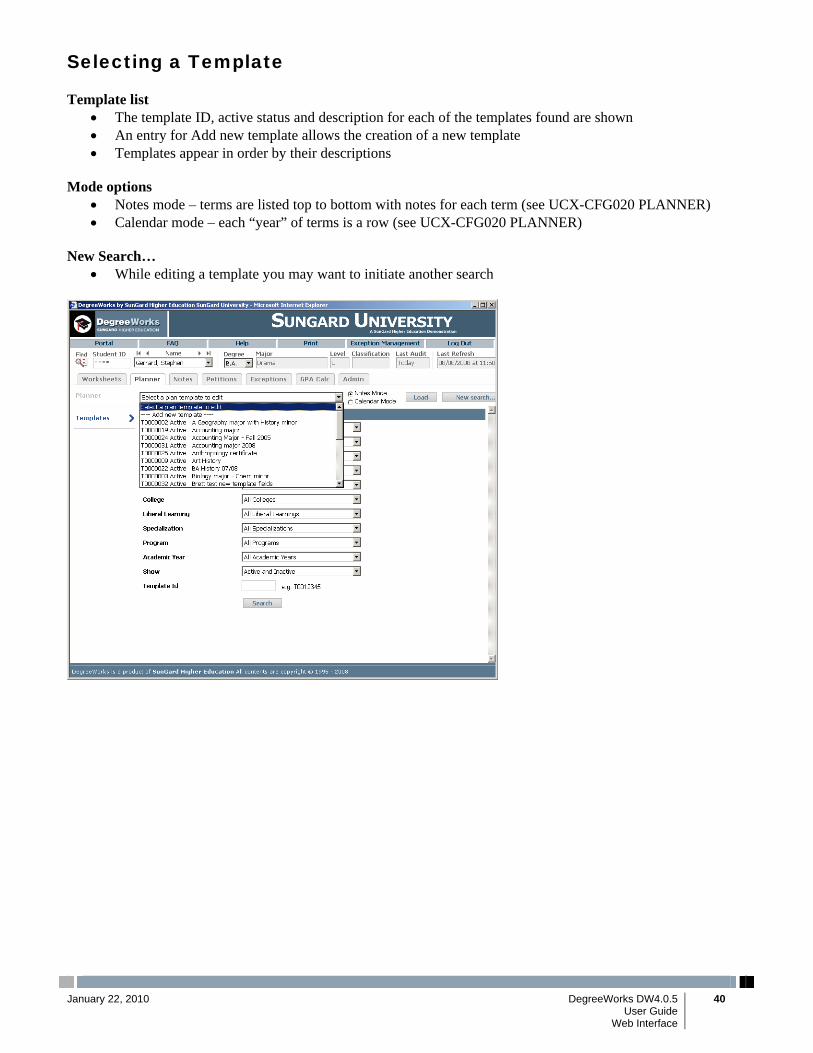
Selecting a Template Template list
• The template ID, active status and description for each of the templates found are shown • An entry for Add new template allows the creation of a new template • Templates appear in order by their descriptions
Mode options
• Notes mode – terms are listed top to bottom with notes for each term (see UCX-CFG020 PLANNER) • Calendar mode – each “year” of terms is a row (see UCX-CFG020 PLANNER)
New Search…
• While editing a template you may want to initiate another search
January 22, 2010 DegreeWorks DW4.0.5 40 User Guide Web Interface
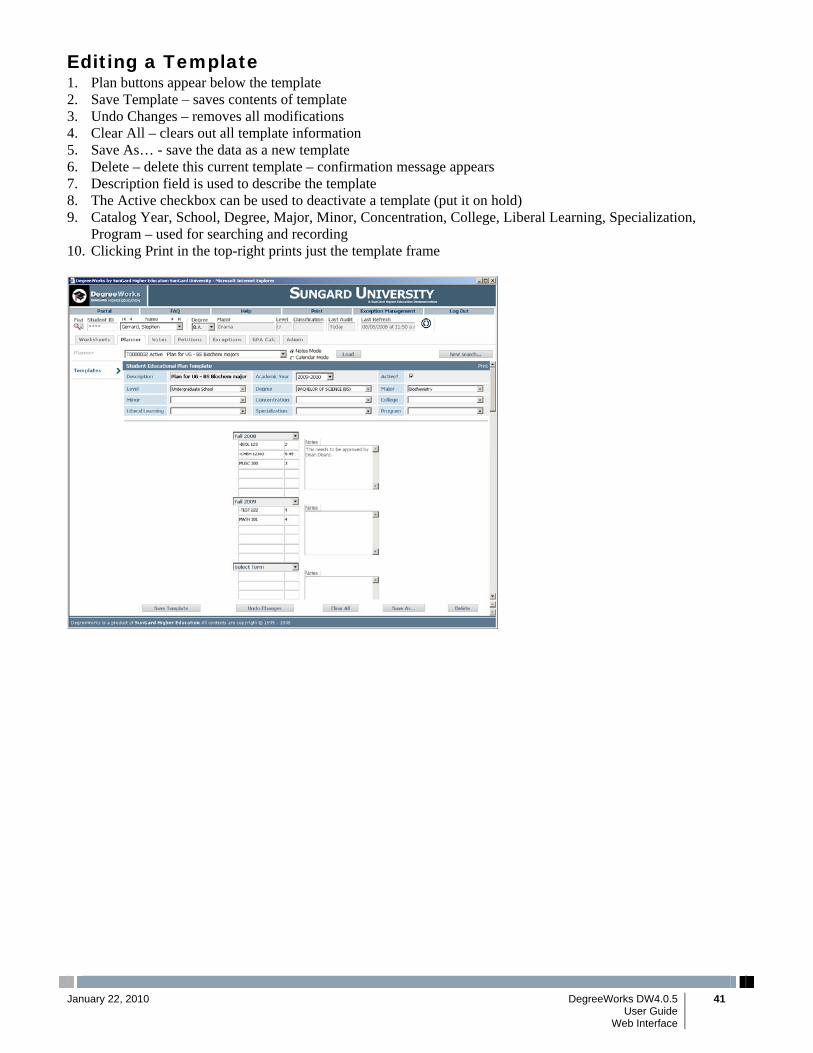
Editing a Template 1. Plan buttons appear below the template 2. Save Template – saves contents of template 3. Undo Changes – removes all modifications 4. Clear All – clears out all template information 5. Save As… - save the data as a new template 6. Delete – delete this current template – confirmation message appears 7. Description field is used to describe the template 8. The Active checkbox can be used to deactivate a template (put it on hold) 9. Catalog Year, School, Degree, Major, Minor, Concentration, College, Liberal Learning, Specialization,
Program – used for searching and recording 10. Clicking Print in the top-right prints just the template frame
January 22, 2010 DegreeWorks DW4.0.5 41 User Guide Web Interface

January 22, 2010 DegreeWorks DW4.0.5 42 User Guide Web Interface
Course Validation See the Course Validation section under the Planner.
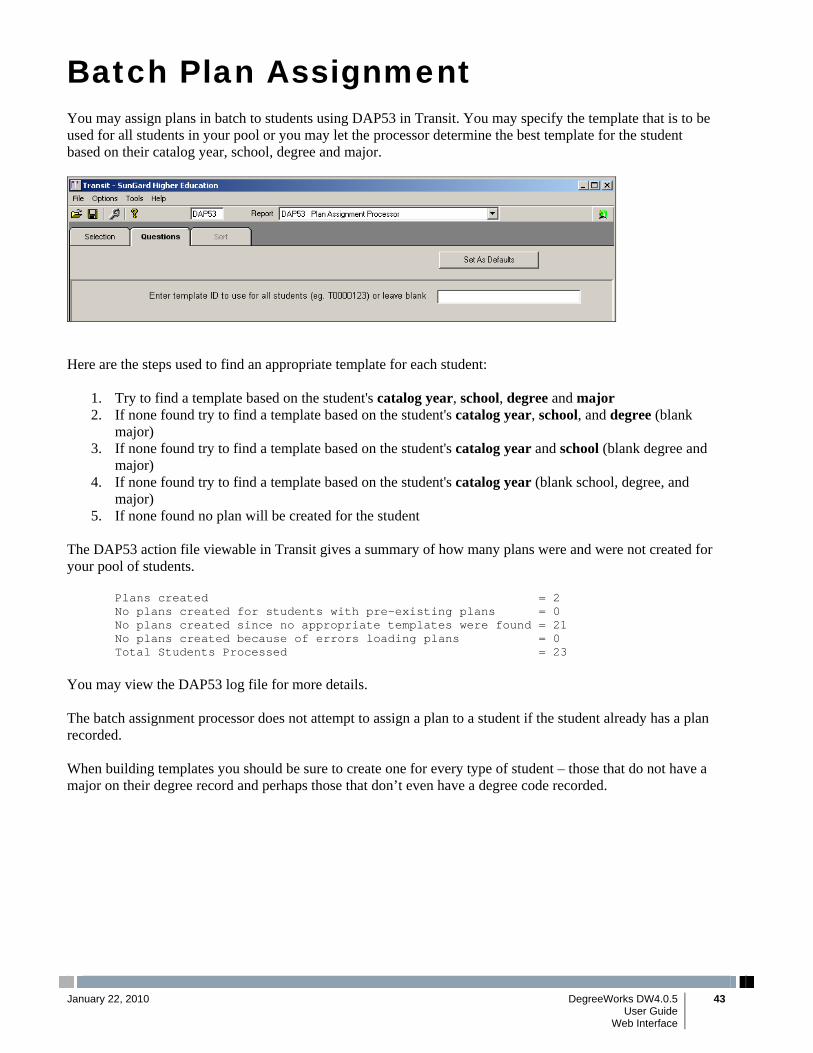
Batch Plan Assignment You may assign plans in batch to students using DAP53 in Transit. You may specify the template that is to be used for all students in your pool or you may let the processor determine the best template for the student based on their catalog year, school, degree and major.
Here are the steps used to find an appropriate template for each student:
1. Try to find a template based on the student's catalog year, school, degree and major 2. If none found try to find a template based on the student's catalog year, school, and degree (blank
major) 3. If none found try to find a template based on the student's catalog year and school (blank degree and
major) 4. If none found try to find a template based on the student's catalog year (blank school, degree, and
major) 5. If none found no plan will be created for the student
The DAP53 action file viewable in Transit gives a summary of how many plans were and were not created for your pool of students.
Plans created = 2 No plans created for students with pre-existing plans = 0 No plans created since no appropriate templates were found = 21 No plans created because of errors loading plans = 0 Total Students Processed = 23
You may view the DAP53 log file for more details. The batch assignment processor does not attempt to assign a plan to a student if the student already has a plan recorded. When building templates you should be sure to create one for every type of student – those that do not have a major on their degree record and perhaps those that don’t even have a degree code recorded.
January 22, 2010 DegreeWorks DW4.0.5 43 User Guide Web Interface

Look Ahead Shown below is a DegreeWorks Student View Worksheet for Stephen Gerrard, a freshman majoring in accounting. As you can see, he is 0% complete with degree requirements. Working with his advisor, Stephen wants to plan a series of registrations assuring he is on course to graduate.
Using the Planner tab, Stephen and his advisor lay out a series of recommended class registrations based on advice from the Student View worksheet shown on the previous page. As you can see below, his future schedules include four classes during the Fall of 2003, another three classes in the Spring of 2004, and one course in the Summer of 2004. Wanting to assure these registrations will keep him on track for graduation, Stephen and his advisor added check marks to each of the terms in question, and then clicked Process New, which runs a “Look Ahead” audit. This audit will show exactly how each of the classes in Stephen's Planner will apply toward graduation requirements (assuming he completes them successfully). If a requirement or an entire set of requirements will be completed by any of the courses from Stephen's Planner or other courses he may have in progress, a ~ (tilde) will appear in the check box associated with each fulfilled requirement. The Planner can be saved at any point by clicking Save Plan.
January 22, 2010 DegreeWorks DW4.0.5 44 User Guide Web Interface

After clicking Process New, DegreeWorks displays the Look Ahead audit in the left panel of the Planner screen. As you can see, Stephen jumps from 0% complete to 37% complete when the projected classes from his Plan are applied against his requirements. You can produce a printed copy of the Plan Ahead audit by clicking Print in the upper right of the screen.
January 22, 2010 DegreeWorks DW4.0.5 45 User Guide Web Interface

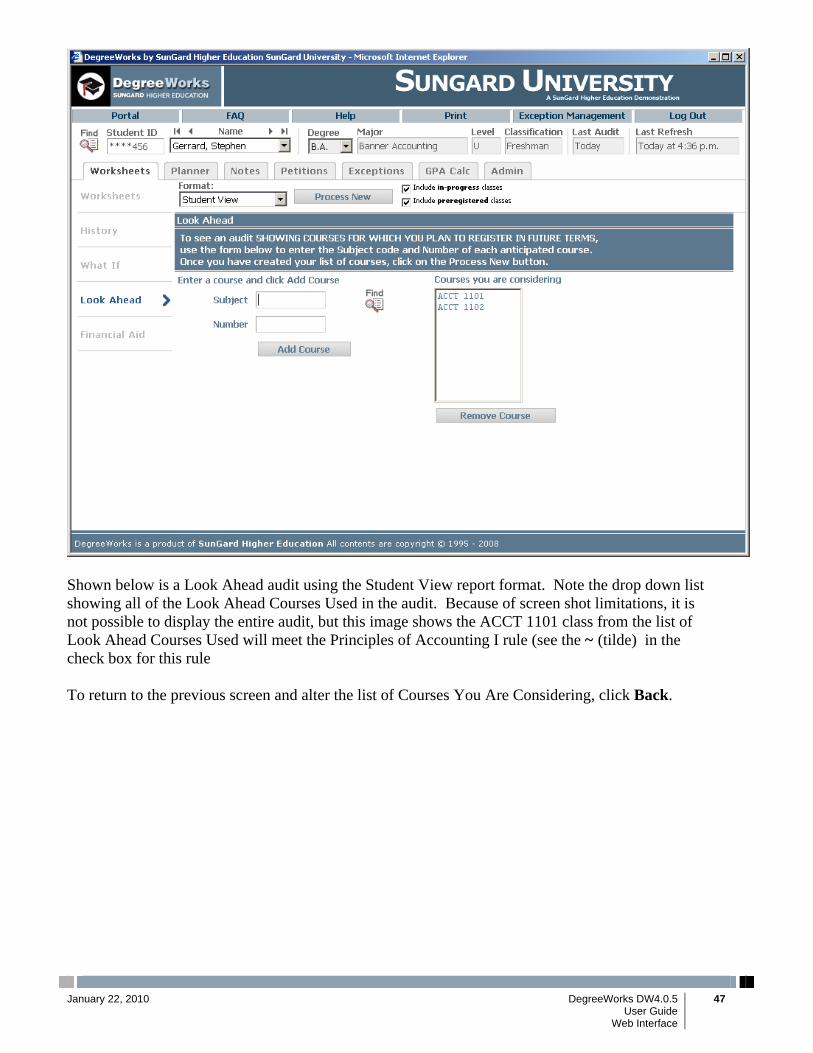
Stephen and his advisor can adjust his projected schedule using the Planner tab, running Look Ahead audits until the list of courses in his planner gets him to 100% of his degree requirements. At this point, he can save the resulting academic plan as part of his permanent advising record, knowing both he and his advisor (or others advisors he may see) can always use the Planner to modify or adjust his academic plan, with full confidence that projected changes will keep him on track for completion of his educational goals. The Look Ahead audit can also be used in an ad hoc mode, allowing you to input as many courses as you desire. To do so, click the Look Ahead tab, which will display the data entry form shown below. On the left side of the screen, type the Discipline (e.g. ACCT) and Number (e.g. 1101) for each class you would like to use in a Look Ahead audit. Clicking Add Class updates the list of courses shown under the “Courses you are considering” label. If you need help finding courses by discipline and number, click the Find icon. To remove a course, highlight it in the “Courses you are considering list” and click Remove Course. When your projected course list is complete, select the version of the audit you want to see from the drop down menu under the Format label and click Process New.
January 22, 2010 DegreeWorks DW4.0.5 46 User Guide Web Interface
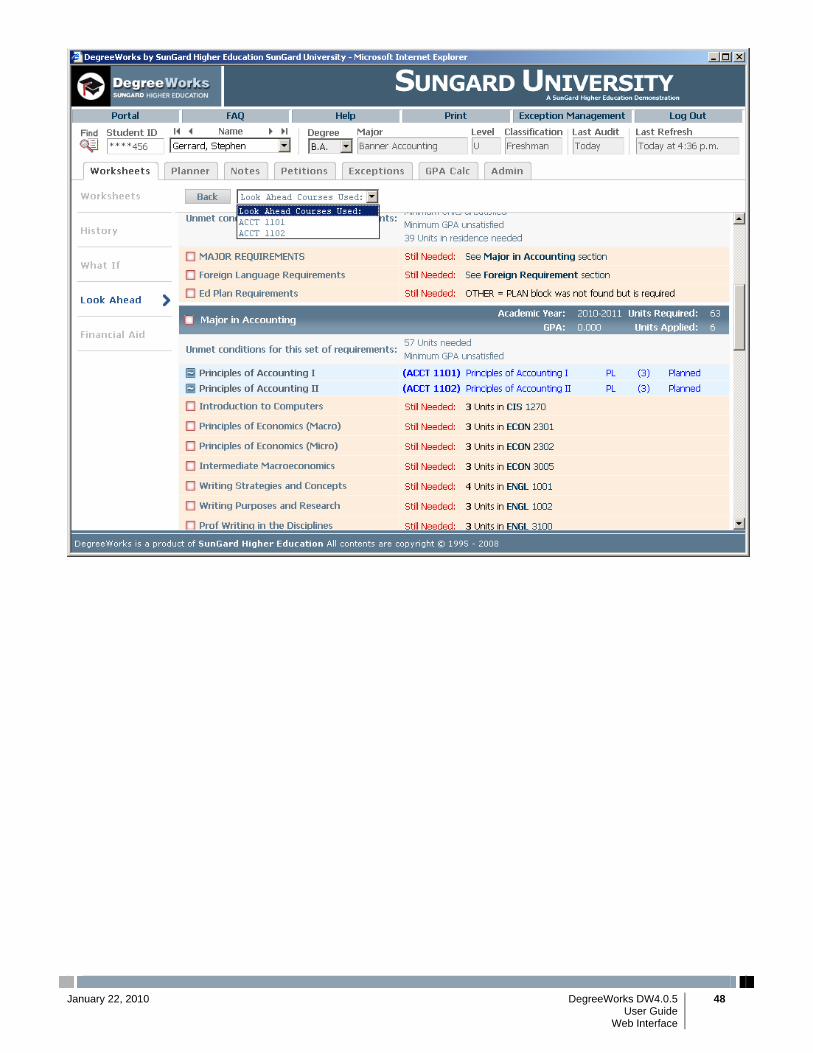
Shown below is a Look Ahead audit using the Student View report format. Note the drop down list showing all of the Look Ahead Courses Used in the audit. Because of screen shot limitations, it is not possible to display the entire audit, but this image shows the ACCT 1101 class from the list of Look Ahead Courses Used will meet the Principles of Accounting I rule (see the ~ (tilde) in the check box for this rule To return to the previous screen and alter the list of Courses You Are Considering, click Back.
January 22, 2010 DegreeWorks DW4.0.5 47 User Guide Web Interface
January 22, 2010 DegreeWorks DW4.0.5 48 User Guide Web Interface

Notes The Notes utility allows DegreeWorks users to document academic advising on student records. These Notes can be used for internal- use only or they can be made available to the student through DegreeWorks on the Web or via printed audit reports. Notes made available to the student appear in audit reports in a Notes section at the bottom of the report. To access the Notes screen, click on the Notes tab. This will bring up the following Notes screen with View Notes already selected as shown below.
Four functions are available. These are View Notes, Add Notes, Modify Notes or Delete Notes. While anyone with access to Notes can view a Note, only the person who created the Note (or a Registrar Class user) can modify or delete a Note. All Notes are stamped with the date and name of the person who created or modified the Note. To add a note, click the Add Note button. This will bring up the Add New Note text box shown below. Enter the text of the note you wish to add. Notes can also be made unavailable to students by clicking the appropriate check box as shown below. For all audits run after this note is posted, the text of the note will appear at the bottom of the report (assuming the report type chosen displays Notes and the user has access to Notes). To modify an existing note, click the Modify Notes button This will bring up the modify notes window shown below.
January 22, 2010 DegreeWorks DW4.0.5 49 User Guide Web Interface

You can only modify those notes created by yourself. Registrar-class users are able to modify or delete any note. Only those notes you are able to modify will appear in the Modify Notes window. To modify a note, click in the text box for the note you wish to modify and enter your changes. To save the modifications, click the note icon located to the left of the note. This will save the changes to the database. To delete a note, click the Delete Notes button to bring up the Delete Notes window. Delete the note by clicking on the notes icon located to the left of the note you wish to delete. When making Notes unavailable to students as indicated above, it is very important to remember that Notes flagged as unavailable to a student will continue to show up on audit reports printed by non-student users such as advisors, faculty members or Registrars. Hence, if a student visits an advisor or faculty member and that person prints an audit report for that student, all Notes flagged as unavailable will be given to that student. Any Notes available to be viewed will be listed in this section of the audit report. Notes saved with the Not available to student check box selected will not appear on audits viewed during student logons. These Notes will also not be printed on audit reports initiated by the student. They will appear on advisor, faculty member, dean or registrar audit reports. The creator of the note and the day the note was written appear to the right of the note. Audits will show as many notes as have been written and made available to the student.
January 22, 2010 DegreeWorks DW4.0.5 50 User Guide Web Interface
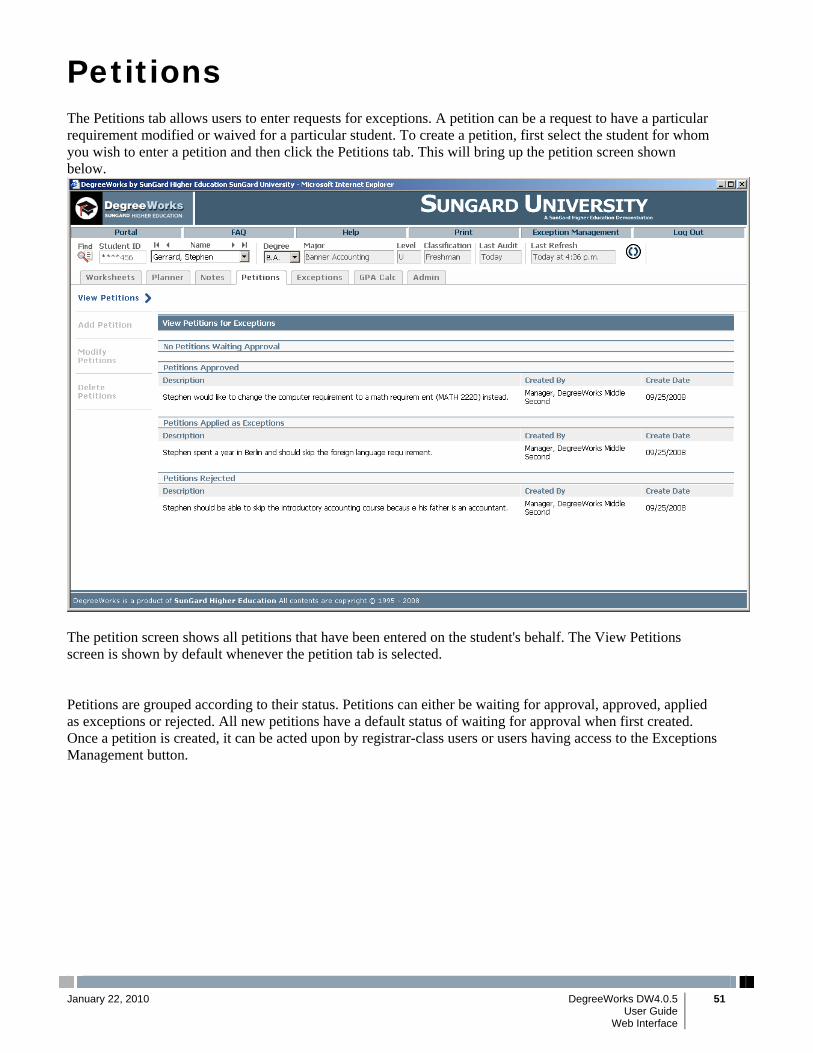
Petitions The Petitions tab allows users to enter requests for exceptions. A petition can be a request to have a particular requirement modified or waived for a particular student. To create a petition, first select the student for whom you wish to enter a petition and then click the Petitions tab. This will bring up the petition screen shown below.
The petition screen shows all petitions that have been entered on the student's behalf. The View Petitions screen is shown by default whenever the petition tab is selected. Petitions are grouped according to their status. Petitions can either be waiting for approval, approved, applied as exceptions or rejected. All new petitions have a default status of waiting for approval when first created. Once a petition is created, it can be acted upon by registrar-class users or users having access to the Exceptions Management button.
January 22, 2010 DegreeWorks DW4.0.5 51 User Guide Web Interface

To create a new petition, click the Add Petition button. This will bring up a text box where you can enter the text for the petition.
Once you have entered the text for the petition, click the Submit Petition button to save the petition to the database. A message will appear telling you your petition was added successfully. To add another petition, click the Add Petition button again and repeat the process. To modify a petition, click the Modify Petition button. Only petitions with a status of Waiting Approval may be modified. A text window will open up for those petitions created by you. You will not be able to modify petitions created by others. To modify a petition, click in the text window and add or delete text. Click the Save button to the left of the petition to save your changes. When a new petition is saved, an e-mail notification message is generated and sent to the Registrar (or another institutional representative) notifying that them that there are new petitions awaiting approval. Please see the DegreeWorks Technical documentation for more information on how to configure this portion of the software. To delete a petition, click the Delete Petition button. Only petitions created by you can be deleted. Click the Delete button to the left of the petition to remove it from the database. Petitions that have been approved, applied as exceptions or rejected cannot be deleted. Only persons with registrar-class authority can delete petitions once they have been acted upon.
January 22, 2010 DegreeWorks DW4.0.5 52 User Guide Web Interface
January 22, 2010 DegreeWorks DW4.0.5 53 User Guide Web Interface
E-mail Notification - petsend and dwpetjob DegreeWorks can be configured to send a notification e-mail letting the e-mail recipient know that there are new petitions either waiting approval or approved petitions waiting to be applied as exceptions. However, if you are a Banner school using Workflow to manage petitions you will not want to use this email notification as Workflow takes care of this for you. (As of DW4.0.2) The petsend Perl script is used to configure where the notification e-mail is to be sent. Below is an example on how to run petsend to send notification e-mails: Example: petsend [email protected] WAITING petsend [email protected] APPROVED The Reply To e-mail address is set to the same e-mail address as the Send To address by default as shown below: $ReplyToEmailAddress = $ToEmailAddress; To modify the Reply To e-mail address, change the $ToEmailAddress in the petsend script to the e-mail address you wish replies to be sent to as shown below: $ReplyToEmailAddress = "computer_center\@yourschool.edu"; You can also configure petsend to carbon copy (CC) one or more individuals at your institution. To activate the CC function, modify the following line with the e-mail address of the person you wish to CC: $CC = "someone_else\@yourschool.edu"; The petsend job can be configured not to send a notification e-mail if there are no petitions either waiting approval or waiting to be applied. To disable sending e-mails under these circumstances, change the value for SEND_ZERO_PETITIONS_MSG to "N" as shown below: $SEND_ZERO_PETITIONS_MSG = "N"; You can edit the content of the notification e-mail by modifying the DefineSubjectAndBody function of the petsend script. The petsend script can be launched by dwpetjob in the batch directory. The dwpetjob script calls the petsend job and then reschedules itself at the interval specified. Dwpetjob can be configured to always send an e-mail to the same person each morning when there are petitions that need to be processed. Change the address that is passed to the petsend script and change the "timeinterval" value as desired.
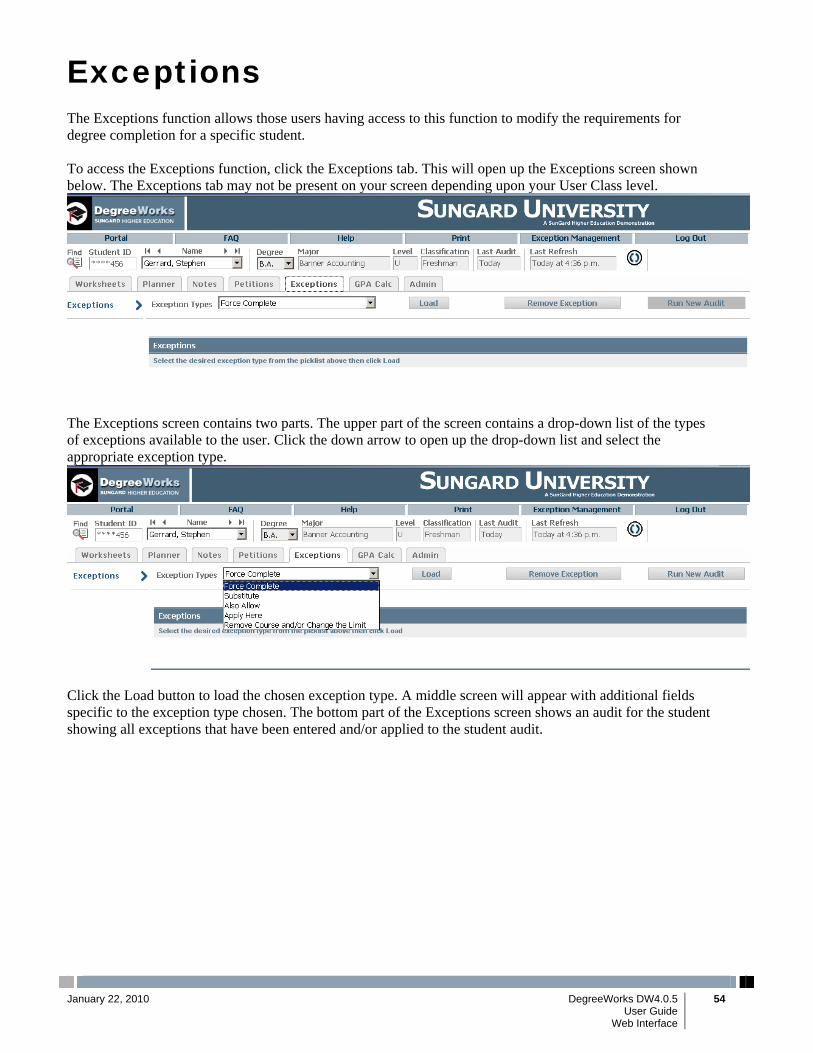
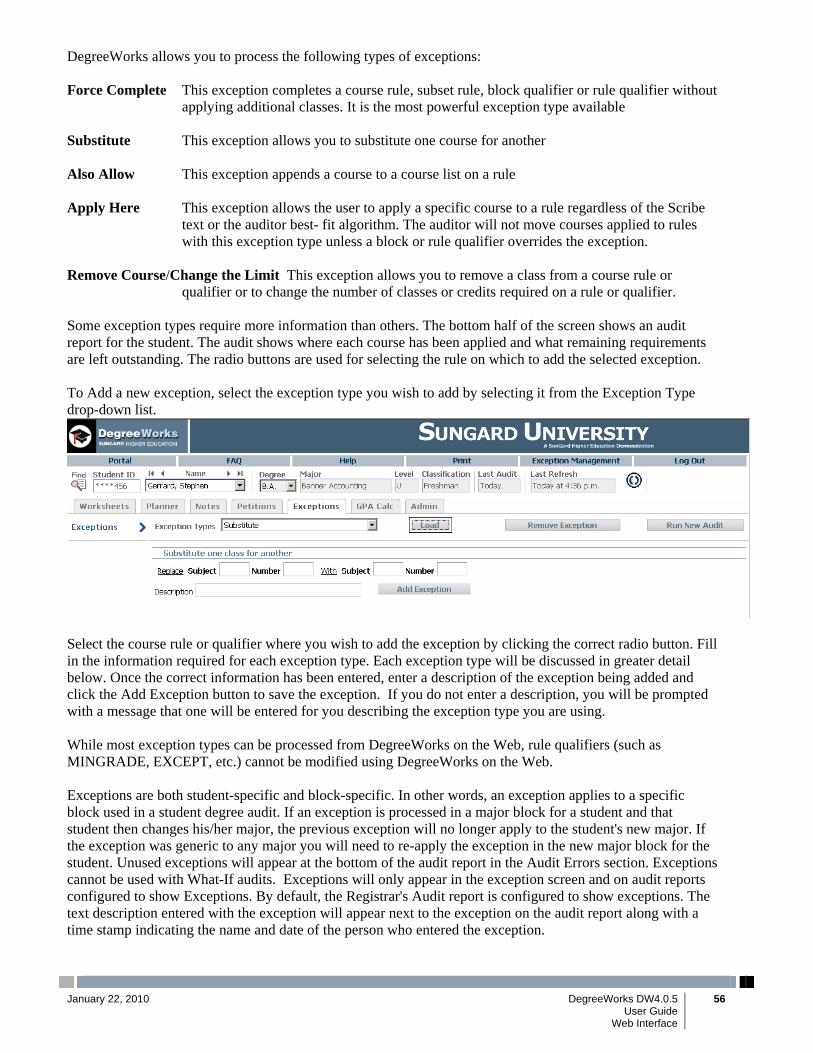
Exceptions The Exceptions function allows those users having access to this function to modify the requirements for degree completion for a specific student. To access the Exceptions function, click the Exceptions tab. This will open up the Exceptions screen shown below. The Exceptions tab may not be present on your screen depending upon your User Class level.
The Exceptions screen contains two parts. The upper part of the screen contains a drop-down list of the types of exceptions available to the user. Click the down arrow to open up the drop-down list and select the appropriate exception type.
Click the Load button to load the chosen exception type. A middle screen will appear with additional fields specific to the exception type chosen. The bottom part of the Exceptions screen shows an audit for the student showing all exceptions that have been entered and/or applied to the student audit.
January 22, 2010 DegreeWorks DW4.0.5 54 User Guide Web Interface
January 22, 2010 DegreeWorks DW4.0.5 55 User Guide Web Interface
DegreeWorks allows you to process the following types of exceptions: Force Complete This exception completes a course rule, subset rule, block qualifier or rule qualifier without
applying additional classes. It is the most powerful exception type available Substitute This exception allows you to substitute one course for another Also Allow This exception appends a course to a course list on a rule Apply Here This exception allows the user to apply a specific course to a rule regardless of the Scribe
text or the auditor best- fit algorithm. The auditor will not move courses applied to rules with this exception type unless a block or rule qualifier overrides the exception.
Remove Course/Change the Limit This exception allows you to remove a class from a course rule or
qualifier or to change the number of classes or credits required on a rule or qualifier. Some exception types require more information than others. The bottom half of the screen shows an audit report for the student. The audit shows where each course has been applied and what remaining requirements are left outstanding. The radio buttons are used for selecting the rule on which to add the selected exception. To Add a new exception, select the exception type you wish to add by selecting it from the Exception Type drop-down list.
Select the course rule or qualifier where you wish to add the exception by clicking the correct radio button. Fill in the information required for each exception type. Each exception type will be discussed in greater detail below. Once the correct information has been entered, enter a description of the exception being added and click the Add Exception button to save the exception. If you do not enter a description, you will be prompted with a message that one will be entered for you describing the exception type you are using. While most exception types can be processed from DegreeWorks on the Web, rule qualifiers (such as MINGRADE, EXCEPT, etc.) cannot be modified using DegreeWorks on the Web. Exceptions are both student-specific and block-specific. In other words, an exception applies to a specific block used in a student degree audit. If an exception is processed in a major block for a student and that student then changes his/her major, the previous exception will no longer apply to the student's new major. If the exception was generic to any major you will need to re-apply the exception in the new major block for the student. Unused exceptions will appear at the bottom of the audit report in the Audit Errors section. Exceptions cannot be used with What-If audits. Exceptions will only appear in the exception screen and on audit reports configured to show Exceptions. By default, the Registrar's Audit report is configured to show exceptions. The text description entered with the exception will appear next to the exception on the audit report along with a time stamp indicating the name and date of the person who entered the exception.
January 22, 2010 DegreeWorks DW4.0.5 56 User Guide Web Interface

January 22, 2010 DegreeWorks DW4.0.5 57 User Guide Web Interface
Exceptions on rules are tied to the rule's label. When a block is modified using Scribe the exception is placed on the correct rule as long as the original rule label can be found in the new block. Since qualifiers do not have labels, exceptions on qualifiers may become unhooked if the qualifier is changed and more than one of the type of qualifier is allowed (such as MinCredits). Exceptions on qualifiers that can only appear once (such as MinGPA, LastRes) should never become unhooked.

January 22, 2010 DegreeWorks DW4.0.5 58 User Guide Web Interface
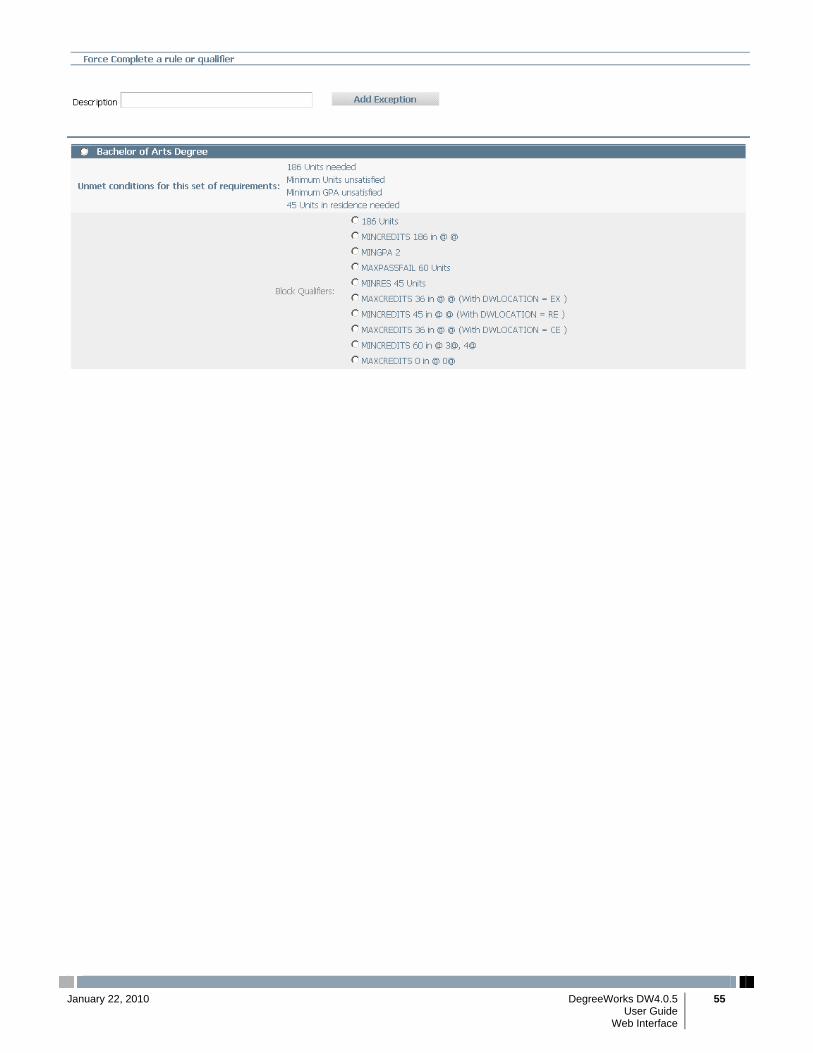
Force Complete To process a Force complete exception select Force Complete from the Exception Types drop-down list and click the Load button. Select the course rule or qualifier by clicking the radio button next to it in the degree audit. Enter a description of why this exception is being processed and then click the Add Exception button located in the middle of the screen. A text box will appear indicating that the exception was successfully saved to the database. If there was an error while trying to process an exception, an error message box will appear indicating the type of error encountered.
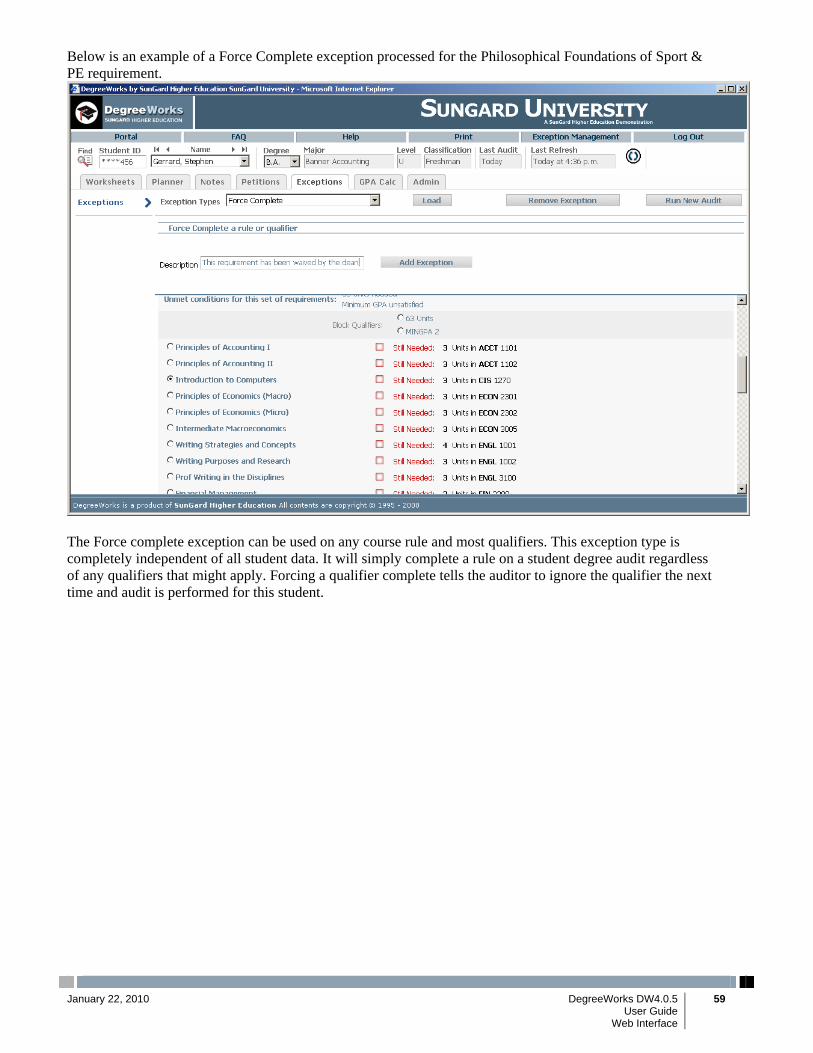
Below is an example of a Force Complete exception processed for the Philosophical Foundations of Sport & PE requirement.
The Force complete exception can be used on any course rule and most qualifiers. This exception type is completely independent of all student data. It will simply complete a rule on a student degree audit regardless of any qualifiers that might apply. Forcing a qualifier complete tells the auditor to ignore the qualifier the next time and audit is performed for this student.
January 22, 2010 DegreeWorks DW4.0.5 59 User Guide Web Interface

Substitute The Substitute exception is used to substitute one course for another. This is distinct from the Also Allow exception type in that one course is exchanged for another. To process a substitute exception, select the Substitute entry from the Exception Type drop-down list and click the Load button. Select the rule or qualifier where you would like the exception to apply. Enter the target course from the course rule in the Replace fields. The target course must be found on the rule where the exception is to be placed in order to be saved to the database. Enter the substituted course in the With fields. The substituted course may also be selected by clicking on a course in the Electives area. This will automatically add the course to the With field. Enter a brief description of why the exception is being processed and click the Add Exception button
The substitute exception requires that one course be used in place of another. If the rule contains only a single course then the substituted course is required for completion of the block. If a substitute exception is processed on a rule with more than one course option that can be used to complete the rule, then the substituted course is not required and is an option available to the student. Only qualifiers that list courses support this type of exception.
January 22, 2010 DegreeWorks DW4.0.5 60 User Guide Web Interface
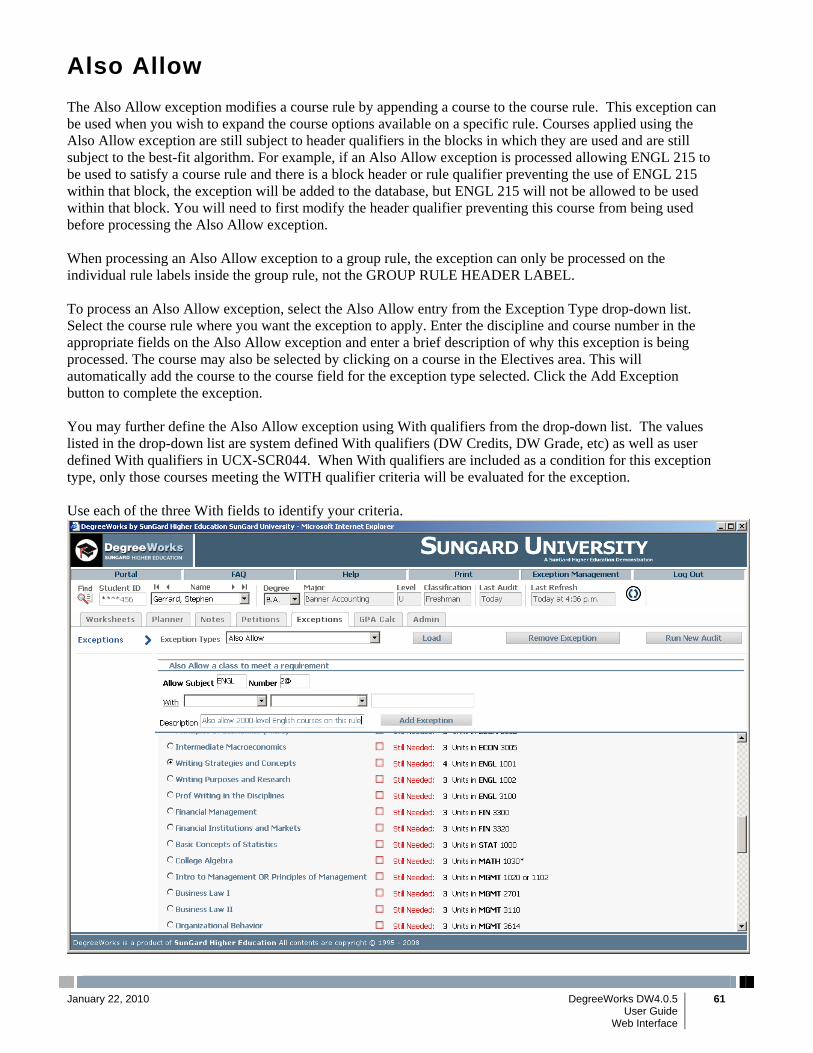
Also Allow The Also Allow exception modifies a course rule by appending a course to the course rule. This exception can be used when you wish to expand the course options available on a specific rule. Courses applied using the Also Allow exception are still subject to header qualifiers in the blocks in which they are used and are still subject to the best-fit algorithm. For example, if an Also Allow exception is processed allowing ENGL 215 to be used to satisfy a course rule and there is a block header or rule qualifier preventing the use of ENGL 215 within that block, the exception will be added to the database, but ENGL 215 will not be allowed to be used within that block. You will need to first modify the header qualifier preventing this course from being used before processing the Also Allow exception. When processing an Also Allow exception to a group rule, the exception can only be processed on the individual rule labels inside the group rule, not the GROUP RULE HEADER LABEL. To process an Also Allow exception, select the Also Allow entry from the Exception Type drop-down list. Select the course rule where you want the exception to apply. Enter the discipline and course number in the appropriate fields on the Also Allow exception and enter a brief description of why this exception is being processed. The course may also be selected by clicking on a course in the Electives area. This will automatically add the course to the course field for the exception type selected. Click the Add Exception button to complete the exception. You may further define the Also Allow exception using With qualifiers from the drop-down list. The values listed in the drop-down list are system defined With qualifiers (DW Credits, DW Grade, etc) as well as user defined With qualifiers in UCX-SCR044. When With qualifiers are included as a condition for this exception type, only those courses meeting the WITH qualifier criteria will be evaluated for the exception. Use each of the three With fields to identify your criteria.
January 22, 2010 DegreeWorks DW4.0.5 61 User Guide Web Interface
January 22, 2010 DegreeWorks DW4.0.5 62 User Guide Web Interface
The Also Allow exception does not require that the selected course be used on the modified rule. The best-fit algorithm of the Audit Processor Engine will still function with this type of exception. Consequently, the allowed course may not be applied to rule bearing the exception if there is a better fit for this course elsewhere in the degree audit. Notice that one exception has already been processed for this student in the previous screen shot. This exception shows up as white band with blue text across the Exceptions page. In addition to the description, the name of the person who processed the exception and the date the exception was processed is also shown. If an exception has been processed but not used in the degree audit, it will show up in the Audit Errors section at the bottom of the screen labeled as Exceptions Not Used. Block header exceptions do not support the Also Allow exception.

January 22, 2010 DegreeWorks DW4.0.5 63 User Guide Web Interface
Apply Here The Apply Here exception allows the user to apply a course to a rule even if the course is not listed as an option. This exception is very useful in correcting audits in cases where the user wishes to dictate specifically where courses are to be used within the degree audit. The Apply Here exception will apply a course to a rule regardless of any scribing, rule or block header qualifiers. For example, suppose a block contains a 'MAXPASSFAIL 0 CLASSES' header qualifier. You can use the Apply Here exception to apply a PASSFAIL class to a rule in this block without having to modify the block header qualifier. The Apply Here exception will also override an EXCEPT list on a rule. Courses applied to rules using this exception type will not be moved around within the audit. When processing an Apply Here exception on a group rule, the exception can only be processed on the individual rule labels inside the group rule. Apply Here exceptions cannot be processed on a Group Rule Header. To process an Apply Here exception, select the Apply Here exception from the Exception Type drop-down list. Enter the course you want applied to a rule. The course selected must be a course already taken by the student and found on the degree audit or one the student is planning to take. The Apply Here exception cannot be used for courses that have not yet been taken. Once you have entered the course you want applied, select the rule to which the course should be applied. A message box will appear telling you the exception has been saved to the database. You may further define the Apply Here exception using WITH qualifiers from the drop-down list. The values listed in the drop-down list are system defined WITH qualifiers (DW Credits, DW Grade, etc) as well as user defined WITH qualifiers in UCX-SCR044. When With qualifiers are included as a condition for this exception type, only those courses meeting the WITH qualifier criteria will be evaluated for the exception. When placing an Apply Here exception any existing WITH data is removed so that a course that normally did not meet the WITH qualifiers will be able to fit on the rule. If the Apply Here exception contains a new WITH qualifier that will be applied – replacing the previous WITH data. (As of DW4.0.1) Use each of the three With fields to identify your criteria.

To view the exception you placed on the student's record, click the Audit Tab, select the Detailed or Registrar's audit and process a new audit for this student. The exception will show up in blue text directly below the rule on which it was placed. If the exceptions are not showing up, be sure you have selected an audit report type that shows exceptions. Exceptions may not be viewable on all report types. Block header exceptions do not support the Apply Here exception.
January 22, 2010 DegreeWorks DW4.0.5 64 User Guide Web Interface
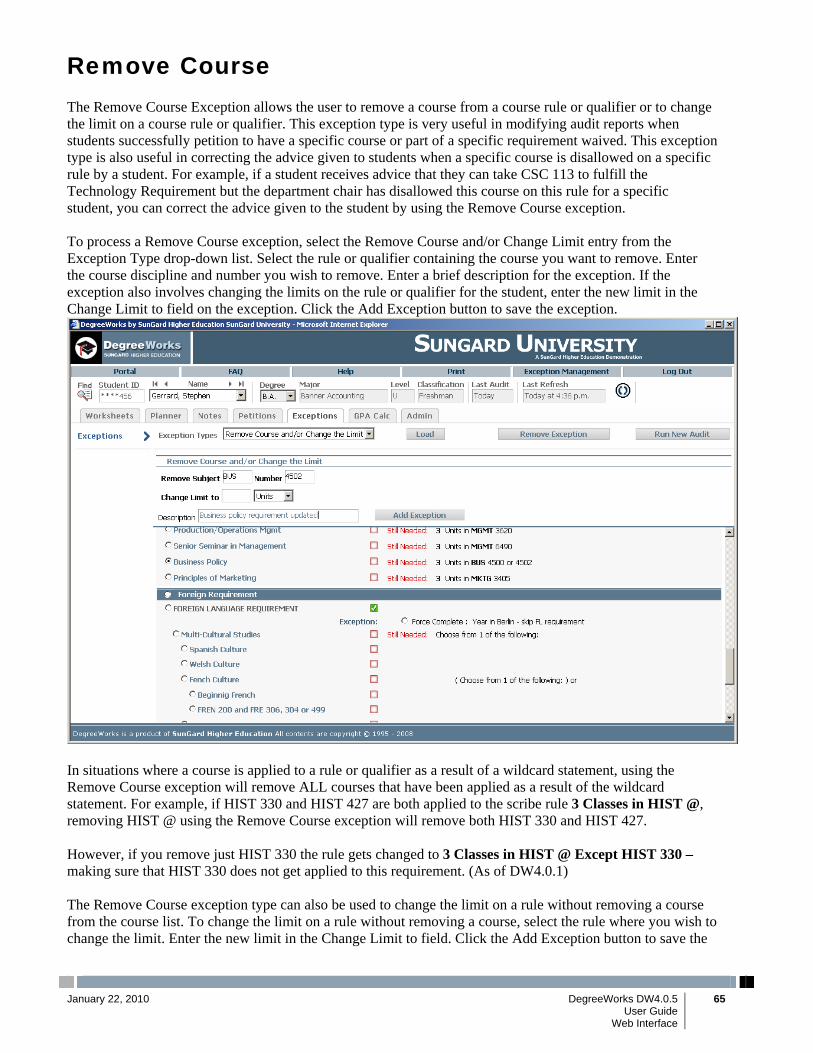
Remove Course The Remove Course Exception allows the user to remove a course from a course rule or qualifier or to change the limit on a course rule or qualifier. This exception type is very useful in modifying audit reports when students successfully petition to have a specific course or part of a specific requirement waived. This exception type is also useful in correcting the advice given to students when a specific course is disallowed on a specific rule by a student. For example, if a student receives advice that they can take CSC 113 to fulfill the Technology Requirement but the department chair has disallowed this course on this rule for a specific student, you can correct the advice given to the student by using the Remove Course exception. To process a Remove Course exception, select the Remove Course and/or Change Limit entry from the Exception Type drop-down list. Select the rule or qualifier containing the course you want to remove. Enter the course discipline and number you wish to remove. Enter a brief description for the exception. If the exception also involves changing the limits on the rule or qualifier for the student, enter the new limit in the Change Limit to field on the exception. Click the Add Exception button to save the exception.
In situations where a course is applied to a rule or qualifier as a result of a wildcard statement, using the Remove Course exception will remove ALL courses that have been applied as a result of the wildcard statement. For example, if HIST 330 and HIST 427 are both applied to the scribe rule 3 Classes in HIST @, removing HIST @ using the Remove Course exception will remove both HIST 330 and HIST 427. However, if you remove just HIST 330 the rule gets changed to 3 Classes in HIST @ Except HIST 330 – making sure that HIST 330 does not get applied to this requirement. (As of DW4.0.1) The Remove Course exception type can also be used to change the limit on a rule without removing a course from the course list. To change the limit on a rule without removing a course, select the rule where you wish to change the limit. Enter the new limit in the Change Limit to field. Click the Add Exception button to save the
January 22, 2010 DegreeWorks DW4.0.5 65 User Guide Web Interface

January 22, 2010 DegreeWorks DW4.0.5 66 User Guide Web Interface
exception. Enter a brief description for the exception. The new limit will be applied to the rule during the next audit process. Only qualifiers that list courses or specify a number of classes or credits support the Remove Course exception.

Block Header Qualifier Exceptions The Force Complete, Substitute, Remove Course and Change Limit exceptions can be used on block header qualifiers. The qualifiers appear above the rules in the block and have a radio button next to them.
Not all qualifiers support the same types of exceptions. Below are the exceptions and the qualifiers on which they can be placed: Exception Type Block Header Qualifiers Allowed Force Complete All except SameDisc and Optional Substitute MaxClasses, MinClasses, MaxCredits, MinCredits, MaxTerm, MinTerm, SpMaxCredit,
SpMaxTerm Remove Course MaxClasses, MinClasses, MaxCredits, MinCredits, MaxTerm, MinTerm, SpMaxCredit,
SpMaxTerm Change Limit All except SameDisc, Option, MinGPA, MinGrade
January 22, 2010 DegreeWorks DW4.0.5 67 User Guide Web Interface
GPA Calculators
Overview We have designed three different GPA calculators: Graduation, Term, and Advice Calculators. The calculators, in conjunction with current DegreeWorks functions, can help students in many ways:
• Realistic goal-setting at the beginning of the term or academic career • Precise calculation of their end-of-term GPA using students' actual academic information • Accurate mapping of students' paths for achieving honors, avoiding probation, or satisfying personal
academic aspirations
January 22, 2010 DegreeWorks DW4.0.5 68 User Guide Web Interface

Specifics Graduation Calculator inputs
• Current GPA (provided from RAD-TERM-DTL: RAD-CUM-GPA) • Credits Remaining • Credits Required • Desired GPA
This calculator takes the most "unknown" inputs. Many students may not know how many credits are required for their degree, nor the number of credits remaining. Its purpose, however, is to give the student a general view of what average GPA they will need to achieve over their final "X" credits in order to achieve their desired GPA. In some cases, this calculator will be useful to inform the student that their desired GPA is not possible to achieve (considering their number of credits remaining). In short, this calculator helps students to set long-term general goals. Enter data into the vacant fields as below and press Calculate.
The following shows you what average you will need to attain your desired results.
January 22, 2010 DegreeWorks DW4.0.5 69 User Guide Web Interface

If you wish to alter some of the entries, click Recalculate and the calculate screen will appear for you to make other entries. When you click Calculate, the revised information will appear.
January 22, 2010 DegreeWorks DW4.0.5 70 User Guide Web Interface

Advice Calculator inputs • Current GPA (provided from RAD-TERM-DTL: RAD-CUM-GPA), • Credits Earned (provided from RAD-TERM-DTL: RAD-CUM-TOT-EARN), • Desired GPA
This calculator is perhaps the easiest to use. The student need only provide their desired GPA. It is used to figure out how a student can raise/lower their GPA using actual grades as advice. While it is fairly general, it is more specific than the graduation calculator. An important feature is that the grades are calculated using UCX-STU385. This table contains the Grade (letter value) as well as grade points for specific grades. So by manipulating UCX-STU385, you can determine how the advice is calculated. However, the Graded Attempted flag in UCX-STU385 is also used to further filter out grades – only those grades with Graded Attempted = Y are used in the Advice Calculator – allowing you to exclude P grades for example. (As of DW4.0.1) Enter data into the vacant field as below and press Calculate.
The following shows you what average you will need to attain your desired results.
January 22, 2010 DegreeWorks DW4.0.5 71 User Guide Web Interface

If you wish to alter some of the entries, click Recalculate and the advice screen will appear for you to make other entries. When you click Calculate, the revised information will appear.
January 22, 2010 DegreeWorks DW4.0.5 72 User Guide Web Interface

Term Calculator inputs • Current GPA (provided from RAD-TERM-DTL: RAD-CUM-GPA) • Credits Earned (provided from RAD-TERM-DTL: RAD-CUM-TOT-EARN) • Class information (Credits per class, Grade per class from UCX-STU385) • In-progress classes (provided from RAD-CLASS-DTL, where the In-Progress flag is "Y")
When done entering class information with expected credits and grades, click calculate. The following screen will produce the new calculated GPA. This is the most specific calculator. If you wish to change class or grade information, simply click Recalculate and the original screen will again be presented for you to make changes. When you click Calculate, the revised information will appear. It can be used for goal-setting as well as mapping paths to avoid probation, achieve honors, etc. Again, this uses UCX-STU385 to select the grades that are specific to your institution. Other configurations include: the ability to control how many classes are available for input; the option to use drop-down list boxes (default) with values coming from UCX-STU385 for the GRADE field (ex: A- [3.700]), or simply text boxes for users to type in the grade value (ex: 3.4). Enter data into the vacant fields as below and press Calculate. Note that the student's current classes and credits have been preloaded into the form.
Notice the use of the drop-down list box shown in Class 5.
January 22, 2010 DegreeWorks DW4.0.5 73 User Guide Web Interface

The following shows you the results of your calculation.
If you wish to alter some of the entries, click Recalculate and the Term Calculator screen will appear for you to make other entries. When you click Calculate, the revised information will appear.
January 22, 2010 DegreeWorks DW4.0.5 74 User Guide Web Interface

January 22, 2010 DegreeWorks DW4.0.5 75 User Guide Web Interface
Who Gets Access? Like many DegreeWorks web functions, users need the appropriate keys to unlock these services. These are the new keys and services associated with them: Keys Associated Services SDGPACLCGPA Calculator Tab SDGPAGRD Graduation Calculator SDGPATRM Term Calculator SDGPAADV Advice Calculator All these keys are included in the groups SRNREG, SRNADVX, SRNADV, SRNSTU. What UCX Tables are Used? UCX-STU385 (UCX-STU385 for RAD):
Flag grades that will be used in GPA calculations. UCX-CFG020 WEB
Controls display of Term Calculator, allows you to specify how to display the GPA values, with 1, 2, or 3 decimals, as well as an option to round or truncate the GPA values.

Exception Management The Exception Management button allows users having access to this function to resolve petitions. Users can query the account to determine how many outstanding exceptions to be applied exist, how many petitions there are and what the statuses of these petitions and/or exceptions are. However, if you are a Banner school using Workflow to approve/reject your petitions you should not allow your users to use the Manage Petitions Waiting Approval option as you do not want to be approving/rejecting petitions using two different tools. You can modify common/SHPCFG to remove the SDEMPEWA key for your users – though you may want to allow one or two admin people to use it in a special situation. Once your Workflow users have approved a petition this Exception Management tool should be used to apply the petition as an exception and view or fix as needed. See the Technical Guide Banner Considerations documentation for information on setting up Banner Workflow with DegreeWorks. (As of DW4.0.2) To begin managing exceptions, click the Exception Management button on the DegreeWorks Introduction page. A new page will open with a drop-down list of exception management services. This drop-down list contains six different services shown below. Each of these services will be explained in detail in the following sections.
The Manage Petitions Waiting Approval service is used to approve, reject or add additional documentation to pending petitions. Any petition with a pending status will appear on this list as shown in the screen shot below.
January 22, 2010 DegreeWorks DW4.0.5 76 User Guide Web Interface

To approve a petition, click the radio button in the Approve column and click the Save Changes button. The selected petition will be flagged as approved and will disappear from the list of petitions waiting approval. To reject a petition, click the radio button in the Reject column and click the Save Changes button. The selected petition will be flagged as rejected and will disappear from the list of petitions waiting approval. You can take action on a single petition or a group of petitions simultaneously from this screen.
January 22, 2010 DegreeWorks DW4.0.5 77 User Guide Web Interface

It is also possible to add additional documentation to a pending petition while approving or rejecting a petition by using the Comments icon. Click the graphic in the Comments column to add additional documentation or comments to a pending petition. This will open up a Comments window where you can add additional comments or documentation to the pending petition as shown below.
Once the additional information has been entered, click the Approve or Reject button below the text window to complete the transaction. The petition will be saved with the appropriate status along with the additional documentation. It is important to remember that an approved petition is not the same as an applied exception. Once a petition has been approved, it is still necessary for someone to actually process the approved petition as an exception on the students' record.
January 22, 2010 DegreeWorks DW4.0.5 78 User Guide Web Interface

To process petitions that have already been approved select the Apply Approved Petitions service from the Exception Management Services drop-down list. This will bring up a list of approved petitions as shown below. This screen shows the original petition request along with any additional information entered when the petition was approved. It also shows the student name and ID, the advisor and the date the petition was created. There is also a Refresh button on the right-hand side of the page that can be used to refresh this list of approved petitions.
To process an exception for an approved petition, click the Apply icon located next to the petition in the Apply column. This will take you into the Exceptions screen where you can select the appropriate exception type and apply the exception. An example of the exception screen is shown on the next page. The student context area shows the student name and ID. The approved petition is also shown in the Exception Request field.
January 22, 2010 DegreeWorks DW4.0.5 79 User Guide Web Interface

Select the appropriate exception type from Exception Type drop-down list and select the rule where you wish to apply the exception in the degree audit shown below. Enter a description in the Description field and click the Add Exception button to process the exception. A message box will appear telling you that the exception has been successfully saved to the database Click OK to process another exception. When you have finished entering all the exceptions for the current student, close the Exception window and you will be taken back to the Apply Approved Petitions window. The approved petition(s) will now be marked as Applied.
January 22, 2010 DegreeWorks DW4.0.5 80 User Guide Web Interface

Once a petition has been applied as an exception, the original petition will have a status of Applied. You can search for all petitions that have been applied as exceptions by selecting the View Petitions Applied as Exceptions item from the Exception Management Services drop-down list. Select the date range and click the Show Applied Petitions button. A list of all petitions applied within the selected date range will appear as shown below.
You can select a specific petition to delete by placing a check in the box next to the petition. You can select all petitions to delete by clicking the Check All button. To delete the selected petitions, click the Delete Selected Petitions button. Deleting the petition will have no effect on the corresponding exception that has already been applied. Some institutions may choose to save all petitions and not delete them once they have been applied. This is perfectly fine to do. It is not necessary to delete petitions once they have been applied as exceptions.
January 22, 2010 DegreeWorks DW4.0.5 81 User Guide Web Interface

You can also view all petitions that have been rejected by choosing the View Rejected Petitions item from the Exception Management Services drop-down list. Select the date range and then click the Review Rejected Petitions button. This will bring up a list of rejected petitions as shown below.
Rejected petitions can be maintained in the database or deleted as necessary. To delete a rejected petition, select it by placing a check in the box next to it. Click the Delete Selected Petitions button to delete the selected petition. When you have finished managing exceptions, click the Audits button in the screen header to return to the DegreeWorks audit page or close the window to exit out of DegreeWorks.
January 22, 2010 DegreeWorks DW4.0.5 82 User Guide Web Interface

To change the status of a petition, select the Fix Petition Status item from the Exception Management Services drop-down list. This will bring up the Fix Petitions Search page shown below. Select the date range and enter the ID of the student you wish to search for. Wild cards (@) can be in the Student ID field to search for petitions for a group of students. Click the Show Petitions button to process the search.
All petitions meeting the search criteria will be displayed as shown below. To change the status of a petition, select the correct status from the drop-down list in the Change column. Click the Save Changes button to save your changes to the database.
If a petition has a status of Approved and additional comments were entered when the petition was approved, changing the petition status back to waiting will not affect the additional comments that were originally entered. These comments will display with the petition until the petition is either applied as an exception or deleted from the database. If a petition has a status of Applied, changing the status of the petition will have no effect on the exception that has already been applied. One should therefore be careful when changing the status of petitions that have already been applied as exceptions as it is possible to apply more than one exception for a given petition.
January 22, 2010 DegreeWorks DW4.0.5 83 User Guide Web Interface

Exception Reports The Exceptions report service allows users having access to this function to query the database and create reports on the number and type of exceptions processed in your account. You can search for exceptions created by an individual, exceptions applied for a particular student or exceptions applied within a specific block. You can also use this function to identify unhooked exceptions as well. To create an exception report, select the Exceptions Report item from the Exception Management Services drop-down list. This will bring up the Exceptions Search screen shown below.
Select the date range to use by choosing a value from the Show exceptions created within the drop-down list. You can view all exception types or select a specific exception type by choosing a value from the Show exception type drop-down list. To select all exceptions created by any user leave the Show exceptions created by ID field blank. To only see those exceptions created by a specific user, enter their ID in this field. You can also select exceptions created for a specific ID by entering the student ID in the Show exceptions on student ID field. Wild cards can be used in these fields to select a group of students. To view exceptions placed within a given scribe block enter the block ID in the Show exceptions on block ID field. To only view those exceptions that have become unhooked place a check mark in the Show unhooked exceptions only checkbox. To only view those exceptions that were unenforced place a check mark in the Show unenforced exceptions only checkbox. (As of DW4.0.2) The search criteria used on the Exceptions Search screen can be used individually or in various combinations. It is not necessary to use all the search criteria elements when searching for exceptions. Not all combinations of select criteria will produce a valid report. For example, if you want to look for all exceptions in a specific block and you select a student ID that does not use that block, the query will not produce any results. Click the Show Exceptions Report button to process your query. Your search will be displayed in a list as shown on the next page.
January 22, 2010 DegreeWorks DW4.0.5 84 User Guide Web Interface
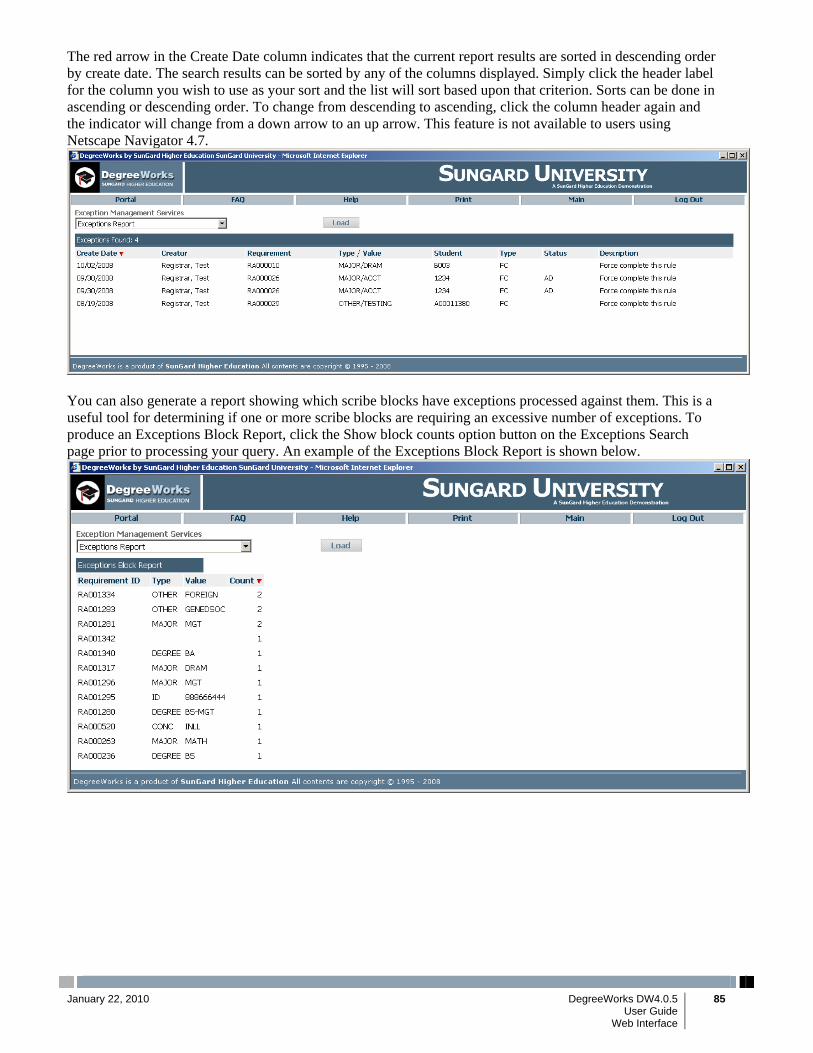
The red arrow in the Create Date column indicates that the current report results are sorted in descending order by create date. The search results can be sorted by any of the columns displayed. Simply click the header label for the column you wish to use as your sort and the list will sort based upon that criterion. Sorts can be done in ascending or descending order. To change from descending to ascending, click the column header again and the indicator will change from a down arrow to an up arrow. This feature is not available to users using Netscape Navigator 4.7.
You can also generate a report showing which scribe blocks have exceptions processed against them. This is a useful tool for determining if one or more scribe blocks are requiring an excessive number of exceptions. To produce an Exceptions Block Report, click the Show block counts option button on the Exceptions Search page prior to processing your query. An example of the Exceptions Block Report is shown below.
January 22, 2010 DegreeWorks DW4.0.5 85 User Guide Web Interface
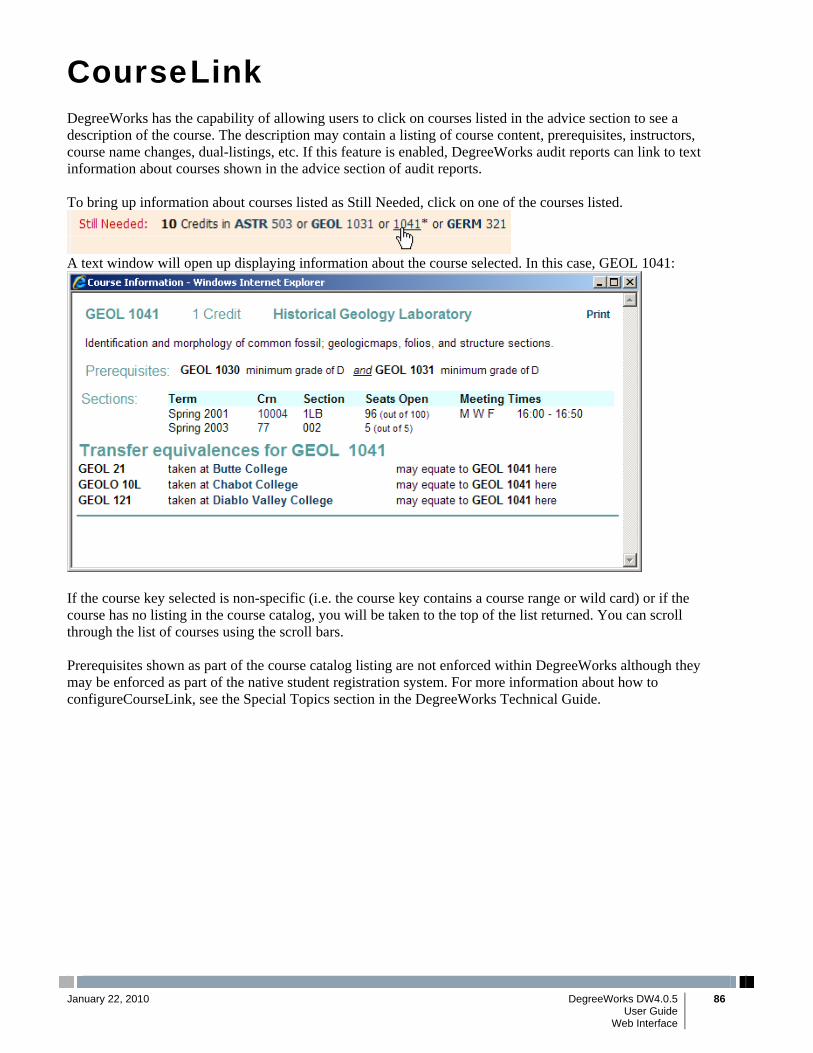
CourseLink DegreeWorks has the capability of allowing users to click on courses listed in the advice section to see a description of the course. The description may contain a listing of course content, prerequisites, instructors, course name changes, dual-listings, etc. If this feature is enabled, DegreeWorks audit reports can link to text information about courses shown in the advice section of audit reports. To bring up information about courses listed as Still Needed, click on one of the courses listed.
A text window will open up displaying information about the course selected. In this case, GEOL 1041:
If the course key selected is non-specific (i.e. the course key contains a course range or wild card) or if the course has no listing in the course catalog, you will be taken to the top of the list returned. You can scroll through the list of courses using the scroll bars. Prerequisites shown as part of the course catalog listing are not enforced within DegreeWorks although they may be enforced as part of the native student registration system. For more information about how to configureCourseLink, see the Special Topics section in the DegreeWorks Technical Guide.
January 22, 2010 DegreeWorks DW4.0.5 86 User Guide Web Interface

Worksheet Reports DegreeWorks offers a number of different types of audit reports. Each audit report displays specific information about students and their progress towards degree completion. In the Audit Format drop-down list box, there are seven default audit reports available. These reports can be customized by the client to meet their respective needs. Additional audit reports can also be created and added to the drop-down list box. Not all of these audit reports are necessary. Reports can be added or remove from the drop-down list by your DegreeWorks administrator. Clients who are part of the Service Members Opportunity Colleges will also use the SOC Military Audit and SOC Civilian Audit. Many campuses choose to not make the Registrar's Audit report available to students. An example of each audit type is shown in the following pages. Here is the Legend that appears at the bottom of every audit.
Class History Link
This link is found on the upper right of each Worksheet screen, and will display classes in the following format:
January 22, 2010 DegreeWorks DW4.0.5 87 User Guide Web Interface

January 22, 2010 DegreeWorks DW4.0.5 88 User Guide Web Interface

Diagnostics Report Here is an example of a Diagnostics Report Worksheet.
January 22, 2010 DegreeWorks DW4.0.5 89 User Guide Web Interface
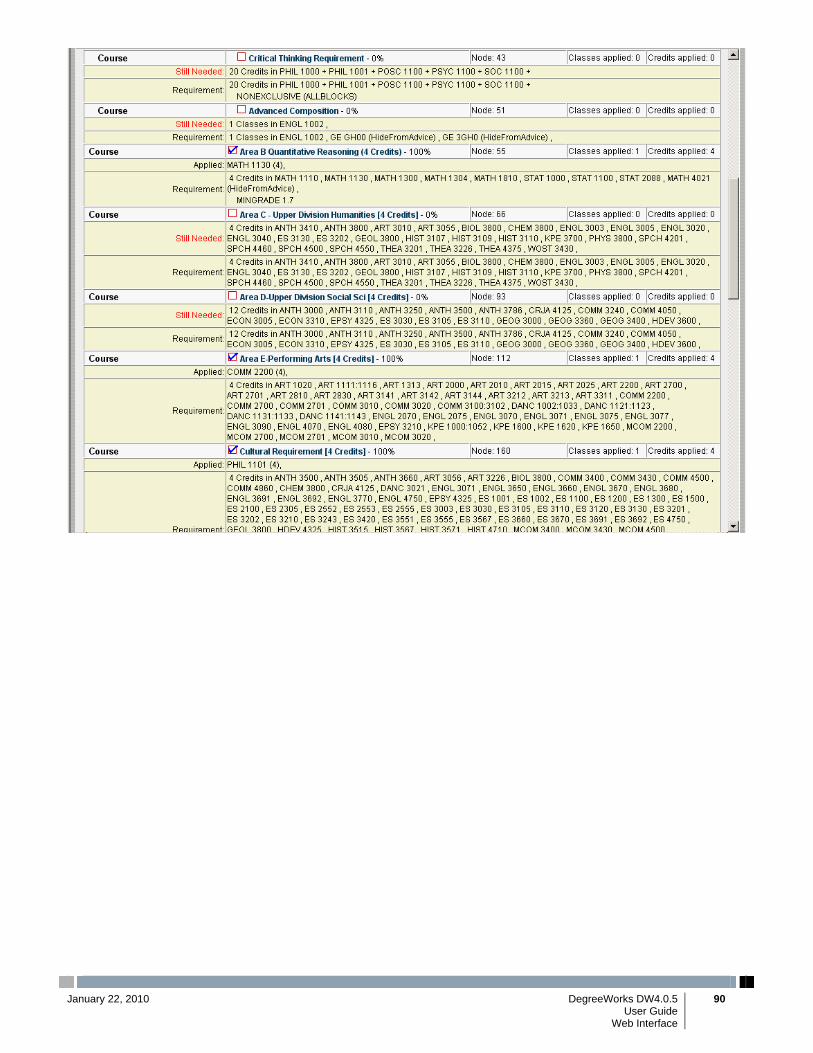
January 22, 2010 DegreeWorks DW4.0.5 90 User Guide Web Interface
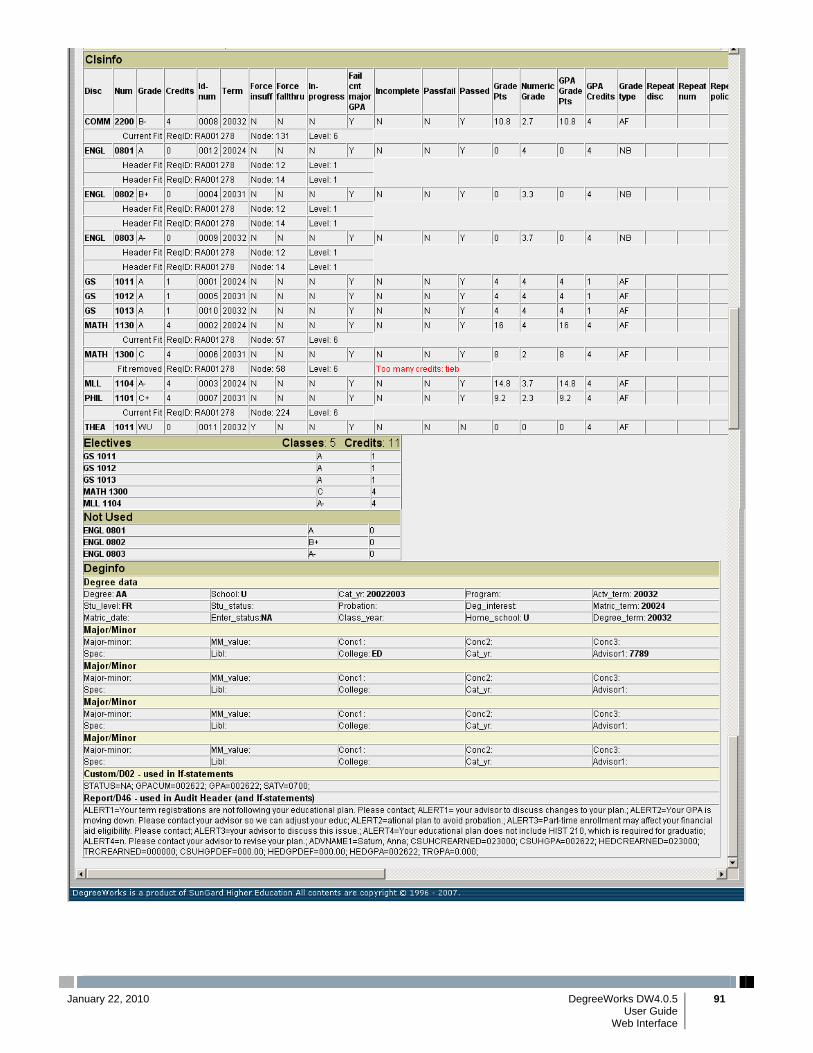
January 22, 2010 DegreeWorks DW4.0.5 91 User Guide Web Interface

Financial Aid Report Here is an example of a Financial Aid Report Worksheet.
Financial Aid audits are processed using the Aid tab. To access this screen, select the student you wish to process and click the Aid tab. This will automatically load the most recent Financial Aid audit for this student. The student context information will be displayed in the fields at the top of the window once the student has been selected. This information includes current degree pursuit, major, school, student level and the date the last audit was processed. To process a new audit for the student select the Process New button. The Include In-Progress classes is disabled and checked while the Include pre-registered classes box is unchecked as we want the current classes but do not want future classes for a financial aid audit. If you have the Historic Report listing showing you may select an older audit and click View to review it. At any time you may also click Process New to obtain a new audit. Once the audit has been processed, the audit report will be displayed in the format selected prior to processing. As mentioned earlier, the audit information displayed depends upon the UCX-RPT036 configuration settings for the audit report format selected. Depending on your access, the Format drop-down list may also display the “Aid and Academic Report”. You may use this report to examine the academic degree audit information alongside the financial aid audit results.
January 22, 2010 DegreeWorks DW4.0.5 92 User Guide Web Interface

Graduation Checklist Here is an example of a Graduation Checklist Worksheet.
January 22, 2010 DegreeWorks DW4.0.5 93 User Guide Web Interface

Registrar Report Here is an example of a Registrar Report Worksheet.
January 22, 2010 DegreeWorks DW4.0.5 94 User Guide Web Interface

January 22, 2010 DegreeWorks DW4.0.5 95 User Guide Web Interface
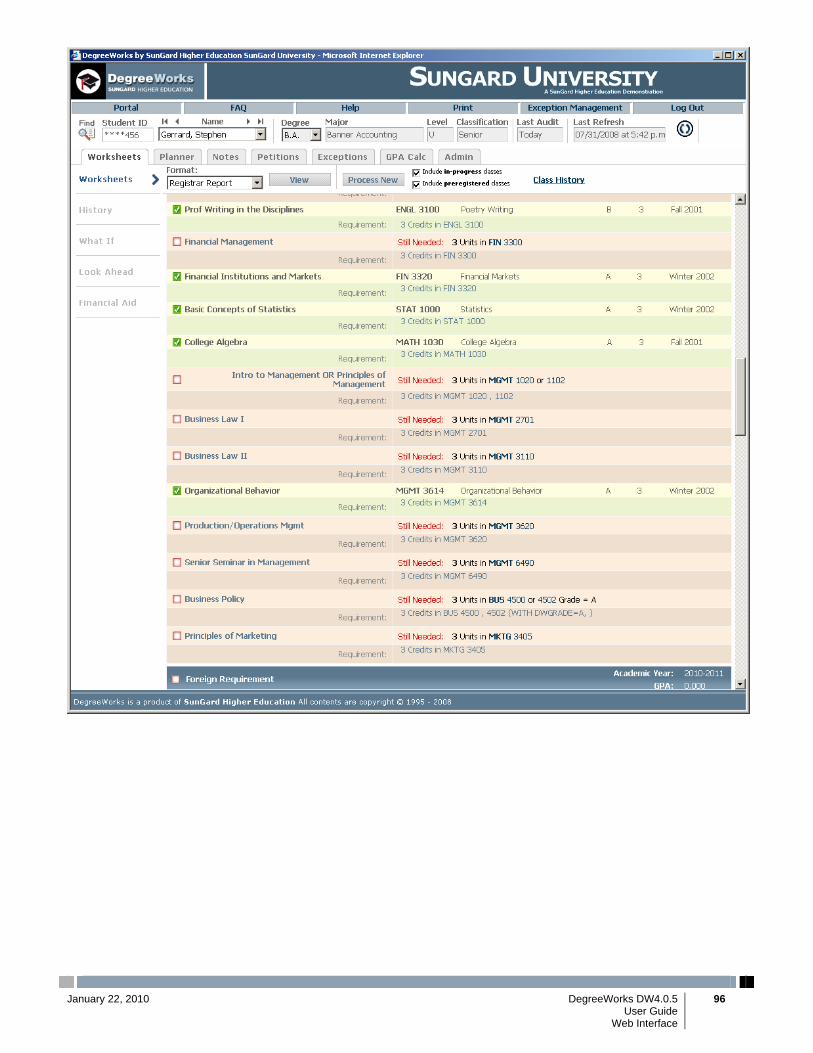
January 22, 2010 DegreeWorks DW4.0.5 96 User Guide Web Interface
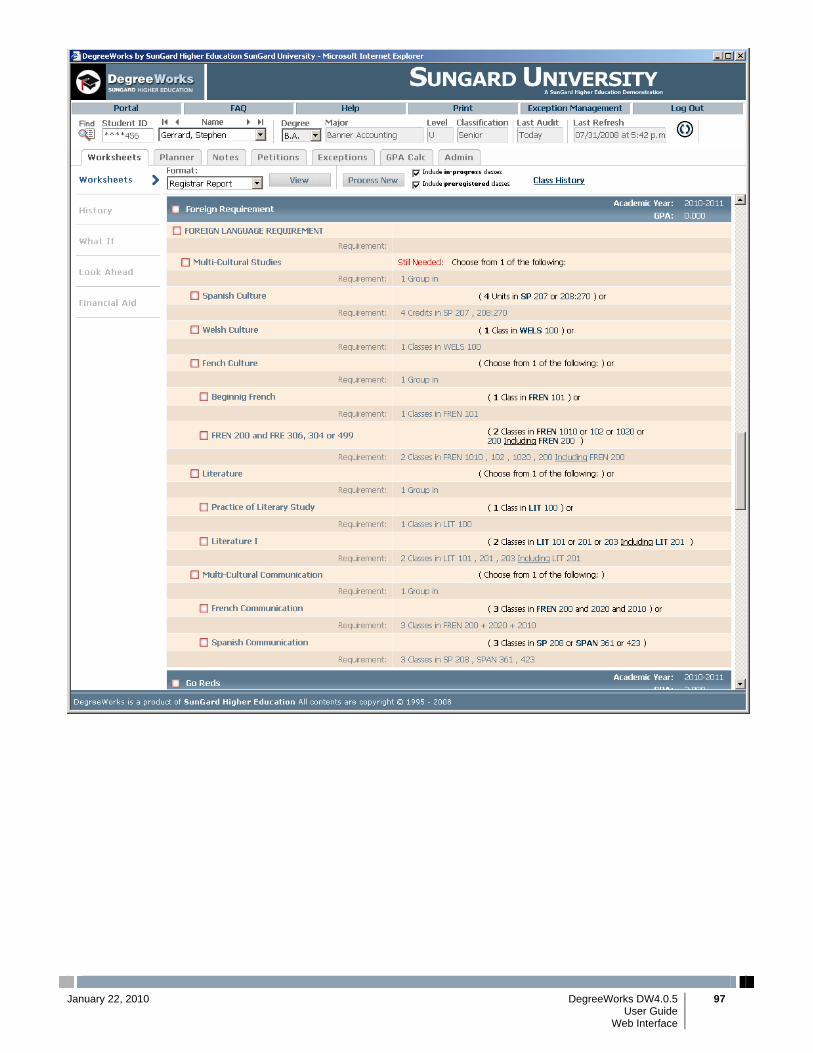
January 22, 2010 DegreeWorks DW4.0.5 97 User Guide Web Interface
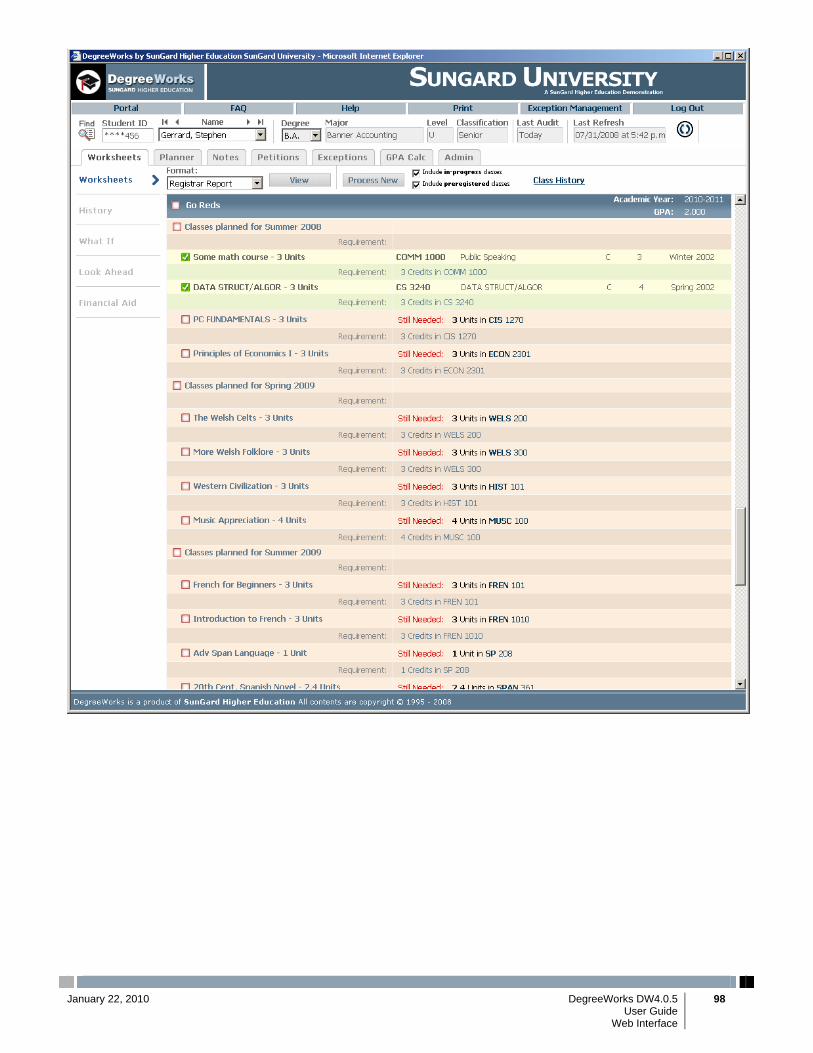
January 22, 2010 DegreeWorks DW4.0.5 98 User Guide Web Interface

January 22, 2010 DegreeWorks DW4.0.5 99 User Guide Web Interface
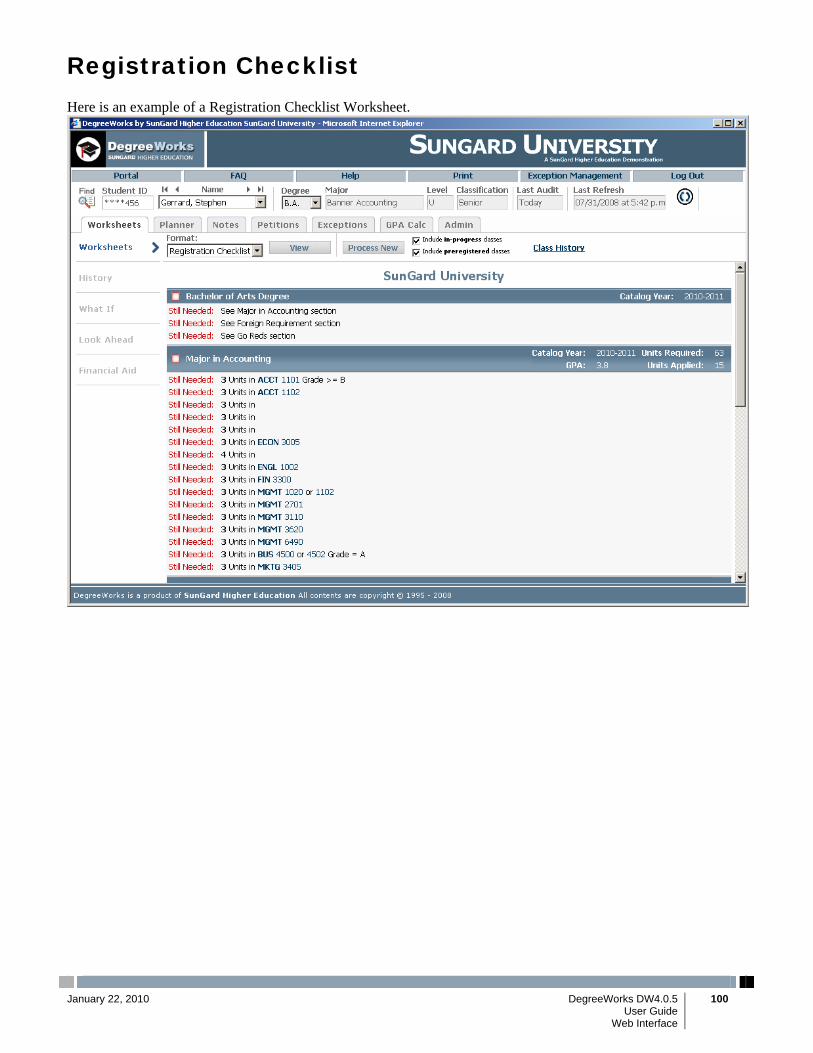
Registration Checklist Here is an example of a Registration Checklist Worksheet.
January 22, 2010 DegreeWorks DW4.0.5 100 User Guide Web Interface
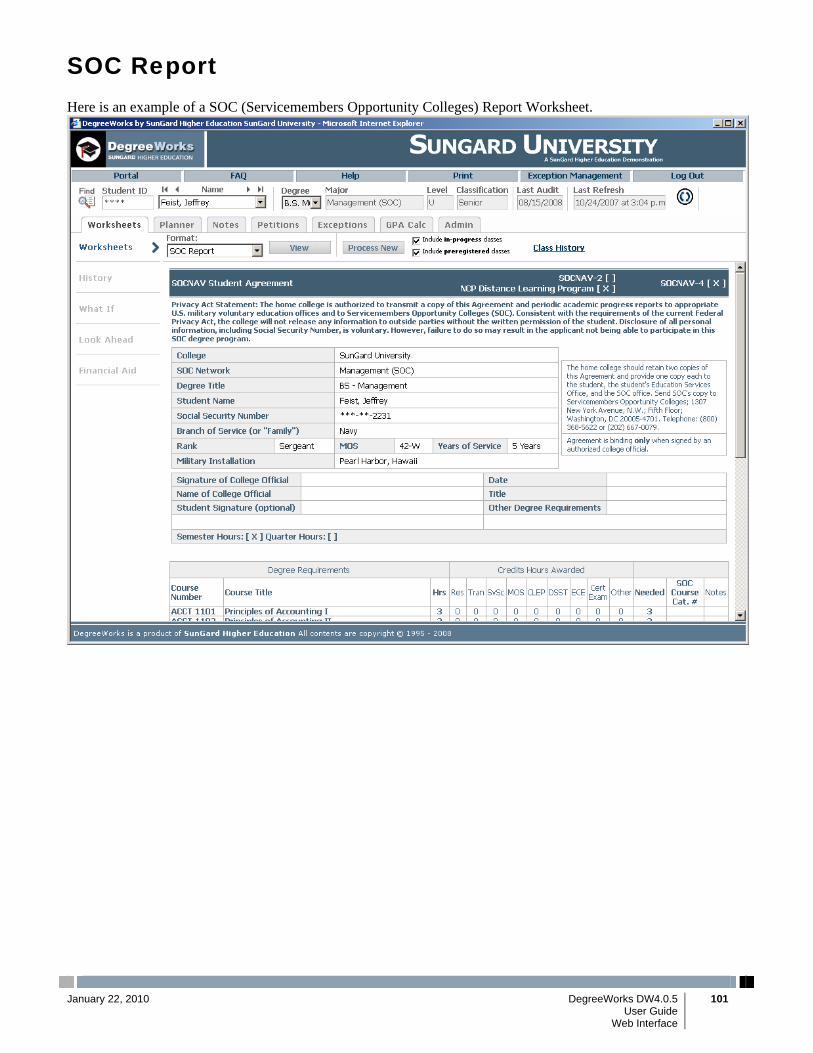
SOC Report Here is an example of a SOC (Servicemembers Opportunity Colleges) Report Worksheet.
January 22, 2010 DegreeWorks DW4.0.5 101 User Guide Web Interface
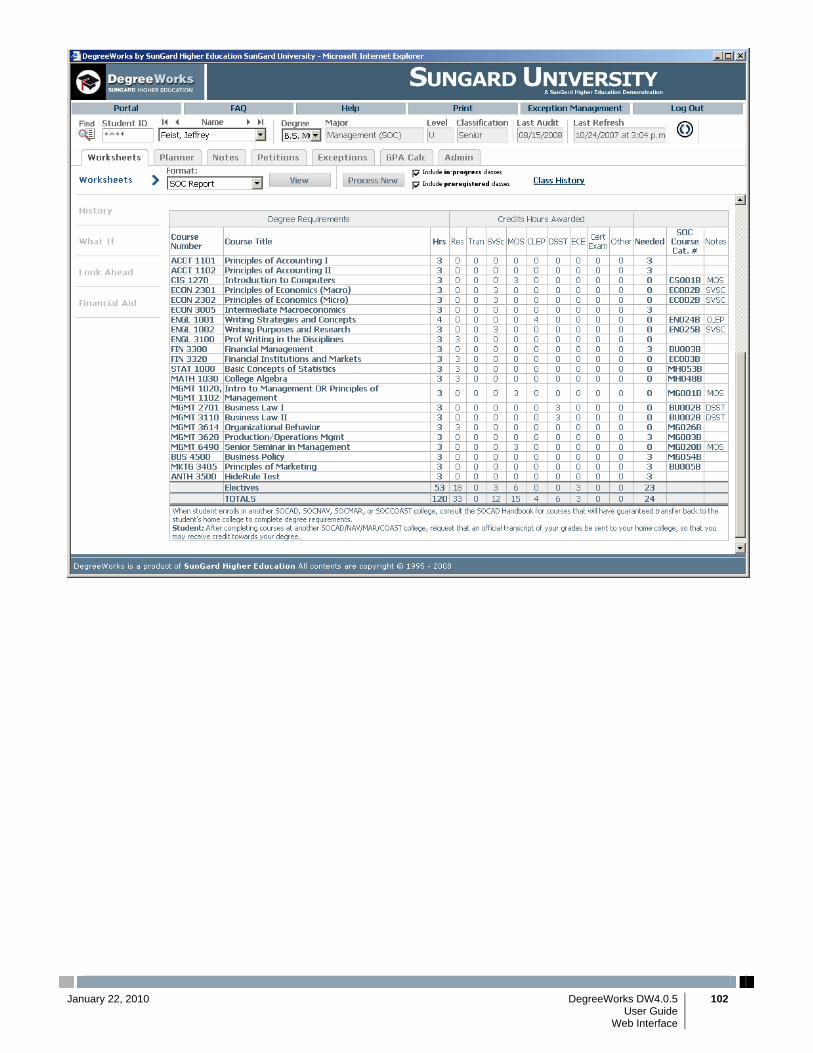
January 22, 2010 DegreeWorks DW4.0.5 102 User Guide Web Interface

Student Data Report Here is an example of a Student Data Report Worksheet.
January 22, 2010 DegreeWorks DW4.0.5 103 User Guide Web Interface

Student View Here is an example of a Student View Worksheet.
January 22, 2010 DegreeWorks DW4.0.5 104 User Guide Web Interface

January 22, 2010 DegreeWorks DW4.0.5 105 User Guide Web Interface

January 22, 2010 DegreeWorks DW4.0.5 106 User Guide Web Interface
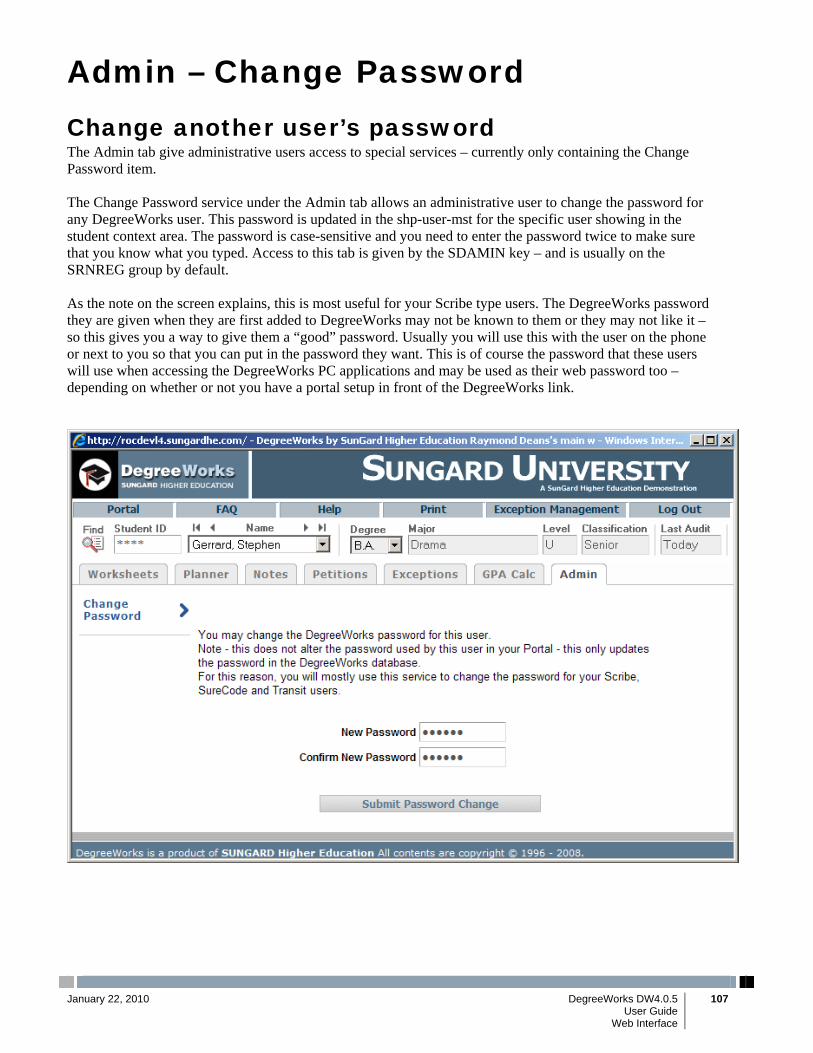
Admin – Change Password
Change another user’s password The Admin tab give administrative users access to special services – currently only containing the Change Password item. The Change Password service under the Admin tab allows an administrative user to change the password for any DegreeWorks user. This password is updated in the shp-user-mst for the specific user showing in the student context area. The password is case-sensitive and you need to enter the password twice to make sure that you know what you typed. Access to this tab is given by the SDAMIN key – and is usually on the SRNREG group by default. As the note on the screen explains, this is most useful for your Scribe type users. The DegreeWorks password they are given when they are first added to DegreeWorks may not be known to them or they may not like it – so this gives you a way to give them a “good” password. Usually you will use this with the user on the phone or next to you so that you can put in the password they want. This is of course the password that these users will use when accessing the DegreeWorks PC applications and may be used as their web password too – depending on whether or not you have a portal setup in front of the DegreeWorks link.
January 22, 2010 DegreeWorks DW4.0.5 107 User Guide Web Interface