Embed Size (px)
Citation preview
1
Dedicated to the memory of John Daniels, who hopefully is gaming elsewhere now.
2
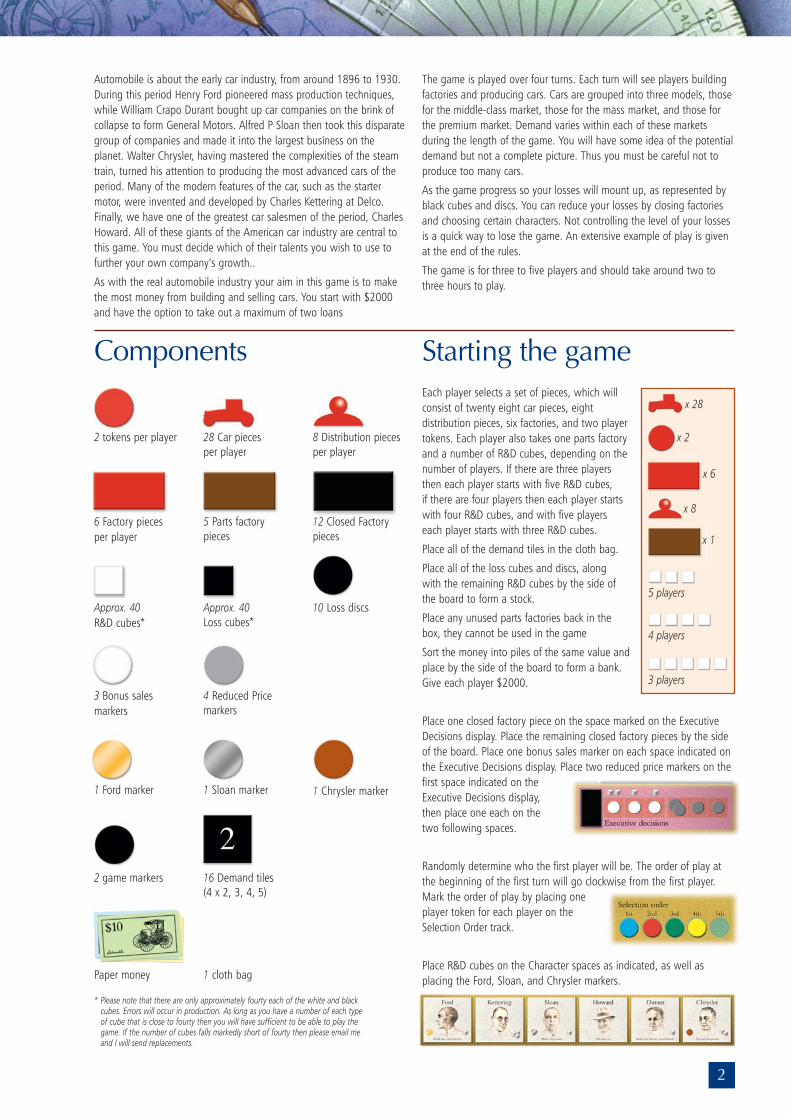
Components
2 tokens per player 28 Car piecesper player
8 Distribution piecesper player
Approx. 40Loss cubes*
10 Loss discs
3 Bonus salesmarkers
4 Reduced Pricemarkers
1 Ford marker 1 Sloan marker
2 game markers 16 Demand tiles(4 x 2, 3, 4, 5)
1 cloth bagPaper money
1 Chrysler marker
6 Factory piecesper player
5 Parts factorypieces
12 Closed Factorypieces
Automobile is about the early car industry, from around 1896 to 1930.During this period Henry Ford pioneered mass production techniques,while William Crapo Durant bought up car companies on the brink ofcollapse to form General Motors. Alfred P Sloan then took this disparategroup of companies and made it into the largest business on theplanet. Walter Chrysler, having mastered the complexities of the steamtrain, turned his attention to producing the most advanced cars of theperiod. Many of the modern features of the car, such as the startermotor, were invented and developed by Charles Kettering at Delco.Finally, we have one of the greatest car salesmen of the period, CharlesHoward. All of these giants of the American car industry are central tothis game. You must decide which of their talents you wish to use tofurther your own company’s growth..
As with the real automobile industry your aim in this game is to makethe most money from building and selling cars. You start with $2000and have the option to take out a maximum of two loans
The game is played over four turns. Each turn will see players buildingfactories and producing cars. Cars are grouped into three models, thosefor the middle-class market, those for the mass market, and those forthe premium market. Demand varies within each of these marketsduring the length of the game. You will have some idea of the potentialdemand but not a complete picture. Thus you must be careful not toproduce too many cars.
As the game progress so your losses will mount up, as represented byblack cubes and discs. You can reduce your losses by closing factoriesand choosing certain characters. Not controlling the level of your lossesis a quick way to lose the game. An extensive example of play is givenat the end of the rules.
The game is for three to five players and should take around two tothree hours to play.
Starting the gameEach player selects a set of pieces, which willconsist of twenty eight car pieces, eightdistribution pieces, six factories, and two playertokens. Each player also takes one parts factoryand a number of R&D cubes, depending on thenumber of players. If there are three playersthen each player starts with five R&D cubes, if there are four players then each player startswith four R&D cubes, and with five players each player starts with three R&D cubes.
Place all of the demand tiles in the cloth bag.
Place all of the loss cubes and discs, along with the remaining R&D cubes by the side ofthe board to form a stock.
Place any unused parts factories back in thebox, they cannot be used in the game
Sort the money into piles of the same value andplace by the side of the board to form a bank.Give each player $2000.
Place one closed factory piece on the space marked on the ExecutiveDecisions display. Place the remaining closed factory pieces by the sideof the board. Place one bonus sales marker on each space indicated onthe Executive Decisions display. Place two reduced price markers on thefirst space indicated on theExecutive Decisions display, then place one each on the two following spaces.
Randomly determine who the first player will be. The order of play atthe beginning of the first turn will go clockwise from the first player.Mark the order of play by placing oneplayer token for each player on theSelection Order track.
Place R&D cubes on the Character spaces as indicated, as well asplacing the Ford, Sloan, and Chrysler markers.
x 28
x 2
x 8
x 6
x 1
5 players
4 players
3 players
Approx. 40 R&D cubes*
* Please note that there are only approximately fourty each of the white and blackcubes. Errors will occur in production. As long as you have a number of each typeof cube that is close to fourty then you will have sufficient to be able to play thegame. If the number of cubes falls markedly short of fourty then please email meand I will send replacements.
3
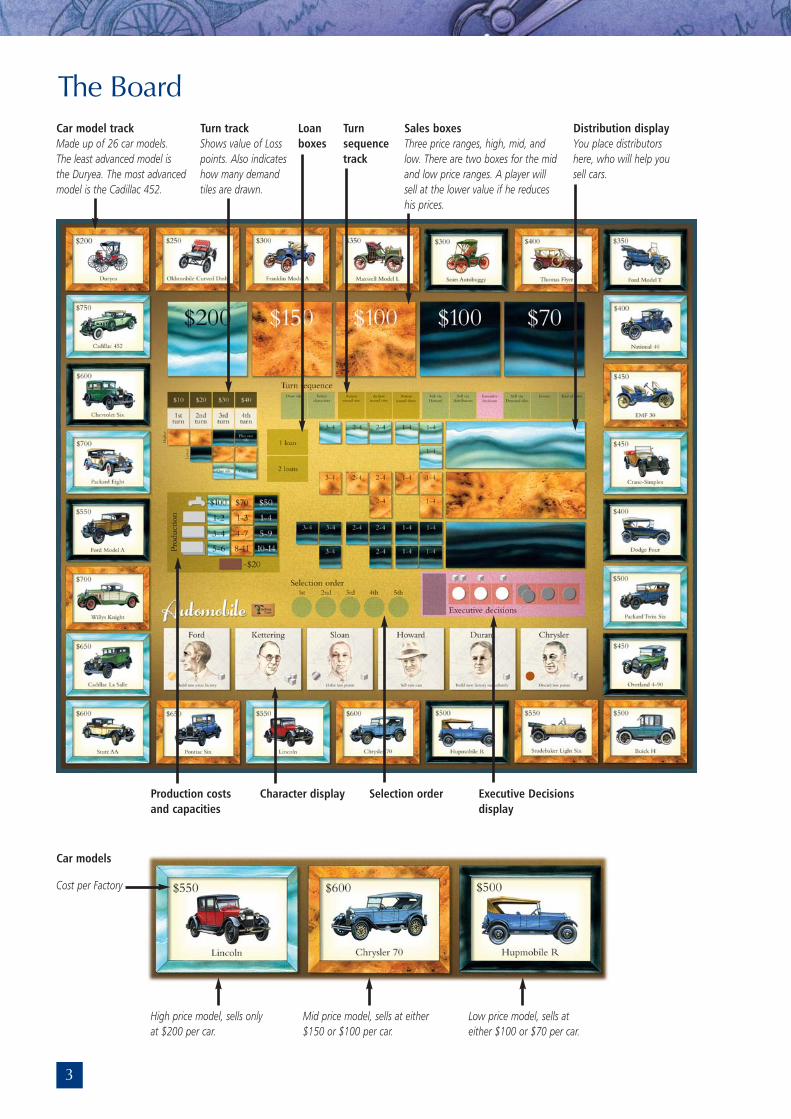
The BoardCar model track Made up of 26 car models. The least advanced model is the Duryea. The most advancedmodel is the Cadillac 452.
Turn trackShows value of Losspoints. Also indicateshow many demandtiles are drawn.
Turnsequencetrack
Distribution displayYou place distributorshere, who will help yousell cars.
Loanboxes
Sales boxesThree price ranges, high, mid, andlow. There are two boxes for the midand low price ranges. A player willsell at the lower value if he reduceshis prices.
Car models
Cost per Factory
High price model, sells onlyat $200 per car.
Mid price model, sells at either$150 or $100 per car.
Low price model, sells ateither $100 or $70 per car.
Production costsand capacities
Character display Selection order Executive Decisionsdisplay
4
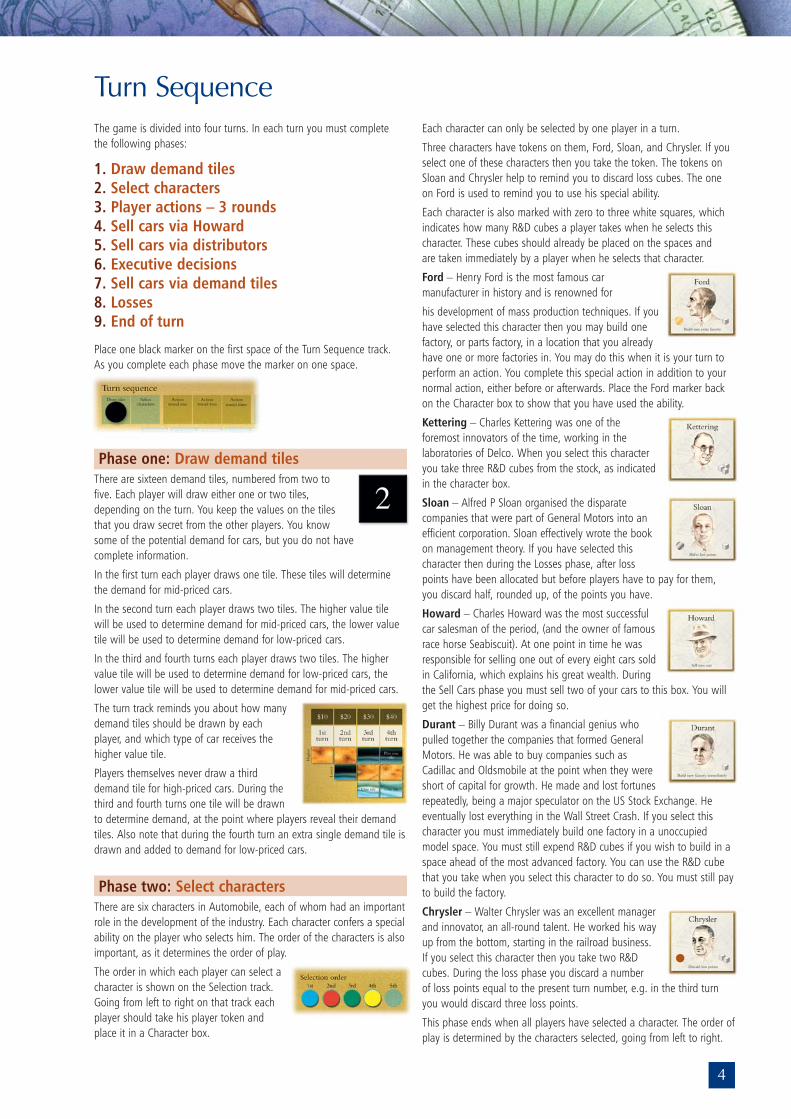
Turn SequenceThe game is divided into four turns. In each turn you must complete the following phases:
1. Draw demand tiles2. Select characters3. Player actions – 3 rounds4. Sell cars via Howard5. Sell cars via distributors6. Executive decisions7. Sell cars via demand tiles8. Losses9. End of turn
Place one black marker on the first space of the Turn Sequence track. As you complete each phase move the marker on one space.
Phase one: Draw demand tilesThere are sixteen demand tiles, numbered from two tofive. Each player will draw either one or two tiles,depending on the turn. You keep the values on the tilesthat you draw secret from the other players. You knowsome of the potential demand for cars, but you do not have complete information.
In the first turn each player draws one tile. These tiles will determinethe demand for mid-priced cars.
In the second turn each player draws two tiles. The higher value tile will be used to determine demand for mid-priced cars, the lower valuetile will be used to determine demand for low-priced cars.
In the third and fourth turns each player draws two tiles. The highervalue tile will be used to determine demand for low-priced cars, thelower value tile will be used to determine demand for mid-priced cars.
The turn track reminds you about how manydemand tiles should be drawn by eachplayer, and which type of car receives thehigher value tile.
Players themselves never draw a thirddemand tile for high-priced cars. During thethird and fourth turns one tile will be drawnto determine demand, at the point where players reveal their demandtiles. Also note that during the fourth turn an extra single demand tile isdrawn and added to demand for low-priced cars.
Phase two: Select charactersThere are six characters in Automobile, each of whom had an importantrole in the development of the industry. Each character confers a specialability on the player who selects him. The order of the characters is alsoimportant, as it determines the order of play.
The order in which each player can select acharacter is shown on the Selection track.Going from left to right on that track eachplayer should take his player token andplace it in a Character box.
Each character can only be selected by one player in a turn.
Three characters have tokens on them, Ford, Sloan, and Chrysler. If youselect one of these characters then you take the token. The tokens onSloan and Chrysler help to remind you to discard loss cubes. The oneon Ford is used to remind you to use his special ability.
Each character is also marked with zero to three white squares, whichindicates how many R&D cubes a player takes when he selects thischaracter. These cubes should already be placed on the spaces and are taken immediately by a player when he selects that character.
Ford – Henry Ford is the most famous carmanufacturer in history and is renowned for
his development of mass production techniques. If youhave selected this character then you may build onefactory, or parts factory, in a location that you alreadyhave one or more factories in. You may do this when it is your turn toperform an action. You complete this special action in addition to yournormal action, either before or afterwards. Place the Ford marker backon the Character box to show that you have used the ability.
Kettering – Charles Kettering was one of theforemost innovators of the time, working in thelaboratories of Delco. When you select this characteryou take three R&D cubes from the stock, as indicatedin the character box.
Sloan – Alfred P Sloan organised the disparatecompanies that were part of General Motors into anefficient corporation. Sloan effectively wrote the bookon management theory. If you have selected thischaracter then during the Losses phase, after losspoints have been allocated but before players have to pay for them, you discard half, rounded up, of the points you have.
Howard – Charles Howard was the most successfulcar salesman of the period, (and the owner of famousrace horse Seabiscuit). At one point in time he wasresponsible for selling one out of every eight cars soldin California, which explains his great wealth. Duringthe Sell Cars phase you must sell two of your cars to this box. You willget the highest price for doing so.
Durant – Billy Durant was a financial genius whopulled together the companies that formed GeneralMotors. He was able to buy companies such asCadillac and Oldsmobile at the point when they wereshort of capital for growth. He made and lost fortunesrepeatedly, being a major speculator on the US Stock Exchange. Heeventually lost everything in the Wall Street Crash. If you select thischaracter you must immediately build one factory in a unoccupiedmodel space. You must still expend R&D cubes if you wish to build in aspace ahead of the most advanced factory. You can use the R&D cubethat you take when you select this character to do so. You must still payto build the factory.
Chrysler – Walter Chrysler was an excellent managerand innovator, an all-round talent. He worked his wayup from the bottom, starting in the railroad business.If you select this character then you take two R&Dcubes. During the loss phase you discard a number of loss points equal to the present turn number, e.g. in the third turnyou would discard three loss points.
This phase ends when all players have selected a character. The order ofplay is determined by the characters selected, going from left to right.
5
If a model space has been skipped over then it can still be built in. Thereis no R&D cost for doing so.
A model space can only have factories belonging to one player built in it.
A model space can have a maximum of three factories and one partsfactory built in it.
You cannot build in a model space containing a Closed factory piece.
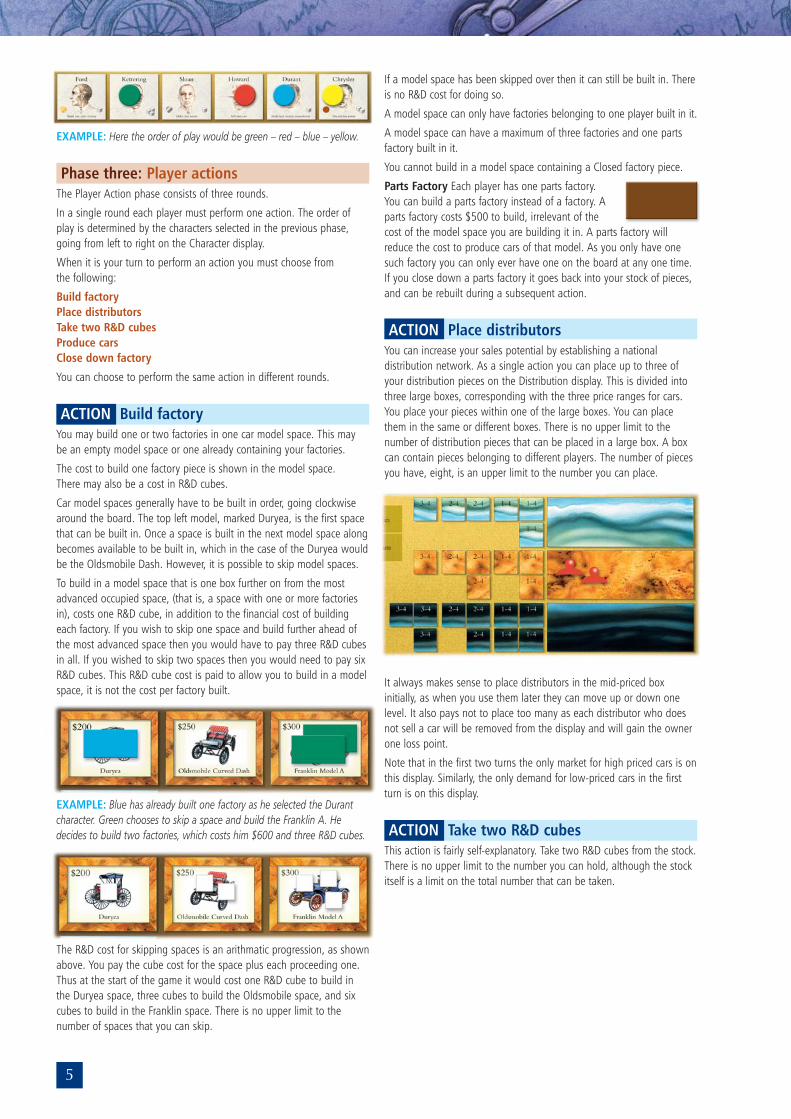
Parts Factory Each player has one parts factory.You can build a parts factory instead of a factory. Aparts factory costs $500 to build, irrelevant of thecost of the model space you are building it in. A parts factory willreduce the cost to produce cars of that model. As you only have onesuch factory you can only ever have one on the board at any one time.If you close down a parts factory it goes back into your stock of pieces,and can be rebuilt during a subsequent action.
ACTION Place distributors You can increase your sales potential by establishing a nationaldistribution network. As a single action you can place up to three ofyour distribution pieces on the Distribution display. This is divided intothree large boxes, corresponding with the three price ranges for cars.You place your pieces within one of the large boxes. You can placethem in the same or different boxes. There is no upper limit to thenumber of distribution pieces that can be placed in a large box. A boxcan contain pieces belonging to different players. The number of piecesyou have, eight, is an upper limit to the number you can place.
It always makes sense to place distributors in the mid-priced boxinitially, as when you use them later they can move up or down onelevel. It also pays not to place too many as each distributor who doesnot sell a car will be removed from the display and will gain the ownerone loss point.
Note that in the first two turns the only market for high priced cars is onthis display. Similarly, the only demand for low-priced cars in the firstturn is on this display.
ACTION Take two R&D cubes This action is fairly self-explanatory. Take two R&D cubes from the stock.There is no upper limit to the number you can hold, although the stockitself is a limit on the total number that can be taken.
EXAMPLE: Here the order of play would be green – red – blue – yellow.
Phase three: Player actionsThe Player Action phase consists of three rounds.
In a single round each player must perform one action. The order ofplay is determined by the characters selected in the previous phase,going from left to right on the Character display.
When it is your turn to perform an action you must choose from the following:
Build factoryPlace distributorsTake two R&D cubesProduce carsClose down factory
You can choose to perform the same action in different rounds.
ACTION Build factory You may build one or two factories in one car model space. This maybe an empty model space or one already containing your factories.
The cost to build one factory piece is shown in the model space. There may also be a cost in R&D cubes.
Car model spaces generally have to be built in order, going clockwisearound the board. The top left model, marked Duryea, is the first spacethat can be built in. Once a space is built in the next model space alongbecomes available to be built in, which in the case of the Duryea wouldbe the Oldsmobile Dash. However, it is possible to skip model spaces.
To build in a model space that is one box further on from the mostadvanced occupied space, (that is, a space with one or more factoriesin), costs one R&D cube, in addition to the financial cost of buildingeach factory. If you wish to skip one space and build further ahead ofthe most advanced space then you would have to pay three R&D cubesin all. If you wished to skip two spaces then you would need to pay sixR&D cubes. This R&D cube cost is paid to allow you to build in a modelspace, it is not the cost per factory built.
EXAMPLE: Blue has already built one factory as he selected the Durantcharacter. Green chooses to skip a space and build the Franklin A. Hedecides to build two factories, which costs him $600 and three R&D cubes.
The R&D cost for skipping spaces is an arithmatic progression, as shownabove. You pay the cube cost for the space plus each proceeding one.Thus at the start of the game it would cost one R&D cube to build inthe Duryea space, three cubes to build the Oldsmobile space, and sixcubes to build in the Franklin space. There is no upper limit to thenumber of spaces that you can skip.
6
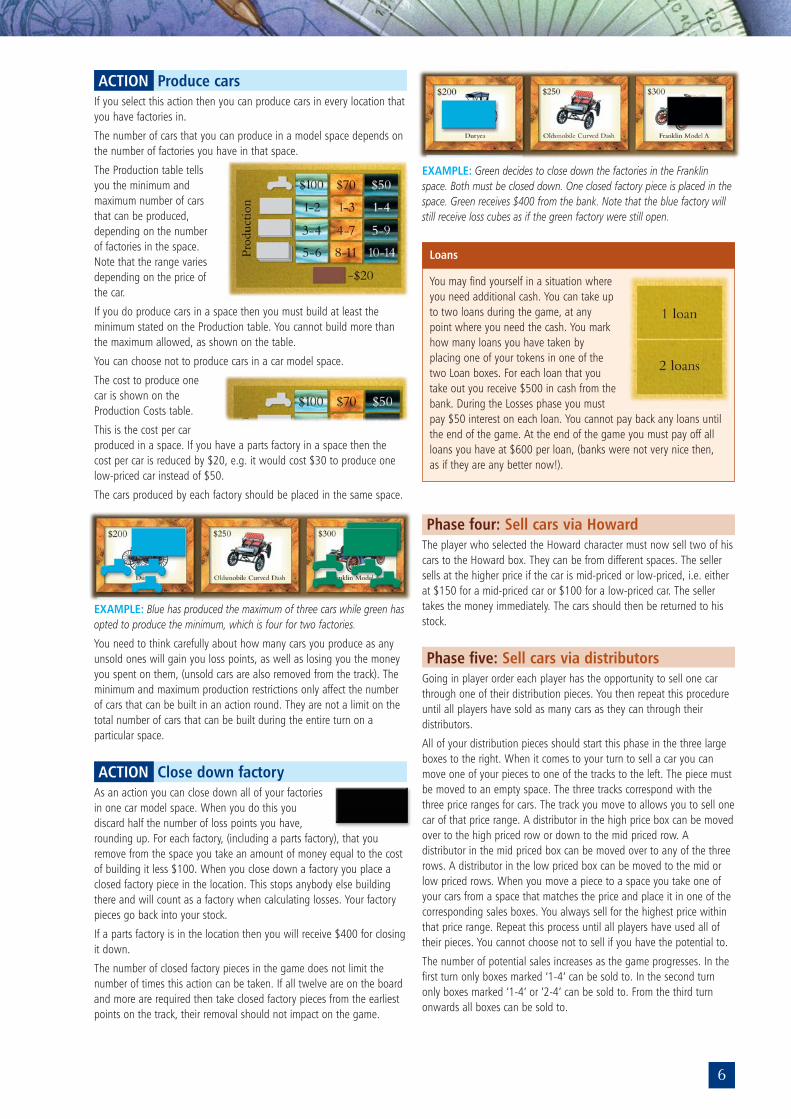
ACTION Produce cars If you select this action then you can produce cars in every location thatyou have factories in.
The number of cars that you can produce in a model space depends onthe number of factories you have in that space.
The Production table tellsyou the minimum andmaximum number of carsthat can be produced,depending on the numberof factories in the space.Note that the range variesdepending on the price ofthe car.
If you do produce cars in a space then you must build at least theminimum stated on the Production table. You cannot build more thanthe maximum allowed, as shown on the table.
You can choose not to produce cars in a car model space.
The cost to produce onecar is shown on theProduction Costs table.
This is the cost per carproduced in a space. If you have a parts factory in a space then the cost per car is reduced by $20, e.g. it would cost $30 to produce onelow-priced car instead of $50.
The cars produced by each factory should be placed in the same space.
EXAMPLE: Blue has produced the maximum of three cars while green hasopted to produce the minimum, which is four for two factories.
You need to think carefully about how many cars you produce as anyunsold ones will gain you loss points, as well as losing you the moneyyou spent on them, (unsold cars are also removed from the track). Theminimum and maximum production restrictions only affect the numberof cars that can be built in an action round. They are not a limit on thetotal number of cars that can be built during the entire turn on aparticular space.
ACTION Close down factory As an action you can close down all of your factoriesin one car model space. When you do this youdiscard half the number of loss points you have,rounding up. For each factory, (including a parts factory), that youremove from the space you take an amount of money equal to the costof building it less $100. When you close down a factory you place aclosed factory piece in the location. This stops anybody else buildingthere and will count as a factory when calculating losses. Your factorypieces go back into your stock.
If a parts factory is in the location then you will receive $400 for closingit down.
The number of closed factory pieces in the game does not limit thenumber of times this action can be taken. If all twelve are on the boardand more are required then take closed factory pieces from the earliestpoints on the track, their removal should not impact on the game.
EXAMPLE: Green decides to close down the factories in the Franklinspace. Both must be closed down. One closed factory piece is placed in thespace. Green receives $400 from the bank. Note that the blue factory willstill receive loss cubes as if the green factory were still open.
Loans
You may find yourself in a situation whereyou need additional cash. You can take upto two loans during the game, at anypoint where you need the cash. You markhow many loans you have taken byplacing one of your tokens in one of thetwo Loan boxes. For each loan that youtake out you receive $500 in cash from thebank. During the Losses phase you mustpay $50 interest on each loan. You cannot pay back any loans untilthe end of the game. At the end of the game you must pay off allloans you have at $600 per loan, (banks were not very nice then, as if they are any better now!).
Phase four: Sell cars via HowardThe player who selected the Howard character must now sell two of hiscars to the Howard box. They can be from different spaces. The sellersells at the higher price if the car is mid-priced or low-priced, i.e. eitherat $150 for a mid-priced car or $100 for a low-priced car. The sellertakes the money immediately. The cars should then be returned to hisstock.
Phase five: Sell cars via distributorsGoing in player order each player has the opportunity to sell one carthrough one of their distribution pieces. You then repeat this procedureuntil all players have sold as many cars as they can through theirdistributors.
All of your distribution pieces should start this phase in the three largeboxes to the right. When it comes to your turn to sell a car you canmove one of your pieces to one of the tracks to the left. The piece mustbe moved to an empty space. The three tracks correspond with thethree price ranges for cars. The track you move to allows you to sell onecar of that price range. A distributor in the high price box can be movedover to the high priced row or down to the mid priced row. Adistributor in the mid priced box can be moved over to any of the threerows. A distributor in the low priced box can be moved to the mid orlow priced rows. When you move a piece to a space you take one ofyour cars from a space that matches the price and place it in one of thecorresponding sales boxes. You always sell for the highest price withinthat price range. Repeat this process until all players have used all oftheir pieces. You cannot choose not to sell if you have the potential to.
The number of potential sales increases as the game progresses. In thefirst turn only boxes marked ‘1-4’ can be sold to. In the second turnonly boxes marked ‘1-4’ or ‘2-4’ can be sold to. From the third turnonwards all boxes can be sold to.
7
Players now collect money for the cars they have sold. The cars shouldnow be removed from the sales boxes. The distribution pieces shouldbe moved to the large box to their immediate right, i.e. all pieces in thelow priced row are moved to the low priced box.
If a player cannot use all of his distribution pieces then he removesthose that are unused and returns them to his own stock. He also takesone loss point for each piece removed.
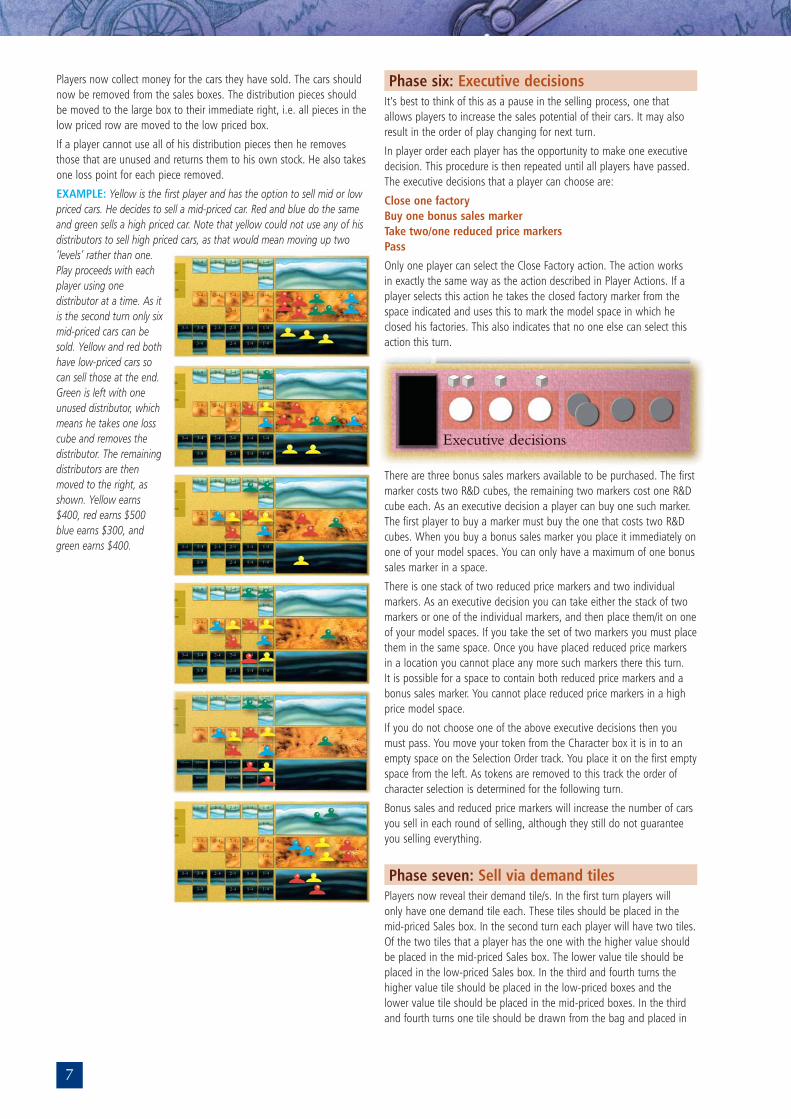
EXAMPLE: Yellow is the first player and has the option to sell mid or lowpriced cars. He decides to sell a mid-priced car. Red and blue do the sameand green sells a high priced car. Note that yellow could not use any of hisdistributors to sell high priced cars, as that would mean moving up two‘levels’ rather than one.Play proceeds with eachplayer using onedistributor at a time. As itis the second turn only sixmid-priced cars can besold. Yellow and red bothhave low-priced cars socan sell those at the end.Green is left with oneunused distributor, whichmeans he takes one losscube and removes thedistributor. The remainingdistributors are thenmoved to the right, asshown. Yellow earns$400, red earns $500blue earns $300, andgreen earns $400.
Phase six: Executive decisionsIt’s best to think of this as a pause in the selling process, one thatallows players to increase the sales potential of their cars. It may alsoresult in the order of play changing for next turn.
In player order each player has the opportunity to make one executivedecision. This procedure is then repeated until all players have passed.The executive decisions that a player can choose are:
Close one factoryBuy one bonus sales markerTake two/one reduced price markersPass
Only one player can select the Close Factory action. The action works in exactly the same way as the action described in Player Actions. If aplayer selects this action he takes the closed factory marker from thespace indicated and uses this to mark the model space in which heclosed his factories. This also indicates that no one else can select thisaction this turn.
There are three bonus sales markers available to be purchased. The firstmarker costs two R&D cubes, the remaining two markers cost one R&Dcube each. As an executive decision a player can buy one such marker.The first player to buy a marker must buy the one that costs two R&Dcubes. When you buy a bonus sales marker you place it immediately onone of your model spaces. You can only have a maximum of one bonussales marker in a space.
There is one stack of two reduced price markers and two individualmarkers. As an executive decision you can take either the stack of twomarkers or one of the individual markers, and then place them/it on oneof your model spaces. If you take the set of two markers you must placethem in the same space. Once you have placed reduced price markersin a location you cannot place any more such markers there this turn. It is possible for a space to contain both reduced price markers and abonus sales marker. You cannot place reduced price markers in a highprice model space.
If you do not choose one of the above executive decisions then youmust pass. You move your token from the Character box it is in to anempty space on the Selection Order track. You place it on the first emptyspace from the left. As tokens are removed to this track the order ofcharacter selection is determined for the following turn.
Bonus sales and reduced price markers will increase the number of carsyou sell in each round of selling, although they still do not guaranteeyou selling everything.
Phase seven: Sell via demand tilesPlayers now reveal their demand tile/s. In the first turn players will only have one demand tile each. These tiles should be placed in themid-priced Sales box. In the second turn each player will have two tiles.Of the two tiles that a player has the one with the higher value shouldbe placed in the mid-priced Sales box. The lower value tile should beplaced in the low-priced Sales box. In the third and fourth turns thehigher value tile should be placed in the low-priced boxes and thelower value tile should be placed in the mid-priced boxes. In the thirdand fourth turns one tile should be drawn from the bag and placed in
8
the high-priced Sales box. In the fourth turn one tile should also bedrawn from the bag and placed in the low-priced boxes.
These tiles dictate the total number of cars that can be sold in eachprice range. There are two sub-boxes for mid and low priced cars, as itis possible for players to reduce their selling prices. The two sub-boxeswithin a price range still constitute one price range for the purpose of demand.
EXAMPLE: In the second turn the higher of each pair of tiles is for mid-priced demand, while the lower value one is assigned to the low-priceddemand. Total demand for mid-priced cars is sixteen cars, total demand for low-priced cars is eleven cars.
The order of selling cars is determined by the position of the cars on the model space track. Cars are sold from the most advanced space,going backwards to the least advanced space. One car is sold fromeach space. This process is repeated until the demand for each pricerange is met. Any unsold cars will result in their owners taking a losspoint. They are then removed and returned to their owning players.
Each single bonus sales and reduced price marker allows you to sellone extra car in each round of selling. If the space contains one or tworeduced price markers then all cars in that space must be sold at thelower price, which is $100 for mid-priced cars and $70 for low pricedcars. You then go to the next occupied space, going backwards, and theowner of that location must now sell one or more cars, depending onbonus sale and reduced price markers. Note that a location couldpotentially have a combination of bonus sales and reduced pricemarkers in it.
EXAMPLE: The order of selling would go yellow-red-green-blue. Eachspace would sell one car, except for red, who would sell two cars duringeach ‘pass through’.
You repeat this procedure until players have sold as many cars as theycan, which depends on the amount of demand for each price range.Players then take cash for each car they have sold, depending on which Sales box it is in.
Players also take one loss point for each car they have not sold.
Players now retrieve all of their cars from the board. All bonus sales andreduced price markers are removed from the board.
Phase eight: LossesThe emerging car companies became some of the largest industries of the time. Managers were not used to running such massiveorganisations, which led to inefficiencies, represented by loss points in this game.
You now check to see which locations receive loss points. You gobackwards from the most advanced car model space in a particularprice range. The first occupied space receives no loss points, the nextoccupied space receives one loss point, the next one two loss points,and so on. A space with a closed factory piece in it will affect thenumber of loss points given to spaces further back, i.e. it counts as anoccupied space even though it does not directly receive loss points.
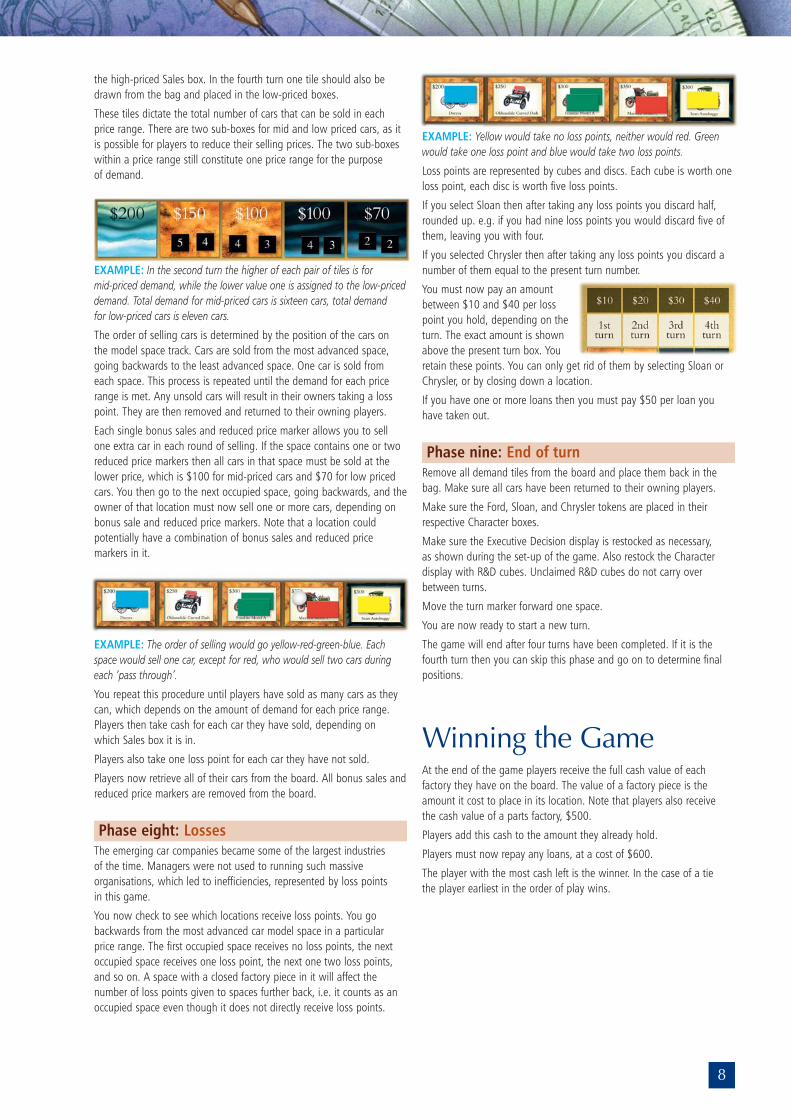
EXAMPLE: Yellow would take no loss points, neither would red. Greenwould take one loss point and blue would take two loss points.
Loss points are represented by cubes and discs. Each cube is worth oneloss point, each disc is worth five loss points.
If you select Sloan then after taking any loss points you discard half,rounded up. e.g. if you had nine loss points you would discard five ofthem, leaving you with four.
If you selected Chrysler then after taking any loss points you discard anumber of them equal to the present turn number.
You must now pay an amountbetween $10 and $40 per losspoint you hold, depending on theturn. The exact amount is shownabove the present turn box. Youretain these points. You can only get rid of them by selecting Sloan orChrysler, or by closing down a location.
If you have one or more loans then you must pay $50 per loan youhave taken out.
Phase nine: End of turnRemove all demand tiles from the board and place them back in thebag. Make sure all cars have been returned to their owning players.
Make sure the Ford, Sloan, and Chrysler tokens are placed in theirrespective Character boxes.
Make sure the Executive Decision display is restocked as necessary, as shown during the set-up of the game. Also restock the Characterdisplay with R&D cubes. Unclaimed R&D cubes do not carry overbetween turns.
Move the turn marker forward one space.
You are now ready to start a new turn.
The game will end after four turns have been completed. If it is thefourth turn then you can skip this phase and go on to determine finalpositions.
Winning the GameAt the end of the game players receive the full cash value of eachfactory they have on the board. The value of a factory piece is theamount it cost to place in its location. Note that players also receive the cash value of a parts factory, $500.
Players add this cash to the amount they already hold.
Players must now repay any loans, at a cost of $600.
The player with the most cash left is the winner. In the case of a tie the player earliest in the order of play wins.
9
Example of PlayThe first two turns of a game are coveredhere. It is a four player game.
In the first turn the initial order of play is red-yellow-green-blue. In that order players thenselect characters. Red selects Howard and willbe able to sell two cars automatically later inthe turn. Green takes three R&D cubes. Yellowtakes one R&D cube and immediately buildsone factory. Blue takes two R&D cubes andalso takes Chrysler’s special token. Later in theturn the blue player will be able to discard oneloss point. The order of play for player actionswill now go green-red-yellow-blue.
First turn, first action round: Yellow hasalready built in the Duryea model space usingthe Durant character action. Green builds onefactory in the Oldsmobile model space. Thiscosts $250 and one R&D cube. Red decides totake two R&D cubes. Yellow builds one factoryin the Maxwell model space, for a cost of$350 and three R&D cubes. Blue pays $300and one R&D cube to build one factory in theSears Autobuggy space.
Second action round: Green builds twofactories in the Thomas Flyer space, at a costof $800 and one R&D cube. Red pays $400and three R&D cubes to build one factory inthe National space. Yellow and blue bothchoose to place three distributors on theDistribution display.
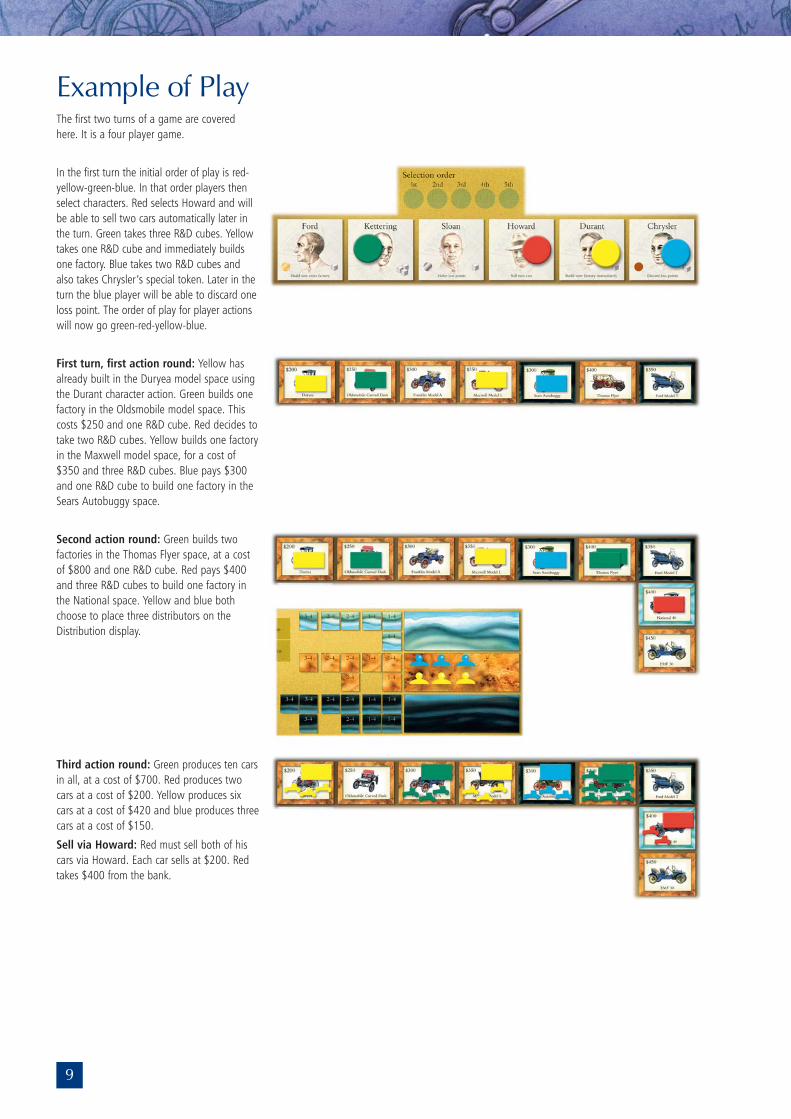
Third action round: Green produces ten carsin all, at a cost of $700. Red produces twocars at a cost of $200. Yellow produces sixcars at a cost of $420 and blue produces threecars at a cost of $150.
Sell via Howard: Red must sell both of hiscars via Howard. Each car sells at $200. Redtakes $400 from the bank.
10
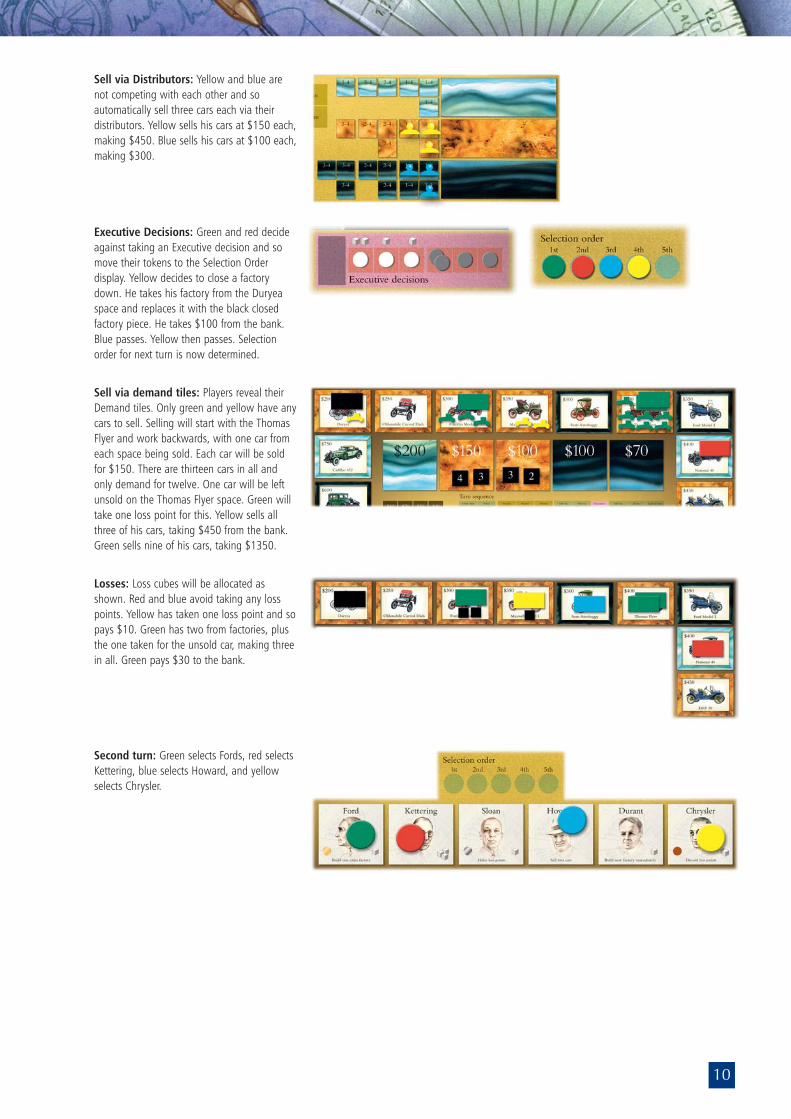
Sell via Distributors: Yellow and blue arenot competing with each other and soautomatically sell three cars each via theirdistributors. Yellow sells his cars at $150 each,making $450. Blue sells his cars at $100 each,making $300.
Executive Decisions: Green and red decideagainst taking an Executive decision and somove their tokens to the Selection Orderdisplay. Yellow decides to close a factorydown. He takes his factory from the Duryeaspace and replaces it with the black closedfactory piece. He takes $100 from the bank.Blue passes. Yellow then passes. Selectionorder for next turn is now determined.
Sell via demand tiles: Players reveal theirDemand tiles. Only green and yellow have anycars to sell. Selling will start with the ThomasFlyer and work backwards, with one car fromeach space being sold. Each car will be soldfor $150. There are thirteen cars in all andonly demand for twelve. One car will be leftunsold on the Thomas Flyer space. Green willtake one loss point for this. Yellow sells allthree of his cars, taking $450 from the bank.Green sells nine of his cars, taking $1350.
Losses: Loss cubes will be allocated asshown. Red and blue avoid taking any losspoints. Yellow has taken one loss point and sopays $10. Green has two from factories, plusthe one taken for the unsold car, making threein all. Green pays $30 to the bank.
Second turn: Green selects Fords, red selectsKettering, blue selects Howard, and yellowselects Chrysler.
11
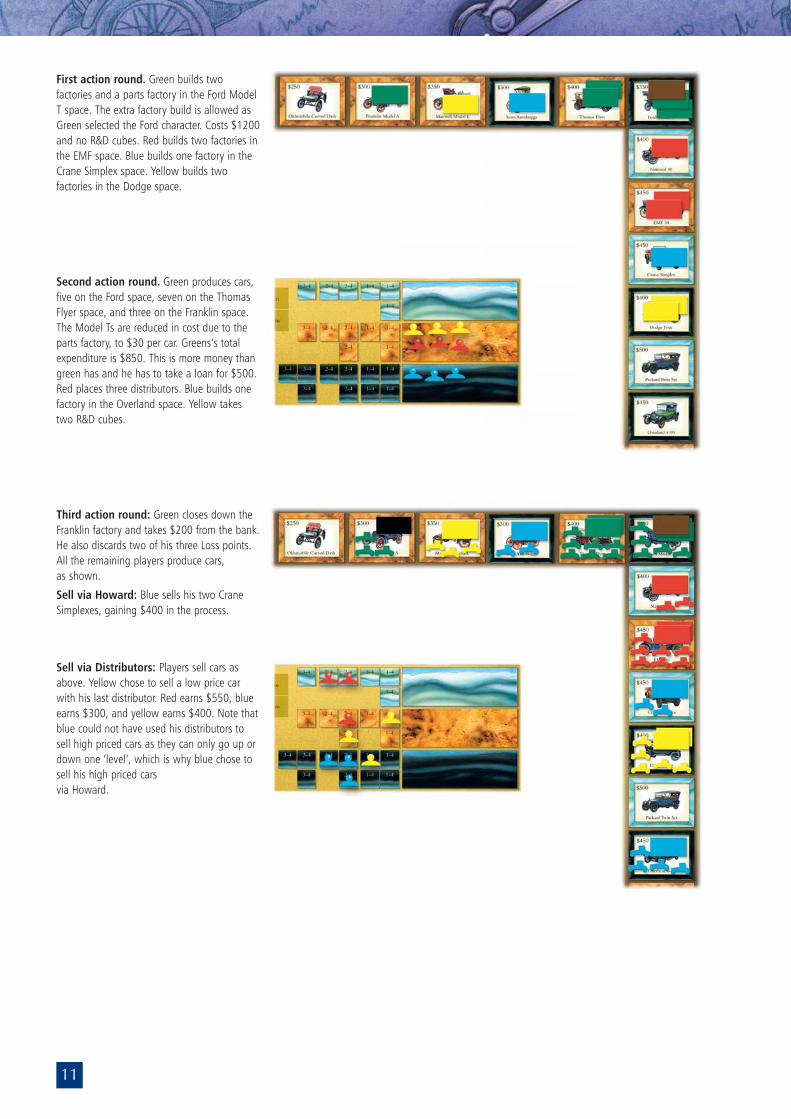
First action round. Green builds twofactories and a parts factory in the Ford ModelT space. The extra factory build is allowed asGreen selected the Ford character. Costs $1200and no R&D cubes. Red builds two factories inthe EMF space. Blue builds one factory in theCrane Simplex space. Yellow builds twofactories in the Dodge space.
Second action round. Green produces cars,five on the Ford space, seven on the ThomasFlyer space, and three on the Franklin space.The Model Ts are reduced in cost due to theparts factory, to $30 per car. Greens’s totalexpenditure is $850. This is more money thangreen has and he has to take a loan for $500.Red places three distributors. Blue builds onefactory in the Overland space. Yellow takestwo R&D cubes.
Third action round: Green closes down theFranklin factory and takes $200 from the bank.He also discards two of his three Loss points.All the remaining players produce cars, as shown.
Sell via Howard: Blue sells his two CraneSimplexes, gaining $400 in the process.
Sell via Distributors: Players sell cars asabove. Yellow chose to sell a low price carwith his last distributor. Red earns $550, blueearns $300, and yellow earns $400. Note thatblue could not have used his distributors tosell high priced cars as they can only go up ordown one ‘level’, which is why blue chose tosell his high priced cars via Howard.
12
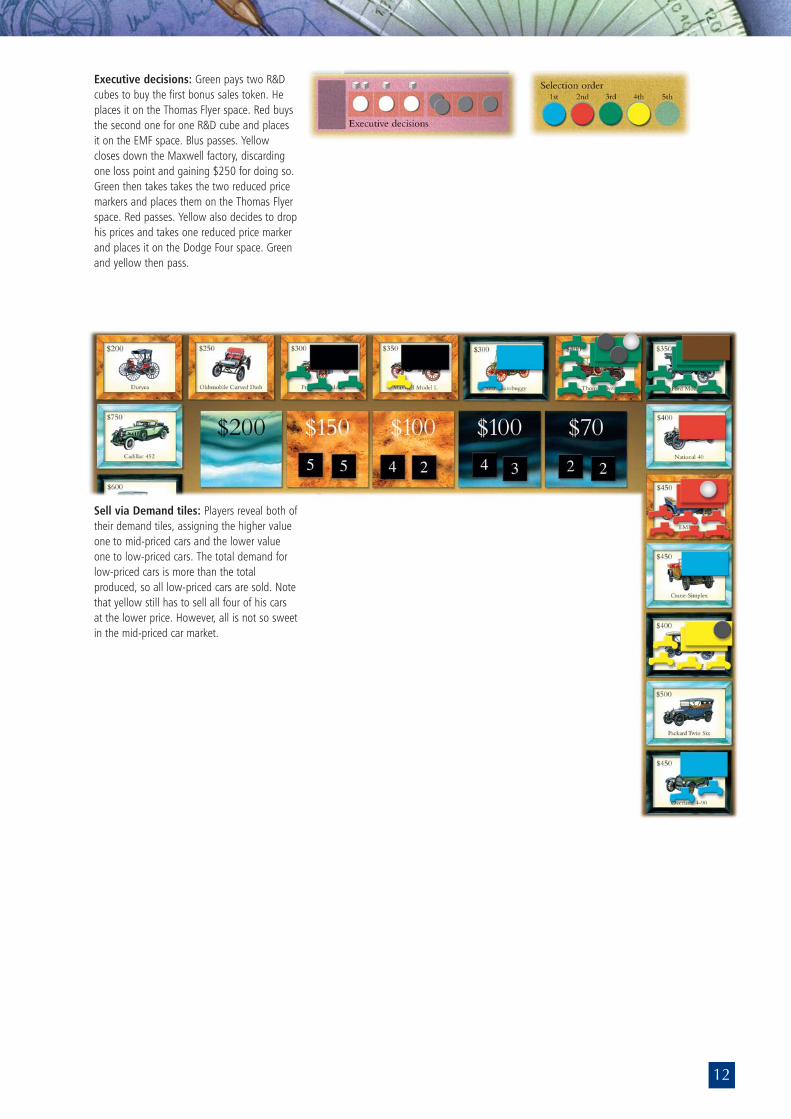
Executive decisions: Green pays two R&Dcubes to buy the first bonus sales token. Heplaces it on the Thomas Flyer space. Red buysthe second one for one R&D cube and placesit on the EMF space. Blus passes. Yellowcloses down the Maxwell factory, discardingone loss point and gaining $250 for doing so.Green then takes takes the two reduced pricemarkers and places them on the Thomas Flyerspace. Red passes. Yellow also decides to drophis prices and takes one reduced price markerand places it on the Dodge Four space. Greenand yellow then pass.
Sell via Demand tiles: Players reveal both oftheir demand tiles, assigning the higher valueone to mid-priced cars and the lower valueone to low-priced cars. The total demand forlow-priced cars is more than the totalproduced, so all low-priced cars are sold. Notethat yellow still has to sell all four of his carsat the lower price. However, all is not so sweetin the mid-priced car market.
13
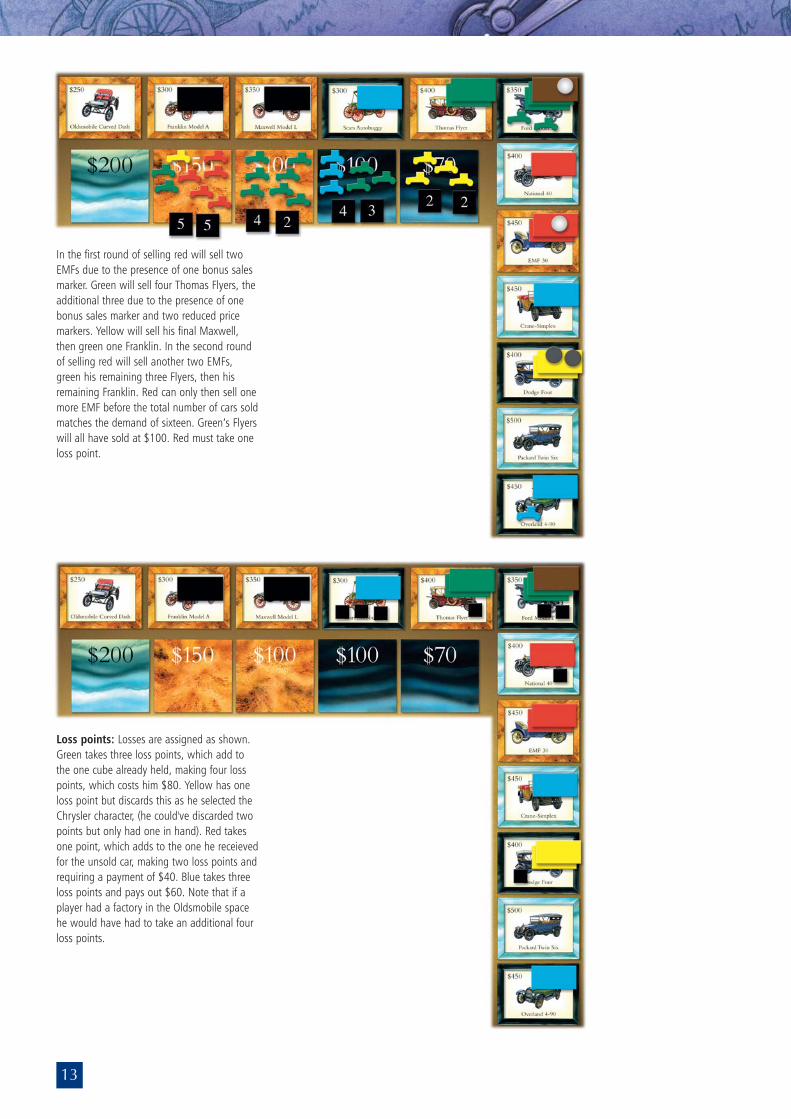
In the first round of selling red will sell twoEMFs due to the presence of one bonus salesmarker. Green will sell four Thomas Flyers, theadditional three due to the presence of onebonus sales marker and two reduced pricemarkers. Yellow will sell his final Maxwell,then green one Franklin. In the second roundof selling red will sell another two EMFs,green his remaining three Flyers, then hisremaining Franklin. Red can only then sell onemore EMF before the total number of cars soldmatches the demand of sixteen. Green’s Flyerswill all have sold at $100. Red must take oneloss point.
Loss points: Losses are assigned as shown.Green takes three loss points, which add tothe one cube already held, making four losspoints, which costs him $80. Yellow has oneloss point but discards this as he selected theChrysler character, (he could've discarded twopoints but only had one in hand). Red takesone point, which adds to the one he receievedfor the unsold car, making two loss points andrequiring a payment of $40. Blue takes threeloss points and pays out $60. Note that if aplayer had a factory in the Oldsmobile spacehe would have had to take an additional fourloss points.
14
I’m not sure to what degree serendipity is cited as a major contributorto any game design but it would have to get a major credit with thisone. To expand; I find that second-hand bookshops are a great place tosearch for new themes. By a series of events too complicated to recountI found myself in a bookshop in Sedburgh that had a lovely illustratedbook on aeroplanes. That set me thinking about doing a game loadedwith images of old aeroplanes. Having done that design, which may beproduced some day, I then settled on cars as the next logical theme tohandle in this manner. Fortunately this was just before a trip to Hay-on-Wye, which is the second-hand book capital of Britain, if not the world.Even the garage had books on sale, one of which had exactly the kindof illustrations I was looking for. I thought I would have to get PeterDennis to re-do these for the final game but a quick Google search toldme that the original artist was alive, still working, and lived abouttwenty minutes from my partner’s parents’ house in Cornwall. MikeAtkinson, the artist in question, kindly offered to reproduce the originalcar images for me, as well as extra art for the box cover.
Even the final production was improved by error. I thought I hadordered twenty four demand tiles for each game but then found that Ihad only asked for sixteen. For some reason this actually makes thegame work better than the original version, so a narrow escape there!
I’m also pleased at the way that the design has come together. Justhaving an interesting theme is no guarantee of a good design. It’ssurprisingly hard to find good books on the history of the car industry.You will see many with pretty pictures in but few that discuss the actualhistory. The particular setting for Automobile, in America, was selecteddue to the relative wealth of texts that covered the lives of the mainfigures, such as Ford and Chrysler. From the very first play test I couldsense that the game had potential. That’s pure chance. I’ve designedhundreds of games and the vast majority require a lot of work to turnthem into something that’s mildly enjoyable. Automobile was prettymuch developed in one long weekend at a games convention, Bayconto be specific.
As I have stated in other Treefrog games, I’m not going to bore youwith tips or strategies. The game is all about making money, you eitherhave the talent to do that or you’re a teacher.
Martin Wallace
Designer Notes
CreditsGame designed by Martin Wallace
Car illustrations and cover by Mike Atkinson, supplementary illustrations by Peter Dennis
Graphic design by Solid Colour
Playtested by a huge number of people, including Simon Bracegirdle, Andy Ogden, Richard Spilsbury, Geoff Brown, Don Oddy, Stewart Pilling, Jerry Elsmore, James Hamilton, Martin Hair, Chris Boote, Richard Dewsbury, Tony Simons, Chris Dearlove, Philip Honeybone and lots of people at Baycon,Sorcon, Leiria Con, and Stabcon.
Thanks to Mary and Ravindra Prasad, Henning Kröpke, Mik Svellov, Pete Card,and Larry Levy.
Special thanks to Julia Bryan.
You can check out the latest Warfrog games at: www.warfroggames.com
You can contact Warfrog at: [email protected]
The rules to ‘Automobile’ are © Martin Wallace 2008.
Car and cover illustrations © Mike Atkinson 2008.
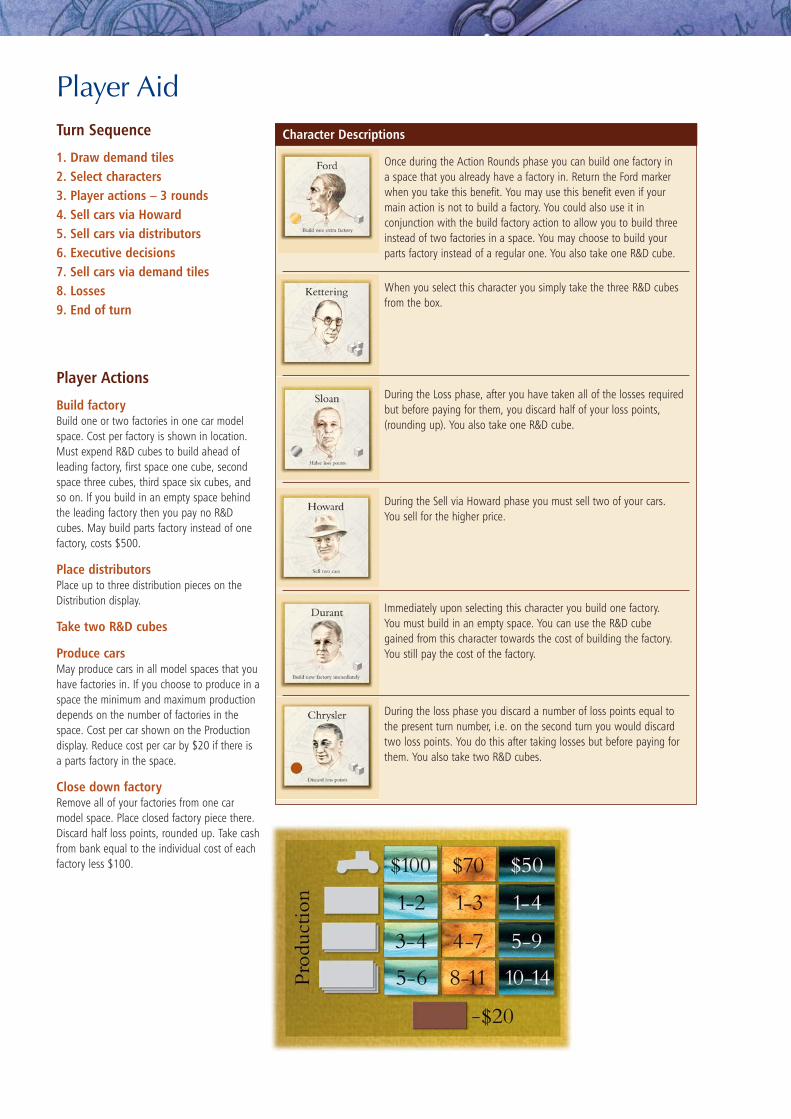
Player AidTurn Sequence
1. Draw demand tiles2. Select characters3. Player actions – 3 rounds4. Sell cars via Howard5. Sell cars via distributors6. Executive decisions7. Sell cars via demand tiles8. Losses9. End of turn
Once during the Action Rounds phase you can build one factory in a space that you already have a factory in. Return the Ford markerwhen you take this benefit. You may use this benefit even if yourmain action is not to build a factory. You could also use it inconjunction with the build factory action to allow you to build threeinstead of two factories in a space. You may choose to build yourparts factory instead of a regular one. You also take one R&D cube.
When you select this character you simply take the three R&D cubesfrom the box.
During the Loss phase, after you have taken all of the losses requiredbut before paying for them, you discard half of your loss points,(rounding up). You also take one R&D cube.
During the Sell via Howard phase you must sell two of your cars. You sell for the higher price.
Immediately upon selecting this character you build one factory. You must build in an empty space. You can use the R&D cube gained from this character towards the cost of building the factory.You still pay the cost of the factory.
During the loss phase you discard a number of loss points equal tothe present turn number, i.e. on the second turn you would discardtwo loss points. You do this after taking losses but before paying forthem. You also take two R&D cubes.
Player Actions
Build factoryBuild one or two factories in one car modelspace. Cost per factory is shown in location.Must expend R&D cubes to build ahead ofleading factory, first space one cube, secondspace three cubes, third space six cubes, andso on. If you build in an empty space behindthe leading factory then you pay no R&Dcubes. May build parts factory instead of onefactory, costs $500.
Place distributorsPlace up to three distribution pieces on theDistribution display.
Take two R&D cubes
Produce carsMay produce cars in all model spaces that youhave factories in. If you choose to produce in aspace the minimum and maximum productiondepends on the number of factories in thespace. Cost per car shown on the Productiondisplay. Reduce cost per car by $20 if there isa parts factory in the space.
Close down factoryRemove all of your factories from one carmodel space. Place closed factory piece there.Discard half loss points, rounded up. Take cashfrom bank equal to the individual cost of eachfactory less $100.
Character Descriptions