Embed Size (px)
Citation preview
Operation guide
Decurler Unit-C1

Copyright and TrademarksCopyright
Copyright 2016 Océ.
Illustrations and specifications do not necessarily apply to products and services offered in eachlocal market. No part of this publication may be reproduced, copied, adapted or transmitted,transcribed, stored in a retrieval system, or translated into any language or computer language inany form or by any means, electronic, mechanical, optical, chemical, manual, or otherwise,without the prior written permission of Océ.
OCÉ MAKES NO WARRANTY OF ANY KIND WITH REGARD TO THE CONTENTS OF THISPUBLICATION, EITHER EXPRESS OR IMPLIED, EXCEPT AS PROVIDED HEREIN, INCLUDINGWITHOUT LIMITATION, THEREOF, WARRANTIES AS TO MARKETABILITY, MERCHANTABILITY,FITNESS FOR A PARTICULAR PURPOSE OF USE OR NON-INFRINGEMENT. OCÉ SHALL NOT BELIABLE FOR ANY DIRECT, INCIDENTAL, OR CONSEQUENTIAL DAMAGES OF ANY NATURE, ORLOSSES OR EXPENSES RESULTING FROM THE USE OF THE CONTENTS OF THIS PUBLICATION.
Océ reserves the right to revise this publication and to make changes from time to time in thecontent hereof without obligation to notify any person of such revision or changes.
Trademarks
Océ, Océ PRISMA, Océ VarioPrint are registered trademarks of Océ-Technologies B.V. Océ is aCanon company.
All other trademarks are the property of their respective owners.
Edition 2016-12 US
Contents
Chapter 1Preface................................................................................................................................. 5
Notes for the reader......................................................................................................................................... 6Naming Conventions for Accessories (Generic Naming in User Interfaces).............................................. 8
Chapter 2Use the decurler..................................................................................................................9
Correct Curled Media via the Control Panel.................................................................................................10Correct Curled Media via the Settings Editor...............................................................................................12
Chapter 3Troubleshooting................................................................................................................13
Labels inside the Decurler............................................................................................................................. 14Clear a Paper Jam in the Decurler................................................................................................................ 15
Chapter 4Specifications.................................................................................................................... 17
Specifications..................................................................................................................................................18
Index...................................................................................................................................19
Contents
3Canon Decurler Unit-C1

Contents
4Canon Decurler Unit-C1

Chapter 1 Preface
Notes for the reader
Typography
This manual uses the following typography to indicate elements that are part of the userinterface.
Typography Indicates
[Text between square brackets] Name of a button, tile, setting, value, or otheroption of the user interface
< Text between angle brackets > Name of a key on a keyboard
Text displayed in courier font • File path• Command Prompt comment
[Text]→[displayed in]→[menucascade] Names of options to be used in a fixed order
Safety symbols
Before using this product, make sure you have read and understood the safety informationbelonging to the product. Find the safety information on http://downloads.oce.com. Also be sureto follow all warnings and instructions marked on the product.
This manual uses the following safety symbols to indicate hazards and precautions.
Symbol Type of symbol Indicates
WARNING Indicates a warning concerning operations that may lead todeath or injury to persons if not performed correctly. To usethe machine safely, always pay attention to these warnings.
CAUTION Indicates a caution concerning operations that may lead to in-jury to persons if not performed correctly. To use the ma-chine safely, always pay attention to these cautions.This indication can concern hazards that have a specific CAU-TION symbol. The 'hot surface', 'electric shock', 'movingparts' and 'laser beam' cautions are listed below.
CAUTION Hot surfaceIndicates a caution concerning operations that may lead to in-jury to persons if not performed correctly. To use the ma-chine safely, always pay attention to these cautions.
CAUTION Electric shockIndicates a caution concerning operations that may lead to in-jury to persons if not performed correctly. To use the ma-chine safely, always pay attention to these cautions.
CAUTION Moving partsIndicates a caution concerning operations that may lead to in-jury to persons if not performed correctly. To use the ma-chine safely, always pay attention to these cautions.
CAUTION Laser beamIndicates a caution concerning operations that may lead to in-jury to persons if not performed correctly. To use the ma-chine safely, always pay attention to these cautions. 4
Notes for the reader
6 Chapter 1 - PrefaceCanon Decurler Unit-C1
Symbol Type of symbol Indicates
IMPORTANT Indicates operational requirements and restrictions. Be sureto read these items carefully to operate the machine correctlyand to avoid damaging the machine or property.
NOTE Indicates a clarification of an operation or contains additionalexplanations for a procedure. Reading these notes is highlyrecommended.
Body protection symbols
This manual uses the following body protection symbols to indicate that it is important to protectyourself before performing a specific task or action.
Symbol Type of symbol Indicates
IMPORTANT Hand protectionWear the mentioned type of gloves when you perform thistask or action.
IMPORTANT Eye protectionUse the mentioned type of eye protection when you performthis task or action.
IMPORTANT Body protectionWear the mentioned type of body protection when you per-form this task or action.
IMPORTANT Foot protectionWear the mentioned type of safety footwear when you per-form this task or action.
Notes for the reader
Chapter 1 - Preface 7Canon Decurler Unit-C1
Naming Conventions for Accessories (Generic Namingin User Interfaces)
Generic Naming of Accessories in User Interfaces
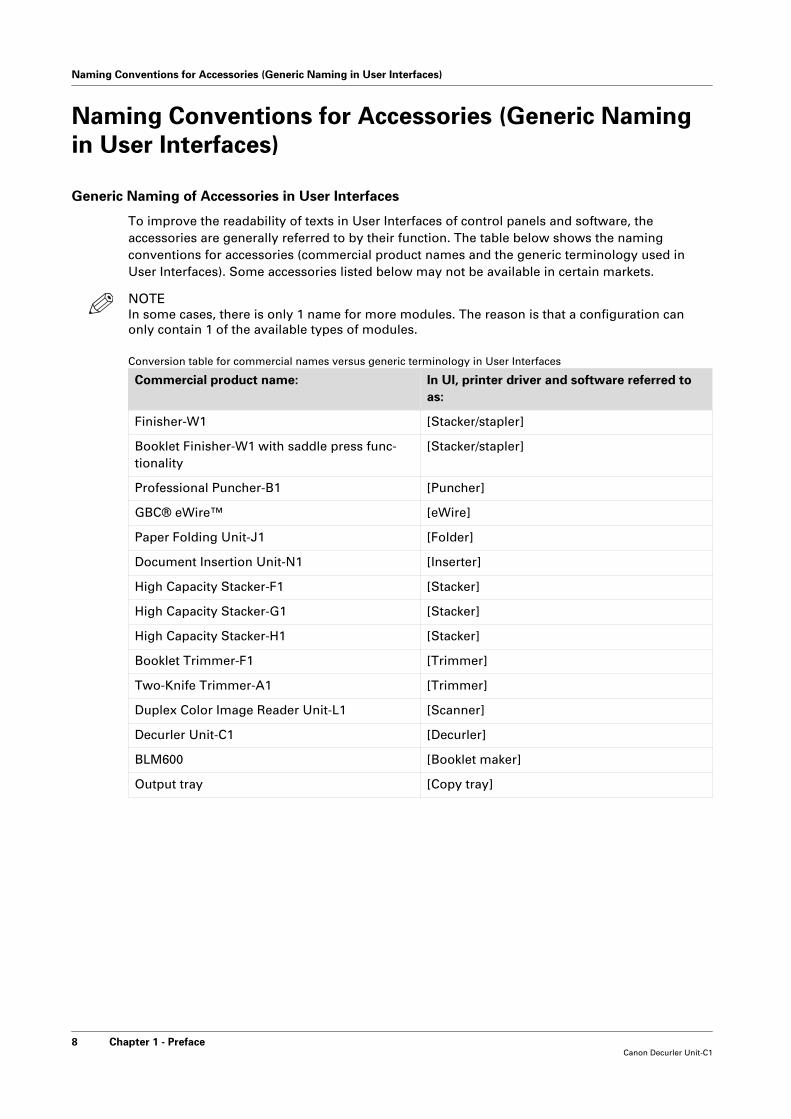
To improve the readability of texts in User Interfaces of control panels and software, theaccessories are generally referred to by their function. The table below shows the namingconventions for accessories (commercial product names and the generic terminology used inUser Interfaces). Some accessories listed below may not be available in certain markets.
NOTEIn some cases, there is only 1 name for more modules. The reason is that a configuration canonly contain 1 of the available types of modules.
Conversion table for commercial names versus generic terminology in User Interfaces
Commercial product name: In UI, printer driver and software referred toas:
Finisher-W1 [Stacker/stapler]
Booklet Finisher-W1 with saddle press func-tionality
[Stacker/stapler]
Professional Puncher-B1 [Puncher]
GBC® eWire™ [eWire]
Paper Folding Unit-J1 [Folder]
Document Insertion Unit-N1 [Inserter]
High Capacity Stacker-F1 [Stacker]
High Capacity Stacker-G1 [Stacker]
High Capacity Stacker-H1 [Stacker]
Booklet Trimmer-F1 [Trimmer]
Two-Knife Trimmer-A1 [Trimmer]
Duplex Color Image Reader Unit-L1 [Scanner]
Decurler Unit-C1 [Decurler]
BLM600 [Booklet maker]
Output tray [Copy tray]
Naming Conventions for Accessories (Generic Naming in User Interfaces)
8 Chapter 1 - PrefaceCanon Decurler Unit-C1

Chapter 2 Use the decurler
Correct Curled Media via the Control Panel
Introduction
This procedure describes how to correct curled media via the control panel. Make test prints onthe adjusted media to check the curl.
IMPORTANTYou are advised to make small increments to avoid paper jams.
NOTEYou can also correct curled media via the Settings Editor.
NOTEIf the curl correction values are different for LEF and SEF, you must create two media in themedia catalog. One media for LEF and another media for SEF.
NOTEYou can correct curled media while the system prints a job. The curl is corrected after a coupleof sheets.When you want to correct the curled media immediately:1. Stop the active job on sheet boundary.2. Correct the curled media.3. Resume the job.
The curl is corrected immediately after you resumed the job.
Procedure
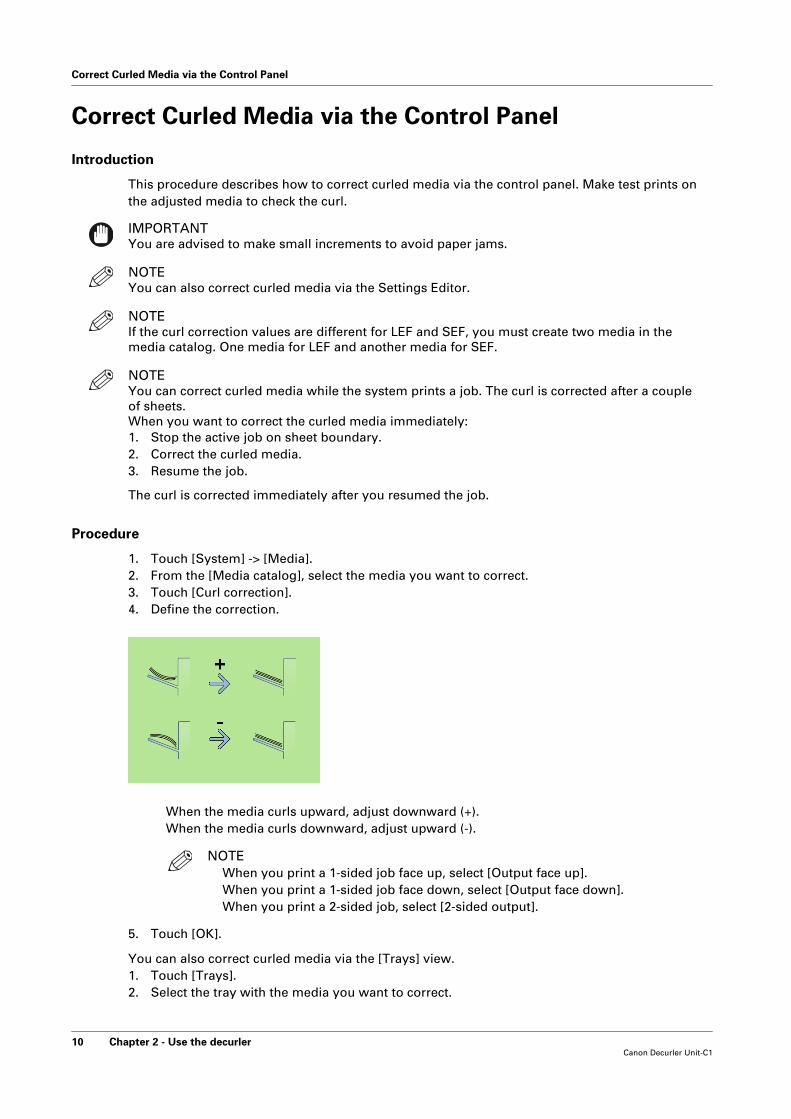
1. Touch [System] -> [Media].2. From the [Media catalog], select the media you want to correct.3. Touch [Curl correction].4. Define the correction.
When the media curls upward, adjust downward (+).When the media curls downward, adjust upward (-).
NOTEWhen you print a 1-sided job face up, select [Output face up].When you print a 1-sided job face down, select [Output face down].When you print a 2-sided job, select [2-sided output].
5. Touch [OK].
You can also correct curled media via the [Trays] view.1. Touch [Trays].2. Select the tray with the media you want to correct.
Correct Curled Media via the Control Panel
10 Chapter 2 - Use the decurlerCanon Decurler Unit-C1

3. Touch [Optimize] -> [Curl correction].4. Define the correction.
When the media curls upward, adjust downward (+).When the media curls downward, adjust upward (-).
NOTEWhen you print a 1-sided job face up, select [Output face up].When you print a 1-sided job face down, select [Output face down].When you print a 2-sided job, select [2-sided output].
5. Touch [OK].
Correct Curled Media via the Control Panel
Chapter 2 - Use the decurler 11Canon Decurler Unit-C1
Correct Curled Media via the Settings Editor
Introduction
This procedure describes how to correct curled media via the Settings Editor. Make test prints onthe adjusted media to check the curl.
IMPORTANTYou are advised to make small increments to avoid paper jams.
NOTEYou can also correct curled media via the control panel.
NOTEIf the curl correction values are different for LEF and SEF, you must create two media in themedia catalog. One media for LEF and another media for SEF.
Procedure
1. Access the Settings Editor.Open your web browser.In the address bar, enter the IP address or host name of the PRISMAsync controller.
2. Select [Media].3. In the [Media catalog], select the media you want to correct.4. Select [Registration].5. Define the correction in the section [Curl corrections].
When the media curls upward, adjust downward (+).When the media curls downward, adjust upward (-).
NOTEWhen you print a 1-sided job face up, select [Curl correction: output face up].When you print a 1-sided job face down, select [Curl correction: output facedown].When you print a 2-sided job, select [Curl correction: 2-sided output].
6. Press [OK].
Correct Curled Media via the Settings Editor
12 Chapter 2 - Use the decurlerCanon Decurler Unit-C1

Chapter 3 Troubleshooting
Labels inside the Decurler
Introduction
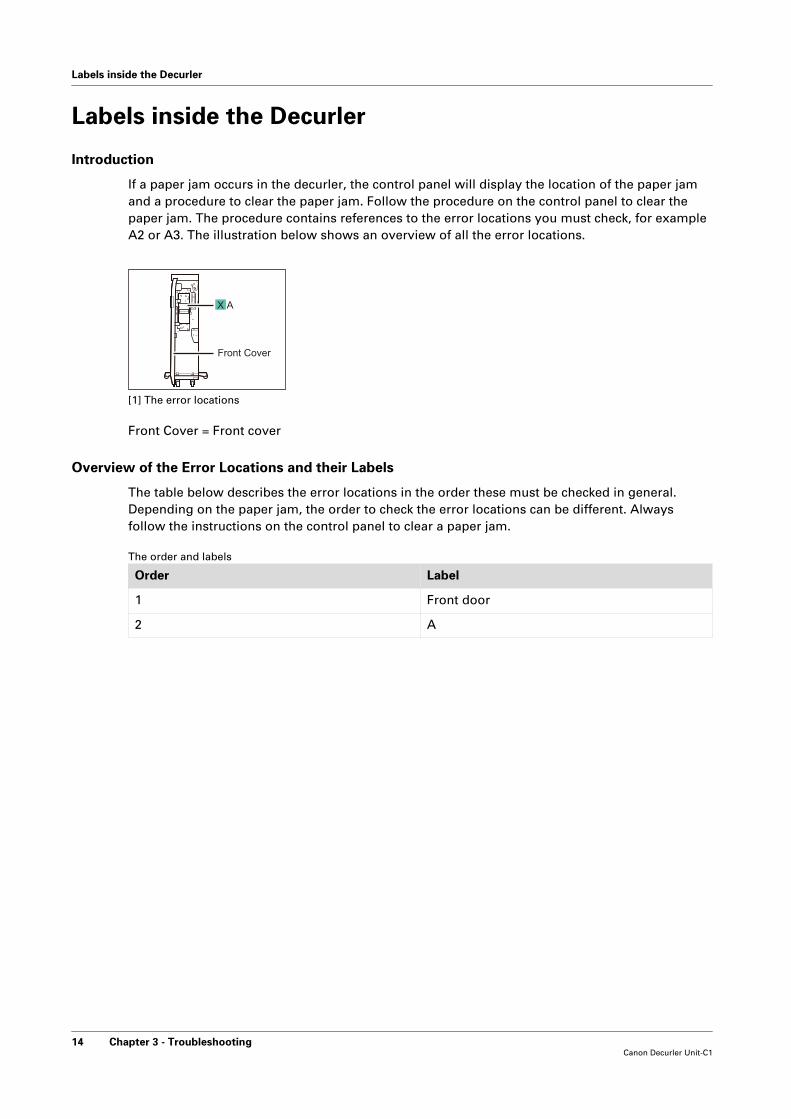
If a paper jam occurs in the decurler, the control panel will display the location of the paper jamand a procedure to clear the paper jam. Follow the procedure on the control panel to clear thepaper jam. The procedure contains references to the error locations you must check, for exampleA2 or A3. The illustration below shows an overview of all the error locations.
X A
Front Cover
[1] The error locations
Front Cover = Front cover
Overview of the Error Locations and their Labels
The table below describes the error locations in the order these must be checked in general.Depending on the paper jam, the order to check the error locations can be different. Alwaysfollow the instructions on the control panel to clear a paper jam.
The order and labels
Order Label
1 Front door
2 A
Labels inside the Decurler
14 Chapter 3 - TroubleshootingCanon Decurler Unit-C1
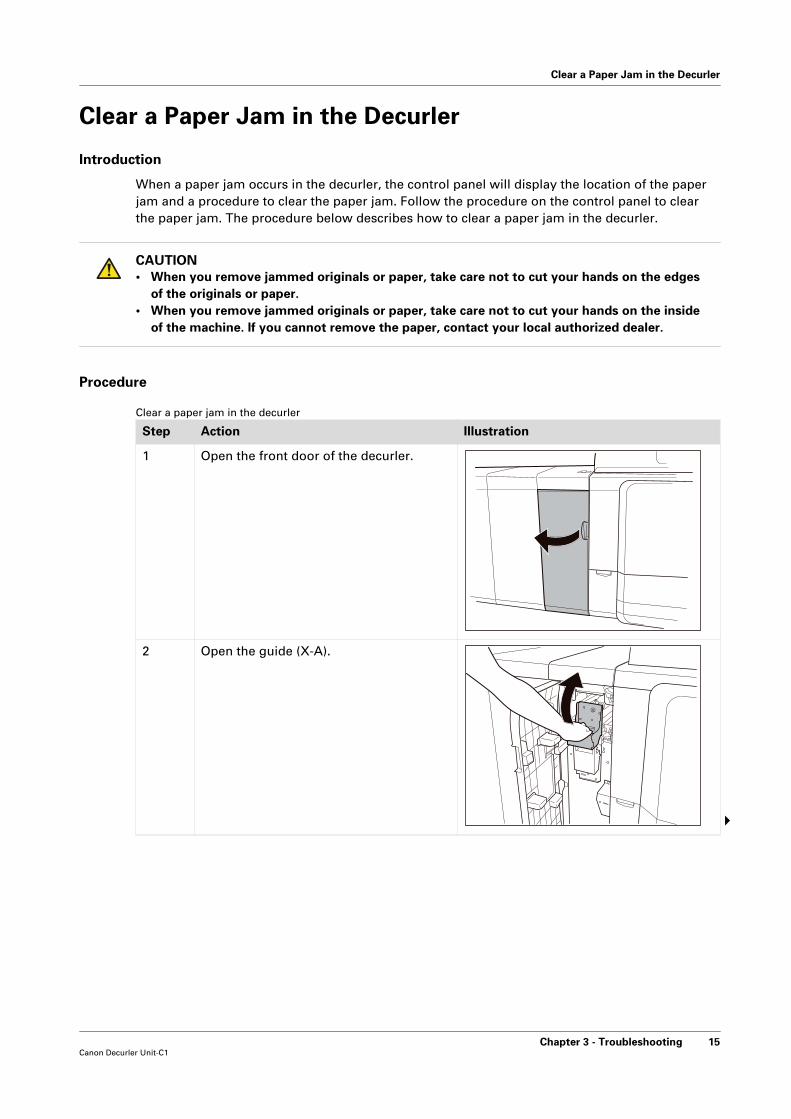
Clear a Paper Jam in the Decurler
Introduction
When a paper jam occurs in the decurler, the control panel will display the location of the paperjam and a procedure to clear the paper jam. Follow the procedure on the control panel to clearthe paper jam. The procedure below describes how to clear a paper jam in the decurler.
CAUTION• When you remove jammed originals or paper, take care not to cut your hands on the edges
of the originals or paper.• When you remove jammed originals or paper, take care not to cut your hands on the inside
of the machine. If you cannot remove the paper, contact your local authorized dealer.
Procedure
Clear a paper jam in the decurler
Step Action Illustration
1 Open the front door of the decurler.
2 Open the guide (X-A).
4
Clear a Paper Jam in the Decurler
Chapter 3 - Troubleshooting 15Canon Decurler Unit-C1
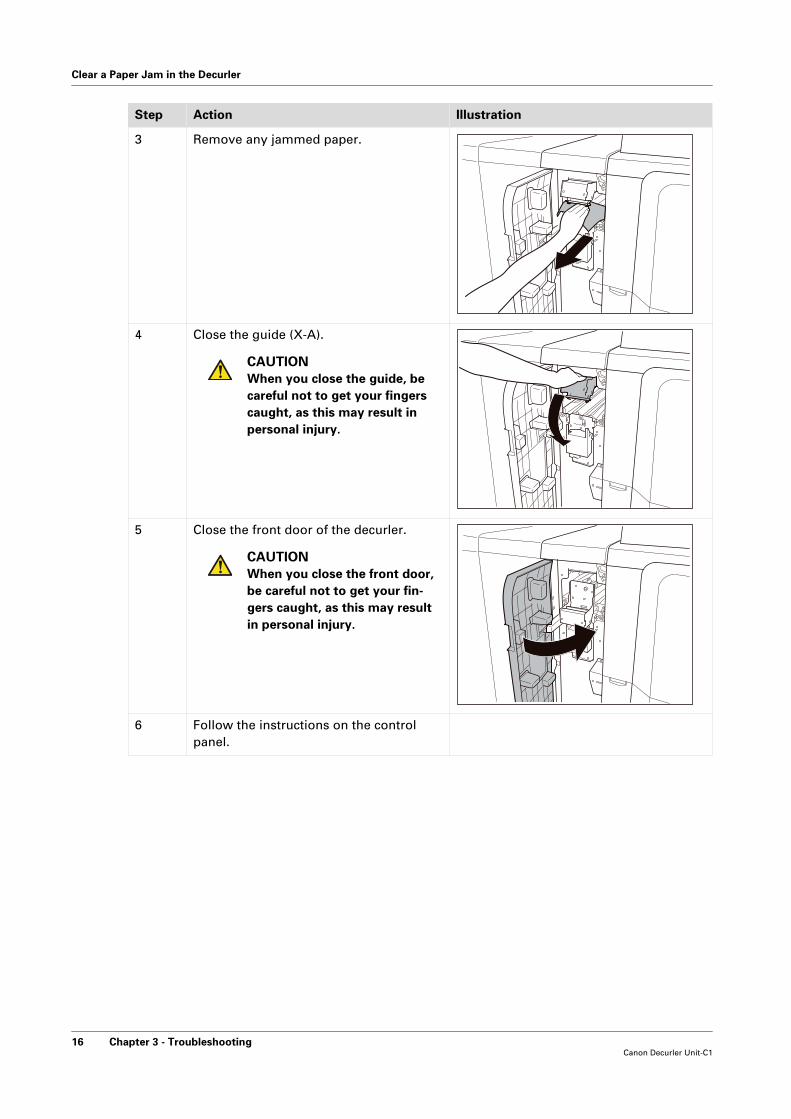
Step Action Illustration
3 Remove any jammed paper.
4 Close the guide (X-A).
CAUTIONWhen you close the guide, becareful not to get your fingerscaught, as this may result inpersonal injury.
5 Close the front door of the decurler.
CAUTIONWhen you close the front door,be careful not to get your fin‐gers caught, as this may resultin personal injury.
6 Follow the instructions on the controlpanel.
Clear a Paper Jam in the Decurler
16 Chapter 3 - TroubleshootingCanon Decurler Unit-C1

Chapter 4 Specifications

Specifications
Decurler Unit-C1
Item Specification
Description Fixes paper curl caused by heat etc.
Supported media sizes • Maximum: 320.2 mm x 487.7 mm (13" x 19.2")• Minimum: 140 mm x 182 mm (5.5" x 7.2")
Supported media weights 50 - 300 g/m² (14 lb bond - 110 lb cover)
Dimensions (HxWxD) 1,040 mm x 250 mm x 792 mm (40.9" x 9.8" x 31.2")
Weight 48 kg (105.8 lb)
Power source The power is supplied via the print engine.
Specifications
18 Chapter 4 - SpecificationsCanon Decurler Unit-C1

Index
A
AccessoriesCommercial naming.......................................... 8Generic naming..................................................8
C
ComponentsCommercial names............................................8
Conversion table for commercial names and userinterface names........................................................ 8Curled media
Control panel....................................................10Settings Editor..................................................12
E
Error locations........................................................ 14
G
Generic naming in User Interfaces......................... 8Generic naming of accessories............................... 8
L
Labels of error locations........................................ 14
M
MediaCurled..........................................................10, 12
Media catalogCurled media.................................................... 10
N
Naming of accessories.............................................8
S
Specifications..........................................................18
T
Trays viewCurled media.................................................... 10
Index
19Canon Decurler Unit-C1

Index
20Canon Decurler Unit-C1

CANON INC.30-2, Shimomaruko 3-chome, Ohta-ku, Tokyo 146-8501, Japan
CANON U.S.A., INC.One Canon Park, Melville, NY 11747, U.S.A.
CANON CANADA INC.8000 Mississauga Road Brampton, ON L6Y 5Z7, Canada
CANON EUROPA N.V.Bovenkerkerweg 59, 1185 XB Amstelveen, The Netherlands
CANON AUSTRALIA PTY. LTDBuilding A, The Park Estate, 5 Talavera Road, Macquarie Park, NSW 2113, Australia
CANON CHINA CO., LTD2F Jinbao Building No.89 Jinbao Street, Dongcheng District, Beijing 100005, China
CANON SINGAPORE PTE. LTD1 Fusionopolis Place, #15-10, Galaxis, Singapore 138522
USRM2-8386-00 © CANON INC. 2016