Embed Size (px)
Citation preview
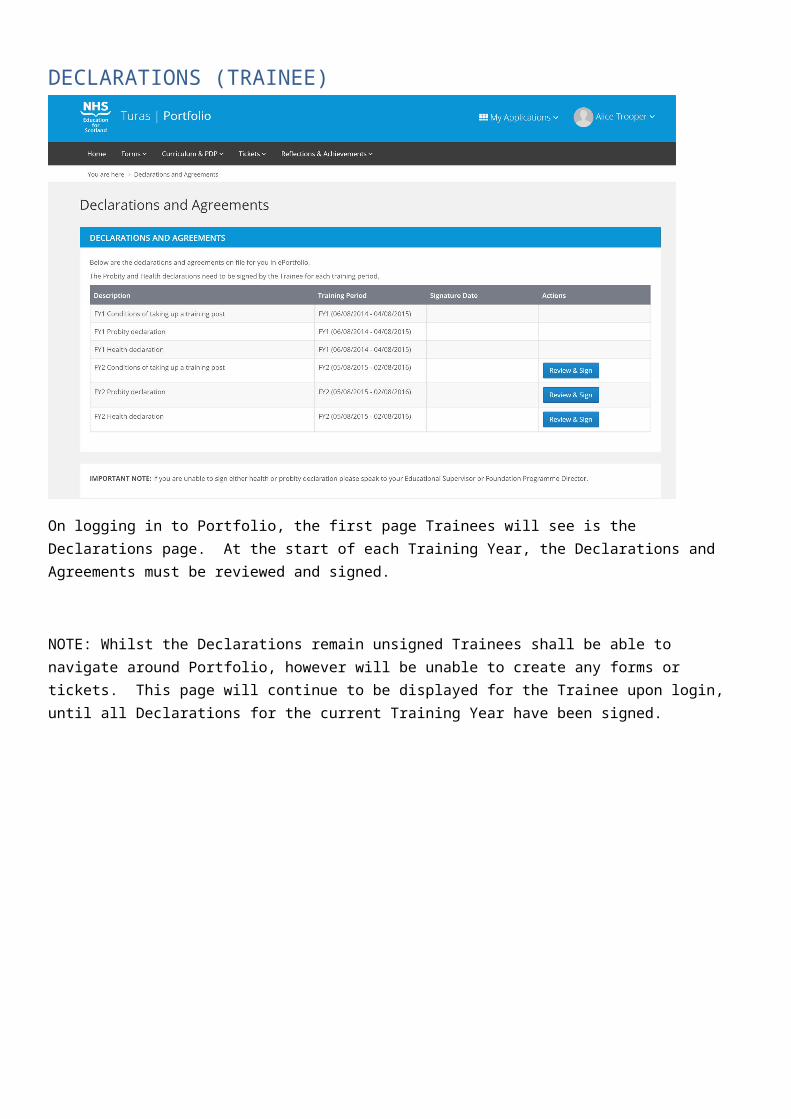
DECLARATIONS (TRAINEE)
On logging in to Portfolio, the first page Trainees will see is the Declarations page. At the start of each Training Year, the Declarations and Agreements must be reviewed and signed.
NOTE: Whilst the Declarations remain unsigned Trainees shall be able to navigate around Portfolio, however will be unable to create any forms or tickets. This page will continue to be displayed for the Trainee upon login, until all Declarations for the current Training Year have been signed.
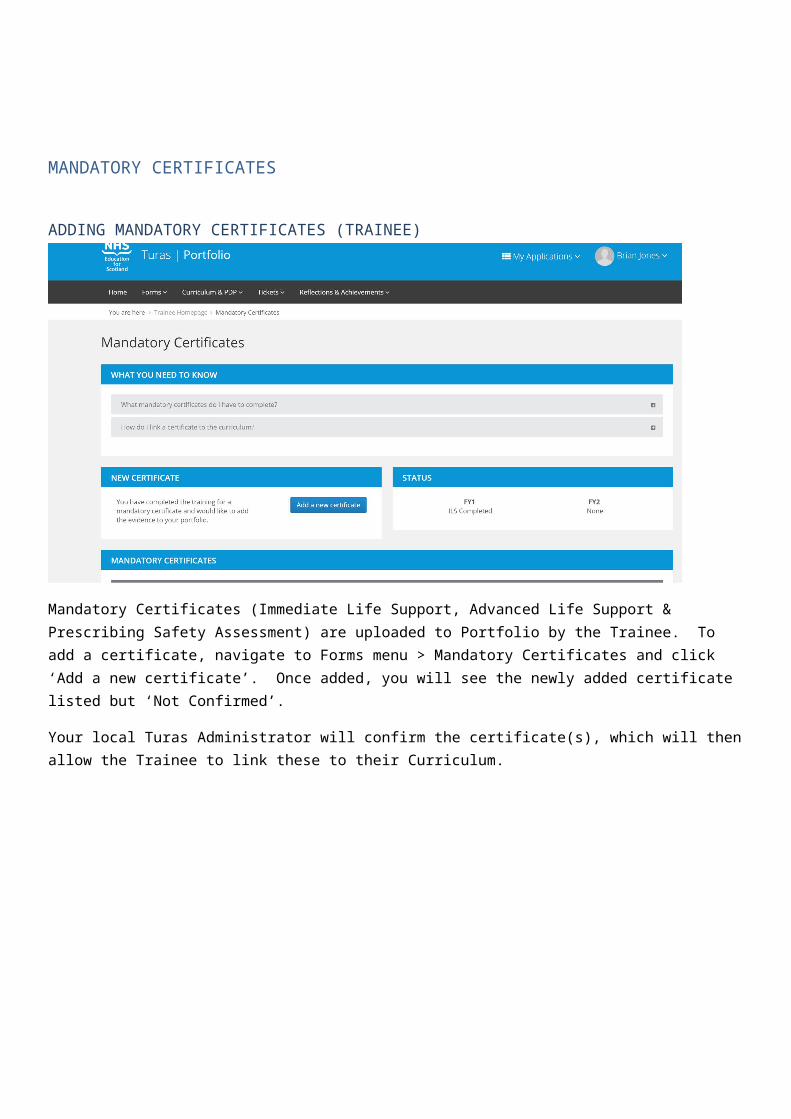
MANDATORY CERTIFICATES
ADDING MANDATORY CERTIFICATES (TRAINEE)
Mandatory Certificates (Immediate Life Support, Advanced Life Support & Prescribing Safety Assessment) are uploaded to Portfolio by the Trainee. To add a certificate, navigate to Forms menu > Mandatory Certificates and click ‘Add a new certificate’. Once added, you will see the newly added certificate listed but ‘Not Confirmed’.
Your local Turas Administrator will confirm the certificate(s), which will then allow the Trainee to link these to their Curriculum.
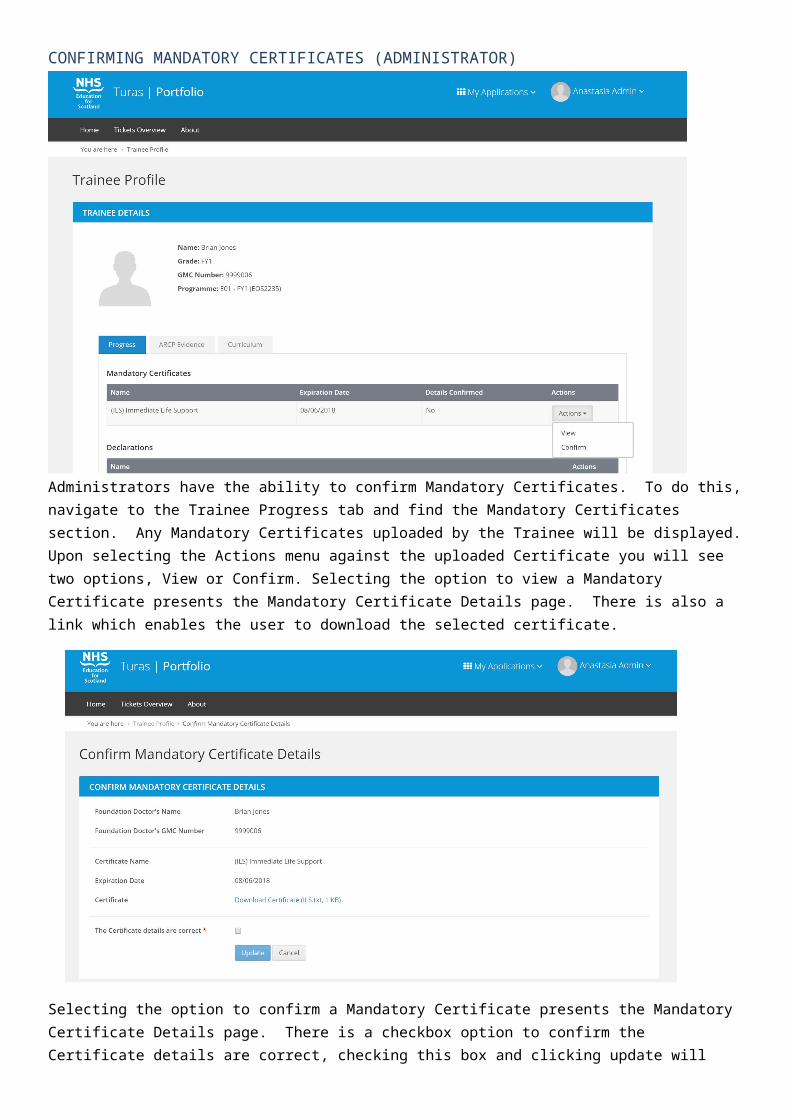
CONFIRMING MANDATORY CERTIFICATES (ADMINISTRATOR)
Administrators have the ability to confirm Mandatory Certificates. To do this, navigate to the Trainee Progress tab and find the Mandatory Certificates section. Any Mandatory Certificates uploaded by the Trainee will be displayed. Upon selecting the Actions menu against the uploaded Certificate you will see two options, View or Confirm. Selecting the option to view a Mandatory Certificate presents the Mandatory Certificate Details page. There is also a link which enables the user to download the selected certificate.
Selecting the option to confirm a Mandatory Certificate presents the Mandatory Certificate Details page. There is a checkbox option to confirm the Certificate details are correct, checking this box and clicking update will update the status of the certificate to ‘Confirmed’ and return the user to the Trainee Profile page. The Trainee can now link the confirmed certificate to their Curriculum.
INITIAL MEETING WITH SUPERVISOR
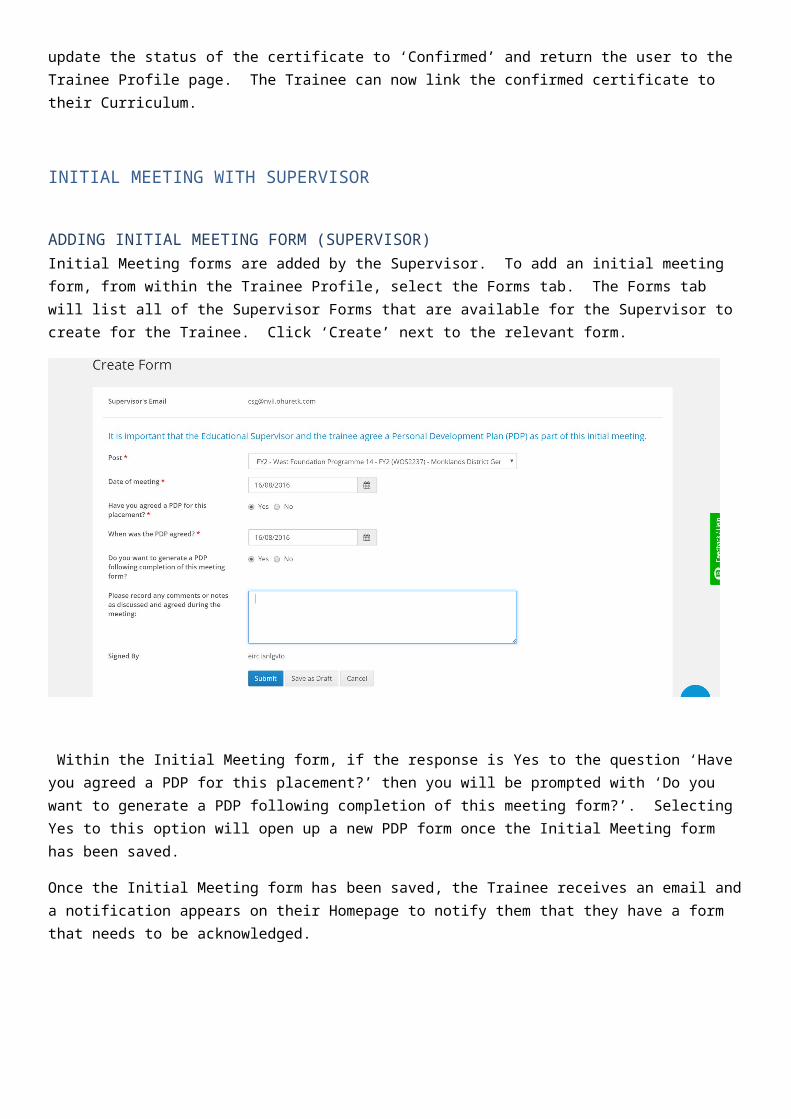
ADDING INITIAL MEETING FORM (SUPERVISOR)Initial Meeting forms are added by the Supervisor. To add an initial meeting form, from within the Trainee Profile, select the Forms tab. The Forms tab will list all of the Supervisor Forms that are available for the Supervisor to create for the Trainee. Click ‘Create’ next to the relevant form.
Within the Initial Meeting form, if the response is Yes to the question ‘Have you agreed a PDP for this placement?’ then you will be prompted with ‘Do you want to generate a PDP following completion of this meeting form?’. Selecting Yes to this option will open up a new PDP form once the Initial Meeting form has been saved.
Once the Initial Meeting form has been saved, the Trainee receives an email and a notification appears on their Homepage to notify them that they have a form that needs to be acknowledged.
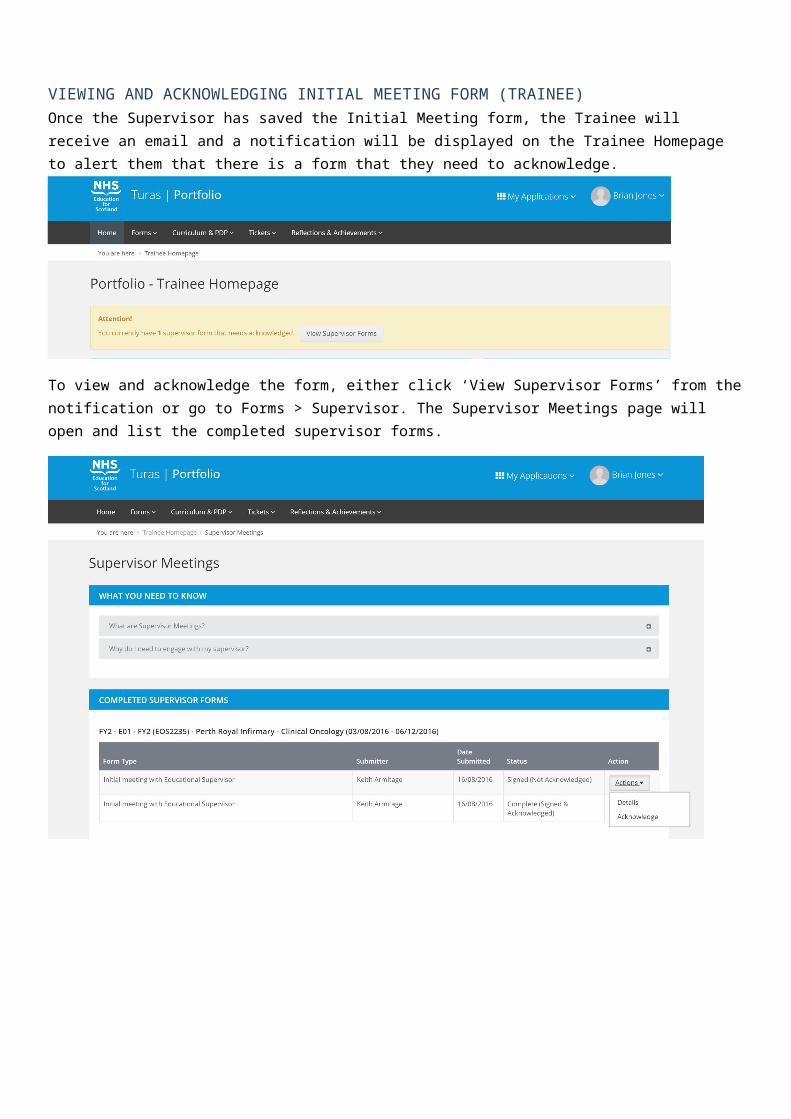
VIEWING AND ACKNOWLEDGING INITIAL MEETING FORM (TRAINEE)Once the Supervisor has saved the Initial Meeting form, the Trainee will receive an email and a notification will be displayed on the Trainee Homepage to alert them that there is a form that they need to acknowledge.
To view and acknowledge the form, either click ‘View Supervisor Forms’ from the notification or go to Forms > Supervisor. The Supervisor Meetings page will open and list the completed supervisor forms.
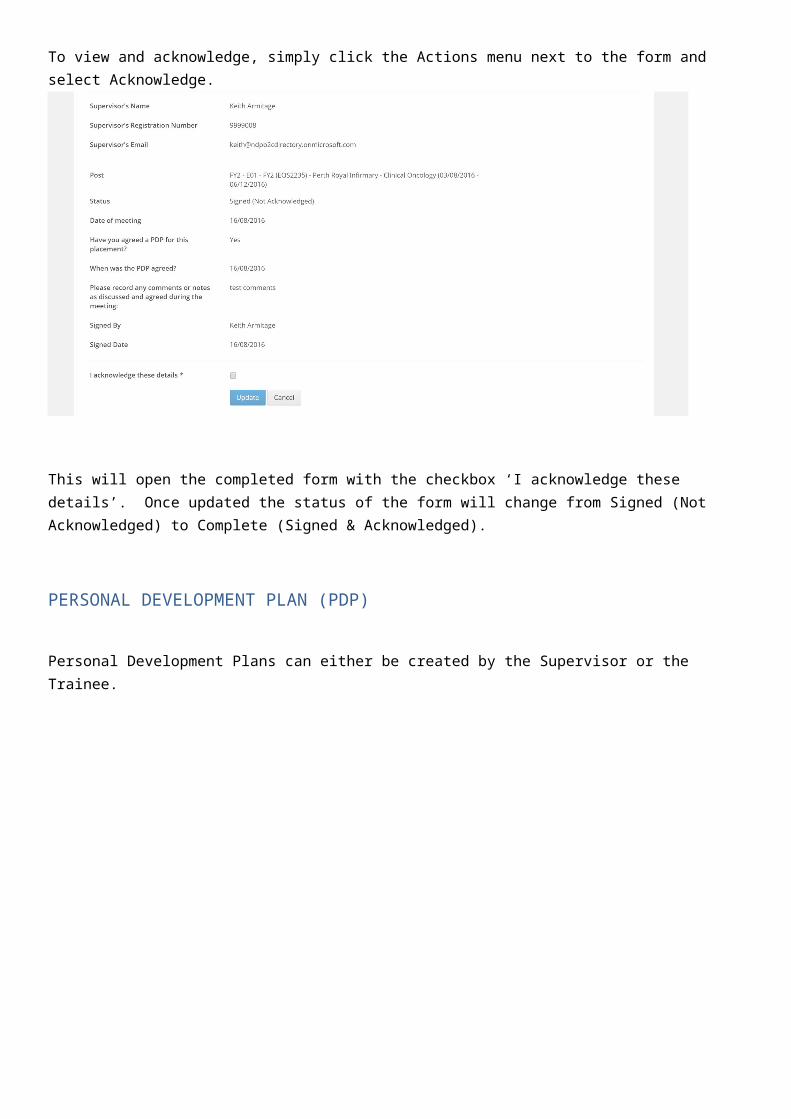
To view and acknowledge, simply click the Actions menu next to the form and select Acknowledge.
This will open the completed form with the checkbox ‘I acknowledge these details’. Once updated the status of the form will change from Signed (Not Acknowledged) to Complete (Signed & Acknowledged).
PERSONAL DEVELOPMENT PLAN (PDP)
Personal Development Plans can either be created by the Supervisor or the Trainee.
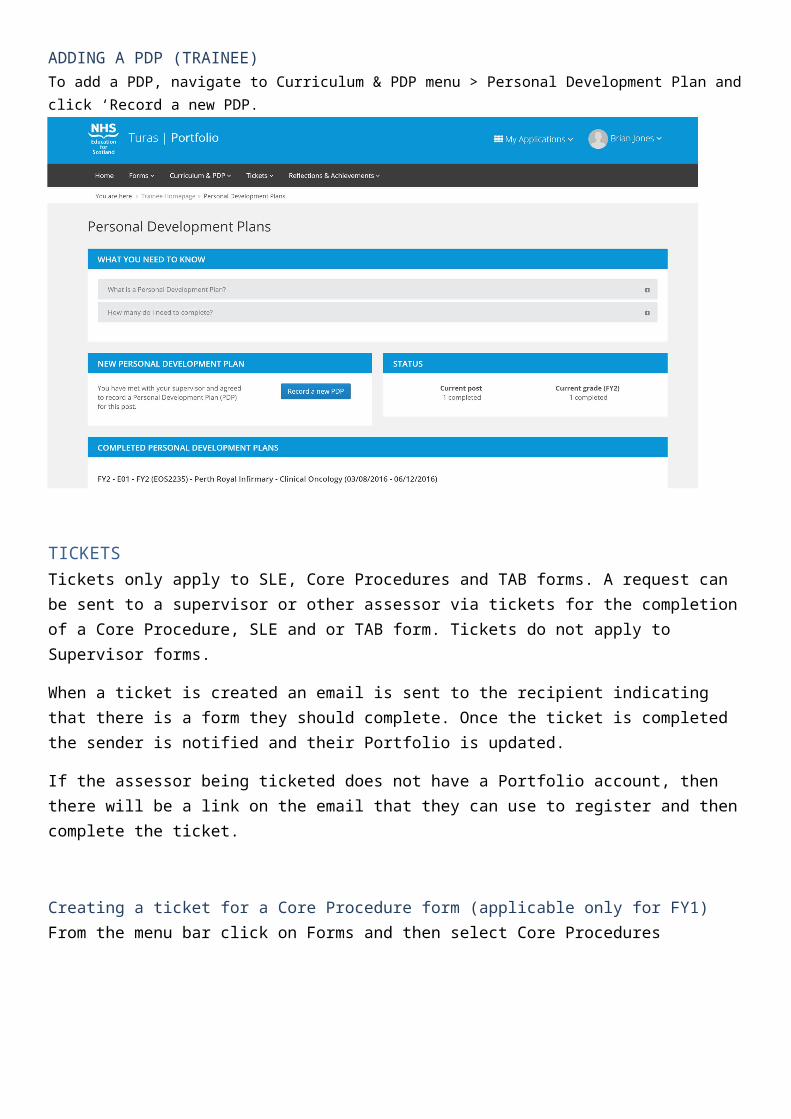
ADDING A PDP (TRAINEE)To add a PDP, navigate to Curriculum & PDP menu > Personal Development Plan and click ‘Record a new PDP.
TICKETSTickets only apply to SLE, Core Procedures and TAB forms. A request can be sent to a supervisor or other assessor via tickets for the completion of a Core Procedure, SLE and or TAB form. Tickets do not apply to Supervisor forms.
When a ticket is created an email is sent to the recipient indicating that there is a form they should complete. Once the ticket is completed the sender is notified and their Portfolio is updated.
If the assessor being ticketed does not have a Portfolio account, then there will be a link on the email that they can use to register and then complete the ticket.
Creating a ticket for a Core Procedure form (applicable only for FY1)From the menu bar click on Forms and then select Core Procedures
Under the Record New Procedure section click the word ‘Ticket’ in the No option.
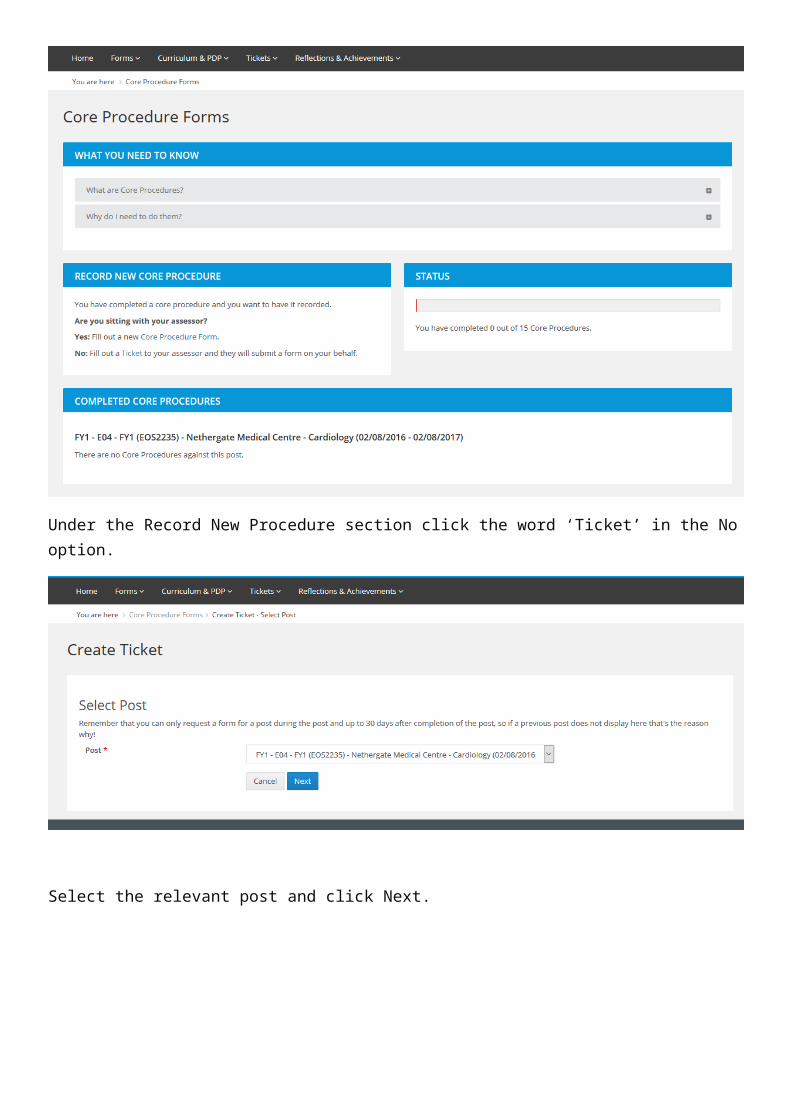
Select the relevant post and click Next.
Select the Core Procedures that you want to ticket and click Next.
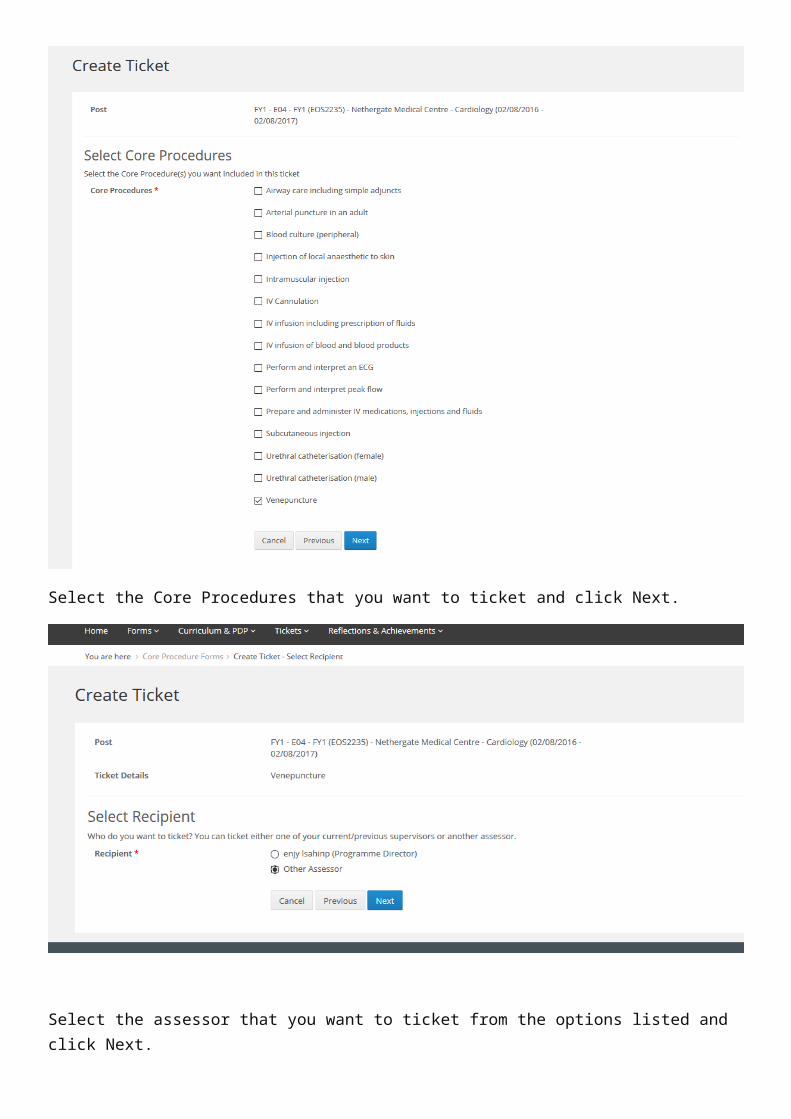
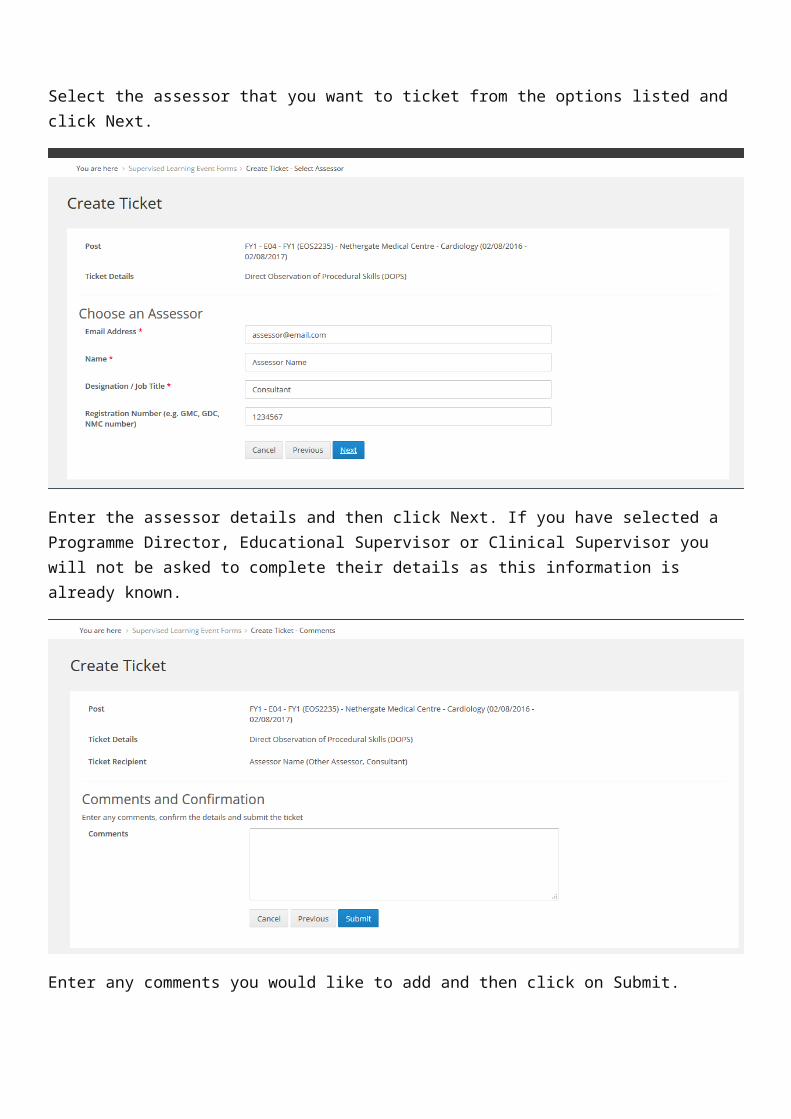
Select the assessor that you want to ticket from the options listed and click Next.
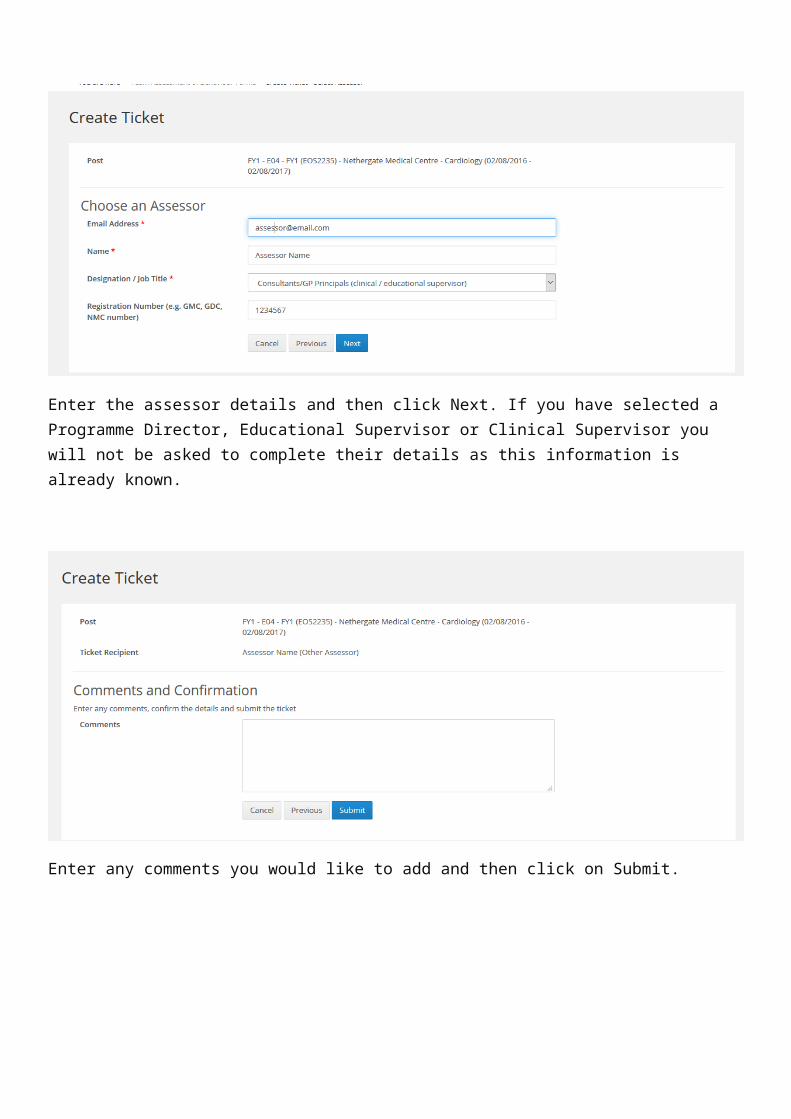
Enter the assessor details and then click Next. If you have selected a Programme Director, Educational Supervisor or Clinical Supervisor you will not be asked to complete their details as this information is already known.
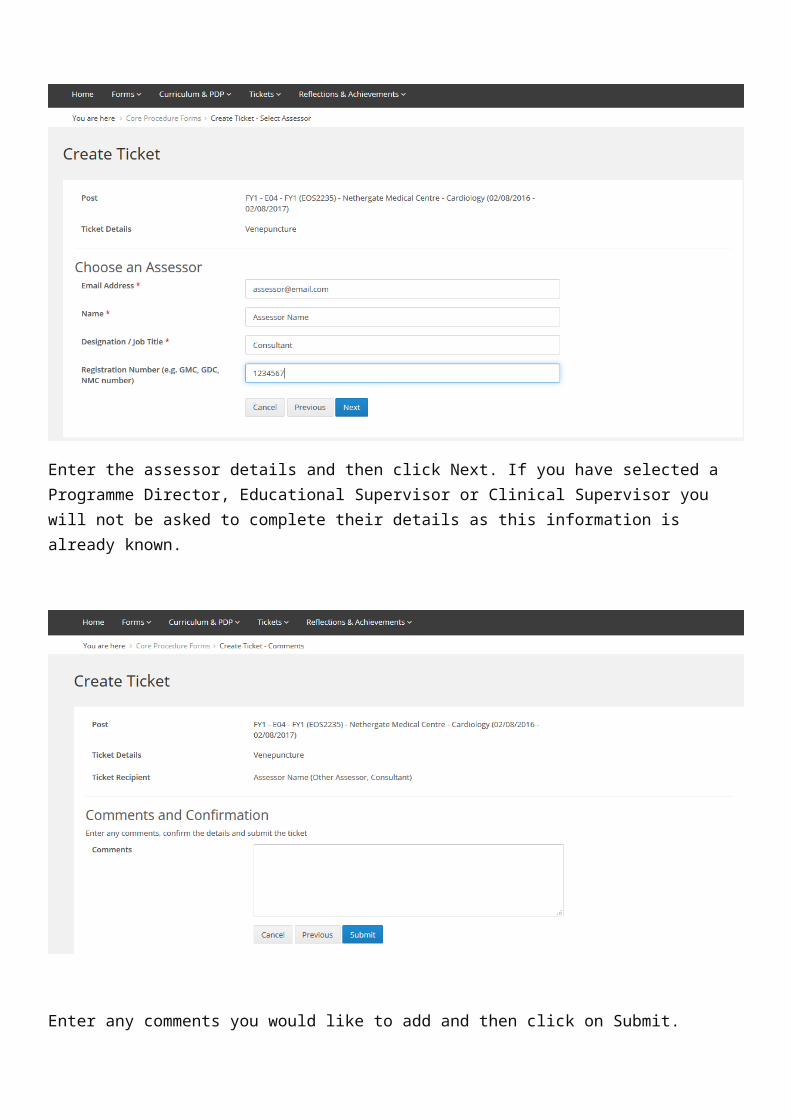
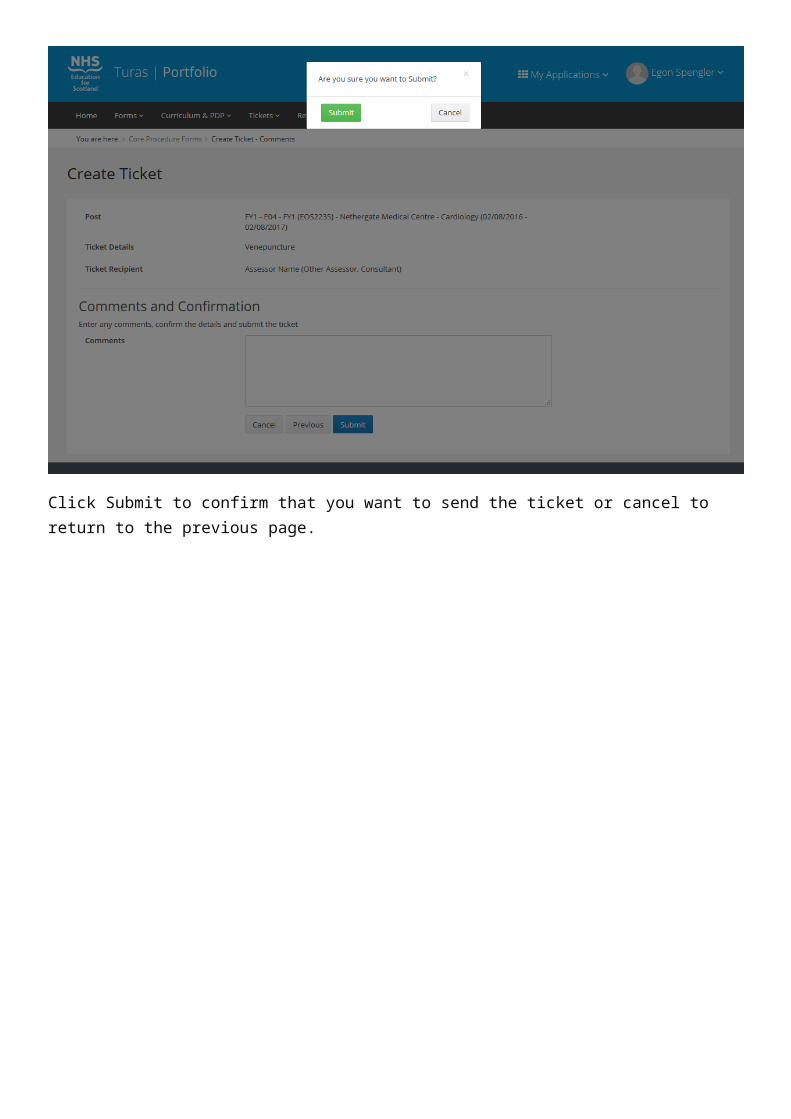
Enter any comments you would like to add and then click on Submit.
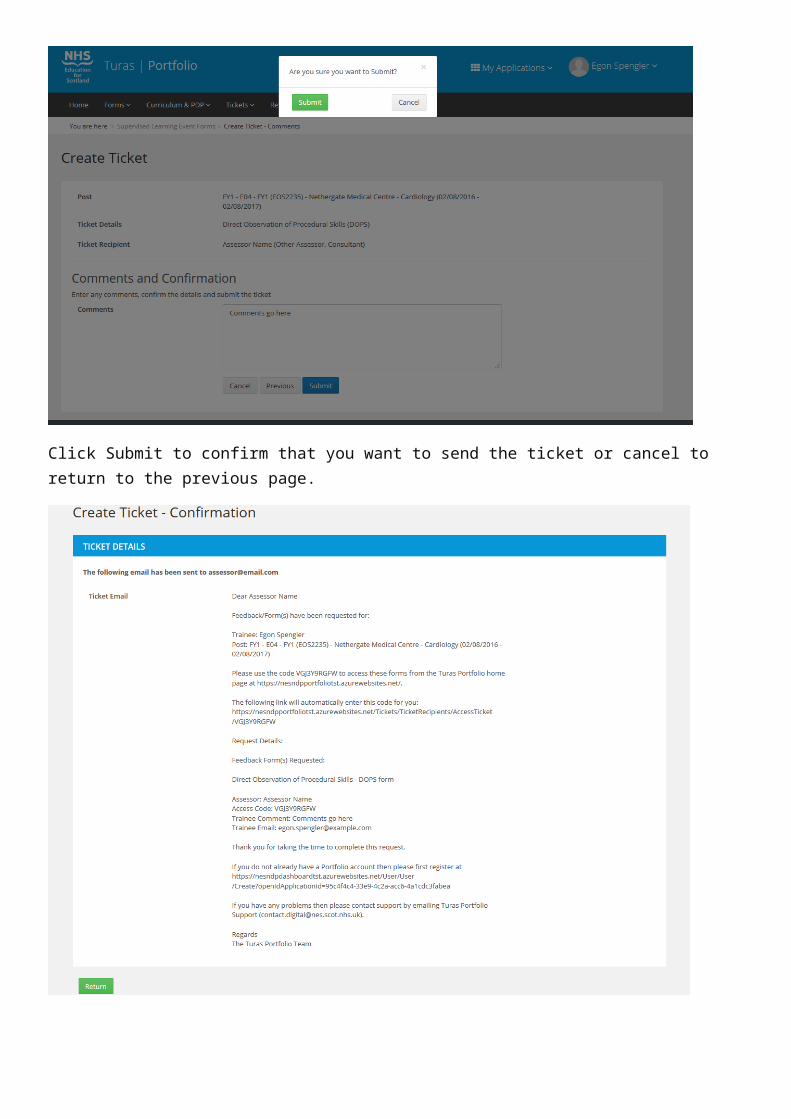
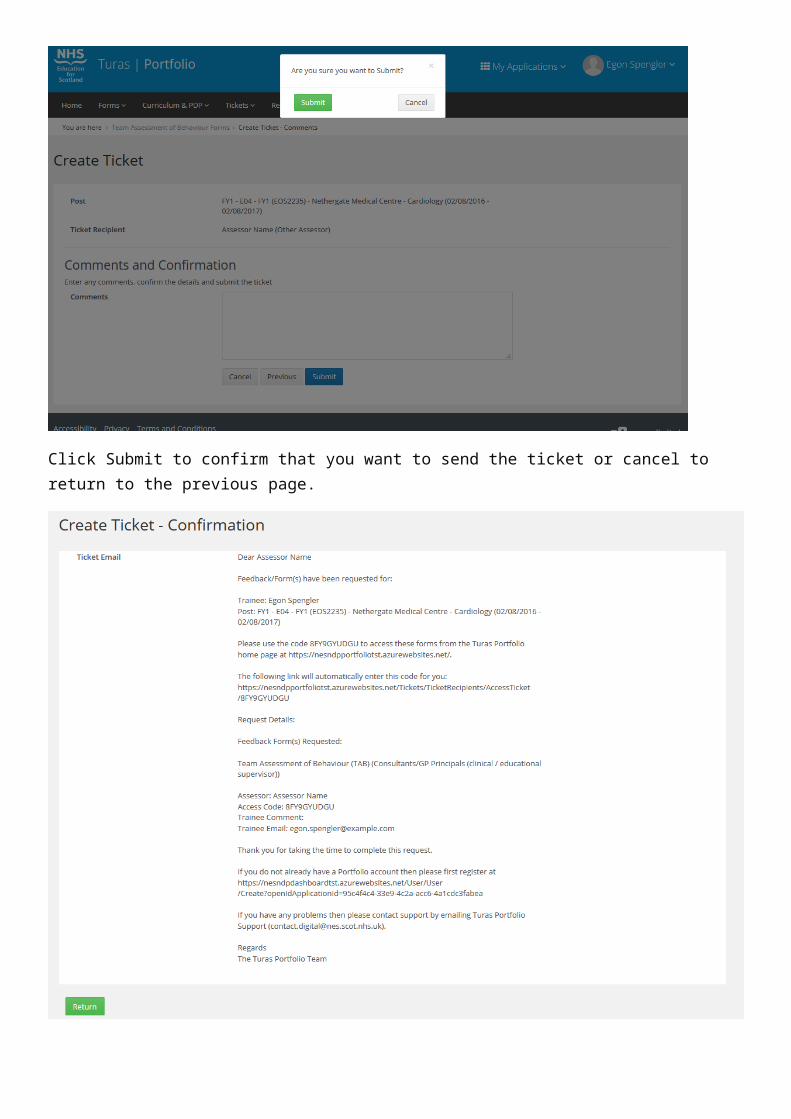
Click Submit to confirm that you want to send the ticket or cancel to return to the previous page.
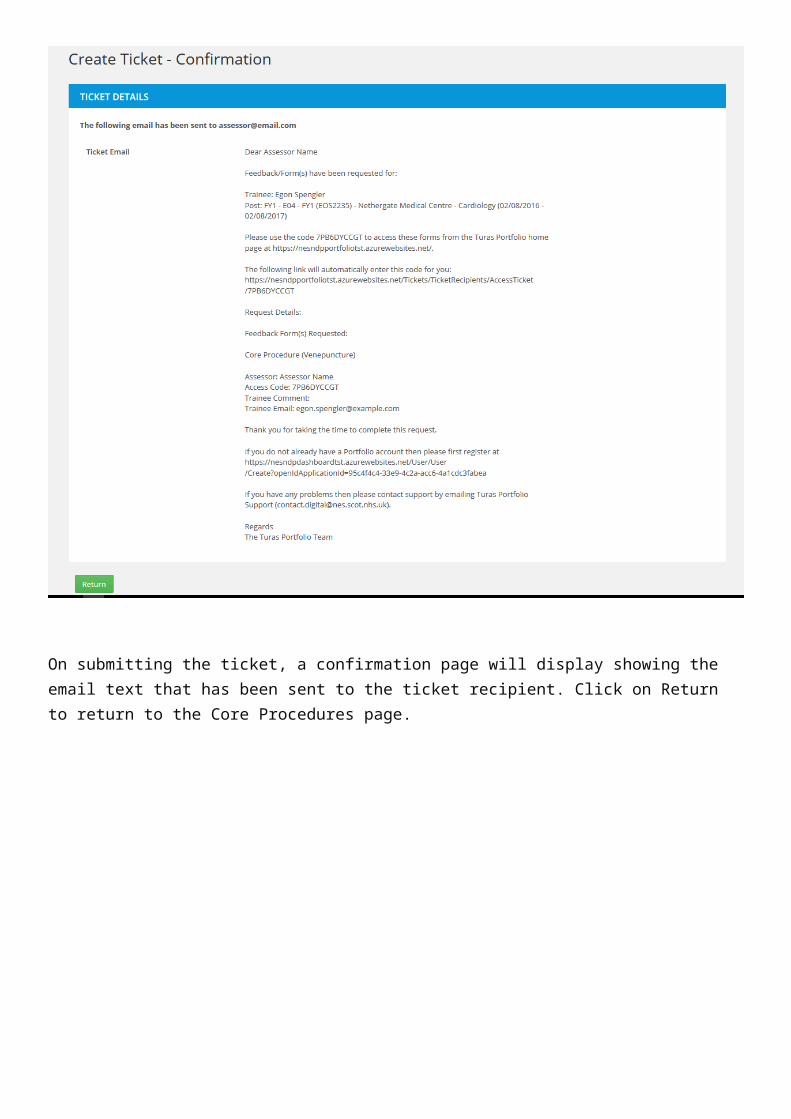
On submitting the ticket, a confirmation page will display showing the email text that has been sent to the ticket recipient. Click on Return to return to the Core Procedures page.
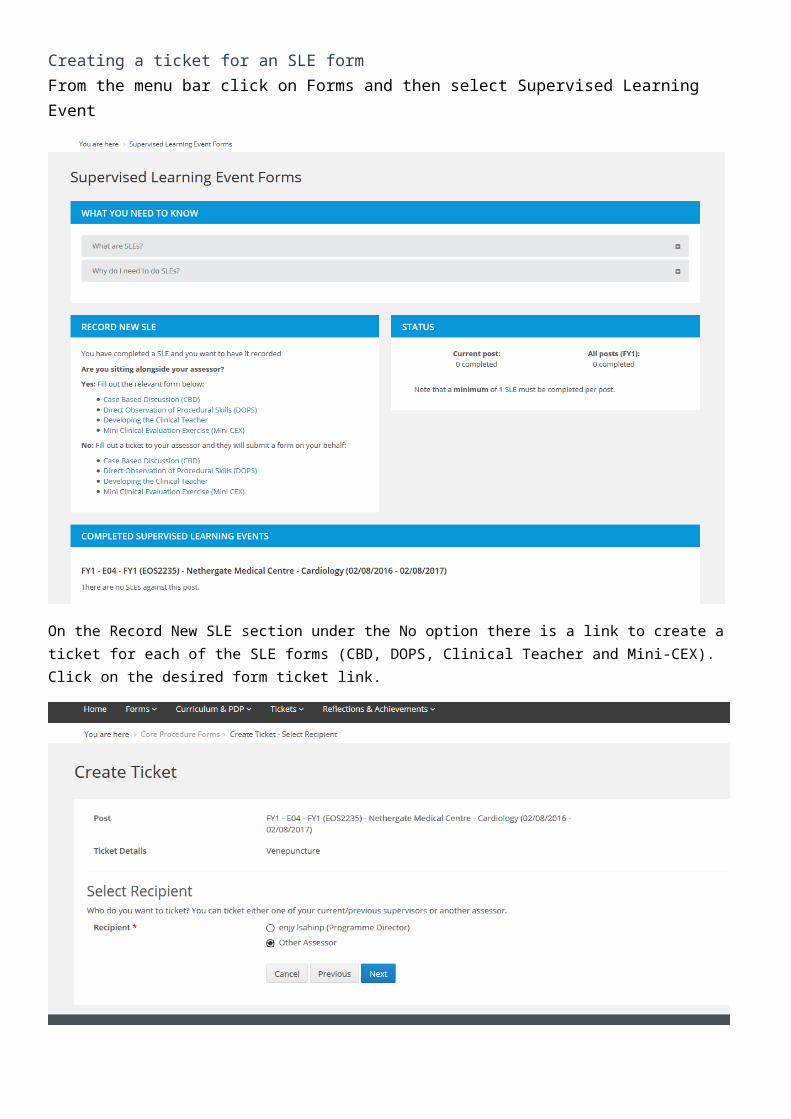
Creating a ticket for an SLE formFrom the menu bar click on Forms and then select Supervised Learning Event
On the Record New SLE section under the No option there is a link to create a ticket for each of the SLE forms (CBD, DOPS, Clinical Teacher and Mini-CEX). Click on the desired form ticket link.
Select the relevant post and click Next.
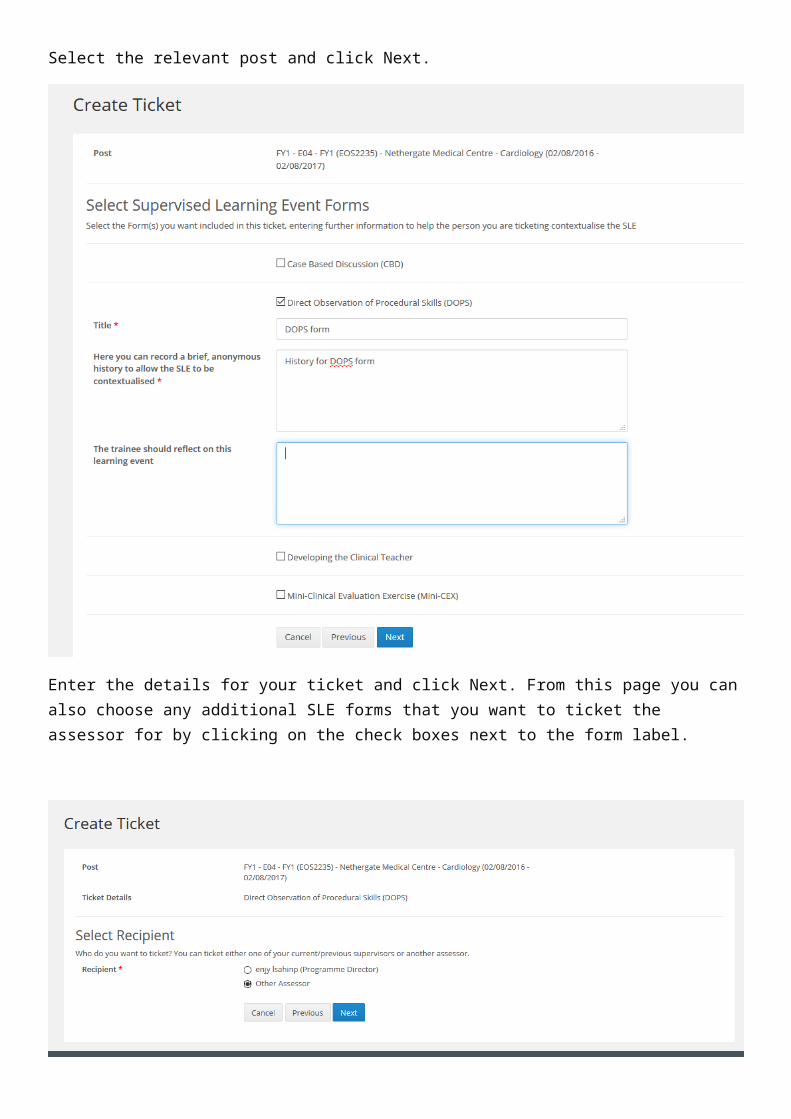
Enter the details for your ticket and click Next. From this page you can also choose any additional SLE forms that you want to ticket the assessor for by clicking on the check boxes next to the form label.
Select the assessor that you want to ticket from the options listed and click Next.
Enter the assessor details and then click Next. If you have selected a Programme Director, Educational Supervisor or Clinical Supervisor you will not be asked to complete their details as this information is already known.
Enter any comments you would like to add and then click on Submit.
Click Submit to confirm that you want to send the ticket or cancel to return to the previous page.
On submitting the ticket, a confirmation page will display showing the email text that has been sent to the ticket recipient. Click on Return to return to the Supervised Learning Event page.
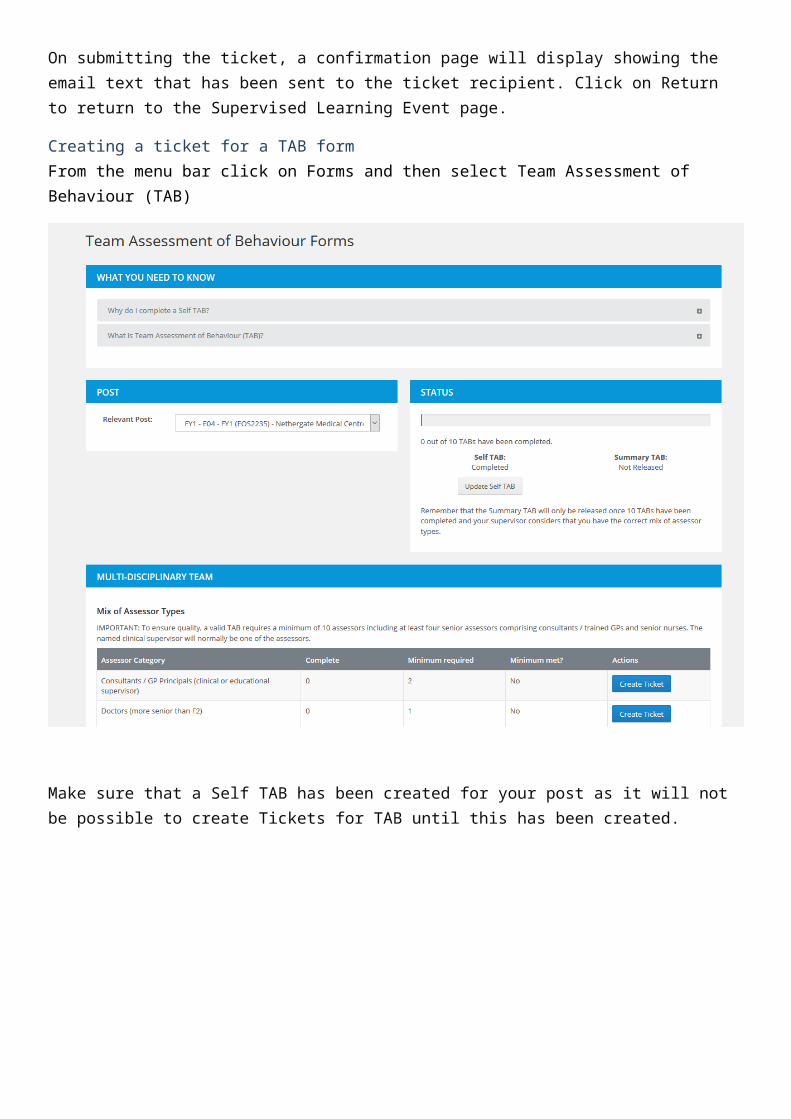
Creating a ticket for a TAB formFrom the menu bar click on Forms and then select Team Assessment of Behaviour (TAB)
Make sure that a Self TAB has been created for your post as it will not be possible to create Tickets for TAB until this has been created.
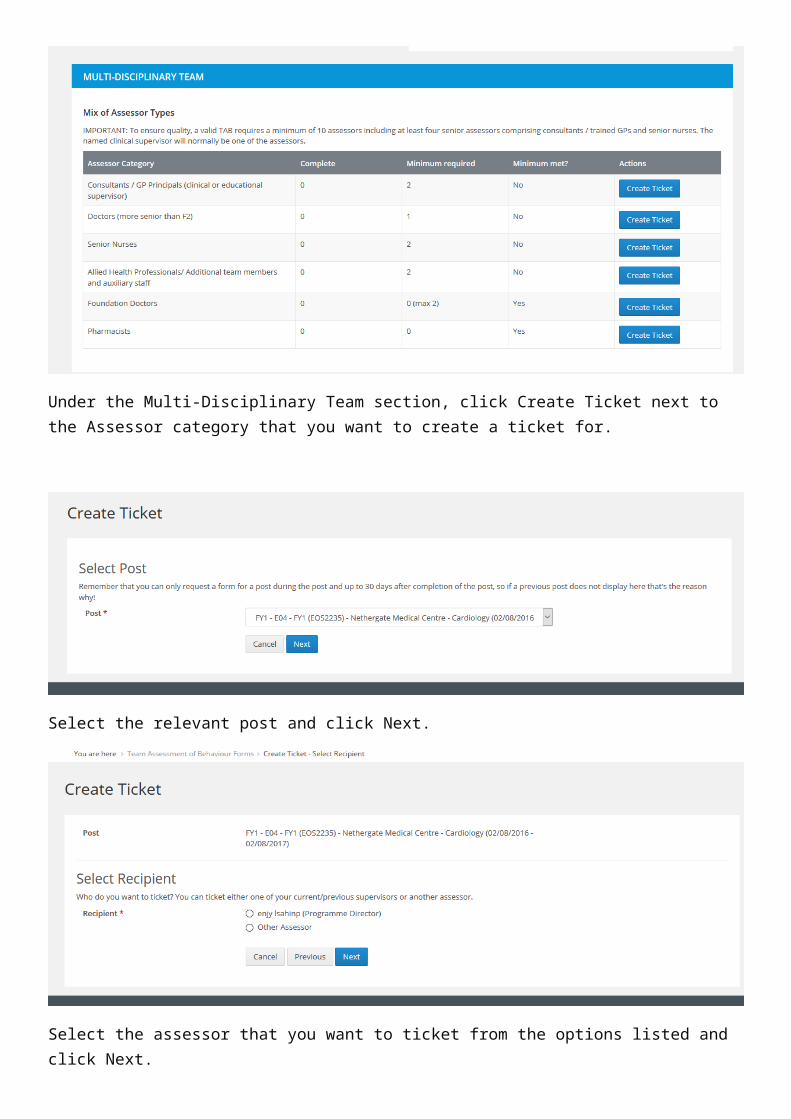
Under the Multi-Disciplinary Team section, click Create Ticket next to the Assessor category that you want to create a ticket for.
Select the relevant post and click Next.
Select the assessor that you want to ticket from the options listed and click Next.
Enter the assessor details and then click Next. If you have selected a Programme Director, Educational Supervisor or Clinical Supervisor you will not be asked to complete their details as this information is already known.
Enter any comments you would like to add and then click on Submit.
Click Submit to confirm that you want to send the ticket or cancel to return to the previous page.
On submitting the ticket, a confirmation page will display showing the email text that has been sent to the ticket recipient. Click on Return to return to the Team Assessment of Behaviour(TAB) page.
CURRICULUMLinkingThere are two ways in which evidence can be linked to a Curriculum. Evidence can be linked via a form summary page or from the Curriculum page.
Linking evidence to a Curriculum via a form summary page.
Navigate to the form page that is required. In this example an SLE form (DOPS) was used.
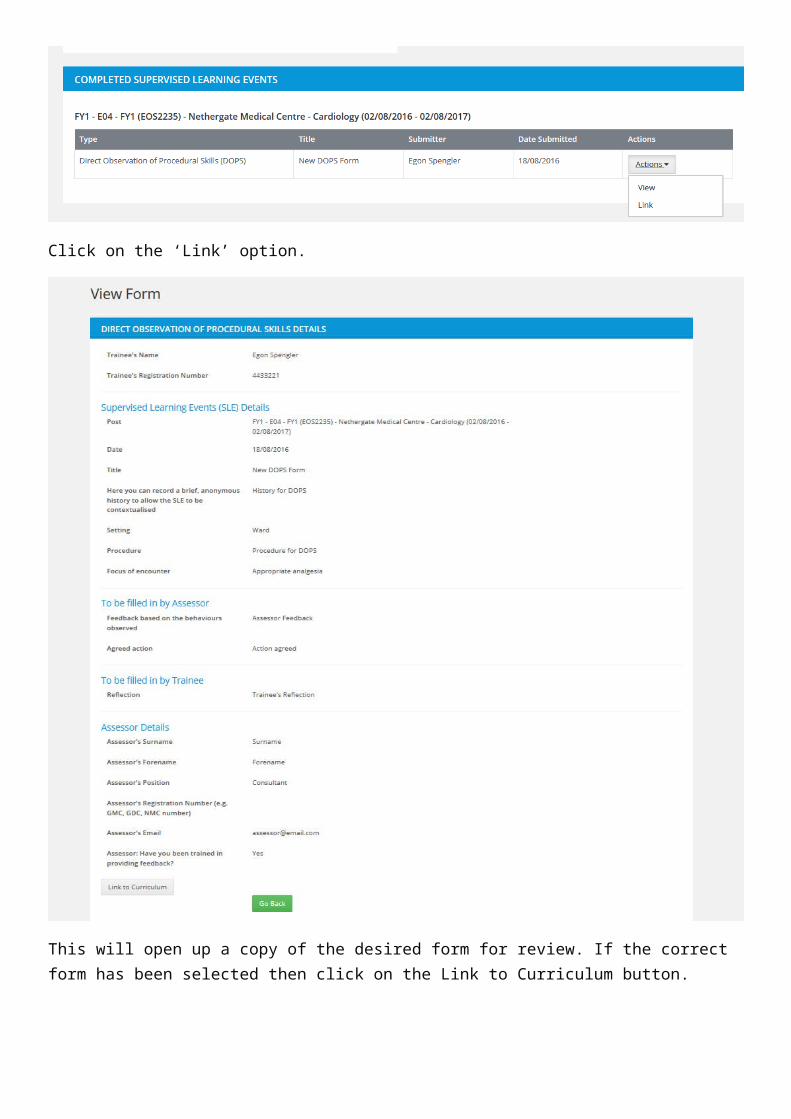
Find the form that is to be linked to the Curriculum and click Actions on that form.
Click on the ‘Link’ option.

This will open up a copy of the desired form for review. If the correct form has been selected then click on the Link to Curriculum button.
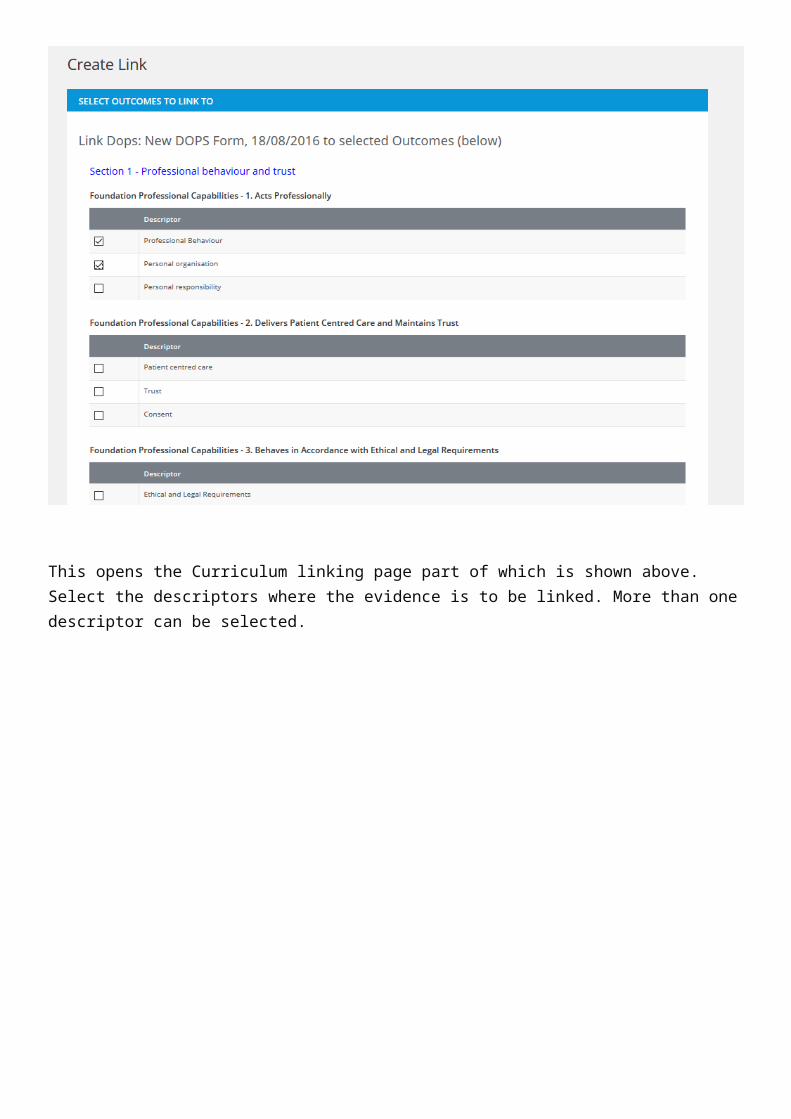
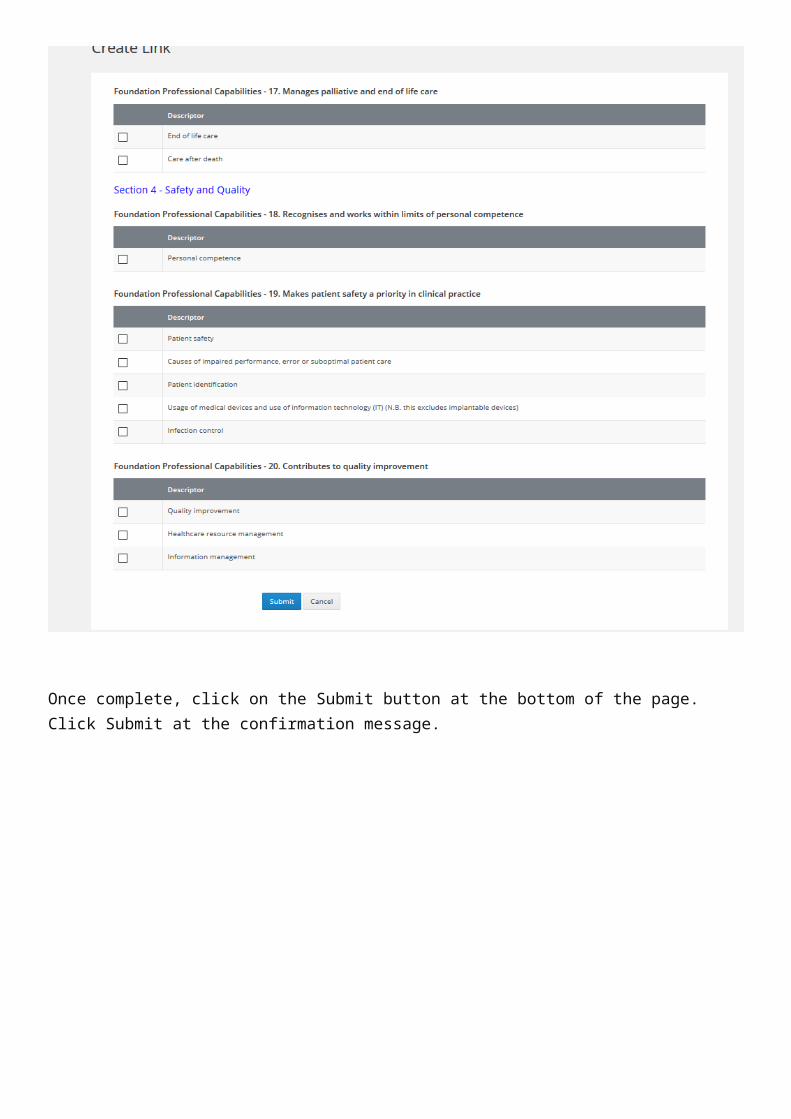
This opens the Curriculum linking page part of which is shown above. Select the descriptors where the evidence is to be linked. More than one descriptor can be selected.
Once complete, click on the Submit button at the bottom of the page. Click Submit at the confirmation message.
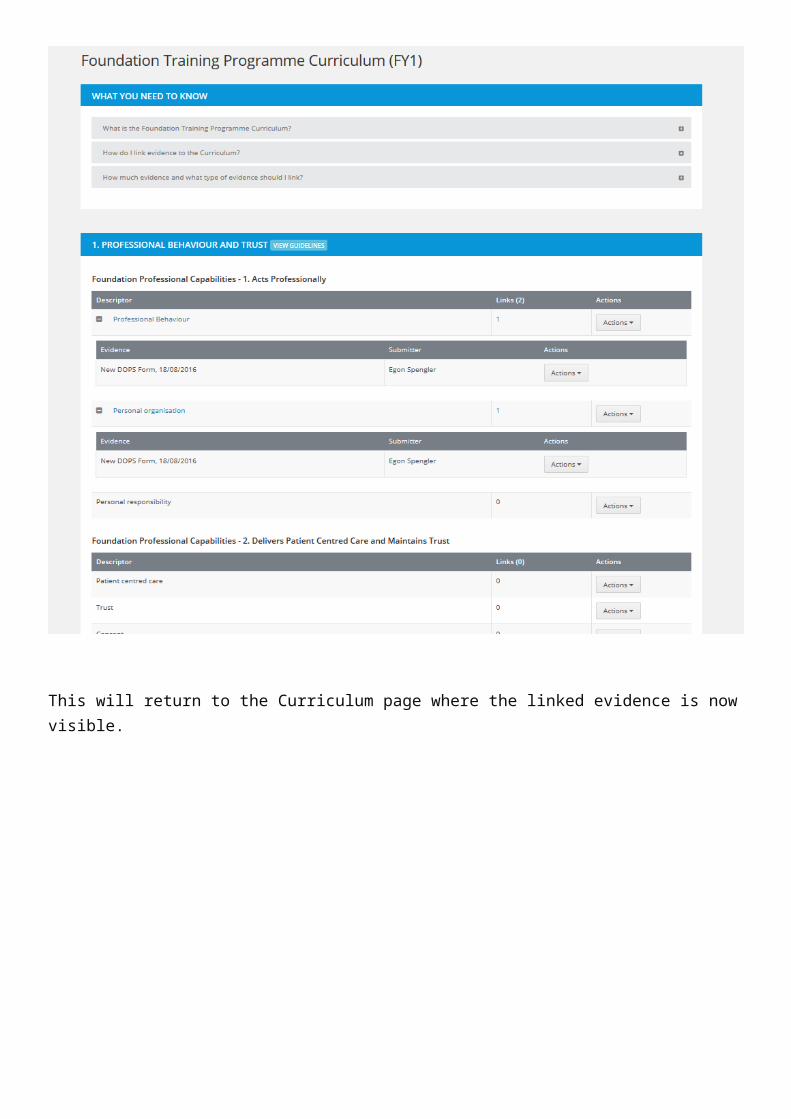
This will return to the Curriculum page where the linked evidence is now visible.
Linking evidence to a Curriculum via the Curriculum pageNavigate to the Curriculum page by clicking Curriculum and PDP from the menu bar and selecting the relevant curriculum.
Click the Actions button next to the descriptor that evidence is to be linked to.

Click on Create Links.
Select the form type required from the drop down list and click Next.
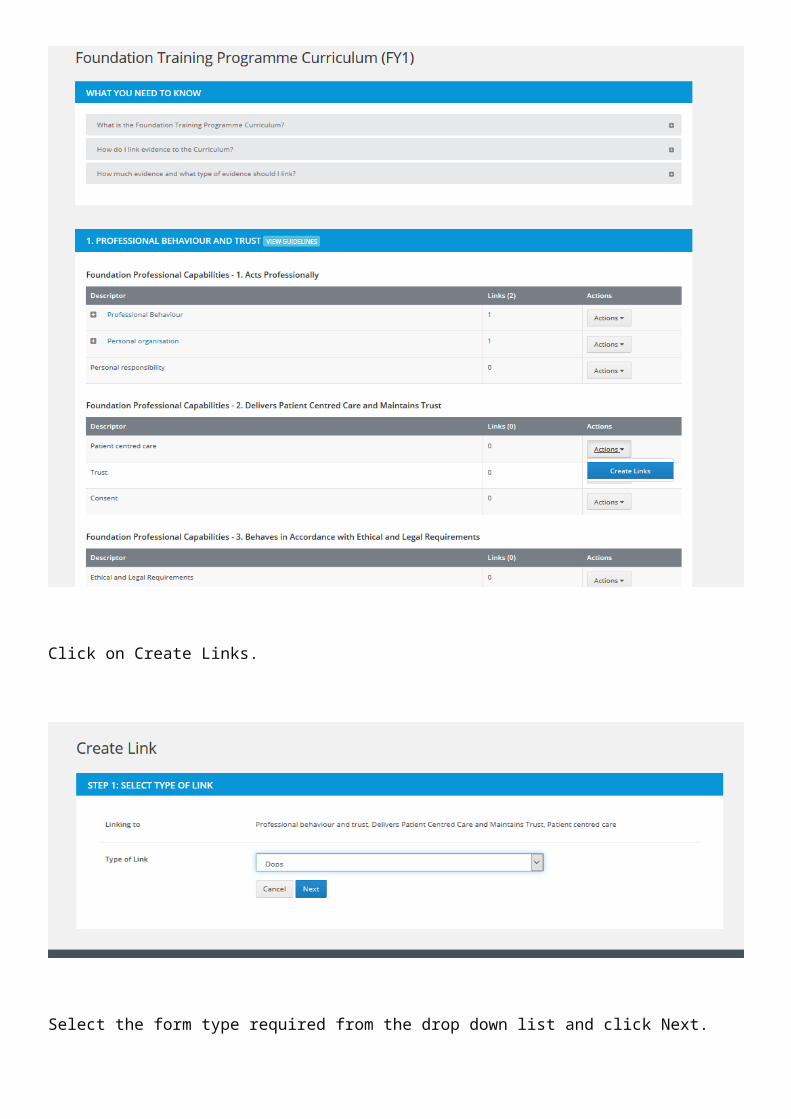
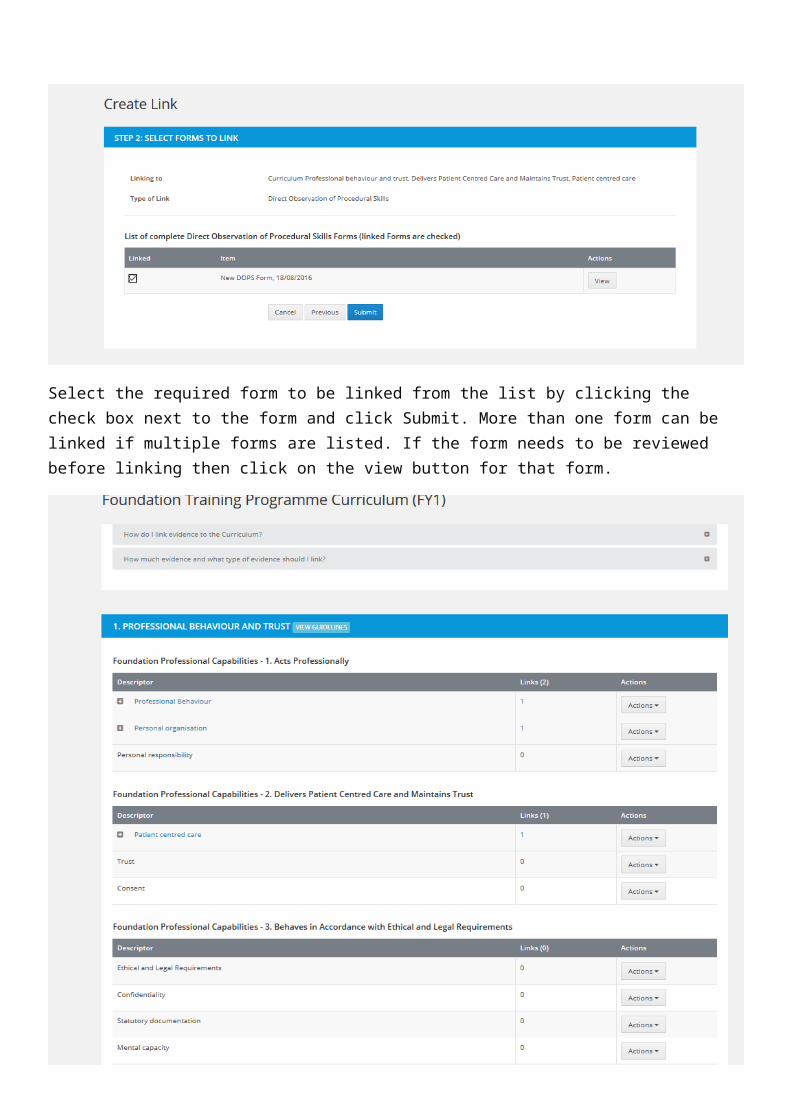
Select the required form to be linked from the list by clicking the check box next to the form and click Submit. More than one form can be linked if multiple forms are listed. If the form needs to be reviewed before linking then click on the view button for that form.
This will return to the Curriculum page where the linked evidence is now visible.
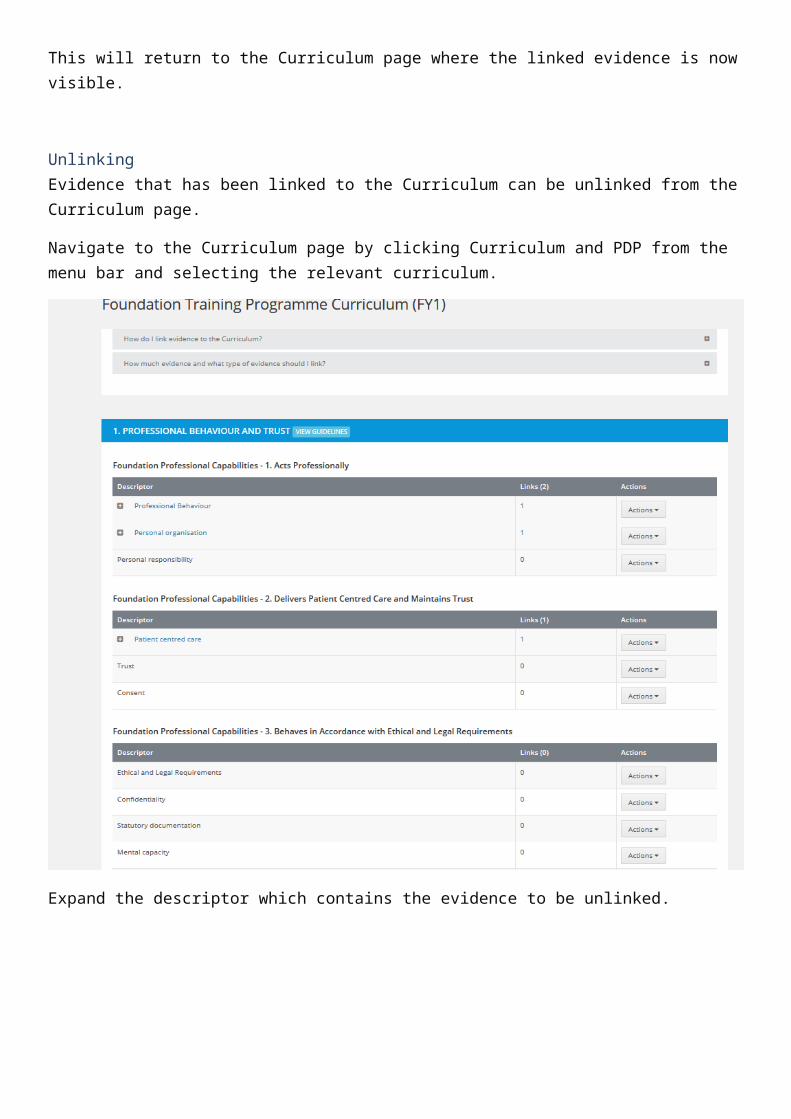
UnlinkingEvidence that has been linked to the Curriculum can be unlinked from the Curriculum page.
Navigate to the Curriculum page by clicking Curriculum and PDP from the menu bar and selecting the relevant curriculum.
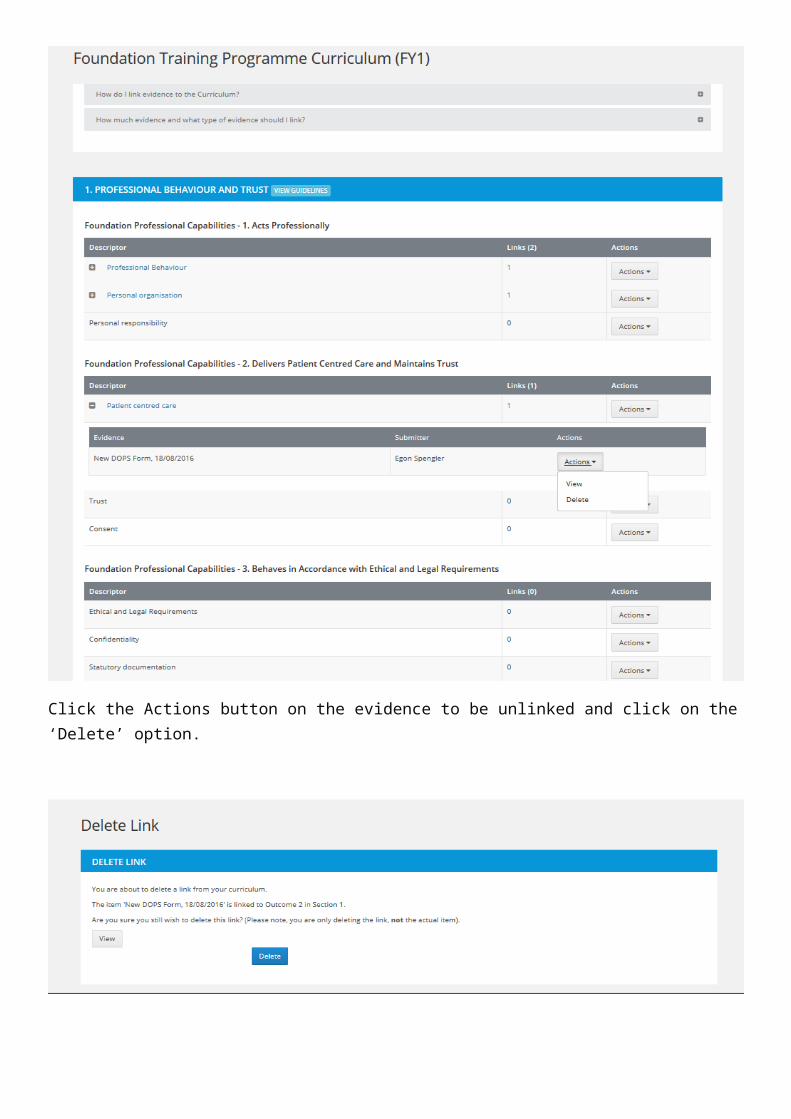
Expand the descriptor which contains the evidence to be unlinked.
Click the Actions button on the evidence to be unlinked and click on the ‘Delete’ option.
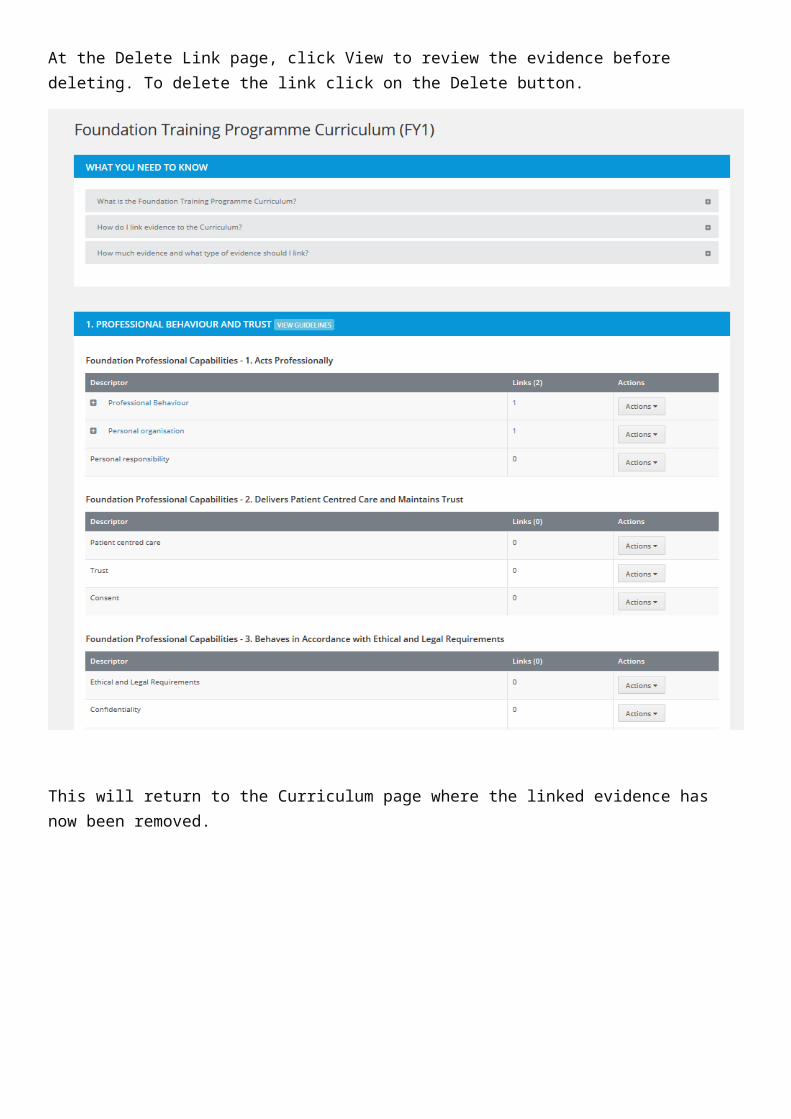
At the Delete Link page, click View to review the evidence before deleting. To delete the link click on the Delete button.
This will return to the Curriculum page where the linked evidence has now been removed.
PERSONAL DETAILSAddress and Contact detailsAt the moment is it not possible to update your own personal details within the dashboard. This functionality will return in the near future. If your details need to be updated, then please contact a Foundation Administrator who will do this for you.
Resetting your passwordIf you are having problems resetting your password then do the following:
Navigate to this link:
https://turasdashboard.nes.nhs.scot/
Click on the ‘Please sign in’ button, then click ‘Can’t access your account’ link. You will be prompted to enter your username. Your username should be the email address that is registered on TPM and Portfolio.
I have also included a link to a demonstration video of some of the frequent queries and resolutions to these:
https://vimeo.com/178591605
BROWSER COMPATIBILITYThe Turas Platform of applications including TPM and Portfolio will work properly on the following browsers:
Google Chrome
Mozilla Firefox (recent versions work best)
Internet Explorer 9 and above
Browsers on Android and Apple devices