Embed Size (px)
Citation preview
INTRODUCTION
Deckadance
Welcome to Deckadance ! Image Line , has had more than 14 years of experience developing andsupporting some of the worlds most popular audio applications, including FL Studio . The Deckadancedevelopment team is lead by L.S.D (Luis Serrano), a DJ with extensive real-world experience and so weare confident that Deckadance has everything it takes to elevate your DJ performances to the next level.Of course, if you suck as a DJ you will still suck, even using Deckadance, but you will suck better , faster, harder and more creatively than ever before.
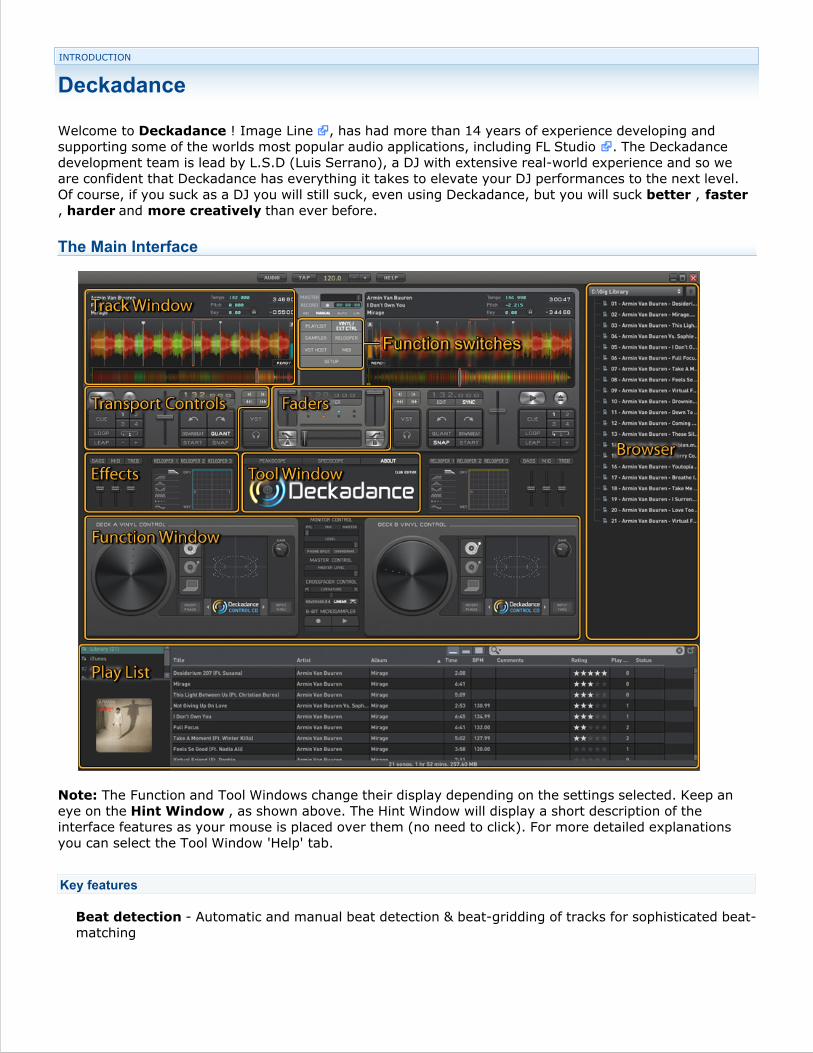
The Main Interface
Note: The Function and Tool Windows change their display depending on the settings selected. Keep aneye on the Hint Window , as shown above. The Hint Window will display a short description of theinterface features as your mouse is placed over them (no need to click). For more detailed explanationsyou can select the Tool Window 'Help' tab.
Key features
Beat detection - Automatic and manual beat detection & beat-gridding of tracks for sophisticated beat-matching

Supported audio formats - mp3, flac, m4a, wma, wav, aiff and ogg
Sampler - Integrated an 8-slot, tempo-synced, sampler that allows you to sample from either deck, orto load samples from disk.
Mixing decks - 2-channel mixer with 3-band EQ, gain and level controls, transformer, auto crossfaderand advanced headphone cueing
DVS CD/Vinyl support - Provides full-time code Vinyl & CD support (Club Edition Only).
Deckadance Control CD - Deckadance can generate its own control CD timecode files . This ultra-accurate timecode locks Deckadance to any CDJ with perfect accuracy.
Time stretching/compression - zPlane Elastique time-stretching/compression technology ('key lock')for best master tempo quality.
Integrated performance effects - 7 amazing internal effects: Lowpass, HighPass, BandPass, Notch,Phaser, Echo, LoFi.
Visual analysis display - Color waveform based on the spectral content and 'peakscope ' display.
AGC - Automatic gain control algorithm based on the perceived loudness psychometrics.
VST host - load up to 8 VST instruments or effects.
VST mode - Deckadance perfectly integrates with FL Studio , Ableton Live and other VST hostapplications as a VST instrument.
Rearrange songs - Relooper beat-detects, slices and provides a grid-based loop rearranging tool.
MIDI - MIDI learn mode for total compatibility with all MIDI compliant controllers. Native support &auto-detection for:
American Audio - VMS4, DP2.
A&H - Xone 3D.
Behringer - BCD2000, BCD3000.
Dj-Tech - DjForAll, Imix Reload MKI&MK2, Imix, Kontrol One, Mix Free, iMix MKII, uSolo FX, PoketDj, 101 series.
EKS - XP5, XP10, Otus.
Hercules - DJ Control MP3 E2, Console MK2, Control Mp3, Console RMX, Control Steel, DJ ConsoleMK4.
iCON - i-DJ.
Kontrol Dj - KDJ500.
M-Audio - X Session Pro, Xponent.
Nintendo - Wii Remote.
Numark - Total Control, OmniControl.
Omnitronic - MMC-1.
Reloop - Digital Jockey.
Stanton - SCS-1D, SCS-3D
Synq - PCM-1, DMC-1000, DMC-2000.
Vestax - VCI-100, VCM-100, VCI-300, Typhoon.
Version information
Deckadance is available in two versions:
Club Edition (full) - All features functional.1.
House Edition (limited) - The House Edition does not support VINYL / CD deck control.2.
1.
2.
Upgrade House to Club Edition by visiting the Image-Line Store . Digital Multiplex lighting control(DMX ) is planned for a future release and will be an optional extra feature. More information onDeckadance and other Image-Line products is available in the Product Information section of this manualor at www.image-line.com .
I don't need the manual!
If you read nothing else then you should read this section. A great way to learn how to useDeckadance is to experiment with it. Click on the HELP button just below the master cross-fader andhover your mouse over anything that looks like a control, and some that don?t. Keep an eye the HintWindow and the Help tab on the Tool Window to see descriptions. Finally, controls often have differentfunctions for a left or right-click, so give anything that can be left-clicked a right-click also.
Minimum System Requirements
Deckadance runs multiple threads (audio, graphics, beat analysis, file searching, native USB controller IO,preview monitoring etc) so large performance gains can be expected on multi-core systems.
PC
OS: Windows XP (SP2) /Vista.
Processor: Intel PIII 1 GHz or Althon XP 1.4 GHz.
Memory: 512Mb RAM.
Hard Disk Space: 200MB free space.
Sound Card: DirectSound or ASIO compatible soundcard.
Mac
OS: OSX v10.4 (Universal Binary)
Processor: G4 1.5 GHz or Intel Core Duo family.
Memory: 512Mb RAM.
Hard Disk Space: 200MB free space.
Sound Card: CoreAudio drivers.
Useful Links
The official Deckadance Website - Check for updates and add-ons.
Image-Line Store - Buy the Juice Pack (effects add-ons for Deckadance), FL Studio and other plugins.
Image-Line - Image-Line corporate site.
FL Studio website - The home of FL Studio, Image-Lines powerful Sequencer / DAW.
Video Tutorials* - Video tutorials for Juice Pack plugins and FL Studio.
* Site is open to registered users only.

MAIN INTERFACE
Tool Bar
The toolbar will only be visible when you are running Deckadance in 'stand-alone' mode (it is not visible inVST mode). If you wish to access File and General options use the [Setup ] button among the Functionswitches on the main interface. The Toolbar contains the following:
Audio -
Audio Setup - Use to select Audio inputs/outputs. This is only available in Stand-Alone mode. If youare running Deckadance as a VST then these options are accessed through your host. The options inthe Audio & MIDI Setup dialog will depend on your soundcard and attached controllers. Use theseoptions to select Audio and MIDI inputs/outputs.
MIDI, File & General Setup - Are accessed from the [SETUP ] button in the Function switches areaon the main interface .
TAP - Tap tempo. Tap this button 4 to 8 times and the average tapping speed will be set in the BPMwindow.
Tempo - Displayed in BPM (32 to 256). Double-click the number display to enter a specific BPM. Thetempo can also be changed with the TAP button or click on the 'fine-tune' +/- switches and dragup/down for fast changes. Right-click on the +/- switches to select Velocity sensitive mode , wheremouse movement speed is used to accelerate the BPM change.
Help - You found it! Opens the help. You know the thing you are now reading...unless you found thistext spray-painted on a cow in the middle of a field, then you are looking at a cow that has been thevictim of some kind of bizarre graffiti attack, not the help. Resist the urge to torment the cow further,it's had a hard day. I think the farmer is coming, run away!
BROWSER WINDOW
Browser
Controls
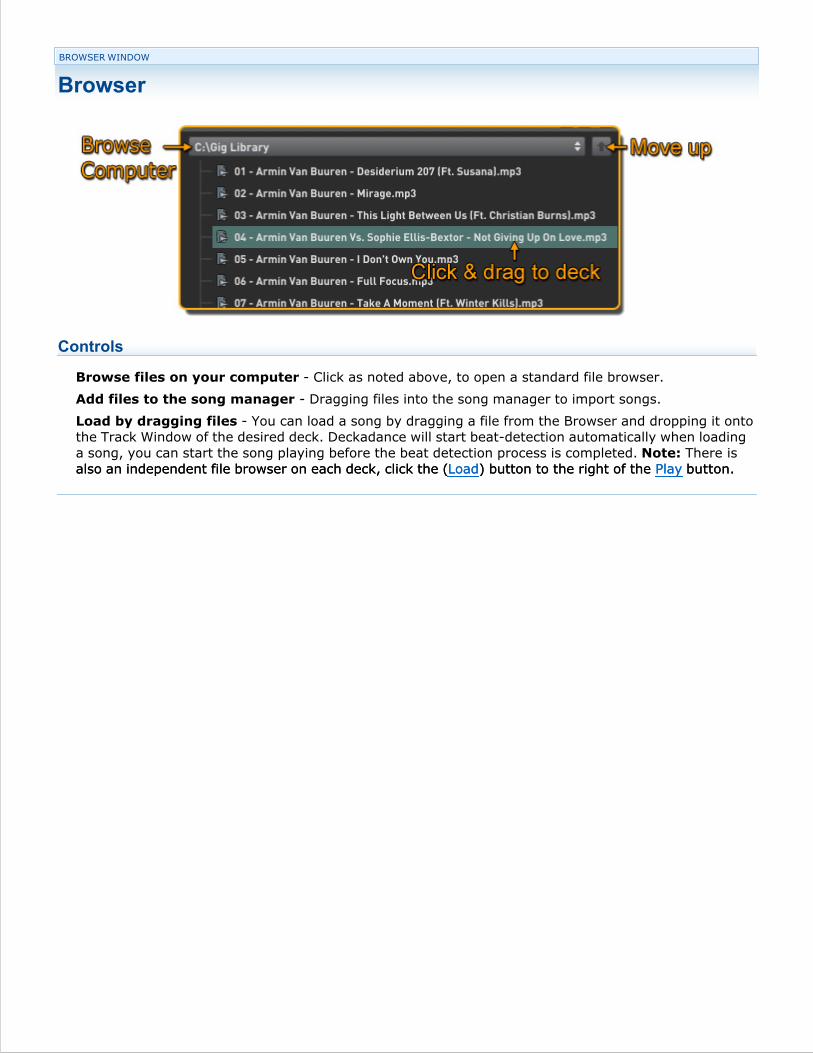
Browse files on your computer - Click as noted above, to open a standard file browser.
Add files to the song manager - Dragging files into the song manager to import songs.
Load by dragging files - You can load a song by dragging a file from the Browser and dropping it ontothe Track Window of the desired deck. Deckadance will start beat-detection automatically when loadinga song, you can start the song playing before the beat detection process is completed. Note: There isalso an independent file browser on each deck, click the (Load) button to the right of the Play button.also an independent file browser on each deck, click the (Load) button to the right of the Play button.
MAIN INTERFACE
Track Window and Transport Controls
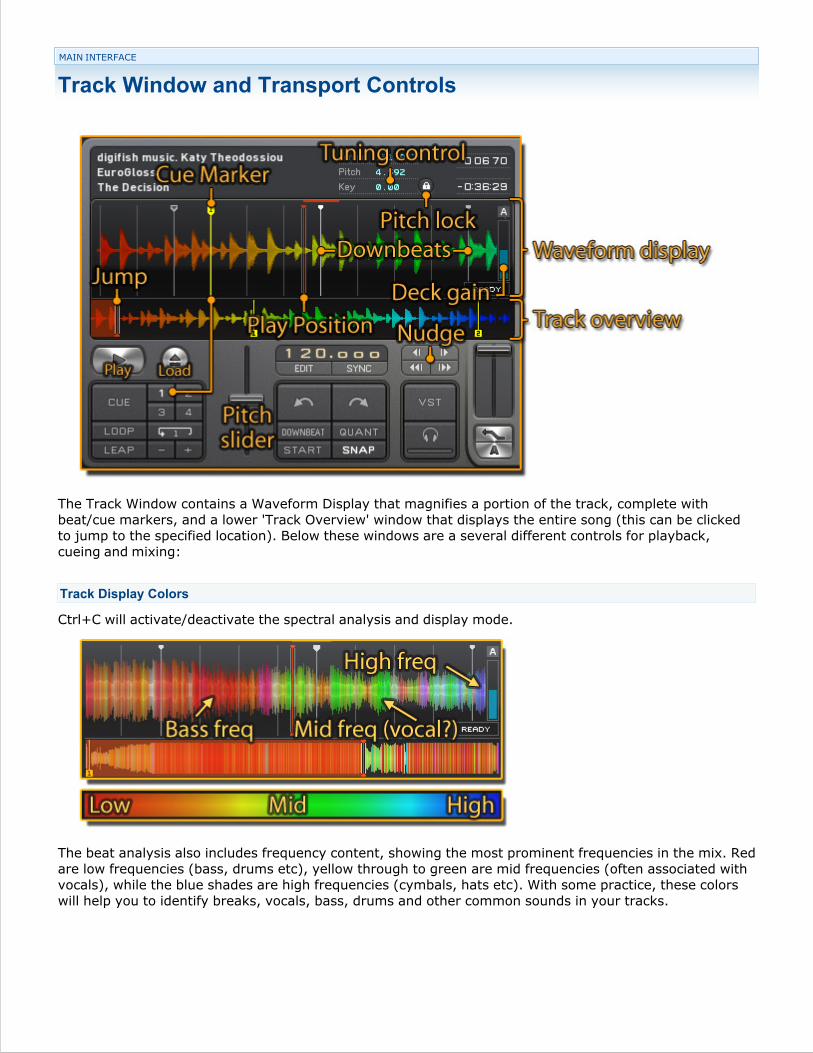
The Track Window contains a Waveform Display that magnifies a portion of the track, complete withbeat/cue markers, and a lower 'Track Overview' window that displays the entire song (this can be clickedto jump to the specified location). Below these windows are a several different controls for playback,cueing and mixing:
Track Display Colors
Ctrl+C will activate/deactivate the spectral analysis and display mode.
The beat analysis also includes frequency content, showing the most prominent frequencies in the mix. Redare low frequencies (bass, drums etc), yellow through to green are mid frequencies (often associated withvocals), while the blue shades are high frequencies (cymbals, hats etc). With some practice, these colorswill help you to identify breaks, vocals, bass, drums and other common sounds in your tracks.

Controls & Display
Artist, Title & Album - Displays track information (if stored in MP3 meta data).
Tempo - Detected tempo of the track.
Pitch - The difference in BPM between the detected BPM and Master Tempo.
Key - When the tempo is locked (see below) drag vertically on this field to change the deck pitch (+/-12 semi-tones) without affecting the tempo.
Lock (symbol) - Locks the tempo of the track. Use the Pitch-lock function to change playback speedand pitch independently.
Waveform & Track Overview Windows
Cueing a track - To move the Playback Position marker at the desired part of the track, left-click insidethe Waveform Display window and move your mouse (or transport controller) left-and right.
Cue Markers - To set a cue marker, select cue position 1 to 4 (to the right of the CUE button), positionthe Play Position marker over the part of the track and left-click the CUE button. If the track is stopped,it will play from that point onward each time you press the CUE button and stop when you release it. Ifthe track is playing, it will jump to the cue point when the CUE button is pressed and then pause. Cuemarkers are overwritten by new ones if the track is manually repositioned while stopped (as per'Cueing a track' procedure above). Each of the 4 numbered buttons to the right of the CUE buttoncorresponds to 4 separate cue positions.
Quick jump - Left-click on the Track Overview window (this displays the whole track) to jump the songto the point selected.
A (Auto-gain button) - Above the 'Deck gain' slider, activates the auto-gain control engine. Thisbalances the perceived loudness of tracks.
Deck gain - Extra gain trim control. Click and drag vertically.
Play position - The red vertical line at the middle of the Waveform window represents the play-head/stylus position.
Lower Controls
Play - Left-click to start the song playing. Right-click to start in sync with the other deck. Note: WhenAutomix is selected the Play button for the active deck is disabled.Automix is selected the Play button for the active deck is disabled.
Load - To the right of the Play is the quick-load button, this will open a file browser and dump theselected track into the deck.
LOOP (Loop and continue) - Loops a section of the song when clicked. Select the loop length usingthe arrows immediately to the right of the LEAP button. On release, the song will continue playing fromthe end of the loop. NOTES: The length indicator (right) can be clicked so that loops/leaps are synced tothe nearest beat/bar. The beat Nudge arrows can be used to reposition a looping segment.
LEAP (Leap after loop) - Loops a section of the song when clicked. Select the loop length using thearrows immediately to the right of the LEAP button. On release, the song will resume from the point itwould have reached if looping had not occurred. Keep an eye on the playback marker in the TrackWindow and you will notice the leap position is shown as a dashed line moving forward while the LEAPloop plays. NOTE: The length indicator (right) can be clicked so that loops/leaps are synced to thenearest beat/bar.
Length Indicator & Length Arrows - To the right of the LOOP/LEAP buttons there are three controls.The length indicator (top) can be clicked so that loops/leaps are synced to the nearest beat/bar. Thearrows are used to increment/decrement the loop/leap length..
Pitch Slider - Move the slider to change the speed of the song (down is faster and up slower). Therange can be adjusted on the General Settings page between +/- 6% and +/-50%. NOTE: Hold downrange can be adjusted on the General Settings page between +/- 6% and +/-50%. NOTE: Hold down

the [CTRL] key while moving the pitch fader to get a finer resolution of 0.01%.
EDIT - Opens a sub-window containing a number of tools to aid in resolving beat-sync & analysisissues:
TAP - Tap the button in time with the song to set thetempo.
A.BEATGRID - Auto beatgrid. The Beatgrid is used tosync all tempo sensitive functions (sampler loops,beat-mixing etc) to the song's tempo:
Auto ON (button white) - Deckadance will set theBeat marks automatically.
Auto OFF (button grey) - Manual beat-gridsettings is possible. Hold Shift+Click anywhere onthe waveform and drag OR click on the nudgebuttons below the A.BEATGRID button.
1/2 & 2/1 - Halves or Doubles the detected tempo(as selected).
<<| & |>> - Nudge the beat-markers forward orbackward as selected.
Rescan - Forces a rescan of the beat and frequencyanalysis.
Ready - Shows the progress of the analysis.
OK - Accept settings and return to the standardinterface controls.
SLAVE - Slaves the tempo to the Master tempo (see the toolbar). Note: The Pitch slider will be de-SLAVE - Slaves the tempo to the Master tempo (see the toolbar). Note: The Pitch slider will be de-activated in slave mode.
SYNC - Syncs the beat to the other Deck. Left-click is momentary, right-click is a locking switch.
Beat jump arrows - Upper arrows jumps one beat, lower jumps one bar, forward/backward.
Left and Right Pitch Seek Arrows - Nudge the track pitch in the direction of the arrow (right isfaster, left slower). A blue box will flash around the arrow to indicate the required action for manualsynchronization of the beat.
DOWNBEAT - Left-click to set the downbeat position of a cued track. The downbeat setting is criticallyimportant when automatic beat-synchronization with other deck samplers, VST MIDI players is required.
START - Left-click to set the track start position. Note that this will prevent cueing to positions beforethat marker.
Beat Indicator circle - Flashes on each beat.
VST - Activates any VST plugins loaded into the VST Plugins page and associated with the deck.
(headphones) - Monitor the selected deck through the headphone buss. This routing is selected in theToolbar, Audio setup.Toolbar, Audio setup.

MAIN INTERFACE
Faders & Beat-phase Display
Controls
This section is important for manual mixing/beatmixing of your tracks.
<| & |> - Jump phase one beat. Note: these buttons also jump the LOOP & LEAP functions.<| & |> - Jump phase one beat. Note: these buttons also jump the LOOP & LEAP functions.
<<| & |>> - Jump phase one bar. Note: these buttons also jump the LOOP & LEAP functions.<<| & |>> - Jump phase one bar. Note: these buttons also jump the LOOP & LEAP functions.
Level - Individual deck A & B level faders.
Beat-phase LEDs - Show the 4 beats of a bar (assuming the track is in 4/4).
Fine beat-phase - A bar will grow toward the leading deck. No bar = perfect phase.
< - & -> - Auto-XFade start buttons.
A & B - Transform deck A and B. Depending on the current state of the X-Fader the switches will Punch/ LMB (left-click) a faded/muted track or Cut / RMB (right-click) a playing track. The transformation isimmediate.
X-Fade - Master cross-fader control.
Beat-phase Display
Beat-phase - Above the main X-fader is a set of 4 LEDs. The LEDs blink on to show beat currently playingin each deck. Deck A upper Deck B lower. The down-beat is indicated below (1st LED as noted). It isimportant to pay attention that the decks are in step, playing the same beat of each bar (they aren’t in thisexample). Mixing tracks that are out of step often ends in tears. The nudge buttons allow you to skipforward/backward a beat (top) or bar (bottom), use these buttons to get the decks in phase.
Fine phase - Below the phase LEDs is a bar-display (shown above, ‘Fine–phase’) that grows in thedirection of the leading deck (A left, B right). When the bar disappears (or is small) in the middle, thedecks are perfectly aligned.
Faders & Mixing
Auto-mix - Toilet breaks and other emergencies are not a problem with the Auto-mix function. See thePlaylist panel. You can set the tracks to be played, X-fade time etc and take a break.Playlist panel. You can set the tracks to be played, X-fade time etc and take a break.
Auto-fade & Punch-in - Auto X-fade is very useful to free your hands during a routine X-fade, leavingAuto-fade & Punch-in - Auto X-fade is very useful to free your hands during a routine X-fade, leavingyou to concentrate on more important matters (your hair for instance). The auto X-fade buttons are the

bent-arrow switches either side of the X-fade slider (left shown). Click to start an auto-X-fade. Note: TheX-fade speed is controlled by the time settings to the right of the Auto-mix button on the Playlist panel,select between 15 to 90 seconds. Below the auto-X-fade buttons are the Deck A and B punch-in switches.There are two options, Left click to momentarily pass a mix of the selected deck to the outputs. Right click(Ctrl+click) to momentarily mute the selected deck. Also shown is the Deck A volume trim slider.
Track selection for the perfect X-fade - Advice mode ON. You will find it a lot easier to pull of perfectX-fades on tracks with long lead in/lead-outs. That is the start and end of the tracks have a beat and nomuch else going on. This means there wont be any discordant melodies or sounds interacting badly. Manysongs are available in a ‘club mix’ or ‘dance mix’ version for this very reason. Seek them out. Anotherhandy tool is the Bass X-fade switch on the Playlist panel. This fades the bass along with the deck volumeand at the 50% mix point drops the bass on both decks to compensate for the added energy of the twotracks. This will keep the perceived volume smooth and perhaps save a few speakers being splattered allover your audience.
Additional settings for the master crossfader on the Vinyl / Extended Control Window in the CrossfaderAdditional settings for the master crossfader on the Vinyl / Extended Control Window in the CrossfaderControl section, include:
CURVATURE SLIDER - Adjusts between a very narrow/quick curve (left), useful forturntablism/scratching and a more gradual X fade (right).
REVERSED - Reverses the crossfader curve, i.e. DECK B is silenced when the crossfader is set to theright.
LINEAR MODE - Bypasses the default fade curves and engages a simple linear fade curve. Mostcommonly used mode by DJs.
Pressing the arrows < and > will start an automatic fade toward the selected deck. The speed of thetransition is controlled by the automatic X-FADE settings in the Playlist Window. The Playlist Windowtransition is controlled by the automatic X-FADE settings in the Playlist Window. The Playlist Windowcontains other settings, such as the BASS X-FADE option, which crossfades the bass and Deck volumesautomatically. The Transformer buttons (A & B) are a crossfader 'Punch In' (Right-click to cut the signal).When held, they set the volume of the deck to 100% instantaneously (0% for right-click), regardless thecrossfader position.

MAIN INTERFACE
Tool Window
Peakscope
The Peakscope shows Deck A peaks in the upper half and Deck B peaks in the lower half. Thisarrangement of peaks is perfect for visual beatmatching of the decks.
Beat Align Decks - Left-click in the top or bottom half of the scope (resisting the temptation to followthe moving peaks with your pointer if the tracks are playing) and move your mouse to the left or rightso that the upper and lower peaks are aligned. When the peaks and or tick-marks are aligned the decksare beat matched. In order to maintain perfect alignment, the tracks have to be the same BPM or onedeck slaved to the other.
Spectroscope
The Spectroscope displays the distribution of low to high frequency energy (left to right) for the Decks (Atop / B bottom). Use this to gauge the relative bass/treble mix of two tracks.
The Help window displays more detailed explanations of features on the display as you hold the mousepointer over them. Keep an eye the Hint Window and the Help tab to see descriptions.
Notes: 1. There are also pop-up 'Tooltips' available that appear when the mouse is left stationary overcontrols. The switch is located above the FUNCTION switches on the main interface. 2. Controls often havecontrols. The switch is located above the FUNCTION switches on the main interface. 2. Controls often havedifferent functions for a left or right-click, so give anything that can be left-clicked a right click (Alt+Click).
About

The About displays your version and Deckadance build-number information.The About displays your version and Deckadance build-number information.

MAIN INTERFACE
Effects
Deckadance comes with several high quality built-in effects which may be particularly useful when mixingdissimilar tracks. For example, removing the bass from a pair of tracks will cut the drums, which can bebeneficial if the tracks have very different beats. As always, experimentation and practice are requiredhere.
Controls
Deckadance also has a number of advanced filtering options, optimized for DJ applications. The levels ofthese effects are controlled by the XY control pad. Choose from:
BASS, MID, TREB 3-band Equalizer - The effects section contains a 3-band equalizer, Bass, Midrangeand Treble frequencies. The BASS slider can be linked automatically to the Crossfader using the 'BASSX-Fade' switch on the left side of the Playlist Window. Note: when in Bass X-Fade mode, the Bass EQslider is disabled. Frequency CUT mode - Left-click on the BASS/MID/TREB buttons to momentarilycut that frequency band, right-click locks the cut state on.
RELOOPER 1, 2 & 3 - These switches activate the Relooper function. Left-click the Relooper buttons forRELOOPER 1, 2 & 3 - These switches activate the Relooper function. Left-click the Relooper buttons formomentary effects. Right-click (or Alt+Click) to lock the mode on. Left or right-click to disengage the re-loop.
LOWPASS FILTER - Cuts the treble frequencies above the cutoff value. X/Y control - Vertical (Y)changes the cutoff value. Horizontal (X) - Changes the resonance. A narrow band of boosted frequenciesat the cutoff point create a more pronounced 'sweeping' effect.
HIGHPASS FILTER - Cuts the bass frequencies above the cutoff value. X/Y control Vertical (Y) changesthe cutoff value. Horizontal (X) changes the resonance. A narrow band of boosted frequencies at thecutoff point creates a more pronounced 'sweeping' effect.
BANDPASS FILTER Allows a narrow band of frequencies through.
BANDREJECT FILTER - Cuts a narrow band of frequencies. Good for 'sweeping' effects.
8 TAP 3D PHASER - Creates a phasing effect - not a great description, we know. OK, sounds likeplunging your head in a bucket of water - better? X/Y control - Vertical (Y) changes the phaser depth.Horizontal (X) - Changes the speed.
ECHO - Left/right stereo bounce effect. X/Y control Vertical (Y) changes the delay volume. Horizontal(X) changes the delay speed (left is faster).
LO FI - A sample rate reducing effect. X/Y control Vertical (Y) is the lo-fi mix amount. Horizontal (X) isthe amount of sample rate reduction.
VST - If the inbuilt effects are not enough, Deckadance can also host VST plugins, as described in the 'VSTVST - If the inbuilt effects are not enough, Deckadance can also host VST plugins, as described in the 'VSTPlugins' section. Also included is a bank of 8 samplers/relooper’s. These allow you to record audio fromPlugins' section. Also included is a bank of 8 samplers/relooper’s. These allow you to record audio fromeither deck, complete with beat-sync start whereby the sampling starts on the beatmark to give you abeat-matched sample.
FUNCTION WINDOW
Function Window
Upper Area Controls
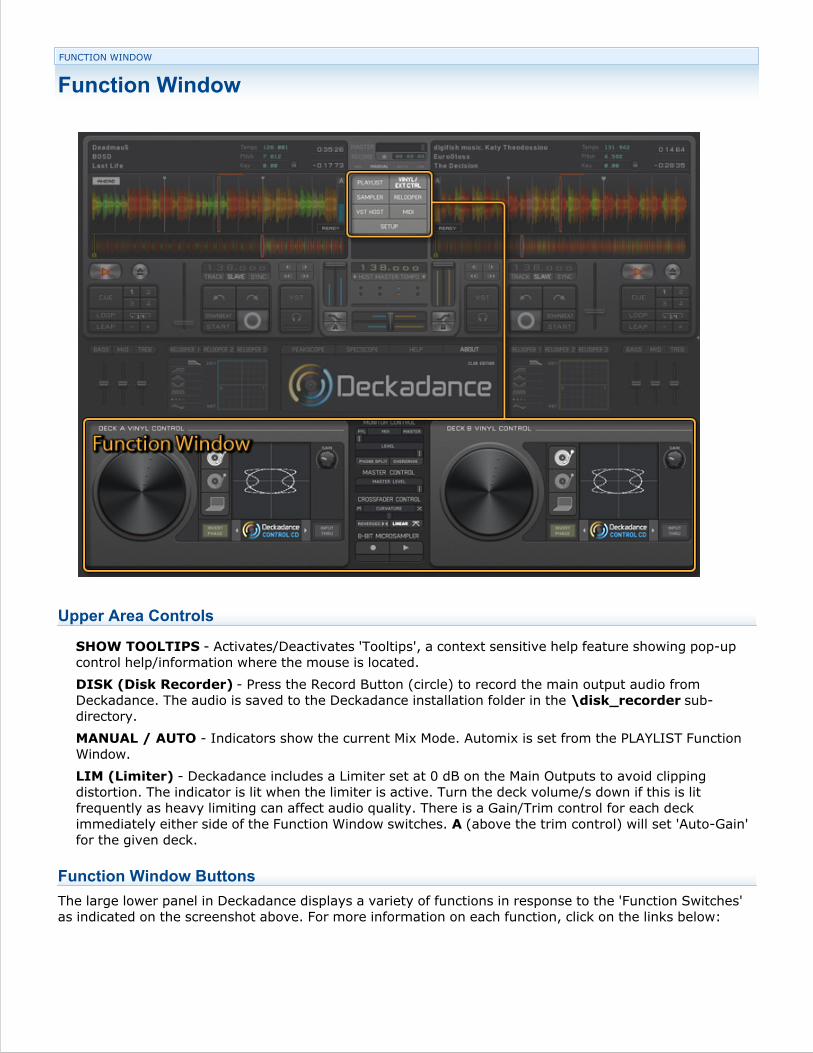
SHOW TOOLTIPS - Activates/Deactivates 'Tooltips', a context sensitive help feature showing pop-upcontrol help/information where the mouse is located.
DISK (Disk Recorder) - Press the Record Button (circle) to record the main output audio fromDeckadance. The audio is saved to the Deckadance installation folder in the \disk_recorder sub-directory.
MANUAL / AUTO - Indicators show the current Mix Mode. Automix is set from the PLAYLIST FunctionWindow.
LIM (Limiter) - Deckadance includes a Limiter set at 0 dB on the Main Outputs to avoid clippingdistortion. The indicator is lit when the limiter is active. Turn the deck volume/s down if this is litfrequently as heavy limiting can affect audio quality. There is a Gain/Trim control for each deckimmediately either side of the Function Window switches. A (above the trim control) will set 'Auto-Gain'for the given deck.
Function Window Buttons
The large lower panel in Deckadance displays a variety of functions in response to the 'Function Switches'as indicated on the screenshot above. For more information on each function, click on the links below:

PLAYLIST - Use to arrange songs for later playback & OR to log songs played.
SAMPLER - Record and play back sections of a song.
VST HOST - Load instruments and effects.
VINYL / EXT CONTROL - Calibrating control vinyl and CDs.
RELOOPER - Slice and stuttering effects.
MIDI - MIDI configuration. Assign controller knobs, sliders and features to target Deckadance controls.
SETUP - General, File & MIDI Controller setup.

FUNCTION WINDOW
Library, iTunes Library, Playlist & Song Manager
The fastest method to add files to the Playlist is to use the Add Dir function or drag songs from theBrowser. Playlist can be saved and loaded for later use. The Playlist when in Automix (non-shuffle) modewill play back from top to bottom.
Controls & Options
Many of the options assocated with this panel are acessed from the Setup tab.
Add files to Playlist - Drag files from the Library, iTunes or other external browsers and drop them onthe Playlist.
Edit data fields - Double-click Playlist fields to edit the information/tags shown.
Sort by Index, Artist, Title, Album, Comments - Click on the headings to sort by that field.
Right-click file menu - Select from:
Load to Deck 1 / 2 - Sends the file to play on deck 1 or 2 as selected.
Append to Automix list - Adds the file to the end of the Automix list. It's OK to do this while DD isplaying the list.
Preview - Plays the track on the Headphone mix as set on the Audio Settings .
Reset Played Status - Sets the track to unplayed.
Reset Played Statistics - Play statistics are kept for all files.
Reload tags - Reloads song information associated with files.
Show in explorer - Shows the file location in the OS file browser.
Analyze - Force beat-analysis on the files selected in the playlist. Pre-analyzing files is useful as itlowers the CPU overhead and load times during a live set. To select multiple files - select the firstfile of a group (click on it) then Shift+click on the last OR Ctrl+Click on individual files. The beat-analysis files are stored in the installation folder. PC: ..\Image-Line\Deckadance\beatmarks\*.mrk , MAC: ../Library/Application Support/Image-Line/Deckadance/beatmarks/*.mrk and will be remembered permanently (it is important thatthe name of the source audio file remains unaltered, the file name and size are used to matchbeatmark and audio files). Note: Beatmark files also store cue points, detected bpm etc.
Remove - Remove the file. A warning is given.
Right-click Library - Gives the following options:
Import Music Folders - Adds folders to the file browser.
Create Backup - Creates a backup of your library (meta data not the original files).
Clear Colletion - Removes the collection from the Library.
Right-click Automix - Gives the following options:
Clear List - Clear the Automix Playlist.
Export - To M3U or HTML format.
Copy to Play Order - Copies the play order to your iTunes playlist.
Right-click Playlists - Gives the following options:
Create Playlis - Create as many Playlists as you need.
Import Playlist - Open a pre-made Playlist.
Change font size - Use SETUP > Global > Browser Settings > Font size .
Library
Shows the files and folders set on the SETUP > Global Settings > Automix Settings section
Playlist
The Playlist Automix options are on the SETUP > Global Settings > File Management section.
iTunes Library
Add songs to the Deckadance playlist - Browse your iTunes library . Click and drag songs anddrop them onto the Drop to playlist box (top left) to add them to the Deckadance Playlist .
Browse library - Click on the categories down the left-side panel to see files saved in each.
NOTE: If you have iTunes installed and your library does not show here, manually set the path to theiTunes library file (iTunes Music Library.xml ) from the Global Options > iTunes Library path.
FUNCTION WINDOW
Sampler
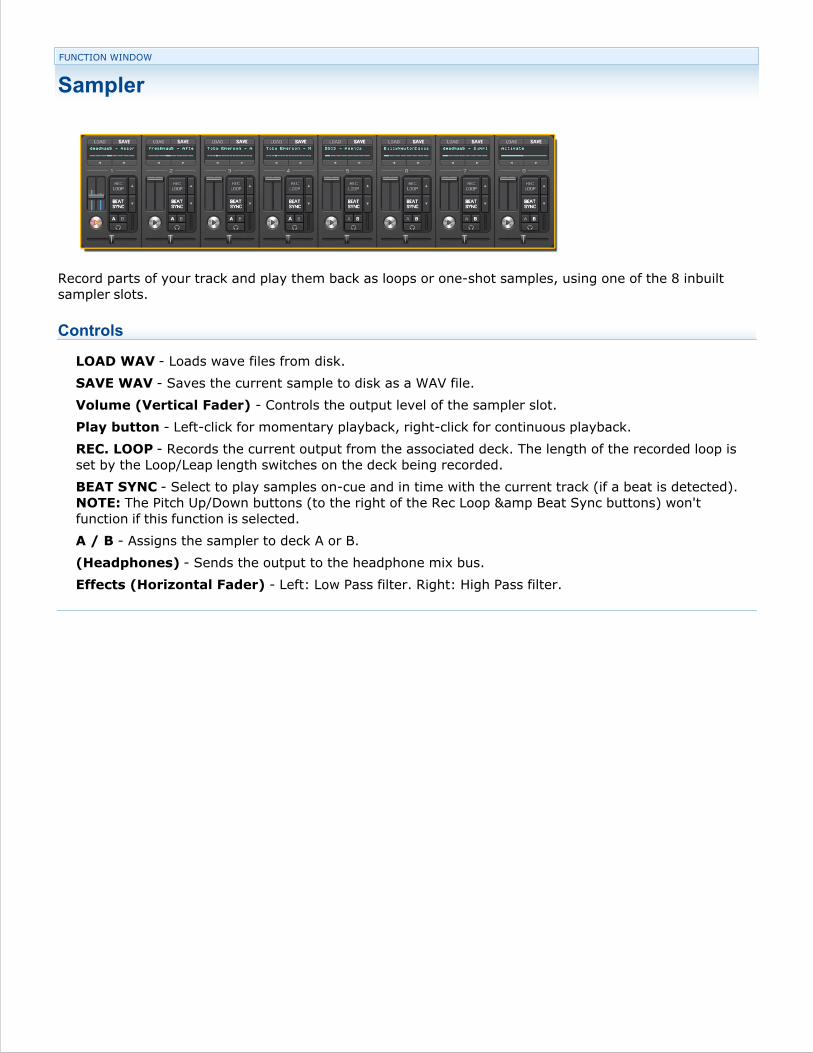
Record parts of your track and play them back as loops or one-shot samples, using one of the 8 inbuiltsampler slots.
Controls
LOAD WAV - Loads wave files from disk.
SAVE WAV - Saves the current sample to disk as a WAV file.
Volume (Vertical Fader) - Controls the output level of the sampler slot.
Play button - Left-click for momentary playback, right-click for continuous playback.
REC. LOOP - Records the current output from the associated deck. The length of the recorded loop isset by the Loop/Leap length switches on the deck being recorded.
BEAT SYNC - Select to play samples on-cue and in time with the current track (if a beat is detected).NOTE: The Pitch Up/Down buttons (to the right of the Rec Loop & Beat Sync buttons) won'tfunction if this function is selected.
A / B - Assigns the sampler to deck A or B.
(Headphones) - Sends the output to the headphone mix bus.
Effects (Horizontal Fader) - Left: Low Pass filter. Right: High Pass filter.

FUNCTION WINDOW
VST Host
Deckadance VST slots accept both Instrument and Effect plugins. VST (Virtual Studio Technology) plugins such as The Juice Pack & Maximus that are a great addition to the inbuilt effects inDeckadance. VSTs can be driven with MIDI files so that Deckadance becomes an 8 track sequencer, thepossibilities are endless.
Controls
LOAD VST - Opens a browse window so that you can locate and load a VST plugin. The VST searchdirectory is set on the 'Setup' Function Window.
E (Expand) - Opens the VST interface.
X - Deletes the VST.
LOAD MIDI - Load a MIDI file to control the VST.
< > (arrows) - Step forward/backward through MIDI files in the load directory.
Vertical Fader - Plugin volume.
Play button - Playback MIDI file.
A / B - Assign the VST to deck A or B.
(Headphones) - Send the output to the headphone mix bus.
MIDI IN THRU - Activate the slot to receive MIDI/Controller input.
Note about 3rd Party VST plugins: The internet is bursting with 3rd party plugins, a great place to startlooking is KVR . However be careful not to go on-stage before thoroughly testing any VST you use insideDeckadance, remember they are independent programs not under Image-Line control and can crash,bringing your computer down with them.
FUNCTION WINDOW
MIDI Setup
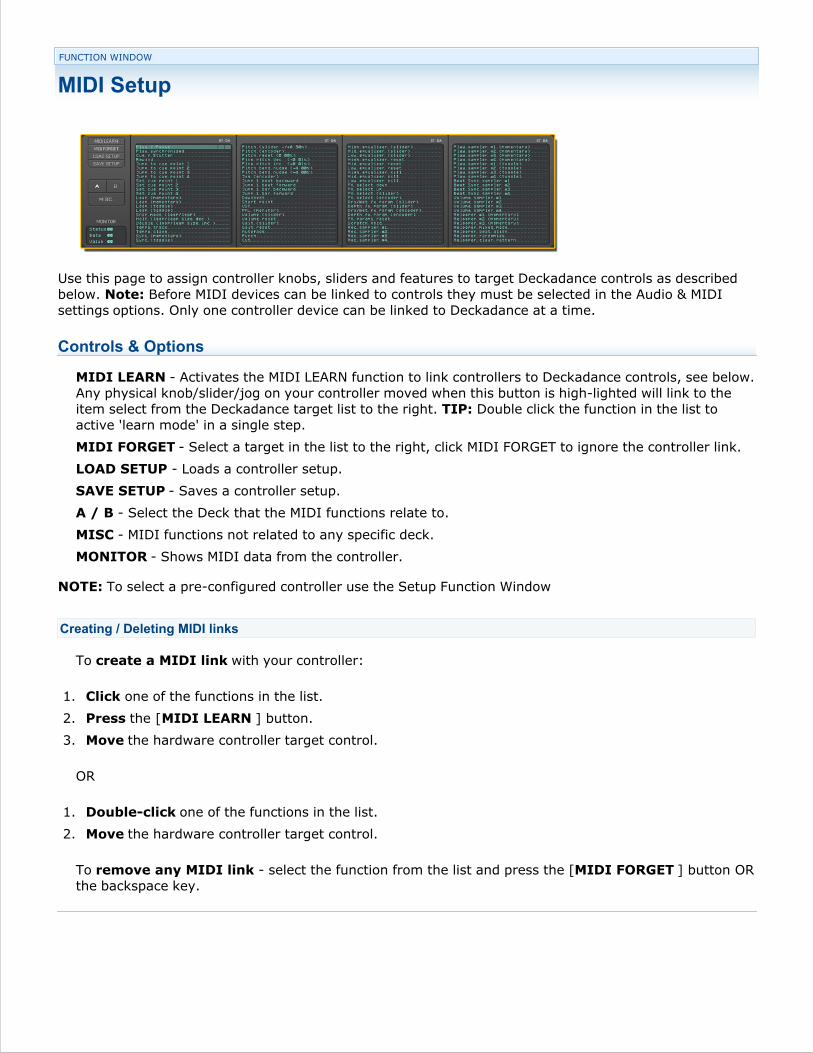
Use this page to assign controller knobs, sliders and features to target Deckadance controls as describedbelow. Note: Before MIDI devices can be linked to controls they must be selected in the Audio & MIDIsettings options. Only one controller device can be linked to Deckadance at a time.
Controls & Options
MIDI LEARN - Activates the MIDI LEARN function to link controllers to Deckadance controls, see below.Any physical knob/slider/jog on your controller moved when this button is high-lighted will link to theitem select from the Deckadance target list to the right. TIP: Double click the function in the list toactive 'learn mode' in a single step.
MIDI FORGET - Select a target in the list to the right, click MIDI FORGET to ignore the controller link.
LOAD SETUP - Loads a controller setup.
SAVE SETUP - Saves a controller setup.
A / B - Select the Deck that the MIDI functions relate to.
MISC - MIDI functions not related to any specific deck.
MONITOR - Shows MIDI data from the controller.
NOTE: To select a pre-configured controller use the Setup Function Window
Creating / Deleting MIDI links
To create a MIDI link with your controller:
Click one of the functions in the list.1.
Press the [MIDI LEARN ] button.2.
Move the hardware controller target control.3.
OR
Double-click one of the functions in the list.1.
Move the hardware controller target control.2.
To remove any MIDI link - select the function from the list and press the [MIDI FORGET ] button ORthe backspace key.
FUNCTION WINDOW
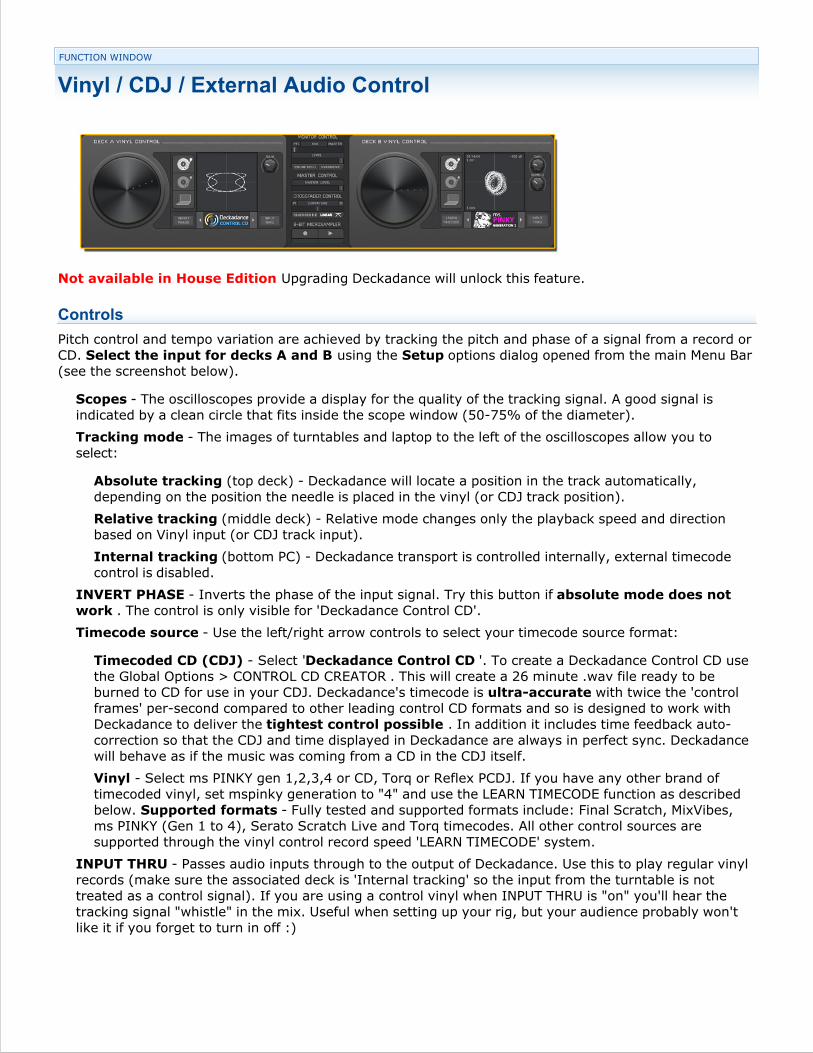
Vinyl / CDJ / External Audio Control
Not available in House Edition Upgrading Deckadance will unlock this feature.
Controls
Pitch control and tempo variation are achieved by tracking the pitch and phase of a signal from a record orCD. Select the input for decks A and B using the Setup options dialog opened from the main Menu Bar(see the screenshot below).
Scopes - The oscilloscopes provide a display for the quality of the tracking signal. A good signal isindicated by a clean circle that fits inside the scope window (50-75% of the diameter).
Tracking mode - The images of turntables and laptop to the left of the oscilloscopes allow you toselect:
Absolute tracking (top deck) - Deckadance will locate a position in the track automatically,depending on the position the needle is placed in the vinyl (or CDJ track position).
Relative tracking (middle deck) - Relative mode changes only the playback speed and directionbased on Vinyl input (or CDJ track input).
Internal tracking (bottom PC) - Deckadance transport is controlled internally, external timecodecontrol is disabled.
INVERT PHASE - Inverts the phase of the input signal. Try this button if absolute mode does notwork . The control is only visible for 'Deckadance Control CD'.
Timecode source - Use the left/right arrow controls to select your timecode source format:
Timecoded CD (CDJ) - Select 'Deckadance Control CD '. To create a Deckadance Control CD usethe Global Options > CONTROL CD CREATOR . This will create a 26 minute .wav file ready to beburned to CD for use in your CDJ. Deckadance's timecode is ultra-accurate with twice the 'controlframes' per-second compared to other leading control CD formats and so is designed to work withDeckadance to deliver the tightest control possible . In addition it includes time feedback auto-correction so that the CDJ and time displayed in Deckadance are always in perfect sync. Deckadancewill behave as if the music was coming from a CD in the CDJ itself.
Vinyl - Select ms PINKY gen 1,2,3,4 or CD, Torq or Reflex PCDJ. If you have any other brand oftimecoded vinyl, set mspinky generation to "4" and use the LEARN TIMECODE function as describedbelow. Supported formats - Fully tested and supported formats include: Final Scratch, MixVibes,ms PINKY (Gen 1 to 4), Serato Scratch Live and Torq timecodes. All other control sources aresupported through the vinyl control record speed 'LEARN TIMECODE' system.
INPUT THRU - Passes audio inputs through to the output of Deckadance. Use this to play regular vinylrecords (make sure the associated deck is 'Internal tracking' so the input from the turntable is nottreated as a control signal). If you are using a control vinyl when INPUT THRU is "on" you'll hear thetracking signal "whistle" in the mix. Useful when setting up your rig, but your audience probably won'tlike it if you forget to turn in off :)

LEARN TIMECODE - Calibrate Deckadance to the default speed of your timecoded vinyl (if you areusing a CD see the section on Timecoded CD (CDJ) above). To obtain the most accurate vinylcalibration :
1. Ensure your setup is fine and that you have a 'healthy' tracking signal on the input, at approximately50%-70% amplitude.
2. Play the record or CD at normal speed (important with normal/reset pitch in your turntable!).
3. Press 'learn' and hold for 3 to 4 seconds.
4. Release 'learn' and you're done!
GAIN - Adjust the input level for the associated deck. Tips to obtaining an accurate lock on thetracking signal on the record. The signal level from your turntable is important, it should be set to about50-70% from the center of the oscilloscope window to the edge. A signal which is too loud will clip anddegrade the tracking signal. A signal which is too low can lead to phase ambiguity and so affect spindirection detection.
RUMBLE - Rumble Threshold, ignores input audio signals below the threshold level. Use Right MouseButton to reset to -50.0 dB.
LEAD IN - Coming soon.
Setting the input control signal
Use the Gain knob to set the amplitude so that a circle is formed about 50-75% of the maximum diameterthat will fit in the window. Use the Rumble knob to clean up scatter or noise in the signal, compare thescreenshot above to the one below, not the cleaner looking circle below.
Setting Control Deck A/B inputs
Audio INPUTS are used to receive the control signals from external Vinyl or CDJ decks. INPUTS areselected and set in the Audio Settings page.

Additional Settings
Between the Vinyl / Extended Controls for Decks A and B are several additional settings:
MONITOR CONTROL
Monitor Mix Fader - An independent monitor fader that blends between Main and PFL (Pre FaderLevel) outputs on the phones.
Monitor Level - Use to adjust the global monitoring level.
PHONE SPLIT - L/R monitoring. When selected, you will hear PFL in your left headphone and Master inthe right one, assuming that your monitor setup is routed to your headphones and you have them onthe correct way around. Perhaps we assume too much?! :)
OVERDRIVE - Colors the monitor signal and boots levels to make it easier to distinguish from the PA.Watch your ears! Note: Consider investing in a good set of 'in-ear' monitors, these effectively reducethe noise from the club PA, allowing you to monitor at levels significantly lower than normal, don't losethe beat..
MASTER CONTROL
MASTER LEVEL - Main output levels from the program, usually this is the feed to the club's PA.
CROSSFADER CONTROL
CURVATURE SLIDER - Adjusts between a very narrow/quick curve (left), useful for

turntablism/scratching, and a more gradual X fade (right).
REVERSED - Reverses the crossfader curve, i.e. Deck B is silenced when the crossfader is set to theright.
LINEAR MODE - Bypasses the default fade curve and engages a simple linear fade curve. Mostcommonly used mode by DJs.
SAMPLER
8-BIT MICROSAMPLER - Record (right click to lock) and Play (right-click to lock) buttons. A simpleinline master sampler with two basic functions: Record and Trigger. It is possible to record the masteroutput mix (what you hear is what you sample) and then trigger it later in the mix. Note: Record timeis limited to ~10 seconds. There is a full disk-recorder located on the central main display above theFunction Window switches.
FUNCTION WINDOW
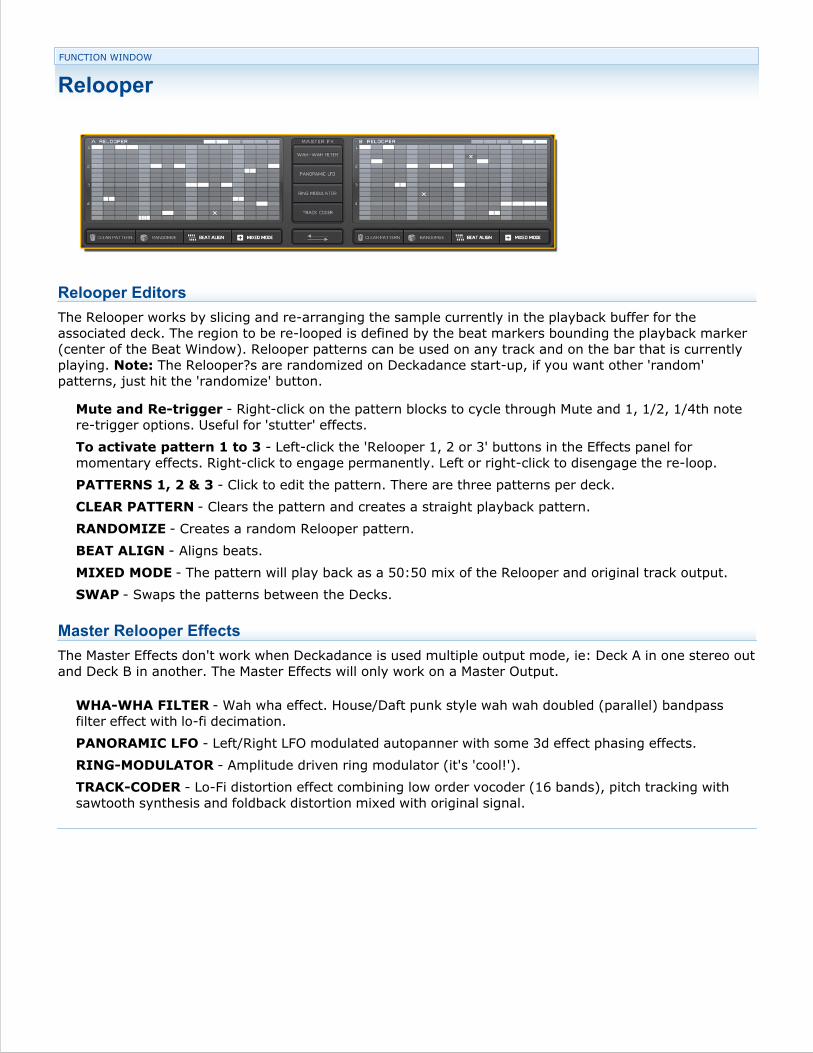
Relooper
Relooper Editors
The Relooper works by slicing and re-arranging the sample currently in the playback buffer for theassociated deck. The region to be re-looped is defined by the beat markers bounding the playback marker(center of the Beat Window). Relooper patterns can be used on any track and on the bar that is currentlyplaying. Note: The Relooper?s are randomized on Deckadance start-up, if you want other 'random'patterns, just hit the 'randomize' button.
Mute and Re-trigger - Right-click on the pattern blocks to cycle through Mute and 1, 1/2, 1/4th notere-trigger options. Useful for 'stutter' effects.
To activate pattern 1 to 3 - Left-click the 'Relooper 1, 2 or 3' buttons in the Effects panel formomentary effects. Right-click to engage permanently. Left or right-click to disengage the re-loop.
PATTERNS 1, 2 & 3 - Click to edit the pattern. There are three patterns per deck.
CLEAR PATTERN - Clears the pattern and creates a straight playback pattern.
RANDOMIZE - Creates a random Relooper pattern.
BEAT ALIGN - Aligns beats.
MIXED MODE - The pattern will play back as a 50:50 mix of the Relooper and original track output.
SWAP - Swaps the patterns between the Decks.
Master Relooper Effects
The Master Effects don't work when Deckadance is used multiple output mode, ie: Deck A in one stereo outand Deck B in another. The Master Effects will only work on a Master Output.
WHA-WHA FILTER - Wah wha effect. House/Daft punk style wah wah doubled (parallel) bandpassfilter effect with lo-fi decimation.
PANORAMIC LFO - Left/Right LFO modulated autopanner with some 3d effect phasing effects.
RING-MODULATOR - Amplitude driven ring modulator (it's 'cool!').
TRACK-CODER - Lo-Fi distortion effect combining low order vocoder (16 bands), pitch tracking withsawtooth synthesis and foldback distortion mixed with original signal.

SETUP
General, File & MIDI Controller
To open the Setup Function Window, click on the [SETUP] button located in the Function switch area at theTo open the Setup Function Window, click on the [SETUP] button located in the Function switch area at theupper middle of the main interface. NOTE: Audio Settings are accessed from the Tool Bar.upper middle of the main interface. NOTE: Audio Settings are accessed from the Tool Bar.
Global Settings Tab
Global Settings
Disable Elastique master tempo and key lock engine - Can decrease CPU load for slowercomputers struggling to run Deckadance without audio glitches (don't forget to increase latency & usecomputers struggling to run Deckadance without audio glitches (don't forget to increase latency & usean ASIO driver).
Lock playing deck - Stops tracks loading on the playing deck. Perhaps we should rename this'Stupidity filter' :)
Show spectral color waveform (CTRL+C) - More than just pretty colors! Engages the spectralShow spectral color waveform (CTRL+C) - More than just pretty colors! Engages the spectraldisplay for the decks. Red hues are bass/low frequencies, blue colors are treble/high frequencies.
Slow Decoder / Analysis - Can decrease CPU load for slower computers struggling to run Deckadancewithout audio glitches (don't forget to increase latency & use an ASIO driver).without audio glitches (don't forget to increase latency & use an ASIO driver).
BPM detector min. threshold - Set the lowest BMP the tempo detector will return. This is useful tostop spurious half speed tempo detections.
Tempo range - Set the maximum range the pitch/tempo slider will cover.Tempo range - Set the maximum range the pitch/tempo slider will cover.
Browser Settings
Show cover art - Shows cover art in the Playlist.
Show iTunes Library - If you have and iTunes library on your computer this will show it inDeckadance.
Font size - Change the font size used in the library/browser.
Automix Settings
Crossfade time - Automatic crossfade time in seconds (set from 1 to 100 seconds).
Enable DJ Style Automix - When you have to go to the loo , select this option to play and crossfadeEnable DJ Style Automix - When you have to go to the loo , select this option to play and crossfadeautomatically through the Playlist. Note: When selected the Play buttons for Decks A and B aredisabled.
Enable Bass X-Fade - Crossfades the bass along with the track volume. Useful for mixing difficult partswith conflicting drums. Note: When selected the Bass EQ slider is disabled.with conflicting drums. Note: When selected the Bass EQ slider is disabled.
Tooltips
Show Tooltips - Shows a help text in the Tool Tip window when you hover your mouse pointer over anitem.
Language - Choose from the usual set of 'imperialist' languages that, as usual, excludes Chinese, Hindi,Bengali & Punjabi that are spoken (in total) by more than 1/2 the worlds population. What a Euro-centric bunch we are, shame on us! If you would like to redress the balance please [email protected] and we can set you up with a table of text to translate into your [email protected] and we can set you up with a table of text to translate into your language.
Language
Select from the Tool Tip languages shown. The Tool Tips switch is on the main interface above the FunctionSelect from the Tool Tip languages shown. The Tool Tips switch is on the main interface above the Functionswitches. Contact Image-Line if you are willing to translate Deckadance into a language not shown.switches. Contact Image-Line if you are willing to translate Deckadance into a language not shown.
File Management Tab
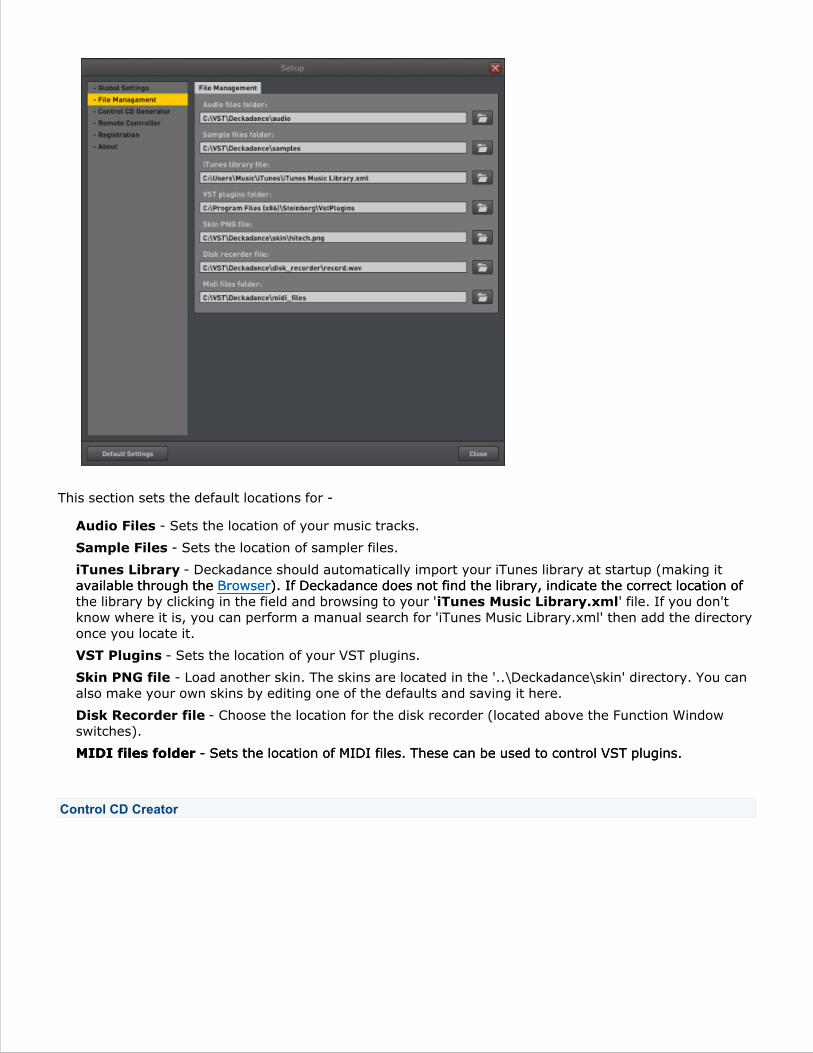
This section sets the default locations for -
Audio Files - Sets the location of your music tracks.
Sample Files - Sets the location of sampler files.
iTunes Library - Deckadance should automatically import your iTunes library at startup (making itavailable through the Browser). If Deckadance does not find the library, indicate the correct location ofavailable through the Browser). If Deckadance does not find the library, indicate the correct location ofthe library by clicking in the field and browsing to your 'iTunes Music Library.xml' file. If you don'tknow where it is, you can perform a manual search for 'iTunes Music Library.xml' then add the directoryonce you locate it.
VST Plugins - Sets the location of your VST plugins.
Skin PNG file - Load another skin. The skins are located in the '..\Deckadance\skin' directory. You canalso make your own skins by editing one of the defaults and saving it here.
Disk Recorder file - Choose the location for the disk recorder (located above the Function Windowswitches).
MIDI files folder - Sets the location of MIDI files. These can be used to control VST plugins.MIDI files folder - Sets the location of MIDI files. These can be used to control VST plugins.
Control CD Creator

Deckadance has the ability to generate an ultra-accurate timecode file, to be burned to CD and used withthe Timecode source Deckadance CONTROL CD option so you can control Deckadance from a CDJ.the Timecode source Deckadance CONTROL CD option so you can control Deckadance from a CDJ.
To create a Deckadance CONTROL CD:
Click the START button. The' Deckadance_Control_CD.wav' file will be generated. Press CANCELat any time to create a shorter file.
1.
The file will be saved in the Deckadance installation directory in a folder titled control_cd. Tospecify an alternative location click in the directory field and browse to the desired save location.
2.
Burn the file to an Audio CD and you are ready to use it in your CDJ, remember to select'Deckadance CONTROL CD' in the Vinyl / External Control options. To learn more about'Deckadance CONTROL CD' in the Vinyl / External Control options. To learn more aboutDeckadance's unique and ultra-accurate timecode technology see the Timecoded CD (CDJ) sectionon the Vinyl / External Control page.on the Vinyl / External Control page.
3.
Remote Controller
Deckadance has a wide range of plug-n-play compatibility with most MIDI controllers and DJ controllers onthe market.
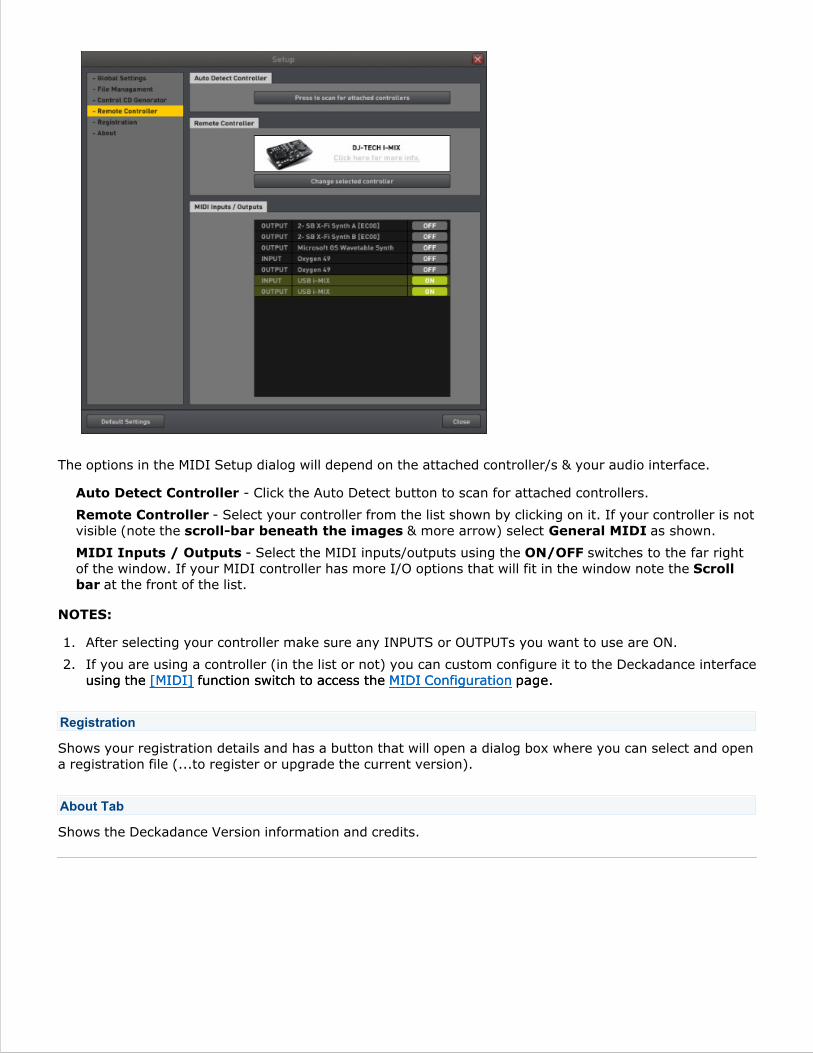
The options in the MIDI Setup dialog will depend on the attached controller/s & your audio interface.
Auto Detect Controller - Click the Auto Detect button to scan for attached controllers.
Remote Controller - Select your controller from the list shown by clicking on it. If your controller is notvisible (note the scroll-bar beneath the images & more arrow) select General MIDI as shown.
MIDI Inputs / Outputs - Select the MIDI inputs/outputs using the ON/OFF switches to the far rightof the window. If your MIDI controller has more I/O options that will fit in the window note the Scrollbar at the front of the list.
NOTES:
After selecting your controller make sure any INPUTS or OUTPUTs you want to use are ON.1.
If you are using a controller (in the list or not) you can custom configure it to the Deckadance interfaceusing the [MIDI] function switch to access the MIDI Configuration page.using the [MIDI] function switch to access the MIDI Configuration page.
2.
Registration
Shows your registration details and has a button that will open a dialog box where you can select and opena registration file (...to register or upgrade the current version).
About Tab
Shows the Deckadance Version information and credits.
SETUP
Audio Settings
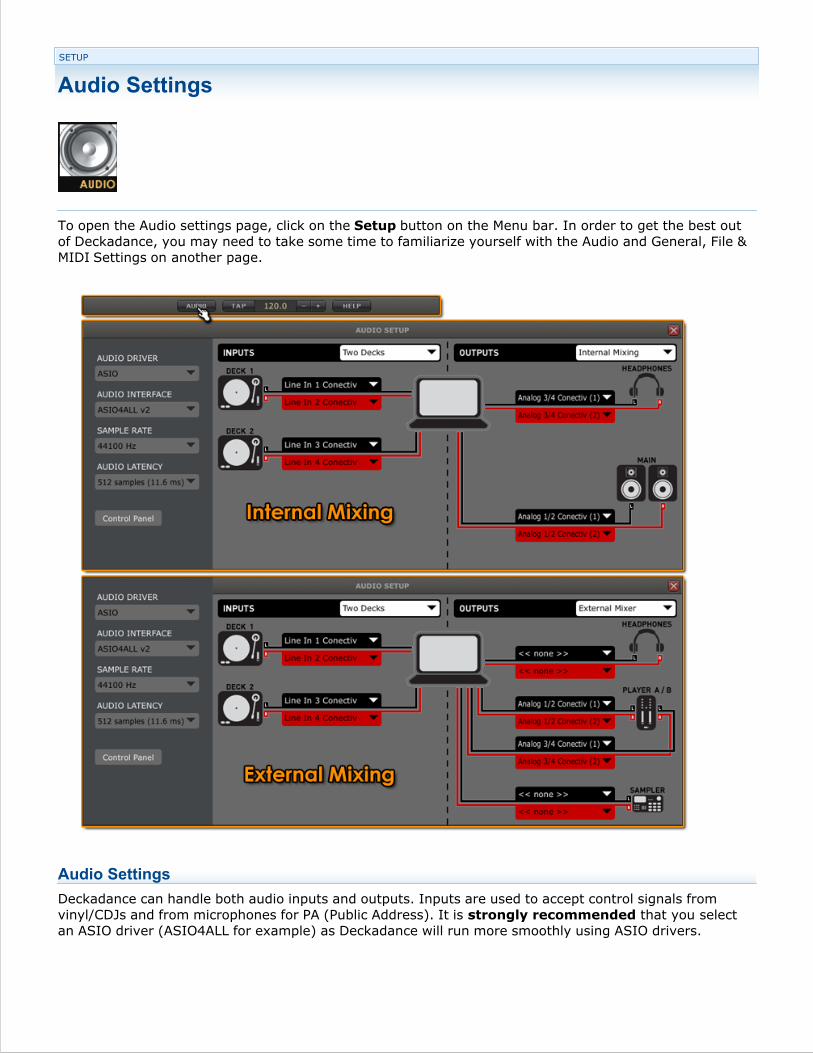
To open the Audio settings page, click on the Setup button on the Menu bar. In order to get the best outof Deckadance, you may need to take some time to familiarize yourself with the Audio and General, File &MIDI Settings on another page.
Audio Settings
Deckadance can handle both audio inputs and outputs. Inputs are used to accept control signals fromvinyl/CDJs and from microphones for PA (Public Address). It is strongly recommended that you selectan ASIO driver (ASIO4ALL for example) as Deckadance will run more smoothly using ASIO drivers.
AUDIO DRIVER - Select the audio driver type. PC: ASIO or Direct Sound (ASIO recommened). Mac:This option is not available.
AUDIO INTERFACE - Selects your soundcard/audio & driver. PC users: We recommend using theASIO4ALL driver if you don't have specific hardware in mind. The Deckadance installer includes theASIO4ALL .
SAMPLE RATE - Select the play-back frequency of your audio interface. 44100 Hz (44.1 kHz) is mostcommon although some interfaces use 48000 Hz (48 kHz).
AUDIO LATENCY - This is a working buffer (breathing space) used by Deckadance to avoid CPUoverload. As the latency is increased the delay between moving a MIDI/interface control andhearing/seeing the result is at least equal to this setting (in ms). The ideal buffer is the smallest yourcomputer can manage without causing glitches. Notes:
Generally - For most DJ work there is no need to set a latency below 512 samples (~11 ms @ 44.1kHz).
Elastique - When Elastique master tempo engine is active, a minimum suggested latency is 128samples. We also recommend multiples of this latency in case longer latencies are required: 256,512, 1024, 2048.
DVS - For DVS 'scratching' we suggest that you disable the master tempo engine and reduce thelatency as low as possible around (88 samples for an average computer and soundcard with ASIOdrivers).
CONTROL PANEL - Opens the soundcard driver interface. PC users: If your audio interface does nothave native ASIO drivers we recommend using ASIO4ALL soundcard driver. This allows you to use morethan one audio input/output device.
INPUTS - Select audio input configuration. Your ability to use the options below will depend on thenumber of inputs your audio interface has:
No inputs - Using only Deckadance internal audio sources.
Mic - You are using a single microphone input. Must we listen to your voice?
One deck - You have a single deck, Vinyl or CDJ. Cheapskate!
Two decks - You have two decks, Vinyl and or CDJ. You rock!
Two decks and a mic - You have two decks, Vinyl and or CDJ plus a mic. Playing with the bigleague now...
OUTPUTS - Select audio output configuration for internal or external audio mixing. Your ability to usethe options below will depend on the number of outputs your audio interface has:
Internal mixing - In this configuration you can select 2 stereo audio outputs . 1. Headphones(Monitor) and 2. Main outputs (Speakers/Mixing desk).
External mixing - In this configuration you have the option to configure 4 stereo audio outputs .1. Headphones (Monitor) and 2. & 3. Two stereo channels feeding the A and B inputs to the Mixer x-fader and 4. Auxiliary output to a sampler or recorder.
NOTE: If you have a 'surround-sound' (5.1 or 7.1) audio interface, you can use the rear speakeroutputs as a second audio out for headphones for example.
Setting up your inputs & outputs
Click the Audio button.1.
Select a soundcard - From the Audio Interface field, select a driver (see the screenshot above).This is your Soundcard or audio interface device labeled by the name of the soundcard driver (M-AudioUSB ASIO for example). Options available in this menu depend on the soundcard devices connected toyour computer. PC users will have access to the ASIO4ALL universal soundcard driver included in theDeckadance installation.
2.
3.
Select a sample rate - 44100 Hz is the preferred default CD audio rate, however some soundcards,such as the Creative Audigy series, are limited to 48000 Hz (minimum).
3.
Set the soundcard latency - Open the Control Panel (ASIO settings) and adjust the soundcardlatency. This is a working buffer with which Deckadance performs mixing operations. Generally,shorter latencies put more load on your CPU (which can cause audio stuttering), however shortlatencies are desirable for greater 'responsiveness' when scratching, for example. Soundcard latency isexpressed in milliseconds or samples. 20 ms (882 samples @ 44.1 kHz) is sufficiently short for mostDJ work. 10 ms or less (441 samples @ 44.1 kHz) ) is desirable if greater responsiveness is required.Experimentation will help you to determine what is suitable for your needs.
Eliminating audio glitches: The shortest latency achievable without overloading the CPU andstuttering, will depend on your soundcard and computer speed. There are a number of options on theGeneral, File & MIDI Settings panel that can aid in reducing CPU load and stuttering if you findincreasing the latency AND using an ASIO driver is not successful. Try selecting the 'Slow decoderanalysis mode ' & 'Disable Elastique master tempo and keylock engine ' options.
4.
If you have more than one soundcard, or wish to use independent INPUT and OUTPUTdevices, you can use the ASIO4ALL driver. This should make all the INPUTS/OUTPUTS on your audiodevices available on the drop-down menus for each INPUT/OUTPUT category. Follow this link for moredetails .
5.
Headphone Mix - It is often useful to monitor decks A and B while cueing tracks, without sound beingpassed to the Main Outputs of Deckadance. Where you see headphone symbols on the main interface,it means that an output can be sent to the Monitor Buss (usually a separate mix for the DJsHeadphones). To set up this feature, you need to have either multiple audio devices or a soundcardwith more than one output. If your soundcard has surround-sound capability, for example, you can usethe rear channels to feed your headphone mix and select those in Monitor Left and Right settings inthe Audio & MIDI Setup panel. In another 'low rent' approach, many USB headsets used with Skypeetc, have a built in mic and are also headphones. These will appear as a USB audio device and willallow you to use the PA feature (from the mic) and to monitor your cueing, all hands-free (but is itcool? who knows!).
6.
SETUP
Audio ASIO4ALL (PC Only)
For PC users the Deckadance installation includes a 3rd party ASIO driver ASIO4ALL . There are twoFor PC users the Deckadance installation includes a 3rd party ASIO driver ASIO4ALL . There are twoadvantages:
Speed: ASIO drivers (in general) allow lower CPU overhead and shorter buffer length than thestandard Windows (DirectSound, WDM Driver). If your audio interface has a native ASIO driver then werecommend you use that.
Multiple audio devices: Specific to the ASIO4ALL driver, you to select inputs and outputs fromseparate soundcards/audio-devices, something that is not possible with standard ASIO drivers. Thisis how you can use a USB microphone with your regular soundcard (see point 6 below).
NOTE: ASIO4ALL is a generic ASIO driver that works with most soundcards, your experience may bedifferent, including long periods of silence and head-scratching. If ASIO4ALL doesn't produce any sound werecommend that you work through all the steps below including the Troubleshooting section.recommend that you work through all the steps below including the Troubleshooting section.
Using the ASIO4ALL Advanced Settings
This section explains how to use the ASIO4ALL settings.
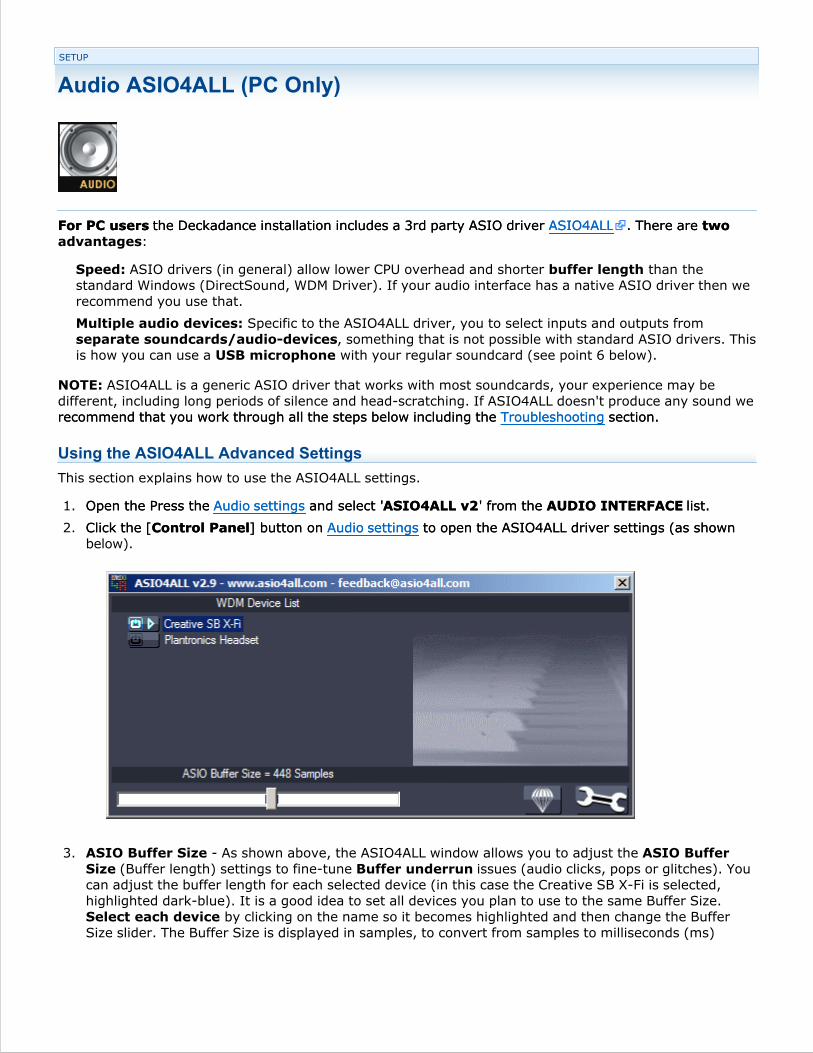
Open the Press the Audio settings and select 'ASIO4ALL v2' from the AUDIO INTERFACE list.Open the Press the Audio settings and select 'ASIO4ALL v2' from the AUDIO INTERFACE list.1.
Click the [Control Panel] button on Audio settings to open the ASIO4ALL driver settings (as shownClick the [Control Panel] button on Audio settings to open the ASIO4ALL driver settings (as shownbelow).
2.
ASIO Buffer Size - As shown above, the ASIO4ALL window allows you to adjust the ASIO BufferSize (Buffer length) settings to fine-tune Buffer underrun issues (audio clicks, pops or glitches). Youcan adjust the buffer length for each selected device (in this case the Creative SB X-Fi is selected,highlighted dark-blue). It is a good idea to set all devices you plan to use to the same Buffer Size.Select each device by clicking on the name so it becomes highlighted and then change the BufferSize slider. The Buffer Size is displayed in samples, to convert from samples to milliseconds (ms)
3.

divide the Buffer length in samples by 44.1 (if your soundcard is using 44100 Hz) or 48 (if it is at48,000 Hz). In this case, the soundcard is set to 44100 Hz so the Buffer length of 448 samples = 10ms (approximately).
WDM Device List - The screenshot also shows 2 devices in the WDM Device List (Creative SB X-Fiand Plantronics Headset). The devices that appear in your list will probably be different and are thoseaudio devices that have soundcard drivers correctly installed and registered with the Windowsoperating system. If your sound is working correctly under Windows, there should be at least onedevice listed (something with Realtek or AC97 in the title are common for motherboard-basedsoundcards). If nothing is showing in this list, re-install the soundcard drivers for your PC, reboot andlook here again.
4.
Advanced settings - Make sure you are in Advanced mode as shown below. Click the Spanner(lower-right) to change between 'Simple' and 'Advanced' modes.
5.
Active devices - Only active devices (and their active Inputs/Outputs) can be used by Deckadance,i.e show in the INPUT / OUTPUT ROUTING options. This is the step that is required to use a USBi.e show in the INPUT / OUTPUT ROUTING options. This is the step that is required to use a USBmicrophone with your soundcard. To activate a device click the button in front of the devicename, the blue button & arrow will light to indicate the device is active. You must also ensure thatthe device's Inputs (In:) and Outputs (Out:) are also activated. Click on any [+] squares in front ofthe device to expand the list of Inputs and Outputs and click on the activate buttons. NOTE: activatinga device at the highest level does not necessarily mean it's inputs and outputs are activated. Forexample, in the screenshot above the Plantronics Headset Output is not activated and so won't beavailable in Deckadance.
Activate the In: and Out: options you want to use with Deckadance on any or all soundcards. Theseoutputs will now appear as Inputs and Output options in the drop-down menus on the Audio Setuppage.
6.
Latency compensation In/Out - sliders. Leave these at the default settings. The ASIO4ALL driverreports to Deckadance the latency it adds to the audio stream, and this is taken into account by theprogram where appropriate. However, if you have measured the input/output latency of yoursoundcard using a loop-back cable, and know what you are doing, then set the 'Latency compensation'sliders according to your measured results.
7.
Use hardware Buffer - Can reduce Buffer underruns (audio clicks, pops or glitches). Whether ornot it helps will depend on the design of your soundcard's design and drivers.
8.
Always resample 44.1 kHz <-> 48 kHz - This option fixes a no sound issue on SigmaTel C-Major Audio devices. If everything else seems to be correct on your soundcard settings and you arenot hearing anything you can give this option a try.
9.
Force WDM Driver to 16-Bit - This option fixes a no sound issue on SoundMax Digital Audiodevices. If everything else seems to be correct on your soundcard settings and you are not hearing
10.
11.

anything you can give this option a try.
10.
When you are done, close the ASIO4ALL options with the [X] window control in the top-right corner.When you are done, close the ASIO4ALL options with the [X] window control in the top-right corner.11.
Troubleshooting
Make sure you are using the latest version of ASIO4ALL, install it and try again. The latestASIO4ALL driver will be available at www.asio4all.com . Don't be afraid to try the latest Beta (if thereASIO4ALL driver will be available at www.asio4all.com . Don't be afraid to try the latest Beta (if thereis one).
1.
Unavailable - If any of the inputs/outputs of the devices in the 'WDM Device List' have a RED Xthrough them, it means they are probably being used by another audio application. For example,programs such as 'MSN Messenger', 'Skype', media players etc. can tie up inputs/outputs so, closeDeckadance, close any program that may use your soundcard and re-open Deckadance and theASIO4ALL options.
2.
Nothing shows - If your soundcard or its IN/OUTputs don't show in advanced mode, trydownloading the latest driver for your soundcard. This happens when the driver for your soundcardhasn't registered itself correctly with Windows.
3.
No sound - Check the following:
Select all Outputs - In 'Advanced view' expand your Soundcard Inputs/Outputs and ensure allOutputs are active. In the example above, the Creative SB X-Fi has its main analog outputselected ('Out: 8x 44.1 1-192kHz, 32Bits') but the 'SPDIF' Output and 'Plantronics Head' setOutput ('Out: 2x 6 4-48 kHz, 16 bits') are both deselected and so would not be available in theAudio settings.Audio settings.
Main Outputs - Make sure your ASIO Output is selected in the Master OUT Audio settings.Main Outputs - Make sure your ASIO Output is selected in the Master OUT Audio settings.
Switches - Try the 4 possible combinations of the 'Always resample 44.1 kHz <-> 48 kHz'and 'Force WDM Driver to 16-Bit' switches (Off/Off, On/Off, Off/On, On/On).
Any sound? - If there is still no sound, make sure you can hear sound from other Windowsprograms. If not then your problem isn't related to ASIO4ALL (try re-installing your soundcarddrivers).
Output Errors? - Make sure the Outputs are not showing Unavailable or Beyond logic asdescribed elsewhere in this section.
4.
Crackling noises without the underrun count increasing - Check the following:
Switches - Try the 4 possible combinations of the 'Always resample 44.1 kHz <-> 48 kHz'and 'Force WDM Driver to 16-Bit' switches (Off/Off, On/Off, Off/On, On/On).
Hardware buffer switch - Try On/Off.
5.
Beyond Logic - Similar to 'unavailable', if the control panel of your card provides the option to lockthe sample rate deselect it, a known cause of 'Beyond Logic' errors. Also try closing and re-opening thecontrol panel, unplugging/re-inserting USB audio devices and/or reinstalling the Windows (WDM) driverfor the soundcard.
6.
Check the ASIO4ALL Manual in the installation directory ..:\Program Files\ASIO4ALL v2\ASIO4ALLv2 Instruction Manual.pdf, FAQ at www.asio4all.com or try the ASIO4ALL forums.v2 Instruction Manual.pdf, FAQ at www.asio4all.com or try the ASIO4ALL forums.
7.
SETUP
Aggregate Device Editor (Mac only)
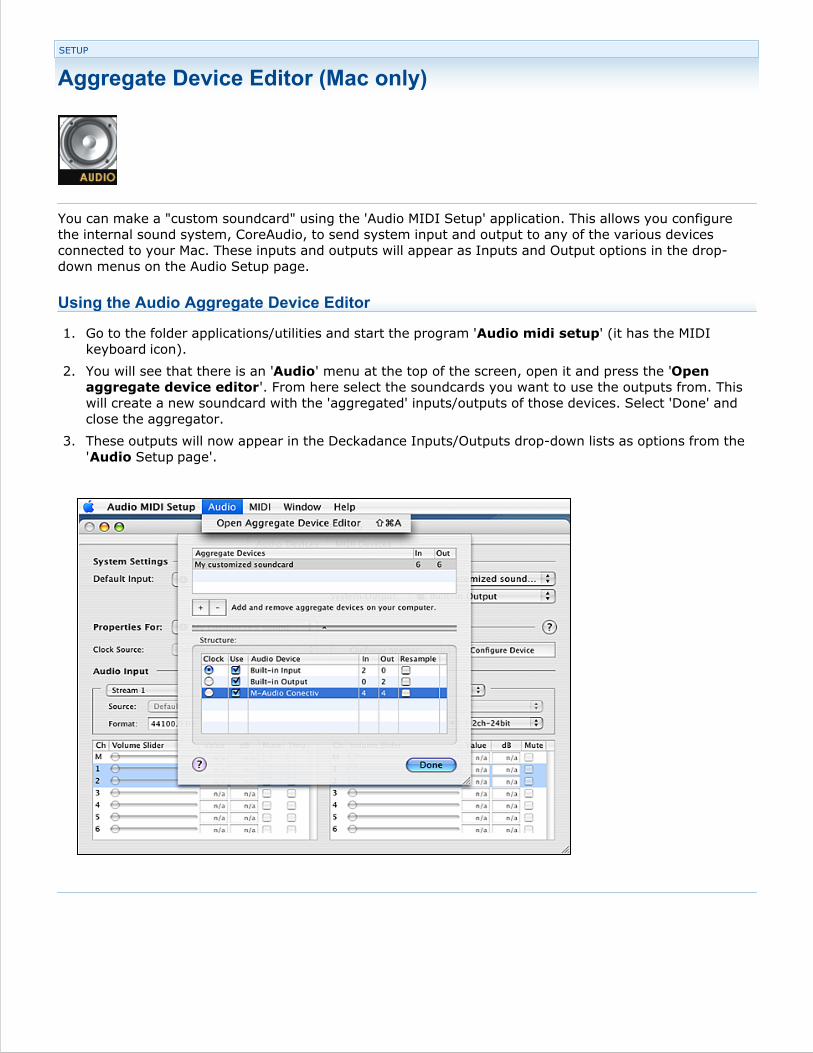
You can make a "custom soundcard" using the 'Audio MIDI Setup' application. This allows you configurethe internal sound system, CoreAudio, to send system input and output to any of the various devicesconnected to your Mac. These inputs and outputs will appear as Inputs and Output options in the drop-down menus on the Audio Setup page.
Using the Audio Aggregate Device Editor
Go to the folder applications/utilities and start the program 'Audio midi setup' (it has the MIDIkeyboard icon).
1.
You will see that there is an 'Audio' menu at the top of the screen, open it and press the 'Openaggregate device editor'. From here select the soundcards you want to use the outputs from. Thiswill create a new soundcard with the 'aggregated' inputs/outputs of those devices. Select 'Done' andclose the aggregator.
2.
These outputs will now appear in the Deckadance Inputs/Outputs drop-down lists as options from the'Audio Setup page'.
3.

Deckadance VST
FL Studio
This section explains how to use Deckdance in FL Studio. FL Studio is Image-Line's music productionapplication (DAW). Download the FL Studio Demo here . It installs as both a VST and Stand-aloneversion.
External Audio Inputs & Outputs
Deckadance is a multi-input and output plugin . Use the Wrapper Processing tab to routeinputs/outputs to and from Deckance. The following method shows how to connect two external turntables/ VJDs to Deckadance while inside FL Studio or route Deckadance decks to an external Mixer. Once youunderstand the principles of track sidechaining/routing and IN/OUTputs available on each Mixer track youwill be on your way to creating more complex setups if required.
Audio Inputs
External audio device - Make sure FL Studio is using the same audio device your Turntables areconnected to. Open the F10 > Audio Settings and select your INPUT audio-interface Soundcard Driver.
1.
Load Deckadance as an Effect - Load Deckadance on a Mixer track FX slot.2.

2.
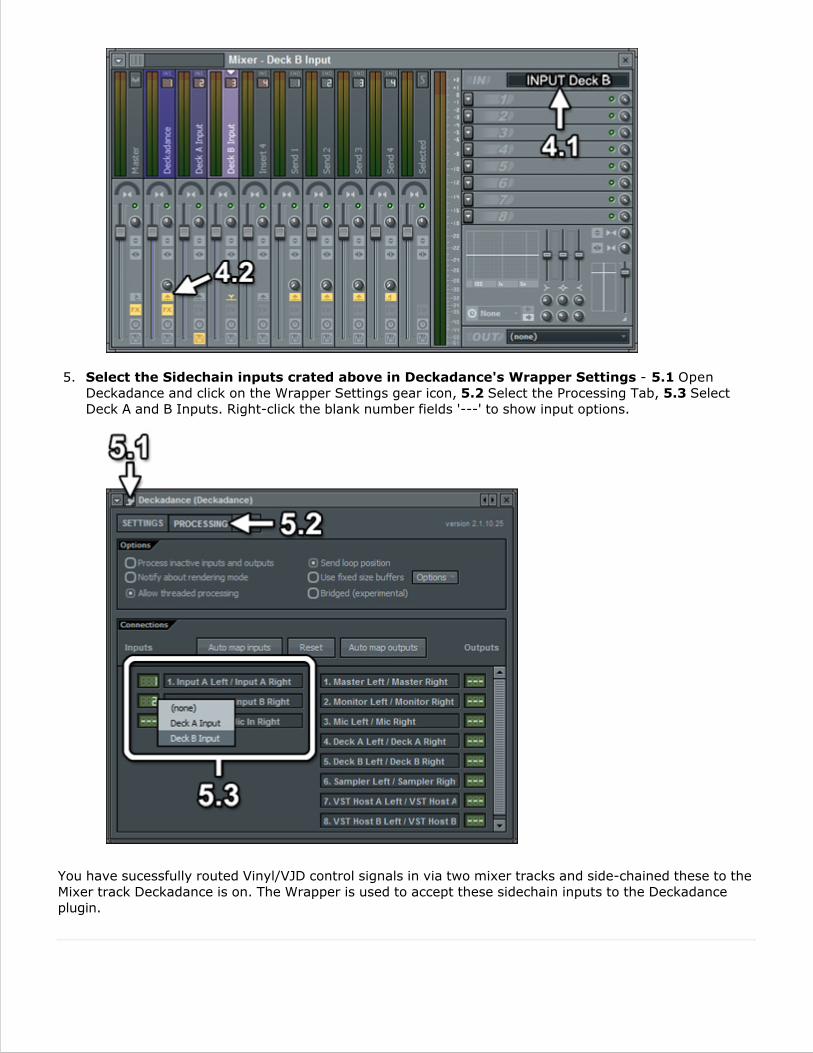
Assign a Mixer Track for the Deck A Input - 3.1 Set the Deck A INput to your Left Turntable'saudio. 3.2 Route the Deck A Input track exclusively to the Deckadance Mixer Track (from step 2).
3.
Assign a Mixer Track for the Deck B Input - 4.1 Set the Deck A INput to your Left Turntable'saudio. 4.2 Route the Deck A Input track exclusively to the Deckadance Mixer Track (from step 2).
4.
4.
Select the Sidechain inputs crated above in Deckadance's Wrapper Settings - 5.1 OpenDeckadance and click on the Wrapper Settings gear icon, 5.2 Select the Processing Tab, 5.3 SelectDeck A and B Inputs. Right-click the blank number fields '---' to show input options.
5.
You have sucessfully routed Vinyl/VJD control signals in via two mixer tracks and side-chained these to theMixer track Deckadance is on. The Wrapper is used to accept these sidechain inputs to the Deckadanceplugin.
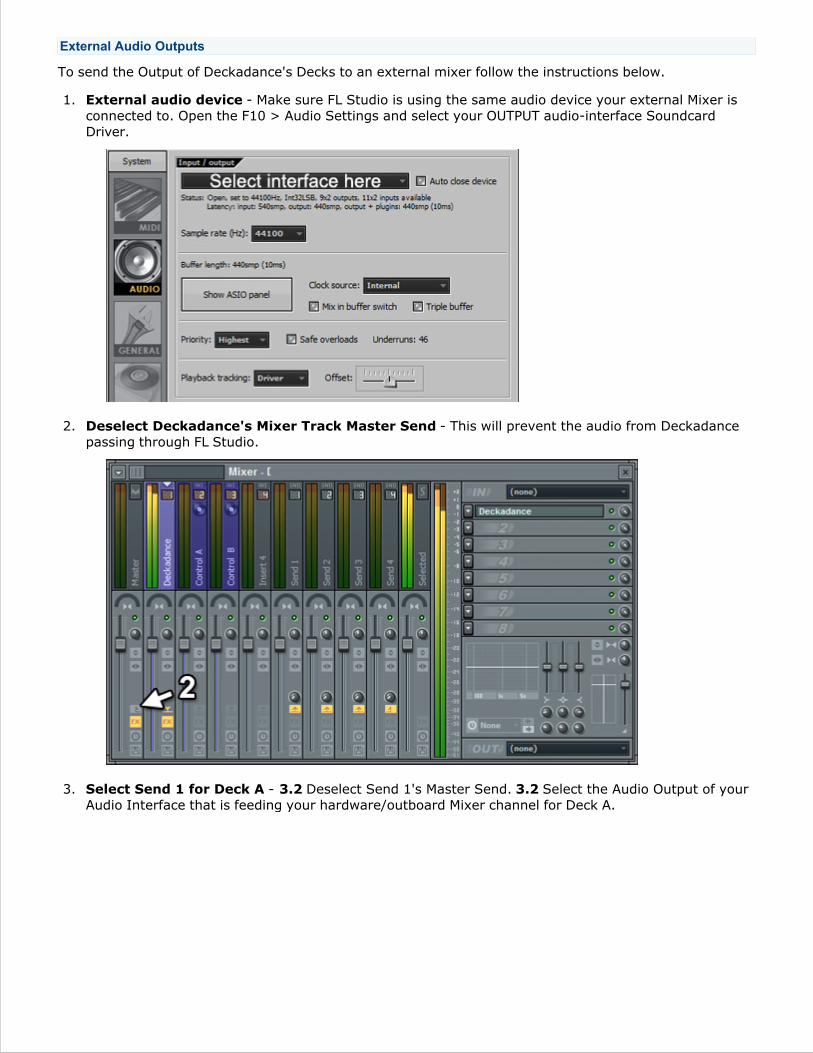
External Audio Outputs
To send the Output of Deckadance's Decks to an external mixer follow the instructions below.
External audio device - Make sure FL Studio is using the same audio device your external Mixer isconnected to. Open the F10 > Audio Settings and select your OUTPUT audio-interface SoundcardDriver.
1.
Deselect Deckadance's Mixer Track Master Send - This will prevent the audio from Deckadancepassing through FL Studio.
2.
Select Send 1 for Deck A - 3.2 Deselect Send 1's Master Send. 3.2 Select the Audio Output of yourAudio Interface that is feeding your hardware/outboard Mixer channel for Deck A.
3.

3.
Select Send 2 for Deck B - 4.1 Deselect Send 1's Master Send. 4.2 Select the Audio Output of yourAudio Interface that is feeding your hardware/outboard Mixer channel for Deck B.
4.
Map Deckadance's Outputs to Send 1 and Send 2 - 5.1 Open Deckadance and select the WrapperSettings gear icon. 5.2 Select the Processing tab. 5.3 Route Deck A to Send 1 and Deck B to Send 2.Right-click the blank field '---' to select the appropriate Send.
5.

5.
If you have routed things correctly Deckadance deck A and B will be leaving your computer via separateoutputs on your audio interface.

MISC
Keyboard Shortcuts
Key Action [Shift] Action [Ctrl] Action
Q Play / Pause (deck A) Play / Pause (deck B) n/a
W Cue / Stop (deck A) Cue / Stop (deck B) Tool window switcher
A Rewind (deck A) Rewind (deck B) Automix
Z Sync (deck A) Sync (deck B) n/a
E Pitch up (deck A) Pitch up (deck B) n/a
D Pitch down (deck A) Pitch down (deck B) Disk recorder
R Bend up (deck A) Bend up (deck B) Set Reloop (deck A)
F Bend down (deck A) Bend down (deck B) Set Reloop (deck B)
T Volume up (deck A) Volume up (deck B) n/a
G Volume down (deck A) Volume down (deck B) n/a
YJump 1 beat fwd (deckA)
Jump 1 beat fwd (deckB)
n/a
HJump 1 beat back (deckA)
Jump 1 beat back (deckB)
n/a
U Jump 1 bar fwd (deck A) Jump 1 bar fwd (deck B) n/a
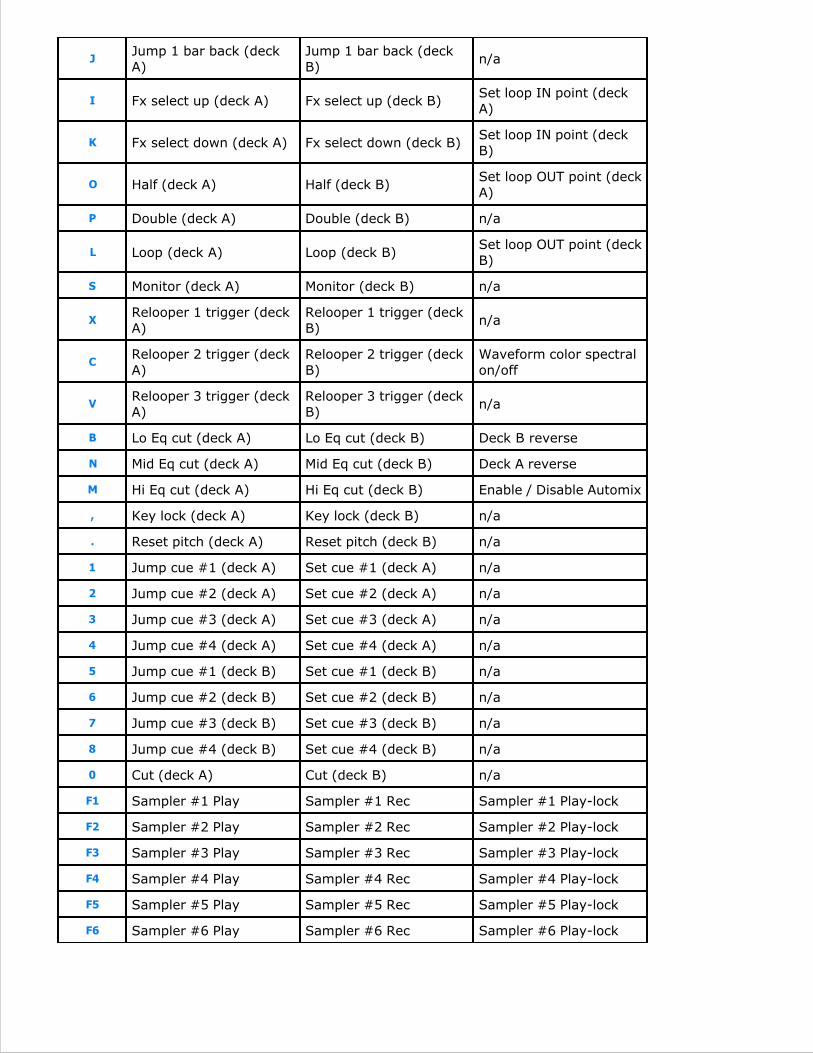
JJump 1 bar back (deckA)
Jump 1 bar back (deckB)
n/a
I Fx select up (deck A) Fx select up (deck B)Set loop IN point (deckA)
K Fx select down (deck A) Fx select down (deck B)Set loop IN point (deckB)
O Half (deck A) Half (deck B)Set loop OUT point (deckA)
P Double (deck A) Double (deck B) n/a
L Loop (deck A) Loop (deck B)Set loop OUT point (deckB)
S Monitor (deck A) Monitor (deck B) n/a
XRelooper 1 trigger (deckA)
Relooper 1 trigger (deckB)
n/a
CRelooper 2 trigger (deckA)
Relooper 2 trigger (deckB)
Waveform color spectralon/off
VRelooper 3 trigger (deckA)
Relooper 3 trigger (deckB)
n/a
B Lo Eq cut (deck A) Lo Eq cut (deck B) Deck B reverse
N Mid Eq cut (deck A) Mid Eq cut (deck B) Deck A reverse
M Hi Eq cut (deck A) Hi Eq cut (deck B) Enable / Disable Automix
, Key lock (deck A) Key lock (deck B) n/a
. Reset pitch (deck A) Reset pitch (deck B) n/a
1 Jump cue #1 (deck A) Set cue #1 (deck A) n/a
2 Jump cue #2 (deck A) Set cue #2 (deck A) n/a
3 Jump cue #3 (deck A) Set cue #3 (deck A) n/a
4 Jump cue #4 (deck A) Set cue #4 (deck A) n/a
5 Jump cue #1 (deck B) Set cue #1 (deck B) n/a
6 Jump cue #2 (deck B) Set cue #2 (deck B) n/a
7 Jump cue #3 (deck B) Set cue #3 (deck B) n/a
8 Jump cue #4 (deck B) Set cue #4 (deck B) n/a
0 Cut (deck A) Cut (deck B) n/a
F1 Sampler #1 Play Sampler #1 Rec Sampler #1 Play-lock
F2 Sampler #2 Play Sampler #2 Rec Sampler #2 Play-lock
F3 Sampler #3 Play Sampler #3 Rec Sampler #3 Play-lock
F4 Sampler #4 Play Sampler #4 Rec Sampler #4 Play-lock
F5 Sampler #5 Play Sampler #5 Rec Sampler #5 Play-lock
F6 Sampler #6 Play Sampler #6 Rec Sampler #6 Play-lock

F7 Sampler #7 Play Sampler #7 Rec Sampler #7 Play-lock
F8 Sampler #8 Play Sampler #8 Rec Sampler #8 Play-lock
F9 Playlist window Vinyl / Ext Ctrl. window n/a
F10 Setup window iTunes library n/a
F11 Sampler window VST host window n/a
F12 Relooper window MIDI window n/a
+ Master volume up n/a Phones volume up
- Master volume down n/a Phones volume down
* Reset crossfader n/a n/a
LeftArrow
Crossfader to left n/a Load deck A
RightArrow
Crossfader to right n/a Load deck B
Up Arrow Move up Playlist n/a Preview track
DownArrow
Move down Playlist n/a n/a
Esc Preview close n/a n/a
BackspacePlaylist remove / MIDIlearn delete
n/a n/a

INFORMATION, THAT ONLY OUR MOTHERS WOULD BE EXCITED TO SEE
Deckadance Acknowledgements
Credits
Deckadance: L.S.D (Luis Serrano), Argu (Juan Antonio Arguelles).
CD Tracking Technology: Licensed from Schaack Audio Technologies.
Manuals: Scott Fisher.
Safety Statement: If you DJ in rivers or lakes, check the water depth and temperature first. Make sure toonly use battery powered equipment, never lead a mains power cable into the water.
Copyright© Image-Line Software 2007-2011
Image Line Software BVBAImage Line Software BVBA
Kortrijksesteenweg 281
B-9830 Sint-Martens-Latem
BelgiumBelgium