Embed Size (px)
Citation preview
Debugging Your NetView Automation Table
Compiled byLarry Green
December 10, 2013 1 of 53

© Copyright IBM Corporation 2013.
December 10, 2013 2 of 53
Table of ContentsTable of Contents....................................................................................................3Table of Figures......................................................................................................4Introduction.............................................................................................................6Verify the Syntax.....................................................................................................7Test Automation Table Logic................................................................................10Parallel testing.......................................................................................................10Pre-recorded testing.............................................................................................11Activate the Automation Table..............................................................................15Add Another Table................................................................................................16Enable / Disable....................................................................................................19Check Automation Table Status...........................................................................23Other Reports........................................................................................................24AUTOCNT Message Detail Report.......................................................................24AUTOCNT Message Summary Report.................................................................28Tracing..................................................................................................................31Example 1.............................................................................................................31Example 2.............................................................................................................34Unautomated Messages and MSUs.....................................................................36Other Tools...........................................................................................................37AUTOMAN............................................................................................................37Summary...............................................................................................................49For more information.............................................................................................50Notices..................................................................................................................51Trademarks...........................................................................................................53
December 10, 2013 3 of 53
Table of FiguresFigure 1 Example: Automation Table member EXSYNS......................................7Figure 2 Example: Main Automation Table...........................................................7Figure 3 Example Automation Table Listing...........................................................9Figure 4 Example AUTOTEST Report.................................................................13Figure 5 Inserting a new automation table...........................................................16Figure 6 Adding a new automation table as last..................................................17Figure 7 Adding a new automation table after an existing table..........................18Figure 8 Replacing an existing automation table.................................................19Figure 9 LABEL / ENDLABEL in an automation table..........................................20Figure 10 Automation Table Management screen...............................................20Figure 11 Automation Table Management command menu................................21Figure 12 Enable/Disable from Automation Table Management menu...............21Figure 13 Enable/Disable a Statement/Block/Group............................................22Figure 14 Search commands with blocks / groups / labels..................................23Figure 15 Automation Table status.......................................................................24Figure 16 AUTOCNT Command..........................................................................25Figure 17 AUTOCNT Message Details................................................................26Figure 18 AUTOCNT Message Summary............................................................29Figure 19 AUTOCNT Summary statistics and indications...................................29Figure 20 Starting an Automation Table Trace....................................................31Figure 21 Selecting an Automation Table for Reload...........................................32Figure 22 Reload an Automation Table................................................................32Figure 23 Automation Table Trace Results..........................................................33Figure 24 Determine Listing Data Set..................................................................34Figure 25 Listing Member Excerpt........................................................................34Figure 26 Trace setup...........................................................................................35Figure 27 Trace results.........................................................................................35Figure 28 AUTOMAN: Automation Table Management......................................37Figure 29 Commands Menu for Individual Automation Tables............................38Figure 30 Testing a Selected Automation Table..................................................38Figure 31 Enable/Disable Parts of an Automation Table.....................................39Figure 32 Insert an Automation Table..................................................................39Figure 33 Specify Where to Add the New Table..................................................40Figure 34 Display Options....................................................................................41Figure 35 Display Options Menu..........................................................................41Figure 36 Display INCLUDE Structure.................................................................42Figure 37 INCLUDE Structure..............................................................................42Figure 38 Display Synonyms................................................................................43Figure 39 Synonym Definitions.............................................................................43Figure 40 Display Labels, Blocks and Groups.....................................................44Figure 42 Display Disabled Statements...............................................................44Figure 43 Display Statistics..................................................................................45Figure 44 AUTOCNT Message Detail Statistics...................................................45Figure 45 AUTOCNT MSU Detail Statistics.........................................................46
December 10, 2013 4 of 53
Figure 46 AUTOCNT Message and MSU Summary Statistics............................46Figure 47 Browse the Automation Table Listing...................................................47Figure 48 Automation Table Listing......................................................................47Figure 49 Display Global Commands...................................................................48Figure 50 Global Commands................................................................................48
December 10, 2013 5 of 53
IntroductionThe Automation Table is one of a number of capabilities in the IBM® Tivoli®
NetView® for z/OS® program that allow for automated handling of many of the information-system and network operations that usually require human intervention. Automation can improve the availability of systems and networks by quickly and accurately responding to unexpected events. And when outages do occur, whether planned or unplanned, automation can dramatically reduce recovery time. Automation can reduce the chances for operator errors by either eliminating the need for operator response entirely, or if operator intervention is required, by simplifying the task, and ensuring consistent responses to similar events. As customer environments grow larger and more complex, automation can increase operator productivity, ensure consistent operating procedures, allow for centralized control, slow the growth of staffing requirements, and remove other constraints that could hinder smooth growth.
The Automation Table allows customers to identify conditions they want automation to handle and to specify actions to be taken in response to those conditions. The Automation Table can be structured as a single table defined in one data set member, or as multiple, concatenated tables; it also allows for one table to include another one. Within a table, related statements can be further organized into blocks. This flexibility allows the customer to structure the table efficiently to minimize condition checking and therefore CPU usage, and if desired, in a way to reflect organizational, geographic, or other considerations of their company.
Regardless of how simple or complex your automation table is, there will undoubtedly be times when your automation is not doing what you expected – there’s a bug somewhere. How do you find it? This paper explores a variety of techniques for debugging both the syntax and the logic of your automation table.
December 10, 2013 6 of 53
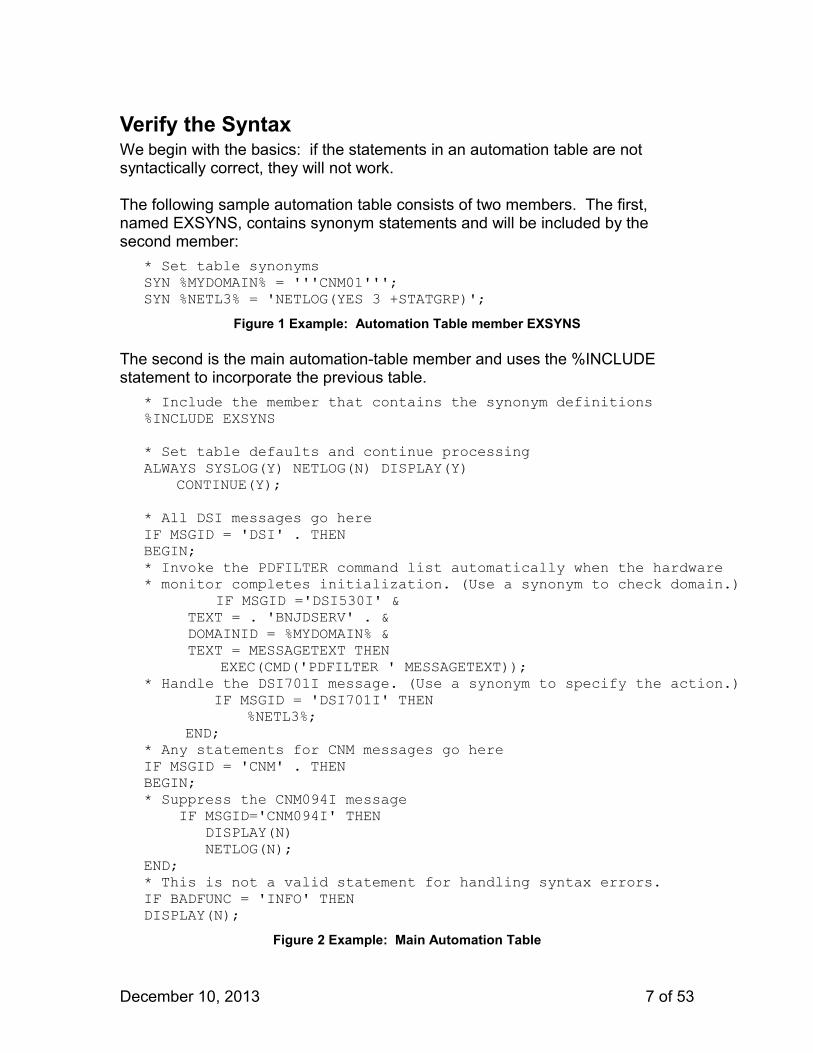
Verify the SyntaxWe begin with the basics: if the statements in an automation table are not syntactically correct, they will not work.
The following sample automation table consists of two members. The first, named EXSYNS, contains synonym statements and will be included by the second member:
* Set table synonymsSYN %MYDOMAIN% = '''CNM01''';SYN %NETL3% = 'NETLOG(YES 3 +STATGRP)';
Figure 1 Example: Automation Table member EXSYNS
The second is the main automation-table member and uses the %INCLUDE statement to incorporate the previous table.
* Include the member that contains the synonym definitions %INCLUDE EXSYNS
* Set table defaults and continue processing ALWAYS SYSLOG(Y) NETLOG(N) DISPLAY(Y)
CONTINUE(Y);
* All DSI messages go here IF MSGID = 'DSI' . THEN BEGIN; * Invoke the PDFILTER command list automatically when the hardware * monitor completes initialization. (Use a synonym to check domain.)
IF MSGID ='DSI530I' & TEXT = . 'BNJDSERV' . & DOMAINID = %MYDOMAIN% & TEXT = MESSAGETEXT THEN
EXEC(CMD('PDFILTER ' MESSAGETEXT)); * Handle the DSI701I message. (Use a synonym to specify the action.) IF MSGID = 'DSI701I' THEN
%NETL3%; END;
* Any statements for CNM messages go here IF MSGID = 'CNM' . THENBEGIN; * Suppress the CNM094I message IF MSGID='CNM094I' THEN DISPLAY(N) NETLOG(N); END;* This is not a valid statement for handling syntax errors. IF BADFUNC = 'INFO' THEN DISPLAY(N);
Figure 2 Example: Main Automation Table
December 10, 2013 7 of 53
The second member contains an invalid function, BADFUNC, that syntax checking will find. To test the syntax and generate a listing of the automation table, use the AUTOTBL command:
AUTOTBL MEMBER=membername,TEST,LISTING=lnameThe MEMBER keyword identifies the member of the NetView DSIPARM data set1
that contains the automation table, and the LISTING keyword specifies the member or file where the NetView program will place the listing output2 that it creates. LISTING creates or replaces the lname member in the first data set in the NetView DSILIST DD statement. READSEC authorization checking3 is performed to determine access authority for the membername before a listing is generated. The Listing is very useful in determining the order of automation statements, and also helps in debugging logic errors in automation tables by showing the entire automation table in one place.
If there are no errors, we get message CNM501I:CNM501I TEST OF NETVIEW AUTOMATION FILE “membername" WAS SUCCESSFUL
If there are errors, refer to the Listing file. It includes: • Header lines:
– The AUTOTBL command you issued– The task that ran the command– The time when it was executed
• Start and end lines that indicate where each member in the table begins and ends.
• An asterisk (*) in column 1 marks each comment line. • Synonyms that you defined are resolved. In the example, %MYDOMAIN%
and %NETL3% are replaced with their resolved values.• Columns 1 - 4: statement number.• Columns 6 - 8: BEGIN-END nesting level. Examples: 001 indicates a
statement that is not within a BEGIN-END section; 002 indicates a statement in a first-level BEGIN-END section.
• Columns 10 - 72: statement text• Columns 73 - 80: sequence number, if any• An error message follows each statement that is not valid.
At the end of the listing is a line stating the total number of errors.
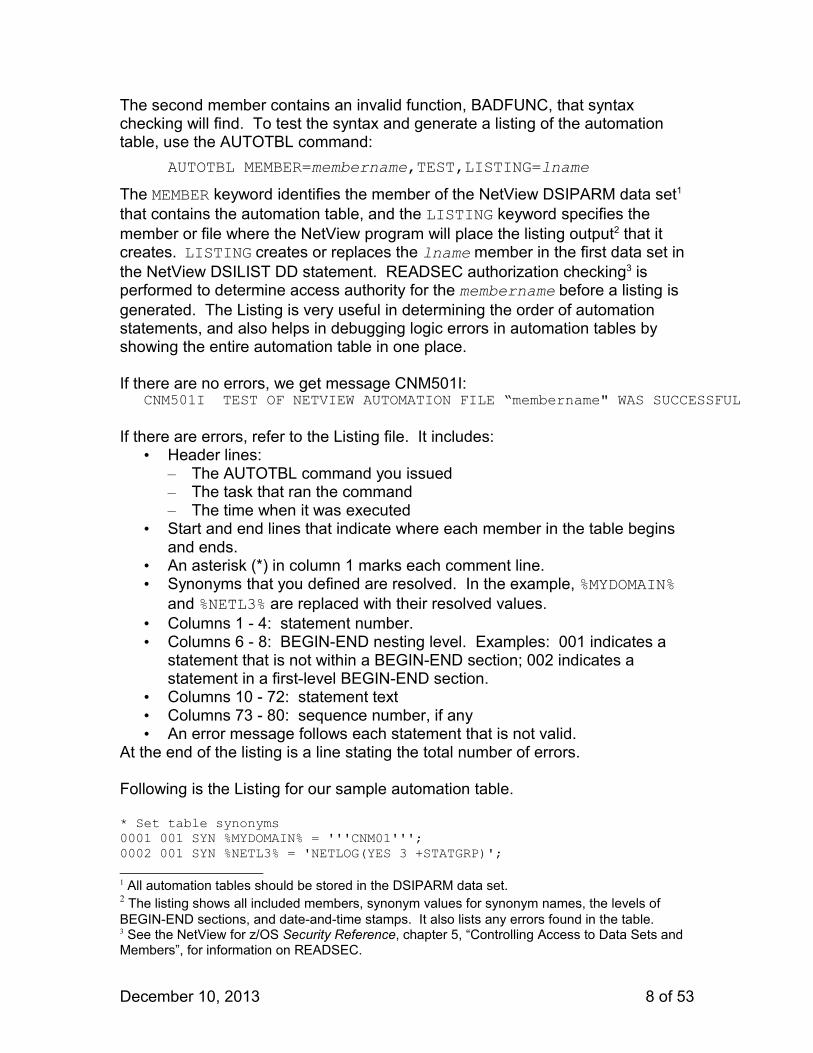
Following is the Listing for our sample automation table.
* Set table synonyms 0001 001 SYN %MYDOMAIN% = '''CNM01'''; 0002 001 SYN %NETL3% = 'NETLOG(YES 3 +STATGRP)'; 1 All automation tables should be stored in the DSIPARM data set.2 The listing shows all included members, synonym values for synonym names, the levels of BEGIN-END sections, and date-and-time stamps. It also lists any errors found in the table.3 See the NetView for z/OS Security Reference, chapter 5, “Controlling Access to Data Sets and Members”, for information on READSEC.
December 10, 2013 8 of 53
------------------------------ END OF 'EXSYNS ' --------------------- * Set table defaults and continue processing 0003 001 ALWAYS SYSLOG(Y) NETLOG(N) DISPLAY(Y) CONTINUE(Y); * All DSI messages go here 0004 001 IF MSGID = 'DSI' . THEN BEGIN; * Invoke the PDFILTER command list automatically when the hardware * monitor completes initialization. (Use a synonym to check domain.) 0005 002 IF MSGID ='DSI530I' & TEXT = . 'BNJDSERV' . & DOMAINID = 'CNM01' & TEXT = MESSAGETEXT THEN EXEC(CMD('PDFILTER ' MESSAGETEXT)); * Handle the DSI701I message. (Use a synonym to specify the action.) 0006 002 IF MSGID = 'DSI701I' THEN NETLOG(YES 3 +STATGRP); 0007 002 END; Any statements for CNM messages go here 0008 001 IF MSGID = 'CNM' . THEN BEGIN; * Suppress the CNM094I message 0009 002 IF MSGID='CNM094I' THEN DISPLAY(N) NETLOG(N); 0010 002 END; * This invalid statement demonstrates handling of syntax errors 0011 001 IF BADFUNC = 'INFO' THEN DISPLAY(N); ERROR CNM505E INVALID FUNCTION NAME "BADFUNC" SPECIFIED IN CONDITIONAL ------------------------------ END OF 'EXMAIN ' ----------------------------- 1 STATEMENT(S) IN ERROR
Figure 3 Example Automation Table Listing
Statement 0011 is flagged as having an error, identified by message CNM505E. As indicated by the last statement in the listing, that is the only error. Correct that error and re-run the AUTOTBL command to confirm that the syntax is correct. Once the syntax is correct, you are ready to test the logic of your table.
December 10, 2013 9 of 53
Test Automation Table Logic
In order to simulate realistic conditions, use sample messages (and perhaps events) that you expect your automation actually to handle. Ideally you should have a test environment that duplicates or closely approximates your production environment. It’s a good idea to introduce your automation incrementally and test one section at a time, especially if it’s complex, rather than testing the whole automation table at once. AUTOTEST and AUTOCNT are the relevant commands for testing automation logic. Note that these commands can only test one automation table at a time – but, that table can %INCLUDE other members, so you can still test a sizeable set of automation in one operation.
There are 2 approaches for testing automation table logic:1. Parallel testing, whereby you run the test automation table in parallel with
your active automation, so the same messages/events go through both tables. Use the report generated with the AUTOCNT command.
2. Pre-recorded testing, where you record messages/events as they are processed by your live automation table. Then you can play back these recorded messages/events as input to your test automation later.
Parallel testingHere’s an example of parallel testing:AUTOTEST MEMBER=TESTTBL,LISTING=TESTLST,SOURCE=PARALLEL,
REPORT=TESTRPT
1. We start active testing with the AUTOTEST command, specifying where the test automation table is located (the TESTTBL member of the DSIPARM data set), where we want the listing file and the report file to go (TESTLST and TESTRPT, respectively4), and indicating that testing should be done in parallel. AUTOTEST keeps a new set of statistics for TESTTBL. If you want to record incoming messages/events, use the RECORD keyword to indicate where they should be saved:
AUTOTEST MEMBER=TESTTBL, LISTING=TESTLST, SOURCE=PARALLEL, REPORT=TESTRPT, RECORD=TESTRECS
2. Issue the AUTOCNT command to reset the automation table counters: AUTOCNT RESET
3. Let the test run as long as you think is needed.4. Then create reports for both the active and test automation tables.5
AUTOCNT REPORT=BOTH,FILE=PRODTBL,STATS=DETAILAUTOCNT REPORT=BOTH,FILE=TESTTBL,TEST,STATS=DETAIL
Here, the FILE keyword indicates the production and test automation tables (PRODTBL and TESTTBL, respectively).
4 See Figure 4 for a sample AUTOTEST report file.5 See Figure 17 for a sample AUTOCNT report.
December 10, 2013 10 of 53
5. You can examine the results at any time. If you do so but then want to resume testing, you might want to reset the automation table counters in order to start fresh:
AUTOCNT RESET,STATS=DETAILAUTOCNT RESET,TEST,STATS=DETAIL
6. Compare the output generated by the AUTOCNT and AUTOTEST commands to determine whether automation table processing was satisfactory.
7. Examine the testing report to verify that table logic is correct: confirm that key messages and alerts that arrived during testing matched on the correct automation table statement.
8. What next?• If the test was not satisfactory, modify the test automation table and
rerun the test against recorded messages/events.• If test was satisfactory, you are ready to activate the test
automation table.
Pre-recorded testingYou can also test an automation table using message/events (AIFRs6) recorded by a prior AUTOTEST command. This allows you to make changes or additions to the automation table, and analyze the effect of those changes using a constant set of input data. To record AIFRs, use the AUTOTEST command with the RECORD keyword:
AUTOTEST RECORD=membernameAfter a period of time, stop recording:
AUTOTEST RECORD=OFF
If desired, you can modify the file that contains the recorded messages/events, deleting messages or events that don’t pertain or that you’re not yet ready to test.
1. Locate the AIFR to be deleted in the file. Below the AIFR in the file is a separator line beginning with !!------------
2. Delete the AIFR data lines and the separator line following the AIFR.
Once you’ve recorded the messages/events you want to use for testing, you can start the test.
1. Reset the automation table counters:AUTOCNT RESET,TEST
2. Start testing, specifying the SOURCE of input for the test and where the report should be stored:
AUTOTEST SOURCE=TESTRECS,REPORT=TESTRPT 3. Let the test run until all of the source messages/events have been tested,
as indicated by message BNH382:BNH382 AUTOMATION TABLE TESTING STOPPED, SOURCE=membername
6 Messages and events are represented internally in a format called an automation internal function request (AIFR).
December 10, 2013 11 of 53
4. Then check the results in the test report file. Again, if everything is good, then you’re ready to activate the test automation table. If not, make corrections, and re-run the test:
AUTOCNT RESET,TESTAUTOCNT REPORT=BOTH, FILE=TESTTBL,TEST
5. Analyze the reports and statistics to determine whether automation table processing was satisfactory. If so, you are ready to activate the new automation table. If not, modify the automation table and repeat this process until the results are satisfactory.
You can use recorded messages/events to compare 2 different test automation tables – perhaps you want to compare two different approaches for processing a given condition. For example, to compare processing between TESTTBL1 and TESTTBL2:
1. Test automation table TESTTBL1 using the recorded AIFRs from the previous example: AUTOTEST MEMBER=TESTTBL1,LISTING=LIST1,SOURCE=TESTRECS, REPORT=TESTRPT1
2. When message BNH382I is displayed, indicating that testing of TESTTBL1 has completed, then test automation table TESTTBL2:AUTOTEST MEMBER=TESTTBL2,LISTING=LIST2,SOURCE=TESTRECS, REPORT=TESTRPT2
3. When message BNH382I is displayed, indicating that testing of TESTTBL2 has completed, compare the reports found in TESTRPT1 and TESTRPT2 to verify that table logic is correct.
After you’ve run a test, you’ll want to check the results. The AUTOTEST report shows the messages/events that were processed by the automation table you’re testing. On the first line of the report file is a two-character security key.
• The first character indicates the type of file:‒ “R”: REPORT file‒ “L”: LISTING file‒ “S”: AIFR file
• The second character indicates whether the file can or cannot be overwritten by a subsequent AUTOTEST command. You can change this if needed.
‒ “>”: the file can be overwritten by a subsequent AUTOTEST command
‒ “<“: prevents the AUTOTEST command from overwriting the file.So after saving the recorded AIFR file, you can change the security key on the first line of the recorded file from “S>” to “S<” to prevent subsequent AUTOTEST commands from overwriting the file. The AUTOTEST command requires a security key of “S>” or “S< “to be present in the first record of a file to be used as a source file for the command.
December 10, 2013 12 of 53
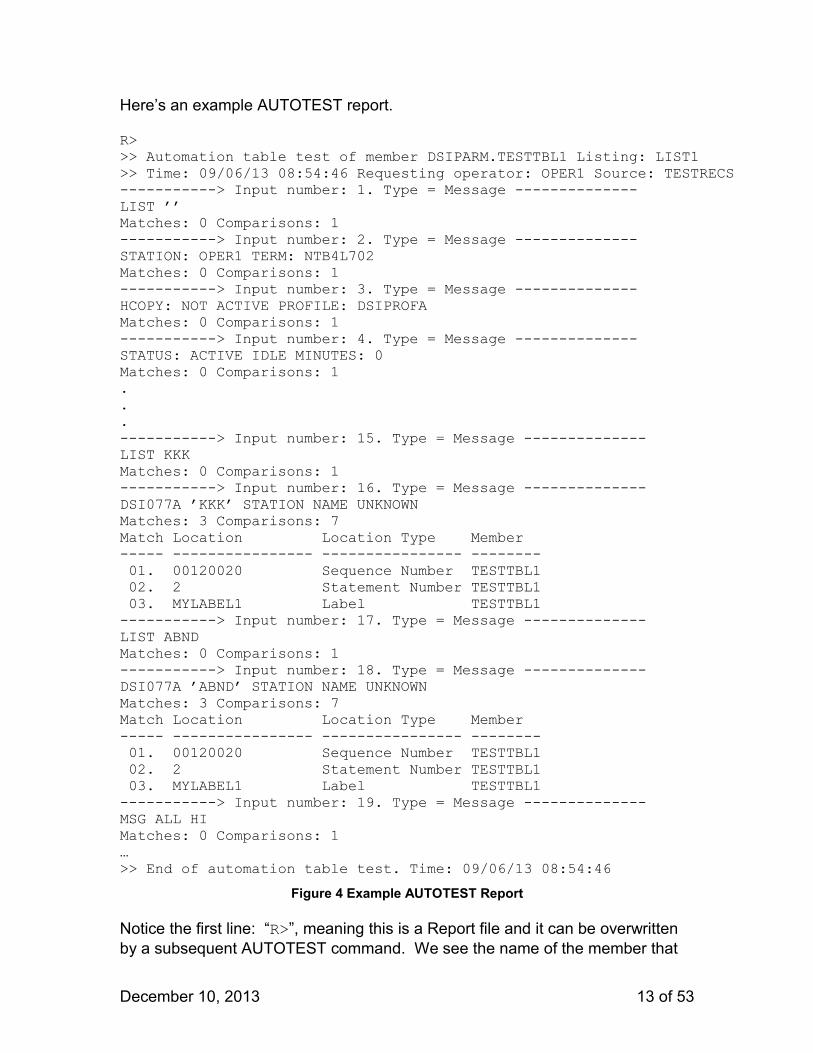
Here’s an example AUTOTEST report.
R>>> Automation table test of member DSIPARM.TESTTBL1 Listing: LIST1>> Time: 09/06/13 08:54:46 Requesting operator: OPER1 Source: TESTRECS-----------> Input number: 1. Type = Message --------------LIST ’’Matches: 0 Comparisons: 1-----------> Input number: 2. Type = Message --------------STATION: OPER1 TERM: NTB4L702Matches: 0 Comparisons: 1-----------> Input number: 3. Type = Message --------------HCOPY: NOT ACTIVE PROFILE: DSIPROFAMatches: 0 Comparisons: 1-----------> Input number: 4. Type = Message --------------STATUS: ACTIVE IDLE MINUTES: 0Matches: 0 Comparisons: 1...-----------> Input number: 15. Type = Message --------------LIST KKKMatches: 0 Comparisons: 1-----------> Input number: 16. Type = Message --------------DSI077A ’KKK’ STATION NAME UNKNOWNMatches: 3 Comparisons: 7Match Location Location Type Member----- ---------------- ---------------- -------- 01. 00120020 Sequence Number TESTTBL1 02. 2 Statement Number TESTTBL1 03. MYLABEL1 Label TESTTBL1-----------> Input number: 17. Type = Message --------------LIST ABNDMatches: 0 Comparisons: 1-----------> Input number: 18. Type = Message --------------DSI077A ’ABND’ STATION NAME UNKNOWNMatches: 3 Comparisons: 7Match Location Location Type Member----- ---------------- ---------------- -------- 01. 00120020 Sequence Number TESTTBL1 02. 2 Statement Number TESTTBL1 03. MYLABEL1 Label TESTTBL1-----------> Input number: 19. Type = Message --------------MSG ALL HIMatches: 0 Comparisons: 1…>> End of automation table test. Time: 09/06/13 08:54:46
Figure 4 Example AUTOTEST Report
Notice the first line: “R>”, meaning this is a Report file and it can be overwritten by a subsequent AUTOTEST command. We see the name of the member that
December 10, 2013 13 of 53
this report pertains to (DSIPARM.TESTTBL1), the date/time when the report was created (09/06/13 08:54:46), the operator who ran the test (OPER1), and the source file for input (TESTRECS).
We see each input item that was tested (LIST, STATION, HCOPY, STATUS, etc.), its type (each was a message), the number of conditions it was checked against, and how many of those it matched. Input items 1, 2, 3, 4, 15, 17 and 19 were each compared against 1 condition, and there were no matches.
Input items 16 (message DSI077A) and 18 (also message DSI077A) were each checked against 7 conditions and each item matched 3 of them. Check the statements at sequence #00120020, at statement #2, and at label MYLABEL1. Did you want a match at all those places? Should the condition(s) be changed to make them more/less strict? Perhaps you only wanted the message to match at one of those statements. Are there other conditions that you think should have matched, but in fact did not? Should you add a CONTINUE(NO) statement to prevent further checking after a match occurs?
Finally at the bottom of the report, we see the “end of test” message.
December 10, 2013 14 of 53
Activate the Automation TableOnce you’ve tested your automation table and are satisfied that the syntax and logic are correct, you’re ready to activate it. Use the AUTOTBL command to activate an automation table:
AUTOTBL MEMBER=membername
Note:• Include this command in your command authorization setup to limit its use
to the initialization command list and a small set of authorized operators. • The NetView program will not activate a table with syntactic errors. But
you can set a constant in the NetView constants module, DSICTMOD, if you want the automation table to be installed even if commands or command lists that are to be executed by the automation table are missing.
December 10, 2013 15 of 53
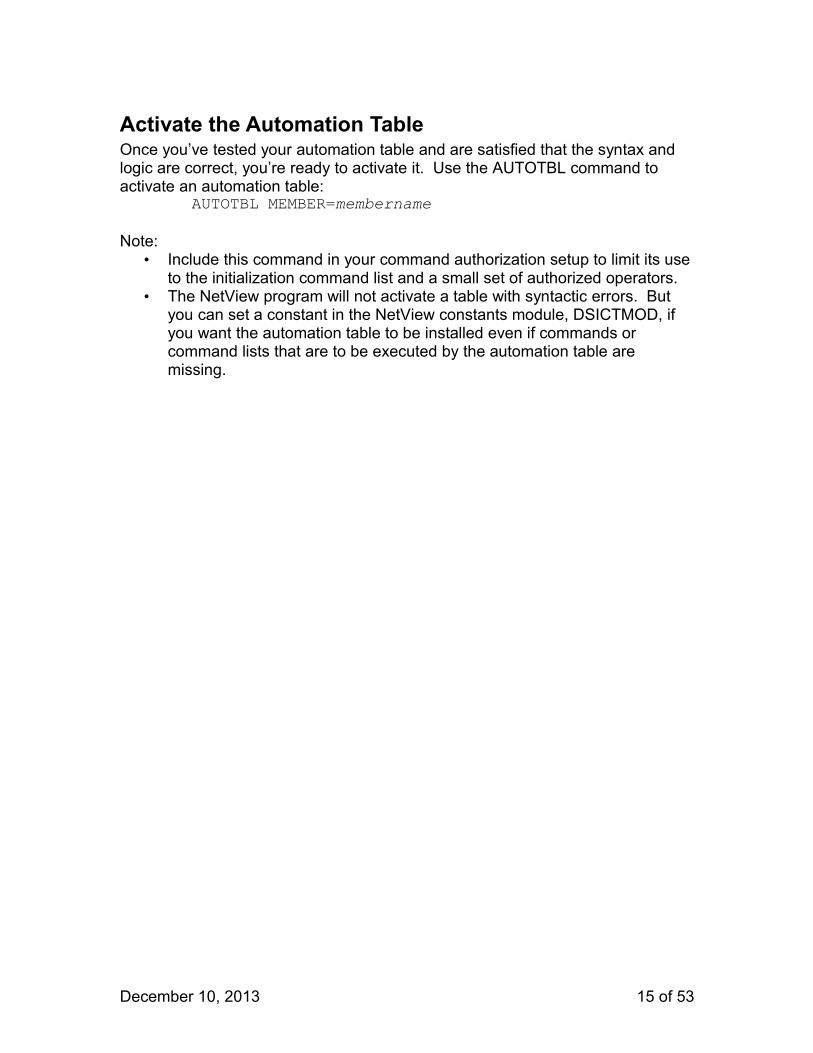
Add Another TableIf you have a concatenated series of several active automation tables and you want to add a new one or replace an existing one, you can do that with the AUTOTBL command. Following are several examples that illustrate adding and/or replacing a table.Example 1: In this example we want to add table DSITBL99 as the second member in the set.
Figure 5 Inserting a new automation table
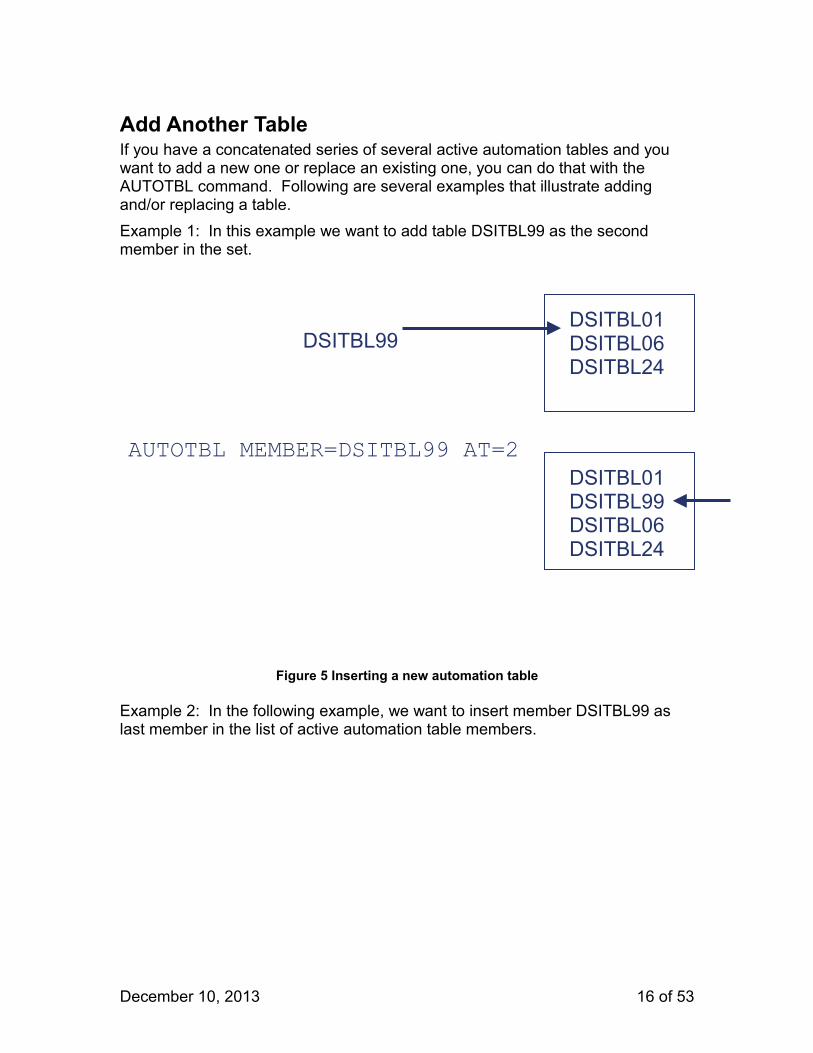
Example 2: In the following example, we want to insert member DSITBL99 as last member in the list of active automation table members.
December 10, 2013 16 of 53
DSITBL01DSITBL06DSITBL24
DSITBL99
AUTOTBL MEMBER=DSITBL99 AT=2DSITBL01DSITBL99DSITBL06DSITBL24
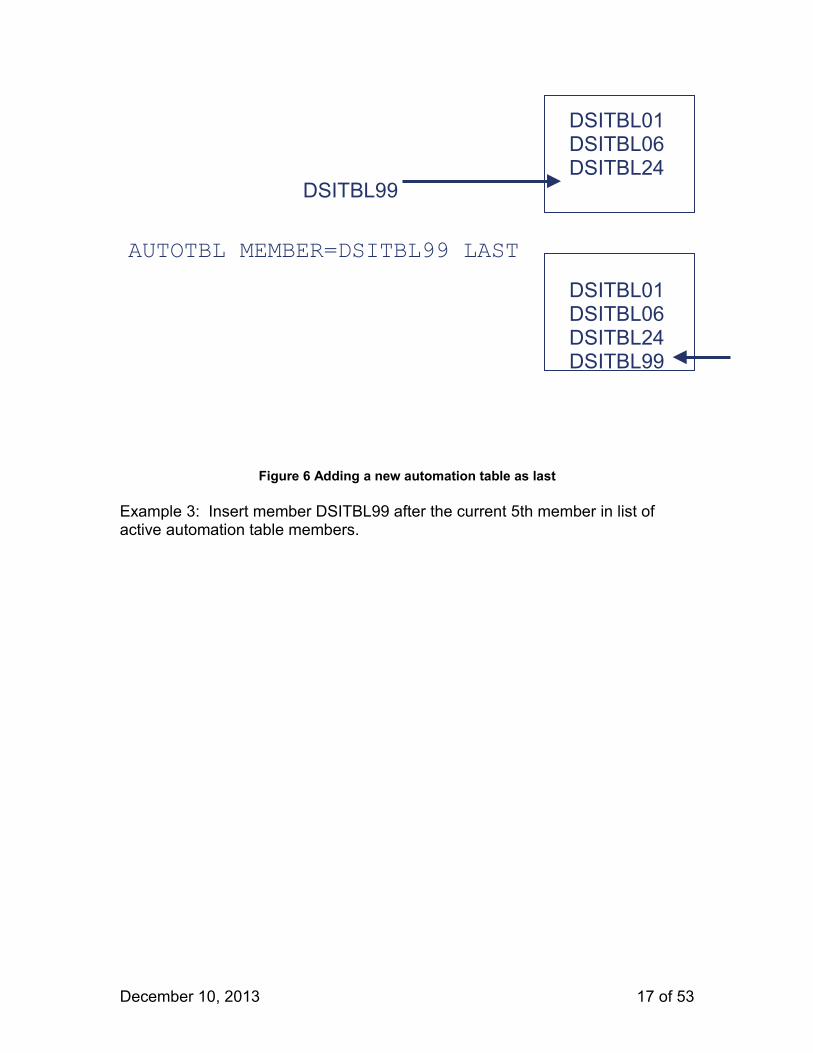
Figure 6 Adding a new automation table as last
Example 3: Insert member DSITBL99 after the current 5th member in list of active automation table members.
December 10, 2013 17 of 53
DSITBL01DSITBL06DSITBL24
DSITBL99
AUTOTBL MEMBER=DSITBL99 LASTDSITBL01DSITBL06DSITBL24DSITBL99
Figure 7 Adding a new automation table after an existing table
Example 4: Replace the current 5th member in the list of active automation table members with new member DSITBL99.
December 10, 2013 18 of 53
DSITBL01DSITBL06DSITBL24DSITBL25DSITBL26DSITBL27DSITBL99
AUTOTBL MEMBER=DSITBL99 AFTER=5DSITBL01DSITBL06DSITBL24DSITBL25DSITBL26DSITBL99DSITBL27
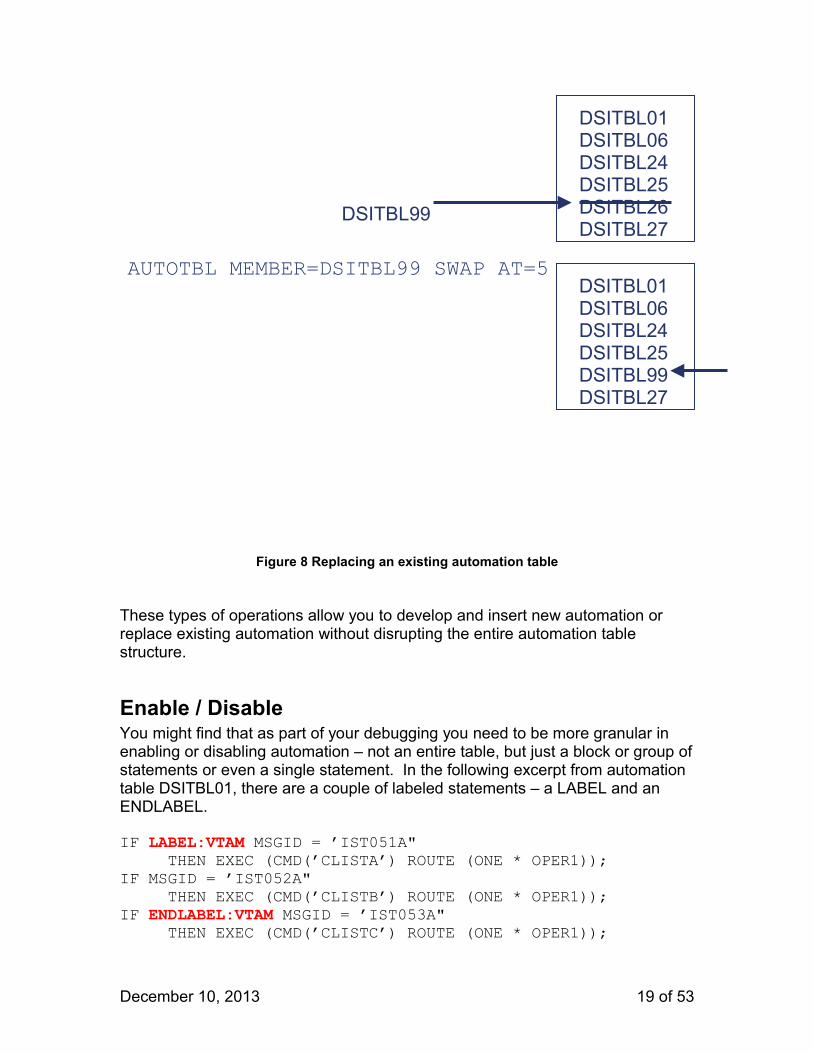
Figure 8 Replacing an existing automation table
These types of operations allow you to develop and insert new automation or replace existing automation without disrupting the entire automation table structure.
Enable / DisableYou might find that as part of your debugging you need to be more granular in enabling or disabling automation – not an entire table, but just a block or group of statements or even a single statement. In the following excerpt from automation table DSITBL01, there are a couple of labeled statements – a LABEL and an ENDLABEL.
IF LABEL:VTAM MSGID = ’IST051A"THEN EXEC (CMD(’CLISTA’) ROUTE (ONE * OPER1));
IF MSGID = ’IST052A"THEN EXEC (CMD(’CLISTB’) ROUTE (ONE * OPER1));
IF ENDLABEL:VTAM MSGID = ’IST053A"THEN EXEC (CMD(’CLISTC’) ROUTE (ONE * OPER1));
December 10, 2013 19 of 53
DSITBL01DSITBL06DSITBL24DSITBL25DSITBL26DSITBL27
DSITBL99
AUTOTBL MEMBER=DSITBL99 SWAP AT=5DSITBL01DSITBL06DSITBL24DSITBL25DSITBL99DSITBL27
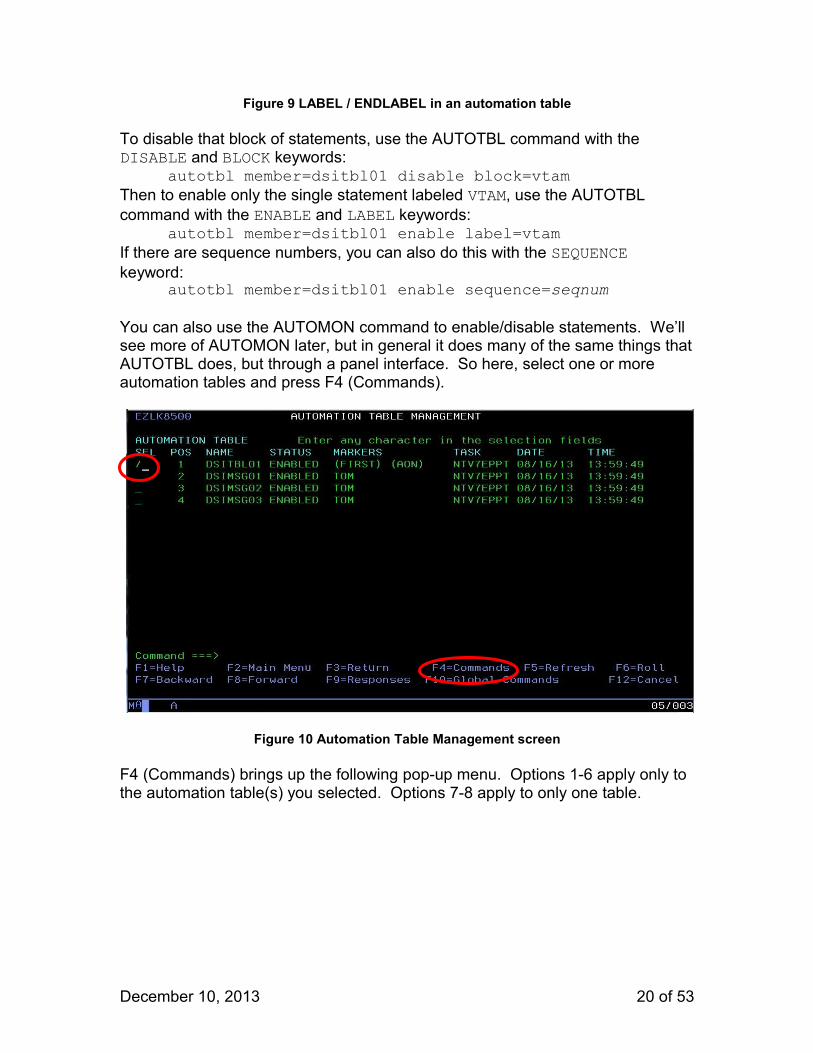
Figure 9 LABEL / ENDLABEL in an automation table
To disable that block of statements, use the AUTOTBL command with the DISABLE and BLOCK keywords:
autotbl member=dsitbl01 disable block=vtamThen to enable only the single statement labeled VTAM, use the AUTOTBL command with the ENABLE and LABEL keywords:
autotbl member=dsitbl01 enable label=vtamIf there are sequence numbers, you can also do this with the SEQUENCE keyword:
autotbl member=dsitbl01 enable sequence=seqnum
You can also use the AUTOMON command to enable/disable statements. We’ll see more of AUTOMON later, but in general it does many of the same things that AUTOTBL does, but through a panel interface. So here, select one or more automation tables and press F4 (Commands).
Figure 10 Automation Table Management screen
F4 (Commands) brings up the following pop-up menu. Options 1-6 apply only to the automation table(s) you selected. Options 7-8 apply to only one table.
December 10, 2013 20 of 53
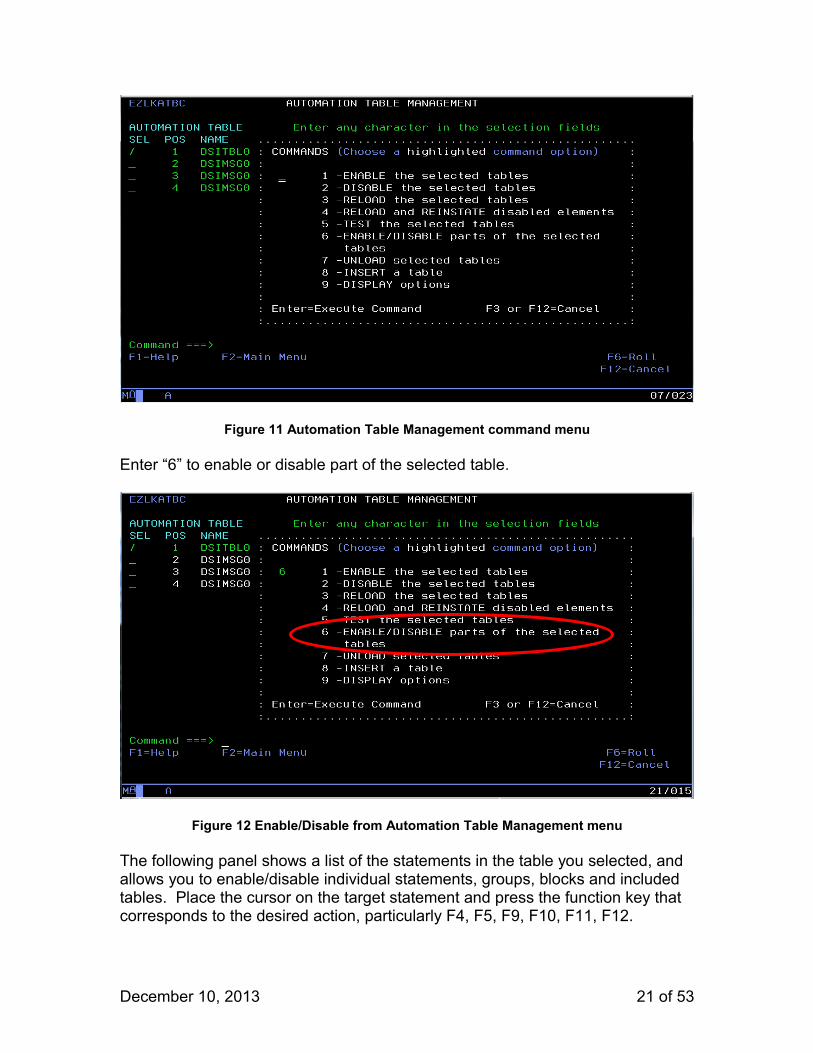
Figure 11 Automation Table Management command menu
Enter “6” to enable or disable part of the selected table.
Figure 12 Enable/Disable from Automation Table Management menu
The following panel shows a list of the statements in the table you selected, and allows you to enable/disable individual statements, groups, blocks and included tables. Place the cursor on the target statement and press the function key that corresponds to the desired action, particularly F4, F5, F9, F10, F11, F12.
December 10, 2013 21 of 53

Figure 13 Enable/Disable a Statement/Block/Group
The display portion of the panel contains the following:• MEMBER: This column displays the name of the INCLUDE hierarchy
member that contains the statement that follows. If '********' is displayed in this column, then the current statement is an INCLUDE. The name of the member being included is found in the STATEMENT area.
• STATEMENT: This is the actual automation table statement as taken from the listing member. If an automation table statement spans more than one line, you may place your cursor on any line to perform your action.
Each row in the display area is also color coded:• GREEN: The statement or INCLUDE is currently enabled.• RED: The statement or INCLUDE is currently disabled.• BLUE: The statement contains no sequence number or labeling and
cannot be individually disabled.• PINK: The statement is disabled and cannot be enabled by itself because
it was disabled as part of a result of a previous %INCLUDE member, BEGIN or block.
You can take any of the following actions against the selected statement:• F4 Enable: Enable any type of disabled statement(s) or member.• F5 Display Group/Block: Display only the block or group selected.• F9 Disable Stmt/Member: Disable an individual statement or the
INCLUDE statement selected by the cursor.• F10 Disable Block: Disable the block selected.• F11 Disable Group: Disable the group selected.• F12 Results: Display the results of the most recent action.
December 10, 2013 22 of 53
Selecting blocks or groups: • Select a group by placing the cursor on any line of any automation table statement containing a defined GROUP label.• Select a block by placing the cursor on an automation table statement with the LABEL or ENDLABEL for the particular block name. A LABEL that is not matched by a corresponding ENDLABEL is not part of a block.
The panel is refreshed after each action. If you attempt to perform an unsupported action, a message is displayed.
Use F3 when you are ready to leave the Enable/Disable Panel.
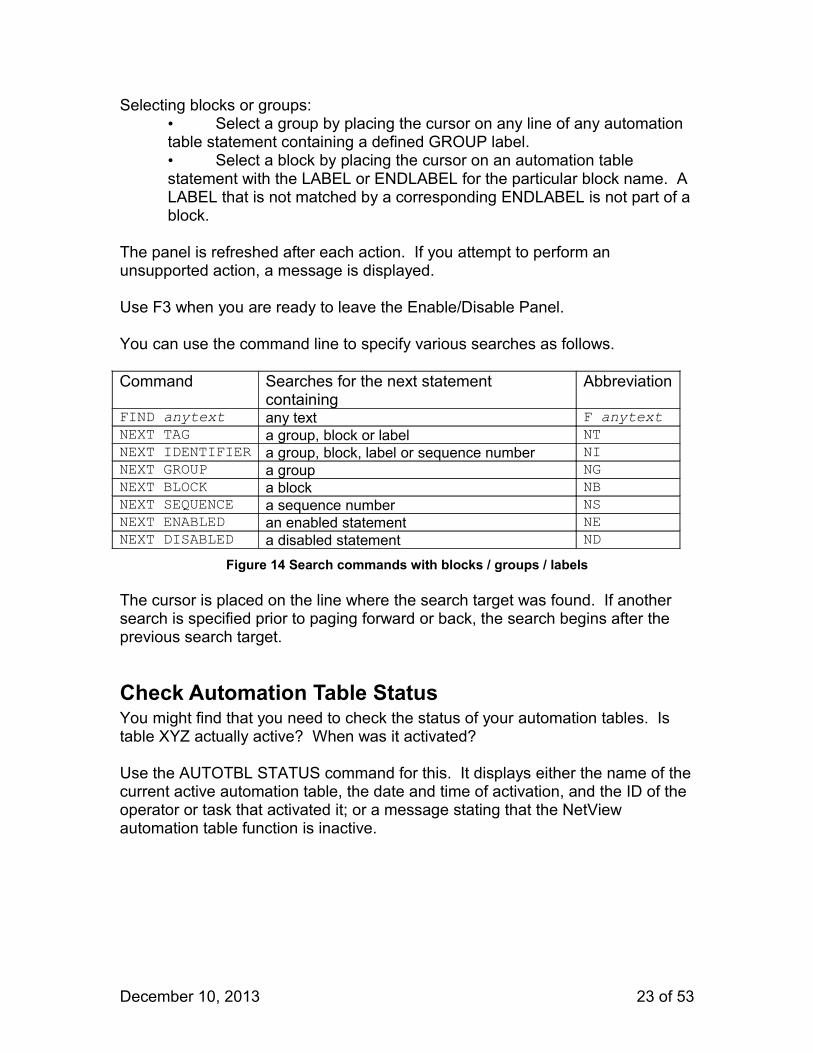
You can use the command line to specify various searches as follows.
Command Searches for the next statement containing
Abbreviation
FIND anytext any text F anytextNEXT TAG a group, block or label NTNEXT IDENTIFIER a group, block, label or sequence number NINEXT GROUP a group NGNEXT BLOCK a block NBNEXT SEQUENCE a sequence number NSNEXT ENABLED an enabled statement NENEXT DISABLED a disabled statement ND
Figure 14 Search commands with blocks / groups / labels
The cursor is placed on the line where the search target was found. If another search is specified prior to paging forward or back, the search begins after the previous search target.
Check Automation Table StatusYou might find that you need to check the status of your automation tables. Is table XYZ actually active? When was it activated?
Use the AUTOTBL STATUS command for this. It displays either the name of the current active automation table, the date and time of activation, and the ID of the operator or task that activated it; or a message stating that the NetView automation table function is inactive.
December 10, 2013 23 of 53

Figure 15 Automation Table status
Other ReportsThere are other reports too. You might want to know how efficient your automation is:
• How many messages / events are compared against each condition?• How many cause automation actions to be run?
You might want to test new statements, or determine general or specific message / event traffic, or do trend analysis. You might need to do some tuning to make automation more efficient:
• Move frequently-matched statements toward the beginning of the table so there is less checking of unmatched criteria.• Examine statements that are never matched. Should they be changed because of logic errors? Should they be deleted?
We mentioned the AUTOCNT command and its report earlier, and we return to it now. It produces a report that is based on counters that automation processing keeps. You can test a live automation table or a test table (the one being tested with the AUTOTEST command); you can reset automation counters; you can get either a summary report or a detailed report; and you can get the report as an online display or in a file.
AUTOCNT Message Detail Report
December 10, 2013 24 of 53
Name of current automation table(s), date/time of activation, ID of operator/task who activated it
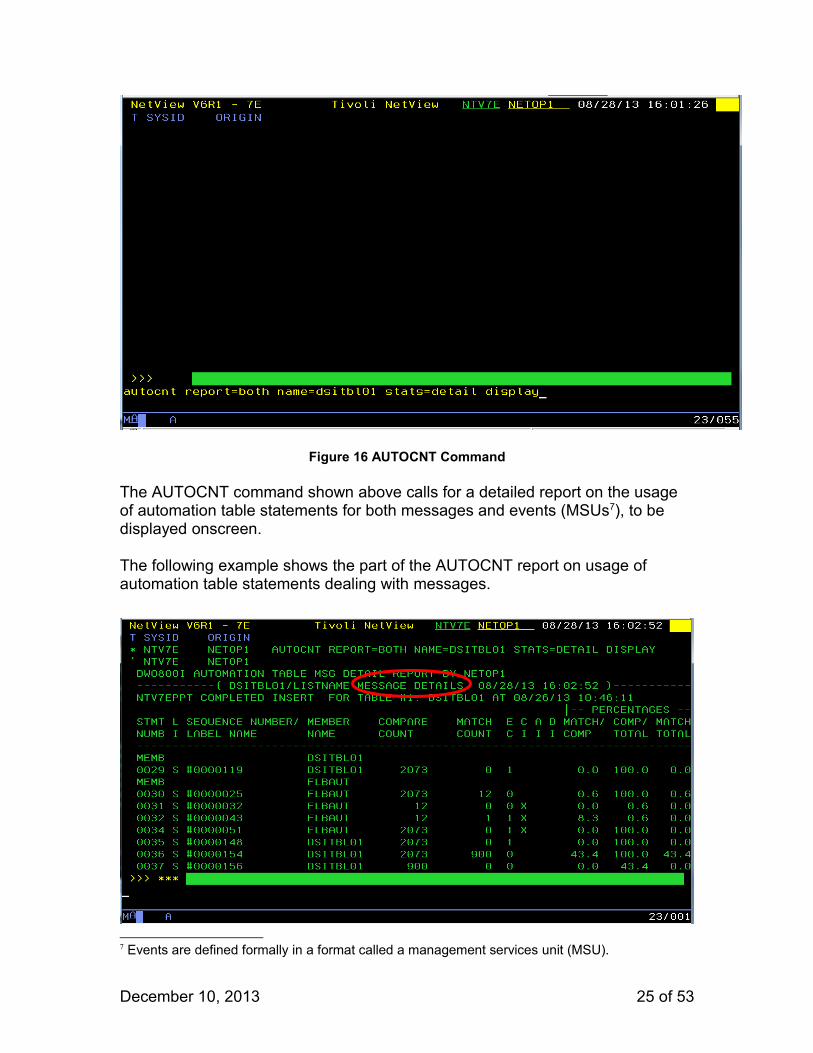
Figure 16 AUTOCNT Command
The AUTOCNT command shown above calls for a detailed report on the usage of automation table statements for both messages and events (MSUs7), to be displayed onscreen.
The following example shows the part of the AUTOCNT report on usage of automation table statements dealing with messages.
7 Events are defined formally in a format called a management services unit (MSU).
December 10, 2013 25 of 53
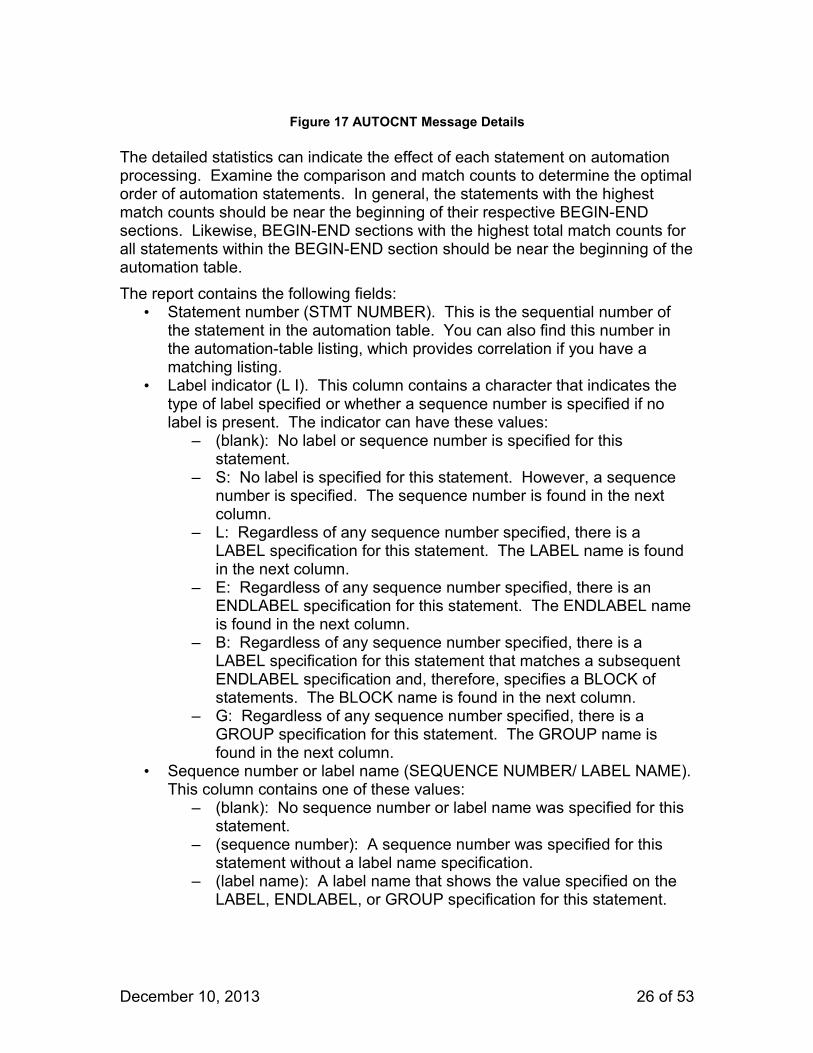
Figure 17 AUTOCNT Message Details
The detailed statistics can indicate the effect of each statement on automation processing. Examine the comparison and match counts to determine the optimal order of automation statements. In general, the statements with the highest match counts should be near the beginning of their respective BEGIN-END sections. Likewise, BEGIN-END sections with the highest total match counts for all statements within the BEGIN-END section should be near the beginning of the automation table.The report contains the following fields:
• Statement number (STMT NUMBER). This is the sequential number of the statement in the automation table. You can also find this number in the automation-table listing, which provides correlation if you have a matching listing.
• Label indicator (L I). This column contains a character that indicates the type of label specified or whether a sequence number is specified if no label is present. The indicator can have these values:
‒ (blank): No label or sequence number is specified for this statement.
‒ S: No label is specified for this statement. However, a sequence number is specified. The sequence number is found in the next column.
‒ L: Regardless of any sequence number specified, there is a LABEL specification for this statement. The LABEL name is found in the next column.
‒ E: Regardless of any sequence number specified, there is an ENDLABEL specification for this statement. The ENDLABEL name is found in the next column.
‒ B: Regardless of any sequence number specified, there is a LABEL specification for this statement that matches a subsequent ENDLABEL specification and, therefore, specifies a BLOCK of statements. The BLOCK name is found in the next column.
‒ G: Regardless of any sequence number specified, there is a GROUP specification for this statement. The GROUP name is found in the next column.
• Sequence number or label name (SEQUENCE NUMBER/ LABEL NAME). This column contains one of these values:
‒ (blank): No sequence number or label name was specified for this statement.
‒ (sequence number): A sequence number was specified for this statement without a label name specification.
‒ (label name): A label name that shows the value specified on the LABEL, ENDLABEL, or GROUP specification for this statement.
December 10, 2013 26 of 53
• Member name (MEMBER NAME). The name of the member where the statement is located. This, along with the sequence number, provides correlation with the source automation-table members or files.
• Conditional comparisons (COMPARE COUNT). The counter that is incremented when the associated conditional statement is selected for evaluation.
• Evaluation matches (MATCH COUNT). The counter that is incremented when the associated conditional statement is evaluated as true, resulting in performance of all automation actions specified on the statement.
• Executed commands (E C). This column reports the number of commands that are run for this automation statement when there is an evaluation match. If the number of EXEC actions with CMD keywords is greater than 99, an asterisk (*) appears in the column.
• Continue indicator (C I). A report column marked X indicates that the conditional statement contained a CONTINUE action, causing the NetView program to continue to scan the automation table. CONTINUE(Y) actions cause additional conditional processing for later statements in the table, and can enable a conditional match on additional statements.
• Always statement indicator (A I). A report column marked X indicates that the statement was an ALWAYS. For ALWAYS statements, the MATCH/COMP field is always 100%.
• Disable indicator (D I). This column describes whether the statement is currently part of a DISABLE request or was part of a DISABLE request since the last time usage statistics were reset. The possible values are:
‒ (blank): The statement has not been part of a DISABLE request since the last time usage statistics were reset.
‒ d: The individual statement has been disabled since the last time usage statistics were reset, but is not currently disabled.
‒ b: The block of statements has been disabled since the last time usage statistics were reset, but is not currently disabled.
‒ S: The statement is currently disabled using its sequence number.‒ L: The statement is currently disabled using a LABEL request.‒ E: The statement is currently disabled using an ENDLABEL
request.‒ B: The statement is currently disabled using a BLOCK request.‒ G: The statement is currently disabled using a GROUP request.
Note: To view the status of individual automation-table statements, blocks, or groups, use the automation-table management (AUTOMAN) function.
• Match to compare percentage (MATCH/COMP). A statistic calculated by dividing the ratio of MATCH COUNT by the COMPARE COUNT of the conditional statement, multiplied by 100. If the number of matches and the number of comparisons are both zero, the ratio is shown as -.- to indicate division by zero.
• Compare percentage (COMP/TOTAL). A statistic calculated by dividing the ratio of COMPARE COUNT of the conditional statement by the total
December 10, 2013 27 of 53
number of messages (or MSUs), multiplied by 100. If the number of comparisons against this statement and the total number of messages or MSUs processed by automation are both zero, the ratio is shown as -.- to indicate division by zero.
• Match percentage (MATCH/TOTAL). A statistic calculated by dividing the ratio of MATCH COUNT of the conditional statement by the total number of messages (or MSUs), multiplied by 100. If the number of matches for this statement and the total number of messages or MSUs processed by automation are both zero, the ratio is shown as -.- to indicate division by zero.
Any numeric column value that exceeds 99999999 is overwritten with eight asterisks (*).
The report may suggest re-locating statements in the table. But do so with care, so as not to affect the sequential logic of the table. Consider the following example.
1. IF MSGID = 'XYZ123I' & TOKEN(5) = 'DEVICE1' THEN EXEC(CMD('COMMAND1'));
2. IF MSGID = 'XYZ456I' & DOMAINID = 'CNM99' THEN EXEC(CMD('COMMAND2'));
3. IF MSGID = 'XYZ123I' | MSGID = 'XYZ456I' THEN EXEC(CMD('COMMAND3'));
Even if usage statistics show that statement 3 is matched more frequently than statements 1 and 2, moving statement 3 sequentially ahead of the first two affects the automation actions performed: the statements that call COMMAND1 and COMMAND2 never match, because the statement that calls COMMAND3 always matches the messages first, due to the MSGID = 'XYZ456I' condition item.
AUTOCNT Message Summary Report
The following example shows an AUTOCNT Message Summary report.
December 10, 2013 28 of 53
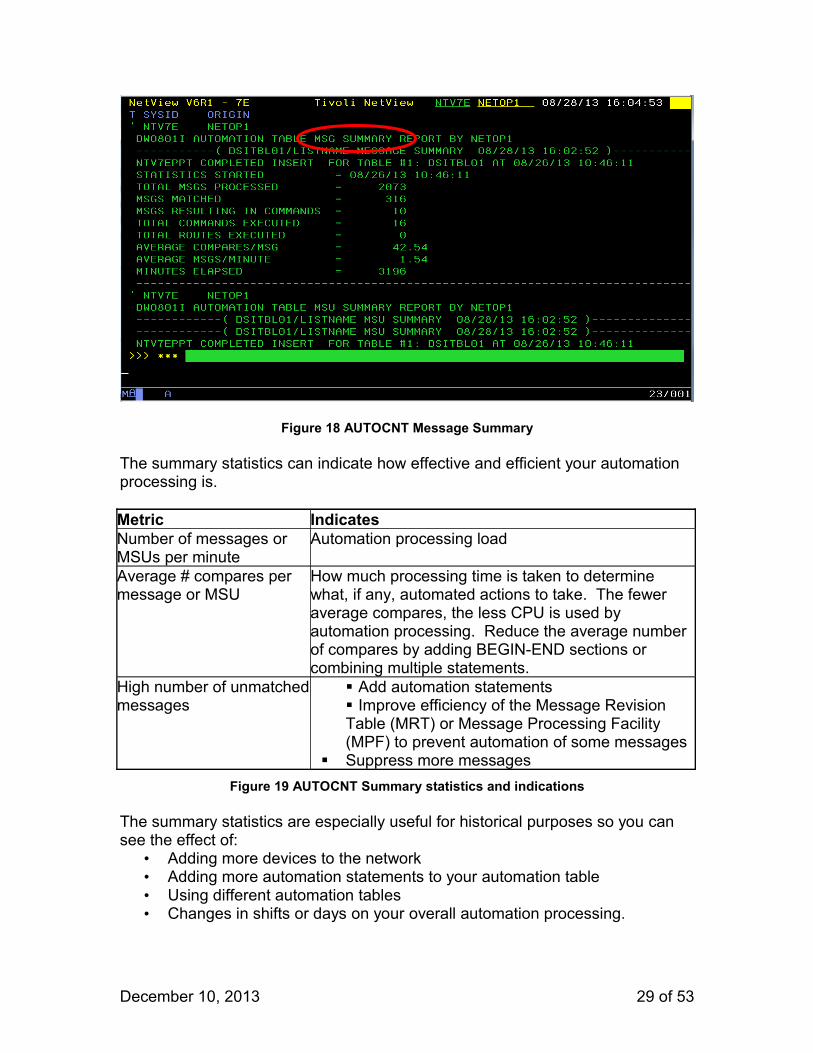
Figure 18 AUTOCNT Message Summary
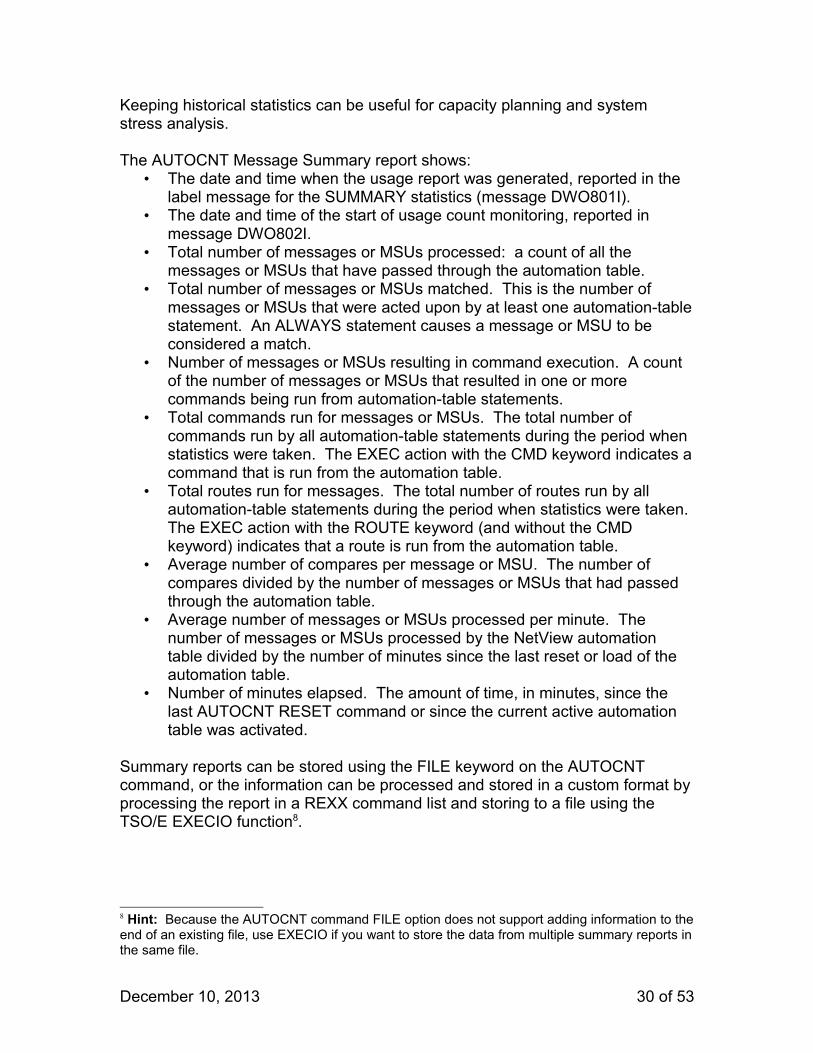
The summary statistics can indicate how effective and efficient your automation processing is.
Metric IndicatesNumber of messages or MSUs per minute
Automation processing load
Average # compares per message or MSU
How much processing time is taken to determine what, if any, automated actions to take. The fewer average compares, the less CPU is used by automation processing. Reduce the average number of compares by adding BEGIN-END sections or combining multiple statements.
High number of unmatched messages
Add automation statements Improve efficiency of the Message Revision Table (MRT) or Message Processing Facility (MPF) to prevent automation of some messages
Suppress more messagesFigure 19 AUTOCNT Summary statistics and indications
The summary statistics are especially useful for historical purposes so you can see the effect of:
• Adding more devices to the network • Adding more automation statements to your automation table • Using different automation tables• Changes in shifts or days on your overall automation processing.
December 10, 2013 29 of 53
Keeping historical statistics can be useful for capacity planning and system stress analysis.
The AUTOCNT Message Summary report shows:• The date and time when the usage report was generated, reported in the
label message for the SUMMARY statistics (message DWO801I).• The date and time of the start of usage count monitoring, reported in
message DWO802I.• Total number of messages or MSUs processed: a count of all the
messages or MSUs that have passed through the automation table.• Total number of messages or MSUs matched. This is the number of
messages or MSUs that were acted upon by at least one automation-table statement. An ALWAYS statement causes a message or MSU to be considered a match.
• Number of messages or MSUs resulting in command execution. A count of the number of messages or MSUs that resulted in one or more commands being run from automation-table statements.
• Total commands run for messages or MSUs. The total number of commands run by all automation-table statements during the period when statistics were taken. The EXEC action with the CMD keyword indicates a command that is run from the automation table.
• Total routes run for messages. The total number of routes run by all automation-table statements during the period when statistics were taken. The EXEC action with the ROUTE keyword (and without the CMD keyword) indicates that a route is run from the automation table.
• Average number of compares per message or MSU. The number of compares divided by the number of messages or MSUs that had passed through the automation table.
• Average number of messages or MSUs processed per minute. The number of messages or MSUs processed by the NetView automation table divided by the number of minutes since the last reset or load of the automation table.
• Number of minutes elapsed. The amount of time, in minutes, since the last AUTOCNT RESET command or since the current active automation table was activated.
Summary reports can be stored using the FILE keyword on the AUTOCNT command, or the information can be processed and stored in a custom format by processing the report in a REXX command list and storing to a file using the TSO/E EXECIO function8.
8 Hint: Because the AUTOCNT command FILE option does not support adding information to the end of an existing file, use EXECIO if you want to store the data from multiple summary reports in the same file.
December 10, 2013 30 of 53
TracingYou might sometimes need to trace the path of processing through automation.The NetView Automation Table Trace can be used to identify matching statements during message processing, and results in message BNH370I, which displays detailed trace information for each part of each automation table statement that is processed.
Tracing is indicated by the TRACE ('tracetag') keyword in IF – THEN and ALWAYS statements. It sets the tracing indicator and tag for the message or MSU of interest so automation-table processing can be traced. The tracetag must be enclosed in quotation marks, must be no more than 16 characters long, and cannot include blanks. A CONTINUE(Y) action is implied.
The following examples illustrate tracing.
Example 1The problem:
NetView automation is not handling a message as expected. The message is seen in the netlog/canzlog, but the expected action is not executed. Message CNM493I is issued, indicating there was an automation table match9. How can we know which automation table statement was matched?
The automation table trace will show• all of the automation table entries that are checked for the specific message• which entries were matched and used• which entries were bypassed.
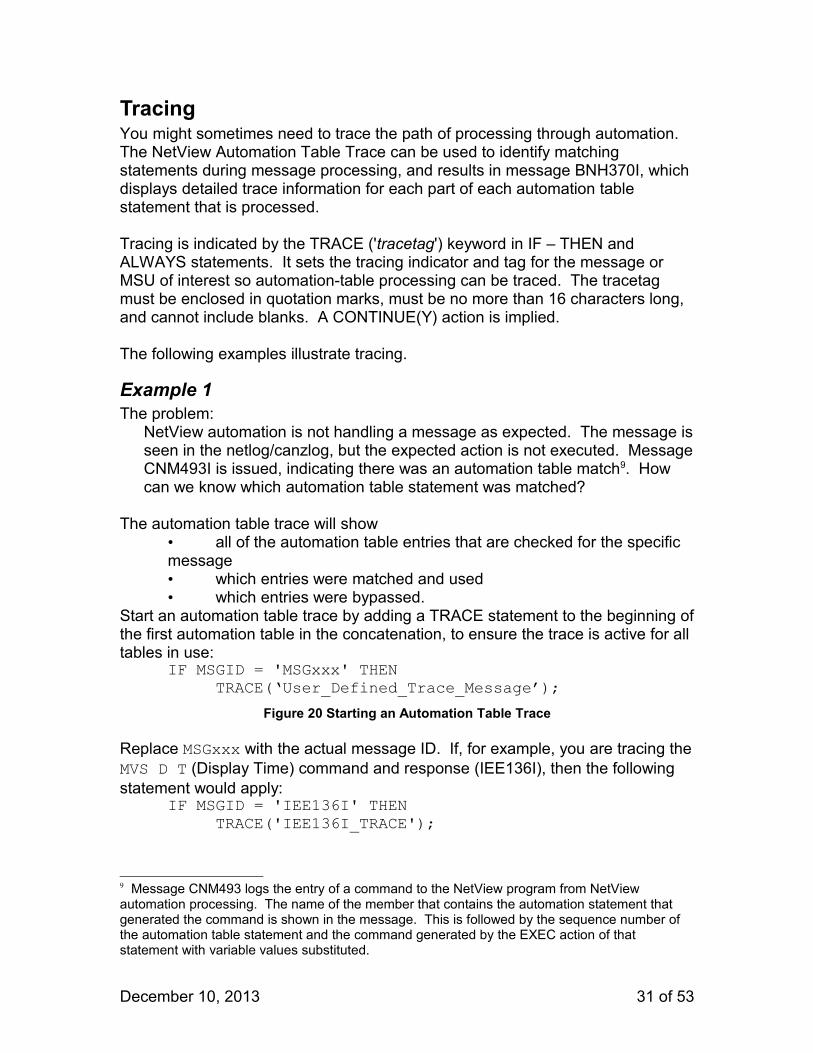
Start an automation table trace by adding a TRACE statement to the beginning of the first automation table in the concatenation, to ensure the trace is active for all tables in use:
IF MSGID = 'MSGxxx' THEN TRACE(‘User_Defined_Trace_Message’);
Figure 20 Starting an Automation Table Trace
Replace MSGxxx with the actual message ID. If, for example, you are tracing the MVS D T (Display Time) command and response (IEE136I), then the following statement would apply:
IF MSGID = 'IEE136I' THEN TRACE('IEE136I_TRACE');
9 Message CNM493 logs the entry of a command to the NetView program from NetView automation processing. The name of the member that contains the automation statement that generated the command is shown in the message. This is followed by the sequence number of the automation table statement and the command generated by the EXEC action of that statement with variable values substituted.
December 10, 2013 31 of 53
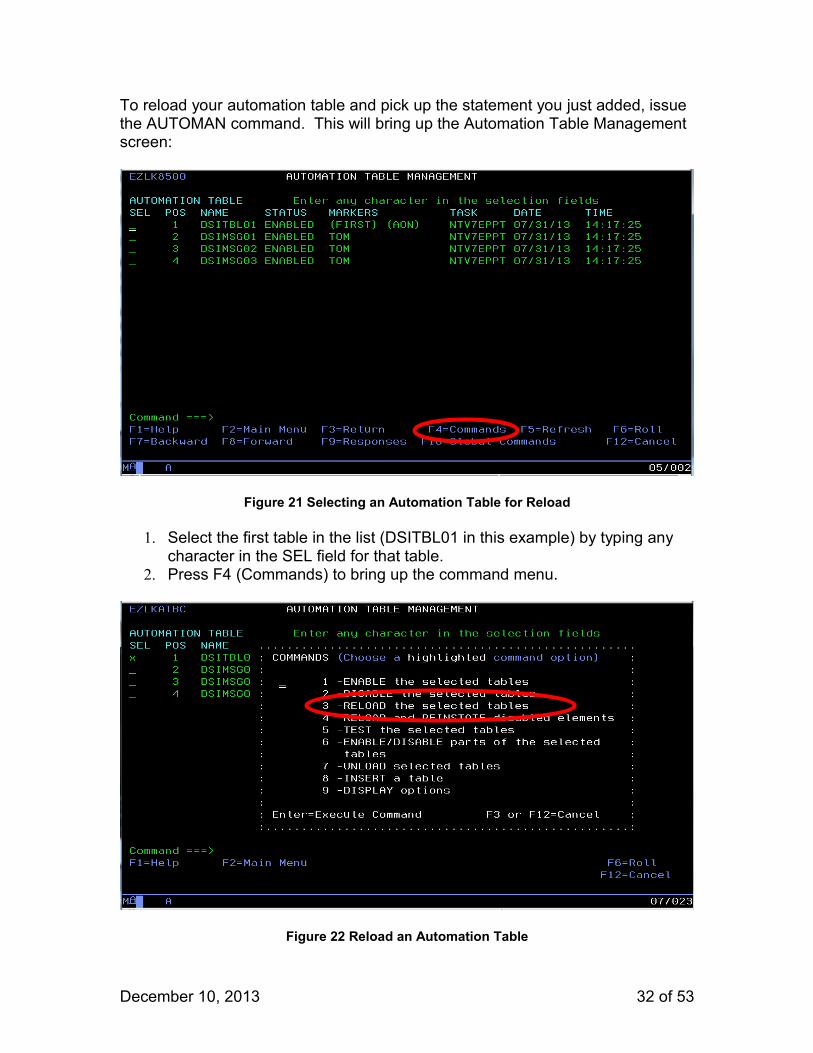
To reload your automation table and pick up the statement you just added, issue the AUTOMAN command. This will bring up the Automation Table Management screen:
Figure 21 Selecting an Automation Table for Reload
1. Select the first table in the list (DSITBL01 in this example) by typing any character in the SEL field for that table.
2. Press F4 (Commands) to bring up the command menu.
Figure 22 Reload an Automation Table
December 10, 2013 32 of 53
On the resulting pop-up menu, type 3 in the entry field and press ENTER.
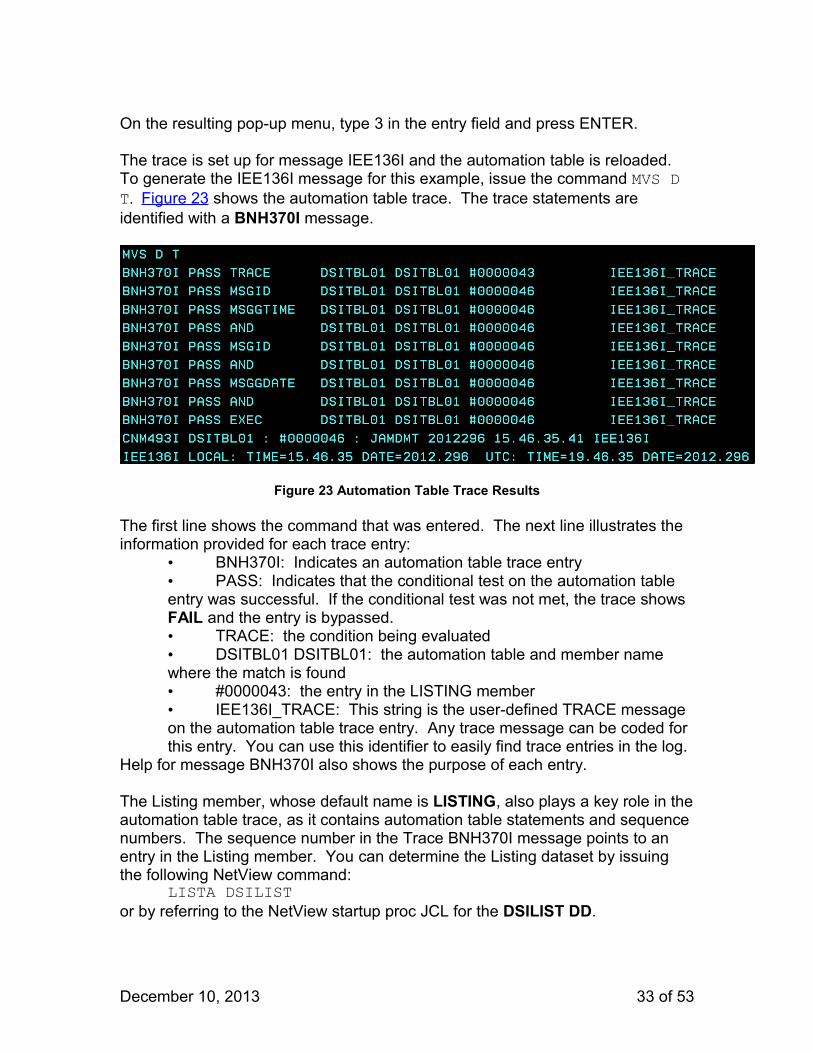
The trace is set up for message IEE136I and the automation table is reloaded. To generate the IEE136I message for this example, issue the command MVS D T. Figure 23 shows the automation table trace. The trace statements are identified with a BNH370I message.
Figure 23 Automation Table Trace Results
The first line shows the command that was entered. The next line illustrates the information provided for each trace entry:
• BNH370I: Indicates an automation table trace entry • PASS: Indicates that the conditional test on the automation table entry was successful. If the conditional test was not met, the trace shows FAIL and the entry is bypassed.• TRACE: the condition being evaluated • DSITBL01 DSITBL01: the automation table and member name where the match is found• #0000043: the entry in the LISTING member • IEE136I_TRACE: This string is the user-defined TRACE message on the automation table trace entry. Any trace message can be coded for this entry. You can use this identifier to easily find trace entries in the log.
Help for message BNH370I also shows the purpose of each entry.
The Listing member, whose default name is LISTING, also plays a key role in the automation table trace, as it contains automation table statements and sequence numbers. The sequence number in the Trace BNH370I message points to an entry in the Listing member. You can determine the Listing dataset by issuing the following NetView command:
LISTA DSILISTor by referring to the NetView startup proc JCL for the DSILIST DD.
December 10, 2013 33 of 53
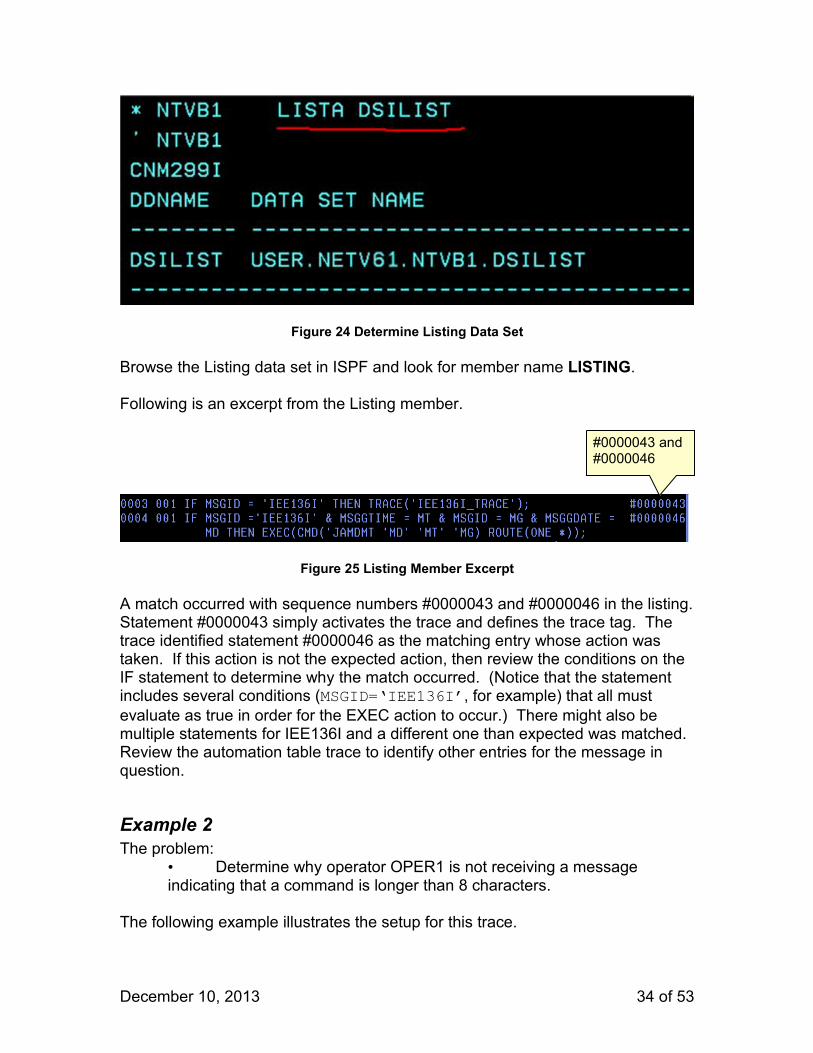
Figure 24 Determine Listing Data Set
Browse the Listing data set in ISPF and look for member name LISTING.
Following is an excerpt from the Listing member.
Figure 25 Listing Member Excerpt
A match occurred with sequence numbers #0000043 and #0000046 in the listing. Statement #0000043 simply activates the trace and defines the trace tag. The trace identified statement #0000046 as the matching entry whose action was taken. If this action is not the expected action, then review the conditions on the IF statement to determine why the match occurred. (Notice that the statement includes several conditions (MSGID=‘IEE136I’, for example) that all must evaluate as true in order for the EXEC action to occur.) There might also be multiple statements for IEE136I and a different one than expected was matched. Review the automation table trace to identify other entries for the message in question.
Example 2The problem:
• Determine why operator OPER1 is not receiving a message indicating that a command is longer than 8 characters.
The following example illustrates the setup for this trace.
December 10, 2013 34 of 53
#0000043 and #0000046
(Note: Message DSI002I indicates that a command is not valid. When the command is longer than 8 characters, DSI002I is displayed as an immediate message (with a HDRMTYPE value of “!” (that is, HDRTYPED)) rather than as a regular message. It is usually sent to the screen using DSIPSS TYPE=IMMED. When displayed in the immediate message area on the screen, the HDRMTYPE and DOMAIN name are not displayed. When received cross-domain, this type of message is in the normal output area, along with its domain name and type prefix. DSIPSS TYPE=IMMED does not enforce or set HDRTYPED. Therefore, HDRMTYPE is checked to determine whether the command name was longer than 8 characters.)
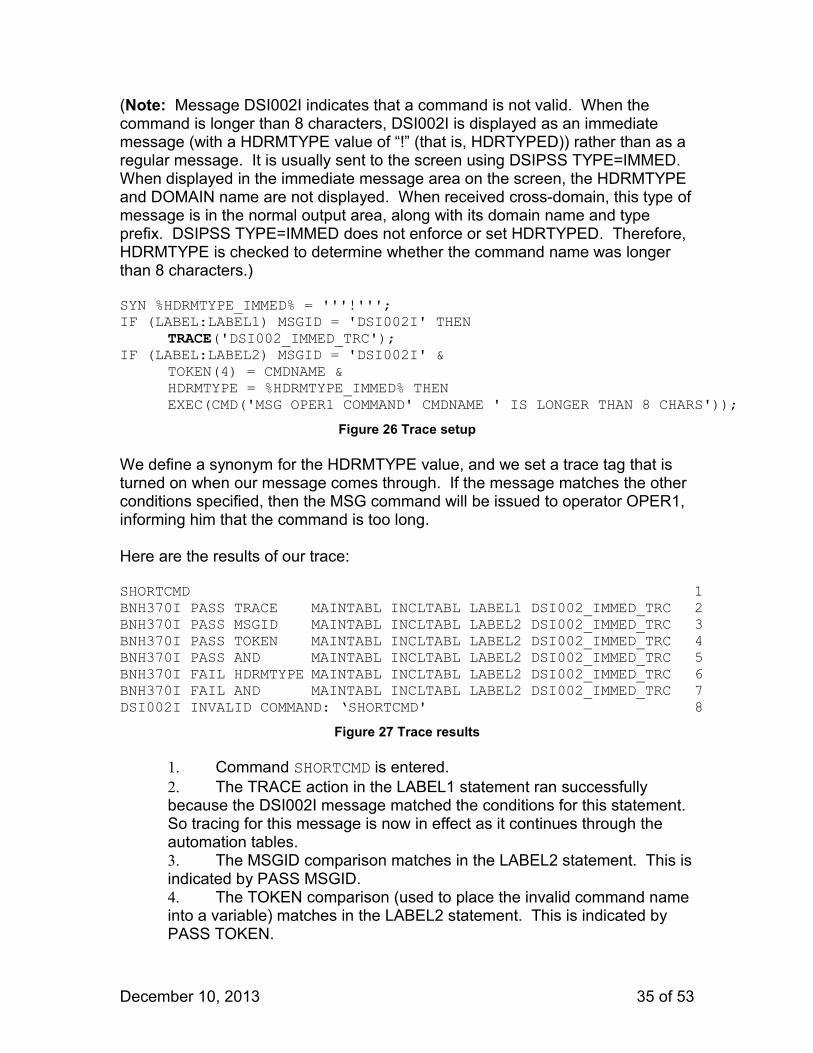
SYN %HDRMTYPE_IMMED% = '''!'''; IF (LABEL:LABEL1) MSGID = 'DSI002I' THEN
TRACE('DSI002_IMMED_TRC'); IF (LABEL:LABEL2) MSGID = 'DSI002I' &
TOKEN(4) = CMDNAME & HDRMTYPE = %HDRMTYPE_IMMED% THEN EXEC(CMD('MSG OPER1 COMMAND' CMDNAME ' IS LONGER THAN 8 CHARS'));
Figure 26 Trace setup
We define a synonym for the HDRMTYPE value, and we set a trace tag that is turned on when our message comes through. If the message matches the other conditions specified, then the MSG command will be issued to operator OPER1, informing him that the command is too long.
Here are the results of our trace:
SHORTCMD 1BNH370I PASS TRACE MAINTABL INCLTABL LABEL1 DSI002_IMMED_TRC 2BNH370I PASS MSGID MAINTABL INCLTABL LABEL2 DSI002_IMMED_TRC 3BNH370I PASS TOKEN MAINTABL INCLTABL LABEL2 DSI002_IMMED_TRC 4BNH370I PASS AND MAINTABL INCLTABL LABEL2 DSI002_IMMED_TRC 5BNH370I FAIL HDRMTYPE MAINTABL INCLTABL LABEL2 DSI002_IMMED_TRC 6BNH370I FAIL AND MAINTABL INCLTABL LABEL2 DSI002_IMMED_TRC 7DSI002I INVALID COMMAND: ‘SHORTCMD' 8
Figure 27 Trace results
1. Command SHORTCMD is entered.2. The TRACE action in the LABEL1 statement ran successfully because the DSI002I message matched the conditions for this statement. So tracing for this message is now in effect as it continues through the automation tables.3. The MSGID comparison matches in the LABEL2 statement. This is indicated by PASS MSGID.4. The TOKEN comparison (used to place the invalid command name into a variable) matches in the LABEL2 statement. This is indicated by PASS TOKEN.
December 10, 2013 35 of 53

5. The logical AND that joins the MSGID and TOKEN comparisons is successful in the LABEL2 statement. This is indicated by PASS AND. The logical AND operator is successful because its two operands (MSGID and TOKEN) were successful.6. The HDRMTYPE comparison fails in the LABEL2 statement. This is indicated by FAIL HDRMTYPE. The comparison fails because the command was not more than 8 characters long. So message DSI002I is output as a regular message, rather than an immediate message.7. The logical AND operator (that joins HDRMTYPE with the preceding logical AND operator) fails in the LABEL2 statement. This is indicated by FAIL AND. The logical AND operator fails because its second operand (HDRMTYPE) failed.8. Message DSI002I (just processed through the automation table) is displayed on the console.
The command failed because it was invalid, not because it was too long. So the MSG command was not executed.
Unautomated Messages and MSUsThere might be messages or events that you think should trigger automation, but in fact they do not. Why? To find out, you could create a list of messages and MSUs that are not automated by your automation table, and use that list to:
• Identify existing condition items that should be corrected or refined;• Determine additional messages and MSUs that can be automated.
Here’s an example:• You could write a command processor named LOGSEQ that records in a sequential log data set everything that is passed to it.• Add the following statement as the last statement in your automation table to pass all (unautomated) messages to the LOGSEQ command processor:IF MSGID = ANYID THEN EXEC(CMD('LOGSEQ ' ANYID ' NOT AUTOMATED'));• For each message processed without finding a match in the automation table, LOGSEQ writes a record to the log file, indicating that the message was not automated. You can then examine the log to see if messages that should be automated are not being automated, and analyze the automation table to determine why. Use same technique for MSUs.10
You can use the same technique • in BEGIN-END blocks to determine whether messages or MSUs are being automated as intended. This can help to determine whether you should add additional statements to the BEGIN-END section.• with condition items other than MSGID to obtain other information about unautomated messages and MSUs.
10 This technique assumes you only allow unautomated messages and MSUs to reach the bottom of your table. This method might not be suitable for all tables.
December 10, 2013 36 of 53
Other Tools
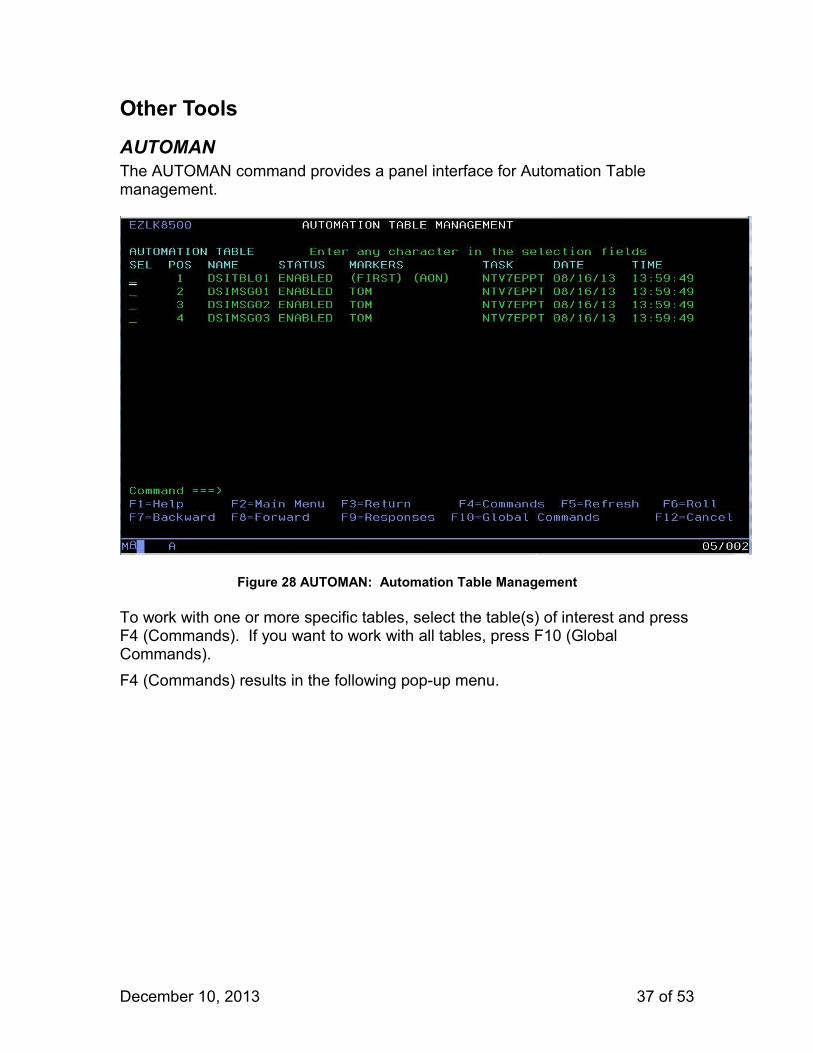
AUTOMANThe AUTOMAN command provides a panel interface for Automation Table management.
Figure 28 AUTOMAN: Automation Table Management
To work with one or more specific tables, select the table(s) of interest and press F4 (Commands). If you want to work with all tables, press F10 (Global Commands).F4 (Commands) results in the following pop-up menu.
December 10, 2013 37 of 53
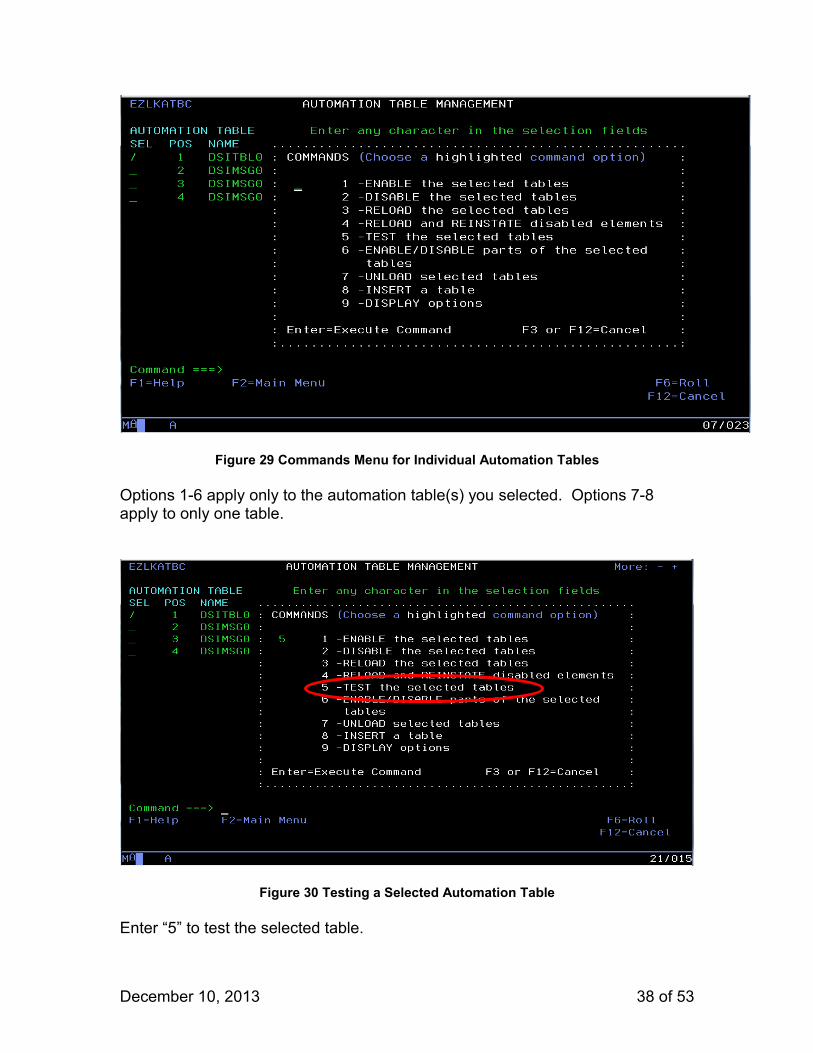
Figure 29 Commands Menu for Individual Automation Tables
Options 1-6 apply only to the automation table(s) you selected. Options 7-8 apply to only one table.
Figure 30 Testing a Selected Automation Table
Enter “5” to test the selected table.
December 10, 2013 38 of 53
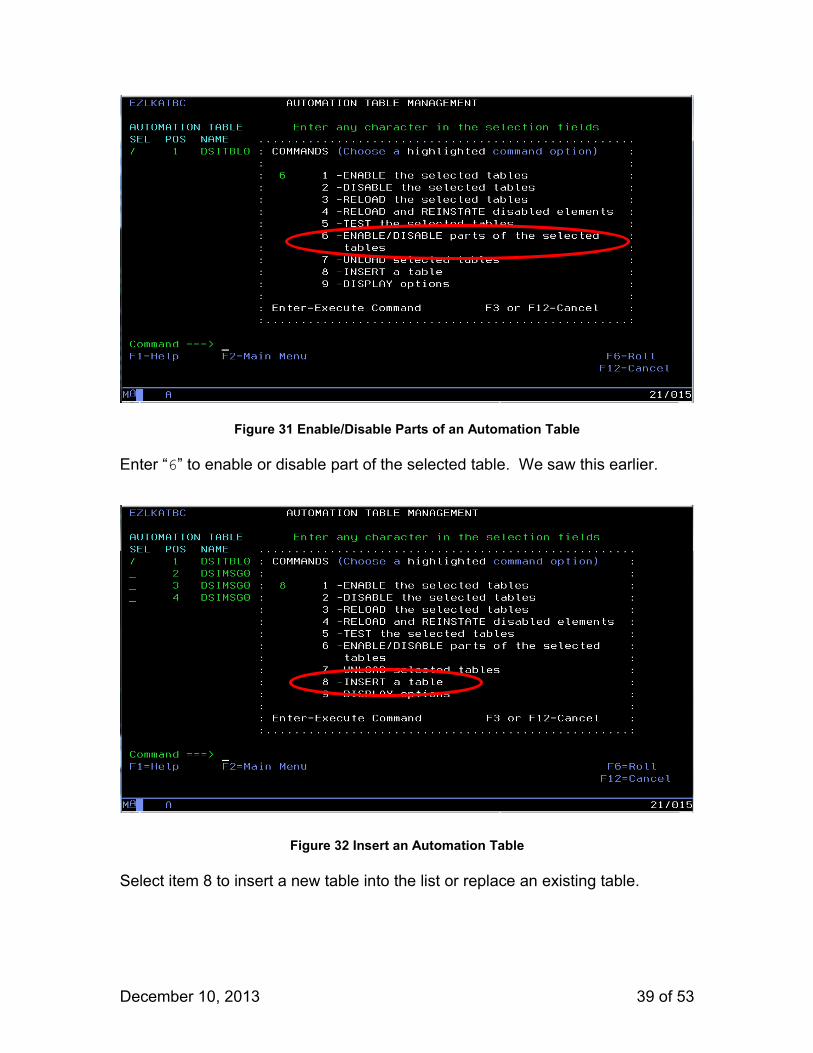
Figure 31 Enable/Disable Parts of an Automation Table
Enter “6” to enable or disable part of the selected table. We saw this earlier.
Figure 32 Insert an Automation Table
Select item 8 to insert a new table into the list or replace an existing table.
December 10, 2013 39 of 53
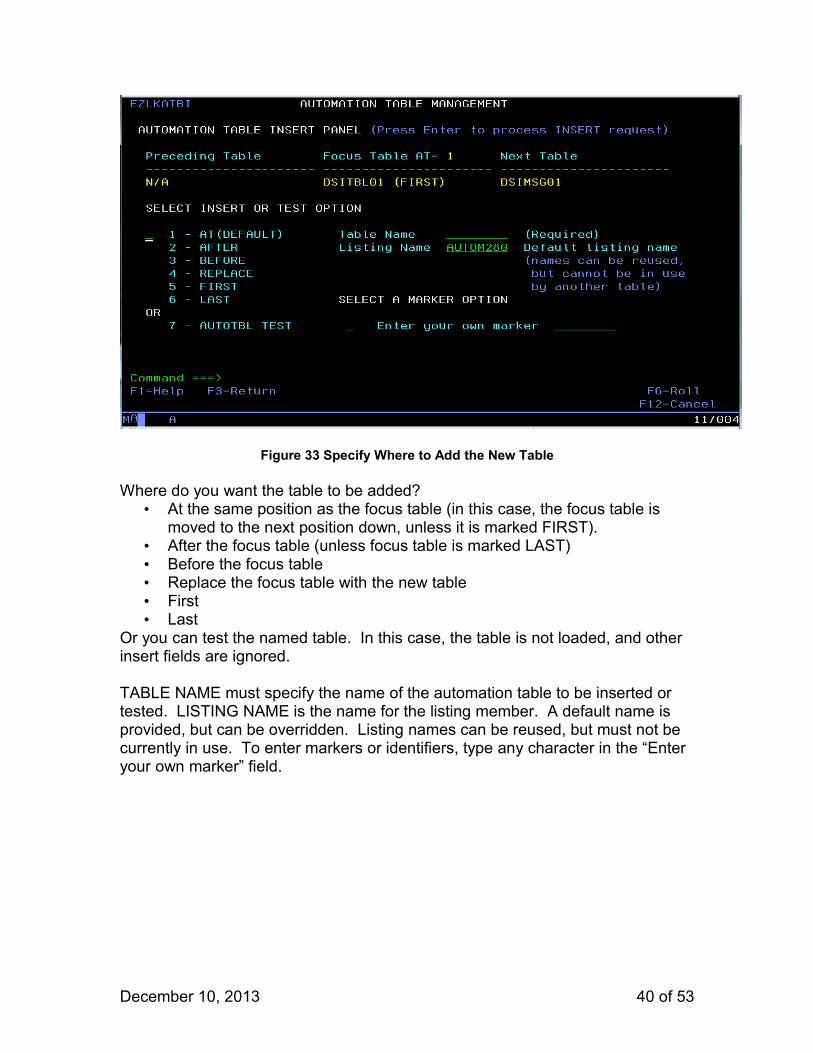
Figure 33 Specify Where to Add the New Table
Where do you want the table to be added?• At the same position as the focus table (in this case, the focus table is
moved to the next position down, unless it is marked FIRST).• After the focus table (unless focus table is marked LAST)• Before the focus table• Replace the focus table with the new table• First• Last
Or you can test the named table. In this case, the table is not loaded, and other insert fields are ignored.
TABLE NAME must specify the name of the automation table to be inserted or tested. LISTING NAME is the name for the listing member. A default name is provided, but can be overridden. Listing names can be reused, but must not be currently in use. To enter markers or identifiers, type any character in the “Enter your own marker” field.
December 10, 2013 40 of 53
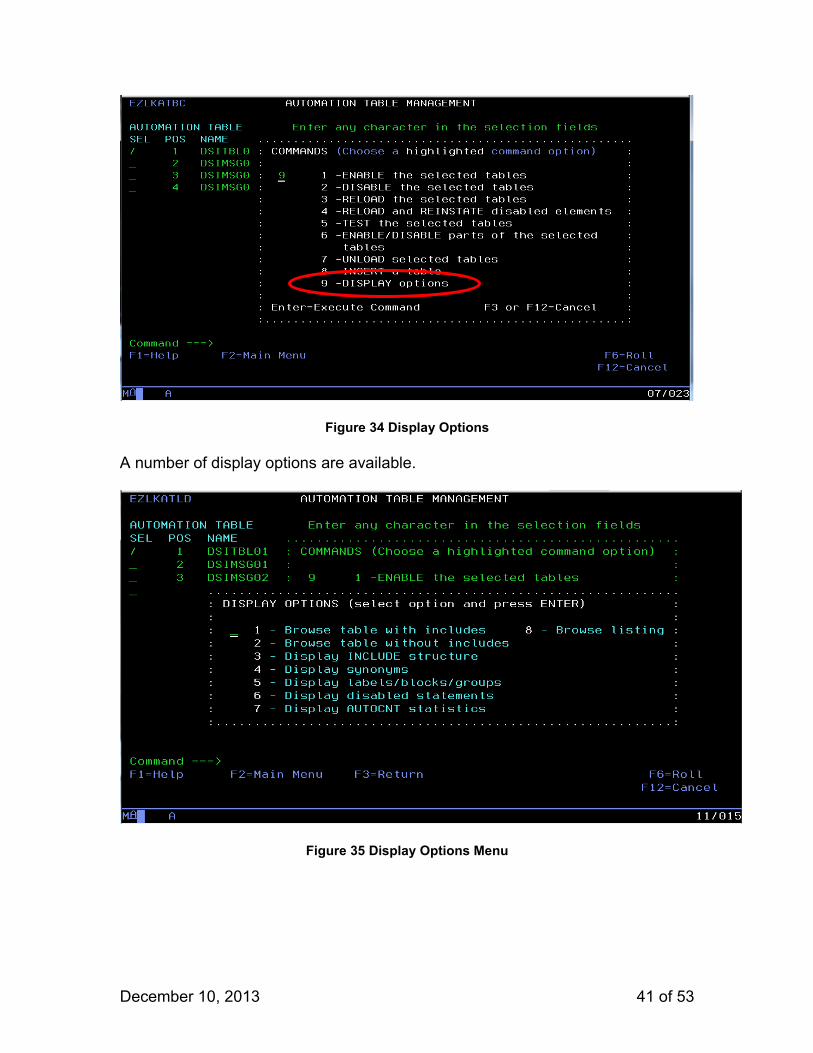
Figure 34 Display Options
A number of display options are available.
Figure 35 Display Options Menu
December 10, 2013 41 of 53

Figure 36 Display INCLUDE Structure
If you have %INCLUDEd multiple automation tables, item 3 “Display INCLUDE structure” can be helpful in confirming their correct placement:
Figure 37 INCLUDE Structure
In this example, the primary automation table is DSITBL01. It %INCLUDEs several other tables, two of which (EZLDSIAO and FKXISTAO) also %INCLUDE yet other tables.
December 10, 2013 42 of 53
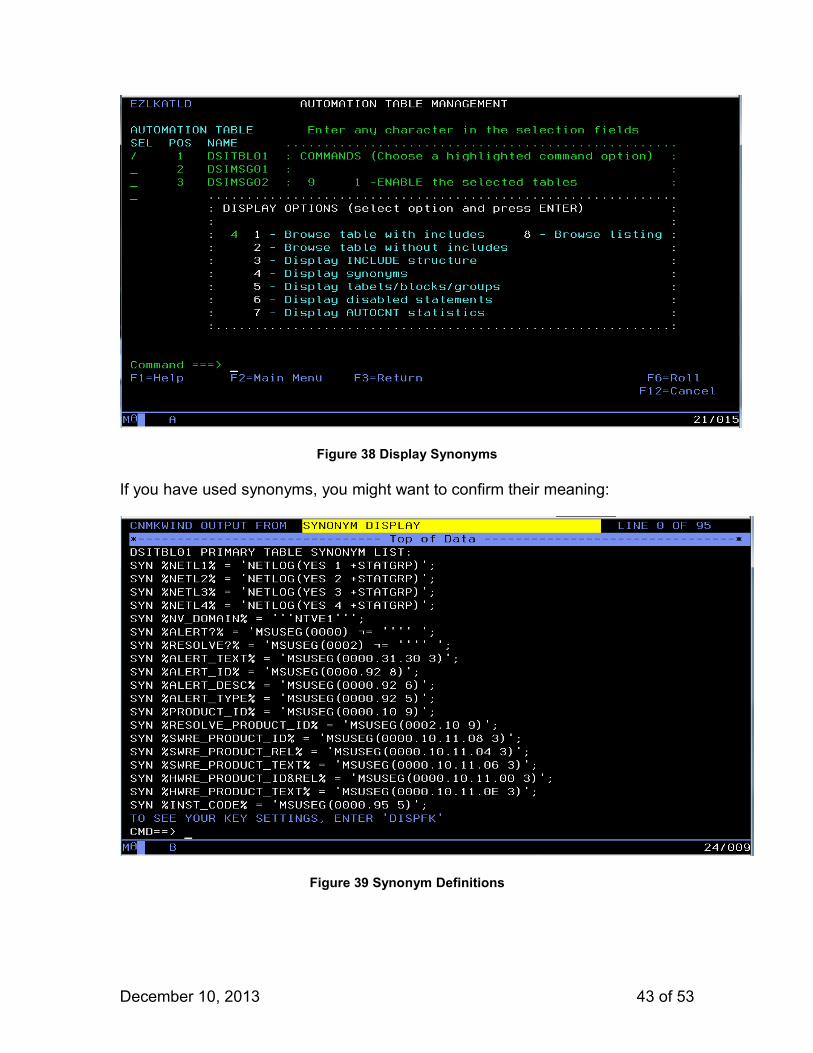
Figure 38 Display Synonyms
If you have used synonyms, you might want to confirm their meaning:
Figure 39 Synonym Definitions
December 10, 2013 43 of 53
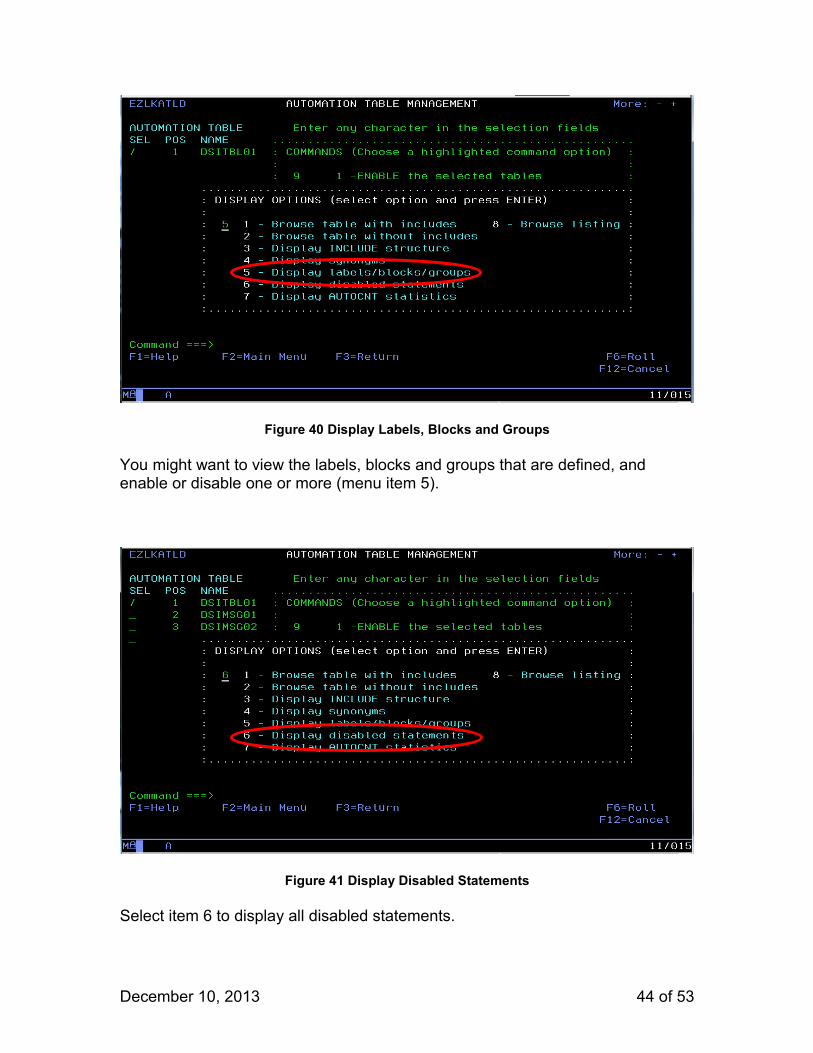
Figure 40 Display Labels, Blocks and Groups
You might want to view the labels, blocks and groups that are defined, and enable or disable one or more (menu item 5).
Figure 41 Display Disabled Statements
Select item 6 to display all disabled statements.
December 10, 2013 44 of 53
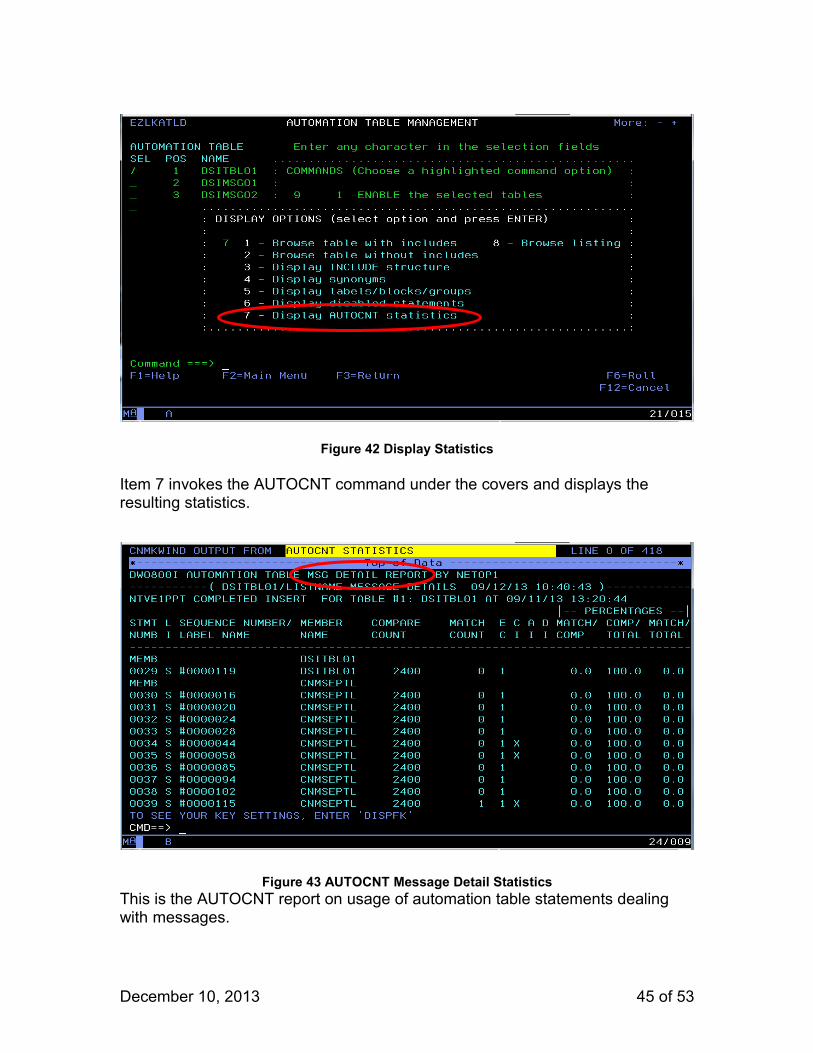
Figure 42 Display Statistics
Item 7 invokes the AUTOCNT command under the covers and displays the resulting statistics.
Figure 43 AUTOCNT Message Detail StatisticsThis is the AUTOCNT report on usage of automation table statements dealing with messages.
December 10, 2013 45 of 53
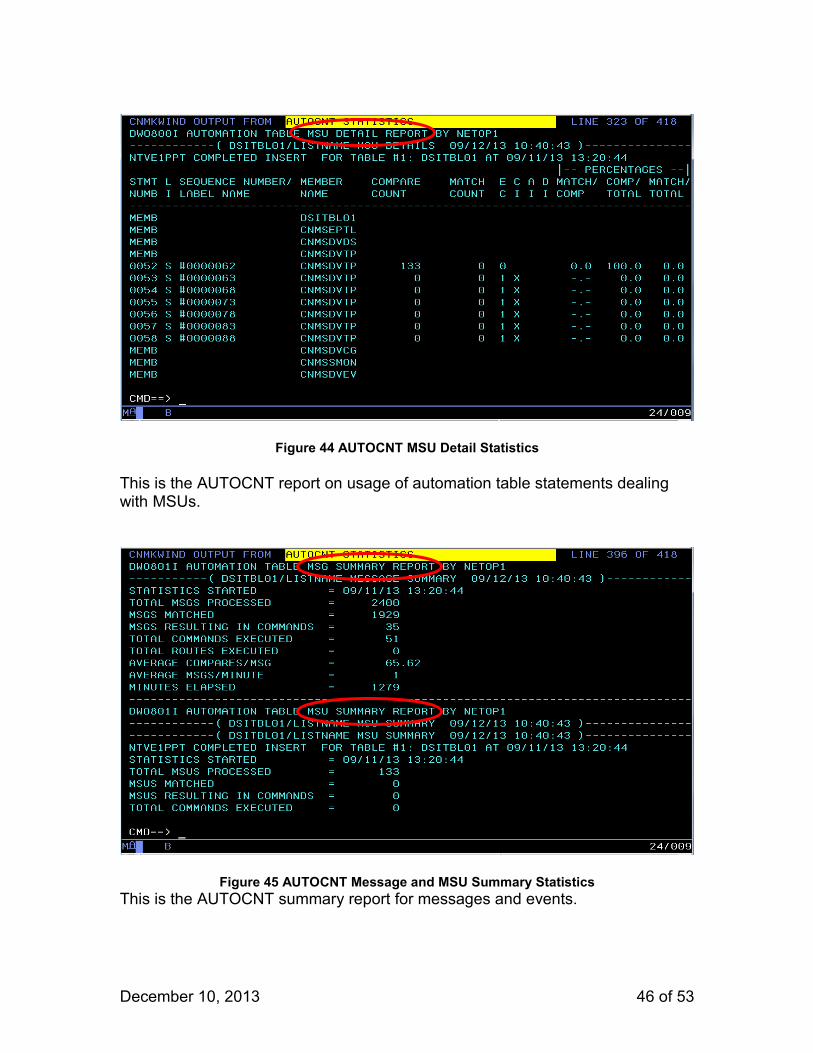
Figure 44 AUTOCNT MSU Detail Statistics
This is the AUTOCNT report on usage of automation table statements dealing with MSUs.
Figure 45 AUTOCNT Message and MSU Summary StatisticsThis is the AUTOCNT summary report for messages and events.
December 10, 2013 46 of 53
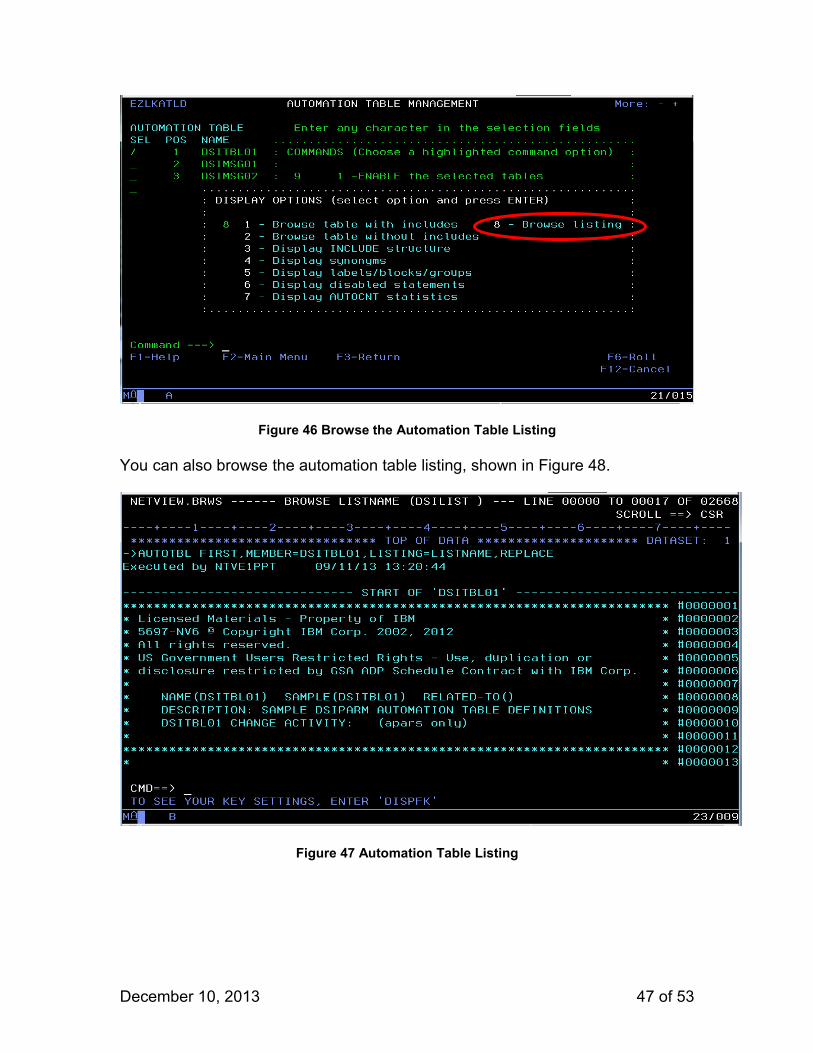
Figure 46 Browse the Automation Table Listing
You can also browse the automation table listing, shown in Figure 48.
Figure 47 Automation Table Listing
December 10, 2013 47 of 53
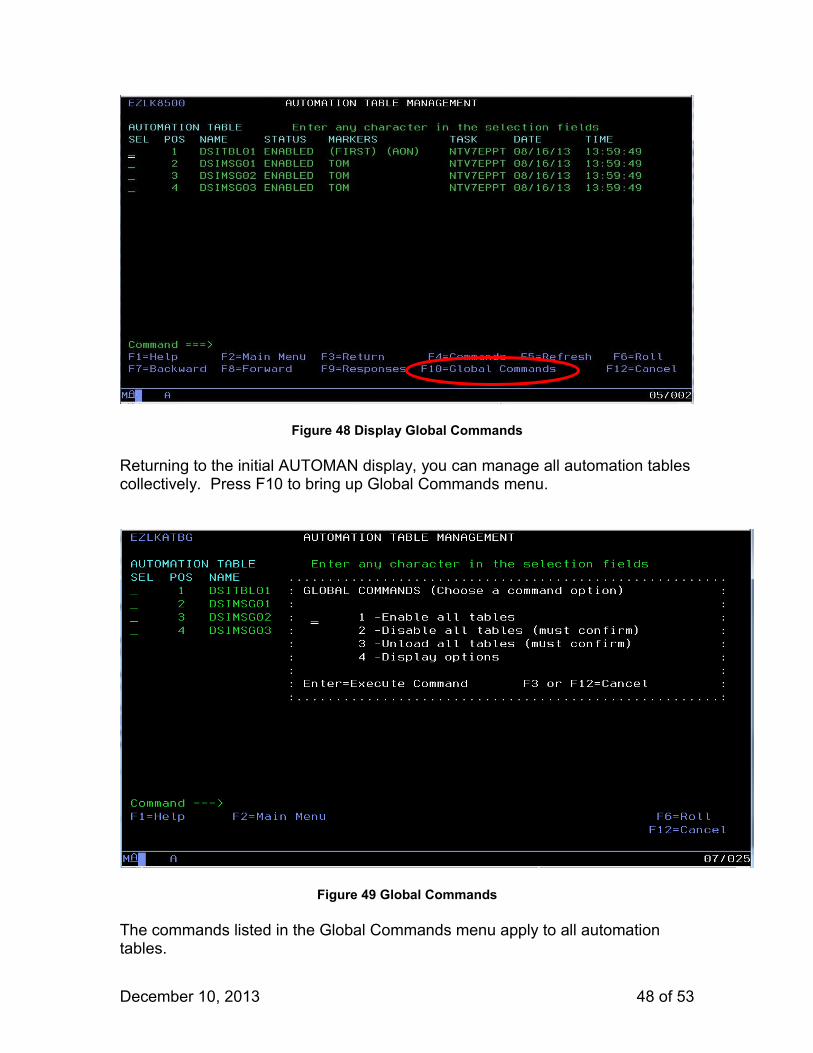
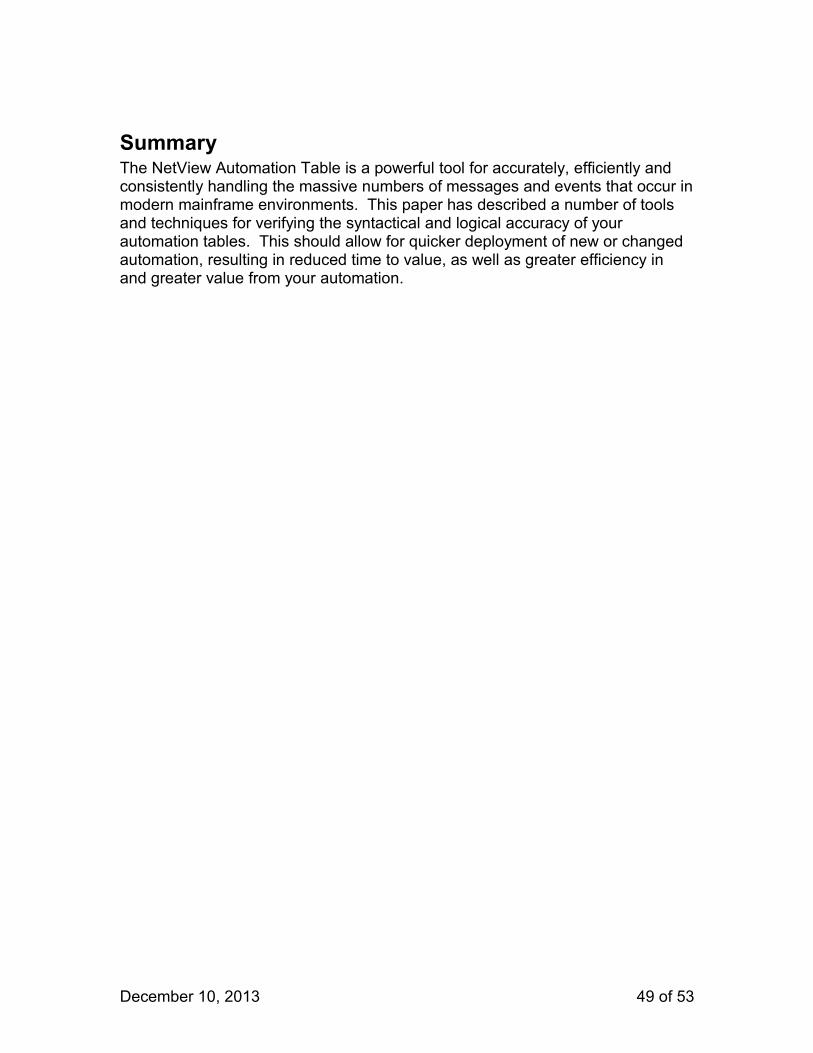
Figure 48 Display Global Commands
Returning to the initial AUTOMAN display, you can manage all automation tables collectively. Press F10 to bring up Global Commands menu.
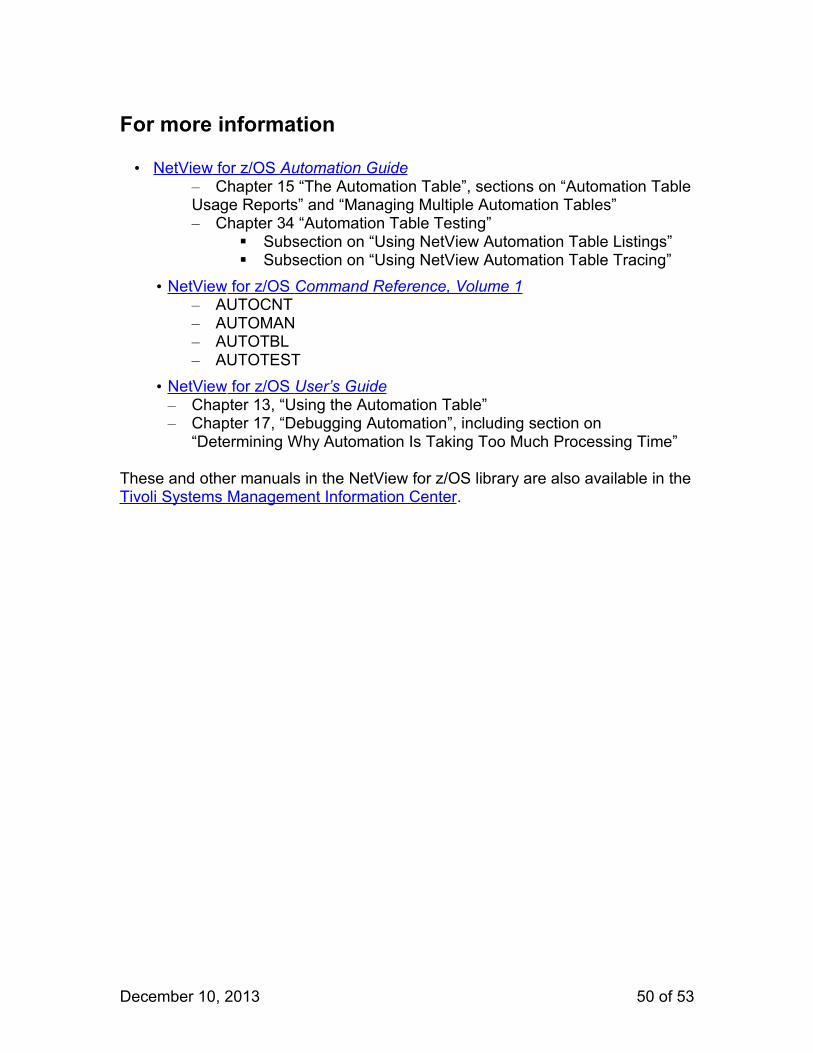
Figure 49 Global Commands
The commands listed in the Global Commands menu apply to all automation tables.
December 10, 2013 48 of 53
SummaryThe NetView Automation Table is a powerful tool for accurately, efficiently and consistently handling the massive numbers of messages and events that occur in modern mainframe environments. This paper has described a number of tools and techniques for verifying the syntactical and logical accuracy of your automation tables. This should allow for quicker deployment of new or changed automation, resulting in reduced time to value, as well as greater efficiency in and greater value from your automation.
December 10, 2013 49 of 53
For more information
• NetView for z/OS Automation Guide – Chapter 15 “The Automation Table”, sections on “Automation Table Usage Reports” and “Managing Multiple Automation Tables”– Chapter 34 “Automation Table Testing”
Subsection on “Using NetView Automation Table Listings” Subsection on “Using NetView Automation Table Tracing”
• NetView for z/OS Command Reference, Volume 1 – AUTOCNT– AUTOMAN– AUTOTBL– AUTOTEST
• NetView for z/OS User’s Guide – Chapter 13, “Using the Automation Table”– Chapter 17, “Debugging Automation”, including section on
“Determining Why Automation Is Taking Too Much Processing Time”
These and other manuals in the NetView for z/OS library are also available in the Tivoli Systems Management Information Center.
December 10, 2013 50 of 53
Notices
This information was developed for products and services offered in the U.S.A. IBM may not offer the products, services, or features discussed in this document in other countries. Consult your local IBM representative for information on the products and services currently available in your area.
IBM may have patents or pending patent applications covering subject matter described in this document. The furnishing of this document does not give you any license to these patents. You can send license inquiries, in writing, to:
IBM Director of LicensingIBM CorporationNorth Castle DriveArmonk, NY 10504-1785 U.S.A.
For license inquiries regarding double-byte (DBCS) information, contact the IBM Intellectual Property Department in your country or send inquiries, in writing, to:
Intellectual Property LicensingLegal and Intellectual Property LawIBM Japan, Ltd.1623-14, Shimotsuruma, Yamato-shiKanagawa 242-8502 Japan
The following paragraph does not apply to the United Kingdom or any other country where such provisions are inconsistent with local law:INTERNATIONAL BUSINESS MACHINES CORPORATION PROVIDES THIS PUBLICATION "AS IS" WITHOUT WARRANTY OF ANY KIND, EITHER EXPRESS OR IMPLIED, INCLUDING, BUT NOT LIMITED TO, THE IMPLIED WARRANTIES OF NON-INFRINGEMENT, MERCHANTABILITY OR FITNESS FOR A PARTICULAR PURPOSE.
Some states do not allow disclaimer of express or implied warranties in certain transactions, therefore, this statement might not apply to you.
This information could include technical inaccuracies or typographical errors. Changes may be periodically made to the information herein. IBM may make improvements and/or changes in the product(s) and/or the program(s) described in this document at any time without notice.
Any references in this information to non-IBM websites are provided for convenience only and do not in any manner serve as an endorsement of those websites. The materials at those websites are not part of the materials for this IBM product and use of those websites is at your own risk.
IBM may use or distribute any of the information you supply in any way it believes appropriate without incurring any obligation to you.
Licensees of this program who wish to have information about it for the purpose of enabling: (i) the exchange of information between independently created programs and other programs (including this one) and (ii) the mutual use of the information which has been exchanged, should contact:
IBM Corporation2Z4A/10111400 Burnet Road
December 10, 2013 51 of 53
Austin, TX 78758 U.S.A.
Such information may be available, subject to appropriate terms and conditions, including in some cases payment of a fee.
The licensed program described in this document and all licensed material available for it are provided by IBM under terms of the IBM Customer Agreement, IBM International Program License Agreement or any equivalent agreement between us.
Any performance data contained herein was determined in a controlled environment. Therefore, the results obtained in other operating environments may vary significantly. Some measurements may have been made on development-level systems and there is no guarantee that these measurements will be the same on generally available systems. Furthermore, some measurements may have been estimated through extrapolation. Actual results may vary. Users of this document should verify the applicable data for their specific environment.
Information concerning non-IBM products was obtained from the suppliers of those products, their published announcements or other publicly available sources. IBM has not tested those products and cannot confirm the accuracy of performance, compatibility or any other claims related to non-IBM products. Questions on the capabilities of non-IBM products should be addressed to the suppliers of those products.
All statements regarding IBM's future direction or intent are subject to change or withdrawal without notice, and represent goals and objectives only.
This information is for planning purposes only. The information herein is subject to change before the products described become available.
This information contains examples of data and reports used in daily business operations. To illustrate them as completely as possible, the examples might include the names of individuals, companies, brands, and products. All of these names are fictitious and any similarity to the names and addresses used by an actual business enterprise is entirely coincidental.
COPYRIGHT LICENSE:
This information contains sample application programs in source language, which illustrate programming techniques on various operating platforms. You may copy, modify, and distribute these sample programs in any form without payment to IBM, for the purposes of developing, using, marketing or distributing application programs conforming to the application programming interface for the operating platform for which the sample programs are written. These examples have not been thoroughly tested under all conditions. IBM, therefore, cannot guarantee or imply reliability, serviceability, or function of these programs. You may copy, modify, and distribute these sample programs in any form without payment to IBM for the purposes of developing, using, marketing, or distributing application programs conforming to IBM‘s application programming interfaces.
Each copy or any portion of these sample programs or any derivative work must include a copyright notice as follows:
© (your company name) (year). Portions of this code are derived from IBM Corp. Sample Programs. © Copyright IBM Corp. _enter the year or years_. All rights reserved.
If you are viewing this information in softcopy form, the photographs and color illustrations might not be displayed.
December 10, 2013 52 of 53
Trademarks
IBM, the IBM logo, and ibm.com are trademarks or registered trademarks of International Business Machines Corporation in the United States, other countries, or both. If these and other IBM trademarked terms are marked on their first occurrence in this information with a trademark symbol (® or ™), these symbols indicate U.S. registered or common law trademarks owned by IBM at the time this information was published. Such trademarks may also be registered or common law trademarks in other countries. A current list of IBM trademarks is available on the web at "Copyright and trademark information" at http://www.ibm.com/legal/copytrade.shtml.
Other company, product, or service names may be trademarks or service marks of others.
December 10, 2013 53 of 53


![Beverage World - April 2016 [46 - 47]](https://img.pdfslide.us/doc/110x75/587dae951a28abae2f8b5947/beverage-world-april-2016-46-47.jpg)