Embed Size (px)
Citation preview

Page 1 of 19
Technical Note TN260
Debugging the Linux® Kernel using the CodeWarrior™ IDE for ColdFire® Architectures
Version 2.4 with Abatron
By: Oscar Gueta
You can use the CodeWarrior IDE to debug Linux applications, the Linux kernel and kernel modules. This document provides step-by-step instructions for configuring the CodeWarrior IDE for Linux debugging using the Abatron BDI2000.
Introduction
To develop and debug Linux embedded applications, use the CodeWarrior Target Resident Kernel (TRK). The CodeWarrior TRK is a highly-modular, reusable debug server that resides on the target system and communicates with the CodeWarrior debugger.
On embedded Linux systems, the CodeWarrior TRK is packaged as a regular Linux application for use with the CodeWarrior debugger. The CodeWarrior TRK source code is provided to you so that you can modify it to work in custom situations.
For more information about the CodeWarrior TRK, see “Using CodeWarrior Target-Resident Kernel” in the CodeWarrior™ Development Studio for ColdFire® Architectures, Linux® Platform Edition Version 2.4 Targeting Manual.
For Linux kernel and module development and debugging the Abatron BDI2000 is the preferred tool.
This document covers debugging the Linux kernel for MCF5329EVB. You can use the same methodology to set up the environment for other Freescale Evaluation Boards (EVB).
Refer to the release notes included in the CodeWarrior Development Studio for the specifics of each EVB. The release notes are located in the following directory in the CodeWarrior installation:
CWInstallDir/CodeWarriorIDE/Release_Notes/
Setting up the BSP for the Freescale Evaluation Board (EVB)
First, set up the Board Support Package (BSP) and make sure that the base boot loader and Linux kernel boot correctly on the EVB.

Page 2 of 19
Technical Note TN260
NOTE Find the Board Support Package image files for test boards at www.codewarrior.com under:Downloads > Linux Board Support Packages > BSPs for Coldfire Architectures.
For more information on setting up Linux on the EVB, refer to the User Manual located on the BSP ISO disc. To mount the disc:
1. Login as root, or use sudo privileges, to mount the ISO file (change ISO filename as needed).
mount -o loop m532xevb-20071102-ltib.iso /mnt/cdrom
2. Change to the user manual directory:
cd /mnt/cdrom/Help/software
3. Open the pdf file User_Manual_MCGF5329.pdf (change user manual name as needed).
Follow the instructions and set up the environment on the host Linux machine. For the MCF5329EVB, the original dBUG boot loader included on the board is recommended, and is configured as the boot loader for the Linux kernel. Mount the Linux file system using Network File System (NFS).
Configuring Abatron BDI2000
The release notes provided with the IDE state that the target board must have the original dBUG firmware to use the kernel/module debugging feature. You must configure the BDI2000 device with "stop" mode to support the kernel/module debugging feature.
The CodeWarrior IDE includes BDI files with the correct Abatron settings that correspond to each supported board. The .bdi files are located in CWInstallDir/CodeWarriorIDE/CodeWarrior/ThirdPartyTools.
Example: CWInstallDir/CodeWarriorIDE/CodeWarrior/ThirdPartyTools/MCF532x/Abatron/Sample_BDI_Files/MCF5329_stop.bdi
NOTE Do not use a target initialization file with the kernel project when using the Abatron debug tool.
If you are doing kernel debugging with the P&E USB ColdFire MultiLink Cable, use StartBootloader.cfg as the target initialization file.
NOTE This example uses the MCF5329EVB, MCF5329_stop.bdi, and the B20mcf.exe Abatron flashing/configuring utility that is located on the diskette provided with the Abatron tool.
Page 3 of 19
Technical Note TN260
1. Connect a serial cable between a serial port on the host computer and the serial port of the Abatron tool.
NOTE To connect to the Abatron using the network, the Abatron tool must be configured with a static IP address. This IP address is transmitted to the Abatron tool over a serial connection.
2. Run B20mcf.exe. This window-based Abatron configuration utility is located on the diskette that comes with the Abatron tool.
NOTE You can download the source files for a command line tool, bdisetup, from the Abatron web page and compile them using gcc, if the window-based tool B20mcf.exe is not available.
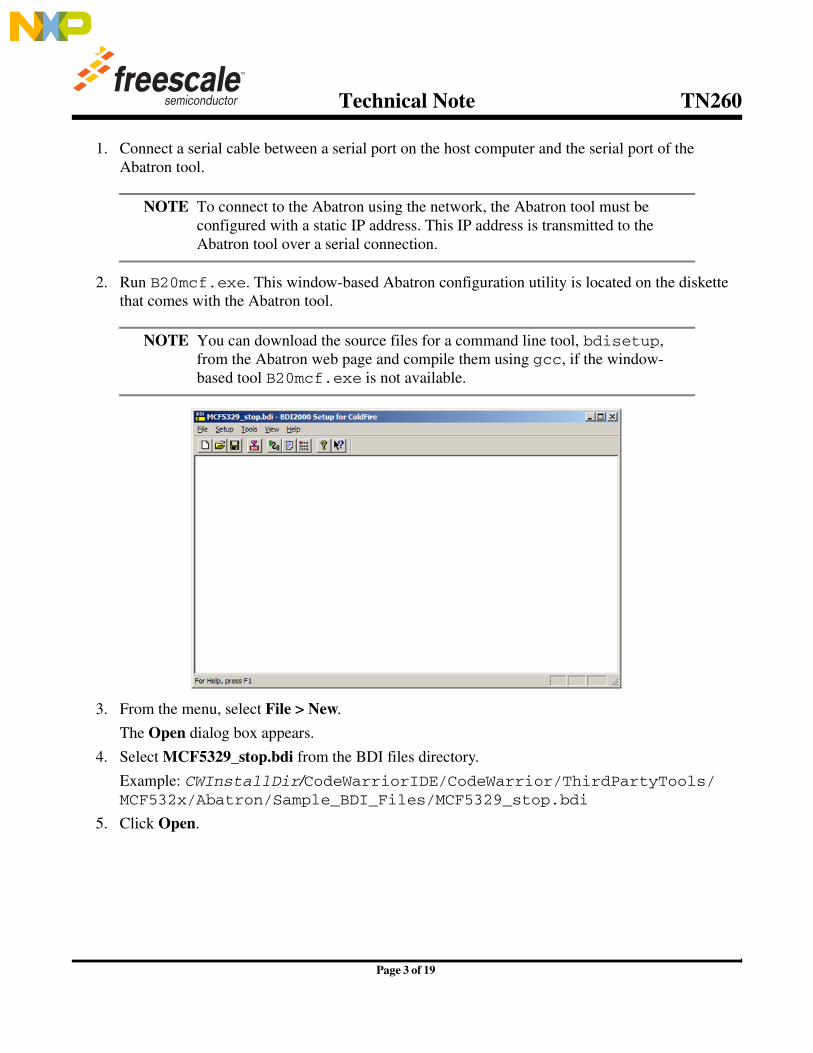
3. From the menu, select File > New.
The Open dialog box appears.
4. Select MCF5329_stop.bdi from the BDI files directory.
Example: CWInstallDir/CodeWarriorIDE/CodeWarrior/ThirdPartyTools/MCF532x/Abatron/Sample_BDI_Files/MCF5329_stop.bdi
5. Click Open.

Page 4 of 19
Technical Note TN260
6. From the menu, select Setup.
The Communication Setup window appears.
7. Verify that the Channel and Baudrate are set correctly for the serial port on your host machine.
8. Click the Test button to test the serial communication between the host machine and the Abatron tool via the serial port.
A message box confirms that the link to BDI was successfully tested.
9. Click OK to return to the main Communication Setup screen.
Page 5 of 19
Technical Note TN260
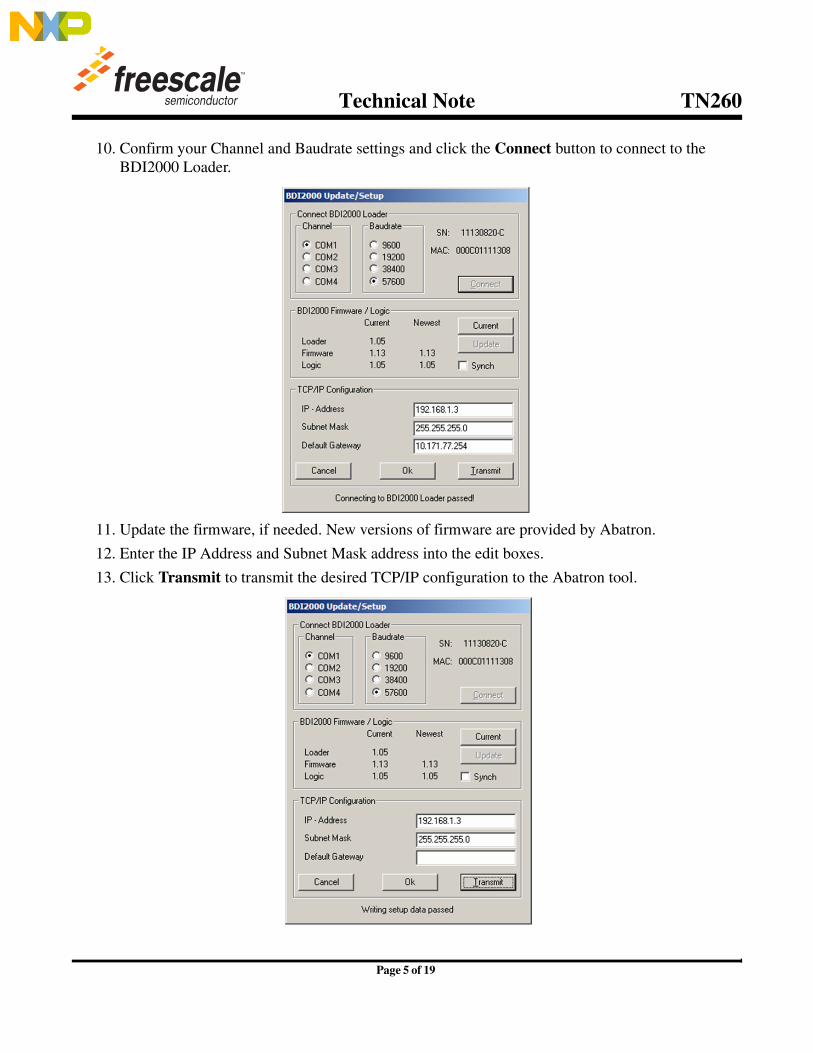
10. Confirm your Channel and Baudrate settings and click the Connect button to connect to the BDI2000 Loader.
11. Update the firmware, if needed. New versions of firmware are provided by Abatron.
12. Enter the IP Address and Subnet Mask address into the edit boxes.
13. Click Transmit to transmit the desired TCP/IP configuration to the Abatron tool.

Page 6 of 19
Technical Note TN260
14. Transmit the default BDI Working Mode settings which were read from the previously opened BDI file.
Abatron is now ready.
Configuring PE Micro USB Multilink
CodeWarrior IDE for ColdFire Architectures includes P&E Micro USB Multilink's Linux driver, called windrv6 under Linux. This driver compiles and installs at CodeWarrior IDE installation time and is known to compile and work on the supported Linux distributions described in CodeWarrior release notes.
For newer versions of the drivers or to address problems when compiling or loading this driver, visit http://www.pemicro.com.
Configuring BSP/Linux Kernel using LTIB
You must use the Linux Target Image Builder (LTIB) to configure the settings of the Linux image you are building. Specifically, you need to change the boot loader, kernel configuration and the kernel sources.
1. Change the directory to the LTIB subdirectory.
Example: cd /home/<username>/ltib-m532xevb-20071102
2. Run the command:
./ltib --configure
This command launches the LTIB shell script which begins the installation of the LTIB files and launches the LTIB configuration screen.

Page 7 of 19
Technical Note TN260
NOTE A log file named host_config.log contains a record of the install progress. View this file using the tail -f host_config.log command.
NOTE According to the BSP documentation and the CodeWarrior release notes, you must use dBUG as the boot loader.
3. Select the Build a boot loader option.
4. Under Bootloader choice select Build dBUG bootloader.
5. Select the Configure the kernel option.
This tells the kernel configuration screen to launch after the LTIB configuration is done.

Page 8 of 19
Technical Note TN260
6. Select the Leave the sources after building option.
7. Select Exit.
You are asked if you want to save the LTIB configuration.
8. Click Yes to save the LTIB configuration.
The setup continues and the kernel configuration screen appears.
9. Next, enter the Kernel Hacking option.
10. Select the Kernel debugging option.

Page 9 of 19
Technical Note TN260
11. Select the Compile the Kernel with debug info option.
12. Click Exit to exit the Kernel hacking screen.
13. Select Exit.
You are asked if you want to save the kernel configuration.
14. Click Yes to save the kernel configuration.
The kernel recompiles with debug information.
A Build Succeeded message appears in the terminal window upon successful completion.

Page 10 of 19
Technical Note TN260
Creating the Linux Kernel CodeWarrior Project
After you compile the kernel, you need to create a kernel project.
1. Open the CodeWarrior IDE.
a) Open a terminal window from the Linux desktop.
b) Change to the CWInstallDir/CodeWarriorIDE/ subdirectory.
c) Run the CodeWarrior configuration file:
./cwide
The CodeWarrior IDE top level menu window appears.
2. In the CodeWarrior IDE menu, select File > Open.
A standard file open dialog box appears.
3. Select the uncompressed kernel image built in the previous procedure.
LTIBInstallDir/rpm/BUILD/linux/vmlinux
4. Click Open.
NOTE If you did not compile the kernel with debug symbols, the IDE displays an error message.

Page 11 of 19
Technical Note TN260
5. The Choose Debugger window appears.
6. Select the ColdFire Abatron TCP/IP option.
7. Click OK.
The IDE creates a dummy CodeWarrior project named vmlinux.mcp. The vmlinux.mcp file is in the same directory as vmlinux (/rpm/BUILD/linux). This directory also contains the source code files used to build the kernel.
As the IDE creates this project, it displays a progress bar that indicates project creation progress. If the IDE cannot find a kernel source file, it displays a dialog box that allows you to navigate to and select the missing file.
You have created a CodeWarrior Linux kernel debug project.
Page 12 of 19
Technical Note TN260
Configuring the Kernel Project for Debugging
Now that you have created a CodeWarrior project for your Linux kernel image, the next step is to configure this project for debugging. The CodeWarrior IDE provides the correct kernel debug settings to use via .xml files located in CWInstallDir/CodeWarriorIDE/CodeWarrior/ColdFire_Support/KernelDebug_Settings.
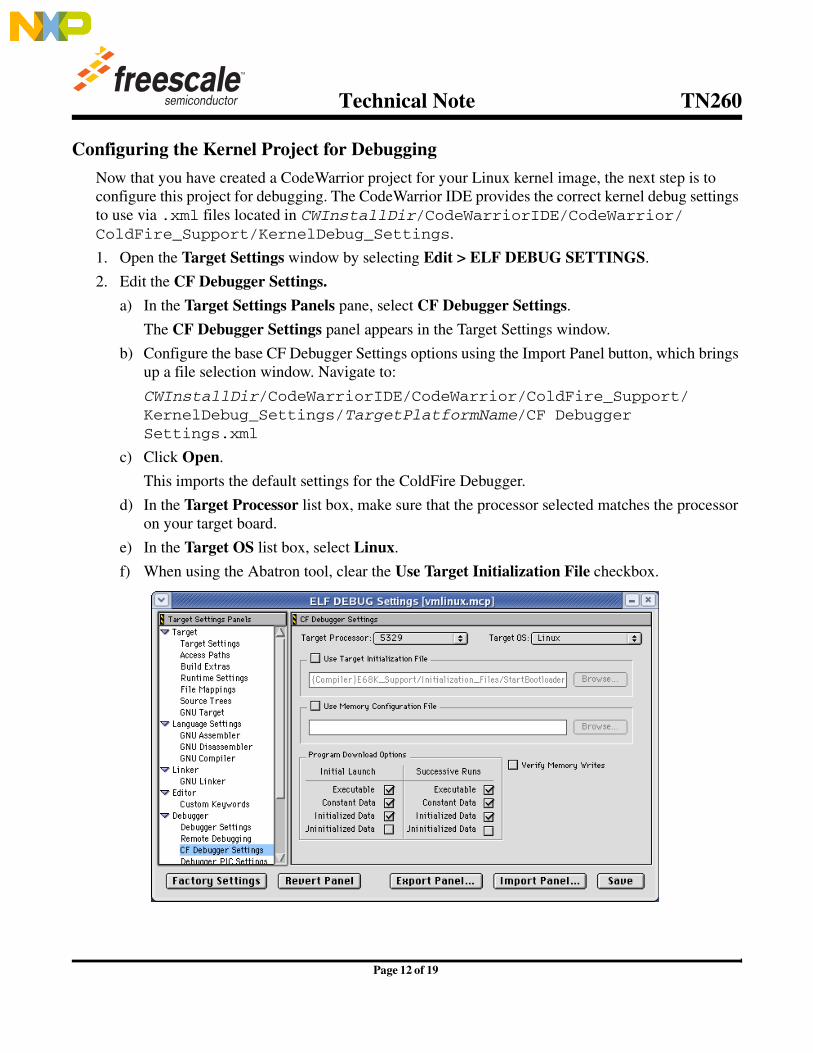
1. Open the Target Settings window by selecting Edit > ELF DEBUG SETTINGS.
2. Edit the CF Debugger Settings.
a) In the Target Settings Panels pane, select CF Debugger Settings.
The CF Debugger Settings panel appears in the Target Settings window.
b) Configure the base CF Debugger Settings options using the Import Panel button, which brings up a file selection window. Navigate to:
CWInstallDir/CodeWarriorIDE/CodeWarrior/ColdFire_Support/KernelDebug_Settings/TargetPlatformName/CF Debugger Settings.xml
c) Click Open.
This imports the default settings for the ColdFire Debugger.
d) In the Target Processor list box, make sure that the processor selected matches the processor on your target board.
e) In the Target OS list box, select Linux.
f) When using the Abatron tool, clear the Use Target Initialization File checkbox.
Page 13 of 19
Technical Note TN260
NOTE Do not use an initialization file with the Abatron BDI2000 tool.If you are using a USB P&E Micro cable, or other debug device, you must specify an initialization file.
g) Under Program Download Options for both the Initial Launch and Successive Runs sections, check the following:
• Executable
• Constant Data
• Initialized Data
These options specify what portions of the project to download on the initial and successive launches of the kernel.
h) Click Save if you made any changes.
The IDE saves your settings.
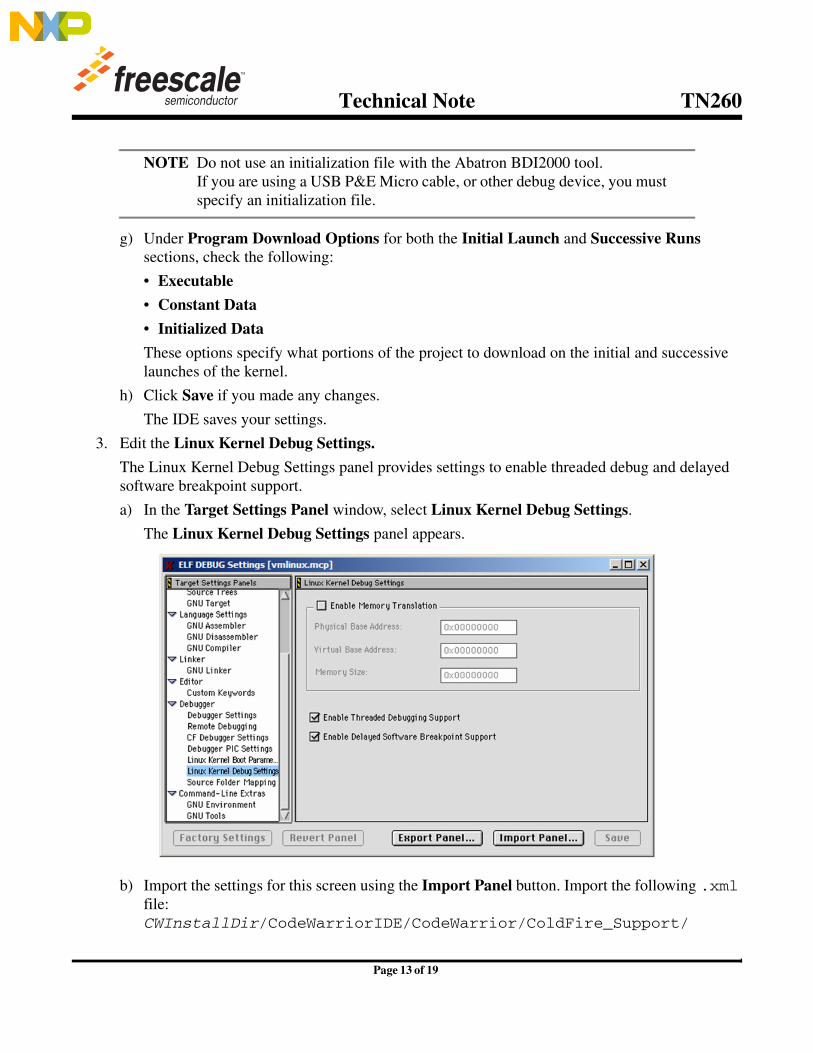
3. Edit the Linux Kernel Debug Settings.
The Linux Kernel Debug Settings panel provides settings to enable threaded debug and delayed software breakpoint support.
a) In the Target Settings Panel window, select Linux Kernel Debug Settings.
The Linux Kernel Debug Settings panel appears.
b) Import the settings for this screen using the Import Panel button. Import the following .xml file: CWInstallDir/CodeWarriorIDE/CodeWarrior/ColdFire_Support/

Page 14 of 19
Technical Note TN260
KernelDebug_Settings/TargetPlatformName/Linux Kernel Debug Settings.xml.
c) Click Save if you made any changes.
The IDE saves your settings.
4. Edit the Remote Debugging options.
a) In the Target Settings Panels window, select Remote Debugging.
The Remote Debugging settings panel appears in the Target Settings window.
b) Make sure that you select the debug probe you are using in the Connection list box. In this case, select ColdFire Abatron TCP/IP.
c) Select Edit Connection to modify the IP Address of the debug probe.
The ColdFire Abatron TCP/IP configuration screen appears.

Page 15 of 19
Technical Note TN260
d) Change the IP Address to the same IP address as your Abatron tool.
e) Click OK to save settings and exit the screen.
f) Click Save, if you made changes.
The IDE saves your settings.
5. Close the Target Settings panel.
You have now configured the project for debugging.
Debugging the Linux Kernel
At this point, the environment is ready to start a debug session.
1. Click on the CodeWarrior debug icon or select from the menu Project > Debug to start downloading the Linux kernel.
The kernel starts downloading to the RAM of the target board.

Page 16 of 19
Technical Note TN260
You can observe the Linux boot process in a serial console:
The IDE displays the CodeWarrior debugger.

Page 17 of 19
Technical Note TN260
2. Click the Stop button to stop execution of the Linux kernel.
The debugger windows show what the kernel is currently executing.
3. As an example, set a breakpoint in the process creation module of the Linux kernel (do_fork() at fork.c) to break when the operating system is creating a process.
A red dot appears next to the line of code where the breakpoint is set.

Page 18 of 19
Technical Note TN260
4. Click the Run icon
The debugger stops at the requested point when a process is being created. You can trigger this action by typing a command in the Linux serial console.
You can now continue debugging the Linux kernel.
Passing Parameters to the Linux Kernel from the CodeWarrior Software
The latest BSPs include Linux kernels that allow the user to include the kernel boot parameters in the binary itself. This removes the need to pass parameters externally.
For Linux kernels that do not support this feature, the CodeWarrior IDE includes a panel for passing parameters. At boot time, the Linux kernel looks for the parameters at the memory location right after the last kernel symbol (A_end). Symbols can be located at System.map, which is produced by the linker during kernel compilation. As an example, a MCF5485 Linux kernel produces these symbols at the end of the file:
…
c02b0085 A __initramfs_end
c02b2000 A __init_end
c02b2000 D init_thread_union
c02b4000 A _end
In this case, the last symbol is at 0xc02b4000. However, as MCF5485 is an MMU-enabled unit, it uses a "normal" Linux kernel, so that all addresses appearing in System.map are virtual addresses. In this case, the kernel needs a physical address, so you must perform a conversion: remove the number "c" from the address, which results in 0x002b4000. Use this location in the CodeWarrior panel.
For µcLinux BSPs (such as the ones corresponding to V2 and V3 cores), no conversion is needed.

Document Number: TN260
10 March 2008
How to Reach Us:
Home Page:www.freescale.com
E-mail:[email protected]
USA/Europe or Locations Not Listed:Freescale SemiconductorTechnical Information Center, CH3701300 N. Alma School RoadChandler, Arizona 85224+1-800-521-6274 or [email protected]
Europe, Middle East, and Africa:Freescale Halbleiter Deutschland GmbHTechnical Information CenterSchatzbogen 781829 Muenchen, Germany+44 1296 380 456 (English)+46 8 52200080 (English)+49 89 92103 559 (German)+33 1 69 35 48 48 (French)[email protected]
Japan:Freescale Semiconductor Japan Ltd.HeadquartersARCO Tower 15F1-8-1, Shimo-Meguro, Meguro-ku,Tokyo 153-0064, Japan0120 191014 or +81 3 5437 [email protected]
Asia/Pacific:Freescale Semiconductor Hong Kong Ltd.Technical Information Center2 Dai King StreetTai Po Industrial EstateTai Po, N.T., Hong Kong+800 2666 [email protected]
For Literature Requests Only:Freescale Semiconductor Literature Distribution CenterP.O. Box 5405Denver, Colorado 802171-800-521-6274 or 303-675-2140Fax: [email protected]
Information in this document is provided solely to enable system and software implementers to use Freescale Semiconductor products. There are no express or implied copyright licenses granted hereunder to design or fabricate any integrated circuits or integrated circuits based on the information in this document.
Freescale Semiconductor reserves the right to make changes without further notice to any products herein. Freescale Semiconductor makes no warranty, representation or guarantee regarding the suitability of its products for any particular purpose, nor does Freescale Semiconductor assume any liability arising out of the application or use of any product or circuit, and specifically disclaims any and all liability, including without limitation consequential or incidental damages. “Typical” parameters that may be provided in Freescale Semiconductor data sheets and/or specifications can and do vary in different applications and actual performance may vary over time. All operating parameters, including “Typicals”, must be validated for each customer application by customer’s technical experts. Freescale Semiconductor does not convey any license under its patent rights nor the rights of others. Freescale Semiconductor products are not designed, intended, or authorized for use as components in systems intended for surgical implant into the body, or other applications intended to support or sustain life, or for any other application in which the failure of the Freescale Semiconductor product could create a situation where personal injury or death may occur. Should Buyer purchase or use Freescale Semiconductor products for any such unintended or unauthorized application, Buyer shall indemnify and hold Freescale Semiconductor and its officers, employees, subsidiaries, affiliates, and distributors harmless against all claims, costs, damages, and expenses, and reasonable attorney fees arising out of, directly or indirectly, any claim of personal injury or death associated with such unintended or unauthorized use, even if such claim alleges that Freescale Semiconductor was negligent regarding the design or manufacture of the part.
Freescale™ and the Freescale logo are trademarks of Freescale Semiconductor, Inc. CodeWarrior™ is a trademark or registered trademark of Freescale Semiconductor, Inc. StarCore® is a registered trademark of Freescale Semiconductor, Inc. in the United States and/or other countries. All other product or service names are the property of their respective owners.
© Freescale Semiconductor, Inc. 2007. All rights reserved.
Additional Information• CodeWarrior™ Development Studio for ColdFire® Architectures, Linux® Platform Edition
Version 2.4 Targeting Manual contains useful information and is the starting point for learning to use the CodeWarrior IDE for Linux.
• The BSP user manual contains vital information to quickly start using Linux in the target EVB.
• For information on Feature Support and Known Issues, refer to the CodeWarrior Release Notes.
• Visit http://www.freescale.com/support for additional assistance.


![KERNEL WARS: KERNEL-EXPLOITATION DEMYSTIFIED · –pGDI[(H & 0xffff)].nType == Windows Local GDI Kernel Memory Overwrite • Setting up a kernel debugging environment](https://img.pdfslide.us/doc/110x75/5c01a56009d3f252338ceb13/kernel-wars-kernel-exploitation-demystified-pgdih-0xffffntype-.jpg)