Embed Size (px)
DESCRIPTION
Merak DB Help
Citation preview

Merak DBTools Help December, 2006

COPYRIGHT Copyright © 2006 Schlumberger. All rights reserved.
The information in this document is subject to change without notice. The software described in this document is furnished under a license agreement. This software may be used or copied only in accordance with the terms of such agreement. It is against the law to copy the software on any medium except as specifically allowed in the license agreement. No part of this document may be reproduced or transmitted in any form, or by any means, electronic or mechanical, including photocopying and recording, for any purpose without the express written permission of Schlumberger.
Merak™ is a trademark of Schlumberger.
Merak Peep, Merak PetroDesk, Merak Portfolio, Merak Decision Tool Kit, Merak VOLTS, Merak Capital Planning, Merak Petroleum Financials, Merak DBTools, Avocet™ Data Manager, Avocet Capture, Avocet Allocation, Avocet Nomination, Avocet Mobile, Avocet Exchange, Avocet Import/Export, Avocet Integrated Asset Modeler, OFM, FieldBA, and FieldViz are marks of Schlumberger.
Microsoft® is a registered trademark of Microsoft Corporation.
BackOffice®, Internet Explorer®, Windows®, Windows 98®, Windows NT®, Windows 2000®, Windows XP®, MS-DOS®, Word®, Excel®, ActiveX®, ODBC®, OLE®, COM®, Terminal Server®, Microsoft Access®, Visual C++®, and Microsoft SQL Server® are registered trademarks of Microsoft Corporation.
Oracle ® is a registered trademark of Oracle Corporation.
Crystal Reports™ is a trademark of Business Objects.
All other names and trademarks are the property of their respective owners.

Contents
Merak Database Toolkit (DBTools).................................................................................. 1 Before you upgrade ........................................................................................................................1 DBTools v4.4 Upgrade and the RS_SUMMARY_RESULT_SET table..........................................1 Pre-upgrade instructions - RS_summary_result_set table .............................................................2 Setting up DBTools .........................................................................................................................2 About installing and updating databases ........................................................................................3 Updating an existing database........................................................................................................3 Installing a new database ...............................................................................................................4 Securing a database (VOLTS and Peep) .......................................................................................5
Oracle ........................................................................................................................................................6 SQL Server ................................................................................................................................................7
Update document dependencies ....................................................................................................7 Post-upgrade instructions - RS_summary_result_set_table ..........................................................8 Securing the Merak demo database...............................................................................................8 Problem 1: Database/User login IDs out-of-synch..........................................................................9 Problem 2: Adjusting MERAK_USER_MAP entries .......................................................................10
How to reach us ................................................................................................................ 13
Merak DBTools Help
Merak Database Toolkit (DBTools)
Before you upgrade In the 2000 release of the Merak suite of software a security enhancement was made which may require some security and administrative changes for customers running Oracle or SQL Server databases. In the past anyone with CREATE TABLE authority was able to create Peep database reports and result sets. These objects were created under the security context of the current database login. This led to the possibility of multiple database reports and result set tables being created in the same database with different owners, which then led to confusion over which table was valid and which table contained the most recent results. To fix this problem a check was added to the software to only allow the schema owner (i.e. the login that created all of the other database tables) to create these objects. This check ensures that only one copy of these database objects exist and that the results in those tables is always the most recent. This may require some security and administrative changes depending on how each client has implemented security. Clients who have multiple users connecting to their database with a different login name and password will now require that all result sets and database reports be created by the schema owner. Depending on the database security implemented you may also need to grant select, insert, update and delete privileges to users who want to access them, and for Oracle clients you will also need to create private or public synonyms for the underlying database tables. A future release of the Merak software suite is planned to reduce the amount of manual intervention required, making the administration of these objects easier. Caution: Before upgrading your databases, please read the DBTools v4.4 Upgrade and the RS_SUMMARY RESULT_SET table section to determine whether you must perform some pre-upgrade steps to prevent loss of data related to the RS_summary_result_set table.
DBTools v4.4 Upgrade and the RS_SUMMARY_RESULT_SET table
A problem can occur during the Merak objects upgrade portion of DBTools when upgrading to version 2044.00.00.02, which applies to the Merak Suite v4.4 when used with Oracle databases. If you have customized the default summary result set table there is a potential for loss of data. Note: this issue does not apply to SQL Server or MSDE databases. During the v4.4 upgrade of the MERAK objects there is a requirement to adjust the precision of columns. In Oracle, this requires that a new table be recreated with higher precision, and then populated with the data from the old table. This step does not take into account that users may have customized the table by either removing or adding columns. As a result, two types of problems can occur: • If columns have been removed from the default table, the upgrade will recreate the columns
resulting in a disconnect between the MERAK_RESULT_VAR table, which stores meta data defining which columns exist in result set tables, and the actual table.
www.sis.slb.com 1

Merak DBTools Help
• If columns have been added to the default table, the upgrade will delete these columns, potentially resulting in a loss of data and also resulting in a disconnect between the MERAK_RESULT_VAR table and the default result set table.
Prior to running the upgrade, detect if this situation exists: 1. As the schema owner in SQLPLUS, run the script “RS_SUMMARY_TEST.sql” which will
indicate if any columns have been added and/or deleted from the standard RS_SUMMARY_RESULT_SET table. If changes were made, proceed with the pre-upgrade instructions.
2. If no custom changes have been made, proceed with the upgrade. OR, If custom changes have been made: • complete the pre-upgrade instructions; • perform the standard DBTools database upgrade; • complete the post-upgrade instructions.
Pre-upgrade instructions - RS_summary_result_set table If you have already determined that modifications have been made to your RS_summary_result_set table: • Copy the RS_SUMMARY_RESULT_SET table to a temporary table, renaming it
"SAVE_RS_SUMMARY" as the temporary tablename. This table name is not used by the DBTOOLS upgrade process.
Once the table has been saved under the new name, proceed with the standard update process. When completed, you must then follow the Post-upgrade instructions for the RS_summary_result_set table.
Setting up DBTools You are required to set up the following items before using DBTools:
For this type of database…
Set this up…
Microsoft SQL Server
An ODBC source pointing to the desired SQL Server and database, which must be created first. The ID you use to create the database must have DBO permissions on the database
Oracle 8.i/9.i/10g
An ODBC source pointing to the TNS alias for the database you want to create. The data and index tablespaces must be created. The ID used to create the tables must be the table/schema owned ID. The owner of all objects must be set to the Oracle login ID you will be using to create the database.
Note:
Use of software versions outside of those identified for the Merak Suite of software will likely cause application failure and are not supported. This includes versions of Oracle, SQL Server, ODBC, and MDAC other than those specified in this guide. Please ensure that the version you are attempting to run complies with
www.sis.slb.com 2

Merak DBTools Help
the supported versions in the install guide. If unsure, or looking for the latest update please contact our support desk.
About installing and updating databases All Merak software requires either direct or indirect access to a database in which to store information. In addition, upgrade releases of Merak software generally involve changes to the database structure. SIS provides a utility called Merak DBTools to assist in the creation and modification of Microsoft MSDE, Microsoft SQL Server, or Oracle 8.i/9.i/10g databases. Upgrading an existing database is a complex task and may take some time to complete. Performing a series of test upgrades is highly recommended. The DBTools application assumes that the data being upgraded is in pristine condition which may or may not be the case. Given the “all or nothing” nature of the database upgrade, running upgrade tests would allow you the opportunity to identify areas in the data that may need to be corrected prior to the upgrade. For further assistance please contact your GeoMarket representative or the Upgrade Task Force in Calgary.
Important:
Prior to updating databases, ensure all data is backed up.
Updating an existing database
Important:
Before beginning the upgrade process, ensure all databases you intend to upgrade are properly backed up.
3. Insert the Merak Suite CD into your CD-ROM drive. 4. From the DBTools directory run the program DBTools.exe. The Merak Database Toolkit
dialog box opens. 5. Select the Upgrade an existing Merak database option and click Next. The Select Data Source
dialog box opens. 6. You are required to provide the ODBC Data Source into which you want to install a Merak
database. If you have not yet created an ODBC source, click ODBC Admin and set up the necessary data source(s).
7. If required (Oracle and SQL Server), enter the User ID and Password for administrative access to the database.
8. Click Next. 9. Type the Global Parameter data source into the field, or click the arrow button to choose
from the drop-down list. Type the Userid and Password into their respective fields if necessary. (If you are uncertain of the location of this data source, open Peep and choose Edit ⇒ Preferences. The Global Parms data source is shown in the Database tab.)
10. In the Application Upgrade Selection dialog box, confirm the applications for which you are updating the database. If your database contains data for multiple applications all the applicable applications are highlighted. If your database contains data for only one application (as in this example), only that application is highlighted.
11. Be sure to confirm the version of the database you wish to upgrade to. Normally, this should be the latest version available.
www.sis.slb.com 3

Merak DBTools Help
Notes:
• if you are upgrading a VOLTS database you will also need to upgrade your Peep database to the same version. DBTools will check for this and display a message if all of the appropriate databases are not upgraded to the correct version.
• starting with the v4.0 release in 2003 the user is allowed to select the version number for the MERAK database objects (shared tables). Ensure that you receive the proper version numbers for the release.
12. Click Next. DBTools creates a transaction log that records the progress of the database creation.
13. Type the path where you want to store the log file. 14. Click Next. If you are installing an Oracle database, you are prompted for the Data and
Index tablespace you want to populate using the Oracle Parameters dialog box. The fields for each Tablespace are detected from the Oracle database.
15. Select the appropriate tablespace from the Data Tablespace and Index Tablespace drop-down lists. DBTools will verify that there is enough free space available in the tablespace(s) selected before allowing you to continue.
16. Click Next. You are prompted to confirm all of the settings entered into DBTools.
Note:
Please take a moment at this time to confirm that all of the information is correct before proceeding.
17. If an item requires modification, click Back to return to the appropriate dialog box. 18. When you are sure that all the information is correct, click Finish to update the database.
Note:
If an error occurs during the upgrade process the upgrade must be stopped, the schema restored from backup, and the upgrade restarted. It is advisable to retain the upgrade log and consult with SLB resources if you encounter this problem.
.
Installing a new database To create the database: 19. Insert the Merak Suite CD into your CD-ROM drive. 20. From the DBTools directory, run the program DBTools.exe. The Merak Database Toolkit
dialog box opens and the Welcome dialog box opens. You can now choose to install a new database or upgrade an existing one.
21. Select the Install a new Merak database option and click Next. The Select Data Source dialog box opens.
22. You are required to provide the ODBC Data Source into which you want to install a Merak database. If you have not yet created an ODBC source, click ODBC Admin and set up the necessary data source(s).
23. If required (for Oracle and SQL Server), enter the User ID and Password for administrative access to the database. Click Next.
24. From the Application Select dialog box, identify which applications you want to create the database for. Note: the available applications will differ depending on the type of database
www.sis.slb.com 4

Merak DBTools Help
selected. Consult the System Requirements section in the Introduction for information about which databases are supported by a particular application.
25. Click Next. The Database Type Select dialog box opens. 26. Click Next. DBTools creates a transaction log that records the progress of the database
creation. 27. Type the path where you want the log file installed and click Next. 28. If you are installing an Oracle database, you are prompted for the Data and Index tablespace
you want to populate in the Oracle Parameters dialog box. The list of available tablespaces is read directly from the Oracle database along with the amount of free space available within each tablespace. Fields for each tablespace are detected from the Oracle database.
29. Select the appropriate tablespace from the Data Tablespace and Index Tablespace drop-down lists. DBTools will verify that there is enough free space available in the tablespace(s) selected before allowing you to continue.
30. Click Next. You are prompted to confirm all of the settings entered into DBTools. 31. If an item requires modification, click the Back button to return to the appropriate dialog box. 32. When you are sure that all the information is correct, click Finish to create the database.
Securing a database (VOLTS and Peep) A number of changes have been made to the 2001 and newer versions of DBTools to support the new Merak security components being implemented by VOLTS and Peep in this release. • Permissions • Security Options • Database Privileges
Note: For more information about secured databases, please see the VOLTS Security v4.4.pdf document shipped with the Merak Suite v4.4 release.
Database privileges To properly install or upgrade a database to include the new security components, DBTools must now perform additional security tasks including creating database roles and users. Before DBTools attempts to install or upgrade a VOLTS or Peep database, it will check to see if the database login name has the appropriate privileges. If the appropriate privileges have not been granted then you will see a message similar to this:
When DBTools performs these security checks, it writes the results to a file called CHECK.LOG, created in the same directory as the DBTools executable. You can check this log file to see what permissions are missing. are The minimum set of permissions required for Oracle and SQL Server database users are listed at the end of this chapter.
Notes:
• DBTools should no longer be executed directly from the Merak Suite CD. All of the files must first be copied to your local hard drive before attempting to install or upgrade your database.
www.sis.slb.com 5

Merak DBTools Help
In addition to creating all of the database objects (tables, views, procedures etc.), DBTools will also create the following logins and roles:
• xxx_ADMIN_ROLE: This is a password protected role that contains permissions to all of the database objects in this particular Oracle schema or SQL Server database. Only users of the Merak applications will be assigned and able to enable this role.
• xxx_BOOT_USER: This is an account that is created to allow Merak applications to connect to the database and confirm the login authentication (i.e. username and password) of the user attempting to connect. By default, this user only has SELECT access to the tables and views necessary to authenticate the user login.
• xxx_APP_USER: This is an Oracle user or SQL Server login created and assigned the xxx_ADMIN_ROLE. By default, this user has no privileges to any of the database objects and only one of the supporting Merak applications can the xxx_ADMIN_ROLE be enabled.
• xxx_AUTH_USER: This is an Oracle user or SQL Server login created and reserved for future use.
• For Oracle databases, the xxx prefix is replaced by the name of the schema
owner. For example, if you connect to the database using the Oracle user name SCOTT then the roles and users created would be named: SCOTT_ADMIN_ROLE, SCOTT_BOOT_USER and SCOTT_APP_USER. For SQL Server databases, these objects are automatically named MERAK_ADMIN_ROLE, MERAK_BOOT_USER and MERAK_APP_USER. It should also be noted that although user and role passwords are stored within the security tables, they are always stored in an encrypted format and in most cases are never decrypted but used for comparison to other encrypted passwords to ensure that they match.
Security options A new option has been added to DBTools to allow administrators to add new database users/logins, to reset the password of one of the database users, or to reset the password for the database roles. As the following indicates, this option is only for those applications that have implemented the new security components (VOLTS and Peep). When you select this option, you are presented with the same login screen that you would normally see when installing or upgrading a database. You must connect to the database as the owner of the database objects in order to perform any of the security functions. Once connected, select the option you want to perform from the Operation drop-down list and type in the necessary fields for that operation. To complete the operation, click Save to commit your changes to the database. Only once you have completed all of the security operations you want to perform should you click Finish.
Permissions
Oracle The following is a list of permissions required in order to install or upgrade an Oracle database: • CREATE USER • ALTER USER • CREATE SESSION WITH ADMIN OPTION; • CREATE ROLE
www.sis.slb.com 6

Merak DBTools Help
• CREATE ANY SYNONYM (Note: this permission must be granted directly to the Schema Owner and not via a ROLE)
• CREATE PUBLIC SYNONYM • DROP PUBLIC SYNONYM • DROP ANY SYNONYM
(Note: this permission must be granted directly to the Schema Owner and not via a ROLE) • DROP USER • CREATE SEQUENCE • CREATE PROCEDURE
(Note: this permission must be granted directly to the Schema Owner and not via a ROLE) • CREATE TABLE
(Note: this permission must be granted directly to the Schema Owner and not via a ROLE) • CREATE VIEW • CREATE TRIGGER
SQL Server To install or upgrade a SQL Server database the SQL Server login must have the db_owner database role for the database you are installing or upgrading, and the Security Administrators server role to enable the creation of the database logins and roles.
Update document dependencies As part of the upgrade and deployment of the Merak v4.4 Suite, System Administrators should plan to perform the Update Dependencies function. This is a one-time operation, to be performed after your databases have been upgraded using DBTools, and before deployment the new version of the software to your users. This function will write all document dependencies to a table within your database, which will then continue to be dynamically updated whenever document links are created or updated. By using this dependency table, the time required to export dependencies during an export operation is drastically reduced. If either the Peep application or the database is using a Peep Security license, this operation can be performed only by an Administrator. For unsecured databases, it can be executed by any user. Note: the Update Dependencies operation is best performed overnight: a large database (containing 20,000 wells and 8,000 cases) will take an average 6 – 8 hours to complete; small databases (600 cases and 200 wells) will take approximately 10 – 15 minutes to complete.
To perform the Update document dependencies function: 33. Open Peep Preferences > Database tab, and click Update all Document Dependencies. A
confirmation dialog box is displayed. 34. Ensure you leave sufficient time to perform this operation; an interrupted update will cause
database errors for Peep and other applications using Peep data if not completed. 35. Click OK. When the update is complete, a confirmation message is displayed. If you do not
see this message, contact your SIS Support Group. Note: if you do not see the Update all Document Dependencies button in Preferences, the operation has been performed already, and nothing else is required.
See also If you are performing an upgrade that includes custom changes made to the RS_summary_result_set table, ensure you complete the post-upgrade instructions after you have finished updating document dependencies.
www.sis.slb.com 7

Merak DBTools Help
Post-upgrade instructions - RS_summary_result_set_table Before proceeding with these instructions, ensure you have already determined that custom changes have been made to the RS_summary_result_set table and that you have completed the pre-upgrade instructions and standard DBTools upgrade process.
To complete the process of upgrading your RS_summary_result_set table: 1. For the columns that have been added to the RS_SUMMARY_RESULT_SET table, alter the
table in SQLPLUS adding the columns to the current table with the same names that appear in the SAVE_RS_SUMMARY table. For example, if a custom column named AB_Gas_Production was identified, the following SQL would add this column to the current table: • alter table RS_SUMMARY_RESULT_SET add AB_Gas_Production FLOAT;
2. Once this is completed, remove any columns from the current table that have been removed from the custom table. For example: if a column named COND_WI_VOL was removed from the table, the current table needs to be adjusted to drop the column using the following SQL: • Alter table RS_SUMMARY_RESULT_SET drop column COND_WI_VOL;
3. The final step is to repopulate the columns from the table you saved when following the pre-upgrade instructions. Using the example of AB_Gas_Production as the new column, use the following SQL: • Update RS_SUMMARY_RESULT_SET set AB_Gas_Production = (select
AB_Gas_Production from SAVE_RS_SUMMARY where RS_SUMMARY_RESULT_SET.case_id = SAVE_RS_SUMMARY.case_id and RS_SUMMARY_RESULT_SET.rs_qualifier = SAVE_RS_SUMMARY.rs_qualifier);
• Commit; 4. Once all columns have been repopulated you can delete the SAVE_RS_SUMMARY table
created during the pre-upgrade instructions.
Securing the Merak demo database There are potentially 2 issues with attaching databases to SQL Server, specifically when working in a secured environment. • When the databases are attached to SQL Server/MSDE, the MERAK_APP_USER and
MERAK_BOOT_USER that are associated with the database are not associated with a specific login in SQL Server.
• The application users built by either DBTOOLS or the Merak Administration Console (MAC) for security are mapped to the "sa" login for the SQL Server instance that the database was created for, and therefore may not match the "sa" login for the target SQL Server instance to which the database is being attached.
The typical error message when logging into the MAC as the Administrator is as follows:
This message is a result of a disconnect between the database username and password stored in the MERAK_USER_MAP table in the database and the actual "sa" login for the database. During the DBTools installation, the database is setup as non-secure and the "sa" user and password are
www.sis.slb.com 8

Merak DBTools Help
typically mapped to the Administrator and Merak users. If you are not using the Peep security features you do not need to proceed any further. Note: VOLTS must always access security, so you must resolve any issues you have in security the demo database.
Problem 1: Database/User login IDs out-of-synch The issue of the database or user login IDs being out-of-synch can be rectified by running an MS-DOS .cmd file called login_adjust.cmd. This file is a DOS script that will correct the issue of the database users not being mapped properly to SQL Server/MSDE logins. 1. Open the login file using Notepad and you will see a set of lines near the top of the script as
follows: REM ######################################################################### REM REM You need to adjust these entries for your database and PC REM set SQL_PASSWORD=merak set SERVER=clean3-cal\merakmsde set DATABASE=volts_3_demo set TEMP_FILES_DIR=d:\home\v2003.1\volts REM REM ######################################################################### REM
2. Alter the file so that the four parameters listed reflect the setup of where your SQL Server/MSDE are installed: • SQL_PASSWORD – is the password for the sa account. The installation typically sets
this to "Merak". • SERVER – this is the full name of your SQL Server/MSDE server, typically "[machine
name]\merakmsde". • DATABASE – is the database name to be adjusted. For the Merak Suite v4.4 release, the
database name is "Value and Risk 4.4 - Secured" and "Value and Risk 4.4 - Unsecured". Note: if there is a blank in the database name then place double quotes around the whole database name.
• TEMP_FILES_DIR – is a location on your hard disk that you can write temporary files to, d:\temp is a good name.
3. Save the changes to the script. 4. Run the file by double-clicking on it in Windows Explorer or launch it manually from a DOS
command prompt by typing "login_adjust.cmd". 5. The script will adjust the login IDs and database users so that they are in-synch with each
other.
www.sis.slb.com 9

Merak DBTools Help
Problem 2: Adjusting MERAK_USER_MAP entries The second issue with securing the Merak demo database can be addressed by adjusting entries in the MERAK_USER_MAP table. 1. Check the MERAK_LOGIN_VW view and see if the users are mapped to the "sa" or to the
"APP_USER" database users. If the users are mapped to "sa" then continue with step 2. 2. Launch DBTools.
3. Select the Add and reset database security accounts option. The Select Data Source dialog
box opens. 4. Log in to the data source with the "sa" password and click Next. The Security Manager
dialog box opens.
www.sis.slb.com 10
Merak DBTools Help
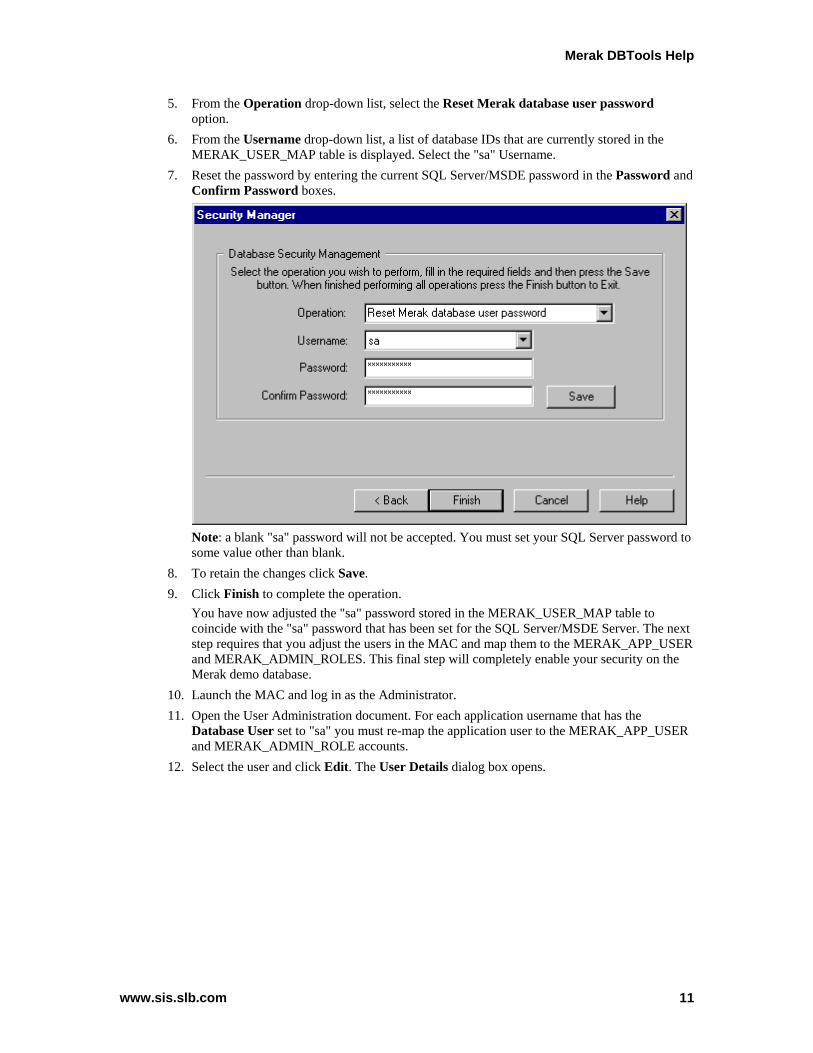
5. From the Operation drop-down list, select the Reset Merak database user password option.
6. From the Username drop-down list, a list of database IDs that are currently stored in the MERAK_USER_MAP table is displayed. Select the "sa" Username.
7. Reset the password by entering the current SQL Server/MSDE password in the Password and Confirm Password boxes.
Note: a blank "sa" password will not be accepted. You must set your SQL Server password to some value other than blank.
8. To retain the changes click Save. 9. Click Finish to complete the operation.
You have now adjusted the "sa" password stored in the MERAK_USER_MAP table to coincide with the "sa" password that has been set for the SQL Server/MSDE Server. The next step requires that you adjust the users in the MAC and map them to the MERAK_APP_USER and MERAK_ADMIN_ROLES. This final step will completely enable your security on the Merak demo database.
10. Launch the MAC and log in as the Administrator. 11. Open the User Administration document. For each application username that has the
Database User set to "sa" you must re-map the application user to the MERAK_APP_USER and MERAK_ADMIN_ROLE accounts.
12. Select the user and click Edit. The User Details dialog box opens.
www.sis.slb.com 11

Merak DBTools Help
13. Adjust the user's Database Settings as follows:
• DB User: MERAK_APP_USER; • Password & Confirm Password: merak; • DB role: MERAK_ADMIN_ROLE; • Password & Confirm Password is the default password setup by DBTOOLS – call for
this password as we don’t want this published. 14. Once each user has been reset to use the database login of MERAK_APP_USER the security
on the demo database will work properly.
www.sis.slb.com 12

Merak DBTools Help
How to reach us
United States
E-mail: [email protected]
Houston Tel.: +1 713-621-1165
Canada
E-mail: [email protected]
Calgary Tel.: +1-888-986-4357 (toll-free)
Europe and Africa
E-mail: [email protected]
London Tel.: +44 (0)207 517 2626
Russia and Caspian
E-mail: [email protected]
Moscow Tel.: 7 495 935 8200 Ext. 1218
South America
E-mail: [email protected] Offices Mexico Tel.: 001 866 326 0174
Argentina Tel.: 0 800 444 0919
Brazil Tel.: 000811 005 9068
Colombia Tel.: 980912 3029
Venezuela Tel.: 0800 1 00 3588
Middle East
E-mail: [email protected]
Asia and Australia
E-mail: [email protected]
Malaysia Tel.: +60-3-21694266
Indonesia Tel.: +62-21-5229343
Australia Tel.: +61-1800001112
Thailand Tel.: +66-2-9371300
China Tel.: +86-10-64746699 Ext. 2816
Schlumberger supplements the standard maintenance agreement by offering extended on-site support worldwide. This enhanced level of support includes on-site assistance, installation, troubleshooting, and maintenance services of licensed Schlumberger software. Merak is a product line of Schlumberger Information Solutions (SIS). For more information about SIS, please go to our Web site at http://www.sis.slb.com.
www.sis.slb.com 13