Embed Size (px)
Citation preview

DB Architect User's Guide
Revision 2.0 Thank you for using DB Architect. This innovative new
program helps you create Java objects that map to Tables and views in a relational database. It includes templates for Data
Access Objects, Value Objects and Entity Beans (BMP)
This guide provides you detailed instructions on how to use the program. Although the user interface is very intuitive and
easy to understand, you might find this guide useful when doing some advanced features.
If you find any area in the document that needs improvement, please contact us at [email protected]

Installation and configuration ............................................................................................. 3
Installing DB Architect ................................................................................................... 3 For Windows (All platforms)...................................................................................... 3 For UNIX (Solaris, Linux, AIX, HP-UX) .................................................................. 3 Using RAW files......................................................................................................... 3
Creating a new project ........................................................................................................ 4 Getting familiarized with the interface ............................................................................... 6 Establishing connection to the database ............................................................................. 6
Specifying CLASSPATH ............................................................................................... 7 Adding tables and views to the project ............................................................................... 9 Sample application............................................................................................................ 10 Source code templates....................................................................................................... 10
Data access object ......................................................................................................... 11 Extended classes ....................................................................................................... 12
Value Object ................................................................................................................. 13 Generic Entity Beans .................................................................................................... 13
Generating source code..................................................................................................... 14 Step 1 – Select a table ............................................................................................... 14 Step 2 – Modify detail pane ...................................................................................... 15 Step 3 – Specify relationships................................................................................... 17 Step 4 – Changing field attributes............................................................................. 19 Step 5 – Enable performance logging (Optional) ..................................................... 20 Step 6 – Click the generate button ............................................................................ 21
Appendix A – Synametrics Logging Framework ............................................................. 23 Introduction................................................................................................................... 23 Setup instructions.......................................................................................................... 23 Usage Instructions......................................................................................................... 24 Logging Level............................................................................................................... 24 Performance Logging.................................................................................................... 25
Where do performance log messages go?................................................................. 25 Performance Log Viewer – Remote Logging........................................................... 26 Viewing Logs............................................................................................................ 26
Frequently Asked Questions ......................................................................................... 27 Glossary ............................................................................................................................ 29

DB Architect User’s Guide
Installation and configuration DB Architect requires:
• A JDBC driver that is configured to connect with your local database system.
• Java development kit 1.2 or higher to compile the generated code.
Installing DB Architect
For Windows (All platforms) Installation on Windows is pretty straight forward. Download the installer program from Synametrics’s website and double-click the downloaded file. This installer will create appropriate icons and the Java CLASSPATH
For UNIX (Solaris, Linux, AIX, HP-UX) Download the installation file in a temp directory and change its permission to executable by typing chmod +x install.bin
Log in as root and run the install.bin file. Follow the instructions on the screen to install the program.
Using RAW files
If you decide not to use the installer, simply unzip the files into a directory of your choice. There are two script files – run.bat for Windows and run.sh for UNIX. These batch files include all the appropriate JAR files in the CLASSPATH that are necessary to run the application. There are four sub-directories in the zip file:
1. config – Holds configuration-related files for DB Architect 2. lib – Holds required JAR files for DB Architect 3. project – Default directory for all user projects

DB Architect User’s Guide
4. templates – Code templates used by DB Architect.
Creating a new project The first step in using DB Architect is creating a new project. A project is a logical grouping of actions performed on a database.
Click the “Create a new project” button to open up the new project screen shown below.

DB Architect User’s Guide
Field name Description Project Name A user-specified project name. We recommend that you do not use
spaces in your project names since this represents a file name on the hard drive.
Location This is the directory where the project is going to be installed. Click the button next to the text control to change the directory.
Company Your company name. This information gets printed in the header of all generated files.
Database A user-defined name for a database. This name does not have to point to any physical database. The connection parameters will be asked for in the later screens.
Copyright This text appears in the header of all generated code.

DB Architect User’s Guide
Getting familiarized with the interface DB Architect Studio has three main components: the object pane, detail pane and code pane. The contents of the detail pane depend on what is currently selected in the object pane. For example, if a table name is selected, the detail pane shows information related to that particular table.
ObjectPane
Detail Pane
Code Pane. Tabbedpanels - one foreach generated file
Establishing connection to the database After creating a new project, you must provide connection parameters for the database. Click on the newly created database node in the object pane.

DB Architect User’s Guide
Specifying CLASSPATH Before connecting to the database, you need to specify the CLASSPATH for the JDBC drivers. Remember that DB Architect does not come with any JDBC built-in JDBC except the JDBC-ODBC Bridge that comes with the JDK itself. In order to specify include a specific JAR/ZIP file in the CLASSPATH, click the JDBC Mgr. Button or select “JDBC Driver Manager” under the File menu.
All JAR/ZIP files that appear in this window will be included in the CLASSPATH for DB Architect
Buttons Description
Click to add a new JAR/ZIP file in the CLASSPATH
Remove the selected JAR file from path
Click this button to parse the JAR/ZIP file and extract driver classes
Save configuration

DB Architect User’s Guide
After you close the JDBC Driver Manager window, the JDBC Driver Class combo box gets filled with all drivers that are found in the CLASSPATH.
Click here todisplayconnectionparameters
Specify theconnectionparameters here
Click here to invokethe JDBC Driver
Manager
Field name Description JDBC Driver class
This is the name of the JDBC Driver class. This combo displays all drivers that in the CLASSPATH. If you do not see the desired Driver, add it in through JDBC Driver Manager. Due to licensing issues, we cannot ship the actual driver with DB Architect.
Connection URL This is the database connection URL. Please refer to the

DB Architect User’s Guide
JDBC driver documentation for the exact syntax. User Id Your database user id. Password Connection password
After the connection parameters are specified, click the “Connect” button to establish connection to the database. You can optionally select the “Display all tables after connection” check box to automatically include all the tables in the database. However, if you have a large set of tables, do not select this box.
Adding tables and views to the project Once a connection to the database is established, you can add as many tables as you like in the project using the add table screen shown below.
Click the “Search” button to populate “Available Tables” list box.

DB Architect User’s Guide
Sample application The best way to understand the value of DB Architect is to see it in action via a sample application and use DB Architect to generate the Java objects for this application. Please note that this sample application is purposely made simple for the sake of this tutorial. A real world application will contain many more tables and relationships. This sample application is a simple order entry application where customers place their orders and the employees get some commission based on the sale amount. The E/R Diagram of this database is given below:
The remaining document will talk about these tables and the Java code necessary to retrieve the data.
Source code templates DB Architect uses different templates for code generation. Before we go further, let’s discuss more about templates and their uses.

DB Architect User’s Guide
Data access object Data access objects (DAO) are used to decouple business logic from data access logic. This decoupling allows developers to implement business logic that is independent of the underlying database. The DAO template in DB Architect creates four files. The relationship between these files is shown by the Unified Modeling Language (UML) diagram below.
The above diagram is based on the generated code for Customer table in the sample application. The DaoCustomer class holds references to all the fields in the Customer table. Besides providing getter and setter functions for the fields, it
DB Architect User’s Guide
also provides insert, post, delete, and fetch methods. These methods are responsible for submitting SQL queries to the database. The user of this class does not have to worry about how and where the actual data resides. The second important class is DaoCustomerCollection, which holds an in-memory cursor of DaoCustomer objects. The objects of this class allow you to fetch a list of customers based on some criteria, query the database and store the result in a Vector object. Once this Vector is populated you can move back and forth as many times as you like without going back to the database. A Collection object is a good candidate for holding lookup and related objects. In the example application, you can call the getAssociatedOrdersCollection() method in the DaoCustomer class to retrieve a list of associated orders for a particular customer. The collection object comes in two flavors:
1. Static Cursor – Default 2. Dynamic Cursor
The fetch method of a collection object creates an in-memory cursor based on the rows returned by a SQL query, which allows forward and backward browsing. There are two ways to implement this cursor: static and dynamic. Static cursor holds instances of DAO class while the dynamic cursor stores values for the primary key fields only. Static cursors are better if the resultSet is relatively small and the table content does not change, ie for, lookup tables, configuration tables, etc. Since the static cursor does not re-query the database, if the data gets changed by another user, those changes are not detected. On one hand, they have a larger memory foot print and on the other, they are faster. In the case of the dynamic cursor, the getData method uses the primary keys fields to retrieve the remaining attributes from the database by issuing a second query. This not only requires less amount of memory to hold the cursor, but is also live; that is, it can detect changes made by other users. Caution: The objects of this class should be used carefully. Avoid using collection objects where the actual number exceeds 500 objects.
Extended classes The remaining two classes are an extension to DAO and Collection class. DB Architect does not write any implementation code in these classes. If you want to add additional logic to manipulate the records, this is where you would add your code. If you need to regenerate the DAO and Collection classes for any reason, do not generate the code for these. We recommend that your business logic classes should always use the extended version of DAO and Collection classes. The fetch, insert, post and delete methods

DB Architect User’s Guide
in the DAO class throw SQL exceptions in case of an error. It is always a good practice not to throw SQL exception to the business logic. However, in order to allow exception handling, the DAO class throws the exception to the calling method. We recommend that you override all the methods in the DAO class that throws SQL exception in the extended classes and handle the SQL exception before returning control back to your business logic objects.
Value Object Value objects are remote representation of a DAO object. In a multi-tiered environment in order to avoid multiple remote calls you create a proxy object that represents remote data. Once you are done with setting all the properties of the value object, send it to a remove receiver, which will update its state. You can read more about Value Object on Sun’s site that talks about J2EE design patterns (http://java.sun.com/blueprints/patterns/j2ee_patterns/value_object/index.html) Similar to the DAO template, the Value Object template creates two kinds of classes. The first one is the Value Object class itself and the second is a collection of VO objects. The following image illustrates the created classes in UML.
Generic Entity Beans Entity beans are an integral part of EJB. There are two kinds of entity beans: container managed persistence (CMP) and bean managed persistence (BMP). The

DB Architect User’s Guide
Generic Entity Beans template allow you to create code for BMP. The generated code includes files for Remote and Home interface as well as classes for bean implementation and primary key. You can read more about entity bean on Sun’s site (http://java.sun.com/j2ee/tutorial/1_3-fcs/doc/EJBConcepts4.html#62936)
Generating source code Generating source code using DB Architect is very simple. With a few mouse clicks you can generate source code that would normally take weeks. The steps to generate code are given below
1. Select a table or view in the object pane for which you wish to generate code.
2. Change the values in the detail pane to suit you project needs, for example the package name.
3. Optionally specify if there are any relationships with other tables 4. Optionally change the field attributes 5. Click the “Generate java code” button.
Let’s talk about each step in detail.
Step 1 – Select a table Our sample application only contains three tables. Simply click the Customer table to display related information in the detail pane. Refer to the image below.

DB Architect User’s Guide
Step 2 – Modify detail pane The detail pane for a table contains three tabs:
• Primary Information • Relationships • Fields
The following table summarizes the fields in the Primary Information tab Field Name Description Output directory Directory where the generated files will be stored. If there
are any packages, DB Architect will create them
DB Architect User’s Guide
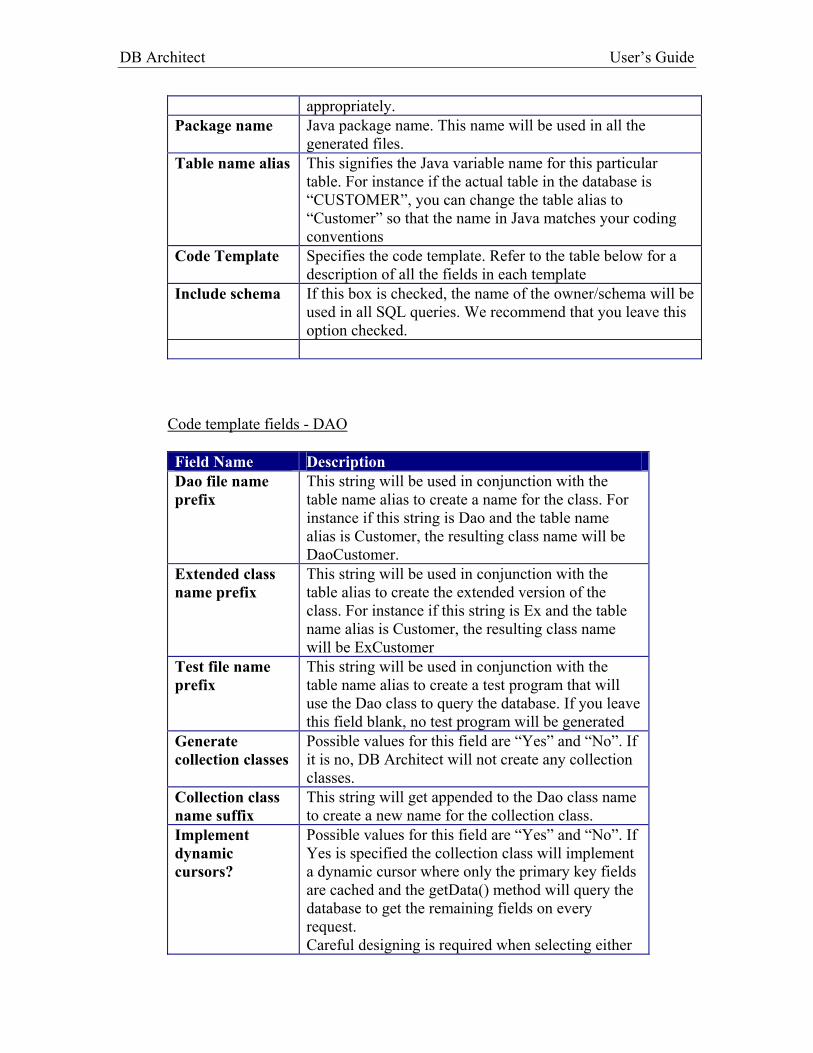
appropriately. Package name Java package name. This name will be used in all the
generated files. Table name alias This signifies the Java variable name for this particular
table. For instance if the actual table in the database is “CUSTOMER”, you can change the table alias to “Customer” so that the name in Java matches your coding conventions
Code Template Specifies the code template. Refer to the table below for a description of all the fields in each template
Include schema If this box is checked, the name of the owner/schema will be used in all SQL queries. We recommend that you leave this option checked.
Code template fields - DAO Field Name Description Dao file name prefix
This string will be used in conjunction with the table name alias to create a name for the class. For instance if this string is Dao and the table name alias is Customer, the resulting class name will be DaoCustomer.
Extended class name prefix
This string will be used in conjunction with the table alias to create the extended version of the class. For instance if this string is Ex and the table name alias is Customer, the resulting class name will be ExCustomer
Test file name prefix
This string will be used in conjunction with the table name alias to create a test program that will use the Dao class to query the database. If you leave this field blank, no test program will be generated
Generate collection classes
Possible values for this field are “Yes” and “No”. If it is no, DB Architect will not create any collection classes.
Collection class name suffix
This string will get appended to the Dao class name to create a new name for the collection class.
Implement dynamic cursors?
Possible values for this field are “Yes” and “No”. If Yes is specified the collection class will implement a dynamic cursor where only the primary key fields are cached and the getData() method will query the database to get the remaining fields on every request. Careful designing is required when selecting either
DB Architect User’s Guide
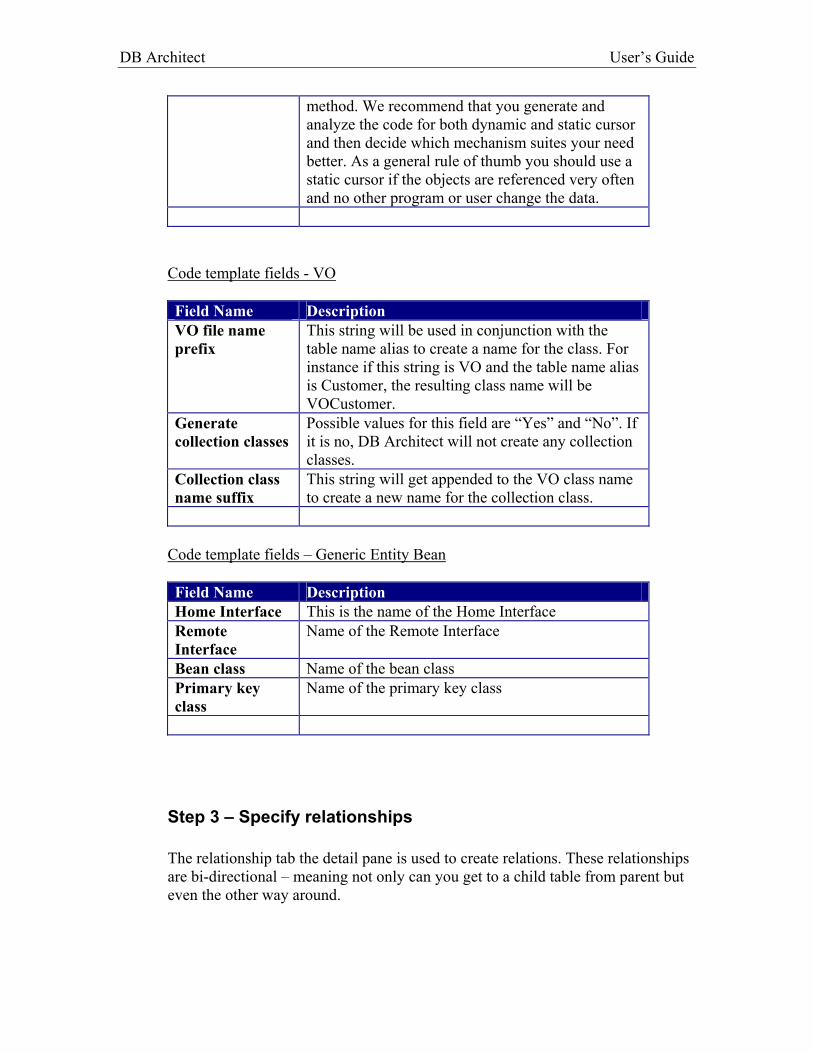
method. We recommend that you generate and analyze the code for both dynamic and static cursor and then decide which mechanism suites your need better. As a general rule of thumb you should use a static cursor if the objects are referenced very often and no other program or user change the data.
Code template fields - VO Field Name Description VO file name prefix
This string will be used in conjunction with the table name alias to create a name for the class. For instance if this string is VO and the table name alias is Customer, the resulting class name will be VOCustomer.
Generate collection classes
Possible values for this field are “Yes” and “No”. If it is no, DB Architect will not create any collection classes.
Collection class name suffix
This string will get appended to the VO class name to create a new name for the collection class.
Code template fields – Generic Entity Bean Field Name Description Home Interface This is the name of the Home Interface Remote Interface
Name of the Remote Interface
Bean class Name of the bean class Primary key class
Name of the primary key class
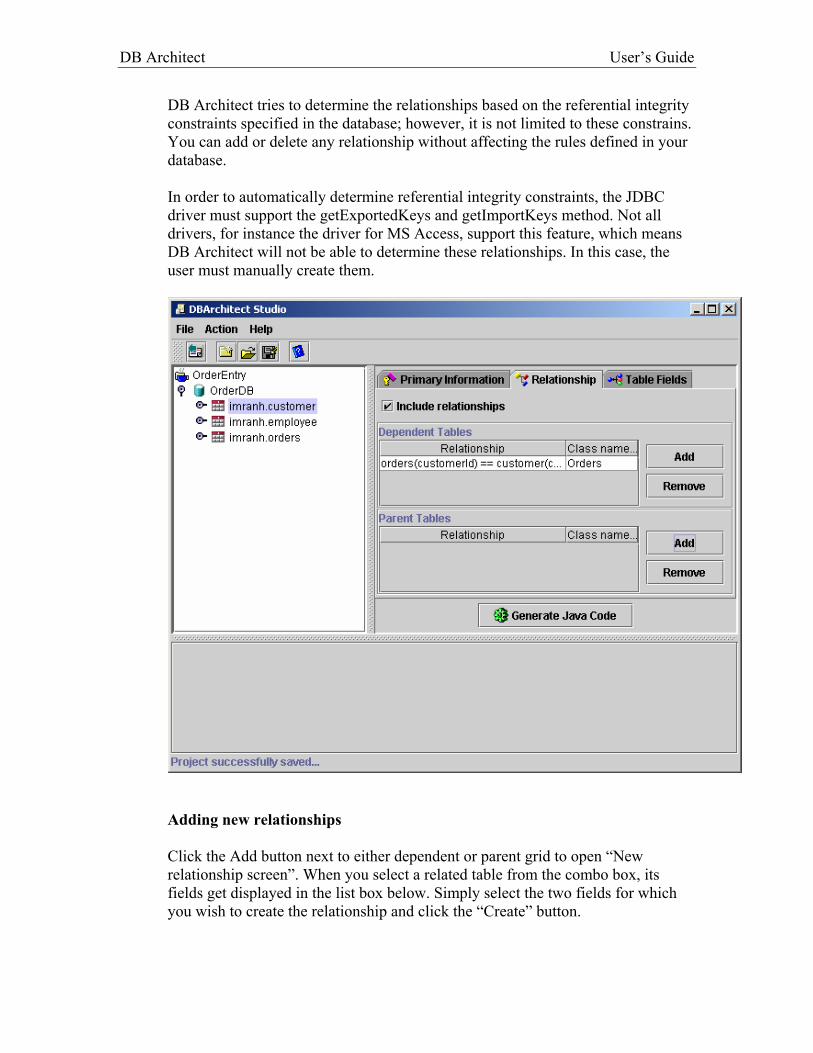
Step 3 – Specify relationships The relationship tab the detail pane is used to create relations. These relationships are bi-directional – meaning not only can you get to a child table from parent but even the other way around.
DB Architect User’s Guide
DB Architect tries to determine the relationships based on the referential integrity constraints specified in the database; however, it is not limited to these constrains. You can add or delete any relationship without affecting the rules defined in your database. In order to automatically determine referential integrity constraints, the JDBC driver must support the getExportedKeys and getImportKeys method. Not all drivers, for instance the driver for MS Access, support this feature, which means DB Architect will not be able to determine these relationships. In this case, the user must manually create them.
Adding new relationships Click the Add button next to either dependent or parent grid to open “New relationship screen”. When you select a related table from the combo box, its fields get displayed in the list box below. Simply select the two fields for which you wish to create the relationship and click the “Create” button.

DB Architect User’s Guide
If you don’t see the desired table in the combo box, you must close this window and add additional tables in the project. This screen only displays tables that are currently included in the project.
Step 4 – Changing field attributes You can optionally change the field attributes by either clicking the Table fields tab in the detail pane when a table is selected in the object pane or expand the table in the object pane and select the individual field. You can change the following attributes for a field.
• Java Data Type – The new data type must comply with JDBC standards. For instance changing the data type to java.sql.Date when the field is defined as VARCHAR may result in runtime errors. However, if you do want to change the data type, you should manually write the code in the extended class that handle the conversion
• Java Variable Name – This is the name of the member variable in the class
• Ignore Field – If checked, the field will be ignored • Primary Key – If checked, the field will be treated as part of the primary
key by the generated code

DB Architect User’s Guide
• Auto Increment – If checked, the insert method will not include this field in the query statement.
• Default value – This is the default value for the field and will be used if no value is provided.
Step 5 – Enable performance logging (Optional) Check the “Enable performance logging in generated code” box if you wish DB Architect to include performance logging statements in the generated code. IMPORTANT: If you check this box your application will require Synametrics Logging Framework in the CLASSPATH. Refer to appendix for more information regarding the logging framework
What happens when you check this box? When this box is checked, the generated code puts a few extra lines that are used for performance logging. Please refer to the Appendix section for more details on performance logging.

DB Architect User’s Guide
Step 6 – Click the generate button Once you are satisfied with the entire input, click the “Generate Java Code” button to generate the code. All the files generated files are displayed in the Code pane below.
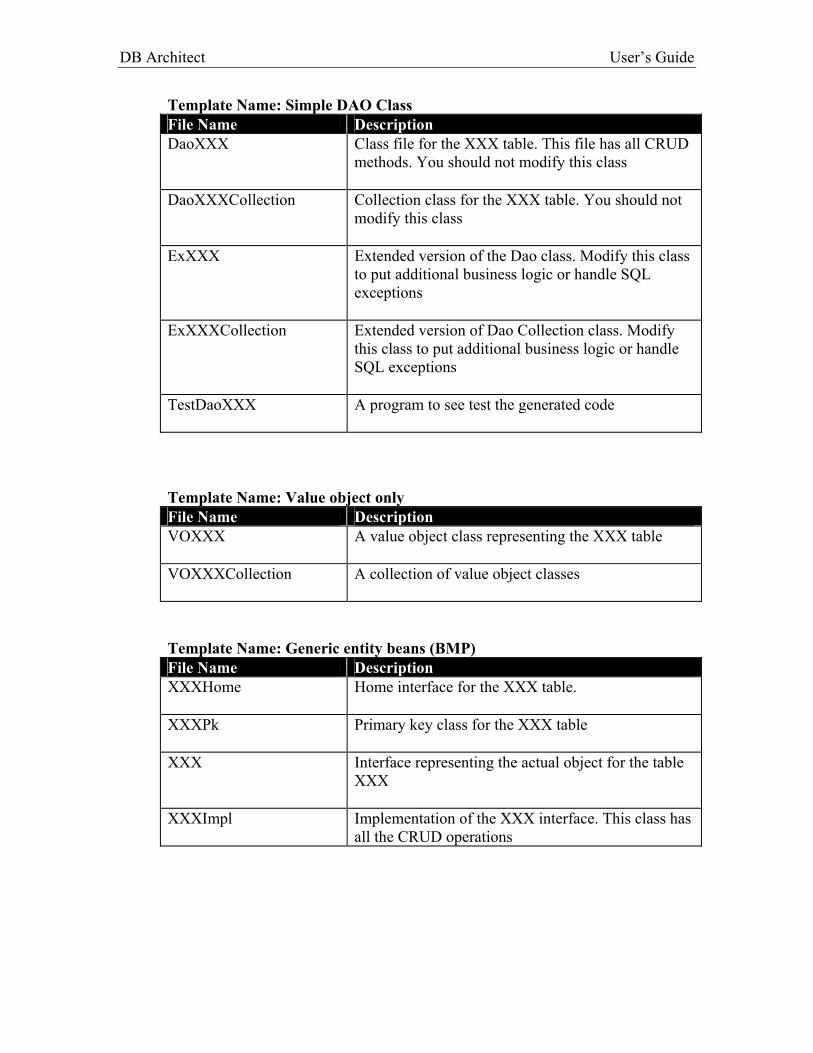
Depending on the Code template you selected the number of files will differ. The table below summarizes the output files
DB Architect User’s Guide
Template Name: Simple DAO Class File Name Description DaoXXX Class file for the XXX table. This file has all CRUD
methods. You should not modify this class
DaoXXXCollection Collection class for the XXX table. You should not modify this class
ExXXX Extended version of the Dao class. Modify this class to put additional business logic or handle SQL exceptions
ExXXXCollection Extended version of Dao Collection class. Modify this class to put additional business logic or handle SQL exceptions
TestDaoXXX A program to see test the generated code
Template Name: Value object only File Name Description VOXXX A value object class representing the XXX table
VOXXXCollection A collection of value object classes
Template Name: Generic entity beans (BMP) File Name Description XXXHome Home interface for the XXX table.
XXXPk Primary key class for the XXX table
XXX Interface representing the actual object for the table
XXX
XXXImpl Implementation of the XXX interface. This class has all the CRUD operations

DB Architect User’s Guide
Appendix A – Synametrics Logging Framework
Introduction Synametrics Logging Framework is an extension to Apache Log4J framework. On one hand Log4J is a extremely reliable, fast and extensible logging library for Java, on the other hand it has a steep learning curve. The Synametrics Logging Framework adds following features on top of Log4j • Ease of use • Adds performance logging • Adds a performance log viewer – A GUI based viewer to watch for
performance record in production environment.
Setup instructions In order to use Synametrics Logging Framework in your application you need the following JAR files in your CLASSPATH • SynametricsLoggingFW.jar • Log4j-1.2.x.jar – x is the version of log4j Besides setting the CLASSPATH, you also need to specify a configuration file for the logging framework. This can be either in XML file format or a Java property file. You pass the name of this XML file as a system property, for example: java –DloggingConfigFile=\logConfig.xml com.app.MyApp
A sample XML file is shown below. <?xml version="1.0" encoding="UTF-8" ?> <!DOCTYPE log4j:configuration SYSTEM "log4j.dtd"> <log4j:configuration> <appender name="STDOUT" class="org.apache.log4j.ConsoleAppender"> <layout class="com.synametrics.commons.util.logging.SynametricsLayout"> <param name="ConversionPattern" value="%d {%-5p %t} [%c] $L - %m%n"/> </layout> </appender> <category name="com.acme.myApp" additivity="false"> <priority value="DEBUG" /> <appender-ref ref="STDOUT"/> </category> <root> <priority value ="INFO"/> <appender-ref ref="STDOUT" /> </root>
DB Architect User’s Guide
</log4j:configuration>
The above XML file is configured to send all messages where log level is equal to or higher than INFO to console, using Synametrics layout. For more details on the configuration file please refer to Log4J web site (http://jakarta.apache.org/log4j)
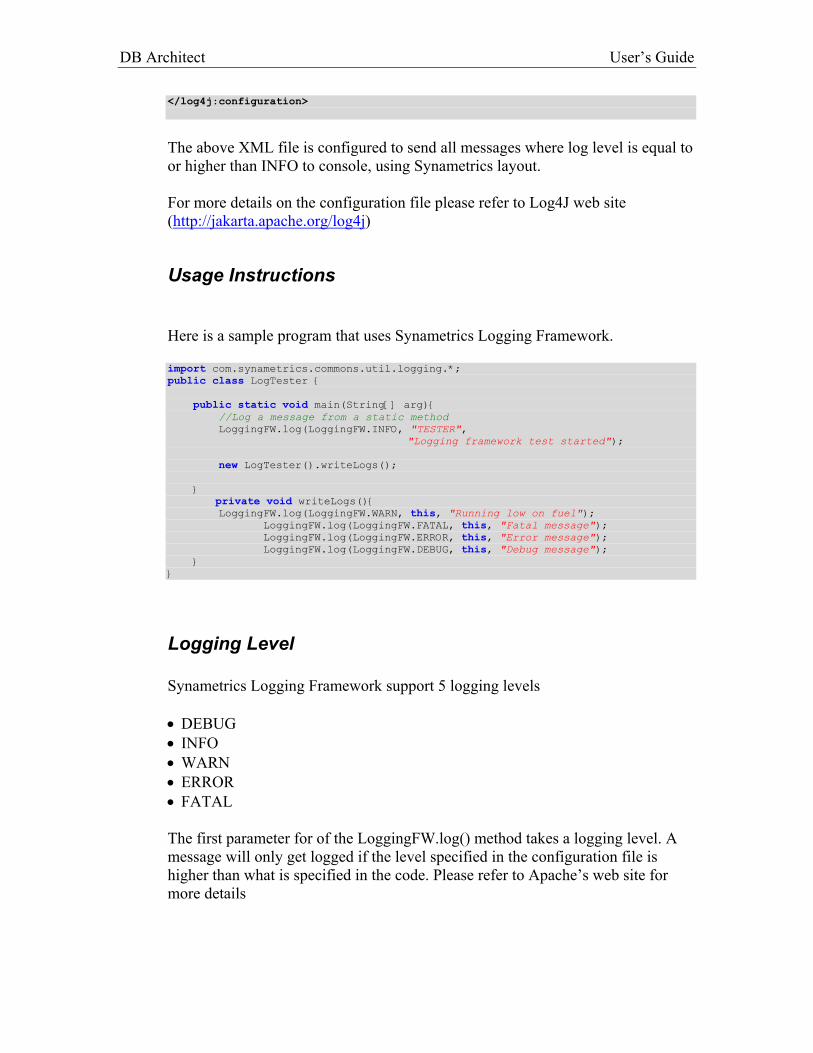
Usage Instructions Here is a sample program that uses Synametrics Logging Framework. import com.synametrics.commons.util.logging.*; public class LogTester { public static void main(String[] arg){ //Log a message from a static method LoggingFW.log(LoggingFW.INFO, "TESTER", "Logging framework test started"); new LogTester().writeLogs(); } private void writeLogs(){ LoggingFW.log(LoggingFW.WARN, this, "Running low on fuel"); LoggingFW.log(LoggingFW.FATAL, this, "Fatal message"); LoggingFW.log(LoggingFW.ERROR, this, "Error message"); LoggingFW.log(LoggingFW.DEBUG, this, "Debug message"); } }
Logging Level Synametrics Logging Framework support 5 logging levels • DEBUG • INFO • WARN • ERROR • FATAL The first parameter for of the LoggingFW.log() method takes a logging level. A message will only get logged if the level specified in the configuration file is higher than what is specified in the code. Please refer to Apache’s web site for more details

DB Architect User’s Guide
Performance Logging One feature of Synametrics Logging Framework is that it allows you to measure and view the response time of part of your program. In short, performance logging has two main methods: ENTRY and EXIT. Before calling a lengthy process you call the ENTRY method and after the process is over you call the exit method. Consider the example below import com.synametrics.commons.util.logging.*; import java.io.*; public class LogTester { //========================================================================== /** * This method will slow down the execution to simulate real load */ private void performATimeConsumingTask(){ try{ Thread.currentThread().sleep( (long) (Math.random() * 10000)); } catch(InterruptedException ex){ } } public static void main(String[] arg){ //The following call is necessary if you wish to view the //performance logging live. You will need to start //Synametrics Log Viewer to view the log messages. //Example: java -jar SynametricsLoggingFW.jar LoggingFW.enableRemoteLoggingForPerformance( "hostName",//Viewers host name 7500); //TCP/IP port for the viewer //Log a ENTRY message LoggingFW.perf(LoggingFW.ENTER, "TESTER", "A Lengthy Process"); performATimeConsumingTask();
//Log a EXIT message LoggingFW.perf(LoggingFW.EXIT, "TESTER", "A Lengthy Process"); } }
Where do performance log messages go? There are three destinations for a performance log message: • Console - Default • A log file • Performance Log Viewer By default all performance log messages are sent to the console. If you want to send them to a flat file, you need to specify a System property. The name of this property is “com.synametrics.perfFileName” and the value must be

DB Architect User’s Guide
the name of the file. For example from command line you can specify this property like: java –Dcom.synametrics.perFileName=c:\myperf.log –cp SynametricsLoggingFW.jar com.foo.MyApp
Programmatically, you can set this property by using the System.setProperty() method.
Performance Log Viewer – Remote Logging Performance Log Viewer is a GUI based program that receives performance messages from any source that is using Synametrics Logging Framework. The messages can be sent to either same machine or to a remote machine. By default performance logging messages are not sent to any viewer. Therefore, you must turn “Remote Logging” on in order to receive log messages, which is done by calling the enableRemoteLoggingForPerformance() method of the Logging Framework. The first parameter of enableRemoteLoggingForPerformance takes the host name of the Log Viewer and the second parameter is the TCP/IP port, which by default is set to 7500.
Viewing Logs In order to view performance log from a remote machine, you need to run the following command, which brings up the Synametrics Performance Monitor window (image shown below) java –jar SynametricsLoggingFW.jar By default this application listens for incoming log events on port 7500. If you wish to change this setting, you need to set a System Property called “com.synametrics.pvport”. Let’s say you want this application to listen on port 17500, the command like would change as follows. Java –Dcom.synametrics.pvport=17500 –jar SynametricsLoggingFW.jar

DB Architect User’s Guide
The table below describes the fields displayed in the GUI. Field Description Client IP Address of the machine where log was generated Time (ms) Time in millisecond between ENTER and EXIT. Message Message that is entered during logging Class name Name of the class where this message originated Thread name Name of the thread with the client application
Frequently Asked Questions
Q Can I use Synametrics Logging Framework in any of my own application and do I have to pay any royalties?
A Yes, you can use Synametrics Logging Framework in any application you like and you DO NOT have to pay us any royalties
Q Can I get the source code for the framework?
A If you purchase DB Architect or WinSQL for JDBC, you are eligible to get the source code for Logging Framework at no additional charge.

DB Architect User’s Guide
Q Can I leave performance logging statement in my code even in production environment?
A Absolutely, the whole point of having performance logging is to monitor the performance during production. Therefore, leave the logging statements within your code even in production mode. However, we do recommend that you disable performance logging when not needed. You can disable performance logging by calling the LoggingFW.enablePerformanceLogging(false) method on the logging framework. Once this method is called all messages to LoggingFW.perf(...)are ignored.

Glossary application server A program that provides services to other programs based on certain specifications. CLASSPATH A search path that the Java runtime environment uses to locate files on the hard drive. foreign key A field or combination of fields that identify records in another table. Foreign keys are used to represent the relationships between records in different tables. JDBC Java Open Database Connectivity; allows relational databases to be accessed from a common Java interface