Embed Size (px)
Citation preview

DAVA
(Drugs Authentication and Verification Application)
Department of Commerce
Ministry of Commerce and Industry
Government of India
Commerce & Industry Information Systems
Division National Informatics Centre
Department of Information Technology
Ministry of Communications and Information
Technology
Government of India
No part of this document shall be reproduced without prior permission of
Deputy Director General and Head,
Commerce & Industry Information Systems Division,
National Informatics Centre
Guidelines and User Manual for
Registration of Manufacturer (Version-1.0.1)
Dated : 10-08-2015
Amendment log
Version Number
Date Change Number
Brief Description Sections changed
1.0.1 10.08.2015 - Draft Release -
REGISTRATION PROCESS (Version-1.0.1)
Dated : 10-08-2015
1.1 Purpose
To register manufacturer and/or its designated agencies with the
DAVA Central Portal for their identification and enablement of data upload and maintenance.
1.2 Users
Manufacturer
GS1 India
1.3 Pre-requisites
1.3.1 Windows Client machine. 1.3.2 Internet connection with browser IE 8.0 or above. Registration is
supported only in IE8.0 and above.
1.3.3 The Java Runtime Enterprise (JRE) 1.6 or later. If it is not installed, follow the steps mentioned at Annexure X to install on your computer.
1.3.4 The manufacturer must have manufacturer code (User Id) registered with GS1 India. If not, contact GS1 India.
1.3.5 Class II or Class III Digital Certificate, issued by Certifying Authority
(CA), installed on the machine with proper token driver.
1.4 Process Flow
1.5 Process Description
As already indicated this process is for the Manufacturers for
getting them registered with the DAVA Central Portal so that their
requisite data could be hosted on the central portal. The
manufacturer is solely responsible for hosting of data related to

its manufactured drugs and their movement in the complete
supply chain maintaining the parent-child relationship of their
packaging. However, the responsibilities of the data upload on the
DAVA central portal related to the movement of drug consignment
may be delegated by the manufacturer to its distributors, retailers
etc.
The manufacturer already registered with the GS1 India can apply
for the registration on the DAVA Portal. It must have the valid
Digital Signature Certificate of Class–II or Class-III issued by any
Certifying Authority (CA) in India.
The manufacturer needs submit online request on the portal. (The
stepwise procedure is described below at $3.6).On successful
submission of the request on the portal, a Registration Number,
Registration Id and the Authorization Letter would be generated.
The applicant (manufacturer) needs to download the Authorization
Letter and upload the physical copy after getting it duly filled for
the additional columns and signed from authorized signatory of the
organization.
The registration request received from the manufacturer would be
verified and confirmed by GS1 India. The verified and confirmed
request would get registered for the Portal with ‘Administrator’
privileges (Refer Definition at $2). The applicant would get the OTP
(PIN) number through Email and SMS.
On receiving the OTP, the applicant would confirm it on the postal
to get activated itself and complete the process of registration.
1.6 Operating Instructions
1.6.1 Invoking DSC
1.6.1.1 Insert the token having the DSC having the Private Key of
the user at the USB Port of the Client machine and install the token driver (if not installed earlier) as provided by the
Certifying Authority.
1.6.1.2 Invoke the internet browser and confirm successful
installation of DSC by looking the DSC’s successfully installation of certificate, it has to appear in
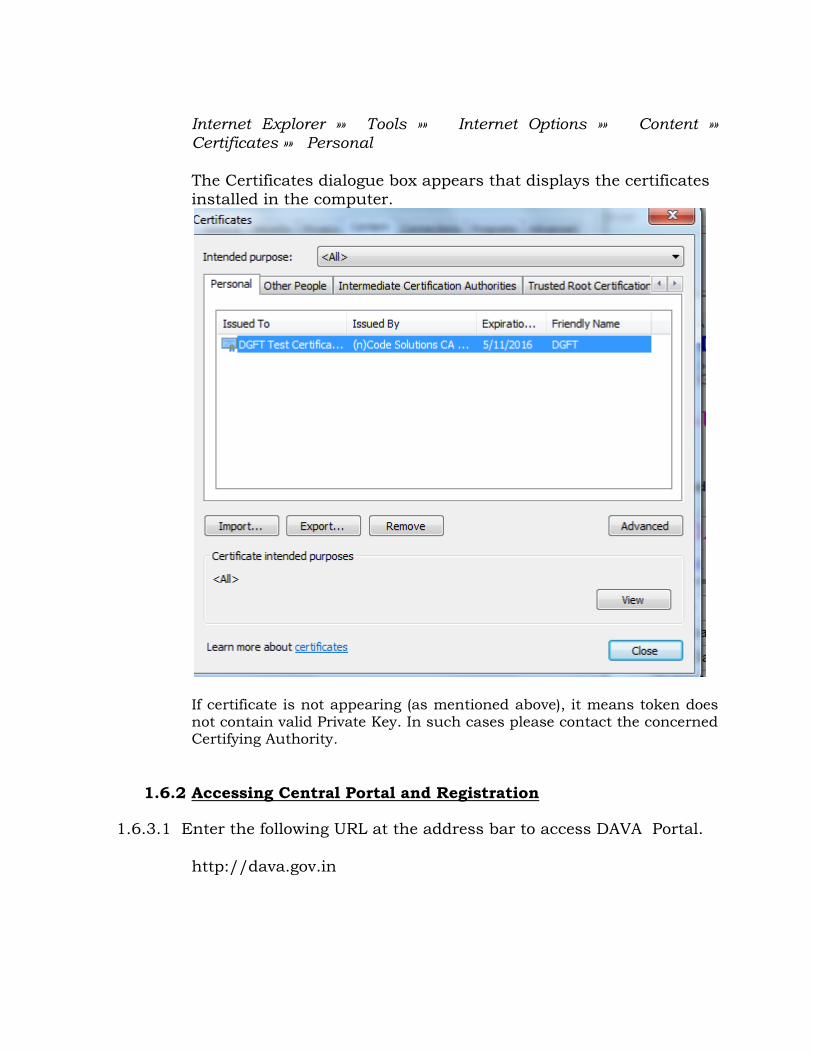
Internet Explorer »» Tools »» Internet Options »» Content »» Certificates »» Personal
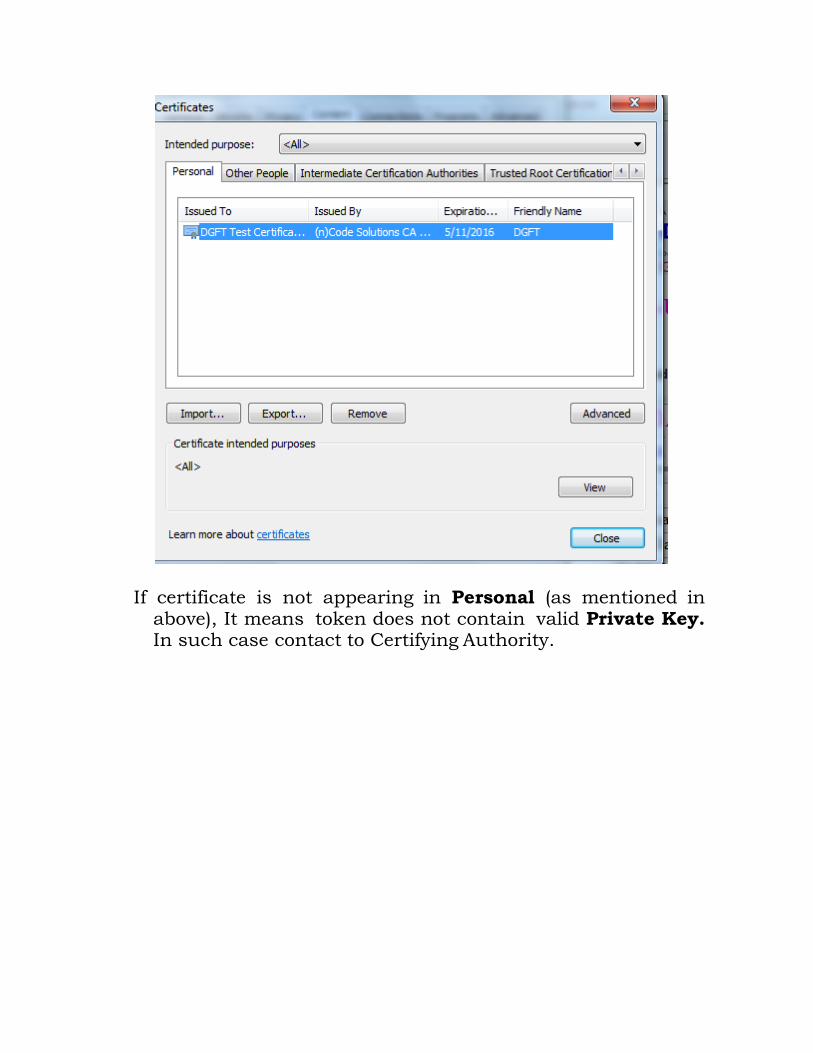
The Certificates dialogue box appears that displays the certificates installed in the computer.
If certificate is not appearing (as mentioned above), it means token does not contain valid Private Key. In such cases please contact the concerned Certifying Authority.
1.6.2 Accessing Central Portal and Registration
1.6.3.1 Enter the following URL at the address bar to access DAVA Portal.
http://dava.gov.in
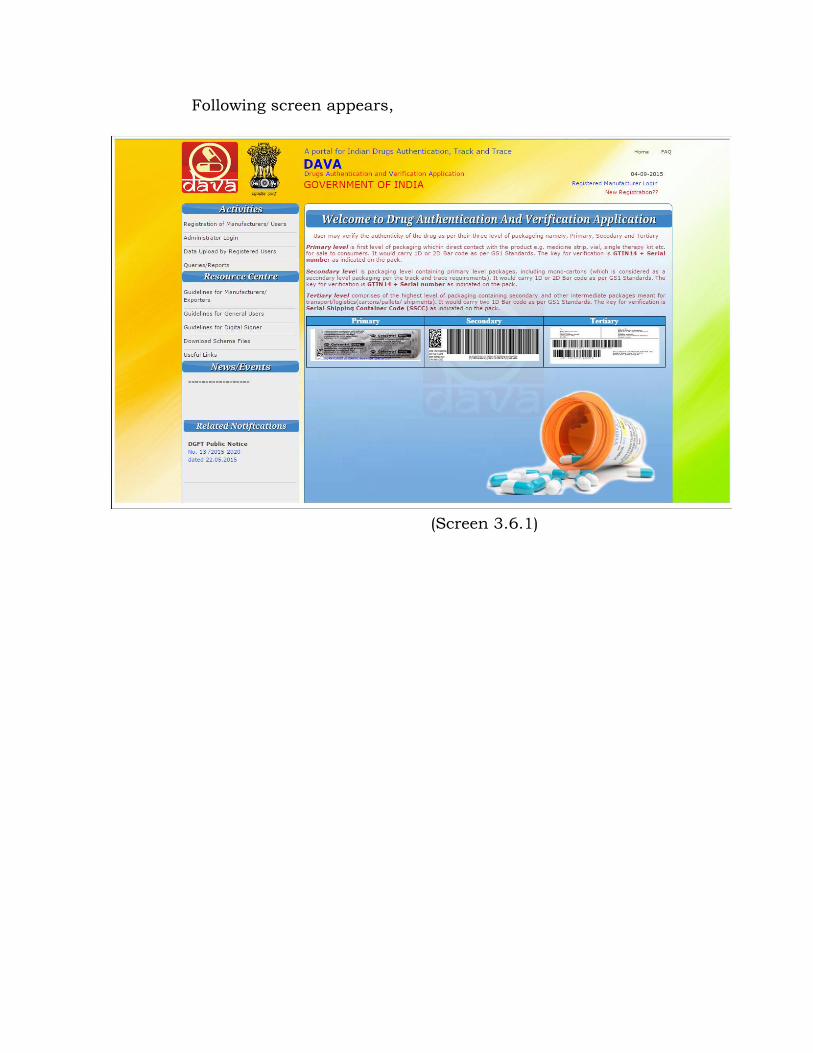
Following screen appears,
(Screen 3.6.1)

1.6.3.2 Select option ‘New Registration’ available on the top right on the homepage. Following Screen would appear,
(Screen 3.6.2)
1.6.3.3 Select option ‘ Registration’. a pop-up window will appear asking you to either “Run” or “Cancel” the application.

1.6.3.4 Click on Run.The following screen would appear
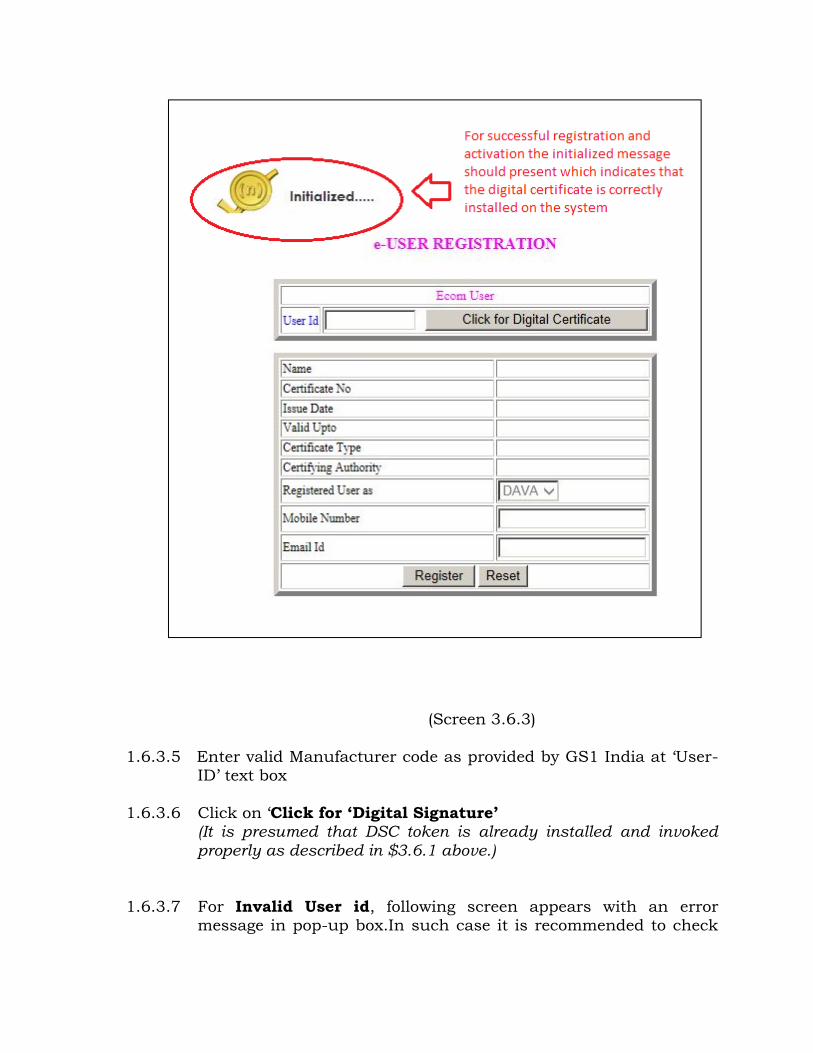
(Screen 3.6.3)
1.6.3.5 Enter valid Manufacturer code as provided by GS1 India at ‘User-ID’ text box
1.6.3.6 Click on ‘Click for ‘Digital Signature’ (It is presumed that DSC token is already installed and invoked properly as described in $3.6.1 above.)
1.6.3.7 For Invalid User id, following screen appears with an error
message in pop-up box.In such case it is recommended to check

User Id once again or contact the concerned authority for necessary action.
(Screen 3.6.4)
1.6.3.8 For Valid User id, following screen appears with the pop up
window appear as shown below.
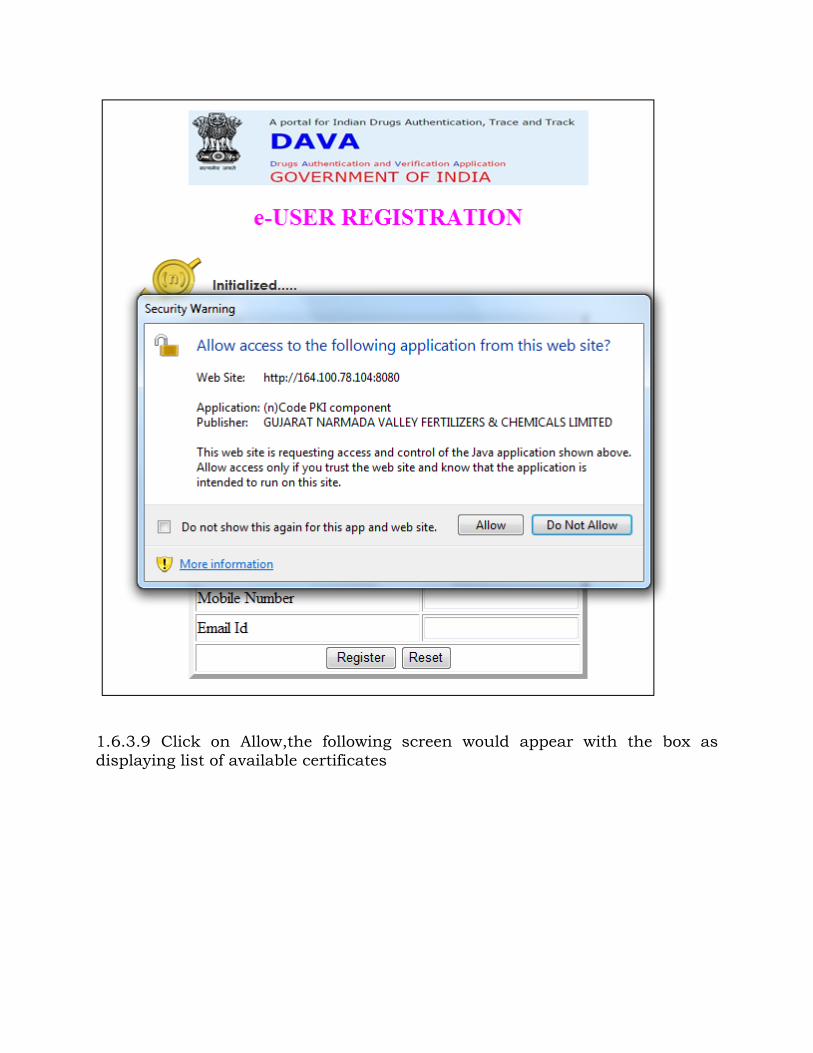
1.6.3.9 Click on Allow,the following screen would appear with the box as
displaying list of available certificates
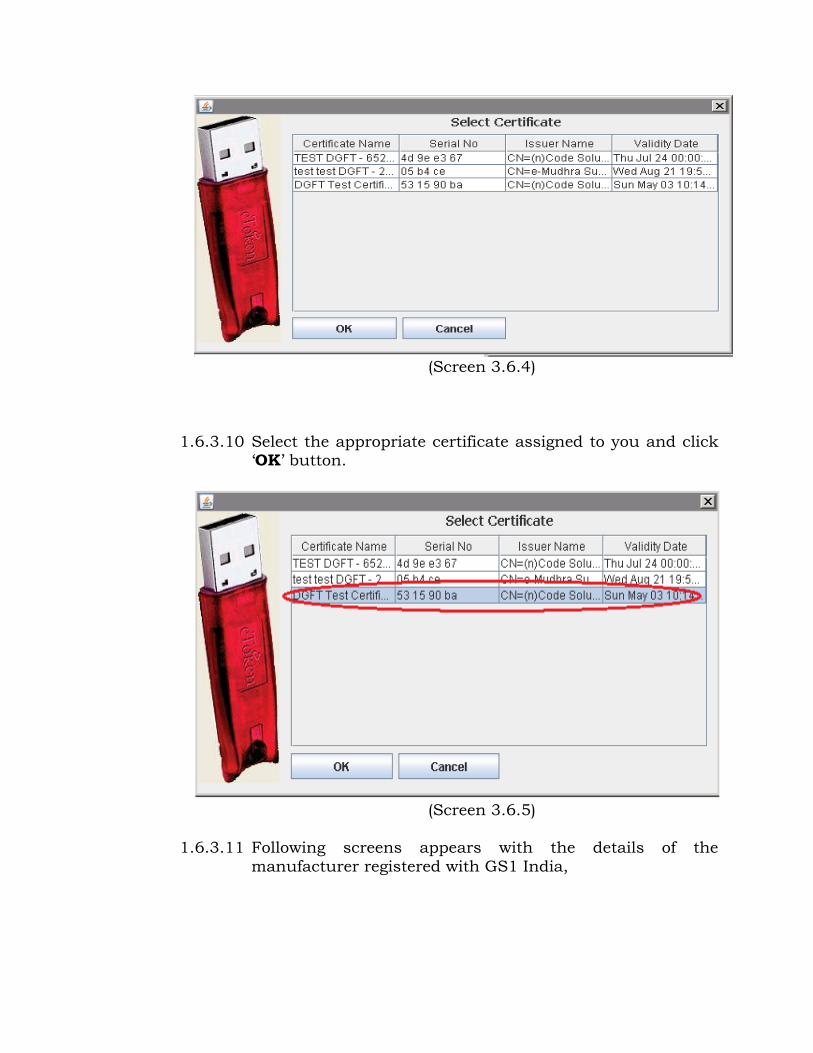
(Screen 3.6.4)
1.6.3.10 Select the appropriate certificate assigned to you and click
‘OK’ button.
(Screen 3.6.5)
1.6.3.11 Following screens appears with the details of the
manufacturer registered with GS1 India,
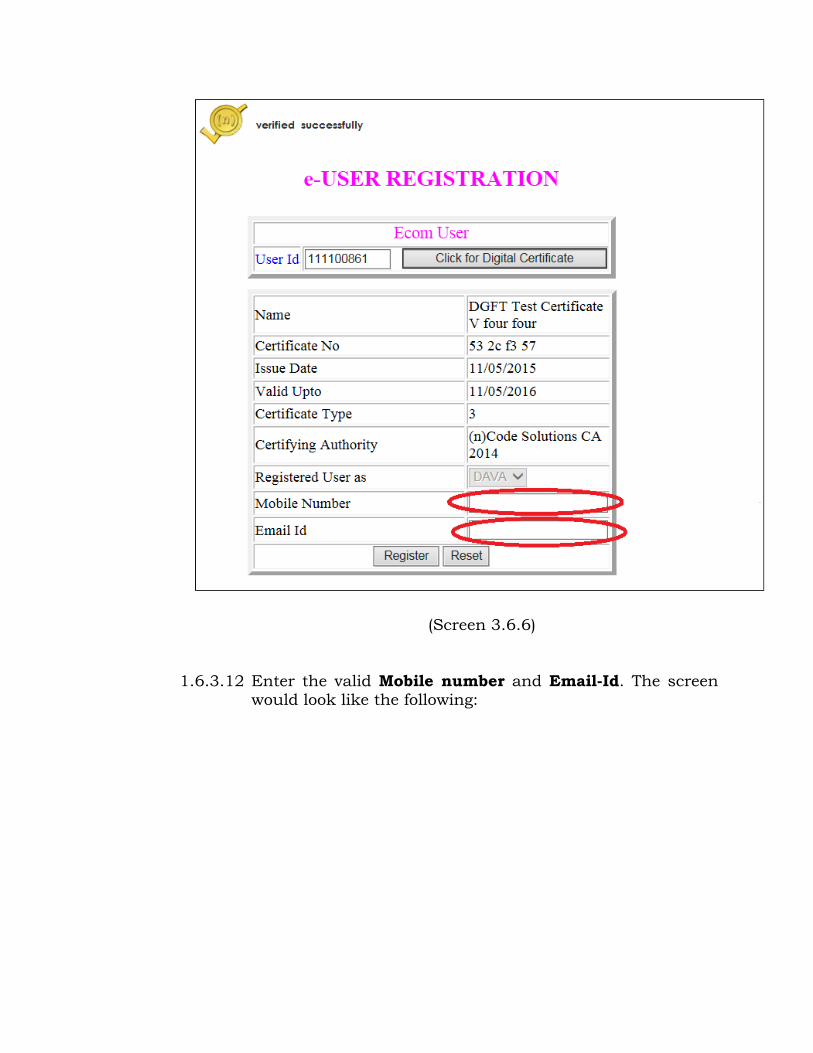
(Screen 3.6.6)
1.6.3.12 Enter the valid Mobile number and Email-Id. The screen
would look like the following:
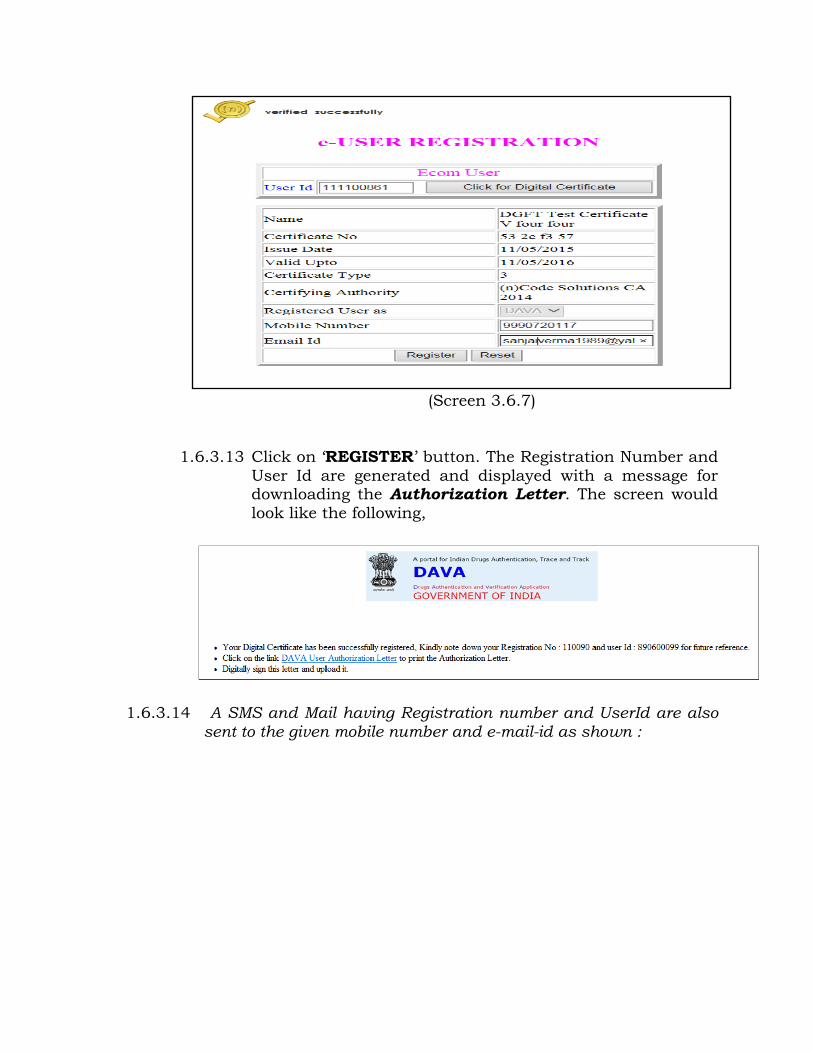
(Screen 3.6.7)
1.6.3.13 Click on ‘REGISTER’ button. The Registration Number and
User Id are generated and displayed with a message for downloading the Authorization Letter. The screen would
look like the following,
1.6.3.14 A SMS and Mail having Registration number and UserId are also sent to the given mobile number and e-mail-id as shown :
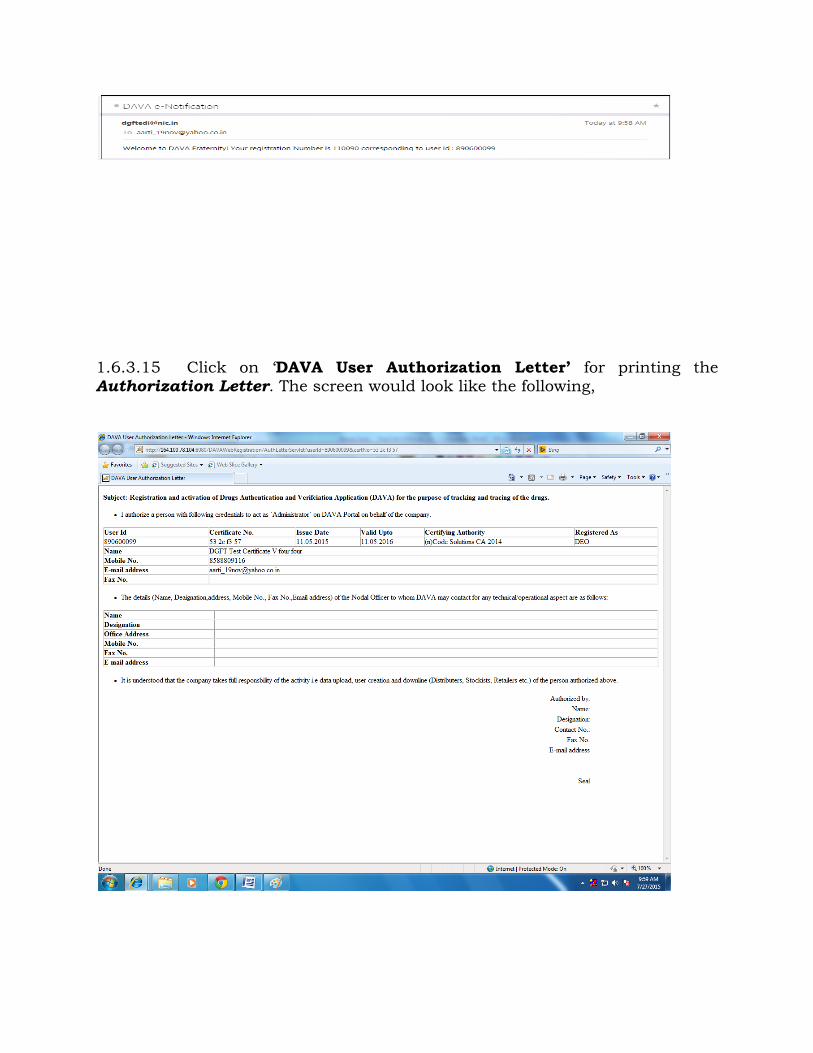
1.6.3.15 Click on ‘DAVA User Authorization Letter’ for printing the Authorization Letter. The screen would look like the following,
Print the authorization letter, Scan the duly signed and stamped letter and
save it in your system for next process. Please note that
a) Only JPG,GIF and PDF file formats are allowed for authorization letter. . b) Authorization letter should not be saved on desktop or external drives(like
pendrive,harddrive etc) it has to be saved only in Internal drives(like C:,D:,E: etc)
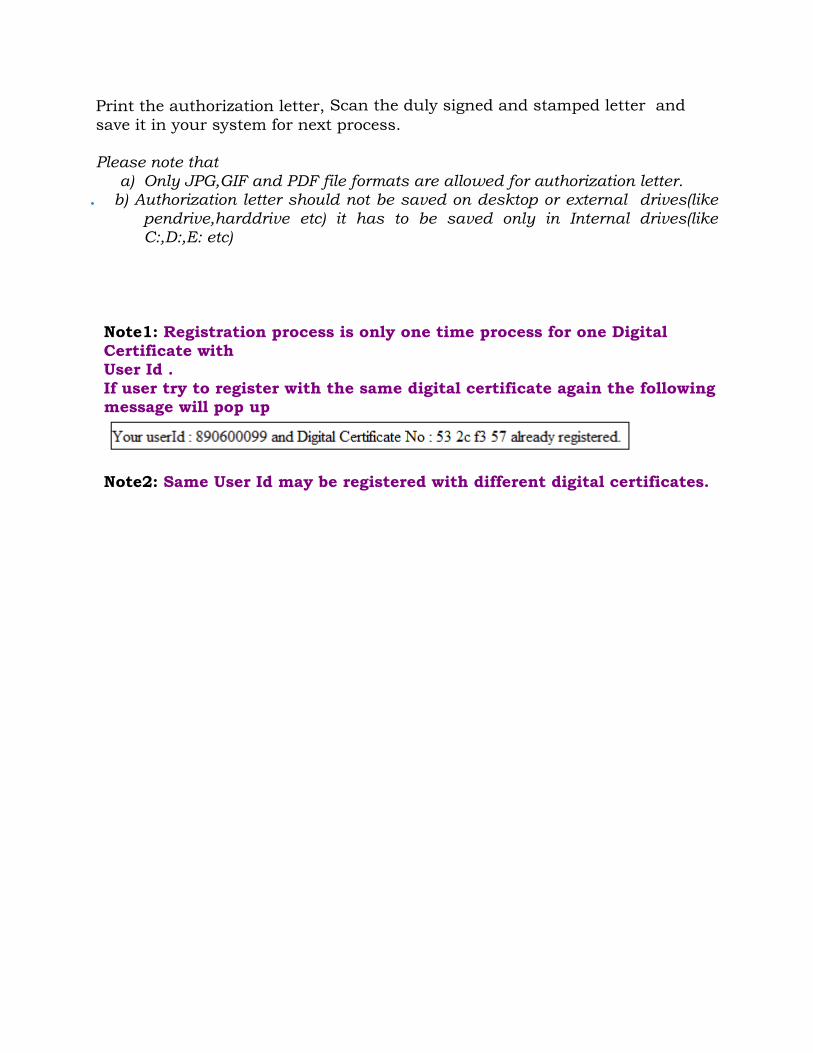
Note1: Registration process is only one time process for one Digital
Certificate with User Id .
If user try to register with the same digital certificate again the following message will pop up
Note2: Same User Id may be registered with different digital certificates.

2 ACTIVATION PROCESS
2.1 Purpose
To activate the manufacturers’ and/or its designated agencies’ ID already
registered with the DAVA Central Portal for their identification and
enablement of data upload and maintenance.
2.2 Users
Manufacturer
GS1 India
2.3 Pre-requisites
2.4 Process Flow
2.5 Process Description:
Steps Required for Activation Process to the DAVA system:
2.5.1 Launch the web browser and select option ‘New Registration’
available on the top right on the homepage .Following Screen would appear
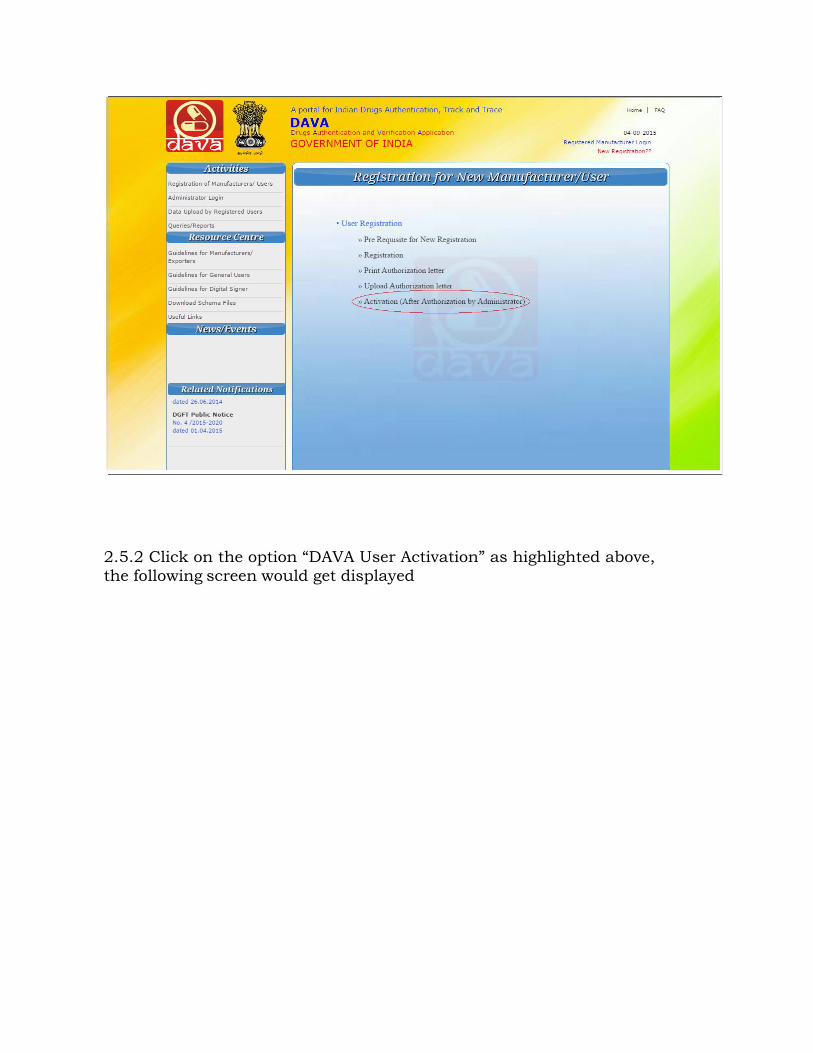
2.5.2 Click on the option “DAVA User Activation” as highlighted above,
the following screen would get displayed

2.5.3 Enter the User Id and Registration Number (received from SMS or
email as shown in 3.6.3.13 step), then Click on Status Button as indicated in the screen below.
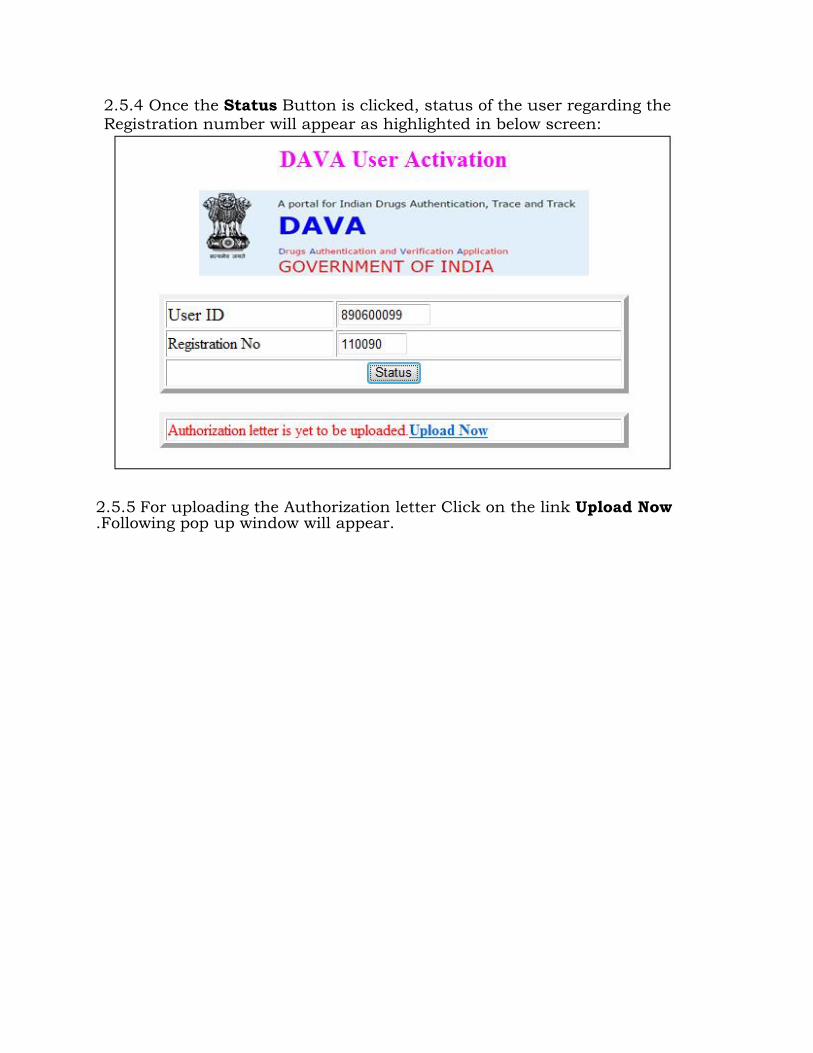
2.5.4 Once the Status Button is clicked, status of the user regarding the Registration number will appear as highlighted in below screen:
2.5.5 For uploading the Authorization letter Click on the link Upload Now .Following pop up window will appear.

Click on Run.The window will appear as:
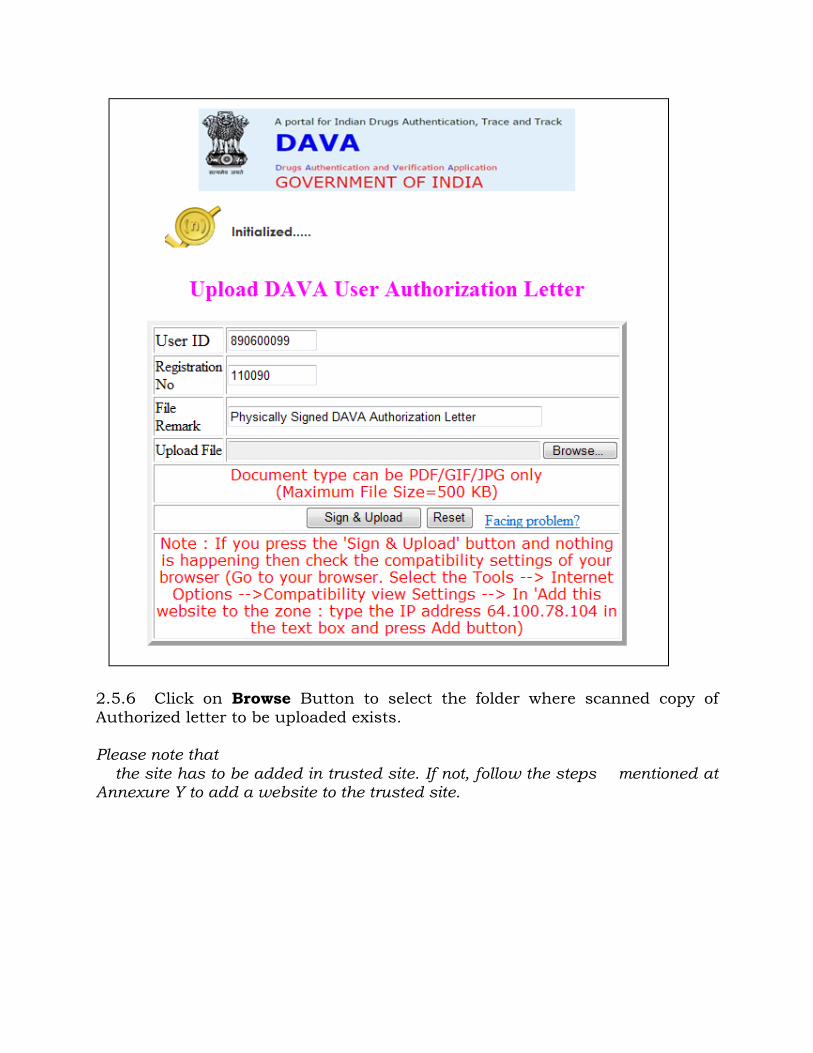
2.5.6 Click on Browse Button to select the folder where scanned copy of
Authorized letter to be uploaded exists. Please note that
the site has to be added in trusted site. If not, follow the steps mentioned at Annexure Y to add a website to the trusted site.
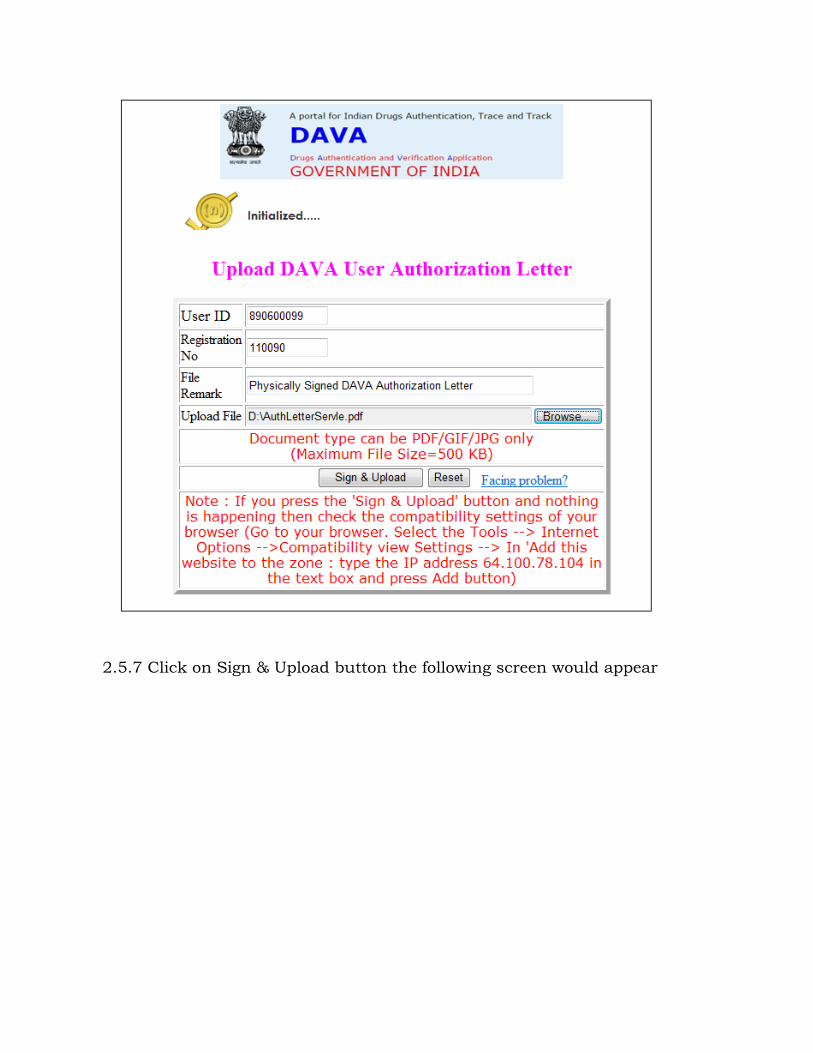
2.5.7 Click on Sign & Upload button the following screen would appear
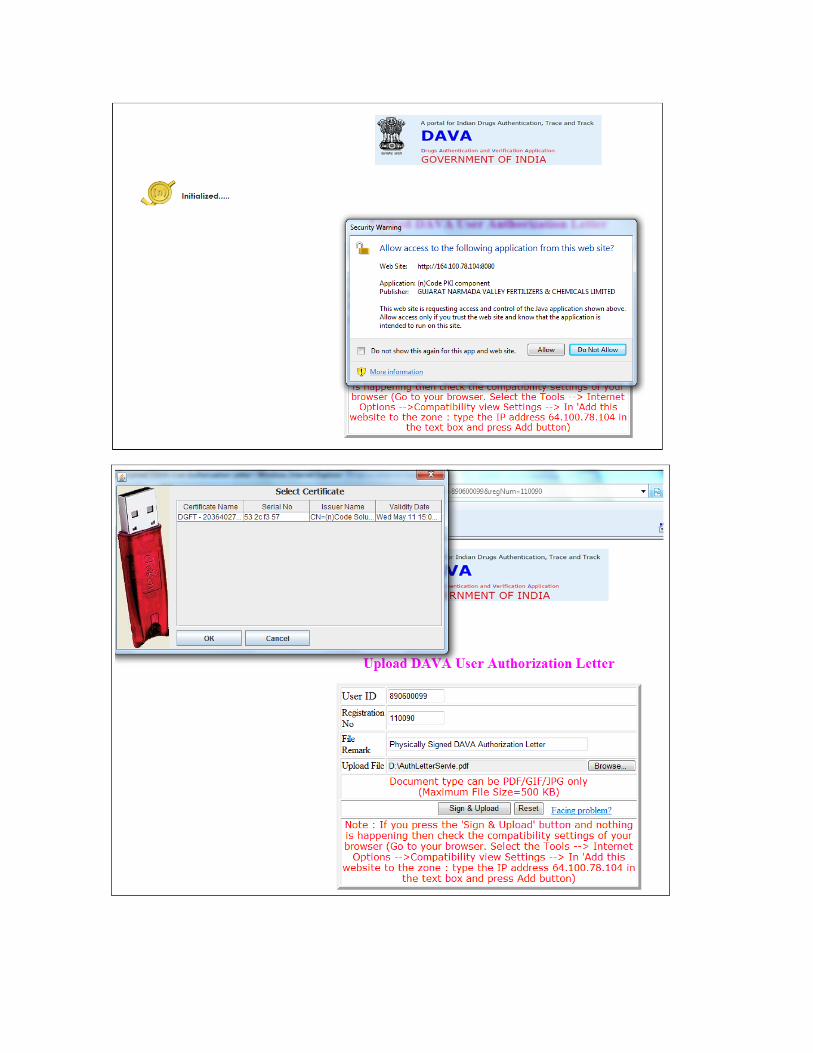
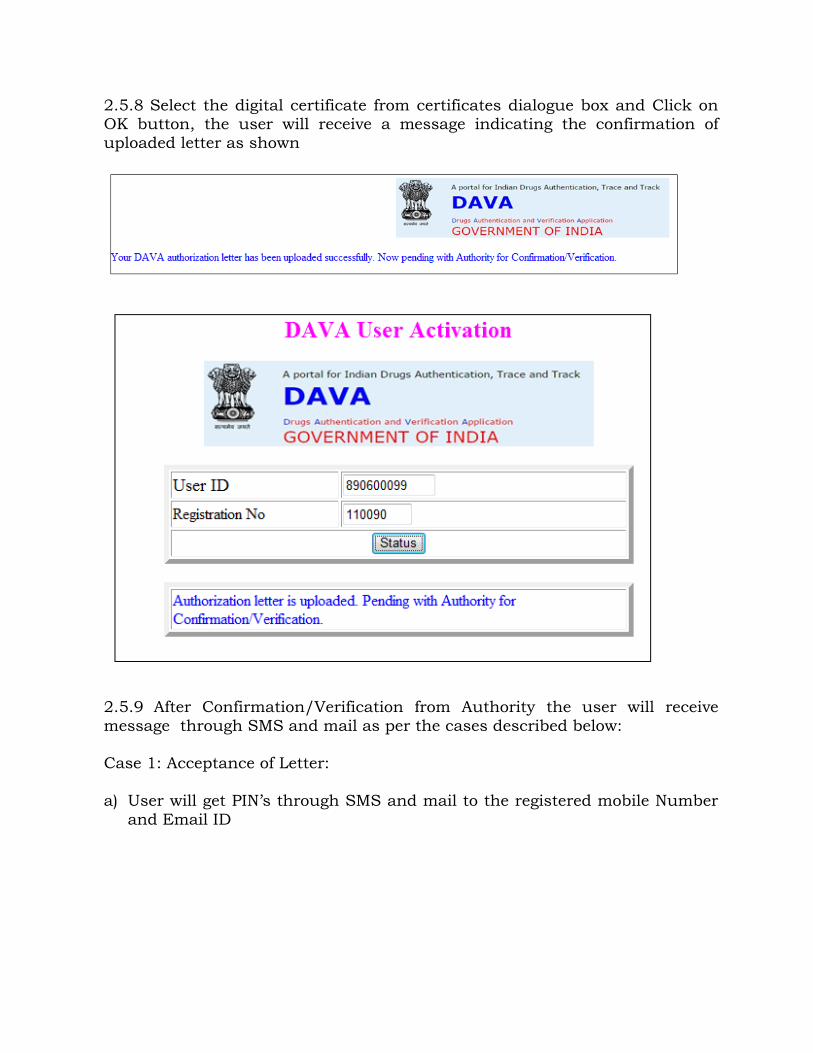
2.5.8 Select the digital certificate from certificates dialogue box and Click on OK button, the user will receive a message indicating the confirmation of
uploaded letter as shown
2.5.9 After Confirmation/Verification from Authority the user will receive
message through SMS and mail as per the cases described below: Case 1: Acceptance of Letter:
a) User will get PIN’s through SMS and mail to the registered mobile Number
and Email ID

b) User has to activate the account from “Activation” link” as highlighted in
the below screen:
The following screen would appear:
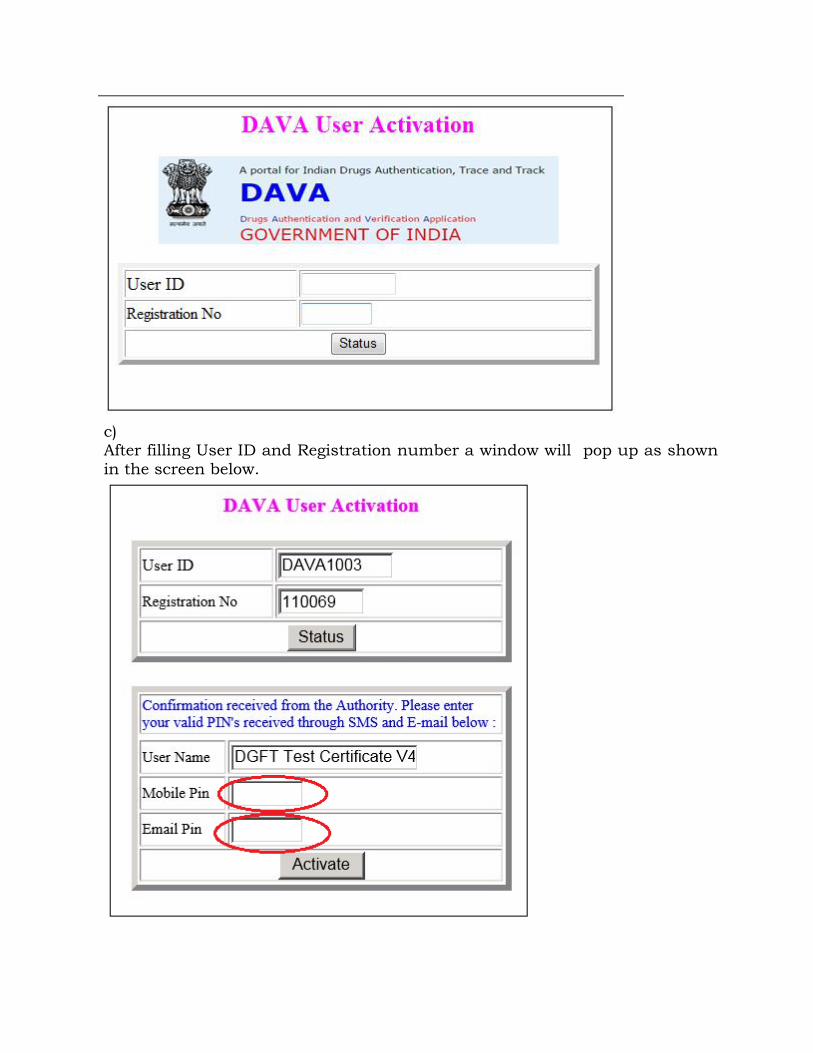
c) After filling User ID and Registration number a window will pop up as shown
in the screen below.
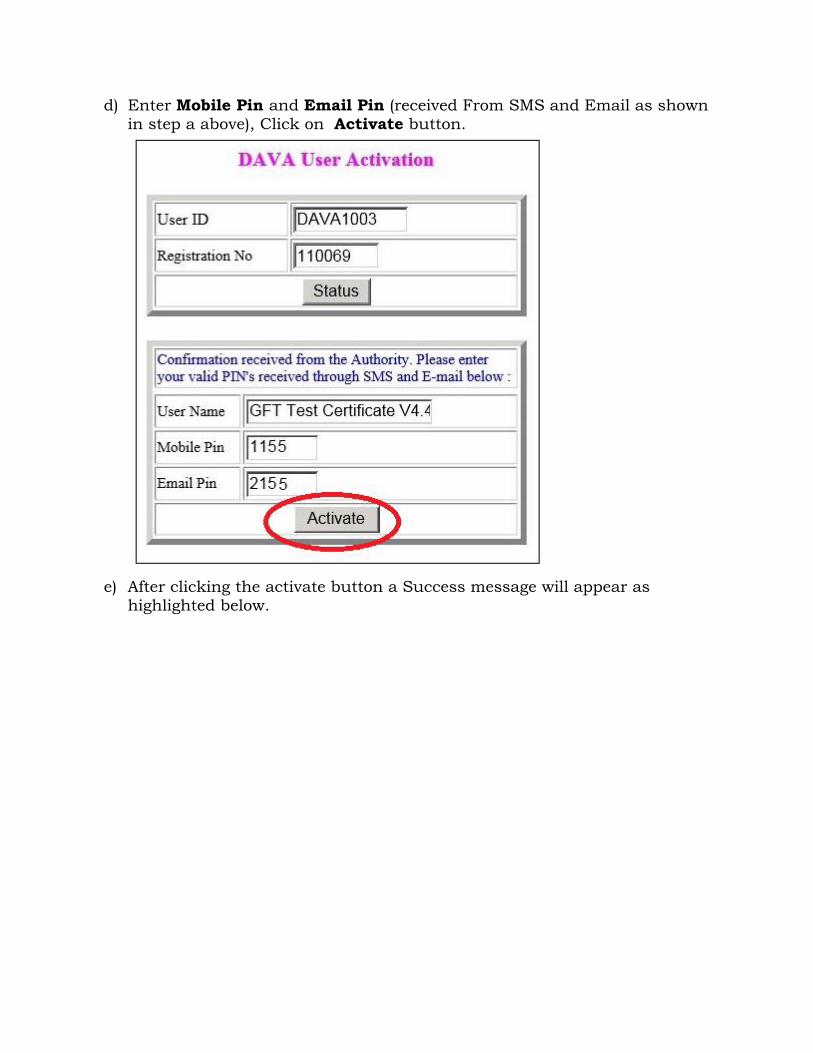
d) Enter Mobile Pin and Email Pin (received From SMS and Email as shown in step a above), Click on Activate button.
e) After clicking the activate button a Success message will appear as
highlighted below.
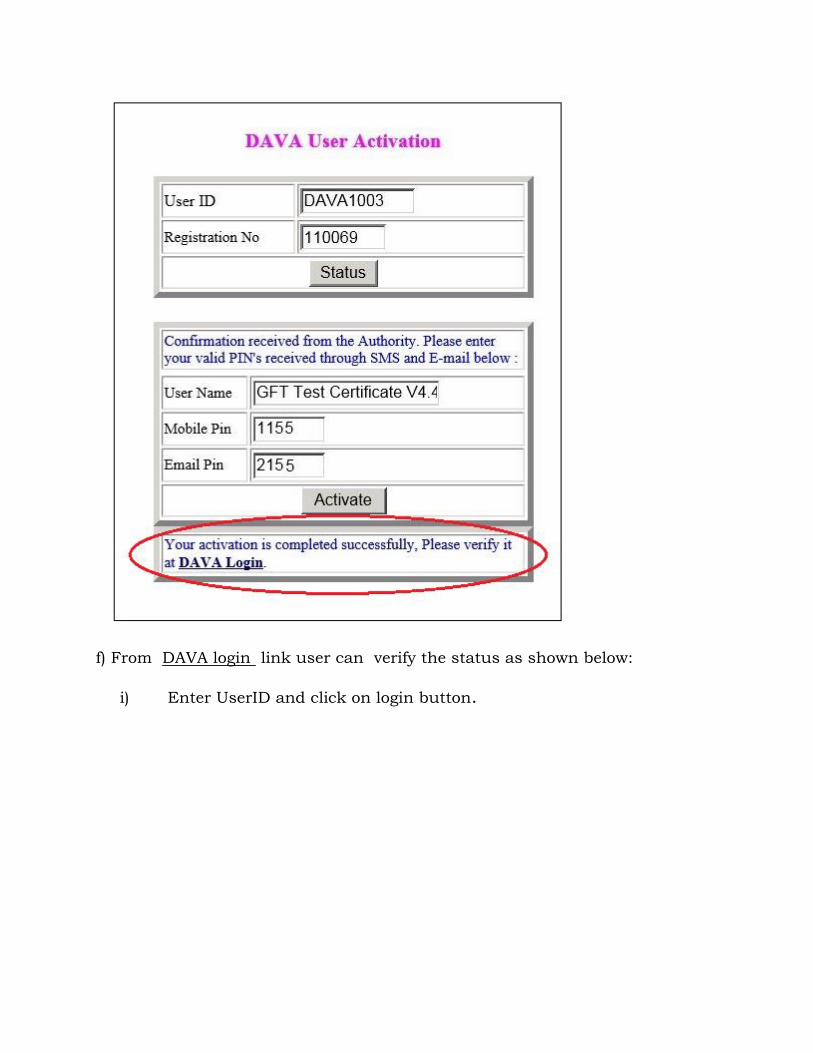
f) From DAVA login link user can verify the status as shown below:
i) Enter UserID and click on login button.

ii) Select the digital certificate and click on OK button.

iii)After Clicking the OK button the following screen would appear stating the
verification status:

Case 2: Rejection of Letter :
a) A message will be sent to the user to the registered Mobile no and Email ID as indicated in the screen below.
b) User can check the status from “ Activation link” on the following URL :
http://dava.gov.in/drug_reg.html
After filling User ID and Registration number a window will pop up as shown
in the screen below.
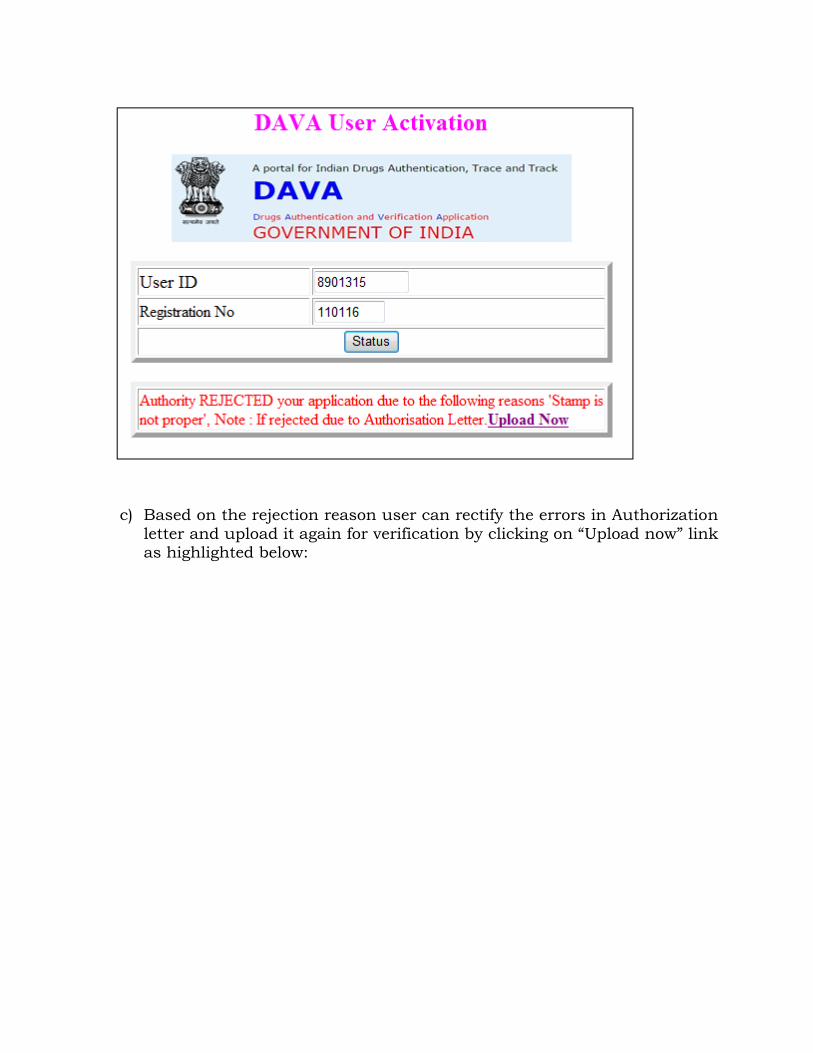
c) Based on the rejection reason user can rectify the errors in Authorization
letter and upload it again for verification by clicking on “Upload now” link as highlighted below:
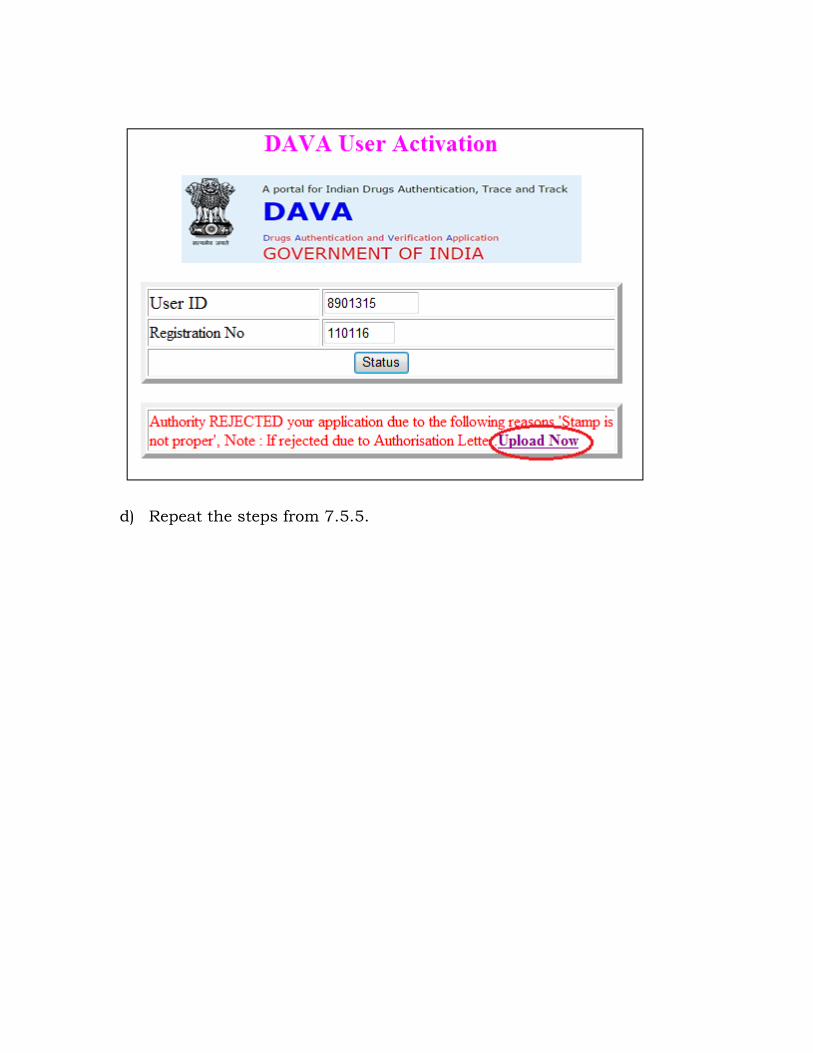
d) Repeat the steps from 7.5.5.
Annexures
How to Check the certificates in Internet Explorer:
Invoking DSC
a) Insert the token having the DSC having the Private Key of the user at
the USB Port of the Client machine and install the token driver (if not installed earlier) as provided by the Certifying Authority.
b) Invoke the internet browser and confirm successful installation of
DSC by looking the DSC’s successfully installation of certificate, it
has to appear in
Internet Explorer Tools Internet Options Content
Certificates Personal
The Certificates dialogue box appears that displays the certificates installed in the computer.
If certificate is not appearing in Personal (as mentioned in above), It means token does not contain valid Private Key. In such case contact to Certifying Authority.
Annexure X C.1 How to install JRE: Verify Windows :
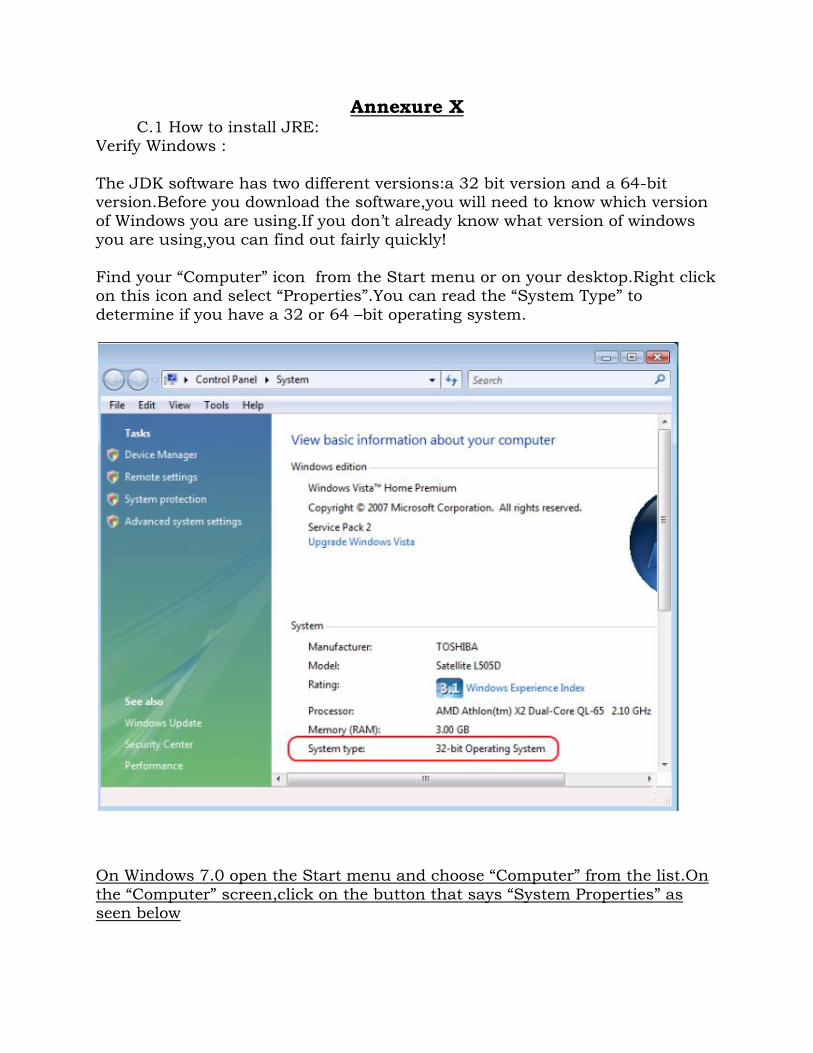
The JDK software has two different versions:a 32 bit version and a 64-bit version.Before you download the software,you will need to know which version
of Windows you are using.If you don’t already know what version of windows you are using,you can find out fairly quickly!
Find your “Computer” icon from the Start menu or on your desktop.Right click on this icon and select “Properties”.You can read the “System Type” to
determine if you have a 32 or 64 –bit operating system.
On Windows 7.0 open the Start menu and choose “Computer” from the list.On
the “Computer” screen,click on the button that says “System Properties” as seen below
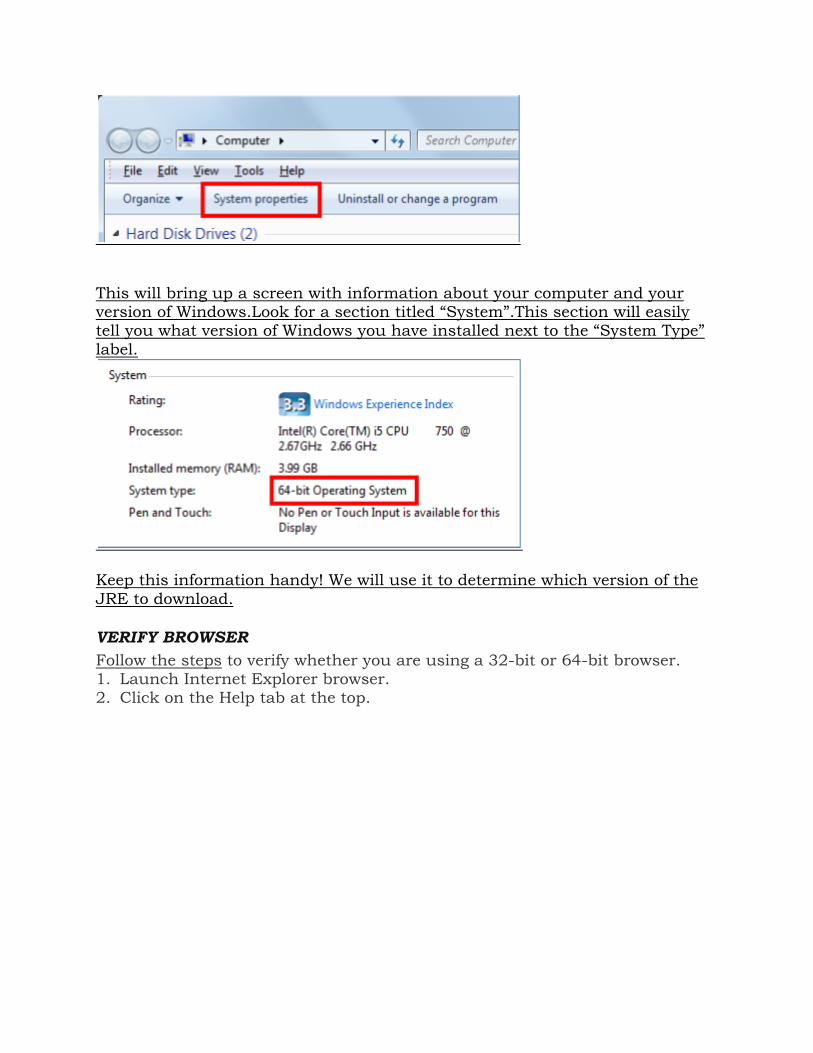
This will bring up a screen with information about your computer and your version of Windows.Look for a section titled “System”.This section will easily tell you what version of Windows you have installed next to the “System Type”
label.
Keep this information handy! We will use it to determine which version of the
JRE to download.
VERIFY BROWSER
Follow the steps to verify whether you are using a 32-bit or 64-bit browser. 1. Launch Internet Explorer browser. 2. Click on the Help tab at the top.
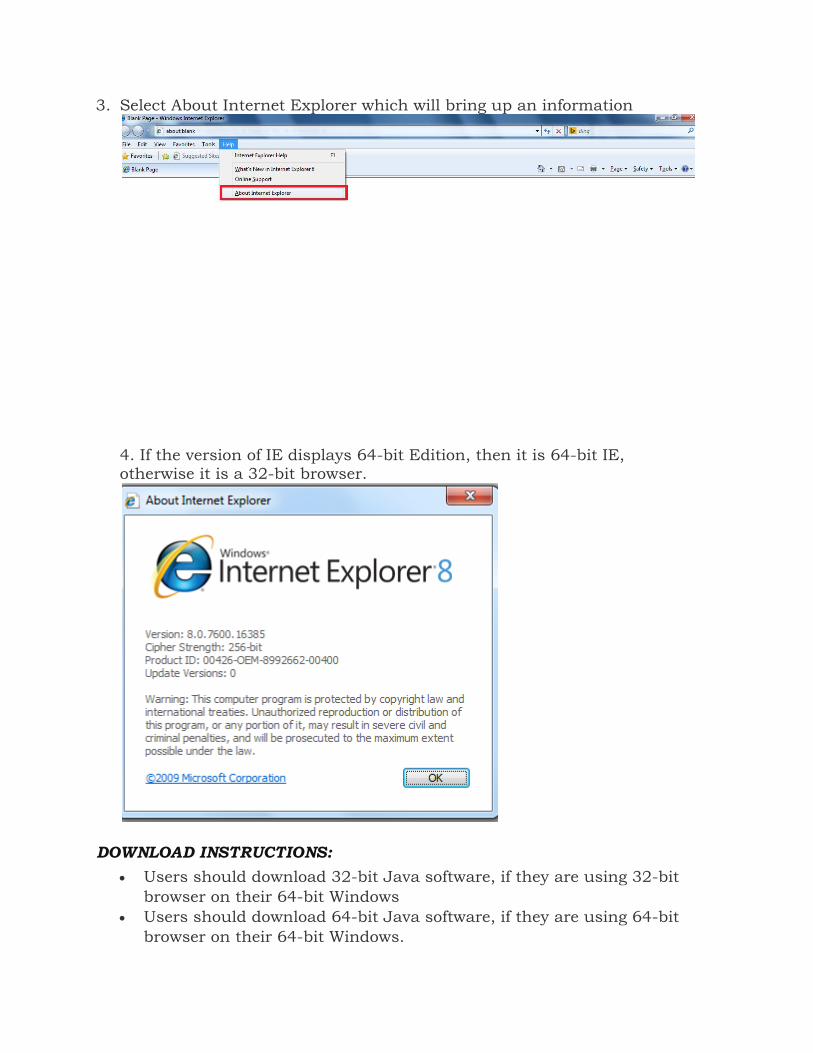
3. Select About Internet Explorer which will bring up an information
4. If the version of IE displays 64-bit Edition, then it is 64-bit IE, otherwise it is a 32-bit browser.
DOWNLOAD INSTRUCTIONS:
Users should download 32-bit Java software, if they are using 32-bit
browser on their 64-bit Windows
Users should download 64-bit Java software, if they are using 64-bit
browser on their 64-bit Windows.
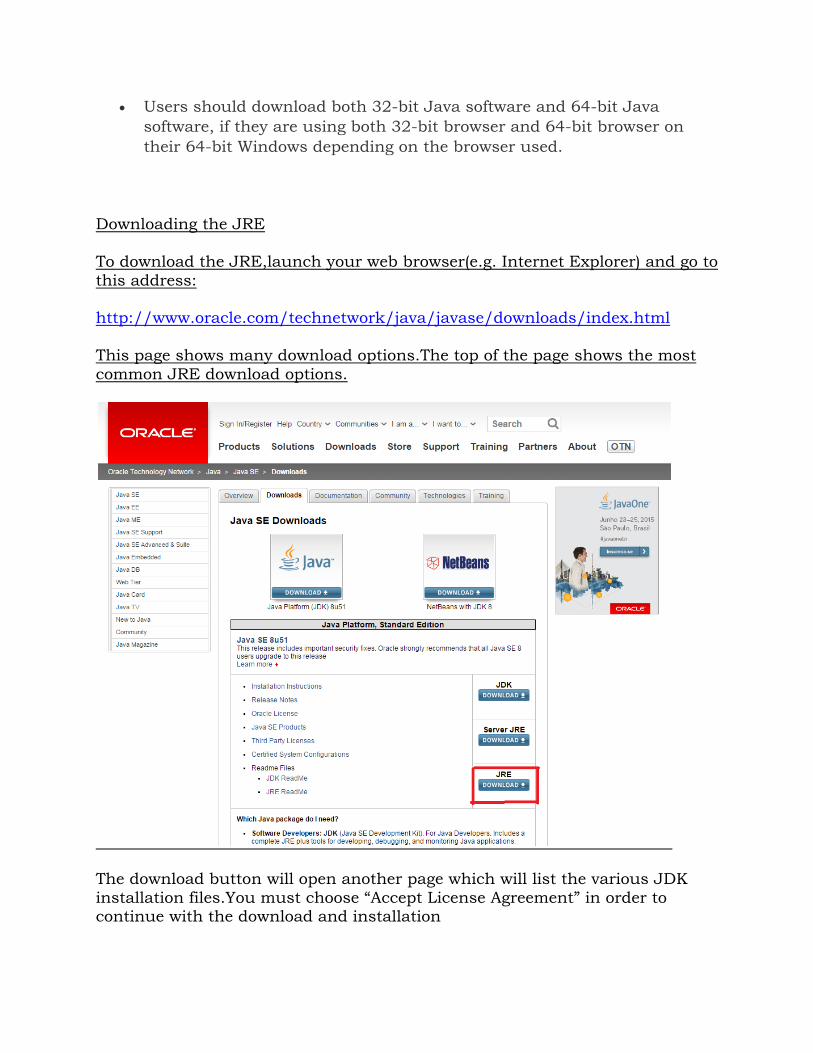
Users should download both 32-bit Java software and 64-bit Java
software, if they are using both 32-bit browser and 64-bit browser on
their 64-bit Windows depending on the browser used.
Downloading the JRE
To download the JRE,launch your web browser(e.g. Internet Explorer) and go to
this address: http://www.oracle.com/technetwork/java/javase/downloads/index.html
This page shows many download options.The top of the page shows the most
common JRE download options.
The download button will open another page which will list the various JDK
installation files.You must choose “Accept License Agreement” in order to continue with the download and installation

Once you have accepted the license agreement choose a file to download.If you have a 32-bit browser,you will choose the “Windows x86” file.If you have a 64-bit browser,you will need to choose the “Windows x64” file.
As soon as you click to download the file,a pop-up window will appear asking
you to either “Save” or “Run” the program. The look of this window will depend on what version of Windows and which Internet browser you are using to download the file. The following screenshots are from Internet Explorer:
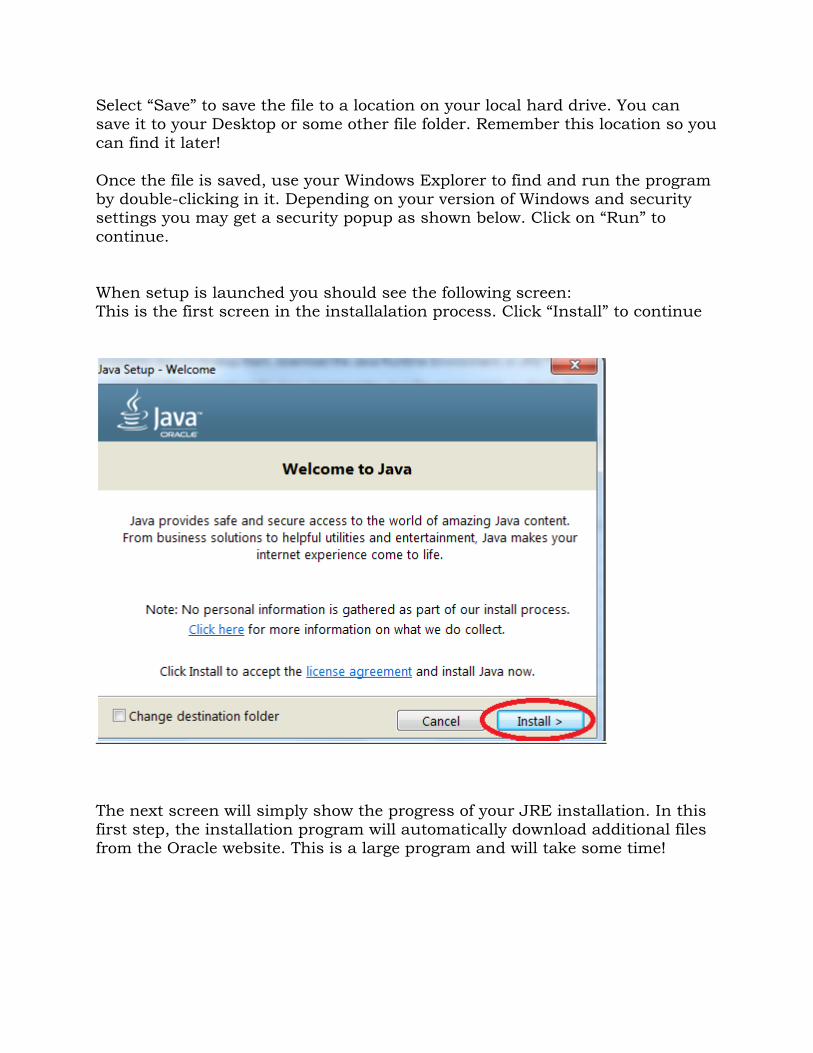
Select “Save” to save the file to a location on your local hard drive. You can save it to your Desktop or some other file folder. Remember this location so you
can find it later!
Once the file is saved, use your Windows Explorer to find and run the program by double-clicking in it. Depending on your version of Windows and security settings you may get a security popup as shown below. Click on “Run” to
continue.
When setup is launched you should see the following screen: This is the first screen in the installalation process. Click “Install” to continue
The next screen will simply show the progress of your JRE installation. In this first step, the installation program will automatically download additional files from the Oracle website. This is a large program and will take some time!

At this point, the installation of the JRE is complete.
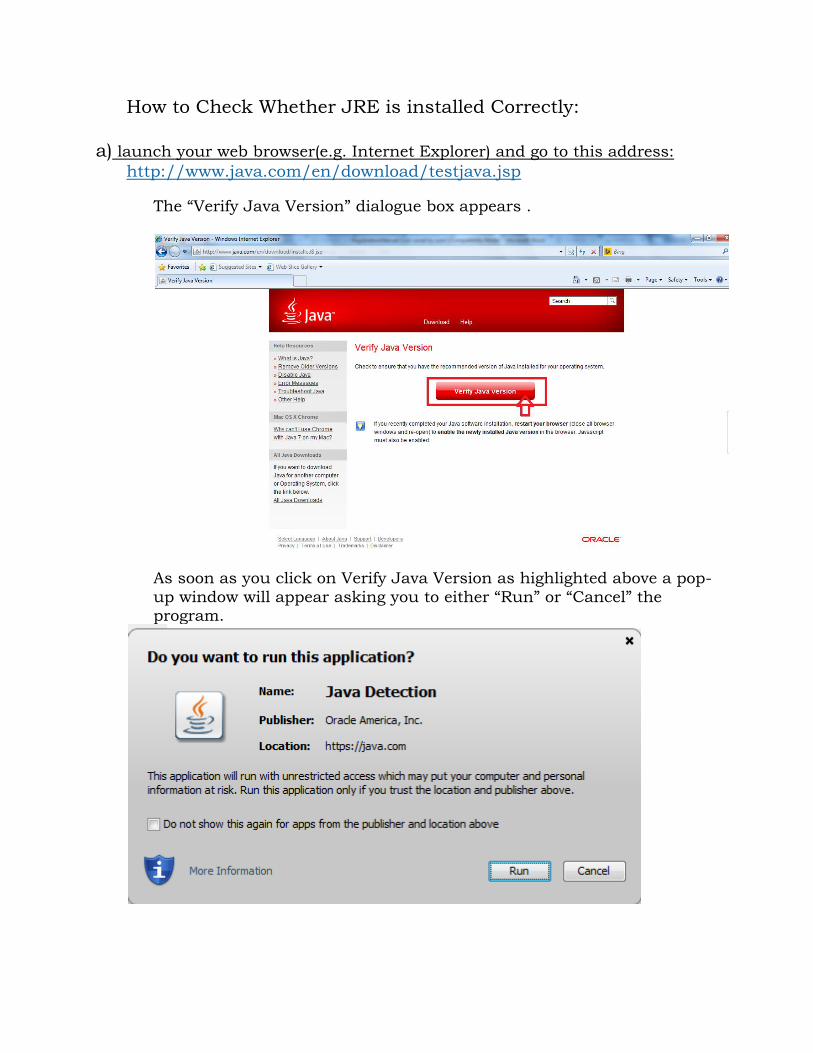
How to Check Whether JRE is installed Correctly:
a) launch your web browser(e.g. Internet Explorer) and go to this address:
http://www.java.com/en/download/testjava.jsp
The “Verify Java Version” dialogue box appears .
As soon as you click on Verify Java Version as highlighted above a pop-
up window will appear asking you to either “Run” or “Cancel” the program.
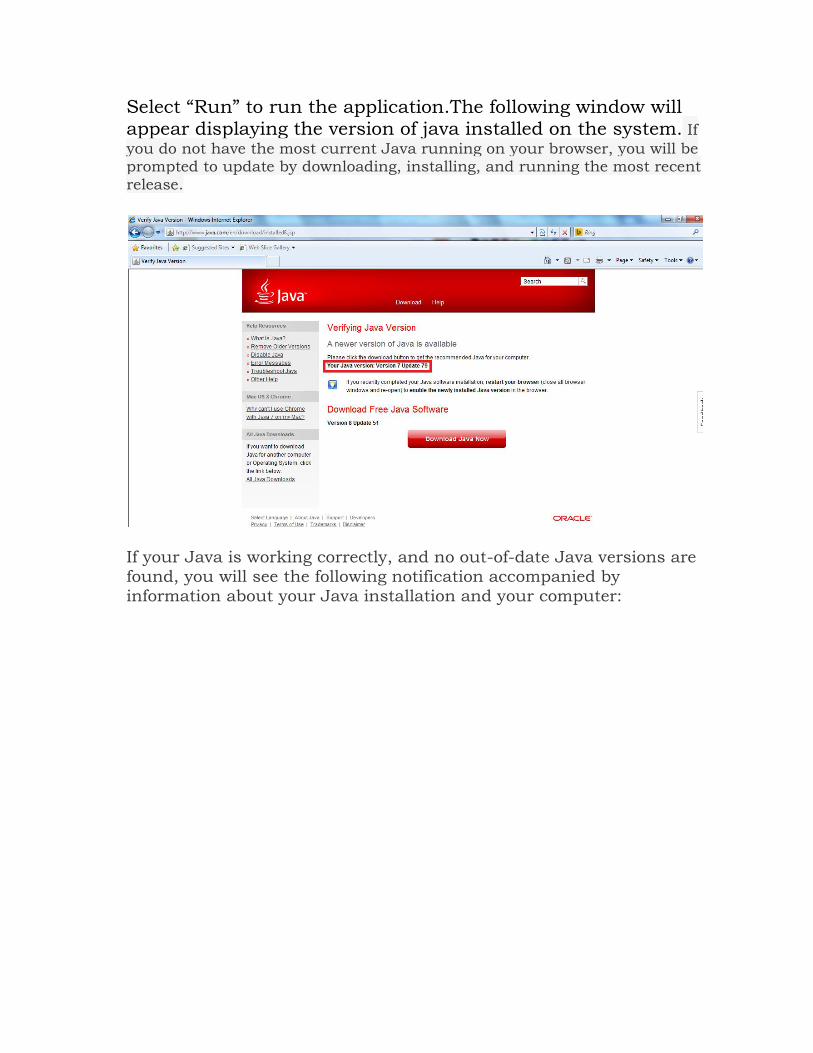
Select “Run” to run the application.The following window will appear displaying the version of java installed on the system. If you do not have the most current Java running on your browser, you will be prompted to update by downloading, installing, and running the most recent
release.
If your Java is working correctly, and no out-of-date Java versions are found, you will see the following notification accompanied by information about your Java installation and your computer:
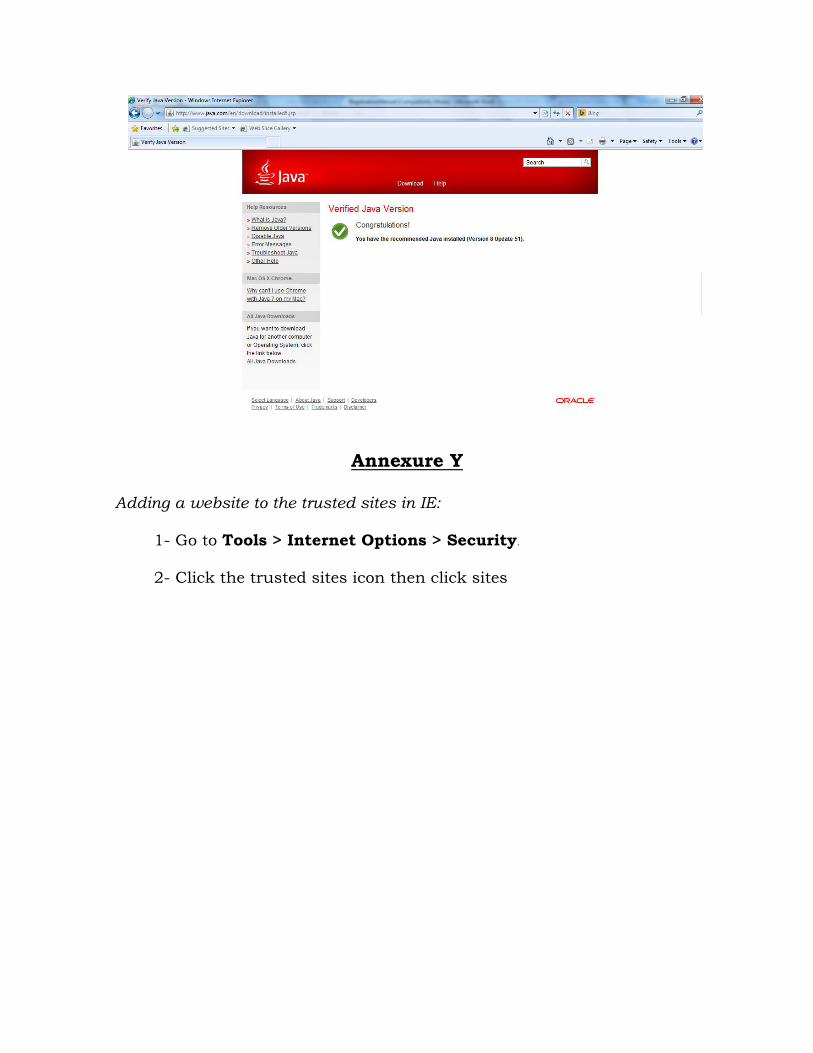
Annexure Y
Adding a website to the trusted sites in IE:
1- Go to Tools > Internet Options > Security.
2- Click the trusted sites icon then click sites

4- Click close.


![Cloud Service Authentication Verification using 3D · PDF fileCloud Service Authentication Verification ... Schema 4. Existing Schemes In ... Similarly, in[a] A Novel 3D Graphical](https://img.pdfslide.us/doc/110x75/5abda6dc7f8b9aa3088be393/cloud-service-authentication-verification-using-3d-service-authentication-verification.jpg)