Embed Size (px)
Citation preview
www.fxalgotrader.com [email protected]
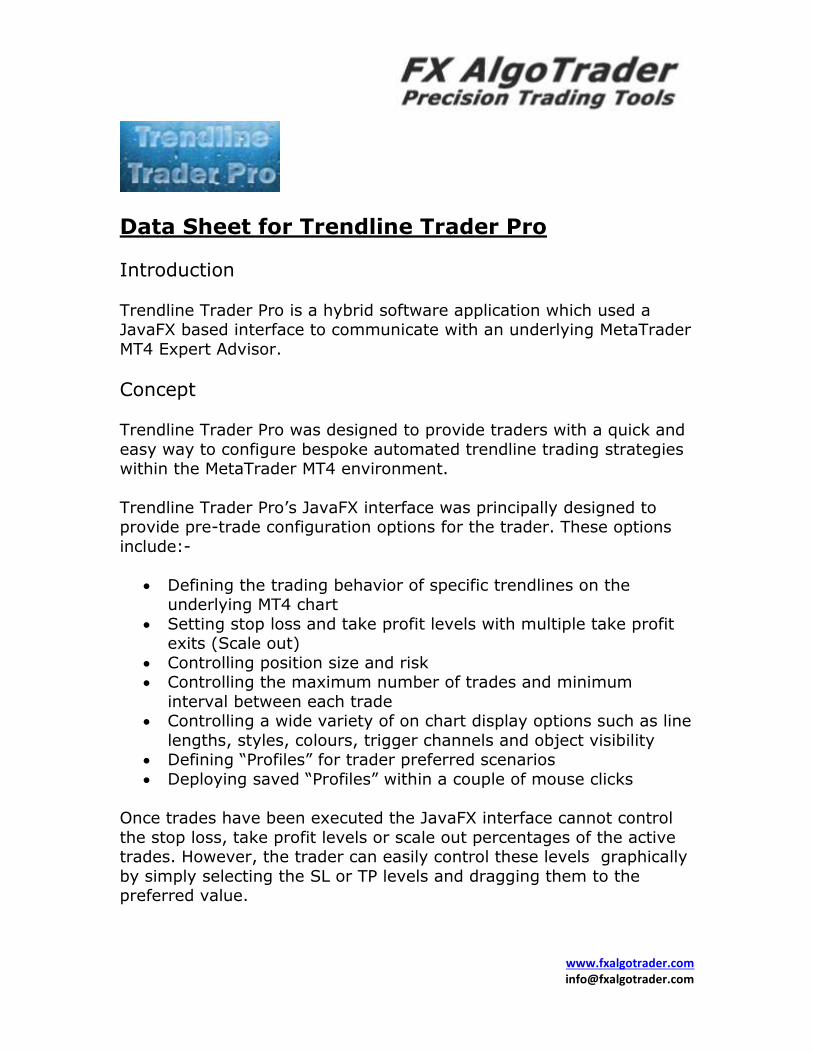
Data Sheet for Trendline Trader Pro
Introduction
Trendline Trader Pro is a hybrid software application which used a JavaFX based interface to communicate with an underlying MetaTrader
MT4 Expert Advisor.
Concept Trendline Trader Pro was designed to provide traders with a quick and
easy way to configure bespoke automated trendline trading strategies within the MetaTrader MT4 environment.
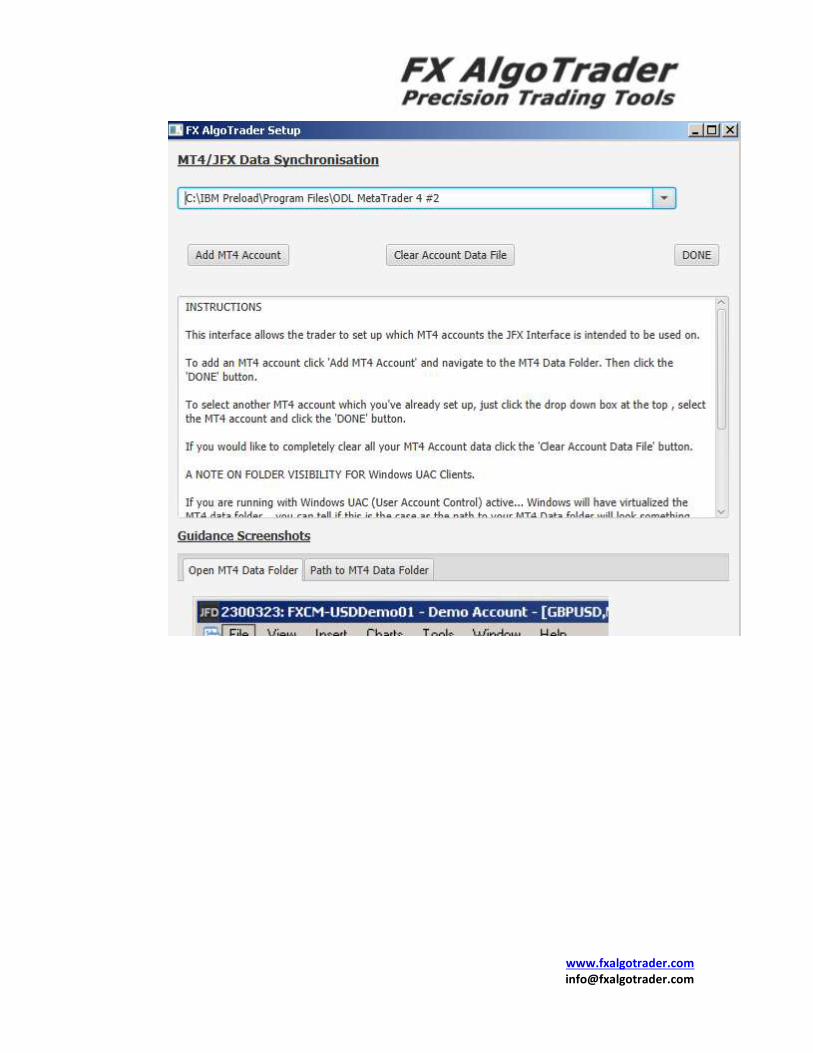
Trendline Trader Pro’s JavaFX interface was principally designed to provide pre-trade configuration options for the trader. These options
include:-
Defining the trading behavior of specific trendlines on the underlying MT4 chart
Setting stop loss and take profit levels with multiple take profit exits (Scale out)
Controlling position size and risk Controlling the maximum number of trades and minimum
interval between each trade Controlling a wide variety of on chart display options such as line
lengths, styles, colours, trigger channels and object visibility Defining “Profiles” for trader preferred scenarios
Deploying saved “Profiles” within a couple of mouse clicks
Once trades have been executed the JavaFX interface cannot control
the stop loss, take profit levels or scale out percentages of the active trades. However, the trader can easily control these levels graphically
by simply selecting the SL or TP levels and dragging them to the preferred value.
www.fxalgotrader.com [email protected]
Getting Started
A note on tick data
Trendline Trader Pro like every other MT4 EA and indicator is driven by tick data. However Trendline Trader Pro is a little more complex as it
uses system files to pass information between the JavaFX interface
and the MQL4 program (the Expert Advisor) which sits on the MT4 chart. Therefore the market must be open in order for changes made
in the JavaFX interface to be reflected in the MT4 Expert Advisor.
www.fxalgotrader.com [email protected]
Installation
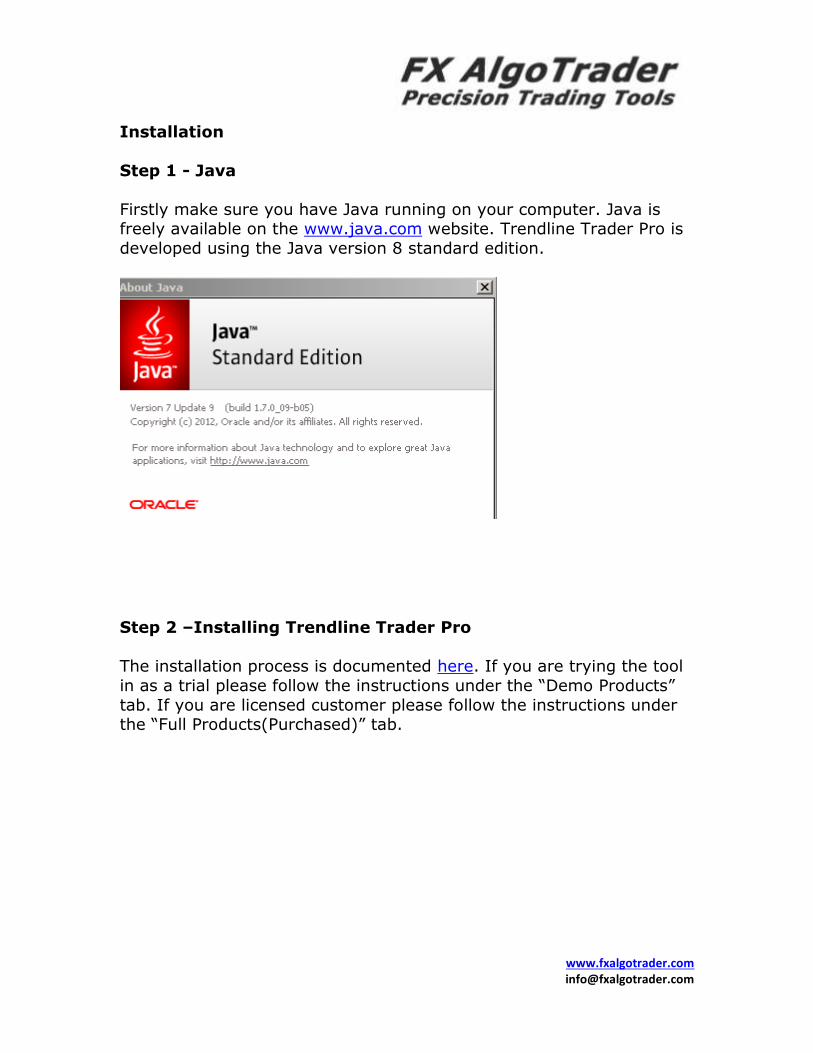
Step 1 - Java
Firstly make sure you have Java running on your computer. Java is freely available on the www.java.com website. Trendline Trader Pro is
developed using the Java version 8 standard edition.
Step 2 –Installing Trendline Trader Pro
The installation process is documented here. If you are trying the tool
in as a trial please follow the instructions under the “Demo Products”
tab. If you are licensed customer please follow the instructions under the “Full Products(Purchased)” tab.
www.fxalgotrader.com [email protected]
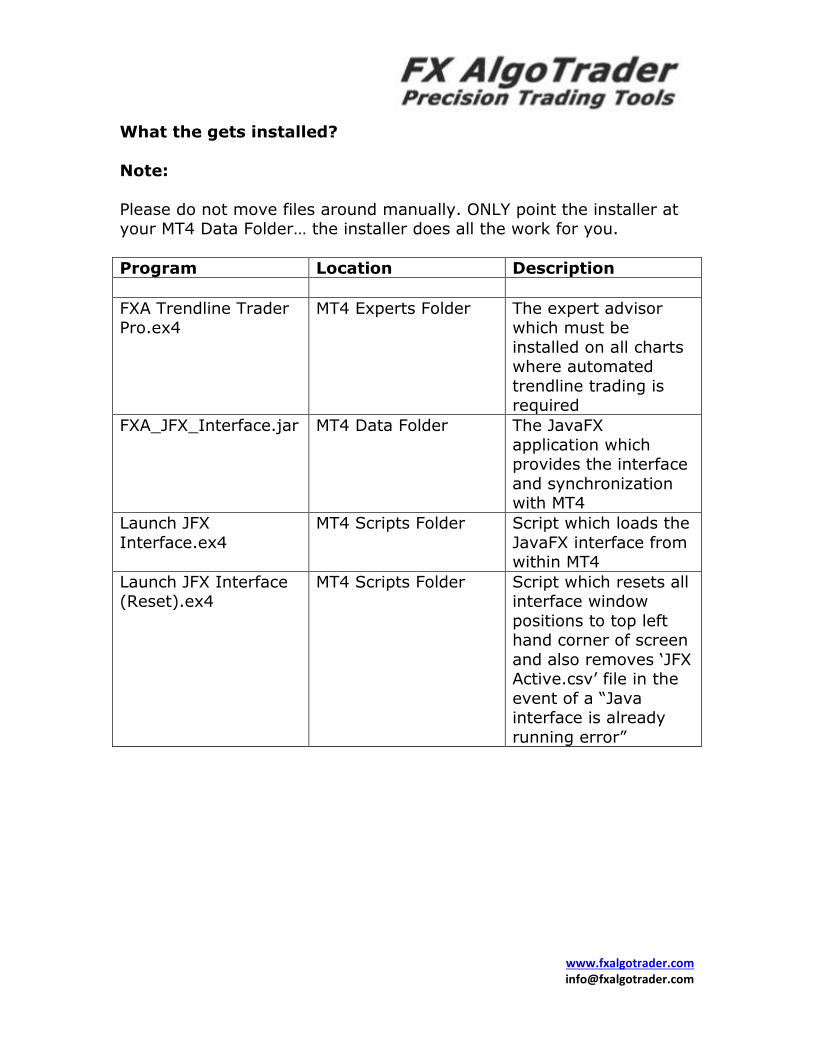
What the gets installed?
Note:
Please do not move files around manually. ONLY point the installer at your MT4 Data Folder… the installer does all the work for you.
Program Location Description
FXA Trendline Trader Pro.ex4
MT4 Experts Folder The expert advisor which must be
installed on all charts where automated
trendline trading is required
FXA_JFX_Interface.jar MT4 Data Folder The JavaFX
application which provides the interface
and synchronization with MT4
Launch JFX
Interface.ex4
MT4 Scripts Folder Script which loads the
JavaFX interface from within MT4
Launch JFX Interface (Reset).ex4
MT4 Scripts Folder Script which resets all interface window
positions to top left hand corner of screen
and also removes ‘JFX Active.csv’ file in the
event of a “Java interface is already
running error”
www.fxalgotrader.com [email protected]
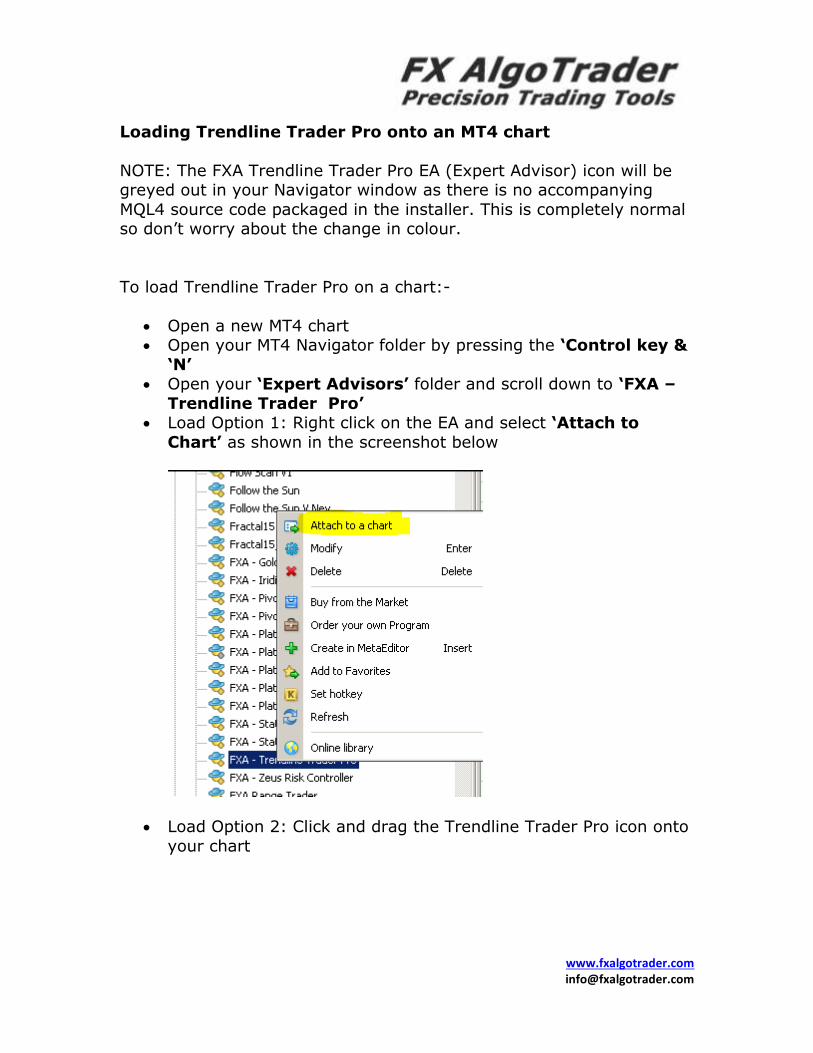
Loading Trendline Trader Pro onto an MT4 chart
NOTE: The FXA Trendline Trader Pro EA (Expert Advisor) icon will be greyed out in your Navigator window as there is no accompanying
MQL4 source code packaged in the installer. This is completely normal so don’t worry about the change in colour.
To load Trendline Trader Pro on a chart:-
Open a new MT4 chart Open your MT4 Navigator folder by pressing the ‘Control key &
‘N’ Open your ‘Expert Advisors’ folder and scroll down to ‘FXA –
Trendline Trader Pro’ Load Option 1: Right click on the EA and select ‘Attach to
Chart’ as shown in the screenshot below
Load Option 2: Click and drag the Trendline Trader Pro icon onto
your chart
www.fxalgotrader.com [email protected]
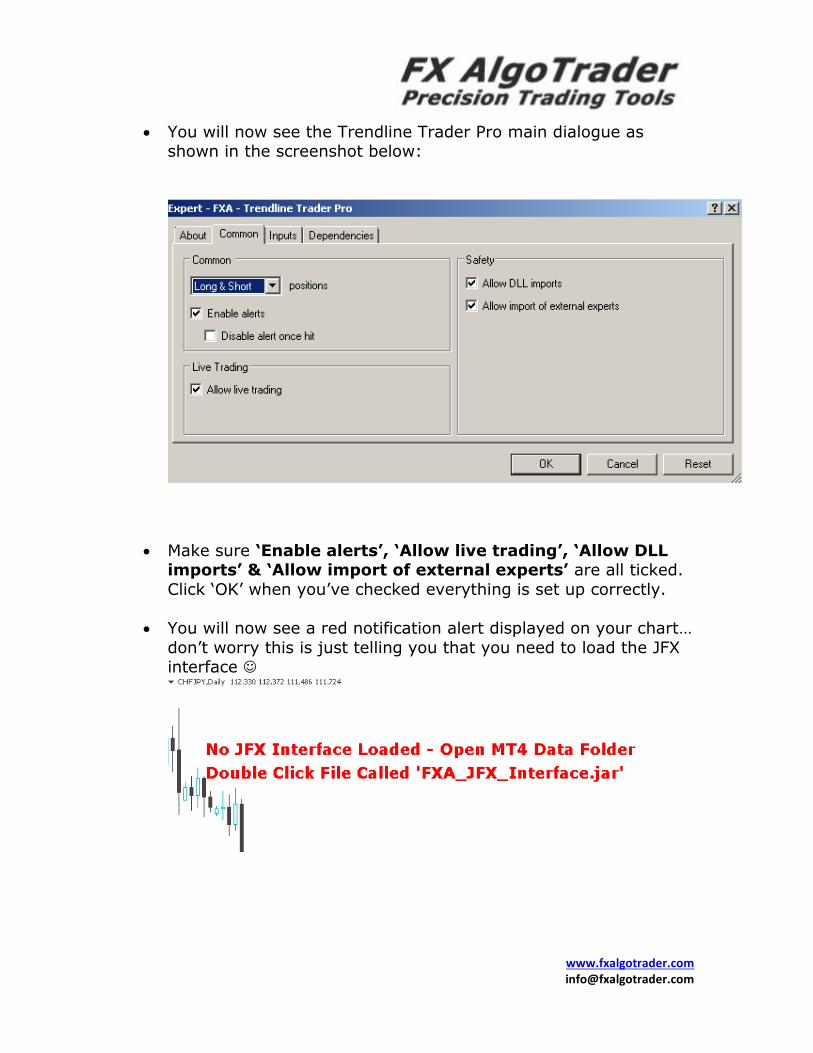
You will now see the Trendline Trader Pro main dialogue as shown in the screenshot below:
Make sure ‘Enable alerts’, ‘Allow live trading’, ‘Allow DLL imports’ & ‘Allow import of external experts’ are all ticked.
Click ‘OK’ when you’ve checked everything is set up correctly.
You will now see a red notification alert displayed on your chart…
don’t worry this is just telling you that you need to load the JFX interface
www.fxalgotrader.com [email protected]
Now load the JavaFX interface. You can do this in two ways which are:-
o By double clicking the script called ‘Launch JFX Interface’ in your MT4 scripts folder
o By opening the MT4 Data Folder and double clicking the file called ‘FXA_JFX_Interface.jar’
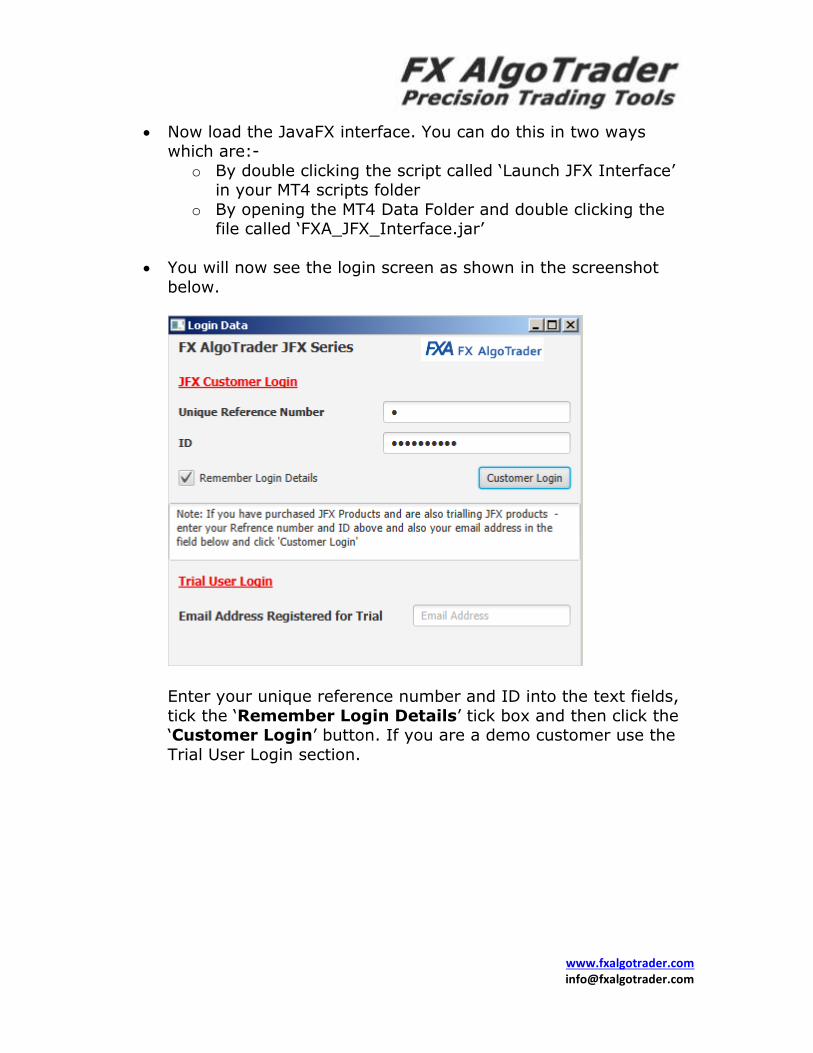
You will now see the login screen as shown in the screenshot
below.
Enter your unique reference number and ID into the text fields,
tick the ‘Remember Login Details’ tick box and then click the ‘Customer Login’ button. If you are a demo customer use the
Trial User Login section.
www.fxalgotrader.com [email protected]
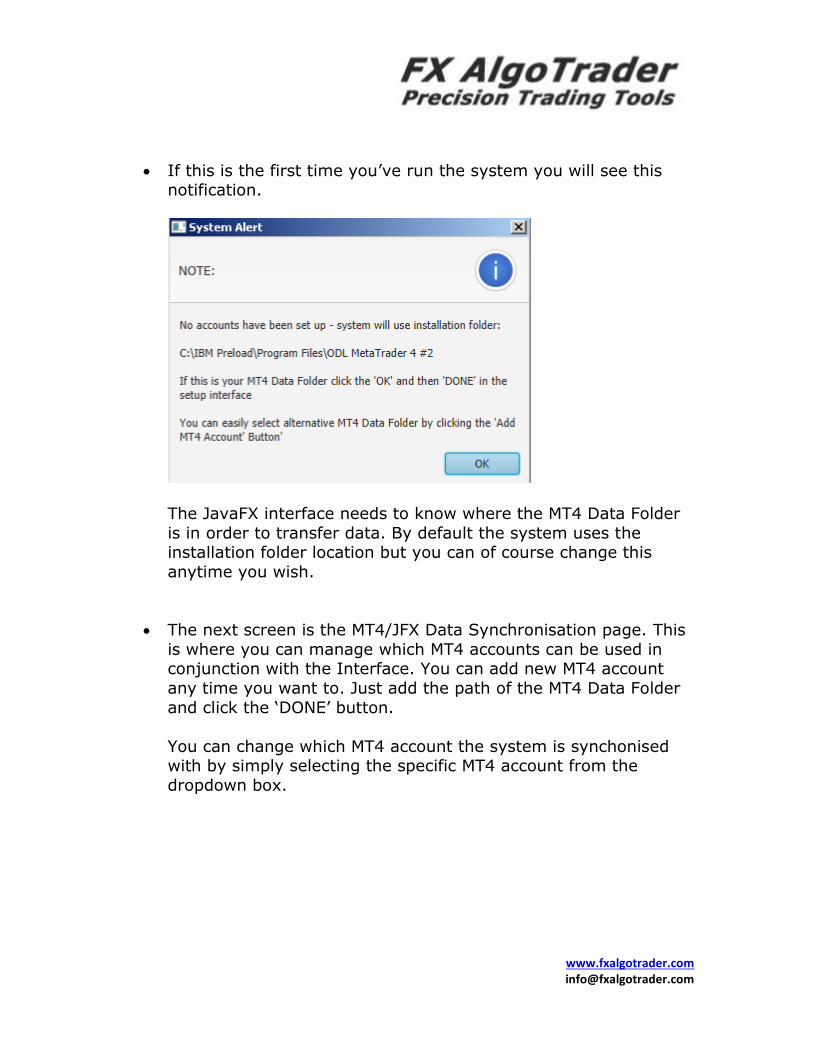
If this is the first time you’ve run the system you will see this notification.
The JavaFX interface needs to know where the MT4 Data Folder
is in order to transfer data. By default the system uses the installation folder location but you can of course change this
anytime you wish.
The next screen is the MT4/JFX Data Synchronisation page. This
is where you can manage which MT4 accounts can be used in conjunction with the Interface. You can add new MT4 account
any time you want to. Just add the path of the MT4 Data Folder
and click the ‘DONE’ button.
You can change which MT4 account the system is synchonised with by simply selecting the specific MT4 account from the
dropdown box.

www.fxalgotrader.com [email protected]
The next screen you see will be the product catalogue
To select Trendline Trader Pro – click ‘Trendline Trading Systems’ and then select ‘Trendline Trader Pro’ from the dropdown list.
www.fxalgotrader.com [email protected]
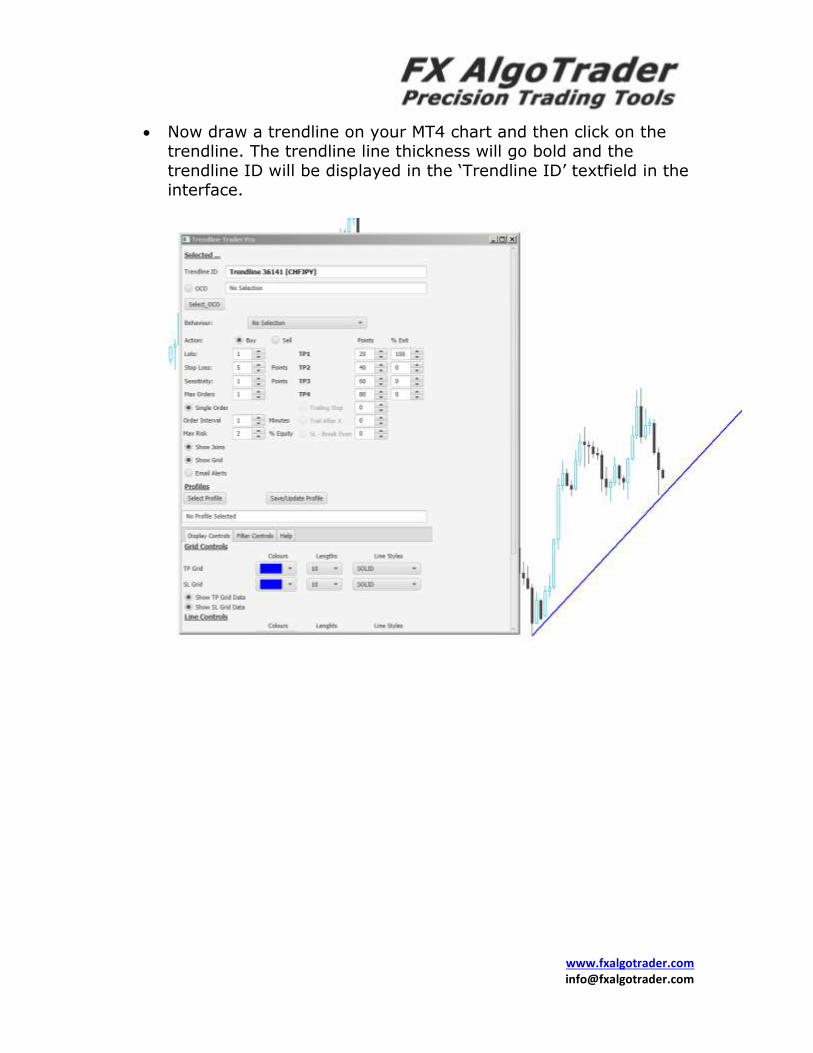
Now draw a trendline on your MT4 chart and then click on the trendline. The trendline line thickness will go bold and the
trendline ID will be displayed in the ‘Trendline ID’ textfield in the interface.
www.fxalgotrader.com [email protected]
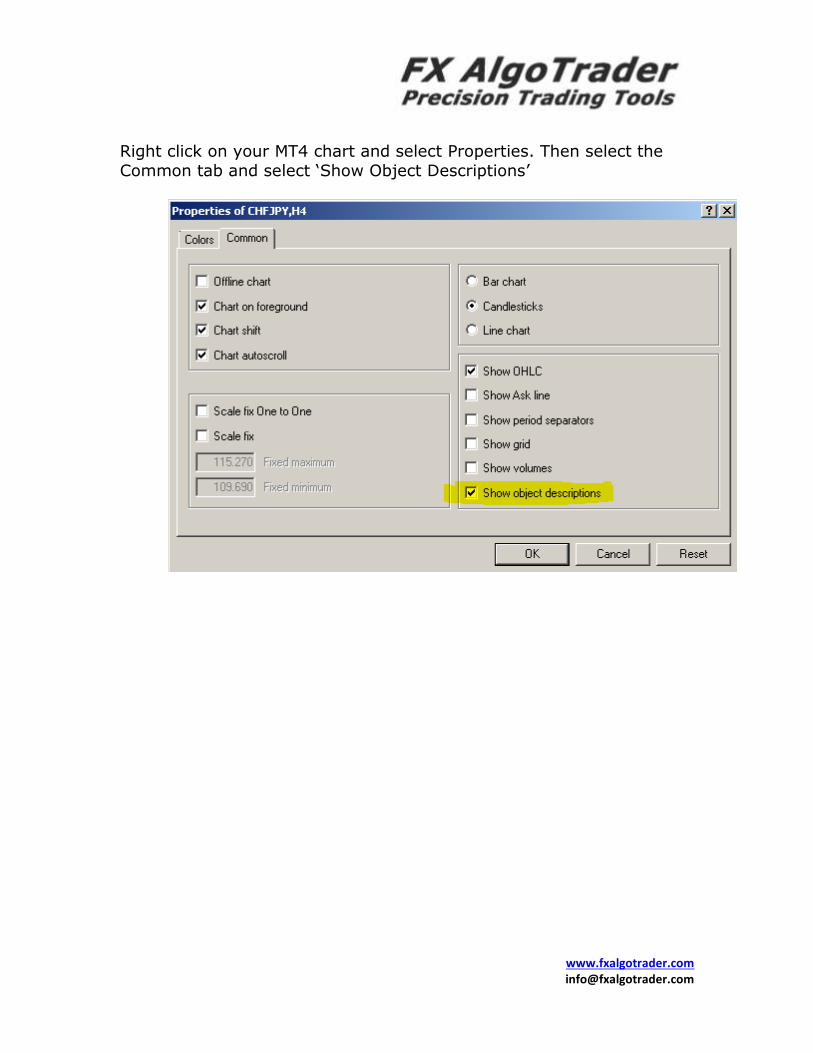
Right click on your MT4 chart and select Properties. Then select the
Common tab and select ‘Show Object Descriptions’

www.fxalgotrader.com [email protected]
Now go to the JavaFX interface and select “Touch” from the Behaviour dropdown menu. As soon as you select the trading
behavior you will see data displayed around the selected trendline as shown in the screenshot below. You will see the Stop Loss, Take Profit
level, trigger channel and associated labels. This is the ‘Trigger Grid’ which visibly shows the trader where the entry and exit levels are for
the trade.
www.fxalgotrader.com [email protected]
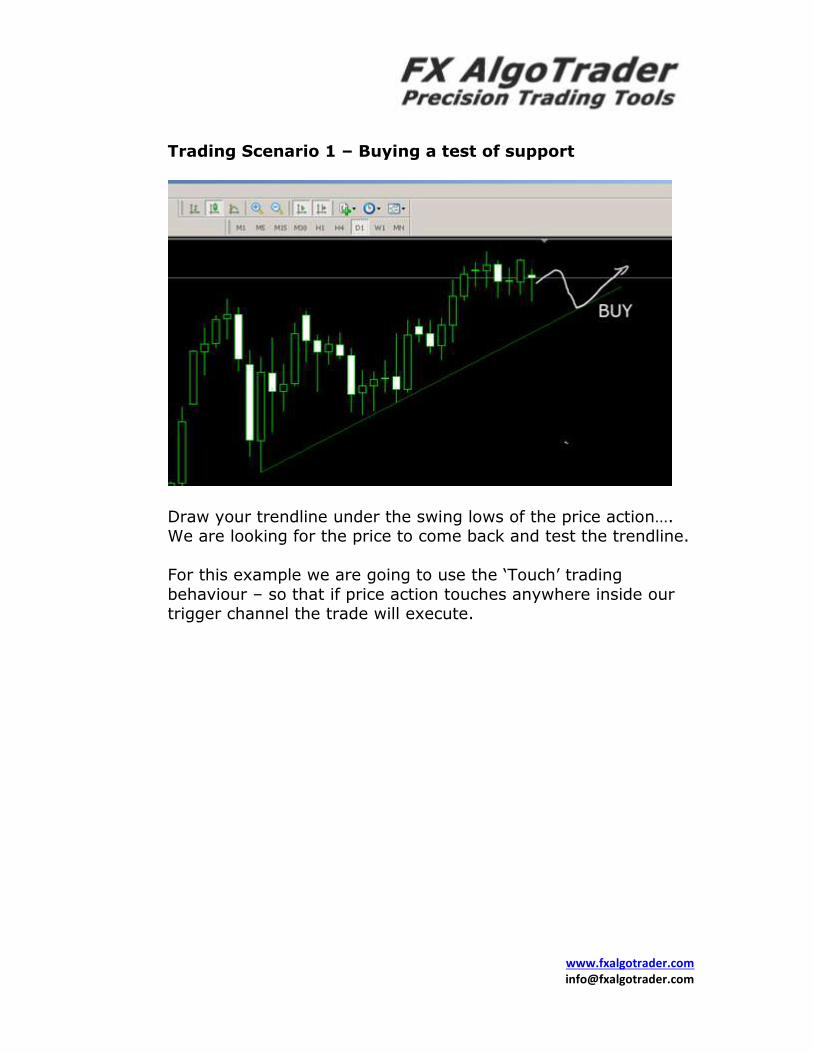
Trading Scenario 1 – Buying a test of support
Draw your trendline under the swing lows of the price action…. We are looking for the price to come back and test the trendline.
For this example we are going to use the ‘Touch’ trading
behaviour – so that if price action touches anywhere inside our trigger channel the trade will execute.

www.fxalgotrader.com [email protected]
So let’s go ahead and configure the interface accordingly. In the screenshot below the highlighted sections are of particular
interest to us… we’ve configured the Behaviour as ‘Touch’, set the Action as ‘Buy’, set Lots at ‘0.5’, Set our Stop Loss at 25
pips, our Take Profit at 50 pips, our exit at 100%, our Sensitivity at 5 pips, selected the ‘Single Order’ radio button and set out
Max Risk at 2% of the account equity.
In depth analysis of parameters…..
Most of the parameters are self explanatory but there are a couple of parameters which require further explanation.
% Exit – by default the system uses 100% exit for TP1… this means that if price hits the TP1 level – the entire position will be
www.fxalgotrader.com [email protected]
closed. Ie 100% of the position which in this example would be 0.5 lots. On the other hand if we set the % Exit for TP1 at 50%
the system then moves the remaining % to TP2… so we would exit 50% of the trade (0.25 lots) at TP1 and 50% (0.25 Lots) at
TP2. You can set up to 4 take profit levels with custom percentages at each level.
Single Order
If this radio button is selected the system will only place a single
trade from this trendline.
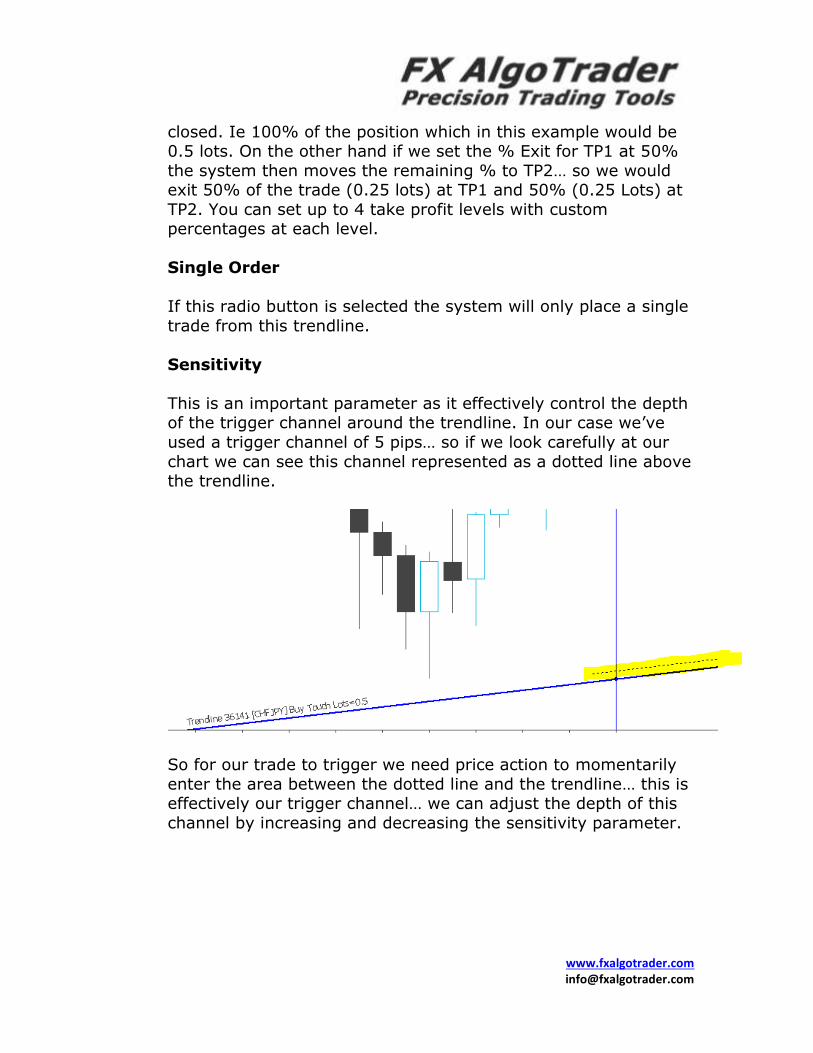
Sensitivity
This is an important parameter as it effectively control the depth of the trigger channel around the trendline. In our case we’ve
used a trigger channel of 5 pips… so if we look carefully at our
chart we can see this channel represented as a dotted line above the trendline.
So for our trade to trigger we need price action to momentarily
enter the area between the dotted line and the trendline… this is effectively our trigger channel… we can adjust the depth of this
channel by increasing and decreasing the sensitivity parameter.
www.fxalgotrader.com [email protected]
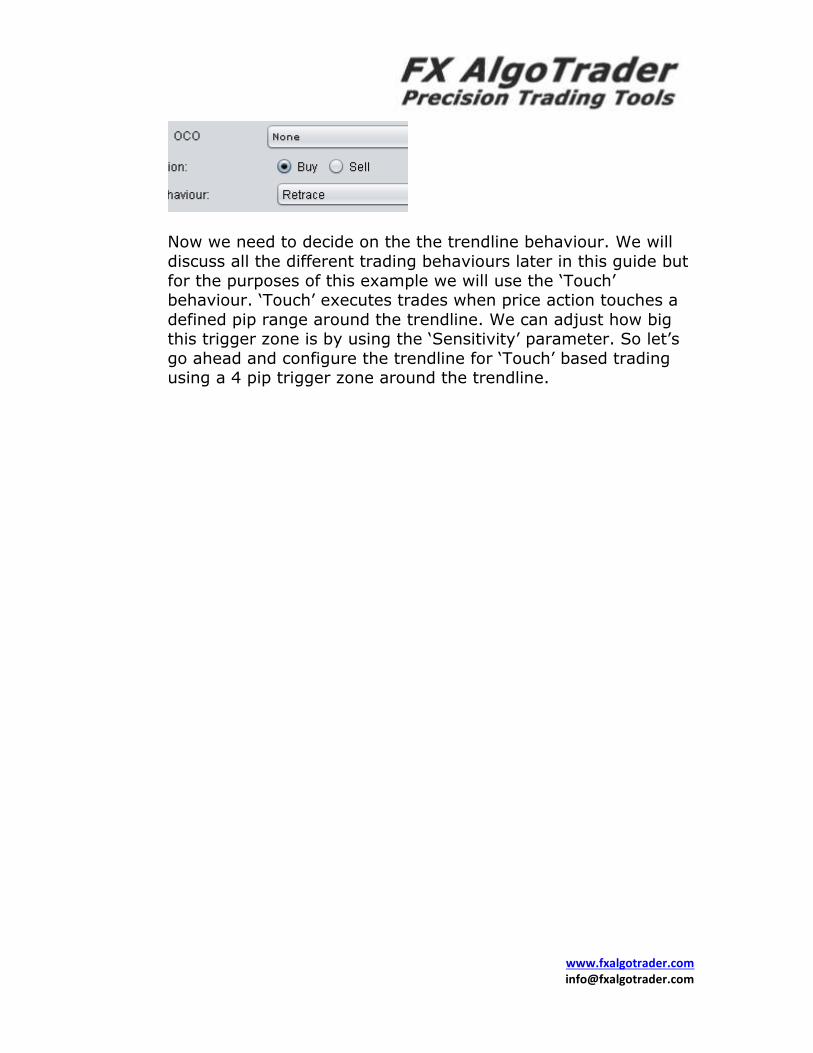
Now we need to decide on the the trendline behaviour. We will
discuss all the different trading behaviours later in this guide but
for the purposes of this example we will use the ‘Touch’ behaviour. ‘Touch’ executes trades when price action touches a
defined pip range around the trendline. We can adjust how big this trigger zone is by using the ‘Sensitivity’ parameter. So let’s
go ahead and configure the trendline for ‘Touch’ based trading using a 4 pip trigger zone around the trendline.
www.fxalgotrader.com [email protected]
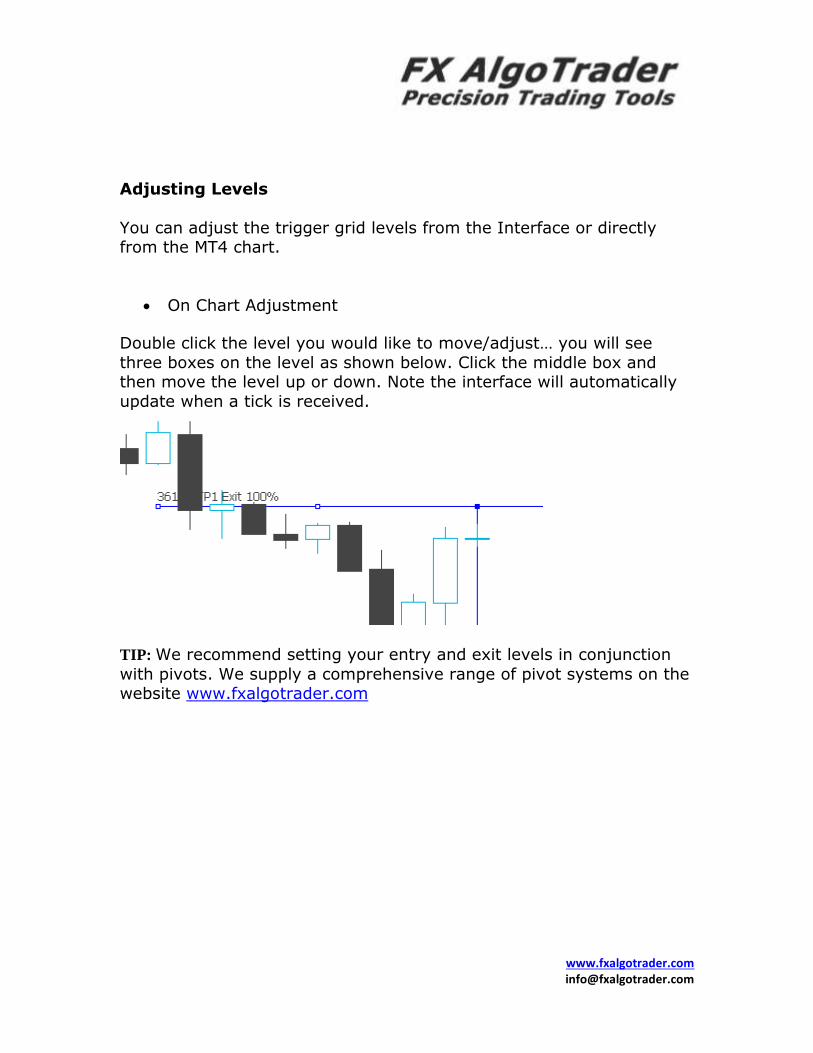
Adjusting Levels
You can adjust the trigger grid levels from the Interface or directly from the MT4 chart.
On Chart Adjustment
Double click the level you would like to move/adjust… you will see
three boxes on the level as shown below. Click the middle box and then move the level up or down. Note the interface will automatically
update when a tick is received.
TIP: We recommend setting your entry and exit levels in conjunction
with pivots. We supply a comprehensive range of pivot systems on the website www.fxalgotrader.com
www.fxalgotrader.com [email protected]
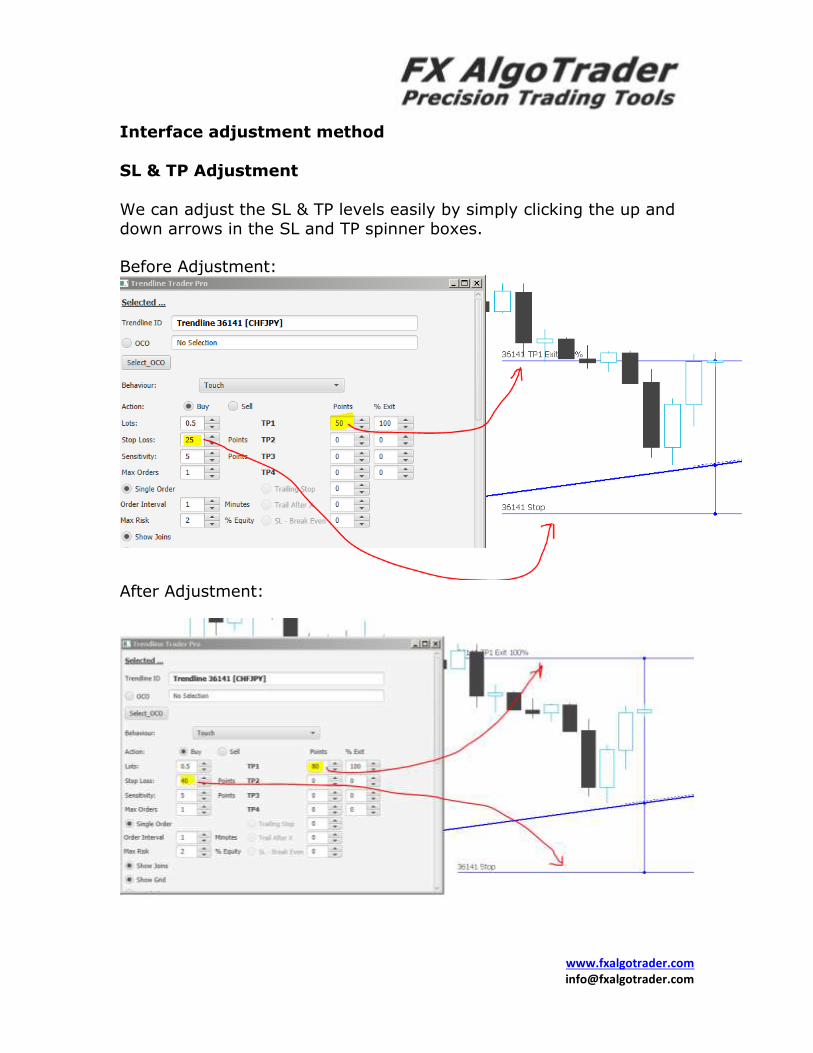
Interface adjustment method
SL & TP Adjustment
We can adjust the SL & TP levels easily by simply clicking the up and down arrows in the SL and TP spinner boxes.
Before Adjustment:
After Adjustment:
www.fxalgotrader.com [email protected]
A note on spinner adjustment.
You can enter numbers directly into the spinner fields from your keyboard but you need to press the ENTER key for the change to be
detected by the system.
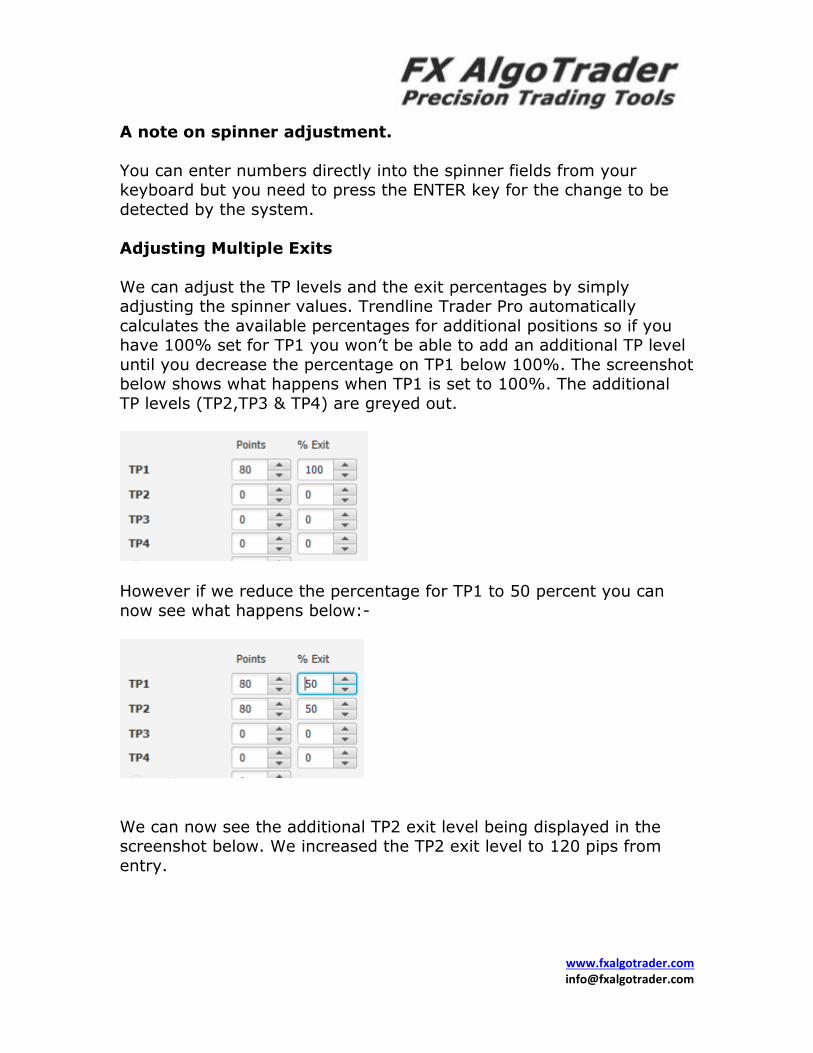
Adjusting Multiple Exits
We can adjust the TP levels and the exit percentages by simply adjusting the spinner values. Trendline Trader Pro automatically
calculates the available percentages for additional positions so if you have 100% set for TP1 you won’t be able to add an additional TP level
until you decrease the percentage on TP1 below 100%. The screenshot below shows what happens when TP1 is set to 100%. The additional
TP levels (TP2,TP3 & TP4) are greyed out.
However if we reduce the percentage for TP1 to 50 percent you can
now see what happens below:-
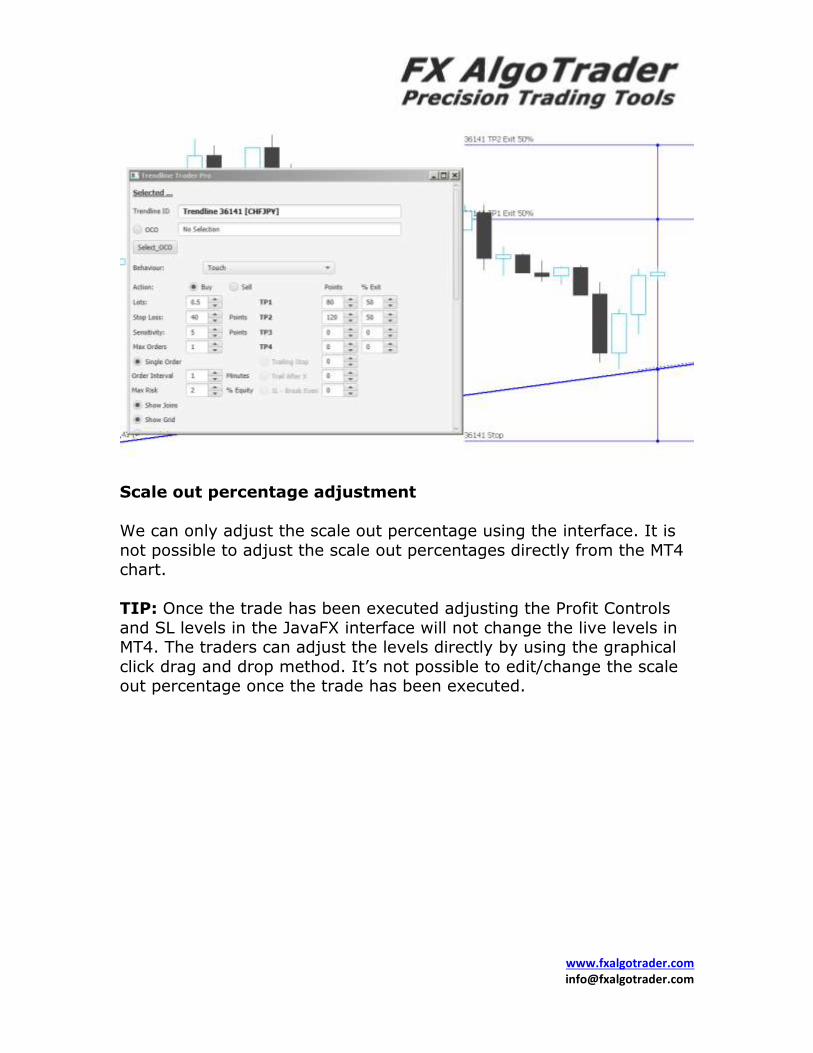
We can now see the additional TP2 exit level being displayed in the screenshot below. We increased the TP2 exit level to 120 pips from
entry.
www.fxalgotrader.com [email protected]
Scale out percentage adjustment
We can only adjust the scale out percentage using the interface. It is
not possible to adjust the scale out percentages directly from the MT4 chart.
TIP: Once the trade has been executed adjusting the Profit Controls
and SL levels in the JavaFX interface will not change the live levels in MT4. The traders can adjust the levels directly by using the graphical
click drag and drop method. It’s not possible to edit/change the scale out percentage once the trade has been executed.
www.fxalgotrader.com [email protected]
Controlling Risk
The final stages of setting up the system are:-
Defining the maximum risk parameters Controlling the maximum number of orders
Defining the minimum order interval
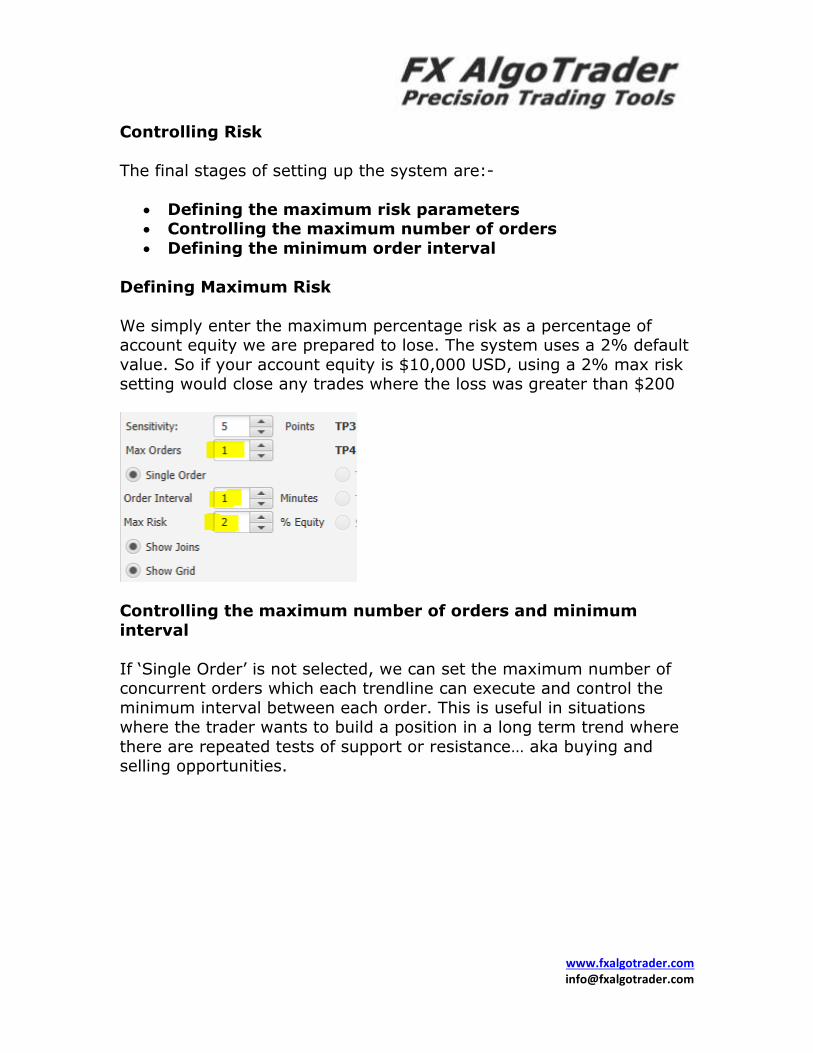
Defining Maximum Risk
We simply enter the maximum percentage risk as a percentage of account equity we are prepared to lose. The system uses a 2% default
value. So if your account equity is $10,000 USD, using a 2% max risk setting would close any trades where the loss was greater than $200
Controlling the maximum number of orders and minimum
interval
If ‘Single Order’ is not selected, we can set the maximum number of concurrent orders which each trendline can execute and control the
minimum interval between each order. This is useful in situations where the trader wants to build a position in a long term trend where
there are repeated tests of support or resistance… aka buying and selling opportunities.
www.fxalgotrader.com [email protected]
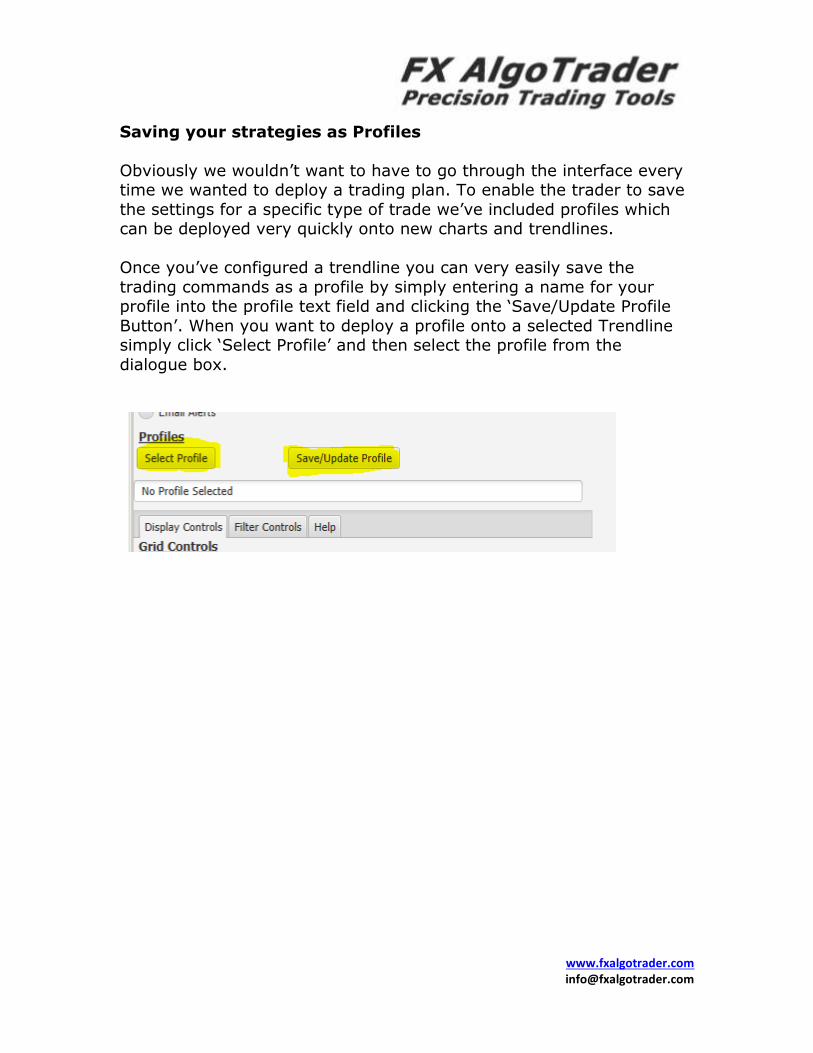
Saving your strategies as Profiles
Obviously we wouldn’t want to have to go through the interface every time we wanted to deploy a trading plan. To enable the trader to save
the settings for a specific type of trade we’ve included profiles which can be deployed very quickly onto new charts and trendlines.
Once you’ve configured a trendline you can very easily save the
trading commands as a profile by simply entering a name for your profile into the profile text field and clicking the ‘Save/Update Profile
Button’. When you want to deploy a profile onto a selected Trendline simply click ‘Select Profile’ and then select the profile from the
dialogue box.
www.fxalgotrader.com [email protected]
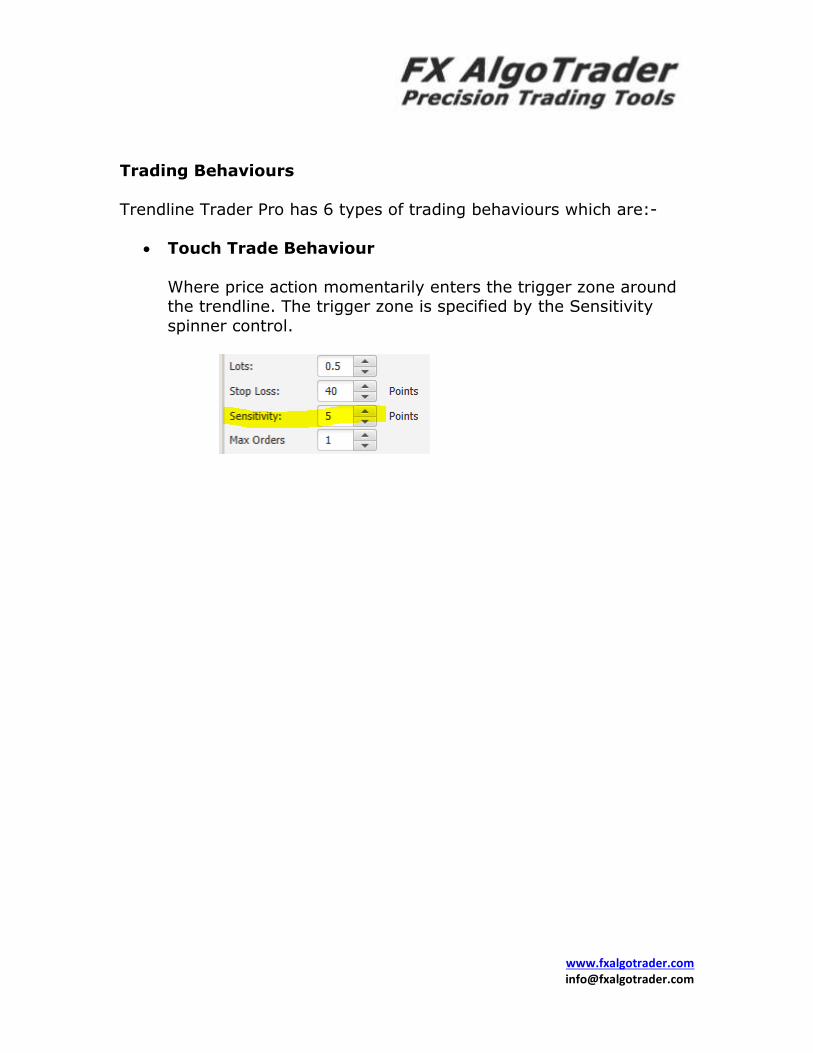
Trading Behaviours
Trendline Trader Pro has 6 types of trading behaviours which are:-
Touch Trade Behaviour
Where price action momentarily enters the trigger zone around the trendline. The trigger zone is specified by the Sensitivity
spinner control.
www.fxalgotrader.com [email protected]
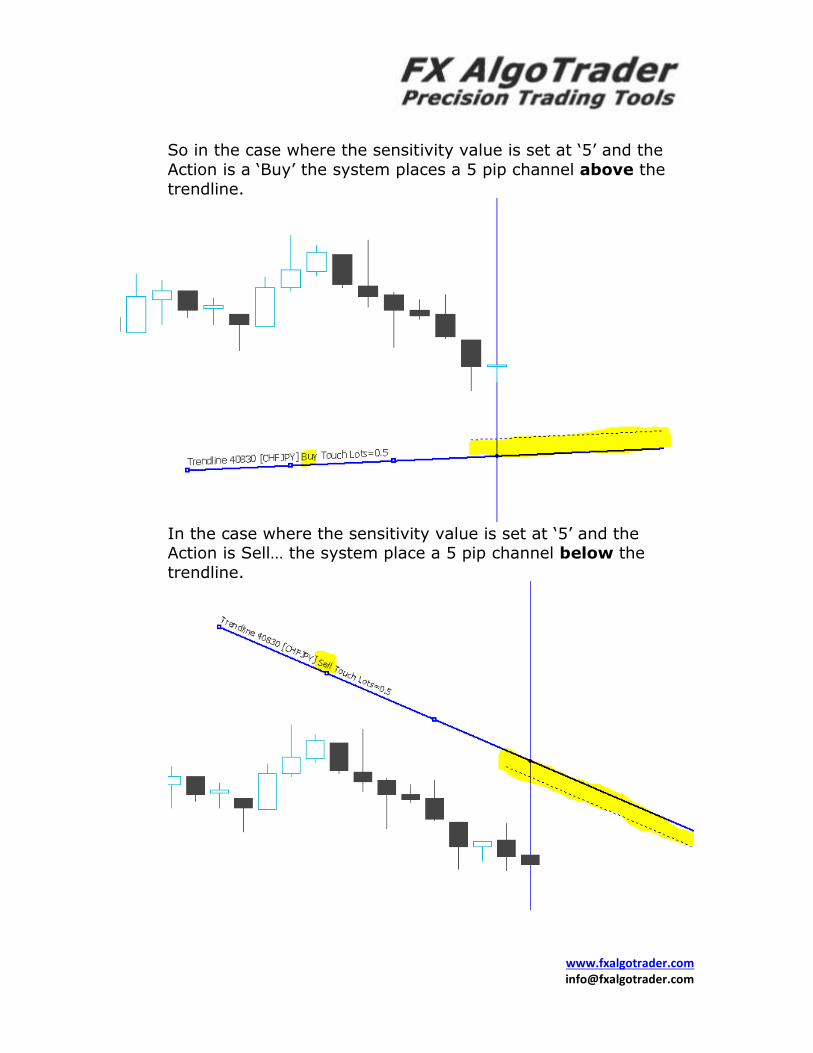
So in the case where the sensitivity value is set at ‘5’ and the
Action is a ‘Buy’ the system places a 5 pip channel above the
trendline.
In the case where the sensitivity value is set at ‘5’ and the Action is Sell… the system place a 5 pip channel below the
trendline.
www.fxalgotrader.com [email protected]
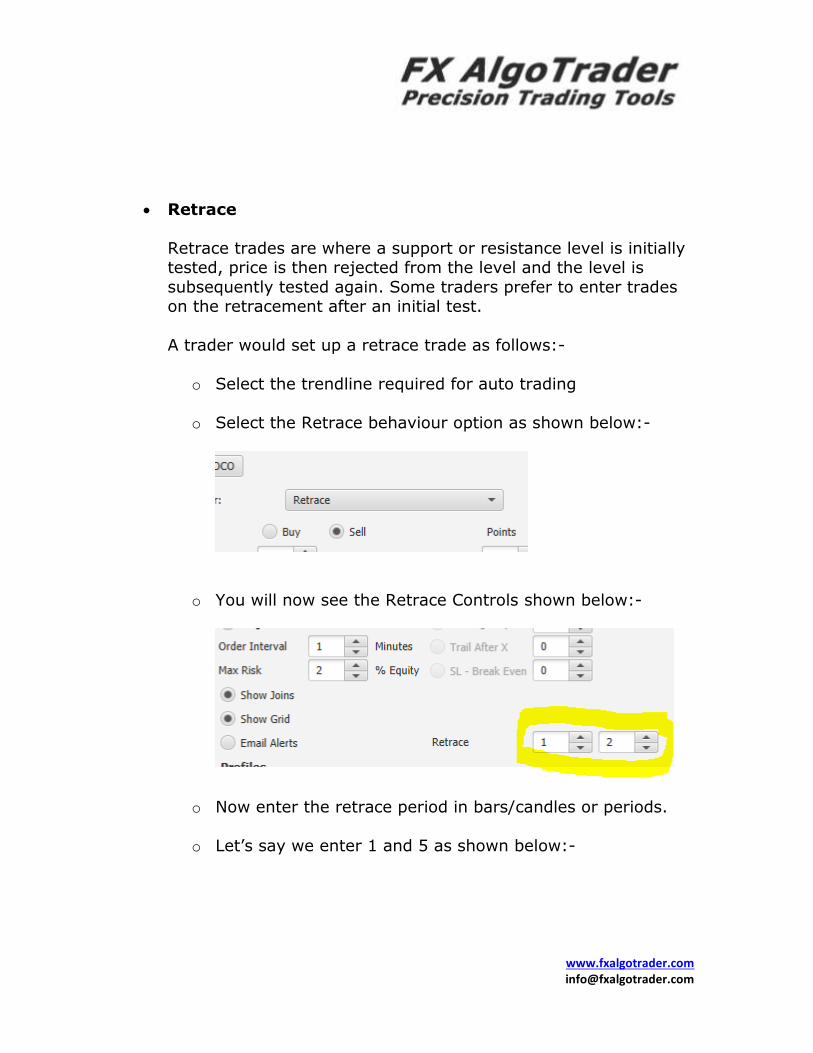
Retrace
Retrace trades are where a support or resistance level is initially tested, price is then rejected from the level and the level is
subsequently tested again. Some traders prefer to enter trades on the retracement after an initial test.
A trader would set up a retrace trade as follows:-
o Select the trendline required for auto trading
o Select the Retrace behaviour option as shown below:-
o You will now see the Retrace Controls shown below:-
o Now enter the retrace period in bars/candles or periods.
o Let’s say we enter 1 and 5 as shown below:-
www.fxalgotrader.com [email protected]
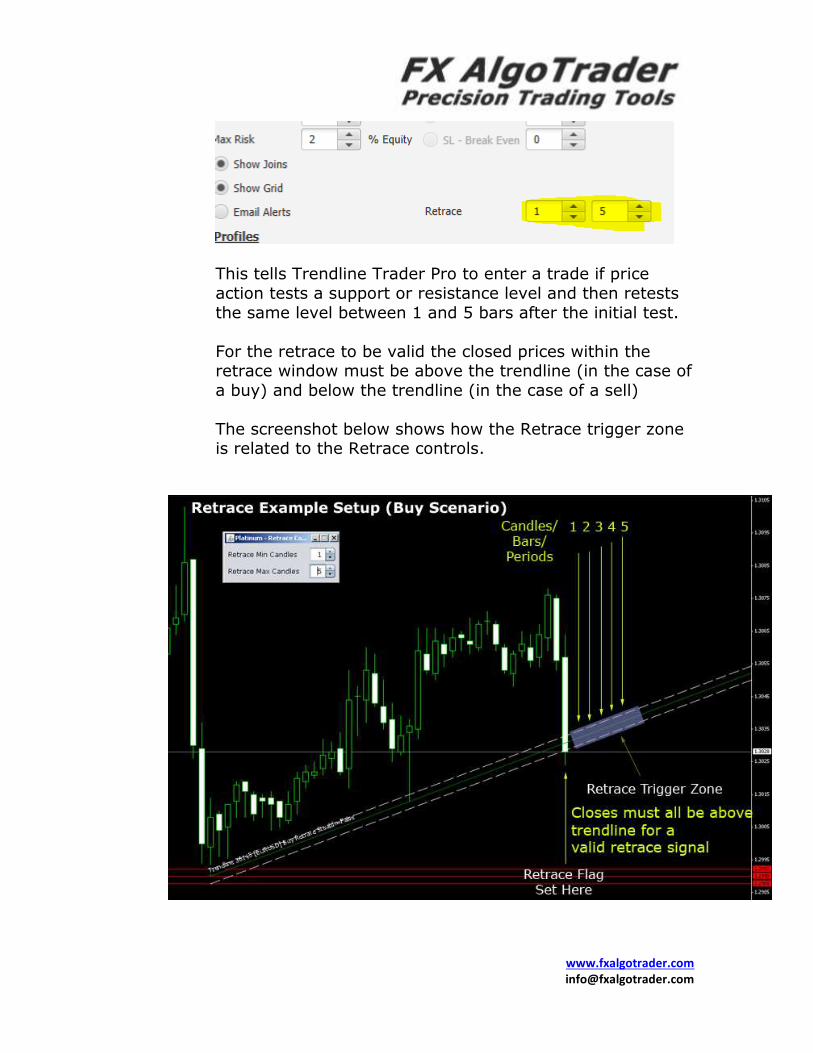
This tells Trendline Trader Pro to enter a trade if price
action tests a support or resistance level and then retests
the same level between 1 and 5 bars after the initial test.
For the retrace to be valid the closed prices within the retrace window must be above the trendline (in the case of
a buy) and below the trendline (in the case of a sell)
The screenshot below shows how the Retrace trigger zone is related to the Retrace controls.


![TRENDLINE ANALYSIS EBOOK[1]](https://img.pdfslide.us/doc/110x75/577d2d931a28ab4e1eadca71/trendline-analysis-ebook1.jpg)