Embed Size (px)
Citation preview
Data ONTAP 7.3 File Access and ProtocolsManagement Guide
NetApp, Inc.495 East Java DriveSunnyvale, CA 94089 USATelephone: +1 (408) 822-6000Fax: +1 (408) 822-4501Support telephone: +1 (888) 4-NETAPPDocumentation comments: [email protected] Web: http://www.netapp.com
Part number: 210-04505_B0Updated for Data ONTAP 7.3.2 on 10 September 2009

Contents
Copyright information.................................................................................13Trademark information...............................................................................15About this guide............................................................................................17
Audience......................................................................................................................17
Accessing Data ONTAP man pages............................................................................17
Where to enter commands...........................................................................................18
Keyboard and formatting conventions.........................................................................19
Special messages.........................................................................................................20
How to send your comments.......................................................................................20
Introduction to file access management.....................................................21File protocols that Data ONTAP supports...................................................................21
How Data ONTAP controls access to files..................................................................21
Authentication-based restrictions....................................................................21
File-based restrictions......................................................................................21
File access using NFS....................................................................................23Exporting or unexporting file system paths.................................................................23
Editing the /etc/exports file..............................................................................24
Using the exportfs command...........................................................................25
Enabling and disabling fencing of one or more NFS clients from
one or more file system paths................................................................................27
Displaying the actual file system path for an exported file system path.....................28
Displaying the export options for a file system path...................................................29
Managing the access cache..........................................................................................29
Adding entries to the access cache..................................................................30
Removing entries from the access cache.........................................................31
Viewing access cache statistics........................................................................31
Optimizing access cache performance.............................................................32
Setting access cache timeout values................................................................32
Enabling Kerberos v5 security services for NFS.........................................................33
Configuring Kerberos v5 security services for NFS to use
an Active-Directory-based KDC................................................................34
Table of Contents | 3
Configuring Kerberos v5 security services for NFS to use
a UNIX-based KDC...................................................................................37
Determining whether an NFS client supports Kerberos v5
security services.........................................................................................41
Debugging mounting problems...................................................................................42
Displaying mount service statistics.................................................................42
Tracing mountd requests..................................................................................43
Displaying NFS statistics.............................................................................................43
Enabling or disabling NFSv3......................................................................................44
Supporting NFSv4 clients............................................................................................44
About Data ONTAP support of NFSv4...........................................................45
Limitations of Data ONTAP support for NFSv4.............................................45
How the pseudo-fs in NFSv4 affects mountpoints..........................................46
Enabling or disabling NFSv4..........................................................................47
Specifying the user ID domain for NFSv4......................................................47
Managing NFSv4 ACLs...................................................................................47
Managing NFSv4 open delegations.................................................................51
Configuring NFSv4 file and record locking....................................................54
Supporting PC-NFS clients.........................................................................................56
How the pcnfsd daemon works........................................................................56
Enabling or disabling the pcnfsd daemon........................................................57
Creating PC-NFS user entries in the storage system's local files....................57
Defining the umask for files and directories that PC-NFS
users create.................................................................................................58
Supporting WebNFS clients.........................................................................................59
Enabling or disabling the WebNFS protocol...................................................59
Setting a WebNFS root directory.....................................................................59
NFS over IPv6.............................................................................................................60
Enabling or disabling NFS over IPv6 .............................................................61
Textual representation of IPv6 addresses.........................................................61
File access using CIFS..................................................................................63Configuring CIFS on your storage system..................................................................63
Supported Windows clients and domain controllers........................................64
What the cifs setup command does.................................................................64
Setting up your system initially.......................................................................65
Specifying WINS servers.................................................................................65
4 | Data ONTAP 7.3 File Access and Protocols Management Guide
Changing the storage system domain..............................................................66
Changing protocol modes................................................................................67
Specifying Windows user account names........................................................69
Reconfiguring CIFS on your storage system...................................................70
Configuring SMB on your storage system..................................................................71
Support for the original SMB protocol............................................................72
Support for the SMB 2.0 protocol...................................................................72
When to enable the SMB 2.0 protocol............................................................74
Enabling or disabling the SMB 2.0 protocol...................................................75
Enabling or disabling SMB 2.0 durable handles.............................................75
Specifying the SMB 2.0 durable handle timeout value...................................76
SMB signing....................................................................................................76
Enabling or disabling the storage system's SMB 2.0
protocol client capability............................................................................79
Managing shares..........................................................................................................79
Creating a share...............................................................................................80
Displaying and changing the properties of a share..........................................83
Deleting a share...............................................................................................92
Managing access control lists......................................................................................93
About share-level ACLs...................................................................................93
Displaying and changing a share-level ACL...................................................93
Displaying and changing a file-level ACL.......................................................99
Specifying how group IDs work with share-level ACLs...............................101
Managing home directories.......................................................................................102
About home directories on the storage system..............................................103
How Data ONTAP matches a directory with a user......................................103
How symbolic links work with home directories..........................................104
Specifying home directory paths...................................................................105
Displaying the list of home directory paths...................................................106
Specifying the naming style of home directories..........................................106
Creating directories in a home directory path
(domain-naming style).............................................................................107
Creating directories in a home directory path
(non-domain-naming style)......................................................................108
Creating subdirectories in home directories when a home
directory path extension is used...............................................................108
Table of Contents | 5
Syntax for specifying a home directory using a UNC name.........................109
Enabling users to access other users’ home directories.................................110
Accessing your CIFS home directory using a share alias.............................110
Enabling or disabling wide symbolic links from a share...............................110
Disabling home directories............................................................................111
Managing local users and groups..............................................................................111
Managing local users.....................................................................................112
Managing local groups..................................................................................113
Applying Group Policy Objects.................................................................................116
Requirements for using GPOs with storage systems.....................................117
Associating the storage system with an OU..................................................117
Enabling or disabling GPO support on a storage system..............................118
Managing GPOs on the storage system.........................................................118
Improving client performance with oplocks..............................................................124
Write cache data loss considerations when using oplocks............................125
Enabling or disabling oplocks on the storage system....................................125
Enabling or disabling oplocks on a qtree.......................................................126
Changing the delay time for sending oplock breaks......................................127
Managing authentication and network services.........................................................128
Understanding authentication issues.............................................................128
Setting the storage system's minimum security level....................................129
Preventing Kerberos passive replay attacks...................................................130
Selecting domain controllers and LDAP servers...........................................131
Using null sessions to access storage in non-Kerberos environments...........135
Creating NetBIOS aliases for the storage system..........................................137
Disabling NetBIOS over TCP........................................................................139
Monitoring CIFS activity...........................................................................................140
Different ways to specify a user....................................................................140
Displaying a summary of session information..............................................141
Timing out idle sessions................................................................................141
Tracking statistics..........................................................................................141
Viewing specific statistics..............................................................................142
Saving and reusing statistics queries.............................................................143
CIFS resource limitations..............................................................................143
Managing CIFS services............................................................................................143
Disconnecting selected clients using the MMC............................................144
6 | Data ONTAP 7.3 File Access and Protocols Management Guide
Disconnecting a selected user from the command line.................................144
Disabling CIFS for the entire storage system................................................145
Specifying which users receive CIFS shutdown messages............................146
Restarting CIFS service.................................................................................146
Sending a message to all users on a storage system......................................146
Displaying and changing the description of the storage system....................147
Changing the computer account password of the storage system.................147
About file management using Windows administrative tools.......................148
Troubleshooting access control problems..................................................................149
Adding permission tracing filters..................................................................149
Removing permission tracing filters..............................................................150
Displaying permission tracing filters.............................................................151
Finding out why Data ONTAP allowed or denied access..............................152
Using FPolicy............................................................................................................153
Introduction to FPolicy..................................................................................153
Use of FPolicy within Data ONTAP..............................................................159
How to use native file blocking.....................................................................160
How to work with FPolicy.............................................................................164
FAQs, error messages, warning messages, and keywords.............................214
CIFS over IPv6..........................................................................................................234
Enabling or disabling CIFS over IPv6...........................................................235
Listing IPv4 or IPv6 CIFS sessions...............................................................236
Listing cumulative IPv4 or IPv6 CIFS sessions............................................237
File sharing between NFS and CIFS.........................................................239About NFS and CIFS file naming.............................................................................239
Length of file names......................................................................................240
Characters a file name can use.......................................................................240
Case-sensitivity of a file name.......................................................................240
Creating lowercase file names.......................................................................241
How Data ONTAP creates file names...........................................................241
Controlling the display of dot files from CIFS clients..................................241
Enabling file name character translation between UNIX and Windows...................242
Character restrictions.....................................................................................243
Clearing a character mapping from a volume............................................................244
About file locking between protocols........................................................................244
About read-only bits..................................................................................................245
Table of Contents | 7

Deleting files with the read-only bit set.........................................................246
Managing UNIX credentials for CIFS clients...........................................................246
How CIFS users obtain UNIX credentials.....................................................246
Ensuring that only intended CIFS users receive UNIX credentials...............247
Managing the SID-to-name map cache.....................................................................258
Enabling or disabling the SID-to-name map cache.......................................259
Changing the lifetime of SID-to-name mapping entries...............................259
Clearing all or part of the SID-to-name map cache.......................................259
Using LDAP services.................................................................................................261
Configuring LDAP services...........................................................................261
Managing client authentication and authorization.........................................268
Managing LDAP user-mapping services.......................................................269
Specifying base and scope values for user-mapping.....................................270
Managing Active Directory LDAP servers....................................................270
Managing LDAP schema...............................................................................273
Enabling Storage-Level Access Guard using the fsecurity command.......................275
About the fsecurity command........................................................................275
Generating and editing the job definition file................................................276
Specifying job definition file elements..........................................................277
Creating a security job and applying it to the storage object.........................278
Checking the status of or canceling a security job........................................279
Displaying the security settings on files and directories...............................279
Removing the Storage-Level Access Guard..................................................280
Auditing system access events...................................................................................280
About auditing...............................................................................................281
Events that Data ONTAP can audit...............................................................281
Configuring system event auditing................................................................283
Viewing and understanding event detail displays..........................................294
Controlling CIFS access to symbolic links................................................................298
Enabling CIFS clients to follow symbolic links............................................299
Specifying how CIFS clients interact with symbolic links ...........................299
Why you should avoid symbolic links to files...............................................300
About Map entries.........................................................................................300
About Widelink entries..................................................................................300
About disabling share boundary checking for symbolic links......................301
Redirecting absolute symbolic links..............................................................302
8 | Data ONTAP 7.3 File Access and Protocols Management Guide
How the storage system uses Map and Widelink entries...............................304
Optimizing NFS directory access for CIFS clients...................................................304
Creating Unicode-formatted directories........................................................305
Converting to Unicode format.......................................................................305
Preventing CIFS clients from creating uppercase file names....................................306
Accessing CIFS files from NFS clients.....................................................................306
Adding mapping entries to the WAFL credential cache................................307
Deleting mapping entries from the WAFL credential cache..........................307
Setting how long mapping entries are valid...................................................308
Monitoring WAFL credential cache statistics................................................309
Managing mapping inconsistencies...............................................................311
Tracing CIFS logins.......................................................................................312
Tracing domain controller connections.........................................................313
Giving CIFS clients implicit permission to run .dll and .exe files
even when they lack UNIX "execute" permissions.............................................313
File access using FTP..................................................................................315Managing FTP...........................................................................................................315
Enabling or disabling the FTP server............................................................316
Enabling or disabling FTP file locking..........................................................316
Specifying the FTP authentication style........................................................317
Enabling or disabling the bypassing of FTP traverse checking.....................318
Restricting FTP access...................................................................................319
Managing FTP log files.................................................................................320
Viewing SNMP traps that the FTP server generates......................................323
Viewing FTP statistics...................................................................................324
Resetting FTP statistics.................................................................................325
Specifying the maximum number of FTP connections.................................325
Setting the FTP connection threshold............................................................325
Specifying the TCP window size for FTP operations....................................326
Specifying the FTP idle timeout value..........................................................326
Managing anonymous FTP access.................................................................326
Managing the Secure File Transfer Protocol (SFTP)................................................328
About SFTP...................................................................................................328
Enabling or disabling SFTP...........................................................................329
Enabling or disabling SFTP file locking.......................................................329
Specifying the SFTP authentication style......................................................330
Table of Contents | 9
Enabling or disabling SFTP bypass traverse checking..................................331
Enabling or disabling SFTP user home directory restrictions.......................331
Specifying the SFTP override path for user home directories.......................332
Enabling or disabling the overriding of UNIX permissions..........................332
Managing SFTP log files...............................................................................333
Viewing SFTP statistics.................................................................................334
Resetting SFTP statistics...............................................................................335
Specifying the maximum number of SFTP connections...............................335
Specifying the SFTP idle timeout value........................................................335
Managing FTP over SSL (FTPS)..............................................................................336
About FTPS...................................................................................................336
Enabling or disabling explicit FTPS..............................................................337
Allowing or preventing the opening of explicit FTPS data
connections in secure mode.....................................................................338
Enabling or disabling implicit FTPS.............................................................339
Managing FTP over IPv6...........................................................................................339
Enabling or disabling FTP over IPv6 ...........................................................340
Viewing FTP over IPv6 statistics ..................................................................340
File access using HTTP..............................................................................341Managing Data ONTAP's built-in HTTP server........................................................341
Enabling or disabling Data ONTAP's built-in HTTP server..........................342
Enabling or disabling the bypassing of HTTP traverse checking..................342
Specifying the root directory for Data ONTAP's built-in
HTTP server.............................................................................................343
Specifying the maximum size of the log file for Data
ONTAP's built-in HTTP server................................................................343
Testing Data ONTAP's built-in HTTP server................................................343
Specifying how Data ONTAP's built-in HTTP server
maps MIME content types to file name extensions.................................344
Specifying how Data ONTAP's built-in HTTP server
translates HTTP requests.........................................................................345
Configuring MIME Content-Type values......................................................348
Maintaining security for Data ONTAP's built-in HTTP server.....................349
Displaying statistics for Data ONTAP's built-in HTTP server......................355
Resetting statistics for Data ONTAP's built-in HTTP server.........................358
10 | Data ONTAP 7.3 File Access and Protocols Management Guide
Viewing connection information for Data ONTAP's
built-in HTTP server................................................................................359
Purchasing and connecting a third-party HTTP server to your
storage system......................................................................................................360
HTTP and HTTPS over IPv6.....................................................................................360
Enabling or disabling HTTP and HTTPS over IPv6.....................................361
Listing HTTP connections over IPv4 or IPv6 ..............................................362
File access using WebDAV..........................................................................365Understanding WebDAV............................................................................................365
Managing Data ONTAP's built-in WebDAV server...................................................366
Enabling or disabling Data ONTAP's built-in WebDAV server.....................366
Pointing a WebDAV client to a home directory.............................................367
Purchasing and connecting a third-party WebDAV server to your
storage system......................................................................................................367
CIFS resource limits by system memory..................................................369Limits for the FAS60xx storage systems...................................................................369
Limits for the 30xx and 31xx storage systems..........................................................370
Limits for the FAS2040 storage system.....................................................................370
Limits for the FAS900 series storage systems...........................................................371
Limits for the FAS200 series storage systems...........................................................371
Limits for the R200 storage systems.........................................................................372
Event log and audit policy mapping..........................................................373Event Log mapping values........................................................................................373
Audit mapping values................................................................................................374
Glossary.......................................................................................................377
Table of Contents | 11


Copyright information
Copyright © 1994–2009 NetApp, Inc. All rights reserved. Printed in the U.S.A.
No part of this document covered by copyright may be reproduced in any form or by any means—graphic,electronic, or mechanical, including photocopying, recording, taping, or storage in an electronic retrievalsystem—without prior written permission of the copyright owner.
Software derived from copyrighted NetApp material is subject to the following license and disclaimer:
THIS SOFTWARE IS PROVIDED BY NETAPP "AS IS" AND WITHOUT ANY EXPRESS ORIMPLIED WARRANTIES, INCLUDING, BUT NOT LIMITED TO, THE IMPLIED WARRANTIESOF MERCHANTABILITY AND FITNESS FOR A PARTICULAR PURPOSE, WHICH ARE HEREBYDISCLAIMED. IN NO EVENT SHALL NETAPP BE LIABLE FOR ANY DIRECT, INDIRECT,INCIDENTAL, SPECIAL, EXEMPLARY, OR CONSEQUENTIAL DAMAGES (INCLUDING, BUTNOT LIMITED TO, PROCUREMENT OF SUBSTITUTE GOODS OR SERVICES; LOSS OF USE,DATA, OR PROFITS; OR BUSINESS INTERRUPTION) HOWEVER CAUSED AND ON ANYTHEORY OF LIABILITY, WHETHER IN CONTRACT, STRICT LIABILITY, OR TORT(INCLUDING NEGLIGENCE OR OTHERWISE) ARISING IN ANY WAY OUT OF THE USE OFTHIS SOFTWARE, EVEN IF ADVISED OF THE POSSIBILITY OF SUCH DAMAGE.
NetApp reserves the right to change any products described herein at any time, and without notice.NetApp assumes no responsibility or liability arising from the use of products described herein, exceptas expressly agreed to in writing by NetApp. The use or purchase of this product does not convey alicense under any patent rights, trademark rights, or any other intellectual property rights of NetApp.
The product described in this manual may be protected by one or more U.S.A. patents, foreign patents,or pending applications.
RESTRICTED RIGHTS LEGEND: Use, duplication, or disclosure by the government is subject torestrictions as set forth in subparagraph (c)(1)(ii) of the Rights in Technical Data and Computer Softwareclause at DFARS 252.277-7103 (October 1988) and FAR 52-227-19 (June 1987).
Copyright information | 13

Trademark information
NetApp, the Network Appliance logo, the bolt design, NetApp-the Network Appliance Company,Cryptainer, Cryptoshred, DataFabric, DataFort, Data ONTAP, Decru, FAServer, FilerView, FlexClone,FlexVol, Manage ONTAP, MultiStore, NearStore, NetCache, NOW NetApp on the Web, SANscreen,SecureShare, SnapDrive, SnapLock, SnapManager, SnapMirror, SnapMover, SnapRestore,SnapValidator, SnapVault, Spinnaker Networks, SpinCluster, SpinFS, SpinHA, SpinMove, SpinServer,StoreVault, SyncMirror, Topio, VFM, VFM Virtual File Manager, and WAFL are registered trademarksof NetApp, Inc. in the U.S.A. and/or other countries. gFiler, Network Appliance, SnapCopy, Snapshot,and The evolution of storage are trademarks of NetApp, Inc. in the U.S.A. and/or other countries andregistered trademarks in some other countries. The NetApp arch logo; the StoreVault logo;ApplianceWatch; BareMetal; Camera-to-Viewer; ComplianceClock; ComplianceJournal;ContentDirector; ContentFabric; EdgeFiler; FlexShare; FPolicy; Go Further, Faster; HyperSAN;InfoFabric; Lifetime Key Management, LockVault; NOW; ONTAPI; OpenKey, RAID-DP; ReplicatorX;RoboCache; RoboFiler; SecureAdmin; Serving Data by Design; Shadow Tape; SharedStorage;Simplicore; Simulate ONTAP; Smart SAN; SnapCache; SnapDirector; SnapFilter; SnapMigrator;SnapSuite; SohoFiler; SpinMirror; SpinRestore; SpinShot; SpinStor; vFiler; VPolicy; and Web Filerare trademarks of NetApp, Inc. in the U.S.A. and other countries. NetApp Availability Assurance andNetApp ProTech Expert are service marks of NetApp, Inc. in the U.S.A.
IBM, the IBM logo, and ibm.com are trademarks or registered trademarks of International BusinessMachines Corporation in the United States, other countries, or both. A complete and current list of otherIBM trademarks is available on the Web at http://www.ibm.com/legal/copytrade.shtml.
Apple is a registered trademark and QuickTime is a trademark of Apple, Inc. in the U.S.A. and/or othercountries. Microsoft is a registered trademark and Windows Media is a trademark of MicrosoftCorporation in the U.S.A. and/or other countries. RealAudio, RealNetworks, RealPlayer, RealSystem,RealText, and RealVideo are registered trademarks and RealMedia, RealProxy, and SureStream aretrademarks of RealNetworks, Inc. in the U.S.A. and/or other countries.
All other brands or products are trademarks or registered trademarks of their respective holders andshould be treated as such.
NetApp, Inc. is a licensee of the CompactFlash and CF Logo trademarks.
NetApp, Inc. NetCache is certified RealSystem compatible.
Trademark information | 15

About this guide
You can use your product more effectively when you understand this document's intended audienceand the conventions that this document uses to present information.
Next topics
Audience on page 17
Accessing Data ONTAP man pages on page 17
Where to enter commands on page 18
Keyboard and formatting conventions on page 19
Special messages on page 20
How to send your comments on page 20
AudienceThis document is written with certain assumptions about your technical knowledge and experience.
This document is for system administrators who are familiar with operating systems such as UNIX andWindows, that run on the storage system's clients. It also assumes that you are familiar with how toconfigure the storage system and how Network File System (NFS), Common Internet File System(CIFS), Hypertext Transport Protocol (HTTP), File Transport Protocol (FTP), Secure File TransportProtocol (SFTP), File Transport Protocol over SSL (FTPS), and Web-based Distributed Authoring andVersioning (WebDAV) are used for file sharing or transfers. This guide doesn't cover basic system ornetwork administration topics, such as IP addressing, routing, and network topology; it emphasizes thecharacteristics of the storage system.
Accessing Data ONTAP man pagesYou can use the Data ONTAP manual (man) pages to access technical information.
About this task
Data ONTAP manual pages are available for the following types of information. They are grouped intosections according to standard UNIX naming conventions.
About this guide | 17

Man page sectionTypes of information
1Commands
4Special files
5File formats and conventions
8System management and services
Step
1. View man pages in the following ways:
• Enter the following command at the storage system command line:
man command_or_file_name
• Click the manual pages button on the main Data ONTAP navigational page in the FilerViewuser interface.
• Use the Commands: Manual Page Reference, Volumes 1 and 2 (which can be downloaded orordered through the NOW site).
Note: All Data ONTAP man pages are stored on the storage system in files whose names areprefixed with the string "na_" to distinguish them from client man pages. The prefixed names areused to distinguish storage system man pages from other man pages and sometimes appear in theNAME field of the man page, but the prefixes are not part of the command, file, or services.
Where to enter commandsYou can use your product more effectively when you understand how this document uses commandconventions to present information.
You can perform common administrator tasks in one or more of the following ways:
• You can enter commands either at the system console or from any client computer that can obtainaccess to the storage system using a Telnet or Secure Shell (SSH) session.In examples that illustrate command execution, the command syntax and output shown might differfrom what you enter or see displayed, depending on your version of the operating system.
• You can use the FilerView graphical user interface.For information about accessing your system with FilerView, see the Data ONTAP SystemAdministration Guide.
18 | Data ONTAP 7.3 File Access and Protocols Management Guide
Keyboard and formatting conventionsYou can use your product more effectively when you understand how this document uses keyboardand formatting conventions to present information.
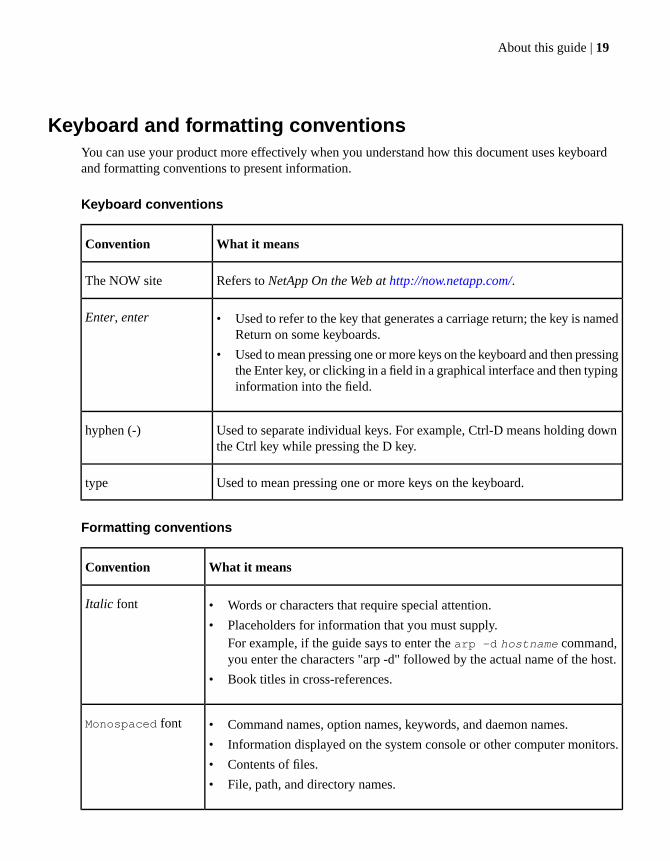
Keyboard conventions
What it meansConvention
Refers to NetApp On the Web at http://now.netapp.com/.The NOW site
• Used to refer to the key that generates a carriage return; the key is namedReturn on some keyboards.
• Used to mean pressing one or more keys on the keyboard and then pressingthe Enter key, or clicking in a field in a graphical interface and then typinginformation into the field.
Enter, enter
Used to separate individual keys. For example, Ctrl-D means holding downthe Ctrl key while pressing the D key.
hyphen (-)
Used to mean pressing one or more keys on the keyboard.type
Formatting conventions
What it meansConvention
• Words or characters that require special attention.
• Placeholders for information that you must supply.For example, if the guide says to enter the arp -d hostname command,you enter the characters "arp -d" followed by the actual name of the host.
• Book titles in cross-references.
Italic font
• Command names, option names, keywords, and daemon names.
• Information displayed on the system console or other computer monitors.
• Contents of files.
• File, path, and directory names.
Monospaced font
About this guide | 19
What it meansConvention
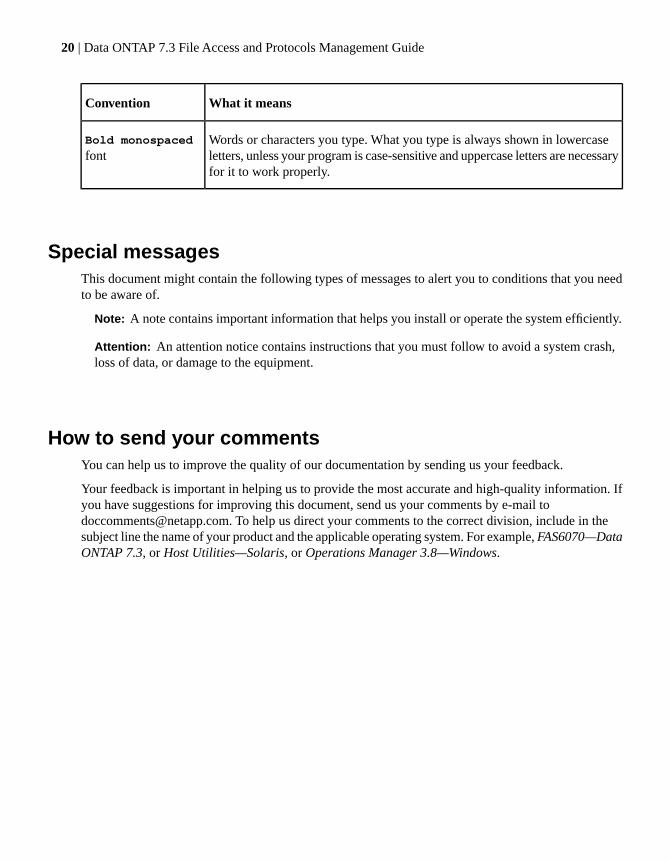
Words or characters you type. What you type is always shown in lowercaseletters, unless your program is case-sensitive and uppercase letters are necessaryfor it to work properly.
Bold monospaced
font
Special messagesThis document might contain the following types of messages to alert you to conditions that you needto be aware of.
Note: A note contains important information that helps you install or operate the system efficiently.
Attention: An attention notice contains instructions that you must follow to avoid a system crash,loss of data, or damage to the equipment.
How to send your commentsYou can help us to improve the quality of our documentation by sending us your feedback.
Your feedback is important in helping us to provide the most accurate and high-quality information. Ifyou have suggestions for improving this document, send us your comments by e-mail [email protected]. To help us direct your comments to the correct division, include in thesubject line the name of your product and the applicable operating system. For example, FAS6070—DataONTAP 7.3, or Host Utilities—Solaris, or Operations Manager 3.8—Windows.
20 | Data ONTAP 7.3 File Access and Protocols Management Guide
Introduction to file access management
Through Data ONTAP, you can manage access to files of different protocols.
Next topics
File protocols that Data ONTAP supports on page 21
How Data ONTAP controls access to files on page 21
File protocols that Data ONTAP supportsData ONTAP supports all of the most common file protocols, including NFS, CIFS, FTP, HTTP, andWebDAV.
How Data ONTAP controls access to filesData ONTAP controls access to files according to the authentication-based and file-based restrictionsthat you specify.
Next topics
Authentication-based restrictions on page 21
File-based restrictions on page 21
Authentication-based restrictionsWith authentication-based restrictions, you can specify which client machines and which users canconnect to the entire storage system.
Data ONTAP supports Kerberos authentication from both UNIX and Windows servers.
File-based restrictionsWith file-based restrictions, you can specify which users can access which files.
When a user creates a file, Data ONTAP generates a list of access permissions for the file. While theform of the permissions list varies with each protocol, it always includes common permissions, suchas reading and writing permissions.
Introduction to file access management | 21

When a user tries to access a file, Data ONTAP uses the permissions list to determine whether to grantaccess. Data ONTAP grants or denies access according to the operation that the user is performing,such as reading or writing, and the following factors:
• User account
• User group or netgroup
• Client protocol
• Client IP address
• File type
As part of the verification process, Data ONTAP maps host names to IP addresses using the lookupservice you specify—Lightweight Directory Access Protocol (LDAP), Network Information Service(NIS), or local storage system information.
22 | Data ONTAP 7.3 File Access and Protocols Management Guide
File access using NFS
You can export and unexport file system paths on your storage system, making them available orunavailable, respectively, for mounting by NFS clients, including PC-NFS and WebNFS clients.
Next topics
Exporting or unexporting file system paths on page 23
Enabling and disabling fencing of one or more NFS clients from one or more file systempaths on page 27
Displaying the actual file system path for an exported file system path on page 28
Displaying the export options for a file system path on page 29
Managing the access cache on page 29
Enabling Kerberos v5 security services for NFS on page 33
Debugging mounting problems on page 42
Displaying NFS statistics on page 43
Enabling or disabling NFSv3 on page 44
Supporting NFSv4 clients on page 44
Supporting PC-NFS clients on page 56
Supporting WebNFS clients on page 59
NFS over IPv6 on page 60
Exporting or unexporting file system pathsYou can export or unexport a file system path, making it available or unavailable to NFS clients, byediting the /etc/exports file or running the exportfs command.
Before you begin
To support secure NFS access (through using the sec=krb* export option), you must first enableKerberos v5 security services.
About this task
If you need to make permanent changes to several export entries at once, it is usually easiest to edit the/etc/exports file directly. However, if you need to make changes to a single export entry or you needto make temporary changes, it is usually easiest to run the exportfs command.
Next topics
Editing the /etc/exports file on page 24
File access using NFS | 23

Using the exportfs command on page 25
Editing the /etc/exports fileTo specify which file system paths Data ONTAP exports automatically when NFS starts, you can editthe /etc/exports file. For more information, see the na_exports(5) manual page.
Before you begin
If the nfs.export.auto-update option is on, which it is by default, Data ONTAP automaticallyupdates the /etc/exports file when you create, rename, or delete volumes. For more information, see thena_options(1) manual page.
Note: The maximum number of export entries in the /etc/exports file is 10,240. The maximumnumber of characters in each export entry, including the end of line character, is 4,096.
About this task
An export entry has the following syntax:
path -option[,option...]
In the export entry syntax, path is a file system path (for example, a path to a volume, directory, orfile) and option is an export option that specifies the following information:
• Which NFS clients have which access privileges (read-only, read-write, or root)
• The user ID (or name) of all anonymous or root NFS client users that access the file system path
• Whether NFS client users can create setuid and setgid executables and use the mknod commandwhen accessing the file system path
• The security types that an NFS client must support to access the file system path
• The actual file system path corresponding to the exported file system path
Steps
1. Open the /etc/exports file in a text editor on an NFS client that has root access to the storage system.2. Make your changes.3. Save the file.
After you finish
If you edit the /etc/exports file using a text editor, your changes will not take effect until you export allfile system paths in the /etc/exports file or synchronize the currently exported file system paths withthose specified in the /etc/exports file.
Note:
Running the exportfs command with the -b, -p, or -z option also changes the /etc/exports file.
24 | Data ONTAP 7.3 File Access and Protocols Management Guide

Using the exportfs commandTo export or unexport file system paths from the command line, you can run the exportfs command.For more information, see the na_exportfs(1) man page.
Next topics
Exporting file system paths on page 25
Unexporting file system paths on page 26
Synchronizing the currently exported file system paths with those specified in the /etc/exportsfile on page 27
Exporting file system paths
You can export a file system path with or without adding a corresponding entry to the /etc/exports file.In addition, you can export all file system paths specified in the /etc/exports file.
Next topics
Exporting a file system path and adding a corresponding entry to the /etc/exports file on page 25
Exporting a file system path without adding a corresponding entry to the /etc/exports file on page 26
Exporting all file system paths specified in the /etc/exports file on page 26
Exporting a file system path and adding a corresponding entry to the /etc/exports file
To export a file system path and add a corresponding export entry to the /etc/exports file, you can usethe exportfs -p command.
Step
1. Enter the following command:
exportfs -p [options] path
options is a comma-delimited list of export options (for more information, see the na_exports(5)man page) and path is a file system path (for example, a path to a volume, directory, or file).
Note: If you do not specify any export options, Data ONTAP automatically exports the filesystem path with the rw and sec=sys export options.
File access using NFS | 25
Exporting a file system path without adding a corresponding entry to the /etc/exports file
To export a file system path without adding a corresponding export entry to the /etc/exports file, youcan use the exportfs -io command.
Step
1. Enter the following command:
exportfs -io [options] path
options is a comma-delimited list of export options (for more information, see the na_exports(5)man page) and path is a file system path (for example, a path to a volume, directory, or file).
Note: If you do not specify any export options, Data ONTAP uses the export options specifiedfor the file system path in the /etc/exports file, if any.
Exporting all file system paths specified in the /etc/exports file
To export all file system paths specified in the /etc/exports file, you can enter the exportfs -acommand.
Unexporting file system paths
You can unexport one file system path and optionally remove its corresponding entry from the/etc/exports file. In addition, you can unexport all file system paths without removing their correspondingentries from the /etc/exports file.
Next topics
Unexporting one file system path on page 26
Unexporting all file system paths on page 27
Unexporting one file system path
To unexport one file system path without removing its corresponding entry from the /etc/exports file,you can use the exportfs -u command. To unexport one file system path and remove its correspondingentry from the /etc/exports file, you can use the exportfs -z command.
Step
1. Unexport one file system path.
26 | Data ONTAP 7.3 File Access and Protocols Management Guide

Then...If you want to unexport one file system path...
Enter the following command:
exportfs -u path
path is the file system path.
Without removing its corresponding entry from the/etc/exports file
Enter the following command:
exportfs -z path
path is the file system path.
And remove its corresponding entry from the/etc/exports file
Unexporting all file system paths
To unexport all file system paths without removing their corresponding entries from the /etc/exportsfile, you can use the exportfs -ua command.
Step
1. Enter the following command:
exportfs -ua
Synchronizing the currently exported file system paths with those specified in the /etc/exportsfile
To export all file system paths specified in the /etc/exports file and unexport all file system paths notspecified in the /etc/exports file, you can enter the exportfs -r command.
Enabling and disabling fencing of one or more NFS clientsfrom one or more file system paths
You can use fencing to give multiple NFS clients temporary or permanent read-only or read-write accessto multiple file system paths.
About this task
When you enable or disable fencing, Data ONTAP moves the NFS clients you specify to the front oftheir new access lists (rw= or ro=). This reordering can change your original export rules.
Step
1. Enter the following command:
File access using NFS | 27
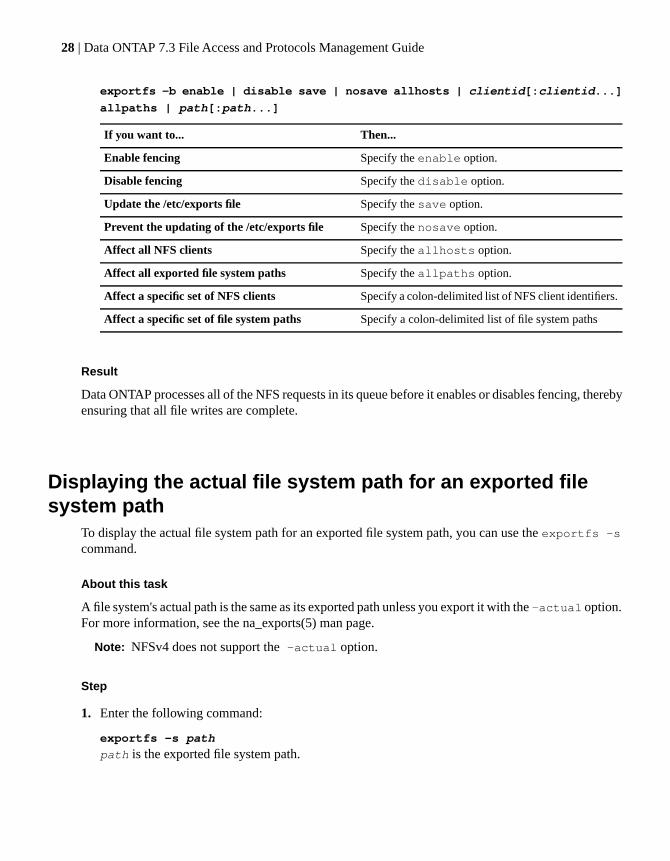
exportfs -b enable | disable save | nosave allhosts | clientid[:clientid...]
allpaths | path[:path...]
Then...If you want to...
Specify the enable option.Enable fencing
Specify the disable option.Disable fencing
Specify the save option.Update the /etc/exports file
Specify the nosave option.Prevent the updating of the /etc/exports file
Specify the allhosts option.Affect all NFS clients
Specify the allpaths option.Affect all exported file system paths
Specify a colon-delimited list of NFS client identifiers.Affect a specific set of NFS clients
Specify a colon-delimited list of file system pathsAffect a specific set of file system paths
Result
Data ONTAP processes all of the NFS requests in its queue before it enables or disables fencing, therebyensuring that all file writes are complete.
Displaying the actual file system path for an exported filesystem path
To display the actual file system path for an exported file system path, you can use the exportfs -scommand.
About this task
A file system's actual path is the same as its exported path unless you export it with the -actual option.For more information, see the na_exports(5) man page.
Note: NFSv4 does not support the -actual option.
Step
1. Enter the following command:
exportfs -s path
path is the exported file system path.
28 | Data ONTAP 7.3 File Access and Protocols Management Guide

Displaying the export options for a file system pathTo display the export options for a file system path, which can help you in debugging an export problem,you can use the exportfs -q command.
Step
1. Enter the following command:
exportfs -q path
path is the file system path.
Data ONTAP displays the export options for the path you specify.
Note: Data ONTAP also displays a rule identifier for each option, but you do not need the ruleidentifier unless you are using diagnostic commands. For more information, contact technicalsupport.
Managing the access cacheData ONTAP uses an access cache to reduce the likelihood it will have to perform a reverse DNS lookupor parse netgroups when granting or denying an NFS client access to a file system path.
Whenever an NFS client attempts to access a file system path, Data ONTAP must determine whetherto grant or deny access. Except in the most simple cases (for example, when file systems paths areexported with just the ro or rw option), Data ONTAP grants or denies access according to a value inthe access cache that corresponds to the following things:
• The file system path
• The NFS client's IP address, access type, and security type
If no such value exists in the access cache entry (for example, if Data ONTAP has not made a previousaccess determination or you have not created an access cache entry using the exportfs -c commandfor this particular NFS-client-file-system-path combination), Data ONTAP grants or denies accessaccording to the result of a comparison between the following things:
• The NFS client’s IP address (or host name, if necessary), access type, and security type
• The file system path’s export options
Then Data ONTAP stores the result of this comparison in the access cache.
To reduce the likelihood that it will have to perform a reverse DNS lookup or parse netgroups, DataONTAP breaks this comparison into three stages. It performs each successive stage of the comparisononly if necessary to determine whether the NFS client has access to the file system path.
File access using NFS | 29
In the first stage, Data ONTAP compares the NFS client’s IP address with all export rules that consistentirely of IP addresses, including single IP addresses, subnets, and host names that Data ONTAP haspreviously resolved to IP addresses.
In the second stage, Data ONTAP performs a reverse DNS lookup on the NFS client’s IP address, andthen compares the NFS client’s host name with all of the export rules that contain subdomains and hostnames that Data ONTAP has not resolved into IP addresses.
In the third stage, Data ONTAP parses netgroups.
Data ONTAP backs up the entry cache onto disk every 15 minutes so that the information in the accesscache is available after reboots and after takeover or giveback.
Next topics
Adding entries to the access cache on page 30
Removing entries from the access cache on page 31
Viewing access cache statistics on page 31
Optimizing access cache performance on page 32
Setting access cache timeout values on page 32
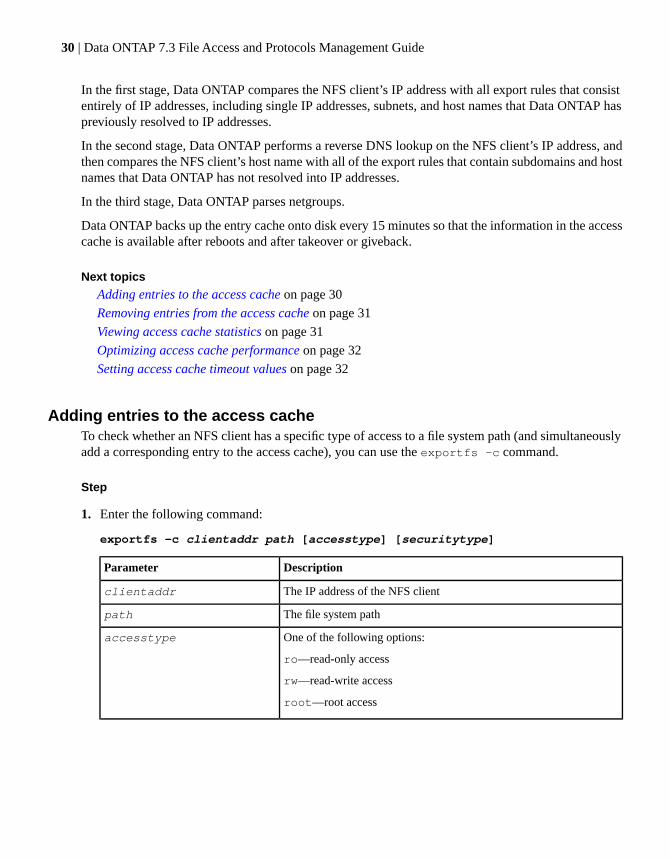
Adding entries to the access cacheTo check whether an NFS client has a specific type of access to a file system path (and simultaneouslyadd a corresponding entry to the access cache), you can use the exportfs -c command.
Step
1. Enter the following command:
exportfs -c clientaddr path [accesstype] [securitytype]
DescriptionParameter
The IP address of the NFS clientclientaddr
The file system pathpath
One of the following options:
ro—read-only access
rw—read-write access
root—root access
accesstype
30 | Data ONTAP 7.3 File Access and Protocols Management Guide
DescriptionParameter
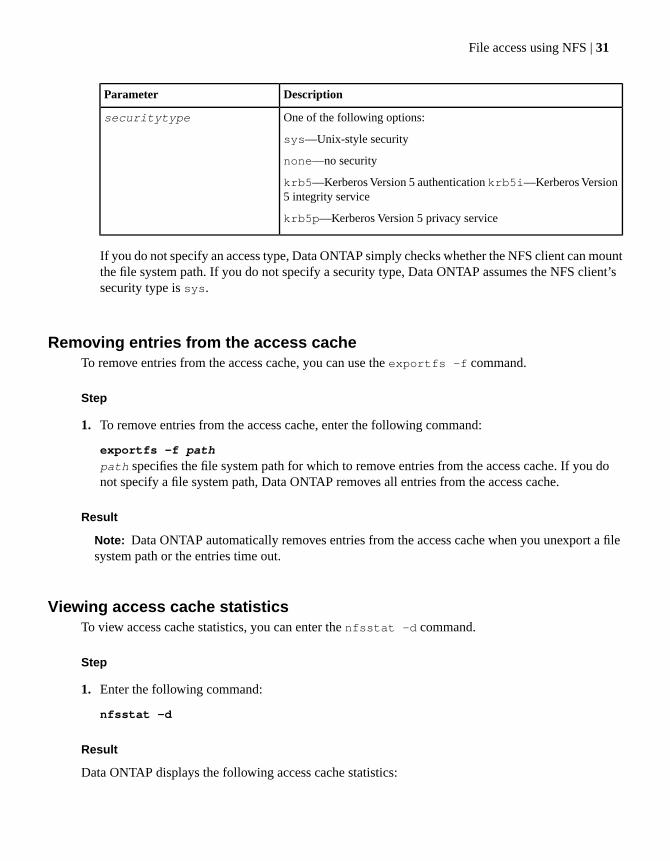
One of the following options:
sys—Unix-style security
none—no security
krb5—Kerberos Version 5 authentication krb5i—Kerberos Version5 integrity service
krb5p—Kerberos Version 5 privacy service
securitytype
If you do not specify an access type, Data ONTAP simply checks whether the NFS client can mountthe file system path. If you do not specify a security type, Data ONTAP assumes the NFS client’ssecurity type is sys.
Removing entries from the access cacheTo remove entries from the access cache, you can use the exportfs -f command.
Step
1. To remove entries from the access cache, enter the following command:
exportfs -f path
path specifies the file system path for which to remove entries from the access cache. If you donot specify a file system path, Data ONTAP removes all entries from the access cache.
Result
Note: Data ONTAP automatically removes entries from the access cache when you unexport a filesystem path or the entries time out.
Viewing access cache statisticsTo view access cache statistics, you can enter the nfsstat -d command.
Step
1. Enter the following command:
nfsstat -d
Result
Data ONTAP displays the following access cache statistics:
File access using NFS | 31

access cache (hits, partial misses, misses)access cache lookup requests (curr, total, max)access cache nodes (found, created)access cache requests (queued, unqueued)access cache requests unqueued by (flush, restore)access cache read requests (queued, unqueued)access cache write requests (queued, unqueued)access cache root requests (queued, unqueued)access cache expired hits (total, read, write, root)access cache inserts (full, partial, dup, subnet, restore)access cache refreshes requested (total, read, write, root)access cache refreshes done (total, read, write, root)access cache errors (query, insert, nomem)access cache nodes (flushed, harvested, harvestsfailed)access cache nodes (allocated, free)access cache qctx (allocated, free)access cache persistence errors (total)access cache persistence nodes handled (restored, saved)access cache persistence rules deleted (total)access cache persistence memchunks (allocated, freed)
For more information about these access cache statistics, see the na_nfsstat(1) man page.
Optimizing access cache performanceTo optimize access cache performance, you should reuse identical export rules as often as possible.
About this task
Data ONTAP maintains a single access cache entry for all export entries that specify the same rule.
Reusing a group rule
Even though the ro,rw=@group1 rule exists in both of the following export entries, Data ONTAPmaintains a single access cache entry for the rule:
/vol/a -sec=sys,ro,sec=sys,rw=@group1,sec=krb5,rw=@group2
/vol/b -sec=sys,ro,sec=sys,rw=@group1
Setting access cache timeout valuesTo specify how long Data ONTAP keeps an entry in the access cache, you can set thenfs.export.harvest.timeout option. To specify how long Data ONTAP uses an access cache
32 | Data ONTAP 7.3 File Access and Protocols Management Guide
entry before refreshing it, you can set the nfs.export.neg.timeout and nfs.export.pos.timeoutoptions. For more information, see the na_options(1) man page.
Enabling Kerberos v5 security services for NFSTo enable Kerberos v5 security services for NFS, you can use the nfs setup command.
About this task
Data ONTAP provides secure NFS access using the Kerberos v5 authentication protocol to ensure thesecurity of data and the identity of users within a controlled domain.
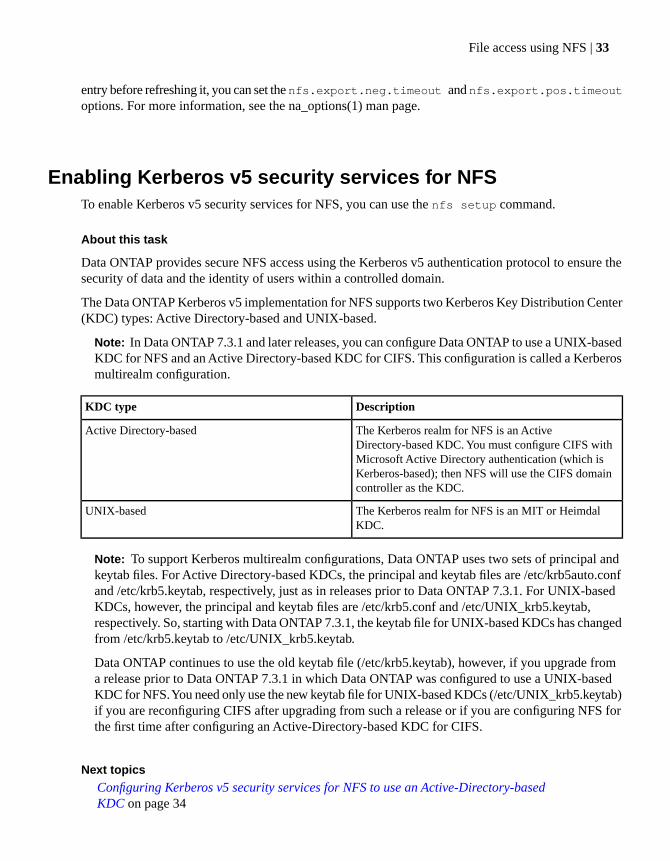
The Data ONTAP Kerberos v5 implementation for NFS supports two Kerberos Key Distribution Center(KDC) types: Active Directory-based and UNIX-based.
Note: In Data ONTAP 7.3.1 and later releases, you can configure Data ONTAP to use a UNIX-basedKDC for NFS and an Active Directory-based KDC for CIFS. This configuration is called a Kerberosmultirealm configuration.
DescriptionKDC type
The Kerberos realm for NFS is an ActiveDirectory-based KDC. You must configure CIFS withMicrosoft Active Directory authentication (which isKerberos-based); then NFS will use the CIFS domaincontroller as the KDC.
Active Directory-based
The Kerberos realm for NFS is an MIT or HeimdalKDC.
UNIX-based
Note: To support Kerberos multirealm configurations, Data ONTAP uses two sets of principal andkeytab files. For Active Directory-based KDCs, the principal and keytab files are /etc/krb5auto.confand /etc/krb5.keytab, respectively, just as in releases prior to Data ONTAP 7.3.1. For UNIX-basedKDCs, however, the principal and keytab files are /etc/krb5.conf and /etc/UNIX_krb5.keytab,respectively. So, starting with Data ONTAP 7.3.1, the keytab file for UNIX-based KDCs has changedfrom /etc/krb5.keytab to /etc/UNIX_krb5.keytab.
Data ONTAP continues to use the old keytab file (/etc/krb5.keytab), however, if you upgrade froma release prior to Data ONTAP 7.3.1 in which Data ONTAP was configured to use a UNIX-basedKDC for NFS. You need only use the new keytab file for UNIX-based KDCs (/etc/UNIX_krb5.keytab)if you are reconfiguring CIFS after upgrading from such a release or if you are configuring NFS forthe first time after configuring an Active-Directory-based KDC for CIFS.
Next topics
Configuring Kerberos v5 security services for NFS to use an Active-Directory-basedKDC on page 34
File access using NFS | 33

Configuring Kerberos v5 security services for NFS to use a UNIX-based KDC on page 37
Determining whether an NFS client supports Kerberos v5 security services on page 41
Configuring Kerberos v5 security services for NFS to use anActive-Directory-based KDC
You can configure Kerberos v5 security services for NFS to use an Active-Directory-based KDC beforeor after running the cifs setup command.
Result
The security service setup procedure adds your storage system to an Active Directory-based KDC asa service principal called nfs/hostname.domain@REALM.
Next topics
Configuring Kerberos v5 security services for NFS to use an Active-Directory-based KDC beforeconfiguring CIFS on page 34
Configuring Kerberos v5 security services for NFS to use an Active-Directory-based KDC afterconfiguring CIFS on page 36
Configuring Kerberos v5 security services for NFS to use an Active-Directory-based KDCbefore configuring CIFS
If you have not run cifs setup to configure CIFS, you must provide configuration information thatwould otherwise have been taken from your CIFS configuration.
Configure your storage system to use the Active Directory-based domain name service, modify the/etc/resolv.conf file as necessary to ensure that it lists only Active Directory servers.
For example, for a Kerberos realm in which the Active Directory servers are 172.16.1.180 and172.16.1.181, change /etc/resolv.conf to include only the following Active Directory server entries:
nameserver 172.16.1.180
nameserver 172.16.1.181
Make sure you remove all other Active Directory server entries for that realm.
If you have already used nfs setup to enter configuration information, the prompts you receive maydiffer from those shown in the following procedure.
Steps
1. Enter the following command:
nfs setup
You receive the following message from nfs setup:
34 | Data ONTAP 7.3 File Access and Protocols Management Guide
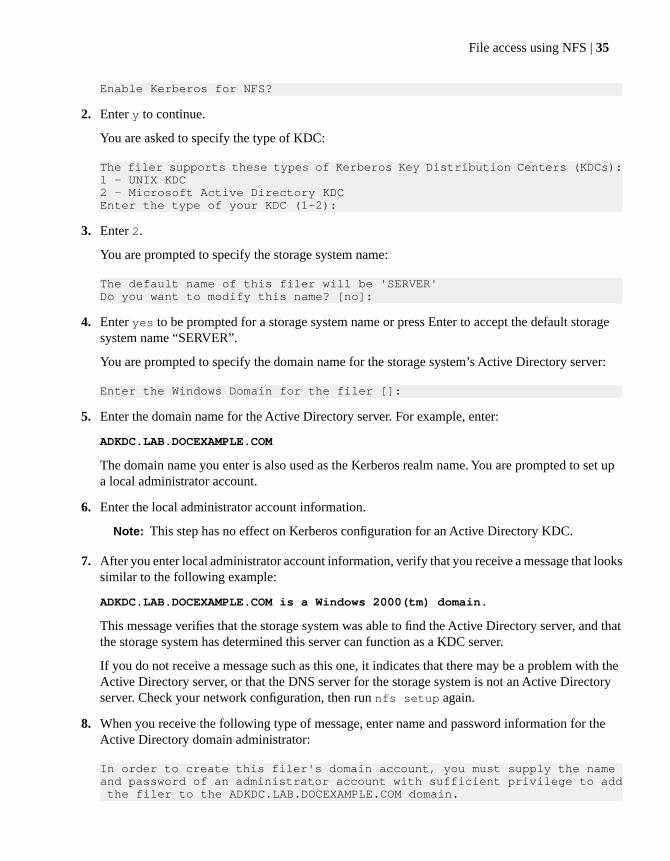
Enable Kerberos for NFS?
2. Enter y to continue.
You are asked to specify the type of KDC:
The filer supports these types of Kerberos Key Distribution Centers (KDCs):1 - UNIX KDC2 - Microsoft Active Directory KDCEnter the type of your KDC (1-2):
3. Enter 2.
You are prompted to specify the storage system name:
The default name of this filer will be 'SERVER'Do you want to modify this name? [no]:
4. Enter yes to be prompted for a storage system name or press Enter to accept the default storagesystem name “SERVER”.
You are prompted to specify the domain name for the storage system’s Active Directory server:
Enter the Windows Domain for the filer []:
5. Enter the domain name for the Active Directory server. For example, enter:
ADKDC.LAB.DOCEXAMPLE.COM
The domain name you enter is also used as the Kerberos realm name. You are prompted to set upa local administrator account.
6. Enter the local administrator account information.
Note: This step has no effect on Kerberos configuration for an Active Directory KDC.
7. After you enter local administrator account information, verify that you receive a message that lookssimilar to the following example:
ADKDC.LAB.DOCEXAMPLE.COM is a Windows 2000(tm) domain.
This message verifies that the storage system was able to find the Active Directory server, and thatthe storage system has determined this server can function as a KDC server.
If you do not receive a message such as this one, it indicates that there may be a problem with theActive Directory server, or that the DNS server for the storage system is not an Active Directoryserver. Check your network configuration, then run nfs setup again.
8. When you receive the following type of message, enter name and password information for theActive Directory domain administrator:
In order to create this filer's domain account, you must supply the name and password of an administrator account with sufficient privilege to add the filer to the ADKDC.LAB.DOCEXAMPLE.COM domain.
File access using NFS | 35
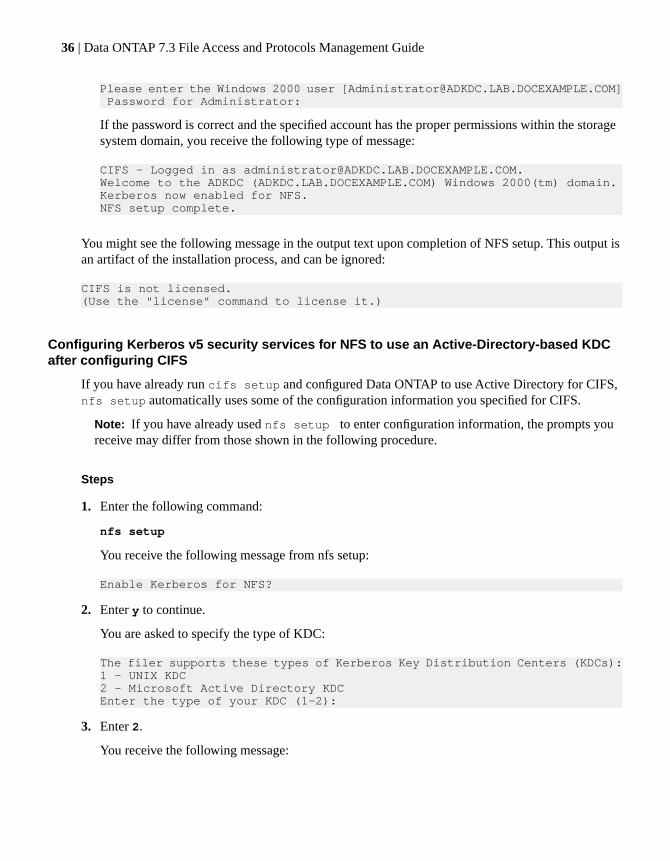
Please enter the Windows 2000 user [[email protected]] Password for Administrator:
If the password is correct and the specified account has the proper permissions within the storagesystem domain, you receive the following type of message:
CIFS - Logged in as [email protected] to the ADKDC (ADKDC.LAB.DOCEXAMPLE.COM) Windows 2000(tm) domain.Kerberos now enabled for NFS.NFS setup complete.
You might see the following message in the output text upon completion of NFS setup. This output isan artifact of the installation process, and can be ignored:
CIFS is not licensed.(Use the "license" command to license it.)
Configuring Kerberos v5 security services for NFS to use an Active-Directory-based KDCafter configuring CIFS
If you have already run cifs setup and configured Data ONTAP to use Active Directory for CIFS,nfs setup automatically uses some of the configuration information you specified for CIFS.
Note: If you have already used nfs setup to enter configuration information, the prompts youreceive may differ from those shown in the following procedure.
Steps
1. Enter the following command:
nfs setup
You receive the following message from nfs setup:
Enable Kerberos for NFS?
2. Enter y to continue.
You are asked to specify the type of KDC:
The filer supports these types of Kerberos Key Distribution Centers (KDCs):1 - UNIX KDC2 - Microsoft Active Directory KDCEnter the type of your KDC (1-2):
3. Enter 2.
You receive the following message:
36 | Data ONTAP 7.3 File Access and Protocols Management Guide
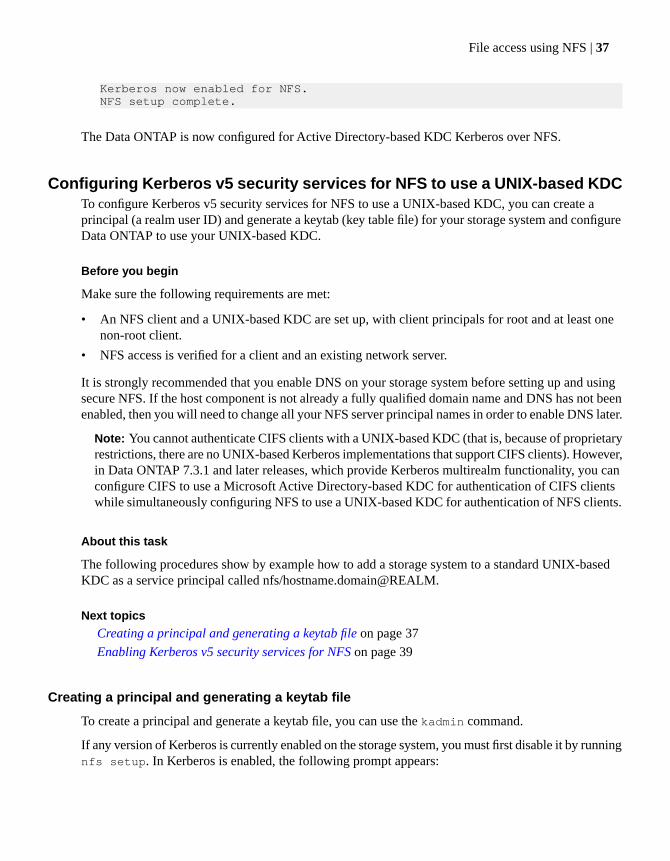
Kerberos now enabled for NFS.NFS setup complete.
The Data ONTAP is now configured for Active Directory-based KDC Kerberos over NFS.
Configuring Kerberos v5 security services for NFS to use a UNIX-based KDCTo configure Kerberos v5 security services for NFS to use a UNIX-based KDC, you can create aprincipal (a realm user ID) and generate a keytab (key table file) for your storage system and configureData ONTAP to use your UNIX-based KDC.
Before you begin
Make sure the following requirements are met:
• An NFS client and a UNIX-based KDC are set up, with client principals for root and at least onenon-root client.
• NFS access is verified for a client and an existing network server.
It is strongly recommended that you enable DNS on your storage system before setting up and usingsecure NFS. If the host component is not already a fully qualified domain name and DNS has not beenenabled, then you will need to change all your NFS server principal names in order to enable DNS later.
Note: You cannot authenticate CIFS clients with a UNIX-based KDC (that is, because of proprietaryrestrictions, there are no UNIX-based Kerberos implementations that support CIFS clients). However,in Data ONTAP 7.3.1 and later releases, which provide Kerberos multirealm functionality, you canconfigure CIFS to use a Microsoft Active Directory-based KDC for authentication of CIFS clientswhile simultaneously configuring NFS to use a UNIX-based KDC for authentication of NFS clients.
About this task
The following procedures show by example how to add a storage system to a standard UNIX-basedKDC as a service principal called nfs/hostname.domain@REALM.
Next topics
Creating a principal and generating a keytab file on page 37
Enabling Kerberos v5 security services for NFS on page 39
Creating a principal and generating a keytab file
To create a principal and generate a keytab file, you can use the kadmin command.
If any version of Kerberos is currently enabled on the storage system, you must first disable it by runningnfs setup. In Kerberos is enabled, the following prompt appears:
File access using NFS | 37
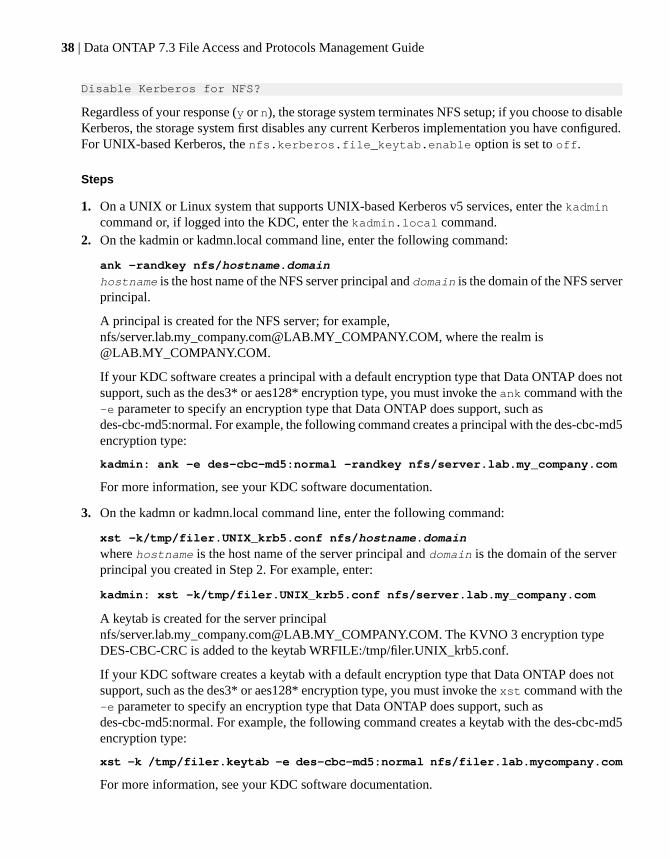
Disable Kerberos for NFS?
Regardless of your response (y or n), the storage system terminates NFS setup; if you choose to disableKerberos, the storage system first disables any current Kerberos implementation you have configured.For UNIX-based Kerberos, the nfs.kerberos.file_keytab.enable option is set to off.
Steps
1. On a UNIX or Linux system that supports UNIX-based Kerberos v5 services, enter the kadmincommand or, if logged into the KDC, enter the kadmin.local command.
2. On the kadmin or kadmn.local command line, enter the following command:
ank -randkey nfs/hostname.domain
hostname is the host name of the NFS server principal and domain is the domain of the NFS serverprincipal.
A principal is created for the NFS server; for example,nfs/[email protected]_COMPANY.COM, where the realm [email protected]_COMPANY.COM.
If your KDC software creates a principal with a default encryption type that Data ONTAP does notsupport, such as the des3* or aes128* encryption type, you must invoke the ank command with the-e parameter to specify an encryption type that Data ONTAP does support, such asdes-cbc-md5:normal. For example, the following command creates a principal with the des-cbc-md5encryption type:
kadmin: ank -e des-cbc-md5:normal -randkey nfs/server.lab.my_company.com
For more information, see your KDC software documentation.
3. On the kadmn or kadmn.local command line, enter the following command:
xst -k/tmp/filer.UNIX_krb5.conf nfs/hostname.domain
where hostname is the host name of the server principal and domain is the domain of the serverprincipal you created in Step 2. For example, enter:
kadmin: xst -k/tmp/filer.UNIX_krb5.conf nfs/server.lab.my_company.com
A keytab is created for the server principalnfs/[email protected]_COMPANY.COM. The KVNO 3 encryption typeDES-CBC-CRC is added to the keytab WRFILE:/tmp/filer.UNIX_krb5.conf.
If your KDC software creates a keytab with a default encryption type that Data ONTAP does notsupport, such as the des3* or aes128* encryption type, you must invoke the xst command with the-e parameter to specify an encryption type that Data ONTAP does support, such asdes-cbc-md5:normal. For example, the following command creates a keytab with the des-cbc-md5encryption type:
xst -k /tmp/filer.keytab -e des-cbc-md5:normal nfs/filer.lab.mycompany.com
For more information, see your KDC software documentation.
38 | Data ONTAP 7.3 File Access and Protocols Management Guide
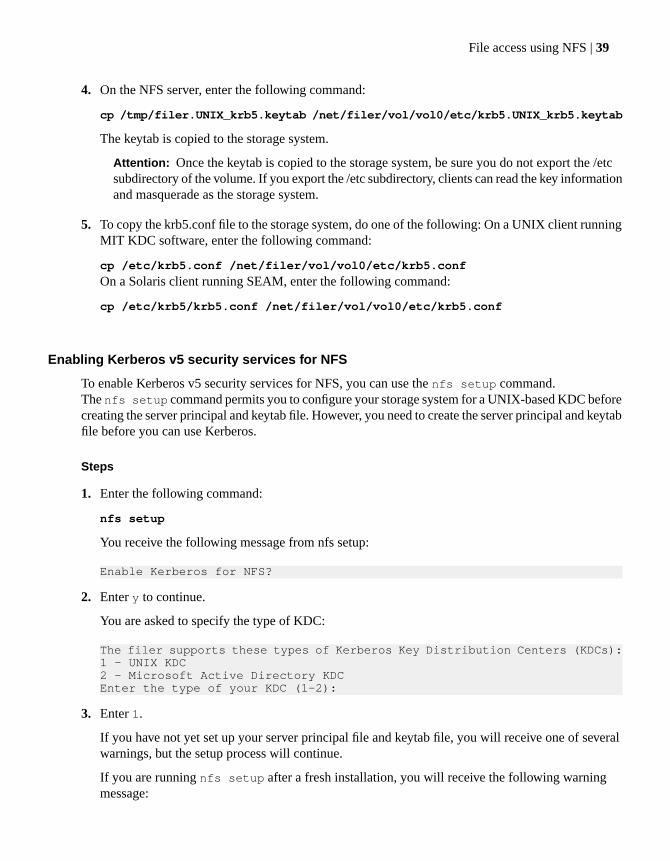
4. On the NFS server, enter the following command:
cp /tmp/filer.UNIX_krb5.keytab /net/filer/vol/vol0/etc/krb5.UNIX_krb5.keytab
The keytab is copied to the storage system.
Attention: Once the keytab is copied to the storage system, be sure you do not export the /etcsubdirectory of the volume. If you export the /etc subdirectory, clients can read the key informationand masquerade as the storage system.
5. To copy the krb5.conf file to the storage system, do one of the following: On a UNIX client runningMIT KDC software, enter the following command:
cp /etc/krb5.conf /net/filer/vol/vol0/etc/krb5.conf
On a Solaris client running SEAM, enter the following command:
cp /etc/krb5/krb5.conf /net/filer/vol/vol0/etc/krb5.conf
Enabling Kerberos v5 security services for NFS
To enable Kerberos v5 security services for NFS, you can use the nfs setup command.The nfs setup command permits you to configure your storage system for a UNIX-based KDC beforecreating the server principal and keytab file. However, you need to create the server principal and keytabfile before you can use Kerberos.
Steps
1. Enter the following command:
nfs setup
You receive the following message from nfs setup:
Enable Kerberos for NFS?
2. Enter y to continue.
You are asked to specify the type of KDC:
The filer supports these types of Kerberos Key Distribution Centers (KDCs):1 - UNIX KDC2 - Microsoft Active Directory KDCEnter the type of your KDC (1-2):
3. Enter 1.
If you have not yet set up your server principal file and keytab file, you will receive one of severalwarnings, but the setup process will continue.
If you are running nfs setup after a fresh installation, you will receive the following warningmessage:
File access using NFS | 39
There is no /etc/krb5.conf file yet. You will need to establish one. Unix KDC uses the keytab file /etc/UNIX_krb5.keytab. There is no /etc/UNIX_krb5.keytab file yet. You will need to establish one.
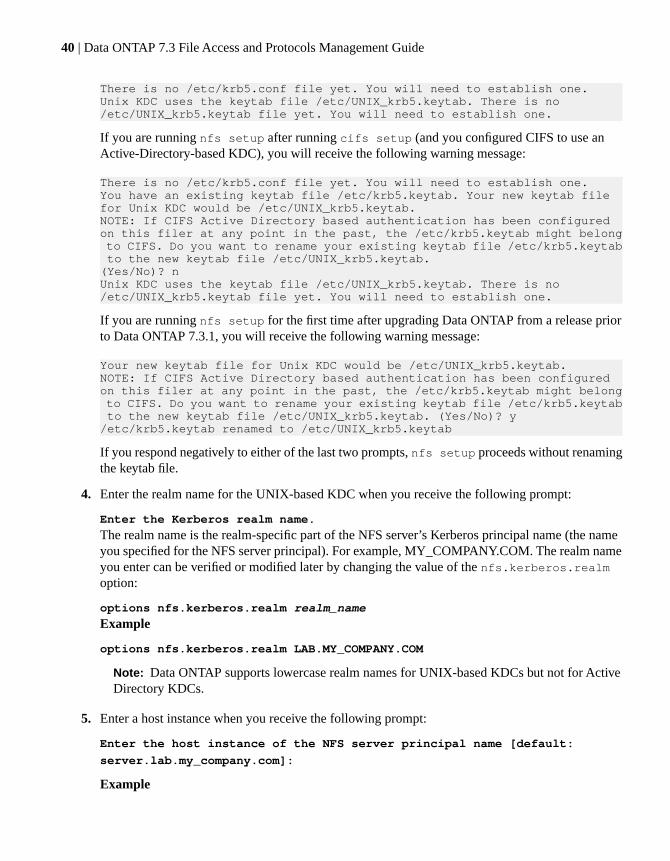
If you are running nfs setup after running cifs setup (and you configured CIFS to use anActive-Directory-based KDC), you will receive the following warning message:
There is no /etc/krb5.conf file yet. You will need to establish one.You have an existing keytab file /etc/krb5.keytab. Your new keytab file for Unix KDC would be /etc/UNIX_krb5.keytab.NOTE: If CIFS Active Directory based authentication has been configured on this filer at any point in the past, the /etc/krb5.keytab might belong to CIFS. Do you want to rename your existing keytab file /etc/krb5.keytab to the new keytab file /etc/UNIX_krb5.keytab.(Yes/No)? nUnix KDC uses the keytab file /etc/UNIX_krb5.keytab. There is no /etc/UNIX_krb5.keytab file yet. You will need to establish one.
If you are running nfs setup for the first time after upgrading Data ONTAP from a release priorto Data ONTAP 7.3.1, you will receive the following warning message:
Your new keytab file for Unix KDC would be /etc/UNIX_krb5.keytab.NOTE: If CIFS Active Directory based authentication has been configured on this filer at any point in the past, the /etc/krb5.keytab might belong to CIFS. Do you want to rename your existing keytab file /etc/krb5.keytab to the new keytab file /etc/UNIX_krb5.keytab. (Yes/No)? y/etc/krb5.keytab renamed to /etc/UNIX_krb5.keytab
If you respond negatively to either of the last two prompts, nfs setup proceeds without renamingthe keytab file.
4. Enter the realm name for the UNIX-based KDC when you receive the following prompt:
Enter the Kerberos realm name.
The realm name is the realm-specific part of the NFS server’s Kerberos principal name (the nameyou specified for the NFS server principal). For example, MY_COMPANY.COM. The realm nameyou enter can be verified or modified later by changing the value of the nfs.kerberos.realmoption:
options nfs.kerberos.realm realm_name
Example
options nfs.kerberos.realm LAB.MY_COMPANY.COM
Note: Data ONTAP supports lowercase realm names for UNIX-based KDCs but not for ActiveDirectory KDCs.
5. Enter a host instance when you receive the following prompt:
Enter the host instance of the NFS server principal name [default:
server.lab.my_company.com]:
Example
40 | Data ONTAP 7.3 File Access and Protocols Management Guide

server.lab.my_company.com
If DNS is enabled, it is used to verify that you have entered a fully qualified domain name for yourhost. If you have entered a partial name and your host has been entered in DNS, the missing domaininformation will be appended to your entry.
The host instance you enter can be verified using the nfs.kerberos.principal option:
options nfs.kerberos.principal
The nfs setup command uses your entries for the host instance and realm name to identify theKerberos principal. The principal is derived from nfs setup entries as described here:
nfs/value from nfs.kerberos.principal@value from nfs.kerberos.realm
Once you enter the host instance and exit nfs setup, the storage system is configured to use thekey table file you generated. You can modify this configuration later by running nfs setup again.
Determining whether an NFS client supports Kerberos v5 security servicesBefore using Kerberos v5 security services with an NFS client, you should make sure the NFS clientsupports RFC1964 and RFC2203.
About this task
The list of NFS clients that support Kerberos v5 security includes widely used NFS clients that havebeen tested either in the production laboratory or at interoperability test events, such as Connectathon(www.connectathon.org).
For example, the following NFS clients support Kerberos v5.
Required software and availabilitynotes
Versions supported for Kerberos v5Operating system
AIX 5L Expansion Pack and WebDownload Pack, available from IBM
AIX 5.3 running NFSv2, NFSv3, NFSv4AIX
No additional softwareLinux 2.6 running NFSv2, NFSv3, or NFSv4Linux
Sun Enterprise AuthenticationMechanism (SEAM) 1.0, available inSun Microsystems’ Solaris EasyAccess Server (SEAS) 3.0 productbundle
Solaris 2.6 running NFS version 2 (NFSv2) or NFSversion 3 (NFSv3)
Solaris
SEAM 1.0, available from SunMicrosystems’ SEAS 3.0 productbundle
Solaris 7 running NFSv2 or NFSv3
File access using NFS | 41
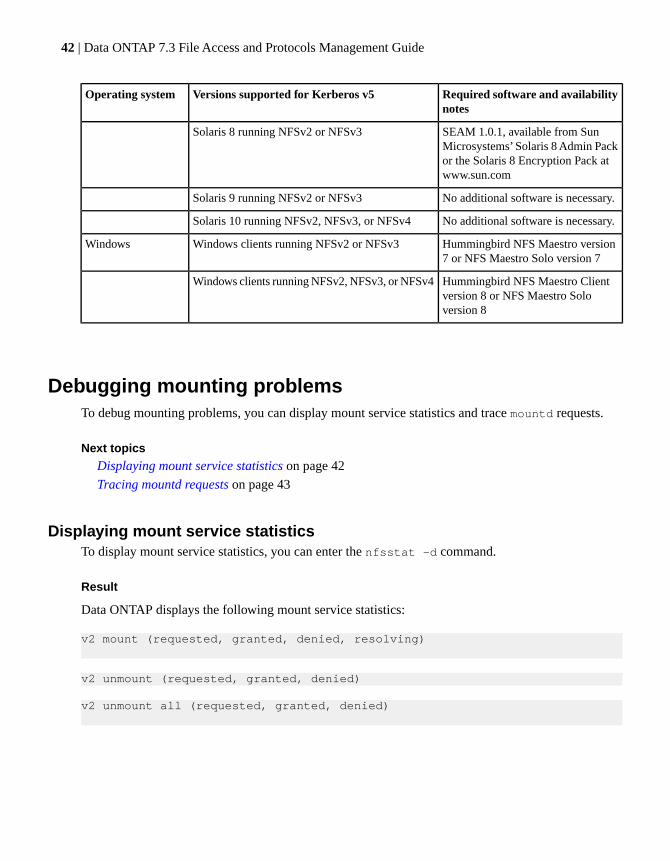
Required software and availabilitynotes
Versions supported for Kerberos v5Operating system
SEAM 1.0.1, available from SunMicrosystems’ Solaris 8 Admin Packor the Solaris 8 Encryption Pack atwww.sun.com
Solaris 8 running NFSv2 or NFSv3
No additional software is necessary.Solaris 9 running NFSv2 or NFSv3
No additional software is necessary.Solaris 10 running NFSv2, NFSv3, or NFSv4
Hummingbird NFS Maestro version7 or NFS Maestro Solo version 7
Windows clients running NFSv2 or NFSv3Windows
Hummingbird NFS Maestro Clientversion 8 or NFS Maestro Soloversion 8
Windows clients running NFSv2, NFSv3, or NFSv4
Debugging mounting problemsTo debug mounting problems, you can display mount service statistics and trace mountd requests.
Next topics
Displaying mount service statistics on page 42
Tracing mountd requests on page 43
Displaying mount service statisticsTo display mount service statistics, you can enter the nfsstat -d command.
Result
Data ONTAP displays the following mount service statistics:
v2 mount (requested, granted, denied, resolving)
v2 unmount (requested, granted, denied)
v2 unmount all (requested, granted, denied)
42 | Data ONTAP 7.3 File Access and Protocols Management Guide
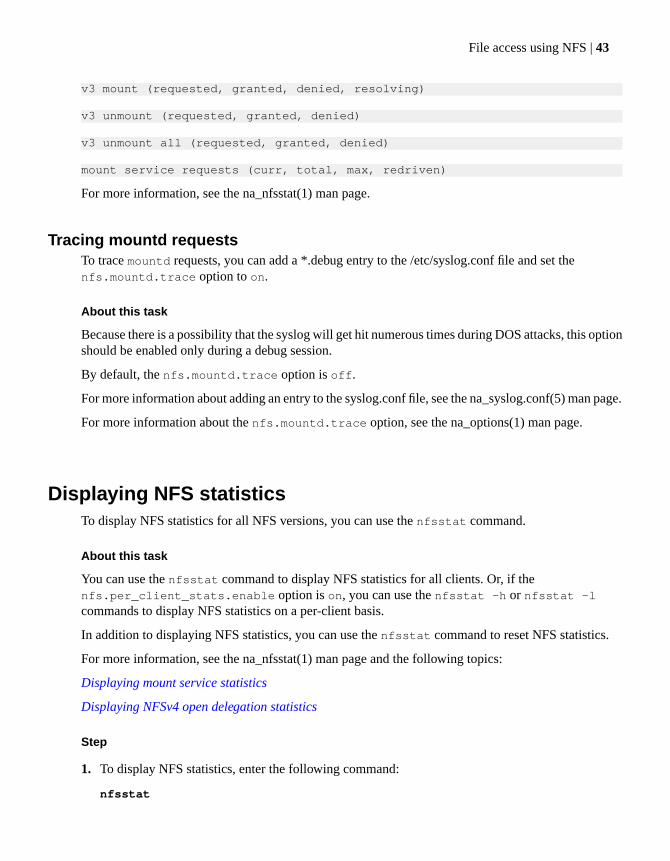
v3 mount (requested, granted, denied, resolving)
v3 unmount (requested, granted, denied)
v3 unmount all (requested, granted, denied)
mount service requests (curr, total, max, redriven)
For more information, see the na_nfsstat(1) man page.
Tracing mountd requestsTo trace mountd requests, you can add a *.debug entry to the /etc/syslog.conf file and set thenfs.mountd.trace option to on.
About this task
Because there is a possibility that the syslog will get hit numerous times during DOS attacks, this optionshould be enabled only during a debug session.
By default, the nfs.mountd.trace option is off.
For more information about adding an entry to the syslog.conf file, see the na_syslog.conf(5) man page.
For more information about the nfs.mountd.trace option, see the na_options(1) man page.
Displaying NFS statisticsTo display NFS statistics for all NFS versions, you can use the nfsstat command.
About this task
You can use the nfsstat command to display NFS statistics for all clients. Or, if thenfs.per_client_stats.enable option is on, you can use the nfsstat -h or nfsstat -lcommands to display NFS statistics on a per-client basis.
In addition to displaying NFS statistics, you can use the nfsstat command to reset NFS statistics.
For more information, see the na_nfsstat(1) man page and the following topics:
Displaying mount service statistics
Displaying NFSv4 open delegation statistics
Step
1. To display NFS statistics, enter the following command:
nfsstat
File access using NFS | 43
Enabling or disabling NFSv3You can enable or disable NFSv3 by setting the nfsv3.enable option to on or off, respectively.(This option is on by default.)
About this task
By default, NFSv3 is enabled and NFSv4 is disabled.
Step
1. Then...If you want to...
Enter the following command:
options nfs.v3.enable on
Enable NFSv3
Enter the following command:
options nfs.v3.enable off
Disable NFSv3
Supporting NFSv4 clientsSupporting NFSv4 clients involves enabling or disabling the NFSv4 protocol, specifying an NFSv4user ID domain, managing NFSv4 ACLS and file delegation, and configuring file and record locking.
Next topics
About Data ONTAP support of NFSv4 on page 45
Limitations of Data ONTAP support for NFSv4 on page 45
How the pseudo-fs in NFSv4 affects mountpoints on page 46
Enabling or disabling NFSv4 on page 47
Specifying the user ID domain for NFSv4 on page 47
Managing NFSv4 ACLs on page 47
Managing NFSv4 open delegations on page 51
Configuring NFSv4 file and record locking on page 54
44 | Data ONTAP 7.3 File Access and Protocols Management Guide
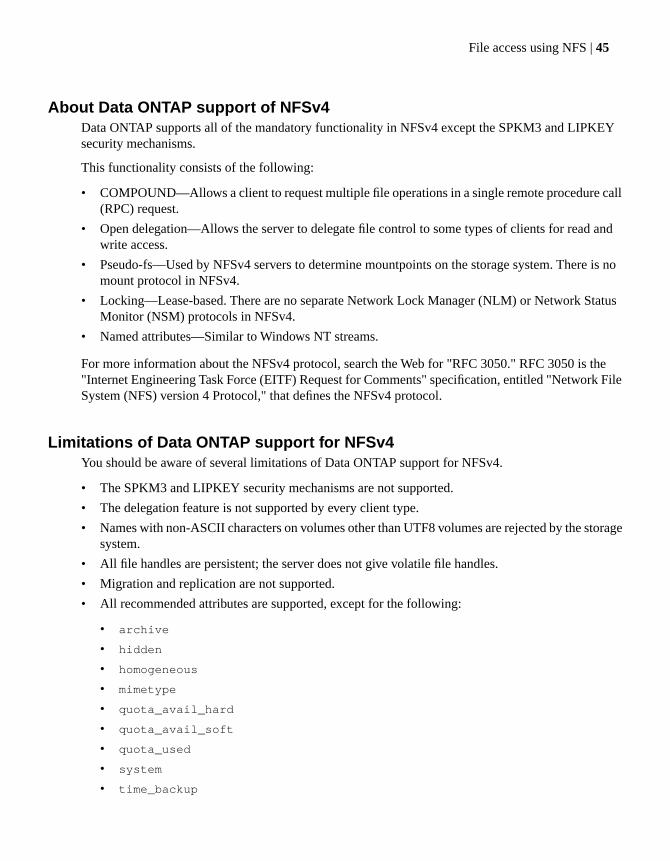
About Data ONTAP support of NFSv4Data ONTAP supports all of the mandatory functionality in NFSv4 except the SPKM3 and LIPKEYsecurity mechanisms.
This functionality consists of the following:
• COMPOUND—Allows a client to request multiple file operations in a single remote procedure call(RPC) request.
• Open delegation—Allows the server to delegate file control to some types of clients for read andwrite access.
• Pseudo-fs—Used by NFSv4 servers to determine mountpoints on the storage system. There is nomount protocol in NFSv4.
• Locking—Lease-based. There are no separate Network Lock Manager (NLM) or Network StatusMonitor (NSM) protocols in NFSv4.
• Named attributes—Similar to Windows NT streams.
For more information about the NFSv4 protocol, search the Web for "RFC 3050." RFC 3050 is the"Internet Engineering Task Force (EITF) Request for Comments" specification, entitled "Network FileSystem (NFS) version 4 Protocol," that defines the NFSv4 protocol.
Limitations of Data ONTAP support for NFSv4You should be aware of several limitations of Data ONTAP support for NFSv4.
• The SPKM3 and LIPKEY security mechanisms are not supported.
• The delegation feature is not supported by every client type.
• Names with non-ASCII characters on volumes other than UTF8 volumes are rejected by the storagesystem.
• All file handles are persistent; the server does not give volatile file handles.
• Migration and replication are not supported.
• All recommended attributes are supported, except for the following:
• archive
• hidden
• homogeneous
• mimetype
• quota_avail_hard
• quota_avail_soft
• quota_used
• system
• time_backup
File access using NFS | 45

Note: Although it does not support the quota* attributes, Data ONTAP does support user andgroup quotas through the RQUOTA side band protocol.
• NFSv4 does not use the User Datagram Protocol (UDP) transport protocol.
If you enable NFSv4 and disable NFS over TCP by setting options nfs.tcp.enable to off, thenNFSv4 is effectively disabled.
How the pseudo-fs in NFSv4 affects mountpointsNFSv4 uses a pseudo-fs (file system) as an entry point into your storage system for determiningmountpoints. A pseudo-fs allows you to use one port for security, rather than several. All NFSv4 serverssupport the use of a pseudo-fs.
Because of the pseudo-fs used in NFSv4, you might experience inconsistencies with mountpointsbetween NFSv3 and NFSv4,
In the examples that follow, you have these volumes:
• /vol/vol0 (root)
• /vol/vol1
• /vol/home
Example 1
In NFSv3 if you do not use the complete path from /vol/vol0, and you mount filer:/, the mountpoint isfiler:/vol/vol0. That is, if the path does not begin with /vol in NFSv3, Data ONTAP adds /vol/vol0 tothe beginning of the path.
In NFSv4, if you do not use the complete path from /vol/vol0 and you mount filer:/, you mount the rootof the pseudo-fs and not /vol/vol0. Data ONTAP does not add /vol/vol0 to the beginning of the path.
Therefore, if you mount filer:/ /n/filer using NFSv3 and try the same mount using NFSv4, you wouldmount a different file system.
Example 2
In the Data ONTAP implementation of the NFSv4 pseudo-fs, the nodes “/” and “/vol” are always presentand form the common prefix of any reference into the pseudo-fs. Any reference that does not beginwith “/vol” is invalid.
In this example, there is a /vol/vol0/home directory. In NFSv3, if you mount filer:/home/users, /homeis considered as the directory /vol/vol0/home. In NFSv4, if you mount filer:/home/users, /home is notinterpreted as the volume /vol/home; it is considered an invalid path in the pseudo-fs tree.
46 | Data ONTAP 7.3 File Access and Protocols Management Guide

Enabling or disabling NFSv4You can enable or disable NFSv4 by setting the nfs.v4.enable option to on or off, respectively.(By default, this option is set to off.)
Step
1. Then...If you want to...
Enter the following command:
options nfs.v4.enable on
Enable NFSv4
Enter the following command:
options nfs.v4.enable off
Disable NFSv4
Specifying the user ID domain for NFSv4To specify the user ID domain, you can set the nfs.v4.id_domain option.
About this task
The domain that Data ONTAP uses for NFSv4 user ID mapping by default is the NIS domain, if oneis set. If an NIS domain is not set, the DNS domain is used. You might need to set the user ID domainif, for example, you have multiple user ID domains.
Step
1. Enter the following command:
options nfs.v4.id_domain domain
Managing NFSv4 ACLsYou can enable, disable, set, modify, and view NFSv4 access control lists (ACLs).
Next topics
How NFSv4 ACLs work on page 48
Benefits of enabling NFSv4 ACLs on page 49
Compatibility between NFSv4 ACLs and Windows (NTFS) ACLs on page 49
How Data ONTAP uses NFSv4 ACLs to determine whether it can delete a file on page 49
Enabling and disabling NFSv4 ACLs on page 49
Setting or modifying an NFSv4 ACL on page 50
Viewing an NFSv4 ACL on page 50
File access using NFS | 47

How NFSv4 ACLs work
A client using NFSv4 ACLs can set and view ACLs on files and directories on the system. When a newfile or subdirectory is created in a directory that has an ACL, the new file or subdirectory inherits allACL Entries (ACEs) in the ACL that have been tagged with the appropriate inheritance flags.
For access checking, CIFS users are mapped to UNIX users. The mapped UNIX user and that user’sgroup membership are checked against the ACL.
If a file or directory has an ACL, that ACL is used to control access no matter what protocol—NFSv2,NFSv3, NFSv4, or CIFS—is used to access the file or directory and is used even if NFSv4 is no longerenabled on the system.
Files and directories inherit ACEs from NFSv4 ACLs on parent directories (possibly with appropriatemodifications) as long as the ACEs have been tagged with the appropriate inheritance flags.
When a file or directory is created as the result of an NFSv4 request, the ACL on the resulting file ordirectory depends on whether the file creation request includes an ACL or only standard UNIX fileaccess permissions, and whether the parent directory has an ACL:
• If the request includes an ACL, that ACL is used.
• If the request includes only standard UNIX file access permissions, but the parent directory has anACL, the ACEs in the parent directory's ACL are inherited by the new file or directory as long asthe ACEs have been tagged with the appropriate inheritance flags.
Note: A parent ACL is inherited even if nfs.v4.acl.enable is set to off.
• If the request includes only standard UNIX file access permissions, and the parent directory doesnot have an ACL, the client file mode is used to set standard UNIX file access permissions.
• If the request includes only standard UNIX file access permissions, and the parent directory has anon-inheritable ACL, a default ACL based on the mode bits passed into the request is set on thenew object.
The security semantics of a qtree are determined by its security style and its ACL (NFSv4 or NTFS):
For a qtree with UNIX security style:
• NFSv4 ACLs and mode bits are effective.
• NTFS ACLs are not effective.
• Windows clients cannot set attributes.
For a qtree with NTFS security style:
• NFSv4 ACLs are not effective.
• NTFS ACLs and mode bits are effective.
• UNIX clients cannot set attributes.
For a qtree with mixed security style:
48 | Data ONTAP 7.3 File Access and Protocols Management Guide

• NFSv4 ACLs and mode bits are effective.
• NTFS ACLs are effective.
• Both Windows and UNIX clients can set attributes.
Note: Files and directories in a qtree can have either an NFSv4 ACL or an NTFS ACL, but not both.Data ONTAP remaps one type to the other, as necessary.
Benefits of enabling NFSv4 ACLs
There are many benefits to enabling NFSv4 ACLs.
The benefits of enabling NFSv4 ACLs include the following:
• Finer-grained control of user access for files and directories
• Better NFS security
• Improved interoperability with CIFS
• Removal of the NFS limitation of 16 groups per user
Compatibility between NFSv4 ACLs and Windows (NTFS) ACLs
NFSv4 ACLs are different from Windows file-level ACLs (NTFS ACLs), but Data ONTAP can mapNFSv4 ACLs to Windows ACLs for viewing on Windows platforms.
Permissions displayed to NFS clients for files that have Windows ACLs are "display" permissions, andthe permissions used for checking file access are those of the Windows ACL.
Note: Data ONTAP does not support POSIX ACLs.
How Data ONTAP uses NFSv4 ACLs to determine whether it can delete a file
To determine whether it can delete a file, Data ONTAP uses not just the value of the file's DELETEbit, but a combination of the file's DELETE bit and the containing directory's DELETE_CHILD bit, asspecified in the NFS 4.1 RFC. For more information, see the NFS 4.1 RFC.
Enabling and disabling NFSv4 ACLs
To enable or disable NFSv4 ACLs, you can set the nfs.v4.acl.enable option to on or off,respectively. This option is set to off by default.
The nfs.v4.acl.enable option controls the setting and viewing of NFSv4 ACLs; it does not controlenforcement of these ACLs for access checking. For more information, see the na_options(1) man page.
Step
1. Enable or disable NFS4v ACLs.
File access using NFS | 49
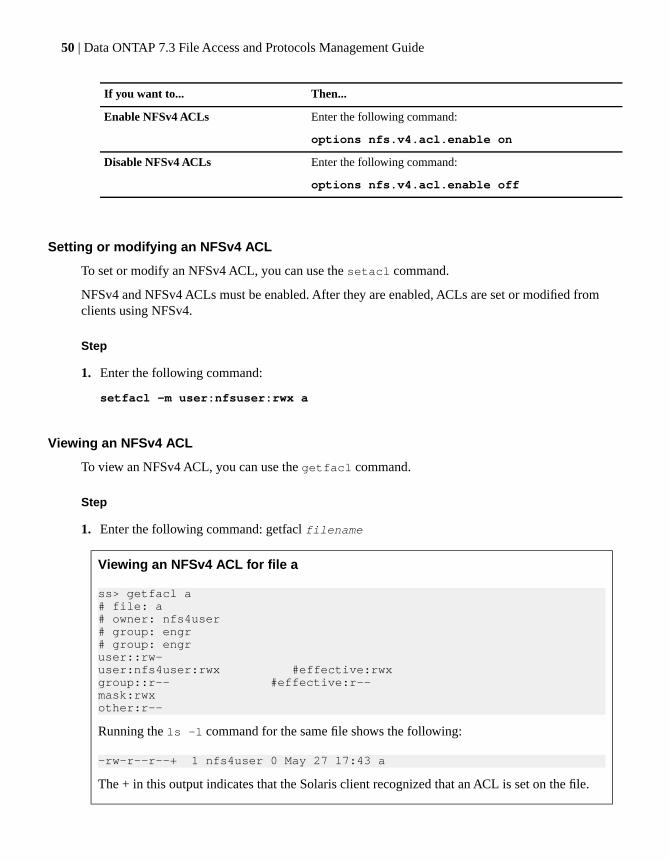
Then...If you want to...
Enter the following command:
options nfs.v4.acl.enable on
Enable NFSv4 ACLs
Enter the following command:
options nfs.v4.acl.enable off
Disable NFSv4 ACLs
Setting or modifying an NFSv4 ACL
To set or modify an NFSv4 ACL, you can use the setacl command.
NFSv4 and NFSv4 ACLs must be enabled. After they are enabled, ACLs are set or modified fromclients using NFSv4.
Step
1. Enter the following command:
setfacl -m user:nfsuser:rwx a
Viewing an NFSv4 ACL
To view an NFSv4 ACL, you can use the getfacl command.
Step
1. Enter the following command: getfacl filename
Viewing an NFSv4 ACL for file a
ss> getfacl a# file: a# owner: nfs4user# group: engr# group: engruser::rw-user:nfs4user:rwx #effective:rwxgroup::r-- #effective:r--mask:rwxother:r--
Running the ls -l command for the same file shows the following:
-rw-r--r--+ 1 nfs4user 0 May 27 17:43 a
The + in this output indicates that the Solaris client recognized that an ACL is set on the file.
50 | Data ONTAP 7.3 File Access and Protocols Management Guide

Managing NFSv4 open delegationsYou can enable and disable NFSv4 open delegations and retrieve NFSv4 open delegation statistics.
Next topics
How NFSv4 open delegations work on page 51
Enabling or disabling NFSv4 read open delegations on page 52
Enabling or disabling NFSv4 write open delegations on page 52
Displaying NFSv4 open delegation statistics on page 53
How NFSv4 open delegations work
Data ONTAP supports read and write open delegations in accordance with RFC 3530.
As specified in RFC 3530, when an NFSv4 client opens a file, Data ONTAP can delegate furtherhandling of opening and writing requests to the opening client. There are two types of open delegations:read and write. A read open delegation allows a client to handle requests to open a file for reading thatdo not deny read access to others. A write open delegation allows the client to handle all open requests.
Delegation works on files within any style of qtree, whether or not opportunistic lock (oplocks) havebeen enabled.
Delegation of file operations to a client can be recalled when the lease expires, or when the storagesystem receives the following requests from another client:
• Write to file, open file for writing, or open file for “deny read”
• Change file attributes
• Rename file
• Delete file
When a lease expires, the delegation state is revoked and all of the associated state is marked “soft.”This means that if the storage system receives a conflicting lock request for this same file from anotherclient before the lease has been renewed by the client previously holding the delegation, the conflictinglock is granted. If there is no conflicting lock and the client holding the delegation renews the lease,the soft locks are changed to hard locks and will not be removed in the case of a conflicting access.However, the delegation is not granted again upon a lease renewal.
When the server reboots, the delegation state is lost. Clients can reclaim the delegation state uponreconnection instead of going through the entire delegation request process again. When a client holdinga read delegation reboots, all delegation state information is flushed from the storage system cacheupon reconnection. The client must issue a delegation request to establish a new delegation.
File access using NFS | 51
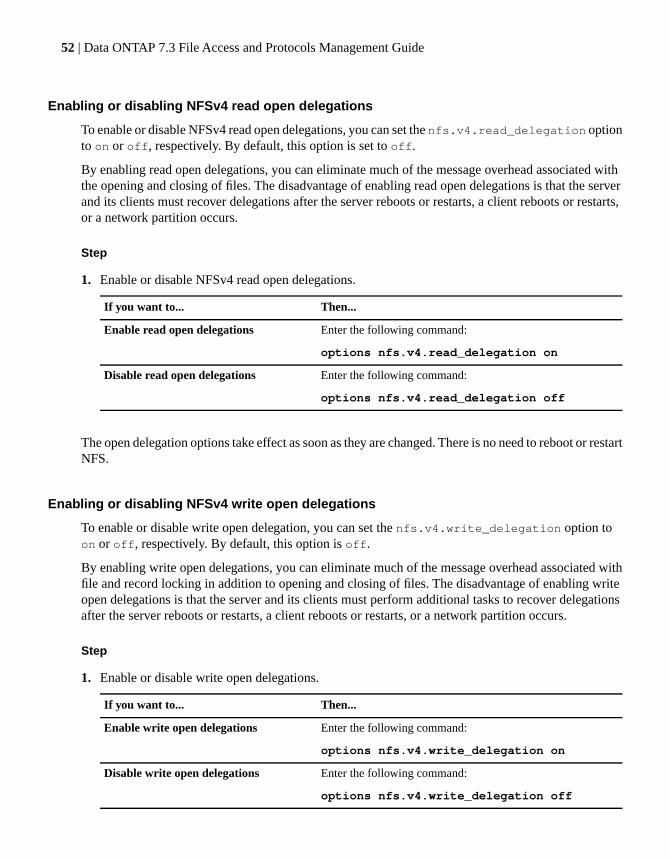
Enabling or disabling NFSv4 read open delegations
To enable or disable NFSv4 read open delegations, you can set the nfs.v4.read_delegation optionto on or off, respectively. By default, this option is set to off.
By enabling read open delegations, you can eliminate much of the message overhead associated withthe opening and closing of files. The disadvantage of enabling read open delegations is that the serverand its clients must recover delegations after the server reboots or restarts, a client reboots or restarts,or a network partition occurs.
Step
1. Enable or disable NFSv4 read open delegations.
Then...If you want to...
Enter the following command:
options nfs.v4.read_delegation on
Enable read open delegations
Enter the following command:
options nfs.v4.read_delegation off
Disable read open delegations
The open delegation options take effect as soon as they are changed. There is no need to reboot or restartNFS.
Enabling or disabling NFSv4 write open delegations
To enable or disable write open delegation, you can set the nfs.v4.write_delegation option toon or off, respectively. By default, this option is off.
By enabling write open delegations, you can eliminate much of the message overhead associated withfile and record locking in addition to opening and closing of files. The disadvantage of enabling writeopen delegations is that the server and its clients must perform additional tasks to recover delegationsafter the server reboots or restarts, a client reboots or restarts, or a network partition occurs.
Step
1. Enable or disable write open delegations.
Then...If you want to...
Enter the following command:
options nfs.v4.write_delegation on
Enable write open delegations
Enter the following command:
options nfs.v4.write_delegation off
Disable write open delegations
52 | Data ONTAP 7.3 File Access and Protocols Management Guide
The open delegation options take effect as soon as they are changed. There is no need to reboot or restartNFS.
Displaying NFSv4 open delegation statistics
To display information about NFSv4 open delegation requests, you can use the nfsstat command.
Results returned by the nfsstat command include open delegation requests that have been grantedas well as requests that have been denied due to an error.
For information about open delegation requests that your storage system has denied, view the systemlog file.
Next topics
Displaying NFSv4 open delegation statistics for all clients on page 53
Displaying NFSv4 open delegation statistics for a specific client on page 53
Displaying NFSv4 open delegation statistics for a vFiler unit on page 54
Displaying NFSv4 open delegation statistics for a storage system on page 54
Displaying NFSv4 open delegation statistics for all clients
To display NFSv4 open delegation information for all clients, you can enter the nfsstat -l command.
Step
1. Enter the following command:
nfsstat -l count
The storage system returns individual NFSv4 open delegation statistics for each client up to the countyou specify. If you do not specify a count, the storage system returns statistics for the first 256 clientsin order of the total NFS operations performed by each client.
Displaying NFSv4 open delegation statistics for a specific client
To display NFSv4 open delegation information for a specific client, you can use the nfsstat -hcommand.
Step
1. Enter the following command:
nfsstat -h hostname or ip_address
The storage system returns individual NFSv4 open delegation statistics for the specified client.
File access using NFS | 53
Displaying NFSv4 open delegation statistics for a vFiler unit
To display NFSv4 open delegation statistics for a vFiler unit, you can run the nfsstat -d commandin the vFiler unit's context.
Step
1. Enter the following command:
vfiler run filername nfsstat -d
Displaying NFSv4 open delegation statistics for a storage system
To display NFSv4 open delegation information for a storage system, you can enter the nfsstat -dcommand.
Step
1. Enter the following command:
nfsstat -d
The storage system returns the total number of NFSv4 open delegations handled by the storage system,including current NFSv4 open delegations and any that have been recalled. To view only current NFSv4open delegations handled by the storage system, use the lock status command.
Configuring NFSv4 file and record lockingYou can configure NFSv4 file and record locking by specifying the locking lease period and graceperiod.
Next topics
About NFSv4 file and record locking on page 54
Specifying the NFSv4 locking lease period on page 55
Specifying the NFSv4 locking grace period on page 55
About NFSv4 file and record locking
For NFSv4 clients, Data ONTAP supports the NFSv4 byte-range file-locking mechanism, maintainingthe state of all file locks under a lease-based model.
In accordance with RFC 3530, Data ONTAP "defines a single lease period for all state held by a[n]NFS client. If the client does not renew its lease within the defined period, all state associated with theclient's lease may be released by the server." The client can renew its lease explicitly or implicitly byperforming an operation, such as reading a file.
54 | Data ONTAP 7.3 File Access and Protocols Management Guide
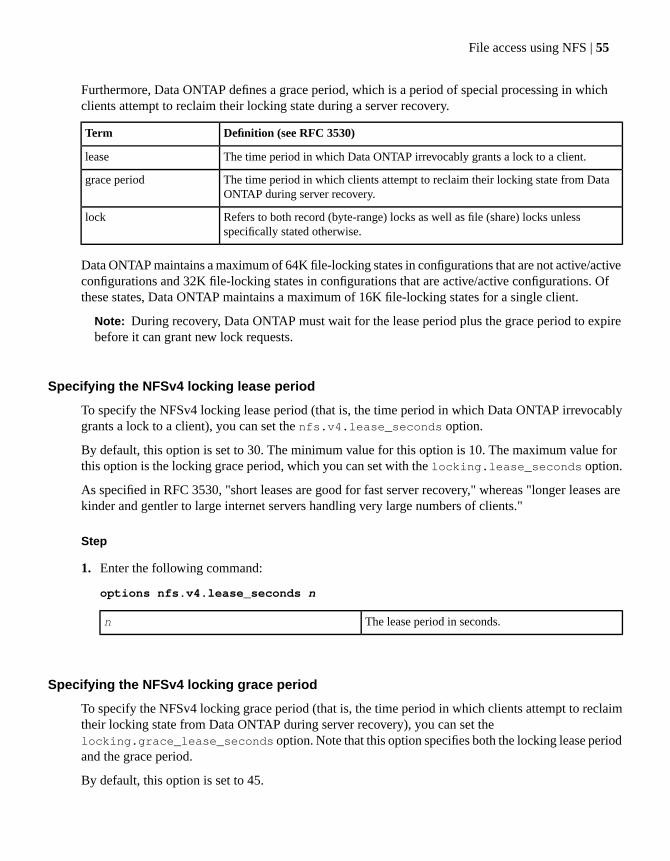
Furthermore, Data ONTAP defines a grace period, which is a period of special processing in whichclients attempt to reclaim their locking state during a server recovery.
Definition (see RFC 3530)Term
The time period in which Data ONTAP irrevocably grants a lock to a client.lease
The time period in which clients attempt to reclaim their locking state from DataONTAP during server recovery.
grace period
Refers to both record (byte-range) locks as well as file (share) locks unlessspecifically stated otherwise.
lock
Data ONTAP maintains a maximum of 64K file-locking states in configurations that are not active/activeconfigurations and 32K file-locking states in configurations that are active/active configurations. Ofthese states, Data ONTAP maintains a maximum of 16K file-locking states for a single client.
Note: During recovery, Data ONTAP must wait for the lease period plus the grace period to expirebefore it can grant new lock requests.
Specifying the NFSv4 locking lease period
To specify the NFSv4 locking lease period (that is, the time period in which Data ONTAP irrevocablygrants a lock to a client), you can set the nfs.v4.lease_seconds option.
By default, this option is set to 30. The minimum value for this option is 10. The maximum value forthis option is the locking grace period, which you can set with the locking.lease_seconds option.
As specified in RFC 3530, "short leases are good for fast server recovery," whereas "longer leases arekinder and gentler to large internet servers handling very large numbers of clients."
Step
1. Enter the following command:
options nfs.v4.lease_seconds n
The lease period in seconds.n
Specifying the NFSv4 locking grace period
To specify the NFSv4 locking grace period (that is, the time period in which clients attempt to reclaimtheir locking state from Data ONTAP during server recovery), you can set thelocking.grace_lease_seconds option. Note that this option specifies both the locking lease periodand the grace period.
By default, this option is set to 45.
File access using NFS | 55

Step
1. Enter the following command:
options locking.grace_lease_seconds n
The grace period in seconds.n
Supporting PC-NFS clientsTo support PC-NFS clients, you can enable the pcnfsd daemon, create PC-NFS user entries in thestorage system's local files, and define the umask for files and directories that PC-NFS users create onthe storage system.
Next topics
How the pcnfsd daemon works on page 56
Enabling or disabling the pcnfsd daemon on page 57
Creating PC-NFS user entries in the storage system's local files on page 57
Defining the umask for files and directories that PC-NFS users create on page 58
How the pcnfsd daemon worksData ONTAP's pcnfsd daemon provides authentication services for clients using PC-NFS version 1 or2. Authenticated PC-NFS users can mount file system paths on your storage system just like NFS users.The pcnfsd daemon does not support printer service.
When the pcnfsd daemon receives an authentication request, it can use local files or NIS maps to validatethe user’s password. The local file used can be the /etc/shadow file or /etc/passwd file. The NIS mapsused can be passwd.adjunct or passwd.byname. When the shadow source is available, Data ONTAPuses it. The shadow source contains encrypted user information, instead of the password database.
The following list describes how the pcnfsd daemon uses local files or NIS maps for authenticatingboth PC-NFS version 1 and version 2 users:
If a shadow source is available, Data ONTAP uses the /etc/shadow file or the passwd.adjunct NIS mapto determine the user’s password.
If a shadow source is not available, Data ONTAP uses the /etc/passwd file or the passwd.byname NISmap to determine the user’s user ID (UID), primary group ID (GID), and password.
When the pcnfsd daemon receives a PC-NFS version 2 authentication request, it looks up the /etc/groupfile or the group.byname NIS map to determine all the groups to which the user belongs.
56 | Data ONTAP 7.3 File Access and Protocols Management Guide

Enabling or disabling the pcnfsd daemonTo enable or disable the pcnfsd daemon, you can set the pcnfsd.enable option to on or off,respectively.
Before you begin
NFS must be enabled on the storage system before you can enable the pcnfsd daemon.
About this task
Enable the pcnfsd daemon if you want the storage system to authenticate PC-NFS users when they tryto mount file system paths on the storage system. If you want another computer to authenticate users,you do not need to enable the pcnfsd daemon. Users authenticated by other computers can access filesystem paths on the storage system just like users authenticated by the storage system.
Step
1. Enable or disable the pcnfsd daemon.
Then...If you want to...
Enter the following command:
options pcnfsd.enable on
Enable the pcnfsd daemon
Enter the following command:
options pcnfsd.enable off
Disable the pcnfsd daemon
Creating PC-NFS user entries in the storage system's local filesTo create PC-NFS user entries in the storage system's local files, you can copy the /etc/passwd,/etc/shadow, and /etc/group files to the storage system from a UNIX host that properly authenticatesall of the PC-NFS users.
About this task
Create PC-NFS user entries in the storage system's local files if you want to use local files to authenticatePC-NFS users and determine group membership.
File access using NFS | 57
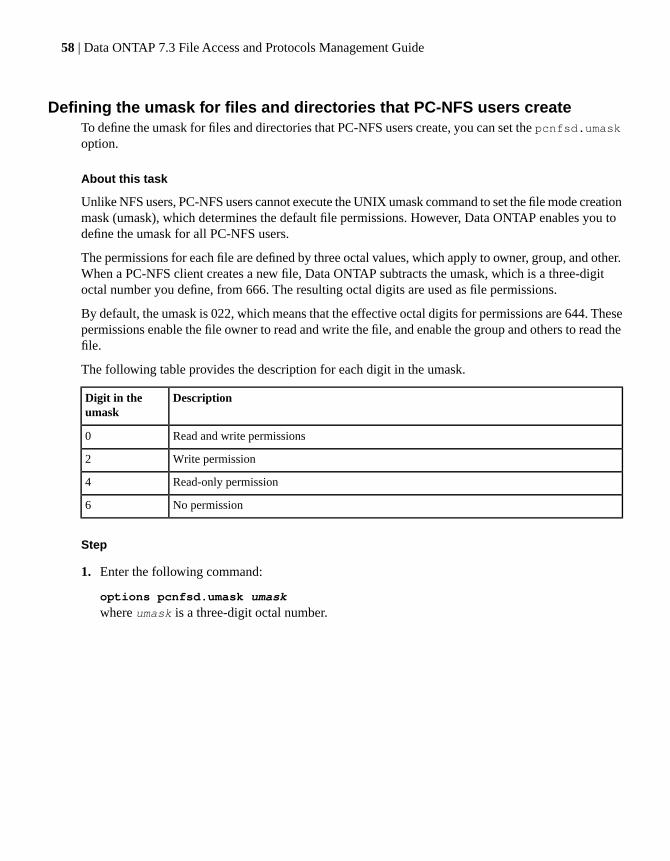
Defining the umask for files and directories that PC-NFS users createTo define the umask for files and directories that PC-NFS users create, you can set the pcnfsd.umaskoption.
About this task
Unlike NFS users, PC-NFS users cannot execute the UNIX umask command to set the file mode creationmask (umask), which determines the default file permissions. However, Data ONTAP enables you todefine the umask for all PC-NFS users.
The permissions for each file are defined by three octal values, which apply to owner, group, and other.When a PC-NFS client creates a new file, Data ONTAP subtracts the umask, which is a three-digitoctal number you define, from 666. The resulting octal digits are used as file permissions.
By default, the umask is 022, which means that the effective octal digits for permissions are 644. Thesepermissions enable the file owner to read and write the file, and enable the group and others to read thefile.
The following table provides the description for each digit in the umask.
DescriptionDigit in theumask
Read and write permissions0
Write permission2
Read-only permission4
No permission6
Step
1. Enter the following command:
options pcnfsd.umask umask
where umask is a three-digit octal number.
58 | Data ONTAP 7.3 File Access and Protocols Management Guide

Supporting WebNFS clientsTo support WebNFS clients, you can enable the WebNFS protocol and, optionally, set the WebNFSroot directory.
About this task
If you enable the WebNFS protocol, WebNFS client users can specify a URL starting with nfs:// totransfer a file from the storage system.
Next topics
Enabling or disabling the WebNFS protocol on page 59
Setting a WebNFS root directory on page 59
Enabling or disabling the WebNFS protocolTo enable or disable the WebNFS protocol, you can set the nfs.webnfs.enable option to on or offrespectively.
Step
1. Enable or disable the WebNFS protocol.
Then...If you want the Web NFS protocol...
Enter the following command:
options nfs.webnfs.enable on
Enabled
Enter the following command:
options nfs.webnfs.enable off
Disabled
Setting a WebNFS root directoryTo set a WebNFS root directory, you can specify the name of the root directory; then you can enablethe root directory.
About this task
If you set a root directory for WebNFS lookup, a WebNFS user can specify only the path name relativeto the root directory instead of the absolute path name. For example, if the WebNFS root directory is/vol/vol1/web, a WebNFS user can access the /vol/vol1/web/specs file by specifying nfs://specs as theURL.
File access using NFS | 59
Next topics
Specifying the name of the WebNFS root directory on page 60
Enabling the WebNFS root directory on page 60
Specifying the name of the WebNFS root directory
To specify the name of the WebNFS root directory, you can set the nfs.webnfs.rootdir option.
Step
1. Enter the following command:
options nfs.webnfs.rootdir directory
directory is the full path to the root directory.
Enabling the WebNFS root directory
To enable the WebNFS root directory, you can set the nfs.webnfs.rootdir.set option to on.
You must specify the name of the WebNFS root directory before you enable it.
Step
1. Enter the following command:
options nfs.webnfs.rootdir.set on
NFS over IPv6Starting with Data ONTAP 7.3.1, NFS clients can access files from your storage system over an IPv6network.
Next topics
Enabling or disabling NFS over IPv6 on page 61
Textual representation of IPv6 addresses on page 61
60 | Data ONTAP 7.3 File Access and Protocols Management Guide

Enabling or disabling NFS over IPv6You can enable or disable NFS over IPv6 by setting the nfs.ipv6.enable option to on or off,respectively.
Before you begin
You must enable IPv6 on the storage system by setting the ip.v6.enable option to on. For moreinformation about enabling IPv6 on your storage system, see the Data ONTAP Network ManagementGuide.
About this task
If you have enabled NFS over IPv6 and you then disable IPv6 on your storage system by setting theip.v6.enable option to off, NFS is automatically disabled over IPv6.
Steps
1. Then...If you want NFS over IPv6 to be...
Enter the following command:
options nfs.ipv6.enable on
Enabled
Enter the following command:
options nfs.ipv6.enable off
Disabled
2. Restart NFS. Enter the following commands:
nfs off
nfs on
Textual representation of IPv6 addressesAccording to RFC 3513, the preferred form for representing IPv6 addresses as text strings isx:x:x:x:x:x:x:x, where the x's are "the hexadecimal values of the eight 16-bit pieces of the addresses."
Examples:
FEDC:BA98:7654:3210:FEDC:BA98:7654:3210
1080:0:0:0:8:800:200C:417A
For more information, search the Web for RFC 3513.
File access using NFS | 61

File access using CIFS
You can enable and configure the CIFS server to let CIFS clients access files on your storage system.
Next topics
Configuring CIFS on your storage system on page 63
Configuring SMB on your storage system on page 71
Managing shares on page 79
Managing access control lists on page 93
Managing home directories on page 102
Managing local users and groups on page 111
Applying Group Policy Objects on page 116
Improving client performance with oplocks on page 124
Managing authentication and network services on page 128
Monitoring CIFS activity on page 140
Managing CIFS services on page 143
Troubleshooting access control problems on page 149
Using FPolicy on page 153
CIFS over IPv6 on page 234
Configuring CIFS on your storage systemYou can use the cifs setup command to configure CIFS on your storage system. For generalinformation about configuring a storage system for the first time, see the Data ONTAP Software SetupGuide .
Next topics
Supported Windows clients and domain controllers on page 64
What the cifs setup command does on page 64
Setting up your system initially on page 65
Specifying WINS servers on page 65
Changing the storage system domain on page 66
Changing protocol modes on page 67
Specifying Windows user account names on page 69
Reconfiguring CIFS on your storage system on page 70
File access using CIFS | 63

Supported Windows clients and domain controllersStorage systems running Data ONTAP can provide services to a specific set of Windows clients anddomain controllers.
Supported Windows clients:
• Windows Server 2008
• Windows Vista
• Windows Server 2003 R2
• Windows Server 2003
• Windows XP
• Windows 2000
• Windows NT
• Windows 98
• Windows 95
Supported domain controllers:
• Windows Server 2008
• Windows Server 2003 R2
• Windows Server 2003
• Windows 2000
• Windows NT
For more information, see the Windows File Services (CIFS) Compatibility Matrix on the NOW siteat http://now.netapp.com/.
There, you will find information on the following topics:
• Interoperability of Data ONTAP and new releases of Microsoft operating systems
• Data ONTAP and Microsoft Service Packs Compatibility Matrix
• Data ONTAP and Microsoft Security Updates
What the cifs setup command doesIn addition to performing initial CIFS configuration, the cifs setup command enables you to performseveral tasks.
With the cifs setup command, you can perform the following tasks:
• Create and name a CIFS server that your CIFS clients can access
• Join the CIFS server to a domain or workgroup, or move between them
• Create a default set of local CIFS users and groups
64 | Data ONTAP 7.3 File Access and Protocols Management Guide
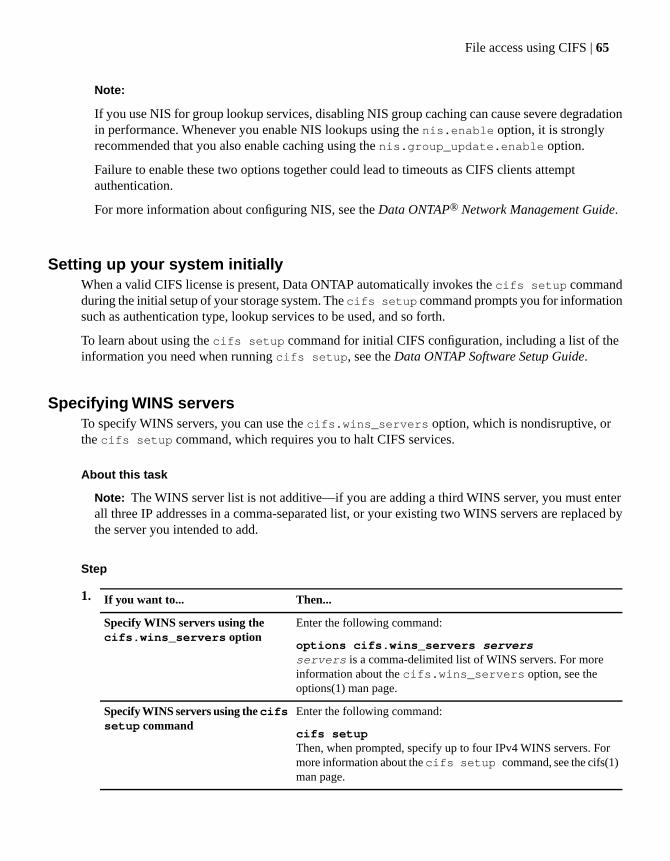
Note:
If you use NIS for group lookup services, disabling NIS group caching can cause severe degradationin performance. Whenever you enable NIS lookups using the nis.enable option, it is stronglyrecommended that you also enable caching using the nis.group_update.enable option.
Failure to enable these two options together could lead to timeouts as CIFS clients attemptauthentication.
For more information about configuring NIS, see the Data ONTAP® Network Management Guide.
Setting up your system initiallyWhen a valid CIFS license is present, Data ONTAP automatically invokes the cifs setup commandduring the initial setup of your storage system. The cifs setup command prompts you for informationsuch as authentication type, lookup services to be used, and so forth.
To learn about using the cifs setup command for initial CIFS configuration, including a list of theinformation you need when running cifs setup, see the Data ONTAP Software Setup Guide.
Specifying WINS serversTo specify WINS servers, you can use the cifs.wins_servers option, which is nondisruptive, orthe cifs setup command, which requires you to halt CIFS services.
About this task
Note: The WINS server list is not additive—if you are adding a third WINS server, you must enterall three IP addresses in a comma-separated list, or your existing two WINS servers are replaced bythe server you intended to add.
Step
1. Then...If you want to...
Enter the following command:
options cifs.wins_servers serversservers is a comma-delimited list of WINS servers. For moreinformation about the cifs.wins_servers option, see theoptions(1) man page.
Specify WINS servers using thecifs.wins_servers option
Enter the following command:
cifs setupThen, when prompted, specify up to four IPv4 WINS servers. Formore information about the cifs setup command, see the cifs(1)man page.
Specify WINS servers using the cifssetup command
File access using CIFS | 65

Changing the storage system domainIf you have already configured your storage system for Windows Domain authentication and you wantto move the storage system to a different domain, you need to run the cifs setup command.
Before you begin
In order to perform this procedure, you need an administrative account with permissions to add anyWindows server to the domain.
About this task
After you change the storage system’s domain, Data ONTAP updates the membership of theBUILTIN\Administrators group to reflect the new domain. This change ensures that the new domain’sAdministrators group can manage the storage system even if the new domain is not a trusted domainof the old domain.
Note: Until you actually put the CIFS server into a new domain or workgroup, you can cancel theCIFS setup process and return to your old settings by pressing Ctrl+C and then entering the cifsrestart command.
Steps
1. If CIFS is currently running, enter the following command:
cifs terminate
2. Run the cifs setup command:
cifs setup
The following prompt appears:
Do you want to delete the existing filer account information? [no]
3. To delete your existing account information, enter the following:
yes
Note: You must delete your existing account information in order to reach the DNS server entryprompt.
After deleting your account information, you are given the opportunity to rename the storage system:
The default name of this filer will be 'filer1'.
Do you want to modify this name? [no]:
4. To keep the current storage system name, press Enter; otherwise, enter yes and enter a new storagesystem name.
Data ONTAP displays a list of authentication methods:
66 | Data ONTAP 7.3 File Access and Protocols Management Guide

Data ONTAP CIFS services support four styles of user authentication. Choose the one from the list below that best suits your situation.
(1) Active Directory domain authentication (Active Directory domains only)
(2) Windows NT 4 domain authentication (Windows NT or Active Directory domains)
(3) Windows Workgroup authentication using the filer's local user accounts
(4) /etc/passwd and/or NIS/LDAP authentication
Selection (1-4)? [1]:
5. To accept the default method for domain authentication (Active Directory), press Enter. Otherwise,choose a new authentication method.
6. Respond to the remainder of the cifs setup prompts. To accept a default value, press Enter.
Upon exiting, the cifs setup utility starts CIFS.
7. To confirm your changes, enter the following command:
cifs domaininfo
Data ONTAP displays the storage system's domain information.
Changing protocol modesWhen you have a valid CIFS license and a valid NFS license, you can change your protocol settingfrom unix (the default) to ntfs or mixed (multiprotocol) mode.
About this task
The protocol mode determines whether NFS, CIFS, or both clients have access to the files on the storagesystem.
You can set the protocol mode by running the cifs setup utility or setting thewafl.default_security_style option.
If you use cifs setup to change to multiprotocol mode, files are not immediately available to NFSclients. To make files available to NFS clients after changing to multiprotocol mode using cifs setup,you must also change the root volume qtree security style to unix; then use the chmod command topermit UNIX client access as desired.
Note: An NFS client can also get access to a file a with a Windows ACL if Data ONTAP successfullymaps the user's Unix user id to a CIFS credential and verifies (with the CIFS credential) that the usercan access the file. For example, if Data ONTAP successfully maps the Unix root user to a user inthe BUILTIN\Administrators group, then the Unix root user can access the same files that theWindows user can access regardless of the security style.
File access using CIFS | 67
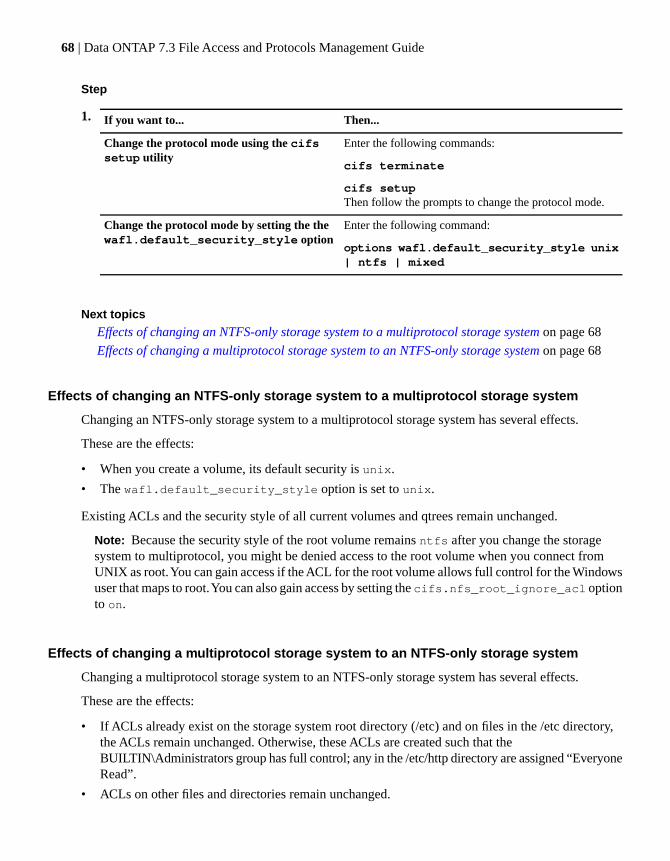
Step
1. Then...If you want to...
Enter the following commands:
cifs terminate
cifs setupThen follow the prompts to change the protocol mode.
Change the protocol mode using the cifssetup utility
Enter the following command:
options wafl.default_security_style unix| ntfs | mixed
Change the protocol mode by setting the thewafl.default_security_style option
Next topics
Effects of changing an NTFS-only storage system to a multiprotocol storage system on page 68
Effects of changing a multiprotocol storage system to an NTFS-only storage system on page 68
Effects of changing an NTFS-only storage system to a multiprotocol storage system
Changing an NTFS-only storage system to a multiprotocol storage system has several effects.
These are the effects:
• When you create a volume, its default security is unix.
• The wafl.default_security_style option is set to unix.
Existing ACLs and the security style of all current volumes and qtrees remain unchanged.
Note: Because the security style of the root volume remains ntfs after you change the storagesystem to multiprotocol, you might be denied access to the root volume when you connect fromUNIX as root. You can gain access if the ACL for the root volume allows full control for the Windowsuser that maps to root. You can also gain access by setting the cifs.nfs_root_ignore_acl optionto on.
Effects of changing a multiprotocol storage system to an NTFS-only storage system
Changing a multiprotocol storage system to an NTFS-only storage system has several effects.
These are the effects:
• If ACLs already exist on the storage system root directory (/etc) and on files in the /etc directory,the ACLs remain unchanged. Otherwise, these ACLs are created such that theBUILTIN\Administrators group has full control; any in the /etc/http directory are assigned “EveryoneRead”.
• ACLs on other files and directories remain unchanged.
68 | Data ONTAP 7.3 File Access and Protocols Management Guide
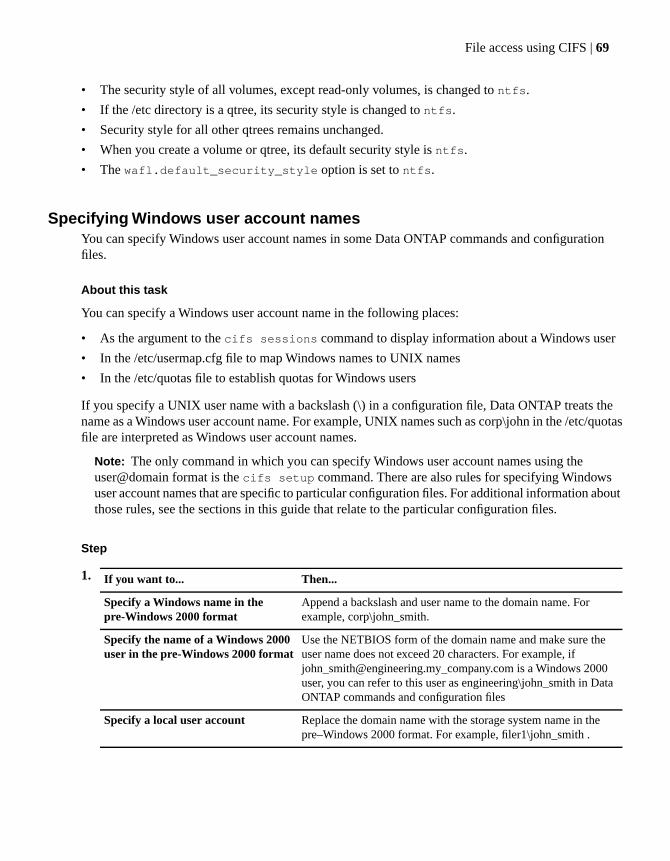
• The security style of all volumes, except read-only volumes, is changed to ntfs.
• If the /etc directory is a qtree, its security style is changed to ntfs.
• Security style for all other qtrees remains unchanged.
• When you create a volume or qtree, its default security style is ntfs.
• The wafl.default_security_style option is set to ntfs.
Specifying Windows user account namesYou can specify Windows user account names in some Data ONTAP commands and configurationfiles.
About this task
You can specify a Windows user account name in the following places:
• As the argument to the cifs sessions command to display information about a Windows user
• In the /etc/usermap.cfg file to map Windows names to UNIX names
• In the /etc/quotas file to establish quotas for Windows users
If you specify a UNIX user name with a backslash (\) in a configuration file, Data ONTAP treats thename as a Windows user account name. For example, UNIX names such as corp\john in the /etc/quotasfile are interpreted as Windows user account names.
Note: The only command in which you can specify Windows user account names using theuser@domain format is the cifs setup command. There are also rules for specifying Windowsuser account names that are specific to particular configuration files. For additional information aboutthose rules, see the sections in this guide that relate to the particular configuration files.
Step
1. Then...If you want to...
Append a backslash and user name to the domain name. Forexample, corp\john_smith.
Specify a Windows name in thepre-Windows 2000 format
Use the NETBIOS form of the domain name and make sure theuser name does not exceed 20 characters. For example, [email protected]_company.com is a Windows 2000user, you can refer to this user as engineering\john_smith in DataONTAP commands and configuration files
Specify the name of a Windows 2000user in the pre-Windows 2000 format
Replace the domain name with the storage system name in thepre–Windows 2000 format. For example, filer1\john_smith .
Specify a local user account
File access using CIFS | 69
Reconfiguring CIFS on your storage systemYou can reconfigure CIFS after your initial setup by running the cifs setup utility again.
Before you begin
Make sure to complete all of the prequisite steps that are appropriate to your setup before you reconfigureCIFS:
• If you want to change the storage system's domain from a Windows NT domain to another domainas you reconfigure your storage system, the storage system must be able to communicate with theprimary domain controller for the domain in which you want to install the storage system.You cannot use the backup domain controller for installing the storage system.
• If you want to change the name of the storage system, you must create a new computer account onthe domain controller.(Required only for versions of Windows after Windows 2000.)
• Your storage system and the domain controllers in the same domain must be synchronized with thesame time source. If the time on the storage system and the time on the domain controllers are notsynchronized, the following error message is displayed:
Clock skew too great
For detailed steps on how to set up time synchronization services, see the Data ONTAP SystemAdministration Guide.
About this task
The CIFS configuration settings that you can change by running cifs setup are as follows:
• WINS server addresses
• Whether your storage system is multiprotocol or NTFS-only
• Whether the storage system uses Windows domain authentication, Windows workgroupauthentication, or UNIX password authentication
• The domain or workgroup to which the storage system belongs
• The storage system name
Note: If you reconfigure CIFS with the cifs setup command when a UNIX-based KDC isconfigured for NFS, Data ONTAP renames your UNIX keytab file to include the string UNIX. Torename the keytab file for UNIX-based KDCs, enter "yes" when Data ONTAP displays the followingmessage prompt during CIFS reconfiguration:
*** Setup has detected that this filer is configured to supportKerberos *** authentication with NFS clients using a non-ActiveDirectory KDC. If *** you choose option 1 below, to allow NFS touse the non-Active *** Directory KDC, your existing keytab file'/etc/krb5.keytab' will be *** renamed to '/etc/UNIX_krb5.keytab'.
70 | Data ONTAP 7.3 File Access and Protocols Management Guide
NFS will be using the new keytab *** file '/etc/UNIX_krb5.keytab'.Do you want to continue. (Yes/No)?
If you enter "yes," Data ONTAP renames the keytab file for UNIX-based KDCs; if you enter "no"or press Enter, Data ONTAP terminates the CIFS reconfiguration process. This renaming is neededfor Kerberos multirealm configurations.
Note: If you need to terminate the cifs setup utility when it is in progress, press Ctrl-C. You thenenter the cifs restart command to restart CIFS using your old configuration information.
Steps
1. Enter the following command:
cifs terminate
CIFS service is stopped for the storage system.
2. Enter the following command:
cifs setup
Data ONTAP runs the cifs setup program, which displays a list of prompts for you to reconfigureCIFS.
Configuring SMB on your storage systemIn addition to the CIFS protocol, Data ONTAP supports the original Server Message Block (SMB)protocol and the SMB 2.0 protocol.
Next topics
Support for the original SMB protocol on page 72
Support for the SMB 2.0 protocol on page 72
When to enable the SMB 2.0 protocol on page 74
Enabling or disabling the SMB 2.0 protocol on page 75
Enabling or disabling SMB 2.0 durable handles on page 75
Specifying the SMB 2.0 durable handle timeout value on page 76
SMB signing on page 76
Enabling or disabling the storage system's SMB 2.0 protocol client capability on page 79
File access using CIFS | 71

Support for the original SMB protocolData ONTAP supports the original SMB protocol, which extends CIFS with security, file, anddisk-management features.
According to the Microsoft SMB protocol specification, the original SMB protocol includes the followingfeatures:
• New authentication methods, including Kerberos authentication
• Signing of messages
• Enumeration of and access to previous versions of files
• Management of files on the server by a client without the need to read all of the data from the serverand write it back
• SMB connections that use direct TCP (instead of NetBIOS over TCP/UDP), NetBIOS overInternetwork Packet Exchange (IPX), NetBIOS Extended User Interface (NetBEUI), for SMBtransport
• Support of client use of file system controls (FSCTLs) to request file system operations exposed bythe server
• Support for retrieving extended information in response to existing commands
For more information, see the Microsoft SMB protocol specification.
Support for the SMB 2.0 protocolIn addition to the original SMB protocol, Data ONTAP supports the SMB 2.0 protocol, which providesseveral enhancements to the original SMB protocol.
The SMB 2.0 protocol is a major revision of the original SMB protocol in that it uses completelydifferent packet formats; however, the SMB 2.0 protocol maintains compatibility with servers andclients that use the original SMB protocol because the client may use the original SMB protocol tonegotiate the use of the SMB 2.0 protocol.
According to the Microsoft SMB 2.0 protocol specification, SMB 2.0 includes the following features:
• It allows "an open to a file to be reestablished after a client connection becomes temporarilydisconnected."An open is "[a] runtime object that corresponds to a currently established access to a specific fileor named pipe from a specific client to a specific server, using a specific user security context. Bothclients and servers maintain opens that represent active accesses."
• It allows "the server to balance the number of simultaneous operations that a client can haveoutstanding at any time."
• It provides "scalability in terms of the number of shares, users, and simultaneously open files."
In particular, Data ONTAP supports the following SMB 2.0 features:
• Asynchronous messages
72 | Data ONTAP 7.3 File Access and Protocols Management Guide
Data ONTAP uses asynchronous messages to send an interim response to an SMB 2.0 client forany request that could potentially block a full response for an indefinite amount of time, includingthe following requests:
• CHANGE_NOTIFY requests
• CREATE requests blocked by an oplock revocation
• LOCK requests on an already locked byte range
• Durable handlesData ONTAP uses durable handles, which are file handles that persist across SMB 2.0 sessions, toprevent data loss from occurring during short network outages. When a client opens a file, it specifieswhether it needs a durable handle. If so, Data ONTAP creates the durable handle. Then, if an SMB2.0 connection goes down, Data ONTAP makes the durable handle available for reclaiming by thesame user on a different SMB 2.0 connection. You can enable or disable Data ONTAP support fordurable handles. You can also specify how long Data ONTAP preserves durable handles after anetwork failure.
• SHA-256 signingData ONTAP uses the SHA-256 hash function to generate the message authentication codes (MAC)for the signing of SMB 2.0 messages. If you enable SMB 2.0 signing, Data ONTAP accepts SMB2.0 messages only if they have valid signatures.
• An algorithm for the granting of creditsAccording to the Microsoft SMB 2.0 protocol specification, "credits limit the number of outstandingrequests that a client can send to a server" and can "allow clients to send multiple simultaneousrequests to the storage system."
• Compounded requestsAccording to the Microsoft SMB 2.0 protocol specification, compounded requests are a "methodof combining multiple SMB 2.0 Protocol requests... into a single transmission request for submissionto the underlying transport."
Furthermore, you can enable or disable the storage system's SMB 2.0 protocol client capability, whichdetermines whether the storage system communicates with Windows servers using the SMB 2.0 protocolor the original SMB protocol.
Note: Data ONTAP does not support symbolic links, which are an optional feature of the SMB 2.0protocol.
For more information, see the Microsoft SMB 2.0 protocol specification.
Next topics
Support for create contexts on page 74
Support for file system controls on page 74
File access using CIFS | 73
Support for create contexts
Data ONTAP supports a subset of the create contexts defined in the Microsoft SMB 2.0 protocolspecification.
Data ONTAP supports the following create contexts:
• SMB2_CREATE_EA_BUFFER
• SMB2_CREATE_SD_BUFFER
• SMB2_CREATE_QUERY_MAXIMAL_ACCESS
• SMB2_CREATE_TIMEWARP_TOKEN
• SMB2_CREATE_DURABLE_HANDLE_REQUEST
• SMB2_CREATE_DURABLE_HANDLE_RECONNECT
Data ONTAP does not support the following create contexts, for which there is no known use case:
• SMB2_CREATE_ALLOCATION_SIZE
• SMB2_CREATE_QUERY_ON_DISK_ID
Support for file system controls
Data ONTAP supports a subset of the file system controls (FSCTLs) defined in the Microsoft SMB 2.0protocol specification.
Data ONTAP supports the following file system controls:
• FSCTL_PIPE_TRANSCEIVE
• FSCTL_PIPE_PEEK
• FSCTL_GET_DFS_REFERRALS
• FSCTL_SRV_ENUMERATE_SNAPSHOTS
Data ONTAP does not support the following file system controls, for which there is no known use case:
• FSCTL_SRV_REQUEST_RESUME_KEY
• FSCTL_SRV_COPYCHUNK
When to enable the SMB 2.0 protocolThere are several file-transferring and interprocess communication scenarios for which the SMB 2.0protocol is more suited than the original SMB protocol.
According to the Microsoft SMB 2.0 protocol specification, such scenarios might include those thathave the following requirements:
• More scalability with regard to simultaneously open files, number of shares, and user sessions
74 | Data ONTAP 7.3 File Access and Protocols Management Guide
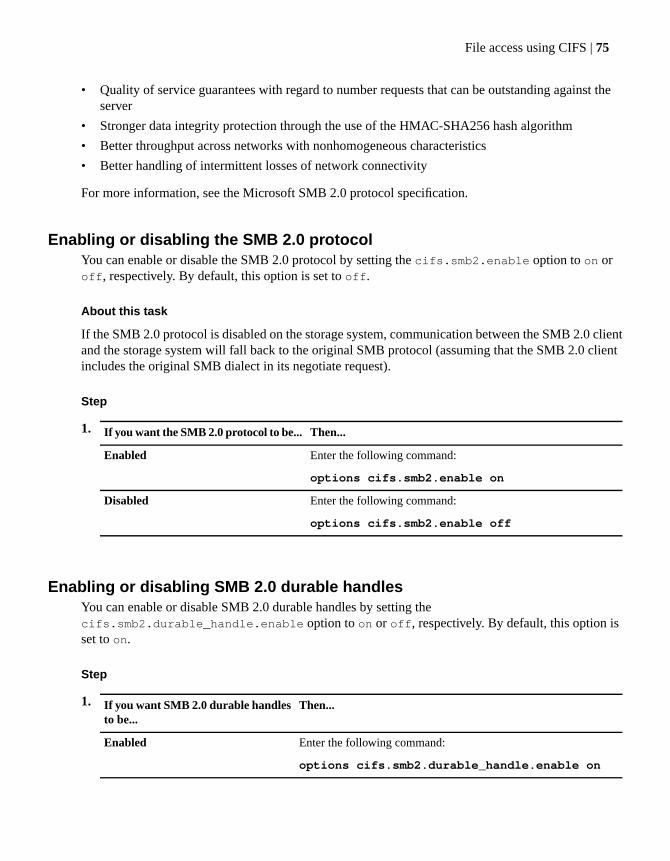
• Quality of service guarantees with regard to number requests that can be outstanding against theserver
• Stronger data integrity protection through the use of the HMAC-SHA256 hash algorithm
• Better throughput across networks with nonhomogeneous characteristics
• Better handling of intermittent losses of network connectivity
For more information, see the Microsoft SMB 2.0 protocol specification.
Enabling or disabling the SMB 2.0 protocolYou can enable or disable the SMB 2.0 protocol by setting the cifs.smb2.enable option to on oroff, respectively. By default, this option is set to off.
About this task
If the SMB 2.0 protocol is disabled on the storage system, communication between the SMB 2.0 clientand the storage system will fall back to the original SMB protocol (assuming that the SMB 2.0 clientincludes the original SMB dialect in its negotiate request).
Step
1. Then...If you want the SMB 2.0 protocol to be...
Enter the following command:
options cifs.smb2.enable on
Enabled
Enter the following command:
options cifs.smb2.enable off
Disabled
Enabling or disabling SMB 2.0 durable handlesYou can enable or disable SMB 2.0 durable handles by setting thecifs.smb2.durable_handle.enable option to on or off, respectively. By default, this option isset to on.
Step
1. Then...If you want SMB 2.0 durable handlesto be...
Enter the following command:
options cifs.smb2.durable_handle.enable on
Enabled
File access using CIFS | 75
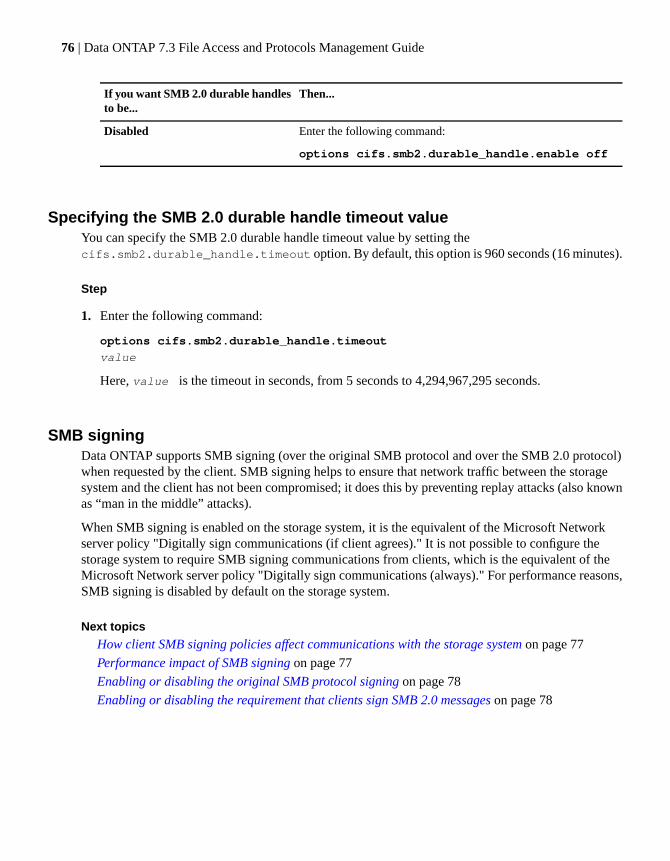
Then...If you want SMB 2.0 durable handlesto be...
Enter the following command:
options cifs.smb2.durable_handle.enable off
Disabled
Specifying the SMB 2.0 durable handle timeout valueYou can specify the SMB 2.0 durable handle timeout value by setting thecifs.smb2.durable_handle.timeout option. By default, this option is 960 seconds (16 minutes).
Step
1. Enter the following command:
options cifs.smb2.durable_handle.timeout
value
Here, value is the timeout in seconds, from 5 seconds to 4,294,967,295 seconds.
SMB signingData ONTAP supports SMB signing (over the original SMB protocol and over the SMB 2.0 protocol)when requested by the client. SMB signing helps to ensure that network traffic between the storagesystem and the client has not been compromised; it does this by preventing replay attacks (also knownas “man in the middle” attacks).
When SMB signing is enabled on the storage system, it is the equivalent of the Microsoft Networkserver policy "Digitally sign communications (if client agrees)." It is not possible to configure thestorage system to require SMB signing communications from clients, which is the equivalent of theMicrosoft Network server policy "Digitally sign communications (always)." For performance reasons,SMB signing is disabled by default on the storage system.
Next topics
How client SMB signing policies affect communications with the storage system on page 77
Performance impact of SMB signing on page 77
Enabling or disabling the original SMB protocol signing on page 78
Enabling or disabling the requirement that clients sign SMB 2.0 messages on page 78
76 | Data ONTAP 7.3 File Access and Protocols Management Guide

How client SMB signing policies affect communications with the storage system
There are two SMB signing policies on Windows clients that control the digital signing ofcommunications between clients and the storage system: "always" and "if server agrees."
Client SMB policies are controlled through security settings using the Microsoft Management Console(MMC). For more information about client SMB signing and security issues, see the Microsoft Windowsdocumentation.
Here are descriptions of the two SMB signing policies on Microsoft Network clients:
• "Digitally sign communications (if server agrees)": This setting controls whether the client’s SMBsigning capability is enabled. It is enabled by default. When this setting is disabled on the client,the client communicates normally with the storage system without SMB signing, regardless of theSMB signing setting on the storage system. When this setting is enabled on the client, communicationsbetween the client and storage system proceed as follows:
• If SMB signing is enabled on the storage system, all communications between client and storagesystem use SMB signing.
• If SMB signing is not enabled on the storage system, communications proceed normally withoutSMB signing.
• "Digitally sign communications (always)": This setting controls whether the client requires SMBsigning to communicate with a server. It is disabled by default. When this setting is disabled on theclient, SMB signing behavior is based on the policy setting for “Digitally sign communications (ifserver agrees)” and the setting on the storage system.When this setting is enabled on the client,communications between the client and storage system proceed as follows:
• If SMB signing is enabled on the storage system, all communications between client and storagesystem use SMB signing.
• If SMB signing is not enabled on the storage system, the client rejects communication with it.
Note: If your environment includes Windows clients configured to require SMB signing, youmust enable SMB signing on the storage system. If you do not, the storage system cannot servedata to these systems.
Performance impact of SMB signing
When SMB signing is enabled, all CIFS communications to and from Windows clients experience asignificant impact on performance, which affects both the clients and the server (that is, the storagesystem running Data ONTAP).
The performance degradation shows as increased CPU usage on both the clients and the server, althoughthe amount of network traffic does not change.
Depending on your network and your storage system implementation, the performance impact of SMBsigning can vary widely; you can verify it only through testing in your network environment.
File access using CIFS | 77
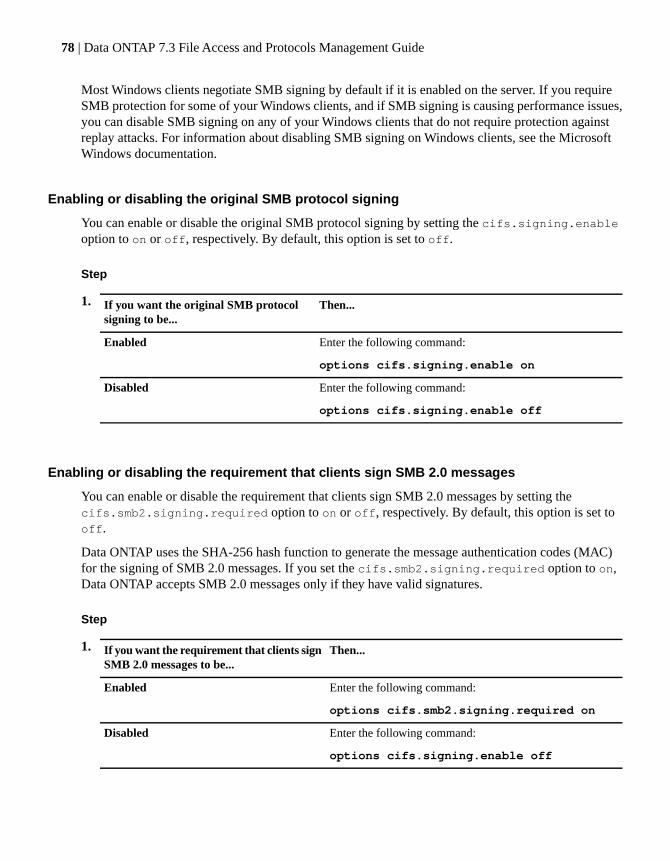
Most Windows clients negotiate SMB signing by default if it is enabled on the server. If you requireSMB protection for some of your Windows clients, and if SMB signing is causing performance issues,you can disable SMB signing on any of your Windows clients that do not require protection againstreplay attacks. For information about disabling SMB signing on Windows clients, see the MicrosoftWindows documentation.
Enabling or disabling the original SMB protocol signing
You can enable or disable the original SMB protocol signing by setting the cifs.signing.enableoption to on or off, respectively. By default, this option is set to off.
Step
1. Then...If you want the original SMB protocolsigning to be...
Enter the following command:
options cifs.signing.enable on
Enabled
Enter the following command:
options cifs.signing.enable off
Disabled
Enabling or disabling the requirement that clients sign SMB 2.0 messages
You can enable or disable the requirement that clients sign SMB 2.0 messages by setting thecifs.smb2.signing.required option to on or off, respectively. By default, this option is set tooff.
Data ONTAP uses the SHA-256 hash function to generate the message authentication codes (MAC)for the signing of SMB 2.0 messages. If you set the cifs.smb2.signing.required option to on,Data ONTAP accepts SMB 2.0 messages only if they have valid signatures.
Step
1. Then...If you want the requirement that clients signSMB 2.0 messages to be...
Enter the following command:
options cifs.smb2.signing.required on
Enabled
Enter the following command:
options cifs.signing.enable off
Disabled
78 | Data ONTAP 7.3 File Access and Protocols Management Guide
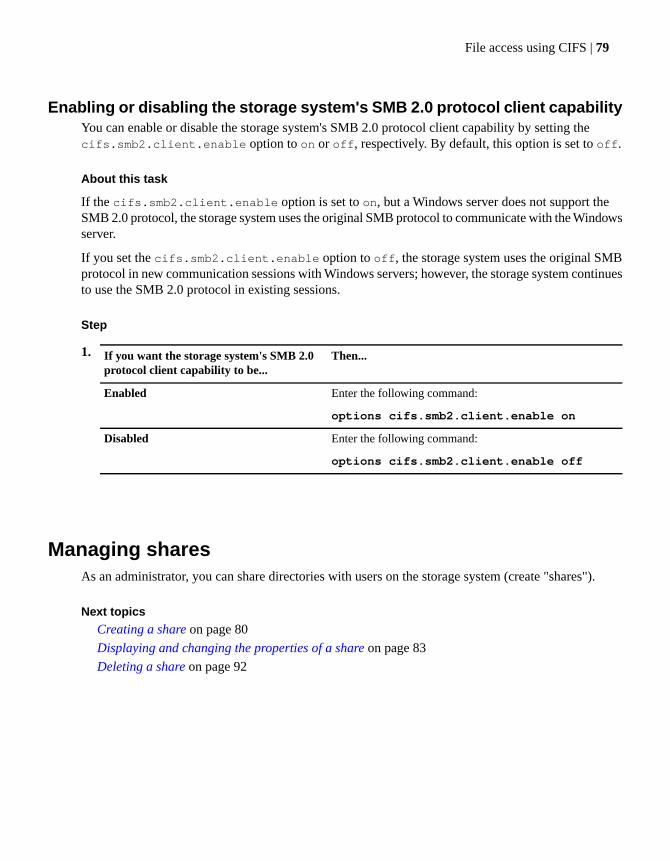
Enabling or disabling the storage system's SMB 2.0 protocol client capabilityYou can enable or disable the storage system's SMB 2.0 protocol client capability by setting thecifs.smb2.client.enable option to on or off, respectively. By default, this option is set to off.
About this task
If the cifs.smb2.client.enable option is set to on, but a Windows server does not support theSMB 2.0 protocol, the storage system uses the original SMB protocol to communicate with the Windowsserver.
If you set the cifs.smb2.client.enable option to off, the storage system uses the original SMBprotocol in new communication sessions with Windows servers; however, the storage system continuesto use the SMB 2.0 protocol in existing sessions.
Step
1. Then...If you want the storage system's SMB 2.0protocol client capability to be...
Enter the following command:
options cifs.smb2.client.enable on
Enabled
Enter the following command:
options cifs.smb2.client.enable off
Disabled
Managing sharesAs an administrator, you can share directories with users on the storage system (create "shares").
Next topics
Creating a share on page 80
Displaying and changing the properties of a share on page 83
Deleting a share on page 92
File access using CIFS | 79
Creating a shareYou can create a share (that is, specify a folder, qtree, or volume for access by CIFS users) from theMicrosoft Management Console (MMC) on a Windows client or from the Data ONTAP command line.
Before you begin
When you create a share, you must provide all of the following information:
• The complete path name of an existing folder, qtree, or volume to be shared
• The name of the share entered by users when they connect to the share
• The access rights for the share
Note: You can select from a list of access rights, or enter specific access rights for each user or agroup of users.
When you create a share, you can optionally specify a description for the share. The share descriptionappears in the Comment field when you browse the shares on the network.
If you create the share from the Data ONTAP command line, you can also specify the following shareproperties:
• Group membership for files in the share
• Whether CIFS clients can follow symbolic links in the share to destinations anywhere on the samestorage system
• Support for wide symbolic links in the share
• The umask value for the share
• Whether the share is browsable
• Disabling of virus scanning when files in the share are opened
• Disallowing file caching in the share by Windows clients
• Support for automatic caching of documents and programs in the share by Windows clients
• Controlling the display of shared resources with Windows Access -based Enumeration (ABE)
Note: You can change these properties at any time after you create a share.
After you finish
After you have created a share, you can specify these share properties:
• Maximum number of users who can simultaneously access the share
Note: If you do not specify a number of users, additional users are blocked only if there is nomore storage system memory.
• A share-level ACL
80 | Data ONTAP 7.3 File Access and Protocols Management Guide

Next topics
Share naming conventions on page 81
Creating a share from the MMC on a Windows client on page 81
Creating a share from the Data ONTAP command line on page 82
Share naming conventions
Share naming conventions for Data ONTAP are the same as for Windows.
For example, share names ending with the $ character are hidden shares, and certain share names, suchas ADMIN$ and IPC$, are reserved.
Share names are not case-sensitive.
Creating a share from the MMC on a Windows client
You can create a share from the MMC on a Windows client by connecting the MMC to the storagesystem and then running the Share Folder wizard.
Next topics
Connecting the MMC to the storage system on page 81
Running the "Share a Folder" wizard on page 82
Connecting the MMC to the storage system
You can connect the MMC to the storage system using the MMC menu commands.
Steps
1. On your Windows server, go to the MMC.
For example, choose Run from the Start menu; then enter the following command:
mmc
2. On the left panel, select Computer Management.3. From the Action menu, choose "Connect to another computer."
The Another Computer box appears.
4. Type the name of the storage system or click Browse to browse for the storage system.5. Click OK.
File access using CIFS | 81
Running the "Share a Folder" wizard
You can run the "Share a Folder" wizard by using the MMC.
Steps
1. Connect the MMC to the storage system.2. If it is not already selected, in the left pane, select Computer Management.3. Select System Tools > Shared Folders > Shares > Action.
The wording of these menu items might vary slightly, depending on your Windows version.
4. Double-click New Share.5. Follow the instructions in the "Share a Folder" wizard.
Creating a share from the Data ONTAP command line
You can create a share from the Data ONTAP command line by using the cifs shares command.
Step
1. Enter the following command:
cifs shares -add shareName path [-comment description] [-userlimit] [-browse
| -nobrowse] [-forcegroup groupname] [-widelink]
[-nosymlink_strict_security] [-novscan] [-novscanread] [-umask mask]
[-no_caching | -auto_document_caching | -auto_program_caching]
If an argument contains a space, enclose it in double quotation marks.
Path separators can be backward or forward slashes, although Data ONTAP displays them as forwardslashes.
For more information, see the na_cifs_shares(1) man page.
Example: Creating a webpages share
To create a share that is accessible on the Web (is a webpages share) in the /vol/vol1/companyinfodirectory with a maximum number of 100 users and in which all files that CIFS users create areowned by all users, enter the following command:
cifs shares -add webpages /vol/vol1/companyinfo -comment "Product
Information" -forcegroup webgroup1 -maxusers 100
82 | Data ONTAP 7.3 File Access and Protocols Management Guide
About the forcegroup option
When you create a share from the Data ONTAP command line, you can use the forcegroup optionto specify that all files created by CIFS users in that share belong to the same group (that is, the"forcegroup"), which must be a predefined group in the UNIX group database.
Specifying a forcegroup is meaningful only if the share is in a UNIX or mixed qtree. There is no needto use forcegroups for shares in an NTFS qtree because access to files in these shares is determined byWindows permissions, not GIDs.
If a forcegroup has been specified for a share, the following becomes true of the share:
• CIFS users in the forcegroup who access this share are temporarily changed to the GID of theforcegroup.This GID enables them to access files in this share that are not accessible normally with their primaryGID or UID.
• All files in this share created by CIFS users belong to the same forcegroup,regardless of the primary GID of the file owner.
When CIFS users try to access a file created by NFS, the CIFS users' primary GIDs determine accessrights.
The forcegroup does not affect how NFS users access files in this share. A file created by NFS acquiresthe GID from the file owner. Determination of access permissions is based on the UID and primaryGID of the NFS user who is trying to access the file.
Using a forcegroup makes it easier to ensure that files can be accessed by CIFS users belonging tovarious groups. For example, if you want to create a share to store the company's Web pages and givewrite access to users in Engineering and Marketing, you can create a share and give write access to aforcegroup named "webgroup1." Because of the forcegroup, all files created by CIFS users in this shareare owned by the web group. In addition, users are automatically assigned the GID of the web groupwhen accessing the share. As a result, all the users can write to this share without your managing theaccess rights of the Engineering and Marketing groups.
Displaying and changing the properties of a shareYou can display and change share properties from the MMC or at the Data ONTAP command line.
About this task
You can change the following share properties:
• The description for the share
• The maximum number of users who can simultaneously access the share
• The share-level permissions
• Whether Access-Based Enumeration is enabled or disabled
File access using CIFS | 83

Next topics
Displaying and changing the properties of a share from the MMC on a Windows client on page 84
Displaying the properties of a share from the Data ONTAP command line on page 85
Changing the properties of a share from the Data ONTAP command line on page 86
Displaying and changing the properties of a share from the MMC on a Windows client
You can display and change the properties of a share from the MMC on a Windows client.
Steps
1. Connect the MMC to the storage system.2. If it is not already selected, in the left pane, select Computer Management.3. Select System Tools > Shared Folders.4. Double-click Shares.5. In the right pane, right-click the share.6. Choose Properties.
Properties for the share you selected are displayed as shown in the following example.
84 | Data ONTAP 7.3 File Access and Protocols Management Guide
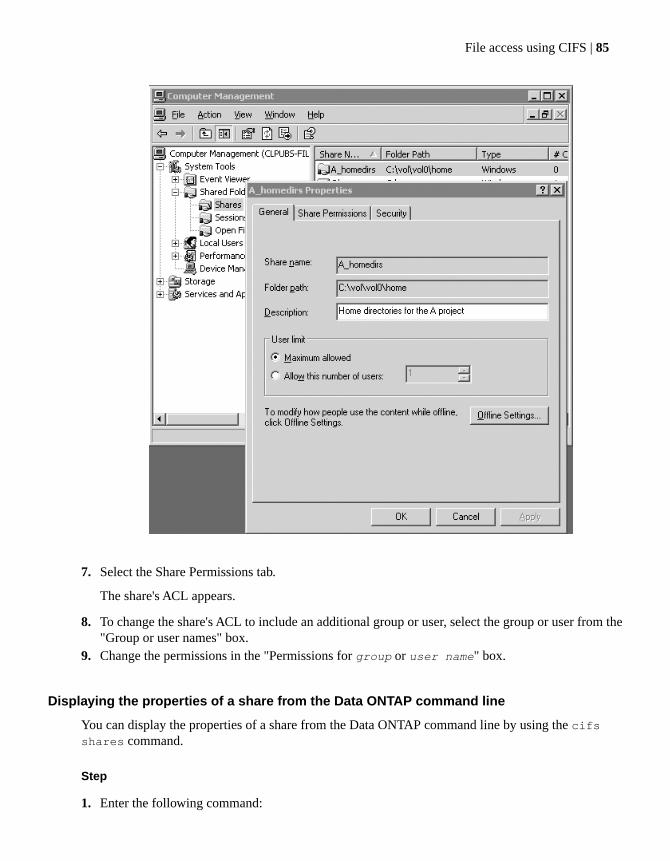
7. Select the Share Permissions tab.
The share's ACL appears.
8. To change the share's ACL to include an additional group or user, select the group or user from the"Group or user names" box.
9. Change the permissions in the "Permissions for group or user name" box.
Displaying the properties of a share from the Data ONTAP command line
You can display the properties of a share from the Data ONTAP command line by using the cifsshares command.
Step
1. Enter the following command:
File access using CIFS | 85
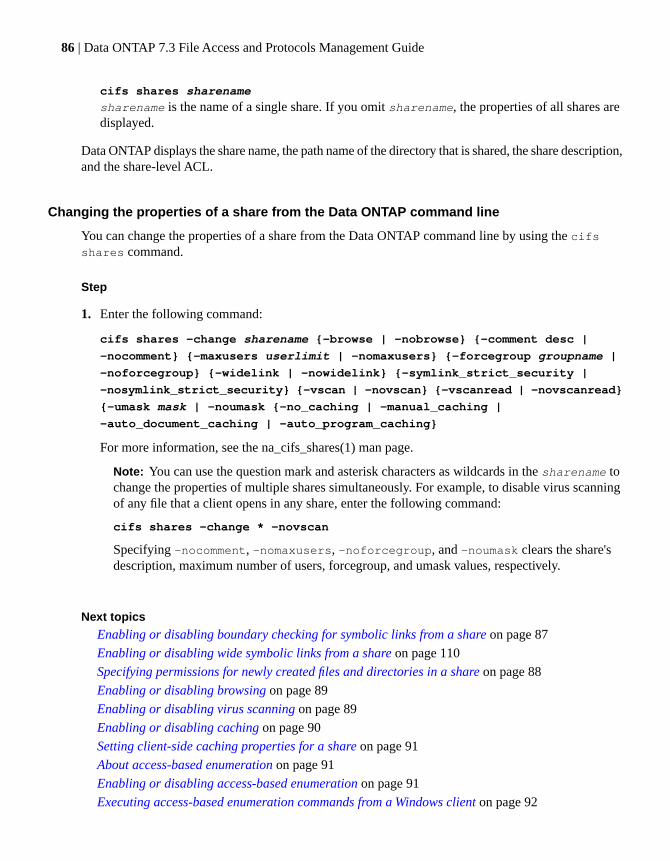
cifs shares sharename
sharename is the name of a single share. If you omit sharename, the properties of all shares aredisplayed.
Data ONTAP displays the share name, the path name of the directory that is shared, the share description,and the share-level ACL.
Changing the properties of a share from the Data ONTAP command line
You can change the properties of a share from the Data ONTAP command line by using the cifsshares command.
Step
1. Enter the following command:
cifs shares -change sharename {-browse | -nobrowse} {-comment desc |
-nocomment} {-maxusers userlimit | -nomaxusers} {-forcegroup groupname |
-noforcegroup} {-widelink | -nowidelink} {-symlink_strict_security |
-nosymlink_strict_security} {-vscan | -novscan} {-vscanread | -novscanread}
{-umask mask | -noumask {-no_caching | -manual_caching |
-auto_document_caching | -auto_program_caching}
For more information, see the na_cifs_shares(1) man page.
Note: You can use the question mark and asterisk characters as wildcards in the sharename tochange the properties of multiple shares simultaneously. For example, to disable virus scanningof any file that a client opens in any share, enter the following command:
cifs shares -change * -novscan
Specifying -nocomment, -nomaxusers, -noforcegroup, and -noumask clears the share'sdescription, maximum number of users, forcegroup, and umask values, respectively.
Next topics
Enabling or disabling boundary checking for symbolic links from a share on page 87
Enabling or disabling wide symbolic links from a share on page 110
Specifying permissions for newly created files and directories in a share on page 88
Enabling or disabling browsing on page 89
Enabling or disabling virus scanning on page 89
Enabling or disabling caching on page 90
Setting client-side caching properties for a share on page 91
About access-based enumeration on page 91
Enabling or disabling access-based enumeration on page 91
Executing access-based enumeration commands from a Windows client on page 92
86 | Data ONTAP 7.3 File Access and Protocols Management Guide
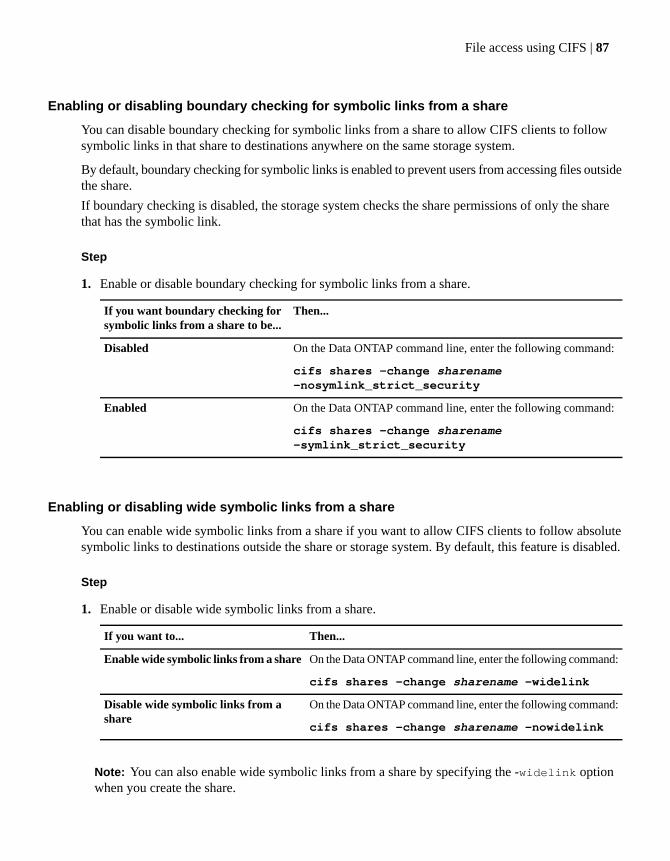
Enabling or disabling boundary checking for symbolic links from a share
You can disable boundary checking for symbolic links from a share to allow CIFS clients to followsymbolic links in that share to destinations anywhere on the same storage system.
By default, boundary checking for symbolic links is enabled to prevent users from accessing files outsidethe share.
If boundary checking is disabled, the storage system checks the share permissions of only the sharethat has the symbolic link.
Step
1. Enable or disable boundary checking for symbolic links from a share.
Then...If you want boundary checking forsymbolic links from a share to be...
On the Data ONTAP command line, enter the following command:
cifs shares -change sharename-nosymlink_strict_security
Disabled
On the Data ONTAP command line, enter the following command:
cifs shares -change sharename-symlink_strict_security
Enabled
Enabling or disabling wide symbolic links from a share
You can enable wide symbolic links from a share if you want to allow CIFS clients to follow absolutesymbolic links to destinations outside the share or storage system. By default, this feature is disabled.
Step
1. Enable or disable wide symbolic links from a share.
Then...If you want to...
On the Data ONTAP command line, enter the following command:
cifs shares -change sharename -widelink
Enable wide symbolic links from a share
On the Data ONTAP command line, enter the following command:
cifs shares -change sharename -nowidelink
Disable wide symbolic links from ashare
Note: You can also enable wide symbolic links from a share by specifying the -widelink optionwhen you create the share.
File access using CIFS | 87
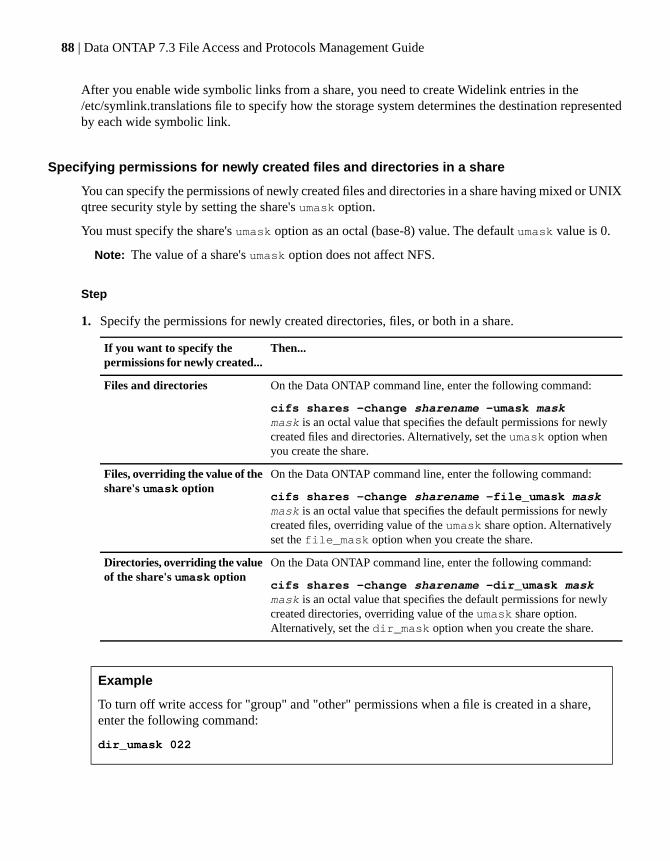
After you enable wide symbolic links from a share, you need to create Widelink entries in the/etc/symlink.translations file to specify how the storage system determines the destination representedby each wide symbolic link.
Specifying permissions for newly created files and directories in a share
You can specify the permissions of newly created files and directories in a share having mixed or UNIXqtree security style by setting the share's umask option.
You must specify the share's umask option as an octal (base-8) value. The default umask value is 0.
Note: The value of a share's umask option does not affect NFS.
Step
1. Specify the permissions for newly created directories, files, or both in a share.
Then...If you want to specify thepermissions for newly created...
On the Data ONTAP command line, enter the following command:
cifs shares -change sharename -umask maskmask is an octal value that specifies the default permissions for newlycreated files and directories. Alternatively, set the umask option whenyou create the share.
Files and directories
On the Data ONTAP command line, enter the following command:
cifs shares -change sharename -file_umask maskmask is an octal value that specifies the default permissions for newlycreated files, overriding value of the umask share option. Alternativelyset the file_mask option when you create the share.
Files, overriding the value of theshare's umask option
On the Data ONTAP command line, enter the following command:
cifs shares -change sharename -dir_umask maskmask is an octal value that specifies the default permissions for newlycreated directories, overriding value of the umask share option.Alternatively, set the dir_mask option when you create the share.
Directories, overriding the valueof the share's umask option
Example
To turn off write access for "group" and "other" permissions when a file is created in a share,enter the following command:
dir_umask 022
88 | Data ONTAP 7.3 File Access and Protocols Management Guide
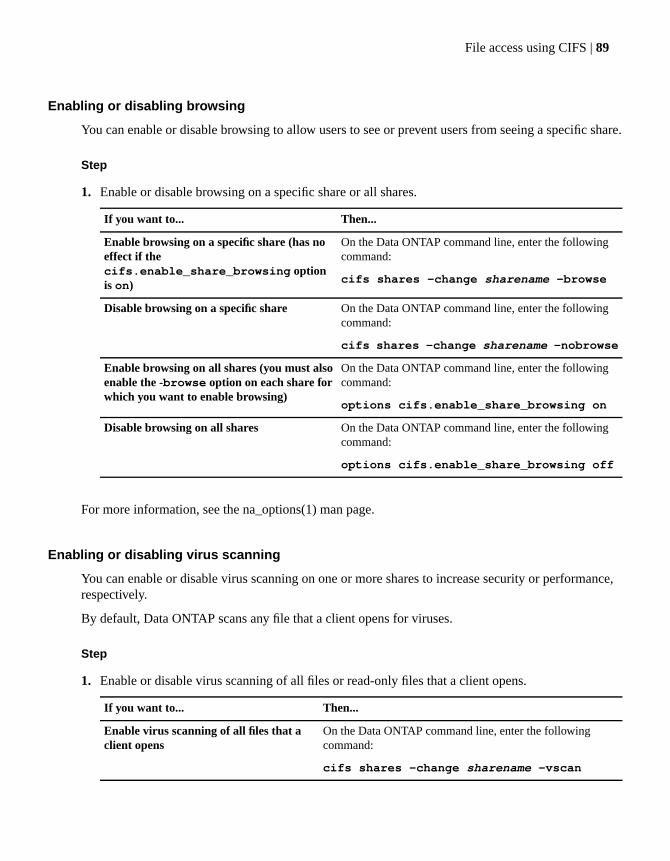
Enabling or disabling browsing
You can enable or disable browsing to allow users to see or prevent users from seeing a specific share.
Step
1. Enable or disable browsing on a specific share or all shares.
Then...If you want to...
On the Data ONTAP command line, enter the followingcommand:
cifs shares -change sharename -browse
Enable browsing on a specific share (has noeffect if thecifs.enable_share_browsing optionis on)
On the Data ONTAP command line, enter the followingcommand:
cifs shares -change sharename -nobrowse
Disable browsing on a specific share
On the Data ONTAP command line, enter the followingcommand:
options cifs.enable_share_browsing on
Enable browsing on all shares (you must alsoenable the -browse option on each share forwhich you want to enable browsing)
On the Data ONTAP command line, enter the followingcommand:
options cifs.enable_share_browsing off
Disable browsing on all shares
For more information, see the na_options(1) man page.
Enabling or disabling virus scanning
You can enable or disable virus scanning on one or more shares to increase security or performance,respectively.
By default, Data ONTAP scans any file that a client opens for viruses.
Step
1. Enable or disable virus scanning of all files or read-only files that a client opens.
Then...If you want to...
On the Data ONTAP command line, enter the followingcommand:
cifs shares -change sharename -vscan
Enable virus scanning of all files that aclient opens
File access using CIFS | 89
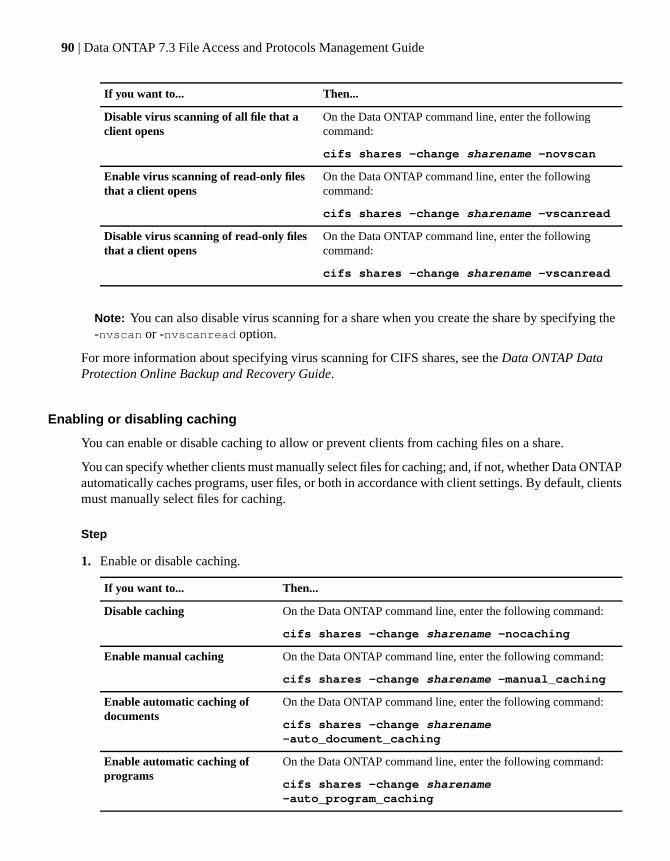
Then...If you want to...
On the Data ONTAP command line, enter the followingcommand:
cifs shares -change sharename -novscan
Disable virus scanning of all file that aclient opens
On the Data ONTAP command line, enter the followingcommand:
cifs shares -change sharename -vscanread
Enable virus scanning of read-only filesthat a client opens
On the Data ONTAP command line, enter the followingcommand:
cifs shares -change sharename -vscanread
Disable virus scanning of read-only filesthat a client opens
Note: You can also disable virus scanning for a share when you create the share by specifying the-nvscan or -nvscanread option.
For more information about specifying virus scanning for CIFS shares, see the Data ONTAP DataProtection Online Backup and Recovery Guide.
Enabling or disabling caching
You can enable or disable caching to allow or prevent clients from caching files on a share.
You can specify whether clients must manually select files for caching; and, if not, whether Data ONTAPautomatically caches programs, user files, or both in accordance with client settings. By default, clientsmust manually select files for caching.
Step
1. Enable or disable caching.
Then...If you want to...
On the Data ONTAP command line, enter the following command:
cifs shares -change sharename -nocaching
Disable caching
On the Data ONTAP command line, enter the following command:
cifs shares -change sharename -manual_caching
Enable manual caching
On the Data ONTAP command line, enter the following command:
cifs shares -change sharename-auto_document_caching
Enable automatic caching ofdocuments
On the Data ONTAP command line, enter the following command:
cifs shares -change sharename-auto_program_caching
Enable automatic caching ofprograms
90 | Data ONTAP 7.3 File Access and Protocols Management Guide
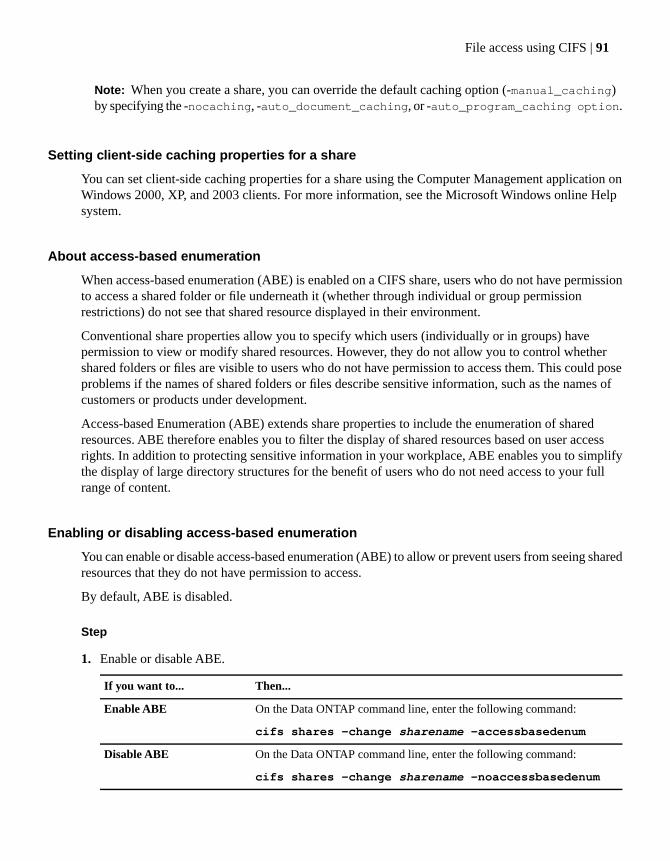
Note: When you create a share, you can override the default caching option (-manual_caching)by specifying the -nocaching, -auto_document_caching, or -auto_program_caching option.
Setting client-side caching properties for a share
You can set client-side caching properties for a share using the Computer Management application onWindows 2000, XP, and 2003 clients. For more information, see the Microsoft Windows online Helpsystem.
About access-based enumeration
When access-based enumeration (ABE) is enabled on a CIFS share, users who do not have permissionto access a shared folder or file underneath it (whether through individual or group permissionrestrictions) do not see that shared resource displayed in their environment.
Conventional share properties allow you to specify which users (individually or in groups) havepermission to view or modify shared resources. However, they do not allow you to control whethershared folders or files are visible to users who do not have permission to access them. This could poseproblems if the names of shared folders or files describe sensitive information, such as the names ofcustomers or products under development.
Access-based Enumeration (ABE) extends share properties to include the enumeration of sharedresources. ABE therefore enables you to filter the display of shared resources based on user accessrights. In addition to protecting sensitive information in your workplace, ABE enables you to simplifythe display of large directory structures for the benefit of users who do not need access to your fullrange of content.
Enabling or disabling access-based enumeration
You can enable or disable access-based enumeration (ABE) to allow or prevent users from seeing sharedresources that they do not have permission to access.
By default, ABE is disabled.
Step
1. Enable or disable ABE.
Then...If you want to...
On the Data ONTAP command line, enter the following command:
cifs shares -change sharename -accessbasedenum
Enable ABE
On the Data ONTAP command line, enter the following command:
cifs shares -change sharename -noaccessbasedenum
Disable ABE
File access using CIFS | 91
Note: You can also enable ABE when you create a share by specifying the -accessbasedenumoption.
Executing access-based enumeration commands from a Windows client
You can execute access-based enumeration (ABE) commands from a Windows client using the abecmdcommand.
Before executing ABE commands from a Windows client, you must enable ABE in Data ONTAP.
Step
1. From a Windows client that supports ABE, enter the following command:
abecmd [/enable | /disable] [/server filername] {/all | ShareName}
For more information about the abecmd command, see your Windows client documentation.
Deleting a shareYou can delete a share from the MMC or the Data ONTAP command line.
Next topics
Deleting a share from the MMC on page 92
Deleting a share from the Data ONTAP command line on page 93
Deleting a share from the MMC
You can delete a share from the MMC.
Steps
1. Connect the MMC to the storage system.2. If it is not selected already, in the left pane, select Computer Management.3. Select System Tools > Shared Folders.4. Double-click Shares.5. In the right pane, right-click the share; then choose Stop Sharing.6. In the confirmation box, choose Yes.
The MMC deletes the share.
92 | Data ONTAP 7.3 File Access and Protocols Management Guide

Deleting a share from the Data ONTAP command line
You can delete a share from the Data ONTAP command line using the cifs shares command.
Step
1. Enter the following command:
cifs shares -delete [-f] sharename
The -f option forces all files closed on a share without prompting. This is useful for scripts.
Managing access control listsYou can display and change share-level ACLs from the MMC or the command line. You can changefile-level ACLs from the command line only.
Next topics
About share-level ACLs on page 93
Displaying and changing a share-level ACL on page 93
Displaying and changing a file-level ACL on page 99
Specifying how group IDs work with share-level ACLs on page 101
About share-level ACLsWhen a CIFS user tries to access a share, Data ONTAP always checks the share-level ACL to determinewhether access should be granted, regardless of the security style of the qtree containing the share.
A share-level ACL (access control list) consists of a list of access control entries (ACEs). Each ACEcontains a user or group name and a set of permissions that determines user or group access to the share.
A share-level ACL only restricts access to files in the share; it never grants more access than the file-levelACLs.
Displaying and changing a share-level ACLYou can change a share-level ACL to give users greater or fewer access rights to the share.
About this task
After you create a share, by default, the share-level ACL gives read access to the standard group namedEveryone. Read access in the ACL means that all users in the domain and all trusted domains haveread-only access to the share.
File access using CIFS | 93

You can change a share-level ACL using the MMC on a Windows client or the Data ONTAP commandline.
If you use the MMC, remember these guidelines:
• You can specify only Windows permissions.
• The user and group names specified must be Windows names.
• The share-level ACL must not have UNIX-style permissions.
If you use the Data ONTAP command line, remember these guidelines:
• You can specify either Windows permissions or UNIX-style permissions.
• The user and group names can be Windows or UNIX names.
• If the storage system is authenticated by the /etc/passwd file, the user or group name in the ACL isassumed to be a UNIX name. If the storage system is authenticated by a domain controller, the nameis at first assumed to be a Windows name, but if the name is not found on the domain controller,the storage system tries to look up the name in the UNIX name database.
Next topics
Adding a user or group to a share-level ACL from the MMC on a Windows client on page 94
Displaying and changing a share-level ACL from the MMC on a Windows client on page 95
Removing a user or group from a share-level ACL using the MMC on a Windows client on page 97
Changing a share-level ACL from the Data ONTAP command line on page 97
Removing a user or group from a share-level ACL using the Data ONTAP command line on page 98
Specifying whether NFSv3 and NFSv4 clients display Windows ACL permissions based on minimumor maximum access on page 98
Adding a user or group to a share-level ACL from the MMC on a Windows client
You can add a user or group to an ACL from the MMC on a Windows client.
Steps
1. Connect the MMC to the storage system.2. If it is not already selected, in the left pane, select Computer Management.3. Select System Tools > Shared Folders.4. Double-click Shares.5. In the right pane, right-click on the share.6. Choose Properties.7. Select the Share Permissions tab.
The share's ACL appears.
8. Click Add.
94 | Data ONTAP 7.3 File Access and Protocols Management Guide
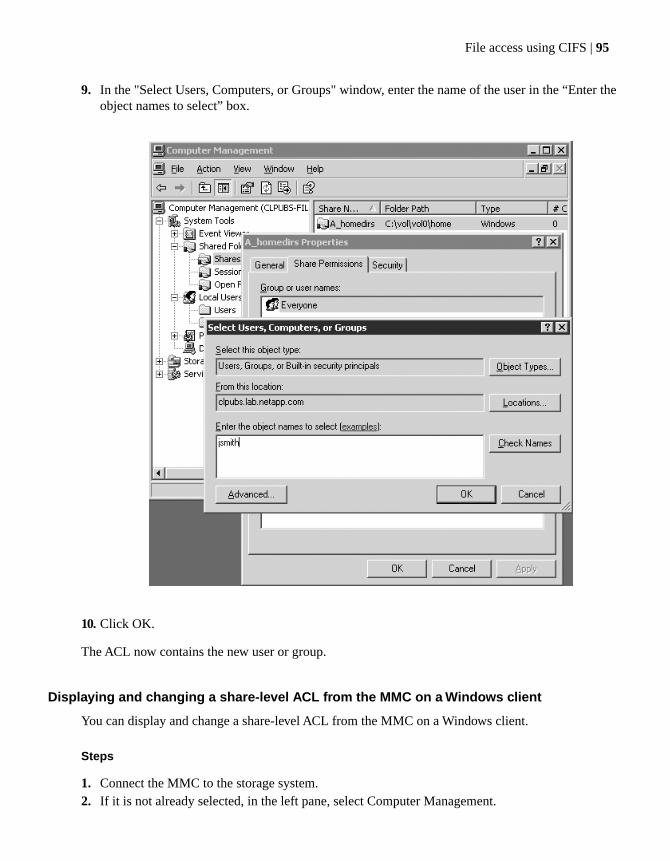
9. In the "Select Users, Computers, or Groups" window, enter the name of the user in the “Enter theobject names to select” box.
10. Click OK.
The ACL now contains the new user or group.
Displaying and changing a share-level ACL from the MMC on a Windows client
You can display and change a share-level ACL from the MMC on a Windows client.
Steps
1. Connect the MMC to the storage system.2. If it is not already selected, in the left pane, select Computer Management.
File access using CIFS | 95

3. Select System Tools > Shared Folders.4. Double-click Shares.5. In the right pane, right-click on the share.6. Choose Properties.7. Select the Share Permissions tab.
The share's ACL appears.
8. To change the ACL for a group or user, select the group or user from the "Group or user names"box and change the permissions in the "Permissions for group or user name" box.
96 | Data ONTAP 7.3 File Access and Protocols Management Guide
Removing a user or group from a share-level ACL using the MMC on a Windows client
You can remove a user or group from a share-level ACL using the MMC on a Windows client.
Steps
1. Connect the MMC to the storage system.2. If it is not already selected, in the left pane, select Computer Management.3. Select System Tools > Shared Folders.4. Double-click Shares.5. In the right pane, right-click on the share.6. Choose properties.7. Select the Share Permissions tab.
The share's ACL appears.
8. Select the user or group.9. Click Remove.
The ACL no longer contains the user or group.
Changing a share-level ACL from the Data ONTAP command line
You can change a share-level ACL from the Data ONTAP command line by using the cifs accesscommand.
Step
1. Enter the following command:
cifs access share [-g] user rights
share is the name of the share (you can use the * and ? wildcards).
user is the name of the user or group (UNIX or Windows).
If user is a local group, specify the storage system name as the domain name (for example,toaster\writers).
rights are the access rights. For Windows users, you specify one of these choices of access rights:No Access, Read, Change, Full Control. For UNIX users, you specify one of these choicesof access rights: r (read), w (write), x (execute).
Use the -g option to specify that user is the name of a UNIX group.
File access using CIFS | 97
Examples
The following example grants Windows read access to the Windows user ENGINEERING\maryon the share releases:
cifs access releases ENGINEERING\mary Read
The following example grants UNIX read and execute access to the user john on the accountingshare:
cifs access accounting john rx
The following example grants full access to the UNIX group wheel on the sysadmins share:
cifs access sysadmins -g wheel Full Control
Removing a user or group from a share-level ACL using the Data ONTAP command line
You can remove a user or group from an ACL using the Data ONTAP command line.
Step
1. Enter the following command:
cifs access -delete share [-g] user
share is the name of the share (you can use the * and ? wildcards).
user is the name of the user or group (UNIX or Windows).
If user is a local group, specify the storage system name as the domain name (for example,toaster\writers).
Use the -g option to specify that user is the name of a UNIX group (that is, that user is not a UNIXuser, Windows user, or Windows group).
Example: Deleting an ACL entry for ENGINEERING\mary from the releases share
cifs access -delete releases ENGINEERING\mary
Specifying whether NFSv3 and NFSv4 clients display Windows ACL permissions based onminimum or maximum access
To specify that NFSv3 and NFSv4 clients should display Windows ACL permissions (not UNIX orNFSv4 ACL permissions) based on the minimum access granted by the Windows ACL, you can set
98 | Data ONTAP 7.3 File Access and Protocols Management Guide
the nfs.ntacl_display_permissive_perms option to on. Otherwise, you can set the option tooff. By default, this option is off.
In versions of Data ONTAP earlier than 7.2.1, the permissions displayed to NFSv3 and NFSv4 clientson files were based on the maximum access granted by the Windows ACL. However, starting in DataONTAP 7.2.1, the permissions displayed to NFSv3 and NFSv4 clients on files are based on the minimumaccess granted by the Windows ACL to any user.
Step
1. Enter the following command:
options nfs.ntacl_display_permissive_perms on | off
Displaying and changing a file-level ACLYou can change a file-level ACL to control whether specific users and groups have access to the file.
About this task
Permission settings for files and directories are stored in file-level ACLs. These ACLs follow theWindows 2000 NTFS security model. For files that have NTFS-style security, CIFS users can set anddisplay file-level ACLs from their PC. All files in an NTFS-style qtree and some files in a mixed qtreemight have NTFS-style security.
Files in a FAT (file allocation table) file system do not have ACLs; they use UNIX permissions. Whenviewed from a CIFS client, files without ACLs will not display the Security tab in the file Propertieswindow.
The file system (FAT or NTFS) for a given resource depends upon the storage system authenticationmethod and qtree style for that resource.
File systemQtree style and authentication method
FATUNIX-style qtree and all authentication methods
FATMixed or NTFS-style qtree and /etc/passwdauthentication
NTFSMixed or NTFS-style qtree and domain or workgroupauthentication
Steps
1. From the Windows desktop, right-click a file and select Properties from the pop-up menu.
File access using CIFS | 99
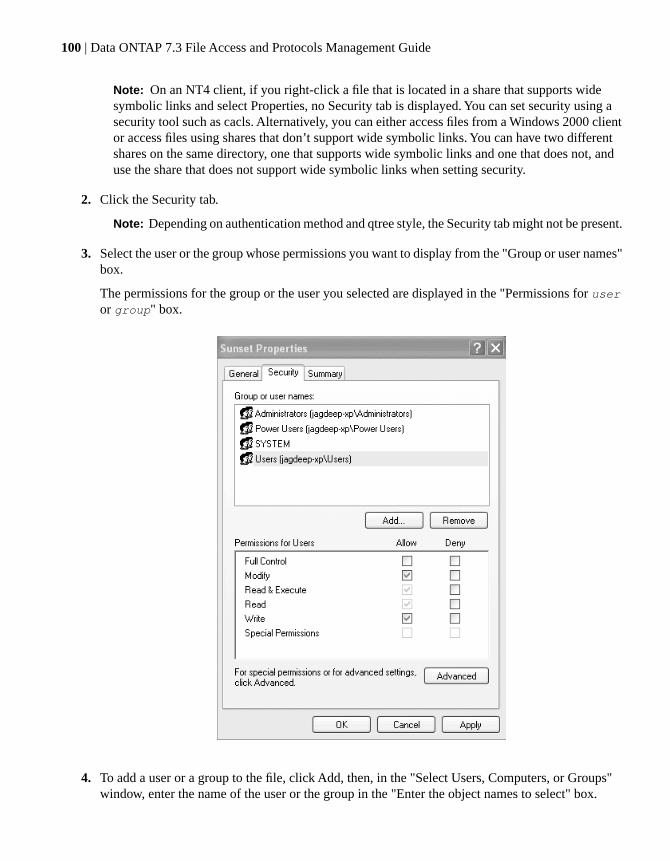
Note: On an NT4 client, if you right-click a file that is located in a share that supports widesymbolic links and select Properties, no Security tab is displayed. You can set security using asecurity tool such as cacls. Alternatively, you can either access files from a Windows 2000 clientor access files using shares that don’t support wide symbolic links. You can have two differentshares on the same directory, one that supports wide symbolic links and one that does not, anduse the share that does not support wide symbolic links when setting security.
2. Click the Security tab.
Note: Depending on authentication method and qtree style, the Security tab might not be present.
3. Select the user or the group whose permissions you want to display from the "Group or user names"box.
The permissions for the group or the user you selected are displayed in the "Permissions for useror group" box.
4. To add a user or a group to the file, click Add, then, in the "Select Users, Computers, or Groups"window, enter the name of the user or the group in the "Enter the object names to select" box.
100 | Data ONTAP 7.3 File Access and Protocols Management Guide

A user or a group is added to the ACL.
Specifying how group IDs work with share-level ACLsIf a share contains files with UNIX-style security and if you want to use the share-level ACL to controlaccess by UNIX groups, you must decide whether you want Data ONTAP to grant user access to filesbased on group ID.
About this task
If a share named specs exists in a UNIX-style qtree and you want two UNIX groups, engineering andmarketing, to have full access to the share, you give rwx permissions to these groups at the share level.
Suppose in this share, a file owned by the engineering group is named draft and it has the followingpermissions:
draft rwxr-x---
When a member of engineering tries to access the draft file, the share-level ACL gives this userunrestricted access to the specs share, and access to the draft file is determined by the access rightsassigned to the engineering group (r-x, in this example).
However, when a member of marketing tries to access the draft file, access is denied because theUNIX-style file permissions grant nonmembers of engineering no access to the file. To make the draftfile readable by the marketing group, you need to change the file-level permissions to the followingsettings:
draft rwxr-xr-x
The disadvantage of these permissions is that in addition to marketing, all UNIX users can read the file,which creates a security problem.
To solve this problem, you can configure Data ONTAP to disregard the GID when granting access.
File access using CIFS | 101

If you configure Data ONTAP to disregard the user’s GID when granting access, all users who are notthe file’s owner are considered members of the UNIX group that owns the file. In the preceding example,permissions that apply to the engineering group also apply to members of marketing who try to accessthe file. That is, both engineering members and marketing members have the r-x permissions to thedraft file.
By default, Data ONTAP considers the user’s GID before granting access. This default configurationis useful if either of the following statements is true:
• The share does not contain files with UNIX-style security.
• You do not use a share-level ACL to control any UNIX group’s access.
Step
1. Specify whether you want to consider or disregard the user's GID when granting user access.
Then...If, when granting user access, you want to...
Enter the following command:
options cifs.perm_check_use_gid off
Disregard the user's GID
Enter the following command:
options cifs.perm_check_use_gid on
Consider the user's GID
Managing home directoriesYou can create user home directories on the storage system and configure Data ONTAP to automaticallyoffer each user a home directory share.
About this task
From the CIFS client, the home directory works the same way as any other share to which the user canconnect.
Each user can connect only to his or her home directories, not to home directories for other users.
Next topics
About home directories on the storage system on page 103
How Data ONTAP matches a directory with a user on page 103
How symbolic links work with home directories on page 104
Specifying home directory paths on page 105
Displaying the list of home directory paths on page 106
102 | Data ONTAP 7.3 File Access and Protocols Management Guide
Specifying the naming style of home directories on page 106
Creating directories in a home directory path (domain-naming style) on page 107
Creating directories in a home directory path (non-domain-naming style) on page 108
Creating subdirectories in home directories when a home directory path extension isused on page 108
Syntax for specifying a home directory using a UNC name on page 109
Enabling users to access other users’ home directories on page 110
Accessing your CIFS home directory using a share alias on page 110
Enabling or disabling wide symbolic links from a share on page 110
Disabling home directories on page 111
About home directories on the storage systemData ONTAP maps home directory names to user names, searches for home directories that you specify,and treats home directories slightly differently than regular shares
Data ONTAP offers the share to the user with a matching name. The user name for matching can be aWindows user name, a domain name followed by a Windows user name, or a UNIX user name. Homedirectory names are not case-sensitive.
When Data ONTAP tries to locate the directories named after the users, it searches only the paths thatyou specify. These paths are called home directory paths. They can exist in different volumes.
The following differences exist between a home directory and other shares:
• You cannot change the share-level ACL and the comment for a home directory.
• The cifs shares command does not display the home directories.
• The format of specifying the home directory using the Universal Naming Convention (UNC) issometimes different from that for specifying other shares.
If you specify /vol/vol1/enghome and /vol/vol2/mktghome as the home directory paths, Data ONTAPsearches these paths to locate user home directories. If you create a directory for jdoe in the/vol/vol1/enghome path and a directory for jsmith in the /vol/vol2/mktghome path, both users are offereda home directory. The home directory for jdoe corresponds to the /vol/vol1/enghome/jdoe directory,and the home directory for jsmith corresponds to the /vol/vol2/mktghome/jsmith directory.
How Data ONTAP matches a directory with a userYou can specify the naming style of home directories to determine how Data ONTAP matches a directorywith a user.
These are the naming styles that you can choose from, and some information about each style:
• Windows name—Data ONTAP searches for the directory whose name matches the user’s Windowsname.
File access using CIFS | 103
• Hidden name—If the naming style is hidden, users connect to their home directories using theirWindows user name with a dollar sign appended to it (name$), and Data ONTAP searches for adirectory that matches the Windows user name (name).
• Windows domain name and Windows name—If users from different domains have the same username, they must be differentiated using the domain name.In this naming style, Data ONTAP searches for a directory in the home directory path that matchesthe domain name. Then it searches the domain directory for the home directory that matches theuser name.Example: To create a directory for engineering\jdoe and a directory for marketing\jdoe, you createthe two directories in the home directory paths. The directories have the same names as the domainnames (engineering and marketing). Then you create user home directories in these domaindirectories.
• Mapped UNIX name—If the naming style is UNIX, Data ONTAP searches for the directory thatmatches the user’s mapped UNIX name.Example: If John Doe’s Windows name jdoe maps to the UNIX name johndoe, Data ONTAPsearches the home directory paths for the directory named johndoe (not jdoe) and offers it as thehome directory to John Doe.
If you do not specify a home directory naming style, Data ONTAP uses the user’s Windows name fordirectory matching. This is the same style used by versions of Data ONTAP prior to version 6.0.
How symbolic links work with home directoriesThe way symbolic links work depends on the home directory naming style.
Naming style prior to Data ONTAP 6.0: If you do not specify a naming style, Data ONTAP usessymbolic links the same way it used them before Data ONTAP 6.0. It follows any symbolic link thatpoints to a directory outside the home directory path to locate a home directory.
Example: Suppose the home directory path is /vol/vol0/eng_homes and you use the pre-6.0 homedirectory naming style. To locate the home directory for jdoe, Data ONTAP searches for/vol/vol0/eng_homes/jdoe, which can be a symbolic link pointing to a directory outside the homedirectory path, such as /vol/vol1/homes/jdoe.
Other naming styles: If you specify a home directory naming style, by default a symbolic link worksonly if the symbolic link points to a directory in the home directory path.
Example: Suppose the home directory path is /vol/vol0/eng_homes and you use the Windows namingstyle. To locate the home directory for jdoe, Data ONTAP searches for /vol/vol0/eng_homes/jdoe. Ifthe path is a symbolic link, the user can access the home directory only if the target of the symboliclink resides in the home directory path. For example, the symbolic link works if it points to the/vol/vol0/eng_homes/john directory; it does not work if it points to the /vol/vol1/homes/john directory.
Note: You can change the default storage system settings to allow CIFS clients to follow symboliclinks to destinations outside the home directory path.
104 | Data ONTAP 7.3 File Access and Protocols Management Guide

In releases prior to Data ONTAP 6.0, if you wanted home directories to reside in different volumes,you had to specify symbolic links as home directories in the home directory path. Because Data ONTAPnow supports home directories in different volumes, you do not need to use symbolic links as homedirectory names. However, Data ONTAP continues to support symbolic links as home directory namesfor backward compatibility.
Specifying home directory pathsData ONTAP searches the home directory paths in the order you specify for the directory that matchesthe user name.
Before you begin
You can change the home directory paths at any time by changing the entries in the cifs_homedir.cfgfile. However, if a user has open files in a home directory path that you remove from the list, DataONTAP displays a warning message and requests a confirmation for the change. Changing a directorypath that contains an open file terminates the connection to the home directory.
About this task
You can specify multiple home directory paths. Data ONTAP stops searching when it finds the matchingdirectory.
You can add an extension to the home directory path if you do not want users to access the top levelof their home directories. The extension specifies a subdirectory that is automatically opened whenusers access their home directories.
You can specify home directory paths by editing the /etc/cifs_homedir.cfg file. You can specify up to1,000 path names in the /etc/cifs_homedir.cfg file.
Data ONTAP creates a default cifs_homedir.cfg file in the /etc directory when CIFS starts, if the filedoes not already exist. Changes to this file are processed automatically whenever CIFS starts. You canalso process changes to this file by using the cifs homedir load command.
Steps
1. Create directories to use as home directory paths. For example, in the /vol/vol0 volume, create adirectory named enghome.
2. Open the /etc/cifs_homedir.cfg file for editing.3. Enter the home directory path names created in Step 1 in the /etc/cifs_homedir.cfg file, one entry
per line, to designate them as the paths where Data ONTAP searches for user home directories.
Note: You can enter up to 1,000 path names.
4. Enter the following command to process the entries:
cifs homedir load [-f]
The -f option forces the use of new paths.
File access using CIFS | 105
Displaying the list of home directory pathsYou can use the cifs homedir command to display the current list of directory paths.
Step
1. Enter the following command:
cifs homedir
Note: If you are using the hidden naming style for home directories, when you display the listof home directory paths, Data ONTAP automatically appends a dollar sign to the home directoryname (for example, name$).
Result
If you are using the hidden naming style for home directories, home directories are not displayed in thefollowing cases:
• In DOS, when you use the net view \\filer command
• In Windows, when you use an Explorer application to access the storage system and display homedirectory folders
Specifying the naming style of home directoriesYou can specify the naming style used for home directories by setting the cifs.home_dir_namestyleoption.
Step
1. Enter the following command:
options cifs.home_dir_namestyle {ntname | hidden | domain | mapped | ""}
Use ntname if the home directories have the same names as the Windows user names.
Use hidden if you want to use a Windows user name with a dollar sign ($) appended to it to initiatea search for a home directory with the same name as the Windows user name.
Use domain if you want to use the domain name in addition to the Windows user name to searchfor the home directory.
Use mapped if the home directories have the UNIX user names as specified in the usermap.cfg file.
Use "" if you do not want to specify a name style and want Data ONTAP to match home directoriesto users the same way it did before Data ONTAP 6.0; that is, by following any symbolic link thatpoints to a directory outside the home directory path to locate a home directory.
By default, the cifs.home_dir_namestyle option is "".
106 | Data ONTAP 7.3 File Access and Protocols Management Guide

Creating directories in a home directory path (domain-naming style)If the cifs.home_dir_namestyle option is domain, you can create home directories by editing the/etc/cifs_homedir.cfg, creating the directories, and setting the permissions on the directories.
Steps
1. Open the /etc/cifs_homedir.cfg file and add the path that represents where the home directories willexist.
The home directories will exist within folders named for the NetBIOS domains to which each userbelongs. For example, add the path /vol/vol1/homedir to the /etc/cifs_homedir.cfg file.
2. In the directory that you added to the /etc/cifs_homedir.cfg file, create a directory for each domain.
For example, if there are two domains, HQ and UK, create a /vol/vol1/homedir/hq/ directory and a/vol/vol1/homedir/uk/ directory.
3. In each domain directory created in Step 2, create home directories for the users in that domain.
For example, if two users have the name jsmith and they are in the HQ domain and the UK domain,create the /vol/vol1/homedir/HQ/jsmith home directory and the /vol/vol1/homedir/UK/jsmith homedirectory.
4. Make each user the owner of his or her home directory.
For example, make HQ\jsmith the owner of the /vol/vol1/homedir/HQ/jsmith home directory andUK\jsmith the owner of the /vol/vol1/homedir/UK/jsmith home directory.
The user with the name HQ\jsmith can attach to the jsmith share corresponding to the/vol/vol1/homedir/HQ/jsmith home directory. The user with the name UK\jsmith can attach to thejsmith share corresponding to the /vol/vol1/homedir/UK/jsmith home directory.
5. Load the new CIFS homedir configuration into the storage system.
For example, enter the following command:
cifs homedir load -f
6. Make sure that the CIFS homedir domain name style is working by entering the following command:
cifs homedir showuser user_name
For example, enter one of the following commands:
cifs homedir showuser hq/jsmith
cifs homedir showuser uk/jsmith
File access using CIFS | 107

Creating directories in a home directory path (non-domain-naming style)If the cifs.home_dir_namestyle option is not domain, you can create home directories by creatingthe directories and making the users the owners of the directories.
Steps
1. In the specified home directory paths, create home directories.
For example, if there are two users, jsmith and jdoe, create the /vol/vol0/enghome/jsmith and/vol/vol1/mktghome/jdoe home directories.
Users can attach to the share that has the same name as their user name and start using the share astheir home directory.
2. Make each user the owner of his or her home directory.
For example, make jsmith the owner of the /vol/vol0/enghome/jsmith home directory and jdoe theowner of the /vol/vol1/mktghome/jdoe home directory.
The user with the name engineering\jsmith can attach to the share named jsmith, which correspondsto the /vol/vol0/enghome/engineering/jsmith home directory.
The user with the name marketing\jdoe can attach to the share named jdoe, which corresponds tothe /vol/vol1/mktghome/marketing/jdoe home directory.
Result
Note: If the naming style is hidden, users must enter their user name with a dollar sign appended toit (for example, name$) to attach to their home directory.
Creating subdirectories in home directories when a home directory pathextension is used
You can create subdirectories that users can access in their home directories if you use a home directorypath extension.
Step
1. For each home directory that resides in a home directory path with an extension, create a subdirectorythat you want users to access. For example, if the /etc/cifs_homedir.cfg file includes the/vol/vol0/enghome/%u%/data path, create a subdirectory named data in each home directory.
Users can attach to the share that has the same name as their user name. When they read or writeto the share, they effectively access the data subdirectory.
108 | Data ONTAP 7.3 File Access and Protocols Management Guide
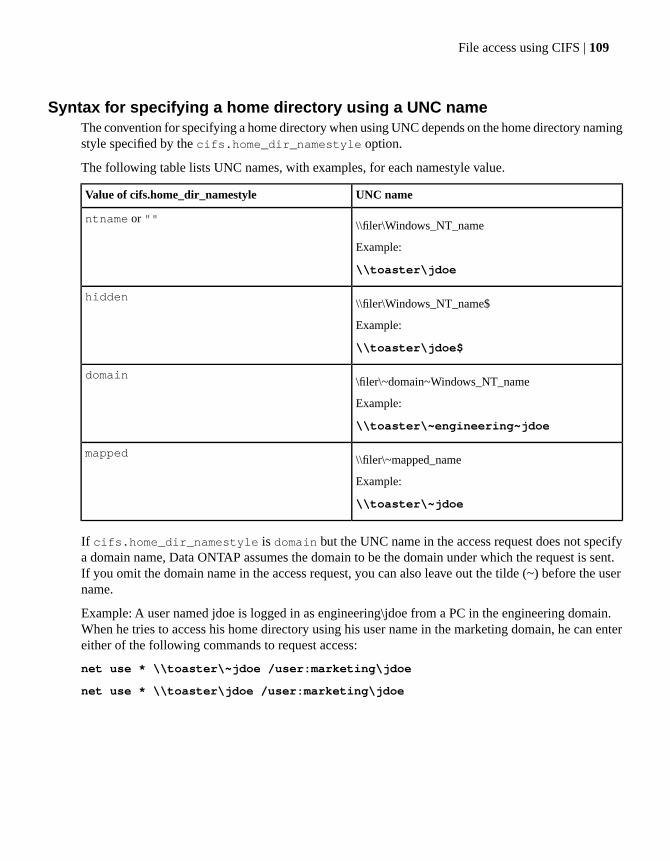
Syntax for specifying a home directory using a UNC nameThe convention for specifying a home directory when using UNC depends on the home directory namingstyle specified by the cifs.home_dir_namestyle option.
The following table lists UNC names, with examples, for each namestyle value.
UNC nameValue of cifs.home_dir_namestyle
\\filer\Windows_NT_name
Example:
\\toaster\jdoe
ntname or ""
\\filer\Windows_NT_name$
Example:
\\toaster\jdoe$
hidden
\filer\~domain~Windows_NT_name
Example:
\\toaster\~engineering~jdoe
domain
\\filer\~mapped_name
Example:
\\toaster\~jdoe
mapped
If cifs.home_dir_namestyle is domain but the UNC name in the access request does not specifya domain name, Data ONTAP assumes the domain to be the domain under which the request is sent.If you omit the domain name in the access request, you can also leave out the tilde (~) before the username.
Example: A user named jdoe is logged in as engineering\jdoe from a PC in the engineering domain.When he tries to access his home directory using his user name in the marketing domain, he can entereither of the following commands to request access:
net use * \\toaster\~jdoe /user:marketing\jdoe
net use * \\toaster\jdoe /user:marketing\jdoe
File access using CIFS | 109
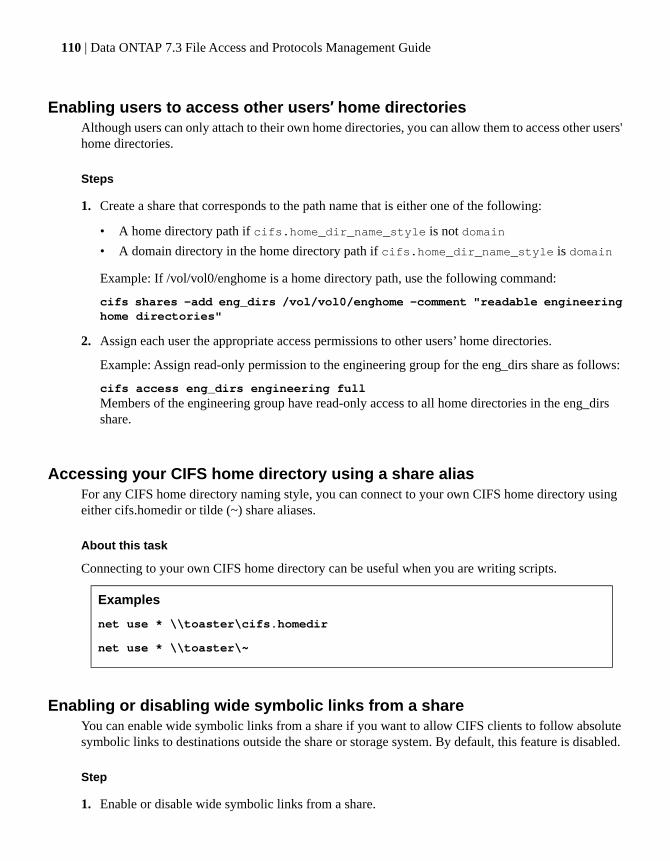
Enabling users to access other users’ home directoriesAlthough users can only attach to their own home directories, you can allow them to access other users'home directories.
Steps
1. Create a share that corresponds to the path name that is either one of the following:
• A home directory path if cifs.home_dir_name_style is not domain
• A domain directory in the home directory path if cifs.home_dir_name_style is domain
Example: If /vol/vol0/enghome is a home directory path, use the following command:
cifs shares -add eng_dirs /vol/vol0/enghome -comment "readable engineeringhome directories"
2. Assign each user the appropriate access permissions to other users’ home directories.
Example: Assign read-only permission to the engineering group for the eng_dirs share as follows:
cifs access eng_dirs engineering fullMembers of the engineering group have read-only access to all home directories in the eng_dirsshare.
Accessing your CIFS home directory using a share aliasFor any CIFS home directory naming style, you can connect to your own CIFS home directory usingeither cifs.homedir or tilde (~) share aliases.
About this task
Connecting to your own CIFS home directory can be useful when you are writing scripts.
Examples
net use * \\toaster\cifs.homedir
net use * \\toaster\~
Enabling or disabling wide symbolic links from a shareYou can enable wide symbolic links from a share if you want to allow CIFS clients to follow absolutesymbolic links to destinations outside the share or storage system. By default, this feature is disabled.
Step
1. Enable or disable wide symbolic links from a share.
110 | Data ONTAP 7.3 File Access and Protocols Management Guide
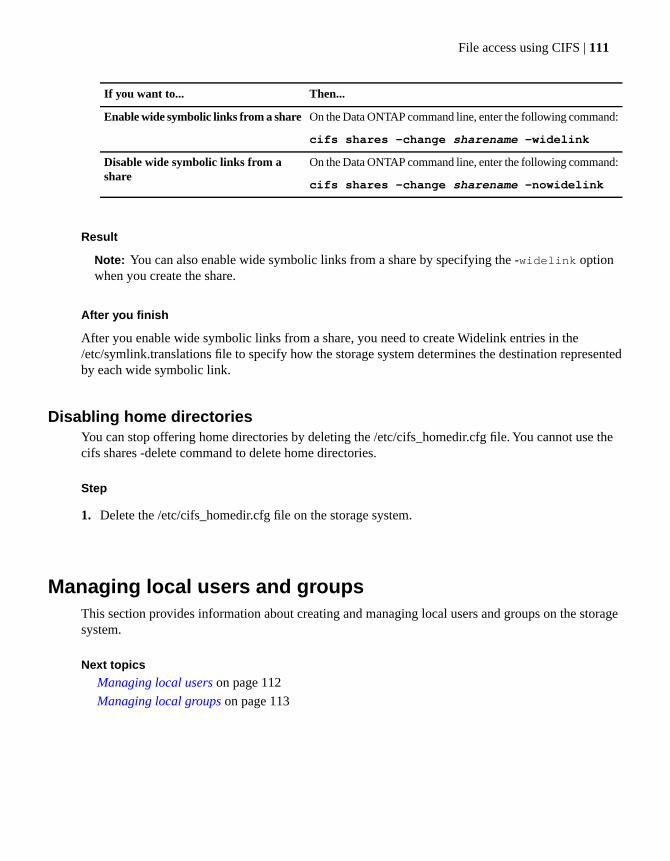
Then...If you want to...
On the Data ONTAP command line, enter the following command:
cifs shares -change sharename -widelink
Enable wide symbolic links from a share
On the Data ONTAP command line, enter the following command:
cifs shares -change sharename -nowidelink
Disable wide symbolic links from ashare
Result
Note: You can also enable wide symbolic links from a share by specifying the -widelink optionwhen you create the share.
After you finish
After you enable wide symbolic links from a share, you need to create Widelink entries in the/etc/symlink.translations file to specify how the storage system determines the destination representedby each wide symbolic link.
Disabling home directoriesYou can stop offering home directories by deleting the /etc/cifs_homedir.cfg file. You cannot use thecifs shares -delete command to delete home directories.
Step
1. Delete the /etc/cifs_homedir.cfg file on the storage system.
Managing local users and groupsThis section provides information about creating and managing local users and groups on the storagesystem.
Next topics
Managing local users on page 112
Managing local groups on page 113
File access using CIFS | 111
Managing local usersLocal users can be specified in user and group lists. For example, you can specify local users in file-levelACLs and share-level ACLs. You can also add local users to local groups.
Next topics
When you should create local user accounts on page 112
Displaying the storage system's authentication method on page 112
Limitations of local user accounts on page 113
Adding, displaying, and removing local user accounts on page 113
When you should create local user accounts
There are several reasons for creating local user accounts on your storage system.
• You must create local user accounts if, during setup, you configured the storage system to be amember of a Windows workgroup. In this case, the storage system must use the information in localuser accounts to authenticate users.
• If your storage system is a member of a domain:
• Local user accounts enable the storage system to authenticate users who try to connect to thestorage system from an untrusted domain.
• Local users can access the storage system when the domain controller is down or when networkproblems prevent your storage system from contacting the domain controller. For example, youcan define a BUILTIN\Administrator account that you can use to access the storage system evenwhen the storage system fails to contact the domain controller.
Note:
If, during setup, you configured your storage system to use UNIX mode for authenticating users, youshould not create local user accounts. In UNIX mode, the storage system always authenticates usersusing the UNIX password database.
Displaying the storage system's authentication method
You can display the storage system's authentication method, and thus determine whether you shouldcreate local users and groups, by entering the cifs sessions command
Step
1. Enter the following command:
cifs sessions
112 | Data ONTAP 7.3 File Access and Protocols Management Guide

For more information, see the na_cifs_sessions(1) man page.
Limitations of local user accounts
There are several limitations with local user accounts.
• You cannot use User Manager to manage local user accounts on your storage system.
• You can use User Manager in Windows NT 4.0 only to view local user accounts. If you use UserManager in Windows 2000, however, you cannot use the Users menu to view local users. You mustuse the Groups menu to display local users.
• You can create a maximum of 96 local user accounts.
Adding, displaying, and removing local user accounts
You can add, display, and remove local user accounts with the useradmin command.You use the useradmin command for creating, displaying, and deleting administrative users on thestorage system. (You can also use this command to manage non-local users through the domainusersubcommand.) For information about how to use the useradmin command, see the section about managinglocal user accounts in the introduction to storage system administration in the System AdministrationGuide.
Note: Data ONTAP keeps a single list of user accounts created by the useradmin command. Thesame types of information exist for local user accounts and administrative user accounts. CIFS userswho have local user accounts with the appropriate Admin Roles can use Windows RPC calls to login to the storage system. For more information, see the chapter on managing Administrator accessin the Data ONTAP System Administration Guide.
Managing local groupsYou can manage local groups to control which users have access to which resources.
About this task
A local group can consist of users or global groups from any trusted domains. Members of a local groupcan be given access to files and resources.
Membership in certain well-known local groups confers special privileges on the storage system. Forexample, members of BUILTIN\Power Users can manipulate shares, but have no other administrativecapabilities.
CIFS clients display the name of a local group in one of the following formats:
• FILERNAME\localgroup
• BUILTIN\localgroup
File access using CIFS | 113
Next topics
Adding, displaying, and removing local groups from the Data ONTAP command line on page 114
Adding a local group from the MMC on a Windows client on page 114
Adding users to a local group from the MMC on a Windows client on page 114
Removing a local group using the MMC on a Windows client on page 115
How SnapMirror works with local groups on page 116
Adding, displaying, and removing local groups from the Data ONTAP command line
You can add, display, and remove local groups from the Data ONTAP command line using theuseradmin command
For more information, see the Data ONTAP System Administration Guide.
Adding a local group from the MMC on a Windows client
You can add a local groups from the MMC on a Windows client.
Steps
1. Connect the MMC to the storage system.2. If it is not already selected, in the left pane, select Computer Management.3. Select System Tools > Local Users and Groups.4. Right-click Groups.5. Choose New Group.6. In the New Group box, enter the name and description of the group.7. Click Create.
A new group is created on the storage system.
Adding users to a local group from the MMC on a Windows client
You can add users to a local group from the MMC on a Windows client.
Steps
1. Connect the MMC to the storage system.2. If it is not already selected, in the left pane, select Computer Management.3. Select System Tools > Local Users and Groups.4. Double-click Groups.5. In the right panel, right-click on the group to which you want to add a user.6. Select Add to Group.
Result: The MMC displays the Properties box.
114 | Data ONTAP 7.3 File Access and Protocols Management Guide

7. In the Properties box, click Add.8. In the Select Users, Computers, or Groups window, enter the name of the user in the "Enter the
object names to select" box.
9. Click OK.
The MMC adds the user to the group.
Removing a local group using the MMC on a Windows client
You can remove a local group using the MMC on a Windows client.
Steps
1. Connect the MMC to the storage system.2. If it is not already selected, in the left pane, select Computer Management.3. Select System Tools > Local Users and Groups > Groups.4. In the right pane, right-click the local group that you want to remove.5. Select Remove.6. Click OK.
The MMC removes the local group.
File access using CIFS | 115
How SnapMirror works with local groups
Because the mirror is a read-only volume and you cannot change ACLs or permissions on it, do notuse local groups in ACLs for files to be replicated by SnapMirror.
If you use the SnapMirror feature to copy a volume to another storage system and the volume has anACL for a local group, the ACL does not apply on the mirror. This is because the group is local to thesource storage system.
If you want to use local groups in ACLs for files to be replicated by SnapMirror, you can do this usingthe MultiStore product. For more information about the MultiStore product, see the MultiStoreManagement Guide.
Applying Group Policy ObjectsYour storage system supports Group Policy Objects (GPOs), a set of rules (known as group policyattributes) that apply to computers in an Active Directory environment.
About this task
When CIFS and GPOs are enabled on your storage system, Data ONTAP sends LDAP queries to theActive Directory server requesting GPO information. If there are GPO definitions that are applicableto your storage system, the Active Directory server returns GPO information, including:
• GPO name
• Current GPO version
• Location of the GPO definition
• Lists of UUIDs (universally unique identifiers) for GPO policy sets
Note: For more information about Windows GPOs, see the Microsoft Web site at www.microsoft.com.
While not all GPOs are applicable to your storage system, the storage system is able to recognize andprocess the relevant set of GPOs.
The following GPOs are currently supported for your storage system:
• Startup and shutdown scripts
• Group Policy refresh interval for computer (includes random offset)
• File System security policy
• Restricted Groups security policy
• Event Log
• Auditing
• Take Ownership user right
116 | Data ONTAP 7.3 File Access and Protocols Management Guide
Note: Event Log and Auditing policy settings are applied differently to storage systems than toWindows systems. Also, if you define a Take Ownership user or group list that does not containWindows built-in administrator accounts, these administrators will lose Take Ownership privileges.
Next topics
Requirements for using GPOs with storage systems on page 117
Associating the storage system with an OU on page 117
Enabling or disabling GPO support on a storage system on page 118
Managing GPOs on the storage system on page 118
Requirements for using GPOs with storage systemsTo use GPOs with your storage system, several requirements must be met.
These requirements are:
• CIFS is licensed and enabled on the storage system.
• CIFS is configured using the cifs setup command, and the setup process included joining the storagesystem to a Windows domain version 2000 or later.
• GPOs are configured on a Windows Active Directory server by associating the storage system withan Organizational Unit (OU).
• GPO support is enabled on the storage system.
Associating the storage system with an OUThe cifs setup process does not associate the storage system with an OU by default—you mustexplicitly configure the association.
Steps
1. On the Windows server, open the Active Directory Users and Computers tree.2. Locate the storage system’s Active Directory object.3. Right-click the object and select Move.4. Select the OU that you want to associate with the storage system.
Result
The storage system object is placed in the selected OU.
File access using CIFS | 117

Enabling or disabling GPO support on a storage systemYou can enable or disable GPO support on the storage system by setting the cifs.gpo.enable option.
Step
1. Then...If you want to...
Enter the following command:
options cifs.gpo.enable on
enable GPO
Enter the following command:
options cifs.gpo.enable off
disable GPO
Managing GPOs on the storage systemYou can create, display, configure the updating of, and troubleshoot the Group Policy Objects on thestorage system.
Next topics
Creating File System security GPOs on page 118
Displaying current GPOs and their effects on page 122
Updating GPO settings on page 122
Troubleshooting GPO update problems on page 123
About startup and shutdown scripts on a storage system on page 124
About the /etc/ad directory on page 124
Configuration requirements for Data ONTAP pathnames on page 124
Creating File System security GPOs
You can specify GPO File System security settings directly on Data ONTAP file system objects(directories or files).
GPO File System security settings are propagated down the directory hierarchy; that is, when you seta GPO security setting on a directory, those settings are applied to objects within that directory.
Note:
These File System security settings can only be applied in mixed or NTFS volumes or qtrees. Theycannot be applied to a file or directory in a UNIX volume or qtree.
File System security ACL propagation is limited to about 280 levels of directory hierarchy.
118 | Data ONTAP 7.3 File Access and Protocols Management Guide
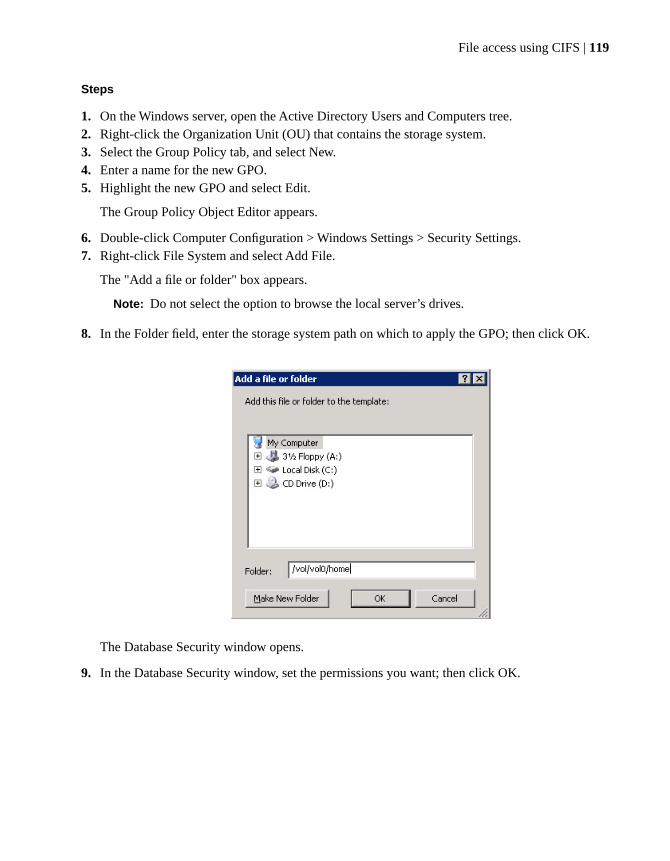
Steps
1. On the Windows server, open the Active Directory Users and Computers tree.2. Right-click the Organization Unit (OU) that contains the storage system.3. Select the Group Policy tab, and select New.4. Enter a name for the new GPO.5. Highlight the new GPO and select Edit.
The Group Policy Object Editor appears.
6. Double-click Computer Configuration > Windows Settings > Security Settings.7. Right-click File System and select Add File.
The "Add a file or folder" box appears.
Note: Do not select the option to browse the local server’s drives.
8. In the Folder field, enter the storage system path on which to apply the GPO; then click OK.
The Database Security window opens.
9. In the Database Security window, set the permissions you want; then click OK.
File access using CIFS | 119

The Add Object window opens.
10. In the Add Object window, select the ACL inheritance you want; then click OK.
120 | Data ONTAP 7.3 File Access and Protocols Management Guide
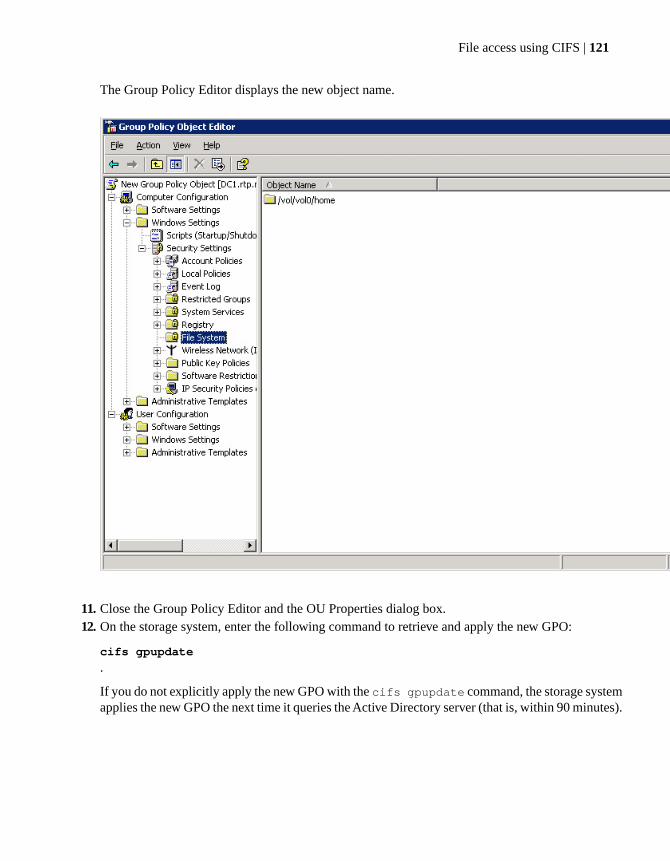
The Group Policy Editor displays the new object name.
11. Close the Group Policy Editor and the OU Properties dialog box.12. On the storage system, enter the following command to retrieve and apply the new GPO:
cifs gpupdate
.
If you do not explicitly apply the new GPO with the cifs gpupdate command, the storage systemapplies the new GPO the next time it queries the Active Directory server (that is, within 90 minutes).
File access using CIFS | 121

Displaying current GPOs and their effects
You can display GPOs currently in effect for the storage system and the results of those GPOs by usingthe cifs gpresult command.
The cifs gpresult command simulates the output of the Windows 2000/XP gpresult.exe /forcecommand.
Note: The cifs gpresult command displays only those group policy settings that are relevantto your storage system and current Data ONTAP release.
Step
1. Enter the following command:
cifs gpresult [-r] [-d] [-v]
OutputOption
Displays information about the GPOs currentlyapplicable to the storage system, including name,version and location.
none
Displays the results of applying current GPOs to thestorage system.
-r
Generates a verbose display, including informationabout applicable GPOs and the results of applyingthem.
-v
Dumps the output from cifs gpresult -v to the/etc/ad/gpresult_timestamp file.
-d
Updating GPO settings
Data ONTAP retrieves and applies GPO changes every 90 minutes and refreshes security settings every16 hours, but you can also force an update by entering the cifs gpupdate command.
Group Policy settings on the storage system can be updated in three ways:
• All GPOs are verified every 90 minutes. By default, Data ONTAP queries Active Directory forchanges to GPOs. If the GPO version numbers recorded in Active Directory are higher than thoseon the storage system, Data ONTAP retrieves and applies the new GPOs. If the version numbersare the same, GPOs on the storage system are not updated.
• Security Settings GPOs are refreshed every 16 hours. Data ONTAP retrieves and applies SecuritySettings GPOs every 16 hours, whether or not these GPOs have changed.
Note: The 16 hour default value cannot be changed in the current Data ONTAP version. It is aWindows client default setting.
122 | Data ONTAP 7.3 File Access and Protocols Management Guide
• All GPOs can be updated on demand with a Data ONTAP command. This command simulates theWindows 2000/XP gpupdate.exe /force command.
Step
1. To update Group Policy settings manually, enter the following command: cifs gpupdate.
Troubleshooting GPO update problems
If Data ONTAP does not display messages on the console indicating that it has successfully appliedGPO settings—for example, after you issue the cifs gpupdate command—you should checkdiagnostic information about storage system GPO connections using the cifs.gpo.trace.enableoption.
When updated Policy Settings have been applied on storage system GPOs, messages similar to one orboth of the following appear on the storage system console:
CIFS GPO System: GPO processing is successfully completed.
CIFS GPO System: GPO Security processing is completed.
Steps
1. Enter the following command to enable GPO tracing:
options cifs.gpo.trace.enable on
2. Enter the following command to update GPO settings:
cifs gpupdate
You see messages similar to the following that include Active Directory information about GPOs:
CIFS GPO Trace: Site DN: cn=Default-First-Site-Name, cn=sites,CN=Configuration,DC=cifs,DC=lab,DC=company, DC=com.
CIFS GPO Trace: Domain DN: dc=CIFS,dc=LAB,dc=COMPANY, dc=COM.
CIFS GPO Trace: Filer DN: cn=user1,ou=gpo_ou,dc=cifs, dc=lab,dc=company,dc=com.
CIFS GPO Trace: Processing GPO[0]: T_sub.
CIFS: Warning for server \\LAB-A0: Connection terminated.
GPO trace messages are written to the console and message logs until GPO tracing is turned off.
3. Enter the following command to disable GPO tracing:
options cifs.gpo.trace.enable off
File access using CIFS | 123

About startup and shutdown scripts on a storage system
When GPOs have been enabled on a storage system and specified in the Active Directory domain, DataONTAP runs startup and shutdown scripts automatically whenever you start or shutdown CIFS.
The storage system accesses the scripts from the Domain Controller's sysvol directory and saves thesefiles locally in the /etc/ad directory.
Note: Although the storage system periodically retrieves updates to the startup and shutdown scripts,startup scripts are not applied until the next time CIFS restarts.
About the /etc/ad directory
When GPO support is enabled on the storage system for the first time using the cifs.gpo.enableoption, an /etc/ad directory is created.
This directory is used as a repository for the following files:
• GPO startup and shutdown scripts retrieved from the domain controller.
• Output for the cifs gpresult -d command.
Configuration requirements for Data ONTAP pathnames
The format of target file or directory names must be recognized by Data ONTAP and must be in absoluteor relative form.
Here is more information about the path name forms:
• Absolute pathname—for example, /vol/vol0/home.When an absolute pathname is supplied, Data ONTAP applies File System security settings to thespecified target file or files within the target directories. In this example, the settings are applied tothe /home directory in the storage system root volume.
• Relative pathname—for example, /home.When a relative pathname is supplied (any pathname that does not begin with /vol), Data ONTAPapplies File System security settings to any target file or directory containing the specified element.This is a convenient way to apply settings to multiple parallel targets in a single storage system; inthis example, the settings are applied to all vFiler units with /home directories.
Improving client performance with oplocksOplocks (opportunistic locks) enable a CIFS client in certain file-sharing scenarios to perform client-sidecaching of read-ahead, write-behind, and lock information. A client can then read from or write to a
124 | Data ONTAP 7.3 File Access and Protocols Management Guide
file without regularly reminding the server that it needs access to the file in question. This improvesperformance by reducing network traffic.
Next topics
Write cache data loss considerations when using oplocks on page 125
Enabling or disabling oplocks on the storage system on page 125
Enabling or disabling oplocks on a qtree on page 126
Changing the delay time for sending oplock breaks on page 127
Write cache data loss considerations when using oplocksUnder some circumstances, if a process has an exclusive oplock on a file and a second process attemptsto open the file, the first process must invalidate cached data and flush writes and locks. The client mustthen relinquish the oplock and access to the file. If there is a network failure during this flush, cachedwrite data might be lost.
Data loss possibilities: Any application that has write-cached data can lose that data under the followingset of circumstances:
• It has an exclusive oplock on the file.
• It is told to either break that oplock or close the file.
• During the process of flushing the write cache, the network or target system generates an error.
Error handling and write completion: The cache itself does not have any error handling—the applicationsdo. When the application makes a write to the cache, the write is always completed. If the cache, inturn, makes a write to the target system over a network, it must assume that the write is completedbecause if it does not, the data is lost.
Enabling or disabling oplocks on the storage systemIf you enable oplocks on the storage system, you can enable or disable oplocks for individual qtrees.
About this task
CIFS oplocks on your storage system are on by default.
You might turn CIFS oplocks off under either of the following circumstances:
• You are using a database application whose documentation recommends that oplocks be turned off.
• The CIFS clients are on an unreliable network.
• You are handling critical data and you cannot afford even the slightest data loss.
Otherwise, you can leave CIFS oplocks on.
File access using CIFS | 125
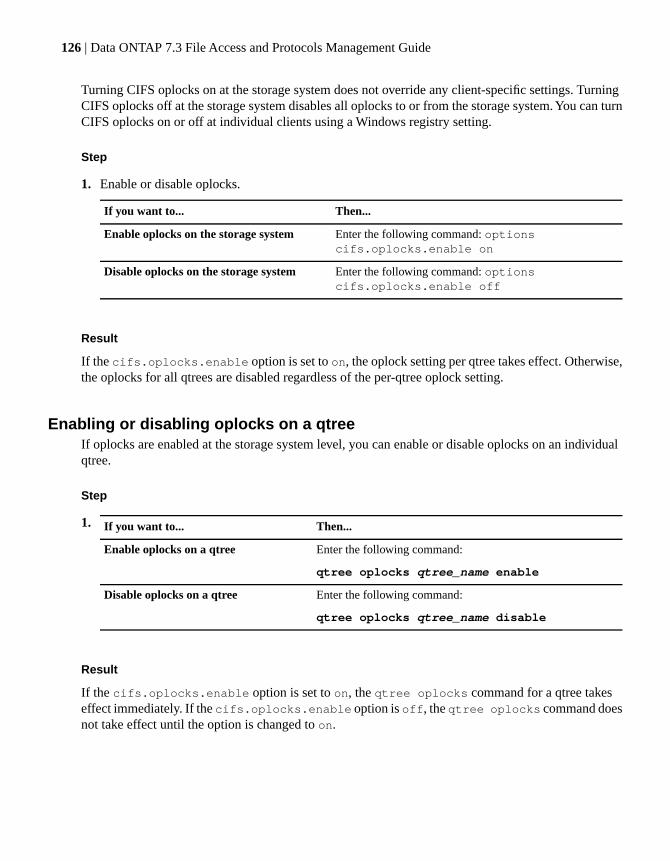
Turning CIFS oplocks on at the storage system does not override any client-specific settings. TurningCIFS oplocks off at the storage system disables all oplocks to or from the storage system. You can turnCIFS oplocks on or off at individual clients using a Windows registry setting.
Step
1. Enable or disable oplocks.
Then...If you want to...
Enter the following command: optionscifs.oplocks.enable on
Enable oplocks on the storage system
Enter the following command: optionscifs.oplocks.enable off
Disable oplocks on the storage system
Result
If the cifs.oplocks.enable option is set to on, the oplock setting per qtree takes effect. Otherwise,the oplocks for all qtrees are disabled regardless of the per-qtree oplock setting.
Enabling or disabling oplocks on a qtreeIf oplocks are enabled at the storage system level, you can enable or disable oplocks on an individualqtree.
Step
1. Then...If you want to...
Enter the following command:
qtree oplocks qtree_name enable
Enable oplocks on a qtree
Enter the following command:
qtree oplocks qtree_name disable
Disable oplocks on a qtree
Result
If the cifs.oplocks.enable option is set to on, the qtree oplocks command for a qtree takeseffect immediately. If the cifs.oplocks.enable option is off, the qtree oplocks command doesnot take effect until the option is changed to on.
126 | Data ONTAP 7.3 File Access and Protocols Management Guide
Changing the delay time for sending oplock breaksIf a client that owns a file oplock sends a file open request, it is temporarily vulnerable to a “racecondition” that can occur if the storage system requests an oplock break. To prevent this condition, thestorage system delays sending an oplock break according to the delay time value (in milliseconds)specified by the cifs.oplocks.opendelta option.
About this task
By default, the default delay time is 0 milliseconds. If your storage system must support some olderMicrosoft Windows clients, including Microsoft Windows NT 4.0 without the latest Service Pack andMicrosoft Windows NT 3.5.1, you should keep this default value to prevent the performance problemdescribed in Microsoft Knowledge Base article 163525.
If you don't have clients running older version of Windows, you can set the delay time to another value,such as 8. This means that after the storage system receives or responds to a request to open a file, thestorage system will make sure that 8 milliseconds have elapsed before sending an oplock break to thatclient.
You might want to increase the delay time if you issue the cifs stat command and the output showsa non-zero value for the OpLkBkNoBreakAck field.
You might also want to increase the delay time for sending oplock breaks if you see syslog messagessimilar to the following:
Mon Jan 21 15:18:38 PST [CIFSAdmin:warning]: oplock break timed out to station JOHN-PC for file \\FILER\share\subdir\file.txt
Step
1. Enter the following command:
options cifs.oplocks.opendelta time
Here, time is the delay in milliseconds.
Setting the cifs.oplocks.opendelta option postpones the sending of oplock break requests toclients that have just opened files. You must consult technical support if you are considering settingthis value higher than 35.
File access using CIFS | 127
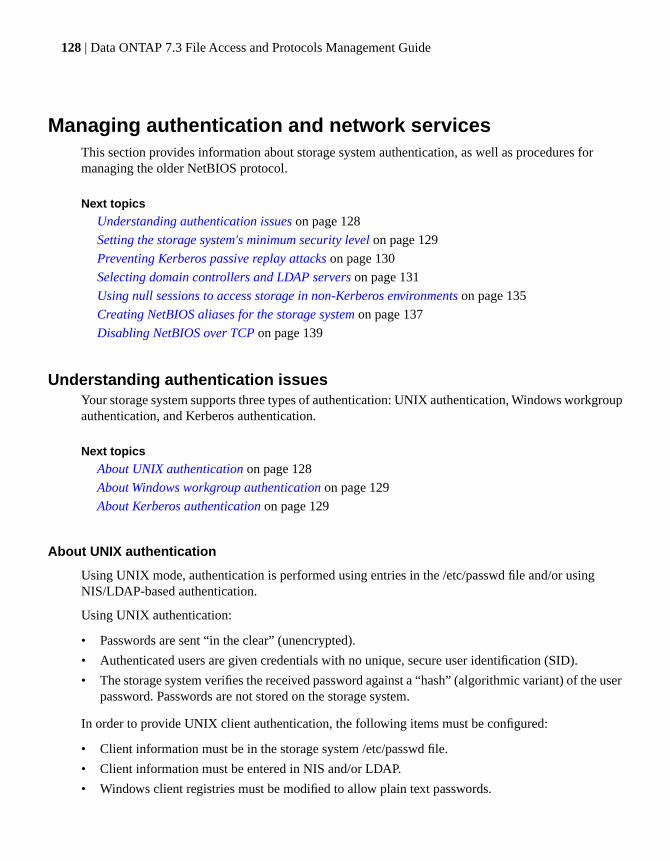
Managing authentication and network servicesThis section provides information about storage system authentication, as well as procedures formanaging the older NetBIOS protocol.
Next topics
Understanding authentication issues on page 128
Setting the storage system's minimum security level on page 129
Preventing Kerberos passive replay attacks on page 130
Selecting domain controllers and LDAP servers on page 131
Using null sessions to access storage in non-Kerberos environments on page 135
Creating NetBIOS aliases for the storage system on page 137
Disabling NetBIOS over TCP on page 139
Understanding authentication issuesYour storage system supports three types of authentication: UNIX authentication, Windows workgroupauthentication, and Kerberos authentication.
Next topics
About UNIX authentication on page 128
About Windows workgroup authentication on page 129
About Kerberos authentication on page 129
About UNIX authentication
Using UNIX mode, authentication is performed using entries in the /etc/passwd file and/or usingNIS/LDAP-based authentication.
Using UNIX authentication:
• Passwords are sent “in the clear” (unencrypted).
• Authenticated users are given credentials with no unique, secure user identification (SID).
• The storage system verifies the received password against a “hash” (algorithmic variant) of the userpassword. Passwords are not stored on the storage system.
In order to provide UNIX client authentication, the following items must be configured:
• Client information must be in the storage system /etc/passwd file.
• Client information must be entered in NIS and/or LDAP.
• Windows client registries must be modified to allow plain text passwords.
128 | Data ONTAP 7.3 File Access and Protocols Management Guide

Because UNIX authentication transmits unencrypted passwords, Windows clients require a registryedit to enable them to send passwords without encryption. Clients that are not properly configured tosend clear text passwords to the storage system might be denied access and display an error messagesimilar to the following:
System error 1240 has occurred.
The account is not authorized to login from this station.
Refer to Microsoft support for information to enable plain text passwords, to allow clients to use UNIXauthentication.
About Windows workgroup authentication
Workgroup authentication allows local Windows client access.
The following facts apply to workgroup authentication:
• Does not rely upon a domain controller
• Limits storage system access to 96 local clients
• Is managed using the storage system’s useradmin command
About Kerberos authentication
With Kerberos authentication, upon connection to your storage system, the client negotiates the highestpossible security level.
There are two primary levels of security that can be chosen:
• Basic (Windows NT-4) security, based on network services such as NT Lan Manager (NTLM),lanman, and netlogon
• Extended security using Windows 2000 Kerberos implementation
Note: Extended security features are only available to clients that are members of a Windows ActiveDirectory domain.
Setting the storage system's minimum security levelTo set the storage system's minimum security level (that is, the minimum level of the security tokensthat the storage system accepts from clients), you can set the cifs.LMCompatibilityLevel option.By default, this option is set to 1.
Step
1. Enter the following command:
options cifs.LMCompatibilityLevel minimum_level
File access using CIFS | 129
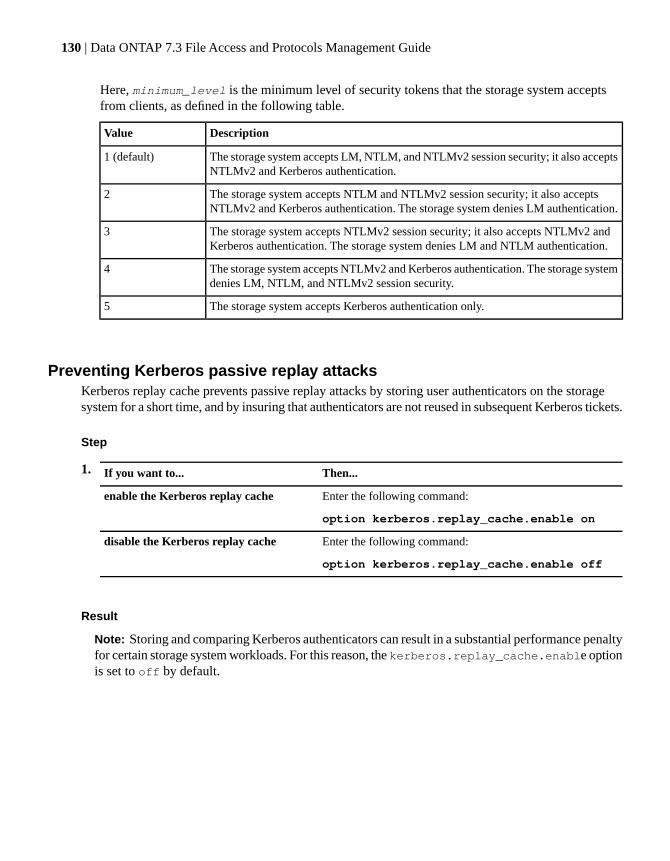
Here, minimum_level is the minimum level of security tokens that the storage system acceptsfrom clients, as defined in the following table.
DescriptionValue
The storage system accepts LM, NTLM, and NTLMv2 session security; it also acceptsNTLMv2 and Kerberos authentication.
1 (default)
The storage system accepts NTLM and NTLMv2 session security; it also acceptsNTLMv2 and Kerberos authentication. The storage system denies LM authentication.
2
The storage system accepts NTLMv2 session security; it also accepts NTLMv2 andKerberos authentication. The storage system denies LM and NTLM authentication.
3
The storage system accepts NTLMv2 and Kerberos authentication. The storage systemdenies LM, NTLM, and NTLMv2 session security.
4
The storage system accepts Kerberos authentication only.5
Preventing Kerberos passive replay attacksKerberos replay cache prevents passive replay attacks by storing user authenticators on the storagesystem for a short time, and by insuring that authenticators are not reused in subsequent Kerberos tickets.
Step
1. Then...If you want to...
Enter the following command:
option kerberos.replay_cache.enable on
enable the Kerberos replay cache
Enter the following command:
option kerberos.replay_cache.enable off
disable the Kerberos replay cache
Result
Note: Storing and comparing Kerberos authenticators can result in a substantial performance penaltyfor certain storage system workloads. For this reason, the kerberos.replay_cache.enable optionis set to off by default.
130 | Data ONTAP 7.3 File Access and Protocols Management Guide
Selecting domain controllers and LDAP serversUpon startup and as listed below, your storage system searches for a Windows domain controller. Thissection describes how and when the storage system finds and selects domain controllers.
About this task
The storage system searches for domain controllers where any of the following is true:
• The storage system has been started or rebooted.
• A cifs resetdc command has been issued.
• Four hours have elapsed since the last search.
Note: Active Directory LDAP servers are searched for under the same conditions.
Next topics
Understanding the domain controller discovery process on page 131
Specifying a list of preferred domain controllers and LDAP servers on page 132
Deleting servers from the prefdc list on page 133
Troubleshooting domain controller connections on page 134
Displaying a list of preferred domain controllers and LDAP servers on page 134
Reestablishing the storage system connection with a domain on page 135
Understanding the domain controller discovery process
When you run CIFS in a domain environment, your storage system attempts to rediscover all of itsdomain controllers by sending Internet Control Message Protocol (ICMP) packets once every 4 hours.Doing so enables it to verify that the current domain controller is still accessible and to prioritizeavailable domain controllers using the packets’ round trip time.
If a storage system loses access to a domain controller with a very good connection rate and has to goto a backup domain controller with a slower rate, it will rediscover domain controllers every 2 minutesuntil a better connection is found. Once that connection is found, it will connect to the new domaincontroller and return to sending discovery packets every 4 hours.
The following table describes the domain controller discovery process and priority groups. The storagesystem only progresses to a lower priority group when it has failed to contact all domain controllers inthe priority group above it.
Note: For Active Directory environments, site membership is one of the criteria by which the storagesystem selects domain controllers (when no preferred domain controllers are available). Therefore,it is important to have the Sites and Services configured properly (with the storage system’s subnetinformation included in the same site as the storage system).
File access using CIFS | 131
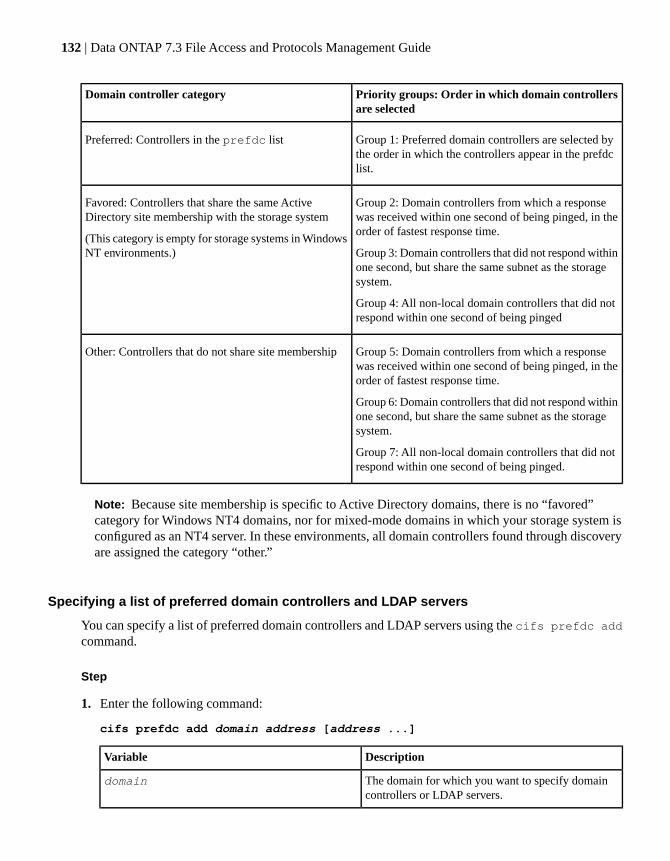
Priority groups: Order in which domain controllersare selected
Domain controller category
Group 1: Preferred domain controllers are selected bythe order in which the controllers appear in the prefdclist.
Preferred: Controllers in the prefdc list
Group 2: Domain controllers from which a responsewas received within one second of being pinged, in theorder of fastest response time.
Group 3: Domain controllers that did not respond withinone second, but share the same subnet as the storagesystem.
Group 4: All non-local domain controllers that did notrespond within one second of being pinged
Favored: Controllers that share the same ActiveDirectory site membership with the storage system
(This category is empty for storage systems in WindowsNT environments.)
Group 5: Domain controllers from which a responsewas received within one second of being pinged, in theorder of fastest response time.
Group 6: Domain controllers that did not respond withinone second, but share the same subnet as the storagesystem.
Group 7: All non-local domain controllers that did notrespond within one second of being pinged.
Other: Controllers that do not share site membership
Note: Because site membership is specific to Active Directory domains, there is no “favored”category for Windows NT4 domains, nor for mixed-mode domains in which your storage system isconfigured as an NT4 server. In these environments, all domain controllers found through discoveryare assigned the category “other.”
Specifying a list of preferred domain controllers and LDAP servers
You can specify a list of preferred domain controllers and LDAP servers using the cifs prefdc addcommand.
Step
1. Enter the following command:
cifs prefdc add domain address [address ...]
DescriptionVariable
The domain for which you want to specify domaincontrollers or LDAP servers.
domain
132 | Data ONTAP 7.3 File Access and Protocols Management Guide

DescriptionVariable
The IP address of the domain controller or LDAPserver.
address
Specifying two preferred domain controllers for the lab domain
To specify two preferred domain controllers for the lab domain, enter the following command:
cifs prefdc add lab 10.10.10.10 10.10.10.11
Note: To force the storage system to use a revised list of preferred domain controllers, orLDAP servers, use the cifs resetdc command.
Deleting servers from the prefdc list
You can delete servers form the prefdc list using the cifs prefdc delete command.
After you delete a domain from the prefdc list, you should always perform a cifs resetdc commandto update the storage system’s available domain controller information, as described in step 2 of thefollowing procedure. The storage system does not update the domain controller discovery informationfrom network services when the prefdc list is updated. Failure to reset the domain controller informationcan cause a connection failure, if the storage system tries to establish a connection with an unavailabledomain controller (or LDAP server).
Note: Storage systems do not automatically perform domain controller discovery operations uponrestart; restarting the storage system does not update the available domain controller and LDAPserver list.
Steps
1. Enter the following command:
cifs prefdc delete domain
domain is the domain where the preferred domain controller or LDAP server resides.2. Enter the following command:
cifs resetdc [domain]
domain is the domain you specified in step one.
The storage system disconnects and searches for a domain controller in the order specified in the revisedprefdc list.
Deleting lab from the prefdc list
To delete lab from the prefdc list, enter the following command:
File access using CIFS | 133
cifs prefdc delete lab
Troubleshooting domain controller connections
Because of potential security concerns, you should verify that any increase in ICTM Echo Request(ping) traffic is associated with a change in domain controller connection status.
Steps
1. Verify that any ICMP packets you see are going between the storage system and known domaincontrollers. To display a list of known domain controllers, enter the following command:
cifs domaininfo
2. Confirm that the storage system pings these devices only once every 4 hours.3. If you are seeing more frequent ping traffic, search your logs for any message indicating loss of
connectivity with a domain controller.4. You can also temporarily enable the cifs.trace_dc_connection option to log all domain
controller address discovery and connection activities on the storage system. This allows you tocorrelate the packets that you are seeing with the times that the storage system reports when it isrediscovering domain controllers. For usage information about this option, see the options(1) manpage.
Displaying a list of preferred domain controllers and LDAP servers
You can display a list of preferred domain controllers and LDAP servers using the cifs prefdcprint command.
Step
1. Enter the following command:
cifs prefdc print [domain]
domain is the domain for which you want to display domain controllers. When a domain is notspecified, this command displays preferred domain controllers for all domains.
Displaying the preferred controllers and LDAP servers for the lab domain
To display the preferred controllers and LDAP servers for the lab domain, enter the followingcommand:
cifs prefdc print lab
134 | Data ONTAP 7.3 File Access and Protocols Management Guide
Reestablishing the storage system connection with a domain
You can reestablish the storage system connection with a domain using the cifs resetdc command.
The following procedure disconnects your storage system from the current domain controller andestablishes a connection between the storage system and a preferred domain controller. It also forcesdomain controller discovery, updating the list of available domain controllers.
Note: This procedure also reestablishes LDAP connections, and performs LDAP server discovery.
Step
1. Enter the following command:
cifs resetdc domain
domain is the domain from which the storage system disconnects. If it is omitted, the storage systemdisconnects from the domain in which the storage system is installed.
Disconnecting the storage system from the domain controllers for the lab domain
To disconnect the storage system from the domain controllers for the lab domain, enter thefollowing command:
cifs resetdc lab
Using null sessions to access storage in non-Kerberos environmentsNull session access provides permissions for network resources, such as storage system data, toclient-based services running under the local system. A null session occurs when a client process usesthe “system” account to access a network resource. Null session configuration is specific to non-Kerberosauthentication.
Next topics
How the storage system provides null session access on page 135
Granting null users access to file system shares on page 136
Using machine accounts to access storage in Kerberos environments on page 137
How the storage system provides null session access
Because null session shares do not require authentication, clients that require null session access musthave their IP addresses mapped on the storage system.
By default, unmapped null session clients can access certain Data ONTAP system services, such asshare enumeration, but they are restricted from accessing any storage system data.
File access using CIFS | 135
Note: Data ONTAP supports Windows RestrictAnonymous registry setting values with thecifs.restrict_anonymous option. This allows you to control the extent to which unmapped nullusers can view or access system resources. For example, you can disable share enumeration andaccess to the IPC$ share (the hidden named pipe share). For more information, see the options(1)man page.
Unless otherwise configured, a client running a local process that requests storage system access througha null session is a member only of nonrestrictive groups, such as “everyone.” To limit null sessionaccess to selected storage system resources, you might want to create a group to which all null sessionclients belong; creating this group enables you to restrict storage system access and to set storage systemresource permissions that apply specifically to null session clients.
Granting null users access to file system shares
You can allow access to your storage system resources by null session clients by assigning a group tobe used by null session clients and recording the IP addresses of null session clients to add to the storagesystem’s list of clients allowed to access data using null sessions
Steps
1. Open the /etc/usermap.cfg file.2. Add an entry for each null user using the following format:
IPqual:"" => unixacct
IPqual specifies either an IP address (hostname or numeric dot-format) or a subnet (IP address +network mask); "" indicates null user; => indicates the mapping direction; and unixacct is theUNIX account (from /etc/passwd or NIS) that the mapped null user will have.
3. Set the cifs.mapped_null_user_extra_group option to the group name you intend to use fornull session clients.
4. Set permissions to allow appropriate access rights to null session clients.
Examples
10.10.20.19:"" => exchuser
192.168.78.0/255.255.255.0:"" => iisuser
The client at IP address 10.10.20.19 is allowed null session access to the storage system. Thenull user account is mapped to a UNIX account called exchuser, which must exist in the/etc/passwd or NIS database.
Also, any clients establishing a connection from the 192.168.78.0 class C subnet are allowed nullsession access and are mapped to the UNIX account iisuser. Other null user connections to thestorage system are not allowed.
Data ONTAP provides a mapping syntax in the /etc/usermap.cfg file to specify the IP address of clientsallowed access to storage system resources using a null user session. Once you create a group for null
136 | Data ONTAP 7.3 File Access and Protocols Management Guide
users, you can specify access restrictions for storage system resources and resource permissions thatapply only to null sessions.
Any null user accessing the storage system from a mapped IP address is granted mapped user permissions.Consider appropriate precautions to prevent unauthorized access to storage systems mapped with nullusers. For maximum protection, place the storage system and all clients requiring null user storagesystem access on a separate network, to eliminate the possibility of IP address "spoofing."
Using machine accounts to access storage in Kerberos environments
Machine accounts are subjected to the same Kerberos authentication as user accounts, so they do notneed to be mapped on the storage system.
When authenticated using Kerberos, clients that run local processes using the “system” account assignthose processes to the machine account when accessing remote resources. The machine account isassigned the computer name registered with the domain controller, followed by a dollar sign ($).
Preventing machine accounts from accessing data
By default, machine accounts (like any other authenticated user) always have access to data shares.However, for security reasons, you might want to prevent services running on a Kerberos-enabled clientfrom accessing data using CIFS.
Note: Disabling machine account access to data shares can cause a number of services to fail, suchas offline folders and roaming profiles. Be sure to evaluate your storage system service needs beforedisabling machine account access.
Step
1. Enter the following command:
cifs access -delete share_name -m
Note: Access to the IPC$ share (the hidden named pipe share) cannot be changed and is alwayspermitted.
For more information, see the cifs_access(1) man page.
Creating NetBIOS aliases for the storage systemYou can create NetBIOS aliases by setting the cifs.netbios_aliases option or by editing the/etc/cifs_nbalias.cfg file.
About this task
NetBIOS aliases are alternative names for your storage system. You can connect to the storage systemusing any of the names in the list.
File access using CIFS | 137
With the cifs.netbios_aliases option, you can create NetBIOS aliases as a comma-separated list.This list allows up to 255 characters, including commas. The /etc/cifs_nbalias.cfg file allows up to 200entries.
Next topics
Creating NetBIOS aliases from the command line on page 138
Creating NetBIOS aliases in the /etc/cifs_nbalias.cfg file on page 138
Displaying the list of NetBIOS aliases on page 139
Creating NetBIOS aliases from the command line
You can create NetBIOS aliases from the command line by setting the cifs.netbios_aliasesoption.
Steps
1. Enter the following command:
options cifs.netbios_aliases name,...
You can enter up to 255 characters, including commas.
Example
options cifs.netbios_aliases alias1,alias2,alias3
2. Enter the following command to process the entries:
cifs nbalias load
Creating NetBIOS aliases in the /etc/cifs_nbalias.cfg file
You can create NetBIOS aliases in the /etc/cifs_nbalias.cfg file.
Data ONTAP creates a default cifs_nbalias.cfg file in the /etc directory when CIFS starts, if the filedoes not already exist. Changes to this file are processed automatically whenever CIFS starts. You canalso process changes to this file using the command cifs nbalias load.
Steps
1. Open the /etc/cifs_nbalias.cfg file for editing.2. Enter NetBIOS aliases in the /etc/cifs_nbalias.cfg file, one entry per line.
Note: You can enter up to 200 NetBIOS aliases in the file, using either ASCII or Unicodecharacters.
3. Enter the following command to process the entries:
138 | Data ONTAP 7.3 File Access and Protocols Management Guide

cifs nbalias load
Displaying the list of NetBIOS aliases
You can display the list of NetBIOS aliases by entering the cifs nbalias command.
Step
1. Enter the following command: cifs nbalias
Disabling NetBIOS over TCPIf NetBIOS over TCP has been disabled in your Windows 2000 network, you can use thecifs.netbios_over_tcp.enable option to disable NetBIOS over TCP on your storage system.
About this task
NetBIOS over TCP is the standard protocol used for CIFS prior to Windows 2000. The option to usethis protocol, cifs.netbios_over_tcp.enable, is enabled on your storage system by default. Itcorresponds to the “Enable NetBIOS over TCP” setting in the Windows 2000 Advanced TCP/IP settingstab.
To verify the status of NetBIOS over TCP on your storage system, use the nbtstat command, asdescribed in the nbtstat(1) man page.
In order to disable NetBIOS over TCP, all storage system clients must be running Windows 2000 orlater. Once you disable NetBIOS over TCP, only Windows 2000 domain controllers and virus scannerscan be used.
Note: Once you disable NetBIOS over TCP, clients no longer receive Data ONTAP notificationmessages, such as shutdown messages and vscan warnings.
Step
1. Enter the following command:
options cifs.netbios_over_tcp.enable off
File access using CIFS | 139
Monitoring CIFS activityThis section provides information about monitoring CIFS sessions activity and collecting storage systemstatistics.
About this task
You can display the following types of session information:
• A summary of session information, which includes storage system information and the number ofopen shares and files opened by each connected user.
• Share and file information about one connected user or all connected users, which includes
• The names of shares opened by a specified connected user or all connected users
• The access levels of opened files
• Security information about a specified connected user or all connected users, which includesthe UNIX UID and a list of UNIX groups and Windows groups to which the user belongs.
Note: The number of open shares shown in the session information includes the hidden IPC$ share.
Next topics
Different ways to specify a user on page 140
Displaying a summary of session information on page 141
Timing out idle sessions on page 141
Tracking statistics on page 141
Viewing specific statistics on page 142
Saving and reusing statistics queries on page 143
CIFS resource limitations on page 143
Different ways to specify a userWhen displaying session information about a connected user, you can specify the user by the user nameor the IP address of the workstation. In addition, if the user is connected to your storage system froma pre–Windows 2000 client, you can specify the name of the workstation.
Clients sometimes connect with an unauthenticated “null” session. Such sessions are sometimes usedby clients to enumerate shares. If a client has only the null session connected to the storage system, youwill see the following status message:
140 | Data ONTAP 7.3 File Access and Protocols Management Guide
User (or PC) not logged in
Displaying a summary of session informationYou can use the cifs sessions command to display a summary of session information.
Step
1. Enter the following command:
cifs sessions
Timing out idle sessionsYou can specify the amount of time that elapses (in seconds) before Data ONTAP disconnects an idlesession.
About this task
If a user does not have a file opened on your storage system, the session is considered idle. By default,Data ONTAP disconnects a session after it has been idle for 30 minutes.
If an idle session is disconnected, it will automatically reconnect the next time the client accesses thestorage system.
Step
1. Enter the following command:
options cifs.idle_timeout time
time is the number of seconds.
The new value for this option takes effect immediately.
Tracking statisticsUsing the stats commands, you can view system statistics to track performance.
About this task
The stats command is not specific to CIFS-related statistics. The two stats commands that outputstatistics data are stats show (for real-time statistical data and stats stop (when you are trackingstatistics over a range of time). (Note that the cifs stats command is still available.)
The statistics displayed by the stats command are accumulated in counters. You reference a specificcounter using a hierarchical name with components: object_name:instance_name:counter_name.For example, a counter might be named system:system:cifs_ops. You can use the stats list
File access using CIFS | 141
command to determine the object_names, instance_names and counter_names available onyour storage system.
The output of the stats show command provides data describing the storage system at the momentyou issued the command. To track statistics over time, use the stats start command to mark thebeginning of the time period you want to track, and the stats stop command to mark the end of thetime period for which you want to collect statistical data. Data ONTAP outputs the collected data assoon as you enter the stats stop command.
Data ONTAP allows you to use the stats start and stats stop commands to track differentstatistics concurrently. To do this, you can enter an instance (-i) argument with the stats startand stats stop commands. .
For more information about usage and syntax, see the stats(1) man page.
Steps
1. Enter the following command to view a list of objects that are tracked by the stats command:
stats list objects
Data ONTAP returns a list of objects you can view using the stats show object_name
2. Enter the following command to view a list of statistics instances: stats list instances.
Data ONTAP returns a list of instances you can view using the stats show command. You canuse these instances to focus the output of the stats show command.
3. Enter the following command to view a list of statistics counters: stats list counters.
Data ONTAP returns a list of counters you can view using the stats show command.
4. Enter the following command to receive a description of all counters, instances, or objects: statsexplain counters.
Data ONTAP returns a description of all counters, instances, and objects you can use to focus theoutput of the stats show command.
Viewing specific statisticsOnce you know the objects, instances, and counters you can monitor to track individual statistics, youcan use them as command line arguments to focus the output of the cifs show command.
About this task
For more information, see the stats(1) man page.
Step
1. Enter the following command:
142 | Data ONTAP 7.3 File Access and Protocols Management Guide

stats show [[object_name][:instance_name][:counter_name]]
Data ONTAP returns the specific statistics you request.
Saving and reusing statistics queriesYou can store and reuse “preset” statistics queries you commonly perform. Preset queries are stored inXML files, in the following location and naming format: /etc/stats/preset/preset_name.xml. Forinformation about how to store and reuse queries, see the stats_preset(5) man page.
CIFS resource limitationsAccess to some CIFS resources is limited by your storage system's memory and the maximum memoryavailable for CIFS services.
These resources include:
• Connections
• Shares
• Share connections
• Open files
• Locked files
• Locks
Note: If your storage system is not able to obtain sufficient resources in these categories, contacttechnical support.
Managing CIFS servicesThis section provides information about managing CIFS services on the storage system.
Next topics
Disconnecting selected clients using the MMC on page 144
Disconnecting a selected user from the command line on page 144
Disabling CIFS for the entire storage system on page 145
Specifying which users receive CIFS shutdown messages on page 146
Restarting CIFS service on page 146
Sending a message to all users on a storage system on page 146
Displaying and changing the description of the storage system on page 147
Changing the computer account password of the storage system on page 147
About file management using Windows administrative tools on page 148
File access using CIFS | 143
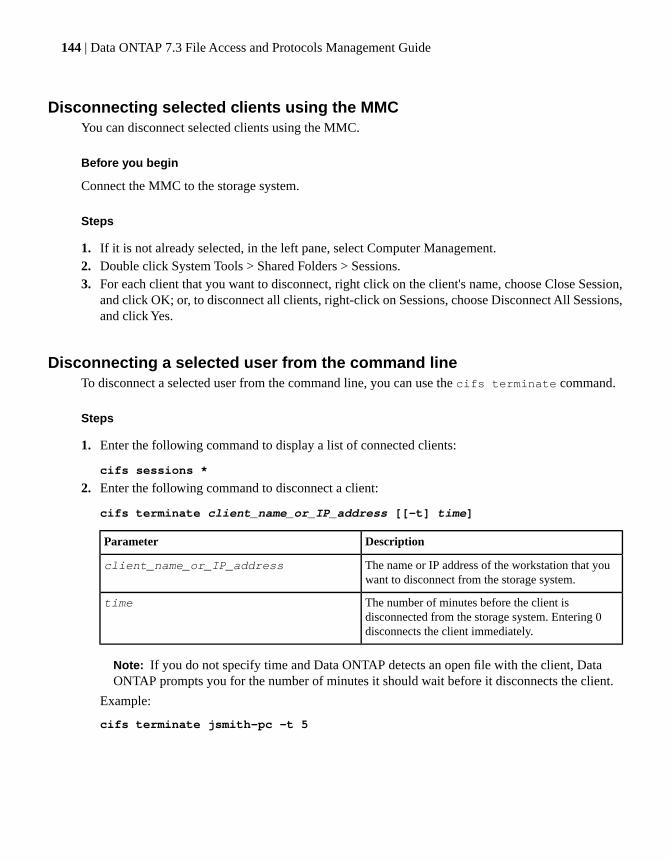
Disconnecting selected clients using the MMCYou can disconnect selected clients using the MMC.
Before you begin
Connect the MMC to the storage system.
Steps
1. If it is not already selected, in the left pane, select Computer Management.2. Double click System Tools > Shared Folders > Sessions.3. For each client that you want to disconnect, right click on the client's name, choose Close Session,
and click OK; or, to disconnect all clients, right-click on Sessions, choose Disconnect All Sessions,and click Yes.
Disconnecting a selected user from the command lineTo disconnect a selected user from the command line, you can use the cifs terminate command.
Steps
1. Enter the following command to display a list of connected clients:
cifs sessions *
2. Enter the following command to disconnect a client:
cifs terminate client_name_or_IP_address [[-t] time]
DescriptionParameter
The name or IP address of the workstation that youwant to disconnect from the storage system.
client_name_or_IP_address
The number of minutes before the client isdisconnected from the storage system. Entering 0disconnects the client immediately.
time
Note: If you do not specify time and Data ONTAP detects an open file with the client, DataONTAP prompts you for the number of minutes it should wait before it disconnects the client.
Example:
cifs terminate jsmith-pc -t 5
144 | Data ONTAP 7.3 File Access and Protocols Management Guide

Result
Data ONTAP sends a message to the workstation named jsmith-pc, notifying the user of the impendingdisconnection. Five minutes after you enter the command, jsmith-pc is disconnected from the storagesystem.
Disabling CIFS for the entire storage systemThe disabling of CIFS service is not persistent across reboots. If you reboot the storage system afterdisabling CIFS service, Data ONTAP automatically restarts CIFS
Steps
1. Enter the following command to disable CIFS service:
cifs terminate [-t time]
time is the number of minutes before the storage system disconnects all clients and terminates CIFSservice. Entering 0 makes the command take effect immediately.
Note: If you enter the cifs terminate command without an argument and Data ONTAPdetects an open file with any client, Data ONTAP prompts you for the number of minutes it shouldwait before it disconnects the client.
Example
cifs terminate -t 5
2. To prevent CIFS from starting automatically after the storage system reboots, rename the/etc/cifsconfig.cfg file.
Result
Data ONTAP sends a message to all connected clients, notifying the users of the impendingdisconnection. Five minutes after you enter the command, all clients are disconnected and the storagesystem stops providing CIFS service.
After you finish
After you disable CIFS for the entire storage system, most cifs commands become unavailable. Thecifs commands you can still use with CIFS disabled are:
• cifs prefdc
• cifs restart
• cifs setup
• cifs testdc
File access using CIFS | 145
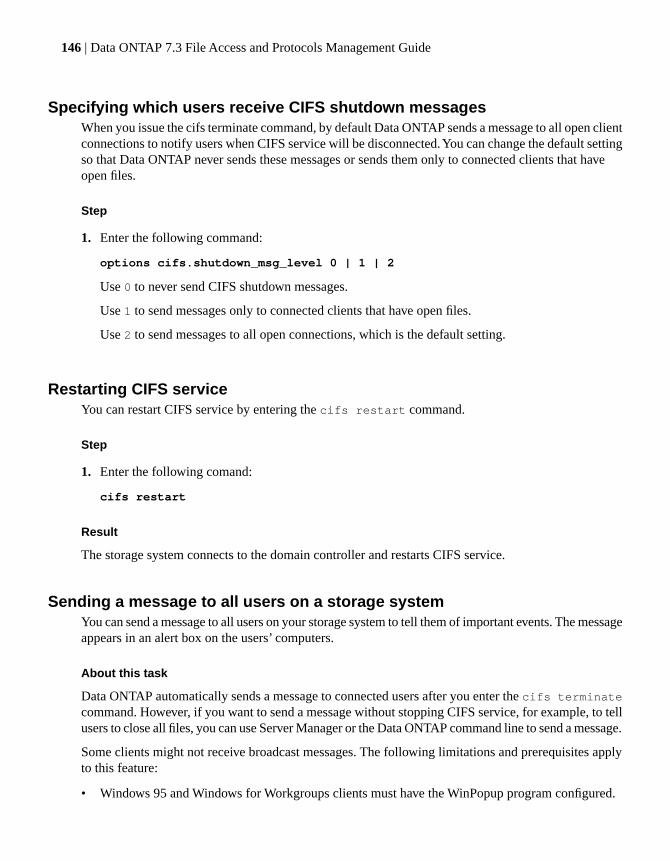
Specifying which users receive CIFS shutdown messagesWhen you issue the cifs terminate command, by default Data ONTAP sends a message to all open clientconnections to notify users when CIFS service will be disconnected. You can change the default settingso that Data ONTAP never sends these messages or sends them only to connected clients that haveopen files.
Step
1. Enter the following command:
options cifs.shutdown_msg_level 0 | 1 | 2
Use 0 to never send CIFS shutdown messages.
Use 1 to send messages only to connected clients that have open files.
Use 2 to send messages to all open connections, which is the default setting.
Restarting CIFS serviceYou can restart CIFS service by entering the cifs restart command.
Step
1. Enter the following comand:
cifs restart
Result
The storage system connects to the domain controller and restarts CIFS service.
Sending a message to all users on a storage systemYou can send a message to all users on your storage system to tell them of important events. The messageappears in an alert box on the users’ computers.
About this task
Data ONTAP automatically sends a message to connected users after you enter the cifs terminatecommand. However, if you want to send a message without stopping CIFS service, for example, to tellusers to close all files, you can use Server Manager or the Data ONTAP command line to send a message.
Some clients might not receive broadcast messages. The following limitations and prerequisites applyto this feature:
• Windows 95 and Windows for Workgroups clients must have the WinPopup program configured.
146 | Data ONTAP 7.3 File Access and Protocols Management Guide
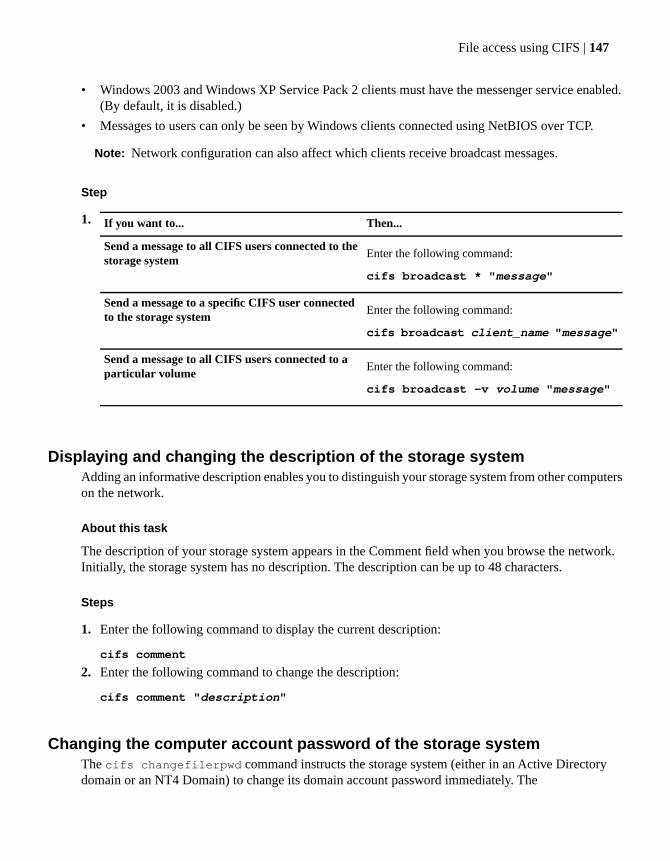
• Windows 2003 and Windows XP Service Pack 2 clients must have the messenger service enabled.(By default, it is disabled.)
• Messages to users can only be seen by Windows clients connected using NetBIOS over TCP.
Note: Network configuration can also affect which clients receive broadcast messages.
Step
1. Then...If you want to...
Enter the following command:
cifs broadcast * "message"
Send a message to all CIFS users connected to thestorage system
Enter the following command:
cifs broadcast client_name "message"
Send a message to a specific CIFS user connectedto the storage system
Enter the following command:
cifs broadcast -v volume "message"
Send a message to all CIFS users connected to aparticular volume
Displaying and changing the description of the storage systemAdding an informative description enables you to distinguish your storage system from other computerson the network.
About this task
The description of your storage system appears in the Comment field when you browse the network.Initially, the storage system has no description. The description can be up to 48 characters.
Steps
1. Enter the following command to display the current description:
cifs comment
2. Enter the following command to change the description:
cifs comment "description"
Changing the computer account password of the storage systemThe cifs changefilerpwd command instructs the storage system (either in an Active Directorydomain or an NT4 Domain) to change its domain account password immediately. The
File access using CIFS | 147
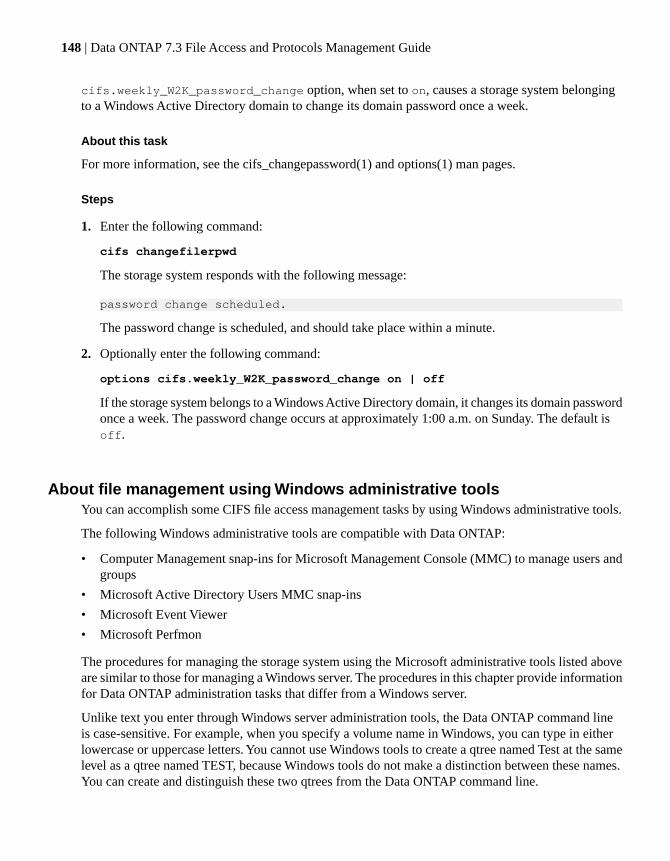
cifs.weekly_W2K_password_change option, when set to on, causes a storage system belongingto a Windows Active Directory domain to change its domain password once a week.
About this task
For more information, see the cifs_changepassword(1) and options(1) man pages.
Steps
1. Enter the following command:
cifs changefilerpwd
The storage system responds with the following message:
password change scheduled.
The password change is scheduled, and should take place within a minute.
2. Optionally enter the following command:
options cifs.weekly_W2K_password_change on | off
If the storage system belongs to a Windows Active Directory domain, it changes its domain passwordonce a week. The password change occurs at approximately 1:00 a.m. on Sunday. The default isoff.
About file management using Windows administrative toolsYou can accomplish some CIFS file access management tasks by using Windows administrative tools.
The following Windows administrative tools are compatible with Data ONTAP:
• Computer Management snap-ins for Microsoft Management Console (MMC) to manage users andgroups
• Microsoft Active Directory Users MMC snap-ins
• Microsoft Event Viewer
• Microsoft Perfmon
The procedures for managing the storage system using the Microsoft administrative tools listed aboveare similar to those for managing a Windows server. The procedures in this chapter provide informationfor Data ONTAP administration tasks that differ from a Windows server.
Unlike text you enter through Windows server administration tools, the Data ONTAP command lineis case-sensitive. For example, when you specify a volume name in Windows, you can type in eitherlowercase or uppercase letters. You cannot use Windows tools to create a qtree named Test at the samelevel as a qtree named TEST, because Windows tools do not make a distinction between these names.You can create and distinguish these two qtrees from the Data ONTAP command line.
148 | Data ONTAP 7.3 File Access and Protocols Management Guide
The following limitations apply to NT User Manager when you use NT User Manager for your storagesystem:
• Although the storage system supports local users, you cannot use the New Users command on theUser menu to create or delete local user accounts.
• The Policies menu is disabled, but some policies can be controlled through options or groupmembership.
The following NT Server Manager features are not supported because they are not applicable to DataONTAP:
• Stopping and starting services
• Specifying the recipients of alerts
Troubleshooting access control problemsTo troubleshoot access control problems (that is, to determine why a client or user is given or deniedaccess to a file on the storage system when you think it should not be), you can use the sectracecommand.
Next topics
Adding permission tracing filters on page 149
Removing permission tracing filters on page 150
Displaying permission tracing filters on page 151
Finding out why Data ONTAP allowed or denied access on page 152
Adding permission tracing filtersYou can add permission tracing filters to instruct Data ONTAP to log information in the system logabout why the storage system allows or denies a client or user to perform an operation.
About this task
Adding permission tracing filters has a minor effect on storage system performance; therefore, youshould add permission tracing filters for debugging purposes only. When you are done debugging, youshould remove all permission tracing filters. Furthermore, the filtering criteria you specify should beas specific as possible so that Data ONTAP does not send a large number of EMS messages to theconsole.
Keep the following limitations in mind:
• You can add a maximum of 10 permission tracing filters per vFiler.
• You can add permission tracing filters for CIFS requests only.
File access using CIFS | 149
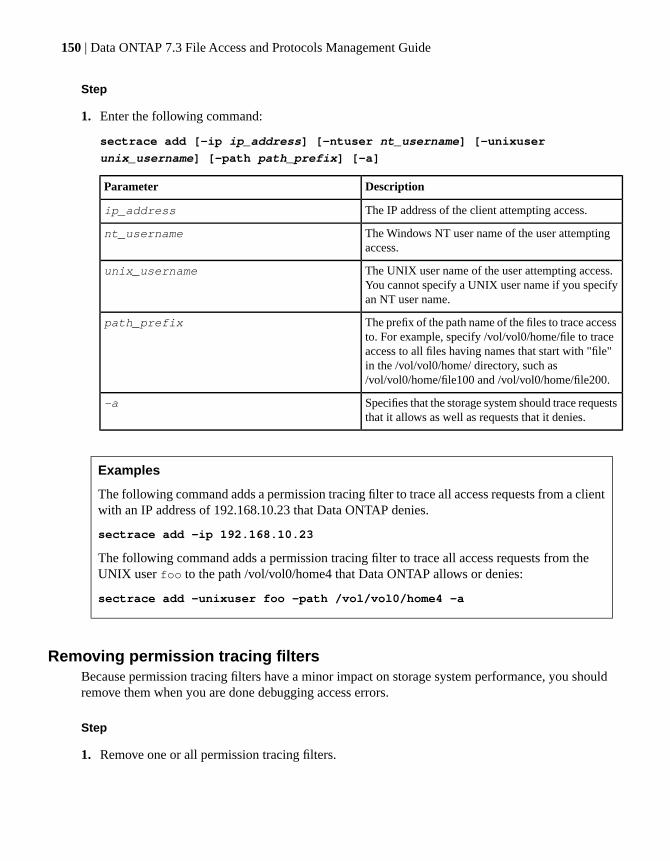
Step
1. Enter the following command:
sectrace add [-ip ip_address] [-ntuser nt_username] [-unixuser
unix_username] [-path path_prefix] [-a]
DescriptionParameter
The IP address of the client attempting access.ip_address
The Windows NT user name of the user attemptingaccess.
nt_username
The UNIX user name of the user attempting access.You cannot specify a UNIX user name if you specifyan NT user name.
unix_username
The prefix of the path name of the files to trace accessto. For example, specify /vol/vol0/home/file to traceaccess to all files having names that start with "file"in the /vol/vol0/home/ directory, such as/vol/vol0/home/file100 and /vol/vol0/home/file200.
path_prefix
Specifies that the storage system should trace requeststhat it allows as well as requests that it denies.
-a
Examples
The following command adds a permission tracing filter to trace all access requests from a clientwith an IP address of 192.168.10.23 that Data ONTAP denies.
sectrace add -ip 192.168.10.23
The following command adds a permission tracing filter to trace all access requests from theUNIX user foo to the path /vol/vol0/home4 that Data ONTAP allows or denies:
sectrace add -unixuser foo -path /vol/vol0/home4 -a
Removing permission tracing filtersBecause permission tracing filters have a minor impact on storage system performance, you shouldremove them when you are done debugging access errors.
Step
1. Remove one or all permission tracing filters.
150 | Data ONTAP 7.3 File Access and Protocols Management Guide

Then...If you want to...
Enter the following command:
sectrace delete all
Remove all permission tracing filters
Enter the following command:
sectrace delete index
Here, index is the index of the permission tracing filter to delete.(When you add a permission tracing filter, Data ONTAP assigns itan index between 1 and 10.)
Remove one permission tracing filter
Example: Removing the permission tracing filter with an index of 1
Enter the following command to remove the permission tracing filter with an index of 1:
sectrace delete 1
Displaying permission tracing filtersTo display the permission tracing filters on a storage system or vFiler, you can use the sectrace showcommand.
Step
1. Enter the following command:
sectrace show [index]
Here, index is the index of the permission tracing filter to display. (When you add a permissiontracing filter, Data ONTAP assigns it an index between 1 and 10.) If you do not specify an index,Data ONTAP displays all of the permission tracing filters.
Example: Displaying all permission tracing filters
To display all permission tracing filters on a storage system, enter the following command:
sectrace show
Data ONTAP displays all of the permission tracing filters in output like this:
Sectrace filter: 1Hits: 5Path: /vol/vol1/unix1/file1.txtNT User: CIFS-DOM\harryTrace DENY and ALLOW eventsSectrace filter: 2
File access using CIFS | 151
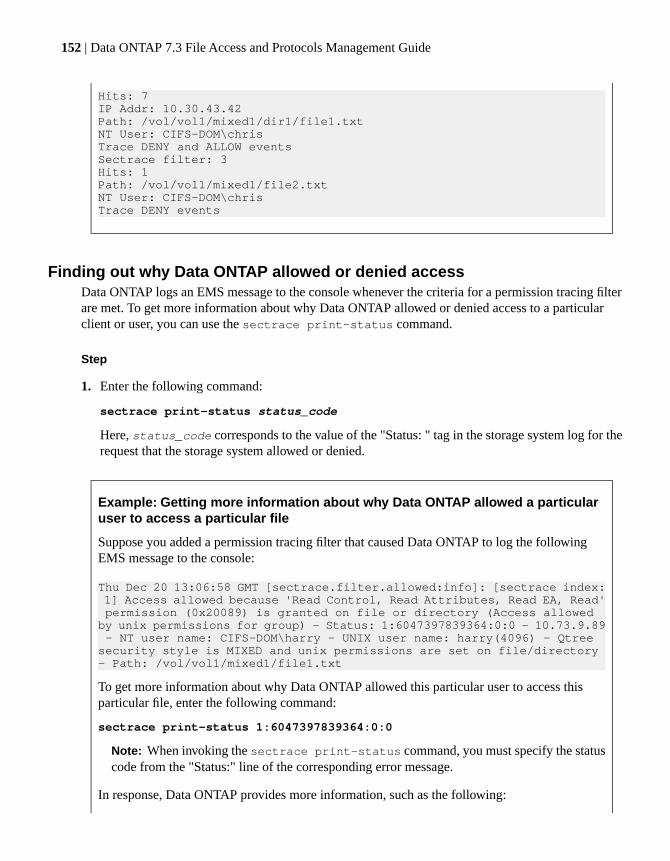
Hits: 7IP Addr: 10.30.43.42Path: /vol/vol1/mixed1/dir1/file1.txtNT User: CIFS-DOM\chrisTrace DENY and ALLOW eventsSectrace filter: 3Hits: 1Path: /vol/vol1/mixed1/file2.txtNT User: CIFS-DOM\chrisTrace DENY events
Finding out why Data ONTAP allowed or denied accessData ONTAP logs an EMS message to the console whenever the criteria for a permission tracing filterare met. To get more information about why Data ONTAP allowed or denied access to a particularclient or user, you can use the sectrace print-status command.
Step
1. Enter the following command:
sectrace print-status status_code
Here, status_code corresponds to the value of the "Status: " tag in the storage system log for therequest that the storage system allowed or denied.
Example: Getting more information about why Data ONTAP allowed a particularuser to access a particular file
Suppose you added a permission tracing filter that caused Data ONTAP to log the followingEMS message to the console:
Thu Dec 20 13:06:58 GMT [sectrace.filter.allowed:info]: [sectrace index: 1] Access allowed because 'Read Control, Read Attributes, Read EA, Read' permission (0x20089) is granted on file or directory (Access allowed by unix permissions for group) - Status: 1:6047397839364:0:0 - 10.73.9.89 - NT user name: CIFS-DOM\harry - UNIX user name: harry(4096) - Qtree security style is MIXED and unix permissions are set on file/directory - Path: /vol/vol1/mixed1/file1.txt
To get more information about why Data ONTAP allowed this particular user to access thisparticular file, enter the following command:
sectrace print-status 1:6047397839364:0:0
Note: When invoking the sectrace print-status command, you must specify the statuscode from the "Status:" line of the corresponding error message.
In response, Data ONTAP provides more information, such as the following:
152 | Data ONTAP 7.3 File Access and Protocols Management Guide
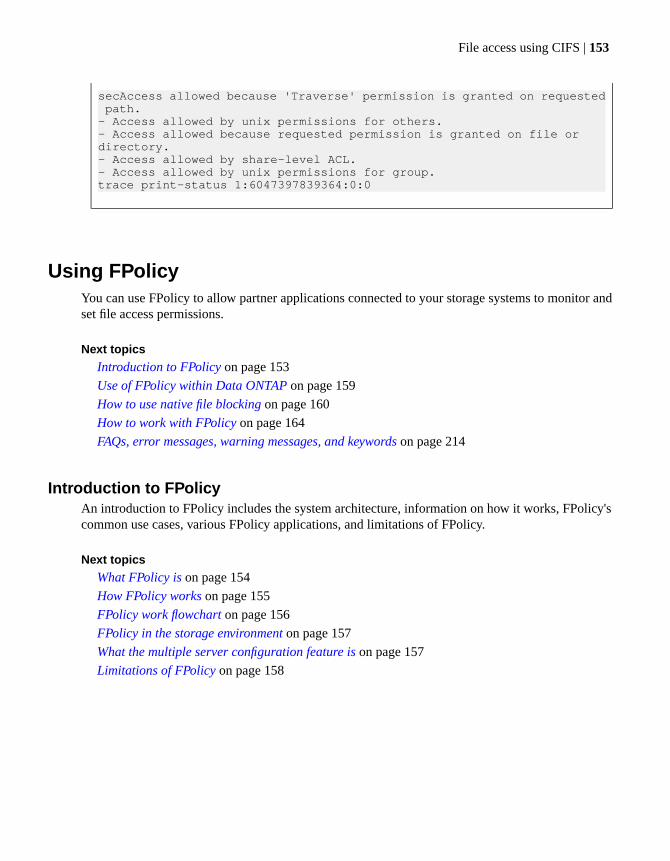
secAccess allowed because 'Traverse' permission is granted on requested path. - Access allowed by unix permissions for others.- Access allowed because requested permission is granted on file or directory.- Access allowed by share-level ACL.- Access allowed by unix permissions for group.trace print-status 1:6047397839364:0:0
Using FPolicyYou can use FPolicy to allow partner applications connected to your storage systems to monitor andset file access permissions.
Next topics
Introduction to FPolicy on page 153
Use of FPolicy within Data ONTAP on page 159
How to use native file blocking on page 160
How to work with FPolicy on page 164
FAQs, error messages, warning messages, and keywords on page 214
Introduction to FPolicyAn introduction to FPolicy includes the system architecture, information on how it works, FPolicy'scommon use cases, various FPolicy applications, and limitations of FPolicy.
Next topics
What FPolicy is on page 154
How FPolicy works on page 155
FPolicy work flowchart on page 156
FPolicy in the storage environment on page 157
What the multiple server configuration feature is on page 157
Limitations of FPolicy on page 158
File access using CIFS | 153
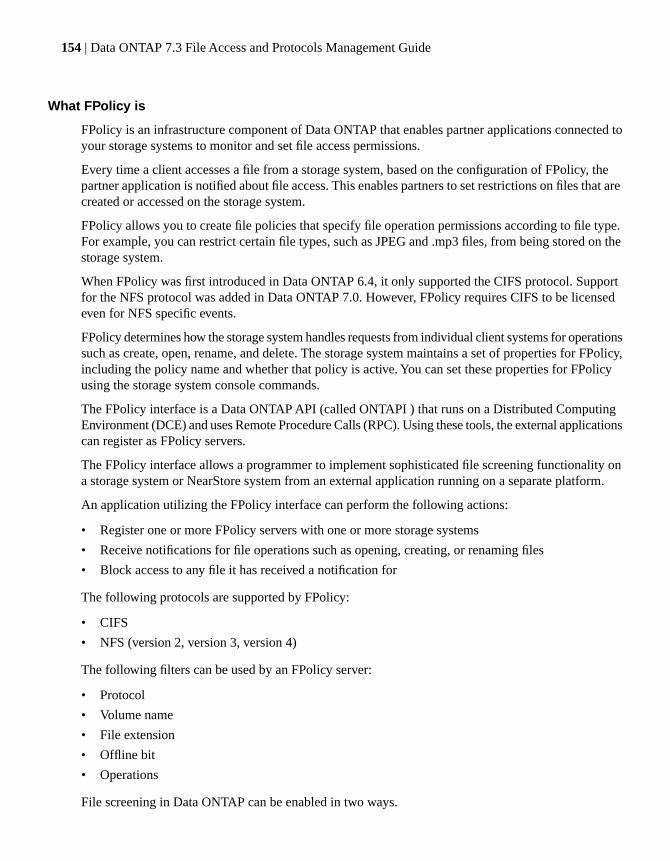
What FPolicy is
FPolicy is an infrastructure component of Data ONTAP that enables partner applications connected toyour storage systems to monitor and set file access permissions.
Every time a client accesses a file from a storage system, based on the configuration of FPolicy, thepartner application is notified about file access. This enables partners to set restrictions on files that arecreated or accessed on the storage system.
FPolicy allows you to create file policies that specify file operation permissions according to file type.For example, you can restrict certain file types, such as JPEG and .mp3 files, from being stored on thestorage system.
When FPolicy was first introduced in Data ONTAP 6.4, it only supported the CIFS protocol. Supportfor the NFS protocol was added in Data ONTAP 7.0. However, FPolicy requires CIFS to be licensedeven for NFS specific events.
FPolicy determines how the storage system handles requests from individual client systems for operationssuch as create, open, rename, and delete. The storage system maintains a set of properties for FPolicy,including the policy name and whether that policy is active. You can set these properties for FPolicyusing the storage system console commands.
The FPolicy interface is a Data ONTAP API (called ONTAPI ) that runs on a Distributed ComputingEnvironment (DCE) and uses Remote Procedure Calls (RPC). Using these tools, the external applicationscan register as FPolicy servers.
The FPolicy interface allows a programmer to implement sophisticated file screening functionality ona storage system or NearStore system from an external application running on a separate platform.
An application utilizing the FPolicy interface can perform the following actions:
• Register one or more FPolicy servers with one or more storage systems
• Receive notifications for file operations such as opening, creating, or renaming files
• Block access to any file it has received a notification for
The following protocols are supported by FPolicy:
• CIFS
• NFS (version 2, version 3, version 4)
The following filters can be used by an FPolicy server:
• Protocol
• Volume name
• File extension
• Offline bit
• Operations
File screening in Data ONTAP can be enabled in two ways.
154 | Data ONTAP 7.3 File Access and Protocols Management Guide

• Using external file screening softwareThe file screening software runs on a client that functions as a file screening server. File screeningsoftware provides flexible control and filtering of file content.
Note: For optimal performance, you should configure the FPolicy server to be on the same subnetas the storage system.
• Using native file blockingThe file screening software runs natively on the storage system. Native file blocking provides simpledenial of restricted file types.
How FPolicy works
An FPolicy server should be registered with a storage system before it can be configured to sendnotification for access by clients using NFS and CIFS.
After registering the FPolicy server with the storage system, when a client makes a request for accessto a file, the storage system notifies the FPolicy server for events that are registered for notification.The storage system sends information about client access to the FPolicy server as part of the notificationsent on the client request. The information sent to the FPolicy server includes the file name, path name,client information, protocol information, and operations requested by the client. Based on the informationreceived and how the FPolicy server is configured, the FPolicy server responds to the client's request.The FPolicy server communicates to the storage system whether to allow or deny the request from theclient.
You can use file policies to specify file or directory operations, and place restrictions on them. Uponreceiving a file or directory operation request (such as open, write, create, or rename), Data ONTAPchecks the file policies before permitting the operation.
If the policy specifies screening for that file based on its extension, file screening takes place either ona file screening server or on the storage system. The following list describes these methods of filescreening:
• On a file screening server (using external screening software): The notification is sent to the filescreening server to be screened and the file screening server, which applies rules to determinewhether the storage system should allow the requested file operation. The file screening server thensends a response to the storage system to either allow or block the requested file operation.
• On the storage system (using native file blocking): The request is denied and the file operation isblocked.
Related concepts
What native file blocking is on page 159
File access using CIFS | 155
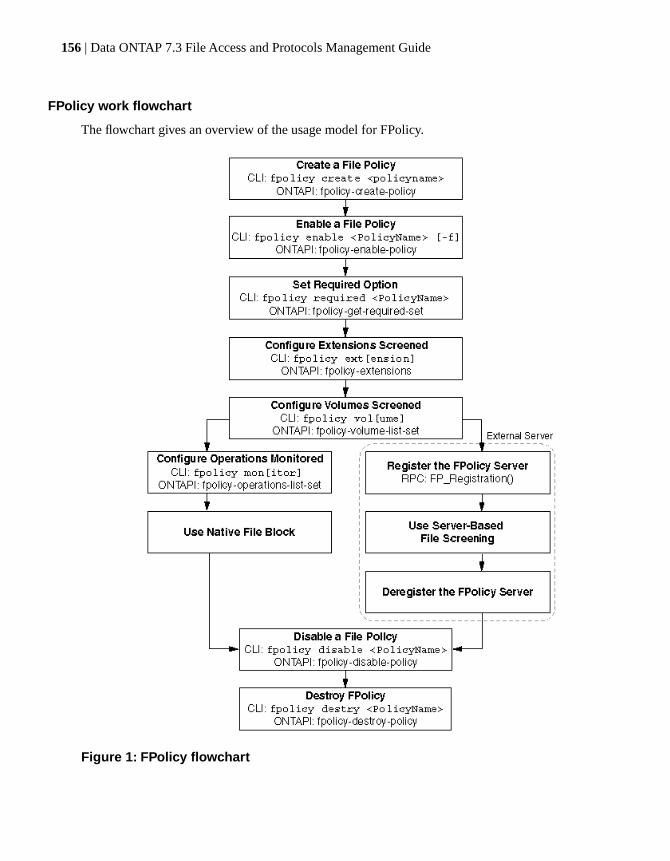
FPolicy work flowchart
The flowchart gives an overview of the usage model for FPolicy.
Figure 1: FPolicy flowchart
156 | Data ONTAP 7.3 File Access and Protocols Management Guide

FPolicy in the storage environment
When a client requests a file, the request is sent to the Protocol Stack. If the FPolicy feature is enabled,the Protocol Stack identifies CIFS and NFS requests and marks them for FPolicy screening.
The request is then sent to the WAFL module. The WAFL module redirects the request from the storagesystem to the FPolicy server. The WAFL module sends the file request to the FPolicy engine.
The FPolicy engine consists of the FPolicy infrastructure, ONTAPIs and RPCs. It sends the request tothe FPolicy server as an RPC call. When the FPolicy server returns the response, the FPolicy engineresponds to the client request. This response is forwarded to the WAFL module which in turn forwardsit to the Protocol Stack and then sends it to the client.
If the file access is allowed, the client is provided with the file. If file access is denied, an appropriateresponse is sent to the client. For CIFS clients, when file access is denied, the STATUS_ACCESS_DENIEDerror message is displayed.
The system architecture diagram provides an overview of the entire system architecture and indicatesthe FPolicy infrastructure in various layers of Data ONTAP.
Figure 2: FPolicy in storage environment
What the multiple server configuration feature is
FPolicy supports load sharing among different servers registered for one policy. FPolicy allows morethan one server to register for one policy. These servers can register as primary or secondary servers.
In a scenario where more than one FPolicy server registers to the same policy on the storage system,all FPolicy notifications for that policy are load-shared among the FPolicy servers. The storage system
File access using CIFS | 157
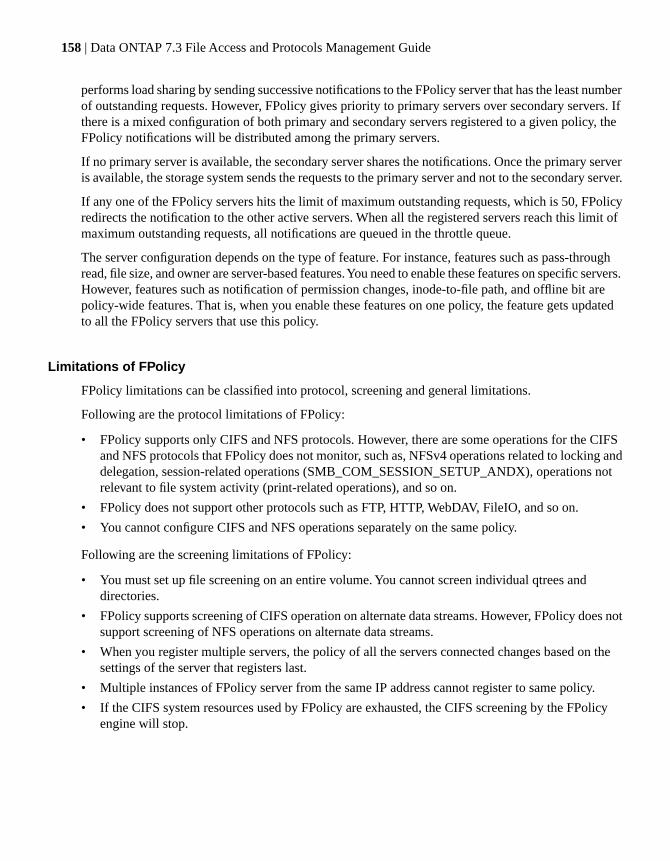
performs load sharing by sending successive notifications to the FPolicy server that has the least numberof outstanding requests. However, FPolicy gives priority to primary servers over secondary servers. Ifthere is a mixed configuration of both primary and secondary servers registered to a given policy, theFPolicy notifications will be distributed among the primary servers.
If no primary server is available, the secondary server shares the notifications. Once the primary serveris available, the storage system sends the requests to the primary server and not to the secondary server.
If any one of the FPolicy servers hits the limit of maximum outstanding requests, which is 50, FPolicyredirects the notification to the other active servers. When all the registered servers reach this limit ofmaximum outstanding requests, all notifications are queued in the throttle queue.
The server configuration depends on the type of feature. For instance, features such as pass-throughread, file size, and owner are server-based features. You need to enable these features on specific servers.However, features such as notification of permission changes, inode-to-file path, and offline bit arepolicy-wide features. That is, when you enable these features on one policy, the feature gets updatedto all the FPolicy servers that use this policy.
Limitations of FPolicy
FPolicy limitations can be classified into protocol, screening and general limitations.
Following are the protocol limitations of FPolicy:
• FPolicy supports only CIFS and NFS protocols. However, there are some operations for the CIFSand NFS protocols that FPolicy does not monitor, such as, NFSv4 operations related to locking anddelegation, session-related operations (SMB_COM_SESSION_SETUP_ANDX), operations notrelevant to file system activity (print-related operations), and so on.
• FPolicy does not support other protocols such as FTP, HTTP, WebDAV, FileIO, and so on.
• You cannot configure CIFS and NFS operations separately on the same policy.
Following are the screening limitations of FPolicy:
• You must set up file screening on an entire volume. You cannot screen individual qtrees anddirectories.
• FPolicy supports screening of CIFS operation on alternate data streams. However, FPolicy does notsupport screening of NFS operations on alternate data streams.
• When you register multiple servers, the policy of all the servers connected changes based on thesettings of the server that registers last.
• Multiple instances of FPolicy server from the same IP address cannot register to same policy.
• If the CIFS system resources used by FPolicy are exhausted, the CIFS screening by the FPolicyengine will stop.
158 | Data ONTAP 7.3 File Access and Protocols Management Guide
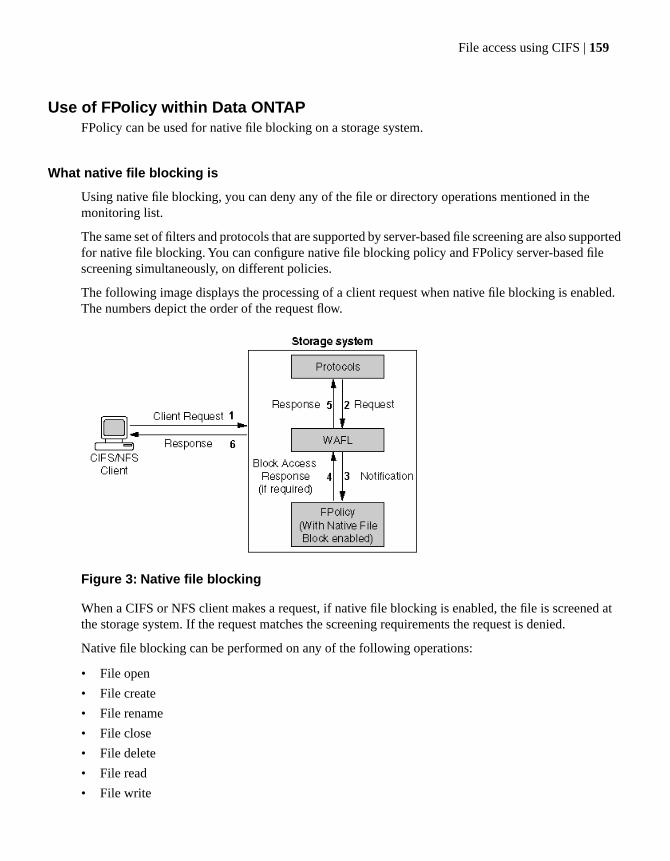
Use of FPolicy within Data ONTAPFPolicy can be used for native file blocking on a storage system.
What native file blocking is
Using native file blocking, you can deny any of the file or directory operations mentioned in themonitoring list.
The same set of filters and protocols that are supported by server-based file screening are also supportedfor native file blocking. You can configure native file blocking policy and FPolicy server-based filescreening simultaneously, on different policies.
The following image displays the processing of a client request when native file blocking is enabled.The numbers depict the order of the request flow.
Figure 3: Native file blocking
When a CIFS or NFS client makes a request, if native file blocking is enabled, the file is screened atthe storage system. If the request matches the screening requirements the request is denied.
Native file blocking can be performed on any of the following operations:
• File open
• File create
• File rename
• File close
• File delete
• File read
• File write
File access using CIFS | 159
• Directory delete
• Directory rename
• Directory create
• Getattr (NFS only)
• Setattr
• Create hard link (NFS only)
• Create symlink (NFS only)
• Lookup (NFS only)
• Notification of permission changes (CIFS only)
• Change of owner
• Change of group
• Change of system ACL (SACL)
• Change of discretionary ACL (DACL)
Related concepts
How to use native file blocking on page 160
Related references
Events monitored through CIFS on page 162
Events monitored through NFS on page 163
How to use native file blockingTo use native file blocking, you first create an FPolicy and then configure FPolicy to provide notificationsfor certain operations. The native file blocking feature is available by default with Data ONTAP.
Native file blocking enables you to deny any of the file operations mentioned in the file screeningsection. Access to files with particular extensions can be blocked.
For example, to block files that contain .mp3 extensions, you configure a policy to provide notificationsfor certain operations with target file extensions of .mp3. The policy is configured to deny .mp3 filerequests. When a client requests a file with an .mp3 extension, the storage system denies access to thefile, based on the native file blocking configuration.
You can configure native file blocking and server-based file screening applications at the same time.
Note: The native file blocking feature only screens files based on the extensions and not on thecontent of the file.
160 | Data ONTAP 7.3 File Access and Protocols Management Guide

Configuring native file blocking
To configure native file blocking, you create a policy and then configure it with a list of file extensionsto block.
The CIFS protocol needs to be licensed and configured.
Steps
1. Create a file policy using the following CLI command:
fpolicy create PolicyName Policytype
Example
To create a screening policy named mp3blocker, enter the following command:
fpolicy create mp3blocker screen
FPolicy creates the file policy with the specified policy name, using the screenpolicy type.
2. Configure the policy to monitor the .mp3 extension, using the following command
fpolicy extensions include set PolicyName ext-list
ExampleTo configure the policy to monitor the .mp3 extension, enter the following command:
fpolicy extensions include set mp3blocker mp3
3. Set the operations and protocols monitored by the policy using the following command:
fpolicy monitor {add|remove|set} PolicyName [-p protocols] [-f] op-spec
PolicyName is the name of the policy you want to add operations to.
protocols is the set of protocols you want to enable monitoring for. Use cifs to monitor CIFSrequests, nfs to monitor NFS requests, or cifs,nfs to monitor both.
The -f option forces the policy to be enabled even if there are no servers available to enforce thepolicy.
op-spec is the list of operations you want to add.
Example
To replace the policy .mp3blocker's list of operations monitored for CIFS and NFS operations, enterthe following command:
fpolicy monitor set .mp3blocker -p cifs,nfs create,rename
Specify the create option to prevent creation of .mp3 files. In addition, to ensure that an .mp3 fileis not copied onto the storage system with a different extension and renamed, also specify the renameoption.
This CLI command sets specific operations to be monitored.
File access using CIFS | 161

4. Set the required option to on, using the following command syntax:
fpolicy options PolicyName required on
ExampleTo enable mandatory screening on the mp3blocker policy, enter the following command:
fpolicy options mp3blockerrequired on
This CLI command makes file screening mandatory before the files can be accessed.
5. Enable the FPolicy feature using the following CLI command:
fpolicy enable PolicyName [-f]
.
Example
To enable the FPolicy .mp3blocker, enter the following command:
fpolicy enable mp3blocker
This CLI command enables the file policy.
On completion of the preceding steps, if a client tries to perform an operation that uses a blocked file,the operation fails and a STATUS_ACCESS_DENIED error code is sent.
Next topics
Events monitored through CIFS on page 162
Events monitored through NFS on page 163
Related concepts
How to monitor operations using FPolicy on page 210
Related tasks
Creating a file policy on page 165
Specifying mandatory file screening on page 166
Enabling the FPolicy feature on page 165
Events monitored through CIFS
FPolicy can monitor many CIFS events.
The following table lists the CIFS operations that FPolicy can monitor and a brief description of howFPolicy handles each operation.
DescriptionEvents
Notification sent when a file is openedFile open
162 | Data ONTAP 7.3 File Access and Protocols Management Guide

DescriptionEvents
Notification sent when a file is createdFile create
Notification sent when a file name is changedFile rename
Notification sent when a file is closedFile close
Notification sent when a file is deletedFile delete
Notification sent when a file is readFile read
Notification sent when a file is changedFile write
Notification sent when a directory is deletedDirectory delete
Notification sent when a directory name is changedDirectory rename
Notification sent when a directory is createdDirectory create
Notification sent when attribute information is setSetattr
Events monitored through NFS
FPolicy can monitor many NFS events.
The following table lists the NFS operations that FPolicy can monitor, and a brief description of eachoperation.
DescriptionEvents
Notification sent when a file is openedFile open
Notification sent when a file is createdFile create
Notification sent when a file name is changedFile rename
Notification sent when a file is closedFile close
Notification sent when a file is deletedFile delete
Notification sent when a file is readFile read
Notification sent when a file is changedFile write
Notification sent when a directory is deletedDirectory delete
Notification sent when a directory name is changedDirectory rename
Notification sent when a directory is createdDirectory create
Notification sent when attribute information is setsetattr
Notification sent when attribute information is requestedgetattr
File access using CIFS | 163
DescriptionEvents
Notification sent when a hard link is createdlink
Notification sent when a symbolic link is createdsymlink
Notification sent when an NFS lookup occursLookup
How to work with FPolicyUsing CLI commands, you can create, enable, and configure FPolicy, monitor operations, and screenfiles based on volumes and extensions.
Next topics
How to set up FPolicy on page 164
Events screened for NFS and CIFS clients on page 172
What a file or directory event is on page 173
What screening by volume is on page 194
What screening by extension is on page 201
How to manage the file screening server on page 207
How to monitor operations using FPolicy on page 210
What the different CLI commands are on page 212
How to set up FPolicy
FPolicy can be set up using simple CLI commands.
Next topics
Enabling the FPolicy feature on page 165
Disabling the FPolicy feature on page 165
Creating a file policy on page 165
Enabling the file policy on page 166
Specifying mandatory file screening on page 166
Displaying information for a file policy on page 167
Displaying information for all file policies on page 168
Disabling a file policy on page 168
Destroying a file policy on page 168
Stopping server screening for disconnected CIFS requests on page 169
Setting a limit on simultaneous screening of CIFS requests on page 169
Setting server timeout on page 170
Setting request screening timeout on page 171
164 | Data ONTAP 7.3 File Access and Protocols Management Guide
Enabling multiple open instances of the SMB named pipe on page 172
Enabling the FPolicy feature
FPolicy is enabled, by default, when the CIFS protocol is licensed and configured.
Step
1. To enable the FPolicy feature, enter the following command:
options fpolicy.enable on
When you enter this command, the FPolicy feature is enabled.
Disabling the FPolicy feature
Disabling the FPolicy feature overrides the enable or disable settings for individual policies and willdisable all policies.
Step
1. To disable the FPolicy feature, enter the following command:
options fpolicy.enable off
When you enter this command, the FPolicy feature is disabled.
Creating a file policy
To set up a file policy, you first need to create it. To create a file policy, you use the create command.
To configure policies for notifications, create a file policy. A file policy can then be configured to sendnotifications, to the FPolicy server, for particular file operation requests or for native file blocking.
The create command creates a new file policy with a unique policy name.
After the new file policy is created, you can set the options and determine the requests that need to bescreened for certain extensions.
Step
1. To create a file policy, enter the following command:
fpolicy create PolicyName policytype
PolicyName is the name of the file policy that you want to create. The policy name should beunique and not more than 80 characters long. The file policy name can consist of UNICODEcharacters. The only special characters from the ASCII character set allowed in the policy name are
File access using CIFS | 165

the underscore (_) and the hyphen (-). In addition to not allowing most special characters in newpolicy names, FPolicy truncates the existing policy names that contains a "." (dot) in them bydropping the characters after and including the dot. Any options configured on this file policy willbe lost after the upgrade.
policytype is the policy group to which this file policy should belong. Currently, the only policytype supported by FPolicy is screen.
Example
fpolicy create policy1 screen
A file policy is created using the policy name policy1 specified using the screen policy type.
Note: You can create and use up to 20 file policies for each VFiler unit at one time.
For the file policy to work and take effect, enable the created file policy.
Related tasks
Enabling the FPolicy feature on page 165
Enabling the file policy
Once created, a file policy needs to be enabled before notification policies can be configured. To enablea file policy, you use the enable command.
Step
1. To enable the file policy, enter the following command:
fpolicy enable PolicyName
PolicyName is the name of the policy that you want to enable.
Example
fpolicy enable policy1
The specified file policy is enabled.
Note: To activate the file policy, make sure that options fpolicy.enable is turned on.
Specifying mandatory file screening
The required option determines if file screening should be mandatory.
When the required option is set to on, file screening becomes mandatory. If an FPolicy server is notavailable, since screening cannot be performed, the client request is denied. Use this option to enablenative file blocking as well.
166 | Data ONTAP 7.3 File Access and Protocols Management Guide
When the required option is set to off, file screening is not mandatory. If an FPolicy server is notconnected, operations are permitted without screening.
Step
1. To make file screening mandatory, enter the following command:
fpolicy options PolicyName required on
PolicyName is the name of the policy for which you want to set the required option.
This option is set to off, by default. If you turn on the required option for a policy when no filescreening servers are available, the native file blocking feature blocks access to files specified in thatpolicy.
Note: If you do not want to make file screening mandatory, set the same command to off.
Related concepts
What native file blocking is on page 159
Displaying information for a file policy
Important information on a particular file policy can be displayed using the fpolicy show command.
Step
1. Enter the following command:
fpolicy show PolicyName
PolicyName is the name of the file policy for which you want to view information.
The show command displays the following information about a particular file policy:
• Status of the file policy
• List of operations monitored
• List of volumes screened
• List of extensions screened
• Total time that the server has been connected
• Number of requests screened
• Number of requests denied
• Number of requests blocked locally
File access using CIFS | 167
Displaying information for all file policies
Important information on all the file policies can be displayed using the fpolicy command.
Step
1. Enter the following command:
fpolicy
The fpolicy show command displays the following information about all existing file policies:
• The list of FPolicy servers registered
• Status of all file policies
• List of operations monitored by each file policy
• List of volumes screened by each file policy
• List of extensions screened by each file policy
• Total time that the server has been connected
• Number of requests screened by each file policy
• Number of requests denied by each file policy
• Number of requests blocked locally
Disabling a file policy
When a file policy is disabled, the operations that are specified for that particular file policy will notbe monitored. When a particular file policy is disabled, no file request notification is sent to the FPolicyserver even if the FPolicy server is registered with the storage system.
Step
1. To disable a file policy, enter the following command:
fpolicy disable PolicyName
Example
fpolicy disable policy1
Destroying a file policy
Destroying a file policy immediately removes an existing file policy from the connected storage system.
To destroy or delete a particular file policy, use the destroy command. You must disable the filepolicy before destroying it. If an FPolicy server is connected to a file policy, the FPolicy server isderegistered.
168 | Data ONTAP 7.3 File Access and Protocols Management Guide
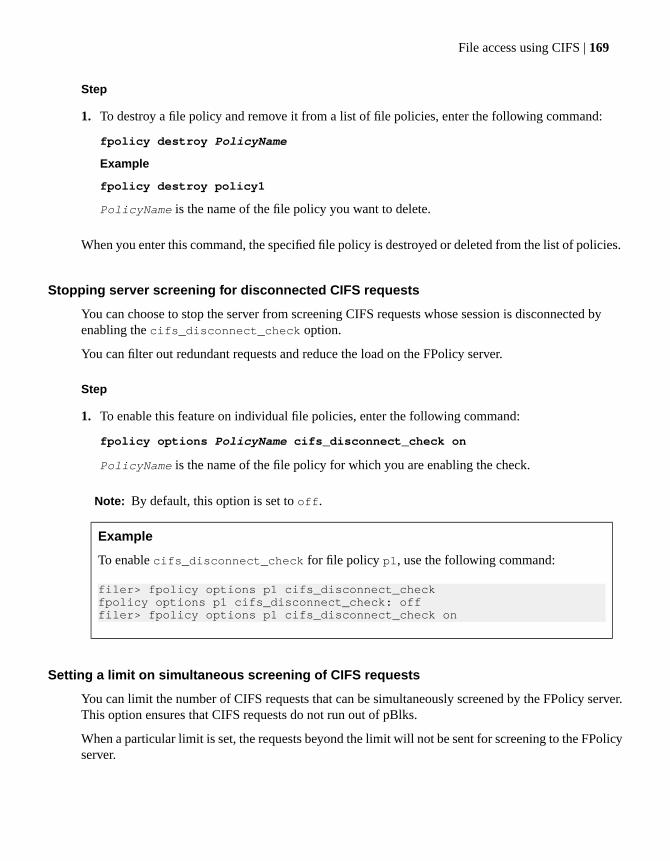
Step
1. To destroy a file policy and remove it from a list of file policies, enter the following command:
fpolicy destroy PolicyName
Example
fpolicy destroy policy1
PolicyName is the name of the file policy you want to delete.
When you enter this command, the specified file policy is destroyed or deleted from the list of policies.
Stopping server screening for disconnected CIFS requests
You can choose to stop the server from screening CIFS requests whose session is disconnected byenabling the cifs_disconnect_check option.
You can filter out redundant requests and reduce the load on the FPolicy server.
Step
1. To enable this feature on individual file policies, enter the following command:
fpolicy options PolicyName cifs_disconnect_check on
PolicyName is the name of the file policy for which you are enabling the check.
Note: By default, this option is set to off.
Example
To enable cifs_disconnect_check for file policy p1, use the following command:
filer> fpolicy options p1 cifs_disconnect_checkfpolicy options p1 cifs_disconnect_check: offfiler> fpolicy options p1 cifs_disconnect_check on
Setting a limit on simultaneous screening of CIFS requests
You can limit the number of CIFS requests that can be simultaneously screened by the FPolicy server.This option ensures that CIFS requests do not run out of pBlks.
When a particular limit is set, the requests beyond the limit will not be sent for screening to the FPolicyserver.
File access using CIFS | 169

This limit can be set through the flag, fp_maxcifsreqs_pblkpercent, which sets the limit as apercentage of maximum number of pBlks available on the storage system. You can set this using thesetflag and printflag commands.
Note: The setflag and printflag are available only at the diag privilege level.
Step
1. To set the limit on screening use the following command:
setflag fp_maxcifsreqs_pblkpercent limit_value
limit_value is the maximum number of simultaneous requests you want to allow. The valueshould range between 1 and 100.
Note: The feature will be disabled for any value outside the range [1- 100].
Example
To set the limit, enter the following commands:
filer> priv set diagfiler*> printflag fp_maxcifsreqs_pblkpercentfp_maxcifsreqs_pblkpercent = 0filer*> setflag fp_maxcifsreqs_pblkpercent 30
To determine the maximum number of pBlks on the storage system, run the command cifs stat.The Max pBlks field in the output displays the maximum number of pBlks on the storage system.
filer> cifs stat......Max pBlks = 256 Current pBlks = 256 Num Logons = 0
Setting server timeout
You can set the limit on how long the system waits for the FPolicy server to respond to a request. Youcan set this limit individually for each file policy. This option ensures that the FPolicy server is makingprogress.
Step
1. To set the timeout value for individual file policies, enter the following command:
fpolicy options PolicyName serverprogress_timeout timeout-in-secs
PolicyName is the name of the file policy for which you want to set the FPolicy server timeout.
timeout-in-secs is the timeout value in seconds.
170 | Data ONTAP 7.3 File Access and Protocols Management Guide
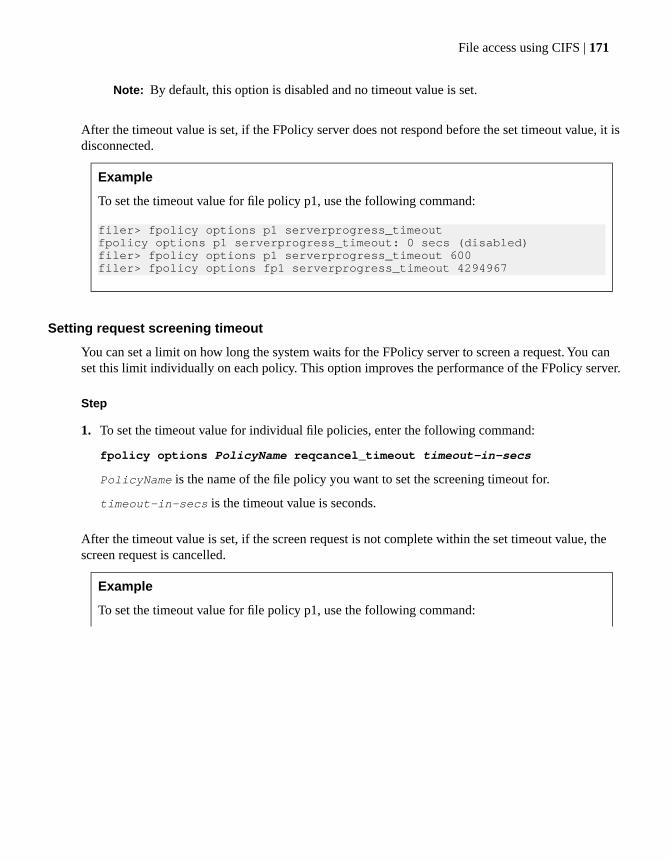
Note: By default, this option is disabled and no timeout value is set.
After the timeout value is set, if the FPolicy server does not respond before the set timeout value, it isdisconnected.
Example
To set the timeout value for file policy p1, use the following command:
filer> fpolicy options p1 serverprogress_timeoutfpolicy options p1 serverprogress_timeout: 0 secs (disabled)filer> fpolicy options p1 serverprogress_timeout 600filer> fpolicy options fp1 serverprogress_timeout 4294967
Setting request screening timeout
You can set a limit on how long the system waits for the FPolicy server to screen a request. You canset this limit individually on each policy. This option improves the performance of the FPolicy server.
Step
1. To set the timeout value for individual file policies, enter the following command:
fpolicy options PolicyName reqcancel_timeout timeout-in-secs
PolicyName is the name of the file policy you want to set the screening timeout for.
timeout-in-secs is the timeout value is seconds.
After the timeout value is set, if the screen request is not complete within the set timeout value, thescreen request is cancelled.
Example
To set the timeout value for file policy p1, use the following command:
File access using CIFS | 171
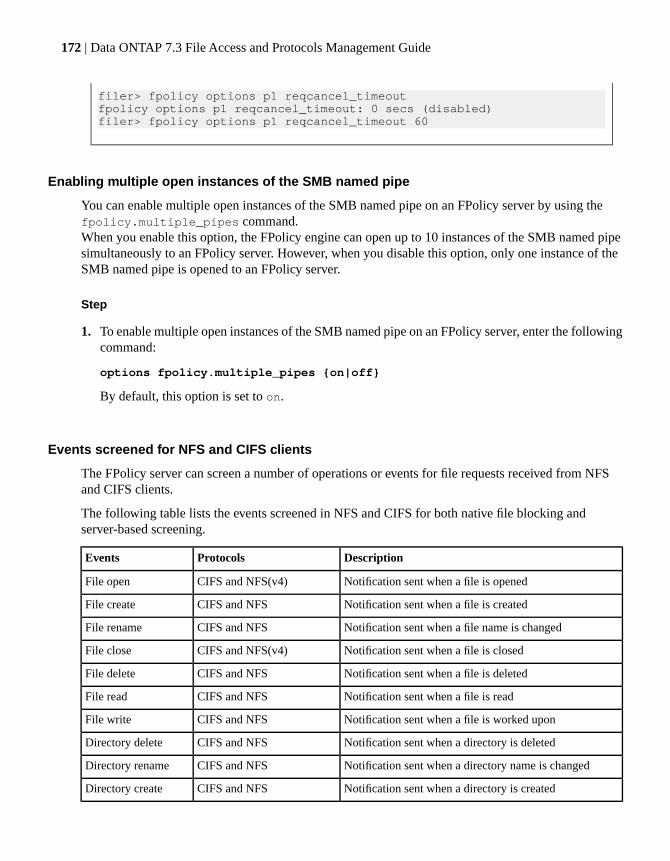
filer> fpolicy options p1 reqcancel_timeoutfpolicy options p1 reqcancel_timeout: 0 secs (disabled)filer> fpolicy options p1 reqcancel_timeout 60
Enabling multiple open instances of the SMB named pipe
You can enable multiple open instances of the SMB named pipe on an FPolicy server by using thefpolicy.multiple_pipes command.When you enable this option, the FPolicy engine can open up to 10 instances of the SMB named pipesimultaneously to an FPolicy server. However, when you disable this option, only one instance of theSMB named pipe is opened to an FPolicy server.
Step
1. To enable multiple open instances of the SMB named pipe on an FPolicy server, enter the followingcommand:
options fpolicy.multiple_pipes {on|off}
By default, this option is set to on.
Events screened for NFS and CIFS clients
The FPolicy server can screen a number of operations or events for file requests received from NFSand CIFS clients.
The following table lists the events screened in NFS and CIFS for both native file blocking andserver-based screening.
DescriptionProtocolsEvents
Notification sent when a file is openedCIFS and NFS(v4)File open
Notification sent when a file is createdCIFS and NFSFile create
Notification sent when a file name is changedCIFS and NFSFile rename
Notification sent when a file is closedCIFS and NFS(v4)File close
Notification sent when a file is deletedCIFS and NFSFile delete
Notification sent when a file is readCIFS and NFSFile read
Notification sent when a file is worked uponCIFS and NFSFile write
Notification sent when a directory is deletedCIFS and NFSDirectory delete
Notification sent when a directory name is changedCIFS and NFSDirectory rename
Notification sent when a directory is createdCIFS and NFSDirectory create
172 | Data ONTAP 7.3 File Access and Protocols Management Guide
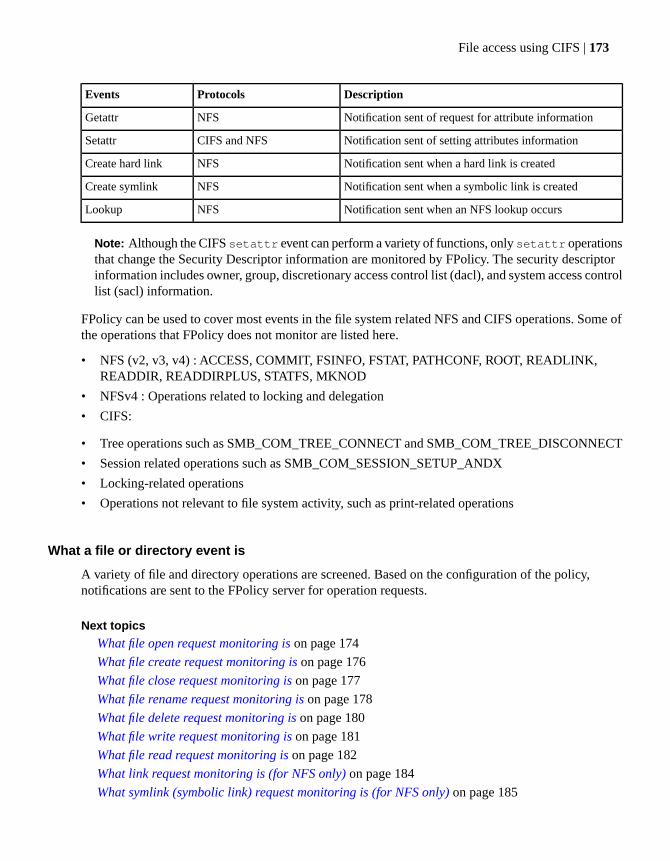
DescriptionProtocolsEvents
Notification sent of request for attribute informationNFSGetattr
Notification sent of setting attributes informationCIFS and NFSSetattr
Notification sent when a hard link is createdNFSCreate hard link
Notification sent when a symbolic link is createdNFSCreate symlink
Notification sent when an NFS lookup occursNFSLookup
Note: Although the CIFS setattr event can perform a variety of functions, only setattr operationsthat change the Security Descriptor information are monitored by FPolicy. The security descriptorinformation includes owner, group, discretionary access control list (dacl), and system access controllist (sacl) information.
FPolicy can be used to cover most events in the file system related NFS and CIFS operations. Some ofthe operations that FPolicy does not monitor are listed here.
• NFS (v2, v3, v4) : ACCESS, COMMIT, FSINFO, FSTAT, PATHCONF, ROOT, READLINK,READDIR, READDIRPLUS, STATFS, MKNOD
• NFSv4 : Operations related to locking and delegation
• CIFS:
• Tree operations such as SMB_COM_TREE_CONNECT and SMB_COM_TREE_DISCONNECT
• Session related operations such as SMB_COM_SESSION_SETUP_ANDX
• Locking-related operations
• Operations not relevant to file system activity, such as print-related operations
What a file or directory event is
A variety of file and directory operations are screened. Based on the configuration of the policy,notifications are sent to the FPolicy server for operation requests.
Next topics
What file open request monitoring is on page 174
What file create request monitoring is on page 176
What file close request monitoring is on page 177
What file rename request monitoring is on page 178
What file delete request monitoring is on page 180
What file write request monitoring is on page 181
What file read request monitoring is on page 182
What link request monitoring is (for NFS only) on page 184
What symlink (symbolic link) request monitoring is (for NFS only) on page 185
File access using CIFS | 173
What directory delete request monitoring is on page 186
What directory rename request monitoring is on page 188
What directory create request monitoring is on page 189
What file lookup request monitoring is (for NFS only) on page 190
What getattr request monitoring is (for NFS only) on page 191
What setattr request monitoring is on page 193
What file open request monitoring is
FPolicy receives a notification from the storage system for file open operations.
When a file open request is made by a CIFS or NFSv4 client to the storage system, the storage systemconducts all the relevant checks on the file. The relevant checks include checking permissions, fileavailability, and whether the file is being accessed by another client. After the file passes the checks,if the file extension is included in the file policy extension include list, the request is forwardedto the FPolicy server. The FPolicy server receives this request and allows or blocks the file open request,based on the configuration of the policies.
If the storage system reboots, NFSv4 clients can reclaim file handles for files that were open beforeshutdown. After the storage system is functional again, if the FPolicy server connects to the storagesystem before the NFS clients, the storage system forwards the reclaim file as an open request to theFPolicy server.
If the FPolicy server connects to the storage system after the NFS clients, the storage system does notforward the open reclaim request as an open request to the FPolicy server. In this case, the NFS clientgets the file handle using the NFSv4 reclaim operation.
To enable file extension-based screening for NFS operations, set the no_i2p option to off on thevolume. This enables inode-to-path file name translation on the volume.
Previous releases of FPolicy do not support NFSv4 protocol and the i2p option.
Note: FPolicy supports the NFSv4 protocol and the i2p option on volumes beginning with the DataONTAP 7.3 release.
If you are running an FPolicy for Data ONTAP based application in NFSv4 environments, you mustupgrade the FPolicy application to support NFSv4.
NFSv4 adds support for file OPEN and CLOSE events. Therefore, in applications based on previousreleases of FPolicy, these file operations might appear as UNKNOWN event errors to the FPolicyapplication.
The file open operation should be added to the monitored operations list for the FPolicy server to receivea notification from the storage system. The file open operation can be monitored through the CLI orONTAPI. It can also be set by the FPolicy server using a bitmask.
Next topics
Configuring FPolicy to monitor file open operations through the CLI on page 175
174 | Data ONTAP 7.3 File Access and Protocols Management Guide
Configuring FPolicy to monitor file open operations through ONTAPI on page 175
Registering FPolicy for monitoring file open requests on page 175
Configuring FPolicy to monitor file open operations through the CLITo configure a file policy to monitor file open operations, you use the fpolicy monitor addcommand.
Step
1. To monitor the file open operation, use the following CLI command:
fpolicy monitor add PolicyName open
This CLI command can add the file open operations to the list of monitored events for CIFS and NFSrequests.
Configuring FPolicy to monitor file open operations through ONTAPIYou can use an ONTAPI call to configure a file policy to monitor file open operations.
Step
1. To set the monitoring options for file open operations, you can use the following ONTAPI call:fpolicy-operations-list-set
In the monitored-operations input name field, the monitored-operation-info[] should contain the file-openoperation. The monitored-protocols should contain the specific protocols that you want to monitor. Inthe case of a file open operation, both NFS and CIFS requests can be monitored.
Registering FPolicy for monitoring file open requestsYou can monitor file open operations by registering for it when you register an FPolicy server.
Step
1. To enable the screening of file open operations, set the following bit in the OpsToScreen bitmaskin the FP_registration() call when you register the FPolicy server to the storage system:
FS_OP_OPEN 0x0001
After the registration is complete, the FPolicy server monitors all file open requests.
File access using CIFS | 175

What file create request monitoring is
The FPolicy server receives a notification from the storage system for file create operations.
When a file create request is made by a CIFS or NFS client to the storage system, the storage systemconducts all the relevant checks on the file. The relevant checks include checking permissions, checkingif the file is available, checking if the file is being accessed by some other client, and so on. After thefile passes the checks, the request is forwarded to the FPolicy server, if the file extension is includedin the FPolicy extension include list. The FPolicy server receives this request and allows or blocksthe file create request, based on the configuration of the policies.
The file create operation should be added to the monitored operations list for the FPolicy server toreceive a notification from the storage system. The file create operation can be monitored using theCLI or ONTAPI. It can also be set by the FPolicy server using a bitmask.
Next topics
Configuring FPolicy to monitor file create operations through the CLI on page 176
Configuring FPolicy to monitor file create operations through ONTAPI on page 176
Registering FPolicy for monitoring file create requests on page 177
Configuring FPolicy to monitor file create operations through the CLITo configure a file policy to monitor file create operations, use the fpolicy monitor add command.
Step
1. To monitor the file create operation, use the following CLI command:
fpolicy monitor add PolicyName create
This CLI command can add the create file operations to the list of monitored events for CIFS and NFSrequests.
Configuring FPolicy to monitor file create operations through ONTAPIYou can use an ONTAPI call to configure a file policy to monitor file create operations.
Step
1. To set the monitoring options for file create operations, you can use the following ONTAPI call:fpolicy-operations-list-set
In the monitored-operations input name field, the monitored-operation-info[] should contain the file-createoperation. The monitored-protocols should contain the specific protocols that you want to monitor. Inthe case of a file create operation, both NFS and CIFS requests can be monitored.
176 | Data ONTAP 7.3 File Access and Protocols Management Guide

Registering FPolicy for monitoring file create requestsYou can monitor file create operations by registering for it when you register an FPolicy server.
Step
1. To enable the screening of file create operations, set the following bit in the OpsToScreen bitmaskin the FP_registration() call when you register the FPolicy server to the storage system:
FS_OP_CREATE 0x0002
After the registration is complete, the FPolicy server monitors all file create requests.
What file close request monitoring is
The FPolicy server receives a notification from the storage system for file close operations.
When a file close request is made by a CIFS or NFSv4 client to the storage system, the storage systemconducts all the relevant checks on the file. The relevant checks include checking permission, checkingif the file is available, checking if the file is being accessed by some other client, and so on. After thefile passes the checks, the request is forwarded to the FPolicy server. After the file is closed, the storagesystem sends a notification to the FPolicy server that the file is closed.
The FPolicy server cannot block the file close operation.
The file close operation should be added to the monitored operations list for the FPolicy server to receivea notification from the storage system. The file close operation can be monitored using the CLI orONTAPI. It can also be set by the FPolicy server using a bitmask.
Open downgrade operations in NFSv4 are also considered close operations, and notifications are sentfor such operations.
To enable file extension-based screening, for NFSv4 operations, set the no_i2p option to off on thevolume. This enables the inode-to-path file name translation on the volume.
Note: Beginning with the Data ONTAP 7.3 release, FPolicy supports the NFSv4 protocol.
Next topics
Configuring FPolicy to monitor file close operations through the CLI on page 178
Configuring FPolicy to monitor file close operations through ONTAPI on page 178
Registering FPolicy for monitoring file close requests on page 178
File access using CIFS | 177
Configuring FPolicy to monitor file close operations through the CLIYou can use the the fpolicy monitor add CLI command to configure a file policy to monitor fileclose operations.
Step
1. To monitor the file close operation, use the following CLI command:
fpolicy monitor add PolicyName close
This CLI command can add the close file operations to the list of monitored events for CIFS and NFSrequests.
Configuring FPolicy to monitor file close operations through ONTAPIYou can use an ONTAPI to configure a file policy to monitor file close operations.
Step
1. To set the monitoring options for file close operations, use the following ONTAPI call:fpolicy-operations-list-set
In the monitored-operations input name field, the monitored-operation-info[] should contain the file-closeoperation. The monitored-protocols should contain the specific protocols that you want to monitor. Inthe case of a file close operation, both NFS and CIFS requests can be monitored.
Registering FPolicy for monitoring file close requestsYou can monitor file close operations by registering for it when you register an FPolicy server.
Step
1. To enable the screening of file close operations, set the following bit in the OpsToScreen bitmaskin the FP_registration() call when you register the FPolicy server to the storage system:
FS_OP_CLOSE 0x0008
After the registration is complete, the FPolicy server monitors all file close requests.
What file rename request monitoring is
The FPolicy server receives a notification from the storage system for file rename operations.
When a file rename request is made by a CIFS or NFS client to the storage system, the storage systemconducts all the relevant checks on the file. The relevant checks include checking permission, checkingif the file is available, checking if the file is being accessed by some other client, and so on. After the
178 | Data ONTAP 7.3 File Access and Protocols Management Guide
file passes the checks, the request is forwarded to the FPolicy server, if the file extension is includedin FPolicy ext[ension] inc[lude] list.
The rename request is sent to the FPolicy server only if either the old or the new extension is listed inthe ext[ension] inc[lude] list. That is, if a file name is being changed from test.txt to test.mp3,either or both the extensions (txt or .mp3) should be listed in the extension include list.
The FPolicy server receives this request and allows or blocks the file rename request, based on theconfiguration of the policies.
The file rename operation should be added to the monitored operations list for the FPolicy server toreceive a notification from the storage system. The file rename operation can be monitored through theCLI or ONTAPI. It can also be set by the FPolicy server using a bitmask.
Next topics
Configuring FPolicy to monitor file rename operations through the CLI on page 179
Configuring FPolicy to monitor file rename operations through ONTAPI on page 179
Registering FPolicy to monitor file rename requests on page 180
Configuring FPolicy to monitor file rename operations through the CLIUse the fpolicy monitor add CLI command to monitor file rename operations.
Step
1. To monitor the file rename operation, use the following CLI command:
fpolicy monitor add PolicyName rename
This CLI command can add the create file operations to the list of monitored events for CIFS and NFSrequests.
Configuring FPolicy to monitor file rename operations through ONTAPIUse the fpolicy-operations-list-set ONTAPI call to configure a file policy to monitor file renameoperations.
Step
1. To set the monitoring options for file rename operations, use the following ONTAPI call:fpolicy-operations-list-set
In the monitored-operations input name field, the monitored-operation-info[] shouldcontain the file-rename operation. The monitored-protocols should contain the specific protocolsthat you want to monitor. In the case of file create, both NFS and CIFS requests can be monitored.
File access using CIFS | 179
Registering FPolicy to monitor file rename requestsYou can monitor file rename operations by registering for it when you register an FPolicy server.
Step
1. To enable the screening of file rename operations, set the following bit in the OpsToScreen bitmaskin the FP_registration() call when you register the FPolicy server to the storage system:
FS_OP_RENAME 0x0004
After the registration is complete, the FPolicy server monitors all file rename requests.
What file delete request monitoring is
The FPolicy server receives a notification from the storage system for file delete operations.
When a file delete request is made by a CIFS or NFS client to the storage system, the storage systemconducts all the relevant checks on the file. The relevant checks include checking permissions, checkingif the file is available, checking if the file is being accessed by some other client, and so on. When thechecks are complete and the file passes the check, the request notification is sent to the FPolicy server.The FPolicy server receives this request and allows or blocks the file delete request, based on theconfiguration of the policies.
The file delete operation should be added to the monitored operations list for the FPolicy server toreceive a notification from the storage system. The file delete operation can be monitored using theCLI or ONTAPI. It can also be set by the FPolicy server using a bitmask.
To enable file extension-based screening, for NFS operations, set the no_i2p option to off on thevolume. This enables the inode-to-path file name translation on the volume.
Next topics
Configuring FPolicy to monitor file delete operations through CLI on page 180
Configuring FPolicy to monitor file delete operations through ONTAPI on page 181
Registering FPolicy for monitoring file delete requests on page 181
Configuring FPolicy to monitor file delete operations through CLIUse the fpolicy monitor CLI command to to monitor file delete operations.
Step
1. To monitor the file delete operation, use the following CLI command:
fpolicy monitor add PolicyName delete
This CLI command can add the delete file operations to the list of monitored events for CIFS and NFSrequests.
180 | Data ONTAP 7.3 File Access and Protocols Management Guide
Configuring FPolicy to monitor file delete operations through ONTAPIUse the fpolicy-operations-list-set ONTAPI call to monitor file delete operations.
Step
1. To set the monitoring options for file delete operations, you can also use the following ONTAPIcall: fpolicy-operations-list-set
In the monitored-operations input name field, the monitored-operation-info[] should contain the file-deleteoperation. The monitored-protocols should contain the specific protocols that you want to monitor. Inthe case of a file delete operation, both CIFS and NFS requests can be monitored.
Registering FPolicy for monitoring file delete requestsYou can monitor file delete operations by registering for it when you register an FPolicy server.
Step
1. To enable the screening of file delete operations, set the following bit in the OpsToScreen bitmaskin the FP_registration() call when you register the FPolicy server to the storage system:
FS_OP_DELETE 0x0010
After the registration is complete, the FPolicy server monitors all file delete requests.
What file write request monitoring is
The FPolicy server receives a notification from the storage system for file write operations.
When a file write request is made by a CIFS or NFS client to the storage system, the storage systemconducts all the relevant checks on the file. The relevant checks include checking permissions, checkingif the file is available, checking if the file is being accessed by some other client, and so on. After thefile passes the checks, the request is forwarded to the FPolicy server, if the file extension is includedin the FPolicy extension include list.
The FPolicy server receives this request and allows or blocks the file write request, based on theconfiguration of the policies.
The file write operation should be added to the monitored operations list for the FPolicy server to receivea notification from the storage system. The file write operation can be monitored using the CLI orONTAPI. It can also be set by the FPolicy server using a bitmask.
To enable file extension-based screening, for NFS operations, set the no_i2p option to off on thevolume. This enables the translation of inode-to-path file name on the volume.
Next topics
Configuring FPolicy to monitor file write operations through the CLI on page 182
File access using CIFS | 181

Configuring FPolicy to monitor file write operations through ONTAPI on page 182
Registering FPolicy to monitor file write requests on page 182
Configuring FPolicy to monitor file write operations through the CLIUse the fpolicy monitor CLI command to monitor file write operations.
Step
1. To monitor the file write operation, use the following CLI command:
fpolicy monitor add PolicyName write
This CLI command can add the write file operations to the list of monitored events for CIFS and NFSrequests.
Configuring FPolicy to monitor file write operations through ONTAPIUse the fpolicy-operations-list-set ONTAPI call to configure a file policy to monitor file write operations.
Step
1. To monitor the file write operation , you can use the following ONTAPI call:
fpolicy-operations-list-set
In the monitored-operations input name field, the monitored-operation-info[] should contain the writeoperation. The monitored-protocols should contain the specific protocols that you want to monitor. Inthe case of a file write operation, both CIFS and NFS requests can be monitored.
Registering FPolicy to monitor file write requestsYou can monitor file write operations by registering for it when you register an FPolicy server.
Step
1. To enable the screening of file write operations, set the following bit in the OpsToScreen bitmaskin the FP_registration() call when you register the FPolicy server to the storage system:
FS_OP_WRITE 0x4000
After the registration is complete, the FPolicy server monitors all file write requests.
What file read request monitoring is
The FPolicy server receives a notification from the storage system for file read operations.
When a file read request is made by a CIFS or NFS client to the storage system, the storage systemconducts all the relevant checks on the file. The relevant checks include checking permissions, checking
182 | Data ONTAP 7.3 File Access and Protocols Management Guide
if the file is available, checking if the file is being accessed by some other client, and so on. After thefile passes the checks, the request is forwarded to the FPolicy server, if the file extension is includedin FPolicy ext[ension] inc[lude] list.
The FPolicy server receives this request and allows or blocks the file read request, based on theconfiguration of the policies.
The file read operation should be added to the monitored operations list for the FPolicy server to receivea notification from the storage system. The file read operation can be monitored through the CLI orONTAPI. It can also be set by the FPolicy server using a bitmask.
To enable file extension-based screening, for NFS operations, set the no_i2p option to off on thevolume. This enables the inode-to-path file name translation on the volume.
Next topics
Configuring FPolicy to monitor file read operations through the CLI on page 183
Configuring FPolicy to monitor file read operations through ONTAPI on page 183
Registering FPolicy to monitor file read requests on page 184
Configuring FPolicy to monitor file read operations through the CLIUse the fpolicy monitor CLI command to monitor file read operations.
Step
1. To monitor the file read operation, use the following CLI command:
fpolicy monitor add PolicyName read
This CLI command can add the read file operations to the list of monitored events for CIFS and NFSrequests.
Configuring FPolicy to monitor file read operations through ONTAPIYou can use the fpolicy-operations-list-set ONTAPI call to monitor file read operations.
Step
1. To set the monitoring options for file read operations, you can also use the following ONTAPI call:fpolicy-operations-list-set
In the monitored-operations input name field, the monitored-operation-info[] should contain the readoperation. The monitored-protocols should contain the specific protocols that you wish to monitor. Inthe case of a file read operation, both CIFS and NFS requests can be monitored.
File access using CIFS | 183
Registering FPolicy to monitor file read requestsYou can monitor file read operations by registering for it when you register an FPolicy server.
Step
1. To enable the screening of file read operations, set the following bit in the OpsToScreen bitmaskin the FP_registration() call when you register the FPolicy server to the storage system:
FS_OP_READ 0x2000
After the registration is complete, the FPolicy server monitors all file read requests.
What link request monitoring is (for NFS only)
The FPolicy server receives a notification from the storage system for file link operations.
When a file link request is made by an NFS client to the storage system, the storage system conductsall the relevant checks on the file. The relevant checks include checking permissions, checking if thefile is available, checking if the file is being accessed by some other client, and so on. After the filepasses the checks, the request is forwarded to the FPolicy server, if the file extension is included inFPolicy extension include list. The FPolicy server receives this request and allows or blocks thefile link request, based on the configuration of the policies.
The file link operation should be added to the monitored operations list for the FPolicy server to receivea notification from the storage system. The file link operation can be monitored through the CLI orONTAPI. It can also be set by the FPolicy server using a bitmask.
Next topics
Configuring FPolicy to monitor file link operations through the CLI on page 184
Configuring FPolicy to monitor file link operations through ONTAPI on page 185
Registering FPolicy to monitor file link requests on page 185
Configuring FPolicy to monitor file link operations through the CLIYou can use the fpolicy monitor CLI command to configure a file policy, to monitor file linkoperations.
Step
1. To monitor the file link operation, use the following CLI command:
fpolicy monitor add PolicyName link
This CLI command can add the file link operations to the list of monitored events for NFS requests.
184 | Data ONTAP 7.3 File Access and Protocols Management Guide
Configuring FPolicy to monitor file link operations through ONTAPIYou can use the fpolicy-operations-list-set ONTAPI call to monitor file link operations.
Step
1. To set the monitoring options for file link operations, you can also use the following ONTAPI call:fpolicy-operations-list-set
In the monitored-operations input name field, the monitored-operation-info[] should contain the linkoperation. The monitored-protocols should contain the specific protocols that you want to monitor. Inthe case of a file link operation, only NFS requests can be monitored.
Registering FPolicy to monitor file link requestsYou can monitor file link operations by registering for it when you register an FPolicy server.
Step
1. To enable the screening of file link operations, set the following bit in the OpsToScreen bitmaskin the FP_registration() call when you register the FPolicy server to the storage system:
FS_OP_LINK 0x0400
After the registration is complete, the FPolicy server monitors all file link requests.
What symlink (symbolic link) request monitoring is (for NFS only)
The FPolicy server receives a notification from the storage system for file symlink operations.
When a file symlink request is made by an NFS client to the storage system, the storage system conductsall the relevant checks on the file. The relevant checks include checking permissions, checking if thefile is available, checking if the file is being accessed by some other client, and so on. After the filepasses the checks, the request is forwarded to the FPolicy server, if the file extension is included in theFPolicy extension include list. The FPolicy server receives this request and allows or blocks thefile symlink request, based on the configuration of the policies.
The file symlink operation should be added to the monitored operations list for the FPolicy server toreceive a notification from the storage system. The file symlink operation can be monitored using theCLI or ONTAPI. It can also be set by the FPolicy server using a bitmask.
To enable file extension-based screening, for NFS operations, set the no_i2p option to off on thevolume. This enables the inode-to-path file name translation on the volume.
Next topics
Configuring FPolicy to monitor file symlink operations through the CLI on page 186
Configuring FPolicy to monitor file symlink operations through ONTAPI on page 186
File access using CIFS | 185
Registering FPolicy to monitor file symlink requests on page 186
Configuring FPolicy to monitor file symlink operations through the CLIYou can use a CLI command to configure a file policy, to monitor file symlink operations.
Step
1. To monitor the file symlink operation, use the following CLI command:
fpolicy mon[itor] add PolicyName symlink
This CLI command can add the symlink file operations to the list of monitored events for NFS requests.
Configuring FPolicy to monitor file symlink operations through ONTAPIYou can use an ONTAPI to configure a file policy, to monitor file symlink operations.
Step
1. To set the monitoring options for file symlink operations, you can use the following ONTAPI call:fpolicy-operations-list-set
In the monitored-operations input name field, the monitored-operation-info[] should contain the symlinkoperation. The monitored-protocols should contain the specific protocols that you want to monitor. Inthe case of a file symlink operation, both CIFS and NFS requests can be monitored.
Registering FPolicy to monitor file symlink requestsYou can monitor file symlink operations by registering for it when you register an FPolicy server.
Step
1. To enable the screening of file symlink operations, set the following bit in the OpsToScreen bitmaskin the FP_registration() call when you register the FPolicy server to the storage system:
FS_OP_SYMLINK 0x0800
After the registration is complete, the FPolicy server monitors all file symlink requests.
What directory delete request monitoring is
The FPolicy server receives a notification from the storage system for directory delete operations.
When a directory delete request is made by a CIFS client using RMDIR operations or an NFS clientusing UNLINK operations to the storage system, the storage system conducts all the relevant checkson the directory. The relevant checks include checking permission, checking if the direcory is available,checking if the directory is being accessed by some other client, and so on. After the directory passes
186 | Data ONTAP 7.3 File Access and Protocols Management Guide

the checks, the request is forwarded to the FPolicy server. If the required option is set to on in thefile policy and a directory delete operation is requested, the request is denied.
The directory delete operation should be added to the monitored operations list for the FPolicy serverto receive a notification from the storage system. The directory delete operation can be monitoredthrough CLI or ONTAPI. It can also be set by the FPolicy server using a bitmask.
Next topics
Configuring FPolicy to monitor directory delete operations through the CLI on page 187
Configuring FPolicy to monitor directory delete operations through ONTAPI on page 187
Registering FPolicy to monitor directory delete requests on page 187
Configuring FPolicy to monitor directory delete operations through the CLIYou can use a CLI command to configure a file policy, to monitor directory delete operations.
Step
1. To monitor the directory delete operation, use the following CLI command:
fpolicy mon[itor] add PolicyName directory-delete
This CLI command can add the directory delete operations to the list of monitored events for CIFS andNFS requests.
Configuring FPolicy to monitor directory delete operations through ONTAPIYou can use an ONTAPI to configure a file policy, to monitor directory delete operations.
Step
1. To set the monitoring options for directory delete operations, you can use the following ONTAPIcall: fpolicy-operations-list-set
In the monitored-operations input name field, the monitored-operation-info[] should contain thedirectory-delete operation. The monitored-protocols should contain the specific protocols that you wantto monitor. In the case of a directory delete operation, both CIFS and NFS requests can be monitored.
Registering FPolicy to monitor directory delete requestsYou can monitor directory delete operations by registering for it when you register an FPolicy server.
Step
1. To enable the screening of directory delete operations, set the following bit in the OpsToScreenbitmask in the FP_registration() call when you register the FPolicy server to the storage system:
FS_OP_DELETE_DIR 0x0020
File access using CIFS | 187
After the registration is complete, the FPolicy server monitors all directory delete requests.
What directory rename request monitoring is
The FPolicy server receives a notification from the storage system for directory rename operations.
When a directory rename request is made by a CIFS or NFS client to the storage system, the storagesystem conducts all the relevant checks on the directory. The relevant checks include checkingpermissions, checking if the directory is available, checking if the directory is being accessed by someother client, and so on. After the directory passes the checks, the request is forwarded to the FPolicyserver. If the required option is set to on in the file policy and a directory rename operation is requested,the request is denied.
The directory rename operation should be added to the monitored operations list for the FPolicy serverto receive a notification from the storage system. The directory rename operation can be monitoredthrough the CLI or ONTAPI. It can also be set by the FPolicy server using a bitmask.
Next topics
Configuring FPolicy to monitor directory rename operations through CLI on page 188
Configuring FPolicy to monitor directory rename operations through ONTAPI on page 188
Registering FPolicy to monitor directory rename requests on page 189
Configuring FPolicy to monitor directory rename operations through CLIYou can use a CLI command to configure a file policy, to monitor directory rename operations.
Step
1. To monitor the directory rename operation, use the following CLI command:
fpolicy mon[itor] add PolicyName directory-rename
This CLI command can add the directory rename operations to the list of monitored events for CIFSand NFS requests.
Configuring FPolicy to monitor directory rename operations through ONTAPIYou can use an ONTAPI to configure a file policy, to monitor directory rename operations.
Step
1. To set the monitoring options for directory rename operations, you can use the following ONTAPIcall: fpolicy-operations-list-set
In the monitored-operations input name field, the monitored-operation-info[] should contain thedirectory-rename operation. The monitored-protocols should contain the specific protocols that you
188 | Data ONTAP 7.3 File Access and Protocols Management Guide
want to monitor. In the case of a directory rename operation, both CIFS and NFS requests can bemonitored.
Registering FPolicy to monitor directory rename requestsYou can monitor directory rename operations by registering for it when you register an FPolicy server.
Step
1. To enable the screening of directory rename operations, set the following bit in the OpsToScreenbitmask in the FP_registration() call when you register the FPolicy server to the storage system:
FS_OP_RENAME_DIR 0x0040
After the registration is complete, the FPolicy server monitors all directory rename requests.
What directory create request monitoring is
The FPolicy server receives a notification from the storage system for directory create operations.
When a directory create request is made by a CIFS or NFS client to the storage system, the storagesystem conducts all the relevant checks on the directory. The relevant checks include checkingpermissions, checking if the drectory is available, checking if the directory is being accessed by someother client, and so on. After the directory passes the checks, the request is forwarded to the FPolicyserver. If the required option is set to on in the file policy and a directory create operation is requested,the request is denied.
The directory create operation should be added to the monitored operations list for the FPolicy serverto receive a notification from the storage system. The directory create operation can be monitoredthrough the CLI or ONTAPI. It can also be set by the FPolicy server using a bitmask.
Next topics
Configure FPolicy to monitor directory create operations through the CLI on page 189
Configuring FPolicy to monitor directory create operations through ONTAPI on page 190
Registering FPolicy to monitor directory create requests on page 190
Configure FPolicy to monitor directory create operations through the CLIYou can use a CLI command to configure a file policy, to monitor directory create operations.
Step
1. To monitor the directory create operation, use the following command:
fpolicy mon[itor] add PolicyName directory-create
This CLI command can add the directory create operations to the list of monitored events for CIFS andNFS requests.
File access using CIFS | 189
Configuring FPolicy to monitor directory create operations through ONTAPIYou can use an ONTAPI to configure a file policy, to monitor directory create operations.
Step
1. To set the monitoring options for directory create operations, you can use the following ONTAPIcall: fpolicy-operations-list-set
In the monitored-operations input name field, the monitored-operation-info[ ] should contain thedirectory-create operation. The monitored-protocols should contain the specific protocols that you wantto monitor. In the case of a directory create operation, both CIFS and NFS requests can be monitored.
Registering FPolicy to monitor directory create requestsYou can monitor directory create operations by registering for it when you register an FPolicy server.
Step
1. To enable the screening of directory create operations, set the following bit in the OpsToScreenbitmask in the FP_registration() call when you register the FPolicy server to the storage system:
FS_OP_CREATE_DIR 0x0080
After the registration is complete, the FPolicy server monitors all directory create requests.
What file lookup request monitoring is (for NFS only)
The FPolicy server receives a notification from the storage system for file lookup operations.
When a file lookup request is made by an NFS client to the storage system, the storage system conductsall the relevant checks on the file. The relevant checks include checking permissions, checking if thefile is available, checking if the file is being accessed by some other client, and so on. After the filepasses the checks, the request is forwarded to the FPolicy server, if the file extension is included in theFPolicy ext[ension] inc[lude] list. The FPolicy server receives this request and allows or blocksthe file lookup request, based on the configuration of the policies.
The file lookup operation should be added to the monitored operations list for the FPolicy server toreceive a notification from the storage system. The file lookup operation can be monitored using theCLI or ONTAPI. It can also be set by the FPolicy server using a bitmask.
Next topics
Configuring FPolicy to monitor file lookup operations through the CLI on page 191
Configuring FPolicy to monitor file lookup operations through ONTAPI on page 191
Registering FPolicy to monitor file lookup requests on page 191
190 | Data ONTAP 7.3 File Access and Protocols Management Guide

Configuring FPolicy to monitor file lookup operations through the CLIYou can use a CLI command to configure a file policy, to monitor file lookup operations.
Step
1. To monitor the file lookup operation, use the following CLI command:
fpolicy mon[itor] add PolicyName lookup
Configuring FPolicy to monitor file lookup operations through ONTAPIYou can use an ONTAPI to configure a file policy, to monitor file lookup operations.
Step
1. To set the monitoring options for file lookup operations, you can also use the following ONTAPIcall: fpolicy-operations-list-set
In the monitored-operations input name field, the monitored-operation-info[] should contain the lookupoperation. The monitored-protocols should contain the specific protocols that you want to monitor. Inthe case of a file lookup operation, only NFS requests can be monitored.
Registering FPolicy to monitor file lookup requestsYou can monitor file lookup operations by registering for it when you register an FPolicy server.
Step
1. To enable the screening of file lookup operations, set the following bit in the OpsToScreen bitmaskin the FP_registration() call when you register the FPolicy server to the storage system:
FS_OP_LOOKUP 0x1000
After the registration is complete, the FPolicy server monitors all file lookup requests.
What getattr request monitoring is (for NFS only)
The FPolicy server receives a notification from the storage system for getattr operations.
When a get attributes (getattr) request is made by an NFS client to the storage system, the storage systemconducts all the relevant checks on the file. The relevant checks include checking permissions, checkingif the file is available, checking if the file is being accessed by some other client, and so on. After thefile passes the checks, the request is forwarded to the FPolicy server, if the file extension is includedin the FPolicy ext[ension] inc[lude] list.
The FPolicy server receives this request and allows or blocks the getattr request, based on theconfiguration of the policies.
File access using CIFS | 191

The getattr operation should be added to the monitored operations list for the FPolicy server to receivea notification from the storage system. The getattr operation can be monitored through the CLI orONTAPI. It can also be set by the FPolicy server using a bitmask.
To enable file extension-based screening, for NFS operations, set the no_i2p option to off on thevolume. This enables the inode-to-path file name translation on the volume.
Next topics
Configuring FPolicy to monitor get attributes operations through CLI on page 192
Configuring FPolicy to monitor get attributes operations through ONTAPI on page 192
Registering FPolicy to monitor get attributes requests on page 192
Configuring FPolicy to monitor get attributes operations through CLIYou can use a CLI command to configure a file policy, to monitor getattr operations.
Step
1. To monitor the get attributes operation, use the following CLI command:
fpolicy mon[itor] add PolicyName getattr
This CLI command can add the get attributes operations to the list of monitored events for NFS requests.
Configuring FPolicy to monitor get attributes operations through ONTAPIYou can use an ONTAPI to configure a file policy, to monitor getattr operations.
Step
1. To set the monitoring options for getattr operations, you can also use the following ONTAPI call:fpolicy-operations-list-set
In the monitored-operations input name field, the monitored-operation-info[] should contain the getattroperation. The monitored-protocols should contain the specific protocols that you want to monitor. Inthe case of a getattr operation, only NFS requests can be monitored.
Registering FPolicy to monitor get attributes requestsYou can monitor getattr operations by registering for it when you register an FPolicy server.
Step
1. To enable the screening of getattr operations, set the following bit in the OpsToScreen bitmask inthe FP_registration() call when you register the FPolicy server to the storage system:
FS_OP_GETATTR 0x0100
192 | Data ONTAP 7.3 File Access and Protocols Management Guide
After the registration is complete, the FPolicy server monitors all get attributes requests.
What setattr request monitoring is
The FPolicy server receives a notification from the storage system for setattr operations.
When a set attributes (setattr) request is made by an NFS client to the storage system, the storage systemconducts all the relevant checks on the file. The relevant checks include checking permissions, checkingif the file is available, checking if the file is being accessed by some other client, and so on. After thefile passes the checks, the request is forwarded to the FPolicy server, if the file extension is includedin the FPolicy ext[ension] inc[lude] list. The FPolicy server receives this request and allows orblocks the setattr request, based on the configuration of the policies.
When a set attributes (setattr) request is made by CIFS clients to the storage system using theNT_TRANSACT_SET_SECURITY_DESC operation, the storage system sends setattr notification if theCIFS client makes changes to the security descriptor. The security descriptor information includesowner, group, discretionary access control list (dacl), and system access control list (sacl) information.If the Windows-based CIFS client sends the NT_TRANSACT_SET_SECURITY_DESC operation to thestorage system, without changing the security descriptor information, it does not forward the requestto the FPolicy server.
The setattr operation should be added to the monitored operations list for the FPolicy server to receivea notification from the storage system. The setattr operation can be monitored through the CLI orONTAPI. It can also be set by the FPolicy server using a bitmask.
To enable file extension-based screening, for NFS operations, set the no_i2p option to off on thevolume. This enables the inode-to-path file name translation on the volume.
Next topics
Configuring FPolicy to monitor set attributes operations through the CLI on page 193
Configuring FPolicy to monitor set attributes operations through ONTAP on page 194
Registering FPolicy to monitor set attributes requests on page 194
Configuring FPolicy to monitor set attributes operations through the CLIYou can use a CLI command to configure a file policy, to monitor setattr operations.
Step
1. To monitor the set attributes operation, use the following CLI command:
fpolicy mon[itor] add PolicyName setattr
This CLI command can add the set attribute operations to the list of monitored events for NFS requests.
File access using CIFS | 193
Configuring FPolicy to monitor set attributes operations through ONTAPYou can use an ONTAPI to configure a file policy, to monitor setattr operations.
Step
1. To set the monitoring options for setattr operations, you can use the following ONTAPI call:fpolicy-operations-list-set
In the monitored-operations input name field, the monitored-operation-info[] should contain the setattroperation. The monitored-protocols should contain the specific protocols that you wish to monitor. Inthe case of a setattr operation, only NFS requests can be monitored.
Registering FPolicy to monitor set attributes requestsYou can monitor setattr operations using bitmasks when you register an FPolicy server.
Step
1. To enable the screening of setattr operations, set the following bit in the OpsToScreen bitmask inthe FP_registration() call when you register the FPolicy server to the storage system:
FS_OP_SETATTR 0x0200
After the registration is complete, the FPolicy server monitors all set attributes requests.
What screening by volume is
FPolicy enables you to restrict a policy to a certain list of volumes, by including or excluding volumesthat need to be screened.
Using the include list, you can request notifications for the specified volume list. Using the excludelist, you can request notifications for all volumes except the specified volume list.
Note: If both an include list and an exclude list are set, the include list is ignored.
It is possible to set different include and exclude volumes for different policies.
The default volumes list for a file policy is:
• All volumes are listed in the include list.
• No volumes are listed in the exclude list.
You can perform the following operations on the exclude and include lists:
• Reset or restore the volume list to the default list.
• Show or display the volumes in an include or exclude list.
• Add a volume to the include or exclude list.
194 | Data ONTAP 7.3 File Access and Protocols Management Guide

• Remove a volume from the include or exclude list.
• Set or replace the existing list with a new volume list.
• Display the list of volumes for a file policy with wildcard characters.
From the command line, you can display or change the list of included and excluded volumes.
The command syntax to reset or display the file volumes list is as follows:
fpolicy vol[ume] {inc[lude]|exc[lude]} {reset|show} PolicyName
The command syntax to work with file volumes is as follows:
fpolicy vol[ume] {inc[lude]|exc[lude]} {add| remove|set|eval}PolicyNamevol-spec
include is used to make changes to the include list.
exclude is used to make changes to the exclude list.
reset is used to restore the file volume list to the default list.
show is used to display the exclude or include list as entered.
add is used to add a volume to the exclude or include list.
remove is used to remove a volume from the exclude or include list.
set is used to replace the existing list with a new volume list.
eval is used to display the list of volumes for a file policy with wildcard characters.
PolicyName is the name of the file policy.
vol-spec is the name of the volume list that you want to change.
Next topics
Wildcard information for screening with volumes on page 195
How to display the list of volumes on page 196
How to add volumes to the list on page 197
How to remove volumes from the list on page 198
How to specify or replace a list of volumes on page 199
How to reset the volumes in a list on page 200
Wildcard information for screening with volumes
You can use the question mark (?) or asterisk (*) wildcard characters, to specify the volume.
The question mark (?) wildcard character stands for a single character. For example, entering vol? ina list of volumes that contain vol1, vol2, vol23, voll4 will match vol1 and vol2.
File access using CIFS | 195

The asterisk (*) wildcard character stands for any number of characters that contain the specified string.Entering *test* in a list of volumes to exclude from file screening excludes all volumes that contain thestring such as test_vol and vol_test.
How to display the list of volumes
To display the list of volumes you have specified to include or exclude for a file policy, use the showor eval command.
Next topics
Displaying volumes using the show command on page 196
Displaying volumes using the eval command on page 196
Displaying volumes using the show commandYou can display the list of specified volumes using the show command.The show command of the fpolicy volume command displays the list of specified volumes as enteredat the command line. If you specified a set of volumes using wildcard characters, the show commanddisplays the wildcard character you entered. For example, vol*.
Step
1. To display the list of excluded volumes you specified for a file policy, enter the following command:
fpolicy vol[ume] exc[lude] show PolicyName
When you enter this command, Data ONTAP responds with a list of entries from the exclude list forthe file you specified. This might include volume names and wildcard characters that describe a set ofvolumes (for example, vol*).
Note: If you want to show volumes from the list of files to be included for file screening, use theinclude (inc) option in place of the exclude (exc) option.
Displaying volumes using the eval commandYou can display the list of specified volumes using the eval command.The eval command of the fpolicy volume command displays the specified volumes after evaluatingany wildcard character included in the list you entered. For example, if your list includes vol*, the evalcommand lists all volumes including the string vol, such as vol1, vol22, or vol_sales.
Step
1. To display the list of excluded volumes for a file policy with the wildcard character evaluated, enterthe following command:
fpolicy vol[ume] exc[lude] eval PolicyName
196 | Data ONTAP 7.3 File Access and Protocols Management Guide
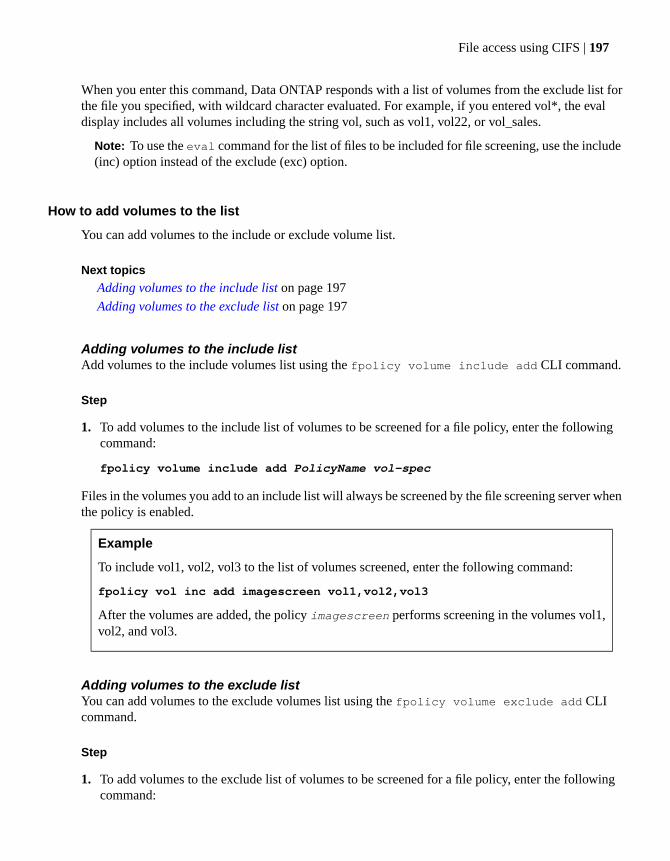
When you enter this command, Data ONTAP responds with a list of volumes from the exclude list forthe file you specified, with wildcard character evaluated. For example, if you entered vol*, the evaldisplay includes all volumes including the string vol, such as vol1, vol22, or vol_sales.
Note: To use the eval command for the list of files to be included for file screening, use the include(inc) option instead of the exclude (exc) option.
How to add volumes to the list
You can add volumes to the include or exclude volume list.
Next topics
Adding volumes to the include list on page 197
Adding volumes to the exclude list on page 197
Adding volumes to the include listAdd volumes to the include volumes list using the fpolicy volume include add CLI command.
Step
1. To add volumes to the include list of volumes to be screened for a file policy, enter the followingcommand:
fpolicy volume include add PolicyName vol-spec
Files in the volumes you add to an include list will always be screened by the file screening server whenthe policy is enabled.
Example
To include vol1, vol2, vol3 to the list of volumes screened, enter the following command:
fpolicy vol inc add imagescreen vol1,vol2,vol3
After the volumes are added, the policy imagescreen performs screening in the volumes vol1,vol2, and vol3.
Adding volumes to the exclude listYou can add volumes to the exclude volumes list using the fpolicy volume exclude add CLIcommand.
Step
1. To add volumes to the exclude list of volumes to be screened for a file policy, enter the followingcommand:
File access using CIFS | 197
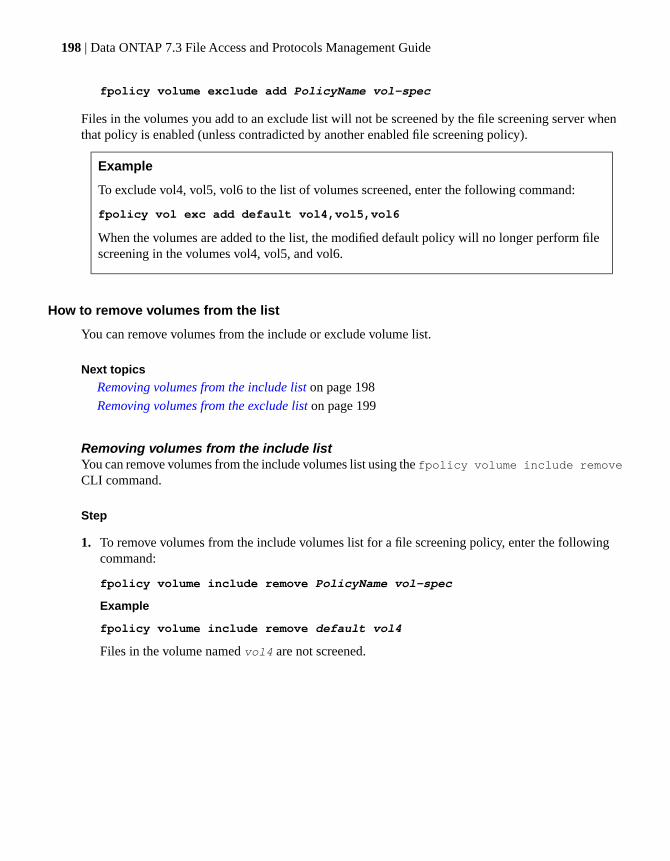
fpolicy volume exclude add PolicyName vol-spec
Files in the volumes you add to an exclude list will not be screened by the file screening server whenthat policy is enabled (unless contradicted by another enabled file screening policy).
Example
To exclude vol4, vol5, vol6 to the list of volumes screened, enter the following command:
fpolicy vol exc add default vol4,vol5,vol6
When the volumes are added to the list, the modified default policy will no longer perform filescreening in the volumes vol4, vol5, and vol6.
How to remove volumes from the list
You can remove volumes from the include or exclude volume list.
Next topics
Removing volumes from the include list on page 198
Removing volumes from the exclude list on page 199
Removing volumes from the include listYou can remove volumes from the include volumes list using the fpolicy volume include removeCLI command.
Step
1. To remove volumes from the include volumes list for a file screening policy, enter the followingcommand:
fpolicy volume include remove PolicyName vol-spec
Example
fpolicy volume include remove default vol4
Files in the volume named vol4 are not screened.
198 | Data ONTAP 7.3 File Access and Protocols Management Guide
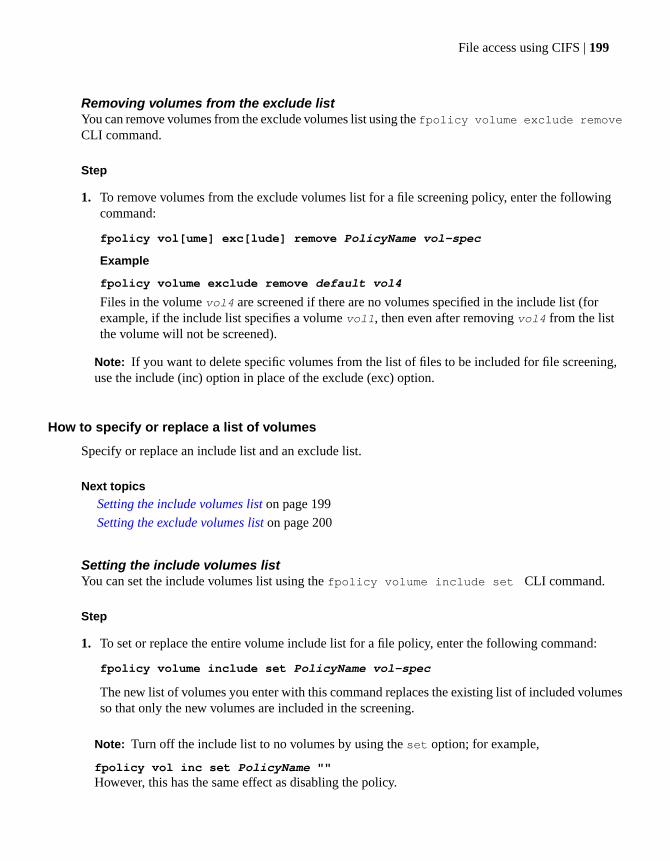
Removing volumes from the exclude listYou can remove volumes from the exclude volumes list using the fpolicy volume exclude removeCLI command.
Step
1. To remove volumes from the exclude volumes list for a file screening policy, enter the followingcommand:
fpolicy vol[ume] exc[lude] remove PolicyName vol-spec
Example
fpolicy volume exclude remove default vol4
Files in the volume vol4 are screened if there are no volumes specified in the include list (forexample, if the include list specifies a volume vol1, then even after removing vol4 from the listthe volume will not be screened).
Note: If you want to delete specific volumes from the list of files to be included for file screening,use the include (inc) option in place of the exclude (exc) option.
How to specify or replace a list of volumes
Specify or replace an include list and an exclude list.
Next topics
Setting the include volumes list on page 199
Setting the exclude volumes list on page 200
Setting the include volumes listYou can set the include volumes list using the fpolicy volume include set CLI command.
Step
1. To set or replace the entire volume include list for a file policy, enter the following command:
fpolicy volume include set PolicyName vol-spec
The new list of volumes you enter with this command replaces the existing list of included volumesso that only the new volumes are included in the screening.
Note: Turn off the include list to no volumes by using the set option; for example,
fpolicy vol inc set PolicyName ""However, this has the same effect as disabling the policy.
File access using CIFS | 199
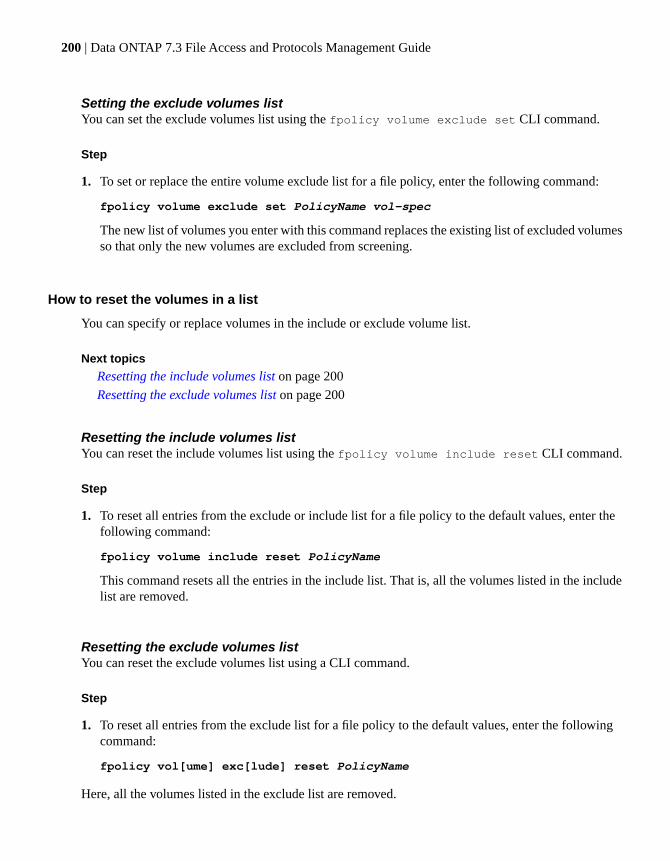
Setting the exclude volumes listYou can set the exclude volumes list using the fpolicy volume exclude set CLI command.
Step
1. To set or replace the entire volume exclude list for a file policy, enter the following command:
fpolicy volume exclude set PolicyName vol-spec
The new list of volumes you enter with this command replaces the existing list of excluded volumesso that only the new volumes are excluded from screening.
How to reset the volumes in a list
You can specify or replace volumes in the include or exclude volume list.
Next topics
Resetting the include volumes list on page 200
Resetting the exclude volumes list on page 200
Resetting the include volumes listYou can reset the include volumes list using the fpolicy volume include reset CLI command.
Step
1. To reset all entries from the exclude or include list for a file policy to the default values, enter thefollowing command:
fpolicy volume include reset PolicyName
This command resets all the entries in the include list. That is, all the volumes listed in the includelist are removed.
Resetting the exclude volumes listYou can reset the exclude volumes list using a CLI command.
Step
1. To reset all entries from the exclude list for a file policy to the default values, enter the followingcommand:
fpolicy vol[ume] exc[lude] reset PolicyName
Here, all the volumes listed in the exclude list are removed.
200 | Data ONTAP 7.3 File Access and Protocols Management Guide
What screening by extension is
FPolicy enables you to restrict a policy to a certain list of file extensions, by including or excludingextensions that needs to be screened.
Using the include list, you can request notifications for the specified file extensions.
You can provide both an include list and an exclude list. The extensions are first checked in the excludelist. If the requested file's extension is not in the exclude list, the include list is checked. If the fileextension is listed in the include list, the file is screened. If the file extension is not listed in the includelist, the request is allowed without screening.
Note: The maximum length of file name extension supported for screening is 260 characters.
Screening by extensions is based only on the characters after the last period (.) in the file name. Forexample, for a file named file1.txt.name.jpg, file access notification takes place only if a file policyis configured for the .jpg extension.
The screening by extension feature is policy-based. Therefore, you can specify different extensions fordifferent policies.
The default extension lists for a file policy are as follows:
• All file extensions are listed in the include list.
• No file extensions are listed in the exclude list.
You can perform the following operations on the exclude and include lists:
• Reset or restore the extension list to the default list.
• Set or replace the existing list with a new extensions list.
• Add an extension to the include or exclude list.
• Remove an extension from the include or exclude list.
• Show or display the extension in an include or exclude list.
• Display the list of extensions for a file policy using wildcard characters.
From the command line, you can display or change the list of included and excluded extensions.
The command syntax to reset or display the file extension list is as follows:
fpolicy extensions { include | exclude } { reset | show } PolicyName
The command syntax to work with file extension is as follows:
fpolicy extensions { include | exclude } { set | add | remove } PolicyNameext-list
include is used to make changes to the include list.
exclude is used to make changes to the exclude list.
reset is used to restore the file extension list to the default list.
File access using CIFS | 201
show is used to display the exclude or include list as entered.
set is used to replace the existing list with a new list of extensions.
add is used to add an extension to the exclude or include list.
remove is used to remove an extension from the exclude or include list.
PolicyName is the name of the file policy.
ext-list is the list of extension that you want to change.
Note: Extension-based screening is not performed for directory operations such as directory create,directory delete, and directory rename.
Next topics
Wildcard information for screening with extensions on page 202
How to display the list of extensions on page 202
How to add extensions to the list on page 203
How to remove extensions from the list on page 204
How to set or replace a list of extensions on page 205
How to reset the extensions in the list on page 206
Wildcard information for screening with extensions
You can use the question mark (?) wildcard to specify the extension.
If the question mark (?) wildcard character is used in the beginning of the string, it stands for a singlecharacter. At the end of the string, it stands for any number of characters.
For example:
• Entering ?s in a list of file extensions to include for file screening includes all file extensions thathave two characters ending with s (such as as and js extensions).
• Entering ??m in a list of file extensions to include for file screening includes all file extensions thathave three characters ending with m (such as htm and vtm extensions).
• Entering j? in a list of file extensions to include for file screening includes all file extensions thatbegin with j? (such as js, jpg, and jpe extensions).
How to display the list of extensions
You can display the list of included and excluded extensions using the fpolicy extensions CLIcommand.
Next topics
Displaying the list of extension in the include list on page 203
202 | Data ONTAP 7.3 File Access and Protocols Management Guide
Displaying the list of extension in the exclude list on page 203
Displaying the list of extension in the include listYou can display the list of extensions in the include extensions list using the fpolicy extensionsinclude show CLI command.
Step
1. To display the list of included file extensions for a file policy, enter the following command:
fpolicy extensions include show PolicyName
When you enter this command, Data ONTAP responds with a list of extensions from the include listfor the file you specified.
Displaying the list of extension in the exclude listYou can display the list of extensions in the exclude extensions list using the fpolicy extensionsexclude show CLI command.
Step
1. To display the list of excluded file extensions for a file policy, enter the following command:
fpolicy extensions exclude show PolicyName
When you enter this command, Data ONTAP responds with a list of extensions from the exclude listfor the file you specified.
How to add extensions to the list
You can add extensions to the list of included and excluded extensions using the fpolicy extensionsCLI command.
Next topics
Adding extensions to the include list on page 203
Adding extensions to the exclude list on page 204
Adding extensions to the include listAdd extensions to the include extensions list using the fpolicy extensions include CLI command.
Step
1. To add file extensions to the list of file extensions to be screened for a file policy, enter the followingcommand:
File access using CIFS | 203

fpolicy extensions include add PolicyName ext-list
Example
fpolicy ext inc add imagescreen jpg,gif,bmp
After the extensions are added to the list, the policy imagescreen performs screening for any fileswith file extension .jpg, .gif, or .bmp.
The file extensions you add to an include list will always be screened by the file screening server whenthat policy is enabled.
Adding extensions to the exclude listYou can add extensions to the exclude extensions list using the fpolicy extensions exclude CLIcommand.
Step
1. To add file extensions to the list of file extensions to be excluded from file screening for a file policy,enter the following command:
fpolicy extensions exclude add PolicyName ext-list
Example
fpolicy ext exc add default txt,log,hlp
When the extensions are added to the list, the modified policy will no longer screen .txt, .log, and.hlp files to be screened by the file screening server.
The file extensions you add to an exclude list will not be screened by the file screening server whenthat policy is enabled (unless contradicted by another enabled file screening policy).
How to remove extensions from the list
You can remove extensions from the list of included and excluded extensions using fpolicyextensions CLI command.
Next topics
Removing extensions from the include list on page 205
Removing extensions from an exclude list on page 205
204 | Data ONTAP 7.3 File Access and Protocols Management Guide

Removing extensions from the include listYou can remove extensions from the include extensions list using the fpolicy extensions includeremove CLI command.
Step
1. To remove file extensions from the include extensions list for a file policy, enter the followingcommand:
fpolicy extensions include remove PolicyName ext-list
Example
fpolicy ext inc remove default wav
Files with a .wav extension are not screened.
This command removes entries from the current file extension list.
Removing extensions from an exclude listYou can remove extensions from the exclude extensions list using the fpolicy extensions excluderemove CLI command.
Step
1. To remove file extensions from the exclude extensions list for a file screening policy, enter thefollowing command:
fpolicy extensions exclude remove PolicyName ext-list
Example
fpolicy ext exc remove default wav
Files with a .wav extension are screened.
This command removes entries from the current file extension list.
How to set or replace a list of extensions
You can set or replace the list of included and excluded extensions using the fpolicy extensionsCLI command.
Next topics
Setting the include extensions list on page 206
Setting the exclude extensions list on page 206
File access using CIFS | 205
Setting the include extensions listYou can set the include extensions list using the fpolicy extensions include set CLI command.
Step
1. To replace the entire include list for FPolicy, enter the following command:
fpolicy extensions include set PolicyName ext-list
On entering this command, the new list of extensions you specified with this command replaces theexisting list of excluded extensions so that only the new extensions are included for screening.
Note: You can also set the include list to not screen file extensions by using the set option. Forexample,
fpolicy ext inc set PolicyName ""When this command is used, no files will be screened.
Setting the exclude extensions listYou can set the exclude extensions list using the fpolicy extensions exclude set CLI command.
Step
1. To replace the entire exclude list for FPolicy, enter the following command:
fpolicy extensions exclude set PolicyName ext-list
On entering this command, the new list of extensions you specified with this command replaces theexisting list of excluded extensions so that only the new extensions are excluded from screening.
How to reset the extensions in the list
You can reset the list of included and excluded extensions using the fpolicy extensions CLIcommand.
Next topics
Resetting the include extensions list on page 207
Resetting the exclude extensions list on page 207
206 | Data ONTAP 7.3 File Access and Protocols Management Guide
Resetting the include extensions listYou can reset the include extensions list using fpolicy extensions include reset CLI command.
Step
1. To reset all entries from the include list for FPolicy to the default values, enter the followingcommand:
fpolicy extensions include reset PolicyName
This command restores the file extension include list to the default list.
Resetting the exclude extensions listYou can reset the exclude extensions list using the fpolicy extensions exclude reset CLIcommand.
Step
1. To reset all entries from the exclude list for FPolicy to the default values, enter the followingcommand:
fpolicy extensions exclude reset PolicyName
This command restores the file extension exclude list to the default list.
How to manage the file screening server
You can display important file screening server information using the CLI commands. You can alsoassign servers to the secondary server list, or remove them from the secondary server list.
Next topics
Displaying the file screening server information on page 207
Disabling the connection on page 208
What secondary servers are on page 208
Displaying the file screening server information
You can display important file screening server information using the fpolicy servers show CLIcommand. The information displayed includes the list of servers registered, the list of connected servers,and the features enabled.
The command displays the following information about a particular FPolicy:
• The list of FPolicy servers registered
• The list of FPolicy servers connected
File access using CIFS | 207
• Total time for which the server has been connected
• The list of features enabled for the server supported in Data ONTAP 7.3
• The status of the primary server
• The status of the secondary server
Step
1. To display the status of file screening servers, enter the following command:
fpolicy servers show PolicyName
When you enter this command, Data ONTAP returns the status of the file screening servers for thepolicy you specified.
Disabling the connection
When a server's connection is disabled, the connection between the FPolicy server and the storagesystem are terminated.
Step
1. To disable the connection to a file screening server, enter the following command:
fpolicy servers stop PolicyName server-IP-address
PolicyName is the name of the policy that you want to disable the connection for.
server-IP-address is the list of FPolicy server IP addresses that you want to disable from thestorage system.
The server's connection is disabled.
What secondary servers are
FPolicy servers can be used as both primary and secondary servers. You can designate a particularFPolicy server or a list of FPolicy servers as secondary servers using the fpolicy options command.
The storage system uses the secondary servers to enforce file policies only if no primary servers areavailable. That is, when an FPolicy server is designated as a secondary server, the storage system neveruses it as long as a primary server is available. If all primary servers are unavailable, the storage systemuses any secondary servers connected to the storage system until a primary server becomes availableagain.
Any FPolicy server not classified as secondary is considered a primary server.
208 | Data ONTAP 7.3 File Access and Protocols Management Guide
Next topics
Assigning secondary servers list on page 209
Removing all secondary servers on page 209
Assigning secondary servers listYou can assign or designate a particular FPolicy server as a secondary server using the fpolicyoptions secondary_servers CLI command.
Step
1. To designate a list of secondary servers to be used when the primary file screening server isunavailable, enter the following command:
fpolicy options PolicyName secondary_servers [server_list]
PolicyName is the name of the policy that you want the secondary server to use.
server_list is the list of FPolicy server IP addresses that you want to designate as secondaryservers. Use a comma (,) to separate the IP addresses. A connection from any of the IP addresseslisted in this field is classified by the storage system as a secondary server.
When you enter this command, the specified servers are designated as secondary servers for the specifiedFPolicy.
Note: When the comma-separated list of IP addresses is provided, any existing list is replaced withthe new list. Therefore, to retain existing secondary servers, you must add their IP addresses to thenew list.
Removing all secondary serversYou can convert all secondary servers to primary servers using the fpolicy options CLI command.
Step
1. To convert all secondary servers to primary servers, enter the following command:
fpolicy options PolicyName secondary_servers ""
PolicyName is the name of the policy that you want the secondary server to use.
After running this command, all FPolicy servers assigned to be secondary FPolicy servers becomeprimary FPolicy servers.
File access using CIFS | 209
How to monitor operations using FPolicy
The fpolicy monitor CLI command enables you to add, remove, or set the list of operations to bemonitored.
To monitor a specific operation, enter the following command:
fpolicy monitor {add|remove|set} PolicyName [-p { cifs|nfs|cifs,nfs} ] [-f]op-spec
Use add to add operations to the list of operations monitored, remove to remove the operation fromthe list of operations monitored, and set to reset the entire list of operations in the list.
PolicyName is the name of the policy that you want to change.
The -p option indicates the protocols you want FPolicy to monitor.
Use cifs to monitor CIFS operations, use nfs to monitor NFS operations, or use cifs,nfs to monitorboth CIFS and NFS operations. If the protocol information is not specified in the monitor command,the storage system sends notifications for both CIFS and NFS protocols.
The -f option forces the policy to be enabled even if there are no servers available to enforce the policy.
op-spec is the list of operations to be monitored.
You can also choose to set the monitoring options for all operations together, by replacing the list ofoperations with all option.
To monitor all operations use the following command syntax:
fpolicy mon[itor] {add|remove|set } PolicyName [-p {cifs|nfs|cifs,nfs } ][-f] all
When a particular operation is set for CIFS operations and then later set for NFS operations, theoperations are monitored for requests from both the protocols. However, when the operation is removedfrom one of the protocols, monitoring for that operation stops for both the protocols.
When a particular operation is set only for CIFS and not on NFS, this operation is monitored for boththe protocols. When this operation is removed from the list of monitored operations for NFS it alsostops monitoring for CIFS.
Next topics
Adding operations to the monitor list on page 211
Removing operations from the monitor list on page 211
Setting or replacing the list of monitored operations on page 212
210 | Data ONTAP 7.3 File Access and Protocols Management Guide

Adding operations to the monitor list
For FPolicy to implement native file blocking, it first needs to monitor operations that need to be blockednatively. You can do that by adding the operations to the list of operations monitored.
Step
1. To add operations to the list of monitored operations to be screened for FPolicy, enter the followingcommand:
fpolicy mon[itor] add PolicyName [-p {cifs|nfs|cifs,nfs} ] [-f] op-spec
PolicyName is the name of the policy you want to add operations to.
protocols is the protocols you want to enable monitoring for. Use cifs to monitor CIFS requests,nfs to monitor NFS requests, or cifs,nfs to monitor both.
op-spec is the list of operations you want to add.
The specified operation is added to the list of monitored operations.
Example
To add read, write, and lookup operations to the list of monitored operations, enter the followingcommand:
fpolicy mon add p1 read,write,lookup
Once enabled, the policy p1 monitors read, write, and lookup operations along with any otheroperations that have been set previously.
Removing operations from the monitor list
You can remove operations from the list using fpolicy monitor remove CLI command. When youremove an operation from the list of monitored operations, the particular operation is not monitored bythe FPolicy.
Step
1. To remove operations from the list of monitored operations to be screened for FPolicy, enter thefollowing command:
fpolicy mon[itor] remove PolicyName [-p {cifs|nfs|cifs,nfs} ] [-f] op-spec
The specified operation is removed from the list of monitored operations.
File access using CIFS | 211
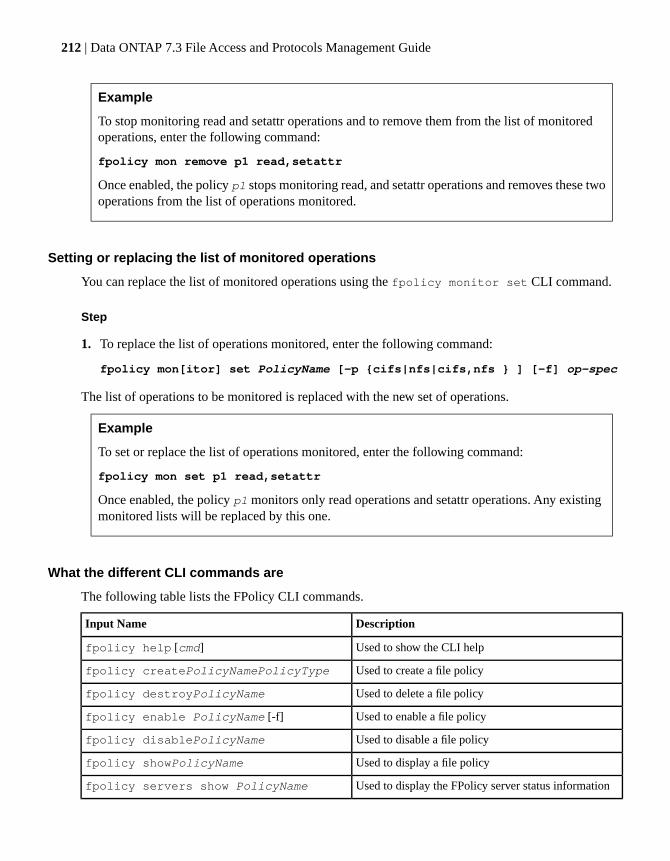
Example
To stop monitoring read and setattr operations and to remove them from the list of monitoredoperations, enter the following command:
fpolicy mon remove p1 read,setattr
Once enabled, the policy p1 stops monitoring read, and setattr operations and removes these twooperations from the list of operations monitored.
Setting or replacing the list of monitored operations
You can replace the list of monitored operations using the fpolicy monitor set CLI command.
Step
1. To replace the list of operations monitored, enter the following command:
fpolicy mon[itor] set PolicyName [-p {cifs|nfs|cifs,nfs } ] [-f] op-spec
The list of operations to be monitored is replaced with the new set of operations.
Example
To set or replace the list of operations monitored, enter the following command:
fpolicy mon set p1 read,setattr
Once enabled, the policy p1 monitors only read operations and setattr operations. Any existingmonitored lists will be replaced by this one.
What the different CLI commands are
The following table lists the FPolicy CLI commands.
DescriptionInput Name
Used to show the CLI helpfpolicy help [cmd]
Used to create a file policyfpolicy createPolicyNamePolicyType
Used to delete a file policyfpolicy destroyPolicyName
Used to enable a file policyfpolicy enable PolicyName [-f]
Used to disable a file policyfpolicy disablePolicyName
Used to display a file policyfpolicy showPolicyName
Used to display the FPolicy server status informationfpolicy servers show PolicyName
212 | Data ONTAP 7.3 File Access and Protocols Management Guide
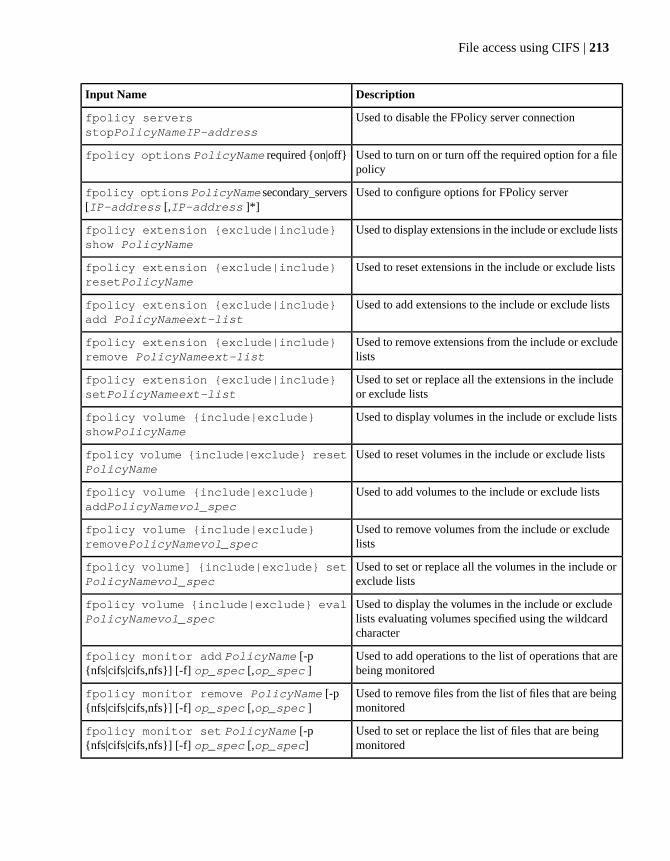
DescriptionInput Name
Used to disable the FPolicy server connectionfpolicy serversstopPolicyNameIP-address
Used to turn on or turn off the required option for a filepolicy
fpolicy optionsPolicyName required {on|off}
Used to configure options for FPolicy serverfpolicy optionsPolicyName secondary_servers[IP-address [,IP-address ]*]
Used to display extensions in the include or exclude listsfpolicy extension {exclude|include}show PolicyName
Used to reset extensions in the include or exclude listsfpolicy extension {exclude|include}resetPolicyName
Used to add extensions to the include or exclude listsfpolicy extension {exclude|include}add PolicyNameext-list
Used to remove extensions from the include or excludelists
fpolicy extension {exclude|include}remove PolicyNameext-list
Used to set or replace all the extensions in the includeor exclude lists
fpolicy extension {exclude|include}setPolicyNameext-list
Used to display volumes in the include or exclude listsfpolicy volume {include|exclude}showPolicyName
Used to reset volumes in the include or exclude listsfpolicy volume {include|exclude} resetPolicyName
Used to add volumes to the include or exclude listsfpolicy volume {include|exclude}addPolicyNamevol_spec
Used to remove volumes from the include or excludelists
fpolicy volume {include|exclude}removePolicyNamevol_spec
Used to set or replace all the volumes in the include orexclude lists
fpolicy volume] {include|exclude} setPolicyNamevol_spec
Used to display the volumes in the include or excludelists evaluating volumes specified using the wildcardcharacter
fpolicy volume {include|exclude} evalPolicyNamevol_spec
Used to add operations to the list of operations that arebeing monitored
fpolicy monitor add PolicyName [-p{nfs|cifs|cifs,nfs}] [-f] op_spec [,op_spec ]
Used to remove files from the list of files that are beingmonitored
fpolicy monitor remove PolicyName [-p{nfs|cifs|cifs,nfs}] [-f] op_spec [,op_spec ]
Used to set or replace the list of files that are beingmonitored
fpolicy monitor set PolicyName [-p{nfs|cifs|cifs,nfs}] [-f] op_spec [,op_spec]
File access using CIFS | 213

FAQs, error messages, warning messages, and keywordsThis section describes frequently asked questions and error and warning messages.
Next topics
Frequently asked questions (FAQs) on page 214
Error messages on page 220
Warning messages on page 227
Keywords list for screening operations on page 233
Frequently asked questions (FAQs)
General FAQs and FAQs about access rights and permissions and other specific subjects are coveredin this section.
Next topics
General FAQs on page 214
Access rights and permissions FAQs on page 216
Performance FAQs on page 217
File screening FAQs on page 218
FPolicy server FAQs on page 219
General FAQs
Is there a limit currently to the total number of active file policies?
Yes, currently the limit to the total number of active file policies is 20 per vFiler unit.
If two policies are created, will the storage system handle the requests in a sequentialor parallel manner?
When two policies are created, the storage system handles the requests sequentially.
Can you prioritize the policies so that one is favored over the other?
The existing implementation of FPolicy does not support ordering of policies.
Can multiple policies be created for different FPolicy servers?
Yes. It is possible to create multiple policies and use individual policies for different FPolicy servers.For example, you can create two policies, one for the FLM and one for NTP, and point the two FPolicyservers to these two policies.
214 | Data ONTAP 7.3 File Access and Protocols Management Guide
The order in which notifications will be sent is the same as the order in which policies are listed underthe fpolicy command. This is the reverse of the order in which policies are created on the filer. Forexample, if policy p1 was created followed by policy p2, notifications will be sent to p2 and subsequentlyto p1.
It is important to note the difference between "multiple file policies" and "multiple servers."
Some problems you might face are as follows:
• Currently the FPolicy engine sends requests sequentially (instead of sending them parallely) for themultiple policies so they might see double the performance degradation.
What licences are needed to be enabled for FPolicy to work on your storage systems?
CIFS needs to be licensed and set up on the storage system for FPolicy to work.
Why do I need CIFS to be licensed and set up even on an NFS-only storage system?
An FPolicy server wields a lot of power, and it is authenticated using CIFS security to ensure that theserver has Backup-Operator privileges (or more) on the storage system. Therefore, CIFS needs to belicensed even in an NFS exclusive environment. Also, to apply file policies to NFS files, you must alsohave NFS licensed and running.
Does FPolicy have any limitations?
Yes, the following are FPolicy limitations:
• FPolicy supports only CIFS and NFS protocols. However, there are some operations for the CIFSand NFS protocols that FPolicy does not monitor, such as, NFSv4 operations related to locking anddelegation, session-related operations (SMB_COM_SESSION_SETUP_ANDX), operations notrelevant to file system activity (print-related operations), and so on.
• FPolicy does not support other protocols such as FTP, HTTP, WebDAV, FileIO, and so on.
• You cannot configure CIFS and NFS operations separately on the same policy.
Following are the screening limitations of FPolicy:
• You must set up file screening on an entire volume. You cannot screen individual qtrees anddirectories.
• FPolicy supports screening of CIFS operations on alternate data streams. However, FPolicy doesnot support screening of NFS operations on alternate data streams.
• When you register multiple servers, the policy of all the servers connected changes based on thesettings of the server that registers last.
• Multiple instances of an FPolicy server from the same IP address cannot register to same policy.
• If the CIFS system resources used by FPolicy are exhausted, the CIFS screening by the FPolicyengine will stop.
File access using CIFS | 215
Is FPolicy dependent upon Virus Scanning (vscan)?
FPolicy runs independently from vscan operations. FPolicy occurs before virus scanning operations,so that paths indicated in stub files (such as symlinks) can be traversed to load the actual file, insteadof just scanning the stub file.Vscan operations are independent of file policies. That is, vscan can openand scan files that have been blocked by file policies. Therefore, there is no interdependence betweenFPolicy and vscan.
Where are FPolicy settings saved?
FPolicy settings are saved in the registry.
What happens when a user attempts to make changes to a migrated file that wasaccessed with read permission?
The FPolicy server has to do the following:
For CIFS and NFS version 4, it can recall the file at open time if the open request is for write (orread-write) access mode. Alternatively, it can do it when the write request is made. However, for thisoption the server has to be registered to monitor write operations.
Since NFSv2 and NFSv3 versions do not have an open call, the HSM server will need to register tomonitor read and write operations. The HSM server will have to recall the file when it receives thewrite request. For read operations, the HSM server has an option of either using pass through read orwrite.
Access rights and permissions FAQs
What is the minimal access right for an account that connects to the storage systems,and registers as an FPolicy server listening to FPolicy events?
The FPolicy server needs backup privileges at least, to register to the storage system.
What is the minimal access right for an account that connects to the storage systemand scans q-tree ACLs?
The right to scan ACLs is granted to CIFS logins using standard Windows methods. If you are connectedto the storage system using an account that is a member of the Backup Operators or Administratorsgroups you can use the FILE_FLAG_BACKUP_SEMANTICS open mode, which allows you to accessany file, regardless of security.
216 | Data ONTAP 7.3 File Access and Protocols Management Guide
Performance FAQs
What factors does the performance of an FPolicy depend on?
The following are some of the factors that the performance of FPolicy depends on:
• Number of Operations (like read, open, close, and so on) being monitored
• Number of registered FPolicy servers (load sharing)
• Number of Policies screening the same operation
• Network bandwidth between storage system and FPolicy server (round-trip time of the screenrequest)
• Response time of the FPolicy server
How can we measure how FPolicy traffic is divided between CIFS and NFS traffic?
The output of the FPolicy command run at the storage system contains a counter for the total numberof request screened by that particular file policy. However, currently there is no way to understand thedivision between CIFS and NFS traffic.
Every client request that goes through FPolicy screening generates some extra CIFS requests for internalFPolicy communication. This is true for both CIFS and NFS clients requests. Currently there is no wayto measure this extra traffic.
If you switch on FPolicy before doing recalls, does that have an impact on performance?
Yes, switching on FPolicy before doing any recalls has an impact on the performance. The impact ofthe performance depends primarily on how FPolicy is configured. It is therefore recommended that youdo not turn on FPolicy before doing any recalls.
When there are two FPolicy servers registered to a storage system with differentperformance levels, does the performance of the slower server affect the performanceof the fast server?
Yes, the performance of the slower server does affect the performance of the faster server. It is thereforerecommended that servers with same capabilities are used while connecting to a storage system.
Do we have a metric to determine the additional load on the CPU when FPolicy isenabled?
No, such data is not currently available for FPolicy.
File access using CIFS | 217
File screening FAQs
How does file screening work?
File screening policies are used to specify files or directories on which one wants to put some restrictions.Upon receiving a file operation request (such as open, write, create, or rename), Data ONTAP checksits file screening policies before permitting the operation.
If the policy specifies screening for that file based on its extension, the file name is sent to the filescreening server to be screened. The file screening server applies policies to the file name to determinewhether the storage system should allow the requested file operation. The file screening server thensends a response to the storage system to either allow or block the requested file operation.
Does the performance of the system go down while using file screening?
Yes, the performance of the system goes down while using file screening.
Can we use default options for setting file screening options?
There is a master setting for all file policies, the fpolicy.enable option, which is on by default.When an individual FPolicy is newly created, it is off by default. This allows the system administratorto fully configure the policy before activating it. Whether something is actually screened or not, dependsupon whether or not there is a supported external file screening server running and accessible to thestorage system. Remember that an external file screening server is a requirement in order to use FPolicy.
What happens if I create screening policies but do not have a screening server?
If you enable a policy when no file screening servers are available, nothing happens. However, if youhave turned on the fpolicy option required for that policy, then access to files specified in thatpolicy will be denied. The setting for 'required' on a policy is set to off by default.
How can I display the status of file screening servers?
You can display the status of the file screening server by using the following command:
fpolicy servers show PolicyName
Data ONTAP returns the status of the file screening server for the policy you specified.
Can I specify secondary screening servers? If yes, how can I do it?
Yes, you can designate a list of secondary servers to be used when the primary file screening server isunavailable. Use the following command:
fpolicy options PolicyName secondary_servers [ server_list ]
218 | Data ONTAP 7.3 File Access and Protocols Management Guide
Any FPolicy server that connects to the storage system will be a primary server unless its IP address isin the secondary server list. Secondary servers will never be used by the storage system unless allprimary servers are unavailable.
How can I disable the connection to a file screening server?
You can disable the connection to a file screening server by using the following command:
fpolicy servers stop PolicyName server-IP-address
Is FPolicy file screening applied at the volume level or at the qtree level?
FPolicy file screening is applied at the volume level, and not at the qtree level.
FPolicy server FAQs
What is the difference between primary and secondary servers?
Primary servers are active servers that screen client requests. Secondary servers are registered for thefail safe mode. When all the primary servers are down, all the secondary servers start screening requests.
How can I register a secondary server?
To use a server as a secondary server, you have to add the server IP in the secondary server list.
When the server connects, it will be treated as secondary.
File access using CIFS | 219
Error messages
The following table contains a list of common FPolicy error messages, probable causes, andrecommended actions, if any.
Recommendedaction
CauseError message
Examine the errorcode to see if ithelps point to theuse of the problem.
Examine the eventlogs of the FPolicy(file policy) serverto learn if it hasdisconnected fromthe storage systemand why.
Examine the storagesystem's syslog forerror messageswhich could provideclues. Correct anyproblems that arefound such asnetwork errors orhardware problemson the FPolicyserver. Check to seeif a software patchhas been recentlyinstalled on theFPolicy serverwhich may havechanged securitysettings.
This error is generated when the storage systemencounters an error while attempting tocommunicate with an FPolicy (file policy) server.The communication failure will cause the storagesystem to break its connection with this server.
The error can be due to network problems, securitysettings on the FPolicy server that deny access tothe storage system, or hardware/software problemson the FPolicy server. The problem can also occurif a low memory situation on the storage systemprevents the storage system from obtainingresources needed to perform the operation.
fpolicy.fscreen.server.connectErrorseverity="ERR"
220 | Data ONTAP 7.3 File Access and Protocols Management Guide
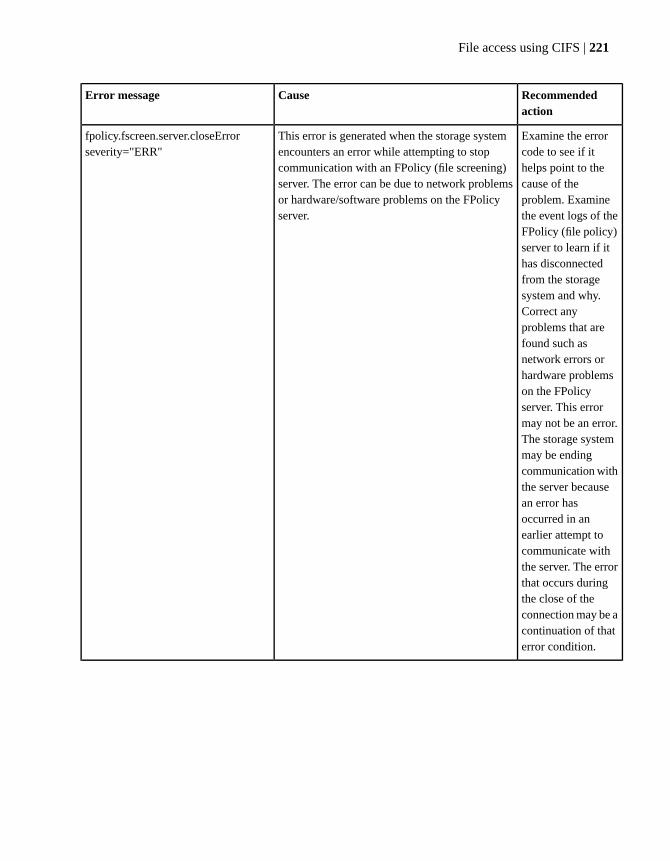
Recommendedaction
CauseError message
Examine the errorcode to see if ithelps point to thecause of theproblem. Examinethe event logs of theFPolicy (file policy)server to learn if ithas disconnectedfrom the storagesystem and why.Correct anyproblems that arefound such asnetwork errors orhardware problemson the FPolicyserver. This errormay not be an error.The storage systemmay be endingcommunication withthe server becausean error hasoccurred in anearlier attempt tocommunicate withthe server. The errorthat occurs duringthe close of theconnection may be acontinuation of thaterror condition.
This error is generated when the storage systemencounters an error while attempting to stopcommunication with an FPolicy (file screening)server. The error can be due to network problemsor hardware/software problems on the FPolicyserver.
fpolicy.fscreen.server.closeErrorseverity="ERR"
File access using CIFS | 221
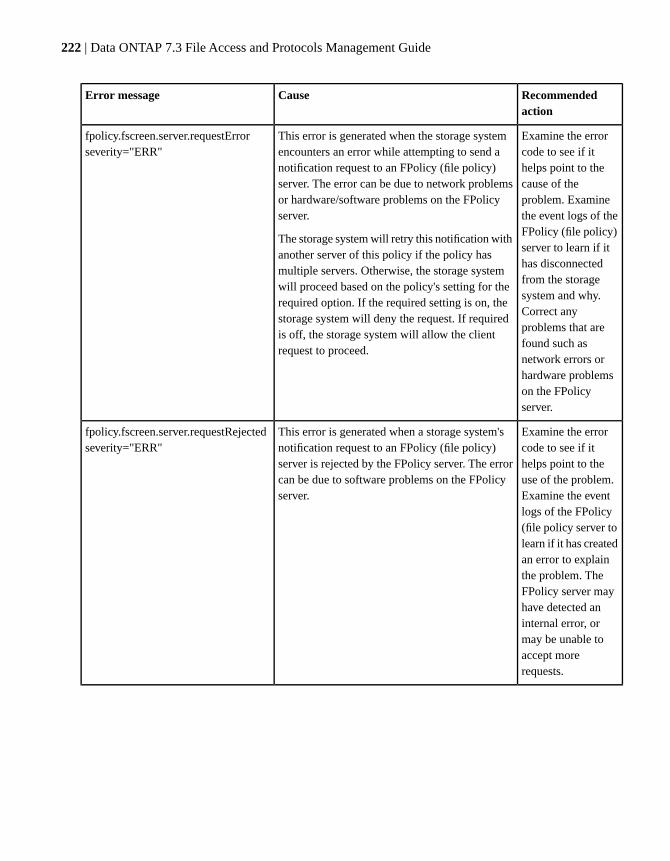
Recommendedaction
CauseError message
Examine the errorcode to see if ithelps point to thecause of theproblem. Examinethe event logs of theFPolicy (file policy)server to learn if ithas disconnectedfrom the storagesystem and why.Correct anyproblems that arefound such asnetwork errors orhardware problemson the FPolicyserver.
This error is generated when the storage systemencounters an error while attempting to send anotification request to an FPolicy (file policy)server. The error can be due to network problemsor hardware/software problems on the FPolicyserver.
The storage system will retry this notification withanother server of this policy if the policy hasmultiple servers. Otherwise, the storage systemwill proceed based on the policy's setting for therequired option. If the required setting is on, thestorage system will deny the request. If requiredis off, the storage system will allow the clientrequest to proceed.
fpolicy.fscreen.server.requestErrorseverity="ERR"
Examine the errorcode to see if ithelps point to theuse of the problem.Examine the eventlogs of the FPolicy(file policy server tolearn if it has createdan error to explainthe problem. TheFPolicy server mayhave detected aninternal error, ormay be unable toaccept morerequests.
This error is generated when a storage system'snotification request to an FPolicy (file policy)server is rejected by the FPolicy server. The errorcan be due to software problems on the FPolicyserver.
fpolicy.fscreen.server.requestRejectedseverity="ERR"
222 | Data ONTAP 7.3 File Access and Protocols Management Guide
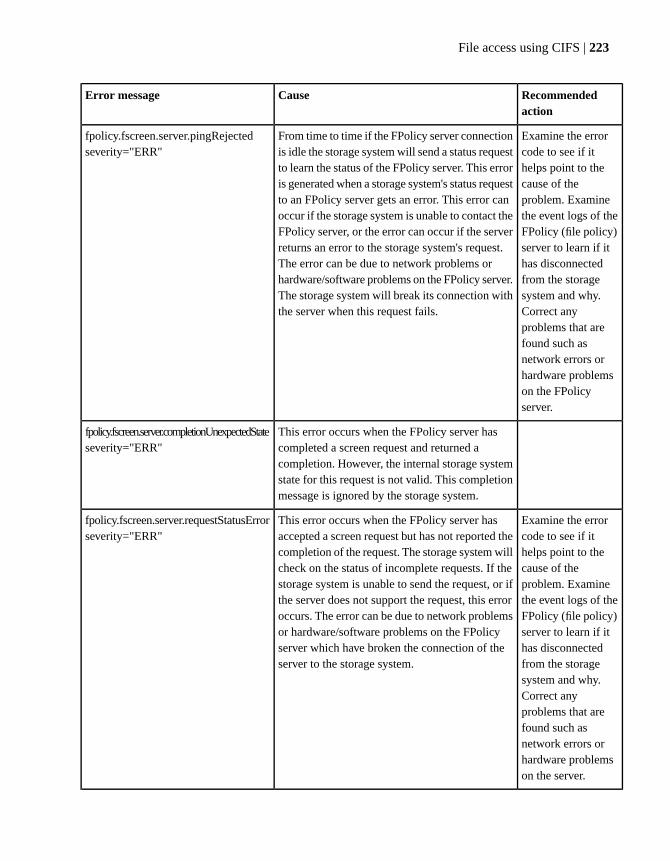
Recommendedaction
CauseError message
Examine the errorcode to see if ithelps point to thecause of theproblem. Examinethe event logs of theFPolicy (file policy)server to learn if ithas disconnectedfrom the storagesystem and why.Correct anyproblems that arefound such asnetwork errors orhardware problemson the FPolicyserver.
From time to time if the FPolicy server connectionis idle the storage system will send a status requestto learn the status of the FPolicy server. This erroris generated when a storage system's status requestto an FPolicy server gets an error. This error canoccur if the storage system is unable to contact theFPolicy server, or the error can occur if the serverreturns an error to the storage system's request.The error can be due to network problems orhardware/software problems on the FPolicy server.The storage system will break its connection withthe server when this request fails.
fpolicy.fscreen.server.pingRejectedseverity="ERR"
This error occurs when the FPolicy server hascompleted a screen request and returned acompletion. However, the internal storage systemstate for this request is not valid. This completionmessage is ignored by the storage system.
fpolicy.fscreen.server.completionUnexpectedStateseverity="ERR"
Examine the errorcode to see if ithelps point to thecause of theproblem. Examinethe event logs of theFPolicy (file policy)server to learn if ithas disconnectedfrom the storagesystem and why.Correct anyproblems that arefound such asnetwork errors orhardware problemson the server.
This error occurs when the FPolicy server hasaccepted a screen request but has not reported thecompletion of the request. The storage system willcheck on the status of incomplete requests. If thestorage system is unable to send the request, or ifthe server does not support the request, this erroroccurs. The error can be due to network problemsor hardware/software problems on the FPolicyserver which have broken the connection of theserver to the storage system.
fpolicy.fscreen.server.requestStatusErrorseverity="ERR"
File access using CIFS | 223

Recommendedaction
CauseError message
Contact technicalsupport.
This error occurs when the file policy serverregisters with the storage system and offers towork as an FPolicy server or the storage system.The storage system has not been able to getmemory it needs to hold information related to theFPolicy server.
fpolicy.fscreen.server.connecting.internalErrorseverity="ERR"
Turn on the fileroptioncifs.trace_login tosee what user namethe server is using toconnect to thestorage system.Remember to turnthe option off aftersolving this problembecause tracing canaffect storage systemperformance. Checkto see the user nameunder which the filepolicy service isrunning on theFPolicy server. Usethe wcc command tolearn which groupsthis user belongs to.Perhaps add thisuser to anappropriate group,or change theproperties of theFPolicy server sothat it runs under adifferent user name.
This error occurs when the FPolicy server registerswith the storage system and offers to work as anFPolicy server for the storage system. The serverhas connected as a user that has insufficientprivileges to act as an FPolicy server. The storagesystem requires that the user under whose namethe server connects to the storage system must beat least a member of the storage system'sbackup-operators group. This registration attemptwill be rejected.
fpolicy.fscreen.server.connecting.privErrorseverity="ERR"
224 | Data ONTAP 7.3 File Access and Protocols Management Guide
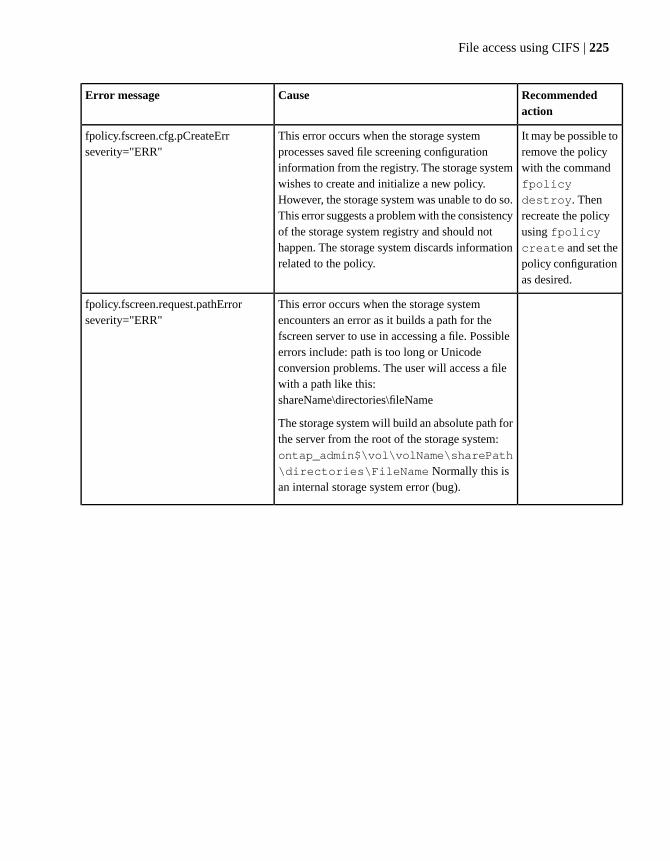
Recommendedaction
CauseError message
It may be possible toremove the policywith the commandfpolicy
destroy. Thenrecreate the policyusing fpolicycreate and set thepolicy configurationas desired.
This error occurs when the storage systemprocesses saved file screening configurationinformation from the registry. The storage systemwishes to create and initialize a new policy.However, the storage system was unable to do so.This error suggests a problem with the consistencyof the storage system registry and should nothappen. The storage system discards informationrelated to the policy.
fpolicy.fscreen.cfg.pCreateErrseverity="ERR"
This error occurs when the storage systemencounters an error as it builds a path for thefscreen server to use in accessing a file. Possibleerrors include: path is too long or Unicodeconversion problems. The user will access a filewith a path like this:shareName\directories\fileName
The storage system will build an absolute path forthe server from the root of the storage system:ontap_admin$\vol\volName\sharePath
\directories\FileName Normally this isan internal storage system error (bug).
fpolicy.fscreen.request.pathErrorseverity="ERR"
File access using CIFS | 225
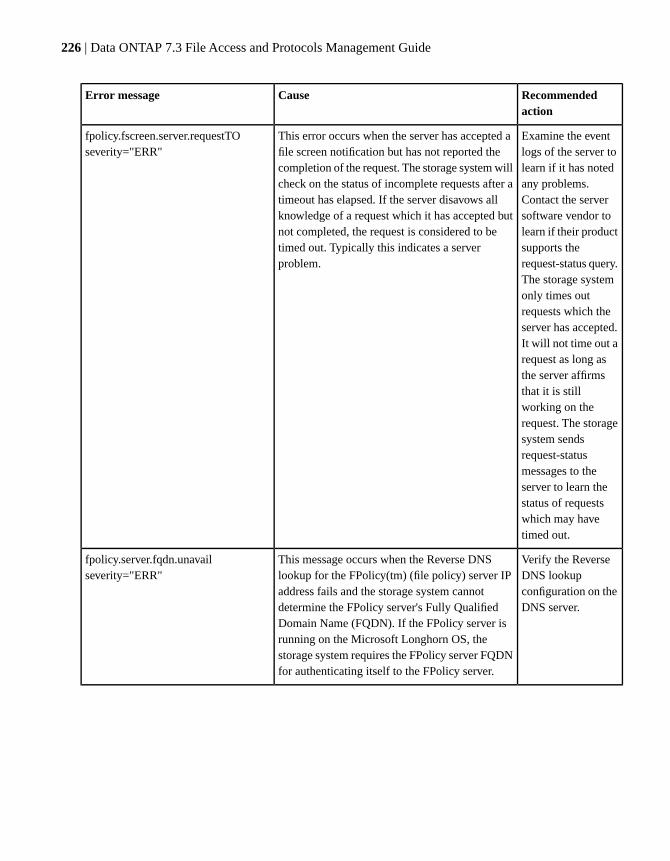
Recommendedaction
CauseError message
Examine the eventlogs of the server tolearn if it has notedany problems.Contact the serversoftware vendor tolearn if their productsupports therequest-status query.The storage systemonly times outrequests which theserver has accepted.It will not time out arequest as long asthe server affirmsthat it is stillworking on therequest. The storagesystem sendsrequest-statusmessages to theserver to learn thestatus of requestswhich may havetimed out.
This error occurs when the server has accepted afile screen notification but has not reported thecompletion of the request. The storage system willcheck on the status of incomplete requests after atimeout has elapsed. If the server disavows allknowledge of a request which it has accepted butnot completed, the request is considered to betimed out. Typically this indicates a serverproblem.
fpolicy.fscreen.server.requestTOseverity="ERR"
Verify the ReverseDNS lookupconfiguration on theDNS server.
This message occurs when the Reverse DNSlookup for the FPolicy(tm) (file policy) server IPaddress fails and the storage system cannotdetermine the FPolicy server's Fully QualifiedDomain Name (FQDN). If the FPolicy server isrunning on the Microsoft Longhorn OS, thestorage system requires the FPolicy server FQDNfor authenticating itself to the FPolicy server.
fpolicy.server.fqdn.unavailseverity="ERR"
226 | Data ONTAP 7.3 File Access and Protocols Management Guide
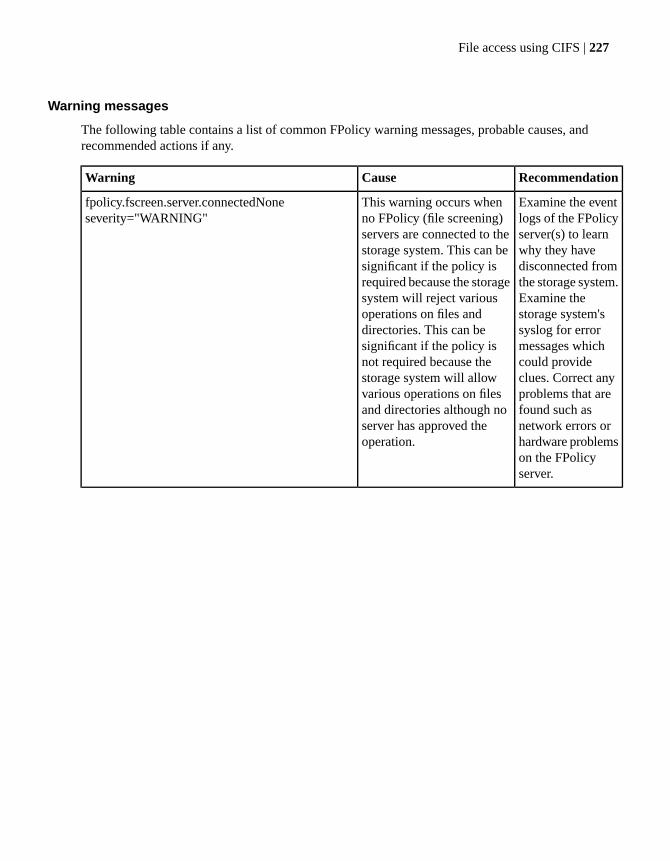
Warning messages
The following table contains a list of common FPolicy warning messages, probable causes, andrecommended actions if any.
RecommendationCauseWarning
Examine the eventlogs of the FPolicyserver(s) to learnwhy they havedisconnected fromthe storage system.Examine thestorage system'ssyslog for errormessages whichcould provideclues. Correct anyproblems that arefound such asnetwork errors orhardware problemson the FPolicyserver.
This warning occurs whenno FPolicy (file screening)servers are connected to thestorage system. This can besignificant if the policy isrequired because the storagesystem will reject variousoperations on files anddirectories. This can besignificant if the policy isnot required because thestorage system will allowvarious operations on filesand directories although noserver has approved theoperation.
fpolicy.fscreen.server.connectedNoneseverity="WARNING"
File access using CIFS | 227
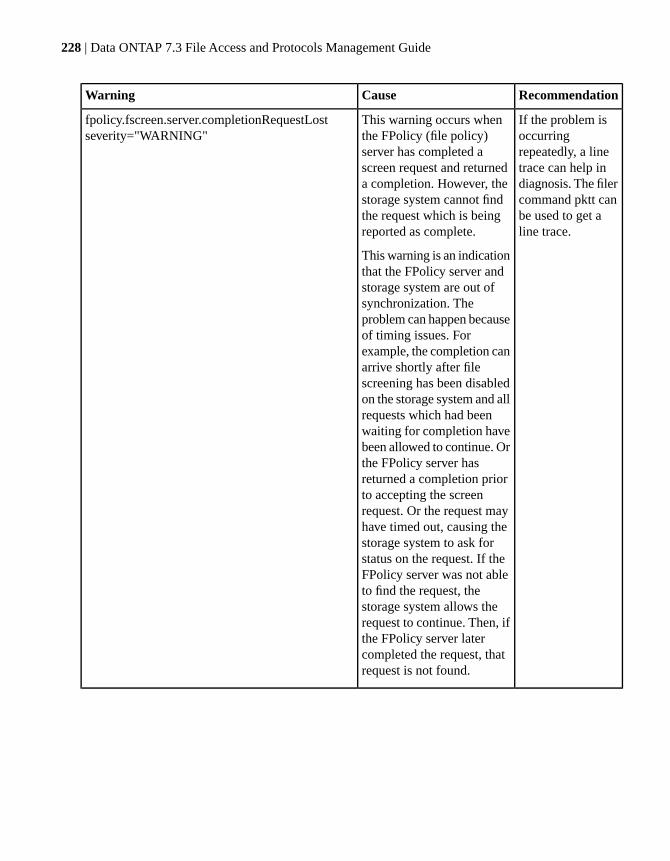
RecommendationCauseWarning
If the problem isoccurringrepeatedly, a linetrace can help indiagnosis. The filercommand pktt canbe used to get aline trace.
This warning occurs whenthe FPolicy (file policy)server has completed ascreen request and returneda completion. However, thestorage system cannot findthe request which is beingreported as complete.
This warning is an indicationthat the FPolicy server andstorage system are out ofsynchronization. Theproblem can happen becauseof timing issues. Forexample, the completion canarrive shortly after filescreening has been disabledon the storage system and allrequests which had beenwaiting for completion havebeen allowed to continue. Orthe FPolicy server hasreturned a completion priorto accepting the screenrequest. Or the request mayhave timed out, causing thestorage system to ask forstatus on the request. If theFPolicy server was not ableto find the request, thestorage system allows therequest to continue. Then, ifthe FPolicy server latercompleted the request, thatrequest is not found.
fpolicy.fscreen.server.completionRequestLostseverity="WARNING"
228 | Data ONTAP 7.3 File Access and Protocols Management Guide
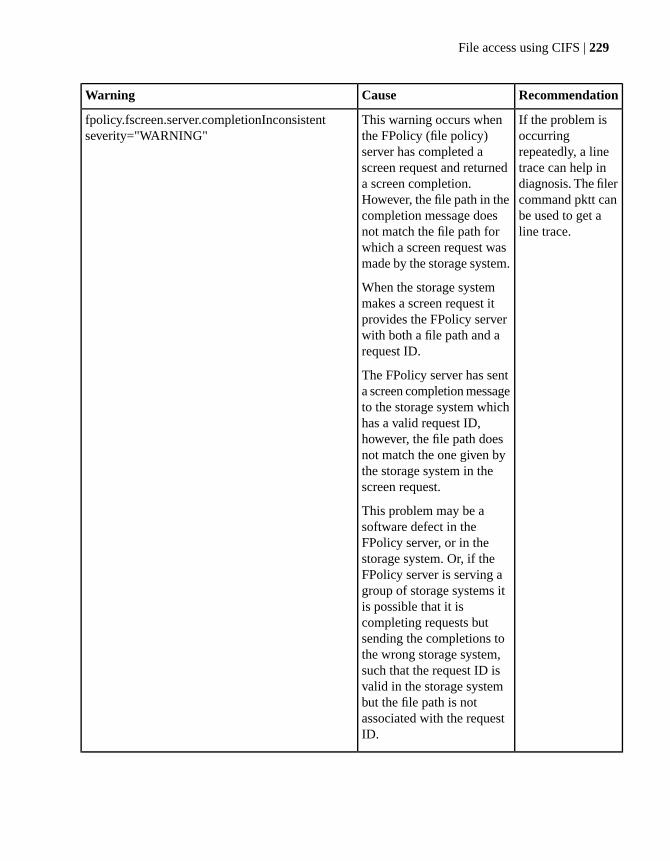
RecommendationCauseWarning
If the problem isoccurringrepeatedly, a linetrace can help indiagnosis. The filercommand pktt canbe used to get aline trace.
This warning occurs whenthe FPolicy (file policy)server has completed ascreen request and returneda screen completion.However, the file path in thecompletion message doesnot match the file path forwhich a screen request wasmade by the storage system.
When the storage systemmakes a screen request itprovides the FPolicy serverwith both a file path and arequest ID.
The FPolicy server has senta screen completion messageto the storage system whichhas a valid request ID,however, the file path doesnot match the one given bythe storage system in thescreen request.
This problem may be asoftware defect in theFPolicy server, or in thestorage system. Or, if theFPolicy server is serving agroup of storage systems itis possible that it iscompleting requests butsending the completions tothe wrong storage system,such that the request ID isvalid in the storage systembut the file path is notassociated with the requestID.
fpolicy.fscreen.server.completionInconsistentseverity="WARNING"
File access using CIFS | 229
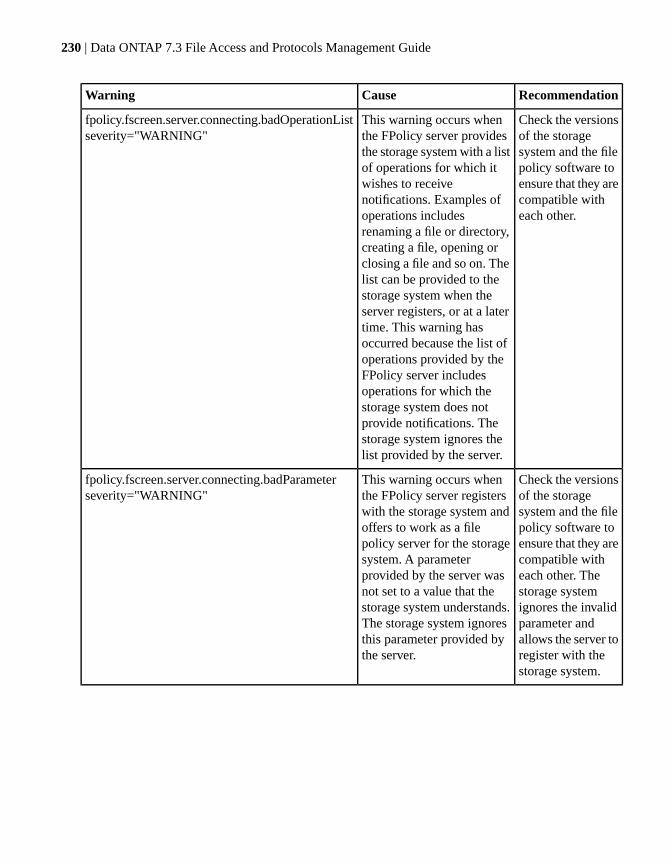
RecommendationCauseWarning
Check the versionsof the storagesystem and the filepolicy software toensure that they arecompatible witheach other.
This warning occurs whenthe FPolicy server providesthe storage system with a listof operations for which itwishes to receivenotifications. Examples ofoperations includesrenaming a file or directory,creating a file, opening orclosing a file and so on. Thelist can be provided to thestorage system when theserver registers, or at a latertime. This warning hasoccurred because the list ofoperations provided by theFPolicy server includesoperations for which thestorage system does notprovide notifications. Thestorage system ignores thelist provided by the server.
fpolicy.fscreen.server.connecting.badOperationListseverity="WARNING"
Check the versionsof the storagesystem and the filepolicy software toensure that they arecompatible witheach other. Thestorage systemignores the invalidparameter andallows the server toregister with thestorage system.
This warning occurs whenthe FPolicy server registerswith the storage system andoffers to work as a filepolicy server for the storagesystem. A parameterprovided by the server wasnot set to a value that thestorage system understands.The storage system ignoresthis parameter provided bythe server.
fpolicy.fscreen.server.connecting.badParameterseverity="WARNING"
230 | Data ONTAP 7.3 File Access and Protocols Management Guide
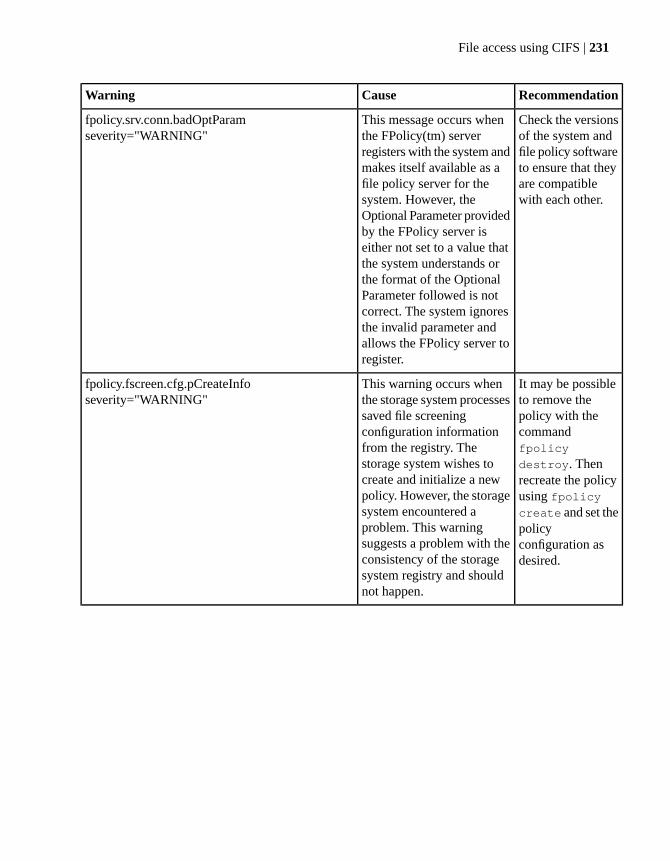
RecommendationCauseWarning
Check the versionsof the system andfile policy softwareto ensure that theyare compatiblewith each other.
This message occurs whenthe FPolicy(tm) serverregisters with the system andmakes itself available as afile policy server for thesystem. However, theOptional Parameter providedby the FPolicy server iseither not set to a value thatthe system understands orthe format of the OptionalParameter followed is notcorrect. The system ignoresthe invalid parameter andallows the FPolicy server toregister.
fpolicy.srv.conn.badOptParamseverity="WARNING"
It may be possibleto remove thepolicy with thecommandfpolicy
destroy. Thenrecreate the policyusing fpolicycreate and set thepolicyconfiguration asdesired.
This warning occurs whenthe storage system processessaved file screeningconfiguration informationfrom the registry. Thestorage system wishes tocreate and initialize a newpolicy. However, the storagesystem encountered aproblem. This warningsuggests a problem with theconsistency of the storagesystem registry and shouldnot happen.
fpolicy.fscreen.cfg.pCreateInfoseverity="WARNING"
File access using CIFS | 231

RecommendationCauseWarning
Check to see ifyour server is stillfunctioning. Checknetworkconnectivitybetween thestorage system andthe server. Checkthe server's eventlog to see if thereare errors thatexplain thedisconnect. Makesure that CIFS isrunning on yourstorage system.
This warning is generatedwhen connection to a filepolicy (fscreen) server islost. A connection can belost when the servervoluntarily disconnects fromthe storage system. Otherpossible reasons for droppedconnections include networkerrors, termination of CIFSservices on the storagesystem, andhardware/software failureson the server.
fpolicy.fscreen.server.droppedConnseverity="WARNING"
Turn off theno_i2p option byissuing thefollowingcommand:
vol options
volumeName
no_i2p off
This commandenables theinode-to-path nametranslation for fileson the volume.
This message occurs whenan FPolicy(tm) serverregisters with the system fora file policy and requiredinode-to- path nametranslation for file policynotifications against NFSrequests. However, thevolume monitored by the filepolicy hasinode-to-pathnametranslation disabled. TheFPolicy fails to generate afile path for NFS requests incase inode-to-pathnametranslation is disabled on thevolume.
fpolicy.fscreen.vol.i2p.off severity="WARNING"
232 | Data ONTAP 7.3 File Access and Protocols Management Guide

RecommendationCauseWarning
If the problemoccurs repeatedly,use packet trace tohelp in diagnosis.Use the pkttcommand to getpacket trace.
For example:
pktt start all
-i
FpolicyServerIP
This message occurs whenthe FPolicy server sends filedata to the system for a RRD(Read Redirect) request butthe system cannot find therequest for which file datasent. This warning is anindication that the FPolicyserver and system are out ofsynchronization.
This problem can happenbecause of timing issues. Forexample, the file data mightarrive shortly after filescreening is disabled on thesystem and all requests thatare waiting for completionhave been allowed tocontinue; or the FPolicyserver has returned a filedata before accepting thescreen request; or the requestmight have timed out,causing the system to ask forstatus on the request. Or, ifthe FPolicy server was notable to find the request, thesystem would allow therequest to continue. Then, ifthe FPolicy server latersends file data for therequest, that request wouldnot be found by the system.
fpolicy.fscreen.server.unexpectedFileDataResponseseverity="WARNING"
Keywords list for screening operations
All operations can be monitored in three ways. They can be set using a bitmask while registering anFPolicy server, they can be configured by using an ONTAPI call, and they can be configured using aCLI.
You can use different keywords to configure monitoring of the different operations supported by FPolicy.The following table lists the keywords used for each of the operations, when you attempt to configurethem with the three options.
File access using CIFS | 233
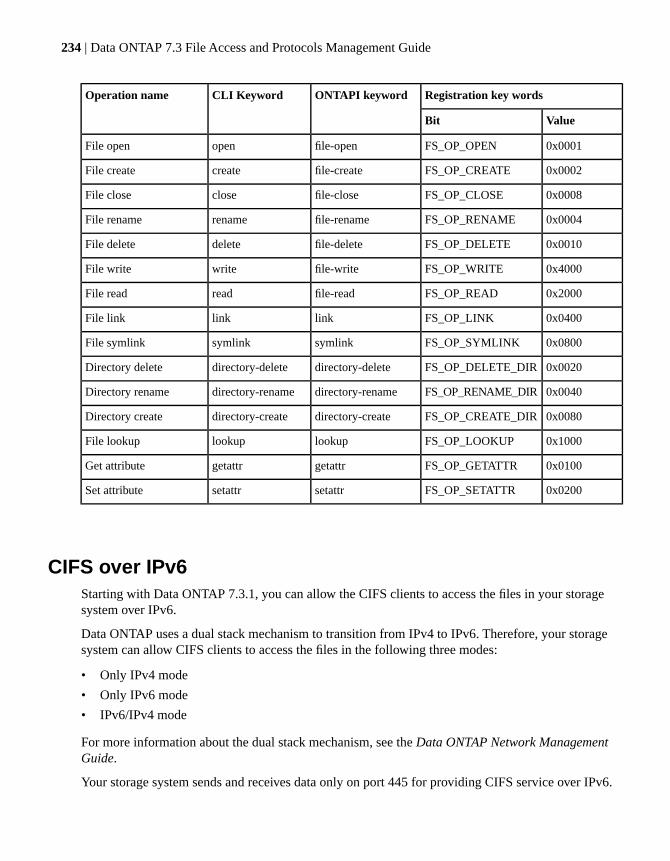
Registration key wordsONTAPI keywordCLI KeywordOperation name
ValueBit
0x0001FS_OP_OPENfile-openopenFile open
0x0002FS_OP_CREATEfile-createcreateFile create
0x0008FS_OP_CLOSEfile-closecloseFile close
0x0004FS_OP_RENAMEfile-renamerenameFile rename
0x0010FS_OP_DELETEfile-deletedeleteFile delete
0x4000FS_OP_WRITEfile-writewriteFile write
0x2000FS_OP_READfile-readreadFile read
0x0400FS_OP_LINKlinklinkFile link
0x0800FS_OP_SYMLINKsymlinksymlinkFile symlink
0x0020FS_OP_DELETE_DIRdirectory-deletedirectory-deleteDirectory delete
0x0040FS_OP_RENAME_DIRdirectory-renamedirectory-renameDirectory rename
0x0080FS_OP_CREATE_DIRdirectory-createdirectory-createDirectory create
0x1000FS_OP_LOOKUPlookuplookupFile lookup
0x0100FS_OP_GETATTRgetattrgetattrGet attribute
0x0200FS_OP_SETATTRsetattrsetattrSet attribute
CIFS over IPv6Starting with Data ONTAP 7.3.1, you can allow the CIFS clients to access the files in your storagesystem over IPv6.
Data ONTAP uses a dual stack mechanism to transition from IPv4 to IPv6. Therefore, your storagesystem can allow CIFS clients to access the files in the following three modes:
• Only IPv4 mode
• Only IPv6 mode
• IPv6/IPv4 mode
For more information about the dual stack mechanism, see the Data ONTAP Network ManagementGuide.
Your storage system sends and receives data only on port 445 for providing CIFS service over IPv6.
234 | Data ONTAP 7.3 File Access and Protocols Management Guide
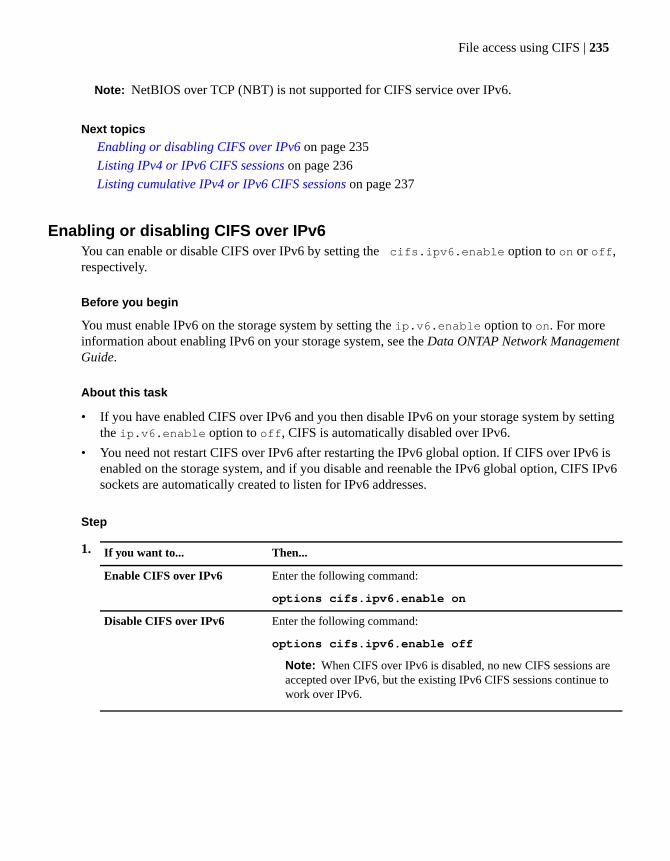
Note: NetBIOS over TCP (NBT) is not supported for CIFS service over IPv6.
Next topics
Enabling or disabling CIFS over IPv6 on page 235
Listing IPv4 or IPv6 CIFS sessions on page 236
Listing cumulative IPv4 or IPv6 CIFS sessions on page 237
Enabling or disabling CIFS over IPv6You can enable or disable CIFS over IPv6 by setting the cifs.ipv6.enable option to on or off,respectively.
Before you begin
You must enable IPv6 on the storage system by setting the ip.v6.enable option to on. For moreinformation about enabling IPv6 on your storage system, see the Data ONTAP Network ManagementGuide.
About this task
• If you have enabled CIFS over IPv6 and you then disable IPv6 on your storage system by settingthe ip.v6.enable option to off, CIFS is automatically disabled over IPv6.
• You need not restart CIFS over IPv6 after restarting the IPv6 global option. If CIFS over IPv6 isenabled on the storage system, and if you disable and reenable the IPv6 global option, CIFS IPv6sockets are automatically created to listen for IPv6 addresses.
Step
1. Then...If you want to...
Enter the following command:
options cifs.ipv6.enable on
Enable CIFS over IPv6
Enter the following command:
options cifs.ipv6.enable off
Note: When CIFS over IPv6 is disabled, no new CIFS sessions areaccepted over IPv6, but the existing IPv6 CIFS sessions continue towork over IPv6.
Disable CIFS over IPv6
File access using CIFS | 235
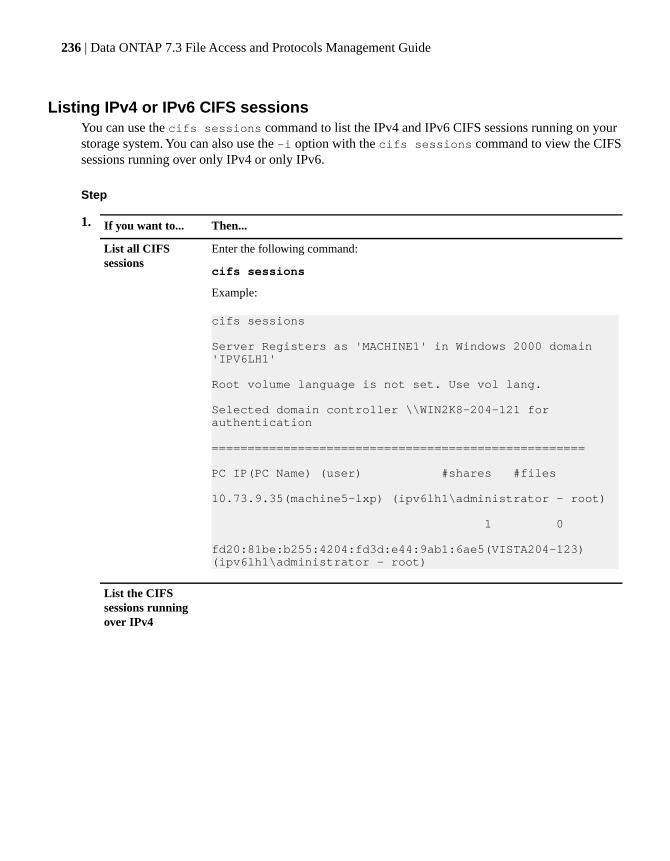
Listing IPv4 or IPv6 CIFS sessionsYou can use the cifs sessions command to list the IPv4 and IPv6 CIFS sessions running on yourstorage system. You can also use the -i option with the cifs sessions command to view the CIFSsessions running over only IPv4 or only IPv6.
Step
1. Then...If you want to...
Enter the following command:
cifs sessions
Example:
cifs sessions
Server Registers as 'MACHINE1' in Windows 2000 domain 'IPV6LH1'
Root volume language is not set. Use vol lang.
Selected domain controller \\WIN2K8-204-121 for authentication
====================================================
PC IP(PC Name) (user) #shares #files
10.73.9.35(machine5-lxp) (ipv6lh1\administrator - root)
1 0
fd20:81be:b255:4204:fd3d:e44:9ab1:6ae5(VISTA204-123) (ipv6lh1\administrator - root)
List all CIFSsessions
List the CIFSsessions runningover IPv4
236 | Data ONTAP 7.3 File Access and Protocols Management Guide
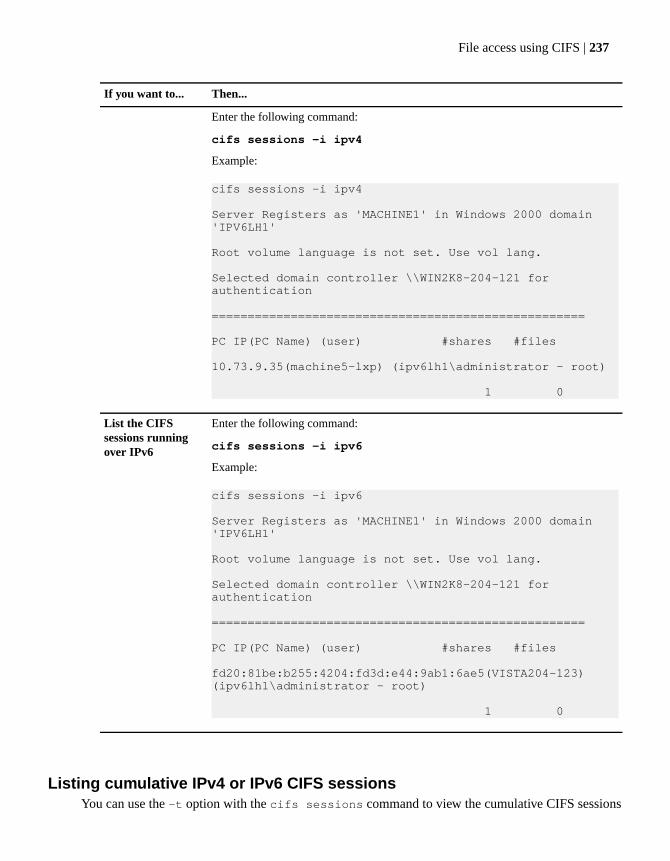
Then...If you want to...
Enter the following command:
cifs sessions -i ipv4
Example:
cifs sessions -i ipv4
Server Registers as 'MACHINE1' in Windows 2000 domain 'IPV6LH1'
Root volume language is not set. Use vol lang.
Selected domain controller \\WIN2K8-204-121 for authentication
====================================================
PC IP(PC Name) (user) #shares #files
10.73.9.35(machine5-lxp) (ipv6lh1\administrator - root)
1 0
Enter the following command:
cifs sessions -i ipv6
Example:
cifs sessions -i ipv6
Server Registers as 'MACHINE1' in Windows 2000 domain 'IPV6LH1'
Root volume language is not set. Use vol lang.
Selected domain controller \\WIN2K8-204-121 for authentication
====================================================
PC IP(PC Name) (user) #shares #files
fd20:81be:b255:4204:fd3d:e44:9ab1:6ae5(VISTA204-123) (ipv6lh1\administrator - root)
1 0
List the CIFSsessions runningover IPv6
Listing cumulative IPv4 or IPv6 CIFS sessionsYou can use the -t option with the cifs sessions command to view the cumulative CIFS sessions
File access using CIFS | 237
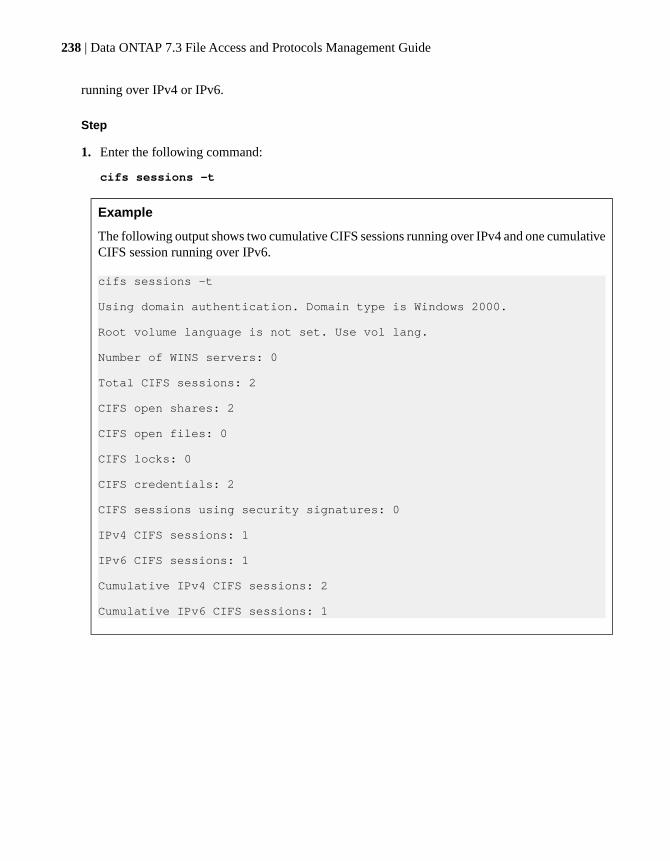
running over IPv4 or IPv6.
Step
1. Enter the following command:
cifs sessions -t
Example
The following output shows two cumulative CIFS sessions running over IPv4 and one cumulativeCIFS session running over IPv6.
cifs sessions -t
Using domain authentication. Domain type is Windows 2000.
Root volume language is not set. Use vol lang.
Number of WINS servers: 0
Total CIFS sessions: 2
CIFS open shares: 2
CIFS open files: 0
CIFS locks: 0
CIFS credentials: 2
CIFS sessions using security signatures: 0
IPv4 CIFS sessions: 1
IPv6 CIFS sessions: 1
Cumulative IPv4 CIFS sessions: 2
Cumulative IPv6 CIFS sessions: 1
238 | Data ONTAP 7.3 File Access and Protocols Management Guide

File sharing between NFS and CIFS
You can optimize Data ONTAP to share files quickly between NFS and CIFS clients without errors.
Next topics
About NFS and CIFS file naming on page 239
Enabling file name character translation between UNIX and Windows on page 242
Clearing a character mapping from a volume on page 244
About file locking between protocols on page 244
About read-only bits on page 245
Managing UNIX credentials for CIFS clients on page 246
Managing the SID-to-name map cache on page 258
Using LDAP services on page 261
Enabling Storage-Level Access Guard using the fsecurity command on page 275
Auditing system access events on page 280
Controlling CIFS access to symbolic links on page 298
Optimizing NFS directory access for CIFS clients on page 304
Preventing CIFS clients from creating uppercase file names on page 306
Accessing CIFS files from NFS clients on page 306
Giving CIFS clients implicit permission to run .dll and .exe files even when they lack UNIX "execute"permissions on page 313
About NFS and CIFS file namingFile naming conventions depend on both the network clients’ operating systems and the file-sharingprotocols.
The operating system and the file-sharing protocols determine the following:
• Length of a file name
• Characters a file name can use
• Case-sensitivity of a file name
Next topics
Length of file names on page 240
Characters a file name can use on page 240
Case-sensitivity of a file name on page 240
Creating lowercase file names on page 241
File sharing between NFS and CIFS | 239
How Data ONTAP creates file names on page 241
Controlling the display of dot files from CIFS clients on page 241
Length of file namesData ONTAP supports different file name lengths for CIFS clients that support the PC long file nameformat and CIFS clients that support the 8.3 format.
Data ONTAP supports the following file name lengths:
• Maximum of 255 characters for NFS clients and CIFS clients that support the PC long file nameformat
• Maximum of 8-character file names and 3-character file name extensions for CIFS clients thatsupport the 8.3 format, such as MS-DOS and Windows 3.x clients
Characters a file name can useIf you are sharing a file between clients on different operating systems, you should use characters thatare valid in both operating systems.
For example, if you use UNIX to create a file, don’t use a colon (:) in the file name because the colonis not allowed in MS-DOS file names. Because restrictions on valid characters vary from one operatingsystem to another, see the documentation for your client operating system for more information aboutprohibited characters.
Case-sensitivity of a file nameFile names are case-sensitive for NFS clients and case-insensitive but case-preserving for CIFS clients.
For example, if a CIFS client creates Spec.txt, both CIFS and NFS clients display the file name asSpec.txt. However, if a CIFS user later tries to create spec.txt, the name is not allowed because, to theCIFS client, that name currently exists. If an NFS user later creates a file named spec.txt, NFS and CIFSclients display the file name differently, as follows:
• On NFS clients, you see both file names as they were created, Spec.txt and spec.txt, because filenames are case-sensitive.
• On CIFS clients, you see Spec.txt and Spec~1.txt. Data ONTAP creates the Spec~1.txt file nameto differentiate the two files.
240 | Data ONTAP 7.3 File Access and Protocols Management Guide
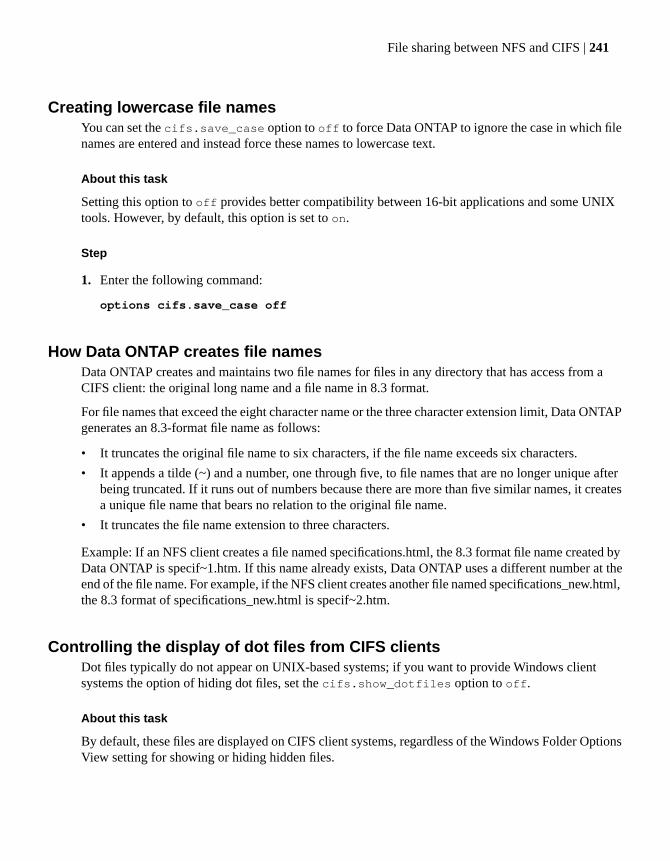
Creating lowercase file namesYou can set the cifs.save_case option to off to force Data ONTAP to ignore the case in which filenames are entered and instead force these names to lowercase text.
About this task
Setting this option to off provides better compatibility between 16-bit applications and some UNIXtools. However, by default, this option is set to on.
Step
1. Enter the following command:
options cifs.save_case off
How Data ONTAP creates file namesData ONTAP creates and maintains two file names for files in any directory that has access from aCIFS client: the original long name and a file name in 8.3 format.
For file names that exceed the eight character name or the three character extension limit, Data ONTAPgenerates an 8.3-format file name as follows:
• It truncates the original file name to six characters, if the file name exceeds six characters.
• It appends a tilde (~) and a number, one through five, to file names that are no longer unique afterbeing truncated. If it runs out of numbers because there are more than five similar names, it createsa unique file name that bears no relation to the original file name.
• It truncates the file name extension to three characters.
Example: If an NFS client creates a file named specifications.html, the 8.3 format file name created byData ONTAP is specif~1.htm. If this name already exists, Data ONTAP uses a different number at theend of the file name. For example, if the NFS client creates another file named specifications_new.html,the 8.3 format of specifications_new.html is specif~2.htm.
Controlling the display of dot files from CIFS clientsDot files typically do not appear on UNIX-based systems; if you want to provide Windows clientsystems the option of hiding dot files, set the cifs.show_dotfiles option to off.
About this task
By default, these files are displayed on CIFS client systems, regardless of the Windows Folder OptionsView setting for showing or hiding hidden files.
File sharing between NFS and CIFS | 241

Step
1. Enter the following command to set the cifs.show_dotfiles option to off:
options cifs.show_dotfiles off
Dot files on this system can be excluded from display when Windows client users select "Do notshow hidden files and folders" from the View tab on the Folder Options box. (To display the FolderOptions box, choose Folder Options from the Tools menu in Windows Explorer.)
Enabling file name character translation between UNIX andWindows
If you have legacy file names on both operating systems (Windows and UNIX) that contain charactersthat are not valid in both operating systems, you can use the charmap command to allow CIFS clientsto access files with NFS names that would otherwise not be valid for CIFS.
About this task
When files created by NFS clients are accessed by CIFS clients, the storage system looks at the nameof the file and if the name is not a valid CIFS file name (for example, if it has an embedded colon “:”character) the storage system returns the 8.3 file name that is maintained for each file. However, thiscauses problems for applications that encode important information into long file names.
Therefore, if you are sharing a file between clients on different operating systems, you should usecharacters in the file names that are valid in both operating systems.
However, if you have legacy file names on both operating systems (Windows and UNIX) that containcharacters that are not valid in both operating systems, you can define a map that converts the invalidNFS characters into Unicode characters that both CIFS and certain Windows applications can accept.
For more information, see the na_charmap(1) man page.
Note: This functionality supports the CATIA MCAD and Mathematica applications as well as otherapplications that have this requirement.
Step
1. Enter the following command:
charmap [volname [mapspec]]
DescriptionParameter
The name of a volume on a storage system.volname
242 | Data ONTAP 7.3 File Access and Protocols Management Guide
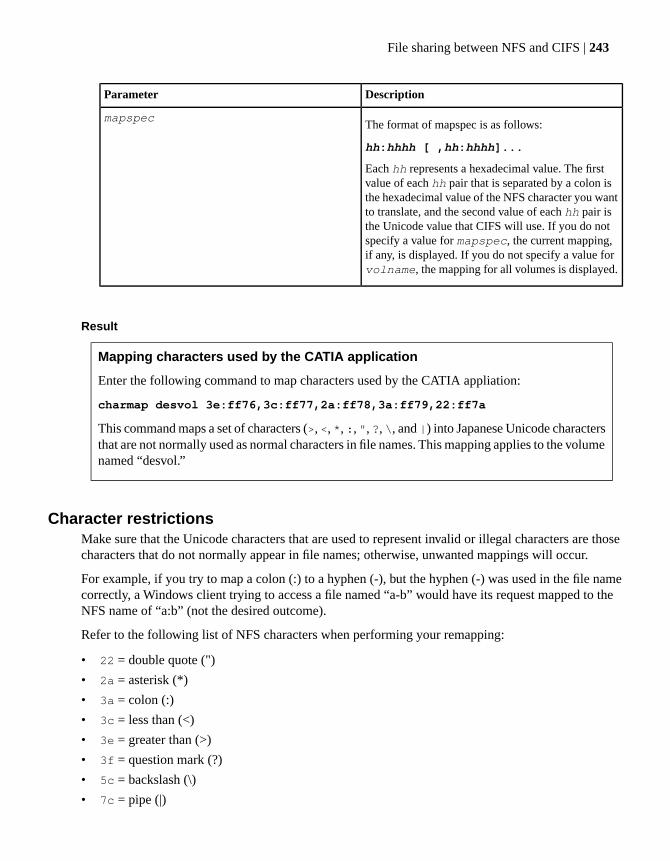
DescriptionParameter
The format of mapspec is as follows:
hh:hhhh [ ,hh:hhhh]...
Each hh represents a hexadecimal value. The firstvalue of each hh pair that is separated by a colon isthe hexadecimal value of the NFS character you wantto translate, and the second value of each hh pair isthe Unicode value that CIFS will use. If you do notspecify a value for mapspec, the current mapping,if any, is displayed. If you do not specify a value forvolname, the mapping for all volumes is displayed.
mapspec
Result
Mapping characters used by the CATIA application
Enter the following command to map characters used by the CATIA appliation:
charmap desvol 3e:ff76,3c:ff77,2a:ff78,3a:ff79,22:ff7a
This command maps a set of characters (>, <, *, :, ", ?, \, and |) into Japanese Unicode charactersthat are not normally used as normal characters in file names. This mapping applies to the volumenamed “desvol.”
Character restrictionsMake sure that the Unicode characters that are used to represent invalid or illegal characters are thosecharacters that do not normally appear in file names; otherwise, unwanted mappings will occur.
For example, if you try to map a colon (:) to a hyphen (-), but the hyphen (-) was used in the file namecorrectly, a Windows client trying to access a file named “a-b” would have its request mapped to theNFS name of “a:b” (not the desired outcome).
Refer to the following list of NFS characters when performing your remapping:
• 22 = double quote (")
• 2a = asterisk (*)
• 3a = colon (:)
• 3c = less than (<)
• 3e = greater than (>)
• 3f = question mark (?)
• 5c = backslash (\)
• 7c = pipe (|)
File sharing between NFS and CIFS | 243
• b1 = (±)
In addition, if you attempt to create or rename a file or directory from a CIFS client with a name thatcontains the Unicode character 0x0080, an error message appears. The Unicode character 0x0080 isnot supported on the storage system.
Clearing a character mapping from a volumeWhen you no longer need a character mapping (for example, when you remove an application that usesthe character mapping from the storage system), you can clear it from a volume using the charmapcommand.
Step
1. Enter the following command:
charmap volname ""
volname is the name of a volume on the storage system.
About file locking between protocolsFile locking is a method used by client applications to prevent a user from accessing a file previouslyopened by another user. How Data ONTAP locks files depends on the protocol of the client.
If the client is an NFS client, locks are advisory; If the client is a CIFS client, locks are mandatory.
Because of differences between the NFS and CIFS file locks, some attempts by an NFS client to accessa file opened by a CIFS application fail.
The following occurs when an NFS client attempts to access a file locked by a CIFS application:
• In mixed or NTFS qtrees, file manipulation operations, such as rm, rmdir, and mv, can cause theNFS application to fail.
• NFS read and write operations are denied by CIFS deny-read and deny-write open modes,respectively.
• NFS write operations fail when the written range of the file is locked with an exclusive CIFS bytelock.
Exception: One exception to the enforcement of locks set by CIFS clients on the storage system is whenthe storage system runs the dump command. The dump command ignores any read access file lock setby a CIFS client. Ignoring the file lock enables the storage system to back up all files.
Note: If an attempt by an NFS client to access a file opened by a CIFS application fails, you can usethe cifs terminate command to disconnect the session that has the open file that you want to
244 | Data ONTAP 7.3 File Access and Protocols Management Guide

access. You can determine which session has that file open using the cifs sessions * commandor Server Manager. However, if you terminate a CIFS session, the client might receive errors.
About read-only bitsThe read-only bit is a binary digit, which holds a value of 0 or 1, that is set on a file-by-file basis toreflect whether a file is writable (disabled) or read-only (enabled).
CIFS clients that use MS-DOS and Windows can set a per-file read-only bit. NFS clients do not set aper-file read-only bit, because NFS clients do not have any protocol operations that use a per-fileread-only bit.
Data ONTAP can set a read-only bit on a file when a CIFS client that uses MS-DOS or Windows createsthat file. Data ONTAP can also set a read-only bit when a file is shared between NFS clients and CIFSclients. Some software, when used by NFS clients and CIFS clients, requires the read-only bit to beenabled.
For Data ONTAP to keep the appropriate read and write permissions on a file shared between NFSclients and CIFS clients, it treats the read-only bit according to the following rules:
• NFS treats any file with the read-only bit enabled as if it has no write permission bits enabled.
• If an NFS client disables all write permission bits and at least one of those bits had previously beenenabled, Data ONTAP enables the read-only bit for that file.
• If an NFS client enables any write permission bit, Data ONTAP disables the read-only bit for thatfile.
• If the read-only bit for a file is enabled and an NFS client attempts to discover permissions for thefile, the permission bits for the file are not sent to the NFS client; instead, Data ONTAP sends thepermission bits to the NFS client with the write permission bits masked.
• If the read-only bit for a file is enabled and a CIFS client disables the read-only bit, Data ONTAPenables the owner’s write permission bit for the file.
• Files with the read-only bit enabled are writable only by root.
Note: Changes to file permissions take effect immediately on CIFS clients, but might not take effectimmediately on NFS clients if the NFS client enables attribute caching.
File sharing between NFS and CIFS | 245
Deleting files with the read-only bit setWindows does not allow you to delete a file with the read-only bit enabled. Some multiprotocol sourcecontrol applications require UNIX delete semantics; files for these applications also cannot be deletedwhen the read-only bit is enabled.
Step
1. To allow deletion of files using UNIX delete semantics when the read-only bit is enabled,enter thefollowing command:
options cifs.perm_check_ro_del_ok on
This option is off by default.
Managing UNIX credentials for CIFS clientsWhen connecting to your storage system, a user on a CIFS client receives a CIFS credential. The usermust also have one or more UNIX credentials to access resources controlled by Data ONTAP.
Next topics
How CIFS users obtain UNIX credentials on page 246
Ensuring that only intended CIFS users receive UNIX credentials on page 247
How CIFS users obtain UNIX credentialsA UNIX credential consists of a UNIX-style user ID (UID) and group IDs (GIDs).
Data ONTAP uses the UNIX credential for the following purposes:
• When a user tries to access files that have UNIX-style security, Data ONTAP uses the UID andGID to determine the access rights of the user.
• When you want to use group quotas on a group that contains CIFS users, those CIFS users musthave UNIX credentials. For more information about group quotas, see the Storage ManagementGuide.
When a CIFS user tries to connect to the storage system, Data ONTAP tries to determine the UID andprimary GID of the CIFS user. If Data ONTAP cannot determine the UID of the CIFS user, the user isdenied access.
Data ONTAP obtains UNIX credentials by looking up the UNIX password database, which can be anNIS map or the /etc/passwd file, to obtain the UID for a user. The database contains accounts for allusers that might access the storage system. Each account contains a UNIX-style user name and UID.
For Data ONTAP to obtain a UID for a CIFS user, it must first determine the user’s UNIX-style name.Data ONTAP does not require that a user’s Windows name be identical to the UNIX name. By entering
246 | Data ONTAP 7.3 File Access and Protocols Management Guide
information in the /etc/usermap.cfg file, you can specify how each Windows name maps to a UNIXname. If you accept the default mapping, you do not need to enter this information. By default, DataONTAP uses the Windows name as the UNIX name when it looks up the UID. (The storage systemconverts uppercase characters in the Windows name to lowercase before the lookup.)
If the user names in the UNIX password database are identical to the Windows names, you need notprovide the mapping information in the /etc/usermap.cfg file. If the user name is not found in the UNIXpassword database and the wafl.default_unix_user option has been specified, the default login namespecified for that option is used. See the options(1) man page for more information about setting thewafl.default_unix_user option.
Data ONTAP obtains a user’s GIDs in the following ways:
• Data ONTAP obtains the user’s primary GID from the UNIX password database. Each account inthe UNIX password database contains the primary GID for that user.
• Data ONTAP obtains the user’s other GIDs from the group database, which can be the NIS groupmap or the /etc/group file. The group database is where you define membership for various groups.
You can see the UNIX credential of a connected CIFS user when you display CIFS session information
Ensuring that only intended CIFS users receive UNIX credentialsYou can configure which CIFS users receive UNIX credentials by editing the /etc/usermap.cfg file,creating UNIX groups and users, and enabling the Windows guest user account.
Steps
1. If some Windows names are different from UNIX names or you want to prevent some CIFS usersfrom accessing the storage system, edit the /etc/usermap.cfg file.
2. Create groups in the UNIX group database.3. For each CIFS user with a mapped UNIX name, enter the user account in the UNIX password
database.4. If you rename the Administrator account, make sure at least one CIFS user maps to the UNIX root
account.5. If you want CIFS users who do not have an entry in the UNIX password database to access the
storage system, create a default user account in the UNIX password database and set thewafl.default_unix_user option to that user.
6. If you want unauthenticated users to access the storage system, enable the Windows guest useraccount.
Next topics
Specifying entries in the /etc/usermap.cfg file on page 248
Mapping a Windows account to root on page 254
Mapping UNIX names to UIDs and GIDs on page 255
Enabling or disabling the default UNIX user account on page 256
File sharing between NFS and CIFS | 247

Enabling or disabling the Windows guest user account on page 257
Specifying entries in the /etc/usermap.cfg file
Data ONTAP uses the /etc/usermap.cfg file to map user names. In its simplest form, each /etc/usermap.cfgentry contains a pair of names: the Windows name and the UNIX name. Data ONTAP can translatethe Windows name to the UNIX name or vice versa.
When CIFS is started, if the /etc/usermap.cfg file is missing, a default file is created. It containscommented-out sample map entries that are useful for improving security.
When Data ONTAP receives a connection request from a CIFS user, it searches the /etc/usermap.cfgfile to see whether an entry matches the user’s Windows domain name and user name.
If an entry is found, Data ONTAP uses the UNIX name specified in the entry to look up the UID andGID from the UNIX password database. If the UNIX name is a null string, Data ONTAP denies accessto the CIFS user.
If an entry is not found, Data ONTAP converts the Windows name to lowercase and considers theUNIX name to be the same as the Windows name. Data ONTAP uses this UNIX name to look up theUID and GID from the UNIX password database.
Data ONTAP scans the file sequentially. It uses the first matching entry for mapping.
For information about character coding of the /etc/usermap.cfg file, see the information about thecontents of the /etc directory in the Storage Management Guide.
Step
1. Specify each entry using the following format:
[IP_qualifier:] Windows_name [direction] [IP_qualifier:] UNIX_name
You can embed comments in the file by beginning the comment lines with #. Comments at the end ofan entry are also allowed if preceded by #. Blank lines are ignored.
Next topics
About the IP_qualifier field on page 249
About the Windows_name field on page 249
About the Direction field on page 250
About the UNIX_name field on page 250
How Data ONTAP interprets domain names in /etc/usermap.cfg on page 251
Examples of usermap.cfg entries on page 251
Guidelines for mapping user names on page 253
Recommended entries for increased security on page 253
Verifying NFS clients on page 254
248 | Data ONTAP 7.3 File Access and Protocols Management Guide
About the IP_qualifier field
The IP_qualifier field is an IP address that qualifies the user name by narrowing the match.
The IP qualifier can be any of the following:
• An IP address in bit notation. You can specify a subnet by including the number of bits in the subnetmask. For example, 192.4.1.0/24 means the 192.4.1.0 class C subnet.
• A name. Data ONTAP first considers a name to be a host name. If it cannot find a matching hostname in its host name database, it considers the name to be a network name.
• A subnet address that includes a network name or IP address and the subnet mask (for example,corpnet/255.255.255.0).
Note: Data ONTAP uses the IP qualifier only for matching. If an IP qualifier is present on thedestination side of a map entry, Data ONTAP does not consider the login request to come from thatIP qualifier.
About the Windows_name field
The Windows_name field consists of a Windows domain name, which is optional, and a Windows username.
On the source side of the map entry, the domain specifies the domain in which the user resides. On thedestination side of the map entry, it specifies the domain used for the mapped UNIX entry. If the accountname in the entry is a local user account, the Windows domain name is the storage system name.
If you omit the domain name in the Windows_name field, it is assumed to be the domain in which thestorage system is installed. If the storage system uses local user accounts for authentication, the domainname is the storage system name.
You can use an asterisk (*) as a wildcard character in the following ways:
• You can use it on the source side to indicate that the specified name in any domain maps to thespecified UNIX name.
• You can use it on the destination side to indicate that the specified UNIX name maps to a Windowsname in any trusted domain. The trusted domain used for the mapping depends on where DataONTAP finds the first matching Windows name. Data ONTAP searches only the trusted domainsyou specify with the cifs.search_domains option, in the order in which the trusted domains arespecified. If you do not set this option, Data ONTAP searches all trusted domains in an unspecifiedorder.
If the user name contains spaces or a pound sign, enclose the name in double quotation marks, forexample, "bob smith" or "eng#lab"\"#joe".
Note: Do not enclose the \ in quotation marks.
You can use an asterisk (*) in the Windows name. For more information about how to use the asterisk,see “Guidelines for wildcard character in user name” on page 254.
File sharing between NFS and CIFS | 249

If the user name is empty or blank (specified as "") on the destination side of the map entry, the matchingUNIX name is denied access. Use entries with a blank user name to deny access to some or all UNIXusers. If you use these entries in conjunction with IP_qualifier, you can exclude all UNIX users exceptfor certain hosts or subnets.
About the Direction field
The direction field indicates the direction of the mapping.
The direction field can be one of the values in the following table.
MeaningValue of the direction field
Mapping is bidirectional. The entry maps from Windowsto UNIX and from UNIX to Windows.
Omitting the direction field has the same meaning asspecifying ==.
==
The entry maps from UNIX to Windows<=
The entry maps from Windows to UNIX.=>
About the UNIX_name field
The UNIX_name field is a UNIX name in the UNIX password database.
If the UNIX_name field is empty or blank (specified as "") on the destination side of the map entry,the specified source name is prevented from logging in. The Windows user cannot log in to the storagesystem even if the user can see the storage system while browsing the network.
You can use an asterisk (*) in the UNIX name. The asterisk is considered the wildcard character. Itmeans any user. Remember these guidelines when including an asterisk in the Windows name or theUNIX name:
• If the asterisk is on the source side of the mapping, any user maps to the specified name on thedestination side.
• If the destination side contains an asterisk but the source side does not, no mapping is done. DataONTAP does not map an explicitly specified name to a name with an asterisk.
• If both the source and destination sides contain an asterisk, the corresponding name is mapped.
250 | Data ONTAP 7.3 File Access and Protocols Management Guide
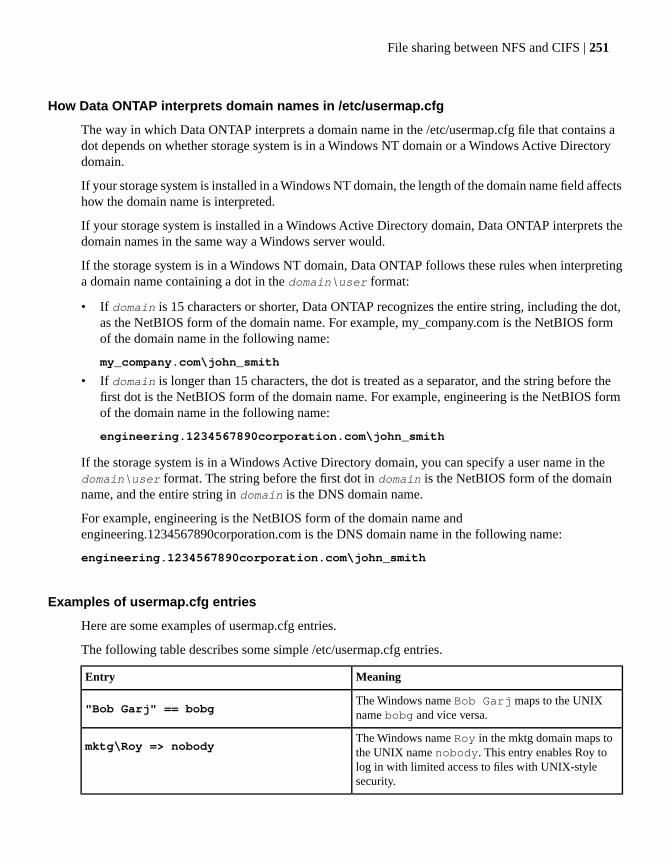
How Data ONTAP interprets domain names in /etc/usermap.cfg
The way in which Data ONTAP interprets a domain name in the /etc/usermap.cfg file that contains adot depends on whether storage system is in a Windows NT domain or a Windows Active Directorydomain.
If your storage system is installed in a Windows NT domain, the length of the domain name field affectshow the domain name is interpreted.
If your storage system is installed in a Windows Active Directory domain, Data ONTAP interprets thedomain names in the same way a Windows server would.
If the storage system is in a Windows NT domain, Data ONTAP follows these rules when interpretinga domain name containing a dot in the domain\user format:
• If domain is 15 characters or shorter, Data ONTAP recognizes the entire string, including the dot,as the NetBIOS form of the domain name. For example, my_company.com is the NetBIOS formof the domain name in the following name:
my_company.com\john_smith
• If domain is longer than 15 characters, the dot is treated as a separator, and the string before thefirst dot is the NetBIOS form of the domain name. For example, engineering is the NetBIOS formof the domain name in the following name:
engineering.1234567890corporation.com\john_smith
If the storage system is in a Windows Active Directory domain, you can specify a user name in thedomain\user format. The string before the first dot in domain is the NetBIOS form of the domainname, and the entire string in domain is the DNS domain name.
For example, engineering is the NetBIOS form of the domain name andengineering.1234567890corporation.com is the DNS domain name in the following name:
engineering.1234567890corporation.com\john_smith
Examples of usermap.cfg entries
Here are some examples of usermap.cfg entries.
The following table describes some simple /etc/usermap.cfg entries.
MeaningEntry
The Windows name Bob Garj maps to the UNIXname bobg and vice versa."Bob Garj" == bobg
The Windows name Roy in the mktg domain maps tothe UNIX name nobody. This entry enables Roy tolog in with limited access to files with UNIX-stylesecurity.
mktg\Roy => nobody
File sharing between NFS and CIFS | 251
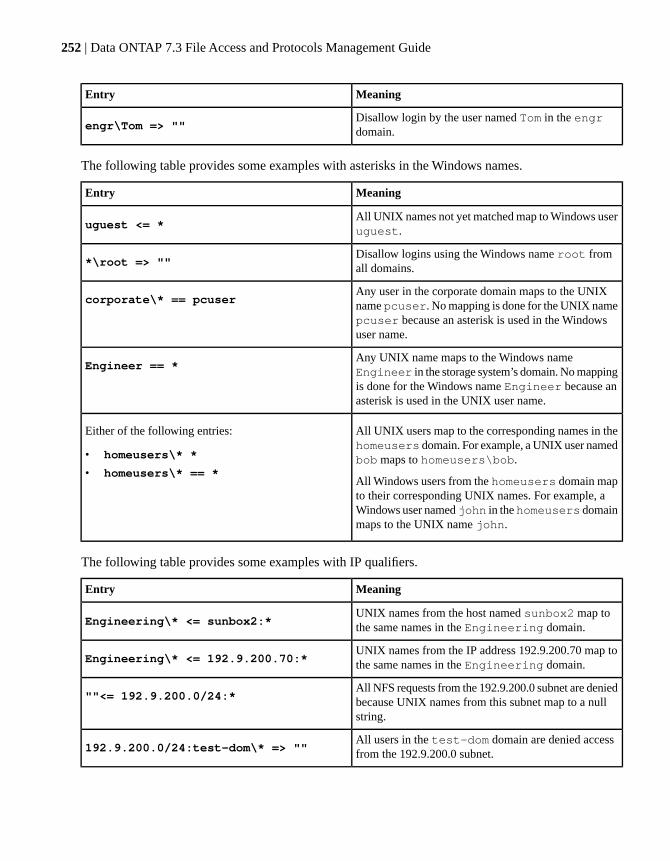
MeaningEntry
Disallow login by the user named Tom in the engrdomain.engr\Tom => ""
The following table provides some examples with asterisks in the Windows names.
MeaningEntry
All UNIX names not yet matched map to Windows useruguest.uguest <= *
Disallow logins using the Windows name root fromall domains.*\root => ""
Any user in the corporate domain maps to the UNIXname pcuser. No mapping is done for the UNIX namepcuser because an asterisk is used in the Windowsuser name.
corporate\* == pcuser
Any UNIX name maps to the Windows nameEngineer in the storage system’s domain. No mappingis done for the Windows name Engineer because anasterisk is used in the UNIX user name.
Engineer == *
All UNIX users map to the corresponding names in thehomeusers domain. For example, a UNIX user namedbob maps to homeusers\bob.
All Windows users from the homeusers domain mapto their corresponding UNIX names. For example, aWindows user named john in the homeusers domainmaps to the UNIX name john.
Either of the following entries:
• homeusers\* *
• homeusers\* == *
The following table provides some examples with IP qualifiers.
MeaningEntry
UNIX names from the host named sunbox2 map tothe same names in the Engineering domain.Engineering\* <= sunbox2:*
UNIX names from the IP address 192.9.200.70 map tothe same names in the Engineering domain.Engineering\* <= 192.9.200.70:*
All NFS requests from the 192.9.200.0 subnet are deniedbecause UNIX names from this subnet map to a nullstring.
""<= 192.9.200.0/24:*
All users in the test-dom domain are denied accessfrom the 192.9.200.0 subnet.192.9.200.0/24:test-dom\* => ""
252 | Data ONTAP 7.3 File Access and Protocols Management Guide
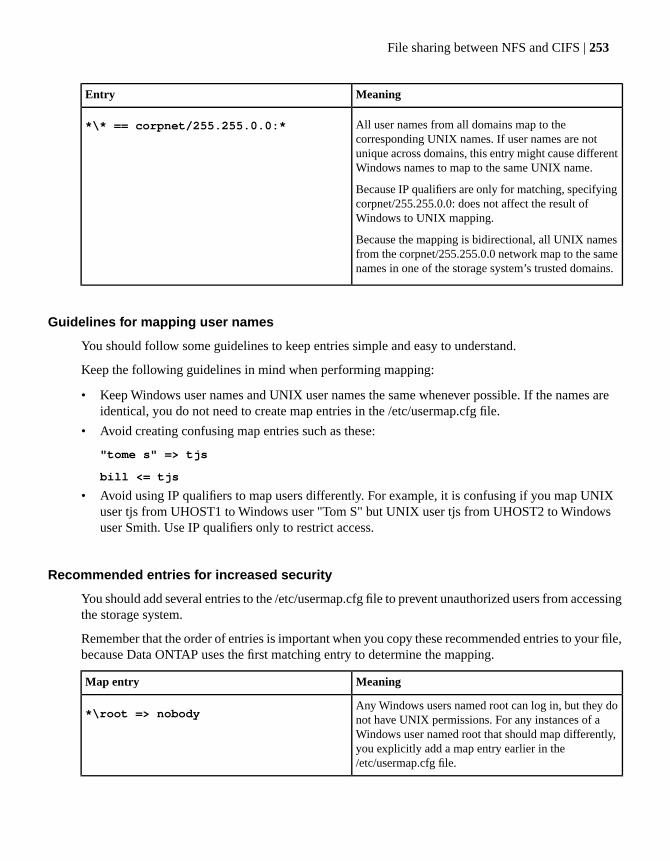
MeaningEntry
All user names from all domains map to thecorresponding UNIX names. If user names are notunique across domains, this entry might cause differentWindows names to map to the same UNIX name.
Because IP qualifiers are only for matching, specifyingcorpnet/255.255.0.0: does not affect the result ofWindows to UNIX mapping.
Because the mapping is bidirectional, all UNIX namesfrom the corpnet/255.255.0.0 network map to the samenames in one of the storage system’s trusted domains.
*\* == corpnet/255.255.0.0:*
Guidelines for mapping user names
You should follow some guidelines to keep entries simple and easy to understand.
Keep the following guidelines in mind when performing mapping:
• Keep Windows user names and UNIX user names the same whenever possible. If the names areidentical, you do not need to create map entries in the /etc/usermap.cfg file.
• Avoid creating confusing map entries such as these:
"tome s" => tjs
bill <= tjs
• Avoid using IP qualifiers to map users differently. For example, it is confusing if you map UNIXuser tjs from UHOST1 to Windows user "Tom S" but UNIX user tjs from UHOST2 to Windowsuser Smith. Use IP qualifiers only to restrict access.
Recommended entries for increased security
You should add several entries to the /etc/usermap.cfg file to prevent unauthorized users from accessingthe storage system.
Remember that the order of entries is important when you copy these recommended entries to your file,because Data ONTAP uses the first matching entry to determine the mapping.
MeaningMap entry
Any Windows users named root can log in, but they donot have UNIX permissions. For any instances of aWindows user named root that should map differently,you explicitly add a map entry earlier in the/etc/usermap.cfg file.
*\root => nobody
File sharing between NFS and CIFS | 253

MeaningMap entry
The first entry prevents spoofing the WindowsAdministrator account from UNIX (if the Administratoraccount has not been renamed). The second entry mapsthe UNIX user root to the Windows guest account. Typethe second entry near the end of the /etc/usermap.cfgfile after any explicit map entries for root-privilegedUNIX hosts or subnets.
guest <= administrator
guest <= root
These entries, placed at the end of the file, prevent anyother mapping from occurring. They defeat the defaultbehavior that if an entry is not matched, the same nameis tried.
*\* => ""
"" <= *
Verifying NFS clients
For multiprotocol storage systems, you can restrict NFS access to allow only clients that have beenmapped in the usermap.cfg file.
This security restriction is probably most appropriate for non-Kerberos environments that primarilyserve CIFS clients but want to allow connections from certain known (IP-mapped) NFS clients. Seethe options(1) man page for more information about the nfs.require_valid_mapped_uid option.
Mapping a Windows account to root
If you have only CIFS clients in your environment and your storage system was set up as a multiprotocolstorage system, you must have at least one Windows account that has root privilege for accessing fileson the storage system; otherwise, you cannot manage the storage system because you do not have accessto files with UNIX-style security, which might include some configuration files in the /etc directory.
If your storage system was set up as NTFS-only, however, the /etc directory has a file-level ACL thatenables the Administrators group to access the Data ONTAP configuration files.
Step
1. Then...If you want to mapaccounts in thefollowing group toroot...
Verify that the wafl.nt_admin_priv_map_to_root option is set to on.
Result : All accounts in the Administrators group are considered root, even if youdo not have an /etc/usermap.cfg entry mapping the accounts to root. If you createa file using an account that belongs to the Administrators group, the file is ownedby root when you view the file from a UNIX client.
Administrators
254 | Data ONTAP 7.3 File Access and Protocols Management Guide
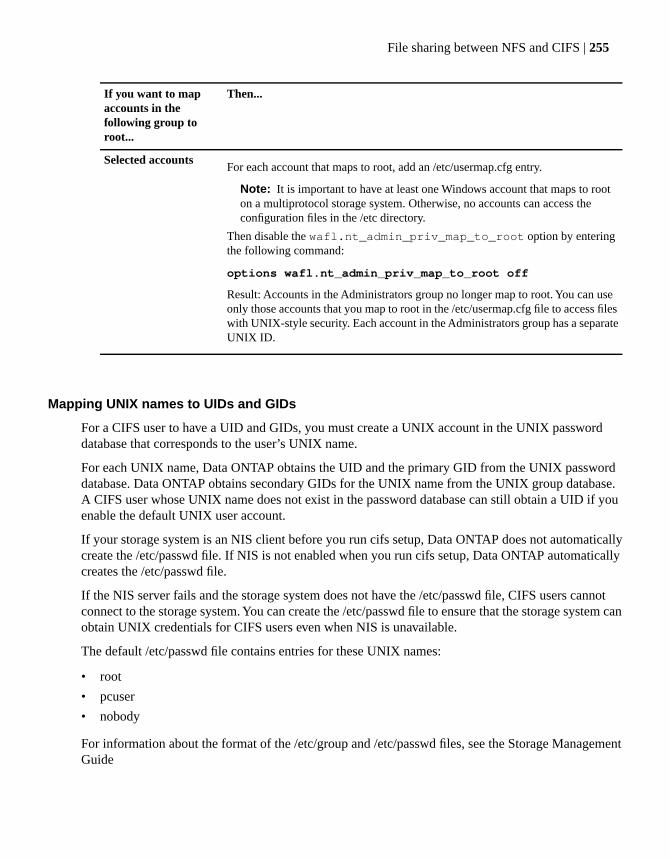
Then...If you want to mapaccounts in thefollowing group toroot...
For each account that maps to root, add an /etc/usermap.cfg entry.
Note: It is important to have at least one Windows account that maps to rooton a multiprotocol storage system. Otherwise, no accounts can access theconfiguration files in the /etc directory.
Then disable the wafl.nt_admin_priv_map_to_root option by enteringthe following command:
options wafl.nt_admin_priv_map_to_root off
Result: Accounts in the Administrators group no longer map to root. You can useonly those accounts that you map to root in the /etc/usermap.cfg file to access fileswith UNIX-style security. Each account in the Administrators group has a separateUNIX ID.
Selected accounts
Mapping UNIX names to UIDs and GIDs
For a CIFS user to have a UID and GIDs, you must create a UNIX account in the UNIX passworddatabase that corresponds to the user’s UNIX name.
For each UNIX name, Data ONTAP obtains the UID and the primary GID from the UNIX passworddatabase. Data ONTAP obtains secondary GIDs for the UNIX name from the UNIX group database.A CIFS user whose UNIX name does not exist in the password database can still obtain a UID if youenable the default UNIX user account.
If your storage system is an NIS client before you run cifs setup, Data ONTAP does not automaticallycreate the /etc/passwd file. If NIS is not enabled when you run cifs setup, Data ONTAP automaticallycreates the /etc/passwd file.
If the NIS server fails and the storage system does not have the /etc/passwd file, CIFS users cannotconnect to the storage system. You can create the /etc/passwd file to ensure that the storage system canobtain UNIX credentials for CIFS users even when NIS is unavailable.
The default /etc/passwd file contains entries for these UNIX names:
• root
• pcuser
• nobody
For information about the format of the /etc/group and /etc/passwd files, see the Storage ManagementGuide
File sharing between NFS and CIFS | 255
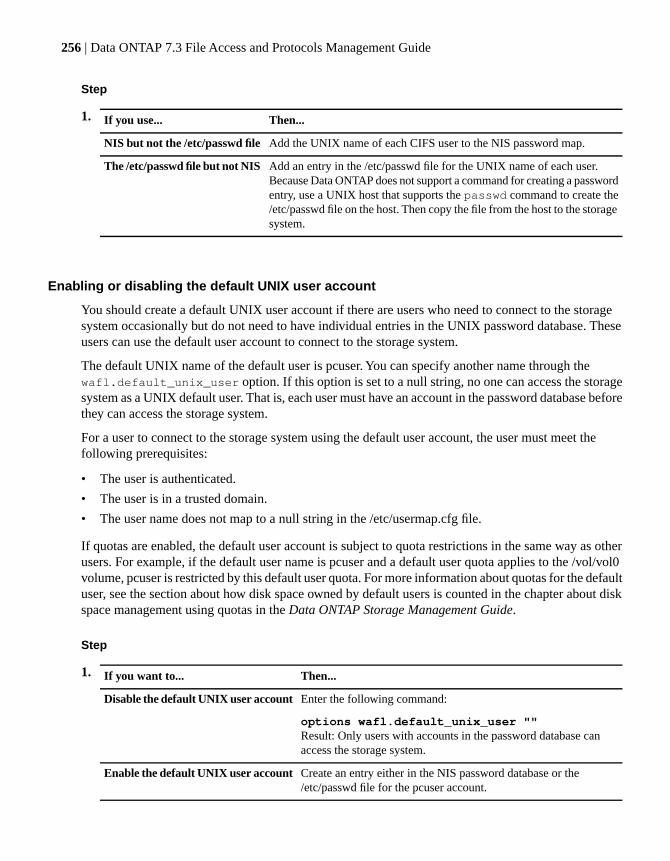
Step
1. Then...If you use...
Add the UNIX name of each CIFS user to the NIS password map.NIS but not the /etc/passwd file
Add an entry in the /etc/passwd file for the UNIX name of each user.Because Data ONTAP does not support a command for creating a passwordentry, use a UNIX host that supports the passwd command to create the/etc/passwd file on the host. Then copy the file from the host to the storagesystem.
The /etc/passwd file but not NIS
Enabling or disabling the default UNIX user account
You should create a default UNIX user account if there are users who need to connect to the storagesystem occasionally but do not need to have individual entries in the UNIX password database. Theseusers can use the default user account to connect to the storage system.
The default UNIX name of the default user is pcuser. You can specify another name through thewafl.default_unix_user option. If this option is set to a null string, no one can access the storagesystem as a UNIX default user. That is, each user must have an account in the password database beforethey can access the storage system.
For a user to connect to the storage system using the default user account, the user must meet thefollowing prerequisites:
• The user is authenticated.
• The user is in a trusted domain.
• The user name does not map to a null string in the /etc/usermap.cfg file.
If quotas are enabled, the default user account is subject to quota restrictions in the same way as otherusers. For example, if the default user name is pcuser and a default user quota applies to the /vol/vol0volume, pcuser is restricted by this default user quota. For more information about quotas for the defaultuser, see the section about how disk space owned by default users is counted in the chapter about diskspace management using quotas in the Data ONTAP Storage Management Guide.
Step
1. Then...If you want to...
Enter the following command:
options wafl.default_unix_user ""Result: Only users with accounts in the password database canaccess the storage system.
Disable the default UNIX user account
Create an entry either in the NIS password database or the/etc/passwd file for the pcuser account.
Enable the default UNIX user account
256 | Data ONTAP 7.3 File Access and Protocols Management Guide
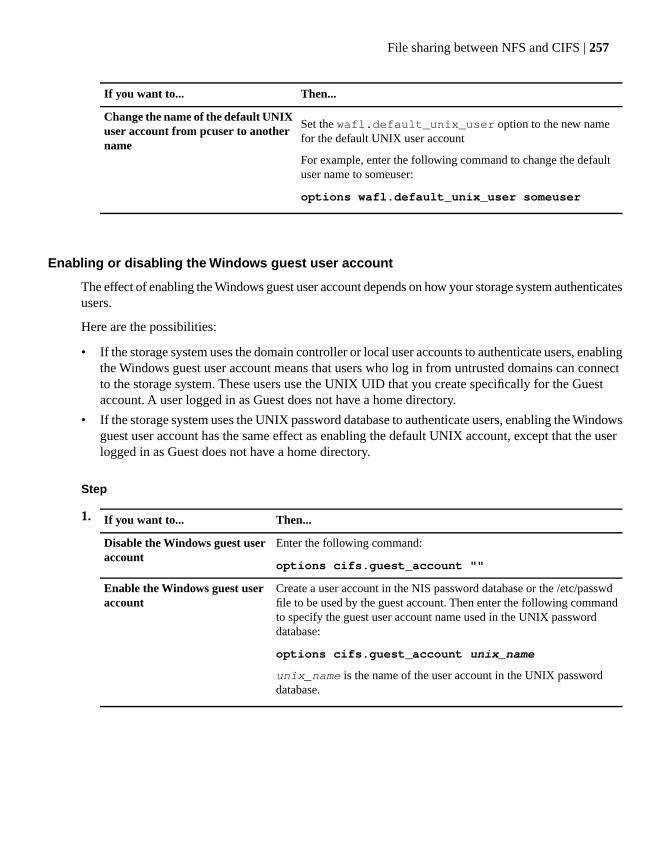
Then...If you want to...
Set the wafl.default_unix_user option to the new namefor the default UNIX user account
For example, enter the following command to change the defaultuser name to someuser:
options wafl.default_unix_user someuser
Change the name of the default UNIXuser account from pcuser to anothername
Enabling or disabling the Windows guest user account
The effect of enabling the Windows guest user account depends on how your storage system authenticatesusers.
Here are the possibilities:
• If the storage system uses the domain controller or local user accounts to authenticate users, enablingthe Windows guest user account means that users who log in from untrusted domains can connectto the storage system. These users use the UNIX UID that you create specifically for the Guestaccount. A user logged in as Guest does not have a home directory.
• If the storage system uses the UNIX password database to authenticate users, enabling the Windowsguest user account has the same effect as enabling the default UNIX account, except that the userlogged in as Guest does not have a home directory.
Step
1. Then...If you want to...
Enter the following command:
options cifs.guest_account ""
Disable the Windows guest useraccount
Create a user account in the NIS password database or the /etc/passwdfile to be used by the guest account. Then enter the following commandto specify the guest user account name used in the UNIX passworddatabase:
options cifs.guest_account unix_name
unix_name is the name of the user account in the UNIX passworddatabase.
Enable the Windows guest useraccount
File sharing between NFS and CIFS | 257
Managing the SID-to-name map cacheCIFS frequently is required to map security identifiers (SIDs) to user and group names and vice versafor user authentication, quota management, console command processing, and various RPC responses.The SID-to-name map cache contains entries that map SIDs to pre-Windows 2000 user and groupnames.
About this task
The storage system obtains the SID-to-name mapping information by querying the domain controller.To minimize multiple lookups of the same names, SID-to-name information received from the domaincontroller is saved in the SID-to-name map cache on the storage system.
The SID-to-name map cache is enabled on the storage system by default. You can manually controlthe cache by changing the lifetime of the entries, clearing entries, or turning SID-to-name map cachingoff or on. The cache persists if CIFS is terminated or restarted, but it does not persist across a rebootor a takeover and giveback.
When the storage system requires SID-to-name mapping information, it first looks for a matching entryin the SID-to-name map cache. If a matching entry is not found or if an expired matching entry is found,the storage system queries the appropriate domain controller for current mapping information. If thedomain controller is not available, an expired mapping entry might be used by the storage system.
Here are the main benefits of using the SID-to-name map cache for name lookup:
• Increased performance for authorization
• Faster user response for console commands that perform mapping operations
Next topics
Enabling or disabling the SID-to-name map cache on page 259
Changing the lifetime of SID-to-name mapping entries on page 259
Clearing all or part of the SID-to-name map cache on page 259
258 | Data ONTAP 7.3 File Access and Protocols Management Guide

Enabling or disabling the SID-to-name map cacheYou can enable or disable the SID-to-name map cache by setting the cifs.sidcache.enable optionto on or off, respectively.
Step
1. Then...If you want the SID-to-name mapcache...
Enter the following command:
options cifs.sidcache.enable on
Enabled
Enter the following command:
options cifs.sidcache.enable off
Disabled
Changing the lifetime of SID-to-name mapping entriesYou can change the lifetime of SID-to-name mapping entries by setting the cifs.sidcache.lifetimeoption.
Step
1. Enter the following command:
options cifs.sidcache.lifetime time
time is the number of minutes that new mapping entries are used before they expire.
Clearing all or part of the SID-to-name map cachePeriodically, expired entries that are more than one week old are automatically cleared from theSID-to-name map cache; however, you might want to manually clear entries in the SID-to-name mapcache when users change their accounts or user names. Alternatively, you might want to manually clear
File sharing between NFS and CIFS | 259
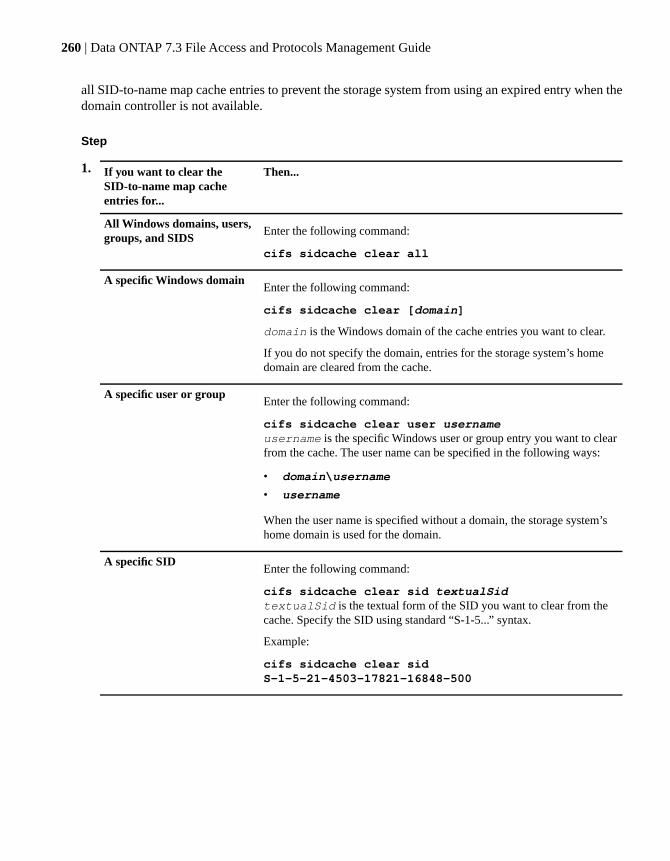
all SID-to-name map cache entries to prevent the storage system from using an expired entry when thedomain controller is not available.
Step
1. Then...If you want to clear theSID-to-name map cacheentries for...
Enter the following command:
cifs sidcache clear all
All Windows domains, users,groups, and SIDS
Enter the following command:
cifs sidcache clear [domain]
domain is the Windows domain of the cache entries you want to clear.
If you do not specify the domain, entries for the storage system’s homedomain are cleared from the cache.
A specific Windows domain
Enter the following command:
cifs sidcache clear user usernameusername is the specific Windows user or group entry you want to clearfrom the cache. The user name can be specified in the following ways:
• domain\username
• username
When the user name is specified without a domain, the storage system’shome domain is used for the domain.
A specific user or group
Enter the following command:
cifs sidcache clear sid textualSidtextualSid is the textual form of the SID you want to clear from thecache. Specify the SID using standard “S-1-5...” syntax.
Example:
cifs sidcache clear sidS-1-5-21-4503-17821-16848-500
A specific SID
260 | Data ONTAP 7.3 File Access and Protocols Management Guide

Using LDAP servicesData ONTAP supports LDAP for user authentication, file access authorization, user lookup and mappingservices between NFS and CIFS, and LDAP over the Secure Sockets Layer (SSL).
About this task
An LDAP server enables you to centrally maintain user information. As a result, you do not have tomaintain separate configuration files for each storage system that is on your network. If you have severalstorage systems on your network, maintaining user information centrally saves you from updating thesefiles on each storage system every time you add or delete a user or a group.
If you store your user database on an LDAP server, you can configure your storage system to look upuser information in the LDAP database. For example, on your LDAP server, you can store logins andpasswords for administrative users of the console and the rsh, telnet, http, https, and ssh protocols,making it possible for you to centrally manage them.
Data ONTAP LDAP support includes the following types of LDAP servers:
• Netscape
• iPlanet
• OpenLDAP
• Windows Active Directory
• Novell NDS
Data ONTAP supports connections to LDAP servers that require signing. LDAP signing support isenabled by default.
Next topics
Configuring LDAP services on page 261
Managing client authentication and authorization on page 268
Managing LDAP user-mapping services on page 269
Specifying base and scope values for user-mapping on page 270
Managing Active Directory LDAP servers on page 270
Managing LDAP schema on page 273
Configuring LDAP servicesThis section provides information to help you configure Data ONTAP to connect to your LDAP database.
Next topics
Specifying the general search base and scope on page 262
File sharing between NFS and CIFS | 261
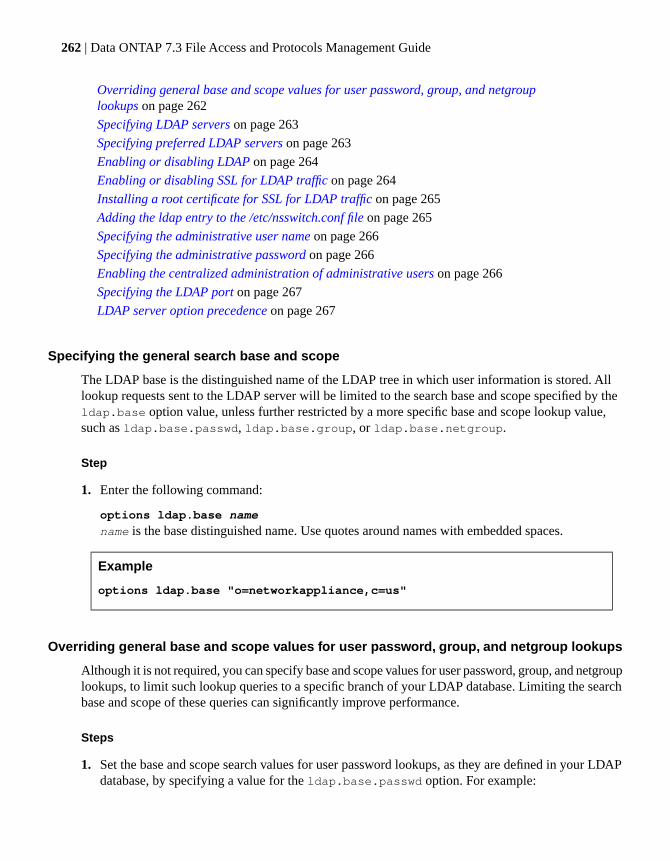
Overriding general base and scope values for user password, group, and netgrouplookups on page 262
Specifying LDAP servers on page 263
Specifying preferred LDAP servers on page 263
Enabling or disabling LDAP on page 264
Enabling or disabling SSL for LDAP traffic on page 264
Installing a root certificate for SSL for LDAP traffic on page 265
Adding the ldap entry to the /etc/nsswitch.conf file on page 265
Specifying the administrative user name on page 266
Specifying the administrative password on page 266
Enabling the centralized administration of administrative users on page 266
Specifying the LDAP port on page 267
LDAP server option precedence on page 267
Specifying the general search base and scope
The LDAP base is the distinguished name of the LDAP tree in which user information is stored. Alllookup requests sent to the LDAP server will be limited to the search base and scope specified by theldap.base option value, unless further restricted by a more specific base and scope lookup value,such as ldap.base.passwd, ldap.base.group, or ldap.base.netgroup.
Step
1. Enter the following command:
options ldap.base name
name is the base distinguished name. Use quotes around names with embedded spaces.
Example
options ldap.base "o=networkappliance,c=us"
Overriding general base and scope values for user password, group, and netgroup lookups
Although it is not required, you can specify base and scope values for user password, group, and netgrouplookups, to limit such lookup queries to a specific branch of your LDAP database. Limiting the searchbase and scope of these queries can significantly improve performance.
Steps
1. Set the base and scope search values for user password lookups, as they are defined in your LDAPdatabase, by specifying a value for the ldap.base.passwd option. For example:
262 | Data ONTAP 7.3 File Access and Protocols Management Guide
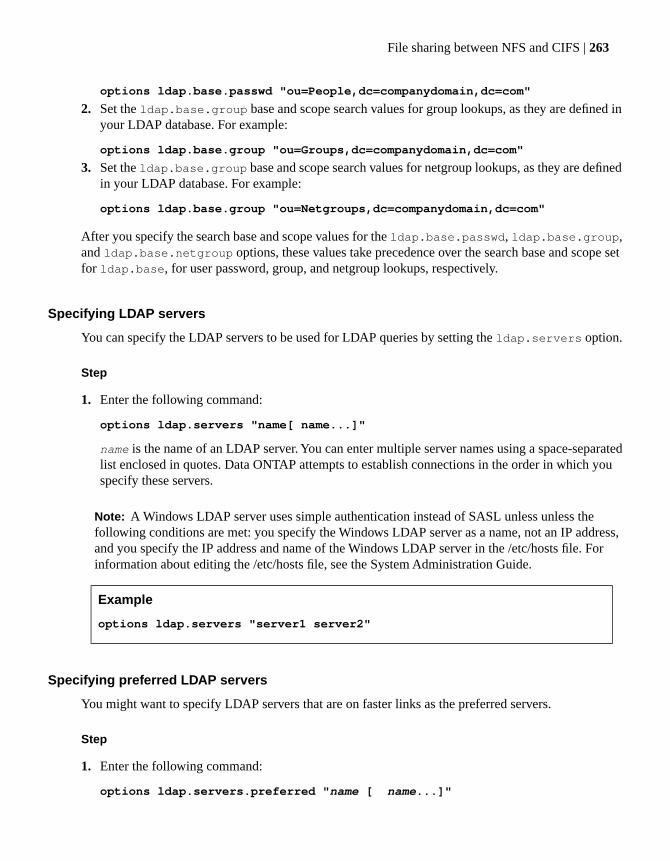
options ldap.base.passwd "ou=People,dc=companydomain,dc=com"
2. Set the ldap.base.group base and scope search values for group lookups, as they are defined inyour LDAP database. For example:
options ldap.base.group "ou=Groups,dc=companydomain,dc=com"
3. Set the ldap.base.group base and scope search values for netgroup lookups, as they are definedin your LDAP database. For example:
options ldap.base.group "ou=Netgroups,dc=companydomain,dc=com"
After you specify the search base and scope values for the ldap.base.passwd, ldap.base.group,and ldap.base.netgroup options, these values take precedence over the search base and scope setfor ldap.base, for user password, group, and netgroup lookups, respectively.
Specifying LDAP servers
You can specify the LDAP servers to be used for LDAP queries by setting the ldap.servers option.
Step
1. Enter the following command:
options ldap.servers "name[ name...]"
name is the name of an LDAP server. You can enter multiple server names using a space-separatedlist enclosed in quotes. Data ONTAP attempts to establish connections in the order in which youspecify these servers.
Note: A Windows LDAP server uses simple authentication instead of SASL unless unless thefollowing conditions are met: you specify the Windows LDAP server as a name, not an IP address,and you specify the IP address and name of the Windows LDAP server in the /etc/hosts file. Forinformation about editing the /etc/hosts file, see the System Administration Guide.
Example
options ldap.servers "server1 server2"
Specifying preferred LDAP servers
You might want to specify LDAP servers that are on faster links as the preferred servers.
Step
1. Enter the following command:
options ldap.servers.preferred "name [ name...]"
File sharing between NFS and CIFS | 263

name is the name of a preferred LDAP server. You can enter multiple server names using aspace-separated list enclosed in quotes.
Example
options ldap.servers.preferred "server1 server2"
Enabling or disabling LDAP
You can enable or disable LDAP by setting the ldap.enable option to on or off, respectively.
Step
1. Then...If you want to...
Enter the following command:
options ldap.enable on
Enable LDAP
Enter the following command:
options ldap.enable off
Disable LDAP
Enabling or disabling SSL for LDAP traffic
You can enable or disable secure sockets layer (SSL) encrypting of LDAP traffic by setting theldap.ssl.enable option to on or off, respectively.
Step
1. Then...If you want SSL for LDAP...
Enter the following command:
options ldap.ssl.enable on
Enabled
Enter the following command:
options ldap.ssl.enable off
Disabled
In addition to enabling SSL for LDAP, you must have a root authority-signed certificate installed onyour storage system.
Note: The same certificate-signing authority must issue both the certificate on the storage systemand the certificate on the server.
264 | Data ONTAP 7.3 File Access and Protocols Management Guide
Installing a root certificate for SSL for LDAP traffic
You can install a root certificate for use for Secure Sockets Layer (SSL) encrypting of LDAP trafficon your storage system by using the keymgr command.
Steps
1. Download a certificate from your preferred trusted signing authority to the storage system. Rememberthe certificate’s location on the storage system.
2. Enter the following command:
keymgr install root certificate_filename
certificate_filename is the complete file name for the certificate. After the keymgr commandinstalls the certificate, you can remove the copy you placed on the storage system.
Example
keymgr install root /etc/my_cert
Note: The same certificate-signing authority must issue both the certificate on the storage systemand the certificate on the server.
3. Set the LDAP port to port 636.
Adding the ldap entry to the /etc/nsswitch.conf file
You can add the ldap entry to the /etc/nsswitch.conf file to enable LDAP for UNIX client authentication.
Steps
1. Open the /etc/nsswitch.conf file on the storage system for editing.2. Enter the following at the password, group, and netgroup lines:
ldap
You can optionally add files and/or nis to the password line, but they must be entered after ldapif you want to use LDAP as the primary mechanism to retrieve user information.
Example
passwd: ldap files nis
3. Save the file.
File sharing between NFS and CIFS | 265
Specifying the administrative user name
If anonymous authentication does not work in your environment, you need to specify an administrativeuser name to be used for administrative queries for looking up UIDs and GIDs.
Step
1. Enter the following command:
options ldap.name name
name is the LDAP distinguished name to be used for administrative queries. The best practice isfor this to be the name of a user with read-only access to the LDAP database. Use quotes aroundnames with embedded spaces.
Example
options ldap.name "cn=root,o=networkappliance,c=us"
Specifying the administrative password
You can set the administrative password by setting the ldap.passwd option.
Step
1. Enter the following command:
options ldap.passwd password
password is the password for the administrative user.
The password is displayed as a series of asterisks.
Enabling the centralized administration of administrative users
You can enable the centralized administration of Data ONTAP administrative users of the console andthe rsh, telnet, HTTP, and HTTPS protocols by setting the appropriate options.
Steps
1. Make sure the value of the security.admin.authentication option includes nsswitch.
For example, enter any of the following commands:
options security.admin.authentication nsswitch
options security.admin.authentication internal,nsswitch
options security.admin.authentication nsswitch,internal
266 | Data ONTAP 7.3 File Access and Protocols Management Guide

2. Set the value of the security.admin.nsswitchgroup option to the name of a group within theconfines of the nsswitch.conf file that specifies the users to whom you want to grant administrativeaccess.
Example
If you want to grant administrative access to all of the engineers in your organization, you cancreate a user group called engineers, add all of the engineers in your organization to that group,and then enter the following command:
options security.admin.nsswitchgroup engineers
Specifying the LDAP port
You might need to specify the port to use for LDAP queries if the LDAP server has been set up to usea port other than the default for LDAP, port 389.
Step
1. Enter the following command:
options ldap.port N
N is the LDAP port number.
LDAP server option precedence
Data ONTAP chooses an LDAP server based on your LDAP server option settings.
Server selection orderServer designation option
When specified, servers listed in this option value willbe tried first, according to list order.
ldap.preferred.servers
When no ldap.preferred.servers are specified,or specified servers are not available, servers designatedin this option value will be tried, according to list order.
ldap.servers
When no ldap.preferred.servers and noldap.servers are specified or available, serversdesignated in this option value will be tried using domaincontroller selection methodology.
ldap.ADdomain
File sharing between NFS and CIFS | 267
Managing client authentication and authorizationYou can enable LDAP authentication of UNIX and Windows clients; in addition, you can enable LDAPauthorization of Windows client access to UNIX files and UNIX client access to NTFS or mixed files.
Next topics
Enabling LDAP-based UNIX client authentication on page 268
Enabling LDAP-based Windows client authentication on page 268
Enabling LDAP authorization for NFS file access from Windows clients on page 268
Enabling LDAP authorization for NTFS or mixed file system access from UNIX clients on page 269
Enabling LDAP-based UNIX client authentication
You can enable LDAP-based UNIX client authentication by making sure ldap is entered on the passwordline of the /etc/nsswitch.conf file.
Enabling LDAP-based Windows client authentication
You can authenticate Windows clients through an LDAP server by performing steps in addition toadding ldap to the passwd line of the /etc/nsswitch.conf file.
Steps
1. Run cifs setup on the storage system to be accessed, and specify NIS/LDAP as the authenticationmethod to be used for CIFS clients on that storage system.
2. Configure the local security settings of each Windows client to use clear text (unencrypted) passwordauthentication rather than Kerberos or other encrypted authentication methods.
3. Verify that your Windows clients have their userpassword attribute configured in the LDAP userdatabase.
Enabling LDAP authorization for NFS file access from Windows clients
You can enable authorization of Windows client access to UNIX files on a storage system that usesLDAP authentication by performing two tasks.
Steps
1. On the storage system to be accessed, verify that every CIFS user who needs to access UNIX filesis mapped to an associated UNIX user name in the usermap.cfg file.
2. Verify that every associated UNIX user name has an entry in the LDAP database.
268 | Data ONTAP 7.3 File Access and Protocols Management Guide

Enabling LDAP authorization for NTFS or mixed file system access from UNIX clients
You can enable authorization of UNIX client access to an NTFS or mixed file system on a storagesystem that uses LDAP authentication by performing several tasks.
Steps
1. Verify that every UNIX user that needs to access an NTFS or mixed file system has an entry in theLDAP database.
2. On the storage system to be accessed, verify that every UNIX user that needs to access an NTFS ormixed file system is mapped to an associated CIFS user name in the usermap.cfg file.
Managing LDAP user-mapping servicesYou can use LDAP services to map between UNIX and Windows user accounts, instead of using NISdata or to adding entries to the usermap.cfg file. By default, Data ONTAP uses the same (one-to-one)user account resolution process in both directions: UNIX-to-Windows mapping and Windows-to-UNIXmapping.
About this task
By default, LDAP-based user-mapping is disabled. (Data ONTAP retrieves user-mapping informationfrom the etc/usermap.cfg file.)
When converting to LDAP from file-based user-mapping, you must remove mapping entries (exceptfor null session entries) from the usermap.cfg file. If mapping entries are present in that file, they willbe used for user-mapping instead of LDAP records.
If you’ve configured Data ONTAP for null sessions, make sure you leave the null session client entryin the usermap.cfg file.
To allow Data ONTAP access to LDAP lookup services, if your UNIX user account information isstored in a non-Active Directory LDAP server, that LDAP server must be configured to allow eithersimple authentication or anonymous user searches.
Steps
1. From the Data ONTAP command line, specify a value for the optionldap.usermap.attribute.windowsaccount:
options ldap.usermap.attribute.windowsaccount account_name
account_name is the user object attribute Data ONTAP will use for Windows account lookups.2. Extend your LDAP schema to include the user object attribute you entered in Step 1.3. From the Data ONTAP command line, specify a value for the ldap.usermap.attribute.unixaccount
option :
options ldap.usermap.attribute.unixaccount account_name
File sharing between NFS and CIFS | 269
account_name is the user object attribute Data ONTAP will use for UNIX account lookups.4. Extend your LDAP schema to include the values you entered in Step 2 and Step 3.5. Enter the following command:
options ldap.usermap.enable on
If you have a significant load on your LDAP server, you might want to improve performance bysetting a separate search base or search base and scope for user-mapping, as described in the followingsection.
Specifying base and scope values for user-mappingLDAP options allow you to set search base and scope, to limit attribute searches to the appropriate areasof your LDAP database. Setting these options will improve the speed of LDAP lookups.
Step
1. Use the following syntax when specifying search base and scope. Base and scope values mustcorrespond to the structure of your LDAP data:
options ldap.usermap.base "base[:scope][;base2[:scope2]]"
Result
Examples
Entering this command sets the search base for user-mapping lookups to ou=People,dc=domain0and the (unspecified) search scope defaults to SUBTREE:
options ldap.usermap.base ou=People,dc=domain0”
The use of parentheses applies the specified search scope (BASE) to ou=People,dc=domain0.The unspecified search scope for the o ("org") object defaults to SUBTREE.
options ldap.usermap.base "(ou=People,dc=domain0):BASE;o=org
After you finish
For more information about setting search base and scope values, see your LDAP documentation.
Managing Active Directory LDAP serversData ONTAP provides the ability to connect to Active Directory for LDAP lookup services.
Next topics
Using Active Directory LDAP servers on page 271
Requirements for Active Directory LDAP servers on page 271
270 | Data ONTAP 7.3 File Access and Protocols Management Guide
Enabling Active Directory LDAP lookup services on page 271
Monitoring Active Directory LDAP server connections on page 272
Troubleshooting Active Directory LDAP server connections on page 272
About Active Directory LDAP server connection pooling and selection on page 273
Do not use the ldap.servers and ldap.preferred.servers options with Active Directoryservers on page 273
Using Active Directory LDAP servers
You can use Active Directory for LDAP services by entering the fully qualified Active Directory domaininto the Data ONTAP ldap.ADdomain option.
As Windows-to-UNIX mapping is performed using Active Directory, Data ONTAP does the following:
• Verifies that the user account exists within the Active Directory domain specified for that account
• Performs a query to the Active Directory domain specified in the ldap.ADdomain option
• Returns the UNIX user account information and verifies that the user account exists
Requirements for Active Directory LDAP servers
You need several things to use Active Directory as your LDAP server.
You need these things to use Active Directory as your LDAP server:
• A valid CIFS license
• Your storage system joined to an Active Directory domain
• A two-way trust relationship established between your storage system’s domain and your LDAPserver’s domain, if they are different
Enabling Active Directory LDAP lookup services
You can enable Active Directory for LDAP lookup services by performing several tasks.
Steps
1. If your UNIX user account information is not in Active Directory, or if it is not in an LDAP serverthat is configured to allow anonymous user searches, enter the user name and password to be usedfor LDAP lookups into the ldap.name and ldap.passwd options, respectively.
options ldap.name user_name
options ldap.passwd password
2. In the etc/nsswitch.conf file, specify ldap for the passwd entry, the group entry, or both, todesignate LDAP as the lookup service to use.
3. If you have a custom schema, enter values for NSSMAP options.
File sharing between NFS and CIFS | 271

4. From the Data ONTAP command line, enter the following command:
options ldap.ADdomain fully_qualified_domain_name
Example
options ldap.ADdomain group.company.com
Note: The domain you enter must either be the local domain or a domain that shares a trustrelationship with the local domain.
Monitoring Active Directory LDAP server connections
To monitor Active Directory LDAP server connection, you can display Active Directory LDAP serverinformation and connection status for all LDAP server types.
Step
1. Then...If you want to...
Enter the following command:
cifs domaininfo
Result: Following the list of domain controller connections and domaincontroller selection preferences, a list of Active Directory LDAP serverconnections is displayed, followed by the list of LDAP server selectionpreferences.
Display Active Directory LDAPserver information
Enter the following command:
netstat
Result: Both Active Directory and non-Active Directory LDAP serverconnection state information is shown on port 389 (or the non-defaultvalue assigned using the ldap.port option).
Display connection status for allLDAP server types
Troubleshooting Active Directory LDAP server connections
You can instruct Data ONTAP to log all domain controller address discovery and connection activitiesby setting the cifs.trace_dc_connection option to on.
Step
1. Enter the following command:
options cifs.trace_dc_connection on
272 | Data ONTAP 7.3 File Access and Protocols Management Guide
Data ONTAP logs all domain controller address discovery and connection activities to the systemlog.
About Active Directory LDAP server connection pooling and selection
Data ONTAP performs several operations to improve LDAP performance.
These operations include the following operations:
• Active Directory LDAP server connections are pooled on a per-domain basis.
• When no response is received from the current LDAP server, subsequent connections are made tothe next best available LDAP server.
• Once every minute, Data ONTAP performs a check to see whether a better LDAP server has becomeavailable.
• Every four hours, Data ONTAP discovers the available Active Directory LDAP servers and reordersthe list, sorting servers in the following order:
• Preferred servers, left in the order specified by the prefdc command.
• Favored servers, sorted by fastest response time
• Other Active Directory LDAP servers, sorted by fastest response time
Do not use the ldap.servers and ldap.preferred.servers options with Active Directory servers
Data ONTAP connects to servers specified by ldap.servers and ldap.preferred.serversoptions and attempts to authenticate using a simple bind. Because simple binds do not provide sufficientauthentication to establish a connection with Active Directory servers, do not specify Active Directoryservers within these two option values.
Managing LDAP schemaBy default, Data ONTAP supports LDAP servers that comply with RFC 2307, which specifies a NetworkInformation Service (NIS)-style schema. You can replace the default values of LDAP options with yourcustom attribute names to configure Data ONTAP to query your custom (not RFC 2307-compliant)schema.
About this task
Your RFC 2307-compliant schema must be extended on the LDAP servers that you want to use forLDAP queries.
For more information refer to RFC 2307 or to documentation by third-party directory integrationvendors.
Next topics
About the default schema on page 274
File sharing between NFS and CIFS | 273

Modifying the custom schema options to match your LDAP schema on page 274
About the default schema
By default, the Data ONTAP's schema variables are set to the appropriate RFC 2307 values.
Default value (per RFC 2307)Option
posixAccountldap.nssmap.objectClass.posixAccount
posixGroupldap.nssmap.objectClass.posixGroup
cnldap.nssmap.attribute.groupname
cnldap.nssmap.attribute.netgroupname
nisNetGroupTripleldap.nssmap.attribute.nisNetGroupTriple
memberUidldap.nssmap.attribute.memberUid
uidldap.nssmap.attribute.uid
uidNumberldap.nssmap.attribute.uidNumber
gidNumberldap.nssmap.attribute.gidNumber
userPasswordldap.nssmap.attribute.userPassword
homeDirectoryldap.nssmap.attribute.homeDirectory
loginShellldap.nssmap.attribute.loginShell
gecosldap.nssmap.attribute.gecos
Modifying the custom schema options to match your LDAP schema
You can change Data ONTAP's schema to match your LDAP schema by changing the appropriateldap.nssmap.* options.
Examples
For a custom LDAP schema in which the object containing Group ID (GID) numbers is “groupid,”you would enter the following command:
options ldap.nssmap.attribute.gidNumber groupid
274 | Data ONTAP 7.3 File Access and Protocols Management Guide
Enabling Storage-Level Access Guard using the fsecuritycommand
Beginning in Data ONTAP 7.2.2, storage administrators can set security (permissions and auditing) onvolumes and qtrees using the fsecurity command. This feature is called Storage-Level Access Guard.
About this task
With the Storage-Level Access Guard security in place, any storage object can contain up to three typesof security layers:
• NTFS/UNIX/NFSv4 security. Exists on the directory or file that represents the storage object. Thissecurity is also the same security you can set from a client.
• Storage-Level Access Guard file security. Applies to every file within the storage object. Applyingthis security will not affect access to, or auditing of, directories.
• Storage-Level Access Guard directory security. Applies to every directory within the storage object.Applying this security will not affect access to, or auditing of, files.
Note: At this time, only NTFS access permissions are supported for Storage-Level Access Guard.For a UNIX user to perform a security check on qtrees or volumes where Storage-Level AccessGuard has been applied, the UNIX user must be mapped to a Windows user.
Storage-Level Access Guard security applies to files and directories but is not inherited by them. If youview the security settings on a file or directory, you will not see the Storage-Level Access Guard security.
However, access to a file or directory in Data ONTAP is determined by the combined effect of boththe native permissions applied to files and/or directories and the Storage-Level Access Guard permissionsset on qtrees and/or volumes. Both levels of security are evaluated to determine what the effectivepermissions a file or directory has.
Next topics
About the fsecurity command on page 275
Generating and editing the job definition file on page 276
Specifying job definition file elements on page 277
Creating a security job and applying it to the storage object on page 278
Checking the status of or canceling a security job on page 279
Displaying the security settings on files and directories on page 279
Removing the Storage-Level Access Guard on page 280
About the fsecurity commandUsing the fsecurity command, storage administrators can apply security over large directories withoutexperiencing significant performance degradation, because security settings are being managed locally
File sharing between NFS and CIFS | 275
on the storage system, not from remote clients. In addition, storage administrators can set security onmany files and directories at once using the same command.
Note: For a list of all fsecurity commands, enter fsecurity help at the storage system commandline or refer to the fsecurity(1) man page.
Generating and editing the job definition fileYou can generate a job definition file to apply Storage-Level Access Guard security to a qtree or volume,or to set bulk permissions on files and directories.
About this task
The job definition file is a Unicode text file that contains information such as security descriptors andpaths that define discretionary access control lists (DACLs) and system access control lists (SACLs).
This information is encoded using the Security Descriptor Definition Language (SDDL).
Once the file is created or edited and copied to the storage system, the fsecurity apply commandis used to validate and apply the file’s security definitions. Running the command on the file creates ajob that runs in the background on the storage system. Once the job is complete, you can view the resultsfrom the storage system console.
There are no requirements for the name and storage system location of the job definition file. In theseexamples, the following name and location are used:
/vol/vol0/templates/security-base.sec
The job definition file format must be ASCII or Unicode (UCS-2).
There are two ways to create and update the job definition file:
• Using the secedit utility (available from the NOW site)
• Using a text editor
Next topics
Managing the job definition file with the secedit utility on page 276
Managing the job definition file with a text editor on page 277
Managing the job definition file with the secedit utility
You can generate the job definition file using the secedit utility.
Steps
1. Download the secedit.exe executable file from the following NOW site:http://now.netapp.com/eservice/toolchest.
2. Follow the instructions in the Secedit_Readme.txt file to generate the job definition file.
276 | Data ONTAP 7.3 File Access and Protocols Management Guide

You can also use the secedit.exe utility to edit and update the job definition file.
Managing the job definition file with a text editor
You can generate, update, and then validate the job definition file using using a text editor.
Steps
1. Create a text file (for example, security-base.sec) or edit an existing job definition file.2. Copy the new or updated file to a directory on your storage system (for example, /vol/vol0/templates/).3. Check the validity of the file before you apply the definitions to jobs by running the fsecurity
apply command with the -c option.
Note: If any line in the definition file is invalid, the security job will not be created when thefsecurity apply command is run.
Specifying job definition file elementsWhen you are defining your security settings in the job definition file, you can apply bulk securitysettings (permissions and auditing) by specifying a propagation mode.
About this task
Specifying a propagation modeallows you to quickly and effectively set these settings without theperformance degradation caused by applying them over a network.
The available propagation modes are:
• 0 = Propagate inheritable permissions to all subfolders and files (Propagate)
• 1 = Do not allow permissions on this file or folders to be replaced (Ignore); this mode is not currentlyavailable
• 2 = Replace existing permissions on all subfolders and files with inheritable permissions (Replace)
The following is an example of an fsecurity job description file.
cb56f6f4
1,0,"/vol/vol0/qt1",0,"D:(A;CIOI;0x1f01ff;;;DOMAIN\Administrator)"
1,1,"/vol/vol0/qt2",0,"D:(D;CIOI;0x000002;;;Everyone)"
The first line, the string cb56f6f4, is mandatory, and is always the same. The following table describeshow the elements in the second line of the example apply security settings to a qtree called /vol/vol0/qt1.
DescriptionSample Element
NTFS security type1
File sharing between NFS and CIFS | 277
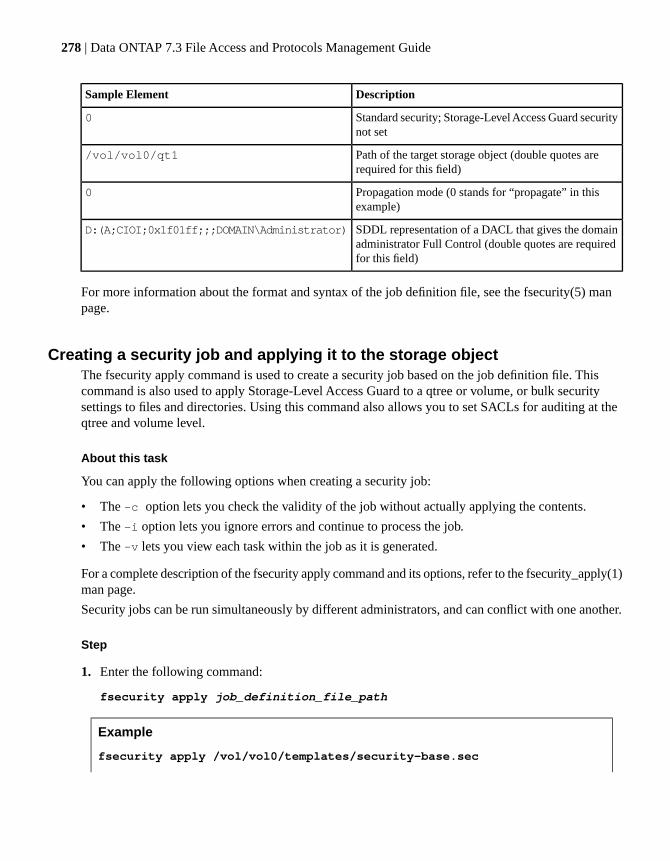
DescriptionSample Element
Standard security; Storage-Level Access Guard securitynot set
0
Path of the target storage object (double quotes arerequired for this field)
/vol/vol0/qt1
Propagation mode (0 stands for “propagate” in thisexample)
0
SDDL representation of a DACL that gives the domainadministrator Full Control (double quotes are requiredfor this field)
D:(A;CIOI;0x1f01ff;;;DOMAIN\Administrator)
For more information about the format and syntax of the job definition file, see the fsecurity(5) manpage.
Creating a security job and applying it to the storage objectThe fsecurity apply command is used to create a security job based on the job definition file. Thiscommand is also used to apply Storage-Level Access Guard to a qtree or volume, or bulk securitysettings to files and directories. Using this command also allows you to set SACLs for auditing at theqtree and volume level.
About this task
You can apply the following options when creating a security job:
• The -c option lets you check the validity of the job without actually applying the contents.
• The -i option lets you ignore errors and continue to process the job.
• The -v lets you view each task within the job as it is generated.
For a complete description of the fsecurity apply command and its options, refer to the fsecurity_apply(1)man page.
Security jobs can be run simultaneously by different administrators, and can conflict with one another.
Step
1. Enter the following command:
fsecurity apply job_definition_file_path
Example
fsecurity apply /vol/vol0/templates/security-base.sec
278 | Data ONTAP 7.3 File Access and Protocols Management Guide
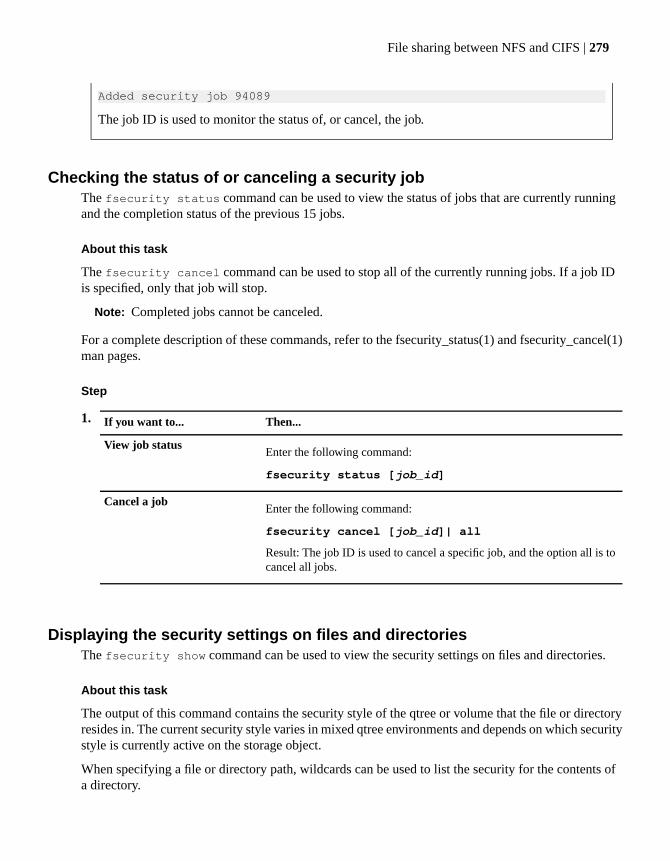
Added security job 94089
The job ID is used to monitor the status of, or cancel, the job.
Checking the status of or canceling a security jobThe fsecurity status command can be used to view the status of jobs that are currently runningand the completion status of the previous 15 jobs.
About this task
The fsecurity cancel command can be used to stop all of the currently running jobs. If a job IDis specified, only that job will stop.
Note: Completed jobs cannot be canceled.
For a complete description of these commands, refer to the fsecurity_status(1) and fsecurity_cancel(1)man pages.
Step
1. Then...If you want to...
Enter the following command:
fsecurity status [job_id]
View job status
Enter the following command:
fsecurity cancel [job_id]| all
Result: The job ID is used to cancel a specific job, and the option all is tocancel all jobs.
Cancel a job
Displaying the security settings on files and directoriesThe fsecurity show command can be used to view the security settings on files and directories.
About this task
The output of this command contains the security style of the qtree or volume that the file or directoryresides in. The current security style varies in mixed qtree environments and depends on which securitystyle is currently active on the storage object.
When specifying a file or directory path, wildcards can be used to list the security for the contents ofa directory.
File sharing between NFS and CIFS | 279
For a complete description of this command, refer to the fsecurity_show(1) man page.
Step
1. Enter the following command:
fsecurity show file_directory_qtree_path [option]
You can also specify the inode number of the file or directory (instead of the file or directory path),as shown in the following example.
fsecurity show -v volume_name -i inode_number [option]
For a complete listing of options and description of command output, see the fsecurity_show(1)man page.
Removing the Storage-Level Access GuardThe fsecurity remove-guard command can be used to remove the Storage-Level Access Guardfrom a qtree or volume. A qtree cannot be deleted if Storage-Level Access Guard is applied to it. Formore information, refer to the fsecurity remove-guard(1) man page.
Step
1. Enter the following command:
fsecurity remove-guard volume_qtree_path
Result
Removing the Storage-Level Access Guard does not remove the standard file-level security (such asNTFS security) that is present on the files and directories within a qtree or volume.
Auditing system access eventsData ONTAP audits logon, logoff, and file access events similarly to Windows. There are somedifferences, however, in how you enable auditing and how you manage the files that log audit eventinformation.
Next topics
About auditing on page 281
Events that Data ONTAP can audit on page 281
Configuring system event auditing on page 283
Viewing and understanding event detail displays on page 294
280 | Data ONTAP 7.3 File Access and Protocols Management Guide

About auditingWhen you configure Data ONTAP for auditing, the event log file and the settings for all options persistacross a reboot or if CIFS is terminated or restarted.
Data ONTAP auditing can be performed in two ways:
• CIFS auditing refers to auditing access events from Windows clients that access data on the storagesystem using the CIFS protocol.
• NFS auditing refers to auditing access events from UNIX clients that access data on the storagesystem using the NFS protocol.
Both CIFS and NFS auditing can be configured on a storage system. Each type has different configurationrequirements and audit capabilities.
Auditing is not currently supported for other file access protocols.
Events that Data ONTAP can auditYou can enable auditing for several categories of events.
The following categories can be audited:
• Logon and logoff events (available only with CIFS auditing enabled)
• Local user and group account management (available only with CIFS auditing enabled)
• File access events at the file and directory level
Note: You must activate access auditing for individual files and directories.
• File access events at the qtree or volume level
Note: Auditing of events at the qtree or volume level is available only by applying Storage-LevelAccess Guard security.
CategoryDescriptionEventEvent ID
Audit LogAudit events were lostAdtEvntDiscard516
Audit LogAudit log was clearedAdtLogClear517
Logon/LogoffLocal logonAdtSuccessfulLogon528
Logon/LogoffUnknown user name or badpassword
AdtUnknownUser529
Logon/LogoffAccount logon timerestriction
AdtCantLogonNow530
Logon/LogoffAccount currently disabledAdtAccountDisabled531
Logon/LogoffUser account has expiredAdtUserAccountExpired532
File sharing between NFS and CIFS | 281
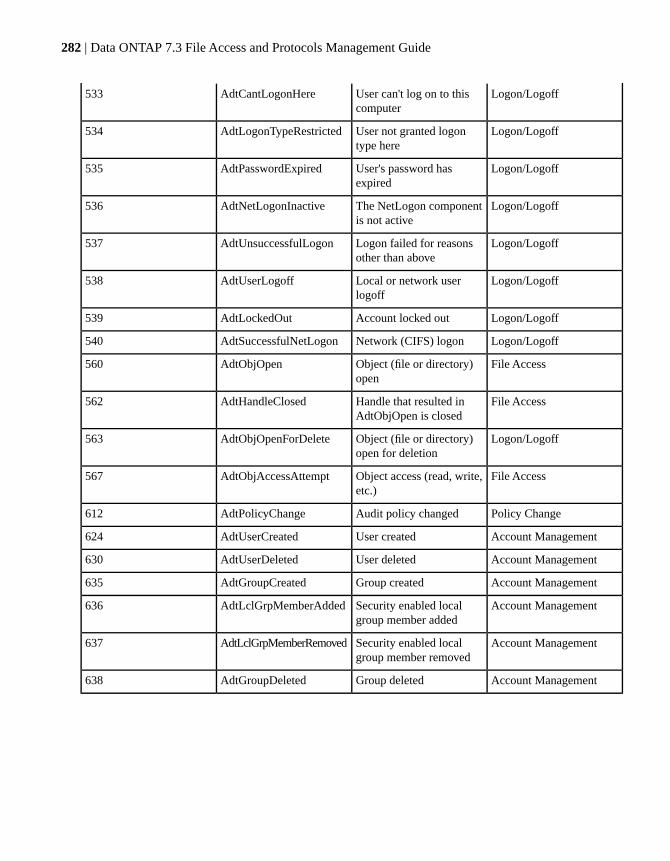
Logon/LogoffUser can't log on to thiscomputer
AdtCantLogonHere533
Logon/LogoffUser not granted logontype here
AdtLogonTypeRestricted534
Logon/LogoffUser's password hasexpired
AdtPasswordExpired535
Logon/LogoffThe NetLogon componentis not active
AdtNetLogonInactive536
Logon/LogoffLogon failed for reasonsother than above
AdtUnsuccessfulLogon537
Logon/LogoffLocal or network userlogoff
AdtUserLogoff538
Logon/LogoffAccount locked outAdtLockedOut539
Logon/LogoffNetwork (CIFS) logonAdtSuccessfulNetLogon540
File AccessObject (file or directory)open
AdtObjOpen560
File AccessHandle that resulted inAdtObjOpen is closed
AdtHandleClosed562
Logon/LogoffObject (file or directory)open for deletion
AdtObjOpenForDelete563
File AccessObject access (read, write,etc.)
AdtObjAccessAttempt567
Policy ChangeAudit policy changedAdtPolicyChange612
Account ManagementUser createdAdtUserCreated624
Account ManagementUser deletedAdtUserDeleted630
Account ManagementGroup createdAdtGroupCreated635
Account ManagementSecurity enabled localgroup member added
AdtLclGrpMemberAdded636
Account ManagementSecurity enabled localgroup member removed
AdtLclGrpMemberRemoved637
Account ManagementGroup deletedAdtGroupDeleted638
282 | Data ONTAP 7.3 File Access and Protocols Management Guide

Configuring system event auditingYou must perform several tasks to configure system event auditing.
Steps
1. Determine what events you want to audit. For example, if you want to audit all the events on avolume or qtree, apply the Storage-Level Access Guard security using the fsecurity command.
2. If you want to audit file and directory access events, set your system access control lists (SACLs).3. Enable CIFS auditing and/or NFS auditing.4. You want to use Live View to manage auditing, enable Live View. Otherwise, familiarize yourself
with audit log management.5. Use Event Viewer to display audit events.
Next topics
Setting SACLs on page 283
Configuring Data ONTAP for CIFS auditing on page 284
Configuring Data ONTAP for NFS auditing on page 285
Configuring Live View on page 287
Saving and clearing audit events on page 288
Setting SACLs
System access control lists (SACLs) can be used to enable auditing access on files and directories.
There are three ways to set SACLs for auditing access:
• If you want to audit access events on all files and directories within a volume or qtree, it isrecommended that you set SACLs by applying Storage-Level Access Guard security.
• If you want to audit access events on individual files and directories, you can set SACLs in twoways:
• Using your Windows Explorer GUI.
• Using the fsecurity command
Note: Make sure that you select only the events you need to audit, as selecting too many audit optionsmight impact system performance.
To enable auditing access on individual files and directories, complete the following steps on theWindows administration host.
Steps
1. Select the file or directory for which you want to enable auditing access.2. Right-click on the file or directory, and select Properties.
File sharing between NFS and CIFS | 283
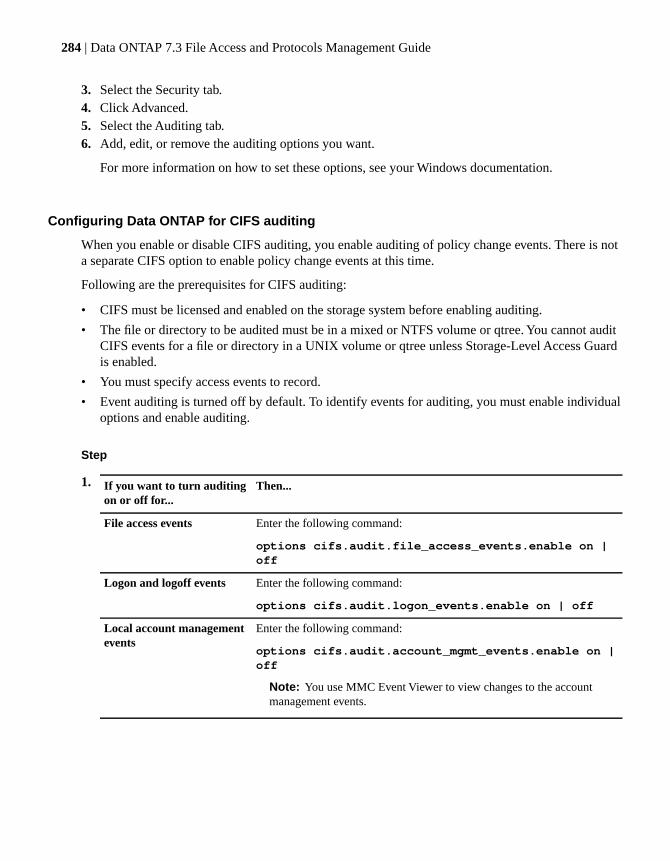
3. Select the Security tab.4. Click Advanced.5. Select the Auditing tab.6. Add, edit, or remove the auditing options you want.
For more information on how to set these options, see your Windows documentation.
Configuring Data ONTAP for CIFS auditing
When you enable or disable CIFS auditing, you enable auditing of policy change events. There is nota separate CIFS option to enable policy change events at this time.
Following are the prerequisites for CIFS auditing:
• CIFS must be licensed and enabled on the storage system before enabling auditing.
• The file or directory to be audited must be in a mixed or NTFS volume or qtree. You cannot auditCIFS events for a file or directory in a UNIX volume or qtree unless Storage-Level Access Guardis enabled.
• You must specify access events to record.
• Event auditing is turned off by default. To identify events for auditing, you must enable individualoptions and enable auditing.
Step
1. Then...If you want to turn auditingon or off for...
Enter the following command:
options cifs.audit.file_access_events.enable on |off
File access events
Enter the following command:
options cifs.audit.logon_events.enable on | off
Logon and logoff events
Enter the following command:
options cifs.audit.account_mgmt_events.enable on |off
Note: You use MMC Event Viewer to view changes to the accountmanagement events.
Local account managementevents
284 | Data ONTAP 7.3 File Access and Protocols Management Guide

Then...If you want to turn auditingon or off for...
Enter the following command:
cifs audit start | stop
Alternatively, you can start and stop CIFS auditing using thecifs.audit.enable option. For example, entering the followingcommand is the equivalent of using the cifs audit start command:
options cifs.audit.enable on | off
Use on to start CIFS auditing or off to stop auditing.
Note: CIFS auditing is disabled by default.
All events
Configuring Data ONTAP for NFS auditing
NFS auditing can record access events for files and directories, but it cannot record logon, logoff, andother events supported by CIFS auditing. The file or directory to be audited can be in a volume or qtreeof any security style (NTFS, UNIX, or mixed).
Following are the prerequisites for NFS auditing:
• CIFS must be licensed and enabled on the storage system before enabling NFS auditing.
• CIFS auditing must be enabled on the storage system before enabling NFS auditing. Auditing isdisabled by default.
• You must identify events to record.
Next topics
Specifying NFS audit events on page 285
How the filter file controls NFS audit events on page 286
Enabling NFS auditing on page 286
Specifying NFS audit events
To specify events for NFS auditing in an NTFS or mixed security style qtree or volume, you must setsystem access control lists (SACLs) on files and directories.
Steps
1. Create the log filter file (usually called /etc/log/nfs-audit) on the storage system. This file is usedto identify which file events get included in the audit log by default. The filter file has no content.
Note: You must create the NFS log filter file in an NTFS or mixed style volume or qtree. If youdo not, you will not be able to set a SACL on the filter file, which is required for auditing.
File sharing between NFS and CIFS | 285
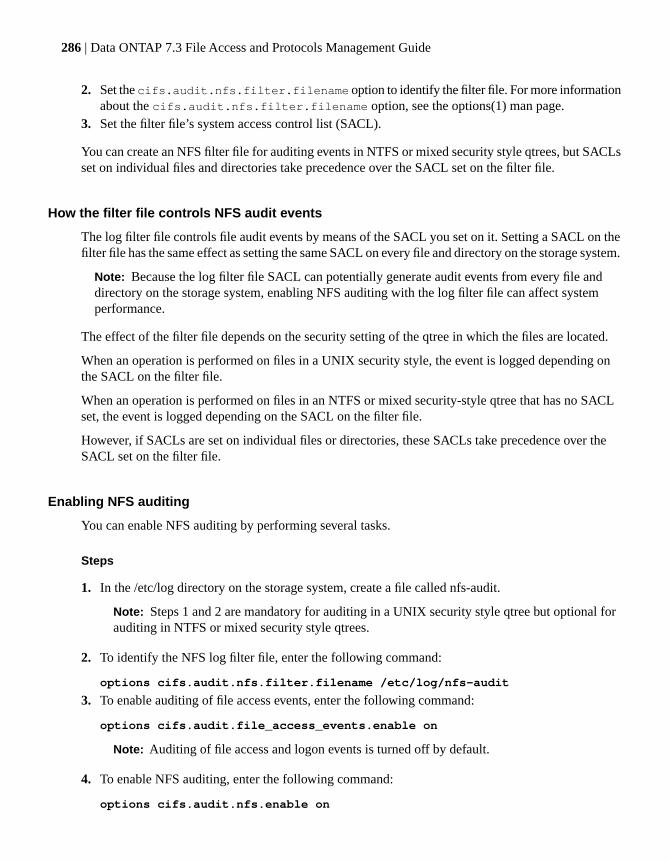
2. Set the cifs.audit.nfs.filter.filename option to identify the filter file. For more informationabout the cifs.audit.nfs.filter.filename option, see the options(1) man page.
3. Set the filter file’s system access control list (SACL).
You can create an NFS filter file for auditing events in NTFS or mixed security style qtrees, but SACLsset on individual files and directories take precedence over the SACL set on the filter file.
How the filter file controls NFS audit events
The log filter file controls file audit events by means of the SACL you set on it. Setting a SACL on thefilter file has the same effect as setting the same SACL on every file and directory on the storage system.
Note: Because the log filter file SACL can potentially generate audit events from every file anddirectory on the storage system, enabling NFS auditing with the log filter file can affect systemperformance.
The effect of the filter file depends on the security setting of the qtree in which the files are located.
When an operation is performed on files in a UNIX security style, the event is logged depending onthe SACL on the filter file.
When an operation is performed on files in an NTFS or mixed security-style qtree that has no SACLset, the event is logged depending on the SACL on the filter file.
However, if SACLs are set on individual files or directories, these SACLs take precedence over theSACL set on the filter file.
Enabling NFS auditing
You can enable NFS auditing by performing several tasks.
Steps
1. In the /etc/log directory on the storage system, create a file called nfs-audit.
Note: Steps 1 and 2 are mandatory for auditing in a UNIX security style qtree but optional forauditing in NTFS or mixed security style qtrees.
2. To identify the NFS log filter file, enter the following command:
options cifs.audit.nfs.filter.filename /etc/log/nfs-audit
3. To enable auditing of file access events, enter the following command:
options cifs.audit.file_access_events.enable on
Note: Auditing of file access and logon events is turned off by default.
4. To enable NFS auditing, enter the following command:
options cifs.audit.nfs.enable on
286 | Data ONTAP 7.3 File Access and Protocols Management Guide

5. Configure audit log management.6. On the Windows administration host, set the filter file’s system access control list (SACL).
For more information about the options described in these steps, see the options(1) man page.
Configuring Live View
When Live View is enabled, an Access Logging Facility (ALF) daemon runs once a minute, flushingaudit events from memory to the internal log file /etc/log/cifsaudit.alf on disk.
The ALF daemon also attempts to save and convert ALF records to EVT records that can be viewedby Event Viewer. It does so either once every minute, or when the .alf file becomes 75 percent full.
EVT records are stored in three files in the /etc/log directory:
• fixedsection
• varsectiona
• varsectionb
The ALF daemon uses these files to service Eventlog RPC requests from Windows clients runningEvent Viewer. When Live View is enabled, Event Viewer displays the most recent audit events up to5,000 records.
Each time new records are saved from the internal log file, they are written to the Live View files andthey are also backed up into EVT files. The backup files are saved in the /etc/log directory with atimestamp as part of their name.
Audit events can be viewed in real-time and backup EVT files can be viewed as static files using EventViewer.
Note: Beginning in Data ONTAP 7.2.2, Live View can be enabled together withcifs.audit.autosave options, which control the size of the internal audit file and how it is saved.
Step
1. Then...If you want to...
Enter the following command:
options cifs.audit.liveview.enable on | off
Use on to enable Live View or off to disable it.
Note: Before enabling Live View, you must enable auditing on the storagesystem. Live View is disabled by default.
Enable or disable Live View
File sharing between NFS and CIFS | 287

Then...If you want to...
Enter the following command:
cifs audit clearResult: The internal cifsaudit.alf log file and the current EVT log files in the/etc/log directory are cleared. However, any backup EVT files with timestampsare not affected by this command.
Clear the current ALF andEVT files
Saving and clearing audit events
You can specify when automatic saves occur, the maximum number of automatically-saved files, andthe maximum size of the cifsaudit.alf file. You can also clear the cifsaudit.alf file.
Next topics
Where Data ONTAP logs audit event information on page 288
Size and format of the internal and external log files on page 288
How Data ONTAP updates the event log on page 289
Saving audit events to the event log manually on page 289
Specifying when automatic saves occur on page 290
Specifying the maximum number of automatically saved files on page 293
Specifying the maximum size of the cifsaudit.alf file on page 293
SNMP traps for auditing events on page 294
Clearing the cifsaudit.alf file on page 294
Where Data ONTAP logs audit event information
Audit event information is stored in an internal log file, /etc/log/cifsaudit.alf. If you do not use LiveView, you should periodically save the contents of this file to an external EVT event log file eithermanually or by setting up automatic saving of this file.
By default, the external event log is the /etc/log/adtlog.evt file. You can specify another file as the eventlog. If the specified file does not already exist, Data ONTAP creates the file when it saves informationto the file. The directory containing the file, however, must exist; otherwise, an error message appearswhen you specify the file.
Size and format of the internal and external log files
You can specify the maximum size of the internal cifsaudit.alf log file between 524,288 bytes (512K)and 68,719,476,736 bytes (64 GB). The default size is 524,288 bytes.
The external event log (.evt file) that is generated from the cifsaudit.alf file will be larger, because thecompressed contents of the cifsaudit.alf file are expanded and reformatted in the external event log file.
288 | Data ONTAP 7.3 File Access and Protocols Management Guide
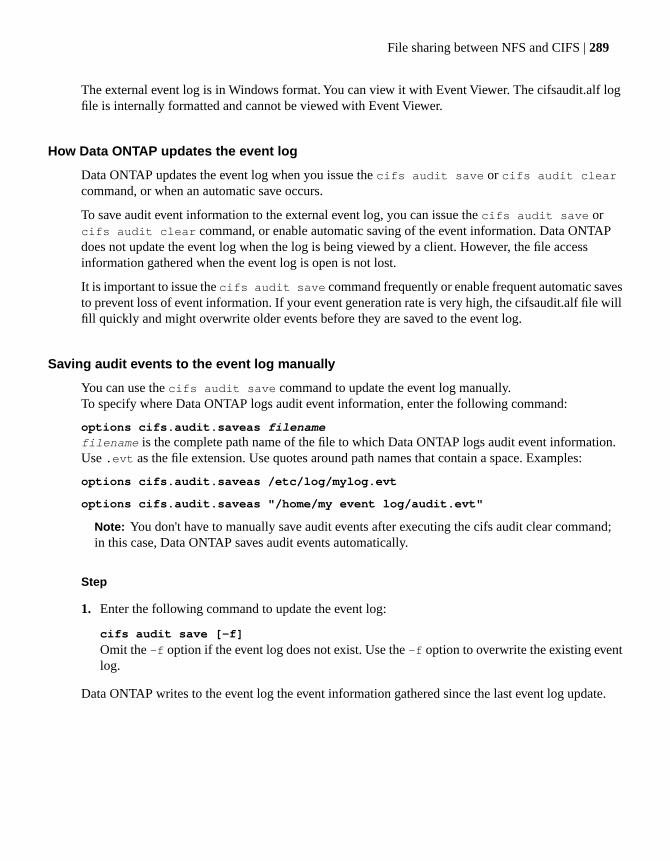
The external event log is in Windows format. You can view it with Event Viewer. The cifsaudit.alf logfile is internally formatted and cannot be viewed with Event Viewer.
How Data ONTAP updates the event log
Data ONTAP updates the event log when you issue the cifs audit save or cifs audit clearcommand, or when an automatic save occurs.
To save audit event information to the external event log, you can issue the cifs audit save orcifs audit clear command, or enable automatic saving of the event information. Data ONTAPdoes not update the event log when the log is being viewed by a client. However, the file accessinformation gathered when the event log is open is not lost.
It is important to issue the cifs audit save command frequently or enable frequent automatic savesto prevent loss of event information. If your event generation rate is very high, the cifsaudit.alf file willfill quickly and might overwrite older events before they are saved to the event log.
Saving audit events to the event log manually
You can use the cifs audit save command to update the event log manually.To specify where Data ONTAP logs audit event information, enter the following command:
options cifs.audit.saveas filenamefilename is the complete path name of the file to which Data ONTAP logs audit event information.Use .evt as the file extension. Use quotes around path names that contain a space. Examples:
options cifs.audit.saveas /etc/log/mylog.evt
options cifs.audit.saveas "/home/my event log/audit.evt"
Note: You don't have to manually save audit events after executing the cifs audit clear command;in this case, Data ONTAP saves audit events automatically.
Step
1. Enter the following command to update the event log:
cifs audit save [-f]
Omit the -f option if the event log does not exist. Use the -f option to overwrite the existing eventlog.
Data ONTAP writes to the event log the event information gathered since the last event log update.
File sharing between NFS and CIFS | 289
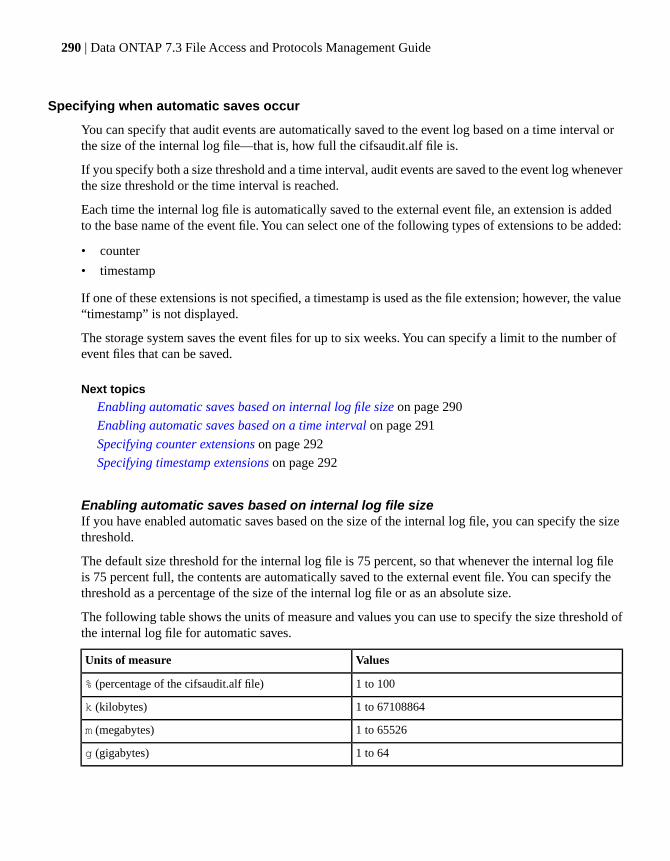
Specifying when automatic saves occur
You can specify that audit events are automatically saved to the event log based on a time interval orthe size of the internal log file—that is, how full the cifsaudit.alf file is.
If you specify both a size threshold and a time interval, audit events are saved to the event log wheneverthe size threshold or the time interval is reached.
Each time the internal log file is automatically saved to the external event file, an extension is addedto the base name of the event file. You can select one of the following types of extensions to be added:
• counter
• timestamp
If one of these extensions is not specified, a timestamp is used as the file extension; however, the value“timestamp” is not displayed.
The storage system saves the event files for up to six weeks. You can specify a limit to the number ofevent files that can be saved.
Next topics
Enabling automatic saves based on internal log file size on page 290
Enabling automatic saves based on a time interval on page 291
Specifying counter extensions on page 292
Specifying timestamp extensions on page 292
Enabling automatic saves based on internal log file sizeIf you have enabled automatic saves based on the size of the internal log file, you can specify the sizethreshold.
The default size threshold for the internal log file is 75 percent, so that whenever the internal log fileis 75 percent full, the contents are automatically saved to the external event file. You can specify thethreshold as a percentage of the size of the internal log file or as an absolute size.
The following table shows the units of measure and values you can use to specify the size threshold ofthe internal log file for automatic saves.
ValuesUnits of measure
1 to 100% (percentage of the cifsaudit.alf file)
1 to 67108864k (kilobytes)
1 to 65526m (megabytes)
1 to 64g (gigabytes)
290 | Data ONTAP 7.3 File Access and Protocols Management Guide
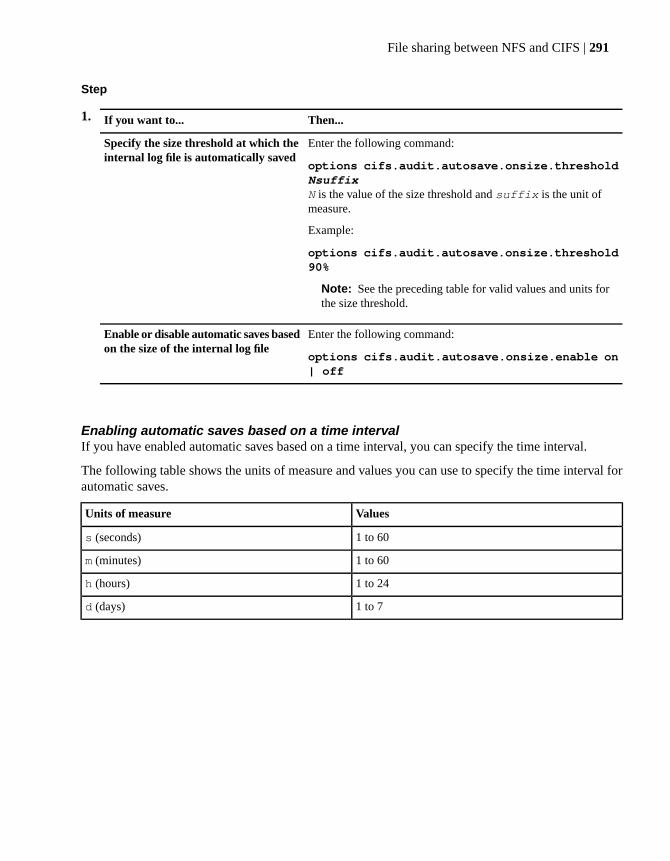
Step
1. Then...If you want to...
Enter the following command:
options cifs.audit.autosave.onsize.thresholdNsuffixN is the value of the size threshold and suffix is the unit ofmeasure.
Example:
options cifs.audit.autosave.onsize.threshold90%
Note: See the preceding table for valid values and units forthe size threshold.
Specify the size threshold at which theinternal log file is automatically saved
Enter the following command:
options cifs.audit.autosave.onsize.enable on| off
Enable or disable automatic saves basedon the size of the internal log file
Enabling automatic saves based on a time intervalIf you have enabled automatic saves based on a time interval, you can specify the time interval.
The following table shows the units of measure and values you can use to specify the time interval forautomatic saves.
ValuesUnits of measure
1 to 60s (seconds)
1 to 60m (minutes)
1 to 24h (hours)
1 to 7d (days)
File sharing between NFS and CIFS | 291
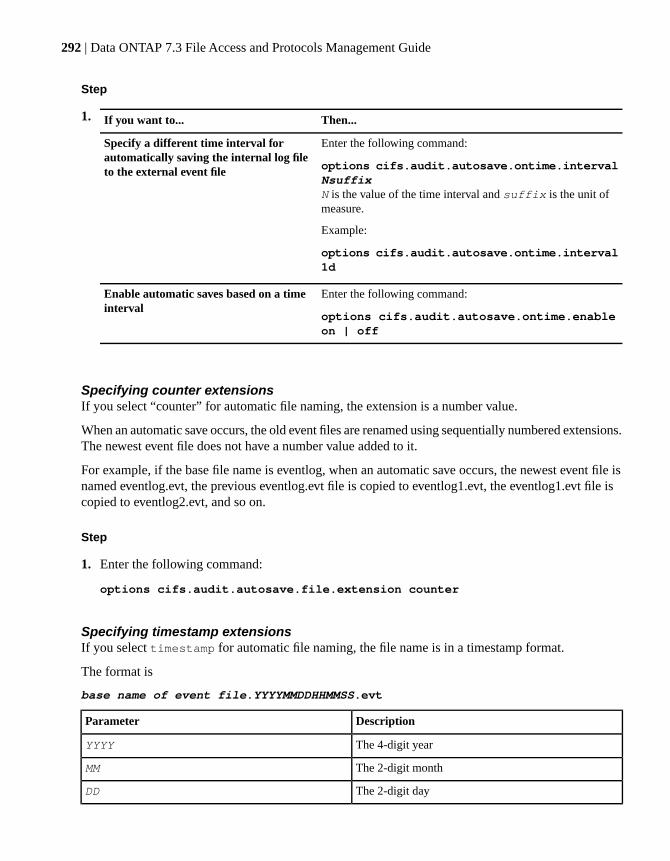
Step
1. Then...If you want to...
Enter the following command:
options cifs.audit.autosave.ontime.intervalNsuffixN is the value of the time interval and suffix is the unit ofmeasure.
Example:
options cifs.audit.autosave.ontime.interval1d
Specify a different time interval forautomatically saving the internal log fileto the external event file
Enter the following command:
options cifs.audit.autosave.ontime.enableon | off
Enable automatic saves based on a timeinterval
Specifying counter extensionsIf you select “counter” for automatic file naming, the extension is a number value.
When an automatic save occurs, the old event files are renamed using sequentially numbered extensions.The newest event file does not have a number value added to it.
For example, if the base file name is eventlog, when an automatic save occurs, the newest event file isnamed eventlog.evt, the previous eventlog.evt file is copied to eventlog1.evt, the eventlog1.evt file iscopied to eventlog2.evt, and so on.
Step
1. Enter the following command:
options cifs.audit.autosave.file.extension counter
Specifying timestamp extensionsIf you select timestamp for automatic file naming, the file name is in a timestamp format.
The format is
base name of event file.YYYYMMDDHHMMSS.evt
DescriptionParameter
The 4-digit yearYYYY
The 2-digit monthMM
The 2-digit dayDD
292 | Data ONTAP 7.3 File Access and Protocols Management Guide
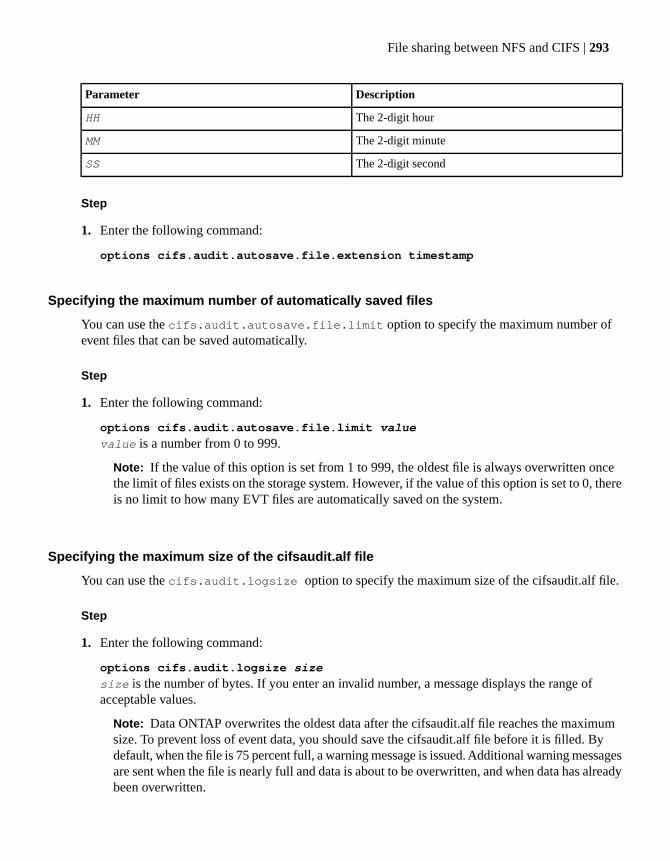
DescriptionParameter
The 2-digit hourHH
The 2-digit minuteMM
The 2-digit secondSS
Step
1. Enter the following command:
options cifs.audit.autosave.file.extension timestamp
Specifying the maximum number of automatically saved files
You can use the cifs.audit.autosave.file.limit option to specify the maximum number ofevent files that can be saved automatically.
Step
1. Enter the following command:
options cifs.audit.autosave.file.limit value
value is a number from 0 to 999.
Note: If the value of this option is set from 1 to 999, the oldest file is always overwritten oncethe limit of files exists on the storage system. However, if the value of this option is set to 0, thereis no limit to how many EVT files are automatically saved on the system.
Specifying the maximum size of the cifsaudit.alf file
You can use the cifs.audit.logsize option to specify the maximum size of the cifsaudit.alf file.
Step
1. Enter the following command:
options cifs.audit.logsize size
size is the number of bytes. If you enter an invalid number, a message displays the range ofacceptable values.
Note: Data ONTAP overwrites the oldest data after the cifsaudit.alf file reaches the maximumsize. To prevent loss of event data, you should save the cifsaudit.alf file before it is filled. Bydefault, when the file is 75 percent full, a warning message is issued. Additional warning messagesare sent when the file is nearly full and data is about to be overwritten, and when data has alreadybeen overwritten.
File sharing between NFS and CIFS | 293

SNMP traps for auditing events
Data ONTAP includes SNMP traps to provide a trigger for certain actions (such as notification) basedon information about certain auditing events.
If you want CIFS clients to receive SNMP traps for auditing events, you must register the clients usingthe SNMP feature of Data ONTAP. Registered clients must have SNMP software that listens for SNMPtraps.
An SNMP trap is issued whenever any of the following occurs:
• The specified time interval is reached and the cifsaudit.alf file is saved.
• The specified size threshold is reached and the cifsaudit.alf file is saved.
• The default size threshold, 75 percent full, is reached and the cifsaudit.alf file is in danger of wrappingand overwriting event data, but the file is not saved because thecifs.audit.autosave.onsize.enable and cifs.audit.autosave.ontime.enableoptions are turned off.
• The cifsaudit.alf file has wrapped and event data has been overwritten, because none of the automaticsave options are turned on.
Clearing the cifsaudit.alf file
You can use the cifs audit clear command to clear the internal cifsaudit.alf file.
Step
1. Enter the following command:
cifs audit clear
If the audit has started, the internal cifsaudit.alf log file is cleared. If the audit has stopped, the cifsaudit.alffile is deleted. After you execute this command, Data ONTAP automatically saves the event log.
Viewing and understanding event detail displaysYou can view real-time audit events captured with Live View, the external event log (.evt file) that yousaved, or a backup log file created by Live View.
About this task
The following event detail displays are available:
• Network logon
• Unsuccessful network logon
• Network logoff
• Windows file access
294 | Data ONTAP 7.3 File Access and Protocols Management Guide
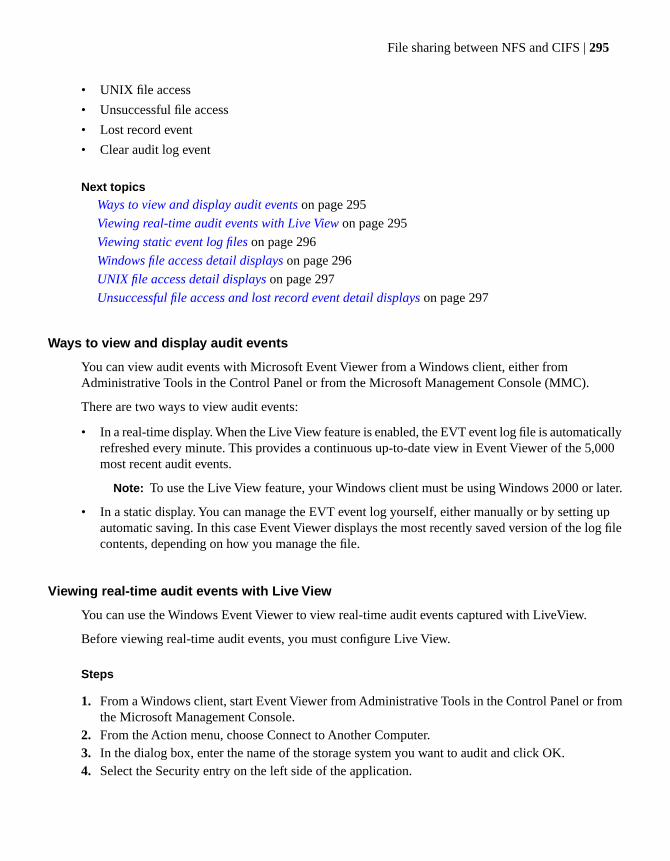
• UNIX file access
• Unsuccessful file access
• Lost record event
• Clear audit log event
Next topics
Ways to view and display audit events on page 295
Viewing real-time audit events with Live View on page 295
Viewing static event log files on page 296
Windows file access detail displays on page 296
UNIX file access detail displays on page 297
Unsuccessful file access and lost record event detail displays on page 297
Ways to view and display audit events
You can view audit events with Microsoft Event Viewer from a Windows client, either fromAdministrative Tools in the Control Panel or from the Microsoft Management Console (MMC).
There are two ways to view audit events:
• In a real-time display. When the Live View feature is enabled, the EVT event log file is automaticallyrefreshed every minute. This provides a continuous up-to-date view in Event Viewer of the 5,000most recent audit events.
Note: To use the Live View feature, your Windows client must be using Windows 2000 or later.
• In a static display. You can manage the EVT event log yourself, either manually or by setting upautomatic saving. In this case Event Viewer displays the most recently saved version of the log filecontents, depending on how you manage the file.
Viewing real-time audit events with Live View
You can use the Windows Event Viewer to view real-time audit events captured with LiveView.
Before viewing real-time audit events, you must configure Live View.
Steps
1. From a Windows client, start Event Viewer from Administrative Tools in the Control Panel or fromthe Microsoft Management Console.
2. From the Action menu, choose Connect to Another Computer.3. In the dialog box, enter the name of the storage system you want to audit and click OK.4. Select the Security entry on the left side of the application.
File sharing between NFS and CIFS | 295

The right side of the application is populated with the latest audit events captured on the storagesystem (up to 5,000 events).
Viewing static event log files
You can use a Windows client to view the external event log (.evt file) that you saved, or to view abackup log file created by Live View.
Steps
1. From a Windows client, start Event Viewer from Administrative Tools in the Control Panel or fromthe Microsoft Management Console.
2. In the Log menu, choose Open.
Note: Do not try to open the event log by choosing Select Computer from the Log menu anddouble-clicking the storage system name. If you do, the Event Viewer displays the error message“The RPC server is unavailable,” because Data ONTAP does not communicate with the EventViewer with RPC calls unless Live View is enabled.
3. Choose the event log on the storage system.
Windows file access detail displays
Windows file access detail displays show many types of information
The following table describes the fields of Windows file access detail displays.
DescriptionField
The name of the subsystem server process calling theaudit check function. This is always SECURITY becausethis is a security log.
Object Server
The type of object being accessed.Object Type
The name (such as a file name) of the object beingaccessed.
Object Name
The new handle identifier of the open object.New Handle ID
A unique identifier associating multiple events resultingfrom a single operation.
Operation ID
The identifier of the client process accessing the object.Process ID
The user name of the user requesting the object access.When impersonation is taking place, this is the username with which the server process is logged on.
Primary User Name
296 | Data ONTAP 7.3 File Access and Protocols Management Guide

DescriptionField
The name of the computer, or SYSTEM if the useridentified by Primary User Name is SYSTEM. If thecomputer is a member of a Windows NT Server domain,this can also be the name of the domain containing theprimary user's account.
Primary Domain
A unique identifier assigned when the primary userlogged on.
Primary Logon ID
Your login name.Client User Name
The name of your computer or the domain containingthe client user's account.
Client Domain
A unique identifier assigned when the client user loggedon.
Client Logon ID
The types of accesses to the object that were attempted.Accesses
Your privileges.Privileges
UNIX file access detail displays
UNIX file access detail displays show the same kind of information as the Windows file access detaildisplays, but NFS access appears instead of an object name, because the file is accessed through NFS.
In addition, UNIX file access detail displays show the following information about the file that you areauditing:
• The ID of the volume in which the file is located
• The ID of the latest Snapshot™ copy in which the file is located
• The inode of the file
This information enables you to find the file using the find -inum command from an NFS client.
Unsuccessful file access and lost record event detail displays
Unsuccessful file access detail displays show failed attempts to access a file. Furthermore, if DataONTAP cannot create an audit record, the lost record event detail displays give a reason
For example, an unsuccessful file access occurs when a user tries to access a file but does not havepermission to access it. The display shows the ID of the user who tried to access the file and an indicationthat the access attempt was unsuccessful.
If Data ONTAP cannot create an audit record, the lost record event detail displays give a reason, suchas the following:
File sharing between NFS and CIFS | 297
Internal resources allocated for the queueing of audit messages have been exhausted, leading to the loss of some audits.
Number of audit records discarded: 1
Controlling CIFS access to symbolic linksA symbolic link is a special file created by NFS clients that points to another file or directory. A symboliclink is, in some respects, similar to a “shortcut” in the Windows environment.
About this task
There are two kinds of symbolic links:
• Absolute symbolic links begin with a slash (/) and are treated as a path derived from the root of thefile system.
• Relative symbolic links begin with a character other than a slash (/) and are treated as a path relativeto the parent directory of the symbolic link.
CIFS clients cannot create symbolic links, but they can follow the symbolic links created by NFS clients.
There are special requirements to enable CIFS access to the following types of symbolic links:
• Absolute symbolic links. Since the destination of an absolute symbolic link depends on the type ofUNIX mount, CIFS clients need additional information to interpret absolute symbolic links.
• Relative symbolic links to destinations on the same storage system outside the share in which therelative symbolic link is located. By default, Data ONTAP does not allow a CIFS client to followa symbolic link outside the share to which the CIFS client is authenticated.
Next topics
Enabling CIFS clients to follow symbolic links on page 299
Specifying how CIFS clients interact with symbolic links on page 299
Why you should avoid symbolic links to files on page 300
About Map entries on page 300
About Widelink entries on page 300
About disabling share boundary checking for symbolic links on page 301
Redirecting absolute symbolic links on page 302
How the storage system uses Map and Widelink entries on page 304
298 | Data ONTAP 7.3 File Access and Protocols Management Guide

Enabling CIFS clients to follow symbolic linksYou can use the cifs.symlinks.enable option to enable CIFS access to symbolic links after theyhave been disabled.
About this task
The cifs.symlinks.enable option is enabled by default.
Step
1. Enter the following command to enable CIFS access to symbolic links:
options cifs.symlinks.enable on
Result
CIFS clients will directly follow relative symbolic links to destinations in the same share
Specifying how CIFS clients interact with symbolic linksYou can specify how CIFS clients interact with symbolic links by creating Map entries in the/etc/symlink.translations file (absolute symbolic links only), creating Widelink entries in the/etc/symlink.translations file (absolute symbolic links only), or disabling NT share boundary checkingfor symbolic links (relative and absolute symbolic links).
About this task
Use the following table to help determine which options you want to implement. The table shows foreach option the types of destinations that symbolic links will be able to point to.
No share boundary checkWidelink entriesMap entriesSymbolic link destinationcan be...
XXXThe same share on thesame storage system
XXAnother share on the samestorage system
XA non-shared area of thesame storage system
XA share on another storagesystem
XA share on another CIFSserver or a desktop PC
File sharing between NFS and CIFS | 299
Why you should avoid symbolic links to filesYou should prevent CIFS clients from following symbolic links that point to files because Data ONTAPcan update the wrong files.
The wrong files might be updated because many CIFS client applications perform operations such aswriting to a temporary file, renaming the original file to a backup name, then renaming the temporaryfile to the original name.
When client applications perform these operations, if the original file was targeted directly by a symboliclink, that file would be stored in the directory where the symbolic link was, and the renamed symboliclink would point to the original file rather than to the updated file.
Note: CIFS clients following symbolic links to directories, rather than to individual files, do notexperience this problem.
About Map entriesMap entries are used to redirect absolute symbolic links on the storage system. You create Map entriesin the /etc/symlink.translations file. Map entries allow CIFS clients to follow absolute symbolic linksto target destinations within the same share.
Note: CIFS client users who follow symlinks to resources outside the link’s share do not work,unless the cifs share -nosymlink_strict_security option has been specified for the sourceshare.
Map entries have the following requirements:
• To resolve an absolute symbolic link, there must be a Map entry in the /etc/symlink.translations filethat determines the destination of the link.
• The symbolic link destination must be in the same share as the link itself, or the link must be in ashare for which the -nosymlink_strict_security option has been specified.
When you use Map entries to redirect absolute symbolic links, Windows share security is preservedfor both the symbolic link and the destination, because they are in the same share. If you have bothMap entries and Widelink entries in the symlink.translations file, the storage system uses the firstmatching entry it finds.
About Widelink entriesWidelink entries are another way to redirect absolute symbolic links on your storage system. You createWidelink entries in the /etc/symlink.translations file.
Widelink entries allow CIFS clients to follow absolute symbolic links to target destinations either onthe same storage system or outside the storage system. They are enabled on a per-share basis.
Widelink entries have the following requirements:
300 | Data ONTAP 7.3 File Access and Protocols Management Guide

• The share in which the absolute symbolic links are located must be enabled for wide symbolic links.
• In order to resolve an absolute symbolic link, there must be a Widelink entry in the/etc/symlink.translations file that determines the destination of the link.
• The destination of the Widelink entry must be one of the following:
• The same share as the symbolic link
• Another share on the same storage system
• A share on another storage system
• A share on another CIFS server or desktop PC
• The CIFS client must have client-side support for Microsoft Distributed File System (DFS). WindowsNT and later clients support DFS by default.
To follow Widelink entries, the CIFS client automatically requests and receives a DFS referral fromthe storage system to establish an authenticated connection with the target share. This preserves NTshare security for both the symbolic link and the destination. Once the connection is established, theCIFS client can make new requests directly to the target share or server, thereby increasing performance.
If you have both Map entries and Widelink entries in the symlink.translations file, the storage systemuses the first matching entry it finds.
Widelink entries have the following limitations:
• Even if the destination of the wide symbolic link is a file, it appears as a directory in directorylistings. The system API for opening the file will correctly follow the wide symbolic link, but thismight confuse certain applications. To avoid this problem, you should create a wide symbolic linkthat resolves to a directory, rather than a file.
• Windows 95, Windows 98, and Windows ME clients cannot follow a wide symbolic link to anotherwide symbolic link.
• Windows NT clients cannot display or modify ACLs in a share enabled for wide symbolic links.This restriction does not apply to Windows 2000 and later clients.
• Wide symbolic links cannot direct a client to a non-shared area on the destination machine.
About disabling share boundary checking for symbolic linksWhen you disable share boundary checking for symbolic links, CIFS clients can follow symbolic linksanywhere on the storage system. This behavior is set on a per-share basis and affects both relative andabsolute symbolic links.
Disabling share boundary checking for symbolic links has the following requirements:
• The share in which the symbolic links are located must be set to nosymlink_strict_security.
• In order to resolve an absolute symbolic link, there must be a Map entry in the/etc/symlink.translations file that determines the destination of the link.
• The destinations for relative symbolic links and for mapped absolute symbolic links might be inany shared or non-shared area of the storage system.
File sharing between NFS and CIFS | 301
Disabling share boundary checking for symbolic links has the following limitations:
• Relative symbolic links cannot be used to span volumes; you must use absolute symbolic links.
• Symbolic links cannot be followed off the storage system to other systems.
• NT share security is preserved for the symbolic link itself because the CIFS client has to authenticateto connect to the share in which the symbolic link is located.
• NT share security is preserved for the destination of the symbolic link only if the destination is inthe same share.
• NT share security is not preserved for the destination of the symbolic link if the destination is outsidethe share, because the CIFS client does not have to authenticate to the destination (which might ormight not be a CIFS share).
Note: If you disable share boundary checking for symbolic links, be sure to secure any areas of thestorage system that you do not want users to access. This is necessary because a user can create asymbolic link to any path on the storage system.
Redirecting absolute symbolic linksYou can redirect absolute symbolic links on the storage system by creating Map entries in the/etc/symlink.translations file or creating Widelink entries in the /etc/symlink.translations file.
About this task
NFS clients interpret the file system location represented by an absolute symbolic link based on howthe file systems are mounted on the client. CIFS clients do not have access to NFS clients’ mountinformation.
To allow CIFS clients to follow absolute symbolic links on the storage system, you must redirect theabsolute symbolic link so that CIFS clients can interpret the file system location represented by theabsolute symbolic link. You can redirect absolute symbolic links by creating entries in the/etc/symlink.translations file. The /etc/symlink.translations file performs the same role on the storagesystem as automounter tables on UNIX servers
Next topics
Creating Map entries on page 302
Creating Widelink entries on page 303
Creating Map entries
You can create Map entries by editing the /etc/symlink.translations file.
Steps
1. Open the /etc/symlink.translations file for editing.2. Enter one or more lines in the file using the following format:
302 | Data ONTAP 7.3 File Access and Protocols Management Guide

Map template result
DescriptionParameter
Used to match absolute symbolic linkstemplate
A storage system path that is substituted for thematching absolute symbolic link
result
Note: To specify a space or pound (#) character in a file path, you must prepend a backslash (\)escape character.
Examples
Map /u/users/charlie/* /home/charlie/*
Map /temp1/* /vol/vol2/util/t/*
Map /u/users/bob\ smith/* /home/bob\ smith/*
Creating Widelink entries
You can create Widelink entries by editing the /etc/symlink.translations file.
Steps
1. Open the /etc/symlink.translations file for editing.
2. Enter one or more lines in the file using the following format:
Widelink template [@qtree] result
DescriptionParameter
The UNIX path nametemplate
The CIFS UNC path nameresult
Can be optionally specified to allow multiple entriesin different qtrees to have the same template value
qtree
Note: Unlike in a Map entry, you can specify a space and pound (#) character in a file pathwithout prepending a backslash (\) escape character. In fact, in a Widelink entry, a backslashcharacter is a standard file path character in accordance with the Universal Naming Convention.
File sharing between NFS and CIFS | 303

Examples
In the following examples, result uses CIFS path name syntax, with backslashes as separators,and allows an embedded space. The wildcard character (*) in the template path name representszero or more characters, including the backslash character (\). In the result path name, the wildcardcharacter represents text from the corresponding match in the template path name:
Widelink /eng/proj/* @/vol/vol2 \\filer\hw\proj\*
Widelink /eng/proj/* \\filer\sw\proj\*
How the storage system uses Map and Widelink entriesTo allow CIFS clients to follow absolute symbolic links, the storage system searches the entries in theetc/symlink.translations file in sequential order until a matching entry is found or the lookup fails.
The storage system uses the first matching entry it finds to generate a path to the destination. Therefore,it is important to put the most restrictive entries first to prevent premature mapping errors.
This example shows how to list Map entries. /u/home/* is more specific than /u/*:
Map /u/home/* /vol/vol2/home/*
Map /u/* /vol/vol0/*
This example shows how to list Widelink entries:
Widelink /u/docs/* \\filer\engr\tech pubs\*
Widelink /u/* \\filer\engr\*
Optimizing NFS directory access for CIFS clientsYou can optimize CIFS client access to an NFS directory by configuring Data ONTAP to convertnon-Unicode directories to Unicode format when either CIFS clients or NFS clients access directoriesand create only Unicode-formatted directories, thereby eliminating the need to convert formats.
About this task
Note: If you intend to share files between CIFS and NFS clients, configure Data ONTAP to createdirectories in Unicode format immediately after installing Data ONTAP. This will to ensure that allnew directories are created in Unicode format.
When you first install Data ONTAP, directories created by NFS clients are created in non-Unicodeformat and directories created by CIFS clients are in Unicode format. Because of this, CIFS directoriesare directly accessible to NFS clients, but NFS directories are not directly accessible to CIFS clients.To provide a CIFS client with access to an NFS directory, your storage system must first convert theNFS directory to Unicode format. This is done automatically (“on the fly”), as the storage system
304 | Data ONTAP 7.3 File Access and Protocols Management Guide
receives the access request. Depending on the amount of data involved, Unicode conversion can taketime and consume storage system resources.
Next topics
Creating Unicode-formatted directories on page 305
Converting to Unicode format on page 305
Creating Unicode-formatted directoriesYou can use the vol options command to cause Data ONTAP to create all directories in Unicodeformat.
Step
1. Enter the following command:
vol options volume_name create_ucode on
Converting to Unicode formatBy default, Data ONTAP performs Unicode conversion of a directory only when a CIFS client requestsaccess. You can reduce the time required for Unicode conversion by limiting the number of entries ineach directory to less than 50,000.
About this task
Once you already have large directories, you can minimize the performance impact of Unicode conversionby preemptively forcing Unicode conversion for large directories as described in the procedure below.
To force Unicode conversion of large directories and to convert directories to Unicode format whenthey are accessed from both CIFS and NFS clients, complete the following steps.
Steps
1. If you have a directory that contains more than 50,000 files, create a new CIFS directory from aWindows client on the same volume and in the same qtree as the directory you want to convert, usethe NFS mv command to move the files into the directory you just created, and optionally removethe old directory and assign its name to the new directory.
2. Enter the following command:
vol options volume_name convert_ucode on
Unicode conversion is performed when NFS clients access files.
Note: Do not enable the convert_ucode option when you have directories that contain more than50,000 files.
File sharing between NFS and CIFS | 305
Preventing CIFS clients from creating uppercase file namesYou can set the cifs.save_case option to off to prevent CIFS clients from creating uppercase filenames.
About this task
Older, 16-bit CIFS clients that open and save files change the file name by changing the lowercase ormixed-case characters to all uppercase characters. You can prevent these uppercase file names by forcingData ONTAP to store CIFS file names using lowercase characters.
Step
1. Enter the following command:
options cifs.save_case off
Accessing CIFS files from NFS clientsData ONTAP uses Windows NT File System (NTFS) security semantics to determine whether a UNIXuser, on an NFS client, has access to a file in a mixed or NTFS qtree.
About this task
Data ONTAP does this by converting the user’s UNIX User ID (UID) into a CIFS credential, then usingthe CIFS credential to verify that the user has access rights to the file. A CIFS credential consists of aprimary Security Identifier (SID), usually the user’s Windows user name, and one or more group SIDsthat correspond to Windows groups of which the user is a member.
The time Data ONTAP takes converting the UNIX UID into a CIFS credential can be from tens ofmilliseconds to hundreds of milliseconds because the process involves contacting a domain controller.Data ONTAP maps the UID to the CIFS credential and enters the mapping in a WAFL credential cacheto reduce the verification time caused by the conversion. You can control the WAFL credential cacheto further reduce the time Data ONTAP takes to verify rights. You can also monitor WAFL credentialcache statistics to help you determine what CIFS credentials are currently in the WAFL credentialcache.
Next topics
Adding mapping entries to the WAFL credential cache on page 307
Deleting mapping entries from the WAFL credential cache on page 307
Setting how long mapping entries are valid on page 308
Monitoring WAFL credential cache statistics on page 309
Managing mapping inconsistencies on page 311
306 | Data ONTAP 7.3 File Access and Protocols Management Guide
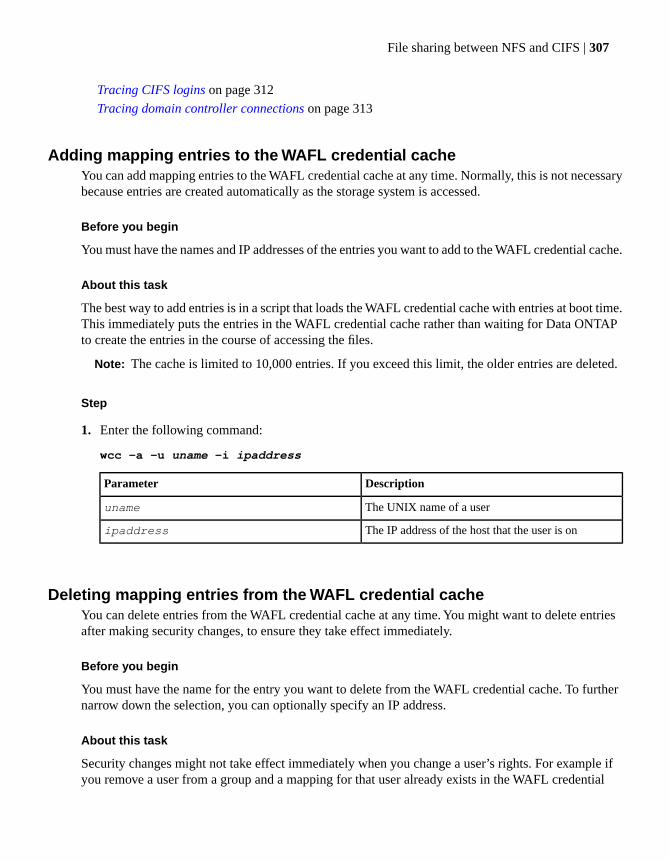
Tracing CIFS logins on page 312
Tracing domain controller connections on page 313
Adding mapping entries to the WAFL credential cacheYou can add mapping entries to the WAFL credential cache at any time. Normally, this is not necessarybecause entries are created automatically as the storage system is accessed.
Before you begin
You must have the names and IP addresses of the entries you want to add to the WAFL credential cache.
About this task
The best way to add entries is in a script that loads the WAFL credential cache with entries at boot time.This immediately puts the entries in the WAFL credential cache rather than waiting for Data ONTAPto create the entries in the course of accessing the files.
Note: The cache is limited to 10,000 entries. If you exceed this limit, the older entries are deleted.
Step
1. Enter the following command:
wcc -a -u uname -i ipaddress
DescriptionParameter
The UNIX name of a useruname
The IP address of the host that the user is onipaddress
Deleting mapping entries from the WAFL credential cacheYou can delete entries from the WAFL credential cache at any time. You might want to delete entriesafter making security changes, to ensure they take effect immediately.
Before you begin
You must have the name for the entry you want to delete from the WAFL credential cache. To furthernarrow down the selection, you can optionally specify an IP address.
About this task
Security changes might not take effect immediately when you change a user’s rights. For example ifyou remove a user from a group and a mapping for that user already exists in the WAFL credential
File sharing between NFS and CIFS | 307
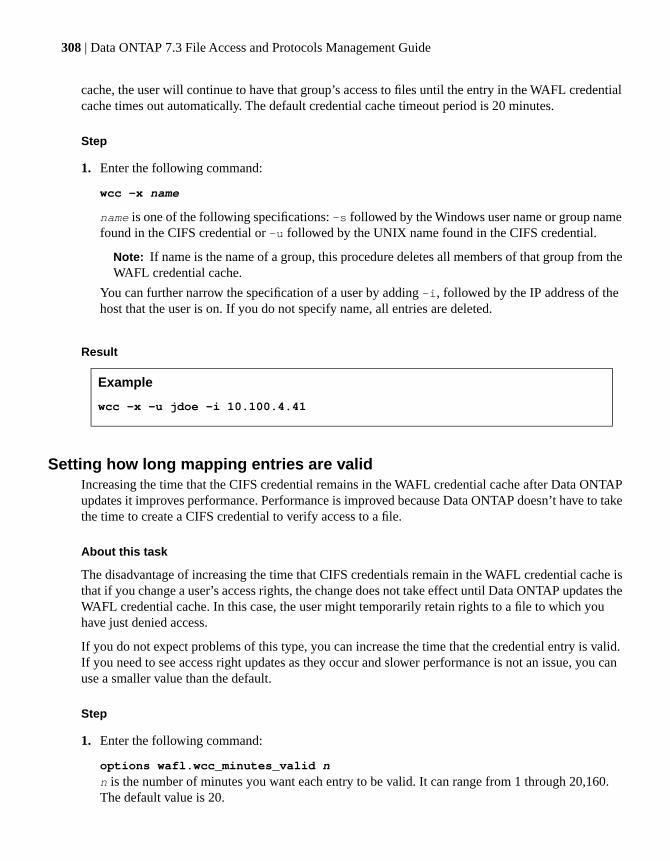
cache, the user will continue to have that group’s access to files until the entry in the WAFL credentialcache times out automatically. The default credential cache timeout period is 20 minutes.
Step
1. Enter the following command:
wcc -x name
name is one of the following specifications: -s followed by the Windows user name or group namefound in the CIFS credential or -u followed by the UNIX name found in the CIFS credential.
Note: If name is the name of a group, this procedure deletes all members of that group from theWAFL credential cache.
You can further narrow the specification of a user by adding -i, followed by the IP address of thehost that the user is on. If you do not specify name, all entries are deleted.
Result
Example
wcc -x -u jdoe -i 10.100.4.41
Setting how long mapping entries are validIncreasing the time that the CIFS credential remains in the WAFL credential cache after Data ONTAPupdates it improves performance. Performance is improved because Data ONTAP doesn’t have to takethe time to create a CIFS credential to verify access to a file.
About this task
The disadvantage of increasing the time that CIFS credentials remain in the WAFL credential cache isthat if you change a user’s access rights, the change does not take effect until Data ONTAP updates theWAFL credential cache. In this case, the user might temporarily retain rights to a file to which youhave just denied access.
If you do not expect problems of this type, you can increase the time that the credential entry is valid.If you need to see access right updates as they occur and slower performance is not an issue, you canuse a smaller value than the default.
Step
1. Enter the following command:
options wafl.wcc_minutes_valid n
n is the number of minutes you want each entry to be valid. It can range from 1 through 20,160.The default value is 20.
308 | Data ONTAP 7.3 File Access and Protocols Management Guide
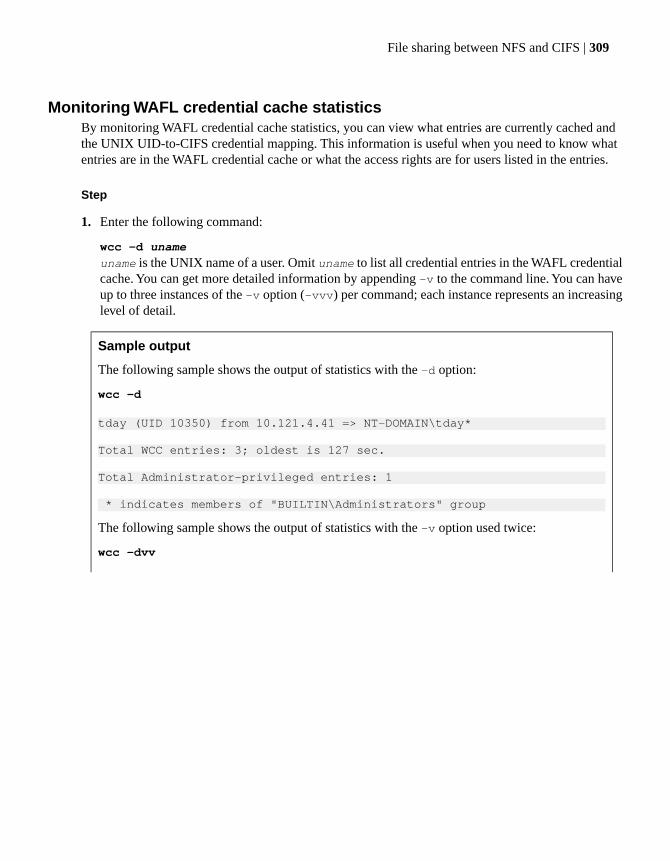
Monitoring WAFL credential cache statisticsBy monitoring WAFL credential cache statistics, you can view what entries are currently cached andthe UNIX UID-to-CIFS credential mapping. This information is useful when you need to know whatentries are in the WAFL credential cache or what the access rights are for users listed in the entries.
Step
1. Enter the following command:
wcc -d uname
uname is the UNIX name of a user. Omit uname to list all credential entries in the WAFL credentialcache. You can get more detailed information by appending -v to the command line. You can haveup to three instances of the -v option (-vvv) per command; each instance represents an increasinglevel of detail.
Sample output
The following sample shows the output of statistics with the -d option:
wcc -d
tday (UID 10350) from 10.121.4.41 => NT-DOMAIN\tday*
Total WCC entries: 3; oldest is 127 sec.
Total Administrator-privileged entries: 1
* indicates members of "BUILTIN\Administrators" group
The following sample shows the output of statistics with the -v option used twice:
wcc -dvv
File sharing between NFS and CIFS | 309
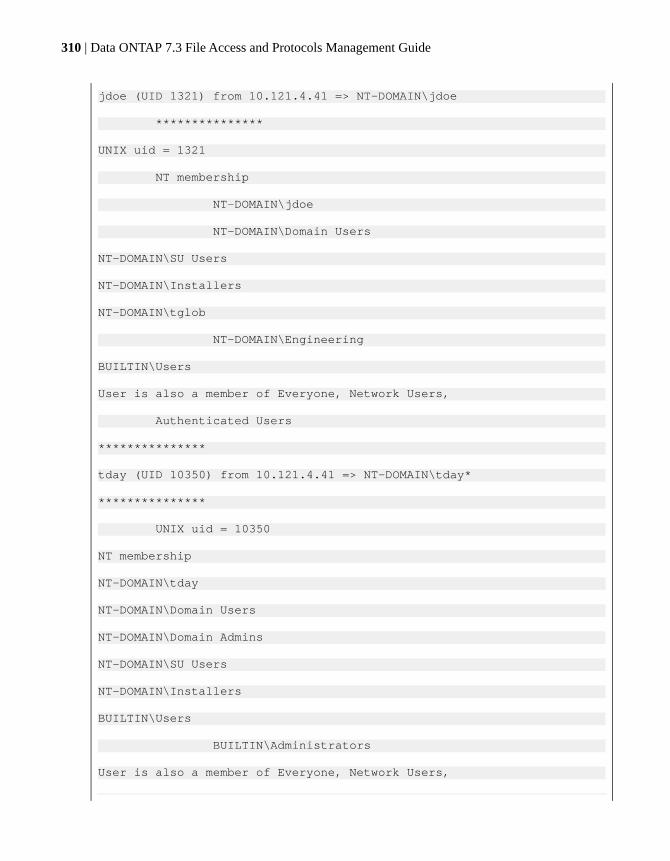
jdoe (UID 1321) from 10.121.4.41 => NT-DOMAIN\jdoe
***************
UNIX uid = 1321
NT membership
NT-DOMAIN\jdoe
NT-DOMAIN\Domain Users
NT-DOMAIN\SU Users
NT-DOMAIN\Installers
NT-DOMAIN\tglob
NT-DOMAIN\Engineering
BUILTIN\Users
User is also a member of Everyone, Network Users,
Authenticated Users
***************
tday (UID 10350) from 10.121.4.41 => NT-DOMAIN\tday*
***************
UNIX uid = 10350
NT membership
NT-DOMAIN\tday
NT-DOMAIN\Domain Users
NT-DOMAIN\Domain Admins
NT-DOMAIN\SU Users
NT-DOMAIN\Installers
BUILTIN\Users
BUILTIN\Administrators
User is also a member of Everyone, Network Users,
310 | Data ONTAP 7.3 File Access and Protocols Management Guide
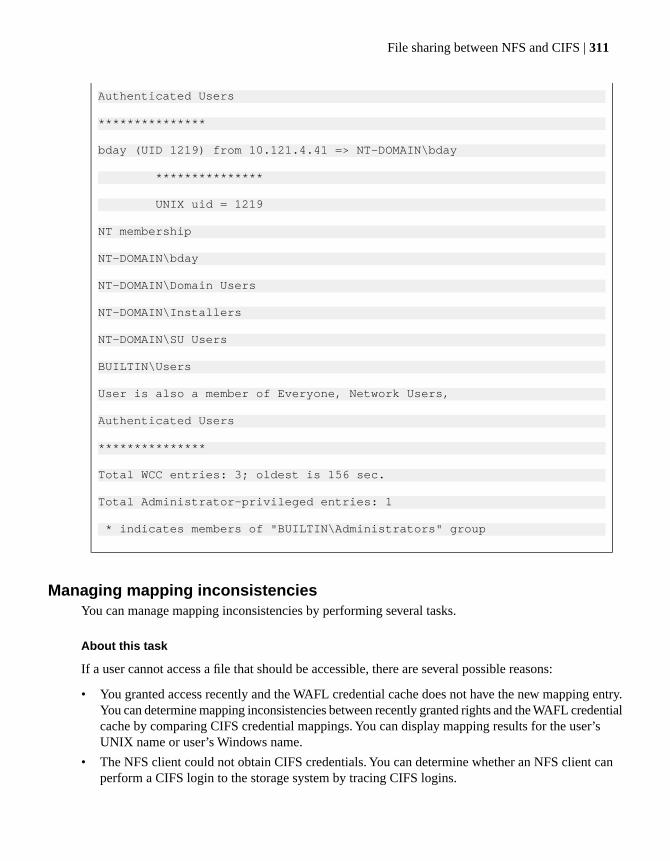
Authenticated Users
***************
bday (UID 1219) from 10.121.4.41 => NT-DOMAIN\bday
***************
UNIX uid = 1219
NT membership
NT-DOMAIN\bday
NT-DOMAIN\Domain Users
NT-DOMAIN\Installers
NT-DOMAIN\SU Users
BUILTIN\Users
User is also a member of Everyone, Network Users,
Authenticated Users
***************
Total WCC entries: 3; oldest is 156 sec.
Total Administrator-privileged entries: 1
* indicates members of "BUILTIN\Administrators" group
Managing mapping inconsistenciesYou can manage mapping inconsistencies by performing several tasks.
About this task
If a user cannot access a file that should be accessible, there are several possible reasons:
• You granted access recently and the WAFL credential cache does not have the new mapping entry.You can determine mapping inconsistencies between recently granted rights and the WAFL credentialcache by comparing CIFS credential mappings. You can display mapping results for the user’sUNIX name or user’s Windows name.
• The NFS client could not obtain CIFS credentials. You can determine whether an NFS client canperform a CIFS login to the storage system by tracing CIFS logins.
File sharing between NFS and CIFS | 311
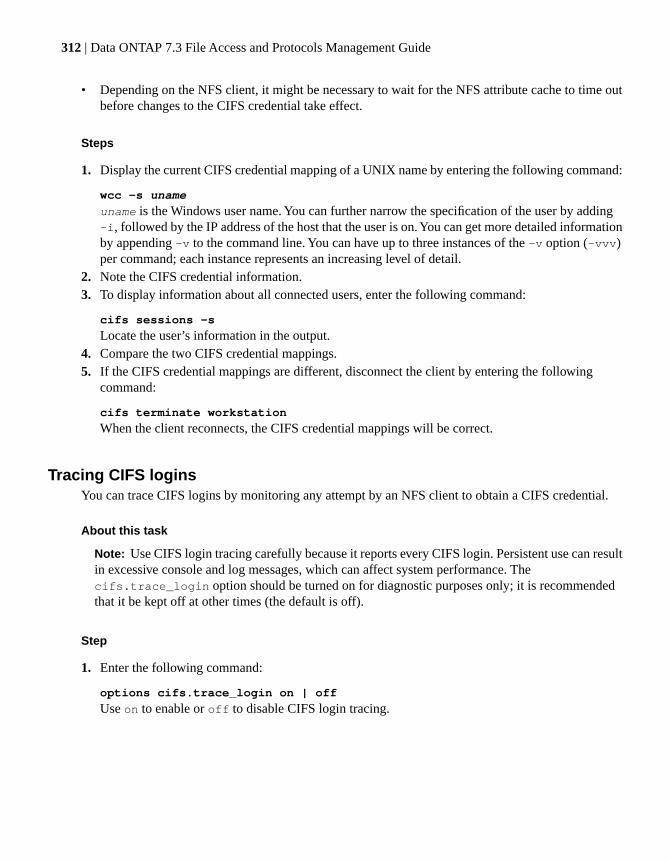
• Depending on the NFS client, it might be necessary to wait for the NFS attribute cache to time outbefore changes to the CIFS credential take effect.
Steps
1. Display the current CIFS credential mapping of a UNIX name by entering the following command:
wcc -s uname
uname is the Windows user name. You can further narrow the specification of the user by adding-i, followed by the IP address of the host that the user is on. You can get more detailed informationby appending -v to the command line. You can have up to three instances of the -v option (-vvv)per command; each instance represents an increasing level of detail.
2. Note the CIFS credential information.3. To display information about all connected users, enter the following command:
cifs sessions -s
Locate the user’s information in the output.4. Compare the two CIFS credential mappings.5. If the CIFS credential mappings are different, disconnect the client by entering the following
command:
cifs terminate workstation
When the client reconnects, the CIFS credential mappings will be correct.
Tracing CIFS loginsYou can trace CIFS logins by monitoring any attempt by an NFS client to obtain a CIFS credential.
About this task
Note: Use CIFS login tracing carefully because it reports every CIFS login. Persistent use can resultin excessive console and log messages, which can affect system performance. Thecifs.trace_login option should be turned on for diagnostic purposes only; it is recommendedthat it be kept off at other times (the default is off).
Step
1. Enter the following command:
options cifs.trace_login on | off
Use on to enable or off to disable CIFS login tracing.
312 | Data ONTAP 7.3 File Access and Protocols Management Guide

Tracing domain controller connectionsYou can configure Data ONTAP to send messages to the console when it tries to improve the domaincontroller connection every few minutes.
About this task
Note: Because tracing functions send frequent messages to the console and system log, do notpersistently enable this option.
Step
1. Enter the following command:
options cifs.trace_dc_connection on | off
The default is off.
Giving CIFS clients implicit permission to run .dll and .exefiles even when they lack UNIX "execute" permissions
You can set the cifs.grant_implicit_exe_perm option to on to allow CIFS clients to run .dll and.exe files even when the UNIX executable bit is not set.
Step
1. Enter the following command:
options cifs.grant_implicit_exe_perm on
Result
Executables with only "read" UNIX permissions are implicitly granted execute permissions when runfrom a CIFS client.
File sharing between NFS and CIFS | 313


File access using FTP
You can enable and configure the Internet File Transfer Protocol (FTP) server to let users of Windowsand UNIX FTP clients access the files on your storage system.
Next topics
Managing FTP on page 315
Managing the Secure File Transfer Protocol (SFTP) on page 328
Managing FTP over SSL (FTPS) on page 336
Managing FTP over IPv6 on page 339
Managing FTPYou can manage FTP by enabling or disabling it, configuring it, and viewing statistics related to it.
Next topics
Enabling or disabling the FTP server on page 316
Enabling or disabling FTP file locking on page 316
Specifying the FTP authentication style on page 317
Enabling or disabling the bypassing of FTP traverse checking on page 318
Restricting FTP access on page 319
Managing FTP log files on page 320
Viewing SNMP traps that the FTP server generates on page 323
Viewing FTP statistics on page 324
Resetting FTP statistics on page 325
Specifying the maximum number of FTP connections on page 325
Setting the FTP connection threshold on page 325
Specifying the TCP window size for FTP operations on page 326
Specifying the FTP idle timeout value on page 326
Managing anonymous FTP access on page 326
File access using FTP | 315
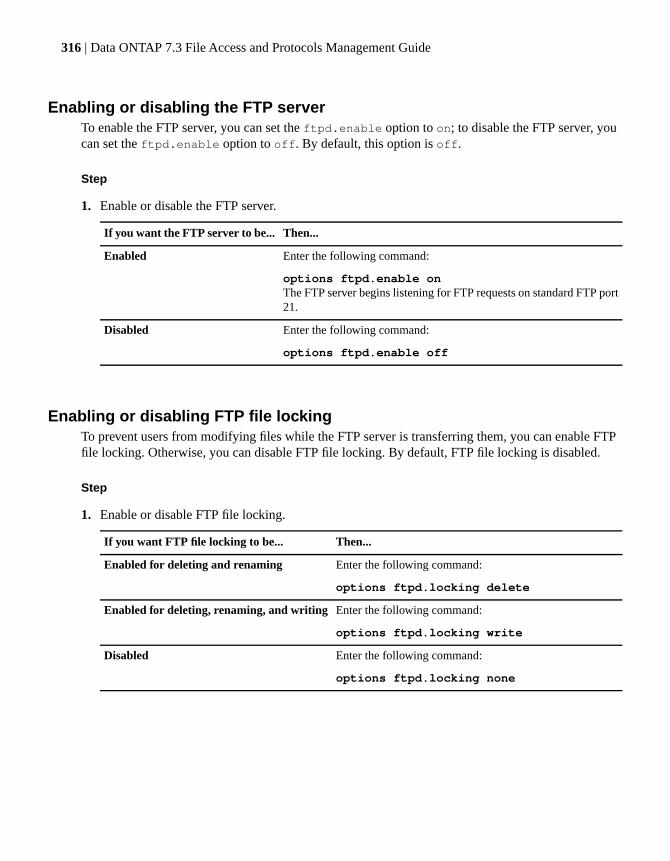
Enabling or disabling the FTP serverTo enable the FTP server, you can set the ftpd.enable option to on; to disable the FTP server, youcan set the ftpd.enable option to off. By default, this option is off.
Step
1. Enable or disable the FTP server.
Then...If you want the FTP server to be...
Enter the following command:
options ftpd.enable onThe FTP server begins listening for FTP requests on standard FTP port21.
Enabled
Enter the following command:
options ftpd.enable off
Disabled
Enabling or disabling FTP file lockingTo prevent users from modifying files while the FTP server is transferring them, you can enable FTPfile locking. Otherwise, you can disable FTP file locking. By default, FTP file locking is disabled.
Step
1. Enable or disable FTP file locking.
Then...If you want FTP file locking to be...
Enter the following command:
options ftpd.locking delete
Enabled for deleting and renaming
Enter the following command:
options ftpd.locking write
Enabled for deleting, renaming, and writing
Enter the following command:
options ftpd.locking none
Disabled
316 | Data ONTAP 7.3 File Access and Protocols Management Guide
Specifying the FTP authentication styleTo configure the FTP server to use UNIX, Windows, or both authentication styles, you can set theftpd.auth_style option to unix, ntlm, or mixed, respectively. By default, this option is mixed.
About this task
When you specify the UNIX authentication style, the FTP server authenticates users using the /etc/passwdfile or Network Information Service (NIS) server.
When you specify the NTLM authentication style, the FTP server authenticates users using the Windowsdomain controller. The NTLM authentication style is more secure than the UNIX authentication stylebecause it uses encrypted user names and passwords.
When you specify the mixed authentication style, the FTP server uses the UNIX authentication stylefor users with names containing a backslash (\) character; it uses the NTLM authentication style for allother users.
Steps
1. Enter the following command:
options ftpd.auth_style style
style is unix, ntlm, or mixed.2. If you specified ntlm in Step 1, specify the CIFS home directory in the /etc/cifs_homedir.cfg file
and then enter the following command:
cifs homedir load
The home directory of a user is a combination of the path you specify in /etc/cifs_homedir.cfg andthe user ID of the user. The path you specify in /etc/cifs_homedir.cfg is case-sensitive; however,the user ID is not case-sensitive. For example, if the path is \home and the user name is JOHN, thehome directory for the user is \home\john.
After you finish
If you set the ftpd.auth_style option to unix and you previously enabled NIS (that is, if thenis.enable option is on), you must add an appropriate passwd entry to the /etc/nsswitch file.
• To authenticate users using the /etc/passwd file only, add the following entry:
passwd: files
• To authenticate users using NIS only, add the following entry:
passwd: nis
• To authenticate users using both the /etc/passwd file and NIS, add the following entry:
passwd: files nis
File access using FTP | 317
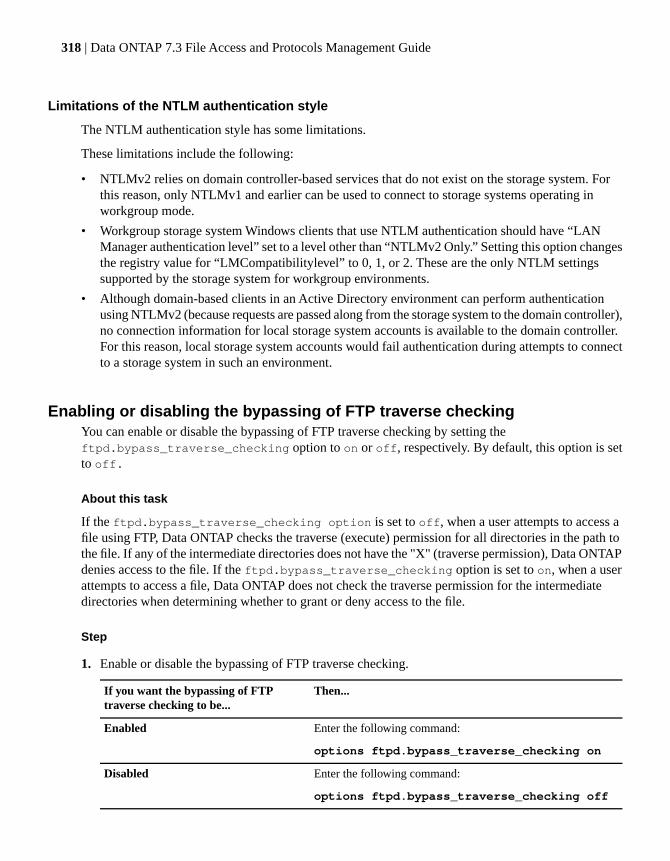
Limitations of the NTLM authentication style
The NTLM authentication style has some limitations.
These limitations include the following:
• NTLMv2 relies on domain controller-based services that do not exist on the storage system. Forthis reason, only NTLMv1 and earlier can be used to connect to storage systems operating inworkgroup mode.
• Workgroup storage system Windows clients that use NTLM authentication should have “LANManager authentication level” set to a level other than “NTLMv2 Only.” Setting this option changesthe registry value for “LMCompatibilitylevel” to 0, 1, or 2. These are the only NTLM settingssupported by the storage system for workgroup environments.
• Although domain-based clients in an Active Directory environment can perform authenticationusing NTLMv2 (because requests are passed along from the storage system to the domain controller),no connection information for local storage system accounts is available to the domain controller.For this reason, local storage system accounts would fail authentication during attempts to connectto a storage system in such an environment.
Enabling or disabling the bypassing of FTP traverse checkingYou can enable or disable the bypassing of FTP traverse checking by setting theftpd.bypass_traverse_checking option to on or off, respectively. By default, this option is setto off.
About this task
If the ftpd.bypass_traverse_checking option is set to off, when a user attempts to access afile using FTP, Data ONTAP checks the traverse (execute) permission for all directories in the path tothe file. If any of the intermediate directories does not have the "X" (traverse permission), Data ONTAPdenies access to the file. If the ftpd.bypass_traverse_checking option is set to on, when a userattempts to access a file, Data ONTAP does not check the traverse permission for the intermediatedirectories when determining whether to grant or deny access to the file.
Step
1. Enable or disable the bypassing of FTP traverse checking.
Then...If you want the bypassing of FTPtraverse checking to be...
Enter the following command:
options ftpd.bypass_traverse_checking on
Enabled
Enter the following command:
options ftpd.bypass_traverse_checking off
Disabled
318 | Data ONTAP 7.3 File Access and Protocols Management Guide

Restricting FTP accessYou can restrict FTP access by blocking FTP users and restricting FTP users to a specific directory(either their home directories or a default directory).
Next topics
Blocking specific FTP users on page 319
Restricting FTP users to a specific directory on page 319
Restricting FTP users to their home directories or a default directory on page 320
Blocking specific FTP users
To prevent specific FTP users from accessing the storage system, you can add them to the /etc/ftpusersfile.
Steps
1. Access the /etc/ directory on the storage system's default volume (/vol/vol0 by default) from an NFSor CIFS client.
2. Open the /etc/ftpusers file in a text editor. (If the file does not exist, create it.)3. Add the user names of the users (one name per line) to whom you want to deny access.
For NTLM authentication, you must specify user names using one of the following formats:
• Domain\username
• Username@domain
Note: In the preceding formats, you must specify the exact name of the domain; otherwise, theFTP server will not deny access to the user. For example, if the name of a domain includes a".com" suffix, you must include that suffix.
4. Save the /etc/ftpusers file.
Restricting FTP users to a specific directory
To restrict FTP users to a specific directory, you can set the ftpd.dir.restriction option to on;otherwise, to let FTP users access the entire storage system, you can set the ftpd.dir.restrictionoption to off. By default, this option is on.
Step
1. Restrict FTP users to their home directories or let them access the entire storage system.
File access using FTP | 319
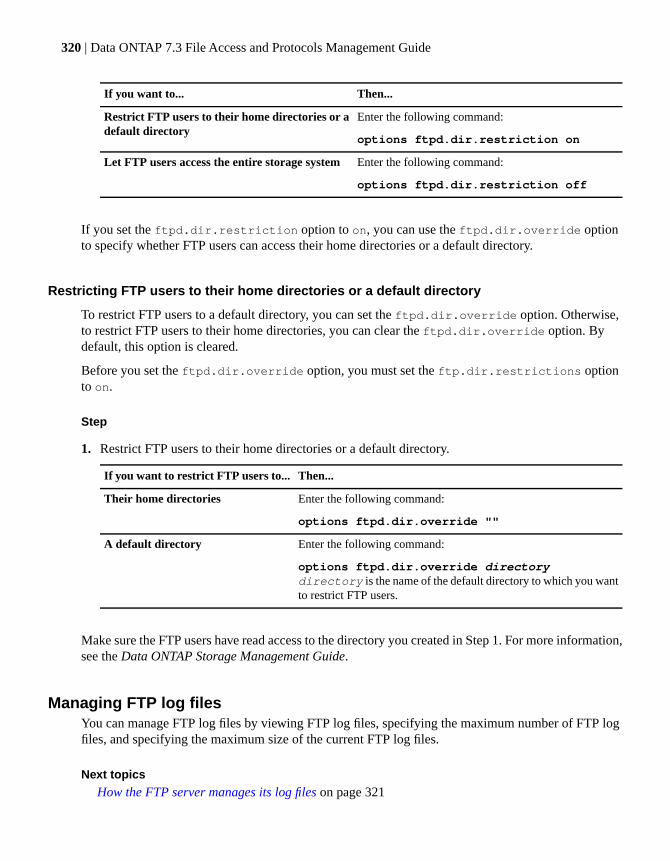
Then...If you want to...
Enter the following command:
options ftpd.dir.restriction on
Restrict FTP users to their home directories or adefault directory
Enter the following command:
options ftpd.dir.restriction off
Let FTP users access the entire storage system
If you set the ftpd.dir.restriction option to on, you can use the ftpd.dir.override optionto specify whether FTP users can access their home directories or a default directory.
Restricting FTP users to their home directories or a default directory
To restrict FTP users to a default directory, you can set the ftpd.dir.override option. Otherwise,to restrict FTP users to their home directories, you can clear the ftpd.dir.override option. Bydefault, this option is cleared.
Before you set the ftpd.dir.override option, you must set the ftp.dir.restrictions optionto on.
Step
1. Restrict FTP users to their home directories or a default directory.
Then...If you want to restrict FTP users to...
Enter the following command:
options ftpd.dir.override ""
Their home directories
Enter the following command:
options ftpd.dir.override directorydirectory is the name of the default directory to which you wantto restrict FTP users.
A default directory
Make sure the FTP users have read access to the directory you created in Step 1. For more information,see the Data ONTAP Storage Management Guide.
Managing FTP log filesYou can manage FTP log files by viewing FTP log files, specifying the maximum number of FTP logfiles, and specifying the maximum size of the current FTP log files.
Next topics
How the FTP server manages its log files on page 321
320 | Data ONTAP 7.3 File Access and Protocols Management Guide
The /etc/log/ftp.xfer log file format on page 321
The /etc/log/ftp.cmd log file format on page 322
Viewing an FTP log file on page 322
Specifying the maximum number of FTP log files on page 322
Specifying the maximum size of the current FTP log files on page 323
How the FTP server manages its log files
Data ONTAP logs all FTP server requests in the /etc/log/ftp.cmd file and all file transfers in the/etc/log/ftp.xfer file.
Data ONTAP writes data to an FTP log file (either the /etc/log/ftp.cmd or /etc/log/ftp.xfer file) untilthe FTP log file reaches its maximum size. Then Data ONTAP performs the following tasks:
1. If the total number of FTP log files is equal to the maximum number of FTP log files, it deletes theoldest FTP log file.
2. It increments the suffixes of the old FTP log files.3. It adds the .1 suffix to the current FTP log file, thereby making it an old FTP log file.4. It creates a new FTP log file.
Example
Assuming that the maximum number of log files is 6, when the /etc/log/ftp.xfer log file reachesits maximum size, Data ONTAP performs the following tasks:
1. It deletes the /etc/log/ftp.xfer.5 file, if the file exists.2. It renames /etc/log/ftp.xfer.4 to /etc/log/ftp.xfer.5, /etc/log/ftp.xfer.3 to /etc/log/ftp.xfer.4, and
so on.3. It renames /etc/log/ftp.xfer to /etc/log/ftp.xfer.1.4. It creates a new /etc/log/ftp.xfer log file.
The /etc/log/ftp.xfer log file format
The /etc/log/ftp.xfer file contains information on all files that the FTP server transfers.
The following table describes the fields in the /etc/log/ftp.xfer file.
DescriptionField
Timestamp of the log recordtimestamp
Duration, in seconds, of the file transferxferTime
IP address of the FTP clientclientIP
Byte count of transferred filexferCount
File access using FTP | 321
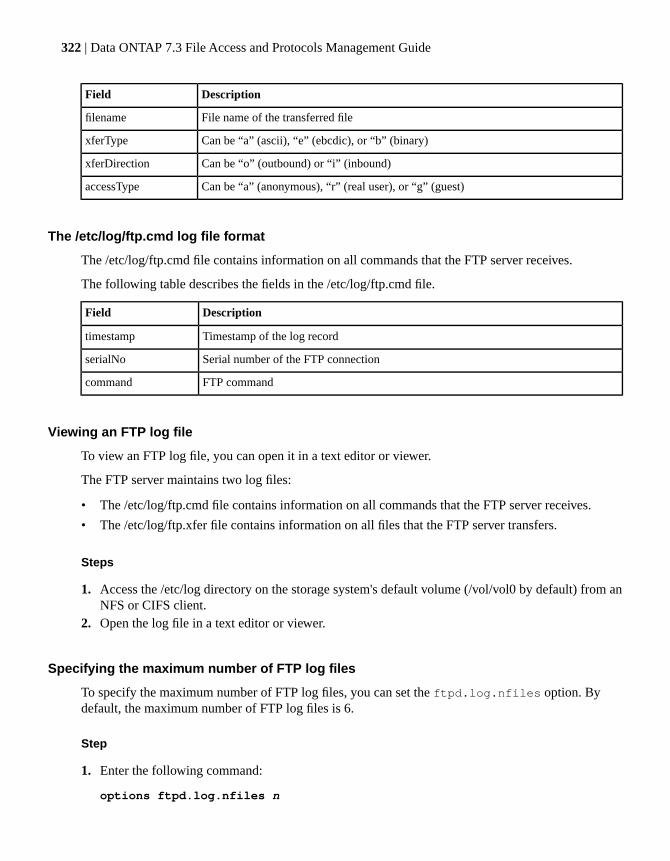
DescriptionField
File name of the transferred filefilename
Can be “a” (ascii), “e” (ebcdic), or “b” (binary)xferType
Can be “o” (outbound) or “i” (inbound)xferDirection
Can be “a” (anonymous), “r” (real user), or “g” (guest)accessType
The /etc/log/ftp.cmd log file format
The /etc/log/ftp.cmd file contains information on all commands that the FTP server receives.
The following table describes the fields in the /etc/log/ftp.cmd file.
DescriptionField
Timestamp of the log recordtimestamp
Serial number of the FTP connectionserialNo
FTP commandcommand
Viewing an FTP log file
To view an FTP log file, you can open it in a text editor or viewer.
The FTP server maintains two log files:
• The /etc/log/ftp.cmd file contains information on all commands that the FTP server receives.
• The /etc/log/ftp.xfer file contains information on all files that the FTP server transfers.
Steps
1. Access the /etc/log directory on the storage system's default volume (/vol/vol0 by default) from anNFS or CIFS client.
2. Open the log file in a text editor or viewer.
Specifying the maximum number of FTP log files
To specify the maximum number of FTP log files, you can set the ftpd.log.nfiles option. Bydefault, the maximum number of FTP log files is 6.
Step
1. Enter the following command:
options ftpd.log.nfiles n
322 | Data ONTAP 7.3 File Access and Protocols Management Guide
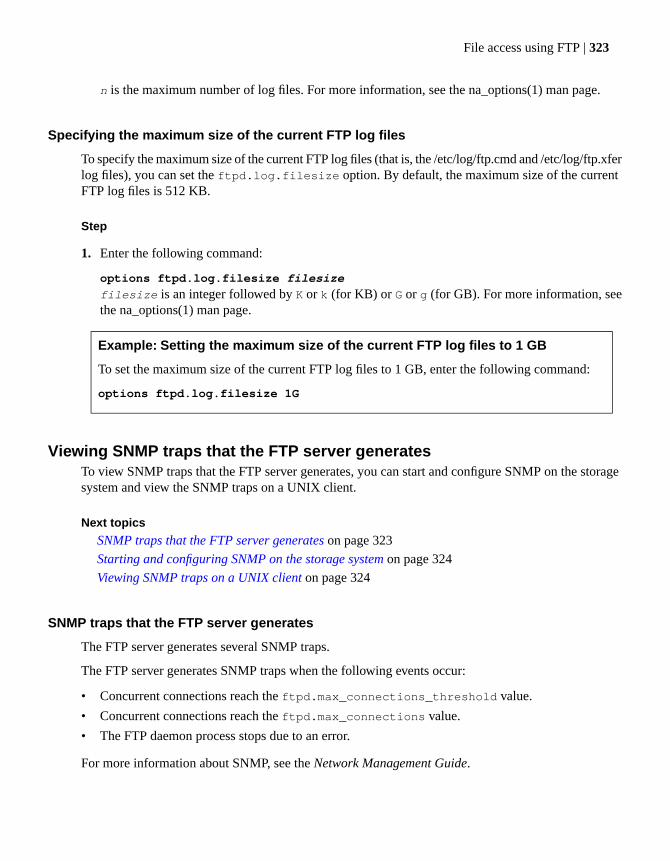
n is the maximum number of log files. For more information, see the na_options(1) man page.
Specifying the maximum size of the current FTP log files
To specify the maximum size of the current FTP log files (that is, the /etc/log/ftp.cmd and /etc/log/ftp.xferlog files), you can set the ftpd.log.filesize option. By default, the maximum size of the currentFTP log files is 512 KB.
Step
1. Enter the following command:
options ftpd.log.filesize filesize
filesize is an integer followed by K or k (for KB) or G or g (for GB). For more information, seethe na_options(1) man page.
Example: Setting the maximum size of the current FTP log files to 1 GB
To set the maximum size of the current FTP log files to 1 GB, enter the following command:
options ftpd.log.filesize 1G
Viewing SNMP traps that the FTP server generatesTo view SNMP traps that the FTP server generates, you can start and configure SNMP on the storagesystem and view the SNMP traps on a UNIX client.
Next topics
SNMP traps that the FTP server generates on page 323
Starting and configuring SNMP on the storage system on page 324
Viewing SNMP traps on a UNIX client on page 324
SNMP traps that the FTP server generates
The FTP server generates several SNMP traps.
The FTP server generates SNMP traps when the following events occur:
• Concurrent connections reach the ftpd.max_connections_threshold value.
• Concurrent connections reach the ftpd.max_connections value.
• The FTP daemon process stops due to an error.
For more information about SNMP, see the Network Management Guide.
File access using FTP | 323

Starting and configuring SNMP on the storage system
To start SNMP on the storage system, you can use the snmp command.
Steps
1. Enter the following command:
snmp init 1
2. Enter the following command:
snmp traphost add hostname
hostname is the host name of the UNIX client that will receive SNMP traps that the FTP servergenerates.
You must enable SNMP traps on the UNIX client that you specified in Step 2.
Viewing SNMP traps on a UNIX client
To view SNMP traps on a UNIX client, you can enter the snmptrapd -P command.
Before you can view SNMP traps on a UNIX client, you must start and configure SNMP on the storagesystem.
Step
1. Enter the following command:
snmptrapd -P
Viewing FTP statisticsTo view FTP statistics, you can enter the ftp stat command.
Step
1. Enter the following command:
ftp stat -p native
You an also use this command to view SFTP-only, explicit-FTPS-only, implicit-FTPS-only,IPv4-only, or IPv6-only statistics. For more information, see the na_ftp(1) man page.
Result
The ftp stat command displays the following statistics:
324 | Data ONTAP 7.3 File Access and Protocols Management Guide
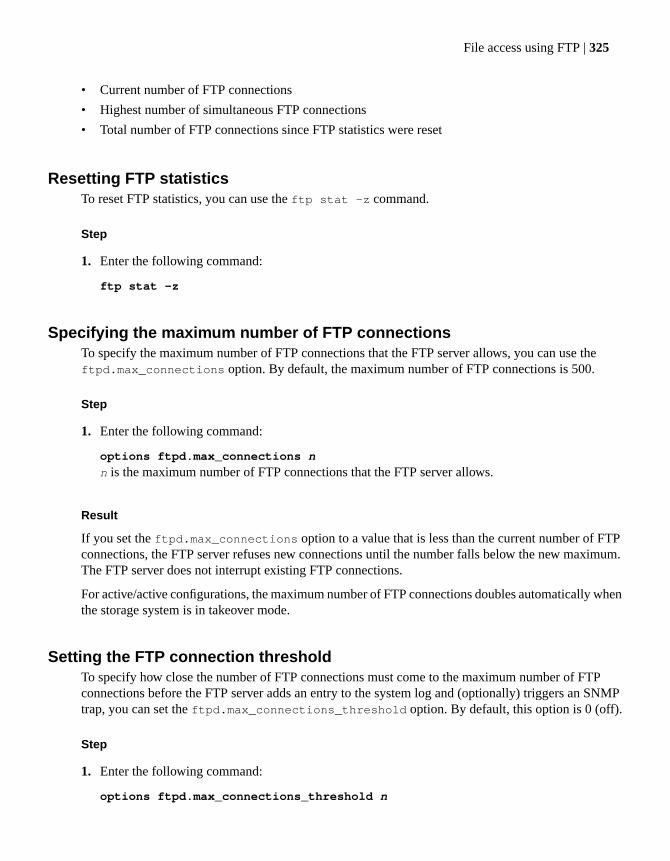
• Current number of FTP connections
• Highest number of simultaneous FTP connections
• Total number of FTP connections since FTP statistics were reset
Resetting FTP statisticsTo reset FTP statistics, you can use the ftp stat -z command.
Step
1. Enter the following command:
ftp stat -z
Specifying the maximum number of FTP connectionsTo specify the maximum number of FTP connections that the FTP server allows, you can use theftpd.max_connections option. By default, the maximum number of FTP connections is 500.
Step
1. Enter the following command:
options ftpd.max_connections n
n is the maximum number of FTP connections that the FTP server allows.
Result
If you set the ftpd.max_connections option to a value that is less than the current number of FTPconnections, the FTP server refuses new connections until the number falls below the new maximum.The FTP server does not interrupt existing FTP connections.
For active/active configurations, the maximum number of FTP connections doubles automatically whenthe storage system is in takeover mode.
Setting the FTP connection thresholdTo specify how close the number of FTP connections must come to the maximum number of FTPconnections before the FTP server adds an entry to the system log and (optionally) triggers an SNMPtrap, you can set the ftpd.max_connections_threshold option. By default, this option is 0 (off).
Step
1. Enter the following command:
options ftpd.max_connections_threshold n
File access using FTP | 325
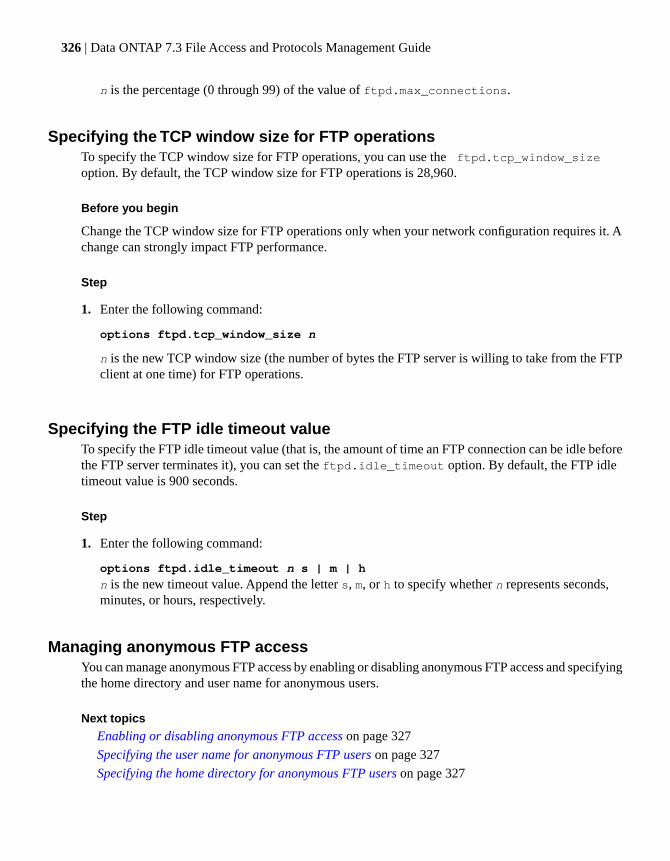
n is the percentage (0 through 99) of the value of ftpd.max_connections.
Specifying the TCP window size for FTP operationsTo specify the TCP window size for FTP operations, you can use the ftpd.tcp_window_sizeoption. By default, the TCP window size for FTP operations is 28,960.
Before you begin
Change the TCP window size for FTP operations only when your network configuration requires it. Achange can strongly impact FTP performance.
Step
1. Enter the following command:
options ftpd.tcp_window_size n
n is the new TCP window size (the number of bytes the FTP server is willing to take from the FTPclient at one time) for FTP operations.
Specifying the FTP idle timeout valueTo specify the FTP idle timeout value (that is, the amount of time an FTP connection can be idle beforethe FTP server terminates it), you can set the ftpd.idle_timeout option. By default, the FTP idletimeout value is 900 seconds.
Step
1. Enter the following command:
options ftpd.idle_timeout n s | m | h
n is the new timeout value. Append the letter s, m, or h to specify whether n represents seconds,minutes, or hours, respectively.
Managing anonymous FTP accessYou can manage anonymous FTP access by enabling or disabling anonymous FTP access and specifyingthe home directory and user name for anonymous users.
Next topics
Enabling or disabling anonymous FTP access on page 327
Specifying the user name for anonymous FTP users on page 327
Specifying the home directory for anonymous FTP users on page 327
326 | Data ONTAP 7.3 File Access and Protocols Management Guide
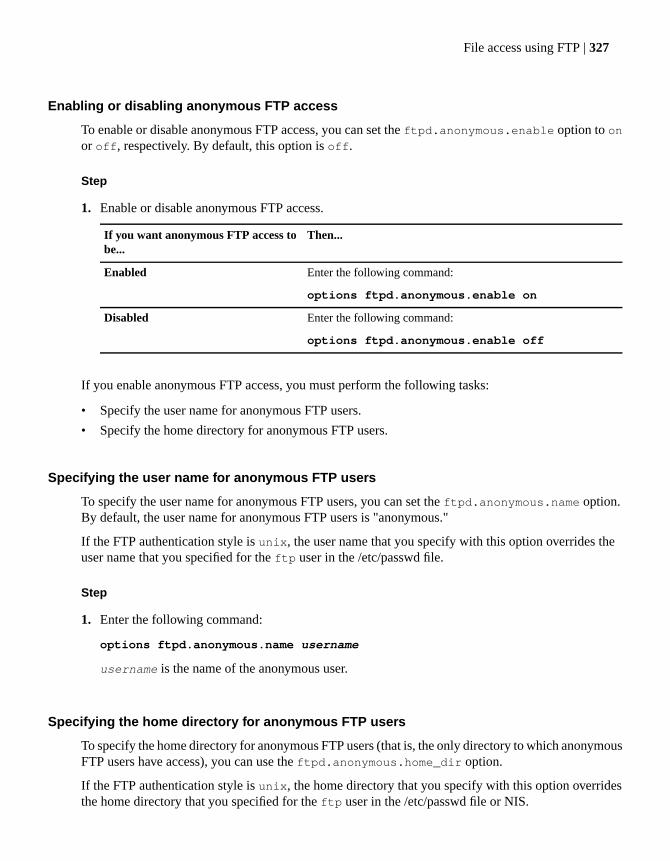
Enabling or disabling anonymous FTP access
To enable or disable anonymous FTP access, you can set the ftpd.anonymous.enable option to onor off, respectively. By default, this option is off.
Step
1. Enable or disable anonymous FTP access.
Then...If you want anonymous FTP access tobe...
Enter the following command:
options ftpd.anonymous.enable on
Enabled
Enter the following command:
options ftpd.anonymous.enable off
Disabled
If you enable anonymous FTP access, you must perform the following tasks:
• Specify the user name for anonymous FTP users.
• Specify the home directory for anonymous FTP users.
Specifying the user name for anonymous FTP users
To specify the user name for anonymous FTP users, you can set the ftpd.anonymous.name option.By default, the user name for anonymous FTP users is "anonymous."
If the FTP authentication style is unix, the user name that you specify with this option overrides theuser name that you specified for the ftp user in the /etc/passwd file.
Step
1. Enter the following command:
options ftpd.anonymous.name username
username is the name of the anonymous user.
Specifying the home directory for anonymous FTP users
To specify the home directory for anonymous FTP users (that is, the only directory to which anonymousFTP users have access), you can use the ftpd.anonymous.home_dir option.
If the FTP authentication style is unix, the home directory that you specify with this option overridesthe home directory that you specified for the ftp user in the /etc/passwd file or NIS.
File access using FTP | 327
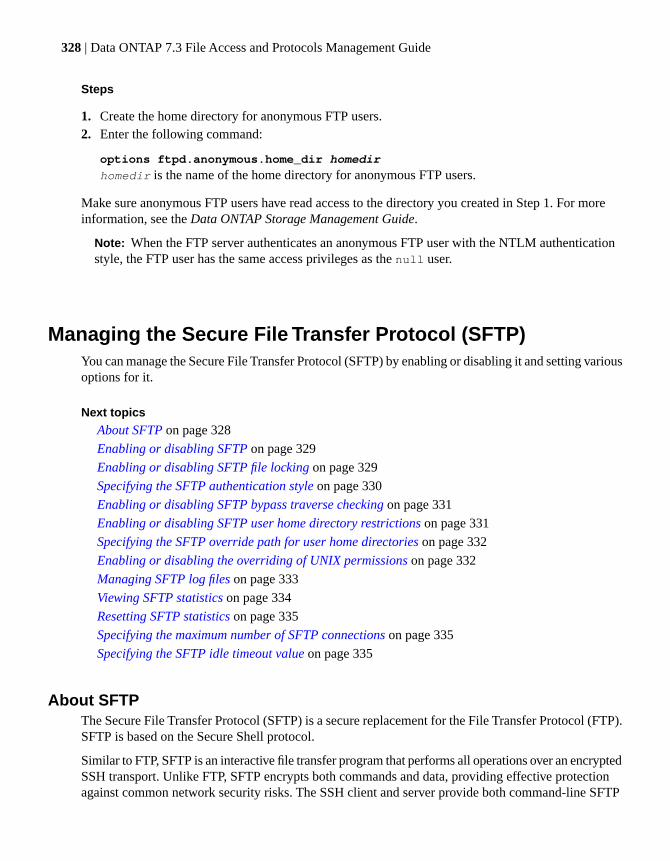
Steps
1. Create the home directory for anonymous FTP users.2. Enter the following command:
options ftpd.anonymous.home_dir homedir
homedir is the name of the home directory for anonymous FTP users.
Make sure anonymous FTP users have read access to the directory you created in Step 1. For moreinformation, see the Data ONTAP Storage Management Guide.
Note: When the FTP server authenticates an anonymous FTP user with the NTLM authenticationstyle, the FTP user has the same access privileges as the null user.
Managing the Secure File Transfer Protocol (SFTP)You can manage the Secure File Transfer Protocol (SFTP) by enabling or disabling it and setting variousoptions for it.
Next topics
About SFTP on page 328
Enabling or disabling SFTP on page 329
Enabling or disabling SFTP file locking on page 329
Specifying the SFTP authentication style on page 330
Enabling or disabling SFTP bypass traverse checking on page 331
Enabling or disabling SFTP user home directory restrictions on page 331
Specifying the SFTP override path for user home directories on page 332
Enabling or disabling the overriding of UNIX permissions on page 332
Managing SFTP log files on page 333
Viewing SFTP statistics on page 334
Resetting SFTP statistics on page 335
Specifying the maximum number of SFTP connections on page 335
Specifying the SFTP idle timeout value on page 335
About SFTPThe Secure File Transfer Protocol (SFTP) is a secure replacement for the File Transfer Protocol (FTP).SFTP is based on the Secure Shell protocol.
Similar to FTP, SFTP is an interactive file transfer program that performs all operations over an encryptedSSH transport. Unlike FTP, SFTP encrypts both commands and data, providing effective protectionagainst common network security risks. The SSH client and server provide both command-line SFTP
328 | Data ONTAP 7.3 File Access and Protocols Management Guide

tools and a graphical user interface for Windows users. SFTP encrypts the session, preventing the casualdetection of your user name, password, or anything you have transmitted. This protocol assumes thatit runs over a secure channel, that the server has already authenticated the user at the client end, andthat the identity of the client user is externally available to the server implementation. SFTP runs fromthe SSH Connection Protocol as a subsystem.
Data ONTAP implements SFTP in accordance with version 03 of the Internet-Draft of the SSH FileTransfer Protocol, which is available at http://tools.ietf.org/html/draft-ietf-secsh-filexfer-03.
Enabling or disabling SFTPTo enable or disable SFTP, you can set the sftp.enable option to on or off, respectively. Bydefault, this option is off.
Before you begin
Before you can enable SFTP, you must setup and start SSH using the secureadmin command. Formore information, see the na_secureadmin(1) man page or the Data ONTAP System AdministrationGuide .
Step
1. Enable or disable SFTP.
Then...If you want SFTP to be...
Enter the following command:
options sftp.enable on
Enabled
Enter the following command:
options sftp.enable off
Disabled
Enabling or disabling SFTP file lockingTo prevent users from modifying files while the SFTP server is transferring them, you can enable SFTPfile locking. By default, SFTP file locking is disabled.
Step
1. Enable or disable SFTP file locking.
Then...If you want SFTP file locking to be...
Enter the following comand:
options sftp.locking none
Disabled
File access using FTP | 329
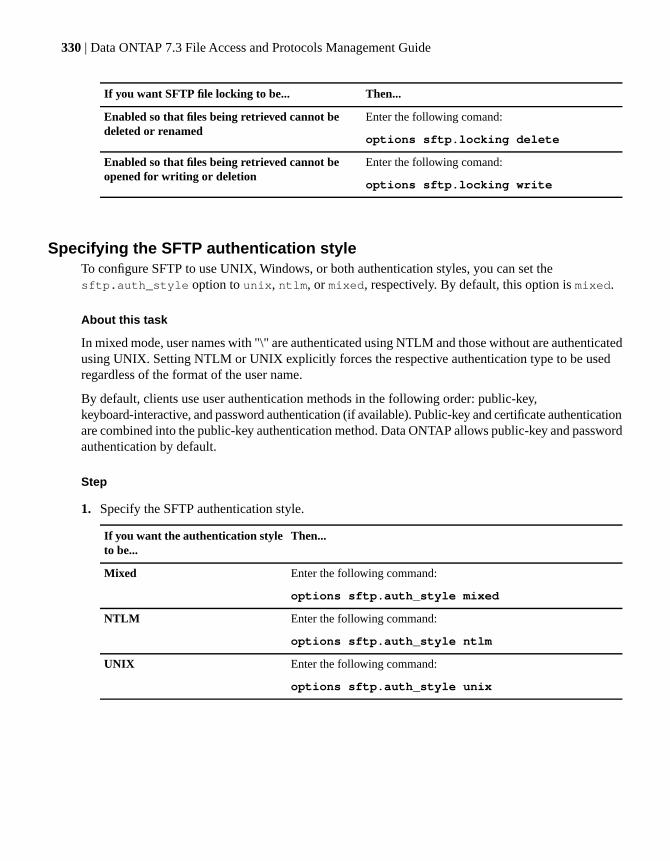
Then...If you want SFTP file locking to be...
Enter the following comand:
options sftp.locking delete
Enabled so that files being retrieved cannot bedeleted or renamed
Enter the following comand:
options sftp.locking write
Enabled so that files being retrieved cannot beopened for writing or deletion
Specifying the SFTP authentication styleTo configure SFTP to use UNIX, Windows, or both authentication styles, you can set thesftp.auth_style option to unix, ntlm, or mixed, respectively. By default, this option is mixed.
About this task
In mixed mode, user names with "\" are authenticated using NTLM and those without are authenticatedusing UNIX. Setting NTLM or UNIX explicitly forces the respective authentication type to be usedregardless of the format of the user name.
By default, clients use user authentication methods in the following order: public-key,keyboard-interactive, and password authentication (if available). Public-key and certificate authenticationare combined into the public-key authentication method. Data ONTAP allows public-key and passwordauthentication by default.
Step
1. Specify the SFTP authentication style.
Then...If you want the authentication styleto be...
Enter the following command:
options sftp.auth_style mixed
Mixed
Enter the following command:
options sftp.auth_style ntlm
NTLM
Enter the following command:
options sftp.auth_style unix
UNIX
330 | Data ONTAP 7.3 File Access and Protocols Management Guide
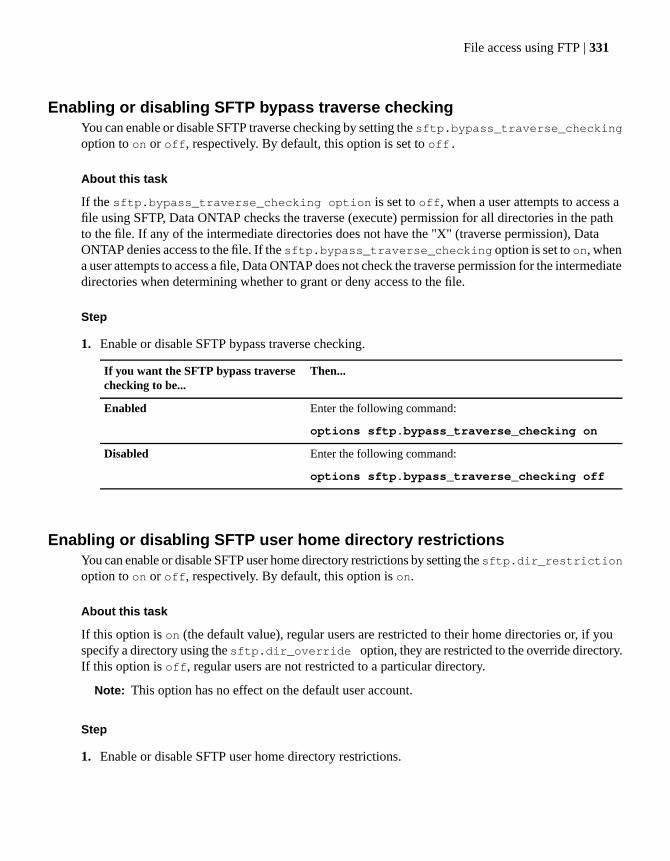
Enabling or disabling SFTP bypass traverse checkingYou can enable or disable SFTP traverse checking by setting the sftp.bypass_traverse_checkingoption to on or off, respectively. By default, this option is set to off.
About this task
If the sftp.bypass_traverse_checking option is set to off, when a user attempts to access afile using SFTP, Data ONTAP checks the traverse (execute) permission for all directories in the pathto the file. If any of the intermediate directories does not have the "X" (traverse permission), DataONTAP denies access to the file. If the sftp.bypass_traverse_checking option is set to on, whena user attempts to access a file, Data ONTAP does not check the traverse permission for the intermediatedirectories when determining whether to grant or deny access to the file.
Step
1. Enable or disable SFTP bypass traverse checking.
Then...If you want the SFTP bypass traversechecking to be...
Enter the following command:
options sftp.bypass_traverse_checking on
Enabled
Enter the following command:
options sftp.bypass_traverse_checking off
Disabled
Enabling or disabling SFTP user home directory restrictionsYou can enable or disable SFTP user home directory restrictions by setting the sftp.dir_restrictionoption to on or off, respectively. By default, this option is on.
About this task
If this option is on (the default value), regular users are restricted to their home directories or, if youspecify a directory using the sftp.dir_override option, they are restricted to the override directory.If this option is off, regular users are not restricted to a particular directory.
Note: This option has no effect on the default user account.
Step
1. Enable or disable SFTP user home directory restrictions.
File access using FTP | 331
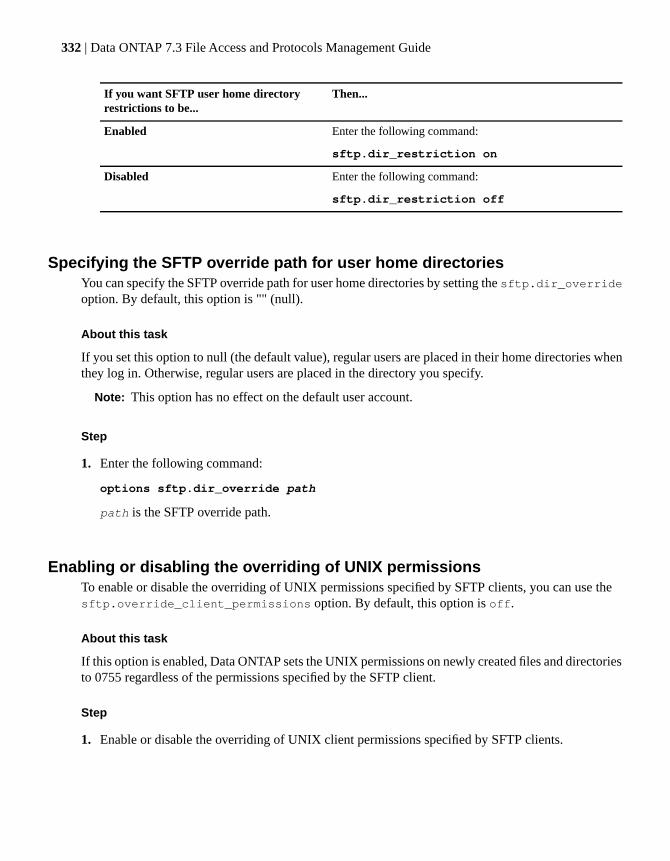
Then...If you want SFTP user home directoryrestrictions to be...
Enter the following command:
sftp.dir_restriction on
Enabled
Enter the following command:
sftp.dir_restriction off
Disabled
Specifying the SFTP override path for user home directoriesYou can specify the SFTP override path for user home directories by setting the sftp.dir_overrideoption. By default, this option is "" (null).
About this task
If you set this option to null (the default value), regular users are placed in their home directories whenthey log in. Otherwise, regular users are placed in the directory you specify.
Note: This option has no effect on the default user account.
Step
1. Enter the following command:
options sftp.dir_override path
path is the SFTP override path.
Enabling or disabling the overriding of UNIX permissionsTo enable or disable the overriding of UNIX permissions specified by SFTP clients, you can use thesftp.override_client_permissions option. By default, this option is off.
About this task
If this option is enabled, Data ONTAP sets the UNIX permissions on newly created files and directoriesto 0755 regardless of the permissions specified by the SFTP client.
Step
1. Enable or disable the overriding of UNIX client permissions specified by SFTP clients.
332 | Data ONTAP 7.3 File Access and Protocols Management Guide
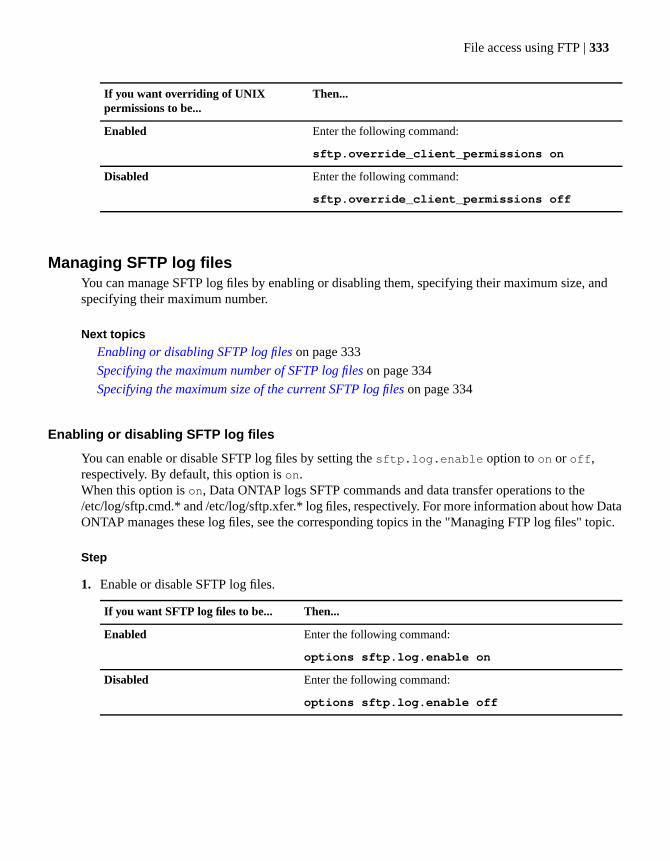
Then...If you want overriding of UNIXpermissions to be...
Enter the following command:
sftp.override_client_permissions on
Enabled
Enter the following command:
sftp.override_client_permissions off
Disabled
Managing SFTP log filesYou can manage SFTP log files by enabling or disabling them, specifying their maximum size, andspecifying their maximum number.
Next topics
Enabling or disabling SFTP log files on page 333
Specifying the maximum number of SFTP log files on page 334
Specifying the maximum size of the current SFTP log files on page 334
Enabling or disabling SFTP log files
You can enable or disable SFTP log files by setting the sftp.log.enable option to on or off,respectively. By default, this option is on.When this option is on, Data ONTAP logs SFTP commands and data transfer operations to the/etc/log/sftp.cmd.* and /etc/log/sftp.xfer.* log files, respectively. For more information about how DataONTAP manages these log files, see the corresponding topics in the "Managing FTP log files" topic.
Step
1. Enable or disable SFTP log files.
Then...If you want SFTP log files to be...
Enter the following command:
options sftp.log.enable on
Enabled
Enter the following command:
options sftp.log.enable off
Disabled
File access using FTP | 333
Specifying the maximum number of SFTP log files
To specify the maximum number of SFTP log files, you can set the sftp.log.nfiles option. Bydefault, the maximum number of SFTP log files is 6.
Step
1. Enter the following command:
options sftp.log.nfiles n
n is the maximum number of log files from 1 to 100. For more information, see the na_options(1)man page.
Specifying the maximum size of the current SFTP log files
To specify the maximum size of the current SFTP log files (that is, the /etc/log/sftp.cmd and/etc/log/sftp.xfer log files), you can set the sftp.log.filesize option. By default, the maximumsize of the current SFTP log files is 512 KB.
Step
1. Enter the following command:
options ftpd.log.filesize filesize
filesize is the maximum size of the current SFTP files expressed as a value from 1K to 4G. Youcan specify the value in gigabytes (G), megabytes (M), kilobytes (K), or bytes (blank). For moreinformation, see the na_options(1) man page.
Example: Setting the maximum size of the current SFTP log files to 1 GB
To set the maximum size of the current SFTP log files to 1 GB, enter the following command:
options sftpd.log.filesize 1G
Viewing SFTP statisticsTo view SFTP statistics, you can enter the sftp stat command.
Step
1. Enter the following command:
sftp stat
334 | Data ONTAP 7.3 File Access and Protocols Management Guide
Resetting SFTP statisticsTo reset SFTP statistics, you can enter the sftp stat -z command.
Step
1. Enter the following command:
sftp stat -z
Specifying the maximum number of SFTP connectionsTo specify the maximum number of SFTP connections, you can use the sftp.max_connectionsoption. By default, the maximum number of FTP connections is 15.
About this task
The maximum number of connections cannot exceed 15. Furthermore, the maximum number of SSHconnections is reduced by the maximum number of SFTP connections.
Step
1. Enter the following command:
options sftp.max_connections n
n is the maximum number of SFTP connections from 0 to 15.
Result
If you set the sftp.max_connections option to a value that is less than the current number of SFTPconnections, Data ONTAP refuses new connections until the number falls below the new maximum.Data ONTAP does not interrupt existing SFTP connections.
Specifying the SFTP idle timeout valueTo specify the SFTP idle timeout value (that is, the amount of time an SFTP connection can be idlebefore it becomes a candidate for termination), you can set the sftp.idle_timeout option. By default,the SFTP idle timeout value is 900 seconds.
About this task
Note: The ssh.idle.timeout option has no effect on SFTP connections. You must use thesftp.idle_timeout option to specify the timeout value for SFTP connections.
File access using FTP | 335
Step
1. Enter the following command:
options sftp.idle_timeout timeout
Here, timeout is an SFTP timeout value that is between 300s and 48h. You can specify the SFTPtimeout value in seconds (s), minutes (m), or hours (h).
Managing FTP over SSL (FTPS)You can manage FTP over SSL (FTPS) by enabling or disabling implicit FTPS, enabling or disablingexplicit FTPS, and specifying whether explicit FTPS connections can be opened in secure mode.
Next topics
About FTPS on page 336
Enabling or disabling explicit FTPS on page 337
Allowing or preventing the opening of explicit FTPS data connections in secure mode on page 338
Enabling or disabling implicit FTPS on page 339
About FTPSFTP over SSL (FTPS) allows FTP software to perform secure file transfers.
Normally, data sent over an FTP connection, whether over a control connection or a data connection,is sent in clear text and without any freshness or integrity guarantees. FTPS provides an extension tothe FTP protocol that allows FTP software to perform secure file transfers over an implicit FTPSconnection or an explicit FTPS connection.
Explicit FTPS
Data ONTAP implements explicit FTPS in accordance with RFC 2228 and RFC 4217. In particular,explicit FTPS works like this:
• Data ONTAP listens on port 21 (the standard FTP port).
• The FTP client connects to port 21 over a normal TCP connection. Any communication over theconnection is clear text to begin with. The connection can be made secure by issuing the AUTHcommand.
• On receiving the AUTH command, Data ONTAP initiates an SSL handshake. The CCC commandcan be used to restore the command channel back to clear text.
• Before starting a data connection the client must issue PBSZ and PROT commands. Without thesecommands the data connection would be clear text. The only arguments Data ONTAP supports forthe PROT command are C and P. In other words, Data ONTAP supports only a private or clear typeof data channel.
336 | Data ONTAP 7.3 File Access and Protocols Management Guide
• As specified in the RFC, the PBSZ command should be preceded by a successful authentication dataexchange, and the PROT command should be preceded by a successful PBSZ command.
• The default port for the data channel is 20.
Implicit FTPS
Data ONTAP provides an industry-standard implementation of implicit FTPS; there is no correspondingRFC. With implicit FTPS, security is achieved by encrypting and decrypting data in the transport layerby SSL. In particular, implicit FTPS works like this:
• Data ONTAP listens on port 990.
• The FTPS client connects to port 990. A SSL handshake is initiated on connection. If the handshakefails no further communication is allowed.
• On the completion of a successful SSL handshake all further FTP communication goes through SSLand is secure.
• The command channel cannot be restored back to clear text. New packets that some clients mightrequire are PBSZ and PROT. The only argument that Data ONTAP supports for the PROT commandis P. In other words, Data ONTAP only supports encrypted communications.
• The default port for the data channel is 989.
Enabling or disabling explicit FTPSYou can enable or disable explicit FTPS by setting the ftpd.explicit.enable option to on or off,respectively. By default, this option is off.
Before you begin
Before you can enable FTPS, you must setup and start SSL using the secureadmin command. Formore information, see the na_secureadmin(1) man page or the System Administration Guide.
Note: SSL certificates for vfilers are shared with with the default vfiler. Therefore, you must set upand start SSL on the default vfiler.
About this task
When the ftpd.explicit.enable option is on, Data ONTAP allows explicit FTPS connections onport 21. When this option is off, Data ONTAP does not allow explicit FTPS connections on port 21.
Step
1. Enable or disable explicit FTPS.
Then...If you want explicit FTPS to be...
Enter the following comand:
options ftpd.explicit.enable on
Enabled
File access using FTP | 337
Then...If you want explicit FTPS to be...
Enter the following comand:
options ftpd.explicit.enable off
Disabled
Allowing or preventing the opening of explicit FTPS data connections insecure mode
You can allow or prevent the opening of explicit FTPS data connections in secure mode by setting theftpd.explicit.allow_secure_data_conn option to on or off, respectively. By default, thisoption is on.
Before you begin
Make sure explicit FTPS is enabled. Otherwise, this option has no effect.
About this task
When this option is on, Data ONTAP allows explicit FTPS connections to open data connections insecure mode (that is, by sending the PROT P command). When this option is off, Data ONTAP preventsexplicit FTPS connections from opening data connections in secure mode.
Step
1. Allow or prevent the opening of explicit FTPS data connections in secure mode.
Then...If you want the opening of explicit FTPSdata connections in secure mode to be...
Enter the following comand:
optionsftpd.explicit.allow_secure_data_conn on
Allowed
Enter the following comand:
optionsftpd.explicit.allow_secure_data_conn off
Prevented
338 | Data ONTAP 7.3 File Access and Protocols Management Guide
Enabling or disabling implicit FTPSYou can enable or disable implicit FTPS by setting the ftpd.implicit.enable option to on or off,respectively. By default, this option is off.
Before you begin
To enable implicit FTPS, you must also enable FTP.
About this task
When this option is on, Data ONTAP allows implicit FTPS connections on port 990. When this optionis off, Data ONTAP does not allow implicit FTPS connections on port 990.
Step
1. Enable or disable implicit FTPS.
Then...If you want implicit FTPS to be...
Enter the following comand:
options ftpd.implicit.enable on
Enabled
Enter the following comand:
options ftpd.implicit.enable off
Disabled
Managing FTP over IPv6Starting with Data ONTAP 7.3.1, you can allow FTP clients to access the files on your storage systemover IPv6.
Next topics
Enabling or disabling FTP over IPv6 on page 340
Viewing FTP over IPv6 statistics on page 340
File access using FTP | 339
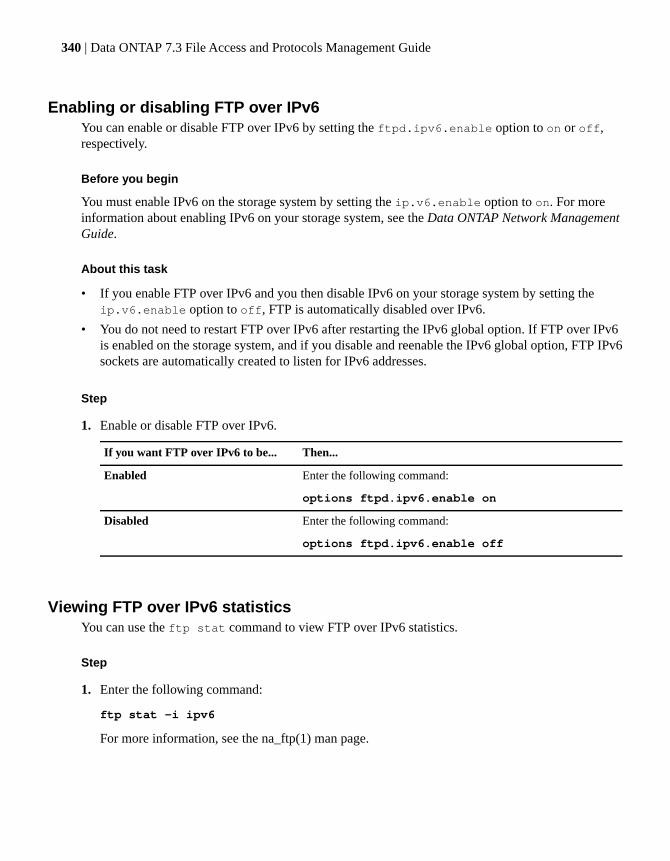
Enabling or disabling FTP over IPv6You can enable or disable FTP over IPv6 by setting the ftpd.ipv6.enable option to on or off,respectively.
Before you begin
You must enable IPv6 on the storage system by setting the ip.v6.enable option to on. For moreinformation about enabling IPv6 on your storage system, see the Data ONTAP Network ManagementGuide.
About this task
• If you enable FTP over IPv6 and you then disable IPv6 on your storage system by setting theip.v6.enable option to off, FTP is automatically disabled over IPv6.
• You do not need to restart FTP over IPv6 after restarting the IPv6 global option. If FTP over IPv6is enabled on the storage system, and if you disable and reenable the IPv6 global option, FTP IPv6sockets are automatically created to listen for IPv6 addresses.
Step
1. Enable or disable FTP over IPv6.
Then...If you want FTP over IPv6 to be...
Enter the following command:
options ftpd.ipv6.enable on
Enabled
Enter the following command:
options ftpd.ipv6.enable off
Disabled
Viewing FTP over IPv6 statisticsYou can use the ftp stat command to view FTP over IPv6 statistics.
Step
1. Enter the following command:
ftp stat -i ipv6
For more information, see the na_ftp(1) man page.
340 | Data ONTAP 7.3 File Access and Protocols Management Guide
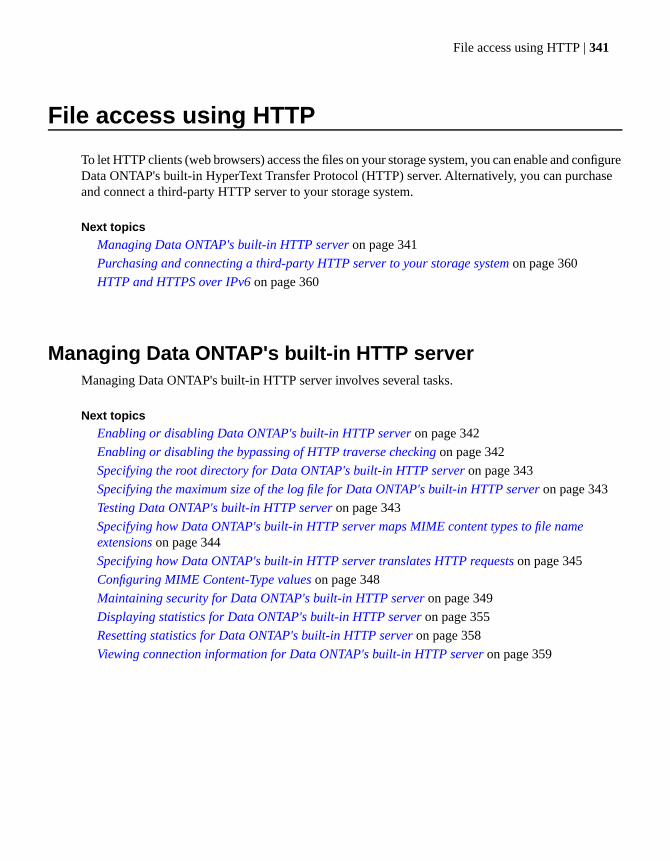
File access using HTTP
To let HTTP clients (web browsers) access the files on your storage system, you can enable and configureData ONTAP's built-in HyperText Transfer Protocol (HTTP) server. Alternatively, you can purchaseand connect a third-party HTTP server to your storage system.
Next topics
Managing Data ONTAP's built-in HTTP server on page 341
Purchasing and connecting a third-party HTTP server to your storage system on page 360
HTTP and HTTPS over IPv6 on page 360
Managing Data ONTAP's built-in HTTP serverManaging Data ONTAP's built-in HTTP server involves several tasks.
Next topics
Enabling or disabling Data ONTAP's built-in HTTP server on page 342
Enabling or disabling the bypassing of HTTP traverse checking on page 342
Specifying the root directory for Data ONTAP's built-in HTTP server on page 343
Specifying the maximum size of the log file for Data ONTAP's built-in HTTP server on page 343
Testing Data ONTAP's built-in HTTP server on page 343
Specifying how Data ONTAP's built-in HTTP server maps MIME content types to file nameextensions on page 344
Specifying how Data ONTAP's built-in HTTP server translates HTTP requests on page 345
Configuring MIME Content-Type values on page 348
Maintaining security for Data ONTAP's built-in HTTP server on page 349
Displaying statistics for Data ONTAP's built-in HTTP server on page 355
Resetting statistics for Data ONTAP's built-in HTTP server on page 358
Viewing connection information for Data ONTAP's built-in HTTP server on page 359
File access using HTTP | 341

Enabling or disabling Data ONTAP's built-in HTTP serverTo enable or disable Data ONTAP's built-in HTTP server, you can set the httpd.enable option toon or off, respectively. By default, this option is off.
Step
1. Then...If you want HTTP to be...
Enter the following command:
options httpd.enable on
Enabled
Enter the following command:
options httpd.enable off
Disabled
After you finish
If you purchased an HTTP license, web browsers can access all of the files in the HTTP server's rootdirectory; otherwise, web browsers can access the man pages and FilerView only.
Enabling or disabling the bypassing of HTTP traverse checkingYou can enable or disable the bypassing of HTTP traverse checking by setting thehttpd.bypass_traverse_checking option to on or off, respectively. By default, this option isset to off.
About this task
If the httpd.bypass_traverse_checking option is set to off, when a user attempts to accessa file using the HTTP protocol, Data ONTAP checks the traverse (execute) permission for all directoriesin the path to the file. If any of the intermediate directories does not have the "X" (traverse permission),Data ONTAP denies access to the file. If the http.bypass_traverse_checking option is set toon, when a user attempts to access a file, Data ONTAP does not check the traverse permission for theintermediate directories when determining whether to grant or deny access to the file.
Step
1. Enable or disable the bypassing of HTTP traverse checking.
Then...If you want the bypassing of HTTP traversechecking to be...
Enter the following command:
optionshttpd.bypass_traverse_checking on
Enabled
342 | Data ONTAP 7.3 File Access and Protocols Management Guide

Then...If you want the bypassing of HTTP traversechecking to be...
Enter the following command:
optionshttpd.bypass_traverse_checking off
Disabled
Specifying the root directory for Data ONTAP's built-in HTTP serverTo specify the root directory for Data ONTAP's built-in HTTP server (that is, the directory that containsall of the files that an HTTP client can access), you can set the httpd.rootdir option.
Step
1. Enter the following command:
options httpd.rootdir directory
directory is the full path to the HTTP server's root directory.
Setting the HTTP server's root directory to /vol0/home/users/pages
To set the HTTP server's root directory to /vol0/home/users/pages, enter the following command:
options httpd.rootdir /vol0/home/users/pages
Specifying the maximum size of the log file for Data ONTAP's built-in HTTPserver
To specify the maximum size of the log file for Data ONTAP's built-in HTTP server (/etc/log/httpd.log),you can set the ftpd.log.filesize option. (This option specifies the maximum log file size of theHTTP and FTP log files in the /etc/log directory, including the ftp.cmd, ftp.xfer, and httpd.log files.)By default, this option is set to 512 kilobytes.
Step
1. Enter the following command:
options ftpd.log.filesize bytes
Here, bytes is the new maximum size of the HTTP server's log file.
Testing Data ONTAP's built-in HTTP serverTo confirm that Data ONTAP's built-in HTTP server is working, you can copy an HTML file into theHTTP server's root directory and then access the file from a web browser. You can also access the
File access using HTTP | 343

HTTP server's root directory (or a subdirectory of the HTTP server's root directory) directly from aweb browser.
Steps
1. Copy an HTML file into the HTTP server's root directory.2. From a web browser running on a separate system, access the file you copied into the HTTP server's
root directory.
The URL is http://www.hostname.com/myfile.html, where hostname is the host name of thestorage system and myfile.html is the name of the file you copied into the HTTP server's rootdirectory. You should see the contents of the file.
3. Optionally access the HTTP server's root directory (or a subdirectory of the HTTP server's rootdirectory) directly from a web browser running on a separate client.
The URL is http://www.hostname.com, where hostname is the host name of the storage system.
The HTTP server looks for the following files in the following order in the directory that you specify:
a. index.htmlb. default.htmc. index.htmd. default.html
If none of these files exists, the storage system automatically generates an HTML version of thedirectory listing for that directory (if the httpd.autoindex.enable option is on) or respondswith the “403” (forbidden) error code (if the httpd.autoindex.enable option is off). For moreinformation about the httpd.autoindex.enable option, see the na_options(1) man page.
Specifying how Data ONTAP's built-in HTTP server maps MIME content typesto file name extensions
To specify how Data ONTAP's built-in HTTP server maps Multipurpose Internet Mail Extensions(MIME) content types to file name extensions, you can create or edit the /etc/httpd.mimetypes file. Ifthe /etc/httpd.mimetypes file does not exist, the HTTP server uses the mappings in the/etc/httpd.mimetypes.sample file. For more information, see the na_httpd.mimetypes(5) man page.
About this task
Web browsers interpret files according to their MIME content type. For example, if a file's MIMEcontent type is an image type, web browsers render the file as an image using a graphics program.
Note: For more information about MIME, see RFC 1521.
Entries in the /etc/httpd.mimetypes file have the following format:
# An optional comment.
344 | Data ONTAP 7.3 File Access and Protocols Management Guide
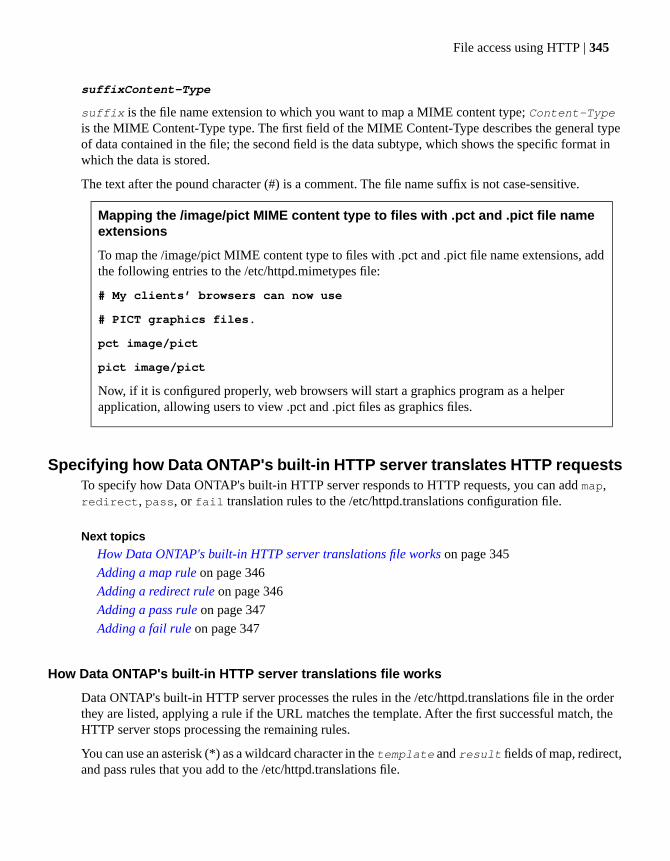
suffixContent-Type
suffix is the file name extension to which you want to map a MIME content type; Content-Typeis the MIME Content-Type type. The first field of the MIME Content-Type describes the general typeof data contained in the file; the second field is the data subtype, which shows the specific format inwhich the data is stored.
The text after the pound character (#) is a comment. The file name suffix is not case-sensitive.
Mapping the /image/pict MIME content type to files with .pct and .pict file nameextensions
To map the /image/pict MIME content type to files with .pct and .pict file name extensions, addthe following entries to the /etc/httpd.mimetypes file:
# My clients’ browsers can now use
# PICT graphics files.
pct image/pict
pict image/pict
Now, if it is configured properly, web browsers will start a graphics program as a helperapplication, allowing users to view .pct and .pict files as graphics files.
Specifying how Data ONTAP's built-in HTTP server translates HTTP requestsTo specify how Data ONTAP's built-in HTTP server responds to HTTP requests, you can add map,redirect, pass, or fail translation rules to the /etc/httpd.translations configuration file.
Next topics
How Data ONTAP's built-in HTTP server translations file works on page 345
Adding a map rule on page 346
Adding a redirect rule on page 346
Adding a pass rule on page 347
Adding a fail rule on page 347
How Data ONTAP's built-in HTTP server translations file works
Data ONTAP's built-in HTTP server processes the rules in the /etc/httpd.translations file in the orderthey are listed, applying a rule if the URL matches the template. After the first successful match, theHTTP server stops processing the remaining rules.
You can use an asterisk (*) as a wildcard character in the template and result fields of map, redirect,and pass rules that you add to the /etc/httpd.translations file.
File access using HTTP | 345
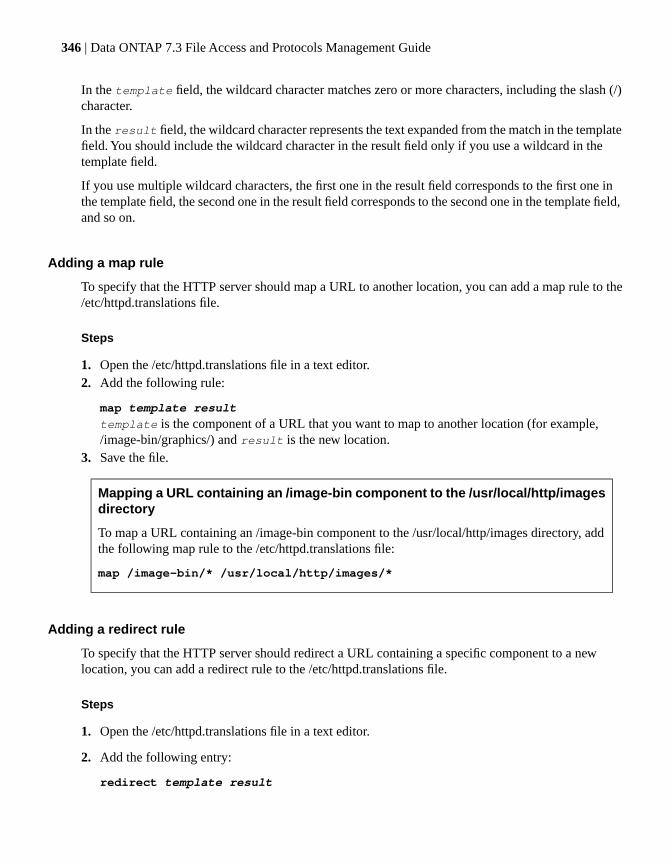
In the template field, the wildcard character matches zero or more characters, including the slash (/)character.
In the result field, the wildcard character represents the text expanded from the match in the templatefield. You should include the wildcard character in the result field only if you use a wildcard in thetemplate field.
If you use multiple wildcard characters, the first one in the result field corresponds to the first one inthe template field, the second one in the result field corresponds to the second one in the template field,and so on.
Adding a map rule
To specify that the HTTP server should map a URL to another location, you can add a map rule to the/etc/httpd.translations file.
Steps
1. Open the /etc/httpd.translations file in a text editor.2. Add the following rule:
map template result
template is the component of a URL that you want to map to another location (for example,/image-bin/graphics/) and result is the new location.
3. Save the file.
Mapping a URL containing an /image-bin component to the /usr/local/http/imagesdirectory
To map a URL containing an /image-bin component to the /usr/local/http/images directory, addthe following map rule to the /etc/httpd.translations file:
map /image-bin/* /usr/local/http/images/*
Adding a redirect rule
To specify that the HTTP server should redirect a URL containing a specific component to a newlocation, you can add a redirect rule to the /etc/httpd.translations file.
Steps
1. Open the /etc/httpd.translations file in a text editor.
2. Add the following entry:
redirect template result
346 | Data ONTAP 7.3 File Access and Protocols Management Guide
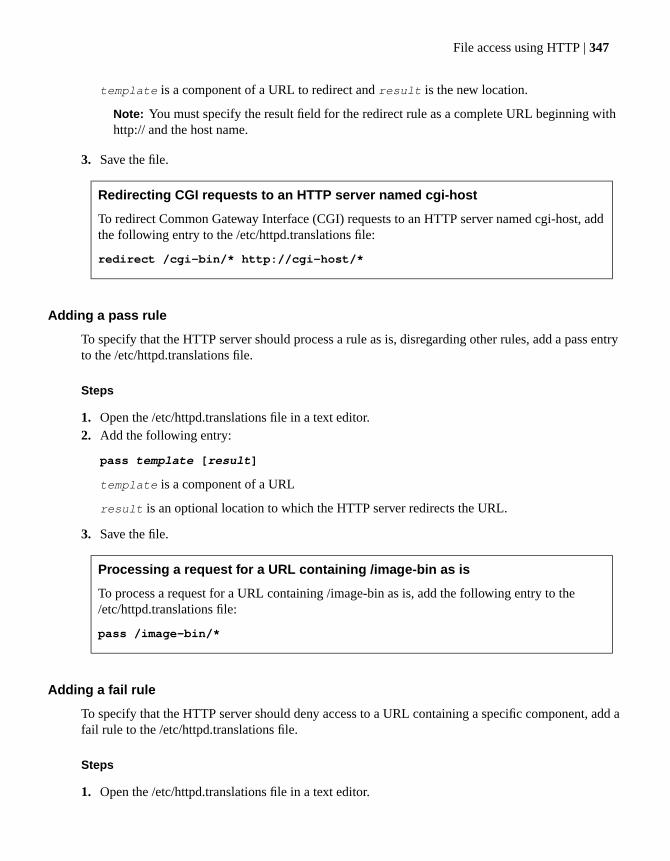
template is a component of a URL to redirect and result is the new location.
Note: You must specify the result field for the redirect rule as a complete URL beginning withhttp:// and the host name.
3. Save the file.
Redirecting CGI requests to an HTTP server named cgi-host
To redirect Common Gateway Interface (CGI) requests to an HTTP server named cgi-host, addthe following entry to the /etc/httpd.translations file:
redirect /cgi-bin/* http://cgi-host/*
Adding a pass rule
To specify that the HTTP server should process a rule as is, disregarding other rules, add a pass entryto the /etc/httpd.translations file.
Steps
1. Open the /etc/httpd.translations file in a text editor.2. Add the following entry:
pass template [result]
template is a component of a URL
result is an optional location to which the HTTP server redirects the URL.
3. Save the file.
Processing a request for a URL containing /image-bin as is
To process a request for a URL containing /image-bin as is, add the following entry to the/etc/httpd.translations file:
pass /image-bin/*
Adding a fail rule
To specify that the HTTP server should deny access to a URL containing a specific component, add afail rule to the /etc/httpd.translations file.
Steps
1. Open the /etc/httpd.translations file in a text editor.
File access using HTTP | 347

2. Add the following entry:
fail template
template is the URL component to which the HTTP server should deny access.3. Save the file.
Denying access to the /user/forbidden directory
To deny access to the /user/forbidden directory, add the following entry to the/etc/httpd.translations file:
fail /usr/forbidden/*
Configuring MIME Content-Type valuesYou can configure the storage system to send the appropriate MIME Content-Type value in eachresponse to a get request from a client by mapping the file name suffix, for example, .gif, .html, or.mpg, according to information in the /etc/httpd.mimetypes file.
About this task
The MIME (Multipurpose Internet Mail Extensions) Content-Type value of a file tells a browser on aclient how to interpret the file. For example, if the MIME Content-Type value shows that a file is animage file, and the client is configured properly, the browser can render the image by using a graphicsprogram.
For more information about MIME, see RFC 1521.
Step
1. Edit the entries in the /etc/httpd.mimetypes file.
Entries are in the following format:
# An optional comment.
suffixContent-Type
Lines preceded by the # sign are comments. The file name suffix is not case-sensitive.
Example
The following are sample entries:
348 | Data ONTAP 7.3 File Access and Protocols Management Guide
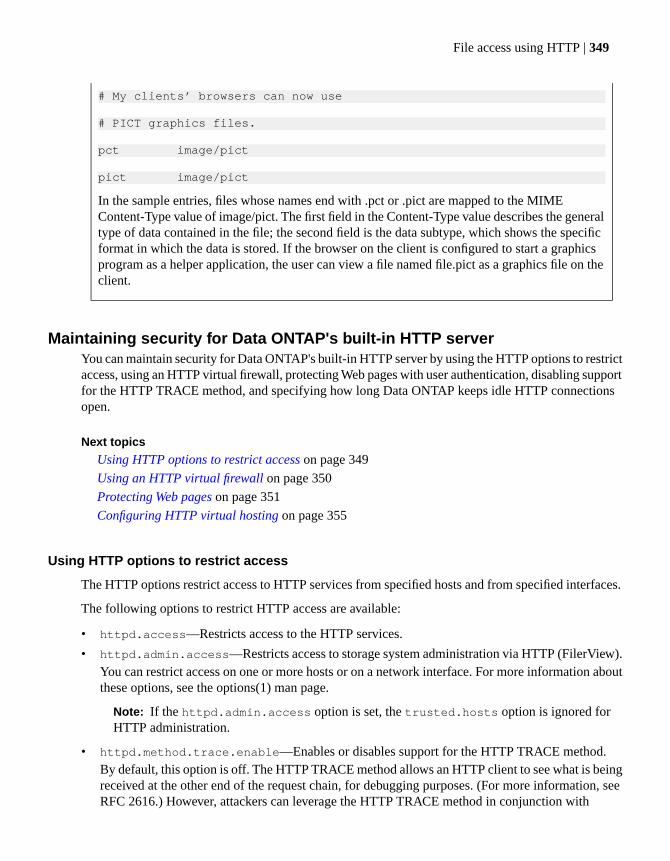
# My clients’ browsers can now use
# PICT graphics files.
pct image/pict
pict image/pict
In the sample entries, files whose names end with .pct or .pict are mapped to the MIMEContent-Type value of image/pict. The first field in the Content-Type value describes the generaltype of data contained in the file; the second field is the data subtype, which shows the specificformat in which the data is stored. If the browser on the client is configured to start a graphicsprogram as a helper application, the user can view a file named file.pict as a graphics file on theclient.
Maintaining security for Data ONTAP's built-in HTTP serverYou can maintain security for Data ONTAP's built-in HTTP server by using the HTTP options to restrictaccess, using an HTTP virtual firewall, protecting Web pages with user authentication, disabling supportfor the HTTP TRACE method, and specifying how long Data ONTAP keeps idle HTTP connectionsopen.
Next topics
Using HTTP options to restrict access on page 349
Using an HTTP virtual firewall on page 350
Protecting Web pages on page 351
Configuring HTTP virtual hosting on page 355
Using HTTP options to restrict access
The HTTP options restrict access to HTTP services from specified hosts and from specified interfaces.
The following options to restrict HTTP access are available:
• httpd.access—Restricts access to the HTTP services.
• httpd.admin.access—Restricts access to storage system administration via HTTP (FilerView).You can restrict access on one or more hosts or on a network interface. For more information aboutthese options, see the options(1) man page.
Note: If the httpd.admin.access option is set, the trusted.hosts option is ignored forHTTP administration.
• httpd.method.trace.enable—Enables or disables support for the HTTP TRACE method.By default, this option is off. The HTTP TRACE method allows an HTTP client to see what is beingreceived at the other end of the request chain, for debugging purposes. (For more information, seeRFC 2616.) However, attackers can leverage the HTTP TRACE method in conjunction with
File access using HTTP | 349
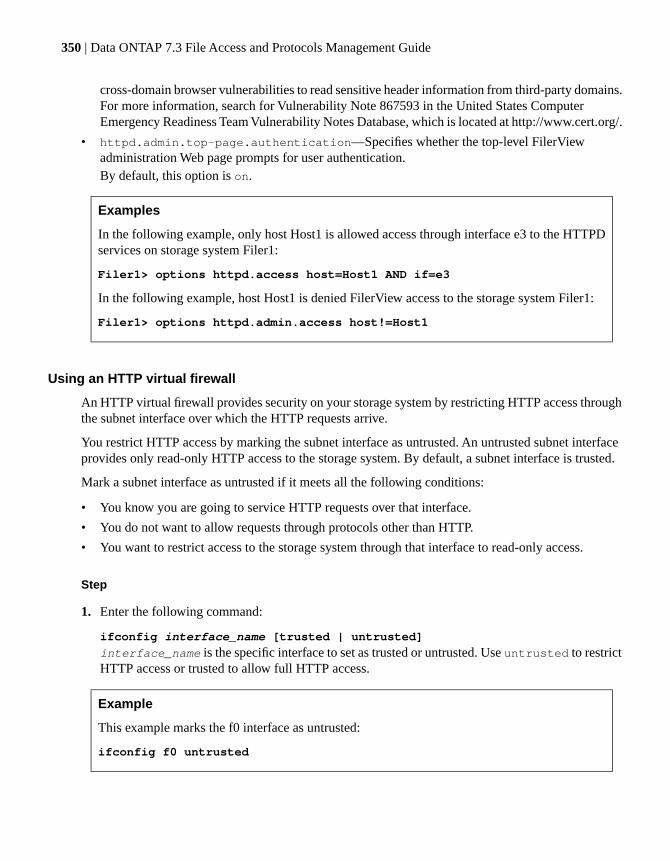
cross-domain browser vulnerabilities to read sensitive header information from third-party domains.For more information, search for Vulnerability Note 867593 in the United States ComputerEmergency Readiness Team Vulnerability Notes Database, which is located at http://www.cert.org/.
• httpd.admin.top-page.authentication—Specifies whether the top-level FilerViewadministration Web page prompts for user authentication.By default, this option is on.
Examples
In the following example, only host Host1 is allowed access through interface e3 to the HTTPDservices on storage system Filer1:
Filer1> options httpd.access host=Host1 AND if=e3
In the following example, host Host1 is denied FilerView access to the storage system Filer1:
Filer1> options httpd.admin.access host!=Host1
Using an HTTP virtual firewall
An HTTP virtual firewall provides security on your storage system by restricting HTTP access throughthe subnet interface over which the HTTP requests arrive.
You restrict HTTP access by marking the subnet interface as untrusted. An untrusted subnet interfaceprovides only read-only HTTP access to the storage system. By default, a subnet interface is trusted.
Mark a subnet interface as untrusted if it meets all the following conditions:
• You know you are going to service HTTP requests over that interface.
• You do not want to allow requests through protocols other than HTTP.
• You want to restrict access to the storage system through that interface to read-only access.
Step
1. Enter the following command:
ifconfig interface_name [trusted | untrusted]
interface_name is the specific interface to set as trusted or untrusted. Use untrusted to restrictHTTP access or trusted to allow full HTTP access.
Example
This example marks the f0 interface as untrusted:
ifconfig f0 untrusted
350 | Data ONTAP 7.3 File Access and Protocols Management Guide

Protecting Web pages
You can restrict HTTP access, and thereby protect Web pages, by preventing unauthorized users fromaccessing Web pages. In this way, only specified users or groups can access directories containing theWeb pages.
Data ONTAP provides the following two methods of authentication for HTTP access:
• Basic
• NTLM
You specify the method of authentication to use in the /etc/httpd.access file. Both authentication methodscan coexist on a storage system, but you can specify only one authentication method per directory inthe HTTP subtree.
Next topics
Basic authentication on page 351
NTLM authentication on page 351
Editing the /etc/httpd.access file on page 352
Creating and editing the httpd.passwd file on page 354
Creating and editing the httpd.group file on page 354
Basic authentication
You use the following three configuration files to set up authentication for the HTTP service:/etc/httpd.access, /etc/httpd.passwd, and /etc/httpd.group.
The /etc/httpd.access file contains the method of authentication, the directories for which you want torestrict access, and the list of users and groups authorized to access these directories.
The /etc/httpd.passwd file contains the encrypted form of the password that a user, specified in the/etc/httpd.access file, uses to gain access to the directories specified in the /etc/httpd.access file. The/etc/httpd.passwd file uses the same format that the /etc/passwd file uses.
The /etc/httpd.group file contains group and user IDs of the members of each group who are authorizedto access the directories specified in the /etc/httpd.access file. The /etc/httpd.group file uses the sameformat that the /etc/group file uses.
NTLM authentication
You can use Windows Domain Authentication instead of basic authentication for a directory. DataONTAP uses the Domain Controller (DC) to authenticate users accessing the directories containing theWeb pages.
You must specify the directories in the /etc/httpd.access file for which you want the domain controllerto authenticate users.
File access using HTTP | 351
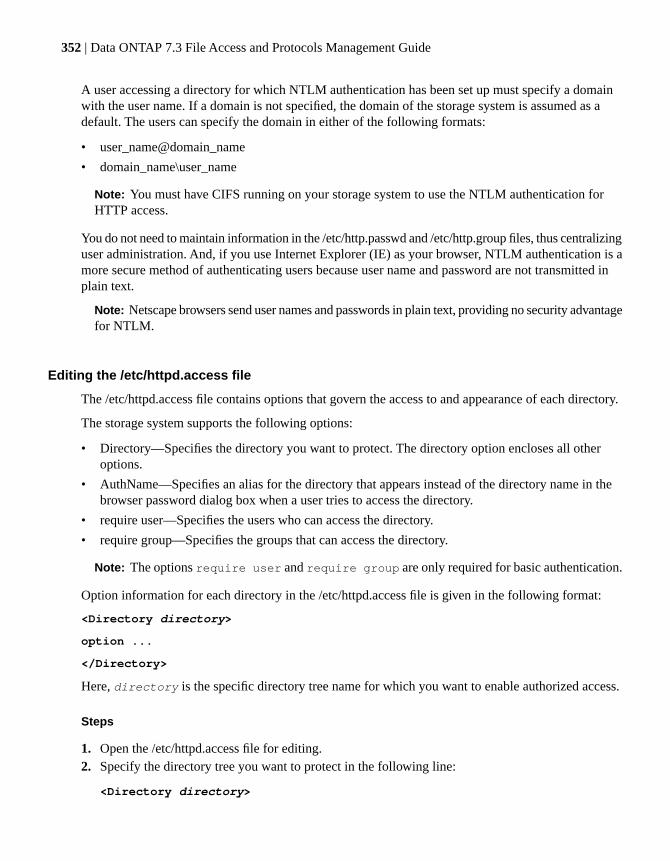
A user accessing a directory for which NTLM authentication has been set up must specify a domainwith the user name. If a domain is not specified, the domain of the storage system is assumed as adefault. The users can specify the domain in either of the following formats:
• user_name@domain_name
• domain_name\user_name
Note: You must have CIFS running on your storage system to use the NTLM authentication forHTTP access.
You do not need to maintain information in the /etc/http.passwd and /etc/http.group files, thus centralizinguser administration. And, if you use Internet Explorer (IE) as your browser, NTLM authentication is amore secure method of authenticating users because user name and password are not transmitted inplain text.
Note: Netscape browsers send user names and passwords in plain text, providing no security advantagefor NTLM.
Editing the /etc/httpd.access file
The /etc/httpd.access file contains options that govern the access to and appearance of each directory.
The storage system supports the following options:
• Directory—Specifies the directory you want to protect. The directory option encloses all otheroptions.
• AuthName—Specifies an alias for the directory that appears instead of the directory name in thebrowser password dialog box when a user tries to access the directory.
• require user—Specifies the users who can access the directory.
• require group—Specifies the groups that can access the directory.
Note: The options require user and require group are only required for basic authentication.
Option information for each directory in the /etc/httpd.access file is given in the following format:
<Directory directory>
option ...
</Directory>
Here, directory is the specific directory tree name for which you want to enable authorized access.
Steps
1. Open the /etc/httpd.access file for editing.2. Specify the directory tree you want to protect in the following line:
<Directory directory>
352 | Data ONTAP 7.3 File Access and Protocols Management Guide
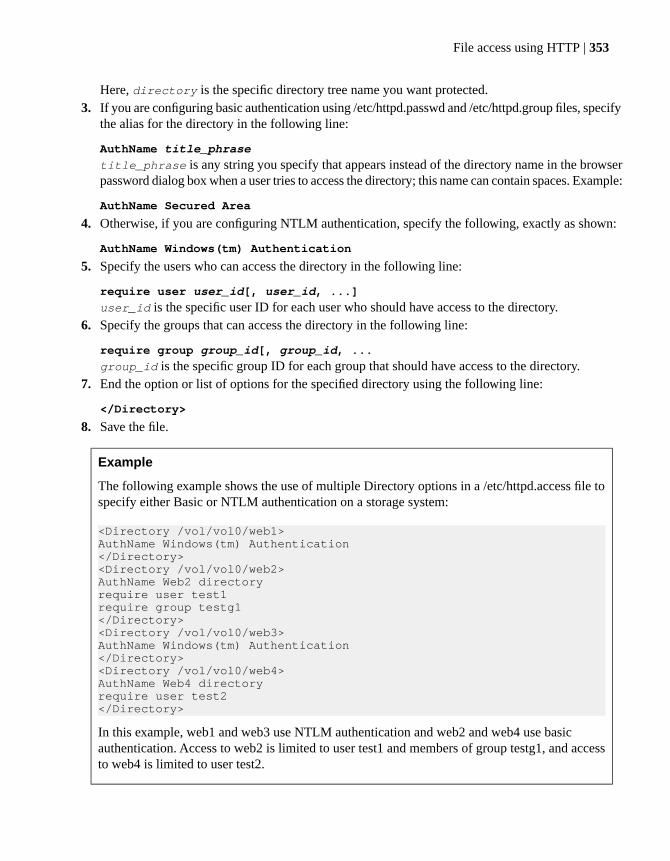
Here, directory is the specific directory tree name you want protected.3. If you are configuring basic authentication using /etc/httpd.passwd and /etc/httpd.group files, specify
the alias for the directory in the following line:
AuthName title_phrase
title_phrase is any string you specify that appears instead of the directory name in the browserpassword dialog box when a user tries to access the directory; this name can contain spaces. Example:
AuthName Secured Area
4. Otherwise, if you are configuring NTLM authentication, specify the following, exactly as shown:
AuthName Windows(tm) Authentication
5. Specify the users who can access the directory in the following line:
require user user_id[, user_id, ...]
user_id is the specific user ID for each user who should have access to the directory.6. Specify the groups that can access the directory in the following line:
require group group_id[, group_id, ...
group_id is the specific group ID for each group that should have access to the directory.7. End the option or list of options for the specified directory using the following line:
</Directory>
8. Save the file.
Example
The following example shows the use of multiple Directory options in a /etc/httpd.access file tospecify either Basic or NTLM authentication on a storage system:
<Directory /vol/vol0/web1>AuthName Windows(tm) Authentication</Directory><Directory /vol/vol0/web2>AuthName Web2 directoryrequire user test1require group testg1</Directory><Directory /vol/vol0/web3>AuthName Windows(tm) Authentication</Directory><Directory /vol/vol0/web4>AuthName Web4 directoryrequire user test2</Directory>
In this example, web1 and web3 use NTLM authentication and web2 and web4 use basicauthentication. Access to web2 is limited to user test1 and members of group testg1, and accessto web4 is limited to user test2.
File access using HTTP | 353
Creating and editing the httpd.passwd file
The /etc/httpd.passwd file contains encrypted passwords of users listed in the /etc/httpd.access file. Thisfile is only required if you are using basic authentication to authenticate users.
If you have an HTTP server that uses a user name and password method to authenticate users, you cancopy user IDs and encrypted passwords from it. You must edit the /etc/httpd.passwd file to removeusers that you do not want to have access.
If an HTTP server is not available, you can copy an existing /etc/passwd file from a UNIX server andsave it on the storage system as the /etc/httpd.passwd file.
Steps
1. Open the /etc/httpd.passwd file.2. Remove the user IDs and encrypted passwords of users that you do not want to have access to the
directory you specified in the /etc/httpd.access file.3. Save the edits.
Creating and editing the httpd.group file
The /etc/httpd.group file contains the group names and the users belonging to those groups. This fileis only required if you are using basic authentication to authenticate users.
If you have an HTTP server that authenticates groups of users, you can copy the group names and userIDs from it. You must edit the /etc/httpd.group file to remove groups that you do not want to haveaccess.
If an HTTP server is not available, you can copy an existing /etc/group file from a UNIX server andsave it on the storage system as the /etc/httpd.group file.
Steps
1. In the /etc/httpd.group file, edit the following line:
group_id:user_id [, user_id, ...]
The lists are copied in from a server that has a similar list.2. Add or remove groups and users. Group and user information is listed in the following format:
group_id: user_id[user_id ...]
group_id is the group name and user_id is the name of each user who belongs to the group.3. Save the file.
354 | Data ONTAP 7.3 File Access and Protocols Management Guide
Configuring HTTP virtual hosting
In Data ONTAP 7.3 and later releases, you can configure HTTP virtual hosting by adding alias IPaddresses to a physical interface. Data ONTAP no longer uses vh interfaces for this purpose.
Steps
1. Enable HTTP by entering the following command:
options httpd.enable on
2. Add one or more alias IP addresses to the physical interface that you will be using for HTTP virtualhosting by entering the following command:
ifconfig physical_interface_name [IP_address_family] alias IP_address
ExampleTo add the 192.225.37.102 alias IP address (an IPv6 address) to the e0a physical interface, enterthe following command:
ifconfig e0a alias 192.225.37.102For more information, see the na_ifconfig(1) man page.
3. Add entries to the /etc/httpd.hostprefixes file that map the alias IP addresses you specified in Step2 to one or more subdirectories of the HTTP root directory.
To determine the HTTP root directory, check the value of the httpd.rootdir option.
ExampleTo map the fd20:81be:b255:4136::a48:8a5f alias IP address to the /httpdir1 subdirectory, add thefollowing entry to the /etc/httpd.hostprefixes file:
/httpdir1 192.225.37.102
4. Test your HTTP virtual hosting configuration by using an HTTP client to connect to the alias IPaddresses you created and mapped in Steps 2 and 3, respectively.
Displaying statistics for Data ONTAP's built-in HTTP serverYou can use the httpstat command to display five types of statistics about operations of Data ONTAP'sbuilt-in HTTP server.
About this task
These five types are:
• Request
• Detailed
• Error
• Service
• Timeout
File access using HTTP | 355

Step
1. Enter the following command:
httpstat [-dersta]
Information displayedOption
Detailed statistics-d
Error statistics-e
Request statistics.-r
Service statistics-s
Timeout statistics-t
All HTTP statistics-a
If you use no arguments, httpstat displays HTTP request statistics.
For detailed information about the httpstat command, see the httpstat(1) man page.
Next topics
Request statistics on page 356
Detailed statistics on page 357
Error statistics on page 357
Service statistics on page 357
Timeout statistics on page 358
Request statistics
If you specify request statistics, Data ONTAP displays the following statistics.
DescriptionLabel of statistic
Number of new connections accepted by the storage systemAccept
Number of new requests received on existing connectionsReuse
Number of responses sentResponse
Number of bytes received for all incoming requestsInBytes
Number of bytes sent, including all HTTP headers, but not including data generatedby servlets
OutBytes
356 | Data ONTAP 7.3 File Access and Protocols Management Guide
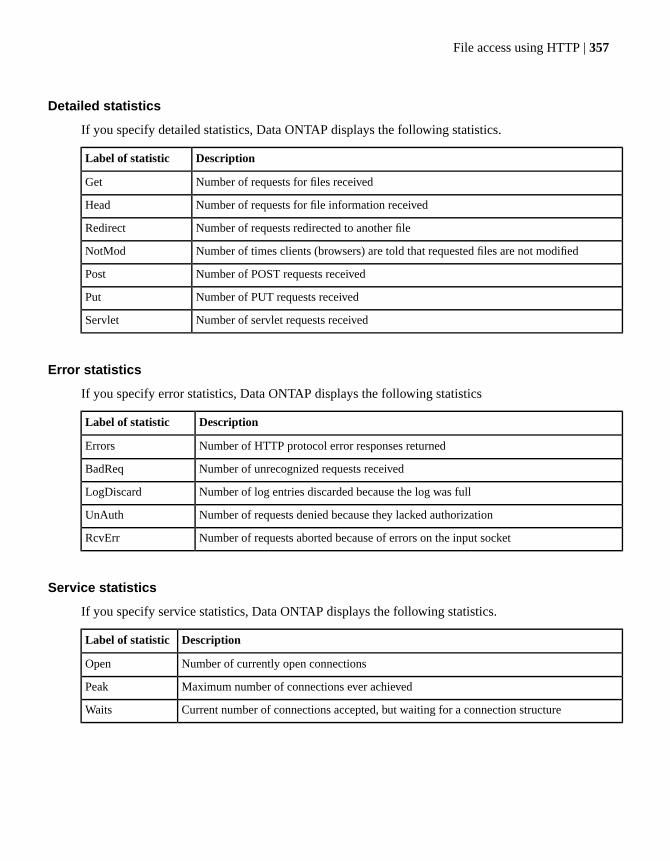
Detailed statistics
If you specify detailed statistics, Data ONTAP displays the following statistics.
DescriptionLabel of statistic
Number of requests for files receivedGet
Number of requests for file information receivedHead
Number of requests redirected to another fileRedirect
Number of times clients (browsers) are told that requested files are not modifiedNotMod
Number of POST requests receivedPost
Number of PUT requests receivedPut
Number of servlet requests receivedServlet
Error statistics
If you specify error statistics, Data ONTAP displays the following statistics
DescriptionLabel of statistic
Number of HTTP protocol error responses returnedErrors
Number of unrecognized requests receivedBadReq
Number of log entries discarded because the log was fullLogDiscard
Number of requests denied because they lacked authorizationUnAuth
Number of requests aborted because of errors on the input socketRcvErr
Service statistics
If you specify service statistics, Data ONTAP displays the following statistics.
DescriptionLabel of statistic
Number of currently open connectionsOpen
Maximum number of connections ever achievedPeak
Current number of connections accepted, but waiting for a connection structureWaits
File access using HTTP | 357
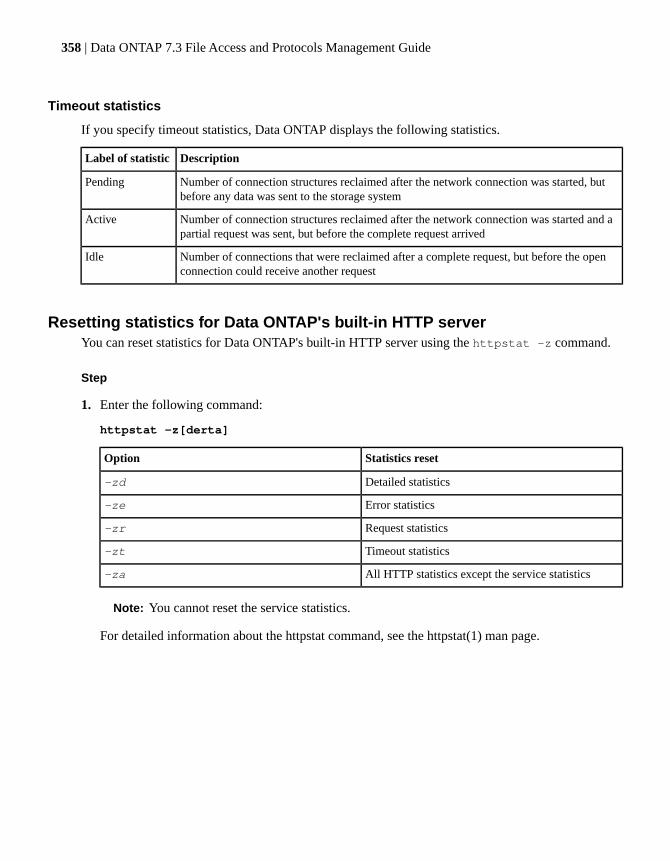
Timeout statistics
If you specify timeout statistics, Data ONTAP displays the following statistics.
DescriptionLabel of statistic
Number of connection structures reclaimed after the network connection was started, butbefore any data was sent to the storage system
Pending
Number of connection structures reclaimed after the network connection was started and apartial request was sent, but before the complete request arrived
Active
Number of connections that were reclaimed after a complete request, but before the openconnection could receive another request
Idle
Resetting statistics for Data ONTAP's built-in HTTP serverYou can reset statistics for Data ONTAP's built-in HTTP server using the httpstat -z command.
Step
1. Enter the following command:
httpstat -z[derta]
Statistics resetOption
Detailed statistics-zd
Error statistics-ze
Request statistics-zr
Timeout statistics-zt
All HTTP statistics except the service statistics-za
Note: You cannot reset the service statistics.
For detailed information about the httpstat command, see the httpstat(1) man page.
358 | Data ONTAP 7.3 File Access and Protocols Management Guide

Viewing connection information for Data ONTAP's built-in HTTP serverYou can view many types of information in the /etc/log/httpd.log file for each connection establishedby Data ONTAP's built-in HTTP server.
Steps
1. Access the /etc/log directory on the storage system default volume (/vol/vol0 by default) from anNFS or CIFS client.
2. Use a text viewer or text editor to open and view the httpd.log file.3. Close the log file when you are finished viewing it.
Result
Data ONTAP displays the following types of information:
• IP address of HTTP client
• Names of authorized users making requests. If the page is protected, Data ONTAP lists authorizednames it gets from the /etc/httpd.passwd file. If the page is not protected, dashes appear instead ofa name
• Time of connection — Greenwich Mean Time (GMT), in dd/mm/yy:hh:mm:ss format
• Request line from connecting host, for example, get /my_company.html
• Status code returned by the server, as defined in the HTTP 1.0 specifications
• Total bytes sent in response by the storage system, not including the MIME header
Example
192.9.77.2 - - [26/Aug/2003:16:45:50] "GET /top.html" 200 1189192.9.77.2 - - [26/Aug/2003:16:45:50] "GET /header.html" 200 531192.7.15.6 - - [26/Aug/2003:16:45:51] "GET /logo.gif" 200 1763198.9.200.2 - - [26/Aug/2003:16:45:57] "GET /task/top.html" 200 334192.9.20.5 authuser [26/Aug/2003:16:45:57] "GET /task/head.html" 200 519
Changing the /etc/log/httpd.log file format
The default format of the /etc/log/httpd.log file shows the IP address of the HTTP clients and the HTTPpath accessed, but not which virtual host is accessed. You can change the format of the /etc/log/httpd.logfile so that it distinguishes HTTP messages by virtual hosts by setting the httpd.log.format option.
Step
1. Enter the following command:
options httpd.log.format alt1
File access using HTTP | 359
To revert the setting for log format, change this option from alt1 to the default value, common.
Purchasing and connecting a third-party HTTP server to yourstorage system
You can work around limitations of the Data ONTAP built-in HTTP server by purchasing and connectinga third-party HTTP server to your storage system.
About this task
The Data ONTAP built-in HTTP server has the following limitations:
• No support for Secure HTTP (HTTPS)
• No support for more than one HTTP root directory
• No support for scripts (that is, the HTTP supports file serving only)
• Scalability and performance problems if there are a large number of file operations on a large numberof small files
Steps
1. Purchase a third-party HTTP server.2. Connect the third-party HTTP server to your storage system using the NFS protocol.
For more information, see the documentation that comes with your third-party HTTP server.
HTTP and HTTPS over IPv6Starting with Data ONTAP 7.3.1, you can allow HTTP clients to access the files on your storage systemover IPv6. You can also enable HTTPS for secure administrative access to the storage system.
You can use HTTP over IPv6 only for accessing files from your storage system. You cannot use HTTPfor FilerView and Secure FilerView with IPv6.
Note: FilerView and Secure FilerView are not enabled over IPv6.
Next topics
Enabling or disabling HTTP and HTTPS over IPv6 on page 361
Listing HTTP connections over IPv4 or IPv6 on page 362
360 | Data ONTAP 7.3 File Access and Protocols Management Guide
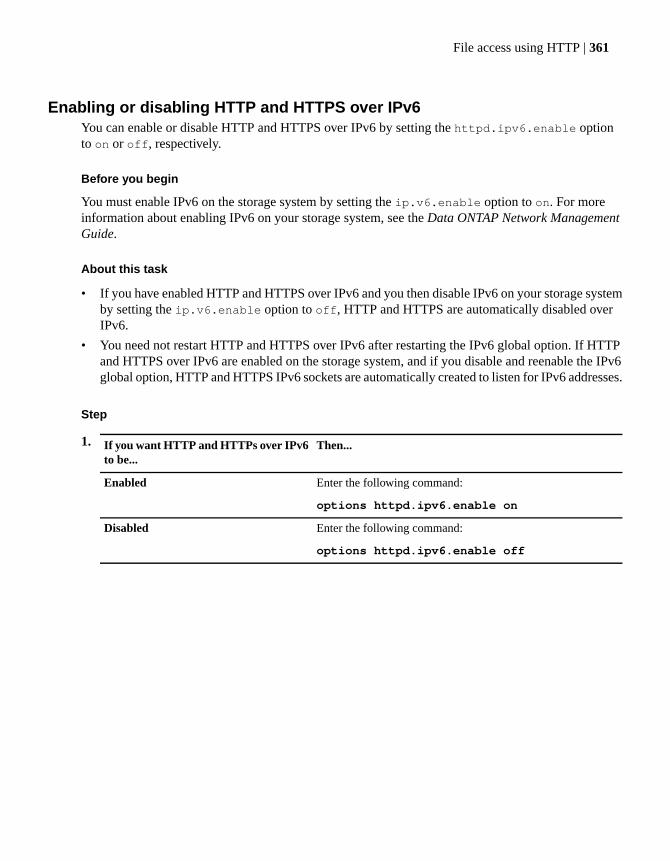
Enabling or disabling HTTP and HTTPS over IPv6You can enable or disable HTTP and HTTPS over IPv6 by setting the httpd.ipv6.enable optionto on or off, respectively.
Before you begin
You must enable IPv6 on the storage system by setting the ip.v6.enable option to on. For moreinformation about enabling IPv6 on your storage system, see the Data ONTAP Network ManagementGuide.
About this task
• If you have enabled HTTP and HTTPS over IPv6 and you then disable IPv6 on your storage systemby setting the ip.v6.enable option to off, HTTP and HTTPS are automatically disabled overIPv6.
• You need not restart HTTP and HTTPS over IPv6 after restarting the IPv6 global option. If HTTPand HTTPS over IPv6 are enabled on the storage system, and if you disable and reenable the IPv6global option, HTTP and HTTPS IPv6 sockets are automatically created to listen for IPv6 addresses.
Step
1. Then...If you want HTTP and HTTPs over IPv6to be...
Enter the following command:
options httpd.ipv6.enable on
Enabled
Enter the following command:
options httpd.ipv6.enable off
Disabled
File access using HTTP | 361
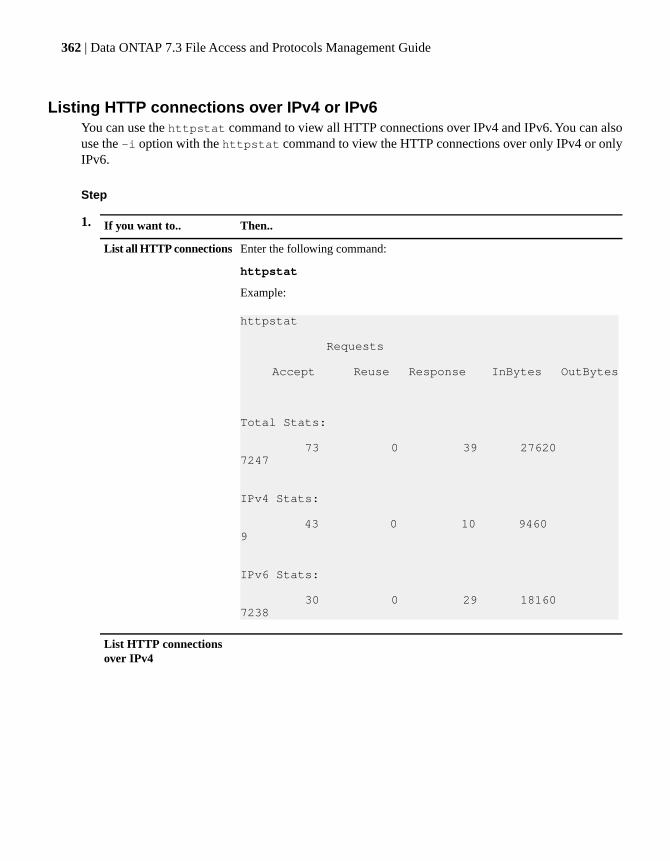
Listing HTTP connections over IPv4 or IPv6You can use the httpstat command to view all HTTP connections over IPv4 and IPv6. You can alsouse the -i option with the httpstat command to view the HTTP connections over only IPv4 or onlyIPv6.
Step
1. Then..If you want to..
Enter the following command:
httpstat
Example:
httpstat
Requests
Accept Reuse Response InBytes OutBytes
Total Stats:
73 0 39 27620 7247
IPv4 Stats:
43 0 10 9460 9
IPv6 Stats:
30 0 29 18160 7238
List all HTTP connections
List HTTP connectionsover IPv4
362 | Data ONTAP 7.3 File Access and Protocols Management Guide
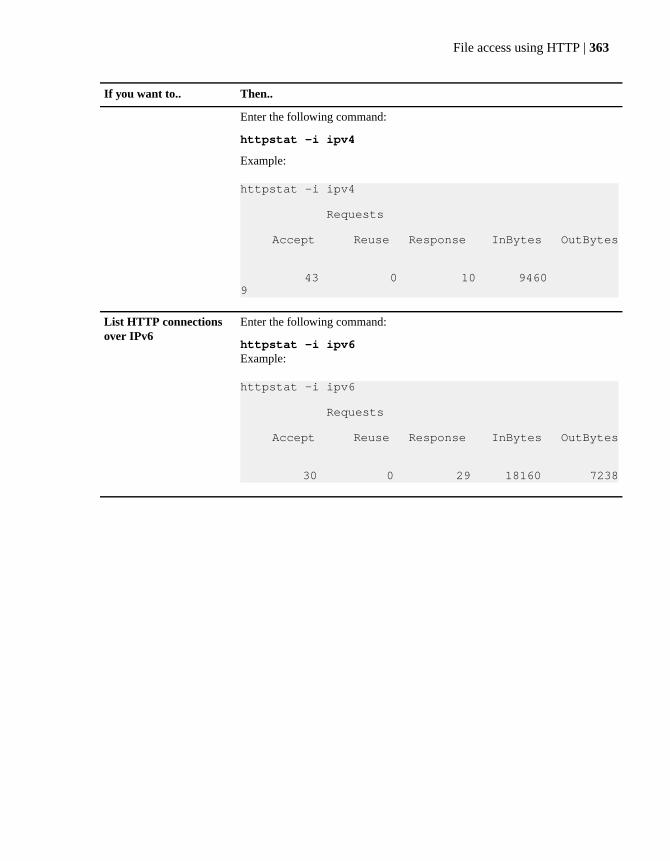
Then..If you want to..
Enter the following command:
httpstat -i ipv4
Example:
httpstat -i ipv4
Requests
Accept Reuse Response InBytes OutBytes
43 0 10 9460 9
Enter the following command:
httpstat -i ipv6Example:
httpstat -i ipv6
Requests
Accept Reuse Response InBytes OutBytes
30 0 29 18160 7238
List HTTP connectionsover IPv6
File access using HTTP | 363

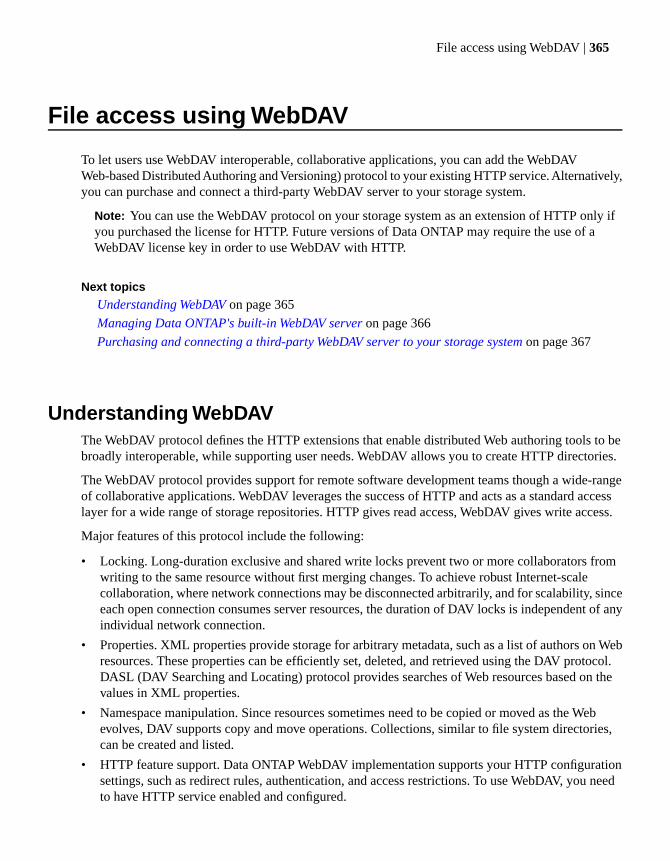
File access using WebDAV
To let users use WebDAV interoperable, collaborative applications, you can add the WebDAVWeb-based Distributed Authoring and Versioning) protocol to your existing HTTP service. Alternatively,you can purchase and connect a third-party WebDAV server to your storage system.
Note: You can use the WebDAV protocol on your storage system as an extension of HTTP only ifyou purchased the license for HTTP. Future versions of Data ONTAP may require the use of aWebDAV license key in order to use WebDAV with HTTP.
Next topics
Understanding WebDAV on page 365
Managing Data ONTAP's built-in WebDAV server on page 366
Purchasing and connecting a third-party WebDAV server to your storage system on page 367
Understanding WebDAVThe WebDAV protocol defines the HTTP extensions that enable distributed Web authoring tools to bebroadly interoperable, while supporting user needs. WebDAV allows you to create HTTP directories.
The WebDAV protocol provides support for remote software development teams though a wide-rangeof collaborative applications. WebDAV leverages the success of HTTP and acts as a standard accesslayer for a wide range of storage repositories. HTTP gives read access, WebDAV gives write access.
Major features of this protocol include the following:
• Locking. Long-duration exclusive and shared write locks prevent two or more collaborators fromwriting to the same resource without first merging changes. To achieve robust Internet-scalecollaboration, where network connections may be disconnected arbitrarily, and for scalability, sinceeach open connection consumes server resources, the duration of DAV locks is independent of anyindividual network connection.
• Properties. XML properties provide storage for arbitrary metadata, such as a list of authors on Webresources. These properties can be efficiently set, deleted, and retrieved using the DAV protocol.DASL (DAV Searching and Locating) protocol provides searches of Web resources based on thevalues in XML properties.
• Namespace manipulation. Since resources sometimes need to be copied or moved as the Webevolves, DAV supports copy and move operations. Collections, similar to file system directories,can be created and listed.
• HTTP feature support. Data ONTAP WebDAV implementation supports your HTTP configurationsettings, such as redirect rules, authentication, and access restrictions. To use WebDAV, you needto have HTTP service enabled and configured.
File access using WebDAV | 365
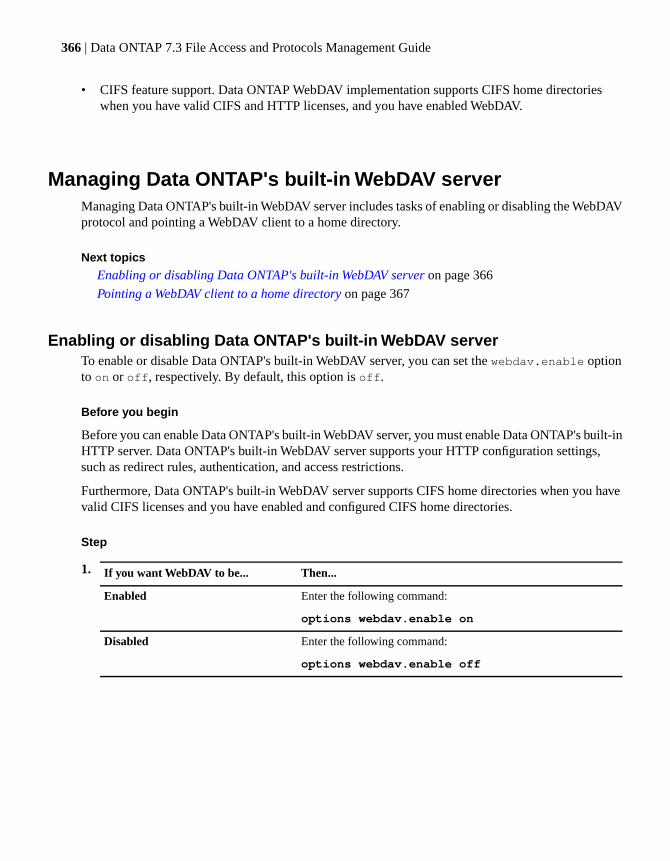
• CIFS feature support. Data ONTAP WebDAV implementation supports CIFS home directorieswhen you have valid CIFS and HTTP licenses, and you have enabled WebDAV.
Managing Data ONTAP's built-in WebDAV serverManaging Data ONTAP's built-in WebDAV server includes tasks of enabling or disabling the WebDAVprotocol and pointing a WebDAV client to a home directory.
Next topics
Enabling or disabling Data ONTAP's built-in WebDAV server on page 366
Pointing a WebDAV client to a home directory on page 367
Enabling or disabling Data ONTAP's built-in WebDAV serverTo enable or disable Data ONTAP's built-in WebDAV server, you can set the webdav.enable optionto on or off, respectively. By default, this option is off.
Before you begin
Before you can enable Data ONTAP's built-in WebDAV server, you must enable Data ONTAP's built-inHTTP server. Data ONTAP's built-in WebDAV server supports your HTTP configuration settings,such as redirect rules, authentication, and access restrictions.
Furthermore, Data ONTAP's built-in WebDAV server supports CIFS home directories when you havevalid CIFS licenses and you have enabled and configured CIFS home directories.
Step
1. Then...If you want WebDAV to be...
Enter the following command:
options webdav.enable on
Enabled
Enter the following command:
options webdav.enable off
Disabled
366 | Data ONTAP 7.3 File Access and Protocols Management Guide
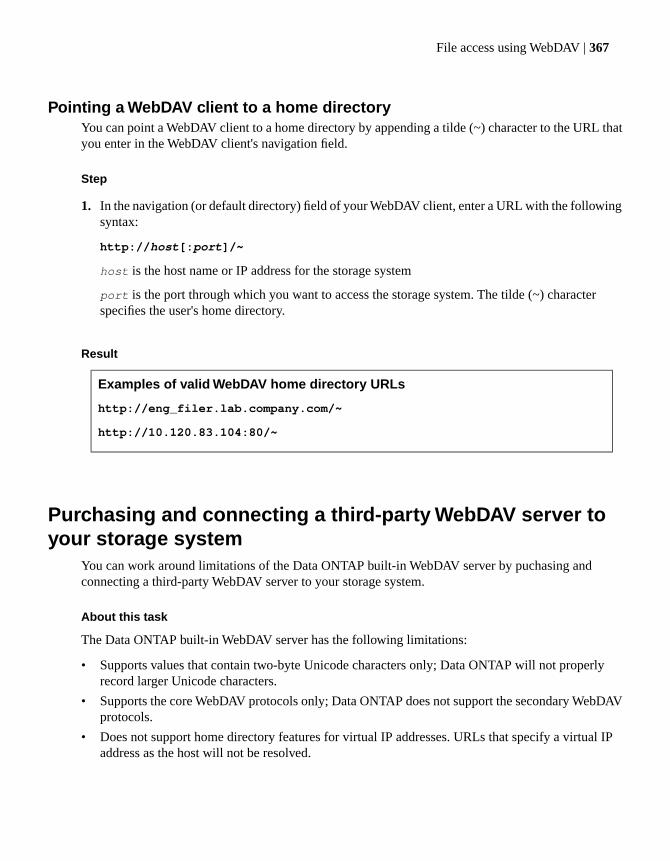
Pointing a WebDAV client to a home directoryYou can point a WebDAV client to a home directory by appending a tilde (~) character to the URL thatyou enter in the WebDAV client's navigation field.
Step
1. In the navigation (or default directory) field of your WebDAV client, enter a URL with the followingsyntax:
http://host[:port]/~
host is the host name or IP address for the storage system
port is the port through which you want to access the storage system. The tilde (~) characterspecifies the user's home directory.
Result
Examples of valid WebDAV home directory URLs
http://eng_filer.lab.company.com/~
http://10.120.83.104:80/~
Purchasing and connecting a third-party WebDAV server toyour storage system
You can work around limitations of the Data ONTAP built-in WebDAV server by puchasing andconnecting a third-party WebDAV server to your storage system.
About this task
The Data ONTAP built-in WebDAV server has the following limitations:
• Supports values that contain two-byte Unicode characters only; Data ONTAP will not properlyrecord larger Unicode characters.
• Supports the core WebDAV protocols only; Data ONTAP does not support the secondary WebDAVprotocols.
• Does not support home directory features for virtual IP addresses. URLs that specify a virtual IPaddress as the host will not be resolved.
File access using WebDAV | 367

Steps
1. Purchase a third-party WebDAV server.2. Connect the third-party WebDAV server to your storage system via the NFS protocol.
For more information, see the documentation that comes with your third-party WebDAV server.
368 | Data ONTAP 7.3 File Access and Protocols Management Guide
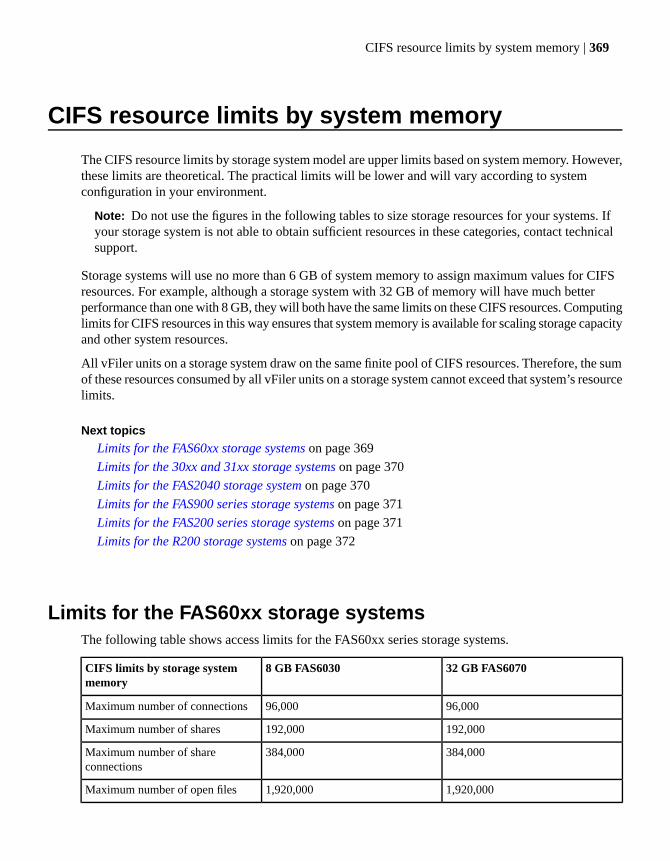
CIFS resource limits by system memory
The CIFS resource limits by storage system model are upper limits based on system memory. However,these limits are theoretical. The practical limits will be lower and will vary according to systemconfiguration in your environment.
Note: Do not use the figures in the following tables to size storage resources for your systems. Ifyour storage system is not able to obtain sufficient resources in these categories, contact technicalsupport.
Storage systems will use no more than 6 GB of system memory to assign maximum values for CIFSresources. For example, although a storage system with 32 GB of memory will have much betterperformance than one with 8 GB, they will both have the same limits on these CIFS resources. Computinglimits for CIFS resources in this way ensures that system memory is available for scaling storage capacityand other system resources.
All vFiler units on a storage system draw on the same finite pool of CIFS resources. Therefore, the sumof these resources consumed by all vFiler units on a storage system cannot exceed that system’s resourcelimits.
Next topics
Limits for the FAS60xx storage systems on page 369
Limits for the 30xx and 31xx storage systems on page 370
Limits for the FAS2040 storage system on page 370
Limits for the FAS900 series storage systems on page 371
Limits for the FAS200 series storage systems on page 371
Limits for the R200 storage systems on page 372
Limits for the FAS60xx storage systemsThe following table shows access limits for the FAS60xx series storage systems.
32 GB FAS60708 GB FAS6030CIFS limits by storage systemmemory
96,00096,000Maximum number of connections
192,000192,000Maximum number of shares
384,000384,000Maximum number of shareconnections
1,920,0001,920,000Maximum number of open files
CIFS resource limits by system memory | 369

32 GB FAS60708 GB FAS6030CIFS limits by storage systemmemory
2,116,6082,116,608Maximum number of locked files
4,233,2164,233,216Maximum number of locks
Limits for the 30xx and 31xx storage systemsThe following table shows access limits for the 30xx and 31xx storage systems.
8 GB FAS3070and FAS3160
4 GB FAS3040 andFAS3140
4 GB FAS30502 GB FAS3020CIFS limits bystorage systemmemory
96,00064,00055,00032,000Maximum numberof connections
192,000128,000110,00064,000Maximum numberof shares
384,000256,000220,000128,000Maximum numberof share connections
1,920,0001,280,0001,100,000640,000Maximum numberof open files
2,116,6081,411,0721,212,640705,536Maximum numberof locked files
4,233,2162,822,1442,425,2801,411,072Maximum numberof locks
Limits for the FAS2040 storage systemThe following table shows the access limits for the FAS2040 storage system.
2 GB FAS2040CIFS limits by storage system memory
44,000Maximum number of connections
88,000Maximum number of shares
176,000Maximum number of share connections
880,000Maximum number of open files
970,112Maximum number of locked files
370 | Data ONTAP 7.3 File Access and Protocols Management Guide
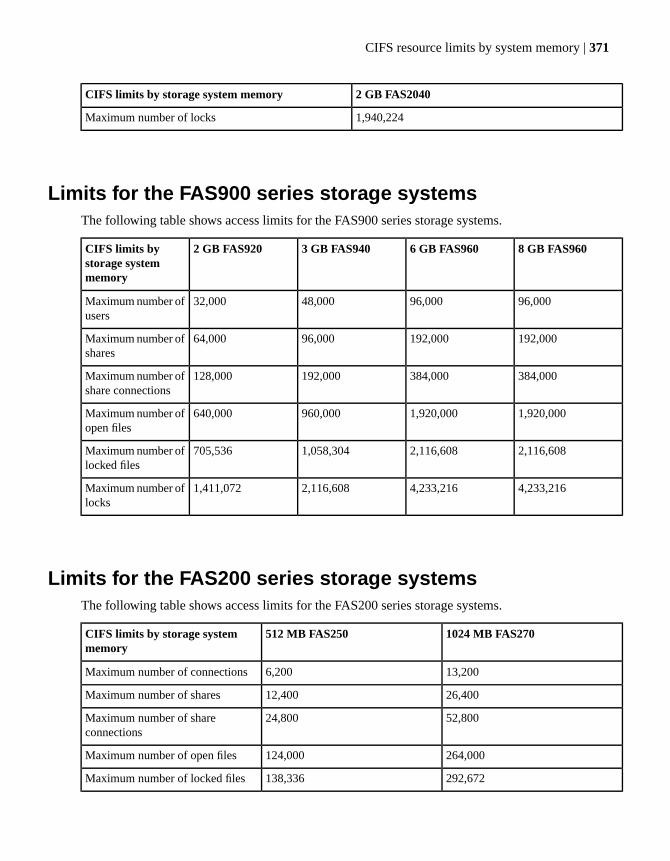
2 GB FAS2040CIFS limits by storage system memory
1,940,224Maximum number of locks
Limits for the FAS900 series storage systemsThe following table shows access limits for the FAS900 series storage systems.
8 GB FAS9606 GB FAS9603 GB FAS9402 GB FAS920CIFS limits bystorage systemmemory
96,00096,00048,00032,000Maximum number ofusers
192,000192,00096,00064,000Maximum number ofshares
384,000384,000192,000128,000Maximum number ofshare connections
1,920,0001,920,000960,000640,000Maximum number ofopen files
2,116,6082,116,6081,058,304705,536Maximum number oflocked files
4,233,2164,233,2162,116,6081,411,072Maximum number oflocks
Limits for the FAS200 series storage systemsThe following table shows access limits for the FAS200 series storage systems.
1024 MB FAS270512 MB FAS250CIFS limits by storage systemmemory
13,2006,200Maximum number of connections
26,40012,400Maximum number of shares
52,80024,800Maximum number of shareconnections
264,000124,000Maximum number of open files
292,672138,336Maximum number of locked files
CIFS resource limits by system memory | 371
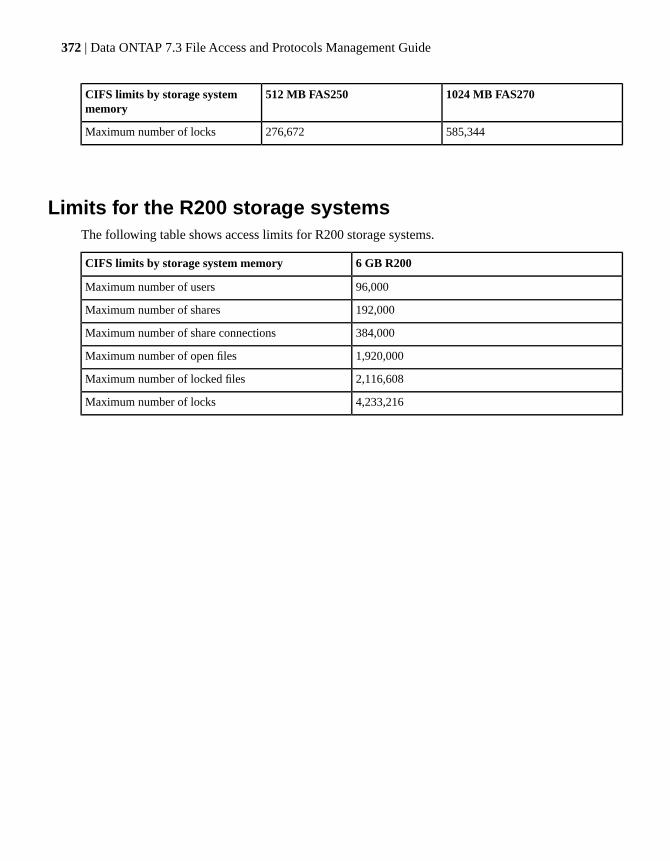
1024 MB FAS270512 MB FAS250CIFS limits by storage systemmemory
585,344276,672Maximum number of locks
Limits for the R200 storage systemsThe following table shows access limits for R200 storage systems.
6 GB R200CIFS limits by storage system memory
96,000Maximum number of users
192,000Maximum number of shares
384,000Maximum number of share connections
1,920,000Maximum number of open files
2,116,608Maximum number of locked files
4,233,216Maximum number of locks
372 | Data ONTAP 7.3 File Access and Protocols Management Guide
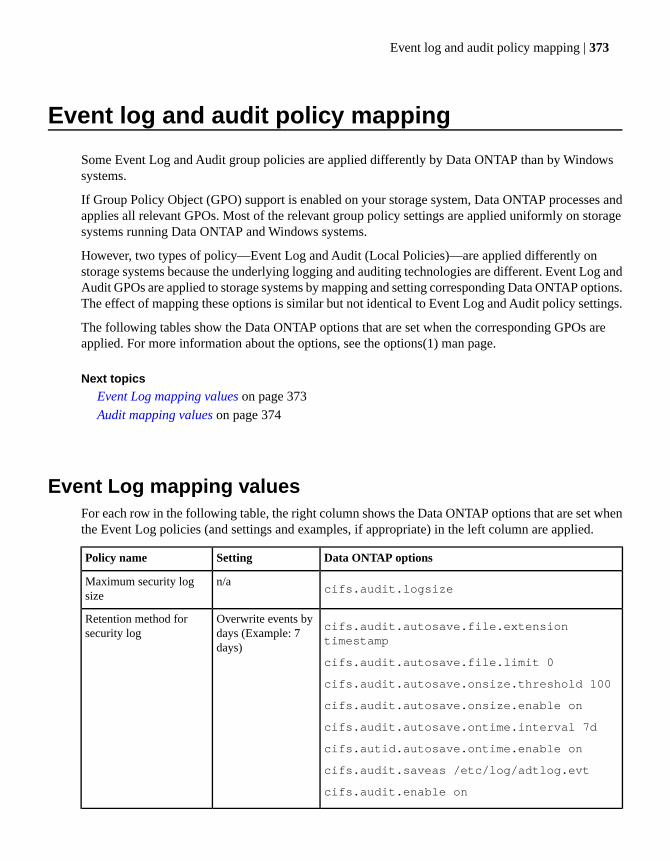
Event log and audit policy mapping
Some Event Log and Audit group policies are applied differently by Data ONTAP than by Windowssystems.
If Group Policy Object (GPO) support is enabled on your storage system, Data ONTAP processes andapplies all relevant GPOs. Most of the relevant group policy settings are applied uniformly on storagesystems running Data ONTAP and Windows systems.
However, two types of policy—Event Log and Audit (Local Policies)—are applied differently onstorage systems because the underlying logging and auditing technologies are different. Event Log andAudit GPOs are applied to storage systems by mapping and setting corresponding Data ONTAP options.The effect of mapping these options is similar but not identical to Event Log and Audit policy settings.
The following tables show the Data ONTAP options that are set when the corresponding GPOs areapplied. For more information about the options, see the options(1) man page.
Next topics
Event Log mapping values on page 373
Audit mapping values on page 374
Event Log mapping valuesFor each row in the following table, the right column shows the Data ONTAP options that are set whenthe Event Log policies (and settings and examples, if appropriate) in the left column are applied.
Data ONTAP optionsSettingPolicy name
cifs.audit.logsizen/aMaximum security log
size
cifs.audit.autosave.file.extensiontimestamp
cifs.audit.autosave.file.limit 0
cifs.audit.autosave.onsize.threshold 100
cifs.audit.autosave.onsize.enable on
cifs.audit.autosave.ontime.interval 7d
cifs.autid.autosave.ontime.enable on
cifs.audit.saveas /etc/log/adtlog.evt
cifs.audit.enable on
Overwrite events bydays (Example: 7days)
Retention method forsecurity log
Event log and audit policy mapping | 373
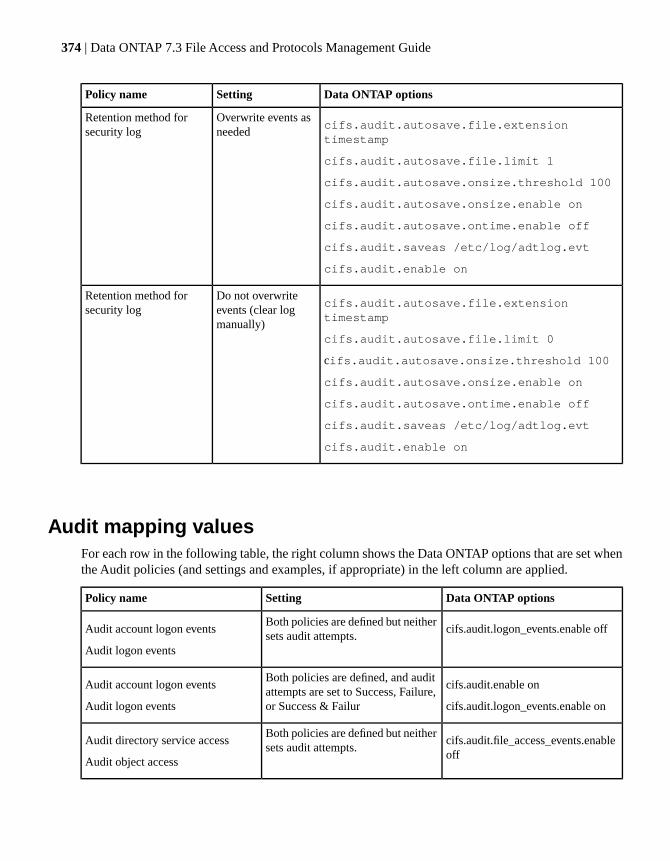
Data ONTAP optionsSettingPolicy name
cifs.audit.autosave.file.extensiontimestamp
cifs.audit.autosave.file.limit 1
cifs.audit.autosave.onsize.threshold 100
cifs.audit.autosave.onsize.enable on
cifs.audit.autosave.ontime.enable off
cifs.audit.saveas /etc/log/adtlog.evt
cifs.audit.enable on
Overwrite events asneeded
Retention method forsecurity log
cifs.audit.autosave.file.extensiontimestamp
cifs.audit.autosave.file.limit 0
cifs.audit.autosave.onsize.threshold 100
cifs.audit.autosave.onsize.enable on
cifs.audit.autosave.ontime.enable off
cifs.audit.saveas /etc/log/adtlog.evt
cifs.audit.enable on
Do not overwriteevents (clear logmanually)
Retention method forsecurity log
Audit mapping valuesFor each row in the following table, the right column shows the Data ONTAP options that are set whenthe Audit policies (and settings and examples, if appropriate) in the left column are applied.
Data ONTAP optionsSettingPolicy name
cifs.audit.logon_events.enable offBoth policies are defined but neithersets audit attempts.
Audit account logon events
Audit logon events
cifs.audit.enable on
cifs.audit.logon_events.enable on
Both policies are defined, and auditattempts are set to Success, Failure,or Success & Failur
Audit account logon events
Audit logon events
cifs.audit.file_access_events.enableoff
Both policies are defined but neithersets audit attempts.
Audit directory service access
Audit object access
374 | Data ONTAP 7.3 File Access and Protocols Management Guide

Data ONTAP optionsSettingPolicy name
cifs.audit.enable on
cifs.audit.file_access_events.enableon
Both policies are defined, and auditattempts are set to Success, Failure,or Success & Failure
Audit directory service access
Audit object access
No mapping action is performed.Other Audit policies and settings.
Event log and audit policy mapping | 375


Glossary
The following terms are frequently used in the context of file access and protocols management.
ACL. Access control list. A list that contains the users’ or groups’ access rights to each share.
active/active configuration. A pair of storage systems connected so that one system can detect whenthe other is not working and, if so, can serve the failed system’s data. In Data ONTAP documentationand other information resources, active/active configurations are sometimes also referred to as clustersor active/active pairs.
adapter card. A SCSI card, network card, hot swap adapter card, serial adapter card, or VGA adapterthat plugs into an expansion slot.
address resolution. The procedure for determining a Media Access Control (MAC) addresscorresponding to the address of a LAN or WAN destination.
administration host. The client you specify during system setup for managing your storage system.The setup program automatically configures the storage system to accept telnet and rsh connectionsfrom this client, to give permission to this client for mounting the / and /home directories, and to usethis client as the mail host for sending AutoSupport email messages. At any time after you run the setupprogram, you can configure the storage system to work with other clients in the same way as it doeswith the administration host.
agent. A Data ONTAP process that gathers status and diagnostic information and forwards it to NMSs.
appliance. A device that performs a well-defined function and is easy to install and operate.
ATM. Asynchronous Transfer Mode. A network technology that combines the features of cell-switchingand multiplexing to offer reliable and efficient network services. ATM provides an interface betweendevices such as workstations and routers, and the network.
authentication. A security step performed by a domain controller for the storage system’s domain, orby the storage system itself, using its /etc/passwd file.
AutoSupport. A storage system daemon that triggers email messages from the customer site to technicalsupport or another specified email recipient when there is a potential storage system problem.
big-endian. A binary data format for storage and transmission in which the most significant bit or bytecomes first.
CIFS. Common Internet File System. A protocol for networking PCs.
client. A computer that shares files on a storage system.
cluster interconnect. Cables and adapters with which the two storage systems in an active/activeconfiguration are connected and over which heartbeat and WAFL log information are transmitted whenboth systems are running.
Glossary | 377
cluster monitor. Software that administers the relationship of storage systems in the active/activeconfiguration through the cf command.
community. A name used as a password by the SNMP manager to communicate with the storage systemagent.
console. A terminal that is attached to a storage system’s serial port and is used to monitor and managestorage system operation.
copy-on-write. The technique for creating Snapshot copies without consuming excess disk space.
degraded mode. The operating mode of storage systems when a disk is missing from the RAID arrayor the batteries on the NVRAM card are low.
disk ID number. A number assigned by the storage system to each disk when it probes the disks atboot time.
disk shelf. A shelf that contains disk drives and is attached to the storage system.
emulated storage system. A software copy of the failed storage system that is hosted by the takeoverstorage system. The emulated storage system appears to users and administrators like a functionalversion of the failed storage system. For example, it has the same name as the failed storage system.
Ethernet adapter. An Ethernet interface card.
expansion card. A SCSI card, NVRAM card, network card, hot swap card, or console card that plugsinto a storage system expansion slot.
expansion slot. The slots on the system board in which you insert expansion cards.
failed storage system. The physical storage system that has ceased operating. It remains the failedstorage system until giveback succeeds.
FDDI adapter. A Fiber Distributed Data Interface (FDDI) interface card.
FDDI-fiber. An FDDI adapter that supports a fiber-optic cable.
FDDI-TP. An FDDI adapter that supports a twisted-pair cable.
FPolicy. Data ONTAP’s proprietary file policy feature that provides the ability to control accesspermissions based on file properties, such as file type.
GID. Group ID.
giveback. The return of identity from the virtual storage system to the failed storage system, resultingin a return to normal operation; the reverse of takeover.
group. A group of users defined in the storage system’s /etc/group file.
heartbeat. A repeating signal transmitted from one storage system to another that indicates that thesystem is in operation. Heartbeat information is also stored on disk.
hot spare disk. A disk installed in storage systems that can be used to substitute for a failed disk. Beforethe disk failure, the hot spare disk is not part of the RAID disk array.
hot swap. The process of adding, removing, or replacing a disk while storage systems are running.
378 | Data ONTAP 7.3 File Access and Protocols Management Guide
hot swap adapter. An expansion card that makes it possible to add or remove a hard disk with minimalinterruption to file system activity.
inode. A data structure containing information about files on a storage system and in a UNIX filesystem.
interrupt switch. A switch on some storage system front panels used for debugging purposes.
LAN Emulation (LANE). The architecture, protocols, and services that create an Emulated LAN usingATM as an underlying network topology. LANE enables ATM-connected end systems to communicatewith other LAN-based systems.
local storage system. The storage system you are logged in to.
magic directory. A directory that can be accessed by name but does not show up in a directory listing.The Snapshot copy directories, except for the one at the mount point or at the root of the share, aremagic directories.
mailbox disk. One of a set of disks owned by each storage system that is used to store the active/activeconfiguration state information of the system. If that storage system stops operating, the takeover systemuses the information in the mailbox disks in constructing a virtual storage system. Mailbox disks arealso used as file system disks.
mail host. The client host responsible for sending automatic email to technical support when certainstorage system events occur.
maintenance mode. An option when booting a storage system from a system boot disk. Maintenancemode provides special commands for troubleshooting hardware and configuration.
MIB. Management Information Base. An ASCII file that describes the information that the agentforwards to NMSs.
MIME. Multipurpose Internet Mail Extensions. A specification that defines the mechanisms forspecifying and describing the format of Internet message bodies. An HTTP response containing theMIME Content-Type header allows the HTTP client to start the application that is appropriate for thedata received.
MultiStore. An optional storage system software product that enables you to partition the storage andnetwork resources of a single storage system so that it appears as multiple storage systems on thenetwork.
NDMP. Network Data Management Protocol. A protocol that allows storage systems to communicatewith backup applications, and provides capabilities for controlling the robotics of multiple tape backupdevices.
network adapter. An Ethernet, FDDI, or Asynchronous Transfer Mode (ATM) adapter.
network management station. See NMS.
NMS. Network Management Station. A host on a network that uses third-party network managementapplication (SNMP manager) to process status and diagnostic information about a storage system.
normal mode. The state of storage systems when there is no takeover in the active/active configuration.
Glossary | 379
null user. The Windows NT machine account used by applications to access remote data.
NVRAM cache. Nonvolatile RAM in storage systems, used for logging incoming write data and NFSrequests. Improves system performance and prevents loss of data in case of a storage system or powerfailure.
NVRAM card. An adapter card that contains the storage system’s NVRAM cache.
NVRAM mirror. A synchronously updated copy of the contents of storage system NVRAM (NonvolatileRandom Access Memory) contents kept on the partner storage system.
panic. A serious error condition causing the storage system to halt. Similar to a software crash in theWindows system environment.
parity disk. The disk on which parity information is stored for the RAID-4 disk drive array. Used toreconstruct data in failed disk blocks or on a failed disk.
partner. From the point of view of the local storage system, the other storage system in the active/activeconfiguration.
partner mode. The method you use to communicate through the command-line interface with thevirtual storage system during a takeover.
PCI. Peripheral Component Interconnect. The bus architecture used in newer storage system models.
pcnfsd. A storage system daemon that permits PCs to mount storage system file systems. Thecorresponding PC client software is called PC-NFS.
PDC. Primary Domain Controller. The domain controller that has negotiated to be, or has been assignedas, the primary authentication server for the domain.
POST. Power-on self-tests. The tests run by storage systems after the power is turned on.
PVC. Permanent Virtual Circuit. A link with a static route defined in advance, usually by manual setup.
qtree. A special subdirectory of the root of a volume that acts as a virtual subvolume with specialattributes.
RAID. Redundant array of independent disks. A technique that protects against disk failure by computingparity information based on the contents of all the disks in the array. Storage systems use RAID Level4, which stores all parity information on a single disk.
RAID disk scrubbing. The process in which the system reads each disk in the RAID group and triesto fix media errors by rewriting the data to another disk area.
SCSI adapter. An expansion card that supports the SCSI disk drives and tape drives.
SCSI address. The full address of a disk, consisting of the disk’s SCSI adapter number and the disk’sSCSI ID; for example, 9a.1.
SCSI ID. The number of a disk drive on the SCSI chain (0 to 6).
serial adapter. An expansion card for attaching a terminal as the console on some storage systemmodels.
380 | Data ONTAP 7.3 File Access and Protocols Management Guide

serial console. An ASCII or ANSI terminal attached to a storage system’s serial port. Used to monitorand manage storage system operations.
share. A directory or directory structure on the storage system that has been made available to networkusers and can be mapped to a drive letter on a CIFS client.
SID. Security ID.
Snapshot copy. An online, read-only copy of the entire file system that protects against accidentaldeletions or modifications of files without duplicating file contents. Snapshot copies enable users torestore files and to back up the storage system to tape while the system is in use.
SVC. Switched Virtual Circuit. A connection established through signaling. The user defines theendpoints when the call is initiated.
system board. A printed circuit board that contains the storage system’s CPU, expansion bus slots,and system memory.
takeover. The emulation of the failed storage system identity by the takeover storage system in anactive/active configuration; the reverse of giveback.
takeover storage system. A storage system that remains in operation after the other storage systemstops working and that hosts a virtual storage system that manages access to the failed storage systemdisk shelves and network connections. The takeover storage system maintains its own identity and thevirtual storage system maintains the failed storage system identity.
takeover mode. The method you use to interact with a storage system while it has taken over its partner.The console prompt indicates when the storage system is in takeover mode.
trap. An asynchronous, unsolicited message sent by an SNMP agent to an SNMP manager indicatingthat an event has occurred on the storage system.
tree quota. A type of disk quota that restricts the disk usage of a directory created by the quota qtreecommand. Different from user and group quotas that restrict disk usage by files with a given UID orGID.
UID. User ID.
Unicode. A 16-bit character set standard. It was designed and is maintained by the nonprofit consortiumUnicode Inc.
VCI. Virtual Channel Identifier. A unique numerical tag defined by a 16-bit field in the ATM cellheader that identifies a virtual channel over which the cell is to travel.
vFiler unit. A virtual storage system you create using MultiStore, which enables you to partition thestorage and network resources of a single storage system so that it appears as multiple storage systemson the network.
VGA adapter. An expansion card for attaching a VGA terminal as the console.
volume. A file system.
VPI. Virtual Path Identifier. An eight-bit field in the ATM cell header that indicates the virtual pathover which the cell should be routed.
Glossary | 381
WAFL. Write Anywhere File Layout. The WAFL file system was designed for storage systems runningData ONTAP to optimize write performance.
WINS. Windows Internet Name Service.
workgroup. A collection of computers running Windows NT or Windows for Workgroups that isgrouped for browsing and sharing.
382 | Data ONTAP 7.3 File Access and Protocols Management Guide


![Data ONTAP Cook Book v3 - NetApp Community · Data ONTAP Cook Book v3.1 ... Features introduced in Data Ontap 7.3 and 8.0 are preceded by [7.3] or ... Refer to the Data ONTAP Storage](https://img.pdfslide.us/doc/110x75/5aee25a67f8b9a662590f60e/data-ontap-cook-book-v3-netapp-community-ontap-cook-book-v31-features-introduced.jpg)