Embed Size (px)
Citation preview

7/31/2019 Data Modeller
http://slidepdf.com/reader/full/data-modeller 1/52
7/31/2019 Data Modeller
http://slidepdf.com/reader/full/data-modeller 2/52
2 Data Modeller
COPYRIGHT 1994-2003 SoftVelocity Incorporated. All rights reserved.
This publication is protected by copyright and all rights are reserved by SoftVelocityIncorporated. It may not, in whole or part, be copied, photocopied, reproduced, translated,or reduced to any electronic medium or machine-readable form without prior consent, inwriting, from SoftVelocity Incorporated.
This publication supports Clarion. It is possible that it may contain technical ortypographical errors. SoftVelocity Incorporated provides this publication “as is,”without warranty of any kind, either expressed or implied.
SoftVelocity Incorporated2769 East Atlantic Blvd.Pompano Beach, Florida 33062(954) 785-4555
www.softvelocity.com
Trademark Acknowledgements:
SoftVelocity is a trademark of SoftVelocity Incorporated. Clarion is a trademark of SoftVelocity Incorporated. Btrieve is a registered trademark of Pervasive Software.Microsoft, Windows, and Visual Basic are registered trademarks of Microsoft Corporation.All other products and company names are trademarks of their respective owners.
Printed in the United States of America (1003)
7/31/2019 Data Modeller
http://slidepdf.com/reader/full/data-modeller 3/52
Quick Reference Guide 3
Contents:
Introduction 5 Documentation Conventions ........................................................................... 5 Overview.......................................................................................................... 6
Technical Support ..................................................................................... 7 Design Pad 8 Data Pools 15
Column Pool............................................................................................ 15 Column Order.......................................................................................... 16 Table order.............................................................................................. 17 Subset order............................................................................................ 17 Key Order................................................................................................ 17 Key Pool Popup Menu ............................................................................ 18
The Data Modeller Menus 19 File Menu ................................................................................................ 19 Edit Menu................................................................................................ 20
Dictionary Menu ...................................................................................... 20 Views Menu............................................................................................. 21 Sort Tables Menu.................................................................................... 21 Zoom Menu............................................................................................. 21 Tools Menu ............................................................................................. 22 Print Menu............................................................................................... 33 Setup Menu............................................................................................. 34 Help Menu............................................................................................... 35
User Preferences 36 Color Settings.......................................................................................... 36 Other Settings ......................................................................................... 37 Advanced Settings .................................................................................. 39 Cascade Edits......................................................................................... 41 Database Drivers ....................................................................................42

7/31/2019 Data Modeller
http://slidepdf.com/reader/full/data-modeller 4/52
4 Data Modeller
Table Aliases 43 Table Relationships 45 SQL Script Generation 47 Large Dictionaries 49
Duplicate Idents 50 Index: 51
7/31/2019 Data Modeller
http://slidepdf.com/reader/full/data-modeller 5/52
Quick Reference Guide 5
Introduction
Documentation Conventions
The documentation uses the typeface and keyboard conventions that appear below.
Typeface Conventions
Italics Indicates what to type at the keyboard, such as Type This . It also indicates thetext of a window’s title bar.
ALL CAPS Indicates keystrokes to enter at the keyboard, such as ENTER or ESCAPE, andalso indicates Clarion Language keywords. For more information on thesekeywords, see the Language Reference PDF.
Boldface Indicates commands or options from a pull down menu or text in a dialogwindow.
COURIER NEW Used for diagrams, source code listings, to annotate examples, and for examples
of the usage of source statements.
These graphics indicate information that is not immediately evident from the topic explanation.
Keyboard Conventions
F1 Indicates a keystroke. Press and release the F1 key.
ALT+X Indicates a combination of keystrokes. Hold down the alt key and press the x key, then
release both keys.
7/31/2019 Data Modeller
http://slidepdf.com/reader/full/data-modeller 6/52
6 Data Modeller
Data Modeller
Overview
Data Modeller is a graphical, point and CLICK database dictionary editor for Clarion.
Data Modeller draws your dictionary design on a graphical (visual) Design Pad. The Design Paddisplays your tables in boxes containing column and key names. You can optionally displaycolumn types, pictures, key structures and prompts as well. You can create relationships betweentables simply by dragging and dropping. Data Modeller displays the resulting relationships aslines drawn between the boxes.
Dictionary, table, key, column and relationship attributes are immediately accessible with the rightmouse button—simply RIGHT-CLICK on the item you want to modify and Data Modeller providesthe appropriate popup menu choices for the selected item.
The right mouse button is the key to a successful relationship with Data Modeller!
Editing data dictionaries with Data Modeller is very fast and very easy, plus you can print thegraphical representation of the dictionary—up to 10 x 10 pages large! Of course you can print adetailed text report of the dictionary too.
Data Modeller has comprehensive built-in error checking that ensures your dictionaries areaccurately designed with the minimum of column name and type inconsistencies. Data Modelleranalyzes existing dictionaries too.
Data Modeller provides a wealth of time-saving utilities:
Column PoolStores entire column definitions (independent of any tables) for easy reuse. For example, youmay use a customer number column in several tables in your dictionary. Add the column to thecolumn pool, then simply select it from the column pool for each additional table that uses it. This
guarantees that a particular column is defined the same way every time. In addition, DataModeller optionally propagates changes from the column pool to each instance of the column inthe dictionary.
Key PoolStores entire key definitions for easy reuse. Add the key to the key pool, then simply select itfrom the pool for each table that uses it.
7/31/2019 Data Modeller
http://slidepdf.com/reader/full/data-modeller 7/52
Quick Reference Guide 7
Type PoolStores column type definitions for easy reuse. For example, you may frequently create datesusing a LONG, with picture @D6 and the Initial Value set to TODAY(). Store all these attributesas a Column Type. The next time you create a date column, select the attributes from the TypePool.
Favorite Pictures
Instead of typing in the picture every time you create a column, point and CLICK to select apicture from the favorite pictures list.
Data Type DefaultsCreate defaults for data types, complete with size and picture. For example, you may only useBYTE columns for check boxes—simply check the True or False attribute in the Data Type Defaults dialog. Whenever you create a new column, the default attributes are set.
Prompts ManagerPerform global search and replace on prompts, adjust the position of the prompt colons, andgenerate prompt hot keys. Use the Prompts Manager to strip out undesired underscores,including those that may have remained from very old Clarion applications.
Display SubsetsIf you are working with a very large dictionary you can focus on specific areas by defining andviewing subsets of the tables.
SQL Script GeneratorData Modeller automatically generates custom SQL scripts for creating and maintaining the SQLtables defined within your data dictionary.
Technical Support
Primary support for Data Modeller is provided by SoftVelocity. However, you may also contactPea Brain Software directly at:
Pea Brain Software ccPO Box 51694
Wierdapark0149SOUTH AFRICA
Or by email at: [email protected]
In order to provide you with quick efficient replies we ask that you be as clear and concise aspossible in your queries. Always include the version number of your Data Modeller (for example,version 2.0, release 001). To see the version number, choose Help About from the menu.
If Data Modeller fails with a specific dictionary, please send both the Clarion dictionary file and the.TXD file that are causing the problem.
7/31/2019 Data Modeller
http://slidepdf.com/reader/full/data-modeller 8/52
8 Data Modeller
Design Pad
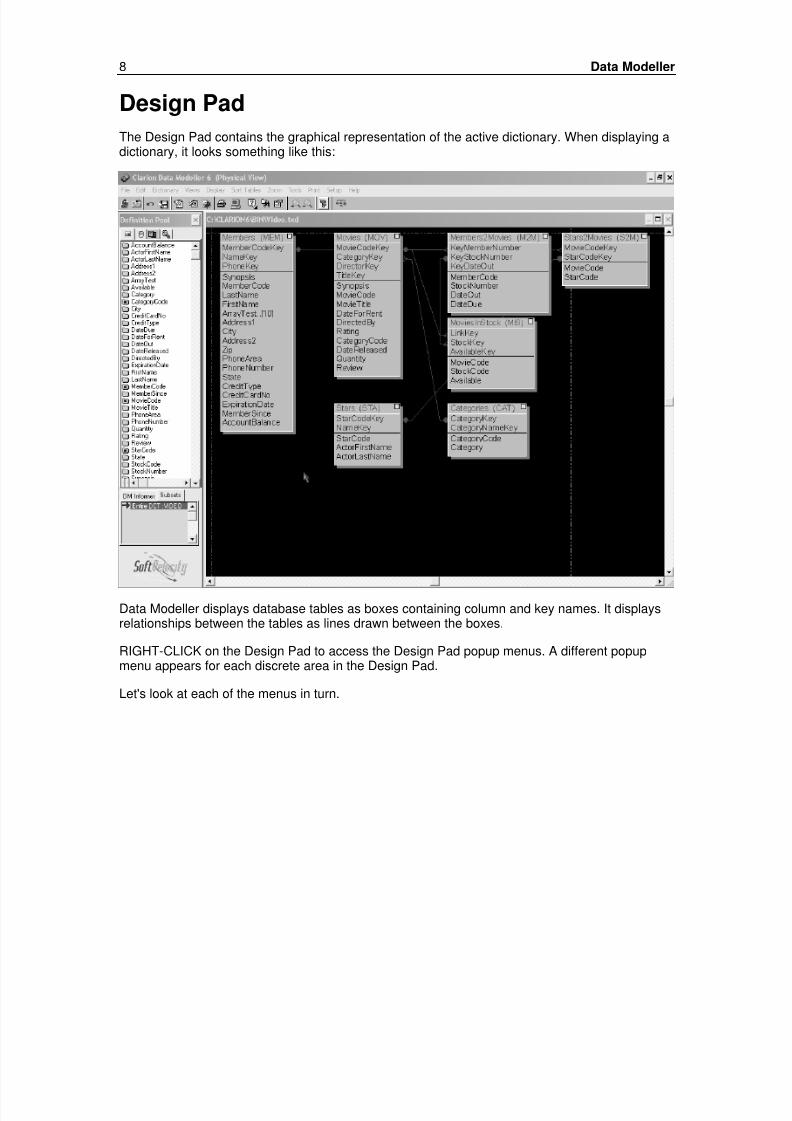
The Design Pad contains the graphical representation of the active dictionary. When displaying adictionary, it looks something like this:
Data Modeller displays database tables as boxes containing column and key names. It displaysrelationships between the tables as lines drawn between the boxes.
RIGHT-CLICK on the Design Pad to access the Design Pad popup menus. A different popupmenu appears for each discrete area in the Design Pad.
Let's look at each of the menus in turn.
7/31/2019 Data Modeller
http://slidepdf.com/reader/full/data-modeller 9/52
Quick Reference Guide 9
Table Popup Menu
RIGHT-CLICK on a table name. The resulting popup menu contains the following options.
Table to PopulateToggles the Table to Populate mode. When the mode is on, the background color of the tablename is red, and you can add new columns to the table simply by CLICKing on the column
names in the Column Pool.
Table PropertiesOpens the Table Properties dialog. This is the same as the Clarion Table Properties dialog.
Delete TableDelete the table and its relationships from the dictionary. Data Modeller will prompt first forconfirmation.
SummaryOpens the Table Statistics dialog which displays information about the table including the numberof keys and columns as well as the row length.
Copy TableOpens the Copy Table dialog which lets you create a new table with an identical layout.
Select fields for actionThis option, once activated allows you to select multiple columns from a file or from differenttables. The option is in the form of a toggle and it you call for the popup menu again only themultiple field options will be shown. They are Move Columns, Copy Columns and DeleteColumns.
To use the option do the following. CLICK on the "Select Columns For Action" option on the Tableor Columns Popup menu. Your cursor will return to normal once the selection is made. Select theColumns you wish to Move, Copy or delete. You may select from different tables at the sametime.
Once your selection is made use the right mouse and on the Target table call the Table Popupmenu. You will notice that only a few multi column option are available. If you wish to cancel theaction select Cancel from the option list and your menu will return to normal.
AttachmentsThis is used for the Smart documentation add-on available from PeaBrain.
Print StructurePrints a report with the details of this table (only). You can control whether the print optionsdialog and print preview display in the User Preferences.
7/31/2019 Data Modeller
http://slidepdf.com/reader/full/data-modeller 10/52
10 Data Modeller
Print Fields In FilePrints the column detail, similar to the Column Details Printout but only the fields for this selectedtable.
Tools (sub-menu)Provides quicker access to the tools that are more fully described later, in the section regardingthe Data Modeller menus:
Easy DocumentationAn oversize comment column, allowing both short table descriptions and extensiveprogrammers’ notes.
Browse / Convert Table . . .Displays the contents of the selected table.Please refer to the much fuller description of this function that can be found, under Tools,in the section titled The Data Modeller Menus .
Convert Table (Advanced). . .Allows you to convert the contents of a modified table to the new layout.Please refer to the much fuller description of this function that can be found, under Tools,
in the section titled The Data Modeller Menus.
Create Test Data . . .Enables you to generate test data for the selected table in the Design Pad.Please refer to the much fuller description of this function that can be found, under Tools,in the section titled The Data Modeller Menus.
Create New Empty TableOpens the Table Properties dialog to create a new (empty) table. Similar to the CreateTable command in the Dictionary menu. In contrast to the related command Create Tableand Populate.
Delete Table from diskDeletes the table and its associated relations from the dictionary.
Export Structure As SourceUse this dialog to generate the Clarion source code declaration for the selected table.
Export File The name of the .CLW file to be generated. Type the full filename, including the extension.
Append File Check to append this table declaration to an existing source file.If this option is not checked, any existing file is overwritten.
Export Comments:Include the short table description. (see Edit Comments)
7/31/2019 Data Modeller
http://slidepdf.com/reader/full/data-modeller 11/52
Quick Reference Guide 11
Export Long Descriptions:Include the full text of any developer notes.(see Edit Comments)
Keys (sub-menu)Create New KeyOpens the Key Properties dialog which is the same as the corresponding Clariondialog.
Add Selected KeyAdds the selected key in the Key Pool to the table. This option is disabled untilyou select a key.
AttachmentsThis is used for the Smart documentation add-on available from PeaBrain.
Columns (sub-menu)Create New ColumnOpens the Column Properties dialog which is the same as the correspondingClarion dialog. By selecting the Multiple option, initial development can go muchfaster, since on OK the user is returned to the top instead of exiting to the Design
Pad.
Add Selected ColumnAdds the selected column in the Column Pool to the table. This option is disableduntil you select a column.
Subsets (sub-menu)Hide Table OnlyHides this table only. See also: Define Subsets.
Hide Table and Related Tables (Setup)Hides this table and all related tables.
Hide All But... and Related Tables (Setup)Hides all the tables in the dictionary, except for this table and its related tables.
Hide All But... and Related Tables (First Level)Hides all the tables in the dictionary, except for this table and its related tables.
Cancel Subset DisplayUn-hides all the tables in the dictionary.

7/31/2019 Data Modeller
http://slidepdf.com/reader/full/data-modeller 12/52
12 Data Modeller
Key Popup Menu
Key PropertiesOpens the Key Properties dialog, which looks and acts the same as the corresponding Clariondialog.
Edit CommentsDescription columns for the key.
Delete KeyDeletes the selected key and all relationships depending on this key.
Column Popup Menu
Create New ColumnOpens the Column Properties dialog. This dialog is similar to its equivalent in Clarion. It allows fullaccess to, and editing of, the column attributes.
Create New Column (multiple)Opens the Column Properties dialog to create new columns for the selected table. The Dialog
redisplays to allow multiple adding of new columns. CLICK on Cancel to exit the Dialog.
Add Selected ColumnAdds the currently selected key in the Column Pool to the table. Note that this option is disabledunless you have already selected a column.
AttachmentsThis is used for the Smart documentation add-on available from PeaBrain.
SubsetsThe Subsets sub menu contains the following options:
Hide Table Only
Hides this table from the Design Pad. See also: Define Subsets.
Hide Table and Related Tables (Setup)Hides this table and all related tables from the Design Pad. You can specify whether directlyrelated tables only or all related tables are to be hidden. See Preferences, Other Settings.
Hide All But and Related Tables (Setup)Hides all the tables in the dictionary, except for this table and all its related tables.
Hide All But and Related Tables (First Level)Hides all the tables in the dictionary, except for this table and all its immediate related tables.
Cancel Subset Display Un-hides all the tables in the dictionary.
7/31/2019 Data Modeller
http://slidepdf.com/reader/full/data-modeller 13/52
Quick Reference Guide 13
Relationship Popup MenuThis popup menu is available when RIGHT-CLICKing on a relationship line.
Relation PropertiesOpens the Relation Properties dialog for the selected relationship. This dialog is identical to itsequivalent in Clarion, with the exception that in Data Modeller, you can name the relationships.
Use meaningful relationship names to make your data dictionary self-documenting.
You can display the relation names on the title bar of the Design Pad. Choose View RelationNames to toggle the display of relation names. Set the default in the User Preferences dialog inthe Other Settings tab. You can set the color of the relation names in the Color Settings tab.
Delete Relation Deletes the selected relationship.
Print Relations Prints a report showing all the relations for the dictionary.
Go to Primary File Moves the mouse cursor to the primary file in a relationship.
Go to Secondary File Moves the mouse cursor to the secondary file in a relationship.
In Data Modeller, you can create relationships by dragging and dropping. See Creating a Two- way Relationship and Creating a One-way Relationship .
Open Area Popup Menu
Dictionary PropertiesOpens the Dictionary Properties dialog.
Create TableOpens the Table Properties dialog to create a new (empty) table with a blank key and a blankcolumn to act as placeholders for the respective popup menus. When you enter a Key or aColumn, the respective placeholder disappears.
Create Table and PopulateCreates a new table and automatically fills it with selected columns from the Column Pool.
You must switch tagging on in the Column Pool (by RIGHT-CLICKING anywhere in that box), andthen CLICK the columns that you want in the table before you select this option.
7/31/2019 Data Modeller
http://slidepdf.com/reader/full/data-modeller 14/52
14 Data Modeller
Import Structure From TableSee the section on the File menu for more about this command.
Include Table in subsetsThis is enabled only when subsets are active. To use this feature, make a subset with all tables.Then for each table you wish to add to the current subset, use this menu to select which tablesmake up the subset.
Locate TablesOpens the Locate Tables dialog. This is most useful when you have a dictionary that is verylarge, with many tables. Simply highlight the table you want to locate then CLICK on OK (orDOUBLE-CLICK on the table name). The Design Pad places the mouse cursor on the selectedtable.
AliasesOpens the Alias Editor. You can set up aliases for any table in the dictionary. See Aliases formore information.
The fastest way to work with Data Modeller, is in 100% zoom mode, and to locate tables byDOUBLE-CLICKING in the Locate Table dialog. If you have a large dictionary, 'scale to fit' is notefficient as it can take a long time to redraw all the tables. See also Define Subsets.
Re-Position TablesRearranges the Design Pad, so that the tables are displayed from left to right with the largertables on the left, the smaller tables on the right. Note: Re-Position Tables is not reversible!
Re-size ViewCenters the dictionary display on the Design Pad
AttachmentsThis is used for the Smart documentation add-on available from PeaBrain..
7/31/2019 Data Modeller
http://slidepdf.com/reader/full/data-modeller 15/52
Quick Reference Guide 15
Data Pools
Column PoolThe Column Pool lists all the columns that have been defined in your dictionary. This makes iteasy, quick and accurate to create a new table based on existing columns, and it also helps avoidcommon bugs in your applications.
Locating ColumnsCLICK on a column name in the Column Pool. All instances of the column in the dictionary areimmediately highlighted.
If there is more than one instance of the column, they are displayed in different colors. The firstinstance that directly corresponds with the version selected in the Column Pool is displayed inone color. All other instances are displayed in a second color. You can choose the colors in theUser Preferences dialog.
Columns that have the same nameBy default the Column Pool lists all the columns in your dictionary, displaying each version ofcolumns that have the same name. These are color coded so that identical columns are taggedwith a blue flag icon, while columns that have the same name but different attributes are taggedwith a red flag icon.
Columns that have different attributes are always displayed. In the Advanced Settings tab of theUser Preferences dialog, you can choose whether or not to display those columns that haveidentical attributes.
Changing a column's attributesYou can choose in the Advanced Settings tab of the User Preferences dialog whether tocascade the changes automatically to other columns that have the same name and identical
attributes. Columns with the same name but different attributes are not affected.
7/31/2019 Data Modeller
http://slidepdf.com/reader/full/data-modeller 16/52
16 Data Modeller
Column OrderIn the Item Pool, there are 4 tabs across the top. The first tab is the Column Order. This lists allthe columns in name order.
Set FilterOpens the Pool Filter dialog which lets you display a subset of the columns in the Column Pool.
This is particularly useful if you have a large dictionary with many columns defined. For example,CLICK on the A tab to list only those columns whose names begin with 'A' (or 'a'). CLICK on theAll tab to cancel the subset display.
Show Only Tables Where UsedDisplays a subset of the dictionary, revealing just the tables where this column is used. SelectCancel Subset Display from the View Menu, to return the Design Pad to normal.
Create ColumnOpens the Column Properties dialog to create a new column.
Quick Add Opens the Quick Columns dialog, which lets you create a number of columns rapidly. The QuickColumns feature was inspired by its equivalent in the Clarion Quick Start utility. However, in DataModeller you can choose the data types for your columns.
Column Name Type a column name.Data Type Select a data type from the drop-down list.Size Type the size required. (For numeric data types
this column is disabled.)Use Data Type defaults Check to automatically apply attributes from the
data type pool. OK Save the new column to the quick list.Edit Edit the selected column.Delete Delete the selected column
Column PropertiesOpens the Column Properties dialog to change the attributes of the selected column. Note that if
you have multiple columns with the same name, any changes that you make may be carriedthrough to the other columns that have the same attributes. You can control this feature in theUser Preferences dialog.
Delete ColumnDeletes the column from the Column Pool. The column is also deleted from all tables, keys andrelations.
Copy ColumnOpens the Column Properties dialog. The attributes of the selected column are copied into thedialog. You must type a new name for the column.
7/31/2019 Data Modeller
http://slidepdf.com/reader/full/data-modeller 17/52
Quick Reference Guide 17
Untag AllQuickly releases multiple tags (checks). Use this when you wish to cancel all tagged columnsfrom any tagging operation.
Import From...Lets you merge dictionaries. You can import all columns from the selected dictionary. Only thefirst occurrence of each column is imported. Data Modeller does not check whether columnnames already exist so the import may result in duplicate column names in the Column Pool.
Table orderThis is the second tab and shows the columns in table order. This is a tree list and you mayexpand or contract any table. This shows the columns in the context they are used. The pop-upmenu is exactly the same as the Column Order. See Column Order for details.
Subset orderThis is active only when a subset is active. It is the same as the column order, except only for thecurrent subset.
Key Order
The Key Order lists all the keys defined in your dictionary.
Locating KeysCLICK on a key name in the Key Pool. Every occurrence of that key throughout the dictionary ishighlighted on the Design Pad. The highlight color can be set in the User Preferences dialog.
Creating a KeyIn the Design Pad, RIGHT-CLICK on the Table Name of the table for which you wish to create akey. From the popup menu, select Keys -> Create New Key.
Using an Existing Key
You can add an existing key to a table. Highlight the key in the Key Pool. Now RIGHT-CLICK onan existing key in the table. Select Keys->Add Selected Key. The key is added to the table. Notethat the table must have a key, before another can be added this way.
If the key columns don't exist in the table, they are automatically added to the table as well.

7/31/2019 Data Modeller
http://slidepdf.com/reader/full/data-modeller 18/52
18 Data Modeller
Key Pool Popup MenuOpens the Key Properties dialog for the selected key. The Key Properties dialog is similar to itsequivalent in Clarion. The only difference is in the Columns tab, where you choose the keycolumns directly from a list box.
DOUBLE-CLICK on a column in the Key Columns list box to change the sort order.
Delete KeyDeletes the selected key. The key is also deleted from its table. If the key is involved in a relation,the relation is also deleted.
Column PoolOpens the Column Pool and closes the Key Pool.
7/31/2019 Data Modeller
http://slidepdf.com/reader/full/data-modeller 19/52
Quick Reference Guide 19
The Data Modeller Menus
File MenuThe File menu lets you open, close, import and export dictionary files.
Import Current DCTImports the dictionary currently loaded in Clarion.
Export to Current DCTExports your changes back to the dictionary currently loaded in Clarion.
Support/UpdatesDescribes how to obtain support.
New DictionaryCreate a new dictionary. You will be asked whether you wish to save the currentdictionary.
Undo
DM saves a copy of the DCT at every startup point. If you press undo it will restore theprevious undo point and you will loose all changes made since them.
Open DMLOpens a selected .DML file for editing.
Close DictionaryClose the current dictionary. You will be asked whether the dictionary should be saved.
Export TXD Saves the dictionary to a .TXD file. Note that this option does not update the currentlyloaded dictionary (if any) in Clarion. In order to so, select the File, Export to Current DCToption.
Export AsCreates a .TXD file with the name you specify.
Export to SQL Script Opens the Export Script Type dialog, which allows to define the type of SQL script youwish to create. See SQL Script Generation below.
Delete TXD FileDeletes the .TXD file of your choice from your hard drive.
Printer SetupCalls the Windows Print Setup dialog.
7/31/2019 Data Modeller
http://slidepdf.com/reader/full/data-modeller 20/52
20 Data Modeller
Import Structure from TableImports a table structure into Data Modeller by allowing the user to select table type andthe name of the data table to be imported.
MRU ListThe names of the four most recently edited dictionaries are listed in the File menu. Toopen one of these dictionaries, CLICK on the name or type Alt-# where # is the numberof the dictionary in the list.
ExitExit Data Modeller.
Edit MenuThe Edit menu provides the following choices:
AliasesOpens the Alias Editor . See the section named Table Aliases later in this chapter.
Dictionary MenuThe Dictionary menu provides the following choices:
PropertiesOpens the Dictionary Properties dialog.
Create TableOpens the Table Properties dialog to create a new (empty) table with a blank key and ablank column to act as placeholders for the respective popup menus. When you enter aKey or a Column, the respective placeholder disappears.
Create Table and PopulateCreates a new table and automatically fills it with selected columns from the ColumnPool.
You must switch tagging on in the Column Pool, and CLICK on the columns that youwant in the table before you select this option.
7/31/2019 Data Modeller
http://slidepdf.com/reader/full/data-modeller 21/52
Quick Reference Guide 21
Views MenuThe View menu lets you change the way the tables are displayed in the Design Pad.
Physical ViewThis shows the physical layout of your dictionary.
Logical View
This shows the logical layout of your dictionary. When in this mode, you see any labelsyou may have attached to relationships, virtual relationships, etc.
Wizatron ViewThis shows the physical layout of your dictionary. The type and size attributes of eachcolumn display. Wizatron properties are applied, E.g. Column orders, No populate fieldsare let-out etc.
Sort Tables MenuThis menu allows you to sort the tables. This is effective as a way to quickly find tables whenusing a large dictionary.
All sort operations are not reversible!
by SizeRe-arranges the tables starting with the biggest table first.
by NameRe-arranges the tables alphabetically.
by PrefixRe-arranges the tables alphabetically by prefix
Zoom Menu
The Zoom menu lets you display as much of the dictionary as you want.
You can also zoom by CLICKing on the Design Pad with the left mouse button, if you ActivateLeft Mouse Button Zoom in the User Preferences dialog.
Zoom +Reveals more table, column name, and relation details, by showing less of the big picture.
Zoom -Reveals more of the schema, at the expense of some structure detail.
Scale to FitRe-scales the Design Pad so that all the tables in the dictionary are visible.
7/31/2019 Data Modeller
http://slidepdf.com/reader/full/data-modeller 22/52
22 Data Modeller
25%Scales the Design Pad so that the tables are displayed at 25%.
50%Scales the Design Pad so that the tables are displayed at 50%.
75%Scales the Design Pad so that the tables are displayed at 75%.
100%Scales the Design Pad so that the tables are displayed at 100%.
Tools MenuThe Tools menu contains options that allow you to analyze your dictionary, control the DesignPad and edit your own user-defined data types.
Prompts ManagerUse the Prompts Manager dialog to organize and control the prompts that have been set up inyour dictionary.
Apply to Selected Table onlyAllows the settings for prompts to be made table-by-table, or for the entire dictionary. This isenabled only when a table is selected.
Remove ColonsSelect to remove all colons from all prompts throughout your dictionary.
Add ColonsSelect to add colons to all prompts throughout your dictionary.
Spaces between text and colonThe number of spaces that will be generated between the last character of the prompt
and the colon.
The Microsoft Windows interface guidelines call for prompts to have a colon at the immediateright hand side of the text like this:
My Prompt:
Some developers, however, prefer their prompts to have a space before the colon like this: My Prompt :
With Data Modeller, either style is easy to generate!
7/31/2019 Data Modeller
http://slidepdf.com/reader/full/data-modeller 23/52
Quick Reference Guide 23
Hot KeysSelect to generate or delete hot keys for your prompts. The algorithm used is as follows: ifpossible the first letter of the prompt is used. If that has already been used, then the first letter ofthe second word (if it exists) is used. If that letter has already been used, then the second letter ofthe first word is used, and so on. If there are no unique letters left, the first letter found with theleast duplicates is used.
Create Hot KeysSelect to generate hot keys in all prompts.
Remove Hot KeysSelect to remove all existing hot keys from all prompts.
Remove All UnderscoresSelect to remove underscores from all the prompts in the dictionary. (Those of us who knew (andloved!) Clarion Professional Developer will appreciate this Prompt Manager utility. In ancienttimes programmers did not have the space-character option, and so they used underscores tomake labels and prompts more readable, as in FIRST_NAME_:. When you create a dictionary byimporting a CPD table definition, therefore, you’ll see that “legacy” prompts are infected withunderscores. Use this procedure to get rid of them.)
Search and ReplaceSelect to perform search and replace on all prompts.
Search For The string to search for.Replace With The string with which to replace the search string. If you leave this blank,
it will have the effect of deleting the search string.Case SensitiveCheck this box to make the search case sensitive.
Change JustificationNew Justification
The choices are Left, Right, Center, and Decimal. You may also choose“None”.
Make Prompts TransparentMake all prompts for the selected table or all tables transparent. This is useful when you usebackground images for windows.
Easy DocumentationEdit your comments and short descriptions from one function.
Properties Manager . . .Change many of the principal properties and options for one, for a group, or for all tables orcolumns. DOUBLE-CLICK on a column or a table to “tag” that item and add it to the batch forediting. Less frequently-changed attributes will still have to be changed via the Edit Propertiesdialog in Clarion.

7/31/2019 Data Modeller
http://slidepdf.com/reader/full/data-modeller 24/52
24 Data Modeller
Volumetric CalculationA handy tool for rough extrapolation of your capacity expectations for a specified table, based onthe ratio of file size to rows in the existing table. Permits early estimation of performance penaltiesassociated with different layouts.
Browse / Convert Table . . .Displays the contents of the selected table. The Data Modeller Table Browser is similar toClarion’s. Using either the menus or a RIGHT-CLICK popup, list or Print the rows in a specifiedtable; Order the rows by any key, or leave unsorted (i.e., “row order”); Filter the rows by any valueof any column; Change the column formatting in a specified table, even while the table is in use.Especially useful is the Header option, which allows you to view and change the label, picture,and data type of any column (a.k.a. column ) attributes.
In addition, the powerful Data Modeller browser has the following features:
You can display and edit the contents of ARRAY columns. ( + - Keys to scroll). BLOBscan also be displayed using the appropriate viewer.
You can Search for and Replace any column in a table.
Convert Tables (Advanced)This dialog (CLICK on Tools, Create Convert Program) allows you to transform data files fromone layout to another. For example you may want to simply add a column to an existing tableand simply convert the table without losing data. Or you may want to create an entirely new tableby copying and modifying selected columns from an existing table.

7/31/2019 Data Modeller
http://slidepdf.com/reader/full/data-modeller 25/52
Quick Reference Guide 25
You can either have Data Modeller execute the changes automatically, or you can generatesource code for a conversion program that may be compiled and shipped to your customers.
Source Input TableDriver Select the driver for the source file.
Owner Type the Owner Name which is typically a password for access to the source file.
Table Type or select the name of the source file.
Driver StringType the Driver Options string necessary for access to the file. See your Clariondocumentation for more details.
Target Table StructureTable Name Type or select the name of the target table.
Dictionary Data Modeller requires that the target table's structure exists in thecurrently loaded dictionary.
7/31/2019 Data Modeller
http://slidepdf.com/reader/full/data-modeller 26/52
26 Data Modeller
Structure Select the table structure for the target table. Note that this name neednot correspond with the physical table name chosen.
Program Name Type or select the name of the table that will contain the source code forthe conversion program. This table can be edited later in the Clarionsource editor. Note that a project file is also automatically created.
Assign ColumnsOpens the Convert Table, Assign dialog that allows you to control how the columns are copiedacross to the target table.
Execute InternalSimply executes the conversion process immediately without generating the conversion program.
Write CodeCreates the conversion program, complete with project file for you to modify (if necessary),compile and execute.
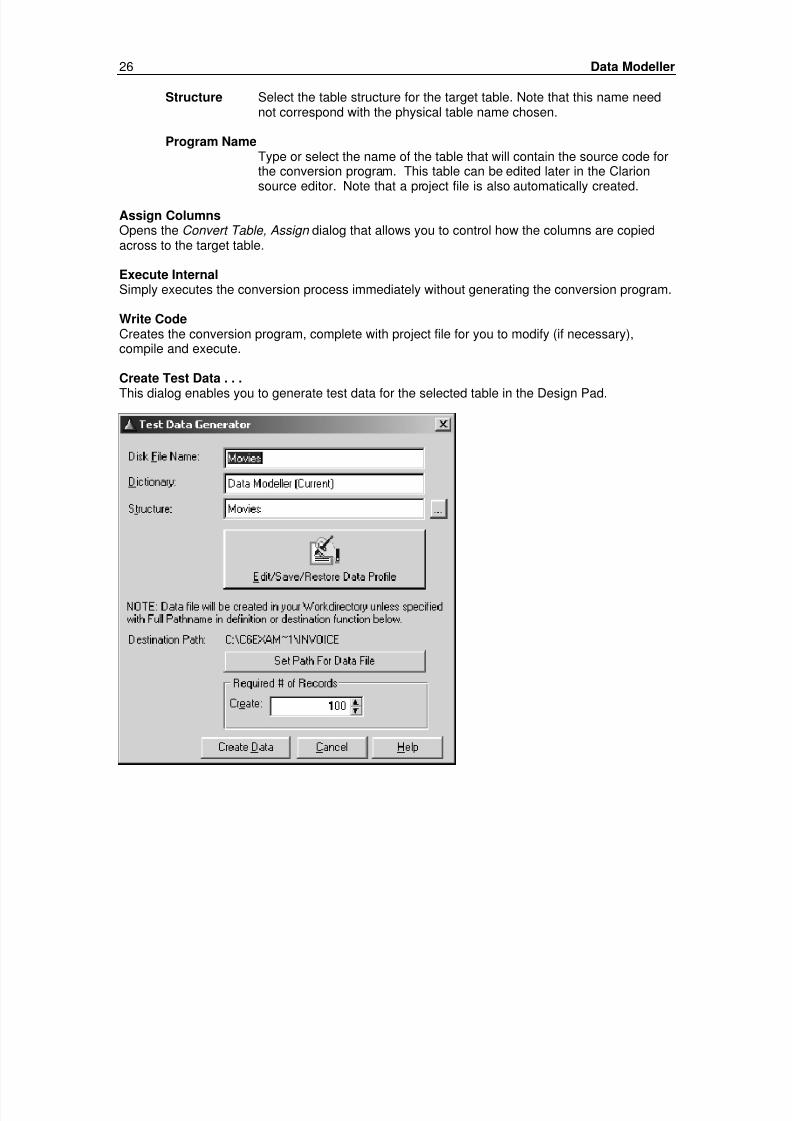
Create Test Data . . .
This dialog enables you to generate test data for the selected table in the Design Pad.
7/31/2019 Data Modeller
http://slidepdf.com/reader/full/data-modeller 27/52
Quick Reference Guide 27
Disk File Name:Type (or select) the name of the physical data file into which the test data will be placed. The fileextension is optional.
Dictionary:The current dictionary loaded in Data Modeller will be used. This cannot be changed.
Structure:Type (or select) the structure of the table into which the test data will be placed. Make sure thatthe table structure and table name are matched - you will overwrite data if the wrong disk target isselected.
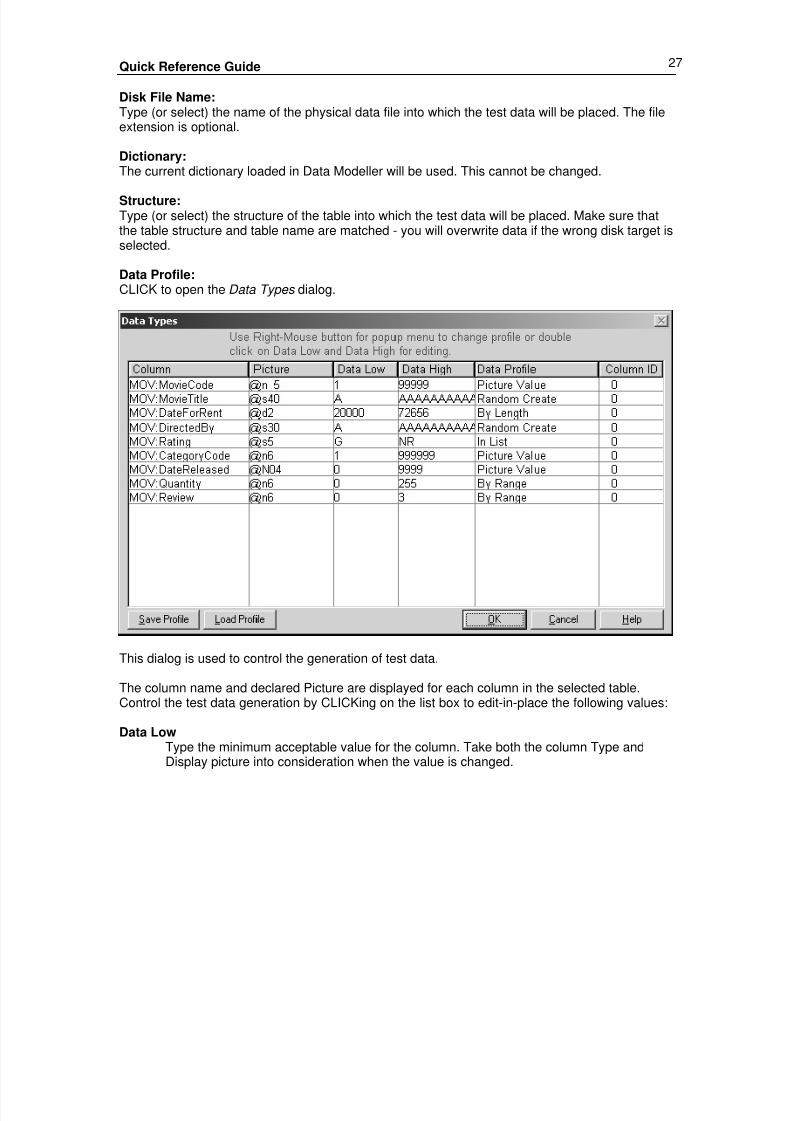
Data Profile:CLICK to open the Data Types dialog.
This dialog is used to control the generation of test data.
The column name and declared Picture are displayed for each column in the selected table.Control the test data generation by CLICKing on the list box to edit-in-place the following values:
Data LowType the minimum acceptable value for the column. Take both the column Type andDisplay picture into consideration when the value is changed.
7/31/2019 Data Modeller
http://slidepdf.com/reader/full/data-modeller 28/52
28 Data Modeller
Typing an incorrect value will result in data over flow indicated by the # sign in your application.
Data HighType the maximum acceptable value for the column. Take both the column Type and DisplayPicture into consideration when the value is changed.
Typing an incorrect value will result in data over flow indicated by the # sign in your application.
Data ProfileThe default Data Profile is generated by Data Modeller depending on the Column Type, Pictureand Length. You can change the Data Profile by RIGHT-CLICKing on the cell. See Data ProfilePopup Menu below for an explanation of the available options.
Column IDShows the ID number of the column selected from the Generation Database. Choose the columnby CLICKing on Fill From in the Data Profile Popup Menu.
Save ProfileCLICK to save your profile settings.
Load ProfileCLICK to load a previously defined profile for this table.
Required no of Rows:Type the number of rows you wish to generate. Data Modeller will generate up to 200,000 rowsper table.
Create Data:CLICK to generate the test data. If Data Modeller detects rows in the table before the generationstarts it will prompt you to clear the table or append rows to the table.

7/31/2019 Data Modeller
http://slidepdf.com/reader/full/data-modeller 29/52
Quick Reference Guide 29
SQL Converter AssistantThis menu provides access to tools to assist you in writing scripts for SQL tables.
SQL Converter
Relational ConstraintsThis option will convert all relations to server constraints.
Table DriverAll Tables will be changes to this driver.
Server NameThe Server name, Database and Login ID will be used to create the Owner name of theTable.
Example:If you enter ZASQL1 as the server name, AMIC as the database name and buser as theLogin ID then the Owner name field of table properties will be filled withZASQL1,AMIC,buser
Database Enter the Database name (Example: Northwind)
Login ID Enter the login name.
7/31/2019 Data Modeller
http://slidepdf.com/reader/full/data-modeller 30/52
30 Data Modeller
Full NameThis field will create the full name field on Table Properties. If you enterDB0 . the table name will be added, resulting in DB0.MyTables
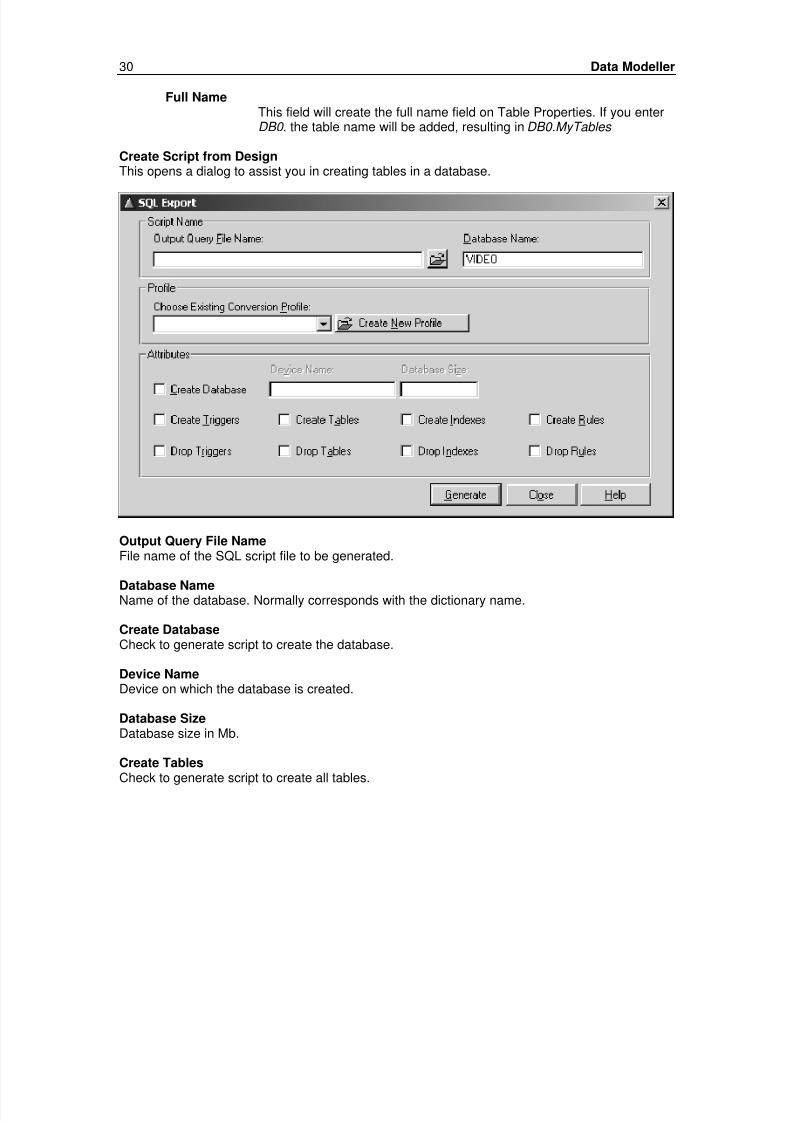
Create Script from DesignThis opens a dialog to assist you in creating tables in a database.
Output Query File NameFile name of the SQL script file to be generated.
Database NameName of the database. Normally corresponds with the dictionary name.
Create DatabaseCheck to generate script to create the database.
Device NameDevice on which the database is created.
Database SizeDatabase size in Mb.
Create TablesCheck to generate script to create all tables.
7/31/2019 Data Modeller
http://slidepdf.com/reader/full/data-modeller 31/52
Quick Reference Guide 31
Create IndexesCheck to generate script to create indexes for all tables.
Create RulesCheck to generate script to create rules on all columns that have validity checks set on them.
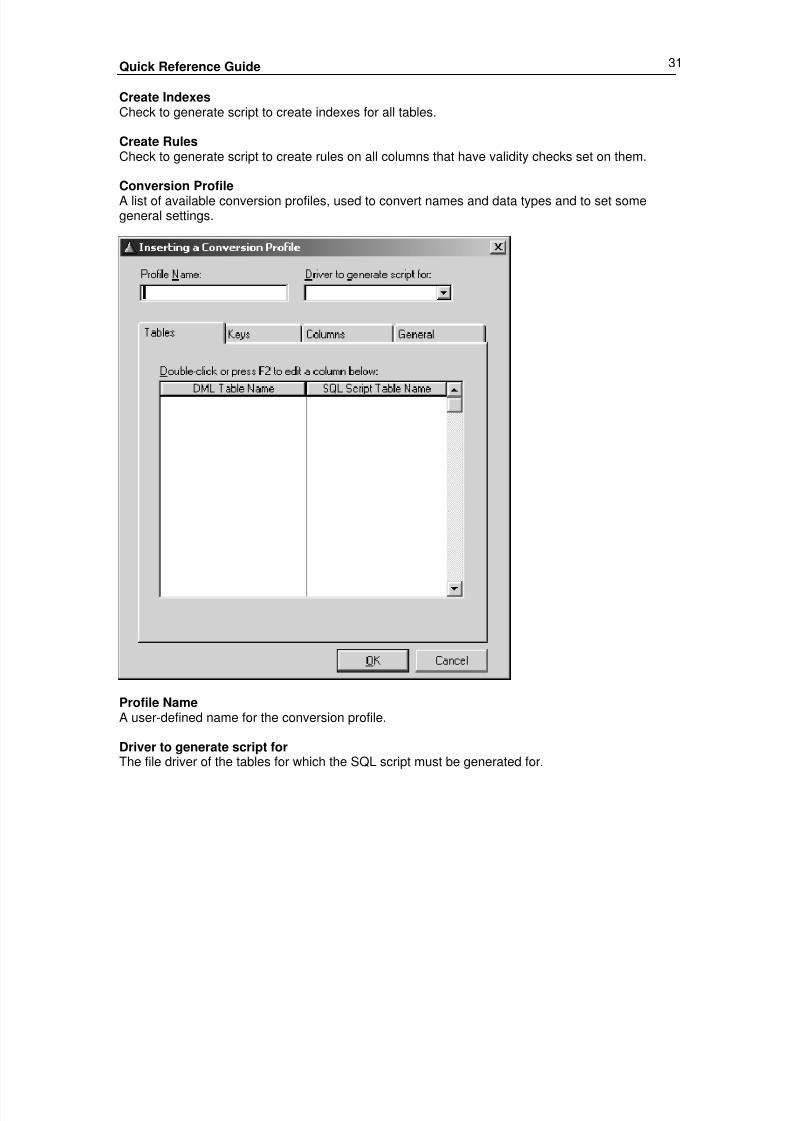
Conversion Profile
A list of available conversion profiles, used to convert names and data types and to set somegeneral settings.
Profile NameA user-defined name for the conversion profile.
Driver to generate script forThe file driver of the tables for which the SQL script must be generated for.

7/31/2019 Data Modeller
http://slidepdf.com/reader/full/data-modeller 32/52
32 Data Modeller
TablesA conversion from a Data Modeller table name to the expected SQL script table name.
KeysA conversion from a Data Modeller key name to the expected SQL script key name.
Columns - Names
A conversion from the Data Modeller column name to the expected SQL script column name.
Columns - Data TypesA conversion from the Data Modeller column data type to the expected SQL script data type.
From Data Type To Data Type
REAL FLOAT(24)
STRING CHAR
STRING(8) DATETIME
General - Create primary key constraintsCreate every table with its primary key constraint.
General - Create foreign key constraintsCreate every table with its foreign key constraint, as defined by a Clarion key and a relationshipwith another table.
General - Exclude DIMmed columnsExclude array columns.
Use external names if availableFor columns and keys, use external provided names.
OVERToggles the generation of OVER or OVERed columns. For example, if the following Clarioncolumn definition is provided:
DT_TransDate STRING (8)
TransDate_Group GROUP, OVER (DT_TransDate)
TransDate DATE
TransDate_Time TIME
END
The first choice (Generate only OVER columns) will generate the columns TransDate andTransDate_Time. The second choice (Generate only OVERed columns) will generateDT_TransDate.
7/31/2019 Data Modeller
http://slidepdf.com/reader/full/data-modeller 33/52
Quick Reference Guide 33
Set Table Export SeqThis dialog shows the order in which tables are exported to the .TXD file. This is importantbecause column declarations that are referred to in LIKE statements must be processed beforethe references.
Data Modeller stores the import sequence of your dictionary and maintains it unless you change itin this dialog. The export sequence has no effect on any other part of Data Modeller.
Analyse Import Error . . .When errors are detected as Data Modeller attempts to import a dictionary (“The dictionary that you have tried to load has duplicate Ident numbers and cannot be imported ”), enter the given linenumber in this dialog to display the “duplicate Ident numbers”. You can then edit the sourcedictionary, in the source application. See: Duplicate Ident Numbers at the end of this manual.
Analyze Dictionary (Report)Creates a report that lists all possible errors that Data Modeller has detected in your dictionary.
Print MenuPrint All Table ReferencePrints a detailed text report of your dictionary, one page per table.
Print Selected Table ReferencePrints a detailed text report of the selected table(s).
Print RelationsPrints a report of all the relations in your dictionary.
Print Column DetailsPrints a report of all the columns in your dictionary.
Print DesignPrints a comprehensive report, listing all files, columns, keys and relations in your dictionary.
Number of pages wideSpecify the width of the design (in pages). The height is adjusted automatically. Thissetting lets you make a readable representation of very large dictionaries. The largestallowable width is 10 pages.

7/31/2019 Data Modeller
http://slidepdf.com/reader/full/data-modeller 34/52
34 Data Modeller
Do not print background shadingThis setting is ON by default. Check it OFF if you have a color printer—the dictionary isthen printed in full color. If you have a non-color printer we recommend leaving thesetting ON both to save ink and because shading usually does not work well on blackand white printers.
Analysis Report
Prints a report of the discrepancies found in your dictionary. For example, columns in differentfiles that have the same name but different attributes are listed. This report can be used to helpavoid bugs in your applications.
Setup Menu
PreferencesOpens the User Preferences dialog where you can customize the look and feel of Data Modeller.See User Preferences below.
Data Type DefaultsOpens the Data Type Defaults dialog. This allows you to set the default characteristics
for columns of each data type.
This dialog allows you to set defaults for each data type. For example you may know thatmost often the STRING columns that you declare will be length 80, picture @s20.DECIMALs may usually be currency columns and as such have length 8,2 and a pictureof @N$12.2.The defaults that you set here are automatically applied to new columns created in DataModeller. See also: Quick Columns .
7/31/2019 Data Modeller
http://slidepdf.com/reader/full/data-modeller 35/52
Quick Reference Guide 35
Column LengthType the length of the Column. (If the data type is numeric, this column is disabled.)
Must be True or FalseCheck for BYTE data type to set this attribute automatically. BYTE variables are oftenused for True/False flags. (This option is hidden for any data type except BYTE.)
Case Set the default attribute.
Typing Mode Set the default attribute.
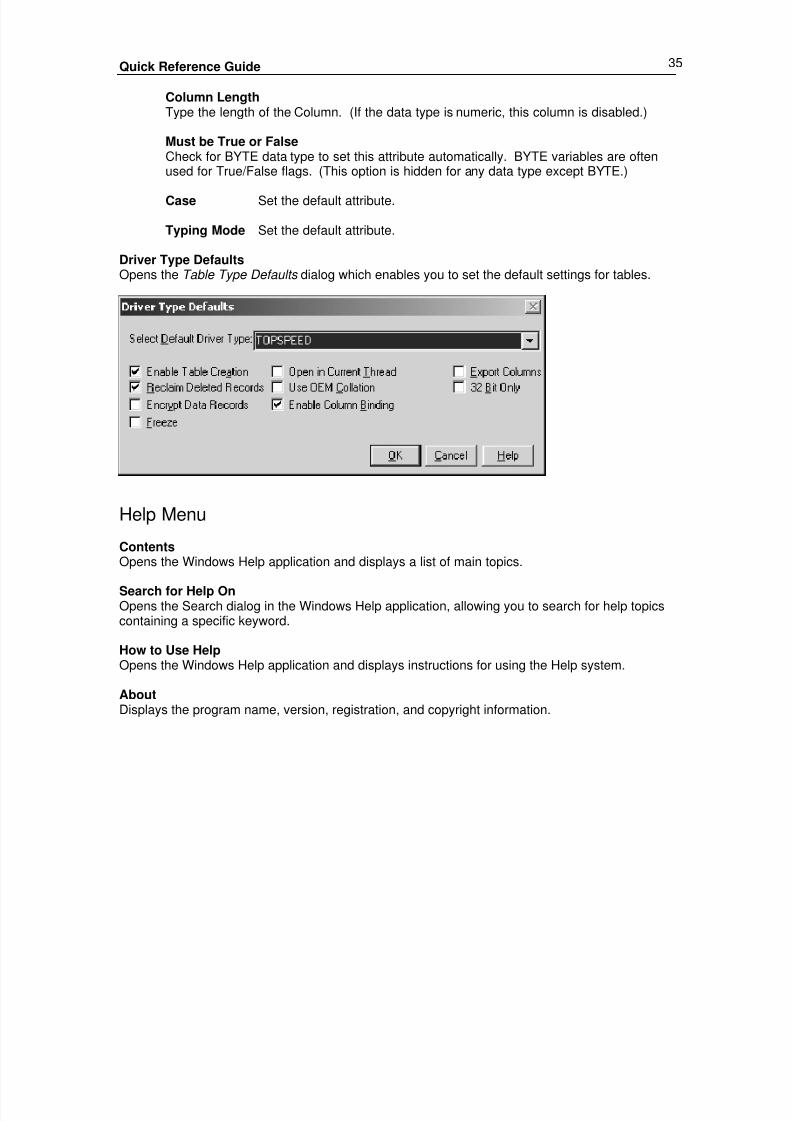
Driver Type DefaultsOpens the Table Type Defaults dialog which enables you to set the default settings for tables.
Help Menu
ContentsOpens the Windows Help application and displays a list of main topics.
Search for Help OnOpens the Search dialog in the Windows Help application, allowing you to search for help topicscontaining a specific keyword.
How to Use HelpOpens the Windows Help application and displays instructions for using the Help system.
AboutDisplays the program name, version, registration, and copyright information.
7/31/2019 Data Modeller
http://slidepdf.com/reader/full/data-modeller 36/52
36 Data Modeller
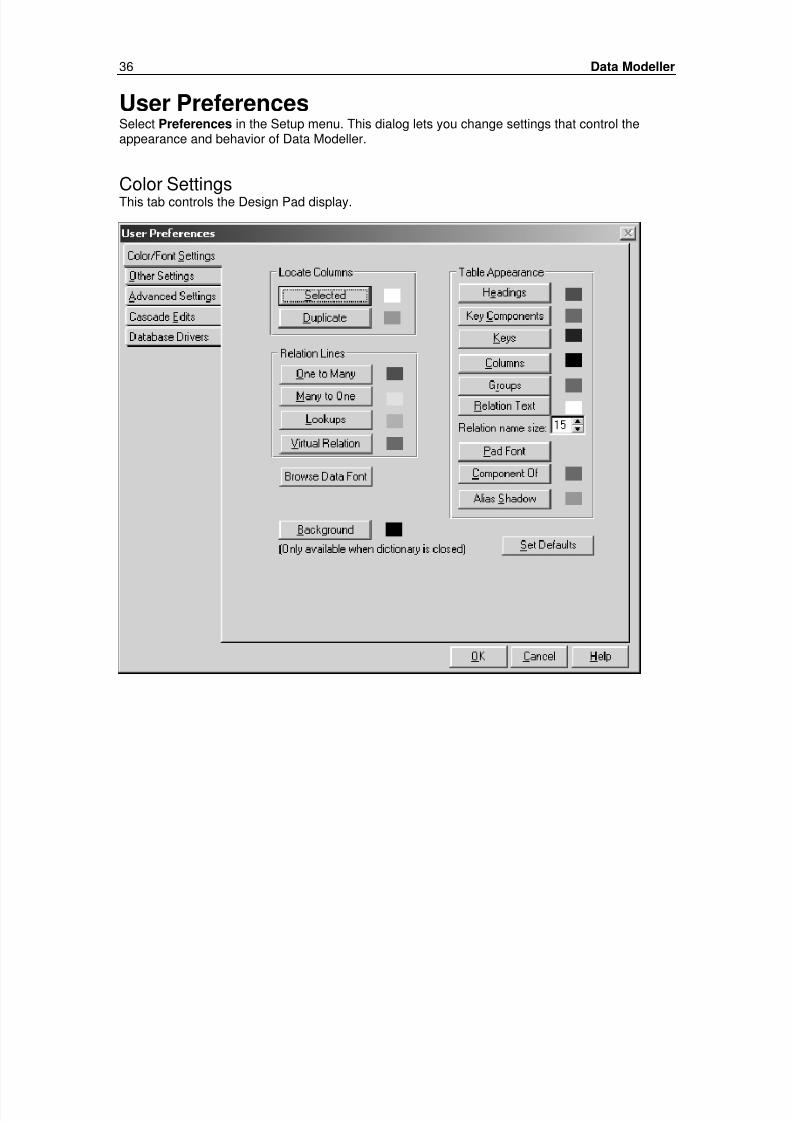
User PreferencesSelect Preferences in the Setup menu. This dialog lets you change settings that control theappearance and behavior of Data Modeller.
Color SettingsThis tab controls the Design Pad display.
7/31/2019 Data Modeller
http://slidepdf.com/reader/full/data-modeller 37/52
Quick Reference Guide 37
Locate Columns
Selected Sets the Design Pad color for the current selected column. When youselect a column name in the Column Pool, all instances of the name infiles in the Design Pad are highlighted in the color chosen.
Duplicate Sets the highlight color for duplicate columns. See also: Column Pool.
Choose two well-contrasted colors so that you can easily see the selected column, and quicklyrecognize any duplicates.
Relation LinesCLICK on the buttons to set colors for the One to Many, Many to One, Lookups, Alias lines, andVirtual Relations in the Design Pad.
Table AppearanceCLICK on the buttons to select the colors for the respective table components displayed in theDesign Pad.
Changing the Pad Font is particularly useful if you have a high resolution monitor and a very busy
dictionary! There are fonts provided with MS-Word, for example, which are clearly readable evenwhen the writing on your screen is very small.
BackgroundYou can only change the Design Pad background color when no dictionary is loaded.
Other Settings
Design Pad (Graphics Area)Check Show Relation Names to actually label the relation lines on the Design Pad. This setsthe default for all dictionaries loaded into Data Modeller. To temporarily toggle the display of
relation names, choose View Relation Names in the View Menu.
Switch Relation Names OFF to speed up the repainting of the Design Pad window. You canswitch them back on just before you print the dictionary.
Check Show Column and Key Pools on the right-hand side to move the list box.
Check Highlight all occurrences... to reveal all instances of a column across the database,when you CLICK on the column name either in the Design Pad or the Column Pool.
Other self-evident options are to Create Hot Keys Automatically, to Untag columns afterpopulating (columns to a table), and to Add Colons to Column Prompts.
7/31/2019 Data Modeller
http://slidepdf.com/reader/full/data-modeller 38/52
38 Data Modeller
Printing
Check Preview report before printing to preview reports before they are sent to the printer.
Check Allow printer setup on reports to switch on the Printer Setup icon in the Report Previewwindow.
Check Include long descriptions if you wish to see the long descriptions in reports that listcolumn attributes.
Check Include short descriptions if you wish to see the short descriptions in reports that listcolumn attributes.
Subset Creation and Related Files
Check Cascade related table display to all levels to control the creation of Display Subsets. Ifthis check box is ON, when you choose Hide Table and Related Files, all related files, no matterhow distantly, are hidden. For example if table A is related to table B which is related to table C,all three tables are hidden. If the check box is OFF then only tables A and B are hidden.
Importing Dictionaries
Switch on or off any system prompting of your import options. Choose whether or not to keep thesource dictionary table after the import.
Tips
Check Show Tip of the Day to see useful hints whenever you load a new dictionary. CheckDisable Tooltips to prevent tool tips from displaying.
Application
Check Always keep Data Modeller on top of other applications, if you prefer it that way. Wedon’t recommend this setting when Data Modeller is maximized!
7/31/2019 Data Modeller
http://slidepdf.com/reader/full/data-modeller 39/52
Quick Reference Guide 39
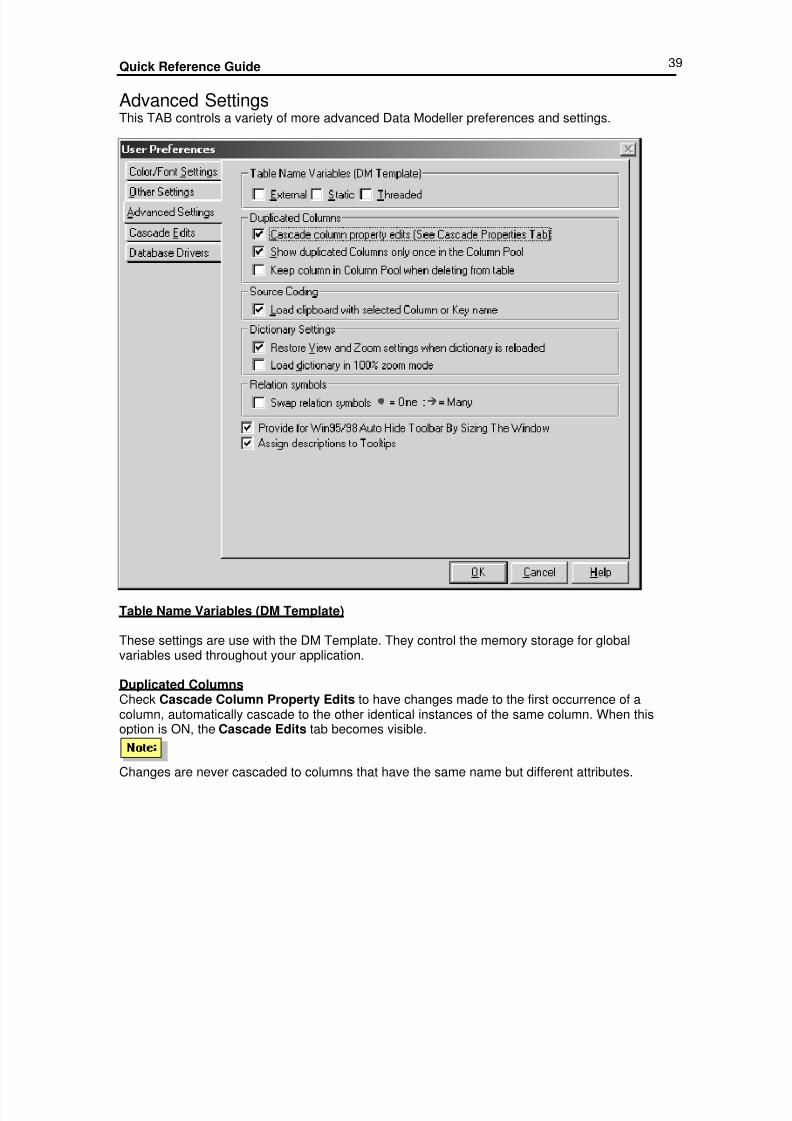
Advanced SettingsThis TAB controls a variety of more advanced Data Modeller preferences and settings.
Table Name Variables (DM Template)
These settings are use with the DM Template. They control the memory storage for globalvariables used throughout your application.
Duplicated ColumnsCheck Cascade Column Property Edits to have changes made to the first occurrence of acolumn, automatically cascade to the other identical instances of the same column. When thisoption is ON, the Cascade Edits tab becomes visible.
Changes are never cascaded to columns that have the same name but different attributes.
7/31/2019 Data Modeller
http://slidepdf.com/reader/full/data-modeller 40/52
40 Data Modeller
CLICK on Show duplicated Columns only once . . . to display only one instance of duplicatecolumn names in the Column Pool. If this option is OFF, then the Column Pool displays onlythose duplicate columns whose column attributes are not identical.
CLICK on Keep column in Column Pool when deleting from table to keep the column with itsattributes in the Column Pool even though it has been deleted from a table.
Source CodingCheck the Load Clipboard With Selected Column or Key option to automatically copy thename to the clipboard whenever you CLICK on a column. Then you can switch back to Clarionand simply paste the name into place.
Dictionary Settings
Check Restore View and Zoom... to restore the appearance of your dictionary when you reloadit. Otherwise the dictionary is scaled to fit.
Check Load dictionary in 100% zoom mode to load the dictionary at 100% zoom mode. Seealso the Zoom Menu. This setting overrides the Restore View setting. Otherwise the dictionary isscaled to fit.
Relation symbols
Check Swap relation symbols to swap the arrow and ball symbols that appear at either end ofthe relation lines.
Provide for Win 95/98 Auto Hide Toolbar...
Check to have Data Modeller leave a space for the toolbar when first loading.
Assign Descriptions to Tool TipsCheck this box to allow column descriptions to be applied to the tool tip attribute.
7/31/2019 Data Modeller
http://slidepdf.com/reader/full/data-modeller 41/52
Quick Reference Guide 41
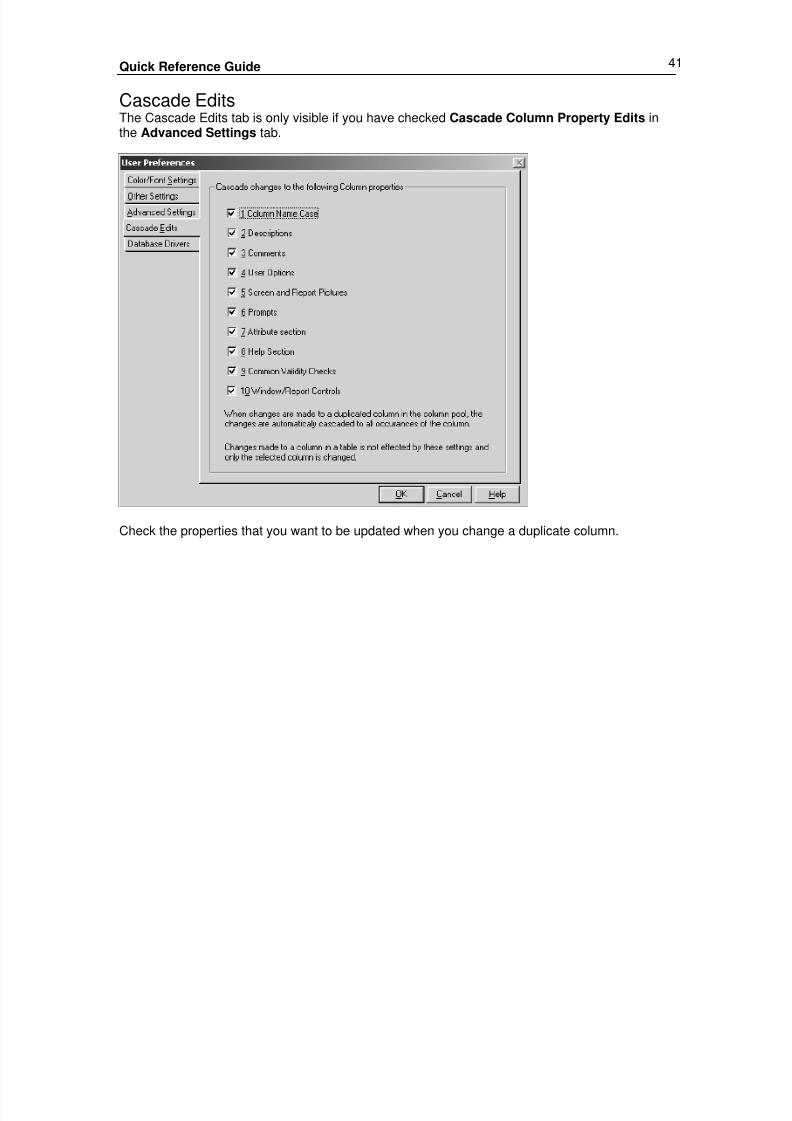
Cascade EditsThe Cascade Edits tab is only visible if you have checked Cascade Column Property Edits inthe Advanced Settings tab.
Check the properties that you want to be updated when you change a duplicate column.
7/31/2019 Data Modeller
http://slidepdf.com/reader/full/data-modeller 42/52
42 Data Modeller
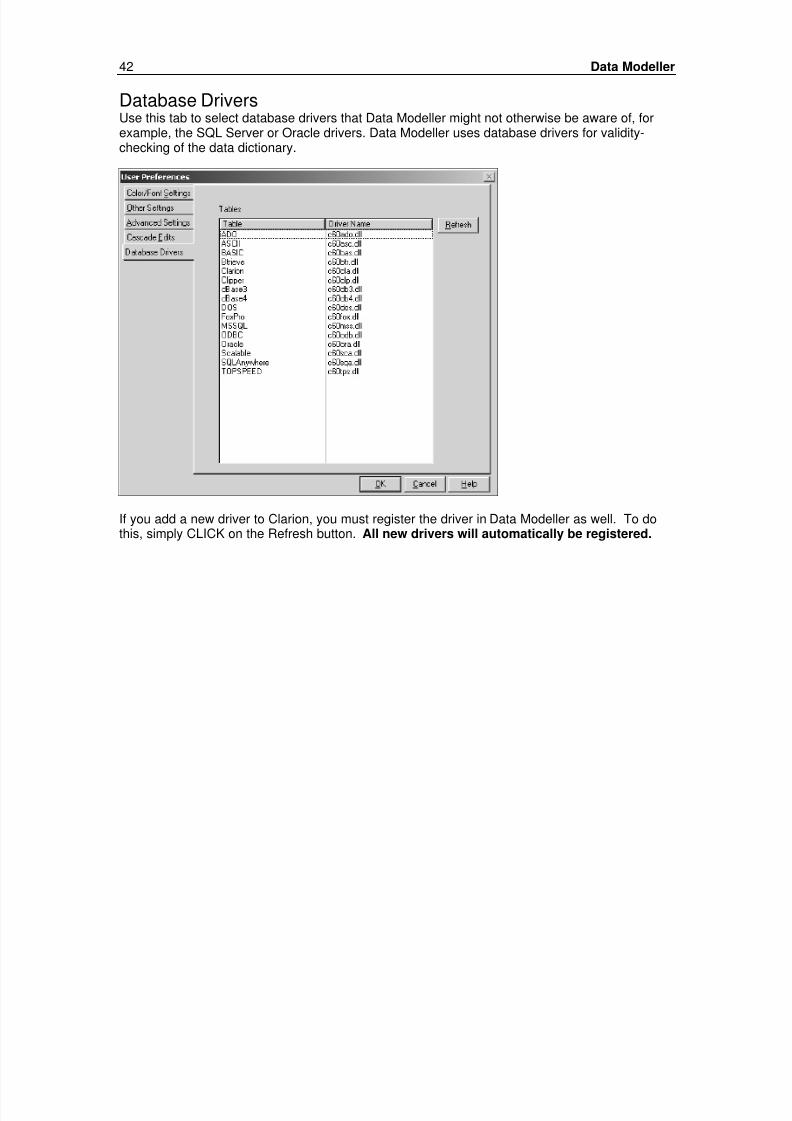
Database DriversUse this tab to select database drivers that Data Modeller might not otherwise be aware of, forexample, the SQL Server or Oracle drivers. Data Modeller uses database drivers for validity-checking of the data dictionary.
If you add a new driver to Clarion, you must register the driver in Data Modeller as well. To dothis, simply CLICK on the Refresh button. All new drivers will automatically be registered.

7/31/2019 Data Modeller
http://slidepdf.com/reader/full/data-modeller 43/52
Quick Reference Guide 43
Table AliasesAn alias creates a second reference for a table without duplicating the table on disk. Using analias can help in complex relationships. See your Clarion documentation for more information.
Alias Editor
The Alias Editor lets you create or delete aliases for tables. Simply RIGHT-CLICK on an openarea of the Design Pad, then choose Aliases from the popup menu (or choose Edit Aliases).
You can add an alias for a table only if the table is already on the Dictionary list.
Aliased tables appear with a different shadow color. You can set up the alias color in the UserPreferences window by choosing Setup Preferences in the Main Menu.
CreateOpens the Alias Properties dialog which provides the following prompts.
Alias NameType a table "name", as you wish to refer to it in your code. The name must be a validClarion label.
PrefixBy default, Clarion will use the first three letters of the Name for the prefix. Optionallyspecify up to 14 characters to use as a Prefix.
Alias to TableChoose a table from the drop down list. This is the original table that the alias"references." The drop down list shows only the tables previously defined.

7/31/2019 Data Modeller
http://slidepdf.com/reader/full/data-modeller 44/52
44 Data Modeller
PropertiesOpens the Alias Properties dialog for the selected alias.
DeleteDeletes the highlighted table alias.

7/31/2019 Data Modeller
http://slidepdf.com/reader/full/data-modeller 45/52
Quick Reference Guide 45
Table Relationships
One-way Relationships
One-way relationships are so called because you can't 'see' them from both tables. Only onetable needs a key which contains the linking column(s). (You can also create two-way
relationships.)
Referential Integrity constraints cannot be defined for a one-way relationship.
What’s the point of a one-way relationship? In order to have Clarion automatically generate codeto perform lookups or validations, you must have a relationship defined between the tables. Butyou may not want the overhead of maintaining a key in each of the two tables.
A two-way hypothesis can almost always be manufactured - but many times the relation isdeliberately kept simpler. Perhaps for security, but usually just to keep the logic manageablewherever possible. Remember that any design has to have some defined constraints, even withfast and cheap processing. Remember too that we are talking just about one relation that existsbetween two tables. “One-way” doesn’t tell you anything about either table - it describes just one
simple relation in the midst of perhaps many complex interactions that each of these tables haswith the rest of the database.
If it can be declared then that in a given relationship between two tables, a specified table willalways be a provider of data, never a seeker of data, then the provider table does not need toknow how to get to the other table. (It simply must wait to be found, instead). So the providertable does not need a key for this relationship. The seeking table does need to have somehandle, some way of sorting and ordering, even indexing the rows that it finds in the providertable. The only handle that works is a column whose internals are understood both by the seekerand by the provider - namely, a column that is a part of both their rows. Only shared columns canever be keys.
The seeker table needs that key - the provider does not. The provider needs only to have that
shared column, the column that makes up the key, in order to be sorted and indexed by theSeeker key.
The benefit of a one-way relationship? A little less overhead means slightly faster throughput - butthen think of an airline reservation system, for instance, using simple, highly inflexible,“hardwired” lookups, and reusing those pathways a million times an hour. However, the moreimportant benefit for most of us, of simplified relations (no referential integrity to worry about), isthe probable earlier delivery of the application, and easier troubleshooting.
CLICK on OK to complete the relationship definition.

7/31/2019 Data Modeller
http://slidepdf.com/reader/full/data-modeller 46/52
46 Data Modeller
Two-way RelationshipsTwo-way relationships are so called because you can 'see' them from both tables. Both tablesmust have a key which contains the linking column(s). (For a simple lookup, this might be anunnecessary overhead - you can also create one-way relationships.)
Referential Integrity constraints can be defined for a two-way relationship.
Relationships can be ONE:MANY. For example, one Invoice row can be related to many Itemrows. One Customer to many Invoices.
MANY:ONE relationships are exactly the same as ONE:MANY - the viewpoint is merely shiftedfrom the one table to the other.
ONE:ONE relationships are just special cases of ONE:MANY.
MANY:MANY cannot be handled directly by relational database theory - you get around it bycreating an extra intermediate table and declaring two ONE:MANY relationships.
In Data Modeller, relationships are represented by lines drawn between the tables in the DesignPad. You create a relationship by CLICKing on one key and dragging to another key. For
example, consider the following tables:
One invoice can have many items. So you want to create a ONE:MANY between the Invoicetable and the Item table. (From the Item table's point of view, of course, the relationship is aMANY:ONE.)
If you want referential integrity to be coded into the application, you must specify the 'On delete'and 'On update' restrictions. The 'On delete' restriction defines the action that must be takenwhen a row on the ONE side is deleted. For example - what if an Invoice row is deleted? In thisfamiliar example we might say that if line item rows exist, no user is allowed to delete the Invoice.The restriction, then, would be set to RESTRICT:
However, we want to allow the user to change the invoice number in the Invoice row. When he
does that, though, the changed number must automatically be updated to all the line item rows.So we choose CASCADE for 'On Update':
Note that there are no other choices: NO ACTION which merely means that there is noreferential integrity implemented between the two tables and CLEAR which means that thevalue of the linking column is blanked. For example set the 'On Update' restriction to CLEAR.When the user changes the InvoiceNumber column in the Invoice table, the InvoiceNumbercolumn in all the related Item rows would simply be set to zero.
7/31/2019 Data Modeller
http://slidepdf.com/reader/full/data-modeller 47/52
Quick Reference Guide 47
SQL Script GenerationThis dialog controls the creation of the SQL script table. Choose Table Export to SQL Script to open this dialog.
Output Table NameThe name of the SQL script table to be created. Data Modeller automatically appends the
suffix .SQL to the name.
Database NameThe name of the database to be created.
Create DatabaseCheck to include SQL statements to create the database.
Device NameThe name of the Device where the database will be stored.
Database SizeThe size of the database in Megabytes.
Create TablesCheck to generate CREATE TABLE statements.
Create IndexesCheck to generate CREATE INDEX statements for keys that are not involved inrelationships.
Create Primary KeysCheck to generate CREATE PRIMARY KEY statements for keys that are referenced inthe ONE side of ONE:MANY relationships.
Create Foreign Keys
Check to generate CREATE FOREIGN KEY statements for keys that are referenced inthe MANY side of ONE:MANY relationships.
Create RulesCheck to create sets of triggers to implement validity checks specified in your dictionary.
Drop rules for all columnsCheck to generate DROP TRIGGER statements on all columns in the dictionary.
Drop rules to be createdCheck to generate DROP TRIGGER statements on existing triggers before generatingCREATE TRIGGER statements.

7/31/2019 Data Modeller
http://slidepdf.com/reader/full/data-modeller 48/52
48 Data Modeller
Do not drop rulesCheck to prevent DROP TRIGGER statements from being generated.
Create TriggersCheck to generate error codes to be raised by triggers.
Raise Error Codes For Triggers
The error codes to be raised by the database triggers.For more information, refer to your database manual.

7/31/2019 Data Modeller
http://slidepdf.com/reader/full/data-modeller 49/52
Quick Reference Guide 49
Large Dictionaries
Very large dictionaries can be slow and cumbersome to edit. Try the following to streamlineprocessing of large dictionaries.
In User Preferences, set Load Dictionary in 100% Zoom Mode ON. This will speed up
the re-display of the dictionary.
Reduce the number of visible tables by creating a subset display. Now you can focus inon the tables you're working with.
Find tables using the Locate Tables dialog (RIGHT-CLICK in an open area of the DesignPad).
Print the dictionary. Print the graphical representation of either the subsets or the entiredictionary. (choose Print Print Design).
Limit the number of columns displayed in the Column Pool by using the Column PoolFilter (RIGHT-CLICK in the Column Pool, then choose Set Filter).
7/31/2019 Data Modeller
http://slidepdf.com/reader/full/data-modeller 50/52
50 Data Modeller
Duplicate Idents
Duplicate Ident numbers are sometimes found in corrupted Clarion dictionaries. The Ident is anidentification number that is used by Clarion to synchronize columns declared in a dictionary withcontrols in an application. The corruption has been found to occur with earlier versions of Clarion,particularly when tables have been imported from one dictionary to another.
Data Modeller halts with an error message if you try to load a dictionary with duplicate idents. Theerror message includes the name of the offending column name. If you create a .TXD file for thedictionary (from the dictionary editor in Clarion), and try to re-import the .TXD file, Clarion stopswith an error message which includes the line number where the error was detected. Between thetwo error messages you should be able to identify the location of the offending ident.
One way of fixing the problem is to manually edit the .TXD file, replacing the duplicate ident withanother (large) number that you know has not been used elsewhere in the dictionary. You canthen create a new dictionary (with a different name) in Clarion by importing the corrected .TXDfile. If the dictionary has been used in an application, you must change the dictionary in theapplication, re-synchronizing the application and dictionary. See the Clarion documentation formore details. Note that you cannot simply re-import the .TXD file into a new dictionary of the
same name, as this may cause synchronization problems that could corrupt your application file.
7/31/2019 Data Modeller
http://slidepdf.com/reader/full/data-modeller 51/52
Quick Reference Guide 51
Index:
Advanced Settings.....................................39Cascade Edits ...........................................41Changing a column's attributes .................15Color Settings............................................36Column Order............................................16Column Pool ................................................6Column Popup Menu.................................12Columns.....................................................11Columns that have the same name...........15Convert Table ............................................10Convert Tables ..........................................24Create Test Data .......................................10Data Modeller Menus ................................19Data Pools .................................................15Data Type Defaults......................................7database drivers ........................................42Design Pad ..................................................8
Display Subsets...........................................7Easy Documentation .................................10Export to Current DCT...............................19Favorite Pictures..........................................7Ident numbers............................................50Import Current DCT...................................19Key Order ..................................................17
Key Pool.......................................................6Key Popup Menu .......................................12Keys ...........................................................11large dictionaries........................................49Locating Columns ......................................15MRU List ....................................................20One-way relationships ...............................45Other Settings............................................37Prompts Manager ..................................7, 22Quick Add ..................................................16Setup Menu................................................34SQL Converter Assistant ...........................29SQL Script Generation...............................47SQL Script Generator ..................................7Subset order ..............................................17Table Aliases .............................................43Table order.................................................17
Table Popup Menu ......................................9Tools ..........................................................22Two-way relationships ...............................46Type Pool.....................................................7User Preferences.......................................36Volumetrics Calculation .............................24Zoom..........................................................21

7/31/2019 Data Modeller
http://slidepdf.com/reader/full/data-modeller 52/52
52 Data Modeller