Embed Size (px)
Citation preview

Product GuideRevision A
McAfee Data Loss Prevention Endpoint9.3.100 and McAfee Device Control

COPYRIGHTCopyright © 2013 McAfee, Inc. Do not copy without permission.
TRADEMARK ATTRIBUTIONSMcAfee, the McAfee logo, McAfee Active Protection, McAfee DeepSAFE, ePolicy Orchestrator, McAfee ePO, McAfee EMM, Foundscore, Foundstone, PolicyLab, McAfee QuickClean, Safe Eyes, McAfee SECURE, SecureOS, McAfee Shredder, SiteAdvisor, McAfee Stinger, McAfee Total Protection, TrustedSource,VirusScan, WaveSecure are trademarks or registered trademarks of McAfee, Inc. or its subsidiaries in the United States and other countries. Othernames and brands may be claimed as the property of others.
Product and feature names and descriptions are subject to change without notice. Please visit mcafee.com for the most current products and features.
LICENSE INFORMATION
License AgreementNOTICE TO ALL USERS: CAREFULLY READ THE APPROPRIATE LEGAL AGREEMENT CORRESPONDING TO THE LICENSE YOU PURCHASED, WHICH SETSFORTH THE GENERAL TERMS AND CONDITIONS FOR THE USE OF THE LICENSED SOFTWARE. IF YOU DO NOT KNOW WHICH TYPE OF LICENSE YOUHAVE ACQUIRED, PLEASE CONSULT THE SALES AND OTHER RELATED LICENSE GRANT OR PURCHASE ORDER DOCUMENTS THAT ACCOMPANY YOURSOFTWARE PACKAGING OR THAT YOU HAVE RECEIVED SEPARATELY AS PART OF THE PURCHASE (AS A BOOKLET, A FILE ON THE PRODUCT CD, OR AFILE AVAILABLE ON THE WEBSITE FROM WHICH YOU DOWNLOADED THE SOFTWARE PACKAGE). IF YOU DO NOT AGREE TO ALL OF THE TERMS SETFORTH IN THE AGREEMENT, DO NOT INSTALL THE SOFTWARE. IF APPLICABLE, YOU MAY RETURN THE PRODUCT TO MCAFEE OR THE PLACE OFPURCHASE FOR A FULL REFUND.
2 McAfee Data Loss Prevention Endpoint 9.3.100 and McAfee Device Control Product Guide

Contents
Preface 7About this guide . . . . . . . . . . . . . . . . . . . . . . . . . . . . . . . . . . 7
Audience . . . . . . . . . . . . . . . . . . . . . . . . . . . . . . . . . . 7Conventions . . . . . . . . . . . . . . . . . . . . . . . . . . . . . . . . . 7
Find product documentation . . . . . . . . . . . . . . . . . . . . . . . . . . . . . . 8
1 Introduction 9How McAfee DLP Endpoint works . . . . . . . . . . . . . . . . . . . . . . . . . . . 10
Classify . . . . . . . . . . . . . . . . . . . . . . . . . . . . . . . . . . 10Track . . . . . . . . . . . . . . . . . . . . . . . . . . . . . . . . . . . 11Protect . . . . . . . . . . . . . . . . . . . . . . . . . . . . . . . . . . . 12Monitor . . . . . . . . . . . . . . . . . . . . . . . . . . . . . . . . . . . 13
Product components and how they interact . . . . . . . . . . . . . . . . . . . . . . . 14McAfee Data Loss Prevention Endpoint client software . . . . . . . . . . . . . . . . 15
Deployment2 Deployment options and scenarios 19
Choosing an endpoint product option . . . . . . . . . . . . . . . . . . . . . . . . . . 19Recommended installation . . . . . . . . . . . . . . . . . . . . . . . . . . . . . . 21Understanding backward compatibility . . . . . . . . . . . . . . . . . . . . . . . . . 22
3 Planning your deployment 23Verify the system requirements . . . . . . . . . . . . . . . . . . . . . . . . . . . . 24Configure the server . . . . . . . . . . . . . . . . . . . . . . . . . . . . . . . . 25Working in a cluster environment . . . . . . . . . . . . . . . . . . . . . . . . . . . 26
Prepare the cluster . . . . . . . . . . . . . . . . . . . . . . . . . . . . . . 27Test the cluster . . . . . . . . . . . . . . . . . . . . . . . . . . . . . . . 27
Create and configure repository folders . . . . . . . . . . . . . . . . . . . . . . . . . 27Configure folders on Windows Server 2008 . . . . . . . . . . . . . . . . . . . . 28Configure folders on Windows Server 2003 . . . . . . . . . . . . . . . . . . . . 29
Installation checklist . . . . . . . . . . . . . . . . . . . . . . . . . . . . . . . . 30
Installation4 Installing the McAfee DLP Endpoint software 33
Install the McAfee Data Loss Prevention Endpoint extension . . . . . . . . . . . . . . . . 33Initialize the McAfee DLP Endpoint policy console . . . . . . . . . . . . . . . . . . 34Upgrade the license . . . . . . . . . . . . . . . . . . . . . . . . . . . . . . 36
Check in the McAfee DLP Endpoint package to ePolicy Orchestrator . . . . . . . . . . . . . . 37
5 Installing a version upgrade 39Upgrade McAfee DLP Endpoint software . . . . . . . . . . . . . . . . . . . . . . . . . 41Phased upgrade . . . . . . . . . . . . . . . . . . . . . . . . . . . . . . . . . . 41
McAfee Data Loss Prevention Endpoint 9.3.100 and McAfee Device Control Product Guide 3

Restore the policy after upgrade . . . . . . . . . . . . . . . . . . . . . . . . . . . . 42
6 Deploying McAfee DLP Endpoint 45Deploy the client software . . . . . . . . . . . . . . . . . . . . . . . . . . . . . . 45
Define a default rule . . . . . . . . . . . . . . . . . . . . . . . . . . . . . 45Deploy McAfee DLP Endpoint client with ePolicy Orchestrator . . . . . . . . . . . . . 46Verify the installation . . . . . . . . . . . . . . . . . . . . . . . . . . . . . 48
Deploy policies with ePolicy Orchestrator . . . . . . . . . . . . . . . . . . . . . . . . 48Apply the system policy . . . . . . . . . . . . . . . . . . . . . . . . . . . . 49Assign a policy or agent configuration . . . . . . . . . . . . . . . . . . . . . . 49Import policies and editing policy descriptions . . . . . . . . . . . . . . . . . . . 50Refresh the policy . . . . . . . . . . . . . . . . . . . . . . . . . . . . . . 50
Configuration and use7 Protecting removable media 55
Categorizing devices with device classes . . . . . . . . . . . . . . . . . . . . . . . . 56Define a device class . . . . . . . . . . . . . . . . . . . . . . . . . . . . . 56
Controlling devices with device definitions . . . . . . . . . . . . . . . . . . . . . . . . 58Importing device parameters . . . . . . . . . . . . . . . . . . . . . . . . . . 59Create device definitions . . . . . . . . . . . . . . . . . . . . . . . . . . . . 60
Device rules . . . . . . . . . . . . . . . . . . . . . . . . . . . . . . . . . . . . 63Create and define device rules . . . . . . . . . . . . . . . . . . . . . . . . . 66
Device parameters . . . . . . . . . . . . . . . . . . . . . . . . . . . . . . . . . 70
8 Configuring system components 73Agent configuration . . . . . . . . . . . . . . . . . . . . . . . . . . . . . . . . . 73
Apply the global agent configuration . . . . . . . . . . . . . . . . . . . . . . . 74Import the global agent configuration . . . . . . . . . . . . . . . . . . . . . . 74Reset the Agent Configuration values . . . . . . . . . . . . . . . . . . . . . . . 74
Configure Safe Mode operation . . . . . . . . . . . . . . . . . . . . . . . . . . . . 74
9 Classifying sensitive content 75Classifying by content . . . . . . . . . . . . . . . . . . . . . . . . . . . . . . . . 75
Using dictionaries to classify content . . . . . . . . . . . . . . . . . . . . . . . 75Classifying content with document properties or file extensions . . . . . . . . . . . . 77Text pattern definitions . . . . . . . . . . . . . . . . . . . . . . . . . . . . 77Whitelist . . . . . . . . . . . . . . . . . . . . . . . . . . . . . . . . . . 82
Classifying by file location . . . . . . . . . . . . . . . . . . . . . . . . . . . . . . 83How discovery scanning works . . . . . . . . . . . . . . . . . . . . . . . . . 84Defining network file shares . . . . . . . . . . . . . . . . . . . . . . . . . . 91Defining network parameters . . . . . . . . . . . . . . . . . . . . . . . . . . 92Defining registered document repositories . . . . . . . . . . . . . . . . . . . . . 93
Classifying by file destination . . . . . . . . . . . . . . . . . . . . . . . . . . . . . 95How sensitive content is controlled in email . . . . . . . . . . . . . . . . . . . . 95Defining local and network printers . . . . . . . . . . . . . . . . . . . . . . . 98Controlling information uploaded to websites . . . . . . . . . . . . . . . . . . . 100
Classification in use . . . . . . . . . . . . . . . . . . . . . . . . . . . . . . . . 102How McAfee DLP Endpoint categorizes applications . . . . . . . . . . . . . . . . . 102Applications and how to use them . . . . . . . . . . . . . . . . . . . . . . . 103Adding and removing applications . . . . . . . . . . . . . . . . . . . . . . . 108Defining file types . . . . . . . . . . . . . . . . . . . . . . . . . . . . . . 109
Classification rules . . . . . . . . . . . . . . . . . . . . . . . . . . . . . . . . . 110How classification rules link categories to content . . . . . . . . . . . . . . . . . 111Create and define classification rules . . . . . . . . . . . . . . . . . . . . . . 111
Contents
4 McAfee Data Loss Prevention Endpoint 9.3.100 and McAfee Device Control Product Guide

10 Tracking content with tags and classifications 115How tags and content categories are used to classify content . . . . . . . . . . . . . . . 115
Create tags, content categories, catalogs, and groups . . . . . . . . . . . . . . . 116How tagging rules link tags to content . . . . . . . . . . . . . . . . . . . . . . . . . 118
Create and define tagging rules . . . . . . . . . . . . . . . . . . . . . . . . 118Manual tags . . . . . . . . . . . . . . . . . . . . . . . . . . . . . . . . . . . 120
Tag files manually . . . . . . . . . . . . . . . . . . . . . . . . . . . . . . 121Remove manual tags from content . . . . . . . . . . . . . . . . . . . . . . . 121
11 Applying McAfee DLP protection 123Protecting files with rights management . . . . . . . . . . . . . . . . . . . . . . . . 123
How Data Loss Prevention works with rights management . . . . . . . . . . . . . . 124Adobe rights management users . . . . . . . . . . . . . . . . . . . . . . . . 126Define an Adobe RM server and synchronize policies . . . . . . . . . . . . . . . . 126Define a Microsoft Rights Management Service server and synchronize templates . . . . 127Define a Seclore server and synchronize policies . . . . . . . . . . . . . . . . . 128
Controlling sensitive content with protection rules . . . . . . . . . . . . . . . . . . . . 129How protection rules work . . . . . . . . . . . . . . . . . . . . . . . . . . 129Improved clipboard protection rules . . . . . . . . . . . . . . . . . . . . . . . 132Cloud protection rules . . . . . . . . . . . . . . . . . . . . . . . . . . . . 132Removable storage protection rule enhancement . . . . . . . . . . . . . . . . . 133Definitions and how they define rules . . . . . . . . . . . . . . . . . . . . . . 133Delete rules, definitions, device classes, or user groups . . . . . . . . . . . . . . . 147Using predefined definitions . . . . . . . . . . . . . . . . . . . . . . . . . . 147
Limiting rules with assignment groups . . . . . . . . . . . . . . . . . . . . . . . . . 148User assignment . . . . . . . . . . . . . . . . . . . . . . . . . . . . . . 149Computer assignment groups . . . . . . . . . . . . . . . . . . . . . . . . . 151
Monitoring and reporting12 Monitoring and reporting events 155
Collecting and managing data . . . . . . . . . . . . . . . . . . . . . . . . . . . . 155DLP Incident Manager/DLP Operational Events . . . . . . . . . . . . . . . . . . 156Incident tasks . . . . . . . . . . . . . . . . . . . . . . . . . . . . . . . 160Edit the task runner . . . . . . . . . . . . . . . . . . . . . . . . . . . . . 161Creating reports . . . . . . . . . . . . . . . . . . . . . . . . . . . . . . 161Working with the database . . . . . . . . . . . . . . . . . . . . . . . . . . 165Documenting events with evidence . . . . . . . . . . . . . . . . . . . . . . . 166
Redaction and role-based access control . . . . . . . . . . . . . . . . . . . . . . . . 168Protecting confidentiality with redaction . . . . . . . . . . . . . . . . . . . . . 168Role-based access control . . . . . . . . . . . . . . . . . . . . . . . . . . . 170
13 Users and permission sets 173DLP Permission Sets . . . . . . . . . . . . . . . . . . . . . . . . . . . . . . . . 173Create and define McAfee DLP administrators . . . . . . . . . . . . . . . . . . . . . . 174Create and define permission sets . . . . . . . . . . . . . . . . . . . . . . . . . . 175
Non-standard and advanced operations14 Non-standard operations 179
Agent bypass and related features . . . . . . . . . . . . . . . . . . . . . . . . . . 179Request an override key . . . . . . . . . . . . . . . . . . . . . . . . . . . 180
Advanced topics: Running the PST crawler from the command line . . . . . . . . . . . . . 181
15 Diagnostics 183
Contents
McAfee Data Loss Prevention Endpoint 9.3.100 and McAfee Device Control Product Guide 5

System tools . . . . . . . . . . . . . . . . . . . . . . . . . . . . . . . . . . . 183Diagnostic Tool . . . . . . . . . . . . . . . . . . . . . . . . . . . . . . . . . . 184
Checking the agent status . . . . . . . . . . . . . . . . . . . . . . . . . . 184Run the Diagnostic Tool . . . . . . . . . . . . . . . . . . . . . . . . . . . . 185Tuning policies . . . . . . . . . . . . . . . . . . . . . . . . . . . . . . . 185
Index 187
Contents
6 McAfee Data Loss Prevention Endpoint 9.3.100 and McAfee Device Control Product Guide

Preface
Contents About this guide Find product documentation
About this guideThis information describes the guide's target audience, the typographical conventions and icons usedin this guide, and how the guide is organized.
AudienceMcAfee documentation is carefully researched and written for the target audience.
The information in this guide is intended primarily for:
• Administrators — People who implement and enforce the company's security program.
• Security officers — People who determine sensitive and confidential data, and define thecorporate policy that protects the company's intellectual property.
ConventionsThis guide uses these typographical conventions and icons.
Book title, term,emphasis
Title of a book, chapter, or topic; a new term; emphasis.
Bold Text that is strongly emphasized.
User input, code,message
Commands and other text that the user types; a code sample; a displayedmessage.
Interface text Words from the product interface like options, menus, buttons, and dialogboxes.
Hypertext blue A link to a topic or to an external website.
Note: Additional information, like an alternate method of accessing anoption.
Tip: Suggestions and recommendations.
Important/Caution: Valuable advice to protect your computer system,software installation, network, business, or data.
Warning: Critical advice to prevent bodily harm when using a hardwareproduct.
McAfee Data Loss Prevention Endpoint 9.3.100 and McAfee Device Control Product Guide 7

Find product documentationMcAfee provides the information you need during each phase of product implementation, frominstallation to daily use and troubleshooting. After a product is released, information about the productis entered into the McAfee online KnowledgeBase.
Task1 Go to the McAfee Technical Support ServicePortal at http://mysupport.mcafee.com.
2 Under Self Service, access the type of information you need:
To access... Do this...
User documentation 1 Click Product Documentation.
2 Select a product, then select a version.
3 Select a product document.
KnowledgeBase • Click Search the KnowledgeBase for answers to your product questions.
• Click Browse the KnowledgeBase for articles listed by product and version.
PrefaceFind product documentation
8 McAfee Data Loss Prevention Endpoint 9.3.100 and McAfee Device Control Product Guide

1 Introduction
McAfee® Data Loss Prevention (McAfee DLP) protects enterprises from the risk associated withunauthorized transfer of data from within or outside of the organization.
McAfee Data Loss Prevention Endpoint (McAfee DLP Endpoint) software is a content-based agentsolution that inspects enterprise users’ actions concerning sensitive content in their own workenvironment, their computers.
McAfee DLP Endpoint software uses advanced discovery technology, text pattern recognition, andpredefined dictionaries to identify this sensitive content, and incorporates device management andencryption for additional layers of control. It works with third-party protection software such as AdobeLiveCycle Rights Management, Microsoft Rights Management Service, Seclore FileSecure, and TitusMessage Classification to extend security of your data. Policies and rules can be configured to beapplied within the enterprise network, outside it, or both.
This guide provides the necessary information for installing, deploying, and using McAfee DLP Endpointsoftware: configuring agents, creating device rules, tagging and protecting content, and monitoringpolicies to prevent data loss.
McAfee DLP Endpoint software version 9.3 runs in McAfee® ePolicy Orchestrator® (McAfee ePO™)software, the centralized policy manager for security products and systems.
Contents How McAfee DLP Endpoint works Product components and how they interact
1
McAfee Data Loss Prevention Endpoint 9.3.100 and McAfee Device Control Product Guide 9

How McAfee DLP Endpoint worksMcAfee DLP Endpoint safeguards sensitive enterprise information by deploying policies which are madeup of classification rules, protection rules, device rules, and user and group assignments.
McAfee DLP Endpoint monitors policies, and blocks or monitors defined actions containing sensitivecontent, as required. Alternately, it can encrypt sensitive content before allowing the action toproceed. McAfee DLP Endpoint creates reports for review and control of the process, and can storesensitive content as evidence.
Figure 1-1 McAfee DLP Endpoint workflow
ClassifyIn order to protect sensitive content, the McAfee DLP administrator starts by defining and classifyingwhat is to be protected. Content can be classified by:
1 IntroductionHow McAfee DLP Endpoint works
10 McAfee Data Loss Prevention Endpoint 9.3.100 and McAfee Device Control Product Guide

Location Locations can be defined according to where the content comes from (for example, theFinance department folder) or where it is being copied to (for example, anunencrypted flash drive.) A special category is the Registered Document Repository.
Location from, that is, location-based tagging rules, are not supported in McAfee DeviceControl.
Content type Content types include encrypted content, content with specified document propertiesor file types, or content with tags or content categories.
Specificterms
Dictionaries define lists of sensitive words. For example, to protect private medicalinformation, the HIPAA dictionary lists medical terms that may be required to be keptconfidential.
Text patterns Defined strings, such as Company Confidential, or regular expressions, which can beused to identify credit card numbers or other regular patterns, can be used to classifyinformation.
Email can be classified using the popular Titus Message Classification application. The Titusclassifications are recognized as text patterns which are used to create email protection rules.
Titus Message Classification is not supported in McAfee Device Control.
Classification rules
Classification rules apply content categories based on parsing the content and matching it againstpredefined patterns or keywords. There are two types of classification rules:
• Content Classification Rules — Match content against predefined strings and text patterns ordictionaries.
• Registered Documents Classification Rules — Classify all specified content in a defined groupof folders.
See also Create a registered document repository definition on page 94
TrackYou keep track of sensitive content by applying a tag or content category to the file containing thesensitive content. Tags are stored in a file's extended file attributes (EA) or alternate data streams(ADS). Whenever such files are accessed, McAfee DLP Endpoint software tracks data transformationsand maintains the classification of the sensitive content persistently, regardless of how it is beingused. For example, if a user opens a tagged Word document, copies a few paragraphs of it into a textfile, and attaches the text file to an email message, the outgoing message has the same tag as theoriginal document.
Support for persistent tag information
For file systems that do not support EA or ADS, McAfee DLP Endpoint software stores tag informationas a meta-file on the disk. The meta-files are stored in a hidden folder named ODB$, which is createdautomatically by the McAfee DLP Endpoint client software.
IntroductionHow McAfee DLP Endpoint works 1
McAfee Data Loss Prevention Endpoint 9.3.100 and McAfee Device Control Product Guide 11

Tagging rules
Tagging rules, based on enterprise requirements, identify confidential information and its sources.Data can be classified by:
• Application — Application-based tagging rules apply tags generically based on the application orapplications that create a file, as specified in application definitions, or based on the file type or fileextension.
• Location — When files are copied or accessed by local processes, location-based tagging rulesapply tags based on the location of the source file. For example, a file being copied locally from ashare on a network server.
You can add text patterns and dictionaries to a location- or application-based tagging rule, combiningthe two types of rules.
In addition to using tagging rules, tags can be applied manually or during the discovery process
Discovery rules
McAfee Data Loss Prevention Discover is a crawler that runs on managed computers. File system andemail storage discovery rules can define the content being searched for, whether it is to be monitored,quarantined, or tagged, and whether evidence is to be stored. File system discovery rules can also beused to encrypt or apply RM policies to files. Settings in the Global Agent Configuration determinewhere and when the search is performed.
ProtectProtection is defined with device and protection rules that can be filtered by user (application) groups.The rules are applied with policies. Exceptions are defined with whitelists.
Protection rules
Protection rules prevent unauthorized distribution of tagged data. When a user attempts to copy orattach tagged data, protection rules determine whether this should be allowed, monitored, or blocked.In addition to tags and content categories, protection rules are defined with applications or applicationgroups, user assignments, and definitions such as email destinations, document properties, or textpatterns.
Device rules
Device rules monitor and potentially block the system from loading physical devices such asremovable storage devices, Bluetooth, Wi-Fi, and other Plug and Play devices. Device classes anddevice definitions are used to define device rules.
Assignment groups
Assignment groups apply specific protection rules to different groups, users, and computers in theenterprise.
Policies and policy deployment
A policy is the combination of tagging rules, protection rules, definitions, and assignment groups.Policies are deployed by ePolicy Orchestrator software to the enterprise’s managed computers(computers with McAfee Agent installed).
1 IntroductionHow McAfee DLP Endpoint works
12 McAfee Data Loss Prevention Endpoint 9.3.100 and McAfee Device Control Product Guide

Whitelists
Whitelists are collections of items that you want the system to ignore. McAfee DLP Endpoint softwareuses four types of whitelists:
• Application — Device rules can block applications run from removable devices. To allow necessaryapplications such as encryption software, whitelisted application definitions can be created toexempt such applications from the blocking rule. The definitions apply to removable storagedevices only.
• Content — The whitelist folder contains text files defining content (typically boilerplate) that is nottagged and restricted. The main purpose of this is to improve the efficiency of the tagging processby skipping standard content that does not need to be protected.
• Plug and Play devices — Some Plug and Play devices do not handle device management well.Attempting to manage them might cause the system to stop responding or cause other seriousproblems. Whitelisted Plug and Play devices are automatically excluded when a policy is applied.
• Printers — To prevent printing of confidential data, McAfee DLP Endpoint software replaces theoriginal printer driver with a proxy driver that intercepts printing operations and passes themthrough to the original driver. In some cases printer drivers cannot work in this architecture,causing the printer to stop responding. Whitelisted printers are excluded from the proxy driverinstallation process.
MonitorWhen the application of a rule blocks, monitors, or causes some other action, an event is generated,sent to the ePolicy Orchestrator Event Parser, and stored in a database. The event can containevidence of the rule violation. In addition, administrative events are generated by system events suchas policy deployment or discovery scans. The policy monitor function includes:
• Incident monitoring —The DLP Incident Manager page in ePolicy Orchestrator allows administrators toview agent events and evidence as they are received.
• Administrative event monitoring — The DLP Operational Events page in ePolicy Orchestrator allowsadministrators to view administrative events.
• Evidence collection — If protection rules are defined to collect evidence, a copy of the taggeddata is saved and linked to the specific event. This information can help determine the severity orexposure of the event. Evidence is encrypted using the AES algorithm before being saved.
• Hit highlighting — Evidence can be saved with highlighting of the text that caused the event.Highlighted evidence is stored as a separate encrypted HTML file.
In addition, event trends can be displayed in ePolicy Orchestrator dashboards.
IntroductionHow McAfee DLP Endpoint works 1
McAfee Data Loss Prevention Endpoint 9.3.100 and McAfee Device Control Product Guide 13

Product components and how they interactMcAfee DLP Endpoint software consists of several components. Each component plays a part indefending your network from data loss.
Figure 1-2 McAfee DLP Endpoint software
Policy console
The McAfee DLP Endpoint policy console is the interface where the administrator defines and enforcesthe enterprise information security policy. It is used to create the information security policy andadminister the McAfee DLP Endpoint software components.
The McAfee DLP Endpoint policy console is accessed in ePolicy Orchestrator by selecting Menu | DataProtection | DLP Policy.
Event monitoring
DLP monitoring is now a native ePolicy Orchestrator feature. Events generated by DLP policies are nowreferred to as "incidents" to differentiate them from administrative events generated by ePolicyOrchestrator.
Incidents are displayed on the DLP Incident Manager | Incident List page. DLP events are displayed on the DLPOperational Events List page. These pages are accessed from Menu | Data Protection in ePolicy Orchestrator. Allevents can be filtered and sorted based on criteria such as protection rules, severity, date, time, user,computer name, or policy version. Events can be labeled by the administrator for tracking purposes.
By defining ePolicy Orchestrator permission sets, you can set incident or event list viewing permissionsto assign reviewers to different sets of events. You can have a different reviewer responsible forviewing redacted information.
See also Create and define permission sets on page 175
1 IntroductionProduct components and how they interact
14 McAfee Data Loss Prevention Endpoint 9.3.100 and McAfee Device Control Product Guide

McAfee Data Loss Prevention Endpoint client softwareThe McAfee DLP Endpoint client software is deployed as a McAfee® Agent plug-in, and enforces thepolicies defined in the McAfee DLP Endpoint policy. The McAfee DLP Endpoint client software auditsuser activities to monitor, control, and prevent unauthorized users from copying or transferringsensitive data. It then generates events recorded by the ePolicy Orchestrator Event Parser.
Online/offline operation
Device and protection rules can monitor or protect sensitive data when the managed computer isonline, offline, or both. A computer is considered online when it is connected to the ePolicyOrchestrator server.
Multiple user sessions
The McAfee DLP Endpoint client software supports Fast User Switching (FUS) on Windows Vista,Windows 7, Windows 8, Windows Server 2003, Windows Server 2008, and Windows Server 2012 withmultiple user sessions. Virtual desktop support can also lead to multiple users sessions on a singlehost computer. You can view the user sessions on the ePolicy Orchestrator System Tree | DLP User Sessionspage.
Event Parser
Events that are generated by the McAfee DLP Endpoint client software are sent to the ePolicyOrchestrator Event Parser, and recorded in tables in the ePolicy Orchestrator database. Events arestored in the database for further analysis and used by other system components.
IntroductionProduct components and how they interact 1
McAfee Data Loss Prevention Endpoint 9.3.100 and McAfee Device Control Product Guide 15

1 IntroductionProduct components and how they interact
16 McAfee Data Loss Prevention Endpoint 9.3.100 and McAfee Device Control Product Guide
DeploymentThis section describes the options for planning your McAfee DLP Endpointproduct deployment.It covers differences in McAfee Data Loss Prevention products,recommended installation, and issues of backward compatibility for thoseupgrading a previous version.
Because McAfee DLP Endpoint products work with McAfee ePolicyOrchestrator, this section also covers McAfee ePO and Microsoft SQL setupissues, and server configuration for the McAfee DLP Endpoint productsoftware's requirements.
When you have completed this section, you should be ready to install theMcAfee DLP Endpoint software extension in ePolicy Orchestrator, check theagent package in to the McAfee ePO repository, and deploy the clientsoftware to your endpoint computers.
Chapter 2 Deployment options and scenariosChapter 3 Planning your deployment
McAfee Data Loss Prevention Endpoint 9.3.100 and McAfee Device Control Product Guide 17

Deployment
18 McAfee Data Loss Prevention Endpoint 9.3.100 and McAfee Device Control Product Guide

2 Deployment options and scenarios
Classifying corporate information into different data loss prevention categories is a key step indeploying and administering McAfee Data Loss Prevention Endpoint software. While guidelines andbest practices exist, the ideal schema is dependent on your enterprise goals and needs, and is uniquefor each installation. Choosing between the two DLP options — McAfee Device Control and full McAfeeDLP Endpoint — is the first step in determining how those needs will be met.
Because it might be difficult to determine in advance exactly what your unique needs are, werecommend initial deployment to a sample group of 15 to 20 users for a trial period of about a month.During this trial no data is classified, and a policy is created to monitor, not block, transactions. Themonitoring data helps the security officers make good decisions about where and how to classifycorporate data. The policies created from this information should be tested on a larger test group (or,in the case of very large companies, on a series of successively larger groups) before being deployedto the entire enterprise.
Contents Choosing an endpoint product option Recommended installation Understanding backward compatibility
Choosing an endpoint product optionMcAfee offers two endpoint data loss prevention options: McAfee Device Control and McAfee DLPEndpoint. The two products use the same installed software, and are differentiated by licensing.
Understanding McAfee endpoint DLP options
McAfee DLP Endpoint software is available in two configurations: a device control-only configuration,and full McAfee DLP Endpoint. On installation, the McAfee Device Control configuration is activated bydefault. Changing to the full-featured configuration is accomplished by upgrading the license key inthe Help menu.
What is McAfee Device Control?
McAfee Device Control software prevents unauthorized use of removable media devices, the mostwidespread and costly source of data loss in many companies today. It is the default configuration oninstallation.
McAfee Device Control software provides:
• Persistent content-aware data protection for devices — Controls what data can be copied toremovable devices, or controls the devices themselves, blocking them completely or making themread-only; blocks applications run from removable drives
• Protection on the go — For USB drives, iPods, Bluetooth devices, CDs, DVDs, and otherremovable media, and for non-system hard disks
2
McAfee Data Loss Prevention Endpoint 9.3.100 and McAfee Device Control Product Guide 19

The default installation of McAfee DLP Endpoint software is for a 90-day trial license for McAfee DeviceControl software. Upgrade to the full McAfee DLP Endpoint software configuration by upgrading thelicense. License options for either version of the software are 90-day trial or unlimited. Whenupgrading, you do not need to re-install the software.
What is full McAfee DLP Endpoint?
McAfee DLP Endpoint software provides:
• Universal protection — Protects against data loss through the broadest set of data-loss channels:removable devices, non-system hard disks, email or email attachments, web posts, clipboard andscreen capture, printing, file system, and more
• Persistent content-aware data protection — Protects against data loss regardless of theformat in which data is stored or manipulated; enforces data loss prevention without disruptinglegitimate user activities
• Protection on the go — Prevents transmission of sensitive data from desktops and laptops,whether or not they are connected to the enterprise network
What is the difference between configurations?
The following definitions are turned off (unavailable) in McAfee Device Control software:
• Discovery • Printers
• Email Destinations • Rights Management
• File Servers • Web Destinations
• Network
The following features are unavailable:
2 Deployment options and scenariosChoosing an endpoint product option
20 McAfee Data Loss Prevention Endpoint 9.3.100 and McAfee Device Control Product Guide

• Protection rules (with the exception of removable storage rules)
• Tags and tagging rules
Recommended installationThe recommended installation for a simple McAfee Data Loss Prevention Endpoint implementation ison a single server together with McAfee ePolicy Orchestrator software.For recommendations on whether or not to use a separate server for the ePolicy Orchestratordatabase see the ePolicy Orchestrator 4.5 Hardware Sizing and Bandwidth Usage Guide or ePolicyOrchestrator 4.6 Hardware Sizing and Bandwidth Usage Guide.
Figure 2-1 McAfee DLP Endpoint components and relationships
The recommended architecture includes:
• ePolicy Orchestrator server — Hosts the embedded McAfee DLP Endpoint policy consoleinterface and communicates with McAfee Agent software on the endpoint computers
In version 9.3 the embedded interface for McAfee DLP Monitor has been replaced with two ePolicyOrchestrator components: DLP Incident Manager and DLP Operational Events. This improvessecurity by eliminating the WCF communications link.
• McAfee ePO Reports — A list of McAfee DLP Endpoint Events within the McAfee ePolicy Orchestratorreporting service replaces DLP Reports
• ePolicy Orchestrator Event Parser — Communicates with the McAfee Agent and stores eventinformation in a database
• DLP Event Parser — Collects McAfee DLP Endpoint events from the ePolicy Orchestrator EventParser and stores them in DLP tables in the SQL database
• ePO database — Communicates with the ePolicy Orchestrator Policy Distributor to distributepolicies, and with the DLP Event Parser to collect events and evidence
Deployment options and scenariosRecommended installation 2
McAfee Data Loss Prevention Endpoint 9.3.100 and McAfee Device Control Product Guide 21

• Administrator workstation — Accesses ePolicy Orchestrator and the McAfee DLP Endpoint policyconsole in a browser
• Managed endpoint — Applies the security policies using the following software:
• McAfee DLP Endpoint client — A McAfee Agent plug-in that provides the McAfee DLP policiesand processes
• McAfee Agent — Provides the communication channel between the ePolicy Orchestrator serverand the McAfee DLP Endpoint client software
Understanding backward compatibilityTo allow an orderly upgrade in large enterprises that have deployed previous versions of McAfee DLPEndpoint in their production environment, an option exists to deploy backward-compatible policies tocomputers still running the older agents.
Host DLP Agent 9.1 is the earliest version supported by this feature. Enterprises running earlierversions must upgrade to Host DLP Agent 9.1 or later before upgrading to McAfee DLP Endpoint 9.3.
The backward compatibility option that allows communication with both old and new agents has threelevels:
• No compatibility (all endpoints are version 9.3)
• McAfee DLP Endpoint Agent 9.2 and later
• McAfee DLP Endpoint Agent 9.1 and later
The agent compatibility option is selected during the McAfee DLP Endpoint policy console initialization.It can be edited at any time from Tools | Options.
2 Deployment options and scenariosUnderstanding backward compatibility
22 McAfee Data Loss Prevention Endpoint 9.3.100 and McAfee Device Control Product Guide

3 Planning your deployment
Prepare your environment to install McAfee DLP Endpoint software in ePolicy Orchestrator.
Before installing McAfee DLP Endpoint software, configure the ePolicy Orchestrator server and createand configure the repository folders.
When installing ePolicy Orchestrator, consider the following:
• In the ePolicy Orchestrator installation options, we recommend selecting the Install Server and Consoleoption.
• McAfee DLP Endpoint software requires Microsoft SQL Server 2005 or later. When installing onWindows Server 2003, we recommend using the SQL Server 2005 Express installer included in theMcAfee ePO installer.
After verification that you want to install the software, the SQL installation continues without userinput. If prompted to install SQL Server 2005 Backward Compatibility, you must install it.
The preferred option when installing on Windows Server 2008 is to create an ePolicy Orchestratorinstance on an existing SQL Server 2005 or 2008 server and select it. We recommend using an SQLServer account. If preferred, an NT account can also be used.
• During the installation, you might see a warning about trusted sites. Write down the recommendedadditions to the Internet Explorer trusted sites list before clicking OK. You will need to add themlater.
Some of the installation scripts require the NETWORK SERVICE account to have write permission for theC:\Windows\Temp folder. In secure systems, this folder might be locked down. In that case, you musttemporarily change the permissions for this folder. Otherwise, the installation fails. We recommendcompleting all software installations before resetting the permissions.
Roles and permissions
Consider the administrator roles you need to manage the system, and create the necessary userprofiles. Roles such as McAfee DLP administrators, policy makers, monitor viewers, manual taggers,and others may be necessary, depending on the size of the system and how centralized you wantcontrol to be. The system can be modified at any time, so the list does not have to be comprehensive.
See Chapter 12 Users and permission sets in this guide for more information.
Contents Verify the system requirements Configure the server Working in a cluster environment Create and configure repository folders Installation checklist
3
McAfee Data Loss Prevention Endpoint 9.3.100 and McAfee Device Control Product Guide 23

Verify the system requirements The following hardware is recommended for running McAfee DLP Endpoint software version 9.3.100.
Table 3-1 Hardware requirements
Hardware type Specifications
Servers • RAM — 1 GB minimum (2 GB recommended)
• Hard Disk — 80 GB minimum
Endpoint computers • RAM — 1 GB minimum (2 GB recommended)
• Hard Disk — 300 MB minimum free disk space (500 MB recommended)
Network 100 megabit LAN serving all workstations and the McAfee ePO server
The following operating systems are supported.
Table 3-2 Operating systems supported
Computer type Software
Servers • Windows Server 2003 Standard (SE) SP1 or later 32- or 64-bit
• Windows Server 2003 Enterprise (EE) SP1 or later 32- or 64-bit
• Windows Server 2008 Enterprise SP1 or later 32- or 64-bit
• Windows Server 2012 64-bit
Endpointcomputers
• Windows XP Professional SP3 or later 32-bit
• Windows Vista SP1 or later 32-bit only
• Windows 7 or SP1 32- or 64-bit
• Windows 8 32- or 64-bit
DLP rules are not supported on Metro-style versions of apps such as InternetExplorer.
• Windows Server 2003 SP2 32- or 64-bit
• Windows Server 2003 R2 SP2 32- or 64-bit
• Windows Server 2008 SP2 32-bit
• Windows Server 2008 R2 SP1 64-bit
• Windows Server 2012 64-bit
File System Discovery Rules and Network Communication Protection Rules are notsupported on servers.
The user installing McAfee DLP Endpoint software on the servers must be a member of the localadministrators group.
The following virtual operating systems are supported.
3 Planning your deploymentVerify the system requirements
24 McAfee Data Loss Prevention Endpoint 9.3.100 and McAfee Device Control Product Guide

Table 3-3 Virtual operating systems supported
System type Software
VDI systems • Citrix XenDesktop 5.5, 5.6, and 7.0
• VMware View 4.6, 5.0, 5.1 and 5.2
Remote desktops • Citrix XenApp 6.0 and 6.5
• Microsoft Remote Desktop
The following software is required on the server running the McAfee DLP Endpoint policy console.
Table 3-4 Server software requirements
Software Supported versions
McAfee ePolicy Orchestrator • 4.5 Patch 3 or later
• 4.6 or later
• 5.0 or later
McAfee Agent • 4.5 Patch 3 or later
• 4.6 Patch 3 or later
• 4.8
Microsoft .NET 3.5 SP1, 4.0, or 4.5
Agent handlers on remote servers no longer require the .NETFramework.
Microsoft SQL Server • 2005 or 2008, Advanced Express or Enterprise, 32- or 64-bit
• 2012 Express or Enterprise, 32-, or 64-bit
Microsoft SQL ServerManagement Studio
Install the version that matches the version of Microsoft SQL Serveryou are using.
The McAfee DLP Endpoint software version 9.3.100.xx package includes the following:
• McAfee DLP Endpoint client (McAfee Agent 9.3.100.xx plug-in)
• McAfee DLP Endpoint extension (contains the components installed through ePolicy Orchestrator,including McAfee® Help Desk 2.0, McAfee DLP Endpoint 9.3.100 Help extension module, and McAfeeHelp Desk 2.0 Help extension module.)
Configure the serverBasic configuration of the McAfee ePO server includes setting the security configuration and verifyingthe .NET installation.
Before you beginVerify that the server meets the minimum system requirements.
Planning your deploymentConfigure the server 3
McAfee Data Loss Prevention Endpoint 9.3.100 and McAfee Device Control Product Guide 25

Task1 Install Microsoft Windows Server 2003, Windows Server 2008 or Windows Server 2012.
2 Install Windows Installer 3.0 (Windows Server 2003) or 4.5 (Windows Server 2008) and restart thesystem. Install all Microsoft Windows service packs.
3 Run Windows Update and install all patches and updates.
4 Disable Microsoft Internet Explorer Enhanced Security Configuration.
• In Windows Server 2003, open the Windows Control Panel, then select Add/Remove WindowsComponents.
• In Windows Server 2008, open the Server Manager, then select Configure IE ESC in the SecurityInformation section.
This Microsoft product can hinder proper installation of McAfee DLP Endpoint components. Disable itbefore installation, then reconfigure it after installation if it is required.
5 Verify that Microsoft .NET Framework 3.5 SP1, 4.0, or 4.5 is installed.
6 Set the server to a static IP address.
We recommend using a subnet separate from your company's production network for initial testing.If you are setting up a production environment, set the server’s static IP address within that range.
See also Verify the system requirements on page 24
Working in a cluster environmentMcAfee DLP Endpoint software provides high availability for environments running ePolicy Orchestratorin a cluster.We recommend cluster installation on a Microsoft Windows Server 2008 with Failover Clustering role.Installation on other operating systems has not been tested and is not currently supported.
Before running McAfee DLP Endpoint software in a cluster environment, ensure the following:
• Microsoft Failover Clustering is set up and running on a cluster of two or more servers.
• Two separate drives are configured for clustering: a Quorum drive and a Data drive.
• There is a supported database server (SQL Server 2005 or SQL Server 2008) in the network.
• ePolicy Orchestrator is set up according to the McAfee ePolicy Orchestrator cluster installationguidelines. See the McAfee ePolicy Orchestrator Product and Installation Guides for your ePolicyOrchestrator version. Also, consult the KnowledgeBase for updates and specific version information.
Tasks• Prepare the cluster on page 27
Before running McAfee DLP Endpoint software in a cluster environment, ensure thefollowing.
• Test the cluster on page 27Cluster installations should be tested before use.
3 Planning your deploymentWorking in a cluster environment
26 McAfee Data Loss Prevention Endpoint 9.3.100 and McAfee Device Control Product Guide

Prepare the cluster Before running McAfee DLP Endpoint software in a cluster environment, ensure the following.
• Microsoft Failover Clustering is set up and running on a cluster of two or more servers.
• Two separate drives are configured for clustering: a Quorum drive and a Data drive.
• There is a supported database server (SQL Server 2005 or SQL Server 2008) in the network.
• ePolicy Orchestrator is set up correctly.
• For ePolicy Orchestrator 4.5, see McAfee ePolicy Orchestrator 4.5 Cluster Installation Guide. Theguide can be found at: https://kc.mcafee.com/resources/sites/mcafee/content/live/product_documentation/21000/pd21842/en_us/epo_450_cluster_install_guide_en-us.pdf.
• For ePolicy Orchestrator 4.6, see the cluster installation section in the McAfee ePolicyOrchestrator 4.6 Installation Guide. The guide can be found at: https://kc.mcafee.com/resources/sites/mcafee/content/live/product_documentation/22000/pd22974/en_us/epo_460_install_guide_en-us.pdf.
Test the clusterCluster installations should be tested before use.
When the McAfee DLP Endpoint cluster is set up and online, use this task to ensure that it functions ina failover situation.
Task1 Restart the system functioning as the active node.
The passive node automatically becomes the active node.
2 Log on to McAfee ePolicy Orchestrator, select Data Protection | DLP Policy, and click Apply to apply thepolicy.
If the apply policy screen finishes successfully you can conclude that the McAfee DLP Endpointcluster has continued to function during the failover.
Create and configure repository foldersRepository folders contain information used by the McAfee DLP Endpoint software for creating policiesand for reporting.
Two folders and network shares must be created, and their properties and security settings must beconfigured appropriately. The folders do not need to be on the same computer as the McAfee DLPEndpoint Database server, but it is usually convenient to put them there.
We suggest the following folder paths, folder names, and share names, but you can create others asappropriate for your environment.
Planning your deploymentCreate and configure repository folders 3
McAfee Data Loss Prevention Endpoint 9.3.100 and McAfee Device Control Product Guide 27

• c:\dlp_resources\
• c:\dlp_resources\evidence
• c:\dlp_resources\whitelist
• Evidence folder — Certain protection rules allow for storing evidence, so you must designate, inadvance, a place to put it. If, for example, an email is blocked, a copy of the email is placed in theEvidence folder.
• Whitelist folder — Text fingerprints to be ignored by the endpoint software are placed in awhitelist repository folder. An example is standardized text such as disclaimers or copyright.McAfee DLP Endpoint software saves time by skipping these chunks of text that are known to notinclude sensitive content.
Configure folders on Windows Server 2008Configuration of the repository folders on Windows Server 2008 requires specific security settings.
Before you beginCreate the evidence and whitelist folders, as described in Before you install the extension.
Both folders are configured in the same manner. Repeat this task for each folder.
Task1 Right-click the evidence / whitelist folder and select Properties.
2 Click the Sharing tab, then click Advanced sharing. Select the Share this folder option.
3 Modify Share name to evidence$ / whitelist$. Click OK.
The $ ensures that the share is hidden.
4 Click Permissions and select Full Control for SYSTEM. Click OK twice.
5 Click the Security tab, then click Advanced.
6 In the Permissions tab, deselect the Include inheritable permissions from the object's parent option.
A confirmation message explains the effect this change will have on the folder.
7 Click Remove.
The Permissions tab in the Advanced Security Settings window shows all permissions eliminated.
8 Click Add to select an object type.
9 In the Enter the object name to select field, type Domain Computers, then click OK.
The Permission Entry dialog box is displayed.
10 In the Allow column, select:
• Create Files/Write Data and Create Folders/Append Data for the evidence folder
• List Folder/Read Data for the whitelist folder
Verify that the Apply onto option says This folder, subfolders and files, then click OK.
The Advanced Security Settings window now includes Domain Computers.
11 Click Add again to select an object type.
3 Planning your deploymentCreate and configure repository folders
28 McAfee Data Loss Prevention Endpoint 9.3.100 and McAfee Device Control Product Guide
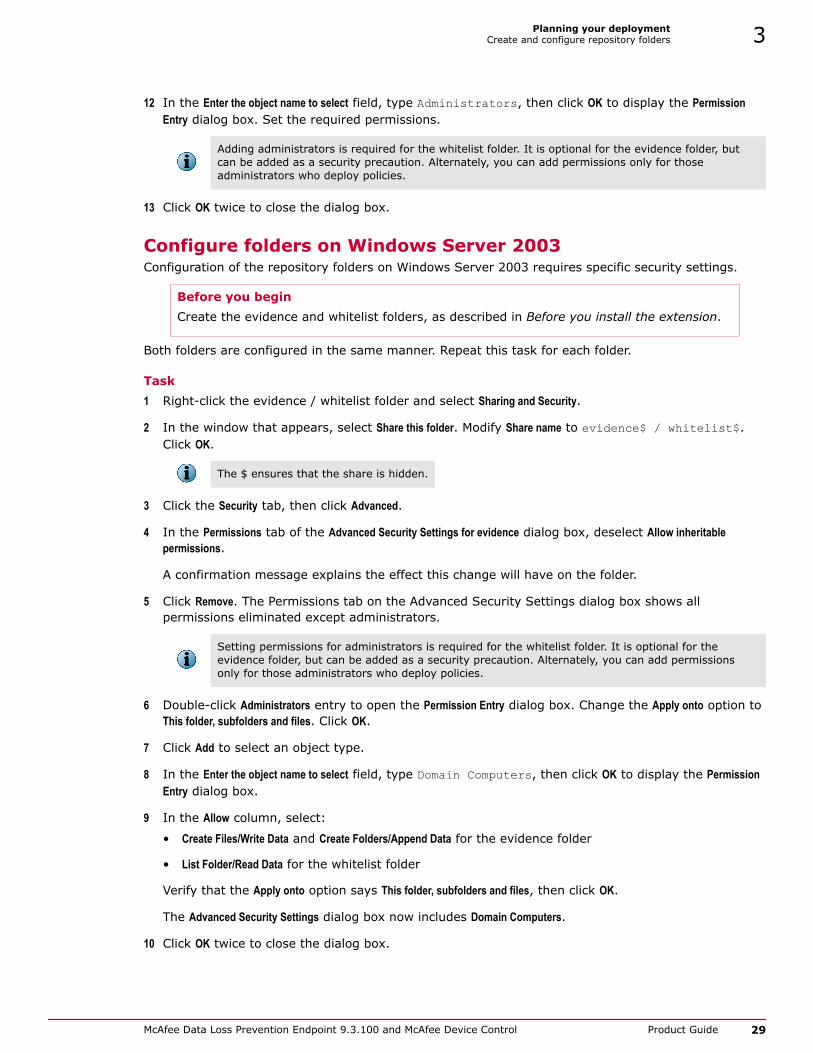
12 In the Enter the object name to select field, type Administrators, then click OK to display the PermissionEntry dialog box. Set the required permissions.
Adding administrators is required for the whitelist folder. It is optional for the evidence folder, butcan be added as a security precaution. Alternately, you can add permissions only for thoseadministrators who deploy policies.
13 Click OK twice to close the dialog box.
Configure folders on Windows Server 2003Configuration of the repository folders on Windows Server 2003 requires specific security settings.
Before you beginCreate the evidence and whitelist folders, as described in Before you install the extension.
Both folders are configured in the same manner. Repeat this task for each folder.
Task1 Right-click the evidence / whitelist folder and select Sharing and Security.
2 In the window that appears, select Share this folder. Modify Share name to evidence$ / whitelist$.Click OK.
The $ ensures that the share is hidden.
3 Click the Security tab, then click Advanced.
4 In the Permissions tab of the Advanced Security Settings for evidence dialog box, deselect Allow inheritablepermissions.
A confirmation message explains the effect this change will have on the folder.
5 Click Remove. The Permissions tab on the Advanced Security Settings dialog box shows allpermissions eliminated except administrators.
Setting permissions for administrators is required for the whitelist folder. It is optional for theevidence folder, but can be added as a security precaution. Alternately, you can add permissionsonly for those administrators who deploy policies.
6 Double-click Administrators entry to open the Permission Entry dialog box. Change the Apply onto option toThis folder, subfolders and files. Click OK.
7 Click Add to select an object type.
8 In the Enter the object name to select field, type Domain Computers, then click OK to display the PermissionEntry dialog box.
9 In the Allow column, select:
• Create Files/Write Data and Create Folders/Append Data for the evidence folder
• List Folder/Read Data for the whitelist folder
Verify that the Apply onto option says This folder, subfolders and files, then click OK.
The Advanced Security Settings dialog box now includes Domain Computers.
10 Click OK twice to close the dialog box.
Planning your deploymentCreate and configure repository folders 3
McAfee Data Loss Prevention Endpoint 9.3.100 and McAfee Device Control Product Guide 29
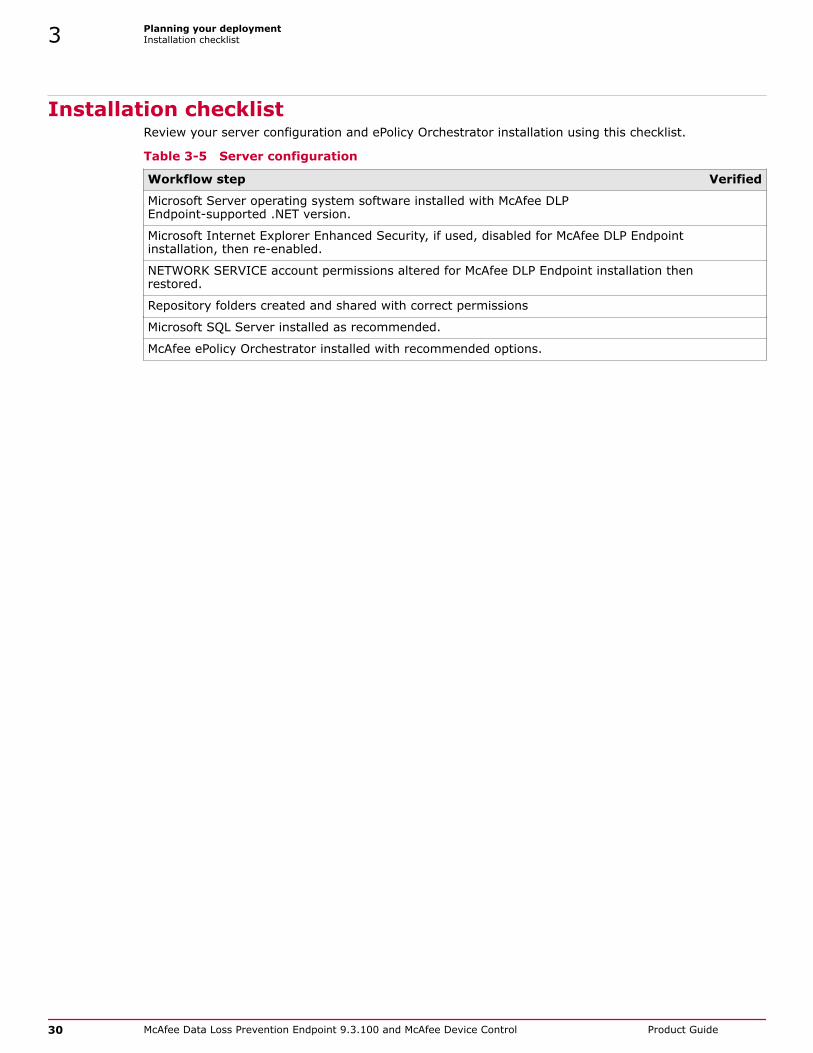
Installation checklistReview your server configuration and ePolicy Orchestrator installation using this checklist.
Table 3-5 Server configuration
Workflow step Verified
Microsoft Server operating system software installed with McAfee DLPEndpoint-supported .NET version.
Microsoft Internet Explorer Enhanced Security, if used, disabled for McAfee DLP Endpointinstallation, then re-enabled.
NETWORK SERVICE account permissions altered for McAfee DLP Endpoint installation thenrestored.
Repository folders created and shared with correct permissions
Microsoft SQL Server installed as recommended.
McAfee ePolicy Orchestrator installed with recommended options.
3 Planning your deploymentInstallation checklist
30 McAfee Data Loss Prevention Endpoint 9.3.100 and McAfee Device Control Product Guide

InstallationThis section describes the installation of the McAfee DLP Endpoint extensionin ePolicy Orchestrator and deploying the client software to the endpointcomputers.
Chapter 4 Installing the McAfee DLP Endpoint softwareChapter 5 Installing a version upgradeChapter 6 Deploying McAfee DLP Endpoint
McAfee Data Loss Prevention Endpoint 9.3.100 and McAfee Device Control Product Guide 31

Installation
32 McAfee Data Loss Prevention Endpoint 9.3.100 and McAfee Device Control Product Guide

4 Installing the McAfee DLP Endpointsoftware
McAfee DLP Endpoint Version 9.3.x can be installed in ePolicy Orchestrator 4.5, 4.6, or 5.0.
Contents Install the McAfee Data Loss Prevention Endpoint extension Check in the McAfee DLP Endpoint package to ePolicy Orchestrator
Install the McAfee Data Loss Prevention Endpoint extensionThe McAfee DLP Endpoint software extension is installed in ePolicy Orchestrator.
Before you beginDownload the McAfee DLP Endpoint extension from the McAfee download site for McAfeeData Loss Prevention Endpoint software.
The McAfee DLP Endpoint Help extension module is now bundled in the software extension,and no longer needs to be installed separately.
McAfee DLP Endpoint software does not currently support the McAfee ePolicy Orchestrator4.6 and 5.0 Software Manager feature.
Verify that the ePolicy Orchestrator server name is listed under Trusted Sites in the InternetExplorer security settings.
The default installation is a 90-day license for McAfee Device Control software. If you purchased alicense for full McAfee Data Loss Prevention Endpoint software, you must upgrade the license after youcomplete the installation.
TaskFor option definitions, click ? in the interface.
1 In ePolicy Orchestrator, select Menu | Software | Extensions, then click Install Extension.
2 Click Browse and select the McAfee DLP Endpoint .zip file (..\DLPE_package_9_3_100_xx.zip). ClickOpen, then click OK.
The installation dialog box displays the file parameters to verify that you are installing the correctextension.
3 Click OK. The extension is installed.
4
McAfee Data Loss Prevention Endpoint 9.3.100 and McAfee Device Control Product Guide 33

The following applications are installed in ePolicy Orchestrator:
• McAfee DLP Endpoint 9.3.100 policy console (in Menu | Data Protection)
• DLP Incident Manager and DLP Operational Events (in Menu | Data Protection)
• DLP Event Parser
• McAfee Help Desk 2.0.0
• McAfee DLP Endpoint and McAfee Help Desk Help Content
4 Click OK.
Tasks
• Initialize the McAfee DLP Endpoint policy console on page 34The first time you open the McAfee Data Loss Prevention Endpoint policy console, a wizardruns for first-time initialization.
• Upgrade the license on page 36McAfee DLP Endpoint software comes in two versions, McAfee Device Control and fullMcAfee Data Loss Prevention Endpoint, with two licensing options for each, 90-day trial andunlimited. The default installation is McAfee Device Control with a 90-day trial license.
Initialize the McAfee DLP Endpoint policy consoleThe first time you open the McAfee Data Loss Prevention Endpoint policy console, a wizard runs forfirst-time initialization.
The wizard can be run at any time by selecting Initialization Wizard from the Tools menu in the McAfee DLPEndpoint policy console.
The McAfee DLP Endpoint Management Tools installer and McAfee DLP Endpoint policy consoleinitialization wizard use ActiveX technology. To prevent the installer from being blocked, verify that thefollowing are enabled in Internet Explorer Tools | Internet Options | Security | Custom level:
• Automatic prompting for ActiveX controls
• Download signed ActiveX controls
Task
1 In ePolicy Orchestrator, select Menu | Data Protection | DLP Policy.
The McAfee DLP Endpoint Management Tools installer runs and, after a brief delay, the Welcomewindow of the DLP Management Tools Setup wizard appears. Complete the steps in the wizard.
2 After the McAfee DLP Endpoint Management Tools installation has completed, the McAfee DLPEndpoint policy console begins loading. If you have an existing policy, you are prompted to convertit to the new format. Click Convert and skip to step 4.
McAfee DLP Endpoint version 9.3 adds a number of new text pattern definitions. These are notadded to the policy during conversion. To add these new definitions, use the Template SynchronizationWizard.
3 If no previous policy exists, the message DLP global policy is unavailable. Loading default policy appears. ClickOK to continue.
4 When the message Agent configuration is unavailable. Loading a default agent. appears, click OK.
5 When the McAfee DLP Endpoint policy console First Time Initialization wizard appears, complete thefollowing steps:
4 Installing the McAfee DLP Endpoint softwareInstall the McAfee Data Loss Prevention Endpoint extension
34 McAfee Data Loss Prevention Endpoint 9.3.100 and McAfee Device Control Product Guide

Option Description
1 of 8 Click Next.
2 of 8 Normally, file system discovery rules give you the option of applying an RM policy,tagging, or quarantining sensitive files. Though we do not recommend it, you can add aDelete option by selecting the Support file system discovery delete option.
This option is not available until you update to the full McAfee Data Loss PreventionEndpoint software installation.
For troubleshooting, when you need to review an easily readable version of the policy,select Generate verbose policy. For most installations, we recommend leaving thesecheckboxes deselected.
In very large organizations where the rollout of McAfee DLP Endpoint 9.3 is staged overtime, earlier versions of the plug-in need to coexist. Select the appropriate Backwardcompatibility mode:• No compatibility (all endpoints are version 9.3 or later)
• McAfee DLP Endpoint Agent 9.2 and later
• McAfee DLP Endpoint Agent 9.1 and later
Select your directory access protocol: Microsoft Active Directory or OpenLDAP. Whenusing Microsoft AD in very large organizations where search times could be excessive,select Restrict AD searches to default domain.
When you have completed all changes, click Next.
3 of 8This step is not available when installing McAfee Device Control.
Type user names for manual tagging authorization, or click one of the buttons to searchfor user names in Active Directory or Open LDAP (optional). Click Next.
We recommend creating a role-based group such as DLP Manual Tagging Users, andusing the group when configuring Access Control.
4 of 8 Type a password and confirmation (required). McAfee DLP Endpoint software requiresstrong passwords, that is, at least 8 characters with at least one each uppercase, lowercase, digit, and special character (symbol). If you are upgrading, this is not implementeduntil you change a password or use a new policy.If you don't want endpoint key generation events reported to the database, deselect thecheckbox. If you want to use short challenge/response (8 digits instead of 16), select thecheckbox.
Click Next.
5 of 8 Browse to the Whitelist storage share, then click Next. The UNC whitelist path is requiredto apply the policy to ePolicy Orchestrator. Size limits are displayed, but cannot bechanged in the Initialization wizard.
6 of 8 Modify the agent popup service options (optional). Agent popup managed features aredisplayed, but cannot be changed in the Initialization wizard. Manual/automatic popupclose and release code lockout policy can be set.Modify the default notification messages (optional). Select each event type in turn, andtype the message in the text field. Click Next.
7 of 8 Browse to the evidence storage share and click Next. The evidence storage path isrequired to apply the policy to ePolicy Orchestrator. Select a user account and passwordfor copying evidence (optional). Set the required Evidence Replication option. Click Next.
Installing the McAfee DLP Endpoint softwareInstall the McAfee Data Loss Prevention Endpoint extension 4
McAfee Data Loss Prevention Endpoint 9.3.100 and McAfee Device Control Product Guide 35

Option Description
8 of 8 Click Finish.
6 Answer the Apply initial configuration message.
• If you have not skipped any required steps, click Yes and apply the initial policy.
• If you have skipped required steps, click No to complete the initialization.
A password and the evidence storage share are required to complete initialization. The other stepsindicated as required are necessary to complete the policy. They can be skipped during initializationand completed at a later time. If you did not apply the policy, select File | Save to save the policy to afile.
7 Click Finish.
Upgrade the licenseMcAfee DLP Endpoint software comes in two versions, McAfee Device Control and full McAfee DataLoss Prevention Endpoint, with two licensing options for each, 90-day trial and unlimited. The defaultinstallation is McAfee Device Control with a 90-day trial license.
Before you beginBefore starting this task, purchase your upgrade license and get an activation key fromyour McAfee sales representative.
Task1 In the McAfee DLP Endpoint policy console menu bar, select Help | Update License.
The View and Update License window displays the current (default) activation key and expiration date.
2 Click Update.
3 Type or paste the activation key Activation Key field and click Apply.
A warning that you must log on again for the change to take effect appears.
4 Click OK to close the message box, and click Close to close the View and Update License window, then logoff ePolicy Orchestrator.
5 Log on to ePolicy Orchestrator to complete the upgrade.
6 From the Agent Configuration menu, select Edit Global Agent Configuration.
a In the Evidence tab, set the Storage share.
A storage share is required for applying the configuration to ePolicy Orchestrator.
b In the File Tracking tab, verify the required Operation Mode.
Device control and full content protection is the default when you upgrade the license.
c In the Miscellaneous tab, select the modules you require.
Do not enable modules you don't use. They increase the McAfee DLP Endpoint agent size andslow its operation unnecessarily.
You can set other options at this time, or accept the defaults and modify the options later.
7 Click OK.
4 Installing the McAfee DLP Endpoint softwareInstall the McAfee Data Loss Prevention Endpoint extension
36 McAfee Data Loss Prevention Endpoint 9.3.100 and McAfee Device Control Product Guide

8 On the toolbar, click Apply.
The policy changes are applied to ePolicy Orchestrator.
9 In ePolicy Orchestrator, issue a wake-up call to deploy the policy change to the workstations.
Check in the McAfee DLP Endpoint package to ePolicyOrchestrator
Any enterprise computer with data protected by McAfee software must have the McAfee Agentinstalled, making it a managed computer. To add data loss protection, you must also deploy theMcAfee DLP Endpoint plug-in for McAfee Agent. The installation can be performed using the ePolicyOrchestrator infrastructure.
TaskFor option definitions, click ? in the interface.
1 In McAfee ePolicy Orchestrator, select Menu | Software | Master Repository.
2 In the Master Repository, select Actions | Check In Package.
3 Select package type Product or Update (.ZIP), browse to ..\HDLP_Agent_9_3_100_xx.zip, then click Next.The Check in Package page appears.
4 Review the details on the screen, then click Save.
The package is added to the Master Repository.
Installing the McAfee DLP Endpoint softwareCheck in the McAfee DLP Endpoint package to ePolicy Orchestrator 4
McAfee Data Loss Prevention Endpoint 9.3.100 and McAfee Device Control Product Guide 37

4 Installing the McAfee DLP Endpoint softwareCheck in the McAfee DLP Endpoint package to ePolicy Orchestrator
38 McAfee Data Loss Prevention Endpoint 9.3.100 and McAfee Device Control Product Guide
5 Installing a version upgrade
Upgrading the software has consequences in ePolicy Orchestrator and in the McAfee DLP Endpointsetup.
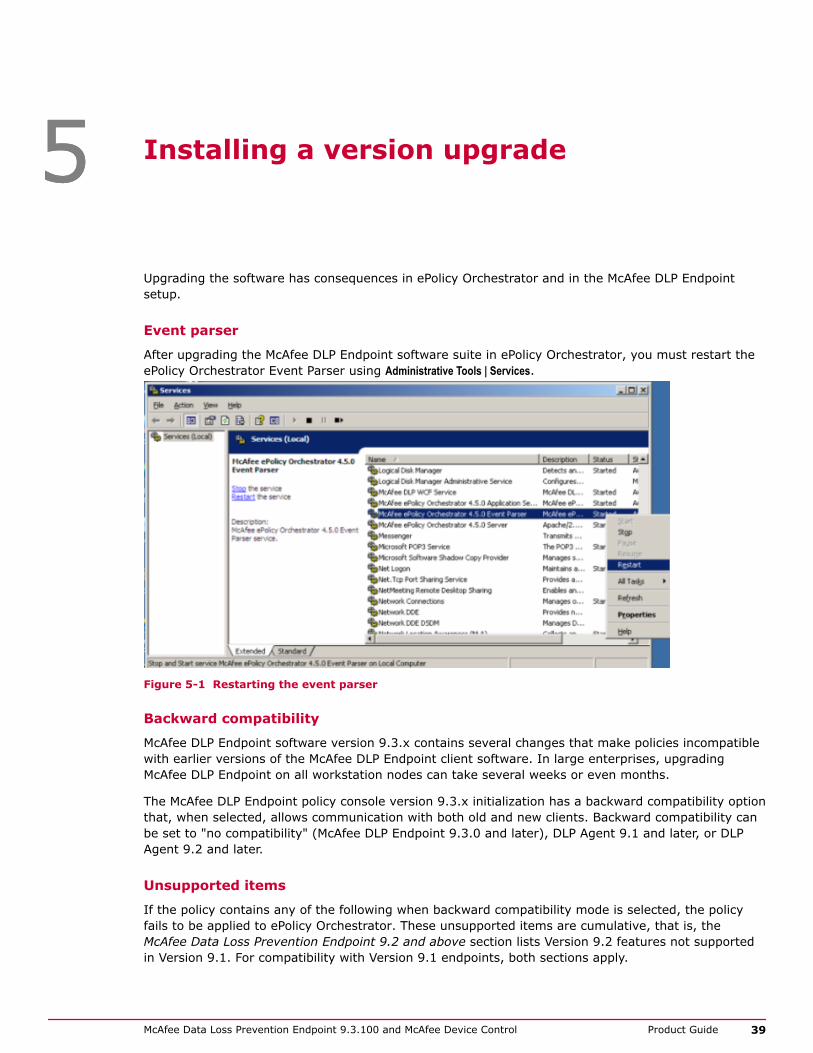
Event parser
After upgrading the McAfee DLP Endpoint software suite in ePolicy Orchestrator, you must restart theePolicy Orchestrator Event Parser using Administrative Tools | Services.
Figure 5-1 Restarting the event parser
Backward compatibility
McAfee DLP Endpoint software version 9.3.x contains several changes that make policies incompatiblewith earlier versions of the McAfee DLP Endpoint client software. In large enterprises, upgradingMcAfee DLP Endpoint on all workstation nodes can take several weeks or even months.
The McAfee DLP Endpoint policy console version 9.3.x initialization has a backward compatibility optionthat, when selected, allows communication with both old and new clients. Backward compatibility canbe set to "no compatibility" (McAfee DLP Endpoint 9.3.0 and later), DLP Agent 9.1 and later, or DLPAgent 9.2 and later.
Unsupported items
If the policy contains any of the following when backward compatibility mode is selected, the policyfails to be applied to ePolicy Orchestrator. These unsupported items are cumulative, that is, theMcAfee Data Loss Prevention Endpoint 9.2 and above section lists Version 9.2 features not supportedin Version 9.1. For compatibility with Version 9.1 endpoints, both sections apply.
5
McAfee Data Loss Prevention Endpoint 9.3.100 and McAfee Device Control Product Guide 39

Table 5-1 Items unsupported in backward-compatible mode
Compatibility mode Unsupported items
McAfee Data LossPrevention Endpoint 9.1and later backwardcompatibility mode
• An application file access, email, file system, removable storage, or webpost protection rule contains a document property definition containing aFile Name property.
• An application file access protection rule contains a Store Evidence action.
• A discovery or protection rule contains a Content Category or Tag Group.
• An application file access protection rule contains a file type definition.
• A policy contains an email storage discovery rule.
• A clipboard rule restricts pasting into all applications.
• A policy contains a TrueCrypt device rule.
McAfee Data LossPrevention Endpoint 9.2and later backwardcompatibility mode
• A policy contains a Seclore FileSecure server definition or policy, or aprotection rule restricts a rule to Seclore encryption.
• A policy contains a Fixed Hard Drive or Citrix XenApp device rule.
• A policy contains a cloud protection rule.
• A policy contains MTP support (uses the Portable Devices handler)
• A text pattern definition contains one of the validators introduced inversion 9.3.
• A clipboard protection rule contains an application definition.
• A removable storage file access rule contains a file extension.
• A document property definition contains only a file size parameter.
Queries and computer assignments
Queries and Dashboards are saved when you upgrade McAfee DLP Endpoint software, as long as youuse the recommended procedure. If you remove the existing Data Loss Prevention extension beforeinstalling the new one, all queries and Dashboards are lost.
To customize a sample query, we recommend using the Duplicate option, to rename the query beforechanging it. To use the new sample queries in My Queries in a Dashboard, use the Make Public option. If apublic query exists with the same name, remove or rename the public query first.
ePolicy Orchestrator requires all query names to be unique. The first time you install McAfee DLPEndpoint software in ePolicy Orchestrator, the sample queries are installed as Public Queries. To viewthis, select Reporting | Queries, and scroll down the queries on the left side of the screen. When youupgrade McAfee DLP Endpoint, ePolicy Orchestrator notices that the names of the sample queries arealready used, and installs the samples in My Queries instead. However, to use a query in a Dashboard, itmust be a public query.
Contents Upgrade McAfee DLP Endpoint software Phased upgrade Restore the policy after upgrade
5 Installing a version upgrade
40 McAfee Data Loss Prevention Endpoint 9.3.100 and McAfee Device Control Product Guide
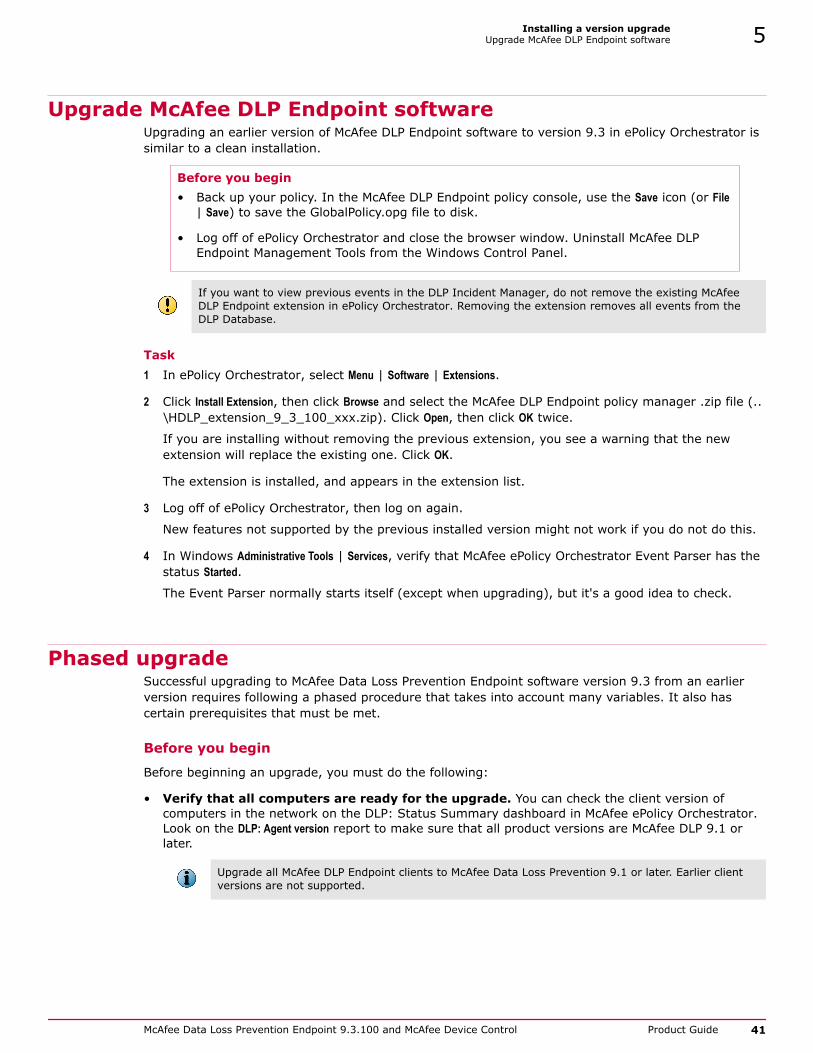
Upgrade McAfee DLP Endpoint softwareUpgrading an earlier version of McAfee DLP Endpoint software to version 9.3 in ePolicy Orchestrator issimilar to a clean installation.
Before you begin• Back up your policy. In the McAfee DLP Endpoint policy console, use the Save icon (or File
| Save) to save the GlobalPolicy.opg file to disk.
• Log off of ePolicy Orchestrator and close the browser window. Uninstall McAfee DLPEndpoint Management Tools from the Windows Control Panel.
If you want to view previous events in the DLP Incident Manager, do not remove the existing McAfeeDLP Endpoint extension in ePolicy Orchestrator. Removing the extension removes all events from theDLP Database.
Task1 In ePolicy Orchestrator, select Menu | Software | Extensions.
2 Click Install Extension, then click Browse and select the McAfee DLP Endpoint policy manager .zip file (..\HDLP_extension_9_3_100_xxx.zip). Click Open, then click OK twice.
If you are installing without removing the previous extension, you see a warning that the newextension will replace the existing one. Click OK.
The extension is installed, and appears in the extension list.
3 Log off of ePolicy Orchestrator, then log on again.
New features not supported by the previous installed version might not work if you do not do this.
4 In Windows Administrative Tools | Services, verify that McAfee ePolicy Orchestrator Event Parser has thestatus Started.
The Event Parser normally starts itself (except when upgrading), but it's a good idea to check.
Phased upgradeSuccessful upgrading to McAfee Data Loss Prevention Endpoint software version 9.3 from an earlierversion requires following a phased procedure that takes into account many variables. It also hascertain prerequisites that must be met.
Before you begin
Before beginning an upgrade, you must do the following:
• Verify that all computers are ready for the upgrade. You can check the client version ofcomputers in the network on the DLP: Status Summary dashboard in McAfee ePolicy Orchestrator.Look on the DLP: Agent version report to make sure that all product versions are McAfee DLP 9.1 orlater.
Upgrade all McAfee DLP Endpoint clients to McAfee Data Loss Prevention 9.1 or later. Earlier clientversions are not supported.
Installing a version upgradeUpgrade McAfee DLP Endpoint software 5
McAfee Data Loss Prevention Endpoint 9.3.100 and McAfee Device Control Product Guide 41

• Backup the current DLP policy. Saving the policy to disk allows you to convert the policy to thenew format for reuse. You can back up the policy from the McAfee DLP Endpoint policy console. TheSave As option on the File menu saves the policy in .opg format.
• Save the agent configuration and computer assignment groups. You can save the agentconfiguration and computer assignment groups from the McAfee ePolicy Orchestrator Menu | Policy |Policy Catalog page. Select the product (Data Loss Prevention x.x.0.0) and the category (Computers AssignmentGroup or Agent Configuration) from the drop-down lists, and edit the selection. From the Edit page, youcan select Save to File and specify a destination for the backup file.
Figure 5-2 Saving the agent configuration
Restore the policy after upgradeAfter upgrading the McAfee DLP Endpoint software, you must restore the DLP policy, computerassignment groups, and agent configurations from your previous installation.
Install and initialize the McAfee DLP Endpoint policy console. See the sections Upgrade McAfee DataLoss Prevention Endpoint software and Initialize the McAfee DLP Endpoint policy console in thismanual. When you have completed the basic installation, continue with this task.
Task1 Restore the policy.
a Start the McAfee DLP Endpoint policy console, select File | Open, and browse to the locationwhere you saved the backup of the previous policy.
b When prompted, click Convert to convert it.
c Select Tools | Options and verify in the Backward compatibility mode section that the required version isselected.
d Click Apply to save the policy to McAfee ePolicy Orchestrator.
5 Installing a version upgradeRestore the policy after upgrade
42 McAfee Data Loss Prevention Endpoint 9.3.100 and McAfee Device Control Product Guide

2 Restore the computer assignment groups.
a In ePolicy Orchestrator, select Policy | Policy Catalog. From the Product drop-down list, select DataLoss Prevention 9.3.0.0 policies.
b From the Category drop-down list, select Computers Assignment Group.
c Select Actions | New Policy, type a policy name, and create a new computers assignment grouppolicy.
d Click Load from file and browse to the computers assignment group backup file.
Figure 5-3 Restoring the computers assignment group settings
3 Restore the agent configurations.
a In ePolicy Orchestrator, select System | Policy Catalog. From the Product drop-down list, select DataLoss Prevention 9.3.0.0 policies.
b From the Category drop-down list, select Agent Configuration.
c Type a name and create an agent configuration.
d Click Load from file and browse to the agent configuration backup file.
See also Initialize the McAfee DLP Endpoint policy console on page 34
Installing a version upgradeRestore the policy after upgrade 5
McAfee Data Loss Prevention Endpoint 9.3.100 and McAfee Device Control Product Guide 43

5 Installing a version upgradeRestore the policy after upgrade
44 McAfee Data Loss Prevention Endpoint 9.3.100 and McAfee Device Control Product Guide

6 Deploying McAfee DLP Endpoint
McAfee DLP Endpoint policies are enforced by McAfee Agent software on endpoint computers.
The first step is deployment of the McAfee DLP Endpoint client software, a McAfee Agent plug-in, tothe endpoints.
Contents Deploy the client software Deploy policies with ePolicy Orchestrator
Deploy the client softwareDeploying McAfee DLP Endpoint client software is the final step of software installation, and the firststep of policy deployment.
Tasks
• Define a default rule on page 45To verify that the McAfee DLP Endpoint software has been deployed properly, werecommend defining a default rule before deploying to the managed computers.
• Deploy McAfee DLP Endpoint client with ePolicy Orchestrator on page 46Before policies can be applied, McAfee DLP Endpoint client must be deployed to theendpoint computers by ePolicy Orchestrator.
• Verify the installation on page 48After installing McAfee DLP Endpoint software, you should verify the installation in the DLPOperational Events console.
Define a default ruleTo verify that the McAfee DLP Endpoint software has been deployed properly, we recommend defininga default rule before deploying to the managed computers.
The rule described is an example of a simple rule that can be used to test the system.
TaskFor option definitions, press F1.
1 Create a classification rule:
a In the McAfee DLP Endpoint policy console navigation pane under Content Protection, selectClassification Rules.
b Right-click in the Classification Rules window and select Add New | Content Classification Rule. Rename therule Email Classification Rule.
c Double-click the rule icon to modify the rule.
6
McAfee Data Loss Prevention Endpoint 9.3.100 and McAfee Device Control Product Guide 45

d In step 1 of the rule creation wizard, select either of the options (ANY or ALL) then scroll downthe text patterns list and select Email Address. Click Next three times, skipping to step 4.
e In step 4 of the rule creation wizard, click Add New to create a new category. Name it EmailCategory, click OK to accept the new category, then click Finish.
f Right-click the rule icon and select Enable.
2 Create a protection rule:
a In the McAfee DLP Endpoint policy console navigation pane under Content Protection, select ProtectionRules.
b Right-click in the Protection Rules window and select Add New | Removable Storage Protection Rule.
c Double-click the rule icon to modify the rule.
d Click through to step 2 of the rule creation wizard and add the Email Category created whencreating the classification rule in the Included column.
e Click through to step 7 of the rule creation wizard. Select Monitor, then click Finish.
f Right-click the rule icon and select Enable.
3 From the Tools menu, select Run Policy Analyzer. You should receive warnings, but no errors.
If you receive errors, they probably come from improper initialization, such as not specifying anevidence folder or override password. You can rerun the initialization from the Tools menu to correctthis.
4 On the toolbar, click Apply. The policy is applied to McAfee ePolicy Orchestrator.
Deploy McAfee DLP Endpoint client with ePolicy OrchestratorBefore policies can be applied, McAfee DLP Endpoint client must be deployed to the endpointcomputers by ePolicy Orchestrator.
Before you beginA current version of McAfee Agent must be installed in ePolicy Orchestrator and deployed tothe target computers before McAfee DLP Endpoint is deployed.
• For ePolicy Orchestrator 4.5, install McAfee Agent 4.5 Patch 3 or later.
• For ePolicy Orchestrator 4.6, install McAfee Agent 4.6 Patch 3 or later.
• For ePolicy Orchestrator 5.0, install McAfee Agent 4.8 or later.
Consult the McAfee ePolicy Orchestrator documentation on how to verify this, and how toinstall it if necessary.
6 Deploying McAfee DLP EndpointDeploy the client software
46 McAfee Data Loss Prevention Endpoint 9.3.100 and McAfee Device Control Product Guide

TaskFor option definitions, click ? in the interface.
1 In ePolicy Orchestrator, select Menu | System Tree.
2 In the System Tree, select the level at which to deploy McAfee DLP Endpoint.
Leaving the level at My Organization deploys to all workstations managed by McAfee ePolicyOrchestrator.
If you select a level under My Organization, the right pane displays the available workstations. You canalso deploy McAfee DLP Endpoint to individual workstations.
3 Open the Client Task Builder wizard:
• In ePolicy Orchestrator 4.5, Click the Client Tasks tab. Select Actions | New Task.
• In ePolicy Orchestrator 4.6 and 5.0, Click the Assigned Client Tasks tab. Select Actions | New Client TaskAssignment.
The Client Task Builder wizard opens.
4 Fill in the Task Builder fields:
• In ePolicy Orchestrator 4.5, in the Type field, select Product Deployment. Click Next. In the Name field,type a suitable name, for example, Install DLP Endpoint. Typing a description is optional.
• In ePolicy Orchestrator 4.6 and 5.0, in the Product field, select McAfee Agent. In the Task Type field,select Product Deployment. Click Create New Task.
5 In the Products and Components field, select Data Loss Prevention 9.3.0.xx. The Action field automatically resetsto Install.
6 Complete the Task Builder:
• In ePolicy Orchestrator 4.5, click Next.
• In ePolicy Orchestrator 4.6 and 5.0, click Save.
7 Change the Schedule type to Run immediately. Click Next.
8 Review the task summary. When you are satisfied that it is correct, click Save. The task is scheduledfor the next time the McAfee Agent updates the policy. To force the installation to take placeimmediately, issue an agent wake-up call.
9 After McAfee DLP Endpoint has been deployed, restart the managed computers.
Deploying McAfee DLP EndpointDeploy the client software 6
McAfee Data Loss Prevention Endpoint 9.3.100 and McAfee Device Control Product Guide 47

Verify the installationAfter installing McAfee DLP Endpoint software, you should verify the installation in the DLP OperationalEvents console.
Task1 Select Menu | Data Protection | DLP Operational Events. Click an event to view the details.
Figure 6-1 DLP Operational Events details pane
2 Verify the McAfee DLP Endpoint client software installation from the McAfee system tray icon on theendpoint computer by selecting About. Scroll through the information for McAfee DLP Endpoint.
Deploy policies with ePolicy OrchestratorMcAfee DLP Endpoint policies contain definitions, rules, assignment groups and agent configuration. Apolicy is first applied (saved) to the ePolicy Orchestrator server, then assigned (deployed) to theendpoints.
McAfee DLP Endpoint works with three policies:
• DLPE policy
• Agent configuration
• Computer assignment group
DLPE policy is created in the McAfee DLP Endpoint policy console; agent configuration and computerassignment group are created in ePolicy Orchestrator.
Each of these policies is assigned the revision number 1 when it is created, and the number isincremented each time the policy is changed. The revision number is important for supportingtroubleshooting processes, to ensure that policy changes are actually applied to the endpointcomputers. It is also used when requesting an agent bypass or uninstall key. Both the McAfee DLPEndpoint policy console in ePolicy Orchestrator and the DLP Endpoint console on the client computerdisplay the current policy revision numbers.
Before applying a policy, verify that:
• All settings are configured correctly.
• All rules are enabled.
6 Deploying McAfee DLP EndpointDeploy policies with ePolicy Orchestrator
48 McAfee Data Loss Prevention Endpoint 9.3.100 and McAfee Device Control Product Guide

• User assignment groups (where required) are assigned to each rule.
• The agent configuration and the computer assignment groups are assigned to the relevant groupsand computers in the ePolicy Orchestrator Policy Catalog.
Tasks• Apply the system policy on page 49
When a policy is completed, it must be applied to ePolicy Orchestrator. From there, it isdeployed to the managed computers that enforce the policy.
• Assign a policy or agent configuration on page 49Policies applied to ePolicy Orchestrator must be assigned and deployed to managedcomputers in order to be used.
• Import policies and editing policy descriptions on page 50Use these tasks to import policies from ePolicy Orchestrator, or to modify policydescriptions.
• Refresh the policy on page 50Normally, the system policy deployment relies on the ePolicy Orchestrator server, and thepolicy refresh on the managed computer is performed in accordance with the McAfee Agentsettings. Policy refresh can, however, be performed on demand.
Apply the system policyWhen a policy is completed, it must be applied to ePolicy Orchestrator. From there, it is deployed tothe managed computers that enforce the policy.
Task1 In ePolicy Orchestrator, select Menu | Data Protection | DLP Policy.
2 Verify the policy before applying it: select Tools | Run Policy Analyzer.
Policies can be applied to ePolicy Orchestrator with warnings, but not if they contain errors. If yousee errors, resolve the problem(s) causing the error(s), or customize the policy analyzer options. Ifyou are using the agent backward compatibility option and a policy contains a feature that isunsupported in older agent versions, it will generate an error. See Upgrading issues in this guide fora list of unsupported features.
3 From the McAfee DLP Endpoint policy console File menu, select Apply to ePO. The Applying to ePO windowappears.
If you have activated the browser Status Bar, you see the message “Validation succeeded.”
The policy is saved to the ePolicy Orchestrator database, and an administrative event is generated.
Assign a policy or agent configurationPolicies applied to ePolicy Orchestrator must be assigned and deployed to managed computers in orderto be used.
TaskFor option definitions, click ? in the interface.
1 In ePolicy Orchestrator, click System Tree.
2 Locate the directory containing the computers that will be assigned a policy, and select them.
3 Select Actions | Agent | Wake Up Agents.
4 Select Agent Wake-Up Call, and set Randomization to 0 minutes. Click OK.
Deploying McAfee DLP EndpointDeploy policies with ePolicy Orchestrator 6
McAfee Data Loss Prevention Endpoint 9.3.100 and McAfee Device Control Product Guide 49

5 When the agent wake-up call is completed, you are returned to the System Tree. Reselect thecomputers that will be assigned a policy, and click Actions | Agent | Set Policy & Inheritance.
6 On the Assign Policy page, select the Product, Category, and Policy to be applied.
7 Click Save.
Import policies and editing policy descriptionsUse these tasks to import policies from ePolicy Orchestrator, or to modify policy descriptions.
Tasks• Import a policy from ePolicy Orchestrator on page 50
The policy last applied to ePolicy Orchestrator can be imported into the McAfee DLPEndpoint policy console. This is typically done when the policy console is updated, or anytime you want to throw away changes and restore an old policy.
• Edit a policy description on page 50Policy name and description are editable fields, accessible from the console File menu.
Import a policy from ePolicy OrchestratorThe policy last applied to ePolicy Orchestrator can be imported into the McAfee DLP Endpoint policyconsole. This is typically done when the policy console is updated, or any time you want to throw awaychanges and restore an old policy.
TaskFor option definitions, click ? in the interface.
1 From the McAfee DLP Endpoint policy console File menu, select Import Policy from ePO.
2 Click Yes in the confirmation window.
Edit a policy descriptionPolicy name and description are editable fields, accessible from the console File menu.
Task1 From the McAfee DLP Endpoint policy console menu, select File | Edit Policy Description.
2 Edit the policy name and description in the Security Policy window.
3 Click OK.
Refresh the policyNormally, the system policy deployment relies on the ePolicy Orchestrator server, and the policyrefresh on the managed computer is performed in accordance with the McAfee Agent settings. Policyrefresh can, however, be performed on demand.
Use this task to update a policy in ePolicy Orchestrator without waiting for the scheduled refresh.
6 Deploying McAfee DLP EndpointDeploy policies with ePolicy Orchestrator
50 McAfee Data Loss Prevention Endpoint 9.3.100 and McAfee Device Control Product Guide

TaskFor option definitions, click ? in the interface.
1 In the ePolicy Orchestrator system tree, select the computer or computers to be refreshed.
2 Click More Actions | Wake Up Agents.
3 Select the wake-up call type, and set Randomization to 0 minutes. Click OK.
Policies are updated on a scheduled basis by the ePolicy Orchestrator server. Users of managedcomputers do not refresh policies manually unless specifically instructed to do so.
Deploying McAfee DLP EndpointDeploy policies with ePolicy Orchestrator 6
McAfee Data Loss Prevention Endpoint 9.3.100 and McAfee Device Control Product Guide 51

6 Deploying McAfee DLP EndpointDeploy policies with ePolicy Orchestrator
52 McAfee Data Loss Prevention Endpoint 9.3.100 and McAfee Device Control Product Guide

Configuration and useThis section system configuration and policy creation.After installation, the software is configured for optimized use in theenterprise environment. Then, policies are created based on managementdecisions of what content needs to be protected, and how best to protect it.
For new installations, we recommend an information gathering period, whererules are set to Monitor rather than Block, and data is collected to aid thedecision making process.
Chapter 7 Protecting removable mediaChapter 8 Configuring system componentsChapter 9 Classifying sensitive contentChapter 10 Tracking content with tags and classificationsChapter 11 Applying McAfee DLP protection
McAfee Data Loss Prevention Endpoint 9.3.100 and McAfee Device Control Product Guide 53

Configuration and use
54 McAfee Data Loss Prevention Endpoint 9.3.100 and McAfee Device Control Product Guide

7 Protecting removable media
Device control is the prevention of unauthorized use of removable media devices to prevent dataleaks.
McAfee Data Loss Prevention Endpoint can monitor or block devices — such as smartphones,removable storage devices, Bluetooth devices, MP3 players, non-system hard disks, or Plug and Playdevices — attached to enterprise-managed computers, allowing you to monitor and control their use inthe distribution of sensitive information. For many organizations, this level of data loss prevention isthe primary goal. This is the level of protection provided by McAfee Device Control software, which isthe default implementation of McAfee DLP Endpoint software when first installed.
When McAfee DLP Endpoint blocks the copying of files to removable devices, the copy function issuspended until the scanning is complete. If the file is still being scanned after 3 seconds, a pop-upinforms the user that the file is being scanned. A second pop-up informs the user if the file is blockedor monitored. The feature is enabled with the File Copy Handler option on the Agent Configuration |Miscellaneous tab.
If the File Copy Handler is disabled, or if the file was created on USB with a non-Windows copy function, thelegacy blocking mechanism, that is, scanning the file for policy violations simultaneously with theWindows copy function and immediate deletion if a policy was violated, is applied.
McAfee Device Control is built in three layers:
• Device classes — Group devices that have similar characteristics and can be managed in a similarmanner
• Device definitions — Identify and group devices according to their common properties
• Device Rules — Control the behavior of devices
Device class is one of several parameters that can be specified in a device definition. A device ruleconsists of a list of the device definitions included or excluded from the rule, and the action takenwhen the rule is triggered by content being sent to or from the named device or devices. In addition,it can specify users or user groups included or excluded from the rule.
Contents Categorizing devices with device classes Controlling devices with device definitions Device rules Device parameters
7
McAfee Data Loss Prevention Endpoint 9.3.100 and McAfee Device Control Product Guide 55

Categorizing devices with device classesDevice classes name and identify the devices used by the system. Each class of devices is identified bya name, an (optional) description, and one or more globally unique identifiers (GUIDs).
A device class is a collection of devices that have similar characteristics and that can be managed in asimilar manner. For example, the "Intel® PRO/1000 PL Network Connection" and "Dell wireless 1490Dual Band WLAN Mini-Card" are two devices that belong to the Network Adapter device-class. When youinstall McAfee DLP Endpoint software, you find built-in device classes listed under Device Management |Device Classes. The devices are categorized by status:
• Managed — Specific Plug and Play or removable storage devices, defined by device class, that canbe managed by McAfee DLP Endpoint
• Unmanaged — Device classes not managed by McAfee DLP Endpoint, but whose status can bechanged to Managed by the system administrator
• Unmanageable — Device classes not managed by McAfee DLP Endpoint because attempts tomanage them can affect the managed computer, system health, or efficiency. New classes ofdevices cannot be added to this list
In day-to-day tasks, the system administrator should not tamper with the device classes list becauseimproper use (for example, blocking the managed computer’s hard disk controller) can cause a systemor operating system malfunction.
Instead of editing an existing item to suit the needs of a device protection rule, add a new, user-definedclass to the list.
Use case — changing a device class statusWhen troubleshooting device classes, you might want to change a particular device classstatus temporarily to unmanaged. To change a device class status between managed andunmanaged, right-click on the class icon and select the appropriate status change option.
Define a device classIf a suitable device class does not exist on the pre-defined list, or is not created automatically whennew hardware is installed, a new device class can be created in the McAfee DLP Endpoint PolicyManager software.
7 Protecting removable mediaCategorizing devices with device classes
56 McAfee Data Loss Prevention Endpoint 9.3.100 and McAfee Device Control Product Guide
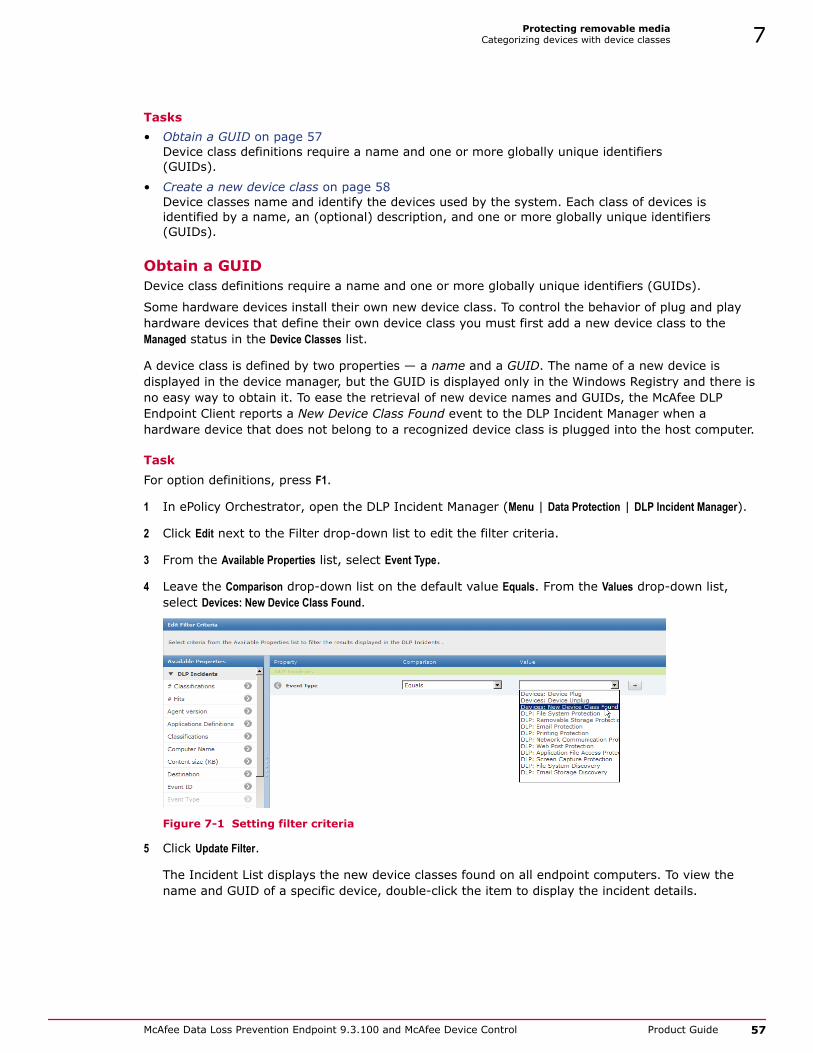
Tasks• Obtain a GUID on page 57
Device class definitions require a name and one or more globally unique identifiers(GUIDs).
• Create a new device class on page 58Device classes name and identify the devices used by the system. Each class of devices isidentified by a name, an (optional) description, and one or more globally unique identifiers(GUIDs).
Obtain a GUIDDevice class definitions require a name and one or more globally unique identifiers (GUIDs).
Some hardware devices install their own new device class. To control the behavior of plug and playhardware devices that define their own device class you must first add a new device class to theManaged status in the Device Classes list.
A device class is defined by two properties — a name and a GUID. The name of a new device isdisplayed in the device manager, but the GUID is displayed only in the Windows Registry and there isno easy way to obtain it. To ease the retrieval of new device names and GUIDs, the McAfee DLPEndpoint Client reports a New Device Class Found event to the DLP Incident Manager when ahardware device that does not belong to a recognized device class is plugged into the host computer.
TaskFor option definitions, press F1.
1 In ePolicy Orchestrator, open the DLP Incident Manager (Menu | Data Protection | DLP Incident Manager).
2 Click Edit next to the Filter drop-down list to edit the filter criteria.
3 From the Available Properties list, select Event Type.
4 Leave the Comparison drop-down list on the default value Equals. From the Values drop-down list,select Devices: New Device Class Found.
Figure 7-1 Setting filter criteria
5 Click Update Filter.
The Incident List displays the new device classes found on all endpoint computers. To view thename and GUID of a specific device, double-click the item to display the incident details.
Protecting removable mediaCategorizing devices with device classes 7
McAfee Data Loss Prevention Endpoint 9.3.100 and McAfee Device Control Product Guide 57

Create a new device classDevice classes name and identify the devices used by the system. Each class of devices is identified bya name, an (optional) description, and one or more globally unique identifiers (GUIDs).
Before you beginObtain the device GUID before beginning this task.
TaskFor option definitions, press F1.
1 In the McAfee DLP Endpoint policy console navigation pane under Device Management, select DeviceClasses.
The available devices appear in the right pane.
2 Right-click in the Device Classes pane and select Add New | Device Class.
A new Device Class icon appears (default name Device Class) in the unmanaged device class section.
3 Double-click the icon.
The edit dialog box appears.
4 Type a name, a description (optional), and the device's globally unique identifier (GUID) in theappropriate text boxes.
A GUID in the correct format is required. The OK button remains unavailable until you enter a GUIDin the correct format.
5 To move the device to Managed status, select the checkbox.
6 Click OK.
Controlling devices with device definitionsDevice definitions serve as filter criteria for controlling devices, providing the advantage of usingportable devices while maintaining the company policy for sensitive information. Built-in definitions forMcAfee Endpoint Encryption for Files and Folders and McAfee Endpoint Encryption for RemovableMedia facilitate the use of those products.
Device definitions control specific devices by fine-tuning the device properties such as the device class,device Product ID/Vendor ID (PID/VID), or USB class code.
Device definition groups can be created as a flexible and accurate way to maintain the required levelof security. They combine a different set of properties for each device needing to be blocked ormonitored by the system. The device definitions and groups are available for three types:
7 Protecting removable mediaControlling devices with device definitions
58 McAfee Data Loss Prevention Endpoint 9.3.100 and McAfee Device Control Product Guide

• Plug and Play devices — Devices that can be added to the managed computer without anyconfiguration or manual installation of dlls and drivers. Plug and Play devices include mostMicrosoft Windows devices. Plug and Play device definitions allow you to manage and control mostavailable devices, for example, Bluetooth, Wi-Fi, and PCMCIA, to prevent such devices from beingloaded by the system.
• Removable Storage devices — External devices containing a file system that appear on themanaged computer as drives
• Fixed Hard Drive devices — Fixed disk drives attached to the computer and not marked by theoperating system as removable storage
Each type of device definition is matched by a device rule type.
Plug and Play device definitions and rules include general device properties. Removable storage devicedefinitions and rules are more flexible and include additional properties related to the removablestorage devices. We recommend using the removable storage device definitions and rules to controldevices that can be classified as either, such as USB mass storage devices.
Removable storage devices
In addition to user-defined removable storage devices, three pre-defined device definitions areincluded: All Removable Storage Devices, Content encrypted by McAfee Endpoint Encryption, and McAfee Encrypted USBDevices. These can be used in removable storage and removable storage file access rules by selectingthe required parameters.
We do not recommend editing the parameter definitions for pre-defined device definitions.
Whitelisted Plug and Play devices
The purpose of whitelisted Plug and Play devices is to deal with those devices that do not handledevice management well, and might cause the system to stop responding or cause other seriousproblems. We recommend adding such devices to the whitelisted device list to avoid compatibilityproblems.
Whitelisted Plug and Play device definitions are added automatically to the "excluded" list in every Plugand Play device rule. They are never managed, even if their parent device class is managed.
If you inspect the device rules, you do not see the whitelist definition because the definition is notadded to the rule until the policy is applied. You do not have to rewrite existing rules to include newwhitelisted devices.
Importing device parametersDevice parameters can be entered from lists saved in CSV format.
A device parameter list can be made by selecting multiple events in the DLP Incident Manager display,then selecting Export Device Incident Parameters from the Actions menu. Lists can also be created manually.
See the online Help for information on formatting the CSV file.
Protecting removable mediaControlling devices with device definitions 7
McAfee Data Loss Prevention Endpoint 9.3.100 and McAfee Device Control Product Guide 59

Create device definitionsWhen you create a device definition with multiple parameters, the parameters defined in eachParameter Name are added to the definition as logical ORs, and multiple Parameter Names are addedas logical ANDs.
For example, the following parameter selection creates the device definition shown below:
Table 7-1 Device definition example
Device definition Selected parameters
Bus Type Firewire; USB
Device Class Memory Devices; Windows Portable Devices
• Bus Type is one of: Firewire (IEEE 1394) OR USB
• AND Device Class is one of Memory Devices OR Windows Portable Devices.
Tasks
• Create a Plug and Play device definition on page 60A Plug and Play device is a device that can be added to the managed computer without anyconfiguration or manual installation of dlls and drivers. Plug and Play device definitionsallow you to manage and control most available devices.
• Create a whitelisted Plug and Play definition on page 61The purpose of whitelisted Plug and Play devices is to deal with those devices that do nothandle device management well, and might cause the system to stop responding or causeother serious problems. We recommend adding such devices to the whitelisted device list toavoid compatibility problems.
• Create a removable storage device definition on page 61A removable storage device is an external device containing a file system that appears onthe managed computer as a drive. Removable storage device definitions are more flexiblethan Plug and Play device definitions, and include additional properties related to thedevices.
• Import device definitions on page 62You can create a device definition by importing parameters from lists saved in CSV format.You can import a new definition from a file, or import a parameter to an existing definition.
• Import a parameter to an existing device definition on page 63Device parameters can be imported from lists saved in CSV format. You can import a newdefinition from a file, or import a parameter to an existing definition.
• Create a device definition group on page 63Device definition groups simplify rules while maintaining granularity by combining severaldevice definitions into one group.
Create a Plug and Play device definitionA Plug and Play device is a device that can be added to the managed computer without anyconfiguration or manual installation of dlls and drivers. Plug and Play device definitions allow you tomanage and control most available devices.
TaskFor option definitions, press F1.
1 In the McAfee DLP Endpoint policy console navigation pane under Device Management, select DeviceDefinitions.
The available device definitions and device definition groups appear in the right-hand pane.
7 Protecting removable mediaControlling devices with device definitions
60 McAfee Data Loss Prevention Endpoint 9.3.100 and McAfee Device Control Product Guide

2 In the Device Definitions pane, right-click and select Add New | Plug and Play Device Definition.
The new Plug and Play Device Definition icon appears.
3 Name the new device definition and double-click the icon.
The edit dialog box appears.
4 Type a description (optional).
5 Select the device parameters from the available list.
6 Click OK.
Create a whitelisted Plug and Play definitionThe purpose of whitelisted Plug and Play devices is to deal with those devices that do not handledevice management well, and might cause the system to stop responding or cause other seriousproblems. We recommend adding such devices to the whitelisted device list to avoid compatibilityproblems.
Whitelisted Plug and Play devices are added automatically to the excluded list in all Plug and Playdevice rules when the policy is applied. They are never managed, even if their parent device class ismanaged.
TaskFor option definitions, press F1.
1 In the McAfee DLP Endpoint policy console navigation pane under Device Management, select DeviceDefinitions.
The available device definitions and device definition groups appear in the right-hand pane.
2 In the Device Definitions pane, right-click and select Add New | Whitelisted Plug and Play Device Definition.
The new Whitelisted Plug and Play Device Definition icon appears.
3 Name the new device definition and double-click the icon.
The edit dialog box appears.
4 Type a description (optional).
5 Select the Parameter Name from the available list.
The Edit the device definition parameter dialog box opens.
6 Click Add New and type in the parameter information.
7 Click OK twice.
Create a removable storage device definitionA removable storage device is an external device containing a file system that appears on themanaged computer as a drive. Removable storage device definitions are more flexible than Plug andPlay device definitions, and include additional properties related to the devices.
Protecting removable mediaControlling devices with device definitions 7
McAfee Data Loss Prevention Endpoint 9.3.100 and McAfee Device Control Product Guide 61

TaskFor option definitions, press F1.
1 In the McAfee DLP Endpoint policy console navigation pane under Device Management, select DeviceDefinitions.
The available device definitions and device definition groups appear in the right-hand pane.
2 In the Device Definitions pane, right-click and select Add New | Removable Storage Device Definition.
The new Removable Storage Device Definition icon appears.
3 Name the new device definition and double-click the icon.
The edit dialog box appears.
4 Type a description (optional).
5 Select the device parameters from the available list.
6 Click OK.
Import device definitionsYou can create a device definition by importing parameters from lists saved in CSV format. You canimport a new definition from a file, or import a parameter to an existing definition.
Before you beginCreate a device parameter list, one comma-separated row per parameter, and save in CSVformat. The list can be made by selecting multiple events from the DLP Incident Managerdisplay and selecting Actions | Export Device Incident Parameters on the context menu. You can alsouse open-source/third party CSV libraries to create the file.
Task1 In the McAfee DLP Endpoint policy console navigation pane under Device Management, select Device
Definitions.
The available device definitions and device definition groups appear in the right-hand pane.
2 In the Device Definitions pane, right-click and select Import from file. Select the type of definition:
• Plug and Play
• Removable storage
3 In the Import From dialog box, navigate to the CSV file and click Open. The parameters are imported tothe new device definition.
If the file contains parameters that do not match the type of device definition selected, for examplea File Volume Serial Number imported into a Plug and Play definition, the definition is ignored andthe import continues. If the format is not correct, the import fails.
4 Name the new device definition and click OK to create it.
7 Protecting removable mediaControlling devices with device definitions
62 McAfee Data Loss Prevention Endpoint 9.3.100 and McAfee Device Control Product Guide

Import a parameter to an existing device definitionDevice parameters can be imported from lists saved in CSV format. You can import a new definitionfrom a file, or import a parameter to an existing definition.
Before you beginCreate a file containing the device definition parameter to import.
Task1 Open an existing device definition by double-clicking on it.
2 Select a parameter to edit. In the parameter definition edit dialog box, click Import.
3 In the Import From dialog box, navigate to a file and click Open. The parameter values are imported tothe parameter definition.
4 Click OK to accept the changes to the device definition.
Create a device definition groupDevice definition groups simplify rules while maintaining granularity by combining several devicedefinitions into one group.
TaskFor option definitions, press F1.
1 In the McAfee DLP Endpoint policy console navigation pane under Device Management, select DeviceDefinitions.
The available device definitions and device definition groups appear in the right-hand pane.
2 In the Device Definitions pane, right-click and select Add New | Plug and Play Device Definition Group or Add New| Removable Storage Device Definition Group.
The new Device Definition Group icon appears.
3 Name the new device definition group and double-click the icon.
The edit dialog box appears.
4 Type a description (optional).
5 Select the relevant Plug and Play device or removable storage device definition entries from theavailable list.
6 Click OK.
Device rulesDevice rules define the action taken when particular devices are used.
There are six types of endpoint device rules:
• Plug and Play Device Rule — Used to block or monitor Plug and Play devices. The user can benotified of the action taken.
• Removable Storage Device Rule — Used to block or monitor removable storage devices, or setas read-only. The user can be notified of the action taken.
Protecting removable mediaDevice rules 7
McAfee Data Loss Prevention Endpoint 9.3.100 and McAfee Device Control Product Guide 63

• Removable Storage File Access Rule — Used to block executables on plug-in devices fromrunning.
• Fixed Hard Drive Rule — Used to block or monitor fixed hard drives, or set as read-only. Theuser can be notified of the action taken. Fixed hard drive device rules do not protect the boot orsystem partition.
• Citrix XenApp Device Rule — Used to block Citrix devices mapped to shared desktop sessions.
• TrueCrypt Device Rule — Used to protect TrueCrypt devices. Can be used to block, monitor, orset to read-only. The user can be notified of the action taken.
Plug and Play device rules
For Plug and Play device rules to control hardware devices, the device classes specified in devicedefinitions used by the rule must be set to Managed status.
Use case — blocking Bluetooth adapters with a Plug and Play device ruleThere are three steps to creating a simple Plug and Play device rule to the use of Bluetoothdevices :
7 Protecting removable mediaDevice rules
64 McAfee Data Loss Prevention Endpoint 9.3.100 and McAfee Device Control Product Guide

1 Verify that the device class for Bluetooth Adapters is a Managed Device Class.
2 Create a device definition that matches the properties of the specific Bluetooth devicesyou want to control.
3 Create a device rule to match the device definition and set the action to Block.
Removable storage device rules
Removable storage device rules do not require a managed device class. The reason is related to thedifference in how the two types of device rules utilize device classes:
Protecting removable mediaDevice rules 7
McAfee Data Loss Prevention Endpoint 9.3.100 and McAfee Device Control Product Guide 65

• Plug and Play device rules are triggered when the hardware device is plugged into the computer.Since the reaction is to a device driver, the device class must be managed for the device to berecognized.
• Removable storage device rules are triggered when a new file system is mounted. When file systemmount occurs, the McAfee DLP Endpoint software associates the drive letter with the specifichardware device and checks the device properties. Since the reaction is to a file system operation,not a device driver, the device class does not need to be managed.
Use case — allow MP3 player as read-onlySince a managed device class is not necessary, removable storage device rules have twobasic steps:
1 Create the device definition.
2 Create the device rule.
Removable storage file access rulesRemovable storage file access rules block removable storage devices from running applications.Because some executables, such as encryption applications on encrypted devices, must be allowed torun, Whitelisted Application definitions can be included in the rule to exempt specifically named filesfrom the blocking rule.
File access rules determine if a file is an executable by its extension. The following extensions areblocked by default: .bat, .cgi, .cmd, .com, .cpl, .dll, .exe, .jar, .msi, .py, .pyc, .scr, .vb, .vbs, .ws,and .wsf. To block files that might be executed from within archives, .cab, .rar, and .zip files are alsoblocked. In addition, you can add any extension you want to the list.
File access rules also block executable files from being copied to removable storage devices because thefile filter driver cannot differentiate between opening and creating an executable.
Citrix XenApp device rulesMcAfee DLP Endpoint software can block Citrix devices mapped to shared desktop sessions. Floppydisks, fixed, CD, removable, and network drives can all be blocked, as well as printers and clipboardredirection. The rule can be filtered by adding user assignment groups.
Rules are assigned using computer assignment groups (Menu | Systems | System Tree | Assigned Policies) toCitrix servers. In the System Tree, a new DLP User Sessions tab has been added to the SystemInformation page to view the user sessions and the rules that are applied to each session.
TrueCrypt device rulesTrueCrypt device rules are used to block or monitor TrueCrypt virtual encryption devices, or set themto read-only. TrueCrypt rules are a subset of removable storage device rules.
TrueCrypt devices can also be protected with removable storage protection rules. See Controllingsensitive content with protection rules in this Guide for using protection rules with TrueCrypt devices.
McAfee DLP Endpoint client software treats all TrueCrypt mounts as removable storage, even when theTrueCrypt application is writing to the local disk.
Create and define device rulesDevice rules assign actions to device definitions.Use these tasks to create and define device rules.
7 Protecting removable mediaDevice rules
66 McAfee Data Loss Prevention Endpoint 9.3.100 and McAfee Device Control Product Guide

Tasks• Create and define a Plug and Play device rule on page 67
Plug and Play device definitions are incorporated into Plug and Play device rules to controldevices.
• Create and define a removable storage device rule on page 68Removable storage device rules are the recommend way of blocking USB devices.
• Create and define a removable storage file access rule on page 68File access rules block removable storage media from running applications. Whitelistedapplication definitions specified in step 2 provide lists of specific files that are exempt fromthe blocking rule.
• Create and define a fixed hard drive device rule on page 69Fixed hard drive device rules control the copying of sensitive information to local fixeddrives, and can set fixed drives to read-only. Dynamic drives are not supported.
• Create and define a Citrix XenApp device rule on page 69Citrix XenApp device rules block floppy, CD, fixed, or network drives running in Citrixdesktop sessions.
• Create a whitelisted application definition on page 70Whitelisted application definitions are used in removable storage file access rules to exemptspecifically named files from being blocked.
Create and define a Plug and Play device rulePlug and Play device definitions are incorporated into Plug and Play device rules to control devices.
TaskFor option definitions, press F1.
1 In the McAfee DLP Endpoint policy console navigation pane select Device Management | Device Rules.
The available device management rules appear in the right-hand pane.
2 In the Device Rules pane, right-click and select Add New | Plug and Play Device Rule.
You can use the Plug and Play device blocking rule to block USB devices, but we recommend usingthe removable storage device blocking rule instead. Using the Plug and Play device blocking rule canresult in blocking the entire USB hub/controller. The removable storage device blocking rule allowsthe device to initialize and register with the operating system. It also allows you to define the deviceas read-only.
3 Rename the new device rule and double-click the icon. Follow these steps in the wizard.Step Action
1 of 3 Select a Plug and Play device definition or definitions or group from theavailable list. You can include or exclude definitions. Click Add item to create anew Plug and Play definition. Click Add group to create a new Plug and Playgroup. When you have finished, click Next.
2 of 3 Select actions from the available list. By default, selecting an action selectsboth Online and Offline. Deselect either as required. If you select Monitor, clickSeverity to modify the value. If you select Notify User, click Change default alert tomodify the alert message, URL, or link text.
3 of 3 (optional) Select an assignment group or groups, or define a new group by clicking Add.Click Finish.
4 To activate the rule, right-click the rule icon and click Enable.
Protecting removable mediaDevice rules 7
McAfee Data Loss Prevention Endpoint 9.3.100 and McAfee Device Control Product Guide 67

Create and define a removable storage device ruleRemovable storage device rules are the recommend way of blocking USB devices.
TrueCrypt device rules are a essentially a subset of removable storage device rules, with the devicedefinition preset in the rule so that only two steps are required to define a rule.
TaskFor option definitions, press F1.
1 In the McAfee DLP Endpoint policy console navigation pane select Device Management | Device Rules.
The available device management rules appear in the right-hand pane.
2 In the Device Rules pane, right-click and select Add New | Removable Storage Device Rule.
We recommend using the removable storage device blocking rule to block USB devices. While it ispossible to use a Plug and Play device blocking rule, this can result in blocking the entire USB hub/controller. The removable storage device blocking rule allows the device to initialize and register withthe operating system. It also allows you to define the device as read-only.
3 Rename the new device rule and double-click the icon. Follow these steps in the wizard:Step Action
1 of 3 Select a removable storage device definition or definitions or group from theavailable list. You may include or exclude definitions. Click Add item to create anew removable storage device definition. Click Add group to create a newremovable storage device group. When you have finished, click Next.
2 of 3 Select actions from the available list. By default, selecting an action selectsboth Online and Offline. Deselect either as required. If you select Monitor, clickSeverity to modify the value. If you select Notify User, click Change default alert tomodify the alert message, URL, or link text. Click Next.
3 of 3 (optional) Select an assignment group or groups, or define a new group by clicking Add.Click Finish.
4 To activate the rule, right-click the rule icon and select Enable.
Create and define a removable storage file access ruleFile access rules block removable storage media from running applications. Whitelisted applicationdefinitions specified in step 2 provide lists of specific files that are exempt from the blocking rule.
TaskFor option definitions, press F1.
1 In the McAfee DLP Endpoint policy console navigation pane under Device Management, select DeviceRules.
The available device management rules appear in the right-hand pane.
2 In the Device Rules pane, right-click and select Add New | Removable Storage File Access Rule.
7 Protecting removable mediaDevice rules
68 McAfee Data Loss Prevention Endpoint 9.3.100 and McAfee Device Control Product Guide

3 Rename the new device rule and double-click the icon. Follow these steps in the wizard:Step Action
Step 1 of 4 Select a removable storage device definition or definitions or group from theavailable list. You may include or exclude definitions. Click Add item to create a newremovable storage device definition. Click Add group to create a new removablestorage device group. When you have finished, click Next.
Step 2 of 4 Select the Select from list option, then select file extensions from the available list. ClickNext.
Step 3 of 4 Select a whitelisted application or applications from the available list. Click Add tocreate a new whitelisted application definition or Edit to modify an existing definition.When you have finished, click Next.
Step 4 of 4 Select an assignment group or groups, or define a new group by clicking Add. ClickFinish.
4 To activate the rule, right-click the rule icon and click Enable.
Create and define a fixed hard drive device ruleFixed hard drive device rules control the copying of sensitive information to local fixed drives, and canset fixed drives to read-only. Dynamic drives are not supported.
System and boot drives are always excluded from fixed hard disk device rules.
TaskFor option definitions, press F1.
1 In the McAfee DLP Endpoint policy console navigation pane select Device Management | Device Rules.
The available device management rules appear in the right-hand pane.
2 In the Device Rules pane, right-click and select Add New | Fixed Hard Drive Rule.
3 Rename the new device rule and double-click the icon. Follow these steps in the wizard.Step Action
1 of 3 Select a Fixed Hard Drive device definition or definitions or group from theavailable list. You can include or exclude definitions. Click Add item to create anew definition. Click Add group to create a new group. When you have finished,click Next.
2 of 3 Select actions from the available list. By default, selecting an action selectsboth Online and Offline. Deselect either as required. If you select Monitor, clickSeverity to modify the value. If you select Notify User, click Change default alert tomodify the alert message, URL, or link text.
3 of 3 (optional) Select an assignment group or groups, or define a new group by clicking Add.Click Finish.
4 To activate the rule, right-click the rule icon and click Enable.
Create and define a Citrix XenApp device ruleCitrix XenApp device rules block floppy, CD, fixed, or network drives running in Citrix desktopsessions.
Citrix XenApp device rules cannot be used with organizational units (OUs). If a User Assignment Group(UAG) is chosen that contains an OU, the rule is not enabled.
Protecting removable mediaDevice rules 7
McAfee Data Loss Prevention Endpoint 9.3.100 and McAfee Device Control Product Guide 69

TaskFor option definitions, press F1.
1 In the McAfee DLP Endpoint policy console navigation pane select Device Management | Device Rules.
The available device management rules appear in the right-hand pane.
2 In the Device Rules pane, right-click and select Add New | Citrix XenApp Device Rule.
3 Rename the new device rule (optional) and double-click the icon. Follow these steps in the wizard.Step Action
1 of 2 Select the storage devices you want to block. When you have finished, clickNext.
2 of 2 (optional) Select an assignment group or groups, or define a new group by clicking Add.Click Finish.
4 To activate the rule, right-click the rule icon and click Enable.
Create a whitelisted application definitionWhitelisted application definitions are used in removable storage file access rules to exemptspecifically named files from being blocked.
TaskFor option definitions, press the F1 key.
1 In the McAfee DLP Endpoint policy console navigation pane under Device Management, select WhitelistedApplications.
The available whitelisted applications appear in the right-hand pane.
2 Right-click in the Whitelisted Applications pane and select Add New | Whitelisted Application.
A new whitelisted application icon appears.
3 Double-click the icon.
The edit dialog box appears.
4 Type a name, a description (optional), and the file name of the executable you want to allow to runin the appropriate text boxes.
5 Click Add to add the file name to the list. Repeat typing and adding file names as required.
6 When you have finished adding file names, click Save.
Device parametersDevice parameters are used to define device definitions
The following table provides definitions for all parameters used in device definitions. It indicates whichtype of device the parameter is found in and whether it can be imported as a list from a file (seeDevice definition parameter management.)
7 Protecting removable mediaDevice parameters
70 McAfee Data Loss Prevention Endpoint 9.3.100 and McAfee Device Control Product Guide

Table 7-2 Device definitions for Plug and Play and removable storage devices
Parametername
Foundin...
Importparameters
Description
Bus Type All Yes Selects the device BUS type from the available list(Bluetooth, Firewire (IEEE1394), IDE/SATA, PCI, PCMIA,SCSI, USB).
CD/DVDDrives
RS only No Select to indicate any CD or DVD drive.
Contentencrypted byMcAfeeEndpointEncryption forFiles andFolders
RS only No Select to indicate a device protected with McAfee EndpointEncryption for Files and Folders.
Device Class PnP only No Selects the device class from the available managed list.
DeviceCompatibleIDs
All Yes A list of physical device descriptions. Effective especiallywith device types other than USB and PCI, which are moreeasily identified using PCI VendorID/DeviceID or USB PID/VID.
DeviceInstance ID (MicrosoftWindows XP)DeviceInstance Path(WindowsVista and laterMicrosoftWindowsoperatingsystems,includingservers)
All Yes A Windows-generated string that uniquely identifies thedevice in the system. For example, USB\VID_0930&PID_6533\5&26450FC&0&6.
Device Name All Yes The name attached to a hardware device, representing itsphysical address.
File SystemType
RS andHarddisk
No The type of file system. For hard disks, select one of exFAT,FAT16, FAT32, or NTFS. For removable storage devices, anyof the above plus CDFS or UDFS.
File SystemAccess
RS only No The access to the file system: read only or read-write.
File SystemVolume Label
RS andHarddisk
Yes The user-defined volume label, viewable in WindowsExplorer. Partial matching is allowed.
File SystemVolume SerialNumber
RS andHarddisk
Yes A 32-bit number generated automatically when a filesystem is created on the device. It can be viewed byrunning the command line command dir x:, where x: isthe drive letter.
PCIVendorID /DeviceID
All Yes The PCI VendorID and DeviceID are embedded in the PCIdevice. These parameters can be obtained from theHardware ID string of physical devices, for example, PCI\VEN_8086&DEV_2580&SUBSYS_00000000&REV_04.
TrueCryptdevices
RS only No Select to specify a TrueCrypt device.
Protecting removable mediaDevice parameters 7
McAfee Data Loss Prevention Endpoint 9.3.100 and McAfee Device Control Product Guide 71

Table 7-2 Device definitions for Plug and Play and removable storage devices (continued)
Parametername
Foundin...
Importparameters
Description
USB ClassCode
PnP only No Identifies a physical USB device by its general function.Select the class code from the available list.
USB DeviceSerial Number
RS andPnP
Yes A unique alphanumeric string assigned by the USB devicemanufacturer, typically for removable storage devices. Theserial number is the last part of the instance ID; forexample, USB\VID_3538&PID_0042\00000000002CD8.A validserial number must have a minimum of 5 alphanumericcharacters and must not contain ampersands (&). If thelast part of the instance ID does not follow theserequirements, it is not a serial number.
USB VendorID / ProductID
RS andPnP
Yes The USB VendorID and ProductID are embedded in the USBdevice. These parameters can be obtained from theHardware ID string of physical devices, for example: USB\Vid_3538&Pid_0042.
7 Protecting removable mediaDevice parameters
72 McAfee Data Loss Prevention Endpoint 9.3.100 and McAfee Device Control Product Guide

8 Configuring system components
System components can be customized to best fit the needs of your enterprise. By configuring theagent and system options, you can optimize the system to safeguard sensitive enterprise informationefficiently.
You can configure and fine-tune these options and components:
• Agent configuration — Sends the McAfee DLP Endpoint client software all relevant informationabout event storage locations, customized user notifications, whitelisted content limitations andlocations, file tracing parameters, Microsoft Outlook logon settings, and agent module selections
• System options — Allows you to set the policy analyzer settings, system logging options, andsystem report printing options
Contents Agent configuration Configure Safe Mode operation
Agent configurationThe McAfee DLP Endpoint client software for McAfee Agent resides on enterprise computers andexecutes the defined policy. The software also monitors user activities involving sensitive content.Agent configuration is stored in the policy, which is deployed to managed computers.
To define the behavior of McAfee DLP Endpoint software and other system components on managedcomputers, click Agent Configuration on the McAfee DLP Endpoint policy console toolbar. The configurationis stored in the policy, which is deployed to managed computers by ePolicy Orchestrator. If theconfiguration is updated, the policy needs to be redeployed.
To configure the client software for full protection in Safe Mode, set the functionality in the AgentConfiguration | Advanced Configuration tab. This option is disabled by default.
Agent Service WatchDog
To maintain normal operation of McAfee DLP Endpoint software even in the event of maliciousinterference, McAfee DLP Endpoint runs a protective service called the Agent Service WatchDog(ASWD). This service monitors the McAfee DLP Endpoint software, and restarts it if it stops running forany reason. ASWD is enabled by default. If you want to verify that ASWD is running, look in theMicrosoft Windows Task Manager processes for a service named fcagswd.exe.
8
McAfee Data Loss Prevention Endpoint 9.3.100 and McAfee Device Control Product Guide 73

Apply the global agent configurationGlobal agent configuration is applied from the McAfee DLP Endpoint policy console.
Task• From the McAfee DLP Endpoint policy console menu bar, select Agent Configuration | Apply Global Agent
Configuration.
The Agent Configuration progress bar window appears as the configuration is applied to ePolicyOrchestrator.
Import the global agent configurationImporting the global agent configuration is performed from the McAfee DLP Endpoint policy console.
TaskFor option definitions, click ? in the interface.
1 Select Agent Configuration | Import Global Agent Configuration from ePO.
2 Click Yes to confirm.
Reset the Agent Configuration valuesAgent Configuration values are set from the McAfee DLP Endpoint policy console.
Task1 From the Agent Configuration menu, select Reset Agent Configuration values.
2 Click Yes to restore default settings.
Configure Safe Mode operationMcAfee DLP Endpoint software is fully functional when the computer is started in Safe Mode.Functionality is disabled by default, but can be activated in the Agent Configuration | Advanced Configurationtab.
An administrative event, User Logged Into Safe Mode, can be displayed in the DLP Operational Eventsconsole by selecting an option in the Agent Configuration | Events and Logging tab.
TaskFor option definitions, press F1.
1 From the McAfee DLP Endpoint policy console, select Agent Configuration | Edit Global Agent Configuration.
2 Click the Advanced Configuration tab.
3 Select Activate DLP full functionality in safe mode and change the setting to Enabled.
Full McAfee DLP Endpoint functionality is now available in Safe Mode, not just the Watch Dog, as inprevious versions. There is a recovery mechanism in case McAfee DLP Endpoint is the cause of theboot failure.
4 Click OK.
8 Configuring system componentsConfigure Safe Mode operation
74 McAfee Data Loss Prevention Endpoint 9.3.100 and McAfee Device Control Product Guide

9 Classifying sensitive content
McAfee DLP Endpoint software gives you several ways of classifying sensitive content. The differentclassifications help you create granular tagging and protection rules to control different content indifferent ways.
Contents Classifying by content Classifying by file location Classifying by file destination Classification in use Classification rules
Classifying by contentDocuments can be classified by defining the sensitive content you need to protect, or by documentproperties.
Using dictionaries to classify contentA dictionary is a collection of keywords or key phrases where each entry is assigned a weight. Contentclassification rules use specified dictionaries to classify a document if a defined threshold (total weight)is exceeded, that is, if enough words from the dictionary appear in the document.
The difference between a dictionary entry and a string in a text pattern definition is the assignedweight. A string text pattern tagging rule always tags the document if the phrase is present. Adictionary tagging rule gives you more flexibility because you can set a threshold, which makes therule relative. The assigned weights can be negative or positive, which allows you to look for words orphrases in the presence of other words or phrases.
In addition to the ability to create your own dictionaries, McAfee DLP Endpoint software comes withseveral built-in dictionaries with terms commonly used in health, banking, finance, and otherindustries.
Dictionaries can be created (and edited) manually or by copying and pasting from other documents.
Limitations
This section describes the design of the dictionary feature and some limitations this design entails.Dictionaries are saved in Unicode (UTF-8), and therefore can be written in any language. The followingdescriptions are specifically for dictionaries written in English. Other languages should behave in asimilar manner, but there may be unforeseen problems in certain languages.
9
McAfee Data Loss Prevention Endpoint 9.3.100 and McAfee Device Control Product Guide 75

Dictionary matching has the following characteristics:
• It is not case-sensitive.
• It can optionally match substrings or whole phrases.
• It matches phrases including spaces.
If substring matching is specified you should use caution when entering short words because of thepotential of false positives. For example, a dictionary entry of "cat" would flag both "cataracts" and"duplicate." To prevent false positives of this type, use the whole phrase matching option, or usestatistically improbable phrases (SIPs) to give the best results. Another source of false positives issimilar entries. For example, in some HIPAA disease lists, both "celiac" and "celiac disease" appear asseparate entries. If the second term appears in a document, and substring matching is specified, itgets two hits — one for each entry — skewing the total score.
Create a dictionaryDictionary definitions are used to define content classification rules.
TaskFor option definitions, press F1.
1 In the McAfee DLP Endpoint policy console navigation pane under Content Based Definitions, selectDictionaries.
The available dictionaries appear in the right-hand pane.
2 In the Dictionaries window, right-click and select Add New | Dictionary.
A new Dictionary icon appears.
3 Name the new dictionary and double-click the icon.
4 (Optional) Enter an optional description.
5 To create a new entry:
• Click Add to create a new text box. Type the new word or phrase in the text box.
The default weight is added as "1".
• To change the default weight, select the number and edit.
6 If you want to import entries from other documents:
• Single entry — Click Import Entries
• Multiple entries — Set up a source document with one entry per line separated by a singlecarriage return
A text window opens that allows you to copy and paste entries. The text window is limited to10,000 lines of 50 characters per line.
7 Select the Count multiple entries checkbox to have each appearance of a term contribute to the totalscore.
Default behavior is for a term to be counted only once, no matter how many times it appears in thedocument.
8 Deselect the Match whole phrase only option if you want to match substrings.
Default behavior is to match whole phrases only because this tends to reduce false positives.
9 Classifying sensitive contentClassifying by content
76 McAfee Data Loss Prevention Endpoint 9.3.100 and McAfee Device Control Product Guide

Classifying content with document properties or file extensionsDocument property definitions classify content by predefined metadata values. File extensiondefinitions classify content by filename extension.
Document properties
Document properties can be retrieved from any Microsoft Office document. They are used in protectionrules as well as discovery rules. The Date Created property has both exact and relative date options(document is stored more than X days.)
For most properties, partial matching is permitted. This feature appears in the McAfee Device Controlversion of the software, where it is an optional filter in removable storage protection rules, as well asthe full McAfee DLP Endpoint version. It is also included as a tab in the template synchronizationwizard. There are three types of document properties:
• Predefined properties — Standard properties such as author and title.
• User defined properties — Custom properties added to the document metadata allowed by someapplications such as Microsoft Word. A user defined property can also reference a standarddocument property that is not on the predefined properties list, but cannot duplicate a propertythat is on the list.
• Any property — Allows defining a property by value alone. This feature is useful in cases wherethe keyword has been entered in the wrong property parameter or when the property name isunknown. For example, adding the value Secret to the Any property parameter classifies alldocuments that have the word Secret in at least one property.
The Filename document property is applicable to all file types, not just Microsoft Office documents. It isexact match by default, but can be set to partial match.
File extensions
File extension definitions are used in protection, discovery, and tagging rules to increase granularity. Apredefined list of extensions is included, and new definitions can be added. File extension groups canbe used to simplify rules by defining, for example, all graphic file formats as a single definition.
Text pattern definitionsTagging rules and content classification rules use text patterns to classify data according to specificwords or patterns. They can identify known strings, such as Company Classified or Internal Use Only,or regular expressions (Regex), which allow complex pattern matching, such as in social securitynumbers or credit card numbers.
Regex text patterns begin and end with \b by default. This is the standard Regex notation for wordseparation. Thus, text pattern matching is now, by default, whole-word matching to reduce falsepositives.
Text patterns can include a validator — an algorithm used to test regular expressions. Use of theproper validator can also significantly reduce false positives.
Text patterns can be marked as sensitive. Files containing sensitive patterns are encrypted in hithighlighted evidence.
If multiple text patterns are used for matching similar content, text pattern groups can be used toassociate multiple patterns to a single group. This simplifies the creation of content categories if youdefined many text patterns.
If both an included pattern and an excluded pattern are specified, the excluded pattern has priority.This allows you to specify a general rule and add exceptions to it without rewriting the general rule.
Classifying sensitive contentClassifying by content 9
McAfee Data Loss Prevention Endpoint 9.3.100 and McAfee Device Control Product Guide 77

Classifying content with text patternsText patterns can be used as individual definitions or as text pattern groups. McAfee DLP Endpointsoftware has a feature that tests text patterns for accuracy before they are used.
Use these tasks to classify content with text patterns.
Tasks• Create a text pattern on page 78
Text patterns can be used to define content classification rules. A text pattern definition canconsist of a single pattern or a combination of included and excluded patterns.
• Test a text pattern on page 80Before using a text pattern in a rule you should test it to see that it identifies the text youwant and does not give false positives.
• Create a text pattern group on page 81Text pattern groups can be created from existing text patterns. Using text pattern groupssimplifies rules when multiple text patterns are required while maintaining the granularityof separate text patterns.
Create a text patternText patterns can be used to define content classification rules. A text pattern definition can consist ofa single pattern or a combination of included and excluded patterns.
Many, but not all, text patterns are defined using regular expressions (regex). A discussion of regex isbeyond the scope of this document. There are a number of regex tutorials on the Internet where youcan learn more about this subject.
TaskFor option definitions, press F1.
1 In the McAfee DLP Endpoint policy console navigation pane under Content Based Definitions, select TextPatterns.
The available text patterns appear in the right-hand pane.
2 In the Text Patterns window, right-click and select Add New | Text Pattern.
A new text patterns icon appears.
9 Classifying sensitive contentClassifying by content
78 McAfee Data Loss Prevention Endpoint 9.3.100 and McAfee Device Control Product Guide

3 Name the new text pattern and double-click the icon.
Figure 9-1 Text pattern dialog box
4 Add a description (optional).
5 Under Included Patterns, do the following:
a Select the pattern recognition method (All or Any patterns).
b Click Add to define the new pattern, then type the text string.
If you have text patterns stored in an external document, you can copy-paste them into thedefinition with Import Entries.
c Select Is Regex if the string is a regular expression.
d If you select Is Regex, select an appropriate validator (optional). The default is No Validation.
e Under Threshold, type the number of times the pattern must be found in the data for it to beconsidered a match. For example, finding one credit card in an email may be acceptable, butadding a threshold of 5 requires five or more matches of the credit card pattern.
6 Under Excluded Patterns, do the following:
a Click Add to add an exclusion pattern, then type the text strings that, when found, are ignoredby the system.
b Select Is Regex if the string is a regular expression.
c If you select Is Regex, select an appropriate validator (optional). The default is No Validation.
Classifying sensitive contentClassifying by content 9
McAfee Data Loss Prevention Endpoint 9.3.100 and McAfee Device Control Product Guide 79

d Under Threshold, add the number of times the pattern must be found to be considered a match.
e Click OK.
Test a text patternBefore using a text pattern in a rule you should test it to see that it identifies the text you want anddoes not give false positives.
Before you beginCreate a new text pattern definition, or add a new item to an existing definition. You do nothave to save the definition before testing.
TaskFor option definitions, press F1.
1 In the text pattern definition, click the Edit button ( ) of the item to be tested. The test dialog boxappears with the search text or regular expression in the Pattern: text box.
2 If applicable, select the Regular expression checkbox and select a validation method from thedrop-down list.
3 Type some test patterns in the Test text box and click Check. The matches and validated matches aredisplayed.
Figure 9-2 Testing a credit card pattern
If you make any changes or additions to the text in the Test box, you must click Check again toretest.
4 If results are unacceptable, modify the text pattern and retest. When you click OK the text patternin the definition is modified to match the last pattern you tested.
9 Classifying sensitive contentClassifying by content
80 McAfee Data Loss Prevention Endpoint 9.3.100 and McAfee Device Control Product Guide

Create a text pattern groupText pattern groups can be created from existing text patterns. Using text pattern groups simplifiesrules when multiple text patterns are required while maintaining the granularity of separate textpatterns.
TaskFor option definitions, press F1.
1 In the McAfee DLP Endpoint policy console navigation pane under Content Based Definitions, select TextPattern.
The available text patterns and groups appear in the right-hand pane.
2 In the Text Patterns window, right-click and select Add New | Text Pattern Group.
The new Text Pattern Group icon appears.
3 Double-click the icon.
The edit window appears.
4 Name the new text pattern group.
5 Type a description (optional).
6 Select the text patterns from the available list.
7 Click OK.
Integrate Titus Message Classification software with text patterns Specific text patterns are required to define an email protection rule that recognizes Titusclassifications.
Before you beginIntegration is enabled or disabled in the Agent Configuration | Advanced Configuration tab.
Titus Message Classification for Microsoft Outlook is a widely used email solution that ensures everyemail is classified and protectively marked before it is sent. McAfee DLP Endpoint software canintegrate with Titus and block emails based on Titus classifications.
The McAfee DLP Endpoint client software determines if an email has been classified by Titus (to reducefalse positives), and what the classification is. You use both of these strings to define the protectionrule.
Classifying sensitive contentClassifying by content 9
McAfee Data Loss Prevention Endpoint 9.3.100 and McAfee Device Control Product Guide 81

TaskFor option definitions, press F1.
1 In the McAfee DLP Endpoint policy console navigation pane under Text Patterns, create the textpattern TLPropertyRoot=[Organization Name].
The Organization Name must match the name from the Titus Message Classification AdministrationTool License Info page.
This is the string used to reduce false positives.
For example, for the McAfee implementation of Titus Message Classification, we create the textpattern:
2 Create the text pattern Classification=[Titus classification].
For example, if you want to block emails based on the Titus classification Confidential, create thetext pattern Classification=Confidential.
Repeat this step, creating a text pattern for each Titus classification you want to add to the emailprotection rule.
You can combine the text patterns into a text pattern group.
3 Define a classification rule using the text patterns or text pattern group with the Titus strings.
McAfee DLP Endpoint client considers the Titus classification to be part of the body, so you canselect Scan body in step 3 of the Content Classification Rule wizard.
The rule creates a content category based on the Titus classification, if you have not alreadycreated one.
4 Include the content category in the email protection rule (step 2 of the Email Protection Rule wizard).
WhitelistThe whitelist is a shared folder containing files that McAfee DLP Endpoint software references whentagging or categorizing data. The files define text that is ignored by the McAfee DLP Endpoint trackingmechanism. This allows users to distribute standard content that would otherwise be tagged orcategorized and restricted by the system.
A typical use for the whitelist is to define text that is often added to documents, such as a disclaimer,license and trademark attributions, or copyright notes.
9 Classifying sensitive contentClassifying by content
82 McAfee Data Loss Prevention Endpoint 9.3.100 and McAfee Device Control Product Guide

To use the whitelist, a file share must be created with read-only access by the group domaincomputers. See the Installation Guide for instructions. The file share must be defined in the agentconfiguration options.
Each file in the whitelist folder must contain at least 400 characters for it to be ignored by the system.
If a file contains both tagged or categorized data and whitelisted data, it is not ignored bythe system. However, all relevant tags and content categories associated with the contentremain in effect.
Some files in the whitelist folder might not be added to the policy distribution because ofconfiguration. These files are listed in the Warning tab when you select Tools | Run PolicyAnalyzer .
Add new whitelist contentTo save time parsing documents, place standard text such as disclaimers in the whitelist folder.
TaskFor option definitions, click ? in the interface.
1 Create a file containing only the text you want to add to the whitelist, and copy it to the Whitelistfolder.
2 In the McAfee DLP Endpoint policy console navigation pane under Definitions, select Whitelist. Theavailable whitelist files appear in the right-hand pane.
3 Right-click in the Whitelist window and click Refresh. The window is updated with the latest list of files.
Delete whitelist filesContent that is no longer relevant should be removed from the whitelist folder.
TaskFor option definitions, click ? in the interface.
1 In the McAfee DLP Endpoint policy console navigation pane under Definitions, select Whitelist. Theavailable whitelist files appear in the right-hand pane.
2 Select the file to remove from the whitelist folder, right-click, and select Delete.
3 Click Yes to confirm the deletion.
4 Click OK.
Classifying by file locationSensitive content can be can be defined by where it is located (stored) or by where it is used (fileextension or application).McAfee DLP Endpoint uses several methods to locate and classify sensitive content. Data-at-rest is theterm used to describe file locations. It classifies content by asking questions like "where is it in thenetwork?" or "which folder is it in?" Data-in-use is the term used to define content by how or where itis used. It classifies content by asking questions like "which application called it?" or "what is the fileextension?"
McAfee DLP Discover finds your data-at-rest. It can search for content in endpoint computer files oremail storage (PST, mapped PST, and OST) files.
Classifying sensitive contentClassifying by file location 9
McAfee Data Loss Prevention Endpoint 9.3.100 and McAfee Device Control Product Guide 83

Contents How discovery scanning works Defining network file shares Defining network parameters Defining registered document repositories
How discovery scanning worksMcAfee DLP Discover scans are used to locate data-at-rest. There are currently two versions of theDiscover software: network and endpoint. This document describes the endpoint version.
McAfee DLP Discover is a crawler that runs on client computers. When it finds predefined content, itcan monitor, quarantine, tag, or apply an RM policy to the files containing that content. McAfee DLPDiscover can scan computer files or email storage (PST, mapped PST, and OST) files. Email storagefiles are cached on a per-user basis.
To use McAfee DLP Discover, you must activate the discovery modules in the Agent Configuration |Miscellaneous tab.
Figure 9-3 Discovery options on the Miscellaneous tab
At the end of each discovery scan, the McAfee DLP Endpoint client sends a Discovery Summary eventto the DLP Operational Events console in ePolicy Orchestrator to log the details of the scan. The eventincludes an evidence file that lists the files that could not be scanned and the reason for not scanningeach of these files. To use this feature, you must enable the Discovery Summary Report on the AgentConfiguration | Events and Logging tab.
When can you search?
Scheduling is set in the Agent Configuration dialog box. You can run a scan at a specific time daily,or on specified days of the week or month. You can specify start and stop dates, or run a scan whenthe McAfee DLP Endpoint configuration is enforced. You can suspend a scan when the computer's CPUor RAM exceed a specified limit.
If you change the discovery policy while an endpoint scan is running, rules and schedule parameterswill change immediately. Changes to which parameters are enabled or disabled will take effect with thenext scan. If the computer is restarted while a scan is running, the scan continues where it left off.
What content can be discovered?
There are two ways to define sensitive content.
9 Classifying sensitive contentClassifying by file location
84 McAfee Data Loss Prevention Endpoint 9.3.100 and McAfee Device Control Product Guide

• Using tags or content categories. Categories match specific text patterns, dictionaries, or registereddocuments repositories to the files. Tags define files in specified locations or produced withspecified applications.
If no tag or category is defined, a document property is required. The new document propertyfilename allows this option for any file type, not just Microsoft Office files.
• Using file context. You can specify file types, file extensions, document properties, encryption type,and user assignment in the discovery rule.
What happens to discovered files with sensitive content?
You can apply RM protection (file system discovery only), encrypt, monitor, quarantine, or tag thefiles. RM protection, encryption, and quarantine are mutually exclusive. Monitoring and tagging can beadded to other actions. When you monitor, you can also choose to store evidence.
A setting in the Tools | Options | General tab allows you to delete files instead of quarantining them. Thisoption was requested by a specific customer. For general use, we do not recommend using this option.
Find content with the McAfee DLP Discover crawlerUse these tasks to set up and run the discovery crawler.
There are three steps to running the discovery crawler. They can be done in any order.
• Create and define a discovery rule.
• Set up the scan parameters.
• Set the scheduling.
Tasks• Create and define a file system discovery rule on page 85
File system discovery rules define the content the McAfee DLP Discover crawler searchesfor, and what to do when this content is found.
• Create and define an email storage discovery rule on page 87McAfee DLP Discover can find sensitive content in email storage (PST, mapped PST, andOST) files. The crawler scans email items (body and attachments), calendar items, andtasks. It does not scan public folders or sticky notes. Actions are limited to Monitor,Quarantine, Store Evidence, and Tag.
• Set up a McAfee DLP Discover scan on page 88McAfee DLP Discover scans are first defined, then scheduled, using the Agent Configurationmenu.
• Schedule a McAfee DLP Discover scan on page 89McAfee DLP Discover scans are first defined, then scheduled, using the Agent Configurationmenu.
• Restore quarantined files or email items on page 90When McAfee DLP Endpoint discovery finds sensitive content, it moves the affected files oremail items into a quarantine folder, replacing them with placeholders that notify users thattheir files or emails have been quarantined. The quarantined files and email items are alsoencrypted to prevent unauthorized use.
Create and define a file system discovery ruleFile system discovery rules define the content the McAfee DLP Discover crawler searches for, and whatto do when this content is found.
Changes to a discovery rule take effect as soon as the policy is deployed. Even if a scan is in progress,a new rule takes effect immediately.
Classifying sensitive contentClassifying by file location 9
McAfee Data Loss Prevention Endpoint 9.3.100 and McAfee Device Control Product Guide 85

You can specify a document property instead of a tag or content category. Either is valid. A new actionallows matched files to be tagged. Tagging is additive to other selected actions.
When excluding tags or content categories in discovery rules, the exclude rule works relative to theinclude rule. You must include at least one tag or content category to exclude any other tags or contentcategories.
TaskFor option definitions, press F1.
1 In the McAfee DLP Endpoint policy console navigation pane, select Content Protection | Discovery Rules.
The available discovery rules appear in the right-hand pane.
2 In the Discovery Rules pane, right-click and select Add New | File System Discovery Rule.
3 Rename the rule to something that will help you recognize its specific function.
4 Double-click the rule icon and follow these steps in the wizard:Step Action
1 of 7(optional)
Select the Select from list option, then select file types from the available list. Use theOther File Types option to select unlisted (unknown) file types. Click Next.
2 of 7(optional)
Select the Select from list option, then select file extensions from the available list.Default exclusionsare: .avi, .bmp, .exe, .gif, .jar, .jpeg, .jpg, .mkv, .ico, .mp3, .mpeg, .png, .mov, .tif,and .tiff. Click Next.
3 of 7(required*)
Select tags, content categories, and groups to be included or excluded from therule. Click Add item to create a new tag or content category. Click Add group to createa new tag and content category group. Click Next.
4 of 7(required*)
Select an existing document property definition or group by selecting one of thecheck boxes to indicate whether the definition is included or excluded. Click Add itemto create a new document property definition, or Add group to create a new group.Click Next.
5 of 7(optional)
Select the Select from list option, then select an encryption type.
6 of 7(required)
Select actions from the available list.
• Apply RM Policy: Click Select RM Policy to select an RM Policy and the server where itis located.
• Encrypt: Click Select an Encryption key to select an encryption key or add a new key.
• Monitor: Click Severity to modify the value.
• Quarantine
• Store Evidence: Linked to Monitor. (If you did not select Monitor, it is selectedautomatically.)
9 Classifying sensitive contentClassifying by file location
86 McAfee Data Loss Prevention Endpoint 9.3.100 and McAfee Device Control Product Guide

Step Action
• Report in DLP Endpoint Console
• Tag: Click Select a tag. The tag you use must be predefined. There is no option foradding a tag.
Apply RM Policy, Quarantine, and Encrypt are mutually exclusive actions;selecting one deselects the others. Other actions are additive.
If you select Apply RM Policy and the specified RM policy cannot be applied,the content is monitored. If you select Encrypt and McAfee EndpointEncryption for Files and Folders is not installed, the content is quarantined.
If you select the Support file system discovery delete option in Tools | Options, theDelete action appears, and can be used instead of Encrypt or Quarantine. We donot recommend activating the discovery delete option.
Click Next.
7 of 7(optional)
Select an assignment group or groups, or define a new group by clicking Add. ClickFinish.
(required*) means that at least one of the properties must be defined.
5 To activate the rule, right-click the discovery rule icon and select Enable.
Create and define an email storage discovery ruleMcAfee DLP Discover can find sensitive content in email storage (PST, mapped PST, and OST) files. Thecrawler scans email items (body and attachments), calendar items, and tasks. It does not scan publicfolders or sticky notes. Actions are limited to Monitor, Quarantine, Store Evidence, and Tag.
McAfee DLP Endpoint version 9.3 supports scanning of Microsoft Outlook 32-bit email storage (OST andPST) on Windows 64-bit operating systems.
TaskFor option definitions, press F1.
1 In the McAfee DLP Endpoint policy console navigation pane, select Content Protection | Discovery Rules.
The available discovery rules appear in the right-hand pane.
2 In the Discovery Rules pane, right-click and select Add New | Email Storage Discovery Rule.
3 Rename the rule to something that will help you recognize its specific function.
4 Double-click the rule icon and follow these steps in the wizard:Step Action
1 of 7 (optional) Select the Select from list option, then select file types from the available list.Use the Other File Types option to select unlisted (unknown) file types. ClickNext.
2 of 7 (optional) Select the Select from list option, then select file extensions from the availablelist. Click Next.
3 of 7 (required*) Select tags, content categories, and groups to be included or excluded fromthe rule. Click Add item to create a new tag or content category. Click Add groupto create a new tag and content category group. Click Next.
Classifying sensitive contentClassifying by file location 9
McAfee Data Loss Prevention Endpoint 9.3.100 and McAfee Device Control Product Guide 87

Step Action
4 of 7 (required*) Select an existing document property definition or group by selecting one ofthe checkboxes to indicate whether the definition is included or excluded.Click Add item to create a new document property definition, or Add group tocreate a new group. Click Next.
5 of 7 (optional) Select the Select from list option, then select an encryption type.
6 of 7 (required) Select actions from the available list.
• Monitor: Click Severity to modify the value.
• Quarantine
• Report in DLP Endpoint Console
• Store Evidence: Linked to Monitor. (If you did not select Monitor, it is selectedautomatically.)
• Tag: Click Select a tag. The tag you use must be predefined. There is nooption for adding a tag.
Click Next.
7 of 7 (optional) Select an assignment group or groups, or define a new group by clicking Add.Click Finish.
(required*) means that at least one of the properties must be defined.
5 To activate the rule, right-click the discovery rule icon and select Enable.
If you leave a rule disabled, Apply the rule to the database, and deploy it to agents, the disabledstatus will terminate any email discovery rule that is running.
Set up a McAfee DLP Discover scanMcAfee DLP Discover scans are first defined, then scheduled, using the Agent Configuration menu.
Changes in discovery setting parameters take effect on the next scan. They are not applied to scansalready in progress.
TaskFor option definitions, press F1.
1 In the Agent Configuration | Discovery settings tab, set the performance parameters.
Use the pause controls to minimize the impact of the scan on system performance. The optionsare:
• Suspend scan when the system's CPU is above (%)
• Suspend scan when the system's used RAM is above (%)
• Do not scan files larger than (MB)
Most files of interest are small. Skipping large files can significantly shorten the scan time.
9 Classifying sensitive contentClassifying by file location
88 McAfee Data Loss Prevention Endpoint 9.3.100 and McAfee Device Control Product Guide

2 Set the notification details.
File and email storage notification details are set separately.
When the Quarantine action is selected in a discovery rule, discovery removes files with sensitivecontent to the quarantine folder. If no notifications are set, users might wonder why their filesdisappeared. The notification feature replaces files with stand-in files with the same namecontaining the notification text. If the discovery rule is set to encrypt files, no notification is neededbecause the files remain in place.
To get files out of quarantine, users must request a quarantine release key from the administrator.This works in a similar manner to the agent override key. To unlock encrypted files, users musthave the encryption key specified in the discovery rule.
The default path for the quarantine folder is now %USERPROFILE%\McAfee DLP QuarantinedFiles. We recommend using only this default folder, as accidental file deletion has occurred inother scenarios.
If you select the Encrypt action and McAfee Endpoint Encryption for Files and Folders is not installed,the files are monitored. If you select the Apply RM policy action and the RM provider is not available,the files are monitored.
3 Select the folders to scan and the folders to skip.
a Click Edit ( ) in the Folders section.
b Use Windows Explorer to browse to a folder.
c Copy and paste the address into the Enter folder text box.
d Use the plus icon to add the folder to the scan list; Use the minus icon to remove folders.
If you don't specify any folders for either scan or skip, all folders on the computer are scannedexcept C:\Windows, C:\Program Files, and the McAfee DLP Endpoint quarantine folder. The followingfile types will always be skipped, no matter which folder they are in:
• The specific files ntldr, boot.ini, and .cekey
• Executable files (*.com, *.exe, *.sys)
4 Select the email storage types to be scanned. Select the email folders to scan and the folders toskip.
When Microsoft Outlook is running in non-cached Exchange mode, OST files are not present andcannot be scanned. If you create a shared mailbox when running in non-cached Exchange mode(OST mailbox) McAfee DLP Endpoint recognizes it as a Mapped PST mailbox. You must, therefore,specify Mapped PST as a storage type in the discovery rule to scan the mailbox.
Schedule a McAfee DLP Discover scanMcAfee DLP Discover scans are first defined, then scheduled, using the Agent Configuration menu.
The discovery scan scheduler is in the Agent Configuration | Discovery Settings dialog box.
TaskFor option definitions, press F1.
1 In the Agent Configuration | Discovery Settings tab, click the File system scan schedule button ( ).Alternately, to schedule a mail storage scan, click the PST and OST scan schedule icon.
A pop-up window appears.
Classifying sensitive contentClassifying by file location 9
McAfee Data Loss Prevention Endpoint 9.3.100 and McAfee Device Control Product Guide 89

2 Set the time of day for the scan to start using the thumbwheel.
3 Set the scanning frequency using the option buttons and checkboxes.
4 If you want to run a discovery scan immediately, select Run now.
5 If you want to prevent runs being missed because of the user being logged off, select Resumediscovery missed runs after login.
6 Set the start and end dates for discovery scans.
Restore quarantined files or email itemsWhen McAfee DLP Endpoint discovery finds sensitive content, it moves the affected files or email itemsinto a quarantine folder, replacing them with placeholders that notify users that their files or emailshave been quarantined. The quarantined files and email items are also encrypted to preventunauthorized use.
Before you beginTo display the McAfee DLP icon in Microsoft Outlook, the Show Release from Quarantine Controls inOutlook option must be enabled in Agent Configuration | Miscellaneous.
When you set a file system discovery rule to Quarantine and the crawler finds sensitive content, it movesthe affected files into a quarantine folder, replacing them with placeholders that notify users that theirfiles have been quarantined. The quarantined files are encrypted to prevent unauthorized use.
For quarantined email items, McAfee DLP Discover software attaches a prefix to the Outlook Subject toindicate to users that their emails have been quarantined. Emails can have either the email body orattachments or both quarantined. If the body is quarantined, the replacement text appears in thebody, and the body text appears as an encrypted attachment.
Microsoft Outlook calendar items and tasks can also be quarantined.
Figure 9-4 Quarantined email example
Task1 To restore quarantined files:
a In the system tray of the managed computer, click the McAfee Agent icon, and select Manage Features| DLP Endpoint Console.
The DLP Endpoint Console opens.
b On the Tasks tab, select Open Quarantine Folder.
The quarantine folder opens.
c Select the files to be restored. Right-click and select Release from Quarantine.
The Release from Quarantine context-sensitive menu item only appears when selecting files oftype *.dlpenc (DLP encrypted).
The Release Code pop-up window appears.
9 Classifying sensitive contentClassifying by file location
90 McAfee Data Loss Prevention Endpoint 9.3.100 and McAfee Device Control Product Guide

2 To restore quarantined email items: Click the McAfee DLP icon, or right-click and select ManualDecryption.
a In Microsoft Outlook, select the emails (or other items) to be restored.
b Click the McAfee DLP icon,
The Release Code popup window appears.
3 Copy the challenge ID code from the popup window and send it to the DLP administrator.
4 The administrator generates a response code and sends it to the user. (This also sends an event toDLP Operational Events recording all the details.)
5 The user enters the release code in the Release Code popup window and clicks OK.
The decrypted files are restored to their original location. If the release code lockout policy hasbeen activated (in the Agent Configuration | Notification Service tab) and you enter the code incorrectlythree times, the popup window times out for 30 minutes (default setting).
For files, if the path has been changed or deleted, the original path is restored. If a file with thesame name exists in the location, the file is restored as xxx-copy.abc
Defining network file sharesThe file server list is a list of file shares used for location-based tagging rules.
The file server list is created by an LDAP query or network scan. Define the network servers that areused in location-based tagging rules. If a server doesn’t contain a file share used for a location-basedtagging rule, you don’t need to include it in this list.
Create a file server listThe file server list is a list of file shares used for location-based tagging rules.
TaskFor option definitions, press F1.
1 In the McAfee DLP Endpoint policy console navigation pane under Definitions, select File Servers.
The available file servers appear in the right-hand pane.
2 In the File Servers window, right-click and select Scan for these scanning options:
You cannot scan network servers in OpenLDAP.
• All Network Servers - By Organizational Units — Select the organizational unit to search and click OK.
• All Network Servers - By Net View — Find all available file servers on the local network.
• Network Servers By LDAP Selection — Select the file servers and click OK.
Add a single server to a listThe file server list is a list of file shares used for location-based tagging rules.
Task1 In the McAfee DLP Endpoint policy console navigation pane under Definitions, select File Servers.
The available file servers appear in the right-hand pane.
Classifying sensitive contentClassifying by file location 9
McAfee Data Loss Prevention Endpoint 9.3.100 and McAfee Device Control Product Guide 91

2 In the File Servers window, right-click and select Add New | Server.
The new Server icon appears.
3 Type the server name.
Defining network parametersNetwork definitions serve as filter criteria in network-related protection rules.
• The Network Port Range allows you to use network port ranges to enforce the network-related rules toa specific service.
• The Network Address Range monitors network connections between an external source and a managedcomputer.
• The Network Address Ranges Group allows you to use multiple network ranges for network-related rules.
Create a network address rangeNetwork address ranges serve as filter criteria in network-related protection rules.
TaskFor option definitions, press F1.
1 In the McAfee DLP Endpoint policy console navigation pane under Definitions, select Network.
The available network address ranges appear in the right-hand pane.
2 In the Network window, right-click and select Add New | Network Address Range.
The new Network Address Range icon appears.
3 Double-click the icon.
The edit window appears.
4 Type the name of the network address range.
5 Type a description (optional).
6 Type the IP address range using one of these methods:
• Define using address range
• Define using a network mask
• Define using CIDR notation
7 Click OK.
Create a network address range groupNetwork address ranges serve as filter criteria in network-related protection rules. Network addressrange groups simplify rules while maintaining granularity by combining several address rangedefinitions into one group.
TaskFor option definitions, press F1.
1 In the McAfee DLP Endpoint policy console navigation pane under Definitions, select Network.
The available network address range groups appear in the right-hand pane.
9 Classifying sensitive contentClassifying by file location
92 McAfee Data Loss Prevention Endpoint 9.3.100 and McAfee Device Control Product Guide

2 In the Network window, right-click and select Add New | Network Address Range Group.
The new Network Address Range Group icon appears.
3 Double-click the icon.
The edit window appears.
4 Type the name of the network address group.
5 Type a description (optional).
6 Select the network address ranges from the available list.
7 Click OK.
Create a new network port rangeNetwork port ranges serve as filter criteria in network-related protection rules.
TaskFor option definitions, press F1.
1 In the McAfee DLP Endpoint policy console navigation pane under Definitions, select Network.
The available network port ranges appear in the right-hand pane.
2 In the Network window, right-click and select Add New | Network Port Range.
The new Network Port Range icon appears.
3 Double-click the icon.
The edit window appears.
4 Type the name of the network port range.
5 Type a description (optional).
6 Type the port range (single port, multiple ports, range.).
7 Select the protocol type (UDP, TCP or both).
8 Click OK.
Defining registered document repositoriesThe registered documents feature is an extension of location-based tagging. It gives administratorsanother way to define the location of sensitive information, to protect it from being distributed inunauthorized ways.To use registered document repositories, the administrator selects a list of shared folders to beregistered. The definition can be limited to specified file extensions within those folders, and to amaximum file size. The content of these folders is categorized, fingerprinted and distributed to allendpoint workstations. McAfee DLP Endpoint software on the managed computers blocks distributionof documents containing registered content fragments outside of the enterprise.
When setting up registered document repositories, we recommend setting both share and securitypermissions for the repository folders and giving full permission to SYSTEM.
Advantages of registering documentsTwo advantages of registered documents over traditional location-based tagging are:
Classifying sensitive contentClassifying by file location 9
McAfee Data Loss Prevention Endpoint 9.3.100 and McAfee Device Control Product Guide 93

• Documents that existed before the location-based tag was defined are not detected bylocation-based tagging rules unless the user opens or copies the original file from its networklocation. Registered documents classification rules detect all files in the defined folders.
• If the same confidential content exists in several documents, you need to categorize it only onceusing a registered document repository. When you use location-based tagging you have to identifyevery network share where the confidential content is located, and tag each one.
Registering documents on managed computers
Two advantages of registering documents over traditional location-based tagging are:
• Documents that existed before the location-based tag was defined are not detected bylocation-based tagging rules unless the user opens or copies the original file from its networklocation. Registered documents classification rules detect all files in the defined folders.
• If the same confidential content exists in several documents, you need to categorize it only onceusing a registered document repository. When you use location-based tagging you have to identifyevery network share where the confidential content is located, and tag each one.
Indexing registered document repositoriesRegistered document repositories are indexed periodically using ePolicy Orchestrator Server Tasks. Theindexing process creates a package (reg_docs9300_x.zip) that is added to the ePolicy Orchestratorrepository and deployed to the managed computers.
Content in registered document folders is protected with registered documents classification rules. Theclassification rule associates a specified content category with the files in the registered documentrepository. The separation of definitions, groups, and categories increases modularity, and allows thecreation of new classification rules, or modification of existing ones, without the need to re-index andre-deploy.
When you have defined a registered documents classification rule, add the associated categories to aprotection rule that accepts content categories.
When an index, a registered documents classification rule, and a protection rule specifying thecategory are deployed to a managed computer, all content leaving the managed computer is checkedagainst all registered document fingerprints, and the content is blocked or monitored according to theprotection rule.
Whitelisted content is removed from the registered document repository database. Registereddocuments classification rules apply only to content in the repository that is not whitelisted.
Create a registered document repository definitionRegistered document repositories are used to define Registered Documents Classification rules.
TaskFor option definitions, press F1.
1 In the McAfee DLP Endpoint policy console navigation pane under Content Based Definitions, selectRegistered Documents Repositories.
The available registered documents appear in the right-hand pane.
2 In the Registered Documents Repositories window, right-click and select Add New | Registered DocumentRepository.
A new Registered Documents Repository icon appears.
3 Name the new registered document repository and double-click the icon.
9 Classifying sensitive contentClassifying by file location
94 McAfee Data Loss Prevention Endpoint 9.3.100 and McAfee Device Control Product Guide

4 Add a description (optional).
5 Type the UNC path to the folder you are defining, or click Browse to locate the folder.
6 Type a user name to access the folder, and a password if required.
7 Specify document extensions to include or exclude (optional). You can Add a new extension, or Editan existing one, if required.
8 Specify the maximum file size (optional) and click OK.
Create a registered document repository groupRegistered document repository groups are used to define registered documents classification rules.
TaskFor option definitions, press F1.
1 In the McAfee DLP Endpoint policy console navigation pane under Content Based Definitions, selectRegistered Documents Repositories.
The available registered documents repositories and groups appear in the right-hand pane.
2 In the Registered Documents Repositories window, right-click and select Add New | Registered DocumentRepository Group.
The new Registered Document Repository Group icon appears.
3 Double-click the icon. The edit window appears.
4 Name the new registered document group.
5 Type a description (optional).
6 Select the registered document definitions from the available list.
7 Click OK.
Classifying by file destinationIn addition to classifying content by its originating location, you can classify, and control, wherecontent is being sent. In data loss prevention parlance, this is known as data-in-motion.
This chapter describes the destinations you can control, and the creation of definitions to exercise thatcontrol.
Contents How sensitive content is controlled in email Defining local and network printers Controlling information uploaded to websites
How sensitive content is controlled in emailEmail destination objects are predefined email domains or specific email addresses that can bereferenced in email protection rules. The email protection rule can block tagged data from beingemailed to specific domains, or can prevent tagged data from being emailed to undefined domains.
Classifying sensitive contentClassifying by file destination 9
McAfee Data Loss Prevention Endpoint 9.3.100 and McAfee Device Control Product Guide 95

Typically, the email destinations section defines any internal domains and external domains whereemailing tagged data is allowed.
Email destination groups allow protection rules to reference a single entity that defines multipledestinations. A typical use of this feature is to create an email destination group for all internaldomains.
Outgoing email is handled by either Outlook Object Model (OOM) or Messaging ApplicationProgramming Interface (MAPI). OOM is the default API, but some configurations require MAPI. Theoption is set in the Agent Configuration | Email Probe tab. The MAPI option supports McAfee DLP Endpoint9.1 Patch 2, 9.2 Patches 1 and 2, and 9.3.x clients only.
A new administrative event, Agent Exceeds Memory Limit On Load, can be selected in the Agent Configuration |Events and Logging tab to record when the agent process (fcag.exe) exceeds the configured memory afterclient software has been restarted.
Create email destinationsEmail destination objects are predefined email domains or specific email addresses that can bereferenced in email protection rules.
TaskFor option definitions, press F1.
1 In the McAfee DLP Endpoint policy console navigation pane under Definitions, select Email Destinations.
The available email destinations and groups appear in the right-hand pane.
2 In the Email Destinations window, right-click and select Add New | Email destination.
A new Email Destination icon appears.
3 Double-click the icon.
The edit window appears.
9 Classifying sensitive contentClassifying by file destination
96 McAfee Data Loss Prevention Endpoint 9.3.100 and McAfee Device Control Product Guide

4 Add the email destination name: under Email address, type the domain name and click Add.
• To create an email destination of external domains, Add a domain entry for every internaldomain, then deselect all domains and select Other email domain.
Figure 9-5 Email destination edit dialog box
• To add a specific email address from this domain, right-click the domain name, select Add | EmailUser, then type the user name and click OK.
• To exclude a particular email address from the domain, add the user to the domain, right-clickthe domain name and select Add | Other email user, then deselect the user.
5 Click OK.
Create an email groupEmail groups simplify rules while maintaining granularity by combining several email definitions intoone group.
TaskFor option definitions, press F1.
1 In the McAfee DLP Endpoint policy console navigation pane under Definitions, select Email Destinations.
The available email destinations and groups appear in the right-hand pane.
2 In the Email Destinations window, right-click and select Add New | Email Group.
A new Email Group icon appears.
3 Double-click the icon. The edit window appears.
4 Type the name of the email group.
5 Type a description (optional).
6 Select the email destination definitions from the available list.
7 Click OK.
Classifying sensitive contentClassifying by file destination 9
McAfee Data Loss Prevention Endpoint 9.3.100 and McAfee Device Control Product Guide 97

Defining local and network printersPrinter definitions are used to define printing protection rules. Printing protection rules are used tomanage both local and network printers and either block or monitor the printing of confidentialmaterial.
There are two types of printer definitions: network printers and unmanaged printers (whitelistedprinters). Network printers can be added manually by creating a definition that specifies the UNC pathto the printer, or automatically from a printer list. The printer list is created by an LDAP query ornetwork scan. Printers from the scan list are then selected to add them to the printer definitions.
Whitelisted printers are printers that cannot work with the proxy driver architecture required for DataLoss Prevention management. To prevent operational problems, these printers are defined asunmanaged. Unmanaged printer definitions are created manually using printer model information fromthe operating system printer properties.
For reporting purposes, there is a third category of printer. When a printer is connected to a managedcomputer and the McAfee DLP Endpoint software fails to install its printer driver, it is reported as anunsupported printer. After investigation of the reason for the failure, these printers are placed on thewhitelist if no other solution is found.
Create a printer list and add printersPrinter lists are used to manage sensitive content sent to printers. Use these tasks to create a printerlist and add printers to it.
Tasks• Create a printer list on page 98
Printer lists are used to manage sensitive content sent to printers.
• Add a printer to the printer list on page 99Before network printers can be defined in printer protection rules, they must be added tothe printer list.
• Add an unmanaged printer to the printer list on page 99Some printers stop responding when the McAfee DLP Endpoint software assigns them aproxy driver. These printers cannot be managed, and must be exempted from printer rulesto avoid problems. In other cases, you might choose to exempt a printer, such as onebelonging to a top executive, from printer rules. In either case, you define these printers asunmanaged, placing them on the printer whitelist.
• Add an existing printer to the printer whitelist on page 100When an existing network printer malfunctions, you can add it to the printer whitelisttemporarily until the problem is clarified. In this procedure, the printer remains on thenetwork printer list but is also whitelisted, preventing printer protection rules from beingapplied to it. When the problem is resolved, the definition is removed.
Create a printer listPrinter lists are used to manage sensitive content sent to printers.
TaskFor option definitions, press F1.
1 In the McAfee DLP Endpoint policy console navigation pane under Definitions, select Printers.
The available printers appear in the right-hand pane.
9 Classifying sensitive contentClassifying by file destination
98 McAfee Data Loss Prevention Endpoint 9.3.100 and McAfee Device Control Product Guide

2 In the Printers window, right-click, select Scan and select a scanning option:
You cannot scan for printers in OpenLDAP.
• Network Printers By Organizational Units
• Network Printers By LDAP Selection
• Scan Shared Printers
3 Edit the search parameters (optional), add a filter (optional), then click Search.
After editing parameters or adding a filter, you can rerun the search by clicking Refresh.
A list of printers appears in the view window.
4 Select the printers to add to the printer list and click OK.
Add a printer to the printer listBefore network printers can be defined in printer protection rules, they must be added to the printerlist.
TaskFor option definitions, press F1.
1 In the McAfee DLP Endpoint policy console navigation pane under Definitions, select Printers.
The printers that have already been added appear in the right-hand pane.
2 In the Printers window, right-click and select Add New | Network Printer.
The new Network Printer icon appears.
3 Double-click the Network Printer icon.
The edit window appears.
4 Type the name of the network printer.
5 Type the UNC path of the network printer.
6 Click OK.
Add an unmanaged printer to the printer listSome printers stop responding when the McAfee DLP Endpoint software assigns them a proxy driver.These printers cannot be managed, and must be exempted from printer rules to avoid problems. Inother cases, you might choose to exempt a printer, such as one belonging to a top executive, fromprinter rules. In either case, you define these printers as unmanaged, placing them on the printerwhitelist.
TaskFor option definitions, press F1.
1 In the McAfee DLP Endpoint policy console navigation pane under Definitions, select Printers.
The printers that have already been added appear in the right pane.
2 In the Printers window, right-click and select Add New | Unmanaged Printer Model. Type a name into thetext box.
Classifying sensitive contentClassifying by file destination 9
McAfee Data Loss Prevention Endpoint 9.3.100 and McAfee Device Control Product Guide 99

3 Double-click the icon.
The edit window appears.
4 Type the printer model. You can copy and paste the information using the Model information fromthe printer properties:
a From the Microsoft Windows Start menu, select Printers and Faxes.
b Right-click the printer you are whitelisting and select Properties.
c In the General tab, copy the Model information (below the Comment text box).
Figure 9-6 Copying the printer model information
5 Paste the model information into the Model text box in the Unmanaged Printer Model dialog box.
6 Add a definition (optional).
7 Click OK.
Add an existing printer to the printer whitelistWhen an existing network printer malfunctions, you can add it to the printer whitelist temporarily untilthe problem is clarified. In this procedure, the printer remains on the network printer list but is alsowhitelisted, preventing printer protection rules from being applied to it. When the problem is resolved,the definition is removed.
• Right-click an existing network printer definition and click Add as Unmanaged Printer. The printerappears in the Unmanaged Printer Model section of the Printers pane.
Controlling information uploaded to websitesWeb destination objects are predefined web addresses that can be referenced in web post protectionrules. You can use web destination definitions to block tagged data from being posted to defined webdestinations (websites or specific pages in a website), or use them to prevent tagged data from being
9 Classifying sensitive contentClassifying by file destination
100 McAfee Data Loss Prevention Endpoint 9.3.100 and McAfee Device Control Product Guide

posted to websites that are not defined. Typically, the web destinations section defines any internalwebsites as well as external websites where posting tagged data is allowed.
If you have defined numerous web destinations, you can create web destination groups so thatprotection rules can reference a single entity. A typical use of this feature is to create a webdestination group for all internal websites.
Create a web destinationWeb destination objects are predefined web addresses that can be referenced in web post protectionrules.
TaskFor option definitions, press F1.
1 In the McAfee DLP Endpoint policy console navigation pane under Definitions, select Web Servers.
The available web servers appear in the main pane.
2 In the Web Servers window, right-click and select Add New | Web Server.
A new Web Server icon appears.
3 Double-click the icon.
The edit window appears.
4 In the text box at the bottom of the window, type the web server URL, and click Add to add a webserver address.
5 To add a resource path, right-click the web server address, and select Add | Resource Path. Type thepath and click OK.
6 Type a description (optional).
7 Click OK.
Create a web destination groupWeb destination groups simplify rules while maintaining granularity by combining several webdestination definitions into one group.
TaskFor option definitions, press F1.
1 In the McAfee DLP Endpoint policy console navigation pane under Definitions, select Web Servers.
The available web servers groups appear in the right-hand pane.
2 In the Web Servers window, right-click and select Add New | Web Server Group.
A new Web Server Group icon appears.
3 Double-click the icon.
The edit window appears.
4 Type the name of the web server group.
5 Type a description (optional).
Classifying sensitive contentClassifying by file destination 9
McAfee Data Loss Prevention Endpoint 9.3.100 and McAfee Device Control Product Guide 101

6 Select the web servers from the available list.
7 Click OK.
Classification in useData-in-use is the term used to define content by how or where it is used.
McAfee DLP Endpoint definitions and rules classify your data-in-use. These definitions providegranularity to help you protect only those files that need to be protected.
Contents How McAfee DLP Endpoint categorizes applications Applications and how to use them Adding and removing applications Defining file types
How McAfee DLP Endpoint categorizes applicationsBefore you create rules using applications, you should understand how McAfee DLP Endpointcategorizes them, and the effect this has on system performance.
McAfee DLP Endpoint software divides applications into four categories called strategies. These affecthow the software works with different applications. You can change the strategy to achieve a balancebetween security and the computer’s operating efficiency.
Figure 9-7 Strategies displayed in the Application Definitions window
The strategies, in order of decreasing security, are:
9 Classifying sensitive contentClassification in use
102 McAfee Data Loss Prevention Endpoint 9.3.100 and McAfee Device Control Product Guide
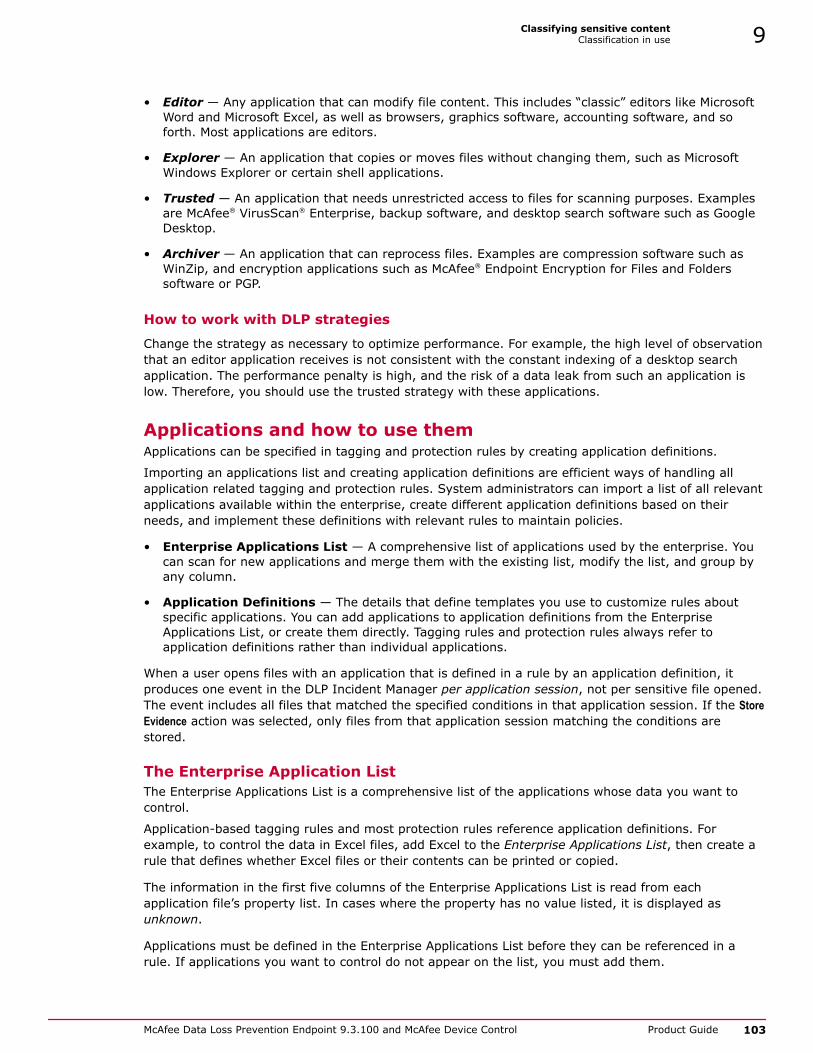
• Editor — Any application that can modify file content. This includes “classic” editors like MicrosoftWord and Microsoft Excel, as well as browsers, graphics software, accounting software, and soforth. Most applications are editors.
• Explorer — An application that copies or moves files without changing them, such as MicrosoftWindows Explorer or certain shell applications.
• Trusted — An application that needs unrestricted access to files for scanning purposes. Examplesare McAfee® VirusScan® Enterprise, backup software, and desktop search software such as GoogleDesktop.
• Archiver — An application that can reprocess files. Examples are compression software such asWinZip, and encryption applications such as McAfee® Endpoint Encryption for Files and Folderssoftware or PGP.
How to work with DLP strategies
Change the strategy as necessary to optimize performance. For example, the high level of observationthat an editor application receives is not consistent with the constant indexing of a desktop searchapplication. The performance penalty is high, and the risk of a data leak from such an application islow. Therefore, you should use the trusted strategy with these applications.
Applications and how to use themApplications can be specified in tagging and protection rules by creating application definitions.
Importing an applications list and creating application definitions are efficient ways of handling allapplication related tagging and protection rules. System administrators can import a list of all relevantapplications available within the enterprise, create different application definitions based on theirneeds, and implement these definitions with relevant rules to maintain policies.
• Enterprise Applications List — A comprehensive list of applications used by the enterprise. Youcan scan for new applications and merge them with the existing list, modify the list, and group byany column.
• Application Definitions — The details that define templates you use to customize rules aboutspecific applications. You can add applications to application definitions from the EnterpriseApplications List, or create them directly. Tagging rules and protection rules always refer toapplication definitions rather than individual applications.
When a user opens files with an application that is defined in a rule by an application definition, itproduces one event in the DLP Incident Manager per application session, not per sensitive file opened.The event includes all files that matched the specified conditions in that application session. If the StoreEvidence action was selected, only files from that application session matching the conditions arestored.
The Enterprise Application ListThe Enterprise Applications List is a comprehensive list of the applications whose data you want tocontrol.
Application-based tagging rules and most protection rules reference application definitions. Forexample, to control the data in Excel files, add Excel to the Enterprise Applications List, then create arule that defines whether Excel files or their contents can be printed or copied.
The information in the first five columns of the Enterprise Applications List is read from eachapplication file’s property list. In cases where the property has no value listed, it is displayed asunknown.
Applications must be defined in the Enterprise Applications List before they can be referenced in arule. If applications you want to control do not appear on the list, you must add them.
Classifying sensitive contentClassification in use 9
McAfee Data Loss Prevention Endpoint 9.3.100 and McAfee Device Control Product Guide 103

Application definitions and how they are categorizedApplication definitions control specific applications using properties such as product or vendor name,executable file name, or window title.
Application definitions replace the application groups used in previous versions of McAfee DLP Endpointsoftware. Because they are defined in a similar manner to device definitions, they are more intuitive,granular, scalable, and configurable. They also reduce policy size by using a different data model.
A subcategory, web application definitions, creates a URL-based template. Files, screenshots, orclipboards saved from a browser can now be tagged and blocked based on URL.
Application definitions can be identified by any of the following parameters:
• Command line — Allows command line arguments, for example: java-jar, that can controlpreviously uncontrollable applications.
• Executable file hash — The application display name, with an identifying SHA2 hash.
• Executable file name — Normally the same as the display name (minus the SHA2 hash), butcould be different if the file is renamed.
• Original executable name — Identical to the executable file name, unless the file has beenrenamed.
• Product name — The generic name of the product, for example, Microsoft Office 2003, if listed inthe executable file's properties.
• Vendor name — The company name, if listed in the executable file's properties.
• Window title — A dynamic value that changes at runtime to include the active filename.
• Working directory — The directory where the executable is located. One use of this parameter isto control U3 applications.
With the exception of the SHA2 application name and working directory, all parameters acceptsubstring matches.
As a result of this data model, application strategy is defined in the application definitions not in theEnterprise Applications List, as was done in earlier versions. One result of this is that the sameapplication can be included in several application definitions and can therefore be assigned more thanone strategy. McAfee DLP Endpoint software resolves potential conflicts according to the followinghierarchy: archiver > trusted > explorer > editor, that is, editor has the lowest ranking. If anapplication is an editor in one definition and anything else in another, McAfee DLP Endpoint softwaredoes not treat the application as an editor.
9 Classifying sensitive contentClassification in use
104 McAfee Data Loss Prevention Endpoint 9.3.100 and McAfee Device Control Product Guide

A new option allows analysis of memory mapped files. This option was added for compatibility withAutodesk 3ds Max graphic files. Although the option is available on all definition windows, it isautomatically selected only on the 3ds Max application definition. Due to processing overhead, we donot recommend using this option unless it is specifically required.
Figure 9-8 Application definition window
Create application definitionsUse these tasks to create application definitions.
Classifying sensitive contentClassification in use 9
McAfee Data Loss Prevention Endpoint 9.3.100 and McAfee Device Control Product Guide 105

Tasks• Create an application definition on page 106
Application definitions control specific applications using properties such as product orvendor name, executable file name, or window title.
• Create an application definition from the Enterprise Applications List on page 107Application definitions control specific applications using properties such as product orvendor name, executable file name, or window title.
• Create a web application definition on page 107Web application definitions are used to create tagging and protection rules for files savedfrom browsers, based on the browsed URL.
Create an application definitionApplication definitions control specific applications using properties such as product or vendor name,executable file name, or window title.
Use this task to create an application definition directly. You can also create an application definitionfrom the Enterprise Application List. Application definitions have replaced the application groups usedin earlier versions of McAfee DLP Endpoint software.
TaskFor option definitions, press F1.
1 In the McAfee DLP Endpoint policy console navigation pane under Definitions, select ApplicationDefinitions.
The available definitions appear in the right-hand pane.
2 In the Application Definitions window, right-click and select Add New | Application Definition.
A new application definition icon appears.
3 Name the new application definition and double-click the icon.
The edit window appears.
4 Type a description (optional).
5 Select parameters.
As you select each parameter, its edit window appears.
6 Click Add New, and type a value and optional description. Some parameters allow partial matching.Select the option if you want to use it.
If you select partial matching, the typed in value is matched as a substring.
7 Click Add New to add more values. When you have finished, click OK to close the parameter editwindow.
8 When you are finished adding parameters, click OK to save the edited definition.
9 By default, all new application definitions are created with the Editor strategy. To change thestrategy, right-click the definition name and select Process Strategy.
Because the strategy affects the system’s observation level, it can strongly affect systemperformance.
9 Classifying sensitive contentClassification in use
106 McAfee Data Loss Prevention Endpoint 9.3.100 and McAfee Device Control Product Guide

Create an application definition from the Enterprise Applications ListApplication definitions control specific applications using properties such as product or vendor name,executable file name, or window title.
Use this task to create an application definition from the Enterprise Applications List. You can alsocreate application definitions directly.
TaskFor option definitions, press F1.
1 In the McAfee DLP Endpoint policy console navigation pane under Applications, select EnterpriseApplications List.
The available applications list appears in the right-hand pane.
2 Right-click an application and select Create Application Definition.
The edit window appears with several parameters selected, based on the information available. Youcan modify the definition now or after creating it. You can also add multiple applications to adefinition. Select them, using the usual Shift-click and Ctrl-click selection rules, beforeright-clicking.
If application definitions that include the selected application already exist, the Go To option isenabled. Clicking a Go To option opens Application Definitions in the main pane and selects theapplication.
3 Type a description (optional).
4 Click OK. In the McAfee DLP Endpoint policy console navigation pane under Definitions, selectApplication Definitions to view the new definition.
5 By default, all new application definitions are created with the Editor strategy. To change thestrategy, right-click the definition name and select Process Strategy.
Because the strategy affects the system’s observation level, it can strongly affect systemperformance.
Create a web application definitionWeb application definitions are used to create tagging and protection rules for files saved frombrowsers, based on the browsed URL.
TaskFor option definitions, press F1.
1 In the McAfee DLP Endpoint policy console navigation pane under Definitions, select ApplicationDefinitions.
The available definitions appear in the right-hand pane.
2 In the Application Definitions window, right-click and select Add New | Web Application Definition.
A new web application definition icon appears.
3 Name the new web application definition and double-click the icon.
The edit window appears. The window contains one parameter: Browser URL.
4 Type a description (optional).
5 Select the browser URL parameter to open its edit window.
Classifying sensitive contentClassification in use 9
McAfee Data Loss Prevention Endpoint 9.3.100 and McAfee Device Control Product Guide 107

6 Click Add New, and type a value and optional description. Select partial matching if you want thetyped value to be used as a substring.
7 Click Add New to add more URL values. When you are finished, click OK to close the parameter editwindow.
8 Click OK to save the edited definition.
Adding and removing applicationsUse these tasks to add or remove applications from the Enterprise Applications List.
Tasks• Import an application manually on page 108
The Enterprise Applications List is a comprehensive list of the applications whose data you wantto control.
• Import new applications by scanning on page 108The Enterprise Applications List is a comprehensive list of the applications whose data youwant to control.
• Remove applications from the list on page 109The Enterprise Applications List is a comprehensive list of the applications whose data youwant to control.
Import an application manuallyThe Enterprise Applications List is a comprehensive list of the applications whose data you want to control.
Task1 In the Enterprise Applications List window, right-click and select Add.
The Add Executable window appears.
2 Click Browse and select the application .exe file.
3 Select an application and click Open.
The application details appear.
4 Click Add to import the application to the list.
You can also add an application by selecting the executable, then dragging and dropping it into theEnterprise Applications List window.
Import new applications by scanningThe Enterprise Applications List is a comprehensive list of the applications whose data you want tocontrol.
You can add groups of applications to the Enterprise Applications List from specific drives or folders. Youmust use the Merge option to do this.
Task1 In the Enterprise Applications List window, right-click and select Scan Applications.
The Scan for Applications window appears.
2 Click the Start button and select the drives and folders to scan for applications.
All available applications appear.
9 Classifying sensitive contentClassification in use
108 McAfee Data Loss Prevention Endpoint 9.3.100 and McAfee Device Control Product Guide

3 Select the required action from the list:
• The Clear button discards the current list.
• The Merge button adds the applications to the Enterprise Applications List.
4 Close the Scan for Applications window.
The merged applications appear in the Enterprise Applications List.
Remove applications from the listThe Enterprise Applications List is a comprehensive list of the applications whose data you want tocontrol.
Task1 In the McAfee DLP Endpoint policy console navigation pane under Applications, select Enterprise
Applications List.
The available applications appear in the right-hand pane.
2 Right-click the application’s main executable (.exe) file, and select Remove.
3 Click Yes to confirm the deletion.
The entire application is removed, that is, the executable and all associated files.
You cannot remove an application if it is included in an application definition. Right-click and selectApplication Definitions | Go To to see if the application is included in any definitions before removing.
Defining file typesFile extension definitions restrict tagging rules and protection rules to particular file types.
A list of default file extensions used in tagging rules and protection rules is available in the software.You can manually add file extensions as needed for your environment.
Tasks• Create file extensions on page 109
File extension definitions restrict tagging rules and protection rules to particular file types.
• Create file extension groups on page 110File extension definitions restrict tagging rules and protection rules to particular file types.They simplify rules while maintaining granularity by combining several file extensiondefinitions into one group.
Create file extensionsFile extension definitions restrict tagging rules and protection rules to particular file types.
TaskFor option definitions, press F1.
1 In the McAfee DLP Endpoint policy console navigation pane under Definitions, select File Extensions.
The available file extensions appear in the right-hand pane.
2 In the File Extensions window, right-click and select Add New | File Extension.
The new File Extension icon appears.
Classifying sensitive contentClassification in use 9
McAfee Data Loss Prevention Endpoint 9.3.100 and McAfee Device Control Product Guide 109

3 Double-click the icon.
The edit window appears.
4 Type the name of the new file extension entry and double-click the icon. The edit window appears.
5 In the Extension text box, type the extension preceded with a period, for example .GIF.
6 Type a description for the file extension (optional).
7 Click OK.
Create file extension groupsFile extension definitions restrict tagging rules and protection rules to particular file types. Theysimplify rules while maintaining granularity by combining several file extension definitions into onegroup.
TaskFor option definitions, press F1.
1 In the McAfee DLP Endpoint policy console navigation pane under Definitions, select File Extensions.
The available file extension groups appear in the right-hand pane.
2 Click Add New | File Extension Group either on the McAfee DLP Endpoint policy console toolbar, or afterright-clicking in the File Extensions window.
The new File Extension Group icon appears.
3 Double-click the icon.
The edit window appears.
4 Type the name of the file extension group.
5 Add a description for this group (optional).
6 Select the file extensions from the available list.
7 Click OK.
Classification rulesClassification rules assign content categories to files or registered document repository definitions.
Rules can be filtered by text patterns and dictionaries, or applied to specific document parts (header,footer, body).
Contents How classification rules link categories to content Create and define classification rules
9 Classifying sensitive contentClassification rules
110 McAfee Data Loss Prevention Endpoint 9.3.100 and McAfee Device Control Product Guide

How classification rules link categories to contentClassification rules associate files and data with the appropriate content categories.
Content categories
Content category definitions are created in the Tags and Categories definition pane. Categories can begrouped to simplify rule making. A content category definition consists of a suitable name, an optionaldescription, and a GUID assigned by the system.
Content classification rules
Content classification rules associate specified text pattern and dictionary definitions with contentcategories. When those categories are added to protection rules, content containing the specified textis monitored or blocked. Rules can contain any combination of text patterns and dictionaries. ForMicrosoft Word files, you can also specify where in the document (header/body/footer) the specifiedcontent is found.
Text extractor
The text extractor parses the file content when files are opened or copied and compares it to textpatterns and dictionary definitions in the classification rules. When a match occurs, a suitable contentcategory is applied to the content.
The text extractor can run multiple processes depending on the number of cores in the processor: witha single core processor only one process runs, dual-core processors run up to two processes,multi-core processors run up to three simultaneous processes. If multiple users are logged on, eachuser has their own set of processes, so the number of text extractors depends on the number of coresand the number of user sessions. The multiple processes can be viewed in the Windows Task Manager.
Memory usage by the text extractor can be configured in the Agent Configuration | Advanced Configuration tab.If the maximum memory is exceeded, the text extractor restarts. The default is 75 MB. Thisconfiguration option is available only to 9.2 Patch 1 and later clients.
McAfee DLP Endpoint software supports accented characters. When an ASCII text file contains a mix ofaccented characters such as French and Spanish as well as some regular Latin characters, the textextractor might not correctly identify the character set. This is not a defect, but rather a known issuefor all text extraction programs. There is no known method or technique to identify the ANSI codepage in such a case. When the text extractor cannot identify the code page, text patterns and tagsignatures are not recognized, the document cannot be properly classified, and the correct blocking ormonitoring action cannot be taken. To work around this problem, McAfee DLP Endpoint client softwareuses a fallback code page when the code page cannot be determined. The fallback is set in the AgentConfiguration | File Tracking tab, and is either the default language of the computer or a different languageset by the administrator.
Registered documents classification rules
Registered documents classification rules associate all content matching a specified registereddocuments repository definition to a content category. As with content classification rules, whencategories are added to protection rules, content containing the specified text is monitored or blocked.
Create and define classification rulesClassification rules associate content with the appropriate content categories. There are two types:content rules and registered document rules.
Use these tasks to create and define classification rules.
Classifying sensitive contentClassification rules 9
McAfee Data Loss Prevention Endpoint 9.3.100 and McAfee Device Control Product Guide 111

Tasks• Create and define a content classification rule on page 112
Content classification rules link text patterns or dictionaries to content classifications. Inprevious versions of McAfee DLP Endpoint, they were known as content-based taggingrules.
• Create and define a registered documents classification rule on page 112Registered documents classification rules apply repository definitions and contentcategories to files.
Create and define a content classification ruleContent classification rules link text patterns or dictionaries to content classifications. In previousversions of McAfee DLP Endpoint, they were known as content-based tagging rules.
TaskFor option definitions, press F1.
1 In the McAfee DLP Endpoint policy console navigation pane, select Content Protection | ClassificationRules.
The available classification rules appear in the right-hand pane.
2 In the Classification Rules pane, right-click and select Add New | Content Classification Rule.
3 Rename the rule to something that will help you recognize its specific function.
4 Double-click the rule icon and follow these steps in the wizard:Step Action
1 of 4 Select one of the text pattern options, ANY (logical OR) or ALL (logical AND),then select one or more text patterns or text pattern groups from theavailable list. Click Add item to create a new text pattern, or click Add group tocreate a new text pattern group. Click Edit to modify an existing text pattern orgroup. Click Next.
2 of 4 Select one of the dictionary options,
3 of 4 (optional) Select the part of the document where the text pattern or dictionary matchingtakes place. This option is primarily intended to be used with Microsoft Wordfiles, but applies to any file type that has a header / footer.
4 of 4 Select a content category, or create a new one by clicking Add New. Click Finish.
5 To activate the rule, right-click the classification rule icon and select Enable.
Create and define a registered documents classification ruleRegistered documents classification rules apply repository definitions and content categories to files.
TaskFor option definitions, press F1.
1 In the McAfee DLP Endpoint policy console navigation pane, select Content Protection | ClassificationRules.
The available classification rules appear in the right-hand pane.
2 In the Classification Rules pane, right-click and select Add New | Registered Documents Classification Rule.
3 Rename the rule to something that will help you recognize its specific function.
9 Classifying sensitive contentClassification rules
112 McAfee Data Loss Prevention Endpoint 9.3.100 and McAfee Device Control Product Guide

4 Double-click the rule icon and follow these steps in the wizard:Step Action
1 of 2 Select one or more registered documents repository definitions or groups from theavailable list. Click Add item to create a new registered documents repository definition, orAdd Group to create a new registered documents repository group. Click Next.
2 of 2 Select a content category, or create a new one by clicking Add New. Click Finish.
5 To activate the rule, right-click the classification rule icon and select Enable.
Tasks• Index the registered documents repositories on page 113
Indexing of registered document repositories is scheduled in ePolicy Orchestrator servertasks.
• Deploy a registered document package to the client computers on page 113Indexed registered document repository packages are distributed to the managedcomputers as a product deployment.
Index the registered documents repositoriesIndexing of registered document repositories is scheduled in ePolicy Orchestrator server tasks.
Before you beginCreate a registered documents repository definition, then create and enable a registereddocuments classification rule and a protection rule using the content category specified inthe classification rule. Apply the policy to ePolicy Orchestrator.
TaskFor option definitions, click ? in the interface.
1 In ePolicy Orchestrator, select Menu | Automation | Server Tasks.
2 Select New Task.
3 In the Server Task Builder, name the new task and click Next.
4 On the Actions page, select DLP Register Documents Scanner from the drop-down list. Click Next to schedulethe scan. Review your task, then click Save.
The task now appears in the Server Tasks list. Select it and click Run to run the scan immediately.
Deploy a registered document package to the client computersIndexed registered document repository packages are distributed to the managed computers as aproduct deployment.
Before you beginThe registered document package must be indexed in ePolicy Orchestrator.
Classifying sensitive contentClassification rules 9
McAfee Data Loss Prevention Endpoint 9.3.100 and McAfee Device Control Product Guide 113

TaskFor option definitions, click ? in the interface.
1 In ePolicy Orchestrator select Menu | System Tree.
2 In the System Tree, select the level at which to deploy the registered document package.
Leaving the level at My Organization deploys to all workstations managed by ePolicy Orchestrator.
If you select a level under My Organization, the right-hand pane displays the available workstations.You can also deploy the registered document package to individual workstations.
3 Open the Client Task Builder wizard:
• In ePolicy Orchestrator 4.5, click the Client Tasks tab. Under Actions, select New Task.
• In ePolicy Orchestrator 4.6 and 5.0, click the Assigned Client Tasks tab. Under Actions, select NewClient Task Assignment.
4 Select the deployment type:
• In ePolicy Orchestrator 4.5, in the Type field, select Product Deployment. Click Next.
• In ePolicy Orchestrator 4.6 and 5.0, in the Product field select McAfee Agent. In the Task Type fieldselect Product Deployment. Click Create New Task.
5 In the Name field, type a suitable name, for example, Install DLP Registered Documents. Typinga description is optional.
6 In the Products and Components field, select DLP Registered Documents 9.2.0.0 or DLP Registered Documents 9.3.0.0.Leave the Action field on Install.
Choose the registered documents version based on which McAfee DLP Endpoint clients you aredeploying to. Registered document packages are not compatible between versions, so if you aresupporting two client versions, you must make two separate packages.
• In ePolicy Orchestrator 4.5, click Next.
• In ePolicy Orchestrator 4.6 and 5.0, click Save.
7 Select a suitable Schedule type and set the Options, date, and Schedule parameters. Click Next.
8 Review the task summary. When you are satisfied that it is correct, click Save.
9 Classifying sensitive contentClassification rules
114 McAfee Data Loss Prevention Endpoint 9.3.100 and McAfee Device Control Product Guide

10 Tracking content with tags andclassifications
McAfee DLP Endpoint software tracks and controls sensitive information using two similarmechanisms: tags and content categories.
Tagging rules associate files and data with the appropriate tags. Classification rules associate files anddata with content categories. In both cases, the sensitive information is labeled, and the label stayswith the content even if it is copied into another document or saved to a different format.
Contents How tags and content categories are used to classify content How tagging rules link tags to content Manual tags
How tags and content categories are used to classify contentTags give you a method for classifying content and reusing that classification.
Tagging rules assign tags to content from specific applications or locations. Once assigned, the tagstays with the content as it is moved or copied, or included in or attached to other files or file types.
Content categories
Content categories, known as content tags in earlier versions of McAfee DLP Endpoint software, areanother way of classifying content. Content categories are used with classification rules to classifycontent and registered document groups. They can also be specified directly in most protection rules.
In McAfee Device Control software only content categories are available, not tags.
To protect data, follow this high-level process:
1 Classify the information that needs to be protected.
2 Create tags or content categories for each classification of data.
3 Create tagging rules and classification rules that associate sensitive data with the appropriate tagsand content categories.
4 Define protection rules incorporating the tags and content categories that block, monitor, orencrypt the sensitive data when users send it to portable devices or specified network locations.
10
McAfee Data Loss Prevention Endpoint 9.3.100 and McAfee Device Control Product Guide 115

Category catalogs
Category catalogs are sets of content categories and associated predefined classification rules that canbe used as an out-of-the-box building block for policies. When you select a content category from acatalog, it automatically adds both the content category and the related classification rules to thepolicy. If you have already created a category with that name, only the rules are added.
Create tags, content categories, catalogs, and groupsUse these tasks to create tags, content categories, and tag and category groups, which are thenattached to files with tagging or classification rules. Or create content catalogs, which add a contentcategory and the related classification rule simultaneously.
Consider the distinctions you need to make between different types of content, and make a tag orcontent category for each type.
Tasks
• Create a tag on page 116Tags give you a method for classifying content and reusing that classification.
• Create a content category on page 116A content category definition consists of a suitable name, an optional description, and aGUID assigned by the system.
• Import a category catalog on page 117Category catalogs are sets of content categories and associated predefined classificationrules. Once a category catalog is imported into the policy, the classification rules can beused as is or modified as required. If a content category with the same name alreadyexists, only the classification rules are imported.
• Create a tag and category group on page 117Tag and category groups are used to place multiple tags and content categories on filesmore efficiently.
Create a tagTags give you a method for classifying content and reusing that classification.
TaskFor option definitions, press F1.
1 In the McAfee DLP Endpoint policy console navigation pane under Definitions, select Tags and Categories.
The available tags, content categories, and groups appear in the right-hand pane.
2 In the Tags and Categories window, right-click and select Add New | Tag.
The new tag icon appears with the name selected.
3 Type a name, then double-click the icon.
4 Add a description (optional).
5 Click OK.
You can also create a new tag while creating a tagging or protection rule.
Create a content categoryA content category definition consists of a suitable name, an optional description, and a GUIDassigned by the system.
10 Tracking content with tags and classificationsHow tags and content categories are used to classify content
116 McAfee Data Loss Prevention Endpoint 9.3.100 and McAfee Device Control Product Guide

TaskFor option definitions, press F1.
1 In the McAfee DLP Endpoint policy console navigation pane under Definitions, select Tags and Categories.
The available tags, content categories, and groups appear in the right-hand pane.
2 In the Tags and Categories window, right-click and select Add New | Content Category.
The new content category icon appears with the name selected.
3 Type a name, then double-click the icon.
4 Add a description (optional).
5 Click OK.
You can also create a new content category while creating a classification or protection rule.
Import a category catalogCategory catalogs are sets of content categories and associated predefined classification rules. Once acategory catalog is imported into the policy, the classification rules can be used as is or modified asrequired. If a content category with the same name already exists, only the classification rules areimported.
TaskFor option definitions, press F1.
1 In the McAfee DLP Endpoint policy console navigation pane under Definitions, select Tags and Categories.
The available tags, content categories, and groups appear in the right-hand pane.
2 In the Tags and Categories window, right-click and select Import Categories.
After a few seconds, the Category Catalog window opens.
3 Select the categories you want to import, then click OK.
The categories and related classification rules are imported.
Create a tag and category groupTag and category groups are used to place multiple tags and content categories on files moreefficiently.
TaskFor option definitions, press F1.
1 In the McAfee DLP Endpoint policy console navigation pane under Definitions, select Tags and Categories.
The available tags, content categories, and groups appear in the right-hand pane.
2 In the Tags and Categories window, right-click and select Add New | Tag and Category Group.
The new tag and category group icon appears.
3 Name the new group and double-click the icon.
The edit window appears.
Tracking content with tags and classificationsHow tags and content categories are used to classify content 10
McAfee Data Loss Prevention Endpoint 9.3.100 and McAfee Device Control Product Guide 117

4 Add a description (optional).
5 Select the tags and content categories for the group.
6 Click OK.
When using a tag group in protection rules, all tags in the selected group must be available in thespecific content for the protection rule to be triggered.
How tagging rules link tags to contentTagging rules associate files and data with the appropriate tags.
Tags
Tag definitions are created in the Tags and Categories definition pane. Tags can be grouped to simplify rulemaking. A tag definition consists of a suitable name, an optional description, and a GUID assigned bythe system.
Tagging rules
Simple application-based tagging rules monitor or block all files created by the application orapplications designated in an application definition. Simple location-based tagging rules monitor orblock all files in the specified location. Adding conditions to a simple rule restricts it by adding a logicalAND.
File types and extensions are predefined in the system and cannot be modified by the administrator.Adding a specific file type or extension to an application-based or location-based tagging rule attachesa tag only on files created by a specific application or in a specific location, AND with the selected filetype or extension.
Using the text pattern or dictionary restriction in application-based or location-based tagging rulesattaches tags only to files in a specific location, or created by a specific application, AND containingthe specific pattern or dictionary threshold. This option allows you to combine features of contentcategories with tagging. Multiple text patterns or dictionaries can be selected, specified as ANY of thefollowing or ALL the following. For the Microsoft Word file type, you can also specify where in thedocument (header/body/footer) the specified content is found.
Once a tag is attached to a file, the tag stays with the content, even when that content is copied to afile of different type or location.
A specific tag can be used by more than one tagging rule. For example, an application-based taggingrule can attach a tag called “Finance” to specific file types, irrespective of location. A location-basedtagging rule can attach the same “Finance” tag to files in a specific location, irrespective of file type.
Create and define tagging rulesCreating tagging rules is a three step process. A tagging rule must first be created, then defined, thenenabled before it can be used.
Use these tasks to create and define tagging rules.
Tasks• Create and define an application-based tagging rule on page 119
Tagging rules associate files and data with the appropriate tags.
• Create and define a location-based tagging rule on page 119Tagging rules associate files and data with the appropriate tags.
10 Tracking content with tags and classificationsHow tagging rules link tags to content
118 McAfee Data Loss Prevention Endpoint 9.3.100 and McAfee Device Control Product Guide

Create and define an application-based tagging ruleTagging rules associate files and data with the appropriate tags.
For option definitions, press F1.
Task1 In the McAfee DLP Endpoint policy console navigation pane, select Content Protection | Tagging Rules.
The available tagging rules appear in the right-hand pane.
2 In the Tagging Rules pane, right-click and select Add New | Application Based Tagging Rule.
3 Rename the rule to something that will help you recognize its specific function.
4 Double-click the rule icon and follow these steps in the wizard:Step Action
1 of 7 Select an application definition or definitions from the available list. You caninclude or exclude definitions. Click Add item to create a new applicationdefinition. Click Next.
2 of 7 (optional) Select the Select from list option, then select file types from the available list. Usethe Other File Types option to select unlisted (unknown) file types. Click Next.
3 of 7 (optional) Select the Select from list option, then select file extensions from the availablelist. Click Next.
4 of 7 (optional) Select one of the text pattern options, ANY (logical OR) or ALL (logical AND),then select one or more text patterns or text pattern groups from theavailable list. Click Add item to create a new text pattern, or click Add group tocreate a new text pattern group. Click Edit to modify an existing text pattern orgroup. Click Next.
5 of 7 (optional) Select one of the dictionary options, ANY (logical OR) or ALL (logical AND),then select one or more dictionaries. Click Add to create a new dictionary orEdit to modify an existing dictionary. Click Next.
6 of 7 (optional) Select the part of the document where the text pattern or dictionary matchingtakes place. This option is intended to be used with Microsoft Word files.
7 of 7 Select an available tag for this rule, or create a new one by clicking Add New.Click Finish.
5 To activate the rule, right-click the protection rule icon and select Enable.
When you create an application definition tagging rule with multiple applications, all includedapplications are added in one line of the rule with logical OR and all excluded applications areadded to a second line with logical OR. The two lines are a logical AND. For example:
...definition is 'Email Client Applications' OR 'Microsoft Office Applications' AND the definition is not'Media Burner Applications'
If you do not include at least one application definition, the rule applies to all applications notspecifically excluded.
Create and define a location-based tagging ruleTagging rules associate files and data with the appropriate tags.
Tracking content with tags and classificationsHow tagging rules link tags to content 10
McAfee Data Loss Prevention Endpoint 9.3.100 and McAfee Device Control Product Guide 119

TaskFor option definitions, press F1.
1 In the McAfee DLP Endpoint policy console navigation pane, select Content Protection | Tagging Rules.
The available tagging rules appear in the right-hand pane.
2 In the Tagging Rules pane, right-click and select Add New | Location Based Tagging Rule.
3 Rename the rule to something that will help you recognize its specific function.
4 Double-click the rule icon and follow these steps in the wizard:Step Action
1 of 7 Select one or more locations from the available list. If you select a Network FileServer, a Configure Selection dialog box opens. Type a network location, or clickBrowse and locate the server. Alternately, you can select Any Network File Servers.Click OK. When you have completed all selections, click Next.
2 of 7 (optional) Select the Select from list option, then select file types from the available list. Usethe Other File Types option to select unlisted (unknown) file types. Click Next.
3 of 7 (optional) Select the Select from list option, then select file extensions from the availablelist. Click Next.
4 of 7 (optional) Select one of the text pattern options, ANY (logical OR) or ALL (logical AND),then select the text patterns from the available list. Click Add item to create anew text pattern, or click Add group to create a new text pattern group. ClickEdit to modify an existing text pattern or group. Click Next.
5 of 7 (optional) Select one of the dictionary options, ANY (logical OR) or ALL (logical AND),then select one or more dictionaries. Click Add to create a new dictionary orEdit to modify an existing dictionary. Click Next.
6 of 7 (optional) Select the part of the document where the text pattern or dictionary matchingtakes place. This option is intended to be used with Microsoft Word files.
7 of 7 Select an available tag for this rule, or create a new one by clicking Add New.Click Finish.
5 To activate the rule, right-click the protection rule icon and select Enable.
Manual tags The Manual Tagging option allows authorized users to add or remove tags from files without usingtagging rules. This option is accessed from the managed computer.
Manual tagging provides the ability to maintain your organization’s classification policy even in specialcases of sensitive or unique information that is not being tagged by the system automatically. To applyor remove tags manually, a user must be authorized. This authorization is set on the Security tab of theAgent Configuration, using either Microsoft Active Directory or OpenLDAP.
Tags that are applied to files manually affect the transmission options of the content immediately,based on the relevant protection rules.
Contents Tag files manually Remove manual tags from content
10 Tracking content with tags and classificationsManual tags
120 McAfee Data Loss Prevention Endpoint 9.3.100 and McAfee Device Control Product Guide

Tag files manuallyWhen necessary, tags can be applied to files manually by authorized users.
A user must be authorized to use manual tagging. Permission for manual tagging is defined in theMcAfee DLP Endpoint policy console on the Agent Configuration | Edit Global Agent Configuration | Security tab.
Task1 On a managed computer, open Windows Explorer.
2 Right-click the file, then select Manual Tagging.
The Manual Tags window with the available tags appears.
3 Select the tags that are appropriate for the file.
4 Click OK.
Remove manual tags from contentTags that were applied manually must be removed manually.
A user must be authorized to use manual tagging. Permission for manual tagging is defined in theMcAfee DLP Endpoint policy console on the Agent Configuration | Edit Global Agent Configuration | Security tab,using either Microsoft Active Directory or OpenLDAP.
Task1 On a managed computer, open Windows Explorer.
2 Right-click the file with tags you want to remove, and select Manual Tagging.
The Manual Tags window with all the assigned tags appears.
3 Select the tags that need to be removed from these files.
4 Click OK.
When selecting multiple files with several assigned tags, only those tags assigned to all selected filesare removed.
Tracking content with tags and classificationsManual tags 10
McAfee Data Loss Prevention Endpoint 9.3.100 and McAfee Device Control Product Guide 121
10 Tracking content with tags and classificationsManual tags
122 McAfee Data Loss Prevention Endpoint 9.3.100 and McAfee Device Control Product Guide

11 Applying McAfee DLP protection
McAfee DLP Endpoint protects sensitive content with a combination of device and protection rules.Rules are applied with policies that are distributed to the managed computers.
Contents Protecting files with rights management Controlling sensitive content with protection rules Limiting rules with assignment groups
Protecting files with rights managementMcAfee DLP Endpoint software supports Adobe LiveCycle™ Rights Management, Microsoft WindowsRights Management Services, and Seclore FileSecure™ information rights management (IRM).
Two rights management (RM) use cases are currently supported:
• McAfee DLP Endpoint file system discovery can apply RM policies to files detected in discoveryscans.
• Email, removable storage, file system, and web post protection rules can recognize RM protectedfiles. These files can be included or excluded from the rule.
Adobe RM
McAfee DLP Endpoint supports Adobe LiveCycle Rights Management ES2 and the Extension forMicrosoft Office. You can apply RM protection to:
• PDF documents
• Microsoft Word 2003, Word 2007, and Word 2010 documents
• Microsoft Excel 2003, Excel 2007, and Excel 2010, documents
• Microsoft PowerPoint 2003, PowerPoint 2007, and PowerPoint 2010
Microsoft Windows Rights Management Services
McAfee DLP Endpoint supports Rights Management Services on Windows Server 2003 and ActiveDirectory RMS (AD-RMS) on Windows Server 2008. You can apply Windows Rights ManagementServices protection to:
• Microsoft Word 2003, Word 2007, Word 2010, and Word 2013 documents
• Microsoft Excel 2003, Excel 2007, Excel 2010, and Excel 2013 documents
• Microsoft PowerPoint 2003, PowerPoint 2007, PowerPoint 2010, and PowerPoint 2013 documents
11
McAfee Data Loss Prevention Endpoint 9.3.100 and McAfee Device Control Product Guide 123

• SharePoint 2007 documents
• Exchange Server 2007 documents
Seclore IRM
McAfee DLP Endpoint supports Seclore FileSecure RM, which supports over 140 file formats includingmost commonly used document formats:
• Microsoft Office documents
• Open Office documents
• Text and text-based formats, including CSV, XML, and HTML
• Image formats, including JPEG, BMP, GIF and so forth
• Engineering design formats, including DWG, DXF, and DWF
The McAfee DLP Endpoint client works with the FileSecure desktop client to provide DLP integrationboth online and offline.
For more information on Adobe LiveCycle Rights Management, go to http://www.adobe.com/products/livecycle.html. For more information on Microsoft Rights Management Services, go to http://technet.microsoft.com/en-us/library/cc772403.aspx. For more information on Seclore IRM, go tohttp://seclore.com/seclorefilesecure_overview.html.
How Data Loss Prevention works with rights managementRights Management (RM) in McAfee DLP Endpoint software is managed from the RM and Encryptionsection of the navigation pane. In this section, you define the RM server and manage the RM policiesused by file system discovery rules, and email, removable storage, and web post protection rules.
When you select the Apply RM Policy action in a file system discovery rule, you must specify the RMserver and policy as properties.
Adobe LiveCycle Rights Management workflow
When the McAfee DLP Endpoint software applying the file system discovery rule finds a file to protect,it sends the file to the RM server. The protection is applied according to the selected policy and the fileis sent back to the managed computer. If the operation fails on the RM server side (because youcannot connect to the server for any reason) the file is monitored and an event (RM Failed) is sent to
11 Applying McAfee DLP protectionProtecting files with rights management
124 McAfee Data Loss Prevention Endpoint 9.3.100 and McAfee Device Control Product Guide

the DLP Incident Manager console. If the operation fails on the McAfee DLP Endpoint side (forexample, you try to protect an unsupported file type) the file is monitored, but no error event appearsin the DLP Incident Manager display.
You must enable the Apply RM Policy Failed event in Agent Configuration | Events and Logging for the event to belogged.
Figure 11-1 Adobe LiveCycle Rights Management protection flow diagram
We recommend creating a Policy Set on the Adobe LiveCycle Rights Management server exclusively forpolicies used with McAfee DLP Endpoint software. At least one policy in the policy set must be enabledfor the policy set to appear in the policy synchronization dialog box. If you disable a policy on the RMserver, the policy is deleted from the RM policies page when you re-synchronize. If the disabled policyis used in a file system discovery rule, it is not deleted but becomes Not Active (with a different icon)and creates an error in the DLP Policy Analyzer.
If a policy is disabled on the RM server, but you do not re-synchronize, the policy remains active.When the McAfee DLP Endpoint software attempts to apply the policy, an Administrative RM Protect Failedevent is sent to the DLP Incident Manager.
Limitations
McAfee DLP Endpoint software does not inspect RM protected files for content. When a tagged file isRM protected, only static tags (location and application) are maintained. If a user modifies the file, alltags are lost when the file is saved.
Applying McAfee DLP protectionProtecting files with rights management 11
McAfee Data Loss Prevention Endpoint 9.3.100 and McAfee Device Control Product Guide 125

Windows Rights Management Services workflow
When the McAfee DLP Endpoint software applying the file system discovery rule finds a file to protect,it uses the template GUID as a unique identifier to locate the template and apply protection.
Figure 11-2 Windows Rights Management Services protection flow diagram
With Windows Rights Management Services, McAfee DLP Endpoint software can inspect the content ofprotected files if the current user has view permissions.
Adobe rights management usersMcAfee Data Loss Prevention requires two types of Adobe LiveCycle Rights Management users.
Adobe LiveCycle Rights Management users are named in the Rights Management Server definition.Before they can be used in McAfee DLP Endpoint, they must be created, and their roles defined, in theSettings | User Management section of the Adobe LiveCycle Rights Management ES2 server. In all cases,McAfee DLP Endpoint users must be on the Document Publisher list for the DLP Policy Set and musthave the role of Services User. These are set on the RM server by the Adobe LiveCycle RightsManagement administrator.
• McAfee DLP Endpoint Policy User — Logs on to the Adobe server and synchronizes policies.
• McAfee DLP Endpoint User — Applies RM policies to files on the managed computer. There aretwo ways to set up this user:
• Using Windows authentication — The user must have Kerberos credentials (Service PrincipalName – SPN) defined on the Adobe LiveCycle server. See the Adobe LiveCycle Help for details.
• Using Adobe LiveCycle authentication — The user must be on the Document Publisher list forthe DLP Policy Set and must have the role of Services User.
Define an Adobe RM server and synchronize policiesSet up users in the Adobe LiveCycle Rights Management server with appropriate roles andpermissions.
11 Applying McAfee DLP protectionProtecting files with rights management
126 McAfee Data Loss Prevention Endpoint 9.3.100 and McAfee Device Control Product Guide

TaskFor option definitions, press F1.
1 In the McAfee DLP Endpoint policy console navigation pane, select RM and Encryption | Rights ManagementServers.
2 In the Rights Management Servers pane, right-click and select Add New | Adobe LiveCycle Rights ManagementServer.
3 Double-click the rule icon. The Adobe LiveCycle Rights Management Server dialog box appears.
4 Enter the Adobe RM server URL path and Adobe RM user name and password, then test theconnection.
We recommend creating a single Policy Set for all DLP-related policies. The named user should be aDocument Publisher for this policy set.
5 Enter the DLP Agent user credentials.
6 Select the Import RM Policies on OK checkbox to synchronize policies immediately, then click OK.
If you don't select the checkbox, you can synchronize at any time from the context-sensitive menu.You must synchronize policies to use RM policies in DLP file system discovery rules.
When you synchronize, the Adobe LiveCycle Rights Management Server dialog box appears listing allpolicy sets available to the logged on user.
7 Select the policy sets to import. All enabled policies in the set are imported and can be viewed inthe Rights Management Policies pane.
Define a Microsoft Rights Management Service server andsynchronize templatesSet up users in the Microsoft Rights Management Service server with appropriate roles andpermissions.
TaskFor option definitions, press F1.
1 In the McAfee DLP Endpoint policy console navigation pane, select RM and Encryption | Rights ManagementServers.
2 In the Rights Management Servers pane, right-click and select Add New | Microsoft RMS Server.
3 Double-click the rule icon.
The Microsoft RMS Server dialog box appears.
4 Click Edit to set up the RMS template source. Enter the path and password, if required. Click OK.
You can retrieve templates from either a network share or a web service.
5 Enter the URL of the RMS server, or select Using Auto service discovery to find the server.
6 Enter a User ID to specify a specific user, or select the Use end point logged in user option.
Applying McAfee DLP protectionProtecting files with rights management 11
McAfee Data Loss Prevention Endpoint 9.3.100 and McAfee Device Control Product Guide 127

7 Select the Import RMS Templates on OK checkbox to synchronize policies immediately, then click OK.
If you don't select the check box, you can synchronize at any time from the context-sensitivemenu. You must synchronize policies to use RMS templates in McAfee DLP Endpoint file systemdiscovery rules.
There is an option in the RMS template settings to allow trusted browsers, such as RightsManagement Update for Internet Explorer, to view the content of RMS protected documents. Thisoption is NOT supported by McAfee DLP Endpoint software. If such a template is applied by aMcAfee DLP Endpoint file system discovery rule, the protected files cannot be viewed by trustedbrowsers.
8 Select Rights Management Policies in the navigation pane to view the imported templates.
Define a Seclore server and synchronize policiesMcAfee DLP Endpoint client integrates with Seclore FileSecure desktop client for file system discoveryand protection rule creation.
Before you beginSet up a Seclore FileSecure server and create users and policies. You will need to know theserver URLs for all available servers, Hot Folder Cabinet ID, and passphrase to set up theMcAfee DLP Endpoint integration.
Seclore server synchronization is supported through ePolicy Orchestrator. You cannot set up Secloreintegration from a McAfee DLP Endpoint stand-alone extension.
TaskFor option definitions, press F1.
1 In the McAfee DLP Endpoint policy console navigation pane, select RM and Encryption | Rights ManagementServers.
2 In the Rights Management Servers pane, right-click and select Add New | Seclore FileSecure server.
3 Double-click the rule icon. The Seclore Fileserver dialog box appears.
4 Edit the Name if required, and type a Description (optional).
5 Enter a Seclore policy server URL and click Add to add it to the list. Repeat until all available serversare listed.
Seclore supports multiple servers. The Seclore API decides which server to connect to.
6 Enter the Seclore Hot Folder Cabinet ID and passphrase and click Test Connection to verify that youcan connect to the server.
The test connection button is not available if you are running a standalone version of the McAfeeDLP Endpoint policy console.
The connection might fail if you are running an evaluation version of FileSecure. If this happens,contact your McAfee service representative for a workaround.
7 Select the license types that apply.
8 Select the Import Hot Folders on OK (optional). Click OK.
If you do not choose to import when you create the definition, you can import at any time byselecting Synchronize from the right-click menu. You should also synchronize whenever the policieson the server are updated.
11 Applying McAfee DLP protectionProtecting files with rights management
128 McAfee Data Loss Prevention Endpoint 9.3.100 and McAfee Device Control Product Guide

Hot folders and descriptions from the server appear in the RM and Encryption | Rights Management Policiespane. Use these policies to define protection and discovery rules.
Controlling sensitive content with protection rulesProtection rules control the flow of data by defining the action taken when an attempt is made totransfer or transmit sensitive data. They do this by linking actions with definitions, tags and contentcategories, and user assignment groups.
You can define protection rules to include or exclude specific tags, file extensions, or documentproperties. You can also specify file types, users, and encryption (including password protection). (Notall options are available for all rules.) These options allow creation of rules with considerablegranularity.
When excluding tags or content categories in protection rules, the exclude rule works relative to theinclude rule. You must include at least one tag or content category to exclude any other tags or contentcategories.
Working with TrueCrypt
TrueCrypt encrypted virtual devices can be protected with TrueCrypt device rules, or with removablestorage protection rules. Use a device rule if you want to block or monitor a TrueCrypt volume, ormake it read-only. Use a protection rule if you want content-aware protection of TrueCrypt volumes.You must enable the TrueCrypt option in the Agent Configuration | Advanced Configuration tag in order to useremovable storage protection rules to protect TrueCrypt volumes.
TrueCrypt volumes do not support extended file attributes, causing tagged content copied to TrueCryptvolumes to lose its tags. You can, however, specify file types, file extensions, document properties,encryption types, or user assignment groups to define the protection rule.
How protection rules workProtection rules specify the transfer method, named tag or tags, and how the system should react toattempts to transfer data. Each event is given a severity level and options for responding to the event.In some cases, protection rules merely log the event. In other cases, the protection rules mightprevent the transfer of data and notify the user of the violation. Protection rules are optionally appliedto assignment groups, allowing a rule to apply only to particular user groups.
Protection rules define the action taken when an attempt is made to transfer or transmit tagged data.The following tables describe the actions available for each rule, the content types associated with therules, and whether the default alert displayed when the rule is triggered is customizable.
When Notify User is selected, and multiple events are triggered, the pop-up message states: There arenew DLP events in your DLP console, rather than displaying multiple messages.
Applying McAfee DLP protectionControlling sensitive content with protection rules 11
McAfee Data Loss Prevention Endpoint 9.3.100 and McAfee Device Control Product Guide 129

Table 11-1 Actions/Rules matrix
Rules
Actions
Device Rules
Citrix XenApp device rule D
Fixed hard drive device rule A A A A
Plug and Play device rules A A A
Removable storage devicerules (includes TrueCryptdevice rules)
A A A A
Removable storage file accessdevice rules D P 1
Protection Rules
Application file accessprotection rules A A A
Clipboard protection rules D A A A
Cloud protection rules A A A A A 2
Email protection rules A A A A A
File system protection rules A A A A A
Network communicationprotection rules A A A
PDF/Image Writer protectionrules A A A A
Printing protection rules A A A A A
Removable storage protectionrules A A A A A A
Screen capture protectionrules A A A A
Web post protection rules A A A A A
Discovery Rules
File system discovery rules A A A 3 A A A A
Email discovery rules A A A A A
Table 11-2 Content/Rules matrix
RulesContent types Change
defaultalertTags Content
categoriesDocumentproperties
Encryptiontypes
Device Rules
Citrix XenApp device rule
11 Applying McAfee DLP protectionControlling sensitive content with protection rules
130 McAfee Data Loss Prevention Endpoint 9.3.100 and McAfee Device Control Product Guide

Table 11-2 Content/Rules matrix (continued)
RulesContent types Change
defaultalertTags Content
categoriesDocumentproperties
Encryptiontypes
Fixed hard drive devicerule A
Plug and Play device rules A
Removable storage devicerules A
Removable storage fileaccess device rules
Tagging Rules
Application based taggingrules A
Location based taggingrules A
Classification Rules
Content classification rules A
Registered documenttagging rules A
Protection Rules
Application file accessprotection rules A A A
Clipboard protection rules A A A
Cloud protection rules A A A A A
Email protection rules A A A A A
File system protectionrules A A A A A
Network communicationprotection rules A A
PDF/Image Writerprotection rules A
Printing protection rules A A A
Removable storageprotection rules A A A A A
Screen capture protectionrules A A
Web post protection rules A A A A A
Discovery Rules
File system discovery rules A A A A
Email discovery rules A A A A
Legend (for both tables) Notes
A available (for actions)associated (for content types)
1 Windows displays a message. McAfee DLP Endpoint does notdisplay a message.
Applying McAfee DLP protectionControlling sensitive content with protection rules 11
McAfee Data Loss Prevention Endpoint 9.3.100 and McAfee Device Control Product Guide 131

D default 2 Microsoft RMS and Seclore FileSecure only
P partial 3 Alternate Delete (not recommended) must be enabled in Tools |Options
Improved clipboard protection rulesClipboard protection rules block use of the clipboard to copy sensitive data.
Clipboard protection rules control use of the clipboard. Blocked content can be limited to data copiedfrom specified applications or web sites, having specific tags or content categories, or copied byspecified users or user groups.
The paste operation can be allowed into the same application the content was copied from, the samedocument only, or into specified applications, with all other possibilities being blocked. Specifiedapplications can be included or excluded (allowed or blocked) and can include ICQ, IM, and Skype,application types that could not be blocked in previous versions of McAfee DLP Endpoint software.
Paste into behavior
The default option is to block pasting outside the current application. This option allows pasting withinthe document, or between documents opened by the same application. The other option is to specify,by means of Include and Exclude checkboxes, which applications are allowed and which are blocked.When using this option, pasting into the current document is always allowed, but pasting betweendocuments in the current application is blocked, unless the application is specifically excluded from therule.
Actions
Clipboard protection rule actions include Block, Monitor, Store Evidence, and Notify User. If evidence is to bestored, the Monitor action must also be selected. When the User Notification action is selected, theuser notification pop-up is activated. (The Clipboard Agent notification message in the Agent Configuration | UserInterface Service tab is no longer grayed out, and can be edited.) Clipboard text is not replaced with anotification, as in previous McAfee DLP Endpoint software versions. The Block action is no longermandatory, as with previous McAfee DLP Endpoint software versions; the Monitor action (alone) is alsoan option.
Limitations
Opening a new document from the File menu is not recognized as a new document, and pasting into itis always allowed.
Cloud protection rulesCloud protection rules manage files uploaded to cloud applications.
Cloud applications are increasingly popular ways of backing up and sharing files. Most cloudapplications create a special folder on the disk drive that synchronizes with the cloud server. McAfeeDLP Endpoint intercepts file creation in the cloud application folder, scans the files, and applies therelevant policies. If McAfee DLP Endpoint allows synchronizing the file to the cloud application folder,and the file is later modified, it is rescanned and the policy reapplied. If the modified file violates apolicy, it cannot be synchronized to the cloud.
The McAfee DLP Endpoint Cloud Protection rule currently supports Google Drive, Dropbox, SkyDrive,Syncplicity, and Box.inc.
11 Applying McAfee DLP protectionControlling sensitive content with protection rules
132 McAfee Data Loss Prevention Endpoint 9.3.100 and McAfee Device Control Product Guide

Actions
Available actions are Monitor, Notify User, Business Justification, Store Evidence, and Apply RM Policy. Due to alimitation in Adobe LiveCycle, the Apply RM Policy action is only available for Microsoft RMS and SecloreFileSecure.
Agent configuration
To support the Cloud protection rule, a new Cloud Protection Handler appears on the Agent Configuration |Miscellaneous tab. The handler and all supported applications are selected by default. You can deselectindividual applications for more granular control.
Removable storage protection rule enhancementDevices using media transfer protocol can be protected using an enhancement of the removablestorage protection rule.
Media Transfer Protocol (MTP) is used for transferring files and associated metadata from computers tomobile devices such as smartphones. MTP devices are not traditional removable devices because thedevice implements the file system, not the computer it is connected to. An enhancement to theremovable storage protection rule allows it to intercept MTP transfers and apply security policies. OnlyUSB connections are currently supported.
When the Portable Devices handler on the Agent Configuration | Miscellaneous tab is enabled, all removablestorage protection rules can be applied to MTP devices as well as other removable devices.
Limitation
The handler works with all data transfers made by Windows Explorer. It does not work with iOSdevices, which use iTunes to manage the data transfers. One alternative strategy with iOS devices isto use a Removable Storage Device rule to set the devices to read-only.
Definitions and how they define rulesDefinitions are the fundamental building blocks used to create rules. You create a definition for eachcategory you want to control. When you modify a definition, the modification is automaticallypropagated to all rules that use the definition.
Definitions let you customize the system to enforce your enterprise security policy and otherrequirements, such as compliance issues and privacy laws. Customizing these definitions creates anefficient method of maintaining company policies.
Definitions can be assigned to any new or existing rule. Changes take effect immediately uponredeploying the system policy to the agents.
Definitions are created in a two-step process: first you create the definition (right-click, select AddNew), then you define it (double-click the newly created definition.) These two steps should always bedone together. Leaving a definition empty (undefined) will, in most cases, generate an error when youtry to apply the policy to ePolicy Orchestrator. At the very least, it will generate a warning.
Table 11-3 Definitions and the tagging and protection rules that use them
Definition Associated tagging/classification rules
Associated protection rules
Application Application-based tagging Application File Access, Clipboard, FileSystem, Network Communication,Printing, Removable Storage, ScreenCapture
Dictionary Content classification NA
Applying McAfee DLP protectionControlling sensitive content with protection rules 11
McAfee Data Loss Prevention Endpoint 9.3.100 and McAfee Device Control Product Guide 133

Table 11-3 Definitions and the tagging and protection rules that use them (continued)
Definition Associated tagging/classification rules
Associated protection rules
Email Destination NA Email
File Extension Application-based, Location- based Application File Access Protection,Cloud Protection, Email Protection, FileSystem Protection, NetworkCommunication Protection, RemovableStorage Protection, Web PostProtection
File Server NA File System Protection
Network NA Network Communication Protection
Printer NA Printing Protection
Registered documentrepository
Registered document classification NA
Tag/Content Category Application-based tagging,Location-based tagging, Contentclassification, Registered documentclassification
all Protection Rules
Text Pattern Content classification,Application-based tagging,Location-based tagging
NA
Web Destination NA Web Post Protection
Whitelist NA NA
If you are also working with McAfee Endpoint Encryption for Files and Folders, be aware that includingMcAfee DLP Endpoint processes on a McAfee Endpoint Encryption for Files and Folders BlockedProcesses list will prevent protection rules with encryption definitions from triggering, and might causethe McAfee DLP Endpoint software to malfunction.
Create and define an application file access protection ruleProtection rules for application file access monitor or block files based on the application orapplications that created them. By selecting different combinations of application definitions and fileextensions, you have considerable granularity in deciding which files are blocked.
You can specify content categories as well as tags to filter the rule.
TaskFor option definitions, press F1.
1 In the McAfee DLP Endpoint policy console navigation pane, select Content Protection | Protection Rules
The available protection rules appear in the right pane.
2 In the Protection Rules pane, right-click and select Add New | Application File Access Protection Rule.
3 Rename the rule to something that will help you recognize its specific function.
11 Applying McAfee DLP protectionControlling sensitive content with protection rules
134 McAfee Data Loss Prevention Endpoint 9.3.100 and McAfee Device Control Product Guide

4 Double-click the rule icon and follow these steps in the wizard:Step Action
1 of 7 Select an application definition or definitions from the available list. You caninclude or exclude definitions. Click Add item to create a new applicationdefinition. Click Next.
You must select at least one application definition, and that definition must nothave the Explorer or Trusted strategy. An error message is generated if youviolate this rule.
2 of 7 Select available tags or content categories to be included or excluded from therule. You must include at least one tag or content category to use the excludetag option. Click Add item to create a new tag. Click Next.
3 of 7(optional)
Select the Select from list option, then select file types from the available list. Usethe Other File Types option to select unlisted (unknown) file types. Click Next.
4 of 7(optional)
Select the Select from list option, then select file extensions from the availablelist. Click Next.
The extensions .dll and .exe are preselected as Exclude. This is because certainapplications open a great many such files, and including them can cause aserious deterioration in performance. You can deselect the exclusion for greaterprotection, but be aware of the potential performance tradeoff.
5 of 7(optional)
Select a document properties definition or definition group from the availablelist. You can include or exclude definitions. Click Add item to create a newdocument properties definition or Add group to create a new documentproperties group. Click Next.
6 of 6 Select actions from the available list. By default, selecting an action selectsboth Online and Offline. Deselect either as required. The only options forapplication file access rules are Monitor, Notify User, and Store Evidence. If youselect Monitor, click Severity to modify the value.
7 of 7(optional)
Select an assignment group or groups, or define a new group by clicking Add.Click Finish.
You can include or exclude tags and file extensions as well as application definitions.
5 To activate the rule, right-click the protection rule icon and select Enable.
Create and define a clipboard protection ruleClipboard protection rules block use of the clipboard to copy sensitive data.
Clipboard protection has been enhanced to include the following:
• Blocking copy/paste from any application into ICQ or IM
• Blocking copy/paste of any data to Skype
• Blocking copy/paste from Microsoft Office applications (Word, Excel, PowerPoint) to Microsoft OfficeCommunicator
These enhancements are in addition to the previous capability to:
Applying McAfee DLP protectionControlling sensitive content with protection rules 11
McAfee Data Loss Prevention Endpoint 9.3.100 and McAfee Device Control Product Guide 135

• Block copy/paste from Microsoft Word, Excel, or PowerPoint to any other application (that is, allowcopy/paste only from Word to Word, from Excel to Excel, or from PowerPoint to PowerPoint)
• Block copy/paste from one Word document to another
Trusted processes are not part of the clipboard rule logic. Applications with a Trusted strategy are notexempt from being blocked by clipboard rules.
TaskFor option definitions, press F1.
1 In the McAfee DLP Endpoint policy console navigation pane, select Content Protection | Protection Rules
The available protection rules appear in the right-hand pane.
2 In the Protection Rules pane, right-click and select Add New | Clipboard Protection Rule.
3 Rename the rule to something that will help you recognize its specific function.
4 Double-click the rule icon and follow these steps in the wizard:Step Action
1 of 6 (optional) Select an application definition or definitions from the available list. You caninclude or exclude definitions. Click Add item to create a new applicationdefinition. Click Next.
2 of 6 (optional) Type the title of a specific application window and click Add. Repeat asrequired. Click Next.
3 of 6 (optional) Select tags, content categories, and groups to be included or excluded fromthe rule. You must include at least one tag, content category, or group to usethe exclude option. Click Add item to create a new tag or content category. ClickAdd group to create a new tag and content category group. Click Next.
4 of 6 Select the pasting limitation. By default, the rule will block pasting outside thecurrent application. The second option is to restrict pasting into differentdocuments in the current application. This more restrictive rule also blockspasting into the Find and Replace dialog box, but prevents sensitiveinformation from being copied from tagged documents to untaggeddocuments in the same application. The third option blocks pasting intospecified applications, either by including or excluding the selectedapplications.
5 of 6 Select actions from the available list. By default, selecting an action selectsboth Online and Offline. Deselect either as required. If you select Monitor, clickSeverity to modify the value. If you select Notify User, click Change default alert tomodify the alert message. Click Next
6 of 6 (optional) Select an assignment group or groups, or define a new group by clicking Add.Click Finish.
You can include or exclude tags as well as application definitions.
5 To activate the rule, right-click the protection rule icon and select Enable.
See also Improved clipboard protection rules on page 132
11 Applying McAfee DLP protectionControlling sensitive content with protection rules
136 McAfee Data Loss Prevention Endpoint 9.3.100 and McAfee Device Control Product Guide

Create and define a cloud protection ruleCloud protection rules monitor or block sensitive content being uploaded to the cloud with commoncloud applications.
Before you beginVerify that required cloud protection handlers are activated on the Agent Configuration |Miscellaneous tab. Verify that cloud protection event notification messages are specified onthe Agent Configuration | User Interface Service tab.
Supported cloud applications are:
• Box.inc • SkyDrive
• Dropbox • Syncplicity
• Google Drive
TaskFor option definitions, press F1.
1 In the McAfee DLP Endpoint policy console navigation pane, select Content Protection | Protection Rules.
The available protection rules appear in the right pane.
2 Right-click in the right pane and select Add New | Cloud Protection Rule.
3 Rename the rule to something that helps you recognize its specific function.
Applying McAfee DLP protectionControlling sensitive content with protection rules 11
McAfee Data Loss Prevention Endpoint 9.3.100 and McAfee Device Control Product Guide 137

4 Double-click the rule icon and follow these steps in the wizard. Click Next after each step.Step Action
1 of 8 Select one or more cloud applications to manage. Click Next.
2 of 8 (optional) Select tags, content categories, and groups to include or exclude from therule. You must include at least one tag, content category, or group to use theexclude option. Click Add item to create a tag or content category. Click Add groupto create a tag and content category group.
3 of 8 (optional) Select the Select from list option, then select file types from the available list. Usethe Other File Types option to select unlisted (unknown) file types.
4 of 8 (optional) Select the Select from list option, then select file extensions from the availablelist.
5 of 8 (optional) Select a document properties definition or definition group from the availablelist. You can include or exclude definitions. Click Add item to create a documentproperties definition or Add group to create a document properties group.
6 of 8 (optional) To apply the rule to specific encryption types, select the Select from list option,and select one or more encryption types.
7 of 8 Select actions from the available list. By default, selecting an action selectsboth Online and Offline. Deselect either as required. If you select Monitor, clickSeverity to modify the value. If you select Notify User, click Change default alert tomodify the alert message, URL, or link text.
Due to a limitation in Adobe LiveCycle, the Apply RM Policy action is onlyavailable for Microsoft RMS and Seclore FileSecure.
8 of 8 (optional) Select an assignment group or groups, or define a new group by clicking Add.Click Finish.
You can include or exclude tags and file extensions.
5 To activate the rule, right-click the protection rule icon and select Enable.
See also Cloud protection rules on page 132
Create and define an email protection ruleEmail protection rules monitor or block email sent to specific destinations or users.
Before you beginTo activate Lotus Notes support, select the Lotus Notes Handler on the Agent Configuration |Miscellaneous tab. We recommend disabling unused handlers.
In systems where both Microsoft Exchange and Lotus Notes are available, email rules willnot work if the outgoing mail server (SMTP) name is not configured for both.
To use Titus Message Classifications as content categories, see the section on setting upintegration, and verify that the Agent Configuration settings specified in that section arecorrect.
11 Applying McAfee DLP protectionControlling sensitive content with protection rules
138 McAfee Data Loss Prevention Endpoint 9.3.100 and McAfee Device Control Product Guide

TaskFor option definitions, press F1.
1 In the McAfee DLP Endpoint policy console navigation pane, select Content Protection | Protection Rules
The available protection rules appear in the right-hand pane.
2 In the Protection Rules pane, right-click and select Add New | Email Protection Rule.
3 Rename the rule to something that will help you recognize its specific function.
4 Double-click the rule icon and follow these steps in the wizard:Step Action
1 of 9 (optional) Select Select from list option, and select one or more email destinationdefinitions. Click Add item to create a new email destination definition, or Addgroup to create a new destination group. Click Next.
2 of 9 (optional) Select tags, content categories, and groups to be included or excluded fromthe rule. You must include at least one tag to use the exclude tag option. ClickAdd item to create a new tag or content category. Click Add group to create a newtag and content category group. Click Next.
3 of 9 (optional) Select the Select from list option, then select file types from the available list. Usethe Other File Types option to select unlisted (unknown) file types. Click Next.
4 of 9 (optional) Select the Select from list option, then select file extensions from the availablelist. Click Next. You can include or exclude file extensions.
5 of 9 (optional) Select a document properties definition or definition group from the availablelist. You can include or exclude definitions. Click Add item to create a newdocument properties definition or Add group to create a new documentproperties group. Click Next.
6 of 9 (optional) To apply the rule to attachments of specific encryption types, select the Selectfrom list option, and select one or more attachment encryption types.
7 of 9 (optional) Email bypass feature: To exclude an email based on subject, select Do notapply this rule if the email subject contains this pattern and select a pattern.
Text patterns must be predefined, and only one can be used per rule.
8 of 9 Select actions from the available list. By default, selecting an action selectsboth Online and Offline. Deselect either as required. If you select Monitor, clickSeverity to modify the value. If you select Notify User, click Change default alert tomodify the alert message, URL, or link text. If you want Request Justification toblock email when no justification is provided, you must also select Block. ClickNext.
9 of 9 (optional) Select an assignment group or groups, or define a new group by clicking Add.Click Finish.
5 To activate the rule, right-click the protection rule icon and select Enable.
See also How sensitive content is controlled in email on page 95
Applying McAfee DLP protectionControlling sensitive content with protection rules 11
McAfee Data Loss Prevention Endpoint 9.3.100 and McAfee Device Control Product Guide 139

Create and define a file system protection ruleFile system protection rules protect files on specific file servers or mass storage devices. Files can bemonitored, but not blocked. You can save evidence, and notify the user when files are monitored. Youcan specify applications, file types, file extensions, or tags to limit to the rule.
TaskFor option definitions, press F1.
1 In the McAfee DLP Endpoint policy console navigation pane, select Content Protection | Protection Rules
The available protection rules appear in the right-hand pane.
2 In the Protection Rules pane, right-click and select Add New | File System Protection Rule.
3 Rename the rule to something that will help you recognize its specific function.
4 Double-click the rule icon and follow these steps in the wizard:Step Action
1 of 9 Select a destination or destinations where files are being sent. If you select FileServers, the Configure Selection window opens. Type a network path and click Add,or click Browse to select a new network destination, then Add to add it to thelist. Click Next.
2 of 9 (optional) Select an application definition or definitions from the available list. You caninclude or exclude definitions. Click Add item to create a new applicationdefinition. Click Next.
3 of 9 (optional) Select tags, content categories, and groups to be included or excluded fromthe rule. You must include at least one tag, content category, or group to usethe exclude option. Click Add item to create a new tag or content category. ClickAdd group to create a new tag and content category group. Click Next.
4 of 9 (optional) Select the Select from list option, then select file types from the available list. Usethe Other File Types option to select unlisted (unknown) file types. Click Next.
5 of 9 (optional) Select the Select from list option, then select file extensions from the availablelist. Click Next.
6 of 9 (optional) Select a document properties definition or definition group from the availablelist. You can include or exclude definitions. Click Add item to create a newdocument properties definition or Add group to create a new documentproperties group. Click Next.
7 of 9 (optional) To apply the rule to files with specific encryption types, select the Select from listoption, and select one or more encryption types.
8 of 9 Select actions from the available list. By default, selecting an action selectsboth Online and Offline. Deselect either as required. If you select Monitor, clickSeverity to modify the value. If you want Request Justification to encrypt files whenno justification is provided, you must also select Encrypt. Click Next.
9 of 9 (optional) Select an assignment group or groups, or define a new group by clicking Add.Click Finish.
You can include or exclude tags and file extensions as well as application definitions.
5 To activate the rule, right-click the protection rule icon and select Enable.
11 Applying McAfee DLP protectionControlling sensitive content with protection rules
140 McAfee Data Loss Prevention Endpoint 9.3.100 and McAfee Device Control Product Guide

Create and define a network communication protection ruleNetwork communication protection rules monitor or block incoming or outgoing data on your network.You can limit the rule with specific applications or tags.
McAfee DLP Endpoint version 9.3 uses a new network driver (McAfee FireCore, a networkinginterception infrastructure shared with other McAfee point products). As a result of this change, networkcommunication protection rules are only supported on non-server Windows operating systems.
TaskFor option definitions, press F1.
1 In the McAfee DLP Endpoint policy console navigation pane, select Content Protection | Protection Rules
The available protection rules appear in the right-hand pane.
2 In the Protection Rules pane, right-click and select Add New | Network Communication Protection Rule.
3 Rename the rule to something that will help you recognize its specific function.
4 Double-click the rule icon and follow these steps in the wizard:Step Action
1 of 7 (optional) Select the Select from list option, then select one or more available networkaddress ranges. You can protect or exclude range definitions. Click Add item tocreate a new network address range definition. Click Add group to create a newnetwork address range group. Click Next.
2 of 7 (optional) Select the Select from list option, then select one or more available network portranges. You can protect or exclude range definitions. Click Add item to create anew network port range definition. Click Add group to create a new network portrange group. Click Next.
3 of 7 Select the network connection direction. You can protect incoming or outgoingconnections or both directions. Click Next.
4 of 7 (optional) Select an application definition or definitions from the available list. You caninclude or exclude definitions. Click Add item to create a new applicationdefinition. Click Next.
5 of 7 (optional) Select tags to be included or excluded from the rule. You must include at leastone tag to use the exclude tag option. Click Add item to create a new tag. ClickNext.
6 of 7 Select actions from the available list. By default, selecting an action selectsboth Online and Offline. Deselect either as required. If you select Monitor, clickSeverity to modify the value. If you select Notify User, click Change default alert tomodify the alert message, URL, or link text. Click Next.
7 of 7 (optional) Select an assignment group or groups, or define a new group by clicking Add.Click Finish.
You can include or exclude tags as well as application definitions.
5 To activate the rule, right-click the protection rule icon and select Enable.
Create and define a PDF/Image Writer protection ruleMcAfee DLP Endpoint software can block PDF and Image Writer print drivers that print to files.
Applying McAfee DLP protectionControlling sensitive content with protection rules 11
McAfee Data Loss Prevention Endpoint 9.3.100 and McAfee Device Control Product Guide 141

TaskFor option definitions, press F1.
1 In the McAfee DLP Endpoint policy console navigation pane, select Content Protection | Protection Rules
The available protection rules appear in the right-hand pane.
2 In the Protection Rules pane, right-click and select Add New | PDF/Image Writers Protection Rule.
3 Rename the rule to something that will help you recognize its specific function.
4 Double-click the rule icon and follow these steps in the wizard:Step Action
1 of 2 Select actions from the available list. By default, selecting an action selectsboth Online and Offline. Deselect either as required. If you select Monitor, clickSeverity to modify the value. If you select Notify User, click Change default alert tomodify the alert message, URL, or link text. If you want Request Justification toblock printing when no justification is provided, you must also select Block.Click Next.
2 of 2 (optional) Select an assignment group or groups, or define a new group by clicking Add.Click Finish.
5 To activate the rule, right-click the protection rule icon and select Enable.
Create and define a printing protection rulePrinting protection rules monitor or block files from being printed. You can limit the rule to specificapplications or tags.
Printer add-ins, enabled on the Agent Configuration | Miscellaneous tab, can improve printer performancewhen using certain common applications. The add-ins are only installed when a printing protectionrule is enabled on the managed computer.
TaskFor option definitions, press F1.
1 In the McAfee DLP Endpoint policy console navigation pane, select Content Protection | Protection Rules
The available protection rules appear in the right-hand pane.
2 In the Protection Rules pane, right-click and select Add New | Printing Protection Rule.
3 Rename the rule to something that will help you recognize its specific function.
11 Applying McAfee DLP protectionControlling sensitive content with protection rules
142 McAfee Data Loss Prevention Endpoint 9.3.100 and McAfee Device Control Product Guide

4 Double-click the rule icon and follow these steps in the wizard:Step Action
1 of 6 (optional) Select the Select from list option, then select an available network printer. SelectOther network printer to protect all network printers that have not been defined,including PDF and Image Writer printer drivers. Click Next.
2 of 6 (optional) Select the Select from list option, then select Any local printer to protect printingfrom local printers. Click Next.
Only one of the first two steps can be optional. You must select a networkprinter, local printers, or both.
3 of 6 (optional) Select an application definition or definitions from the available list. You caninclude or exclude definitions. Click Add item to create a new applicationdefinition. Click Next.
4 of 6 (optional) Select tags, content categories, and groups to be included or excluded fromthe rule. You must include at least one tag, content category, or group to usethe exclude option. Click Add item to create a new tag or content category. ClickAdd group to create a new tag and content category group. Click Next.
5 of 6 Select actions from the available list. By default, selecting an action selectsboth Online and Offline. Deselect either as required. If you select Monitor, clickSeverity to modify the value. If you select Notify User, click Change default alert tomodify the alert message, URL, or link text. If you want Request Justification toblock printing when no justification is provided, you must also select Block.Click Next.
6 of 6 (optional) Select an assignment group or groups, or define a new group by clicking Add.Click Finish.
You can include or exclude tags as well as application definitions.
5 To activate the rule, right-click the protection rule icon and select Enable.
Create and define a removable storage protection ruleRemovable storage protection rules monitor or block data from being written to removable storagedevices.
TaskFor option definitions, press F1.
1 In the McAfee DLP Endpoint policy console navigation pane, select Content Protection | Protection Rules
The available protection rules appear in the right-hand pane.
2 In the Protection Rules pane, right-click and select Add New | Removable Storage Protection Rule.
3 Rename the rule to something that will help you recognize its specific function.
Applying McAfee DLP protectionControlling sensitive content with protection rules 11
McAfee Data Loss Prevention Endpoint 9.3.100 and McAfee Device Control Product Guide 143
4 Double-click the rule icon and follow these steps in the wizard:Step Action
1 of 8 (optional) Select an application definition or definitions from the available list. You caninclude or exclude definitions. Click Add item to create a new applicationdefinition. Click Next.
2 of 8 (optional) Select tags, content categories, and groups to be included or excluded fromthe rule. You must include at least one tag, content category, or group to usethe exclude option. Click Add item to create a new tag or content category. ClickAdd group to create a new tag and content category group. Click Next.
3 of 8 (optional) Select the Select from list option, then select file types from the available list. Usethe Other File Types option to select unlisted (unknown) file types. Click Next.
4 of 8 (optional) Select the Select from list option, then select file extensions from the availablelist. Click Next.
5 of 8 (optional) Select a document properties definition or definition group from the availablelist. You can include or exclude definitions. Click Add item to create a newdocument properties definition or Add group to create a new documentproperties group. Click Next.
6 of 8 (optional) To apply the rule to specific encryption types, select the Select from list option,and select one or more encryption types.
7 of 8 Select actions from the available list. By default, selecting an action selectsboth Online and Offline. Deselect either as required. If you select Encrypt, clickSelect an Encryption key to select an encryption key or add a new key. If you selectMonitor, click Severity to modify the value. If you select Notify User, click Changedefault alert to modify the alert message, URL, or link text. If you want RequestJustification to block files when no justification is provided, you must also selectBlock. If you want Request Justification to encrypt files when no justification isprovided, you must also select Encrypt. Click Next.
8 of 8 (optional) Select an assignment group or groups, or define a new group by clicking Add.Click Finish.
You can include or exclude tags and file extensions as well as application definitions.
5 To activate the rule, right-click the protection rule icon and select Enable.
See also Removable storage protection rule enhancement on page 133
Create and define a screen capture protection ruleScreen capture protection rules control data copy/pasted from a screen.
Before you beginThe screen capture module must be enabled in the Agent configuration. In the Miscellaneoustab, select Screen Capture and at least one of the options: the Print Screen key handler optionenables keyboard screen capture blocking; the Applications handler option allows blocking ofthird-party screen capture programs. If you select the Applications handler option, specifywhich applications are blocked in the Advanced Configuration tab with Screen capture applications |Settings.
The screen capture feature supports only Graphics Device Interface (GDI) API blocking.Applications capturing the screen through DirectX or the Windows Media Player API are notblocked.
11 Applying McAfee DLP protectionControlling sensitive content with protection rules
144 McAfee Data Loss Prevention Endpoint 9.3.100 and McAfee Device Control Product Guide

TaskFor option definitions, press F1.
1 In the McAfee DLP Endpoint policy console navigation pane, select Content Protection | Protection Rules
The available protection rules appear in the right-hand pane.
2 In the Protection Rules pane, right-click and select Add New | screen Capture Protection Rule.
3 Rename the rule to something that will help you recognize its specific function.
4 Double-click the rule icon and follow these steps in the wizard:Step Action
1 of 5 (optional) Select an application definition or definitions from the available list. You caninclude or exclude definitions. Click Add item to create a new applicationdefinition. Click Next.
Trusted processes are not part of the screen capture rule logic. Applicationswith a Trusted strategy are therefore not exempt from screen capture rules,and will be blocked like any other applications.
2 of 5 Type the title of a specific application window and click Add. Repeat asrequired. Click Next.
3 of 5 (optional) Select tags to be included or excluded from the rule. You must include at leastone tag to use the exclude tag option. Click Add item to create a new tag. ClickNext.
4 of 5 Select actions from the available list. By default, selecting an action selectsboth Online and Offline. Deselect either as required. If you select Monitor, clickSeverity to modify the value. If you select Notify User, click Change default alert tomodify the alert message, URL, or link text. Click Next.
5 of 5 (optional) Select an assignment group or groups, or define a new group by clicking Add.Click Finish.
You can include or exclude tags as well as application definitions.
5 To activate the rule, right-click the protection rule icon and select Enable.
Create and define a web post protection ruleWeb post protection rules monitor or block data from being posted to websites, including web-basedemail sites.
The web post protection rule is supported for Microsoft Internet Explorer 6 and later, and Firefox 3.6and later. For other browsers, use network communication protection rules.
Web post protection rules can block or monitor content uploaded to websites based on AJAX or Flashtechnologies. This includes the following sites:
• Microsoft Outlook Web Access • Yahoo
• Gmail • Hotmail
• Google Docs
When a web post protection rule is enabled, web post file uploads continue in the background after theupload bar indicates that the upload is finished.
Applying McAfee DLP protectionControlling sensitive content with protection rules 11
McAfee Data Loss Prevention Endpoint 9.3.100 and McAfee Device Control Product Guide 145

TaskFor option definitions, press F1.
1 In the McAfee DLP Endpoint policy console navigation pane, select Content Protection | Protection Rules
The available protection rules appear in the right-hand pane.
2 In the Protection Rules pane, right-click and select Add New | Web Post Protection Rule.
3 Rename the rule to something that will help you recognize its specific function.
4 Double-click the rule icon and follow these steps in the wizard:Step Action
1 of 8 (optional) Select the Select from list option, then select an available web destination or webdestination group for this rule. Click Add item to create a new web destinationdefinition. Click Add group to create a new web destination group. Click Next.
Not defining any specific web destinations will block all outgoing HTTP content.
2 of 8 (optional) Select tags, content categories, and groups to be included or excluded fromthe rule. You must include at least one tag, content category, or group to usethe exclude option. Click Add item to create a new tag or content category. ClickAdd group to create a new tag and content category group. Click Next.
3 of 8 (optional) Select the Select from list option, then select file types from the available list. Usethe Other File Types option to select unlisted (unknown) file types. Click Next.
4 of 8 (optional) Select the Select from list option, then select file extensions from the availablelist. Click Next.
5 of 8 (optional) Select a document properties definition or definition group from the availablelist. You can include or exclude definitions. Click Add item to create a newdocument properties definition or Add group to create a new documentproperties group. Click Next.
6 of 8 (optional) To apply the rule to specific encryption types, select the Select from list option,and select one or more encryption types.
7 of 8 Select actions from the available list. By default, selecting an action selectsboth Online and Offline. Deselect either as required. If you select Monitor, clickSeverity to modify the value. If you select Notify User, click Change default alert tomodify the alert message, URL, or link text. If you want Request Justification toblock web posts when no justification is provided, you must also select Block.Click Next.
8 of 8 (optional) Select an assignment group or groups, or define a new group by clicking Add.Click Finish.
You can include or exclude tags and file extensions.
5 To activate the rule, right-click the protection rule icon and select Enable.
11 Applying McAfee DLP protectionControlling sensitive content with protection rules
146 McAfee Data Loss Prevention Endpoint 9.3.100 and McAfee Device Control Product Guide

Delete rules, definitions, device classes, or user groupsRules, device classes. or definitions can be deleted from policies, but not if they are in use.
You cannot remove a definition or device class that is in use. Before removing, you must deselect it inall rules and groups that contain it. To remove tags, you must either remove the rules that use them,or remove the tags from the rules, before proceeding.
If you don't know if or where the item is in use, attempt to remove it. If the item is in use, a messageidentifies which rules or groups contain it.
Task1 In the McAfee DLP Endpoint policy console navigation pane, select the category (for example,
Network definition) of the item you want to remove.
The available items and groups appear in the main panel.
2 Select the item or group to remove, right-click and select Delete.
3 Click Yes to confirm the deletion.
Using predefined definitionsTemplates are predefined system definitions such as application definitions or text patterns.
Using the template synchronizer wizard, you can copy templates to an existing policy or create newtemplates from definitions created for the current system policy. Policy definitions stored in thetemplates directory can be shared or used later.
When distributing a template to create a Plug and Play device definition, make sure that any deviceclasses used in definitions are included in the system’s defaults. If you use a device class that is not inthe system default, the definition is removed with a notification message.
Synchronize templatesTemplates are predefined system definitions such as application definitions or text patterns.
Use this task to synchronize templates with the current policy.
TaskFor option definitions, press F1.
1 From the McAfee DLP Endpoint policy console File menu, select Synchronize Templates.
The Template Synchronization wizard appears.
Applying McAfee DLP protectionControlling sensitive content with protection rules 11
McAfee Data Loss Prevention Endpoint 9.3.100 and McAfee Device Control Product Guide 147

2 Select the template type from the tabs.
Where there is no match between the templates folder and the current system policy the definitionwill be displayed as missing.
Figure 11-3 The Template Synchronization Wizard
3 To view the selected definition properties, click View ( ). To remove the selected definition, click
Delete ( ).
4 To copy a template to the current policy, or create a new template from a current policy definition,select the definition and click one of the Move icons or .
The definition entry is changed from Missing to the definition name.
5 Click OK.
Limiting rules with assignment groupsDevice and protection rules are applied equally for every computer and user receiving a policy, unlessotherwise specified in the rule. However, when required, rules can be applied to particular users,groups, organizational units, or computers.
Defining assignment groups can be done with either Microsoft Active Directory or OpenLDAP. Theflexibility to define specific users or groups allows administrators to apply rules that are appropriatefor a user’s job function. Individuals or computers that should not access sensitive data can haverestrictive rule sets, while a manager’s rule set can be much less restrictive. When protection rules arecreated, they can be applied to a specific user or group by using the assignment group, or tocomputers by using ePolicy Orchestrator deployment.
Contents User assignment Computer assignment groups
11 Applying McAfee DLP protectionLimiting rules with assignment groups
148 McAfee Data Loss Prevention Endpoint 9.3.100 and McAfee Device Control Product Guide

User assignmentDevice and protection rules are applied equally for every computer and user receiving a policy, unlessotherwise specified in the rule. However, when required, rules can be applied to particular users,groups, organizational units, or computers.
The Privileged Users setting can be used to override blocking or monitoring rules for certain users. Thereare two strategies available for privileged users: Monitor only and Override all. You create the list in asimilar manner to creating the user assignment groups — by scanning the user list and selectingnames.
In addition, you can include or exclude users from the rule the group is assigned to, or add local usersto a user assignment group.
Excluded users are similar to privileged users, in that they are exempt from particular rules. Thedifference is that the excluded user is defined in the assignment group, so only that one group needbe assigned to a rule. On the other hand, you can’t monitor that user if the group is being blocked.The option to use excluded users or privileged users gives the administrator considerable flexibility inhow rules are applied.
Local users are defined as users logged on remotely who have local authentication.
Create a user assignment groupUser assignment groups define groups of users to be included or excluded from rules.
TaskFor option definitions, press F1.
1 In the McAfee DLP Endpoint policy console navigation pane under Policy Assignment, select UserAssignment Groups.
The available assignment groups appear in the right-hand pane.
2 In the User Assignment Groups pane, right-click and select Add New | User Assignment Group.
The new User Assignment Group icon appears.
3 Name the new User Assignment Group entry and double-click the icon.
The edit window appears with the Policy Assignment tab displayed.
4 Click Add to select the objects for this group (domains, organizational units, groups, and users).
A search window appears.
5 Select the Object Types to search for, then type in a filter and click Search to find users and groups.
6 Select the users and groups to be added to the assignment group, and click OK.
Applying McAfee DLP protectionLimiting rules with assignment groups 11
McAfee Data Loss Prevention Endpoint 9.3.100 and McAfee Device Control Product Guide 149
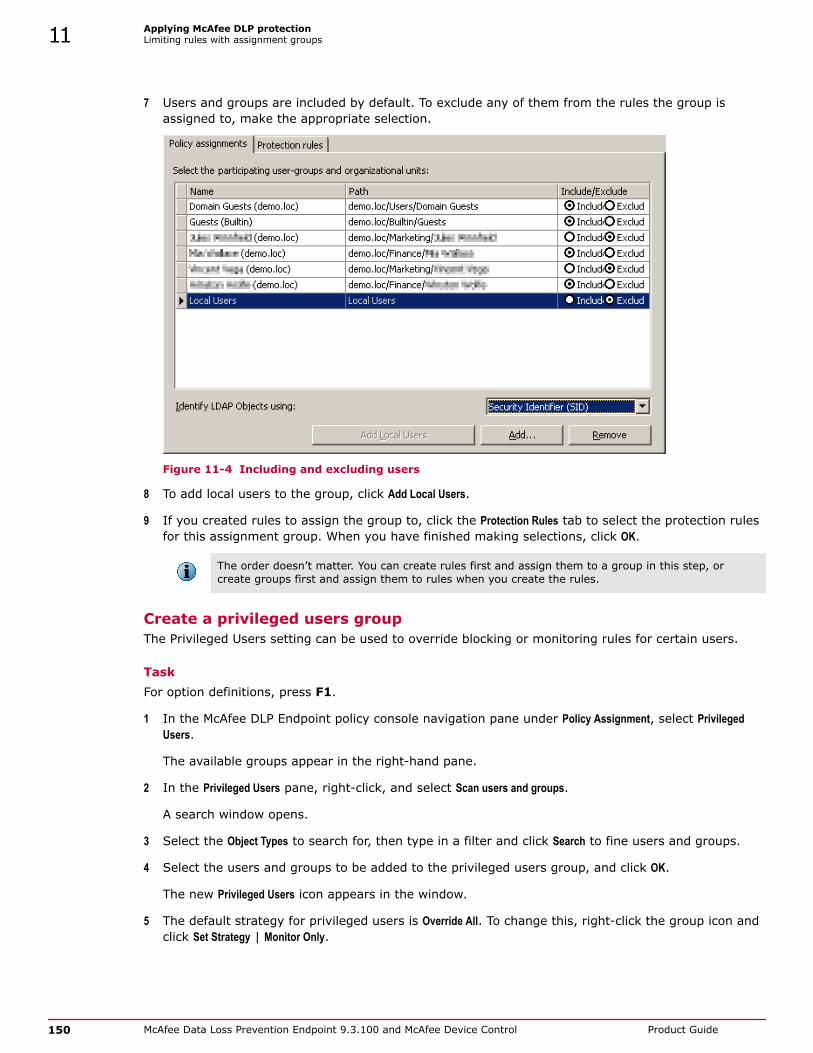
7 Users and groups are included by default. To exclude any of them from the rules the group isassigned to, make the appropriate selection.
Figure 11-4 Including and excluding users
8 To add local users to the group, click Add Local Users.
9 If you created rules to assign the group to, click the Protection Rules tab to select the protection rulesfor this assignment group. When you have finished making selections, click OK.
The order doesn’t matter. You can create rules first and assign them to a group in this step, orcreate groups first and assign them to rules when you create the rules.
Create a privileged users groupThe Privileged Users setting can be used to override blocking or monitoring rules for certain users.
TaskFor option definitions, press F1.
1 In the McAfee DLP Endpoint policy console navigation pane under Policy Assignment, select PrivilegedUsers.
The available groups appear in the right-hand pane.
2 In the Privileged Users pane, right-click, and select Scan users and groups.
A search window opens.
3 Select the Object Types to search for, then type in a filter and click Search to fine users and groups.
4 Select the users and groups to be added to the privileged users group, and click OK.
The new Privileged Users icon appears in the window.
5 The default strategy for privileged users is Override All. To change this, right-click the group icon andclick Set Strategy | Monitor Only.
11 Applying McAfee DLP protectionLimiting rules with assignment groups
150 McAfee Data Loss Prevention Endpoint 9.3.100 and McAfee Device Control Product Guide

Computer assignment groupsComputer assignment groups specify which computers are assigned which policies. You can use thisfeature to apply different policies to groups of computers in your network. When a computer group isassigned specific policies, those policies are enforced on the named computers, and user assignmentgroups in McAfee DLP Endpoint rules are lost.
Computer assignment groups is a feature of ePolicy Orchestrator. It is being described here because ofthe effect on McAfee DLP Endpoint rules. Computer assignment groups are accessed from the PolicyCatalog by specifying the Computer Assignment Group Category.
Assigning policies with computer assignment groups
The computer assignment group feature allows you to choose which McAfee DLP Endpoint rules youwant to assign to a particular group of computers.
Figure 11-5 Assigning rules with ePO computer assignment groups
If, for example, you have assigned Marketing computers to a group, and then select an emailprotection rule and a web post protection rule in the computer assignment group definition, those DLPrules are applied to all users in the Marketing computer group, and not according to any UserAssignment Groups defined in the DLP protection rule. Any rules not included in the computerassignment group (for example, a removable storage protection rule) are applied according to theUser Assignment Group definition in the rule.
Applying McAfee DLP protectionLimiting rules with assignment groups 11
McAfee Data Loss Prevention Endpoint 9.3.100 and McAfee Device Control Product Guide 151

11 Applying McAfee DLP protectionLimiting rules with assignment groups
152 McAfee Data Loss Prevention Endpoint 9.3.100 and McAfee Device Control Product Guide

Monitoring and reportingThis section describes the DLP Incident Manager and how to use it to trackand review policy violations, and DLP Operational Events, which is used totrack administrative events such as agent deployment, policy refresh, and soforth.
Chapter 12 Monitoring and reporting eventsChapter 13 Users and permission sets
McAfee Data Loss Prevention Endpoint 9.3.100 and McAfee Device Control Product Guide 153

Monitoring and reporting
154 McAfee Data Loss Prevention Endpoint 9.3.100 and McAfee Device Control Product Guide

12 Monitoring and reporting events
Administrators view security events in the DLP Incident Manager.
McAfee DLP Endpoint version 9.3 divides events into two classes: incidents (that is, policy violations)and administrative events. These events are viewed in the two consoles, DLP Incident Manager andDLP Operational Events.
When the McAfee DLP Endpoint software on a managed computer determines a policy violation hasoccurred, it generates an event and sends it to the ePolicy Orchestrator Event Parser. These events areviewed, filtered, and sorted in the DLP Incident Manager console, allowing security officers oradministrators to view events and respond quickly. If applicable, suspicious content is attached asevidence to the event.
As McAfee DLP Endpoint takes a major role in a enterprise’s effort to comply with all regulation andprivacy laws, the DLP Incident Manager presents information about the transmission of sensitive datain an accurate and flexible way. Auditors, signing officers, privacy officials and other key workers canuse the DLP Incident Manager to observe suspicious or unauthorized activities and act in accordancewith enterprise privacy policy, relevant regulations or other laws. The system administrator or thesecurity officer can follow administrative events regarding agents and policy distribution status.
The DLP Operational Events console displays details on client deployment, policy changes, policydeployment, Safe Mode logons, agent overrides, and other administrative events.
Contents Collecting and managing data Redaction and role-based access control
Collecting and managing dataData from the DLP tables in the ePolicy Orchestrator database is viewed in the DLP Incident Managerand DLP Operational Events pages or is collated into reports and dashboards.
Monitoring the system consists of gathering and reviewing evidence and events, and producingreports. You can use the database administration tools to manage the database and view databasestatistics.
By reviewing recorded events and evidence, administrators determine when rules are too restrictive,causing unnecessary work delays, and when they are too lax, allowing data leaks.
Contents DLP Incident Manager/DLP Operational Events Incident tasks Edit the task runner Creating reports Working with the database Documenting events with evidence
12
McAfee Data Loss Prevention Endpoint 9.3.100 and McAfee Device Control Product Guide 155

DLP Incident Manager/DLP Operational EventsAdministrators use the DLP Incident Manager page in ePolicy Orchestrator to view the security events frompolicy violations along with the evidence and hit highlighting specified in the agent configuration, aswell as hit counts and other details. It also defines Incident Tasks. Administrators use the DLPOperational Events page to view administrative events such as agent deployments.
To improve security, McAfee DLP Endpoint software version 9.3 has eliminated the WCFcommunications link formerly used to connect the ePolicy Orchestrator database to the McAfee DLPMonitor. The new monitor interface is an integral part of ePolicy Orchestrator and consists of twoePolicy Orchestrator pages:
• DLP Incident Manager — to display security events
• DLP Operational Events — to display administrative events
A new feature, Incident Tasks, is included as a tab in the Incident Manager. In version 9.3, three tasksare available: email notification of policy violations, purging according to predefined criteria, andsetting a reviewer.
How it works
The Incident List tab of the DLP Incident Manager has all of the functionality of the old McAfee DLPMonitor. Event details are viewed by clicking on a specific event. You can create and save filters tomodify the view. You can also modify the view by selecting and ordering columns. You can labelindividual events (for filtering by label) and set properties for status, resolution, and assignedreviewer. The DLP Operational Events page works in an identical manner with administrative events.
Figure 12-1 DLP Incident Manager
Use the Incident Tasks tab to set criteria for scheduled tasks. For email tasks you set up the email(recipients, subject, body) as well as define the criteria that will trigger it being sent.
The Incident Tasks tab works with ePolicy Orchestrator Server Tasks to schedule tasks. A new servertask, DLP tasks runner, is installed with the McAfee DLP Endpoint software for this purpose. The IncidentList tab works with ePolicy Orchestrator Queries & Reports to create reports and display data onePolicy Orchestrator dashboards.
12 Monitoring and reporting eventsCollecting and managing data
156 McAfee Data Loss Prevention Endpoint 9.3.100 and McAfee Device Control Product Guide

Use case — setting propertiesProperties are data added to an incident that requires follow-up. You can add theproperties from Actions | Set Properties or from the Details pane of the incident. The propertiesare:
• Severity
• Status
• Resolution
• Reviewer
The reviewer can be any ePolicy Orchestrator user. The reason severity can be changed isthat if the administrator determines that the status is False Positive, then the originalseverity is no longer meaningful.
Use case — changing the viewIn addition to using filters to modify the view, you can also customize the fields and theorder of display. Customized views can be saved and reused.
Creating a filter involves the following tasks:
1 Click Actions | View | Choose Columns to open the view edit window.
2 Use the x icon to delete columns, and the arrow icons to move columns to the left orright.
3 Click Update View to apply the customized view, and Actions | View | Save View to save forfuture use. When you save the view, you can also save the time and custom filters.Saved views can be chosen from the drop-down menu at the top of the page.
View event detailsYou can view event details and evidence from the DLP Incident Manager page. You can also assign areviewer, and edit the severity, status, and resolution of the incident.
Task1 In ePolicy Orchestrator, select Menu | Data Protection | DLP Incident Manager.
2 In the Incident List pane, sort the list by clicking any column. Sort by severity, time of day, user, andso forth.
3 Click an event in the list to display its full details. The event information appears in the DLP IncidentInformation pane.
Monitoring and reporting eventsCollecting and managing data 12
McAfee Data Loss Prevention Endpoint 9.3.100 and McAfee Device Control Product Guide 157

4 To view redacted fields, select Actions | Release Redaction. In the dialog box that appears, enter theuser name and password of an administrator with permission to reveal sensitive data. Redactedevidence is viewed in a similar manner.
Depending on how the role-based permissions are set up, two administrators might be required: onewith permission to view the DLP Incident Manager display (except sensitive text), the other withpermission to view sensitive text. See Create and define permission sets in this guide forinformation on setting up the permission sets.
5 If Store Evidence is part of the protection or discovery rule producing the event, the number ofevidence files is displayed on the Evidence tab in the lower section of the DLP Incident Information pane.To view the evidence file, select the tab to display the file list. Click a link to display the evidencefile.
Figure 12-2 Incident List detail
Define filtersWhen viewing events on the DLP Incident Manager or DLP Operational Events pages, you might needto reduce the amount of information shown to see relevant details at a glance. You can apply a filter todefine specific criteria to reduce the list of events to only relevant data.
The McAfee DLP Endpoint version 9.3 monitoring features (DLP Incident Manager and DLP OperationalEvents) do not have predefined filters (except for time filters), only user-defined filters.
For DLP Operational Events, only DLP operational event properties and DLP labels are displayed asfilter options.
When you create a new filter, it is displayed as unsaved in the Filter window, and is preserved for thatuser session. That is, you can switch between unsaved and no custom filter without losing thefilter. You must save the filter before closing the user session (that is, logging off of ePolicyOrchestrator) or if you want to work with more than one filter.
Filter parameters can define events (Event ID, Event Type), aspects of the policy (File Types,Reactions), or properties (Resolution, Status). If you have created DLP Labels, you can use them todefine filters.
12 Monitoring and reporting eventsCollecting and managing data
158 McAfee Data Loss Prevention Endpoint 9.3.100 and McAfee Device Control Product Guide

TaskFor option definitions, click ? in the interface.
1 Select the event list you want to filter:
• Select Menu | Data Protection | DLP Incident Manager for the Incidents List page.
• Select Menu | Data Protection | DLP Operational Events for the Operational Events List page.
2 Select Actions | Filter | Edit Filter – or click Edit next to the Filter window.
3 Add properties from the Available Properties list by clicking the arrow to the right of the property name.Fill in the Comparison and Value fields using the drop-down lists or by typing in the value.
You can remove a property by clicking the arrow to the left of the Property field, or add more valuesto a property by clicking +.
Use the property Occurred (UTC) to add times and Occurred (Endpoint) to add dates. The property Occurredrefers to online/offline status.
4 Click Update Filter to apply the filter.
The message (unsaved) appears in the Filter drop-down list window. An unsaved filter remainsavailable until you log off ePolicy Orchestrator.
5 To save the filter for future use, select Actions | Filter | Save Filter.
You are prompted for a name, and are asked to define the filter as Private or Public. Click OK whenyou are finished.
To delete a filter, select it from the Filter drop-down list, then select Actions | Filter | Delete Filter.
Example - Filter by agent versionIf you are using McAfee DLP Endpoint in backward-compatible mode and have multiple clientversions deployed, you might want to look only at results from a particular client version. Todo this, do the following:
1 In the DLP Incidents section of the property list, select Agent version.
This property refers to the McAfee DLP Endpoint client version, not the McAfee Agentversion. That property is listed as Product Version (Agent).
2 In the Comparison field, select a value that includes or excludes the targeted agent version.The Value field must be entered from a list. The software scans all incidents and only listsexisting values.
See also Use labels to mark events on page 159
Use labels to mark eventsCustomized labels allow you to mark events with a unique tag. The events can then be easily sortedand filtered by these customized labels.
Task1 In ePolicy Orchestrator, select Menu | Data Protection | DLP Incident Manager.
Labels can also be used with DLP Operational Events in a similar manner.
Monitoring and reporting eventsCollecting and managing data 12
McAfee Data Loss Prevention Endpoint 9.3.100 and McAfee Device Control Product Guide 159

2 To add a label select an event or several events. Select Actions | Manage Labels | Set.• Select Add then type a new label name. Click OK
• Select Replace All then select an existing label or labels. Click OK
The label or labels are attached to the events. You can now use these labels to filter or sort the list.
3 To remove labels:Option Description
To remove a label fromspecific events
Select the event or events, then select Actions | Manage Labels | Detach. Inthe dialog box, select the label or labels to remove from the event.Click OK.
To remove a label fromall events
select Actions | Manage Labels | Delete. In the dialog box, select the label orlabels to delete from the list. Click OK.
See also Define filters on page 158
Incident tasksThe Incident Tasks tab of the DLP Incident Manager uses ePolicy Orchestrator Server Tasks to performoperations when certain criteria are met.
In the current version, three incident tasks are supported:
• Mail notification — used to inform users, mangers, or others based on specified criteria
• Set reviewer — used to restrict viewing access when assigning incidents to a reviewer or group
• Purge — used to purge incidents from the database. Criteria can include any incident field, as wellas ePolicy Orchestrator tags or system tree path.
The tasks are run by the DLP tasks runner server task.
Use case — creating a new incident taskClick Actions | New and select one of the three task types. Fill in required and optional fieldsin the Task Properties pane. Add and define properties in the incident properties pane. Savethe task.
Incident property values can only be added from values that exist in the database. Youcannot create a task based on theoretically expected results.
Use case — changing the viewThe Incident Tasks view is customizable. Select Actions | Choose columns to view the Select theColumns to Display page. You can add or delete columns and rearrange the order. Click Save toenable the customized view, or Use Default to return to the standard view.
Use case — enabling/disabling, editing, deletingIn the default view, the Actions column is displayed, allowing you to Edit, Enable/Disable, orDelete the task directly in the Incident Tasks page. If the column is not displayed, select Actions| Set to enable/disable, Actions | Edit to edit, or Actions | Delete to remove a task.
12 Monitoring and reporting eventsCollecting and managing data
160 McAfee Data Loss Prevention Endpoint 9.3.100 and McAfee Device Control Product Guide

Edit the task runnerThe ePolicy Orchestrator server task DLP task runner schedules and runs tasks set up in DLP IncidentManager Incident Tasks.
Before you beginSet up one or more tasks in DLP Incident Manager Incident Tasks.
The DLP task runner has a default schedule of once a day, but no tasks are enabled by default. Youmust edit the default settings to run any tasks, or create a new task runner task.
TaskFor option definitions, press F1.
1 On the ePolicy Orchestrator Server Tasks page, click New Task.
The Server Task Builder appears.
2 On the Description page, type a name for the task. Click Next.
3 On the Actions page, select DLP incident tasks runner from the Actions drop-down list. Click Select Tasks andselect the tasks from the list.
Figure 12-3 Editing the task runner
Tasks are displayed on the Actions page.
4 Use the arrows to set the task order, or delete tasks you don't want to run by clicking X.
5 On the Schedule page, adjust the schedule as required. Click Next.
6 Review the settings, then click Save.
Creating reportsMcAfee DLP Endpoint software utilizes ePolicy Orchestrator reporting features. Severalpre-programmed reports are available, as well as the option of designing custom reports.
See the Querying the Database topic in the McAfee ePolicy Orchestrator Product Guide for details.
Two types of reports are supported:
Monitoring and reporting eventsCollecting and managing data 12
McAfee Data Loss Prevention Endpoint 9.3.100 and McAfee Device Control Product Guide 161
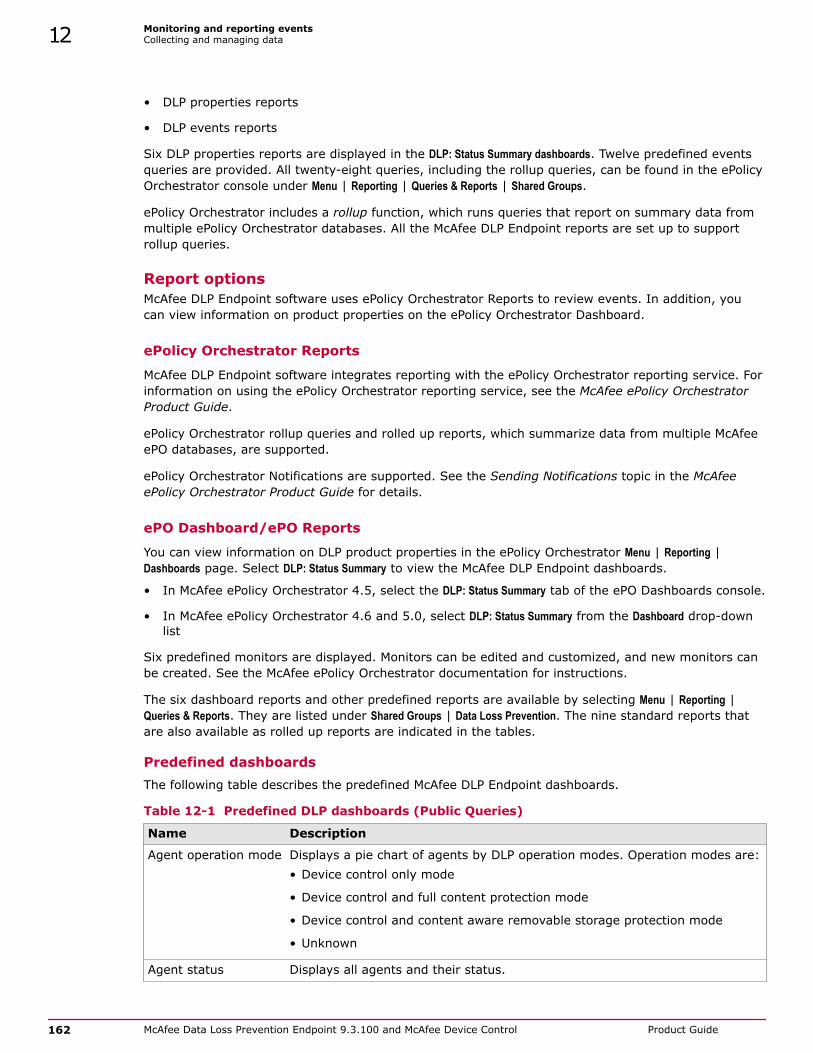
• DLP properties reports
• DLP events reports
Six DLP properties reports are displayed in the DLP: Status Summary dashboards. Twelve predefined eventsqueries are provided. All twenty-eight queries, including the rollup queries, can be found in the ePolicyOrchestrator console under Menu | Reporting | Queries & Reports | Shared Groups.
ePolicy Orchestrator includes a rollup function, which runs queries that report on summary data frommultiple ePolicy Orchestrator databases. All the McAfee DLP Endpoint reports are set up to supportrollup queries.
Report optionsMcAfee DLP Endpoint software uses ePolicy Orchestrator Reports to review events. In addition, youcan view information on product properties on the ePolicy Orchestrator Dashboard.
ePolicy Orchestrator Reports
McAfee DLP Endpoint software integrates reporting with the ePolicy Orchestrator reporting service. Forinformation on using the ePolicy Orchestrator reporting service, see the McAfee ePolicy OrchestratorProduct Guide.
ePolicy Orchestrator rollup queries and rolled up reports, which summarize data from multiple McAfeeePO databases, are supported.
ePolicy Orchestrator Notifications are supported. See the Sending Notifications topic in the McAfeeePolicy Orchestrator Product Guide for details.
ePO Dashboard/ePO Reports
You can view information on DLP product properties in the ePolicy Orchestrator Menu | Reporting |Dashboards page. Select DLP: Status Summary to view the McAfee DLP Endpoint dashboards.
• In McAfee ePolicy Orchestrator 4.5, select the DLP: Status Summary tab of the ePO Dashboards console.
• In McAfee ePolicy Orchestrator 4.6 and 5.0, select DLP: Status Summary from the Dashboard drop-downlist
Six predefined monitors are displayed. Monitors can be edited and customized, and new monitors canbe created. See the McAfee ePolicy Orchestrator documentation for instructions.
The six dashboard reports and other predefined reports are available by selecting Menu | Reporting |Queries & Reports. They are listed under Shared Groups | Data Loss Prevention. The nine standard reports thatare also available as rolled up reports are indicated in the tables.
Predefined dashboardsThe following table describes the predefined McAfee DLP Endpoint dashboards.
Table 12-1 Predefined DLP dashboards (Public Queries)
Name Description
Agent operation mode Displays a pie chart of agents by DLP operation modes. Operation modes are:• Device control only mode
• Device control and full content protection mode
• Device control and content aware removable storage protection mode
• Unknown
Agent status Displays all agents and their status.
12 Monitoring and reporting eventsCollecting and managing data
162 McAfee Data Loss Prevention Endpoint 9.3.100 and McAfee Device Control Product Guide

Table 12-1 Predefined DLP dashboards (Public Queries) (continued)
Name Description
Agent version Displays the distribution of endpoints in the enterprise. Used to monitor agentdeployment progress.
Bypassed agents Displays how many DLP nodes are in policy bypass mode. This is a real-timeview that refreshes when a bypass begins or expires.
Enforced rules Displays the number of user sessions enforcing each rule, grouped by ruletype. This dashboard replaces the separate device, protection, and discoveryenforced rule dashboards of previous versions.
Policy distribution Displays the DLP policy distribution throughout the enterprise. Used tomonitor progress when deploying a new policy.
Predefined event reportsThe following table describes the predefined McAfee DLP Endpoint event reports.
Table 12-2 Predefined DLP event reports (My Queries)
Name Description
Agent operation mode Displays agents by operation mode.
Agent status(also rolled up report)
Displays all agents and their status. This report has new values forversion 9.3 clients:• Driver Installation failed • Agent installation failed
• Agent installed - pendingreboot
• Agent is running
• Agent up - no policy • Agent is not running
• Agent uninstalled
Agent to ePO communicationsdistribution(also rolled up report)
Displays endpoints according to the date of their lastcommunication with ePolicy Orchestrator.
Agent version(also rolled up report)
Displays the distribution of endpoints in the enterprise. Used tomonitor agent deployment progress.
Block and block write deviceevents
Displays device events that were blocked or write-blocked.
Bypassed agents(also rolled up report)
Displays how many DLP nodes are in policy bypass mode. This is areal-time view that refreshes when a bypass begins or expires.
Daily events distribution byseverity
Displays a day's events ordered by severity.
Enforced rules(also rolled up report)
Displays the number of user sessions enforcing each rule, groupedby rule type.
Events by event type(also rolled up report)
Displays the number of events for each event type.
Events by protection rule Displays the number of events for each rule.
Events by protection / discoveryrule by date
Displays the number of events for each rule, for different dates.
Events by severity(also rolled up report)
Displays the number of events for each severity level.
Monitoring and reporting eventsCollecting and managing data 12
McAfee Data Loss Prevention Endpoint 9.3.100 and McAfee Device Control Product Guide 163

Table 12-2 Predefined DLP event reports (My Queries) (continued)
Name Description
Events by tag and category(also rolled up report)
Displays the number of events for each tag and content categorythat they recognize.
Evidence path distribution Displays the different evidence shares used by the agents. Usefulwhen there are several different agent configurations.
Policy distribution(also rolled up report)
Displays the DLP policy distribution throughout the enterprise.Used to monitor progress when deploying a new policy.
Privileged permissions Displays the current privileged DLP users. It allows you to drilldown to view normal DLP users as well as users with monitor onlypermissions, and users allowed to bypass all DLP events.
Undefined device classes Lists and shows a bar graph of the devices whose device classcannot be determined.
Unmanaged printers Lists and shows a bar graph of the unmanaged (whitelisted)printers and the number of nodes attached to each. Clicking eithera listed printer or a bar on the graph drills down to a list of thecomputers connected to it. Clicking on a computer drills down tothe properties of the computer.
Unsupported printers Lists and shows a bar graph of the unsupported printers (that is,printers detected by the DLP Endpoint that were not whitelistedbut failed to install a DLP proxy driver) and the number of nodesattached to each. Clicking either a listed printer or a bar on thegraph drills down to a list of the computers connected to it.Clicking on a workstation drills down to the properties of thecomputer.
Dashboard and report support for pre-9.3 clients
McAfee DLP Endpoint client version prior to 9.3 do not support multiple user sessions. Older clientscontinue to report properties as previously, and these are displayed in the Product Details page in theePolicy Orchestrator system tree. These clients are tagged as not supporting multi-user sessions.
To make the DLP MA Properties reporting task is backward compatible, certain properties – AgentStatus, Agent to ePO Communication Distribution, Bypassed Agents, and Policy Distribution – havebeen deprecated, that is, there is a version of the property for new clients and a version for olderclients. When upgrading, user-defined and user-modified queries add the note "Deprecated - pleasesee Release Notes". Reports that were not modified are replaced with the new functionality.
Set up Data Loss Prevention rolled up reportsRolled up reports are a function of ePolicy Orchestrator that can be used with McAfee DLP Endpointdata.
TaskFor option definitions, click ? in the interface.
1 In ePolicy Orchestrator, select Menu | Automation | Server Tasks.
2 Select New Task (or Actions | New Task).
3 Type a name for the task, and (optional) notes, then click Next.
4 From the Actions drop-down list, select Roll Up Data. From the Data Type drop-down list, select one ofthe McAfee DLP Endpoint report types: DLP Enforced Rules, DLP Enforced Rules (deprecated), DLP Events, DLPMA Properties, DLP MA Properties (deprecated), or DLP Passwords.
12 Monitoring and reporting eventsCollecting and managing data
164 McAfee Data Loss Prevention Endpoint 9.3.100 and McAfee Device Control Product Guide

5 Continue with the configuration as required. Click Next.
6 Set the schedule type, date and time. Click Next.
7 Review the setup information, then click Save.
Working with the databaseMcAfee DLP Endpoint software contains two tools for working with the database.
Administer the databaseUnwanted events can be removed from the events database.
Before you beginWhen removing events from the database, make sure they have been properly reportedand analyzed. We recommend creating a database backup prior to removing events.Removing all events from the system can potentially remove violations before they havebeen seen by security officers or administrators.
TaskFor option definitions, click ? in the interface.
1 In the McAfee DLP Endpoint policy console navigation pane, under Database Administration, selectDatabase Administration.
The administrative actions appear in the right-hand pane.
2 Select an action from the available list. The confirmation window appears.
Pay attention to the description of each option. Specifically, the Date option removes events olderthan the date specified.
3 Click Execute to proceed with the operation or Close to cancel the operation.
The operation progress bar window appears.
View database statisticsDatabase statistics can be viewed directly in the policy console.
TaskFor option definitions, click ? in the interface.
1 In the McAfee DLP Endpoint policy console navigation pane, under Database Administration, selectDatabase Statistics.
The list of available statistical values appears in the right-hand pane.
2 On the toolbar, select Refresh Database statistics to update the information.
3 Select any value from the available list to view details.
Monitoring and reporting eventsCollecting and managing data 12
McAfee Data Loss Prevention Endpoint 9.3.100 and McAfee Device Control Product Guide 165

Documenting events with evidenceEvidence is a copy of the file or email that caused a security event to be posted to the DLP IncidentManager.
Some rules allow the option of storing evidence. When this option is selected, an encrypted copy ofthe content that was blocked or monitored is stored in the predefined evidence folder on the endpointcomputer. When the McAfee DLP Endpoint software passes information to the server, the folder ispurged and the evidence is stored in the server evidence folder. Settings on the Evidence tab of theAgent Configuration can be used to control the maximum size and age of local evidence storage whenthe computer is offline.
Prerequisites for evidence storage
Evidence storage must be enabled before it can be used. This is the default condition for McAfee DataLoss Prevention software. If you do not want to save evidence, you can improve performance bydisabling the evidence service. The following are either required or set as defaults when setting up thesoftware:
• Evidence storage folder — Specifying the UNC path to the evidence storage folder is arequirement for applying a policy to McAfee ePolicy Orchestrator. See the Creating and configuringrepository folders in this guide for details on setting up the folder and setting access permissions(also known as Evidence Network Share).
• Evidence service — The evidence service is enabled in the Agent Configuration | Miscellaneous. It is asubentry under Reporting Service, which must also be enabled for evidence collection.
• Evidence replication setting — A setting in the Agent Configuration | Evidence tab allows you to selectevidence collection, hit highlighting, or both.
Evidence storage and memory
The number of evidence files stored per event has implications for storage volume, event parserperformance, and the screen rendering (and thus user experience) of the DLP Incident Manager andDLP Operational Events pages. To handle different evidence requirements, McAfee DLP Endpointsoftware does the following:
• The maximum number of evidence files to store per event is set in the Agent Configuration | Evidencetab. The default is 1,000; permissible entries are 1–10,000.
• When a large number of evidence files are linked to a single event only the first 100 filenames arestored in the database and displayed in the DLP Incident Manager details page. The remainingevidence files (up to the set maximum) are stored in the evidence storage share, but are notassociated with the event. Reports and queries that filter evidence based on filename have accessonly to these first 100 filenames.
• The DLP Incident Manager field Original Evidence Count displays the total evidence count.
• For all evidence-storing events and release from quarantine events, the McAfee DLP Endpoint clientsoftware creates an all_evidences.csv file which is stored with the evidence in the database. Thefile can be sent to end users for self-remediation. This can be done automatically by selecting theAttach Evidence CSV option in a mail notification task.
The CSV file is coded in UTF-16 to allow for localized filenames, and contains the file name, thefull-path location of the folder that contains the file, size, hit count, and https:// links to theevidence and hit highlight in the database.
When working in backward compatibility mode with previous client versions, evidence files beyond the100 stored in the database cannot be displayed because the older clients do not create theall_evidences.csv file.
12 Monitoring and reporting eventsCollecting and managing data
166 McAfee Data Loss Prevention Endpoint 9.3.100 and McAfee Device Control Product Guide
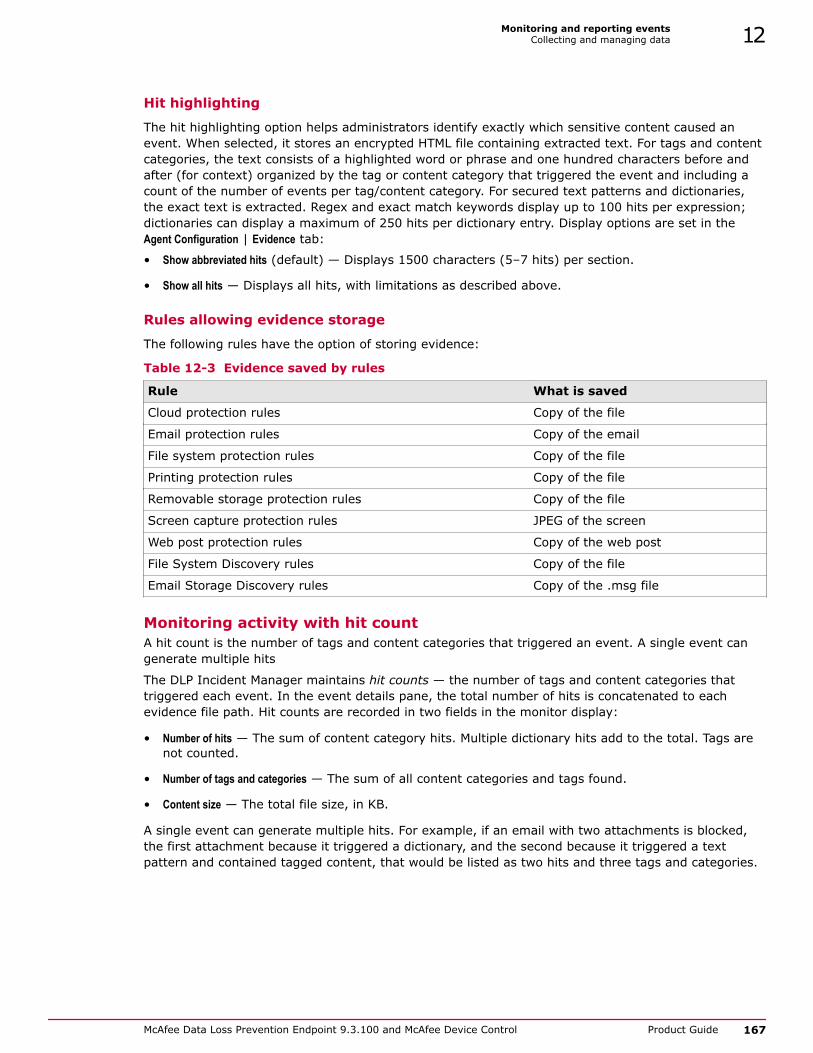
Hit highlighting
The hit highlighting option helps administrators identify exactly which sensitive content caused anevent. When selected, it stores an encrypted HTML file containing extracted text. For tags and contentcategories, the text consists of a highlighted word or phrase and one hundred characters before andafter (for context) organized by the tag or content category that triggered the event and including acount of the number of events per tag/content category. For secured text patterns and dictionaries,the exact text is extracted. Regex and exact match keywords display up to 100 hits per expression;dictionaries can display a maximum of 250 hits per dictionary entry. Display options are set in theAgent Configuration | Evidence tab:
• Show abbreviated hits (default) — Displays 1500 characters (5–7 hits) per section.
• Show all hits — Displays all hits, with limitations as described above.
Rules allowing evidence storage
The following rules have the option of storing evidence:
Table 12-3 Evidence saved by rules
Rule What is saved
Cloud protection rules Copy of the file
Email protection rules Copy of the email
File system protection rules Copy of the file
Printing protection rules Copy of the file
Removable storage protection rules Copy of the file
Screen capture protection rules JPEG of the screen
Web post protection rules Copy of the web post
File System Discovery rules Copy of the file
Email Storage Discovery rules Copy of the .msg file
Monitoring activity with hit countA hit count is the number of tags and content categories that triggered an event. A single event cangenerate multiple hits
The DLP Incident Manager maintains hit counts — the number of tags and content categories thattriggered each event. In the event details pane, the total number of hits is concatenated to eachevidence file path. Hit counts are recorded in two fields in the monitor display:
• Number of hits — The sum of content category hits. Multiple dictionary hits add to the total. Tags arenot counted.
• Number of tags and categories — The sum of all content categories and tags found.
• Content size — The total file size, in KB.
A single event can generate multiple hits. For example, if an email with two attachments is blocked,the first attachment because it triggered a dictionary, and the second because it triggered a textpattern and contained tagged content, that would be listed as two hits and three tags and categories.
Monitoring and reporting eventsCollecting and managing data 12
McAfee Data Loss Prevention Endpoint 9.3.100 and McAfee Device Control Product Guide 167

Redaction and role-based access controlMcAfee DLP Endpoint software limits the viewing of incidents in two ways.
To meet legal demands in some markets, and to protect confidential information in all circumstances,McAfee DLP Endpoint software offers a data redaction feature. When using data redaction, specificfields in the DLP Incident Manager and DLP Operational Events displays containing confidentialinformation are encrypted to prevent unauthorized viewing, and links to evidence are hidden.
In addition to specific fields being designated as confidential, reviewers can be restricted to viewingonly incidents assigned to them, or to specific user groups.
Protecting confidentiality with redactionData redaction is the encrypting of confidential information to prevent unauthorized viewing. Somecountries require redaction practices be followed, and it is considered Best Practice (even when notrequired by law) to separate incident and operational events reviewing permissions, and to blocksensitive data from those not required to view it.
Redacted information is encrypted in:
• the DLP Incident Manager display
• the DLP Operational Events display
Currently, the fields computer name and user name are predefined as private.
There are two ways of viewing sensitive data:
• Giving administrators permission to view all fields in the incidents they are allowed to view
• Creating a "redaction reviewer" — a reviewer who cannot view incidents, but can reveal encryptedfields when another reviewer views the incident
(This is the "4-eyes" review model that was the only option in earlier versions of McAfee DLPEndpoint.)
DLP Permissions in ePolicy Orchestrator
The following table shows how DLP permissions affect access to features and ePolicy Orchestratorreports:
Table 12-4 Summary of DLP Incidents and Operational Events permissions and their effects
Permission Description Effect in
DLP PolicyManager
DLP IncidentManager
DLPOperationalEvents
ePO Reports
Policy
User cannotview policies.
User isunauthorized toview or createDLP policies.
DLP Policy Mgrtab is notavailable.
Not relevant.Depends onincident accesspermissions.
Not relevant.Depends onoperationalevents accesspermissions.
Not relevant.
User can onlyview policies.
User isauthorized toview policies,but cannotcreate or editthem.
DLP Policy Mgrtab is available.
12 Monitoring and reporting eventsRedaction and role-based access control
168 McAfee Data Loss Prevention Endpoint 9.3.100 and McAfee Device Control Product Guide

Table 12-4 Summary of DLP Incidents and Operational Events permissions and their effects(continued)
Permission Description Effect in
DLP PolicyManager
DLP IncidentManager
DLPOperationalEvents
ePO Reports
User can viewand savepolicies.
User is authorizeto create andedit policies.
Incidents Access Control
User can notview DLPincidents.
User isunauthorized toview the DLPIncidentManager.
Not relevant.Depends onpolicy accesspermissions.
DLP IncidentManager tab isnot available.
Not relevant.Depends onoperationalevents accesspermissions.
All DLPincidents arefiltered out.
User can viewincidentsassigned tohim.
User can view allpersonallyassigned DLPincident data.
DLP IncidentManager tab isavailable.
Incidents arefiltered byuser accessrights.
User can viewincidentsassigned tomembers ofthe followingpermissionssets.
User can viewDLP incidentsassigned togroups he is amember of, andincidentsassigned to anymember of thosegroups.
User can viewall incidents.
User can view allDLP incidentdata.
All incidentsare displayed.
Incidents Data Redaction
Sensitive datais redacted.
User is notauthorized toview confidentialfields.
Not relevant.Depends onpolicy accesspermissions.
The display is available, but sensitive fields areredacted. Evidence is not accessible.
Sensitive datais in clear text.
User can view allfields.
All fields are displayed, evidence is accessible.
User canrevealredactedsensitive data.
User is notauthorized toview DLPincidents, butcan decryptconfidentialfields in thepresence of auser who canview DLPincidents.
Not relevant. Not relevant. No DLPReports areauthorized.
Incident Task Creation
User cancreate a MailNotificationtask.
User can createthe selectedtasks.
Not relevant.Depends onpolicy accesspermissions.
Only availableto users with atleast partialaccess.
Not relevant.Depends onincident accesspermissions.
Not relevant.
Monitoring and reporting eventsRedaction and role-based access control 12
McAfee Data Loss Prevention Endpoint 9.3.100 and McAfee Device Control Product Guide 169

Table 12-4 Summary of DLP Incidents and Operational Events permissions and their effects(continued)
Permission Description Effect in
DLP PolicyManager
DLP IncidentManager
DLPOperationalEvents
ePO Reports
User cancreate a Purgetask.
User cancreate a SetReviewer task.
Operational Events
User cannotviewoperationalevents.
User isunauthorized toview the DLPOperationalEvents display.
Not relevant.Depends onpolicy accesspermissions.
Not relevant.Depends onincident accesspermissions.
DLP OperationalEvents tab isnot available.
Operationalevents arefiltered byuser accessrights.
User can viewall operationalevents.
User can view allDLP operationalevent data.
DLP OperationalEvents tab isavailable.
Alloperationalevents aredisplayed.
See also Create and define permission sets on page 175
Role-based access controlIncidents in the DLP Incident Manager or DLP Operational Events consoles can be assigned to specificusers or user groups.
Role-based access control gives granular control over the viewing of DLP Incident Manager and DLPOperational Events data. By assigning incidents to specific administrators or groups and settingpermissions in ePolicy Orchestrator permission sets, you can control which reviewers see whichincidents.
Workflow
To use the role-based access control feature, use the following workflow:
• Create a reviewer — You can use an existing user or user group, or create a new user in ePolicyOrchestrator Menu | User Management | Users.
• Create a permission set — In ePolicy Orchestrator Menu | User Management | Permission Sets, create anew permission set then assign the Data Loss Prevention permission to your user.
• Create a Set Reviewer task in DLP Incident Manager | Incident Tasks to assign reviewers according to presetconditions.
Use case — email protection rulesAs an example, lets say you want to assign an administrator to review all violations ofemail protection rules. The exact order is not important, but you would need to do thefollowing:
12 Monitoring and reporting eventsRedaction and role-based access control
170 McAfee Data Loss Prevention Endpoint 9.3.100 and McAfee Device Control Product Guide

1 Create a DLP email policy reviewer. In ePolicy Orchestrator, under User Management | Users,create a user with a suitable name, for example "DLP email reviewer".
2 Create a new permission set, let's call it "Review DLP email," assign your new reviewerto it, and set the Data Loss Prevention permissions. To activate the role-based permissions,you have to allow your user to either "view" or "partially view" incidents and events. Ifyou select "partially view," the reviewer will not be able to view private (redacted)fields.
3 You can assign reviewers manually (from the incident details pane) or automatically. Toautomatically assign your reviewer all email incidents, go to DLP Incident Manager | IncidentTasks and create a new Set Reviewer task. Select the Process Product property and set it equalto Microsoft Outlook. If you might see incidents from Lotus Notes, add that property aswell.
The new reviewer is assigned the next time the ePolicy Orchestrator server task DLP incidenttasks runner is run.
Monitoring and reporting eventsRedaction and role-based access control 12
McAfee Data Loss Prevention Endpoint 9.3.100 and McAfee Device Control Product Guide 171

12 Monitoring and reporting eventsRedaction and role-based access control
172 McAfee Data Loss Prevention Endpoint 9.3.100 and McAfee Device Control Product Guide

13 Users and permission sets
We recommend creating specific administrator roles and permissions in ePolicy Orchestrator forMcAfee DLP Endpoint policy console and DLP Incident Manager. These roles can include creating andsaving policies, viewing (but not changing) policies, generating override, uninstall, and quarantinerelease keys, viewing the DLP Incident Manager, and revealing sensitive fields.
System tree filtering permissions support
McAfee DLP Endpoint supports ePolicy Orchestrator System Tree filtering permissions in the DLPIncident Manager and DLP Operational Events. As a result, McAfee ePO operators can only seeincidents from computers in their permitted System Tree portion. Group Administrators do not haveany permissions in the ePolicy Orchestrator System Tree by default, so regardless of permissionsassigned in the Data Loss Prevention permission set, they cannot see any incidents in DLP IncidentManager or DLP Operational Events.
Customers who have been using Group Administrators in Data Loss Prevention permission sets are advisedto give Group Administrators View "System Tree" tab permission (under Systems) and Sytem Tree accesspermissions at the appropriate level.
Sensitive data redaction and the ePolicy Orchestrator permission sets
To meet the legal demand in some markets to protect confidential information in all circumstances,McAfee DLP Endpoint software offers a data redaction feature. Fields in the DLP Incident Manager andDLP Operational Events containing confidential information are encrypted to prevent unauthorizedviewing, and links to sensitive evidence are hidden. The feature is designed with a "double key"release. This means that to use the feature, you must create two permission sets: one to view theincidents and events and another to view the encrypted fields. Both roles are required to use thefeature.
Contents DLP Permission Sets Create and define McAfee DLP administrators Create and define permission sets
DLP Permission SetsDLP Permission Sets assign permissions to view and save policies, and view redacted fields. They arealso used to assign role-based access control (RBAC).
Data Loss Prevention permission sets are divided into five sections:
13
McAfee Data Loss Prevention Endpoint 9.3.100 and McAfee Device Control Product Guide 173

• Policy • Incident Task Creation
• Incident Access Control • Operational Events
• Incident Data Redaction
This allows you to differentiate between DLP policy administrators, incident and operational eventadministrators, and incident reviewers. The option User cannot view DLP incidents in the Incidents Access Controlsection renders the other incident sections unavailable (except for the reveal redacted data option).Otherwise, options are independent, and administrative and review roles can be assigned as desired.
Permissions for setting release keys for Agent Override and Uninstall, and for releasing quarantinedemails and files, have been moved to the Help Desk Actions permission set.
Use case - DLP administratorUse the following selections for a DLP administrator who only creates policies and has noevent review responsibilities.
• In the Policy section, select User can view and save policies.
• In the Incident Access Control section, select User cannot view DLP incidents.
Optionally, the DLP administrator might be allowed to view operational events.
Use case — redacted fields reviewerThis example requires setting permissions for two reviewers: one to review events andincidents, one to view the redacted fields. Assuming that reviewer roles are separated frompolicy administrator roles, make the following selections:
• For both reviewers — in the Policy section, select User cannot view and save policies.
• For the incident reviewer —in the Incident Access Control section, select either of thepartial view options: User can see incidents assigned to him or User can see incidents assigned tomembers of the following permission sets:. In the Incident Data Redaction section, select Sensitivedata is redacted.
• For the redaction reviewer —in the Incident Access Control section, select User cannot viewDLP incidents. In the Incident Data Redaction section, select User can reveal redacted sensitivedata (4 eyes).
Create and define McAfee DLP administratorsAdministrative users can be created either before or after the permission sets assigned to them.
TaskFor option definitions, click ? in the interface.
1 In McAfee ePolicy Orchestrator, select Menu | User Management | Users.
2 Click New User.
13 Users and permission setsCreate and define McAfee DLP administrators
174 McAfee Data Loss Prevention Endpoint 9.3.100 and McAfee Device Control Product Guide

3 Type a user name and specify logon status, authentication type, and permission sets.
We recommend creating user groups related to the role, for example DLP QuarantineAdministrator.
The order of creating users and permission sets is not critical. If you create users first, user namesappear in the permission set form and you can attach them to the set. If you create permission setsfirst, the permission set names appear in the user form and you can attach the user to them.
4 Click Save.
Create and define permission setsPermission sets are useful for defining different administrative roles in McAfee DLP Endpoint software.
TaskFor option definitions, click ? in the interface.
1 In McAfee ePolicy Orchestrator, select Menu | User Management | Permission Sets.
2 Select a pre-defined permission set or click Actions | New Permission Set to create a new set.
a Type a name for the set and select users.
The order of creating users and permission sets is not critical. If you create users first, usernames appear in the permission set form and you can attach them to the set. If you createpermission sets first, the permission set names appear in the user form and you can attach theuser to them.
b Click Save.
3 In the Data Loss Prevention field for the permission set, click Edit.
4 To define Role Based Access Control (RBAC) for this user or group, select the desired permissionsthen click Save.
Permissions can be set separately for five categories:
• policies • incident task creation
• incident access control • operational events
• incident data redaction
Figure 13-1 Editing a permission set for McAfee DLP Endpoint
Users and permission setsCreate and define permission sets 13
McAfee Data Loss Prevention Endpoint 9.3.100 and McAfee Device Control Product Guide 175

13 Users and permission setsCreate and define permission sets
176 McAfee Data Loss Prevention Endpoint 9.3.100 and McAfee Device Control Product Guide

Non-standard and advancedoperationsIn normal operation, ePolicy Orchestrator is used for all system changes.Situations can occur, however, that require doing things like upgradingpolicies or uninstalling the client software manually.
Chapter 14 Non-standard operationsChapter 15 Diagnostics
McAfee Data Loss Prevention Endpoint 9.3.100 and McAfee Device Control Product Guide 177

Non-standard and advanced operations
178 McAfee Data Loss Prevention Endpoint 9.3.100 and McAfee Device Control Product Guide

14 Non-standard operations
In some situations, the McAfee DLP Endpoint client must be uninstalled when ePolicy Orchestrator isnot available.
Similar, but more common operations. include agent bypass and quarantine release.
Contents Agent bypass and related features Advanced topics: Running the PST crawler from the command line
Agent bypass and related featuresAgent bypass is a temporary suspension of blocking rules. It is applied when a user needs temporarypermission to send information normally considered sensitive.
Agent bypass temporarily suspends blocking by the endpoint software for a specified amount of time.When in bypass mode, the endpoint software still collects and sends event information to the ePolicyOrchestrator Event Parser. Events are marked with the bypass flag. The user does not receive visualnotification of events while in bypass mode.
The bypass mechanism is known as "challenge/response." The user opens a McAfee DLP Endpointclient pop-up that displays an Identification Code and Revision ID. This code and ID are sent to the DLPAdministrator to request a release code. The administrator accepts the request by creating a releasecode and sending it to the user, who enters it in the pop-up Release Code text box. For security, a new IDcode is generated each time you open the pop-up window, and the release code is generated from it.Thus, the user must leave the pop-up window open until the matching release code is entered.
Agent bypass is no longer terminated by logging out or restarting the computer. It remains active forthe full time period set in the policy. (Bypass duration can range from 5 minutes to 30 days.)
Creating the agent bypass release code requires the McAfee Help Desk utility, which is included in theMcAfee DLP Endpoint installer. See the McAfee Help Desk documentation for more information onrelease codes.
Related functions
Agent uninstall
McAfee DLP Endpoint client software is protected from unauthorized removal. There are two methodsof authorized removal:
• Network uninstall from ePolicy Orchestrator, performed by the McAfee ePO administrator.
• Local uninstall using Windows Add or Remove Programs. This method uses the challenge/responsemechanism.
Quarantine release
14
McAfee Data Loss Prevention Endpoint 9.3.100 and McAfee Device Control Product Guide 179

When the McAfee DLP Discover crawler quarantines sensitive emails or files, the challenge/responsemechanism is used to release the information from quarantine. Release from quarantine uses only theRelease Code, not the Revision ID.
Use case — master release codesNormally, release codes are generated from identification codes, and are unique to the userrequesting the code. In some cases, however, the administrator might want to issue arelease code for multiple computers. The typical case is when a problem occurs with aspecific build of McAfee DLP Endpoint client software, and it must be uninstalled fromseveral endpoints. In this case, the administrator creates a master release code that canbe used with any McAfee DLP Endpoint client. The master code is time-based, and expiresafter a specified time.
For more information on master release codes, see the McAfee Help Desk Product Guide.
Request an override keyOccasionally, a user has a valid need to copy something that is blocked by a rule. In such cases, theuser requests an override key, which bypasses normal McAfee DLP Endpoint action for a presetamount of time.
Before you beginThe option Show task 'Request DLP bypass' in DLP Endpoint Console must be selected on the AgentConfiguration | User interface service tab.
When in bypass mode, the endpoint software still collects and sends event information to the ePolicyOrchestrator Event Parser, marking them with the override flag. The user does not receive visualnotification of events while in bypass mode.
Task1 In the system tray of the managed computer, click the McAfee Agent icon, then select Manage Features |
DLP Endpoint Console.
The DLP Endpoint Console appears.
14 Non-standard operationsAgent bypass and related features
180 McAfee Data Loss Prevention Endpoint 9.3.100 and McAfee Device Control Product Guide

2 Click the Tasks tab
Figure 14-1 DLP Endpoint console bypass request
3 Send the Identification Code and Revision ID to the administrator, along with user name and emailaddress. Optional information you can also include are computer name and business justificationfor the override. When approved, the administrator generates the Release Code and sends it to theuser. The system administrator sets the length of time for the override before generating the code.
Each time you select Request Agent Bypass from the menu a new Identification Code is generated. Youmust leave the bypass request window open until you receive your matching Release Code.
4 Type or paste the Release Code into the text box and click OK.
The release code is a 8- or 16-digit alphanumeric. If the code contains dashes (making it easier toread), you must remove them before pasting the number into the text box. If you enter the codeincorrectly three times, and the release code lockout policy has been activated in the AgentConfiguration | Notification Service tab, the pop-up window times out for 30 minutes (default setting).
The agent pop-up window displays a verification.
Advanced topics: Running the PST crawler from the commandline
Email storage discovery can be run from the command line.
Separation of the PST crawler function to a separate executable, fcpst.exe, creates the possibility ofrunning email storage scans from the command line. By default, the crawler only performs listing ofexisting items and printing to a log file. The following command line parameters can be used:
Parameter Definition
-t1 Scans PST files on the local hard drives
-t2 Scans OST file
-t4 Scans mapped PST files
Non-standard operationsAdvanced topics: Running the PST crawler from the command line 14
McAfee Data Loss Prevention Endpoint 9.3.100 and McAfee Device Control Product Guide 181

Combining values combines the operations. For example:
Command Definition
fcpst.exe -t3 Scans PST files on the local drives AND scans OST file
fcpst.exe -t7 Scans everything: all PST files on local drives, mapped PST files, and OST file
14 Non-standard operationsAdvanced topics: Running the PST crawler from the command line
182 McAfee Data Loss Prevention Endpoint 9.3.100 and McAfee Device Control Product Guide

15 Diagnostics
McAfee DLP Endpoint includes a System Tools function for monitoring system health. More advancedfeatures are available in the Diagnostic Tool utility.
Contents System tools Diagnostic Tool
System toolsUse the system tools in McAfee DLP Endpoint software to keep track of system health alerts and toconfigure advanced features.
System tools are designed to be the first step in troubleshooting problems. They are accessed fromthe Tools menu. Tools are included for:
• Analyzing the policy
• Viewing the system log
• Rerunning the initialization wizard
• Setting the tool options
Use case — analyzing a policyPolicies containing errors cannot be applied to the ePolicy Orchestrator database. Beforeattempting to apply a new policy, verify the policy with the policy analyzer and fix anyerrors. The policy analyzer also displays warnings, indicating that a rule or definition isincomplete or disabled. Incomplete policies can be applied to the database, thus allowingyou to test partial policies in the course of building new policies.
To view the Policy Analyzer, select Tools | Run Policy Analyzer in the McAfee DLP Endpoint policyconsole (or press F8). The bottom of the window displays the policy analyzer entries.
Use case — viewing the system logUse the system log to observe and receive alerts about the system health and relatedevents. The system log is crucial for troubleshooting.
To view the system log, select Tools | View Log in the McAfee DLP Endpoint policy console (orpress F7). The bottom of the window displays the system log entries.
15
McAfee Data Loss Prevention Endpoint 9.3.100 and McAfee Device Control Product Guide 183

Diagnostic ToolThe Diagnostic Tool is designed to aid troubleshooting McAfee DLP Endpoint problems on endpointcomputers.
The Diagnostic Tool gathers information on the performance of McAfee DLP Endpoint client software.The IT team uses this information to troubleshoot problems and tune policies. When severe problemsexist, it can be used to collect data for analysis by the McAfee DLP Endpoint development team.
The tool is distributed as a utility to install on problem computers. It consists of seven tabbed pages,each devoted to a different aspect of McAfee DLP Endpoint software operation.
On all pages displaying information in tables (all pages except General information and Tools), you can sortthe tables on any column by clicking the column header.
Generalinformation
Collects data such as whether the agent processes and drivers are running andgeneral policy, agent, and logging information. Where an error is detected,information about the error is presented.
DLPE Modules Displays the agent configuration (as shown in the McAfee DLP Endpoint policyconsole as the Agent Configuration | Miscellaneous page). It shows the status of eachmodule, add-in, and handler, and gives details on any problems.
Data Flow Displays the number of events and the memory used by the McAfee DLP Endpointclient, and displays event details when a specific event is selected.
Tools Allows you to perform several tests and displays the results. When necessary, a datadump is performed for further analysis.
Process list Displays all processes currently running on the computer. Selecting a processdisplays details and related window titles and application definitions.
Devices Displays all Plug and Play and removable devices currently connected to thecomputer. Selecting a device displays details of the device and related devicedefinitions.
Active policy Displays all rules contained in the active policy, and the relevant policy definitions.Selecting a rule or definition displays the details.
Checking the agent statusUse the General information tab to get an overview of the agent status.
The information on the General information tab is designed to confirm expectations and answer basicquestions. Are the agent processes and drivers running? What product versions are installed? What isthe current operation mode and policy?
Agent processes and drivers
One of the most important questions in troubleshooting is, "Is everything running as expected?" TheAgent processes and Drivers sections show this at a glance. The checkboxes show if the process isenabled; the colored dot shows if it is running. If the process or driver is down, the text box givesinformation on what is wrong.
The default maximum memory is 150 MB. A high value for this parameter can indicate problems.
Table 15-1 Agent processes
Term Process Expected status
Fcag McAfee DLP Endpoint agent (client) enabled; running
Fcags McAfee DLP Endpoint agent service enabled; running
Fcagte McAfee DLP Endpoint text extractor enabled; running
15 DiagnosticsDiagnostic Tool
184 McAfee Data Loss Prevention Endpoint 9.3.100 and McAfee Device Control Product Guide
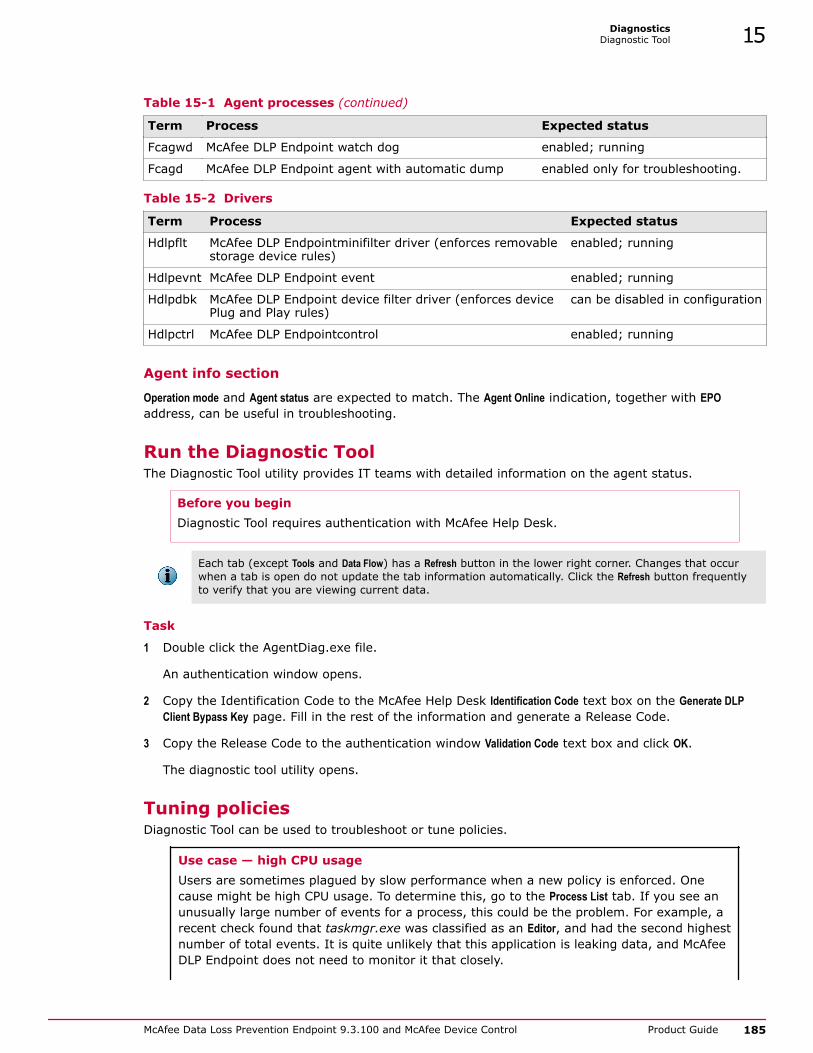
Table 15-1 Agent processes (continued)
Term Process Expected status
Fcagwd McAfee DLP Endpoint watch dog enabled; running
Fcagd McAfee DLP Endpoint agent with automatic dump enabled only for troubleshooting.
Table 15-2 Drivers
Term Process Expected status
Hdlpflt McAfee DLP Endpointminifilter driver (enforces removablestorage device rules)
enabled; running
Hdlpevnt McAfee DLP Endpoint event enabled; running
Hdlpdbk McAfee DLP Endpoint device filter driver (enforces devicePlug and Play rules)
can be disabled in configuration
Hdlpctrl McAfee DLP Endpointcontrol enabled; running
Agent info section
Operation mode and Agent status are expected to match. The Agent Online indication, together with EPOaddress, can be useful in troubleshooting.
Run the Diagnostic ToolThe Diagnostic Tool utility provides IT teams with detailed information on the agent status.
Before you beginDiagnostic Tool requires authentication with McAfee Help Desk.
Each tab (except Tools and Data Flow) has a Refresh button in the lower right corner. Changes that occurwhen a tab is open do not update the tab information automatically. Click the Refresh button frequentlyto verify that you are viewing current data.
Task
1 Double click the AgentDiag.exe file.
An authentication window opens.
2 Copy the Identification Code to the McAfee Help Desk Identification Code text box on the Generate DLPClient Bypass Key page. Fill in the rest of the information and generate a Release Code.
3 Copy the Release Code to the authentication window Validation Code text box and click OK.
The diagnostic tool utility opens.
Tuning policiesDiagnostic Tool can be used to troubleshoot or tune policies.
Use case — high CPU usageUsers are sometimes plagued by slow performance when a new policy is enforced. Onecause might be high CPU usage. To determine this, go to the Process List tab. If you see anunusually large number of events for a process, this could be the problem. For example, arecent check found that taskmgr.exe was classified as an Editor, and had the second highestnumber of total events. It is quite unlikely that this application is leaking data, and McAfeeDLP Endpoint does not need to monitor it that closely.
DiagnosticsDiagnostic Tool 15
McAfee Data Loss Prevention Endpoint 9.3.100 and McAfee Device Control Product Guide 185

Select the application, and note the Original name that is listed in the Process Details. Use thisname to create a new application definition in the policy that changes the strategy toTrusted. Apply the policy, and test to see if performance has improved.
Use case — creating effective tagsTagging sensitive data lies at the heart of a data protection policy. Diagnostic Tool displaysinformation that helps you design effective tags. Tags can be too tight, missing data thatshould be tagged, or too loose, creating false positives.
The Active Policy page lists the tagging rules and the tags that they apply. The Data Flow pagelists all tags applied by the policy, and the count for each. When counts are higher thanexpected, false positives are suspected. In one case, an extremely high count led to thediscovery that the tagging rule was triggered by Disclaimer text. Adding the Disclaimer tothe whitelist removed the false positives. By the same token, lower than expected countssuggest a tagging rule that is too strict.
If a new file is tagged while the Diagnostic Tool is running, the file path is displayed. in thedetails pane. Use this information to locate files for testing.
15 DiagnosticsDiagnostic Tool
186 McAfee Data Loss Prevention Endpoint 9.3.100 and McAfee Device Control Product Guide

Index
Aabout this guide 7actions/rules matrix (graph) 129
administrators, defining 174
Adobe LiveCycle Rights Management, See rights management agent bypass 179
agent configurationassigning with ePolicy Orchestrator 49
global 74
agent uninstall 179
aggregated event behavior 103
aggregation, of pop-up messages 129
all_evidences.csv file 166
application definitionsabout 104
creating 106
creating from the Enterprise Applications List 107
removing 147
strategy 102
templates 147
using 103
web applications 107
application strategy 103
applications, in rules 103
archiver, application strategy 103
assignment groupscomputer 151
creating 149
definition 12
privileged users 150
users, including and excluding 149
Bbackward compatibility 22, 34, 39
backward compatibility, errors with 49
Box.inc 132
business justification 138, 145
Ccategory catalog 117
challenge/response 90
Citrix support 14
Citrix XenApp device rules 63
classification rules 10, 111
clipboard protectionrules, creating 135
clipboard protection rules 132
cloud protection rules 137
clusterspreparing the environment 27
testing the installation 27
using DLP software in a cluster environment 26
components, Data Loss Prevention (diagram) 21
components, described 14
computer assignment groups 151
computer assignments, when upgrading 39
configuration, server 25
content categories 111, 115, 116
conventions and icons used in this guide 7
Ddashboards, report options 162
dataclassifying 75
data-in-motion 95, 100
data-in-use 109
Data Loss Prevention software, description 19
data-at-rest 84
databaseremoving events 165
statistics, viewing 165
default rule, defining 45
definitionsapplication 103
device, See device definitionsdictionaries 75
document properties 77, 93
email destination 95
file extension 77, 93, 109
file server list 91
network 92
printer 98
registered document repository 93
registered documents 95
removing 147
table of 133
tags 115
McAfee Data Loss Prevention Endpoint 9.3.100 and McAfee Device Control Product Guide 187

definitions (continued)text pattern 77
web destination 100
whitelist 82
device classcreating new 58
removing 147
types of 56
device definitionsgroups 63
importing 62
importing to existing 63
parameter management 59
Plug and Play 60
removable storage 61
device GUID 57
device rulesabout 63
Citrix XenApp 69
definition 12
fixed disk 69
Plug and Play 67
removable storage 68
deviceslists, adding Plug and Play definitions 61
management 56
parameters, list of 70
Plug and Play 58
removable storage 58
whitelisted 58
diagnostic tool 184
Diagnostic Tool 185
dictionariesabout 75
creating 76
importing entries 76
discoveryabout 84
creating a file system discovery rule 85
creating an email storage discovery rule 87
scheduling 89
setup 88
discovery rules 11
DLP administrators, defining 174
DLP Agent, See DLP Endpoint DLP Agent service watch dog 73
DLP data, classifying 77
DLP Discover 84
DLP Endpointchecking in to ePolicy Orchestrator 37
defined 14
deploying 46
deployment verification 48
wake-up call 50
DLP eventsviewing database statistics 165
DLP Incident Manager 156
responding to events 155
system events and alerts 157
DLP Policyconsole, illustrated 10
DLP Policy console, installing 33
DLP repositories, registered document 93
DLP rulesclassification 10
device 12, 67, 68
protection 12
removable storage file access 68
tagging 11
DLP tasks runner server task 160
document groupsregistered, creating 95
document properties definitions 77
documentationaudience for this guide 7product-specific, finding 8typographical conventions and icons 7
Dropbox 132
Eeditor, application strategy 103
emailsending DLP events by 160
email bypass 138
email destinationsabout 95
creating 96
definitions (table) 133
groups 97
removing 147
email protection rules 138
email storage discovery 181
endpoint configurationabout 73
Safe Mode 74
enterprise applications listabout 103
importing by scanning 108
importing to 108
removing applications 109
ePO Event Parser 14
ePO notifications 162
ePO reports 162
ePolicy Orchestratorcomputer assignment groups 151
policy template synchronization wizard 48
system policy, assigning 49
event filter 158
event parser, when upgrading 39
Index
188 McAfee Data Loss Prevention Endpoint 9.3.100 and McAfee Device Control Product Guide

eventsmarking with labels 159
monitoring 155
removing 165
viewing 157
evidenceDLP Incident Manager 157
endpoint events 155
storage for encrypted content 166
evidence folder 27
evidence folder, configuring on Windows Server 2003 29
evidence folder, configuring on Windows Server 2008 28
explorer, application strategy 103
Ffile access
rules, about 63
rules, removable storage 68
file extensionsabout 109
creating 109
creating groups 110
definitions 77
definitions (table) 133
removing 147
file server listabout 91
adding a server 91
creating 91
definitions (table) 133
file system protection rule 140
FileSecure 128
filtersnetwork definitions 92
Gglobal agent configuration 74
Google Drive 132
groupsdevice definitions 63
email 97
network address range 92
text patterns 78, 81
GUID, See device GUID
Hhandlers
cloud protection 132
hardware requirements 24
hit count 167
hit highlighting, events 166
IImage Writer, in printing protection rules 142
incident filter 158
incident manager 156
incident tasks 156, 160, 161
Jjustification, See business justification
Kkey generator 179
Llabels, marking events with 159
license, Device Control and DLP 36
local users 149
location, classifying by 83
Lotus Notes, email protection rule 138
Mmail notification task 160
manual tags 120
McAfee Endpoint Encryption for Files and Folders 58
McAfee Endpoint Encryption for Removable Media 58
McAfee ServicePortal, accessing 8media transfer protocol 133
memory mapped files, analyzing 104
monitoring 14, 156
Nnetwork definitions
(table) 133
about 92
address range 92
address range group 92
port range 93
protection rule 141
removing 147
notifications, ePolicy Orchestrator 162
Oonline/offline operation 14
OpenLDAP 149
overridekey, requesting 180
override mode, See policies, bypass
Pparameters, device 70
PDF writer, in printing protection rules 141
permission sets, defining 175
permission sets, system tree filtering 173
phased upgrade 41
Plug and Play devicesdevice definitions 60
Index
McAfee Data Loss Prevention Endpoint 9.3.100 and McAfee Device Control Product Guide 189

Plug and Play devices (continued)whitelisted 58
whitelisted definition, creating 61
policiesapplying to 49
assigning with 49
assignment with 48
bypass 179
definition 12
editing a description 50
importing 50
refreshing 50
user assignment 149
policies, tuning 185
policy bypass 180
Policy consoleconsole, illustrated 10
policy revision numbers 48
policy, initializing 34
policy, restoring after upgrade 42
printer listadding printers 99
creating 98
definitions (table) 133
printer protection rule 142
printersabout 98
unmanaged 98, 99
unsupported 98
whitelisted 98–100
privileged users assignment group 150
protection rulesapplication file access 134
clipboard 132, 135
cloud 132, 137
definition 12
email 138
file system 140
how they work 129, 133
network communication 141
printer 142
removable storage 143
screen capture 144
web post 145
protection rules, Data Loss Preventionhow they work 129
purge task 160
Qquarantine 179
release from 166
restoring files or email items from 90
queries, when upgrading 39
RRDP support 14
redaction 168, 173
about 168
viewing redacted text 157
registered document repositories 93, 94, 113
registered document repositories, using 94
removable storageprotection rules 143
reporting 161
repositories, registered document 94
revision numbers 48
rights management 126, 128
setting up the server 126, 127
synchronizing policies 126
synchronizing templates 127
users 126
working with Data Loss Prevention 124
role based access control 175
role-based access control 168, 170
roles and permissions 27
rolled up reports 162
rollup queries 161
rulesCitrix XenApp 63
classification 111
removing 147
tagging 11, 118
SSafe Mode 74
screen capture protection rules 144
Seclore FileSecure 128
server configuration 25
server software requirements 24
ServicePortal, finding product documentation 8set reviewer task 160
SkyDrive 132
storage devices, removable 58
strategy, See application definitions strategy, for applications 103
supported operating systems 24
Syncplicity 132
system configuration 73
system log, viewing 183
system requirements 24
system tools 183
Ttagging rules
application-based 119
content-based 112
creating 118
definition 11
Index
190 McAfee Data Loss Prevention Endpoint 9.3.100 and McAfee Device Control Product Guide

tagging rules (continued)dictionary 112
links to content 118
location-based 119
tagsabout 115
content, See content categoriescreating 116
definitions (table) 133
linking tags to content 118
manual 120, 121
removing 147
tag groups 117
Technical Support, finding product information 8templates 147
templates, Data Loss Prevention 147
text patternsabout 77
creating 78
definitions (table) 133
for Titus Message Classification integration 81
groups 81
removing 147
testing 80
Titus Message Classification, integration 81
TrueCrypt 129
TrueCrypt device rules 63, 68
trusted, application strategy 103
Uunmanaged printers, See printers, whitelisted upgrade (task description) 41
upgrade, phased 41
upgrade, unsupported items 39
user assignment groupscreating 149
user permissions 168
user sessions 63
usersassignment groups 149
excluding from a user assignment group 149
users (continued)local 149
Vvalidators 77, 80
VDI support 14
verifying the installation 48
VMware support 14
Wwake-up call 50
WatchDog protective service, about 73
web destinationsabout 100
creating 101
definitions (table) 133
groups 101
removing 147
web post protection rules 145
whitelistadding content 83
definition (table) 133
deleting content 83
printer 98
whitelist folder 27
whitelist folder, configuring on Windows Server 2003 29
whitelist folder, configuring on Windows Server 2008 28
whitelisted Plug and Play devices 58
whitelists 12
about 82
application definitions 70
Plug and Play definitions, creating 61
printers 100
unmanaged printers 99
window titles, in screen capture protection rules 144
wizardsClient Task Builder 113
Template Synchronization 147
wizards, Data Loss PreventionTemplate Synchronization 147
Index
McAfee Data Loss Prevention Endpoint 9.3.100 and McAfee Device Control Product Guide 191

93100-A00

![PHD KnowledgeBase Software User's Guide KnowledgeBase...knowledgebase file, testing the connection to the PHD-ODE server from which resources are downloaded [PHD-ODE only], displaying](https://img.pdfslide.us/doc/110x75/5f62ef8c765e9d699e179689/phd-knowledgebase-software-users-knowledgebase-knowledgebase-file-testing-the.jpg)