Embed Size (px)
Citation preview

Data Import Guide
© 2017 DBA Software Inc.
3Contents
3
© 2017 DBA Software Inc.
Table of Contents
1 Introduction 4
2 Data Import Instructions 5
3 Data Import - Customers 10
4 Data Import - Customer Contacts 16
5 Data Import - Delivery Addresses 19
6 Data Import - Suppliers 23
7 Data Import - Supplier Contacts 28
8 Data Import - Locations 31
9 Data Import - Item Categories 33
10 Data Import - Stock Items (New) 35
11 Data Import - Stock Items (Update) 39
12 Data Import - MRP Settings - M Items 43
13 Data Import - MRP Settings - P Items 46
14 Data Import - MRP Analysis Code - Items 49
15 Data Import - Cycle Code - Items 52
16 Data Import - Item Suppliers 55
17 Data Import - Manufacturers 58
18 Data Import - Mfgr Part Numbers 60
19 Data Import - Base Prices 63
20 Data Import - Qty Breaks by Price 66
21 Data Import - Qty Breaks by Percentage 69
22 Data Import - BOM Routings 72
23 Data Import - BOM Components 77
24 Data Import - BOM References 81
Data Import Guide4
© 2017 DBA Software Inc.
1 Introduction
This guide provides data import overview and specifications for use during systemstartup and ongoing maintenance.
Data import is used to populate initial master tables
The data import screens are used with the Startup Wizard to populate initial mastertables during system implementation.
Data import can also be used for ongoing maintenance
Data import is also used for ongoing maintenance. New field values can be importedinto existing records or new records can be imported into existing tables.
WARNING: Only import data using the data import screens
Never import data by any means other than the data import screens provided within thesystem. The data import screens include many safeguards that protect the integrity ofyour database.
NOTE: Importing data on your own or through any third party tools or utilities isprohibited by our end user license agreement.
Import Process
The import process goes like this.
For each table to be imported, you export the data from your old system. Youeither export the data directly into an Excel spreadsheet or you take your exportfile and convert it into an Excel spreadsheet.
You then edit your Excel spreadsheet so that the data conform to therequirements of the DBA system.
Once your spreadsheet is finalized, you map each of its columns to itscorresponding field in DBA and then you import the data in a single batchtransaction.
Data Import Instructions 5
© 2017 DBA Software Inc.
2 Data Import Instructions
(File – Data Import Menu)
All the data import screens are located on the Data Import menu. All screens use thesame data import utility, which works as follows:
Import Process
The import process goes like this.
For each table to be imported, you export the data from your old system. Youeither export the data directly into an Excel spreadsheet or you take your exportfile and convert it into an Excel spreadsheet.
You then edit your Excel spreadsheet so that the data conform to therequirements of the DBA system.
Once your spreadsheet is finalized, you map each of its columns to itscorresponding field in DBA and then you import the data in a single batchtransaction.
The specific steps in the data import process are detailed in the next three sections.
Phase 1 – Export Data into Excel
Most accounting systems include a data export utility that will enable you to export someor all of the master tables listed at the beginning of this chapter.
Export directly into Excel, if you can
If your data export utility can create an export file directly in Excel format, do so.
If you cannot export directly into an Excel spreadsheet, we recommend that you exportinto a comma delimited text file format that you can then import into an Excelspreadsheet.
Importing a text file into Excel
If you need to import a comma delimited text file into Excel, do so as follows:
· Open a new Excel spreadsheet.
· Click Data – Import External Data – Import Data.
· Select your comma delimited text file.
· Specify Delimited as the file type and click Next.
· On the next screen, select Comma as the Delimiter and click Next.
· Verify the settings on the next screen and click Finish.
Data Import Guide6
© 2017 DBA Software Inc.
· Click OK on the final screen. Your data should now be visible and organizedinto columns on your spreadsheet.
· Click File – Save As and save your spreadsheets as a *.csv file type.
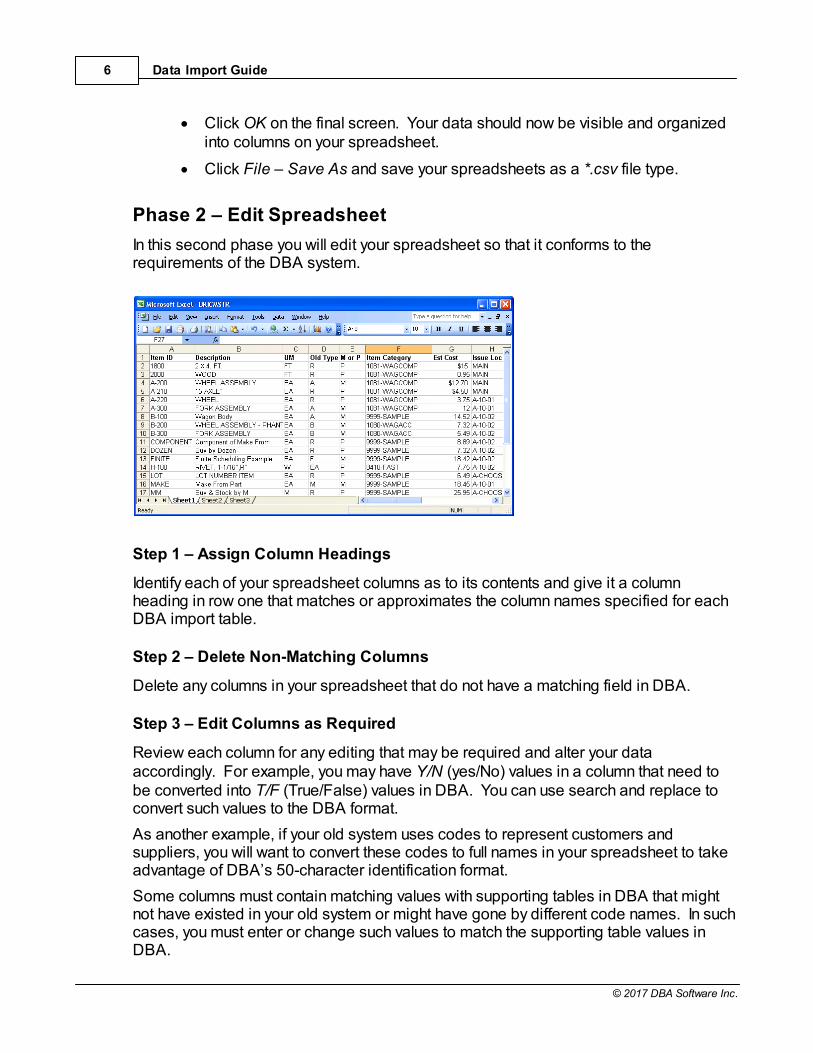
Phase 2 – Edit Spreadsheet
In this second phase you will edit your spreadsheet so that it conforms to therequirements of the DBA system.
Step 1 – Assign Column Headings
Identify each of your spreadsheet columns as to its contents and give it a columnheading in row one that matches or approximates the column names specified for eachDBA import table.
Step 2 – Delete Non-Matching Columns
Delete any columns in your spreadsheet that do not have a matching field in DBA.
Step 3 – Edit Columns as Required
Review each column for any editing that may be required and alter your dataaccordingly. For example, you may have Y/N (yes/No) values in a column that need tobe converted into T/F (True/False) values in DBA. You can use search and replace toconvert such values to the DBA format.
As another example, if your old system uses codes to represent customers andsuppliers, you will want to convert these codes to full names in your spreadsheet to takeadvantage of DBA’s 50-character identification format.
Some columns must contain matching values with supporting tables in DBA that mightnot have existed in your old system or might have gone by different code names. In suchcases, you must enter or change such values to match the supporting table values inDBA.
Data Import Instructions 7
© 2017 DBA Software Inc.
All such editing considerations are documented later in this chapter for each importtable.
Editing Tools
The following tools are available within Excel that can help you edit your export datato conform to DBA’s requirements. Click Help within Excel for detailedinstructions.
Find & Replace You can highlight a column and then use the Find & Replace function to masschange a value. For example, if you need to convert all the ‘Y’ (yes) values in acolumn to ‘T’ (true), this function can find all ‘Y’ values and replace them with ‘T’values.
Move Columns You can use Cut and Paste to move columns to any desired left-to-right order. This can be useful if you choose to structure your spreadsheet in the samecolumn order as the import specifications.
Split Columns You can use the Text to Columns function to split the data within a single columninto multiple columns. For example, your old system may store the city, state, andpostal code for an address within a single field. The Text to Columns functioncan split these values out by comma and/or space separators into separatecolumns, as required by DBA. After the split is done, some manual editing isusually required to make sure all the text was split correctly.
NOTE: When you split a column, always temporarily move it to the far right positionin your spreadsheet so that the new columns that get created do notoverwrite any other columns.
Merge Columns You can merge data from two columns into one column by creating a third columnand populating that column with a merge formula, such as:
=(A7&” “&B7)
For example, your old system may store a contact name in two fields, one for thefirst name and one for the last name. In DBA, the contact name is a single field. Using a merge formula, you can combine the contents of two columns into asingle column.
Phase 3 – Import Data
The final step is to import the data. The import process involves four screens that arepresented in succession by clicking the Next button.
Data Import Guide8
© 2017 DBA Software Inc.
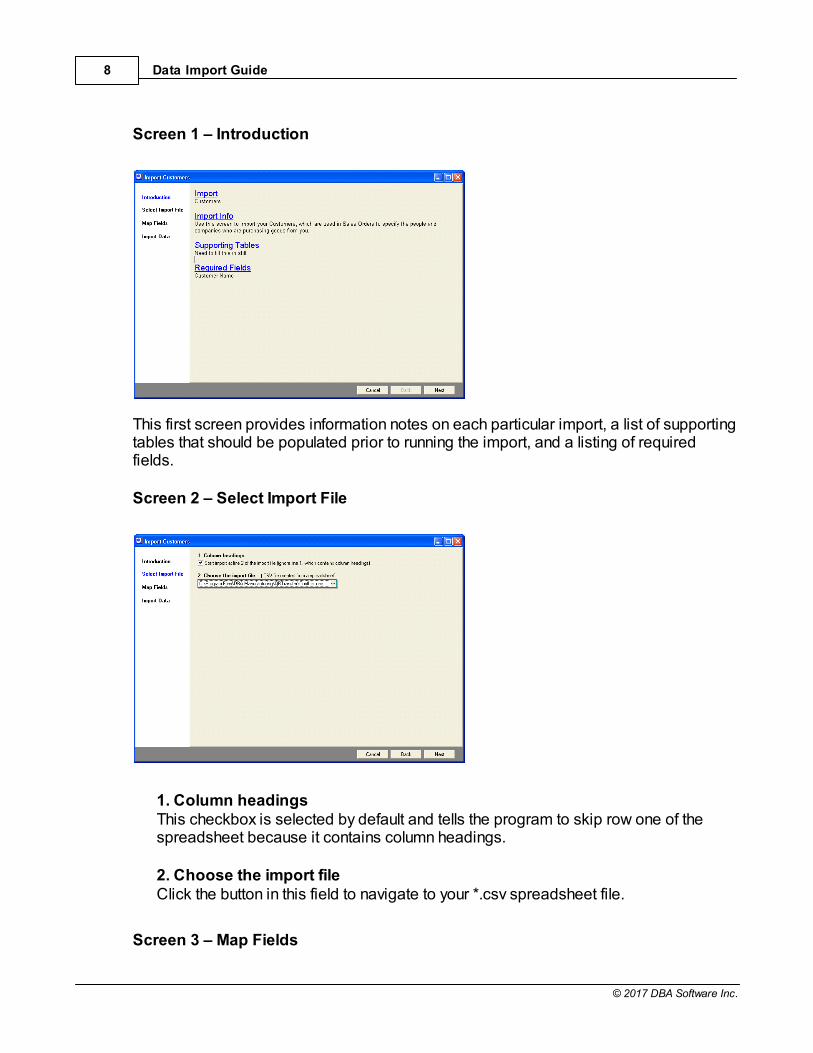
Screen 1 – Introduction
This first screen provides information notes on each particular import, a list of supportingtables that should be populated prior to running the import, and a listing of requiredfields.
Screen 2 – Select Import File
1. Column headings This checkbox is selected by default and tells the program to skip row one of thespreadsheet because it contains column headings.
2. Choose the import file Click the button in this field to navigate to your *.csv spreadsheet file.
Screen 3 – Map Fields
Data Import Instructions 9
© 2017 DBA Software Inc.
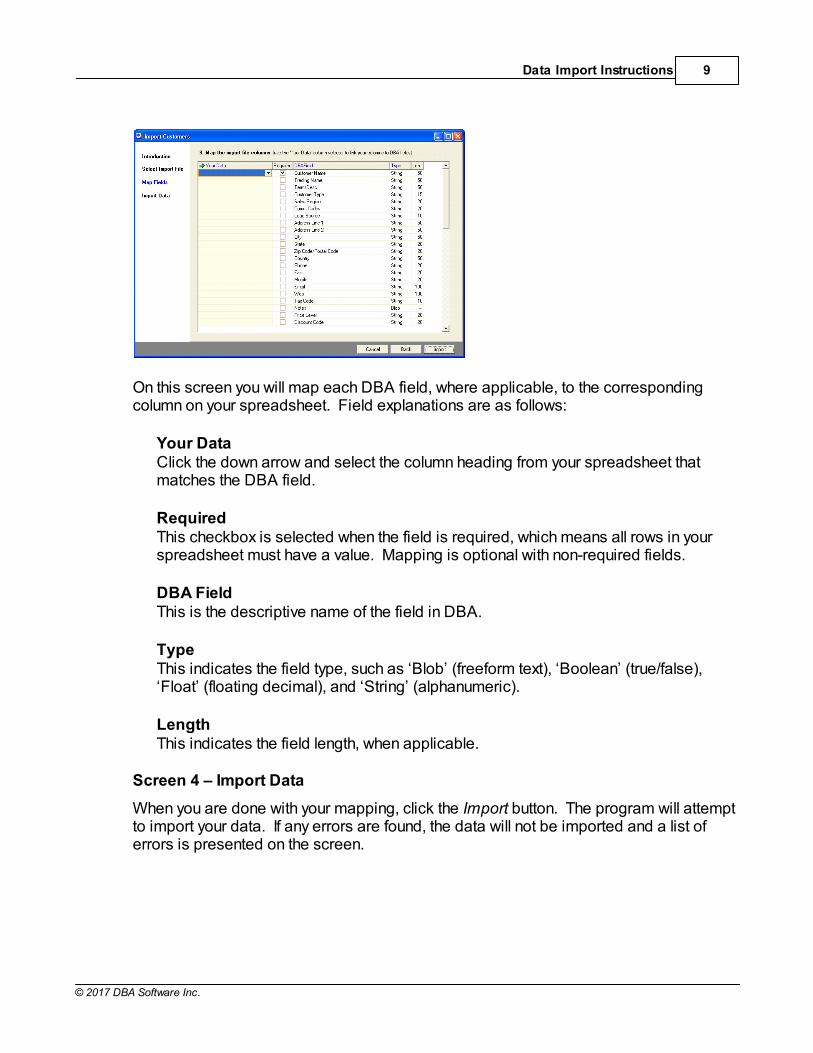
On this screen you will map each DBA field, where applicable, to the correspondingcolumn on your spreadsheet. Field explanations are as follows:
Your Data Click the down arrow and select the column heading from your spreadsheet thatmatches the DBA field.
RequiredThis checkbox is selected when the field is required, which means all rows in yourspreadsheet must have a value. Mapping is optional with non-required fields.
DBA Field This is the descriptive name of the field in DBA.
TypeThis indicates the field type, such as ‘Blob’ (freeform text), ‘Boolean’ (true/false),‘Float’ (floating decimal), and ‘String’ (alphanumeric).
LengthThis indicates the field length, when applicable.
Screen 4 – Import Data
When you are done with your mapping, click the Import button. The program will attemptto import your data. If any errors are found, the data will not be imported and a list oferrors is presented on the screen.

Data Import Guide10
© 2017 DBA Software Inc.
3 Data Import - Customers
(File – Data Import – Customers – Customers)
Supporting Tables
Some or all of the following tables must be created in advance before you can importyour customers. Refer to the Startup Guide for details.
Tax CodesIn USA and Canadian tax environments, tax codes are assigned at the customerlevel, in which case you must set up all your tax codes in advance of importingcustomers. In VAT/GST environments, a system level default sales tax code is used,in which case no advance setup is required.
Customer Types Each customer is assigned to a Customer Type.
Customer Terms Payment terms are assigned to each customer, so you must set up your customerterms table.
Sales Regions Sales regions are optional and help you organize your customers geographically.
Sales Reps & Commission Codes Sales rep types, sales reps, and commission codes should be set up if you paycommissions to sales reps.
Lead Sources Lead sources are optional and help you gather statistics on where your newcustomer leads are coming from.
Ship MethodsThe ship methods table determines the preferred shipping method for eachcustomer.
Price LevelsIf you will be differentiating pricing among your customers using price levels, youmust set up your price levels in advance.
Discount CodesIf you will be differentiating pricing among customers using discount codes, you mustset up your discount codes in advance.
Data Import - Customers 11
© 2017 DBA Software Inc.
*.csv File Format
Make sure you save the locations spreadsheet as a *.csv file type, which is the formatrequired by the mapping screen.
Spreadsheet Columns
Your spreadsheet can consist of some or all of the following columns. Be sure andinsert a title in row one of each column heading so that the column can be identifiedduring the import process.
Customer Name (Required, String, 50)This is the unique name or code that identifies the customer.
Trading Name (String, 50)This is the name that prints on quotes, acknowledgments, packing slips, andinvoices. Unlike the Customer Name, duplicate values are allowed. If a value is notspecified, the program will populate this field with the Customer Name.
Customer Terms (String, 50)Any value in this column must correspond to a code in the Customer Terms table. Ifyou leave this blank when importing a new record, the default terms from the SalesSetup – Customer Terms screen is assigned.
Customer Type (String, 15)The Customer Type classifies customers for reporting purposes. If a value is notspecified, the program assigns the system’s default Customer Type. Any value inthis column must correspond to a code in the Customer Types table.
Sales Region (String, 20)This field is optional and organizes customers by geography for reporting purposes. Any value in this column must correspond to a code in the Sales Regions table.
Commission Code (String, 20)This is a code that identifies a sales rep or group of sales reps assigned to thiscustomer. Any value in this column must correspond to a code in the CommissionCodes table.
Lead Source (String, 10)This is a code that represents the source of the initial sales lead for this customer. Any value in this column must correspond to a code in the Lead Sources table.
Address Line 1 (String, 50)This is usually the street address or PO Box associated with the billing address.
Data Import Guide12
© 2017 DBA Software Inc.
NOTE: Each customer’s delivery addresses are imported separately in the DataImport – Customers – Delivery Addresses screen.
Address Line 2 (String, 50)This can be used for an office, unit, or suite number.
City (String, 50)This is the city associated with the billing address.
State (String, 20)This is the state or province associated with the billing address.
Postal Code (String, 20) This is the postal code associated with the billing address.
Country (String, 50)This is the country associated with the billing address.
Phone (String, 20)This is a company-level setting that is not for a specific contact person.
Fax (String, 20)This is a company-level setting that is not for a specific contact person.
Mobile (String, 20)This is a company-level setting that is not for a specific contact person.
Email (String, 100)This is a company-level setting that is not for a specific contact person.
Web (String, 100)This is the customer’s website address.
Tax Code (String, 10)Populate this field as follows:
New Customer Import
When importing new customers, only give this field a value when the customer isto be assigned an exception to the Default Sales Tax Code designated in theTax – Tax Defaults screen. Any value in this column must correspond to a valuein the Tax Codes table.
Data Import - Customers 13
© 2017 DBA Software Inc.
Existing Customer Update
WARNING: When updating existing customers, be aware that if you map this fieldand leave it blank, a blank value will set the customer’s Tax Code Source to ‘Default’ and will override any tax code exception.
Notes (Blob)These are unlimited, freeform customer notes.
Price Level (String, 20)The customer can optionally be assigned to a Price Level. Any value in this columnmust correspond to a record in the Price Levels table.
Discount Code (String, 20)The customer can optionally be assigned to a Discount Code. Any value in thiscolumn must correspond to a record in the Discount Codes table.
Credit Limit (Float)The open aging balance plus new sales orders are not permitted to exceed thisamount.
Customer PO Required (Boolean)Enter a ‘T’ if this customer requires a purchase order number on all sales orders. Enter an ‘F’ if a purchase order number is optional.
Ship Method (String, 20)This is the customer’s preferred shipping method. Any value in this column mustcorrespond to a record in the Ship Methods table.
Tax Reference No (String, 50)This is the customer’s tax ID code or number.
Bank Name (String, 25)This identifies the customer’s bank.
Bank Account No (String, 50)This identifies the customer’s bank account number.
User-Defined Fields (up to 6) (Date or String, 50)The remaining mapping fields are user-defined fields specified in the Utilities –User-Defined Fields screen for customers. Up to six such fields can be defined ineither text or date format.
Data Import Guide14
© 2017 DBA Software Inc.
Date Field Format
If the user-defined field is a date type, it must conform to the Short Date formatdefined in the Regional and Language Options found in the Windows ControlPanel on your file server.
X-Ref Code (String, 30)If you are using DBA with an outside accounting system, it may be that the customeris identified in the outside system with a short code instead of the full customer nameas in DBA. For financial transfer purposes, you can store the short code in this field,which is one of the fields available for transfer in the AR Transfer screen. When youimport the AR invoice transfer file into your outside system, this field is mapped tothe customer code in your outside system.
Spreadsheet Import
The import process involves four screens that are presented in succession by clickingthe Next button.
Screen 1 – Introduction
This first screen provides information notes on each particular import, a list of supportingtables that should be populated prior to running the import, and a listing of requiredfields.
Screen 2 – Select Import File
1. Column headings This checkbox is selected by default and tells the program to skip row one of thespreadsheet because it contains column headings.
2. Choose the import file Click the button in this field to navigate to your *.csv spreadsheet file.
Screen 3 – Map Fields
Om this screen you will map each DBA field, where applicable, to the correspondingcolumn on your spreadsheet. Field explanations are as follows:
Your Data Click the down arrow and select the column heading from your spreadsheet thatmatches the DBA field.
RequiredThis checkbox is selected when the field is required, which means all rows in yourspreadsheet must have a value. Mapping is optional with non-required fields.
Data Import - Customers 15
© 2017 DBA Software Inc.
DBA Field This is the descriptive name of the field in DBA.
TypeThis indicates the field type, such as ‘Blob’ (freeform text), ‘Boolean’ (true/false),‘Float’ (floating decimal), and ‘String’ (alphanumeric).
LengthThis indicates the field length, when applicable.
Screen 4 – Import Data
When you are done with your mapping, click the Import button. The program will attemptto import your data. If any errors are found, the data will not be imported and a list oferrors is presented on the screen.
Data Import Guide16
© 2017 DBA Software Inc.
4 Data Import - Customer Contacts
(File – Data Import – Customers – Customer Contacts)
Customer contacts are imported separately from customers because they are stored ina separate sub-table that allows for multiple contacts per customer.
Supporting Tables
Some or all of the following tables must be created in advance before you can importyour customer contacts. Refer to the Startup Guide for details.
CustomersYou must import or enter all your customers before you can import customercontacts. See the previous chapter for details.
Contact Types Contact types are used to classify contacts and are set up in the Sales – SalesSetup – Contact Types screen.
*.csv File Format
Make sure you save the locations spreadsheet as a *.csv file type, which is the formatrequired by the mapping screen.
Spreadsheet Columns
Your spreadsheet can consist of some or all of the following columns. Be sure andinsert a title in row one of each column heading so that the column can be identifiedduring the import process.
Customer Name (Required, String, 50)This is the unique name or code that identifies the customer associated with thiscontact.
Contact Name (Required, String, 30)This is the name of the contact person.
Contact Type (String, 20)Contact Types are used to classify contacts and must correspond to a record in theContact Types table.
Phone (String, 20)This is the contact person’s phone number.
Data Import - Customer Contacts 17
© 2017 DBA Software Inc.
Fax (String, 20)This is the contact person’s fax number.
Email (String, 100)This is the contact person’s Email address.
Mobile (String, 20)This is the contact person’s cell phone number.
Description (String, 50)This is a reference note that further describes the contact person.
Main Contact (Boolean)If this is the main contact person at this company, enter a ‘T’ in this field; otherwise,enter an ‘F’.
Spreadsheet Import
The import process involves four screens that are presented in succession by clickingthe Next button.
Screen 1 – Introduction
This first screen provides information notes on each particular import, a list of supportingtables that should be populated prior to running the import, and a listing of requiredfields.
Screen 2 – Select Import File
1. Column headings This checkbox is selected by default and tells the program to skip row one of thespreadsheet because it contains column headings.
2. Choose the import file Click the button in this field to navigate to your *.csv spreadsheet file.
Screen 3 – Map Fields
Om this screen you will map each DBA field, where applicable, to the correspondingcolumn on your spreadsheet. Field explanations are as follows:
Your Data Click the down arrow and select the column heading from your spreadsheet thatmatches the DBA field.

Data Import Guide18
© 2017 DBA Software Inc.
RequiredThis checkbox is selected when the field is required, which means all rows in yourspreadsheet must have a value. Mapping is optional with non-required fields.
DBA Field This is the descriptive name of the field in DBA.
TypeThis indicates the field type, such as ‘Blob’ (freeform text), ‘Boolean’ (true/false),‘Float’ (floating decimal), and ‘String’ (alphanumeric).
LengthThis indicates the field length, when applicable.
Screen 4 – Import Data
When you are done with your mapping, click the Import button. The program will attemptto import your data. If any errors are found, the data will not be imported and a list oferrors is presented on the screen.
Data Import - Delivery Addresses 19
© 2017 DBA Software Inc.
5 Data Import - Delivery Addresses
(File – Data Import – Customers – Delivery Addresses)
Customer delivery addresses are imported separately from customers because theyare stored in a separate sub-table that allows for multiple delivery addresses percustomer.
Supporting Tables
Some or all of the following tables must be created in advance before you can importyour customer delivery addresses. Refer to the Startup Guide for details.
CustomersYou must import or enter all your customers before you can import deliveryaddresses.
Customer ContactsYou can optionally assign a contact person from the customer contacts table to thedelivery address.
Ship MethodsYou can optionally assign a shipping method from the ship methods table to thedelivery address.
Tax CodesIn USA and Canadian tax environments, tax codes are often assigned at the deliveryaddress level, in which case you must set up all your tax codes in advance ofimporting delivery addresses. In VAT/GST environments, a system level defaultsales tax code is used, in which case no advance setup is required.
*.csv File Format
Make sure you save the locations spreadsheet as a *.csv file type, which is the formatrequired by the mapping screen.
Spreadsheet Columns
Your spreadsheet can consist of some or all of the following columns. Be sure andinsert a title in row one of each column heading so that the column can be identifiedduring the import process.
Customer Name (Required, String, 50)This is the unique name or code that identifies the customer associated with thisdelivery address.
Data Import Guide20
© 2017 DBA Software Inc.
Delivery Name (Required, String, 50)This identifies the delivery address record.
Address Line 1 (String, 50)This is the street address associated with the delivery address.
Address Line 2 (String, 50)The second address line can be used for an office, unit, or suite number.
City (String, 50)This is the city associated with the delivery address.
State (String, 20)This is the state or province associated with the delivery address.
Postal Code (String, 20)This is the postal code associated with the delivery address.
Country (String, 50)This is the country associated with the delivery address.
Contact (String, 30)This is the main contact person at the delivery location.
NOTE: This field does not have to correspond to a record in the CustomerContacts table.
Phone (String, 20)This is the phone number associated with the contact person or delivery addresslocation.
Fax (String, 20)This is the fax number associated with the contact person or delivery addresslocation.
Ship Method (String, 50)This is the preferred shipping method for this delivery destination. Any value in thiscolumn must correspond to a code in the Ship Methods table.
Tax Code (String, 10)Only give this field a value when the delivery address requires a different Tax Codethan the one assigned to the main customer record. Any value in this column mustcorrespond to a value in the Tax Codes table.
Data Import - Delivery Addresses 21
© 2017 DBA Software Inc.
Default (Boolean)If this customer has multiple delivery addresses, you are required to enter a ‘T’against the default address. Enter a value of ‘F’ against the non-default addresses.
Spreadsheet Import
The import process involves four screens that are presented in succession by clickingthe Next button.
Screen 1 – Introduction
This first screen provides information notes on each particular import, a list of supportingtables that should be populated prior to running the import, and a listing of requiredfields.
Screen 2 – Select Import File
1. Column headings This checkbox is selected by default and tells the program to skip row one of thespreadsheet because it contains column headings.
2. Choose the import file Click the button in this field to navigate to your *.csv spreadsheet file.
Screen 3 – Map Fields
Om this screen you will map each DBA field, where applicable, to the correspondingcolumn on your spreadsheet. Field explanations are as follows:
Your Data Click the down arrow and select the column heading from your spreadsheet thatmatches the DBA field.
RequiredThis checkbox is selected when the field is required, which means all rows in yourspreadsheet must have a value. Mapping is optional with non-required fields.
DBA Field This is the descriptive name of the field in DBA.
TypeThis indicates the field type, such as ‘Blob’ (freeform text), ‘Boolean’ (true/false),‘Float’ (floating decimal), and ‘String’ (alphanumeric).
Data Import Guide22
© 2017 DBA Software Inc.
LengthThis indicates the field length, when applicable.
Screen 4 – Import Data
When you are done with your mapping, click the Import button. The program will attemptto import your data. If any errors are found, the data will not be imported and a list oferrors is presented on the screen.
Data Import - Suppliers 23
© 2017 DBA Software Inc.
6 Data Import - Suppliers
(File – Data Import – Suppliers – Suppliers)
Use this screen to import your suppliers, which are assigned to purchased items andare used for miscellaneous purchases and accounts payable processing. If you areusing the Financial Transfer option, you only need to import suppliers used for job andinventory purchasing.
Supporting Tables
Some or all of the following tables must be created in advance before you can importyour suppliers. Refer to the Startup Guide for details.
Supplier Types Each supplier is assigned to a supplier type.
Supplier Terms Payment terms are assigned to each supplier, so you must set up your supplierterms table.
Ship MethodsEach supplier can optionally be assigned a default ship method.
NOTE: This table is normally set up later during the Sales Orders phase ofimplementation. If you wish to import ship methods against suppliers, you mustset up the Ship Methods table now to do so.
Supplier Regions Supplier regions are optional and help you organize your suppliers geographically.
Supplier Codes Supplier codes are optional and are user-defined codes that can be used for anyclassification purpose.
*.csv File Format
Make sure you save the suppliers spreadsheet as an *.csv file type, which is the formatrequired by the mapping screen.

Data Import Guide24
© 2017 DBA Software Inc.
Spreadsheet Columns
Your spreadsheet can consist of some or all of the following columns. Be sure andinsert a title in row one of each column heading so that the column can be identifiedduring the mapping process.
Supplier Name (Required, String, 50)This is the unique name or code that identifies the supplier.
Trading Name (String, 50)This is the name that prints on purchase orders. Unlike the supplier name, duplicatevalues are allowed. If left blank, this field will be populated with the Supplier Name.
Supplier Terms (String, 50)Any value in this column must correspond to a code in the Supplier Terms table. Ifyou leave this blank when importing a new record, the default terms from the Purchasing Setup – Supplier Terms screen is assigned.
Notes (Blob)These are unlimited freeform notes.
Currency (String, 3) A currency code can be specified if the supplier is assigned to a foreign currency. Any value in this column must correspond to a code in the General Ledger Setup –Currency Table screen.
Supplier Type (String, 15)The supplier type classifies suppliers for reporting purposes. If a value is notspecified, the program assigns the system’s default Supplier Type specified in thePurchasing Setup – Supplier Types screen. Any value in this column mustcorrespond to a code in the Supplier Types table.
Supplier Region (String, 20)The Supplier Region can be used to organize suppliers by geography for reportingpurposes. Any value in this column must correspond to a code in the SupplierRegions table.
Supplier Code (String, 20)The Supplier Code is a user-defined code that can be used for any classificationpurpose. Any value in this column must correspond to a code in the Supplier Codestable.
Address Line 1 (String, 50)This is usually the street address or PO box associated with the mailing address.
Data Import - Suppliers 25
© 2017 DBA Software Inc.
Address Line 2 (String, 50)The second address line can be used for an office, unit, or suite number.
City (String, 50)This is the city associated with the mailing address.
State (String, 20)This is the state or province associated with the mailing address.
Postal Code (String, 20)This is the postal code associated with the mailing address.
Country (String, 50)This is the country associated with the mailing address.
Phone (String, 20)This is a company-level setting that is not for a specific contact person.
Fax (String, 20)This is a company-level setting that is not for a specific contact person.
Mobile (String, 20)This is a company-level setting that is not for a specific contact person.
Email (String, 100)This is a company-level setting that is not for a specific contact person.
Web (String, 100)The supplier’s website URL.
Tax Code (String, 10)Populate this field as follows:
New Supplier Import
When importing new suppliers, only give this field a value when the supplier is tobe assigned an exception to the Default Purchase Tax Code designated in theTax – Tax Defaults screen. Any value in this column must correspond to a valuein the Tax Codes table.
Existing Supplier Update
WARNING: When updating existing suppliers, be aware that if you map this fieldand leave it blank, a blank value will set the supplier’s Tax Code Source to ‘Default’ and will override any tax code exception.
Data Import Guide26
© 2017 DBA Software Inc.
Ship Method (String, 20)This optional field is your default Ship Method for POs submitted to this supplier. Any value in this column must correspond to a value in the Ship Methods table.
Tax Reference No (String, 50)‘This is the supplier’ tax ID or number.
Bank Name (String, 25)This identifies the supplier’s bank.
Bank Account No (String, 50)This identifies the supplier’s bank account.
User-Defined Fields (up to 6) (Date or String, 50)The remaining mapping fields are user-defined fields specified in the Utilities –User-Defined Fields screen for suppliers. Up to six such fields can be defined ineither text or date format.
Date Field Format
If the user-defined field is a date type, it must conform to the Short Date formatdefined in the Regional and Language Options found in the Windows ControlPanel on your file server.
X-Ref Code (String, 30)If you are using DBA with an outside accounting system, it may be that the supplier isidentified in the outside system with a short code instead of the full supplier name asin DBA. For financial transfer purposes, you can store the short code in this field,which is one of the fields available for transfer in the PO Invoice Transfer screen. When you import the PO invoice transfer file into your outside system, this field ismapped to the supplier code in your outside system.
Spreadsheet Import
The import process involves four screens that are presented in succession by clickingthe Next button.
Screen 1 – Introduction
This first screen provides information notes on each particular import, a list of supportingtables that should be populated prior to running the import, and a listing of requiredfields.
Data Import - Suppliers 27
© 2017 DBA Software Inc.
Screen 2 – Select Import File
1. Column headings This checkbox is selected by default and tells the program to skip row one of thespreadsheet because it contains column headings.
2. Choose the import file Click the button in this field to navigate to your *.csv spreadsheet file.
Screen 3 – Map Fields
Om this screen you will map each DBA field, where applicable, to the correspondingcolumn on your spreadsheet. Field explanations are as follows:
Your Data Click the down arrow and select the column heading from your spreadsheet thatmatches the DBA field.
RequiredThis checkbox is selected when the field is required, which means all rows in yourspreadsheet must have a value. Mapping is optional with non-required fields.
DBA Field This is the descriptive name of the field in DBA.
TypeThis indicates the field type, such as ‘Blob’ (freeform text), ‘Boolean’ (true/false),‘Float’ (floating decimal), and ‘String’ (alphanumeric).
LengthThis indicates the field length, when applicable.
Screen 4 – Import Data
When you are done with your mapping, click the Import button. The program will attemptto import your data. If any errors are found, the data will not be imported and a list oferrors is presented on the screen.
Data Import Guide28
© 2017 DBA Software Inc.
7 Data Import - Supplier Contacts
(File – Data Import – Suppliers – Supplier Contacts)
Supplier contacts are imported separately from suppliers because they are stored in aseparate sub-table that allows for multiple contacts per supplier.
Supporting Tables
Some or all of the following tables must be created in advance before you can importyour supplier contracts. Refer to the Startup Guide for details.
Suppliers You must import or enter all your suppliers before you can import supplier contacts. See the previous chapter for details.
Contact Types Contact types are used to classify contacts and are set up in the Purch –Purchasing Setup – Contact Types screen.
*.csv File Format
Make sure you save the locations spreadsheet as a *.csv file type, which is the formatrequired by the mapping screen.
Spreadsheet Columns
Your spreadsheet can consist of some or all of the following columns. Be sure andinsert a title in row one of each column heading so that the column can be identifiedduring the import process.
Supplier Name (Required, String, 50)This is the unique name or code that identifies the supplier associated with thiscontact.
Contact Name (Required, String, 50)This is the name of the contact person.
Contact Type (String, 20)Contact Types are used to classify contacts and must correspond to a record in theContact Types table.
Phone (String, 20)This is the contact person’s phone number.

Data Import - Supplier Contacts 29
© 2017 DBA Software Inc.
Fax (String, 20)This is the contact person’s fax number.
Email (String, 100)This is the contact person’s Email address.
Mobile (String, 20)This is the contact person’s cell phone number.
Description (String, 50)This is a reference note that further describes the contact person.
Main Contact (Boolean)If this is the main contact person at this company, enter a ‘T’ in this field; otherwise,enter an ‘F’.
Spreadsheet Import
The import process involves four screens that are presented in succession by clickingthe Next button.
Screen 1 – Introduction
This first screen provides information notes on each particular import, a list of supportingtables that should be populated prior to running the import, and a listing of requiredfields.
Screen 2 – Select Import File
1. Column headings This checkbox is selected by default and tells the program to skip row one of thespreadsheet because it contains column headings.
2. Choose the import file Click the button in this field to navigate to your *.csv spreadsheet file.
Screen 3 – Map Fields
Om this screen you will map each DBA field, where applicable, to the correspondingcolumn on your spreadsheet. Field explanations are as follows:
Your Data Click the down arrow and select the column heading from your spreadsheet thatmatches the DBA field.
Data Import Guide30
© 2017 DBA Software Inc.
RequiredThis checkbox is selected when the field is required, which means all rows in yourspreadsheet must have a value. Mapping is optional with non-required fields.
DBA Field This is the descriptive name of the field in DBA.
TypeThis indicates the field type, such as ‘Blob’ (freeform text), ‘Boolean’ (true/false),‘Float’ (floating decimal), and ‘String’ (alphanumeric).
LengthThis indicates the field length, when applicable.
Screen 4 – Import Data
When you are done with your mapping, click the Import button. The program will attemptto import your data. If any errors are found, the data will not be imported and a list oferrors is presented on the screen.

Data Import - Locations 31
© 2017 DBA Software Inc.
8 Data Import - Locations
(File – Data Import – Stock Items – Locations)
Use this screen to import your inventory locations, which are the physical locations(racks, bins, shelves, staging areas, inspection areas, vans or trucks) where on handstock is stored.
*.csv File Format
Make sure you save the locations spreadsheet as a *.csv file type, which is the formatrequired by the mapping screen.
Spreadsheet Columns
Your spreadsheet can consist of some or all of the following columns. Be sure andinsert a title in row one of each column heading so that the column can be identifiedduring the mapping process.
Location ID (Required, String, 10)This identifies the location.
Description (Required, String, 50)This further identifies the location on lookups. .
Transitory (Boolean) Enter a ‘T’ to flag this as a “transitory” location, which is a temporary location, suchas an inspection location, not available for picking. Enter an ‘F’ if this is a permanentlocation available for picking.
Notes (Blob)Freeform notes can be entered in this field.
Spreadsheet Import
The import process involves four screens that are presented in succession by clickingthe Next button.
Screen 1 – Introduction
This first screen provides information notes on each particular import, a list of supportingtables that should be populated prior to running the import, and a listing of requiredfields.

Data Import Guide32
© 2017 DBA Software Inc.
Screen 2 – Select Import File
1. Column headings This checkbox is selected by default and tells the program to skip row one of thespreadsheet because it contains column headings.
2. Choose the import file Click the button in this field to navigate to your *.csv spreadsheet file.
Screen 3 – Map Fields
Om this screen you will map each DBA field, where applicable, to the correspondingcolumn on your spreadsheet. Field explanations are as follows:
Your Data Click the down arrow and select the column heading from your spreadsheet thatmatches the DBA field.
RequiredThis checkbox is selected when the field is required, which means all rows in yourspreadsheet must have a value. Mapping is optional with non-required fields.
DBA Field This is the descriptive name of the field in DBA.
TypeThis indicates the field type, such as ‘Blob’ (freeform text), ‘Boolean’ (true/false),‘Float’ (floating decimal), and ‘String’ (alphanumeric).
LengthThis indicates the field length, when applicable.
Screen 4 – Import Data
When you are done with your mapping, click the Import button. The program will attemptto import your data. If any errors are found, the data will not be imported and a list oferrors is presented on the screen.
Data Import - Item Categories 33
© 2017 DBA Software Inc.
9 Data Import - Item Categories
(File – Data Import – Stock Items – Item Categories)
Use this screen to import your item categories, which are used to organize your stockitems into groups for lookup and reporting purposes.
*.csv File Format
Make sure you save the item categories spreadsheet as a *.csv file type, which is theformat required by the mapping screen.
Spreadsheet Columns
Your spreadsheet can consist of some or all of the following columns. Be sure andinsert a title in row one of each column heading so that the column can be identifiedduring the mapping process.
Category (Required, String, 20)This identifies the item category.
Description (String, 50)This further identifies the item category on lookups. .
Spreadsheet Import
The import process involves four screens that are presented in succession by clickingthe Next button.
Screen 1 – Introduction
This first screen provides information notes on each particular import, a list of supportingtables that should be populated prior to running the import, and a listing of requiredfields.
Screen 2 – Select Import File
1. Column headings This checkbox is selected by default and tells the program to skip row one of thespreadsheet because it contains column headings.
2. Choose the import file Click the button in this field to navigate to your *.csv spreadsheet file.

Data Import Guide34
© 2017 DBA Software Inc.
Screen 3 – Map Fields
Om this screen you will map each DBA field, where applicable, to the correspondingcolumn on your spreadsheet. Field explanations are as follows:
Your Data Click the down arrow and select the column heading from your spreadsheet thatmatches the DBA field.
RequiredThis checkbox is selected when the field is required, which means all rows in yourspreadsheet must have a value. Mapping is optional with non-required fields.
DBA Field This is the descriptive name of the field in DBA.
TypeThis indicates the field type, such as ‘Blob’ (freeform text), ‘Boolean’ (true/false),‘Float’ (floating decimal), and ‘String’ (alphanumeric).
LengthThis indicates the field length, when applicable.
Screen 4 – Import Data
When you are done with your mapping, click the Import button. The program will attemptto import your data. If any errors are found, the data will not be imported and a list oferrors is presented on the screen.
Data Import - Stock Items (New) 35
© 2017 DBA Software Inc.
10 Data Import - Stock Items (New)
(File – Data Import – Stock Items – Stock Items (New))
Use this screen to create new stock items
Use this import screen to create new stock item records. To update existing records,use the Stock Items (Update) screen.
Supporting Tables
Some or all of the following tables must be created in advance before you can importyour stock items. Refer to the Startup Guide for details.
Item Categories (Required) Each item is assigned to an item category for classification purposes.
Locations Each item can optionally be assigned to a default Issue Location and ReceiptLocation.
Location Groups Each item can optionally be assigned to a Location Group. User-defined LocationGroups enable allowable locations to be assigned to a set of stock items.
*.csv File Format
Make sure you save the locations spreadsheet as a *.csv file type, which is the formatrequired by the mapping screen.
Spreadsheet Columns
Your spreadsheet can consist of some or all of the following columns. Be sure andinsert a title in row one of each column heading so that the column can be identifiedduring the import process.
Item ID (Required, String, 30)This is the code (part number) that identifies the item.
Item Description (Required, String, 60)This is the item’s formal description.
Data Import Guide36
© 2017 DBA Software Inc.
Stocking UM (Required, String, 8)This is the item’s stocking unit of measure. If you also have a purchasing unit ofmeasure, it will be imported later using the Data Import – Item Sources – ItemSuppliers screen.
Item Category (Required, String, 20)The Item Category is used to classify items for reporting and posting purposes. Thevalues in this column must correspond to records in the Item Categories table.
Mfg or Purch (Required, String, 1)Assign each manufactured item a value of ‘M’ and each purchased item a value of‘P’.
Item Notes (Blob)This field is for freeform notes against the item.
Estimated Cost (Float)Import an estimated cost against ‘P’ (purchased) items. The estimated cost for'M' (manufactured) items is calculated at a later time by the BOM - Cost Rollup, butyou can optionally import an estimated cost for now as a placeholder cost until therolled up cost gets calculated.
Primary Location (String, 10) Enter the item’s primary storage location. Any value in this column must correspondto a record in the Locations table. If you leave this field blank when importing a newrecord, the program assigns the default Primary Location designated in theInventory Setup – Inventory Defaults screen.
Receipt Location (String, 10)Enter the item’s default receipt location. Any value in this column must correspond toa record in the Locations table. If you leave this field blank when importing a newrecord, the program assigns the default Receipt Location designated in theInventory Setup – Inventory Defaults screen.
Location Group (String, 20)Each item can optionally be assigned to a Location Group, which enables you toassign allowable locations to a set of stock items as an alternative to doing so oneitem at a time. Any value in this column must correspond to a value in the LocationGroups table.
Drawing No (String, 30)This setting applies to ‘M’ (manufactured) items only.
Data Import - Stock Items (New) 37
© 2017 DBA Software Inc.
Drawing Title (String, 60)This setting applies to ‘M’ (manufactured) items only.
Unit Weight (Float)The weight (pounds, kilos, etc.) associated with one unit of the item.
Unit Volume (Float)The volume (cubic feet, meters, etc.) associated with one unit of the item.
Standard Pack Size (Float)The number of units included in one shipping pack (carton, pallet, etc.) for the item.
Tax Code (String, 10)Only give this field a value when the item is to be assigned an exception to theheader Tax Code in sales orders or purchase orders. Any value in this column mustcorrespond to a value in the Tax Codes table.
Warranty Code (String, 20)Any value in this column must correspond to a record in the Warranty Codes table.
UPC Bar Code (String, 20)This is a cross-reference ID number used in association with UPC bar coding.
Creation Date (Date)This is the date the item was originally created.
User-Defined Fields (up to 6) (Date or String, 50)The remaining mapping fields are user-defined fields specified in the Utilities –User-Defined Fields screen for stock items. Up to six such fields can be defined ineither text or date format.
Date Field Format
If the user-defined field is a date type, it must conform to the Short Date formatdefined in the Regional and Language Options found in the Windows ControlPanel on your file server.
Spreadsheet Import
The import process involves four screens that are presented in succession by clickingthe Next button.
Data Import Guide38
© 2017 DBA Software Inc.
Screen 1 – Introduction
This first screen provides information notes on each particular import, a list of supportingtables that should be populated prior to running the import, and a listing of requiredfields.
Screen 2 – Select Import File
1. Column headings This checkbox is selected by default and tells the program to skip row one of thespreadsheet because it contains column headings.
2. Choose the import file Click the button in this field to navigate to your *.csv spreadsheet file.
Screen 3 – Map Fields
Om this screen you will map each DBA field, where applicable, to the correspondingcolumn on your spreadsheet. Field explanations are as follows:
Your Data Click the down arrow and select the column heading from your spreadsheet thatmatches the DBA field.
RequiredThis checkbox is selected when the field is required, which means all rows in yourspreadsheet must have a value. Mapping is optional with non-required fields.
DBA Field This is the descriptive name of the field in DBA.
TypeThis indicates the field type, such as ‘Blob’ (freeform text), ‘Boolean’ (true/false),‘Float’ (floating decimal), and ‘String’ (alphanumeric).
LengthThis indicates the field length, when applicable.
Screen 4 – Import Data
When you are done with your mapping, click the Import button. The program will attemptto import your data. If any errors are found, the data will not be imported and a list oferrors is presented on the screen.
Data Import - Stock Items (Update) 39
© 2017 DBA Software Inc.
11 Data Import - Stock Items (Update)
(File – Data Import – Stock Items – Stock Items (Update))
Use this screen to update existing stock items
Use this import screen to update existing stock items. To create new records, use the Stock Items (New) screen.
*.csv File Format
Make sure you save the locations spreadsheet as a *.csv file type, which is the formatrequired by the mapping screen.
Spreadsheet Columns
Your spreadsheet can consist of some or all of the following columns. Be sure andinsert a title in row one of each column heading so that the column can be identifiedduring the import process.
Item ID (Required, String, 30)This is the only required field when updating existing record.
Item Description (String, 60)This is the item’s formal description.
Stocking UM (String, 8)This is the item’s stocking unit of measure.
Item Category (String, 20)The Item Category is used to classify items for reporting and posting purposes. Thevalues in this column must correspond to records in the Item Categories table.
Item Notes (Blob)This field is for freeform notes against the item.
Estimated Cost (Float)Only enter a value against ‘P’ (purchased) items. Values against ‘M’ (manufactured)items will be ignored.
Primary Location (String, 10) This is the item’s primary storage location. Any value in this column mustcorrespond to a record in the Locations table.
Data Import Guide40
© 2017 DBA Software Inc.
Receipt Location (String, 10)This is the item’s default receipt location. Any value in this column must correspondto a record in the Locations table.
Location Group (String, 20)Each item can optionally be assigned to a Location Group, which enables you toassign allowable locations to a set of stock items as an alternative to doing so oneitem at a time. Any value in this column must correspond to a value in the LocationGroups table.
Drawing No (String, 30)This setting applies to ‘M’ (manufactured) items only.
Drawing Title (String, 60)This setting applies to ‘M’ (manufactured) items only.
Unit Weight (Float)The weight (pounds, kilos, etc.) associated with one unit of the item.
Unit Volume (Float)The volume (cubic feet, meters, etc.) associated with one unit of the item.
Standard Pack Size (Float)The number of units included in one shipping pack (carton, pallet, etc.) for the item.
Tax Code (String, 10)Only give this field a value when the item is to be assigned an exception to theheader Tax Code in sales orders or purchase orders. Any value in this column mustcorrespond to a value in the Tax Codes table.
WARNING: Be aware that if you map this field and leave it blank, a blankvalue will set the item’s Tax Code Source to ‘Order Header’ and will overrideany tax code exception.
Warranty Code (String, 20)Any value in this column must correspond to a record in the Warranty Codes table.
UPC Bar Code (String, 20)This is a cross-reference ID number used in association with UPC bar coding.
User-Defined Fields (up to 6) (Date or String, 50)The remaining mapping fields are user-defined fields specified in the Utilities –User-Defined Fields screen for stock items. Up to six such fields can be defined ineither text or date format.
Data Import - Stock Items (Update) 41
© 2017 DBA Software Inc.
Date Field Format
If the user-defined field is a date type, it must conform to the Short Date formatdefined in the Regional and Language Options found in the Windows ControlPanel on your file server.
Spreadsheet Import
The import process involves four screens that are presented in succession by clickingthe Next button.
Screen 1 – Introduction
This first screen provides information notes on each particular import, a list of supportingtables that should be populated prior to running the import, and a listing of requiredfields.
Screen 2 – Select Import File
1. Column headings This checkbox is selected by default and tells the program to skip row one of thespreadsheet because it contains column headings.
2. Choose the import file Click the button in this field to navigate to your *.csv spreadsheet file.
Screen 3 – Map Fields
Om this screen you will map each DBA field, where applicable, to the correspondingcolumn on your spreadsheet. Field explanations are as follows:
Your Data Click the down arrow and select the column heading from your spreadsheet thatmatches the DBA field.
RequiredThis checkbox is selected when the field is required, which means all rows in yourspreadsheet must have a value. Mapping is optional with non-required fields.
DBA Field This is the descriptive name of the field in DBA.
TypeThis indicates the field type, such as ‘Blob’ (freeform text), ‘Boolean’ (true/false),‘Float’ (floating decimal), and ‘String’ (alphanumeric).

Data Import Guide42
© 2017 DBA Software Inc.
LengthThis indicates the field length, when applicable.
Screen 4 – Import Data
When you are done with your mapping, click the Import button. The program will attemptto import your data. If any errors are found, the data will not be imported and a list oferrors is presented on the screen.
Data Import - MRP Settings - M Items 43
© 2017 DBA Software Inc.
12 Data Import - MRP Settings - M Items
(File – Data Import – Stock Items – MRP Setting – M Items)
Use this screen to import MRP settings for your ‘M’ (manufactured) items.
Supporting Tables
Some or all of the following tables must be created in advance before you can importyour stock items. Refer to the Startup Guide for details.
Stock Items (Required) MRP settings are assigned to stock items.
*.csv File Format
Make sure you save the locations spreadsheet as a *.csv file type, which is the formatrequired by the mapping screen.
Spreadsheet Columns
Your spreadsheet can consist of some or all of the following columns. Be sure andinsert a title in row one of each column heading so that the column can be identifiedduring the import process.
Item ID (Required, String, 30)This required field identifies the stock item.
Reorder Level (Float)This is the item’s Reorder Level, which is used to trigger planned jobs when netdemand within the item’s planning period falls below this amount.
Min Order (Float)This is the item’s Min Order amount, which helps determine the planned job quantity.
Lead Days (Float)This is the number of days normally required before a job can be started to accountfor time required to procure material or to make lower level subassemblies.
Whole No Rounding (Boolean)Enter a ‘T’ if the item is always ordered and stocked in whole number increments. Enter an ‘F’ if the item can be stocked in a decimal quantity.
Data Import Guide44
© 2017 DBA Software Inc.
Order Multiple (Float)This setting rounds job quantities so that they are always divisible by a specifiedincrement.
Custom to Order (Boolean)This identifies when an item is always made to customer order and is customized insome manner such that it can’t be stocked or shipped to other customers. Enter a‘T’ against such items. If the item is not customized and can be shipped to anycustomers, enter an ‘F’. If you leave the column blank, items are assigned ‘F’ bydefault.
Job Days (Float)This represents the typical number of production days required from job releasethrough job finish.
Run Size (Integer)This represents the most typical job quantity for this item and is used to calculate unitsetup cost.
Spreadsheet Import
The import process involves four screens that are presented in succession by clickingthe Next button.
Screen 1 – Introduction
This first screen provides information notes on each particular import, a list of supportingtables that should be populated prior to running the import, and a listing of requiredfields.
Screen 2 – Select Import File
1. Column headings This checkbox is selected by default and tells the program to skip row one of thespreadsheet because it contains column headings.
2. Choose the import file Click the button in this field to navigate to your *.csv spreadsheet file.
Screen 3 – Map Fields
Om this screen you will map each DBA field, where applicable, to the correspondingcolumn on your spreadsheet. Field explanations are as follows:

Data Import - MRP Settings - M Items 45
© 2017 DBA Software Inc.
Your Data Click the down arrow and select the column heading from your spreadsheet thatmatches the DBA field.
RequiredThis checkbox is selected when the field is required, which means all rows in yourspreadsheet must have a value. Mapping is optional with non-required fields.
DBA Field This is the descriptive name of the field in DBA.
TypeThis indicates the field type, such as ‘Blob’ (freeform text), ‘Boolean’ (true/false),‘Float’ (floating decimal), and ‘String’ (alphanumeric).
LengthThis indicates the field length, when applicable.
Screen 4 – Import Data
When you are done with your mapping, click the Import button. The program will attemptto import your data. If any errors are found, the data will not be imported and a list oferrors is presented on the screen.
Data Import Guide46
© 2017 DBA Software Inc.
13 Data Import - MRP Settings - P Items
(File – Data Import – Stock Items – MRP Settings – P Items)
Use this screen to import MRP settings for your ‘P’ (purchased) items.
Supporting Tables
Some or all of the following tables must be created in advance before you can importyour stock items. Refer to the Startup Guide for details.
Stock Items (Required) MRP settings are assigned to stock items.
*.csv File Format
Make sure you save the locations spreadsheet as a *.csv file type, which is the formatrequired by the mapping screen.
Spreadsheet Columns
Your spreadsheet can consist of some or all of the following columns. Be sure andinsert a title in row one of each column heading so that the column can be identifiedduring the import process.
Item ID (Required, String, 30)This required field identifies the stock item.
Reorder Level (Float)This is the item’s Reorder Level, which triggers a planned PO whenever net demandwithin the item’s planning period falls below this level.
Min Order (Float)This is the item’s Min Order amount, which helps determine the planned PO quantity.
Lead Days (Float)This is the total number of days allocated by MRP for ordering and receiving thisitem from the default supplier.
WARNING: When planning for electronic components or any item where amanufacturer part number is specified, never use the manufacturer’s lead time asthe Lead Days allocation. This is because you will typically source an alternatepart when the default manufacturer’s part is not currently available. A lengthy
Data Import - MRP Settings - P Items 47
© 2017 DBA Software Inc.
manufacturer’s lead time is never used for actual planning and will corrupt itemaction windows, PO due dates, and higher-Level M item Lead Days allocations.
Whole No Rounding (Boolean)Enter a ‘T’ if the item is always ordered and stocked in whole number increments. Enter an ‘F’ if the item can be stocked in a decimal quantity.
Order Multiple (Float)This rounds PO quantities so that they are always divisible by a specified increment. For example, a particular item might always have to be ordered in multiples of onehundred, such as 100, 200, 300, etc.
Spreadsheet Import
The import process involves four screens that are presented in succession by clickingthe Next button.
Screen 1 – Introduction
This first screen provides information notes on each particular import, a list of supportingtables that should be populated prior to running the import, and a listing of requiredfields.
Screen 2 – Select Import File
1. Column headings This checkbox is selected by default and tells the program to skip row one of thespreadsheet because it contains column headings.
2. Choose the import file Click the button in this field to navigate to your *.csv spreadsheet file.
Screen 3 – Map Fields
Om this screen you will map each DBA field, where applicable, to the correspondingcolumn on your spreadsheet. Field explanations are as follows:
Your Data Click the down arrow and select the column heading from your spreadsheet thatmatches the DBA field.
RequiredThis checkbox is selected when the field is required, which means all rows in yourspreadsheet must have a value. Mapping is optional with non-required fields.
Data Import Guide48
© 2017 DBA Software Inc.
DBA Field This is the descriptive name of the field in DBA.
TypeThis indicates the field type, such as ‘Blob’ (freeform text), ‘Boolean’ (true/false),‘Float’ (floating decimal), and ‘String’ (alphanumeric).
LengthThis indicates the field length, when applicable.
Screen 4 – Import Data
When you are done with your mapping, click the Import button. The program will attemptto import your data. If any errors are found, the data will not be imported and a list oferrors is presented on the screen.
Data Import - MRP Analysis Code - Items 49
© 2017 DBA Software Inc.
14 Data Import - MRP Analysis Code - Items
(File – Data Import – Stock Items – MRP Analysis Code - Items)
Use this screen to import a set of stock items for assignment to an MRP analysis code.
Supporting Tables
The following tables are required for MRP analysis code items import.
Stock Items
Each import file includes a set of stock items.
MRP Analysis Codes
Each import file is associated with one MRP Analysis Code.
*.csv File Format
Make sure you save the MRP analysis code items spreadsheet as a *.csv file type,which is the format required by the mapping screen.
Spreadsheet Columns
Your spreadsheet can consist of some or all of the following columns. Be sure andinsert a title in row one of each column heading so that the column can be identifiedduring the import process.
Analysis Code (Required, String, 30)
This required field identifies the MRP analysis code.
Stock Item (Required, String, 30)
This required field identifies the stock item.
Spreadsheet Import
The import process involves five screens that are presented in succession by clickingthe Next button.
Screen 1 – Import Type
Select an Import Type. Two options are available:
Data Import Guide50
© 2017 DBA Software Inc.
Full Replace
The option deletes the existing Analysis Code item assignments and uses theimported items to create a new set of item assignments
Incremental Add
This option adds imported items to the existing Analysis Code item assignmentsset.
Screen 2 – Information
This screen provides an information overview of the data import process, including Import Info, Supporting Tables, and Required Fields.
Screen 3 – Select Import File
1. Column headings
This checkbox is selected by default and tells the program to skip row one of thespreadsheet because it contains column headings.
2. Choose the import file
Click the button in this field to navigate to your *.csv spreadsheet file.
Screen 4 – Map Fields
Om this screen you will map each DBA field, where applicable, to the correspondingcolumn on your spreadsheet. Field explanations are as follows:
Your Data
Click the down arrow and select the column heading from your spreadsheet thatmatches the DBA field.
Required
This checkbox is selected when the field is required, which means all rows in yourspreadsheet must have a value. Mapping is optional with non-required fields.
DBA Field
This is the descriptive name of the field in DBA.
Data Import - MRP Analysis Code - Items 51
© 2017 DBA Software Inc.
Type
This indicates the field type, such as ‘Blob’ (freeform text), ‘Boolean’ (true/false),‘Float’ (floating decimal), and ‘String’ (alphanumeric).
Length
This indicates the field length, when applicable.
Screen 5 – Import Data
When you are done with your mapping, click the Import button. The program will attemptto import your data. If any errors are found, the data will not be imported and a list oferrors is presented on the screen.
Data Import Guide52
© 2017 DBA Software Inc.
15 Data Import - Cycle Code - Items
(File – Data Import – Stock Items – Cycle Code - Items)
Use this screen to import a set of stock items for assignment to a cycle code.
Supporting Tables
The following tables are required for cycle code items import.
Stock Items
Each import file includes a set of stock items.
Cycle Codes
Each import file is associated with one Cycle Code.
*.csv File Format
Make sure you save the cycle code items spreadsheet as a *.csv file type, which is theformat required by the mapping screen.
Spreadsheet Columns
Your spreadsheet can consist of some or all of the following columns. Be sure andinsert a title in row one of each column heading so that the column can be identifiedduring the import process.
Cycle Code (Required, String, 30)
This required field identifies the cycle code.
Stock Item (Required, String, 30)
This required field identifies the stock item.
Spreadsheet Import
The import process involves five screens that are presented in succession by clickingthe Next button.
Screen 1 – Import Type
Select an Import Type. Two options are available:
Data Import - Cycle Code - Items 53
© 2017 DBA Software Inc.
Full Replace
The option deletes the existing Cycle Code item assignments and uses theimported items to create a new set of item assignments
Incremental Add
This option adds imported items to the existing Cycle Code item assignments set.
Screen 2 – Information
This screen provides an information overview of the data import process, including Import Info, Supporting Tables, and Required Fields.
Screen 3 – Select Import File
1. Column headings
This checkbox is selected by default and tells the program to skip row one of thespreadsheet because it contains column headings.
2. Choose the import file
Click the button in this field to navigate to your *.csv spreadsheet file.
Screen 4 – Map Fields
Om this screen you will map each DBA field, where applicable, to the correspondingcolumn on your spreadsheet. Field explanations are as follows:
Your Data
Click the down arrow and select the column heading from your spreadsheet thatmatches the DBA field.
Required
This checkbox is selected when the field is required, which means all rows in yourspreadsheet must have a value. Mapping is optional with non-required fields.
DBA Field
This is the descriptive name of the field in DBA.
Data Import Guide54
© 2017 DBA Software Inc.
Type
This indicates the field type, such as ‘Blob’ (freeform text), ‘Boolean’ (true/false),‘Float’ (floating decimal), and ‘String’ (alphanumeric).
Length
This indicates the field length, when applicable.
Screen 5 – Import Data
When you are done with your mapping, click the Import button. The program will attemptto import your data. If any errors are found, the data will not be imported and a list oferrors is presented on the screen.
Data Import - Item Suppliers 55
© 2017 DBA Software Inc.
16 Data Import - Item Suppliers
(File – Data Import – Item Sources – Item Suppliers)
Use this screen to import purchased item suppliers, including supplier part numbers andprices.
Supporting Tables
Some or all of the following tables must be created in advance before you can importyour item suppliers. Refer to the Startup Guide for details.
Stock Items (Required) All your purchased items must be entered or imported before you can import itemsuppliers.
Suppliers (Required) All item suppliers designated for import must exist in the suppliers table.
*.csv File Format
Make sure you save the item suppliers spreadsheet as a *.csv file type, which is theformat required by the mapping screen.
Spreadsheet Columns
Your spreadsheet must include the following columns. Be sure and insert a title in rowone of each column heading so that the column can be identified during the mappingprocess.
Item ID (Required, String, 30)This is the item ID associated with this item supplier. Any value in the column mustcorrespond to a record in the Stock Items table.
Supplier (Required, String, 50)This is a supplier for this item. Any value in the column must correspond to a recordin the Suppliers table.
Supplier Part No (String, 30)This is the supplier’s part number for this item.
Supplier Description (String, 60)You can optionally specify the supplier’s description for the item.
Data Import Guide56
© 2017 DBA Software Inc.
Supplier UM (String, 8)This is the supplier’s unit of measure for this item.
Multiplier (Float)This is used to calculate the supplier’s order quantity if the supplier sells the item in adifferent unit of measure than your stocking unit of measure. The DBA quantity ismultiplied by this amount to arrive at the supplier’s quantity. Here are twoexamples:
Stock in Buy in Multiplier
FT YARD .333333
FT INCH 12
Supplier Price (Float)This is the supplier’s price for this item for your most typical order quantity.
NOTE: This field can be updated after the initial import to reflect current supplierprices.
Default (String, 1)Enter a ‘T’ against the default supplier for the item. It is not necessary to enter an ‘F’against each non-default supplier. If you leave this field blank, the first supplierimported for the item is flagged as the default supplier. If you flag two suppliers foran item by mistake, the last one imported gets flagged as the default supplier.
Spreadsheet Import
The import process involves four screens that are presented in succession by clickingthe Next button.
Screen 1 – Introduction
This first screen provides information notes on each particular import, a list of supportingtables that should be populated prior to running the import, and a listing of requiredfields.
Screen 2 – Select Import File
1. Column headings This checkbox is selected by default and tells the program to skip row one of thespreadsheet because it contains column headings.
2. Choose the import file Click the button in this field to navigate to your *.csv spreadsheet file.
Data Import - Item Suppliers 57
© 2017 DBA Software Inc.
Screen 3 – Map Fields
Om this screen you will map each DBA field, where applicable, to the correspondingcolumn on your spreadsheet. Field explanations are as follows:
Your Data Click the down arrow and select the column heading from your spreadsheet thatmatches the DBA field.
RequiredThis checkbox is selected when the field is required, which means all rows in yourspreadsheet must have a value. Mapping is optional with non-required fields.
DBA Field This is the descriptive name of the field in DBA.
TypeThis indicates the field type, such as ‘Blob’ (freeform text), ‘Boolean’ (true/false),‘Float’ (floating decimal), and ‘String’ (alphanumeric).
LengthThis indicates the field length, when applicable.
Screen 4 – Import Data
When you are done with your mapping, click the Import button. The program will attemptto import your data. If any errors are found, the data will not be imported and a list oferrors is presented on the screen.
Data Import Guide58
© 2017 DBA Software Inc.
17 Data Import - Manufacturers
(File – Data Import – Item Sources – Manufacturers)
Use this screen to import manufacturers for your purchased items. Manufacturer partnumbers are imported separately, using the Mfgr Part Numbers import screen.
*.csv File Format
Make sure you save the manufacturers spreadsheet as a *.csv file type, which is theformat required by the mapping screen.
Spreadsheet Columns
Your spreadsheet must include the following columns. Be sure and insert a title in rowone of each column heading so that the column can be identified during the mappingprocess.
Manufacturer (Required, String, 50)This is a name or code that identifies the manufacturer.
Web (String, 100)This is the manufacturer’s website URL.
Phone (String, 20)This is the manufacturer’s phone number.
Fax (String, 20)This is the manufacturer’s fax number.
Email (String, 100)This is the manufacturer’s Email address.
Notes (Blob)Freeform notes can be entered in this field.
Spreadsheet Import
The import process involves four screens that are presented in succession by clickingthe Next button.
Data Import - Manufacturers 59
© 2017 DBA Software Inc.
Screen 1 – Introduction
This first screen provides information notes on each particular import, a list of supportingtables that should be populated prior to running the import, and a listing of requiredfields.
Screen 2 – Select Import File
1. Column headings This checkbox is selected by default and tells the program to skip row one of thespreadsheet because it contains column headings.
2. Choose the import file Click the button in this field to navigate to your *.csv spreadsheet file.
Screen 3 – Map Fields
Om this screen you will map each DBA field, where applicable, to the correspondingcolumn on your spreadsheet. Field explanations are as follows:
Your Data Click the down arrow and select the column heading from your spreadsheet thatmatches the DBA field.
RequiredThis checkbox is selected when the field is required, which means all rows in yourspreadsheet must have a value. Mapping is optional with non-required fields.
DBA Field This is the descriptive name of the field in DBA.
TypeThis indicates the field type, such as ‘Blob’ (freeform text), ‘Boolean’ (true/false),‘Float’ (floating decimal), and ‘String’ (alphanumeric).
LengthThis indicates the field length, when applicable.
Screen 4 – Import Data
When you are done with your mapping, click the Import button. The program will attemptto import your data. If any errors are found, the data will not be imported and a list oferrors is presented on the screen.
Data Import Guide60
© 2017 DBA Software Inc.
18 Data Import - Mfgr Part Numbers
(File – Data Import – Item Sources – Mfgr Part Numbers)
Use this screen to import manufacturer part numbers. Manufacturers are importedseparately prior to this import, using the Manufacturers data import screen.
Supporting Tables
Some or all of the following tables must be created in advance before you can importmanufacturer part numbers.
Stock Items (Required) All your purchased items must be entered or imported before you can assignmanufacturer part numbers.
Manufacturers (Required) All manufacturers associated with manufacturer part numbers must already exist inthe Manufacturers table.
*.csv File Format
Make sure you save the manufacturer part numbers spreadsheet as a *.csv file type,which is the format required by the mapping screen.
Spreadsheet Columns
Your spreadsheet must include the following columns. Be sure and insert a title in rowone of each column heading so that the column can be identified during the mappingprocess.
Item ID (Required, String, 30)This is the item ID associated with this manufacturer part number. Any value in thecolumn must correspond to a record in the Stock Items table.
Manufacturer (Required, String, 50)This is the manufacturer associated with this manufacturer part number. Any value inthe column must correspond to a record in the Manufacturers table.
Mfgr Part No (String, 30)This is the manufacturer’s part number for this item.
Data Import - Mfgr Part Numbers 61
© 2017 DBA Software Inc.
Default (String, 1)Enter a ‘T’ against the default manufacturer part number for the item. It is notnecessary to enter an ‘F’ against each non-default manufacturer part number. If youleave this field blank, the first manufacturer part number imported for the item isflagged as the default. If you flag two records for an item by mistake, the last oneimported gets flagged as the default.
Spreadsheet Import
The import process involves four screens that are presented in succession by clickingthe Next button.
Screen 1 – Introduction
This first screen provides information notes on each particular import, a list of supportingtables that should be populated prior to running the import, and a listing of requiredfields.
Screen 2 – Select Import File
1. Column headings This checkbox is selected by default and tells the program to skip row one of thespreadsheet because it contains column headings.
2. Choose the import file Click the button in this field to navigate to your *.csv spreadsheet file.
Screen 3 – Map Fields
Om this screen you will map each DBA field, where applicable, to the correspondingcolumn on your spreadsheet. Field explanations are as follows:
Your Data Click the down arrow and select the column heading from your spreadsheet thatmatches the DBA field.
RequiredThis checkbox is selected when the field is required, which means all rows in yourspreadsheet must have a value. Mapping is optional with non-required fields.
DBA Field This is the descriptive name of the field in DBA.
Data Import Guide62
© 2017 DBA Software Inc.
TypeThis indicates the field type, such as ‘Blob’ (freeform text), ‘Boolean’ (true/false),‘Float’ (floating decimal), and ‘String’ (alphanumeric).
LengthThis indicates the field length, when applicable.
Screen 4 – Import Data
When you are done with your mapping, click the Import button. The program will attemptto import your data. If any errors are found, the data will not be imported and a list oferrors is presented on the screen.
Data Import - Base Prices 63
© 2017 DBA Software Inc.
19 Data Import - Base Prices
(File – Data Import – Selling Prices – Base Prices)
Use this screen to enter initial base prices prior to system startup day or to mass updatebase prices as an alternative to doing so in the Base Prices screen.
When to use this import
Use this import under two conditions:
Your items all have a single base price, without any quantity break prices.
Your items have quantity break prices that are calculated during sales order entryas a percentage of base price. In that case, you will import in two steps, usingthis import for your base prices and the Qty Breaks by Percentage import tospecify the percentage breaks.
Skip this import if your items have quantity break prices
If your items have quantity break prices, skip this import and use the Qty Breaks byPrice import instead to import base prices and quantity break prices in a single import. In that import, each item’s base price is given a row in the spreadsheet, with a quantityvalue of null (blank), ‘0’, or a text value of ‘BASE’.
New prices go into effect immediately
This import bypasses the Next Base field and directly updates the Current Base valuedisplayed in the Base Prices screen, which means that imported prices go into effectimmediately.
Training Video
Support Center – Videos–Setup – Data Import – Selling Prices Import
Supporting Tables
The following table must be created in advance before you can import base prices. Refer to the Startup Guide for details.
Stock Items (Required) All the items you sell must be entered or imported before you can import baseprices.
*.csv File Format
Make sure you save the base prices spreadsheet as a *.csv file type, which is the formatrequired by the mapping screen.
Data Import Guide64
© 2017 DBA Software Inc.
Spreadsheet Columns
Your spreadsheet must include the following columns. Be sure and insert a title in rowone of each column heading so that the column can be identified during the mappingprocess.
Item ID (Required, String, 30)This is the item ID associated with the base price. Any value in the column mustcorrespond to a record in the Stock Items table.
Base Price (Required, Float) This is the new base price, which goes into effect immediately upon beingimported.
Spreadsheet Import
The import process involves four screens that are presented in succession by clickingthe Next button.
Screen 1 – Introduction
This first screen provides information notes on each particular import, a list of supportingtables that should be populated prior to running the import, and a listing of requiredfields.
Screen 2 – Select Import File
1. Column headings This checkbox is selected by default and tells the program to skip row one of thespreadsheet because it contains column headings.
2. Choose the import file Click the button in this field to navigate to your *.csv spreadsheet file.
Screen 3 – Map Fields
Om this screen you will map each DBA field, where applicable, to the correspondingcolumn on your spreadsheet. Field explanations are as follows:
Your Data Click the down arrow and select the column heading from your spreadsheet thatmatches the DBA field.
Data Import - Base Prices 65
© 2017 DBA Software Inc.
RequiredThis checkbox is selected when the field is required, which means all rows in yourspreadsheet must have a value. Mapping is optional with non-required fields.
DBA Field This is the descriptive name of the field in DBA.
TypeThis indicates the field type, such as ‘Blob’ (freeform text), ‘Boolean’ (true/false),‘Float’ (floating decimal), and ‘String’ (alphanumeric).
LengthThis indicates the field length, when applicable.
Screen 4 – Import Data
When you are done with your mapping, click the Import button. The program will attemptto import your data. If any errors are found, the data will not be imported and a list oferrors is presented on the screen.
Data Import Guide66
© 2017 DBA Software Inc.
20 Data Import - Qty Breaks by Price
(File – Data Import – Selling Prices – Qty Breaks by Price)
Use this screen to enter initial base prices and quantity break prices prior to systemstartup day or to mass update prices as an alternative to doing so in the Base Pricesscreen.
When to use this import
Use this import when your items have quantity break prices. Base prices and quantitybreak prices are imported together in a single process. Each item’s base price is givena row in the source spreadsheet, with a quantity value of null (blank), ‘0’ (zero), or a textvalue of ‘BASE’.
New prices go into effect immediately
This import bypasses the Next Base field and directly updates the Current Base valuedisplayed in the Base Prices screen, which means that imported prices go into effectimmediately.
Training Video
Support Center – Videos–Setup – Data Import – Selling Prices Import
Supporting Tables
The following table must be created in advance before you can import base prices. Refer to the Startup Guide for details.
Stock Items (Required) All the items you sell must be entered or imported before you can import baseprices.
*.csv File Format
Make sure you save the quantity breaks by price spreadsheet as a *.csv file type, whichis the format required by the mapping screen.
Spreadsheet Columns
Your spreadsheet must include the following columns. Be sure and insert a title in rowone of each column heading so that the column can be identified during the mappingprocess.
Data Import - Qty Breaks by Price 67
© 2017 DBA Software Inc.
Item ID (Required, String, 30)This is the item ID associated with the price. Any value in the column mustcorrespond to a record in the Stock Items table.
Qty (Required, Float)This value depends on whether the price is the item’s base price or a quantity breakprice.
Base Price (Required)
Each item must have a base price specified in the spreadsheet as a requirementfor entering any quantity break prices. The base price can be given a quantity ofnull (blank), ‘0’, or a text value of ‘BASE’ (all caps).
Quantity Break Price
Quantity break prices are optional. Enter the quantity associated with thequantity break price.
Price (Required, Float)This is the new base price or quantity break price, which goes into effectimmediately upon being imported.
Spreadsheet Import
The import process involves four screens that are presented in succession by clickingthe Next button.
Screen 1 – Introduction
This first screen provides information notes on each particular import, a list of supportingtables that should be populated prior to running the import, and a listing of requiredfields.
Screen 2 – Select Import File
1. Column headings This checkbox is selected by default and tells the program to skip row one of thespreadsheet because it contains column headings.
2. Choose the import file Click the button in this field to navigate to your *.csv spreadsheet file.
Data Import Guide68
© 2017 DBA Software Inc.
Screen 3 – Map Fields
Om this screen you will map each DBA field, where applicable, to the correspondingcolumn on your spreadsheet. Field explanations are as follows:
Your Data Click the down arrow and select the column heading from your spreadsheet thatmatches the DBA field.
RequiredThis checkbox is selected when the field is required, which means all rows in yourspreadsheet must have a value. Mapping is optional with non-required fields.
DBA Field This is the descriptive name of the field in DBA.
TypeThis indicates the field type, such as ‘Blob’ (freeform text), ‘Boolean’ (true/false),‘Float’ (floating decimal), and ‘String’ (alphanumeric).
LengthThis indicates the field length, when applicable.
Screen 4 – Import Data
When you are done with your mapping, click the Import button. The program will attemptto import your data. If any errors are found, the data will not be imported and a list oferrors is presented on the screen.
Data Import - Qty Breaks by Percentage 69
© 2017 DBA Software Inc.
21 Data Import - Qty Breaks by Percentage
(File – Data Import – Selling Prices – Qty Breaks by Percentage)
This screen is only used when your items have quantity break prices that are calculatedduring sales order entry as a percentage of base price. Use this screen to import thequantity break percentages.
Import base prices first
Before you can import quantity break percentages, you must import base prices usingthe Base Prices import.
Training Video
Support Center – Videos–Setup – Data Import – Selling Prices Import
Supporting Tables
The following table must be created in advance before you can import quantity breakpercentages.
Base Prices (Required) Each item must have a base price before you can import quantity breakpercentages.
*.csv File Format
Make sure you save the quantity breaks by percentage spreadsheet as a *.csv file type,which is the format required by the mapping screen.
Spreadsheet Columns
Your spreadsheet must include the following columns. Be sure and insert a title in rowone of each column heading so that the column can be identified during the mappingprocess.
Item ID (Required, String, 30)This is the item ID associated with the price. Any value in the column mustcorrespond to a record in the Stock Items table.
Qty (Required, Float)This is the quantity associated with the price break percentage.
Data Import Guide70
© 2017 DBA Software Inc.
Percent (Required, Float)This is the percentage multiplier that gets applied to the item’s base price. Forexample, if you want the quantity break price to be 10% lower than base price, enter‘90.00’.
Spreadsheet Import
The import process involves four screens that are presented in succession by clickingthe Next button.
Screen 1 – Introduction
This first screen provides information notes on each particular import, a list of supportingtables that should be populated prior to running the import, and a listing of requiredfields.
Screen 2 – Select Import File
1. Column headings This checkbox is selected by default and tells the program to skip row one of thespreadsheet because it contains column headings.
2. Choose the import file Click the button in this field to navigate to your *.csv spreadsheet file.
Screen 3 – Map Fields
Om this screen you will map each DBA field, where applicable, to the correspondingcolumn on your spreadsheet. Field explanations are as follows:
Your Data Click the down arrow and select the column heading from your spreadsheet thatmatches the DBA field.
RequiredThis checkbox is selected when the field is required, which means all rows in yourspreadsheet must have a value. Mapping is optional with non-required fields.
DBA Field This is the descriptive name of the field in DBA.
TypeThis indicates the field type, such as ‘Blob’ (freeform text), ‘Boolean’ (true/false),‘Float’ (floating decimal), and ‘String’ (alphanumeric).

Data Import - Qty Breaks by Percentage 71
© 2017 DBA Software Inc.
LengthThis indicates the field length, when applicable.
Screen 4 – Import Data
When you are done with your mapping, click the Import button. The program will attemptto import your data. If any errors are found, the data will not be imported and a list oferrors is presented on the screen.
Data Import Guide72
© 2017 DBA Software Inc.
22 Data Import - BOM Routings
(Data Import – BOM – BOM Routings)
Supporting Tables
Some or all of the following tables must be created in advance before you can importyour BOM routings. Refer to the Startup Guide for details.
Stock Items (Required)All your ‘M’ (manufactured) items should be entered or imported before you canimport BOM routings.
Work Centers (Required) Each routing sequence must be assigned to a work center.
Machines You can optionally assign each routing sequence to a particular machine.
SuppliersAll suppliers that provide subcontract services must be entered or imported beforeyou can import BOM routings.
*.csv File Format
Make sure you save the BOM routings spreadsheet as a *.csv file type, which isrequired by the mapping screen.
Spreadsheet Columns
Your spreadsheet can consist of some or all of the following columns. Be sure andinsert a title in row one of each column heading so that the column can be identifiedduring the import process.
BOM Parent (Required, String, 30)This is the BOM parent item associated with this routing sequence. Any value in thisfield must correspond to an ‘M’ (manufactured) item record in the stock items table.
BOM Type (String, 1)This is a one character field that corresponds to the following BOM type values.
B = BOM
F = Batch
Data Import - BOM Routings 73
© 2017 DBA Software Inc.
NOTE: If you leave this field blank, the program assigns ‘B’ (BOM) bydefault.
Revision (String, 20)This is the revision associated with this BOM parent. If you leave this field blank, thedefault revision specified in the BOM Defaults screen will be assigned by theprogram. If a default revision is not specified in BOM Defaults, a value in this field isrequired.
Sequence (Required, String, 10)This is the ID number that identifies this routing sequence and determines thesequence sort order.
Process ID (String, 20)If you leave this field blank, the program assigns this work center’s default process. Ifyou enter a value in this field, it must correspond to a process ID assigned to thiswork center.
Description (String, 50)This is the process description, which describes the work or service to beperformed.
Work Center (Required, String, 12)Each routing sequence must be assigned to an in-house or subcontract work center. Any value in this column must correspond to a record in the work centers table.
Machine ID (String, 20)Each routing sequence can optionally be assigned to a machine. Any value in thiscolumn must correspond to a record in the machines table that is assigned to thiswork center.
NOTE: If this is a subcontract service sequence, leave this field blank.
Setup Hours (Float)These are the setup hours required to prepare this sequence.
NOTE1: Setup hours are stored as a decimal number. If your old systemstores this in hours, minutes, and seconds, you must convert all the values inthis column into decimal numbers. 30 minutes, for example, would be ‘.5’hours.
NOTE2: If this is a subcontract service sequence, leave this field blank.
Items / Process (Float)If you leave this blank, the program will give it a value of ‘1’.
Data Import Guide74
© 2017 DBA Software Inc.
NOTE: If this is a subcontract service sequence, leave this field blank.
Processes / Hour (Float)This is your cycle time or production rate.
NOTE: If this is a subcontract service sequence, leave this field blank.
Hours Type (String, 8) Enter a value of ‘Standard’ or ‘Actual’, which determines whether standard or actualhours are to be reported for this sequence in the Job Labor screen. If you leave thisfield blank, the program assigns ‘Standard’ by default.
NOTE: If this is a subcontract service sequence, leave this field blank.
Days to Next (Float)This is an optional field that specifies an interval in days between this sequence andthe next sequence.
NOTE: If this is a subcontract service sequence, leave this field blank.
Traveler Notes (Blob)This is the freeform text that documents the process to be performed.
NOTE: This field is normally left blank on subcontract service sequences, butcould be used for internal notes that do not flow through to the PO.
Subcontract: Supp Price (Float) This is the price charged by this supplier for the subcontract service.
NOTE: If this sequence is an in-house process, leave this field blank.
Subcontract: Supp UM (String, 8)This is the unit of measure associated with the supplier price. If you leave this blank,the program assigns the BOM parent’s unit of measure by default.
NOTE: If this sequence is an in-house process, leave this field blank.
Subcontract: Multiplier (Float)The supplier price is multiplied by this number to determine the estimated cost forthe subcontract service. If you leave this blank, the program assigns a value of ‘1’ bydefault.
NOTE: If this sequence is an in-house process, leave this field blank.
Subcontract: Days to Next (Float)This is the lead time for the subcontract service.
NOTE: If this sequence is an in-house process, leave this field blank.

Data Import - BOM Routings 75
© 2017 DBA Software Inc.
Subcontract: PO Notes (Blob)These are the freeform notes that flow from the job to the subcontract service PO.
NOTE: If this sequence is an in-house process, leave this field blank.
Spreadsheet Import
The BOM routings spreadsheet is imported using the Import BOM Routings screenshown below.
1. Column headings
This checkbox is selected by default and tells the program to skip row one of thespreadsheet because it contains column headings.
2. Choose the import file
Click the 3-dot button to navigate to your *.csv file, which is your spreadsheet.
3. Map the import file columns.
Om this step you will map each DBA field, where applicable, to the correspondingcolumn on your spreadsheet. Field explanations are as follows:
Your Data Click the down arrow and select the column heading from your spreadsheet thatmatches the DBA Field.
Data Import Guide76
© 2017 DBA Software Inc.
RequiredThis checkbox is selected when the field is required, which means all rows in yourspreadsheet must have a value. Non-required fields do not have to be mapped to aspreadsheet column.
DBA Field This is the descriptive name of the field in DBA.
Type, Len ‘C’ in the Type column indicates an alphanumeric field with a limit of so manycharacters as specified in the Len column. ‘N’ in the Type column indicates anumeric field.
Info You can click the button in this column for additional information regarding this field.
DBA Field Name This is the actual name of the field in the database.
4. Import
When you are done with your mapping, click the Import button. The program will attemptto import your data. If any errors are found, the data will not be imported and you will begiven an error report. You should print out the report and make corrections to yourspreadsheet.
NOTE: After you print out your report, do not close the Import Routings screen. Ifyou do so, you’ll have to re-do all your mappings once again.
When the program is able run through the data without finding any errors, it will then askyou if you wish to import the data. Click Yes and all the data on the spreadsheet will beimported.
Copyright Notice
Portions of this import program Copyright 2005-2006 White Peak Software Inc

Data Import - BOM Components 77
© 2017 DBA Software Inc.
23 Data Import - BOM Components
(File – Data Import – BOM – BOM Components)
Supporting Tables
Some or all of the following tables must be created in advance before you can importyour BOM components. Refer to the Startup Guide for details.
Stock Items (Required)All BOM parent items and components should be entered or imported before youcan import BOM components.
Routings Routings should be entered or imported before BOM components so thatcomponents can be assigned to the routing sequences in which they areconsumed.
Descriptors We do not recommend using descriptors as BOM components, but if you choose todo so, you must first create them manually in the Descriptors screen.
*.csv File Format
Make sure you save the BOM components spreadsheet as a *.csv file type, which isrequired by the mapping screen.
Spreadsheet Columns
Your spreadsheet can consist of some or all of the following columns. Be sure andinsert a title in row one of each column heading so that the column can be identifiedduring the import process.
BOM Parent (Required, String, 30)This is the BOM parent item associated with this component. Any value in this fieldmust correspond to an ‘M’ (manufactured) item record in the stock items table.
BOM Type (String, 1)This is a one character field that corresponds to the following BOM type values.
B = BOM
P = Phantom
F = Batch
Data Import Guide78
© 2017 DBA Software Inc.
NOTE: If you leave this field blank, the program assigns ‘B’ (BOM) by default.
Revision (String, 20)This is the revision associated with this BOM parent. If you leave this field blank, thedefault revision specified in the BOM Defaults screen will be assigned by theprogram. If a default revision is not specified in BOM Defaults, a value in this field isrequired.
Component (Required, String, 30)Values in this column must correspond to a record in the stock items or descriptorstable.
Line No (Float)This field enables you to bring in your existing line numbers. If you delete this columnfrom your spreadsheet and do not map it, the import program will automaticallyassign line numbers in increments of ‘10’ in the order that components are listed.
NOTE: Do not map the column if it has blank values or else all line numberswill be given a value of ‘0’ (zero).
Sequence (String, 10)You can optionally assign each component to the routing sequence in which it isconsumed. This field value must correspond to a valid sequence number within therouting for this BOM revision.
Type (String, 1)Stock item components should be identified with an ‘S’ and descriptors with a ‘D’. Ifyou leave this column blank, the program assigns a value of ‘S’.
Usage Qty (Required, Float)This is the quantity required to make one unit (or batch size) of the BOM parent. Decimal quantities are permitted.
Fixed Qty (String, 1)Set this to ‘T’ if you want this component to have a fixed usage quantity, regardlessof the BOM parent’s job quantity. Set this to ‘F’ if you want a variable usage quantity,which generally applies to most components. If you leave this field blank, theprogram assigns an ‘F’ value by default.
Overage % (Float)This is the expected scrap percentage associated with the component.
NOTE: You may need to edit the overage percentage field values. Somesystems use a yield factor instead of a scrap percentage. 90% yield is the
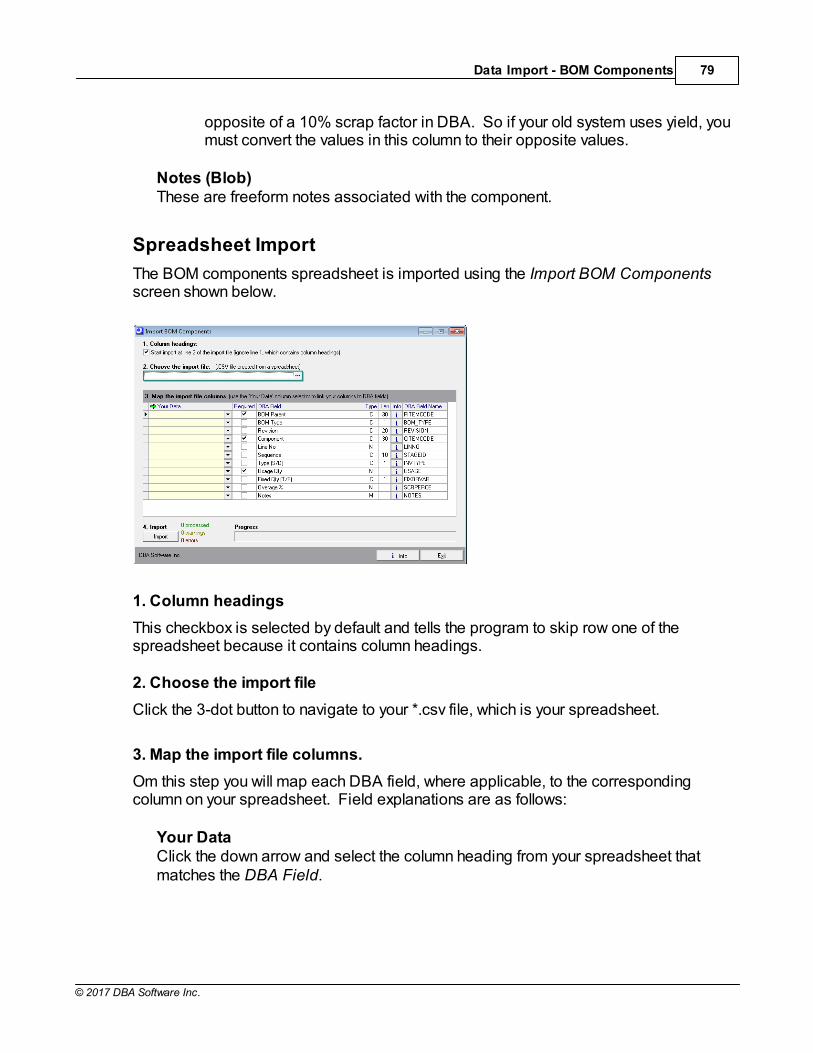
Data Import - BOM Components 79
© 2017 DBA Software Inc.
opposite of a 10% scrap factor in DBA. So if your old system uses yield, youmust convert the values in this column to their opposite values.
Notes (Blob)These are freeform notes associated with the component.
Spreadsheet Import
The BOM components spreadsheet is imported using the Import BOM Componentsscreen shown below.
1. Column headings
This checkbox is selected by default and tells the program to skip row one of thespreadsheet because it contains column headings.
2. Choose the import file
Click the 3-dot button to navigate to your *.csv file, which is your spreadsheet.
3. Map the import file columns.
Om this step you will map each DBA field, where applicable, to the correspondingcolumn on your spreadsheet. Field explanations are as follows:
Your Data Click the down arrow and select the column heading from your spreadsheet thatmatches the DBA Field.
Data Import Guide80
© 2017 DBA Software Inc.
RequiredThis checkbox is selected when the field is required, which means all rows in yourspreadsheet must have a value. Non-required fields do not have to be mapped to aspreadsheet column.
DBA Field This is the descriptive name of the field in DBA.
Type, Len ‘C’ in the Type column indicates an alphanumeric field with a limit of so manycharacters as specified in the Len column. ‘N’ in the Type column indicates anumeric field.
Info You can click the button in this column for additional information regarding this field.
DBA Field Name This is the actual name of the field in the database.
4. Import
When you are done with your mapping, click the Import button. The program will attemptto import your data. If any errors are found, the data will not be imported and you will begiven an error report. You should print out the report and make corrections to yourspreadsheet.
NOTE: After you print out your report, do not close the Import BOM Componentsscreen. If you do so, you’ll have to re-do all your mappings once again.
When the program is able run through the data without finding any errors, it will then askyou if you wish to import the data. Click Yes and all the data on the spreadsheet will beimported.
Copyright Notice
Portions of this import program Copyright 2005-2006 White Peak Software Inc
Data Import - BOM References 81
© 2017 DBA Software Inc.
24 Data Import - BOM References
(File – Data Import – BOM – BOM References)
Use this screen to import references against bill of material components. A referencecan be a location coordinate, a drawing bubble number, or it can be used for any tablethat has a one-to-many relationship with the component.
Supporting Tables
Some or all of the following tables must be created in advance before you can importBOM references. Refer to the Startup Guide for details.
BOM Components (Required)Bill of material components must already exist before you can import BOMreferences.
*.csv File Format
Make sure you save the BOM references spreadsheet as a *.csv file type, which is theformat required by the mapping screen.
Spreadsheet Columns
Your spreadsheet can consist of some or all of the following columns. Be sure andinsert a title in row one of each column heading so that the column can be identifiedduring the mapping process.
Parent ID (Required, String, 30)This is the BOM parent item associated with this component. Any value in this fieldmust correspond to an ‘M’ (manufactured) item record in the stock items table.
Revision (Required, String, 20)This is the BOM revision associated with this component. If you leave this fieldblank, the default revision specified in the BOM Defaults screen will be assigned bythe program. If a default revision is not specified in BOM Defaults, a value in thisfield is required.
Line No (Required, Float) This is the component’s line number.
Component ID (Required, String, 30)This is the component associated with this reference.
Data Import Guide82
© 2017 DBA Software Inc.
Reference (Required, String, 30)This is the reference assigned to this component.
Qty (Float)You can optionally specify a quantity for this reference.
Spreadsheet Import
The import process involves four screens that are presented in succession by clickingthe Next button.
Screen 1 – Introduction
This first screen provides information notes on each particular import, a list of supportingtables that should be populated prior to running the import, and a listing of requiredfields.
Screen 2 – Select Import File
1. Column headings This checkbox is selected by default and tells the program to skip row one of thespreadsheet because it contains column headings.
2. Choose the import file Click the button in this field to navigate to your *.csv spreadsheet file.
Screen 3 – Map Fields
Om this screen you will map each DBA field, where applicable, to the correspondingcolumn on your spreadsheet. Field explanations are as follows:
Your Data Click the down arrow and select the column heading from your spreadsheet thatmatches the DBA field.
RequiredThis checkbox is selected when the field is required, which means all rows in yourspreadsheet must have a value. Mapping is optional with non-required fields.
DBA Field This is the descriptive name of the field in DBA.
TypeThis indicates the field type, such as ‘Blob’ (freeform text), ‘Boolean’ (true/false),‘Float’ (floating decimal), and ‘String’ (alphanumeric).
Data Import - BOM References 83
© 2017 DBA Software Inc.
LengthThis indicates the field length, when applicable.
Screen 4 – Import Data
When you are done with your mapping, click the Import button. The program will attemptto import your data. If any errors are found, the data will not be imported and a list oferrors is presented on the screen.