Embed Size (px)
Citation preview
v1.201301
Creator in Storage
Data GuardRemote Backup
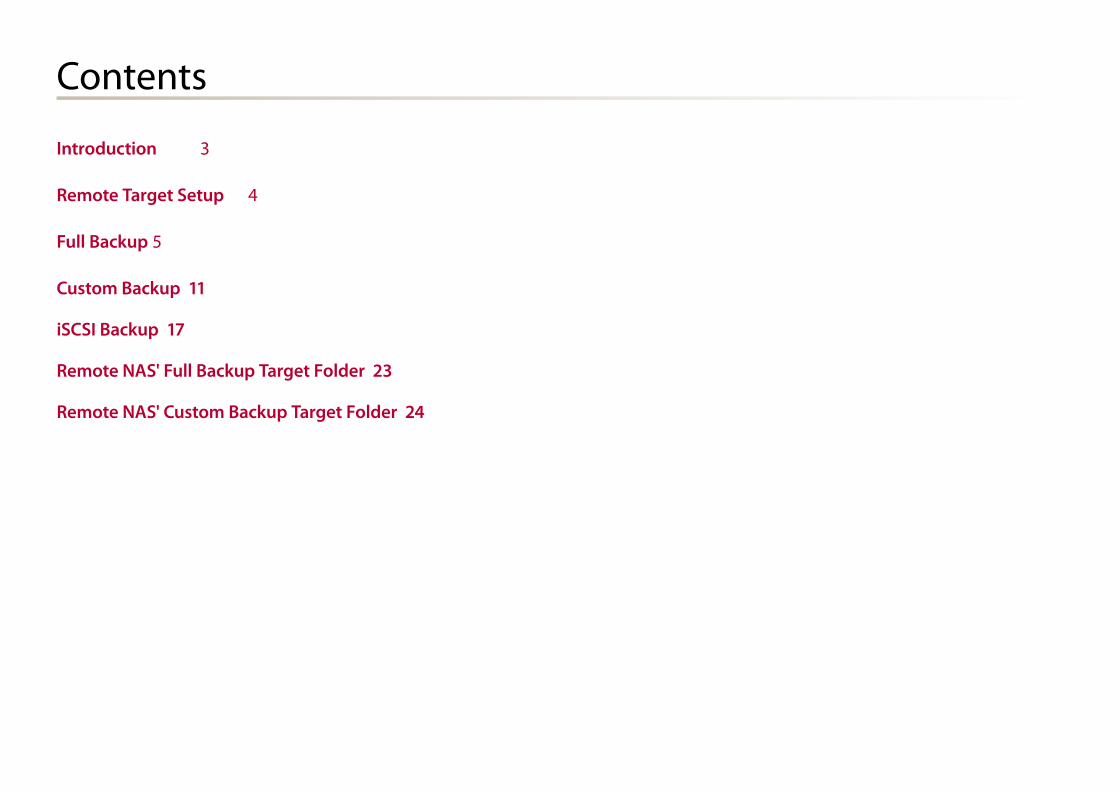
Contents
Introduction 3
Remote Target Setup 4
Full Backup 5
Custom Backup 11
iSCSI Backup 17
Remote NAS' Full Backup Target Folder 23
Remote NAS' Custom Backup Target Folder 24
2012-08 | © 2012 Thecus Technology Corp.. All Rights Reserved. 3
Remote Backup
Introduction
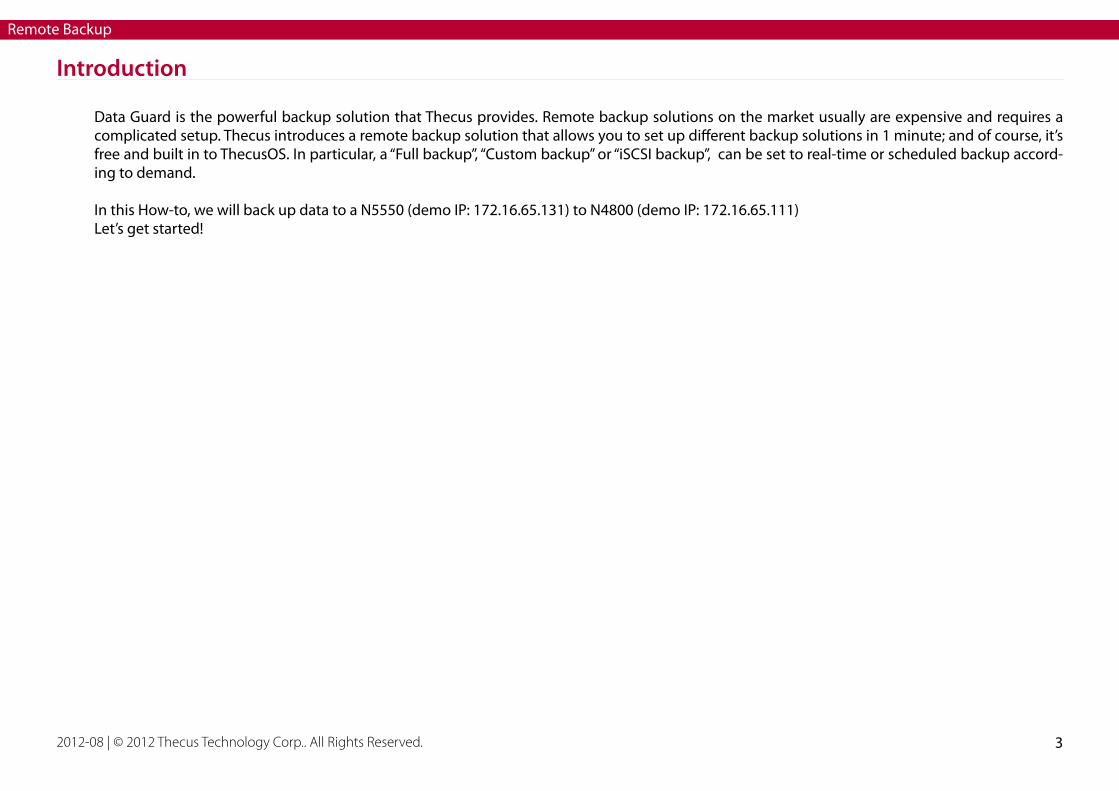
Data Guard is the powerful backup solution that Thecus provides. Remote backup solutions on the market usually are expensive and requires a complicated setup. Thecus introduces a remote backup solution that allows you to set up different backup solutions in 1 minute; and of course, it’s free and built in to ThecusOS. In particular, a “Full backup”, “Custom backup” or “iSCSI backup”, can be set to real-time or scheduled backup accord-ing to demand.
In this How-to, we will back up data to a N5550 (demo IP: 172.16.65.131) to N4800 (demo IP: 172.16.65.111)Let’s get started!
2012-08 | © 2012 Thecus Technology Corp.. All Rights Reserved. 4
Remote Backup
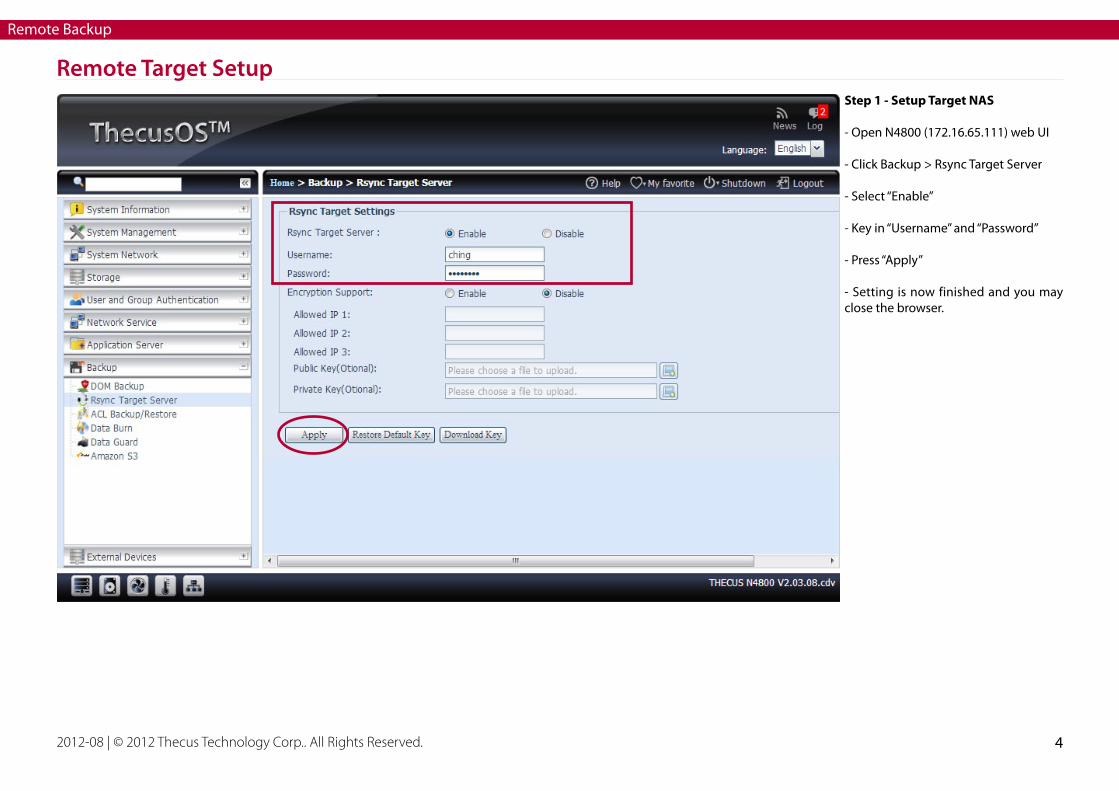
Remote Target SetupStep 1 - Setup Target NAS
- Open N4800 (172.16.65.111) web UI
- Click Backup > Rsync Target Server
- Select “Enable”
- Key in “Username” and “Password”
- Press “Apply”
- Setting is now finished and you may close the browser.
2012-08 | © 2012 Thecus Technology Corp.. All Rights Reserved. 5
Remote Backup
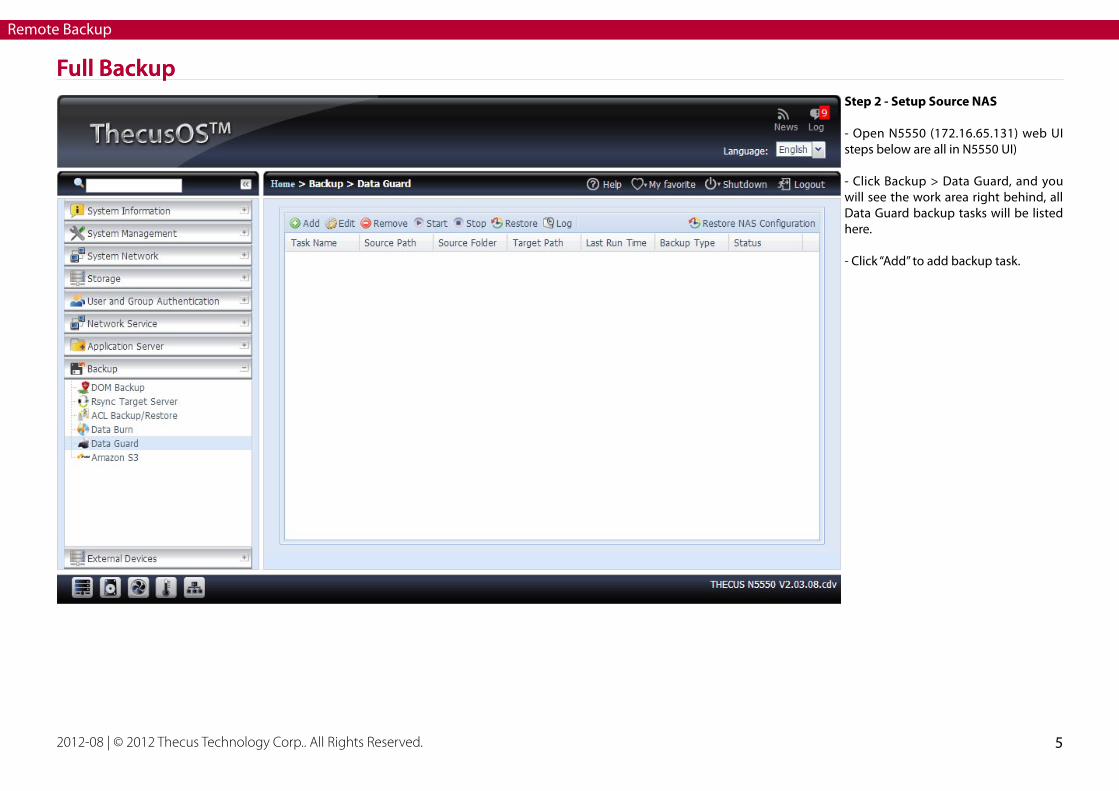
Step 2 - Setup Source NAS
- Open N5550 (172.16.65.131) web UI steps below are all in N5550 UI)
- Click Backup > Data Guard, and you will see the work area right behind, all Data Guard backup tasks will be listed here.
- Click “Add” to add backup task.
Full BackupFull Backup

2012-08 | © 2012 Thecus Technology Corp.. All Rights Reserved. 6
Remote Backup
Step 3 - Remote Backup’s Full Backup
- After clicking “Add”, the Data Backup Wizard will popup.
- Choose “Remote Backup”
Full Backup
2012-08 | © 2012 Thecus Technology Corp.. All Rights Reserved. 7
Remote Backup
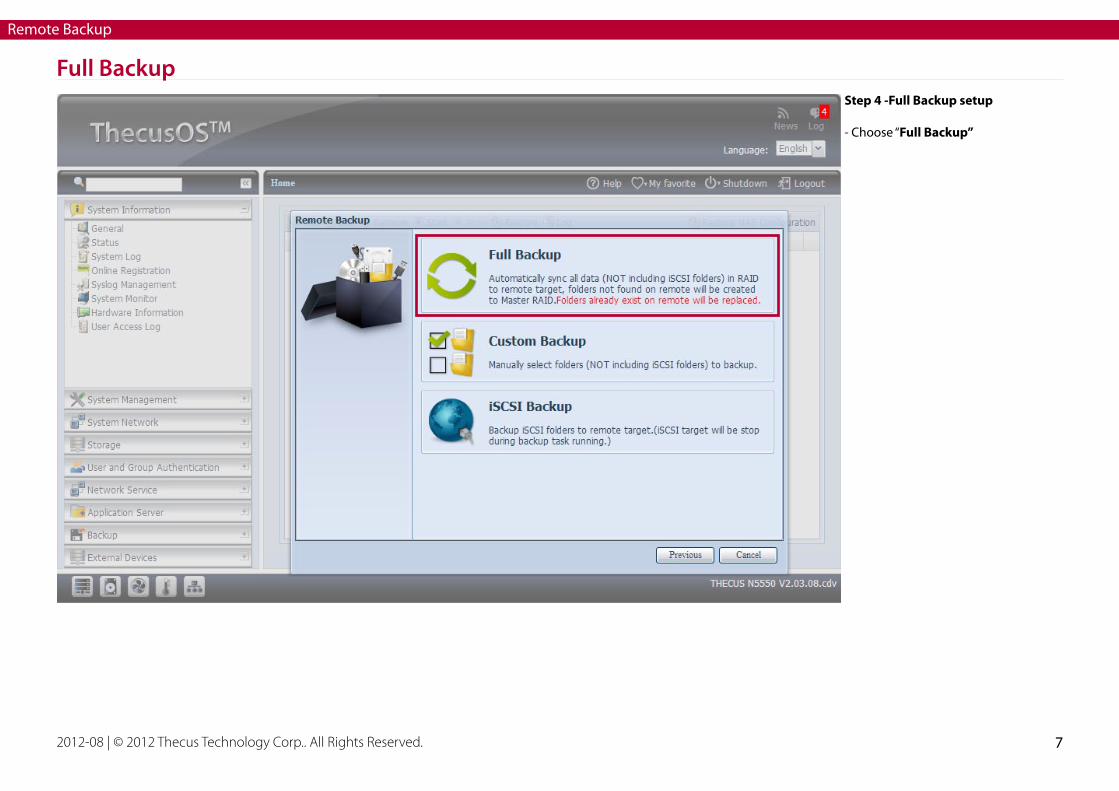
Step 4 -Full Backup setup
- Choose “Full Backup”
Full Backup
2012-08 | © 2012 Thecus Technology Corp.. All Rights Reserved. 8
Remote Backup
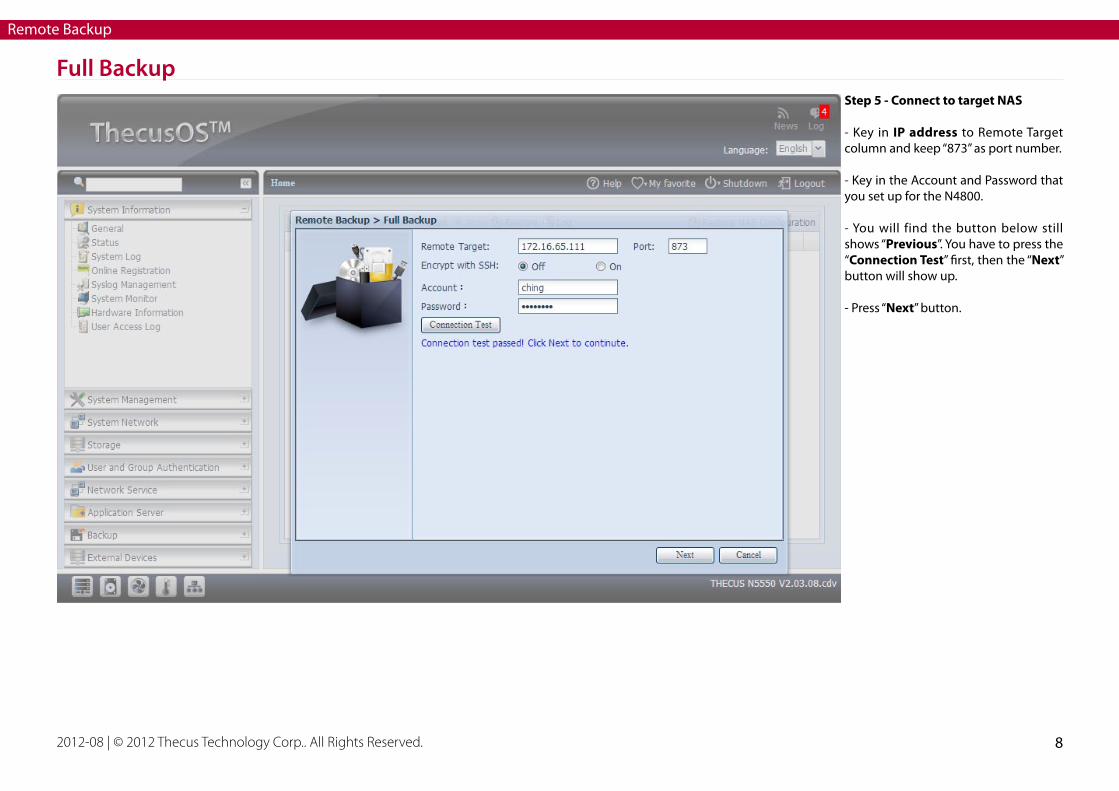
Step 5 - Connect to target NAS
- Key in IP address to Remote Target column and keep “873” as port number.
- Key in the Account and Password that you set up for the N4800.
- You will find the button below still shows “Previous”. You have to press the “Connection Test” first, then the “Next” button will show up.
- Press “Next” button.
Full Backup
2012-08 | © 2012 Thecus Technology Corp.. All Rights Reserved. 9
Remote Backup
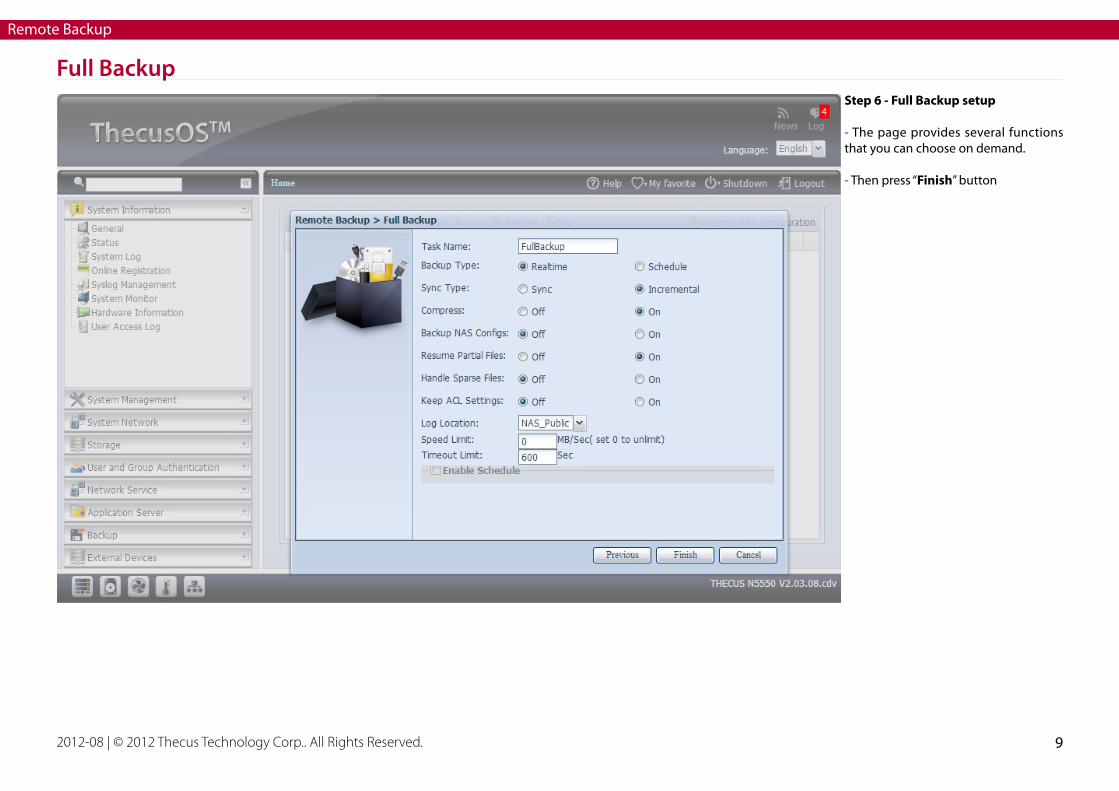
Step 6 - Full Backup setup
- The page provides several functions that you can choose on demand.
- Then press “Finish” button
Full Backup
2012-08 | © 2012 Thecus Technology Corp.. All Rights Reserved. 10
Remote Backup
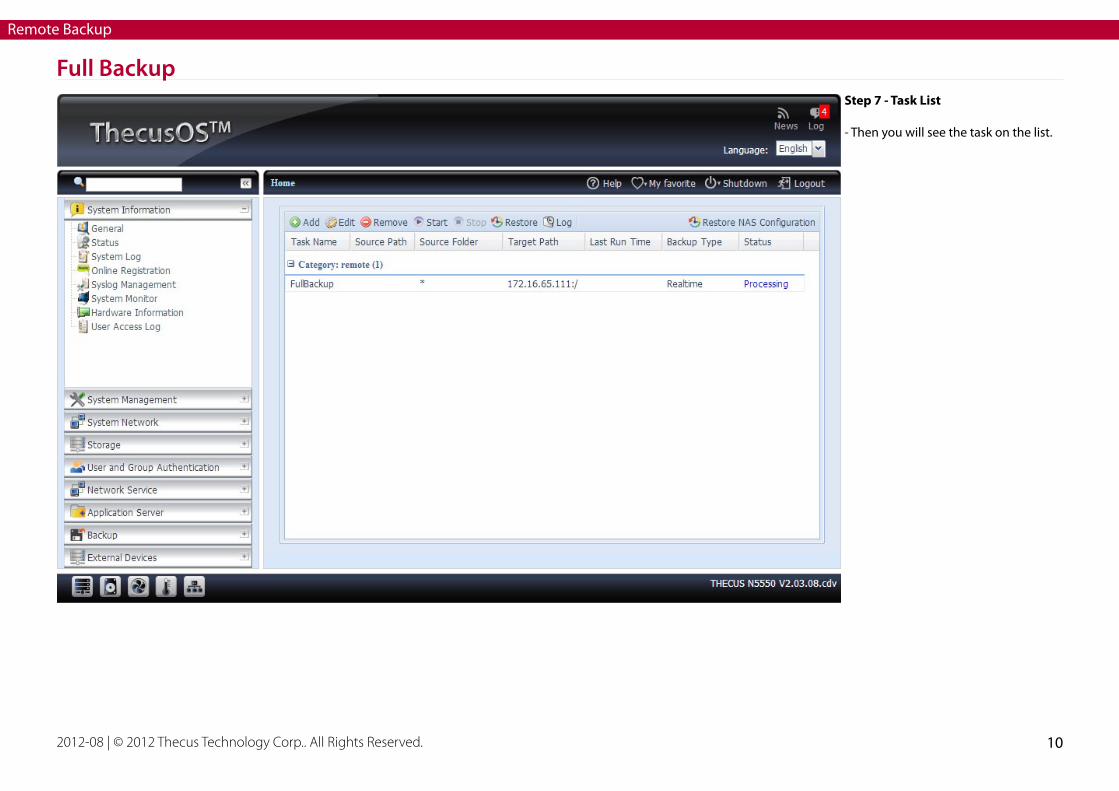
Step 7 - Task List
- Then you will see the task on the list.
Full Backup
2012-08 | © 2012 Thecus Technology Corp.. All Rights Reserved. 11
Remote Backup
Custom Backup
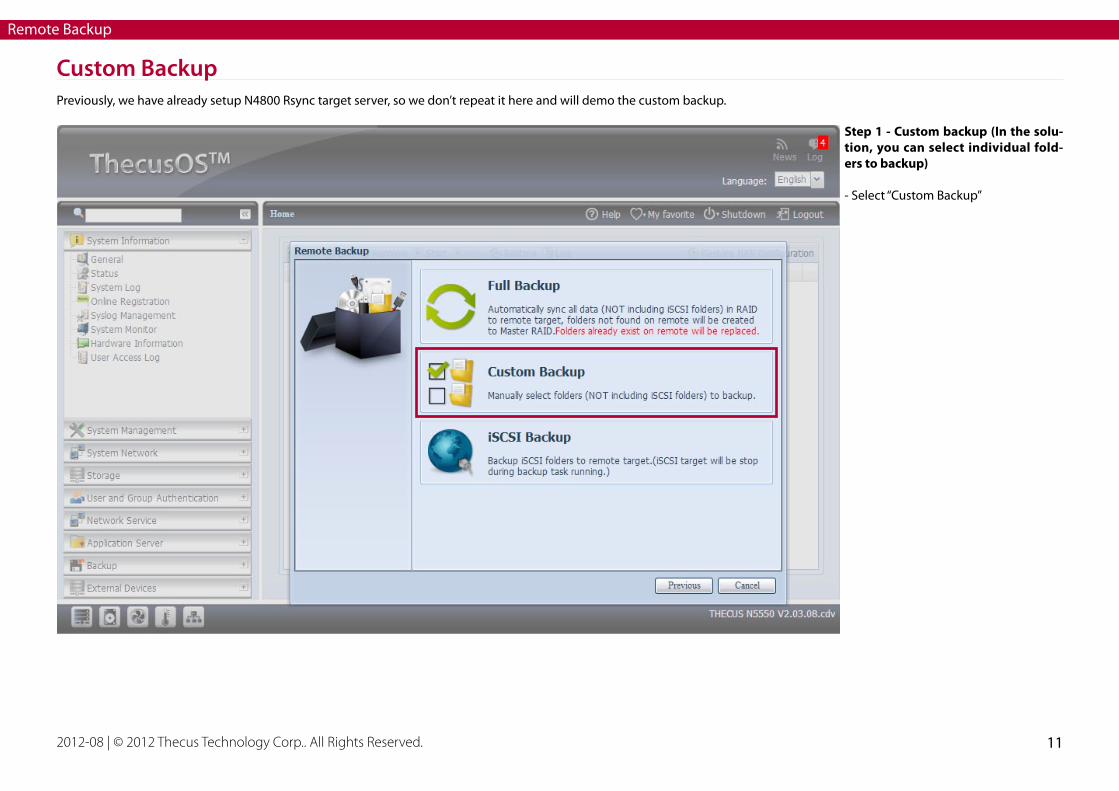
Step 1 - Custom backup (In the solu-tion, you can select individual fold-ers to backup)
- Select “Custom Backup”
Previously, we have already setup N4800 Rsync target server, so we don’t repeat it here and will demo the custom backup.

2012-08 | © 2012 Thecus Technology Corp.. All Rights Reserved. 12
Remote Backup
Custom BackupStep 2- Connect target NAS
- Key in Remote Target’s IP address, Ac-count and Password.
- Type “Target Folder” name. Please note that the letter case are consistent.
- Press “Connection Test”
- Press “Next”
2012-08 | © 2012 Thecus Technology Corp.. All Rights Reserved. 13
Remote Backup
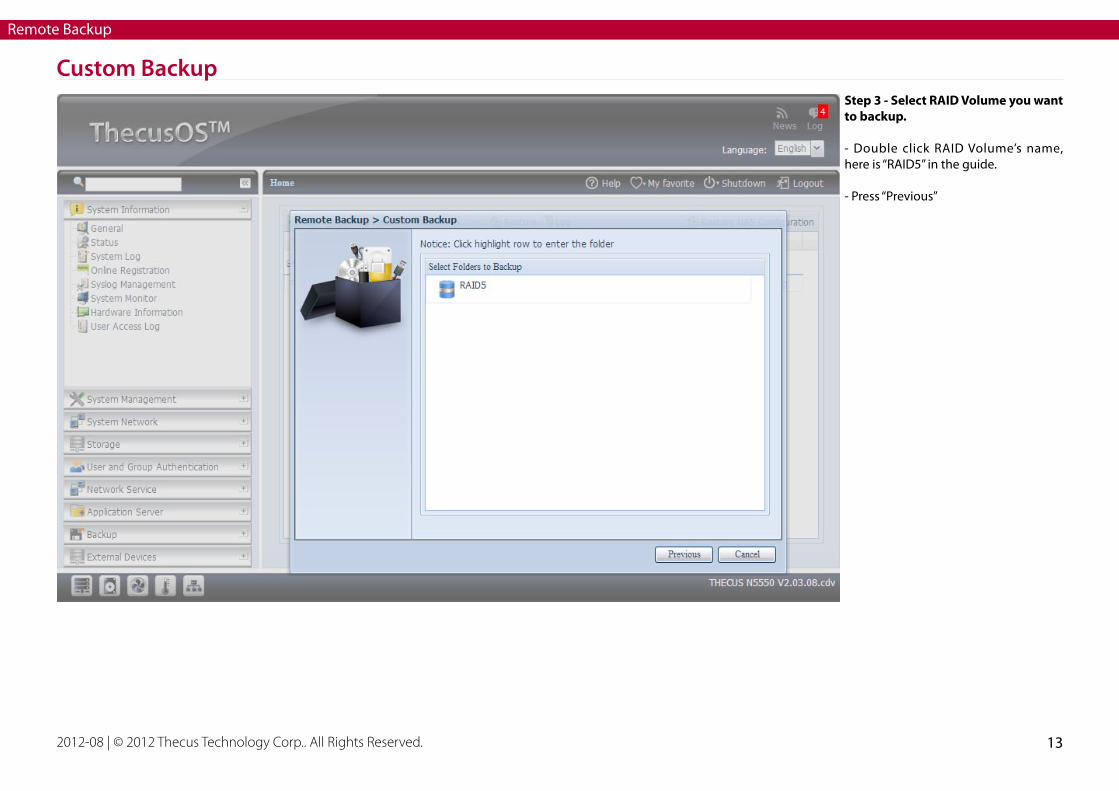
Custom BackupStep 3 - Select RAID Volume you want to backup.
- Double click RAID Volume’s name, here is “RAID5” in the guide.
- Press “Previous”
2012-08 | © 2012 Thecus Technology Corp.. All Rights Reserved. 14
Remote Backup
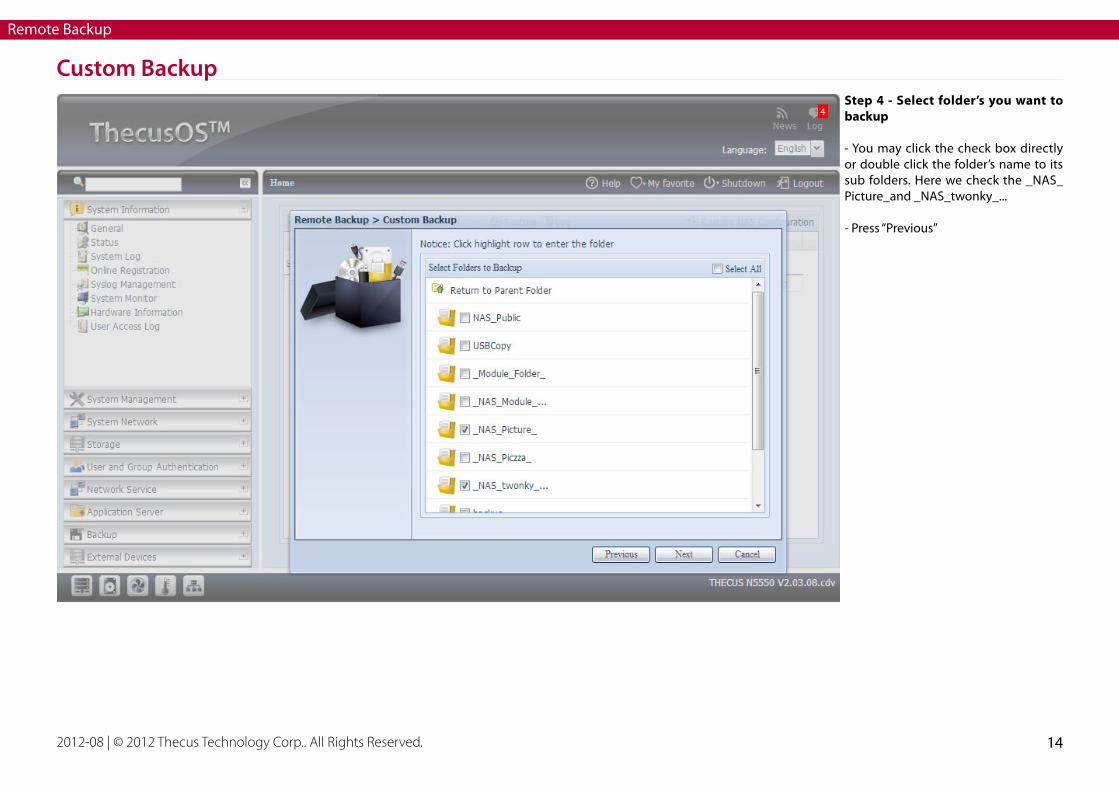
Custom BackupStep 4 - Select folder’s you want to backup
- You may click the check box directly or double click the folder’s name to its sub folders. Here we check the _NAS_Picture_and _NAS_twonky_...
- Press “Previous”

2012-08 | © 2012 Thecus Technology Corp.. All Rights Reserved. 15
Remote Backup
Custom BackupStep 5 - Custom Backup setup
- You can select functions on demand.- Press “Finish”

2012-08 | © 2012 Thecus Technology Corp.. All Rights Reserved. 16
Remote Backup
Custom BackupStep 6 - Custom backup task list
-You will see the custom backup task show up on the list.
2012-08 | © 2012 Thecus Technology Corp.. All Rights Reserved. 17
Remote Backup
iSCSI Backup
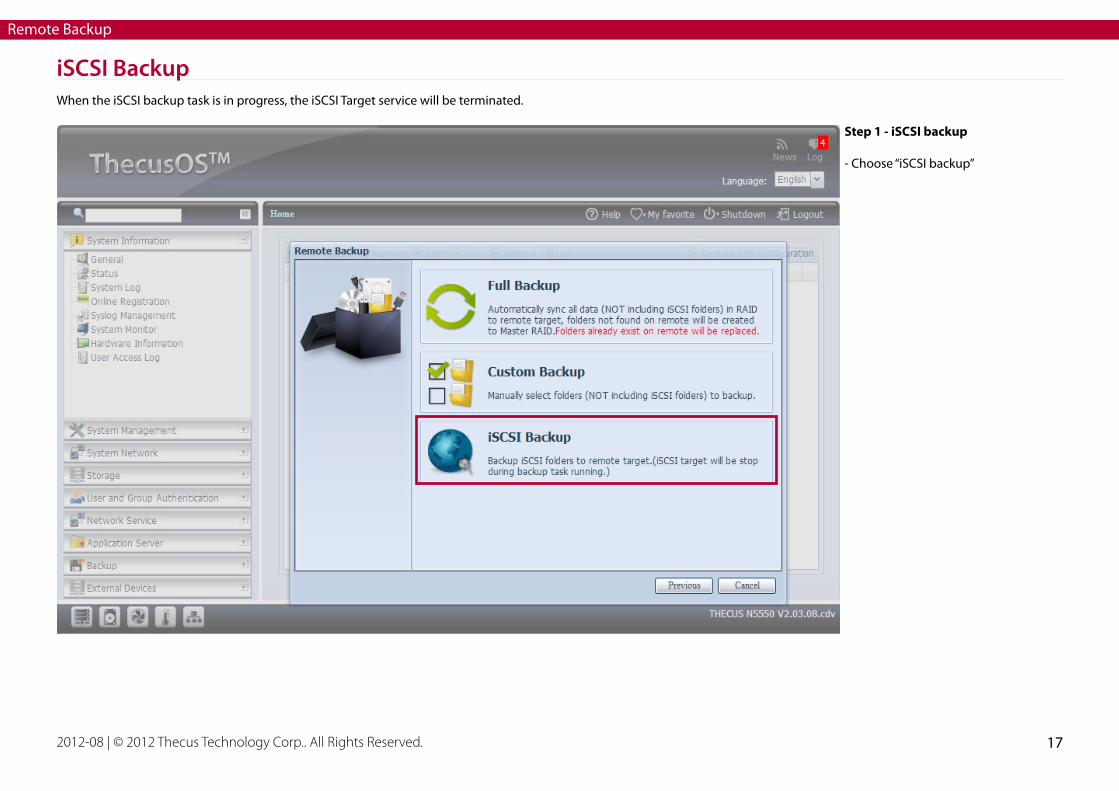
Step 1 - iSCSI backup
- Choose “iSCSI backup”
When the iSCSI backup task is in progress, the iSCSI Target service will be terminated.
2012-08 | © 2012 Thecus Technology Corp.. All Rights Reserved. 18
Remote Backup
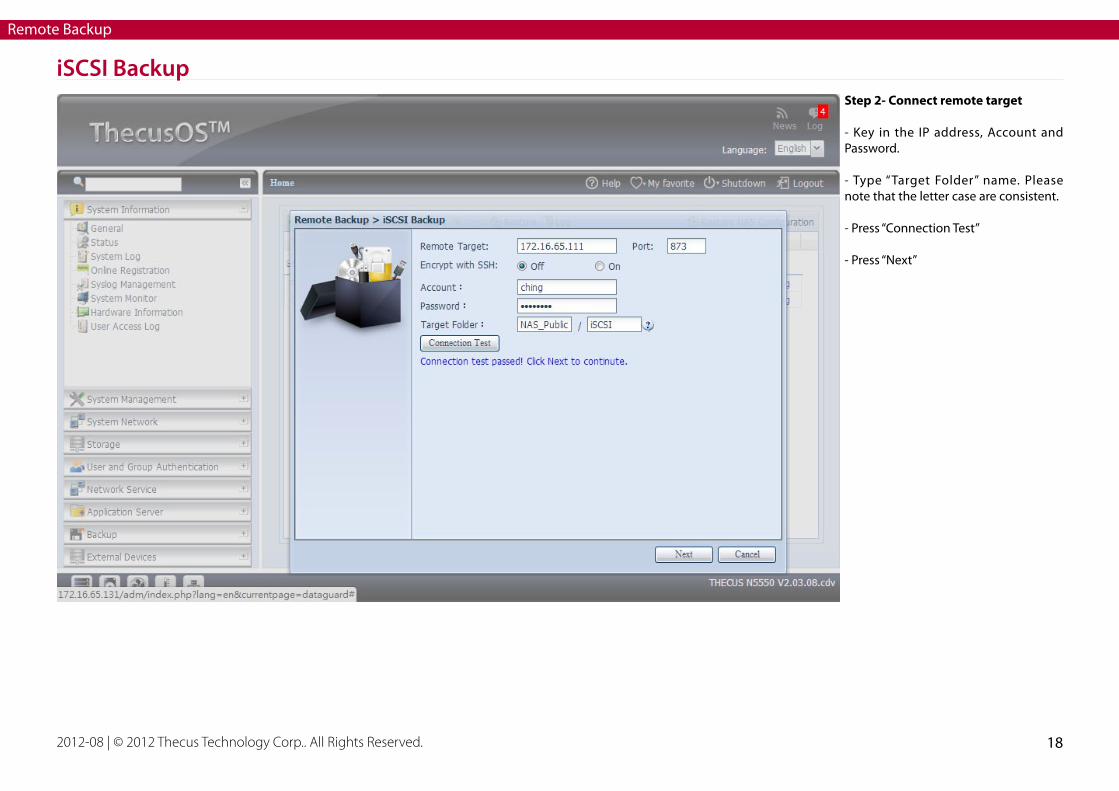
iSCSI BackupStep 2- Connect remote target
- Key in the IP address, Account and Password.
- Type “Target Folder” name. Please note that the letter case are consistent.
- Press “Connection Test”
- Press “Next”

2012-08 | © 2012 Thecus Technology Corp.. All Rights Reserved. 19
Remote Backup
iSCSI BackupStep 3 - Choose the iSCSI Volume you want to backup
- Select the iSCSI Volume
- Press “Next” button.

2012-08 | © 2012 Thecus Technology Corp.. All Rights Reserved. 20
Remote Backup
iSCSI BackupStep 3 - Choose the iSCSI Volume you want to backup
- Select the iSCSI Volume
- Press “Next” button.
2012-08 | © 2012 Thecus Technology Corp.. All Rights Reserved. 21
Remote Backup
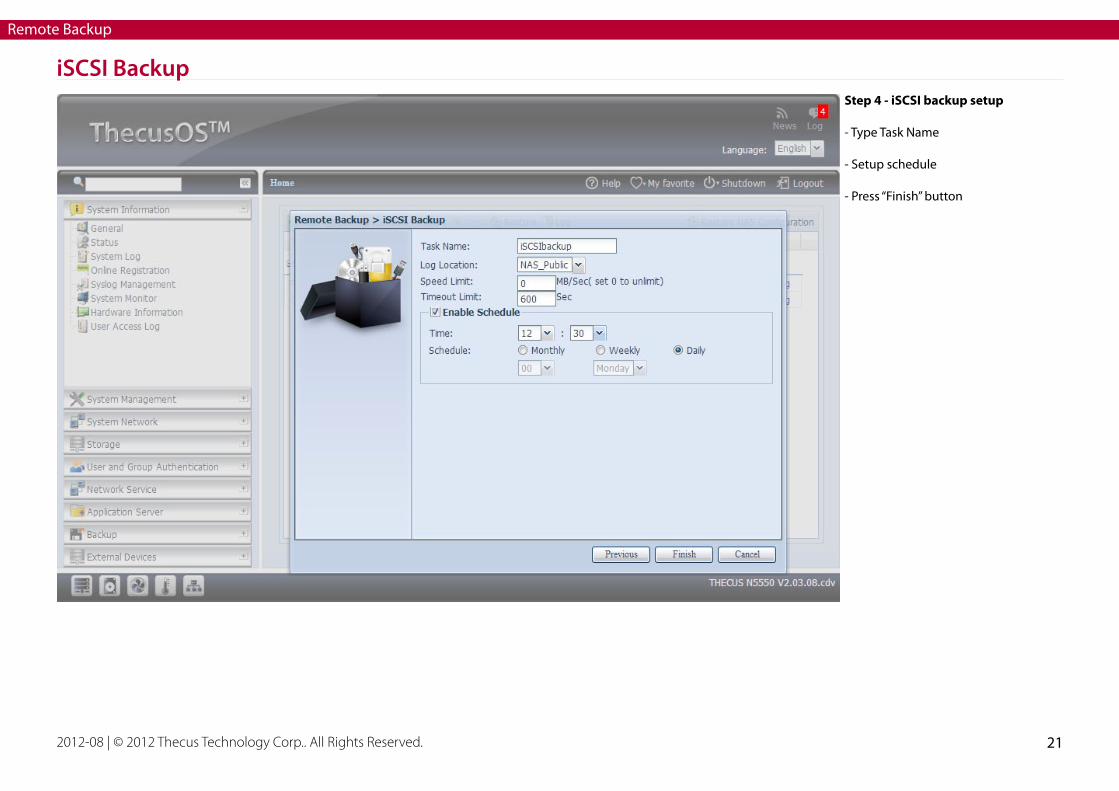
iSCSI BackupStep 4 - iSCSI backup setup
- Type Task Name
- Setup schedule
- Press “Finish” button

2012-08 | © 2012 Thecus Technology Corp.. All Rights Reserved. 22
Remote Backup
iSCSI BackupStep 5 - iSCSI backup task list
- Now we can find the iSCSI backup task on the list.
* When iSCSI backup is in processing, the iSCSI LUN will disappear on client end in 1 minute; but if you terminate the task iSCSI LUN will recover immedi-ately.
2012-08 | © 2012 Thecus Technology Corp.. All Rights Reserved. 23
Remote Backup
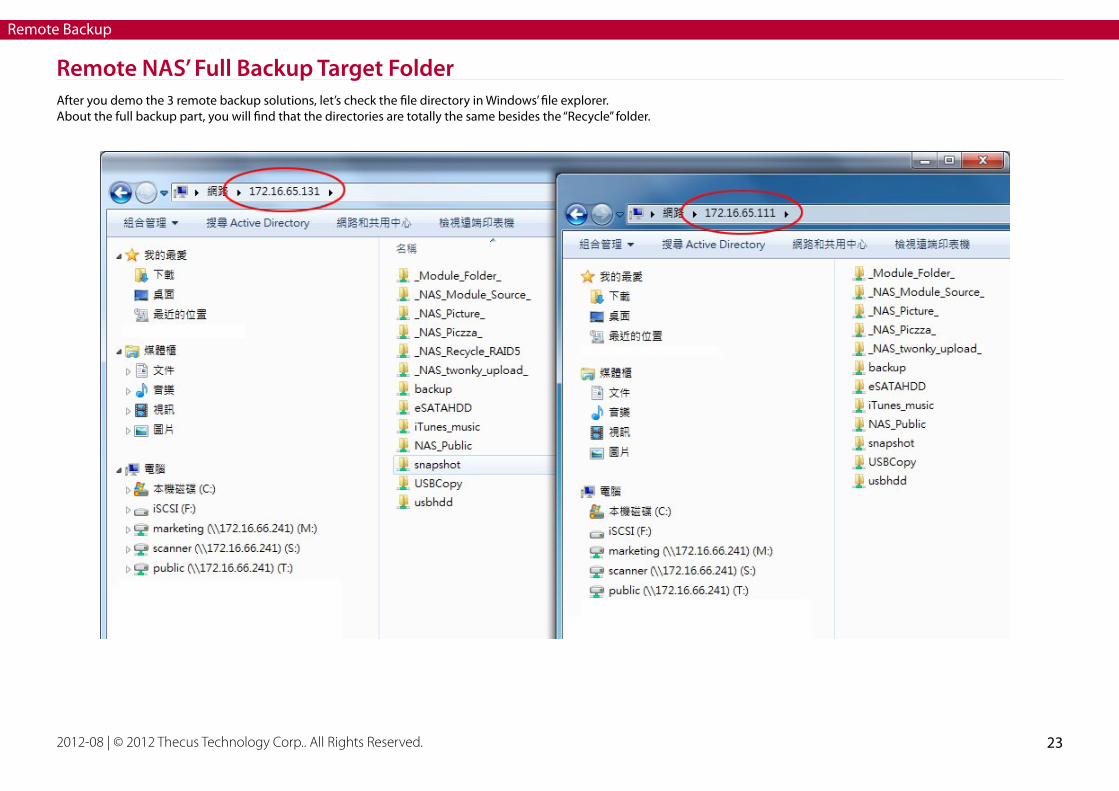
Remote NAS’ Full Backup Target FolderAfter you demo the 3 remote backup solutions, let’s check the file directory in Windows’ file explorer.About the full backup part, you will find that the directories are totally the same besides the “Recycle” folder.
2012-08 | © 2012 Thecus Technology Corp.. All Rights Reserved. 24
Remote Backup
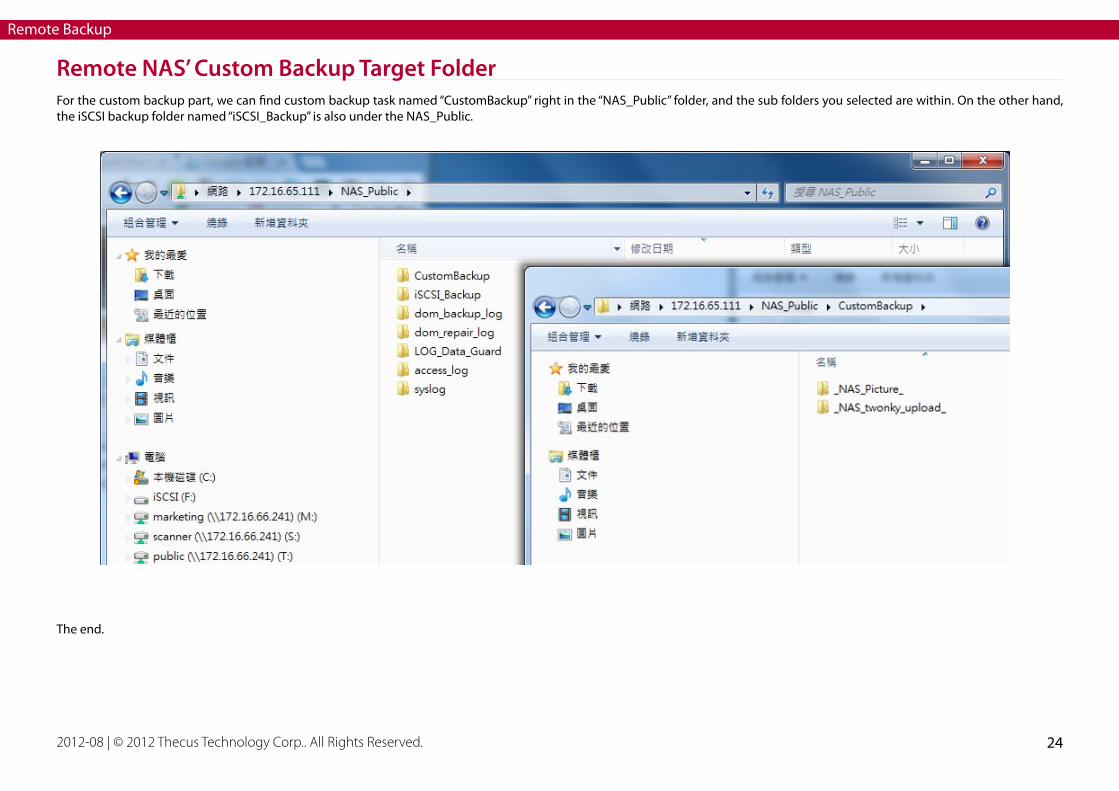
Remote NAS’ Custom Backup Target FolderFor the custom backup part, we can find custom backup task named “CustomBackup” right in the “NAS_Public” folder, and the sub folders you selected are within. On the other hand, the iSCSI backup folder named “iSCSI_Backup” is also under the NAS_Public.
The end.