Embed Size (px)
Citation preview

DUV P9RZ-15E
Dalton Pro ATV Clutch Kit
2015 Polaris 900 RZR EBS (engine brake clutch model) - Stock / Over sized tires, adjustable kit.
*For Non-EBS model use kit# DUV P9RZ-15
Kit #: DUV P9RZ-15E
Components: 1) Dalton Orange/Silver primary spring (DPPS-O/S) 1) Dalton Blue secondary clutch spring (DPSS-BL) 1) set of Dalton Quick Adjust flyweights/hardware (QP94-53) 6) steel flyweight thrust washers (.250x.500x.030) 10) pcs.M5x 12mm long threaded set screw. (1.2g each) 4) pcs.M5x 6mm threaded set screw. (0.6g each) 1) pkg silver hollow steel mass rivets (1.8g) part # DFRS-Y 1) pkg aluminum mass rivets (0.85g) part # DFRA-Y 1) Dalton Custom Billet Helix (Private label w/2 sets of custom curve ramps) (Part# R9-1)Tools:1) Primary clutch puller bolt is recommended, a primary clutch puller makes for easier drive clutch service if you intend to do clutch work in future (maintenance), or remove the drive clutch for easier work and inspection. Polaris dealers have them or you can order Dalton part# DCP-C 2) Secondary clutch spring compression tool or shop press to contain secondary spring retainer.
Description:Adjustable clutch kit for the 2015 Polaris RZR 900 Sport Utility Vehicle (stock or over sized tires).
It is like having many kits in one !
One clutch kit that can be set up for different terrain, tire sizes and conditions means accurate clutch tuning for your situation. Improved acceleration, back shifting, and belt performance. It also means youdon't have to wonder if you bought the “correct version” of a kit.This kit includes Dalton’s patented “Quick Adjust” flyweight system that allows you to add or subtract some of the weight from the flyweights, without even removing the flyweights from the drive clutch. The new “Quick Adjust” flyweights set in this kit was designed specifically for this application.
This kit also includes a new machined billet helix that is actually two helixes in one. The helix has two different sets of custom ramp curve profiles, making the kit extremely flexible for different tires, terrain, and conditions. This feature means that you will not have to buy another kit or extra parts to be tuned correctly if you make a special trip or use different tire sizes seasonally, etc.
-Ultimate RPM control (can be adjusted for modifications)-Set up manual includes “set up instructions” for different applications.
PLEASE READ ALL INSTRUCTIONS CAREFULLY FIRST!

Please take the time to thoroughly read and understand all of these pages before continuing. It is a greatbenefit to you to get some basic understanding of the CVT drive system and how it works. This can help save your components, drive belts, as well as make your ride more enjoyable and trouble free.
WARNING
Clutch components should only be installed by factory trained mechanics and personnel with a complete knowledge of variable rate belt transmission systems or CVT’s.
CVT clutches are assembled under spring pressure .DO NOT attempt to disassemble clutches if not experienced or qualified.
This is a performance kit and is intended for the use of experienced adult riders ,who are trying to obtain a higher level of performance for racing, etc. Dalton Industries has no control over the use ,misuse, or installation of these components and assumes no responsibility for any injury or damage.
IMPORTANT !Take the time to read the associated documents and set up instructions for the components. This kit contains various set up options and recommended settings for different applications.
INSTALLATION: (dealer recommended)
Important: Always remove the KEY from the ignition before working on clutches.
1) Remove left rear wheel to access CVT clutch area. Remove the cover bolts to remove the plastic cover shroud. Note: If you jack up the rear center of the vehicle, the cover will have more clearance and be easier to remove.
2) Take note of direction of belt before removal. Remove belt. Remove primary clutch center bolt. Keep the spacers on the bolt and set the primary bolt aside.
3) Thread the primary clutch puller into the drive clutch and remove drive clutch now. Remove the 6 bolts and clutch cover plate. Be sure to look for alignment marks on cover plate or mark the clutch with a magic marker for orientation during re- installation. Be careful when removing coverplate bolts, the primary spring is under pressure.
4) With the primary clutch cover plate off, and the spring removed, remove the flyweight pivot pin (note direction) and the stock flyweights. **Take note that with the new adjustable flyweights kit you will be using a thrust washer on each side of the flyweight.
5)* Set up the flyweights as described in this instruction manual for your desired application See “Set-Up Guide” Take note of your set up guide and set up the flyweights, then install the flyweights into the drive clutch. Be sure to read the complete document before continuing.** Install thrust washer on each side of new supplied flyweights. (see next page)
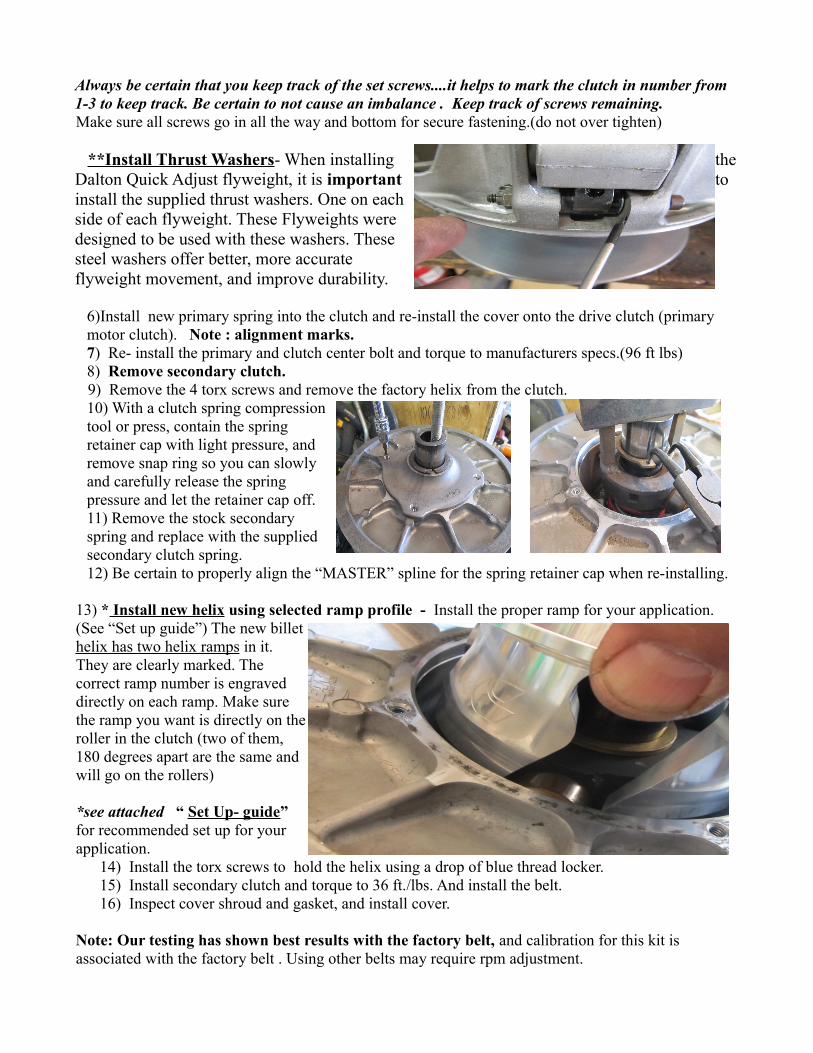
Always be certain that you keep track of the set screws....it helps to mark the clutch in number from 1-3 to keep track. Be certain to not cause an imbalance . Keep track of screws remaining. Make sure all screws go in all the way and bottom for secure fastening.(do not over tighten)
**Install Thrust Washers- When installing theDalton Quick Adjust flyweight, it is important to install the supplied thrust washers. One on eachside of each flyweight. These Flyweights weredesigned to be used with these washers. Thesesteel washers offer better, more accurateflyweight movement, and improve durability.
6)Install new primary spring into the clutch and re-install the cover onto the drive clutch (primary motor clutch). Note : alignment marks.7) Re- install the primary and clutch center bolt and torque to manufacturers specs.(96 ft lbs)8) Remove secondary clutch.
9) Remove the 4 torx screws and remove the factory helix from the clutch.10) With a clutch spring compressiontool or press, contain the springretainer cap with light pressure, andremove snap ring so you can slowlyand carefully release the springpressure and let the retainer cap off.11) Remove the stock secondaryspring and replace with the suppliedsecondary clutch spring.12) Be certain to properly align the “MASTER” spline for the spring retainer cap when re-installing.
13) * Install new helix using selected ramp profile - Install the proper ramp for your application. (See “Set up guide”) The new billet helix has two helix ramps in it.They are clearly marked. Thecorrect ramp number is engraveddirectly on each ramp. Make surethe ramp you want is directly on theroller in the clutch (two of them,180 degrees apart are the same andwill go on the rollers)
*see attached “ Set Up- guide” for recommended set up for yourapplication. 14) Install the torx screws to hold the helix using a drop of blue thread locker. 15) Install secondary clutch and torque to 36 ft./lbs. And install the belt. 16) Inspect cover shroud and gasket, and install cover.
Note: Our testing has shown best results with the factory belt, and calibration for this kit is associated with the factory belt . Using other belts may require rpm adjustment.

OVERVIEW - and general CVT tuning
There are books written on CVT clutch tuning and some in depth principals of controlling the rate of shift of the belt on belt drive systems. The following is a very general guide to help those unfamiliar with understanding some basic principles of the system.The CVT system on your vehicle is a variable rate system. It is a two pulley system that gives different belt ratio as it shifts. As the belt goes up on the primary motor clutch, it also goes down into the driven (or secondary clutch) giving a higher clutch ratio and more speed.. Conversely, as the machine comes under load or slows down its speed, it back shifts to a lower belt ratio so that it will be able to pull away again after slowing or stopping. A system that is properly calibrated for its intended application will UP SHIFT as quick as possible while still maintaining the proper rpm for the engines power curve.If a system is up shifted TOO quickly it lowers the engine rpm to a level below peak hp....if it up shifts too slowly it will rev higher during the shift phase than that rpm where the engine makes best power . This same system should also BACK SHIFT properly. Back shifting properly means maintaining that optimum rpm as best possible, as the vehicle comes under load. Clutch components “control the rate of shift of the belt”..***It is very important to realize that on most ATV/UTV situations, that the “clutch phase “(the timethat the belt goes from low ratio to high ratio) is only for a distance of approximately 500 feet on hard pack at wide open throttle, or around 50 mph. After which, the belt is fully shifted, and clutch components have little effect on rpm or speed. Once the belt is to the top, it is to the top... and the engine starts to build rpm as the belt is out of ratio. Clutch components cannot control rpm after fullshift out is achieved. Clutch components change the rate of shift of the belt...once the belt is shifted out, clutch kits cannot offer top speed increases.
When testing for clutch RPM, it is important to check rpm at around 250-300 ft of distance on a wide open throttle run (while the clutches are still not fully shifted ).- The 2015 RZR 900 operates best in the zone of 7500-7900 RPM. This wide power band is good because we have noted that the belt runs at a lower rpm when hot.
Different tuning components can control the rate of up shift and back shift of the belt to maintain a desired rpm range. The goal of a CVT clutch system is to keep the belt in the proper ratio at any given speed and load situation. The factory has set up your system to be a decent “all around” calibration, that means it can ride in different terrain, or haul a trailer, or maintain decent emissions, and be a “general” calibration that the factory feels is a suitable compromise in many respects .Many users of these vehicles, for various reasons, like to change the desired effects and purpose of their machine to a more case specific application, whether it be over sized tires for mud, drag racing, sand applications, pulling competition, high altitude operation where less power is available, different engine(rpm) characteristics from engine modification etc. In different situations like this , performance can be optimized by re- calibrating the shift pattern of the CVT.An example of a need to change the shift pattern would be adding larger mud tires. When installing larger tires there are a couple of factors that effect the clutching. The larger tires result in taller gearing. With a taller gearing situation, the last thing you would want to do is up shift too fast, as you are already starting off in a higher final drive ratio from the tires. The other factor is rotating mass. Heavier, large diameter rotating mass is a real negative for acceleration. Although most experienced tuners know that a atv/utv with over sized tires will never be as quick as one with stock lightweight tires, clutch tuning can help compensate for some of the losses and help restore performance.

The Clutch Tuning Components (General tuning info) Heavier Weights- Quicker up shift and lower rpm during the “clutch phase”.Depending on the situation, sometimes you can get away with a quicker up shift. It is important to remember that the primary spring is the opposing force to the clutch weights, and that changing the rating of the primary spring can effect the amount of force required from the flyweights.Lighter weights - Slower up shift during the clutching phase. Slower up shift higher rpm.Note: Remember, sometimes different curvature and profile can make total GRAMS irrelevant to each other. You can only compare flyweights by grams if the curve and distribution of mass of two flyweights are the same. Curvature and distribution of mass are also tuning methods.
Springs – In general, stiffer springs slow the up shift. Softer springs up shift faster. Primary springs are in the front motor clutch. Sometimes primary springs are compared on load charts. The initial load (first part of the compression) ,of a primary spring controls engagement RPM. Primary motor clutch springs are the principal control of engagement rpm. Sometimes a strongercompressed load rating spring (second part or load listing of a primary spring on a spring load comparison chart) can allow the use of more flyweight and the combination is effective for a situation ,but not all situations are the same. Secondary springs are more related to controlling back shift, torque sensing. A spring is another type of tuning component. A spring is always chosen relative to the flyweight and the rest of the system. Sometimes the stock springs are fine, other times re-calibration requires one or both springs in the clutches to be changed to suit the application.
Helix – Helix ramps are one of the controlling forces of the rate of shift of the secondary.A steeper helix ramp up shifts faster (thus lowering operating rpm during the clutch phase). A more shallow helix ramp up shifts slower and thus allows more rpm. It also back shifts faster.Remember, never focus on ONE tuning part, different secondary springs, etc effect the required helix. It is NOT that quicker or slower up shift is BETTER....it is totally dependent on the situation. The goal is to achieve the best shift pattern for the application, so that the engine stays in its best rpm zone.-2015 RZR 900 make best hp at 7500-7900 rpm during the clutch phase.(see “clutch phase” in overview).
Dalton Pro Quick Adjust Cam Arms - Adjustable flyweights.Dalton’s patented quick adjust method means that you can add and subtract some of the flyweight massfrom the main body of the flyweight without removing the weights from the drive clutch.There is one rivet hole at the tip of the flyweight that can be used to change the “range” of the flyweight with different optional mass rivets (this rivet must be done with flyweight removed from clutch). Where the weight is located can change the shift pattern.
The threaded passage can hold up to 3 of the supplied threaded set screws that weigh 1.2 grams each. 3.6 grams can be* added or subtracted by simply turning the clutch so that the desired weight is up atthe top, and using the supplied T-handle Allen key to add or subtract set screws thus changing the total mass of the flyweight.Sometimes, for example, switch from one application or terrain to another, you could adjust your clutchto the recommended setting by simply removing the plastic cover shroud, and make weight adjustments(according to instruction sheet), then re-install the plastic cover. No puller or primary clutch disassembly required. Set up and guidelines are on following pages.

SET UP GUIDE – 2015 RZR 900 Trail/S (not for XP versions)Primary spring Orange/Silver (DPPS-O/S) This is the primary spring included in this kit. (motor clutch)In this particular flyweight configuration, the orange /silver will engage only slightly higher than stock. It does also have different fully compressed load. There are many primary spring tuning options available on our website that control “engagement rpm”, etc.. If you need more info contact us.
Secondary SpringSecondary springs are tested for efficiency for the application. In this application always use the provided BLUE (DPSS-BL) secondary spring.
Helix - Pay attention in your category for the proper helix ramp selection for your application. They are clearly marked on the edge of the billet helix “S-1” or “S-2”. The chosen ramp is used right at the roller location when you install it. Ramp curve #1 is a steeper ramp. Curve # 2 is more shallow.(see previous) Set Up Guide 2015 RZR 900 (Standard/Stock vehicle)
Use TIRE SIZE FIRST, then the provided info. A lways use both springs provided, and the flyweight set up and helix listed for your application.
26 – 27” Tires – Stock machine, 0-3500' elevation
26” applications - QP94-53 base weight, + aluminum rivet + 2 long set screws +1 short set screw* in each flyweight, and use S-1 helix ramp. Most general mixed trail riding with most of the 26”.27” tires - (most) QP 94-53 base weight, + aluminum rivet + 2 long set screws in each flyweight.(S-1)**For some 27” that are heavier extreme mud tires and/or measure a full 27”+ tall (Eg:27 XTR radials, Outlaw Mud tires,etc.) use aluminum rivet + 3 long set screws. S-2 helix. Tires / terrain are speculative,it's easy to adjust later if you are not sure of the tire.
4000-6000' elevation (occasional use) 26-27” tires- Leave the 26-27” primary and switch helix to S-2.4000'+ elevation (primary use) - Use the base weight with no rivet in the tip for first test. Start with 2 long,+1 short set screws in the threaded passage of each flyweight. Use S-2 helix ramp. Test RPM *
Sand applications (0-3500) – Use S-2 helix ramp. (Sand is speculative..some is deep dry sand while others is desert roads and beaches, etc) For most sand riders (26-27 tires), start with aluminum rivet and 2 long screws and test. Remember that sometimes shift rpm is a bit different with a hot belt.
28” Tires – QP94-53 base weight + Aluminum rivet +3 long set screws in each flyweight. S-2 helix28” Heavy mud applications use aluminum rivet +2 long + 1 short set screw in each. S-2 helix.Sand applications (0-3500')– Use aluminum rivet and 2 set screws for first test. S-2 helix4000+ elevation - Use the base weight with no rivet in the tip for first test. Start with 2 long set screws*
29” and larger tires - Stock machine, 0-3500' elev. QP94-53 base weight + Aluminum rivet + 2 long + 1 short set screws in each flyweightS-2 helix ramp. Above 4000 ft use no rivet and 1 full length screw. (S-2 helix)
*Tire weight, actual size, elevations, terrain type is very speculative. Dalton's Patented “Quick Adjust” makes it easy to test and adjust the flyweights so you can easily fine tune for your own.

CVT Clutch Tuning
We have given you the guidelines for many applications. There can however, be some varying terrain, tire weight, and conditions. Individual vehicles themselves vary in output. There are ways to fine tune small adjustments that are quite quick and easy.
There are some overlapping ways to tune rpm. For instance, if you are running in the helix position S-1and move the helix to S-2 it will increase rpm. If you were already running in S-2 and remove weight from the flyweights it will increase rpm.
In another example, if you are hitting the rev limiter on take off, you could need to add weight so that the clutches up shift faster and lower the rpm. If you get on the rev limiter for any reason right after take off, add a set screw (or half screw*), or next heavier rivet in the tip of the weight. Try using set screws first. Remember though, that sometimes it is normal to have a slight bit of this when the belt is cold.
More notes on HIGH ALTITUDE - High altitude is less oxygen, and even though modern fuel injection can lean out the fuel and keep the mixture ratio corrected, there is less oxygen, and less fuel which equals less hp. You do not want to up shift too quickly. If you spend a lot of time at very high elevations you may want to experiment. Always try to calibrate for where you do most of your riding.
Special modifications? – There are heavier tip rivets included for things like extra hp add ons, or smaller tire sizes, etc...and more available, but if doing mods, expect to test.
If you have a modified machine that have special features that effect the operating rpm of the engine, particularly long duration camshafts or big bore kits, you must work closely with your engine shop to find the peak rpm requirement of the engine, etc. In these instances there will be a wide variance in requirements of the clutch shift pattern. You should consult the specific engine shop for recommendation as testing clutch components on your own will most likely be required. There is no way we can accurately test each of these situations. This is the nice feature of an adjustable clutch kit.
Using the Quick Adjust set screws
This can be done on the bench for initial set up, and as mentioned earlier in the set up guide, it can be adjusted later while the flyweight is still in the clutch.
1) Carefully install the set screw into the threaded passage. Be careful, as the small M5 screws can easily be cross threaded. Wind the set screw all the way in until it is snug at bottom of threads.
2) Add additional screws as required, always bottoming on the one inside.
Important: be sure to keep track of what you are installing and where it is installed. It helps to mark the clutch with a permanent marker from 1-3 to be sure you install the same amount of set screws.
For “installing and removing tip rivets” see last page.

Some notes on the model
Belt Burning/ Excessive wear
This vehicle is fast, and a very popular model for sport use. Power is good, and gearing is tall for high speeds, however, proper operation and CVT clutch calibration are important for belt life.
You often hear of people burning a belt. There are a few contributing factors. The factory sends the clutching for what they refer to as general purpose, but there is a wide variety of uses for the vehicle. Case specific clutch tuning can help make the CVT system more efficient for what you do. This is a very flexible kit that allows adjustment. There is a detailed guide to get you set up correctly. Some people have some experience, and like to do their own clutch tuning. There is certainly nothing wrong with that, but we sometimes hear that they only consider rpm or drag race results,etc. We like to stress that other things are very important with respect to clutch calibration.
Care must always be taken to consider the side effects of changing clutch calibration. It is important not to neglect things like “back shifting of the belt as the vehicle comes under load”. Proper calibration of the CVT system for your application can reduce belt temperatures and belt problems. This kit is adjustable and allows you to be better calibrated for different situations.
If you are having belt problems, proper CVT calibration like this kit can help. There are also other things that could contribute to belt life issues, things like “not using low range” when you should.This vehicle comes from factory with quite tall final drive gearing that will allow very high top speeds. The side effect of that is the clutch system can strain in load situations from a take off in high range.
ANY time you are operating at low speeds or in load conditions you should use low range in the gearbox.
Example: The vehicle is being operated in tight woods trails at approximately 10- 14 mph average.
If you use high range for slowly crawling around at these speeds, the belt stays down on the center hub of the primary a lot of the time. It will hardly up shift the belt to achieve that speed in high range. The belt is wrapped around a small diameter hub on the primary (motor) clutch. There is not as much grip surface there, and the clutch cannot always shift further to the required lower belt ratio for the load situation.
if you shift the gearbox to low range and travel that same speed, the belt will be shifted up mid way on the primary motor clutch, where it has a much better (larger diameter) grip surface. Thisalso puts the flyweight in a better leverage position and the result is less slippage of the belt (and thus lower clutch and belt temperatures).
Running around at slow speeds or load conditions in high range can easily overheat the belt, and it maynot fail immediately, but may later on. You WILL have better belt life if you practice using low when you should.
Never hold Gas and Brake at the same time ! - The primary clutch has to grab the belt each time it engages. If you hold the brakes (and thus the belt), then press the throttle, the primary sheaves close on the belt to try to move the belt....and it cant move, so you burn a flat spot on the belt and it is ruined.

Installation and removal of Mass Rivet (tip weight)
1) Push the rivet ALL the way into the appropriate hole in the tip of the flyweight.2) Using a large shop vise, hold the weight in a manner in the vise that holds the rivet all the way
through the hole (The rivet should expand as pressed).3) Squeeze/expand the rivet. Be sure to use enough force to fully expand the rivet, some of the
larger solid steel ones need a large vise with very strong force to fully expand. Place all rivets pointing the same direction.
4) Be certain to compress this rivet to be less than the width of the roller path up insidethe spider assembly. . ( approx .460”-.500 “ total compressed length ) If you are uncertain, install flyweight and cycle it up to see if the rivet clears. You can peen them to a finish length if they are already mostly compressed/expanded. Do not over compress the rivet as you could damage the base weight.
For later removal of rivets if desired, use the following procedure:
1) Mark lightly the center of the flush side of the rivet with a center punch.2) Using a 3/16 “ drill bit, drill approximately half way into the rivet.3) Insert a flat ended punch with a straight shaft of 1/8" diameter into the drilled hole and tap the
rivet through the hole to remove.
Thank you for choosing Dalton Industries !