Embed Size (px)
Citation preview

DAF Dealernet
VIN: 1XKYDP9X3GJ466370
Vehicle Type: MX_EPA13-MX-13 USA
J 1410 322104 001 136
replace front common rail pump unit (Fuel system)

DAF Dealernetreplace front common rail pumpunit (Fuel system)
1 replace front common rail pump unit (Fuel system)
1.1 remove front common rail pump unit (Fuel system)
1.1.1 disconnect battery clamp, negative pole
Explanation
Warning, battery clamp and negative terminalDo not disconnect the vehicle batteries until the DEF dosing system has completed the purgecycle.Before beginning to remove and/or disconnect any components, wait at least 5 minutes afterthe key switch is turned OFF for the aftertreatment DEF dosing system to purge DEF from thesystem.The purge cycle is an automatic process and does not require active intervention. Theaftertreatment DEF dosing unit creates an audible pumping noise during the purging process.
Electrical shock hazard: Never disconnect the battery clamp when the engine is running.Disconnecting the battery clamps while the engine is running may result in death, personalinjury, or equipment damage from electrical arching or damage to electronic components.Turn off the engine and place the ignition switch in the OFF position before disconnecting thebattery clamps.Do not place any tools or other materials on top of or close to the batteries. This can cause adangerous high-current short circuit and, in the worst case, a battery explosion. Keep allobjects away from the battery terminals.Always break the contact between the battery clamp and the negative terminal beforeworking on the vehicle. Working on a vehicle while the battery is connected may result inelectrical injury or damage.Always disconnect the battery at the negative terminal when performing service procedures.
Battery acid can cause chemical burns.If you come into contact with battery acid: flush your skin with water and/or apply bakingsoda or lime to help neutralize the acid.If battery acid comes into contact with the eyes, flush immediately with water and seekmedical attention.Wear protective clothing when handling any part of the battery.
M024327 - 03/05/2010
1.1.2 loosen filler cap, fuel tank
Explanation
Loosening, filler cap, fuel tankLoosen the filler cap from the fuel tank to release the pressure from the system.
M024847 - 20/03/2008
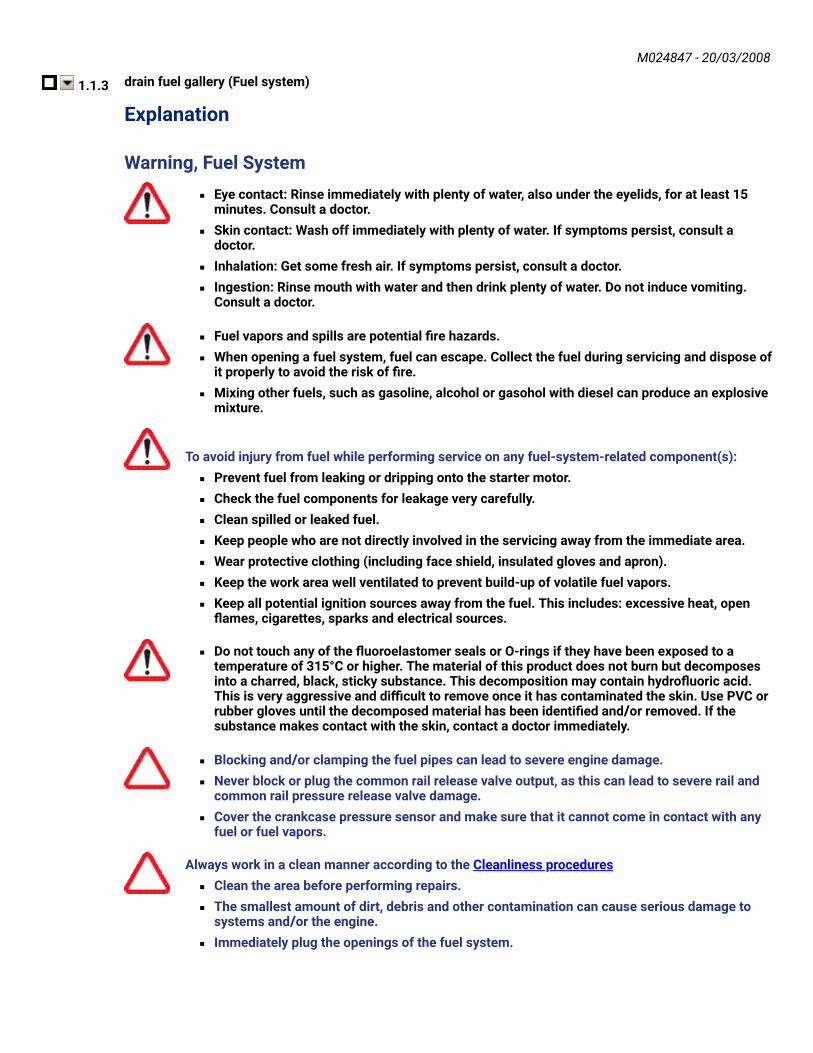
1.1.3 drain fuel gallery (Fuel system)
Explanation
Warning, Fuel SystemEye contact: Rinse immediately with plenty of water, also under the eyelids, for at least 15minutes. Consult a doctor.Skin contact: Wash off immediately with plenty of water. If symptoms persist, consult adoctor.Inhalation: Get some fresh air. If symptoms persist, consult a doctor.Ingestion: Rinse mouth with water and then drink plenty of water. Do not induce vomiting.Consult a doctor.
Fuel vapors and spills are potential fire hazards.When opening a fuel system, fuel can escape. Collect the fuel during servicing and dispose ofit properly to avoid the risk of fire.Mixing other fuels, such as gasoline, alcohol or gasohol with diesel can produce an explosivemixture.
To avoid injury from fuel while performing service on any fuel-system-related component(s):Prevent fuel from leaking or dripping onto the starter motor.Check the fuel components for leakage very carefully.Clean spilled or leaked fuel.Keep people who are not directly involved in the servicing away from the immediate area.Wear protective clothing (including face shield, insulated gloves and apron).Keep the work area well ventilated to prevent build-up of volatile fuel vapors.Keep all potential ignition sources away from the fuel. This includes: excessive heat, openflames, cigarettes, sparks and electrical sources.
Do not touch any of the fluoroelastomer seals or O-rings if they have been exposed to atemperature of 315°C or higher. The material of this product does not burn but decomposesinto a charred, black, sticky substance. This decomposition may contain hydrofluoric acid.This is very aggressive and difficult to remove once it has contaminated the skin. Use PVC orrubber gloves until the decomposed material has been identified and/or removed. If thesubstance makes contact with the skin, contact a doctor immediately.
Blocking and/or clamping the fuel pipes can lead to severe engine damage. Never block or plug the common rail release valve output, as this can lead to severe rail andcommon rail pressure release valve damage. Cover the crankcase pressure sensor and make sure that it cannot come in contact with anyfuel or fuel vapors.
Always work in a clean manner according to the Cleanliness procedures Clean the area before performing repairs. The smallest amount of dirt, debris and other contamination can cause serious damage tosystems and/or the engine. Immediately plug the openings of the fuel system.

M035658 - 20/07/2020Draining fuel gallery
1. Remove the fuel pressure control valve (7) andcollect the fuel.
2. Remove the non-return valve (8) and collect thefuel.
Make sure that the fuel gallery is fullydrained.
3. Install the non-return valve (8) using new usit ringsand tighten it to the specified torque.
8
7
4. Clean the pressure control valve (7) and check itthoroughly for damage and cracks as shown.
Replace the fuel pressure control valveif it is damaged.
5. Install the fuel pressure control valve (7) with anew O-ring and tighten it to the specified torque.
i403709
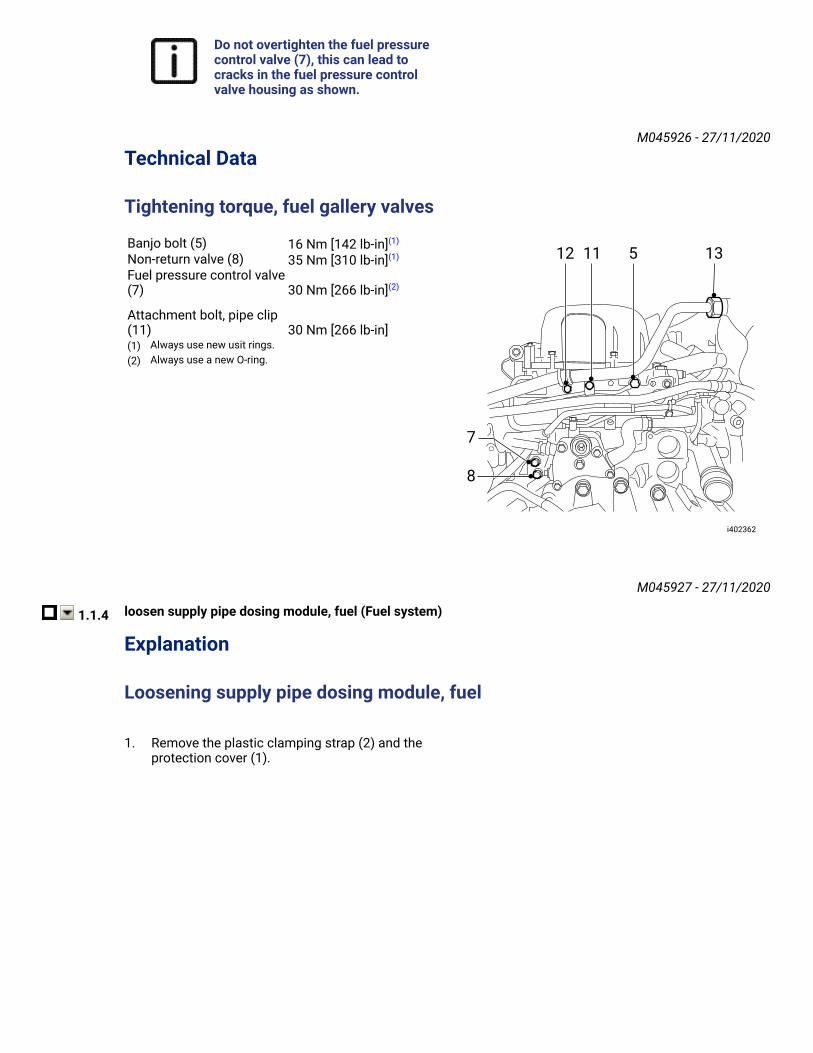
Do not overtighten the fuel pressurecontrol valve (7), this can lead tocracks in the fuel pressure controlvalve housing as shown.
M045926 - 27/11/2020
Technical Data
Tightening torque, fuel gallery valves
Banjo bolt (5) 16 Nm [142 lb-in](1)
Non-return valve (8) 35 Nm [310 lb-in](1)
Fuel pressure control valve(7) 30 Nm [266 lb-in](2)
Attachment bolt, pipe clip(11) 30 Nm [266 lb-in](1) Always use new usit rings.(2) Always use a new O-ring.
8
7
12 11 5 13
i402362
M045927 - 27/11/2020
1.1.4 loosen supply pipe dosing module, fuel (Fuel system)
Explanation
Loosening supply pipe dosing module, fuel
1. Remove the plastic clamping strap (2) and theprotection cover (1).

1. Remove the heat shield.2. Remove the bolt (1).3. Loosen the union nut (5) from the fuel dosing
module (4).
Pressurized fuel can be present, use arag to catch possible leaking fuel.
1 2 3
45
i403701
M031365 - 11/11/2020
1.1.5 loosen assembly fuel intake module (Fuel system)
Explanation
Warning, Fuel SystemEye contact: Rinse immediately with plenty of water, also under the eyelids, for at least 15minutes. Consult a doctor.Skin contact: Wash off immediately with plenty of water. If symptoms persist, consult adoctor.Inhalation: Get some fresh air. If symptoms persist, consult a doctor.
Ingestion: Rinse mouth with water and then drink plenty of water. Do not induce vomiting.Consult a doctor.
Fuel vapors and spills are potential fire hazards.When opening a fuel system, fuel can escape. Collect the fuel during servicing and dispose ofit properly to avoid the risk of fire.Mixing other fuels, such as gasoline, alcohol or gasohol with diesel can produce an explosivemixture.
To avoid injury from fuel while performing service on any fuel-system-related component(s):Prevent fuel from leaking or dripping onto the starter motor.Check the fuel components for leakage very carefully.Clean spilled or leaked fuel.Keep people who are not directly involved in the servicing away from the immediate area.Wear protective clothing (including face shield, insulated gloves and apron).Keep the work area well ventilated to prevent build-up of volatile fuel vapors.Keep all potential ignition sources away from the fuel. This includes: excessive heat, openflames, cigarettes, sparks and electrical sources.
Do not touch any of the fluoroelastomer seals or O-rings if they have been exposed to atemperature of 315°C or higher. The material of this product does not burn but decomposesinto a charred, black, sticky substance. This decomposition may contain hydrofluoric acid.This is very aggressive and difficult to remove once it has contaminated the skin. Use PVC orrubber gloves until the decomposed material has been identified and/or removed. If thesubstance makes contact with the skin, contact a doctor immediately.
Blocking and/or clamping the fuel pipes can lead to severe engine damage. Never block or plug the common rail release valve output, as this can lead to severe rail andcommon rail pressure release valve damage. Cover the crankcase pressure sensor and make sure that it cannot come in contact with anyfuel or fuel vapors.
Always work in a clean manner according to the Cleanliness procedures Clean the area before performing repairs. The smallest amount of dirt, debris and other contamination can cause serious damage tosystems and/or the engine. Immediately plug the openings of the fuel system.

M035658 - 20/07/2020
1.1.6 remove 1 (one) fuel injection pipe from pump unit to fuel rail (Fuel system)
Explanation
Warning, Fuel SystemEye contact: Rinse immediately with plenty of water, also under the eyelids, for at least 15minutes. Consult a doctor.Skin contact: Wash off immediately with plenty of water. If symptoms persist, consult adoctor.Inhalation: Get some fresh air. If symptoms persist, consult a doctor.Ingestion: Rinse mouth with water and then drink plenty of water. Do not induce vomiting.Consult a doctor.
Fuel vapors and spills are potential fire hazards.When opening a fuel system, fuel can escape. Collect the fuel during servicing and dispose ofit properly to avoid the risk of fire.Mixing other fuels, such as gasoline, alcohol or gasohol with diesel can produce an explosivemixture.
To avoid injury from fuel while performing service on any fuel-system-related component(s):Prevent fuel from leaking or dripping onto the starter motor.Check the fuel components for leakage very carefully.Clean spilled or leaked fuel.Keep people who are not directly involved in the servicing away from the immediate area.Wear protective clothing (including face shield, insulated gloves and apron).

Keep the work area well ventilated to prevent build-up of volatile fuel vapors.Keep all potential ignition sources away from the fuel. This includes: excessive heat, openflames, cigarettes, sparks and electrical sources.
Do not touch any of the fluoroelastomer seals or O-rings if they have been exposed to atemperature of 315°C or higher. The material of this product does not burn but decomposesinto a charred, black, sticky substance. This decomposition may contain hydrofluoric acid.This is very aggressive and difficult to remove once it has contaminated the skin. Use PVC orrubber gloves until the decomposed material has been identified and/or removed. If thesubstance makes contact with the skin, contact a doctor immediately.
Blocking and/or clamping the fuel pipes can lead to severe engine damage. Never block or plug the common rail release valve output, as this can lead to severe rail andcommon rail pressure release valve damage. Cover the crankcase pressure sensor and make sure that it cannot come in contact with anyfuel or fuel vapors.
Always work in a clean manner according to the Cleanliness procedures Clean the area before performing repairs. The smallest amount of dirt, debris and other contamination can cause serious damage tosystems and/or the engine. Immediately plug the openings of the fuel system.
M035658 - 20/07/2020Warning, fuel injection pipe
Do not reuse the fuel injection pipe if the Evaluate the injector back leak test in DAVIE cannot beperformed successfully.
The high-pressure fuel injection pipes are not intended to be reused indefinitely.

The fuel injection pipes and connections must be checked properly before reuse.Damaged and / or incorrectly installed injection pipes can cause hot fuel leakage, flammablegases or vapors.
Highly pressurized fuel is present in the common rail, fuel injection pipes and other high-pressurefuel components when the engine is running and when the engine is switched off. The pressureleaks away slowly when the ignition is switched off.Wait at least one minute before performing maintenance on high-pressure fuel components.
M030466 - 22/02/2021Removing fuel injection pipe from pump unit to fuel rail
1. Clean the fuel injection pipe connection and itssurroundings thoroughly.
2. If reusing the fuel injection pipe, label the fuelinjection pipe so it can be reinstalled in the originalposition.
3. Loosen the union nuts on both ends and carefullyremove the fuel injection pipe.
Visually check:The high-pressure fuel pipe forcorrosion, cracks or pinched areas.The union nut for corroded,damaged threads or cracks.Both ends of the high-pressurepipe for damaged or corrodedsealing surfaces.
Replace the fuelinjection pipe if anycorrosion, damage,cracks, or pinchedareas are found onthe pipe, union nutor any sealingsurface.
4. Cover both ends of the fuel injection pipe usingclean protective caps.
If reusing the fuel injection pipe, store itin a clean plastic bag.
M065361 - 22/02/2021
1.1.7 disconnect fuel or coolant temperature sensor (Sensors electrical system, engine)
1.1.8 disconnect 1 (one) common rail pump unit (Fuel system)

1.1.9 remove 1 (one) common rail pump unit (Fuel system)
Explanation
Warning, Fuel SystemEye contact: Rinse immediately with plenty of water, also under the eyelids, for at least 15minutes. Consult a doctor.Skin contact: Wash off immediately with plenty of water. If symptoms persist, consult adoctor.Inhalation: Get some fresh air. If symptoms persist, consult a doctor.Ingestion: Rinse mouth with water and then drink plenty of water. Do not induce vomiting.Consult a doctor.
Fuel vapors and spills are potential fire hazards.When opening a fuel system, fuel can escape. Collect the fuel during servicing and dispose ofit properly to avoid the risk of fire.Mixing other fuels, such as gasoline, alcohol or gasohol with diesel can produce an explosivemixture.
To avoid injury from fuel while performing service on any fuel-system-related component(s):Prevent fuel from leaking or dripping onto the starter motor.Check the fuel components for leakage very carefully.Clean spilled or leaked fuel.Keep people who are not directly involved in the servicing away from the immediate area.Wear protective clothing (including face shield, insulated gloves and apron).Keep the work area well ventilated to prevent build-up of volatile fuel vapors.Keep all potential ignition sources away from the fuel. This includes: excessive heat, openflames, cigarettes, sparks and electrical sources.
Do not touch any of the fluoroelastomer seals or O-rings if they have been exposed to atemperature of 315°C or higher. The material of this product does not burn but decomposesinto a charred, black, sticky substance. This decomposition may contain hydrofluoric acid.This is very aggressive and difficult to remove once it has contaminated the skin. Use PVC orrubber gloves until the decomposed material has been identified and/or removed. If thesubstance makes contact with the skin, contact a doctor immediately.
Blocking and/or clamping the fuel pipes can lead to severe engine damage. Never block or plug the common rail release valve output, as this can lead to severe rail andcommon rail pressure release valve damage. Cover the crankcase pressure sensor and make sure that it cannot come in contact with anyfuel or fuel vapors.
Always work in a clean manner according to the Cleanliness procedures Clean the area before performing repairs. The smallest amount of dirt, debris and other contamination can cause serious damage tosystems and/or the engine. Immediately plug the openings of the fuel system.

M035658 - 20/07/2020Removing common rail pump unit
Prevent dirt or debris from enteringthe common rail pump unit or fuelsystem. Dirt or debris in the pump unit or fuelsystem can lead to pump unit failureresulting in an engine no start orsevere engine damage.
1. Clean the area around the common rail pump unitand the exterior of the fuel tank.
2. Open the fuel tank cap to release the overpressurein the fuel system.
3. Unscrew the common rail pump unit bolts twoturns.
Make sure that the fuel gallery isempty before removing the commonrail pump units.
4. Position two screwdrivers under the common railpump unit flange and tip it loose.
5. Unscrew the common rail pump unit bolts further.6. Tip up the common rail pump unit again with the
screwdrivers.
Keep tipping up the common rail pumpunit in this manner until it follows the
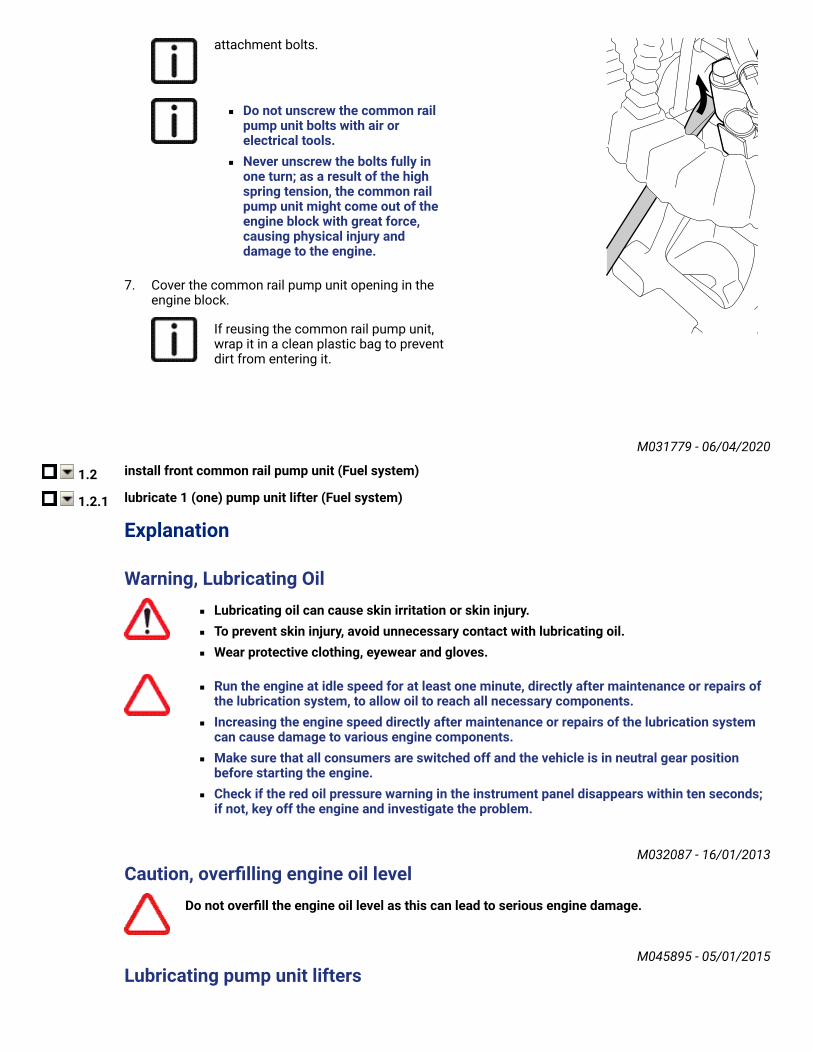
attachment bolts.
Do not unscrew the common railpump unit bolts with air orelectrical tools. Never unscrew the bolts fully inone turn; as a result of the highspring tension, the common railpump unit might come out of theengine block with great force,causing physical injury anddamage to the engine.
7. Cover the common rail pump unit opening in theengine block.
If reusing the common rail pump unit,wrap it in a clean plastic bag to preventdirt from entering it.
M031779 - 06/04/2020
1.2 install front common rail pump unit (Fuel system)
1.2.1 lubricate 1 (one) pump unit lifter (Fuel system)
Explanation
Warning, Lubricating OilLubricating oil can cause skin irritation or skin injury.To prevent skin injury, avoid unnecessary contact with lubricating oil.Wear protective clothing, eyewear and gloves.
Run the engine at idle speed for at least one minute, directly after maintenance or repairs ofthe lubrication system, to allow oil to reach all necessary components. Increasing the engine speed directly after maintenance or repairs of the lubrication systemcan cause damage to various engine components. Make sure that all consumers are switched off and the vehicle is in neutral gear positionbefore starting the engine. Check if the red oil pressure warning in the instrument panel disappears within ten seconds;if not, key off the engine and investigate the problem.
M032087 - 16/01/2013Caution, overfilling engine oil level
Do not overfill the engine oil level as this can lead to serious engine damage.
M045895 - 05/01/2015Lubricating pump unit lifters

1453158 is alsosuitable
Install new pump unit lifters if they arecorroded or damaged in any other way. Newpump unit lifters require a more extensivepre-lubrication. This procedure is described in theinstruction Lubricating pump unit lifters.
1. Visually inspect the top of the pump unit lifter fordebris, wear, and damage.
2. Use approximately 500 ml [0.53 quart] of cleanengine oil to lubricate each pump unit lifter (1):
Crank the engine using special tool(1903018) until the pump unit lifter (1) is atits lowest position.Thoroughly lubricate the bore of the pumpunit lifters (1).Gently pour the remaining clean engine oil ontop of the pump unit tappet using a funnel,and make sure that the oil does not enter thefuel gallery bore (2).
Oil in the fuel gallery bore (2) cancontaminate the fuel system.
1 2
i403863
M045889 - 22/02/2021
Special Tools
Special tool category Mandatory special tool for: NA region1903018
Engine Cranking Tool
ST1903018 - 07/01/2013
1.2.2 install 1 (one) common rail pump unit (Fuel system)
Explanation
Installing common rail pump unit
1. Remove the packaging from the pump units.
If the pump units are reused, the O-rings must be replaced.Install the O-rings in the order asshown.

1
2
3
M202137
1873
337
1352
0000
1. Black2. Violet3. Green
2. Remove the cover from the common rail pumpunit opening in the engine block.
3. Apply a small amount of clean engine oil to the O-rings, and check that the bore in the engine blockis well oiled.
4. Install the pump unit.5. Install the attachment bolts (1 and 2).
Always use new attachment bolts.The pump units are mountedunder pretension.
6. Tighten the attachment bolts (1 and 2) alternately,in several steps, until the pump unit abuts theengine block.
7. Tighten the attachment bolts (1 and 2) to thespecified torque.
1 2
M031781 - 09/04/2015
Technical Data

Tightening torque, common rail pump unitAttachment bolts 30 Nm [266 lb-in] + 60°(1)
(1) Use bolts only once
M031782 - 06/03/2013
1.2.3 connect 1 (one) common rail pump unit (Fuel system)
1.2.4 connect fuel or coolant temperature sensor (Sensors electrical system, engine)
1.2.5 install 1 (one) fuel injection pipe from pump unit to fuel rail (Fuel system)
Explanation
Installing fuel injection pipe from pump unit to fuel rail
The high-pressure fuel injection pipes arenot intended to be reused indefinitely. Thefuel injection pipes can only be reused whenchecked properly.
Checking high-pressure fuel injection pipe
1. Remove the plastic bag and protective caps fromthe fuel injection pipe and visually check:
The high-pressure fuel pipe for corrosion,cracks or pinched areas.The union nut for corroded, damaged threadsor cracks.Both ends of the high-pressure pipe fordamaged or corroded sealing surfaces.
Replace the fuel injection pipe if anycorrosion, damage, cracks, or pinchedareas are found on the pipe, union nutor any sealing surface.
Always check the high-pressure fuel system for leaks after reusing the fuel injection pipes. Perform the 'Evaluate injector back leak' test after repair using DAVIE. If reusing the fuel injection pipe, install the labeled fuel injection pipe in the original position.
Flushing high-pressure fuel pump
1. Loosen the knob of the fuel lift pump (1) byturning it counterclockwise.
2. Operate the manual fuel lift pump (1) to flush thehigh-pressure fuel pump.
Make sure that there is no debris in thehigh-pressure fuel pump output. Dirt ordebris in the fuel system can lead tosevere engine damage.
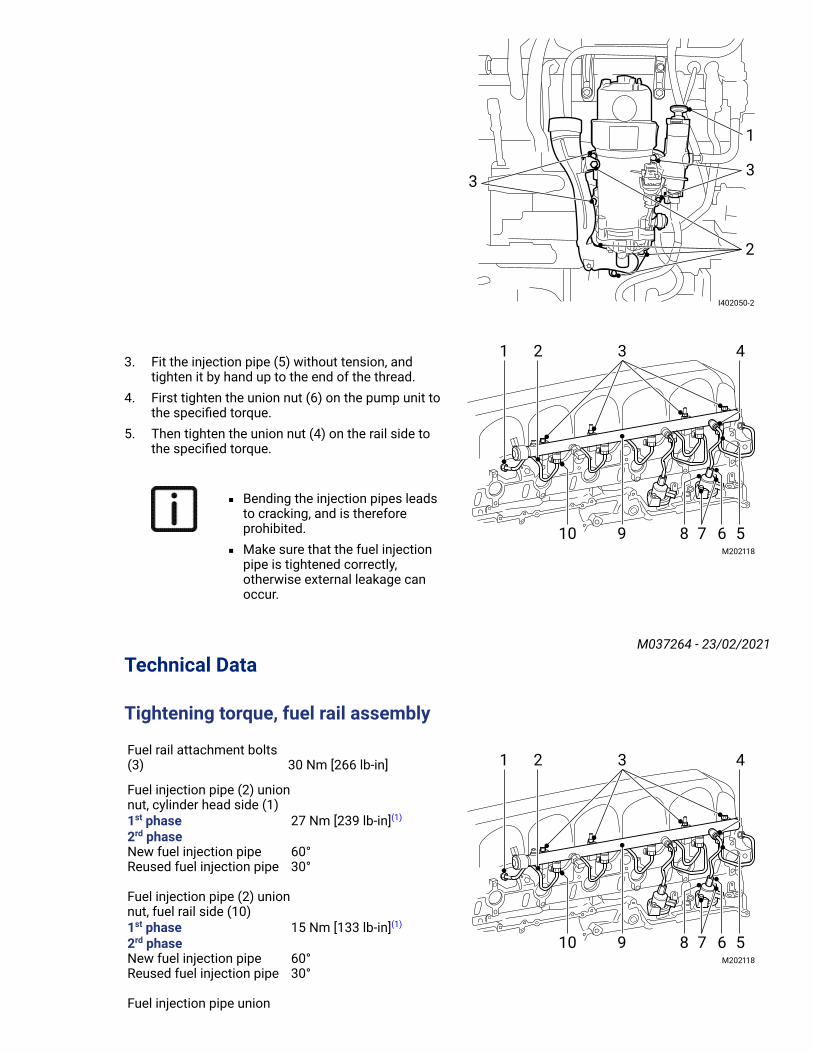
I402050-2
3
1
3
2
3. Fit the injection pipe (5) without tension, andtighten it by hand up to the end of the thread.
4. First tighten the union nut (6) on the pump unit tothe specified torque.
5. Then tighten the union nut (4) on the rail side tothe specified torque.
Bending the injection pipes leadsto cracking, and is thereforeprohibited.Make sure that the fuel injectionpipe is tightened correctly,otherwise external leakage canoccur.
1 2 3 4
5M202118
678910
M037264 - 23/02/2021
Technical Data
Tightening torque, fuel rail assembly
Fuel rail attachment bolts(3) 30 Nm [266 lb-in]
Fuel injection pipe (2) unionnut, cylinder head side (1) 1st phase 27 Nm [239 lb-in](1)
2rd phase New fuel injection pipe 60°Reused fuel injection pipe 30°
Fuel injection pipe (2) unionnut, fuel rail side (10) 1st phase 15 Nm [133 lb-in](1)
2rd phase New fuel injection pipe 60°Reused fuel injection pipe 30°
Fuel injection pipe union
1 2 3 4
5M202118
678910

nuts from pump unit to fuelrail (4 and 6)1st phase 15 Nm [133 lb-in](1)
2rd phase New fuel injection pipe 60°Reused fuel injection pipe 30°(1)Make sure that all fuel injection
pipes are checked andtightened correctly, otherwiseexternal fuel leakage can occur.
M036668 - 03/12/2020
1.2.6 fixing assembly fuel intake module (Fuel system)
Explanation
Fixing assembly fuel intake module
1. Clean the sealing surfaces and fit a new gasket.
Always use a new gasket.
2. Install the fuel intake module (8) and tighten theattachment bolts (2) to the specified torque.
i402101
1
2
3
4
56
109
28
7
M037848 - 27/06/2013
Technical Data
Tightening torque, fuel intake module
Fuel intake moduleattachment bolts (2) 25 Nm [221 lb-in]Fuel pressure sensor, fuelintake module (3) 14 Nm [124 lb-in]Fuel shutoff valveattachment bolts (6) 2.5 Nm [22 lb-in]Air shutoff valveattachment bolts (9) 2.5 Nm [22 lb-in]Quick-release coupling,male (10) 9 Nm [80 lb-in]

i402101
1
2
3
4
56
109
28
7
M032521 - 09/10/2020
1.2.7 fixing supply pipe dosing module, fuel (Fuel system)
Explanation
Fixing supply pipe dosing module, fuel
1. Fit the union nut (5) onto the fuel dosing module(4), and tighten it to the specified torque.
2. Position the clip, and tighten the attachment bolt(1) to the specified torque.
1 2 3
45
i403701
1. Install the protection cover (1) and secure it with anew heat-resistant plastic clamping strap (2).
Replace the protection cover (1) ifdamaged.
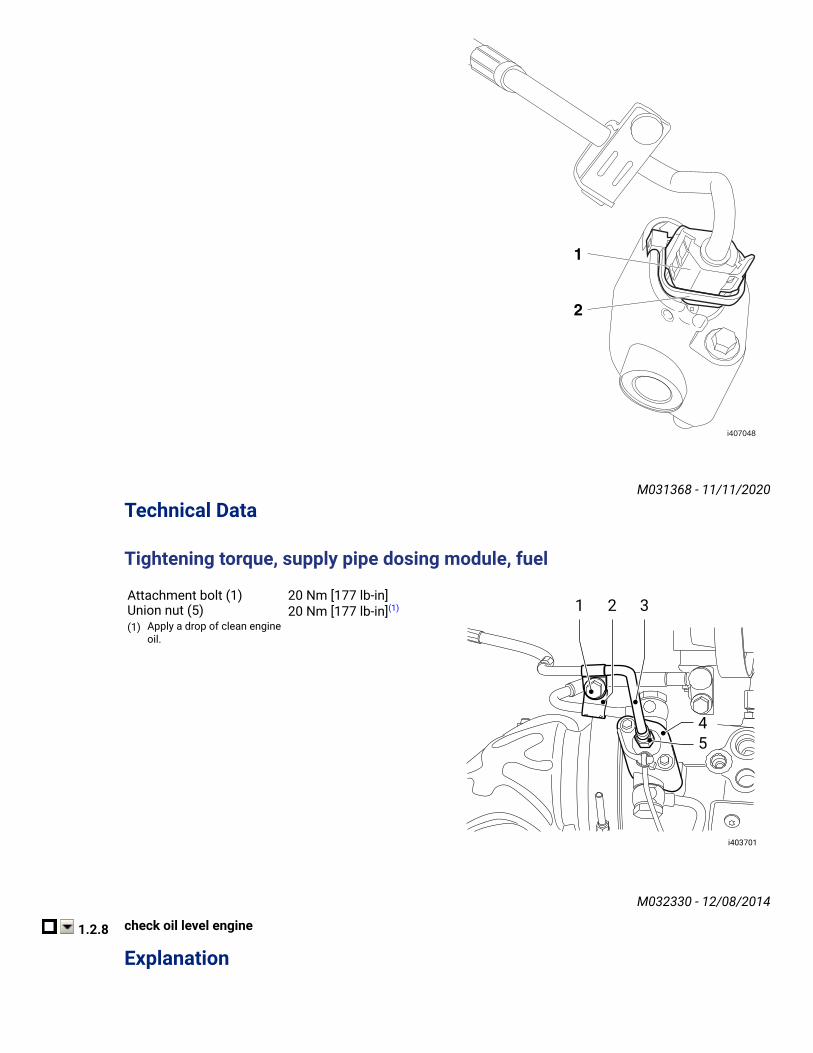
M031368 - 11/11/2020
Technical Data
Tightening torque, supply pipe dosing module, fuel
Attachment bolt (1) 20 Nm [177 lb-in]Union nut (5) 20 Nm [177 lb-in](1)
(1) Apply a drop of clean engineoil.
1 2 3
45
i403701
M032330 - 12/08/2014
1.2.8 check oil level engine
Explanation

Warning, Lubricating OilLubricating oil can cause skin irritation or skin injury.To prevent skin injury, avoid unnecessary contact with lubricating oil.Wear protective clothing, eyewear and gloves.
Run the engine at idle speed for at least one minute, directly after maintenance or repairs ofthe lubrication system, to allow oil to reach all necessary components. Increasing the engine speed directly after maintenance or repairs of the lubrication systemcan cause damage to various engine components. Make sure that all consumers are switched off and the vehicle is in neutral gear positionbefore starting the engine. Check if the red oil pressure warning in the instrument panel disappears within ten seconds;if not, key off the engine and investigate the problem.
M032087 - 16/01/2013Checking engine oil level
Manual level check with cold engine1. Position the vehicle on a level surface.2. Apply the parking brake.
Let the engine run at idle speed forat least one minute directly aftermaintenance or repairs to allow oilto reach all necessarycomponents.Wait at least 15 minutes beforechecking the engine oil level of acold engine.
3. Pull the dipstick out of the holder.4. Wipe the dipstick clean with a lint-free cloth.5. Put the dipstick back into the holder.6. Pull the dipstick out again and check the oil level.
The oil level must be less than 0.5 cmfrom max.The oil level will indicate max when alloil has drained back into the pan.
7. Put the dipstick back into the holder.
Make sure that the dipstick sealson the O-ring after checking the oillevel.Make sure that the dipstick islocked after checking the oil level.
M030899 - 06/12/2019
Technical Data
Filling capacities lubrication system
Filling capacity for service, including oil filter approximately 40 liters [42.3 quarts]Filling capacity, first filling approximately 46 liters [48.6 quarts](1)
Range of minimum - maximum level approximately 9 liters [9.5 quarts](1) Filling capacity after engine overhaul.
M032190 - 13/11/2014
1.2.9 connect battery clamp, negative pole
Explanation
Warning, battery clamp and negative terminalDo not disconnect the vehicle batteries until the DEF dosing system has completed the purgecycle.Before beginning to remove and/or disconnect any components, wait at least 5 minutes afterthe key switch is turned OFF for the aftertreatment DEF dosing system to purge DEF from thesystem.The purge cycle is an automatic process and does not require active intervention. Theaftertreatment DEF dosing unit creates an audible pumping noise during the purging process.
Electrical shock hazard: Never disconnect the battery clamp when the engine is running.Disconnecting the battery clamps while the engine is running may result in death, personalinjury, or equipment damage from electrical arching or damage to electronic components.Turn off the engine and place the ignition switch in the OFF position before disconnecting thebattery clamps.Do not place any tools or other materials on top of or close to the batteries. This can cause adangerous high-current short circuit and, in the worst case, a battery explosion. Keep allobjects away from the battery terminals.Always break the contact between the battery clamp and the negative terminal beforeworking on the vehicle. Working on a vehicle while the battery is connected may result inelectrical injury or damage.Always disconnect the battery at the negative terminal when performing service procedures.
Battery acid can cause chemical burns.If you come into contact with battery acid: flush your skin with water and/or apply bakingsoda or lime to help neutralize the acid.If battery acid comes into contact with the eyes, flush immediately with water and seekmedical attention.Wear protective clothing when handling any part of the battery.
M024327 - 03/05/2010
1.2.10 bleed (Fuel system)
Explanation
Warning, Fuel SystemEye contact: Rinse immediately with plenty of water, also under the eyelids, for at least 15minutes. Consult a doctor.Skin contact: Wash off immediately with plenty of water. If symptoms persist, consult adoctor.Inhalation: Get some fresh air. If symptoms persist, consult a doctor.Ingestion: Rinse mouth with water and then drink plenty of water. Do not induce vomiting.Consult a doctor.
Fuel vapors and spills are potential fire hazards.When opening a fuel system, fuel can escape. Collect the fuel during servicing and dispose ofit properly to avoid the risk of fire.Mixing other fuels, such as gasoline, alcohol or gasohol with diesel can produce an explosivemixture.
To avoid injury from fuel while performing service on any fuel-system-related component(s):Prevent fuel from leaking or dripping onto the starter motor.Check the fuel components for leakage very carefully.Clean spilled or leaked fuel.Keep people who are not directly involved in the servicing away from the immediate area.Wear protective clothing (including face shield, insulated gloves and apron).Keep the work area well ventilated to prevent build-up of volatile fuel vapors.Keep all potential ignition sources away from the fuel. This includes: excessive heat, openflames, cigarettes, sparks and electrical sources.
Do not touch any of the fluoroelastomer seals or O-rings if they have been exposed to atemperature of 315°C or higher. The material of this product does not burn but decomposesinto a charred, black, sticky substance. This decomposition may contain hydrofluoric acid.This is very aggressive and difficult to remove once it has contaminated the skin. Use PVC orrubber gloves until the decomposed material has been identified and/or removed. If thesubstance makes contact with the skin, contact a doctor immediately.
Blocking and/or clamping the fuel pipes can lead to severe engine damage. Never block or plug the common rail release valve output, as this can lead to severe rail andcommon rail pressure release valve damage. Cover the crankcase pressure sensor and make sure that it cannot come in contact with anyfuel or fuel vapors.
Always work in a clean manner according to the Cleanliness procedures Clean the area before performing repairs. The smallest amount of dirt, debris and other contamination can cause serious damage tosystems and/or the engine. Immediately plug the openings of the fuel system.

M035658 - 20/07/2020Prime fuel system
If the fuel injection pipes have beenremoved:
Visually check both injection pipeconnections for leakage during primingthe fuel system.
Immediately stop the engine if fuelleakage occurs and replace theleaking fuel injection pipe.
After performing fuel system service, prime the fuelsystem to remove air from fuel system lines andcomponents. Three priming options are available;however, hand priming should only be performed as alast resort when recommended tooling is not available.After priming, and before releasing the truck, check thedash for residual DTCs.
The engine must idle for five minutes afterpriming with the optional blender bypassedto prevent air entrained in the fuel lines fromdamaging the fuel injection system.If the optional fuel blender is not bypassed,it can take up to 30 minutes of idle time topurge air from the fuel system.
1. Priming with DAVCO Shop Pro MX 40/80 (BaseUnit)
2. Priming with Mityvac MV7430
3. Hand priming
M057901 - 28/11/2019
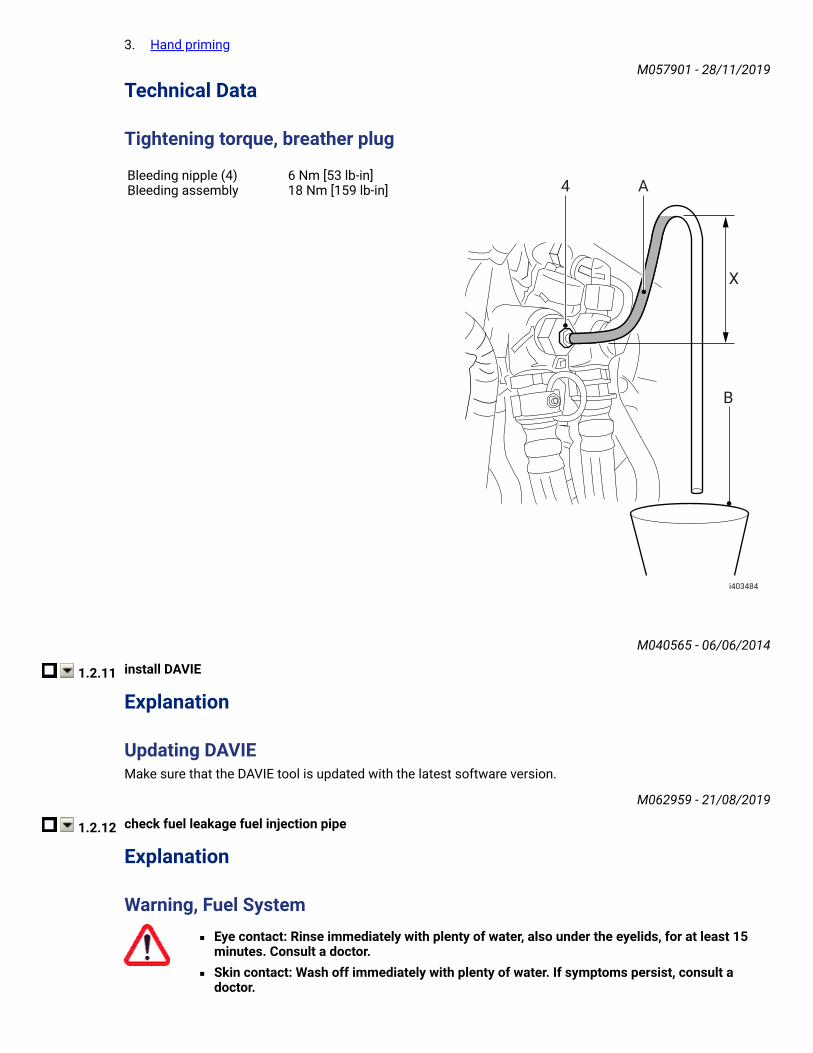
Technical Data
Tightening torque, breather plug
Bleeding nipple (4) 6 Nm [53 lb-in]Bleeding assembly 18 Nm [159 lb-in]
i403484
4
B
X
A
M040565 - 06/06/2014
1.2.11 install DAVIE
Explanation
Updating DAVIEMake sure that the DAVIE tool is updated with the latest software version.
M062959 - 21/08/2019
1.2.12 check fuel leakage fuel injection pipe
Explanation
Warning, Fuel SystemEye contact: Rinse immediately with plenty of water, also under the eyelids, for at least 15minutes. Consult a doctor.Skin contact: Wash off immediately with plenty of water. If symptoms persist, consult adoctor.

Inhalation: Get some fresh air. If symptoms persist, consult a doctor.Ingestion: Rinse mouth with water and then drink plenty of water. Do not induce vomiting.Consult a doctor.
Fuel vapors and spills are potential fire hazards.When opening a fuel system, fuel can escape. Collect the fuel during servicing and dispose ofit properly to avoid the risk of fire.Mixing other fuels, such as gasoline, alcohol or gasohol with diesel can produce an explosivemixture.
To avoid injury from fuel while performing service on any fuel-system-related component(s):Prevent fuel from leaking or dripping onto the starter motor.Check the fuel components for leakage very carefully.Clean spilled or leaked fuel.Keep people who are not directly involved in the servicing away from the immediate area.Wear protective clothing (including face shield, insulated gloves and apron).Keep the work area well ventilated to prevent build-up of volatile fuel vapors.Keep all potential ignition sources away from the fuel. This includes: excessive heat, openflames, cigarettes, sparks and electrical sources.
Do not touch any of the fluoroelastomer seals or O-rings if they have been exposed to atemperature of 315°C or higher. The material of this product does not burn but decomposesinto a charred, black, sticky substance. This decomposition may contain hydrofluoric acid.This is very aggressive and difficult to remove once it has contaminated the skin. Use PVC orrubber gloves until the decomposed material has been identified and/or removed. If thesubstance makes contact with the skin, contact a doctor immediately.
Blocking and/or clamping the fuel pipes can lead to severe engine damage. Never block or plug the common rail release valve output, as this can lead to severe rail andcommon rail pressure release valve damage. Cover the crankcase pressure sensor and make sure that it cannot come in contact with anyfuel or fuel vapors.
Always work in a clean manner according to the Cleanliness procedures Clean the area before performing repairs. The smallest amount of dirt, debris and other contamination can cause serious damage tosystems and/or the engine. Immediately plug the openings of the fuel system.

M035658 - 20/07/2020Warning, fuel injection pipe
Do not reuse the fuel injection pipe if the Evaluate the injector back leak test in DAVIE cannot beperformed successfully.
The high-pressure fuel injection pipes are not intended to be reused indefinitely.The fuel injection pipes and connections must be checked properly before reuse.Damaged and / or incorrectly installed injection pipes can cause hot fuel leakage, flammablegases or vapors.
Highly pressurized fuel is present in the common rail, fuel injection pipes and other high-pressurefuel components when the engine is running and when the engine is switched off. The pressureleaks away slowly when the ignition is switched off.Wait at least one minute before performing maintenance on high-pressure fuel components.
M030466 - 22/02/2021Checking fuel injection pipe with DAVIE
Damaged and / or incorrectly fitted injectorpipes can cause hot fuel leakage,flammable gases and vapors. Immediately stop the engine or test if fuelleakage occurs.
1. Start the engine and run it at idling speed.Visually check both fuel injection pipeconnections for leakage.

Immediately stop the engineif fuel leakage occurs andreplace the leaking fuelinjection pipe.
2. If no leakage occurs, run the engine at 1200 rpm.Visually check both fuel injection pipeconnections for leakage.
Immediately stop the engineif fuel leakage occurs andreplace the leaking fuelinjection pipe.
3. If no leakage occurs, perform the 'Evaluate theinjector back leak' test using DAVIE.
It is not necessary to install thecontainers for the MX-13 engine duringthis check.
Visually check both fuel injection pipeconnections for leakage.
During this test the railpressure builds up to 2500bar [36260 psi].Immediately stop the test ifexternal fuel leakage occursand replace the leaking fuelinjection pipe.
If the engine does not run or stallsand the test fails, repeat the test:
Operate the manual fuel liftpump a few seconds beforeand while starting the engine.Stop operating the manualfuel lift pump a few secondsafter the test has started.
M032569 - 25/06/2020
1.2.13 remove DAVIE
This information applies exclusively to the entered chassis number or the selected vehicle series. Please take into account that this information may changedaily. Therefore the provided information is only valid on 2-4-2021. You cannot derive any rights from the information provided with respect to vehiclesand/or components of another series, with another chassis number and/or of another date

DAF Dealernetreplace front common rail pumpunit (Fuel system)# MPANumber OptionalExchange
Part Description ComponentGroup DescriptionBulletinSupersession
2PCE * usit ring 1410 Fuel
system1PCE * O-ring 1410 Fuel
system1PCE 1934322 X common rail
pump unit 1410 Fuelsystem
1934322~2102391~1~common railpump unit~2102391#
2PCE * flange bolt 10.9 1410 Fuel
system