Embed Size (px)
Citation preview

gINT V8i Enterprise User Guide
DAA039550-1/0001

— 1 —
The information in this publication is subject to change without notice and does not represent a commitment on the part of Bentley. The software described in this document is furnished under a license agreement or nondisclosure agreement. The software must be used or copied only in accordance with the terms of the agreement.
COPYRIGHT NOTICE
Copyright (c) 2011 Bentley Systems, Incorporated. All rights reserved.
Including software, file formats, and audiovisual displays; may only be used pursuant to applicable software license agreement; contains confidential and proprietary information of Bentley Systems, Incorporated and/or third parties which is protected by copyright and trade secret law and may not be provided or otherwise made available without proper authorization.
RESTRICTED RIGHTS LEGENDS
If this software is acquired for or on behalf of the United States of America, its agencies and/or instrumentalities ("U.S. Government"), it is provided with restricted rights. This software and accompanying documentation are "commercial computer software" and "commercial computer software documentation," respectively, pursuant to 48 C.F.R. 12.212 and 227.7202, and "restricted computer software" pursuant to 48 C.F.R. 52.227-19(a), as applicable. Use, modification, reproduction, release, performance, display or disclosure of this software and accompanying documentation by the U.S. Government are subject to restrictions as set forth in this Agreement and pursuant to 48 C.F.R. 12.212, 52.227-19, 227.7202, and 1852.227-86, as applicable. Contractor/Manufacturer is Bentley Systems, Incorporated, 685 Stockton Drive, Exton, PA 19341-0678.
Unpublished - rights reserved under the Copyright Laws of the United States and International treaties.”
Bentley Systems Inc. Corporate Headquarters 685 Stockton Drive Exton, PA 19341, United States Web Site: http://www.bentley.com/en-US/Products/gINT/ Sales and General Support: http://www.bentley.com/en-US/Corporate/Contact+Us/

— 2 —
Contents About this User Guide .......................................................................................................................... 3 Overview of gINT Enterprise ............................................................................................................. 4 Setting up gINT Enterprise ................................................................................................................. 5
Requirements .............................................................................................................................................. 5
SQL Server Requirements ........................................................................................................................... 6
Moving Between gINT Enterprise and gINT Standard ................................................................ 7
Moving Projects to gINT Enterprise ................................................................................................ 8 Upsizing gINT Projects ................................................................................................................................ 8
Appending gINT Projects ............................................................................................................................ 8
Planning and Preparation ....................................................................................................................... 9
Creating a gINT Enterprise Database ............................................................................................... 10
Upsizing Projects ...................................................................................................................................... 13
Upsizing a Single gINT Project .............................................................................................................. 13
Upsizing Multiple gINT Projects ........................................................................................................... 15
Upsizing Existing Project Data ............................................................................................................. 16
Using Append to Merge gINT Projects ............................................................................................. 17
Downsizing Projects ................................................................................................................................ 18
Viewing an Enterprise Database .................................................................................................... 19 Reporting with gINT Enterprise ..................................................................................................... 20
Reporting from an Enterprise Database ......................................................................................... 21
Customizing Reports for gINT Enterprise ...................................................................................... 24
Customizing Fence Reports .................................................................................................................... 25
Customizing Graph Reports .................................................................................................................... 27
Customizing Site Map Reports .............................................................................................................. 29
Exporting Data from gINT Enterprise .......................................................................................... 32

— 3 —
About this User Guide
This user guide covers how to use gINT Enterprise-specific features. It is divided into the following sections:
• Setting up gINT Enterprise: Covers requirements and rights for the gINT Enterprise SQL Server database.
• Moving Projects to gINT Enterprise: Details methods, requirements and procedures for moving gINT projects to a gINT Enterprise database.
• Viewing an Enterprise Database: Briefly explains the differences between viewing single gINT projects and viewing an enterprise database.
• Reporting with gINT Enterprise: Explains the gINT Enterprise-specific reporting procedures and modifications necessary for report templates.
• Exporting Data from gINT Enterprise: Briefly discusses the additional methods of exporting data from gINT Enterprise via the Data Export tab in OUTPUT.
For more information, see the following documents which are located under Help > Manuals > gINT Setup and Introduction within gINT:
• Installation and Licensing Guide: Provides step-by-step instructions on installing, licensing and configuring gINT
• Welcome to gINT: A step-by-step introduction to the gINT user interface for a new user.
• Understanding gINT’s Capabilities: Describes what gINT can do for you, with an overview of the architecture and report samples from practical applications.

— 4 —
Overview of gINT Enterprise
gINT Enterprise enables you to use Microsoft SQL Server for storing and reporting your gINT data. Data is entered and edited in single project (.GPJ) files and then moved to the SQL Server database
By consolidating your gINT projects in a single enterprise database, you can share all of your subsurface data across your organization. For example, you can:
• Print log reports for specified points across all gINT projects.
• Include boreholes from any/all projects in a fence or graph, filtered according to criteria you choose.
• Include items in a graph from multiple projects within particular depth ranges. For example, you may want to see data from SAMPLE records with depths between 10 and 20 feet, or test records for all specimens from a particular lithology layer, across multiple projects.

— 5 —
Setting up gINT Enterprise
For instructions on installing and licensing gINT Enterprise, see the Installation and Licensing Guide (Help > Manuals > gINT Setup and Introduction).
Requirements
gINT Workstation Requirements
The following table lists the system requirements for the computers where gINT Enterprise is installed.
32-bit System Requirements
Operating System Processor Type
Processor Speed RAM
Windows XP Professional Intel Pentium D or higher
Minimum: 2.0GHz
Minimum: 1GB Recommended: 2GB
Windows Vista Business, Ultimate, Enterprise Intel Core2
Duo or higher Minimum: 2.0GHz
Minimum: 2GB Recommended: 4GB
Windows 7 Professional, Ultimate Intel Core2
Duo or higher Minimum: 2.3GHz
Minimum: 2GB Recommended: 4GB
64-bit System Requirements
Operating System Processor Type
Processor Speed RAM
Windows XP Professional Intel Core2 Duo or higher
Minimum: 2.0GHz
Minimum: 1GB Recommended: 2GB
Windows Vista Business, Ultimate, Enterprise Intel Core2
Duo or higher Minimum: 2.0GHz
Minimum: 2GB Recommended: 4GB
Windows 7 Professional, Ultimate Intel Core2
Duo or higher Minimum: 2.3GHz
Minimum: 2GB Recommended: 4GB
— 6 —
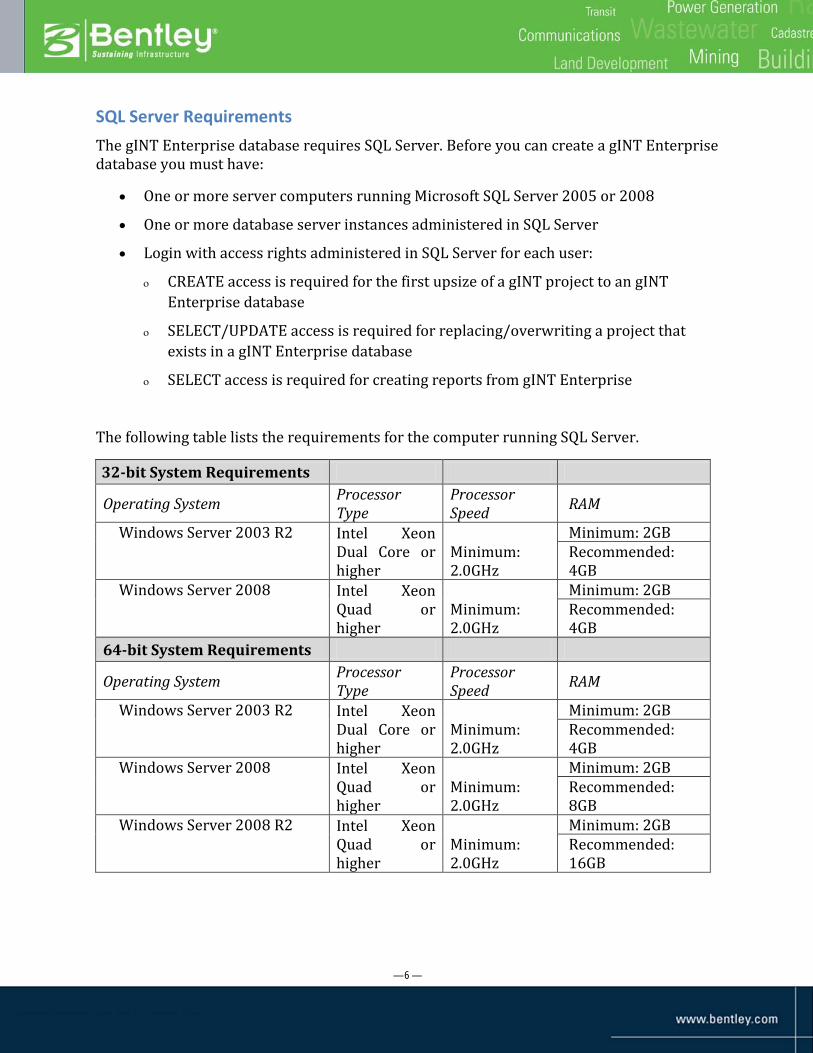
SQL Server Requirements The gINT Enterprise database requires SQL Server. Before you can create a gINT Enterprise database you must have:
• One or more server computers running Microsoft SQL Server 2005 or 2008
• One or more database server instances administered in SQL Server
• Login with access rights administered in SQL Server for each user:
ο CREATE access is required for the first upsize of a gINT project to an gINT Enterprise database
ο SELECT/UPDATE access is required for replacing/overwriting a project that exists in a gINT Enterprise database
ο SELECT access is required for creating reports from gINT Enterprise
The following table lists the requirements for the computer running SQL Server.
32-bit System Requirements
Operating System Processor Type
Processor Speed RAM
Windows Server 2003 R2 Intel Xeon Dual Core or higher
Minimum: 2.0GHz
Minimum: 2GB Recommended: 4GB
Windows Server 2008 Intel Xeon Quad or higher
Minimum: 2.0GHz
Minimum: 2GB Recommended: 4GB
64-bit System Requirements
Operating System Processor Type
Processor Speed RAM
Windows Server 2003 R2 Intel Xeon Dual Core or higher
Minimum: 2.0GHz
Minimum: 2GB Recommended: 4GB
Windows Server 2008 Intel Xeon Quad or higher
Minimum: 2.0GHz
Minimum: 2GB Recommended: 8GB
Windows Server 2008 R2 Intel Xeon Quad or higher
Minimum: 2.0GHz
Minimum: 2GB Recommended: 16GB

— 7 —
Moving Between gINT Enterprise and gINT Standard
If you have licenses for both gINT Professional and gINT Enterprise you can quickly switch between these two editions of gINT.
To switch to gINT Standard (gINT Professional):
• From within gINT Enterprise, choose Help > Launch gINT Standard
To return to gINT Enterprise:
• From within gINT Standard, choose Help > Launch gINT Enterprise

— 8 —
Moving Projects to gINT Enterprise
There are two methods for moving your gINT projects to a gINT Enterprise database: upsize and append. For most users the upsize method will be appropriate, but it is important to understand the difference between the two methods before you begin.
Upsizing gINT Projects
This is the most common method of moving data to gINT Enterprise. During the upsize process, each gINT project is copied to a gINT Enterprise database with its original project association.
Upsizing gINT projects into a gINT Enterprise database
Appending gINT Projects
This method is typically only used for very large gINT projects (over 100MB) that were split due to size limitations. During the append process, projects are merged in gINT Enterprise so that multiple projects become one large project. This requires that the PointIDs (Borehole IDs) be unique in all projects you want to append.

— 9 —
Appending gINT projects into a gINT Enterprise database
Planning and Preparation
Effectively consolidating your gINT projects into a central gINT Enterprise database requires some planning and preparation.
For the gINT project files you want to upsize, ensure the following:
1. Each project requires a unique identifier. This unique identifier can be from a column within in the project’s PROJECT table (For example, the project name or number). You can also use other attributes for the unique identifier, for example, the project file name. The unique identifier is assigned during the upsize process.
2. Each project must correspond to the gINT library (.glb file) that will be used for the gINT Enterprise database. That is, the field names in the reports and user system data items in the library file must match the field names in each of the project files.
3. All projects must have the same database structure. This includes the same tables, fields, key relationships, keysets and data types. The only acceptable differences between projects are:
ο Additional tables
ο Additional fields
Note: That upsizing projects with additional tables and/or fields requires that the

— 10 —
user have CREATE rights in SQL Server.
Creating a gINT Enterprise Database
A gINT Enterprise database is created when you upsize the first gINT project (or projects). The initial structure of a gINT Enterprise database is determined by the first gINT project(s) you upsize.
To create a gINT Enterprise database and upsize your first projects:
1. Open gINT Enterprise, and click the INPUT tab.
2. Do one of the following:
• To upsize a single project to gINT Enterprise, open that project, then select Enterprise Upsize Current Project to Enterprise.
• To upsize multiple projects to gINT Enterprise, select Enterprise Upsize Multiple Projects.
The Select a Database dialog box appears.
3. In the Server/Instance list, select the name of the server where you want to create the gINT Enterprise database

— 11 —
4. To connect to the server, do one of the following:
• Select Use Windows authentication, or
• Enter your username and password
5. In the Database field, type the name of the new database you want to create, and then click OK. The upsize dialog box appears.
To upsize a single project, click OK.
To upsize multiple projects:
• Click the button to the right of Project to Upsize and select the projects you want to upsize.
• Click OK after you have selected all of the projects you want to upsize.
The Project Properties dialog box appears.

— 12 —
4. Under Project Unique ID choose what to use for the unique ID value:
• To use a value from within the project, select Value from Project table Column and then choose the field that contains the unique value.
• To use the project file name or text that you supply, select Value From and then choose the option you want.
5. Under Project Description, select the field that contains the project description (for example, the Name field).
6. Click OK. The gINT Enterprise database is created and project(s) you selected are upsized. When the database creation and upsize are complete, the Project Upsize dialog appears, displaying the results of the upsize.

— 13 —
Upsizing Projects
Upsizing a gINT project involves copying all the data from a gINT .gpj file to a gINT Enterprise database. The first project that is upsized to a new gINT Enterprise database determines the structure of that database.
If you upsize a project that already exists in the gINT Enterprise database, the project will be overwritten.
Upsizing a Single gINT Project
To upsize a single gINT project:
1. Select File Open Project and open the gINT project file you want to upsize.
2. Select Enterprise Upsize Current Project to Enterprise.
The Select a Database dialog box appears.
3. In the Server/Instance list, select the name of the server that contains your gINT Enterprise database.
To connect to the server, do one of the following:
• Select Use Windows authentication, or
• Enter your username and password

— 14 —
4. Select the database where you want to upsize the project, and then click OK. The upsize dialog box appears.
5. Click OK. The project is upsized to the database you selected.

— 15 —
Upsizing Multiple gINT Projects To upsize multiple gINT projects:
1. Select Enterprise Upsize Multiple Projects.
2. The Select a Database dialog box appears.
3. In the Server/Instance list, select the name of the server that contains your gINT Enterprise database.
To connect to the server, do one of the following:
• Select Use Windows authentication, or
• Enter your username and password
4. Select the database where you want to upsize the projects, and then click OK. The upsize dialog box appears.

— 16 —
5. Click OK. The projects are upsized to the database you selected.
Upsizing Existing Project Data
You can replace gINT projects (.gpj files) that have been upsized to the Enterprise database.
Using the Upsize Current Project command you can replace (overwrite) existing projects in the gINT Enterprise database. When you upsize existing projects, all data in the gINT Enterprise database for that project is first deleted, and then replaced by the gINT project (.gpj) file.
To replace a single gINT project in the Enterprise database:
1. Open gINT Enterprise, and click the INPUT tab.
2. Open the gINT project (.gpj) that you want to use to overwrite the data in the gINT Enterprise database.
3. Select Enterprise Upsize Current Project to Enterprise. The Select a Database dialog box appears.
4. Select the gINT Enterprise database where you want to replace the project, and then click OK.
The Upsize Current Project to Enterprise dialog box appears. For projects that have been previously upsized, the project ID and date the project was upsized are displayed.

— 17 —
5. Click OK. Your upsize operation will delete the existing project data, and replace it with the new project data. You are asked to confirm before you proceed.
6. Click OK. The existing data is deleted and the new project data is upsized to the
enterprise database.
Using Append to Merge gINT Projects
If you have gINT project (.gpj) files that are very large (100 MB) and/or have split data among your gINT project files, you can use the Append command to merge your projects in gINT Enterprise.
See “Appending gINT Projects” on page 8 for more information.
To append gINT projects into a gINT Enterprise database:
1. Upsize the first gINT project. This will be the main project to which the other project files are appended.
2. Select Enterprise Append Multiple Projects. The Append Multiple Projects dialog box appears.
3. Click the button to the right of the Projects to Append field and select the projects
you want to upsize.
4. Click OK after you have selected all of the projects you want to upsize.
When the append process is complete, you will still have the first project listed in the Project tab, but this project will now contain all of the PointIDs (Borehole IDs) from the projects that were appended.

— 18 —
Downsizing Projects
You can downsize projects from the gINT Enterprise database to individual gINT project (.gpj) files.
1. Open gINT Enterprise, and click the INPUT tab.
2. Select Enterprise Downsize Project. The Select a Database dialog box appears.
3. Select the gINT Enterprise database that you want to downsize, and then click OK.
The Downsize Project dialog box appears.
4. From the Project to Downsize list, select the appropriate project.
5. In the Downsize to Project file field, enter the path and filename of the gINT project file that will be created.
6. Click OK. The project is downsized to the location and filename you specified.
— 19 —
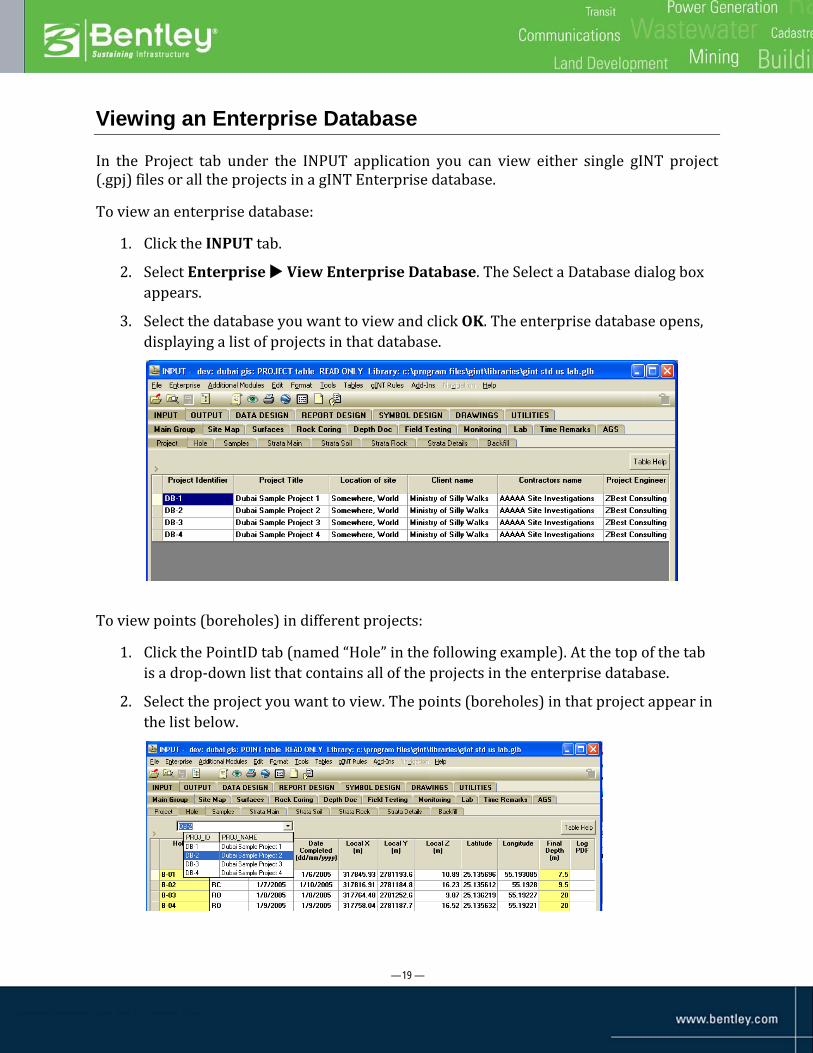
Viewing an Enterprise Database
In the Project tab under the INPUT application you can view either single gINT project (.gpj) files or all the projects in a gINT Enterprise database.
To view an enterprise database:
1. Click the INPUT tab.
2. Select Enterprise View Enterprise Database. The Select a Database dialog box appears.
3. Select the database you want to view and click OK. The enterprise database opens, displaying a list of projects in that database.
To view points (boreholes) in different projects:
1. Click the PointID tab (named “Hole” in the following example). At the top of the tab is a drop-down list that contains all of the projects in the enterprise database.
2. Select the project you want to view. The points (boreholes) in that project appear in the list below.

— 20 —
Reporting with gINT Enterprise
The following instructions assume that you are familiar with how to output and modify reports in gINT. For instructions on how to output and modify gINT reports see the following tutorials which are located under Help > Manuals > gINT Tutorials:
• Performing Data Entry: Covers the essentials of gINT data entry and output using a standard log form and fence form.
• Advanced Output Options and Site Maps: How export to PDF and DFX as well as how to use filters, and scripts.
• Log Report Design: How to design, construct and customize a log report form in gINT.
• Fence Report Design, Surfaces and Modeling: How to design, create and customize gINT fence report forms.
In the OUTPUT tab of gINT Enterprise, you can choose to create reports from a gINT Enterprise database, a single gINT project (.gpj) file or multiple gINT projects files.
To accommodate reporting data from many projects in a gINT Enterprise database, you must modify your reports to include project numbers and names (or identifier) alongside your data points. For example, in a fence report you could include the project number and borehole ID at the top of each fencepost. Or in a lab report you could include the project number in the table underneath a graph.

— 21 —
Reporting from an Enterprise Database
From within a gINT Enterprise database you can select one or more projects to report from, and then choose which PointIDs (borehole points) in those projects to include in your reports.
If you do not specify individual projects then all projects in the current database are included in your report. Similarly, if you do not specify individual PointIDs in a project, then all PointIDs are included
To report using Enterprise data:
1. Go to OUTPUT.
2. If you are not already viewing an Enterprise database, click the Enterprise radio button.
The DATA SOURCE area at top left changes to the following, displaying the last gINT Enterprise database that was viewed:
3. To select a different gINT Enterprise database,
a. Click the Browse button to the right of the Data Store field. The Select a Database dialog box appears.

— 22 —
b. Select the database you want to open and click OK.
The name of the database you selected now appears in the Data Store field.
4. To select individual projects to use for reporting, click the Browse button to the right of the Project cell. The Select dialog box appears.

— 23 —
5. Select one or more projects and click OK. The project(s) you selected appear in the data source grid.
6. To restrict the set of points included in particular projects click the Browse button
to the right of the PointID cell in the desired project row. The Select dialog box appears.

— 24 —
7. Select one or more points and click OK. The point(s) you selected appear in the PointID field next to the appropriate project.
Note that if you leave the PointID cell blank, all points from that project are included.
8. Select the desired report in the object selector in the toolbar.
9. Generate your report, preview or exported graphic file as you normally would in
OUTPUT. The report will print data from all the points you selected in the various projects.
Customizing Reports for gINT Enterprise
gINT log report templates can be used as-is with gINT Enterprise. All other report templates (fences, graphs, tables, site maps, etc.) must be modified to include the project name/number so as to accommodate reporting data from multiple projects.

— 25 —
Fence diagram showing project numbers above borehole number
To learn more about modifying reports, see the Log Report Design and Fence Report Design, Surfaces and Modeling tutorials under Help > Manuals > gINT Tutorials.
Customizing Fence Reports
If your gINT fence reports include a borehole number with each fence graphic column, you can modify your report to also include the project number.
To add the project number to fence reports, do the following:
1. Open the report in REPORT DESIGN Fences.
2. Make a backup copy of the report (File Copy Page), adding the word “Enterprise” somewhere in the name to distinguish this version.
Your fence report will include a borehole number entity near the fence graphic column, as shown in the following example circled in red.

— 26 —
3. Double-click the borehole number entity. The Text Properties dialog box appears.
The Text Expression field property will display the table and field location for the borehole number, typically <<POINT.PointID>>.
4. Add the expression for the project number location. In the example below, “PROJECT” is the name of the Project table and “Number” is the name of the field that contains the project number.

— 27 —
5. You can also use gINT’s expression builder to select the table and field names from a list. To use the expression builder, click the browse button to the right of the text expression field.
6. Save the fence report.
The fencepost labels now display as follows:
Customizing Graph Reports
Many gINT graph reports, especially lab testing reports, have a graph in the upper half of the page and a legend/details table in the lower half. The symbols in the graph portion are typically unlabelled and do not need modification for gINT Enterprise reporting. However, the table in the lower portion typically has one specimen in each row, and each specimen is identified by borehole-depth combination. This needs to change to project-borehole-depth for gINT Enterprise graph reporting.
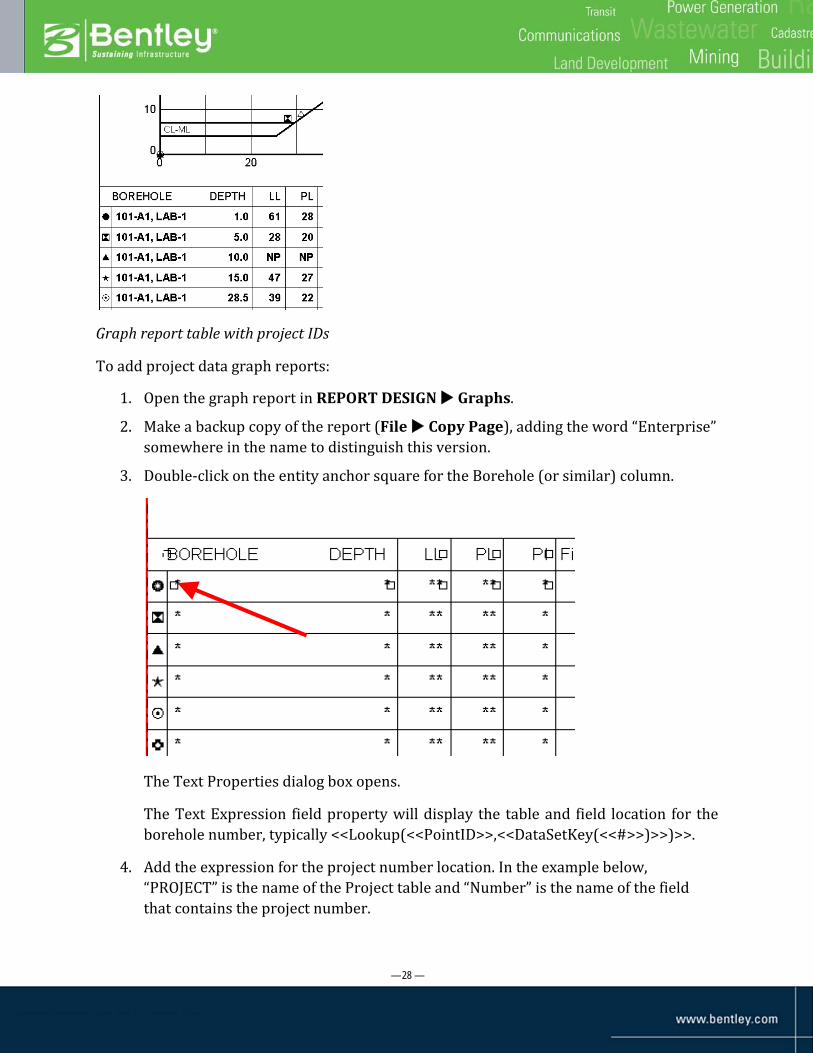
— 28 —
Graph report table with project IDs
To add project data graph reports:
1. Open the graph report in REPORT DESIGN Graphs.
2. Make a backup copy of the report (File Copy Page), adding the word “Enterprise” somewhere in the name to distinguish this version.
3. Double-click on the entity anchor square for the Borehole (or similar) column.
The Text Properties dialog box opens.
The Text Expression field property will display the table and field location for the borehole number, typically <<Lookup(<<PointID>>,<<DataSetKey(<<#>>)>>)>>.
4. Add the expression for the project number location. In the example below, “PROJECT” is the name of the Project table and “Number” is the name of the field that contains the project number.

— 29 —
Typically the second half of this expression (which contains the PointID) is already present, and you must only add the first half (which shows the project number).
5. Save the report.
When you use this report with projects from a gINT Enterprise database, the borehole number values are preceded by the project number value.
Customizing Site Map Reports
A typical gINT site map report contains borehole IDs above the point markers, as shown below. You can modify site map reports to include the project ID with the borehole ID.

— 30 —
To add the project ID to points on a site map:
1. Go to REPORT DESIGN Site Maps. Select the desired site map report, and make a copy with “Enterprise” indicated in the report name.
2. Click the Properties icon in the toolbar.
3. In the Data Representation tab, uncheck the Plot IDs checkbox. This removes the existing borehole ID from the report.
4. In the Data Posting tab, click the Browse icon to the right of the Data Posting field. The Data Posting dialog box opens.
5. In the rows of this dialog box specify where you want the point ID and project number fields placed relative to the marker symbol. For example, in the following example the point ID will be centered just above the marker, and the project number just beneath it.
ο In the Data to Post column, use the Data Tool to select and paste the POINT and PROJECT numbers on separate rows.
ο In the Post Position column for each row, select the direction where the posted item will be placed relative to the marker symbol.
ο In the Horz Aln and Vert Aln column, specify where the alignment point will be on your posted field. For example, for the borehole number (PointID) value in the example, we are posting the data at 12 o’clock (directly above the marker), with the alignment point of the borehole number at its middle horizontally and its bottom vertically.
6. Click OK to save your data posting settings then OK to save your report properties.

— 31 —
7. Preview the report in OUTPUT.
Notice that both point ID’s and project ID’s appear with each symbol.

— 32 —
Exporting Data from gINT Enterprise
You can export data from two main places within gINT Enterprise: from INPUT using the File > Export to File commands, and from OUTPUT, using the Data Export tab.
Although the export formats available in both places are the same, using the Data Export tab in OUTPUT allows you additional selection and filtering capabilities.
Using the Data Export tab you can:
• Specify individual projects and points (boreholes)
• Select points using Site Layout
• Filter points to only include those that meet criteria you specify
• Filter points by zones that you specify
• Create scripts to automate common export processes
For more information on how to use these and other OUTPUT features see the gINT tutorial Advanced Output Options and Site Maps under Help > Manuals > gINT Tutorials.