Embed Size (px)
Citation preview
FOR FACULTY:
What are QUIZZES?
The Quizzes tool enables you to create and manage assessments of students' learning. You
can create questions in your course's Question Library, choose which questions are included in
a particular quiz, and set up grading options.
NOTE: The tabs in the Quiz tool in version 10.3 have changed somewhat. View the details below.
This page includes information on:
Creating Sections and Questions in the Question Library
Creating a Quiz
Importing Questions
Submission View Settings (student view of completed quizzes)
Previewing Quizzes
Deterring Students from Cheating
Viewing Completed Quiz Attempts
Submitting Attempts on Behalf of Students
Manual Quiz Question Grading
Quiz Question Re-Grading
Creating Sections and Questions
Quiz questions should be created in the Question Library in folders called sections. From there,
they can easily be imported into D2L quizzes. The advantage of using the Question Library is
that the same questions can be used in multiple quizzes and imported into quizzes containing
random sections. Sections allow instructors to organize questions in the Question Library. You
can create sections or folders relating to specific topic areas, by quiz or exam, or organized by
the type of question.
D2L: An introduction to QUIZZES University of Wisconsin-Parkside
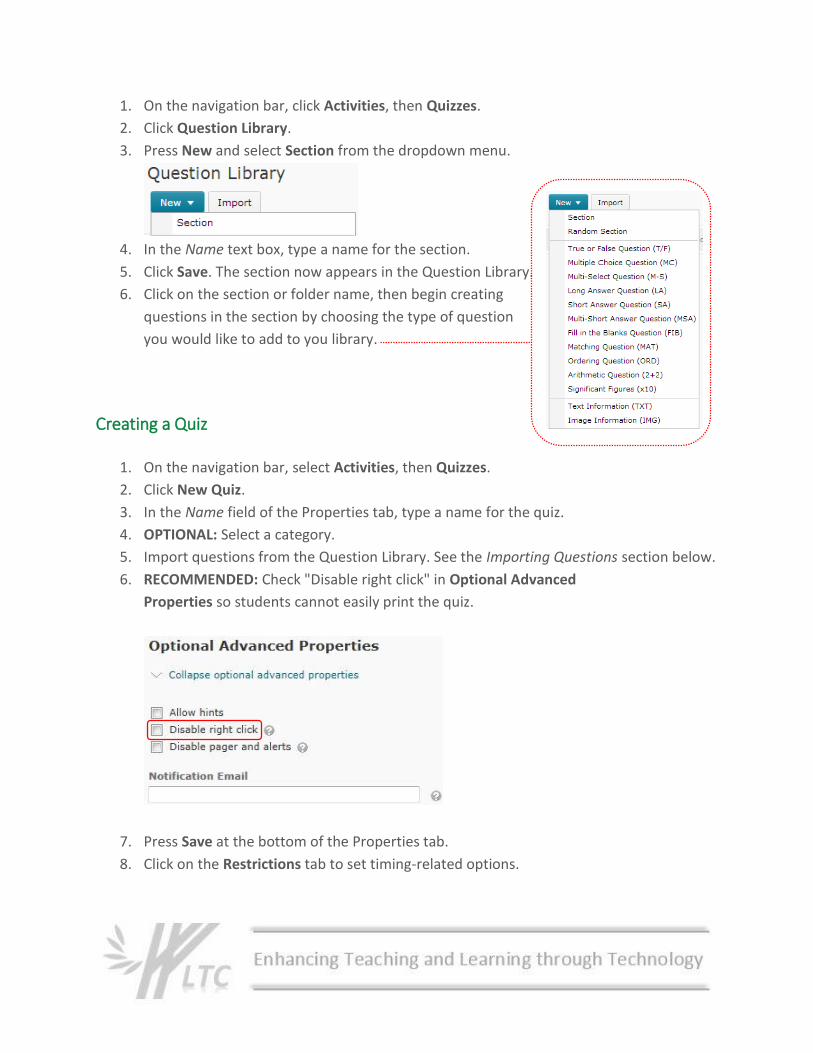
1. On the navigation bar, click Activities, then Quizzes.
2. Click Question Library.
3. Press New and select Section from the dropdown menu.
4. In the Name text box, type a name for the section.
5. Click Save. The section now appears in the Question Library.
6. Click on the section or folder name, then begin creating
questions in the section by choosing the type of question
you would like to add to you library.
Creating a Quiz
1. On the navigation bar, select Activities, then Quizzes.
2. Click New Quiz.
3. In the Name field of the Properties tab, type a name for the quiz.
4. OPTIONAL: Select a category.
5. Import questions from the Question Library. See the Importing Questions section below.
6. RECOMMENDED: Check "Disable right click" in Optional Advanced
Properties so students cannot easily print the quiz.
7. Press Save at the bottom of the Properties tab.
8. Click on the Restrictions tab to set timing-related options.
9. Activate the quiz by choosing Active in the Status (Restrictions Tab) pulldown menu.
Student cannot see inactive quizzes.
10. Click the Has Start Date and Has End Date checkboxes to add start and end dates to
your quiz. Use the pull-down menu to adjust the dates and times. This sets the quiz
window, the period of time which the student has to access the quiz.
11. In the Timing section, limit the amount of time students have to take the quiz:
In the Time Limit text box, enter the number of minutes allowed for the quiz.
RECOMMENDED: Allow normal submission for late submissions.
Also, click the checkboxes in front of enforced and show clock.
12. When you've finished making changes, click Save.
13. Click on the Assessment tab.
14. RECOMMENDED: Link to a grade item on the Assessment tab:
Select one from the Grade Item pull-down menu
OR
Create one by clicking [add grade item]
Fill out the dialog box as appropriate
15. RECOMMENDED: If you want the quiz to be automatically graded and scores sent to
the Grades tool, select Automatic Grade and Auto Export to Grades (Assessment Tab).
16. Set the number of times students can take a quiz in the Attempts Allowed dropdown
menu. The default number of quiz attempts is 1.
17. Press Save.
18. OPTIONAL: To make quiz results available to students, access the Submission Views tab.
Refer to the steps in the Submission View Settings section below.
RANDOM QUIZZING: To make a random quiz, you must
first create a ‘random section’ in the quiz. That is a folder
of the questions to be randomized in the quiz. That way,
some questions may be random (those in that folder) and others not or, if you put all the quiz
questions in that folder, the entire quiz will be random. To be random, the questions must be in
a random section folder.
Importing Questions
You can import questions in to a quiz from the question library.
1. To import questions into your quiz, click on the name of the desired quiz in the Quizzes
tool.
2. On the Properties tab, scroll down to the Quiz Questions
section; press the button labeled Add/Edit Questions.
3. Press the Import button.
4. From Source Collection, select Question Library
5. Select the Source Section that contains the quiz questions to be imported.
6. A list of questions will appear.
7. Check the checkboxes in front of the questions to be imported into this quiz.
8. Press Save. Your questions are now imported in to the quiz. Press Done Editing
Questions.
Submission Views Settings
Using Submission Views, you can set options for displaying to students results of graded quiz
attempts. Students only see their own quiz results. Those students who do not take the quiz will
not have access to the answer views.
1. In the Quizzes tool, click on the name of the desired quiz.
2. On the page that appears, go to the Submission Views tab.
3. The Default view appears. This view opens to students immediately after submitting the
quiz. The default settings allow students to see their own grade on the quiz.
4. To edit the default view, click the linked Default View text. -OR-
To create a new view, click Add Additional View.
NOTE: By default, all D2L quizzes are set up to only display student overall grades on the quiz
immediately after submission.
NOTE: The starting availability of the default quiz submission view begins at the time of the
student's submission.
NEW: When creating an additional view, you may now limit the amount of time students have to
view their answers with the Limited Duration option.
5. RECOMMENDED:
You may choose to show all the questions on the quiz, just the questions answered
incorrectly, or those answered correctly.
You may also allow students to view their own responses to the questions you
display, i.e., Show all questions with user responses.
In addition, you can allow students to see the correct answers for each question you
display, i.e., Show question answers.
You may display the points earned on each quiz question as well as the total points
for each question, i.e., Show question score and out of score.
In the Score section, select Show attempt score and overall attempt score
to each student their total earned points on this quiz.
NOTE: When students view their graded submissions, they will also have the option to View
Feedback for questions in which comments were created.
6. Once you have chosen the desired settings, click Save.
Previewing Quizzes
Once you create your quiz or exam, it is very important to preview it multiple times to review it
from the student perspective. Previewing can help you locate spelling, grammar, and
formatting errors, missed images or instructions, and other errors. Resolving these issues
before students begin taking the quiz or exam means a better experience for students.
To previous a quiz/exam:
1. Click on Activities, then Quizzes on the navigation bar in your D2L course.
2. Find your quiz in the list and click on the arrow to the right of the quiz title.
3. Choose Preview from the dropdown menu.
4. Read the instructions and press Start Quiz! at the bottom of the page.
5. Press OK to confirm.
6. The quiz questions display in preview mode just as students will see them. You may
answer questions, save your answers, then submit your quiz.
NOTE: No scores are recorded for quiz previews.
Deterring Students from Cheating
Consider asking open-ended questions or assigning papers and projects rather than
using multiple-choice exams as your major assessments. Multiple assessments and
different assessment types also deter cheating. Contact [email protected] to discuss
additional strategies.
Viewing Completed Quiz Attempts
1. In the quiz list, click the black arrow to the right of the desired quiz name, and select
Grade from the dropdown menu.
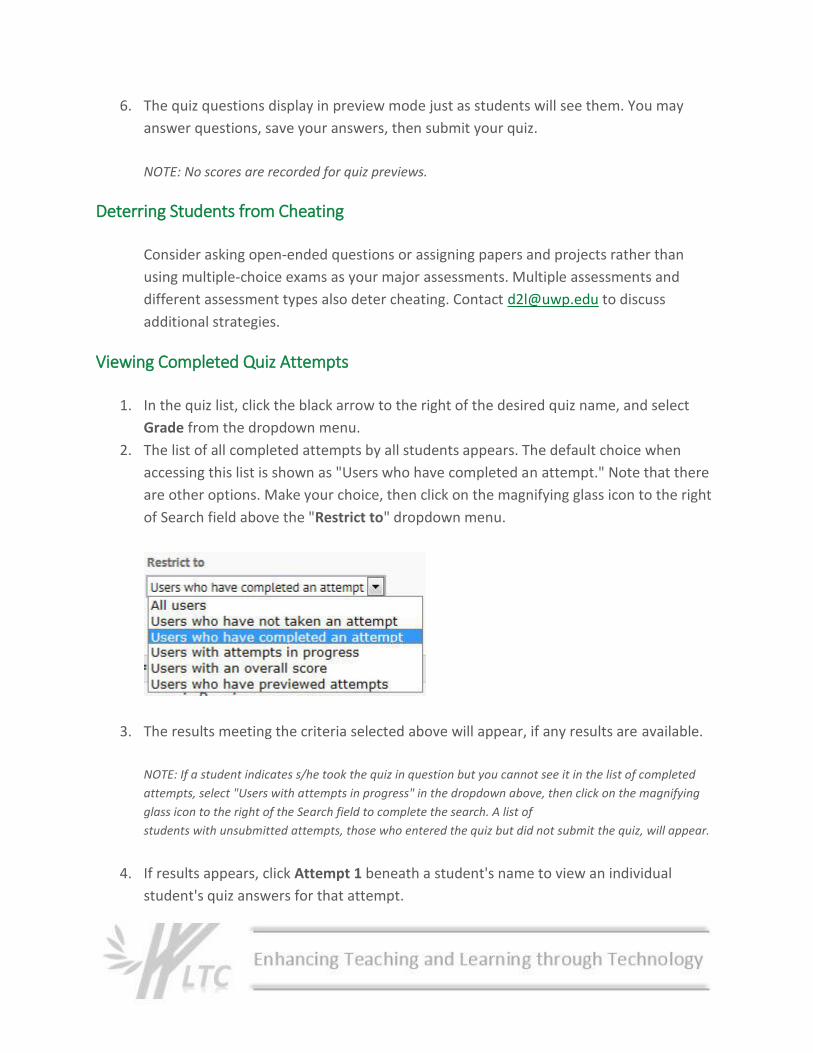
2. The list of all completed attempts by all students appears. The default choice when
accessing this list is shown as "Users who have completed an attempt." Note that there
are other options. Make your choice, then click on the magnifying glass icon to the right
of Search field above the "Restrict to" dropdown menu.
3. The results meeting the criteria selected above will appear, if any results are available.
NOTE: If a student indicates s/he took the quiz in question but you cannot see it in the list of completed
attempts, select "Users with attempts in progress" in the dropdown above, then click on the magnifying
glass icon to the right of the Search field to complete the search. A list of
students with unsubmitted attempts, those who entered the quiz but did not submit the quiz, will appear.
4. If results appears, click Attempt 1 beneath a student's name to view an individual
student's quiz answers for that attempt.
5. OPTIONAL: After clicking on Attempt 1 link, you may access the Quizzes Event
Log (found in the section labeled Attempt 1) to view a timeline of that student's activity
in the quiz.
Submitting Attempts on Behalf of Students
Sometimes students complete a quiz but exit without submitting their attempt. It is
possible for instructors to view and submit those quiz attempts on behalf of the
student(s).
IMPORTANT NOTE: This must be done after the quiz period has ended, or it could interfere with
students currently taking the quiz.
1. From the Manage Quizzes area, click the black arrow to the right of the desired quiz,
and select Grade.
2. From the Restrict to dropdown menu, select Users with attempts in progress.
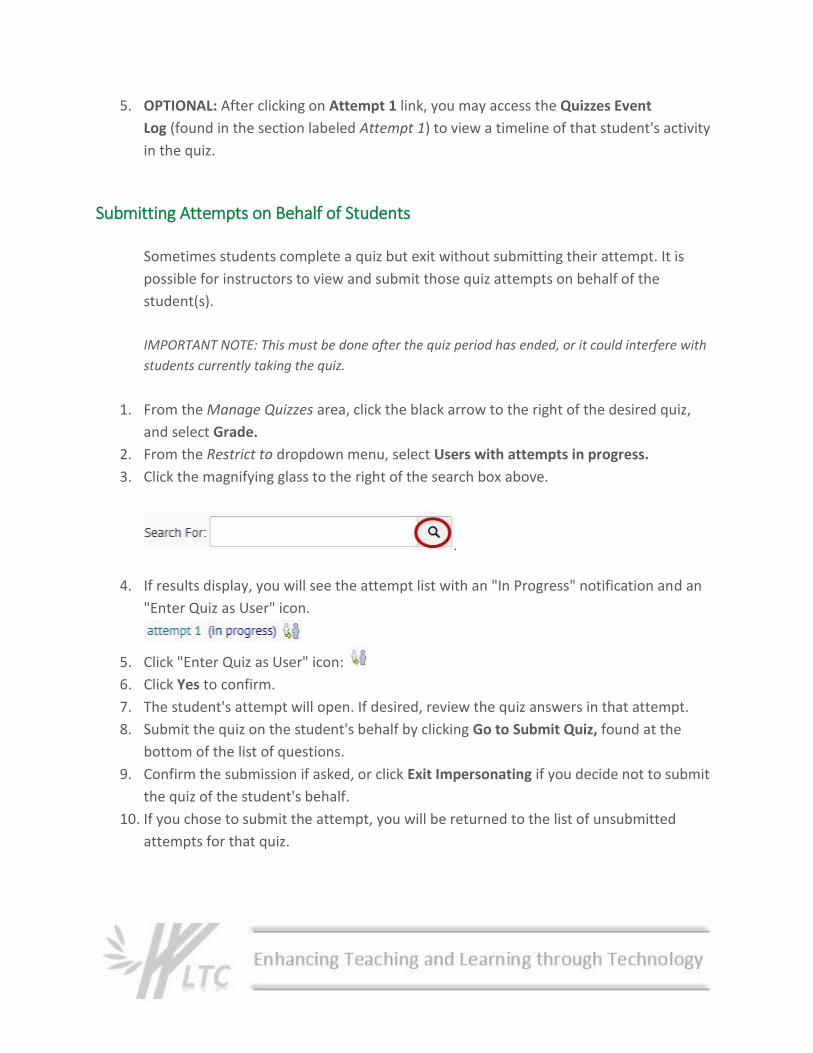
3. Click the magnifying glass to the right of the search box above.
4. If results display, you will see the attempt list with an "In Progress" notification and an
"Enter Quiz as User" icon.
5. Click "Enter Quiz as User" icon:
6. Click Yes to confirm.
7. The student's attempt will open. If desired, review the quiz answers in that attempt.
8. Submit the quiz on the student's behalf by clicking Go to Submit Quiz, found at the
bottom of the list of questions.
9. Confirm the submission if asked, or click Exit Impersonating if you decide not to submit
the quiz of the student's behalf.
10. If you chose to submit the attempt, you will be returned to the list of unsubmitted
attempts for that quiz.
Manual Quiz Question Grading
This section describes how to manually grade a quiz containing question types that are not
practical for D2L to automatically grade. This includes short answer or long answer essay
questions and, in some cases, fill-in-the-blank questions.
1. On the navigation bar, click Quizzes.
2. Click the black arrow to the right of the quiz your wish to grade, and select Grade from
the menu that appears.
3. On the screen that opens, you will see a list of all the users who have completed
attempts.
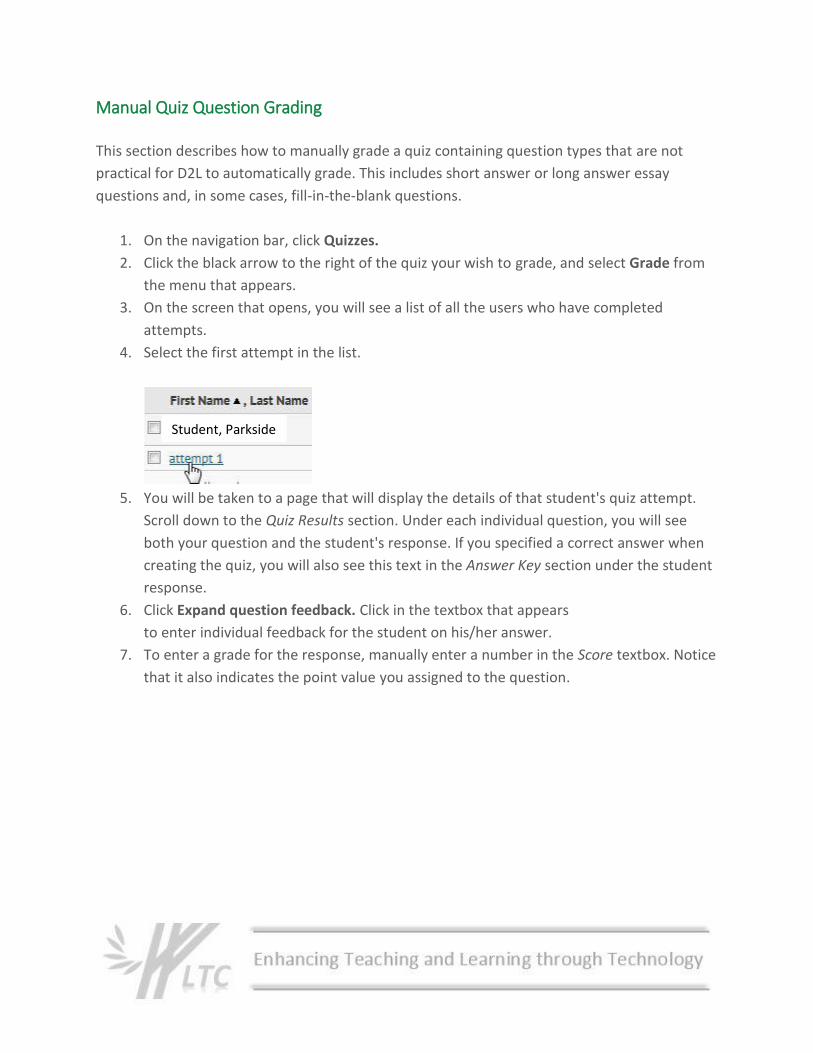
4. Select the first attempt in the list.
5. You will be taken to a page that will display the details of that student's quiz attempt.
Scroll down to the Quiz Results section. Under each individual question, you will see
both your question and the student's response. If you specified a correct answer when
creating the quiz, you will also see this text in the Answer Key section under the student
response.
6. Click Expand question feedback. Click in the textbox that appears
to enter individual feedback for the student on his/her answer.
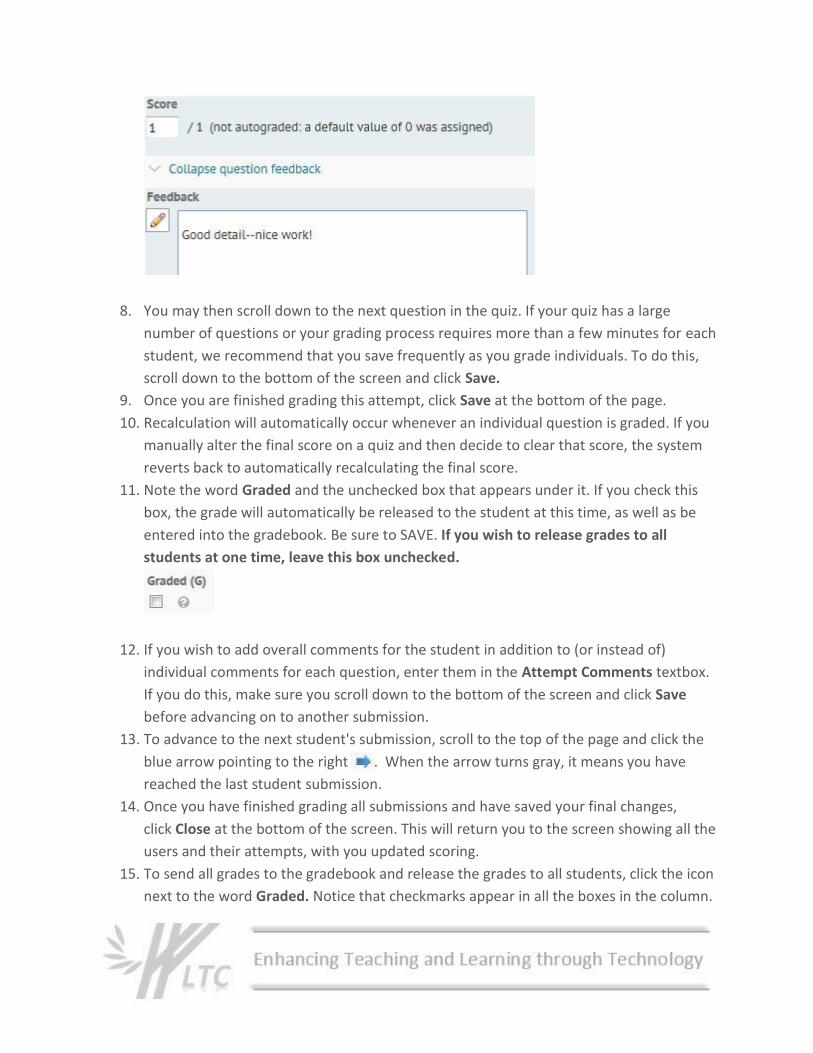
7. To enter a grade for the response, manually enter a number in the Score textbox. Notice
that it also indicates the point value you assigned to the question.
Student, Parkside
8. You may then scroll down to the next question in the quiz. If your quiz has a large
number of questions or your grading process requires more than a few minutes for each
student, we recommend that you save frequently as you grade individuals. To do this,
scroll down to the bottom of the screen and click Save.
9. Once you are finished grading this attempt, click Save at the bottom of the page.
10. Recalculation will automatically occur whenever an individual question is graded. If you
manually alter the final score on a quiz and then decide to clear that score, the system
reverts back to automatically recalculating the final score.
11. Note the word Graded and the unchecked box that appears under it. If you check this
box, the grade will automatically be released to the student at this time, as well as be
entered into the gradebook. Be sure to SAVE. If you wish to release grades to all
students at one time, leave this box unchecked.
12. If you wish to add overall comments for the student in addition to (or instead of)
individual comments for each question, enter them in the Attempt Comments textbox.
If you do this, make sure you scroll down to the bottom of the screen and click Save
before advancing on to another submission.
13. To advance to the next student's submission, scroll to the top of the page and click the
blue arrow pointing to the right . When the arrow turns gray, it means you have
reached the last student submission.
14. Once you have finished grading all submissions and have saved your final changes,
click Close at the bottom of the screen. This will return you to the screen showing all the
users and their attempts, with you updated scoring.
15. To send all grades to the gradebook and release the grades to all students, click the icon
next to the word Graded. Notice that checkmarks appear in all the boxes in the column.
16. Click Update.
Quiz Question Re-Grading
There may be a time when you wish to regrade a quiz after attempts have been made by
students. Perhaps a question was poorly worded, and you wish to make two answers possible.
Or, perhaps you accidentally marked the wrong answer as correct. In any case, it is possible to
automatically regrade quiz questions and award the proper points to the students.
NOTE: After your students take a quiz, it is advisable to review the quiz attempts to make sure they look
correct. If the majority of the class got one question wrong, it may indicate that the question was faulty
or unclear.
NOTE: Correcting your quiz question(s) in the Question Library and in the quiz is a separate step.
It is important to make the corrections so the questions are accurate when you copy the
components of your course to future terms.
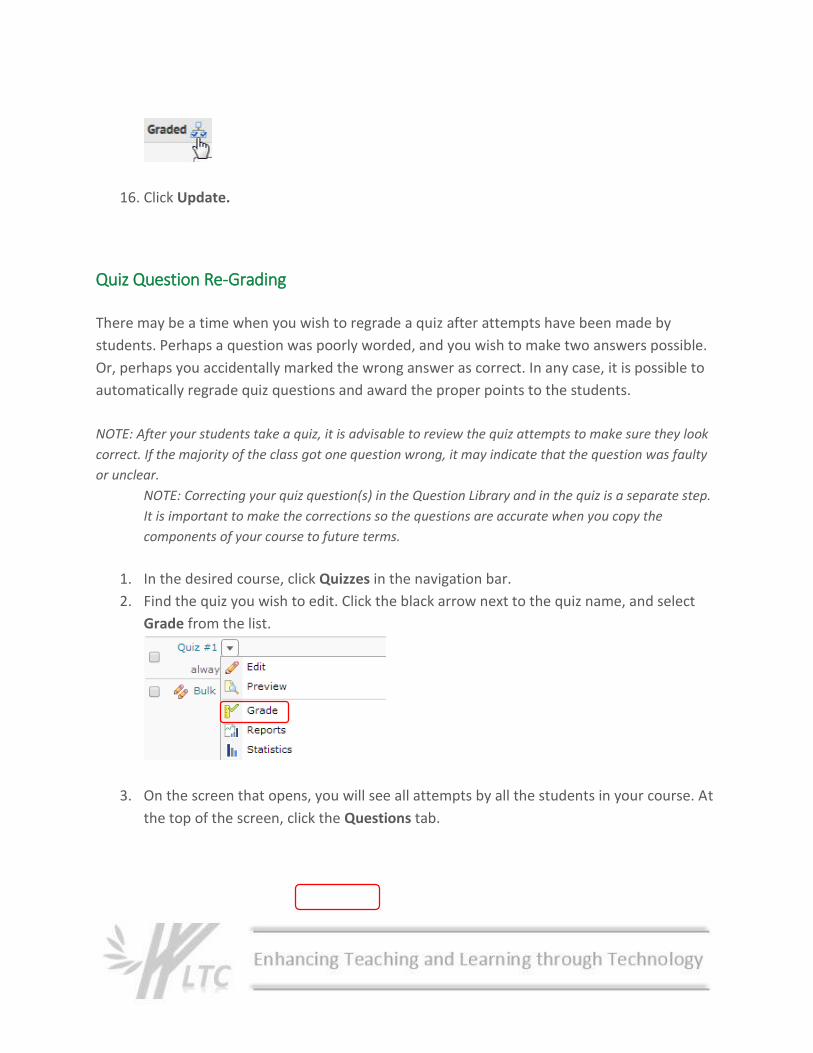
1. In the desired course, click Quizzes in the navigation bar.
2. Find the quiz you wish to edit. Click the black arrow next to the quiz name, and select
Grade from the list.
3. On the screen that opens, you will see all attempts by all the students in your course. At
the top of the screen, click the Questions tab.
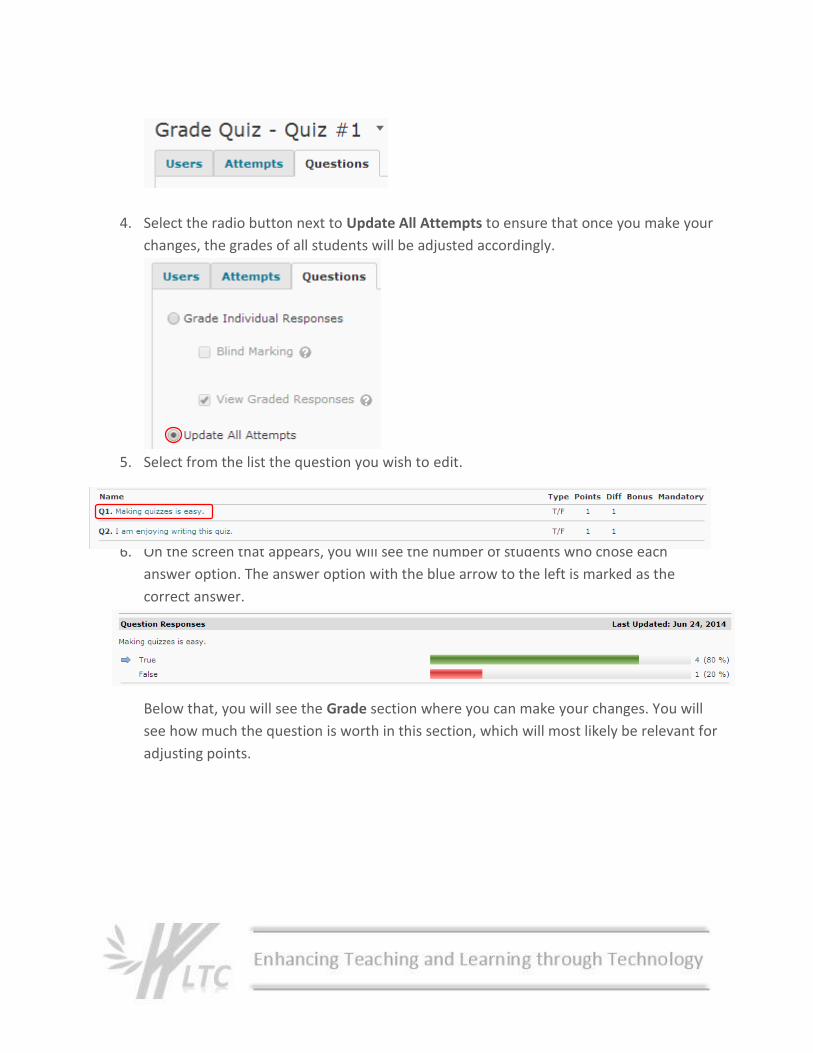
4. Select the radio button next to Update All Attempts to ensure that once you make your
changes, the grades of all students will be adjusted accordingly.
5. Select from the list the question you wish to edit.
6. On the screen that appears, you will see the number of students who chose each
answer option. The answer option with the blue arrow to the left is marked as the
correct answer.
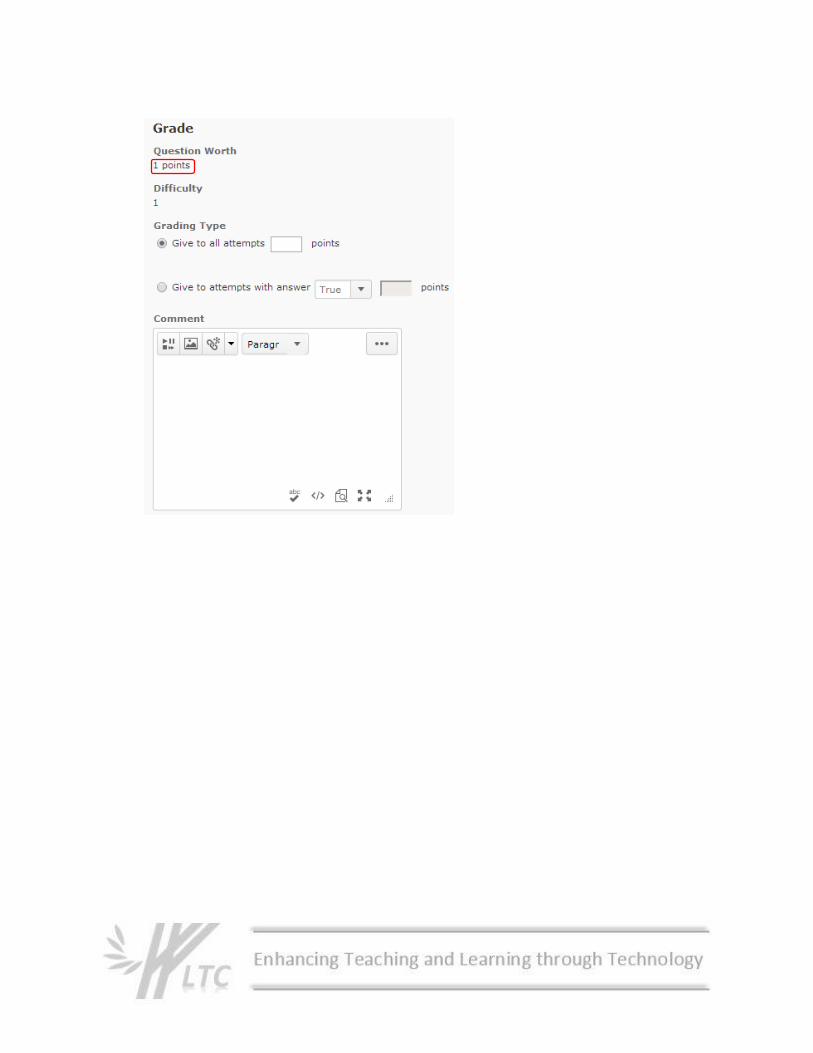
Below that, you will see the Grade section where you can make your changes. You will
see how much the question is worth in this section, which will most likely be relevant for
adjusting points.
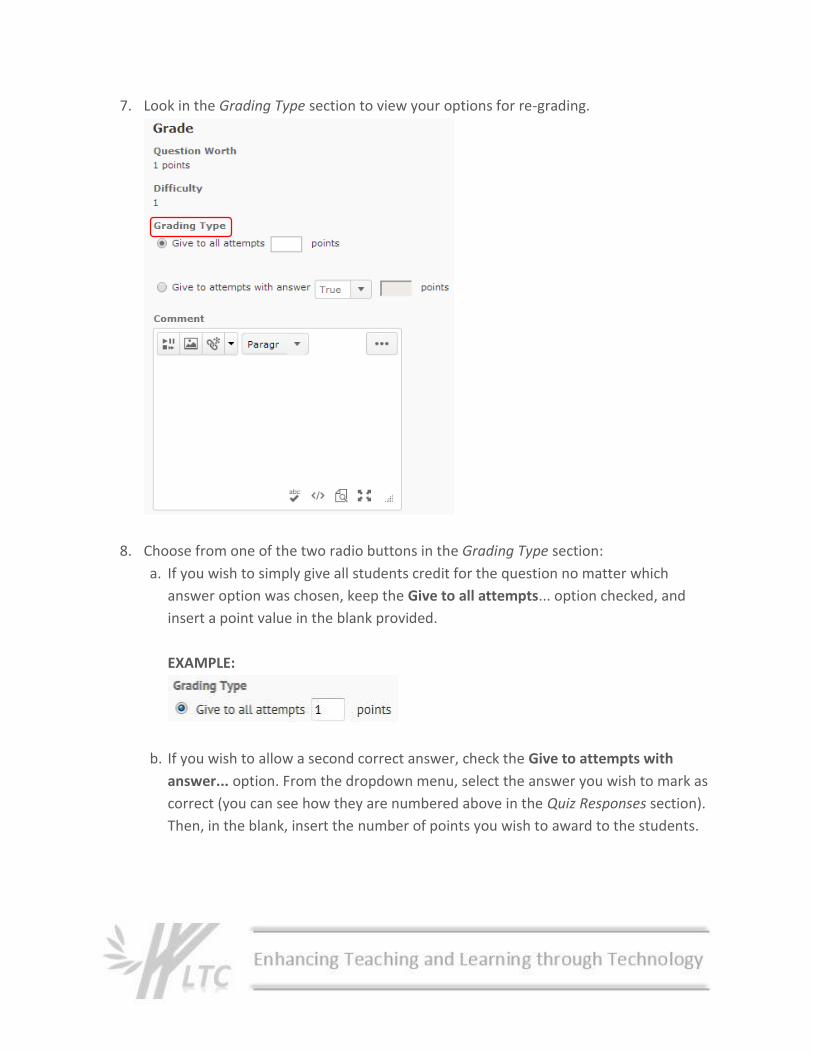
7. Look in the Grading Type section to view your options for re-grading.
8. Choose from one of the two radio buttons in the Grading Type section:
a. If you wish to simply give all students credit for the question no matter which
answer option was chosen, keep the Give to all attempts... option checked, and
insert a point value in the blank provided.
EXAMPLE:
b. If you wish to allow a second correct answer, check the Give to attempts with
answer... option. From the dropdown menu, select the answer you wish to mark as
correct (you can see how they are numbered above in the Quiz Responses section).
Then, in the blank, insert the number of points you wish to award to the students.
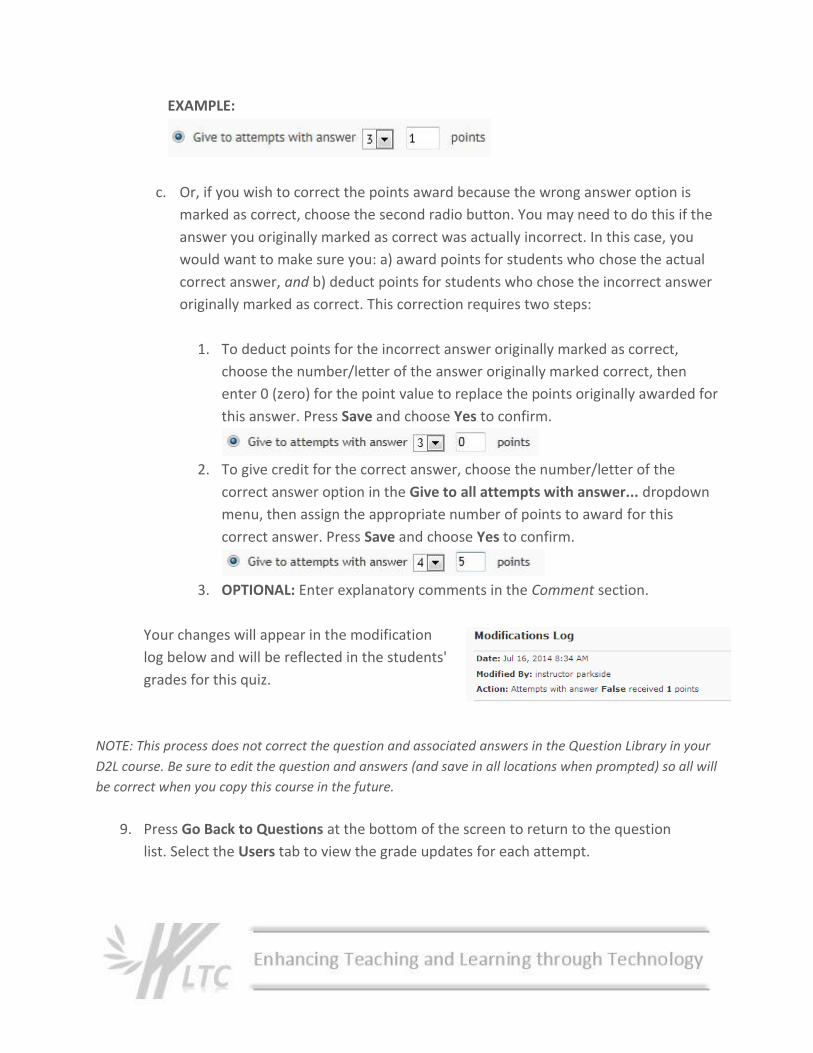
EXAMPLE:
c. Or, if you wish to correct the points award because the wrong answer option is
marked as correct, choose the second radio button. You may need to do this if the
answer you originally marked as correct was actually incorrect. In this case, you
would want to make sure you: a) award points for students who chose the actual
correct answer, and b) deduct points for students who chose the incorrect answer
originally marked as correct. This correction requires two steps:
1. To deduct points for the incorrect answer originally marked as correct,
choose the number/letter of the answer originally marked correct, then
enter 0 (zero) for the point value to replace the points originally awarded for
this answer. Press Save and choose Yes to confirm.
2. To give credit for the correct answer, choose the number/letter of the
correct answer option in the Give to all attempts with answer... dropdown
menu, then assign the appropriate number of points to award for this
correct answer. Press Save and choose Yes to confirm.
3. OPTIONAL: Enter explanatory comments in the Comment section.
Your changes will appear in the modification
log below and will be reflected in the students'
grades for this quiz.
NOTE: This process does not correct the question and associated answers in the Question Library in your
D2L course. Be sure to edit the question and answers (and save in all locations when prompted) so all will
be correct when you copy this course in the future.
9. Press Go Back to Questions at the bottom of the screen to return to the question
list. Select the Users tab to view the grade updates for each attempt.

![Instructors: Zoom D2L Access | D2L Help Pages · Instructors: Zoom D2L Access | D2L Help Pages 3/13/2020 8:08:16 AM] Policies D2L Login](https://img.pdfslide.us/doc/110x75/5fcef59c08bc6a035a7bbe1a/instructors-zoom-d2l-access-d2l-help-pages-instructors-zoom-d2l-access-d2l.jpg)