Embed Size (px)
Citation preview
IBM TRIRIGA AnywhereVersion 10 Release 4
Customizing mobile apps
���
NoteBefore using this information and the product it supports, read the information in “Notices” on page 21.
This edition applies to version 10, release 4, modification 0 of IBM TRIRIGA and to all subsequent releases andmodifications until otherwise indicated in new editions.
© Copyright IBM Corporation 2014.US Government Users Restricted Rights – Use, duplication or disclosure restricted by GSA ADP Schedule Contractwith IBM Corp.
Contents
Customizing IBM TRIRIGA Anywheremobile applications . . . . . . . . . . 1Getting started. . . . . . . . . . . . . . 1
Worklight Studio development environment . . . 1Setting up a build server . . . . . . . . . 1
Installing the Android development tools . . . 2Installing the iOS development tools . . . . 4
Installing an integrated development environment 5Deploying apps by using Worklight Studio . . . 6
Integrating IBM TRIRIGA Anywhere with IBMTRIRIGA Application Platform . . . . . . . . 7
OSLC resources . . . . . . . . . . . . 8Creating OSLC resources in IBM TRIRIGAApplication Platform . . . . . . . . . . 9Importing OSLC resources to IBM TRIRIGAAnywhere . . . . . . . . . . . . . . 10
Creating and modifying fields in mobile apps . . . 11
Changing field labels . . . . . . . . . . 11Rearranging fields in a mobile app . . . . . 11Adding fields to mobile apps . . . . . . . 12Adding values lists as lookups to fields . . . . 13
Organizing the layout of mobile screens . . . . . 15Layout template files . . . . . . . . . . 15Changing the layout of fields in list views . . . 16
Customizing javascript files for mobile apps . . . 18Creating conditional fields in apps. . . . . . 19Creating read-only conditional fields . . . . . 20
Notices . . . . . . . . . . . . . . 21Privacy Policy Considerations . . . . . . . . 22Trademarks . . . . . . . . . . . . . . 23
Index . . . . . . . . . . . . . . . 25
© Copyright IBM Corp. 2014 iii

iv Customizing mobile apps
Customizing IBM TRIRIGA Anywhere mobile applications
You can modify the user interface of IBM® TRIRIGA Anywhere mobile applicationsby editing the application definition file for the application in IBM Worklight®
Studio. You can then preview your changes before you deploy the updated app tothe IBM Worklight Server.
Getting startedBefore you modify the mobile apps, set up the development environment byinstalling the Worklight Studio on the build server.
Worklight Studio development environmentWorklight Studio is an Eclipse-based integrated development environment that youcan deploy with IBM TRIRIGA® Anywhere. You use Worklight Studio to configureand test the IBM TRIRIGA Anywhere apps and to manage the build anddeployment process.
You configure the mobile app by editing the application definition, the app.xml file,in the XML editor in Worklight Studio. By using the Design tab in the XML editor,you can easily find the elements in the file and change or add to the content.When you save your changes, the app is built automatically and you can test yourchanges. You can then deploy the updated apps to the server.
Before you deploy the mobile apps to the production environment, you canpreview and test all updates to mobile apps in the mobile browser simulator. Youmust select Google Chrome as your external web browser to preview in the mobilebrowser simulator.
To preview your changes, right-click on the application folder and select Run As >Preview.Related information:
Worklight Studio overview
Setting up a build serverA build server is the computer on which the IBM TRIRIGA Anywhere mobile appbuild and deployment process is run. If you are not installing an integrateddevelopment environment, the build and deployment process is run by usingcommands.
Before you begin
Ensure that IBM TRIRIGA Application Platform version 3.4.1 and IBM TRIRIGA10.4.0 are installed.
About this task
To build and deploy the apps to iOS mobile devices, your build server must be aMac OS X computer.
Restriction: Worklight Server is not supported on Mac OS X systems.
© Copyright IBM Corp. 2014 1
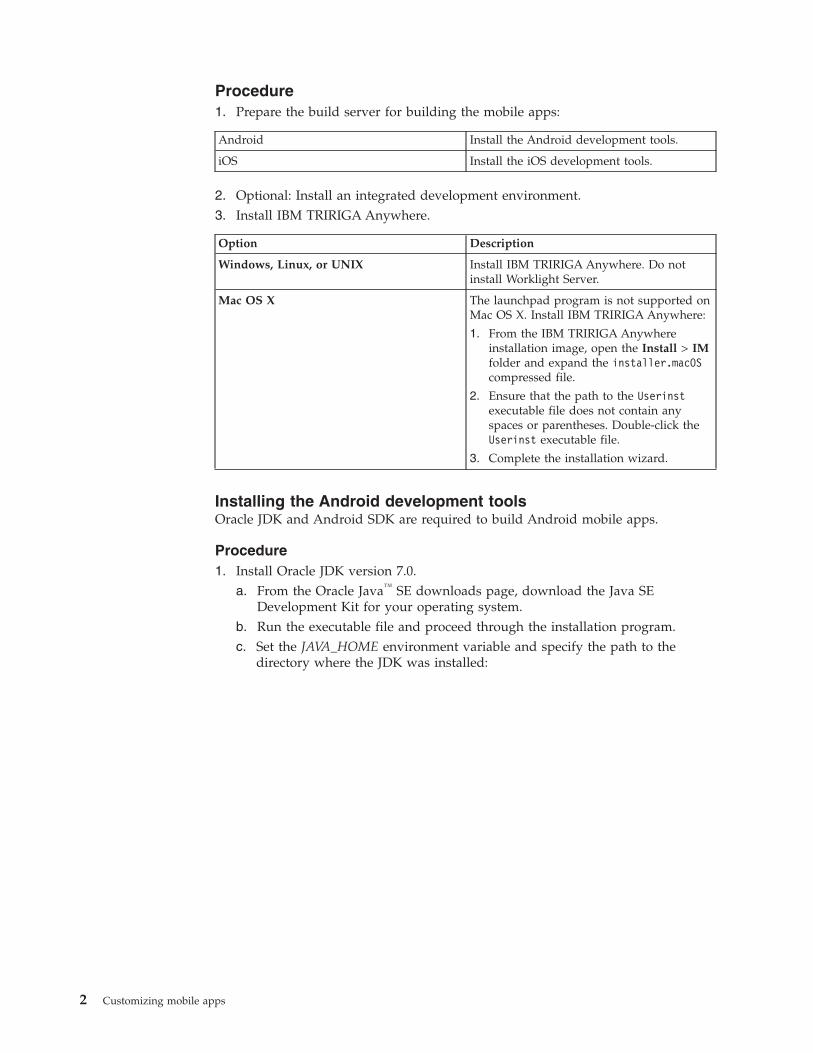
Procedure1. Prepare the build server for building the mobile apps:
Android Install the Android development tools.
iOS Install the iOS development tools.
2. Optional: Install an integrated development environment.3. Install IBM TRIRIGA Anywhere.
Option Description
Windows, Linux, or UNIX Install IBM TRIRIGA Anywhere. Do notinstall Worklight Server.
Mac OS X The launchpad program is not supported onMac OS X. Install IBM TRIRIGA Anywhere:
1. From the IBM TRIRIGA Anywhereinstallation image, open the Install > IMfolder and expand the installer.macOScompressed file.
2. Ensure that the path to the Userinstexecutable file does not contain anyspaces or parentheses. Double-click theUserinst executable file.
3. Complete the installation wizard.
Installing the Android development toolsOracle JDK and Android SDK are required to build Android mobile apps.
Procedure1. Install Oracle JDK version 7.0.
a. From the Oracle Java™ SE downloads page, download the Java SEDevelopment Kit for your operating system.
b. Run the executable file and proceed through the installation program.c. Set the JAVA_HOME environment variable and specify the path to the
directory where the JDK was installed:
2 Customizing mobile apps
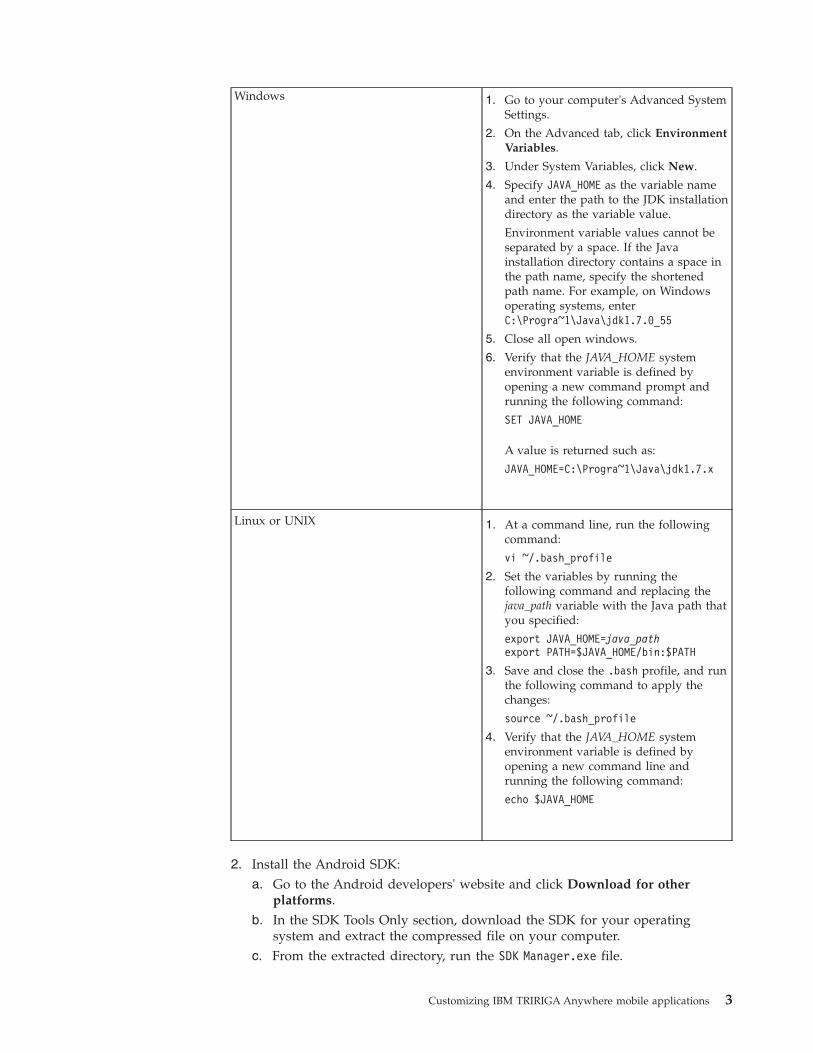
Windows 1. Go to your computer's Advanced SystemSettings.
2. On the Advanced tab, click EnvironmentVariables.
3. Under System Variables, click New.
4. Specify JAVA_HOME as the variable nameand enter the path to the JDK installationdirectory as the variable value.
Environment variable values cannot beseparated by a space. If the Javainstallation directory contains a space inthe path name, specify the shortenedpath name. For example, on Windowsoperating systems, enterC:\Progra~1\Java\jdk1.7.0_55
5. Close all open windows.
6. Verify that the JAVA_HOME systemenvironment variable is defined byopening a new command prompt andrunning the following command:
SET JAVA_HOME
A value is returned such as:
JAVA_HOME=C:\Progra~1\Java\jdk1.7.x
Linux or UNIX 1. At a command line, run the followingcommand:
vi ~/.bash_profile
2. Set the variables by running thefollowing command and replacing thejava_path variable with the Java path thatyou specified:
export JAVA_HOME=java_pathexport PATH=$JAVA_HOME/bin:$PATH
3. Save and close the .bash profile, and runthe following command to apply thechanges:
source ~/.bash_profile
4. Verify that the JAVA_HOME systemenvironment variable is defined byopening a new command line andrunning the following command:
echo $JAVA_HOME
2. Install the Android SDK:a. Go to the Android developers' website and click Download for other
platforms.b. In the SDK Tools Only section, download the SDK for your operating
system and extract the compressed file on your computer.c. From the extracted directory, run the SDK Manager.exe file.
Customizing IBM TRIRIGA Anywhere mobile applications 3
d. Under Tools, select Android SDK Tools Revision 22 or later and the latestAndroid SDK build tools. Also select an Android package with an API of 18or 19 and click Install Packages.
3. Optional: Install an integrated development environment.4. If you installed Eclipse in step 3, install the Android Development Tools (ADT)
plug-in:a. In Eclipse, select Help > Install New Software > Add.b. In the Add Repository window, specify the following URL in the Location
field: https://dl-ssl.google.com/android/eclipse/.c. In the Name field, specify Android Development Tools and click OK.d. On the Available Software pane, click Select All > Next > Next > Finish.e. Restart Eclipse and specify a workspace directory.f. Open the Eclipse Preferences window and specify the Android SDK path.
Click Apply > OK to apply the changes.g. On the Welcome to Android Development pane, select Use existing SDKs
and browse to the SDK directory. Click OK > Next > Finish.
Installing the iOS development toolsFor iOS app development, you use your Apple ID to enroll in a developerprogram.
About this task
You can enroll in the iOS Developer Program as an individual or a company wherean individual is considered a one-person team.
You can also enroll in the iOS Developer Enterprise Program as a company, whichauthorizes you to create proprietary in-house iOS apps. The procedure for settingup the iOS Developer Enterprise account might include extra steps. For moreinformation, see the installation release notes.
The person who creates the team becomes the team agent; the legal contact andadministrator of the team who has all privileges and full access to Member Centerand iTunes Connect. The team agent is required to complete steps 6-8. iOSdevelopers might require the assistance of the team agent to complete theprocedure.
Procedure1. Create an Apple ID by registering as an Apple developer in the Apple
Registration Center.2. Download and install Xcode IDE, including the iOS SDK and Simulator, from
the Mac App Store.3. Add your Apple ID to Xcode.4. In Xcode, create a Developer Certificate.5. Download the Developer Certificate and add it to the Keychain application.6. Register the App IDs.
The bundle ID for WorkTaskManagement is com.WorkTaskManagement.7. Register the Device IDs in Member Center. You can locate the unique device
identifier (UDID) by connecting your device to the Mac OS X computer whileXcode or iTunes are running.
8. Create the provisioning profiles for each app using Member Center. Theprovisioning profiles for the apps must contain the IDs of the devices on which
4 Customizing mobile apps
the app is installed. You can register more iOS devices and add them to theprovisioning profiles. You must download the provisioning profile to the buildserver every time the profile is updated.
9. As the developer, generate the provisioning profiles and then download theprofiles to your Mac OS X computer. Open each provisioning profile in XCode.The provisioning profiles are added to the system library at the followinglocation: ~/Library/MobileDevice/Provisioning Profiles". When you run theapp build and deployment process, the provisioning profiles are collected andstored in the iOS application archive file (IPA).
Installing an integrated development environmentTo create a development environment, install a set of development tools on thebuild server. You can use an integrated development environment to test andconfigure mobile apps before you deploy them to mobile devices.
Before you beginv Set up a build server for your build environment.v Install the development tools for the Android or iOS mobile platform. A
provisioning profile is required to install IBM TRIRIGA Anywhere on Mac OS Xcomputers.
v To preview the apps in the Worklight Studio mobile browser simulator, installGoogle Chrome.
About this task
Worklight Studio is an Eclipse-based development environment that can be used toconfigure the IBM TRIRIGA Anywhere apps. You install Worklight Studio from theEclipse integrated development environment (IDE) workbench. A set of platformdevelopment tools are also required to build and deploy the mobile apps.
You can use the mobile browser simulator, the Android Emulator, or the iOSSimulator to view and test the mobile apps.
You can customize the mobile apps when they are deployed. For more information,see Configuring IBM TRIRIGA Anywhere mobile apps.
Procedure1. Install Eclipse IDE:
a. Go to www.eclipse.org/downloads/packages/eclipse-ide-java-ee-developers/keplersr1 and download Eclipse IDE for Java EE Developersversion 4.3.2 (Kepler) for your operating system.
b. Extract the compressed folder and run the Eclipse application to install thesoftware.
2. Set up your Eclipse development environment:a. Check whether the Eclipse JSDT plug-in is installed. The JavaScript
Development Tool (JSDT) plug-in helps you navigate through the JavaScript code in Eclipse.1) Select Help > About Eclipse and click Eclipse Web Tools Platform
(WTP)
2) Browse for Eclipse JavaScript Development Tools in the About EclipseFeatures window.
Customizing IBM TRIRIGA Anywhere mobile applications 5
b. If the JavaScript Development Tools plug-in is not already installed,complete the following steps:1) Select Help > Install New Software > Add.2) In the Add Repository window, specify the following URL in the
Location field: http://download.eclipse.org/webtools/repository/kepler.
3) In the Name field, specify Eclipse WTP.4) Select Web Tools Platform (WTP) 3.5.1 (or later) > JavaScript
Development Tools and install the plug-in.c. Set Google Chrome as the default web browser by selecting Window >
Preferences > General > Web Browser > Use external web browser. Selectthe Chrome check box and click OK to apply your changes.
3. Install Worklight Studio Consumer Edition:a. In Eclipse, select Help > Install New Software > Add.b. In the Add Repository window, click Archive.c. Browse to the location of the WorklightStudio.6.1.0.1.zip file in the IBM
TRIRIGA Anywhere installation image and click Open > OK.d. On the Available Software pane, select IBM Worklight Studio Development
Tools and click Next > Next > Finish.e. Restart Eclipse to apply the changes.
4. Import the TRIRIGAAnywhere project into Worklight Studio.a. In Eclipse, click File > Import > General, select Existing Projects into
Workspace and click Next.b. Click Select root directory and specify the path to \ibm\TRIRIGAAnywhere.c. Select the TRIRIGAAnywhere project and click Copy projects into workspace.
Click Finish.d. In the Project Explorer pane, expand all nodes. Right-click the
OSLCGenericAdapter folder and select Run As > Deploy Worklight Adapter.e. Right-click the application folder and click Run As > Run on Worklight
Development Server.f. To preview the app, right-click the application folder and click Run As >
Preview.
What to do next
Deploy a mobile app from the development environment to a test or productionenvironment.
Deploying apps by using Worklight StudioWorklight Studio includes an embedded instance of Worklight Server, which meansthat you do not need to deploy the WAR file. Worklight Studio also includes theMobile Browser Simulator for testing your apps.
Before you beginv If you plan to preview the deployed apps in the Mobile Browser Simulator,
Google Chrome must be installed in the development environment. The previewfunction for deployed apps does not support other web browsers.
Procedure1. In Worklight Studio, import the IBM TRIRIGA Anywhere project.
6 Customizing mobile apps
a. Right-click inside the Project Explorer, and select Import. From the Importwindow, select Existing Projects into Workspace and click Next.
b. Browse to the tririgaanywhere_home folder, select the TRIRIGAAnywherefolder, select Copy projects into workspace, and click Finish.
2. Set the Ant file path.a. From the Window menu, select Preferences. Expand Ant and then select
Runtime.b. Select Ant Home Entry and click Ant Home.c. In the Browse for Folder window, expand tririgaanywhere_home >
AnywhereWorkTaskManagement > build > tools > ant and click OK.3. Add the build.xml file to the Ant view. Select the build.xml file from
AnywhereWorkTaskManagement and drag the build.xml file to the Ant view.4. From the Project Explorer, deploy the adapter.
a. Select AnywhereWorkTaskManagement > Adapters and right-clickOSLCGenericAdapter.
b. Select Run As > Deploy Worklight Adapter.5. Build and deploy the IBM TRIRIGA Anywhere Work Task Management app.
a. Under AnywhereWorkTaskManagement > apps, right-clickWorkTaskManagement.
b. Select Run As > Run on Worklight Development Server.6. Verify the application deployment in Worklight Console by right-clicking the
app and selecting Run As > Preview.7. Test your app on your mobile device, Android emulator, or iOS Simulator. To
test the app on the Android emulator, you must first set up the emulator. Totest the app on a mobile device, connect that device to your computer.
Device type Steps
Android 1. In the Project Explorer, select theAndroid project that is under the appthat you are testing and select Run as >Android Application.
2. Select Launch a new Android VirtualDevice for the Android emulator orLaunch a new Android Device for anAndroid mobile device. The .apk artifactfile is generated in the bin folder.
iOS 1. Under AnywhereWorkTaskManagement> apps > app_name > iphone, select Runas > Xcode project.
2. From the Xcode window, choose thesimulated device or mobile device onwhich you want to test the app, andclick the Play icon. The .ipa artifact fileis generated in the bin folder.
Integrating IBM TRIRIGA Anywhere with IBM TRIRIGA ApplicationPlatform
IBM TRIRIGA Anywhere integrates with IBM TRIRIGA Application Platformapplications by using Open Services for Lifecycle Collaboration (OSLC).
Customizing IBM TRIRIGA Anywhere mobile applications 7
OSLC resourcesIBM TRIRIGA Anywhere provides OSLC resources that define the metadata forbusiness objects of OSLC service providers. The OSLC resources are used by themobile app to retrieve and process application data from the service providers inIBM TRIRIGA Application Platform.
The resource metadata includes Resource Description Framework (RDF) formatfiles that are defined for each business object in the integration between IBMTRIRIGA Anywhere and IBM TRIRIGA Application Platform. The resource RDFfiles for IBM TRIRIGA Anywhere are in the TRIRIGAAnywhere\oslc-doc\resources\rdf\oslc directory.
The OSLC resources that IBM TRIRIGA Anywhere provides includes predefinedqueries, service providers, and RDF files. You can also define additional resourcedata in IBM TRIRIGA Application Platform for new resources that you want to usein the mobile app.
After you define the resource data, you must import the RDF files to IBMTRIRIGA Anywhere so that the data can be used by the mobile app. Youimplement the resources in the mobile app by updating the application definitionfile and deploying a new application version.
Typically, you use the OSLC resources in the following scenarios.
Adding fields from IBM TRIRIGA Anywhere resourcesIf the query and RDF file exist in IBM TRIRIGA Anywhere but are notincluded in the app, you update the app.xml file.
Adding new fields from IBM TRIRIGA Application Platform to IBM TRIRIGAAnywhere
When you create a query in IBM TRIRIGA Application Platform for a newfield, add the field to the query. To use the new field in IBM TRIRIGAAnywhere, you must import the RDF file from IBM TRIRIGA ApplicationPlatform to IBM TRIRIGA Anywhere and then update the app.xml file.
Adding a child objectYou can add a child object in IBM TRIRIGA Application Platform bycreating a query for it. In IBM TRIRIGA Application Platform, you createthe child resource by importing the query. Then you can create a linkedresource from the child resource and associate it with the main resource. Touse the child object in IBM TRIRIGA Anywhere, you must import the RDFfile from IBM TRIRIGA Application Platform to IBM TRIRIGA Anywhereand then update the app.xml file.
Creating a query for an existing objectYou can create query for an existing object, such as a list, in IBM TRIRIGAApplication Platform. In IBM TRIRIGA Application Platform, you createthe query and update the resource with the query. To use the list in IBMTRIRIGA Anywhere, you must import the RDF file from IBM TRIRIGAApplication Platform to IBM TRIRIGA Anywhere and then update theapp.xml file.
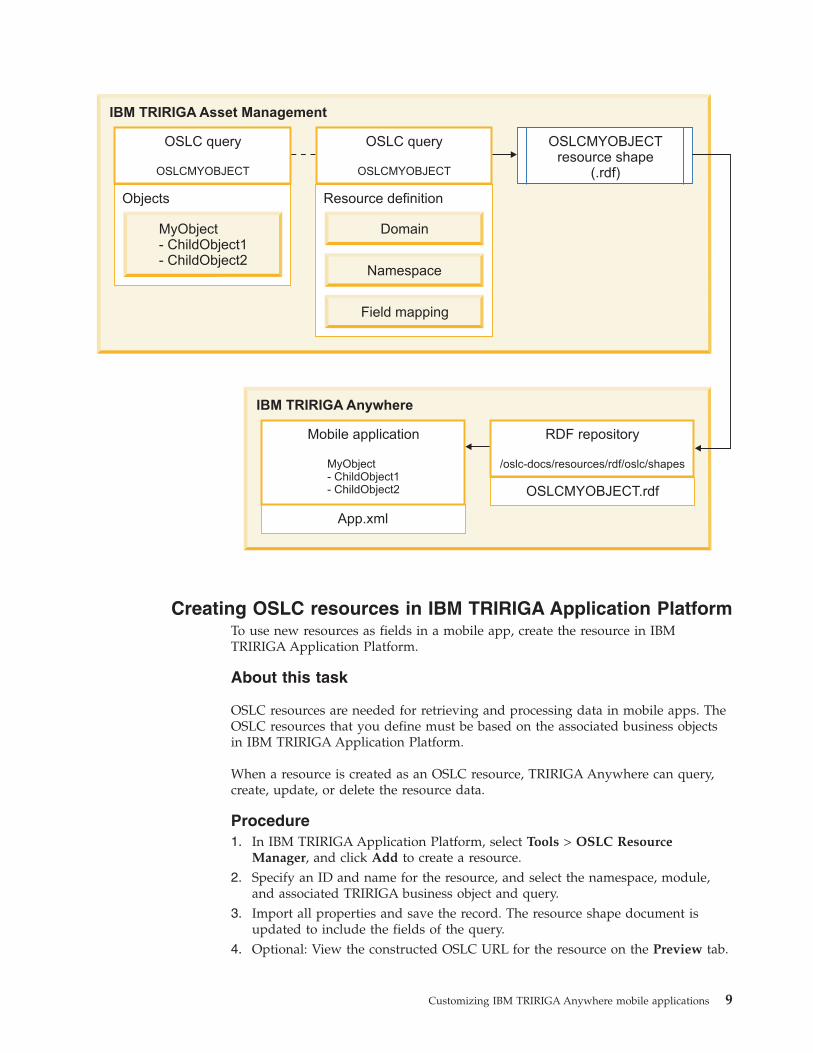
The following figure shows how object data can be configured as resource dataand used in IBM TRIRIGA Anywhere.
8 Customizing mobile apps
Creating OSLC resources in IBM TRIRIGA Application PlatformTo use new resources as fields in a mobile app, create the resource in IBMTRIRIGA Application Platform.
About this task
OSLC resources are needed for retrieving and processing data in mobile apps. TheOSLC resources that you define must be based on the associated business objectsin IBM TRIRIGA Application Platform.
When a resource is created as an OSLC resource, TRIRIGA Anywhere can query,create, update, or delete the resource data.
Procedure1. In IBM TRIRIGA Application Platform, select Tools > OSLC Resource
Manager, and click Add to create a resource.2. Specify an ID and name for the resource, and select the namespace, module,
and associated TRIRIGA business object and query.3. Import all properties and save the record. The resource shape document is
updated to include the fields of the query.4. Optional: View the constructed OSLC URL for the resource on the Preview tab.
IBM TRIRIGA Asset Management
Objects
MyObject- ChildObject1- ChildObject2
Resource definition
Domain
OSLCMYOBJECTresource shape
(.rdf)
Namespace
Field mapping
OSLC query
OSLCMYOBJECT
OSLC query
OSLCMYOBJECT
IBM TRIRIGA Anywhere
App.xml
Mobile application
OSLCMYOBJECT.rdf
RDF repository
/oslc-docs/resources/rdf/oslc/shapesMyObject- ChildObject1- ChildObject2
Customizing IBM TRIRIGA Anywhere mobile applications 9
What to do next
Import the OSLC resource into IBM TRIRIGA Anywhere.
Importing OSLC resources to IBM TRIRIGA AnywhereAfter you create OSLC resources in IBM TRIRIGA Application Platform, you needto import the updated metadata to IBM TRIRIGA Anywhere.
Before you begin
Verify that the following address properties for the service provider are correct inthe build.properties file. The build.properties file is in the TRIRIGAAnywherefolder.v adapter.name=service_provider_name
v adapter.connection.protocol=http
v adapter.connection.domain=ip
v adapter.connection.port=port_number
v adapter.connection.context=port_number
About this task
You run an import utility Ant script to import the resource data from IBMTRIRIGA Application Platform to the RDF files in IBM TRIRIGA Anywhere.
The import utility is named anywhere-rdfs-puller.xml and is in theTRIRIGAAnywhere folder. The utility includes all the shape documents that are usedby the service provider in IBM TRIRIGA Application Platform for the TRIRIGAAnywhere Workplace Operations applications.
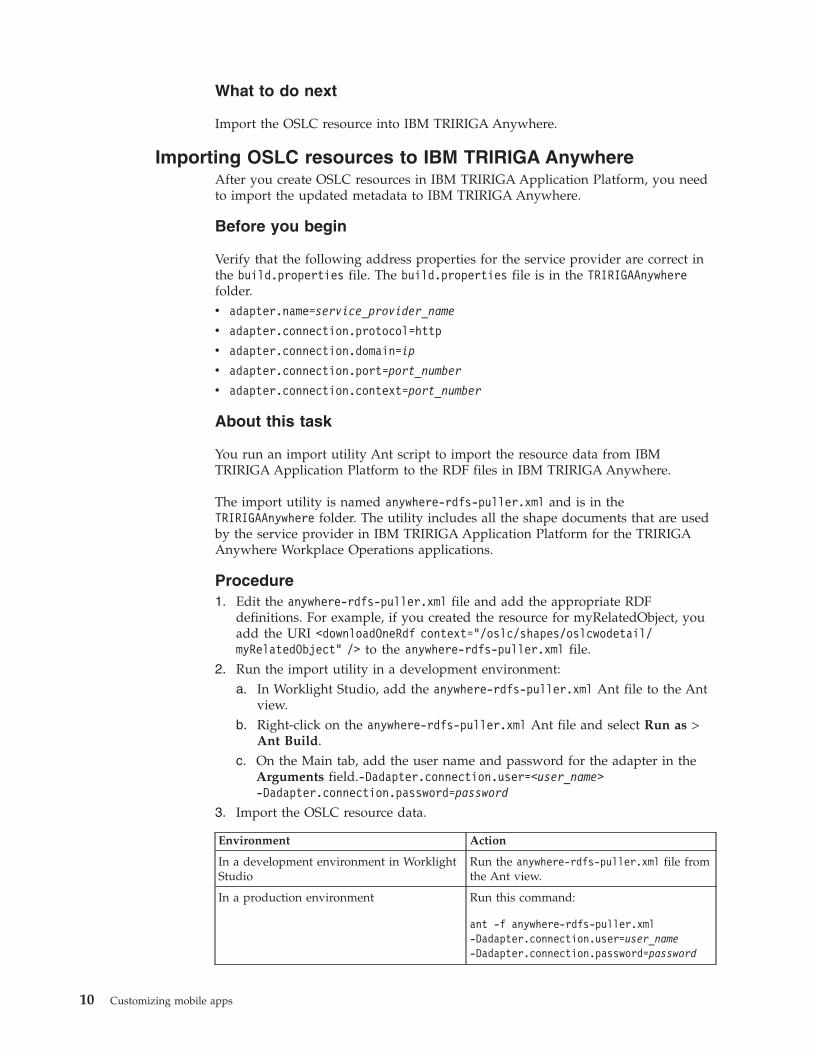
Procedure1. Edit the anywhere-rdfs-puller.xml file and add the appropriate RDF
definitions. For example, if you created the resource for myRelatedObject, youadd the URI <downloadOneRdf context="/oslc/shapes/oslcwodetail/myRelatedObject" /> to the anywhere-rdfs-puller.xml file.
2. Run the import utility in a development environment:a. In Worklight Studio, add the anywhere-rdfs-puller.xml Ant file to the Ant
view.b. Right-click on the anywhere-rdfs-puller.xml Ant file and select Run as >
Ant Build.c. On the Main tab, add the user name and password for the adapter in the
Arguments field.-Dadapter.connection.user=<user_name>-Dadapter.connection.password=password
3. Import the OSLC resource data.
Environment Action
In a development environment in WorklightStudio
Run the anywhere-rdfs-puller.xml file fromthe Ant view.
In a production environment Run this command:
ant -f anywhere-rdfs-puller.xml-Dadapter.connection.user=user_name-Dadapter.connection.password=password
10 Customizing mobile apps
4. Verify that the RDF file is imported and that the RDF content, name, andattributes are correct in the TRIRIGAAnywhere\oslc-doc\resources\rdf\oslcdirectory.
What to do next
Implement the resources in the mobile apps by updating the application definitionand deploying a new application version.
Creating and modifying fields in mobile appsTo develop a IBM TRIRIGA Anywhere mobile app, you can add fields to themobile apps, rename fields and views, and also add values list to fields.
Changing field labelsThe labels for fields in the mobile apps are defined in the app.xml file. You canchange any of the labels to match your implementation of IBM TRIRIGAAnywhere.
Procedure1. In Worklight Studio, go to the TRIRIGAAnywhere\apps\application_name\
artifact directory and open the app.xml file with the XML editor.2. On the Design tab, expand the view that contains the label attribute you want
to change and enter the new name.3. If you translate the mobile app, change the name of the label in the
artifact.js file for each supported language. For example, if the baselanguage of the mobile app is English and you translate the app to French,change the label name in the artifact.js file in the TRIRIGAAnywhere\apps\WorkTaskManagement\common\js\application\translation\nls\fr directory.
4. Save your changes. The application is built automatically.5. Optional: To preview your changes in the mobile browser simulator, right-click
on the application folder and select Run As > Preview.
What to do next
Deploy the app to the server
Rearranging fields in a mobile appThe order of how fields appear in a mobile container view is defined in theapp.xml file. You can change the position of the fields for users to enter theinformation in an order that suits business requirements.
About this task
Fields in a container view are defined as attributes within <groupitem> elementsin the application definition file and are contained within a <group> element. The<group> element displays the fields on an app view. The order of attributes in agroup reflects the order that the attributes appear on the screen.
A container view in a mobile app displays predefined fields and details of arecord. For example, the Work Task Details view on the Work Task Managementapp is a container view that displays the fields for the work task.
Customizing IBM TRIRIGA Anywhere mobile applications 11
Procedure1. In Worklight Studio, go to the TRIRIGAAnywhere\apps\application_name\
artifact directory and open the app.xml file with the XML editor.2. Move the position of the field.
a. On the Design tab, find and select the <group> element that contains the<groupitem> element that you want to move.
b. On the Source tab, cut and paste the <groupitem> element to the newposition.
3. Save your changes. The application is built automatically.4. Optional: To preview your changes in the mobile browser simulator, right-click
on the application folder and select Run As > Preview.
What to do next
Deploy the app to the server
Adding fields to mobile appsThe fields that you add to mobile apps are defined by OSLC resource RDFs. Whenyou add fields to mobile apps, you specify the OSLC resource for the field as aresource attribute in the application definition file.
About this task
The OSLC resource must exist in IBM TRIRIGA Application Platform for the fieldthat you are adding to the mobile app. You can use an existing OSLC resource forthe field that you are adding. You can also create a field by creating the resourcefor the field in IBM TRIRIGA Application Platform and importing the resourceRDF into IBM TRIRIGA Anywhere.
When you add a field to an app view, you must first define the resource for thefield in the Data section of the application definition file. You then add theresource to the view in the UI section so that the field is shown on the app.
If you translate the mobile app, update the artifact.js file for each supportedlanguage to include the name of the field. The artifact.js files for each languageare in the TRIRIGAAnywhere\apps\application_name\common\js\application\translation\nls\fr directory.
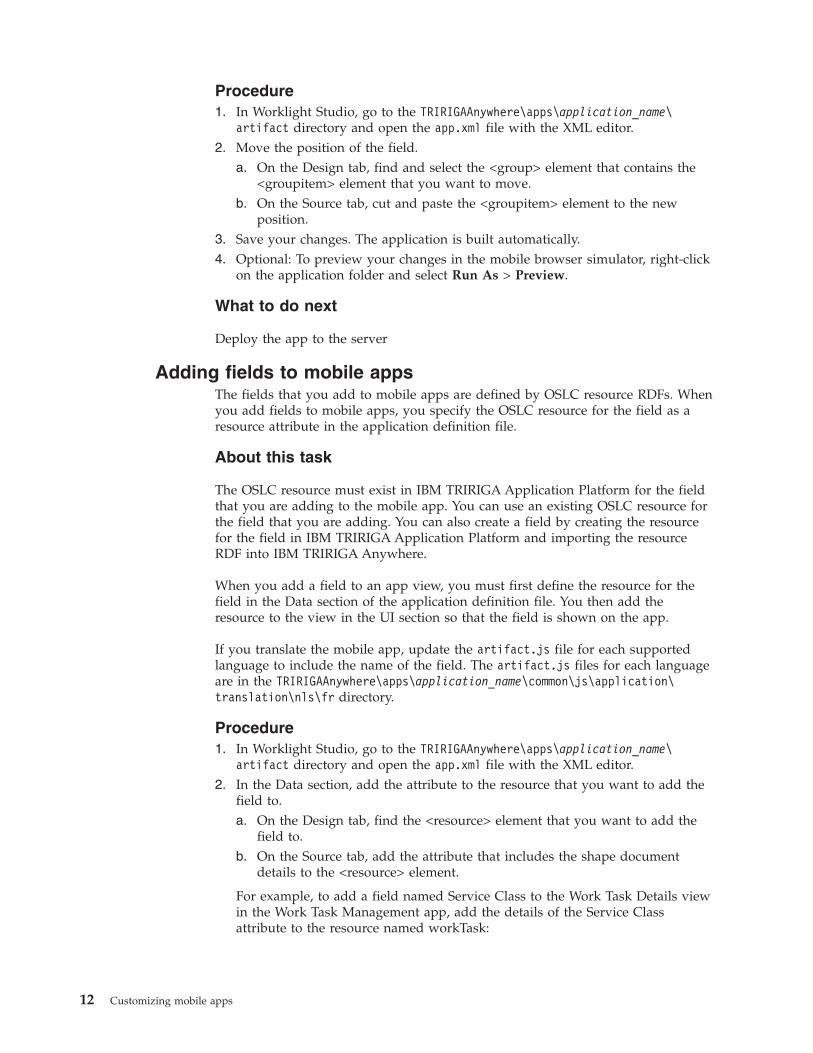
Procedure1. In Worklight Studio, go to the TRIRIGAAnywhere\apps\application_name\
artifact directory and open the app.xml file with the XML editor.2. In the Data section, add the attribute to the resource that you want to add the
field to.a. On the Design tab, find the <resource> element that you want to add the
field to.b. On the Source tab, add the attribute that includes the shape document
details to the <resource> element.
For example, to add a field named Service Class to the Work Task Details viewin the Work Task Management app, add the details of the Service Classattribute to the resource named workTask:
12 Customizing mobile apps
<resource providedBy="/oslc/sp/triWorkManagementSP"describedBy="http://jazz.net/ns/ism/smarter_physical_infrastructure/work#WorkTask"name="workTask" pageSize="50" class="application.business.WorkTaskObject"
<attributes><attribute name="triServiceClassCL" describedByProperty="spi_wm.triServiceClassCL"
3. In the UI section, add the resource attribute to the view that you want to addthe field to.a. On the Design tab, find the <view> element that you want to update.b. On the Source tab, add the resource attribute to the <group item> element
within the view you are updating.
For example, add the resource attribute for the Service Class field to the viewfor Work Task Details:<view id="WorkTask.TaskDetailView" label="Work Task Details"resource="workTask">............<groupitem><text resourceAttribute="triIdTX" label="Task ID"editable="false" />
</groupitem><groupitem transitionTo="WorkTask.DescriptionView"><text resourceAttribute="triServiceClassCL" label=“Service Class”editable="false" />
</groupitem>
4. Optional: Make the field editable by adding the value of true to the editableattribute and adding the value of tap to enter to the placeholder attribute. Theplaceholder attribute indicates that the field is editable and that you can enterany value in the field. To change the field to read only, change the value of theeditable attribute to false and delete the placeholder attribute.
5. Save your changes. The application is built automatically.6. Optional: To preview your changes in a mobile simulator, right-click on the
application folder and select Run As > Preview.
What to do next
Deploy the app to the serverRelated tasks:“Creating OSLC resources in IBM TRIRIGA Application Platform” on page 9To use new resources as fields in a mobile app, create the resource in IBMTRIRIGA Application Platform.
Adding values lists as lookups to fieldsSome fields in a mobile app have value lists, or classifications, from which userscan select a value. You add a value list as a lookup in a field in the app.xmlfile.
Before you begin
Add the field that you want to associate the lookup of values with to the mobileapp.
IBM TRIRIGA Anywhere includes OSLC resources for classifications. Verify thatthe OSLC resource is provided in IBM TRIRIGA Anywhere for the type ofclassification that you are adding. You can also create resources for a classificationin IBM TRIRIGA Application Platform and import them into IBM TRIRIGAAnywhere.
Customizing IBM TRIRIGA Anywhere mobile applications 13
About this task
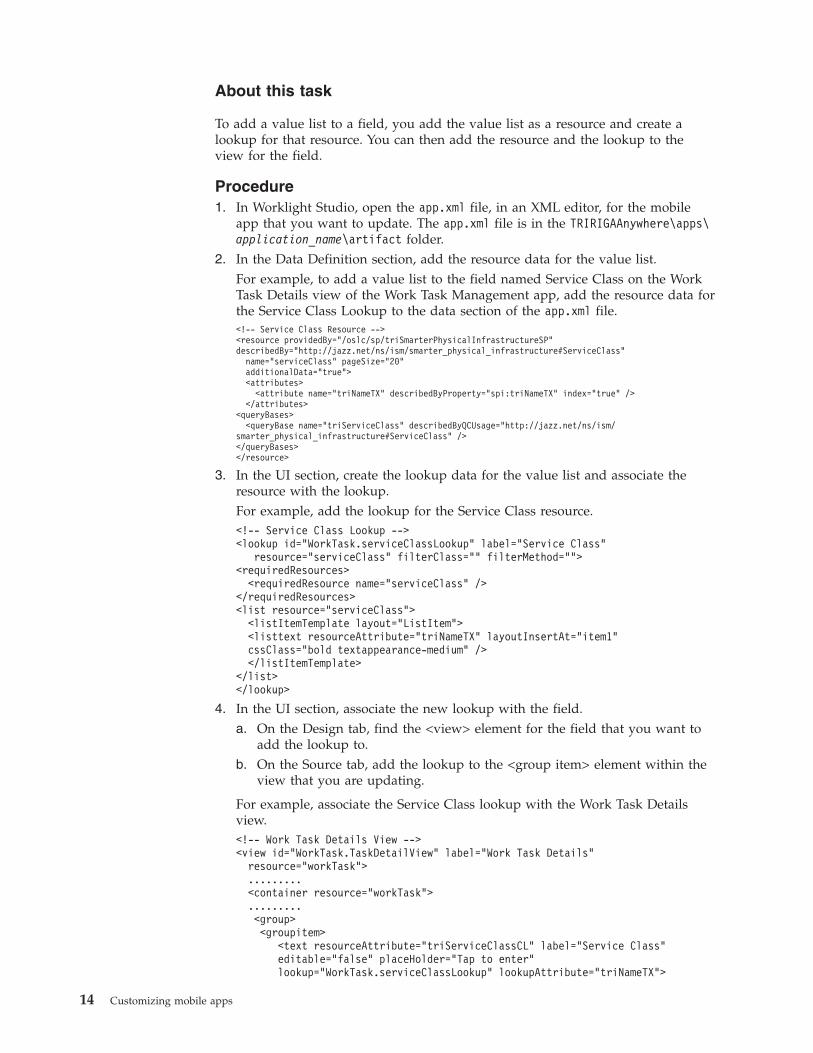
To add a value list to a field, you add the value list as a resource and create alookup for that resource. You can then add the resource and the lookup to theview for the field.
Procedure1. In Worklight Studio, open the app.xml file, in an XML editor, for the mobile
app that you want to update. The app.xml file is in the TRIRIGAAnywhere\apps\application_name\artifact folder.
2. In the Data Definition section, add the resource data for the value list.For example, to add a value list to the field named Service Class on the WorkTask Details view of the Work Task Management app, add the resource data forthe Service Class Lookup to the data section of the app.xml file.<!-- Service Class Resource --><resource providedBy="/oslc/sp/triSmarterPhysicalInfrastructureSP"describedBy="http://jazz.net/ns/ism/smarter_physical_infrastructure#ServiceClass"name="serviceClass" pageSize="20"additionalData="true"><attributes><attribute name="triNameTX" describedByProperty="spi:triNameTX" index="true" />
</attributes><queryBases><queryBase name="triServiceClass" describedByQCUsage="http://jazz.net/ns/ism/
smarter_physical_infrastructure#ServiceClass" /></queryBases></resource>
3. In the UI section, create the lookup data for the value list and associate theresource with the lookup.For example, add the lookup for the Service Class resource.<!-- Service Class Lookup --><lookup id="WorkTask.serviceClassLookup" label="Service Class"
resource="serviceClass" filterClass="" filterMethod=""><requiredResources>
<requiredResource name="serviceClass" /></requiredResources><list resource="serviceClass">
<listItemTemplate layout="ListItem"><listtext resourceAttribute="triNameTX" layoutInsertAt="item1"cssClass="bold textappearance-medium" /></listItemTemplate>
</list></lookup>
4. In the UI section, associate the new lookup with the field.a. On the Design tab, find the <view> element for the field that you want to
add the lookup to.b. On the Source tab, add the lookup to the <group item> element within the
view that you are updating.
For example, associate the Service Class lookup with the Work Task Detailsview.<!-- Work Task Details View --><view id="WorkTask.TaskDetailView" label="Work Task Details"
resource="workTask">.........<container resource="workTask">.........<group><groupitem>
<text resourceAttribute="triServiceClassCL" label="Service Class"editable="false" placeHolder="Tap to enter"lookup="WorkTask.serviceClassLookup" lookupAttribute="triNameTX">
14 Customizing mobile apps
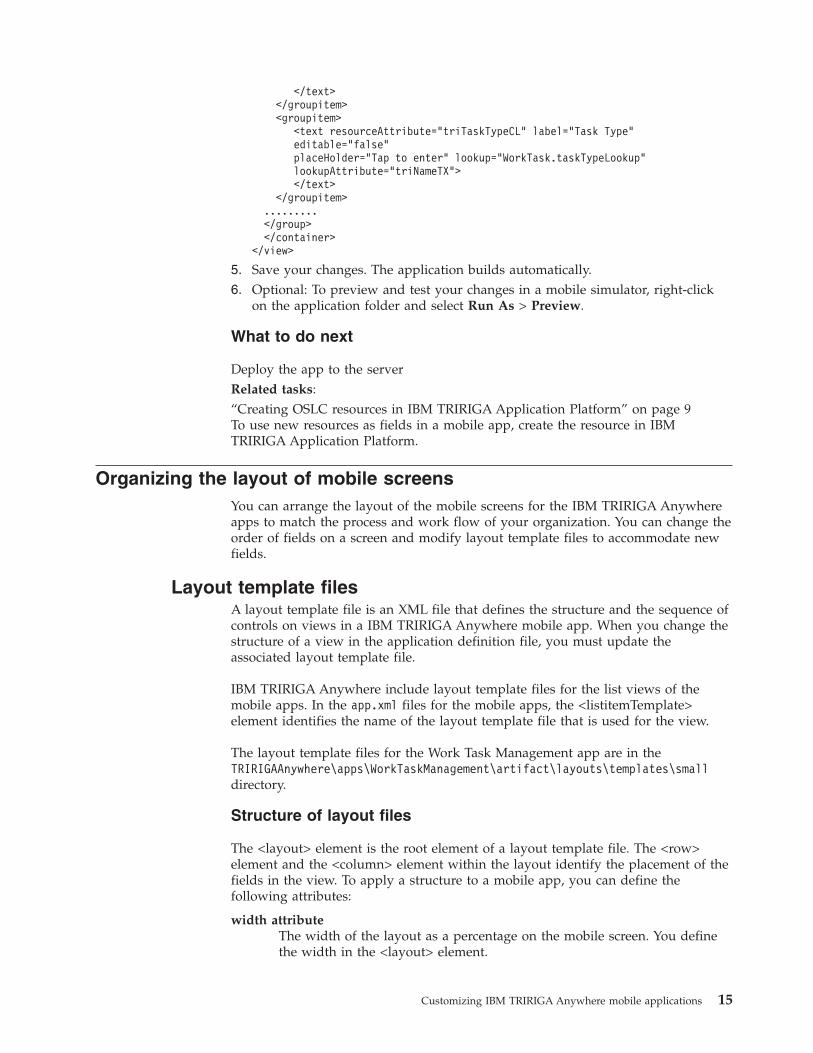
</text></groupitem><groupitem>
<text resourceAttribute="triTaskTypeCL" label="Task Type"editable="false"placeHolder="Tap to enter" lookup="WorkTask.taskTypeLookup"lookupAttribute="triNameTX"></text>
</groupitem>.........</group></container>
</view>
5. Save your changes. The application builds automatically.6. Optional: To preview and test your changes in a mobile simulator, right-click
on the application folder and select Run As > Preview.
What to do next
Deploy the app to the serverRelated tasks:“Creating OSLC resources in IBM TRIRIGA Application Platform” on page 9To use new resources as fields in a mobile app, create the resource in IBMTRIRIGA Application Platform.
Organizing the layout of mobile screensYou can arrange the layout of the mobile screens for the IBM TRIRIGA Anywhereapps to match the process and work flow of your organization. You can change theorder of fields on a screen and modify layout template files to accommodate newfields.
Layout template filesA layout template file is an XML file that defines the structure and the sequence ofcontrols on views in a IBM TRIRIGA Anywhere mobile app. When you change thestructure of a view in the application definition file, you must update theassociated layout template file.
IBM TRIRIGA Anywhere include layout template files for the list views of themobile apps. In the app.xml files for the mobile apps, the <listitemTemplate>element identifies the name of the layout template file that is used for the view.
The layout template files for the Work Task Management app are in theTRIRIGAAnywhere\apps\WorkTaskManagement\artifact\layouts\templates\smalldirectory.
Structure of layout files
The <layout> element is the root element of a layout template file. The <row>element and the <column> element within the layout identify the placement of thefields in the view. To apply a structure to a mobile app, you can define thefollowing attributes:
width attributeThe width of the layout as a percentage on the mobile screen. You definethe width in the <layout> element.
Customizing IBM TRIRIGA Anywhere mobile applications 15
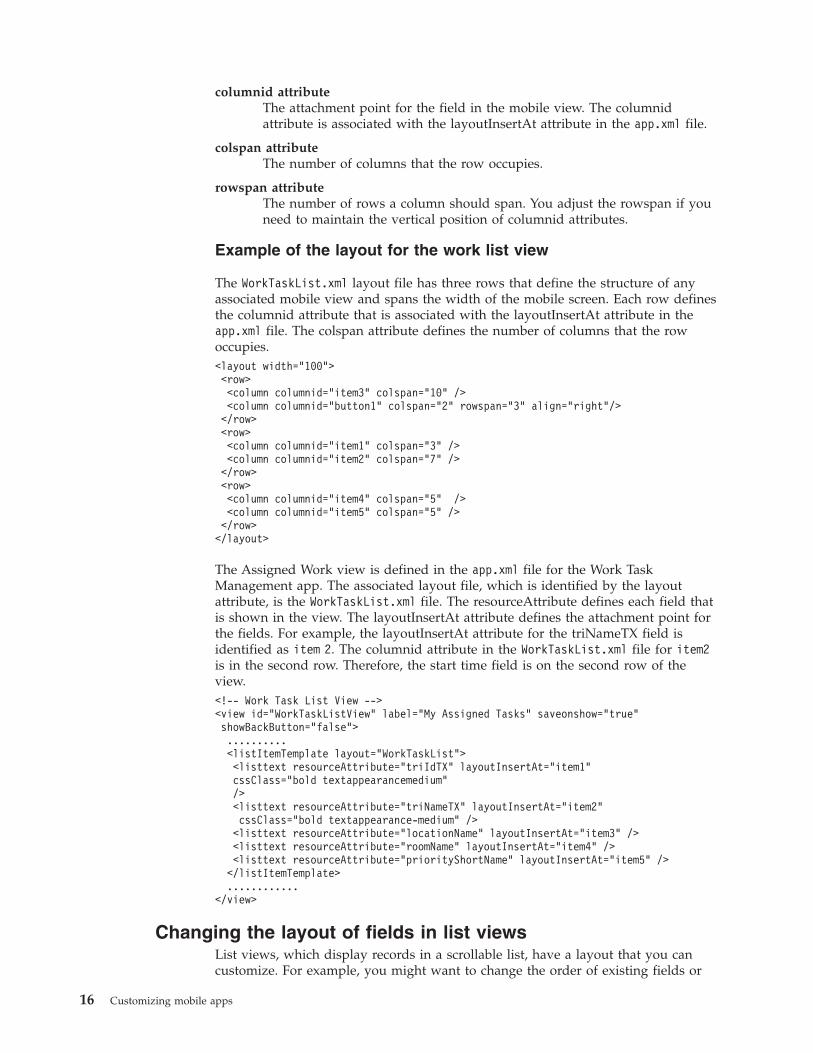
columnid attributeThe attachment point for the field in the mobile view. The columnidattribute is associated with the layoutInsertAt attribute in the app.xml file.
colspan attributeThe number of columns that the row occupies.
rowspan attributeThe number of rows a column should span. You adjust the rowspan if youneed to maintain the vertical position of columnid attributes.
Example of the layout for the work list view
The WorkTaskList.xml layout file has three rows that define the structure of anyassociated mobile view and spans the width of the mobile screen. Each row definesthe columnid attribute that is associated with the layoutInsertAt attribute in theapp.xml file. The colspan attribute defines the number of columns that the rowoccupies.<layout width="100"><row><column columnid="item3" colspan="10" /><column columnid="button1" colspan="2" rowspan="3" align="right"/></row><row><column columnid="item1" colspan="3" /><column columnid="item2" colspan="7" /></row><row><column columnid="item4" colspan="5" /><column columnid="item5" colspan="5" /></row></layout>
The Assigned Work view is defined in the app.xml file for the Work TaskManagement app. The associated layout file, which is identified by the layoutattribute, is the WorkTaskList.xml file. The resourceAttribute defines each field thatis shown in the view. The layoutInsertAt attribute defines the attachment point forthe fields. For example, the layoutInsertAt attribute for the triNameTX field isidentified as item 2. The columnid attribute in the WorkTaskList.xml file for item2is in the second row. Therefore, the start time field is on the second row of theview.<!-- Work Task List View --><view id="WorkTaskListView" label="My Assigned Tasks" saveonshow="true"showBackButton="false">..........<listItemTemplate layout="WorkTaskList"><listtext resourceAttribute="triIdTX" layoutInsertAt="item1"cssClass="bold textappearancemedium"/><listtext resourceAttribute="triNameTX" layoutInsertAt="item2"cssClass="bold textappearance-medium" /><listtext resourceAttribute="locationName" layoutInsertAt="item3" /><listtext resourceAttribute="roomName" layoutInsertAt="item4" /><listtext resourceAttribute="priorityShortName" layoutInsertAt="item5" /></listItemTemplate>............
</view>
Changing the layout of fields in list viewsList views, which display records in a scrollable list, have a layout that you cancustomize. For example, you might want to change the order of existing fields or
16 Customizing mobile apps

add a field. When you change the order of a view in the app.xml file, you applythe changes to the associated layout template file also.
About this task
In the app.xml file, the name of the layout template that is associated with a viewis identified in the layout attribute of the <listItemTemplate> element. The<listtext> element defines the resource attribute or field within the structure of thelayout and the layoutInsertAt attribute defines the attachment point of the field inthe mobile view. In the layout template file, the value of the columnid attributecorresponds to the value of the layoutInsertAt attribute.
If you change the structure of a view, the value of the columnid attribute and thelayoutInsertAt attribute must match for the changes of the layout in the view totake effect. For example, if you add a field to the view in the app.xml file, thevalue of the columnid attribute in the layout template file must match and thevalue of the layoutInsertAt attribute for the field to appear in the mobile view.
Procedure1. In the UI section of the app.xml file, find the view that you want to change.2. Modify the <listtext> element in the <listItemTemplate> element for the view
by updating the resource attribute and the layoutInsertAt attribute and save thefile.For example, to add a field named Service Class to the work list view forAssigned Work, add the resource attribute for the field to the <listtext> elementin the <listItemTemplate>. Identify the layoutInsertAt attribute as item6. Youidentify the layoutInsertAt attribute as item6 because the Service Class field isthe sixth field in the view.<!-- Work Task List View -->
<view id="WorkTaskListView" label="My Assigned Tasks"saveonshow="true" showBackButton="false">..........
<listItemTemplate layout="WorkTaskList"><listtext resourceAttribute="triIdTX" layoutInsertAt="item1"cssClass="bold textappearancemedium"/><listtext resourceAttribute="triNameTX" layoutInsertAt="item2"cssClass="bold textappearance-medium" /><listtext resourceAttribute="locationName" layoutInsertAt="item3" /><listtext resourceAttribute="roomName" layoutInsertAt="item4" /><listtext resourceAttribute="priorityShortName" layoutInsertAt="item5" /><listtext resourceAttribute="triServiceClassCL" layoutInsertAt="item6" />
</listItemTemplate>............
</view>
By adding the field, you must apply the change to the layout template file.
Note: You must also add the resource data for the supervisor field to the WorkOrder resource for the field to exist in the view.
3. Open the associated layout template file in the TRIRIGAAnywhere\apps\application_name\artifact\layouts\templates\small directory
4. Modify the layout structure to reflect the changes that you made in the app.xmlfile. You can make the following changes to update the layout:v Enter a <row> element to add a row.v Enter the columnid attribute to identify the attachment point of the field. The
value for the columnid attribute must match the value of the layoutInsertAtattribute for the field.
Customizing IBM TRIRIGA Anywhere mobile applications 17
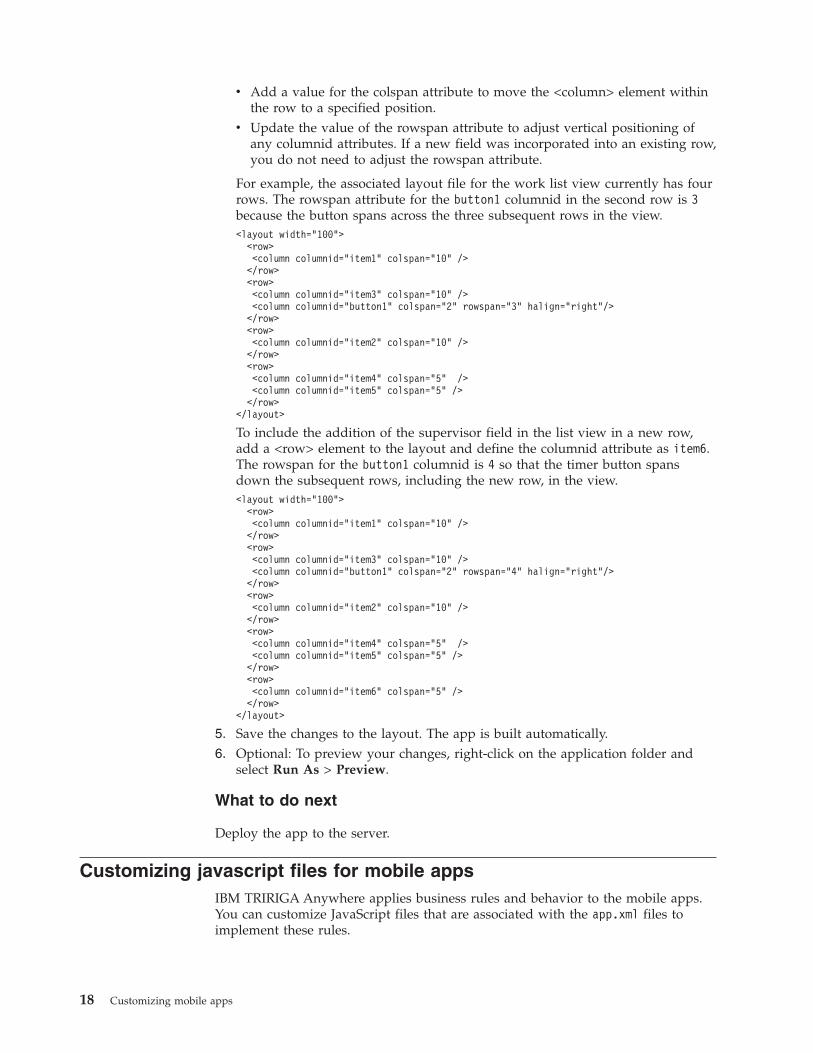
v Add a value for the colspan attribute to move the <column> element withinthe row to a specified position.
v Update the value of the rowspan attribute to adjust vertical positioning ofany columnid attributes. If a new field was incorporated into an existing row,you do not need to adjust the rowspan attribute.
For example, the associated layout file for the work list view currently has fourrows. The rowspan attribute for the button1 columnid in the second row is 3because the button spans across the three subsequent rows in the view.<layout width="100">
<row><column columnid="item1" colspan="10" />
</row><row><column columnid="item3" colspan="10" /><column columnid="button1" colspan="2" rowspan="3" halign="right"/>
</row><row><column columnid="item2" colspan="10" />
</row><row><column columnid="item4" colspan="5" /><column columnid="item5" colspan="5" />
</row></layout>
To include the addition of the supervisor field in the list view in a new row,add a <row> element to the layout and define the columnid attribute as item6.The rowspan for the button1 columnid is 4 so that the timer button spansdown the subsequent rows, including the new row, in the view.<layout width="100">
<row><column columnid="item1" colspan="10" />
</row><row><column columnid="item3" colspan="10" /><column columnid="button1" colspan="2" rowspan="4" halign="right"/>
</row><row><column columnid="item2" colspan="10" />
</row><row><column columnid="item4" colspan="5" /><column columnid="item5" colspan="5" />
</row><row><column columnid="item6" colspan="5" />
</row></layout>
5. Save the changes to the layout. The app is built automatically.6. Optional: To preview your changes, right-click on the application folder and
select Run As > Preview.
What to do next
Deploy the app to the server.
Customizing javascript files for mobile appsIBM TRIRIGA Anywhere applies business rules and behavior to the mobile apps.You can customize JavaScript files that are associated with the app.xml files toimplement these rules.
18 Customizing mobile apps
Creating conditional fields in appsTo control when a field appears in an IBM TRIRIGA Anywhere app, you can makethe field conditional.
About this task
You specify an event handler in the app.xml file to control whether to show or hidea field that depends on values of another field when the value is selected by themobile user. Event handlers are implemented in JavaScript files that are associatedwith a view in the mobile app.
For example, if a work task has a work status of Active, Hold for Parts, or Holdper Requester, the timer button should appear on the Work Task List view.The timer button is not needed for other work tasks status values, so you need toapply a condition to control when the timer button appears. You create an eventhandler for the timer button to monitor the resource and attribute that isassociated with the work status and show the button if a mobile user selectsCompleted in the Work Status field. You also create an event handler for the viewthat the timer belongs to so you can monitor whether the values in the WorkStatus field changes. If a mobile user changes the status value, the handler checksthe value to determine whether the timer is shown.
Procedure1. In Worklight Studio, open the app.xml file for the app that you want to update
and add the field that you want to apply the event to.2. In the UI section of the app.xml file, add a render type of event handler to the
field.a. In the <button> element of the new field, add a child element named
<eventHandlers>.b. In the <eventHandlers> element, add a child element named
<eventHandler>.c. Specify render as the event attribute, and add the method and class
attributes.
For example, to show the timer button for Active, Hold for Parts, or Hold perRequester work status, add an event handler where the event attribute ischanged and the method attribute is enableTimerButton to define the conditionfor the field. The event is associated with the handler for the Work TaskList view named TimerHandler.
3. In the TRIRIGAAnywhere\apps\application_name\common\js\application\handlers directory, add the condition for the event handler to the associatedJavaScript file. For example, to add the JavaScript code for the event handler toshow the timer button for for Active, Hold for Parts, or Hold per Requesterwork status, update the TimerHandler.js file in the TRIRIGAAnywhere\apps\application_name\common\js\application\handlers directory.
4. Optional: To validate anytime status changes, add the datachange handlercondition to the field.
5. Save your changes and preview the updated mobile app in a mobile browsersimulator.
What to do next
Deploy the app to the serverRelated tasks:
Customizing IBM TRIRIGA Anywhere mobile applications 19
“Adding fields to mobile apps” on page 12The fields that you add to mobile apps are defined by OSLC resource RDFs. Whenyou add fields to mobile apps, you specify the OSLC resource for the field as aresource attribute in the application definition file.
Creating read-only conditional fieldsTo control when a field becomes read-only or read/write dynamically in an IBMTRIRIGA Anywhere app, you can make the field conditional to be read-only.
About this task
You specify an event or action in the app.xml file to control whether a field thatdepends on values of another field is read-only. Event handlers are implemented inJavaScript files that are associated with a view in the mobile app.
Procedure1. In Worklight Studio, open the app.xml file for the app that you want to update
and add the field that you want to apply the event to.2. In the UI section of the app.xml file, add an initializer type of event handler to
the fields.a. In the <text> element of the new field, add a child element named
<eventHandlers>.b. In the <eventHandlers> element, add a child element named
<eventHandler>.c. Specify initialize as the event attribute, and add the method and class
attributes.3. Apply the condition for the event handler to a JavaScript file.
a. Create a folder for the handler in the TRIRIGAAnywhere\apps\app_name\common\js\application directory. The folder name must match the namethat is applied to the class attribute of the event handler.
b. Add the JavaScript file to the TRIRIGAAnywhere\apps\app_name\common\js\application directory. The name of the JavaScript file must match the namethat is applied to the class attribute of the event handler.
c. Add the condition for the initialize event handler to the JavaScript file.4. Save your changes and preview the updated mobile app in a mobile browser
simulator.
What to do next
Deploy the app to the server
20 Customizing mobile apps
Notices
This information was developed for products and services offered in the U.S.A.
IBM may not offer the products, services, or features discussed in this document inother countries. Consult your local IBM representative for information on theproducts and services currently available in your area. Any reference to an IBMproduct, program, or service is not intended to state or imply that only that IBMproduct, program, or service may be used. Any functionally equivalent product,program, or service that does not infringe any IBM intellectual property right maybe used instead. However, it is the user's responsibility to evaluate and verify theoperation of any non-IBM product, program, or service.
IBM may have patents or pending patent applications covering subject matterdescribed in this document. The furnishing of this document does not grant youany license to these patents. You can send license inquiries, in writing, to:
IBM Director of LicensingIBM CorporationNorth Castle DriveArmonk, NY 10504-1785U.S.A.
For license inquiries regarding double-byte (DBCS) information, contact the IBMIntellectual Property Department in your country or send inquiries, in writing, to:
Intellectual Property LicensingLegal and Intellectual Property LawIBM Japan Ltd.19-21, Nihonbashi-Hakozakicho, Chuo-kuTokyo 103-8510, Japan
The following paragraph does not apply to the United Kingdom or any othercountry where such provisions are inconsistent with local law: INTERNATIONALBUSINESS MACHINES CORPORATION PROVIDES THIS PUBLICATION "AS IS"WITHOUT WARRANTY OF ANY KIND, EITHER EXPRESS OR IMPLIED,INCLUDING, BUT NOT LIMITED TO, THE IMPLIED WARRANTIES OFNON-INFRINGEMENT, MERCHANTABILITY OR FITNESS FOR A PARTICULARPURPOSE. Some states do not allow disclaimer of express or implied warranties incertain transactions, therefore, this statement may not apply to you.
This information could include technical inaccuracies or typographical errors.Changes are periodically made to the information herein; these changes will beincorporated in new editions of the publication. IBM may make improvementsand/or changes in the product(s) and/or the program(s) described in thispublication at any time without notice.
Any references in this information to non-IBM Web sites are provided forconvenience only and do not in any manner serve as an endorsement of those Websites. The materials at those Web sites are not part of the materials for this IBMproduct and use of those Web sites is at your own risk.
© Copyright IBM Corp. 2014 21
IBM may use or distribute any of the information you supply in any way itbelieves appropriate without incurring any obligation to you.
Licensees of this program who wish to have information about it for the purposeof enabling: (i) the exchange of information between independently createdprograms and other programs (including this one) and (ii) the mutual use of theinformation which has been exchanged, should contact:
IBM Corporation2Z4A/10111400 Burnet RoadAustin, TX 78758U.S.A.
Such information may be available, subject to appropriate terms and conditions,including in some cases, payment of a fee.
The licensed program described in this document and all licensed materialavailable for it are provided by IBM under terms of the IBM Customer Agreement,IBM International Program License Agreement or any equivalent agreementbetween us.
Information concerning non-IBM products was obtained from the suppliers ofthose products, their published announcements or other publicly available sources.IBM has not tested those products and cannot confirm the accuracy ofperformance, compatibility or any other claims related to non-IBM products.Questions on the capabilities of non-IBM products should be addressed to thesuppliers of those products.
All statements regarding IBM's future direction or intent are subject to change orwithdrawal without notice, and represent goals and objectives only.
This information contains examples of data and reports used in daily businessoperations. To illustrate them as completely as possible, the examples include thenames of individuals, companies, brands, and products. All of these names arefictitious and any similarity to the names and addresses used by an actual businessenterprise is entirely coincidental.
Privacy Policy ConsiderationsIBM Software products, including software as service solutions, (“SoftwareOfferings”) may use cookies or other technologies to collect product usageinformation, to help improve the end user experience, to tailor interactions withthe end user or for other purposes. In many cases no personally identifiableinformation is collected by the Software Offerings. Some of our Software Offeringscan help enable you to collect personally identifiable information. If this SoftwareOffering uses cookies to collect personally identifiable information, specificinformation about this offering’s use of cookies is set forth below.
This Software Offering does not use cookies or other technologies to collectpersonally identifiable information.
If the configurations deployed for this Software Offering provide you as customerthe ability to collect personally identifiable information from end users via cookies
22 Customizing mobile apps
and other technologies, you should seek your own legal advice about any lawsapplicable to such data collection, including any requirements for notice andconsent.
For more information about the use of various technologies, including cookies, forthese purposes, see IBM’s Privacy Policy at http://www.ibm.com/privacy andIBM's Online Privacy Statement at http://www.ibm.com/privacy/details in thesection entitled “Cookies, Web Beacons and Other Technologies” and the "IBMSoftware Products and Software-as-a-Service Privacy Statement" athttp://www.ibm.com/software/info/product-privacy/.
TrademarksIBM, the IBM logo, and ibm.com are trademarks or registered trademarks ofInternational Business Machines Corp., registered in many jurisdictions worldwide.Other product and service names might be trademarks of IBM or other companies.A current list of IBM trademarks is available on the Web at “Copyright andtrademark information” at www.ibm.com/legal/copytrade.shtml.
Java and all Java-based trademarks and logos are trademarks or registeredtrademarks of Oracle and/or its affiliates.
Linux is a trademark of Linus Torvalds in the United States, other countries, orboth.
Microsoft, Windows, Windows NT, and the Windows logo are trademarks ofMicrosoft Corporation in the United States, other countries, or both.
UNIX is a registered trademark of The Open Group in the United States and othercountries.
Other product and service names might be trademarks of IBM or other companies.
Notices 23

24 Customizing mobile apps

Index
Aadding values lists 13
Bbuild commands
build all 6build server
setting up 1
Cclassifications 13
Ddevelopment environment 1, 5development tools 5
Android 2iOS 4
Iinstallation
Eclipse 5
OOSLC resources 13
Sset up
build server 1
WWorklight Studio 1
© Copyright IBM Corp. 2014 25

26 Customizing mobile apps


����
Printed in USA