Embed Size (px)
Citation preview
1 © 2015 Aptos, Inc. All rights reserved.
Customer Community User Guide Version 1.7
6/26/2016

2 © 2015 Aptos, Inc. All rights reserved.
Introduction
This guide provides you with instructions on how to login to and navigate the Service Cloud Customer
Community.
The site will allow you to access Account, Contact and Ticket information. In addition, you can create,
view and modify support tickets for your Aptos products.
Through the document various terms may be called out in the following colors as noted below.
Dark blue – notes another section within this document
Gray – highlights items that can be clicked on or selected
Green – emphasizes new terms
Light blue – indicates a link
Orange – bulleted list

3 © 2015 Aptos, Inc. All rights reserved.
Table of Contents
Prerequisites 4
System Requirements 5
How to Log In 6
User Settings 7
How to Log Out 8
Screen Layout & Navigation 9
How to Use Search 13
Accounts 18
Contacts 19
Tickets 20
Related Lists 32
Feedback 35
FAQ 36
Video Links 38
Revision History 39

4 © 2015 Aptos, Inc. All rights reserved.
Prerequisites
No software installation is required to use Service Cloud.
To access Service Cloud, each user will require individual login credentials.
Prior to the initial system launch, user contact information from our previous ticketing systems will be
loaded into Service Cloud. Users will receive an email from Aptos containing your user name and a link
to the screen below to setup your password.
In most cases the user name will be your email address on file. Once you are logged in, both the user
name and password can be changed at any time. The steps to do that are detailed in this document
under the User Settings section.
If you did not receive an email to setup your credentials, or need to be added as a new user to Service
Cloud, please refer to the FAQ section below.

5 © 2015 Aptos, Inc. All rights reserved.
System Requirements
The Service Cloud online application can run on any computer with an Internet connection and
supports multiple browsers.
The current system requirements can be found at the link below, under the To Use Salesforce section
http://resources.docs.salesforce.com/198/16/en-us/sfdc/pdf/salesforce_technical_requirements.pdf

6 © 2015 Aptos, Inc. All rights reserved.
How to Log In
To access Service Cloud, navigate to www.aptos.com and click on Support Login.
Enter your Username and Password, and then click Login.

7 © 2015 Aptos, Inc. All rights reserved.
User Settings
These selections are used to:
Set your date, time and default language
Change your user name or password
Authorize connections to your Service Cloud account from external applications
To view your user settings, click on your name.
Then click on My Settings.
The My Settings options will display. Click on each to view the individual settings. When you are
finished updating your settings, click on Close to exit.
8 © 2015 Aptos, Inc. All rights reserved.
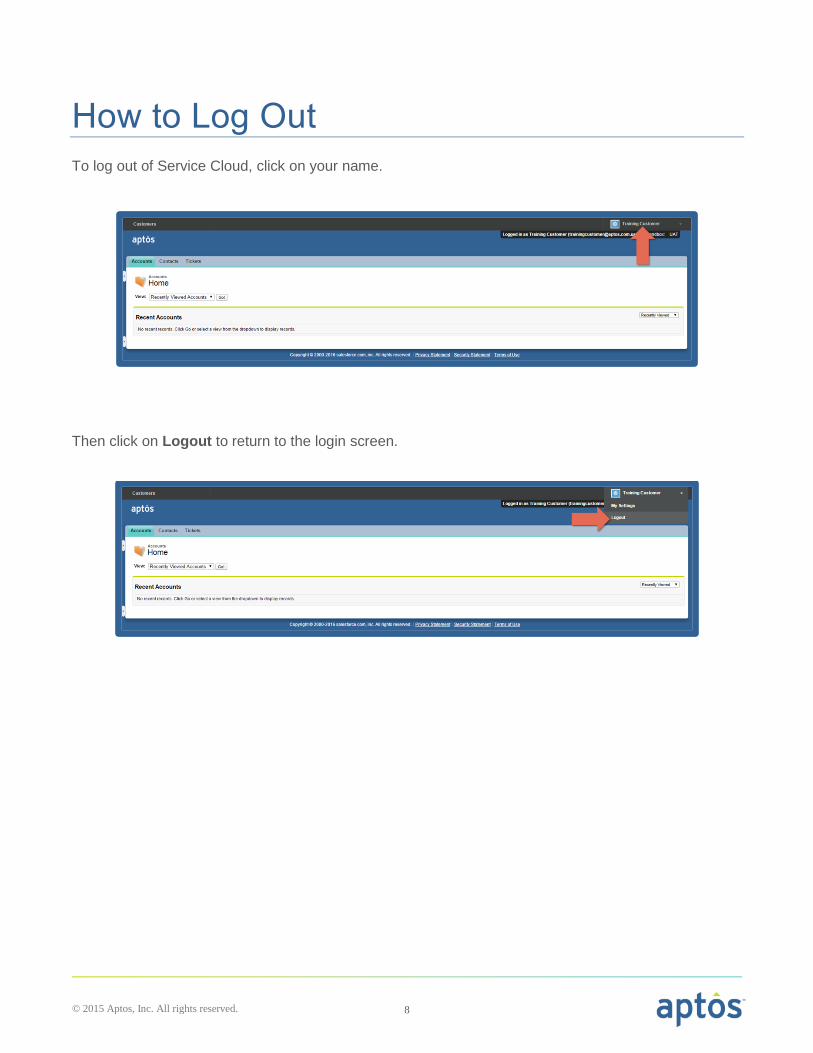
How to Log Out
To log out of Service Cloud, click on your name.
Then click on Logout to return to the login screen.

9 © 2015 Aptos, Inc. All rights reserved.
Screen Layout & Navigation
While navigating the Customer Community, there are some important screen elements you should be
familiar with.
The Content Tabs are shown in the upper left are of the screen. They are used to select the area of
information you wish to be displayed. There are currently three options listed for Accounts, Contacts
and Tickets.
The View field contains a drop down list of pre-configured selections that will change the data that is
displayed under each Content Tab. After making a selection, click on the Go! button to run the View.
For example, if you were to select the Tickets tab, you could select a View option to display “All Tickets”
which would return all tickets in the system. Alternatively, you could select a View option for “My Open
Tickets” which would display only tickets opened by you and that were not closed.

10 © 2015 Aptos, Inc. All rights reserved.
If you would like to print the current View, click on the printer icon in the upper right.
The Recent area displays the latest selections made for that specific Content Tab. The selection list on
the right side of the screen sets either: Recently Created, Recently Modified or Recently Viewed.
In the example below we see the three Accounts that were most recently viewed. If you were to select
the Contacts tab instead, then the most Recent Contacts would be shown.

11 © 2015 Aptos, Inc. All rights reserved.
There is also a dockable Sidebar Window available. If it is not currently visible, hover your cursor
towards the left edge of the screen and click on one of the two arrows or use a keyboard shortcut and
press ALT-S. To hide the Sidebar Window, click on the arrows or press ALT-S again.
The Search and Advanced Search fields are contained at the top of the Sidebar Window. Instructions
and examples of how to use the search functions are covered in the How to Use Search section.
Click on Create New… and the option to open a new Ticket is displayed.

12 © 2015 Aptos, Inc. All rights reserved.
The Recent Items section displays items across all 3 content areas (Accounts, Contacts and Tickets).
You can simply click on the item to jump to that record.
You can also move your cursor next to the item and a preview pane will be displayed with select data
for that item. Within the preview window you also have the ability to click on View or Edit that item.

13 © 2015 Aptos, Inc. All rights reserved.
How to Use Search
The sidebar Search field is located in the dockable Sidebar Window. If the window is not currently
visible, hover the cursor towards the left edge of the screen and click on one of the two arrows or press
ALT-S to display the Sidebar Window
.
The Search Scope field allows you to focus your searches on a specific content area. The default
value is Search All, which indicates that the search will be done across all content areas listed in the
drop down list. However it does not mean that all fields within those content areas will be looked at for
a match to the search criteria.

14 © 2015 Aptos, Inc. All rights reserved.
Enter your search keywords in the blank field under the Search Scope drop down list. Searches can be
done in plain text and are not case sensitive. To initiate the search, click on the Go! button.
If a sidebar Search does not return the results you are looking for, or if you have more complex search
criteria, use the Advanced Search function by clicking either of the Advanced Search links.

15 © 2015 Aptos, Inc. All rights reserved.
The Advanced Search pane will be displayed as shown below.
An Advanced Search evaluates more fields than the sidebar Search, including notes, descriptions, and
comments. The “Use enhanced search capabilities” selection is checked by default. When that is
enabled you can…
Use operators such as AND, OR, and AND NOT to refine your search.
Put quotation marks around multiple keywords to perform an exact phrase match, for example,
"call john smith".
Add an asterisk to the end of your keyword to search for items that start with the word, for
example, acme*
You can also set the Search Scope from this screen by checking the boxes for areas you would like to
search. This provides the same functionality to focus the search on specific content area(s) as when
selecting from the Search Scope drop down list during a sidebar Search.
16 © 2015 Aptos, Inc. All rights reserved.
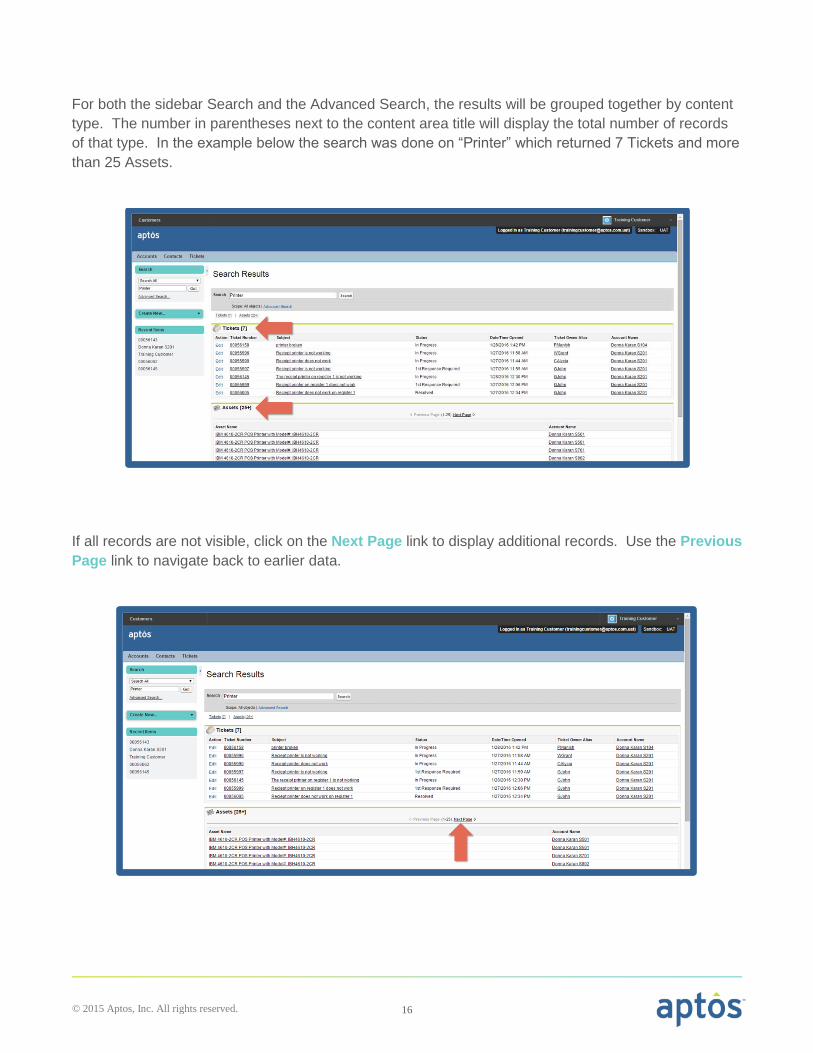
For both the sidebar Search and the Advanced Search, the results will be grouped together by content
type. The number in parentheses next to the content area title will display the total number of records
of that type. In the example below the search was done on “Printer” which returned 7 Tickets and more
than 25 Assets.
If all records are not visible, click on the Next Page link to display additional records. Use the Previous
Page link to navigate back to earlier data.

17 © 2015 Aptos, Inc. All rights reserved.
Within the search results, you can click on any underlined text to view that item. For any records that
you can edit, for example your Tickets, you can click on the blue Edit link to make changes.

18 © 2015 Aptos, Inc. All rights reserved.
Accounts
The Accounts content tab will show you information about your home office and store locations.
To view the details of an Account, click on the Account Name anywhere you see it underlined.
The Account Detail screen displays information in sections, with similar fields grouped together.
In the example below for Donna Karan 201, there are two sections for Address Information and System
Information
Navigating the areas below the yellow bar is covered in the Related Lists section of this document.

19 © 2015 Aptos, Inc. All rights reserved.
Contacts
The Contacts content tab will show you information about people associated to your Account who have
a valid account in Service Cloud.
To view the details of a Contact, click on the Name anywhere you see it underlined.
The Contact Detail screen displays information in sections, with similar fields grouped together.
In the example below for Training Customer, there are two sections for Address Information and
System Information
Navigating the areas below the yellow bar is covered in the Related Lists section of this document.

20 © 2015 Aptos, Inc. All rights reserved.
Tickets
The Tickets content tab contains information about your support issues. From here you can open new
tickets and make changes to existing ones. There are two types of tickets within Service Cloud.
Incident tickets, indicated by a prefix of INC, represent a reported issue, symptom or question. If an
Incident can be resolved thought the Client Care team, it will be handled within that same ticket.
However if further evaluation is needed, such as reporting a defect to the Development team, or more
in depth analysis is needed for wider issues, then an additional ticket maybe opened. This second
ticket type is for Root Cause Analysis, indicated by a prefix of RCA. Only Incidents can be opened
from the Customer Community. If needed, a Root Cause Analysis ticket will then be opened by a Client
Care support analyst.
To open a new Ticket, click on either the Create New Ticket button or use the Create New…Ticket
link in the dockable Sidebar Window.

21 © 2015 Aptos, Inc. All rights reserved.
After selecting to open a new Ticket, complete the fields on the following screen.
Any required fields will have a red bar shown between the field label and the entry field.
Fields with a magnifying glass icon next to them, such as Account Name, are lookup fields. Click on
the icon to display a lookup window where you can enter your search criteria or choose from a list of
recently viewed selections. Please note, if you first type into a lookup field directly, and then click on
the magnifying glass icon, when the lookup window appears it will use what you have already typed to
perform a search. For example if you initially typed “Retail” into the Account Name field, when you click
the magnifying glass icon, it will display showing any results for “Retail” If you do not find a match in
the results, please clear the lookup field, reenter your search criteria, and click Go! to initiate another
search
Fields with a carat, such as Severity Level, are drop down list fields. Click on the field to display a list of
predefined selections.
Fields with no notation are simple entry fields. Click on them to display the cursor and enter your data.

22 © 2015 Aptos, Inc. All rights reserved.
The fields displayed when opening a new Ticket are:
Account Name – the store or home office location you wish to log the ticket against
Ticket Type – select from Software, Hardware or Cloud Ops, to indicate what type of issue you
are reporting. The Software or Hardware options are used to route issues to the Client Care
support team. The Cloud Ops selection is available for SaaS customers to open issues
intended to be handled by the Cloud Ops team.
Asset – select the software application or piece of hardware experiencing the issue
Contact – this will be automatically set to the user logged into Service Cloud, the email
associated to the Contact will be used for any system notifications on this ticket
Other Contact – you can provide additional contact information, however please note that this
field is for informational use and contacts entered here will not receive any automatic email
notifications from Service Cloud
Environment – identifies if the issue is occurring in your production or test environment
Secondary Notification Email – allows you to specify an additional email address that you
would like to receive the same system notifications regarding this ticket as are sent to the email
associated to the Contact
Severity Level – set to the appropriate level based on the impact of the issue
Notify on All Activities – allows you to specify if you would like to receive automatic email
notifications for virtually all activities related to this ticket. Notifications will be sent to the email
associated to the Contact and to the Secondary Notification Email if provided. If you do not
select this option, activities can still be viewed through the Customer Community portal and
email notifications may be sent on a per activity basis if the support analyst specifies they be
sent out.
o Please note, regardless of the preference set for the Notify on All Activities option, you
will still receive notifications in the following scenarios. An email notification will be
generated, when a ticket is set to a status of Resolved in preparation for closing. An
email notification will also be sent when a Root Cause Analysis (RCA) ticket is created
from an Incident (INC) ticket type.

23 © 2015 Aptos, Inc. All rights reserved.
Subject – a short summary of what the issue is
Description – used for a longer explanation of the issue
Customer Reference Number – optional field should you wish to provide a number from an
external system to cross reference with the Service Cloud ticket.
When you have finished entering information for the new ticket, click on one of the following buttons…
Submit – saves the ticket to Service Cloud
Submit & Add Attachment – saves the ticket to Service Cloud and then displays a screen to
add files to the ticket
Cancel – does not save the ticket and returns you to the previous screen.
24 © 2015 Aptos, Inc. All rights reserved.
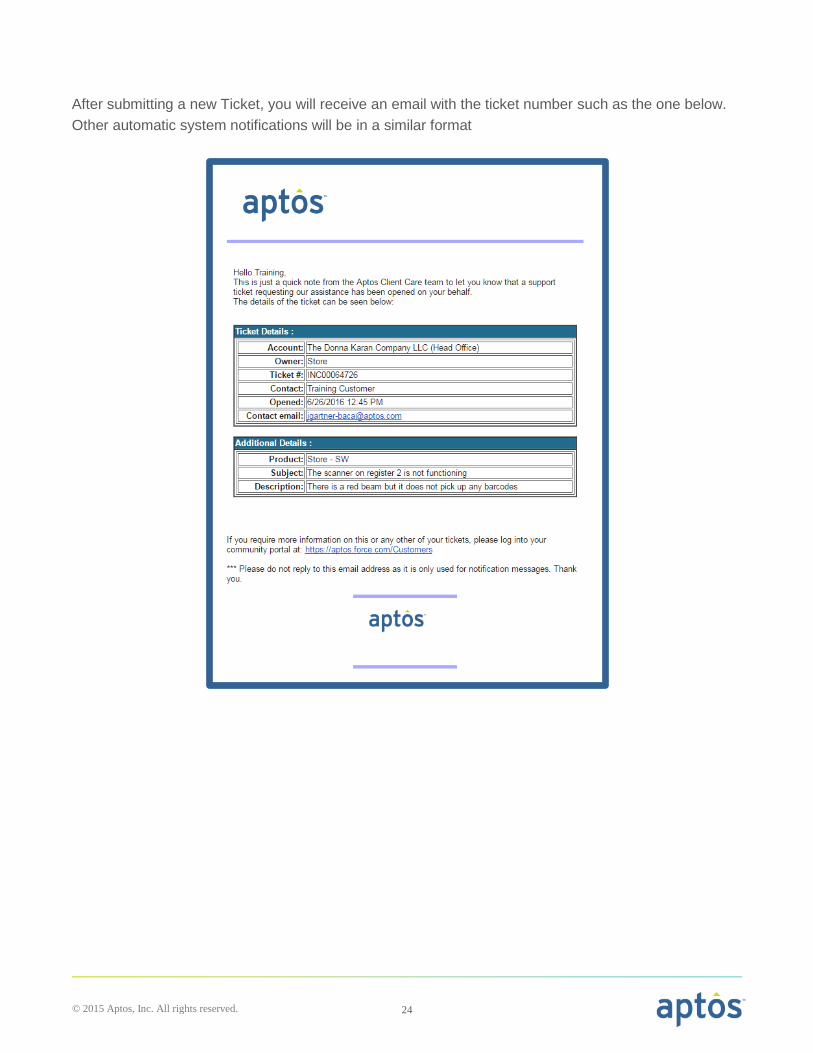
After submitting a new Ticket, you will receive an email with the ticket number such as the one below.
Other automatic system notifications will be in a similar format

25 © 2015 Aptos, Inc. All rights reserved.
The Ticket Detail screen will be displayed with the ticket number in the upper left. From here you can
either click < Back to List to return to the previous view or you can review the Ticket Detail screen.
You can also view the details of any existing Ticket by clicking on the Ticket Number anywhere you
see it underlined.
The Ticket Detail screen displays information in sections, with similar fields grouped together.
In the example below, there are six sections for: Ticket Description, Additional Details, Entitlement
Information, Third Party Escalation, DecisionOne Information and System Information.
26 © 2015 Aptos, Inc. All rights reserved.
The sections are…
Ticket Detail – Contains the date and time the ticket was opened, as well as the Ticket Owner
at Aptos and the current Status. The Ticket Number is also listed here and will be prefaced by
either “INC” to indicate an Incident ticket type or “RCA” to indicate a Root Cause Analyst ticket
type. Only Incidents can be opened from the Customer Community. Root Cause Analysis
tickets will be opened by Client Care analysts for wider issues that require further evaluation.
Ticket Description – Contains the subject and description fields
Additional Details – Contains the Ticket Type and Origin as well as the date and time the ticket
was closed and the Cause. For Root Cause Analysis (RCA) tickets, also displays the link to the
Incident (INC) ticket in the Cloned From Ticket Number field.
Entitlement Information – Contains information related to the Asset selected, including version
number.
Third Party Escalation – Contains fields related to dispatches to 3rd parties
DecisionOne Information – Contains fields related to hardware dispatches specifically with
DecisionOne
System Information – Contains fields showing the user who created the ticket and the last date
and time the ticket was modified. These two fields are populated automatically.
You can make changes to these fields by either clicking on the Edit button at the top of the page, or by
double clicking on a field to perform an in-line edit.
Fields that have a lock icon displayed next to them cannot be edited. Fields that have a pencil icon
shown next to them can be changed.
Changes to a ticket are not finalized until you click on the Save button. Changes that have not yet
been saved are highlighted in orange text

27 © 2015 Aptos, Inc. All rights reserved.
Underneath those sections, there are several additional areas, each beneath yellow bars, which are
referred to as Related Lists. Additional information on navigating can be found in the Related Lists
section of this document.
These sections are…
Ticket Comments – This section is used to add additional information to the ticket. How to add
comments is reviewed later in this document. This section only displays records added by you.
Open Activities – This section is used to view active tasks for the Client Care analyst. This
section will not be visible on a new ticket and will appear once any new task has been added.
This section only displays records added by the Client Care analyst.
Activity History – This section is used to view both completed tasks, from the Client Care
analyst as well as Comments added by you. This section will not be visible on a new ticket and
will appear once any new task or comment has been added.
Google Docs & Attachments – This section is used to add or view Attachments. Instructions
on how to do this is reviewed later in this document.

28 © 2015 Aptos, Inc. All rights reserved.
To add a new Comment, go to the Ticket Comments section and click on the Add Comment button
The Ticket comment Edit screen will appear. Type in the Comment field and click on Save when
completed.
The Client Care analyst assigned, shown in the Ticket Owner field under Ticket Details, will receive an
email notification that a new comment has been added.
The new Comment will now show in both the Ticket Comments and Activity History sections of the
Ticket Details screen.

29 © 2015 Aptos, Inc. All rights reserved.
When a Client Care analyst adds a new activity to the ticket, it will appear in either the Open Activities
section, if it is not yet finished, or under the Activity History section, if it has been completed.
Within the Activity History section, if you would like to view all the activity details at once, you can click
on the View All button. Activities will be sorted chronologically by the End Date/Time field, with the
most recent item at the top of the list.
30 © 2015 Aptos, Inc. All rights reserved.
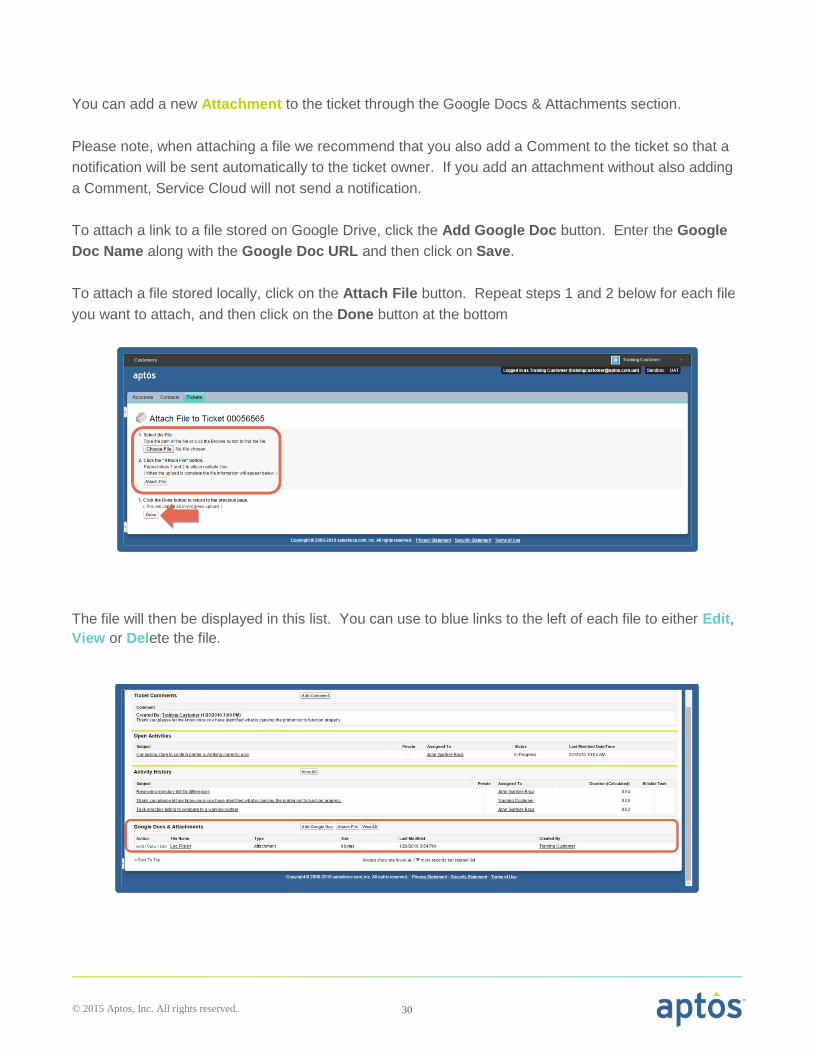
You can add a new Attachment to the ticket through the Google Docs & Attachments section.
Please note, when attaching a file we recommend that you also add a Comment to the ticket so that a
notification will be sent automatically to the ticket owner. If you add an attachment without also adding
a Comment, Service Cloud will not send a notification.
To attach a link to a file stored on Google Drive, click the Add Google Doc button. Enter the Google
Doc Name along with the Google Doc URL and then click on Save.
To attach a file stored locally, click on the Attach File button. Repeat steps 1 and 2 below for each file
you want to attach, and then click on the Done button at the bottom
The file will then be displayed in this list. You can use to blue links to the left of each file to either Edit,
View or Delete the file.
31 © 2015 Aptos, Inc. All rights reserved.
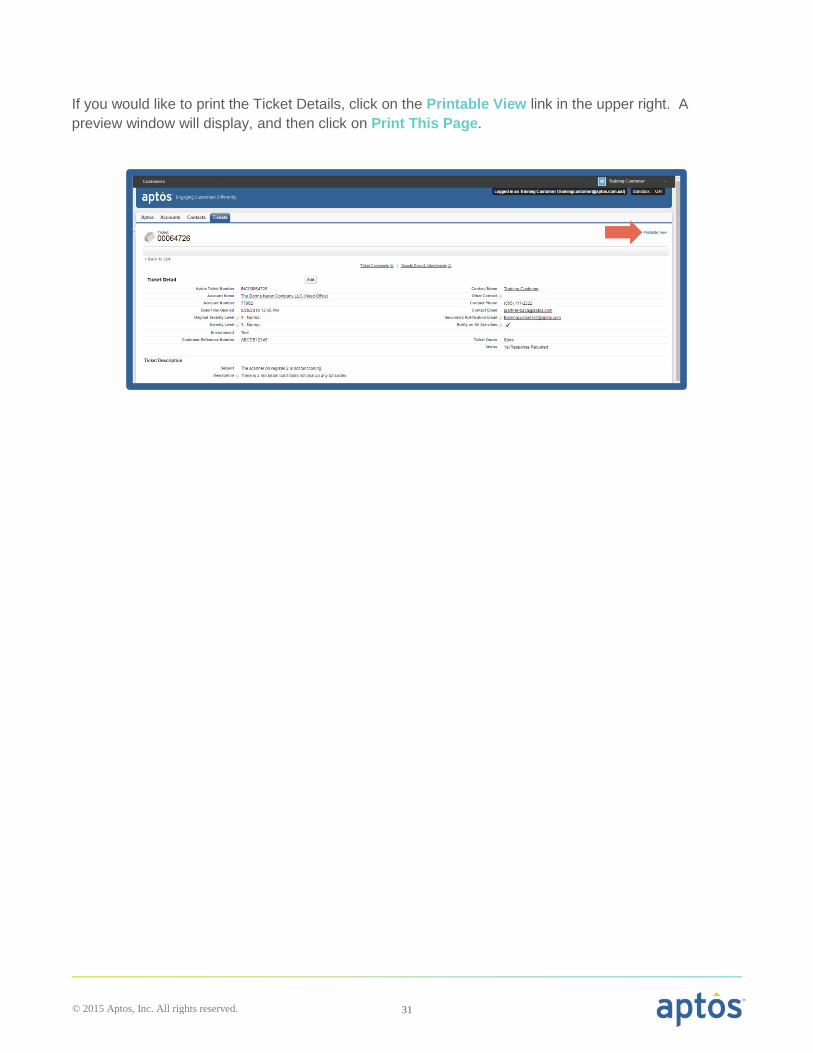
If you would like to print the Ticket Details, click on the Printable View link in the upper right. A
preview window will display, and then click on Print This Page.

32 © 2015 Aptos, Inc. All rights reserved.
Related Lists
Below the main sections for Accounts, Contacts and Tickets, underneath the yellow bars, may be one
or more Related Lists. These lists are grouped by content area and display items that are linked to the
specific item that you are currently viewing. For example, when viewing a specific Contact a Related
List for Tickets will be displayed showing any tickets that are associated to that Contact. If more than
one list is relevant then additional sections will be displayed automatically.
Each Related List initially shows 5 records. If you want to expand the list, you can do it incrementally
by clicking on the Show # more link or you can display the entire list by clicking the Go to list (#) link.

33 © 2015 Aptos, Inc. All rights reserved.
If you would like to adjust the number of records displayed in each list click on the Always show me
fewer/more records per related list link at the bottom of the page. Each time you click more the
default number of records displayed will increase by 5. Each time you click fewer the default number of
records displayed will decrease by 5.
To return to the top of the page, click on the ^Back to Top link in the lower left

34 © 2015 Aptos, Inc. All rights reserved.
Instead of scrolling down the page, you can also view each Related List by clicking on any of the
underlined links towards the top of the page. There will be one link per Related List. In the example
below, since there are two Related Lists for Tickets and Assets, we have two links available.
To jump to the Related List lower on the page, click once on the link. To display the Related List at the
top of the page, move your cursor over the link as shown below.
Within the specific Related List for Tickets, under the Action column, there are links for Edit and Cls.
The Edit link can be used to jump right to the Ticket Edit screen for that particular issue. The Cls
(close) link should not be used as Aptos Client Care Support Analysts have additional information to
enter that is required by the system when closing a support ticket. If you would like to have a ticket
closed, please add a Comment to the ticket and the support analyst assigned will update the necessary
information and close out the ticket.

35 © 2015 Aptos, Inc. All rights reserved.
Feedback
To contact us about any of the following, please email us at [email protected].
Comments and suggestions
Technical issues or problems
If you encounter an urgent issue preventing you from using the system, please contact your Client Care
Support Manager or one of the application Team Leads.

36 © 2015 Aptos, Inc. All rights reserved.
FAQ
Will my existing tickets from previous ticketing systems be available in Service Cloud?
Yes, tickets from the previous systems will be available. We will be importing all open tickets.
Closed tickets for a certain time period will also be imported into Service Cloud.
Will the FTP site(s) that I use to transfer files related to support tickets be changing?
The existing FTP sites that you currently utilize will not change and will still be available.
Who do I contact if I did not receive an email with a link to setup my credentials?
Please contact us at [email protected]
Will I be able to create Contact records for other users within my company?
No, currently all Contact records for users need to be created by the Aptos Service Cloud
administration team.
Who do I contact if I need to be setup as a new user in Service Cloud?
Please contact us at [email protected]
How many characters can we type in the Subject and Description fields for a Ticket?
You can input up to 255 characters in the Subject field and then up to 32,000 characters in the
Description field
Can I re-open a Ticket once it has been closed?
When an analyst completes a ticket, it will first go into a Status of Resolved. Clients will receive
an email notification of that activity. If you feel the ticket is not resolved, you will have 5 days to
add a Comment and request that it not be closed. If no Comment is received, the ticket will be
moved to a Closed status after which it cannot be re-opened.

37 © 2015 Aptos, Inc. All rights reserved.
Can we add new Account records for store locations to the system through the Customer Community?
Currently all store locations will need to be added to the systems by the Aptos Service Cloud
administration team. We are reviewing options, for a later phase, to allow customers the ability
to add store locations, or modify store or contact information. Until that functionality is in place,
please send any requests for new store locations to [email protected]
Are we able to submit our HDD Reload requests through the Customer Community also?
Our goal is to improve all of our processes and migrate as many of our teams as possible, who
manage customer requests, to Service Cloud. At this time, the RDC team is being on-boarded
and should begin using Service Cloud in the next few weeks after our initial go live on March 1st,
2016. As we complete that team’s migration to Service Cloud, we will communicate to all our
clients any change in process, including the ability to request a hard drive replacement. Until
that time, please follow your current process.
Can I access Service Cloud on a mobile device?
Yes. Aptos recommends accessing Service Cloud through the browser app on your mobile
device a consistent user experience. Salesforce does have a mobile application, Salesforce1,
however that app was not tested or considered during this phase of our Service Cloud
implementation.
Is there a timeout on the system to log me out after a period of inactivity?
Yes. The current timeout is 4 hours. After that time period, if there has been no user activity,
you will be automatically logged out of your Service Cloud session.
Can I add more than one person as the Ticket Contact in order to receive updates on the ticket?
Yes. While you cannot add more than one user as the Ticket Contact, you can utilize the
Secondary Notification Email field to add a second person. A valid email entered into that field
will receive the same notifications as that in the Contact Email field.
Can I, or any users within my company, modify, add or delete Contact Information for other users?
No. Currently you can only update your own Contact information. However, Aptos is looking
into changes for a future phase to allow for this.

38 © 2015 Aptos, Inc. All rights reserved.
Video Links
Click on the links below to view a brief video demonstration of that particular topic.
Customer Community Training Session 34 minutes
How to Log In 1 minute
User Settings 1 minute
How to Log Out <1 minute
Screen Layout & Navigation 4 minutes
How to Use Search 4 minutes
Accounts 3 minutes
Contacts 2 minutes
Opening a New Ticket 6 minutes
Viewing and Editing the Ticket Details 2 minutes
Viewing and Adding Comments to a Ticket 2 minutes
How to add an Attachment to a Ticket 2 minutes
Using Related Lists 3 minutes
39 © 2015 Aptos, Inc. All rights reserved.
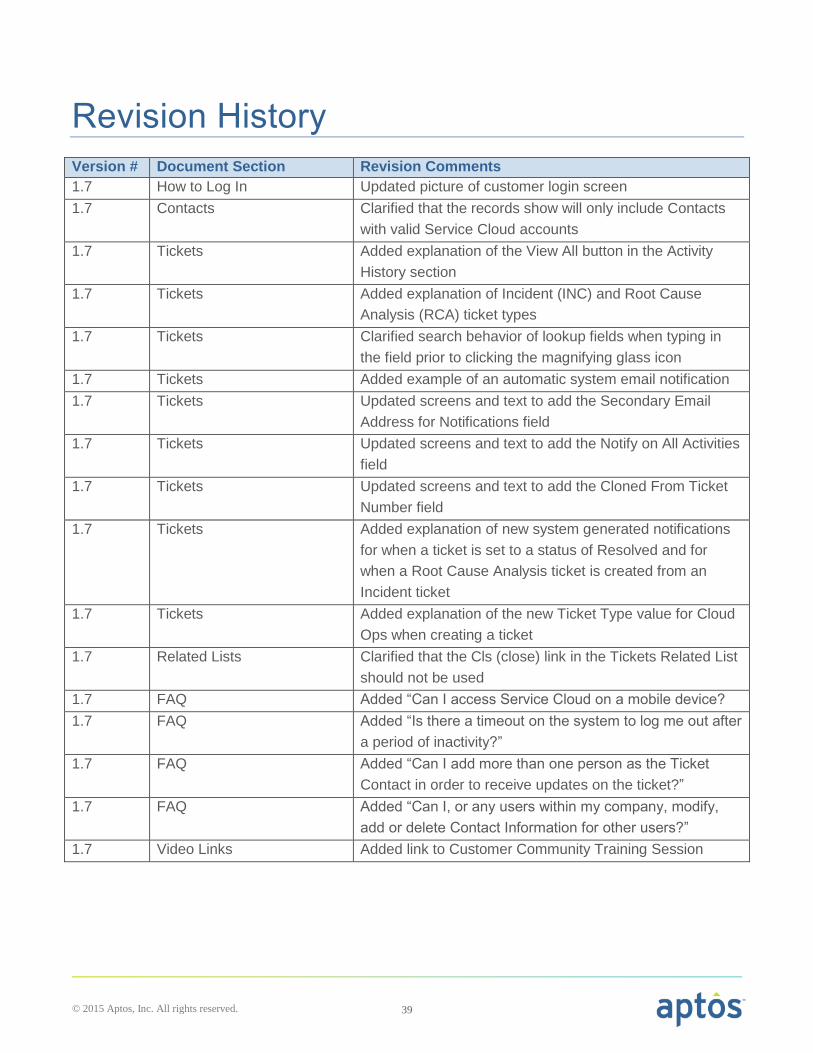
Revision History
Version # Document Section Revision Comments
1.7 How to Log In Updated picture of customer login screen
1.7 Contacts Clarified that the records show will only include Contacts
with valid Service Cloud accounts
1.7 Tickets Added explanation of the View All button in the Activity
History section
1.7 Tickets Added explanation of Incident (INC) and Root Cause
Analysis (RCA) ticket types
1.7 Tickets Clarified search behavior of lookup fields when typing in
the field prior to clicking the magnifying glass icon
1.7 Tickets Added example of an automatic system email notification
1.7 Tickets Updated screens and text to add the Secondary Email
Address for Notifications field
1.7 Tickets Updated screens and text to add the Notify on All Activities
field
1.7 Tickets Updated screens and text to add the Cloned From Ticket
Number field
1.7 Tickets Added explanation of new system generated notifications
for when a ticket is set to a status of Resolved and for
when a Root Cause Analysis ticket is created from an
Incident ticket
1.7 Tickets Added explanation of the new Ticket Type value for Cloud
Ops when creating a ticket
1.7 Related Lists Clarified that the Cls (close) link in the Tickets Related List
should not be used
1.7 FAQ Added “Can I access Service Cloud on a mobile device?
1.7 FAQ Added “Is there a timeout on the system to log me out after
a period of inactivity?”
1.7 FAQ Added “Can I add more than one person as the Ticket
Contact in order to receive updates on the ticket?”
1.7 FAQ Added “Can I, or any users within my company, modify,
add or delete Contact Information for other users?”
1.7 Video Links Added link to Customer Community Training Session