Embed Size (px)
Citation preview

EDUCATOR
IMPLEMENTATION GUID
USER MANUAL NURSING
EDUCATION
Custom Assessment Builder 2.0
YOU MAY BEGIN

Rev. 10/12 ii
CUSTOM ASSESSMENT BUILDER 2.0
USER MANUAL
Revised October 2012

Rev. 10/12 iii
TABLE OF CONTENTS INTRODUCTION .........................................................................................................................................................2
CHAPTER 1: BUILD CUSTOM ASSESSMENT .................................................................................................................5
STEP 1: CONFIGURE ASSESSMENT .............................................................................................................................................. 5 STEP 2: DEFINE ACCESS ............................................................................................................................................................ 8 STEP 3: ADD ITEMS ............................................................................................................................................................... 10
Custom Build – Add Existing Item ................................................................................................................................. 11 Custom Build – Create Custom Item ............................................................................................................................. 15 Custom Build – View Included Items ............................................................................................................................ 24 Auto Build (Blueprint) – Select Banks ........................................................................................................................... 25 Auto Build (Blueprint) – Select Primary Outcomes ....................................................................................................... 26 Auto Build (Blueprint) – Add Optional Outcomes ......................................................................................................... 27 Auto Build (Blueprint) – Create Assessment ................................................................................................................. 28
STEP 4: REVIEW ASSESSMENT ................................................................................................................................................. 29
CHAPTER 2: MANAGE CUSTOM ASSESSMENTS ......................................................................................................... 31
EDIT CREATION STATUS .......................................................................................................................................................... 32 VIEW IDS AND PASSWORDS .................................................................................................................................................... 34 VIEW BLUEPRINT ................................................................................................................................................................... 35 VIEW ASSESSMENT PREVIEW................................................................................................................................................... 36 VIEW ANSWER KEY ................................................................................................................................................................ 38 PRINT PRINTABLE VERSION ..................................................................................................................................................... 39 DELETE AN ASSESSMENT......................................................................................................................................................... 40
CHAPTER 3: BUILD CUSTOM BANKS ......................................................................................................................... 42
STEP 1: CONFIGURE BANK ...................................................................................................................................................... 42 STEP 2: MANAGE AVAILABILITY ............................................................................................................................................... 43 STEP 3: MANAGE AUTHORIZATION .......................................................................................................................................... 44 STEP 4: CONFIGURE BANK ITEMS ............................................................................................................................................. 45
Copy/Move Existing Item ............................................................................................................................................. 45 Create Custom Item ...................................................................................................................................................... 48 Import Items ................................................................................................................................................................. 48 View Included Items ..................................................................................................................................................... 50
STEP 5: REVIEW BANK ........................................................................................................................................................... 51
CHAPTER 4: MANAGE CUSTOM BANKS .................................................................................................................... 53
VIEW BANK .......................................................................................................................................................................... 54 EDIT BANK ........................................................................................................................................................................... 55
CHAPTER 5: MANAGE CUSTOM OUTCOMES ............................................................................................................. 57
REVISION HISTORY ................................................................................................................................................... 58

Rev. 10/12 1
CUSTOM ASSESSMENT BUILDER 2.0
USER MANUAL

Rev. 10/12 2
INTRODUCTION Custom Assessment Builder (CAB) allows instructors to create their own assessments by choosing questions from the ATI Item Bank or by uploading their own items. To access the Custom Assessment Builder, select the Products tab and then select Access Custom Assessment Builder from the Select Activity drop-down list.
The Custom Assessment Builder home page displays. The Build Custom Assessments tab is selected.

Rev. 10/12 3
Click one of the tabs to begin your activity:
If you want to: Click this tab:
Create a custom assessment by selecting questions from the ATI question bank or a custom question bank.
Build Custom Assessments
Retrieve a saved assessment that is in progress and make changes to it.
Manage Custom Assessments
Create a library of custom questions and designate who can use it.
Build Custom Banks
View or modify the details of and/or the items included in a custom question bank.
Manage Custom Banks
This feature is a future enhancement that will enable you to attach an objective to the assessment that defines the targeted skills and topic areas.
Manage Custom Outcomes

Rev. 10/12 4
CHAPTER
BUILD CUSTOM ASSESSMENT
Contents
CHAPTER 1: BUILD CUSTOM ASSESSMENT ................................................ ERROR! BOOKMARK NOT DEFINED. STEP 1: CONFIGURE ASSESSMENT .................................................................................. ERROR! BOOKMARK NOT DEFINED. STEP 2: DEFINE ACCESS ................................................................................................ ERROR! BOOKMARK NOT DEFINED. STEP 3: ADD ITEMS ..................................................................................................... ERROR! BOOKMARK NOT DEFINED.
Custom Build – Add Existing Item ..................................................................... Error! Bookmark not defined. Custom Build – Create Custom Item ................................................................. Error! Bookmark not defined.
Step 1: Add Question .................................................................................................. Error! Bookmark not defined. Step 2: Add Answers ................................................................................................... Error! Bookmark not defined. Step 3: Add Item Outcomes ........................................................................................ Error! Bookmark not defined. Step 4: Add Focused Review ....................................................................................... Error! Bookmark not defined.
Add an ATI Resource ............................................................................................... Error! Bookmark not defined. Add a Custom Resource .......................................................................................... Error! Bookmark not defined. View Linked Resources ........................................................................................... Error! Bookmark not defined.
Step 5: Item Summary ................................................................................................ Error! Bookmark not defined. Custom Build – View Included Items ................................................................. Error! Bookmark not defined. Auto Build (Blueprint) – Select Banks ................................................................ Error! Bookmark not defined. Auto Build (Blueprint) – Select Primary Outcomes ........................................... Error! Bookmark not defined. Auto Build (Blueprint) – Add Optional Outcomes ............................................. Error! Bookmark not defined. Auto Build (Blueprint) – Create Assessment ..................................................... Error! Bookmark not defined.
STEP 4: REVIEW ASSESSMENT........................................................................................ ERROR! BOOKMARK NOT DEFINED.
Rev. 10/12 5
CHAPTER 1: BUILD CUSTOM ASSESSMENT The new look and feel for Custom Assessment Builder includes wizards that will walk you through each step of the workflows. The custom assessment workflow has four distinct steps and allows users to create their own custom assessments to which they can add custom items. The steps for building a custom assessment are presented below. Step 1: Configure Assessment
Step 2: Define Access
Step 3: Add Items
Step 4: Review Assessment
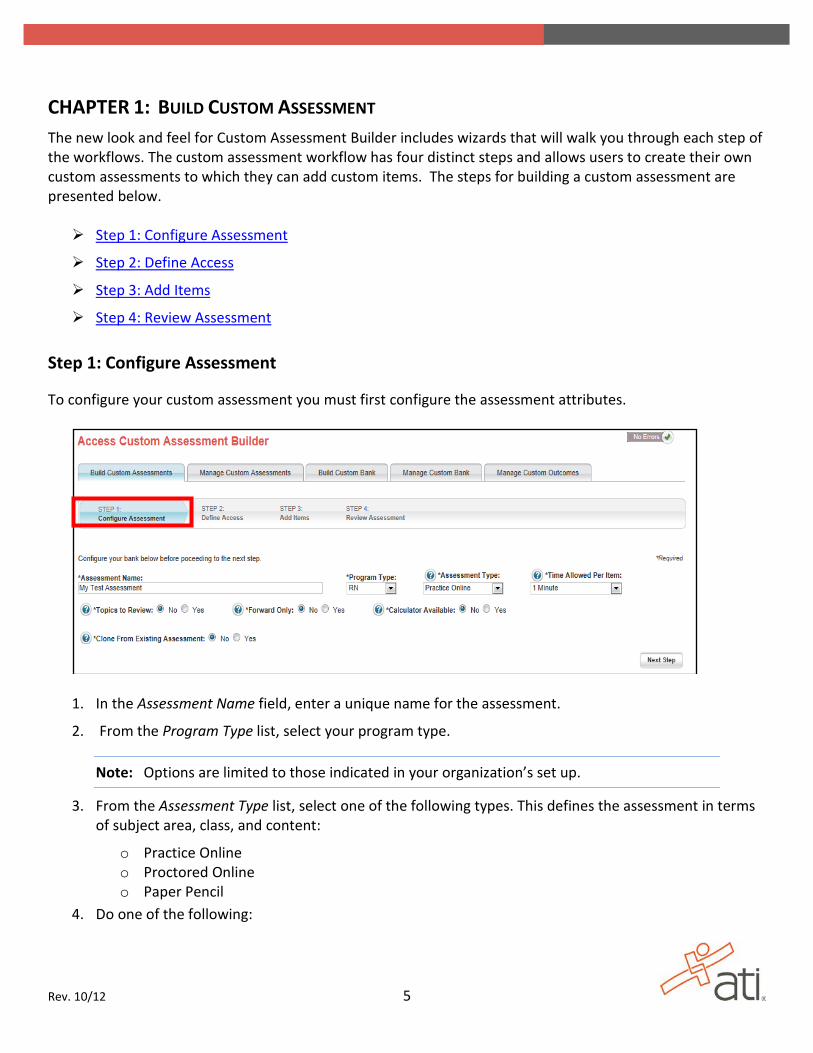
Step 1: Configure Assessment
To configure your custom assessment you must first configure the assessment attributes.
1. In the Assessment Name field, enter a unique name for the assessment.
2. From the Program Type list, select your program type.
Note: Options are limited to those indicated in your organization’s set up.
3. From the Assessment Type list, select one of the following types. This defines the assessment in terms of subject area, class, and content:
o Practice Online o Proctored Online o Paper Pencil
4. Do one of the following:
Rev. 10/12 6
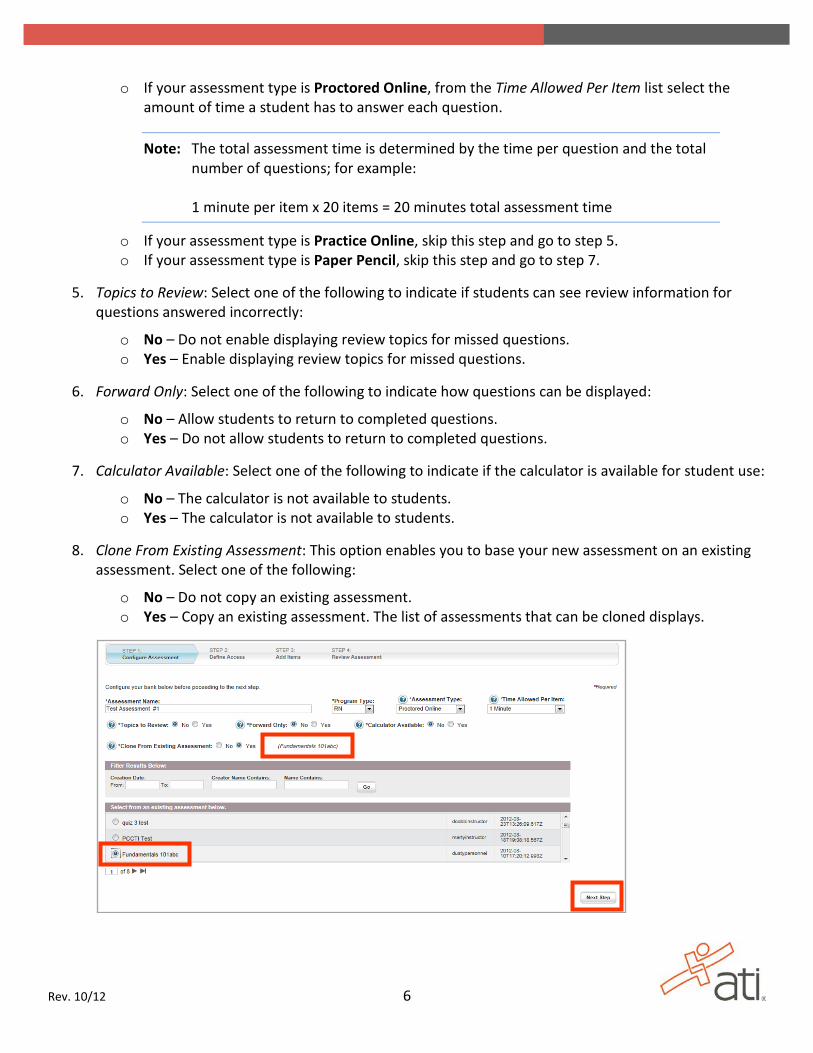
o If your assessment type is Proctored Online, from the Time Allowed Per Item list select the amount of time a student has to answer each question.
Note: The total assessment time is determined by the time per question and the total number of questions; for example: 1 minute per item x 20 items = 20 minutes total assessment time
o If your assessment type is Practice Online, skip this step and go to step 5. o If your assessment type is Paper Pencil, skip this step and go to step 7.
5. Topics to Review: Select one of the following to indicate if students can see review information for questions answered incorrectly:
o No – Do not enable displaying review topics for missed questions. o Yes – Enable displaying review topics for missed questions.
6. Forward Only: Select one of the following to indicate how questions can be displayed:
o No – Allow students to return to completed questions. o Yes – Do not allow students to return to completed questions.
7. Calculator Available: Select one of the following to indicate if the calculator is available for student use:
o No – The calculator is not available to students. o Yes – The calculator is not available to students.
8. Clone From Existing Assessment: This option enables you to base your new assessment on an existing assessment. Select one of the following:
o No – Do not copy an existing assessment. o Yes – Copy an existing assessment. The list of assessments that can be cloned displays.

Rev. 10/12 7
9. Do one of the following:
o If you enabled cloning, go to the next step. o If you did not enable cloning, click Next Step and go to Step 2: Define Access.
10. From the list of current assessments, select the assessment you want to clone. The name of the assessment you selected displays to the right of the Clone from Existing Assessment option.
Note: If necessary, use the filter options to locate the appropriate assessment.
11. Click Next Step and go to Step 2: Define Access.

Rev. 10/12 8
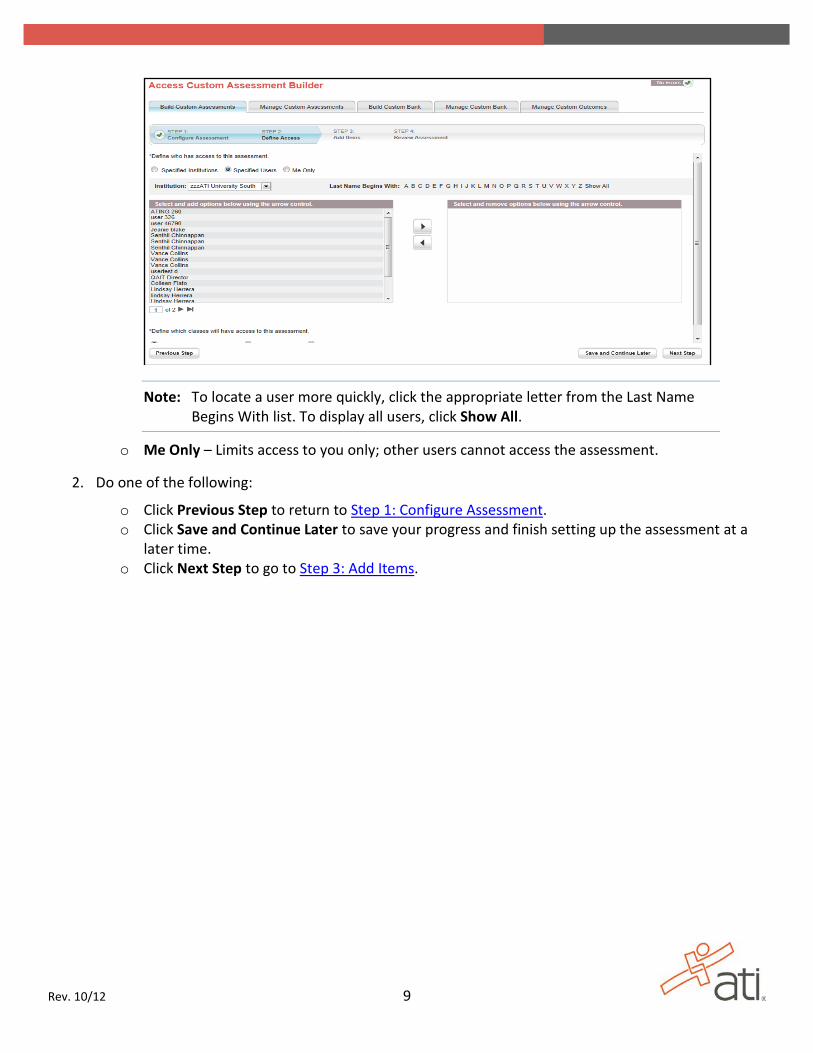
Step 2: Define Access
Define who in your institution or consortium can access the assessments and the associated tutorials.
1. Select one of the following to define who has access to this assessment:
o Specified Institutions – Allows all valid users from a selected institution to access the assessment. Select one of the following options to define which classes have access to this option:
All Active and Future Classes All Active Classes Specified Classes -- Select a class from the list
o Specified Users – Allows you to limit access to the assessment to specific users. Select a user from the list of available users and click the right arrow to enable the user to access this assessment.
Rev. 10/12 9
Note: To locate a user more quickly, click the appropriate letter from the Last Name Begins With list. To display all users, click Show All.
o Me Only – Limits access to you only; other users cannot access the assessment.
2. Do one of the following:
o Click Previous Step to return to Step 1: Configure Assessment. o Click Save and Continue Later to save your progress and finish setting up the assessment at a
later time. o Click Next Step to go to Step 3: Add Items.

Rev. 10/12 10
Step 3: Add Items
You can build an assessment by selecting individual questions from an existing question bank, creating and adding your own custom items, or by automatically adding questions based on desired blueprint percentages.
Note: You can use any or all of the three methods to add items to an individual assessment.
o Custom Build – The tabs on the left side of the page provide the options you will need to create items or individually add existing items to your assessment. Options for Custom Build are:
o Add Existing Item – Click this tab to add questions to your assessment from an existing question bank.
o Create Custom Item – Click this tab to create your own questions and add them to the assessment.
o View Included Items – Click this tab to view all the questions that have been added to the assessment.
o Auto Build (Blueprint) o Select Banks -- Select the question banks from which you will select items to include in your
assessment. o Select Primary Outcomes -- Select your primary outcome category and assign percentages to all
the applicable subcategory outcomes. o Add Additional Outcomes -- Select additional outcomes to include in your assessment.
Rev. 10/12 11
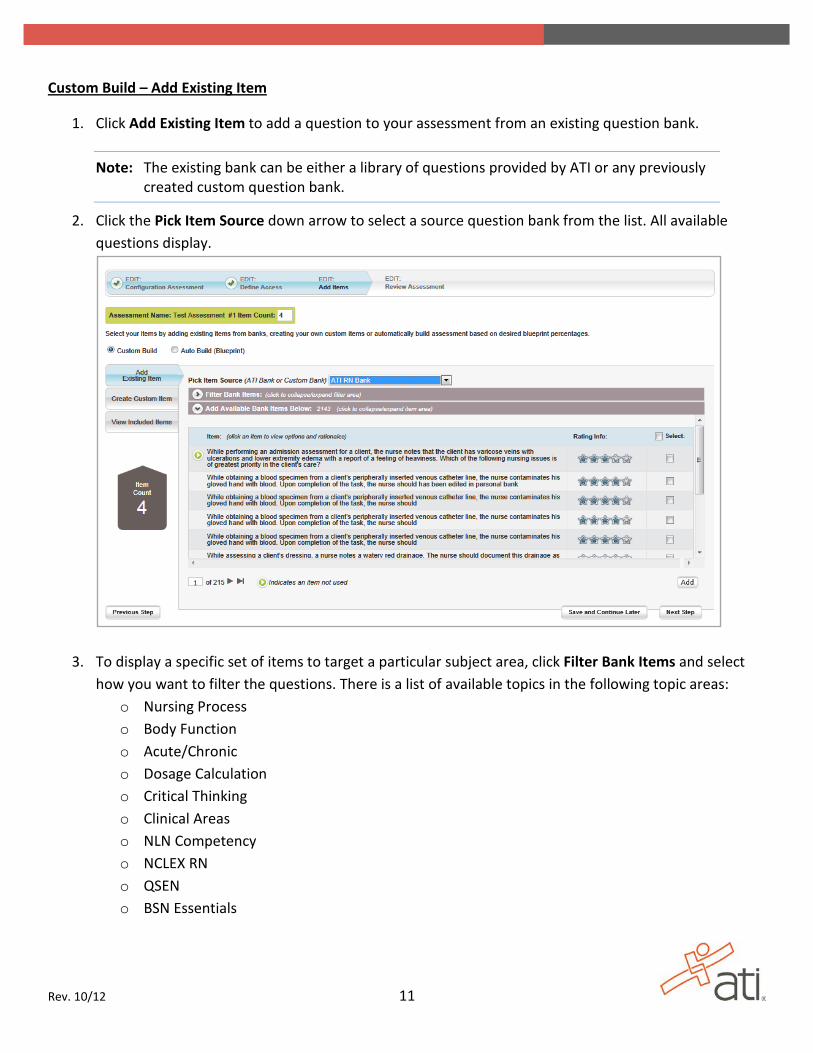
Custom Build – Add Existing Item
1. Click Add Existing Item to add a question to your assessment from an existing question bank.
Note: The existing bank can be either a library of questions provided by ATI or any previously created custom question bank.
2. Click the Pick Item Source down arrow to select a source question bank from the list. All available questions display.
3. To display a specific set of items to target a particular subject area, click Filter Bank Items and select how you want to filter the questions. There is a list of available topics in the following topic areas:
o Nursing Process o Body Function o Acute/Chronic o Dosage Calculation o Critical Thinking o Clinical Areas o NLN Competency o NCLEX RN o QSEN o BSN Essentials

Rev. 10/12 12
To help you find a specific topic, enter a term in the Search for Terms text box and click Go.
Note: The number that displays next to Add Available Bank Items Below indicates the number of questions available as a result of your filter selections. The more filters you apply, the fewer number of questions will be available.
4. Click Add Available Bank Items Below to display the list of questions.
o Questions preceded by the Item Not Included icon have not been added to the assessment and are available for you to select.
o Questions without an icon have already been added to the assessment. o The number displayed under Item Count indicates how many questions have been added.

Rev. 10/12 13

Rev. 10/12 14
5. To view information about a question, click the question to open a Question Summary window. The following information displays:
o Question Summary – The type of question: Multiple Choice Multiple Response Fill-in-the-blank alpha Fill-in-the-blank numeric
o Question – The text of the question. o Graphic – A link to open a graphic, if one is available for the question. o Answer/Rationale – The possible answers and the rationale for each answer. The correct
answer and rationale are highlighted. o Item Outcome Details – A description of the topic and all topic areas the question addresses.
When you are finished reviewing the Question Summary, click the X to close the window and return to the list of questions.
6. To add questions to the assessment, do the following and then click Add. o To add one or multiple questions, locate the question you want to add and select the
associated check box to the right of the question. o To add all questions, select the Select check box at the top.
All questions that have been added are removed from the list of available items and the Item Count number updates to include the number of items you just added.

Rev. 10/12 15
Note: To remove an item from your assessment, refer to View Included Items.
7. When you are finished adding existing items, you have the following options: o To add items from another source question bank, repeat this procedure from step 2. o To create and add custom items to your assessment, click Create Custom Item on the left side
of the page and go to the next section. o To review the items included in your assessment, click View Included Items on the left side of
the page. Use this option to: View the Question Summary Window Edit a question and/or add a graphic. Remove a question.
o To save your progress and continue at a later time, click Save and Continue Later. You can retrieve your saved assessment by using the Manage Custom Assessments tab.
o To return to Step 1: Configure Assessment, click Previous Step. o To go to Step 4: Review Assessment, click Next Step.
Custom Build – Create Custom Item You can add four types of items: Multiple Choice Multiple Response Fill-in-the-blank Alpha Fill-in-the-blank Numeric
This process uses the same wizard formatting as creating a custom assessment. These sample screens demonstrate adding a Multiple Response item. You must complete five steps to add a custom item:
Step 1: Add Question Step 2: Add Answers Step 3: Add Item Outcomes Step 4: Add Focused Review Step 5: Item Summary

Rev. 10/12 16
1. Click Create Custom Item on the left side of the page.
2. Click the Add button for the type of item you are creating; in this case, 2. Multiple Response is the type of item being created. The Add Item: Multiple Response window opens.
Step 1: Add Question
Rev. 10/12 17
1. Enter the text of the item/question in the blank text box.
2. If you want to include an image with the question, enter the file name in the Graphic Import text box or click Browse to locate and insert the file name.
3. Click Next Step to save your question and go to Step 2: Add Answers.
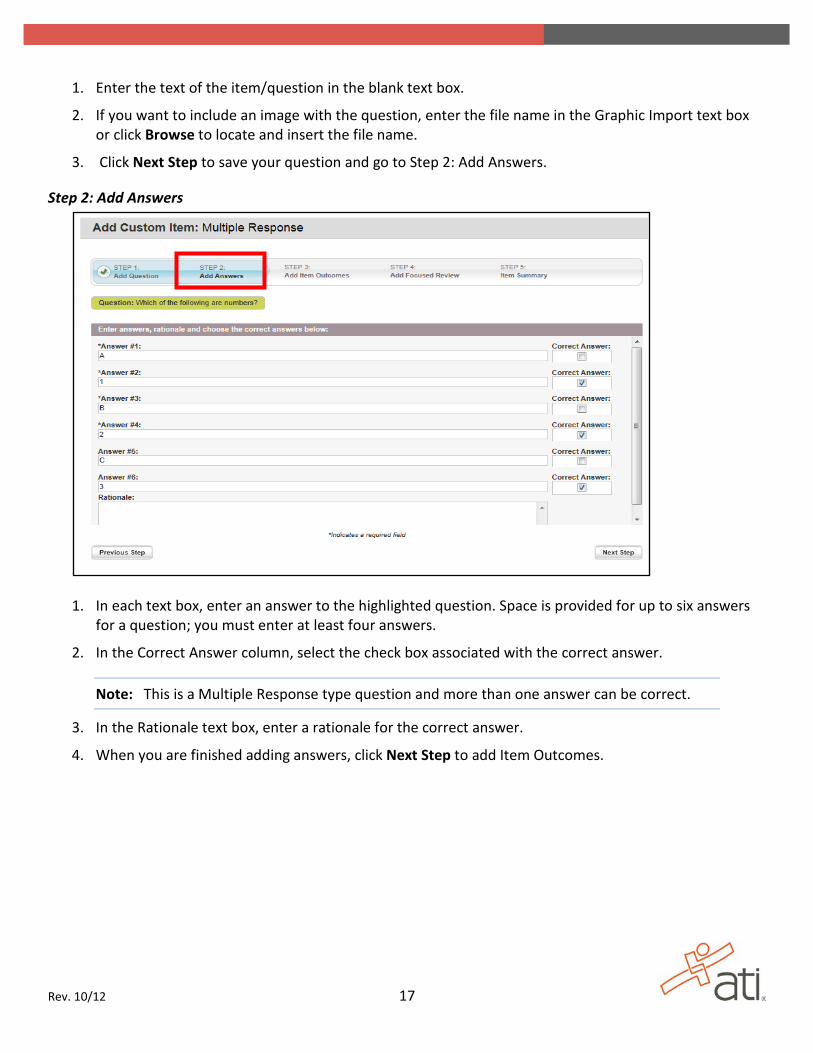
Step 2: Add Answers
1. In each text box, enter an answer to the highlighted question. Space is provided for up to six answers for a question; you must enter at least four answers.
2. In the Correct Answer column, select the check box associated with the correct answer.
Note: This is a Multiple Response type question and more than one answer can be correct.
3. In the Rationale text box, enter a rationale for the correct answer.
4. When you are finished adding answers, click Next Step to add Item Outcomes.

Rev. 10/12 18
Step 3: Add Item Outcomes
1. In the Topic Descriptor text box, enter a term or phrase that describes the focus of the question.
2. From the topic drop-down boxes, select Outcomes for all topics, as appropriate.
3. In Add This Item to Custom Bank, designate to which custom question bank(s) the question should be added. The question must be added to at least one question bank.
o To add the question individually to one or more question banks, select a bank from the list on the left and click the right arrow to move the bank to the box on the right.
o To add the question to all custom banks, select the Add to all custom banks check box.
Note: To remove the question from a question bank, select the name of the bank in the box on the right and click the left arrow.
4. When you are finished adding Item Outcomes, click Next Step to go to Step 4 and add resources for focused review.

Rev. 10/12 19
Step 4: Add Focused Review You can add one or more ATI Resources or your own Custom Resources to the item you are creating. In the Select Resource Type field, select either ATI Resource or Custom Resource and then click Next Step.

Rev. 10/12 20
Add an ATI Resource
1. To link an existing resource to your custom item, select the ATI Resource button.
2. Click Filter Available Resources to narrow the list of displayed resources, if needed.
3. Click View if you want to review an item in a separate browser window.
4. In the Link column, select the check box associated with each of the resources you want to link to your question.
5. When you are finished linking resources, do one of the following:
o Click the View Linked Resources tab to review the resources you have linked to your item. o Click Next Step to go to STEP 5: Item Summary.

Rev. 10/12 21
Add a Custom Resource
1. To link a custom resource to your item, select the Custom Resource button.
2. You can either link an existing (previously uploaded) custom resource or you can add a new resource.
o Click Link Existing Resource to link a custom resource that has already been uploaded. A list of available resources displays. Locate the resource you want to link to your question and select the Link check box associated with the resource.
o Click Upload a Resource to add a new resource to be linked. 3. In the Resource Name field, enter the name you want associated to the resource.
4. Either enter the file path and name or click Browse to locate and select the file you want to upload.
Note: Resources must be in Adobe® .pdf file format.
5. Assign at least one attribute to the resource from the displayed lists. This step enables you to associate a topic area to the resource.
6. Click Upload and Link. The resource is uploaded and linked to the item you are creating.
7. Repeat this process for all the resources you want to upload and then do one of the following:
o Click the View Linked Resources tab to review the resources you have linked to your item. o Click Next Step to go to the Item Summary.
Rev. 10/12 22
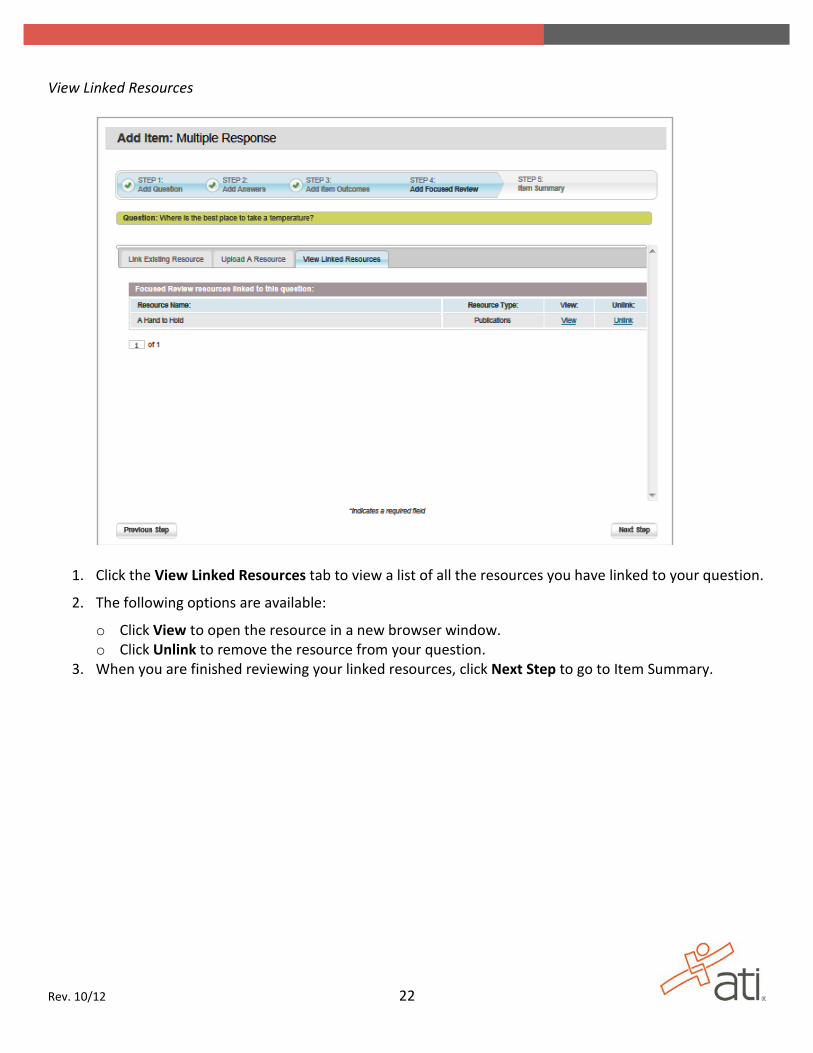
View Linked Resources
1. Click the View Linked Resources tab to view a list of all the resources you have linked to your question.
2. The following options are available:
o Click View to open the resource in a new browser window. o Click Unlink to remove the resource from your question.
3. When you are finished reviewing your linked resources, click Next Step to go to Item Summary.

Rev. 10/12 23
Step 5: Item Summary The Item Summary step allows you to review everything you have created regarding your item or question. Specifically, use this page to: Review and edit the text of your question, answers, and rationale. View any graphic attached to the question. Review and edit specified Item Outcomes.
1. Click STEP 5: Item Summary.
2. Click the Question Edit or Item Outcomes Details Edit button to make changes.
3. Click Graphic to view any image that is attached to the question.
4. Click Save and Finish to save the question and close the Add Item window.

Rev. 10/12 24
Custom Build – View Included Items Use the View Included Items option to review and edit the assessment details.
The following options are available:
Click View Blueprint to open the View Blueprint window and review and edit assessment details.

Rev. 10/12 25
o Click the Custom Assessment Details Edit button to change information you set during STEP 1:
Edit Configuration Assessment. o Click the Access Details Edit button to change the access restrictions you established during
STEP 2: Define Access. Click the text of a question to open the Question Summary window and view the text of the question,
answers/rationale, attached graphics, and item outcome details. Click the Edit Item: Edit button associated with a question to modify the item. Click the Delete Item: Delete button associated with a question to remove it from the assessment.
Auto Build (Blueprint) – Select Banks
1. In the Number of Questions field, change the number of items you are adding, if necessary. The default number of questions is 100.
2. Do one of the following to select banks:
o Select one or more individual bank(s) from the list on the left and click the right arrow to include the bank. If desired, you can filter the list of banks from which to choose: In the Name Contains field, enter all or part of the bank name and then click Go. In the Creator Name Contains field, enter all or part of the name of the person who
created the bank and then click Go. o Select the Select from all available banks check box to be able to choose questions from all
available banks.

Rev. 10/12 26
3. Click Select Primary Outcomes and go to the next section to select a primary outcome category and assign percentages to all applicable outcome subcategories.
Auto Build (Blueprint) – Select Primary Outcomes 1. Click Select Primary Outcomes to select a primary outcome and assign percentages to outcome
subcategories.
2. From the Primary Outcome list, select a category for your primary outcome
3. Enter a percentage for the displayed subcategory outcomes so that the total equals 100%.
4. Click Add Optional Outcomes to select additional outcomes for your assessment.
Note: The percentages assigned must total 100%.

Rev. 10/12 27
Auto Build (Blueprint) – Add Optional Outcomes 1. Click Add Optional Outcomes.
2. Click the Expand icon to open a category.
3. Select the check box next to all the additional outcomes you want to include in your assessment.
4. Click Next Step to create the assessment.

Rev. 10/12 28
Auto Build (Blueprint) – Create Assessment After selecting banks and selecting outcomes, click Next Step to build the assessment. If your auto build settings are too narrow and do not allow the system to pull the desired number of
items for the assessment, the Attention window displays the following message. Do one of the following:
o Click Cancel to go back and adjust your settings. o Click Proceed to continue building the assessment with fewer items.
If the system was able to add the designated number items to your assessment, the Attention window displays the successfully created message. Click Proceed to save your assessment and proceed to Step 4: Review Assessment.
Rev. 10/12 29
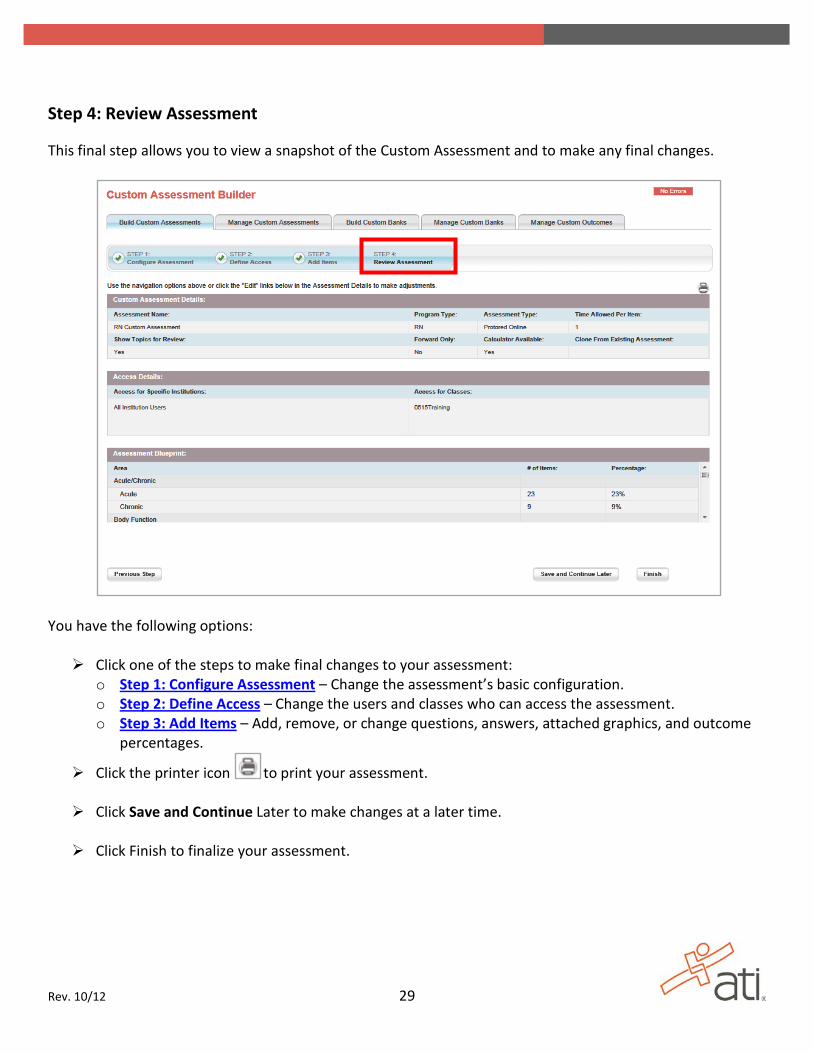
Step 4: Review Assessment
This final step allows you to view a snapshot of the Custom Assessment and to make any final changes.
You have the following options: Click one of the steps to make final changes to your assessment:
o Step 1: Configure Assessment – Change the assessment’s basic configuration. o Step 2: Define Access – Change the users and classes who can access the assessment. o Step 3: Add Items – Add, remove, or change questions, answers, attached graphics, and outcome
percentages.
Click the printer icon to print your assessment. Click Save and Continue Later to make changes at a later time.
Click Finish to finalize your assessment.

Rev. 10/12 30
CHAPTER
MANAGE CUSTOM ASSESSMENT
Contents
CHAPTER 2: MANAGE CUSTOM ASSESSMENTS ......................................... ERROR! BOOKMARK NOT DEFINED. EDIT CREATION STATUS ................................................................................................ ERROR! BOOKMARK NOT DEFINED. VIEW IDS AND PASSWORDS .......................................................................................... ERROR! BOOKMARK NOT DEFINED. VIEW BLUEPRINT ......................................................................................................... ERROR! BOOKMARK NOT DEFINED. VIEW ASSESSMENT PREVIEW ......................................................................................... ERROR! BOOKMARK NOT DEFINED. VIEW ANSWER KEY ...................................................................................................... ERROR! BOOKMARK NOT DEFINED. PRINT PRINTABLE VERSION ........................................................................................... ERROR! BOOKMARK NOT DEFINED. DELETE AN ASSESSMENT ............................................................................................... ERROR! BOOKMARK NOT DEFINED.

Rev. 10/12 31
CHAPTER 2: MANAGE CUSTOM ASSESSMENTS After you have saved an assessment, use the Manage Custom Assessments option to view, modify, print, or delete the assessment.
1. Click the Manage Custom Assessments tab. The Proctored tab on the left side of the page is selected by default, and a list of all Proctored assessments to which you have access displays.
2. If you want to display a list of Practice or Paper/Pencil assessments, click the appropriate tab; otherwise, go to the next step.
3. If necessary, in the Filter Results Below pane, enter one of the following filter options and then click Go; otherwise, go to the next step.
o Creation Date From/To
o Creator Name Contains
o Name Contains
4. Select one of the following options:
o Edit Creation Status – Indicates whether the assessment is still in progress or has been finalized:
o View IDs and Passwords – Assign classes and create a Retake password.
o View Blueprint – View and print the blueprint.

Rev. 10/12 32
o View Assessment Preview – View questions, answers, and rationales; remove questions from the assessment.
o View Answer Key – Generate a detailed answer key in .pdf format.
o Print Printable Version – Generate a copy of the assessment in .pdf format that can be sent to a printer or saved as a file.
o Delete – Permanently remove a custom assessment.
Edit Creation Status
The Creation Status column indicates whether the assessment has been finalized or if you can still edit any aspect of its details or questions. In Progress – edit – The assessment has not been finalized and can be opened and modified.
Finalize – The assessment has been finalized and you cannot add questions. You can:
o Assign classes o Create a Retake password. o View and print the blueprint o View an assessment preview and remove questions o Generate and print the answer key with rationale o Generate a printable version of the assessment o Delete the assessment
Rev. 10/12 33
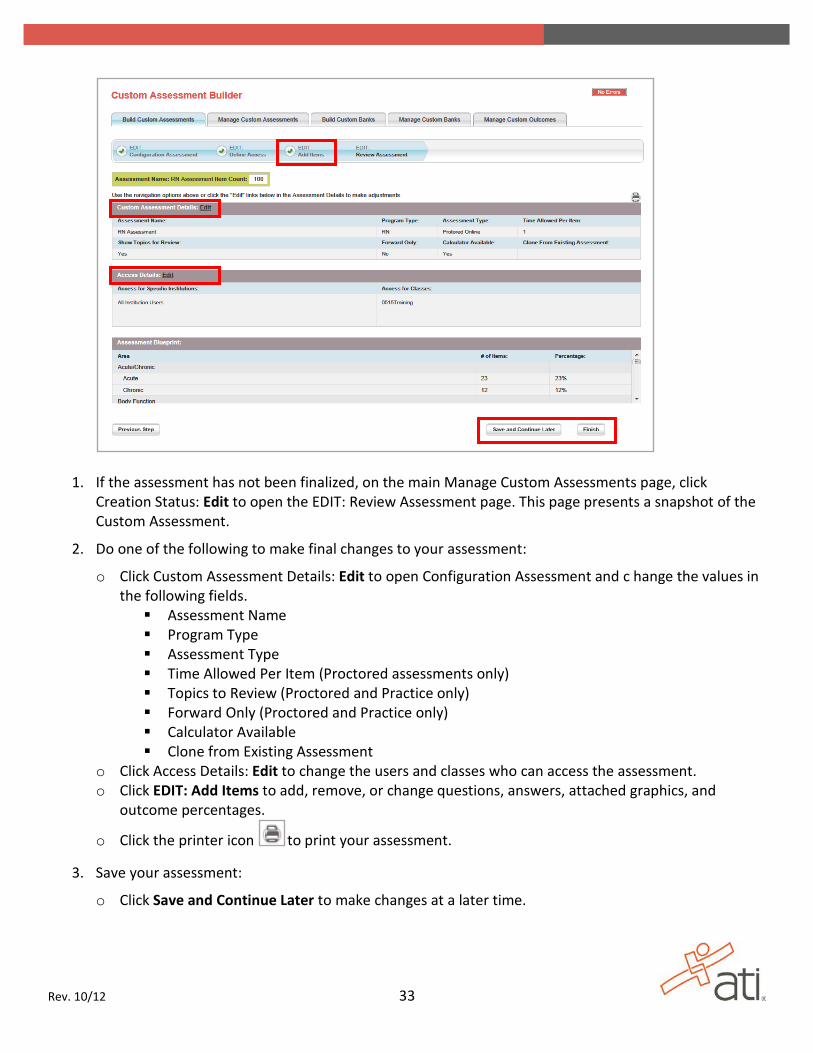
1. If the assessment has not been finalized, on the main Manage Custom Assessments page, click Creation Status: Edit to open the EDIT: Review Assessment page. This page presents a snapshot of the Custom Assessment.
2. Do one of the following to make final changes to your assessment:
o Click Custom Assessment Details: Edit to open Configuration Assessment and c hange the values in the following fields. Assessment Name Program Type Assessment Type Time Allowed Per Item (Proctored assessments only) Topics to Review (Proctored and Practice only) Forward Only (Proctored and Practice only) Calculator Available Clone from Existing Assessment
o Click Access Details: Edit to change the users and classes who can access the assessment. o Click EDIT: Add Items to add, remove, or change questions, answers, attached graphics, and
outcome percentages.
o Click the printer icon to print your assessment.
3. Save your assessment:
o Click Save and Continue Later to make changes at a later time.
Rev. 10/12 34
o Click Finish to finalize your assessment.
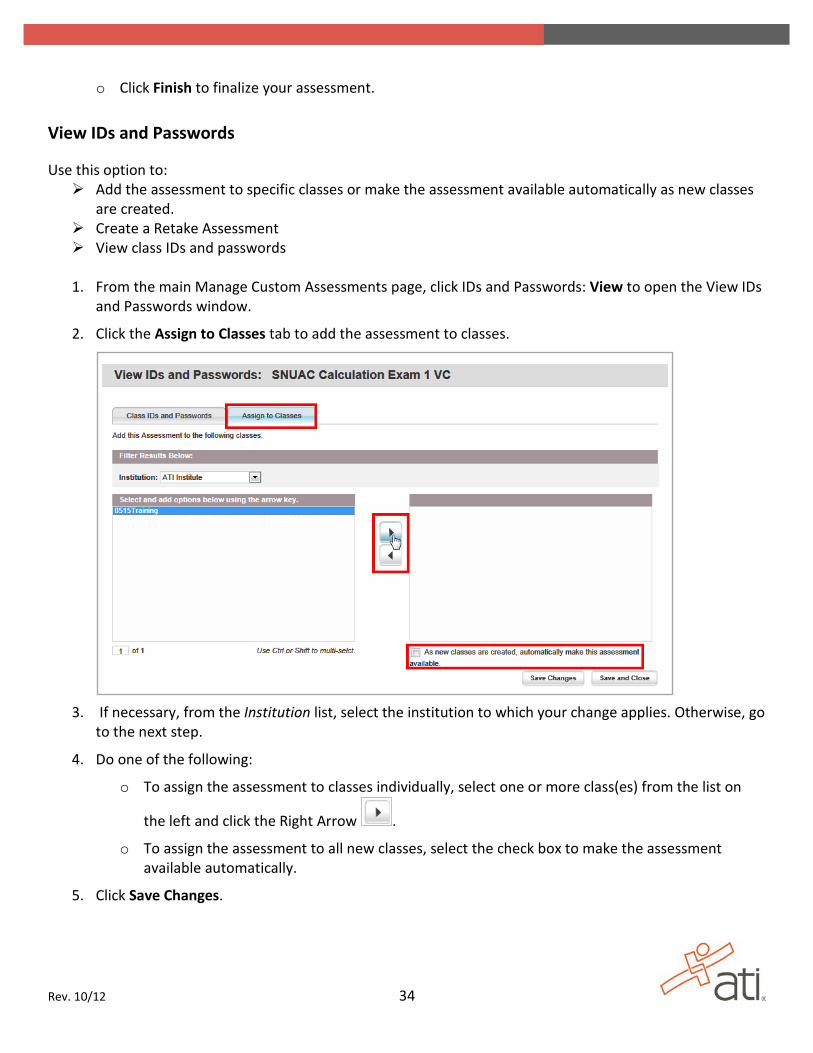
View IDs and Passwords
Use this option to: Add the assessment to specific classes or make the assessment available automatically as new classes
are created. Create a Retake Assessment View class IDs and passwords
1. From the main Manage Custom Assessments page, click IDs and Passwords: View to open the View IDs
and Passwords window.
2. Click the Assign to Classes tab to add the assessment to classes.
3. If necessary, from the Institution list, select the institution to which your change applies. Otherwise, go
to the next step.
4. Do one of the following:
o To assign the assessment to classes individually, select one or more class(es) from the list on
the left and click the Right Arrow .
o To assign the assessment to all new classes, select the check box to make the assessment available automatically.
5. Click Save Changes.

Rev. 10/12 35
6. Click the Class IDs and Passwords tab. All the classes to which this assessment is assigned are listed.
7. Click Retake to create a retake assessment and obtain a Retake ID and Password.
8. Close the window when you are finished making your changes.
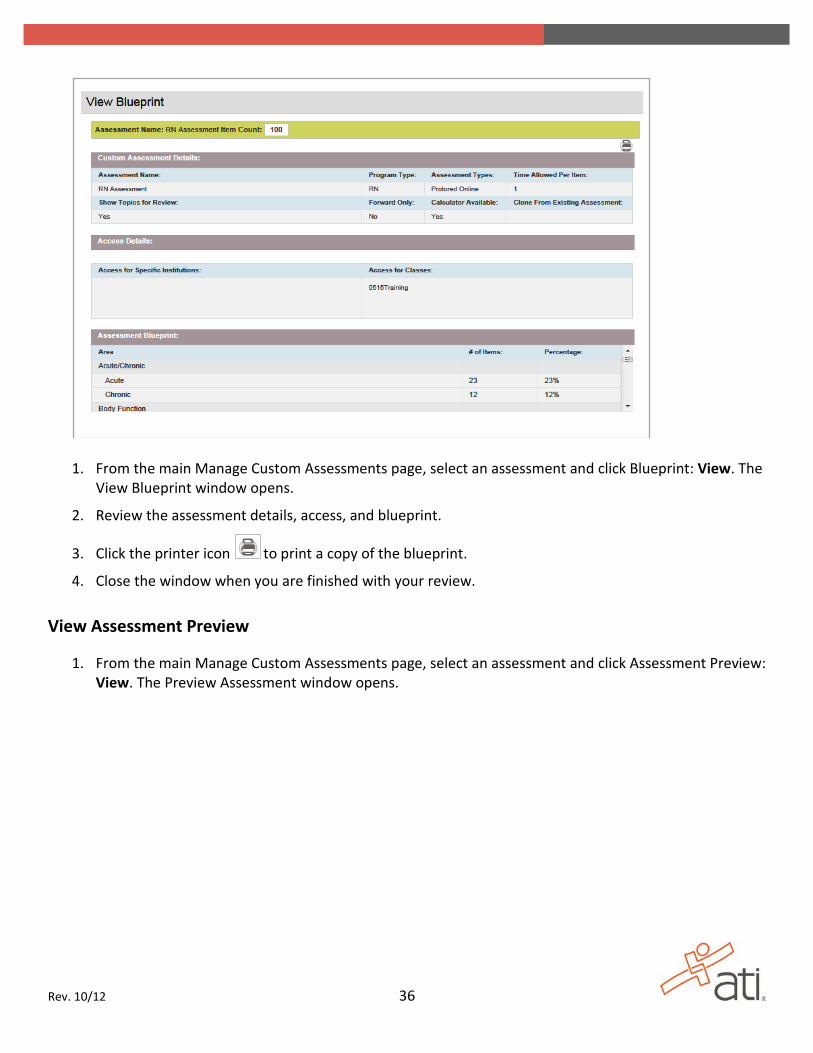
View Blueprint
Use this option to review and/print an overview of your custom assessment details.
Rev. 10/12 36
1. From the main Manage Custom Assessments page, select an assessment and click Blueprint: View. The View Blueprint window opens.
2. Review the assessment details, access, and blueprint.
3. Click the printer icon to print a copy of the blueprint.
4. Close the window when you are finished with your review.
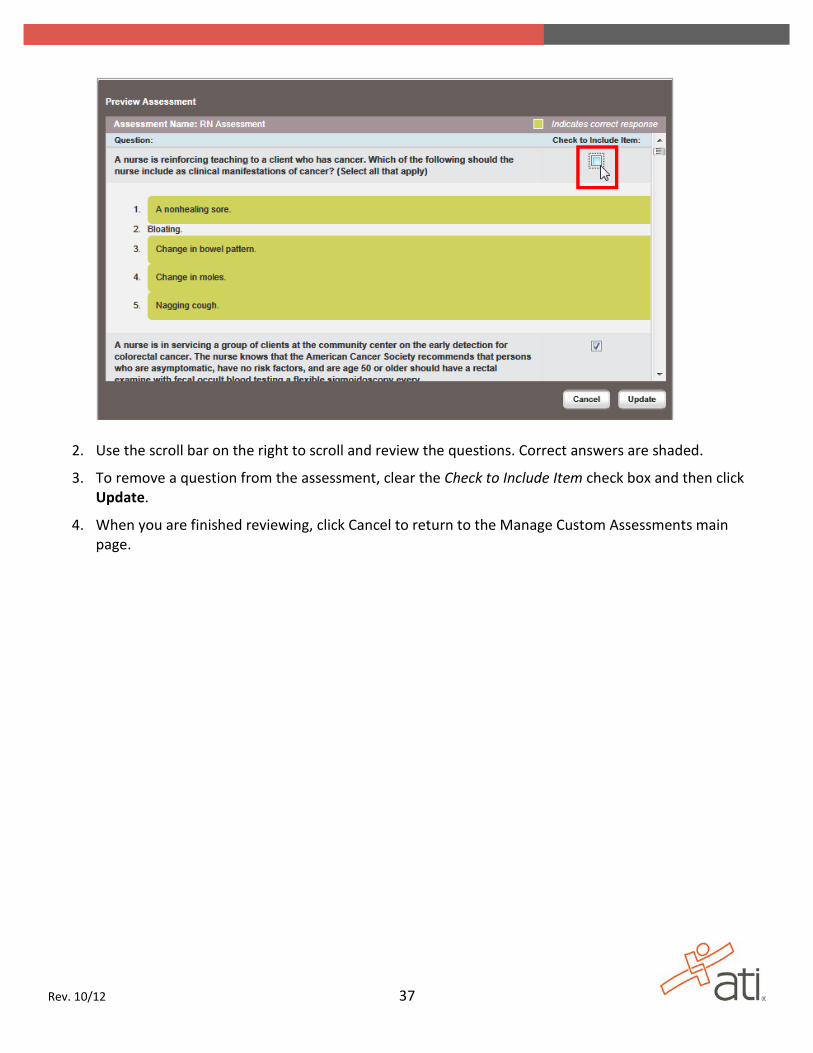
View Assessment Preview
1. From the main Manage Custom Assessments page, select an assessment and click Assessment Preview: View. The Preview Assessment window opens.
Rev. 10/12 37
2. Use the scroll bar on the right to scroll and review the questions. Correct answers are shaded.
3. To remove a question from the assessment, clear the Check to Include Item check box and then click Update.
4. When you are finished reviewing, click Cancel to return to the Manage Custom Assessments main page.
Rev. 10/12 38
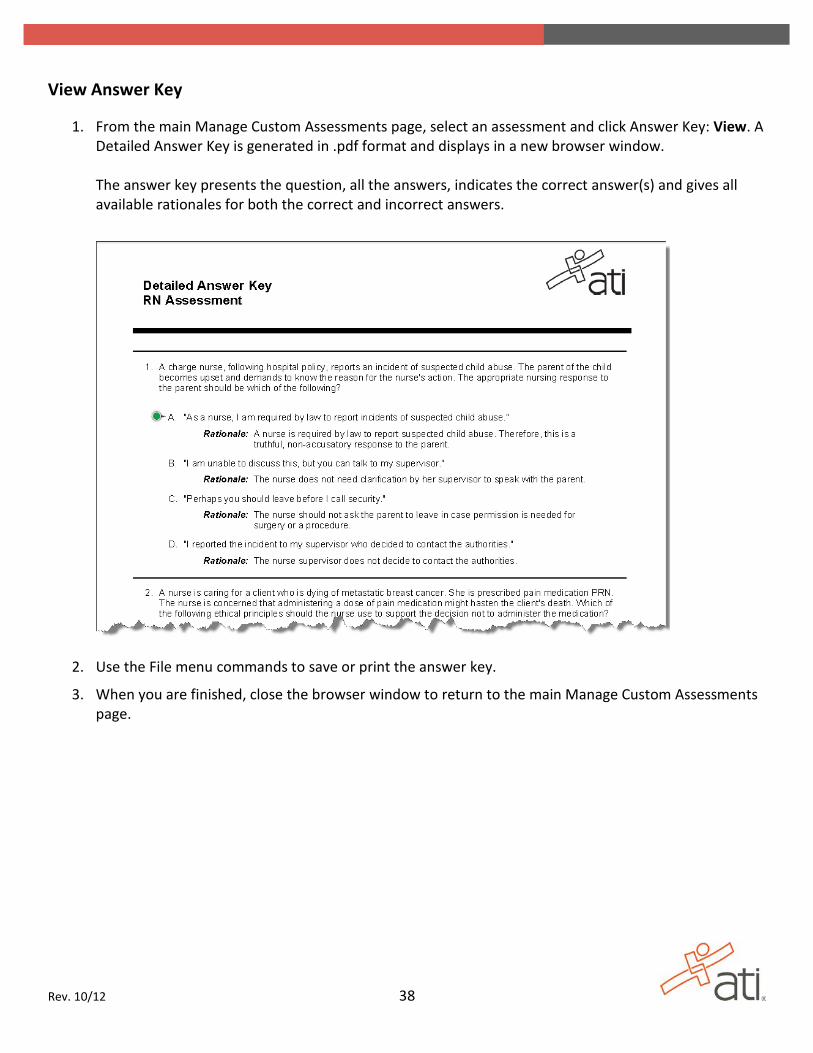
View Answer Key
1. From the main Manage Custom Assessments page, select an assessment and click Answer Key: View. A Detailed Answer Key is generated in .pdf format and displays in a new browser window. The answer key presents the question, all the answers, indicates the correct answer(s) and gives all available rationales for both the correct and incorrect answers.
2. Use the File menu commands to save or print the answer key.
3. When you are finished, close the browser window to return to the main Manage Custom Assessments page.

Rev. 10/12 39
Print Printable Version
1. From the main Manage Custom Assessments page, Select an assessment and click Printable Version: Print. A copy of the assessment (questions and answers only) is generated in .pdf format and displays in a new browser window.
2. Use the File menu commands to save or print the answer key.
3. When you are finished, close the browser window to return to the main Manage Custom Assessments page.

Rev. 10/12 40
Delete an Assessment
1. From the main Manage Custom Assessments page, select the assessment you want to remove and click Delete: Delete to permanently remove a custom assessment. The following confirmation displays:
2. Click Delete to confirm the deletion.
Important: Use care when removing assessments. Deleting an assessment is permanent. You cannot recover assessments that have been deleted.

Rev. 10/12 41
CHAPTER
BUILD CUSTOM BANK
Contents
CHAPTER 3: BUILD CUSTOM BANKS ......................................................... ERROR! BOOKMARK NOT DEFINED. STEP 1: CONFIGURE BANK ............................................................................................ ERROR! BOOKMARK NOT DEFINED. STEP 2: MANAGE AVAILABILITY ..................................................................................... ERROR! BOOKMARK NOT DEFINED. STEP 3: MANAGE AUTHORIZATION ................................................................................. ERROR! BOOKMARK NOT DEFINED. STEP 4: CONFIGURE BANK ITEMS ................................................................................... ERROR! BOOKMARK NOT DEFINED.
Copy/Move Existing Item .................................................................................. Error! Bookmark not defined. Create Custom Item .......................................................................................... Error! Bookmark not defined. Import Items ...................................................................................................... Error! Bookmark not defined. View Included Items .......................................................................................... Error! Bookmark not defined.
STEP 5: REVIEW BANK ................................................................................................. ERROR! BOOKMARK NOT DEFINED.

Rev. 10/12 42
CHAPTER 3: BUILD CUSTOM BANKS There are five steps to building your own bank of questions: STEP 1: Configure Bank – Give your custom bank a name and description; then select a program type. STEP 2: Manage Availability -- Designate who can use this custom bank. STEP 3: Manage Authorization – Assign who has the authority to edit this custom bank. STEP 4: Configure Bank Items – Add existing or create new questions to include in your custom bank. STEP 5: Review Bank – View a snapshot of the question bank and make any final changes.
Step 1: Configure Bank
1. Click STEP 1: Configure Bank.
2. In the Bank Name field, enter a unique name for your custom bank.
3. In the Bank Description field, enter identifying information for your custom bank.
4. In the Program Type field, select a type from the list.
5. Click Next Step to go to STEP 2: Manage Availability and designate who can use this custom bank.

Rev. 10/12 43
Step 2: Manage Availability
1. Click STEP 2: Manage Availability.
2. Select one of the following to establish who will have access to your bank:
o All Institution Users – All ATI system users at your institution can use the items in your bank for their assessments.
o Specified Users – Select specific users in your institution who can use the items in your bank for their assessments.
1. Select Specified Users and the following selection pane displays, listing available users on the left:
Note: To help you locate specific users, you can filter the list alphabetically by selecting a Last Name Begins With letter.
2. From the list of available users on the left, select the user(s) who will have access.
3. Click the Right Arrow to move the users to the access list on the right.
Note: To remove one or more user(s) from the access list, select the user(s)
and click the Left Arrow .

Rev. 10/12 44
o Me Only – Limit access to your custom bank to you and no one else.
3. Click Next Step to go to STEP 3: Manage Authorization and specify users who are authorized to manage your custom bank.
Step 3: Manage Authorization
Any user who is authorized to manage your bank can add or remove questions.
Important: If your bank is used as a source bank and a user who has authorization to manage your bank moves an existing item to their custom bank, the item is deleted from the source (your) bank.
1. Click STEP 3: Manage Authorization.
2. Select one of the following to establish who will have the authority to edit your custom bank:
o All Institution Users – All ATI system users at your institution are authorized.
o Specified Users – Select specific users in your institution who are authorized.
1. Select Specified Users and the following selection pane displays, listing available users on the left:
Note: To help you locate specific users, you can filter the list alphabetically by selecting a Last Name Begins With letter.

Rev. 10/12 45
2. From the list of available users on the left, select the user(s) who will be authorized.
3. Click the Right Arrow to move the users to the list on the right.
Note: To remove one or more user(s) from the access list, select the user(s)
and click the Left Arrow .
o Me Only – Limit authority to manage your custom bank to you and no one else.
2. Click Next Step to go to STEP 4: Configure Bank Items and add and remove items to and from your custom bank.
Step 4: Configure Bank Items
Four options are available from the tabs on the left side of the page: Copy/Move Existing Item Create Custom Item Import Items View Included Items
You can use one option or any combination of options to add items to your custom bank.
Copy/Move Existing Item Click Copy/Move Existing Item to select questions from an existing bank to be included in your custom bank. Copy – You can copy questions to your custom bank from any bank listed as an item source in the Pick
Item Source list.
Move – You can move questions to your custom bank only from banks you are authorized to manage.
Important: Any questions that are moved to your custom bank are subsequently deleted from the source bank.

Rev. 10/12 46
1. Click STEP 4: Configure Bank Items.
2. On the left side of the page, click Copy/Move Existing Item.
3. From the Pick Item Source list, select the question bank from which you are copying or moving questions.
4. If you want to limit the items from which you are choosing to one or more specific topic areas, click Filter Bank Items (pictured above), make your selection(s), and then click Copy or Move Available Bank Items Below. Otherwise, go to the next step.
Note: Use the Search for Terms field to locate specific topic areas.
Indicates the total number of items available in the source bank.
Indicates the total number of items in your custom bank.

Rev. 10/12 47
5. Do one of the following:
o To add individual questions, locate all the questions you want to copy or move and select the associated check box to the right of each question.
o To add all available questions, select the Select check box at the top.
o To view a question’s Answers, Rationale, or Outcome Details, click the question to open a Question Summary window.
6. When you are finished selecting the items to include, click Copy or Move.
7. Go back to step 3 and repeat the process if you want to add more existing items from other sources.

Rev. 10/12 48
Create Custom Item Click Create Custom Item to create your own questions to be included in your custom bank. This option uses the same five-step procedure as Build a Custom Assessment. Refer to Custom Build – Create Custom Item for more information. STEP 1: Add Question STEP 2: Add Answers STEP 3: Add Item Outcomes STEP 4: Add Focused Review STEP 5: Item Summary
Import Items Use the Import Items option to import an Excel file containing assessment questions. You will be able to copy, move, and edit these items just like other Custom Bank items.
1. Click STEP 4: Configure Bank Items.
2. On the left side of the page, click Import Items.
3. Click Importing Instructions and a new browser window displaying detailed instructions opens. Read the document and follow the directions. To create your Excel file, you can:
o Click Sample Template to download a standard Excel template (preferred). Click Enable Editing, enter your items, and save the Excel file to your computer’s hard drive or a network drive.
o Create your own Excel template/file according to the specifications in the instructions.

Rev. 10/12 49
Note: Your Excel file format must exactly match those specified in the instructions. The file size is limited to 4 MB.
4. In the Import a Microsoft Excel Document field, click Browse to open the Choose File to Upload window. Locate and download your Excel file. If you have successfully imported items from your file, the following window displays:
5. Click Import Processed Items to add the items to your custom bank.
Note: The Item Count increments by the number of items you successfully processed and imported.
6. Add your imported items to your custom bank in one of two ways:
o Click Save and Return to Manage Banks to return to the list of custom banks.
o Click Save Changes and continue making further changes to your custom bank.

Rev. 10/12 50
View Included Items
1. Click STEP 4: Configure Bank Items.
2. On the left side of the page, click View Included Items to review and edit the custom bank details, including the Blueprint.
Note: This option uses the same screen and procedure as Build a Custom Assessment. Refer to Custom Build – View Included Items for more information.
3. Click Next Step to go to STEP 5: Review Bank to review your custom bank and make any final changes.

Rev. 10/12 51
Step 5: Review Bank
1. Click STEP 5: Review Bank to view a snapshot of the Custom Bank and to make any final changes.
2. To make changes to your custom bank, click one of the following. Otherwise, go to the next step.
o Custom Bank Details: Edit – Change the custom bank’s name, description, or program type. o Availability and Management Details: Edit – Change the users who can access the custom bank. o STEP 3: Manage Authorization – Change the users who are authorized to modify the custom bank. o STEP 4: Configure Bank Items – Add, remove, or change questions.
3. Click the printer icon to print your custom bank details, if desired; otherwise, go to the next step.
4. Click Finish to finalize your custom bank.
5. Click Manage Custom Banks to make any modifications.

Rev. 10/12 52
CHAPTER
MANAGE CUSTOM BANKS
Contents
CHAPTER 4: MANAGE CUSTOM BANKS..................................................... ERROR! BOOKMARK NOT DEFINED. VIEW BANK ................................................................................................................ ERROR! BOOKMARK NOT DEFINED. EDIT BANK ................................................................................................................. ERROR! BOOKMARK NOT DEFINED.

Rev. 10/12 53
CHAPTER 4: MANAGE CUSTOM BANKS Use the Manage Custom Banks option to view the details of your bank or to make any of the following modifications: Change the bank name and/or description. Change the bank program type. Edit the users who can access the questions in your bank. Edit the users who can modify the details and contents of your custom bank. Add and/or remove questions.

Rev. 10/12 54
View Bank
1. Select a bank and click the associated View button.
2. Click Return to Manage Banks to select another custom bank to view or modify.

Rev. 10/12 55
Edit Bank
1. Select a bank and click the associated Edit button. The Bank Summary page displays.
2. To make changes to your custom bank, click one of the following:
o Custom Bank Details: Edit – Change the custom bank’s name, description, or program type. o Availability and Management Details: Edit – Change the users who can access the custom bank. o EDIT: Bank Authorization – Change the users who are authorized to modify the custom bank. o EDIT: Bank Items – Add, remove, or change questions.
3. Click the printer icon to print your custom bank details, if desired; otherwise, go to the next step.
4. Click Finish to finalize your custom bank.
5. Click Return to Manage Banks to select another custom bank to view or modify.

Rev. 10/12 56
CHAPTER
MANAGE CUSTOM OUTCOMES
Contents
CHAPTER 5: MANAGE CUSTOM OUTCOMES ............................................. ERROR! BOOKMARK NOT DEFINED.

Rev. 10/12 57
CHAPTER 5: MANAGE CUSTOM OUTCOMES The Manage Custom Outcomes option is a future enhancement that will be used to attach an objective to the assessment that defines the targeted skills and topic areas

Rev. 10/12 58
REVISION HISTORY
Date Version Modified By Change
10/17/2012 10/12 W. Knoepker Document Creation