Embed Size (px)
Citation preview
CURRICULUM
Robo Wunderkind — Curriculum2
Learning is a lifelong and never-ending process for any individual.
However, we all know that the most intensive human development
happens in childhood. In the early years, we don’t just learn skills or gain
new knowledge - we discover HOW the world around us works, and how
we as human beings work too.
Our ideas, representations, attitudes, understanding, and critical thinking
all develop in early childhood. Robo Wunderkind is designed to support
the basic needs of children to learn and experience. It helps create a
positive attitude to learning and a perception of learning as a fun activity
and it helps keep children engaged even if they have a really hard
problem to solve. While playing with Robo Wunderkind, children learn
by interacting with the real world, they learn by playing, exploring and
discovering.
Robo grows together with the child through complex problem solving,
which happens during the process of coding projects of different levels.
We will try to make your preparation for lessons with Robo Wunderkind
as easy as a game by providing everything you need to start in this
curriculum book. Join your students in playing with Robo, learn and have
fun together!
INTRODUCTION
Introduction
Robo Wunderkind — Curriculum3
—
CONCLUSION
—
THE EDUCATIONAL CONCEPT
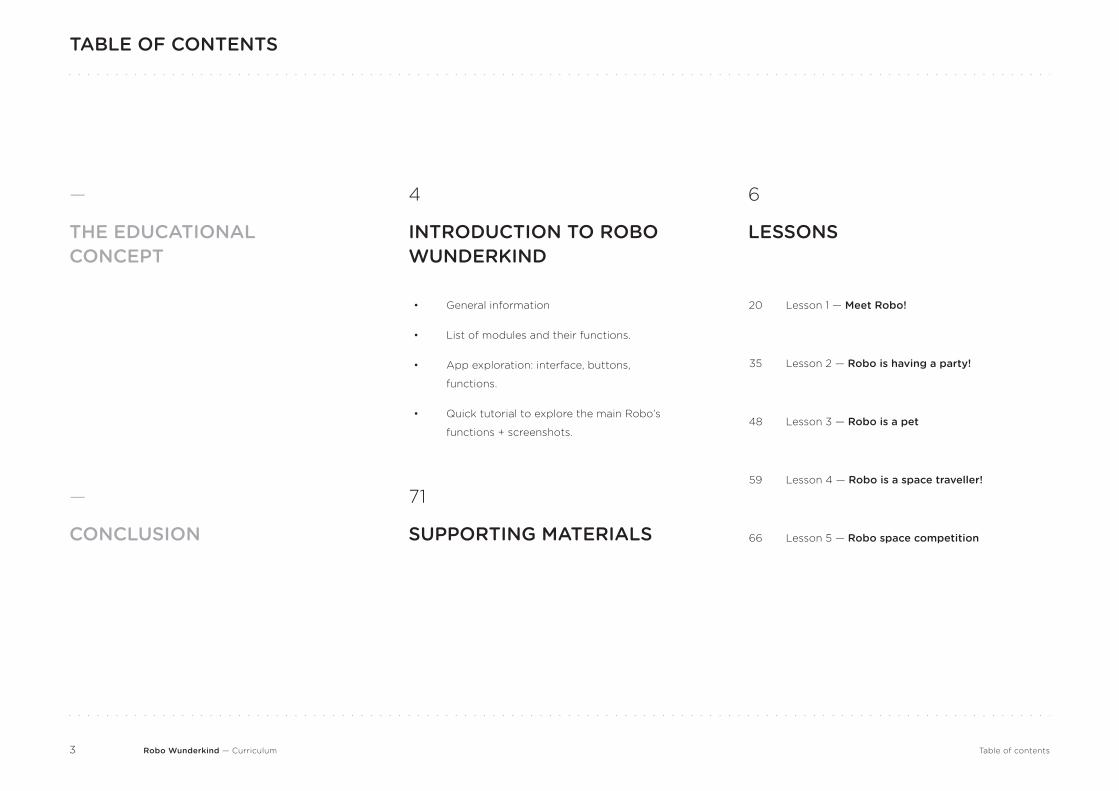
TABLE OF CONTENTS
71
SUPPORTING MATERIALS
4
INTRODUCTION TO ROBO WUNDERKIND
6
LESSONS
General information
List of modules and their functions.
App exploration: interface, buttons,
functions.
Quick tutorial to explore the main Robo’s
functions + screenshots.
•
•
•
•
Lesson 1 — Meet Robo!
Lesson 2 — Robo is having a party!
Lesson 3 — Robo is a pet
Lesson 4 — Robo is a space traveller!
Lesson 5 — Robo space competition
20
35
48
59
66
Table of contents
Robo Wunderkind — Curriculum4
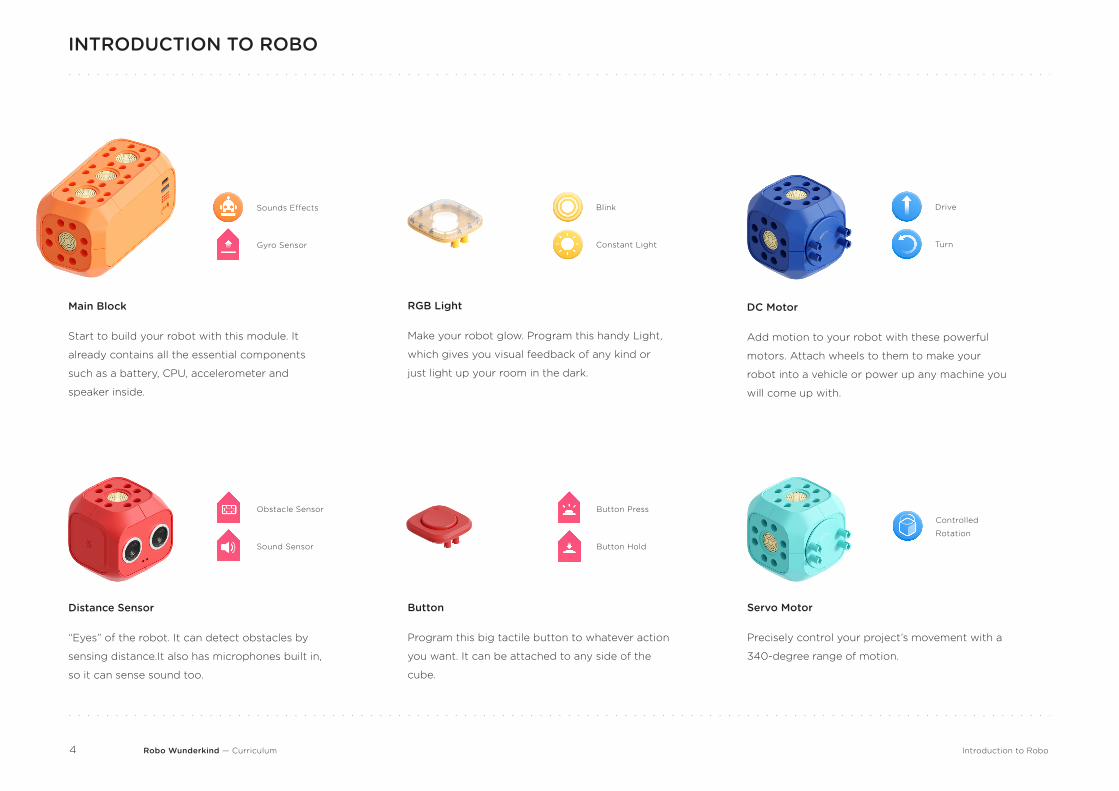
Sounds Effects Drive
Obstacle SensorControlled
Rotation
Button Press
Blink
Gyro Sensor Turn
Sound Sensor Button Hold
Constant Light
Introduction to Robo
INTRODUCTION TO ROBO
Main Block
Start to build your robot with this module. It
already contains all the essential components
such as a battery, CPU, accelerometer and
speaker inside.
DC Motor
Add motion to your robot with these powerful
motors. Attach wheels to them to make your
robot into a vehicle or power up any machine you
will come up with.
Distance Sensor
“Eyes” of the robot. It can detect obstacles by
sensing distance.It also has microphones built in,
so it can sense sound too.
Servo Motor
Precisely control your project’s movement with a
340-degree range of motion.
Button
Program this big tactile button to whatever action
you want. It can be attached to any side of the
cube.
RGB Light
Make your robot glow. Program this handy Light,
which gives you visual feedback of any kind or
just light up your room in the dark.
Robo Wunderkind — Curriculum5
Connector Block
Can connect up to 6 cubes at the same time.
Passive, used to transmit data and power between
blocks.
Wheel
Set your robot on a adventure.
Introduction to Robo
Connector
Snap the blocks together.
Lego™ Connector
Combine your robot with the toys you already
have.
Small Wheel
Give you robot support in getting around tight
corners.
Wired Connector
Connect the blocks at a distance.
Robo Wunderkind — Curriculum6
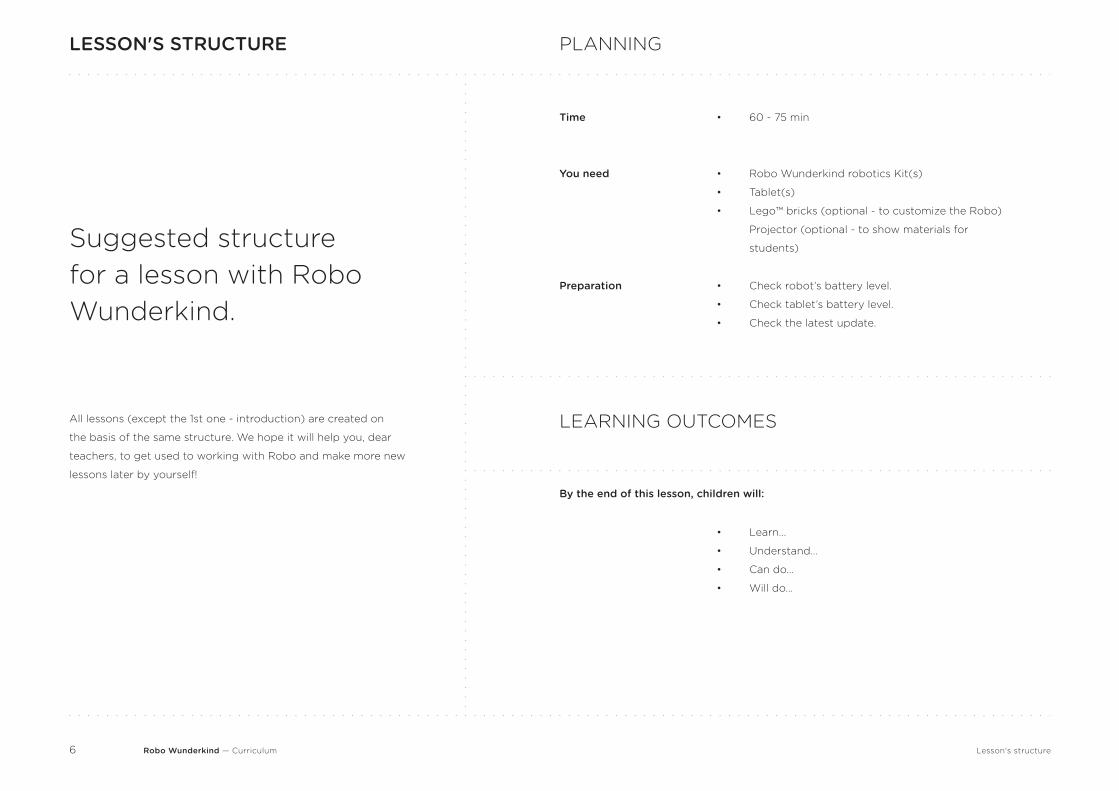
Time
You need
Preparation
By the end of this lesson, children will:
•
•
•
•
•
•
•
•
•
•
•
60 - 75 min
Robo Wunderkind robotics Kit(s)
Tablet(s)
Lego™ bricks (optional - to customize the Robo)
Projector (optional - to show materials for
students)
Check robot’s battery level.
Check tablet’s battery level.
Check the latest update.
Learn...
Understand…
Can do...
Will do...
LEARNING OUTCOMESAll lessons (except the 1st one - introduction) are created on
the basis of the same structure. We hope it will help you, dear
teachers, to get used to working with Robo and make more new
lessons later by yourself!
Suggested structure for a lesson with Robo Wunderkind.
LESSON'S STRUCTURE PLANNING
Lesson's structure
Robo Wunderkind — Curriculum7
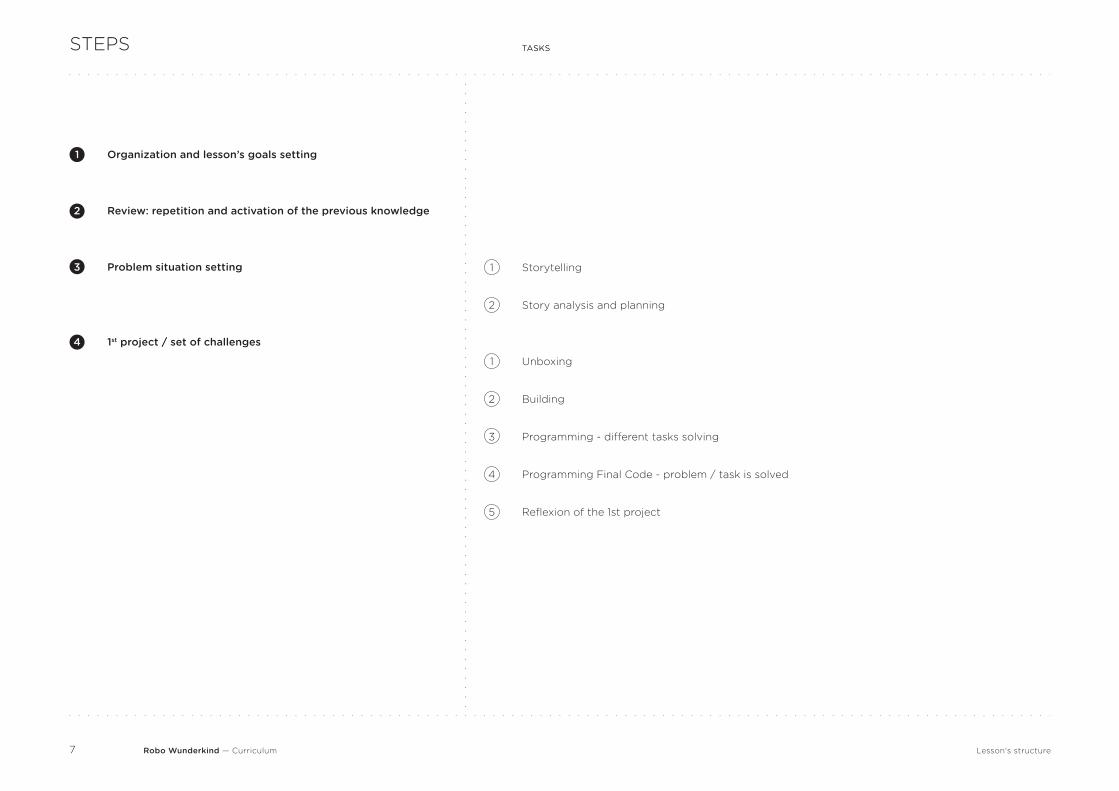
1
2
1
2
3
4
5
Storytelling
Story analysis and planning
Unboxing
Building
Programming - different tasks solving
Programming Final Code - problem / task is solved
Reflexion of the 1st project
TASKS
Organization and lesson’s goals setting
Review: repetition and activation of the previous knowledge
Problem situation setting
1st project / set of challenges
TASKS
1
2
3
4
Lesson's structure
STEPS
Robo Wunderkind — Curriculum8
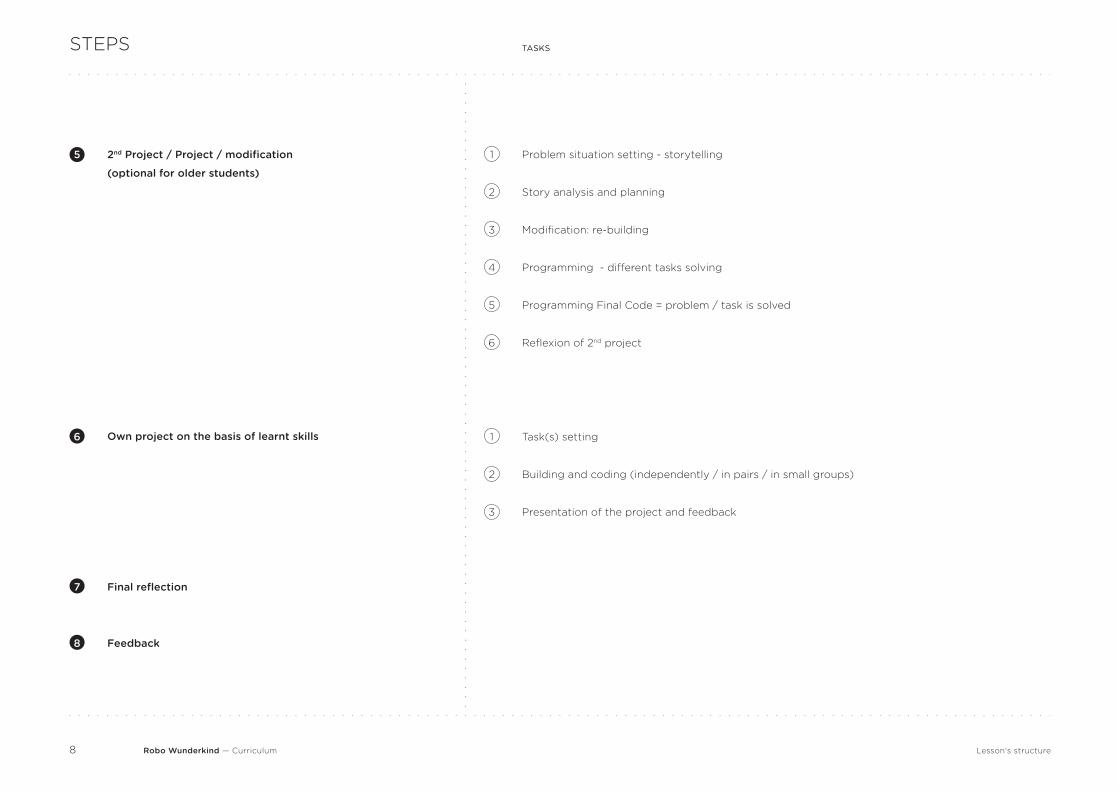
TASKSSTEPS TASKS
1
2
3
4
5
6
1
2
3
Problem situation setting - storytelling
Story analysis and planning
Modification: re-building
Programming - different tasks solving
Programming Final Code = problem / task is solved
Reflexion of 2nd project
Task(s) setting
Building and coding (independently / in pairs / in small groups)
Presentation of the project and feedback
2nd Project / Project / modification
(optional for older students)
Own project on the basis of learnt skills
Final reflection
Feedback
5
6
7
8
Lesson's structure
Robo Wunderkind — Curriculum9
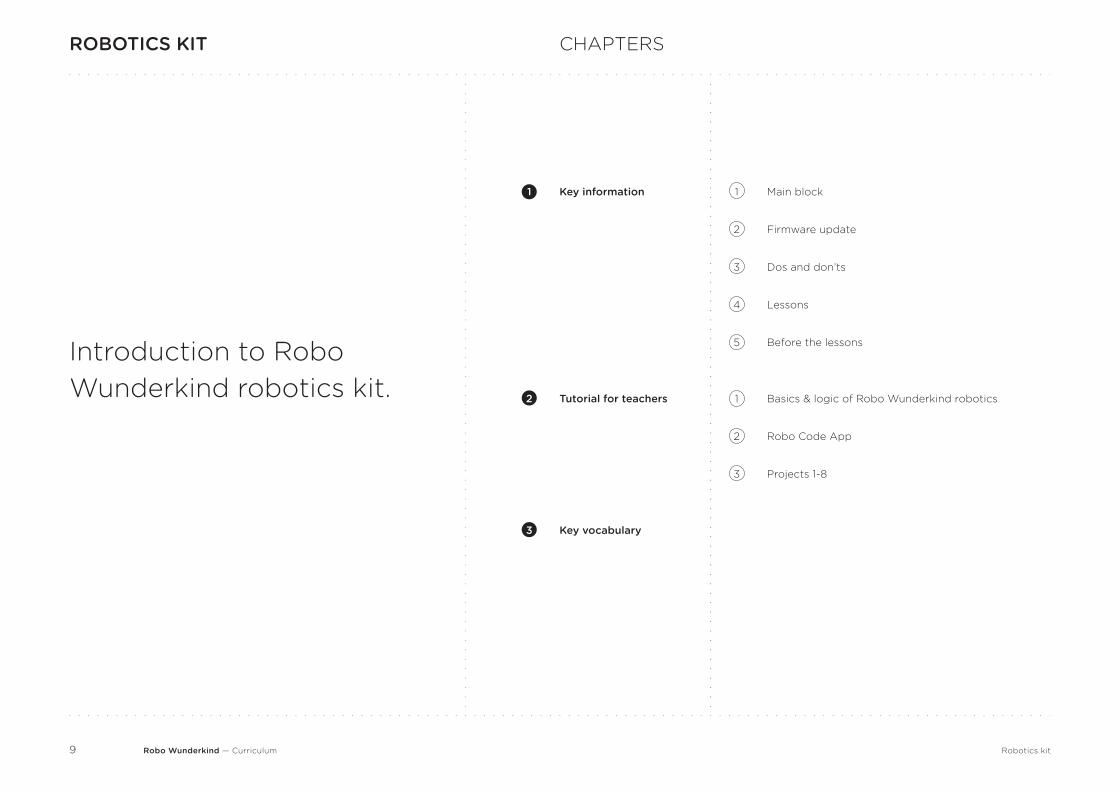
Introduction to Robo Wunderkind robotics kit.
ROBOTICS KIT CHAPTERS
Robotics kit
1
2
3
4
5
1
2
3
Main block
Firmware update
Dos and don’ts
Lessons
Before the lessons
Basics & logic of Robo Wunderkind robotics
Robo Code App
Projects 1-8
Key information
Tutorial for teachers
Key vocabulary
1
2
3
Robo Wunderkind — Curriculum10
•
•
•
•
•
•
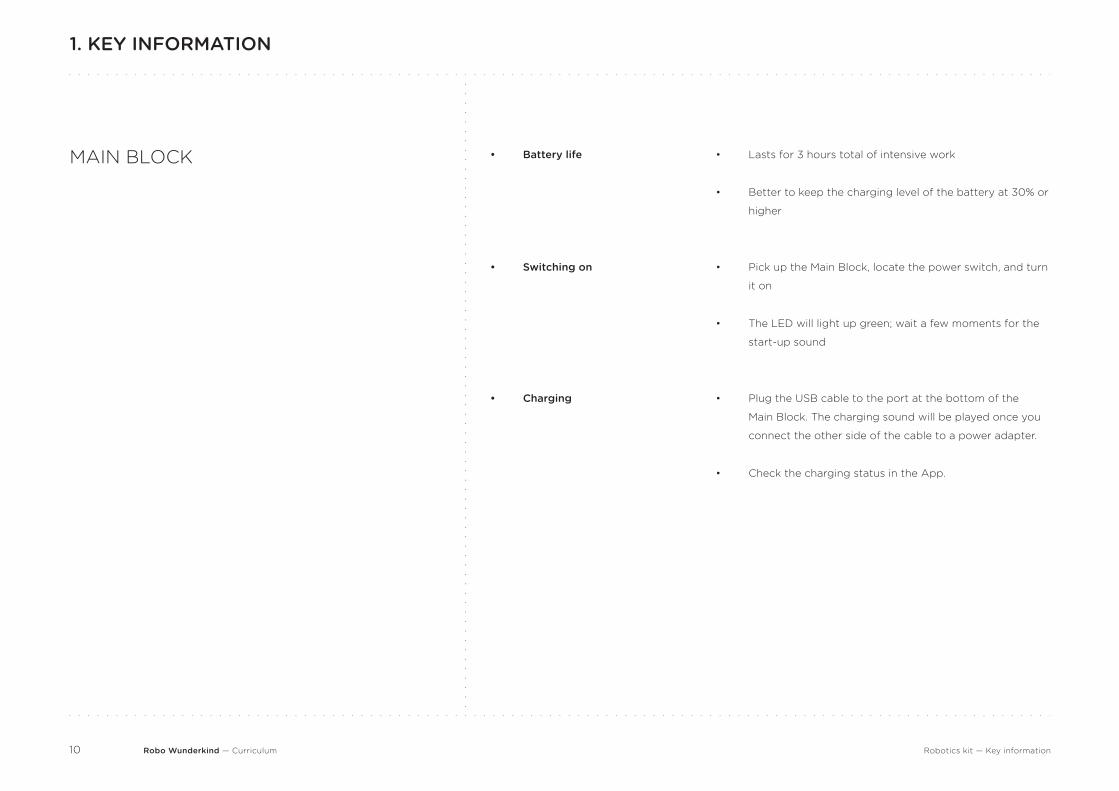
Lasts for 3 hours total of intensive work
Better to keep the charging level of the battery at 30% or
higher
Pick up the Main Block, locate the power switch, and turn
it on
The LED will light up green; wait a few moments for the
start-up sound
Plug the USB cable to the port at the bottom of the
Main Block. The charging sound will be played once you
connect the other side of the cable to a power adapter.
Check the charging status in the App.
TASKS
Battery life
Switching on
Charging
TASKS1. KEY INFORMATION
•
•
•
MAIN BLOCK
Robotics kit — Key information
Robo Wunderkind — Curriculum11
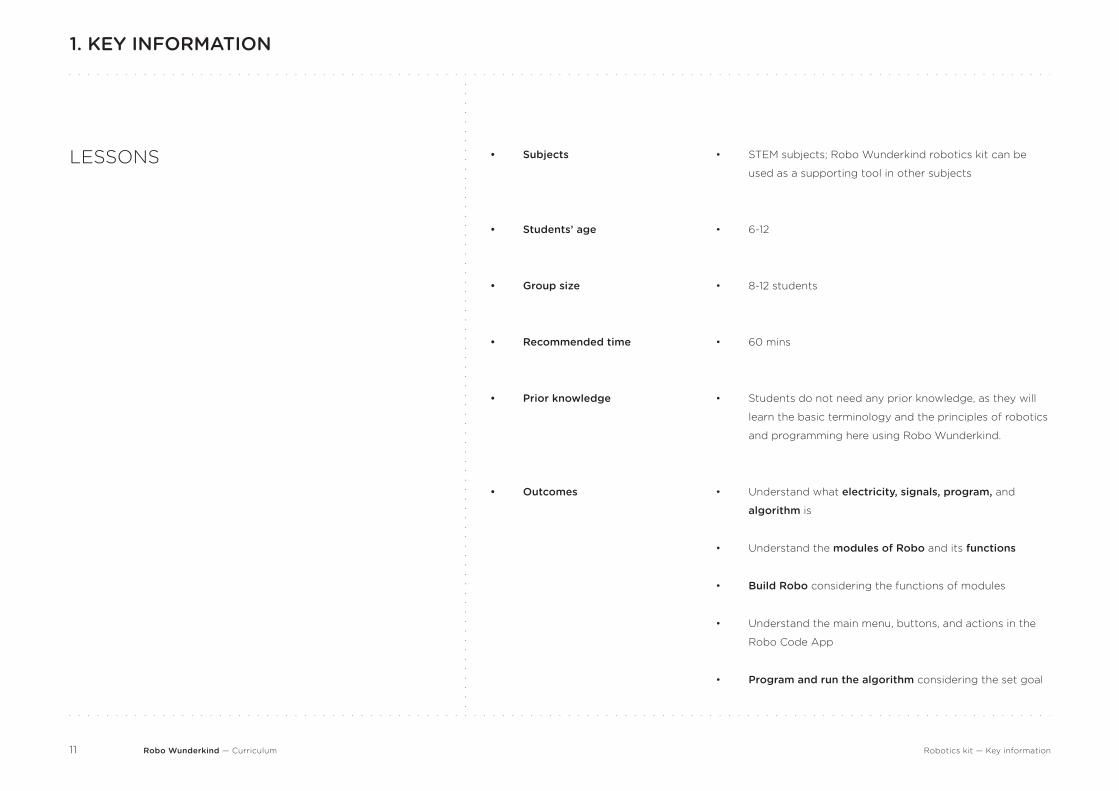
•
•
•
•
•
•
•
•
•
•
STEM subjects; Robo Wunderkind robotics kit can be
used as a supporting tool in other subjects
6-12
8-12 students
60 mins
Students do not need any prior knowledge, as they will
learn the basic terminology and the principles of robotics
and programming here using Robo Wunderkind.
Understand what electricity, signals, program, and
algorithm is
Understand the modules of Robo and its functions
Build Robo considering the functions of modules
Understand the main menu, buttons, and actions in the
Robo Code App
Program and run the algorithm considering the set goal
TASKS
Subjects
Students’ age
Group size
Recommended time
Prior knowledge
Outcomes
TASKS1. KEY INFORMATION
•
•
•
•
•
•
Robotics kit — Key information
LESSONS
Robo Wunderkind — Curriculum12
TASKSTASKS1. KEY INFORMATION
Robotics kit — Key information
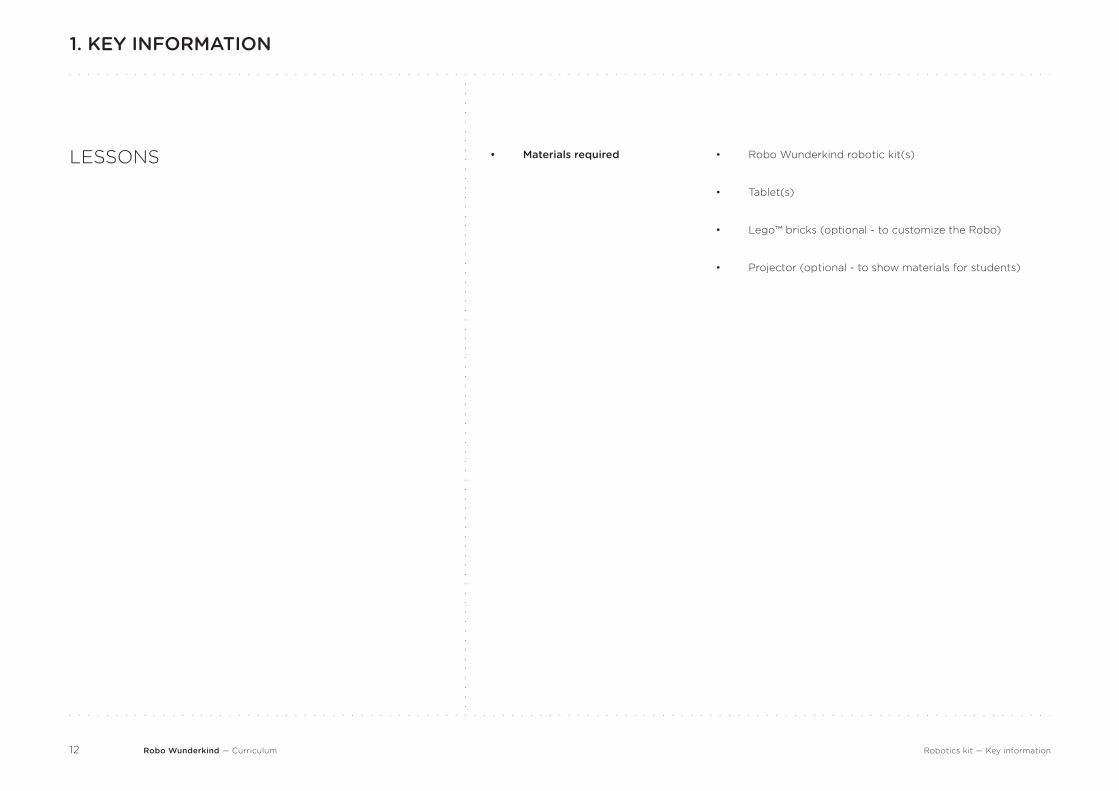
•
•
•
•
Robo Wunderkind robotic kit(s)
Tablet(s)
Lego™ bricks (optional - to customize the Robo)
Projector (optional - to show materials for students)
Materials required•LESSONS
Robo Wunderkind — Curriculum13
TASKSTASKS1. KEY INFORMATION
Robotics kit — Key information
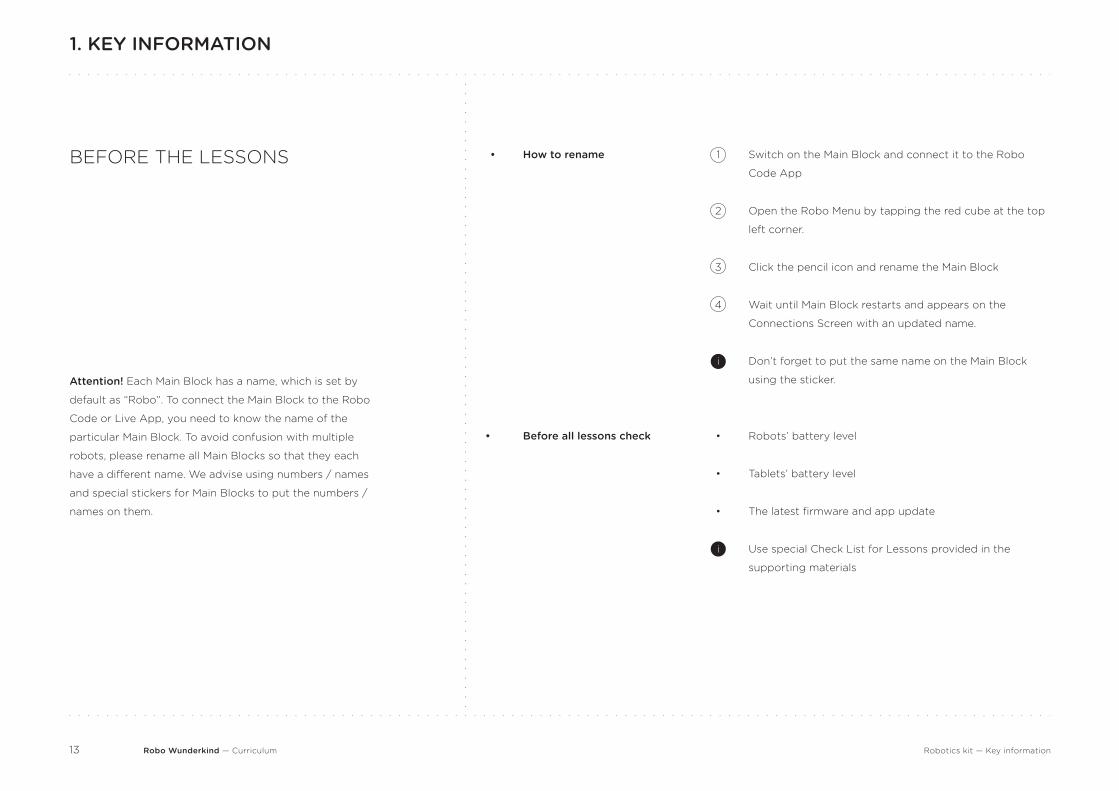
Switch on the Main Block and connect it to the Robo
Code App
Open the Robo Menu by tapping the red cube at the top
left corner.
Click the pencil icon and rename the Main Block
Wait until Main Block restarts and appears on the
Connections Screen with an updated name.
Don’t forget to put the same name on the Main Block
using the sticker.
Robots’ battery level
Tablets’ battery level
The latest firmware and app update
Use special Check List for Lessons provided in the
supporting materials
Attention! Each Main Block has a name, which is set by
default as “Robo”. To connect the Main Block to the Robo
Code or Live App, you need to know the name of the
particular Main Block. To avoid confusion with multiple
robots, please rename all Main Blocks so that they each
have a different name. We advise using numbers / names
and special stickers for Main Blocks to put the numbers /
names on them.
How to rename
Before all lessons check
•
•
BEFORE THE LESSONS 1
2
3
4
i
•
•
•
i
Robo Wunderkind — Curriculum14
TASKSTASKS2. TUTORIAL FOR TEACHERS
Robotics kit — Tutorial for teachers
Let’s meet Robo, get to know it’s functions, build the robot and
programm different algorithms! Go through our tutorials for teachers
step by step exploring the Robo. Be a kid and have fun!
Here you will find the basics of Robo Wunderkind robotics kit and its
logic, an explanation of the Robo Code App interface, and 8 very fast
Projects. The suggested time for the whole tutorial is 30 minutes. After
that you will have become a Robo Wunderkind master!
Robo Wunderkind — Curriculum15
TASKSTASKS2. TUTORIAL FOR TEACHERS
Robotics kit — Tutorial for teachers
The connectors need to be assembled properly, with the sides parallel to the modules’
sides.
Because of the tight connection, in order to disconnect the modules you need to use
the disconnecting tool.
Some modules do not have metallic pins on them, so the electricity doesn’t flow
through them. The Servo Motor is one example; its moving part doesn’t have metallic
pins, so the module which is connected to the moving part of Servo Motor doesn’t
have the electricity connection and will not communicate with the System module.
Wired connector helps to resolve the problem; you can connect the module you need
to work with the Main Block directly by wired connection.
•
•
•
BASICS & LOGIC OF ROBO WUNDERKIND ROBOTICS
•
•
•
•
Robo’s Modules are different colors, each of which expresses a block’s functions and are related to
the colors of actions in the Robo Code App. It makes coding more intuitive for students.
To program a certain action, you need to be sure that the particular module for this action is
assembled to your Robo’s Main Block.
To make modules work, you need the electricity from the Main Block, which passes through
connectors (and small pins on connectors). There are some aspects to be aware of:
Robo Wunderkind — Curriculum16 Robotics kit — Tutorial for teachers
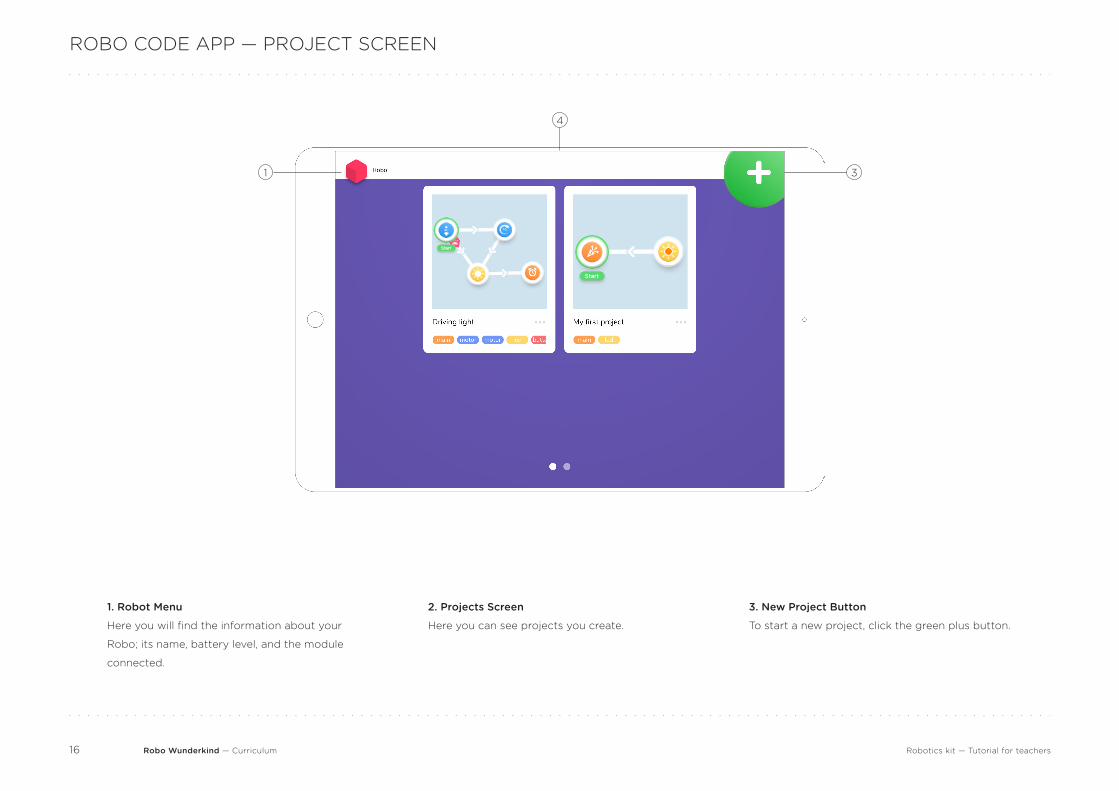
ROBO CODE APP — PROJECT SCREEN
1. Robot Menu
Here you will find the information about your
Robo; its name, battery level, and the module
connected.
2. Projects Screen
Here you can see projects you create.
3. New Project Button
To start a new project, click the green plus button.
1 3
4
Robo Wunderkind — Curriculum17
TASKSTASKS
Robotics kit — Tutorial for teachers
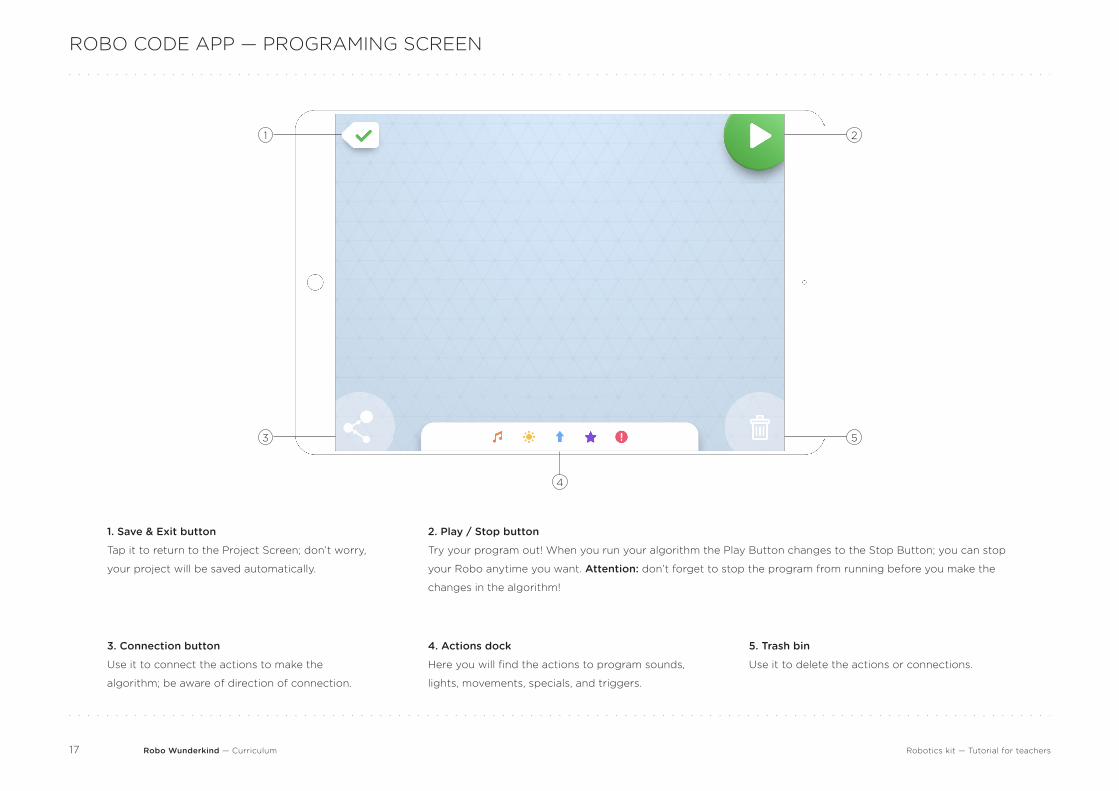
ROBO CODE APP — PROGRAMING SCREEN
1. Save & Exit button
Tap it to return to the Project Screen; don’t worry,
your project will be saved automatically.
3. Connection button
Use it to connect the actions to make the
algorithm; be aware of direction of connection.
4. Actions dock
Here you will find the actions to program sounds,
lights, movements, specials, and triggers.
5. Trash bin
Use it to delete the actions or connections.
2. Play / Stop button
Try your program out! When you run your algorithm the Play Button changes to the Stop Button; you can stop
your Robo anytime you want. Attention: don’t forget to stop the program from running before you make the
changes in the algorithm!
1 2
3 5
4
Robo Wunderkind — Curriculum18
ROBO CODE APP — PROGRAMING SCREEN
•
•
•
•
•
There are 5 types of actions to program in the Action Dock:
sounds, lights, movements, specials, and triggers. All of them
are different colors according to the Modules to which they are
related.
You can drag your sounds, lights, movements, or specials to
any part of your Programming Screen, but the Triggers can be
placed only on arrows / connections between the Actions.
If you have too many Actions on your Programming Screen, you
can always zoom in, zoom out, or move your Programing Screen
to any side.
When you drag the first Action on the empty Programming
Screen, you will see the green circle around it - this is the Start
Point. It means that the algorithm starts here.
If you have more than one Action, you can change the Starting
Point. Just select it and drag on the Action you want to try out
or to be the first in your Algorithm.
Action dock & Actions
First Action and Start Point
•
•
Robotics kit — Tutorial for teachers
Robo Wunderkind — Curriculum19
•
•
•
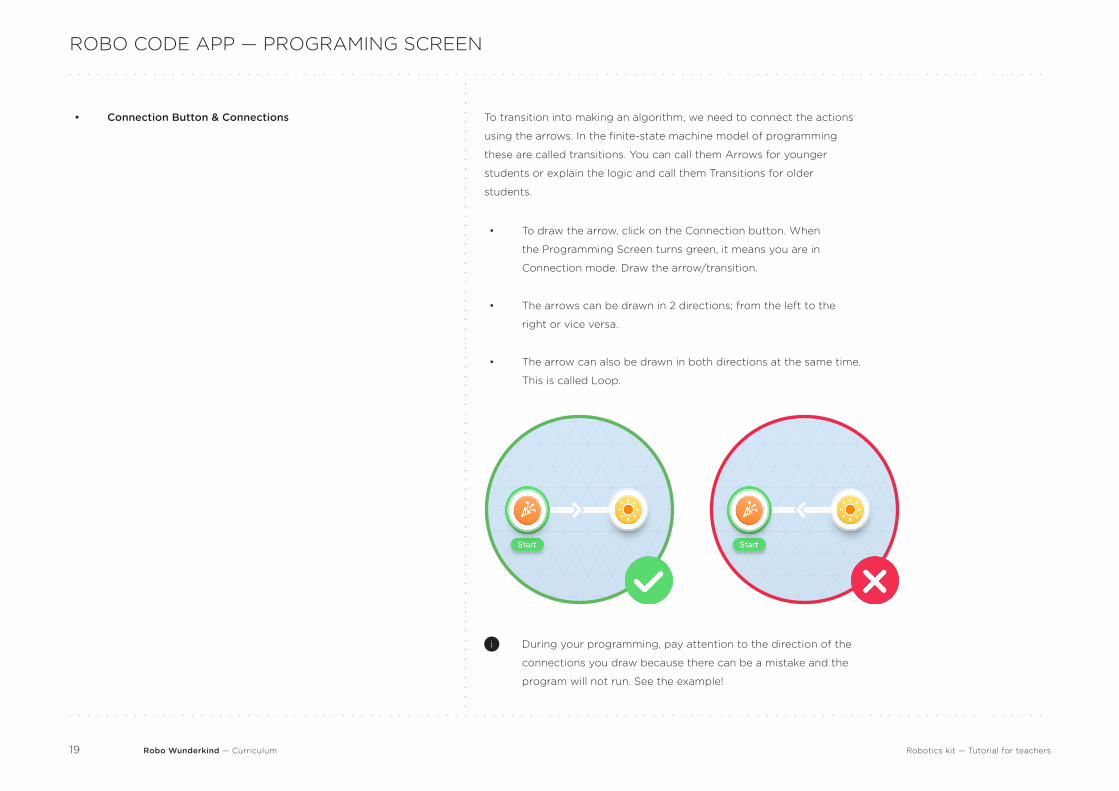
To draw the arrow, click on the Connection button. When
the Programming Screen turns green, it means you are in
Connection mode. Draw the arrow/transition.
The arrows can be drawn in 2 directions; from the left to the
right or vice versa.
The arrow can also be drawn in both directions at the same time.
This is called Loop.
Connection Button & Connections•
Robotics kit — Tutorial for teachers
ROBO CODE APP — PROGRAMING SCREEN
To transition into making an algorithm, we need to connect the actions
using the arrows. In the finite-state machine model of programming
these are called transitions. You can call them Arrows for younger
students or explain the logic and call them Transitions for older
students.
i During your programming, pay attention to the direction of the
connections you draw because there can be a mistake and the
program will not run. See the example!

Robo Wunderkind — Curriculum20
3. KEY VOCABULARY
Electricity - a type of energy that can build up in one
place or flow from one place to another. It is used to
make many different electronic devices work. ROBO
WUNDERKIND is powered by a battery inside the main
orange block. Electricity is passed from block to block
though the connectors at the center of each cube face.
Signal - a type of electrical communication between
electronic devices. Each ROBO WUNDERKIND block
sends signals to each other using wired communication
from the center of each cube face. The ROBO
communicates with the smart device using Bluetooth
wireless communication.
Program / Code - the language that computers use. A
program or code tells a computer what to do. There are
many types of programming language; some are very
complicated while others are similar to spoken English.
ROBO WUNDERKIND uses its unique drag and drop
visual coding language.
Syntax - syntax is the grammar used in a computer
language. In ROBO WUNDERKIND, the syntax is the
correct arrangement of bubbles and arrows.
Programing - the process using “code” in the correct
“syntax” to write an “algoritequence of instructions to
enable a computer to perform a specific set of tasks.
Key vocabulary
Algorithm - a set of instrucons for the machine to
perform. The process of writing an algorithm is called
“programming”, and the language an algorithm is wrth
is called “coding language”.ROBO WUNDERKIND
uses its unique drag and drop visual coding language
to help students program an algorithm for the ROBO
WUNDERKIND machine.
Action / Function - a set of predefined comments
available to be run any time. In ROBO CODE, the actions
are the elements available to be dragged and dropped
into onto the screen.
State - in a “Algorithm” each instruction within an
“Algorithm” is called a State. In ROBO CODE, state is
represented by a bubble.
Transition - is the process of changing states. In ROBO
CODEm a transition is the arrow linking bubbles together.
It defines the order that in which the stages an.
Trigger / Event - is the set of conditions as needs to
be met for onate to change to the next state. In ROBO
CODE, triggers are red tags that can be placed on the
arrows (Transition), one condition is the bubble (State) at
the end of the arrow will be performed.
Parallel Execution - when there is more the action per
bubble, all the actions in the same bubble (state) are
performed at the same time. Thus these actions are
Parallel executed in paralquential Algorithm. Sequential
Algorithm is none step/state to the next. Each step
starts when previous one finishes or meets its trigger
conditions.
In the ROBO CODE app, each bubble represents one
state. The next bubble (state) will run when the triggers
are met. The next state after is indicated by the arrow
leading away from that bubble. There may be many
actions in each state but when they are in the same
bubble, they are all the same step in the sequence and
are executed in parallel.
You can find the description of all Robo Modules & All
App Interface on page...

Robo Wunderkind — Curriculum21
1LESSON 1 - MEET ROBO!
The first lesson is the most important one in the series. This is the
moment when students meet Robo for the first time and see how the
different modules fit in and function. They will get to know the Robo
Code App interface and learn how to code the first program straight
away, allowing them to see the first real result of programming. The first
lesson has a special structure and is more detailed.
•
•
•
•
•
Know what Electricity, Signals, Program and an Algorithm is.
Know Robo’s modules and their functions: Main Block,
Connectors. RGB Light (optional for older students).
Recognise and use the Robo Code App: Project Screen,
Programming Screen, Action Dock, Start button, Connection
button, Trash Bin, Sound. Constant Light (optional for older
students).
Be able to program: Sounds, Change of Start-Point, Transition
in different directions, Loop. Constant Lights (optional for older
students).
Program and run the first Algorithm.
LEARNING OUTCOMES
By the end of this lesson, children will:
Lesson 1 - Meet Robo!

Robo Wunderkind — Curriculum22
FOCUS
Main Block
Time
You need
To prepare
•
•
•
•
•
•
•
•
60 - 70 minutes
Robo Wunderkind robotics Kit(s)
Tablet(s)
Lego™ bricks
(optional - to customize the Robo)
Projector
(optional - to show materials for students)
Check robots’ battery level
Check tablets’ battery level
Check the latest software update
PLANNING
Sounds Effects
Key Vocabulary:
Engineering, Robot and Robotics, Program, Programming, Algorithm.
Project Screen, Programming Screen, Action Dock, Action, Sound, Start
Point, Start Button, Connection / Transition, Direction of Connection /
Transition, Trash Bin button, Loop.
Lesson 1 - Meet Robo!
Robo Wunderkind — Curriculum23
TIME NOTESTASKS
Today we have a special guest in our class! This is Robo, a smart
robot that has come to our school to be our friend. It wants to
learn and play together with us and it really would like to stay in
our class!
What do you think? Can you imagine Robo learning together
with you?
Organization
Introduction & motivation
Problem situation setting
5-7 min 1
2
1
2
Prepare robots, tablets, Lego™ bricks for the lesson.
Today we will have a special guest in our class! We are going to
meet real robots!
Do you know, what a robot is? Why do people create robots?
How do people use them? How can robots help people? How
do people control robots? Who has experience using robots?
Coding robots?
STEPS
Special attention to the terms:
Engineering, Robot and Robotics, Programming and
Program
1
2
3
Lesson 1 - Meet Robo!
Robo Wunderkind — Curriculum24
TIME NOTESTASKS
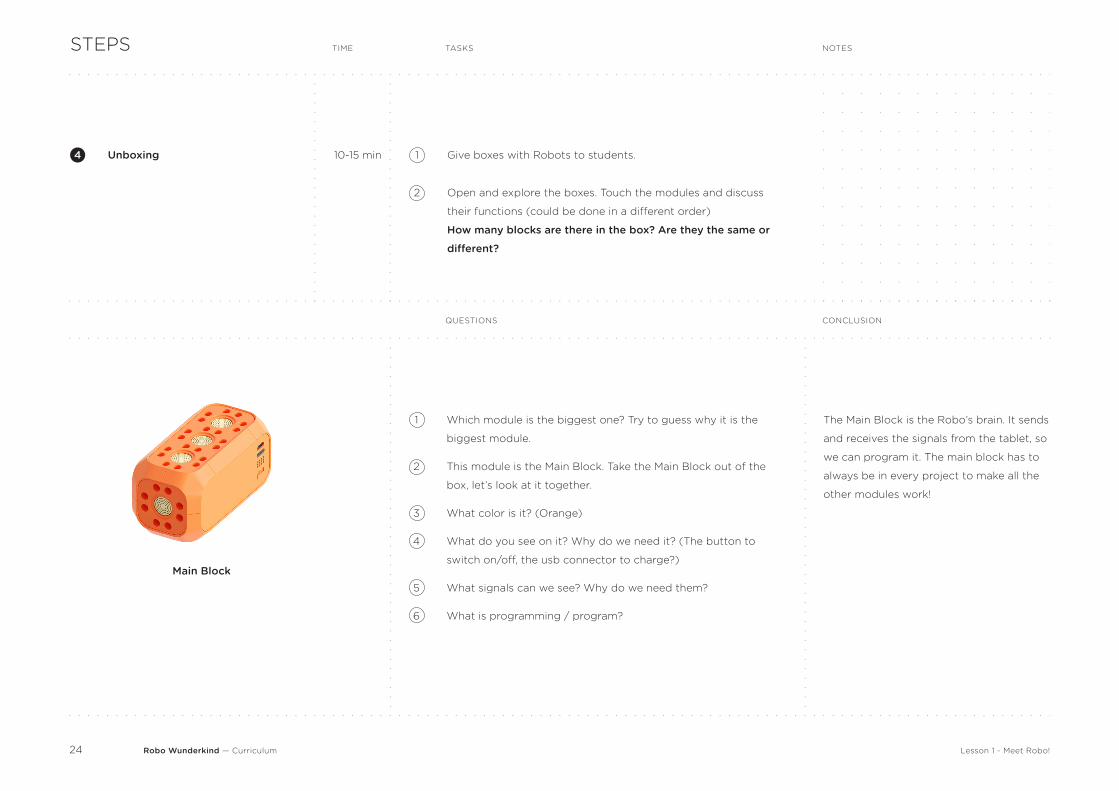
Unboxing 10-15 min 1
2
Give boxes with Robots to students.
Open and explore the boxes. Touch the modules and discuss
their functions (could be done in a different order)
How many blocks are there in the box? Are they the same or
different?
STEPS
4
Which module is the biggest one? Try to guess why it is the
biggest module.
This module is the Main Block. Take the Main Block out of the
box, let’s look at it together.
What color is it? (Orange)
What do you see on it? Why do we need it? (The button to
switch on/off, the usb connector to charge?)
What signals can we see? Why do we need them?
What is programming / program?
1
2
3
4
5
6
The Main Block is the Robo’s brain. It sends
and receives the signals from the tablet, so
we can program it. The main block has to
always be in every project to make all the
other modules work!
Main Block
CONCLUSIONQUESTIONS
Lesson 1 - Meet Robo!
Robo Wunderkind — Curriculum25
CONCLUSIONQUESTIONSSTEPS
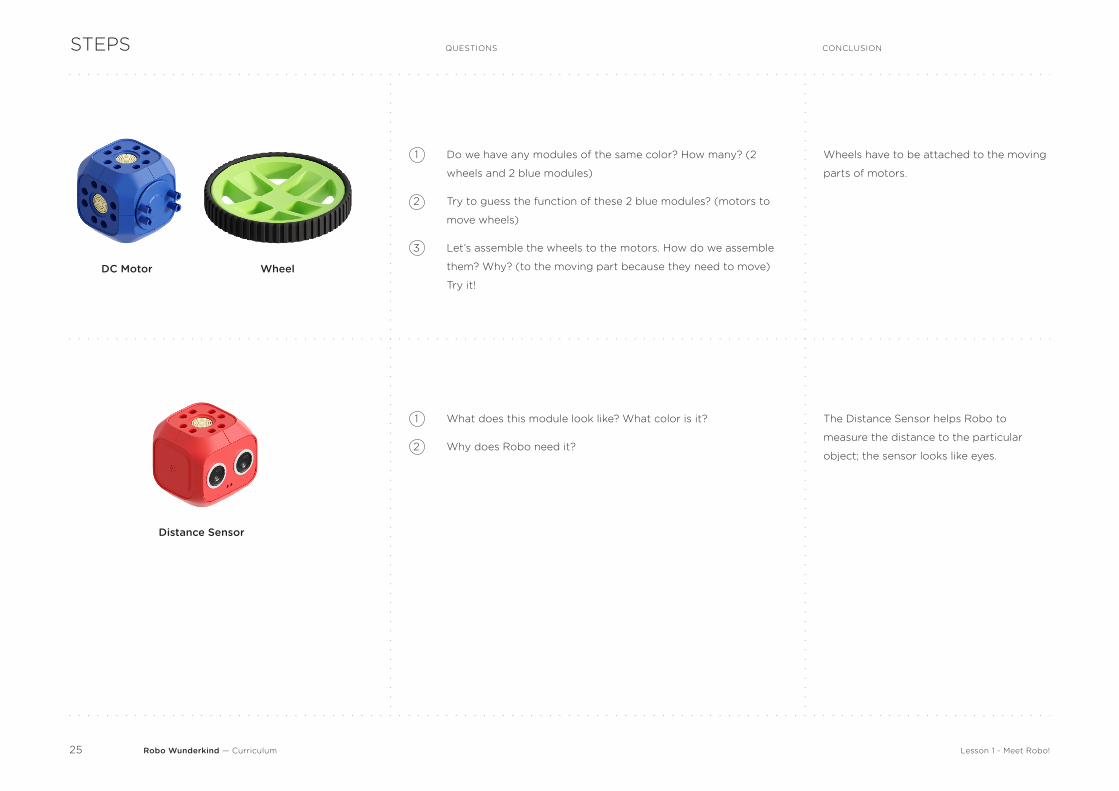
What does this module look like? What color is it?
Why does Robo need it?
1
2
The Distance Sensor helps Robo to
measure the distance to the particular
object; the sensor looks like eyes.
Distance Sensor
DC Motor Wheel
Do we have any modules of the same color? How many? (2
wheels and 2 blue modules)
Try to guess the function of these 2 blue modules? (motors to
move wheels)
Let’s assemble the wheels to the motors. How do we assemble
them? Why? (to the moving part because they need to move)
Try it!
1
2
3
Wheels have to be attached to the moving
parts of motors.
Lesson 1 - Meet Robo!
Robo Wunderkind — Curriculum26
CONCLUSIONQUESTIONSSTEPS
Lesson 1 - Meet Robo!
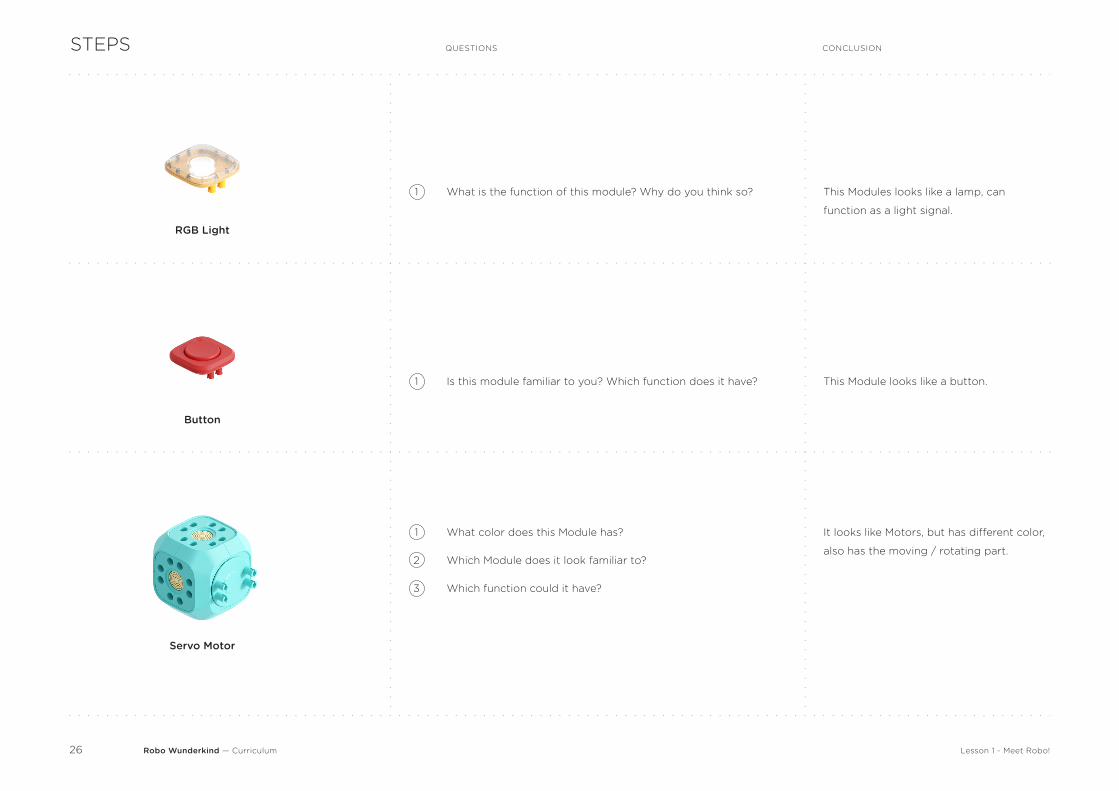
Is this module familiar to you? Which function does it have?1 This Module looks like a button.
Button
RGB Light
What is the function of this module? Why do you think so?1 This Modules looks like a lamp, can
function as a light signal.
Servo Motor
What color does this Module has?
Which Module does it look familiar to?
Which function could it have?
1
2
3
It looks like Motors, but has different color,
also has the moving / rotating part.
Robo Wunderkind — Curriculum27
CONCLUSIONQUESTIONSSTEPS
Lesson 1 - Meet Robo!
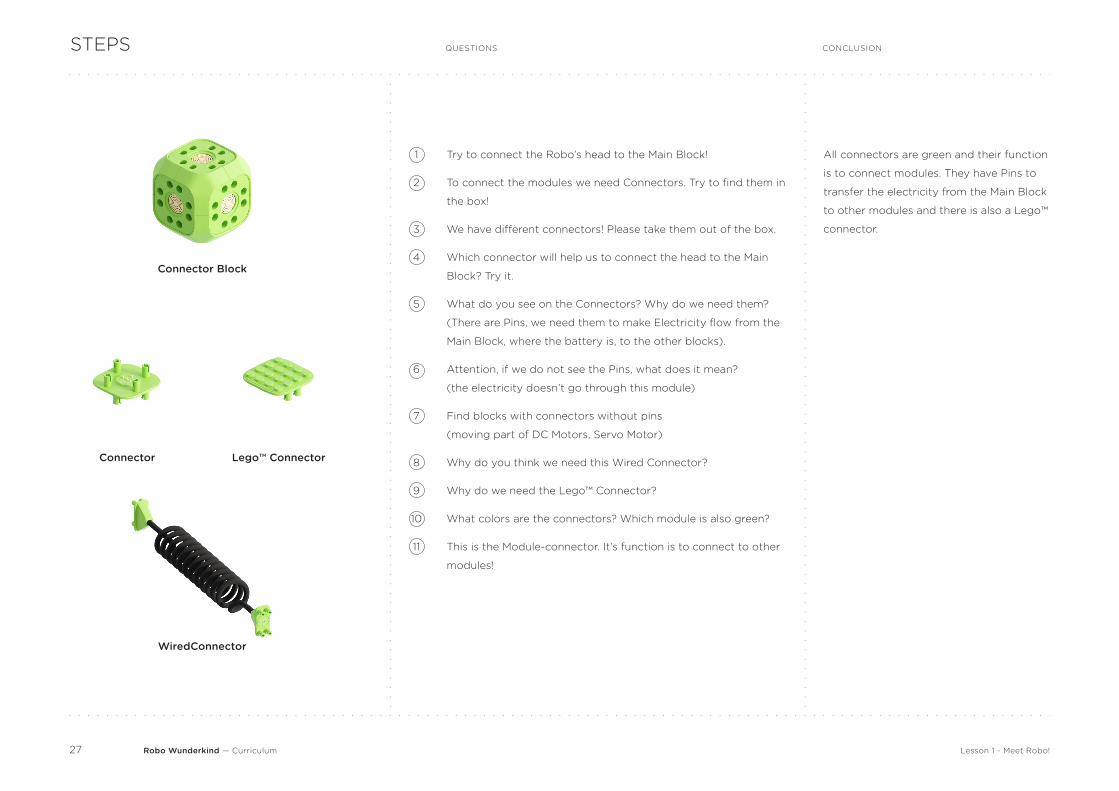
Connector Block
Try to connect the Robo’s head to the Main Block!
To connect the modules we need Connectors. Try to find them in
the box!
We have different connectors! Please take them out of the box.
Which connector will help us to connect the head to the Main
Block? Try it.
What do you see on the Connectors? Why do we need them?
(There are Pins, we need them to make Electricity flow from the
Main Block, where the battery is, to the other blocks).
Attention, if we do not see the Pins, what does it mean?
(the electricity doesn’t go through this module)
Find blocks with connectors without pins
(moving part of DC Motors, Servo Motor)
Why do you think we need this Wired Connector?
Why do we need the Lego™ Connector?
What colors are the connectors? Which module is also green?
This is the Module-connector. It’s function is to connect to other
modules!
1
2
3
4
5
6
7
8
9
10
11
All connectors are green and their function
is to connect modules. They have Pins to
transfer the electricity from the Main Block
to other modules and there is also a Lego™
connector.
Connector Lego™ Connector
WiredConnector
Robo Wunderkind — Curriculum28
TIME NOTESTASKSSTEPS
Lesson 1 - Meet Robo!
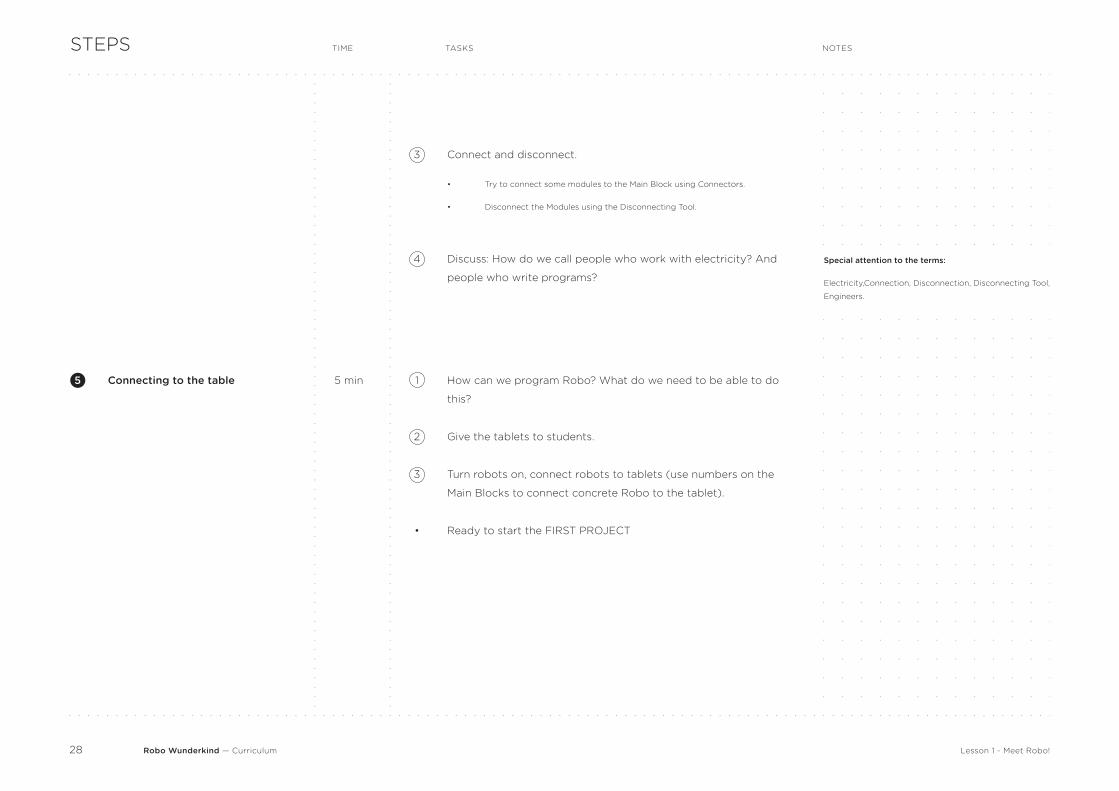
4
3
Discuss: How do we call people who work with electricity? And
people who write programs?
Connect and disconnect.
Try to connect some modules to the Main Block using Connectors.
Disconnect the Modules using the Disconnecting Tool.
•
•
Special attention to the terms:
Electricity,Connection, Disconnection, Disconnecting Tool,
Engineers.
Connecting to the table5 1
2
3
•
How can we program Robo? What do we need to be able to do
this?
Give the tablets to students.
Turn robots on, connect robots to tablets (use numbers on the
Main Blocks to connect concrete Robo to the tablet).
Ready to start the FIRST PROJECT
5 min
Robo Wunderkind — Curriculum29
TIME NOTESTASKS
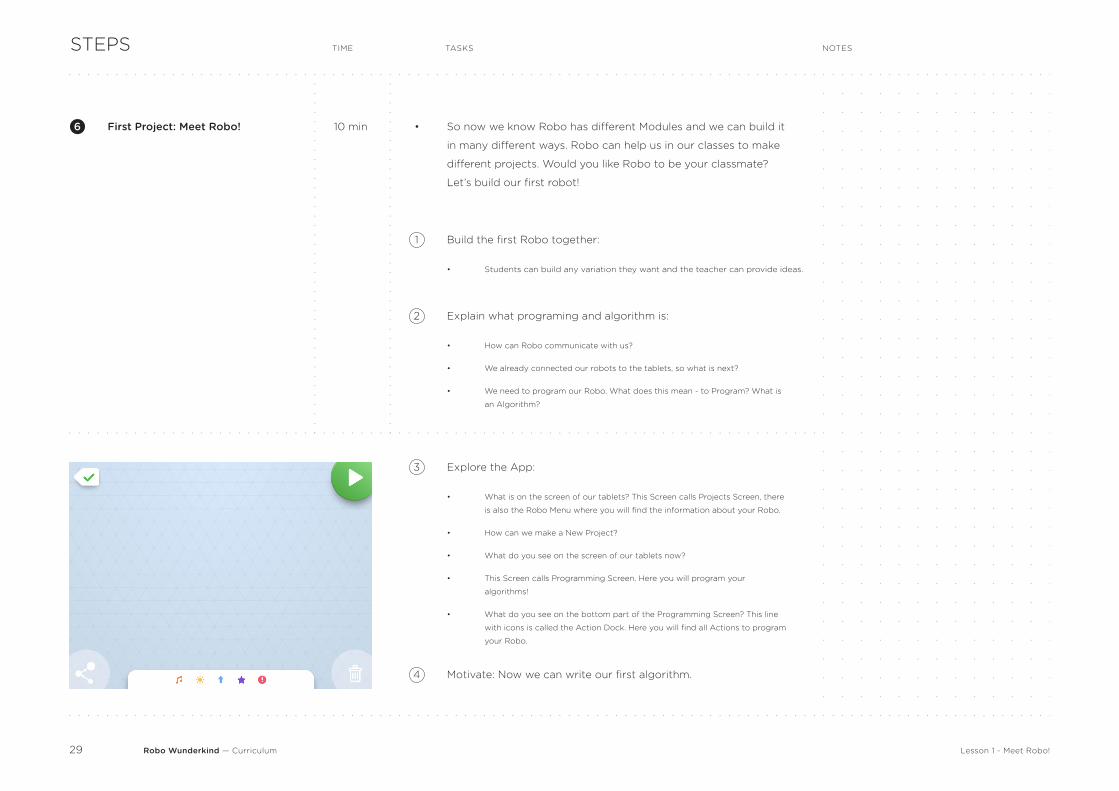
First Project: Meet Robo! 6
1 Build the first Robo together:
Students can build any variation they want and the teacher can provide ideas.•
10 min So now we know Robo has different Modules and we can build it
in many different ways. Robo can help us in our classes to make
different projects. Would you like Robo to be your classmate?
Let’s build our first robot!
•
2 Explain what programing and algorithm is:
How can Robo communicate with us?
We already connected our robots to the tablets, so what is next?
We need to program our Robo. What does this mean - to Program? What is
an Algorithm?
•
•
•
3 Explore the App:
What is on the screen of our tablets? This Screen calls Projects Screen, there
is also the Robo Menu where you will find the information about your Robo.
How can we make a New Project?
What do you see on the screen of our tablets now?
This Screen calls Programming Screen. Here you will program your
algorithms!
What do you see on the bottom part of the Programming Screen? This line
with icons is called the Action Dock. Here you will find all Actions to program
your Robo.
•
•
•
•
•
4 Motivate: Now we can write our first algorithm.
STEPS
Lesson 1 - Meet Robo!
Robo Wunderkind — Curriculum30
TIME NOTESTASKS
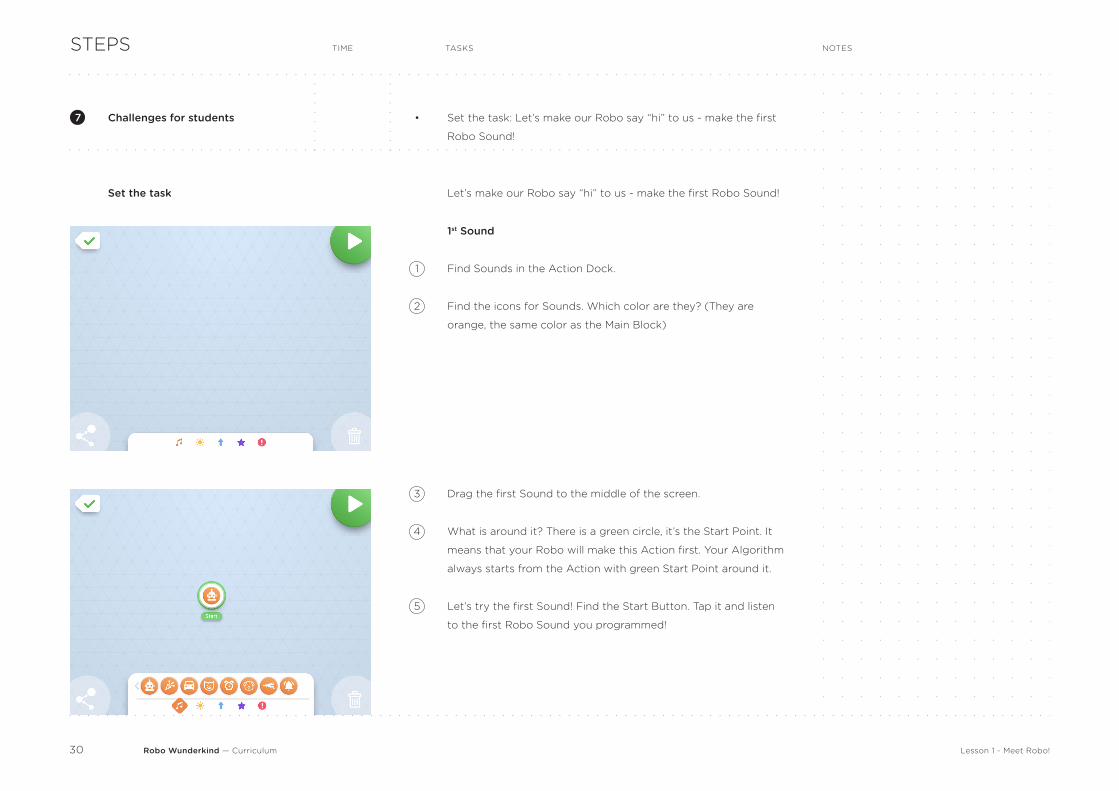
Challenges for students
1st Sound
•
1
2
Set the task: Let’s make our Robo say “hi” to us - make the first
Robo Sound!
Find Sounds in the Action Dock.
Find the icons for Sounds. Which color are they? (They are
orange, the same color as the Main Block)
3
4
5
Drag the first Sound to the middle of the screen.
What is around it? There is a green circle, it’s the Start Point. It
means that your Robo will make this Action first. Your Algorithm
always starts from the Action with green Start Point around it.
Let’s try the first Sound! Find the Start Button. Tap it and listen
to the first Robo Sound you programmed!
7
STEPS
Set the task Let’s make our Robo say “hi” to us - make the first Robo Sound!
Lesson 1 - Meet Robo!
Robo Wunderkind — Curriculum31
TIME NOTESTASKS
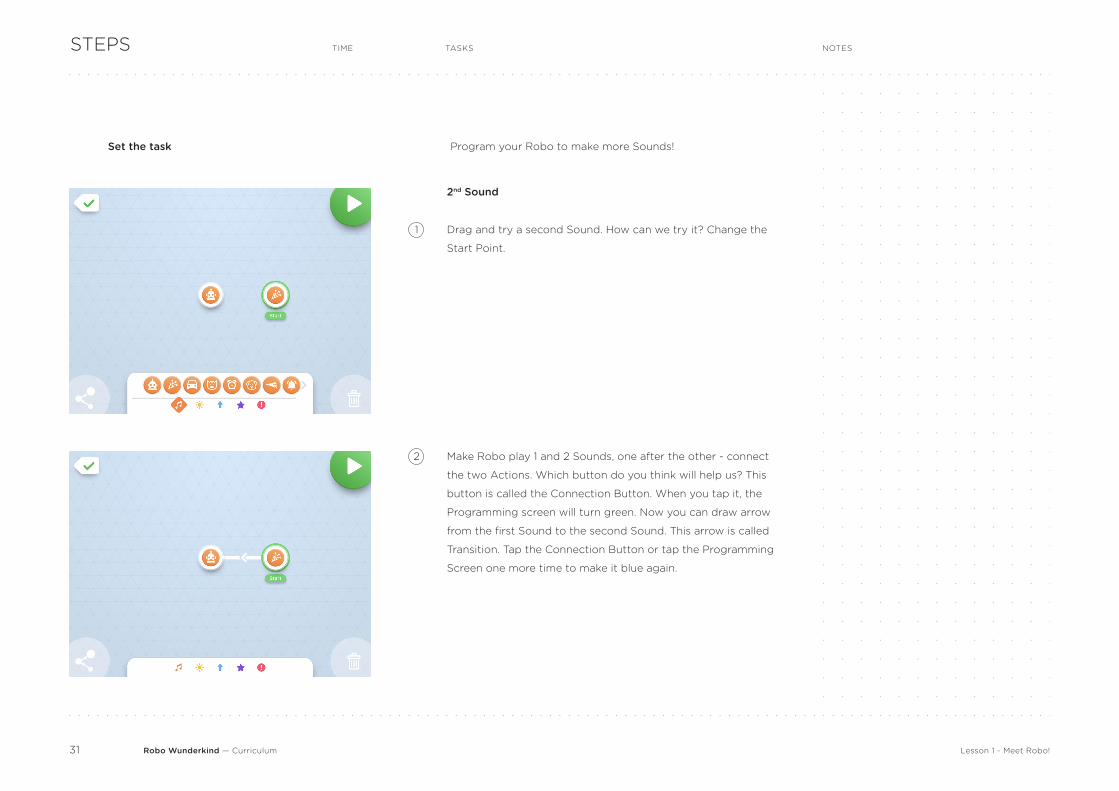
2nd Sound
2 Make Robo play 1 and 2 Sounds, one after the other - connect
the two Actions. Which button do you think will help us? This
button is called the Connection Button. When you tap it, the
Programming screen will turn green. Now you can draw arrow
from the first Sound to the second Sound. This arrow is called
Transition. Tap the Connection Button or tap the Programming
Screen one more time to make it blue again.
1 Drag and try a second Sound. How can we try it? Change the
Start Point.
STEPS
Program your Robo to make more Sounds!Set the task
Lesson 1 - Meet Robo!
Robo Wunderkind — Curriculum32
TIME NOTESTASKS
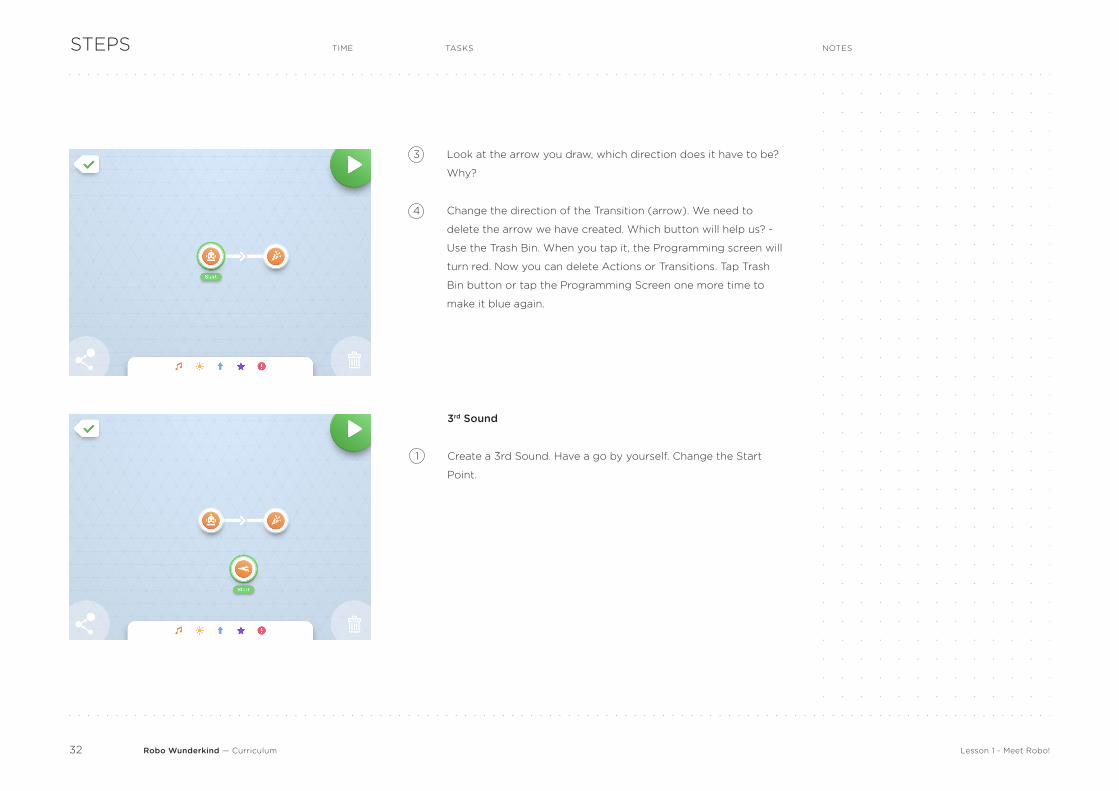
3
4
Look at the arrow you draw, which direction does it have to be?
Why?
Change the direction of the Transition (arrow). We need to
delete the arrow we have created. Which button will help us? -
Use the Trash Bin. When you tap it, the Programming screen will
turn red. Now you can delete Actions or Transitions. Tap Trash
Bin button or tap the Programming Screen one more time to
make it blue again.
STEPS
Lesson 1 - Meet Robo!
1 Create a 3rd Sound. Have a go by yourself. Change the Start
Point.
3rd Sound
Robo Wunderkind — Curriculum33
TIME NOTESTASKSSTEPS
Special attention to the terms:
Actions, Sounds, Start point, Start button, Stop Button,
Connection between Actions (Transition), Trash Bin, Loop1
2
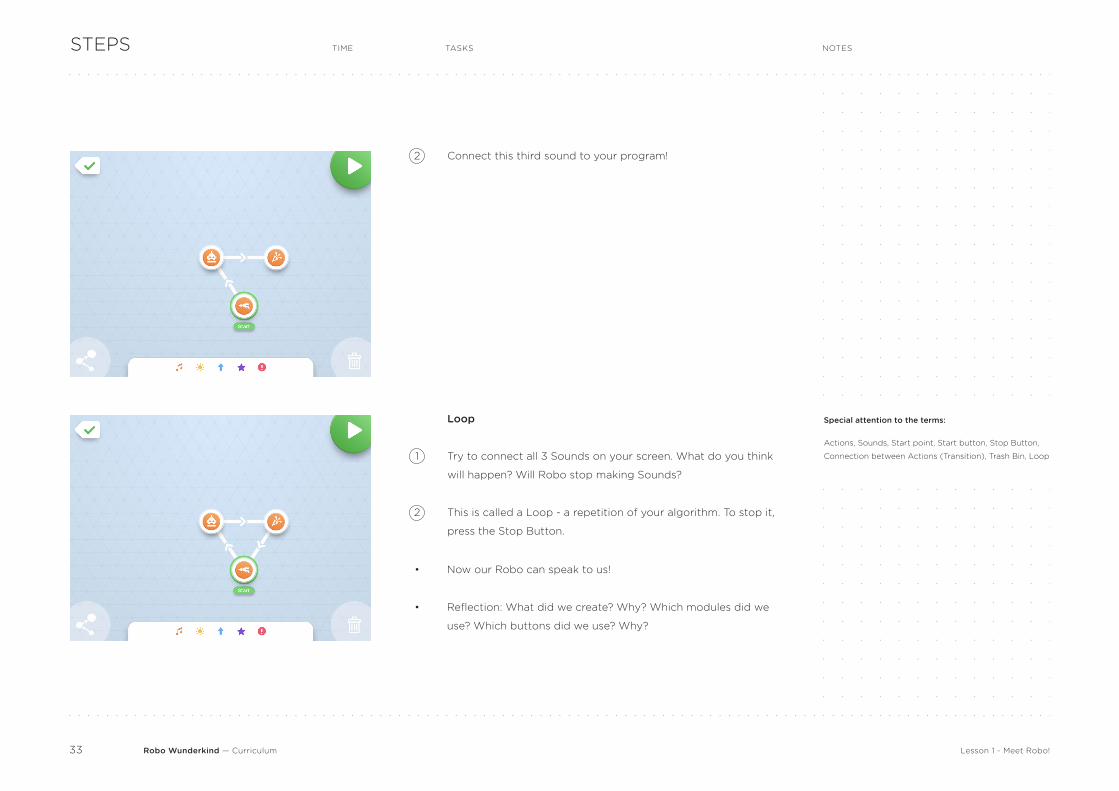
Try to connect all 3 Sounds on your screen. What do you think
will happen? Will Robo stop making Sounds?
This is called a Loop - a repetition of your algorithm. To stop it,
press the Stop Button.
2 Connect this third sound to your program!
Loop
Lesson 1 - Meet Robo!
Now our Robo can speak to us!
Reflection: What did we create? Why? Which modules did we
use? Which buttons did we use? Why?
•
•
Robo Wunderkind — Curriculum34
TIME NOTESTASKSSTEPS
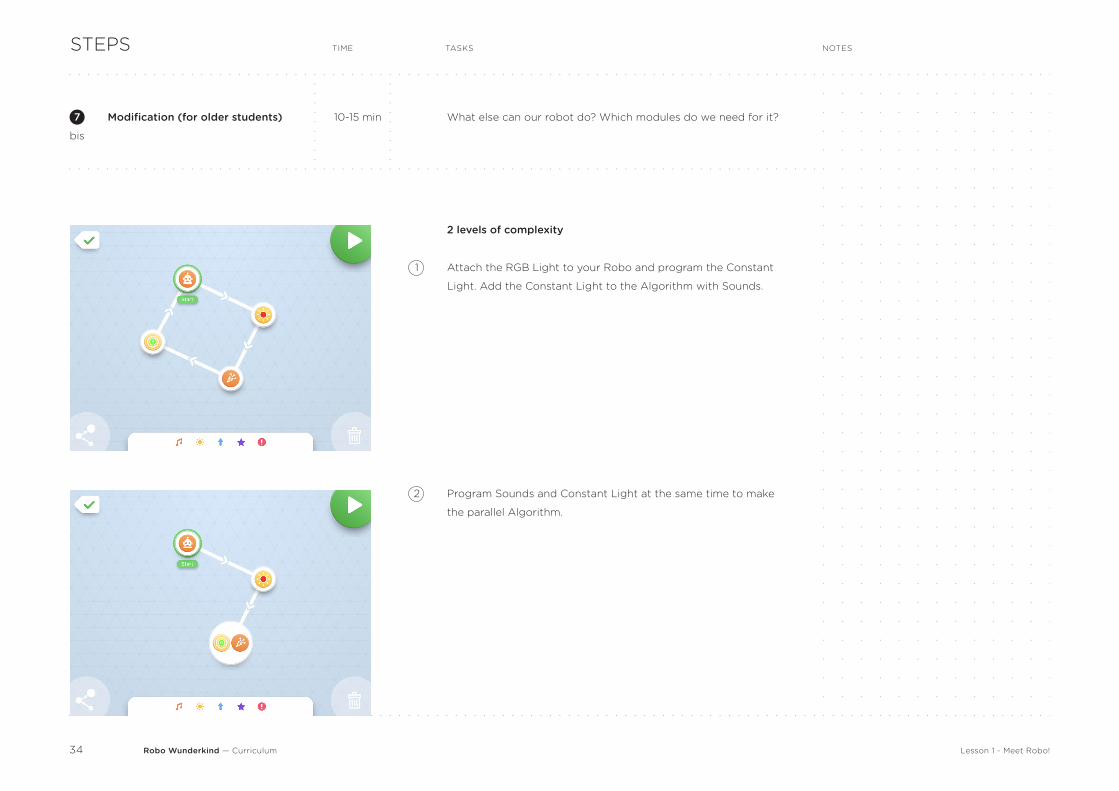
Modification (for older students)
2 levels of complexity
1
What else can our robot do? Which modules do we need for it?
Attach the RGB Light to your Robo and program the Constant
Light. Add the Constant Light to the Algorithm with Sounds.
7
bis
10-15 min
2 Program Sounds and Constant Light at the same time to make
the parallel Algorithm.
Lesson 1 - Meet Robo!
Robo Wunderkind — Curriculum35
TIME NOTESTASKSSTEPS
10-15 minOwn project and presentation
Feedback
8
10
1
2
3
Ask students to build and code Sounds for their Robo and
create a small story about it. Students can use Lego™ connector
to add Lego™ blocks to their projects. You can also set the
concrete task, for example: program your robots to do 3
different Sounds or 2 same Sounds and 3 different.
Ask students to show each other the Robo they have built and
tell the story.
Give constructive feedback about each project.
Robotics, robots and their function for people, how they work.
2 min
5-10 minReflection8
What is programming, program, why do we need it?
What was in the box of their Robo? Modules and their functions, connectors,
tools....
Why did they need to use tablets, what did they program, which buttons
and Actions did they use.
What did we create? Why?
You did a great job, but Robo is a bit tired now, so let’s take it apart and put
all modules of Robo in the boxes.
Tap the Save & Exit Button to go back to the Project screen. Give a name to
your project and close the App.
Were the tasks easy / complex, interesting / boring and why?
Which part of the lesson was the most interesting? why?
What would they like to do in the next lesson?
•
•
•
•
•
•
•
•
•
Lesson 1 - Meet Robo!
Robo Wunderkind — Curriculum36
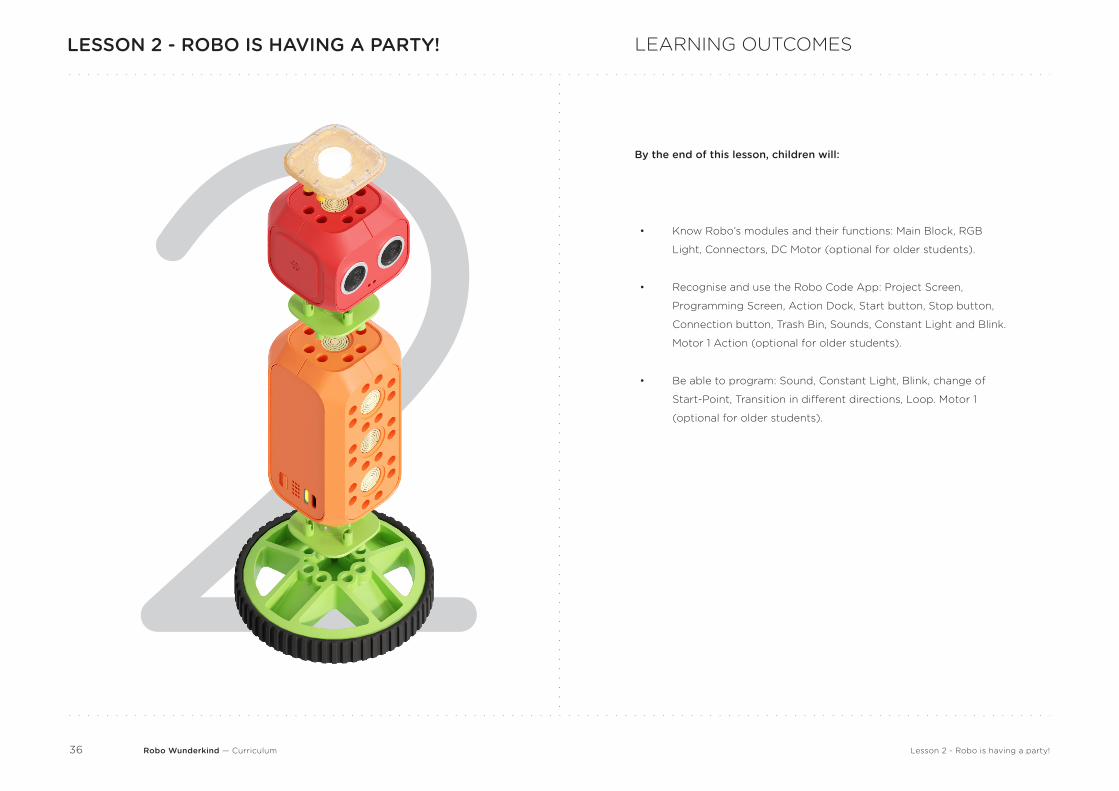
2LESSON 2 - ROBO IS HAVING A PARTY!
•
•
•
Know Robo’s modules and their functions: Main Block, RGB
Light, Connectors, DC Motor (optional for older students).
Recognise and use the Robo Code App: Project Screen,
Programming Screen, Action Dock, Start button, Stop button,
Connection button, Trash Bin, Sounds, Constant Light and Blink.
Motor 1 Action (optional for older students).
Be able to program: Sound, Constant Light, Blink, change of
Start-Point, Transition in different directions, Loop. Motor 1
(optional for older students).
LEARNING OUTCOMES
By the end of this lesson, children will:
Lesson 2 - Robo is having a party!
Robo Wunderkind — Curriculum37
FOCUS
Time
You need
To prepare
•
•
•
•
•
•
•
•
60 minutes
Robo Wunderkind robotics Kit(s)
Tablet(s)
Lego™ bricks
(optional - to customize the Robo)
Projector
(optional - to show materials for students)
Check robots’ battery level
Check tablets’ battery level
Check the latest software update
PLANNING
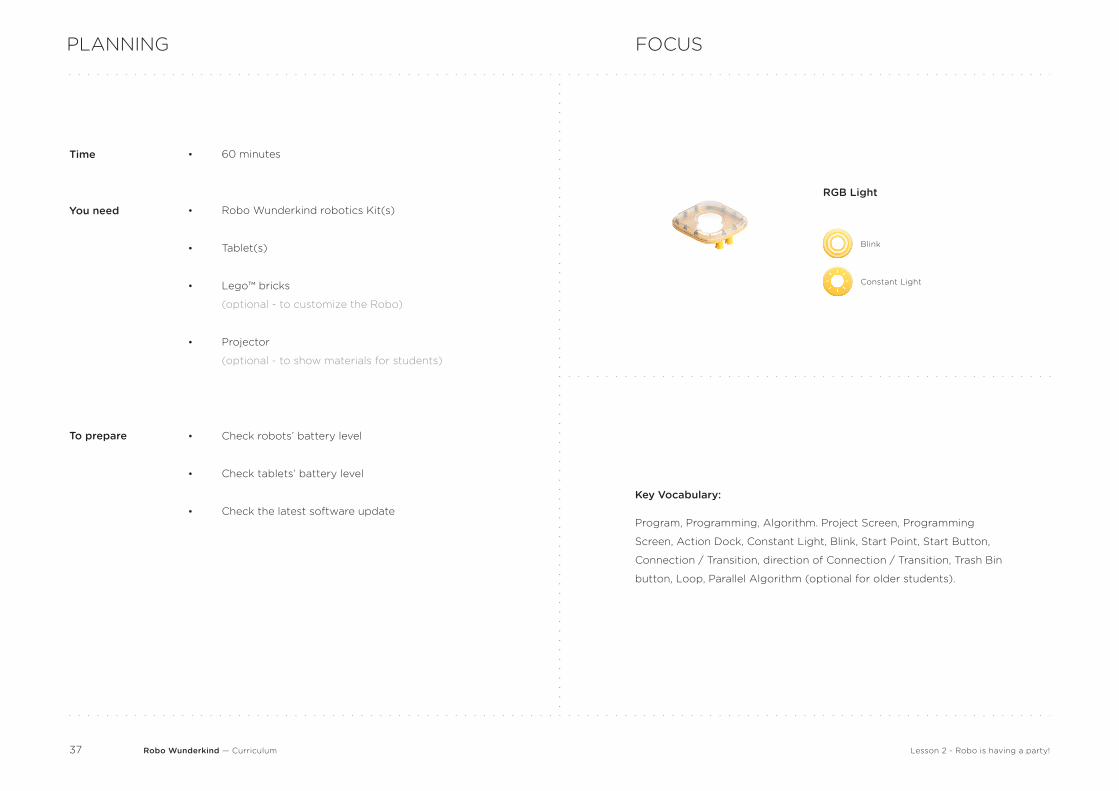
RGB Light
Key Vocabulary:
Program, Programming, Algorithm. Project Screen, Programming
Screen, Action Dock, Constant Light, Blink, Start Point, Start Button,
Connection / Transition, direction of Connection / Transition, Trash Bin
button, Loop, Parallel Algorithm (optional for older students).
Blink
Constant Light
Lesson 2 - Robo is having a party!
Robo Wunderkind — Curriculum38
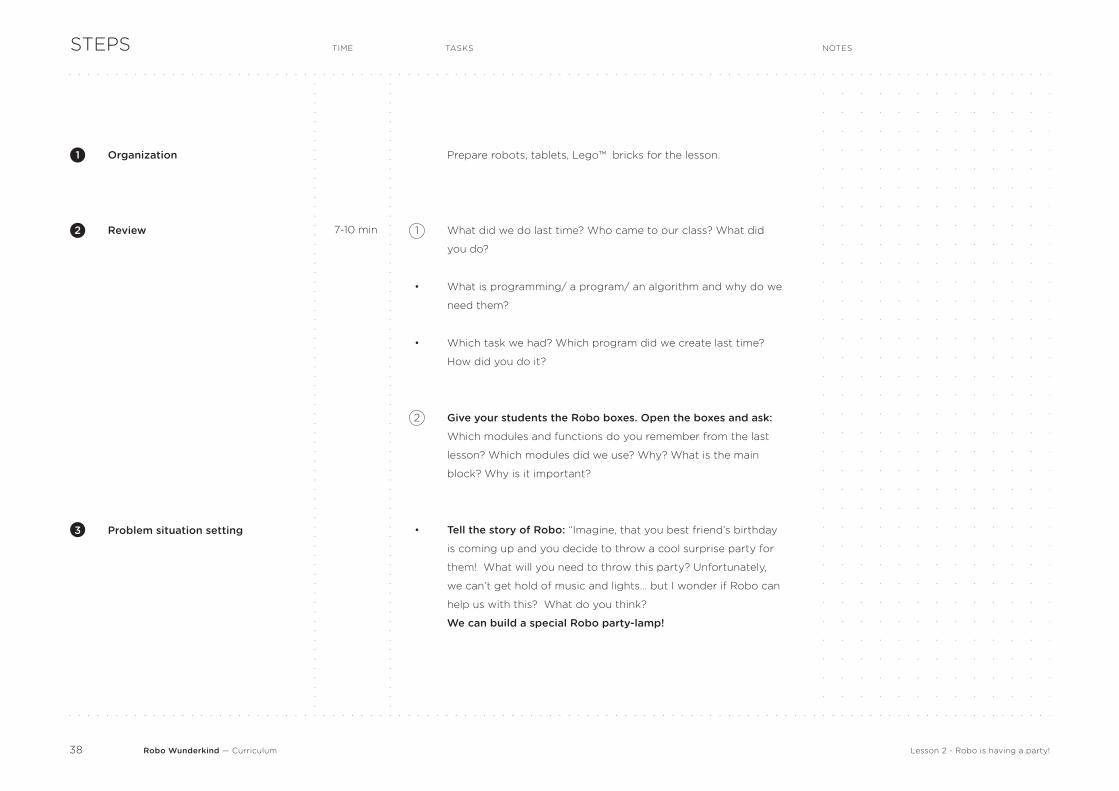
TIME NOTESTASKS
Organization
Review
Problem situation setting
7-10 min 1
•
•
2
•
Prepare robots, tablets, Lego™ bricks for the lesson.
What did we do last time? Who came to our class? What did
you do?
What is programming/ a program/ an algorithm and why do we
need them?
Which task we had? Which program did we create last time?
How did you do it?
Give your students the Robo boxes. Open the boxes and ask:
Which modules and functions do you remember from the last
lesson? Which modules did we use? Why? What is the main
block? Why is it important?
Tell the story of Robo: “Imagine, that you best friend’s birthday
is coming up and you decide to throw a cool surprise party for
them! What will you need to throw this party? Unfortunately,
we can’t get hold of music and lights… but I wonder if Robo can
help us with this? What do you think?
We can build a special Robo party-lamp!
STEPS
1
2
3
Lesson 2 - Robo is having a party!
Robo Wunderkind — Curriculum39
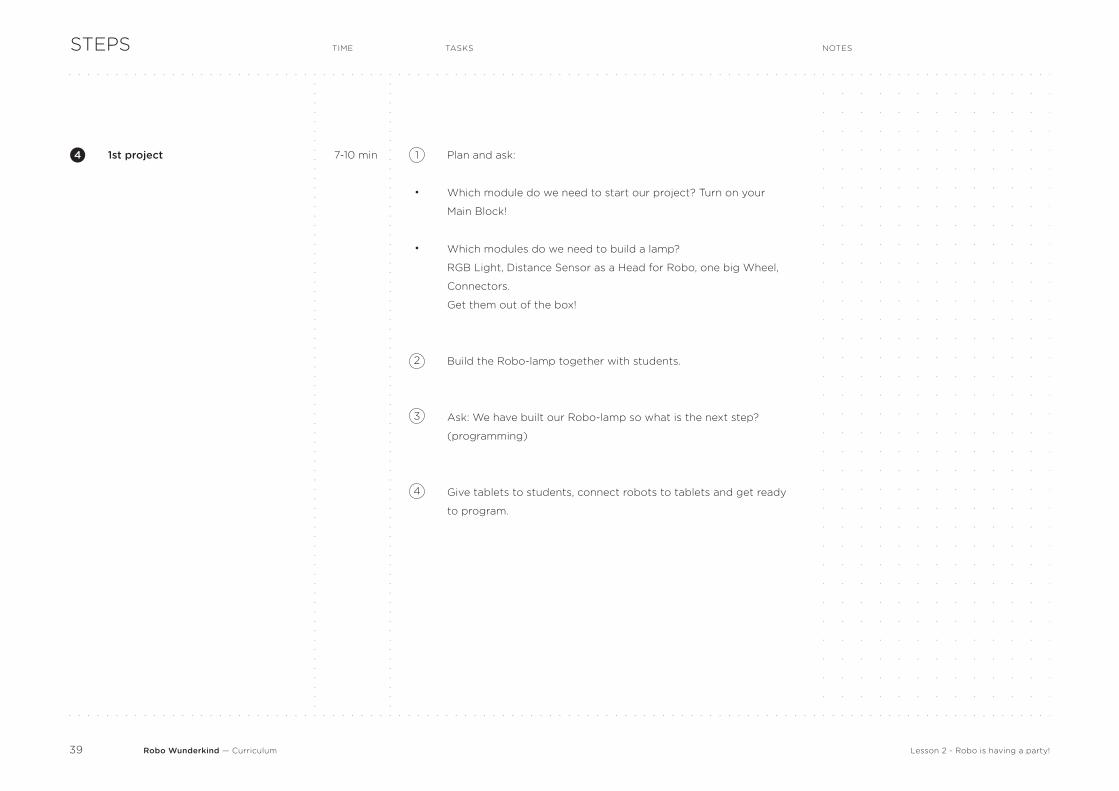
TIME NOTESTASKS
1st project 7-10 min 1
•
•
2
3
4
Plan and ask:
Which module do we need to start our project? Turn on your
Main Block!
Which modules do we need to build a lamp?
RGB Light, Distance Sensor as a Head for Robo, one big Wheel,
Connectors.
Get them out of the box!
Build the Robo-lamp together with students.
Ask: We have built our Robo-lamp so what is the next step?
(programming)
Give tablets to students, connect robots to tablets and get ready
to program.
STEPS
4
Lesson 2 - Robo is having a party!
Robo Wunderkind — Curriculum40
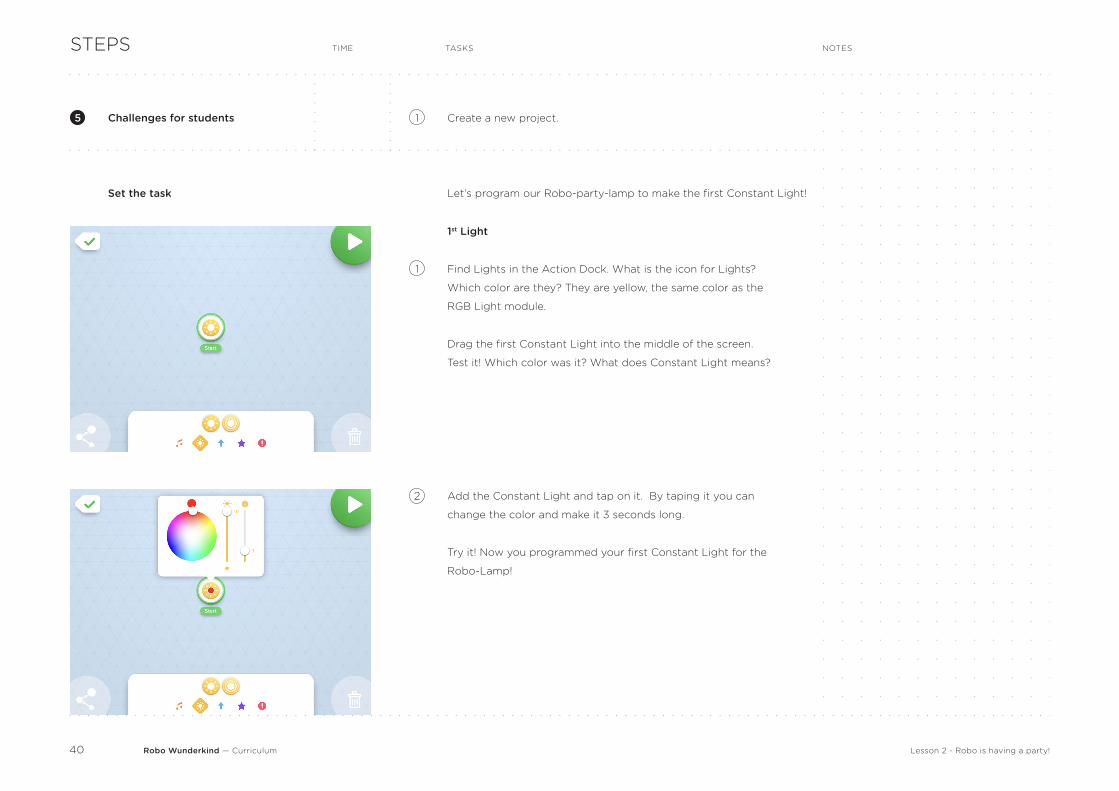
TIME NOTESTASKSSTEPS
Lesson 2 - Robo is having a party!
Set the task
Challenges for students
1st Light
1
1
Create a new project.
Let’s program our Robo-party-lamp to make the first Constant Light!
Find Lights in the Action Dock. What is the icon for Lights?
Which color are they? They are yellow, the same color as the
RGB Light module.
Drag the first Constant Light into the middle of the screen.
Test it! Which color was it? What does Constant Light means?
5
2 Add the Constant Light and tap on it. By taping it you can
change the color and make it 3 seconds long.
Try it! Now you programmed your first Constant Light for the
Robo-Lamp!
Robo Wunderkind — Curriculum41
TIME NOTESTASKSSTEPS
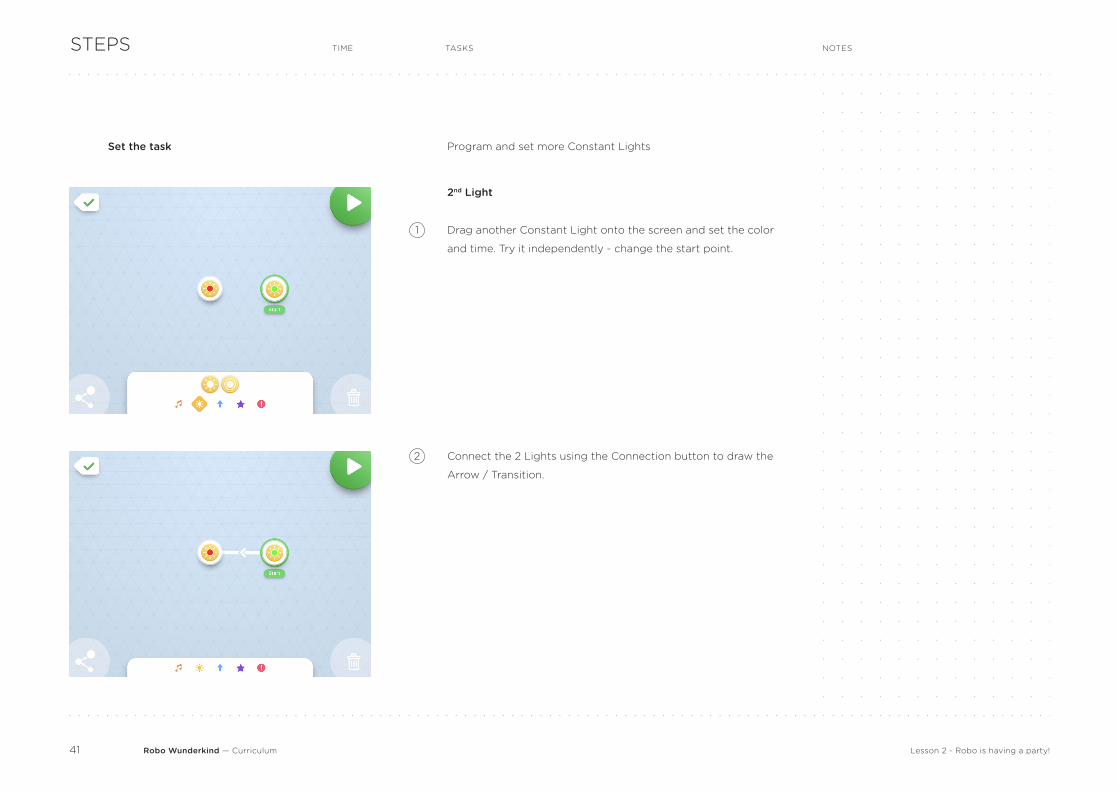
2nd Light
Program and set more Constant Lights
1 Drag another Constant Light onto the screen and set the color
and time. Try it independently - change the start point.
2 Connect the 2 Lights using the Connection button to draw the
Arrow / Transition.
Set the task
Lesson 2 - Robo is having a party!
Robo Wunderkind — Curriculum42
TIME NOTESTASKSSTEPS
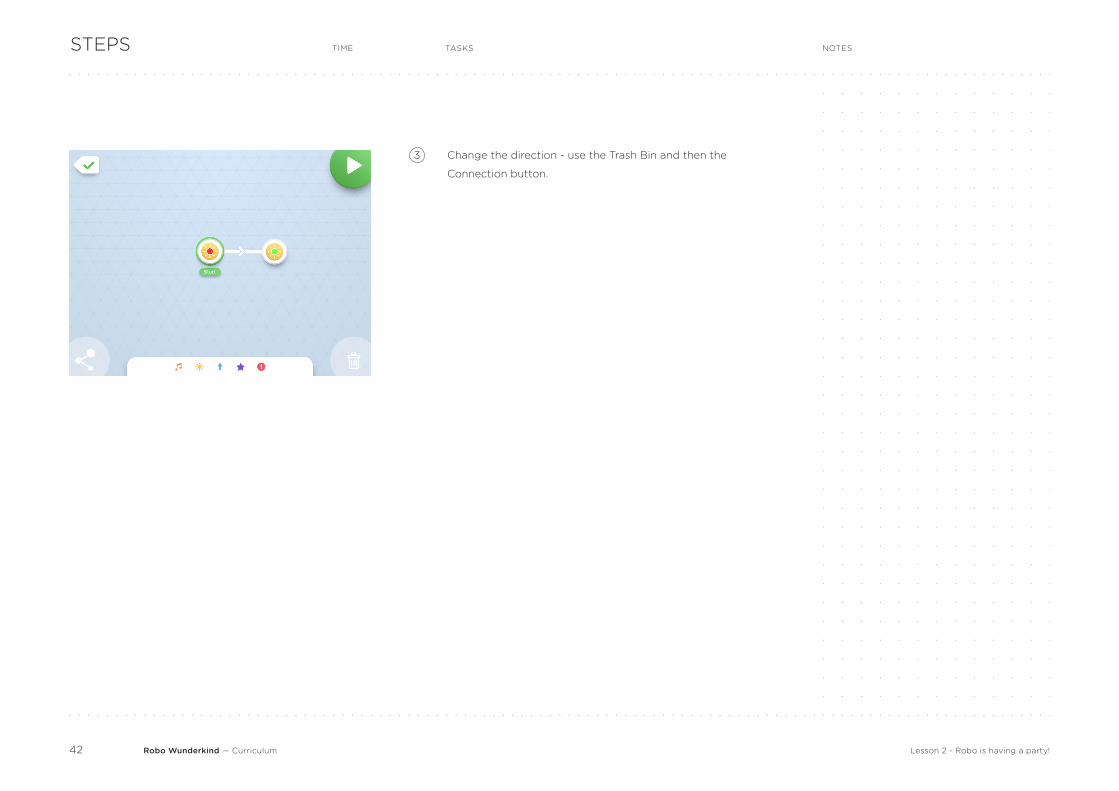
3 Change the direction - use the Trash Bin and then the
Connection button.
Lesson 2 - Robo is having a party!
Robo Wunderkind — Curriculum43
TIME NOTESTASKSSTEPS
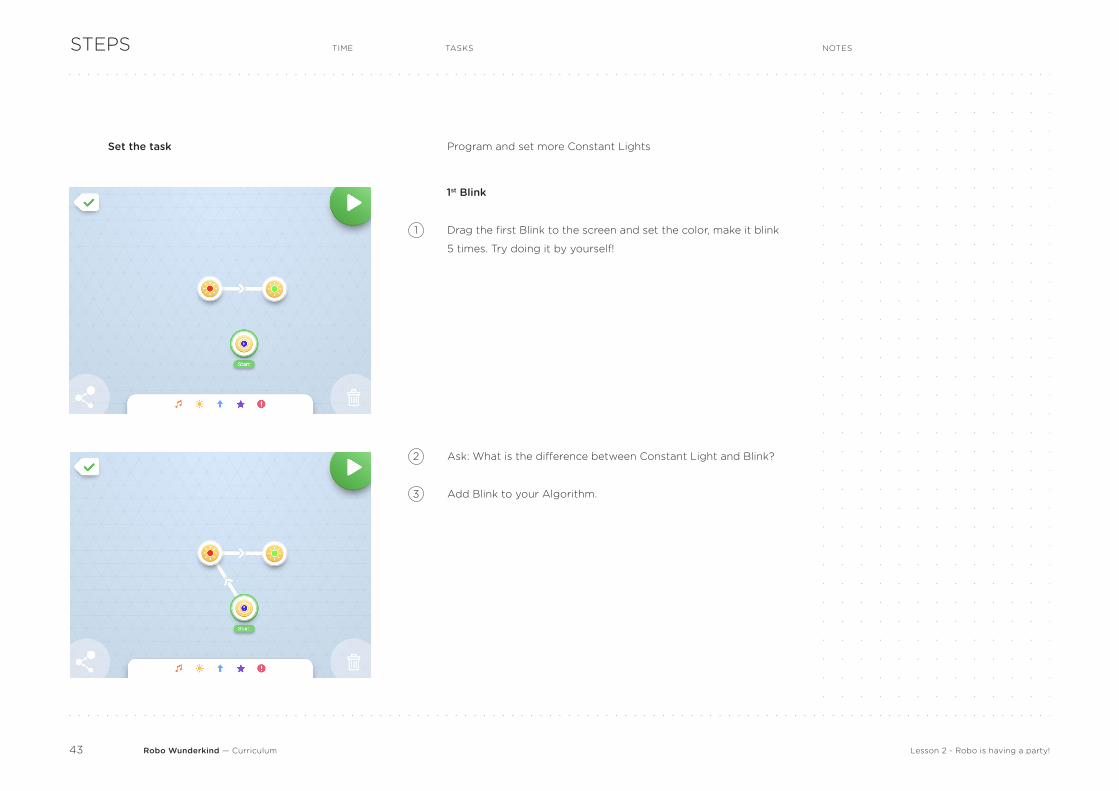
Program and set more Constant LightsSet the task
1st Blink
2
3
Ask: What is the difference between Constant Light and Blink?
Add Blink to your Algorithm.
1 Drag the first Blink to the screen and set the color, make it blink
5 times. Try doing it by yourself!
Lesson 2 - Robo is having a party!
Robo Wunderkind — Curriculum44
TIME NOTESTASKSSTEPS
Ideas for more challenges
All challenges are solved
Reflexion
•
•
•
•
•
•
•
•
Make an algorithm with:
[5] different colored Constant Lights and [3] Blinks that work at
the same time.
[4] Lights different colored Lights and [4] Blinks that work at
different times.
Create and Algorithm which never ends (Loop).
Gradually increase the duration: the first Constant Light is 2
seconds long and each Light after is one second longer than
previous one (2/3/4...).
With 6 different Actions but 8 Transitions.
Tell: Now it’s not dark in here! It is so colorful from your robots’
Lights! We can turn off all the Lights and have a small party with
all these Lights and Sounds!
What did we create? Why? Which modules did we use? Which
tasks did we set? Which Actions and buttons did we use? Why?
•
•
•
Lesson 2 - Robo is having a party!
Robo Wunderkind — Curriculum45
TIME NOTESTASKSSTEPS
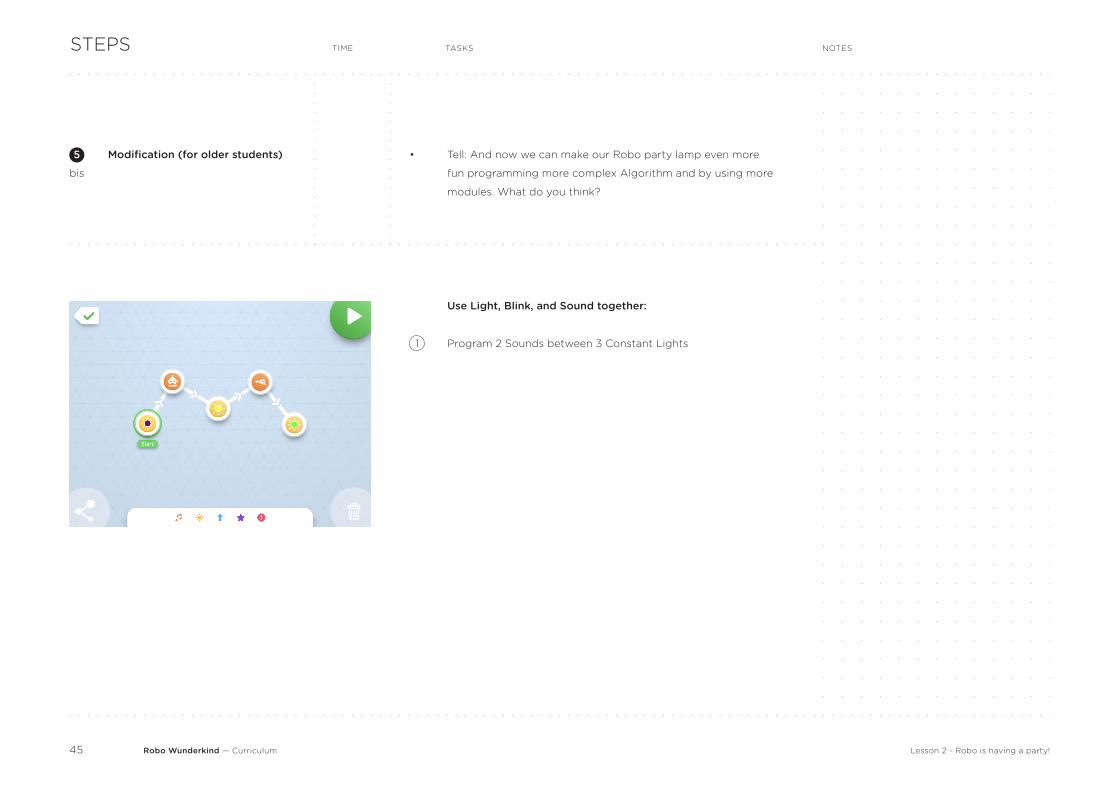
Modification (for older students) Tell: And now we can make our Robo party lamp even more
fun programming more complex Algorithm and by using more
modules. What do you think?
1
Use Light, Blink, and Sound together:
Program 2 Sounds between 3 Constant Lights
5
bis
•
Lesson 2 - Robo is having a party!
Robo Wunderkind — Curriculum46
TIME NOTESTASKSSTEPS
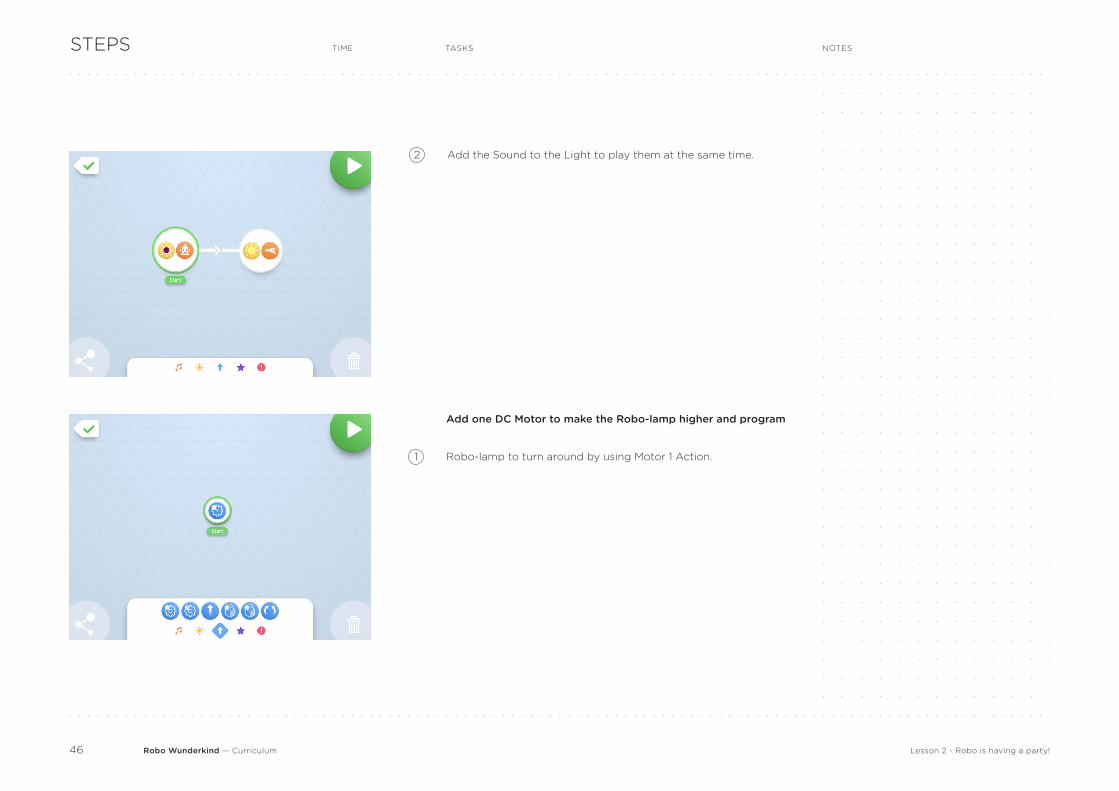
Add one DC Motor to make the Robo-lamp higher and program
1 Robo-lamp to turn around by using Motor 1 Action.
Lesson 2 - Robo is having a party!
2 Add the Sound to the Light to play them at the same time.
Robo Wunderkind — Curriculum47
TIME NOTESTASKSSTEPS
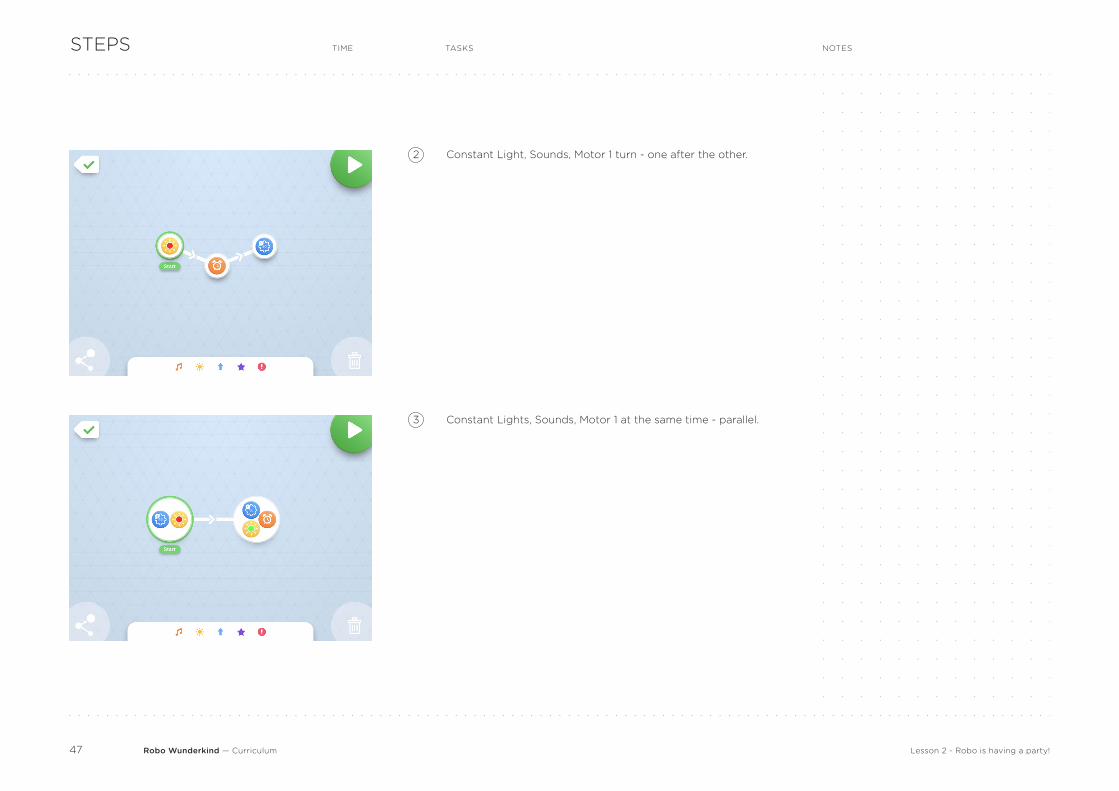
3 Constant Lights, Sounds, Motor 1 at the same time - parallel.
2 Constant Light, Sounds, Motor 1 turn - one after the other.
Lesson 2 - Robo is having a party!

Robo Wunderkind — Curriculum48
TIME NOTESTASKSSTEPS
10-15 minOwn project and presentation of
the project
Reflexion
Feedback
6
7
8
Tell: We created Robo to help us Light up the party. How else
can we use Constant Lights and Blinks?
Ask students:
Ask students about their experience:
Tell:
Ask students to build and code their Robos using constant Lights / Blinks
and Sounds (motor for older students). Create a small story about it.
Students can use the Lego™ connector to add Lego ™. blocks to their
projects.
Ask students to show each other the Robo they have built and tell the story.
Give constructive feedback about each project.
What was the situation we needed Robo to help with? What solution did we
create? Which modules did we use? What are their functions?
Which Actions and buttons did we use to program?
Were the tasks easy / complex, interesting / boring and why?
Which part of the lesson was the most interesting and why?
What would they like to do in the next lesson?
You did a great job but Robo is a bit tired now, so let’s take it apart and put
all of Robo’s modules back in the boxes.
Tap the Save & Exit Button to go back to the Project screen. Give a name to
your project and close the App.
1
2
3
•
•
•
•
•
•
•
Key vocabulary:
Program, Algorithm, Actions, Sounds, Lights,
Blinks, Start Point, Start Button, Change the
Start Point, Connection between Actions,
Direction of Connection, Eraser, Loop.
5 min
2 min
Lesson 2 - Robo is having a party!
Robo Wunderkind — Curriculum49
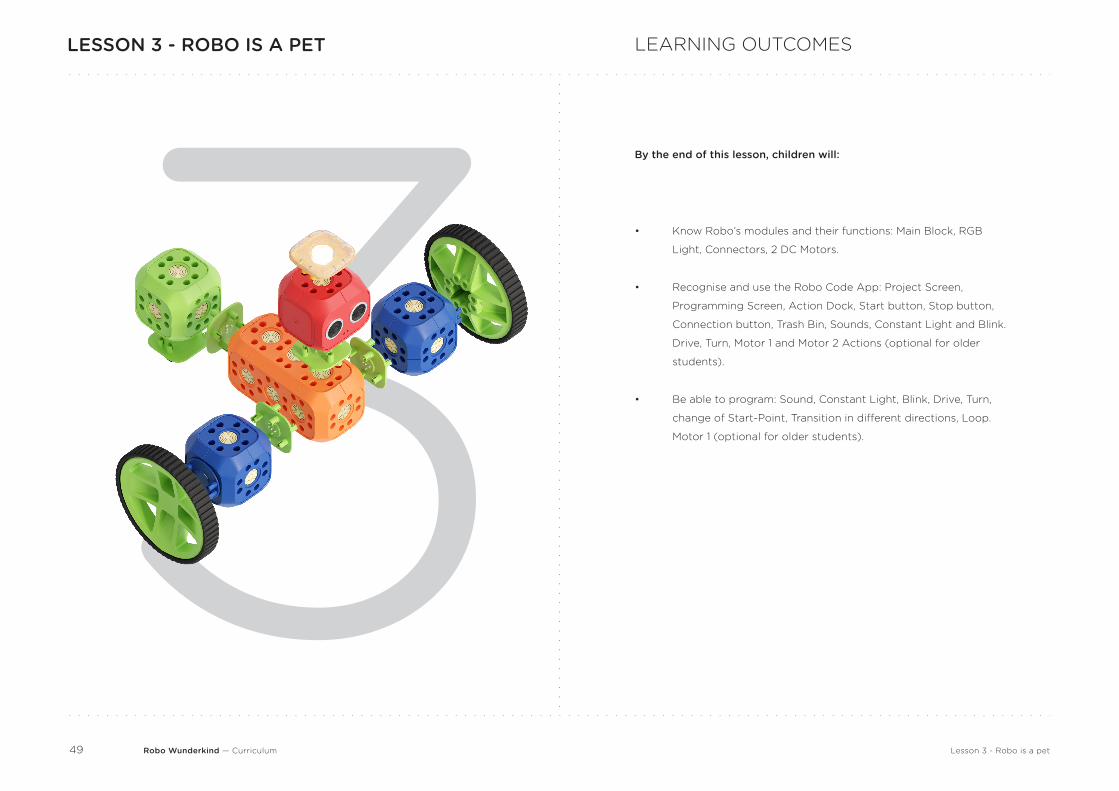
LESSON 3 - ROBO IS A PET
Lesson 3 - Robo is a pet
•
•
•
Know Robo’s modules and their functions: Main Block, RGB
Light, Connectors, 2 DC Motors.
Recognise and use the Robo Code App: Project Screen,
Programming Screen, Action Dock, Start button, Stop button,
Connection button, Trash Bin, Sounds, Constant Light and Blink.
Drive, Turn, Motor 1 and Motor 2 Actions (optional for older
students).
Be able to program: Sound, Constant Light, Blink, Drive, Turn,
change of Start-Point, Transition in different directions, Loop.
Motor 1 (optional for older students).
LEARNING OUTCOMES
By the end of this lesson, children will:
3

Robo Wunderkind — Curriculum50
FOCUS
Time
You need
To prepare
•
•
•
•
•
•
•
•
60 minutes
Robo Wunderkind robotics Kit(s)
Tablet(s)
Lego™ bricks
(optional - to customize the Robo)
Projector
(optional - to show materials for students)
Check robots’ battery level
Check tablets’ battery level
Check the latest software update
PLANNING
Key vocabulary:
DC Motor, Drive, Turn, Start Point, Start Button,
Connection / Transition, direction of Connection /
Transition, Trash Bin button, Loop.
DC Motors
Drive
Turn
Lesson 3 - Robo is a pet
Robo Wunderkind — Curriculum51
TIME NOTESTASKS
Organization
Review
Problem situation setting
5-7 min 1
•
•
2
•
Prepare robots, tablets, Lego™ bricks for the lesson.
What did we do last time? Who came to our class? What did
you do?
What did we do last time? How did Robo help us? Which tasks
did we have?
Which Modules and Actions did we use last time to create the
Algorithm
Give out Robo boxes, open the boxes and ask: Which modules
and functions do you remember from the last time? Which
modules did we use? What is the main block and why is it
important?
Tell the story of Robo: “Do you like pets? Who has a pet? Is it
easy to have a dog or cat? Why? Right, we need to take care
of our pets. They make us happy and we have fun playing with
them. But wait! Do you think we can build Robo to be our pet?
Can we build just a dog or cat, or can we can build any pet we
want? Even an imaginary one!”
We can build a special Robo - pet!
STEPS
1
2
3
Lesson 3 - Robo is a pet
Robo Wunderkind — Curriculum52
TIME NOTESTASKS
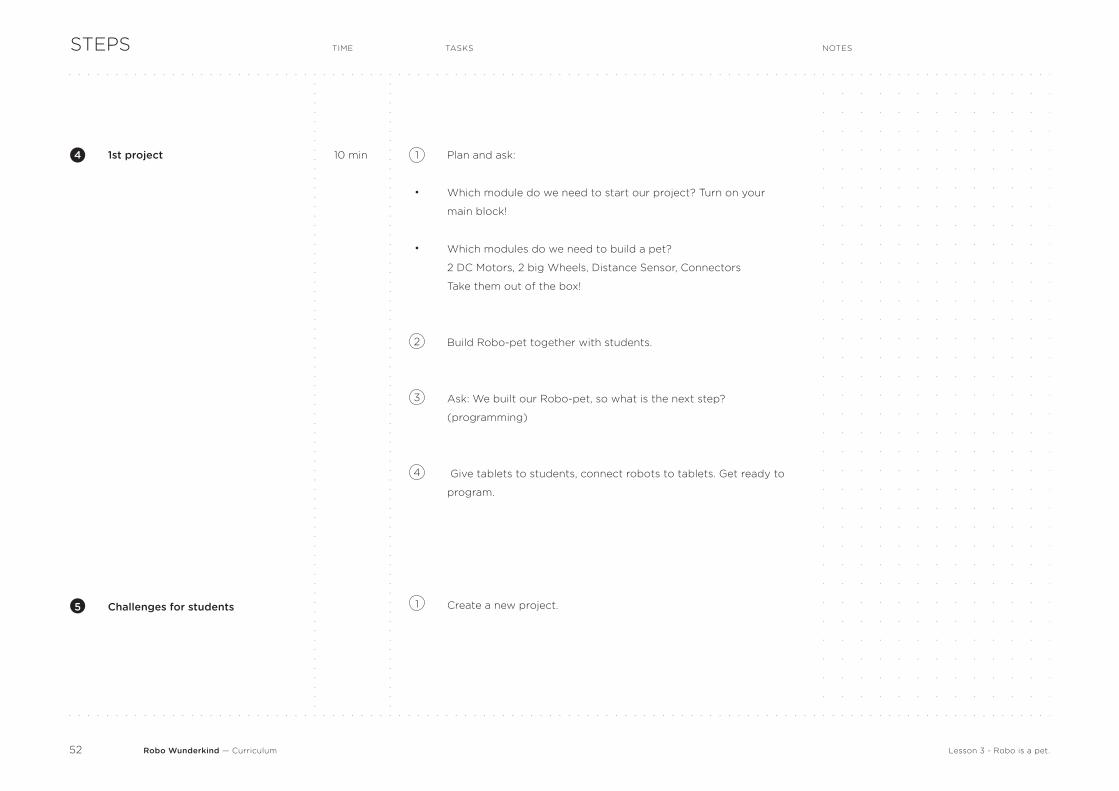
1st project
Challenges for students
10 min 1
•
•
2
3
4
1
Plan and ask:
Which module do we need to start our project? Turn on your
main block!
Which modules do we need to build a pet?
2 DC Motors, 2 big Wheels, Distance Sensor, Connectors
Take them out of the box!
Build Robo-pet together with students.
Ask: We built our Robo-pet, so what is the next step?
(programming)
Give tablets to students, connect robots to tablets. Get ready to
program.
Create a new project.
STEPS
4
5
Lesson 3 - Robo is a pet.
Robo Wunderkind — Curriculum53
TIME NOTESTASKSSTEPS
Let’s program our Robo-pet to move forward!Set the task
1 Find Movements in the Action Dock. What is the icon for
Movements? Which color are they? (They are blue, the same
color as the DC Motors) Find Drive Action. Drag the first Drive
into the middle of the screen. Try it. Does it work? What is the
number on it? Can we change it
1st Drive
2 Set the 1st Drive to 30 by taping on it.
Lesson 3 - Robo is a pet
Robo Wunderkind — Curriculum54
TIME NOTESTASKSSTEPS
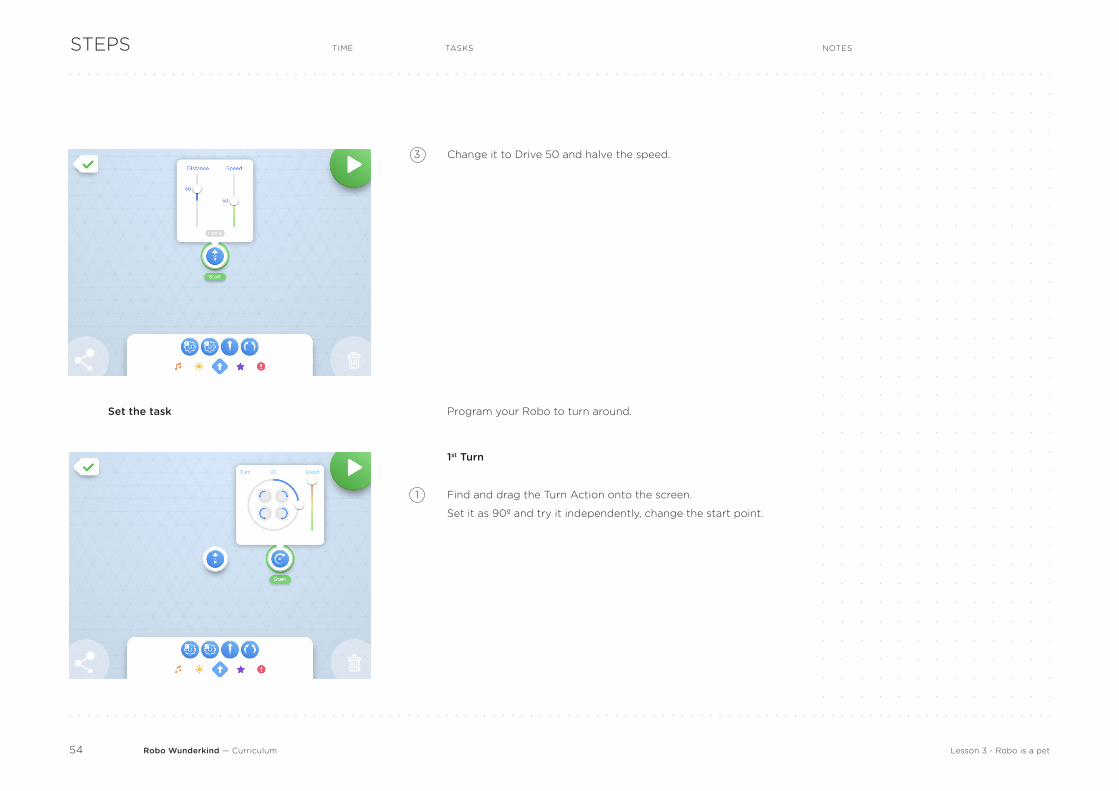
Program your Robo to turn around.Set the task
1st Turn
1 Find and drag the Turn Action onto the screen.
Set it as 90º and try it independently, change the start point.
Lesson 3 - Robo is a pet
3 Change it to Drive 50 and halve the speed.
Robo Wunderkind — Curriculum55
TIME NOTESTASKSSTEPS
2nd Drive
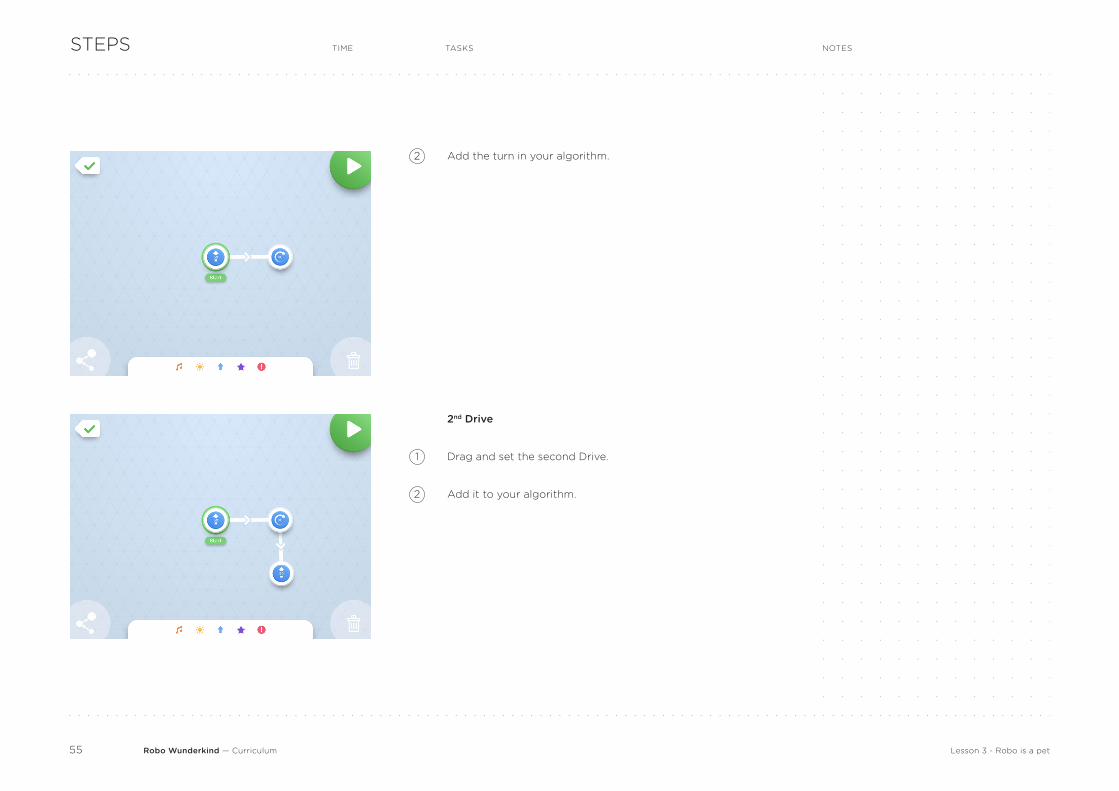
2
1
2
Add the turn in your algorithm.
Drag and set the second Drive.
Add it to your algorithm.
Lesson 3 - Robo is a pet
Robo Wunderkind — Curriculum56
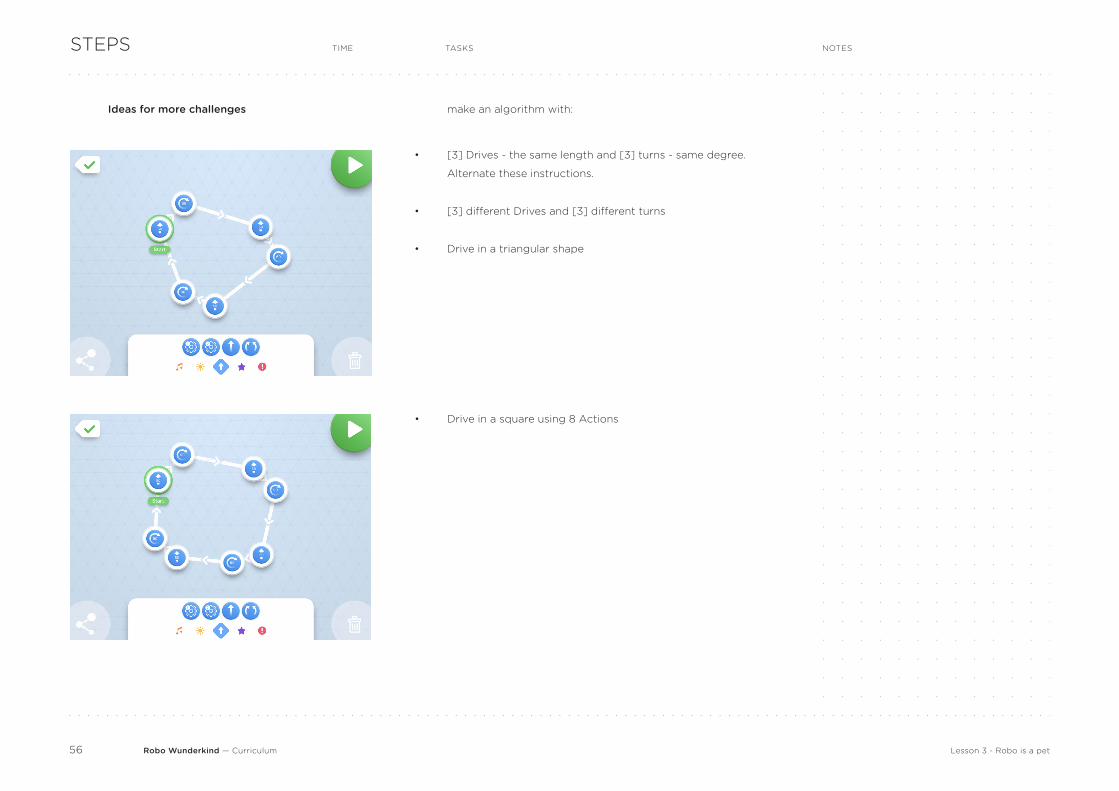
TIME NOTESTASKSSTEPS
make an algorithm with:Ideas for more challenges
•
•
•
• Drive in a square using 8 Actions
[3] Drives - the same length and [3] turns - same degree.
Alternate these instructions.
[3] different Drives and [3] different turns
Drive in a triangular shape
Lesson 3 - Robo is a pet
Robo Wunderkind — Curriculum57
TIME NOTESTASKSSTEPS
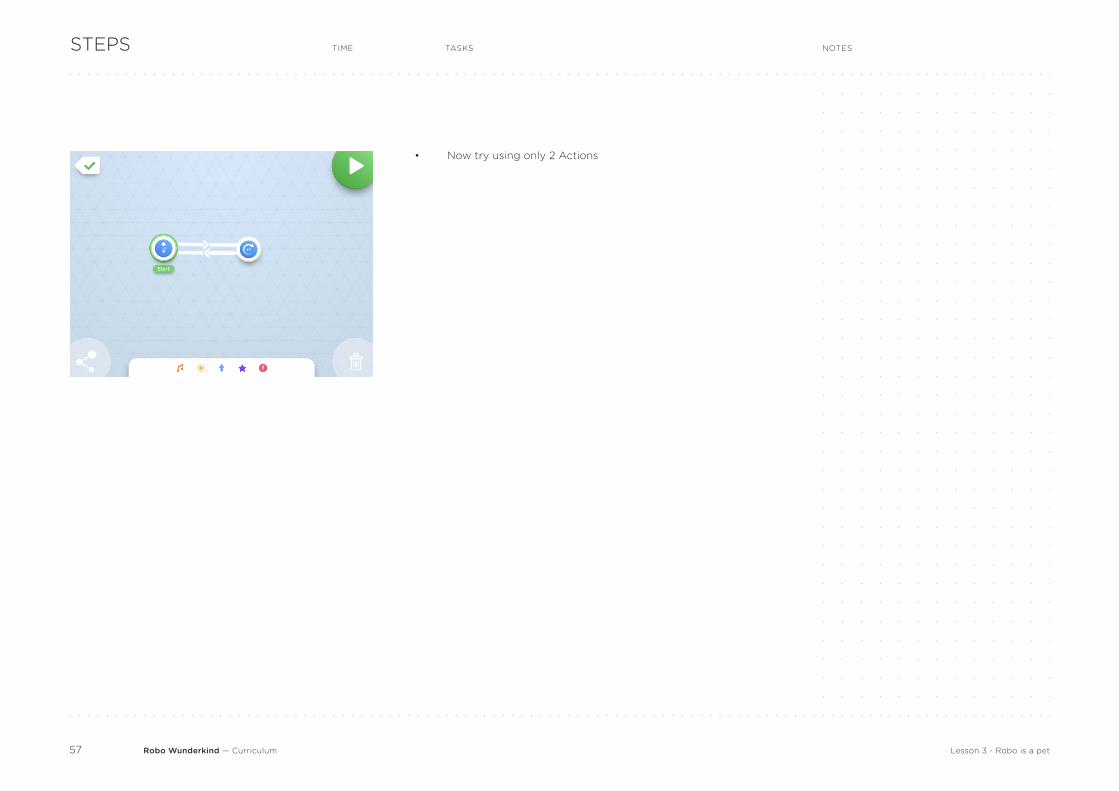
• Now try using only 2 Actions
Lesson 3 - Robo is a pet
Robo Wunderkind — Curriculum58
TIME NOTESTASKSSTEPS
All challenges are solved
Reflexion
•
•
Tell: Now our Robo-pet can move around and play with us!
Ask: What did we create? Why? Which modules did we use?
Which tasks did we have? Which Actions and buttons did we
use? Why?
•
•
Use just one motor in your program.
Lesson 3 - Robo is a pet
•
•
2 levels of complexity
1
2
Tell: we can make our Robo-pet even more fun. What do you
think?
Ask: Which modules can we use? Why would you choose those?
Use just one DC Motor and Motor 1 Action in your program.
Program the parallel Algorithm by using Drive, Turns, Sounds,
Constant Lights and Blinks.
5
bis
Modification (for older students)
Robo Wunderkind — Curriculum59
TIME NOTESTASKSSTEPS
Lesson 3 - Robo is a pet
10-15 minOwn project and presentation
Feedback
6
10
1
2
3
Ask students to build and code their Robo - pet using: Constant
Lights, Blinks, Sounds and different Movements and create a
short story about it. Students can use the Lego™ connector to
add Lego™ blocks to their projects.
Ask students to show each other the Robo they have built and
tell their story.
Give constructive feedback about each project.
2 min
7 minReflection8 Ask students:
Ask students about their experience:
Tell:
What was the situation we needed Robo to help with? What solution did we
create? Which modules did we use? What are their functions?
Which Actions and buttons did we use to program?
Were the tasks easy / complex, interesting / boring and why?.
Which part of the lesson was the most interesting and why?
What would they like to do in the next lesson?
You did a great job but Robo is a bit tired now, so let’s take it apart and put
all of Robo’s modules back in the boxes.
Tap the Save & Exit Button to go back to the Project screen. Give a name to
your project and close the App.
•
•
•
•
•
•
•
Robo Wunderkind — Curriculum60
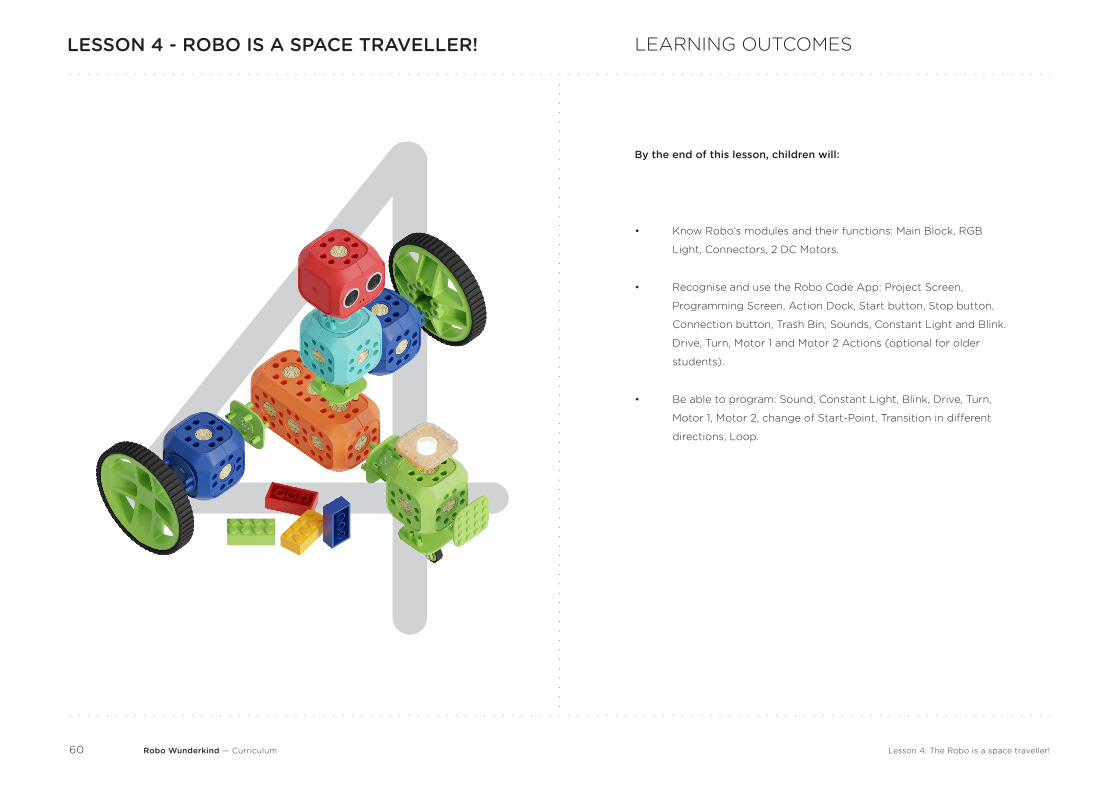
LESSON 4 - ROBO IS A SPACE TRAVELLER!
Lesson 4. The Robo is a space traveller!
•
•
•
Know Robo’s modules and their functions: Main Block, RGB
Light, Connectors, 2 DC Motors.
Recognise and use the Robo Code App: Project Screen,
Programming Screen, Action Dock, Start button, Stop button,
Connection button, Trash Bin, Sounds, Constant Light and Blink.
Drive, Turn, Motor 1 and Motor 2 Actions (optional for older
students).
Be able to program: Sound, Constant Light, Blink, Drive, Turn,
Motor 1, Motor 2, change of Start-Point, Transition in different
directions, Loop.
LEARNING OUTCOMES
By the end of this lesson, children will:
4
Robo Wunderkind — Curriculum61
FOCUS
Lesson 4. The Robo is a space traveller!
Time
You need
To prepare
•
•
•
•
•
•
•
•
60 minutes
Robo Wunderkind robotics Kit(s)
Tablet(s)
Lego™ bricks
(optional - to customize the Robo)
Projector
(optional - to show materials for students)
Check robots’ battery level
Check tablets’ battery level
Check the latest software update
PLANNING
Key vocabulary:
Repeat all learned terms: Engineering, Robot and Robotics, Program,
Programming, Algorithm, Parallel Algorithm (optional for older
students). Project Screen, Programming Screen, Action Dock, Action,
Sound, Constant Light, Drive, Turn, Motor 1, Motor 2, Start Point, Start
Button, Connection / Transition, direction of Connection / Transition,
Trash Bin button, Loop
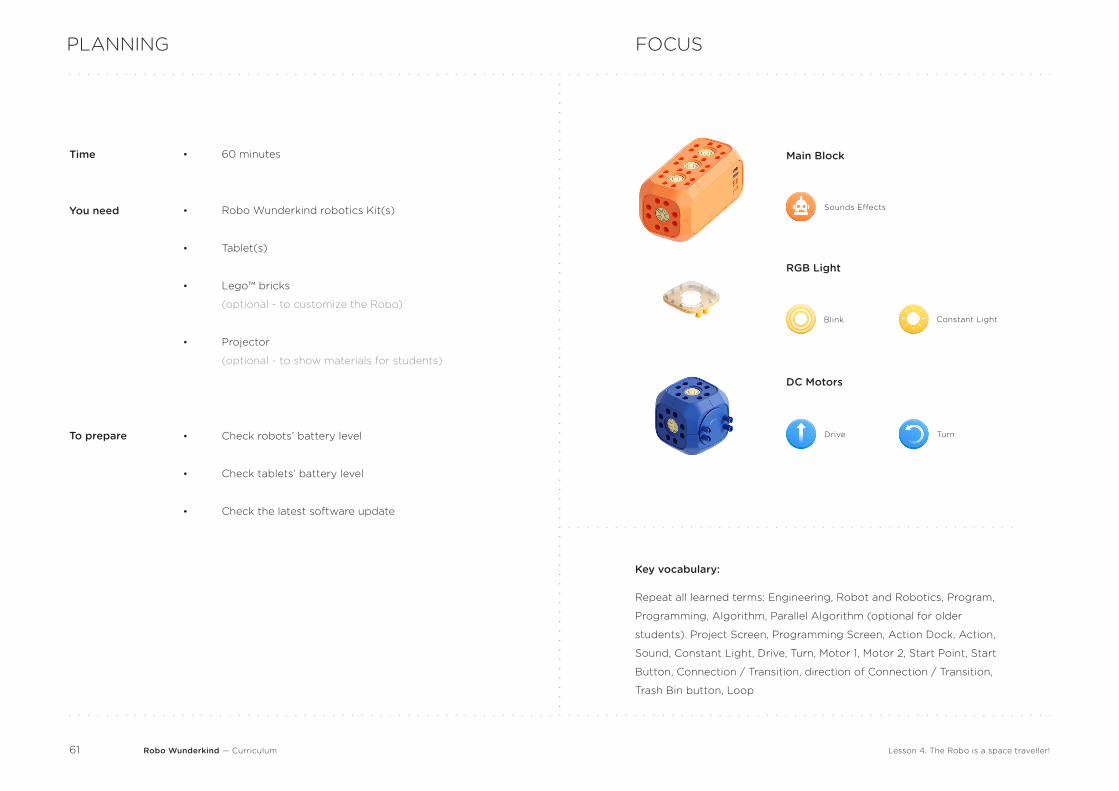
DC Motors
Drive Turn
RGB Light
Blink Constant Light
Main Block
Sounds Effects
Robo Wunderkind — Curriculum62
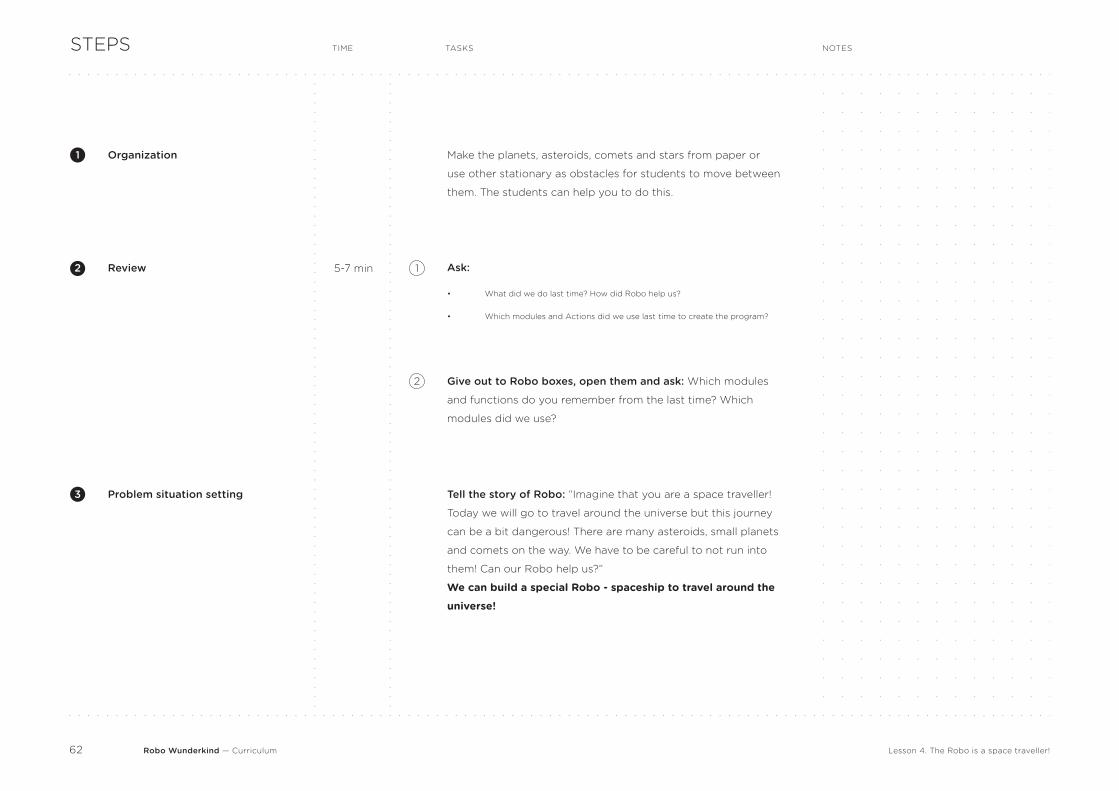
TIME NOTESTASKS
Organization
Review 5-7 min 1
Make the planets, asteroids, comets and stars from paper or
use other stationary as obstacles for students to move between
them. The students can help you to do this.
Ask:
STEPS
1
2
Lesson 4. The Robo is a space traveller!
What did we do last time? How did Robo help us?
Which modules and Actions did we use last time to create the program?
•
•
2 Give out to Robo boxes, open them and ask: Which modules
and functions do you remember from the last time? Which
modules did we use?
Tell the story of Robo: “Imagine that you are a space traveller!
Today we will go to travel around the universe but this journey
can be a bit dangerous! There are many asteroids, small planets
and comets on the way. We have to be careful to not run into
them! Can our Robo help us?”
We can build a special Robo - spaceship to travel around the
universe!
Problem situation setting3
Robo Wunderkind — Curriculum63
TIME NOTESTASKS
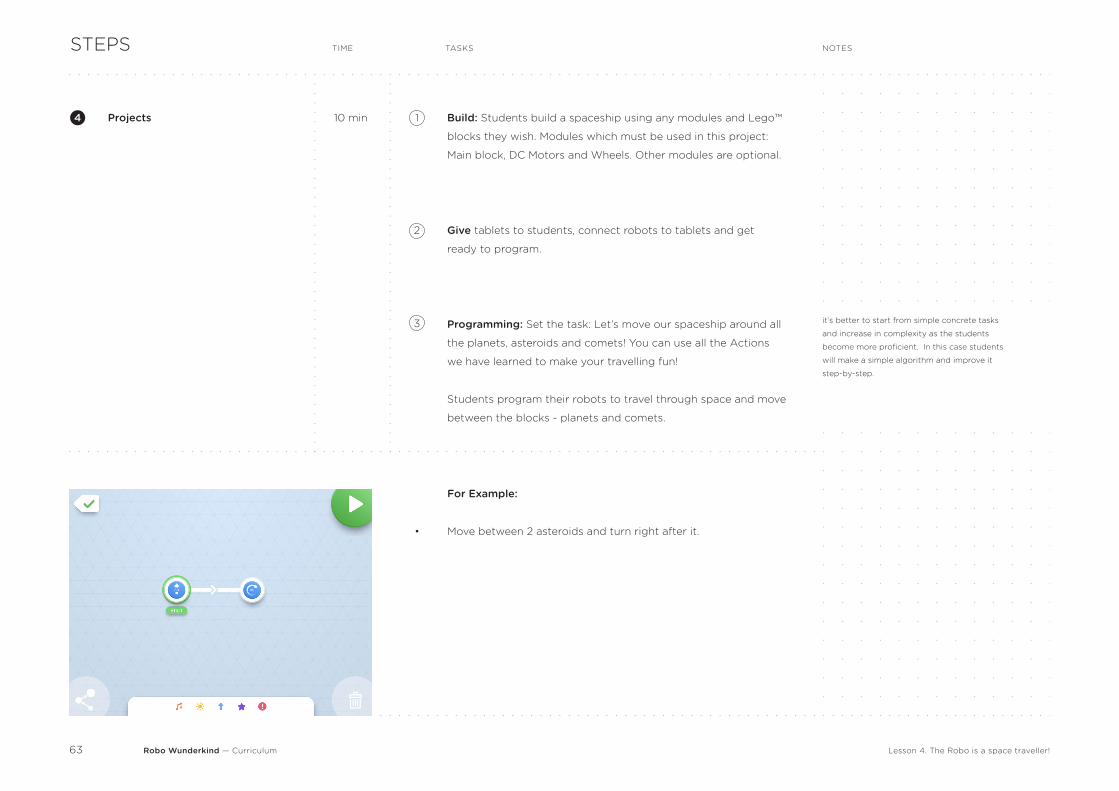
Projects 10 min 1
2
3
Build: Students build a spaceship using any modules and Lego™
blocks they wish. Modules which must be used in this project:
Main block, DC Motors and Wheels. Other modules are optional.
Give tablets to students, connect robots to tablets and get
ready to program.
Programming: Set the task: Let’s move our spaceship around all
the planets, asteroids and comets! You can use all the Actions
we have learned to make your travelling fun!
Students program their robots to travel through space and move
between the blocks - planets and comets.
STEPS
4
it’s better to start from simple concrete tasks
and increase in complexity as the students
become more proficient. In this case students
will make a simple algorithm and improve it
step-by-step.
•
For Example:
Move between 2 asteroids and turn right after it.
Lesson 4. The Robo is a space traveller!
Robo Wunderkind — Curriculum64
TIME NOTESTASKSSTEPS
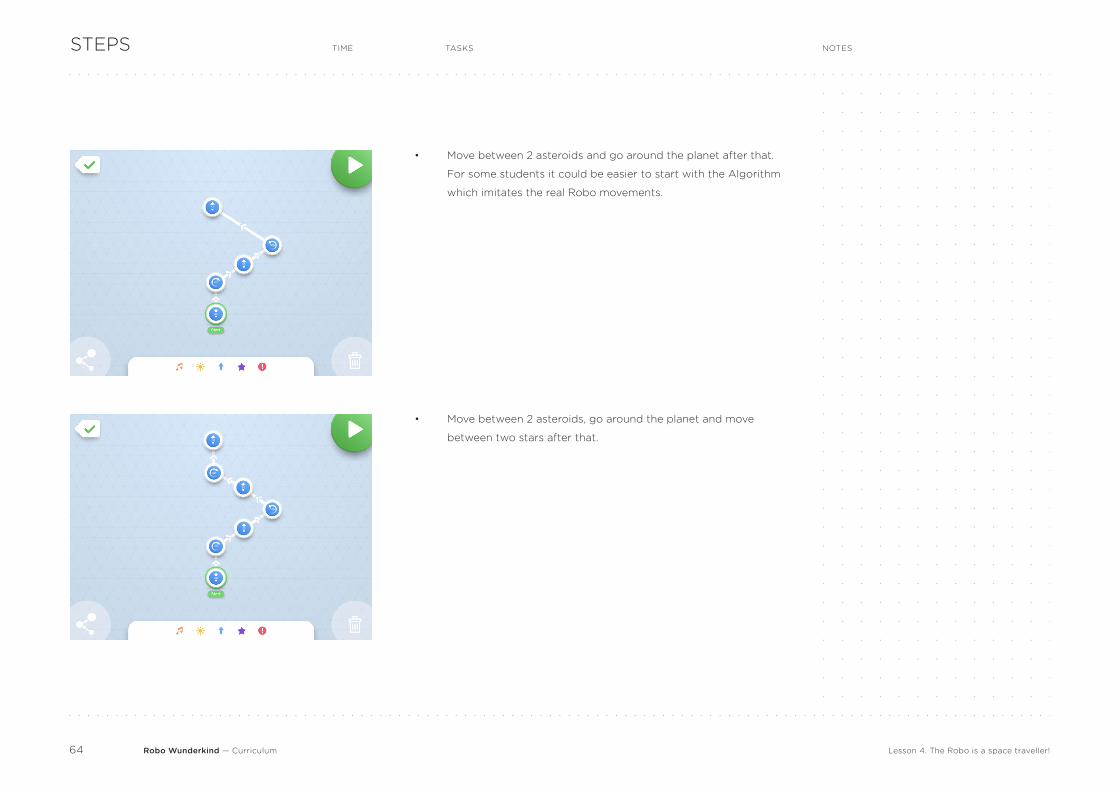
• Move between 2 asteroids and go around the planet after that.
For some students it could be easier to start with the Algorithm
which imitates the real Robo movements.
• Move between 2 asteroids, go around the planet and move
between two stars after that.
Lesson 4. The Robo is a space traveller!
Robo Wunderkind — Curriculum65
TIME NOTESTASKSSTEPS
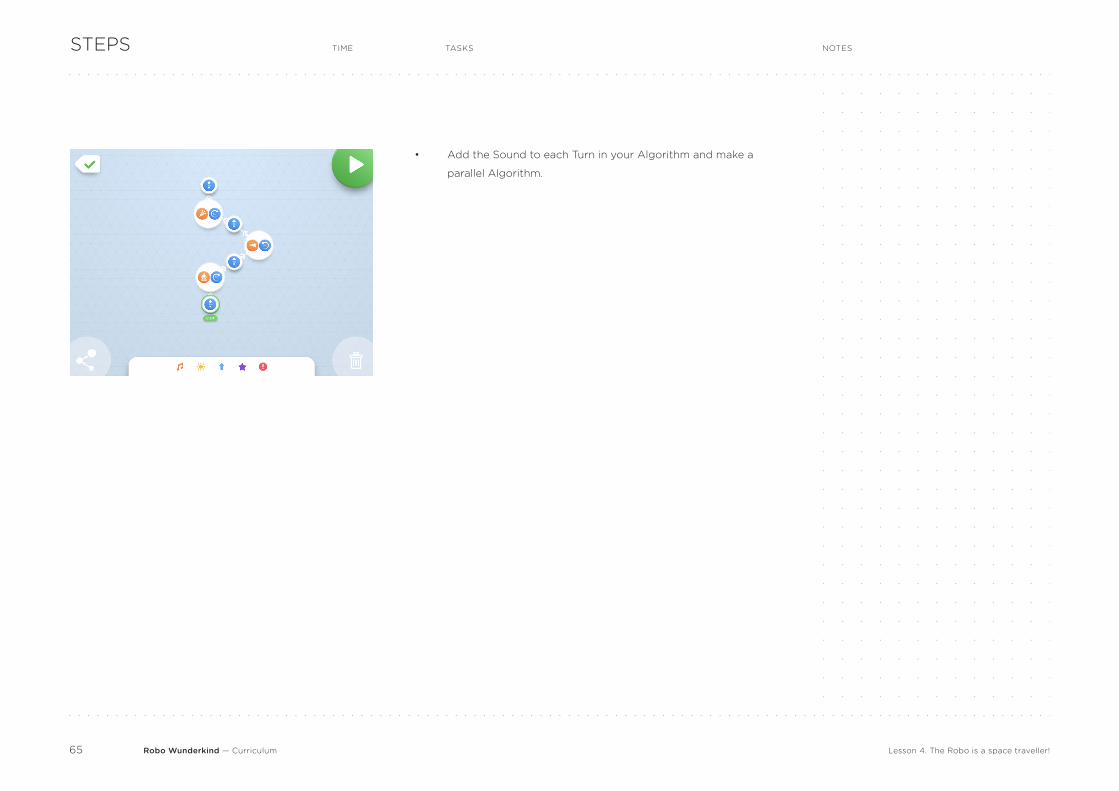
• Add the Sound to each Turn in your Algorithm and make a
parallel Algorithm.
Lesson 4. The Robo is a space traveller!
Robo Wunderkind — Curriculum66
TIME NOTESTASKSSTEPS
Reflexion
Feedback
5
6
Ask students:
Ask students about their experience:
Tell:
What was the situation we needed Robo to help with? What did we create
to solve this task?
Which modules did we use? What are their functions?
Which Actions and buttons did we use to program?
Were the tasks easy / complex, interesting / boring and why?.
Which part of the lesson was the most interesting and why?
What would they like to do in the next lesson?
You did a great job but Robo is a bit tired now, so let’s take it apart and put
all of Robo’s modules back in the boxes.
Tap the Save & Exit Button to go back to the Project screen. Give a name to
your project and close the App.
•
•
•
•
•
•
•
•
5 min
2 min
• Make your Robo go between these 5 different planets and
asteroids, make a Sound every time when Robo turns and Blink
every time when Robo goes straight.
Lesson 4. The Robo is a space traveller!
Robo Wunderkind — Curriculum67
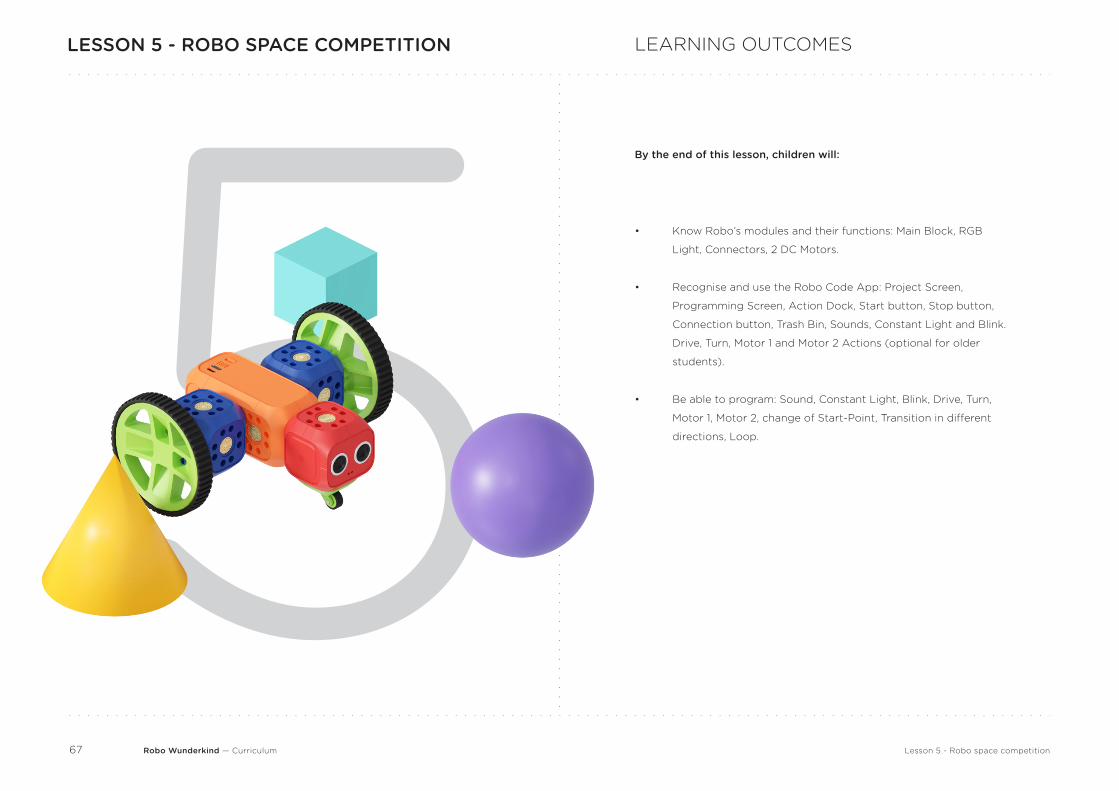
LESSON 5 - ROBO SPACE COMPETITION
Lesson 5 - Robo space competition
•
•
•
Know Robo’s modules and their functions: Main Block, RGB
Light, Connectors, 2 DC Motors.
Recognise and use the Robo Code App: Project Screen,
Programming Screen, Action Dock, Start button, Stop button,
Connection button, Trash Bin, Sounds, Constant Light and Blink.
Drive, Turn, Motor 1 and Motor 2 Actions (optional for older
students).
Be able to program: Sound, Constant Light, Blink, Drive, Turn,
Motor 1, Motor 2, change of Start-Point, Transition in different
directions, Loop.
LEARNING OUTCOMES
By the end of this lesson, children will:
5
Robo Wunderkind — Curriculum68
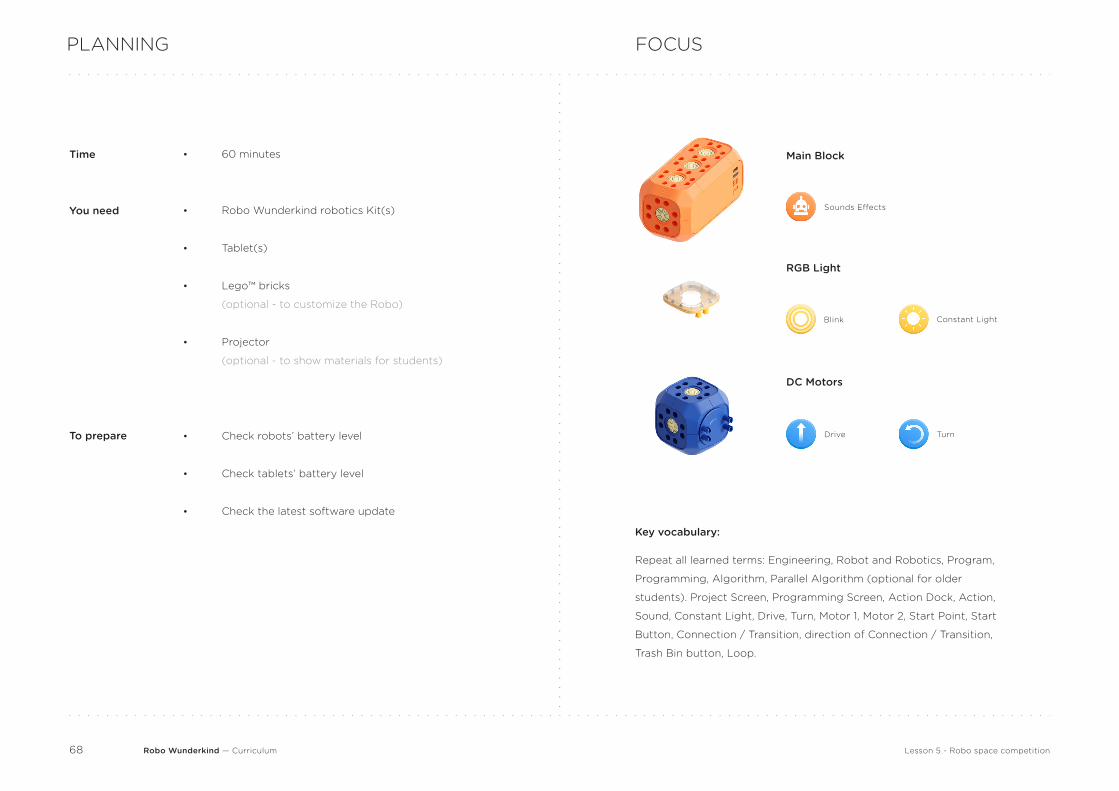
FOCUS
Time
You need
To prepare
•
•
•
•
•
•
•
•
60 minutes
Robo Wunderkind robotics Kit(s)
Tablet(s)
Lego™ bricks
(optional - to customize the Robo)
Projector
(optional - to show materials for students)
Check robots’ battery level
Check tablets’ battery level
Check the latest software update
PLANNING
Key vocabulary:
Repeat all learned terms: Engineering, Robot and Robotics, Program,
Programming, Algorithm, Parallel Algorithm (optional for older
students). Project Screen, Programming Screen, Action Dock, Action,
Sound, Constant Light, Drive, Turn, Motor 1, Motor 2, Start Point, Start
Button, Connection / Transition, direction of Connection / Transition,
Trash Bin button, Loop.
DC Motors
Drive Turn
RGB Light
Blink Constant Light
Main Block
Sounds Effects
Lesson 5 - Robo space competition
Robo Wunderkind — Curriculum69
TIME NOTESTASKS
Organization
Review 5-7 min 1
Make the planets, asteroids, comets and stars from paper or
use other stationary as obstacles for students to move between
them. The students can help you to do this.
Ask:
STEPS
1
2
What did we do last time? Which problem or task did we solve?
Which modules and Actions did we use last time to create the program?
•
•
2 Give out the Robo boxes, open the them and ask: Which
modules and functions do you remember from the last time?
Which modules did we use?
Tell the story of Robo: “Last time we travelled through space on
special Robo-spaceships! Now you are professional spaceships
commanders and ready for real adventures! Today we will go to
the universe one more time to participate in the Ultimate Robo
Spaceship Competition!"
Problem situation setting3
Lesson 5 - Robo space competition
Robo Wunderkind — Curriculum70
TIME NOTESTASKS
Organization
Competition 30-35 min
10-15 min
2
Build: Students build their own spaceships using any modules
and Lego™ blocks they wish. Modules which must be used in
this project: main block, motors and wheels. Other modules are
optional.
Give tablets to students, connect robots to tablets and get ready
to program.
Examples of tasks for students:
STEPS
4
5
Program your Robo-spaceship to fly past all planets and asteroids without
touching them.
Program your Robo-spaceship to fly past all planets and asteroids faster
than any other spaceship.
Program your Robo-spaceship to fly past all planets and asteroids using the
minimal number of Actions.
1
2
3
Lesson 5 - Robo space competition
1
Robo Wunderkind — Curriculum71
TIME NOTESTASKSSTEPS
Reflexion
Feedback
6
7
Ask students:
Ask students about their experience:
Tell:
What was the situation we needed Robo to help us with? What solution did
we create? Which modules did we use? What are their functions?
Which Actions and buttons did we use to program?
Were the tasks easy / complex, interesting / boring and why?.
Which part of the lesson was the most interesting and why?
What else would they like to create next time?
You did a great job but Robo is a bit tired now, so let’s take it apart and put
all of Robo’s modules back in the boxes.
Tap the Save & Exit Button to go back to the Project screen. Give your
project a name and close the App.
•
•
•
•
•
•
•
5-7 min
Lesson 4. The Robo is a space traveller!