Embed Size (px)
Citation preview
OPERATING & MAINTENANCEINSTRUCTIONS
GC03/13
1.25 TONNE ALUMINIUM RACINGJACK
Model No: CTJ1250ABPART NO: 7621824

2
Parts & Service: 020 8988 7400/E-mail:[email protected] or [email protected]
INTRODUCTIONThank you for purchasing this CLARKE Aluminium Racing Jack.
Before attempting to use this product, please read this manual throughoutand follow the instructions carefully. Thoroughly familiarise yourself with thisproduct & its operation in order to ensure the safety of yourself and othersaround you. In so doing, you can look forward to the product giving youlong and satisfactory service.
GUARANTEEThis product is guaranteed against faulty manufacture for a period of 12months from the date of purchase. Please keep your receipt which will berequired as proof of purchase. This guarantee is invalid if the product is foundto have been abused or tampered with in any way, or not used for it’sintended purpose.
Faulty goods should be returned to their place of purchase, no product canbe returned to us without prior permission. This guarantee does not effectyour statutory rights.
SPECIFICATION
Please note that details and specifications contained herein, are correct atthe time of going to print. However, CLARKE International reserve the right tochange specifications at any time without prior notice.
BA0521JTC
rebmuNtraP 4281267
thgieW gk56.11
)HxWxL(snoisnemiD )eldnahtuohtiw(mm012x052x085
daoLdetaR gk0521
elddaSfothgieHniM mm58
xaM elddaSfothgieH mm573
yticapaCpmuPliO sertil11.0
thgieHxaMotniMmorfsekortSfooN 8
ekortSrepdesiaRecnatsiD )egareva(mm63
3
Parts & Service: 020 8988 7400/E-mail:[email protected] or [email protected]
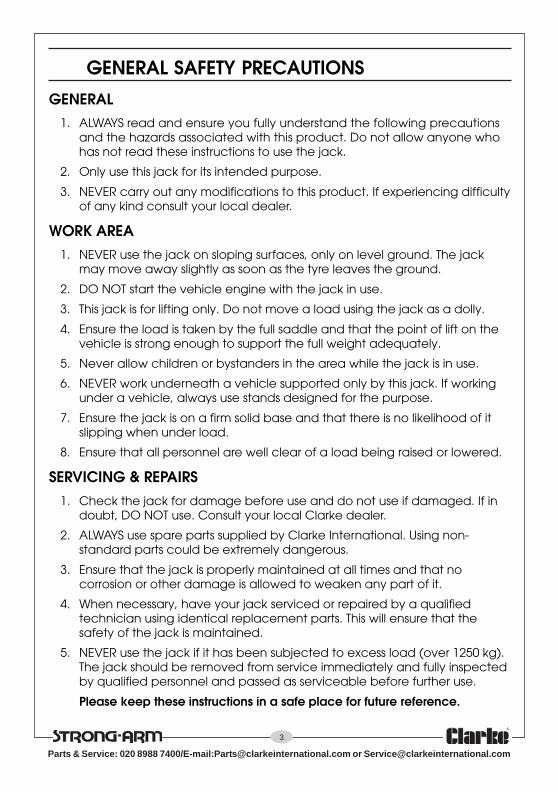
GENERAL SAFETY PRECAUTIONS
GENERAL1. ALWAYS read and ensure you fully understand the following precautions
and the hazards associated with this product. Do not allow anyone whohas not read these instructions to use the jack.
2. Only use this jack for its intended purpose.
3. NEVER carry out any modifications to this product. If experiencing difficultyof any kind consult your local dealer.
WORK AREA1. NEVER use the jack on sloping surfaces, only on level ground. The jack
may move away slightly as soon as the tyre leaves the ground.
2. DO NOT start the vehicle engine with the jack in use.
3. This jack is for lifting only. Do not move a load using the jack as a dolly.
4. Ensure the load is taken by the full saddle and that the point of lift on thevehicle is strong enough to support the full weight adequately.
5. Never allow children or bystanders in the area while the jack is in use.
6. NEVER work underneath a vehicle supported only by this jack. If workingunder a vehicle, always use stands designed for the purpose.
7. Ensure the jack is on a firm solid base and that there is no likelihood of itslipping when under load.
8. Ensure that all personnel are well clear of a load being raised or lowered.
SERVICING & REPAIRS1. Check the jack for damage before use and do not use if damaged. If in
doubt, DO NOT use. Consult your local Clarke dealer.
2. ALWAYS use spare parts supplied by Clarke International. Using non-standard parts could be extremely dangerous.
3. Ensure that the jack is properly maintained at all times and that nocorrosion or other damage is allowed to weaken any part of it.
4. When necessary, have your jack serviced or repaired by a qualifiedtechnician using identical replacement parts. This will ensure that thesafety of the jack is maintained.
5. NEVER use the jack if it has been subjected to excess load (over 1250 kg).The jack should be removed from service immediately and fully inspectedby qualified personnel and passed as serviceable before further use.
Please keep these instructions in a safe place for future reference.
4
Parts & Service: 020 8988 7400/E-mail:[email protected] or [email protected]
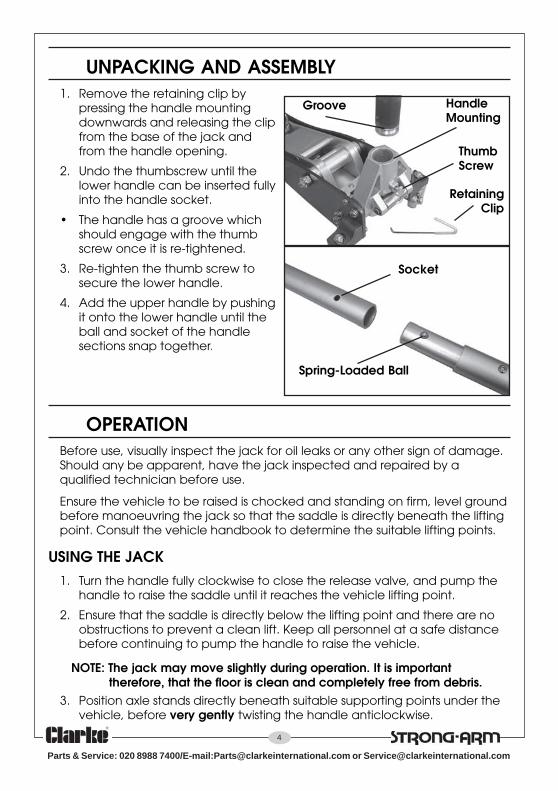
UNPACKING AND ASSEMBLY1. Remove the retaining clip by
pressing the handle mountingdownwards and releasing the clipfrom the base of the jack andfrom the handle opening.
2. Undo the thumbscrew until thelower handle can be inserted fullyinto the handle socket.
• The handle has a groove whichshould engage with the thumbscrew once it is re-tightened.
3. Re-tighten the thumb screw tosecure the lower handle.
4. Add the upper handle by pushingit onto the lower handle until theball and socket of the handlesections snap together.
OPERATIONBefore use, visually inspect the jack for oil leaks or any other sign of damage.Should any be apparent, have the jack inspected and repaired by aqualified technician before use.
Ensure the vehicle to be raised is chocked and standing on firm, level groundbefore manoeuvring the jack so that the saddle is directly beneath the liftingpoint. Consult the vehicle handbook to determine the suitable lifting points.
USING THE JACK1. Turn the handle fully clockwise to close the release valve, and pump the
handle to raise the saddle until it reaches the vehicle lifting point.
2. Ensure that the saddle is directly below the lifting point and there are noobstructions to prevent a clean lift. Keep all personnel at a safe distancebefore continuing to pump the handle to raise the vehicle.
NOTE: The jack may move slightly during operation. It is importanttherefore, that the floor is clean and completely free from debris.
3. Position axle stands directly beneath suitable supporting points under thevehicle, before very gently twisting the handle anticlockwise.
ThumbScrew
Groove
RetainingClip
Spring-Loaded Ball
Socket
HandleMounting
5
Parts & Service: 020 8988 7400/E-mail:[email protected] or [email protected]
• This will open the release valve to lower the vehicle onto the stands. Tostop it lowering, turn the handle clockwise again. Always avoid a rapiddescent by turning the handle slowly.
4. Carefully lower the vehicle onto the axle stand, checking constantly,preferably with an assistant, that the vehicles supporting point rests snuglyand cleanly on the axle stand, and that the stand is stable before all theweight is taken.
NOTE: Ensure this operation is carried out under complete control. Donot allow the load to drop suddenly as this could damageinternal components.
5. Completely remove the jack from the vehicle.
WARNING! NEVER WORK ON THE VEHICLE WHEN SUPPORTED ONLY BY AJACK. THIS IS A HIGHLY DANGEROUS PRACTICE. THE VEHICLE MUST BESUPPORTED ON AXLE STANDS, OR SUITABLE SUPPORTS, BENEATH THEJACKING/SUPPORT POINTS RECOMMENDED BY THE VEHICLEMANUFACTURER. THERE SHOULD BE NO LOAD ON THE JACK.
MAINTENANCE
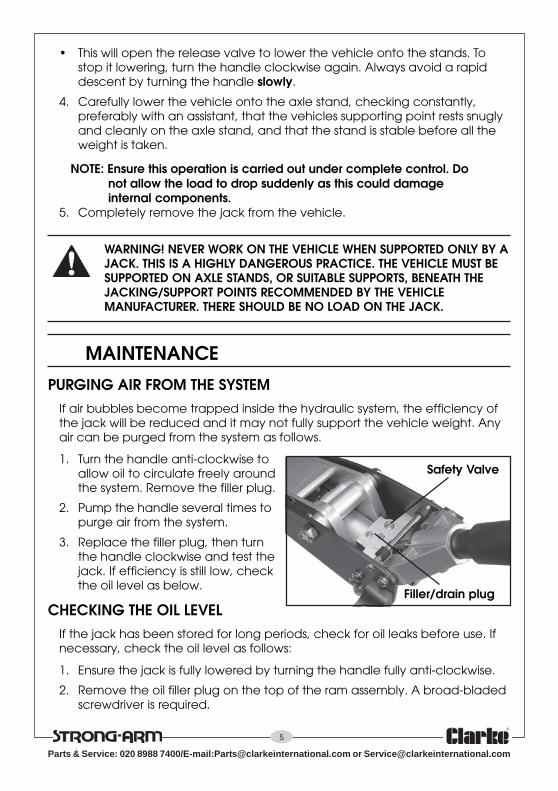
PURGING AIR FROM THE SYSTEMIf air bubbles become trapped inside the hydraulic system, the efficiency ofthe jack will be reduced and it may not fully support the vehicle weight. Anyair can be purged from the system as follows.
1. Turn the handle anti-clockwise toallow oil to circulate freely aroundthe system. Remove the filler plug.
2. Pump the handle several times topurge air from the system.
3. Replace the filler plug, then turnthe handle clockwise and test thejack. If efficiency is still low, checkthe oil level as below.
CHECKING THE OIL LEVELIf the jack has been stored for long periods, check for oil leaks before use. Ifnecessary, check the oil level as follows:
1. Ensure the jack is fully lowered by turning the handle fully anti-clockwise.
2. Remove the oil filler plug on the top of the ram assembly. A broad-bladedscrewdriver is required.
Safety Valve
Filler/drain plug
6
Parts & Service: 020 8988 7400/E-mail:[email protected] or [email protected]
• The oil should be almost level with the bottom of the oil filler hole.
• Oil can be topped up using Clarke Hydraulic Oil: P/No. 3050830 for 1 litre.
OIL REPLACEMENT1. With the jack lowered, remove the filler plug as above. Tilt the jack onto its
side and drain the old oil into a container.
2. Return the jack upright and refill with hydraulic oil up to the lower rim ofthe filler hole.
3. Purge any air from the system and replace the filler plug.
4. Dispose of old oil appropriately and be sure to wipe up any spillage.
GENERAL CARE1. Periodically lubricate the hinges, front roller and rear castors with a light oil.
2. Store in a dry location with the arm in its lowest position.
3. In the event of damage or broken components, replacements areavailable from Clarke Parts & Service.
TROUBLESHOOTING
MELBORP ESUAC NOITULOS
ehtotesiartonlliwkcaJ.thgiehlluf
.levelliowoL fipupotdnaegakaelrofkcehC.gulplioehtaivderiuqer
.rednilycniriA morfriaegrupoteldnahpmuP.metsys
.nrowsgnir-O rofrelaedekralCruoyotnruteR.luahrevo
ehtdlohtonlliwkcaJ.daol
tonevlavesaeleR.desolcylthgit
.yllufgnisolcsievlavkcehC
tonevlavesaeleR.gnitaes
rofrelaedekralCruoyotnruteR.luahrevo
.rednilycniriA morfriaegrupoteldnahpmuP.metsys
rewoltonseodkcaJsievlavehtnehw
.denepo
dellifrevorednilyC.liohtiw
.lioevissecxeffoniarD
mratovipronotsiP.gnidnibrotneb
rofrelaedekralCruoyotnruteR.riaper
rodetcennocsiD.gnirpsnruternekorb
rofrelaedekralCruoyotnruteR.riaper
stnenopmocdegniH.yleerfgnivomton
.stniojdegnihetacirbuL
nehwygnopssleefkcaJ.gnitfil
.metsysnideppartriA morfriaegrupoteldnahpmuP.metsys
7
Parts & Service: 020 8988 7400/E-mail:[email protected] or [email protected]
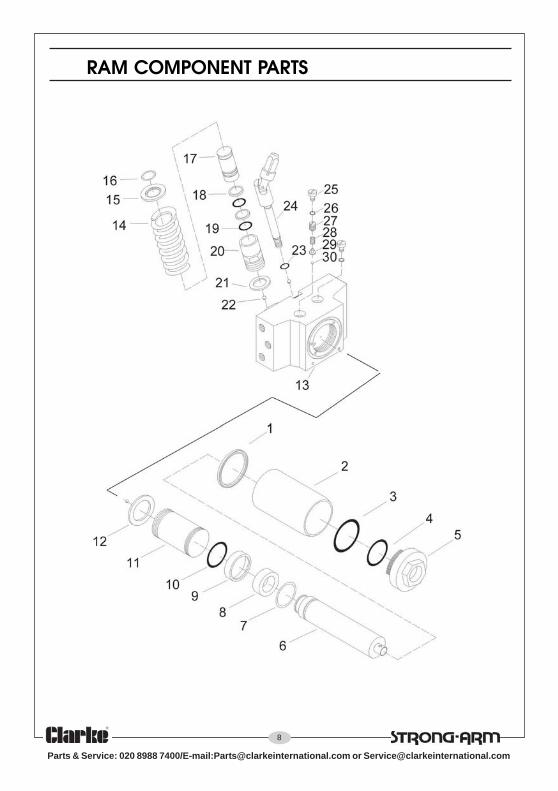
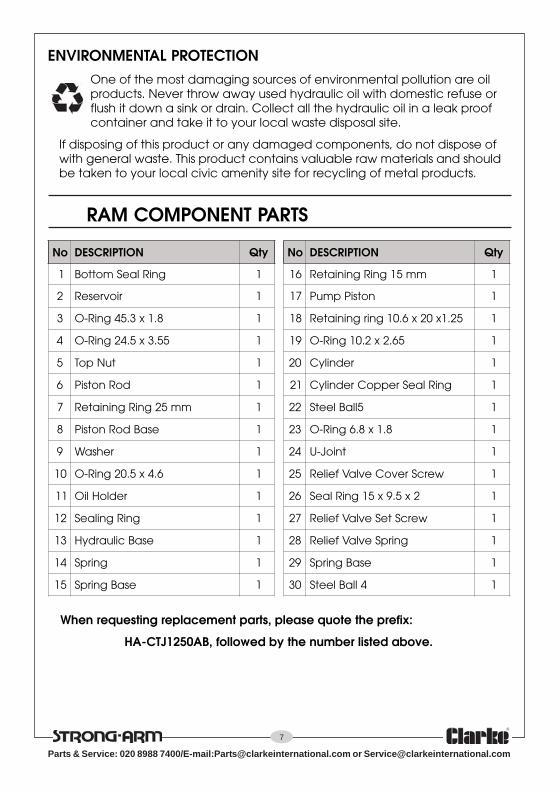
RAM COMPONENT PARTS
When requesting replacement parts, please quote the prefix:
HA-CTJ1250AB, followed by the number listed above.
ENVIRONMENTAL PROTECTIONOne of the most damaging sources of environmental pollution are oilproducts. Never throw away used hydraulic oil with domestic refuse orflush it down a sink or drain. Collect all the hydraulic oil in a leak proofcontainer and take it to your local waste disposal site.
If disposing of this product or any damaged components, do not dispose ofwith general waste. This product contains valuable raw materials and shouldbe taken to your local civic amenity site for recycling of metal products.
oN NOITPIRCSED ytQ oN NOITPIRCSED ytQ
1 gniRlaeSmottoB 1 61 mm51gniRgniniateR 1
2 riovreseR 1 71 notsiPpmuP 1
3 8.1x3.54gniR-O 1 81 52.1x02x6.01gnirgniniateR 1
4 55.3x5.42gniR-O 1 91 56.2x2.01gniR-O 1
5 tuNpoT 1 02 rednilyC 1
6 doRnotsiP 1 12 gniRlaeSreppoCrednilyC 1
7 mm52gniRgniniateR 1 22 5llaBleetS 1
8 esaBdoRnotsiP 1 32 8.1x8.6gniR-O 1
9 rehsaW 1 42 tnioJ-U 1
01 6.4x5.02gniR-O 1 52 wercSrevoCevlaVfeileR 1
11 redloHliO 1 62 2x5.9x51gniRlaeS 1
21 gniRgnilaeS 1 72 wercSteSevlaVfeileR 1
31 esaBciluardyH 1 82 gnirpSevlaVfeileR 1
41 gnirpS 1 92 esaBgnirpS 1
51 esaBgnirpS 1 03 4llaBleetS 1

9
Parts & Service: 020 8988 7400/E-mail:[email protected] or [email protected]
FRAME COMPONENT PARTS
When requesting replacement parts, please quote the prefix:
HA-CTJ1250AB, followed by the number listed above.
oN NOITPIRCSED ytQ oN NOITPIRCSED ytQ
1 daPelddaS 1 51 rehsaW 2
2 wercSgnixiFelddaS 1 61 rotsaCleviwS 2
3 elddaS 1 71 01MtuN 2
4 mrAediS 2 81 kcolBgnitcennoC 1
5 rehsaWgnirpS 2 91 gnirpSnruteR 2
6 wercSdaeHtekcoS 2 02 ylbmessApmuP 1
7 eldnaHediS 2 12 leviwSlortnoC 1
8 etalPediS 2 22 eldnaHreppU 1
9 wercSdaeHtekcoS 2 32 eldnaHrewoL 1
01 rehsaWgnirpS 2 42 ekoY 1
11 52x01MwercSdaeHtekcoS 6 52 wercSbmuhT 1
21 01rehsaWgnirpS 6 62 mrAgnitfiLniaM 1
31 61x8MwercSdaeHtekcoS 2 72 eveelSevitcetorP 1
41 rehsaWgnirpS 2

10
Parts & Service: 020 8988 7400/E-mail:[email protected] or [email protected]
FRAME COMPONENT PARTS

11
Parts & Service: 020 8988 7400/E-mail:[email protected] or [email protected]
DECLARATION OF CONFORMITY