Embed Size (px)
Citation preview

0
INSTRUCTION MANUAL PLEASE READ AND KEEP FOR FUTURE REFERANCE
CT312 CT416

1

2

3

4
1. General Description. CT416 is our newly developed multi-function machine. It can be used as Argon Welder, DC stick welder and air plasma cutting machine. It adopts MOSFET to change frequency of 50/60 Hz to high frequency AC of 100KHz, then through step down, rectification, pulse adjusting technology to change it into DC up to the requirements for welding and cutting. Featuring: light, small, with little power expenditure (improves efficiency more than 30%), with multi-functions. 2. Technical Parameter
Type CT312 CT416 Input Voltage AC220V±10%, 50/60Hz AC220V±10%, 50/60Hz
Input Power Capacity 3.5KVA 4.8KVA No-load Loss 35W 40W Duty Cycle 60% 40% COSφ
0.93 0.93
Efficiency 85% 85% Insulation Class F F Cover Protection Class IP21 IP21 Weight 8Kg 11Kg Dimension 371*155*287mm 423*173*273mm ----------------------- TIG MMA CUT TIG MMA CUT Input Current 10.2A 15.6A 14.3A 23.5A 28A 29A Rated Output Current 125A 110A 30A 160A 150A 40A Current Range 15-120 15-110 10-30 10-160 10-150 10-40 No-load Voltage 58V 58V 220V 64V 64V 260V Working Voltage 15V 23V 92V 16.4V 26V 96V Nozzle’s Inside Diameter
--------- ------ φ1.0mm
---------- ------ φ1.2mm
Air Pressure --------- ------ 0.4Mpa --------- ------- 0.4Mpa Gas Flow 2-5L/min ------ 80L/min 2-5L/min ------ 80L/min Cutting Thickness ---------- ------ 1-8mm ---------- ------ 1-12mm Way to strike arc H/F Vibration Touch H/F Vibration H/F Vibration Touch H/F Vibration
3. Make Up 3.1 Connection of Input Wire (See Figure I) 3.1.1 Make sure that the power wire on back of welder is connected with AC power 220V. 3.1.2 Connect ground with wire of no smaller than 6mm2 : use a cable to do earth connection from
the grounding screw at back of welder to the ground. 3.2 Connection Of Output Wire (See Figure I) For TIG 3.2.1 Connect gas supply: tightly butt connect the Argon gas tube with the copper nozzle at the
back of this machine. Gas supply passage should include gas bottle, Argon pressure reducer and gas tube. The connection part of tube should use hoop to tighten it, in case of gas leakage and entry of other gas.
3.2.2 Install Argon torch properly according to Figure I, connect the gas-electric integrated

5
connect joint and tele-control on the faceplate properly, and turn clockwise to tight it. 3.2.3 Connect joint should connect with the “+” socket on faceplate. The earth clamp on other
terminal should clamp workpiece. Figure I Figure 2 3.3 For MMA 3.3.1 Insert earth wire joint into the relative socket on front faceplate, turn it tight. 3.3.2 Insert electrode holder joint into the relative socket on front faceplate, turn it tight.. ATTENTION: The above mentioned is the positive connection for welding of acid electrode. If
for welding of basic electrode or stainless steel electrode should connect conversely. 3.4 For Plasma Cut 3.4.1 Butt connect the tube of compressed air with the copper nozzle on back of this machine. Use
hoop or other thing to tighten it. (The air source should supply suitable pressure, sufficient flow and need to de dry.)
3.4.2 The other copper nut of cutting torch should connect with the gas-electric integrated joint and turn clockwise to tighten it. The tele-control pin on cutting torch should connect relative connect socket and turn tight the connect screw.
3.4.3 Insert the fast connector on earth clamp to the red fast connect socket on machine’s front faceplate, turn tight.
ATTENTION: when use Argon welding and cutting, should change gas source at first. 4. Operation

6
4.1 Use Argon Welding Function 4.1.1 Turn the power button on front faceplate to “ON”. The power indicating light is on, the fan
inside will turn. 4.1.2 Turn shift switch to TIG welding place. 4.1.3 Open the Argon gas switch, adjust gas flowmeter to rated standard. 4.1.4 Press the switch on welding torch, the solenoid valve starts, you’ll hear the sound of high
frequency fire. Meanwhile, there is Argon gas flowing out from torch nozzle. Attention: you need to press the switch for seconds before first welding, till all the air in gas passage is ventilated. Then when stop welding, there are still some gas flowing out, especially designed to protect welding spot before cooling. So should keep the torch at the welding spot for seconds after the arc is out, then move away the torch.
4.1.5 Choose suitable welding current according to the thickness and technical requirements. 4.1.6 Keep 1-4mm space between wolfram and welding workpiece. Press the control switch on
torch to generate high-frequency electricity discharge between wolfram and workpiece. After striking arc, the high frequency sparkle inside machine will disappear, then can start working.
4.2 Use STICK Function 4.2.1 Turn the shift switch to “STICK”. 4.2.2 Switch on power, the power indicating light is on, fan inside starts to turn. 4.2.3 Set relative welding current and choose suitable electrode according to the thickness of
workpiece, then can do welding. 4.3 Use CUT Function 4.3.1 Turn the shift switch to “CUT”. 4.3.2 Switch on power, the power indicating light is on, fan inside machine starts to turn. 4.3.3 Open the air control valve or switch, adjust pressure and gas flow to rated standard. 4.3.4 Press the switch on torch, the solenoid valve starts, you’ll hear the sound of high frequency
fire, meanwhile there is gas flowing out from torch nozzle. 4.3.5 Set relative cutting current according to thickness of workpiece. 4.3.6 Use spray nozzle of cutting torch to touch the cutting workpiece. Press the button on torch to
strike arc. The high frequency arc strike disappears, then can start cutting. After striking arc, should keep 1mm space between nozzle and workpiece to protect spray nozzle.
5. Attention Points 5.1 Using Condition 5.1.1 Use in dry place, air humidity ≤80%. 5.1.2 Temperature between -10~+40℃. 5.1.3 Avoid using in place with too much dust or erosive air. 5.2 Security Summary 5.2.1 Make sure of fine atmospheric conditions.
It’s small, compact, and with high output current, natural ventilation can’t satisfy the heat emission of components, so an axial fan is installed inside to cool machine.
ATTENTION: the two sides and shutter for ventilation of this machine shouldn’t be blocked or covered. Keep 0.3 meters between machine and its surrounding things. Should assure the atmospheric condition is improved gradually. These are important for welder’s proper work and working life.
7
5.2.2 Never Over load Users should strictly accord with maximum current of each duty cycle condition to control
welding current, never over load, in case of shortening working life, even burn down. 5.2.3 Avoid over voltage As for power voltage, should accord with the Form of Main technical parameters, in this case,
can assure welding current between applicable value. If power voltage exceeds the regulated value, it will damage the components. Users should pay especially attention to this.
5.2.4 There is a earth connection screw at the back of the machine, choose a cable of 10mm2 as earth wire before work, in case of the generated static electricity or electricity leakage and causing breakdown.
6. Maintenance 6.1 Use the dry clean compressed air to clear off dust periodically, should clear off dust once a
month if using in the place with much smoke and pollution. 6.2 Decrease the pressure of compressed air to necessity, in case that it may damage little
components inside machine. 6.3 Check the connection inside machine, especially for the plugs and sockets. Tighten the loose
connections. If there is oxidation, should use sand paper to clear off oxidation film and reconnect it.
6.4 Avoid water entry. If being wetted, should dry it. Use ohmmeter to measure the insulation condition between connections, and between connection and machine.
6.5 Should place it in the original package in dry place, if won’t use it for long. 7. Repair
ATTENTION: For the following operations, operator need enough professional knowledge on electronics and general security knowledge. The operator should received the qualification affirmative.
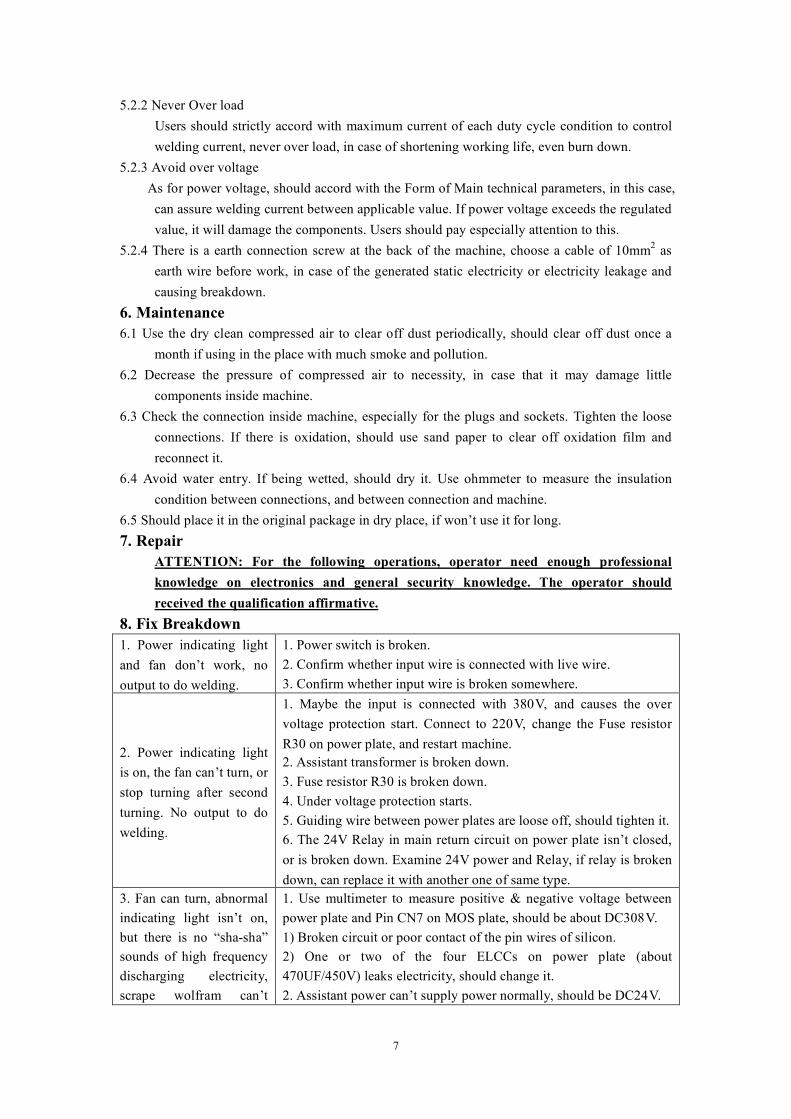
8. Fix Breakdown 1. Power indicating light and fan don’t work, no output to do welding.
1. Power switch is broken. 2. Confirm whether input wire is connected with live wire. 3. Confirm whether input wire is broken somewhere.
2. Power indicating light is on, the fan can’t turn, or stop turning after second turning. No output to do welding.
1. Maybe the input is connected with 380V, and causes the over voltage protection start. Connect to 220V, change the Fuse resistor R30 on power plate, and restart machine. 2. Assistant transformer is broken down. 3. Fuse resistor R30 is broken down. 4. Under voltage protection starts. 5. Guiding wire between power plates are loose off, should tighten it. 6. The 24V Relay in main return circuit on power plate isn’t closed, or is broken down. Examine 24V power and Relay, if relay is broken down, can replace it with another one of same type.
3. Fan can turn, abnormal indicating light isn’t on, but there is no “sha-sha” sounds of high frequency discharging electricity, scrape wolfram can’t
1. Use multimeter to measure positive & negative voltage between power plate and Pin CN7 on MOS plate, should be about DC308V. 1) Broken circuit or poor contact of the pin wires of silicon. 2) One or two of the four ELCCs on power plate (about 470UF/450V) leaks electricity, should change it. 2. Assistant power can’t supply power normally, should be DC24V.

8
strike arc. 3. The pin wires in machine are poorly contacted. 4. Something is wrong with control circuit.
4. Abnormal indicating light isn’t on, with “sha-sha” sound, no welding & cutting output.
1. Torch cable is broken. 2. Earth wire is broken or isn’t connected with welding workpiece. 3. Connection between positive output terminal or Gas-Electric Output of torch and inner part of machine is loose off.
5. Abnormal indicating light isn’t on, no “sha-sha” sounds, scrape wolfram can strike arc.
1. Connection between primary winding of arc strike transformer and power plate is poorly contacted, should tighten. 2. Electricity discharge nozzle is oxidized or is too far, should clear off the oxidation film, or adjust the nozzle distance between 1mm. 3. STICK, TIG, CUT switch is broken, replace it. 4. One or two components on high frequency arc strike circuit is broken, should find out and replace it
6. Abnormal indicating light is on, no output to do welding.
1. May due to over current protection, should power off machine, and restart machine to work normally. 2. May due to over voltage protection, should power off machine and restart after 2-3 minutes to work normally. 3. May due the breakdown at the inverter circuit, please pull off the power plug on main transformer of MOS plate ( near to Fan Pin CN9) restart machine: 1) If the abnormal indicating light is still on, should power off machine, and pull off the power plug on high frequency arc strike power source (near to Fan Pin CN8), restart machine: a) If abnormal indicating light is still on, shows one or two field effect tubes on MOS plate is broken, find out and replace it with the same type one. b. If the abnormal indicating light isn’t on, shows the voltage step-up transformer in high frequency arc strike circuit is broken, replace it. 2) If abnormal indicating light isn’t on. a. Maybe the transformer on middle plate is broken, use bridge to
measure the main transformer’s primary inductance and Q value. K-0.9-1.6Mh, Q>35, if inductance and Q value is small, replace it. b. Maybe some secondary silicon controlled rectification tubes of
transformer are broken down, replace it with the same type ones 4. Maybe feedback circuit is broken down.
7. Output current is not stable or can not be controlled, when welding.
1.1K POT is broken, replace it. 2. The connections are poorly contacted, especially the pins, should examine them.
8. Much splash when do STICK welding, hard to burn basic electrode.
1. Polarity is wrong when connecting, exchange the earth wire and earth clamp wire.
9. Welding and Cutting abilities are poor, with broken arc.
1. Input voltage is low. 2. Poorly contacted or cable is too long. 3. Pressure is over high or over low. 4. Spray nozzle isn’t fit with
electrode. 5. Wave-filter capacitor 47μ/450V loses efficiency.
6. Be wetted or poor. 7. Rated current is too low.

9
9. Install and Operate of Pressure Reduce Valve 1. Connect tightly the copper nozzle with IN and OUTPUT terminals and seal up. 2. Install the top of meter and seal up. 3. Fix the connect rack on the pressure reduce valve installed part like See the following picture. 4. Turn off rubber screw and fix the valve to the connecting rack like showed in the picture. 5. Aerate air, lift the pressure adjust knob, (Graduation on top of meter is Kg value) Adjust
pressure to regulated (increase towards “+”, decrease towards “-”), then press the adjust knob. 6. The graduation on top of meter is as following showed. 7. Should drain water if water is accumulated too much in air filter bottle.
Hutai ! !
"
#$
%
! !
"
#$
%

10