Embed Size (px)
Citation preview
Collapsed Structure Rescue
Course Light Level
CSRC
Reference Manual2007

Collapsed Structures Rescue Course – Light Level
Nov-07 Reference Material RM 2-
1
Lesson 2 Safety Considerations
Incidents involving Light USAR operations, more than any of the other types of incidents, imply significant risk to the rescuers as well as the victims.
The Team Leader (TL) should always remember that the safety of the rescuers is the primary objective in all phases of each tactical situation. The hazards inherent to any collapsed structure are the reason for authorities to call on specialized groups when requiring assistance on the matter. Personnel arriving at the scene should position their apparatus at a minimum of 500 feet from the incident area until a comprehensive zise up has been completed. Current weather conditions and potential for secondary collapse or escalation of the event should be considered prior to arrival.
The different hazards rescuers may face in a Light USAR operation are:
• Earthquake aftershocks • Contaminated athmospheres • Contaminated water • Unstable structures • Excessive noise, dust, smoke and/or fire • Work in small and/or confined areas • Presence of Hazardous Materials • Unknown work scenarios • Adverse weather conditions • Weight lifting, excessive fatigue and stress • Vandalism and theft • Operating tools and equipment in poor
condition
Taking into account all the hazards faced by rescuers, one would say that if safety rules are violated the consequences could be very serious.
It is important for the person responsible for the operation to assign a Safety Officer to en sure safety at the scene, verify safe procedures are followed at all times and notify the Incident Commander of any developments in this regard.
SAFETY OFFICER The Safety Officer (SO) is responsible for maintaining a safe environment for the USAR operations. The SO mantains control of the actions and conditions in all phases of the operation. The SO is an objective observer who does not actively participate in the physical work of surface rescue or in the search. He should be free to monitor the entire work area to discover potentially hazardous situations and correct them before they result in further damage. The SO should be easy to identify by radio call name and by his colored vest. In case it is a small group, it is sufficient to identify the SO at the briefing before the operations start. In limited staffing situations, the team leader will assume the safety officers responsabilities until those might be delegated to another person. In a USAR operation, there may be several levels of responsibility, depending on the characteristics of the environment where the work is being done:
• General SO: for rescue operations in a collapsed structure.
• Specific SO: for a particular work area or activity.
• Special Risk SO: may be one or more people assigned to a specific site to monitor a special condition. This could be a group of two people who have to climb to the highest point of a dam to serve as lookouts for other rescuers during earthquake aftershocks, etc.
UNSAFE CONDITIONS / UNSAFE ACTIONS
An unsafe condition is a situation faced by a rescuer that poses a threat to his physical integrity.
Collapsed Structures Rescue Course – Light Level
Nov-07 Reference Material RM 2-
2
Examples • A leaning wall • Top structures with signs of imminent
collapse • Environmental conditions: strong winds, rain,
thunder • Rainfall may undermine building
foundations, further weakening them • Slippery surfaces and strong winds may
place rescuers in difficult situations for operating equipment and performing the rescue.
Unsafe action is an act or task carried out by a rescuer without following the rules established for his protection.
Example • Entering the work area without PPE • Entering the work area without the
authorization of the Safety Officer • Entering the work area to operate alone • Operating defective equipment or tools
knowing they are in poor condition It is important to understand the concepts of unsafe conditions and unsafe actions. In order for the Safety Officer (SO) to be able to maintain a safe environment for the rescuers, he/she must monitor the actions and conditions in the work area. The SO should be alert of situations that could result in hazardous conditions for the rescuers. These situations must be corrected before the rescue operation can resume. It is difficult to find safe conditions amidst a disaster situation. It is indispensable for the SO and all personnel to be alert to situations that may result in a direct threat to the rescuers. This could be a structural shift or a change in weather. In addition to recognizing unsafe conditions, the Safety Officer should also be aware of unsafe actions by the rescuers. This ability comes not only from experience but also from reviewing previous accidents in similar situations. The SO should ensure that all rescuers follow the safety procedures, including:
• Wearing personal protection equipment • Working in groups • Correctly using tools and equipment • Taking appropriate rests • Keeping well hydrated • Using the personnel accountability system • Following all safety rules established • Knowing the location of the safe heavens
SAFETY CONSIDERATIONS The Team Leader is primarily responsible for the safety of the team members. Despite the inexistence of a safety officer whitin the team, it is essential for all team members to recognize safety as a high priority in the operation and for all to assume responsibility for it. All members have the responsibility of detecting and preventing the occurrence of unsafe actions or conditions in any phase of the mission. Safety considerations should be included in all phases of the rescue mission in collapsed structures. During the Preparation Phase
1. Develop among all group members a positive attitude toward safety during class sessions and practical exercises.
2. Following safety procedures and protocols
3. Equipment 4. Personnel 5. Training 6. Information
During Activation, Registration and Assignment Phase
1. Establish safe procedures and practices from the beginning of the mission.
2. Emphasize safety as a priority during briefings.
3. Verify team members have their personal protection equipment, and that members are in good physical and mental condition. If possible ask rescuers to remove
Collapsed Structures Rescue Course – Light Level
Nov-07 Reference Material RM 2-
3
all rings or other jewelry that may interfere with their performance during the operations. Be congnicent that some jewlery might be of religios value and the rescuer might be reluctant to remove it.
4. Reinforce safety when boarding or leaving airplanes or helicopters.
During Operations Phase
(This is the phase with most risks — reinforce safety) 1. Correctly identify the risks at : • Base of Operations • The scene
2. Briefings: During your daily routine during the deployment, there should be frequent biefings.
• Alert signals: Review of alert and alarm signals (continuously stress the signals to be used in case evacuation is required and call to resume. These signals should not be changed).
• Indication of escape routes, safe areas and safe heavens at the worksites. (These areas should be designate and marked if possible to make sure all members understand their location. This should be reviewed often during all phases of the operation. Assigna person responsible for safety. (Required to guarantee the operation).
• Vests: Identification vests could be used during the incident as job indicators. Those should be clearly identified by all members and if color coding is used, this should not be changed. (Medical Plan: The Information on a medical plan should also be identified during briefings. This plan will identify the place and means of transport to a medical care facility. (This plan could also indicate a geographical location where rescuers or victims might be taken during an emergency).
3. Safety rules to be followed during work at the site:
o Include the safety considerations in the work plan.
o Continuously monitor operations and logistics activities regarding compliance with safety rules. o Ensure any hazards in the type of
scenario have been identified. o Continuously monitor radio
communications. o Reinforce accountability. o Reinforce personnel rotation/rest.
o Monitor personnel for fatigue and stress.
4. Team leaders (or squad leaders) should ensure all personnel complies with personal hygiene standards, especially before and after meals.
5. Report and investigation of injuries or accidents.
SAFETY BRIEFING The outcome of the search and rescue operation is incumbent upon the health and safety of the personnel. The safety standards to be followed to ensure their safety shoule be detailed on a daily briefing chaired by the incident commander. The briefing should contain information on: Known Threats Secondary Threats Safe Heavens Restricted Areas Accountability PPE Emergency Signals Emergency Evacuation Plan Hygiene Hydration PERSONAL PROTECTION EQUIPMENT The various elements for the purpose of protecting the rescuer, reducing exposure to external factors that may cause injury, thus personal protection equipment (PPE) includes any device to be worn by a member who, as a result of the activities to be performed, is vulnerable to the environment and may experience injury or damage.
This equipment should be considered to be temporary and immediate protection as long the hazardous conditions are not eliminated.
Collapsed Structures Rescue Course – Light Level
Nov-07 Reference Material RM 2-
4
The personal protection equipment (PPE), is classified according to the protection it offers the rescuer:
• Head Protection • Eye and Face Protection • Ear Protection • Breathing Protection • Body Protection • Limb Protection
By grouping the the personal protection equipment by construction, durability and appearance, the essential requirements for all personal protection equipment can be established.
1) The equipment should provide adequate protection against the hazards to which rescuers will be exposed.
2) The equipment should provide maximum control, as well as minimum weight, and should be supported on the most appropriate part of the body.
3) The equipment should not restrict the movements of the rescuer or the pace of the work or task carried out.
4) The equipment should be durable within reasonable margins.
5) The equipment should be manufactured in accordance with the standards, taking into consideration the specifications for the work to be performed.
6) The equipment should have an attractive appearance and provide a sense of dependability to the wearer.
Head Protection: Protects against impacts, trapped hair, limited protection against chemical substances, and limited protection against electric shock to the head.
• Helmet
Helmets are currently constructed of fiber, lately visors are being attached constructed of poly-carbonate or other materials, for optimum vision while protecting the face, due to special polishing.
Eye and Face Protection Protects eyes and face against chemical substances, impact of objects, irritating gases, excessive light or hazardous radiations that may hurt eyesight, depending on the protection.
• Glasses and goggles • Face masks
Ear Protection Protects hearing against foreign objects and noise, in some cases is attached to the helmet.
• Ear plugs • Ear muffs
Breathing Protection Protects against inhalation of air polluting elements or oxygen deficiency (depending on the type).
When concrete dust is inhaled, it irritates the alveoli of the lungs. When this membrane is irritated, it segregates a liquid to protect the lining of the lungs; however, this should be taken into consideration because:
• Rescuers and patients may be affected by pneumonia if they inhale these dust particles.
• Doctors have calculated the danger of inhaling small quantities of toxic materials for long periods of time (i.e. asbestos), however, they cannot predict the danger associated with inhaling large quantities in short periods of times. Do not take risks, protecting your airways, using the level of protection according to the threat. This level of protection may include:Dust masks
Collapsed Structures Rescue Course – Light Level
Nov-07 Reference Material RM 2-
5
• Filter masks • Respirators • Valve Respirators • Air purifiers • Air supply breathing apparatus
(BA) • Self-contained breathing
apparatus (SCBA)
Following is a description of some of the functions and limitations of the breathing protection mechanisms available to rescue specialists.
Air Purifiers
• Paper or fabric placed over mouth and nose to filter non toxic particles. Does NOT filter toxic materials and cannot be used in toxic environments or oxygen-deficient atmospheres with a level under 19.5%.
• Face piece usually constructed of plastic that, depending on the design is placed over nose and mouth or covers the whole face. With appropriate filters, the air purifier can filter some, but not all toxic particles. NOT to be used in toxic environments or oxygen-deficient atmospheres with a level under 19.5%.
This type of purifier is the most frequently used in Light USAR operations. Air suppliers (Breathing Apparatus) Equipment consisting of a face piece usually constructed of plastic that is usually placed over nose and mouth or it might cover the whole face. It is dependent on an air hose that connectsto the face piece with a regulator, to reduce the air pressure. The air supply is located away from the rescuer, providing air by positive pressure. The supply system is based on a compressor that fills a cascade which in turn supplies the air to the user through a hose, to allow the rescuer a certain degree of autonomy and permanence time in contaminated or oxygen-deficient environments.
This equipment provides a small air cylinder carried by the rescuer in cases of emergency, that provides a determined amount of air that will last acording to the rescuer’s breathing rhythm. This equipment is not as large as a Self-Contained Breathing Apparatus (SCBA) and is easier to use in reduced spaces, but the rescuer is limited to the distance imposed by the length of the line and, even more, by the time required to escape the event in case of an emergency, which may be complicated by tangling or snagging of the line.
NOTE: This tipe of air supply along with SCBAs are the equipment most used during S&R operations.
Self-Contained Breathing Apparatus (SCBA)
Self-Contained Breathing Apparatus (SCBA), also called “open circuit”, provide air to rescuers for a limited amount of time ranging from 15 to 45 minutes depending on the breathing rhythm. There are some SCBAs that are designed tto last an hour but they are usually heavier and bigger than the ones before mentioned. These SCBAs might be used in toxic or oxygen-deficient environments. The SCBA face piece, covers the face including mouth and nose. It is a large piece of equipment and may be difficult to use in reduced spaces. When the air level drops to a pre established low level, an alarm will sound, indicating a reserve of 3 to 5 minutes of air. The cylinder may be replaced by filled tank or the same one might be refilled with fresh air. SCBA equipment is portable and does not require external air supply sources once filled.
Collapsed Structures Rescue Course – Light Level
Nov-07 Reference Material RM 2-
6
A “closed circuit” is another breathing protection equipment which provides autonomy for 2 to 4 hours. This system is based on the filtering and reusing same air sources. The air passes through an activated coal filter that adds oxygen to the air before it is returned to the rescuer’s breathing system. This type of equipment is used in mines or areas requiring long periods of times in confined spaces or oxygen-deficient atmospheres. A drawback to this system is that as time goes by the air starts to heat as a result of the chemical reaction generated by the filter, making it uncomfortable for the rescuer to breathe warm air.
The problem of warm air has been addressed by by including a deposit for dry ice to cool the coil through which the air passes before going to the demand regulator.
Body Protection This type of protection, guards the body against elements that may cause injury, chemical substances, etc.
• Vests • Gowns • Suits • Hazmat rubber bags • Encapsulated suits
The materials used during Search and Rescue operatioins should maintain body temperature, allowing perspiration, drying quickly if wet, etc. The local weather should be a factor when selecting the appropiate clothing to be worn.
Given the presence of communicable diseases, body bags should be used on deceased people. Any work carried out with injured people and near or with corpses require that protection be used, to prevent contamination; this includes rubber suits for hazmat or encapsulated suits for very specific functions and uses when handling hazmat.
Limb Protection: Protects against impacts, compression forces, sharp objects, humidity, chemicals, communicable diseases, etc.
• Gloves • Knee pads • Elbow pads
• Reinforced work boots Boots: Many first response organizations equip their teams with two pairs of rubber boots, a short pair of leather or synthetic material to be used with the uniform and a pair of long boots specifically for firefighting. It is important that both pairs have steel reinforced toes, to guarantee foot protection against falling objects.
Construction of these boots should be of the highest quality and especially designed for response operations and should be equipped with steel soles to prevent injury from broken glass, nails or other objects. Gloves: Gloves should be worn to protect the hands from hot objects, against injury and as protection for the use of equipment, tools, etc. There are different types of gloves that could be used depending on the work to be carried out. There are other personal protection devices that, although not used as frequently as gloves or helmets, are used to prevent working in unsafe conditions, including: Safety Belts: Belts are manufactured using various resistan materials such as Nylon or Perlon. They provide the anchoring points necessary to support the rescuer, with safety hooks with an easy-to-open device on one end.
Belts are used to slide along a rope or to secure the rescuer to a ladder or other means of support. Whenever work is done in high or unstable places, the rescuer must wear a safety belt.
Harness: There are different types of harnesses are now manufactured to provide better protection to rescuers. Harnesses are used for tasks such as climbing or descending. The most appropriate belt for that particular task should be used.
A full body harnesses will cover the upper and lower body.
Collapsed Structures Rescue Course – Light Level
Nov-07 Reference Material RM 2-
7
ACCESS CONDITIONS
• Determine the safety perimeter. Locate the work area and demarcate it.
• Utilities: Make sure utility services such as gas, water and electricity have been cut-off and disconnected for your protection.
• Keep away from hazards and their effects. Make sure the work plan follows the safety protocol.
• Safe areas and escape routes. Follow the rules related to safe areas and escape routes and maintain contact with team members outside.
• Secure your access by removing debris from the work area. Secure your access area and keep it supervised.
HAZARDOUS MATERIALS: If upon arrival at the scene you determine there might be a hazardous materials incident, take the following actions:
• Establish a safe perimeter
• Deny / limit entry
• Request the deployment of a HAZMAT team.
• Locate your vehicle and your staff in a safe area up wind and up hill. Stage at minimum distance of 100 m for chemical spills and 300 m for explosives.
• Immediately establish the Incident Command System. Evaluate the situation and communicate the report to the other units responding and to the communications Centre.
• Try to identify the product by: UN number from a safe distance. Try to find the name of substance or product marked on the container, transportation documents and safety sheet. Remember not to expose yourself to any hazardous materials.
In case you are able to see an identification number, place or diamond, immediately notify the central in order to determine the type of product and the actions to be taken.
• Do not enter to attempt a rescue; request support from a hazardous materials team.
Watch for the presence of smoke, spills, colored vapors, whistling or other sounds or any other manifestation to indicate the presence of a hazardous material and report it immediately to the communications centrel.
FIRST RESPONSE AND HAZMAT
Some data on HAZMAT:
• There is a relation between the site of the incident and the concrete or probable presence of hazardous materials; these usually happen in:
- Highways and roads - Railroads - Airports - Ports and navigable channels - Terminals (air, land, railroad and
maritime) - Industries and plants (including
warehouses) - Work under construction - Oil storage or distribution plants - Services stations (gas stations) - Hospitals and laboratories - Supermarkets - Hardware stores and agricultural
depots.
Collapsed Structures Rescue Course – Light Level
Nov-07 Reference Material RM 2-
8
• There are 9 classes of hazardous materials according to the UN:
- Class 1: Explosives - Class 2: Gases - Class 3: Flammable Liquids - Class 4: Flammable Solids - Class 5: Oxidant Materials - Class 6: Poisonous Materials - Class 7: Radioactive Materials - Class 8: Corrosive Materials - Class 9: Other Non Regulated and
Miscellaneous Materials.
• A hazardous material is any solid, liquid or gas with the potential to cause damage to people, goods and the environment.
• With hazardous materials, exposure is defined as the contact of the body with a hazardous material. The contact might be throught physical contact (touching), breathing or inhaling and finally radiation.
• Exposure of the human body that enables direct aggression or contact of these agents with the body are: the respiratory tract through inhalation, the eyes through ocular exposure, the skin through exposure and the digestive tract through ingestion.
• Contaminant is any hazardous material released and present in objects, people or the environment.
• Contamination is the process by which a hazardous material is transferred from its point of origin to animals, the environment and groups, which may act as transporters (NFPA-471).
• Neutralization of hazardous materials implies application of products and/or techniques to prevent a dangerous chemical reaction and should only be carried out by technical personnel specializing in hazardous materials, NEVER by a First Responder.
• Asfixiants are gases that deprive human tissue of oxygen. There are two types:
• Simple asfixiants are those that displace oxygen. Example: CO2, N2, Methane, Propane, Argon, etc.
• Chemical asfixiants: toxic gases that prevent the oxygen inhaled from being incorporated, transported and utilized by the human body. Example: CO, Hydrogen Cyanide, etc.
• Hazardous materials may be chemical, biological, infectious or radioactive agents.
• The data provided in the DOT (US Department of Transportation) placard for HAZMAT recognition are:
- Symbol representing the type of risk - Number of the primary risk type - Colors representing the type of risk
and even the warning for response.
• The HAZMAT released in an incident may be identified by:
- UN number onj a placard (plate located on vehicle or container),
- Name of the substance or product marked on the container,
- Transportation or shipping documents,
- Safety Data Sheet (MSDS).
• The ways to recognize hazardous materials are:
1. Observing the plates: - DOT placard (colors,
representative symbols, risk type number).
- MERCOSUR plate and panel. - NFPA 704 placard diamond
standard.
2. Recognition by the senses: - Seeing a spill, preferably from a safe
distance. - Smoke or vapors of various colors. - Observing the clinical symptoms
exhibited by people exposed to the environment or the hazardous product.
Collapsed Structures Rescue Course – Light Level
Nov-07 Reference Material RM 2-
9
• The meaning of the colors in the NFPA 740 placard diamond is:
- Blue: Health Risk. - Red: Flammable Risk. - Yellow: Reactive Risk. - White: To include special
indications.
• The meaning of colors in single-color DOT placard is:
- Orange : Explosive - Green: Compressed Gas
o Yellow: Oxidant o Red: Flammable o White: Toxic, infectious or
poisonous o Blue: Prohibition to use
water
• In the NFPA placard the numbers indicate the degree of risk and/or hazard of the product, as follows:
- 0 = None - 1 = Minimum - 4 = Maximum
• Hazardous material incident is the release or potential release of hazardous materials where the people exposed get sick or have the possibility of getting sick later, whether at the time of contact, days, months or years later.
• The primary function of the Hazardous materials defensive operations is to protect life, property and environment.
• The main actions to be carried out by a first responder upon arrival at the scene are:
1. Take the necessary measures to ensure the safety of first response personnel (deny entry).
2. DO NOT Approach the site: - The first responder should be upwind
(with the wind to your back), - The first responder should also be up hill 3. Obtain more / better information about
the incident (wind speed and direction, material recognition or identification, number of victims, their signs and symptoms ).
4. Notify all competent authorities, institutions and specialized groups.
5. Immediately establish an initial safety perimeter based on the evaluation made (minimum 100 meters around site).
6. Avoid the movement of people downwind or downstream, if a toxic release is suspected.
7. Continue monitoring and make any necessary changes.
NOTE: Hazardous material teams undergo specialized training which is not provided during this course.
References: NFPA 1521 Standard for Fire Department Safety Officer. 1992 Edition
NFPA 1470 Standard on Search and Rescue Training for Structural Collapse Incidents. 1994 Edition
National Fire Protection Association 1 Batterymarch Park, P.O. Box 9101 Quincy, MA USA 02269-9101
Collapsed Structures Rescue Course – Light Level
Nov-07 Reference Material RM 3–1
Lesson 3 Building Damage
Assessment During search and rescue operations in collapsed structures it should always be kept in mind that rescuers are vulnerable to the hazards generated by the structural damage. Therefore it is imperative that rescuers have a basic knowledge of the structures and the materials used in their construction.
For this reason, assessing damaged structures is one of the fundamental steps in this process, however, this course does not prepare it’s graduates to replace the structural engineers knowledge or experience. Therefore rescuers should not enter any structure previously assessed by a structural engineer specialied in USAR activities. Since no structural specialists are attached to a light level USAR team, it will be part of your initial assesment to recognize the need for a more specialized team. It is of trememdous importance to emphicize that many would-be-rescuers have died in rescue attempts. This lesson will only outline the basic principles to recognize the damage a structure may exhibit after a damaging phenomenon so a rescuer does not become a VICTIM.
In addition to this process, the intent is to present a standard set of symbols recognized by any rescuer. These symbols will allow him to quickly identify the structural hazards observed by the structural specialists.
The initial compilation of information is one of the crucial phases at the time of any disaster. This is particularly difficult when there are collapsed structures. The information has to be collected and analyzed as quickly as possible for the benefit of the team and the victims. The
team should carefully validate this information, wihch can be corroborated with the people and authorities present at the scene. CONSTRUCTION MATERIALS: Construction materials include elements extracted from the environment or manufactured with the intention of been used for the construction of structures.
Classification of Construction Materials:
These materials are classified according to their composition:
• Rocky: stone • Organic: wood • Metallic: iron, steel • lime, cement, gypsum • Ceramic: tile • Vitreous: glass • Plastic: thermo-plastic, thermo-stable
At the same time, these materials are classified according to their use in construction:
BUILDING
A building is any structure built for many types of use. Some of the most common uses for a building are residential and commercial. The importance of understanding a building use is the occupancy load and the chances that it was occupied at the time of the incident. A residential dwelling is more likely to have people trapped inside at night than a commercial building.
Building Components: In general, the building elements are:
Collapsed Structures Rescue Course – Light Level
Nov-07 Reference Material RM 3–2
- Foundation: Fulfills the function of transferring all building loads to the supporting ground to provide stability to the building.
- Structure: System or set of elements that interact among themselves, with the function of supporting and transferring the loads to the ground through the foundation.
- Exterior walls: The exterior walls are those seen from the outside, all around the building. The importance of this is that these might have a façade of being of a different component. For example, a brick front that might have a wooden wall behind it. These may or may not be load bearing walls.
- Interior Partitions Partitions are used to divide spaces within the building. Particians mare not tipically load bearing.
- Vertical Systems or fixed points, such as lifts or elevators.
- Utilities: Electricity, water, sewage, telephone and gas supply networks.
1. Support elements (structural): stone, reinforced concrete, iron, steel, wood, brick A structure is the set of construction elements and together they provide a support system for eachother. A defect or damage of one of the elements, may lead to damage or collapse of the whole building. 2. Decorative elements (finishes): lime, gypsum, cement, wood, glass, ceramic, plastic, brick Decorative elements are used to give the work a different finish. This finish is purely decoration and it is not a component of the structural support. These finishes might be
found either on the inside or the outside of the structure. Caution must be kept with these finishes since the might become detached from the main structure causing injury to rescuers while working at the site. 3. Enclosing elements (dividing walls, partitions): reinforced concrete, brick, wood, glass, plastic, roof tiles, fiber Dividing walls or partitions refer to non load bearing elements, destined solely to divide interior spaces in a building, provide acoustic isolation and in some specific cases, thermal isolation, as in the case of firewalls. Walls, as explained in the supporting elements, in addition to fulfilling the same role as partitions, bear loads. 4. Roofs: plastic, roof tiles, fiber, sheet metal, shingles, wooden components etc. This is the set of waterproof materials supported by on the roof frame that protects the building from the weather (rain, sun, wind, etc.). The importance of recognizing this elements is that some might be able to support a rescuers weight and some might not. Remember the key to performing rescues is not to be become a victim.
CHARACTERIZATION OF BUILDINGS IN FOUR CATEGORIES 1. General Buildings have many uses depending on the need. Many edifications undergo modifications to the original state after they have been completed. This creates a new challenge to the rescuer because it is difficult to predict the layout of structure. 2. Architecture Floor plan, number of floors, number of basements, large projections, location of vertical circulation nucleus. Predominant materials.
Collapsed Structures Rescue Course – Light Level
Nov-07 Reference Material RM 3–3
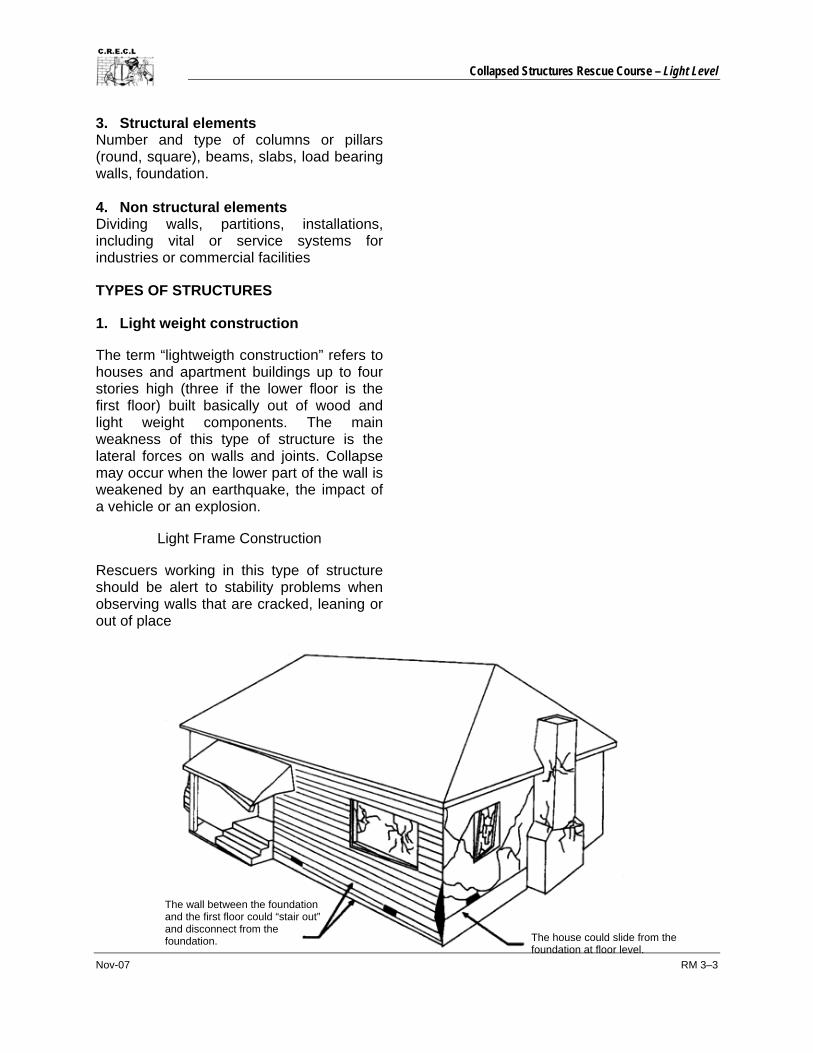
The wall between the foundation and the first floor could “stair out” and disconnect from the foundation. The house could slide from the
foundation at floor level.
3. Structural elements Number and type of columns or pillars (round, square), beams, slabs, load bearing walls, foundation. 4. Non structural elements Dividing walls, partitions, installations, including vital or service systems for industries or commercial facilities
TYPES OF STRUCTURES
1. Light weight construction
The term “lightweigth construction” refers to houses and apartment buildings up to four stories high (three if the lower floor is the first floor) built basically out of wood and light weight components. The main weakness of this type of structure is the lateral forces on walls and joints. Collapse may occur when the lower part of the wall is weakened by an earthquake, the impact of a vehicle or an explosion.
Light Frame Construction
Rescuers working in this type of structure should be alert to stability problems when observing walls that are cracked, leaning or out of place
Collapsed Structures Rescue Course – Light Level
Nov-07 Reference Material RM 3–4
2. Heavy walls
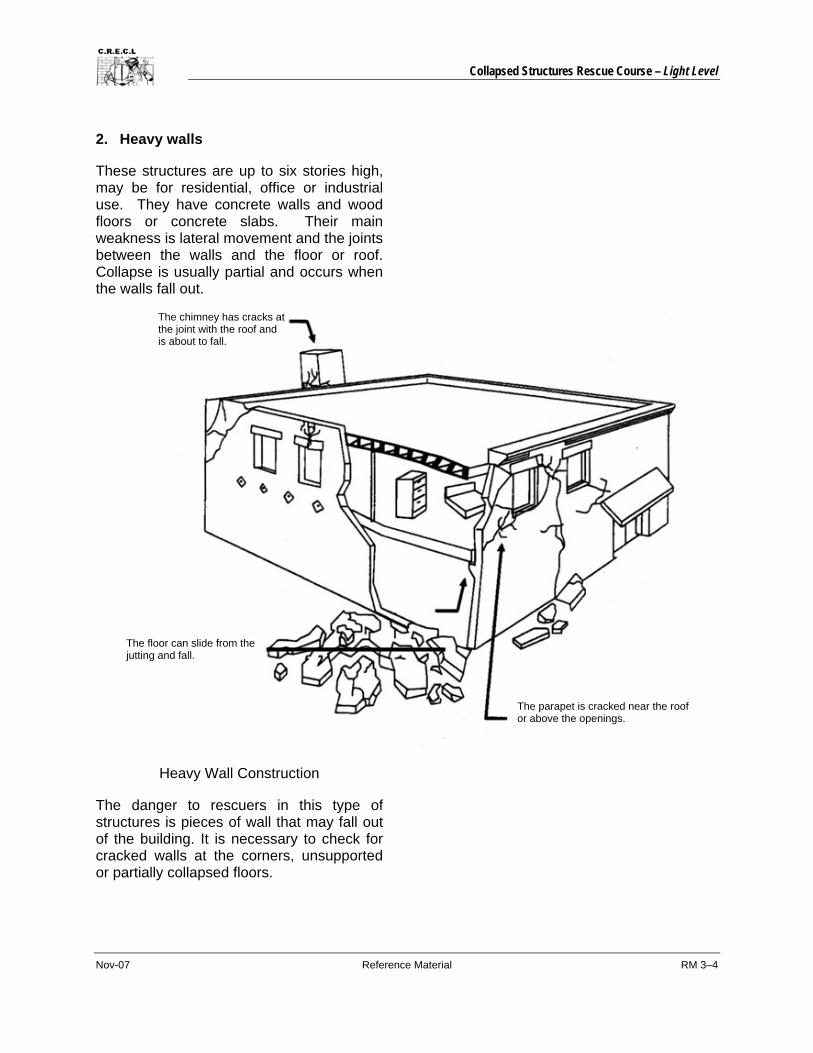
These structures are up to six stories high, may be for residential, office or industrial use. They have concrete walls and wood floors or concrete slabs. Their main weakness is lateral movement and the joints between the walls and the floor or roof. Collapse is usually partial and occurs when the walls fall out.
Heavy Wall Construction
The danger to rescuers in this type of structures is pieces of wall that may fall out of the building. It is necessary to check for cracked walls at the corners, unsupported or partially collapsed floors.
The chimney has cracks at the joint with the roof and is about to fall.
The floor can slide from the jutting and fall.
The parapet is cracked near the roof or above the openings.
Collapsed Structures Rescue Course – Light Level
Nov-07 Reference Material RM 3–5
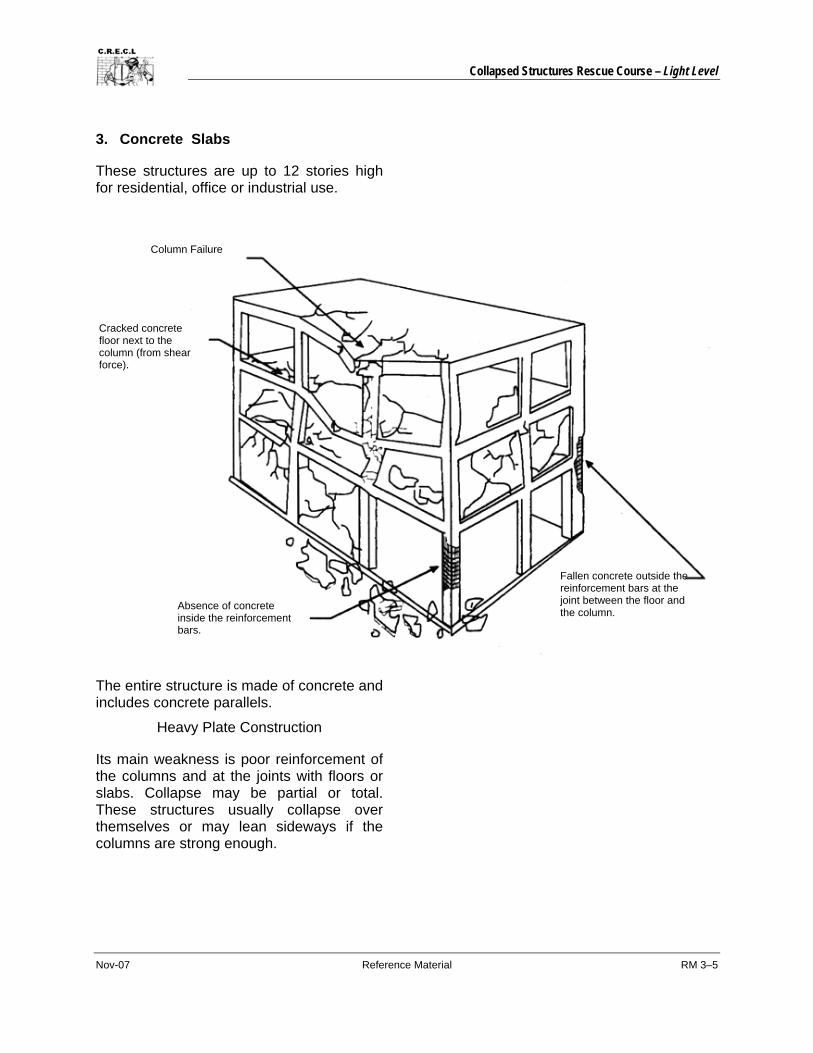
Absence of concrete inside the reinforcement bars.
Column Failure
Cracked concrete floor next to the column (from shear force).
Fallen concrete outside the reinforcement bars at the joint between the floor and the column.
3. Concrete Slabs
These structures are up to 12 stories high for residential, office or industrial use.
The entire structure is made of concrete and includes concrete parallels.
Heavy Plate Construction
Its main weakness is poor reinforcement of the columns and at the joints with floors or slabs. Collapse may be partial or total. These structures usually collapse over themselves or may lean sideways if the columns are strong enough.
Collapsed Structures Rescue Course – Light Level
Nov-07 Reference Material RM 3–6
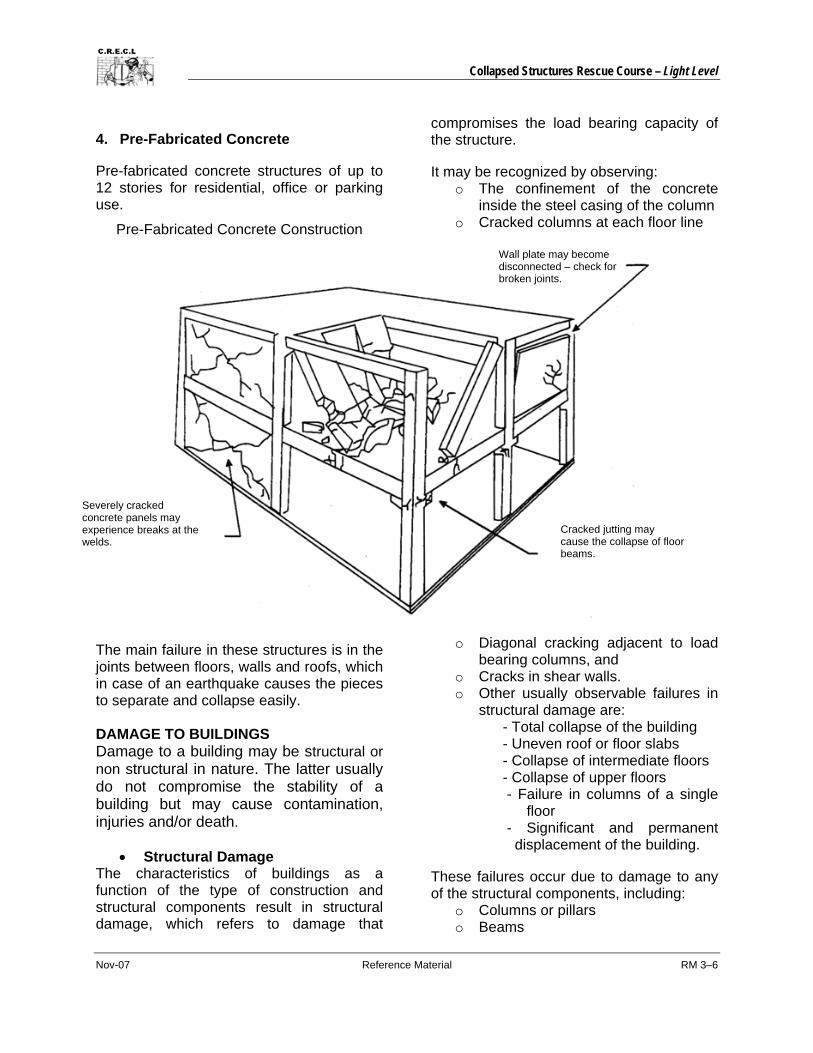
4. Pre-Fabricated Concrete
Pre-fabricated concrete structures of up to 12 stories for residential, office or parking use.
Pre-Fabricated Concrete Construction
The main failure in these structures is in the joints between floors, walls and roofs, which in case of an earthquake causes the pieces to separate and collapse easily. DAMAGE TO BUILDINGS Damage to a building may be structural or non structural in nature. The latter usually do not compromise the stability of a building but may cause contamination, injuries and/or death.
• Structural Damage The characteristics of buildings as a function of the type of construction and structural components result in structural damage, which refers to damage that
compromises the load bearing capacity of the structure.
It may be recognized by observing: o The confinement of the concrete
inside the steel casing of the column o Cracked columns at each floor line
o Diagonal cracking adjacent to load bearing columns, and
o Cracks in shear walls. o Other usually observable failures in
structural damage are: - Total collapse of the building - Uneven roof or floor slabs
- Collapse of intermediate floors - Collapse of upper floors - Failure in columns of a single
floor - Significant and permanent
displacement of the building.
These failures occur due to damage to any of the structural components, including:
o Columns or pillars o Beams
Wall plate may become disconnected – check for broken joints.
Cracked jutting may cause the collapse of floor beams.
Severely cracked concrete panels may experience breaks at the welds.
Collapsed Structures Rescue Course – Light Level
Nov-07 Reference Material RM 3–7
o Joints (beam-column) o Plates or slabs o Walls o Foundations
• Non Structural Damage
Non structural damage refers to that not compromising the structure of the building, but seriously affecting its functioning, even to the point of requiring total evacuation of the structure.
Among the general failures observed in this type of damage we find:
o Generalized cracking. o Façade walls falling to the outside. o collapse stairs. o Damage to elevators. o Gas or hazardous material leaks. o Ruptures water tanks.
These failures occur from damage sustained by non structural components, such as:
o Partitions o Construction joints o Others (Vital systems)
It is possible that certain non structural damages may be confused with structural damages; in these cases, it is better to err on the side of safety, that is, to consider it structural damage until a structural specialists specialized in USAR operations can investigate more in depth and determine the condition of the structure.
Deegres of Building Damage
Once an event has occurred resulting in the possible collapse of a structure, the damage sustained must be known if operations will be conducted inside that structure. In other words, if the initial assessment indicates that a person(s) might be trapped inside the structure, then a risk assessment must be conducted for that the damage degree must be taken into account. The damage of a structure might be classified into three degrees; light, moderate and severe.
Light: Buildings that suffered insignificant or very minor damage to structural components. This damage might be easily repaired and it is not by itself considered dangerous to the occupants. A professional assessment by a structural engineer will dictate whether or not the structure is habitable
Collapsed Structures Rescue Course – Light Level
Nov-07 Reference Material RM 3–8
Moderate: Buildings that suffered considerable damage to its structural support system. This damage might or might not constitute imminent collapse of the structure. A professional assessment by a structural engineer will dictate whether or not the structure is habitable.
Severe: Buildings that suffered severe damage to the structural components. The structure has completely collapse or is has an imminent danger of collapsing. It is necessary to evacuate these structures completely and to deny entry into the collapse zone.
The collapse zone is two and a half (2 ½) times the height of the building. This distances allow for falling debris.
VOID
A void is a space that might be left with adequate conditions for human survival, allowing a person to remain there for long periods of time. These voids are created when a structure collapses. More specifically the voids might be created by intact walls or fallings ceilings, they might alsobe created by furniture that holds the falling debris.
These voids or spaces are not necessarily large and they might not even allow a trapped person to move within. In the case of the 1985 Mexico City earthquake, many people survived in very small voids where they could only move their arms and breathe. Others were trapped in bathroom areas where service pipes ran, affording more resistance to these areas. In other cases, the structure itself supported large concrete blocks preventing injury to the people trapped. Many of the people trapped had access to water, which enabled them to survive for longer periods of time.
A similar event might be descrived during the explosions in the sewage collector in the Reforma sector of the city of Guadalajara, Jalisco on 22 April 1992 where, due to the explosion, many houses collapsed while occupied. Rescuers were able to rescue people who had been trapped for up to 12 hours after impact. Most of those people wre able to survive because they were withing voids created by the structure.
Taking this into acount and adding that the behavior of structures in seismic events, construction defects or failures and physical man-made phenomena have a “certain pattern of behavior”, it is necessary to know the basic characteristics of the different types of damage to be faced, but this is not to mean that every collapsed structure will behave the same in similar phenomenon. Reference is made to the type of collapse and the way in which slabs, beams or columns may behave, so it is necessary to know the basics about them.
TYPES OF COLLAPSE
Each type of collapse has its particular characteristics that at the same time require particular work techniques.
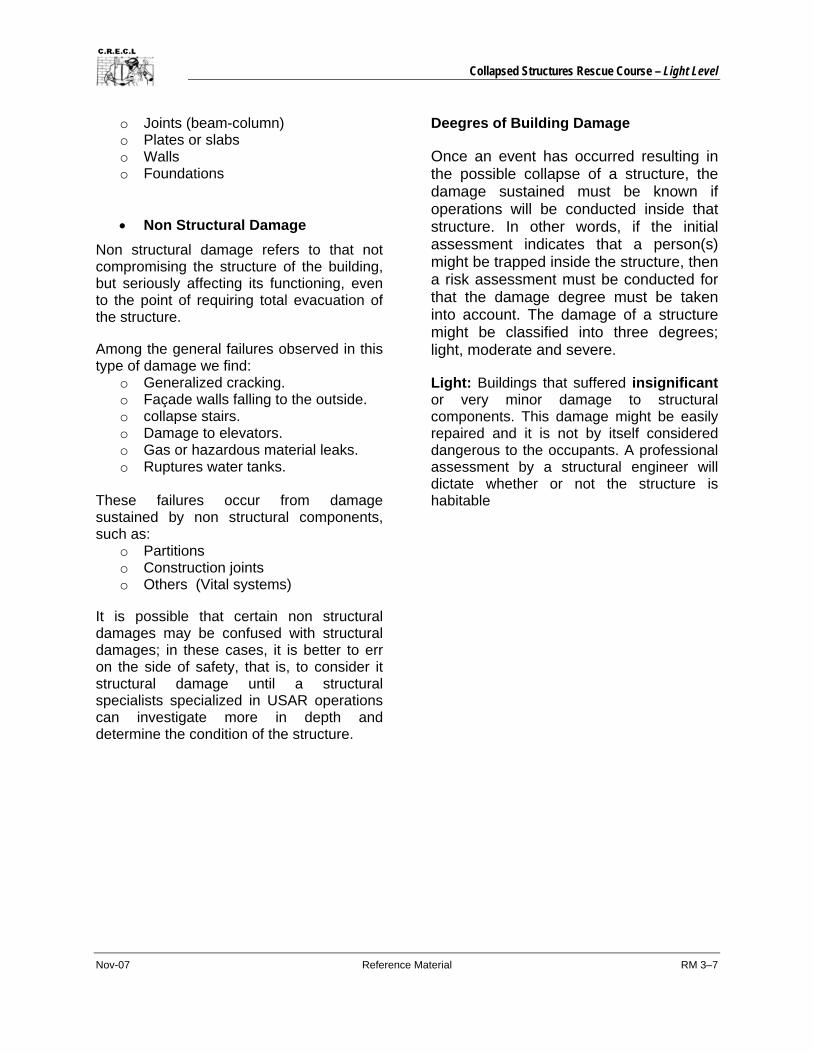
• Lean-to collapse: This type of collapse occurs when one or several walls or floors fracture or separate from the joints, causing one of the extremes to fall and rest on the lower floor.
Collapsed Structures Rescue Course – Light Level
Nov-07 Reference Material RM 3–9
Lean-to Collapse
This type of collapse results in a space in the shape of a triangle, where the possibilities for victim survival are high. Remember that the stability of the extreme that is leaning is precarious. Shoring may be required if rescuers will conduct operations in this area. Rescuers may find victims in the void and on the debris that fell during the collapse.
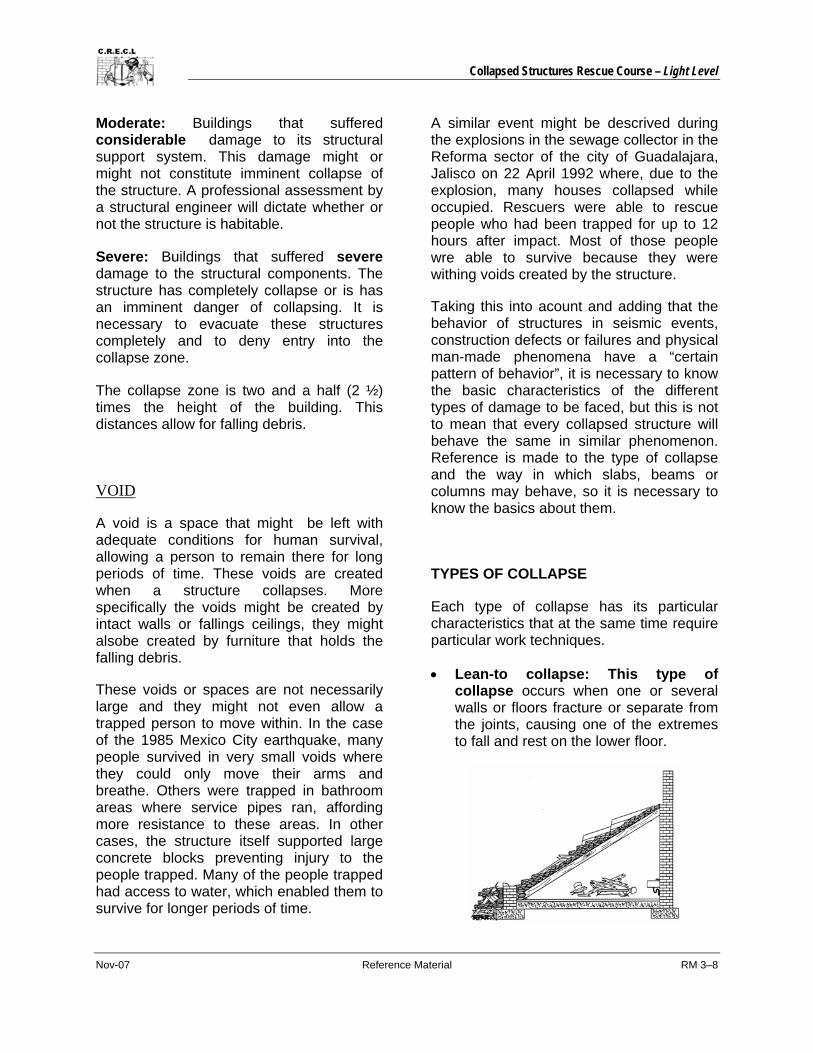
• V-shaped collapse: This collapse is formed by allowing both sides of the collapsed floor and the angle formed by the floor and the lower part of the walls standing. This also happens when the slab or part of it fractures when falling as it hits another part of the structure or other object on the lower floor, resulting in a shape similar to a “V”.
“V” shape collapse
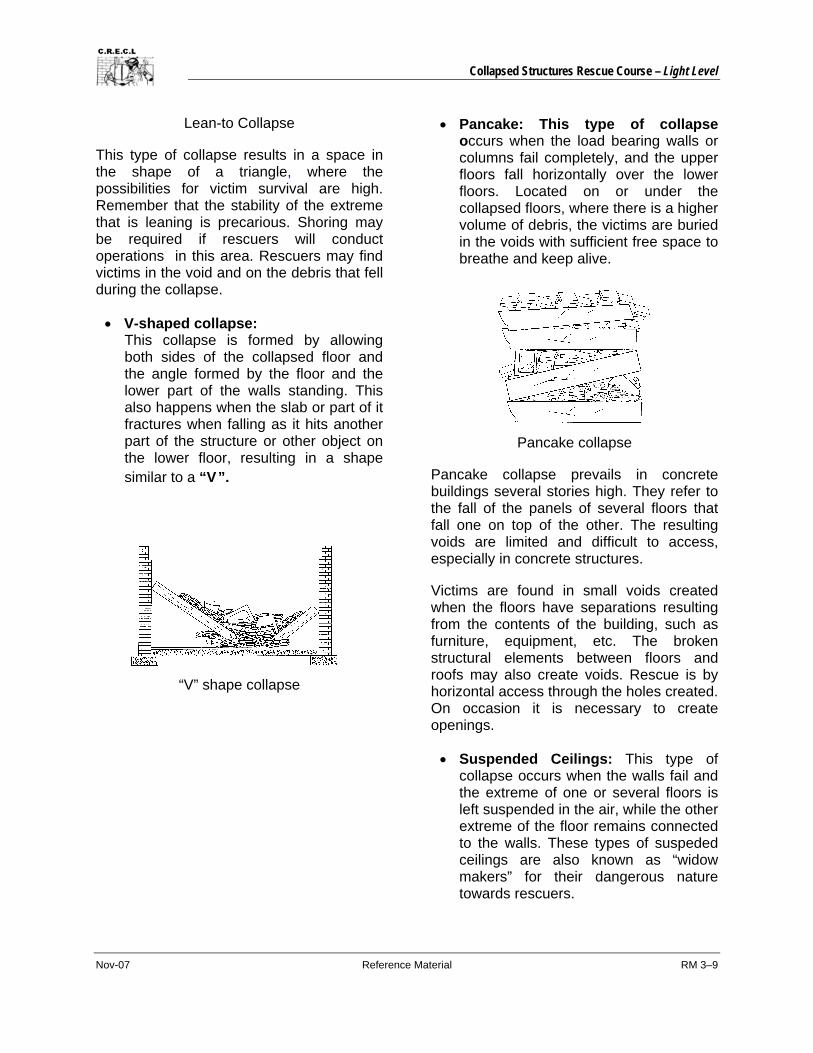
• Pancake: This type of collapse occurs when the load bearing walls or columns fail completely, and the upper floors fall horizontally over the lower floors. Located on or under the collapsed floors, where there is a higher volume of debris, the victims are buried in the voids with sufficient free space to breathe and keep alive.
Pancake collapse
Pancake collapse prevails in concrete buildings several stories high. They refer to the fall of the panels of several floors that fall one on top of the other. The resulting voids are limited and difficult to access, especially in concrete structures.
Victims are found in small voids created when the floors have separations resulting from the contents of the building, such as furniture, equipment, etc. The broken structural elements between floors and roofs may also create voids. Rescue is by horizontal access through the holes created. On occasion it is necessary to create openings.
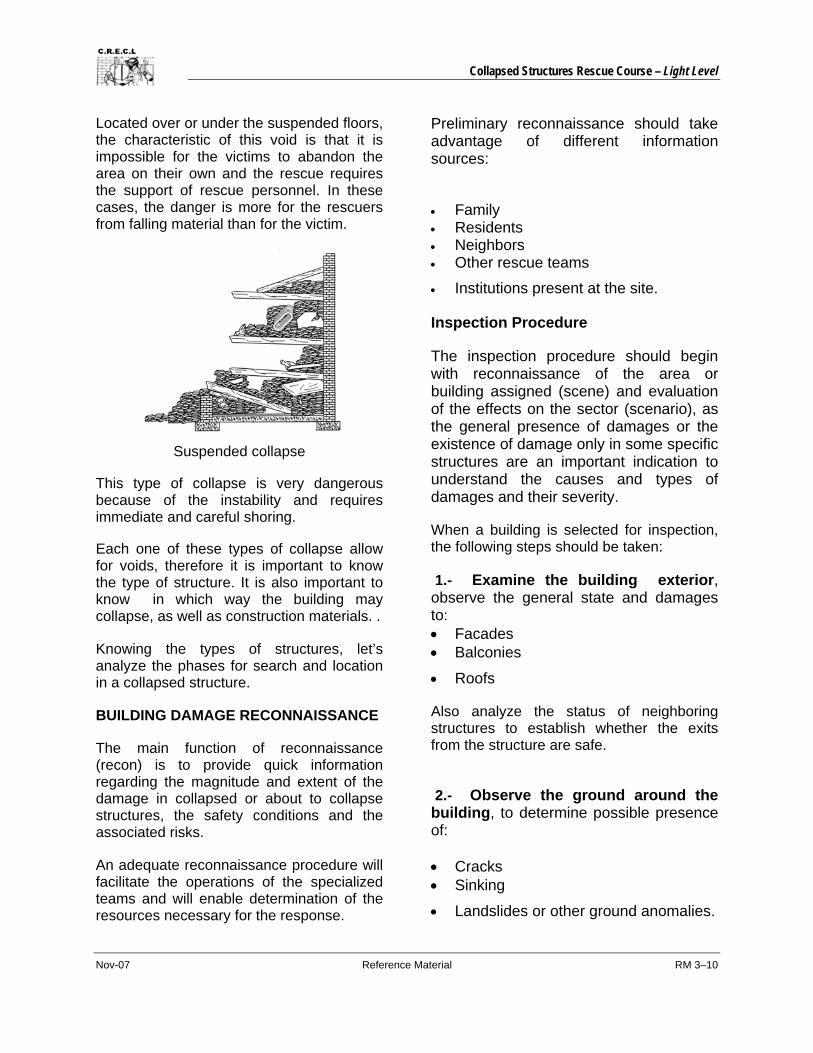
• Suspended Ceilings: This type of collapse occurs when the walls fail and the extreme of one or several floors is left suspended in the air, while the other extreme of the floor remains connected to the walls. These types of suspeded ceilings are also known as “widow makers” for their dangerous nature towards rescuers.
Collapsed Structures Rescue Course – Light Level
Nov-07 Reference Material RM 3–10
Located over or under the suspended floors, the characteristic of this void is that it is impossible for the victims to abandon the area on their own and the rescue requires the support of rescue personnel. In these cases, the danger is more for the rescuers from falling material than for the victim.
Suspended collapse
This type of collapse is very dangerous because of the instability and requires immediate and careful shoring.
Each one of these types of collapse allow for voids, therefore it is important to know the type of structure. It is also important to know in which way the building may collapse, as well as construction materials. .
Knowing the types of structures, let’s analyze the phases for search and location in a collapsed structure.
BUILDING DAMAGE RECONNAISSANCE
The main function of reconnaissance (recon) is to provide quick information regarding the magnitude and extent of the damage in collapsed or about to collapse structures, the safety conditions and the associated risks.
An adequate reconnaissance procedure will facilitate the operations of the specialized teams and will enable determination of the resources necessary for the response.
Preliminary reconnaissance should take advantage of different information sources:
• Family • Residents • Neighbors • Other rescue teams
• Institutions present at the site. Inspection Procedure
The inspection procedure should begin with reconnaissance of the area or building assigned (scene) and evaluation of the effects on the sector (scenario), as the general presence of damages or the existence of damage only in some specific structures are an important indication to understand the causes and types of damages and their severity.
When a building is selected for inspection, the following steps should be taken:
1.- Examine the building exterior, observe the general state and damages to: • Facades • Balconies
• Roofs
Also analyze the status of neighboring structures to establish whether the exits from the structure are safe.
2.- Observe the ground around the building, to determine possible presence of: • Cracks • Sinking
• Landslides or other ground anomalies.
Collapsed Structures Rescue Course – Light Level
Nov-07 Reference Material RM 3–11
3.- Examine the stability of non structural elements, identify : • Falling Ceilings • Leaning Walls
• Stairs or elements representing a hazard to life.
4.- Evaluate the structural system from the outside. Analyze the extent of damage of the various structural elements and determine the percentage of elements affected on the floor with the greatest damage.
5.- Deny entry . Also restrict access to areas designated as unsafe by placing some type of barrier, for example tape with the inscription DANGER.
6.- Suspect the presence of hazards. Try to confirm the existence, or not, of extremely unsafe conditions (broken gas lines, gas transport vehicles with fissured tanks, fuel spills, stored chemicals, live electric cables or fallen transformers).
7.- Notify the result of the evaluation to the communications central, so the appropriate procedures by the competent authorities can be carried out.
8.- Field evaluation form.
The form contains the following aspects. • Identification of the structure. • Description of the structure. • Evaluation of the status of the building
by: type of collapse, extent of damage to structural elements, damage to architectural elements and percentage of damage to the structure.
• Safety measures and recommendations.
• Sketches. • Comments. • Date of inspection.
Collapsed Structures Rescue Course – Light Level
Nov-07 Reference Material RM 4./
1
Lesson 4 Search Strategies and the INSARAG Marking
System To start, we must define the word strategy: Strategy is a long term plan of action designed to achieve a particular goal already agreed on. Strategy is differentiated from tactics immediate actions with resources at hand by its nature of being extensively premeditated, and often practically rehearsed. Strategies are used to make the problem or problems easier to solve, and also for you to understand it more.
In the military, the word strategy has been used to define the movements carried out by military units in combat, in order to deploy the resources in the most appropriate location in relation to enemy forces for when combat begins.
This is understood nowadays as a science onto itself referring to military movements to take an army to a particular battle site in advantageous conditions.
SEARCH Application of techniques and procedures aimed at obtaining responses or indications of the existence of victims in voids within the collapsed structure.
1. Composition of a Search and Location Team
• Team Leader. Responsible for developing the Search Plan, elaborating the diagrams, documentation and making recommendations to incident commander. Also responsible for ensuring the safety of the search operation. The safety component might be delegated to a safety officer if staffing allows for this position.
• Rescuers: Four people who carry out the search operation in compliance with the activities assigned by the Team Leader and in accordance with the search plan. , Each team member may carry out different tasks.
STEPS FOR SEARCH 1. Information collection and analysis
The more detailed the information available, the better the judgment on the number of victims and their physical condition.
• Sources of information • Survivors • Neighbors • Family members • Security or maintenance
personnel
• Type of information • Number of people trapped • Customary behaviors of the
residents • Possible location of the
victims • Building characteristics • Nature and scope of the
damage
All of these aspects have been discussed in detail in previous lessons, so if there are any doubts, please consult the bibliography recommended.
Collapsed Structures Rescue Course – Light Level
Nov-07 Reference Material RM 4./
2
2. Secure the scene Use perimeter tape, deny entry, identify associated hazards and mark them, verify utilities have been disconnected / shut off.
3. Assess the structure A careful inspection should be carried out of the way in which the structure has collapsed, to identify and locate the damaged parts and especially the areas where based on previously collected information, people may be trapped. The building plans and/or a sketch of the collapsed structure may be of great assistance to locate voids and to record the structural details as they are obtained.
A structure may have areas that are more resistant than others, where voids like the ones studied in lesson 3 could be found. Some of these areas may include:
• basements • elevator pits • bathrooms • interior aisles • concrete walls
For this prioritization, it is not always necessary to deploy a group of men for reconnaissance. Canine search (K-9) can provide a rapid assessment of the area.
Also remember to take into account that in collapses there are different types of materials together: concrete, brick, wood, etc. Each material has a different capacity to propagate noises and vibrations. There will be fractures, large pieces and, in general, not very homogenous material.
A method of grids or coordinates should be used to verify that the search has covered all sections of the building.
A second opinion by another specialist should be sought to confirm that a victim has been found.
Identification should be made of all debris formation that results in cavities, passageways or stable openings, that may quickly and safely lead to the voids for reconnaissance. Avoid unstable accesses unless these can be removed, anchored or shored.
4. Rescue Surface Victims
Rescue victims on the surface and easily accessible in case this has not been done before.
5. Elaborate the diagram of the structure Mark the structure Once this exploration has been conducted, the voids explored and their accesses shall be marked, indicating distances, conditions, team conducting the exploration, hazards, etc. See lesson 3.
6. Determine the area to be searched Refers to establishing, based on the information collected, the area with the highest probability of finding people trapped.
7. Determine the pattern to be used As in item 6, this decision should be based on the information collected and the characteristics and conditions of the building.
Collapsed Structures Rescue Course – Light Level
Nov-07 Reference Material RM 4./
3
8. Carry out the search pattern and place the victim markings (INSARAG victim marking system) at the points detected in the structure and record in the diagram.
INSARAG: International Search and Rescue Advisory Group created in 1991, representing a cooperation effort between the United Nations and many countries participating in international search and rescue (SAR) operations. With the assistance of all participants, the conclusions and recommendations approved at the inaugural INSARAG meeting were based on their collective experiences in case of disaster response.
The mission of INSARAG consists in establishing effective international relations aimed at saving human lives and providing humanitarian services when natural or man-made disasters occur. The activities of INSARAG include improving the preparation to face emergency situations and cooperation between international SAR teams, as well as promoting exchange of information on operational procedures and the experience acquired.
9. Continuously analyze the results and reevaluate the plan (make the necessary adjustments).
10. Start patient management and care procedures.
11. Confirm the presence and location of the victims with the resources and equipment available.
SEARCH AND LOCATION Search Modes
Primary Search This search mode is done rapidly to detect the presence of survivors on the surface or in easily accessible voids.
Secondary Search This search mode is carried out methodically and covering in detail and slowly the entire assigned area. The secondary search will include the application of various techniques and search patterns. Types of Search
Physical Search The physical search does not require special equipment or extensive training, but only human capacity, the senses and some pre-established procedures.
This type of search many times is the only one available to local first response groups without technical or canine resources.
Canine Search (K-9) Canine search uses the acute sense of smell of dogs trained for this, certified and highly specialized and trained to locate trapped victims in the shortest time possible. The dogs can access areas too small and unstable for a person. They may be used in surface and secondary search.
Technical Search Technical search requires equipment and personnel trained on this specialized equipment. This equipment might include acoustic devices, temperature measuring devises, small portable video cameras, vibration detection devises etc. This type of search might be carried out with equipment especially designed for this type of search or with equipment locally adapted equipment. If the latter is used, be cognizant of the amount of reliability those tools posses.
Collapsed Structures Rescue Course – Light Level
Nov-07 Reference Material RM 4./
4
Technological progress for this type of search continues to improve every day (search robots may be available in the near future). The combination of canine and electronic search should be used whenever possible to obtain faster results.
Search Patterns
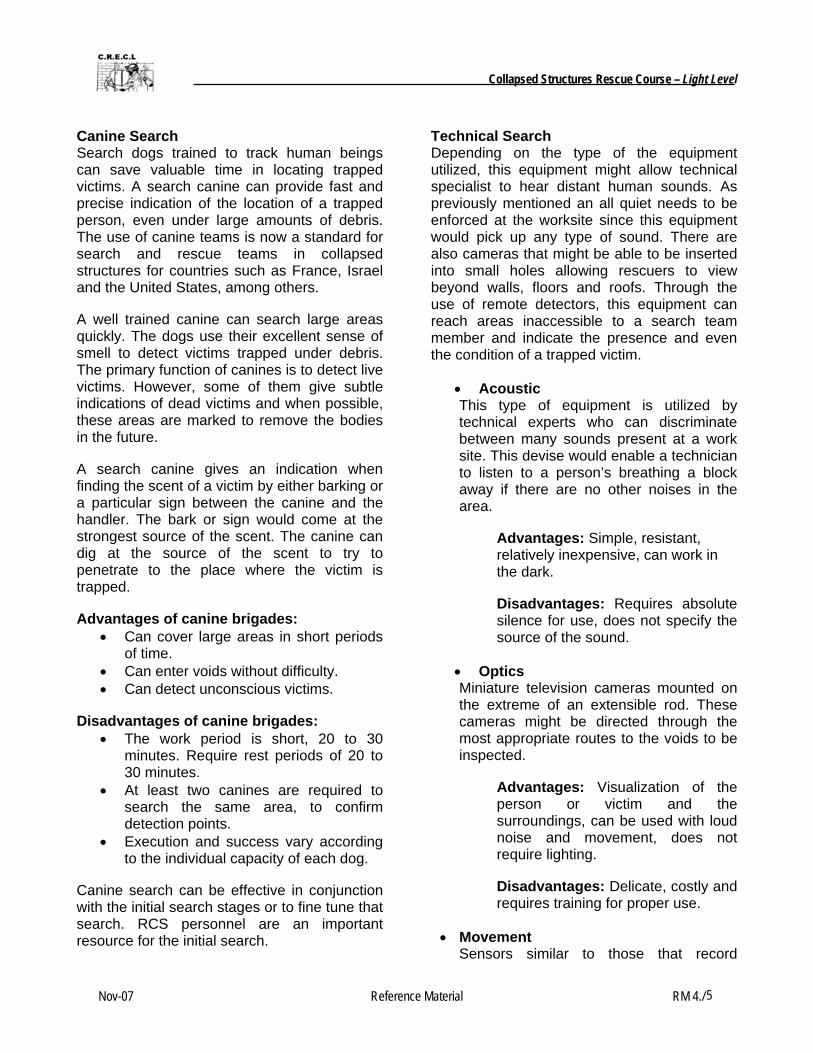
Multiple Rooms This type of search is used when several complete rooms have not collapsed. The procedure to be followed is based on availability of a sketch and the rescuers experience. The search process begins upon entering the structure. If the option is available, select a right hand pattern or a left hand pattern and notify the rest of the group and the leader. The leader is also notified in case of a secondary collapse. If a right hand patter is selected, begin on the right and maintaining continuous contact with the wall and the exterior element group. The path always continues to the right, pausing to call and listen.
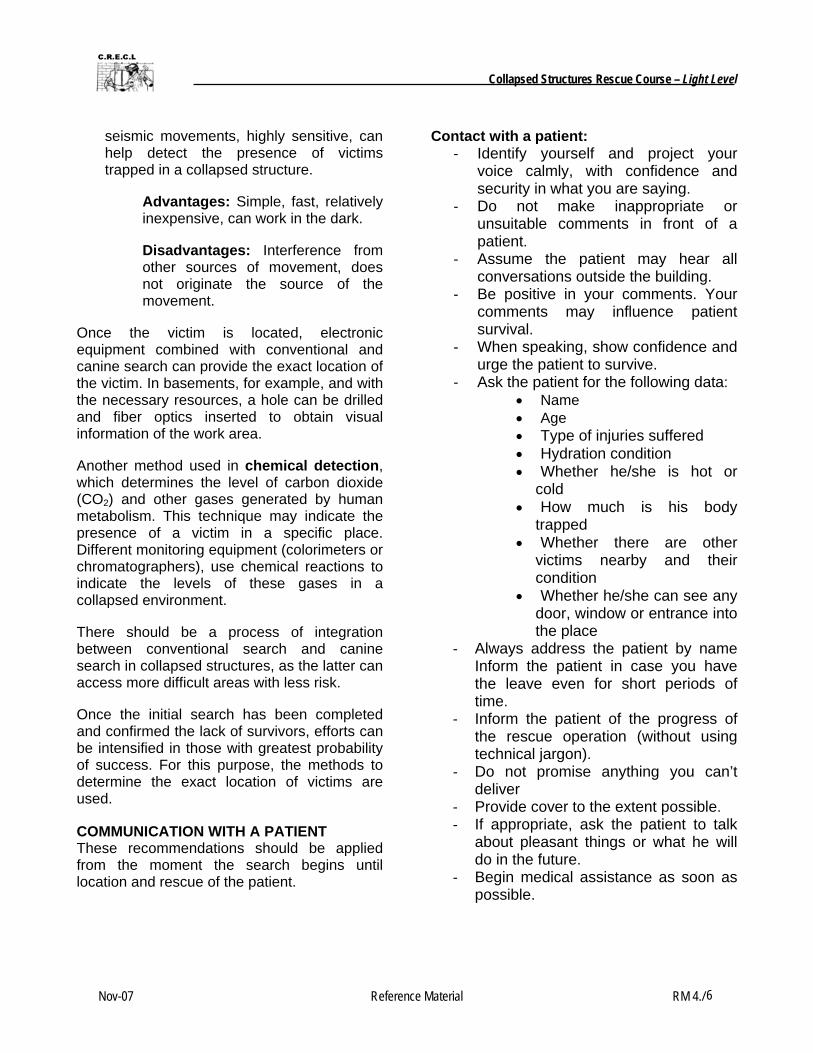
Parallel The parallel search when there are available personnel and the search location is an open space. For this search to be performed, the rubble piles must allow for continuous almost without obstacles.
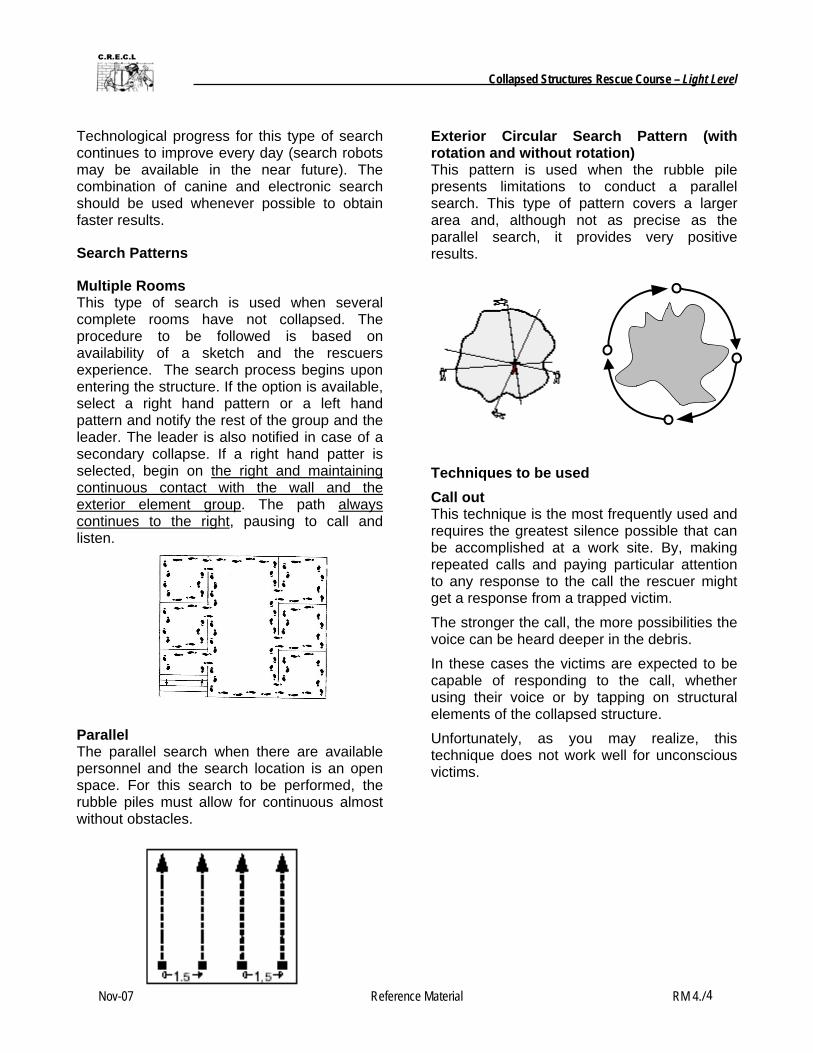
Exterior Circular Search Pattern (with rotation and without rotation) This pattern is used when the rubble pile presents limitations to conduct a parallel search. This type of pattern covers a larger area and, although not as precise as the parallel search, it provides very positive results.
Techniques to be used Call out This technique is the most frequently used and requires the greatest silence possible that can be accomplished at a work site. By, making repeated calls and paying particular attention to any response to the call the rescuer might get a response from a trapped victim.
The stronger the call, the more possibilities the voice can be heard deeper in the debris.
In these cases the victims are expected to be capable of responding to the call, whether using their voice or by tapping on structural elements of the collapsed structure. Unfortunately, as you may realize, this technique does not work well for unconscious victims.
Collapsed Structures Rescue Course – Light Level
Nov-07 Reference Material RM 4./
5
Canine Search Search dogs trained to track human beings can save valuable time in locating trapped victims. A search canine can provide fast and precise indication of the location of a trapped person, even under large amounts of debris. The use of canine teams is now a standard for search and rescue teams in collapsed structures for countries such as France, Israel and the United States, among others.
A well trained canine can search large areas quickly. The dogs use their excellent sense of smell to detect victims trapped under debris. The primary function of canines is to detect live victims. However, some of them give subtle indications of dead victims and when possible, these areas are marked to remove the bodies in the future.
A search canine gives an indication when finding the scent of a victim by either barking or a particular sign between the canine and the handler. The bark or sign would come at the strongest source of the scent. The canine can dig at the source of the scent to try to penetrate to the place where the victim is trapped.
Advantages of canine brigades: • Can cover large areas in short periods
of time. • Can enter voids without difficulty. • Can detect unconscious victims.
Disadvantages of canine brigades: • The work period is short, 20 to 30
minutes. Require rest periods of 20 to 30 minutes.
• At least two canines are required to search the same area, to confirm detection points.
• Execution and success vary according to the individual capacity of each dog.
Canine search can be effective in conjunction with the initial search stages or to fine tune that search. RCS personnel are an important resource for the initial search.
Technical Search Depending on the type of the equipment utilized, this equipment might allow technical specialist to hear distant human sounds. As previously mentioned an all quiet needs to be enforced at the worksite since this equipment would pick up any type of sound. There are also cameras that might be able to be inserted into small holes allowing rescuers to view beyond walls, floors and roofs. Through the use of remote detectors, this equipment can reach areas inaccessible to a search team member and indicate the presence and even the condition of a trapped victim.
• Acoustic This type of equipment is utilized by technical experts who can discriminate between many sounds present at a work site. This devise would enable a technician to listen to a person’s breathing a block away if there are no other noises in the area.
Advantages: Simple, resistant, relatively inexpensive, can work in the dark.
Disadvantages: Requires absolute silence for use, does not specify the source of the sound.
• Optics Miniature television cameras mounted on the extreme of an extensible rod. These cameras might be directed through the most appropriate routes to the voids to be inspected.
Advantages: Visualization of the person or victim and the surroundings, can be used with loud noise and movement, does not require lighting.
Disadvantages: Delicate, costly and requires training for proper use.
• Movement Sensors similar to those that record
Collapsed Structures Rescue Course – Light Level
Nov-07 Reference Material RM 4./
6
seismic movements, highly sensitive, can help detect the presence of victims trapped in a collapsed structure.
Advantages: Simple, fast, relatively inexpensive, can work in the dark.
Disadvantages: Interference from other sources of movement, does not originate the source of the movement.
Once the victim is located, electronic equipment combined with conventional and canine search can provide the exact location of the victim. In basements, for example, and with the necessary resources, a hole can be drilled and fiber optics inserted to obtain visual information of the work area.
Another method used in chemical detection, which determines the level of carbon dioxide (CO2) and other gases generated by human metabolism. This technique may indicate the presence of a victim in a specific place. Different monitoring equipment (colorimeters or chromatographers), use chemical reactions to indicate the levels of these gases in a collapsed environment.
There should be a process of integration between conventional search and canine search in collapsed structures, as the latter can access more difficult areas with less risk.
Once the initial search has been completed and confirmed the lack of survivors, efforts can be intensified in those with greatest probability of success. For this purpose, the methods to determine the exact location of victims are used.
COMMUNICATION WITH A PATIENT These recommendations should be applied from the moment the search begins until location and rescue of the patient.
Contact with a patient: - Identify yourself and project your
voice calmly, with confidence and security in what you are saying.
- Do not make inappropriate or unsuitable comments in front of a patient.
- Assume the patient may hear all conversations outside the building.
- Be positive in your comments. Your comments may influence patient survival.
- When speaking, show confidence and urge the patient to survive.
- Ask the patient for the following data: • Name • Age • Type of injuries suffered • Hydration condition • Whether he/she is hot or
cold • How much is his body
trapped • Whether there are other
victims nearby and their condition
• Whether he/she can see any door, window or entrance into the place
- Always address the patient by name Inform the patient in case you have the leave even for short periods of time.
- Inform the patient of the progress of the rescue operation (without using technical jargon).
- Do not promise anything you can’t deliver
- Provide cover to the extent possible. - If appropriate, ask the patient to talk
about pleasant things or what he will do in the future.
- Begin medical assistance as soon as possible.
Collapsed Structures Rescue Course – Light Level
Nov-07 Reference Material RM 4./
7
PSYCHOLOGICAL SUPPORT AT THE SCENE
POST-TRAUMATIC STRESS. Chronic or traumatic stress is potentially very destructive and may deprive a person of physical and mental health and sometimes, of life itself. Although most people are able to overcome a disaster after some time, there are a small number of people that may have difficulty overcoming the traumatic event.
Some reactions to a disaster might be normal reactions to an unusual and highly stressful event.
Any member of a first response team might be exposed to stressful events every day and are therefore more vulnerable to suffering from post-traumatic stress.
WHEN IS A PERSON MORE SUCEPTIBLE TO STRESS
When there is a sense of urgency. The person feels compelled to do more in less time.
Aggressive impulse to do things well. High level of competitiveness. Do
activities better and in less time.
HOW DOES STRESS BEGIN. Initially this is a normal response to dangerous situations. In response to a danger, the organism prepares to fight or escape by secreting substances such as adrenaline, produced mainly by the suprarenal or adrenal glands. This is typically known as the fight or flight response.
Adrenaline is disseminated through the blood stream and is perceived by special receptors in different parts of the body that respond in preparation for action.
1. The heart beats with more strength and faster.
2. The small arteries that supply oxygen to the less critical organs contract during this event. , This contraction of the arteries allow for a less blood demand on those organs giving priority to the brain
and the more critical organs for action such as the heart, lungs and muscles.
3. The senses are more acute. 4. The mind is on a state of alert.
SOME PROBLEMS CAUSED BY STRESS High blood pressure. Gastritis and stomach ulcers. Decreased renal function. Sleep disorders. Eating disorders. Exhaustion.
WHAT TO DO WHEN FACING STRESS? There is no simple formula to cure stress. Different actions are required to diminish the overload. One of them is relaxation; another is releasing tension through communication. Each individual will respond differently to stress and to any type relaxation.
RELAXATION TECHNIQUES Learn to breathe slowly and deeply to
return cardiac and breathing rhythm to normal.
Non competitive exercise to reduce tension at times of acute stress.
Swim, walk, ride bicycle regularly. Balanced diet, avoid stimulants. Alternate work with pleasure. Sleep sufficient hours. Seek emotional support. Establish realistic goals. Be prepared for some frustration, pain,
failure and allow yourself not to be perfect.
EMERGENCIES: An emergency is a sudden situation of pressure requiring immediate attention. For example, an emergency occurs when someone’s life is in danger due to an accident, attempted suicide or an act of violence.
Emergency response personnel experience different tensions before, during and after an emergency; the most common are:
Collapsed Structures Rescue Course – Light Level
Nov-07 Reference Material RM 4./
8
INITIAL STAGE: This stage is also known as the warning Stage. The emergency response team is put on alert because of an imminent event. Sound and visual alert mechanisms (alarms, emergency lights and loudspeakers), condition the responses and the personnel exhibit nervousness, uncertainty and anxiety to reach the site of the emergency as soon as possible, in order to be first in starting salvage work.
SECOND STAGE: This stage is also known as the impact stage. The personnel is directly involved in the emergency, the event happens. At this time the emergency personnel applies work sequences that have to be carried out in an independent and logical manner, and therefore should not become emotionally involved with those affected.
THIRD STAGE: This stage is a consolidation stage. Once the salvage work has been completed, the events and results obtained are usually discussed. This is when the various emotions come out that can be classified as positive or negative and in some cases a combination of mixed feelings. There can be negative emotions such as guilt, irritability, frustration, exhaustion. These emotions arise if the situation was not successful or there are human losses. On the other hand, the personnel may feel happy, satisfied and successful if the situation allowed an ending without serious consequences thanks to the rapid intervention.
Since it is widely accepted that the psychological well-being of the emergency response personnel greatly affects the overall result, including the health of the primary trauma victims, it is necessary to prevent at all costs the development of potentially handicapping syndromes.
EMERGENCY RESPONSE ORGANIZATIONS
PSYCHOLOGICAL PROFILE OF RESCUERS: Emergency responders tend to have personality traits that help them do a good job, but at the same time, these same special traits may increase their vulnerability to reaction to stress.
The main personality traits, psychological profiles of emergency responders are:
High levels of internal motivation. An action-approach to challenges. Dedication to the job they consider a
life-long career. Need for motivation and stimulation. Willingness to assume risks. Need to see fast results. Need to be needed. Tendency to deny the possibility of
being emotionally affected by traumatic incidents.
Reluctance to accept change. Need to be in control and do a perfect
job.
In addition, it should be remembered that the organizational tensions inherent to all institutions, can also increase the level of stress in relation with the work of emergency response personnel. In addition, the personality of the team member himself also contributes.
Susceptibility to reactions of stress to critical incidents may also be increased by:
a. The psychological personality of the rescue team members.
b. The common psychological profile of the team.
c. The organizational tensions of the institutions.
Collapsed Structures Rescue Course – Light Level
Nov-07 Reference Material RM 4./
9
SUPPORT AT THE SCENE. Support at the scene refers to direct support services provided at the scene of a traumatic incident, usually by trained personnel among the team. Preferably, this support should be provided individually.
Three basic types of support can be provided at the scene when a team member is disturbed. 1. Intervention in short crisis for response
personnel. 2. Counseling and advice to supervision
personnel. 3. Assistance to victims, survivors and family
members directly involved in the incident.
The interventions should be short, flexible and focus solely on immediate concerns. If a disturbed person at the scene does not show marked improvement after fifteen minutes, it is unlikely this person will recover enough to go back to the scene.
BIBLIOGRAPHY 1. COHEN, R. E. (1991) Psiquiatría y
Desastres. En Perales A. (Ed) Manual de Psiquiatría. Segunda Edición. Lima, Perú. Universidad Mayor de San Marcos, Facultad de Medicina.
2. MASLOW, A. (1968) Hacia la Psicología del Ser, Van Nostrand Reinhold 1968.
3. TAILOR. A. J. W. (1989) Desastres y Estrés en Desastres. New York, New York.
4. PREWITT DIAZ, JOSEPH O. Apoyo Psicosocial en Desastres, Un Modelo para Guatemala.
5. WILSON, J. P. La Necesidad de una Teoría Integral de Desorden de Estrés Postraumático.
6. MANUAL DE ASCENSO. Curso para Oficiales de Bomberos. El Manejo del Personal. Escuela Técnica del Cuerpo de Bomberos Municipales de Guatemala.
Collapsed Structures Rescue Course – Light Level
Nov-07 Tools, Equipment and Accessories RM 5- 1
Lesson 5 Hand Tools, Power Tools
and Accessories
For the safety and efficiency of the mission of a USAR team, it is vital to have a good set of tools, equipment and accessories. Having all of those will guarantee the protection of the rescuer, better performance of the task and therefore a more productive effort/achievement ratio. The concepts of hand tools, power tools and accessories should be very clear to the rescuer, and therefore we will review the definition of each one: Definitions: Hand Tools: These are manual objects used to carry out a task where the power is supplied directly by the operator. Examples: bolt cutter, bar, sledge hammer, shovel. Power Tools: These machines or devices have some complexity with their use and require porper training before carring out a task. These machines have an active principle in the transformation of energy to increase work capacity and reducing time. Examples: chainsaw, jack hammer rotary saw. Accessories: These objects complement an either a hand tool or a power tool. Accessories will improve operational capacities or carry out a task. Examples: Bucket, hacksaw blades, extension cord. Example de accessory: Gas container All the devises previously mentioned are used by the team members during the different phases of a rescue operation.
This does not mean that the devices previously mentioned are of sophisticated or complex operation, although some are very high-tech, a large portion are easy to use. Most if not all of this tools are used during out every day life and should not be too foreign to most rescuers. They might be found in homes cars or work locations. These tools have been accepted by the rescue community because they have proved to be trustworthy. Tool Classification 1. By Use The tools, equipment and accessories used in Light USAR activities are classified by their use:
• For rescue • For operational support • For personal protection
1.1 Tools for Rescue These tools are used to penetrate, gain access and rescue victims in an operation. Once the places or points where victims have been detected are analyzed, these tools are used for rescue. 1.2 Tools for Operational Support Those tools that enable the systematic development of a USAR operation and support rescue operations. Those tolls will encompass tools such as a portable electric generator. Without this equipment, we could say the operation is destined to fail. They may be used for several functions:
• Lighting: Consists of cables, extension cords, power cords, bulbs, plug transformers, etc.
• Cooking: Basic materials to support the preparation of food.
• Communications: Any item related to batteries, chargers, hands-free, antennas, programming software, etc.
• Medical Care: Basically included in the Light USAR team.
Collapsed Structures Rescue Course – Light Level
Nov-07 Tools, Equipment and Accessories RM 5- 2
• Transportation: To be obtained at the theater of operations according to the needs.
• Sanitary: Includes everything necessary for supporting hygiene, waste disposal and physical needs of the USAR team members.
1.3 Personal Protection Equipment (PPE) These are various elements for the purpose of protecting the rescuer by reducing exposure to external factors that could cause injury or death. Personal protection equipment (PPE) is should be worn any time a rescuer enters an area that is considered to be of immediately dangerous to life or health (IDLH) Personal protection equipment (PPE) is classified in accordance to the protection it offers the rescuer:
• Head protection • Eye and face protection • Ear protection • Respiratory protection • Corporal protection • Limb protection • Support
2. Hydraulic Tools Hydraulic rescue tools are powered by a hydraulic pump, which can be hand-, foot-, or engine-powered or even built into the tool itself. These tools may be either single-acting, where hydraulic pressure will only move the cylinder in one direction, and the return to starting position is accomplished using a pressure-relief valve and spring setup, or dual-acting, in which hydraulic pressure is used to both open and close the suzette cylinder. • Hydraulic: Use liquids under pressure.
Used to support loads. Example: Hydraulic jack
Among rescue tools we find a series of implements to make the work easier and in many cases, given the characteristics and conditions of the environment where the work is carried out, they will be used to do tasks that can not be carried out using larger equipment. 3. General steps for the use tools 3.1 Before using a tools It is essential for the rescuer to know the use and care of these tools. Most tools come with a care and instructional package that will detail all a rescuer needs to know about that specific tool. Although similar, some tools have specific restrictions that similar tools might not. Therefore it is important that the rescuers become familiar with the tool at hand. Remember, “a place for each tool and each tool in its place” this should be the motto of any USAR team. There is a logistics person invaded to each squad and this person should be the most familiar with the tools been utilized on a rescue operation. The logistics person is also the one who should be in control of the tools when they are not been used and this person should maintain a strict inventory of each item. It’s up to each team to define how they will track their tools and equipment. There is an abundance of methods been utilized across the world that gets the job done. These tracking systems allow for the accountability of items and it lends the responsibility of caring for the tool to the person whom it has been assigned to . The inventory process shall cover all work sessions during disaster response, even during training and exercises. The reasons for any damage or loss of equipment or any of its components shall be notified. During the inventory process, which shall be carried out periodically, shortage of equipment of consumables shall be notified
Collapsed Structures Rescue Course – Light Level
Nov-07 Tools, Equipment and Accessories RM 5- 3
and replenished through the appropriate channels. All of these details will result in good order and it will improve the efficiency of the team. It is important to highlight that the tools should be assesses, selected and acquired according to the needs and financial capabilities. Also keep in mind that search and rescue activities in collapsed structures, the work loads to which tools are subjected are significantly higher than the intensity of the work in a workshop or a home and therefore, when purchasing this equipment it is important to select the best quality and take into account the manufacturer’s recommendations for the working conditions of the equipment. If at all possible, the necessary stock of accessories for the team’s tools should be available. . 3.2 The use of tools during an operation It is absolutely necessary to always following the safety rules. Tools should not be utilized for jobs that they were not designed to perform. The safety factor provided by each tool is only relevant to the function it was designed to do. If the same tool is used in a different manner, it might break with little effort possibly harming the rescuer. 3.3 After (tool care and maintenance) These tools may last indefinitely with good care and first class maintenance should be provided at all times for optimum operation.
1) Wooden handles should have no splits or splints and should be firmly attached at the head.
– Split handles should be replaced immediately. – Splints should be sanded down until the handle is smooth. – Handles should not be painted because splits that have been painted over are hard to see.
2) Movable tool parts are oiled to facilitate movement and prevent oxidation.
3) Any unpainted tool part shall be free of rust; this is prevented by cleaning them with an oily rag. 4) Painted tools shall be kept clean at all times. 5) Cutting tools shall be sharp and without dents; when sharpening avoid overheating because they can lose sharpness and the metal can lose resistance.
Pliers: used for cutting small screws, nails, wires, etc should never be used to cut electric wiring. Picket: generally used to dig, deepen and remove earth, concrete, wooden planks, debris, etc. Many times it is also used to separate iron bars embedded in concrete or masonry. Shovels are used in conjunction with pickets in many cases. Sledge hammer: a tool of considerable weight and great hitting power. May be used to efficiently break concrete, bricks, walls, floors, roofs, etc., or to separate iron bars (there are different sizes and weights). Bar: Used to break brick walls or to force doors open if no other option is available, as well as levers to lift loads. This is a useful tool to lift and force any type of heavy entry where great effort is required. Pick head axe (fire fighter’s axe) and flat head axe: these two types of axes are the most commonly used at fire stations. They may be used as cutting tools, to hit or pry. Crow bar: very useful for forced entry, used to open or remove hinges, door locks, doors, windows, elevator doors, pit covers, etc. Hydraulic jack (bottle type): used to lift comes in various sizes and tonnage, very commonly used because of its usefulness; the disadvantage is that it can only work vertically, mechanical versions exist.
Collapsed Structures Rescue Course – Light Level
Nov-07 Tools, Equipment and Accessories RM 5- 4
Standards It is important to stress that the use of tools, equipment and accessories requires ability and skills by the rescuers, since search and rescue activities are performed under completely hostile conditions. Cutting pipes or using any other tool may result in unsafe conditions for oneself or others, unforeseen or not common under normal conditions, so procedures must then be developed to guarantee optimal use of tools.
Before: • Check fuel/power source. • Check lubricants. • Check that the accessories are
the correct ones and are well attached.
• Know the safety rules. • Validate vital components. • Observe physical conditions
before use.
During: • Do not abuse the capabilities of
the tools • Use the tools for the purpose for
which they were designed. • Operate tools properly • Apply all relevant safety rules
After:
• Cleaning • Corrective, preventive
maintenance. • Storage in proper place • Allocation of consumables and
vital parts • Control
In addition there is a set of accessories that in general support the work of rescuers, such as ropes, carabineers, tubular webbing, descenders, pulleys, harnesses, etc. These accessories separately can support different tasks but together they comprise descent, elevation or traction equipment.
4. ROPES AND THEIR APPLICATIONS Definitions: A rope is a length of fibers, twisted or braided together to improve strength for pulling and connecting. It has tensile strength but is too flexible to provide compressive strength (i.e., it can be used for pulling, not pushing). Rope is thicker and stronger than similarly constructed cord, line, string, or twine. Common materials for rope include natural fibers such as Manila hemp, hemp, linen, cotton, coir, jute, and sisal. Synthetic fibers in use for rope-making include polypropylene, nylon, polyesters polyethylene and Aramids. In order to fasten rope, a large number of knots have been invented for various uses. Pulleys are used to redirect the pulling force to another direction, and may be used to create mechanical advantage, allowing multiple strands of rope to share a load and multiply the force applied to the end. Winches and capstans are machines designed to pull ropes. The knots and anchor systems have multiple applications they vital in search and rescue operations. In particular they are used in tall buildings and/or levels, including:
• Securing the victim • Ascent maneuvers • Descent maneuvers in rappel
systems, helicopter. • As support in extrication maneuvers. • Many other situations.
Terminology The field of ropes, knots and anchors is broad and terminology varies from region to region. It is important to note that any terminology used should be a standard whiting the team so they all understand what is been said. Therefore, we will first define some terms important to know and recognize in this specific area.
Collapsed Structures Rescue Course – Light Level
Nov-07 Tools, Equipment and Accessories RM 5- 5
Rescue Operation: A rescue operation is any techniques and maneuvers to be carried out to rescue people from difficult access sites. Webbing: Webbing is a strong fabric woven as a flat strip or tube of varying width and fibers often used in place of rope. The name webbing comes from the meshed material frequently used in its construction, which resembles a web. It is a versatile component used in climbing, furniture manufacturing, automobile safety, auto racing, towing, parachuting, military apparel, and many other fields. Modern webbing is often made from exceptionally high-strength material, such as Dyneema, Nylon, Polyester, and Kevlar. For less performance-oriented applications, cotton, Polypropylene, and flax can be used. As webbing is both light and strong, with breaking strengths in excess of 10,000 lbs. These webbings are utilized to bi build a rescue harness. Line: A rope that is laid anchored and prepared to start descent maneuvers to approach a victim. Rope Protector: A resistant canvas (may be a section of 1 ½ hose) that protects the rope from friction against any material, place on all spots with edges that may damage or even cut the rope when carrying out a maneuver. Rope Materials: There are different materials to manufacture ropes, divided in two areas or groups: natural or artificial. Natural Ropes: Natural ropes are of plant or animal origin. Ropes of plant origin: • Sisal
• Cotton • Linen
The first type of rope used in Rescue, of a material extracted from sisalnana, and was therefore known as Sisal rope.
SISAL rope is constructed from discontinued filaments woven between them (twisted) with little elasticity and heavy to maneuver, when wet they become rigid and their weight increases considerably, they have limited resistance and is proportional to their diameter, their use in rescue activities is fairly limited.
Later, cotton ropes were used with better qualities for rescue that increased their use due to more safety from the characteristics of the material that made them more manageable and more resistant in proportion to their diameter, which also improved their weight.
All plant fiber ropes are woven due to their discontinued filaments, as this is the only way to achieve more friction and cohesion among them, thereby increasing resistance; however, in laboratory tests, their discontinuity has shown little resistance and when the material is twisted it loses qualities, which is also the case with nylon ropes. Ropes of animal origin:
• Leather
Ropes manufactured from leather are resistant to uniformly accelerated tension, I other words, they cannot withstand a sudden drop, they present problems when humid or wet because when they have not been treated (tanned) they become very hard once they dry and in case they are treated they become very slippery, particularly is protected with lard, oil or similar material. This type of rope if used by cattle ranchers.
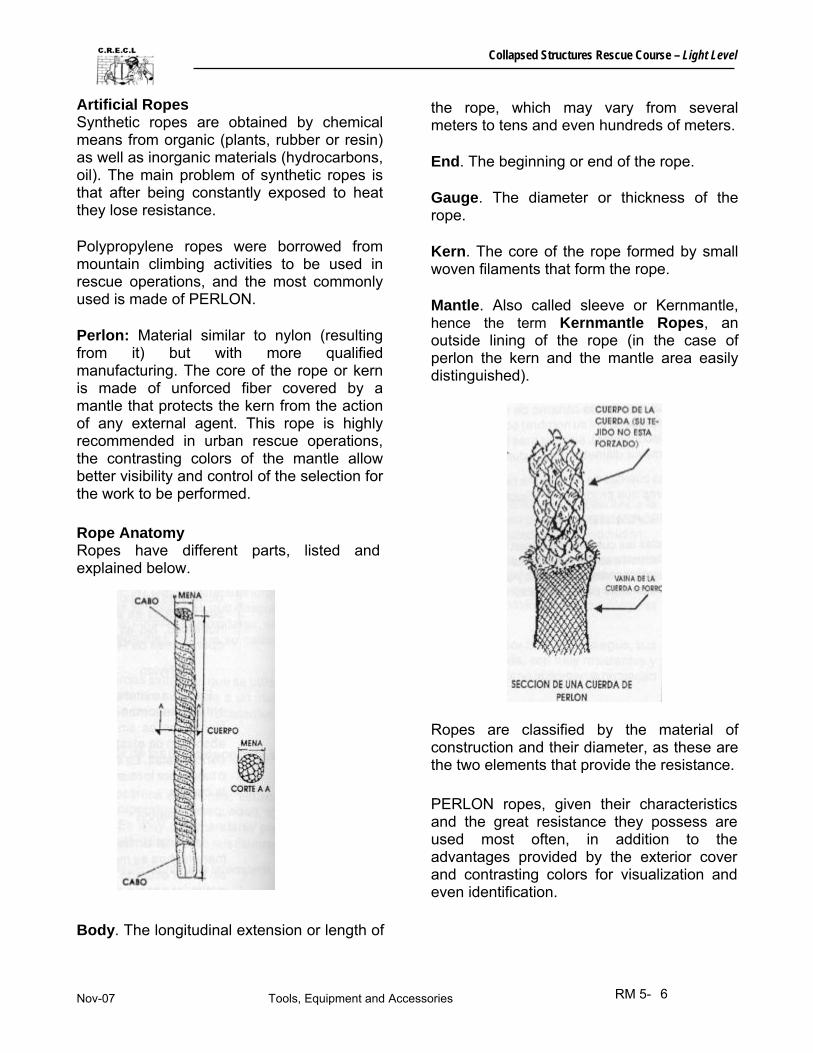
Collapsed Structures Rescue Course – Light Level
Nov-07 Tools, Equipment and Accessories RM 5- 6
Artificial Ropes Synthetic ropes are obtained by chemical means from organic (plants, rubber or resin) as well as inorganic materials (hydrocarbons, oil). The main problem of synthetic ropes is that after being constantly exposed to heat they lose resistance.
Polypropylene ropes were borrowed from mountain climbing activities to be used in rescue operations, and the most commonly used is made of PERLON.
Perlon: Material similar to nylon (resulting from it) but with more qualified manufacturing. The core of the rope or kern is made of unforced fiber covered by a mantle that protects the kern from the action of any external agent. This rope is highly recommended in urban rescue operations, the contrasting colors of the mantle allow better visibility and control of the selection for the work to be performed.
Rope Anatomy Ropes have different parts, listed and explained below.
Body. The longitudinal extension or length of
the rope, which may vary from several meters to tens and even hundreds of meters.
End. The beginning or end of the rope.
Gauge. The diameter or thickness of the rope.
Kern. The core of the rope formed by small woven filaments that form the rope.
Mantle. Also called sleeve or Kernmantle, hence the term Kernmantle Ropes, an outside lining of the rope (in the case of perlon the kern and the mantle area easily distinguished).
Ropes are classified by the material of construction and their diameter, as these are the two elements that provide the resistance.
PERLON ropes, given their characteristics and the great resistance they possess are used most often, in addition to the advantages provided by the exterior cover and contrasting colors for visualization and even identification.
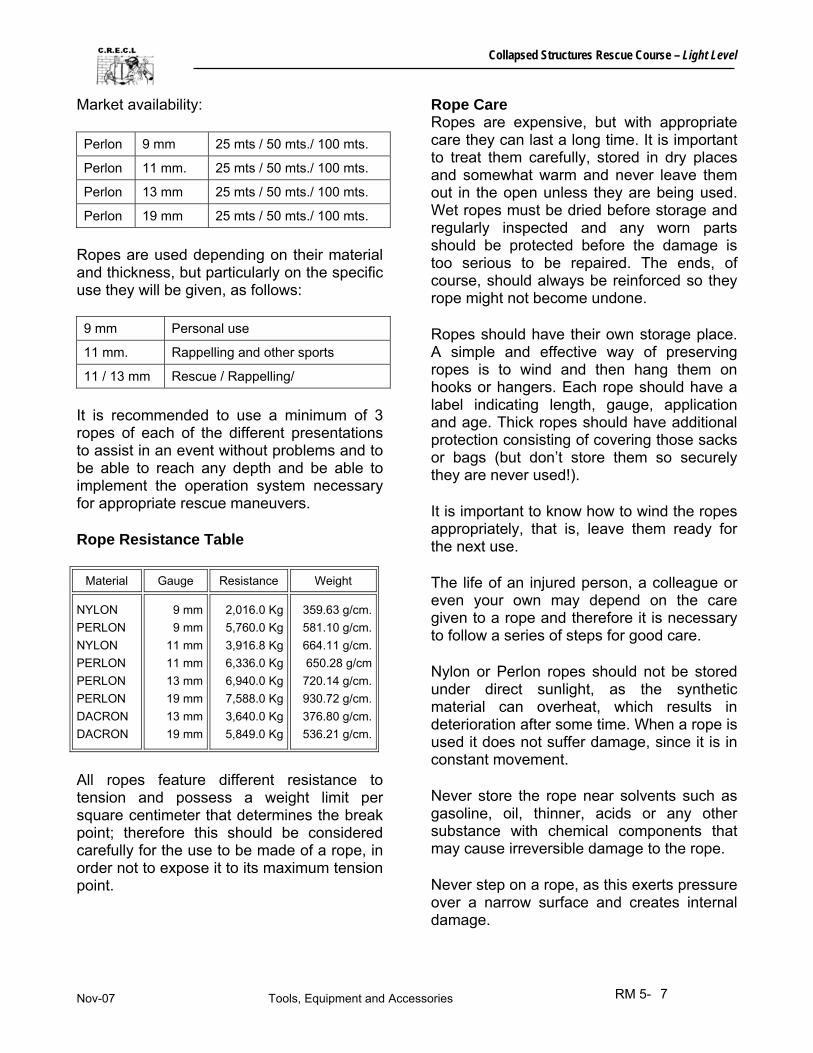
Collapsed Structures Rescue Course – Light Level
Nov-07 Tools, Equipment and Accessories RM 5- 7
Market availability:
Perlon 9 mm 25 mts / 50 mts./ 100 mts.
Perlon 11 mm. 25 mts / 50 mts./ 100 mts.
Perlon 13 mm 25 mts / 50 mts./ 100 mts.
Perlon 19 mm 25 mts / 50 mts./ 100 mts. Ropes are used depending on their material and thickness, but particularly on the specific use they will be given, as follows: 9 mm Personal use
11 mm. Rappelling and other sports
11 / 13 mm Rescue / Rappelling/ It is recommended to use a minimum of 3 ropes of each of the different presentations to assist in an event without problems and to be able to reach any depth and be able to implement the operation system necessary for appropriate rescue maneuvers.
Rope Resistance Table
Material Gauge Resistance Weight
NYLON PERLON NYLON PERLON PERLON PERLON DACRON DACRON
9 mm 9 mm
11 mm 11 mm 13 mm 19 mm 13 mm 19 mm
2,016.0 Kg 5,760.0 Kg 3,916.8 Kg 6,336.0 Kg 6,940.0 Kg 7,588.0 Kg 3,640.0 Kg 5,849.0 Kg
359.63 g/cm. 581.10 g/cm. 664.11 g/cm. 650.28 g/cm
720.14 g/cm. 930.72 g/cm. 376.80 g/cm. 536.21 g/cm.
All ropes feature different resistance to tension and possess a weight limit per square centimeter that determines the break point; therefore this should be considered carefully for the use to be made of a rope, in order not to expose it to its maximum tension point.
Rope Care Ropes are expensive, but with appropriate care they can last a long time. It is important to treat them carefully, stored in dry places and somewhat warm and never leave them out in the open unless they are being used. Wet ropes must be dried before storage and regularly inspected and any worn parts should be protected before the damage is too serious to be repaired. The ends, of course, should always be reinforced so they rope might not become undone.
Ropes should have their own storage place. A simple and effective way of preserving ropes is to wind and then hang them on hooks or hangers. Each rope should have a label indicating length, gauge, application and age. Thick ropes should have additional protection consisting of covering those sacks or bags (but don’t store them so securely they are never used!).
It is important to know how to wind the ropes appropriately, that is, leave them ready for the next use.
The life of an injured person, a colleague or even your own may depend on the care given to a rope and therefore it is necessary to follow a series of steps for good care.
Nylon or Perlon ropes should not be stored under direct sunlight, as the synthetic material can overheat, which results in deterioration after some time. When a rope is used it does not suffer damage, since it is in constant movement.
Never store the rope near solvents such as gasoline, oil, thinner, acids or any other substance with chemical components that may cause irreversible damage to the rope.
Never step on a rope, as this exerts pressure over a narrow surface and creates internal damage.
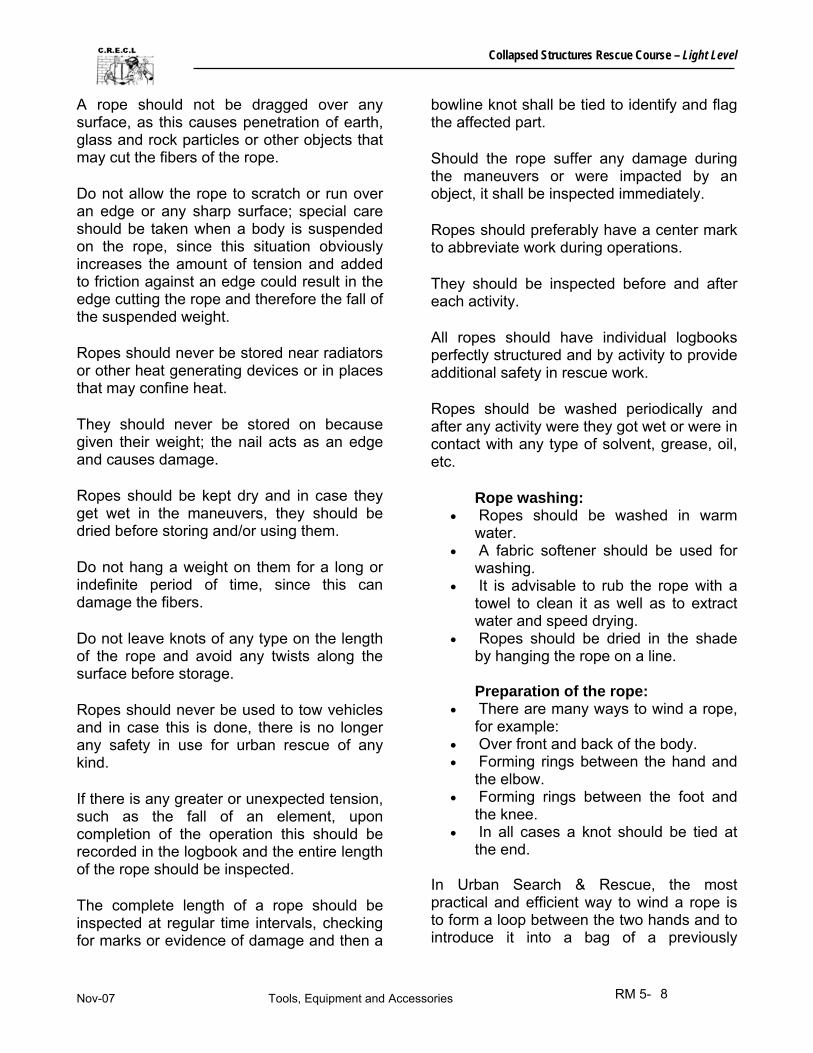
Collapsed Structures Rescue Course – Light Level
Nov-07 Tools, Equipment and Accessories RM 5- 8
A rope should not be dragged over any surface, as this causes penetration of earth, glass and rock particles or other objects that may cut the fibers of the rope.
Do not allow the rope to scratch or run over an edge or any sharp surface; special care should be taken when a body is suspended on the rope, since this situation obviously increases the amount of tension and added to friction against an edge could result in the edge cutting the rope and therefore the fall of the suspended weight.
Ropes should never be stored near radiators or other heat generating devices or in places that may confine heat.
They should never be stored on because given their weight; the nail acts as an edge and causes damage.
Ropes should be kept dry and in case they get wet in the maneuvers, they should be dried before storing and/or using them.
Do not hang a weight on them for a long or indefinite period of time, since this can damage the fibers.
Do not leave knots of any type on the length of the rope and avoid any twists along the surface before storage.
Ropes should never be used to tow vehicles and in case this is done, there is no longer any safety in use for urban rescue of any kind.
If there is any greater or unexpected tension, such as the fall of an element, upon completion of the operation this should be recorded in the logbook and the entire length of the rope should be inspected.
The complete length of a rope should be inspected at regular time intervals, checking for marks or evidence of damage and then a
bowline knot shall be tied to identify and flag the affected part.
Should the rope suffer any damage during the maneuvers or were impacted by an object, it shall be inspected immediately.
Ropes should preferably have a center mark to abbreviate work during operations.
They should be inspected before and after each activity.
All ropes should have individual logbooks perfectly structured and by activity to provide additional safety in rescue work.
Ropes should be washed periodically and after any activity were they got wet or were in contact with any type of solvent, grease, oil, etc.
Rope washing: • Ropes should be washed in warm
water. • A fabric softener should be used for
washing. • It is advisable to rub the rope with a
towel to clean it as well as to extract water and speed drying.
• Ropes should be dried in the shade by hanging the rope on a line. Preparation of the rope:
• There are many ways to wind a rope, for example:
• Over front and back of the body. • Forming rings between the hand and
the elbow. • Forming rings between the foot and
the knee. • In all cases a knot should be tied at
the end. In Urban Search & Rescue, the most practical and efficient way to wind a rope is to form a loop between the two hands and to introduce it into a bag of a previously
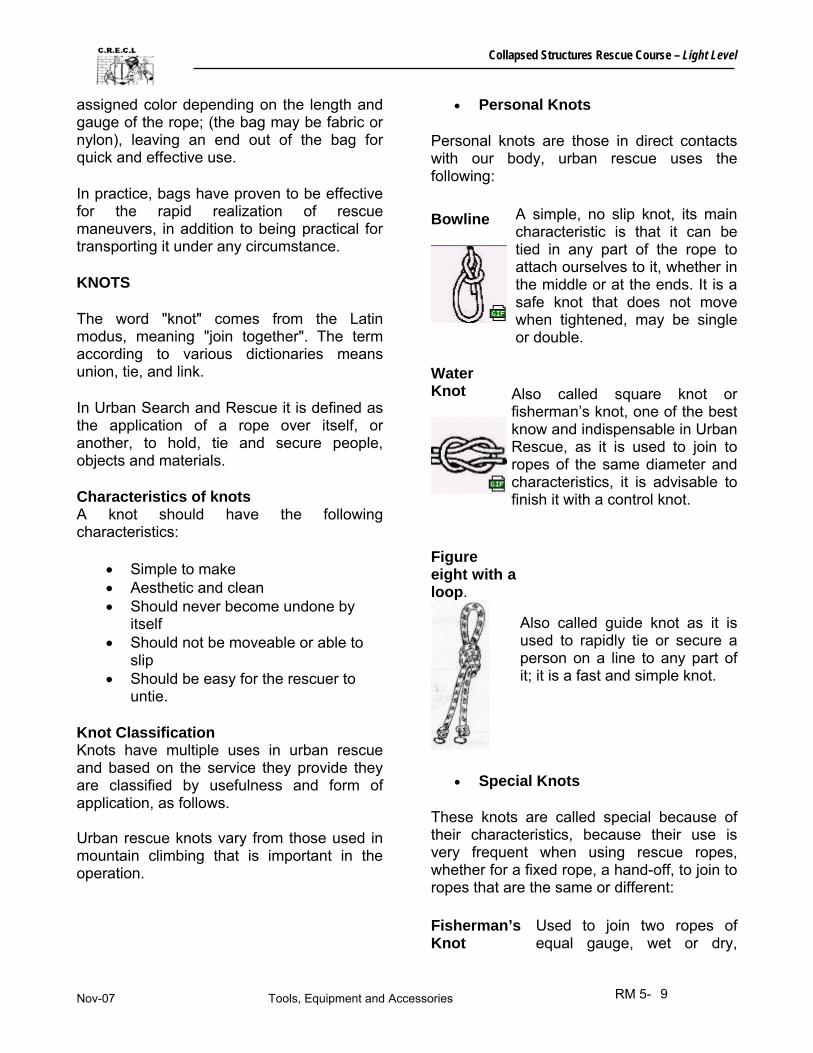
Collapsed Structures Rescue Course – Light Level
Nov-07 Tools, Equipment and Accessories RM 5- 9
assigned color depending on the length and gauge of the rope; (the bag may be fabric or nylon), leaving an end out of the bag for quick and effective use.
In practice, bags have proven to be effective for the rapid realization of rescue maneuvers, in addition to being practical for transporting it under any circumstance.
KNOTS
The word "knot" comes from the Latin modus, meaning "join together". The term according to various dictionaries means union, tie, and link.
In Urban Search and Rescue it is defined as the application of a rope over itself, or another, to hold, tie and secure people, objects and materials.
Characteristics of knots A knot should have the following characteristics:
• Simple to make • Aesthetic and clean • Should never become undone by
itself • Should not be moveable or able to
slip • Should be easy for the rescuer to
untie.
Knot Classification Knots have multiple uses in urban rescue and based on the service they provide they are classified by usefulness and form of application, as follows. Urban rescue knots vary from those used in mountain climbing that is important in the operation.
• Personal Knots
Personal knots are those in direct contacts with our body, urban rescue uses the following:
Bowline
A simple, no slip knot, its main characteristic is that it can be tied in any part of the rope to attach ourselves to it, whether in the middle or at the ends. It is a safe knot that does not move when tightened, may be single or double.
Water Knot
Also called square knot or fisherman’s knot, one of the best know and indispensable in Urban Rescue, as it is used to join to ropes of the same diameter and characteristics, it is advisable to finish it with a control knot.
Figure eight with a loop.
Also called guide knot as it is used to rapidly tie or secure a person on a line to any part of it; it is a fast and simple knot.
• Special Knots
These knots are called special because of their characteristics, because their use is very frequent when using rescue ropes, whether for a fixed rope, a hand-off, to join to ropes that are the same or different: Fisherman’s Knot
Used to join two ropes of equal gauge, wet or dry,
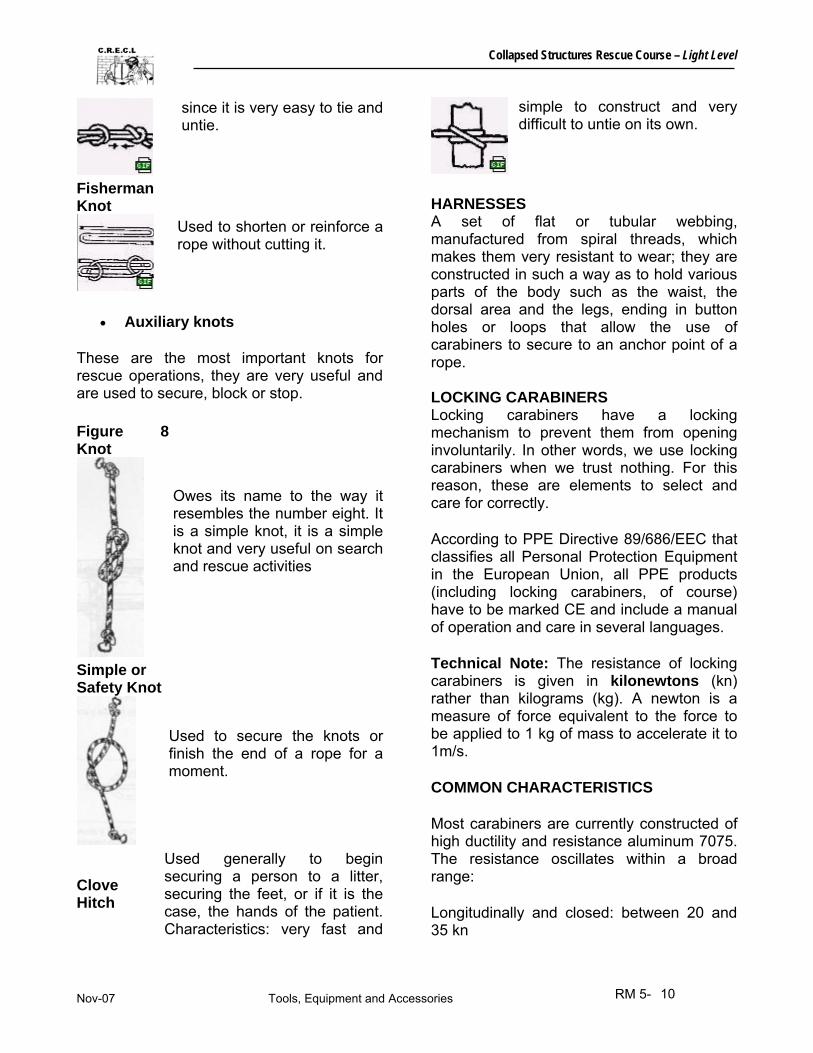
Collapsed Structures Rescue Course – Light Level
Nov-07 Tools, Equipment and Accessories RM 5- 10
since it is very easy to tie and untie.
Fisherman Knot
Used to shorten or reinforce a rope without cutting it.
• Auxiliary knots
These are the most important knots for rescue operations, they are very useful and are used to secure, block or stop. Figure 8 Knot
Owes its name to the way it resembles the number eight. It is a simple knot, it is a simple knot and very useful on search and rescue activities
Simple or Safety Knot
Used to secure the knots or finish the end of a rope for a moment.
Clove Hitch
Used generally to begin securing a person to a litter, securing the feet, or if it is the case, the hands of the patient. Characteristics: very fast and
simple to construct and very difficult to untie on its own.
HARNESSES A set of flat or tubular webbing, manufactured from spiral threads, which makes them very resistant to wear; they are constructed in such a way as to hold various parts of the body such as the waist, the dorsal area and the legs, ending in button holes or loops that allow the use of carabiners to secure to an anchor point of a rope. LOCKING CARABINERS Locking carabiners have a locking mechanism to prevent them from opening involuntarily. In other words, we use locking carabiners when we trust nothing. For this reason, these are elements to select and care for correctly.
According to PPE Directive 89/686/EEC that classifies all Personal Protection Equipment in the European Union, all PPE products (including locking carabiners, of course) have to be marked CE and include a manual of operation and care in several languages.
Technical Note: The resistance of locking carabiners is given in kilonewtons (kn) rather than kilograms (kg). A newton is a measure of force equivalent to the force to be applied to 1 kg of mass to accelerate it to 1m/s.
COMMON CHARACTERISTICS
Most carabiners are currently constructed of high ductility and resistance aluminum 7075. The resistance oscillates within a broad range:
Longitudinally and closed: between 20 and 35 kn
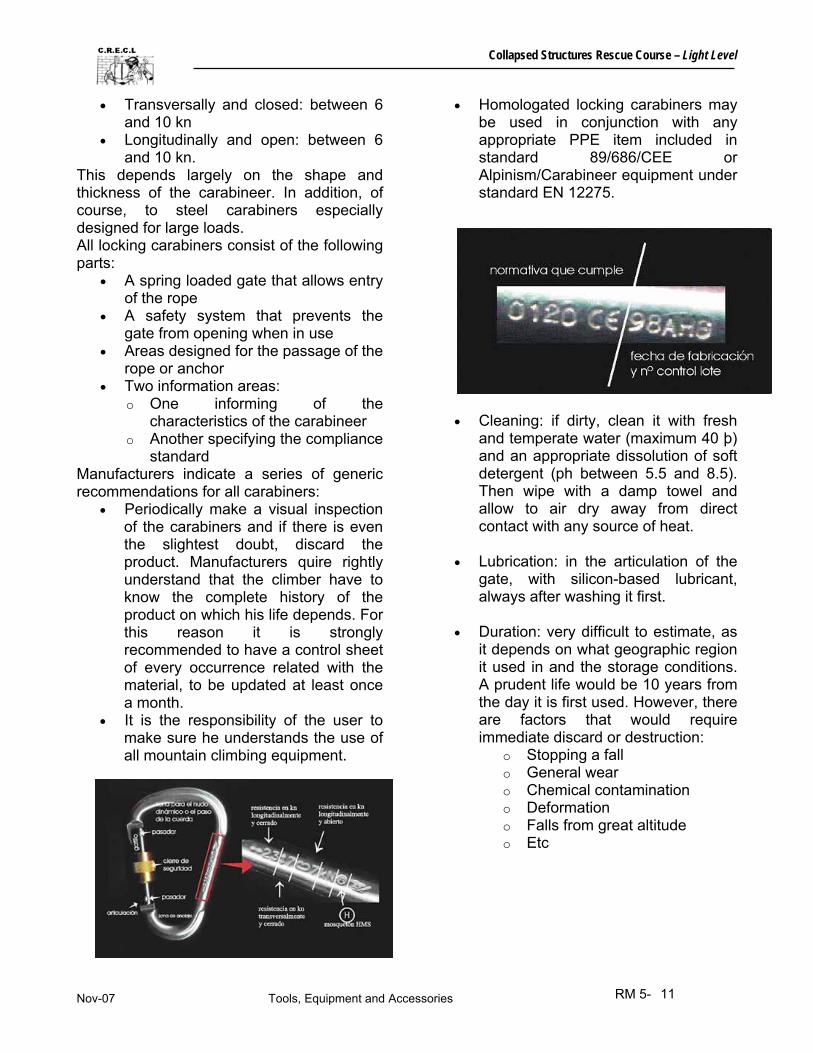
Collapsed Structures Rescue Course – Light Level
Nov-07 Tools, Equipment and Accessories RM 5- 11
• Transversally and closed: between 6 and 10 kn
• Longitudinally and open: between 6 and 10 kn.
This depends largely on the shape and thickness of the carabineer. In addition, of course, to steel carabiners especially designed for large loads. All locking carabiners consist of the following parts:
• A spring loaded gate that allows entry of the rope
• A safety system that prevents the gate from opening when in use
• Areas designed for the passage of the rope or anchor
• Two information areas: o One informing of the
characteristics of the carabineer o Another specifying the compliance
standard Manufacturers indicate a series of generic recommendations for all carabiners:
• Periodically make a visual inspection of the carabiners and if there is even the slightest doubt, discard the product. Manufacturers quire rightly understand that the climber have to know the complete history of the product on which his life depends. For this reason it is strongly recommended to have a control sheet of every occurrence related with the material, to be updated at least once a month.
• It is the responsibility of the user to make sure he understands the use of all mountain climbing equipment.
• Homologated locking carabiners may be used in conjunction with any appropriate PPE item included in standard 89/686/CEE or Alpinism/Carabineer equipment under standard EN 12275.
• Cleaning: if dirty, clean it with fresh
and temperate water (maximum 40 þ) and an appropriate dissolution of soft detergent (ph between 5.5 and 8.5). Then wipe with a damp towel and allow to air dry away from direct contact with any source of heat.
• Lubrication: in the articulation of the
gate, with silicon-based lubricant, always after washing it first.
• Duration: very difficult to estimate, as
it depends on what geographic region it used in and the storage conditions. A prudent life would be 10 years from the day it is first used. However, there are factors that would require immediate discard or destruction:
o Stopping a fall o General wear o Chemical contamination o Deformation o Falls from great altitude o Etc
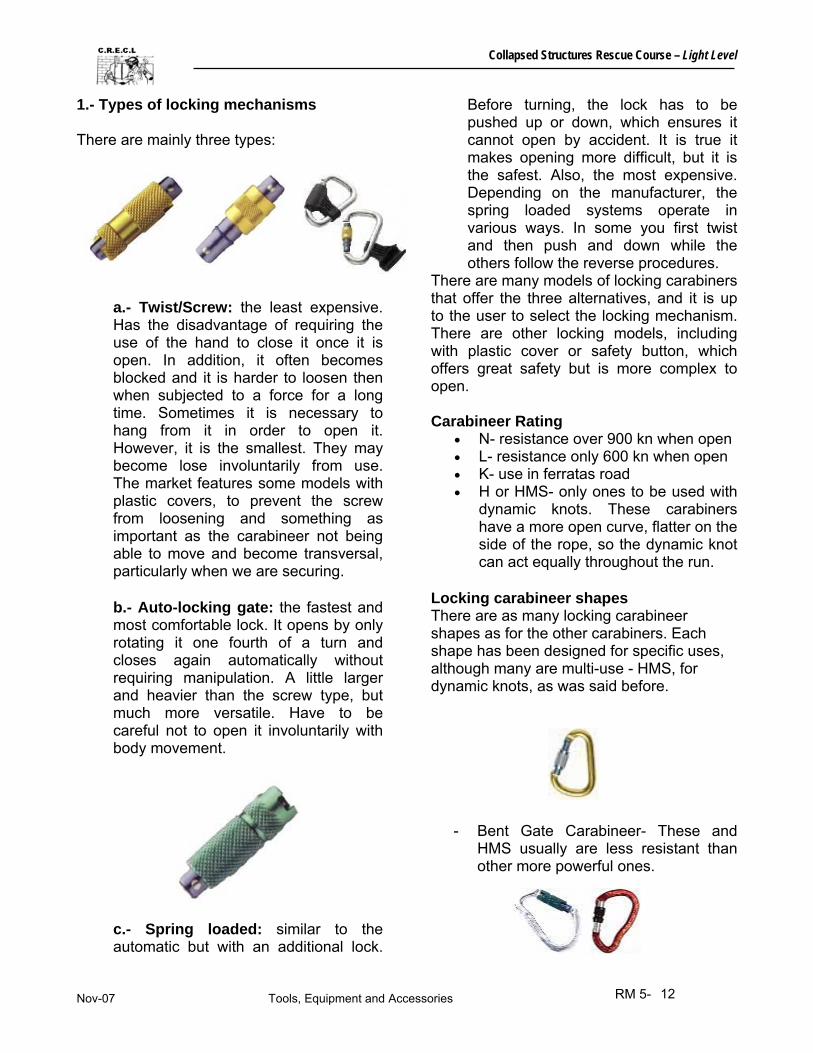
Collapsed Structures Rescue Course – Light Level
Nov-07 Tools, Equipment and Accessories RM 5- 12
- BentHMothe
1.- Types of locking mechanisms There are mainly three types:
a.- Twist/Screw: the least expensive. Has the disadvantage of requiring the use of the hand to close it once it is open. In addition, it often becomes blocked and it is harder to loosen then when subjected to a force for a long time. Sometimes it is necessary to hang from it in order to open it. However, it is the smallest. They may become lose involuntarily from use. The market features some models with plastic covers, to prevent the screw from loosening and something as important as the carabineer not being able to move and become transversal, particularly when we are securing.
b.- Auto-locking gate: the fastest and most comfortable lock. It opens by only rotating it one fourth of a turn and closes again automatically without requiring manipulation. A little larger and heavier than the screw type, but much more versatile. Have to be careful not to open it involuntarily with body movement.
c.- Spring loaded: similar to the automatic but with an additional lock.
Before turning, the lock has to be pushed up or down, which ensures it cannot open by accident. It is true it makes opening more difficult, but it is the safest. Also, the most expensive. Depending on the manufacturer, the spring loaded systems operate in various ways. In some you first twist and then push and down while the others follow the reverse procedures.
There are many models of locking carabiners that offer the three alternatives, and it is up to the user to select the locking mechanism. There are other locking models, including with plastic cover or safety button, which offers great safety but is more complex to open. Carabineer Rating
• N- resistance over 900 kn when open • L- resistance only 600 kn when open • K- use in ferratas road • H or HMS- only ones to be used with
dynamic knots. These carabiners have a more open curve, flatter on the side of the rope, so the dynamic knot can act equally throughout the run.
Locking carabineer shapes There are as many locking carabineer shapes as for the other carabiners. Each shape has been designed for specific uses, although many are multi-use - HMS, for dynamic knots, as was said before.
Gate Carabineer- These and S usually are less resistant than r more powerful ones.

Collapsed Structures Rescue Course – Light Level
Nov-07 Tools, Equipment and Accessories RM 5- 13
- Symmetrical, very useful for certain knots or for pulleys, as the force is well exerted at the center and the sides of the pulley are equally supported on the carabineer.
- - Oval Carabineers- are the original style.
Their large interior space holds lots of gear and their symmetrical curve minimizes shifting when aid climbing. They work well in improvisational situations, such as creating a carabineer-brake rappel. Two ovals in a “gates opposed” configuration can also be used as a substitute for locking carabineers.
Anchoring should ALWAYS use locking carabineers. Finally, a reminder: since we use locking carabineers, in case you are using the screw lock, make sure it is closed. BIBLIOGRAPHY: Grupo de Rescue GREMCA (Manual de Arneses) Cruz Roja (Manual de Nudos y Amarres) Manual Rescue Urbano Básico Cap. IV Asociation de Scout (Manual de Nudos) (http://www.siemprescout.org/nudos3.html)
Cuerpo de Bomberos de Caracas (Manual de Rescue 1) Cascada Expediciones (http://www.cascada-expediciones.cl/mnusecundario/actualidad/Articulos/Mosqueton/Mosqueton.htm Manual de Procedimientos Operacionales FEMA US&R Sistema de Respuesta Manual de Comando en Operaciones Bomberiles Cuerpo de Bomberos del Dtto. Federal. Mando en Incendios Traduction del Manual de Alan V. Brunacini Benemérito Cuerpo de Bomberos de Costa Rica Artículos en Revistas Especializadas Fire Engineering Response Fire Journal Fire Service Today (NFPA) Rescue EMS Security Management Fire Command Mapfre Seguridad Emergency Boletines Técnicos
Collapsed Structures Rescue Course – Light Level
Nov- 07 Pre-Hospital Care RM 6–1
Lesson 6: Pre-Hospital Care
1. PRINCIPLES Providing first aid to a patient in a collapse structure incident is synonymous with providing medical care to an ill or injured person on a medical call. However, there are some differences with the equipment and materials available in a rescue, for evacuation and transfer to a medical care facility. First aid in a collapse structure may range from single person with a minor injury to a mass casualty incident. Laws vary from region to region but for the most part first aid can be provided by any civilian acting in good faith and without major legal implications. Regardless of the specific situation, the objectives in the provision of first aid are:
• To activate the Emergency Medical Services (EMS)
• To preserve human life • To prevent aggravation of the injury
and/or sudden illness • To prepare the patient for transfer to
a higher or equaly trained personnel. In many countries the law does not require for the provision of pre-hospital care in emergency situations; however, providing pre-hospital care (basic and advanced life-support) is one of the main responsibilities of a rescue team. Therefore there is a moral obligation to respond to emergency situations made known to first response teams in accordance to their level of certification. As a pre-hospital medical care provider you should inlcude the following steps in your patient care routine:
• Identify yourself as a responder and obtain authorization from the injured person for treatment before you engage in medical care. The authorization to act is called consent.
• Always proceed according to your level of knowledge (certification). Be prudent, careful and competent.
• Assume your responsibility and not act negligently.
• Never abandon a person to whom you have started to provide pre-hospital care. This attitude is penalized and known as abandonment under the law. Remember that turning over a patient to a with lesser level of medical training is still considered abandonment.
The consent necessary to care for a person may be explicit when it is verbally confirmed or indicated by signs that assistance accepted. An implied concent occurs when the patient it is unconscious/unresponsive. or when the patient does not have the legal / mental capacity to decide. In those cases it is presumed that they would have implied their concent for medical care.
Collapsed Structures Rescue Course – Light Level
Nov- 07 Pre-Hospital Care RM 6–2
One of the fundamental rules for providing pre-hospital care is to provide the necessary assistance under the strictest safety rules, both for the responder as well as the patient. On arrival at the scene, the rescue must engage in the countinous process of assessing the scene and the patient. The assessment process does not end until the patient arrives at the hospital.. The assessment answers questions such as: Is the scene safe for rescuers to engage. Does the rescuer have the necessary universal precautions (gloves, mask, gown ) to care for the patient. what is the nature of the incident, what happened, secondary threats, size of the affected area, how could it evolve, how can we isolate the affected area, location of necessary resources and facilities, access and exit routes, necessary resources, etc. During pre-hospital care, the rescuer and the victim will be in close proximity and this might provide for for the transmission of infectious diseases of various types. Safety precautions comonly known as “universal precautions” should always be adopted to reduce the risk of transmission. Univerals precautions include the use of all necessary safety barriers for the provider and the patient. These might include the use of gloves, gowns, masks, boots, etc. In the case of a mass casualty incident in a collapsed structure, special attention should be given to scene safety and secondary threats. A collpase structure is unstable and posses many threats to a would-be-rescuer. This is why extra caution should be taken before, during and after the inciden. Above and beyond the known treaths of a collapse structure, the possibility of secondary threats should be present in the rescuers mind. A secondary threat might be an aftershock after an earthquake, a secondary explosion etc. Your first priority is as a rescuer is your own safety. You are more useful as a rescuer
than as a victim, don’t go from rescuer to becoming a victim . Rescuers must understand that they will be working agains the clock when working at the rubble pile. Altough safery is of their main concern, they must also realize that they patients lightly trapped, must be rushed to the hospital before the end of the first hour since impact. The first 60 minutes have been defined as the “Golden Hour”. Research has shown that patients taken to a medical heath facility within the first 60 minutes after impact, they will have better chance of recovery than those that are not. INJURY MECHANISMS IN COLLAPSED STRUCTURES To better understand the mechanisim of injury to atrapped person in a collapsed structure. The rescuers must uderstand the collapse mechanism. For example, a trapped person might still be laying down in bed with crushed legs from a beam that fell on her legs. The injury occurred despite of the fact that the victim was in the safety of her bed. Upon arrival at the incident scene, the rescuer should be asking raising the following questions: • What happened to cause this type of injury? • How much force affected the victim? • What body parts have been compromised? • Would the person be better off if she is moved or left in place till personnel with higher training arrives? • Will the person receive further injuries if shes left in place? The answers to these and other questions enable the rescuer determine the mechanism or injury which is very useful information for the rescuer. In an emergency situation, if the mechanism of injury can be identified, it can be determined what injuries are probable and
Collapsed Structures Rescue Course – Light Level
Nov- 07 Pre-Hospital Care RM 6–3
which are less probable and this will indicate the pre-hospital care actions to be taken.
The eight mechanisms that cause injuries are:
1.1 Crush and/or compression syndrom The consequences could be: - Compartment syndrome - Extended crush syndrome - Multiple fractures - Internal bleeding - Loss of limb - Death
1.2 Falls The consequences could be:
- Multiple fractures with or without compromising the spine.
- Internal and/or external bleeding - Paralysis - Death
1.3 Extreme Temperatures The consequences could be:
- Hypothermia and associated complications.
- Hyperthermia and associated complicatoins.
- lose of concioiusness - Heart problems - Burns and associated complications
1.4 Impacts Violent knocks caused by objects or other materials of the structure (at high speed in case of explosion) The consequences could be:
- Internal and/or external bleeding - Shock - Injuries - Penetrating injuries - Severe concussions - Loss of counsiousness - Death
1.5 Contaminated and/or Toxic Atmospheres
Large amounts of dust are present and in some cases hazardous or flammable vapors. The consequences could be:
- Breathing problems - Asphyxia - Heart problems - Cardio-respiratory failure - Neurological problems - Death
1.6 Lack of water and/or food The consequences could be:
- Dehydration - Inanition - Shock - Renal failure - Death
1.7 Extended isolation and desperation The consequences are:
- Traumatic stress - Claustrophobia
1.8 Rodent Attacks The consequences are:
- Injuries - Infections - Diseases
INJURIES IN COLLAPSED STRUCTURES Many injuries occur after the structure has collapsed and can occur to would be rescuers. Injuries: An injury results from damage to the body from direct insult to the tissues and it is defined as trauma. In cases of collapse structures, these trauma injuries might range from slight to very severe injuries. For example: erosions, impacts, cuts, fractures, bleeding, sprains, crush and compartment syndrome. Conditions: A condition is defined as the resul of the injuries to the body. In other words, conditions are the result of injuries. For example: shock, pain, changes in
Collapsed Structures Rescue Course – Light Level
Nov- 07 Pre-Hospital Care RM 6–4
response level, changes in body temperature, convulsions, heart and breathing problems, changes in blood pressure, vomiting from head injuries, dehydration, activation of medical emergencies, etc. Related injuries: These are injuries not directly linked to the structural collapse but that can be the indirect result of the collapse. For example: burns, hypothermia, frostbite and freezing, asphyxia, unsafe atmosphere conditions, live electric wiring, flooding, explosions, gas leaks, poisonous insect bites, hazardous situations caused by extreme temperatures, caring for mental patients, panic attacks, anxiety, depression.
After determining that the scene is safe and concluding the mechanism of injury, it is important to know how to care for those injuries.
2. PATIENT ASSESSMENT GENERAL PROCEDURE: Upon arrival at the scene, you should:
Inform the base of your arrival; if you are the first, assume command and establish the Command Post
Use universal precautions Ensure scene safety and continusly
monitor your own and the patient’s safety (use personal protection equipment)
Verify if the patient is responsive (if conscious: identify yourself and
continue) Detect and correct life-threatening
problems in the short term Stabilize and monitor the patient at
all times until transfer to a hospital PERSONAL INTRODUCTION:
Identify yourself as a trained person Ask if you can help (explicit or implicit
consent). INFORMATION SOURCES:
The scene itself The patient (if able to answer) Any family member or neighbor The obvious mechanism of injury Any noticeable deformity or obvious
injury Any sign or characteristic of certain
types of injuries or diseases 2.1 INITIAL ASSESSMENT: the orderly process used to detect and correct problems threatening the life of the patient in the short term. Assessment includes: - General impresion of the patient - Level of counciousnes - Level of response - Airway - Circulation - Need for transport this is complemented by the trauma protocol presented below, to be applied to victims trapped in a collapsed structure.
Collapsed Structures Rescue Course – Light Level
Nov- 07 Pre-Hospital Care RM 6–5
TRAUMA PROTOCOL 1.- PERSONAL PROTECTION EQUIPMENT (Universal precautions) 2.- VERIFY SCENE SAFETY ( for the medical first responders and the PATIENT) 3.- CERVICAL SPINE IMMOBILIZATION: Ask the patient not to move his head.
4.- INITIAL ASSESSMENT: - General status of the patient - Level of response of the patient: Responds to Alert commands, responds to Verval commands, responds to Painful stimuli, unresponsive. (AVPU) - Airway: Jaw thrust maneuver – unconscious patient with C spine compromised Breathing: Look, listen and feel (3 to 5 seconds)
IF NOT BREATHING, Give A RESCUE BREATH - Circulation: Check carotid pulse: 5 to 10 seconds
IF NO PULSE, begin CPR Check for external bleeding: rapid palpation * - Need for immediate transport: Significant injury mechanism
* Control any prefuse bleeding with direct pressure. 5.- COMUNICATION WITH DOCTOR ON STAND-BY: General description of the
scene and more importantly, the patient
6.- INTUBATION: (performed only by trained personnel)
Includes 3 conditions: Unconscious patient Patient with compromised airway
Patient without gag reflex
7.- CERVICAL COLLAR
Procedure: a.- Examine neck b.- Measure patient’s neck c.- Select and measure cervical collar d.- Place cervical collar
8.- OXYGEN THERAPY: (if needed)
Non rebreather mask with oxygen bottle: 15 lts. / min. (100% oxygen)
9.- LONG SPINAL BACKBOARD: The patient should be moved onto the backboard with caution and as a unit with at least 4 people moving the patient. Examine back and column before placing the patient on the board.
EMOTIONAL SUPPORT – Start the interview
Collapsed Structures Rescue Course – Light Level
Nov- 07 Pre-Hospital Care RM 6–6
10.- TRANSPORT IN AMBULANCE Patients should be reassesed every time they are moved.
11.- IN-ROUTE ASSESSMENT - Detailed physical examination - Vital signs: Assess:
Pulse: (30 seconds times 2) PPM Respiratory frequency: (30 seconds times 2) RPM and capyllary refill < 2.0
seconds. Blood pressure: mmHg. Temperature: strip thermometer
- Treat injuries presented
12.- COMMUNICATION WITH DOCTOR ON STAND-BY
13.- CONSTANT MONITORING UNTIL ARRIVAL AT THE HOSPITAL 3. SYNDROMES AMONG PATIENTS TRAPPED IN COLLAPSED STRUCTURES 3.1 EXTENDED CRUSH SYNDROME
A series of complications from blood toxicity manifested in patients suffering from crushing of one or more limbs for an extended period of time. There is destruction of the crushed muscle, characterized by marked edema of the damaged area and development of hemodynamic instability and could present in shock conditions.
The injured extremities have to be kept at rest, avoiding unnecessary manipulation to prevent the release of toxins into the blood stream and must be immobilized, particularly if there is injury to the bone.
Conditions for its existence: One or more parts of the body usually limbs compressed for a period of as little as 4 to 6 hours. During this period of time the limb is with total or partial reduction of blood circulation.
In the crush syndrome there are a series of changes that are lethal if not treated rapidly and vigorously. Therefore, although the patient may appear in good shape, he should receive immediate medical attention at the site and be hospitalized as soon as possible. According to studies of patients affected by this syndrome, if treated on time and correctly, the probability of recovery is 60%. TREATMENT: The treatment consists in early correction of hypovolemia and therefore it is necessary to have medical personnel at the site to adequately treat the case. It is the responsibility of the rescuers to inform the
IN CASE OF CRITICAL PATIENT, PROCEED TO COMMUNICATE WITH DOCTOR ON STAND-BY TO INDICATE IMMEDIATE TRANSPORT
Collapsed Structures Rescue Course – Light Level
Nov- 07 Pre-Hospital Care RM 6–7
medical staff on site of the condition of the patient. The patien should not be moved nor the weight shold be taken off the entrapped limb until it has been carefully coordinated with trained medical staff. B. COMPARTMENT SYNDROME Increase in the pressure of a compartme delimited by fascias, with damage to the anatomical elements contained and probability of systemic compromise.
Usually occurs as a result of compression (casts, scabs, sutures) or secondary ischemia to vascular injuries, animal venoms, crushing, thrombus, embolus, fractures or hemorrhage. Also from exaggerated muscular effort. Symptoms: Intense pain, weakness. Signs: Edema, increased blood pressure, reduction or absence of peripheral arterial pulse, decreased sensitivity and motor function. All of this can cause serious ischemia and necrosis of the tissue. Requires removing any element compressing the affected area and seeking immediate medical attention. Hoever, this too should be coordinated with medical control via phone or is fiseable, they should come to the scene to coordinate with rescuers. Every country will have different legislation in force in the country and this should be taken into consideration. Treatment: As in the previous case, treatment is based on the necessary
participation of the appropiate medical personnel at site. It is the responsibility of the rescuers to keep medical control informed of the patient’s condition.
4. START Triage The objective of the START triage system is to quickly assess the injuries presented by a group of people. The acronym START stands for Simple Triage And Rapid Treatment. It was developed for use in incidents with multiple victims. It is intended for the rescuer to spend between 15 and 60 seconds (no more than one minute) assesing each patient. This makes it possible to assess a larger number of victims in condition at the site of the incident. The START triage system allows for identifying the victims requiring more higher level of medical attention. It prioritizes the patient conditions in a simple color coding system that facilitates the care and the accountability of all patients. The START triage system is also used so hospitals do not get overwhelmed with highly critical patients only. Comand should coordinate with medical control to make sure the patients are taken to the appropiate level facility with an equal distribution to all hospitals. The START triage system uses three criteria:
• Respiratory frequency • Perfusion • Mental Status
This three criteria might be remembered by using the pneumonic RPM. Respirations, Perfusion and mental status.
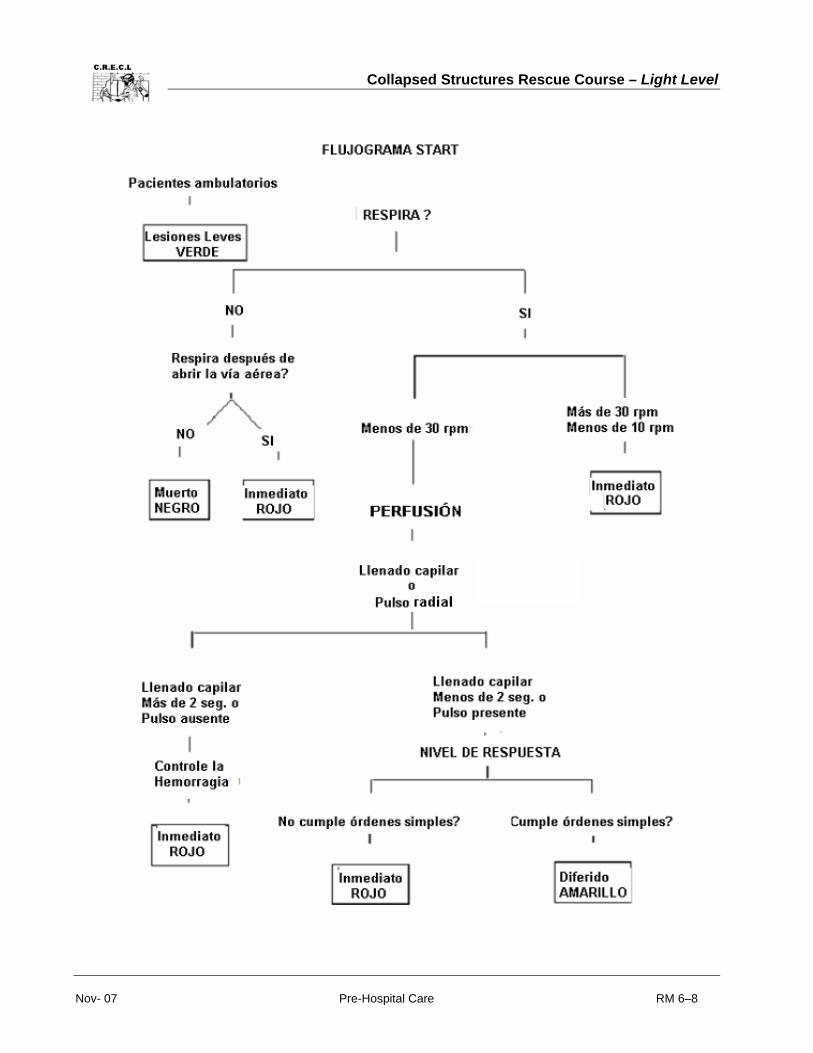
Collapsed Structures Rescue Course – Light Level
Nov- 07 Pre-Hospital Care RM 6–8
Collapsed Structures Rescue Course – Light Level
Nov- 07 Pre-Hospital Care RM 6–9
5. PSYCHOLOGICAL SUPPORT AT THE SCENE INTRODUCTION. Emergency response personnel are the only professionals that dedicate their time and energy to assist people during times of stress caused by disasters such as earthquakes, hurricanes, landslides, floods, etc.
In carrying out the responsibilities associated with providing this assistance, they are repeatedly exposed to traumatic situations that result in stress.
Despite the fact that their training prepares them to live with these situations, the reality is that they are at risk of developing post-traumatic stress syndrome. In addition, it has been found that the psychological well-being of emergency response personnel dealing with emergency situations can, in turn, affect the overall outcome of their work.
Rescuers are trained personnel that protect life and property. In order to do this, they place themselves in harms way and therefore they are exposed to a series of traumatic pressures. This in turn could potentially become post traumatic stress syndrome. This stress syndrom could present itself any time after an incident or a series of incidents. It could also be manifested differently depending of the coping mechanisms of each rescuer. Some of the syumtoms manifested are: irritability, poor interpersonal relations, lack of motivation, eating disorders, sleep disorders, etc.
The main role of the professional emergency responder, in addition to saving lives, is to provide support in moments of crisis. If he is suffering from burn-out syndrome, he will not be able to show empathy and any support that may be provided to an anxious victim may not be appropriate and even intensify the feeling if impotence of victims and patients.
In situations where the rescuer is a member of the family affected by the crisis, or the rescuer knows the families affected, it wil add extra stress to the rescuer and quiet possibly the team. Special attention should be given to these situations since sometime then might not be avoided.
If the rescuer provides support without paying attention to his own needs, this could potentially affect his/her family life.
Rescuers by their nature tend to want to help and they also learn to believe that they can handle any situation. Rescuers might try to ignore the fact that they are are personally affected by the disaster. Thhis is a mistake that can have serious consequences. Any rescuer who is personally been negatively affected or whose family is been negatively affected by any type of dissaster should be relieved from duty.
These rescuers are not capable of relating well to rescue tasks, and should be relieved before getting too involved. If the resucer is not removed from the enviroment causing the stress, this could result in losing control and may have negative effects, both emotional as well as physical.
Once in a while rescuers tend to forget their own needs. In a specific situation of crisis they invests tremendous physuical and emotional effort to support those in need. This might lead them to neglect their physical, mental and emotional needs. ... If as a member of a first response team he ignores his own needs time after time, he may start showing signs of burn-out syndrome.
BIBLIOGRAPHY COHEN, R. E. (1991) Psiquiatría y Desastres. En Perales A. (Ed.) Manual de Psiquiatría. Segunda Edición. Lima, Perú. Universidad Nacional Mayor de San Marcos, Facultad de Medicina.
Collapsed Structures Rescue Course – Light Level
Nov-07 Surface Rescue Techniques RM 7–1
LESSON 7
SURFACE RESCUE TECHNIQUES
Perhaps the most important moment, full of satisfaction and emotion is when a rescuer locates the source of possible human life. When rescuers are able to pinpoint it the possible location of the victim, the process of first contact begins. From that moment the process transforms to approaching and recovering that patient and hopefully until the time the patient is turned over to the medical staff.
Once this process is over, it might be viewed as a great success. The process to reach the patient is long and sometimes difficult the danger to the patient and the rescuer still exist. The rescuer must use all the appropriate techniques for moving and removing debris, accessing the patient and ensuring rescuer and patient safety and protection at all times.
If the personnel are available, it is very important that in parallel, a team of professionals carry out structural monitoring in case of further collapse. This will further ensure patient and rescuer safety. In conclusion, search and rescue in collapsed structures is based on the personnel being able to identify and explore to the fullest extent all debris formations where people may be trapped and which could be used to facilitate access to them.
All of these actions directly depend on the motivation and experience of the rescuers and their capacity to execute the work required. Based on the above, let’s begin the topic by mentioning the conditions necessary to work in a collapsed structure, which may be grouped into five fundamental rules:
1) Scene safety and PPE should be assessed before any steps are carried at the scene.
2) Gather ground information from the command post, neighbors, family or other rescues. The information should contain the basic elements of the possibility of life, secondary threats and operations already in progress.
3) Make sure that utility services such as gas, water and power lines have been shut off and this shut off should be guaranteed. It cannot be allowed for these to be accidentally turned on by mistake for reasons unknown to the rescuers.
4) Make sure tasks are performed away from identified hazards and their effects. Access should be from the most favorable point, following the established safety rules. It is vital to avoid dangerous actions and conditions in carrying out the tasks.
5) Identify from the outside any parts of the building where it is believed victims may be trapped.
6) Follow the referenced standards for safe zones and escape routes, maintain contact with the members of the team.
Remember it may be necessary to remove debris causing access problems. At the same time, it is necessary to secure it as an emergency exit area. The rescuer should identify at least two means of egress in case of an emergency.
Collapsed Structures Rescue Course – Light Level
Nov-07 Surface Rescue Techniques RM 7–2
7) Having identified and secured the access and emergency egress, the trained and equipped teams should start to remove debris to access the victims. Careful considerations should be given to oppose ongoing operations in other worksites. It is very important to assess the physical and mental condition of the patient. Talk to the patient constantly and explain what you are doing.
Debris Removal:
It should be taken into account that debris removal is directly related with the type of structure and the collapse pattern. However, general standards exist, as follows:
Verify through careful study the way in which the building collapsed and the condition of its components; this assessment could provide indications of the actions to be taken at a given point.
Debris removal should be methodical and progressive; this procedure should be used when the debris piles are not too high, if they are, avoiding this process.
To manually remove the debris, start by removing the larger (wood, rocks, furniture) pieces that are loose.
Open a path among the debris, as deep as needed and wide enough to circulate. Work progress will be determined mainly by the type of debris through which the path is to be opened.
When moving large pieces, maximum care should be exercised with the ties these may have to other parts of the structure, whether supporting it or serving as anchors.
In collapsed structures, the cuts and removal of debris shall be carried out using small tools so as not to cause damage or
replica type movements from the vibration of large equipment.
Do not try to move the debris under pressure, as it could be supporting other debris and removing it may create an unstable environment; columns should not be broken either.
Now then, when accessing surface patients is possible, analyze whether another procedure can be used to access patients trapped among debris by assessing each of the following aspects:
• If the floor has not collapsed, try to remove debris from a small area to reach the patient.
A relevant point is that, in order to achieve an efficient and effective operation, it is necessary to work as a team. Some of the rules to be followed are:
• Do not ask unnecessary questions and listening attentively so that instructions only have to be given once.
• Maintain the team grouped together and maintain accountability of the team. Always work with good visibility and lighting.
• Concentrate on the work being carried out.
• Never work alone, always work in pairs and safely. Avoid unsafe actions and conditions. Respect the work and rest periods assigned.
• Maintain the command post informed of your conditions, status, situation and need. For accountability purposes, it would be a good idea to give the command post the names of the people working at your work site.
• All team members shall be familiar with the safe zones and established emergency egress routes. , These emergency routes should meet certain requirements to be effective.
Collapsed Structures Rescue Course – Light Level
Nov-07 Surface Rescue Techniques RM 7–3
Escape Routes
Escape routes are also known as emergency egress routes. These routes are pre-established paths to a safe area or refuge. There should always be more than one since an emergency might not allow to just using one for all rescuers. It is also important to pre establish a meeting point after the emergency egress.
• The safest route to exit an area is not necessarily the shortest one.
• For example, after an earthquake the structural columns may be standing, but may collapse after an aftershock.
• The most direct route to a safe zone may be directly in the path of unstable columns, but following a path that will avoid being close to these columns may be safer.
Rescue situations are dynamic and change constantly. These changes are the result of external forces and sometimes these forces are as a result of rescuers’ actions. The escape plan should be constantly updated to reflect these changes.
• Each time a plan is developed, each team member must be made aware of these changes in the operations. Confirmation of this awareness is required from each team member.
• If members are not aware of the new plan or the new plan is not clear to the team members, the result may be injuries or death to the rescuers.
Monitoring and Control Methods In any partially collapsed structure where a rescue activity is being carried out, it is necessary to monitor and control the structure and some measurement and observation methods are useful for this purpose.
Cracks in concrete or masonry walls can be monitored in different ways. Obviously, it is
important to known whether these cracks in damaged buildings are widening or getting longer. The methods to be used include:
• Marking an “X” transversally through the center of the crack. Significant lateral movements can thus be observed.
• Placing paper folds in the cracks or using light mechanical calibrators, 0.004 to 0.005 inch to measure specific locations.
• Adhesive tape or similar placed through the joint of the crack to measure any change, but dust and dirt to not allow these tapes to stick (so you need to be prepared to clean the surfaces if this is the only option).
• Use to parallel bars taped to the cracks with a perpendicular line drawn through them. If the width of the crack changes, the drawn line will be left outside.
• Some times plastic measurers have been used to detect changes in the structures.
• If the structures suffer significant changes in temperature, the cracks will change width. The larger the structures, the larger the change.
LOAD LIFTING AND SHORING
Factors to consider before lifting a load
Weight of the Load
It is necessary to estimate the weight of the material or object to verify whether the system or tools to be used are capable of doing the work.
Whether the structure to be lifted is anchored to other structures
Whether previous shoring exists or something holding the structure

Collapsed Structures Rescue Course – Light Level
Nov-07 Surface Rescue Techniques RM 7–4
Whether there is sufficient space to carry out the movement
Potential or existing hazards that can arise by lifting the load
VERTICAL RESCUE “HINGE” TECHNIQUE
- Procedure:
This technique shall be used when it is impossible use the stairs or elevators of the structure. For adequate execution, the following resources are required:
6 rescuers distributed as follows:
1 leader
2 rescuers to reach stabilize and place the patient on the litter
3 rescuers to hold the ladder and control the descent
- Description of the technique:
1. Safely lean the ladder on the structure.
2. Access the victim (2 rescuers) to stabilize, package (technique studied in lesson 6) and secure the rescue basket to the ladder. Eight-figure knots shall be used for the litter and clove hitches for the step selected (one or two are recommended over the edge of the exit level of the rescue basket).
3. Coordinated by the leader and once warned to be set for lowering the litter, the rescuers prepare the exit of the litter from the structure verifying the safety conditions.
4. In a coordinated manner, the rescuers on the ground shall regulate the descent of the rescue basket by controlling the weight and movement and avoiding turns; the rescuers on the top shall control the stability and inclination of the rescue basket during the descent, using ropes tied to the rescue basket, until both elements are on the ground.