Embed Size (px)
DESCRIPTION
CS
Citation preview

7/18/2019 CS-AD Reference Guide
http://slidepdf.com/reader/full/cs-ad-reference-guide 1/284
CUNYfirst Admissions Reference Guide
Last Updated: 6/18/2013 CUNYfirst Admissions
Campus Solutions
CUNYfirst Admissions
Reference Guide

7/18/2019 CS-AD Reference Guide
http://slidepdf.com/reader/full/cs-ad-reference-guide 2/284
CUNYfirst Admissions Reference Guide
Last Updated: 6/18/2013 CUNYfirst Admissions2
Table of Contents
How to use this Reference Guide ........................................................................... 6
Introduction to CUNYfirst Student Admissions Module ....................................... 7
Module Objectives ............................................................................................................ 7
Unit I: Foundations of Student Admissions .......................................................... 8
Unit Introduction ................................................................................................................ 8
Unit Objectives .................................................................................................................. 8
Chapter 1: Modules of Campus Solutions ............................................................. 9
Chapter Objectives ........................................................................................................... 9
Topic 1 - Modules of Campus Solutions ...........................................................................10
Topic 2 - “A” Student’s Record in Campus Solutions: .......................................................12
Chapter 2: Understanding Academic Structure .................................................. 13
Chapter Objectives ..........................................................................................................13
Topic 1 - Academic Structure: ..........................................................................................14
Topic 2 - Academic Structure & a Student Record ...........................................................16
Chapter 3: Overview of Student Admissions ...................................................... 20
Chapter Objectives ..........................................................................................................20
Topic 1 - Overview of Student Admissions .......................................................................21
Unit II: CUNYfirst Student Admissions ................................................................ 22
Unit Objectives: ................................................................................................................22
Chapter 1 - Review CAS & ASTA Application Results ........................................ 23
Chapter Objectives ..........................................................................................................23
Topic 1: Review CAS Application Summary ................................................................24
Topic 2: Review ASTA Application Summary ..............................................................28
Chapter 2 – Search/Match in CUNYfirst ............................................................... 32
Chapter Objectives ..........................................................................................................32
Topic 1: Conduct Search/Match ...................................................................................32
Chapter 3 – Add New Application ......................................................................... 41
Chapter Objectives ..........................................................................................................41
Topic 1: Add New Application ......................................................................................42
Topic 2: Add New Application – Second BA ................................................................59

7/18/2019 CS-AD Reference Guide
http://slidepdf.com/reader/full/cs-ad-reference-guide 3/284
CUNYfirst Admissions Reference Guide
Last Updated: 6/18/2013 CUNYfirst Admissions3
Chapter 4 – Maintain Applications ....................................................................... 60
Chapter Objectives ..........................................................................................................60
Topic 1:
Update Bio/Demo Information - General ........................................................60
Topic 2: Update Bio/Demo Information – Names .........................................................63
Topic 3: Update Bio/Demo Information – Addresses ...................................................70
Topic 4: Update Program/Plan .....................................................................................79
Topic 5: Update External Education .............................................................................80
Chapter 5 – Update Applicant Program/Action Status ....................................... 91
Chapter Objectives ..........................................................................................................91
Topic 1: Accepts Admission .........................................................................................92
Topic 2: Defers Admission ...........................................................................................93
Topic 3: Declines Admission ........................................................................................94
Topic 5: Matriculate an Applicant - Single ....................................................................95
Topic 6: Matriculate an Applicant - Batch .....................................................................96
Chapter 6 – View Additional Applicant Data ........................................................ 99
Chapter Objectives ..........................................................................................................99
Topic 1: View Application Summary Page ...................................................................99
Topic 2: View Applicant Progression .......................................................................... 101
Topic 4: View Academic Test Summary..................................................................... 105
Topic 5: View Test Results ........................................................................................ 106
Topic 6: View Unofficial Transcripts ........................................................................... 109
Chapter 7 – Non-Degree Students ...................................................................... 113
Chapter Objectives ........................................................................................................ 113
Topic 1: Non-Degree Students without EMPL - Quick Admit...................................... 114
Topic 2: Non-Degree Students with EMPL – Program/Plan Stack ............................. 124
Chapter 8 – Readmit, Reactivate, Reallocate .................................................... 127
Chapter Objectives ........................................................................................................ 127
Topic 1: Readmitting Students (General Steps) ......................................................... 127
Topic 2: Reactivate Students ..................................................................................... 130
Topic 3: Reallocation ................................................................................................. 131
Unit II: CUNYfirst Campus Community for Admissions ................................... 133
Unit Introduction ............................................................................................................. 133

7/18/2019 CS-AD Reference Guide
http://slidepdf.com/reader/full/cs-ad-reference-guide 4/284
CUNYfirst Admissions Reference Guide
Last Updated: 6/18/2013 CUNYfirst Admissions4
Unit Objectives ............................................................................................................... 133
Chapter 1 – Student Services Center ~ Overview ............................................. 134
Chapter Objectives ........................................................................................................ 134
Topic 1: Student Services Center: Student Center Tab .............................................. 135
Topic 2: Student Services Center: General Info Tab .................................................. 140
Topic 3: Student Services Center: Academics Tab .................................................... 144
Topic 4: Student Services Center: Admissions Tab ................................................... 147
Topic 5: Student Services Center: Transfer Credit Tab .............................................. 150
Topic 6: Student Services Center: Finances Tab ....................................................... 153
Chapter 2 – Add & Update Student Data ............................................................ 154
Chapter Objectives ........................................................................................................ 154
Topic 1: Add a Person ............................................................................................... 155
Topic 2: Update Bio/Demo Information – Names ....................................................... 161
Topic 3: Update Bio/Demo Information – Addresses ................................................. 169
Topic 4: Enter Ethnicity Data for a Student ................................................................ 178
Topic 5: Enter Languages Information for a Student .................................................. 179
Topic 6: Enter Decedent Information ......................................................................... 181
Topic 7: Enter Emergency Contacts Information for a Student ................................... 182
Topic 8: Enter External System ID Information for a Student ..................................... 186
Chapter 3 – Residency & Citizenship ................................................................ 187
Chapter Objectives ........................................................................................................ 187
Topic 1: Entering Residency Information ................................................................... 188
Topic 2: Entering Citizenship Information .................................................................. 194
Topic 3: Entering Visa/Permit Information .................................................................. 196
Chapter 4 – Managing Service Indicators .......................................................... 199
Chapter Objectives ........................................................................................................ 199
Topic 1: Manually Assign a Service Indicator ............................................................. 200
Topic 2: Manually Release a Service Indicator .......................................................... 205
Topic 3: Edit a Service Indicator ................................................................................ 206
Topic 4: View Service Indicator Audits ....................................................................... 207
Topic 5: Assign Service Indicators in Batch ............................................................... 210
Chapter 5 – Student Groups ............................................................................... 212
Chapter Objectives ........................................................................................................ 212

7/18/2019 CS-AD Reference Guide
http://slidepdf.com/reader/full/cs-ad-reference-guide 5/284
CUNYfirst Admissions Reference Guide
Last Updated: 6/18/2013 CUNYfirst Admissions5
Topic 1: Add Student to Student Group ..................................................................... 213
Topic 2: Inactivate a Student in a Student Group ....................................................... 216
Topic 3:
View Students in Student Group .................................................................. 219
Topic 4: Create a New Student Group ....................................................................... 221
Chapter 6 – Managing FERPA............................................................................. 223
Chapter Objectives ........................................................................................................ 223
Topic 1: Use FERPA Quick Entry .............................................................................. 224
Topic 2: View FERPA Display .................................................................................... 229
Chapter 7 – Additional Campus Community Student Services ....................... 231
Chapter Objectives ........................................................................................................ 231
Topic 1: Health Services ~ Overview ......................................................................... 232
Topic 2: View/Update Immunization Records ............................................................ 235
Topic 3: Disability Services ~ Overview ..................................................................... 237
Topic 4: Enter/Update Disability Data ........................................................................ 238
Topic 5: Veterans Affairs ~ Overview ......................................................................... 245
Topic 6: Update Military Status Information ............................................................... 248
Chapter 8 – Three C’s .......................................................................................... 251
Chapter Objectives ........................................................................................................ 251
Topic 1: Three C’s Overview ...................................................................................... 252
Topic 2: Assign Communications to an Individual ...................................................... 254
Topic 3: View an Individual Communication Summary ............................................... 260
Topic 4: View an Individual Communication Detail ..................................................... 262
Topic 5: Assign a Checklist to a Person ..................................................................... 264
Topic 6: View a Person Checklist Summary .............................................................. 268
Topic 7: View a Person Checklist Detail..................................................................... 270
Topic 8: Update a Checklist Item (By Item) ................................................................ 271
Topic 9: Update a Checklist Item (By Person) ........................................................... 273
Course Summary ........................................................................................................... 274
Appendix: CEMLI Search - Repository .............................................................. 275
Appendix: Readmit Student - Scenarios ............................................................ 280
Program Action: RADM (Readmit) ...................................................................... 280

7/18/2019 CS-AD Reference Guide
http://slidepdf.com/reader/full/cs-ad-reference-guide 6/284
CUNYfirst Admissions Reference Guide
Last Updated: 6/18/2013 CUNYfirst Admissions6
How to use this Reference GuideThis reference guide l contains sections that include information on business processes related toStudent Financials. The first section is the introduction of the module. It is followed by Chapter and
Topic sections which include a step summary, detailed information, field definitions and screen shots.
Below is a description for each section type contained in the reference guide.
Introduction
The Introduction contains conceptual information on Student Financials. It also describes thebusiness processes that are used in Student Financials.
Module Objectives
The Module Objectives contain a bulleted list of the learning objectives for the module.
UnitThe Unit information consists of a high-level explanation of a single content area of a module.
Chapter
The Chapter information includes introductory concepts that are needed for understanding thebusiness processes that are presented in the chapter.
Chapter Objectives
The Chapter Objectives contain a bulleted list of the learning objectives for the chapter.
Topic
Topics instruct the user on executing a specific business process.
Step Summary
Step Summary consists of the high-level steps needed to complete a business process.
Detailed Information
Detailed information contains a complete narrative of a business process, including screenshots andtables of items (field names) with their definitions and/or selection criteria.
Appendix
Appendix may contain the following types of information:
Running ReportsStep-by-step guide to running reports and processes in CUNYfirst

7/18/2019 CS-AD Reference Guide
http://slidepdf.com/reader/full/cs-ad-reference-guide 7/284
CUNYfirst Admissions Reference Guide
Last Updated: 6/18/2013 CUNYfirst Admissions7
Introduction to CUNYfirst Student Admissions Module
CUNYfirst Admissions allows for basic application processing to handle a student’s acceptance of
admission, matriculate them into a program, and share the information with the CUNYfirst StudentRecords module. The implementation of CUNYfirst Admissions will occur in two distinct phases. Inthe first phase, CUNY will use interfaces to import admissions data from UAPC into CUNYfirst. Thesecond phase will consist of the full implementation of CUNYfirst Admissions functionality. Thistraining guide provides instruction for the first phase of CUNYfirst Admissions.
CAS InterfaceThe CUNYfirst Admissions module is designed to work collaboratively with existing CUNYapplications and new interface feeds to process important application information. CUNY’s existingUndergraduate Applications Processing Center (UAPC) will remain in place for the initial evaluation ofthe application. The information is then moved into CUNYfirst Admissions via the CUNY AdmissionsSystem (CAS) interface feed for undergraduates.
ASTA InterfaceThe Advanced Student Transfer Admissions (ASTA) interface will be used for Transfer students andpossibly additional applicant populations.
Disclaimer: Please note that even though select imagesand fields are masked, the student data in this guide isfictional.
Module ObjectivesUpon completion of this course, learners will be able to:
Understand the modules of Campus Solutions
Understand CUNYfirst Academic Structure
Describe the Admissions process from Application to Matriculation
Review CAS/ASTA results
Conduct search/match in CUNYfirst
Add new applications
Maintain applications
Update application status
View student data Add non-degree applications
Readmit, Reactivate, and Reallocate students
Navigate the student services center
Update residency
Update citizenship
Manage service indicators
Manage student groups
Understand the Three C’s

7/18/2019 CS-AD Reference Guide
http://slidepdf.com/reader/full/cs-ad-reference-guide 8/284
CUNYfirst Admissions Reference Guide
Last Updated: 6/18/2013 CUNYfirst Admissions8
Unit I: Foundations of Student Admissions
Unit Introduction
Student Admissions components consist of the managing of processes and maintenance and datarelating to admission activity, including:
Applying for Admission
Acceptance of Admission (Pre-Matriculation)
Updating Residency
Updating External Education
Placement in Student Groups
Placement of Service Indicators
Matriculating
The Foundation of Student Admissions provides an overview of key concepts and terminology usedthroughout the CUNYfirst Student Admissions module. It provides a basic understanding offunctions within the module, and the types of processing used to manage and maintain the student’sacademic record.
In addition to managing a student’s data using Student Admissions ds module, users will also be
able to view and use specific student’s integrated data through Campus Community functionality,which is reviewed in Unit III.
Unit ObjectivesUpon completion of this unit, learners will understand the following:
Modules of Campus Solutions
Academic Structure
Student Admissions Overview

7/18/2019 CS-AD Reference Guide
http://slidepdf.com/reader/full/cs-ad-reference-guide 9/284
CUNYfirst Admissions Reference Guide
Last Updated: 6/18/2013 CUNYfirst Admissions9
Chapter 1: Modules of Campus SolutionsCampus Solutions is a tool specifically designed for activities related to higher education.
Chapter ObjectivesUpon completion of this chapter, learners will be able to:
Understand Modules of Campus Solutions.
“A” Student’s Record in Campus Solutions.

7/18/2019 CS-AD Reference Guide
http://slidepdf.com/reader/full/cs-ad-reference-guide 10/284
CUNYfirst Admissions Reference Guide
Last Updated: 6/18/2013 CUNYfirst Admissions10
Topic 1 - Modules of Campus SolutionsWhile this chart below shows each module as separate and equal, in reality the different sections of
Campus Solutions interrelate, and overlap.
.
• Admissions Module: This module establishes a core record for a potential student. Oncethe student matriculates, the maintenance of the student’s information becomes theresponsibility of Student Records. Admissions Module :
• Creates and maintains applicant data• Creates most student records which Includes prospective students and applicants• Contains core data such as demographics, test scores, and program information• Tracks the applicant’s r ecord through the entire admissions process, including the
final decision (admit, deny or withdrawal)• Matriculate or formally admit the student
Information entered in the Admissions module carries over to Student Records.
• Student Records Module: Information about the student’s program, course enrollment,grades, and advisors is in the Student Records module. The Student Records moduleenables you to:
• Tracks a student’s career through graduation, transfer, or withdrawal • Contains information about the student’s program, course enrollment, grades, and
advisors.• Automates/tracks registration functions• Houses course catalog and class schedule information.

7/18/2019 CS-AD Reference Guide
http://slidepdf.com/reader/full/cs-ad-reference-guide 11/284
CUNYfirst Admissions Reference Guide
Last Updated: 6/18/2013 CUNYfirst Admissions11
• Financial Aid Module: Supports the awarding of federal/local need-based aid, departmentalaid, and scholarship funds
• Financial Aid module also awards and deposits the aid to a student’s records
• Student Financials Module: Provides functionality to maintain financial account informationfor all students the functionality for maintaining financial account information includescalculating tuition and fees, receivables, and processing refunds. The Student FinancialModule:
• Calculates tuition & fees• Tracks student disbursements, charges, and both third party and collection payments• Calculates refunds based on both university and government refund policies• Provides current picture of a student’s account, including account history
• Campus Community Module: The core of PeopleSoft Campus Solutions System. Itprovides a single source of data that is shared by offices across the campus
• Stores data common to any person associated with CUNY which includes Bio/Demo
(Biographic/Demographic) data:• Student Services Center• Update Bio-Demo Information• Residency/Citizen• Service Indicators• Student Groups• FERPA• Health Services• Veteran’s Affairs• Disability Services
• Self Service: Self Service through the Student Center, the Faculty Center, and the AdvisorCenter enables users to manage a wide range of activities:
• Student Center: Add or drop classes, check grades, view class schedules, and viewand pay bills.
• Faculty Center: Obtain class rosters, track attendance, and submit grades.• Advisor Center: View a student’s academic progress and enroll students

7/18/2019 CS-AD Reference Guide
http://slidepdf.com/reader/full/cs-ad-reference-guide 12/284
CUNYfirst Admissions Reference Guide
Last Updated: 6/18/2013 CUNYfirst Admissions12
Topic 2 - “A” Student’s Record in Campus Solutions: Following is a representation of “a” student record in relation to all the Campus Office and Campus
Solutions Modules that view and update it. In terms of a student’s record across the campuses,each office has in roads into Student Records Module, each office provides information that helps incompleting the entire career cycle for a student i.e. admissions, registration, graduation etc. Astudent’s record is the core of all the activity: information is added or updated to a student’s recordand viewed by these units to complete their business processes.
Admissions Office admits and matriculates students using Admissions Module.
Registrar Office maintains the catalog, manages enrollment, updates academic statisticsand runs reports using Student Records Module.
Bursar Office records a bill that was paid using Student Financials Module
Financial Aid Office updates the student’s record with monies that were received from adisbursement using Financial Aid Module.
Faculty and Advisors track attendance assign grades and evaluate student progress usingFaculty Center and/or Advisor Center from Self Service Module. Students enroll in classes,view their academic information, request transcripts and apply for graduation using StudentCenter from Self Service Module.
Campus/Administrative Offices view student’s record and apply stops/holds as neededusing Campus Community Module.

7/18/2019 CS-AD Reference Guide
http://slidepdf.com/reader/full/cs-ad-reference-guide 13/284
CUNYfirst Admissions Reference Guide
Last Updated: 6/18/2013 CUNYfirst Admissions13
Chapter 2: Understanding Academic StructureThis chapter will provide an overview of all of Academic structure from both student and institutionalperspectives. Academic Structure can be understood as two interrelated parts, the structure thatdefines a student’s program of study (campus, college or school, major) and the structure that definescourses and classes and the departments that own them.
Chapter ObjectivesUpon completion of this chapter, learners will understand the following:
The Components of Academic Structure
The relationship between a Student Record and Academic Structure

7/18/2019 CS-AD Reference Guide
http://slidepdf.com/reader/full/cs-ad-reference-guide 14/284
CUNYfirst Admissions Reference Guide
Last Updated: 6/18/2013 CUNYfirst Admissions14
Topic 1 - Academic Structure: Academic Structure can be understood as two interrelated parts, the structure that defines a student’sprogram of study (campus, college or school, major) and the structure that defines courses and
classes and the departments that own them.
Student Structure:The key terms within Academic Structure as it relates to a student’s plan of study are Academic
Institution, Academic Career, Academic Program, Academic Plan, and Academic Sub--‐plan.
Academic Institution is an independent entity that has its own set of rules andbusiness processes. At the CUNY, each campus is an academic institution.
Academic Career is a grouping of all academic work undertaken by a student at acampus that the school groups into a single academic record, for exampleUndergraduate, Graduate, Law.
Academic Program is an academic entity to which a student applies, is accepted,and from which the student graduates. For example, Undergraduate-Degree,Undergraduate-Non-Degree is considered academic programs.
Academic Plan is an area of study (major) within a career or a program. Plansresulting in degrees are directly associated to the program. Other types of plans(such as minors or certificates) may be associated to the Career or to the Program,depending on how they are offered.
Academic Sub-plan is an area of further specialized studies directly within an Academic Plan, for example, a concentration.
Following is a partial view of Queens College’s Academic Structure as it relates to a student’s
program of study

7/18/2019 CS-AD Reference Guide
http://slidepdf.com/reader/full/cs-ad-reference-guide 15/284
CUNYfirst Admissions Reference Guide
Last Updated: 6/18/2013 CUNYfirst Admissions15
Course/Class Structure:The key terms within Academic Structure that define courses and classes and the departments thatown them are Academic Organization, Academic Group, Subject Area, Course, and Class.
Academic Organizations are units that define how an academic institution isorganized from an administrative perspective, and are organized in a tree structure.Subject areas and courses are attached to Academic Organizations, and AcademicOrganizations are used to structure security for the course catalog.
Academic Groups are the highest-‐level division within an Academic Institution foradministering courses. Academic groups are used to define schools and divisions.
Subject Areas are the specific areas of instruction within a particular AcademicOrganization in which courses are offered.
Courses are the instruction a student receives in a particular subject area. Coursesrepresent what is being taught, the structure for reporting, the credit awarded forsuccessful study, and how it will be presented.
Classes are specific instances of a course at a defined time and place within aparticular term. Students enroll into classes.
Following is a partial view of Queens College’s complete Academic Structure.

7/18/2019 CS-AD Reference Guide
http://slidepdf.com/reader/full/cs-ad-reference-guide 16/284
CUNYfirst Admissions Reference Guide
Last Updated: 6/18/2013 CUNYfirst Admissions16
Topic 2 - Academic Structure & a Student Record Academic Structure as it relates to Student Records can be understood via student’s perspective andinstitutional perspective.
Student’s Perspective of Student Records:From a Student's perspective, here is an illustration of how an individual's academic record is builtand tracked through Student Records. Once matriculated , a student is admitted to an academiccareer and an academic program within that career:
The student then declares an academic plan (major and/or minor) and, possibly, an academic sub-plan (specialization/concentration of study):
The student then enrolls in terms/sessions for classes to fulfill requirements to obtain a degree, orpossibly a non-degree-related certificate:

7/18/2019 CS-AD Reference Guide
http://slidepdf.com/reader/full/cs-ad-reference-guide 17/284
CUNYfirst Admissions Reference Guide
Last Updated: 6/18/2013 CUNYfirst Admissions17
The student brings coursework, test credit, and other transfer credit taken outside of the College,which is integrated into the student's academic record. Transfer credit is recorded in the student'scareer term records. From a student perspective, the structure of CUNYfirst Student Record s looks like the diagram shown below:

7/18/2019 CS-AD Reference Guide
http://slidepdf.com/reader/full/cs-ad-reference-guide 18/284
CUNYfirst Admissions Reference Guide
Last Updated: 6/18/2013 CUNYfirst Admissions18
Institutional Perspective:From an Institutional perspective, the structure of CUNYfi rs t A cademic Structure looks like the
diagram shown below. The Academic structure and its elements are the building blocks forCUNYfirst Campus Solutions:
We have multiple academic institutions at CUNY and in CUNYfirst they are defineduniquely for example QNS01 stands for Queens College and KCC01 stands forKingsborough Community College
Academic programs are a part of academic careers and the academic institutions.
Subject areas are part of academic organizations and the academic institutions.
Academic plans and academic sub-plans are subdivisions of academic programs.
Degree records are directly linked to academic plans.
Courses and classes are subdivisions of subject areas and are directly linked toterms/sessions:

7/18/2019 CS-AD Reference Guide
http://slidepdf.com/reader/full/cs-ad-reference-guide 19/284
CUNYfirst Admissions Reference Guide
Last Updated: 6/18/2013 CUNYfirst Admissions19

7/18/2019 CS-AD Reference Guide
http://slidepdf.com/reader/full/cs-ad-reference-guide 20/284
CUNYfirst Admissions Reference Guide
Last Updated: 6/18/2013 CUNYfirst Admissions20
Chapter 3: Overview of Student Admissions
Student Admissions components consist of the managing of processes and maintenance and data
relating to students’ admission activity.
Chapter ObjectivesUpon completion of this chapter, learners will understand the basics of the following processes:
Applying for Admission
Acceptance of Admission (Pre-Matriculation)
Updating Residency
Updating External Education
Placement in Student Groups
Placement of Service Indicators Matriculating
Admissions Process
xxxx

7/18/2019 CS-AD Reference Guide
http://slidepdf.com/reader/full/cs-ad-reference-guide 21/284
CUNYfirst Admissions Reference Guide
Last Updated: 6/18/2013 CUNYfirst Admissions21
Topic 1 - Overview of Student Admissions
Diagrams and flow here

7/18/2019 CS-AD Reference Guide
http://slidepdf.com/reader/full/cs-ad-reference-guide 22/284
CUNYfirst Admissions Reference Guide
Last Updated: 6/18/2013 CUNYfirst Admissions22
Unit II: CUNYfirst Student Admissions
Unit Introduction
This course provides instruction on how to
Unit Objectives:Upon completion of this course, the learner will be able to:
set up Term Values
create a new term, associated

7/18/2019 CS-AD Reference Guide
http://slidepdf.com/reader/full/cs-ad-reference-guide 23/284
CUNYfirst Admissions Reference Guide
Last Updated: 6/18/2013 CUNYfirst Admissions23
Chapter 1 - Review CAS & ASTA Application Results
The CAS and ASTA Application Summary View pages are customized pages designed specifically tomeet CUNY’s needs. These pages capture data elements that are required to complete dailyadmissions business processes at CUNY. The CAS Search Match and Post Process, run by UAPC,populates data on these pages.
When provided by the applicant, the CAS and ASTA interfaces will create the following Bio Demodata on the appl ication :
Names
Contact Information
Ethnicity
Languages
External System ID Residency Data
Military Status
Citizenship
Visa Permit Data
Education information
Chapter ObjectivesUpon completion of this chapter, individuals will be able to:
Review CAS pages Review ASTA pages

7/18/2019 CS-AD Reference Guide
http://slidepdf.com/reader/full/cs-ad-reference-guide 24/284
CUNYfirst Admissions Reference Guide
Last Updated: 6/18/2013 CUNYfirst Admissions24
Topic 1: Review CAS Application SummaryThe business process for all freshman applicants who have been processed via UAPC involves
automatically creating an admissions application in CUNYfirst. The CAS interface will insert anapplication program status of “Admitted” with a corresponding program action reason “UAPC”.Periodic updates to the application will be indicated by a program action of “DATA” with acorresponding program action reason “UAPC”.
The CAS Search Match Post process creates an application record for all applicants that are notsuspended. Suspended records are reviewed and resolved at UAPC. Application records that areposted after the CAS Search Match Post process should be reviewed by the campus.
The ASTA interface process will insert an application program status of “Admitted” with acorresponding program action reason “UAPC”. Periodic updates to the application will be indicatedby a program action of “DATA” with a corresponding program action reason “UAPC”. The ASTASearch Match Post process creates an application record for all applicants that are not suspended.
Campuses should also review the application data.
.

7/18/2019 CS-AD Reference Guide
http://slidepdf.com/reader/full/cs-ad-reference-guide 25/284
CUNYfirst Admissions Reference Guide
Last Updated: 6/18/2013 CUNYfirst Admissions25
Step Summary
To review the CAS Application Summary View pages, navigate to: Student Admissions > Application Maintenance > Application Summary View > CAS Application Summary View
1. On the CAS Student Data Load page, enter search criteria to locate and select the desiredrecord.
2. Review applicant choices and admission offers on the CAS Student Choice/Allocation page.
3. Review data collected for Institutional Research at CUNY on the CAS InstitutionalResearch page.
4. Review specific academic information on the CAS Educational Information page.
Detailed Information
The CAS Student Choice/Allocation pageThe Student Choice section shows the order in which an applicant ranked their choices of CUNYinstitutions. The Allocation section shows the institutions that have accepted the applicant.

7/18/2019 CS-AD Reference Guide
http://slidepdf.com/reader/full/cs-ad-reference-guide 26/284
CUNYfirst Admissions Reference Guide
Last Updated: 6/18/2013 CUNYfirst Admissions26
The CAS Institutional Research page
The CAS Institutional Research page was designed to meet CUNY’s data collection needs. Thispage holds information pertaining to nationality, birthplace, and language.
7/18/2019 CS-AD Reference Guide
http://slidepdf.com/reader/full/cs-ad-reference-guide 27/284
CUNYfirst Admissions Reference Guide
Last Updated: 6/18/2013 CUNYfirst Admissions27
The CAS Educational Information page
The CAS Educational Information page collects information regarding specific academic subjects,Teachers’ Academy, Regents exams, and the CUNY Honors program.

7/18/2019 CS-AD Reference Guide
http://slidepdf.com/reader/full/cs-ad-reference-guide 28/284
CUNYfirst Admissions Reference Guide
Last Updated: 6/18/2013 CUNYfirst Admissions28
Topic 2: Review ASTA Application SummaryThe business process involves automatically creating an admissions application in CUNYfirst for allTransfer Applicants who have been processed via UAPC, along with other student applicant
populations that will be determined throughout CUNYfirst admissions implementation.
The ASTA interface process will insert an application program status of “Admitted” with acorresponding program action reason “UAPC”. Periodic updates to the application will be indicatedby a program action of “DATA” with a corresponding program action reason “UAPC”.
The ASTA Search Match Post process creates an application record for all applicants that are notsuspended. Campuses should review the application data. The ASTA Search Match and PostProcess, run by UAPC, populates data on the ASTA Application Summary View pages.
Step Summary
To review the ASTA Application Summary View pages, navigate to: Student Admissions > ApplicationMaintenance > Application Summary View > ASTA Application Summary View.
1. On the ASTA Student Data Load page, enter search criteria to locate and select the desiredrecord.
2. Review applicant choices and admission offers on the ASTA Student Choice/Allocation page.
3. Review data collected for Institutional Research at CUNY on the ASTA InstitutionalResearch page.
4. Review specific academic information on the ASTA Educational Information page.

7/18/2019 CS-AD Reference Guide
http://slidepdf.com/reader/full/cs-ad-reference-guide 29/284
CUNYfirst Admissions Reference Guide
Last Updated: 6/18/2013 CUNYfirst Admissions29
Detailed Information
The ASTA Student Choice/Allocation pageThe Student Choice section shows the order in which an applicant ranked their choices of CUNYinstitutions. The Allocation section shows the institutions that have accepted the applicant.

7/18/2019 CS-AD Reference Guide
http://slidepdf.com/reader/full/cs-ad-reference-guide 30/284
CUNYfirst Admissions Reference Guide
Last Updated: 6/18/2013 CUNYfirst Admissions30
The ASTA Institutional Research page
The ASTA Institutional Research page was designed to meet CUNY’s data collection needs. Thispage holds information pertaining to nationality, birthplace, and language.

7/18/2019 CS-AD Reference Guide
http://slidepdf.com/reader/full/cs-ad-reference-guide 31/284
CUNYfirst Admissions Reference Guide
Last Updated: 6/18/2013 CUNYfirst Admissions31
The ASTA Educational Information page
The ASTA Educational Information page collects information regarding GPA, credits attempted,credits earned, credits in progress, and admissions average.

7/18/2019 CS-AD Reference Guide
http://slidepdf.com/reader/full/cs-ad-reference-guide 32/284
CUNYfirst Admissions Reference Guide
Last Updated: 6/18/2013 CUNYfirst Admissions32
Chapter 2 – Search/Match in CUNYfirst
Chapter ObjectivesUse the CUNYfirst Search/Match feature to search through the database for students, applicants, andemployees. The Search/Match component uses a number of search criteria to identify existingindividuals in the database. The integrity of the database is maintained by taking measures tominimize duplicate or multiple records. Searches can be conducted using any amount of data values.
The Search/Match process m ust b e run b efore add ing an ind iv idua l to CUNYfi rst .
Topic 1: Conduct Search/Match
Step Summary
The Search/Match page can be found by navigating to: Student Admissions > Application Entry >Search/Match.
Alternate Path: Campus Community > Personal Information > Search/Match
To conduct a Search/Match:1. Navigate to the Search/Match component
2. Select Person for the Search Type. NOTE: “Person” is the correct Search Type to select fora student. The value “Applicant” will only be used by Human Resources, as it refers to anemployee applying to CUNY.
3. Select the Search Parameter for Admissions: PSCS_ADMISSIONS.
4. Click Search to access the Search Criteria Page.
5. Select the Search Results Parameter for Admissions: PSCS_ADM_RESULTS
6. Enter desired Search Criteria in select Search Fields. Note that you must tab out of the lastfield you enter in order to access the Search button . Click Search to access results of amatch or potential match.
7. If a potential match is not found, a message will appear with this information. The newapplicant can be added to CUNYfirst. I f a potentia l matc h is foun d, note that the Search
Resul ts gr id might inc lude the same ID mul t ip le t imes . If the name field is included in thesearch result code selected, the search returns rows for each name type and effective datethat match the search criteria entered .
8. Click the Results Tabs, Additional Information Tab, and Detail link for more informationabout a particular search/match result.

7/18/2019 CS-AD Reference Guide
http://slidepdf.com/reader/full/cs-ad-reference-guide 33/284
CUNYfirst Admissions Reference Guide
Last Updated: 6/18/2013 CUNYfirst Admissions33
Detailed Information
When the Search button is clicked, CUNYfirst searches only for the data specified. It filters thesearch orders defined for the Search Parameter selected on the Search/Match page. For example, ifSearch/Match finds at least one potential matching ID at search order number 10, it will stop thesearch and display the results obtained at search order number 10. (An example of search ordermight be: First, Last, Birthday, ID). If no potential matching IDs are found, the search continues to thenext search order number. The Selective Search button will allow searches for a specific ordernumber.
Always begin by conducting a Search/Match to determine if a record already exists for an applicantbefore creating anything new. An individual might already exist in CUNYfirst as an applicant, student,alumni, employee, instructor (or some combination of any/all). To avoid duplicate records,Search/Match must always be used prior to adding any new individuals to the database . For thisreason, Search/Match is a very important step in maintaining the integrity of the CUNYfirst database.If duplicate records are found, further identification is needed to determine if the duplicate recordsneed to be deleted or if a new record should be created.
It is advantageous to enter as much information as possible into the Search Criteria page.Search/Match will use all the possible search orders to find a match in the database.
Use the MMDDYYYY format for the Date of Birth.
Most searches use the First Name and Last Name fields. Note: Do not search usingonly the First Name. When uncertain of the correct spelling, enter a partial value. Forexample, enter only the first few letters of the name.
Enter the Social Security Number without hyphens in the National ID field.
Carry IDIf the record exists, select the ID to automatically carry the ID forward to the following CUNYfirstpages in order to review or update the record. When the Carry ID button is selected, the Empl ID is
carried over to the next search page accessed. If the record does not exist, the person does notcurrently exist in CUNYfirst.
The Search/Match pageThe Search/Match search page is different from a standard search page in CUNYfirst. Search/Matchpermits definition of search parameters that administrators can use to identify potential duplicate IDs.
The Search Type should be set to: Person. There will be more than one Search Parameter listed inthe system, each for different purposes. For instance, setting the search parameter to:“CS_Admissions”, brings up standard search fields such as First Name, Last Name, DOB, and IDtypes.

7/18/2019 CS-AD Reference Guide
http://slidepdf.com/reader/full/cs-ad-reference-guide 34/284
CUNYfirst Admissions Reference Guide
Last Updated: 6/18/2013 CUNYfirst Admissions34
The following table describes the fields on the Search/Match page of the Application Entry component:
Field Description
Search TypeCUNYfirst is configured to use the Person searchtype for admissions applicants.
Search Parameter
The set of search parameter fields selected becomethe Search Result Rule on the next page.
If desired, further specify: Begins With: - The value must begin with this
data. When selecting this value, the StartPosition field begins with a default value of 1,which cannot be modified. The Number ofCharacters fields are available to define.
Contains: - The value must contain this data andcan be preceded or followed by other data. TheStart Position and Number of Characters fieldsfollow the same rules as above.
Equals: The value must be exactly equal to thisdata.
Ad Hoc SearchThis functionality will not be used in Admissions until
Wave 3.
DescriptionCUNYfirst allows search by descriptive words. Ifsearching using this field, the best practice is toenter uniquely descriptive words or phrases.

7/18/2019 CS-AD Reference Guide
http://slidepdf.com/reader/full/cs-ad-reference-guide 35/284
CUNYfirst Admissions Reference Guide
Last Updated: 6/18/2013 CUNYfirst Admissions35
The Search Criteria page - Search Criteria area
The Search Criteria section will display each of the fields associated with the parameters selected onthe Search Criteria page. To enable the Search button at the top of the page, enter the first few
letters of the First and Last name, DOB or National ID and tab out of the field. Selective Searchbuttons become available when Tab is used to exit a field.

7/18/2019 CS-AD Reference Guide
http://slidepdf.com/reader/full/cs-ad-reference-guide 36/284
CUNYfirst Admissions Reference Guide
Last Updated: 6/18/2013 CUNYfirst Admissions36
The following table describes the fields on the Search Criteria page of the Application Entry component:
General top Search Criteria area
Field Description
Search Result Code This code dictates the criteria for displaying theresults of this search.
User Default Use this tool to set up code as default item.
Search The Search button will only become available whendata is entered into a search field and the user TABSout of the field.
Clear All This button will clear all data from search fields.
Carry ID Reset Click the Carry ID Reset button at the top of thepage if the wrong person has been selected. Thiswill prevent that particular ID from being carriedforward into subsequent pages.
Search Fields Enter data into desired field to conduct searchmatch.
Search by Order Number area
CUNYfirst searches only for the data specified. It filters the search orders that are defined for theSearch Parameter selected on the Search/Match page. For example, if Search/Match finds at leastone potential matching ID at search order number 10 (example: search order 10 searches by First,Last, Birthday, and ID), it will stop the search and display the results obtained at search order number10. If no potential matching IDs are found, the search continues to the next search order number,(example: search order 20 searches by SSN only). To search using a narrow Search Order number,use the Selective Search button for that order number. The search orders are listed below. They are
also listed at the bottom of the Search Criteria page.
These Selective Search buttons search by the following information:
7/18/2019 CS-AD Reference Guide
http://slidepdf.com/reader/full/cs-ad-reference-guide 37/284
CUNYfirst Admissions Reference Guide
Last Updated: 6/18/2013 CUNYfirst Admissions37
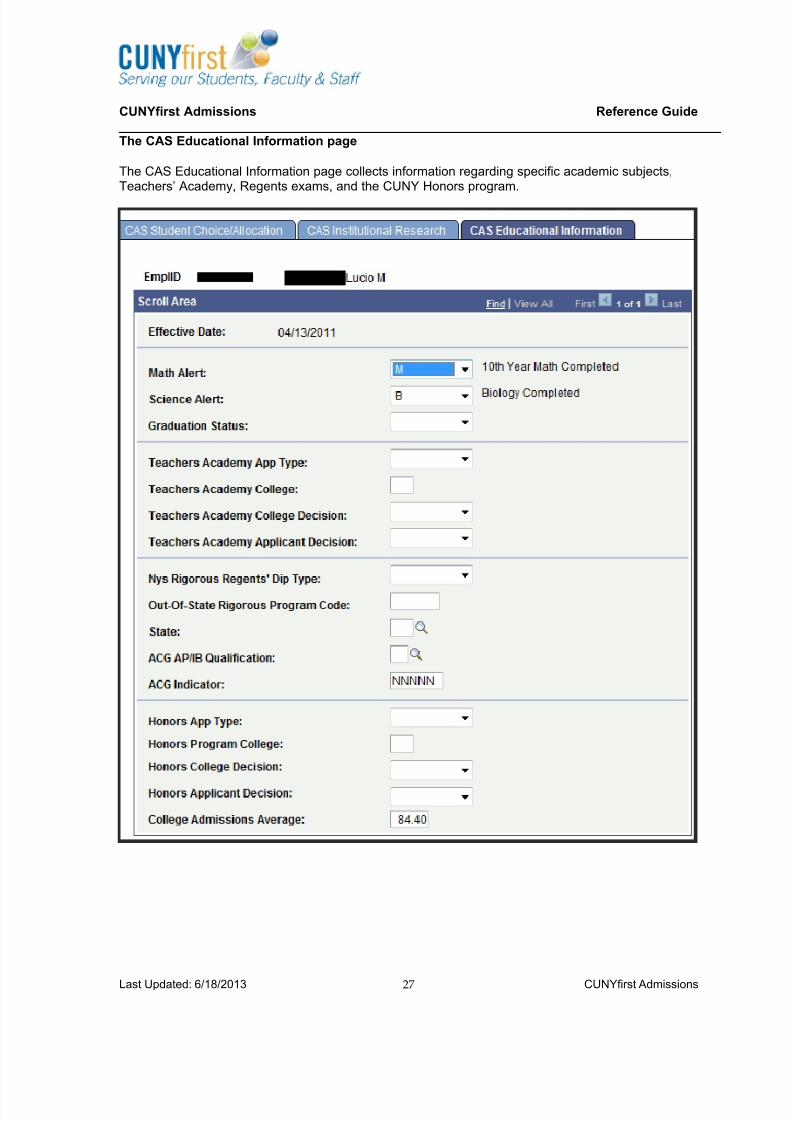
Field Description
Search Order 10 Name, DOB, External Sys Num, and SSN.
Search Order 20 SSN Only.
Search Order 30 External ID Num Only.
Search Order 40 Name, and DOB.
Search Order 50 Name Only.
The following table describes the fields on the Search Criteria page of the Application Entry component:
Field Description
Search Result Code This code dictates the criteria for displaying theresults of this search.
Carry ID Reset Click the Carry ID Reset button at the top of thepage if the wrong person has been selected toprevent their ID information from being carriedforward into subsequent pages.

7/18/2019 CS-AD Reference Guide
http://slidepdf.com/reader/full/cs-ad-reference-guide 38/284
CUNYfirst Admissions Reference Guide
Last Updated: 6/18/2013 CUNYfirst Admissions38
The Search Results page
The Search Results page will retrieve all potential matches. In the image below, the Search hasretrieved 45 ID’s under “Name Only”. CUNYfirst will look for a match in the first three letters of the
first name and the first five of the last name.
The search result code contains all of the information regarding how to display the IDs retrieved bySearch/Match. It also contains data that will help determine whether an ID already exists for thedesignated person.
The Search Results page displays the search results, details of records returned in the search, andoffers the click Carry ID option. This instructs the system to carry the ID forward through differentpages.

7/18/2019 CS-AD Reference Guide
http://slidepdf.com/reader/full/cs-ad-reference-guide 39/284
CUNYfirst Admissions Reference Guide
Last Updated: 6/18/2013 CUNYfirst Admissions39
The Number of ID's found field displays the number of IDs that met the search criteria. This numbermay be smaller than the number of rows returned in the Search Results grid because the grid mightinclude the same ID multiple times. If the name field is included in the search result code selected, hesearch returns rows for each name type and effective date that match the search criteria entered . For
instance, one row could show an individual’s primary name and another row could show theirpreferred name, but both are the same individual with the same ID. If the National ID field is includedin the search result code, the search returns rows for each national ID entered for the recordmatching the search criteria.
The Search Order Number field indicates the search order number at which results were found andindicates how precise the search was—the lower the number, the more restrictive the search and thegreater the chance of having found duplicate IDs. This number can be used as an indicator of howclose the returned IDs match the criteria entered. After viewing the personal information, navigateback to the original browser window where the Search Results page is displayed.
The following table describes the fields on the Search/Results page of the Application Entry
component:
The Results tab
Field Description
Number of ID's Found Displays the number of IDs that met the searchcriteria. This number may be smaller than thenumber of rows returned in the Search Results gridbecause the grid might include the same ID multipletimes. If the name field is included in the searchresult code selected, the search returns rows foreach name type and effective date that match thesearch criteria entered. If the National ID field isincluded in the search result code, the search
returns rows for each national ID entered for therecord matching the search criteria.
Search Order Number Indicates the search order number at which resultswere found. Also indicates the precision of thesearch – the lower the number, the more restrictivethe search and the greater chance of having foundduplicate IDs.
Detail link The Detail link appears if the selected search resultcode was configured to provide the user with a linkto a page for more information about an ID.
The Additional Information tab
Field DescriptionPerson Organizational Summary link Click the Person Organizational Summary link to
access the Person Organizational Summary pageand review the status of this person's record.

7/18/2019 CS-AD Reference Guide
http://slidepdf.com/reader/full/cs-ad-reference-guide 40/284
CUNYfirst Admissions Reference Guide
Last Updated: 6/18/2013 CUNYfirst Admissions40
Field Description
Relations With Institution link Click the Relations With Institution link to access theCampus Solutions Relations With Institution Detailpage to determine the type of relations that theindividual has with the institution and verify searchresult accuracy.
Note that the Relations With Institution link appearsonly if Student Administration or ContributorRelations is selected on the Installation Table(INSTALLATION_TB1) page.

7/18/2019 CS-AD Reference Guide
http://slidepdf.com/reader/full/cs-ad-reference-guide 41/284
CUNYfirst Admissions Reference Guide
Last Updated: 6/18/2013 CUNYfirst Admissions41
Chapter 3 – Add New ApplicationThe Add Application (UGRD) process involves bypassing the CAS method and permits direct entry ofan admissions application using the CUNYfirst Application Entry functionality.
When an applicant submits an application to CUNY and pays the required application fee, aSearch/Match must be performed to determine if the applicant already exists in CUNYfirst, or if this isa new student that will be assigned an EMPLID. If the applicant does exist in CUNYfirst, then thecurrent record should be updated with the proper information.
If the applicant does not exist in CUNYfirst, then a new record can be created using the ApplicationEntry component. Once the application record is saved, CUNYfirst assigns the student an EMPLID.The record exists within the Admissions components until the student is matriculated. From this pointon, the information is moved into the Student Records components. Any updates to student datamust occur in the Application Maintenance component or other areas of Student Records andCampus Community.
Please note that CUNYfirst refers to a student as a “ Person”, which is the correct value to selectwhen entering a student application. The value “Applicant” refers to a potential employee of CUNY,not a student application.
Note: In some cases, campuses may want to use the Add Application functionality to add Non-Degree students to CUNYfirst. Since Quick Admit creates a record, but does not create anapplication, institutions may wish to have the applications on record for data reporting. In this case,these instructions for Adding an Application should be followed and the correct Non-Degree valuesshould be selected for Program, Plan, and Student Groups.
Chapter ObjectivesUpon completion of this chapter, learners will be able to:
add applications manually

7/18/2019 CS-AD Reference Guide
http://slidepdf.com/reader/full/cs-ad-reference-guide 42/284
CUNYfirst Admissions Reference Guide
Last Updated: 6/18/2013 CUNYfirst Admissions42
Topic 1: Add New Application
Step Summary
The Add Application Person Information page can be found by navigating to: Student Admissions> Application Entry > Add Application.
To manually add an application:1. Retain the Application Number of 0000000. Please be certain you DO NOT enter an
application number! CUNYfirst will automatically generate the appropriate number.
2. Retain the default ID NEW. Once the application is saved, “NEW” will become the EMPLID.
3. Select the Academic Institution and the Academic Career . For Senior Colleges, AcademicCareers should be UGRD or GRAD. Community Colleges will have a UGRD value. Forinstruction in adding Non-Degree/Direct Admit students, please refer to the Non-DegreeStudent chapter.
4. Click the Add button. This will bring the user to the first application page: Biographical
Details.
5. On the Biographical Details Page, add Personal Information, Biographical History, NationalID, Contact Information, and Citizenship.
6. On the Regional Page, select pertaining to country code, ethnic group, and military status.
7. On the Application Program Data Page, select data relevant for Program, Action/Reason,Plan/Sub-Plan, and Application Center/Type/Method.
8. On the Application Data page, select the Application Center, Admit Type, Academic Level,and Application Method. The record can be saved after entering all relevant data on the Application Data page, since the Application School/Recruiting page does not have any fieldsthat are required by the system. The record cannot be saved prior to entering the relevantdata on the Application Data page.
9. On the Application School/Recruiting Page, enter data relevant to Last School Attendedand Graduation Date if desired. (Note that this page is not being officially used by Admissions in Wave 1).
10. Click Save. Once the record is saved, the student is assigned an Empl ID. Note: A warningmay appear if the information closely matches another record in CUNYfirst. If a Search/Matchhas not been done, open a new window and navigate to the Search Match component toverify that the student does not have a record in CUNYfirst. If a Search/Match has beenperformed and it has been established that this is a new student, click OK to ignore warningand proceed with saving.
11. Although the application has been saved, there are additional steps needed to complete theapplication process. When information is available, the following areas should be updated:
a. External Education Updates
b. Student Group placement
c. Service Indicator placement
d. Residency Update

7/18/2019 CS-AD Reference Guide
http://slidepdf.com/reader/full/cs-ad-reference-guide 43/284
CUNYfirst Admissions Reference Guide
Last Updated: 6/18/2013 CUNYfirst Admissions43
Detailed Information
The first two pages in the Add Application component store personal information regarding theapplicant (the Biographical Details and Regional pages). This data is shared between all applications
for the applicant. Updating biographical data on these pages will update the information throughoutthe system. The last three pages in this component (the Application Program Data, Application Dataand Application School/Recruiting pages) are application-specific pages. Though they sharebiographical data, each also contains information unique to that respective area.
As dis cus sed in the Search/Match chapter, always search CUNYfirst for an exist ing
record b efore add ing an app l ica t ion .
Once it has been determined that the application can be entered into CUNYfirst, begin by creating theapplicant with biographical and demographical data.
The Application Entry page
NOTE: In adding a new application for a student who does not have an EMPL ID, we must retain the default “00000000” Application Number and “NEW” ID. After saving the application, these valueswill automatically change to an assigned application number and EMPL ID.
The following table describes the fields on the Biographical Details page of the Add Application component:
Field Description
Application Nbr This numeric value is automatically generated by thesystem when a Course Offering is saved. Althoughthis number can be modified, end users should NOT change this value. To do so will have a negativeimpact on the entire system.

7/18/2019 CS-AD Reference Guide
http://slidepdf.com/reader/full/cs-ad-reference-guide 44/284
CUNYfirst Admissions Reference Guide
Last Updated: 6/18/2013 CUNYfirst Admissions44
Field Description
ID If the student does not yet have an ID, the key dialogprompt says NEW in the ID field to indicate theaddition of a new person as well as a newapplication.
If the student is found through a search/match andthe Carry ID option is selected, key dialog promptlists that person’s ID. If the student exists in thedatabase, check to see if an application has alreadybeen entered. Do no t enter a duplicateapplication. Navigate to the Maintain Applications component to determine if the person has anycurrent applications.
Academic Institution Indicates the specific college within the CUNYsystem.
Academic Career The academic level of the course, such asundergraduate, graduate, professional, etc.
Note: At this time, Academic Careers should beUGRD or GRAD. Non-Degree students will beprocessed through Quick Admit.

7/18/2019 CS-AD Reference Guide
http://slidepdf.com/reader/full/cs-ad-reference-guide 45/284
CUNYfirst Admissions Reference Guide
Last Updated: 6/18/2013 CUNYfirst Admissions45
The Biographical Details page
Use this page to enter the applicant's basic biographical and demographical data.

7/18/2019 CS-AD Reference Guide
http://slidepdf.com/reader/full/cs-ad-reference-guide 46/284
CUNYfirst Admissions Reference Guide
Last Updated: 6/18/2013 CUNYfirst Admissions46
The following table describes the fields on the Biographical Details page of the Add Application component:
Person Information group
Field Description
Effective Date Enter an effective date for the application to thisacademic program if different from the default date.
Note: If the application is being entered after thestart date of the admit term, backdate the effectivedate to a date prior to the start date of the admitterm. This is necessary in order to Term Activate
the student once they are matriculated.
Person Information Please note that CUNYfirst refers to a student as a“Person”, which is the correct value to select whenentering a student application. The value “Applicant”
refers to a potential employee of CUNY, not astudent application.
Enter the person’s Prefix, First Name, Last Name,Middle Name, Suffix and Date of Birth.
Date of Birth Enter student’s date of birth.
Birth Information Link Although the system will save the application recordwithout the Date of Birth, this information must beentered as per CUNY business processes. If thestudent is international, either the offices of Admissions or SEVIS can enter the data.
CAS/ASTA will populate the Birth Country but not
the Birth Location (city). For International Students,this data will need to be manually entered for the DS2019.
Campus ID This field is not being used at this time.
Effective Date Refers to the effective date of this row ofinformation. i.e.: Marital Status and Gender.
Biographical History If the information is available, enter the applicant’sMarital Status and Gender.
National ID This is the student’s Social Security number. If anincorrect SSN is entered, the row should be deleted
before attempting to rewrite and save.

7/18/2019 CS-AD Reference Guide
http://slidepdf.com/reader/full/cs-ad-reference-guide 47/284
CUNYfirst Admissions Reference Guide
Last Updated: 6/18/2013 CUNYfirst Admissions47
Contact Information group
Field Description
Address Type An address must be entered in each of the fouraddress types used by CUNY in order to beconsistent with the CAS/ASTA interface. Theinterfaces are populating the following four addresstypes: Mailing, Home, Permanent and Billing.
The address may be the same in each area, exceptin the case of International students. For thesestudents, Mailing refers to the U.S. address andPermanent refers to their International address. Apartment numbers can be entered in the Address 1field.
Effective Date Refers to the effective date of this row ofinformation.
Status Indicates whether the address is Active or Inactive.
Country Indicates Country of that particular address.
Address Links to additional page for address detail entry.
Phone - Type Phone type includes a range of values, such asBusiness, Campus, Home, Cell, etc.
Country/Preferred These fields are not being used at this time.
Email – Type Email type includes a range of values, such asBusiness, Campus, Dorm, Home, and Other.
Visa/Permit Data – Link Enter all information pertaining to Visa type.Detailed information reviewed in SEVIS courseoffering.
Citizenship – Link Enter all information pertaining to Citizenship.Detailed information reviewed in SEVIS course
offering.

7/18/2019 CS-AD Reference Guide
http://slidepdf.com/reader/full/cs-ad-reference-guide 48/284
CUNYfirst Admissions Reference Guide
Last Updated: 6/18/2013 CUNYfirst Admissions48
Visa/Permit Data page – Link from Biographical Details page
The following table describes the fields on the Visa/Permit Details page linked to the BiographicalDetails page:
Field Description
Country USA
Type Select the appropriate Visa Type.
Status The default status is “Applied”. SEVIS will changethe status to “Granted” at the appropriate time.
Note: Additional fields are not being used at
this time.
7/18/2019 CS-AD Reference Guide
http://slidepdf.com/reader/full/cs-ad-reference-guide 49/284
CUNYfirst Admissions Reference Guide
Last Updated: 6/18/2013 CUNYfirst Admissions49
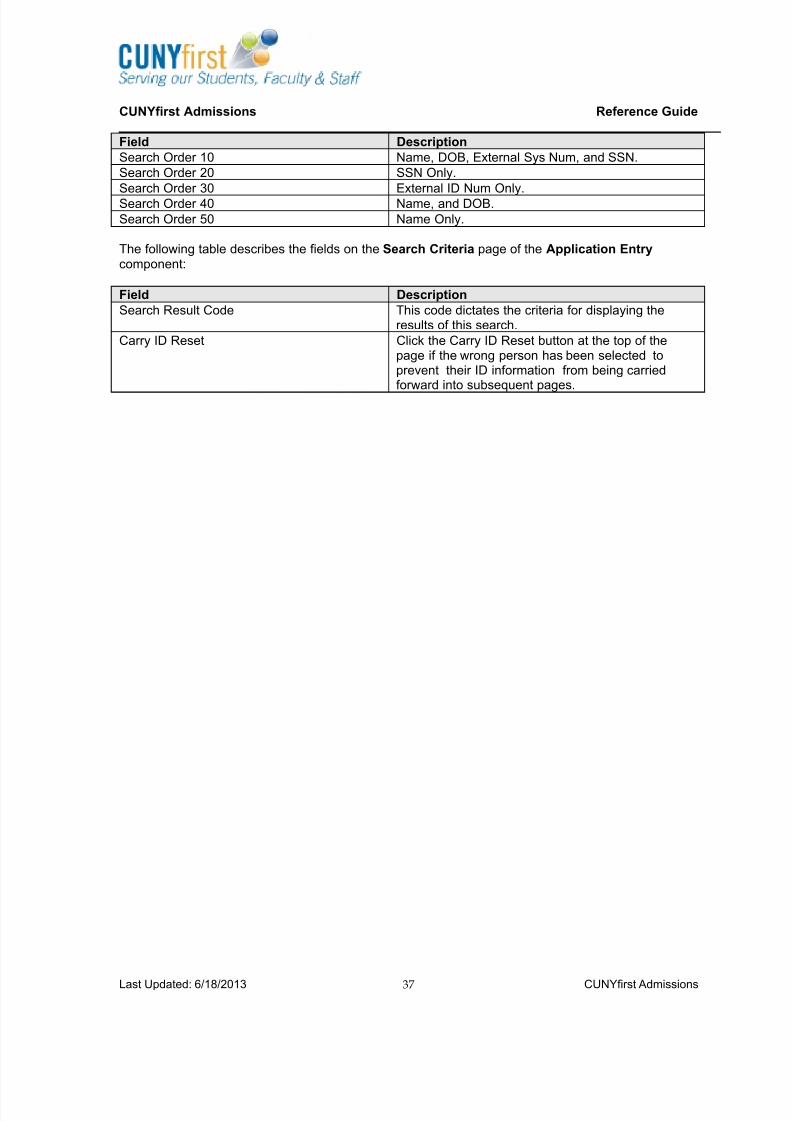
Citizenship page – Link from Biographical Details page
The following table describes the fields on the Citizenship page linked to the Biographical Detailspage:
Field Description
Country Enter USA unless student is an Internationalapplicant. In this case, use the look-up tool to selectthe appropriate country code.
Citizenship Status If this is an International Applicant, two citizenshiprows must be created. One must indicate theircitizenship status in the USA. The additional rowmust indicate their country of originating citizenship.
All citizenship status selections that are being populated via CAS/ASTA are detailed below.
Citizenship Status – Native Enter for a US citizen
Citizenship Status – Alien Permanent Enter for Parolee, Refugee, Granted Asylum
Citizenship Status – Alien Temporary Enter for Student Visa
Citizenship Status – Permanent Resident Enter for Permanent Resident non-citizen
Citizenship Status – Not Indicated Enter if citizenship was not answered
Citizenship Status – Temporary Visa Holder Enter if a Temporary Visa holder, H-1, H-2, H-3, H-4
Citizenship Status – Undocumented Enter for undocumented students
Citizenship Status – Expired Visa Enter for students with an Expired Visa

7/18/2019 CS-AD Reference Guide
http://slidepdf.com/reader/full/cs-ad-reference-guide 50/284
CUNYfirst Admissions Reference Guide
Last Updated: 6/18/2013 CUNYfirst Admissions50
Passport Information These fields are not being used at this time.
The Regional pageUse this page to add region specific information pertaining to country code, ethnic group, and militarystatus.
The following table describes the fields on the Regional page of the Add Application component:
Field Description
Regulatory Region Enter the regulatory region. USA is the default value.
Ethnic group Select the appropriate value for the applicant’sethnic group. Values for the default RegulatoryRegion of ‘USA’ are stored on the Ethnic Groupspage. These values are shared between HR andCS. They are configured and maintained by HR.
If the student is Hispanic or Latino, check thecheckbox and select the appropriate Hispanic/Latinoethnic group. CAS/ASTA will populate thecheckbox, when appropriate, but will not deliver theHispanic/Latino ethnic group. Information regardinggathering this data from current students will bedelivered at a later date.
Primary Check the primary box to indicate primary ethnicity.

7/18/2019 CS-AD Reference Guide
http://slidepdf.com/reader/full/cs-ad-reference-guide 51/284
CUNYfirst Admissions Reference Guide
Last Updated: 6/18/2013 CUNYfirst Admissions51
Field Description
IPEDS/Percentage CUNY is not using these fields at this time.
History Section CUNY is not using this section at this time.
The Application Program Data pageUse this page to enter the applicant's program of interest and related information. Much of the data onthis page comes from user defaults. This page is also be used to matriculate an applicant. Allapplications must be tied to an academic career and program. Lower level tracking is contingent uponeach institution’s business process.
NOTE: The default value for Program Action of “APPL” must be changed to “ADMT” (see redbox) for all applicants. The APPL program action is not being used for CUNY admissionprocessing.
The following table describes the fields on the Application Program Data page of the AddApplication component:
Program Data group

7/18/2019 CS-AD Reference Guide
http://slidepdf.com/reader/full/cs-ad-reference-guide 52/284
CUNYfirst Admissions Reference Guide
Last Updated: 6/18/2013 CUNYfirst Admissions52
Field Description
Effective Date Enter an effective date for the application to thisacademic program if different from the default date.
If entering the application after the start date of theadmit term, backdate the effective date to a dateprior to the start date of the admit term in order toterm activate the student once they are matriculated.
Admit Term If the student has been admitted, enter the admitterm in which the applicant is expected to enroll.Define admit terms on the Term Table page. This isa user default field.
Expected Graduation Term Enter the term in which the student is expected tograduate.
Academic Program Enter or update the academic program to which theperson is applying. The available programs pertaineach CUNY Academic Institution.
After matriculating the applicant, CUNYfirst copiesthe application program data to the Program/Plantables in CUNYfirst Student Records.
Campus Enter or update the campus to which the person isapplying within the academic institution. At this time,“MAIN” is the appropriate selection for all campuses.
Academic Load Select the academic load that the applicant will betaking on if admitted. Values for this field includeFull-Time and Part-Time.
Joint Program Select the Joint Program check box if the applicantis applying to a joint program.
Dual Program This field becomes available when the Joint Programcheck box is selected. Enter the joint academicprogram. Define dual programs on the AcademicProgram page.
Program Status Group
Field Description
Status This field automatically displays “ Applicant” for anew application.
Action Date The default for the action date is the date the actionwas entered into CUNYfirst.
Program Action This field automatically displays “APPL” - Application - for a new application. This value mustbe manually changed from “APPL” to “ADMT”. The APPL program action is not being used forCUNY admissions processing.

7/18/2019 CS-AD Reference Guide
http://slidepdf.com/reader/full/cs-ad-reference-guide 53/284
CUNYfirst Admissions Reference Guide
Last Updated: 6/18/2013 CUNYfirst Admissions53
Field Description
Action Reason When action reasons are associated with theselected program action, choose the appropriate
reason value. Action reasons permit a briefexplanation of the program action. For example, forthe action WADM (Administrative Withdrawal), couldinclude a reason of Incomplete Application.
Evaluation Link This link is not being used at this time.
Career Number Available if the Program Action field contains thevalue Readmit Application. To readmit this applicantinto an existing career, select the proper careernumber here. An admit type must be identified whenthe Readmit Processing Required check box hasbeen selected on the Admit Type Table page.CUNYfirst readmits the applicant into the career thatcorresponds to the career number selected.
Plan Data group
Field Description
Academic Plan Enter the academic plan identified within thisapplication. An academic plan can be any majorarea of study. The available plans pertain to eachCUNY institution and program.
Sub-Plan If a subplan (concentration) exists for the academicplan, enter the subplan here.
Transfer to area – ( Additional Values are not in use for Wave 1.)
Field Description
Education Transfers user to the Education Page.
Test Results Transfers user to the Test Results Page.
Residency Transfers user to the Residency Page.
Application Maintenance Transfers user to the Application Maintenancecomponent.

7/18/2019 CS-AD Reference Guide
http://slidepdf.com/reader/full/cs-ad-reference-guide 54/284
CUNYfirst Admissions Reference Guide
Last Updated: 6/18/2013 CUNYfirst Admissions54
The Application Data page
Use this page to enter additional application data, such as the application date, application center,admit type, academic level, and application method. CUNYfirst stores data on this page at the
application level, as opposed to storing it under a person or academic program. This data is relevantto all academic programs within this application.
The following table describes the fields on the Application Data page of the Add Application component:
Field Description
Application Center Enter the application center that will process thisapplication. This information helps track the officemanaging specific applications. All CAS/ASTAinterface records will show “UAPC” for theapplication center.
Admit Type Enter the Admission Code (Admit Type) for thisapplication (First-Year, Transfer, Readmit, etc.).

7/18/2019 CS-AD Reference Guide
http://slidepdf.com/reader/full/cs-ad-reference-guide 55/284
CUNYfirst Admissions Reference Guide
Last Updated: 6/18/2013 CUNYfirst Admissions55
Field Description
Application Date The default for the application date is CUNYfirstdate that the application was received.
Academic Level Select the academic level to which the applicant isapplying for admission. (First Year, LowerFreshman, Upper Freshman, etc).
Created On The default is the CUNYfirst system date on whichthis application record was created.
Notification Plan Specify whether this student should be on a regularor special notification track. Values include Early Admit, Regular, and Rolling.
Prior Application Select this check box if this applicant previouslyapplied to this career.
Application Method For manual entries, select “Hardcopy”.
Additional Information, File Information, and Application Fee Information CUNY is not using these fields at this time.
Transfer To Use this link to access additional student datapages.

7/18/2019 CS-AD Reference Guide
http://slidepdf.com/reader/full/cs-ad-reference-guide 56/284
CUNYfirst Admissions Reference Guide
Last Updated: 6/18/2013 CUNYfirst Admissions56
The Application School/Recruiting page
Use this page to record all of the applicant's last-school-attended data.
NOTE: The new appl ication record mu st be SAVED after data entry on this page. It sho uld not
be saved prior to this p age or after this page. If a Search/Match warning appears after clicking“Save”, click Cancel and open a new window to conduct a Search/Match prior to saving theapplication record.

7/18/2019 CS-AD Reference Guide
http://slidepdf.com/reader/full/cs-ad-reference-guide 57/284
CUNYfirst Admissions Reference Guide
Last Updated: 6/18/2013 CUNYfirst Admissions57
The following table describes the fields on the Application School/Recruiting page of the AddApplication component:
School Information group
Field Description
Last School Attended Use the look-up tool to select the externalorganization (high school) from which the studenthas graduation or will graduate from. Whensearching for external organizations, it is helpful toenter part of the description, city and state (if known)to help identify the appropriate institution.
Graduation Date Enter the known or anticipated graduation date.
Recruiting Information group
Field DescriptionRecruiting Information This area is not being used by CUNY at this time.
Recruiting Categories This area is not being used by CUNY at this time.
Note: A warning may appear if the information closely matches another record in CUNYfirst.
If a Search/Match has not been done, open a new window and navigate to the SearchMatch component to verify that the student does not have a record in CUNYfirst.
If a Search/Match has been performed and it has been established that this is a newstudent, click OK to ignore the warning and proceed with saving.

7/18/2019 CS-AD Reference Guide
http://slidepdf.com/reader/full/cs-ad-reference-guide 58/284
CUNYfirst Admissions Reference Guide
Last Updated: 6/18/2013 CUNYfirst Admissions58
Note that upon saving, CUNYfirst generates the EMPL ID:
Please remember that although the application has been saved, these addit ion al steps needed
to co mplete the appl icat ion proc ess. When information is available, the following areasshould be updated:
a. External Education Updates
b. Student Group placement
c. Service Indicator placement
d. Residency Update

7/18/2019 CS-AD Reference Guide
http://slidepdf.com/reader/full/cs-ad-reference-guide 59/284
CUNYfirst Admissions Reference Guide
Last Updated: 6/18/2013 CUNYfirst Admissions59
Topic 2: Add New Application – Second BA
All applications follow the process detailed in Topic 1, but there are a few distinctions to make when
adding an applicant for a second Bachelor’s Degree.
Please select the following values to add this type of application:
Admit Term – First Term of Second BA Application Data Tab – Select Admit Type “3” Application School/Recruiting Tab – Select the appropriate External Org ID for the Last School Attended Add student to Student Group - PDBA
Next steps follow standard business process: Matriculate, Residency Update, Term Activate, Transfer
Credit Evaluation, Enrollment Appointments, etc .
Please refer to the Student Records Reference Guide for instruction in these areas. As always,refer to campus policies for any additional procedures and requirements.

7/18/2019 CS-AD Reference Guide
http://slidepdf.com/reader/full/cs-ad-reference-guide 60/284
CUNYfirst Admissions Reference Guide
Last Updated: 6/18/2013 CUNYfirst Admissions60
Chapter 4 – Maintain Applications
Chapter ObjectivesUpon completion of this chapter, learners will be able to:
update general bio-demo Information
update name changes and types
update addresses
update program/plan information
update education information
Topic 1: Update Bio/Demo Information - General
Step Summary
The Add Application Person Information page can be found by navigating to: Student Admissions> Application Maintenance > Maintain Applications
To update an application:1. Enter the appropriate Search criteria. The Academic Institution must be selected to
proceed.
2. Click the Include History checkbox. Note: Include History display all rows of data: current,future, and history. Users can add new data to an existing record. Correct History providesaccess to existing rows of data in the database and display all effective-dated rows. Userscan add new data and update all rows, including history rows. Security access to Correct
History may be limited.3. Select the appropriate record. Update the appropriate information on desired tabs/pages.
Note: Remember to use the Add a New Row icon (+) in order to preserve historical data anduse effective dating for new information.
4. Edit Personal Information, Biographical History, National ID, Contact Information, andCitizenship on the Biographical Details page.
5. Enter country code, ethnic group, and military status on the Regional page.
6. Enter program data on the Application Program Data page.
7. Enter additional application data, such as the application date, application center, admit type,and application method on the Application Data page
8. Record all of the applicant's last-school-attended data on the Application School/Recruiting page.
9. The Application Student Response page and the Program Addition page are not beingused at this time.
10. Click Save.
11. Note: For detailed information on updating Names and Address, please refer to that specifictopic in this document. For more detailed instruction on updating other Bio/Demoinformation, please refer to the Campus Community Reference Guide.

7/18/2019 CS-AD Reference Guide
http://slidepdf.com/reader/full/cs-ad-reference-guide 61/284
CUNYfirst Admissions Reference Guide
Last Updated: 6/18/2013 CUNYfirst Admissions61
.
Detailed Information
After an application has been entered and saved, the Application Maintenance component must beused for updates. Data in this component is stored at the application level, as opposed to theapplicant or program level. This data is relevant to all academic programs applied to with thisapplication. An application must first be entered into the system through the Application Entrycomponent before it can be edited or modified in the Application Maintenance component.
Search Page

7/18/2019 CS-AD Reference Guide
http://slidepdf.com/reader/full/cs-ad-reference-guide 62/284
CUNYfirst Admissions Reference Guide
Last Updated: 6/18/2013 CUNYfirst Admissions62
The Maintain Application component uses all of the same pages reviewed in the Add Application
chapter, with the inclusion of a Names link (to edit/add names), a separate Addresses page, and anarrow icon to show more pages.
All pages and fields in this component are defined in the Add Application chapter.

7/18/2019 CS-AD Reference Guide
http://slidepdf.com/reader/full/cs-ad-reference-guide 63/284
CUNYfirst Admissions Reference Guide
Last Updated: 6/18/2013 CUNYfirst Admissions63
Topic 2: Update Bio/Demo Information – Names
Step Summary - To Change an Existing NameNavigate to: Campus Community > Personal Information (Student) > Biographical Information(Student) > Names.
1. Enter Search Criteria, click the Include History checkbox and click Search. If multipleresults are returned, select the appropriate record.
2. In the Current Name area, click the Name History link.
3. Click the Add a New Row Icon.
4. Within the new field (note the effective dated row), click the Edit Name link.
5. Enter the new name information.
6. Click OK. Review new name information in the area correctly associated with the new
effective date. Click OK again.7. Click Save.
Detailed Information
The Names link on the Biographical Details page

7/18/2019 CS-AD Reference Guide
http://slidepdf.com/reader/full/cs-ad-reference-guide 64/284
CUNYfirst Admissions Reference Guide
Last Updated: 6/18/2013 CUNYfirst Admissions64
Name History is used to edit an existing Name Type
Add a New Row to add data and preserve history

7/18/2019 CS-AD Reference Guide
http://slidepdf.com/reader/full/cs-ad-reference-guide 65/284
CUNYfirst Admissions Reference Guide
Last Updated: 6/18/2013 CUNYfirst Admissions65
The Names Detail page is used to make name changes.

7/18/2019 CS-AD Reference Guide
http://slidepdf.com/reader/full/cs-ad-reference-guide 66/284
CUNYfirst Admissions Reference Guide
Last Updated: 6/18/2013 CUNYfirst Admissions66
The Name Type History page contains name history with associated effective dates.
New Primary Name information appears on main Names page.

7/18/2019 CS-AD Reference Guide
http://slidepdf.com/reader/full/cs-ad-reference-guide 67/284
CUNYfirst Admissions Reference Guide
Last Updated: 6/18/2013 CUNYfirst Admissions67
Step Summary - To Add a New Name TypeNavigate to: Campus Community > Personal Information (Student) > Biographical Information(Student) > Names.
1. Enter Search Criteria, click the Include History checkbox and click Search. If multipleresults are returned, select the appropriate record.
2. To add a new Name Type, use the Add/Change a Name area.
3. Use the pull-down menu to select a Type of Name. Enter the name information.
4. Within the new field (note the effective dated row), click the Edit Name link.
5. Enter the new name information.
6. Click Submit.
7. Review the new name type, which now appears in the Current Name section. Click Save.
Detailed Information
Type of Name drop-down menu permits selection of new Name Type.

7/18/2019 CS-AD Reference Guide
http://slidepdf.com/reader/full/cs-ad-reference-guide 68/284
CUNYfirst Admissions Reference Guide
Last Updated: 6/18/2013 CUNYfirst Admissions68
Names Page permits entry of new Name Type information.

7/18/2019 CS-AD Reference Guide
http://slidepdf.com/reader/full/cs-ad-reference-guide 69/284
CUNYfirst Admissions Reference Guide
Last Updated: 6/18/2013 CUNYfirst Admissions69
Clicking Submit moves new data to Current Names section.

7/18/2019 CS-AD Reference Guide
http://slidepdf.com/reader/full/cs-ad-reference-guide 70/284
CUNYfirst Admissions Reference Guide
Last Updated: 6/18/2013 CUNYfirst Admissions70
Topic 3: Update Bio/Demo Information – Addresses
Step Summary – To Add a New Address Type
The Bio/Demo page can be found by navigating to: Student Admissions > Application Maintenance >Maintain Applications.
Alternate navigation: Campus Community > Personal Information (Student) > BiographicalInformation (Student) >Addresses/Phones > Address
To Add A New Address Type1. Enter Search Criteria, click the Include History checkbox and click Search. If multiple
results are returned, select the appropriate record.
2. To add a new Address type , select the Address Type checkbox appearing under the AddAddress Types column.
3. Click the Edit Address link in the Add Address area.
4. Enter address information. If applicable, click the Override Address Verification checkbox.
5. Click OK.
6. Review the new address information in the Add Address area.
7. Click Submit. Note the new address type now exists in the Current Address section.
8. Click Save.

7/18/2019 CS-AD Reference Guide
http://slidepdf.com/reader/full/cs-ad-reference-guide 71/284
CUNYfirst Admissions Reference Guide
Last Updated: 6/18/2013 CUNYfirst Admissions71
Detailed Information
To Add a New Address – Select a Type and click the Edit Address link
Enter Address Page

7/18/2019 CS-AD Reference Guide
http://slidepdf.com/reader/full/cs-ad-reference-guide 72/284
CUNYfirst Admissions Reference Guide
Last Updated: 6/18/2013 CUNYfirst Admissions72

7/18/2019 CS-AD Reference Guide
http://slidepdf.com/reader/full/cs-ad-reference-guide 73/284
CUNYfirst Admissions Reference Guide
Last Updated: 6/18/2013 CUNYfirst Admissions73
New address information appears. Click Submit to finalize process.

7/18/2019 CS-AD Reference Guide
http://slidepdf.com/reader/full/cs-ad-reference-guide 74/284
CUNYfirst Admissions Reference Guide
Last Updated: 6/18/2013 CUNYfirst Admissions74
New address information has been entered and saved.

7/18/2019 CS-AD Reference Guide
http://slidepdf.com/reader/full/cs-ad-reference-guide 75/284
CUNYfirst Admissions Reference Guide
Last Updated: 6/18/2013 CUNYfirst Admissions75
Step Summary – To change an existing address
Navigate to Campus Community > Personal Information (Student) > Biographical Information(Student) >Addresses/Phones > Address .
To Change an Existing Address:1. Enter Search Criteria, click the Include History checkbox and click Search. If multiple
results are returned, select the appropriate record.
2. To view address history or make changes to an existing address, click the Edit/ViewAddress Detail link.
3. Click the Add a New Row icon.
4. Enter address information.
5. Click OK. Review the new address information associated with the new effective date.
6. Click OK and click Save.
Detailed Information
Click the Address link or tab to access the Address page. Please note that on this page, onlythe f i rs t two rows of address data wi l l d isp lay unt i l the View Al l but ton is c l icked.

7/18/2019 CS-AD Reference Guide
http://slidepdf.com/reader/full/cs-ad-reference-guide 76/284
CUNYfirst Admissions Reference Guide
Last Updated: 6/18/2013 CUNYfirst Admissions76
Screen after clicking Edit/View Address Detail. Add a New Row to enter new address data.

7/18/2019 CS-AD Reference Guide
http://slidepdf.com/reader/full/cs-ad-reference-guide 77/284
CUNYfirst Admissions Reference Guide
Last Updated: 6/18/2013 CUNYfirst Admissions77
Select the Update Address link associated with the new Effective Date.
Add the new address info

7/18/2019 CS-AD Reference Guide
http://slidepdf.com/reader/full/cs-ad-reference-guide 78/284
CUNYfirst Admissions Reference Guide
Last Updated: 6/18/2013 CUNYfirst Admissions78
Review the new address information in the correct effective dated row.
New address information is saved upon clicking OK and previous address has been retained.

7/18/2019 CS-AD Reference Guide
http://slidepdf.com/reader/full/cs-ad-reference-guide 79/284
CUNYfirst Admissions Reference Guide
Last Updated: 6/18/2013 CUNYfirst Admissions79
Topic 4: Update Program/PlanWhen an applicant decides to change their intended Academic Program and/or Plan, a new effected
dated row must be added on the admissions program stack.
Note that there is a different navigation and process for changing a Program/Plan once a student hasbeen matriculated. This functionality exists within the Student Records component. Please refer tothe Student Records Reference Guide for detailed information.
Step Summary
The Application Program Data page can be found by navigating to: Student Admissions > Application Maintenance > Maintain Applications
To change a program/plan:1. On the Maintain Applications search page, enter search criteria to locate the correct record.
2. On the Application Program Data page, click the Add a New Row icon.
3. Update the Program Action field to PRGC (Program Change) or PLNC (Plan Change).
4. Use the Look-Up Tool to select the appropriate admission code (admit type).
5. Click Save.
Detailed Information
The Application Program Data page

7/18/2019 CS-AD Reference Guide
http://slidepdf.com/reader/full/cs-ad-reference-guide 80/284
CUNYfirst Admissions Reference Guide
Last Updated: 6/18/2013 CUNYfirst Admissions80
Topic 5: Update External Education
The Education pages enable users to view, enter or a range of data related to previous degrees,courses and/or subjects.
Details regarding which tabs/fields are used by CUNY at this time are associated below with theappropriate screen images.
Step Summary
The Education page can be found by navigating to: Student Records > Transfer Credit Evaluation >External Education.
Alternate Navigation Path: Student Admissions > Application Maintenance > Maintain Applications > Application Program Data Page > Transfer To: Education.
To Update the External Education Pages:
1. Follow the designated navigation to the External Education pages.
2. Use the External Education page to view school details and enter information regardingexternal careers, courses, and subjects.
3. Use the Courses and Degrees page to enter external course defaults and additionalinformation regarding external courses and degrees.
4. Click Save.

7/18/2019 CS-AD Reference Guide
http://slidepdf.com/reader/full/cs-ad-reference-guide 81/284
CUNYfirst Admissions Reference Guide
Last Updated: 6/18/2013 CUNYfirst Admissions81
Detailed Information
The External Education PageUse the External Education Page to view or update information from external institutions. This imagebelow shows the data that is populated from a CAS load.
The following table describes the fields for School Details, Career Data and Transcript Status onthe External Education page.
Field Description

7/18/2019 CS-AD Reference Guide
http://slidepdf.com/reader/full/cs-ad-reference-guide 82/284
CUNYfirst Admissions Reference Guide
Last Updated: 6/18/2013 CUNYfirst Admissions82
Field Description
External Org ID The source of the external data. The system automatically populates thisfield from the initial add of Last School Attended on the Prospect
School/Recruiting page or the Application School/Recruiting page if avalue is entered. You can edit this field.
Note: Many col leges and univ ersi t ies have both a 4 and 6-Digi t ATP
Code. The 6 digi t code is only for External Organization with career
equals to ‘High School’ , which ind icates they grant GED dip lomas.
Use the 4 digi t co de for col lege-level cou rse work .
Checklist Item Update Select this check box to indicate that the checklist that relates to this rowof external data (or transcript) is updated when you run the Checklist ItemUpdate Automated process. If you enter a value of Received in the Actionfield in the Transcript Status group box, this check box is automaticallyselected when you save the page.
School Details, SchoolCharacteristics, SchoolCodes
Click the arrow to the left of School Details to view information about theexternal organization. This data is populated from the Organization Tablepage and the Organization School Data page.
Term Type Select the term type that is used by the external organization. Values forthis field are delivered as translate values. Example: semester.
Term Year Enter the term year that is relevant to this external data entry.
External Term Enter the external term to which this data relates. For example, if this is aFall transcript, enter FALL in the External Term field. The available valuesdepend on what you enter in the Term Type field. Define external termson the External Term Table page.
This field is optional; leave it blank until you are ready to enter transfercredit information.
Academic Level Select the academic level of the person at the time the external data wascollected or issued. This value might be different from the currentacademic level.
From/To Date Enter the dates of attendance for the career data
Comment Link Click to access the External Education Comment page and entertranscript comments.
Transcript Status: Action Desired appears by default. Select the appropriate action for thetranscript. Available values are Desired and Received. Leave the value asDesired if you are entering data for a transcript that was requested. Selecta value of Received if the data is for a transcript that has been received.
Transcript Date Enter the date that the transcript was issued.
Date Received Enter the date that your office received the transcript.
Transcript Type Select a transcript type.
Transcript Status Select a transcript status.
Data Source Select the data source.
Data Medium Select the format in which the data was received.

7/18/2019 CS-AD Reference Guide
http://slidepdf.com/reader/full/cs-ad-reference-guide 83/284
CUNYfirst Admissions Reference Guide
Last Updated: 6/18/2013 CUNYfirst Admissions83
Transcript Status
CAS transcript status load generally populates as “Desired” action.
This value should be updated to “Received” by UAPC or the campus when the appropriatedocumentation has been received.
Transcript Summary region: Term Tab, GPA/Units Tab, Rank Tab
This area is not b eing pop ulated by the interfaces at this time, but the detai ls below are
prov ided for in form at iona l purposes.
Use the Transcript Summary region to enter GPA (grade point average), units, and rank details forthis data, which can be reported on a transcript, self-reported, or reported from another source.Multiple transcripts (or similar data) can be entered under an external organization.
One or more summaries can be created for a single transcript. The summary GPA, units, and rank of
a person’s entire academic career can be entered here, or new rows can be inserted to createindividual summaries that capture data for various segments of a person’s academic career. Enter asmany summary types as desired. This structure permits entry of the GPA, rank, and units for eachyear of school, in addition to the overall summary, on one transcript.
Transcript Summary: Term Tab
The following table describes the fields for the Transcript Summary: Term Tab on the ExternalEducation page.
Field Description
Summary Type Select the summary type from the following values: Comp, Grade 9,Grade 10, Grade 11, Grade 12, HS Overall.

7/18/2019 CS-AD Reference Guide
http://slidepdf.com/reader/full/cs-ad-reference-guide 84/284
CUNYfirst Admissions Reference Guide
Last Updated: 6/18/2013 CUNYfirst Admissions84
Field Description
External Term, Ext Year Select the external term and year relevant to the summary
Acad Level Select the student's academic level at the time that this information
was current, which may not be the student's current academic level.
Institution Values include all CUNY institutions.
Transcript Summary: GPA/Units Tab
The following table describes the fields for the Transcript Summary: GPA/Units Tab on theExternal Education page.
Field Description
Summary Type Defaults from Term tab.
GPA Type Select the GPA type that is used by the external organization.
Ext GPA Enter the external GPA from the reported information. If the external GPAvalues for this GPA type have been defined on the GPA Type Table page,those values will appear here. Otherwise, enter the appropriate GPA value.
Conv GPA If the GPA conversion rules have been defined, the system automaticallyconverts the GPA based on the External GPA entered. If the GPA conversion
rules have not been defined, the value entered in the External GPA field iscopied to the Conv GPA field.
Unit Type Select the appropriate Unit Type, such as No Credit, Units, Vocational, etc.
Attempted Enter the number of units that the student attempted.
Completed The value in the Completed field is automatically populated from the value inthe Attempted field. It can be overridden. Enter the number of units that thestudent completed if it is different from the number of units attempted.
Transcript Summary: Rank Tab
The following table describes the fields for the Transcript Summary: Rank Tab on the ExternalEducation page.
Field Description

7/18/2019 CS-AD Reference Guide
http://slidepdf.com/reader/full/cs-ad-reference-guide 85/284
CUNYfirst Admissions Reference Guide
Last Updated: 6/18/2013 CUNYfirst Admissions85
Field Description
Summary Type Defaults from Term tab.
Rank Type Select Rank Type, which includes Weighted and Unweighted.
Class Rank. Class Size Enter the student's rank in their class and the size of the class.
Percentile The system automatically calculates the percentile based on the valuesentered in the Class Rank and Class Size fields.
External Subjects region: GPA Tab, Subject Totals Tab, Extended Detail Tab
External subject information can be reported on a transcript, self-reported, or reported from anothersource. Storing this data is useful for grouping subjects. For example, if subject area requirementsare tracked but not all of the external courses that a student has taken, the course level, number ofcourses, units, external GPA, and converted GPA details about external subject areas can berecorded. External subject areas are defined on the External Subject Table page. Multiple rows can
be added to enter external subject data.
External Subjects: GPA Tab
The following table describes the fields for the External Subjects: GPA Tab on the ExternalEducation page.
Field Description
External Subject Area Select the subject area.
Course Level Select the course level taken in this area. Values include high school andcollege levels.
Institution Select the CUNY institution.
GPA Type Enter the GPA type for the school that the student attended.

7/18/2019 CS-AD Reference Guide
http://slidepdf.com/reader/full/cs-ad-reference-guide 86/284
CUNYfirst Admissions Reference Guide
Last Updated: 6/18/2013 CUNYfirst Admissions86
Field Description
External GPA Enter the external GPA from the reported information. If the external GPAvalues for this GPA type have been defined on the GPA Type Table page,
those values will appear here. Otherwise, enter the appropriate numericGPA value.
Converted GPA If the GPA conversion rules have been defined, the system automaticallyconverts the GPA based on the External GPA entered. If the GPAconversion rules have not been defined, the value entered in the ExternalGPA field is copied to the Conv GPA field.
External Subjects: Subject Totals Tab
CAS populates the following information on the Subjects Totals tab:
The following table describes the fields for the External Subjects: Extended Detail Tab on theExternal Education page.
Field Description
External Subject Area Select the subject area.
Courses Attempted Enter the number of courses that the student attempted.
Courses Completed Enter the number of courses that the student completed if it is differentfrom the number of courses the student attempted
Units Attempted Enter the number of units that the student attempted.
Units Completed Enter the number of units that the student completed if it is different fromthe number of units that the student attempted.
Unit Type Select the appropriate Unit Type, such as No Credit, Units, Vocational, etc.

7/18/2019 CS-AD Reference Guide
http://slidepdf.com/reader/full/cs-ad-reference-guide 87/284
CUNYfirst Admissions Reference Guide
Last Updated: 6/18/2013 CUNYfirst Admissions87
The Courses and Degrees PageUse the Courses and Degrees page to enter data relevant to courses completed at externalinstitutions. Note that many fields on this page will pre-populate from the data entered on theExternal Education page.
At this time, CAS does not load courses, but does populate external degree information.
The following table describes the fields for the External Defaults on the Courses and Degreespage.
Field Description
Data Number If the courses entered are linked to a row of transcript data on the External
Education page, enter the data number from that page. When navigating out ofthis field, the system automatically populates a number of the remaining fieldswith the data that is linked to this data number. If the courses entered are not linked to a data number, do not enter a value in this field but complete theremaining fields.
Data Source Select appropriate data source.
Acad Level Select appropriate academic level from the available values. (11th grade,
freshman, doctoral, etc.)
Institution Select the CUNY institution.

7/18/2019 CS-AD Reference Guide
http://slidepdf.com/reader/full/cs-ad-reference-guide 88/284
CUNYfirst Admissions Reference Guide
Last Updated: 6/18/2013 CUNYfirst Admissions88
Field Description
Course Type Select the appropriate course type from the available values. (Course,equivalent, event, etc.)
Unit Type Select the appropriate Unit Type, such as No Credit, Units, Vocational, etc.
Grading Scheme Select the grading scheme to convert the grading scheme of the externalschool to CUNY standards. Define grading schemes on the Grading SchemeTable page.
External Career Select the appropriate career:: Grad, HS, Law, Med, Undergrad.
Term Type If the value Other is selected, the Begin Date and End Date fields becomeavailable. If any other value is selected, the External Term and Term Yearfields become available.
Begin Date/EndDate
Enter dates of external education. These fields appear for high school andGED external education.
External Term/
External Career
Enter dates of external education. These fields appear for post-secondary
external education.Course Level Select the course level taken in this area. Values include high school and
college levels.
Units Taken Enter the number of units taken.
Grading Basis Select appropriate value for grading basis.
Apply DefaultsButton
Click to populate the default values to the first row of the External Coursesgroup box. These defaults will then be applied to subsequent rows.
The defaults only need to be applied once. If another data number is enteredthe default data is changed, do not select the Apply Defaults button again. Thenew defaults will automatically apply to subsequent rows of course dataentered.
External Degrees: Degree Tab
This tab is an example from an ASTA load. ASTA does not populate courses or subjects, but ofcourse includes degree information.
The following table describes the fields for the External Degrees: Degree Tab on the Courses andDegrees page.
Field Description
Degree Select appropriate degree from the available values.
Description If a value is entered in the Degree field, theDescription field is populated. If a degree value isnot available, enter a description.
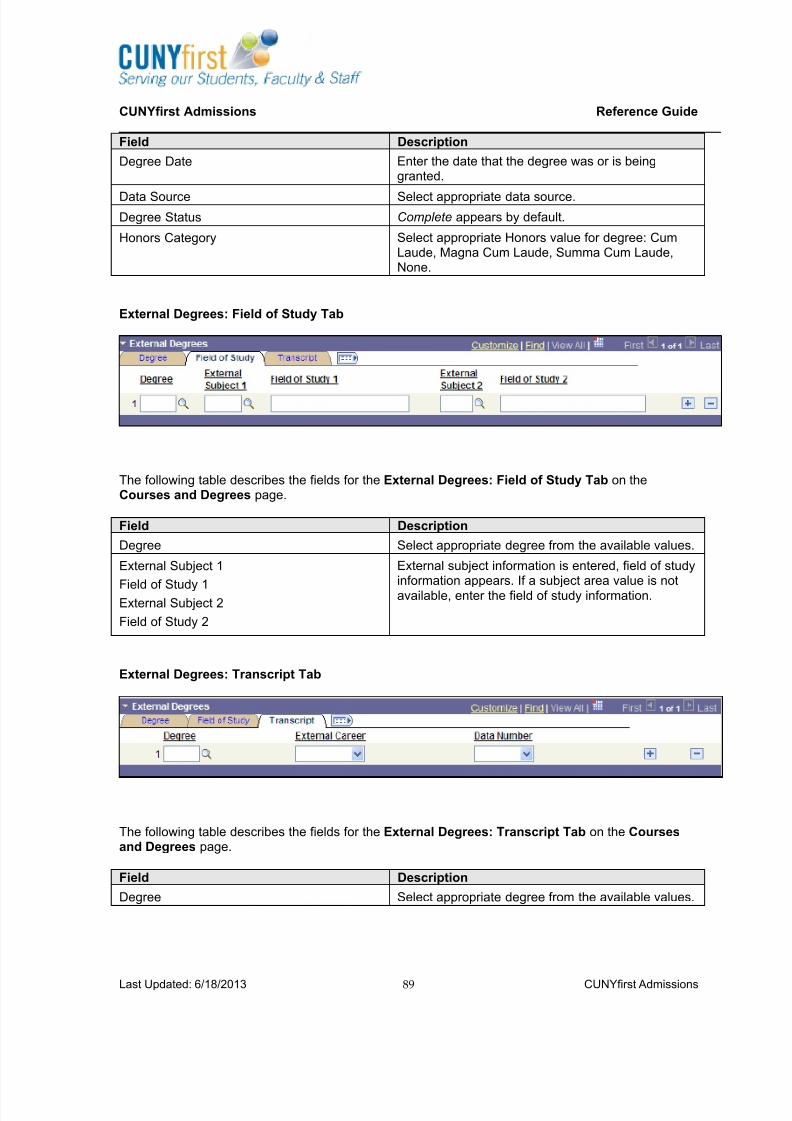
7/18/2019 CS-AD Reference Guide
http://slidepdf.com/reader/full/cs-ad-reference-guide 89/284
CUNYfirst Admissions Reference Guide
Last Updated: 6/18/2013 CUNYfirst Admissions89
Field Description
Degree Date Enter the date that the degree was or is beinggranted.
Data Source Select appropriate data source.
Degree Status Complete appears by default.
Honors Category Select appropriate Honors value for degree: CumLaude, Magna Cum Laude, Summa Cum Laude,None.
External Degrees: Field of Study Tab
The following table describes the fields for the External Degrees: Field of Study Tab on theCourses and Degrees page.
Field Description
Degree Select appropriate degree from the available values.
External Subject 1
Field of Study 1External Subject 2
Field of Study 2
External subject information is entered, field of studyinformation appears. If a subject area value is notavailable, enter the field of study information.
External Degrees: Transcript Tab
The following table describes the fields for the External Degrees: Transcript Tab on the Coursesand Degrees page.
Field Description
Degree Select appropriate degree from the available values.

7/18/2019 CS-AD Reference Guide
http://slidepdf.com/reader/full/cs-ad-reference-guide 90/284
CUNYfirst Admissions Reference Guide
Last Updated: 6/18/2013 CUNYfirst Admissions90
Field Description
External Career Select the appropriate career from the availablevalues: Grad, HS, Law, Med, Undergrad.
Data Number If this degree data is related to a specific transcriptor source of information, select the data number ofthe transcript or other source. The system populatesthis field from the External Education page.

7/18/2019 CS-AD Reference Guide
http://slidepdf.com/reader/full/cs-ad-reference-guide 91/284
CUNYfirst Admissions Reference Guide
Last Updated: 6/18/2013 CUNYfirst Admissions91
Chapter 5 – Update Applicant Program/Action Status
Chapter ObjectivesUpon completion of this chapter, learners will be able to:
update applicant program/action status
The CAS/ASTA interface process will create the initial application program status of“Admitted” with a program action reason of “UAPC”. CAS/ASTA interface also sendsupdates to applications, which add rows to admissions program stack with a program actionof “DATA” and a program action reason of “UAPC”.
This topic covers a variety of scenarios for updating an applicant’s admissions status. Please n ote
that the same funct iona l steps apply to a l l value choices, but campus business process fo r
some m ay di f fer . Refer to your campus pol icy for deta i led in format ion surrounding each
sta tus se lect ion.

7/18/2019 CS-AD Reference Guide
http://slidepdf.com/reader/full/cs-ad-reference-guide 92/284
CUNYfirst Admissions Reference Guide
Last Updated: 6/18/2013 CUNYfirst Admissions92
Topic 1: Accepts Admission
Once the applicant has communicated to the Admissions office an acceptance of admission offer, a
new effective dated row must be added to the admissions program stack. This will update theirprogram status to ‘prematric’.
Step Summary – Accepts admission
The Add Application Person Information page can be found by navigating to: Student Admissions> Application Maintenance > Maintain Applications
To update an application for Accepting Admission:1. On the Maintains Applications Search Page, enter search criteria and select appropriate
record. Selection will lead directly to the Application Program Data Page.
2. Click the Add a New Row icon to insert a new effective dated row.
3. Update the Program Action field to DEIN (Intent to Matriculate)
4. Click Save.
Detailed Information
Program Status – Intent to Matriculate

7/18/2019 CS-AD Reference Guide
http://slidepdf.com/reader/full/cs-ad-reference-guide 93/284
CUNYfirst Admissions Reference Guide
Last Updated: 6/18/2013 CUNYfirst Admissions93
Topic 2: Defers AdmissionWhen an applicant has communicated to the Admissions office an acceptance of admission offer and
then chooses to defer their admission to a future term, a new effective dated row must be added tothe admissions program stack. The admit term also must be updated to reflect the term change.
Step Summary – Defers Admission
The Add Application Person Information page can be found by navigating to: Student Admissions> Application Maintenance > Maintain Applications
To update an application for Deferring Admission:1. On the Maintains Applications Search Page, enter search criteria and select appropriate
record. Selection will lead directly to the Application Program Data Page.
2. Click the Add a New Row icon to insert a new effective dated row.
3. Update the Program Action field to DEFR (Defer Enrollment)
4. Update the Action Reason field with the appropriate admission code (admit type).
5. Update the Admit Term field with the new enrollment term for this applicant.
6. Click Save.
Detailed Information
Program Status – Defers Enrollment

7/18/2019 CS-AD Reference Guide
http://slidepdf.com/reader/full/cs-ad-reference-guide 94/284
CUNYfirst Admissions Reference Guide
Last Updated: 6/18/2013 CUNYfirst Admissions94
Topic 3: Declines AdmissionWhen an applicant declines admission either through notification or due to no response, a new
effective dated row must be added to the admissions program stack.
Step Summary – Declines Admission
The Add Application Person Information page can be found by navigating to: Student Admissions> Application Maintenance > Maintain Applications
To update an application for Declining Admission:1. On the Maintains Applications Search Page, enter search criteria and select appropriate
record. Selection will lead directly to the Application Program Data Page.
2. Click the Add a New Row icon to insert a new effective dated row.
3. Update the Program Action field to WAPP (Applicant Withdrawal).
4. For students who notify the institution of their decision not to attend, update the ActionReason field with DNC (Do Not Contact). For students who did not notify the institution,select the Action Reason of NRSP (No Response).
5. Click Save.
Detailed Information
Program Status – Declines Admission

7/18/2019 CS-AD Reference Guide
http://slidepdf.com/reader/full/cs-ad-reference-guide 95/284
CUNYfirst Admissions Reference Guide
Last Updated: 6/18/2013 CUNYfirst Admissions95
Topic 5: Matriculate an Applicant - Single
This process should be followed when the decision has been made to matriculate the application of a
single student and the application program status is “prematric”.
Step Summary
The Application Program Data page can be found by navigating to: Student Admissions > Application Maintenance > Maintain Applications
Detailed Information
To Matriculate a Single Applicant:1. On the Maintains Applications Search Page, enter search criteria and select appropriate
record. Selection will lead directly to the Application Program Data Page.
2. Click the Add a New Row icon to the Program Data section.
3. Update the Program Action field to MATR (Matriculation)
4. Update the Action Reason field with the appropriate admission code (admit type).
5. Click the Create Program button to create the Program/Plan stack.
6. Click Save.
Application Program Data page – Matriculated Program Action
Pre-matriculated
Matriculated

7/18/2019 CS-AD Reference Guide
http://slidepdf.com/reader/full/cs-ad-reference-guide 96/284
CUNYfirst Admissions Reference Guide
Last Updated: 6/18/2013 CUNYfirst Admissions96
Topic 6: Matriculate an Applicant - BatchThe batch matriculation process will mass update the Program Action and Action reason (if required)
for applicants that have been admitted. It will add a Program Action of MATR and the appropriateaction reason as necessary. A program will be created for applicants and ownership of the studentswill be released to Student Records.
Batch Matriculation contains three actions:
Run the Mass Change Definition
Run the Application Program Update process
Run the Activate Applicant process
Step Summary – Mass Change Definition
The Run Mass Change page can be found by navigating to: Student Admissions > Processing
Applications > Mass Change > Run Mass Change
To Run Mass Change Definition:1. Click Add a New Value on the Run Mass Change page to create a new Run Control ID.
This step can be skipped once a Run Control ID for Mass Change has been created.
2. Under Run Mass Change Type, click Execute Mass Change Group
3. Under Execution Parameters, navigate to Mass Change Group ID. Use the look-up tool tofind the institution’s mass change group.
4. Click Run.
5. Click OK.
6. Click on Process Monitor to check on the status of the process.
7. The Process List tab will indicate Success, Error, or Queued. When the latter two valuesappear, contact the Help Desk. When the value Success appears, proceed to the Run Application Program Update process.
Run Mss Change to Batch Matriculate

7/18/2019 CS-AD Reference Guide
http://slidepdf.com/reader/full/cs-ad-reference-guide 97/284
CUNYfirst Admissions Reference Guide
Last Updated: 6/18/2013 CUNYfirst Admissions97

7/18/2019 CS-AD Reference Guide
http://slidepdf.com/reader/full/cs-ad-reference-guide 98/284
CUNYfirst Admissions Reference Guide
Last Updated: 6/18/2013 CUNYfirst Admissions98
Step Summary – Run the Application Program Update process
The Application Program Update page can be found by navigating to: Student Admissions >Processing Applications > Update Applications > Application Program Update
To Run the Application Program Update process:1. Click Add a New Value on the Application Program Update page to create a new Run
Control ID. This step can be skipped once a Run Control ID for Mass Change has beencreated.
2. Click Run.
3. Click OK.
4. Click on the Process Monitor to check on the status of the process.
5. The Process List tab will indicate Success, Error, or Queued. When the latter two valuesappear, contact the Help Desk. When the value Success appears, proceed to the Run Activate Applicant process.
Step Summary – Run the Activate Applicant process
The Activate Applicants page can be found by navigating to: Student Admissions > Processing Applications > Update Applications > Activate Applicants
To Run the Activate Applicant Process:
1. Click Add a New Value on the Application Program Update page to create a new RunControl ID. This step can be skipped once a Run Control ID for Mass Change has beencreated.
2. Update the fields for Institution, Career, and Admit Term.
3. Click Run.
4. Click OK.
5. Click on the Process Monitor to check on the status of the process.
6. The Process List tab will indicate Success, Error, or Queued. When the latter two valuesappear, contact the Help Desk. When this step is complete, the record is ready for Term Activation.
7/18/2019 CS-AD Reference Guide
http://slidepdf.com/reader/full/cs-ad-reference-guide 99/284
CUNYfirst Admissions Reference Guide
Last Updated: 6/18/2013 CUNYfirst Admissions99
Chapter 6 – View Additional Applicant DataIn addition to student data available through the application and CAS results pages, additional
information is available for viewing.
Note: Depending upon secur i ty access, l inks to m ost of these pages are accessib le
thro ugh th e Studen t Services Center.
Chapter ObjectivesUpon completion of this chapter, learners will be able to:
View Applicant Summary Page
View Applicant Progression
View Educational Summary
View Academic Test Summary View Test Results
View Unofficial Transcripts
Topic 1: View Application Summary PageThe application summary page displays key admissions data for applicants with hyperlinks to the coreadmissions records within CUNYfirst.
Step Summary
The Application Summary page can be found by navigating to: Student Admissions > Applicant
Summaries > Application Summary
To view the Application Summary page:1. Enter Search Criteria and click Search.
2. Use the Application Summary page to view a list of all applications for an individualapplicant, along with associated application numbers, institutions, career, program, term,admit type, and status.
3. Click the Application Data link to review the application’s Application Program Data page.This link opens a new window to the Maintain Applications component.
4. Close the Application Program Data window to return to the Application Summary page.
5. Click the Application Detail page to view select details of a specific application, including
program action (matriculated), action reason (entering freshmen), and evaluation date.6. Click Return to return to the Application Summary page.
.
Detailed Information
The Application Summary page

7/18/2019 CS-AD Reference Guide
http://slidepdf.com/reader/full/cs-ad-reference-guide 100/284
CUNYfirst Admissions Reference Guide
Last Updated: 6/18/2013 CUNYfirst Admissions100
The Application Data link brings users to the Application Program Data page of the application.
The Application Detail link brings users to the following sub-page:

7/18/2019 CS-AD Reference Guide
http://slidepdf.com/reader/full/cs-ad-reference-guide 101/284
CUNYfirst Admissions Reference Guide
Last Updated: 6/18/2013 CUNYfirst Admissions101
Topic 2: View Applicant ProgressionThe applicant progression page displays program status progression from prospect to matriculant
(student), displaying key admissions data. Only the most current program status, program action(with action reason if applicable) and action date display. To view all historical program status, usethe Maintain Application component.
The Applicant Progression page can be found by navigating to: Student Admissions > ApplicantSummaries > Applicant Progression
To view the Application Progression page:1. Enter Search Criteria and click Search.
2. Review the Applicant Progression page to view a summary of an application throughprospect, applicant, and student stages. These fields cannot be modified.
Detailed Information
The Application Progression page

7/18/2019 CS-AD Reference Guide
http://slidepdf.com/reader/full/cs-ad-reference-guide 102/284
CUNYfirst Admissions Reference Guide
Last Updated: 6/18/2013 CUNYfirst Admissions102
Topic 3: View Education SummaryThe education summary pages display information from the applicant’s academic transcript. Thisdata has been received either via the CAS/ASTA interface or by manual entry.
Step Summary
The Education Summary pages can be found by navigating to: Student Admissions > ApplicantSummaries > Education Summary.
To view the Education Summary pages:1. Enter desired criteria and click Search. Note that the Academic Institution field is required.
2. If multiple results are retrieved, select appropriate record.
3. On the External Academic Summary tab, use the Select Academic Data section and thecorresponding Search button to review any existing data.
4. Click the Academic Data Detail link to data for GPA type, class rank, and related data. Click
Return to return to the External Summary page.
5. Click the Sort Academic Data by pull-down menu to sort results by a variety of criteria.
6. Click on the External Subject Summary tab. Use the Select Subjects By section and thecorresponding Search button to review any existing data. Note that only the first five rows ofdata will be displayed
7. Click on the External Subject Summary tab. Use the Select Subjects By section and thecorresponding Search button to review any existing data. Note that only the first five rows ofdata will be displayed.
8. Click the Academic Subject Detail link for data regarding GPA Type, Unit Type, Total Unitsand Courses Attempted. Click Return to return to the External Subject Summary page.
9. Click the External Degree Summary to review data related to external degrees. Use theSort Degree drop-down to organize results, if desired.
10. Click the External Course Summary tab to review any data related to course level, subject,and term.
11. Use the Sort Courses By pull-down menu to sort results by a variety of criteria.
12. Click the Transcript Data link to review any existing data regarding transcripts.
13. Click Return to move back to the External Course Summary page.
14. Click on the Course Detail link to review more data regarding course level, type, and dates.
15. Click Return to move back to the External Course Summary page.

7/18/2019 CS-AD Reference Guide
http://slidepdf.com/reader/full/cs-ad-reference-guide 103/284
CUNYfirst Admissions Reference Guide
Last Updated: 6/18/2013 CUNYfirst Admissions103
Detailed Information
External Academic Summary tab
External Subject Summary tab

7/18/2019 CS-AD Reference Guide
http://slidepdf.com/reader/full/cs-ad-reference-guide 104/284
CUNYfirst Admissions Reference Guide
Last Updated: 6/18/2013 CUNYfirst Admissions104
External Degree Summary tab
External Course Summary tab

7/18/2019 CS-AD Reference Guide
http://slidepdf.com/reader/full/cs-ad-reference-guide 105/284
CUNYfirst Admissions Reference Guide
Last Updated: 6/18/2013 CUNYfirst Admissions105
Topic 4: View Academic Test Summary
The Academic Test Summary page displays test information for applicants. These tests can be eitherinternal to the institution or external. The data had come in either from the CAS/ASTA, SKATinterfaces or manual entry. Viewing these tests is contingent upon row-level security access.
Step Summary
The Academic Test Summary page can be found by navigating to: Student Admissions > ApplicantSummaries > Academic Test Summary
To view Academic Test Summary pages:1. Enter search criteria and click Search. If there are multiple results, select the desired student
record. If multiple results are retrieved, select appropriate record.
2. On the Academic Test Summary Page, the first 6 test scores will be displayed. If there aremore than 6, then click the right arrow in the blue bar to scroll to the next available scores ingroups of 6. Alternatively, you can click on View All to see the entire list.
3. Use the Test Summary by ID/Component and the Sort By/Search button to narrow testresults. Review data for Test Scores, Percentile placement, and related Testing information.
Detailed Information
The Academic Test Summary page

7/18/2019 CS-AD Reference Guide
http://slidepdf.com/reader/full/cs-ad-reference-guide 106/284
CUNYfirst Admissions Reference Guide
Last Updated: 6/18/2013 CUNYfirst Admissions106
Topic 5: View Test ResultsWhen available, test scores and related information will populate students’ records through the CASinterface. Follow the steps below to view test information.
Step Summary – View Test Results
Navigate to Student Admiss ions > A ppl ica t ion Entry > App l icat ion In format ion > Test Resul ts . Alternate navigation: Records and En rol lm ent > Transfer Credit Evaluation > Test Results . Notethat this page is also accessible by using the Go links on the Application Maintenance page.
Note: Test Scores are also available in the Student Services Center. Refer to the relevant chapter fordetailed information.
1. Enter search criteria and click Search. Note: Academic Institution is a required field.
2. View desired information on the Test Results page.
3. Use Row Navigation to view all test results. Use the View All link to view all testing data onone page.
4. End of Procedure.
Detailed Information
The Test Results PageUse the Test Results Page to view and edit testing details for new and continuing students.
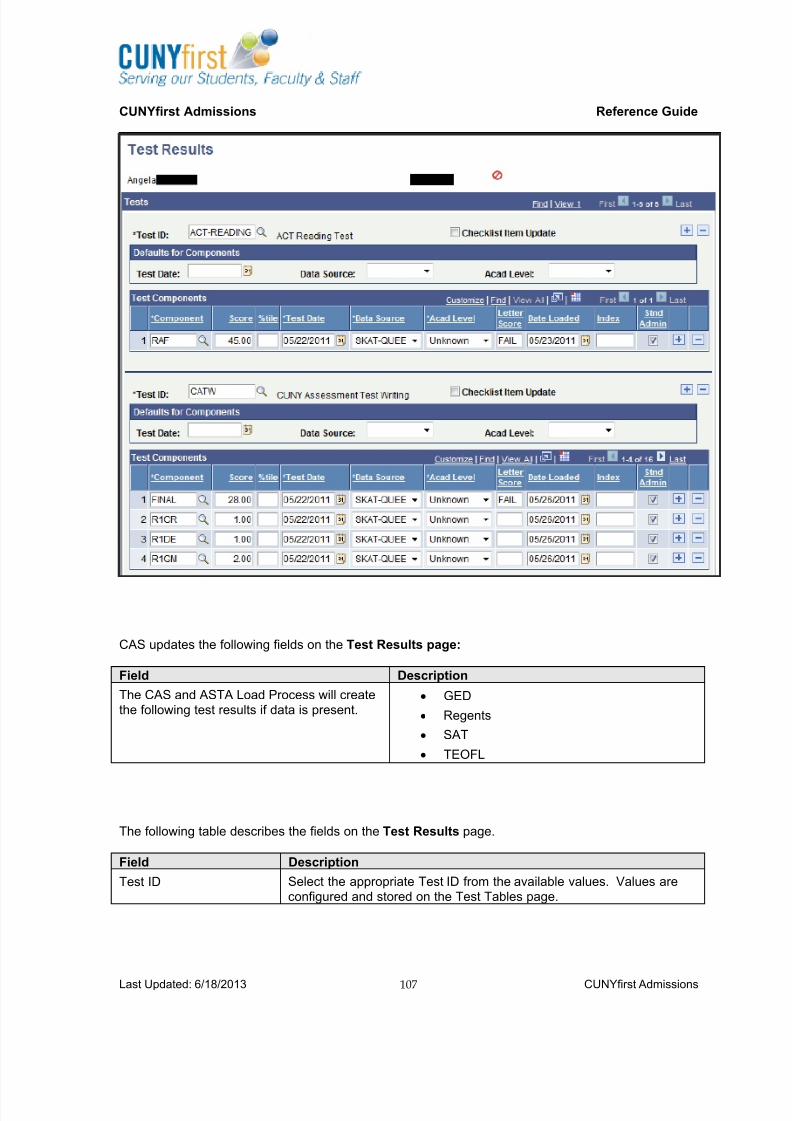
7/18/2019 CS-AD Reference Guide
http://slidepdf.com/reader/full/cs-ad-reference-guide 107/284
CUNYfirst Admissions Reference Guide
Last Updated: 6/18/2013 CUNYfirst Admissions107
CAS updates the following fields on the Test Results page:
Field Description
The CAS and ASTA Load Process will createthe following test results if data is present.
GED
Regents
SAT
TEOFL
The following table describes the fields on the Test Results page.
Field Description
Test ID Select the appropriate Test ID from the available values. Values areconfigured and stored on the Test Tables page.

7/18/2019 CS-AD Reference Guide
http://slidepdf.com/reader/full/cs-ad-reference-guide 108/284
CUNYfirst Admissions Reference Guide
Last Updated: 6/18/2013 CUNYfirst Admissions108
Field Description
Checklist Item Update Select this check box to indicate that the checklist related to this row ofdata is updated when the Checklist Item Update Automated process is
run. When the page is saved, the system selects this check boxautomatically. To clear this check box, save the page, clear the checkbox, then save the page again.
Test Date Select the date on which this test was taken. The value you enter herepopulates the corresponding field in the bottom region of the page.
Data Source Select how this test information was reported. For example, the datacould have been self-reported or received from a testing agency. Thevalue you select here populates the corresponding field in the bottomregion of the page.
Acad Level Select the applicant’s academic level at the time this test was taken.This level can be dif ferent from the applicant’s current level. The valueyou enter here defaults to the corresponding field in the bottom regionof the page.
Component Enter the first test component. Values for this field are determined bythe test ID entered. Define test components on the Test ComponentTable page and link them to tests on the Test Tables page.
Score Enter the score for this test component.
Percentile Enter the percentile for this test component.
Test Date The system automatically populates this field from the value entered inthe Defaults for Components group box. The date can be edited ifnecessary.
Data Source The system automatically populates this field from the value entered inthe Defaults for Components group box. The value can be edited ifnecessary.
Acad Level The system automatically populates this field from the value entered inthe Defaults for Components group box. The value can be edited ifnecessary.
Letter Score Enter a letter score for this test component, if applicable.
Date Loaded The default for the loaded date is your system date. Edit this field ifnecessary. If this information is electronically loaded, this field isautomatically populated with the system date the day the data isloaded.
Index The LSAT 3-Year Test Index appears if this information has beenloaded.
Stnd Admin The system selects this check box by default, which indicates that this
test was administered in a standard way. Clear this check box if the testwas administered in a nonstandard or non-timed way.

7/18/2019 CS-AD Reference Guide
http://slidepdf.com/reader/full/cs-ad-reference-guide 109/284
CUNYfirst Admissions Reference Guide
Last Updated: 6/18/2013 CUNYfirst Admissions109
Topic 6: View Unofficial TranscriptsThough course history, term history, grades, and GPA can all be found in the Student Center,
Unofficial Transcripts can be printed through the Advisor Center. Note that access to the AdvisorCenter is contingent upon security.
Step Summary
The Advisor Center can be found by navigating to: Self Service > Advisor Center > Advisee StudentCenter.
To view Unofficial Transcripts:1. Enter search criteria and click Search. If multiple results are retrieved, select appropriate
record.
2. In the Academics section, use the pull-down menu to select Transcript: View Unofficial.
3. Use the pull-down menus to select the Institution and Report Type: Student UnofficialTranscript.
4. Click the View Report link.
5. Review Report information and click the View Report link again.
6. A new window will open with the Transcript. Please note that if you have pop-up blockers,the transcript may not open.
7. View or Print Unofficial Transcript.

7/18/2019 CS-AD Reference Guide
http://slidepdf.com/reader/full/cs-ad-reference-guide 110/284
CUNYfirst Admissions Reference Guide
Last Updated: 6/18/2013 CUNYfirst Admissions110
Detailed Information
The Advisor Center

7/18/2019 CS-AD Reference Guide
http://slidepdf.com/reader/full/cs-ad-reference-guide 111/284
CUNYfirst Admissions Reference Guide
Last Updated: 6/18/2013 CUNYfirst Admissions111
Selection of Institution and Transcript Type (only Unofficial is available)
Final Step (click View Report) to access Transcript

7/18/2019 CS-AD Reference Guide
http://slidepdf.com/reader/full/cs-ad-reference-guide 112/284
CUNYfirst Admissions Reference Guide
Last Updated: 6/18/2013 CUNYfirst Admissions112
Sample Excerpt of Unofficial Transcript

7/18/2019 CS-AD Reference Guide
http://slidepdf.com/reader/full/cs-ad-reference-guide 113/284
CUNYfirst Admissions Reference Guide
Last Updated: 6/18/2013 CUNYfirst Admissions113
Chapter 7 – Non-Degree StudentsThe process of admitting Non-Degree applicants does not involve UAPC processing of CAS/ASTAfiles and can be processed directly in CUNYfirst by using the Quick Admit and Program/Planfunctionality.
For students who do not already possess an EMPL ID in CUNYfirst, Quick Admi t functionality can beused to create a record without creating an application. Quick Admit enables campuses to rapidlyadd a new student’s personal data record to CUNYfirst and to activate that student into an academiccareer, an academic program, and a specific term. Applicants admitted via the Quick Admitfunctionality do not have applications created in CUNYfirst, but will have a student record with aprogram/plan stack.
If needed, an application can be added at a later date for these students by using the AddApplication component or applying through UAPC. For a manual entry, the EMPL ID would be
entered on the Add App page. The Bio-Demo information from the record would be rolled into theapplication. The admissions administrator would then enter the appropriate data into the remainingapplication-specific pages.
After saving the student’s biographical data and activating the student into the term, the student iseligible for class enrollment. The Quick Enroll a Student component is available to enroll studentsinto the term. CUNYfirst carries forward the key information (ID, academic institution, academiccareer, and term) and automatically opens the Quick Enroll a Student component for the givenstudent.
For Non-Degree stud ents wh o already po ssess an EMPL ID , the Program/Plan stack instructionshould be followed. Students may have an EMPL ID because they have been enrolled at aCUNYfirst institution or because they are employees in any CUNY institution. In such cases, we aresimply adding a new layer of academic program information to the existing student record.
Note: In some cases, campuses may want to use the Add Application functionality to add Non-Degree students to CUNYfirst. Since Quick Admit creates a record, but does not create anapplication, institutions may wish to have the applications on record for data reporting. In this case,instructions for Adding an Application should be followed and the correct Non-Degree values shouldbe selected for Program, Plan, and Student Groups.
Chapter ObjectivesUpon completion of this chapter, learners will be able to:
Use Quick Admit to admit Non-Degree students (without EMPL ID) Use the Program/Plan stack to admit Non-Degree students (with EMPL ID)

7/18/2019 CS-AD Reference Guide
http://slidepdf.com/reader/full/cs-ad-reference-guide 114/284
CUNYfirst Admissions Reference Guide
Last Updated: 6/18/2013 CUNYfirst Admissions114
Topic 1: Non-Degree Students without EMPL - Quick AdmitThis process should be used only fo r stud ents wh o do n ot already have an EMPL ID, either as a
stud ent or a CUNY employ ee. Please refer to the next topic for instruction on admitting Non-
Degree students who already possess an EMPL ID.
Step Summary
The Quick Admit page can be found by navigating to: Records and Enrollment > Enroll Students >Quick Admit
To Quick Admit a Student:1. Perform the Search/Match process to determine if a record (and EMPL ID) already exists.
Access to this component now exists on the Quick Admit Page. Please refer to theSearch/Match chapter for detailed instruction on the Search/Match process.
a. If there is no record, continue with these instructions.
b. If there is a record, follow the instructions in Program/Plan stack.
2. Navigate to the Quick Admit component: Records and Enrollment > Enroll Students > Quick Admit.
3. Retain the default ID “NEW”. Select the Institution.
4. Select UGRD for Undergraduate career or GRAD for Graduate Career.
5. Enter the Term.
6. Click the Add button.
7. On the Biographical Details Page, enter all of the appropriate Personal Information.
8. On the Regional Page, enter Ethnicity details.
9. On the Program/Plan Page, select the appropriate value for Academic Program-Primary:
a. NDEG (Non-Degree value at Community Colleges) for UGRD career. or
b. NDEGU (Non-Degree value at Senior Colleges) for UGRD career or
c. NDEGG (Non-Degree value for Senior/Grad programs) for GRAD career.
10. On the Program/Plan Page, enter:
a. PERMIT – UG plan (undergraduate) or
b. PERMIT – GR plan (graduate) for the Academic Plan.
11. Click the Residency link. On the Residency Official page, enter the Admit Term (EffectiveTerm), Residency, and the current date for Residency date.
12. Click the OK icon.13. Click Save. Once the record is saved, the student is assigned an Empl ID and activated.
However, there are two more important steps to complete this process.
14. Update Status with an MATR row:
a. Upon saving, Quick Admit has automatically matriculated the student record.However, a new row must be added with the Program Action of MATR to facilitatestudent’s claiming of accounts.
b. Navigate to the Program/Plan stack in Records and Enrollment.
7/18/2019 CS-AD Reference Guide
http://slidepdf.com/reader/full/cs-ad-reference-guide 115/284
CUNYfirst Admissions Reference Guide
Last Updated: 6/18/2013 CUNYfirst Admissions115
c. Click the Add a New Row icon.
d. Select the MATR Program Action. This value will enable IMS to recognize thestudent and allow the account to be activated.
e. Click Save.
15. Placing E-Permit students in the appropriate Student Group is essential for subsequentprocesses, including tuition calculation and enrollment, to run effectively:
a. E-Permit student groups are coded as follows: “PIxx”. The “PI” refers to “permit in”and the “xx” refers to the 2 digit code from legacy for each college. Ex: PI02 = Permitin from Baruch College.
b. Enter Student Group Start Date. For Student Financials billing to run effectively, thisStudent Group must be active by the first day of classes for a particular term. Thestatus must be set to ACTIVE.
c. Add a new row to enter Student Group End Date. The future effective date mustexpire on or after the last day of finals. The status must be set to INACTIVE.
d. Click Save.
e. NOTE : Permit-Out students will be served by the Registrar’s Office, but forinformational purposes Admissions should know that they are coded with a Permit-Out student group.
16. Please refer to the Student Records Reference Guide for detailed instruction in thefollowing next-steps for E-Permit Students including:
a. Setting Enrollment Limits
b. Setting the Enrollment Appointment
Once this process is complete, students are eligible to enroll through the Quick Enroll process.
CUNY campus policies may require additional steps (immunization, testing) prior to enrollment.
Detailed Information
The Quick Admit a Student page

7/18/2019 CS-AD Reference Guide
http://slidepdf.com/reader/full/cs-ad-reference-guide 116/284
CUNYfirst Admissions Reference Guide
Last Updated: 6/18/2013 CUNYfirst Admissions116
The following table describes the fields on the Quick Admit a Student page of the Quick Admit aStudent component:
Field Description
ID In add mode, CUNYfirst defaults the student’s ID toNew. Retain this value. This default value will allowCUNYfirst to assign the ID.
Academic Institution Enter the appropriate academic institution.
Academic Career Enter the appropriate academic career. CUNYfirstwill display academic programs based on the
selected academic career.
Term Enter the appropriate term. After entering therequired data for a student and clicking the Savebutton, CUNYfirst activates the student into thespecified term. This functionality works for both newand continuing students.
To use the Quick Admit feature for a specific term,the academic term calendar for the academicprograms within that term must have been defined.
Add Click to open component with specified key values.

7/18/2019 CS-AD Reference Guide
http://slidepdf.com/reader/full/cs-ad-reference-guide 117/284
CUNYfirst Admissions Reference Guide
Last Updated: 6/18/2013 CUNYfirst Admissions117
The Biographical Details page
Use this page to enter and update the known biographical and demographic data for an applicant.
The following table describes the fields on the Biographical Details page of the Quick Admit aStudent component:

7/18/2019 CS-AD Reference Guide
http://slidepdf.com/reader/full/cs-ad-reference-guide 118/284
CUNYfirst Admissions Reference Guide
Last Updated: 6/18/2013 CUNYfirst Admissions118
Person Information group
Field Description
Effective Date Enter an effective date for the application to thisacademic program if different from the default date.If entering the application after the start date of theadmit term, back-date the effective date to a dateprior to the start date of the admit term in order toterm activate the student once they are matriculated.
Person Information Enter the person’s Prefix, First Name, Last Name,Middle Name, Suffix and Date of Birth. NOTE: Onlyenter data on the Birth Information link forInternational students.
Effective Date Refers to the effective date of this row ofinformation. I.e.: the Marital Status and Gender.
Biographical History group
Field Description
Effective Date Enter an effective date for this information if differentfrom default date.
Marital Status/As of Select a value for marital status.
Gender Select a value for Gender.
National ID group
Field Description
National ID CUNY is using this field for the Social Security
number. If an incorrect SSN is entered, the rowshould be deleted before attempting to rewrite and
save.
Contact Information group
Field Description
Address Type An address must be entered in each of the fouraddress types used by CUNY in order to beconsistent with the CAS/ASTA interface. CUNY isusing four types: Mailing, Home, Permanent andBilling. Enter the apartment number in the Address1 field.
Effective Date Refers to the effective date of this row ofinformation.
Status Indicates whether the address is Active or Inactive.
Country Indicates Country of Residence
Address Links to additional page for address detail entry.

7/18/2019 CS-AD Reference Guide
http://slidepdf.com/reader/full/cs-ad-reference-guide 119/284
CUNYfirst Admissions Reference Guide
Last Updated: 6/18/2013 CUNYfirst Admissions119
Field Description
Phone - Type Phone type includes a range of values, such asBusiness, Campus, Home, Cell, etc.
Country/Preferred These fields are not required.
Email – Type Email type includes a range of values, such asBusiness, Campus, Dorm, Home, and Other.
Visa/Permit Data - Link Enter all information pertaining to Visa type.Detailed information reviewed in SEVIS courseoffering.
Citizenship - Link Enter all information pertaining to Citizenship.Detailed information reviewed in SEVIS courseoffering.
The Address link leads to a new page for address data entry.
The Regional pageUse this page to enter or update a student’s information according to regional data requirements.

7/18/2019 CS-AD Reference Guide
http://slidepdf.com/reader/full/cs-ad-reference-guide 120/284
CUNYfirst Admissions Reference Guide
Last Updated: 6/18/2013 CUNYfirst Admissions120
The following table describes the fields on the Regional page of the Quick Admit a Student component:
Field Description
Regulatory Region Enter the regulatory region. USA is the default value.
Ethnic group Select the appropriate value for the applicant’sethnic group. Values for the default Regulatory
Region of ‘USA’ are stored on the Ethnic Groupspage. These values are shared between HR andCS. They are configured and maintained by HR.
Primary Check the primary box to indicate primary ethnicity.
History Section CUNY is not using this section at this time.
The Program Plan pageFor new students, select the primary academic program and enter other program stack information.

7/18/2019 CS-AD Reference Guide
http://slidepdf.com/reader/full/cs-ad-reference-guide 121/284
CUNYfirst Admissions Reference Guide
Last Updated: 6/18/2013 CUNYfirst Admissions121
The following table describes the fields on the Program Plan page of the Quick Admit a Student component:
Field Description
Academic Program Primary (academicprogram primary)
Select the appropriate Non-Degree value for theprogram. CUNYfirst prompts with academic programvalues specific to the selected academic career.
Campus Enter the appropriate campus.
Academic Plan Select the appropriate Non-Degree value for theplan.
Admit Term Non-Degree students are usually entering in thecurrent term, which will be the default field.
Requirement Term The requirement term informs CUNYfirst whichterm’s degree progress requirements apply to thestudent for their primary academic program.
CUNYfirst, by default, sets this value to the AdmitTerm value.
Expected Graduation Term Not relevant for Non-Degree students.
Residency Click to display the Residency Official page andrecord residency information that has been verifiedby the college.
(NZL) Funding Source Not being used by CUNY.
(AUS) Mode of Attendance Not being used by CUNY.

7/18/2019 CS-AD Reference Guide
http://slidepdf.com/reader/full/cs-ad-reference-guide 122/284
CUNYfirst Admissions Reference Guide
Last Updated: 6/18/2013 CUNYfirst Admissions122
Field Description
Quick Enrollment This links to the Quick Enroll component, whereenrollment transactions are processed for the
student.Enrollment Appointments This links to the Appointments component, where
enrollment appointments are processed for thestudent.
Student Program Plan This links to the Student Program/Plan componentwhere any changes to a new or continuing student’sprogram stack information are processed after thestudent data has been saved to CUNYfirst.
Residency Official Page
The following table describes the three fields CUNY is currently using on the Residency Official page:
Field Description
Effective Term Effective date of this record’s data.
Residency Indicates residency: In-State, Out-of-State, In-City,Pending
Residency Date Date as of when the applicant’s residency is official.
Viewing Program Stack Data After Saving the Component

7/18/2019 CS-AD Reference Guide
http://slidepdf.com/reader/full/cs-ad-reference-guide 123/284
CUNYfirst Admissions Reference Guide
Last Updated: 6/18/2013 CUNYfirst Admissions123
When updating a new or continuing student’s records, only the following fields appear:
Field Description
Student Career Nbr (student career number) Please note that Career Number is NOT associatedwith a Career level. It indicates number of programsthat exist within a career. For example, there will beone Career for an Undergraduate degree but twoCareer Numbers for a first and second BA.
Prim Prog (primary program) CUNYfirst displays the primary academic programassociated with the student career number. Theprimary academic program that appears is theacademic program into which CUNYfirst activatesthe student for the specified term.

7/18/2019 CS-AD Reference Guide
http://slidepdf.com/reader/full/cs-ad-reference-guide 124/284
CUNYfirst Admissions Reference Guide
Last Updated: 6/18/2013 CUNYfirst Admissions124
Topic 2: Non-Degree Students with EMPL – Program/Plan StackThis process will be used for non-degree applicants who already p oss ess an EMPL ID . Following
are two different scenarios regarding individuals with EMPL ID’s.
Students who already possess an EMPL ID as a student from another CUNYfirst institution.These students already have a record with a Program/Plan stack, but will need a new row ofNon-Degree enrollment data.
CUNY employees will have an EMPL ID but will not have a Program/Plan stack. Theseindividuals must have their first Program/Plan stack created.
Step Summary
To Add a Non-Degree Applicant with an EMPL ID:
1. Navigate to the student record: Records and Enro l lment > Career and Progr amInform ation > Student Program /Plan.
2. Enter the appropriate Search criteria. The Academic Institution must be selected toproceed. Check the Include History checkbox and click Search. Select the appropriaterecord.
3. If a student has a Program /Plan page , select the most recent record (highest number). Onthe Student Program Page, click the Add a New Row icon.
4. If a student does not have any data on the Program/Plan page, go to the Add a NewValue tab.
a. Copy the EMPL ID into the appropriate field.
b. Select the appropriate level.
c. Retain the Career number “0” to create this first Program/Plan stack and click the ADD button on the bottom of the page.
5. Select the ACTV (Activate) value in the Program Action field.
6. Select the Action Reason (2) for “entering freshmen of grad degree or non-degree”.
7. Select the Institution.
8. Select the appropriate value on the Student Program tab for Academic Program:
a. NDEG (Non-Degree value at Community Colleges) for UGRD career. or
b. NDEGU (Non-Degree value at Senior Colleges) for UGRD career or
c. .NDEGG (Non-Degree value for Senior/Grad programs) for GRAD career.
9. On the Student Plan tab, enter the appropriate Non-Degree value for Academic Plan (ex:non degree permit, Non-Degree UG, Permit UG, etc.).
10. Select the appropriate values for Admit Term and Campus.
11. Retain Admit Term information.
12. Click Save. Please note that the next steps are essential for subsequent processes to runeffectively.

7/18/2019 CS-AD Reference Guide
http://slidepdf.com/reader/full/cs-ad-reference-guide 125/284
CUNYfirst Admissions Reference Guide
Last Updated: 6/18/2013 CUNYfirst Admissions125
13. Update Residency information. On the Residency Official page, enter the Admit Term(Effective Term), Residency, and the current date for Residency date.
14. Click Save. Once the record is saved, the student is assigned an Empl ID and activated.
However, there are two more important steps to complete this process.15. Update Status with an MATR row:
a. Upon saving, Quick Admit has automatically matriculated the student record.However, a new row must be added with the Program Action of MATR to facilitatestudent’s claiming of accounts.
b. Navigate to the Program/Plan stack in Records and Enrollment.
c. Click the Add a New Row icon.
d. Select the MATR Program Action. This v alue wil l enable IMS to recog nize the
student and al low the account to be act iva ted.
e. Click Save.
16. Placing E-Permit students in the appropriate Student Group is essential for subsequentprocesses, including tuition calculation and enrollment, to run effectively:
a. E-Permit student groups are coded as follows: “PIxx”. The “PI” refers to “permit in”and the “xx” refers to the 2 digit code from legacy for each college. Ex: PI02 = Permitin from Baruch College.
b. Enter Student Group Start Date. For Student Financials billing to run effectively, thisStudent Group must be active by the first day of classes for a particular term. Thestatus must be set to ACTIVE.
c. Add a new row to enter Student Group End Date. The future effective date mustexpire on or after the last day of finals. The status must be set to INACTIVE.
d. Click Save.
e. NOTE : Permit-Out students will be served by the Registrar’s Office, but forinformational purposes Admissions should know that they are coded with a Permit-Out student group.
17. Please refer to the Student Records Reference Guide for detailed instruction in thefollowing next-steps for E-Permit Students including:
a. Setting Enrollment Limits
b. Setting the Enrollment Appointment
Note regarding Effective Dating:The effective date on the ACTV row of the Student Program/Plan must be prior to or equal to the termbegin date. A student cannot be active in a program plan unless the date is prior to or equal to the
term begin date. This also applies to any program/plan changes for which rows are inserted during acurrent term.

7/18/2019 CS-AD Reference Guide
http://slidepdf.com/reader/full/cs-ad-reference-guide 126/284
CUNYfirst Admissions Reference Guide
Last Updated: 6/18/2013 CUNYfirst Admissions126
Student Program page
Student Plan page – Academic Plan selection
7/18/2019 CS-AD Reference Guide
http://slidepdf.com/reader/full/cs-ad-reference-guide 127/284
CUNYfirst Admissions Reference Guide
Last Updated: 6/18/2013 CUNYfirst Admissions127
Chapter 8 – Readmit, Reactivate, Reallocate
Chapter ObjectivesUpon completion of this chapter, learners will be able to:
Readmit students
Reactivate students
Reallocate students
Topic 1: Readmitting Students (General Steps)Students seeking readmission must have received a Program Action of Discont inued by theRegistrar’s office prior to the Readmission process. If a student does not have the DISC Program
Action, Admissions representatives should add a row with an ENRM Program Action prior toreactivating the record. Please refer to campus policies for any additional requirements and stepsregarding the readmission process.
There are additional steps in readmitting students who are resuming the same plan and thoseentering with a new plan. See below for details.
Step Summary – Readmit Student with same Program/Plan
1. Navigating to the Student Program page through Records and Enrollment > Career and
Program Information > Program/Plan.
2. Enter the appropriate Search criteria, check the Correct History Checkbox and Search.
3. On the Student Program page, note the current Program Action.
a. If the student has a DISC (Discontinued) row, click the Add a New Row (+) icon andcontinue to step 4.
b. If the student does not have a DISC row, click the Add a New Row (+) icon and usethe Program Action look-up tool to select DISC with an Action Reason of ENRM (NoEnrollment). Once this is done, click the Add a New Row (+) icon again andproceed to step 4.
c. Note: The DISC date must be appropriate to term activity – after the last active termand prior to the new active term. The DISC row must also have the same admi t
terms and requ i rement terms as in the initial Program/Plan record.
4. Navigate to the appropriate Program/Plan stack for your institution. Use the ProgramAction look-up tool to select RADM (Readmit).
5. Use the Action Reason look-up tool to select Readmitted (4). There is ONE exception to
th is : When a student is being readmitted solely for the purpose of graduating without takingclasses, the Action Reason is (9).
6. For Admit Term, enter the term into which the student is being Readmitted.
7. For the Requirement Term, fo l low your campus pol icy regarding retaining the originalterm or the new Admit Term.

7/18/2019 CS-AD Reference Guide
http://slidepdf.com/reader/full/cs-ad-reference-guide 128/284
CUNYfirst Admissions Reference Guide
Last Updated: 6/18/2013 CUNYfirst Admissions128
8. Click Save. Note: When you either Save or click a different tab within this component, theRequirement Term will automatically update to match the Admit Term . If you have chosen toretain the original Requirement Term, you must correct the auto-update after saving. If youneed a reminder of the original date, please remember that it exists on the initial
Program/Plan page.
Step Summary – Readmit Student with new Program/Plan
If the Readmit has indicated a plan change, follow the same steps as above with the followingexception:
9. On the Plan tab, change the Requirement Term to the new term into which the student isbeing admitted. Since this is a new plan (major), the student will follow the curriculumcorresponding to their new Admit Date.
10. Change the Declare Date to the current date.
11. Click Save. Note: When you either Save or click a different tab within this component, theRequirement Term will automatically update to match the Admit Term . If you have chosen toretain the original Requirement Term, you must correct the auto-update after saving. If youneed a reminder of the original date, please remember that it exists on the initialProgram/Plan page.
Detailed Information
Navigate to: Records and Enro l lment > Career and Program Inform ation > Program/Plan.
Verify DISC row

7/18/2019 CS-AD Reference Guide
http://slidepdf.com/reader/full/cs-ad-reference-guide 129/284
CUNYfirst Admissions Reference Guide
Last Updated: 6/18/2013 CUNYfirst Admissions129
Update Program Page
Update Plan Page
For additional scenarios regarding RADM (Readmit) students, please refer to the appendix.

7/18/2019 CS-AD Reference Guide
http://slidepdf.com/reader/full/cs-ad-reference-guide 130/284
CUNYfirst Admissions Reference Guide
Last Updated: 6/18/2013 CUNYfirst Admissions130
Topic 2: Reactivate Students
Appropriate for a student who was admitted and matriculated to the college but never enrolled.
Since the student to be reactivated already has a Program/Plan stack, we must insert a new row witha program action and action reason.
Step Summary – Reactivate Student
1. Navigating to the Student Program page through Records and Enrollment > Career andProgram Information > Program/Plan.
2. Enter the appropriate Search criteria, check the Correct History Checkbox and Search.
3. On the Student Program page, note the current Program Action.
a. If the student has a DISC (Discontinued) row, click the Add a New Row (+) icon andcontinue to step 4.
b. If the student does not have a DISC row, click the Add a New Row (+) icon and usethe Program Action look-up tool to select DISC with an Action Reason of ENRM (NoEnrollment). Once this is done, click the Add a New Row (+) icon again andproceed to step 4.
c. Note: The DISC date must be appropriate to term activity – after the last active termand prior to the new active term. The DISC row must also have the same admi t
terms and requ i rement terms as in the initial Program/Plan record.
4. Navigate to the appropriate Program/Plan stack for your institution. Use the ProgramAction look-up tool to select RADM (Readmit).
5. In the Action Reason field, select the appropriate value: 2 or 3.
6. For Admit Term, select the term into which the student is being Readmitted.
7. Though it is likely you will update the Requirement Term to the Admit Term, please fo l low
your campus pol icy regarding retaining the original or new term.
8. If the student is being readmitted into a different plan, go to the Plan tab and change theRequirement Term to the new term into which the student is being admitted. However, if itis your institution’s policy to retain the original term as t he Requirement Term, then retain theoriginal term.
9. If the student is being readmitted into a different plan, update the Declare Date to the currentdate.
10. Click Save. Note that when you either Save or click a different tab within this component, the
Requirement Term will automatically update to match the Admit Term . If you have chosen toretain the original Requirement Term, you must correct the auto-update after saving. If youneed a reminder of the original date, please remember that it exists on the initialProgram/Plan page.
11. End of Procedure.

7/18/2019 CS-AD Reference Guide
http://slidepdf.com/reader/full/cs-ad-reference-guide 131/284
CUNYfirst Admissions Reference Guide
Last Updated: 6/18/2013 CUNYfirst Admissions131
Topic 3: ReallocationWhen an applicant has been reallocated to a different institution, there are steps that can be taken atboth institutions.
Detailed Information
Step Summary – Reallocation from the originating institution
The Add Application Person Information page can be found by navigating to: Student Admissions
> Application Maintenance > Maintain Applications
To update an application for Reallocation to a Different Institution:Take the fo l lowing act ions for the originating institutions’ appl ication -
1. On the Maintains Applications Search Page, enter search criteria and select appropriaterecord. Selection will lead directly to the Application Program Data Page.
2. Click the Add a New Row icon to insert a new effective dated row.
3. Update the Program Action field with WAPP (Applicant Withdrawal).
4. Update the Action Reason field with REAL (Reallocation).5. Click Save.
Program Status – Withdrawal for Reallocation

7/18/2019 CS-AD Reference Guide
http://slidepdf.com/reader/full/cs-ad-reference-guide 132/284
CUNYfirst Admissions Reference Guide
Last Updated: 6/18/2013 CUNYfirst Admissions132
Step Summary – Reallocation for the new institution
1. On the Maintains Applications Search Page, enter search criteria and select appropriaterecord. Selection will lead directly to the Application Program Data Page.
2. Click the Add a New Row icon to insert a new effective dated row.
3. Update the Program Action field with ADMT (Applicant Admit)
4. Update the Action Reason field with REAL (Reallocation).
5. Click Save.
Program Status – Admission for Reallocation

7/18/2019 CS-AD Reference Guide
http://slidepdf.com/reader/full/cs-ad-reference-guide 133/284
CUNYfirst Admissions Reference Guide
Last Updated: 6/18/2013 CUNYfirst Admissions133
Unit II: CUNYfirst Campus Community for Admissions
Unit IntroductionThis course provides instruction on the various Admissions activities which utilize CampusCommunity functionality.
Unit ObjectivesUpon completion of this section learners will be able to Add, Update and Manage:
Student data in the Student Services Center
Bio-Demo Information
Residency Information
Citizenship Status
Service Indicators
Student Groups
FERPA Control
Health Services data
Veteran’s Services data
Disability Services data
Basic Three C functionality
7/18/2019 CS-AD Reference Guide
http://slidepdf.com/reader/full/cs-ad-reference-guide 134/284
CUNYfirst Admissions Reference Guide
Last Updated: 6/18/2013 CUNYfirst Admissions134
Chapter 1 – Student Services Center ~ Overview
The CUNYfirst Student Services Center provides a comprehensive view of student information. Theability to update information or simply view data is determined by security access. The pagesassociated with Student services Center provide a similar view to the Student Center, which isaccessed by students using Self Service.
The Student Services Center is a collection of the following components:
Student Center - Displays most of what the student sees in Student Center self service
General Info – Contact Information, Service Indicators, Student Groups
Admissions - Current Status, Previous Education, and Program/Plan
Academics - Academic Program, Term, GPA, and Enrollment data Transfer Credit - Transfer Courses, Test Credit and other types of Credit
Finances - Student Billing/Account & Financial Aid Information
Chapter ObjectivesUpon completion of the Student Services Center topics, learners will be able to:
Locate relevant data on each tab of the SS Center
Identify links to update student data

7/18/2019 CS-AD Reference Guide
http://slidepdf.com/reader/full/cs-ad-reference-guide 135/284
CUNYfirst Admissions Reference Guide
Last Updated: 6/18/2013 CUNYfirst Admissions135
Topic 1: Student Services Center: Student Center TabThe student center tab provides administrator with a 360 degree overview of a specific student.Here they can view details of the advisee’s class schedule, service indicators, initiated checklists,
enrollment appointments, and personal information.
Step Summary
Navigate to: Campus Commun i ty > Student Serv ices Center
1. Enter appropriate search criteria: Empl ID; National ID; or Last Name & First Name
2. Click the Search button.
3. Use the sections detailed below of the Student Center to locate student record details.

7/18/2019 CS-AD Reference Guide
http://slidepdf.com/reader/full/cs-ad-reference-guide 136/284
CUNYfirst Admissions Reference Guide
Last Updated: 6/18/2013 CUNYfirst Admissions136
Detailed Information ~ Student Center page
Search for Classes: This takes the viewer to a class search page, where you can search the classschedule for specific class offerings. When you search for a class, and view class details, you canalso see class notes, department or instructor add consent required or pre- or co-requisites placed onthat class. This data is located within the Class Notes, Add Consent Enrollment Requirements sectionon Class Details.
Holds : Positive and negative service indicators list with links to details of institution, start term and/ordate, end term and/or date, amount and department that placed the hold.

7/18/2019 CS-AD Reference Guide
http://slidepdf.com/reader/full/cs-ad-reference-guide 137/284
CUNYfirst Admissions Reference Guide
Last Updated: 6/18/2013 CUNYfirst Admissions137
To Do List: Checklists relevant to this particular student that various units in the campus communitymay be using appear here. For example, Admissions, Financial Aid or an academic department maybe using “to do” lists.
Enrollment Dates: Information regarding enrollment dates and student enrollment appointments willappear here. In addition, you can click on “details” where you can view enrollment dates by sessionand term enrollment limits for this student. From the details page you may also choose to “ change” toview enrollment dates for another term.
Advisor: Iif assigned, this displays a student’s assigned advisor. If populated, you can click on“details” for link to the advisor’s email address.
Academics Section
In the Academics section:
Clicking on will lead to a weekly view of the class schedule
Clicking on My Class Schedule will lead to another view of the student's schedule thatincludes additional information than displayed in This Week's Schedule.
Clicking on My Planner will lead to a view of the student’s Planner. Students may use theplanner to list classes of interest until it is time to enroll for a particular term. Note: The
planner wi l l NOT autom atical ly enrol l stu dents in classes at any time!

7/18/2019 CS-AD Reference Guide
http://slidepdf.com/reader/full/cs-ad-reference-guide 138/284
CUNYfirst Admissions Reference Guide
Last Updated: 6/18/2013 CUNYfirst Admissions138
My Class Schedule
Click the other academic dropdown box icon to select any of the following:
Course History: Course History displays a grid of all courses a student has previously taken(including transfer or test credit) plus units and grades.
Exam Schedule: Shows student’s exam schedule for the selected term.
Grades: You can select a term and bire the classes, term GPA and cumulative GPA for the
student. Transfer Credit - Report information: This report displays the classes for which the student
has been given credit from other institutions and tests. This same information exists on theTransfer Credit tab.
To view the selected information, click the Go icon.

7/18/2019 CS-AD Reference Guide
http://slidepdf.com/reader/full/cs-ad-reference-guide 139/284
CUNYfirst Admissions Reference Guide
Last Updated: 6/18/2013 CUNYfirst Admissions139
The Finances Section
Finances section provides a quick snapshot/summary of student’s account as well as their financialaid information. Account Summary lists current term balance as well as any future balances due
based on the due date; this does not reflect anticipated aid. Account Inquiry permits a view of of allstudent financial activity. Financial Aid permits a view of current financial aid as well as any prioryear financial aid received. Once you click on the aid year, the student’s financial aid is displayed bythe year then by each term.
In the Finances section, click the other financials dropdown and then select any of the following:
Account Activity: Shows all of the account activity that has transpired over a fixed period oftime. Account activity can include any transactions that have been posted to the student'saccount, including charges, cash, checks, or credit card payments, financial aid and refunds.
Charges Due: Shows all of student’s outstanding charges and deposits incurred to date,including charge details.
Payments: Shows all of the payments posted to student’s account.
Pending Financial Aid: Shows pending or anticipated aid that has yet been posted tostudent’s account. Pending financial aid amounts may be viewed by all terms or by specificterms
To view the selected information, click the Go icon.
Personal Information
In the Personal Information section:
Demographic Data : Clicking on “Demographic Data” takes you to a page that displays thestudent's demographic information (if known) including ID number, gender, date of birth, birthcountry, birth state, marital status, ethnic group, military status, last four digits of national IDnumber (SSN), citizenship information, visa or permit data.
Contact Information: A variety of information displays here that may include addresses,phone numbers and email addresses.
Emergency Contact: Click here to view student Emergency Contact info, if the student hasentered it.

7/18/2019 CS-AD Reference Guide
http://slidepdf.com/reader/full/cs-ad-reference-guide 140/284
CUNYfirst Admissions Reference Guide
Last Updated: 6/18/2013 CUNYfirst Admissions140
Topic 2: Student Services Center: General Info TabThe general info page displays detailed personal information for a student. This information
includes: service indicators, initiated checklists, student groups, personal data, and national ID.Contact information including addresses, phone and email addresses is also shown.
Step Summary
Navigate to: Campus Commun i ty > Student Serv ices Center
1. Enter appropriate search criteria: Empl ID; National ID; or Last Name & First Name
2. Click the Search button.
3. Use the General Info tab to locate student record details.
Detailed Information
General Info tab
On the Advisee General Info tab view links to summary details related to:
Service Indicators: If the student has a current active service indicator(s) they will displayhere.
Initiated Checklists: If the student has a checklist(s), it will display here.
Student Groups: If the student is associated with a student group it will display here. Alsodisplayed is current status (active/inactive) in the student group along with the associatedeffective date.
I f a student needs c hanges m ade to the (Personal Data, National ID, Name, Ad dress,
Phone and Email Add ress) they may con tact the Office of the Registrar for assis tance.
Click the Expand All button to expand all sections.

7/18/2019 CS-AD Reference Guide
http://slidepdf.com/reader/full/cs-ad-reference-guide 141/284
CUNYfirst Admissions Reference Guide
Last Updated: 6/18/2013 CUNYfirst Admissions141
General Info tab – upper portion
Note that the Edit Service Indicator link will bring the user to the Manage Service Indicator pages. Access to this link will be determined by campus security access.

7/18/2019 CS-AD Reference Guide
http://slidepdf.com/reader/full/cs-ad-reference-guide 142/284
CUNYfirst Admissions Reference Guide
Last Updated: 6/18/2013 CUNYfirst Admissions142
General Info tab – middle portion Note that the Edit Student Groups link will bring the user to the Manage Student Groups pages.
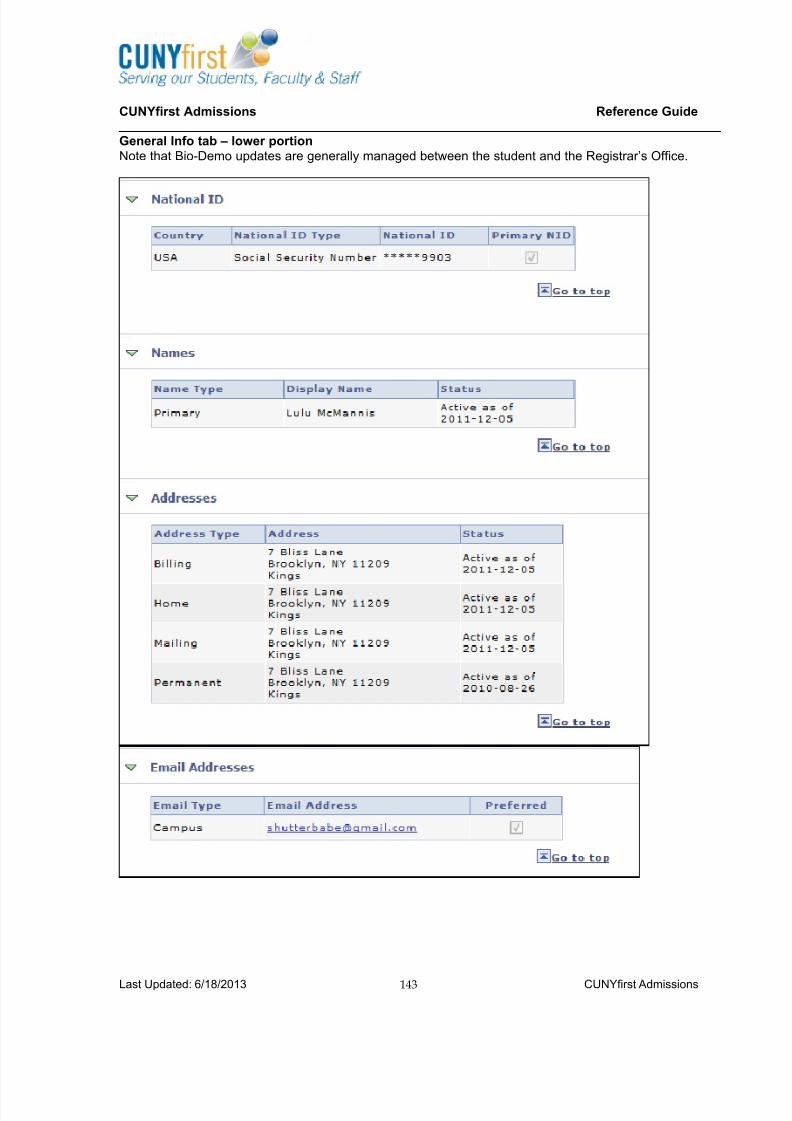
7/18/2019 CS-AD Reference Guide
http://slidepdf.com/reader/full/cs-ad-reference-guide 143/284
CUNYfirst Admissions Reference Guide
Last Updated: 6/18/2013 CUNYfirst Admissions143
General Info tab – lower portionNote that Bio-Demo updates are generally managed between the student and the Registrar’s Office.

7/18/2019 CS-AD Reference Guide
http://slidepdf.com/reader/full/cs-ad-reference-guide 144/284
CUNYfirst Admissions Reference Guide
Last Updated: 6/18/2013 CUNYfirst Admissions144
Topic 3: Student Services Center: Academics Tab
The academics tab contains an overview of Institution/Career/Program section. Also the TermSummary section with details of academic level and load, classes and statistics displays.
Step Summary
Navigate to: Campus Commun i ty > Student Serv ices Center
1. Enter appropriate search criteria: Empl ID; National ID; or Last Name & First Name
2. Click the Search button.
3. Use the Academics tab to locate student record details.
Detailed Information
Academics tab
View the Academics tab that displays::
Institution/Career/Program section:o Left Column: Institution, active career and program information displays in this
column. If the student has multiple careers/programs, clicking on a program in the leftcolumn determines the information that displays in the right column. In many cases,the Expected Graduation Term for a student will be blank. It is important to note thatthis field will remain blank until the student has applied for graduation. Then the fieldwill be populated with the term for which they have applied to graduate. Requirement
Term is similar to the Catalog Year for the student’s requirements.
o Right Column: General information about the student's program & plan, includingstatus, admit term, expected graduation date, approved load, load determination &level determination displays in this column.
Term Summary section:o Left Column: Institution, active career information and terms for which the student
has been term activated displays in this column. You can click on any term in thiscolumn and information relevant to that term displays in the right hand column.
o Right Column: General information relevant to the selected term displays here,including whether or not the student is eligible to enroll (in an active program), theirprimary academic program for that term and their academic standing. In addition youcan view level/load information, classes for which they are enrolled (if any) and termstatistics (including GPA information).If you have access to “quick enroll” (SeeEnrollment : Quick Enroll page for detailed information about this function),there is a link available at the bottom of the “classes” section.

7/18/2019 CS-AD Reference Guide
http://slidepdf.com/reader/full/cs-ad-reference-guide 145/284
CUNYfirst Admissions Reference Guide
Last Updated: 6/18/2013 CUNYfirst Admissions145
Academics tab – Upper portion

7/18/2019 CS-AD Reference Guide
http://slidepdf.com/reader/full/cs-ad-reference-guide 146/284
CUNYfirst Admissions Reference Guide
Last Updated: 6/18/2013 CUNYfirst Admissions146
Academics tab – lower portion

7/18/2019 CS-AD Reference Guide
http://slidepdf.com/reader/full/cs-ad-reference-guide 147/284
CUNYfirst Admissions Reference Guide
Last Updated: 6/18/2013 CUNYfirst Admissions147
Topic 4: Student Services Center: Admissions TabThe admissions tab page displays information including: Institution/Career/ApplicationNumber/Program, External Education and Test Summary.
Step Summary
Navigate to: Campus Commun i ty > Student Serv ices Center
1. Enter appropriate search criteria: Empl ID; National ID; or Last Name & First Name
2. Click the Search button.
3. Use the Admissions tab to locate student record details.
Admissions tab
View the admissions tab that displays:
Institution/Career/Application Nbr/Program: If an application is on file with admissions,this information will display including Applicant Progression. Click the Edit Application Datalink (green bar) to access the Application pages.
External Education: Displays institution(s) attended by the student. Click triangle icon tosee further information. Click the External Education link (green bar) to access the ExternalEducation pages.
Test Summary: If test information (ACT, CPE, SAT, ACT, CPI, TOEFL, GED, REGENTS) isavailable on the student, a summary of each Test ID will display here. Click the TestSummary link (green bar) to access the Test data pages.
Detailed Information
Following are screen-shots of the Student Center Admissions sections and the pagesavailable through links.

7/18/2019 CS-AD Reference Guide
http://slidepdf.com/reader/full/cs-ad-reference-guide 148/284
CUNYfirst Admissions Reference Guide
Last Updated: 6/18/2013 CUNYfirst Admissions148
Admissions tab - Upper sectionClick the Edi t Appl ica t ion Data page to access the Maintain App l ications component. Note thataccess to this link will depend upon security permissions.
Admissions tab – Applicant Progression
.

7/18/2019 CS-AD Reference Guide
http://slidepdf.com/reader/full/cs-ad-reference-guide 149/284
CUNYfirst Admissions Reference Guide
Last Updated: 6/18/2013 CUNYfirst Admissions149
Admissions tab – External Education section
The Edit Education Data link leads to the External Education pages.
Admissions tab – Test Summary section
The Edit Student Tests link leads to the Test Results page

7/18/2019 CS-AD Reference Guide
http://slidepdf.com/reader/full/cs-ad-reference-guide 150/284
CUNYfirst Admissions Reference Guide
Last Updated: 6/18/2013 CUNYfirst Admissions150
Topic 5: Student Services Center: Transfer Credit TabThe transfer credit tab shows the classes that the student has been given credit for because of prior
class work in other institutions and tests.
Step Summary
Navigate to: Campus Commun i ty > Student Serv ices Center
1. Enter appropriate search criteria: Empl ID; National ID; or Last Name & First Name
2. Click the Search button.
3. Use the Transfer Credit tab to locate student record details.
Detailed Information
Transfer Credit tab
View the Transfer Credit tab that displays:
Course Credits: An overview of transfer credit appears in this table. Each institutionattended displays on the Model page. A summary of the credit transferred displays on theStatistics page. If the credit has been posted to the student’s record, the Model Status will beposted. If it shows as Complete, the credit will be posted when the applicant is admitted andmatriculated. Credits that are not in Posted status do not calculate in the student’s earnedhours.
Test Credits: Test credits (AP, CLEP, IB) will display if the test credit has been equated to a
course. Other Credits: Other credits will display exemptions or Life time Achievement credit.

7/18/2019 CS-AD Reference Guide
http://slidepdf.com/reader/full/cs-ad-reference-guide 151/284
CUNYfirst Admissions Reference Guide
Last Updated: 6/18/2013 CUNYfirst Admissions151
Student Services Center – Transfer Credit page
The Detail in the Course Credits area leads to the Transfer Course Entry pages.
The Detail in the Test Credit area leads to the Test Credit Entry pages.
:

7/18/2019 CS-AD Reference Guide
http://slidepdf.com/reader/full/cs-ad-reference-guide 152/284
CUNYfirst Admissions Reference Guide
Last Updated: 6/18/2013 CUNYfirst Admissions152
Student Services Center – Transfer Credit page
The Detail in the Other Credits area leads to the Other Credit Detai l pages (which includesExceptions).

7/18/2019 CS-AD Reference Guide
http://slidepdf.com/reader/full/cs-ad-reference-guide 153/284
CUNYfirst Admissions Reference Guide
Last Updated: 6/18/2013 CUNYfirst Admissions153
Topic 6: Student Services Center: Finances TabThe Student Services Center Finances Tab provides administrators with an overview of a specificstudent’s financial information with easy access to financial transactions.
Step Summary
Navigate to: Campus Commun i ty > Student Serv ices Center
1. Enter appropriate search criteria: Empl ID; National ID; or Last Name & First Name
2. Click the Search button.
3. Use the Finances tab to locate student record details.
Detailed Information
Finances tab
View the Finances tab that displays:
Tuition Calculation Summary:o Left Column: Institution, active career and program information displays in this
column. If the student has multiple careers/programs, clicking on a program in the leftcolumn determines the information that displays in the right column.
o Right Column: General information about the student's finances, including LastDate/Time Tuition was Calculated, Primary Program, Tuition Group, Total Tuition and
Fees and Total Waiver displays in this column. Term Summary section:
o Left Column: Campus/Institution displays in this column.
o Right Column: Detailed information about student’s finances, including AccountTotal Balance, Deposit Due, Anticipated Aid, 1098-T data form, Detailed DueCharges, Refunds, Refundable Credits, Bills, Payment Plans and Credit History andCollection displays in this column.

7/18/2019 CS-AD Reference Guide
http://slidepdf.com/reader/full/cs-ad-reference-guide 154/284
CUNYfirst Admissions Reference Guide
Last Updated: 6/18/2013 CUNYfirst Admissions154
Chapter 2 – Add & Update Student Data A student record is created for every individual who is added to CUNYfirst. Upon saving a new
student record, CUNYfirst automatically assigns an EMPL ID to the individual.
Before adding an individual to the system users should always run the Search/Match process todetermine if a record already exists for that individual. It is essential that campus administrators prevent the creation of duplicate records for the same individual . Each individual’s biographical anddemographical information is tied to a single record which can be accessed throughout the differentmodules in CUNYfirst.
Chapter ObjectivesUpon completion of the Add/Update student data topic, learners will be able to:
Update bio-demo data for a student
Preserve history of data via effective dating mechanisms

7/18/2019 CS-AD Reference Guide
http://slidepdf.com/reader/full/cs-ad-reference-guide 155/284
CUNYfirst Admissions Reference Guide
Last Updated: 6/18/2013 CUNYfirst Admissions155
Topic 1: Add a PersonIf it is necessary to enter an individual into CUNYfirst prior to completion of their application process,a designated administrator can create a record in CUNYfirst. Follow these steps to enter an
individual’s biographical details, including their name, contact information, and ethnicity/regionalinformation. Note that a Program/Plan stack will NOT be created, as this is not an applicationprocess.
Step Summary
The Add/Update a Person component can be found by navigating to: Campus Community >Personal Information > Add/Update a Person
To enter personal information:1. Conduct a Search/Match to ensure the individual does not already have a CUNYfirst record
and EMPL ID!
2. To Add a Person, click on the Add a New Value tab. (ID defaults to NEW). Click the Add
button.
3. The Add/Update a Person Page opens to the Biographical Details tab.
4. Enter the relevant Biographical information for the new record.
5. Click the Regional tab to enter/update ethnicity information.
6. Click Save. An EMPL ID is created upon saving.
Detailed Information
Name/Biographical Data – Add New Value Page
Use the Add a New Value page to create a new person record for an individual who does not havean existing person record in the database.

7/18/2019 CS-AD Reference Guide
http://slidepdf.com/reader/full/cs-ad-reference-guide 156/284
CUNYfirst Admissions Reference Guide
Last Updated: 6/18/2013 CUNYfirst Admissions156
Name/Biographical Data Page
Use the Name/Biographical Data page to add an individual’s biographical details.
The following table describes the fields on the Biographical Details page of the Add/Update aPerson component:

7/18/2019 CS-AD Reference Guide
http://slidepdf.com/reader/full/cs-ad-reference-guide 157/284
CUNYfirst Admissions Reference Guide
Last Updated: 6/18/2013 CUNYfirst Admissions157
Personal Information
Field Description
Effective Date The effective date is the date when the person's record is effective. The defaultfor the Effective Date field is the current system date.
Format Using Select English.
Prefix Select the prefix from the drop-down box.
First Name Enter the individual's first name in this field.
Middle Name Enter the individual's middle name in this field.
Last Name Enter the individual's last name in this field.
Date of Birth Enter the individual's date of birth in this field.
Date of Birth Enter the individual's date of birth in this field.
Birth Information Click the Birth Information link to access the Birth Information Detail page, where
the individual's birth location, country, and state can be entered.
Biographical History
Field Description
Effective Date Use the Effective Date field in the Biographical History section to enter the datefrom which the marital status and gender is valid in the system. This field defaultsto the system date.
Marital Status Specify the individual's marital status (such as single, married, or divorced)
As of Select the date (if known) on which the associated status became effective.
Gender Select the individual's gender from the drop-down menu.
National ID
Field Description
Country Enter the country of this individual's national ID. Select "USA" to add acorresponding for a US Social Security number.
National ID Type Select "Social Security Number" from them drop-down.
National ID Enter the individual's social security number.
Addresses
Field Description
Address Type CUNY is using four address types: Home, Business, Permanent or Mailing. Thesystem displays Home as the default address type. Enter the address for eachtype. When the individual is using just one address, enter this address underHome type, click Add a New Row (+) to select the next CUNY address type andsave. The Home address will copy here. Repeat for all four types.

7/18/2019 CS-AD Reference Guide
http://slidepdf.com/reader/full/cs-ad-reference-guide 158/284
CUNYfirst Admissions Reference Guide
Last Updated: 6/18/2013 CUNYfirst Admissions158
Effective Date The effective date is the date when the address for the selected address type iseffective. The default for the Effective Date field is the current system date.
Status The Status field is set to either Active or Inactive.
Country The system formats the address entry fields based on in the country entered inthis field.
Edit Address Link Click the Edit Address link to be taken to the Edit Address page. Refer to theUpdate Address section for details on using this link.
Edit Addresses Page
Use the Edit Address page to edit an individual's address data. Please see specif ic topic in th is
gu ide for detai led instruct ion o n edi t ing addresses.
The following table describes the fields on the Edit Addresses page of the Add/Update a Personcomponent:
NOTE: To be consistent w i th the CAS and ASTA loads the u ser shou ld create four
address es. The types are Home, Mail ing, Bi l l ing and Perman ent.
Field Description
Address 1 Enter the street address in the Address 1 field.
Address 2 The apartment or suite number should be entered after the street
address to be consistent with the CAS and ASTA loads.City Enter the city in this field.
State Enter the state in this field.
Postal Enter the postal or zip code in this field.
Country Enter the country in this field
County Enter the county in this field.
Override Address Verification The address validation tool will verify that the address being enteredis a valid address and is correctly formatted. Click the checkbox to

7/18/2019 CS-AD Reference Guide
http://slidepdf.com/reader/full/cs-ad-reference-guide 159/284
CUNYfirst Admissions Reference Guide
Last Updated: 6/18/2013 CUNYfirst Admissions159
override the address verification functionality if the address beingentered does not appear on the list of address that are suggested bythe tool and a valid address.
Regional Page

7/18/2019 CS-AD Reference Guide
http://slidepdf.com/reader/full/cs-ad-reference-guide 160/284
CUNYfirst Admissions Reference Guide
Last Updated: 6/18/2013 CUNYfirst Admissions160
Note that upon saving, the addresses appear on their own tab for viewing and editing. TheEMPL ID also appears, along with a link to view/update Names.

7/18/2019 CS-AD Reference Guide
http://slidepdf.com/reader/full/cs-ad-reference-guide 161/284
CUNYfirst Admissions Reference Guide
Last Updated: 6/18/2013 CUNYfirst Admissions161
Topic 2: Update Bio/Demo Information – Names
Step Summary – Change an existing name
The Name/Biographical Data page can be found by navigating to: Campus Community > PersonalInformation (Student) > Biographical Information (Student) > Names.
To change an existing name:
1. Enter Search Criteria, click the Include History checkbox and click Search. If multipleresults are returned, select the appropriate record. Note: Include History display all rows of
data: current, future, and history. Users can add new data to an existing record. CorrectHistory provides access to existing rows of data and displays all effective-dated rows. Userscan add new data and update all rows, including history rows. Security access to CorrectHistory is limited.
2. In the Current Name area, click the Name History link.
3. Click the Add a New Row Icon.
4. Within the new field (note the effective dated row), click the Edit Name link.
5. Enter the new name information.
6. Click OK. Review new name information in the area correctly associated with the neweffective date. Click OK again.
7. Click Save.

7/18/2019 CS-AD Reference Guide
http://slidepdf.com/reader/full/cs-ad-reference-guide 162/284
CUNYfirst Admissions Reference Guide
Last Updated: 6/18/2013 CUNYfirst Admissions162
Detailed Information
The Names link on the Biographical Details page
Name History is used to edit an existing Name Type
Add a New Row to add data and preserve history

7/18/2019 CS-AD Reference Guide
http://slidepdf.com/reader/full/cs-ad-reference-guide 163/284
CUNYfirst Admissions Reference Guide
Last Updated: 6/18/2013 CUNYfirst Admissions163
The Edit Name link selected should be associated with the current effective date.
The Names Detail page is used to make the actual name data changes.

7/18/2019 CS-AD Reference Guide
http://slidepdf.com/reader/full/cs-ad-reference-guide 164/284
CUNYfirst Admissions Reference Guide
Last Updated: 6/18/2013 CUNYfirst Admissions164
The Name Type History page contains name history with associated effective dates.
New Primary Name information appears on main Names page.

7/18/2019 CS-AD Reference Guide
http://slidepdf.com/reader/full/cs-ad-reference-guide 165/284
CUNYfirst Admissions Reference Guide
Last Updated: 6/18/2013 CUNYfirst Admissions165
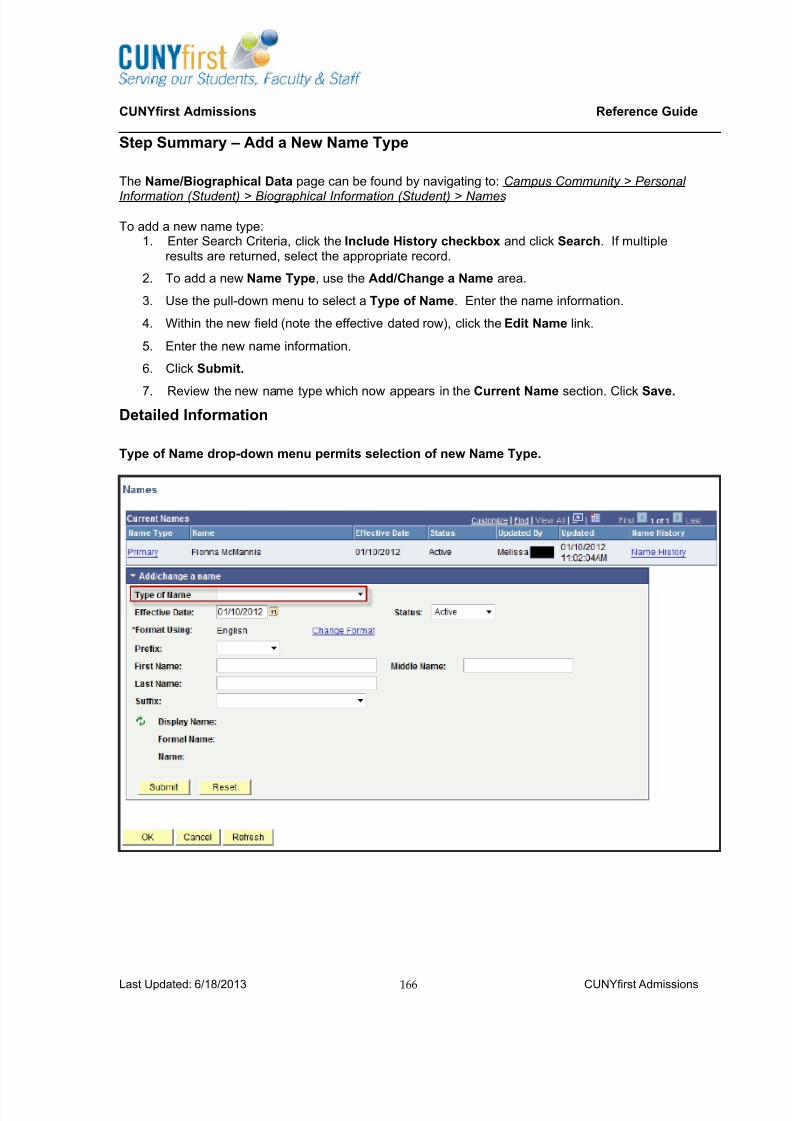
7/18/2019 CS-AD Reference Guide
http://slidepdf.com/reader/full/cs-ad-reference-guide 166/284
CUNYfirst Admissions Reference Guide
Last Updated: 6/18/2013 CUNYfirst Admissions166
Step Summary – Add a New Name Type
The Name/Biographical Data page can be found by navigating to: Campus Community > Personal
Information (Student) > Biographical Information (Student) > Names
To add a new name type:1. Enter Search Criteria, click the Include History checkbox and click Search. If multiple
results are returned, select the appropriate record.
2. To add a new Name Type, use the Add/Change a Name area.
3. Use the pull-down menu to select a Type of Name. Enter the name information.
4. Within the new field (note the effective dated row), click the Edit Name link.
5. Enter the new name information.
6. Click Submit.
7. Review the new name type which now appears in the Current Name section. Click Save.
Detailed Information
Type of Name drop-down menu permits selection of new Name Type.

7/18/2019 CS-AD Reference Guide
http://slidepdf.com/reader/full/cs-ad-reference-guide 167/284
CUNYfirst Admissions Reference Guide
Last Updated: 6/18/2013 CUNYfirst Admissions167
Names Page permits entry of new Name Type information.
Clicking Submit moves new data to Current Names section.

7/18/2019 CS-AD Reference Guide
http://slidepdf.com/reader/full/cs-ad-reference-guide 168/284
CUNYfirst Admissions Reference Guide
Last Updated: 6/18/2013 CUNYfirst Admissions168
Clicking Save retains the information and updates the user identification and date/time stamp.

7/18/2019 CS-AD Reference Guide
http://slidepdf.com/reader/full/cs-ad-reference-guide 169/284
CUNYfirst Admissions Reference Guide
Last Updated: 6/18/2013 CUNYfirst Admissions169
Topic 3: Update Bio/Demo Information – Addresses
Step Summary – Add a New Address
The Address page can be found by navigating to Campus Community > Personal Information(Student) > Biographical Information (Student) >Addresses/Phones > Address
To Add A New Address Type:9. Enter Search Criteria, click the Include History checkbox and click Search. If multiple
results are returned, select the appropriate record.
10. To add a new Address type , select the Address Type checkbox appearing under the Add
Address Types column.
11. Click the Edit Address link in the Add Address area.
12. Enter address information. If applicable, click the Override Address Verification checkbox.
13. Click OK.
14. Review the new address information in the Add Address area.
15. Click Submit. Note the new address type now exists in the Current Address section.
16. Click Save.

7/18/2019 CS-AD Reference Guide
http://slidepdf.com/reader/full/cs-ad-reference-guide 170/284
CUNYfirst Admissions Reference Guide
Last Updated: 6/18/2013 CUNYfirst Admissions170
Detailed Information
To Add a New Address – Select a Type and click the Edit Address link

7/18/2019 CS-AD Reference Guide
http://slidepdf.com/reader/full/cs-ad-reference-guide 171/284
CUNYfirst Admissions Reference Guide
Last Updated: 6/18/2013 CUNYfirst Admissions171
Enter Address Page
New address information appears. Click Submit to move the data up to Current Address.

7/18/2019 CS-AD Reference Guide
http://slidepdf.com/reader/full/cs-ad-reference-guide 172/284
CUNYfirst Admissions Reference Guide
Last Updated: 6/18/2013 CUNYfirst Admissions172
Click Save to retain new data and update the user identification and date/time stamp.

7/18/2019 CS-AD Reference Guide
http://slidepdf.com/reader/full/cs-ad-reference-guide 173/284
CUNYfirst Admissions Reference Guide
Last Updated: 6/18/2013 CUNYfirst Admissions173
Step Summary – Change an existing address
The Address page can be found by navigating to Campus Community > Personal Information(Student) > Biographical Information (Student) >Addresses/Phones > Address
To Change an Address:
7. Enter Search Criteria, click the Include History checkbox and click Search. If multipleresults are returned, select the appropriate record.
8. To view address history or make changes to an existing address, click the Edit/ViewAddress Detail link..
9. Click the Add a New Row icon.
10. Enter address information.11. Click OK.
12. Review the new address information associated with the new effective date.
13. Click OK.
14. Click Save.
Detailed Information
Click the Address link or tab to access the Address page. Please note that on this page, only the firsttwo rows of address data will display until the View All button is clicked .

7/18/2019 CS-AD Reference Guide
http://slidepdf.com/reader/full/cs-ad-reference-guide 174/284
CUNYfirst Admissions Reference Guide
Last Updated: 6/18/2013 CUNYfirst Admissions174

7/18/2019 CS-AD Reference Guide
http://slidepdf.com/reader/full/cs-ad-reference-guide 175/284
CUNYfirst Admissions Reference Guide
Last Updated: 6/18/2013 CUNYfirst Admissions175
Now we can see all four rows of address data.
Screen after clicking Edit/View Address Detail. Add a New Row to enter new address data.
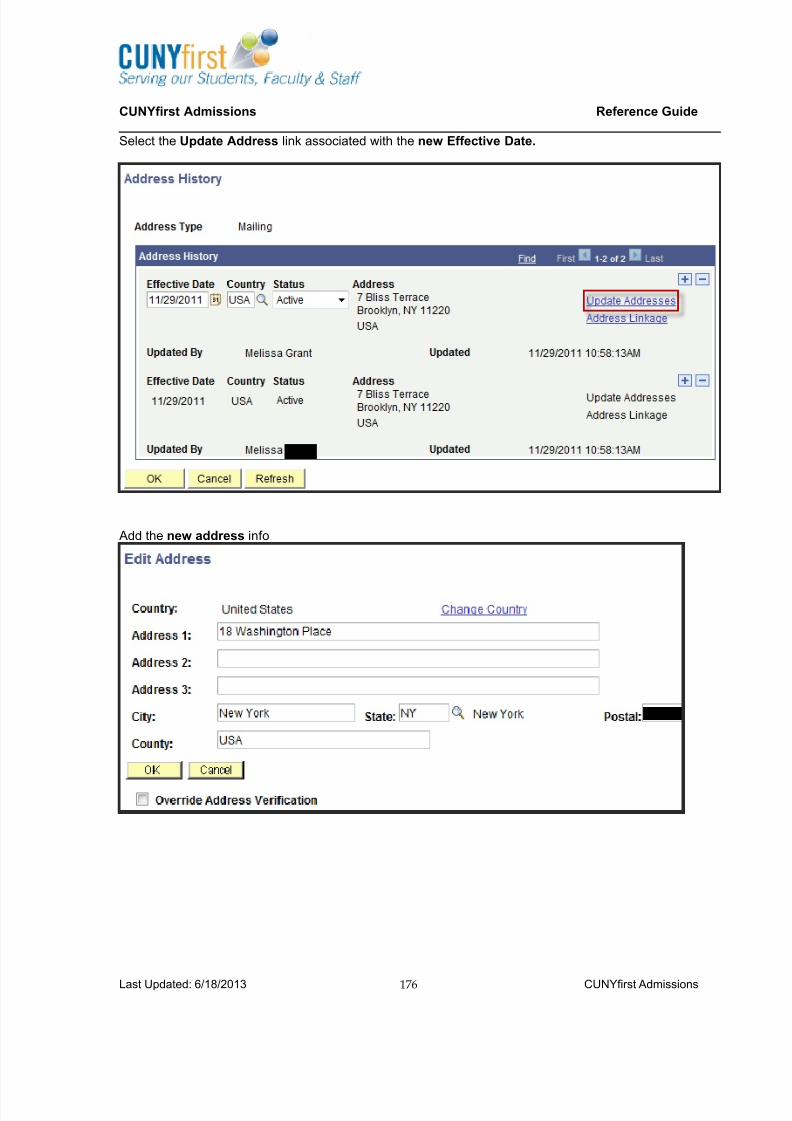
7/18/2019 CS-AD Reference Guide
http://slidepdf.com/reader/full/cs-ad-reference-guide 176/284
CUNYfirst Admissions Reference Guide
Last Updated: 6/18/2013 CUNYfirst Admissions176
Select the Update Address link associated with the new Effective Date.
Add the new address info

7/18/2019 CS-AD Reference Guide
http://slidepdf.com/reader/full/cs-ad-reference-guide 177/284
CUNYfirst Admissions Reference Guide
Last Updated: 6/18/2013 CUNYfirst Admissions177
Review the new address information in the correct effective dated row.
New address information is saved upon clicking OK and previous address has been retained.

7/18/2019 CS-AD Reference Guide
http://slidepdf.com/reader/full/cs-ad-reference-guide 178/284
CUNYfirst Admissions Reference Guide
Last Updated: 6/18/2013 CUNYfirst Admissions178
Topic 4: Enter Ethnicity Data for a StudentEthnicity data is recorded on the regional tab. This data can be used for regulatory state and federal
reporting. Intuitions can collect more detailed ethnicity information than may be required by state orfederal agencies if there is an internal need for this information.
Step Summary
The Regional Tab page can be found by navigating to: Campus Community > Personal Information(Student) > Add/Update a Person > Regional Tab
To enter Ethnicity Data:1. Click the Regional tab.
2. If the student is Hispanic or Latino, check the correct checkbox. In this case,continue to select the correct Ethnic Group from the associated pull-down menu.
3. If a student has multiple ethnicities click the Add button and repeat.
4. Click the Primary checkbox to identify the person’s primary Ethnicity.
5. Click Save.
Detailed Information
Use the Regional Tab page to enter Ethnicity Data

7/18/2019 CS-AD Reference Guide
http://slidepdf.com/reader/full/cs-ad-reference-guide 179/284
CUNYfirst Admissions Reference Guide
Last Updated: 6/18/2013 CUNYfirst Admissions179
Topic 5: Enter Languages Information for a StudentThe Languages page is used to indicate an individual’s proficiency in speaking, reading and writing in
foreign languages.
Step Summary
The Languages page can be found by navigating to: Campus Community > Personal Information(Student) > Biographical (Student) > Personal Attributes > Languages
To enter languages information:1. On the Languages search page, find the student’s record by entering relevant
search criteria and click Search.
2. Select the correct Student on the Search Results page
3. Enter a Language Code.
4. Click Native Language Checkbox, if applicable.5. Click the Add button to enter additional languages.
6. Click Save
Detailed Information
Use the Languages Page to indicate an individual’s proficiency in speaking, reading and writing inlanguages other than English.

7/18/2019 CS-AD Reference Guide
http://slidepdf.com/reader/full/cs-ad-reference-guide 180/284
CUNYfirst Admissions Reference Guide
Last Updated: 6/18/2013 CUNYfirst Admissions180
The following table describes the fields on the Languages page of the Languages component
Field Description
Language Code Enter the language code in this field.
Check Boxes There are three check boxes available for each languageentered.• Native: Select this check box to indicate that this is theindividual's native or primary language.• Translator: Select this check box to indicate that theindividual can translate or interpret this language.• Teacher: Select this check box to indicate that theindividual can teach or has taught this language.
Speak, Read, Write Select the level of proficiency, such as high, medium, orlow, with which the individual can speak, read, and writethis language.
Evaluation Date Enter the date on which the individual's levels ofproficiency in this language were evaluated, reported, orentered.
Set Preferred Communication Language The Set Preferred Communication Language appears onlyif the Support Multiple Languages check box is selectedon the Installation Default - CC (installation default -Campus Community) page. Click this link to access theCommunication Preferences page where the language inwhich the student prefers to receive communications canbe specified.

7/18/2019 CS-AD Reference Guide
http://slidepdf.com/reader/full/cs-ad-reference-guide 181/284
CUNYfirst Admissions Reference Guide
Last Updated: 6/18/2013 CUNYfirst Admissions181
Topic 6: Enter Decedent InformationThe appropriate administrators information relevant for this component, such as date and place ofdeath and the death certificate number. When the date of death is recorded on the Decedent Data
page, the system displays the word “deceased ” on each page related to that individual in thedatabase.
Step Summary
The Decedent Data page can be found by navigating to: Campus Community > Personal Information(Student) > Biographical (Student) >Personal Attributes > Decedent Data
To enter phone information:1. On the Decedent Data search page, find the student’s record by entering relevant
search criteria and click Search.
2. Select the correct Student on the Search Results page.
3. Enter the Date of Death (Required)
4. Enter Place of Death (Optional)
5. Enter Death Certificate Nbr (Optional)
6. Click Save
.
Detailed Information
Use the Decedent Data page to enter decedent information.
The following table describes the fields on the Decedent page of the Decedent component:
Field Description
Date of Death Enter the date the decedent died. This is a required field.
Place of Death Enter where the decedent died. This field is optional.
Death Certificate Nbr Enter the death certificate number. This field is Optional

7/18/2019 CS-AD Reference Guide
http://slidepdf.com/reader/full/cs-ad-reference-guide 182/284
CUNYfirst Admissions Reference Guide
Last Updated: 6/18/2013 CUNYfirst Admissions182
Topic 7: Enter Emergency Contacts Information for a StudentCampuses can enter the names, addresses, and telephone numbers of people to contact when an
individual has an emergency situation.
Step Summary
The Emergency Contacts page can be found by navigating to: Campus Community > PersonalInformation (Student) > Biographical (Student) > Emergency Contacts
To enter emergency contacts information:1. On the Emergency Contacts search page, find the student’s record by entering
relevant search criteria and click Serach.
2. Select the correct student.
3. Enter the Contact Name and select the Contact’s relationship with the person.
4. Check the Primary Contact checkbox for one of contacts (required).
5. If the Contact has the same address and/or phone number as the student complete
Steps 6 If not proceed to Step 7.
6. If relevant, check the Same Address/Same Phone as Individual checkbox.
7. If relevant, click the Edit address link and enter the appropriate information.
8. Click Save.
Detailed Information
Use the Emergency Contacts page to enter emergency contact information.

7/18/2019 CS-AD Reference Guide
http://slidepdf.com/reader/full/cs-ad-reference-guide 183/284
CUNYfirst Admissions Reference Guide
Last Updated: 6/18/2013 CUNYfirst Admissions183
The following table describes the fields on the Emergency Contact page of the Emergency Contactcomponent:
Field Description
Contact Name Enter the contact’s name. This is a free form field.
Relationship Select the relationship to the individual from the drop down list.
Primary Contact Select this checkbox next to the contact who the individual identifiesas their primary contact.
Same Address as Individual Select this checkbox if the contact has the same address as theindividual. If this checkbox is not checked then the contact’s addresscan be entered by clicking the edit address link.
Same Phone as Individual Select this checkbox if the contact has the same phone number as theindividual.
Address Type Select the address type from the drop down list.
Individual’s Current Address Displays the contact’s address.
Individual’s Phone Displays the contact’s phone number.

7/18/2019 CS-AD Reference Guide
http://slidepdf.com/reader/full/cs-ad-reference-guide 184/284
CUNYfirst Admissions Reference Guide
Last Updated: 6/18/2013 CUNYfirst Admissions184
Edit Addresses Page
The following table describes the fields on the Edit Addresses page of the Emergency Contactcomponent:
Field Description
Address 1 Enter the street address, including apartment or suite number, in theAddress 1 field.
Address 2 Enter any related address information not contained in Address 1.
City Enter the city in this field.
State Enter the state in this field.
Postal Enter the postal or zip code in this field.
Country Enter the country in this field
County Enter the county in this field.
OK Click to return to the Emergency Contact page.
Override Address Verification The address validation tool will verify that the address being enteredis a valid address and is correctly formatted. Click the checkbox tooverride the address verification functionality if the address beingentered does not appear on the list of address that are suggested by
the tool and a valid address.

7/18/2019 CS-AD Reference Guide
http://slidepdf.com/reader/full/cs-ad-reference-guide 185/284
CUNYfirst Admissions Reference Guide
Last Updated: 6/18/2013 CUNYfirst Admissions185
Use the Emergency Contact Other Phones page to enter additional phone numbers for theemergency contact.
The following table describes the fields on the Decedent page of the Decedent component:
Field Description
Contact Name Displays the emergency contact’s name.
Relationship Displays the emergency contact’s relationship to the individual.
Primary Contact Will be checked if this contact is the individual’s primary emergency contact.
Phone Type Select the phone type from the drop down list.
Phone Enter the contact’s phone number.
Extension Enter the contact’s phone number extension.
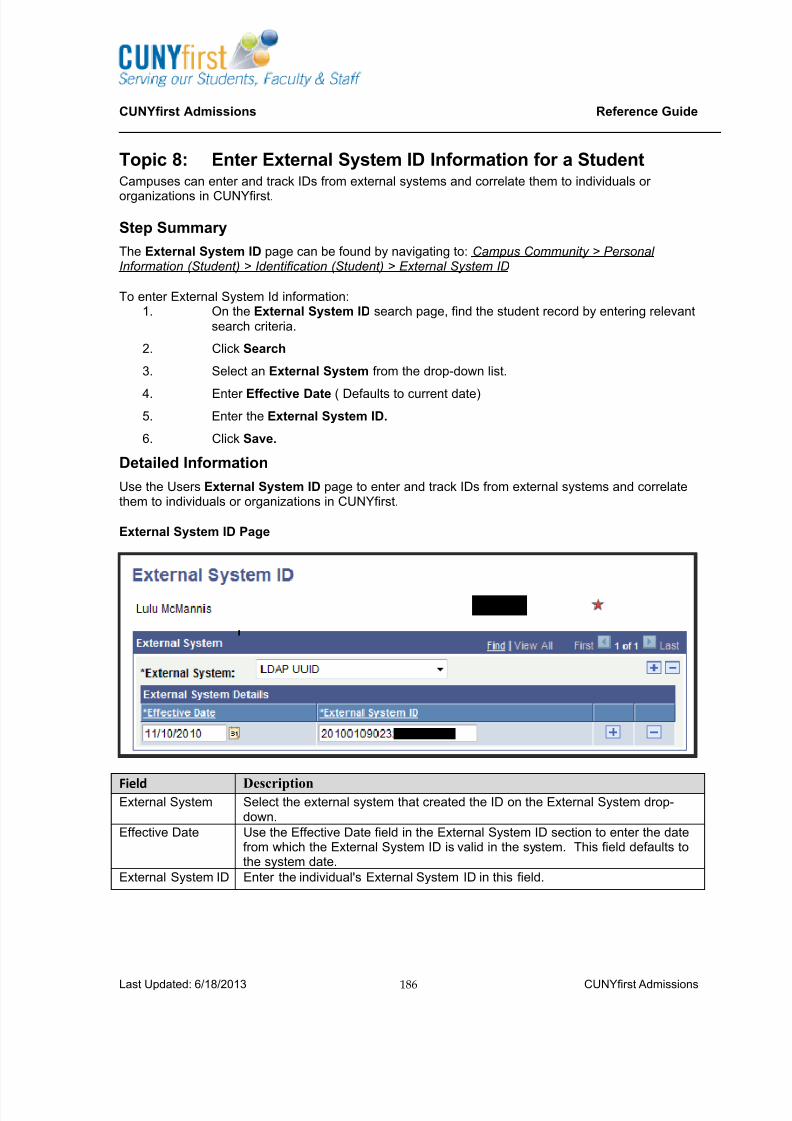
7/18/2019 CS-AD Reference Guide
http://slidepdf.com/reader/full/cs-ad-reference-guide 186/284
CUNYfirst Admissions Reference Guide
Last Updated: 6/18/2013 CUNYfirst Admissions186
Topic 8: Enter External System ID Information for a StudentCampuses can enter and track IDs from external systems and correlate them to individuals or
organizations in CUNYfirst.
Step Summary
The External System ID page can be found by navigating to: Campus Community > PersonalInformation (Student) > Identification (Student) > External System ID
To enter External System Id information:1. On the External System ID search page, find the student record by entering relevant
search criteria.
2. Click Search
3. Select an External System from the drop-down list.
4. Enter Effective Date ( Defaults to current date)
5. Enter the External System ID.
6. Click Save.
Detailed Information
Use the Users External System ID page to enter and track IDs from external systems and correlatethem to individuals or organizations in CUNYfirst.
External System ID Page
Field DescriptionExternal System Select the external system that created the ID on the External System drop-
down.
Effective Date Use the Effective Date field in the External System ID section to enter the datefrom which the External System ID is valid in the system. This field defaults tothe system date.
External System ID Enter the individual's External System ID in this field.

7/18/2019 CS-AD Reference Guide
http://slidepdf.com/reader/full/cs-ad-reference-guide 187/284
CUNYfirst Admissions Reference Guide
Last Updated: 6/18/2013 CUNYfirst Admissions187
Chapter 3 – Residency & CitizenshipOfficial residency should be entered and maintained through the Residency Data component. Note
that the Term A ct iva t ion p rocess is d ependent up on up dated res idency in format ion.
The CUNYfirst citizenship functionality can be used to identify an individual's country of citizenship,the current status of that citizenship, when citizenship was issued, and when citizenship expires.These pages can hold data regarding multiple countries of citizenship.
Chapter ObjectivesUpon completion of this section, learners will be able to:
View Residency determination for a student
Update Residency status (for individuals with security access): View or update United States Citizenship
View or add additional Citizenship data

7/18/2019 CS-AD Reference Guide
http://slidepdf.com/reader/full/cs-ad-reference-guide 188/284
CUNYfirst Admissions Reference Guide
Last Updated: 6/18/2013 CUNYfirst Admissions188
Topic 1: Entering Residency Information
Step Summary
The Residency page can be found by navigating to: Campus Community > Personal Information(Student) > Identification (Student) > Residency Data
To Enter Residency for a Student:
1. Enter Search Criteria, click the Include History checkbox, and click Search.
2. If Residency information exists, click the Add a New Row icon to enter new data.
3. Use the Residency Official 1 page to enter official residency data for an individual. Selectthe Institution, Term, and Residency value from the drop-down list. (Additional ResidencyData section values will default in).
4. In the Residency Date field, enter the date that the individual established or reported theresidency. If applicable at this time, select values for Admission and Financial Aid fields.
5. Use the Residency Official 2 page to enter additional official residency data and locationinformation.
6. Use the Residency Appeal page to record residency appeal information. For example, astudent may have been entered as Out of State for tuition and he or she wants to submitadditional information to qualify for in-state tuition.
7. Use the Residency Self-Report page to enter unofficial, unverified residency informationthat an individual reports to your institution.
8. Click Save.

7/18/2019 CS-AD Reference Guide
http://slidepdf.com/reader/full/cs-ad-reference-guide 189/284
CUNYfirst Admissions Reference Guide
Last Updated: 6/18/2013 CUNYfirst Admissions189
Detailed Information
Residency Official 1 pageUse this page to identify residency status: In-City, In-State, Out-Of-State, Pending.
The following table describes the fields on the Residency Official 1 page of the Residency Datacomponent:
Field Description
Academic Career Displays the student’s academic career.
Institution Enter the applicable institution.
Effective Term Enter the term when the individual’s residency status becomes active.
Residency Select the residency status from the drop down list.
Residency Date Enter the date that the individual’s residency data was entered.

7/18/2019 CS-AD Reference Guide
http://slidepdf.com/reader/full/cs-ad-reference-guide 190/284
CUNYfirst Admissions Reference Guide
Last Updated: 6/18/2013 CUNYfirst Admissions190
Additional Residency Data
Field Description
Admissions Select the student’s residency status for admissions purposes fromthe drop down list. The value that is entered here is defaulted intothe Federal Residency, State Residency and Tuition fields.
Fin Aid Federal Residency Select the student’s residency status for federal residencypurposes from the drop down list.
Fin Aid State Residency Select the student’s residency status for state residency purposesfrom the drop down list.
Tuition Select the student’s residency status for tuition purposes from thedrop down list.
Admission Residency Exception Select the applicable residency exception for admission purposesfrom the drop down list. The value that is entered here is defaultedinto the Federal Residency, State Residency and Tuition exception
fields.Fin Aid Fed Residency Excpt Select the student’s residency exception for federal residency
purposes from the drop down list.
Fin Aid State Residency Excpt Select the student’s residency exception for state residencypurposes from the drop down list.
Tuition Residency Exception Select the student’s residency exception for tuition purposes fromthe drop down list.

7/18/2019 CS-AD Reference Guide
http://slidepdf.com/reader/full/cs-ad-reference-guide 191/284
CUNYfirst Admissions Reference Guide
Last Updated: 6/18/2013 CUNYfirst Admissions191
Residency Official 2 pageUse this page to add residency information related to address.

7/18/2019 CS-AD Reference Guide
http://slidepdf.com/reader/full/cs-ad-reference-guide 192/284
CUNYfirst Admissions Reference Guide
Last Updated: 6/18/2013 CUNYfirst Admissions192
Residency Appeal page
Use this page for data related to appeals including date, status and comments.

7/18/2019 CS-AD Reference Guide
http://slidepdf.com/reader/full/cs-ad-reference-guide 193/284
CUNYfirst Admissions Reference Guide
Last Updated: 6/18/2013 CUNYfirst Admissions193
Residency Self-Report
Use this page to identify residency data reported by a student.

7/18/2019 CS-AD Reference Guide
http://slidepdf.com/reader/full/cs-ad-reference-guide 194/284
CUNYfirst Admissions Reference Guide
Last Updated: 6/18/2013 CUNYfirst Admissions194
Topic 2: Entering Citizenship Information
Step Summary
The Citizenship page can be found by navigating to: Campus Community > Personal Information(Student) > Identification (Student) > Citizenship > Citizenship and Passport
To enter Citizenship information:
1. Navigate to: Campus Community > Personal Information (Student) > Identification (Student)> Citizenship > Citizenship and Passport.
2. Enter Search Criteria, click the Include History checkbox, and click Search.
3. If a record already exists for Citizenship click the (+) Add button under the Citizenship section
to create an additional record and follow the steps below. Please note that the addition ofrows enables campuses to record citizenship status in multiple nations. If no records exist,continue with the steps below.
4. Select values for Country and Citizenship Status. Note that Status values exist only forUnited States Citizenship. Other countries of citizenship can be entered on new rows, butshould only have an associated status value of Self-Reported.
5. CUNY is not using the Passport Information section at this time.
6. Click Save and the OK button.

7/18/2019 CS-AD Reference Guide
http://slidepdf.com/reader/full/cs-ad-reference-guide 195/284
CUNYfirst Admissions Reference Guide
Last Updated: 6/18/2013 CUNYfirst Admissions195
Detailed Information
Use the Citizenship Detail page to enter citizenship/passport information.
The following table describes the fields on the Citizenship section
Field Description
Country Enter the individual's country of citizenship.
Citizenship Status Enter the status of this individual's citizenship in the specified country, forexample, native, naturalized, or alien permanent.
7/18/2019 CS-AD Reference Guide
http://slidepdf.com/reader/full/cs-ad-reference-guide 196/284
CUNYfirst Admissions Reference Guide
Last Updated: 6/18/2013 CUNYfirst Admissions196
Topic 3: Entering Visa/Permit InformationCUNYfirst has the capactity to retain visa and/or permit data for students or employees who are not
citizens of the United States. The Visa Permit Page can also be used to track the supportingdocumentation needed to establish visa status.
Step Summary
The Visa Permit page can be found by navigating to: Campus Community > Personal Information(Student) > Identification (Student) > Citizenship > Visa Permit Data
To enter Visa/Permit information:1. Navigate to: Campus Community > Personal Information (Student) > Identification (Student)
> Citizenship > Citizenship and Passport.
2. Enter Search Criteria and click Search.
3. If a record already exists for Visa/Permit Data click the (+) Add button in the Visa/Permit Datasection to create an additional record and follow the steps below. If no records exist,continue with the steps below.
4. Select values for Country and Citizenship Status
5. Enter information relevant to Country and Visa/Permit type.
6. Click the Get Supporting Documents button to retrieve the supporting document IDs anddescriptions from the Visa/Permit Table page for the visa or permit type specified in the Typefield.
7. Enter information relevant to the dates, status, issuing authority, and documents. Click Save.
8. Click on the Port of Entry Data Tab. If an existing row of information is present for the Portof Entry Data tab, then click on + hyperlink and perform the steps below. If there is noinformation present, then continue with the steps below.
9. Enter data relevant to Port of Entry, including any comments in the Remarks field.
10. Click Save.

7/18/2019 CS-AD Reference Guide
http://slidepdf.com/reader/full/cs-ad-reference-guide 197/284
CUNYfirst Admissions Reference Guide
Last Updated: 6/18/2013 CUNYfirst Admissions197
Detailed Information
Use the Visa Permit page to enter or update Visa/Permit data.
The following table describes the fields on the Visa Permit Data page of the Citizenship component:
Field Description
Country Enter the country that issued the visa or permit.
Type Enter the type of visa or permit possessed by the individual. Thisvalue is dependent on the country that was selected.
Get Supporting Documents Click the Get Supporting Documents button to retrieve thesupporting document IDs and descriptions from the Visa/PermitTable page for the visa or permit type specified in the Type field.
Effective Date Enter the date on which the visa or permit is effective or the date onwhich the information should become effective in the database.The effective date defaults to the current system date, but can bechanged if needed.
Number Enter the issuance number from the individual's official visa orpermit in this field.
Status Select the status of the official visa or permit from the drop-downlist. Valid values are: Applied, Granted, Renewal, and Renewed.
Status Date Enter the date the status became effective at the institution. Thedefault is the system's current date, but this can overridden ifneeded.
Issue Date Enter the date of issuance from the individual's official visa orpermit.

7/18/2019 CS-AD Reference Guide
http://slidepdf.com/reader/full/cs-ad-reference-guide 198/284
CUNYfirst Admissions Reference Guide
Last Updated: 6/18/2013 CUNYfirst Admissions198
Duration; Duration Type Enter specify the length of time during which the visa or permit isvalid. Enter the number in the first field, and in the second fieldspecify the period, such as days, months, terms, or years.
Date of Entry into Country Enter the official date on which the individual entered theinstitution's country.
Expiration Date Enter the date on which this individual's visa or permit expires. Thesystem calculates the expiration date based on the specifiedduration and the date of entry into the country. The system-calculated date can be overridden.
Issuing Authority Enter the name of the agency or authority that issued the officialvisa or permit.
Issue Place Enter the name of the location where the official visa or permit wasissued.
Supporting Documents Needed Enter the dates that the documents were requested and received.
Request Date Enter the date that the request for supporting documentation wasmade.
Date Received Enter the date that the supporting documentation was received.
Port of Entry Data Enter the location the individual used to enter the country.

7/18/2019 CS-AD Reference Guide
http://slidepdf.com/reader/full/cs-ad-reference-guide 199/284
CUNYfirst Admissions Reference Guide
Last Updated: 6/18/2013 CUNYfirst Admissions199
Chapter 4 – Managing Service IndicatorsService indicators can be used to provide or limit access to services for a student. Service indicatorscan be used as holds to prevent a student from receiving certain services, or positive indicators to
designate special services to be provided. Service indicators consist of one or more impact valuesthat identify the types of specific services that are restricted or provided.
Service Indicators can be either positive or negative. Negative service indicators are equivalent toholds. Negative service indicators can impact many services including barring enrollment, withholdingtranscripts and suspending library privileges. Positive service indicators indicate special services tobe provided. For example, Student Financial Services might choose to use a positive service indicatorto indicate when a student has given authorization to speak to their parents. The service indicator Active Date is the date the service indicator goes into effect, and service indicators can be set toexpire at the end of a term or on a specific date.
The negative or positive service indicator buttons display on every page in CUNYfirst that displaysstudent data.
: Negative Service Indicator
: Positive Service Indicator
If a user clicks on one of the Service Indicator buttons on a student record, a summary page opens ina new window. This page displays any service indicators associated with the student. Click the Detailhyperlink to see more detailed information regarding the service indicator.
Chapter ObjectivesUpon completion of the Service Indicator topics, learners will be able to:
Manually assign service indicators
Manually release service indicators
Edit service indicators
View service indicator audit information
Assign service indicators in batch.

7/18/2019 CS-AD Reference Guide
http://slidepdf.com/reader/full/cs-ad-reference-guide 200/284
CUNYfirst Admissions Reference Guide
Last Updated: 6/18/2013 CUNYfirst Admissions200
Topic 1: Manually Assign a Service Indicator
Service indicators can be used to provide or limit access to services for a student. Service indicatorscan be used as holds to prevent a student from receiving certain services, or positive indicators todesignate special services to be provided. Service indicators consist of one or more impact valuesthat identify the types of specific services that are restricted or provided.
When a service indicator is assigned to an individual, the corresponding negative or positive serviceindicator button appears on all pages that display the student data. One button can represent one orseveral service indicators. Click the buttons on any of those pages to navigate to the appropriatedetails page that display which service indicators and service impacts apply to the individual.
The Manage Service Indicators page can be found by navigating to: Campus Community > ServiceIndicators > Person > Manage Service Indicators
To view and add service indicators:1. Enter Search criteria and select the appropriate student.
2. Select an Effect from the drop-down list. The default ALL can be retained. Select anInstitution and Click the Refresh button.
3. View the information or click the + or Add a New Service Indicator link to add a newindicator. Click OK.
4. To add a new service indicator, select the appropriate Institution.
5. Select the Service Indicator Code. The viewer will only have access to the specific serviceindicators associated with their security set-up.
6. Select the relevant Service Indicator Reason Code.
7. Select the appropriate dates for this Service Indicator: Start Term, End Term, Start Date,End Date. A Start Term and Start Date are required. An End Term and Date are not requiredbut are advised in certain situtations, such as with Permit students who will depart the collegeby the end of a term.
8. Note that the department associated with the service indicator will default to Departmentfield. This does not reflect security access, as individuals outside of that department can haveaccess to manage a particular indicator.
9. It is not necessary to use the following fields: Contact ID, Contact Person. The PlacePerson ID will automatically populate to reflect the identity of the user applying the ServiceIndicator.
10. Enter Comment, if desired. Click the OK button. End of Procedure.

7/18/2019 CS-AD Reference Guide
http://slidepdf.com/reader/full/cs-ad-reference-guide 201/284
CUNYfirst Admissions Reference Guide
Last Updated: 6/18/2013 CUNYfirst Admissions201
Detailed Information
When a service indicator is assigned to an individual, the corresponding negative or positive serviceindicator icon appears on all pages that display that individual’s student data. One icon can representone or several service indicators. Click the icon on any of those pages to navigate to the appropriatedetails page which displays the service indicators and associated details.
User ID security determines which service indicators a user can place, remove or view. Serviceindicators can be placed and removed in batch using Population Selection and other automatedprocesses.
Note: CUNYfirst automatically records the Placed Person ID (EmplID), Placed By (Name),and Department of the person who placed the service indicator.
The Manage Service Indicators Search page
The following table describes the fields on the Manage Service Indicators Search page of theService Indicators component:
Field Description
ID Enter the student’s EmplID in this field. Campus ID Enter the student’s campus in this field.
National ID Enter the student’s social security number in thisfield.
Last Name Enter the student’s First Name in this field.
First Name Enter the student’s Last Name in this field.
Case Sensitive Click this box to execute a Case Sensitivesearch.

7/18/2019 CS-AD Reference Guide
http://slidepdf.com/reader/full/cs-ad-reference-guide 202/284
CUNYfirst Admissions Reference Guide
Last Updated: 6/18/2013 CUNYfirst Admissions202
The Manage Service Indicators pageUse the Manage Service Indicators page to add, remove or view service indicators assigned to an
individual.
Field Description
Service Indicator Code Enter the code for the service indicator to assignto the individual. For example, the serviceindicator “HON” is used for honors students.
Service Ind Reason Code Enter the reason that you are assigning thisservice indicator to the individual. Only reason
codes that are associated with the specificservice indicator on the Service Indicator Codespage are available.

7/18/2019 CS-AD Reference Guide
http://slidepdf.com/reader/full/cs-ad-reference-guide 203/284
CUNYfirst Admissions Reference Guide
Last Updated: 6/18/2013 CUNYfirst Admissions203
Effective Period A Start Term and Start Date is required for saving the Service Indicator. The dates can be past/futuredated, if necessary. End Term/Dates are adviseable in cases such as Visiting/Permit students who
will leave the college upon the end of the term.
Field Description
Effective Period and Start / End Term Service impacts associated with a serviceindicator can be term-based or date-based.They are applied or released based on the
start and end information that you enter.
Assignment Details
Field Description
Assignment Details section CUNYfirst will default the department that “owns”this Service Indicator. This linkage does notreflect security access to add, update, or removethe indicator.
Contact ID This is NOT necessary to populate, but it can be
used to enter the ID and name of the person tocontact with questions about this serviceindicator.
Placed Person ID Automatically defaults to the ID of the personwho created the service indicator.

7/18/2019 CS-AD Reference Guide
http://slidepdf.com/reader/full/cs-ad-reference-guide 204/284
CUNYfirst Admissions Reference Guide
Last Updated: 6/18/2013 CUNYfirst Admissions204
Comments & Identification
Field Description
Comments This field is currently not mandated to be used byCUNY.
Service Impact Description Use the Service Impact Description page to viewdetails about the impact. Click a code link in the
Impact column to access the Service ImpactDescription page.
Time/User Stamp Upon saving the Service Indicator (Apply/OK),CUNYfirst will update the Date/Time and theEMPL/Name of the User performing this activity.

7/18/2019 CS-AD Reference Guide
http://slidepdf.com/reader/full/cs-ad-reference-guide 205/284
CUNYfirst Admissions Reference Guide
Last Updated: 6/18/2013 CUNYfirst Admissions205
Topic 2: Manually Release a Service IndicatorIndividuals can release service indicators if given the appropriate security access. If the “Release”
button does not appear on the Service Indicator page, an individual does not have access to performthis task.
Navigate to: Campus Community > Service Indicators (Student) > Manage Service Indicators
NOTE: When working on any page associated with a student, their service indicator icon will appearon the top of the page. Clicking directly on that icon will bring the user to the Mange Service Indicator page.
Step Summary
To release service indicators:
1. Enter Search Criteria for desired student. Click Search.
2. If desired, select Effect field and Academic Institution to narrow results. Click Refresh for thisaction to take effect.
3. Click on the appropriate Code to access data for the desired service indicator.
4. On the Edit Service Indicator page, click the Release button. Note: The Release button willonly appear if the user has security access to remove that specific service indicator.
5. Click OK. End of Procedure.
Detailed Information
Edit Service Indicator page – Release Button

7/18/2019 CS-AD Reference Guide
http://slidepdf.com/reader/full/cs-ad-reference-guide 206/284
CUNYfirst Admissions Reference Guide
Last Updated: 6/18/2013 CUNYfirst Admissions206
Topic 3: Edit a Service IndicatorService Indicators can be edited at any time. A common reason to edit a service indicator would be
to add an expiration date by using the End Term and End Dates fields.
Step Summary
To edit service indicators:1. Follow the above navigation and enter the desired information into the Empl ID field.
2. Click the Search button and select the appropriate student.
3. Select the Service Indicator for editing.
4. Add or update the relevant data.
5. Click OK. End of Procedure.
Detailed Information

7/18/2019 CS-AD Reference Guide
http://slidepdf.com/reader/full/cs-ad-reference-guide 207/284
CUNYfirst Admissions Reference Guide
Last Updated: 6/18/2013 CUNYfirst Admissions207
Topic 4: View Service Indicator AuditsCUNYfirst maintains an audit history that indicates who applied which service indictors to whichindividuals, including add, change, and delete history. Use the Service Indicator Audits page to view a
history of the service indicators that a person has assigned to records in your system.
Step Summary
The Audit Service Indicators page can be found by navigating to: Campus Community > ServiceIndicators (Student) > Audit Service Indicators
To audit service indicators:1. Follow the above navigation to reach the Audit Service Indicators page.
2. Enter the ID or use any of the desired search criteria fields to find the appropriate person.
3. Click the Search button to view all service indicators applied to that person.
Detailed Information
The Audit Service Indicators Search pageUse the Audit Service Indicators page to view an individual's service indicator history, including thedate and time when a service indicator was added or deleted and the ID that added or deleted it.

7/18/2019 CS-AD Reference Guide
http://slidepdf.com/reader/full/cs-ad-reference-guide 208/284
CUNYfirst Admissions Reference Guide
Last Updated: 6/18/2013 CUNYfirst Admissions208
The Audit Service Indicators - Assignment tab
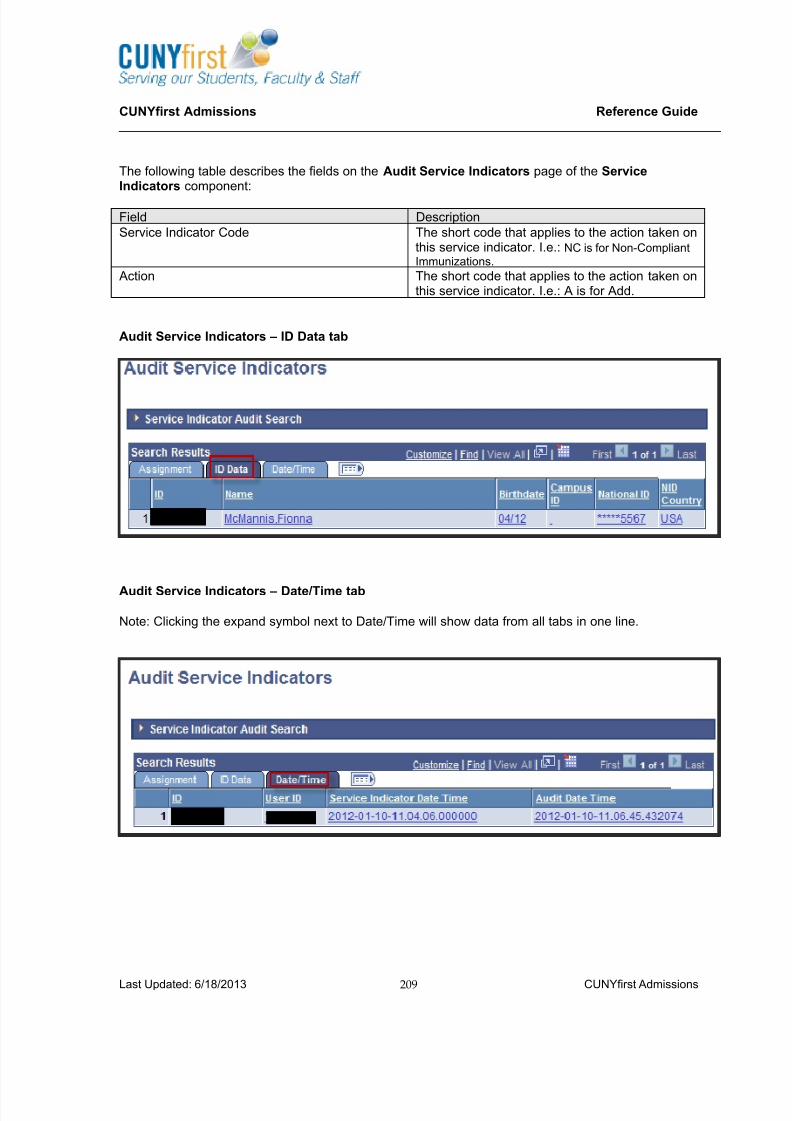
7/18/2019 CS-AD Reference Guide
http://slidepdf.com/reader/full/cs-ad-reference-guide 209/284
CUNYfirst Admissions Reference Guide
Last Updated: 6/18/2013 CUNYfirst Admissions209
The following table describes the fields on the Audit Service Indicators page of the ServiceIndicators component:
Field Description
Service Indicator Code The short code that applies to the action taken onthis service indicator. I.e.: NC is for Non-CompliantImmunizations.
Action The short code that applies to the action taken onthis service indicator. I.e.: A is for Add.
Audit Service Indicators – ID Data tab
Audit Service Indicators – Date/Time tab
Note: Clicking the expand symbol next to Date/Time will show data from all tabs in one line.

7/18/2019 CS-AD Reference Guide
http://slidepdf.com/reader/full/cs-ad-reference-guide 210/284
CUNYfirst Admissions Reference Guide
Last Updated: 6/18/2013 CUNYfirst Admissions210
Topic 5: Assign Service Indicators in Batch
Step Summary
The Mass Assign Service Indicators page can be found by navigating to: Campus Community >Service Indicators (Student) > Mass Assign
To Mass Assign Service Indicators:1. Navigate to the Mass Assign page.
2. Click Add a New value to create a new run control ID. If one has already been created, skipthis step and click on Preview Selection Results prior to running this query.
3. Check the Population Selection box.
4. Use the PS Query Selection Tool.
5. Enter prompt criteria for the query in Edit Prompts including Institution, Student IndicatorCode, Reason.
6. Check System Date field if current date is starting date of Service Indicator.
7. Enter Start Term (0000) – service indicator will take effect as soon as assigned.
8. Enter Start Date if not using the Check System Date field.
9. Department will default from Service Indicator setup.
10. Option to click on Preview Selection Results to view students who will receive this serviceindicator.
11. Click the Run icon.
12. Click OK.
13. Click on the Process Monitor Tab to check the status
14. The Process List Tab should eventually show the status Success. If a process status ofError or Queued appears for a long time, contact the Help Desk.

7/18/2019 CS-AD Reference Guide
http://slidepdf.com/reader/full/cs-ad-reference-guide 211/284
CUNYfirst Admissions Reference Guide
Last Updated: 6/18/2013 CUNYfirst Admissions211
Detailed Information
The Mass Assign Page

7/18/2019 CS-AD Reference Guide
http://slidepdf.com/reader/full/cs-ad-reference-guide 212/284
CUNYfirst Admissions Reference Guide
Last Updated: 6/18/2013 CUNYfirst Admissions212
Chapter 5 – Student Groups
The Student Groups functionality permits grouping of students based upon a common criteria (ex:students with disabilities, honor students, college now students). Correct placement in a StudentGroup is essential as many key processes are run on the basis of a student group, such as assigningenrollment appointments and calculating tuition.
Once students are assigned to a group, they will have associated student groups pages throughouttheir career at CUNY. Though their status may change from Active to Inactive, the student grouprecord will remain available.
Campus administrators, faculty, and staff must be provided access to specific student groups in orderto add and edit a student’s relationship to that group. A student may be assigned to multiple groups
at multiple colleges. A batch process is available to assign students to groups via an uploaded file.
Chapter ObjectivesUpon completion of the Student Group topics, learners will be able to:
Add student to student group
Inactivate a student in a student group
View students in a student group
Create a new student group

7/18/2019 CS-AD Reference Guide
http://slidepdf.com/reader/full/cs-ad-reference-guide 213/284
CUNYfirst Admissions Reference Guide
Last Updated: 6/18/2013 CUNYfirst Admissions213
Topic 1: Add Student to Student GroupIndividuals must have access to specific student groups to be able to add and update student groups.
Step Summary
The Student Groups page can be found through the following navigation paths:
Student Admissions > Application Entry > Academic Information > Student Groups
Records and Enrollment > Career and Program Information > Student Groups
Campus Community > Student Services Center > General Info Tab
Please note that the following Student Groups may be imported from the CAS data load.
Field Description
The CAS Load Process will create thefollowing Student Groups if data is present.
CLIP (Immersion)
ESL
SEEK
CD
DAY
EVE
WKDN (weekend)
To add a student group to a student:1. Follow the navigation above to access the Find an Existing value page.
2. Search by Academic Institution and ID and select the appropriate student.
3. Enter the appropriate data for the student including Academic Institution, Student Group,Effective Date, Status (defaults to active), and Comments.
4. Click Save.
5. Last Update Date/Time, Updated By, and Type will be populated.
6. If necessary, click the Add a New row button next to Academic Institution and repeat.
Detailed Information
Student Groups will be maintained throughout the student's tenure at the college. There may come atime when a student is no longer a member of a group. To indicate that the student is no longer in thegroup, use the Add a Row button to add an effective dated row and change the status to Inactive.

7/18/2019 CS-AD Reference Guide
http://slidepdf.com/reader/full/cs-ad-reference-guide 214/284
CUNYfirst Admissions Reference Guide
Last Updated: 6/18/2013 CUNYfirst Admissions214
The Student Groups pageUse this page to activate, inactivate, or delete a student from a student group.
Note that the top portion of this page shows there are two pages of data, which means this student
belongs to two student groups.
The two pages of data in the lower portion are related to the status of this particular group. Pleaserefer to Inactivating a Student Group for instruction in this area.

7/18/2019 CS-AD Reference Guide
http://slidepdf.com/reader/full/cs-ad-reference-guide 215/284
CUNYfirst Admissions Reference Guide
Last Updated: 6/18/2013 CUNYfirst Admissions215
This page (2 of 2) shows the information pertaining to the second student group for the same student.The area below is associated with this student group.
The following table describes the fields on the Student Groups page of the Application Entry
component:
Field Description
Student Group Enter the appropriate student group for thisstudent.
Effective Date Enter the date the assignment to the group takeseffect.
Status Enter Active or Inactive.
Comments Enter comments for reference about the studentgroup.
Last Update Date/Time Displays the date and time the record wasupdated.
Updated By Displays the user ID responsible for updating thestudent group.
Type Indicates whether the record was processedmanually or by mass update. When updatedthrough the mass process, the program nameappears.
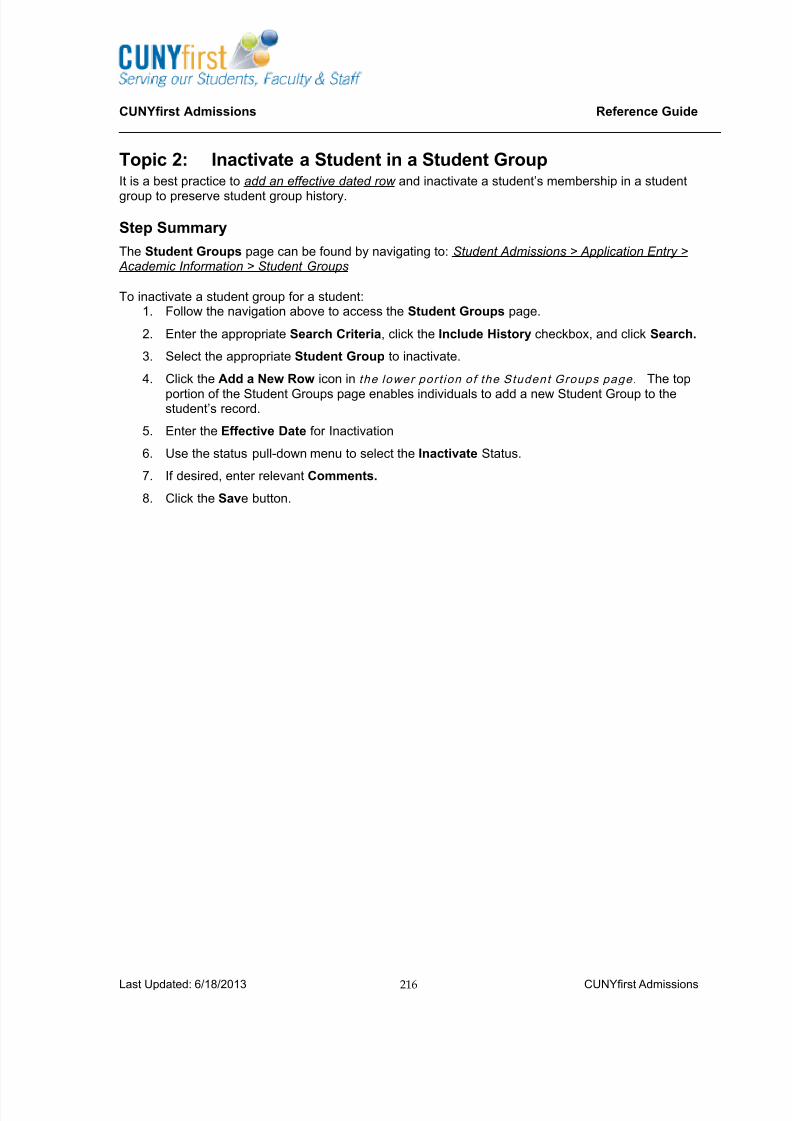
7/18/2019 CS-AD Reference Guide
http://slidepdf.com/reader/full/cs-ad-reference-guide 216/284
CUNYfirst Admissions Reference Guide
Last Updated: 6/18/2013 CUNYfirst Admissions216
Topic 2: Inactivate a Student in a Student GroupIt is a best practice to add an effective dated row and inactivate a student’s membership in a student
group to preserve student group history.
Step Summary
The Student Groups page can be found by navigating to: Student Admissions > Application Entry > Academic Information > Student Groups
To inactivate a student group for a student:1. Follow the navigation above to access the Student Groups page.
2. Enter the appropriate Search Criteria, click the Include History checkbox, and click Search.
3. Select the appropriate Student Group to inactivate.
4. Click the Add a New Row icon in the lower por t ion of the Student Groups page. The top
portion of the Student Groups page enables individuals to add a new Student Group to thestudent’s record.
5. Enter the Effective Date for Inactivation
6. Use the status pull-down menu to select the Inactivate Status.
7. If desired, enter relevant Comments.
8. Click the Save button.

7/18/2019 CS-AD Reference Guide
http://slidepdf.com/reader/full/cs-ad-reference-guide 217/284
CUNYfirst Admissions Reference Guide
Last Updated: 6/18/2013 CUNYfirst Admissions217
Detailed Information
This page shows the student as Inactive at a future date.
The following table describes the fields on the Student Groups page of the Academic Informationcomponent:
Field Description
Student Group Displays the student group to which the studentis assigned.
Effective Date Displays the date the assignment to the grouptakes effect.
Status Select Inactive from the drop down list.Comments Displays comments about the student group.
Last Update Date/Time Displays the date and time the record wasupdated.
Updated By Displays the user ID responsible for updating thestudent group.

7/18/2019 CS-AD Reference Guide
http://slidepdf.com/reader/full/cs-ad-reference-guide 218/284
CUNYfirst Admissions Reference Guide
Last Updated: 6/18/2013 CUNYfirst Admissions218
Field Description
Type Indicates whether the record was processedmanually or by mass update. When updated
through the mass process, the program nameappears.

7/18/2019 CS-AD Reference Guide
http://slidepdf.com/reader/full/cs-ad-reference-guide 219/284
CUNYfirst Admissions Reference Guide
Last Updated: 6/18/2013 CUNYfirst Admissions219
Topic 3: View Students in Student GroupUse this page to display all students in a particular student group. Note that users will only view
groups to which they have been given access.
Step Summary
The View Student Groups by Student page can be found by navigating to: Records and Enrollment> Career and Program Information > Student Groups
To view students in a student groups:1. On the View Student Groups by Student search page, enter the appropriate search criteria.
2. Click Search.
3. Select the Institution and Student Group.
4. If desired, narrow results using the Select Effective Dates field or the Range Selection field.
5. If the additional fields were used, click the Get Results button.
6. Select the Details link to view student group details for a single student.
Detailed Information
The View Student Groups by Student

7/18/2019 CS-AD Reference Guide
http://slidepdf.com/reader/full/cs-ad-reference-guide 220/284
CUNYfirst Admissions Reference Guide
Last Updated: 6/18/2013 CUNYfirst Admissions220
Search Results
The following table describes fields on the View Groups by Student page:
Field Description
Select Effective Dates Enter the type of effective dates to view. Valuesare:
All: Returns all student groups and displays alleffective-dated rows for each group.
Most Current (Any Status): Returns all studentgroups and displays only the most currenteffective-dated row, regardless of status.
Most Current Active: Displays the most currentactive student group row.
Most Current Inactive: Displays the most currentinactive status for a student group row.
Get Results Click to view the list of student groups that matchthe selected effective date search criteria.

7/18/2019 CS-AD Reference Guide
http://slidepdf.com/reader/full/cs-ad-reference-guide 221/284
CUNYfirst Admissions Reference Guide
Last Updated: 6/18/2013 CUNYfirst Admissions221
Topic 4: Create a New Student GroupPlease refer to campus leaders for policy relevant for creating a new student group.
Step Summary
The Student Group Table page can be found by navigating to: Set Up SACR > Common Definitions> Student Group Table
To setup a student group:1. Follow the navigation above and select the Add a New Value tab.
2. Enter the Academic Institution and new code for the Student Group.
3. Enter the Effective Date and Status.
4. Enter a Description and Short Description.
5. Click the Save button.
Detailed Information
The Student Group Table pageUse the Add a New Value page to identify the new student group.

7/18/2019 CS-AD Reference Guide
http://slidepdf.com/reader/full/cs-ad-reference-guide 222/284

7/18/2019 CS-AD Reference Guide
http://slidepdf.com/reader/full/cs-ad-reference-guide 223/284
CUNYfirst Admissions Reference Guide
Last Updated: 6/18/2013 CUNYfirst Admissions223
Chapter 6 – Managing FERPAUnder FERPA regulations, institutions can release directory information about a student, provided
that the student has reasonable opportunity to prohibit, in writing, the disclosure of such information.
When students exercise rights under FERPA, they identify information that they do not want theinstitution to release. The FERPA control must be applied to identify this information and prohibit therelease of restricted information across the institution. Students have the option of permitting theinstitution to release any of the restricted information to specific internal publications.
FERPA regulations define which items qualify as directory information; however, each college mustidentify and make known which of those items it plans to publish or share as directory information.
Chapter ObjectivesUpon completion of the FERPA topics, learners will be able to:
View FERPA settings for a student
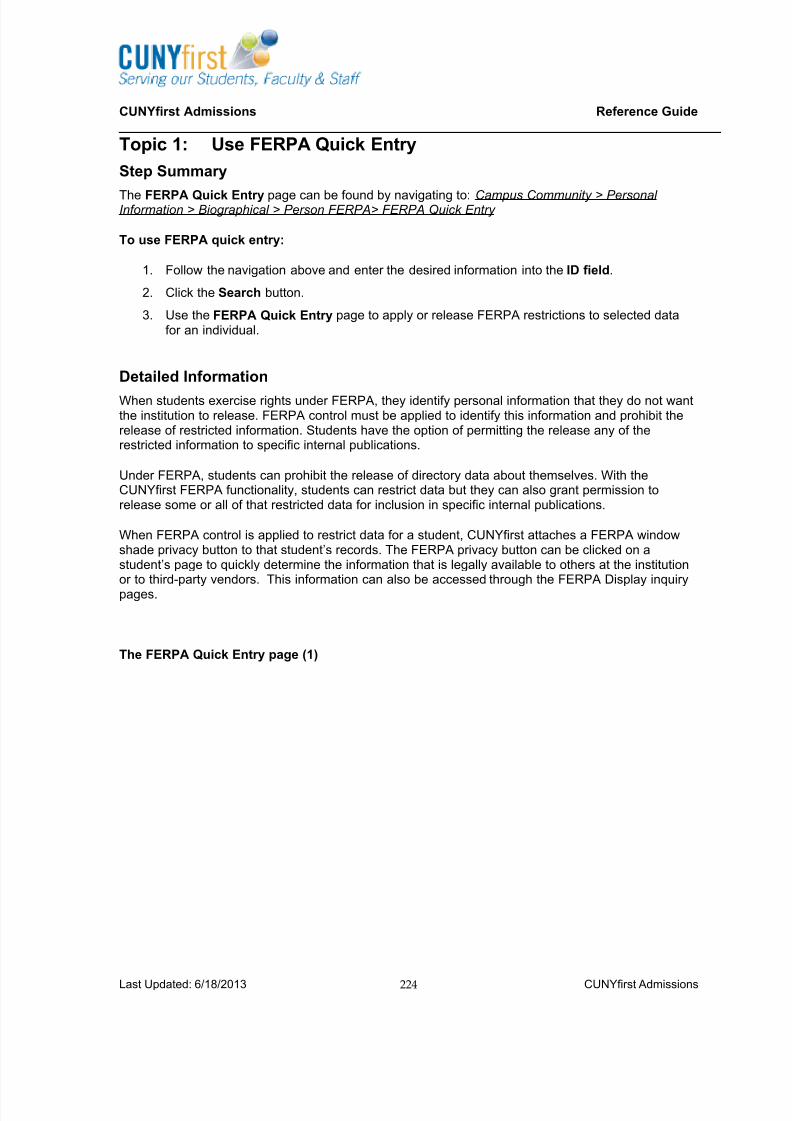
7/18/2019 CS-AD Reference Guide
http://slidepdf.com/reader/full/cs-ad-reference-guide 224/284
CUNYfirst Admissions Reference Guide
Last Updated: 6/18/2013 CUNYfirst Admissions224
Topic 1: Use FERPA Quick Entry
Step Summary
The FERPA Quick Entry page can be found by navigating to: Campus Community > PersonalInformation > Biographical > Person FERPA> FERPA Quick Entry
To use FERPA quick entry:
1. Follow the navigation above and enter the desired information into the ID field.
2. Click the Search button.
3. Use the FERPA Quick Entry page to apply or release FERPA restrictions to selected datafor an individual.
Detailed Information
When students exercise rights under FERPA, they identify personal information that they do not wantthe institution to release. FERPA control must be applied to identify this information and prohibit therelease of restricted information. Students have the option of permitting the release any of therestricted information to specific internal publications.
Under FERPA, students can prohibit the release of directory data about themselves. With theCUNYfirst FERPA functionality, students can restrict data but they can also grant permission torelease some or all of that restricted data for inclusion in specific internal publications.
When FERPA control is applied to restrict data for a student, CUNYfirst attaches a FERPA windowshade privacy button to that student’s records. The FERPA privacy button can be clicked on astudent’s page to quickly determine the information that is legally available to others at the institutionor to third-party vendors. This information can also be accessed through the FERPA Display inquirypages.
The FERPA Quick Entry page (1)

7/18/2019 CS-AD Reference Guide
http://slidepdf.com/reader/full/cs-ad-reference-guide 225/284
CUNYfirst Admissions Reference Guide
Last Updated: 6/18/2013 CUNYfirst Admissions225

7/18/2019 CS-AD Reference Guide
http://slidepdf.com/reader/full/cs-ad-reference-guide 226/284
CUNYfirst Admissions Reference Guide
Last Updated: 6/18/2013 CUNYfirst Admissions226
The FERPA Quick Entry page (continued)

7/18/2019 CS-AD Reference Guide
http://slidepdf.com/reader/full/cs-ad-reference-guide 227/284
CUNYfirst Admissions Reference Guide
Last Updated: 6/18/2013 CUNYfirst Admissions227
The FERPA Quick Entry page (continued)
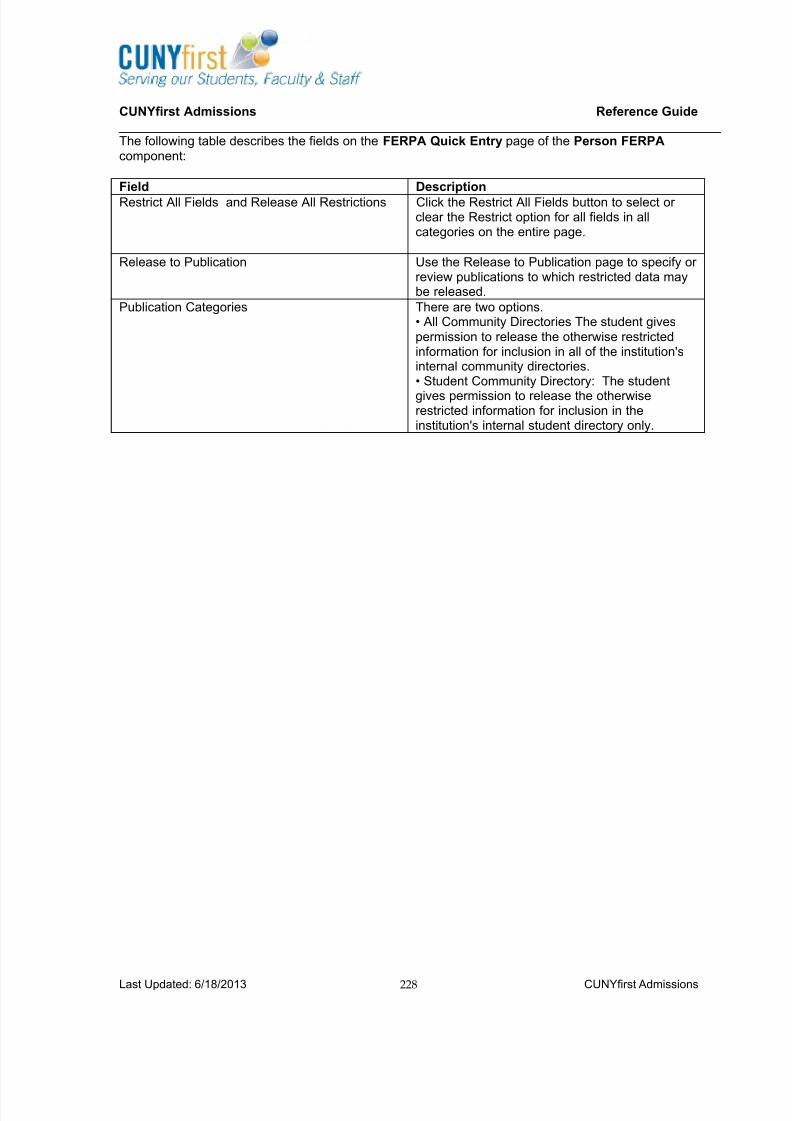
7/18/2019 CS-AD Reference Guide
http://slidepdf.com/reader/full/cs-ad-reference-guide 228/284
CUNYfirst Admissions Reference Guide
Last Updated: 6/18/2013 CUNYfirst Admissions228
The following table describes the fields on the FERPA Quick Entry page of the Person FERPA component:
Field Description
Restrict All Fields and Release All Restrictions Click the Restrict All Fields button to select orclear the Restrict option for all fields in allcategories on the entire page.
Release to Publication Use the Release to Publication page to specify orreview publications to which restricted data maybe released.
Publication Categories There are two options.• All Community Director ies The student givespermission to release the otherwise restrictedinformation for inclusion in all of the institution'sinternal community directories.• Student Community Directory: The student
gives permission to release the otherwiserestricted information for inclusion in theinstitution's internal student directory only.

7/18/2019 CS-AD Reference Guide
http://slidepdf.com/reader/full/cs-ad-reference-guide 229/284
CUNYfirst Admissions Reference Guide
Last Updated: 6/18/2013 CUNYfirst Admissions229
Topic 2: View FERPA Display
Step Summary
The FERPA Bio Demo page can be found by navigating to: Campus Community > PersonalInformation > Biographical > Person FERPA> Review FERPA Display
To view FERPA display:
1. Follow the navigation above and enter the desired information into the ID field.
2. Click the Search button.
3. Use the FERPA Bio Demo page to determine releasable biographical data about anindividual, including gender, marital status, and names.
Detailed Information
Determine releasable information about an individual two ways:
• Click the FERPA (privacy shade) button on a page about an individual to display the ReleasableFERPA Directory Information page.
• Navigate directly to the FERPA Display pages to review all releasable information about anindividual.
Field names appear on the Releasable FERPA Directory Information page and on any of theReview FERPA Display pages only if that type of data is releasable. If a field is releasable but nodata exists for it, the field name appears but with no field value. For example, if the individual's birthlocation is releasable but data for it is not in CUNYfirst, the field name Birth Location appears on thepage, but the field value box beside it is empty.
Use the FERPA Display pages to review all releasable information about an individual.
The FERPA Bio Demo page

7/18/2019 CS-AD Reference Guide
http://slidepdf.com/reader/full/cs-ad-reference-guide 230/284
CUNYfirst Admissions Reference Guide
Last Updated: 6/18/2013 CUNYfirst Admissions230
Example of Restricted Message
The following table describes the fields on the FERPA Bio Demo page of the Person FERPA component:
Field Description
FERPA Addresses tab Determine releasable address data for anindividual.
FERPA Phones tab Determine releasable phone data for anindividual.
FERPA Email Addrs tab Determine releasable email data for an individual.FERPA Activities tab Determine releasable extracurricular activity datafor an individual.
FERPA Photo tab Determine if a photo of the individual isreleasable.

7/18/2019 CS-AD Reference Guide
http://slidepdf.com/reader/full/cs-ad-reference-guide 231/284
CUNYfirst Admissions Reference Guide
Last Updated: 6/18/2013 CUNYfirst Admissions231
Chapter 7 – Additional Campus Community StudentServices
Although security access to the Campus Community functionality discussed in this section is primarilyreserved for Health, Veteran’s and Disability administrators, familiarity with these processes could behelpful to Admissions officers in admitting, advising and processing incoming students.
The Campus Community Student Services in this section includes the following:
Health Services: The CUNYfirst health services functionality includes processing, tracking,communications, and maintenance of student immunity information and records. Proof ofimmunization is reviewed, entered and tracked within the CUNYfirst system by the Health Center atthe student’s home campus.
Disability Services: Designated campus Disability administrators can make updates to the threeDisability pages used to track Disability type and Accommodation requests.
Veteran’s Services: Designated campus Veteran’s Affairs (VA) representatives can make updates tostudents’ Military Status, and employees will report their Military Status updates to their designatedHR representative. A student who is also an employee will be responsible for providing theappropriate updates to both campus and HR representatives
Chapter ObjectivesUpon completion of this chapter, learners will understand how to:
View and update a Student’s Immunization Record Track Disability Accommodation requests
Record Disability Type
Record CUNY provided and personal Accommodations
Update Military Status information

7/18/2019 CS-AD Reference Guide
http://slidepdf.com/reader/full/cs-ad-reference-guide 232/284
CUNYfirst Admissions Reference Guide
Last Updated: 6/18/2013 CUNYfirst Admissions232
Topic 1: Health Services ~ Overview
The CUNYfirst Campus Community component includes functionality for updating Health Records,
which is primarily being used to track immunization status. Overall, the CUNYfirst Health Servicesactivities occur within three Campus Community areas:
Three C’s (checklists and communications)
Service Indicators
Immunization and Health Test pages
The ASTA interface (transfer students) will import immunization data from UAPC and populateimmunization health records. Immunization data includes test status, completion dates, and anyexemption status for the following immunizations: measles, mumps, and rubella. Please note thatwhile ASTA is designed to populate immunization fields, if there is no immunization data in theinterface file, nothing is populated.
The CAS interface (new students) will not provide any immunization information at this time.
Detailed Information
The following information outlines CUNYfirst process for managing student immunizations.
Checklists and CommunicationsThe immunization business process leverages the CUNYfirst checklists and communicationsfunctionality to streamline CUNY’s immunization tracking for all students across all CUNY institutions.
The immunization business process also allows individual institutions to maintain flexibility withregards to their specific student populations and submission deadlines.
Once students have been admitted and matriculated into a program at CUNY, CUNYfirst runs acheck against each student’s immunization record for any missing immunization information. Oncethe process has been triggered, CUNYfirst will automatically assign the Health checklist to anystudent’s record that is missing immunization information. This communication can also be managedmanually.
Within the Health checklist, there are two checklist items which will be displayed in the student’s self -service as a To-Do list:
Meningitis Acknowledgement Form
Immunization Documents
Upon assigning the Health checklist, an automated e-mail communication is sent to the student’scampus e-mail, notifying them of the health requirements.
Approximately two weeks after the start of the term (actual date is determined by each college’sHealth Services office) a second communication will be sent out of CUNYfirst to students who arestill out of compliance with the health requirements. Upon sending this communication, the CUNYfirstsystem will update these students’ checklist items to a status of ‘Notified’. The Health Servicesdepartment is responsible for triggering this communication and checklist update process.
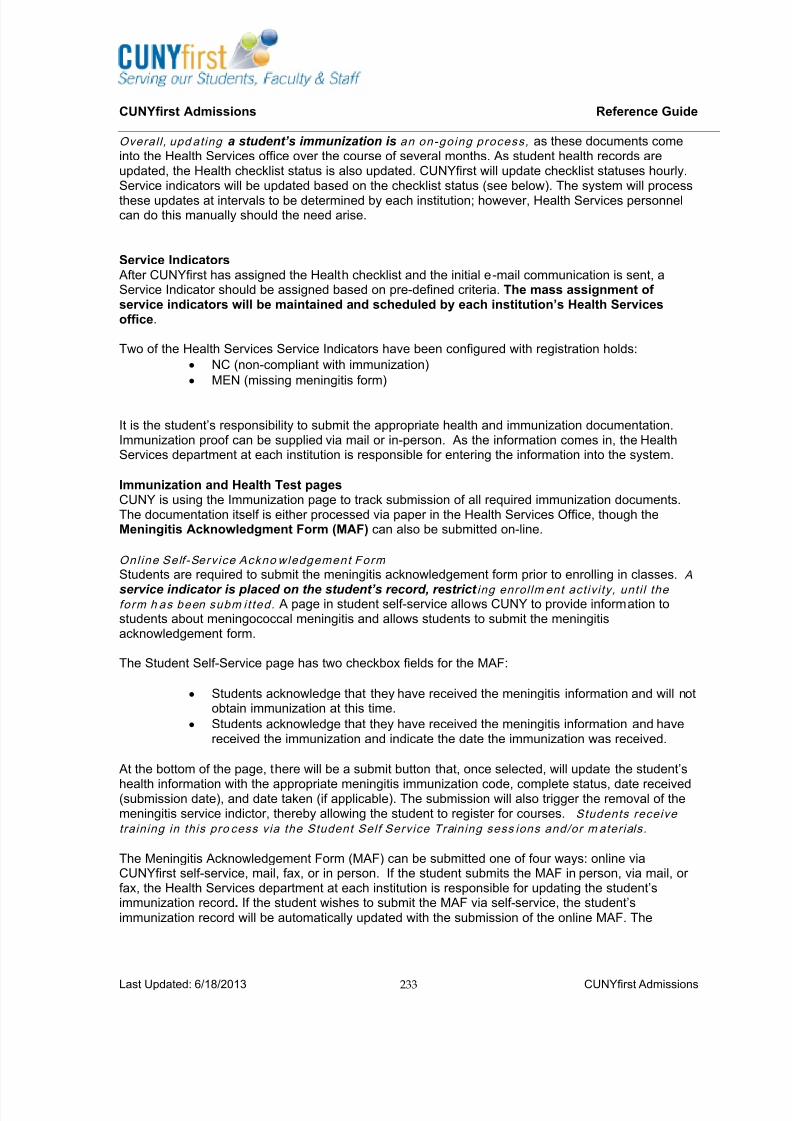
7/18/2019 CS-AD Reference Guide
http://slidepdf.com/reader/full/cs-ad-reference-guide 233/284
CUNYfirst Admissions Reference Guide
Last Updated: 6/18/2013 CUNYfirst Admissions233
Overal l , upd ating a student’s immunization is an on-go ing process, as these documents comeinto the Health Services office over the course of several months. As student health records areupdated, the Health checklist status is also updated. CUNYfirst will update checklist statuses hourly.Service indicators will be updated based on the checklist status (see below). The system will process
these updates at intervals to be determined by each institution; however, Health Services personnelcan do this manually should the need arise.
Service Indicators After CUNYfirst has assigned the Health checklist and the initial e-mail communication is sent, aService Indicator should be assigned based on pre-defined criteria. The mass assignment ofservice indicators will be maintained and scheduled by each institution’s Health Servicesoffice.
Two of the Health Services Service Indicators have been configured with registration holds:
NC (non-compliant with immunization)
MEN (missing meningitis form)
It is the student’s responsibility to submit the appropriate health and immunization documentation.Immunization proof can be supplied via mail or in-person. As the information comes in, the HealthServices department at each institution is responsible for entering the information into the system.
Immunization and Health Test pagesCUNY is using the Immunization page to track submission of all required immunization documents.The documentation itself is either processed via paper in the Health Services Office, though theMeningitis Acknowledgment Form (MAF) can also be submitted on-line.
Onl ine Self -Serv ice Ackno wledgement Form
Students are required to submit the meningitis acknowledgement form prior to enrolling in classes. A
service indicator is placed on the student’s record, restrict ing enrol lm ent activi ty, unti l theform h as been subm i t ted. A page in student self-service allows CUNY to provide information tostudents about meningococcal meningitis and allows students to submit the meningitisacknowledgement form.
The Student Self-Service page has two checkbox fields for the MAF:
Students acknowledge that they have received the meningitis information and will notobtain immunization at this time.
Students acknowledge that they have received the meningitis information and havereceived the immunization and indicate the date the immunization was received.
At the bottom of the page, there will be a submit button that, once selected, will update the student’s
health information with the appropriate meningitis immunization code, complete status, date received(submission date), and date taken (if applicable). The submission will also trigger the removal of themeningitis service indictor, thereby allowing the student to register for courses. Students receive
training in this pro cess via the Student Self Service Training sess ions and/or m aterials.
The Meningitis Acknowledgement Form (MAF) can be submitted one of four ways: online viaCUNYfirst self-service, mail, fax, or in person. If the student submits the MAF in person, via mail, orfax, the Health Services department at each institution is responsible for updating the student’simmunization record. If the student wishes to submit the MAF via self-service, the student’simmunization record will be automatically updated with the submission of the online MAF. The

7/18/2019 CS-AD Reference Guide
http://slidepdf.com/reader/full/cs-ad-reference-guide 234/284
CUNYfirst Admissions Reference Guide
Last Updated: 6/18/2013 CUNYfirst Admissions234
submission of the online MAF will also remove the MEN registration hold allowing the student toenroll in classes (provided they have no outstanding immunization documents). Further instructionand images of the Immunization and Health pages are in the following topic.
Registrar Activities As per current practice, the Registrar’s office manages the following activities which impact studentswho have not submitted their Immunization documentation:
Term Activation
WA Grades
Term Act iva t ion
Prior to each term start, the Term Activation process is run. This process flags students as beingeligible to enroll. Those colleges that allow registration up to 5.5 credits will also run a custom processto apply an enrollment limit of 5.5 credits to their students who are missing immunization documents.CUNYfirst will then enforce the 5.5 credit limit as students enroll in classes. This additional processwill run immediately following the Term Activation process. The Registrar’s Office is responsible for
managing this process in collaboration with the Health Services department.
WA Grades
After 30 days from the start of the term (45 days for students who are from out-of-state), acommunication is sent to students who are still out of compliance to notify them that they are nolonger permitted to attend class and will be issued a ‘WA’ as a grade (irreversible at the end of theterm), will be responsible for tuition charges, and their Financial Aid will be suspended or cancelled (ifapplicable).
Upon sending this communication, the CUNYfirst system will update these students’ checklist itemsto a status of ‘Second Notification’. The Health Services department is responsible for triggering thiscommunication and checklist update process. The ‘WA’ grades will be assigned by running a custommass grade assignment process. The Registrar’s Office will be responsible for triggering this process
in collaboration with the Health Services department.
At this same time in the term, a service indicator of ‘NC’ is assigned to the non-compliant students’record, blocking them from all future registration eligibility until they become compliant with the healthrequirements. The Health Services department is responsible for the placement of service indicators.
Approximately a week after the ‘WA’ grades have been assigned, the Registrar’s Off ice will post aterm withdrawal for those students receiving a ‘WA’ grade. The posting of term withdrawal will place a‘withdrawn’ code, as well as a last date of attendance, on the student’s record which is then used bythe Financial Aid office and impacts the Return to Title IV process. If necessary, the last date ofattendance will be manually overridden by the Registrar’s Office to equate to the date the ‘WA’grades were assigned to the student’s record.
According to CUNY policy, students have until the last day of the term to remove the ‘WA’ grade andreceive a letter grade. In order to have the ‘WA’ grade removed; students must complete the followingtasks:
Show proof of immunization to the Health Services department
Obtain signed approval from all of their current instructorsStudents must bring the signed approval to the Registrar’s Office for removal of ‘WA’ grades, andrequest reinstatement of Financial Aid (if applicable) from the Financial Aid office. Once the last dayof the term is past, the ‘WA’ grades are irreversible and become a permanent grade on the student’stranscript.

7/18/2019 CS-AD Reference Guide
http://slidepdf.com/reader/full/cs-ad-reference-guide 235/284
CUNYfirst Admissions Reference Guide
Last Updated: 6/18/2013 CUNYfirst Admissions235
Topic 2: View/Update Immunization RecordsUse the CUNYfirst Immunization and Health Test pages to enter and track an individual'simmunization and general health test data
Step Summary
To review Immunization and Health pages, navigate to: Campus Community > Personal Information(Student) > Health Information (Student) > Immunization and Health
1. On the Immunization and Health search page, enter search criteria to locate and select thedesired record.
2. Review and/or update immunization Information on the Immunization page.3. Review and/or update health test information on the Health Test page.4. Click Save after any changes have been made.
Detailed InformationThe Immunization pageUser the Immunization page to enter information for immunizations, including dates and status.CUNY is using the area in the red box. The smaller red box illustrates the number of rows which exist,each corresponding to a different immunization.
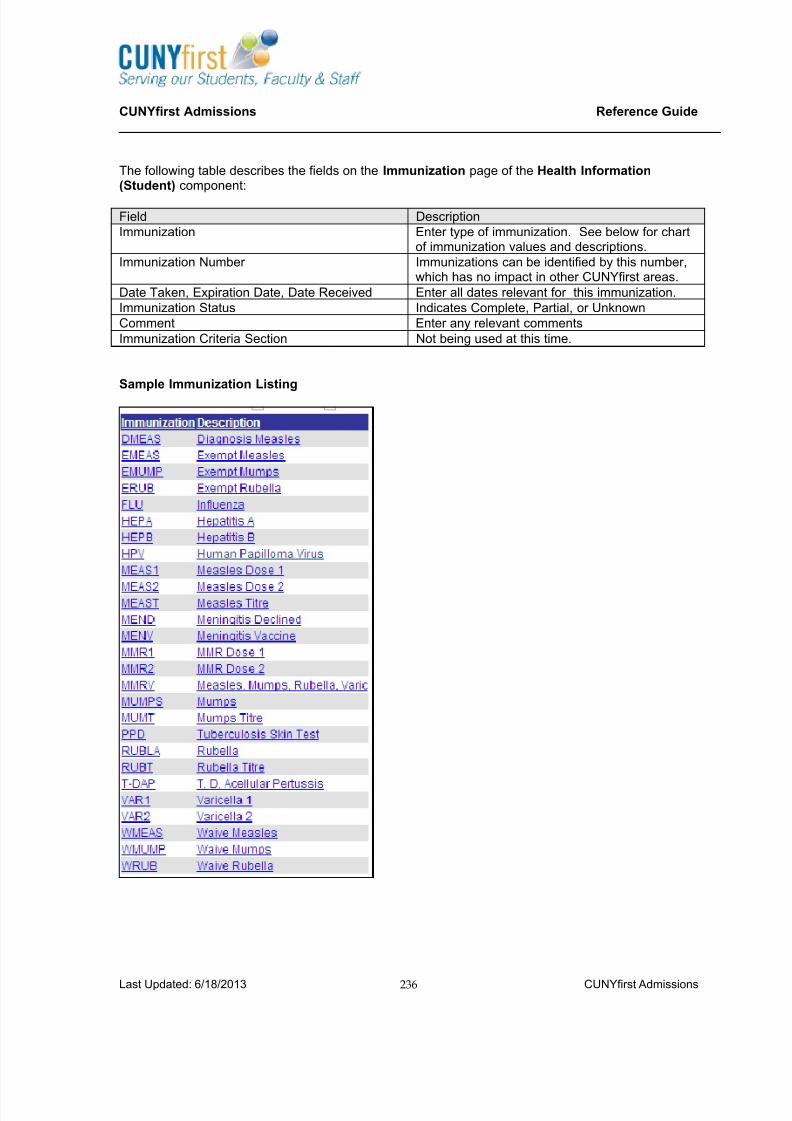
7/18/2019 CS-AD Reference Guide
http://slidepdf.com/reader/full/cs-ad-reference-guide 236/284
CUNYfirst Admissions Reference Guide
Last Updated: 6/18/2013 CUNYfirst Admissions236
The following table describes the fields on the Immunization page of the Health Information(Student) component:
Field Description
Immunization Enter type of immunization. See below for chartof immunization values and descriptions.
Immunization Number Immunizations can be identified by this number,which has no impact in other CUNYfirst areas.
Date Taken, Expiration Date, Date Received Enter all dates relevant for this immunization.
Immunization Status Indicates Complete, Partial, or Unknown
Comment Enter any relevant comments
Immunization Criteria Section Not being used at this time.
Sample Immunization Listing

7/18/2019 CS-AD Reference Guide
http://slidepdf.com/reader/full/cs-ad-reference-guide 237/284
CUNYfirst Admissions Reference Guide
Last Updated: 6/18/2013 CUNYfirst Admissions237
Topic 3: Disability Services ~ Overview A prospective student can make an initial request for accommodation to the Office of Services forStudents with Disabilities at his or her individual college and provide appropriate supporting
documentation.
Disability data is used by CUNY to meet the needs of students with disabilities, as well as for thefollowing purposes:
The data is used by each disability service coordinator/director on campuses togenerate an annual report for central administrative offices at CUNY. This is done notonly to understand data for fiscal planning purposes at the University, but also toexamine trends for legislative campaigns, donation requests, policy adjustments andmodifications, policy creation, service delivery, and to generate strategies forrecruitment purposes.
Directors of disability services often use the data gathered through this mechanism to
acquire campus and external resources. Disability services also uses this data toprovide various intervention related services to students who may or may not be onacademic probation or are believed to be a risk for academic probation.
This data is also intended to help campuses in making decisions regarding assistivetechnology purchases, requesting electronic textbooks from higher educationpublishers, and to generate reports to comply with the higher education electronictextbook legislation in New York State.

7/18/2019 CS-AD Reference Guide
http://slidepdf.com/reader/full/cs-ad-reference-guide 238/284
CUNYfirst Admissions Reference Guide
Last Updated: 6/18/2013 CUNYfirst Admissions238
Topic 4: Enter/Update Disability Data
Before the Disability Services Coordinator can use the CUNY First system to track disability data the
person must exist in the system. The Disability Services Coordinator uses the Search/Match processto investigate if the person exists in the CUNY First system.
Perform a Search/Match to locate any existing record. If a ‘match’ is found thecoordinator can proceed to enter disability data.
If no match is found the coordinator should direct the prospective student to submit orcheck the status of their application. The University Application Processing Center(UAPC) interface will populate (create) the person in the CUNY First system. Thecampus-based Admissions Office can also enter the application manually.
If not match is found and the prospective student is requesting pre-admissionservices, the Disability coordinator should contact the Registrars’ office to have the
student added to the CUNYfirst. Once the prospective student exists in the databaseand has been assigned an EMPL ID, the Disability Coordinator can assign thestudent a pre-admission accommodation type. The business process may varyacross CUNY campuses.
Step Summary
The Accommodation Request can be found by navigating to: Campus Community > PersonalInformation > Disability > Disability
To Enter/Update Student Disability Data:
1. Run a Search/Match for existing name and address in CUNYfirst.2. Select the existing student record to be updated (or if not found, see pre-admit note below)3. Enter or update the Accommodation Request (Disability Type).4. Enter or update any Accommodation Options.5. Enter or update the Accommodation Job Task, if applicable.

7/18/2019 CS-AD Reference Guide
http://slidepdf.com/reader/full/cs-ad-reference-guide 239/284
CUNYfirst Admissions Reference Guide
Last Updated: 6/18/2013 CUNYfirst Admissions239
Detailed Information
The Accommodation Data pageUse this page to search for the appropriate record.
The following table describes the fields on the Accommodation Data – Find an Existing Valuepage of the Disability component:
Field Description
ID Search by the person’s ID number.
Campus ID Search by the person’s Campus ID number.
National ID Search by the person’s National ID number.
Last Name Search by the person’s Last Name.
First Name Search by the person’s First Name.

7/18/2019 CS-AD Reference Guide
http://slidepdf.com/reader/full/cs-ad-reference-guide 240/284
CUNYfirst Admissions Reference Guide
Last Updated: 6/18/2013 CUNYfirst Admissions240
The Accommodation Request pageUse this page to enter and track an individual's accommodation request.
The following table describes the fields on the Accommodation Request page of the Disabilitycomponent:
The Accommodation Request Details group
Field Description
Accommodation ID The number of this request on the list of thisindividual's accommodation requests.
The system displays the next sequential numberfor each accommodation request that you add.The number can be changed to reorder the list ofaccommodation requests.
Comment Enter comments that further identify theaccommodation request for this individual.
Responsible ID Enter the ID of the individual managing thisrequest.
Pending, Accepted, or Undue Hardship Select one of these options to indicate whetherthe request is pending, evaluated and accepted,or evaluated and denied due to an unduehardship on the department or institution.

7/18/2019 CS-AD Reference Guide
http://slidepdf.com/reader/full/cs-ad-reference-guide 241/284
CUNYfirst Admissions Reference Guide
Last Updated: 6/18/2013 CUNYfirst Admissions241
Field Description
Request Status Date Enter the date that the request was changed to astatus of pending, accepted, or denied.
The Disability group
Regulatory Region Enter the code for the country whose regulationsapply to this request.
Disability Code Enter the disability code that describes the illnessor disability for which accommodations havebeen requested.
Description Displays the description that is associated withthe diagnosis code.

7/18/2019 CS-AD Reference Guide
http://slidepdf.com/reader/full/cs-ad-reference-guide 242/284
CUNYfirst Admissions Reference Guide
Last Updated: 6/18/2013 CUNYfirst Admissions242
The Accommodation Option pageUse this page to enter and track options for an accommodations request.
The following table describes the fields on the Accommodation Option page of the Disabilitycomponent:
Field Description
Option ID The system displays the number of this optionrequest in the list of options for thisaccommodation request.
The system displays the next sequential numberfor each option that you add. You can override
the number to reorder the list of options.
Employer Suggested Option Select this check box to indicate that a staffperson suggested this option.
Currency Code Enter the currency in which the cost isexpressed.
Type Enter the type of accommodation (from the Accommodation Type Table page) that isrecommended as part of this option.

7/18/2019 CS-AD Reference Guide
http://slidepdf.com/reader/full/cs-ad-reference-guide 243/284
CUNYfirst Admissions Reference Guide
Last Updated: 6/18/2013 CUNYfirst Admissions243
Field Description
Cost Enter the cost of this type of accommodation.
Description Enter comments to further describe or identify the
item or service suggested in this option.
Accommodation Status and Status Date Enter the status of this option, (such as accepted,approved, consider, offered, or rejected), and thedate of the status.
The Accommodation Job Task pageUse this page to enter and track the employee location and job task that is accommodated byhonoring the request.
The following table describes the fields on the Accommodation Job Task page of the Disabilitycomponent:
Note: Information displayed in these fields is shared with the CUNYfirst HRMS module (HumanResources Management System).
Field Description

7/18/2019 CS-AD Reference Guide
http://slidepdf.com/reader/full/cs-ad-reference-guide 244/284
CUNYfirst Admissions Reference Guide
Last Updated: 6/18/2013 CUNYfirst Admissions244
Field Description
Business Unit Business units are logical units that are used totrack and report specific business information.
CUNYfirst uses Business Unit to designatespecific colleges (Queens College,Queensborough Community, etc).
Job Code In HRMS, jobs are identified jobs by job codes,referring to the specific job that a person holds.
Location Code This field is used to indicate the physical locationof the person.
Job Task This field indicates any special job task requiredof a job, for example: fluency in American SignLanguage.

7/18/2019 CS-AD Reference Guide
http://slidepdf.com/reader/full/cs-ad-reference-guide 245/284

7/18/2019 CS-AD Reference Guide
http://slidepdf.com/reader/full/cs-ad-reference-guide 246/284
CUNYfirst Admissions Reference Guide
Last Updated: 6/18/2013 CUNYfirst Admissions246
the colleges to test competence and allow credit therefore when requested by those students whohave not had an opportunity to submit to the USAFI examinations.
Credit for educational experiences in the armed forces may be evaluated in terms of the degree
toward which the veteran is working, and may be awarded for courses offered in the curriculum of anyaccredited college as well as areas that might be considered part of a potential curriculum of anaccredited college.
The stated course requirements for the degree may be modified in the case of the veteran. Suchadjustments should be made in consideration of the special justification in the individual case andwithout weakening the essential import of the degree or certification for which the veteran is acandidate.
A maximum allowance of twelve credits for military experience may be granted the veteran who hasbeen in the service for six months or more, and a maximum allowance of six credits for the veteranwho has been in service for more than 90 days but less than six months. The granting of this creditshall not deprive the veteran of taking the total number of credits required for his or her degree.
The acceptance of credit for both educational and military experience should be permissive with theveteran.
Special Registration ProceduresThe veteran who re-enters at any time during the term should be given the opportunity to auditcourses without credit. Fees will be waived except for non-matriculated students. The veteran whoreturns after the completion of the normal registration period may be permitted to enroll without latefee for credit either in regular courses or in special tutorial courses, or a combination of both.
Admission of VeteransMatriculation Procedures All student veterans whose high school averages qualified them to enroll as matriculated students,but who were enrolled as non-matriculated students because of their failure to meet the previous
admissions application deadlines are to be fully matriculated effective.
Late Admission All veterans of the U.S. Military Service with no previous college experience will be permitted to filematriculation applications at any time prior to the date that registration is scheduled to begin and thatthe normal University-established dates for filing such applications shall not apply.
In the event the filed application is lacking in supporting data at the time of scheduled registration, theveteran, subject to space limitation, shall be admitted as a conditional matriculant pending receipt ofsuch supporting data, provided, however, that the veteran has presented evidence of a high schooldiploma or equivalent.
Upon receipt of the supporting documentation to complete the application, the veteran shall be placedin full matriculation if he or she meets the admission requirements of the college or if he or she hasmet the college's academic standards for continued matriculation at the end of the aforementionedsemester.
Veterans admitted in accordance with the foregoing resolutions will forfeit their matriculated status ifthey should fail to provide the documentation required by the college in order to complete theadmissions application or if they fail to meet the college's academic standards for continuedmatriculation.
Reinstatement Without Penalty

7/18/2019 CS-AD Reference Guide
http://slidepdf.com/reader/full/cs-ad-reference-guide 247/284
CUNYfirst Admissions Reference Guide
Last Updated: 6/18/2013 CUNYfirst Admissions247
With reference to students in good standing whose enrollment is interrupted by military service or byabsence from college due to refusal to serve in the armed forces, the University will continue its long-established policy of readmitting students without prejudice arising from such absence.
Graduate Work for VeteransThe following procedures are designed to assist the man or woman now in the Armed Forces whowish to commence or resume studies on the graduate level upon return to civilian life.
Subject to approval of the appropriate graduate authority to be designated by the President of eachcollege, a senior may be admitted provisionally as a graduate student, including in the program ofstudy some courses that will count toward the Bachelor's degree and others that will count toward theMaster's degree. Admission to the graduate course of study will be confirmed as soon as theBachelor's degree is confirmed.
If there is a reasonable likelihood that the requirements for the Bachelor's degree have beencompleted, a veteran may be permitted to commence graduate studies, pending the evaluation ofwork completed while in service.
Subject to the approval of the appropriate graduate authority, courses prerequisite to the Master'sdegree may be completed through the Armed Forces Institute and the colleges cooperating with theInstitute program. Likewise, appropriate work completed in a formalized educational program in the Armed Services may be used to fulfill such requirements. Corresponding courses completed throughthe Armed Forces Institute and in cooperating colleges may be credited toward the Master's degreeup to a maximum of six credits, subject to the approval of the appropriate graduate authority. It isrecognized that in some fields of study fewer than six credits will be acceptable or even that no creditwill be allowed.
On the basis of graduate work taken elsewhere the appropriate graduate authority may excuse theveteran from earning in residence as much as one half of the course credits required for the Master'sdegree. This provision is not to be construed as exempting the veteran from other requirements for
the degree. A thesis or a comprehensive examination or both will be required of all candidates.The veteran who is unable to obtain a full graduate program at any one city college because ofinsufficient course offerings shall be permitted to round his or her program at one of the other citycolleges with courses approved by his or her graduate authority.
Admission and Fees for Enlisted Military PersonnelEnlisted personnel in the Armed Forces of the United States shall be admitted to courses given in thecolleges provided there is a vacancy in the course desired and provided also that the applicant hascompleted the prerequisites for that course. The Board of Trustees shall extend to such militarypersonnel the same privileges in respect to fees as those granted residents of the City of New York.
Fees for All Military Personnel and their Families, Stationed in New York StateFor the purposes of calculating tuition and fee charges, members of the Armed Services of the UnitedStates stationed in New York State, their spouses, and their dependent children, are to be consideredas residents of New York State.

7/18/2019 CS-AD Reference Guide
http://slidepdf.com/reader/full/cs-ad-reference-guide 248/284
CUNYfirst Admissions Reference Guide
Last Updated: 6/18/2013 CUNYfirst Admissions248
Topic 6: Update Military Status InformationThe CAS and ASTA interfaces will populate military status on the Veterans Information page.Veteran’s status will be indicated with the value “5” (veteran).
If a student self-reports a change in their military status by bringing the appropriate documentation totheir campus Veterans Affairs representative, manual changes must be made to the students’ record.
The Veteran’s Information page will be available to coordinators and certifying officers in theVeterans’ Affairs Office. VA students who have a service related disability and are in need ofaccommodations or wish to have their disability on file with the college should be directed to theDisability Services Office. Disability/Accommodation pages are available exclusively to the DisabilityServices Office. The “Service Connected” checkbox is purely informational.
Step Summary
The Veteran’s Information page can be found by navigating to: Campus Community > PersonalInformation (Student) > Biographical (Student) > Veteran Information
To update Veteran’s Information:
1. Navigate to the Veteran Information search page to locate and select the appropriaterecord.
2. Update military data on the Veteran Information page.3. Click Save.

7/18/2019 CS-AD Reference Guide
http://slidepdf.com/reader/full/cs-ad-reference-guide 249/284
CUNYfirst Admissions Reference Guide
Last Updated: 6/18/2013 CUNYfirst Admissions249
Detailed Information
The Veteran Information page
The following table describes the fields on the Veteran Information page:
Field Description
Effective Date Date information was entered onto VeteransInformation pages.
Military Status Indicates Status of Duty including:
Active Duty, Active Reserve, Inactive Reserve,Retired Military Veteran, Vet/Reservist with no GIBill, Veteran.
Start Date Date of origin in military.
Discharge Date Date of military discharge, if applicable.
Branch of Service Includes: Air Force, Army, Coast Guard, Marines,National Guard, Navy, Reserves.
Currently Serving Indicates current serving status.
Branch Current Indicates current branch of service (same valuesas Branch of Service field).
Chapter Indicates relevant unit of service.

7/18/2019 CS-AD Reference Guide
http://slidepdf.com/reader/full/cs-ad-reference-guide 250/284
CUNYfirst Admissions Reference Guide
Last Updated: 6/18/2013 CUNYfirst Admissions250
Field Description
Service Connected Informational only – indicates military relateddisability. Student must communicate with the
Disability Services Office for information andaccommodations.
Spouse/Child VA Benefit Indicates if this is a spouse/child of a Veteranreceiving VA benefits.

7/18/2019 CS-AD Reference Guide
http://slidepdf.com/reader/full/cs-ad-reference-guide 251/284
CUNYfirst Admissions Reference Guide
Last Updated: 6/18/2013 CUNYfirst Admissions251
Chapter 8 – Three C’s CUNYfirst 3Cs refers to Communications, Checklists, and Comments. The 3Cs provide a flexible way
to track and analyze correspondence, lists of requirements, and notes about the students, staff,constituents, and organizations in CUNYfirst.
Please note that signi f ic ant upd ates wi l l be made to th e 3 C’s Training Materials as CUNY
cont inues to make decis ions regard ing use and management of th is funct iona l i ty . The
fol low ing inform ation is generic and wil l be revised with CUNY-specif ic usage at the
approp riate time.
Chapter ObjectivesUpon completion of the Three C’s topics, learners will understand the basic functionality of thefollowing:
assign communication to an individual
view an individual communication summary
view an individual communication detail
assign a checklist to a person
view a person’s checklist summary
view person’s checklist detail
update checklist item by item
update checklist item by person.

7/18/2019 CS-AD Reference Guide
http://slidepdf.com/reader/full/cs-ad-reference-guide 252/284
CUNYfirst Admissions Reference Guide
Last Updated: 6/18/2013 CUNYfirst Admissions252
Topic 1: Three C’s Overview This chapter provides an overview of the 3Cs, otherwise known as: Communications, Checklists, andComments.
Communication management includes contacts inside and outside of CUNY.
Checklist management permits the creation of requirement lists and monitoring ofstatus.
Creating Comments enables individuals to attach remarks about individuals andorganizations
Communications, checklists, and comments can be entered manually throughout CUNYfirst.CUNYfirst can also automatically add communications, add comments, and add or update checklistsfor individuals or organizations automatically from within your business processes through the use ofevents and triggers. The Population Selection process can also be used to select a specificpopulation for the 3C engine to assign items to.
Buttons for each of the 3Cs display on many pages of the CUNYfirst pages. Use these buttons, whichare displayed below in each section, to transfer directly to another page within the sameadministrative function to generate or review a communication, checklist, or comment regarding theindividual or organization under review.
Communications
Use the Communications Management page to review or create communications for an individual ororganization. Communications include letters, phone calls, meetings, emails, and faxes.
This component enables CUNY to track and analyze contacts with students, staff, constituents, andorganizations inside and outside the institution, including the following:
all incoming and outgoing communications
all types of communication—letters, emails, phone calls, personal contact, facsimiles
communications generated by other offices that impact your office
all staff involved with a communication
Transfers you to the appropriate Communications Management page, whereyou can review or create communications for the individual or organization.Communications include letters, phone calls, meetings, emails, and faxes.
Checklists
Use the Checklists Management page to review or create checklists for an individual or organization.Checklists may be lists of steps that must be performed, a list of documents that must be provided, orcommunications that are planned to occur.
To create checklists, you must set up checklist items. You can assign a responsible person, a status,and a due date to each checklist item. You can then relate multiple checklist items to a specificchecklist and assign a due date for the overall checklist.

7/18/2019 CS-AD Reference Guide
http://slidepdf.com/reader/full/cs-ad-reference-guide 253/284
CUNYfirst Admissions Reference Guide
Last Updated: 6/18/2013 CUNYfirst Admissions253
Checklist items can be associated with an administrative function and used to enter items as a subsetof a larger, more comprehensive checklist with its own overall due date. In addition, several checklistscan be combined into one monitoring unit called a tracking group.
When a checklist item has been associated with a particular administrative function, additionalchecklist items can be added. When you have set up checklist function items, you can set up trackinggroups.
A tracking group provides a logical connection between the checklists attached to an individual.
Transfers you to the appropriate Checklists Management page, where you canreview or create checklists for the individual or organization. Checklists may be listsof steps that must be performed, or documents that must be provided, orcommunications that are planned to occur.
Note: The timing of the initial checklist assignment is dependent upon the massmatriculation process. Students need to be matriculated in order to have checklists assignedto their record.
Comments
As noted earlier, detailed policy and procedure information for Three Cs will be provided when CUNYfinalizes decisions in this area. Comments instruction will be updated at that time.
Transfers you to the appropriate Comments page, where you can review orenter comments about the individual or organization.

7/18/2019 CS-AD Reference Guide
http://slidepdf.com/reader/full/cs-ad-reference-guide 254/284
CUNYfirst Admissions Reference Guide
Last Updated: 6/18/2013 CUNYfirst Admissions254
Topic 2: Assign Communications to an Individual
Step SummaryThe Person Communication page can be found by navigating to: Campus Community >Communications > Communications Management
To assign communications to an individual:1. Follow the navigation above and click the Add a New Value page.2. Enter the desired information into the ID field and click the Add button.3. Use the Person Communication page to assign communications to individuals.
Note: If a user transfers to this page by clicking the Communication button on another page, the Academic Institution, administrative function, and related data will transfer as well.
Detailed InformationCommunications can be assigned to individuals manually or through the 3C engine to automaticallyassign communications to individuals based on defined rules and conditions.
The form of communication can be noted (phone, letter, email, in-person meeting, etc.) If thecommunication is a letter or an email, the variable data and enclosures that should be included canbe managed. Comments can also be entered that are or are not included in the text.

7/18/2019 CS-AD Reference Guide
http://slidepdf.com/reader/full/cs-ad-reference-guide 255/284
CUNYfirst Admissions Reference Guide
Last Updated: 6/18/2013 CUNYfirst Admissions255
The Person Communication page

7/18/2019 CS-AD Reference Guide
http://slidepdf.com/reader/full/cs-ad-reference-guide 256/284
CUNYfirst Admissions Reference Guide
Last Updated: 6/18/2013 CUNYfirst Admissions256
The following table describes the fields on the Person Communication page of the CommunicationManagement component:
Field Description
Function Specify the code of the functional area thatincludes this communication.
Variable Data button Refresh the page, press Tab to activate thebutton. Click the Variable Data button to accessthe Variable Data page, where you can view orenter the required variable data associated withthe specified function.
Academic Career Enter the desired information into the AcademicCareer field. Example: UGRD for Undergraduate.
Institution Specify the institution responsible for thiscommunication. It defaults to the institutionassigned to the ID, but can be modified ifneeded. It this example, use the default.
Comm Key Enter the name of the communication speed keythat contains the communication category,communication context, method, direction, andletter code for this communication.
When you select a communication speed keythat is valid in your user preferences, CUNYfirstdisplays all the values for you. If you do not use avalid communication speed key, you must enterthe category, context, method, direction, andletter code values manually.
Refresh the page, press Tab, notice all the fields
that were populated as a result of using thisspeed key.
Letter Code Defaults based on the communication speed keyentered. The letter codes available are thoseassociated with the context and function selectedfor this communication.
If the selected letter code represents a letter thatis set up to include enclosures, CUNYfirstautomatically selects the Include Enclosurescheck box for you. You can then click theEnclosures button to review, add, or delete theset enclosures.
If the letter is not set up to include enclosures,you can manually select this check box to includeenclosures now, and click the Enclosures buttonto add the desired enclosures.
Communication Date Displays the CUNYfirst system's current date.You can override this if needed.

7/18/2019 CS-AD Reference Guide
http://slidepdf.com/reader/full/cs-ad-reference-guide 257/284
CUNYfirst Admissions Reference Guide
Last Updated: 6/18/2013 CUNYfirst Admissions257
Field Description
Comments Enter comments to further identify or describe thecommunication for this individual.
If comments are associated with thecommunication speed key, CUNYfirstautomatically displays them here. You canchange these comments or delete them.
Print Comment Select the Print Comment check box to printcomments on the communication.
Create Joint Communication The Create Joint Communications check box isavailable only if the individual to whom you areassigning the communication has a relationshipon the Relationships page set to allow jointcommunications, and if the letter code on theStandard Letters page is set to allow jointcommunications.
When available, select this check box to addressthe communication jointly to this individual andthe related individual identified on theRelationships page.
Communication Outcome When you run the letter generation data extractprocess, CUNYfirst automatically completesfields and selects check boxes in theCommunication Outcome group box to indicatethe outcome of the communication. If you do notuse the letter generation data extract process,you must complete these fields.
Communication Completed Select the Communication Completed check box
to indicate that the communication wassuccessfully completed. For example, thecommunication is complete if the phone call wasmade or if the letter was sent. In the case of theletter generation data extract process, thecommunication is complete if the data wasextracted according to the option selected on therun control page.
If you are using a communication speed key,CUNYfirst might select this check box for youdepending on information associated with thatComm Key.
Date Activity Completed Defaults to the current system date, but you canmanually override this date if needed.

7/18/2019 CS-AD Reference Guide
http://slidepdf.com/reader/full/cs-ad-reference-guide 258/284
CUNYfirst Admissions Reference Guide
Last Updated: 6/18/2013 CUNYfirst Admissions258
Field Description
Unsuccessful Outcome Selecting the Unsuccessful Outcome check boxindicates that the communication wasunsuccessful. For example, no one answered thephone, or the letter was returned undeliverable.In the case of the letter generation data extractprocess, an unsuccessful outcome means thatthe process was unable to successfully extract allthe data for this communication.
If you are using a communication speed key,CUNYfirst might select this check box for youdepending on information associated with thatComm Key.
Reason The Reason field is available when theUnsuccessful Outcome check box is selected. Itindicates the reason that the communication was
unsuccessful. For example, if a letter that yousent was returned, you might select ReturnedMail as the reason that the communication wasunsuccessful. In the case of the letter generationdata extract process, CUNYfirst selects Critical toindicate that the absence of critical dataprevented the extract process from completingfor this communication.

7/18/2019 CS-AD Reference Guide
http://slidepdf.com/reader/full/cs-ad-reference-guide 259/284
CUNYfirst Admissions Reference Guide
Last Updated: 6/18/2013 CUNYfirst Admissions259
The Communication Recipient Data pageUse the Communication Recipient Data page to view data for an additional individual recipient.

7/18/2019 CS-AD Reference Guide
http://slidepdf.com/reader/full/cs-ad-reference-guide 260/284
CUNYfirst Admissions Reference Guide
Last Updated: 6/18/2013 CUNYfirst Admissions260
Topic 3: View an Individual Communication Summary
Step Summary
The Communication Summary page can be found by navigating to: Campus Community >Communication > Communication Summary
To view a summary of an individual’s communications: 1. Enter the desired information into the ID field.2. Click the Search button.3. Use the Communication Summary page to search for and review a summary of
communications to or from an individual.
Detailed Information
Review communication information for an individual on this page. A summary of communications canbe viewed, or details of the communication assignments.
A summary of communications can be retrieved for an individual to determine if a specificcommunication was sent, if it included enclosures, and if it was a joint communication. The 3C groupsthat have security access to categories of communications can be viewed as well, along with detailsof the communication assignments.
The Communication Summary page
The following table describes the fields on the Communication Summary page of theCommunication Summary component:
Field Description

7/18/2019 CS-AD Reference Guide
http://slidepdf.com/reader/full/cs-ad-reference-guide 261/284
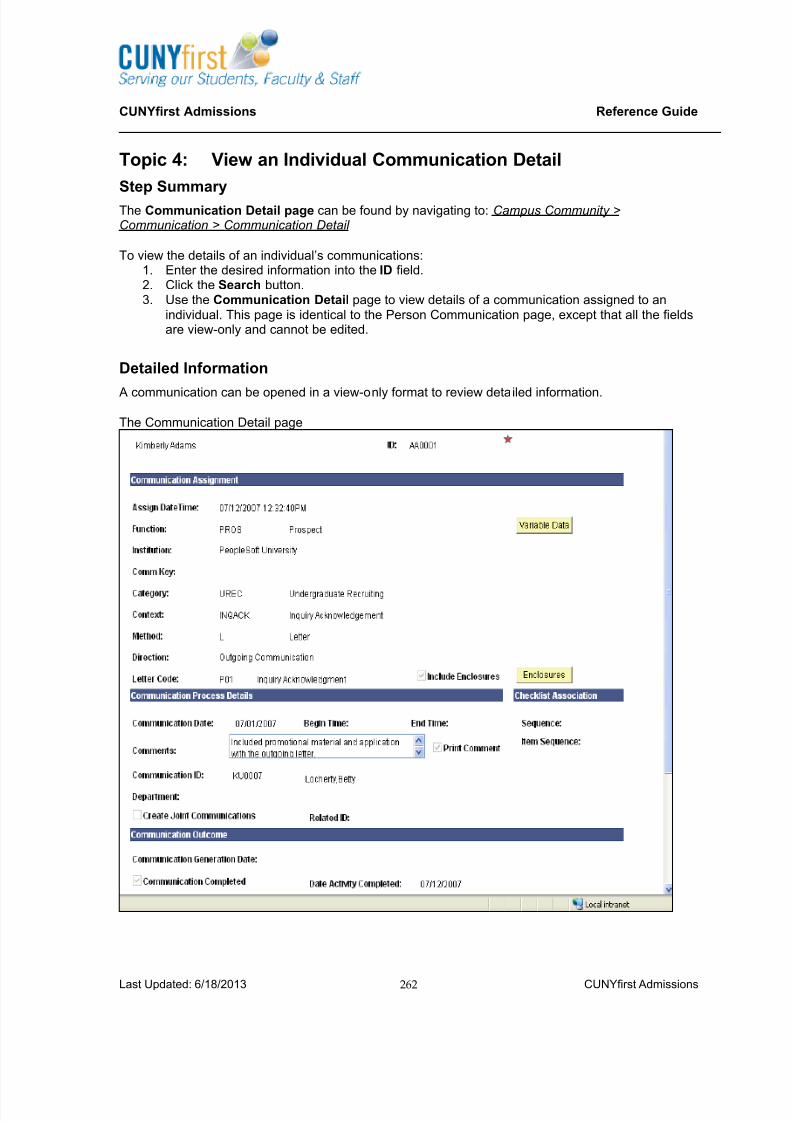
7/18/2019 CS-AD Reference Guide
http://slidepdf.com/reader/full/cs-ad-reference-guide 262/284
CUNYfirst Admissions Reference Guide
Last Updated: 6/18/2013 CUNYfirst Admissions262
Topic 4: View an Individual Communication Detail
Step Summary
The Communication Detail page can be found by navigating to: Campus Community >Communication > Communication Detail
To view the details of an individual’s communications: 1. Enter the desired information into the ID field.2. Click the Search button.3. Use the Communication Detail page to view details of a communication assigned to an
individual. This page is identical to the Person Communication page, except that all the fieldsare view-only and cannot be edited.
Detailed Information
A communication can be opened in a view-only format to review detailed information.
The Communication Detail page

7/18/2019 CS-AD Reference Guide
http://slidepdf.com/reader/full/cs-ad-reference-guide 263/284
CUNYfirst Admissions Reference Guide
Last Updated: 6/18/2013 CUNYfirst Admissions263
The following table describes the fields on the Communication Detail page of the Communication
Summary component:
Field Description
Enclosures button If enclosures are included in this communication,you can view them by clicking the Enclosuresbutton. Use the Communication Enclosure pageto review enclosures assigned to acommunication.
View Generated Communication If the communication was generated by theCommunication Generation process, you canclick the View Generated Communication link tolaunch a new window displaying the final outputs,including softcopy enclosures, generated by the
Communication Generation process.

7/18/2019 CS-AD Reference Guide
http://slidepdf.com/reader/full/cs-ad-reference-guide 264/284
CUNYfirst Admissions Reference Guide
Last Updated: 6/18/2013 CUNYfirst Admissions264
Topic 5: Assign a Checklist to a PersonChecklists can be assigned to individuals or groups of individuals. For each checklist item assigned,
responsible individuals can be specified. A due date for the overall checklist can be included with thesame or different due dates for each item on the checklist.
In addition to assigning checklists manually, the 3C engine can to automatically assign checklistsbased on defined rules and conditions. The Population Selection feature or the Mass Changeprocess can be used to select a group of IDs.
A checklist can be manually assigned to an individual using the Checklist Management pages.
Step Summary
The Checklist Management 1 and 2 pages can be found by navigating to: Campus Community >Checklists > Checklist Management - Person
To assign a checklist to a person:1. Follow the navigation above and click the Add a New Value tab.2. Enter the desired information into the ID field.3. Click the Add button.4. Use the Checklist Management 1 page to assign a checklist to an individual. Use the
Checklist Management 2 page to view or assign all or some of the checklist items to theindividual and identify who is responsible for each item.
Detailed Information
The Checklist Management 1 page

7/18/2019 CS-AD Reference Guide
http://slidepdf.com/reader/full/cs-ad-reference-guide 265/284
CUNYfirst Admissions Reference Guide
Last Updated: 6/18/2013 CUNYfirst Admissions265
The following table describes the fields on the Checklist Management 1 page of the PersonChecklists component:
Field Description
Checklist Date Time CUNYfirst populates the Checklist Date Timefield with the date and time of the checklist'screation. It is set to the current system date andtime.
Administrative Function Use the Administrative Function field to specifythe administrative function code. Theadministrative function codes reside on the Administrative Functions page.
You can associate checklist items with theadministrative function with which an individual isassociated. You can then use that function to
enter checklist items as a subset of items on alarger, more comprehensive checklist with itsown overall due date.
Academic Institution Specify the entity with which this individual isassociated. This entity can be a university or acollege that runs independently from other similarentities and has its own set of rules and businessprocesses.
Variable Data If you refresh the page, the Variable Data buttonhas been enabled. Use this button to access theVariable Data page, on which you can view orenter the variable data associated with the
specified administrative function. If variable datais not required or allowed for the specifiedadministrative function, this button is unavailable.
In this example, this button is activated becausethe Admissions Application administrativefunction was selected. Now, enter the dataassociated with this function.
Based on the individual and administrativefunction that you selected on the ChecklistManagement 1 page, various fields automaticallyappear on the Variable Data page. With this
feature, PeopleSoft ensures consistency betweenall records within a similar functional area acrossthe institution.
Checklist Code Use the Checklist Code field to specify the codethat describes the checklist assigned to thisindividual. Only those checklist codes that areassociated with the administrative functionspecified on the Checklist Item Functions pageare available.

7/18/2019 CS-AD Reference Guide
http://slidepdf.com/reader/full/cs-ad-reference-guide 266/284
CUNYfirst Admissions Reference Guide
Last Updated: 6/18/2013 CUNYfirst Admissions266
Field Description
Status In the Status field, CUNYfirst displays the statusand the date when the status was updated. Validstatus values are Initiated or Completed. Refreshthe page to view current statuses.
The Checklist Management 2 page
The following table describes the fields on the Checklist Management 2 page of the PersonChecklists component:
Field Description
Sequence The Sequence field represents the number of this
checklist item in the list of checklist items for
this individual.
CUNYfirst automatically enters the nextsequential number for each checklist item thatyou add. You can override the number manuallyto reorder the list of items for this checklist.
Item Displays the code for this checklist item. Theavailable item codes are from the Checklist Item
Functions page for the administrative functionselected.
Status and Status Date Display the status and status date of the checklistitem. Valid statuses are: Initiated, Completed, Active, Ordered, Paid Off, Received, Notified,2nd Notification, Returned, Waived, or Cancelled.
7/18/2019 CS-AD Reference Guide
http://slidepdf.com/reader/full/cs-ad-reference-guide 267/284

7/18/2019 CS-AD Reference Guide
http://slidepdf.com/reader/full/cs-ad-reference-guide 268/284
CUNYfirst Admissions Reference Guide
Last Updated: 6/18/2013 CUNYfirst Admissions268
Topic 6: View a Person Checklist Summary
Step Summary
The Person Checklist Summary can be found by navigating to: Campus Community > Checklists >Person Checklists
To view a person’s checklist summary: 1. Follow the navigation above and enter the desired information into the ID field.2. Click the Search button.3. Use the Checklist Summary page to view a summary of checklist item status for an
individual.
Detailed Information
View a summary of the checklist data for an individual.
The Person Checklist Summary page
The following table describes the fields on the Person Checklist Summary page of the Person
Checklists component:
Field Description
Code Item Status tab The Code Item Status tab displays informationabout each checklist item, such as checklistcodes, description, due date, and status.

7/18/2019 CS-AD Reference Guide
http://slidepdf.com/reader/full/cs-ad-reference-guide 269/284
CUNYfirst Admissions Reference Guide
Last Updated: 6/18/2013 CUNYfirst Admissions269
Field Description
Institution and Function Use the Institution and Function tab to determinethe institution, administrative function, andchecklist type associated with the checklist item. Also use it to determine the name of the personwho assigned or is responsible for the checklistitem.
Edit Click the Edit link for any of the rows to open thechecklist in the Checklist Management 1 page,where it can be edited.
View Click the View link for any of the rows to open thechecklist in the Checklist Detail 1 page, whichdisplays a view only version of the sameinformation that can be seen in the ChecklistManagement 1 page.
When Operator 3C Group information is available, data can be viewed on this tab:
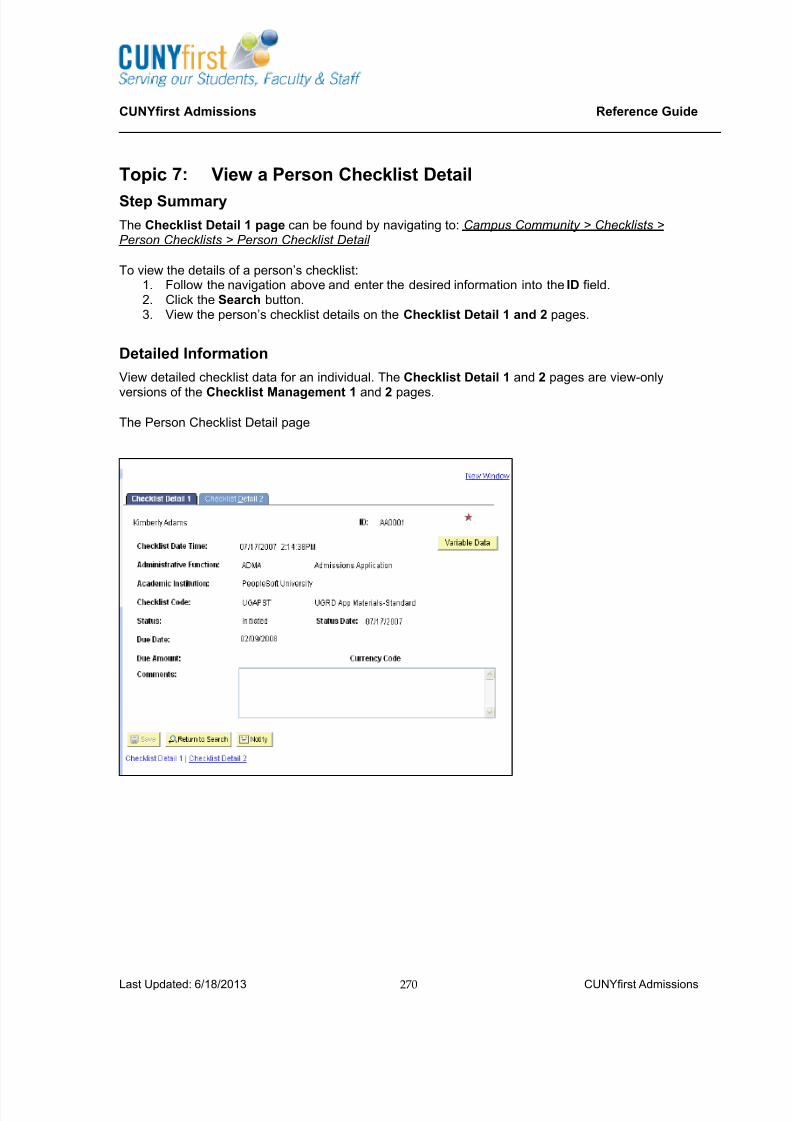
7/18/2019 CS-AD Reference Guide
http://slidepdf.com/reader/full/cs-ad-reference-guide 270/284
CUNYfirst Admissions Reference Guide
Last Updated: 6/18/2013 CUNYfirst Admissions270
Topic 7: View a Person Checklist Detail
Step Summary
The Checklist Detail 1 page can be found by navigating to: Campus Community > Checklists >Person Checklists > Person Checklist Detail
To view the details of a person’s checklist: 1. Follow the navigation above and enter the desired information into the ID field.2. Click the Search button.3. View the person’s checklist details on the Checklist Detail 1 and 2 pages.
Detailed Information
View detailed checklist data for an individual. The Checklist Detail 1 and 2 pages are view-only
versions of the Checklist Management 1 and 2 pages.
The Person Checklist Detail page

7/18/2019 CS-AD Reference Guide
http://slidepdf.com/reader/full/cs-ad-reference-guide 271/284
CUNYfirst Admissions Reference Guide
Last Updated: 6/18/2013 CUNYfirst Admissions271
Topic 8: Update a Checklist Item (By Item)
Step Summary
The Item Update - by Item can be found by navigating to: Campus Community > Checklist > ItemUpdate - by Item
To update a checklist item:1. Follow the navigation above and click the Add a New Value tab.2. Enter the desired information into the Checklist Item Code field.3. Click the Add button.4. Specify the checklist item on the Checklist > Item Update – by Item page. Use this page to
list all the individual IDs for whom you want to change the status of a specific checklist item tocomplete when the update process runs in the background.
5. Indicate for whom the checklist item update is for on the Process Checklists > Item Update – by Item page. Use this page to enter the request parameters. These parameters will be
used to define the processing rules and data to be included when the process is run.
Detailed Information
The status of checklist items can be viewed in many ways, including the Checklist Managementpages, or the Item Update - by Item or Item Update - by Person processes. Another way to updatechecklists is to run the Checklist Item Update - Automated background process, which updates itemsacross all checklists in a batch without manual intervention.
The Item Update - by Item page
The following table describes the fields on the Item Update - by Item page of the Person Checklists component:
Field Description
ID Specify the ID number of the individual who hascompleted the specified checklist item
The Item Update - by Item can be found by navigating to: Campus Community > Checklist >Process Checklists

7/18/2019 CS-AD Reference Guide
http://slidepdf.com/reader/full/cs-ad-reference-guide 272/284
CUNYfirst Admissions Reference Guide
Last Updated: 6/18/2013 CUNYfirst Admissions272
The Update Checklist Item - by Item page
The following table describes the fields on the Process Checklists page of the Person Checklists component:
Field Description
Run Control ID A Run Control ID is an identifier that, when pairedwith your User ID, uniquely identifies the processyou are running. The Run Control ID defines
parameters that are used when a process is run.This ensures that when a process runs in thebackground, CUNYfirst does not prompt you foradditional values.
You can run this process by searching for anexisting Run Control ID or you can add a newvalue. Creating a Run Control ID that is relevantto the report may help you remember it for futureuse.
All Items By default, the All Items option is selected. Itindicates that the process should update allchecklist items specified on the Item Update - byItem table to a status of Complete.
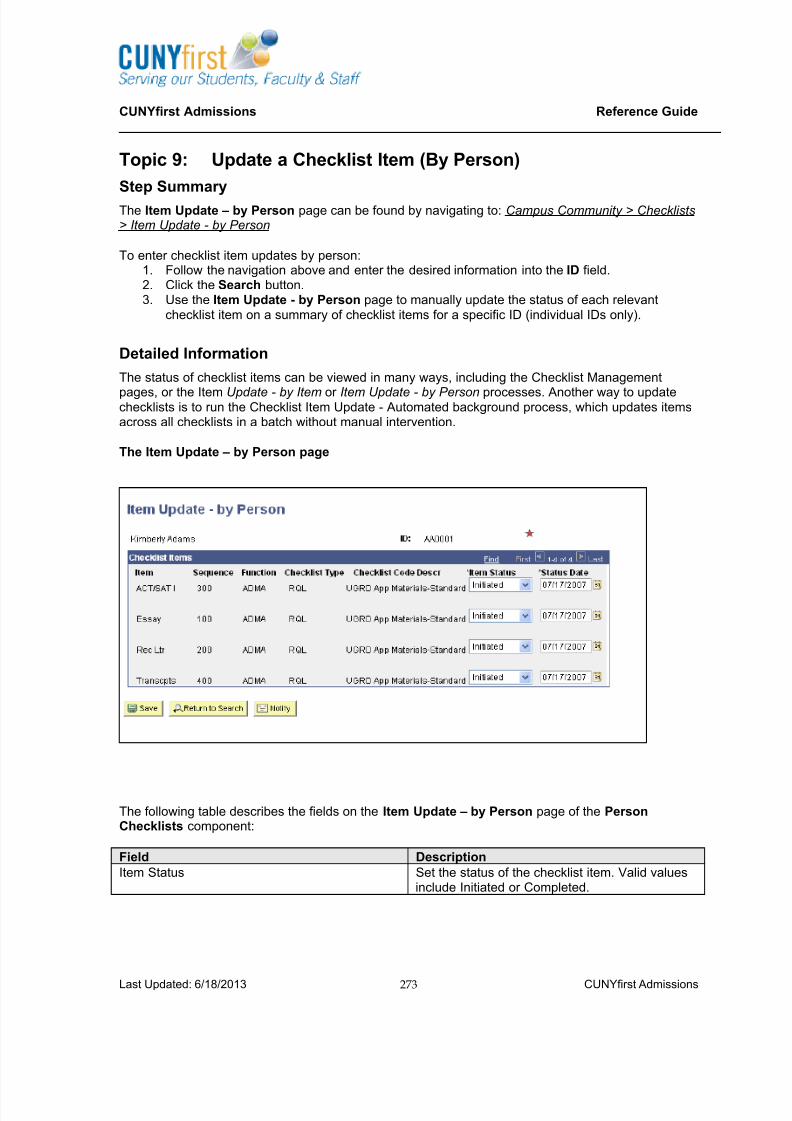
7/18/2019 CS-AD Reference Guide
http://slidepdf.com/reader/full/cs-ad-reference-guide 273/284
CUNYfirst Admissions Reference Guide
Last Updated: 6/18/2013 CUNYfirst Admissions273
Topic 9: Update a Checklist Item (By Person)
Step Summary
The Item Update – by Person page can be found by navigating to: Campus Community > Checklists> Item Update - by Person
To enter checklist item updates by person:1. Follow the navigation above and enter the desired information into the ID field.2. Click the Search button.3. Use the Item Update - by Person page to manually update the status of each relevant
checklist item on a summary of checklist items for a specific ID (individual IDs only).
Detailed Information
The status of checklist items can be viewed in many ways, including the Checklist Management
pages, or the Item Update - by Item or Item Update - by Person processes. Another way to updatechecklists is to run the Checklist Item Update - Automated background process, which updates itemsacross all checklists in a batch without manual intervention.
The Item Update – by Person page
The following table describes the fields on the Item Update – by Person page of the PersonChecklists component:
Field Description
Item Status Set the status of the checklist item. Valid valuesinclude Initiated or Completed.

7/18/2019 CS-AD Reference Guide
http://slidepdf.com/reader/full/cs-ad-reference-guide 274/284
CUNYfirst Admissions Reference Guide
Last Updated: 6/18/2013 CUNYfirst Admissions274
Course Summary
Upon completion of this course, learners should now be able to:
Understand the modules of Campus Solutions
Understand CUNYfirst Academic Structure
Describe the Admissions process from Application to Matriculation
Review CAS/ASTA results
Conduct search/match in CUNYfirst
Add new applications
Maintain applications
Update application status
View student data
Add non-degree applications
Readmit, Reactivate, and Reallocate students
Navigate the student services center
Update residency
Update citizenship
Manage service indicators
Manage student groups
Understand the Three C’s

7/18/2019 CS-AD Reference Guide
http://slidepdf.com/reader/full/cs-ad-reference-guide 275/284
CUNYfirst Admissions Reference Guide
Last Updated: 6/18/2013 CUNYfirst Admissions275
Appendix: CEMLI Search - RepositoryThe CEMLI Search is a repository of information containing reports and queries that have beendeveloped for CUNYfirst. After entering a keyword or other search criteria, displayed is information
including:
•Report Description – Including the Purpose and Use of the Report•Menu Navigation •Security Role(s) needed •Notes and other information.
Procedure
The CEMLI Search component can be found by navigating to: CUNY>CEMLI Search
Step Summary
To CEMLI Search:1. Navigate to the CEMLI Search component2. Enter search criteria and click search.3. Click the CEMLI ID link
Detailed Information
CEMLI Search Page
At least one search field must be populated before searching. Typically users will enter the CEMLIName, CEMLI Type and/or Keywords to locate the desired report or query.
The following table describes the fields on the Search page of the CEMLI Search Page component:

7/18/2019 CS-AD Reference Guide
http://slidepdf.com/reader/full/cs-ad-reference-guide 276/284
CUNYfirst Admissions Reference Guide
Last Updated: 6/18/2013 CUNYfirst Admissions276
Field Name Field Description
CEMLI Name Unique name assigned to the report or query
CEMLI Type Indicates the type of information to be searched. Options include:
ADW Reports
Conversion
Delivered
Extension
Interface
Localization
Modification
Query
Report
Pillar Indicates the Pillar the information is associated with. Options include:
Campus Solutions
Customer Relations Management
Enterprise Learning Management Enterprise Performance Management
Financials & Supply Chain
Human Capital Management
Module Indicates the specific area within a specific pillar.
For example, Student Records module exists in the Campus Solutionspillar or Workforce Administration module exists in the Human CapitalManagement pillar
Technical Contact Provides the name of the individual who provides technical support forthe report, query, etc
Functional Contact Provides the name of the individual who provides functional support forthe report, query, etc.
Support Contact Provides the name of the individual who provides training support forthe report, query, etc.
Enter Keywords A word(s) that serve as a key, as to the meaning of another word

7/18/2019 CS-AD Reference Guide
http://slidepdf.com/reader/full/cs-ad-reference-guide 277/284
CUNYfirst Admissions Reference Guide
Last Updated: 6/18/2013 CUNYfirst Admissions277
Find CEMLI Info Search Results Page
After entering search criteria and selecting the search button, the Find CEMLI Info Search Results page will display. Based on the entered criteria, the search results page will provide the expectedresult. In order to view the CEMLI Report information, select the CEMLI ID hyperlink.
The following table describes the fields on the Search page of the CEMLI Search Page component:
Field Name Field Description
CEMLI Id Unique identifier assigned to the report or query
CEMLI Name Unique name assigned to the report or query
CEMLI Type Indicates the type of information to be searched. Options include:
ADW Reports
Conversion
Delivered
Extension
Interface
Localization
Modification
Query
Report
Pillar Indicates the Pillar the information is associated with. Options include:
Campus Solutions
Customer Relations Management
Enterprise Learning Management
Enterprise Performance Management
Financials & Supply Chain
Human Capital ManagementModule Indicates the specific area within a specific pillar.
For example, Student Records module exists in the Campus Solutionspillar or Workforce Administration module exists in the Human CapitalManagement pillar

7/18/2019 CS-AD Reference Guide
http://slidepdf.com/reader/full/cs-ad-reference-guide 278/284

7/18/2019 CS-AD Reference Guide
http://slidepdf.com/reader/full/cs-ad-reference-guide 279/284
CUNYfirst Admissions Reference Guide
Last Updated: 6/18/2013 CUNYfirst Admissions279

7/18/2019 CS-AD Reference Guide
http://slidepdf.com/reader/full/cs-ad-reference-guide 280/284
CUNYfirst Admissions Reference Guide
Last Updated: 6/18/2013 CUNYfirst Admissions280
Appendix: Readmit Student - ScenariosIn addition to the instruction provided in the Readmit section, specific scenarios regarding Readmittedstudents is included below.
Program Action: RADM (Readmit)GENERAL RULE: a RADM row should always follow a DISC row. If a RADM row is to be posted, aDISC row must also be present or posted.
SCENARIO (1): Same Major
Student attended/completed courses, “stepped out” (break in enrollment), and now wishes to bereadmitted for a particular term, into the same plan/major.
DISC row is already posted on the student’s record (DISC row was posted via DISC CEMLI)
o Action: Insert a RADM row with a “4” Program Action Reason
If no DISC row appears on student’s record . . .
o Action: Manually ADD a DISC row (accept all defaults once row is added)
Effective date for the DISC should correspond to the Census date of the term
following the term the student was last enrolled
o THEN > also be sure to add a RADM row with a “4” Program Action Reason. Also –
be sure to update data (on the RADM row) as desired and according to various BPs
– especially the Admit and Requirement Term(s)!
Once the DISC > RADM rows exist, you may proceed to make additional changes such as a
Plan Change (PLNC, etc.)
GENERAL RULE: For every action there should be a data row.
SCENARIO (2): Different MajorStudent attended/completed courses, “stepped out” (break in enrollment), and now wishes to bereadmitted for a particular term, into a different plan/major (under the same UGRD Program)
DISC row is already posted on the student’s record (DISC row was posted via DISC CEMLI)
o Action: Insert a RADM row with a “4” Program Action Reason
If no DISC row appears on student’s record . . .
o Manually ADD a DISC row (accept all defaults once row is added)
Effective date for the DISC should correspond to the Census date of the term
following the term the student was last enrolled
o THEN > also be sure to add a RADM row with a “4” Program Action Reason. Also –
be sure to update data (on the RADM row) as desired and according to various BPs
– especially the Admit and Requirement Term(s)! Once the DISC > RADM rows exist, you may proceed to make the change to the major by
adding a PLNC row (additional changes such as a Data Changes (DATA), can also follow).

7/18/2019 CS-AD Reference Guide
http://slidepdf.com/reader/full/cs-ad-reference-guide 281/284
CUNYfirst Admissions Reference Guide
Last Updated: 6/18/2013 CUNYfirst Admissions281
SCENARIO (3): As a Non-Degree (formerly Degree-seeking)
Student attended/completed courses, “stepped out” (break in enrollment) and now wishes to bereadmitted for a particular term, as a Non-Degree Student (formerly a degree seeking/matriculated
student) DISC row is already posted on the student’s record (DISC row was posted via DISC CEMLI)
o Action: Insert a RADM row with a “4” Program Action Reason
If no DISC row appears on student’s record . . .
o Manually ADD a DISC row (accept all defaults once row is added)
Effective date for the DISC should correspond to the Census date of the term
following the term the student was last enrolled
o THEN > also be sure to add a RADM row with a “4” Program Action Reason. Also –
be sure to update data (on the RADM row) as desired and according to various BPs
– especially the requirement terms!
Once the DISC > RADM rows exist, you may proceed to make the change to the program by
adding a PRGC row (additional changes such as a Data Changes (DATA), can also follow)
with an action reason of “2”
SCENARIO (4): 2nd Degree (degree previously conferred)
Student attended/completed courses, graduated, has not attended since the degree was conferred(break in enrollment) and now wishes to be readmitted for a particular term, as a 2
nd Degree Student
COMP row is already posted on the student’s record because the degree was conferred
o Action: do not post a DISC or a RADM – student must apply
(REVK is the only row that should be placed after a COMP row - and this isextremely rare!)
o So . . .
If student is being processed via Quick Admit Process where EMPLID already exists
o
THEN > be sure to ADD (see screenshot below) a NEW Program Plan Stack andincrement the Career Number by +1.
o Use ACTV as Program Action with action reason of 2 or 3
If student is being processed via the Admissions module with a new application, follow the
normal MATR processing which will create a new P/P stack when the MATR is saved.
GENERAL RULE: If a COMP is present > NEVER post a RADM row after a COMP row!
SCENARIO (5) A: For Undergraduate Non-Degree (NDEG/NDEGU Program)
Student attended/completed courses, graduated, has not attended since the degree was conferred(break in enrollment), and now wishes to be readmitted for a particular term, as a Non-DegreeStudent. This person is considered to be a NEW non-degree student and a new Program Plan stack
needs to be created. COMP row is already posted on the student’s record because the degree was conferred
o Action: do not post a DISC or a RADM row
o THEN > since the student does not need to apply to attend as Non-Degree, under
the same UGRD career, be sure to ADD (see screenshot below) a NEW Program
Plan Stack and increment the Career Number by +1.
o Action: use/add MATR row
7/18/2019 CS-AD Reference Guide
http://slidepdf.com/reader/full/cs-ad-reference-guide 282/284
CUNYfirst Admissions Reference Guide
Last Updated: 6/18/2013 CUNYfirst Admissions282
SCENARIO (5) B: For Graduate Non-Degree (NDEGG Program)
COMP row is already posted on the student’s record because the degree was conferred on
UGRD career > student wants to attend as a Graduate Non-Degree
o Action: Use different career > GRAD
o Action: ADD a NEW Program Plan Stack under GRAD career and increment the
Career Number by +1.
SCENARIO (6) A: Non-Degree to Degree in subsequent term (exc luding
ePermit)
Student attended/completed courses as a non-degree student (such as a College Now student) andnow wishes to be (re)admitted for the subsequent term as a new Degree seeking Student
Student attending as a non-degree student
o Action: use PRGC Program Action with action reason of ‘2’
NOTE: If this change occurs before the end of the currently active NDEG
term, set the effective date to a date after the end of this term.
o THEN > use the Reset checkbox to separate the Non-Degree (College Now) stats
from the degree seeking stats.
SCENARIO (6) B: Non-Degree (ePermit) to Degree in subsequent term
Student attended/completed courses as an ePermit student (Non-Degree) and now wishes to be(re)admitted for the subsequent term as a new Degree seeking Student
Student attended as a non-degree student
o Action: use PRGC Program Action with action reason of ‘3’
NOTE: If this change occurs before the end of the currently active NDEG
term, set the effective date to a date after the end of this term.
o THEN > use the Reset checkbox to separate the Non-Degree (College Now) stats
from the degree seeking stats.
SCENARIO (6) C: Non-Degree to Degree after a break in enrollment (all cases)
Student attended/completed courses as a non-degree student (such as a College Now student) and,after a break in enrollment, wishes to be (re)admitted for a particular term as a new Degree seekingStudent
DISC row is already posted on the student’s record (DISC row was posted via DISC CEMLI)
o Action: Insert a RADM row with an “8” Program Action Reason
If no DISC row appears on student’s record . . .
o Manually ADD a DISC row (accept all defaults once row is added)
o THEN > also be sure to add a RADM row with an “8” Program Action Reason. Also,
in regards to the RADM row, you should accept the defaults, and if applicable be sure
to update data (on the RADM row) as desired and according to various BPs –
especially the Admit and Requirement Term(s)!

7/18/2019 CS-AD Reference Guide
http://slidepdf.com/reader/full/cs-ad-reference-guide 283/284
CUNYfirst Admissions Reference Guide
Last Updated: 6/18/2013 CUNYfirst Admissions283
Once the DISC > RADM rows exist, you may proceed to make the change to the program by
adding a PRGC row (additional changes such as a Data Changes (DATA), can also follow)
with an action reason of ‘2’ or ‘3’ for new freshman or transfer, respectively.
THEN > use the Reset checkbox to separate the Non-Degree stats from the degree seekingstats.
IMPORTANT TO NOTE: If your college’s business process is to separate the stats from non -degreecoursework and degree seeking courses (degree seeking student), then you must use the ‘ResetCum Stats at Term Start’ checkbox (Records and Enrollment > Student Term Information > TermHistory >> Cumulative Statistics Tab). Checking the checkbox will reset (and separate) the non-degree stats (CUM GPA and CUM Stats) from the degree seeking stats, or vice versa. The transcriptwill also reflect that information.If your current business process is to print transcripts with ALL the courses, regardless of the factwhether or not the student is degree or non-degree, then you do not need to check the ‘Reset CumStats’ checkbox .
How to add a new Program Plan Stack vs. Adding a row to an existing program plan stack

7/18/2019 CS-AD Reference Guide
http://slidepdf.com/reader/full/cs-ad-reference-guide 284/284


![[620]W342 E1 09 CS CJ Communications Commands Reference Manual](https://img.pdfslide.us/doc/110x75/553e73ab550346724a8b4a08/620w342-e1-09-cs-cj-communications-commands-reference-manual.jpg)