Embed Size (px)
Citation preview
About This Checklist Let me begin by answering the most obvious question: “What is this checklist?” This is a modifiable checklist that I use each time I’m about to launch a new crowdfunding campaign. Whenever someone asks me for crowdfunding advice, I print out this list and check off every action item one by one. Truth is- running a crowdfunding campaign can be extremely exhausting. It’s not as simple as slapping together a nice campaign with fancy graphics, and then watching the money roll in on Kickstarter. Instead, you’ll need to complete dozens of steps to make it a success and be consistent every time. Behind every successful entrepreneur is a ‘system of success’ that he or she creates for support. These systems of success are often broken down into easy, actionable items. What you’re looking at is my system of success for crowdfunding. What I hope is that my system will lay the foundation for yours. However, I am aware that what worked for me might not work the exact way for you. So feel free to add, delete, or improvise any part of my system, and use it in the way that best suits you. To your crowdfunding success! Johnathan Leow
Your Free Gift As a way of saying thanks for your purchase, I’m offering a free email course that’s exclusive to my readers. You have a big crowd funding idea? That’s great! But you’ll have to make sure that there are people out there who’ll want to buy your product. That’s why I made the course: 5 Ways To Get Users For Testing Your Crowdfunding Idea. This 3-week email course will show 5 methods that you can use to find out
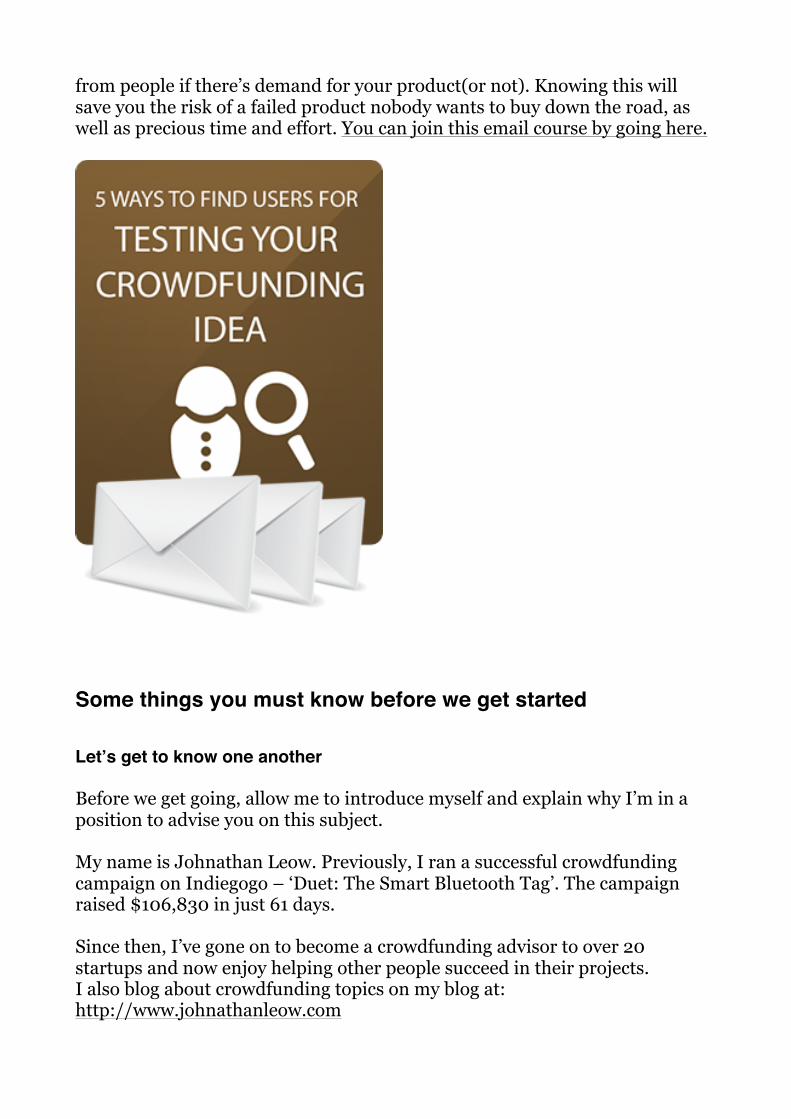
from people if there’s demand for your product(or not). Knowing this will save you the risk of a failed product nobody wants to buy down the road, as well as precious time and effort. You can join this email course by going here.
Some things you must know before we get started
Let’s get to know one another Before we get going, allow me to introduce myself and explain why I’m in a position to advise you on this subject. My name is Johnathan Leow. Previously, I ran a successful crowdfunding campaign on Indiegogo – ‘Duet: The Smart Bluetooth Tag’. The campaign raised $106,830 in just 61 days. Since then, I’ve gone on to become a crowdfunding advisor to over 20 startups and now enjoy helping other people succeed in their projects. I also blog about crowdfunding topics on my blog at: http://www.johnathanleow.com
Back to crowdfunding.. Conceptualising, planning, marketing and launching a crowdfunding campaign in 90 days is quite possible. I did it previously with my team for the PROTAG Duet. It’s not easy, but definitely not impossible. Of course, things do speed up if you have a team working full-time with you on this. The most important thing is to plan your pre-launch preparation properly. You will have to do many things, such as crafting your product message, setting up the campaign page, and building a base of interested audience prior to launch. You might be tempted to skip through this process, but your risks of not being able to raise funding goals are much lower if you follow through it. Luckily for you, we’re covering pre-launch planning here. A disclaimer though: at this stage, you should already have a product prototype, and validated that the market is willing to pay for your product. While crowdfunding in itself is a great way to validate, it is still better if you’ve already done some form of prior validation. Why waste the opportunity on validation, when you can focus on getting as much funding as possible? So do as much homework properly beforehand, and I assure you, the ride will be much smoother.
Settle activities that rely on other people first In order to minimise delays, it is a good idea to first settle all activities that rely on someone else’s schedule. These include: hiring expertise to do your photos/videos, pitching your campaign to media contacts and getting product reviews. Towards launch day, you should also allocate at least one week as a buffer to get your campaign approved and make any final changes (especially if you’re listing on Kickstarter or a crowdfunding platform that requires approval). If you can’t already tell, waiting on other people is the slowest part of planning your campaign.
Market, Market, Market, from day One!
Many crowdfunding campaigns invest a lot of time making kick-ass videos and creating the most enticing rewards on planet Mars. Yet, on launch day, their pledges are eerily quiet. The reason is simple: they did not build up enough pre-launch buzz. This is a sure recipe for failure. The solution? Plan marketing and branding efforts from day One of preparation. Getting the word out about your project takes time, especially if you are only beginning to build your email list and do not have a previous audience base. A good length of time is 5 to 6 months before campaign launch.
Crowdfunding is a full time job It’s easy to be deceived into thinking that once you’ve launched your campaign, its time to sit back, kick your legs up, and drink a tequila after all the hard prep work you’ve put in the last few months. But the truth is that you’ll have to monitor your campaign nearly full-time while it’s running! If your campaign is 30 days in length, then that means 30 days of round-the-clock manning. In fact, you’ll have to hustle and double up even more on your marketing efforts to defeat that dreaded mid-campaign pledge ‘slump’. You’ll also have to monitor backer comments, weeding out negative and non-constructive ones. Oh, and how could I forget to mention, you’ll also have to handle any crisis that comes up - such as answering backers about manufacturing delays. Now that you know why I’m qualified to give you crowdfunding tips and have gone over the preliminaries, let’s dive into the checklist. You’ll learn how to make this step-by-step list a powerful tool in your arsenal.
Week 1
#1: Write out your target audience persona Your campaign begins here.
List down the specific segments of people that you are targeting at. The trick here is to not be general and yet not narrowly specific with describing these customers.
Let’s say you have an innovative idea for takeaway lunch box meals. ‘People who like to eat’ are too broad a category, while ‘People who like to eat only spaghetti bolognese with beef’ is too narrow. ‘White-collar workers who work in the city and takeaway their daily lunch from fast food chains’ sounds much better.
Then, you’ll need to make educated guesses to find out what their biggest problems are, and what they need the most. I have found that it helps tremendously to develop customer personas, which are fictitious models of your target customer.
A quick and simple way to do this is to go to the streets and ask 10 people who fit your target audience profile. If they bring up the same problems that you guessed and are actively looking for solutions, you have a winning campaign.
You get the idea.
#2: Write out the 3 core value propositions of your product
In 30 seconds, you must be able to list out in bullet point length, not more than 3 ways that your customers’ lives will improve by using your product. You should also be able to describe how you foresee your customer using your product in their daily lives, and under certain events or scenarios.
#3: Decide on a catchy name for your product Take time here to carefully figure what you’ll want to name your product. Once your product name is out there in the market, it sticks in peoples’ minds like superglue. My startup team and I spent 2 weeks brainstorming and brooding, and debating over an apt name for what would become ‘Duet: The Smart
Bluetooth Tag’. You wouldn’t believe it, but we started off with boring or ridiculous sounding names like “Tag”, “Peach”, “Tango”, before one smart guy suggested “Duet”, since the device protects two things at once. It helps tremendously to do a quick poll of product names with your family and friends, and ask them what they think of each product when it is mentioned to them.
#4: Decide on the crowdfunding platform you’ll want to use Really, deciding on your crowdfunding site of choice shouldn’t be tough at all. But before you start drowning in the sea of crowdfunding sites, the first thing you’ll want to do is to write down your goals: How much do you want to raise etc. Then, research about crowdfunding sites which are most conducive for your product. Kickstarter and Indiegogo work great for creatives, film and tech projects. GoFundMe is ideal for donations, while MedStartr is catered to the medical industry. Take note that almost all platforms charge 5-6% of your funds raised. For a more in-depth guide to choosing crowdfunding sites, check out my other book: ‘How To Choose A Crowdfunding Site’.
#5: Decide on the funding goal and campaign length This is one of those important, make-or-break questions you must ask yourself. A funding goal that is set too high could mean risking months of hard work and walking away without any capital, if you are using a ‘fixed funding’ campaign. On the other hand, a goal set too low could mean that you have to foot additional campaign costs out of your own pocket, a costly move you don’t want to make. Before you decide on a funding figure, here are three battle-tested, recommendations I’ll make: 1. Start by totalling all project and reward fulfilment costs 2. Budget for more money than you think you’ll need 3. Always set your funding goal lower than what you need
#6: Setup the necessary bank accounts/payment processors (Amazon Payments if using Kickstarter) If you’re crowdfunding on Kickstarter, you MUST have an Amazon Payments account. Kickstarter requires project creators to verify their identity via an Amazon Payments business account, a process that can take up to seven days. The restrictions kick in here, because you’ll need to have a US address and bank account to qualify for Amazon Payments. You’ll have to register for a US address and bank account if you don’t have one. The alternative, of course, would be to register your Kickstarter project under a US citizen’s name instead, and have him or her set up an Amazon Payments account for you. That’s assuming you have a friend or a contact that is a US citizen, and is willing to help you out. For Indiegogo, all you need is a PayPal Business account and you’re good to go. For all other sites, read their payment requirements carefully.
#7: Create a pre-campaign landing page with an email interest opt-in form on Launchrock Creating sufficient buzz before launching your crowdfunding campaign is uber-important! You can generate buzz around your product even if your campaign is not ready yet. Drive traffic to your website landing page, and capture emails using launchrock.com. Launchrock lets you set up a landing page in 5 minutes and is very simple to use. Best of all, it’s completely free! *Power tip: Have a giveaway promo to incentivize people to signup for your product launch. We ran a referral contest to give out 10 Duet devices to 10 lucky guys, and we got 400 leads in return. People really do love free stuff!
#8: Setup a free email marketing account with Mailchimp Mailchimp is an email marketing software that makes it easy to schedule emails to be sent out to your list. You’ll need a way to stay in touch with your subscribers and keep them engaged. If you do not stay in constant contact with your email lists for more than a month, they will start to grow cold. That’s why you should have Mailchimp to automate this process for you. All you need is to set up a simple
sequence of autoresponder emails, something like this: Email 1: Welcome and thanks for your interest! – At signup Email 2: Our story of how we got started – one week later Email 3: When we are launching – two weeks later Email 4: Our campaign launches today! – launch day Tip: The less fancy, simpler and more personalized the email content, the better. No need to get bogged down by fanciful graphics/templates. In my opinion, the humble and good old all text email works best, in a noisy world where companies are trying to sell things to us every single day.
#9: Find out and compile a list of where your target audience hangs out online Knowing where your audience hangs out online is extremely important for your PR strategy later on. If you don’t know where they hang out, you run the risk of launching your campaign to the wrong crowd, or worst no one at all! Start by asking yourself what blogs, websites, online communities, forums, interest groups are your target audience likely to hang out in. If you’re targeting entrepreneurs, then Hacker News and TechCrunch will be their likely hangout places. If you’re looking at hardware enthusiasts, then Good.is is another great community. Compile all these hangout places into a list and add on to it as you discover more sources. You should do this early on in your campaign, as it takes time to figure out these places.
#10: Promote your landing page personally by email to your family and close friends You need some love to get started. Your family and friends are your greatest project supporters, and so you’ll want to let them be the first to know that you’re embarking on this exciting project! Send each of them a personalized email, asking them to signup for updates when your campaign is about to be launched. It’s important to address them each by name, rather than a generic ‘Dear Family’. People are more willing to take action when requested as individuals, rather than as a group.
#11: Start looking for a creative video agency (paid option) Your campaign video is the best foot forward at convincing people to pledge to your project. So look for a professional or a reputable video agency that can shoot and edit a high quality video. In my opinion, your video should be your biggest expenditure, as it is your greatest marketing asset. A good video will serve you well in terms of sales for a long time to come. Furthermore, you can also reuse that same video for other promotions, even after the campaign has ended. If you can afford it, pay the person shooting your video well, and you’ll be rewarded with high quality. The person who produced my video did a pretty superb job, and I’ll be glad to share with you her contact. Just email me at [email protected] Power tip: Your choice of actors/actresses in your video is extremely important. Their ethnicity and skin color should reflect the crowd that you are targeting. For our crowdfunding campaign, we had a blend of Western and Asian crowds, so we engaged a British-White male and a Singaporean-Eurasian female for our main leads. In a similar vein, the voiceover artist you choose for your video should also match your target audience.
#12: Start looking for a photographer (paid option) Again, just like the video, do not skimp on the quality of your product graphics. Hunt around for a good photographer to snap quality pictures of your product. Ensure that the photo resolutions are sharp and clear. At the bare minimum, get your shots done with a DSLR camera. Most of the time, the people who do your video also have good connections to fantastic photographers, as the creative community is quite tightly knitted. Again, I have great contacts that shoot great photos. Simply drop me an email.
Week 2
#13: Brainstorm storyboard for product video
The first thing before you shoot a video is to make a storyboard so you can bring your script to life and present it to other people. A video storyboard is a series of thumbnails that show the breakdown of the video, illustrating the key scenes — how the setting will look, who will be present, and what actions will take place. It is a great brainstorming technique to generate ideas. Using pictorial illustrations drawn on paper, you can quickly manipulate your brainstormed video ideas into the desired sequence. Keep the storyboard simple: I only sketch my storyboard on paper, and by far it is still the fastest way to revise and make changes. It is very helpful at this point to go through your video storyboard with whoever is shooting the video. To begin with storyboarding, first get plenty of colored markers and pieces of plain paper (you will be drawing plenty of pictures). Then the first thing to do before you draw out your scenes on paper is to ask yourself these questions: - What is the goal of your product video? - How should my product story be told? - What people/scenarios should be shown in the video? Brainstorm and conjure up as many scenes in your mind based on those three questions, and draw them out in pictures. The only rule you’ll have to observe in storyboarding is that each piece of paper can only have one scenario drawn on it. But do not limit or ‘shoot down’ any idea here, as doing so might stifle your creative juices. If you can, paste up your pieces of paper on a wall with tape. Once you’ve brainstormed at least 20 scenes, it’s time to filter them out by relevance. Are the scenes you just brainstormed aligned with the 3 questions mentioned earlier? Good. Keep them and throw away all else. The last step would then be to sequence your ideas in a logical manner that a person can easily understand. To give you an example of a video storyboard sequence: Scene #1: Alan, a student is shown in the garden Scene #2: He demonstrates how he uses his phone to keep track of calendar items Scene #3: Alan takes a picture with his girlfriend at a party Scene #4: Alan tells us he has a serious problem with losing phones Scene #5: Alan is shown running for a departing taxi. He has left his phone in there
Scene #6: He accidentally knocks his phone off a café table without realizing. Scene #7: Alan shows that he is very frustrated with himself Scene #8: Alan holds on to the Duet and presses it Scene #9: The Duet device rings Alan’s phone. Scene #10: Alan finds his phone in double quick time.
#14: Plan campaign reward perks and pricing Rewards are benefits your backers will get in return for pledging to your campaign. For the majority of projects, the main rewards are usually early versions of the product itself. The key thing to remember as you plan your reward perks is to think in the shoes of your backers: “What’s in it for me?” This is the time to be creative, and offer your backers rewards besides the core product or service offering. There are 3 best practices I’ve discovered work well when planning rewards: 1. Go for tangible perks over intangible perks 2. Have a $1 token perk for people to show support 3. Have an early bird perk Pricing wise, it is more art than science. Typically, the best rewards are between the $19-$50 range. But if it’s a tech or hardware product, then it’s really fine for the price to be even higher. As pricing can be quite complex, the best way to decide on what price to set is to do a quick research of similar crowdfunding projects, and then use those prices as a benchmark.
#15: Plan a referral campaign for backers to refer people to your site With the right incentives, referrals are one of the best ways to generate a huge flood of backer pledges. If you’ve shopped on Amazon.com before, you might have realized how powerful the power of recommendations can be. Therefore, plan beforehand for a referral campaign where your backers can refer their friends to your site. One method of running a referral contest is what I call the Refund Credits tactic. Allow me to take a leaf from the GOKey Indiegogo campaign to learn how this simple tactic works. View the GOKey Campaign here
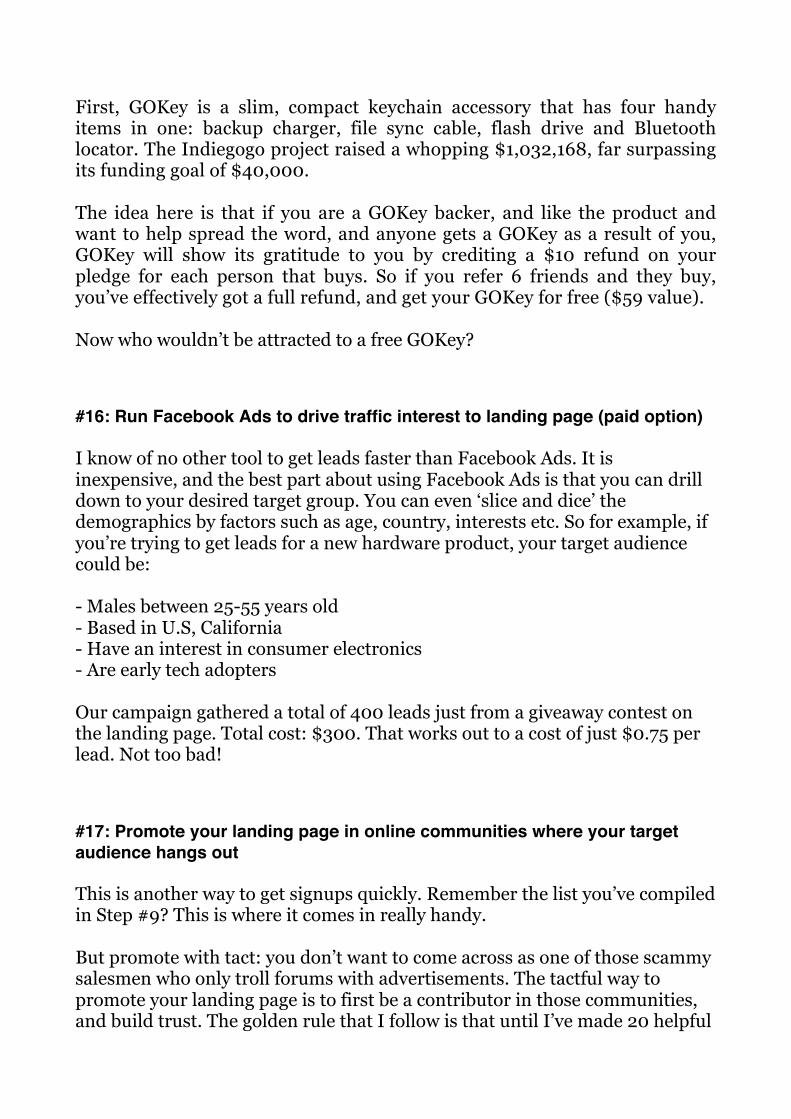
First, GOKey is a slim, compact keychain accessory that has four handy items in one: backup charger, file sync cable, flash drive and Bluetooth locator. The Indiegogo project raised a whopping $1,032,168, far surpassing its funding goal of $40,000. The idea here is that if you are a GOKey backer, and like the product and want to help spread the word, and anyone gets a GOKey as a result of you, GOKey will show its gratitude to you by crediting a $10 refund on your pledge for each person that buys. So if you refer 6 friends and they buy, you’ve effectively got a full refund, and get your GOKey for free ($59 value). Now who wouldn’t be attracted to a free GOKey?
#16: Run Facebook Ads to drive traffic interest to landing page (paid option) I know of no other tool to get leads faster than Facebook Ads. It is inexpensive, and the best part about using Facebook Ads is that you can drill down to your desired target group. You can even ‘slice and dice’ the demographics by factors such as age, country, interests etc. So for example, if you’re trying to get leads for a new hardware product, your target audience could be: - Males between 25-55 years old - Based in U.S, California - Have an interest in consumer electronics - Are early tech adopters Our campaign gathered a total of 400 leads just from a giveaway contest on the landing page. Total cost: $300. That works out to a cost of just $0.75 per lead. Not too bad!
#17: Promote your landing page in online communities where your target audience hangs out This is another way to get signups quickly. Remember the list you’ve compiled in Step #9? This is where it comes in really handy. But promote with tact: you don’t want to come across as one of those scammy salesmen who only troll forums with advertisements. The tactful way to promote your landing page is to first be a contributor in those communities, and build trust. The golden rule that I follow is that until I’ve made 20 helpful
posts or comments, I will not mention anything at all about my upcoming campaign.
#18: Continue promoting your landing page to your networks Throughout the course of the week, you’re likely to interact with more people, both online and offline. Quite naturally, you’ll be excited to tell them about your upcoming campaign. Take this opportunity to refer them to your landing page.
#19: Find out and compile a list of horizontal segments in your industry to promote (etc. university community mailing lists, industry watch mailing lists) Beyond promotion to your own networks and in online communities, you can also leverage on industry and university mailing lists. There are plenty of email list owners who run large email lists, and you can contact them and request for them to publicize your campaign. Just to illustrate to you how powerful leveraging on university mailing lists can be for prelaunch promotion: In my previous startup role, my founder and I happened to be alumni from the Singapore Management University. What we did was contact our mentors over in the entrepreneurship department and requested their help to blast a university wide EDM informing students that we were setting up a booth on campus. They graciously agreed, and what happened thereafter was nothing sort of extraordinary: on the day we arrived to setup our booth, we already had 3 students eagerly waiting for us! Over the course of both days, students came by the droves. By the end of the 2-day campaign, we had gathered over 80 interested leads for our campaign launch. That is the power of promoting your project offline!
#20: Send out email updates to your mailing list Send an email update to thank your list for showing their interest in your campaign. You should also communicate clearly to them again what your crowdfunding campaign is all about, and make it explicitly clear when your targeted launch date will be so that they will not be surprised.
Week 3
#21: Refine video storyboard concept for video further Continue working on adding more scenes to your storyboard. Remove those that don’t make sense, and begin to give your characters names. Run the storyboard through with 2 or 3 other people to see if it makes sense.
#22: Start taking nice photographs of your product prototype Back to #12, it is now time to take action. Invite your photographer to your office to shoot the photos (or do it yourself if you’re a pro). Power Tip: You don’t need to have a fully functioning product to begin shooting the photos. All you’ll need is to have at least the outer casing ready. We 3D-printed our prototype for our photo shoot just a week prior, and spray painted it to look authentic. The point here is to improvise!
#23: Promote your landing page to horizontal industry segments As mentioned in Step #19, this is the time for you to promote your landing page to the list of horizontal industry segments you’ve collected.
#24: Promote your landing page on link sites (Reddit, Hacker News etc.) The next easy thing to do is to submit your landing page to link voting or weekly email lists. Even if your post doesn’t hit the home page of Hacker News, it may still pick up a little traffic from being on the new page. Find the sites most relevant to your topic. Here are link sites you can start with: - Hacker News - Reddit (there are subreddits on nearly every topic) - Inbound.org - Digg - BetaLi.st - GrowthHackers
#25: Start building out your written pitch copy for campaign The written pitch builds upon your video pitch to help sell your campaign. Think of it as a follow up marketing collateral that expands and reinforces your video pitch. After someone has watched the video, your pitch then continues to share further details to convince your viewer to pledge. Your end goal is to have every viewer thinking: “Wow! This guy is able to read my mind!” after reading your pitch copy. If you can communicate the same pains that your visitors are feeling, you’ve nailed it! Things you should write about in your campaign pitch: - What the product is - The story of how your product came about - Key benefits of your product to viewers - Graphics and photos - Social proof (from press coverage, testimonials etc.) - Features of your product - Pricing of your perk packages - Who your team is - What will your funds be used for - Risks and challenges - FAQs
#26: Start assembling a list of relevant media contacts for pitching your campaign If you want your crowdfunding campaign to really succeed, its not enough to only raise funds from your family and friends. You’ll want to have wider coverage in the media. Almost every campaign that’s raised over $100,000 needed to have PR to help raise that level of funds. However, traditional PR agencies are usually not well suited for startups, especially since their services can get really expensive. But the good news is that by using a couple of free online tools, you can still get PR coverage cost-effectively on your own and achieve the same (if not better) results than engaging a PR firm. The best part is that these tools do not cost you a single dime. They make the process of contacting media outlets much simpler. Here they are: - Buzzstream is a great tool to help you save time getting influential bloggers contact info
- Use Google Images to find media outlets that previously covered your competitors - Kicktraq is a Kickstarter focused only tool to find media outlets that previously covered your competitors. - Help A Reporter Out is a free service you can use to turn any journalist into your ally However, this is still a very slow way of assembling your list of contacts together. Alternatively, you could purchase media lists containing names of the top bloggers, journalists, reporters, and editors in your niche. These lists also include phone numbers, direct email addresses, and bio information on them, so you can pitch them on your campaign more effectively. If you would like to purchase one of these lists, drop me an email at [email protected] and I’ll work something out for you. If you would like further hands-on video training, check out the Startup Crowdfunding Udemy course that will teach you exactly how to use those tools.
Week 4
#27: Shoot the video For me, this was the most exciting activity in the entire crowdfunding process. For one or two days, you’ll feel like a Hollywood director, only that someone is directing and doing all the work for you. It’s also exciting to wait for the first cut of the video as it is being produced. Usually, the video shoot will require a full day or two. If it is possible, head down together with the videographer to where the shoot is taking place. This is important because then you can inform the director to make adjustments on the spot, if the video is not going according to your desired taste.
#28: Create a temporary teaser website for your product Rather than pointing people directly to your Kickstarter or Indiegogo campaign page, which is quite verbose, create a teaser site for your product. An appealing and simple page would work as a way of getting the point about what you have to offer across quickly.
Don’t need to worry about programming skills here. Unbounce.com is a great tool to help you set up beautiful, and high-converting teaser pages in just a matter of minutes.
#29: Finish writing your written campaign pitch Your first draft of the campaign pitch should be ready at this point. Before finalizing the pitch, have at least 2 other persons to run through it and highlight any grammatical mistakes and give feedback.
#30: Find a list of offline places to spread awareness Promoting your campaign offline is still one of the best ways to get people interested in your campaign. That is because nothing proves the authenticity of your campaign more than a face-to-face conversation. Some examples of offline places that you can promote are: meetup groups, networking events, seminars, talks you give, and yes even Starbucks (seriously!).
#31: Prepare PR Press Kit for press coverage Your press kit is the one-stop shop for journalists and reporters looking to write about your company. When you are pitching to reporters and journalists with your story, it is extremely important to make it as easy as possible for them to write about you. These people are always working on tight deadlines, and on way too many things. Here are some key things to include in your press kit: - Bios: Use this section to talk about your company's founders, CEO, chairperson, investors or any other key players. - Press Releases: these are written statements to the media announcing your newsworthy crowdfunding campaign. Reporters are usually more likely to consider a story idea if they first receive a press release. Make sure that your campaign launch date is stately very clearly in the press release!
- Product Images: provide high-res product photos of your product that media outlets can easily use. You should also make it clear that journalists are allowed to republish the images or video with any appropriate credits. Including your company logo here is a good way to make your campaign ‘stick’ with the public. - Contact information: sometimes people completely overlook this part. And as such, reporters have no way to contact them. List phone numbers, and email addresses for your company’s spokesperson, or designated staff. - Reviewer Guide (optional): including a reviewer’s guide in your press kit will differentiate your campaign. The reviewer’s guide is an instruction manual that reporters can use to setup and follow through on your product. Once you’ve got your press kit together, zip it up together into a folder, or upload it on Dropbox and keep the ‘shareable’ link handy. For an example of a good press kit, check out Ambiclimate’s press kit: Ambiclimate press kit
Week 5
#32: Review and edit first draft of video I know. It is a very exciting experience to see the first draft of your video in your email inbox. 99.99% of the time, you will still have to make edits to the first draft, before it is ready for production. What you should really concentrate on for the first draft of your video is to ensure that the storyboard scenes are correct, and that your product concept is clearly illustrated. So the first thing you should do is to play the video two or three times, and then compare it back with the storyboard you had prepared earlier. Look out for any missing scenes. Check to ensure that the lighting is right and audio is clear and loud enough. But do not worry too much about getting all these perfected at this point. Those things will be finalized when you get your final draft.
#33: Continue work on the temporary teaser website Resume work on your teaser site. At this juncture, your website should already have most of the content up. This is the time to add in graphics and
videos, and also to double check that your landing page links correctly to your campaign page.
#34: Send out PR Press kit to media contacts Remember the media list you painstakingly put together in step #26? It is now time to pitch your story to these people. But because you only have one shot to make an impression, you must pitch them in an effective manner. Here’s a bad pitch (and it often happens): Hi, My name is John I would like to request for you to write a story about our upcoming crowdfunding campaign called the Duet. If you want I could send some information to you, and I’ll be very grateful to get your opinion. Awaiting your response. Thanks, John This is a bad pitch because 1) The reporter has a name, and it is not “Hi” 2) He doesn’t owe you any favors 3) The product description is too brief.. What exactly is a Duet? When you are pitching to the media, I’ve found that its always more effective to give them something first, before you ask for the favor. It could be something as simple as a compliment about their writing. Whatever the case, be sure to give before you receive. Also, include enough information about your product story in the pitch email so that the reporter will want to explore further. Do not write a love letter, but do not be lazy too. Take the time to practice writing your pitch as concisely as possible. Here’s a great template that you can follow: Subject Title: re: 20 free Coolest Cooler giveaways [Reporter’s first name] - it's great to meet you. I'm a huge fan of [Primary Website Domain] and wanted to pass on something new that could be a nice fit for your outdoor party gear section. I've attached an image of the Coolest Cooler outdoor party box. Our Kickstarter page has a video and bullet points
on why is unique. We think Coolest Cooler could be a great story for [Primary Website Name] for these reasons: Innovative 3-in-1 box - Coolest Cooler is the world's first party box disguised as a cooler, bringing blended drinks, music and fun to any outdoor occasion Versatile use - The cooler box even has USB charging, in a world where people often run out of battery at beach parties. A charging point mounted on a cooler box is unprecedented in the industry. Made for party people - Coolest Cooler is just packed with so much fun you’ll look for excuses to get outside more often. If you're interested, please let me know how I can make the writing process easy for your team. I'm happy to attach these hi-res photos (YOUR PR KIT URL LINK HERE) We've also identified 50 party influencers made up of beach DJs, journalists and bloggers to approach for reviews. You're one of them. We're going to give 10 sets away for a review. Would you like a pair to review? Let me know! We launch December 10 at 9am PST. Thanks for taking the time to check us out, Johnathan
#35: Send out product samples to 10 people in your network and ask for reviews If you are crowdfunding a physical product, getting reviews from early users is a crucial step. With product reviews, your campaign will stand out because it already has social proof. The way to get these early reviews is to send out product samples. A word of caution though: if your product sample fails to function properly when the reviewers are testing it out, it can have a negative blowback effect. My startup made the mistake of being overconfident, and sent out Duet samples to Techcrunch.com before we had thoroughly tested them. Now if you don’t know, Techcrunch is the biggest tech startup blog in the world! What happened was that our mobile app turned out to be buggy, and the reporter who tested our Duets wrote an unfavorable article about our campaign, which didn’t help us in any way. The lesson? Ensure product
samples are fully functioning and devoid of any glitches before they are sent out. Back to sending out your review samples… Do it in two steps. Keep in mind that people are busy, especially if you are sending them out to bloggers. Make sure they understand that you don’t expect anything from them. If they are busy then they can ignore it. If they respond positively, send over the samples. Your results will improve significantly. Once you have the soft commitment from them they’ll be much more likely to actually help you.
Week 6
#36: Temporary teaser website to be ready Once you’re done with the temporary website, it is now time to run it through with at least five other people, and do a last minute check for missing content, pictures, and broken links. It is always a good idea to do A/B split testing of your teaser site. Basically, you create two slightly different versions of your site, to see which converts site visitors better. Ultimately, your goal will be for your visitors to click on the URL link to your campaign page. I recommend using Crazyegg for this purpose. When all is done, get an easy to remember URL that links to your landing page. For example: http://www.theduet.com. The easier it is for people to remember your domain name, the better. If you need an inexpensive domain name provider, check out Bluehost.com.
#37: Continue finding more places to pitch your product It’s tempting to relax and stop pitching your product at this point, especially if you’ve already pitched the media list earlier on. I know, pitching the media is probably one of the most time-consuming tasks in your campaign, but it has to be done. If you’re cold emailing the media the first time, be prepared that only about 10% of them will ever reply to your email. The reason is because these reporters can hundreds of pitches like you everyday, and it is not uncommon for them to gloss over yours. That is why your pitch headline has to be eye-catching enough to warrant their attention!
That said, you do not want to leave things to chance. Your chances of a favorable reply increase as you have more media outlets you can pitch to. Therefore, it is important to continue finding more blogs, sites, and influencers to pitch your story to.
#38: Video to be ready Now’s the time to make sure your video is perfect. Inspect the lighting, audio and special effects (if any) again. Go deep, and go very detailed at this stage. If the audio is too soft at certain points, request for the volume to be turned up. If the lighting appears too bright in some scenes, specifically write down the exact time and inform your videographer immediately. He/she shouldn’t have any problems making the changes within a day or two turnaround time. All in, the final video should be ready for showcase in this week.
#39: Put together the video, written pitch, product pictures, rewards and early reviews on the campaign page Follow your crowdfunding platform’s instructions on how to setup the campaign page. It’s important to read through their Terms and Conditions before you proceed to put the various campaign elements together. Oftentimes, campaigns get rejected even before they are launched for very simple, but often overlooked reasons. One common rejection reason on Kickstarter is when project owners use 3D renderings of their products, instead of an actual prototype for their campaign graphics.
Week 7
#40: Finalise and proofread the campaign page Look through the campaign page once through again, and see if the flow of presentation is smooth and logical. Also check through the pitch copy for grammatical and spelling errors.
#41: Plan your stretch goals Stretch goals are funding targets set by project owners in advance beyond the original funding goals. These additional funding goals are often released midway through the project and are used to raise more money, to make the
rewards better. Stretch goals are best used in conjunction with the introduction of a new, slightly pricier campaign reward perk, as you’ll need a way to up sell existing backers. Some examples of stretch goals are: - Your product in a limited edition color - An add-on accessory - Features that improve the overall quality of your product - A mobile app that will be developed for both Android and iPhone
#42: Continue finding more places to pitch your product As previously discussed in #37, continue finding more blogs, sites, and influencers to pitch your story to.
#43: Submit campaign for approval on crowdfunding platform (if using Kickstarter) When all is ready, submit your campaign for approval if your crowdfunding platform requires it. For Indiegogo, you don’t need approval while for Kickstarter, it could take anywhere between 48-72 hours for your project to be approved, subject to their terms and conditions. So factor in a buffer time of at least 3 days if going the Kickstarter route. Also, you will want to keep an additional week as a ‘buffer’ to test-drive your campaign.
Week 8
#44: Make any final changes to your crowdfunding campaign page This is the week to test-drive your campaign after your campaign is approved. So long as you do not click ‘launch project’ yet, both Kickstarter and Indiegogo will allow you to send a preview link to other people, so that you can get their feedback and make changes. Most of the time, you’ll get feedbacks such as “I think you need to include a picture here’ or “Your pricing is too expensive”. These early feedback is very valuable, and you should quickly take action once you get them.
#45: Continue finding more places to pitch your product As previously discussed in #37, continue finding more blogs, sites, and influencers to pitch your story to.
#46: Take a day or two off to rest (you’ll need to prepare for the next phase of your campaign) For now, take a day or two off to rest and be refreshed, because the next lap is going to be even more challenging (but exciting)! You’ll need to regain the energy and focus to run the most exhilarating mile of the entire campaign: the actual launch!
Week 9
#47: Take a deep breath and press “Launch!” Launching your campaign for the first time can be quite a thrilling, yet scary feeling. Inside, you probably are eager to see that first pledge. On the other hand, you might also get nervous and wonder if any pledges would even come in at all, or if the campaign would hit its goal. If you can identify with these feelings, take heart that I was once in your shoes too. When we launched the Duet project on April 5, we had no idea what to expect. Could we even cross our $5,000 goal? Would backers like our product? What should I do next? All these fears lurked in my mind as I clicked the 'Launch Campaign' button. It would have helped greatly if somebody could come alongside to assure me that I was on the right track after the campaign launch. Luckily for you, we’ll look at the right steps for you to take after you’ve launched.
#48: Back your own campaign if possible (Kickstarter doesn't allow this though) and back the highest possible pledge level you can afford Before you raise any funds, it is preferable if you could first contribute funds to your own project first. ‘Dog fooding’ is the term coined to describe trying out your own products first on yourself, before selling it to others. It is good to do this because you effectively demonstrate that you believe in your product. It is recommended to back your highest priced package, in order to give your pledges a nice big boost. Don’t worry, you’ll still eventually get back most of your pledge, less the crowdfunding platform fees.
#49: If you have a team, get them to back pledges too. (Remember to rebate them later on.) If you have a team working full time with you on the project, get them to contribute too to the project and offer them a rebate or company benefit. Some crowdfunding platforms, such as Indiegogo, allow you to do this as they are pretty lax on where the funding sources come from. Bear in mind though, that Kickstarter does not allow contributions from your own accounts.
#50: Send personalised emails to 20-30 of your family and close friends and ask them to help jumpstart your campaign On launch day, identify 20-30 of your closest family and friends who know you well, and send a personalised email to each of them to ask for their help to jumpstart your campaign. Do not send out a general email to them, as doing so will not do anything to strengthen the relationship. An email addressed to ‘Auntie Anne’ is going to be much more effective, than ‘Dear Family’. Something like:
“Hi Auntie Anne, How have you and Uncle Bob been? Remember the [project name] that I had been sharing with you all the other day over dinner? It has now officially launched, and I was wondering if you would like to help support me by donating to this project. Here is the link if you would like to see it: [project URL here] Many thanks in advance for your support, and I’m already looking forward to our next gathering with the cousins! Love, [Your name]”
It’s that short and simple: just four sections and straight to the point. It has been proven time and time again, that personalised emails are better. This is because people are less likely to do something when asked as a group than
when they are asked individually. Everybody thinks that someone else will step forward to help first. So if you cc-ed Auntie Anne in a general email with all your other family members, chances are she will not take action.
#51: Announce the launch on all your/and your team’s social media networks Now’s the time to be shameless and actively promote your campaign link far and wide! You should announce the launch of your campaign in all the social media networks that you are a part of. At the bare minimum, you should announce your campaign in Facebook, Twitter and Google+. However, bear in mind that having 10000 followers on these networks does not equate to pledges. Besides, there are plenty of not so legit 3rd party services that offer you the option to buy thousands, and even millions of followers on Facebook and Twitter. So it is really not about the numbers. It is about how many engaged followers you have, who will actually support and share your campaign. 100 engaged followers on Twitter are worth much more than 100000 Twitter fans that aren’t engaged. If you don’t already have a crowd of engaged audience, you can still spend time building a following. But do remember that growing a community takes time and lots of effort, and it won’t happen overnight, and you’ll have to continue posting a variety of content (videos, announcements, helpful tips etc.) throughout the campaign. If you do not have the time or resources to handle this, then do consider hiring a community manager to do it for you. In my experience, social media networks are best used as a tool to quickly spread word of your campaign very broadly. If you can afford to budget in Facebook Ads, its a particularly quick and effective way to get awareness of your campaign in front of thousands of eyeballs. But here’s a word of caution. Do not rely on Facebook, Twitter nor Google+ as a primary source of conversion into pledges. Remember that the main reason people hang out on social media sites for catching up with their friends lives, not to view advertisements! So it is only reasonable to expect very low conversion rates.
#52: Announce the launch on all online communities you’re in Do not forget to announce your campaign launch in the forum/discussion groups that you’re in too! Ideally, by the time of the campaign launch, you should already have been an
active contributor and participant in these forums. The trick is to contribute something of value first in the forums, in order to build up credibility. And only much later do you share your campaign link. Most forums will be very willing to allow you to post your campaign link, so long as you do not come across as spammy.
#53: Announce the launch on link sites/crowdfunding list sites Another great avenue to promote your crowdfunding campaign is to submit it on crowdfunding link sites. Keep in mind that these are community websites, bloggers and forums, and they are run by real human beings. People can tell when you do actually care about the community or just want pledges. If you have the mindset to actually establish relationships instead, then you’ll have higher chances of success. Here are some crowdfunding sites you can submit your campaign: - Crowdfundingforum - KickingItForward - Ayudos - Kickstarterforum Google+ Groups - Crowdfunding - Kickstarter Supporters And Campaigns - Crowdfunding Hub - Kickstarters It is highly recommended that you submit your press release article, instead of a direct campaign link by itself, which adds no value to the community.
#54: Send a launch email to your mailing list Up to this point, you’ve got your email list subscribers excited about the impending launch of your campaign. It is now time to send them an email announcing that your campaign has finally launched. Building excitement and anticipation in your email list about the launch of your crowdfunding campaign is an art in itself. Long before you even launch, ensure that you’ve planned and set up a sequence of emails that will inform your subscribers on the exact date you’re campaign will go live, so that they will have time. Do not simply ‘ambush’ your subscribers with one sales email on launch day. I mean, how many times do you buy a product immediately after hearing about it for the first time?

Be sure to include some special incentive to your email subscribers, in order to make it easier for them to back you. Limited early bird stocks of your product, or an additional perk thrown in are just two of the many effective ways to get them to take out their wallets. There are plenty of content and material written out there that deal with email marketing in detail. Nathan Barry has written a very extensive article on product launches here that will help you: How To Launch Anything
#55: Send your first campaign update to thank your early backers on Day 1 From day 1, your backers should feel that you and your team are genuine and always present, so do not forget to thank your early backers. Most crowdfunding platforms have a “New this Week” or “Recently Launched” projects section, and these can be very useful to drive in initial pledges. So thank these backers, and also provide them with simple means to share your campaign with their friends.
#56: Inform media list that your campaign is alive You’ve worked hard to inform the press about the launch of your campaign. Now’s the time to update them that your campaign’s launched! Drop them an email, and of course it doesn’t hurt to remind them with a short write up of what’s your campaign about, together with your campaign link too.
#57: Give yourself a pat on the back at the end of the week Phew! It’s been a really hectic first week of launch. Take a breather at the end of the week and give yourself a pat on the back for a job well done! Small doses of encouragement go a long way to keep you in the race.
#58: Set up a 24/7 routine with your team to watch over your campaign (optional) You should monitor your campaign’s comments section round the clock, all day. The reason is because you do not want to allow any opportunity for a single de-constructive or negative comment to show up in the comments section, and snowball into complaints and worst, refunds.
As your project progresses, you’ll have to maintain relationships with a lot of people. You’ll begin to spend more time answering comments, customer support emails, as well as distributorship and PR enquiries. This can quickly get overwhelming and become your main focus, on top of your list of essential things to do. I find that it pays to set up a team roster to take turns to watch the comment section, or task someone to handle these customer support activities promptly.
#59: Send a 2nd campaign update to backers about your project’s progress For the 2nd campaign update, I’d suggest you to answer any Frequently Asked Questions (FAQs) that your backers might have. Being a brand new project, it’s highly likely that there’ll be areas of your campaign that your backers will still need further clarification. This is a good time to answer their questions.
Week 10 *Note: at this point, if you’ve done all of the things mentioned in the previous week and still have not managed to raise at least 30% of your funding goal; it should serve as a clear danger sign to you. You are either not hustling enough to get more awareness, or people probably don’t see a need to part with their hard earned cash for your project. I recommend that you revisit the previous steps again and see if you’ve missed anything, or kill the campaign early and evaluate what went wrong to save time and effort. After all, crowdfunding is a game of high risk. Sometimes you win big, and sometimes you learn from your mistakes.
#60: Follow up on media contacts/press if they have not replied you yet If your media contacts have not replied you, a simple short reminder email like: “Hey Jim, just checking. .did you happen to receive my previous email last week?” will do the trick most of the time. I’ve tried this out myself when pitching media and often find that the reporters are simply too busy. But if you send in a follow up email, they are much more inclined to reply to your request.
#61: Continue posting a mixture of content on social media Maintaining a social media presence is necessary for people to know you are ‘there’. But the amount of work that goes into preparing your crowdfunding campaign is crazily heavy. It is a headache to always be finding and posting new content on Facebook/Twitter. I recommend that you try out Beatrix. Beatrix is a social media assistant tool, and it is smart enough to source and publish relevant social media updates for you without you needing to lift a finger.
#62: Handle any potential backer enquiries Reply backer enquiries promptly when they comment on your campaign page. You’re also likely get a couple private messages from potential backers, instead of seeing their messages in the comments section. The reason for this is because Kickstarter and Indiegogo rules only allow backers who have pledged to post comments in the campaign page.
#63: Continue monitoring the comments section closely Running a crowdfunding campaign is a 24/7 operation, as your backers come from different timezones. That does not mean you do not need sleep for those 30 days, but you’ll still have to have a way to monitor fresh comments and respond as quickly as you can. During office hours, set a target of responding back within 15minutes, while after office hours, consider having your team rotate and take turns to monitor the comments.
#64: Send a 3rd campaign update to backers You could send backers a 3rd campaign update on your manufacturing and shipping progress. Show them pictures of your factory or office, and also tell them how will you be working out shipping & delivery to get your product to them.
#65: Introduce your first stretch goal (if needed) If momentum has been building well, this is a good time to introduce your stretch goal. Stretch goals typically work best when you already have a reasonable amount of traction, and a sizeable base of backers.
Week 11
#66: Send a 4th campaign contest update to encourage backers to refer friends I think running a referral contest is a fantastic way to mobilize your existing backers to refer friends to your campaign. With the right incentives, referral contests can be a very effective way to motivate your backers to bring in a fresh boost of pledges. Ultimately, be as creative as possible when planning referral contests.
#67: Post a mid-campaign perk to up-sell backers A common pattern often happens midway through any crowdfunding campaign. Sales start to slow down to a trickle, and it can be quite hard to get new backers in. An antidote to this would be to introduce a special perk to upsell your existing backers. This perk should be priced higher than your basic perk package. You might be surprised that people do actually want to pay more for a higher priced reward!
#68: Post a video update A video update to your backers at this point would be a refreshing break from the ordinary text updates they’ve been receiving. Perhaps record a video of you and your team, and show your backers what you’ve been up to at the office. Consider even showing the lighter side of things in the team, like an interview of every team member and his/her interests. Weird as it may sound, but your backers do want to know that you’re human too!
#69: Introduce your second stretch goal (if needed) If you managed to hit your previous stretch goal, you can continue to introduce a second stretch goal to encourage more backers to pledge to your project.
#70: Continue follow up on media contacts/press As discussed in step #60.
#71: Continue posting a mixture of content on social media As discussed in step #61.
#72: Continue monitoring the comments section closely As discussed in step #63.
Week 12
#73: Send a 5th campaign update to remind your backers why you are running this project By the fourth and final week of your campaign, I can almost guarantee you: some of your first backers would have forgotten what your campaign was all about. As your campaign draws to a close, send them an update that reminds them the story of how your product came about, and thank them for investing into your vision.
#74: Continue follow up on media contacts/press As discussed in step #60.
#75: Continue monitoring the comments section closely As discussed in step #63.
#76: Continue posting a mixture of content on social media As discussed in step #61.
#77: Introduce your third stretch goal (if needed)
This is the last push! You can introduce your 3rd (or more) stretch goal here to rally your backers for one final push to the finish line!
#78: Collect the money, and make sure to reward yourself! If you’ve made it to this step, CONGRATULATIONS! You’ve made it to the finish line, after a grueling 90 days. Hopefully you have also managed to hit your funding goal. Even if you did not hit your goal, take heart because the wealth of experience and knowledge you’ve gained is priceless, and can be re-applied to a subsequent crowdfunding campaign. Allow about 5 working days for Kickstarter or Indiegogo to transfer the funds raised to your bank account. In the meantime, kick back your shoes and take a well-deserved break! Spend time with your family. Go out to a nice dinner. Be happy that you’ve done something most people only wished they could do.
Getting Started With The Crowdfunding Launch Checklist You just read a 11000+ word description of my crowdfunding launch checklist. I hope that you’ve gained a better picture of what steps it takes to run a crowdfunding campaign. Try to complete this checklist whenever you have a new idea to crowdfund. That said, after going through this process a few times, you won’t need the detailed explanations behind each action item. By then, you will have internalized the process. So, to keep things simple, I’ve included a simplified version that starts on the next page. This is the same 78 point checklist that you just read- without the verbal diarrhoea. Whenever you, or someone you know has a great product to crowdfund, print out this checklist and work your way slowly through the process. You’ll find that this system is a great way to break down and demystifying the challenging process of running a crowdfunding campaign. All you need to do is to focus on that next step and use the checklist to prompt you into taking action. Lastly, allow me to make a disclaimer… This checklist isn’t perfect.
I often overlook some parts, and more often than not, change my plans. So that is why it is always good to have your help. If you have better suggestions to add to this list, or have any questions at all, I’d love to hear from you. Simply drop me an email at [email protected]. Also, I would love to hear how your campaign is doing: I’d love to share in your joy when its successful, and to be there to empathize with you when its not. Even if you aren’t successful, you can always look at launching a second, improved campaign. Well that’s it, we’ve come to the end of our time together. The final section is a condensed form of the crowdfunding launch checklist. I strongly encourage you to refer back to this and use it to start working on your crowdfunding project. If you would like to have a printable checklist, simply head over to http://crowdfundingchecklist.crowdfundedkit.com and download your copy. Thank you for reading this. Wishing you crowdfunding success! Johnathan Leow http://www.crowdfundedkit.com
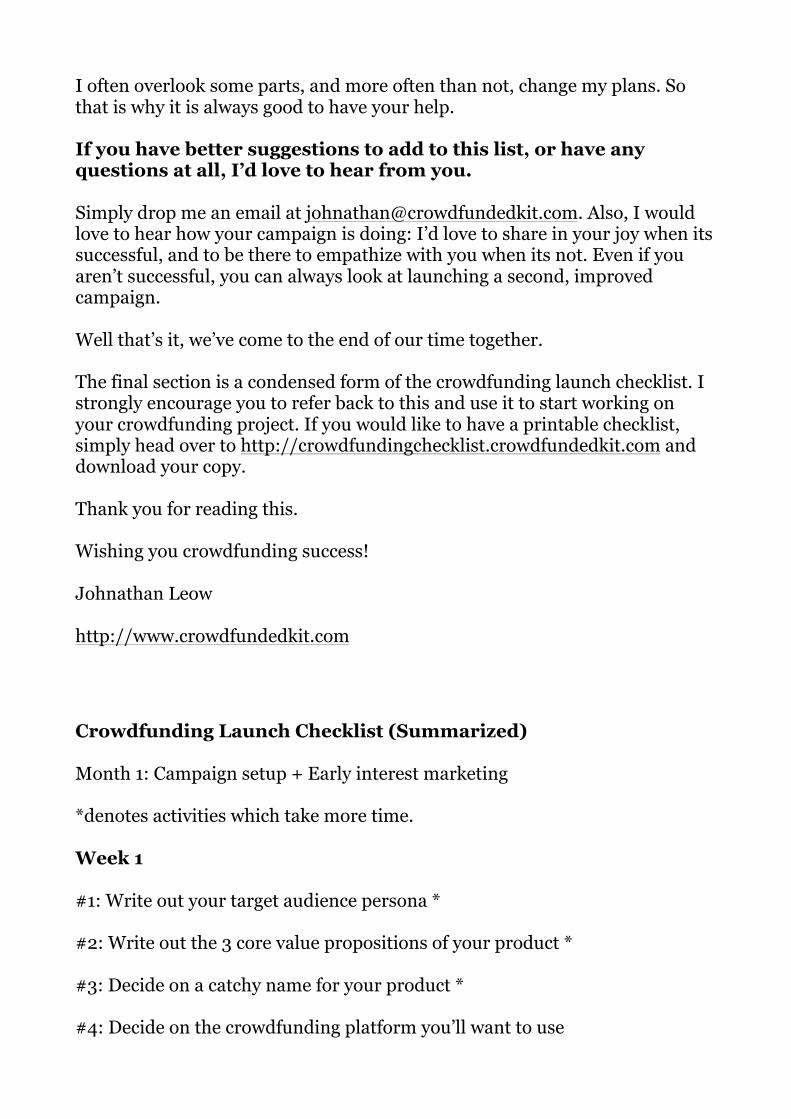
Crowdfunding Launch Checklist (Summarized) Month 1: Campaign setup + Early interest marketing *denotes activities which take more time. Week 1 #1: Write out your target audience persona * #2: Write out the 3 core value propositions of your product * #3: Decide on a catchy name for your product * #4: Decide on the crowdfunding platform you’ll want to use
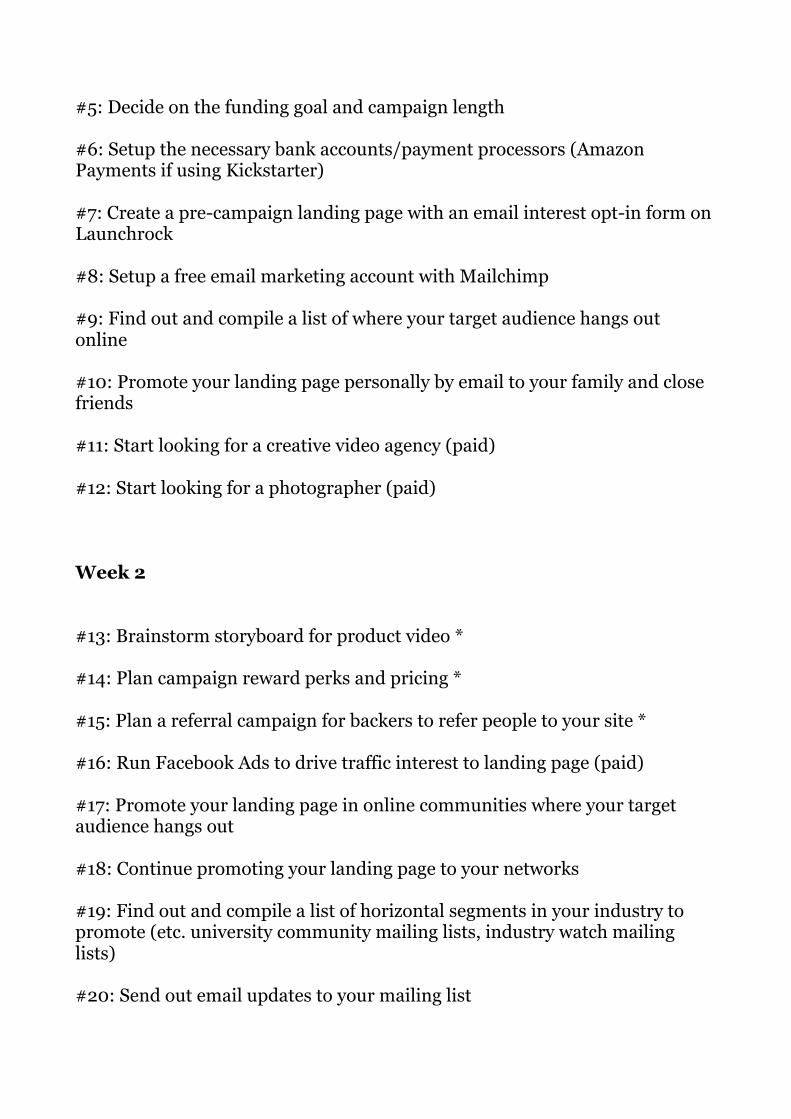
#5: Decide on the funding goal and campaign length #6: Setup the necessary bank accounts/payment processors (Amazon Payments if using Kickstarter) #7: Create a pre-campaign landing page with an email interest opt-in form on Launchrock #8: Setup a free email marketing account with Mailchimp #9: Find out and compile a list of where your target audience hangs out online #10: Promote your landing page personally by email to your family and close friends #11: Start looking for a creative video agency (paid) #12: Start looking for a photographer (paid) Week 2 #13: Brainstorm storyboard for product video * #14: Plan campaign reward perks and pricing * #15: Plan a referral campaign for backers to refer people to your site * #16: Run Facebook Ads to drive traffic interest to landing page (paid) #17: Promote your landing page in online communities where your target audience hangs out #18: Continue promoting your landing page to your networks #19: Find out and compile a list of horizontal segments in your industry to promote (etc. university community mailing lists, industry watch mailing lists) #20: Send out email updates to your mailing list
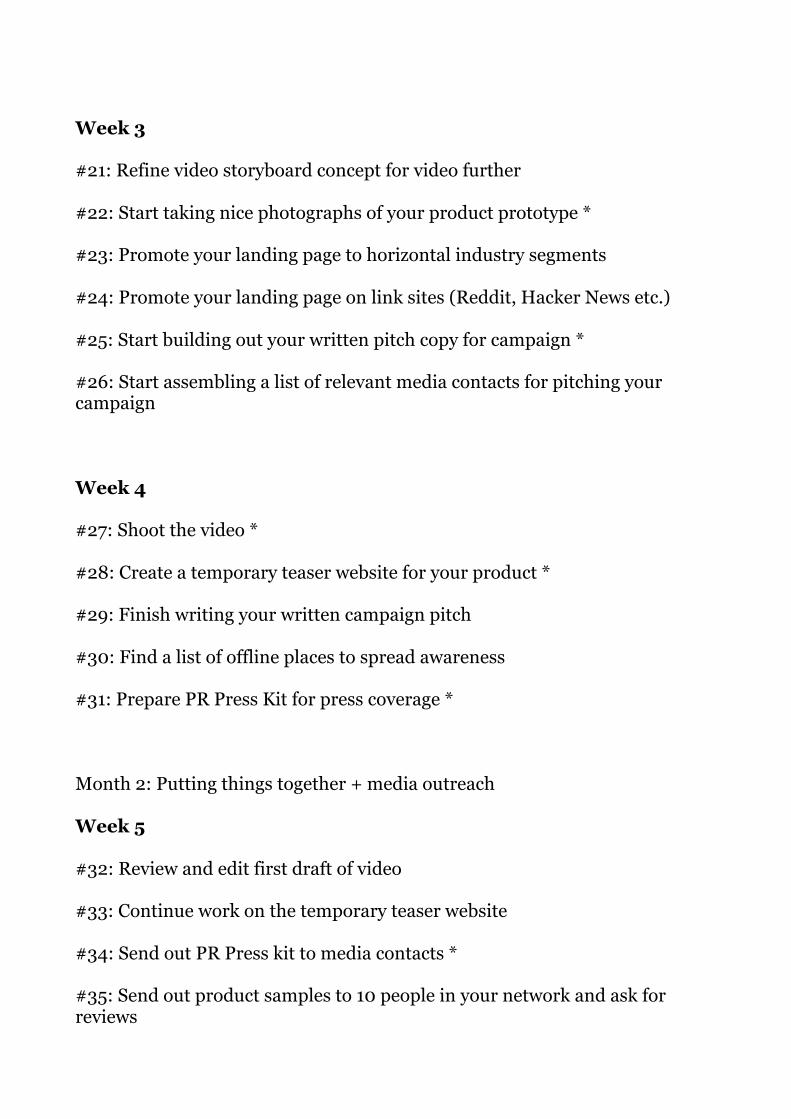
Week 3 #21: Refine video storyboard concept for video further #22: Start taking nice photographs of your product prototype * #23: Promote your landing page to horizontal industry segments #24: Promote your landing page on link sites (Reddit, Hacker News etc.) #25: Start building out your written pitch copy for campaign * #26: Start assembling a list of relevant media contacts for pitching your campaign Week 4 #27: Shoot the video * #28: Create a temporary teaser website for your product * #29: Finish writing your written campaign pitch #30: Find a list of offline places to spread awareness #31: Prepare PR Press Kit for press coverage * Month 2: Putting things together + media outreach Week 5 #32: Review and edit first draft of video #33: Continue work on the temporary teaser website #34: Send out PR Press kit to media contacts * #35: Send out product samples to 10 people in your network and ask for reviews
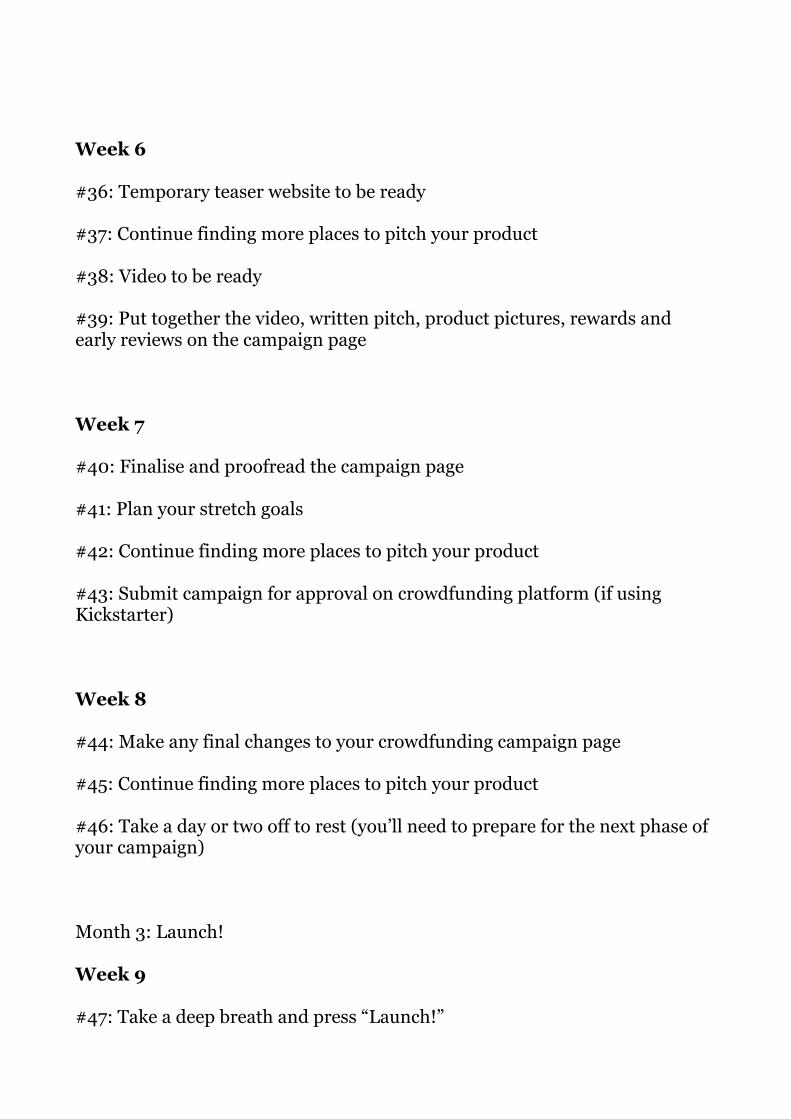
Week 6 #36: Temporary teaser website to be ready #37: Continue finding more places to pitch your product #38: Video to be ready #39: Put together the video, written pitch, product pictures, rewards and early reviews on the campaign page Week 7 #40: Finalise and proofread the campaign page #41: Plan your stretch goals #42: Continue finding more places to pitch your product #43: Submit campaign for approval on crowdfunding platform (if using Kickstarter) Week 8 #44: Make any final changes to your crowdfunding campaign page #45: Continue finding more places to pitch your product #46: Take a day or two off to rest (you’ll need to prepare for the next phase of your campaign) Month 3: Launch! Week 9 #47: Take a deep breath and press “Launch!”
#48: Back your own campaign if possible (Kickstarter doesn't allow this though) and back the highest possible pledge level you can afford #49: If you have a team, get them to back pledges too. (Remember to rebate them later on.) #50: Send personalised emails to 20-30 of your family and close friends and ask them to help jumpstart your campaign #51: Announce the launch on all your/and your team’s social media networks #52: Announce the launch on all online communities you’re in #53: Announce the launch on link sites/crowdfunding list sites #54: Send a launch email to your mailing list #55: Send your first campaign update to thank your early backers on Day 1 #56: Inform media list that your campaign is alive #57: Give yourself a pat on the back at the end of the week #58: Set up a 24/7 routine with your team to watch over your campaign (optional) #59: Send a 2nd campaign update to backers of your project’s progress Week 10 #60: Follow up on media contacts/press if they have not replied you yet #61: Continue posting a mixture of content on social media #62: Handle any potential backer enquiries #63: Continue monitoring the comments section closely #64: Send a 3rd campaign update to backers #65: Introduce your first stretch goal (if needed)
Week 11 #66: Send a 4th campaign contest update to encourage backers to refer friends #67: Post a mid-campaign perk to up-sell backers #68: Post a video update #69: Introduce your second stretch goal (if needed) #70: Continue follow up on media contacts/press #71: Continue posting a mixture of content on social media #72: Continue monitoring the comments section closely Week 12 #73: Send a 5th campaign update to remind your backers why you are running this project #74: Continue follow up on media contacts/press #75: Continue monitoring the comments section closely #76: Continue posting a mixture of content on social media #77: Introduce your third stretch goal (if needed) #78: Collect the money, and make sure to reward yourself!
More Kindle eBooks by Johnathan Launch!: How A Startup Made Over $100,000 Crowdfunding On Indiegogo With This Launch Strategy Youtube Video Marketing: How We Made A 2-Minute Youtube Video That Raised $106,830 Crowdfunding How To Choose A Crowdfunding Site: 12 Top Websites You Can Use Crowdfunding Checklist: The 90-Day Plan For Turning An Idea into a Best-Selling Kickstarter Launch The Crowdfunding Kit: How to Raise Money For Any Startup